
0898 - Blender ARIETE - Free user manual and instructions
Find the device manual for free 0898 ARIETE in PDF.

| Product type | Multifunction immersion blender |
| Brand | Ariete |
| Model | 0898 |
| Intended use | Household use only |
| Power supply | 220-240 V ~ 50/60 Hz |
| Power | 300 W (estimated) |
| Speeds | Variable + Turbo |
| Graduated bowl capacity | 600 ml |
| Blender cup capacity | 500 ml |
| Chopper bowl capacity | 1 L |
| Body material | ABS plastic |
| Blade material | Stainless steel |
| Main functions | Blend, whisk, mash, chop, slice, grate, julienne |
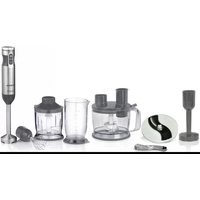
| Included accessories | Immersion blender, wire whisk, potato masher, graduated bowl, blender cup with lid, chopper bowl with lid, chopping blade, processor blade, slicing blade, grating/julienne blade, pusher, blade support |
| Safety | Accessory locking, automatic shut-off in case of overload, protected blades |
| Maximum operating time | 1 minute for liquids, 30 seconds for solids, then 30 min cool-down |
| Care and cleaning | Motor body wiped with damp cloth; accessories dishwasher-safe (max 50°C) |
| Dimensions (approx.) | 25 x 15 x 15 cm (motor body + blender) |
| Weight | 1.2 kg (estimated) |
| Warranty | 2 years |
Frequently Asked Questions - 0898 ARIETE
User questions about 0898 ARIETE
0 question about this device. Answer the ones you know or ask your own.
Ask a new question about this device
Download the instructions for your Blender in PDF format for free! Find your manual 0898 - ARIETE and take your electronic device back in hand. On this page are published all the documents necessary for the use of your device. 0898 by ARIETE.
USER MANUAL 0898 ARIETE
The necessary precautions must be taken when using electrical appliances, and these include the following:
Make sure that the voltage on the appliance rating plate corresponds to that of 1. the mains electricity.
Never leave the appliance unattended when connected to the power supply; 2. unplug it after every use.
Never place the appliance on or close to sources of heat.3.
Always place the appliance on a flat, level surface during use.4.
Never leave the appliance exposed to the elements (rain, sun, etc....).5.
Make sure that the power cord does not come into contact with hot surfaces.6.
- This appliance can be used by persons with reduced physical, sensory or mental capabilities or lack of experience and knowledge if they have been given supervision or instructions concerning use of the appliance in a safe way and understand the hazards involved.
This appliance must not be used by children. Keep the appliance and related 8. cord out of reach of children.
Children shall not play with the appliance.9.
Never place the appliance body, plug or power cord in water or other liquids; 10. always wipe clean with a damp cloth.
- Always unplug the power cord from the electricity mains before fitting or removing single attachments or before cleaning the appliance.
Always make sure that your hands are thoroughly dry before using or adjust-12. Using the switches on the appliance, or before touching the power plug or power connections. - Keep the power cord away from sharp edges. Do not wrap the power cord around the appliance.
- Do not use the appliance close to sinks. Do not use with wet hands.
15.Before starting the appliance, make sure it is perfectly assembled.
16.Never use the appliance empty. -
NE TOUCHEZ JAMAIS LES PARTIES EN MOUVEMENT.
18.Handle blades with care to prevent injury. -
ATTENTION: INSERT THE BLADE BEFORE FOOD TO BE CHOPPED.
Before removing the lid, wait for the blade to stop completely.
Do not use appliance if blades are damaged.20.
Do not use the appliance to mince overly hard food (such as meat with bone).21.
- Make sure the motor unit is not running before inserting or removing the attachments, when cleaning it or when it is not used.
Do not put your hands and do not insert metal tools (forks, knives, etc.) in the 23. various attachments during operation.
Never put long hair or loose clothing close to the operating blade.24.
Before removing the motor body, allow the various attachment to stop com-25. pletely (blades, whisks).
26.Disconnect the power cord in the event of failure during use or when the appliance is not used.
The appliance has been conceived for a limited use of max 1 minute. Switch the 27. appliance off after 1 minute in case of liquid food and after 30 seconds in case of solid food. Allow the appliance to cool down at least 30 minutes at ambient temperature before a new use to avoid to overload the motor.
If the blade does not rotate or it does not rotate freely, to avoid damages, stop 28. its operation immediately. In this case, unplug the appliance. Check there are no hindrances in the container and make sure food is not too hard or that the container is not too full.
The appliance is intended to chop food and blend various types of food.29.
To unplug the appliance, grip the plug and remove it directly from the power 30. socket. Never pull the power cord to unplug the appliance.
- Do not use the appliance if the power cord or plug are damaged or if the appliance itself is faulty; all repairs, including substitution of power cord, must be carried out exclusively by an Ariete assistance centre or by authorized Ariete technicians in order to avoid all risks.
In case of using extension leads, these must be suitable for the appliance 32. power to avoid danger to the operator and for the safety of the environment in which the appliance is being used. Extension leads, if not suitable, can cause operating anomalies.
-
Never allow the cord to dangle in places where it may be grabbed by a child. Do not threaten the safety of the appliance by using parts that are not original 34. or which have not been approved by the manufacturer.
-
This appliance is designed for HOME USE ONLY and may not be used for commercial or industrial purposes.
This appliance conforms to the directives 2014/35/EU and EMC 2014/30/EU, 36. and to the regulations (EC) No. 1935/2004 of 27/10/2004 regarding material in contact with foods.
Any changes to this product that have not been expressly authorised by the 37. manufacturer may lead to the user's guarantee being rendered null and void. In the event that you decide to dispose of the appliance, we advise you to make 38. it inoperative by cutting off the power cord. We also recommend that any parts that could be dangerous be rendered harmless, especially for children, who may play with the appliance or its parts.
Packaging must never be left within the reach of children since it is potentially 39. dangerous.
- To dispose of product correctly according to European Directive 2012/19/EU, please refer to and read the provided leaflet enclosed with the product.
DO NOT THROW AWAY THESE INSTRUCTIONS
DESCRIPTION OF THE APPLIANCE (Fig. 1)
A Speed adjusting dial
B Min speed / speed setting button
C Turbo speed button
D Motor body
E Graduated container
E Graduated container lid
G Hand blender shaft
H Wire whisk attachment
Fitting for potato masher
L Potato masher
Non-slip base
N Chopper blade assembly shaft
O Chopper goblet
P Chopper blade
Q Chopper lid
R Food presser
S Food Processor attachment lid
T Housing for motor body
U Food processor blade
V Food processor goblet
Z Lid unlocking lever
X Food processor blade assembly shaft
Y Non-slip rubber ring
K Blade support
W Slicing blade
J Blade for grating/julienne cutting
ATTENTION:
After having removed the appliance from its package, before using it for the first time, thoroughly wash all parts which will come into contact with food using water and mild soap.
Even if the appliance is at standstill, unplug it before fitting or removing single parts or before cleaning.
USE OF HAND-HELD BLENDER, WIRE WHISK, POTATO MASHER
Hand-held blender
- Mount the motor body (D) onto the shaft (G): put the two parts close, by aligning the symbol of "open lock" on the shaft with the arrow on the motor body and rotate the latter clockwise until it clicks in place (Fig. 2).
- The hand blender (G) is suitable for preparing sauces, soups, mayonnaise, and milkshakes.
Wire whisk
- Mount the motor body (H) onto the wire whisk (H): put the two parts closer, by aligning the symbol of the "open lock" on the whisk with the arrow on the motor body and rotate the motor body until it clicks in place (Fig. 2).
The wire whisk (H) serves to whip cream and egg whites and for soft mixtures.
Potato masher
The potato masher can be used to mash fruit and vegetable, as potatoes, pumpkin, tomatoes, plums, and apples.
Before use, cook vegetables, peel and remove the seeds or the hard parts, if necessary.
- Mount the fitting (I) onto the potato masher (L): put the two parts closer, by aligning the symbol of "open lock" on the potato masher and rotate the fitting clockwise until it clicks in place (Fig. 3).
- Mount the motor body (D) onto the potato masher (L): put the two parts close, by aligning the reference on the fitting (I) with the arrow on the motor body until it clicks in place (Fig. 2).
- During use, move the appliance in the ingredients with a slight movement from up to down until it reaches the required consistency.
Instructions for use
- After having assembled the appliance, plug it in, put it into food (Fig. 4) and start it by pressing the minimum speed button (B). Only after few seconds, according to preparation and kind of food, it is possible to set a higher speed increasing it gradually by rotating the apposite top dial (A). According to use, it is possible to set also the max speed "Turbo" by pressing the apposite button (C).
The best performance of the appliance is achieved through a pulse mode by pressing the button (B-C) for a very short time (2-3 seconds).
- The hand blender (G) and the wire whisk (H) can be used with the supplied graduated container (E). The hand blender (F) can be put directly into the saucepan containing hot food, after having removed it first from the heat to prevent overheating. After use in the graduated container (E), cover with the lid (F).
To avoid splashes during processing, it is advisable to use containers having high edges and turn the appliance on/off whilst it is in the container with food. It is also advisable to use it in an intermittent mode for a best quality of the product and to prevent an unnecessary overheating of the appliance motor. Never process hot food to prevent the risk of burning.
After switching off, allow the blade to stop before removing the appliance from food and continue preparation.
ATTENTION:
Before removing the motor body (D), allows the blade to stop completely and then unplug the appliance.
- Rotate the hand blender shaft (G) or the wire whisk (H) or the potato masher (L) to remove it.
WARNING
In case the appliance does not work, check the attachments are properly inserted.
Do not use the potato masher with solid or raw food to avoid damaging the blade.
Do not use the appliance in a saucepan in contact with heat sources.
Always remove the saucepan from the heat source, place is on a stable flat surface and allow it to cool down.
For a thin, smooth ground, if necessary, remove food from the side of the container and bring it to the centre using an apposite spatula.
USING THE CHOPPER ATTACHMENT
- Mount the blade (P) on the shaft (N) of the goblet (O) (Fig. 5).
ATTENTION:
Handle blades with care to prevent injury.
INSERT THE BLADE BEFORE FOOD TO BE CHOPPED. Before removing the lid, wait for the blade to stop completely.
- Cut food into small pieces (1.5 x 1.5 cm) and insert it into the goblet (O).
- Fit the lid (Q) on the goblet (O) and rotate clockwise until it completely locks, (Fig. 6). Make sure the upper part of the blade (P) is properly inserted in the apposite housing on the lid base.
ATTENTION:
Before using the appliance, make sure the blades and the lid are properly mounted.
- Place the motor body (D) on the lid (Q). Align the symbol of the "open lock" on the lid with the arrow on the motor body and rotate the latter clockwise until it clicks in place (Fig. 7).
- Assemble the appliance and start it by pressing the minimum speed button (B). Only after few seconds, according to preparation and kind of food, it is possible to increase the speed by pressing the relevant top dial (A).
According to use, it is possible to set also the max speed "Turbo" by pressing the apposite button (C).
The best performance of the appliance is achieved through a pulse mode by pressing the button (B-C) for a very short time (2-3 seconds).
ATTENTION:
In case the appliance does not work, check the attachments are properly inserted.
- For a thin, smooth mix, if necessary, remove food from the side of the goblet (O) and bring it to the centre using an apposite spatula, after having removed the motor body (D) and the lid (Q).
- To interrupt the operation, just release the speed button pressed (B-C). The appliance allows to chop food in very short time.
FOOD PROCESSOR ATTACHMENT LID
The food processor can be used for chopping, slicing, mincing, grating.
WARNING
Before use, place the non-slip rubber ring (Y) on the goblet base (Fig. 8).
Chopping, mincing
- Fit the blade (U) on the shaft (X) of the food processor goblet (V), (Fig. 9).
- Cut food into small pieces (1.5 x 1.5 cm) and insert it into the container (V).
ATTENTION:
Do not insert food above the max level indicated on the goblet (V).
- Insert the lid (S) on the goblet (V): press the lid unlocking lever (Z) (Fig. 10) and at the same time rotate the lid clockwise until the lid unlocking lever (Z), when released, locks on the reference notch on the lid (Fig. 11).
- Place the motor body (D) on the apposite housing (T) on the lid (S), (Fig. 12). Align the symbol of the "open lock" on the lid with the arrow on the motor body and rotate the latter clockwise until it clicks in place.
- Plug appliance in and start it by pressing the minimum speed button (B). Only after few seconds, according to preparation and kind of food, it is possible to set a higher speed increasing it gradually by rotating the apposite top dial (A).
According to use, it is possible to set also the max speed "Turbo" by pressing the apposite button (C).
The best performance of the appliance is achieved through a pulse mode by pressing the button (B-C) for a very short time (2-3 seconds).
- If it is necessary to add ingredients during operation, use the opening on the lid (S). Press inserted food using the food presser (R) (Fig. 13).
- To interrupt the operation, just release the speed button pressed (B-C). The appliance allows to chop food in very short time.
- For a thin, smooth ground, if necessary, remove food from the side of the goblet and bring it to the centre using an apposite spatula, after having unplugged it and having removed the lid (S).
- To remove the lid (S), press the lid unlocking lever (Z) by lifting it and at the same time rotate the lid counter-clockwise.
WARNING
Blades are sharp, handle them with care.
To prevent personal injuries and appliance damages, always keep hands and kitchenware out of operating blades and discs.
Make sure the lid is properly locked before starting the appliance.
Do not operate the appliance for more than continuous 30 seconds. Wait at least 2 minutes before proceeding with a new use.
Never insert food with hands. Always use the food presser.
Do not use your fingers to remove food from the sides of the bowl while the appliance is functioning. Always use the appropriate spatula.
Do not remove food from the sides of the bowl while the appliance is operating. Switch the appliance off first and then unplug it.
Slicing, grating/julienne cutting
- Fit the required blade for slicing (W) or for grating/julienne cutting (J), on the apposite support (K) so that the hole on the insert perfectly fits on the support pin; press the insert downwards until it locks in place (Fig. 14).
- Mount the support (K) complete on the shaft (X) of the food processor goblet (V) with the blade upwards (Fig. 15).
- Fit the lid (S) on the goblet (V) and proceed as indicated in the paragraph "Chopping".
ATTENTION:
Blades are sharp, handle them with care.
CLEANING AND MAINTENANCE
ATTENTION:
NEVER IMMERSE THE APPLIANCE BODY, THE PLUG AND THE POWER CORD IN WATER OR OTHER LIQUIDS, USE A DAMP CLOTH FOR CLEANING.
EVEN WHEN NOT IN USE, UNPLUG THE APPLIANCE BEFORE MOUNTING OR REMOVING THE SINGLE PARTS OR BEFORE CLEANING.
Blades are sharp, handle them with care.
- Remove all attachments used, by operating in the reverse way compared to the assembly operations previously described.
- Use a slightly wet cloth for cleaning the motor body (D).
- The chopper goblet (O), the food processor goblet (V), the potato masher (L) and the blades (P-U-W-J) can be washed in the top part of the dishwasher at a max. temperature of 50^ / 122^ . For cleaning the other attachments, it is recommended to wash them under running water using a milo detergent.
ATTENTION:
Do not clean with abrasive sharp objects.
After cleaning, let any part completely dry before mounting.
INSTRUCTIONS IMPORTANTES
LIRE CES INSTRUCTIONS AVANT L'EMPLOI.
BESCHRIJVING VAN HET APPARAAT (Fig. 1)
- YctaHOBInTe HOx (P) Ha BaI (N) YauKn (O) (Pnc. 5).
BHUMAHNE:
NCIOJIb3OBAHNE IPNHADJIEXKHOCTE KYXOHHO POBOTA
HacaKy KyxOHoro KOMbHa MoXHO NcNoB3OBaTb ДЯ И3MeJIbYeHn, Hape3Kn, IN3MeJIbYeHn, TepKn.
BHIMAHNE
Ipeod ucnolb3o6aHuem nomecmume npomueockoJb3rauee pe3uHOoe KOJbO (Y) 8 ochoaHue yawku (puc. 8).
Tepka, Hape3ka
- YctaHOBInTe HOX (U) Ha BaI (X) yauKn KxOHHoro KOM6aHa (V) (pnc. 9).
- HapexbTe npoaykbI He6oBbIMM KycOyKamn (1,5 x 1,5 cm) n IomeCTnte nx B yawky (V).
BHUMAHNE:
He knaadume npodykmbl eblwe makcumaIbHO2O ypo8H, yka3aHHo2O Ha qawke (V).
- YcTaHOBnTe KpbIshky (S) Ha yawky (V): HaxMMte pblur otKpbIBaHnra KpbIshKn (Z) (Pnc. 10) n OndHOBpeMeHHo NOBepHnTe KpbIshKy no YacobOJ CTpeJIke Do Tex nop, Noka pbUar KpbIshKn (Z) He OCTaHOBITcHa KOHTpOJIbHOn BblE MKe Ha KpbIshKe (Pnc. 11).
-Помecтinte 6лOK MOTOPa(D)В COOTBETCTByUOUsI N OTCEK(T)Ha KpbIuKe(S)(pnc.12).COBmecTnte CIMBOJ «3amOK OTkpblT» Ha OTCEKe CO CTpeJIkoI Ha 6lOKe MOTOPa I NOBepHInTe 6lOK MOTOPa no YacOBoi CTpeJIke Do UeJIyKaФИKCaUIN. - BcTaBbTe BnIky B po3eKyu IN BKJIIOHTe npIBOp, HaxaB KHOKNy MINHmAlbHOJ CKOPOCTN (B). ToIbKOYepe3 HeCKoJIbKO cekYHd, B 3aBNCIMOCTN OT pnproTOBNeHry N bIHOda, MOXHO yCTaHOBNTb 6OJIeEBbICOKyU CKOPoCTb, NOCTeNEHNO yBeJIuHBAra ee NOBOPOTOM COOTBETCTByIOUeN pyKn (A).
B 3aBcHMOCTN OT ICNoJIb3OBAHnRA MOxHO yCTaHOBnTB MaKcImaJIbHyIO CKOpocTb «Typ60», HaxaB COOTBeTCTByUOyU KhoNky (C).
OnTImaJIbHoe nCnoJIb3OBAHne npIbopa ocUeCTBIIeTcra chepe mNpyJIbCHbI pExm HaXaTNEM KHOJKN (B-C) chepe3 KOpOTKne npomexyTKn BpemEHn (2-3 cekyHdbI).
- Ecnn Bo BpeMa pa60tbl Heo6xOIMo Do6aBnTb npOyKtbl, BocnoIb3yInTeCb OTBepCTnem Ha KpbIshke (S). PpOToJKNHte npOyKtbl C nOMoUb ToIkaTeJr (R) (pnc. 13).
- YTO6bI BvIKHouHTb np6Op, npocTo OTnycTnte haxaTyO KhoNky ckopocTn (B-C); np6Op no3BOJRAET n3MeJIbYatb npOdyKtbl 3a OueHb KOpOTKoe BpeMra.
-Дя поуеня MeIkoI OODHOpOHorO fapwa npn Heo6xOIMOCTH ChImaIte npOdyKtbo Co CTeHN YuAShKn I nepeMeuTe IN K ueHTpy C NOMOuH O uNaTeJI, PpeBapNTbHO BbIHyB BnIKy n3 po3ETkn I CHYB KpbIshky (S). - YTo6bl ChyTb KpbIuKy (S), HaxMMte pbIur KpbIuKn (Z), NOdHMnTe erO n OndHOBpeMeHNO nobepHnTe KpbIuKy npOTnB yacOBoB cTpeKN.
BHUMAHNE
Hoxu ouehb ocmpbie, co6nodaume ocmopoxhocmb.
Bo u36eKaHue mpaBm u noBpeKdeHua oBOpydoBaHua 8ce2da depXume pyku u KyxOHbIu Uhcmpymem nodaIbe om deuxkyuxxra Hoxe u duckoB.
Y6edumecb, ymo KpbIuKa hadexHo 3akpenneHa, npexde yem EKJIouamb npubop.
He ucnnoj3yume ycmpooucm8 o meueHue 6oJee 30 MuHym noopra. Iodoxdume He Mehee
2 Muhym npexde yem npucmynmb K Hoeomy ucnolb30eaHIO.
Huko2da He Knaadume npodykmby pykamu. Bceeda ucnonb3yume monkameNB.
He cyuzaume nuuy co cmehok yawu naIbauMu 80 bpeM pa6ombl npubopa. Bce2da noIb-3yumecb cneuaIbHbIM unamelem.
He cyuzaume nuuy co smenok yawu 60 epema paobmb npubopa. Bbiknouyme npubop u omcoedunume buky 3nekmpoohypa.
Hape3ka, tepka/pe3ka «Жульец»
- BCTaBbTe HuyKHOe Ie3BHe dIy Hape3Kn IomTKaMn (W) nIi dIy TepKn/Hape3Kn «JyJIbeH» (J) Ha noDxoJaIyO onOpY (K) taK, YTO6bI OTBepCTne, paCnoIooKeHHoe Ha BCTaBKe, IpeaIbHo BxOJIno B WtNΦT ONOpbl; HaxMMte Ha BCTaBky, Ioka He yCblIuIte ⅢeIyOK φHKcAtopa (pnc. 14).
- YcTaHOBnTe onopy (K) B cbope Ha ocB (X) yauKn KxOHHoro KOMbaHa (V) HOxOM KBepxv (pnc. 15).
- 3akpoTe yawky (V) KpbIkwOi (S) n DeicTByIte, KaK yka3aHO B naparpape «N3MeJIbueHne». BHIMAHNE:
Hoxu ouehb ocmpbie, co6nodaume ocmopoxhocmb.
Iata n3roTOBHeHna yka3aHa Ha Kopnyce n3deJnB 3aunpOBAHHOM BnDe SN wk/yrabcdefg, rKe Wk - HeJeI npOn3BODCTBa
yr-ROI npOIN3BOIDCTBa
abcdefg - cepnHbI Homep n3deJIna
CoOTBeTCTByeT TpeBoHaHnA
TP TC 004/2011 «O 6e3oNaChOCTn Hn3KOBONbTHOrO o6OpyOBAHn, yTBePxJdeH PeSeHHem
Komnccnn TamoxeHHoro coo3a No768 ot 16 abrycta 2011 roda
TP TC 020/2011 «ДелкгомагнITHая COBmecTUMOCTb TEXHnuecknx CpeIcTB», yTbepkdeH
PeueHnem Komnccnn TamoxeHHoro coio3a N879 ot 9 deka6pra 2011 roda
HOpMaIg O cepTnΦkaIIN B npInIOxEHN K rapaHTnHOMy TaIOHy n/IIHa yNaKOBKe I3deJIy.
220-240B~ - 50-60Γι - 800-1000Вт - Knacc II - IPX0
CdeJanaHO Kntae
Umnoptep:OOO «PyMeTa»
IOpnduueckn aDpec:127473, ropod MockBa, yI. KpachonpoJeTapcka, d. 16, cTpoehne 11, 3TaX 2, nOmeueHne II, kOMHaTa 6
Фактуеский anecd: 127473, ropod MockBa, у. КpacнорoneTapcka, Д. 16,стpoehne 11, зах 2, пошени II, komhata 6
Изговпель: De' Longhi Appliances Srl /«Дени Amплаенсс CPЛ» Адес: 50013 Итalia, Флоренья, Кампи Биэнци, Ва C. Кунрiko 300.
Cnncok opraHn3aun, ynoHNOeHHbIX n3ROTOBtTeMe H na pa6oTu c npTeH3nA Mn NOTpe6nteJn I cepBnchbIM o6cnyKuBaHneM, pa3Meuen Ha caIte: http://www.ariete.net/ru/assistance
Togya Jinyi Ariete +7915165611
Tobap noctabnayetcB co6paHOM Bnde, cneuaIbHbIX Tpe6oBaHn K nepeBO3Ke I xpaHeHIO He yCTaHOBNeHo.
YTNIN3NPOBAtB COOTBETCTBnC 3aKHOdaTeJIbCTBOM MeCTa peaJIN3aUN.
TapaHTnHbI cpoK 2 roJa. Cpok cnJxkbI n3dEInna 2 roJa.
HOpmaqna O cepTnOkaun B npJIOXeHN K rapaHTnHOMy TaHOHy n/nn Ha yNaKOBKe n3dennia.
BAXJIINBA IHΦOPMAÇIÀ
YBAXHO O3HAIOMNTNc8 3 LIMN IHCTPYKcIaMNI PEPeI NOyATKOM EKCPIyATAciI.
Пд час ecnnyataцii ekeTpunHnx npuctroB cnid doTpmyBaTncsHaJeKnX npabnil 6e3neKn, a came:
IpekeohatncB TOMy, 9o Hapya npucpto BidnoiDae Hanpy3i Baoi1. Mepexi eIektpnHoro XnBHeHHa.
3a6bopohreTbcra 3aIIuataI npncptiYbIMKHyTM y Mepexy eJeKtpnHoro 2. XNBHeHHa 6e3 HaJy; nCJIa KoxHO BnKOpNCtAHNcId BmKHyTn npncptpi Ta BiD'edHaTI NoO BiD MepeXi XNBHeHHa.
3a6opoheta 3aIIuataH npncptoi Ha dxepeJax TeIJa a6o 6iJa Hnx.3.
ONUCAHHI INPNCPTPOIO (MaI.1)
A Peryjatop wBndkocti
B KhoNka minImaJIbHOI WBNKoCTi/HaHaWtYBaHHa WBNKoCTi
C KhoIka Typ6oBnDkoCTi
D Kopnyc Двигуна
E rpaynobha yaa
F Kpnska rpaaynoBaHOi YaSi
G HacaKa Ipa pyHoro 6neHepa
H MetaIeBa Hacadka-BiHnUOK dIy 36nBaHHN
I TpImauch npecy dny niope
L Pnec dIy IIOpe
M HeKOB3ka OCHOBa
N Bicb npBODy TpIMaHa Je3 dIy noDpi6HOBaHa
O YaSha noDiPi6HIOBaua
P Je3o noopri6HIOBaua
Q Kpnuka noopip6HOBaHa
R WToBxau
S Kpnuika kyxohno kombaHa
T MoToPnB ViDcik
U Je3o KxyoHHoro KOM6aHa
V YaSha KuxoHOrO KOM6aHa
Z BaxiNb po36IokyBaHHK KpNshKn
X Bicb npBODy TpIMaJa Je3 dJa KxOHHOKOMbaHa
Y HeKOB3Ke rymOBe KJIbUe
K TpImaay ne3a
W Je3o dIyBaHHcK6Ockamn
J Je3o dny HataHpaHH/WHNKyBaHH
YBARA:
BuiHraWu npunad 3 ynakoeku, neped nepwum eukopcmaHnem pemeIbHo bumuue cci demani, uo KOhmacmyomb 3 npodykmmu, bodoio ma HeimpaIbHM Munom.
Habimb kuo npuahe bukopucmoyembc, iD'cdhaume uo2o bi dneKmpuHoi po3emku neped mum, kMOhmyma um abo demohyma um okpemi demani, a makox neped Mummam.
BVKOPNCTAHHЯ PYHORO BJIENDEPA, BIHNUKA ДЛЯ 3БИBAHHЯ, IPECA ДЛЯ ПIOPE
Puyn6JeHep
- YctahOBiTb KOpNc DvBryHa (D) Ha HacaKv-HixkV (G): 3'edHaiTe Dbi qactnHpa30m, BnpBHBn CmBOI «BiDkpTn 3amok» Ha Hixci 3i ctpiIKoIO Ha Kopnyci DvBryHa, i o6eptaIte KOpNyc DvBryHa 3a rOdnHHNKOBIO CTpiIKOIO, DOKN He noCyTe 3ByK knaCaHnBhacniIDOK 6lOkyBaHHa (pnc.2).
- Puchni 6IeHep (G) yuOBO nIXoDntb dIy npriToYBaHHa CoyciB, cyniB, MaHOHe3y ta MoNoHnx KOKTeJnIB.
MetaneBn BInuok dJa 36nBaHn
- Yctahobitb Kopnyc DBnryHa (D) Ha BiHuyok dIy 36nBaHHa (H): 3'edhaTe dBi yactuHpa30m, BnpiBnBnCIMBOJ «BiIDKpntn 3AMOK» Ha BiHUYk 3i cTpiIKOIO Ha Kopnyci DBnryHa, i o6eptaIte Kopnyc DBnryHa 3a rOdINHHNKOBOIO cTpiKOIO, DOKN He NOuyTe 3ByK KnaUAHn BHaCniDOK 6nOKyBAHHa (pnc.2).
- Binhucok (H) BHKOPUCOByeTbca dnn 36nBaHHaBepKIB iReuHnx bIKiB, a taKoX dnn pikoro ticTa.
Pnec dna niope
Ipec dIy nOpE BnKOpNCTOBYeTbcSdIy po3TnpaHnBaPeHnx 0pykTiB Ta OBOuyiB, TaKx JaK KapToPJI, Ka6auchn, nomIDopn, cInBn Ta J6nyka.
Ipeed BnKOpncTaanHm notpi6Ho BiDbapuTu OBOUi, ONUCTTu BiD uKipKn i BuJaunTu Hacinna a6o TBepdi YactHH, JaKso ue Heo6XiJHO.
- YctahOBiB TpIMaH npcey IHa npec dIy nIope (L): 3'eDHaIte DBi yactHH pa3OM, BnpiBHBwI CTpiIKy i3 CmBOJOM «BIDKpITN 3AmOK» Ha npeci, N o6epTaIte TpIMaU 3a roDHHIOKOBOIO CTpiIKOIO, DOKN He NoCyTe 3ByK KlaCaHNaB HbAcIioK 6IoKyBaHHra (pnc. 3).
- YctahOBiTb KOpNyc DnBHyHa (D) Ha 3MOHTOBaHm npec dIpy nIOpe (L): 3'eHaNte DBi qactHnpa3OM, BnpiBHBsH 3HaK Ha TpIMaHi (I) 3i cTpiKIO Ha KopNcyi DnBHyHa, N o6eptaIte KopNyc DnBHyHa, DOKn He NooyTe 3Byk KnaCaHnBhAcNiIDok 6NoKyBaHnR (pnc.2).
-Пд часвикорисаньперемиутepилад mixнгpeidicHTamn nerknm pyxamn 3Bepxu Bn3, nOKн He doCЯгнete baxaHOI KOHCNCTeHci.
Ihctpykci3 BnKOpncTaHHa
- 3MOHTyBaBn npnlaD, BCTaBte eJekTpoBnky B po3eKy, 3aHypTe Ioro B iKy (pnc. 4) i 3anyciTB, HATNCyBn KONky MInImaIbHOI WbNdkocTi (B). Nlwe uepe3 DeaKm Yac, 3aJeKHo BiD Tnpy npIroTyBaHH Ta XapOvBX PNOyKTIB, MOxHa BcTaHOBnTI 6JIbSy WbNdkicTB, NOCTynoBO 36IbShyOuYn II NOBepTaHHM BiINOBiDHoro peyIaTopa (A). 3aJeKHo BiD Tnpy ekCnPyataqii, TakoK MoXHa BIKOPNCTOByBaTH MaKcImaJIbHy WbNdkicTB «Typ60», HATNCyBn BiDNoBIDHy KONky (C).
OnTImaJIbHe BnKOpNCTaHHЯ npuIaIy: imnyJIbCHn pexm po6OTn IJIaXOM HaTnCKaHn KHOIIKN (B/C) npotrarom dyke KopotkoTo yacy (2-3 cekyHn).
- Puyhni 6bnep (G) i BInHouK dIy 3bBauHHa (H) MoXHa BnKOpNCTOBYBaTn 3 rpaDyIOBAHOU qAweo (E), 00 BxOINTb DO KOMPNeKTy. Puyhni 6bnep (G) takoX MoXHa BnKOpNCTOBYBaTn, 6e3nocepEnb0 3aHypNBuBn B kAcTpyno 3 rapyoo iKeo, nCn83nT8i 3 BOrHIO, 0o6 yHnKHyTN neperpIBAHn. Y pa3i BnKOpNCTAHnraPdnyOBaHOi qAoi (E), 3akHnuBnpo6Ot, hApNiTe cyMiU, yCTaHOBvBn Kpnkky (F). 06 bYnKHytn po36pnsyBaHHa iKi niac o6p6Kn, peKomeHN dyETbcra BnKOpNCTOBYBaTn KOHTeHepn 3 BnCOKIMN KpaAMN 3aNyCKATn/BmNKATn npnilad, KOJI BIn 3aHypeHni y KoHTeHep i3 npodykTam; TakoX peKomeHdyEcBcRA BnKOpNCTOBYBaTn Ioro 3 nepePBamn, ockijbKn ue edHni cnocio OTPmuTn npodykciO kpaIo jKOcTi Ta yHnKHyTN 3aIBORO neperpIBAHn DBrhyna npnilady. He 3miUyte rapuip npodykTu, 06b yHnKHyTN pN3NYkOnikib.
HaTnpaHnTa npDi6HeHHa
- YctaHOBITb Ie3O (U) Ha Bicb npnBOy (X) yawi kyxOHoro KombaHa (V) (pnc. 9).
- Hapijte npoyn HebeNkMn matoKamn (1,5 x 1,5 cm) i noknapitb ix y uawy (V).
YBARA:
He 3anobHoume yawy (V) npodykmaMu 6uue 3a3HaueHo2o MaKcumJIbHO2o pieHra.
W celu zachowania bezpieczenstwa urzadzenia uzywac wyłacznie oryginalnych 34.XXXXXXXXXXXXXXXXXXXXXXXXXXXXXXXXXXXXXXXXXXXXXXXXXXXXXXXXXXXXXXXXXXXXXXXXXXXXXXXXXXXXXXXXXXXXXXXXXXXXXXXXXXXXXXXXXXXXXXXXXXXXXXXXXXXXXXXXXXXXXXXXXXXXXXXXXXXXXXXXXXXXXXXXXXXXXXXXXXXXXXXXXXXXXXXXXXXXXXXXXXXXXXXXXXXXXXXXXXXXXXXXXXXXXXXXXXXXXXXXXXXXXXXXXXXXXXXXXXXXXXXXXXXXXXXXXXXXXXXXXXXXXXXXXXXXXXXXXXXXXXXXXXXXXXXXXXXXXXXXXXXXXXXXXXXXXXXXXXXXXXXXXXXXXXXXXXXXXXXXXXXXXXXXXXXXXXXXXXXXXXXXXXXXXXXXXXXXXXXXXXXXXXXXXXXXXXXXXXXXXXXXXXXXXXXXXXXXXXXXXXXXXXXXXXXXXXXXXXXXXXXXXXXXXXXXXXXXXXXXXXXXXXXXXXXXXXXXXXXXXXXXXXXXXXXXXXXXXXXXXXXXXXXXXXXXXXXXXXXXXXXXXXXXXXXXXXXXXXXXXXXXXXXXXXXXXXXXXXXXXXXXXXXXXXXXXXXXXXXXXXXXXXXXXXXXXXXXXXXXXXXXXXXXXXXXXXXXXXXXXXXXXXXXXXXXXXXXXXXXXXXXXXXXXXXXXxxx
Tłuczek do ziemniaków
Jaaai! J5 2j jll jc A
.
Joo 1
()
i 1
y
j 11 j 11 j 11 j 11 j 11 j 11 j 11 j 11 j 11 j 11 j 11 j 11 j 11 j 11 j 11 j 11 j 11 j 11 j 11 j 11 j 11 j 11 j 11 j 11 j 11 j 11
aaii iia aiee ie eae ee eae
51
Jglio 1 jy JlIgI g Jlgal bai. Jbi Jj gl jge Iaiae
Jb
jglly jll pdc Jibla 9
p 1
aaii iiaaa aiee
J 1
J 1
1
JyIyIyIyIyIyIyIyIyIyIyIyIyIyIyIyIyIyIyIyIyIyIyIy
[{j}_{k} = 1]
1 2
10
- 15 j 15 j 15
45jai1 j21 110
.
19
Jallljraa aag j 1
$$ \therefore \text {i} \text {j} \text {a} \text {i} \text {i} \text {i} \text {i} \text {i} \text {i} \text {i} \text {i} \text {i} \text {i} \text {i} \text {i} \text {i} \text {i} \text {i} \text {i} \text {i} \text {i} \text {i} \text {i} \text {1} \text {i} \text {i} \text {i} \text {i} \text {i} \text {i} \text {i} \text {i} \text {i} $$
$$ \begin{array}{l} \left(\text {a b c} \quad \text {l e} \quad \text {g i l l} \quad \text {p o l l} \quad \text {j i d}\right) \quad \text {a b c} \quad \text {l o a l} \quad \text {d i s t} \quad \text {a e b} \quad \text {p r i j} \quad \text {j g a l l} \quad \text {p r i d} \quad \text {i n} \quad \text {i n} \quad \text {i n}. \ \begin{array}{l} \text {p r e d i c t h e l a w s u r e m a t h {\mathrm {i n}} g} \end{array} \ a d \vert a d i j \ \text {a l i f i a l l} \quad \text {c l a s s o l l} \quad \dot {g} (l a r g e g o n d s) \quad \text {s u b s c r i p t} \quad \text {s u b s c r i p t} \quad \text {j i t e}) \quad \text {a l i f i a l l} \quad \text {c l a s s o l l} \quad \dot {g} (l a r g e g o n d s) \quad \text {s u b s c r i p t} \quad \text {s u b s c r i p t} \quad \text {s u b s c r i p t} \quad \text {r r}. \ \therefore \lim _ {x \to - \infty} \frac {1}{x ^ {2}} \ \end{array} $$
$$ \begin{array}{l} \text {J} _ {\text {区 间}} \text {i} _ {\text {区 间}} \text {i} _ {\text {区 间}} \text {i} _ {\text {区 间}} \text {i} _ {\text {区 间}} \text {i} _ {\text {区 间}} \text {i} _ {\text {区 间}} \text {i} _ {\text {区 间}} \text {i} _ {\text {区 间}}, \ l a l o i \left(a _ {a} \dot {a} \dot {a} \dot {a} \dot {a} \dot {a} \dot {a} \dot {a} \dot {a}\right) \quad a _ {a} \dot {a} \dot {a} \dot {a} \dot {a} \dot {a} \dot {a} \dot {a} \dot {a} \dot {a} \dot {a} \dot {a} \dot {a} \dot {a} \dot {a} \dot {a} \dot {a} \dot {a} \dot {a} \dot {a} \dot {a} \quad a _ {a} \dot {a} \dot {a} \dot {a} \dot {a} \dot {a} \dot {a} \dot {a} \dot {a} \dot {a} \dot {a} \dot {a} \dot {a} \dot {a} \dot {a} \dot {a} \ p d \quad j i c \quad g j l e a l p d i s t i n u l e l i f j b c \dot {g} g d i l l g g g g g g g g g g g g g g g g g g g g g g g g g g g g g g g g g g g g g g g g g g g g g g g g \ A O \bot D C \ \end{array} $$
$$ \begin{array}{l} \text {a} _ {\text {a}} \text {a} _ {\text {a}} \text {a} _ {\text {a}} \text {a} _ {\text {a}} \text {a} _ {\text {a}} \text {a} _ {\text {a}} \text {a} _ {\text {a}} \text {a} _ {\text {a}} \text {a} _ {\text {a}} \text {a} _ {\text {a}} \dots \text {a} _ {\text {a}} \dots \text {a} _ {\text {a}} \dots \text {a} _ {\text {a}} \dots \text {a} _ {\text {a}} \dots \text {a} _ {\text {a}} \dots \text {a} _ {\text {a}} \dots \text {a} _ {\text {a}} \dots \text {a} _ {\text {(1)}} \dots \text {(1)} \ \left. \right.\left. \right.\left. \right.\left. \right.\left. \right.\left. \right.\left. \right.\left. \right.\left. \right.\left. \right.\left. \right.\left. \right.\left.\left.\left.\left.\left.\left.\left.\left.\left.\left.\left.\left.\left.\left.\left.\left.\left.\left.\left.\left.\left.\left. \text {的} \right]\right]\right]\right]\right]\right]\right]\right]\right]\right]\right]\right]\right]\right]\right]\right]\right]\right]\right]\right]\right]\right] \ \left. \int_ {0} ^ {1} \frac {d x}{x - 1} \right| _ {0} ^ {1} \frac {\partial f (x)}{\partial x} = \int_ {0} ^ {1} \frac {\partial f (x)}{\partial x} d x \ . \mathrm {d} j = \mathrm {d} l \mathrm {c} \mathrm {d} j \mathrm {d} l \mathrm {d} j = \mathrm {d} l \ \end{array} $$
$$ \begin{array}{l} \left. \frac {1}{2} \frac {1}{2} \frac {1}{2} \frac {1}{2} \frac {1}{2} \frac {1}{2} \frac {1}{2} \frac {1}{2} \frac {1}{2} \frac {1}{2} \frac {1}{2} \frac {1}{2} \frac {1}{2} \frac {1}{2} \frac {1}{2} \right] \ \left. \right. \int_ {0} ^ {\infty} \int_ {0} ^ {\infty} \int_ {0} ^ {\infty} \int_ {0} ^ {\infty} \int_ {0} ^ {\infty} \int_ {0} ^ {\infty} \int_ {0} ^ {\infty} \int_ {0} ^ {\infty} \int_ {0} ^ {\infty} \int_ {0} ^ {\infty} d x d y d z d t d u d v d w d x d y d z d t d u d v d w d x d y d z d t d u d v d w d x d y d z d t d u d v d w d x d y d z d t d u d v d w d x d y d z d t d u d v d w d x d y d z d t d u d v d w d x d y d z d t d u d v d w d z d t d u d v d w d x d y d z d t d u d v d w d x d y d z d t d u d v d w d x d y d z d t d u d v d w d x d y d z d t \ \begin{array}{l} \text {上} \text {j} \text {i} \text {a} \text {i} \text {i} \text {i} \text {i} \text {i} \text {i} \text {i} \text {i} \text {i} \text {i} \text {i} \text {i} \text {i} \text {i} \text {i} \text {i} \text {i} \text {i} \text {i} \text {i} \text {u l l} \text {j} \text {j} \text {j} \text {j} \text {j} \text {j} \text {j} \text {j} \text {j} \text {j} \text {j} \text {j} \text {j} \text {j} \end{array} \ \end{array} $$
$$ \therefore \text {a d i a t i o n} \in {1, 2, 3, 4, 5, 6, 7, 8, 9, 1 0, 1 1, 1 2, 1 3, 1 4, 1 5, 1 6, 1 7, 1 8, 1 9, 2 0, 2 1, 2 2, 2 3, 2 4, 2 5, 2 6, 2 7, 2 8, 2 9, 3 0, 3 1, 3 2, 3 3, 3 4, 3 5, 3 6, 3 7, 3 8, 3 9, 4 0, 4 1, 4 2, 4 3, 4 4, 4 5, 4 6, 4 7, 4 8, 4 9, \dots }. $$
$$ \int_ {0} ^ {\infty} \log_ {2} (1 + \frac {1}{x}) \frac {1}{x} d x = \int_ {0} ^ {\infty} \log_ {2} (1 + \frac {1}{x}) \frac {1}{x} d x $$
$$ \therefore \mathrm {j} = \mathrm {j} $$
$$ \begin{array}{l} \left. \frac {1}{2} \frac {1}{2} \frac {1}{2} \frac {1}{2} \frac {1}{2} \frac {1}{2} \frac {1}{2} \frac {1}{2} \frac {1}{2} \frac {1}{2} \frac {1}{2} \frac {1}{2} \frac {1}{2} \frac {1}{2} \frac {1}{2} \right] \ \left. \int_ {0} ^ {1} f (x) d x + \int_ {1} ^ {2} f (x) d x + \dots \right| _ {0} ^ {\infty} \ \text {A r i e t e} \quad \text {A r i e t e} \quad \text {A r i e t e} \quad \text {A r i e t e} \quad \text {A r i e t e} \quad \text {A r i e t e} \quad \text {A r i e t e} \quad \text {A r i e t e} \quad \text {A r i e t e} \ . j b i s o \ \end{array} $$
$$ \begin{array}{l} \leqslant \sum_ {i = 1} ^ {n} \sum_ {j = 1} ^ {m} \sum_ {k = 1} ^ {n} \sum_ {l = 1} ^ {m} \sum_ {m = 1} ^ {n} \sum_ {n = 1} ^ {m} \sum_ {l = 1} ^ {n} \sum_ {m = 1} ^ {n} \sum_ {n = 1} ^ {m} \sum_ {l = 1} ^ {n} \sum_ {m = 1} ^ {n} \sum_ {n = 1} ^ {m} \sum_ {l = 1} ^ {n} \sum_ {m = 1} ^ {n} \sum_ {n = 2} ^ {m} \sum_ {l = 1} ^ {n} \sum_ {m = 1} ^ {n} \sum_ {n = 2} ^ {m} \sum_ {l = 1} ^ {n} \sum_ {m = 2} ^ {n} \sum_ {n = 2} ^ {m} \sum_ {l = 2} ^ {n} \sum_ {m = 2} ^ {n} \sum_ {n = 2} ^ {m} \sum_ {l = 2} ^ {n} \sum_ {m = 2} ^ {n} \sum_ {n = 2} ^ {m} \sum_ {l = 2} ^ {n} \sum_ {m = 2} ^ {n} \sum_ {\mathrm {的}} ^ {m} \sum_ {l = 2} ^ {n} \sum_ {m = 2} ^ {n} \sum_ {\mathrm {的}} ^ {m} \sum_ {\mathrm {的}} ^ {n} \ \int_ {0} ^ {\infty} \frac {1}{x} \int_ {0} ^ {x} \frac {1}{y} \int_ {0} ^ {y} \frac {1}{z} d x d y d z \ . \dot {j} \dot {s} \dot {s} \dot {s} \dot {s} \dot {s} \dot {s} \dot {s} \dot {s} \dot {s} \dot {s} \dot {s} \ \therefore \text {以} \quad \text {以} \quad \text {以} \quad \text {以} \quad \text {以} \quad \text {以} \quad \text {以} \quad \text {以} \quad \text {以} \quad \text {以} \quad \text {以} \quad \text {以} \quad \text {以} \quad \text {以} \quad \text {以} \quad \tag {1234567890} \ \end{array} $$
$$ \begin{array}{l} \therefore \text {d i s t a t e} \left. \right.\left. \right.\left. \right.\left. \right.\left. \right.\left. \right.\left. \right.\left. \right.\left. \right.\left. \right.\left. \right.\left. \right.\left. \right.\left. \right.\left. \right.\left. \right.\left. \right.\left. \right.\left. \right.\left. \right.\left. \right.\left. \right.\left. \right.\left. \right.\left. \right.\left. \right.\left. \right.\left. \right.\left. \right.\left. \right.\left. \right.\left. \right.\left. \right.\left. \right. j _ {j _ {j _ {j _ {j _ {j _ {j _ {j _ {j _ {j _ {j _ {j _ {j _ {j _ {j _ {j _ {j _ {j _ {j _ {j _ {j _ {j _ {j _ {j _ {j _ {j _ {j _ {j _ {j _ {j _ {j _ {j _ {j _ {j _ {j}}}}}}}}}}}}}}}}}}}}}}}}}}}}}}}}}} \ j _ {i j} \equiv i j \ \end{array} $$
$$ \begin{array}{l} \left. \int_ {0} ^ {1} \int_ {0} ^ {1} \int_ {0} ^ {1} \int_ {0} ^ {1} \int_ {0} ^ {1} \int_ {0} ^ {1} \int_ {0} ^ {1} \int_ {0} ^ {1} \int_ {0} ^ {1} \int_ {0} ^ {1} \int_ {0} ^ {1 0} \right. \ \therefore \ \end{array} $$
$$ \begin{array}{l} \therefore E U / \text {一} / \text {一} \cdot 1 \text {E M C} _ {9} E U / \text {一} / \text {一} \cdot 1 \text {E M C} _ {9} E U / \text {一} / \text {一} \cdot 1 \text {E M C} _ {9} E U / \text {一} / \text {一} \cdot 1 \text {E M C} _ {9} E U / \text {一} / \text {—} \cdot 1 \text {E M C} _ {9} E U / \text {一} / \text {—} \cdot 1 \text {E M C} _ {9} E U / \text {一} / \text {—} \cdot 1 \text {E M C} _ {9} E U / \text {一} / \text {—} \cdot 1 \ \text {d} \text {g o l l} \text {a} \text {s u s a l l} \text {r} \dots \varepsilon / 1 \dots / \text {r} \text {V} \text {c h i} \text {j} \text {t r i g h t h e} \text {s u s a l l} \text {r} \dots \varepsilon / 1 9 4 0 \text {p r} (\mathrm {E C}) \ \therefore a _ {a b} = 1 \Rightarrow a _ {a c} = 0 \ \end{array} $$
1 1
Jaaalll Jlae Jbji gaiiall
E j 1
1 1
. glll g llilgso gl jgl glgai jkall
1 1
J EU/19/17 17 17 17 17 17 17 17 17 17 17 17

iiJyAolal Aolal oaiil 0
i
(1)
A
B
"Turbo" 88
D
E
wllbsc F
G
aaii H
1
L
M
N
aJol 0
= a_1 + 12 + 13 + ·s + 1719 + 1720 + 1721 + 1722 + ·s
a a a a a a a a a a a a a a a a a a a a a a a a
aalalglal
g j 1j g j j j j j j j j j j j j j j j j j j j j j j j j j j j j j j j j j j j j j j j j j j j j j j j j j
A
aaiy g aiai y
gdu bdu
"gall" jzj 1 (G) gD (D) gD gB
()
. 1
a
"gall jzj (H) aoll (D) 1000
()
H
pababg jg g aababg jiaagabg aagaaa
1
Jl J 121111111111111111111111111111111111111111
()
Jglll: LkL (L) 1000000000000000000000000000000000000000000000000
()
Jgulj Jai jie jn jia a5 kall jge jge jge
1
puiy
gall gll 1000gall "gill" jra (Q) ll (D)
g 1000000000000000000000000000000000000000000
V
150e 1y111111111111111111111111
a a a a a a a a a a a a a a a a a a a a a a a a a
4.
J 1
a 1
J 1 / W)
aalee eae aee ae aee eae ee eae (K) aaeaae aeae ae
(12)
e 1 (V) pale (X) J (K) aale all
( 105 + 1) = 105 + 2
"Jll" 1 (V) 1 (S)
= a_1 + 12
aillg a
A
a a 1
a


- DO NOT THROW AWAY THESE INSTRUCTIONS
- DESCRIPTION OF THE APPLIANCE (Fig. 1)
- ATTENTION:
- USE OF HAND-HELD BLENDER, WIRE WHISK, POTATO MASHER
- Hand-held blender
- Wire whisk
- Potato masher
- Instructions for use
- WARNING
- USING THE CHOPPER ATTACHMENT
- FOOD PROCESSOR ATTACHMENT LID
- Chopping, mincing
- Do not insert food above the max level indicated on the goblet (V).
- Slicing, grating/julienne cutting
- CLEANING AND MAINTENANCE
- Blades are sharp, handle them with care.
- INSTRUCTIONS IMPORTANTES
- LIRE CES INSTRUCTIONS AVANT L'EMPLOI.
- BESCHRIJVING VAN HET APPARAAT (Fig. 1)
- NCIOJIb3OBAHNE IPNHADJIEXKHOCTE KYXOHHO POBOTA
- BHIMAHNE
- Tepka, Hape3ka
- BHUMAHNE:
- BHUMAHNE
- Hape3ka, tepka/pe3ka «Жульец»
- BAXJIINBA IHΦOPMAÇIÀ
- YBAXHO O3HAIOMNTNc8 3 LIMN IHCTPYKcIaMNI PEPeI NOyATKOM EKCPIyATAciI.
- ONUCAHHI INPNCPTPOIO (MaI.1)
- YBARA:
- BVKOPNCTAHHЯ PYHORO BJIENDEPA, BIHNUKA ДЛЯ 3БИBAHHЯ, IPECA ДЛЯ ПIOPE
- Puyn6JeHep
- MetaneBn BInuok dJa 36nBaHn
- Pnec dna niope
- Ihctpykci3 BnKOpncTaHHa
- HaTnpaHnTa npDi6HeHHa
- Tłuczek do ziemniaków
- i
Brand : ARIETE
Model : 0898
Category : Blender