
Touchman TM231 - Smartphone LEXIBOOK - Free user manual and instructions
Find the device manual for free Touchman TM231 LEXIBOOK in PDF.
| Product type | Tactile personal assistant (smartphone) |
| Brand | Lexibook |
| Model | Touchman TM231 |
| Dimensions | 105.5 x 76.3 x 11.5 mm |
| Weight | 70 g (with battery) |
| Power supply | 1 CR2032 battery |
| Memory capacity | 32 KB |
| Display languages | 7 languages: French, English, German, Spanish, Italian, Portuguese, Dutch |
| Main functions | Contacts, calendar, memos, calculator, conversions (currencies, Euro, units), games (777, Loto flash), alarm, PC synchronization |
| Connectivity | PC synchronization via cable (COM port) |
| Software | SyncMan® (downloadable from my.lexibook.com) |
| Alarm | Daily, chime, appointment reminder |
| Password protection | Yes (max 6 characters) |
| Warranty | 2 years |
| Care and cleaning | Clean with a soft, clean, dry cloth. Do not use detergents or solvents. |
| Safety | Avoid drops, water, humidity, dust, extreme temperatures, magnetic fields. Do not disassemble. |
| Spare parts | Replaceable CR2032 battery |
| Reparability | Warranty via retailer. Do not disassemble yourself. |
| General information | Manual available in several languages. Website: lexibook.com |
Frequently Asked Questions - Touchman TM231 LEXIBOOK
User questions about Touchman TM231 LEXIBOOK
0 question about this device. Answer the ones you know or ask your own.
Ask a new question about this device
Download the instructions for your Smartphone in PDF format for free! Find your manual Touchman TM231 - LEXIBOOK and take your electronic device back in hand. On this page are published all the documents necessary for the use of your device. Touchman TM231 by LEXIBOOK.
USER MANUAL Touchman TM231 LEXIBOOK
natural_image
World map silhouette showing continents and oceans (no text or labels)TM 230
FRANÇAIS F1-F9
ENGLISH GB 1 - GB 9
ESPAÑOL E 1 - E 4
DEUTSCH D 1 - D 4
Assistant Personnel TouchMan®230 Series
TM 231 / TM 232 / TM233
CCS = Caracas : NYC = New York : CHI = Chicago : DEN = Denver
LAX = Los Angeles : ANC = Anchorage : HNL = Honolulu : MID = Iles Midway
TNG = Tonga · WLD = Wellington · NOU = Ncuméa · SYD = Sydney
ADL = Adélatte : TYO = Tokyo : HKG = Hong Kong : BKK = Bangkok
RGN = Yangon; DAC = Dhaka; DEL = New Delhi; KHI = Karachi;
KBL = Kaboul ; DXB = Dubai ; THR = Téhéran ; MOW = Moscou ; CAI = La Caire.
3.2 Heure mondiale
Dimensions: 105.5 x 76.3 x 11.5 mm
Congratulations on the purchase of your the LexibookTM230 series PDA. This new PDA generation include many useful features designed to ease the organisation of your daily schedule and personal information.
With Internet access you can connect to Lexibook's exclusive Internet services site at https://my.lexibook.com which provides both useful and interesting information which can be downloaded to your personal computer and then synchronised* with your TM230.
*Some information may not always be able to be synchronised with your TM230.
Before you start using the TouchMan® 230 Series, you must remove carefully the static label protecting the LCD display and pull out the plastic battery tab at the rear of the unit. After you have done this reset the unit:
- Insert a blunt pin, such as an opened paper clip, into the RESET hole (at the rear of the unit) and press gently. RESET ? will displayed on the screen.
- Press OK to confirm. Display shows RESET! during the reset period (just a few seconds).
- Then the display shows local time screen.
Note: Doing a reset will delete all information stored in the unit as well as the secret code if unit has been used previously.
Switching the unit on and off
Press Ⓐ key to switch the unit on or off.
TouchMan® TM230 PDA will power-off automatically after 3 minutes if unused.
Battery replacement
- Switch off your unit and pull open battery cover at the rear of the unit.
- Replace used battery with a new, high quality CR2032 cell with (+) polarity facing up
- Display shows RESET? Press any key except ENTER to NOT reset the unit and keep your information stored in memory.
IMPORTANT! Be sure to complete battery replacement within 1 minute in order to keep your stored information safe.
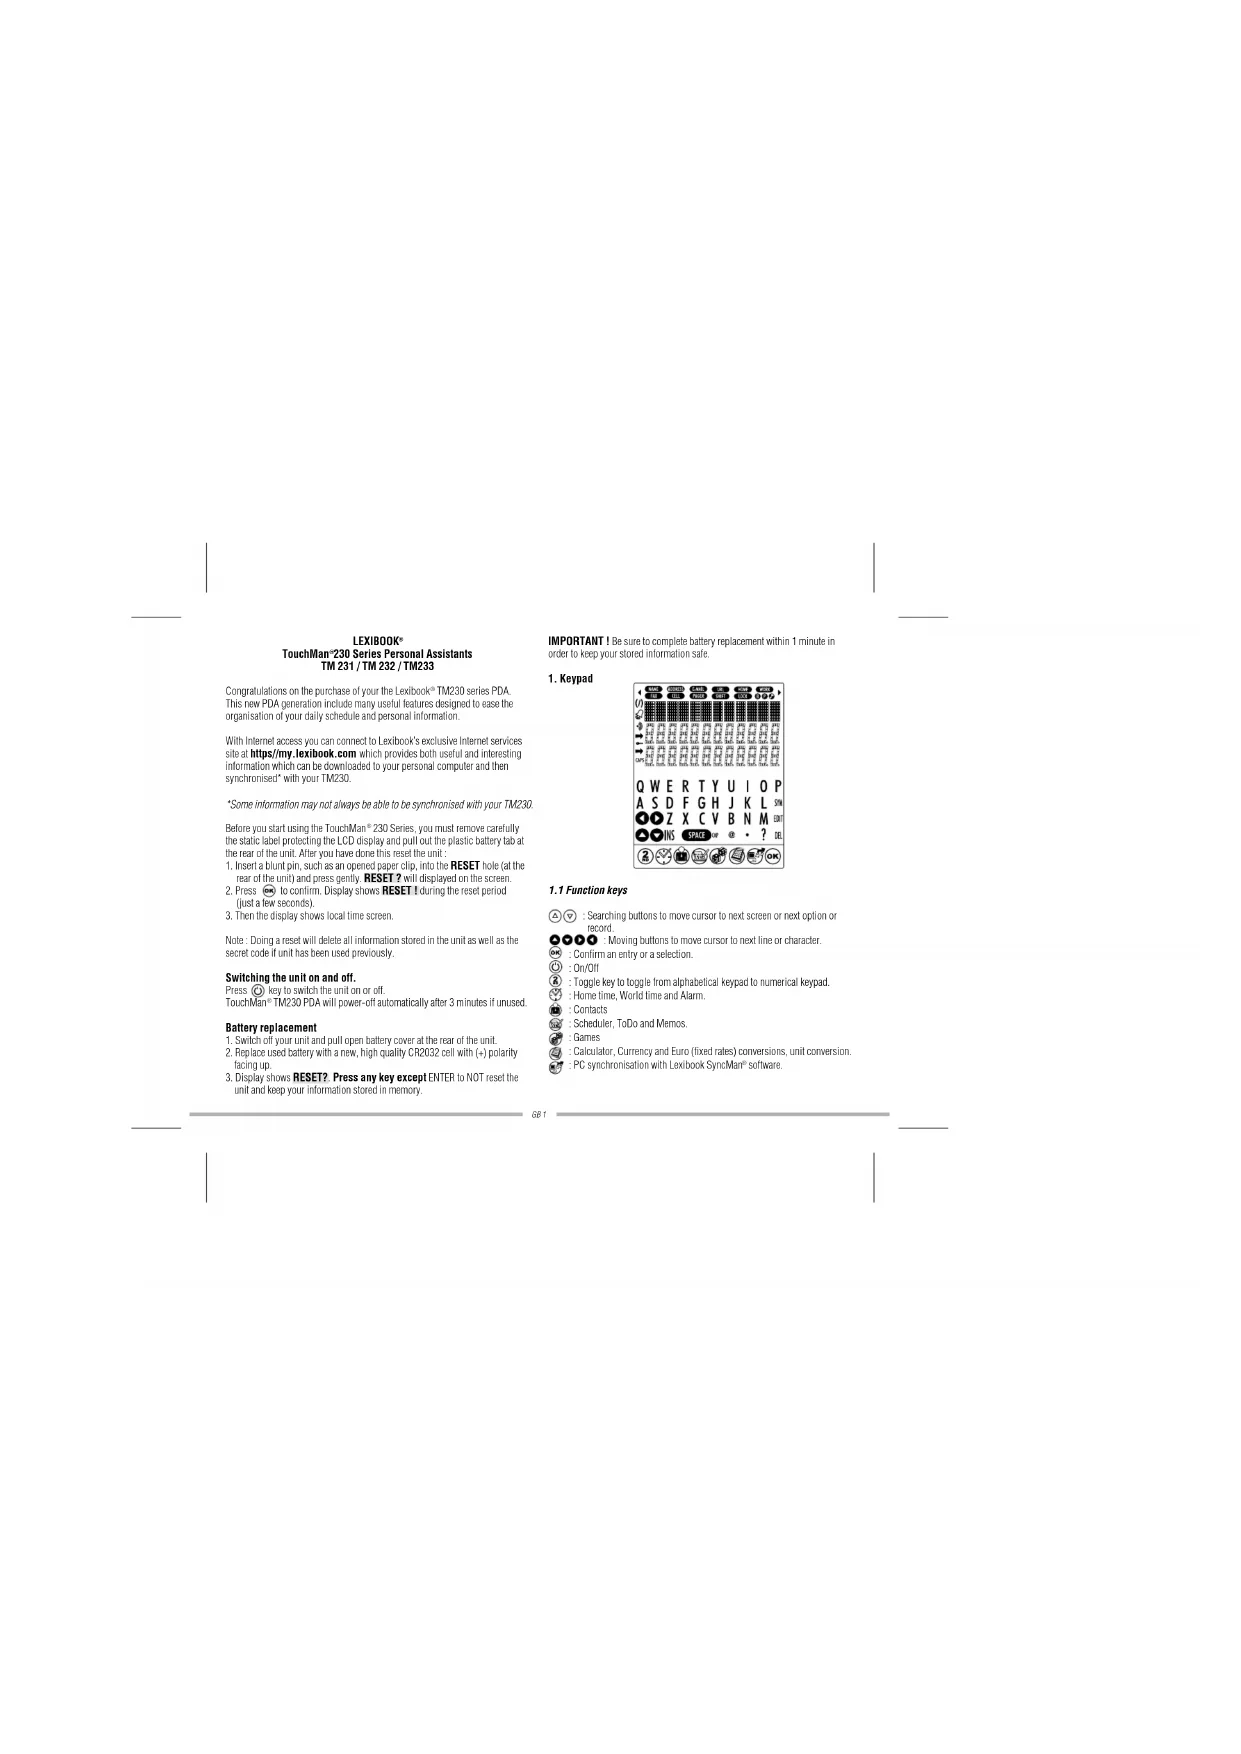
1. Keypad
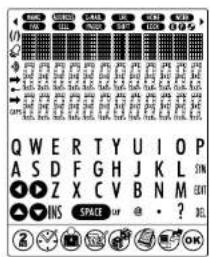
1.1 Function keys
△▽ : Searching buttons to move cursor to next screen or next option or record.
: Moving buttons to move cursor to next line or character.
OK : Confirm an entry or a selection.
On/Off
② : Toggle key to toggle from alphabetical keypad to numerical keypad.
: Home time, World time and Alarm.
Contacts
Scheduler, ToDo and Memos.
GAMES
: Calculator, Currency and Euro (fixed rales) conversions, unit conversion.
PC synchronisation with Lexicook SyncMan® software
1.2 Alphabetical keypad
SYM : Symbols and special characters (refer to appendix for table list).
EDIT : Edit record
DEL : Delete record
INS : Insert space.
SPACE: Tap a space
CAP : Capital letters
2.2 Numerical keypad
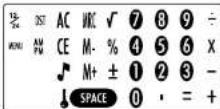
32: Toggle from 12-hour format (AM/PM) to 24-hour format (default setting).
DST : Enable Daylight Saving Time. When Summer time is on, # is displayed before the day
MENU : Open Menu function list : Language, Date Format, Memory check, PC Sync
Enable or disable key tone
Enable secret mode.
Clear All in Calculator mode.
CE : ESC key to cancel operation. Clear entry key in Calculator mode.
ML.M.-M+ : Memory keys in Calculator mode.
2. User settings
Display language
7 languages are available : English, Français (French). Deutsch (German),
Español (Spanish), Italiano (Italian), Português (Portuguese) and
Nederlands (Dutch).
-
Press ☑ once to display home time (*symbol is shown).
-
Press ② key to display numerical keypad then press MENU. LANGUAGE ? option is displayed.
-
Press 📄 and use ▲ and ▼ keys to scroll through language list and select desired one.
-
Press OK to confirm.
Date format
-
Press ✅ once to display home time (* symbol is shown).
-
Press (2) key to display numerical keypad then press MENU LANGUAGE?
onlin is displayed.
-
Use ▶ and 🔒 to scroll through menu option list and select DATE FORMAT. Press OK to confirm.
-
Use ▲ and ▼ to display available date formats: YYYY/MM/DD
MM/DD/YYYY and DD/MM/YYYY
- Press OK to confirm.
3. Time
3.1 Home time
-
Press once. City name abbreviation is shown on first line with *symbol first
-
Press EDIT and use ▲ and ▼ to scroll through city list and select matching time zone.
-
If you wish, you can Tap directly your city name (max. 6 letters) when matching time zone is displayed. Ex: LEEDS.
-
Press ▶ to move cursor to 2nd line and edit date. Numerical keypad is automatically displayed.
-
Tap current day date then Tap current time. If you are in 12-hour format, press AM/PM to toggle from AM (A) to PM (P) time.
-
Press OK to confirm.
Available Time zones
PAR = Paris : LON = London : AZO = Azores Islands : RIO = Rio de Janeiro ;
CCS = Caracas : NYC = New York : CHI = Chicago ; DEN = Denver ;
LAX - Los Angeles; ANC - Anchorage; HNL - Honolulu
MID = Midway Islands ; TNG = Tonga ; WLD = Wellington ; NOU = Nourea
SYD = Sydney; ADL = Adelaide; TYO = Tokyo; HKG = Hong Kong
BKK Bangkok; RGN Yangon; DAC Dhaka; DEL New Delhi; KHI Karachi; KBL Kabul; DXB Dubai; THR Tehran MOW Moscow; CAI Cairo.
3.2 World time
-
Press twice. * symbol is no longer displayed on first line.
-
Use ▲ and ▼ keys to scroll through available time zones. Hours and Dates will be automatically set up accordingly.
3.3 Alarm setting
Your unit offers three alarm modes:
- Daily alarm : (((•)))
- Hourly chime : (((A)))
Scheduler alarm (event reminder) ((/)))
-
Press three times. Alarm is displayed.
-
To change alarm lime, press EDIT.
-
Tap desired time
-
Press 📋 key several time to enable desired alarm modes: hourly chimo, alarm clock or event reminder. When an alarm mode is enabled the corresponding LCD icon is shown on the display. You can enable one, two or all three alarm modes.
-
Press OK to confirm
4. New contact record
There are two contact directories, PERSONAL and BUSINESS.
- Press once to open PERSONAL directory. Press twice to open BUSINESS directory.
- Once directory is opened, lap directly the contact name and then press ▼ to go to ADDRESS data field.
- Tap contact address (max. 36 characters) then press ▼ key to go to E-MAIL data field.
- Tap contact e-mail address then press ● key to go to URL data field.
-
Tao contact URL then press ⬤ to move to TEL./FAX data field. Numerical keypad is displayed.
-
Tap in first number (on second line) then press ● key to Tap in second number on third line (max, 36 characters).
-
Press OK to save record.
5. New scheduler record
-
Press advance to open SCHEDULE mode.
-
Tap the meeting description then press ▼ key to enter date. Numerical keypad is displayed.
-
Tap meeting's date and time.
-
Press OK to save record.
6. New ToDo record
-
Press 📂 twice to open TO-DO mode.
-
Tap task description then press ▼ key to set up priority level, between 1 (highest) to 9 (lowest).
-
Tap desired level number then press ▼ key to enter due date.
-
Tap due date and time. P (pending) is shown before the due date.
-
Press OK to save record
Mark completed task
-
Display desired ToDo record then press EDIT.
-
Press ▼ to display PRIORITY
-
Press 🔒 to remove P letter before due date.
-
Press OK to save record.
7. New memo record
-
Press three times to open MEMO mode.
-
Tap in memo description on first line (max. 36 characters).
-
Press ▼ to go to second and third lines to enter numbers, if desired.
-
Press ☐ to save record.
8. Instructions for character input
Capital letters
Press CAP. (alphabetical keypad) to enable or disable capital letters input.
Figures
Press ② to toggle between alphabetical keypad and numerical keypad, whilst typing.
Symbols
Press SYM (alphabetical keypad) to display first symbol in the list. Press SYM repeatedly to scroll through symbol list until desired one is shown.
Accented letters
Press SYM (alphabetical keypad) then desired letter to show its first accent. Tap letter key repeatedly to scroll through all accents. E.g.: Press SYM then E to display (lower case mode) or (upper case mode). Refer to appendix to view accented letters.
Cancel operation without saving data
Press ② to display numerical keypad then press CE.
Correct input
Use 🔒 and 🔔 keys to move cursor on desired character to edit then Tap desired character.
insert character
Move cursor to desired place and press INS (alphabetical keypad) to insert a blank. Tap desired character.
Delete character
Move cursor in front of the character to delete and press DEL (alphabetical keypad).
9. Record searching
Contact records are sorted in ascending alphabetical order using Contact name. Scheduler records are sorted in chronological order.
- Sequential search
Open desired mode: PERSONAL CONTACTS, BUSINESS CONTACTS, SCHEDULER, TO-DO or MEMO. Press Ⓐ or ▼ to search for desired record. If no record is found, display shows NOT FOUND.
- Direct search
Open desired mode: PERSONAL CONTACTS. BUSINESS CONTACTS, SCHEDULER, TO-DO or MEMO. Tap first letters of contact name or description and press ▲ or ▼ keys to display matching records. If no record is found, display shows NOT FOUND.
10. View a record
Once desired record is displayed, press and to scroll left or right. For contact records, press to view other data fields displayed on first line Names, Address, E-mail, URL.
11. Edit a record
- Once desired record is displayed, press EDIT (alphabetical keypad) and use ● and ● keys to move cursor to desired place.
- Insert a character by pressing INS key or delete a character by pressing DEL key.
- Press ● key to move to other data fields to edit or fill.
- When you have completed editing your record, press 📄 to confirm.
12. Delete a record
- Once desired record is displayed, press DEL (alphabetical keypad).
- Display shows DELETE?. Press 🔒 to confirm or any other key to escape deletion.
13. Secret mode
You can set up a password to protect your Contact, Scheduler, ToDo and Memo records. Password cannot exceed 6 characters.
WARNING! If you forgot your password you will not be able to view your data or enter new records and you will be forced to reset the unit. Resetting the unit will lose all your data!
Set up a password
-
Press ✅ once to display home time (★ symbol is displayed on first line).
-
Press ⚫ to display numerical keypad and there press ↓ . PASSWORD ? is displayed.
-
Tap your password (maximum 6 characters) and press OK. Press Ⓞ to display alphabetical keypad if you wish to Tap letters.
-
Display shows RECONFIRM !
-
Tap again your password and press OK to confirm. Secret mode is now enabled and → secret icon is on screen.
Edit password
-
Press once to display home time ( * symbol is displayed on first line).
-
Press ↓ (numerical keypad). PASSWORD 2 is displayed.
-
Tap your current password and press OK. Display shows EDIT?
-
Press OK. Display shows current password and cursor is flashing on first
character
- Insert character by pressing INS or delete character by pressing DEL
(max. 6 characters). Press OK to confirm.
- Display shows RECONFIRM 1. Tap again new password and press OK
Open modes when password is enabled
First time you press 📄 or 📋 keys to view or enter data, display will show PASSWORD?. Tap your password and press OK to confirm.
14. Calculator
Press to enter Calculator mode.
15. Currency conversion
Set up currency conversion
- Press twice. First currency conversion is displayed: EURO → USD
There are 5 currency conversions
-
Use △ or ▽ keys to scroll through currency conversion list and select desired one.
-
Press EDIT (alphabetical keypad)
-
Cursor is flashing on first character of source currency. Change source currency name if needed (max. 4 characters) then press ▶ to go and change target currency name if needed. Press 🔒 to confirm.
-
If you don't need to change currency names, press OK straight after pressing EDIT.
-
Zero is flashing on third line. Tap currency rate (e.g.: for EURO → USD,
Tap 1.089 if 1 Euro = 1.089 US\$).
- Press OK to confirm. Press CE at anytime to cancel setting.
Perform a conversion
-
Select desired currency conversion. E.g.: EURO → USD
-
Tap amount to convert
If it is a Euro amount, press ▶ to view US\$ result.
If it is a US\$ amount, press ① to view Euro result
16. Euro Conversion (fixed rates)
Fixed Euro rates are not editable.
Perform a conversion
- Press three times. First Euro conversion is displayed EURO→ATS with
its Euro rate 13.7603. There are 11 Euro conversions.
-
Use △ or ▼ arrows to select desired Euro conversion. Ex: EURO → FRF
-
Tap amount to convert
If it is a Euro amount, press ▶ to view FRF result. If it is a FRF amount, press ▶ to view Euro result.
17. Unit conversion
Perform a conversion
-
Press four times. First unit conversion is displayed inch cm with its conversion rate 2.54. There are 8 pre-stored unit conversions.
-
Press △ or ▽ arrows to select desired conversion. Ex: mile → km
-
Tap amount to convert
If it is a mile amount, press ▶ to view km result.
If it is a km amount, press ⬆ to view mile result.
Available unit conversions:
inch → cm (inches and centimeters); yard → m (yards and meters); mile → km (miles and kilometers); C → F (Celsius and Fahrenheit);
ft → m (leel and meters); oz → g (ounces and grams); lb → kg (pounds and kilograms); gal → I US (US gallons and litres); gal → I UK (UK gallons and liters)
18. Reset
This operation will delete all your data and your password.
-
Insert a blunt pin, such as an opened paper clip, in RESET hole at the rear of the unit and press gently Display shows RESET?
-
Press ☑ to confirm or any other key to escape.
19. Memory check
-
Press ✅ once to view home time (* symbol on first line).
-
Press ② to display numerical keypad and there press MENU LANGUAGE? option is displayed.
-
Use △ or ▼ arrows to select MEMORY CHECK and press OK to confirm.
- Display shows how many free bytes are left then returns to home time.
Before synchronising
Prior to performing your first synchronisation, make sure that Lexibock® SyncMan® software is installed on your PC. Insert the CD included in your
pack. The SyncMan installation menu will start automatically. Follow the screen prompts to install the software.
-
Connect the cable. Included with your unit, to a free PC Com Port then insert cable jack into the unit's socket (on top left side).
-
Start SyncMan® software on your PC and check whether synchronisation mode is set up for TM230 Series Personal Assistants by clicking on Tools
Options then Your Device tab
- Setup PC Corn Port in SyncMan ^™ by clicking on Tools, Options then Synchronisation tab. Make sure also that automatic connection is ticked off.
Perform synchronisation
-
Once SyncMan ^® has been started and your unit connected to your PC, press ☑ once to display home ( * symbol on first line).
-
Press 📄 to start Synchronisation. Alternatively you can press MENU then select PC SYNCH, option and press OK
-
Display shows LINKING ... During synchronisation. If you have set up a password, you will be required to enter it at this time to perform synchronisation.
21. Lexibook SYNCMAN® software
SyncMan® UPGRADE downloading
-
Go to https://my.lexibook.com web site and register as new member.
-
You will get by return an activation e-mail to make your account active. Click on the activation link included in this e-mail.
-
Then go back to https://my.lexibook.com and enter your user name and password, this will take you to your account home page, you will find a link to download Lexibook SyncMan * upgrade software free.
Required PC configuration
Your PC must have following configuration to run Lex book SyncMan® software properly :
- Windows *95. 98, Millennium, 2000 & XP or Windows NT*4.0.
- Microsoft® Internet Explorer version 5.0 or above.
• 32MB RAM (for Internet Explorer).
• 10MB free space on your hard drive.
• SVGA colour screen
- One free Com Port.
22. GAMES
777
- Press once. Display shows 777 and \10 on first line. \10 is minimum wager. On second line there is default total money, 490.
- Sel desired wager by pressing either ▲ or ▼ and press OK to start game.
- If you get a 777 result you win fivefold the wager. If you get a ⚙⋯ result you win threefold the wager. If you get a 😊😊 result you win twofold the wager.
- If you get any other result, you lost your wager.
- Maximum money amount you can win is 9990. If you reach 0, game is over.
Lottery
- Press/ twice. A first series of six lottery numbers (from 1 to 49), picked up at random, is displayed.
- To view another series of six numbers, press OK
- To view other series, keep pressing OK
24. CARE AND SAFETY
- Avoid extremes in temperature, exposure to direct sunlight, water, humidity and dust.
- Don't drop the Organiser as this may damage it.
- Do not use detergent, liquid cleaners or solvents to clean unit. Wipe unit with clean, soft dry cloth.
- Keep unit away from strong magnetic fields (e.g. loudspeakers), and any source static electricity.
- Don't attempt to dismantle unit. There are no user serviceable parts inside and any attempt to do so will render the warranty void.
- We strongly recommend that your keep a written record of all important data. In almost any electronic memory system, data can be lost under certain circumstances. We therefore accept no liability for loss of data whether this is caused by incorrect use, repairs, error, changing batteries, using batteries
after they have expired or other circumstances. Keep regular backup's of your PC Data.
- We do not accept any direct or indirect liability for financial losses or claims from third parties, which result from using this product and all its functions, such as stolen credit card numbers, loss or modification of data.
DO NOT dispose of old batteries by throwing into a fire. They may explode and cause serious injury. ALWAYS dispose of batteries carefully.
DO NOT leave balleries in unit for extended periods of non use as they may leak and cause irrevocable damage to your unit. This will invalidate your warranty.
Note:
a) Non-rechargeable batteries are not to be recharged.
b) Different types of batteries or new and used batteries are not to be mixed.
c) Only batteries to the same or equivalent type as recommended are to be used.
d) Batteries are to be inserted with the correct polarity.
e) Exhausted batteries are to be removed from the product.
f) The supply terminals are not to be short-circuited.
If in doubt consult your local stockist or ring the help line for further information.
Warning: If this product receives an electrostatic shock it may cease to function.
To re-start the unit open the battery door (if applicable to this device) and replace
it to do a reset, or alternatively remove batteries and put them back in.
24. WARRANTY
This product is covered by our comprehensive 2-year warranty. In the case of any fault please return the unit to your original place of purchase for replacement or repair. A copy of your sales receipt must be included as proof of purchase.
This warranty does not cover faults occurring through misuse, damage or abuse.
This does not affect your statutory rights.
If you wish to register your product for our extended 3-year warranty programme please enclose a cheque for the total sum of £15.00 along with your full name and address details. You will be registered and a warranty certificate will be forwarded to you.
Return/Warranty extension address: Lexibook UK Limited
PO Box 66
Bordon
Hampshire GU35 OZN
For assistance, please contact our Freephone Help Line 0808 100 3015.
Web site: www.lexibook.co.uk
* Damage to LCD display not included.
25. TECHNICAL SPECIFICATIONS
Specifications are subject to change without notice.
Appendix 1 – Symbol table list

Appendix 2 – Accented letters
A:→A→A→A→A→A→A→A
a:→a→a→a→a→a→a→a→
E→F→E→F→F→F
B:→δ→δ→δ→δ→δ
Appendix 3 – Euro fixed rates
| Country Code | Currency Name | Country | Euro Rate |
| FRF French franc | France 1 Euro = 6 | 55957 FRF | |
| DEM German mark | Germany 1 Euro | = 1.95583 DEM | |
| IEP Irish punt | Ireland (Eire) 1 Euro | 0,78/564 IEP | |
| ESP Peseta Spain | Spain 1 Euro = 166.38 | ESP | |
| ITL Lire Italy 1 | Euro = 1936.27 ITL | ||
| ATS Shilling | Austria | 1 Euro = 13.7603 ATS | |
| BEF Belgium franc | Belgium | 1 Euro = 40.3399 BEF | |
| FIM Finland mark | Finland | 1 Euro = 5.94573 FIM | |
| LUF Luxembourg franc | Luxembourg | 1 Euro = 40.3399 LUF | |
| NLG | Florin | Pays-Bas 1 Euro = 2.20371 NLG | |
| PTE Escudos | Portugal | 1 Euro = 200.482 PTE |
LEXIBOOK®
LAX = Los Angeles; ANC = Anchorage; HNL = Honolulu; MID = Islas Midway;
TNG = Tonga; WLD = Wellington; NOU = Numca; SYD = Sydney;
ADL = Adelaide; TYO = Tokio; HKG = Hong Kong; BKK = Bangkok;
1.1 Funktionstasten
NYC = New York; CHI = Chicago; DEN = Divers; LAX = Los Angeles;
ANC = Anchorage; HNL = Honolulu; MID = Midwayinsolin; TNG = Tonga.
WLD = Wellington; NOU = Nouméa; SYD = Sydney; ADL = Adelaide;
TYO = Tokio; HKG = Hongkong; BKK = Bangkok; RGN = Yangon;
DAC - Dhaka; DEL - New Delhi; KHI - Karachi; KBL - Kabul; DXB - Dubai
THR = Toheran; MOW = Moskau; CAI = Kairo
Alarm einstellen
CHI = Chicago; DEN = Denver; LAX = Los Angeles; ANC = Anchorage;
HNL = Honolulu ; MID = Isole Midway ; TNG = Tonga ; WLD = Wellington
NOU = Noumea, SYD = Sydney; ADL = Adelaide; TYO = Tokyo;
HKG = Hong Kong ; BKK = Bangkok ; RGN = Yangon ; DAC = Dhaka ;
DEL = New Delhi, KHI = Karachi, KBL = Kabul, DXB = Dubai
THR = Teheran ; MOW = Mosca ; CAI = II Cairo
LAX = Los Angeles : ANC = Anchorage ; HNL = Honolulu
MID Midway Islands : TNG Tonga ; WLD Wellington : NOU Noumea ;
SYD = Sydney : ADL = Adelaide : TYO = Tokyo ; HKG = Hong Kong
BKK = Bangkok ; RGN = Yangon ; DAC = Dhaka ; DEL = Nova Doli ;
KHI = Karachi ; KBL = Kaboul : DXB = Dubai ; THR = Teerão
MOW = Moscow CAI = Cairo
Regulação do alarme
1.1 Functietoetsen
CCS = Caracas; NYC = Nowy York; CHI = Chicago; DEN = Denvers;
LAX = Los Angeles; ANC = Anchorage ; HNL = Honolulu;
MID = Wyspy Midway; TNG = Tonga; WLD = Wellington; NOU = Noumea;
SYD = Sydney; ADL = Adelaide; TYO = Tokyo; HKG = Hongkong;
BKK = Bangkok; RGN = Rangun; DAC = Dakka; DEL = Nowe Delhi;
KHI = Karaczi; KBL = Kabul; DXB = Dubai; THR = Teheran;
MOW = Moskwa; CAI = Kair
Ustawienie alarmu.

- Assistant Personnel TouchMan®230 Series
- TM 231 / TM 232 / TM233
- Heure mondiale
- Switching the unit on and off
- Battery replacement
- Keypad
- Function keys
- Alphabetical keypad
- Numerical keypad
- User settings
- Display language
- Date format
- Time
- Home time
- World time
- Alarm setting
- New contact record
- New scheduler record
- New ToDo record
- New memo record
- Instructions for character input
- Capital letters
- Figures
- Symbols
- Accented letters
- Cancel operation without saving data
- Correct input
- insert character
- Delete character
- Record searching
- - Sequential search
- - Direct search
- View a record
- Edit a record
- Delete a record
- Secret mode
- Set up a password
- Edit password
- Open modes when password is enabled
- Calculator
- Currency conversion
- Set up currency conversion
- Perform a conversion
- Euro Conversion (fixed rates)
- Unit conversion
- Available unit conversions:
- Reset
- Memory check
- Before synchronising
- Options then Your Device tab
- Perform synchronisation
- Lexibook SYNCMAN® software
- SyncMan® UPGRADE downloading
- Required PC configuration
- GAMES
- 777
- Lottery
- CARE AND SAFETY
- DO NOT dispose of old batteries by throwing into a fire. They may explode and cause serious injury. ALWAYS dispose of batteries carefully.
- Note:
- WARRANTY
- TECHNICAL SPECIFICATIONS
- LEXIBOOK®
- Funktionstasten
- Alarm einstellen
- Regulação do alarme
- Functietoetsen
- Ustawienie alarmu.
Brand : LEXIBOOK
Model : Touchman TM231
Category : Smartphone