WS5500 - Weather Station ALECTO - Free user manual and instructions
Find the device manual for free WS5500 ALECTO in PDF.

| Features | Details |
|---|---|
| Product type | Weather Station |
| Temperature measurements | Indoor and outdoor |
| Humidity measurements | Indoor and outdoor |
| Weather forecasts | Yes, with forecast icons |
| Display | Backlit LCD screen |
| Power supply | Power adapter and/or batteries |
| Connectivity | Wireless (outdoor sensor) |
| Temperature measurement range | -20�b0C to 60�b0C |
| Humidity measurement range | 1% to 99% |
| Installation | Easy to install, with instructions provided |
| Maintenance | Regular cleaning of the screen and sensors |
| Warranty | Check conditions with the seller |
| Safety precautions | Avoid exposure to water and extreme temperatures |
| Included accessories | Outdoor sensor, power adapter |
| Dimensions | Compact, easy to place on a desk or wall |
Frequently Asked Questions - WS5500 ALECTO
User questions about WS5500 ALECTO
0 question about this device. Answer the ones you know or ask your own.
Ask a new question about this device
Download the instructions for your Weather Station in PDF format for free! Find your manual WS5500 - ALECTO and take your electronic device back in hand. On this page are published all the documents necessary for the use of your device. WS5500 by ALECTO.
USER MANUAL WS5500 ALECTO
- KOPPELEN MET INTERNET (Weather Underground)
0-2 = Low, 3-5 = Moderate, 6-7 = High,
8-10 = Very High, >=11 = Extreme
text_image
Technical diagram of a mechanical device with numbered parts labeled 1 through 7
text_image
Technical diagram of a mechanical device with numbered parts labeled 8, 9, 10, and 11natural_image
Technical line drawings of mechanical components with no visible text or symbolsnatural_image
Technical line drawings of mechanical devices and instruments (no text or symbols)natural_image
Technical line drawing of a mechanical device with no visible text or symbols8. KOPPELEN MET INTERNET (Weather Underground)

text_image
Mobile app screenshot showing a notification dialog with Chinese text and an orange button
text_image
Options C:\Program Files\* C:\Program Files\ns 12.000000000000000000000000000000000000000000000000000000000000000000000000000000000000000000000000000014
text_image
Login Name: Password: OK Cancel
text_image
Select URL Source URL Other URL
text_image
Password Password: Inside 6000 Password: Inside 9000 Passwordtext_image
Mobile app interface screenshot showing a login panel with Chinese text and a 'Cancel' button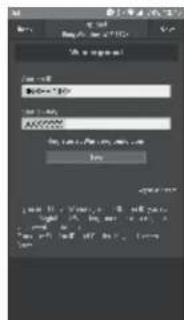
text_image
A: a response I am to I have a value I can't get I can't get the value I can't get the value I can't get the value I can't get the value I can't get the value I can't get the value I can't get the value I can't get the value I can't get the value I can't get the value I can't get the value I can't get the value I can't get the value I can't get the value I can't get the value The result is that the value is 0.0000000000000000000000000000000000000000000000000000000000000000000000000000000000000000000000000000- Registreren via Wunderground:
text_image
Name Name: 10000000000000000000000000000000000000000000000000000000000000000000000000000000000000000000000000000 Name of Response Response
text_image
Login User: www.100.com Login (1) Login (2) Login (3) Login (4) Login (5) Login (6) Login (7) Login (8) Login (9) Login (10) Login (11) Login (12) Login (13) Login (14) Login (15) Login (16) Login (17) Login (18) Login (19) Login (20) Login (21) Login (22) Login (23) Login (24) Login (25) Login (26) Login (27) Login (28) Login (29) Login (30) Login (31) Login (32) Login (33) Login (34) Login (35) Login (36) Login (37) Login (38) Login (39) Login (40) Login (41) Login (42) Login (43) Login (44) Login (45) Login (46) Login (47) Login (48) Login (49) Login (50) Login (51) Login (52) Login (53) Login (54) Login (55) Login (56) Login (57) Login (58) Login (59) Login (60) Login (61) Login (62) Login (63) Login (64) Login (65) Login (66) Login (67) Login (68) Login (69) Login (70) Login (71) Login (72) Login (73) Login (74) Login (75) Login (76) Login (77) Login (78) Login (79) Login (80) Login (81) Login (82) Login (83) Login (84) Login (85) Login (86) Login (87) Login (88) Login (89) Login (90) Login (91) Login (92) Login (93) Login (94) Login (95) Login (96) Login (97) Login (98) Login (99)
text_image
Part 1: Copyright © 2017-03-04 Circumference: "How Pennsylvania Group is your free description" 10.02.2017 Copyright: www.circumference.com Your Subscales are less complete. Then you otherwise from the other group will be due to the Copyright: this image is for the private website.text_image
WIS View We you need to get in the Online: 0.186@WISWA Station-by-XXXXXX you pick required?
text_image
Back Import Authentication Help Membership Login ID: MENIENEX Login Account SIAAISE Login of Membership on Add Add to Show the following: We have you been able to access your account to. Use the Account for your account to add a new user.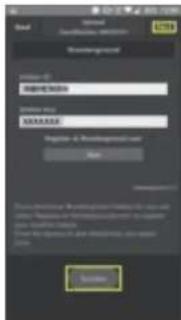
text_image
Login Password Password Password Login to: Passworded user Login Login to: Passworded user Login to: Passworded user Login to: Passworded user Login to: Passworded user Login to: Passworded user Login to: Passworded user Login to: Passworded user Login to: Passworded user Login to: Passworded user Login to: Passworded user Login to: Passworded user Login to: Passworded user Login to: Passworded user Login to: Passworded user Login to: Passworded user Locationtext_image
Scanned screenshot of a software interface with input fields and buttons, likely for a user input or configuration.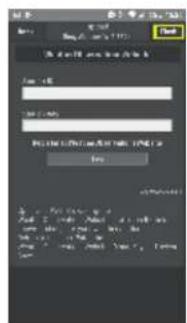
text_image
Scanned form interface with input fields and buttons, likely for a web-based document or login.
text_image
16:00:00 16:00:00 16:12:00 4/31/2015text_image
We I found! You do I get your email Send to email you at OK
text_image
Scanned screenshot of a web form interface with input fields and buttons, likely for a web-based application or registration.
text_image
14.16 4/31/20158.3 Basisfuncties:
Weerstation gegevens inzien
text_image
Microsoft Word Microsoft Word - 12345789 For this instance we have your own name.
text_image
Screenshot of a mobile app interface with a highlighted button labeled 'OK' in the center.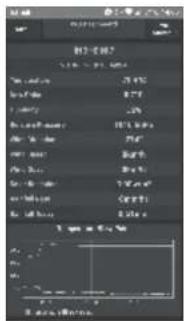
text_image
图层 1 100% 20% 30% 40% 50% 60% 70% 80% 90% 100% 110% 120% 130% 140% 150% 160% 170% 180% 190% 200% 210% 220% 230% 240% 250% 260% 270% 280% 290% 300% 310% 320% 330% 340% 350% 360% 370% 380% 390% 400% 410% 420% 430% 440% 450% 460% 470% 480% 490% 500% 510% 520% 530% 540% 550% 560% 570% 580% 590% 600% 610% 620% 630% 640% 650% 660% 670% 680% 690% 700% 710% 720% 730% 740% 750% 760% 770% 780% 790% 800% 810% 820% 830% 840% 850% 860% 870% 880% 890% 900% 910% 920% 930% 940% 950% 960% 970% 980% 990% 1000%Jouw apparaten
text_image
New Configure a New Device W1 Certificate? Upgrade Web... Wunderguard... Change W1 Database Configure errors.
text_image
Screenshot of a mobile app interface showing a text input field with Chinese characters and a highlighted section.text_image
Add Configure a New Device New User Add Existing Remove Users Predecessor Add User Configure Users.
text_image
OK OK Cancel OK Cancel OK OK Cancel OK OK Cancel OK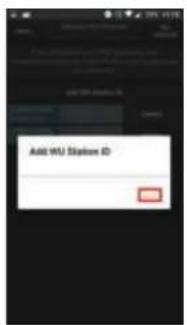
text_image
Add WU Status IDtext_image
Delete WJ Station ID For you have to Delete WJ Station!Eenheden aanpassen
text_image
Configure a New Direction Service Line WS Framework Supplement WSB Rebootbrushes Manage 50% Options Configure the
text_image
12.00 12.00 12.00 12.00 12.00 12.00 12.00 12.00 12.00 12.00 12.00 12.00 12.00 12.00 12.00 12.00 12.00 12.50 12.50 12.50 12.50 12.50 12.50 12.50 12.50 12.50 12.50 12.50 12.50 12.50 12.50 12.50 12.50 12.50 13.00 13.00 13.00 13.00 13.00 13.00 13.00 13.00 13.00 13.00 13.00 13.00 13.00 13.00 13.00 13.50 13.50 13.50 13.50 13.50 13.50 13.50 13.50 13.50 13.50 13.50 13.50 13.50 13.50 13.50 13.50 13.50 14.00 14.00 14.00 14.00 14.00 14.00 14.00 14.00 14.00 14.00 14.00 14.00 14.50 14.50 14.50 14.50 14.50 14.50 14.50 14.50 14.50 14.50 14.50 14.50 14.50 14.50 14.50 14.50 14.50 15.00 15.00 15.00 15.00 15.00 15.00 15.00 15.00 15.00 15.00 15.50 15.50 15.50 15.50 15.50 15.50 15.50 15.50 15.50 16.00 16.00 16.00 16.00 16.00 16.00 16.5LISTE DU CONTENU
-
INTRODUCTION 18
-
MAINTENANCE
3.1 Pluviomètre 19
- OUR LIER AVEC INTERNET (Weather Underground)
8.1 Introduction 30
text_image
Technical diagram of a mechanical device with numbered parts, including top and side views with Chinese labels.natural_image
Technical line drawings of mechanical components with no visible text or symbolsnatural_image
Technical line drawings of two mechanical devices with no visible text or symbolsnatural_image
Technical line drawing of a mechanical device with no visible text or symbolsnatural_image
Technical line drawings of two mechanical components with no visible text or symbols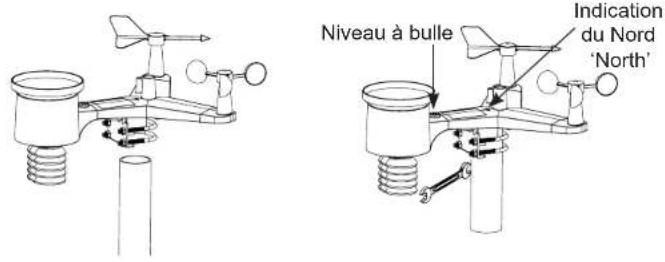
text_image
Bouton reset LEDtext_image
Mobile app screenshot showing a chat log with a placeholder message and an orange button labeled 'OK' in the bottom right.
text_image
Scan Image Scan Image to show the image.
text_image
Login Name: Password: OK Cancel
text_image
Smart SSB Time WW Other WiFi
text_image
Add Configure Options Add Name: 000 Password: Home MSF Password 1234567890 1234567890 1234567890 1234567890 1234567890 1234567890 1234567890 1234567890 1234567890 1234567890text_image
Mobile app interface screenshot showing a login dialog with Chinese text and a 'OK' button
text_image
Web: 10.1.2017 <|vision_start|> E-mail: 10.1.2017 Web: 10.1.2017 E-mail: 10.1.2017 Web: 10.1.2017 Web: 10.1.2017 Web: 10.1.2017 Web: 10.1.2017 Web: 10.1.2017 Web: 10.1.2017 Web: 10.1.2017 Web: 10.1.2 Web: 10.1.2 Web: 10.1.2 Web: 10.1.2 Web: 10.1.2 Web: 10.1.2 Web: 10.1.2 Web: 10.1.2 Web: 10.1.2 Web: 10.1.2 Web: 10.1.3 Web: 10.1.3 Web: 10.1.3 Web: 10.1.3 Web: 10.1.3 Web: 10.1.3 Web: 10.1.3 Web: 10.1.3 Web: 10.1.3 Web: 10.1.3 Web: 10.1.4 Web: 10.1.4 Web: 10.1.4 Web: 10.1.4 Web: 10.1.4 Web: 10.1.4 Web: 10.1.4 Web: 10.1.4 Web: 10.1.4 Web: 10.1.4 Web: 10.1.5 Web: 10.1.5 Web: 10.1.5 Web: 10.1.5 Web: 10.1.5 Web: 10.1.5 Web: 10.1.5 Web: 10.1.5 Web: 10.1.5 Web: 10.1.6 Web: 10.1.6 Web: 10.1.6 Web: 10.1.6 Web: 10.1.6 Web: 10.1.6 Web: 10.1.6 Web: 10.1.6 Web: 10.1.6 Web: 10.1.6 Web: 10.1.7 Web: 10.1.7 Web: 10.1.7 Web: 10.1.7 Web: 10.1.7 Web: 10.1.7 Web: 10.1.7 Web: 10.1.7 Web: 10.1.8 Web: 10.1.8 Web: 10.1.8 Web: 10.1.8 Web: 10.1.8 Web: 10.1.8 Web: 10.1.8 Web: 10.1.8 Web: 10.1.8 Web: 10.1.8 Web: 10.2. Web: 2. Web: 2. Web: 2. Web: 2. Web: 2. Web: 2. Web: 2. Web: 2. Web: 2. Web: 2. Web: 2. Web: 2. Web: 2. Web: 2. Web: 2. Web: 2. Web: 2. Web: 2. Web: 2. Web: 2. Web: N. Web: N. Web: N. Web: N. Web: N. Web: N. Web: N. Web: N. Web: N. Web: N. Web: N. Web: N. Web: N. Web: N. Web: N. web.comtext_image
Login Form: www.basaner.com BASANER Name: BASANER Login of www.basaner.com Home Please check your account for the following: (1) We have you to access your account for the following: (2) We have you to access your account for the following: (3) We have you to access your account for the following: (4) We have you to access your account for the following: (5) We have you to access your account for the following: (6) We have you to access your account for the following: (7) We have you to access your account for the following: (8) We have you to access your account for the following: (9) We have you to access your account for the following: (10) We have you to access your account for the following: (11) We have you to access your account for the following: (12) We have you to access your account for the following: (13) We have you to access your account for the following: (14) We have you to access your account for the following: (15) We have you to access your account for the following: (16) We have you to access your account for the following: (17) We have you to access your account for the following: (18) We have you to access your account for the following: (19) We have you to access your account for the following: (20) We have you to access your account for the following: (21) We have you to access your account for the following: (22) We have you to access your account for the following: (23) We have you to access your account for the following: (24) We have you to access your account for the following: (25) We have you to access your account for the following: (26) We have you to access your account for the following: (27) We have you to access your account for the following: (28) We have you to access your account for the following: (29) We have you to access your account for the following: (30) We have you to access your account for the following: (31) We have you to access your account for the following: (32) We have you to access your account for the following: (33) We have you to access your account for the following: (34) We have you to access your account for the following: (35) We have you to access your account for the following: (36) We have you to access your account for the following: (37) We have you to access your account for the following: (38) We have you to access your account for the following: (39) We have you to access your account for the following: (40) We have you to access your account for the following: (41) We have you to access your account for the following: (42) We have you to access your account for the following: (43) We have you to access your account for the following: (44) We have you to access your account for the following: (45) We have you to access your account for the following: (46) We have you to access your account for the following: (47) We have you to access your account for the following: (48) We have you to access your account for the following: (49) We have you to access your account for the following: (50) We have you to access your account for the following: (51) We have you to access your account for the following: (52) We have you to access your account for the following: (53) We have you to access your account for the following: (54) We have you to access your account for the following: (55) We have you to access your account for the following: (56) We have you to access your account for the following: (57) We have you to access your account for the following: (58) We have you to access your account for the following: (59) We have you to access your account for the following: (60) We have you to access your account for the following: (61) We have you to access your account for the following: (62) We have you to access your account for the following: (63) We have you to access your account for the following: (64) We have you to access your account for the following: (65) We have you to access your account for the following: (66) We have you to access your account for the following: (67) We have you to access your account for the following: (68) We have you to access your account for the following: (69) We have you to access your account for the following: (70) We have you to access your account for the following: (71) We have you to access your account for the following: (72) We have you to access your account for the following: (73) We have you to access your account for the following: (74) We have you to access your account for the following: (75) We have you to access your account for the following: (76) We have you to access your account for the following: (77) We have you to access your account for the following: (78) We have you to access your account for the following: (79) We have you to access your account for the following: (80) We have you to access your account for the following: (81) We have you to access your account for the following: (82) We have you to access your account for the following: (83) We have you to access your account for the following: (84) We have you to access your account for the following: (85) We have you to access your account for the following: (86) We have you to access your account for the following: (87) We have you to access your account for the following: (88) We have you to access your account for the following: (89) We have you to access your account for the following: (90) We have you to access your account for the following: (91) We have you to access your account for the following: (92) We have you to access your account for the following: (93) We have you to access your account for the following: (94) We have you to access your account for the following: (95) We have you to access your account for the following: (96) We have you to access your account for the following: (97) We have you to access your account for the following: (98) We have you to access your account for the following: (99) We have you to access your account for the following:
text_image
Logistics: You can't have a version of the version 10.0 Version: 10.0-20.0 Version: 10.0-20.0 You can't have a version of the version 10.0 Version: 10.0-20.0 Version: 10.0-20.0text_image
WE View Do you need to get on the Device 0.1.INDUSTRIALS Button now SODRASS and your following?
text_image
Add Default: Default Password: Password to: Password to: Password to: Password to: Password to: Password to: Password to: Password to: Password to: Password to: Password to: Password to: Password to: Password to: Password to: Password to: Password to: Password to: Password to: Password to: Password to: Password to: Password to: Password to: Password to: Password to: Password to: Password to: Password to: Password to: Password to: Password to: Password to: Password to: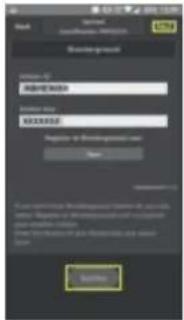
text_image
Back Sponsored Background Login NAME: 00000000 Password: 00000000 Login to https://www.123.cn/ Login: www.123.cntext_image
Scanned screenshot of a software interface with menu bar, numeric input fields, and a dark background image.text_image
Login Get a new user at the end of the session Newsgroup Login to: ABHISTOCK SUPPORT USEUM Recommendation to be completed by: www.abhistock.com Cancel Canceltext_image
View the View it: View the Search of what's selected OK
text_image
A do you have you to you can you can you can you can you can you you can you can you can you you can you can you can you
text_image
12.000 49801 +16.12 47512 35 1251text_image
Screenshot of a mobile app interface showing a user input field with a highlighted 'OK' button
text_image
Screenshot of a mobile app interface showing a user input field with Chinese text and a highlighted button.text_image
Manage 40% Settings To you create this help (apparallel) You can use your own help to access your help #123456789 #123456789 #123456789 #123456789 #123456789 #123456789 #123456789 #123456789 #123456789 #123456789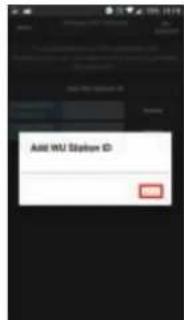
text_image
Add WU Station IDtext_image
OK Save OK Options OK Save OK Cancel
text_image
Delete WSU Station ID For you found by WSU Station IDtext_image
Transfers OK OK Save OK Save OK OKINDEX
text_image
Technical diagram of a mechanical device with numbered parts for identification and assembly reference.natural_image
Technical line drawings of mechanical components with no visible text or symbolsnatural_image
Technical line drawings of mechanical devices and a cylindrical component (no text or symbols)natural_image
Technical line drawing of a mechanical device with no visible text or symbolsnatural_image
Technical line drawings of two mechanical components with no visible text or symbols39
text_image
Mobile app screenshot showing a confirmation message with a location pin and a confirmation button
natural_image
Pure electrical circuit lines without any symbols46
text_image
5.0 10.0 5.0 10.0 5.0 10.0 5.0 10.0 5.0 10.0 5.0 10.0 5.0 10.0 5.0 10.0 5.0 10.0 5.0 10.0 5.0 10.0 5.0 10.0 10.0 10.0 10.0 10.0 10.0 10.0 10.0 10.0 10.0 10.0 10.0 10.0 10.0 10.0 10.0 10.0 10.0 10.0 10.0 12.5 12.5 12.5 12.5 12.5 12.5 12.5 12.5 12.5 12.5 12.5 12.5 12.5 12.5 12.5 12.5 12.5 12.5 12.5 12.5 12.7 12.7 12.7 12.7 12.7 12.7 12.7 12.7 12.7 12.7 12.7 12.7 12.7 12.7 12.7 12.7 12.7 12.7 12.7 12.7 12.8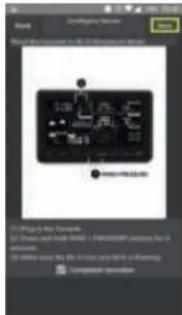
text_image
Start Configure Version Next File of the version to all the following items: 1.00 2.00 3.00 4.00 5.00 6.00 7.00 8.00 9.00 10.00 Computer versiontext_image
OK Password 1. Please check your password to access your password to the user. 2. Please check your password to access your password to the user. 3. Please check your password to access your password to the user.
text_image
Select [DB] Name (WP) Other (WP)
text_image
Login Name: 600 Password: None Password 1234567890text_image
Mobile app interface screenshot showing a login dialog with Chinese text and a 'OK' button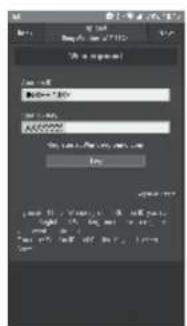
text_image
Read Email: 10-8-2007 Password: Send to Address Send to Address
text_image
Download Microsoft Windows 400000 Download Microsoft Windows 400000 Microsoft Windows 400000 Microsoft Windows 400000 Microsoft Windows 400000 Microsoft Windows 400000 Microsoft Windows 400000 Microsoft Windows 400000 Microsoft Windows 400000 Microsoft Windows 400000 Microsoft Windows 400000 Microsoft Windows 40000 Microsoft Windows 40000 Microsoft Windows 40000 Microsoft Windows 40000 Microsoft Windows 40000 Microsoft Windows 40000 Microsoft Windows 40000 Microsoft Windows 40000 Microsoft Windows 40000 Microsoft Windows 40000 Microsoft Windows 40000 Microsoft Windows 4 Microsoft Windows 4 Microsoft Windows 4 Microsoft Windows 4 Microsoft Windows 4 Microsoft Windows 4 Microsoft Windows 4 Microsoft Windows 4 Microsoft Windows 4 Microsoft Windows 4 Microsoft Windows 4 Microsoft Windows 4 Microsoft Windows 4 Microsoft Windows 4 Microsoft Windows 4 Microsoft Windows 4 Microsoft Windows 4 Microsoft Windows 4 Microsoft Windows 4 Microsoft Windows 4 Microsoft Windows 6 Microsoft Windows 6 Microsoft Windows 6 Microsoft Windows 6 Microsoft Windows 6 Microsoft Windows 6 Microsoft Windows 6 Microsoft Windows 6 Microsoft Windows 6 Microsoft Windows 6 Microsoft Windows 6 Microsoft Windows 6 Microsoft Windows 6 Microsoft Windows 6 Microsoft Windows 6 Microsoft Windows 6 Microsoft Windows 6 Microsoft Windows 6 Microsoft Windows 6 Microsoft Windows 6 Microsoft Windows 7 Microsoft Windows 7 Microsoft Windows 7 Microsoft Windows 7 Microsoft Windows 7 Microsoft Windows 7 Microsoft Windows 7 Microsoft Windows 7 Microsoft Windows 7 Microsoft Windows 7 Microsoft Windows 7 Microsoft Windows 7 Microsoft Windows 7 Microsoft Windows 7 Microsoft Windows 7 Microsoft Windows 7 Microsoft Windows 7 Microsoft Windows 7 Microsoft Windows 7 Microsoft Windows 7 Microsoft Windows 8 Microsoft Windows 8 Microsoft Windows 8 Microsoft Windows 8 Microsoft Windows 8 Microsoft Windows 8 Microsoft Windows 8 Microsoft Windows 8 Microsoft Windows 8 Microsoft Windows 8 Microsoft Windows 8 Microsoft Windows 8 Microsoft Windows 8 Microsoft Windows 8 Microsoft Windows 8 Microsoft Windows 8 Microsoft Windows 8 Microsoft Windows 8 Microsoft Windows 8 Microsoft Windows 8 Microsoft Windows 9 Microsoft Windows 9 Microsoft Windows 9 Microsoft Windows 9 Microsoft Windows 9 Microsoft Windows 9 Microsoft Windows 9 Microsoft Windows 9 Microsoft Windows 9 Microsoft Windows 9 Microsoft Windows 9 Microsoft Windows 9 Microsoft Windows 9 Microsoft Windows 9 Microsoft Windows 9 Microsoft Windows 9 Microsoft Windows 9 Microsoft Windows 9 Microsoft Windows 9 Microsoft Windows 9 Microsoft Windows 1235-1235-1235- 1235-1235-1235- 1235-1235-1235- 1235-1235-1235- 1235-1235-1235- 1235-1235-1235- 1235-1235-1235- 1235-1235- 1235-1235- 1235-1235- 1235-1235- 1235-1235- 1235-1235- 1235-1235- 1235-1235- 1235-1235- 1235-1235-1235- 1235-1235- 1235-1235- 1235-1235- 1235-1235- 1235-1235- 1235-1235- 1235-1235- 1235- 1235- 1235- 1235- 1235- 1235- 1235- 1235- 1235- 1235- 1235- 1235- 1235- 1235- 1235- 1235- 1235- 1235- 1235- 1235-1235- 1235- 1235- 1235- 1235- 1235- 1235- 1235- 1235- 1235- 1235- 1235- 1235- 1235- 1235- 1235- 1235- 1235-1235- 1235-1235- 1235- 1235- 1235- 1235- 1235- 1235- 1235- 1235- 1235- 1235- 1235- 1235- 1235- 1235- 1235-
text_image
App Copyright: www.apps.com Implementation: You can't have a new version (1.0) Copyright: 100%+9233 Copyright: 14332315 You can't have a new version (1.0) or more. Copyright: 100%+9233 Copyright: 14332315text_image
WIS View Do you need to fill in the Home-32 website. Home-day XNOKAKX you'll get home?
text_image
Read Microsoft Consultation information Read Mainpagewarel Profile ID: ADREMARKS Login URL: GOA/00256 Login at Microsoft.com Enter CommandButton This is a version of Microsoft Internet Explorer's website. It is also a version of Microsoft Internet Explorer's website. The following: Use the Web interface to access these web sites in the main browser. Name: Access to Microsoft Internet Explorer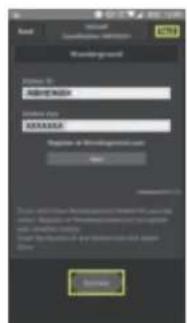
text_image
Name: Microsoft Consultant Information Password Form Name: ASRERIDUS SAMSERS Regiate at https://www.issrnv.com/ Savetext_image
Three mobile app screenshots showing a user interface with input fields, buttons, and a text input prompt in Chinese.text_image
Three smartphone screenshots showing a login interface with input fields, a 'OK' button, and a text input prompt in Chinese.text_image
Screenshot of a mobile app interface showing three panels: a simple GUI with text input, a black canvas with a grid overlay, and a line chart with a histogram.Ihre Geräte
text_image
Configure a New Direction Add Add Function1 Add Function2 Imported With: Remove Ground Manage VIs Stations Configure Online
text_image
Screenshot of a mobile app interface showing a user input field with Chinese text and a highlighted section.text_image
Add MU Station IDtext_image
Name: Manage the function File Edit View Help Add to 100% (1) Add to 100% (1) Save As... Cancel
text_image
Delete WJ Station ID Are you have to Delete WJ Station?Einheiten anpassen
3.2 Outdoor temperature and humidity sensor 51
-
SPECIFICATIONS....51
-
OVERVIEW
5.1 Binnen-unit....52
5.2 Buitenunit....53
- INSTALLATIE
6.1 Indoor unit....54
6.2 Outdoor unit 54
- OPERATION
7.1 First time use 56
7.2 Basis setup 56
7.3 Function buttons 58
7.4 Wake-up alarm....60
7.5 Weather alert 60
7.6 Weather forecast 60
7.7 Trend indication 61
7.8 Calibration....61
- TO LINK WITH THE INTERNET (Weather Underground)
8.1 Introduction....62
8.2 To register your weather station....62
8.3 Basic functions....63
CE:
DECLARATION OF CONFORMITY
Hereby, Hesdo declares that the radio equipment type Alecto WS-5500 is in compliance with directive 2014/53/EU.
The full text of the EU declaration of conformity is available at the following internet address:
http://DOC.hesdo.com/WS-5500-DOC.pdf
2. INTRODUCTION
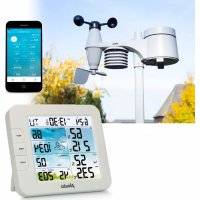
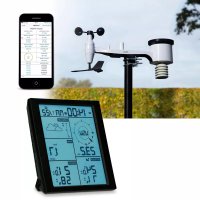
The Alecto WS-5500 weather station consists of the following components:
Outdoor unit:
The outdoor unit includes a built-in rain gauge, wind speed gauge, wind direction gauge, temperature sensor, humidity sensor, LUX meter and solar cell. The measurement data from the sensors is transmitted to the display unit. The outdoor unit is powered by a built-in super cap which in turn is powered by the built-in solar panel.
You may also install lithium backup batteries, for this please see below in this user manual.
The outdoor unit comes including mounting materials.
Indoor unit:
The indoor unit receives the measured data from the outdoor unit and also includes its own temperature sensor, humidity sensor and pressure sensor.
The indoor unit is powered through the supplied power adaptor, although you may also install 3x AAA 1.5 V backup batteries (not incl.).
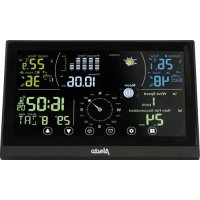
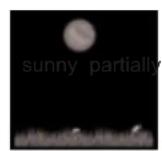
All measurement data is shown in the large 6.9"
(17.5 cm) LCD colour screen. Additionally, you may forward these measurements to websites such as 'Wunderground' to further publish them via the internet or to share the information with third parties.
3. MAINTENANCE
For easy access to the outdoor unit to perform small maintenance or to replace the batteries, it's recommended to install the outdoor unit at an accessible spot. However, keep in mind to place it as open as possible in wind and rain.
3.1 Rain gauge:
You may unscrew the black rain collector tray by turning it counter-clockwise for cleaning the interior of the rain gauge. For this, please use a soft and long-haired brush. Clean the black collector tray and remove any leaves. Replace it onto the rain gauge (pay attention to the 3 protruding notches) and rotate the tray clockwise until you hear a 'click' coming from the mechanism.
3.2 Outdoor temperature and humidity sensor:
Refer to the picture and detach the lower 4 weather vanes from the outdoor unit. Blow into the holder containing the temperature and humidity sensor and use a soft brush with long hairs to clean the wind guides. DO NOT USE WATER. Replace and tighten the wind guides.
4. SPECIFICATIONS
Indoor unit:
measurement range: -10°C - 60°C ('---' when out of this range)
resolution: 0.1°C
humidity: 10% \~ 99% RH
resolution: 1% RH
air pressure: 300-1100hpa
UV meter range: 0-15
0-2 = Low, 3-5 = Moderate, 6-7 = High,
8-10 = Very High, >=11 = Extreme
accuracy: +/-3hpa (at 700-1100hpa)
resolution: 0.1hps
alarm duration: 120 seconds
snooze duration: 10 minutes
power supply: 3x 1.5V battery, size AAA
dimensions: 188(W)x119(H)x20(D)mm
weight: 285gr (batt. incl.)
Outdoor unit:
measurement range: -40°C - 60°C ('---' when out of this range)
accuracy: +/-1°C
resolution: 0.1°C
humidity: 10% \~ 99% RH
accuracy: +/-5%
rainfall: 0-6000mm ('---' when out of this range)
accuracy: +/-10%
resolution: 0.1mm at rainfall <1000mm
1mm at rainfall >1000mm
wind speed: 0-50m/s ('---' when out of this range)
accuracy: +/- 1m/s at wind speed <5m/s
+/- 10% at wind speed >5m/s
light: 0-400KLux
accuracy: +/- 15%
power supply: 2x 1.5V battery, size AA (*)
Radio:
transmitting frequency: 868 MHz
transmitting interval: 16 sec.
range: 100m
RF power: < 0 dBm
*: for prolonged use at temperatures below 0°C, we recommend using Lithium batteries. See also paragraph 6.2.
5. OVERVIEW
5.1 Indoor unit:
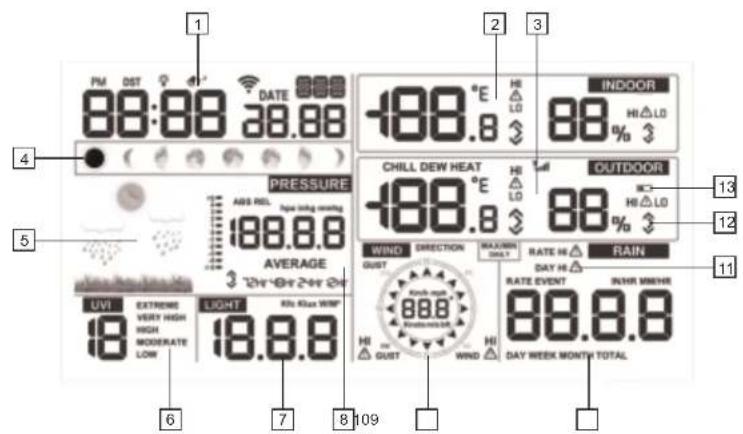
- Display of the time and date (*)
- Display of the indoor temperature & humidity (*)
- Display of the outdoor temperature & air humidity (*)
- Display of the moon position (*)
- Display of the weather forecast (*)
- Display of the UV index (*)
- Display of the light intensity (*)
- Display of the air pressure (*)
- Display of the wind speed and direction (*)
- Display of the rainfall (*)
- Indication that the weather alarm is enabled at this measurement value
- Trend indicator
- Outdoor unit battery indicator, illuminates when the batteries of the outdoor unit are weak
- Function buttons
- Power adaptor input
- Suspension holes
- Foldable table support
- Battery cover
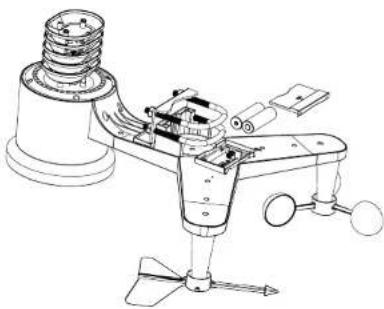
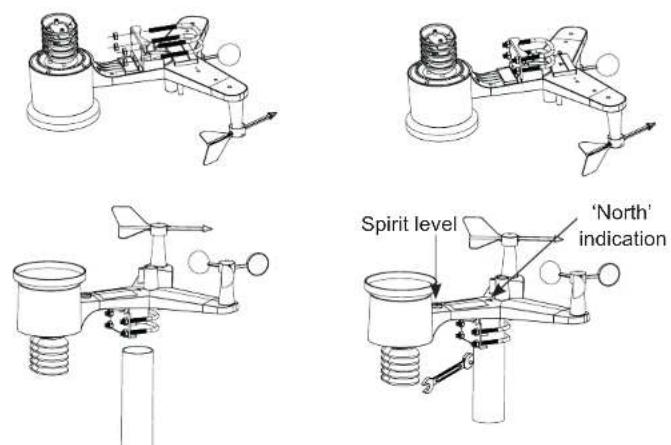
5.2 Outdoor unit:
text_image
Technical diagram of a mechanical device with numbered components labeled 1 through 7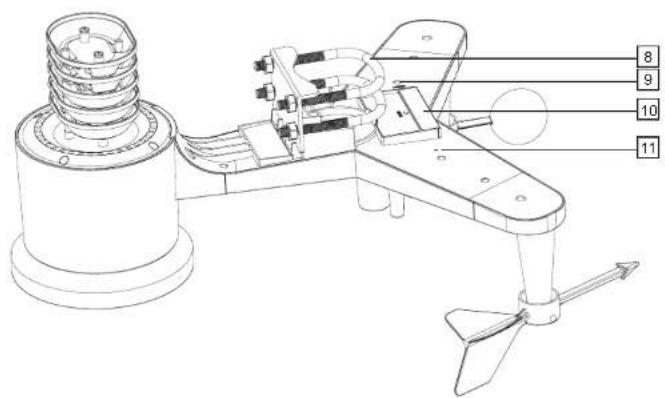
text_image
Technical diagram of a mechanical device with numbered parts labeled 8, 9, 10, and 11-
Rain gauge
-
Spirit level, to install the outdoor unit horizontally
-
Location of the temperature and humidity sensor
-
Solar panel for charging the super cap (see also paragraph 6.2, item 'power supply)
-
UV sensor / light sensor
-
Wind speed gauge
-
Wind direction gauge
-
Brackets for attaching the outdoor unit to a pole (not incl.)
-
Reset button, use a bend paperclip to press and hold this button for 4 seconds to reset the outdoor unit
-
Battery compartment for 2 backup batteries (not incl.)
-
LED, flashes every 16 seconds to indicate that measurements are being transmitted to the indoor unit
6. INSTALLATION
6.1 Indoor unit:
General Installation and positioning tips:
- Make sure that the surrounding temperature at the indoor unit is not affected by lights, radiators, doors or windows, draft, etc.
- When suspended: make sure the unit is freely suspended, i.e. not behind a curtain.
- Make sure that the adaptor wire doesn't create a falling or tripping risk. Use cable-ties when the wire is too long.
Power supply:
The main power of the indoor unit is provided through the supplied power adaptor. Insert the low-voltage plug of the adaptor into the DC5.0V input at the rear of the indoor unit and then connect the adaptor with a 230V wall socket.
You may install 3x 1.5V AAA batteries as a backup for maintaining the measured data in case of a possible power outage or for when the adaptor is disconnected from the wall socket by accident.
- Open the battery compartment at the rear of the indoor unit.
- Insert the first battery and slide it completely to the left.
- Insert the second battery and slide it completely to the right.
- Insert the third battery in between the first 2 batteries.
- Finally, replace the battery
cover.
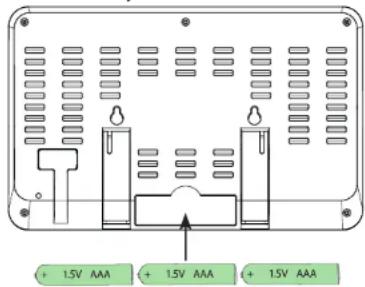
text_image
+ 1.5V AAA + 1.5V AAA + 1.5V AAASuspended or standing:
You may choose to use the indoor unit standing freely on a cabinet or desk (for this, fold out the 2 supports at the rear of the indoor unit) or suspended from a wall (see the suspension keyholes at the rear).
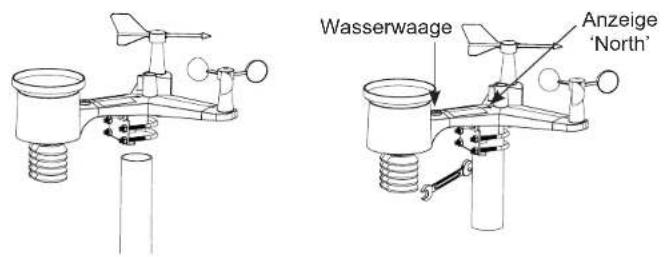
6.2 Outdoor unit:
General installation and positioning tips:
- First check whether the outdoor unit is within range of the indoor unit before permanently installing the outdoor unit. Maintain a distance between the outdoor and indoor unit from 50 to 100 meters.
- Make sure to place the outdoor unit at least 1.5 meters from the ground, positioned freely in the rain and wind.
- To have the rain gauge function as accurate as possible, the outdoor unit must be placed exactly horizontal. For this you may use the built-in spirit level on top of the outdoor unit.
- To be able to indicate from which direction the wind is blowing, the outdoor unit must be aimed to the North. For this, see the North indication on top of the outdoor unit. Use an accurate compass (not incl.) to properly orient the unit.
- Make sure that the outdoor unit is suspended or standing freely. Especially the wind speed gauge and weather vane must be suspended directly into the wind.
- Determine the location with the smallest chance of leaves blowing into the unit. Leaves blown into the rain collector can block the rain gauge and affect the measurement results. In any case, we recommend positioning the outdoor unit in such a way that any leaves blown into the unit can be easily removed and the 2 batteries of the outdoor unit can be easily replaced.
- You may of course keep the outdoor unit within reach for the first week to try out all of its functions. After verifying that everything is working properly, you can then permanently install the outdoor unit.
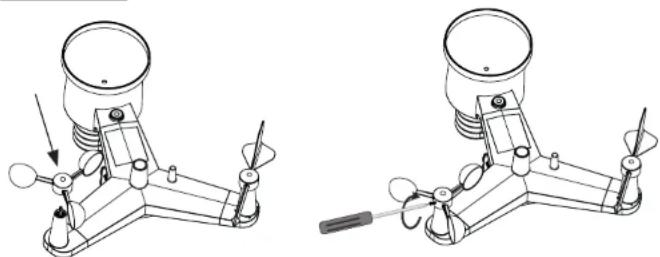
Wind catcher:
natural_image
Technical line drawings of mechanical components with no visible text or symbolsFirst check whether the small screw of the wind catcher is rotated outward far enough and then push the wind catcher over the axle on the outdoor unit. Adequately push in the wind catcher, but never force it!
Use a small cross-head screwdriver (excl.) to rotate the small screw and fix the wind catcher onto the axle. Finally, blow against one of the wind catcher cups to check whether the wind catcher can rotate smoothly.
Wind direction:
natural_image
Technical line drawings of two mechanical devices, one with a cylindrical component and the other with a curved handle (no text or symbols)Attention: Both the axle for the weather vane and the weather vane itself are flattened at one end. This ensures that the vane can slide over the axle in only one way. Please keep this in mind during the installation.
First check whether the small screw of the weather vane is rotated outward far enough and then push the vane over the axle on the outdoor unit. Pay attention to the flattened side!
Adequately push in the weather vane, but never force it! Use a small cross-head screwdriver to rotate the small screw and fix the weather vane onto the axle. Finally, blow against the side of the weather vane to check whether it can rotate smoothly.
Power supply:
The sensors in the outdoor unit are powered by a built-in 'super cap', which is a type or rechargeable battery. This super cap is charged by the solar panel on top of the outdoor unit. As a backup, in case the super cap is not properly charged, you must install 2 AA 1.5V batteries into the outdoor unit (not incl.).
Because regular Alkaline batteries perform poorly or not at all at temperatures around or below 0°C, we don't recommend using standard Alkaline batteries for the outdoor unit.
This is why we recommend inserting Lithium batteries into the outdoor unit, because these are developed for functioning within a temperature range of -20^ to 60^ .
natural_image
Technical line drawing of a mechanical device with no visible text or symbolsThese batteries can be ordered from the customer service department of Alecto via telephone number 073 6411 355 (Netherlands) or 03 238 5666 (Belgium) or via internet www.alecto.nl. Lithium batteries with a capacity of 2900mAh have a life span of at least one year.
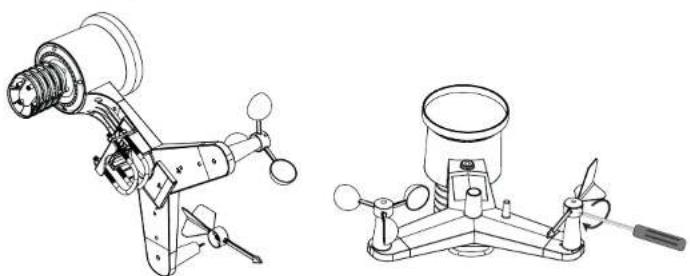
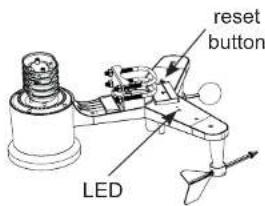
Positioning the outdoor unit:
Refer to the images below and fix the U-shaped cable ends to the outdoor unit, place the outdoor unit over the pole (not incl.) and fasten the nuts. Your weather station is now ready for use.
text_image
Spirit level 'North' indication7. OPERATION
7.1 First time use:
General:
Attention: after installation, it can take several hours up to a day before the display of the indoor unit starts showing the correct values.
Indoor unit/outdoor unit connection:
Indoor unit:
As soon as the power adaptor is connected to the indoor unit and to a 230V wall socket or as soon as the batteries are inserted, the indoor unit starts searching for the outdoor unit.
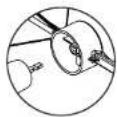
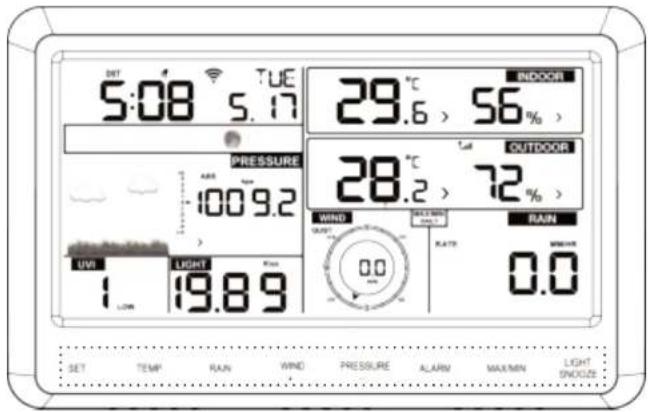
Outdoor unit:
Insert the 2 batteries into the battery compartment as described in the previous chapter and use a bend paperclip to press and hold the reset button at the bottom of the outdoor unit for at least 3 seconds. The red LED will now illuminate for 4 seconds and then start flashing briefly every 16 seconds.
text_image
reset button LEDCheck whether the indoor unit starts showing values at 'OUTDOOR', blow against the wind catchers of the outdoor unit, pour some water into the rain gauge and check whether the values indicated by the indoor unit change.
Standard display:
From this moment on, the indoor unit shows the standard display; see paragraph 5.1 for an overview of all displays.
Paragraph 7.2 describes how the various settings and options of this weather station operate and must be set. Paragraph 7.3 describes how you may personalise the display according to your preferences.
7.2 Basis setup:
Press and hold the SET button for 2 seconds to activate the setup menu:
BEEP Each time you press one of the touch control buttons, you can have the unit emit a beep tone. Use the + and - buttons to enable (BEEP ON) or disable (BEEP OFF) this key tone.
Press 1x the SET button:
HI:LO RST Each day at midnight all measured maximum and minimum values may be reset, with the exception of the rainfall data. Use the + and - buttons to enable the reset of these values (RST ON) or to disable the reset (RST OFF). The rainfall values must be reset separately, for this please see chapter 7.3.
Press 1x the SET button: (*)
DST DST = Daylight Saving Time. Use the + and - buttons to have the switch-over to daylight saving time and vice-versa occur automatically (DST ON) or not (DST OFF).
Press 1x the SET button:
ZON This option allows you to adjust the time zone. For use in the Benelux, set the time zone to 1H.
Press 1x the SET button:
12H / 24H Use the + and - buttons to choose the 12 hours or 24 hours time format.
Press 1x the SET button:
HOURSFLASHING Use the + and - buttons to set the hours.
Press 1x the SET button:
MINUTESFLASHING Use the + and - buttons to set the minutes.
Press 1x the SET button:
D-M / M-D Use the + and - buttons to select the day-month display (D-M) or month-day display (M-D).
Press 1x the SET button:
YEARFLASHING Use the + and - buttons to set the year.
Press 1x the SET button:
MONTHFLASHING Use the + and - buttons to set the month.
Press 1x the SET button:
DAY FLASHING Use the + and - buttons to set the date.
Press 1x the SET button:
PRESSURE Use the + and - buttons to determine whether the air pressure must be shown in mm mercury pressure (mmHg), in inch mercury pressure (inHg) or in hectoPascal (hPa). In the Benelux the hectoPascal notation is generally used; before the air pressure was also expressed in bar; 1 mbar equals 1 hPa.
Press 1x the SET button:
RELPRESSURE The absolute air pressure is the air pressure measured by the weather station; the relative air pressure is the air pressure measured by the weather station but now corrected for the altitude at which the measurement is taken. For this option, use the + and - buttons to set the actual air pressure. Tip: you may find the current air pressure in your area on the website of airports (or on their teletext pages).
Press 1x the SET button:
LIGHT Use the + or - button to display the light intensity in W/m² (Watt per m²), fc (foot candle) or LUX.
Press 1x the SET button:
°C / °F Use the + or - button to display the temperature in degrees Celsius (°C) or in degrees Fahrenheit (°F).
Press 1x the SET button:
WIND Use the + or - button to display the wind speed in Knots, Miles per hour (mph), Kilometres per hour (Km/h), Beaufort (bft) or meters per second (m/s).
Press 1x the SET button:
RAIN Use the + or - button to display the amount of rainfall in millimetre (mm) or inch (IN).
Press 1x the SET button:
NTH / STH Use the + or - button to indicate whether the weather station is used in the Northern hemisphere of the earth (NTH) or in the Southern hemisphere (STH). This concerns the correct display of the moon position. Tip: The Benelux is situated in the Northern hemisphere, in this case please select NTH.
Upon pressing the SET button for the last time, the display will fully illuminate and the setup is now completed.
During setup, you may press the LIGHT/SNOOZE button to instantly end the setup. Any settings already adjusted will remain stored in the memory.
*: as soon as the indoor station is connected with the internet (see chapter 8), the time and date are obtained from the internet. Now repeatedly press the SET button to skip the clock setup.
7.3 Function buttons:
The function buttons underneath the display offer the following functions:
text_image
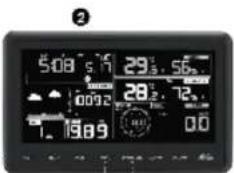
SAT 5:08 TUE 29.6 > 56 % INDOOR PRESSURE 100.9.2 28.2 > 72 % WIND RATR 0.0 RAIN 1 LIME 19.8.9 0.0 SET TEMPI RAIN WIND PRESSURE ALARM MAX/MIN LIGHT SNOLLTEMP.
touch repeatedly to see the following in order:
- CHILL: wind chill (calculated through a combination of the air temperature and the average wind velocity).
- DEW: dew point temperature, this is the temperature at which water vapour is converted into water (mist, dew or frost); the dew point depends on the environmental temperature and humidity.
- HEAT: heat index, this is a combination of the measured temperature and the humidity.
When no extra specification is shown, the actual temperature will be displayed.
RAIN
touch repeatedly to see the following in order:
• DAY: rainfall of today, calculated as of midnight
- WEEK: rainfall from the beginning of the week (Sunday)
• MONTH: rainfall from the beginning of the month
- TOTAL: rainfall from the start of the measurements or from the last reset
- RATE: rainfall in the past hour (this shows the rainfall in the last 60 minutes and is updated every 10 minutes)
- EVENT: this is the amount of rainfall from the moment it started raining until now. This value will be reset after an hour without any rain.
Press and hold the RAIN button for 2 seconds to reset the display of that moment to 0.
When doing so, keep in mind the following:
- when resetting the amount of rainfall per week, also the amount of today will be reset
- when resetting the amount of rain per month, also the amount of today and of this week will be reset
- when resetting the total amount of rainfall, also the amount of today, this week and this month will be reset
WIND / +
touch repeatedly to see the following in order:
• GUST: wind speed of wind gusts
- DIRECTION: wind direction in arc degrees
When no extra specification is shown, the actual temperature will be displayed.
During setup (see paragraph 7.2), this button is also used for selecting choices and increasing values
PRESSURE / -
touch repeatedly to see the following in order:
• AVERAGE 12Hr: average air pressure over the last 12 hours
• AVERAGE 24Hr: average air pressure over the last 24 hours
• AVERAGE 48Hr: average air pressure over the last 48 hours
• AVERAGE 72Hr:average air pressure over the last 72 hours
When no extra specification is shown, the actual temperature will be displayed.
press and hold the PRESSURE button for 2 seconds to switch between the absolute air pressure (ABS) and the relative air pressure (REL)
during setup (see paragraph 7.2), this button is also used for selecting choices and decreasing values
ALARM
when touching this for the first time, the set values for the MAX alarm are displayed when touching this for the second time, the set values for the MIN alarm are displayed see paragraph 7.5 for setting the MIN and MAX limits and for determining how this function must operate
MAX/MIN
touch repeatedly to see the following in order:
• MAX: the highest values measured are displayed
• MIN: the lowest values measured are displayed
while the MAX or MIN value is displayed, press the TEMP, RAIN or WIND button to see all possible variations
while the MAX or MIN value is displayed, press and hold the PRESSURE button for 2 seconds to switch between the absolute air pressure and relative air pressure
press and hold the MAX/MIN button to reset the displayed data of that moment (i.e. all MIN or all MAX measurements)
see paragraph 'Basic setup' (7.2) to automatically reset the MAX/MIN measurements each day at midnight
LIGHT/SNOOZE
repeatedly and briefly touch this button to set the display lighting to low, medium or high
to save battery power, the display lighting will automatically return to the 'low' setting after 15 seconds when the unit is being used on battery power only
this button is also used to return to the standard display from any setting or choice
7.4 Wake-up alarm:
Setup:
- press and hold the ALARM button for 2 seconds, the hour display starts flashing
- use the + and - buttons to set the hours for the wake-up time and press the SET button
- use the + and - buttons to set the minutes for the wake-up time and press the SET button
- briefly press the ALARM button to enable (alarm icon illuminates) or disable (alarm icon off) the wake-up alarm
- briefly press the LIGHT/SNOOZE button to leave the setup
Operation:
As soon as the set moment of time is reached, an alarm tone is emitted. This tone sounds for approx. 2 minutes with an increasing rhythm or until you press the ALARM button to switch off the alarm or until you press the LIGHT/SNOOZE button to postpone the alarm for 10 minutes. The alarm is repeated daily until disabled according to the above instructions.
7.5 Weather alert:
In addition to the wake-up alarm with snooze function, this weather station can also emit an alert tone when temperatures are too high/low, when the humidity is too high/low or in case of excessive wind or rain.
Setup:
-
press and hold the ALARM button for 2 seconds and then repeatedly and briefly press the SET button to choose from the following alarms:
-
max. indoor temperature
- min. indoor temperature
- max. air humidity indoors
- min. air humidity indoors
- max. outdoor temperature
- min. outdoor temperature
- max. air humidity outdoors
- min. air humidity outdoors
- max. wind speed
-
max. wind gust
-
use the + and - buttons to set the limit for the selected measurement value
-
briefly press the ALARM button to enable the concerned weather alert (the ⚠ symbol illuminates followed by HI or LO) or to disable it (the symbol disappears)
Overview:
If an alert is programmed for a certain measurement value, this will be indicated by the ⚠ alarm symbol being constantly illuminated followed by HI or LO. When this symbol is flashing, this limit is exceeded, see also 'Operation' below
In display standby mode, briefly press the ALARM button to show all programmed maximum limits. Press the ALARM button again to display all programmed minimum limits. The ⚠️ alert symbol will also appear for any limit associated with an alarm.
Press the ALARM button again or press the LIGHT/SNOOZE button to return the display to standby mode.
Operation:
As soon as one of the limits is exceeded, for 2 minutes alert tones will sound in an increasingly faster rhythm. The alarm symbol together with HI or LO will start flashing to show which limit is exceeded.
Press the ALARM button to stop the alert tones, the alarm symbol continues flashing until the measured value returns to within the set limits.
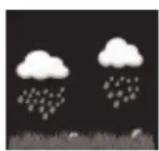
7.6 Weather forecast:
The display of the indoor unit can predict the weather for the next 6 hours through various displays:
cloudy

cloudy
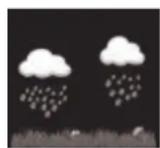
rainy

snow
(snow is displayed when the forecast is 'rainy' and the outside temperature is below 0°C (32°F))
←
storm

←

storm
Remarks:
- the accuracy of a weather forecast based on air pressure is 70% to 75% ; keep in mind that a correct forecast cannot be guaranteed
- the forecast is based on the next 6 hours and may not show the actual situation
7.7 Trend indication:
The temperature, humidity and air pressure displays include a built-in trend indicator. Each half hour, the measurements are compared with the measurements of 3 hours ago
The trend indications displays as follows:
Air humidity: Temperature: Air pressure:
: rising increase >3% increase >1°C/2°F increase >1HPA
: equal remains <= 3% remains <= 1°C/2°F remains <= 1HPA
v : falling decrease >3% decrease >1°C/2°F decrease >1HPA
7.8 Calibration:
In case the indoor unit shows a measurement that deviates from the measurement of another sensor or weather station, each display may be adjusted by several percent.
- press and hold the TEMP and MAX/MIN buttons for 5 seconds and then repeatedly press the SET button to choose from the following measurement values: (in between brackets the values are shown that are used for increasing/decreasing the corresponding reading)
- indoor temperature (+/- 5°C)
- indoor humidity (+/- 9%)
- outdoor temperature (+/- 5°C)
- outdoor humidity (+/- 9%)
- air pressure (+/- 10hpa)
- wind direction (0-360 arc degrees)
- wind velocity (50% - 150%)
- amount of rainfall (50% - 150%)
- use the + and - buttons to increase or decrease the reading
- briefly press the LIGHT/SNOOZE button to return the display to standby mode
You may reset a reading to the standard factory setting by repeating this instruction, but by pressing the ALARM button in step 2.
8. TO LINK WITH THE INTERNET (Weather Underground)

All passwords and ID codes mentioned and shown in this chapter are examples and intended only for illustrative purposes.
The screenshots are from Android, not from iOS.
8.1 Introduction:
It's possible to upload the measurement data from this weather station to the website of Weather Underground (Wunderground). This data is then combined with the measurement data from other weather stations nearby which results in an extremely accurate weather picture.
Furthermore, Wunderground saves your measurement data and you may use your personal account to display the data on the screen of your computer or smartphone in diagram or graph form.
8.2 To register your weather station:
- Make sure that your mobile phone is logged on to your own WiFi network.
- Download the "WS View" application from the Google Play Store or Apple App Store.
- Open the WS View application.
- For Android: Press Allow if prompted.
For iOS: Press the three dashes in the upper left corner. Then press Configure New Device.
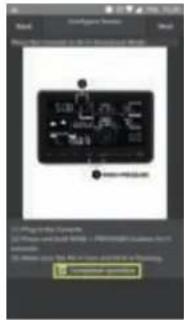
In general: In the product list, choose the weather station WS-5500 described above and then press Next.

text_image
Start Cancel Next Cancel Cancel Cancel Cancel Cancel
text_image
Screenshot of a software interface showing a dialog box with a device image and three labeled icons below.62
- Insert the adaptor into the indoor unit and into a wall socket. Now simultaneously press and hold the WIND+ and PRESSURE- buttons for 4 seconds on the display of the indoor unit (1). The WiFi icon and 'M-B' icon on the display of the indoor unit will start flashing (2) to indicate that the indoor unit is now searching for access to your router.
text_image
5:08 5.76 29.56 00:32 28.72 1.19.89 0.01
- Check the box Completed operation at the bottom of the screen of your phone or laptop and then press Next.
text_image
Screenshot of a software interface showing a device control panel with icons and a warning message in Chinese.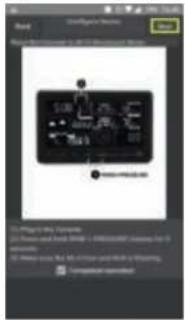
text_image
Scanned screenshot of a software interface showing a diagram with labeled components and buttons, likely for configuration or system settings.- For Android: At the SSID option, press Scan. Choose your own WiFi network from the list and then enter the corresponding Password. For iOS: Enter the password of your WiFi network.
In general: Then press Next.

text_image
OK Parameters OK
text_image
Select 5000 Name: AFP Other: AFP
text_image
Login Name: 0000 Password: Password Password 123456789000000000000000000000000000000000000000000000000000000000000000000000000000000000000000000000- For iOS: Press the home button on your device. Go to your phone's WiFi settings and select EasyWeather-WIFIxxxx. Close the settings and return to the WS View app. The app will now search for the weather station.
For Android: The app will now search for the weather station. In general: Wait until the ecowitt.net screen is displayed. In the ecowitt.net screen, press Next. Then the Wunderground screen appears.
For iOS: The network will now automatically be returned to your own network.

text_image
Scanned screenshot of a mobile app interface with Chinese text and a simple GUI window
text_image
Mobile app interface screenshot showing a login panel with Chinese text and a 'OK' button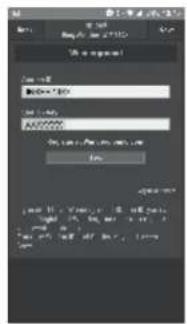
text_image
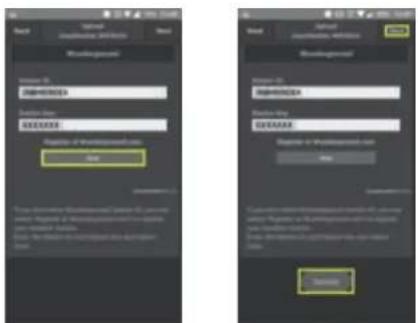
WebForm WebForm WebForm WebForm WebForm WebForm WebForm WebForm WebForm WebForm WebForm WebForm WebForm WebForm WebForm WebForm WebForm WebForm WebForm WebForm WebForm WebForm WebForm WebForm WebForm WebForm WebForm WebForm WebForm WebForm WebForm WebForm WebForm WebForm WBS WBS WBS WBS WBS WBS WBS WBS WBS WBS WBS WBS WBS WBS WBS WBS WBS- To register via Wunderground:
In general: Press Register at Wunderground.com and create a Wunderground account. Enter your email address, create a password, name your weather station and press Current GPS Location.
For iOS: Allow the WS View app access to your location. In general: Accept the user conditions and press Register.
Now a Station ID and Station Password are created for you. Remember these carefully for future use. Press Back.

text_image
Login ID: 100000 Password: Password: 999-8765 Login: 100000 Login: 100000 Login: 100000 Login: 100000 Login: 100000 Login: 100000 Login: 100000 Login: 100000 Login: 100000 Login: 100000 Login: 10000 Login: 10000 Login: 10000 Login: 10000 Login: 10000 Login: 10000 Login: 10000 Login: 10000 Login: 10000 Login: 10000 Login: 10000 Login: 123456666666666666666666666666666666666666666666666666666666666666666666666666666666666666666666666666666
text_image
Login Form: Name: Login Address: Name: Login Address: Login Address: Login Address: Login Address: Login Address: Login Address: Login Address: Login Address: Login Address: Login Address: Login Address: Login Address: Login Address: Login Address: Login Address: Login Address: Login Address: Login Address: Login Address: Login Address: Login Address: Login Address: Login Address: Login Address: Login Address: LoginAddress : LoginAddress : LoginAddress : LoginAddress : LoginAddress : LoginAddress : LoginAddress : LoginAddress : LoginAddress : LoginAddress : LoginAddress : LoginAddress : LoginAddress : LoginAddress : LoginAddress : LoginAddress : LoginAddress : LoginAddress : LoginAddress : LoginAddress : LoginAddress : LoginAddress : LoginAddress : LoginAddress : LoginAddress : LoginAddress: LoginAddress: LoginAddress: LoginAddress: LoginAddress: LoginAddress: LoginAddress: LoginAddress: LoginAddress: LoginAddress: LoginAddress: LoginAddress: LoginAddress: LoginAddress: LoginAddress: LoginAddress: LoginAddress: LoginAddress: LoginAddress: LoginAddress: LoginAddress: LoginAddress: LoginAddress: LoginAddress: LoginAddress: LoginAddress : LoginAddress : LoginAddress : LoginAddress : LoginAddress : LoginAddress : LoginAddress : LoginAddress : LoginAddress : LoginAddress : LoginAddress : LoginAddress : LoginAddress : LoginAddress : LoginAddress : LoginAddress : LoginAddress : LoginAddress : LoginAddress : LoginAddress : LoginAddress : LoginAddress : LoginAddress : LoginAddress : Login address : Login address : Login address : Login address : Login address : Login address : Login address : Login address : Login address : Login address : Login address : Login address : Login address : Login address : Login address : Login address : Login address : Login address : Login address : Login address : Login address : Login address : Login address : Login address : Login address : Loginaddress : Loginaddress : Loginaddress : Loginaddress : Loginaddress : Loginaddress : Loginaddress : Loginaddress : Loginaddress : Loginaddress : Loginaddress : Loginaddress : Loginaddress : Loginaddress : Loginaddress : Loginaddress : | Login Login Login Login Login Login Login Login Login Login Login Login Login Login Login Login Login Login Login Login Login Login Login Login Login Login Login Login Login Login Login Login Login Login
text_image
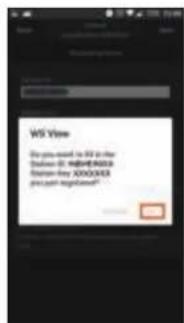
Start Regularly 40k w/100mm Communication? How power/Hz regularly go to your phone Wednesday 10:00:2023 Weather Condition: 11:12:23 Your "Weather Condition is fixed at 6:00 PM" then allowed from the weather condition on Friday, No. 17. Weather Condition is fixed at 15:00 PM, hourly, noon.For Android: Press OK in the pop-up screen. Your Station ID and Station Key will then be automatically entered in the app.
For iOS: Press Upload in the upper left corner of the screen.
In general: Press Save. The pop-up dialogue Success will then appear in the screen. Press Next.
text_image
WIS View Do you need to be in the Windows NT 800740326 Windows NT 800740326 get your email at:1997
text_image
Read Import Classification: addition Read Word background Name: ID NAME: 000000 Password: SINEMA Register at Webpage.com Name Downloaded by: To account for the following web page in the Internet Explorer. It is also available to the Webpage.com or the Internet Explorer. The link between the Webpage.com and the Internet Explorer is displayed in the code.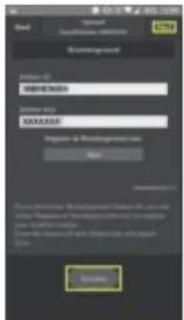
text_image
Read Special Accessories Registration ID: 01 NAME: XXXXX Name: 01 SAMSUNG Login at https://www.sAMSUNG.com New SAMSUNG SAMSUNGIn general: Press Next in the Weathercloud screen.
For Android: Press Finish in the WeatherObservationWebsite screen. For iOS: Press Device List in the upper left corner of the WeatherObservationWebsite screen.
In general: You'll now return to the overview of the various devices.
text_image
Three smartphone screenshots showing a user interface with input fields, buttons, and a text input prompt in Chinese.2) You already have an account on Wunderground.com.
In general: If you already have a Station ID and Station Key, then these will appear in the screen. Press Save. The pop-up dialogue Success will appear in the screen. Press Next.
text_image
Screenshot of two mobile app screenshots showing registration and verification interface with Chinese text fields and buttons.In general: Press Next in the Weathercloud screen. For Android: Press Finish in the WeatherObservationWebsite screen. For iOS: Press Device List in the upper left corner of the WeatherObservationWebsite screen. In general: You'll now return to the overview of the various devices.
text_image
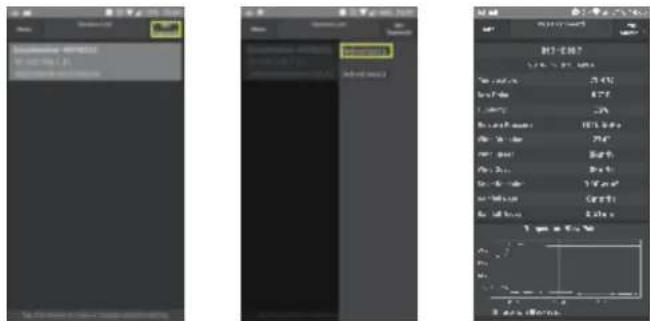
Three smartphone screenshots showing a user interface with input fields, buttons, and a text input prompt in Chinese.8.3 Basic functions:
To view the weather station data You may now view your own weather station via WU StationID. Press a WU StationID to go to the data of your own weather station.
text_image
Screenshot of a software interface showing three panels: left panel with Chinese text, middle panel with numerical data and color settings, and right panel with grid and scale controls.Your devices For Android: Press Menu in the upper left corner of the screen. For iOS: Press the three dashes in the upper left corner. In general: You can check all your devices via Device List. Press the desired device to view its data or to adjust the settings.

text_image
Configure a New Database New Dataset Wt1 SearchBox 1 SearchBox Wt5 UserBackground Manage Wt3 Database NewFigure Sorts
text_image
Screenshot of a mobile app interface showing a user input field with Chinese text and a highlighted button.To add a device to Weather Underground ID
For Android: Press Menu in the upper left corner of the screen.
For iOS: Press the three dashes in the upper left corner.
In general: In the menu, press Manage WU Stations.
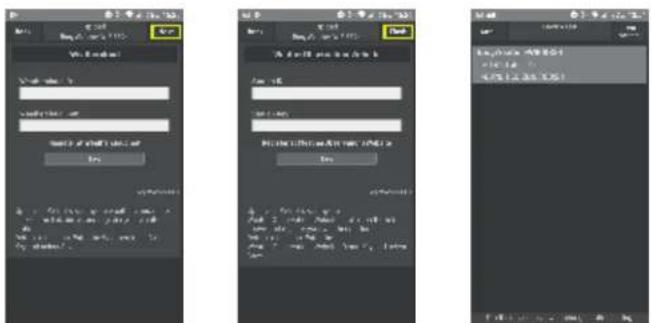
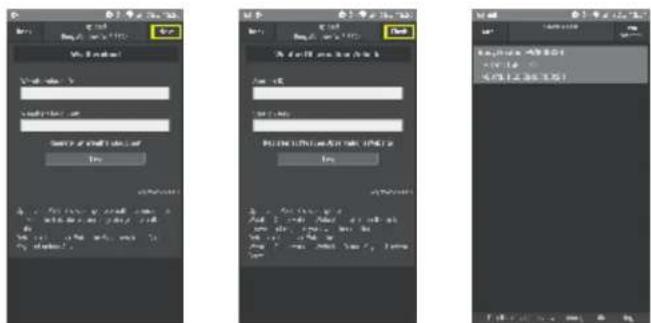
Press Add WU Station ID or ADD. Here you may add a Station ID to easily view the data of that weather station.

text_image
Configure a New Choice Add List Add (Add List) Remove Windows Add (Add List) Remove Windows Configure Smiths
text_image
Add Search Search Browse Download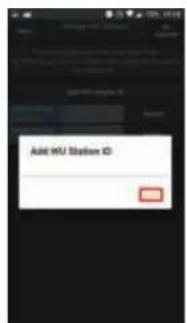
text_image
Add HU Status IDTo remove a device from Weather Underground ID
For Android: Press Menu in the upper left corner of the screen.
For iOS: Press the three dashes in the upper left corner.
In general: In the menu, press Manage WU Stations. Here you'll find a list with all registered Station IDs. Press Delete to remove the desired weather station from the list.
A pop-up screen will appear to ask you whether you're sure that you want to remove the weather station. Press OK. Your weather station is now successfully deleted from Weatherground.

text_image
Configure a New Device Configure LAD M1 Security Configure M8.5 Restructuring Configure M8.5 Configure M8.5
text_image
Message SMS Function OK Cancel OK Cancel OK Cancel
text_image
Delete WJ Station ID Are you have to delete HTML/0007!To adjust units
For Android: Press Menu in the upper left corner of the screen.
For iOS: Press the three dashes in the upper left corner.
In general: In the menu, press Unit Settings to adjust the units according to your preference.
Android: Then press the Save or the Back arrow button.

text_image
Configure a New Service Access Life W1 Discontinently Regulator WRL Reinvergrated Manage W1 Discontinently Configure Tools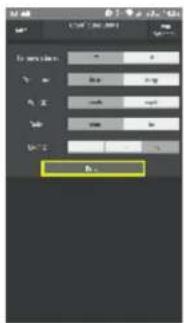
text_image
1.0 2.0 3.0 4.0 5.0 6.0 7.0 8.0 9.0 10.0 11.0 12.0 13.0 14.0 15.0 16.0 17.0 18.0 19.0 20.0 21.0 22.0 23.0 24.0 25.0 26.0 27.0 28.0 29.0 30.0 31.0 32.0 33.0 34.0 35.0 36.0 37.0 38.0 39.0 40.0 41.0 42.0 43.0 44.0 45.0 46.0 47.0 48.0 49.0 50.0 51.0 52.0 53.0 54.0 55.0 56.0 57.0 58.0 59.0 60.0 61.0 62.0 63.0 64.0 65.0 66.0 67.0 68.0 69.0 70.0 71.0 72.0 73.0 74.0 75.0 76.0 77.0 78.0 79.0 80.0 81.0 82.0 83.0 84.0 85.0 86.0 87.0 88.0 89.0 90.0 91.0 92.0 93.0 94.0 95.0 96.0 97.0 98.0 99.0 100.0
Service
Help


WWW.ALECTO.NL
SERVICE@ALECTO.NL