WS3850 - Weather Station ALECTO - Free user manual and instructions
Find the device manual for free WS3850 ALECTO in PDF.
User questions about WS3850 ALECTO
0 question about this device. Answer the ones you know or ask your own.
Ask a new question about this device
Download the instructions for your Weather Station in PDF format for free! Find your manual WS3850 - ALECTO and take your electronic device back in hand. On this page are published all the documents necessary for the use of your device. WS3850 by ALECTO.
USER MANUAL WS3850 ALECTO
4.1 Indoor unit: 4 4.2 Outdoor unit: 5
4.2 Outdoor units....5 4.3 Outdoor unit wind: 5
4.4 Outdoor rain unit: 6
- BASIC DISPLAY AND SETTINGS....7
5.1 Indoor Temp and Humi: 7
5.2 Outdoor Temp and Humir 7
5.3 Pressure Trend and Pressure 7
5.3 Pressure Trend and Pressure....7 5.4 Moon: 7
5.5 Clock 7
5.6 Wind: 8
5.7 Rain: 8 5.8 Function keys: 8
6.5 FUNCTION REYS.... 6
- SETTING INDOOR UNIT....9 6.1 Mode: 9
6.2 Date and time: 9
6.3 Alarm time for the alarm clock: 10
6.4 Height correction setting atmospheric pressure gauge: 10
6.5 Temperature alarm setting for outdoor and indoor temperature: 10
6.6 Rain gauge display extension in mm of inches. 10 6.7 Wind speed display extension in km/h or mph. 10
7 GENERAL OPERATION AND FUNCTIONS: 11
7.1 Barometer: 11
7.2 Trend indication 11
7.3 Weather forecast by icons: 11
7.4 14-day learning mode....11 7.5 Atmospheric pressure trend: 12
7.6 Indoor and outdoor temperature: 12
7.7 Indoor and outdoor humidity: 12
7.8 Maximum and minimum temperature and humidity value: 12
7.9 Moon phase display: 12 7.10 W/nd speed: 13
7.10 Wind speed: 12 7.11 Wind direction: 12
7.12 Rain meter: 12
- MAINTENANCE....13
8.1 Rain meter 13
8.2 Outdoor temperature and humidity sensor: 13 8.3 Wind vane and windmill gauges: 12
0.5 Wind vane and windmill scoops.... 19
-
USE INDOOR UNIT WITH BATTERIES. 13
-
RECEPTION FUNCTION....13
-
SPECIFICATIONS....14
2. INTRODUCTION
The Alecto WS-3850 weather station consists of the following components:
Outdoor wind unit:
The outdoor wind unit has a built-in wind speed meter, wind direction sensor, temperature sensor, humidity sensor and DCF receiver. The measurement data from these sensors is transmitted wirelessly to the display unit. The outdoor wind unit is powered by 4 x AA 1,5 Volt batteries (excl.).
The outdoor wind unit is supplied with mounting materials.
Outdoor rain unit:
The outdoor rain unit has a built-in rain gauge. The measurement data from the sensor is transmitted wirelessly to the display unit. The outdoor rain unit is powered by 2 x AA 1,5 Volt batteries (excl.).
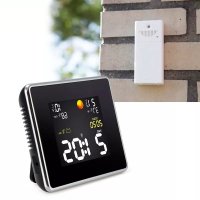
Indoor unit:
The indoor unit receives the measurement data from the outdoor units and also has its own temperature sensor, humidity sensor and air pressure sensor.
The indoor unit is powered by the supplied power adapter and 3 x AAA 1,5V batteries can be installed as a backup (excl.).
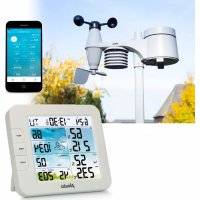
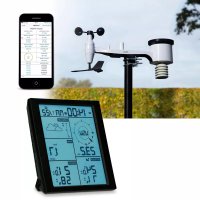
All measurement data is displayed on the 7,5"/19,1 cm large colour LCD screen.
When using the adapter, the snooze/light button functions as a dimmer for the backlight in 4 steps. The backlight will remain off when using batteries only. When touching the snooze/light button, the screen will light up for 5 seconds.
Zz
3. OVERVIEW
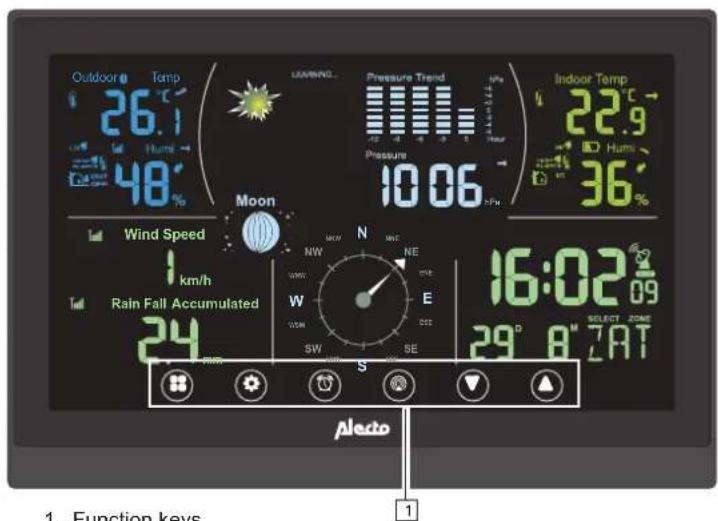
3.1 Indoor unit:
text_image
Outdoor ° Temp 26.1 °C Hum 48° LAWNING... Pressure Trend HPa Pressure 10.06 +Pw Indoor Temp 22.9 °C Hum 36° Moon Wind Speed km/h Rain Fall Accumulated 24 N NW NE W E DCM CCS SW SE 16:02 09 SELECT ZONE 29° 8"7"AT Aledo 1. Function keys 1-
Function keys
-
Outside temperature & humidity display
-
Wind speed display
-
Rainfall display
-
"Mode" key
-
Moon phase display
-
"Settings" key
-
Weather forecast display
-
"Alarm clock" key
-
Wind direction display
-
"Channel" key
-
Atmospheric pressure and atmospheric pressure trend animation
-
"Up/+" key
-
"Down/-" key
-
Power adapter connection
-
Day and month display
-
Current time display
-
Indoor temperature & humidity display
-
Hanging slots
-
Battery compartment for 3 x AAA, 1,5V batteries (excl.)

text_image
Outdoor °Temp 188.0 Max Min Hum 88.0% LEARNING Pressure Trend Pressure 98.00 98.00 Indoor Temp 188.0° Max Min Rain Rain Speed 188.0 max mph km/h Rain Fall Accumulated 98.00 by weekday at hour work min inches AMPM RL1 RL2 Z' 38:00 Select Zone 98.00 98.00 17 16 15 4 5 6 7 8 9 10 11 12 13 14
text_image
AAA 1.5V AA 1.5V AAA 1.5V 19 203
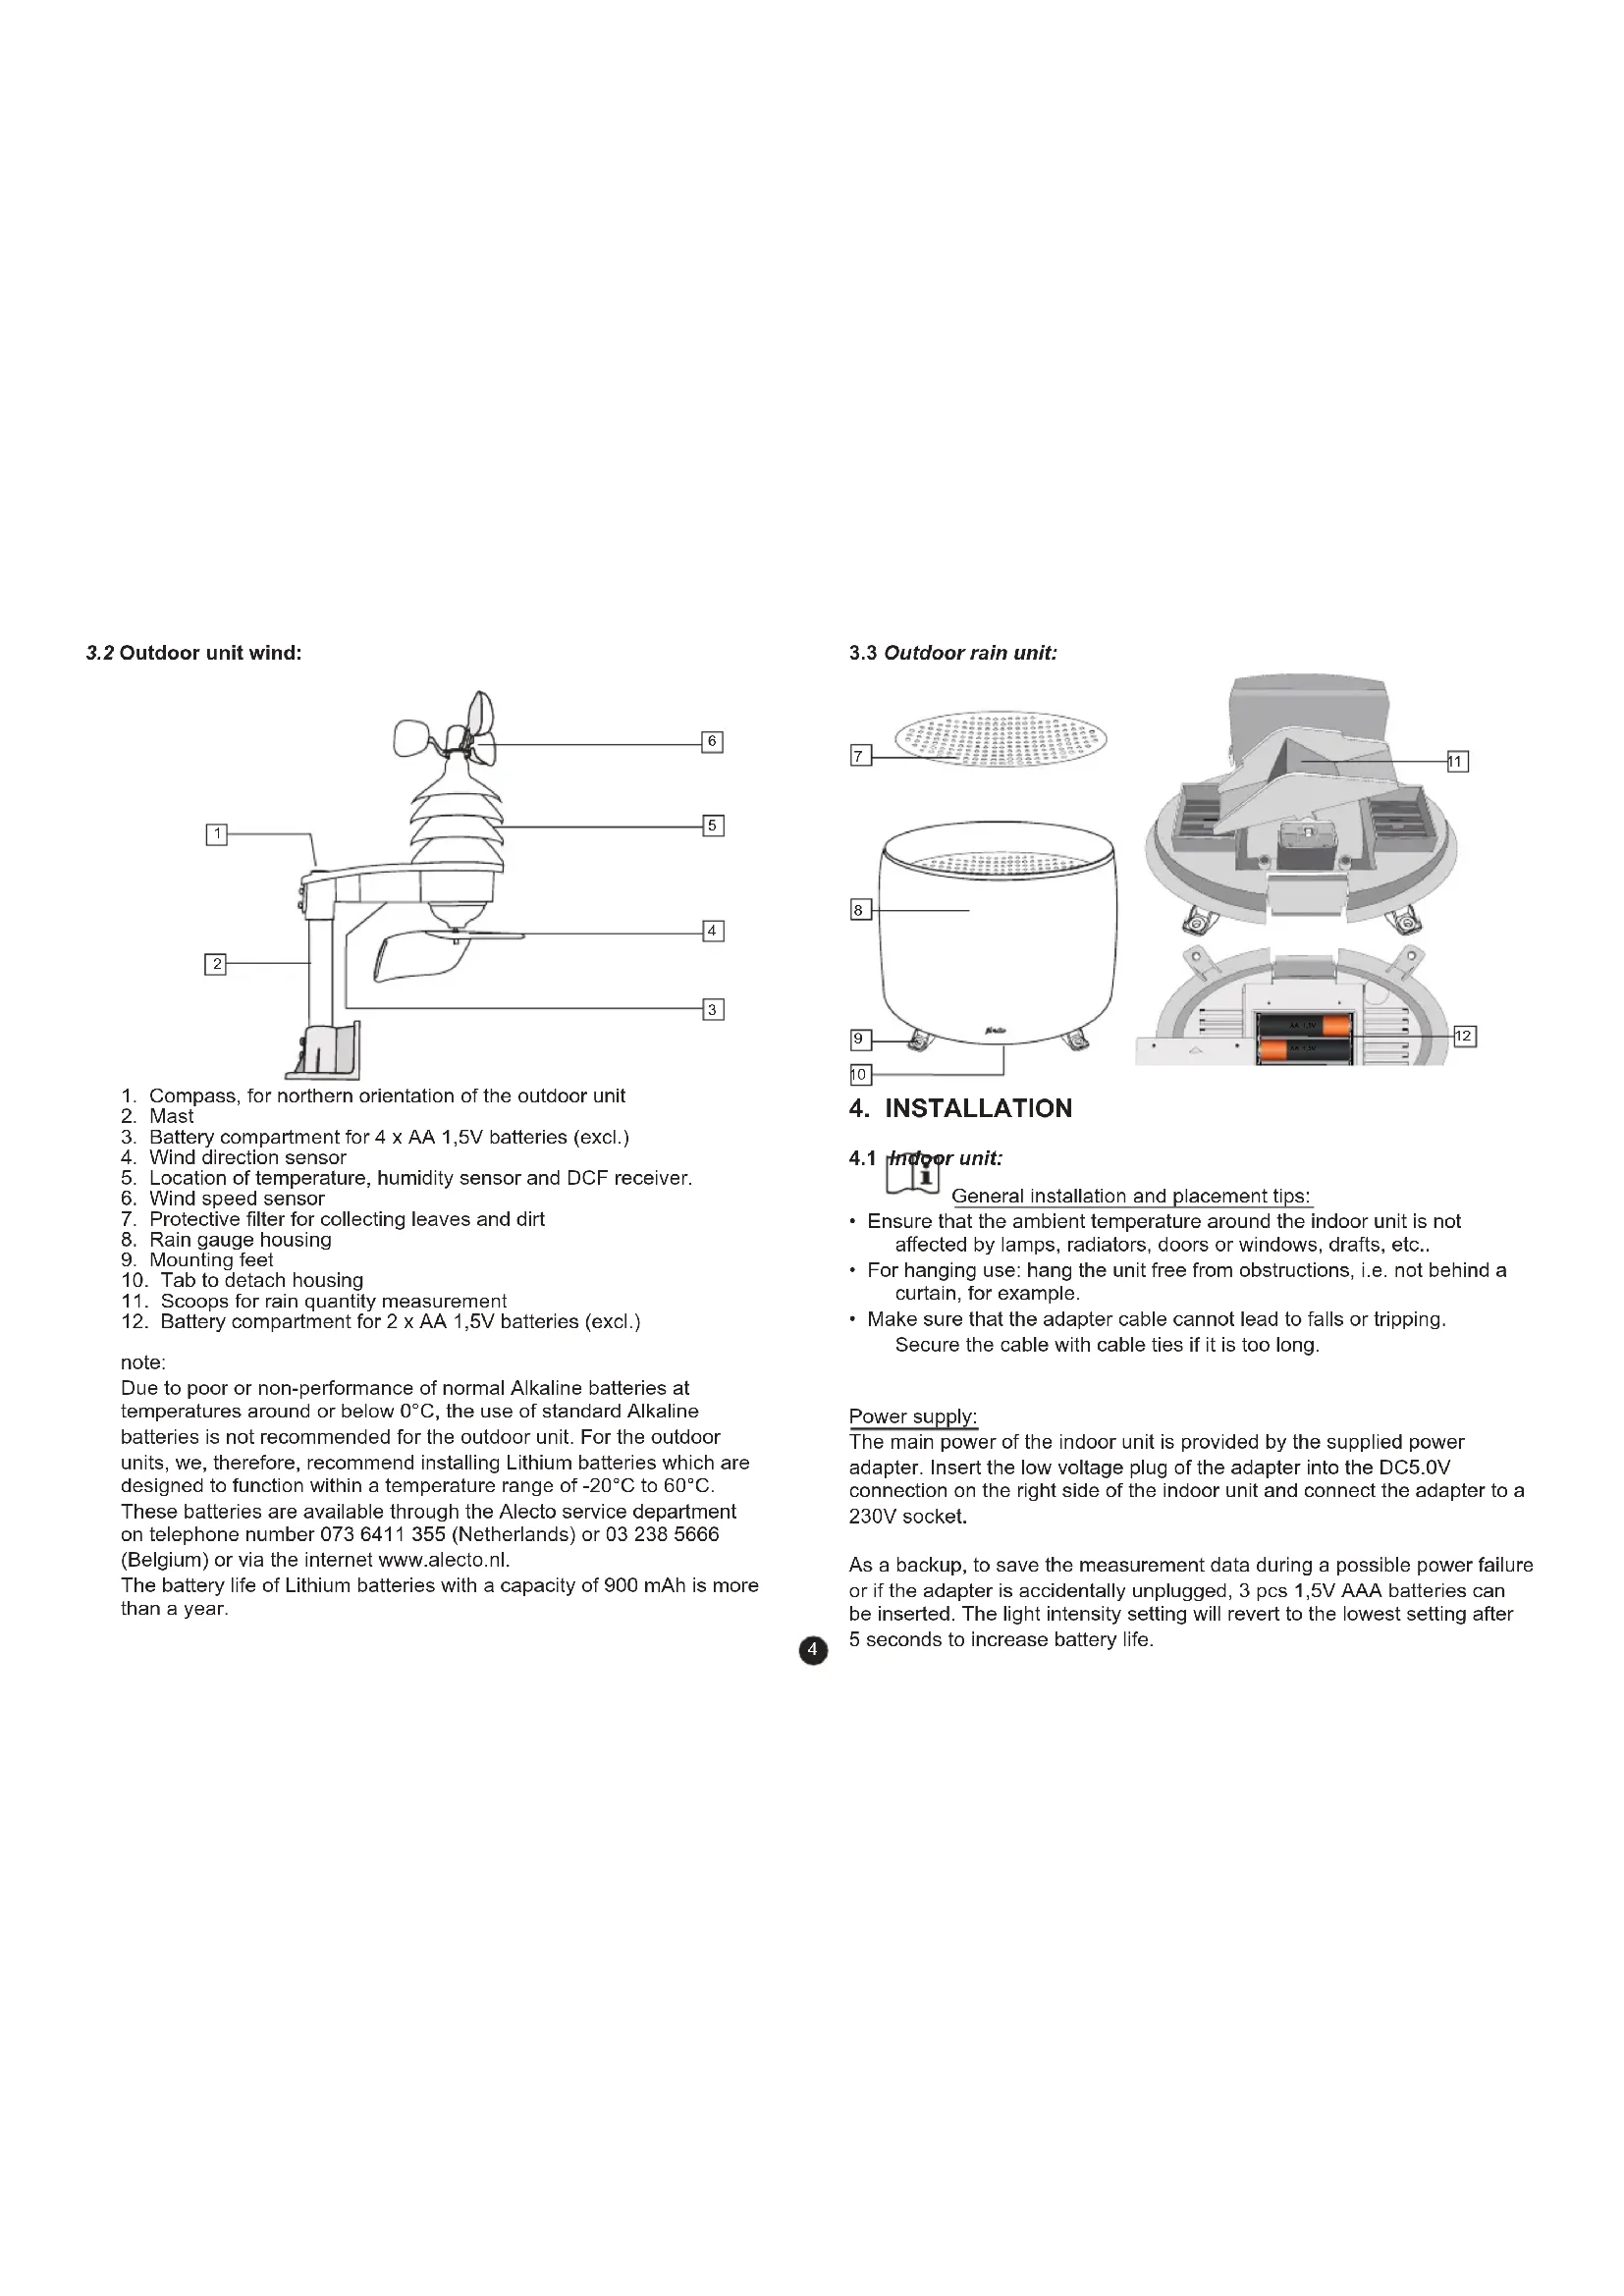
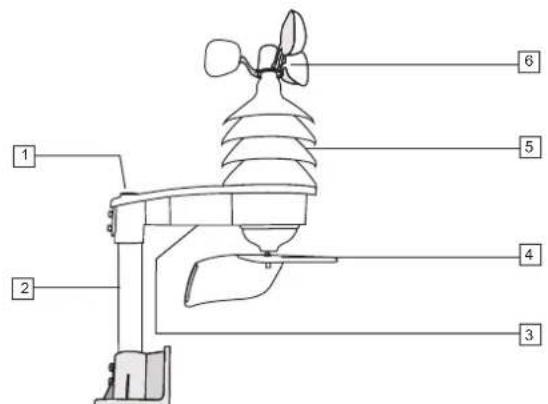
3.2 Outdoor unit wind:

text_image
Diagram of a weather instrument with numbered parts labeled 1 through 6- Compass, for northern orientation of the outdoor unit
- Mast
- Battery compartment for 4 x AA 1,5V batteries (excl.)
- Wind direction sensor
- Location of temperature, humidity sensor and DCF receiver.
- Wind speed sensor
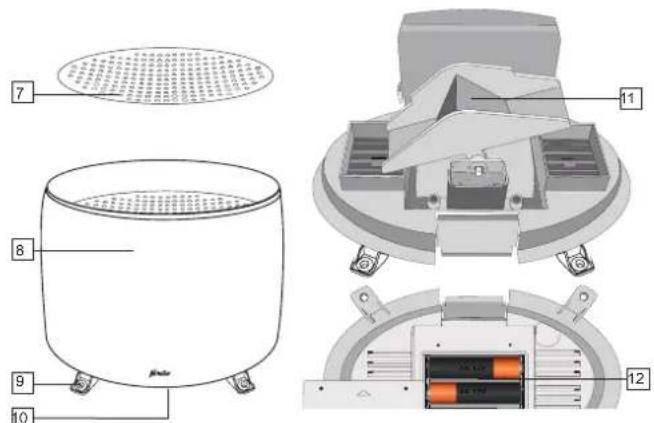
- Protective filter for collecting leaves and dirt
- Rain gauge housing
- Mounting feet
- Tab to detach housing
- Scoops for rain quantity measurement
- Battery compartment for 2 x AA 1,5V batteries (excl.)
note:
Due to poor or non-performance of normal Alkaline batteries at temperatures around or below 0°C, the use of standard Alkaline batteries is not recommended for the outdoor unit. For the outdoor units, we, therefore, recommend installing Lithium batteries which are designed to function within a temperature range of -20°C to 60°C. These batteries are available through the Alecto service department on telephone number 073 6411 355 (Netherlands) or 03 238 5666 (Belgium) or via the internet www.alecto.nl.
The battery life of Lithium batteries with a capacity of 900 mAh is more than a year.
3.3 Outdoor rain unit:
text_image
Technical diagram of a portable air conditioner unit with labeled components and internal structure4. INSTALLATION
4.1 Indoor unit:

General installation and placement tips:
- Ensure that the ambient temperature around the indoor unit is not affected by lamps, radiators, doors or windows, drafts, etc..
- For hanging use: hang the unit free from obstructions, i.e. not behind a curtain, for example.
- Make sure that the adapter cable cannot lead to falls or tripping. Secure the cable with cable ties if it is too long.
Power supply:
The main power of the indoor unit is provided by the supplied power adapter. Insert the low voltage plug of the adapter into the DC5.0V connection on the right side of the indoor unit and connect the adapter to a 230V socket.
As a backup, to save the measurement data during a possible power failure or if the adapter is accidentally unplugged, 3 pcs 1,5V AAA batteries can be inserted. The light intensity setting will revert to the lowest setting after 5 seconds to increase battery life.
4
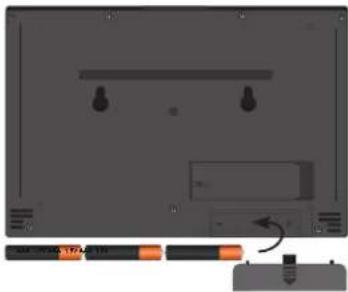
- Open the battery compartment at the back of the indoor unit.
- Insert the first battery and slide it all the way to the left.
- Insert the second battery and slide it all the way to the right.
- Insert the third battery in the middle between the first 2 batteries.
- Finally, replace the battery cover.
text_image
Diagram showing a device panel with labeled buttons and an arrow indicating a process or operation, accompanied by a small inset image.Hang or stand:
The indoor unit can either be placed freestanding on a cabinet or desk (fold out the stand on the back of the indoor unit for this purpose) or the unit can be hung on the wall (see keyhole openings on the back).
4.2 Outdoor units:
General installation and placement tips:
- First, check that the outdoor units are within reach of the indoor unit before permanently mounting the outdoor units. Keep the distance between the outdoor units and the indoor unit to within 30 meters.
- Ensure that the outdoor units are placed at least 1,5 meters above the ground and freely exposed to the rain and wind.
- In order for the outdoor units to work as accurately as possible, they must stand as horizontal as possible. For the outdoor rain unit, check that the surface is level before mounting.
- To indicate which direction the wind is coming from, the outdoor wind unit must be oriented to the South. See the S designation at the bottom of the outdoor unit for this. Use the compass on the outdoor wind unit to correctly orientate the unit.
-
Make sure the outdoor units hang and/or stand freely. The wind speed meter and the wind vane, in particular, should hang in direct wind.
-
Find a location where the likelihood of blowing leaves is minimal. Leaves blown into the rain coop can block the rain gauge or affect the measurement results. In any event, we advise you to place the outdoor units in such a way that it is fairly easy to remove any leaves and to replace the batteries.
• Perhaps the outdoor units can be located within reach for a week to try out all functions. Check that everything is functioning properly before placing the outdoor units in their permanent location.
4.3 Outdoor unit wind:
Registration:
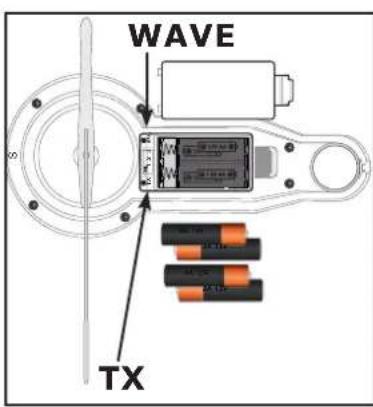
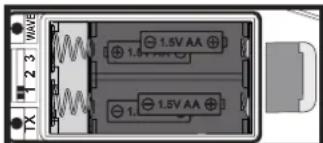
First register the outdoor units with the indoor unit before permanent placement of the outdoor units Once the indoor unit batteries are installed, it will search for the outdoor units for the first 5 minutes. After the 5 minutes, the indoor unit can be manually set to receive. To do this, press the channel button for 2 seconds to set the indoor unit to receive mode.
Insert 4 x 1,5V AA batteries in the outdoor wind unit. See diagram. Set the Channel switch to the same channel selected on the indoor unit. Then press the TX key. Check that the indoor unit has received the signal. Press the TX button once more, if necessary. The outdoor temperature and humidity are displayed on the indoor unit via the outdoor wind unit.
text_image
WAVE TXThe outdoor wind unit is registered when the information appears on the display.
To turn off the DCF-77 time reception, press the "WAVE" key. To turn the DCF-77 reception on again, register the outdoor unit once more by briefly removing and reinserting the batteries and repeating the registration procedure.
5
Installation:
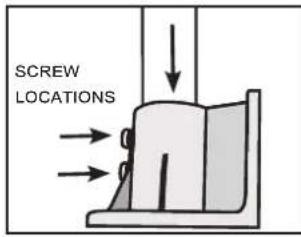
text_image
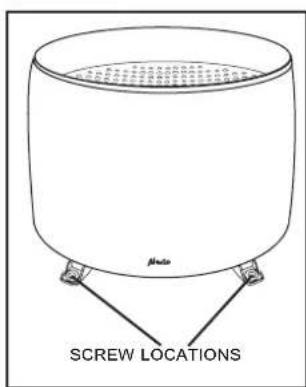
SCREW LOCATIONSInsert the aluminium pole into the mounting base and fasten it with the screws provided. The mounting base can be mounted on a horizontal or vertical surface. Please note that the outdoor wind unit must still be orientated to the north. Make sure there is enough space to do this adequately. Screw the base to a wooden or stone wall using the supplied screws and plugs.
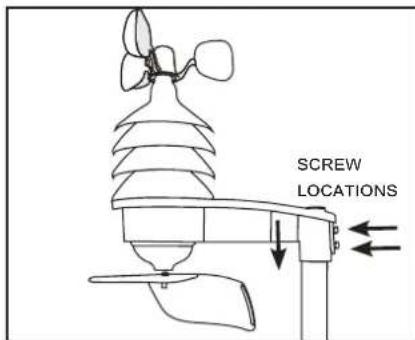
text_image
SCREW LOCATIONSSlide the outdoor wind unit onto the pipe and fasten it with the screws provided.
Orientate the outdoor wind unit using the compass to ensure the correct wind direction.
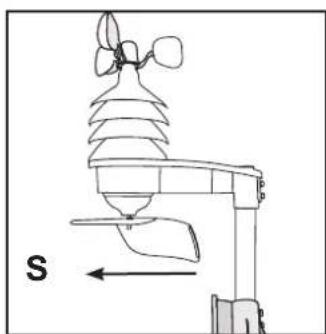
The wind speed sensor, temperature, humidity, and wind direction part must be south facing. See diagram:
natural_image
Diagram of an air quality monitoring device with a sensor and directional arrow (no text or labels)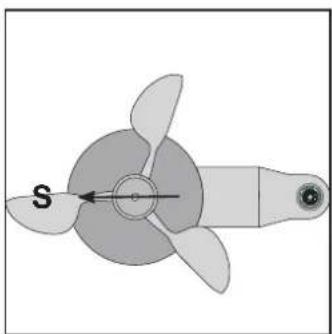
natural_image
Diagram of a propeller with three blades and a central hub, labeled 'S' with an arrow (no text or symbols beyond label)4.4 Outdoor rain unit: Registration:
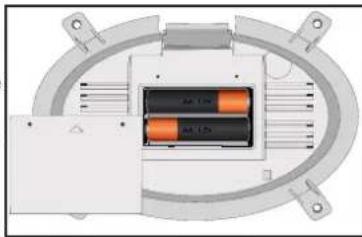
Remove the battery compartment screws at the bottom of the rain gauge. Slide the battery cover off the screw holes, and remove the battery cover. Insert 2 x 1,5V AA batteries in the battery compartment as shown in the diagram:
natural_image
Diagram of a mechanical or electrical component with two orange blocks inside a circular housing (no text or symbols visible)Install the battery within the 5 minute registration time of the indoor unit, or If the indoor unit is set to receive, bot register.
Inserting the batteries is sufficient. As soon as the rain unit transmits, this is detected by the indoor unit and the ---- disappears from the display.
Replace the battery cover and secure it with the screws. This ensures that the batteries do not get wet.
The batteries should be installed before mounting the rain gauge.
Installation:
text_image
Mode SCREW LOCATIONSPlace the rain gauge on a horizontal surface where the rain will not be obstructed. Fasten the rain gauge by inserting the screws through the legs. To replace the batteries, the rain gauge must first be unscrewed.
text_image
A B C D E F G H I J K L M N O P Q R S T U V W X Y Z A B C D E F G H I J K L M N O P Q R S T U V W X Y Z6
Cleaning:
natural_image
Simple line drawing of a cylindrical container with a side-mounted base and an upward arrow indicating direction (no text or symbols)
text_image
Diagram showing a container with a circular diagram above it containing Chinese text, likely illustrating a concept or concept.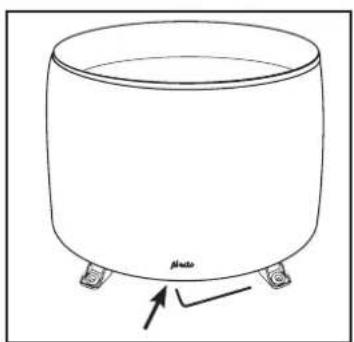
natural_image
Simple line drawing of a cylindrical container with four legs and a label 'plato' at the bottom (no other text or symbols)
natural_image
Simple line drawing of a cylindrical container with two legs and an upward arrow, labeled 'Photo' at the bottom (no text or symbols on the diagram itself)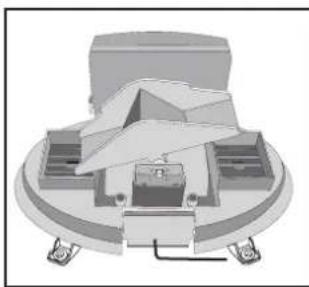
natural_image
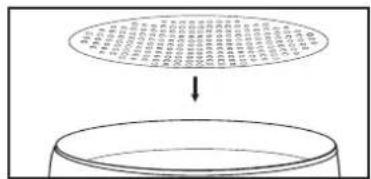
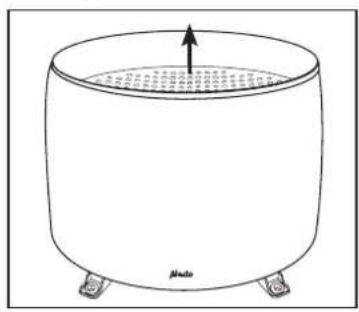
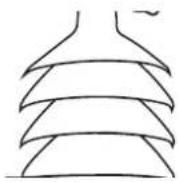
3D mechanical assembly diagram showing a central component with surrounding parts (no visible text or symbols)Remove grid plate and clean it. Remove all leaves from the rain gauge housing. Using an Allen key, the cover can be removed by pressing the internal tab and pulling the cover up.
In case of problems, the rain gauge can also be unscrewed.
Then clean the scoop and all holes thoroughly. Replace the cover by clipping in the rear first and then by pressing until it clicks. Check that the cover is secured. Replace the grid plate.
5. BASIC DISPLAY AND SETTINGS
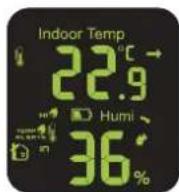
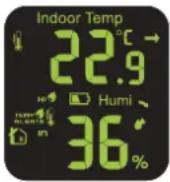
5.1 Indoor Temp and Humi:
- Indoor temperature and indoor humidity.
- Indoor temperature display in ^ or ^ .
- Press to switch between ^ or ^ .
- Indoor humidity display in %
• Trend display higher, equal, or lower. - Adjustable temperature high/low alarm.
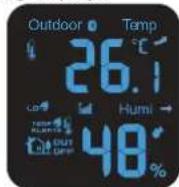
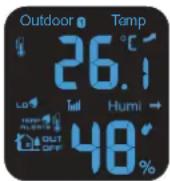
5.2 Outdoor Temp and Humi:
- Display of outdoor unit wind channel 1, 2, 3, or alternating display.
• Outdoor temperature and humidity outdoors.
• Outdoor temperature display in °C or °F. - Press to switch between °C or °F.
• Outdoor humidity display in %. - Trend display higher, equal, or lower.
- Adjustable temperature high/low alarm.
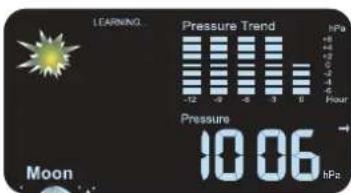
5.3 Pressure Trend and Pressure:
- Display of atmospheric pressure progress and barometric pressure with forecast by icons.
• View previous 12-hour atmospheric pressure progress and a total difference of 12 hPa
• Atmospheric pressure value in: Ft, M, inHG, and hPa.
• Atmospheric pressure trend display - 14 day learning mode.
5.4 Moon:
- Moon phase display indication.
• The stars are displayed between 18.00 and 6.00
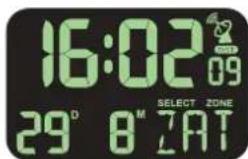
5.5 Clock:
• Time display with date.
- DCF-77 indication time synchronization reception.
- Alarm clock with snooze function.
text_image
LEARNING Pressure Trend +8 +12 +16 -4 -5 -6 -7 -8 -9 -10 -11 -12 -13 -14 -15 -16 -17 -18 -19 -20 -21 -22 -23 -24 -25 -26 -27 -28 -29 -30 -31 -32 -33 -34 -35 -36 -37 -38 -39 -40 -41 -42 -43 -44 -45 -46 -47 -48 -49 -50 -51 -52 -53 -54 -55 -56 -57 -58 -59 -60 -61 -62 -63 -64 -65 -66 -67 -68 -69 -70 -71 -72 -73 -74 -75 -76 -77 -78 -79 -80 -81 -82 -83 -84 -85 -86 -87 -88 -89 -90 -91 -92 -93 -94 -95 -96 -97 -98 -99 -100 Pressure 10.06 hPa
text_image
16:02 29° 8 M 7AT 09 SELECT ZONE5.6 Wind:
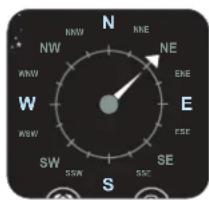
- Wind speed display with reception indication outdoor wind unit.
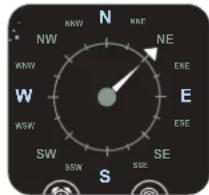
- Wind direction display. Pointer indicates previous and current wind direction. The wider triangle indicates the current wind direction.
• Wind speed is displayed in mph or km/h.

text_image
N NW NNW RKE NE WNW EHE W ESE SW SSW SSC S S5.7 Rain:
- Display amount of precipitation with the following time spans:
total
today
yesterday
last hour
this week

- Precipitation display in mm or inches.
- Low battery indication of the rain unit.
- Reception signal indication.
5.8 Function keys:
- Mode
- Set
- alarm
- channel
- down
- up


Mode key: In normal mode, press mode to view the various functions separately. If the mode key is not pressed for 10 seconds, the display will return to normal mode.

Set key: In normal mode, press set to switch between °C and °F.

alarm key: press alarm key to activate alarm 1, alarm 2, alarm 1 and 2 or no alarm.

channel key: press channel key to switch between channel 1, channel 2, channel 3 or scan between channel 1, 2, and 3. Press and hold channel key for 2 seconds to activate reception of outdoor units with new ID. First select the desired channel.

down key: to switch between rain display in total, today, last hour, yesterday and this week.

up key: display of the lowest or highest measured value of the indoor and outdoor temperature and humidity and the maximum measured wind speed.
6. SETTING INDOOR UNIT:
6.1 Mode:
Use the mode button to select the desired adjustment function:
Press Mode for the following settings
date and time
alarm time for the alarm clock
height correction setting
temperature alarm setting for outdoor and indoor temperature
rain gauge display extension in mm or inches
wind speed display extension in km/h or mph
6.2 Date and time:
The time and date are automatically received via DCF-77 receiver which receives the time data. This receiver is situated in the wind unit. The wind unit must be switched on for at least 5 minutes to receive the DCF-77 signal. If the channels of the wind unit and the indoor unit are the same, the outdoor temperature will be the first to appear in the display during registration. Followed later by the correct time. The wind unit must be switched on for approximately 2 minutes for the signal to be transmitted. Alternatively, you can use the TX button in the battery compartment to transmit manually. The wind unit should already be switched on for several minutes at this point. Once the DCF signal is received, the following icon will appear next to the time: ☐. If DST appears below this icon (then daylight saving time is active (DST - Day Saving Time).
text_image
WAVE 1.5V AA 1.5V AA 1.5V AA TX 1 2 3Pressing the WAVE button for a few seconds will disable reception of the DCF signal. Then wait a day and the DCF-77 receive symbol will disappear. It is also possible to restart the indoor unit. The receive symbol will then also
not appear. The time and date must then be re-set manually.
- zone
press the Mode key 1 x Date and time setting is displayed
Press the Set key for 3 seconds
Select zone starts to flash. Enter the desired value for the DCF time zone using the up and down keys. (In the DCF time zone of the Netherlands this is 0) The DCF time takes daylight saving time into
account.
• day name language
Press the Set key again ⚙ to continue setting the day in English, German, French, Italian, Dutch, Spanish or Danish. Select the desired language with up ⚙ and down keys.
- year
Press the Set key 🧑 gain to continue setting the year. Select the desired year with the up ⓐ and down keys.
• month-day / day month sequence
Press the Set key 📍 again to continue setting the day or month sequence. Select the desired month-day or day-month indication with up ⓐ and down keys.
- month
Press the Set key 🙏 again to continue setting the desired month (1-2-3..to..12). Select the desired year with the up ⚠ and down ⬇ keys the desired month indication.
• day
Press the Set key 🙏 again to continue setting the desired day (1-2-3..to..31). Select the desired day with the up ⚠ and down ⬇ keys.
• 12/24 hour display
Press the Set key 🧑 gain to continue setting the desired hour format (12 or 24 hours). Select the desired hour format with the up 🔒 and down ⬇ keys.
• hour
Press the Set key 🧑 again to continue setting the desired hour Select the desired hour with the up ⏚ and down keys.
- minutes
Press the Set key ✪ again to continue setting the desired minutes. Select the desired minutes with the up ⚠ and down ⚡ keys.
- seconds
Press the Set key 🙏 again to continue setting the desired seconds. Select the desired seconds with the up 🔊 and down 🔕 keys.
6.3 Alarm time for the alarm clock:
There are two alarm clocks present in this weather station. These can be turned on or off individually with separate wake-up time. With the alarm key ☑ the alarms can be activated. When an alarm goes off, it can be turned off with the snooze function. The Snooze key ☑ located on top of the device. The alarm will then stop for 5 minutes and the alarm icon ⚪ and snooze Zicon flashes, whereafter the alarm will sound again. During snooze, the snooze function can be turned off by alarm key ☑ activation. During the alarm, it can be turned off by using any other key. If the alarm is not turned off, it will continue for 3 minutes. The alarm will become progressively louder and then stop.
- alarm 1 hour
press 2 x on the Mode key Alarm time appears
Press the Set key for 3 seconds
Alarm 1 hour will start to flash. Insert here with the up Ⓤnd down, ⬇ the desired alarm hour of alarm 1.
- alarm 1 minutes
Press the Set key again to continue setting the desired minutes.
Select the desired minutes with the up and down keys.
- alarm 2 hour
Press the Set key again to continue setting the desired hour Select the desired hour with the up and down keys.
- alarm 2 minutes
Press the Set key again to continue setting the desired minutes.
Select the desired minutes with the up and down keys.
6.4 Height correction setting atmospheric pressure gauge:
- height
press 3 x on the Mode key Height setting appears
Press the Set key for 3 seconds
Height setting will start to flash. Insert here with the up and down keys, the desired height.
6.5 Temperature alarm setting for outdoor and indoor temperature:
• outdoor temperature alarm low.
press 4 x on the Mode key Height setting appears
press the Set key for 3 seconds
Outdoor temperature setting low starts to flash. Insert here with the up ▲ and down ⬆ keys, the desired temperature.
• outdoor temperature alarm low on or off.
Press the Set key ✿ again to turn the low temperature alarm on or off. Select with the up Ⓤ and down keys whether the low temperature alarm is on or off (OFF = off, ON = on).
• outdoor temperature alarm high.
Press the Set key 🙏 again to adjust the high temperature setting.
Select with the up and down keys the desired alarm temperature.
- outdoor temperature alarm high on or off.
Press the Set key ✪ again to turn the high temperature alarm on or off. Select with the up ⓐ and down keys whether the high temperature alarm is on or off (OFF = off, ON = on).
• indoor temperature alarm low.
Press the Set key 🙏 again to adjust the low temperature setting.
Select with the up 📊 and down keys the desired alarm
temperature.
- indoor temperature alarm low on or off.
Press the Set key 🧑 gain to turn the low temperature alarm on or off. Select with the up ⬆ and down 🧑 keys whether the low temperature alarm is on or off (OFF = off, ON = on).
• indoor temperature alarm high.
Press the Set key 📍 gain to adjust the high temperature setting.
Select with the up ⚠ and down ⚣eys the desired alarm temperature.
• indoor temperature alarm high on or off.
Press the Set key 🧑 gain to turn the high temperature alarm on or off. Select with the up ⬆ and down ⏰ keys whether the high temperature alarm is on or off (OFF = off, ON = on).
6.6 Rain gauge display extension in mm or inches:
- extension setting
press 5 x on the Mode key ■ Precipitation details appear
Press the Set key for 3 seconds
Precipitation extension starts to flash. Insert here with the up and down keys, the desired precipitation extension in (mm or inches).
6.7 Wind speed display extension in km/h or mph:
- extension setting
press 6 x on the Mode key 🎨 Wind speed details appear
Press the Set key for 3 seconds
Wind speed extension starts to flash. Insert here with the up and down key, the desired wind speed extension in (km/h or mph).
7. GENERAL OPERATION AND FUNCTIONS:
7.1 Barometer:
The atmospheric pressure value is measured with a barometer. The atmospheric pressure value can be displayed in Ft, M, inHG, and hPa. In the Benelux, the hectoPascal notation is used; although previously air pressure was also expressed as 1 mbar equals 1 hPa. The atmospheric pressure decreases the higher you are above sea level. A rule of thumb is that the atmospheric pressure decreases by 1 hPa per 8 meters. In this weather station menu, the height can be entered so that the air pressure is compensated for and the correct air pressure value is displayed. The height can be adjusted in 10-meter increments between -90 meters and +1990 meters. See 6.4 for this setting.
7.2 Trend indication

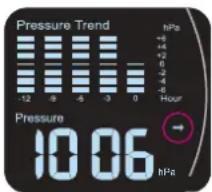
text_image
Pressure Trend -12 -9 -6 -3 -0 +8 +4 +2 +6 -2 -4 -6 Hour Pressure 10.06 hPaIf the atmospheric pressure increases or decreases by 2 hPa per hour, the trend display will point up or down. If the air pressure changes less than 2 hPa per hour, the straight arrow will be displayed.
7.3 Weather forecast by icons:
The following icons indicate the respective weather forecast.:

SUNNY PARTIALLY CLOUDY


CLOUDY RAIN


HEAVY RAIN SNOW

HEAVY SNOW ICE FORECAST


STORM FORECAST
7.4 14-day learning mode:
The automatic learning mode will activate after start-up or reset. This appears in the "LEARNING" display. This will stop and disappear after 14 days.
7.5 Atmospheric pressure trend:
The animated graph below shows the atmospheric pressure for the past 12 hours.
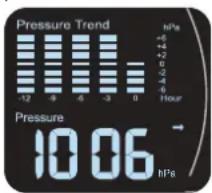
text_image
Pressure Trend -12 -6 -5 -3 0 Pressure 10.06 hPa HourThe weather station must be switched on for at least 12 hours for the correct value. The graph displays differences from +6hPa to -6hPa. This value cannot be modified.
7.6 Indoor and outdoor temperature:
The indoor and outdoor temperature is displayed in the same manner. See 7.7 for outdoor temperature display. The trend arrow indicates the weather course. If the temperature rises or falls by 1 °C, the trend arrow will point up or down respectively. If the temperature change remains below 1 °C for an hour, the trend arrow remains straight.
7.7 Indoor and outdoor humidity:
Indoor and outdoor humidity is displayed in the same manner. See 7.6 for indoor humidity display. The trend arrow indicates the weather course. If the humidity rises or falls by 5%, the trend arrow will point up or down respectively. If the humidity does not change by more than 5% within an hour, the trend arrow will remain straight.
7.8 Maximum and minimum temperature and humidity value:
In these screens, the maximum and minimum measured temperature and humidity value can be displayed. To do this, press the up key ▲ Max. appears in the display and the maximum measured temperatures and humidity are shown. Press the up key again ▲Min appears in the display and the minimum measured temperature and humidity is shown. Hold up key for at least 2 seconds to clear min. and max indoor and outdoor temperature and humidity. Note: the maximum wind speed is also cleared. Indoor and outdoor values are cleared simultaneously.
7.9 Moon phase display:

text_image
Moon Moon Moon Moon Moon Moon Moon
text_image
Moon Moon Moon Moon Moon Moon MoonThe moon phase display is linked to the date, year, and time.
The stars are displayed between 18.00 and 6.00. The stars disappear between 6.00 and 18.00.
The moon goes from no moon to full moon and then back to no moon. The moon is divided into 7 segments.
7.10 Wind speed:

The current wind speed is displayed. The maximum wind speed is indicated by pressing the up key. See 7.8 for clearing the maximum wind speed. The wind speed is displayed in mph or
km/h.
7.11 Wind direction:
text_image
N NW NW W W WSW SW SSW SSE SE ESE ENE NE NWR SWind direction display. The pointer indicates previous and current wind direction. The wider triangle indicates the current wind direction.
The wind rose consists of 16 wind directions with an intermediate space of 22,5°.
Ensure that the wind unit is correctly aligned.
7.12 Rain meter:

The rain gauge displays the total rainfall by default. With the down key you can choose between today, past hour, yesterday and this week. After 10 seconds, the display changes back to total fallen precipitation. Hold the
down key to clear the precipitation value.
8. MAINTENANCE
For easy access to the outdoor units to carry out minor maintenance or to replace the batteries, it is advisable to place the outdoor units in an accessible place, but still as far as possible in the wind or rain.
8.1 Rain meter:
The rain unit housing can be unclipped from the bottom center, and the inside of the rain gauge can then be cleaned. Use a soft long-bristle brush for this.
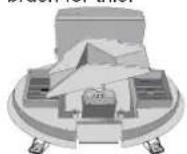
Clean the collection tray and remove any leaves. Place it back on the rain gauge (note the 2 protruding tabs on the back) and press the housing onto the rain gauge again until a mechanical "click" is heard. See also 4.4 cleaning.
8.2 Outdoor temperature and humidity sensor:
Blow the openings of the sensor housing clean and use a long-bristle soft brush to clean the rain slats. DO NOT use WATER but only a damp cloth.
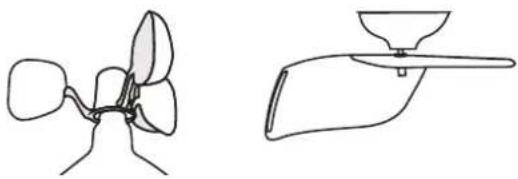
8.3 Wind vane and windmill scoops:
Wipe these parts with a slightly damp cloth.
Check that the bearings still rotate smoothly at the same time.
natural_image
Line drawings of two abstract mechanical or fluidic components, one with a funnel-like structure and the other with a handle (no text or symbols)9. USE INDOOR UNIT WITH BATTERIES.
The indoor unit also runs on batteries without an adapter. This will then run out faster than when using an adapter.
The display background will not illuminate, but when the buttons are pressed the background lighting will come on for 5 seconds. The light can then no longer be dimmed.
10. RECEPTION FUNCTION.
After installing the batteries and/or plugging in the power adapter connected to the mains, the indoor unit will begin receiving signals from the outdoor units for 5 minutes. The first to be received by the indoor unit will be seen as the correct outdoor unit and will remember the code of the outdoor unit. Check that it is the correct outdoor unit. After the 5 minutes, the indoor unit will stop receiving and will only display the value of the outdoor unit received during this process. To switch reception on again, press the channel key ☐ for at least 2 seconds. To turn off reception, press the channel key ☐ again for 2 seconds.
11. SPECIFICATIONS
Indoor-unit:
Temperature:
measurement range:-9.9 ^ C \~ 50 ^ C ('L0' or 'HI' when out of range)
resolution: 0.1°C
accuracy: 20^ C - 24^ C = ±1^ C
0^ - 20^ en 24^ - 40^ = ± 2^
40^ - 50^ = ± 3^
humidity: 1% \~ 99% RH (if out of range, lower then the display will show 1%, higher the display will show 99%)
resolution: 1% RH
accuracy: 40% - 80% = ±5%,
others = ±8%
air pressure: 800 \~ 1100hPa
resolution: 1hPa
measure time: every hour
High correction: -90meter \~ 1990meter
alarm duration: 180 seconds
snooze duration: 5 minutes
high/low alarm: outdoor temperature:
low default 0 °C (-50°C\~10°C)
high default 35°C (28°C\~70°C)
indoor temperature:
low default 20°C (0°C\~23°C)
high default 28°C (26°C\~50°C)
power supply: 3x 1,5V battery, format AAA adapter:
Input voltage: 100-240VAC
Input frequency: 50/60Hz +/-3Hz
Output voltage constant: 5.0V
Output current constant: 0.3A
Output power constant: 1.5W
Efficiency 50% load: 69.86%
Input power no load: 0.08W dimensions: 125(H)x190(W)x15(D)mm
Outdoor-unit wind:
Temperature:
measurement range: -50^ 70^ ('L0' or 'HI' when out of range)
resolution: 0.1°C
accuracy: 20^ - 24^ = ±1^
0^ C-20^ C en 24^ C-40^ C=± 2^ C
40^ - 50^ = ± 3^
humidity: 1% \~ 99% RH (if out of range, lower then the display will show 1%, higher the display will show 99%)
resolution: 1% RH
accuracy: 40% - 80% = ±5%,
others = ±8%
wind speed: 0km/u \~ 127,5km/u
Resolution: 1km/u
power supply: 4x 1,5V battery, format AA (*)
dimensions: 382(H)x260(W)x105(D)mm
Outdoor-unit rain:
rainfall:
measurement range: 0-6000mm ('---' if outside this range)
accuracy: +/-10%
resolution: 0,1mm upon precipitation <1000mm
1mm upon precipitation >1000mm
power supply: 2x 1,5V battery, format AA (*)
dimensions: 120(H)x164(W)x104(D)mm
Radio:
transmit frequency: 434,025 MHz
transmit interval: wind (55sec.) rain (90sec.)
range: 30m.
RF power: < 0 dBm
INHOUDSOPGAVE
-
INTRODUCTIE 15
-
OVERZICHT 16
3.1 Binnen-unit: 16 3.2 Ruiton-unit wind: 17
3.2 Buiten-unit wind: 17 3.3 Buiten-unit regen: 17
3.5 Batten-unit regen: 17
- INSTALLATIE 17
4.1 Binnen-unit 17
4.2 Buiten-units: 18
4.3 Buiten-unit wind: 18
4.4 Buiten-unit regen: 19
- BASIS WEERGAVE EN INSTELLINGEN....20
5.1 Indoor Temp en Humi: 20
5.2 Outdoor Temp en Humi: 20
5.3 Pressure Trend and Pressure: 20
5.4 Moon: 20
5.5 Klok: 20
5.6 Wind: 21
5.7 Regen: 21
text_image
Outdoor °Temp 188.0 Max Min Hum 88.0% LEARNING Pressure Trend Pressure 98.00 98.00 Indoor Temp 188.0° Max Min Rain Rain Speed 188.0 max mph km/h Rain Fall Accumulated 98.00 by weekday at hour work min inches AMPM RL1 RL2 Z' 38:00 Select Zone 98.00 98.00 17 16 15 4 5 6 7 8 9 10 11 12 13 14
text_image
AAA 1.5V AA 1.5V AAA 1.5V 19 203.2 Buiten-unit wind:
text_image
Diagram of a weather instrument with numbered parts labeled 1 to 6text_image
Technical diagram of a portable air conditioner unit with labeled components and internal structure4. INSTALLATIE
4.1 Binnen-unit:

natural_image
Back view of a computer monitor with buttons and a small indicator light (no readable text or symbols)Hangen of staan:
natural_image
Diagram of a weather instrument with directional arrow and label 'S' (no text or symbols on the diagram itself)
natural_image
Diagram of a propeller with three blades and a central hub, labeled 'S' (no text or symbols beyond label)4.4 Batten-unit regen:
Aanmeiden.
natural_image
Technical diagram of a mechanical or electrical component with two orange blocks inside a circular housing (no text or symbols visible)natural_image
Simple line drawing of a cylindrical container with a side-mounted base and an upward arrow indicating direction (no text or symbols)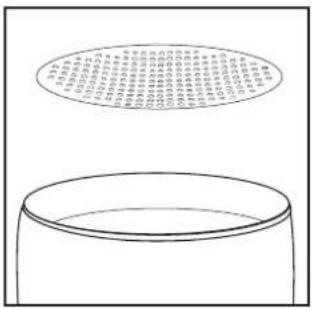
text_image
Diagram showing a cylindrical container with a circular diagram above it containing Chinese text, likely illustrating a physical or mathematical concept.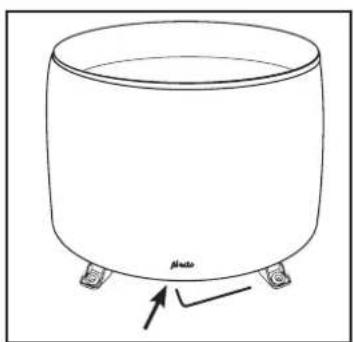
natural_image
Simple line drawing of a cylindrical container with four legs and a label 'plato' at the bottom (no other text or symbols)
natural_image
Simple line drawing of a cylindrical container with four legs and an upward arrow, labeled 'photo' at the bottom (no text or symbols on the diagram itself)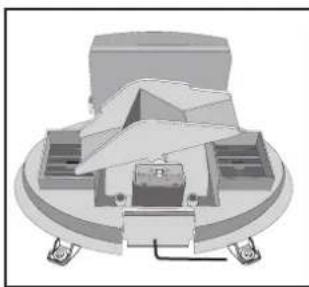
natural_image
3D mechanical assembly diagram showing a central component with surrounding parts and mounting base (no text or symbols)5.3 Pressure Trend and Pressure:
text_image
N NW KNE NE EHE W E WSW ESE SW SSW SSC S S5.7 Regen:

ZWARE SNEEUW IJS INDICATIE


STORM INDICATIE
7.4 14-daags leer mode:
bar
Pressure Trend | Time (h) | Pressure (hPa) | |---|---| | 0 | -1.5 | | 1 | -1.4 | | 2 | -1.3 | | 3 | -1.2 | | 4 | -1.1 | | 5 | -1.0 | | 6 | -0.9 | | 7 | -0.8 | | 8 | -0.7 | | 9 | -0.6 | | 10 | -0.5 | | 11 | -0.4 | | 12 | -0.3 | | 13 | -0.2 | | 14 | -0.1 | | 15 | 0.0 | | 16 | 0.1 | | 17 | 0.2 | | 18 | 0.3 | | 19 | 0.4 | | 20 | 0.5 | | 21 | 0.6 | | 22 | 0.7 | | 23 | 0.8 | | 24 | 0.9 | | 25 | 1.0 | | 26 | 1.1 | | 27 | 1.2 | | 28 | 1.3 | | 29 | 1.4 | | 30 | 1.5 | | 31 | 1.6 | | 32 | 1.7 | | 33 | 1.8 | | 34 | 1.9 | | 35 | 2.0 | | 36 | 2.1 | | 37 | 2.2 | | 38 | 2.3 | | 39 | 2.4 | | 40 | 2.5 | | 41 | 2.6 | | 42 | 2.7 | | 43 | 2.8 | | 44 | 2.9 | | 45 | 3.0 | | 46 | 3.1 | | 47 | 3.2 | | 48 | 3.3 | | 49 | 3.4 | | 50 | 3.5 | | 51 | 3.6 | | 52 | 3.7 | | 53 | 3.8 | | 54 | 3.9 | | 55 | 4.0 | | 56 | 4.1 | | 57 | 4.2 | | 58 | 4.3 | | 59 | 4.4 | | 60 | 4.5 | | 61 | 4.6 | | 62 | 4.7 | | 63 | 4.8 | | 64 | 4.9 | | 65 | 5.0 | | 66 | 5.1 | | 67 | 5.2 | | 68 | 5.3 | | 69 | 5.4 | | 70 | 5.5 | | 71 | 5.6 | | 72 | 5.7 | | 73 | 5.8 | | 74 | 5.9 | | 75 | 6.0 | | 76 | 6.1 | | 77 | 6.2 | | 78 | 6.3 | | 79 | 6.4 | | 80 | 6.5 | | 81 | 6.6 | | 82 | 6.7 | | 83 | 6.8 | | 84 | 6.9 | | 85 | 7.0 | | 86 | 7.1 | | 87 | 7.2 | | 88 | 7.3 | | 89 | 7.4 | | 90 | 7.5 | | 91 | 7.6 | | 92 | 7.7 | | 93 | 7.8 | | 94 | 7.9 | | 95 | 8.0 | | 96 | -0.1 | | -0.2 to +0.2 hPa, Current = -100 Pressure = -10 Pressure = -1 Pressure = -1 Pressure = -1 Pressure = -1 Pressure = -1 Pressure = -1 Pressure = -1 Pressure = -1 Pressure = -1 Pressure = -1 Pressure = -1 Pressure = -1 Pressure = -1 Pressure = -1 Pressure = -1 Pressure = -1 Pressure = -1 Pressure = -1 Pressure = -1 Pressure = -1 Pressure = -0 Pressure = -0 Pressure = -0 Pressure = -0 Pressure = -0 Pressure = -0 Pressure = -0 Pressure = -0 Pressure = -0 Pressure = -0 Pressure = -0 Pressure = -0 Pressure = -0 Pressure = -0 Pressure = -0 Pressure = -0 Pressure = -0 Pressure = -0 Pressure = -0 Pressure = -0 Pressure = -1 Pressure = -1 Pressure = -1 Pressure = -1 Pressure = -1 Pressure = -1 Pressure = -1 Pressure = -1 Pressure = -1 Pressure = -1 Pressure = -1 Pressure = -1 Pressure = -1 Pressure = -1 Pressure = -1 Pressure = -1 Pressure = -1 Pressure = -1 Pressure = -1 Pressure = - Pressure = - Pressure = - Pressure = - Pressure = - Pressure = - Pressure = - Pressure = - Pressure = - Pressure = - Pressure = - Pressure = - Pressure = - Pressure = - Pressure = - Pressure = - Pressure = - Pressure = - Pressure = - Pressure = - Pressure = - Pressure = - Pressure = - Pressure = - Pressure = - Pressure = - Pressurized Pressure (hPa) Pressurized Pressure (hPa) Pressurized Pressure (hPa) Pressurized Pressure (hPa) Pressurized Pressure (hPa) Pressurized Pressure (hPa) Pressurized Pressure (hPa) Pressurized Pressure (hPa) Pressurized Pressure (hPa) Pressurized Pressure (hPa) Pressurized Pressure (hPa) Pressurized Pressure (hPa) Pressurized Pressure (hPa) Pressurized Voltage (hPa) Pressurized Voltage (hPa) Pressurized Voltage (hPa) Pressurized Voltage (hPa) Pressurized Voltage (hPa) Pressurized Voltage (hPa) Pressurized Voltage (hPa) Pressurized Voltage (hPa) Pressurized Voltage (hPa) Pressurized Voltage (hPa) Pressurized Voltage (hPa) Pressurized Voltage (hPa) Pressurized Voltage (hPa)text_image
N NW NE W E ESE SW SSE S SSW NSW ENEnatural_image
Two line drawings of abstract mechanical or fluidic components, one resembling a fan or impeller and the other a funnel-like structure (no text or symbols)9. GEBRUIK BINNEN-UNIT MET BATTERIJEN.
accuracy: 20°C - 24°C = ±1°C
0^ C-20^ C en 24^ C-40^ C=± 2^ C
40^ - 50^ = ± 3^
humidity: 1% \~ 99% RH (if out of range, lower then the display will show 1%, higher the display will show 99%)
resolution: 1% RH
accuracy: 40% - 80% = ±5%,
others = ±8%
air pressure: 800 \~ 1100hPa
resolution: 1hPa
measure time: every hour
High correction: -90meter \~ 1990meter
alarm duration: 180 seconds
snooze duration: 5 minutes
high/low alarm: outdoor temperature:
low default 0 °C (-50°C\~10°C)
high default 35°C (28°C\~70°C)
indoor temperature:
low default 20°C (0°C\~23°C)
high default 28°C (26°C\~50°C)
power supply: 3x 1,5V battery, format AAA
adapter:
Input voltage: 100-240VAC
Input frequency: 50/60Hz +/-3Hz
Output voltage constant: 5.0V
Output current constant: 0.3A
Output power constant: 1.5W
Efficiency 50% load: 69.86%
Input power no load: 0.08W
dimensions: 125(H)x190(W)x15(D)mm
Outdoor-unit wind:
Temperature:
measurement range: -50^ 70^ ('L0' or 'HI' when out of range)
resolution: 0.1°C
accuracy: 20^ C - 24^ C = ±1^ C
0^ C-20^ C en 24^ C-40^ C=± 2^ C
40^-50^=±3^
humidity: 1% \~ 99% RH (if out of range, lower then the display will show 1%, higher the display will show 99%)
resolution: 1% RH
accuracy: 40% - 80% = ±5%,
others = ±8%
wind speed: 0km/u \~ 127,5km/u
Resolution: 1km/u
power supply: 4x 1,5V batterij, formaat AA (*)
dimensions: 382(H)x260(W)x105(D)mm
Outdoor-unit rain:
rainfall:
measurement range: 0-6000mm ('---' indien buiten dit bereik)
accuracy: +/-10%
dimensions: 120(H)x164(W)x104(D)mm
Radio:
text_image
Outdoor °Temp 188.0 Max Min Hum 88.0% LEARNING Pressure Trend Pressure 98.00 98.00 Indoor Temp 188.0° Max Min Rain Rain Speed 188.0 max mph km/h Rain Fall Accumulated 98.00 by Sunday at hour work min inches AMPM RL1 RL2 Z' 38:00 Select Zone 98.00 98.00 17 16 15 4 5 6 7 8 9 10 11 12 13 14
text_image
AAA 1.5V AA 1.5V AAA 1.5V 19 20text_image
Diagram of a weather instrument with numbered parts labeled 1 through 6text_image
Technical diagram of a device with labeled components and internal cross-sections, including a fan cover, vent, and battery pack.4. ANSCHLUSS
natural_image
Back view of a computer monitor with indicator lights and a small battery, no visible text or symbolsnatural_image
Diagram of a weather instrument with directional arrow and label 'S' (no text or symbols on the diagram itself)
natural_image
Diagram of a propeller with three blades and a central hub, labeled 'S' (no text or symbols beyond label)natural_image
Cross-sectional diagram of a mechanical or electrical component with orange and black segments, no visible text or symbolstext_image
P = 1.0 P = 2.0 P = 3.0 P = 4.0 P = 5.0 P = 6.0 P = 7.0 P = 8.0 P = 9.0 P = 10.0 P = 11.0 P = 12.0 P = 13.0 P = 14.0 P = 15.0 P = 16.0 P = 17.0 P = 18.0 P = 19.0 P = 20.0 P = 21.0 P = 22.0 P = 23.0 P = 24.0 P = 25.0 P = 26.0 P = 27.0 P = 28.0 P = 29.0 P = 30.0 P = 31.0 P = 32.0 P = 33.0 P = 34.0 P = 35.0 P = 36.0 P = 37.0 P = 38.0 P = 39.0 P = 40.0 P = 41.0 P = 42.0 P = 43.0 P = 44.0 P = 45.0 P = 46.0 P = 47.0 P = 48.0 P = 49.0 P = 50.0Reinigung:

natural_image
Simple line drawing of a cylindrical container with a side-mounted lid and an upward arrow indicating flow or direction (no text or symbols)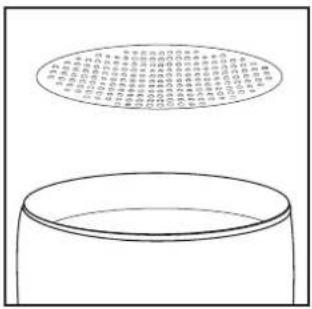
text_image
Diagram showing a container with a circular diagram above it containing Chinese text, likely illustrating a concept or concept.
natural_image
Simple line drawing of a cylindrical container with four legs and a label 'plato' at the bottom (no other text or symbols)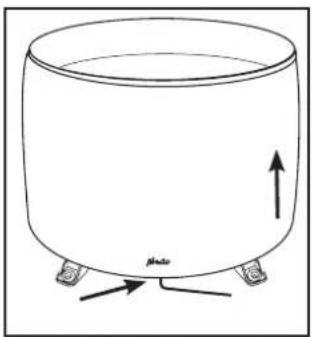
natural_image
Simple line drawing of a cylindrical container with two legs and an upward arrow, labeled 'Photo' at the bottom (no text or symbols on the diagram itself)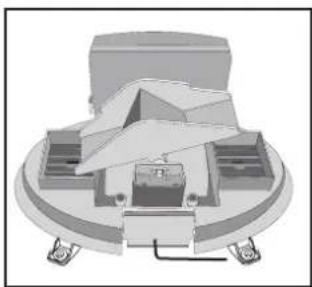
natural_image
3D mechanical assembly diagram showing a central component with surrounding parts and mounting base (no text or symbols)text_image
N NW KNE NE W EHE W E ESE SW SSW SSC S S5.7 Regen:
natural_image
Simple yellow starburst shape on black background (no text or symbols)SONNIG TEILWEISE BEWÖLKT


BEWÖLKT REGEN

text_image
N NW NNE NE WNV ENE W ESE SW SSE SE S WNV WNV WNV WNV SSEnatural_image
Two simple line drawings of abstract organic shapes, one resembling a flower or leaf, the other a funnel-like object (no text or symbols)Output voltage constant: 5.0V
Output current constant: 0.3A
Output power constant: 1.5W
Efficiency 50% load: 69.86%
Input power no load: 0.08W
text_image
Outdoor Temp 180.0 Humid 90.0 Max Min LEARNING Pressure Trend Pressure 88.00 90.00 Indoor Temp 180.0 Max Min 180.0 Rainfall Accumulated by day hour week in inches Wind Speed max mph km/h 5 6 7 8 9 10 11 12 13 14 AmPM 38:00 88 Select Zone 38.20 88 Aldo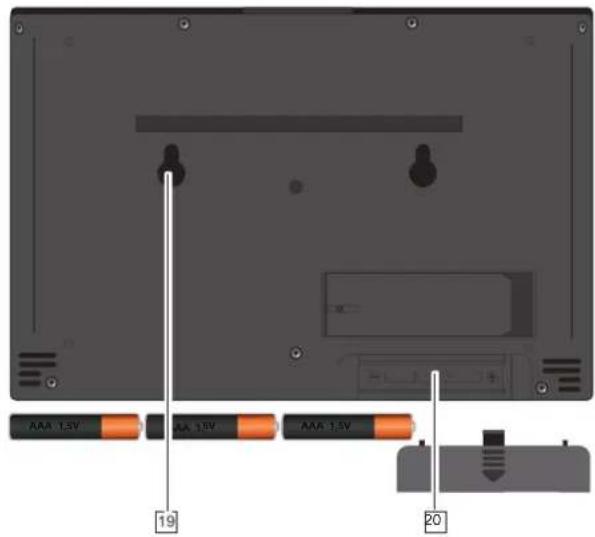
text_image
AAA 1.5V AA 1.5V AAA 1.5V 19 2043
text_image
Diagram of a weather instrument with numbered parts labeled 1 to 6text_image
Technical diagram of a portable air conditioner unit with labeled components and internal structure4. INSTALLATION
text_image
Diagram showing a device panel with labeled ports and an orange indicator box, likely from an electronics or control system.text_image
EMPLACEMENTS DES VIStext_image
EMPLACEMENTS DES VISchevilles fournies.
natural_image
Diagram of an air weather instrument with a labeled arrow indicating direction (no text or symbols present)
natural_image
Diagram of a propeller with a labeled arrow indicating direction (no text or symbols beyond the label 'S')natural_image
Cross-sectional diagram of a mechanical or electronic component with internal components and mounting brackets (no visible text or symbols)natural_image
Simple line drawing of a cylindrical container with a side-mounted lid and two legs, no text or symbols present.
text_image
Diagram showing a cylindrical container with a circular diagram above it containing Chinese text, likely illustrating a physical or mathematical concept.
natural_image
Simple line drawing of a cylindrical container with four legs and a label 'pluto' at the bottom (no other text or symbols)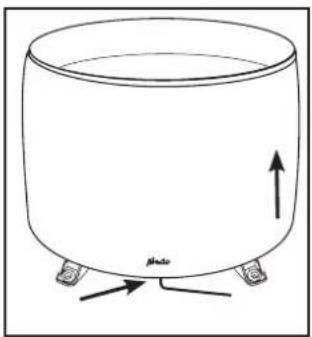
natural_image
Simple line drawing of a cylindrical container with two legs and an upward arrow, labeled 'Photo' at the bottom (no text or symbols on the diagram itself)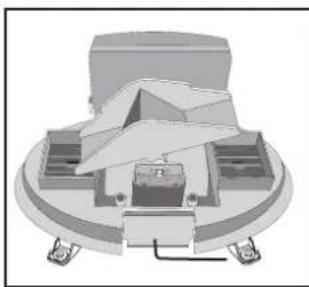
natural_image
3D mechanical assembly diagram showing a cam or cam component with mounting base and housing (no text or symbols)text_image
N NW NNE NE EHE W E SW SSE SSW SSE S5.7 Pluie :
text_image
N NW WNV W WSW SW SSW SSE ESE EHE NE NNE SSEOutput voltage constant: 5.0V
Output current constant: 0.3A
Output power constant: 1.5W
Efficiency 50% load: 69.86%
Input power no load: 0.08W
dimensions :
125(H) × 190(I) × 15(P) mm
Hesdo hereby declares that the radio equipment type Alecto WS-3850 is in compliance with Directive 2014/53/EU. The full text of the EU declaration of compliance can be consulted at the following internet address:
http://DOC.hesdo.com/WS-3850-DOC.pdf
VERKLARING VAN CONFORMITEIT
http://DOC.hesdo.com/WS-3850-DOC.pdf
DÉCLARATION DE CONFORMITÉ
http://DOC.hesdo.com/WS-3850-DOC.pdf

text_image
Alecto® ServiceHelp ↓ ? WWW.ALECTO.NL SERVICE@ALECTO.NL HSC Hesdo, Australiëlaan 1 5232 BB, 's-Hertogenbosch The Netherlands