TexStyle 9 SI 9188 BK - Iron BRAUN - Free user manual and instructions
Find the device manual for free TexStyle 9 SI 9188 BK BRAUN in PDF.
| Brand | Braun |
| Model | TexStyle 9 SI 9188 BK |
| Product type | Steam iron |
| Temperature technology | iCare: single setting suitable for all fabrics |
| Soleplate | 3D rounded soleplate for multidirectional glide |
| Soleplate coating | Sapphire or Eloxal (depending on model, printed on box) |
| Water tank capacity | Not specified (max level indicated on tank) |
| Continuous steam | 6 levels (1 to 6) |
| Turbo function | Yes, turbo steam button for maximum steam (max 30 s) |
| Steam burst | Yes, steam burst trigger, also vertical |
| Spray function | Yes, fine mist to dampen fabric |
| Dry ironing | Yes, steam regulator on position "0" |
| Auto shut-off | Horizontal: 1 min, vertical: 8 min |
| Power supply | Grounded outlet required, extension cord compatible up to 16 A |
| Cleaning and descaling | Automatic steam chamber cleaning; rinse valve with vinegar or lemon juice |
| Soleplate cleaning | Sapphire soleplate: steel wool; Eloxal soleplate: damp cloth |
| Usage | Household use only |
Frequently Asked Questions - TexStyle 9 SI 9188 BK BRAUN
User questions about TexStyle 9 SI 9188 BK BRAUN
0 question about this device. Answer the ones you know or ask your own.
Ask a new question about this device
Download the instructions for your Iron in PDF format for free! Find your manual TexStyle 9 SI 9188 BK - BRAUN and take your electronic device back in hand. On this page are published all the documents necessary for the use of your device. TexStyle 9 SI 9188 BK by BRAUN.
USER MANUAL TexStyle 9 SI 9188 BK BRAUN
D Descaling
Preparation
Self clean
Reset
E Soleplate cleaning
Deutsch
Vor dem Gebrauch
Please read instructions carefully and completely before using the appliance.
Caution

Caution: Hot surfaces! Electric Irons combine
high temperatures and hot steam that could lead to burns.
This appliance can be used by children aged from 8 years and above and persons with reduced physical, sensory or mental capabilities or lack of experience and knowledge if they have been given supervision or instruction concerning use of the appliance in a safe way and understand the hazards involved.
Children shall not play with the appliance.
Cleaning and user maintenance shall not be made by children without supervision.
During operation and cool-down the appliance and its mains cord shall be kept out of reach of children under 8 years.
the supply cord is damaged, it must be replaced by the manufacturer, its service agent or similarly qualified persons in order to avoid a hazard.
Always unplug the station/iron before filling with water.
The appliance must be used and rested on a stable surface.
During ironing pauses, place the iron upright on its heel rest or on the iron rest. Ensure that the heel rest is placed on a stable surface.
The iron must not be left unattended while it is connected to the supply mains.
The appliance must not be used if it has dropped, if there are visible signs of damage or if it is leaking. Regularly check the cords for damages.
Never immerse the unit in water or other liquids.
This appliance is designed for household use only and for processing normal household quantities.
The cords should never come in contact with hot objects, the soleplate, water and sharp edges.
Before plugging into a socket, check whether your voltage corresponds with the voltage printed on the bottom of the appliance and that you are using an earthed socket.
When using an extension cord watch out that it is in good condition, has a plug with an earth connection and corresponds with the power rating of the appliance (16A).
The soleplate and the iron rest can reach very high temperatures that could lead to burns. Do not touch them.
Caution: Due to the high power of this steam iron please make sure that your mains supply is sufficient. Please contact your local electric power company to make sure that the so called mains impedance is not higher than 0.198 Ohm.
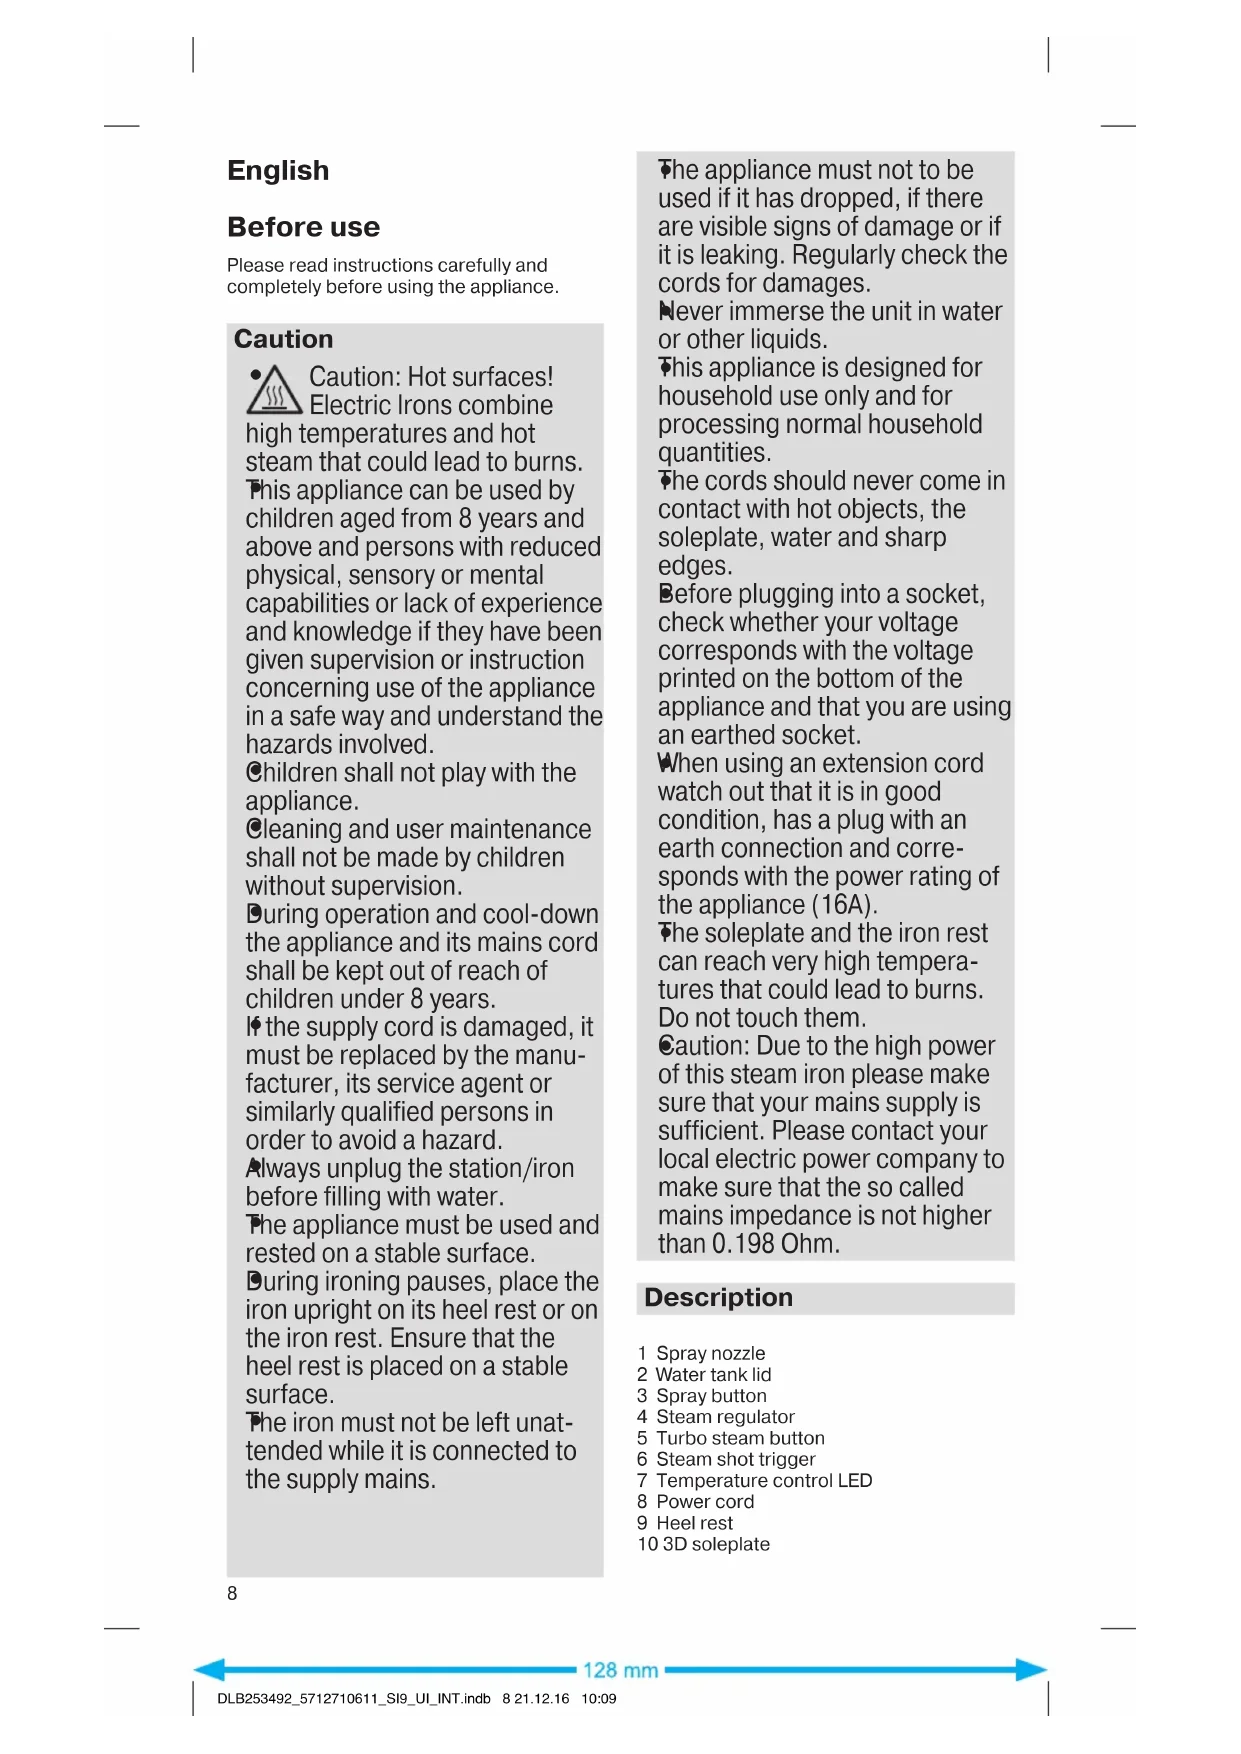
Description
1 Spray nozzle
2 Water tank lid
3 Spray button
4 Steam regulator
5 Turbo steam button
6 Steam shot trigger
7 Temperature control LED
8 Power cord
9 Heel rest
10 3D soleplate
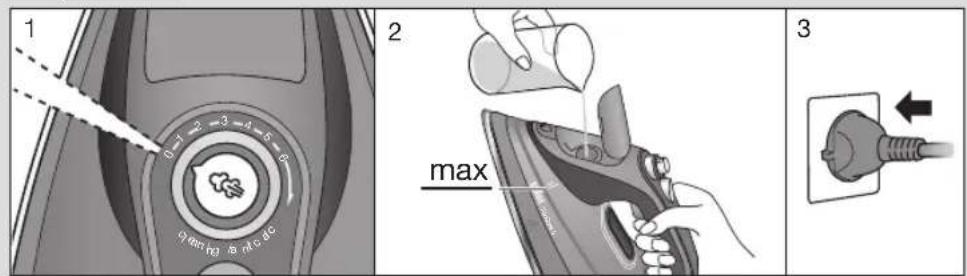
(A) Start ironing
Filling the water tank
- Make sure that the appliance is switched off and unplugged.
- Fill the water tank with tap water by holding the iron slightly inclined, taking care not to exceed the "max" level. If you have extremely hard water, we recommend that you use a mixture of 50% tap water and 50% distilled water.
- Attention: Never use distilled water exclusively. Do not add any additives (e.g. starch). Do not use condensation water from a tumble dryer.
Ironing with steam
- Place the iron on its heel rest (9) and plug in.
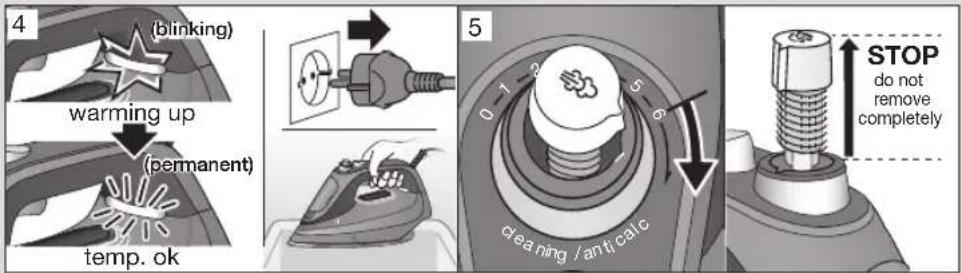
- The iron will start to heat up and the temperature control LED (7) on the iron will blink.
- Once the temperature has been reached, the temperature control LED turns permanently on. Thanks to the ultimate iCare technology, it is possible to iron with one temperature setting, which is perfectly suitable for all garments, without damaging even delicate garments.
Steam options:
Continuous steam (normal)
Select the steam quantity by turning the steam regulator (4) in a range from 1 to 6 . We recommend a medium steam setting for regular ironing. Only when ironing tough fabrics like linen, thick cotton or jeans it is recommended to use the maximum steam setting.
Note: While ironing, do not turn the steam regulator beyond setting «6».
- Continuous steam (turbo)
When the steam regulator is positioned anywhere between 0 and 6 it is possible to activate the turbo function by pressing the turbo steam button (5) in order to emit the highest steam output and remove stubborn creases. Press the turbo steam button for not more than 30 seconds.
- Steamshot
Prior to use, press the steam shot trigger (6) 3 to 4 times to activate it.
- For a powerful boost of steam, press the steam shot trigger at intervals of a few seconds.
- It is possible to use the steam shot function by holding the iron in a vertical position and pulling the steam shot trigger. This is useful for removing creases from hanging clothes, curtains etc.
Spray function
The spray function (3) produces a fine mist that evenly moistens the fabric and makes it easier to iron out creases on very tough textiles.
Dry ironing
Set the steam regulator (4) on position «0» (= steam off).
3D soleplate
The unique round shape of the 3D soleplate ensures best gliding results on difficult parts (e.g. buttons, pockets etc.) and in all directions - even backwards.
(B) Auto off
For safety and reduced power consumption, the auto-off function is automatically activated when the iron is positioned horizontally on its soleplate for about 1 minute or vertically on its heel rest for about 8 minutes.
- When the iron is in the auto-off mode the temperature control LED (7) is blinking.
- To turn the iron on again, just move it forward.
- Before start ironing again wait until the temperature control LED is turned on.
(C) After ironing
- Unplug the iron and empty the water tank.
- Let the iron cool down before storing.
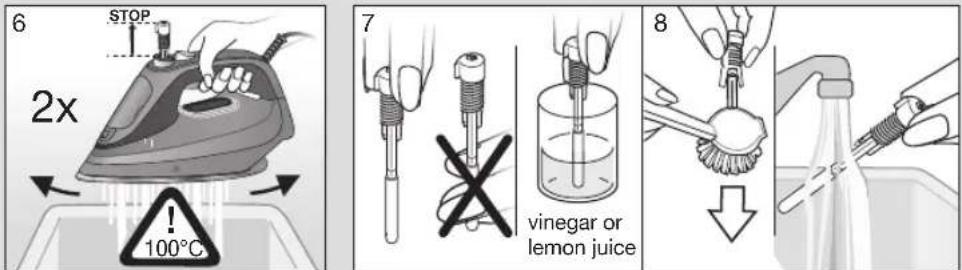
(D) Descaling
Preparation
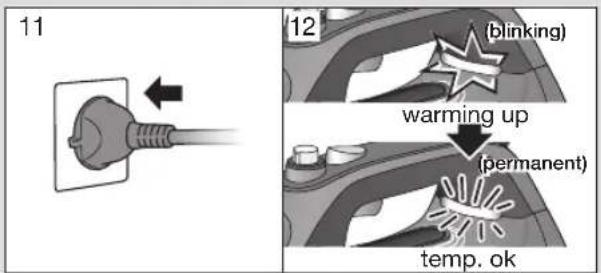
- Set the steam regulator (4) on position 0 (= steam off).
- Fill the water tank.
- Plug in.
- Wait until the temperature control LED (7) turns permanently on and unplug the iron. Hold the iron over the sink.
- Turn the steam regulator clockwise beyond steam stetting 6 .When you hear a click pull it out vertically until the end of the spring appears. It must not be removed completely.
Self clean
- Move the appliance over the sink. Hot water and steam will come out from the soleplate along with the calc particles from the steam chamber. Repeat 1.-6.
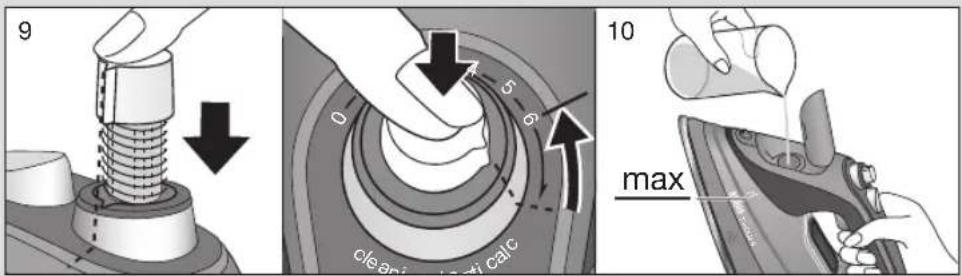
Rinsing the valve
To maintain optimum performance, the valve located on the lower end of the turbo steam button has to be rinsed regularly (whenever steam development is insufficient).
- Immerse the lower end of the valve in vinegar (not vinegar essence) or lemon juice for a minimum of 30 minutes.
- Brush off remaining residues and rinse under running water.
Reset
- Re-insert the steam regulator, firmly push it down and turn it back to steam setting «6».
- Refill the water tank.
- Plug in
- Wait until the temperature control LED turns permanently on.
Note: The iron must never be used without steam regulator.
Do not use commercial decalcifiers, they may damage the iron.
Note: Frequency of descending depends on the hardness of the water, quantity of steam used and frequency and duration of ironing sessions.
It is a good practice to run the descending procedure at least once per month.
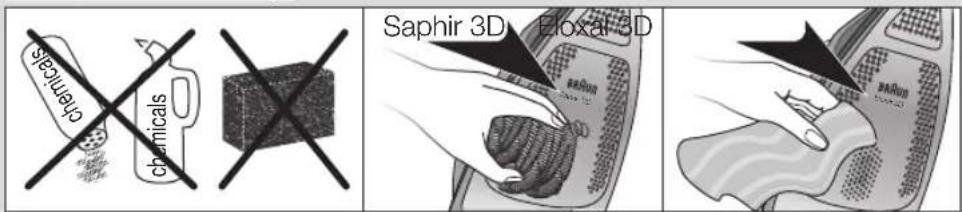
(E) Soleplate cleaning
- Before cleaning, always make sure that the iron is switched off, unplugged and has cooled down completely.
- To clean Saphir soleplate use steel wool.
To clean Eloxal soleplate it is suggested to use a damp cloth.
The name of the soleplate is printed on the gift box and on the soleplate itself.
- Never use chemicals, vinegar or scouring pads (eg. sponges with coarse nylon fabrics etc).
For UK Only
Guarantee Information
All Braun Household products carry a minimum guarantee period of two years. (see below for list of exceptions) The rights and benefits under this guarantee are additional to your statutory rights which are not affected.
Please keep your receipt as this will form the basis of your guarantee.
In the unlikely event of a breakdown you have access to professional help from our team simply by calling:
02392 392333
For service in the Republic of Ireland please call:
012475471
Braun Household undertakes within the specified period to repair or replace any part of the appliance, free of charge (with the exception of any glass or porcelain-ware incorporated in the product) found to be defective provided that:
We are promptly informed of the defect.
The product is used and maintained in accordance with the User Instructions.
- The appliance has not been altered in any way or subjected to misuse or repair by a person other than an authorised service agent for Braun Household.
- No rights are given under this guarantee to a person acquiring the appliance second hand or for commercial or communal use.
- Any repaired or replaced appliance will be guaranteed on these terms for the unexpired portion of the guarantee.
- The need for repair has not been caused by insufficient aftercare or cleaning: or damage caused by the chemical or electrochemical effects of water.
Under no circumstances shall the application of this guarantee give rise to the complete replacement of the appliance or entitle the consumer to damages.
Braun Household, New Lane, Havant, Hampshire PO9 2NH
www.braunhousehold.co.uk
Troubleshooting Guide
| PROBLEM POSSIBLE CAUSES SOLUTION | |
| Water droplets drip on the fabric during ironing. | The water tank lid is not properly closed. Press the water tank lid and check if it is closed. |
| Chemicals have been put into the water tank. Never put chemicals or perfumes into the water tank. Empty the water tank, rinse it 2-3 times. | |
| The steam trigger is overused. Wait at least a few seconds between each use. | |
| Water droplets drip from the soleplate after the iron has been unplugged or has been stored. | The steam regulator is set beyond “0” level. Set the steam regulator to “0”. |
| You have put the iron in horizontal position with water inside the tank. Empty the water tank after ironing and place the iron vertically on a stable surface during the cooling down. | |
| The iron produces little or no steam. | The water tank is empty. Refill the water tank. |
| The valve has collected too much scale. Clean the valve. | |
| The iron is not hot enough to produce steam. Wait until the iron heats up and the temperature control LED is permanently on. | |
| Flakes and white impurities come out during ironing. | The iron has limescale formations inside the steam chamber. Run the descaling procedure (clean the steam chamber and the valve). |
| The spray function or the steam shot do not work properly. | The water tank is empty. Refill the water tank. |
| The LED turns permanently on. | There is a problem with temperature probe. Unplug and plug in again. If the problem does not disappear contact the Braun customer service. |
Subject to change without notice.
Please do not dispose of the product in the household waste at the end of its useful life. Disposal can take place at a Braun Service Centre or at appropriate collection points provided in your country.
Français
Avant utilisation
Bajanaap Kypblfbmeh OHaMaaybI Tnic.
Pa3aay XaHE TexHnKaIbIK Kbl3MeT KepceTy BaIaIap TaapanbHaH 6aKbIayCbI3 OpbHdAmaybi Tnic.
KoJdaHbIC Ke3iHne Hemece YTIKTi CybIy Ke3iHne YTIKTiH CbIMbIH 6aIaIapDbIH KJIbI XeTneTIn XepRe KOIO KEPEK.
Repe KyatneH KaMTy CbIMbl 3aKbIMdaIFaH 60JcA, XapaKaTbI 60JbIpMay ywiH on EHydpUwI, OHbIH Kbi3MeT KOpCETy areHTi Hemece YKcac eKineTTiri 6ap TyIfapanap TapaBHaH aybICTbIPbIybl Tnic.
Cy Kyapda 6eketTi apkaaHaKyaT K03iHeH Cybipblb3.
KypblfblHbI TypaKTbI 6eTKeJde KOJaHbIn, TypaKTbI Jepre KOIO KepeK
3iic Ke3iHde YtIKTi apHaBbl KOfblbHa Hemece TipeyiWHe KOblb3. YtIK TipeyiWIn TypaKTbl 6eTKeIRe KOblHb3.
Kypblfbl KyaT Ke3iHe KaIFaHbIn TpyHa, OHbl 6aKbIayCb13 KaIdbpFyfa 60ImaMdbI.
KypblfblHbI KylaTbIn aIcaHbI3,
6yliHy beJIrIepi aIKbIH KepiHIn
TyPcA Hemece CYbIKTBIK,
XblbICTaca, KOJaHyFa
60JMaIbI. Kyat cbIMapbIHbIH,
KynIH XNI TeKcepH3.
Kypblfbyu wapycbHda KOndaHyfa fHa apHaJFaH XHe TaFamdApdbI yu wapyacbHa KaKeTTi MeIWepe De fHa KOnDaHy KaKeT.
KyaT CbIMbIH bICTbIK 3aTTapFa, YtIK TaabaHbHa, CyFa XeHe yuKip HApceIepre Tnir36ereh Dypbc.
Po3eTKaFa XaJIfap aIbIHda, KyaT Ke3iHIn KepHeyi KypblFbI Ty6iHne KepcetJrReH KepHey MAnHe CaiKec 60JyBH XaHe Po3eTKaHbIH Xepre TyBkTAJyBH KaJaFaJHaHbI3.
3apTbI K0JIaHbIJFaHda, 3apTKblTbIH KyiH TeKcepH3 XHe KyaT aWacbIHxepre TybIKTaJFaBHxHe KpybIFbIa KepcTeIrlReH KyaT MAnHe (16A) cainke6OlybH KaJaFaJalaH3.
Ytik Te, Ta6aHbI Da eTe XOFapbl TEMnepaTypaFa xeTe Kbl3aDbI, COHdbIKTaH Kyin Kany Kayni XOFapbl 6oJaBb. KoJIbHb3DbI TnI36eHi3.
6aB 60JIbIb3:Ocbl6y yTIKTiH KyaTbI eTe XOFapbl, COHdbIKTaH ci3deri 3JIeKTP KyaTbIHbIH XeTKlIKTi eKeHHe K3 XeTKi3iH3.3JIeKTP xeJicHn MMpeHaHcbIHbIH, 0.198 OM MAnHeH XOFapbl EMeC eKeHHe K3 XeTKi3y YwIH 3JIeKTp KyaTbIMeH Xa6DbIKTaHbIH XepriIKTI KOMNaHnFa xa6aplaCbHb3.
CnnaTtAmacbi
1BypikkiKoHdbipMa
2 Cy caybITbHbIH KaKaNaFbI
3 Bypikkiu Tynme
4 By petteriui
5 KapKbIHDbI 6y Xi6epy Tymecci
6 Kapkblbbyxibepy teiri
7 TemnepaTypaHbI backapy wambl
8 KyaT CbIMbl
9 TaHbI
10 Yu shenmeMi (3D) yTik Ta6aHbI
(A) Ytikteydi 6actay
CycaybItbiHa cy kyio
KypbIbIbHbIeWipyJIxHeTOKKe3iHeH axbipatyblEkeHHe Ke3XeTkiHj3.
Ytikti cai KcaaTbIn Tpyin, "max" DeHreIHeAcbIPMa, cy CaybTbHa cy KyuHBi3. Erep ci3deri cy aca KepeMek 6oIca, 6i3 50 % wymeKeTeH aKaH cy MeH 50 % Ta3apTbJFaH cybl Kocbl NaJaHaHybl yCbHaMbI3.
- A6a6b1b13: Ta3apTb1fAH cydbIH, xanFb13 e3iH eWkaaHa naiDalaH6aHb13. EwKaHdai Kocnapanap Kocyfa 60MauiDbI (mbicbl, kpxma).Kip KeTIPeTIH MaunHaJa XnHaJIFaH cydbI KOJaHa6aHb13.
Bymeh yTikTey
YtikTi TaHbIbHa (9) KObIHb3 Da, TOKKa KaJFaHbI3.
Ytik kbl3a 6actaIbI da, YtIKteri TemnepaTpyaHbI 6ackapy IaMbI (7) XblnbkTaNbl.
TahdaFanTeMnepaTpapaXeTKeH Ke3de, TemnepaTaPbI bAckapy wAmbl YHemi XaHbIN TpyaBb. KepemEtCare TexHOJorNcBbHApKacbIHda 6ip TemnepaTypa npaMeTpiniH KEmerImeH YtIKTeYRe 60aIbI, 6yIbAPbIK KNIM TypLepiH YtIKTeY yuH eTe KOaIbI, TiNTi H3ik MaTadaH TirInreH KnIMdep De 6yInh6eNi
By napametpnepi:
- Y3dkci6y (kaIbInTbl)
By peTteriTi (4) 一 1 MeH 一 6 apaIbIbIbIHdaFbI ayKbIMda bpy apKbJIbIb6y KeJIemIH TaHaHaB3. DeTteriJeN YtIKTeY yuH opTaWa 6 by napameTpIn OPhaTyDb I cyBaHAmbl3.Tek 3bIFbp, KaJIbIH MaTa Hemece JxINHC MaTa CnAKTbl KaTKbl MaTaNapbl yTikTeReH Ke3De FaHa eH yJKeH 6by npamaTpIn OPhaTkah XeH.
Eckptne:YtkeTeyKe3iHde6ypeTteriHIN 6"napaMeTpineHaCbipIn6ypMaHbI3.
- Y3diKi ci3 6y (KapKbHdbl)
By petteri i 己 _ 0 ^ 一 MeH 己 _ 6 ^ 一 MAnepinH apaIbIbIHna TpyFaHda,6yblbapbIHwa Kepin,aca KaTbI KbIpTbICTaIFAH KepnepPi tericTey yuH KapKbIHdbI by 6epy TuMecin (5) bacy apKbInbI Typ6o fHyHKunrcbH icKe Kocyfa 60anaDb. KapKbIHdbI by 6epy TuMecin Ke n deHe 30 cekyHd 6acbIHb3.
KapkbHdb6yki6epy
PnIaHaapdAn 6pybH KApKbIHbI 6y xi6epy Tetirin (6) icke Kocy yuhi OHbl 3-4 pet 6acblbl3.
CytbKaTbKapKbHMeH6epy yuiH KapKbHbIb6y6epyTeirih6ipHeWe ckyHdCaBH6acbl3.
YtikTik KaIbInTa YcTan, KapKbIHDb6 by xi6epy Teirih TapTy apKbIbni KapKbIHDb6 by xi6epy fynKcIrcBn naJdaIaHyaFa 6oIaIb. ByfynKcIur iJyI tyPfAH KIMHH, nepdenepeH T.C.C. KbIPtbcH KeTIpy ywiH eTe naJaIbI.
Bypky yHKnuaCbI
BvpyfynKUncb3) bIfapTaBH yCaK cy T03aHb MaTaHb 6ipKeJIki dbIMKbl eTeDi de, KaTbMaTadaFb KblptbICTb YtIKTeydi JeHHneTei.
Kypfak yTikTey
By peTteriW TetikTi (4) «0» KaIIbHa KoiBbHbI3 (=6y eUipyni).
Yw eJiEeMdi (3D) yTik Ta6aHbI
Yu eHemdi yTik Ta6aHbIHbH, biperen DeHReJIeK NiUHIyTKeTeIiH 6yblMHbIH, 6apJIbIK KepJIepIHde XaHe 6apJIbIK BaftTa -Tinti Kepi Kaapan Da XaKcbI CbIPfYbIH KaTMaMac3 eTei.
(B) ABTo eWipy
Ytik Ta6aHbHda Wamameh 1 MInHyT XaTkah Ke3de HEmece TaHbIbHda TiriHe Wamameh 8 MNHy TypFaH Ke3de, Kayinci3dk YwIH KHe KYaT TyTbHbYbH a3aTy yWih aBTO eWipy FyHKcIraCbl aBTOMaTTbI Typde icKe Kocblnabbl.
Ytik abTO eWipy pexMMiHne 6oNfAHa, temnepaTpaHb 6ackapy wambl (7) XblIbIbIKTan TpyaBl.
- Ytikti KaTadaH icKe Kocy yuH OHbl aIFa Kapa K03FaHbI3.
Kaetaan yTikteyre kipicnec 6ypbH TemnepaTypaHb6ackapy WAmbl KaHaHwa KyTih3.
(C) YtikTereHHeh KeinH
YtIKTI TOKTaH CybIPbIHbI3 Da, Cy CaybITbIH 6OcTaHbI3.
YtikTi caKtayFa KOIMac 6ypbH cyblTbn aIbHb3.
(D) KaKaTaH Ta3aJay
3zipney
1.By petteriTuTeikTi(4)0KaJIbHa(=6yewipyni)opHaTbHbI3.
2. Cy caybTbHa cy KyuNbHb3.
3. KaJFaHb3.
4. TemnepaTypaHb6ackapywambl7) y3dkci3 kAHFaHwa KYtHj3 de,YTikTi TOKTaH axbipatbHb3. YtIKTI WyHfbIImaHbIH, YCTIHde YCTan TypbHb3.
5. By petteriuih cafat tiniin, 6afbltbimeh «6» by napametpihen acbipbn 6paHB3. Cbipt etkeh dbibc ectijireHe, cepinnneH ywbl KeipireHwe OHbl tirineH cbptka KapaTapTBHb3. Ohbl tyreJe aIbIu bIFy KaKeT.
03dirinHeTa3apy
- KypbIFbHbI WHyFbIIaHaBbH yCTIHde YCTAN TypbI epi-6epi Ko3FaHbI3.By CaybITbIHAn WbIfaTbIH k TYnipwIKTeipMeH 6ipre yTik Ta6aHbIHah bICTbIK CY MEH 6y WbIFaTbIH 60JaDbI. 1-6-KaamapdbKaTaNbH3.
Knaandbjxyy
Ytik 6apbHwa JkaKcb JyMbIC icTeyi yuH KapkBnDbl 6y XbiEpy TyImeciH TeMeHri WeTInDe opHaIaNackan KnaNaHdb Me3rIm Me3rIN JyBn Tpy Kepek (MbicaJIb, 6y WbIFapy JeTKiIKc36 BonFaH Ke3ne).
- KaT TpyFb36aTbIH KJIanaHdbi CipKe cybHa (cipKe cybHbIH 3CCEHUNcBHa eMec) HEMeCE JIMOH KbIJKbIbHa KEM dereHde 30 MNHT MaTbIPbIN KObHb3.
- ⅢeKKeH KaIbIKTbI WTeKEmeH XnHa n aIbIbI3 Da, aFbI TpyFaH CyFa XyblbI3.
NIOJIb3OBaTeJIaMM,HeIOCTaTOUHO 3HaIOUcIMN,KaK eRO
3KCNJyatnpoBaTb,ecn OHn eRO
6ydyT NcNoB3OBaTb NOI NaJIIOHeHEM IIN NocJe
PPOBEdENHnHCTpykTaJaNo
6e3oNaCHOJKcNlyaTaun np6opa nnoHMaIOT
CB3aHHyO C HIM ONaCHOCTb.
TeTAM 3aIpeueHNO IrpaTb C np6opom.
3a nppeeHa YnCTKa n yXoJ 3a npnbopom DeTbMn 6e3 npncmOTpa.
BoBpemnncnoJb3OBaHnNIOCTbBaHnNdepXnTe npNoOp NkaeJIb nHTaHnBHe
DOCAEMOCTNDeTeB03pactOMdo8JeT.
CcNI COeINHITbHbI Ka6JIb NOBpeKdE,TO eO DoJKeH 3aMeHHTb IPOIN3BOIDNTelb
cepBnchna Cnyk6a nIcneuaJIncTbI TaKo JKeKBaJIuΦNkaUcN C ceJIbIOnpedOTbpaueHnO npacI DnI NOJb3OBaTeIe.
Hepd HanoJHeHem BDOB BCEgda OTKIOaHTe CTaHcNIOOT CETI NITAHNA.
BoBpemNcNoJb3OBAHnI nepepbIOB CTaBBTe np6Op NCKJIQUHTeJIbHO Ha CTA6NJbHyIO NOBepxHOCTb.
Bo BpeMn nepepbIOB B
TJIaXeHn CTaBbTe YTOI
BepTKaJIbHO Ha eO 3aHIOU
NOCTaBky IIN Ha INaTΦOpMy.
PiocNeIte 3a Tem, yTO6bl
3aHnY IOCTaBkA CToJlHa
CTa6NJIbHOI NOBepXHOCTN.
He octaBJIyTe NOdkJIOUeHHbIK Cetn NITaHnI np6Op 6e3npICMOTpa.
He nCNoJb3yIte npn6Op nocJe naDeHn,ecn Ha HEm mMeOTcBnIMbIe NOBpeKdEHNr nnYteKa.PeryJpH0 KOHTPOIpNyTe KaBeJIb NITaHnHa OTCytCTBne NOBpeXdEHn.
aHHbI np6Op npedHa3HaueH NCKJIIOUHTeJIbHO DnI 6bITOBORO NCNoJIb3OBAHnI paCCHTaH Ha nepepa60TKy 06beMOB npOdyKcUN B MacSTa6ax DOMaUSHero Xo3rCTBa.
He donyckaTe KOHTaKT KaBeIeN C TOpAUMn OBeKtAmN, NDoUBoYyTIOra, BODoNIOCTpbIMKpaAMN.
Fepd BKJIOUeHnEM B p03ETky npOBepbTe COOTBETCTBnE HAnpJxHeNBA CetNI HAnpJxHeNry, yKa3aHHOrO B HnXHeN YaCTNu np6Opa. P03eTKa DOLJXHa 6bITb C 3a3EmJIeHnEM.
Pn NcNoJIb3OBAHnUdINHTeJIbHO KabeJIyIOCTOBePBTeCb B TOM, YTO OH HaxoNTcB XOpOWeM COCTOHN, IMeET pa3beM C 3a3EmJIeHNEM I COOTBeTCTBYET HOMHaJIbHOJ MOUHOCTIn npnbopa (16A).
NooBa N OndTaBka DnyyTOra MOrTy HArpeBaTbCra DoUpe3BbUaHNO BbICOKNXTemNepaTyp, YTO MOKeTpNbEcTu K OxOram. HePnKacaiTEcb Hm.
CTOPOXHO: NockoJIbky DaHHbIyTIOgOblaAeTBbICOKO MOHOCbIO, y6eIN-TECb, YTO OHa MoKcT 6bITb ObecneYeHa BaSei 3HepeTnueCKo CTeBIO. YToHNTe y MeCTHOI KOMMyHaJIbHOJ CnyXbI, YTO BHyTpEnHHe COnpOTnBJeHHe BaWei 3JIeKTPnueCKo CETn He npBeBbIaet 0.198 OM.
OnncanHe deTaJe
1 PaCnblnteB
2 Kpbilka pezeepbyapa nBdoB
3 KhoNka noa npa
4 Peryjntop noa npa
5 Khonka《turbo》
6 KhoNka napoBoro yDapa
7 CBeToIOHbI INHdkaTOp TEMpepaTypbI
8 Ka6eBb
93aHnnoDcTaBka
10NoDOWBa «3D»
(A)Haayano rnajkeHn
3anolneHnepe3epByapaDnB0db
- Y6eIntecb, yTO npBOp BbIKIOueH N OTKIOUeyOH OT CETNITAHIN.
3aJIeIeBpe3epByapIINBAObI BOOnpOBOHyO BODy,ApXaYTOI CJIeKKaIOHnAkoHOH;CJIeNITe 3aTeM, YTO6bI yPOBeHb HAnOpHeHnE He npeBbI- IaI OTMeTky «Max».EcIn y Bac OeyH JECTKa BODa,TO Mbl peKOMeHdyEM NcNoJb3OBaTb CMECb,CoCTOaUHOHa 50 % n3 BOOnpOBOHOB BObI Ha 50 % n3 DnCTnllnpoBaHHO BODbl.
BHMaHHe. Hn B KOem Cnyae He IcNoIb3yIte Hepa36abEnHyIO nCTnI- InpoBaHHyIO BDOy.He npimEnrTe KaKx-Jn6O Do6aBOK (HaNPmep, KpaxMa).He IcNoIb3yIte KOHdeHcat N3 CyuINbHO rABOMATA.
JlaxeHne c nCNoB3OBaHHeM npa
- NocTaBbTe yTIOHa 3aDHIIO IOdCTaBky (9) INoDKJIIOHHTe eO K CETn NITaHn.
- YIIOr HaHHeT HArpeBaTbCra, n CBeToDnOД-NbI INdNkATOp TempepaTypbl (7)HaYIIORe 3aMnIraeT.
- PnIOCTNXKeHN 3aJaHHoT EmNepaTyPbI CBeTOINOHDhI INHdkaTOP TemNepaTypbI HauHHaet rOpTeB HeNpepbIBHO. BlaOdaPra HEnpeB30eHHO TExHOLOrnn iCare technology MOKHO IJaIDNbC NcNoJIb3OBaHHeM OJHO TEMNepaTpHoro peXIMa, INdeAJBHO NOxOJaEro DJIra BCex TINOB TkaHei, He 6oRcB NOBpeINb DaXe Cambl DeJIrkatHbIM MaTepnaI.
BapnaHTbI rnaKeHnC nCNoJIb3OBAHn- em napa:
- Постаянна пода на па («normal»)
Bb6epnte KOJnueCTBO NOdaBaemoro npa,yCTaHOVB peryIaTOp noJaun npa (4) B COOTBEcTCTByIOUee NoIOXeHne OT 1]Oo 6].IJI IObIuHOro INaXeHn Mbl peKOMeHdyEM NcNOJB3OBaTBpeKIMbI CO cpeHNm yPOBHeM NOaUn npa.Pexm MaKcMaJIbHOH NOaUn npa peKOMeH dyETcR ToJIbKO IJIra JLaXeHn IIOTHbIX TkaHeN, TaNX KaK JeH, IIIOTHbI XlONOK ININ DxNHCOBaTKaHb.
PnmeHne. He ycTaHaBnBaIte peryIaTOp noIaCh napa 3a npedeIbI noIOXeHn «6» BO BpeM rIaxeHn.
- NocToaHna noaapa napa (turobo)
Pn haxoJdeHn peYyIaTopa noaHn npa B IIO6OM nIoXeHn MekyDy 0 n 6MOxHO BOCNoB3ObA TbC4 cyHKuNei Typ6o》,HakBa HkONkyTurbo(5),IINPOdaHn NToKa npa MaKcImMaJIbHO MOUHocTN pa3rJaXbAHN CToKNX CKlaIOK. YdepXNBaTe KOnKyTurbo He 6oJee 30 cekyHd.
- Napoboyap
IpeepnpimHeHnemHaXMITE Ha KhoNky npoBoro ydapa (6) 3-4 pa3a dner eoakTbauu.
ДЯ MОУHOrO BbIbPoca napa HaxmMaTeHa KHOJky napOBoro ydapa C INHTepBaJIOMBHeCKOJIbKO CeKHyI.
Функцию napOBOrO ydapa MOxHo
NcNoJIb30BaTb,ДePxa YTOr B BepTN-KaIbHOM NOLOXHeHHn HaxmamHa
KHOIIky napOBOrO ydapa.Takay Bo3MOx-HOCTb MoKeT 6blTb NOJIe3HOJ dIydaJIeHnA CKlaIOK C BNCraUeI OJeKDbI,
WToP nT.Д.
Функця paçnbileHn
Функця расьлесня (3) npoINBODIT MeNKOДСпсрсьн TymaH, KOTOpbI paBHOMePHO yBlaJXHReT kAhb N O6JIeRyaeT pa3rJaxNBAHne CKlaDOK Ha OyeHb NIOTHbIX TnIax MaTePnIa.
CyxoerlaxeHne
YctaHOBtpeperyIaTOpnoaHnapa(4)B noJIOXeHne 己 0 ^ (= yHK INoaHnpa OTKnOHeHa).
POnOuBa «3D»
YHnKaJIbHaJa OKpyIJaФOpMa NIOOuBbl «3D» OBeCneHbAeT HAnLyUWee CkOJbKeHHe n 6JraOaJaP aTOMy ycNeUHO CnpaBIAETcRc TnaKeHMe CLOXhBix DeTaJeN B IIObIX HAnpaBJeHnAx, DaXe npn DnBXKeHn yTIOra Ha3aI.
(B) ABTomatnueckoe BbIKJIouyeHne
I3coo6paXeHn 6e30nacHOCTn I
3KOHOMHOro NOTpe6JIeHn 3JIeKtpO3HeprnI
fYHKUaABTomATuYeCKTOB BbIKIOUeHn
AKTNBUPyETcCaMOCToRTeJbHO,ecN yTIO
HAxoDITcB TROP3OHTaJBHom NOLOXeHn
HaNoDOWBBe B TeueHne np6JIIN3nteJbHO1
MNHyTbI ININ B BEPTNKaJIbHOM NOLOXeHn
Ha 3aJHeN NoCTaBKe B TeueHne np6JIIN3nteJbHO8 MNHyT.
Korda yTIOH haoDnTCB pexmme aBTOMaTHueCKOBO BbIKIOUeHnC, CBToIONoHbI INNdkatop TempepaTypbI (7) Miraet. TtobchOBa BKIOHTb yTIOr, IpocTo CdeJaTe IM DnXKeHne Bnepeid. Ipeed TEM KAK CHOBA Hauatb rJaxHeHne, IIOOXINTE, NOKA CBToIONoHbI INNdkatop TempepaTybI He 3aROpNTcR.
(C) Nocle rnajxeHn
OTKJIIOHTe yTOr OT cTeu nITaHnI n CneIte BOy u3 pe3epByapa.
JaTe yIyOCTbITbpeEaTEM, KaN IOMeCTuB erHa XpaHeHne.
(D) YdaJIeHHe HaKInn
NorotoBka
- YctaHOBHTpepyIaTOp noJaHn npa (4) B nIOJoxHeHne 0 (= yHKU I noJaH npa OTKJIouHeHa).
- Hanolnite pe3epByap IJBAbl.
3.Подклочптpeиборксети. - NIOOXINTE, NOKA CBEOTNOHbI INHINKATOP TEMNepaTpy (7) He NaHET RopeTB HENPEPBIBHO, I OTKJIOHTe yTOrOT CETNIITAHNA. DePKeNTe yTOr HaI paKOBuHOI.
- NOBepHnTe peRyIaTOp noDaun npap no yacobOcTpeNke 3a npedeBbI noLoXeHnra «6». Korda Bby ycbluNTe 3Byk UeJka, TAHnTe npxynHy BeptnKaJIbHo, NOKa He NoBnTCa KOHeU. Ee He HuyKHO NOJHOCTbIO BbITACKNBaTb.
Camoochka
- Noprncnte npnbop Ha paKOBHoh. H3 NOOuBb6ydt BxOHTb Tropaay BOda n nap BmecTe C 3BecTKOBbIMn YactNuamn n3 napoBo KamepbI. NOBTOPnTe 1.-6
OuncTkakanaHa
IINIOIDepxHnOITMAmbHbIXpa60nx XapaKTePcNtIK Heo6XODmOppeyJrpho IPOIN3BOIDMbOYNCTKyKlanaHa,paCNOJOKeHHOrHa HNXHEM KOHcE KHOJKN «turbo》 (KaKdbIpa3,KordaKOJIueCTBO O6pa3yeMoro npa CTAHOBNTcHEDOCTaTOHybIM).
- NomecTe HxKHO 即b KlaNaHa B yKCyc (He BYKCCHyIO 3CCEHUIO) NIN JIMOHHB COK MNHIMYM Ha 30 MNHT.
- YdaJInte OCTaTKn 3aFpy3HeHn npi NOMOUsI UcETKn I npOMoTe KlaNaH NOd IpoTOUHO BODoI.
NoBToPHa yCtAHOBka
- BctaBbTe peyIaTOp nOaUn npa ByTIOr, CcNIOH HAdABNTe Ha Hero NOBepHnTe 6bpatHO B noJIOKeHne «6
- CHOBA HANOJIHITe pe3epByap IJRA BOJIb.
-
- Пождклочип рибор к сети.
-
- Поюждnte, noka CBetoNIOHbI INДИКATOP Tempepatpyi He NaHET ropeTb HnpepbIBHO
PnmeHne. XyTIOH N B KOEM Cnyae He DOJXeH IcNOJIb3OBAbC6e3 yCTaHOBJIeHHO Ha HEm peryIaTopa nodaH npa.
He nCnoIb3yIte cpeICTBa OT haknH, npOdaIOUneCe B MaRa3INhAX, OHN MOrYT nobpeIITb yTIOr.
PnmeHne. TaCTota npoBeHnna OCHNTO HAKIN3aBNCIT OT XECTKOCTN BObl, KOINcE7Ba NcNOJb3yEMORO napa, a TAKKHe YaCTOTbI IN PPOJONKHTeJIbHOCTN CeaHCOB IJaXeHnR.
PeKOMeHdyETcI npOBoiHTb OChCTky OT HAKUN KaK MInHMym OINH pa3 B MeCraL.
(E) Ouchtka no dooBbl
- IpeeI OuNCTKoB BcERda CJIeIyET yIOCTOBEPNTbCRA TOM, YTO yTIOBbIKJIOUeH, OTKIOUeH OT CETn IN POJIHOCTbIO OCTbl.
- ONUCTKINIOOUBBISaphirNCNOJB3ynteCTaJIbHyIOMOaJIky.ⅡN ONUCTKNIOOUBBIEIoxal peKOMENdyETcNCJONb3OBAbBNAxHHyTOKaHb.Ha3BaHHe NOIOUBBlyka3aHOHa KOp06Ke Hn Ha cAmO NIOOBE.
- Hn B KOem Cnyae He nCNoJIb3yIte XmMueeCKne CpeIcTBA, yKCyc, r6Kn IINCKpe6Kn (HanpIMep, r6Kn C rpy60n HeJIOHOBOI TKAHbO).
Data n3roTOBJeHn
TtO6bI y3HaTb DaTy BbInycca, nOCMOTpnte Ha Tn3HaHbI KOJ PNOyKTA (BO3ne TaBnUckn C 06o3NaueHHe m cepnn). NepBaI UΦpa 06o3Naaet NocLeHIOU ΚuΦpy rOda u3rTOBJIeHna. DBe CNeDyUOUIe UΦpbI - 3TO KALEnDaHna HeJeI. A NocLdHne DBe yKa3bIbaIOT n3daHne (ABTomAtuYeCKn NoDCHTbIbAETc C 1992 rOda).
PpMep:30421-n3dJIeNE6bIIO BbIpyueHO B 2013 roy (B 4 HeJeIO).
EAC
PykoBODTO NO yCTpaHEnIO HEnCnpaBHOCTeI
PnmuTka: yKoHomy pa3i He BnKOpncToBnyTe npacky 6e3 peryIaTopa nap.
He BnKOpncToBMyTe DoctynHi B npodaxi 3ac06n DnBnDaJIeHHHaKIny, OckIbKnCe MoKe npu3BeCTn Do nowkoDxehn npackn.
PnmuTka: Yactota BuaJaHHeHaKnny 3aJExNtB BiD TBepoCTi BOu, KJIbKOcTi BnKOpNCTOBaHoI napu, YactOTTu TpnuBaNoCTi npacyBaHH.
DouilbHO 3anyckatnpocepy BndaIeHHaHakiny npHaHmHi pa3 Ha Micra.
(E) OuHueHnIiOuBn
- PpeoOuHHeM 3aBxDi nepeBipnTe, nn npacky byo BmKHeHO Ta BiKIOueHo Bi, eJeKtpomepexi, i daBaIte IINOBHicTIO OXJOHOHTN.
- UoO ouHCTn NiOuBv Saphir, BnKOpNCTOByIe CTaJIeBy 1tKy. UoO ouHCTn NiOuBv EIOxAl, peKOMeHNyEMO BnKOpNCTOByBaTn BOJOrTy TkaHInHy. Ha3Ba NiOuWBn Bka3aHa Ha noDapYHKoBI Kopo6i Ta Ha cami iNoDowBi.
- YxOJHOMy pa3i He BnKOpNCToBynte ximiuHi 3ac06n, ouet a6o metaJIeBi ry6Kn (Ha npuKnaI, r6Kn 3 XopcTkoI HeJIOHOBOI TkaHNH TOIO).
Bipob6nHK 3aIIuIe 3a cObo npaboHa BHeceHH 3mH 6e3 nonepdHbOro nobiDomJIeHH.
IpoDyKuB BIDNObiAe TEXHCHM pernAmENTam,
RkI NOUPIIOHTbC H AIO IPODyKUIO 3rIHO
UHHORO 3aKOHOdABCTBa.

Tapya liHia 0 800 503-507 (d3BiHKn 3i cTaioHapHX TelefoHb 6e3KoUToBHi).
Ioci6HnK i3 nowyky Ta ycyHeHHa HecnpaBHOCTe
| ПОНБЛЕМ A M O X J L N B I P R U N H N B V I P I S E H H N | |
| Пд час пасьанни на Тканни поразл Anyы кралп Вори. | Кршka pezeрbyа дя Вори погано зakрпт. |
| У pezeрbyap 6уно нал'tо ximчни засоби. | |
| Задто чastе поветанни вожелany napи. | |
| Кралп Вори витikaюг 3 рiodшни пися захалп abo коли ii shteker 6уно Вийяго 3 розетки. | Рergларларп поверну дали пожжени «0». |
| Ви поверну пpackу B Горизонлары пожжени, кoly B pezeрbyapi 6уна Вори. | |
| Пpackа He Biroobядя Достатны пари abo 3ozcim He Biroobяпс II. | Pezeрbyap дя Вори поожни. |
| У клалahi утборлося забагато Нakини. | |
| Прackа Нedlyстатны rapячддя Того, 社об утборп пapy. | |
| Пд час пасьанни винл Anyы садимп Нakини abo 6bili Domiшки. | У pezeрbyap дя пари утборься Нakи. |
| Функця розбризкуванни abo паровoro удау працюл Anyы He nprabnilho. | Pezeрbyap дя Вори поожни. |
| Свитлodioнй indinkatop CBITINIMETься Бeэперьн. | Датчник Temпера typи Heсрравен. |
jesslll 1sul l jay 1al 1s cull 1s
(D)
j
(0)(4)
4
LED 4
J
J
J
J
J
J
J
J
J
J
J
J
J
J
J
J
J
J
J
J
J
J
J
J
J
J
J
J
J
J
J
J
J
J
J
J
J
J
J
J
J
1
aJ 6
J 1 J
plawal
aalll aai 15y 15y 15y
() 30jLJy jao 8
#
aiey aai jay cai y aai 9
.
.10
.12
a 125 104 104 104 104 104 104 104 104 104 104
425, clll jie 1j 1j 1j 1j 1j 1j 1j 1j 1j 1j 1j 1j 1j 1j 1j 1j 1j 1j 1j 1j 1j 1j 1j 1j 1j 1j 1j 1j
a1a a 2
Jai jai Jai Jai Jai Jai Jai Jai Jai Jai Jai Jai Jai Jai Jai Jai Jai Jai Jai Jai Jai Jai Jai Jai Jai Jai Jai Jai Jai Jai Jai Jai Jai Jai Jai Jai Jai Jai Jai Jai Jai Jai Jai Jai Jai
g y 1111 1111 1111 1111 1111 1111
(4)J 10000000000000000000000000000000000000000000000000000000000000
1
2 1
3 1
4 6
5 30
(y, y)
4 3 (6) jieiie iieieieieieieieieieieieieieieieieieieieieieieieieieieieieieieieieieieieieieieieieieieieieieieieieieieieieieie
(3)jg(1)
(0)(4)()
aaiy 1 aaiy aaiy aaiy aaiy aaiy aaiy aaiy aaiy aaiy aaiy aaiy aaiy aaiy aaiy aaiy aaiy aaiy aaiy aaiy aaiy aaiy aaiy aaiy aaiy aaiy aaiy aaiy aaiy aaiy aaiy aaiy aaiy aaiy aaiy
(B)
aai 8 aai
(7)灯灯灯灯LED 1 LED
(C)
. 12
| الله | اللهاللهاللهالله |
| اللهاللهاللهاللهاللهالله | اللهاللهاللهالله |
| اللهاللهاللهاللهالله | اللهاللهالله |
| اللهاللهالله | اللهالله |
| "0"اللهالله | "0"الله اللهالله الله الله الله الله الله الله الله الله الله الله الله الله الله الله الله الله الله الله الله الله الله الله الله الله الله الله الله الله الله الله الله الله الله AL |
| الله الله الله الله AL | AL |
| AL | AL |
| AL | AL |
| AL | AL |
| AL | AL |
| AL | AL |
| AL | AL |
| AL | AL |
| AL | AL |
| AL | AL |
| AL | AL |
| AL | AL |
| AL | AL |
| AL | AL |
| AL | AL |
| AL | AL |
| AL | AL |
| AL | AL AL |
| AL | AL |
| AL | AL |
| AL | AL |
| AL | AL |
| AL | AL |
| AL | AL |
| AL | AL |
| AL | AL |
| AL | AL |
| AL | AL |
| AL | AL |
| AL | AL |
| AL | AL |
| AL | AL |
| AL | AL |
| AL | AL |