USER MANUAL DMR200 MAKITA
Explanation of general view

2
3
4
5
ENGLISH (Original instructions)
Symbols
The following show the symbols used for the equipment.
Be sure that you understand their meaning before use.

Read instruction manual.

Only for EU countries.
Due to the presence of hazardous components in the equipment, waste electrical and electronic equipment, accumulators and batteries may have a negative impact on the environment and human health.
Do not dispose of electrical and electronic appliances or batteries with household waste! In accordance with the European Directive on waste electrical and electronic equipment and on accumulators and batteries and waste accumulators and batteries, as well as their adaptation to national law, waste electrical equipment, batteries and accumulators should be stored separately and delivered to a separate collection point for municipal waste, operating in accordance with the regulations on environmental protection.
This is indicated by the symbol of the crossed-out wheeled bin placed on the equipment.
IMPORTANT SAFETY INSTRUCTIONS
WARNING:
When using electric tools, basic safety precautions should always be followed to reduce the risk of fire, electric shock, and personal injury, including the following:
- Read this instruction manual and the charger instruction manual carefully before use.
- Clean only with dry cloth.
- Do not install near any heat sources such as radiators, heat registers, stoves, or other apparatus (including amplifiers) that produce heat.
- Only use attachments/accessories specified by the manufacturer.
- Unplug this apparatus during lighting storms or when unused for long periods of time.
- A battery operated speaker with integral batteries or a separate battery pack must be recharged only with the specified charger for the battery. A charger that may be suitable for one type of battery may create a risk of fire when used with another battery.
- Use battery operated speaker only with specifically designated battery packs. Use of any other batteries may create a risk of fire.
- When battery pack is not in use, keep it away from other metal objects like: paper clips, coins, keys, nails, screws, or other small metal objects that can make a connection from one terminal to another. Shorting the battery terminals together may cause sparks, burns, or a fire.
-
Avoid body contact with grounded surfaces such as pipes, radiators, ranges and refrigerators. There is an increased risk of electric shock if your body is grounded.
-
Under abusive conditions, liquid may be ejected from the battery; avoid contact. If contact accidentally occurs, flush with water. If liquid contacts eyes, additionally seek medical help. Liquid ejected from the battery may cause irritation or burns.
- The MAINS plug is used as the disconnect device, and it shall remain readily operable.
SAVE THESE INSTRUCTIONS
SPECIFIC SAFETY RULES
FOR BATTERY CARTRIDGE
- Before using battery cartridge, read all instructions and cautionary markings on (1) battery charger, (2) battery, and (3) product using battery.
- Do not disassemble battery cartridge.
- If operating time has become excessively shorter, stop operating immediately. It may result in a risk of overheating, possible burns and even an explosion.
- If electrolyte gets into your eyes, rinse them out with clear water and seek medical attention right away. It may result in loss of your eyesight.
- Do not short the battery cartridge:
(1) Do not touch the terminals with any conductive material.
(2) Avoid storing battery cartridge in a container with other metal objects such as nails, coins, etc.
(3) Do not expose battery cartridge to water or rain. A battery short can cause a large current flow, overheating, possible burns and even a breakdown.
- Do not store the tool and battery cartridge in locations where the temperature may reach or exceed 50^(122^)
- Do not incinerate the battery cartridge even if it is severely damaged or is completely worn out. The battery cartridge can explode in a fire.
- Be careful not to drop or strike battery.
- Do not use a damaged battery.
- To avoid risk, the manual of replaceable the battery should be read before use. And the max discharging current of the battery should be greater than or equal to 8A.
CAUTION:
- Danger of explosion if battery is incorrectly replaced.
- Replace only with the same or equivalent type.
Tips for maintaining maximum battery life
- Charge the battery cartridge before completely discharged. Always stop tool operation and charge the battery cartridge when you notice less tool power.
- Never recharge a fully charged battery cartridge. Overcharging shortens the battery service life.
- Charge the battery cartridge with room temperature at 10^ - 40^ (50^ - 104^) . Let a hot battery cartridge cool down before charging it.
- Charge the battery cartridge if you do not use it for a long period (more than six months).
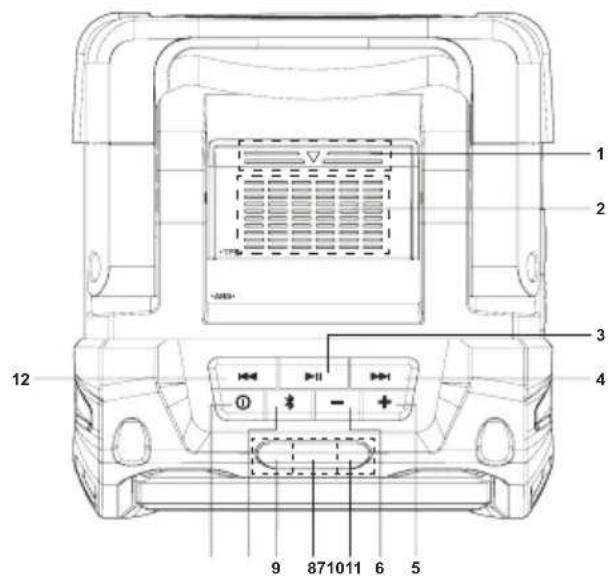
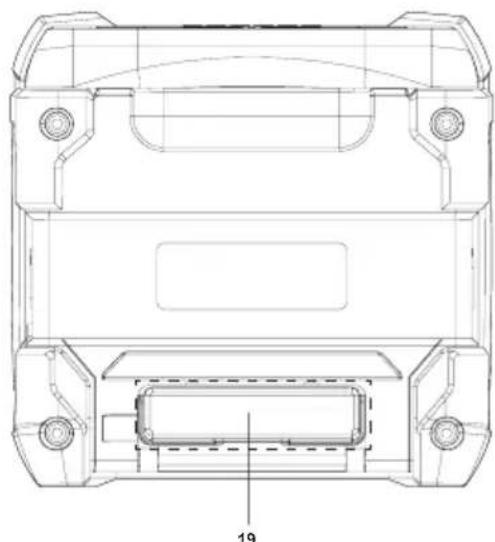
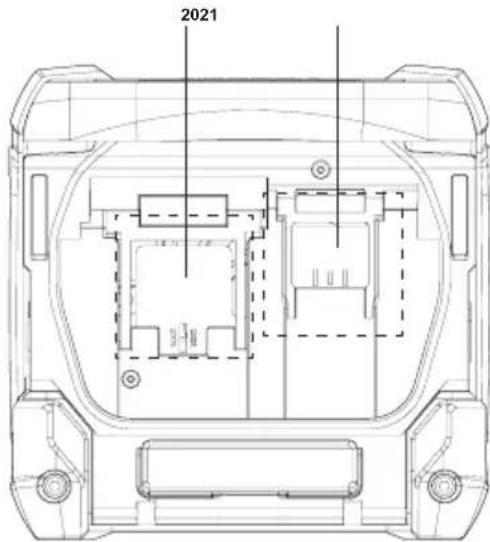
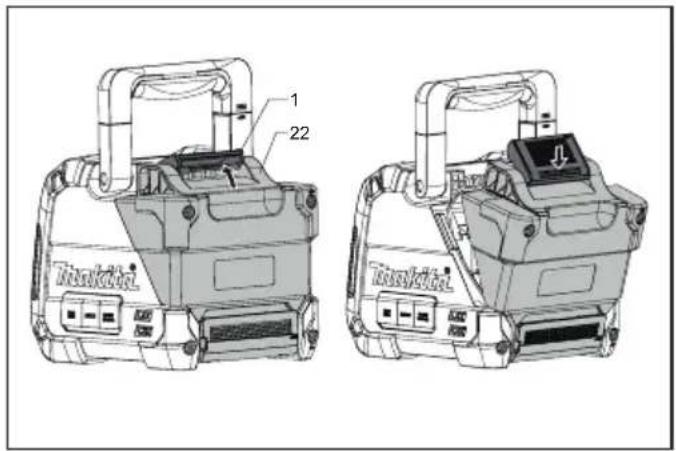
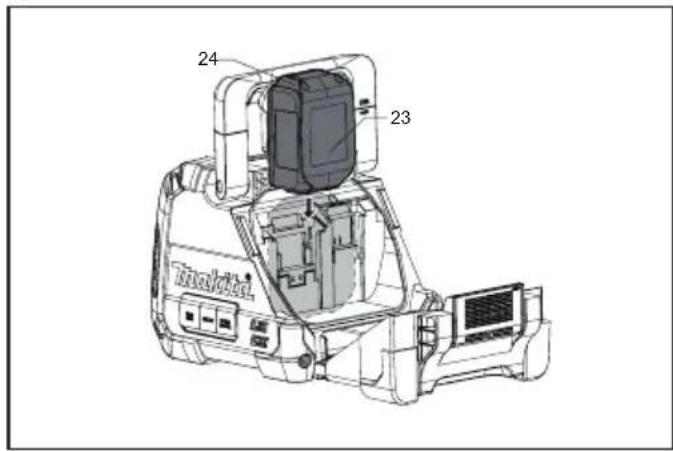
Explanation of general view (Fig.1)
- Battery compartment locker
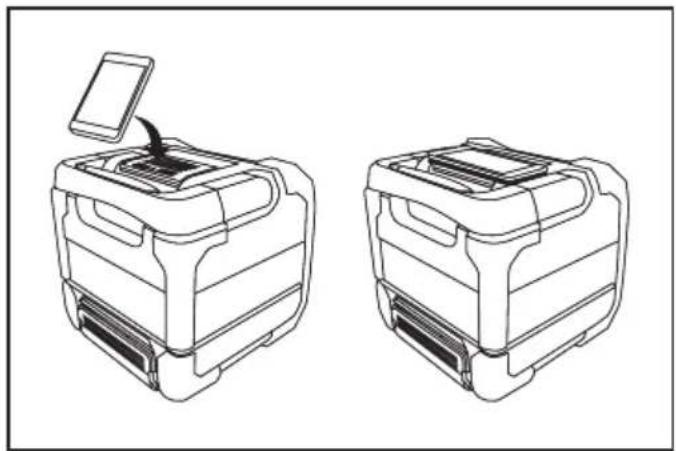
- Mobile (Cell phone) placing panel
- Play/Pause button
- Next track button/Fast-forward button
- Volume up button
- Volume down button
- Aux in indicator
- Volume max. or min. indicator/ Low battery indicator
- Bluetooth indicator
- Bluetooth pairing button
- Power button
- Previous track button/ Rewind button
- Speaker
- Handle
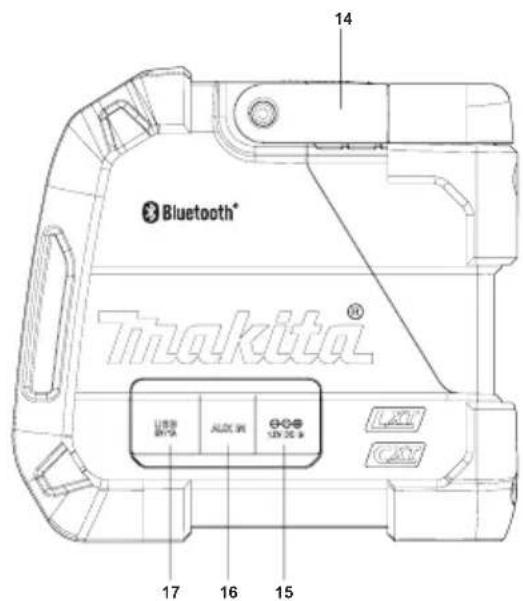
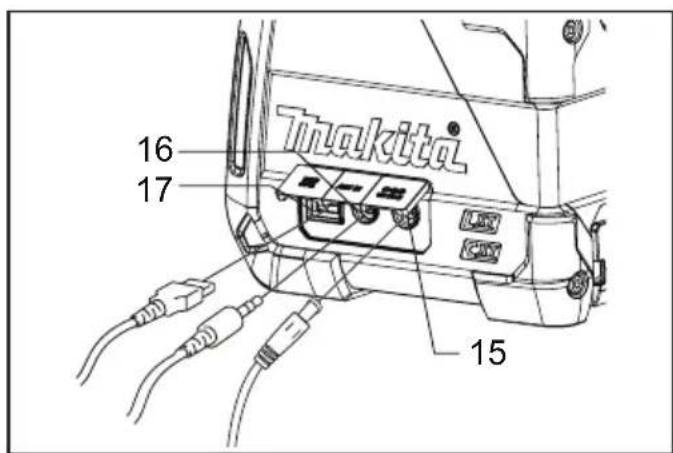
- DC in socket
- Auxiliary input socket
-
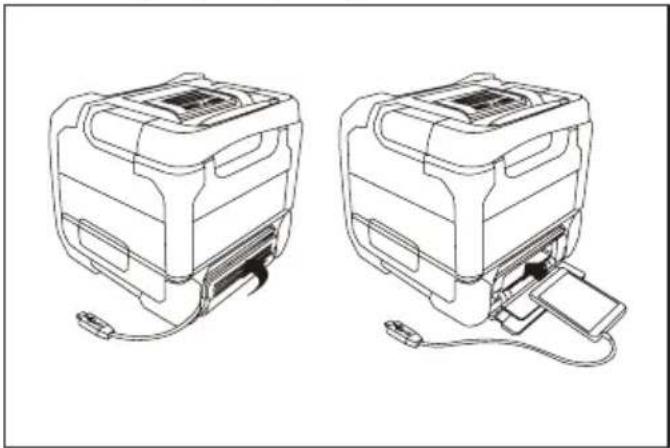
USB charging socket
-
Cable hole
- Mobile (Cell phone) storage cabinet
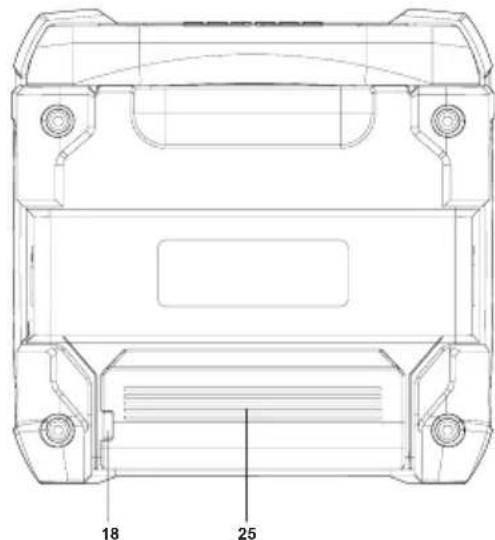
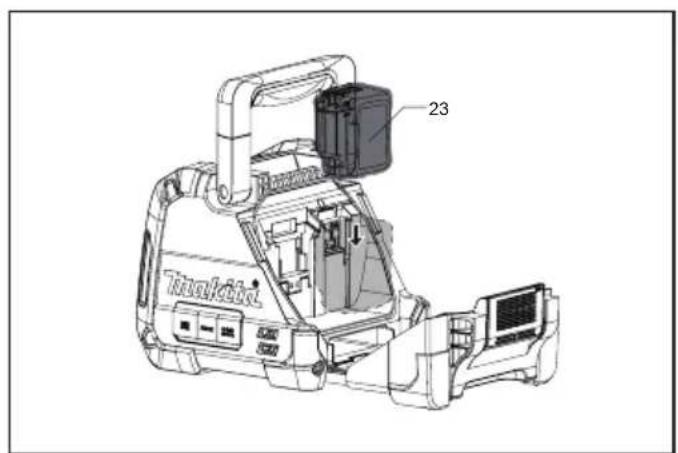
- 14.4 V/18V battery terminal
- 10.8V-12Vmax battery terminal
- Battery cover
- Battery cartridge
- Button
- Mobile storage cabinet cover
Power
The speaker can be powered by Makita battery packs or a standard wall outlet.
Power by battery
The following table indicates the operating time on a single charge.
| Battery capacity | Battery Cartridge Voltage | AT SPEAKER OUTPUT = 100mW (unit: Hour)
(Approximately) |
| 10.8V-12Vmax | 14.4V 18V | AUX IN Bluetooth | | | AUX IN +USB(2.1A) | Bluetooth +USB(2.1A) |
| 1.3Ah | | BL1415 7.5 | 7.0BL1815 | | | 1.0 |
| 1.5Ah | BL1015/BL1016 | | | 12 | 11 | 1.0 |
| BL1415N | | 10 | 9.0 | 1.0 |
| | BL1815N | 9.5 | 9.0 | 1.5 |
| 2.0Ah | BL1020B/BL1021B | | | 15 | 14 | 1.0 |
| | BL1820/BL1820B | 13 | 12 | 2.0 |
| 3.0Ah | | BL1430/BL1430B | | | 15 2.016 | |
| | BL1830/BL1830B | | 17 3.018 | |
| 4.0Ah | BL1040B/BL1041B | | | 31 | 28 | 2.5 |
| BL1440 | | 26 | 24 | 3.0 |
| | BL1840/BL1840B | | 24 4.025 | |
| 5.0Ah | | BL1450 | | | 29 3.531 | |
| | BL1850/BL1850B | 32 | 31 | 5.5 |
| 6.0Ah | | BL1460B | | 34 | 32 | 4.0 |
| | BL1860B | 39 | 37 | 6.5 |
Installing or removing slide battery cartridge (Fig. 3 and 4)
- To install the battery cartridge, align the tongue on the battery cartridge with the groove in the housing and slip it into place. Always insert it all the way until it locks in place with a little click.
If you can see the red indicator on the upper side of the button, it is not locked completely. Install it fully until the red indicator cannot be seen. If not, it may accidentally fall out of the tool, causing injury to you or someone around you.
- Do not use force when inserting the battery cartridge. If the cartridge does not slide in easily, it is not being inserted correctly.
- To remove the battery cartridge, sliding it from the tool while pressing the button on the front of the cartridge.
Note:
When the speaker is in low battery, the middle LED will flash in red.
Indicating the remaining battery capacity
Only for battery cartridges with "B" at the end of the model number
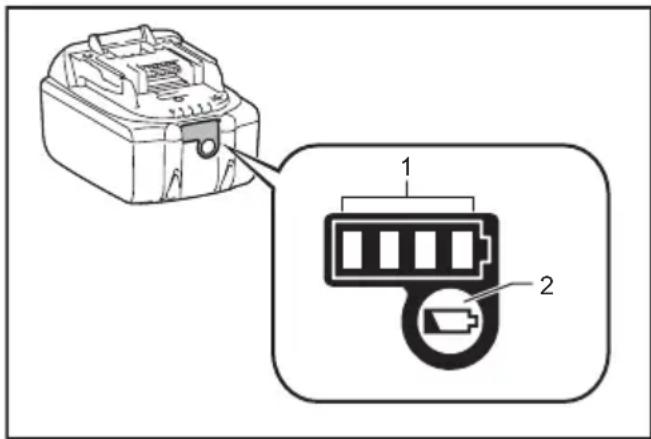
Press the check button on the battery cartridge to indicate the remaining battery capacity. The indicator lamps light up for few seconds.
| Indicator lamps | Remaining capacity |
| Lighted | Off | Blinking |
| | | 75% to 100% |
| | | 50% to 75% |
| | | 25% to 50% |
| | | 0% to 25% |
| | | Charge the battery |

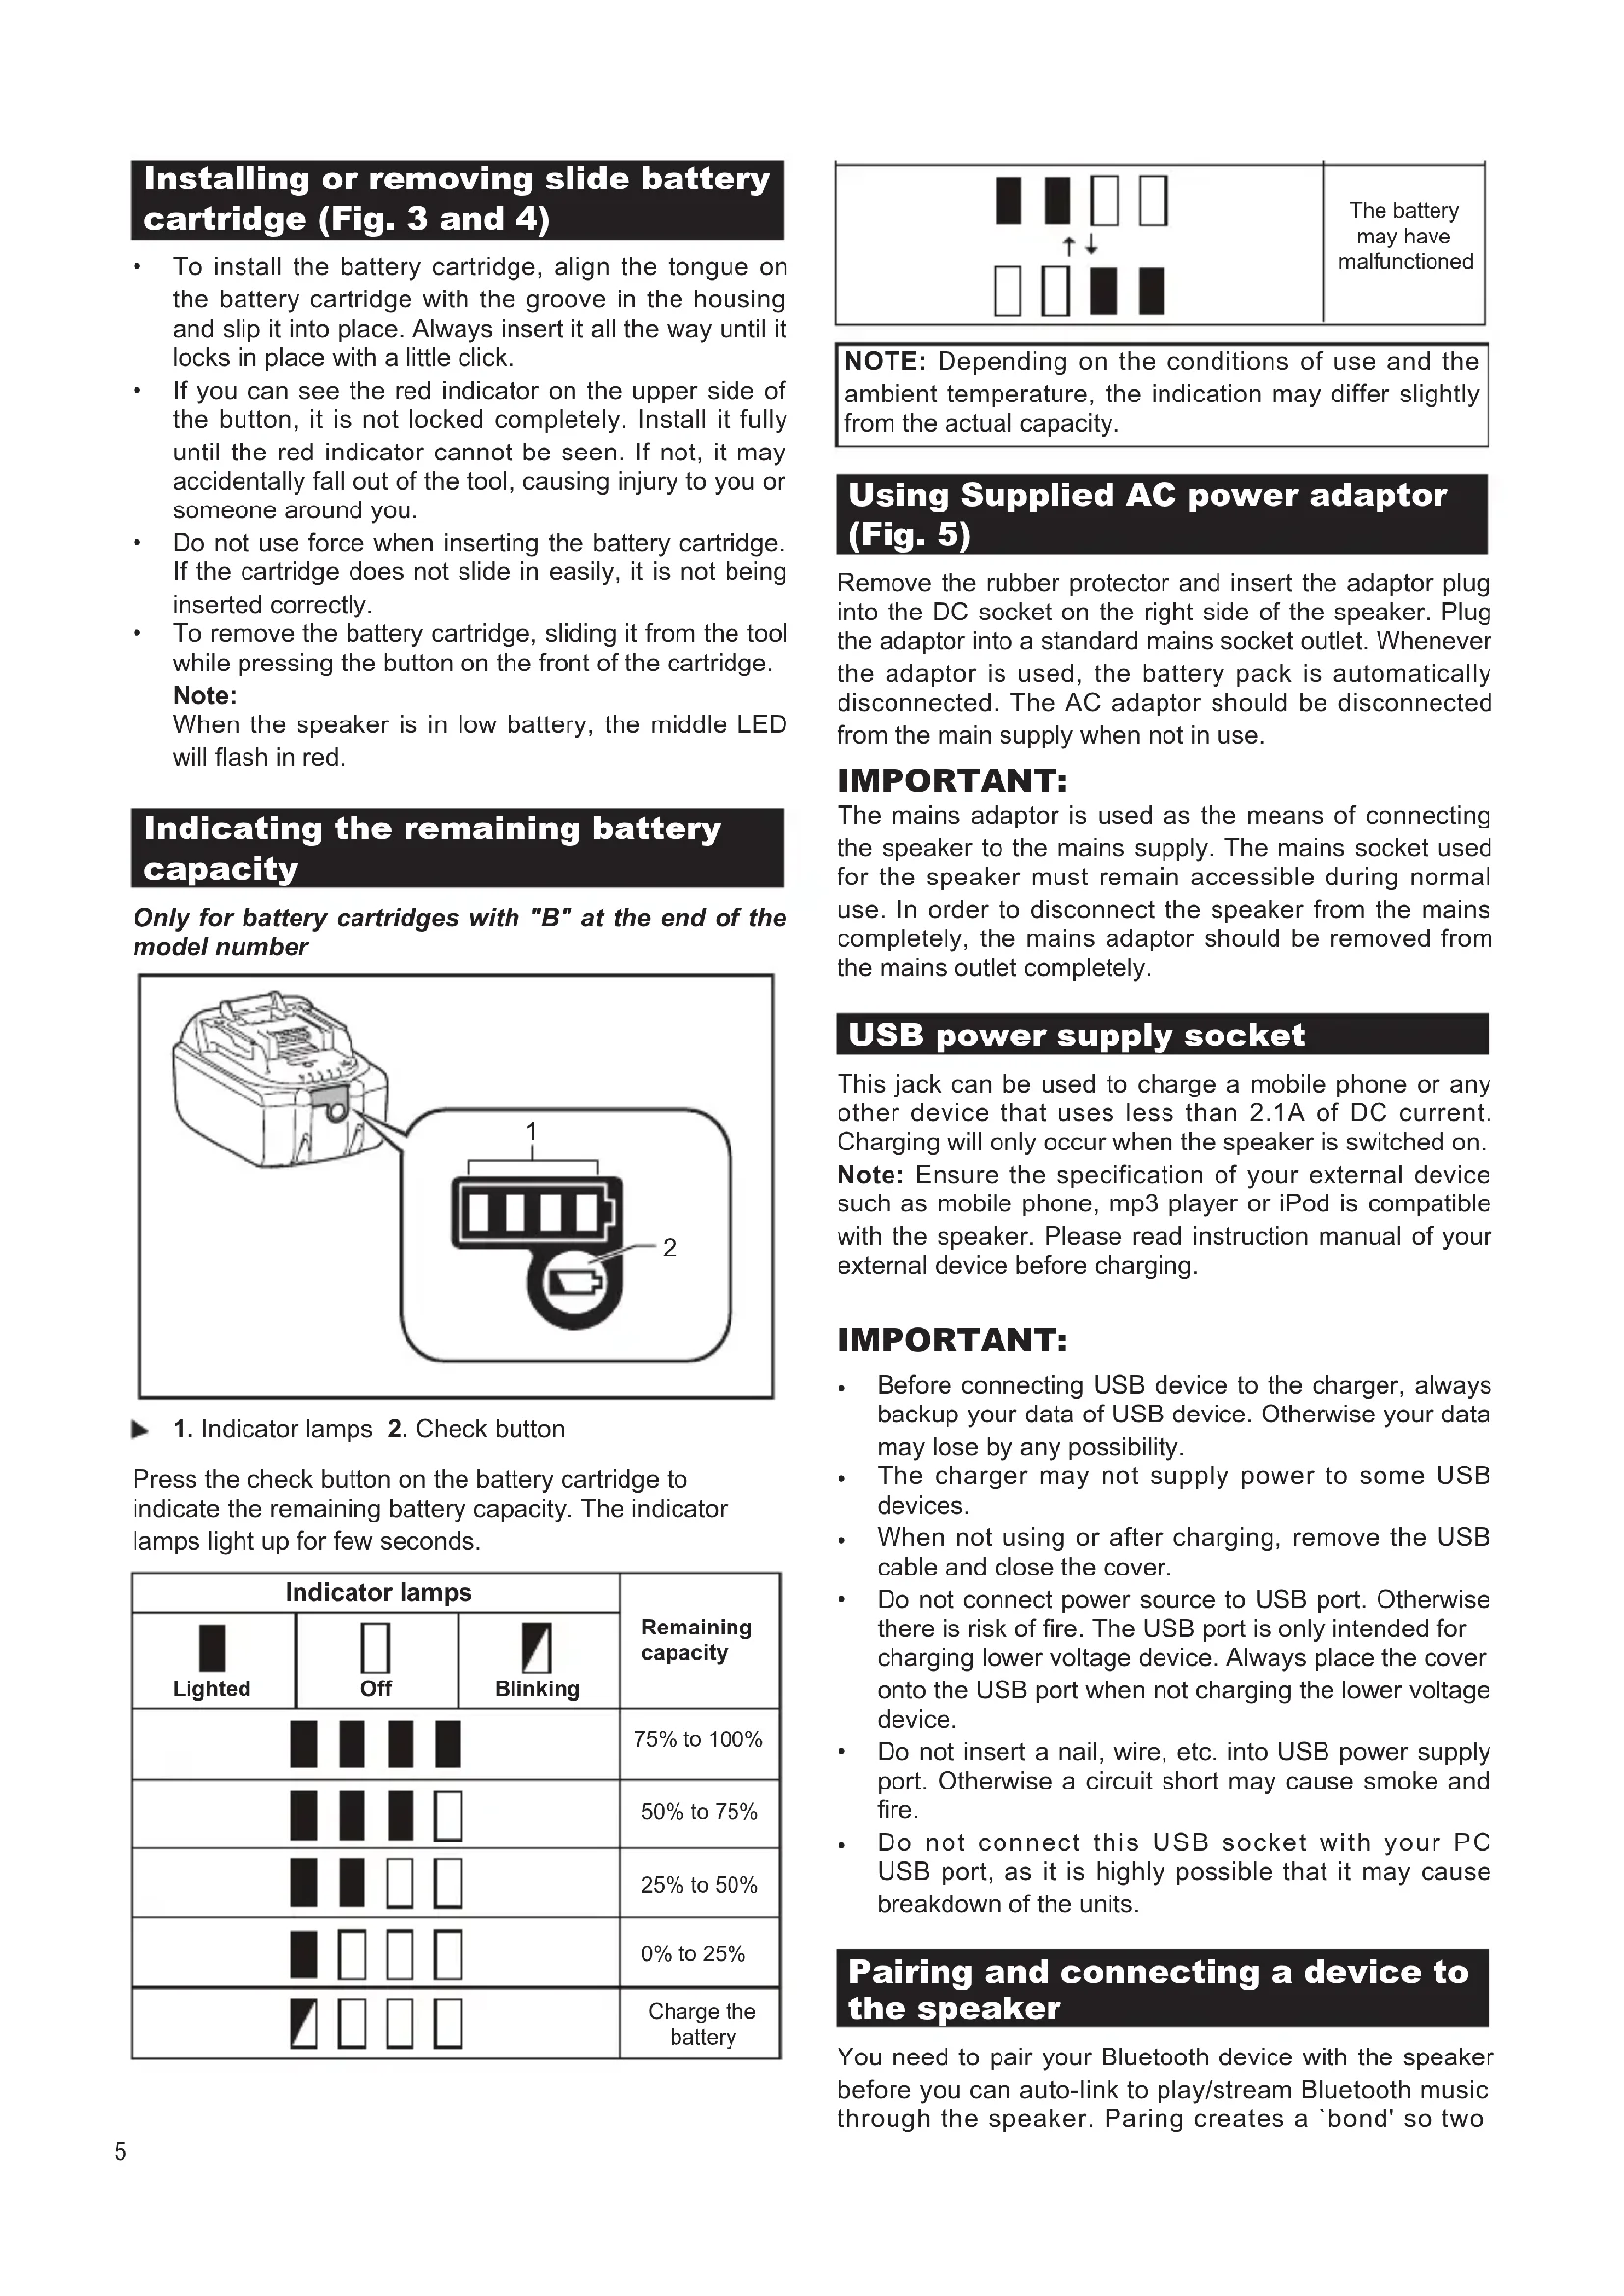
The battery may have malfunctioned
NOTE: Depending on the conditions of use and the ambient temperature, the indication may differ slightly from the actual capacity.
Using Supplied AC power adaptor (Fig. 5)
Remove the rubber protector and insert the adaptor plug into the DC socket on the right side of the speaker. Plug the adaptor into a standard mains socket outlet. Whenever the adaptor is used, the battery pack is automatically disconnected. The AC adaptor should be disconnected from the main supply when not in use.
IMPORTANT:
The mains adaptor is used as the means of connecting the speaker to the mains supply. The mains socket used for the speaker must remain accessible during normal use. In order to disconnect the speaker from the mains completely, the mains adaptor should be removed from the mains outlet completely.
USB power supply socket
This jack can be used to charge a mobile phone or any other device that uses less than 2.1A of DC current. Charging will only occur when the speaker is switched on.
Note: Ensure the specification of your external device such as mobile phone, mp3 player or iPod is compatible with the speaker. Please read instruction manual of your external device before charging.
IMPORTANT:
- Before connecting USB device to the charger, always backup your data of USB device. Otherwise your data may lose by any possibility.
- The charger may not supply power to some USB devices.
- When not using or after charging, remove the USB cable and close the cover.
- Do not connect power source to USB port. Otherwise there is risk of fire. The USB port is only intended for charging lower voltage device. Always place the cover onto the USB port when not charging the lower voltage device.
- Do not insert a nail, wire, etc. into USB power supply port. Otherwise a circuit short may cause smoke and fire.
- Do not connect this USB socket with your PC USB port, as it is highly possible that it may cause breakdown of the units.
Pairing and connecting a device to the speaker
You need to pair your Bluetooth device with the speaker before you can auto-link to play/Stream Bluetooth music through the speaker. Paring creates a 'bond' so two
devices can recognize each other.
To have the better sound quality, we recommend setting the volume to more than two-thirds level on your Bluetooth device and then adjust the volume on the speaker as required.
Pairing and playing your Bluetooth device for the first time
- Press the Power button ① to turn on the speaker and the Bluetooth indicator will flash in blue. The indicator flashes fast flashing blue indicating the speaker is discoverable.
- Activate Bluetooth on your device according to the device's user manual to link to the speaker. Locate the Bluetooth device list and select the device named 'DMR200.' With some mobiles (which are equipped with earlier versions than BT2.1 Bluetooth device), you may need to input the pass code "0000".
- Once connected, there will be a beep sound and the Bluetooth indicator will remain in solid blue. You can simply select and play any music from your source device. Volume control can be adjusted from your source device, or directly from the speaker.
- Use the controls on your Bluetooth-enabled device or on the speaker to play/pause and navigate tracks.
Note:
- If 2 Bluetooth devices, pairing for the first time, both search for the speaker, it will show its availability on both devices. However, if one device links with this unit first, then the other Bluetooth device won't find it on the list.
- If your Bluetooth device is temporarily disconnected to the speaker, then you need to manually reconnect your device again to the speaker.
- If 'DMR200" shows in your Bluetooth device list but your device cannot connect with it, please delete the item from your list and pair the device with the speaker again following the steps described previously.
- The effective operation range between the system and the paired device is approximately 10 meters (30 feet). Any obstacle between the system and the device can reduce the operational range.
- Bluetooth connectivity performance may vary depending on the connected Bluetooth devices. Please refer to the Bluetooth capabilities of your device before connecting to the speaker. All features may not be supported on some paired Bluetooth devices.
Playing audio files in Bluetooth mode
When you have successfully connected the speaker with the chosen Bluetooth device you can start to play your music using the controls on your connected Bluetooth device.
-
Once playing has started adjust the volume to the required setting using the Volume buttons - + on the speaker or on your enabled Bluetooth device. When you press the Volume up/down button, the volume indicator will flash in fast flashing red. If the indicator light in solid red, it indicates the volume is in maximum volume or minimum volume.
-
Use the controls on your device to play/pause and navigate tracks. Alternatively, control the playback using Play/Pause (▶), Next track (▶), Previous track buttons (▶) on the speaker.
- Press and hold the Next track or Previous button to fast-forward/Rewind the current track. Release the button when the desired point in the track is reached.
Note:
- That not all player applications or devices may respond to all of these controls.
- Some mobile phones may temporarily disconnect from the speaker when you make or receive calls. Some devices may temporarily mute their Bluetooth audio streaming when they receive text messages, emails or for other reasons unrelated to audio streaming. Such behaviour is a function of the connected device and does not indicate a fault with the speaker.
Speaker memory and reconnecting a device
The speaker can memorize up to 8 sets of paired device, when the memory exceeds this amount, the oldest pairing history will be over written. If your Bluetooth device already paired with the speaker previously, the unit will memorize your Bluetooth device and it attempts to reconnect with a device in memory which is last connected. If the last connected device is not available, the speaker will be discoverable.
Disconnecting your Bluetooth device
Press and hold the Bluetooth pairing button for 2-3 seconds to disconnect with your Bluetooth device. The Bluetooth indicator flashes in blue indicating the speaker is discoverable again for pairing.
A 3.5mm Auxiliary input socket is provided on the right side of the unit to permit an audio signal to be fed into the unit from any devices that features a headphone or audio output, such as an iPod, MP3 or CD player.
- Connect a stereo or mono audio source (for example, iPod, MP3 or CD player) to the Auxiliary input socket (marked 'AUX') and the Aux in indicator turns green indicating the speaker is in auxiliary input mode.
- Adjust the Volume control on your iPod, MP3 or CD player to ensure an adequate signal and then adjust the volume on the speaker for comfortable listening.
- To have the better sound quality, we recommend setting the volume to more than two-thirds level on your audio device and then adjust the volume on the speaker as required.
Note:
When Aux in socket is connected an audio device, Bluetooth function will be disabled to minimize power consumption.
MAINTENANCE

CAUTION:
- Never use gasoline, benzine, thinner, alcohol or the like. Discoloration, deformation or cracks may result.
Specification
Amplifier
| Output power | 10.8V:3.5W |
| 14.4V:6W |
| 18V:10W |
| Frequency response | 50Hz~20kHz |
Aux In
| Input sensitivity | 250mVrms @100Hz |
Speaker
Bluetooth
| Main speaker | 101.6mm 8 ohm 10W |
| Tweeter speaker | 36mm 8ohm 10W |
(The Bluetooth® word mark and logos are registered trademarks owned by Bluetooth SIG, Inc.)
| Bluetooth version | 4.0 |
| Bluetooth profiles | A2DP/ SCMS-T/ AVRCP |
| Transmission power | Bluetooth specification power Class 2 |
| Transmission range | Max. 10m (varies according to usage conditions) |
| Supported codec | SBC |
| Compatible Bluetooth profile | A2DP |
| Maximum radio-frequency power: BT EDR: 3.84 dBm / BT LE: 3.46 dBm |
General
| AC power adaptor | DC in 12V 1.5A, center pin positive |
| Battery | Slide battery: 10.8V-12Vmax/14.4 V/ 18 V |
| Weight | 2.7KG (without battery) |
The company reserves the right to amend the specification without notice.
FRANCAIS (Instructions d'origine)
Symboles
Bluetooth-profilera2DP/SCMS-T/AVRCP
Sendeeffekt
Bluetooth specifikation effektklasse 2
Profile Bluetooth A2DP/SCMS-T/AVRCP
aalll aalall lall jai 2
aai 1
Jssssssssssssssssssssssssssssssssssssssssssssssssssssssssss
jglg jglgglgglgglgglgglgglgglgglgglgglgglgglgglgglgglgglgglgglgglgglgglgglgglgglgglgglgglgglgglgglgglgglgglgglgglggl
gao 2011 jai 5 2 2 aai
a jai aai jai jai jai
y
e 1
jge gale 10iill udile pldiyly d yolall gssgall
中
1
jclall ic(-+)gwall jjjj plasdy sball
y
jia jia jia jia jia jia jia jia jia jia jia jia jia jia jia jia jia jia jia jia jia jia jia jia jia jia jia jia jia jia jia jia jia jia jia jia jia jia jia jia jia jia jia jia jia jia jia jia jia jia
g 15
a a
i /j 1 jie 2
gall sill 5lln y. julll Jaiill
(1)Jill Jannll (11) Cia 1/
aclawl 1 (1) aylwl lwlal jj
jull jj 1 (1) jll jull jull jyaiy 3
J 1
Jusss
aal 1 aai 1 1 1 1
(5)
Jgall Jgall gll gll gll gll gll gll gll gll gll gll gll gll gll gll gll gll gll gll gll gll gll gll gll gll gll gll gll gll gll gll gll gll gll gll gll gll gll gll gll gll gll gll gll gll gll gll gll gll gll gll gell
J 1 J 1 J 1 J 1 J 1 J 1 J 1 J 1 J 1 J 1 J 1 J 1 J 1 J 1 J 1 J 1 J 1 J 1 J 1 J 1 J 1 J 1 J 1 J 1 J 1 J 1 J 1 J 1 J 1 J 1 J 1 J 1 J 1 J 1 J
USB 2gina
J 1 J 1 J 1 J 1 J 1 J 1 J 1 J 1 J 1 J 1 J 1 J 1 J 1 J 1 J 1 J 1 J 1 J 1 J 1 J 1 J 1 J 1 J 1 J 1 J 1 J 1 J 1 J 1 J 1 J 1 J 1 J 1 J 1 J 1 J
P 为 AQ
111111111111111111111111111111 111111111111111111
L 1
- USB 2. USB 3. USB 4. USB 5. USB 6. USB 7. USB 8. USB 9. USB 10. USB 11. USB 12. USB 13. USB 14. USB 15. USB 16. USB 17. USB 18. USB 19. USB 20. USB 21. USB 22. USB 23. USB 24. USB 25. USB 26. USB 27. USB 28. USB 29. USB 30. USB 31. USB 32. USB 33. USB 34. USB 35. USB 36. USB 37. USB 38. USB 39. USB 40. USB 41. USB 42. USB 43. USB 44. USB 45. USB 46. USB 47. USB 48. USB 49. USB 50. USB 51. USB 52. USB 53. USB 54. USB 55. USB 56. USB 57. USB 58. USB 59. USB 60. USB 61. USB 62. USB 63. USB 64. USB 65. USB 66. USB 67. USB 68. USB 69. USB 70. USB 71. USB 72. USB 73. USB 74. USB 75. USB 76. USB 77. USB 78. USB 79. USB 80.
USB
USB
USB
USB
USB
USB
USB
USB
USB
USB
USB
USB
USB
USB
USB
USB
USB
USB
USB
USB
USB
USB
USB
USB
USB
USB
USB
USB
USB
USB
USB
USB
USB
USB
USB
USB
USB
USB
USB
USB
USB
USB
USB
USB
USB
USB
USB
USB
USB
USB
USB
USB 11. dLJ, Jauu Jaiy p aY - jll g nnss s o aal 8 21. klll
jus USB 11. u USB 11. u 11. u 11. u 11. u 11. u 11. u 11. u
eclalll jjglal
y j 1 1 1 1 1 1 1 1 1 1 1 1 1 1 1 1 1 1 1 1 1 1 1 1 1 1 1 1 1 1 1 1 1 1 1 1 1 1 1
gall gina Jia yai jiai jia jia jia jia jia jia jia jia jia jia jia jia jia jia jia jia jia jia jia jia jia jia jia jia jia jia jia jia jia jia jia jia jia jia jia jia jia jia jia jia jia jia jia jia jia jia jia jia jia jia j
43
a 1
aJi 0jaiy jia o jia.
y 1
J 1511 11 11 11 11 11 11 11 11 11 11 11 11 11
pisiY.
Jallallllallllllllll (3)
m = 311
Lgla 1 gill
jbjbll jae jao jai gie bilall
Lacgolal yolal gai jai jai jai jai jai jai
1s1s1s1s1s1s1s1s1s1s1s1s1s1s1s1s1s1s1s1s1s1s1s1s1s1s1s1s1s1s1s1s1s1s1s1s1s1s1s1s1s1s1s
a
Jolly 1y jai yj 1y jai jai jai jai jai J.2
y jlll 102 yac no y aai ai jll
104gjzj 3
50)494
gaiieale! 2y
alaiiieae ie j 3yall galiell jll 15.5
aLolSlll yIyIyIg aclawll IyIyIy.6
AaJbll 2222n Jaiil 10 baii 1
jE jn 10000000000000000000000000000
7
jbi jbi jbi jbi jbi jbi jbi jbi jbi jbi jbi jbi jbi jbi jbi jbi jbi jbi jbi jbi jbi jbi jbi jbi jbi jbi jbi jbi jbi jbi jbi jbi jbi jbi jbi jbi jbi jbi jbi jbi jbi jbi jbi jbi jbi jbi jbi jbi jbi jbi jbi
1
jck 1
1
a aal plaa 10
J 1
.
1 9
a
10
aally Jau 1. 1u 1
y
a 1
SMAINS.11
Jusill sals
Makita Europe N.V.
Jan-Baptist Vinkstraat 2, 3070 Kortenberg, Belgium
Makita Corporation
3-11-8, Sumiyoshi-cho, Anjo, Aichi 446-8502 Japan