
MTP Pro - Blood pressure monitor MEDISANA - Free user manual and instructions
Find the device manual for free MTP Pro MEDISANA in PDF.
| Product Type | Arm blood pressure monitor |
| Brand | Medisana |
| Model | MTP Pro |
| Dimensions | approx. 120 x 163 x 66 mm |
| Weight | approx. 480 g (batteries included) |
| Power supply | 4 AA LR6 batteries, 1.5 V or mains adapter (ref. 51036, optional) |
| Measurement method | Oscillometric |
| Measurement range (pressure) | 30 – 280 mmHg |
| Measurement range (pulse) | 40 – 200 beats/min |
| Static accuracy | ±3 mmHg |
| Pulse accuracy | ±5% of the reading |
| Memory | 2 x 99 slots, with average values |
| Special features | 3MAM mode (average of 3 measurements), arrhythmia detection, WHO bar |
| Inflation | Automatic by micro-pump |
| Deflation | Automatic |
| Auto-off | after approx. 1 minute |
| Operating conditions | +10°C to +40°C, humidity 15-85% |
| Storage conditions | -5°C to +50°C, humidity 15-85% |
| Cuff | For arm circumference 22-32 cm (adult) |
| Optional accessories | Mains adapter (ref. 51036), large cuff 32-42 cm (ref. 51037) |
| Cleaning and care | Clean with a soft cloth slightly dampened with soapy water; do not immerse |
| Safety | Follow instructions: do not use near high-radiation devices, do not alter treatments based on measurements |
| Spare parts and repairability | Repairs only by authorized technicians; 10-year warranty (excluding normal wear) |
| General information | CE 0297 certified, compliant with standards EN 60601-1, EN 80601-2-30, etc. |
Frequently Asked Questions - MTP Pro MEDISANA
User questions about MTP Pro MEDISANA
0 question about this device. Answer the ones you know or ask your own.
Ask a new question about this device
Download the instructions for your Blood pressure monitor in PDF format for free! Find your manual MTP Pro - MEDISANA and take your electronic device back in hand. On this page are published all the documents necessary for the use of your device. MTP Pro by MEDISANA.
USER MANUAL MTP Pro MEDISANA
Please read carefully!
A fire attentivement s.v.p.!.
1 Safety Information 15
2 Useful Information 17
3 Getting started 19
4 Operation 21
5 Memory 23
6 Miscellaneous
7 Warranty 28
FR Mode d'emploi
Please fold out this page and leave it folded out for quick reference.
Upper arm cuff with hose
Connector for the hose
3 Socket for mains adaptor
4 START button
5 Display
6 MEMO button
7 TIMER button
8 User memory 1 / 2
9 Time / Date
10 Display of systolic pressure
Display of diastolic pressure
12 Display of pulse rate
13 Pulse symbol
14 Memory symbol
15 Unit has detected an arrhythmia
16 Batteries low
Please replace batteries
17 Alarm symbol
Symbol for 3MAM mode
19 Countdown symbol
20 Blood pressure bar display
FR
Read the instruction manual carefully before using this device, especially the safety instructions, and keep the instruction manual for future use. Should you give this device to another person, it is vital that you also pass on these instructions for use.
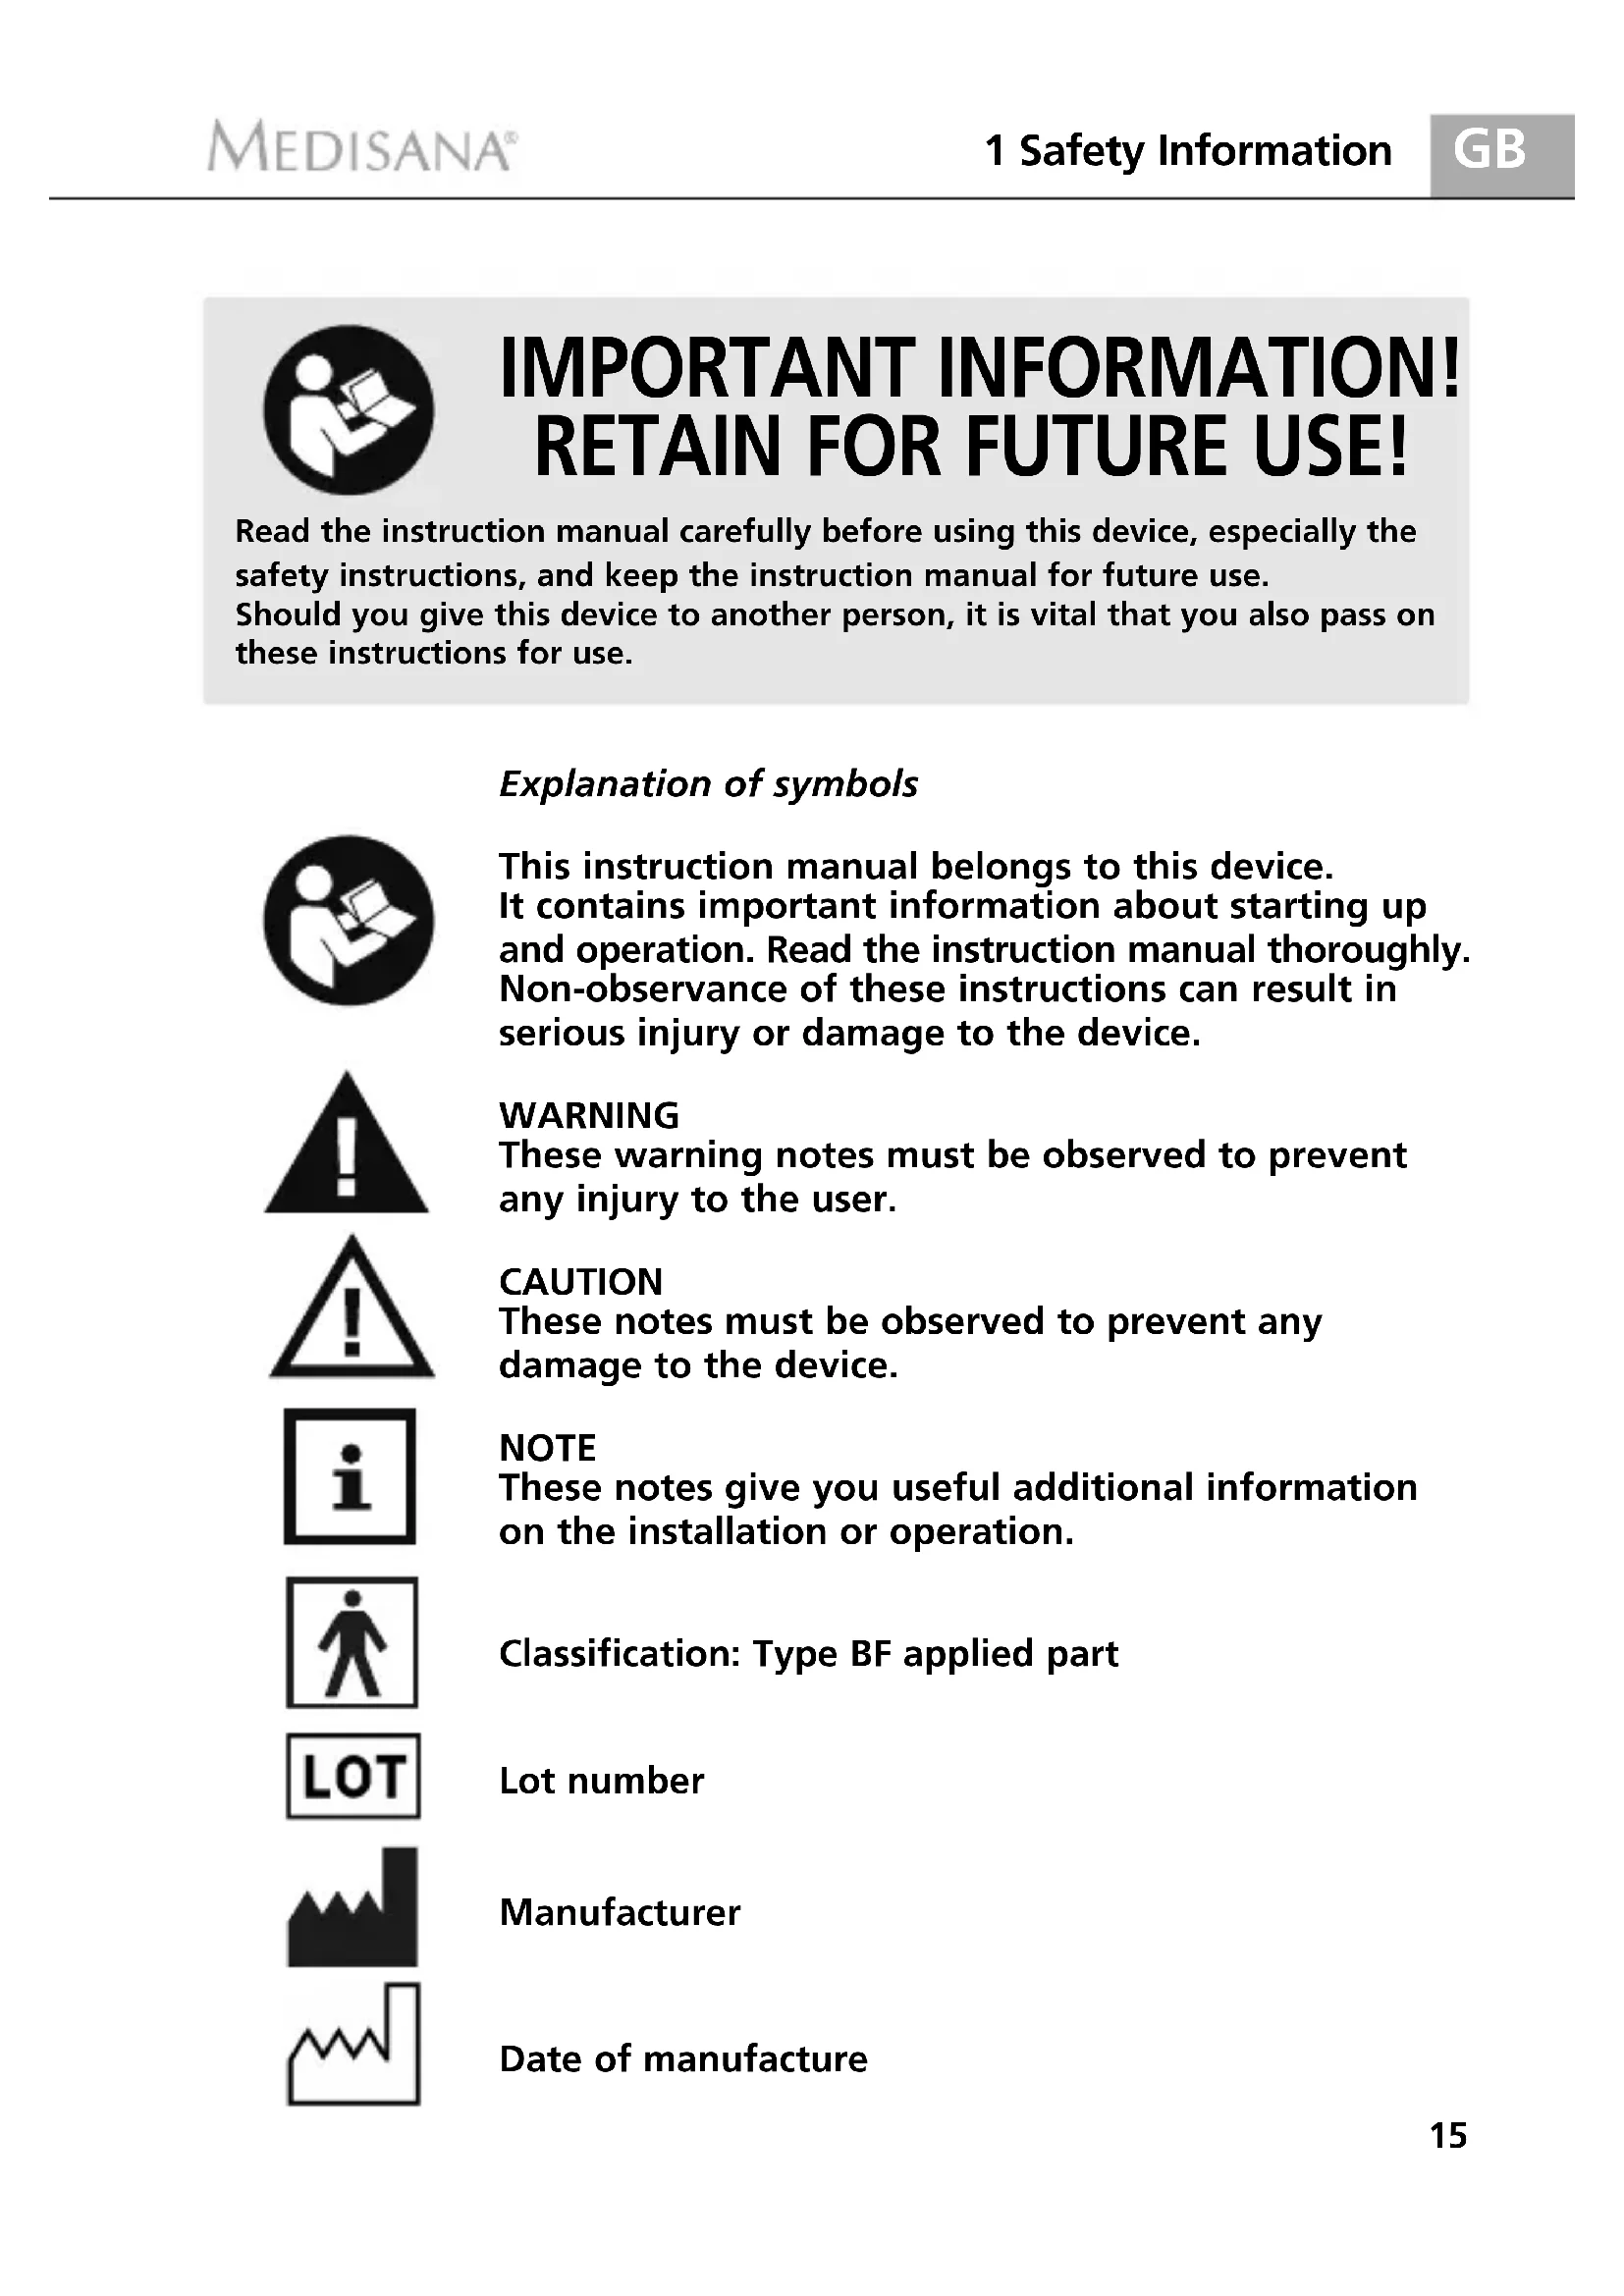
Explanation of symbols

This instruction manual belongs to this device. It contains important information about starting up and operation. Read the instruction manual thoroughly. Non-observation of these instructions can result in serious injury or damage to the device.

WARNING
These warning notes must be observed to prevent any injury to the user.

CAUTION
These notes must be observed to prevent any damage to the device.

NOTE
These notes give you useful additional information on the installation or operation.

Classification: Type BF applied part

Lot number

Manufacturer

Date of manufacture

Safety Information

WARNING
Do not take any therapeutic measures based on your own measurements! Never change the quantity of medication prescribed by your doctor!
1.1 Tips for your well being
- Irregularity of pulse or arrhythmia can lead to difficulties in recording a correct reading when measurements are taken using oscillometric blood pressure devices. This device is elec tronically equipped to detect over 20 of the most commonly occurring types of arrhythmia and movement artifacts and indicates this with a symbol in the display.
If you should suffer from conditions such as arterial occlusive disease, please consult your doctor before using the unit. - The unit may not be used to check the heart rate of patients with a pacemaker.
- Pregnant patients should take their own personal state of health into consideration and take all necessary precautions before using the unit. If in doubt, consult your doctor.
- Should you experience discomfort or other complaints during measurement, for example pain in the upper arm, please take the following action: Press the START button 4 to deflate the cuff immediately. Loosen the cuff and remove it from your arm. Please contact either your dealer or MEDISANA directly.
- Patients with a weak pulse wave should raise their arm and open and close their hand around 10 times before taking a reading. This exercise optimizes the pulse wave and the measuring process.
1.2 Important considerations
- The unit is only to be used for the specific purpose described in this instruction manual.
- Any misuse will void the warranty.
- On the rare occasion of a fault causing the cuff to remain fully inflated during measurement, open the cuff immediately.
- Do not use the unit near to equipment emitting a strong electric or magnetic field, such as radios. This may impair the correct functioning of the unit.
- This device is not designed to be used by persons (including children) with limited physical, sensory or mental abilities, or by persons with insufficient experience and/or knowledge, unless under observation by a person responsible for their safety, or unless they have been instructed in the use of the device.
Children must be supervised to ensure that they do not play with the device. - If a fault occurs, do not try to repair the unit yourself. Attempts to do so will void the warranty. Refer all servicing to authorized service personnel.
- Protect the unit from moisture. Should moisture enter the unit, remove the batteries and stop using it immediately. In this case, please contact either your dealer. You can find details of how to contact us on the address page.
Thank you very much
Thank you for your confidence in us and congratulations on your purchase! You have acquired a quality product with your purchase of the MEDISANA MTP Pro upper arm blood pressure monitor. To ensure the best results and long-term satisfaction with your MEDISANA MTP Pro blood pressure monitor, we recommend that you read the following operating and maintenance instructions carefully.
2.1 Items supplied and packaging
Please check first of all that the device is complete and is not damaged in any way. In case of doubt, do not use it and contact your dealer or your service centre. The following parts are included:
1 MEDISANA Blood pressure monitor MTP Pro
- 1 Cuff with air hose - 4 Batteries (AA type, LR 6) 1,5V
- 1 Storage bag - 1 Blood pressure pass
- 1 Instruction manual

The packaging can be reused or recycled. Please dispose properly of any packaging material no longer required. If you notice any transport damage ing unpacking, please contact your dealer without delay.

WARNING
Please ensure that the polythene packing is kept away from the reach of children! Risk of suffocation!
2.2 What is blood pressure?
Blood pressure is the pressure created in the blood vessels by each heart beat. When the heart contracts (= systole) and pumps blood into the arteries, it brings about a rise in pressure. The highest value is known as the systolic pressure and is the first value to be measured. When the cardiac muscle relaxes to take in fresh blood, the pressure in the arteries also falls. Once the arteries are relaxed, a second reading is taken – the diastolic pressure.
2.3 How is blood pressure measured?
The MTP Pro is a blood pressure unit which is used to measure blood pressure at the upper arm. The measurement is carried out by a microprocessor, which, via a pressure sensor, measures the vibrations resulting from the inflation and deflation of the cuff over the artery.
2.4 Why should you take your blood pressure at home?
MEDISANA has had many years of experience in the field of blood pressure measurement. The high precision of MEDISANA devices has been confirmed by extensive clinical tests, carried out according to strict international standards. One strong argument in favour of taking blood pressure at home is the fact that the readings are taken in familiar surroundings under relaxed conditions. The most important reading is the so-called „baseline value“, the one taken before breakfast, directly after getting up in the morning. As far as it is possible, you should always try to take your blood pressure at the same time and under the same conditions each day.
This ensures comparable results and helps in detecting the first signs of high blood pressure. If high blood pressure remains undetected, it increases the risk of further cardiovascular diseases.

THEREFORE WE RECOMMEND:
Take a blood pressure reading daily and on a regular basis, even if you are experiencing no apparent complaints.
2.5 Blood pressure classification
The following table shows the classification of high and low blood pressure, without taking age into consideration. This blood pressure assessment scale corresponds to the guidelines of the World Health Organisation (WHO).
Low blood pressure Normal blood pressure (green display area 20)
systolic below < 100 systolic 100-139
diastolic below < 60 diastolic 60 - 89
Types of high blood pressure
mild hypertension medium hypertension serious hypertension
(yellow display area 20) (orange display area 20) (red display are 20)
systolic 140 - 159 systolic 160 - 179 systolic >180
diastolic 90 - 99 diastolic 100 - 109 diastolic >110

WARNING
Blood pressure that is too low represents just as great a health risk as blood pressure that is too high! Fits of dizziness may lead to dangerous situations arising (e.g. on stairs or in traffic)!
2.6 Fluctuations in blood pressure
There are many factors that can influence blood pressure. Readings can be affected seriously by stress, fear, heavy physical exertion or the time of day at which the measurements are taken. Your personal blood pressure values are subject to considerable fluctuation during the course of the day and the year. These fluctuations are particularly pronounced in the case of patients suffering from hypertension. Blood pressure is usually at its highest during physical exertion and at its lowest at night when you are asleep.
2.7 Influencing and evaluating readings
- Measure your blood pressure several times, then record and compare the results. Do not draw any conclusions from a single reading.
- Your blood pressure readings should always be evaluated by a doctor who is also familiar with your personal medical history. When using the unit regularly and recording the values for your doctor, you should visit the doctor from time to time to keep him updated.
- When taking readings, remember that the daily values are influenced by several factors. Smoking, consumption of alcohol, drugs and physical exertion influence the measured values in various ways.
Measure your blood pressure before meals. - Before taking readings, allow yourself at least five minutes rest.
- If the systolic and diastolic readings seem unusual (too high or too low) on several occasions, despite correct use of the unit, please inform your doctor. This also applies to the rare occasions when an irregular or very weak pulse prevents you from taking readings.
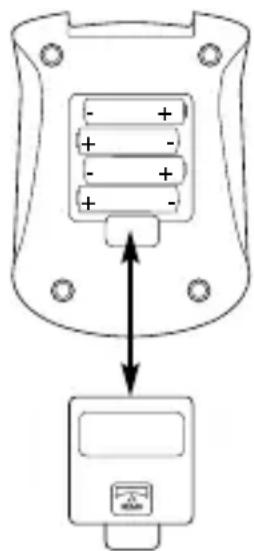
3.1 Inserting / removing batteries
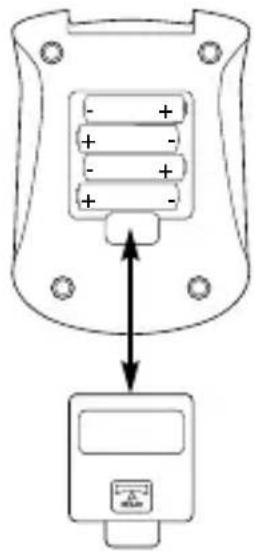
Insertion: Open the battery compartment on the underside of the unit by exerting gentle pressure in the direction indicated by the arrow, and insert the four batteries included with the unit (alkaline batteries, AA type, LR 6). Remember to insert the batteries as indicated in the diagram in the battery compartment. Replace the lid, pressing it until it snaps into place.
Removal: When the battery symbol appears in the display, please replace the batteries with new ones. Should the used batteries be jammed in the compartment, use a pointed instrument, such as a ballpoint pen, to carefully pris them out.
The display showing the year will flash after inserting the batteries for the first time. Set the date and time as described in 3.3 Set Date and Time. Please note that the date and time will have to be reset each time new batteries are inserted. Previously stored results will be lost.

WARNING BATTERY SAFETY INFORMATION
- Do not disassemble batteries!
- Clean the battery and device contacts if necessary before putting in the batteries!
- Remove discharged batteries from the device immediately!
- Increased risk of leakage, avoid contact with skin, eyes and mucous membranes! If battery acid comes in contact with any of this parts, rinse the affected area with copious amounts of fresh water and seek medical attention immediately!
- If a battery has been swallowed seek medical attention immediately!
- Replace all of the batteries simultaneously!
- Only replace with batteries of the same type, never use different types of batteries together or used batteries with new ones!
- Insert the batteries correctly, observing the polarity!
- Remove the batteries from the device if it is not going to be used for an extended period!
- Keep batteries out of children's reach!
- Do not attempt to recharge these batteries! There is a danger of explosion!
- Do not short circuit! There is a danger of explosion!
- Do not throw into a fire! There is a danger of explosion!
- Keep unused batteries in their packaging away from metal objects in order to prevent short circuiting!
- Do not throw used batteries into the household refuse; put them in a hazardous waste container or take them to a battery collection point, at the shop where they were purchased!
3.2 Using a Mains Adaptor
Alternatively, you can use the unit with a special mains adaptor (MEDISANA Art.-No. 51036) This connects to the socket provided at the back of the unit. In this case the batteries remain in the unit.
Inserting the connector into the back of the blood pressure monitor switches the batteries off mechanically. It is necessary, therefore, to plug the mains adaptor into the mains socket first of all and then to connect it to the blood pressure monitor. If the blood pressure monitor is no longer being used, first remove the connector from the blood pressure monitor and then pull the mains adaptor out of the mains socket. Doing this means that the date and time will not have to be reset each time.
3.3 Setting time and date
To set date and time press and hold the TIMER button 7 for several seconds. The symbol for the memory selected starts blinking. Now press the TIMER button 7 again briefly. The year is now shown in the display 5 and starts blinking. Press the MEMORY button 6 to change the year. Press the TIMER button 7 to go to month, day and time. Press the MEMORY button 6 to change the values.
3.4 Setting up the user memory
The MTP Pro gives you the opportunity to assign readings to one of two user memories, each of which provides 99 memory slots.
Press and hold the TIMER button 7 for several seconds. The symbol for memory (USER) 1 in the display 5 starts blinking. You can switch between USER 1 and USER 2 by pressing the MEMORY button 6
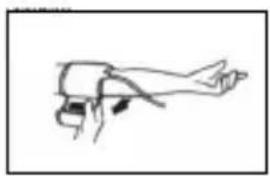
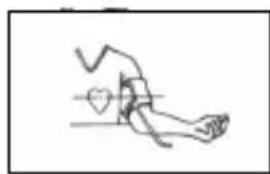
4.1 Fitting the cuff
First attach the free end of the cuff's ① air tube to the designated connector ② on the unit. Open up the cuff to a ring and slip it over the bare left upper arm just above the elbow region. If wearing tight clothing, ensure that the circulation in the arm is not impaired when rolling up the sleeve. Please ensure that the cuff buckle is never positioned directly over the artery, as this can result in an incorrect blood pressure reading.
The tube should run along the centre of the inner arm towards the palm of the hand. Ensure that the cuff itself is not twisted in any way.
Fasten the pressure cuff in such a way that it fits tightly but does not constrict the arm. Do this by passing the end through the buckle, pulling it tight and attaching it to the Velcro fastener.
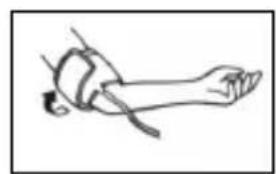
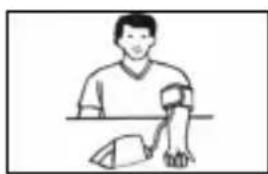
4.2 Correct position for taking readings
Take readings while in a seated position.
- Relax your arm and rest it lightly on a surface such as a table. Relax during the measuring process; do not move or talk, as this can affect the results.
4.3 Taking blood pressure readings Single reading
a. Press the START button 4
- All the display 5 symbols will appear for approx. two seconds.
- The cuff ① will then inflate. The increasing pressure is displayed numerically.
- Pressing the START button 4 during inflation will stop the inflation process. The unit switches off and the cuff deflates.
b. The measuring process begins automatically when inflation is complete by releasing the pressure built up in the cuff. The display shows the current pressure in the cuff.
Initially, deflation occurs at a constant speed. As soon as the pulse can be determined, deflation is synchronised with the beating of the heart until the measurement ends. This procedure is accompanied by a beep and the heart symbol washes at the same time. The measurement is complete when the cuff suddenly deflates and readings are displayed next to SYS, DIA and PUL, together with the WHO blood pressure bar display 20.
If the unit detects an arrhythmia during the measuring process, the arrhythmia symbol will flash while the reading is displayed.
4.4 Taking blood pressure readings 3MAM measuring method (3 consecutive measurements to calculate an average value)
Selecting the 3MAM measuring method
With the MTP Pro, you can choose between two measuring modes.
- Single reading
- 3 consecutive readings ( Measurement Average Mode = 3/MAM-mode ))
In the case of a single reading, just one blood pressure reading is taken and stored.
The 3/MAM-mode is to be recommended if you suffer from severely fluctuating blood pressure. 3 successive readings are taken at 15 second intervals, thus eliminating widely varying readings. In the case of serious deviations, a 4th reading may be taken.
From these three measurements, a weighted average value is calculated, displayed and stored in the selected memory. A reading taken in this way is indicated in the memory by an A
The 3/MAM procedure greatly minimizes the risk of an incorrect reading.
- To switch between single measurement and 3 consecutive measurements (3MAM procedure), press and hold the TIMER button until the symbol for 3MAM mode and " " appear flashing in the display.
- Press the MEMO button to select either "for" "; "OFF" or "off" for the 3MAM measuring method and "for single measurement.
3 consecutive measurements to calculate an average value
- Confirm your selection "On" by pressing the START button 4. The device carries out a self test. Once this is complete, "0" appears on the display. 5 short beeps sound during the procedure. On the display, you can see A 18 (average) and "1" for the first measurement.
- Next, the sleeve 1 automatically inflates until the pressure required for a measurement has been reached. Alternatively, you can create this pressure manually by pressing and holding the START button 4 after the device has automatically reached a pressure of at least 30mmHg . When you think that the device has reached the ideal starting pressure for a measurement, release the START button 4. The increasing pressure is displayed numerically.
- The measuring process begins automatically when inflation is complete by releasing the pressure built up in the cuff. The display shows the current pressure in the cuff.
- Initially, deflation occurs at a constant speed. The pulse symbol appears on the display. As soon as the pulse can be determined, deflation is synchronised with the beating of the heart until the measurement ends. The device beeps for each heartbeat during this procedure, if you did not switch off the beep function beforehand. At the same time, the pulse symbol flushes.
-
The first measurement ends when the pressure has been completely discharged from the sleeve during a 15 second countdown. The countdown symbol 品 ⑲ flashes during this process. Beeps sound during the last 5 seconds.
-
Instead of "1", the display now shows "2" for the second measurement. The second measurement proceeds in the same way as the first (see points 2 - 5).
- Instead of "2", the display now shows "3" for the third measurement. The third measurement proceeds in the same way as the first (see points 2 - 4).
- Once the 3MAM measurement has been taken, the sleeve suddenly deflates and a longer beep sounds.
- The measured values SYS, DIA and PUL are shown on the display, together with the WHO blood pressure bar 20 display. At the same time, a longer beep sounds.
- If the unit detects an arrhythmia during the measuring process, the arrhythmia symbol will flash eight times while the reading is displayed. You may also hear 8 short beeps; these warn the user of an irregular heartbeat.
- If you do not press any buttons for approx. 1 minute, the device automatically switches to standby mode.

NOTE
When the device is used, the errors Err 1, 2, 3, 5, 6 can occur in the integrated circuit. Err 6 can only occur in 3MAM mode. In 3MAM mode, errors Err 1, 2, 3, 5 do not cause the measurement to be cancelled, unless they occur twice in succession. The error display is always accompanied by 3 short beeps.
5 Memory
5.1
Recording the results
This unit features 2 separate memories, each with a capacity of 99 memory slots. Results are automatically stored in the memory selected by the user. When the memory is full, the oldest reading is always the first to be deleted.
5.2
Displaying stored results
Press the MEMORY button to display the stored readings. After all the segments in the display have been shown, an average value of all the measurements in the selected memory is displayed. This average is indicated by " When the MEMORY button is pressed again, the individual readings (switching between systolic, diastolic, pulse and date/time) of the last measurement stored are displayed. If this measurement was taken in the 3MAM procedure, is displayed. If an arrhythmia was detected during the measuring process, the arrhythmia symbol will be displayed, but not flashing.
Press the MEMORY button again to move backwards through the stored readings.
If you do not press any buttons for approx. 1 minute, the device automatically switches back to standby mode.
5.3 Deleting memory
The data can be deleted from the memory selected by pressing and holding the MEMORY button 6 for about 7 seconds. After 7 seconds, the display 5 shows "C CLEAR) which indicates that all data have been deleted.
5.4 Switching off the unit
The unit switches off automatically after about 1 minute, if no button is pressed during this period. It can also be switched off by pressing the START button 4. The time and the personal memory selected are constantly shown in the display.
6 Miscellaneous
6.1 Guide to Display Symbols
Err Error during measurement
Lo Pulse is lower than 40 beats/minute

Determining pulse

Unit has detected an arrhythmia

Batteries low. Please replace batteries.
6.2 Troubleshooting
Error messages
Possible causes and solutions
Err 1
Measurement of the systolic blood pressure was completed.
Either the connection with the hose has been interrupted or no pulse could be determined.
Check the connections between the cuff and the main unit.
Err 2
Non-physiological pressure has been detected. Cause: the arm was moved during the measurement. Repeat the measurement, keeping your arm still.
Err 3
If the cuff takes too long to inflate, it is possible that the cuff is incorrectly positioned or that the connection with the hose is not airtight. Check the connections and repeat the measurement.
If the same error occurs repeatedly with further readings, please contact MEDISANA.
Err 5
An average value could not be calculated due to unstable conditions while the readings were being taken.
Repeat the measuring process, keeping your arm still and not speaking.
Err 6
There were too many errors during the measurement in MAM mode, making it impossible to obtain a final result.
Read through the checklist for performing reliable measurements and then repeat the measurement.
HI
The pressure in the cuff is too high (over 300mmHg ) or the pulse is too high (over 200 beats per minute).
Relax for 5 minutes and repeat the measurement.
LO
The pulse is too low (less than 40 beats per minute).
Repeat the measurement.
6.3
Care and maintenance
- Remove the batteries before cleaning the unit.
- Never use strong detergents or hard brushes.
- Clean the unit with a soft cloth, moistened with mild soapy water. Do not let water enter the unit. After cleaning, only use the unit when completely dry.
- Remove the batteries from the unit if you do not wish to use it for an extended period of time, otherwise there is a risk of battery leakage.
- Do not expose the unit to direct sunlight, and protect it from dust and moisture.
- Only inflate the cuff when it is in position around the upper arm.
Servicing and calibration
The unit has been calibrated by the manufacturer for a period of two years' use. In the case of commercial use, the unit must be serviced and recalibrated at least once every two years. This calibration will be charged for and can be carried out by an appropriate authority or an authorised service centre - in accordance with the regulations for users of medical equipment.
6.5 Directives / Norms
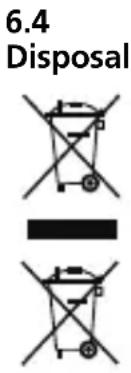
This product must not be disposed of together with domestic waste.
All users are obliged to hand in all electrical or electronic devices, regardless of whether or not they contain toxic substances, at a municipal or commercial collection point so that they can be disposed of in an environmentally acceptable manner.
Please remove the battery before disposing of the device/unit. Do not dispose of old batteries with your household waste, but at a battery collection station at a recycling site or in a shop.
Consult your municipal authority or your dealer for information about disposal.
This blood pressure monitor meets the requirements of the EU standard for non-invasive blood pressure monitors. It is certified in accordance with EC Guidelines and carries the CE symbol (conformity symbol) "CE 0297".
The blood pressure monitor corresponds to European standards EN 60601-1, EN 60601-1-2, EN 80601-2-30, EN 1060-1/3, EN ISO 14971 and EN 15223-1. The specifications of EU Guideline "93/42/EEC of the Council Directive dated 14 June 1993 concerning medical devices" are met.
Clinical trial results:
Clinical trial for this unit was carried out in England according to the BHS protocol and according to the AAMI - Standard (US).
Electromagnetic compatibility:
The device complies with the EN 60601-1-2 standard for electromagnetic compatibility.
Inquire at MEDISANA for details on this measurement data.
Intended use:
This unit is suitable for non-invasive blood pressure measurement in adults (i.e., suitable for external use).
6.6 Technical specifications
Name and model : MEDISANA Upper arm blood pressure monitor MTP Pro
Display system : Digital display
Memory slots : 2 x 99
Measuring technique : Oscillometric
Power supply : 6 V =, 4 x 1,5 V Mignon AA LR 6, Alkaline
Blood pressure measuring
range:30-280mmHg
Pulse measuring range : 40 - 200 beats / Min.
Maximum error tolerance
for static pressure : ± 3 mmHg
Maximum error tolerance
for pulse rate : ± 5 % of the reading
Pressure generation : Automatic, using micro pump
Deflation : Automatic
Automatic switch-off : After approx. 1 minute
Operating conditions: +10^ to +40^ ,
15 - 85% humidity
Storage conditions : - 5 °C to + 50 °C
Dimensions : approx. 120 mm x 163 mm x 66 mm
Cuff size : 22 - 32 cm Adult cuff for average
upper arm circumference
Weight approx. 480 g incl. batteries
Article number : 51090
EAN number : 40 15588 51090 8
Accessories : Mains adapter
Art.-No. 51036
Cuff, large 32 - 42 cm for
adults with upper arm of large circumference
Art.-No. 51037
€0297
In accordance with our policy of continual product improvement, we reserve the right to make technical and optical changes without notice.
The current version of this instruction manual can be found under www.medisana.com
Extended terms of warranty
Please contact your dealer or the service centre in case of a claim under the warranty. If you have to return the unit, please enclose a copy of your receipt and state what the defect is.
The following warranty terms apply:
- The warranty period for MEDISANA products is 10 years from date of purchase. In case of a warranty claim, the date of purchase has to be proven by means of the sales receipt or invoice. In case of a warranty claim, the date of purchase has to be proven by means of the sales receipt or invoice.
- Defects in material or workmanship will be removed free of charge within the warranty period.
- Repairs under warranty do not extend the warranty period either for the unit or for the replacement parts.
- The following is excluded under the warranty:
a. All damage which has arisen due to improper treatment, e.g. non-observation of the user instructions.
b. All damage which is due to repairs or tampering by the customer or unauthorised third parties.
c. Damage which has arisen during transport from the manufacturer to the consumer or during transport to the service centre.
d. Accessories which are subject to normal wear and tear (cuff, batteries etc.).
- Liability for direct or indirect consequential losses caused by the unit are excluded even if the damage to the unit is accepted as a warranty claim.

MEDISANA AG
Jagenbergstraße 19
41468 NEUSS
GERMANY
The service centre address is shown on the attached leaflet.

REMARQUE IMPORTANTE! TOUJOURS CONSERVER!
6.5 Directives / Normes
Dia de la fiestad de la celebración de la day of the day of the day of the day of the day of the day of the day of the day of the day of the day of the day of the day of the day of the day of the day of the day of the day of the day of the day of the day of the day of the day of the day of the day of the day of the day of the day of the day of the day of the day of the day of the day of the day of the day of the

3.1 Colocar / retiring as pilhas
1.1 Odyiecs yia mvy uya oac
Oi kapdiakc appuouie c oniuoupouv evav avwmao naaio. Auo mnpes i va npokaleoi duokolies oynv kataypaq nTc owotnc tua nC kata Tg eptnoic me taavwauetpke c oukeuec. H ava xipac ouokeun Eival nEktpovika Eonlaouevn, wote va avaywpiizl naw ano 20 ek twv ouvnEoTePw v appuouw kaowc kai tic lyóvec texvtec appuouie c npoxoeves a no kivnon kai auto eufavzetai otnv oovn eoow tou ouubolou
- Enions εav éxετe kánoiα aλη ασθένεια π.x. anoφpaKTiKn aptnpionáθεια, μληοτε πριν τη χροση ΜS ouokueuδ με tov γιαπο σaç.
H ouokun 6v mopéi va xpnouonoiθei yia tov eayxo nC kapdiaknc ouxvotntac evoc BnmuatofoTn.
Olykues yuvaicns npenei va npooeouv ta avaykaia metpa npoostaoiac Kaowkai Tny npoosnik Touc avtoh, ouuboueuteTov yiatpo oac.
Eav kata m diapkeia maac metpno napouiaotov duokoliesc onwsc nX. novoc oTo bpaxlova n alloi novoi, evpynote wc eNc: patnote to nKtpo START 4 yia va Expouokwoe aoeowc n mavoeta. Xaapwote m mavoetakai anopakpvte Tnv ano to bpaxlova. Erikoivwnote me tov avinpopo no n aneueic aecmuac.
Atoqa u e enieo nlaikko kua npenei va onkwouv to xepi,va avoiyokleioov tv naaun 10 opec kal ta v eptnoov. Me autnv Tnv aoknon baleiwetai To naaliko kua kal n diaikaiae tprnonc.
1.2 Ti npEe va npooeEe
Xpnoaonoiote tn ouokun mvo yia to okono nou npypapetal otic oyniecs xponc.
Eav Tn XpnouonoioueYia aalouc akonouc ixuei n eyyunon.
- Σε σπάνες περιπώεις εavirus μανοετα λόγω δυσλειουργίας παραείνει κατά τη διαρκεία τής μέτρησις φουσκωμένη πρεπειν την ανοίξετε αμέσως.
H ouokun dev enipentai va aeoupye kovta e ouakeuec nou ekneouv loxupn nektpikn aktivofoia, onwc n.x. padionounc. Etou npoei va empeaotie apvntka n aeoupyia.
Anayopeueta xhon tnc oukeunc ano atoua (oumuiaauovevw naidow) me npiopevec quikec n nveupatikec ikavotntec, eaiooewv, emepiac kai/ ywoons, evd ev entpouvtai yia tnva aopala touc ano kanoio apodio atopo nou tha touc obnyiec yia tn xhon tsoukeunc.
- Θα πέπει va παραλούθείτε τα παιδία ωοτεν αβεβαιώνεοτε πως δεν παιζουν με τη συοκεύη.
Eav unapxouv 3a2ec mny eiokeuaeTe Tn ouokun movl oac, yiati etou naue va loxue n eyyunon. H enoekun npenei va yivetai mvo o8 Eouoiobotmeva ouvepyia.
- PpoulaTe Tn oukeun ano Tnv uypaia. Eav np'oLa auta eioxwpnoe Uypo otn ouokun npenla va byalete aoeowc tic mnatapiec kai va anopuyente tvnpaipewx pnoTnc. Zmu tetoia nepiinwn Enikovwnote me tov avinpopo no n aneuthetaia c me mac. Ia to nwc th Enikovwnote maiz mac avatpeTe otn oelida me tic dieuohvoeic.
EiOn uynnc niesonc
ελαρa uynn nieon μeτpia uynn nieon nolu uynn nieon
4.2 HomegaTnOeon mEtpnoons
- Tn Kaθεοτε.
XaIapwoTe To xepi oac kal akouunnoTe To xaIapa n.x. navw oE eva TpaneZI. Kata tn diapkeia tnc mETpnonc va eioTne pEmuoi: Mny kivnote Kai mnu mAle deiaqopetikca mnpei ta anotelEoMaTa mETpnonc va aalaouv.
4.3
Méptpnon
TnC πεo
Eviaix
μεTpnonc
(Measurement Average Mode = 3/MAM