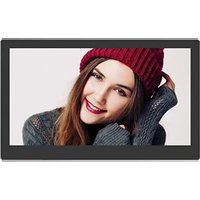
DigiFrame 1570 - Digital photo frame BRAUN - Free user manual and instructions
Find the device manual for free DigiFrame 1570 BRAUN in PDF.
| Technical Features | 15-inch LCD screen, resolution 1024 x 768 pixels, supports JPEG and BMP formats |
|---|---|
| Storage Capacity | Supports SD and SDHC memory cards up to 32 GB |
| Connectivity | USB port for connection to a computer, memory card slot |
| Usage | Photo display, slideshows, option to adjust display duration |
| Maintenance | Clean the screen with a soft cloth, firmware update if available |
| Safety | Avoid exposure to moisture and excessive heat, unplug during storms |
| General Information | Dimensions: 38 x 28 x 5 cm, weight: 1.5 kg, 2-year warranty |
Frequently Asked Questions - DigiFrame 1570 BRAUN
User questions about DigiFrame 1570 BRAUN
0 question about this device. Answer the ones you know or ask your own.
Ask a new question about this device
Download the instructions for your Digital photo frame in PDF format for free! Find your manual DigiFrame 1570 - BRAUN and take your electronic device back in hand. On this page are published all the documents necessary for the use of your device. DigiFrame 1570 by BRAUN.
USER MANUAL DigiFrame 1570 BRAUN
natural_image
Back view of a computer monitor with visible ventilation grilles and a handle (no text or symbols)Audio out
- Kopfhörer-Anschluss
- Headphone socket
- Prise casques
- Connessione cuffia
- Aansluiting voor hoofdtelefoon
- Conexión para auriculares
- Conexão de auscultadores
- Anslutning av hörlurar
- είσοδος ακουστικών
Deutsch 1
English......9
Français ....17
Italiano....25
Nederlands......33
Español....41
Português ....49
Sverige....57
Please note that this Digital Picture Frame comes in different versions. The detailed features of each Digital Picture Frame are specified on the package.
Remarque!
- Secure Digital (SD)
- Multi Media Card (MMC)
• Memory Stick (MS), MS Pro, MS Duo, MS Pro Duo - Secure Digital High Capacity (SDHC)
- Compact Flash (CF)
• MS Duo-Adapter erforderlich
natural_image
Digital tablet displaying a couple smiling at the camera against a blue sky (no text or symbols visible)natural_image
Grid of 24 nature photos including dogs, sunflowers, animals, and landscapes, displayed against a blue background with date and time labels (no readable text or symbols in the images themselves)text_image
C:\New1\File 017.mp3 021.mp3 035.jpg New movie.mpg a001.mpg Copy Deletetext_image
C:\New1\File 017.mp3 021.mp3 035.jpg New movie.mpg a001.mpg Copy Deletenatural_image
Illustration of a white computer monitor with a blue screen and a yellow arrow pointing to it, against a blue gradient background (no text or symbols)Important Safety Precautions....9
Box Content 9
Introduction 10
Main features 10
Memory card slots....10
Setting up the Digital Photo Frame....11
Operating the Digital Foto Frame....11
Menu selection screen....11
Mode selection screen....11
Remote Control 11
Displaying movies
(only model with video function)....12
Playing music (only model with MP3 function)....12
Displaying pictures 12
Using mixed files
(only model with video and MP3 functions)......13
File editing....13
Copying files 13
Deleting files 14
Connecting to a Computer ....14
Setting the Frame Options....14
Setting the Calendar/Clock/Alarm
(only model with this function) .....14
List of Menus and Functions....15
FAQs 16
Technical specifications....16
Important Safety Precautions
- Keep away from water, moisture and dusty areas.
- Operating temperature is 0-40°C. Keep the photo frame away from very hot or cold places.
- Be careful not to drop or knock the photo frame.
- Do not open the case yourself, always seek technical support.
- Connect the AC power adapter to the Digital Photo Frame and a wall outlet.
- Only use accessories approved by the manufacturer.
- Unplug the power cord from the outlet when the Digital Photo Frame will be left unused for a longer period of time.
Warning: To reduce the risk of fire or shock hazard, do not expose this product to rain or moisture.
Box Content

- Digital Photo Frame
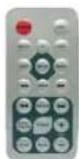
- Remote control.
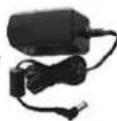
- Adapter
- USB cable (optional)
Important!
Please note that this Digital Photo Frame comes in different versions. The detailed features of the specific model are specified on the package.
Introduction
Welcome to the Digital Picture Frame! Now you can display your digital photos directly from your memory card without needing a computer. Simply insert a memory card into the Digital Picture Frame, turn it on, and you will be treated to a slideshow of your photos.
It's as easy as that.
You can also display individual photos, play video clips, or play background music with your slides-how (only model with video and MP3 functions).
To learn more about your new Digital Picture Frame's features and take full advantage of them, please take a few minutes to read this User Guide.
Important!
Please note that this Digital Picture Frame comes in different versions. The detailed features of each Digital Picture Frame are specified on the package.
Main features:
- Plays digital photos as slideshow with background music (only model with MP3 function)
- Plays music and videos (only model with video and MP3 functions)
- Displays calendar and clock with alarm (only model with this function)
- Rotates and zooms photos
- Brightness, contrast and color can be adjusted
• Built-in memory - Easy to use on-screen menus & button controls
Memory card slots
- Secure Digital (SD)
• Multi Media Card (MMC)
• Memory Stick (MS), MS Pro, MS Duo, MS Pro Duo - Secure Digital High Capacity (SDHC)
- Compact Flash (CF)
• MS Duo adapter required
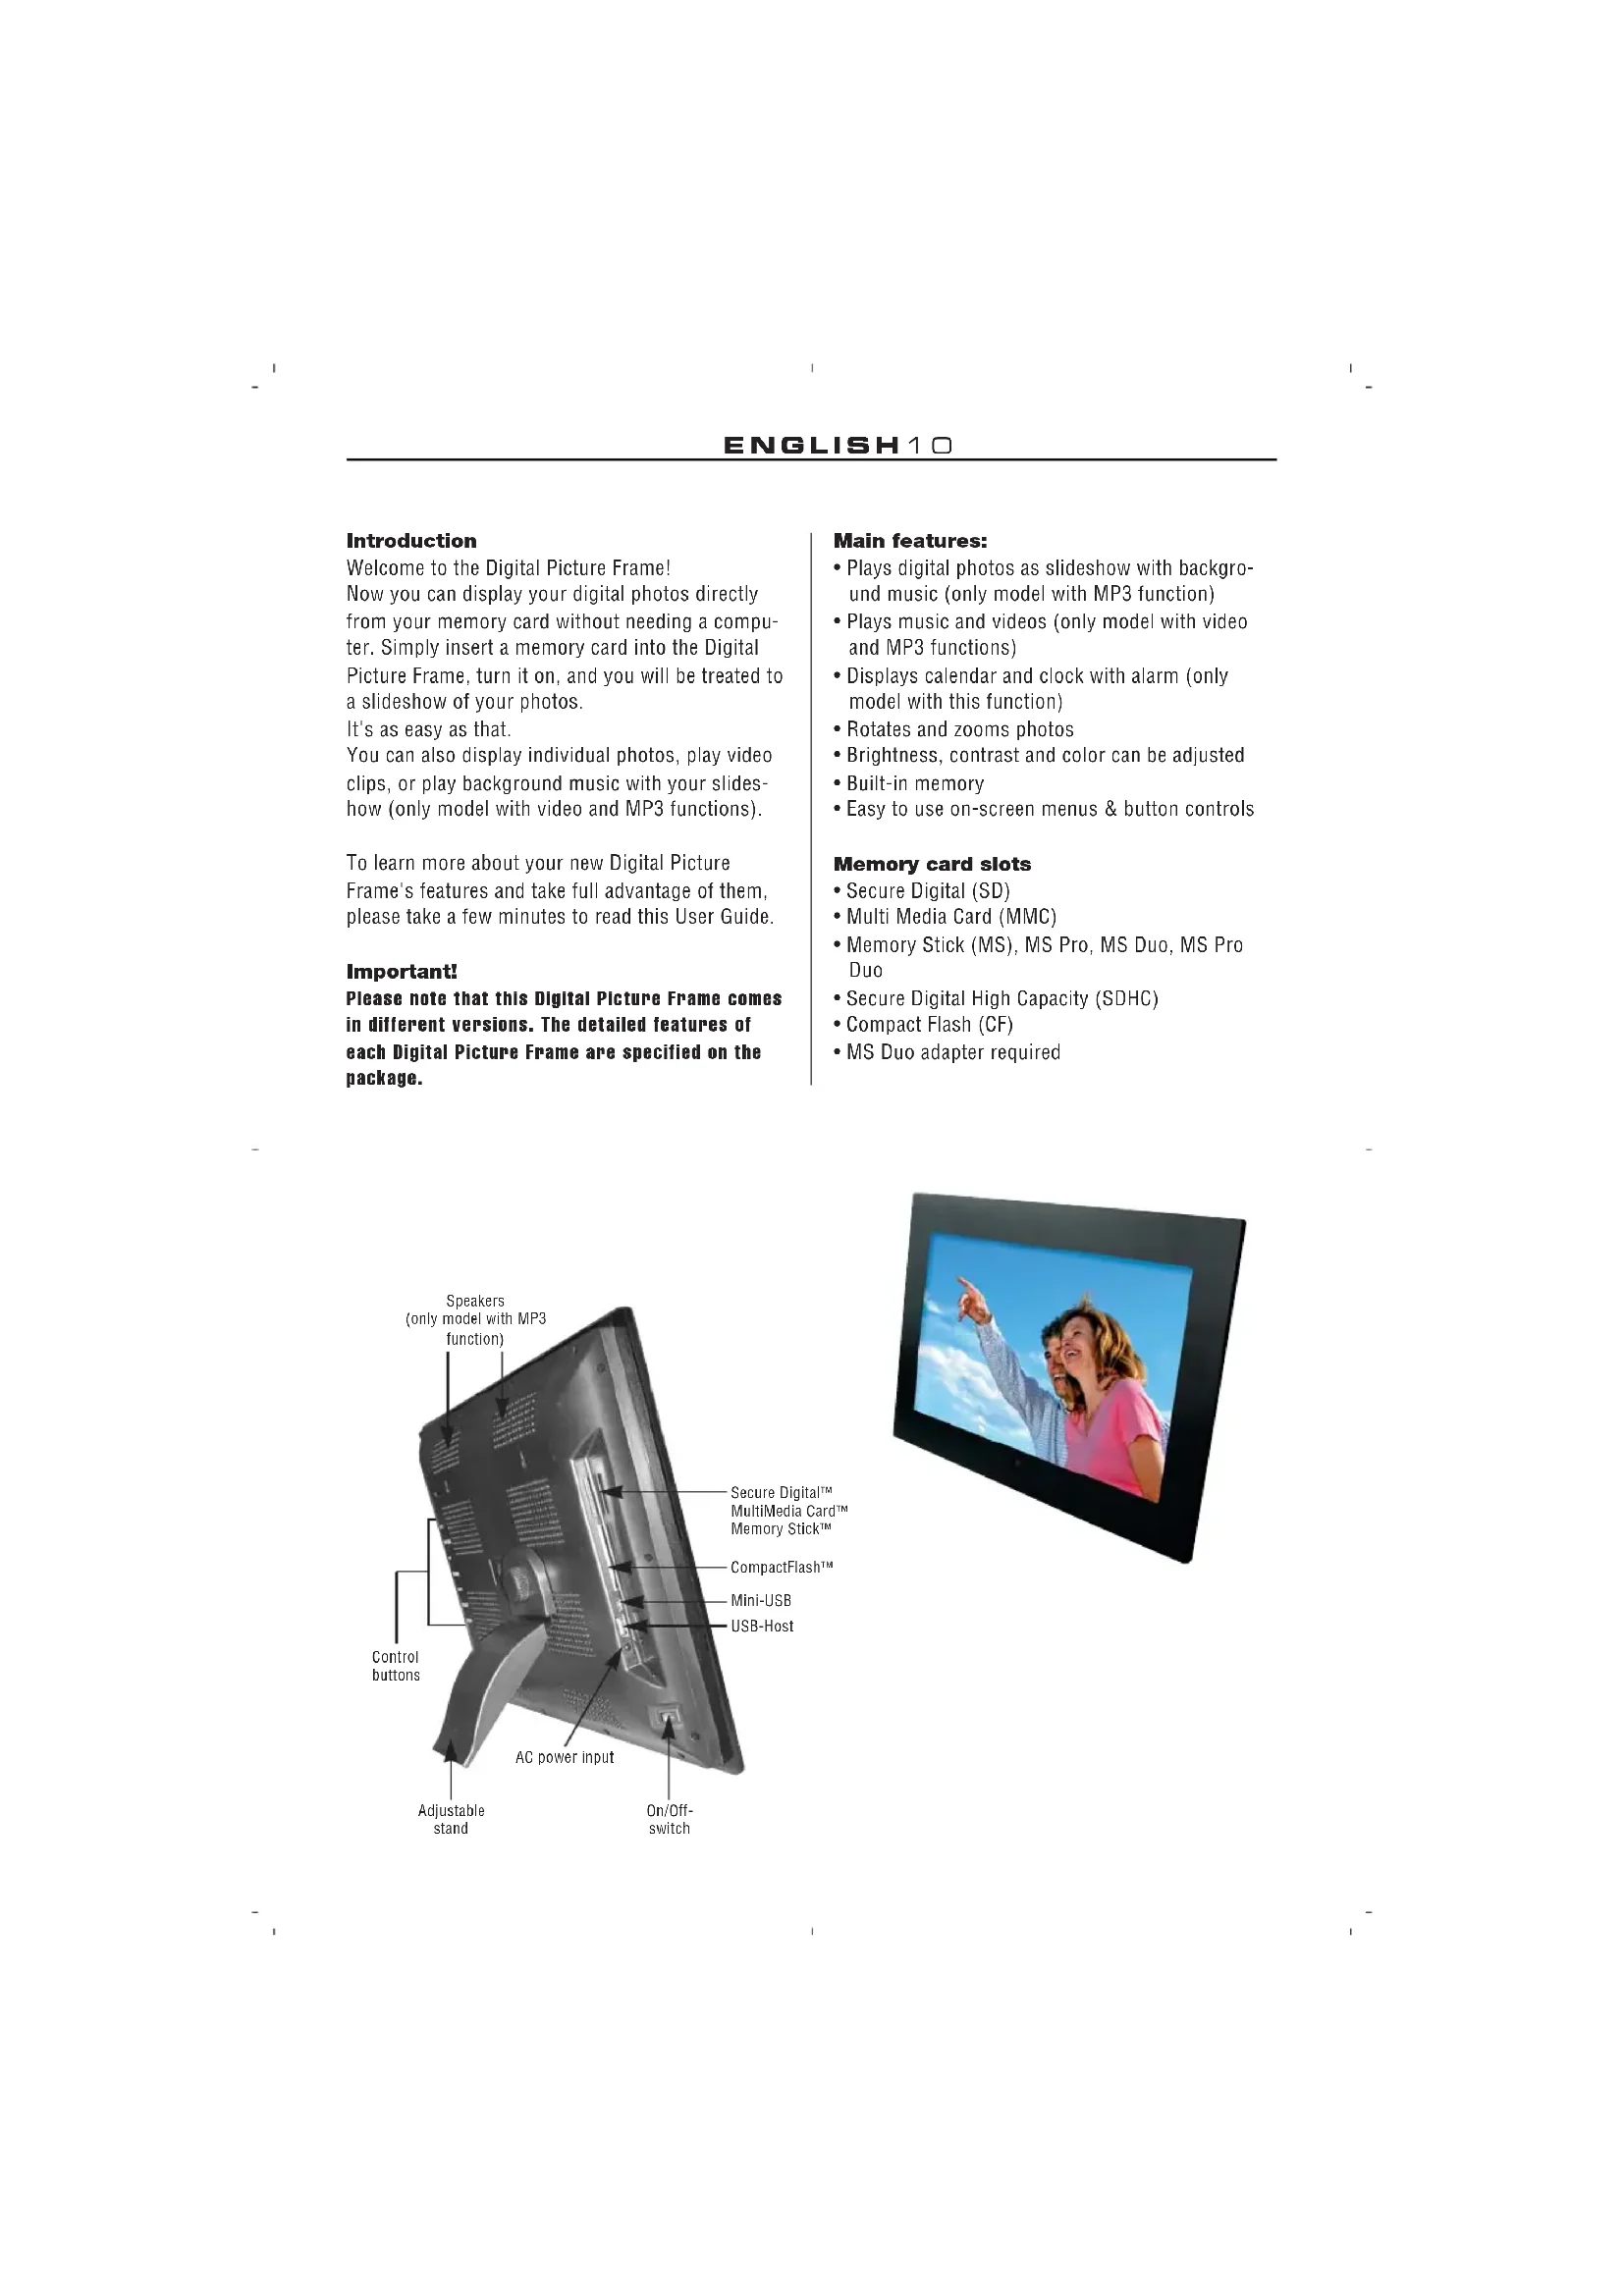
text_image
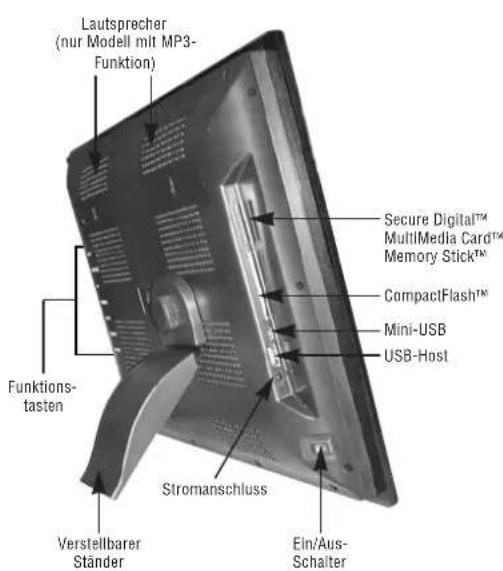
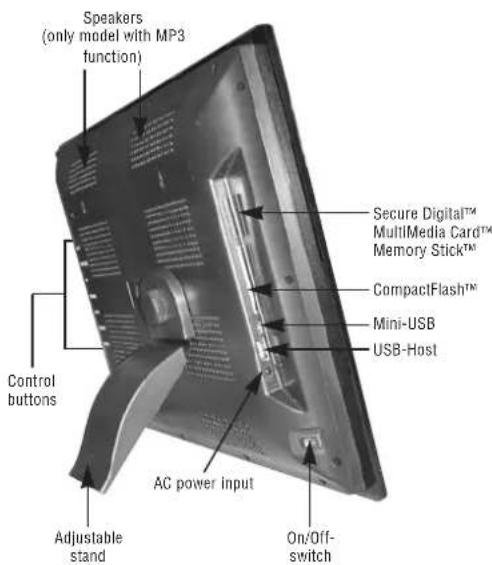
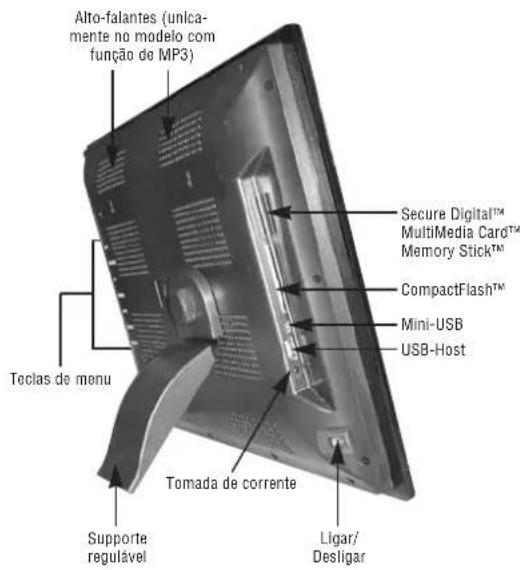
Speakers (only model with MP3 function) Control buttons Adjustable stand AC power input On/Off- switch Secure Digital™ Multimedia Card™ Memory Stick™ CompactFlash™ Mini-USB USB-Host
natural_image
Digital tablet displaying a couple smiling at the camera against a blue sky (no text or symbols visible)Setting up the Digital Photo Frame
- Connect the AC power adapter to the Digital Photo Frame and a wall outlet.
- If your digital photo frame has an On/Off switch, move this switch to the On position.
- Insert a memory card into the appropriate slot. The cards will only fit in one direction. Do not force a card. The card should fit snugly when properly inserted.
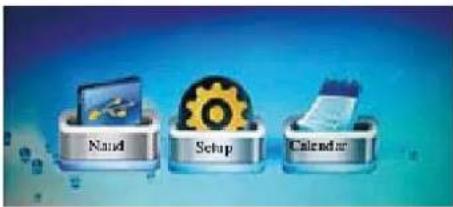
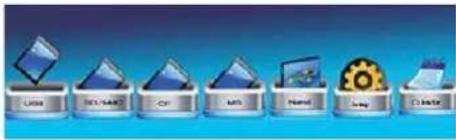
Operating the Digital Photo Frame Menu selection screen
Use the menu selection screen to choose the appropriate menu.
- NAND, SD/MMC, CF, ... Select the type of memory card to be used
- Setup Adjust frame settings
- Calendar Display a calendar with time and alarm settings
text_image
Riad Setup CalendarMenu selection
text_image
USB SQL Server CPU MSI Mail Mail GoogleMemory card selection
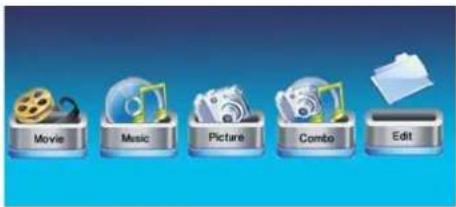
Mode selection screen
The mode selection screen appears after selecting the memory source to choose the type of files you wish to play or display.
- Movie: Play movie files (only model with video function)
- Music: Play music files (only model with MP3 function)
- Picture: Play photos as a slideshow
- Combo: Play slideshow pictures with background music (only model with MP3 function)
- File/Edit: Copy or delete files
text_image
Movie Music Picture Combo EditMenu selection
text_image
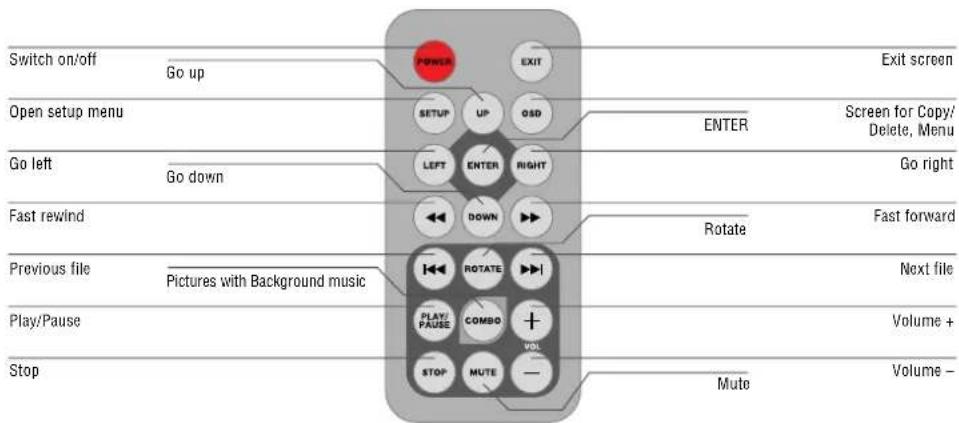
Switch on/off Go up Power EXIT Exit screen Open setup menu SETUP UP OSD ENTER Screen for Copy/ Delete, Menu Go left Go down LEFT ENTER RIGHT Go right Fast rewind DOWN Rotate Fast forward Previous file Pictures with Background music ROTATE Next file Play/Pause PLAY/ PAUSE COMBO + Volume + Stop STOP MUTE - Muto Volume -Displaying movies
(only model with video function)
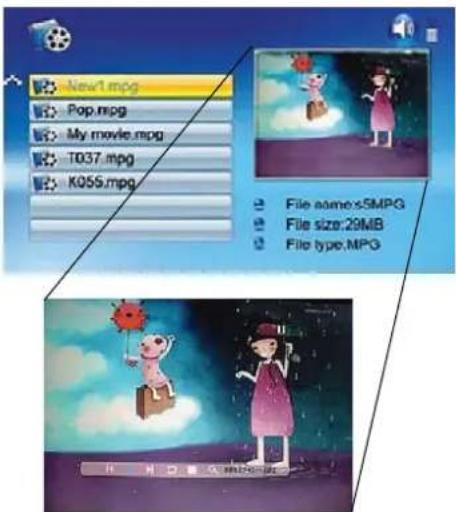
In the mode selection screen, use the arrow buttons to select Movie and press ENTER. A list with all available movie files will be displayed.
- Use the arrow buttons [▲]/[▼] to choose the desired file and press ENTER. The Digital Photo Frame will play the movie.
- To display the info bar during movie playback on the screen, press OSD.
- Press [◀]/[▶] to select the appropriate function in the info bar and execute it with ENTER.
text_image
New1.mpg Pop.mpg My movie.mpg T037.mpg K056.mpg File name.s5MPG File size:29MB File type.MPGPlaying music
(only model with MP3 function)
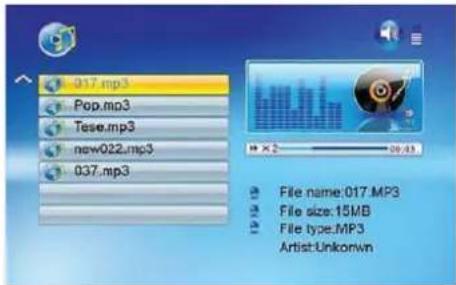
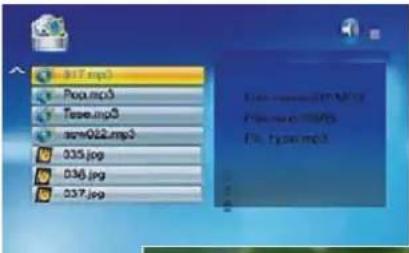
In the mode selection screen, use the arrow buttons to select Music and press ENTER. A list with all available music files will be displayed.
- Use the arrow buttons [▲]/[▼] to choose the desired file and press ENTER. The Digital Photo Frame will play the file.
text_image
017.mp3 Pop.mp3 Tase.mp3 new022.mp3 037.mp3 File name:017.MP3 File size:15MB File type:MP3 Artist:UnkonwnNote: To change the volume, press the VOL ⊕/⊖ on the remote control.
Displaying pictures
- In the mode selection screen, use the arrow buttons to select Photo and press ENTER. A list with all available picture files will be displayed.
- Use the arrow buttons [▲]/[▼] to choose the desired file and press ENTER. The Digital Photo Frame will display the photo.
- To display the info bar, press OSD.
- Press [◀]/[▶] to select the appropriate function in the info bar and execute it with ENTER.

natural_image
Grid of 20 photo frames showing animals and landscapes, no visible text or symbolsUsing mixed files
(only model with video and MP3 functions) In the mode selection screen, use the arrow buttons to select Combo and press ENTER. A list with all available files will be displayed.
- Use the arrow buttons [▲]/[▼] to choose the desired photo and music files and press ENTER to start a slideshow with background music.
text_image
B17.mp3 Prog.mcp3 Tase.mp3 sort022.mp3 035.jpg 036.jpg 037.jpg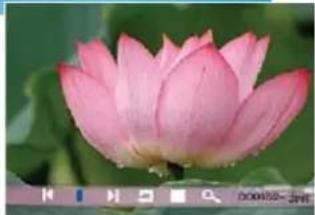
natural_image
Close-up of a pink lotus flower with water droplets, set against a blurred green background (no text or symbols visible)Note: To change the volume, press VOL ⊕/⊖ on the remote control.
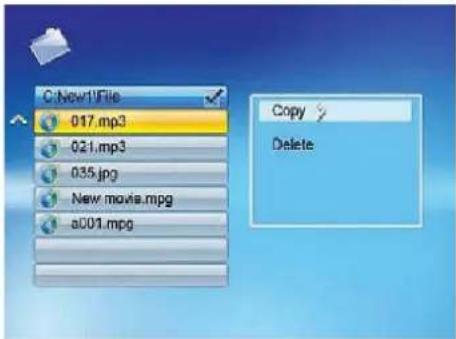
File editing
- In the mode selection screen, use the arrow buttons to select Edit and press ENTER. A list with all files and folders will be displayed.
- Use the arrow buttons [▲]/[▼] to choose the desired file.
- Press [▶] to mark a file. A checkmark √ will be displayed after the file name.
- To unmark a file, press [▶] again.
Copying files
- When the file is marked, press OSD, select COPY and confirm with ENTER.
text_image
C:\New1\File 017.mp3 021.mp3 035.jpg New movie.mpg a001.mpg Copy Delete- Use the arrow buttons [▲]/[▼] to select the copy destination and confirm with the right arrow button [▶]. When you press ENTER, the file will be copied to the respective location.
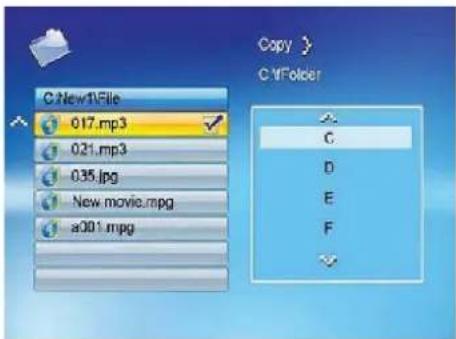
text_image
C New1File 017.mp3 021.mp3 035.jpg New movie.mpg a001.mpg Copy > C:\Folder C D E FDeleting files
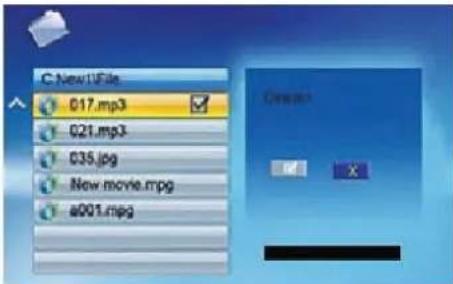
- When the file is marked, press OSD, select DELETE and confirm with ENTER.

text_image
C:\New1\File 017.mp3 021.mp3 035.jpg New movie.mpg a001.mpg Copy Delete- Use the left arrow button [◀] to select the checkmark button √.
text_image
C New1UFile 017.mp3 021.mp3 035.jpg New movie.mpg e001.mpg- When you press ENTER, the file will be deleted.
Connecting to a Computer
You can connect your Digital Photo Frame to a computer by using a USB cable to edit the files on your Frame's memory card on the computer.

natural_image
Illustration of a white computer monitor with a blue screen and a yellow arrow pointing to it, against a blue gradient background (no text or symbols)Setting the Frame Options
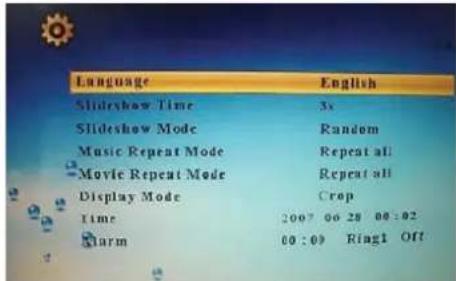
In the menu selection screen, use the arrow buttons to select Setup and press ENTER. A list with the available options will be displayed.
text_image
Language English Slideshow Time 3s Slideshow Mode Random Music Repeat Mode Repeat all Moyle Repeat Mode Repeat all Display Mode Crop Time 2007 00 28 00:02 Alarm 00:00 Ring1 OffThe settings and parameters are selected as follows:
[▲]/[▼]: Shift items or choose parameter
[◀]/[▶]: Change parameter value
ENTER: Confirm the defined setting
EXIT: Return to list of settings
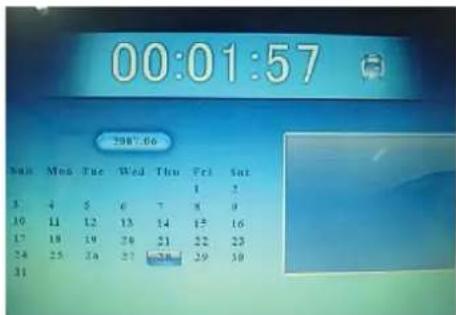
Setting the Calendar / Clock / Alarm
(only model with this function)
In the menu selection screen, use the arrow buttons to select Calendar and press ENTER. A screen will be displayed where you can define the settings.
[▲]/[▼]: Move to previous or next year
[◀]/[▶]: Move to previous or next month
ENTER: Confirm the defined setting
text_image
00:01:57 2007.06 Mon Tue Wed Thu Fri Sat 1 2 3 4 5 6 7 8 9 10 11 12 13 14 15 16 17 18 19 20 21 22 23 24 25 26 27 28 29 30 31List of Menus and Functions
Display option Settings Description
| Selecting menu NAND Internal memorySetup Define frame settingsCalendar Define calendar, clock and alarm settingsUSB-CSD/MMC Available memory cards and storage locationsMSCF |
| Selecting mode Movie Play movieMusic Play MP3 filePicture Display slideshowCombo Display slideshow with background musicFile/Edit Copy/delete files |
Setup menu Language Select the desired language
| Slideshow Time Define the speed of the slideshow (display interval of photos): 3s, 5s, 15s, 1min, 15mins, 1hour | |
| Slideshow Mode 14 special effects used for the transition from one photo to the next in a slideshow | |
| Music Repeat Mode Choose to repeat a single audio file, all audio files, or play the available files only once: Repeat one, Repeat all, Repeat off | |
| Movie Repeat Mode Choose to repeat a single movie file, all movie files, or play the available files only once: Repeat one, Repeat all, Repeat off | |
| Display Mode | Original: Preserves dimension ratios of original pictureCrop: Full screen picture (preserves dimension ratios, but crops picture for full screen)Stretch: Stretches picture to fit screen (dimension ratio is distorted) |
| Time | Set time (year/month/day/hour/minute) |
| Alarm Set alarm | |
| Brightness | Adjust brightness |
| Contrast | Adjust contrast |
| Saturation | Adjust saturation |
| Auto Power On | Set time when frame shall power on automatically, ON/OFF |
| Auto Power Off | Set time when frame shall power off automatically, ON/OFF |
| Splitscreen Function | Display several photos at the same time; On/Off |
| Auto Play | Select type of file to be played when frame is turned on: Movie, Picture, Music |
| Default Pressing ENTER immediately resets the frame to factory defaults. There will be no warning message. | |
Frequently Asked Questions
Question: Why can't the Digital Photo Frame play all images or movie files?
Answer: The Digital Photo Frame supports JPEG, MP3 and some video formats depending on the product specifications. It may not read some files downloaded from the internet.
Question: I have a memory card in the Digital Photo Frame. Why can't it read the card?
Answer: First, make sure that you are using a memory card that is supported by the Digital Photo Frame. Second, ensure that the memory card is inserted all the way into the correct card slot. Third, choose the correct card icon which you want to play.
Question: Why is the picture display slower with some pictures and faster with others?
Answer: Higher resolution pictures usually load slower.

This symbol on the product or in the instructions means that your electrical and electronic equipment should be disposed at the end of its life separately from your household waste. There are separate collection systems for recycling in the EU. For more information, please contact the local authority or your retailer where you purchased the product.
Technical specifications
Pictures: JPEG up to 16 mega pixel resolution
Video: MPEG 1/2/4, Motion JPEG (only model with video function)
Audio: MP3 (only model with MP3 function)
USB ports: USB 2.0 device USB 2.0 host
AC adapter: Input: AC 100 V–240 V, 50–60 Hz Output: DC 12 V, 2.0 A
NOTE: Right to technical and design modifications reserved.
natural_image
Digital TV displaying a couple smiling at the camera against a blue sky (no text or symbols visible)natural_image
Grid of 20 window-style photos showing animals and landscapes, no visible text or symbolstext_image
C:\New1\File 017.mp3 021.mp3 035.jpg New movie.mpg a001.mpg Copy Deletetext_image
C:\New1\File 017.mp3 021.mp3 035.jpg New movie.mpg a001.mpg Copy Deletenatural_image
Illustration of a computer monitor with a yellow arrow pointing to its screen, against a blue gradient background (no text or symbols)natural_image
Grid of 24 photos showing animals and landscapes, no visible text or symbolstext_image
C:\New1\File 017.mp3 021.mp3 035.jpg New movie.mpg a001.mpg Copy Deletetext_image
C:\New1\File 017.mp3 021.mp3 035.jpg New movie.mpg a001.mpg Copy Deletenatural_image
Illustration of a computer monitor with a yellow arrow pointing to its screen, against a blue gradient background (no text or symbols)natural_image
Grid of 20 nature photos including dogs, sunflowers, and mountains under a blue sky (no text or symbols)text_image
C:\New1\File 017.mp3 021.mp3 035.jpg New movie.mpg a001.mpg Copy Deletetext_image
C:\New1\File 017.mp3 021.mp3 035.jpg New movie.mpg a001.mpg Copy Deletenatural_image
Illustration of a computer monitor with a yellow arrow pointing to its screen, against a blue gradient background (no text or symbols)Fotolijst instellen
natural_image
Grid of 20 nature photos including dogs, sunflowers, and landscapes, displayed against a blue background with date and time labels (no readable text in the image itself)text_image
C:\New1\File 017.mp3 021.mp3 035.jpg New movie.mpg a001.mpg Copy Deletetext_image
C:\New1\File 017.mp3 021.mp3 035.jpg New movie.mpg a001.mpg Copy Deletenatural_image
Illustration of a white computer monitor with a blue screen and a yellow arrow pointing outward, against a blue gradient background (no text or symbols)- Secure Digital (SD)
- Multi Media Card (MMC)
• Memory Stick (MS), MS Pro, MS Duo, MS Pro Duo - Secure Digital High Capacity (SDHC)
- Compact Flash (CF)
- Requere-se adaptador de MS Duo
text_image
Alto-falantes (unica- mente no modelo com função de MP3) Teclas de menu Supporte regulável Tomada de corrente Secure Digital™ MultiMedia Card™ Memory Stick™ CompactFlash™ Mini-USB USB-Host Ligar/ Desligar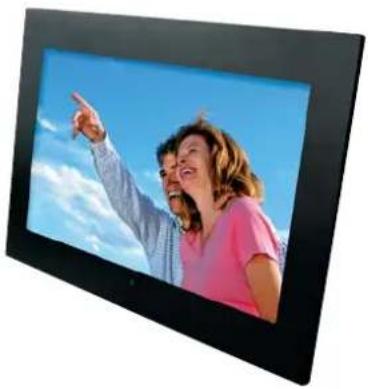
natural_image
Digital TV displaying a couple smiling at the camera against a blue sky with clouds (no text or symbols visible)natural_image
Grid of 20 window-style photos showing animals and landscapes, no visible text or symbolstext_image
C:\New1\File 017.mp3 021.mp3 035.jpg New movie.mpg a001.mpg Copy Deletetext_image
C:\New1\File 017.mp3 021.mp3 035.jpg New movie.mpg a001.mpg Copy Deletenatural_image
Illustration of a white computer monitor with a blue screen and a yellow arrow pointing to it, against a blue gradient background (no text or symbols)natural_image
Digital tablet displaying a couple smiling at the camera against a blue sky with clouds (no text or symbols visible)SWEDISH 59
natural_image
Grid of 24 nature photos including dogs, sunflowers, and animals under natural lighting (no text or symbols)text_image
C:\New1\File 017.mp3 021.mp3 035.jpg New movie.mpg a001.mpg Copy Deletetext_image
C:\New1\File 017.mp3 021.mp3 035.jpg New movie.mpg a00 L.mpg Copy Deletenatural_image
Illustration of a computer monitor with a yellow arrow pointing to its screen, against a blue gradient background (no text or symbols)natural_image
Product photo showing a flat-screen monitor, remote control, charging plug, and USB cable (no visible text or symbols)Ενδειξη!
text_image
LEADER DATA CPU MOS Prepaid In my CODEtext_image
Movies Music Pictures Combs Edittext_image
017.mp3 Pop.mp3 Tissue.mp3 new022.mp3 037.mp3 File name:017.M.P3 File size:15MD File type:MP3 Artist:Unknownnatural_image
Grid of grayscale images showing various animals and landscapes, no visible text or symbolstext_image
C:\New1\File 017.mp3 021.mp3 033.jpg New movie.mpg a001.mpg Copy Deletetext_image
C:\Nep1\File 017.mp3 021.mp3 035.jpg New movie.mpg a001.mpg Copy Deletenatural_image
Illustration of a computer monitor with a curved arrow pointing to its screen (no text or symbols visible)Ρυθμίσεις κορνίζας
This symbol on the product or in the instructions means that your electrical and electronic equipment should be disposed at the end of its life separately from your household waste. There are separate collection systems for recycling in the EU. For more information, please contact the local authority or your retailer where you purchased the product.
Design and specifications are subject to change without notice.