
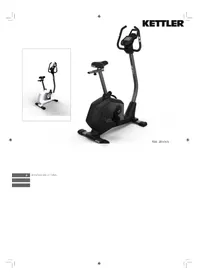
CTR 3 - Exercise bike KETTLER - Free user manual and instructions
Find the device manual for free CTR 3 KETTLER in PDF.
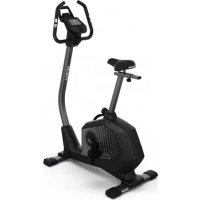
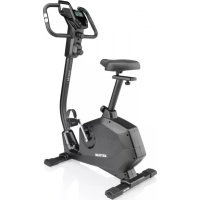
| Product type | Ergometric exercise bike |
| Brand | Kettler |
| Model | CTR 3 |
| Power supply | Batteries or mains adapter (depending on version) |
| Display | Graphic screen with 30x16 dot matrix |
| Training programs | Count Up, Count Down, 6 performance profiles, HRC1, HRC2 |
| Heart rate measurement | Ear clip (supplied), chest strap (optional), hand pulse sensor (depending on version) |
| Resistance range | 25-600 watts (speed-independent mode) |
| Special functions | Recovery, fitness test, automatic scan, display change |
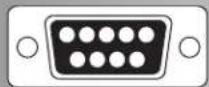
| PC interface | RS232 serial port (SUB-D 9-pin) |
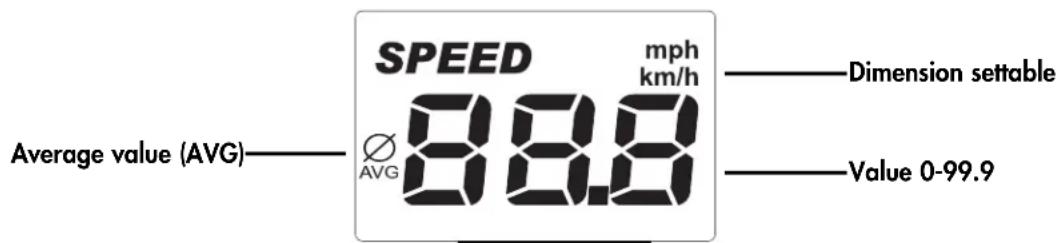
| Display units | km/h or mph, kJ or kcal, real or physical mode (energy) |
| Acoustic signal | Adjustable (on/off) for exceeding max heart rate |
| Maintenance | Check connections before each use, do not expose to prolonged moisture, use only Kettler spare parts |
| Safety | Consult a doctor before any training, do not use if defective, place on a solid base |
| Spare parts | POLAR chest strap with plug-in (ref. 07937-600), plug-in only (ref. 07937-650) |
Frequently Asked Questions - CTR 3 KETTLER
User questions about CTR 3 KETTLER
0 question about this device. Answer the ones you know or ask your own.
Ask a new question about this device
Download the instructions for your Exercise bike in PDF format for free! Find your manual CTR 3 - KETTLER and take your electronic device back in hand. On this page are published all the documents necessary for the use of your device. CTR 3 by KETTLER.
USER MANUAL CTR 3 KETTLER
HRC1-Count-Up 11
HRC2-Count-Down 11
SD4X / SD8X / SDCX / SDEX
- Handpuls (nur Crosstrainer Ergometer)
Programme: Count up / Count down
- (PROGRAM) "Count Up"
- (PROGRAM) "Count Down"
b)Leistungsprofile
PROGM "1"-"6
- (PROGRAM) "HRC1 Count Up"
- (PROGRAM) "HRC2 Count Down"
(PROGRAM) "Count Up"
(PROGRAM) "Count Down"
(PROGRAM) "HRC1" Count Up
(PROGRAM) "HRC2" Count Down
Service 18
- Your safety 18
Short description 19
- Function section / Keys 19
- Display section / Display 20
- Display values 21-23
Quick-start (to become acquainted) 23
- Start of training 23
End of training 23 - Snooze mode 23
Training 24
... by load defaults
- Count-Up 24
- Count-Down 24
Default section 24 Time 24
Energy 24
Distance 24
Age 25
Maximum pulse 25 Target pulse selection (FAT/FIT/Man.)
25
- Target pulse input 25
- Readiness for training 25
Power profiles 1-6 26
- Switchover Time/Distance 26
... by pulse defaults
HRC1 - Count-Up 27
HRC2 - Count-Down 27
Training functions 27
- Display switchover 27
- Profile selection 28
- Speed-dependent/-independent 28
- Interruption / End of training 28
- Restart of training 28
- Recovery (recovery pulse measurement) 29
Entries and functions 29
Table: Entries/Functions 29
Table: Pulse events 29
Individual settings 30
-
Deletion of the total kilometers 30
Saving of defaults 30
Selection: KM/mile display 30
Selection: kjoule/kcal display 30
Selection: Energy display real/phys. 30 -
Alarm sound ON/OFF 30
General notes 31
- System sounds 31
Recovery 31
- Profile display during training 31
- Speed-independent operation 31
- Arrows up / down 31
- Speed-dependent operation 31
Average value calculation 31
Notes on pulse measurement 31 With ear clip 31
With hand pulse 31
With chest strap 31
Interferences at the computer 31
Notes on the interface 31
Training instructions 32
Stamina training 32
- Load intensity 32
- Scope of load 32
Glossary 32

In the instruction, this sign refers to the glossary. There the respective term is explained.
Safety Instructions
Note the following points for your own safety:
- The training apparatus must be set up on a suitable, stable surface.
- Before the first use and also after approx. 6 operating days, the joints are to be checked for firmness.
- In order to avoid injuries as a result of incorrect loading or excessive loading, the training apparatus must only be used in accordance with the instructions.
- It is not recommended that the apparatus be set up in damp spaces, because this will in time lead to rusting.
- At regular intervals, check that the training apparatus is in correct working order and that it is in proper condition.
- The safety / technical checks are among the duties of the operator and must be carried out regularly and properly.
Defective and damaged parts are to be replaced immediately. Only use original KETTLER replacement parts.
The apparatus must not be used until it has been repaired. - The safety level of the apparatus can only be maintained if it is regularly checked for damage and wear.
For your safety:
- Before taking up training, have your family doctor advise you on whether or not you are in suitable health for training with this apparatus. The medical findings should be the basis for the structuring of your training programme. Incorrect or excessive training can lead to damage to health.
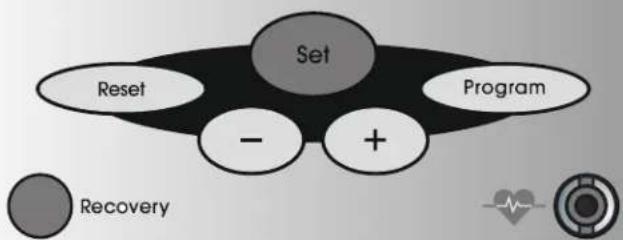
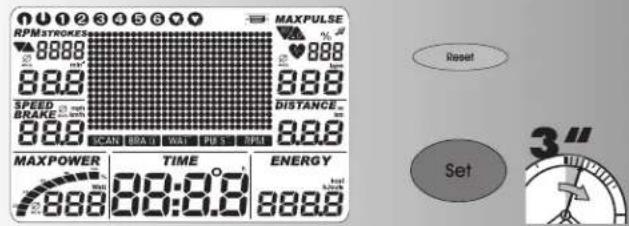
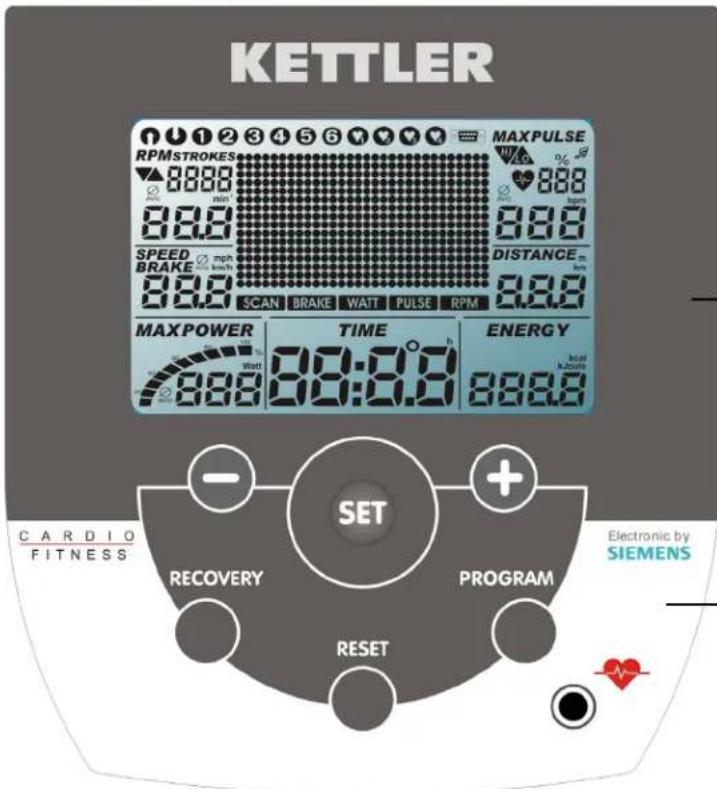
Short description
The ergometer has a function section with keys and a display section (display) with variable symbols and graphics.
SD4 / SD8 / SD5 / SD9 / SDC
KETTLER
Electronic by SIEMENS
CARDIO FITNESS

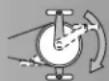
Recovery


Pulse measurement with chest strap
If the chest strap is included in the scope of delivery, the device is already equipped with the receiver. (SD5/7/9/SDC/SDE)
A plug-in receiver is not required.
Ergometer bicycle display SD4B /SD5B/SD8B/SD9B/SDCB/SDEB
Cross trainer ergometer display
SD4X / SD8X / SDCX / SDEX
Running ergometer display SD5S / SD9S / SDCS
Anzeigebereich
Display
Function Area
Keys
SD7/SDE/SDB
Anzeigebereich
Display
Function Area
Keys
(All figures show the electronic unit SD4 - SD9. The functions of the keys are the same as with SD7/SDE/SDB.)
Training and Operating Instructions


Recovery


Short instruction
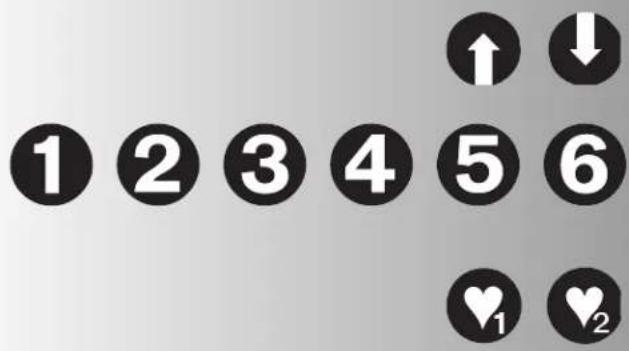
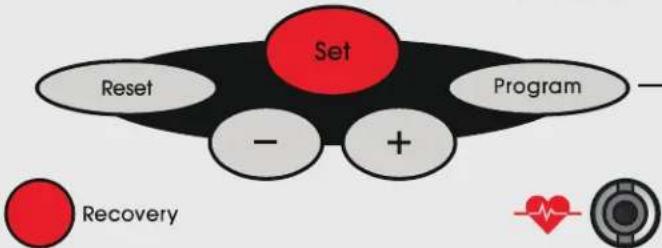
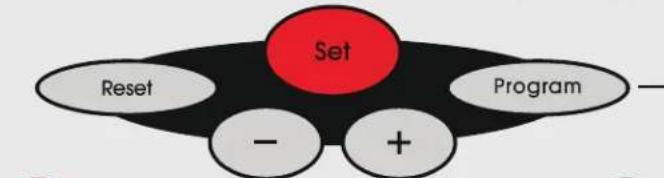
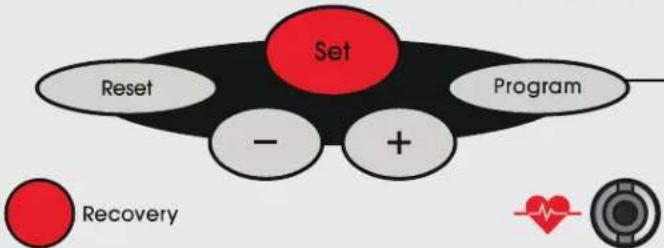
Function section
The six keys are shortly explained in the following.
The more exact application is explained in the individual chapters. In these descriptions the names of the function keys are also used like here.
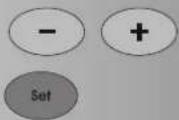
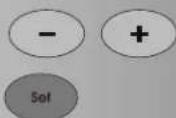
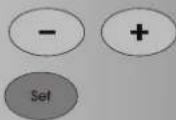
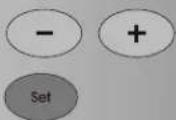
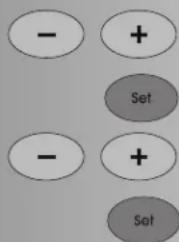
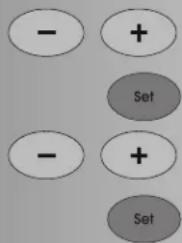
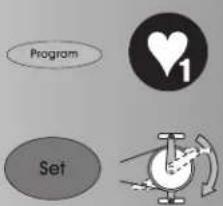
SET (press shortly)
With this function key, entries are called up.
The set data are accepted.
Ergoracer: During training change from speed-independent to speed-dependent operating mode.
SET (press longer)
For display of all segments: call "Individual settings"
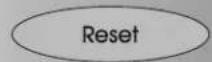
Reset
With this function key, the current display is deleted for a restart.
Program
With this function key, the various programs are selected.
Pressing again > next program
Pressing longer > program sequence
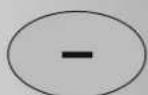
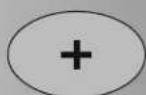
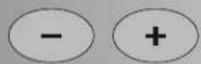
Minus - / Plus + keys
With these function keys, values are changed in the various menus before the training and power is changed during the training.
To continue "Plus"
Or return "Minus"
- Pressing longer > fast change
- Pressing "Plus" and "Minus" together:
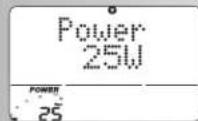
Power jumps to 25 Watt
- Programs switch to origin
- Value entry jumps to Off
RECOVERY
With this function key, the recovery pulse function is started.
Comment:
Further functions of the keys are explained in the respective chapters of the operating instructions.
Pulse measurement
Pulse measuring can be carried out in three ways:
- Ear clip (included in delivery)
The plug is put into the female connector.
2a. SD4/SD8/SDB: Chest strap + plug-in receiver (plug-in)
2b. SD5/SD7/SD9: Chest strap without plug-in. In this electronic unit, the receiver is built in behind the display. A plugged-in ear clip must be removed.
(Chest straps are not always included in delivery)
The Cardio-Pulse-Set with Polar chest strap and plug-in is available as an accessory (item no. 07937-600). If you already have the Polar chest strap, you will only need the plug-in (item no. 07937-650).
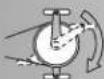
3 Hand pulse (for cross trainer ergometers only)
Display section / display
The display section informs about the various functions and respectively selected setting modes.
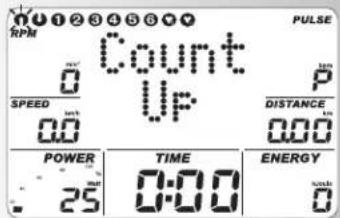
Programs: Count up / Count down
The programs are distinguished by their counting mode.
Programs
Power via time or distance
Default profiles 1-6
Pulse-controlled programs: HRC1/HRC2
Target pulse via time
Two programs, which control power by default pulse value.
Interface
The display of this symbol indicates that there is a data connection to a PC.
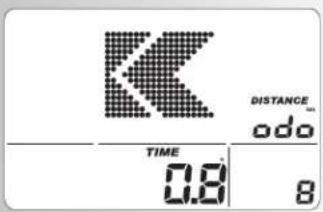
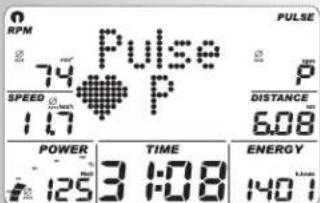
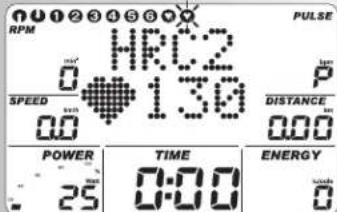
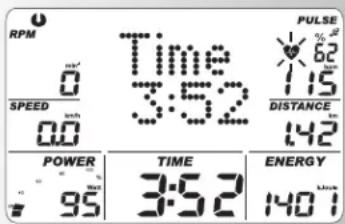
Display values
The sample displays show operation as ergometer bicycle.
With corresponding speed with the sample displays, the values for speed and distance are lower for cross trainer ergometers and higher for running ergometers.
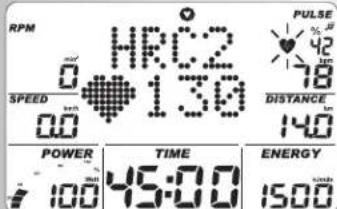
For 60 min (RPM)
Ergometer bicycle = 21.3km / h
Cross trainer ergometer = 9.5km / h
Running ergometer = 25.5km / h
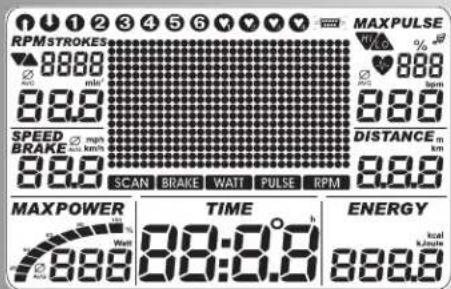


Training and Operating Instructions

Pedal frequency
Speed
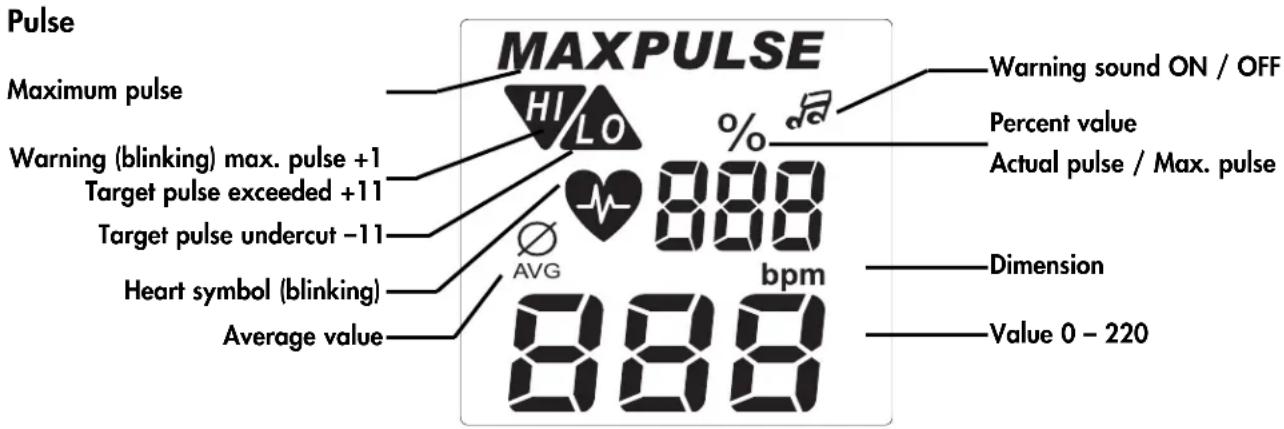
Pulse
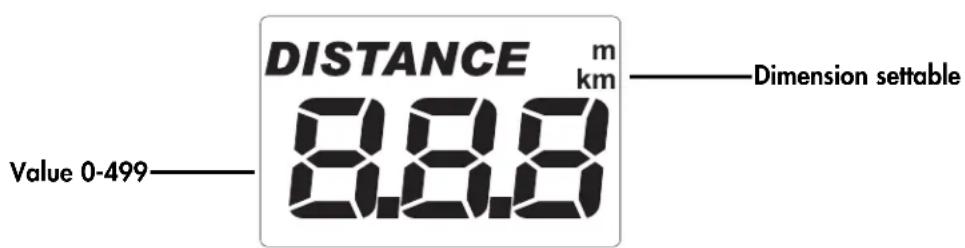
Distance
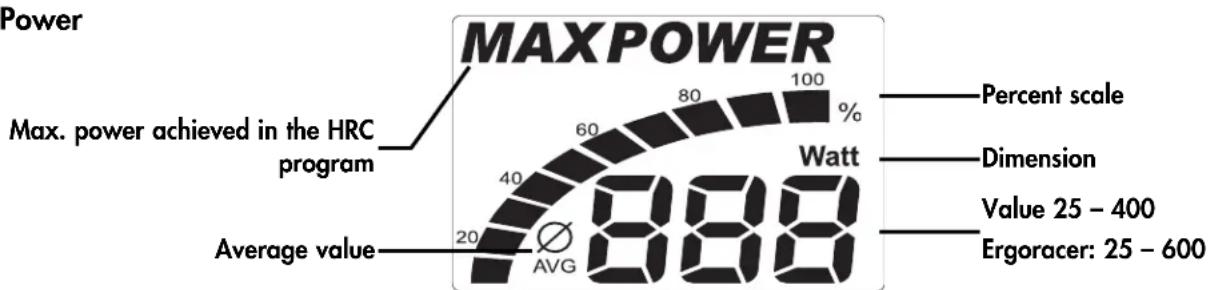
Power
Time

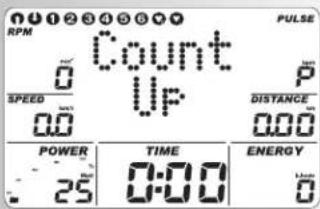
Quick start (to become acquainted)
Start of training:
without special settings
Greeting display on switching on Display of total kilometers and total training time
After 3 seconds: display "Count Up"; all values indicate 0; Power indicates 25 Watts
- Start of training
- Display
- Speed, distance, energy, time, revolutions and power
Alteration of power during the training:
- "Plus": display of value in the window "Power" is increased in steps of 5.
- "Minus" reduces in steps of 5
Continuation of training with these settings. In the meantime power alterations are possible any time.
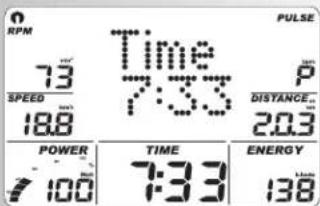
End of training
Average values ()
display Speed, revolutions, power and pulse (if pulse recording active)
Total values Distance, energy and time
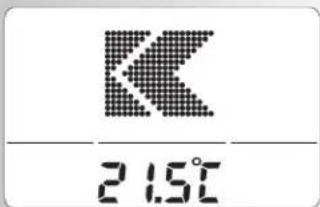
Snoopze mode
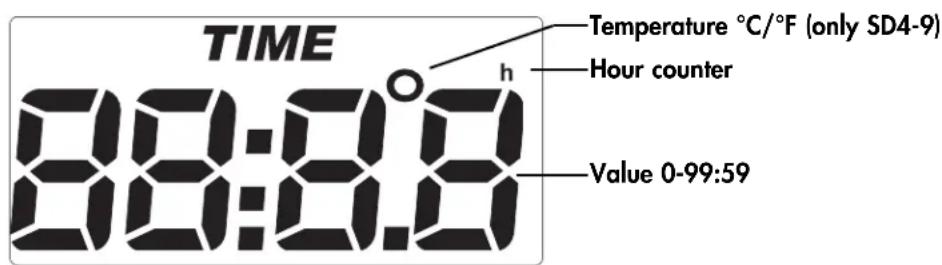
The device switches into the snooze mode with display of the room temperature 4 minutes after the end of training (display of the room temperature only SD4-9). Press any key and the display starts with "Count Up" again.
Training and Operating Instructions
Training
The computer is equipped with 10 training programs. They clearly distinguish in load intensity and duration.
1. Training by power defaults
a)Manual power inputs
- (PROGRAM) "Count Up"
- (PROGRAM) "Count Down"
b)Power profiles
PROGRAM"1"-6
2. Training by pulse defaults
Manual pulse defaults
- (PROGRAM) "HRC1 Count Up"
- (PROGRAM) "HRC2 Count Down"
Training by power defaults
a)Manual power inputs
(PROGRAM) "Count Up"
- Press "PROGRAM" until: display: "Count Up" Start training, all values count up.
or
- Press "SET": default section
- "Plus" or "Minus": change power.
Start of training all values count up.
(PROGRAM) "Count Down"
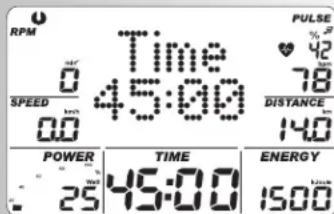
- Press "PROGRAM" until: display: "Count Down" The program counts from an entered value down >0 . If there is no entry, the training starts in program "Count Up". For starting the program, at least one entry for time, energy or distance is required.
- Press "SET": default section
Default section
Display: time default "Time"
Time default
- Enter values with "Plus" or "Minus" (e.g. 45:00) Confirm with "SET".
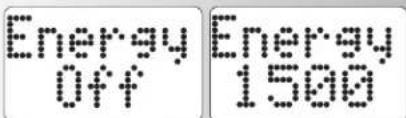
Display: next menu energy default "Energy"
Energy default
- Enter values with "Plus" or "Minus" (e.g. 1500) Confirm with "SET".
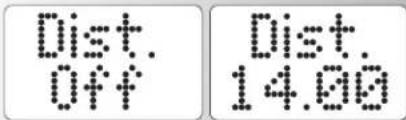
Display: next menu distance default "Dist."
Distance default
- Enter values with "Plus" or "Minus" (e.g. 14.00) Confirm with "SET".
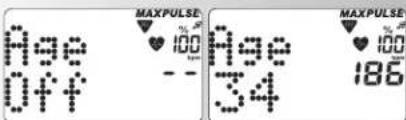
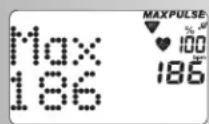
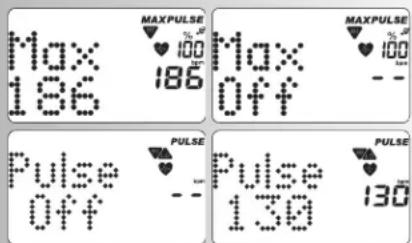
Display: next menu age input "Age"
Age entry
The age entry serves determination and monitoring the maximum pulse (symbol HI, warning sound, if activated
- Enter values with "Plus" or "Minus" (e.g. 34). From this, a maximum pulse of 186 is calculated according to the relation (220 - age).
Confirm with "SET".
Display: next menu maximum pulse input "Max"
Maximum pulse entry
- Enter values with "Minus"
Max Pulse can only be reduced!
Confirm with "SET".
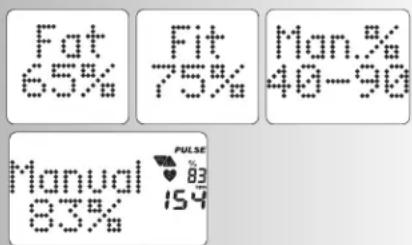
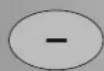
Display: next menu target pulse selection "Fat 65%
Target pulse selection
- Make selection with "Plus" or "Minus"
- Fat burning 65% , Fitness 75% , Manual 40 - 90% Confirm with "SET" (e.g. Manual 40 - 90%)
- Enter values with "Plus" or "Minus" (e.g. Manual 83) Confirm with "SET" (end of default mode)
Display: Readiness for training with all defaults
or
Target pulse entry
The entry 40 - 200 serves determination and monitoring of an age-independent training pulse (symbol HI, warning sound, if activated, no maximum pulse monitoring). For that, the maximum pulse entry must be "Off".
- Deselect maximum pulse monitoring with "Plus" or "Minus". Display: "Max Off"
Confirm with "SET".
Display: next default "Pulse" (target pulse)
- Enter value with "Plus" or "Minus" (e.g. 130)
Confirm with "SET" (end of default mode)
Display: Readiness for training with all defaults
Comment:
- An overview over all setting possibilities in the programs is compiled in the tables (see page 13).
- The defaults are lost on "Reset". If for individual settings "Saving of defaults" is activated (page 14), pulse defaults and the set initial power remain stored. With the next selection of Count Up / Count Down, the data is taken over.
Readiness for training
Power
- Alter power with "Plus" or "Minus". Start of training by pedaling. The power set before the training is stored.
b) Power profiles (PROGRAM) "1" - "6"
All profiles are selected by pressing "PROGRAM"
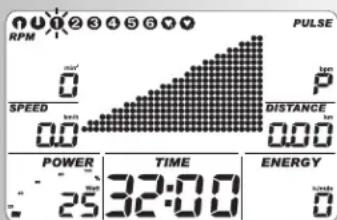
e.g. display: "1" fitness test according to WHO standard Automatically controlled increase in power by 25 Watts every 2 minutes, starting with 25 Watts. The recommended pedal revolution is 60 - 80 RPM.
Only persons without any cardiovascular problems are allowed to do this test without medical supervision.
Press "SET": default section,
Note:
Default overview, see table on page 13


Training and Operating Instructions
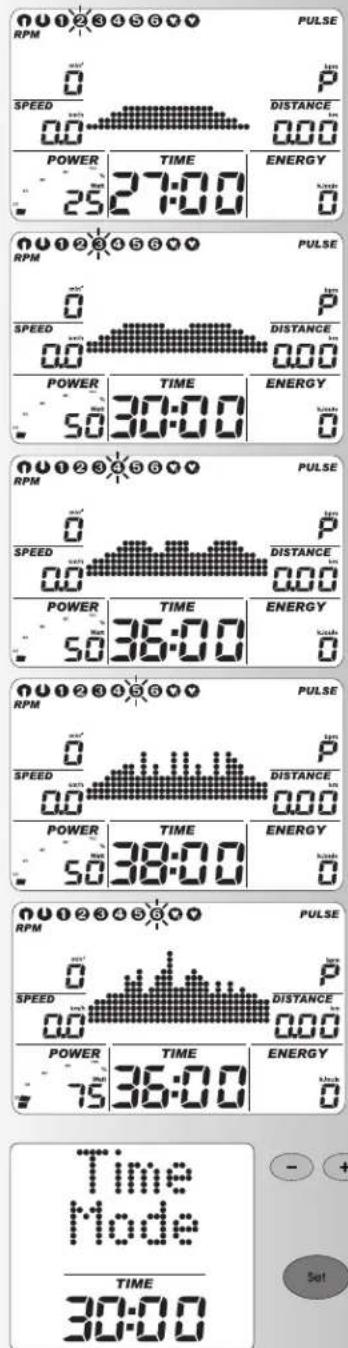

Press "PROGRAM" until: display:"2" Fitness beginner I; load 25-100 Watt, 27 min Press "SET": default section, defaults see table p. 29
Press "PROGRAM" until: display:"3" Fitness beginner II; load 50-125 Watt, 30 min Press "SET": default section, defaults see table p. 29
Press "PROGRAM" until: display "4"
Advanced I; load 50-150 Watt, 36 min
Press "SET": default section, defaults see table p. 29
Press "PROGRAM" until: display "5"
Advanced II; load 50-200 Watt, 38 min
Press "SET": default section, defaults see table p. 29
Press "PROGRAM" until: display "6" Pro1; load 75-300 Watt, 36 min Press "SET": default section
Comment:
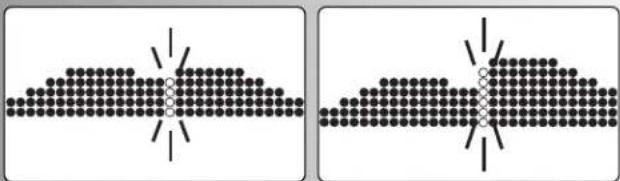
For times over 30 min, the profile is compressed to 30 columns on the program displays.
Program switchover time / distance
In the programs 1-6, switchover from time to distance mode is possible in the default section.
- Set mode with "Minus" or "Plus" Confirm with "SET". Display: Readiness for training
The distance per column is 0.4km (0.2 miles). Cross trainer ergometer: 0.2km (0.1 miles)
2. Training by pulse defaults
Manual pulse defaults
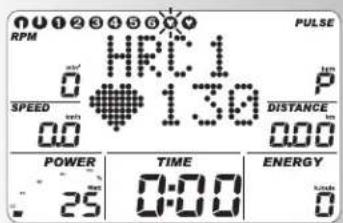
(PROGRAM) "HRC1 Count Up"
- Press "PROGRAM" until: display: HRC1
- Press "SET": default section
or
Start training, all values count up.
Power is increased automatically until the target pulse is achieved (e.g. 130)
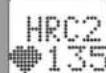
(PROGRAM) "HRC2 Count Down"
- Press "PROGRAM" until: display : HRC2
- Press "SET": default section
The entries and setting possibilities are analogue to program point "Count Down".
- Start of training
Power is automatically increased until the target pulse is achieved (e.g. 130)
01
Start training
Note:
Initial power
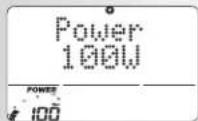
In HRC programs determination of the initial power of 25-100 Watts is possible in the default section.
- Enter values with "Plus" or "Minus" (e.g.. 100)
The power is then automatically increased from 100
Watts on, until the target pulse is achieved (e.g. 130)
Pulse
- With "Plus" or "Minus" the pulse value can still be changed at this point or during training, e.g. from 130 to 135.
Start of training by pedaling.
Default possibilities: see table page 13
Comment:
- For HRC programs, KETTLER recommends pulse measurement with chest strap.
Power adjustment in the HCR programs takes place in case of deviations of + / - 6 heartbeats.
Training functions
Display switchover during the training
Setting: manual
With "PROGRAM", the display changes in the points field in the following order: Time / RPM / Speed / Dist. / Power / Energy / Pulse / (Profile) / Time ...
Setting: automatically (SCAN)
Press the "PROGRAM" key longer until the "SCAN" symbol appears in the display. Change of the displays every 5 seconds. The SCAN function is terminated by renewed pressing of the "PROGRAM" key, the recovery function or interruption of training.

Program


Program


SCAN


Change of power profiles
If the power is changed during program run, the change becomes effective to the right of the blinking column. The columns to the left of it show the rendered performance values and remain unchanged.
Change from speed-independent to speed-dependent operation
(running ergometer)

During training press "SET". A change from speed-dependent to speed-independent operation takes place.
Display: both arrows under RPM
Pressing "SET" again switches operation back to speed-independent.
Note:
The change from speed-dependent to speed-independent operation is only possible in the programs "Count Up" and "Count Down". The ERGORACER always starts speed-independently. If training is interrupted, operation switches back to speed-independent.
Interruption or end of training
For less than 10 pedal revolutions/min or pressing "RECOVERY", the electronic equipment recognizes an interruption of the training. The training data achieved are displayed. Speed, power, revolutions and pulse are represented as average values with the symbol.
With "Plus" or "Minus" you can change into the current display.
The training data are displayed for 4 minutes. If during this period no key is pressed and no training takes place, the electronic equipment switches into the snooze mode with room temperature display (display of the room temperature only SD4-9).
Resumption of training
When continuing the training within 4 minutes, the last values are further counted or counted down.
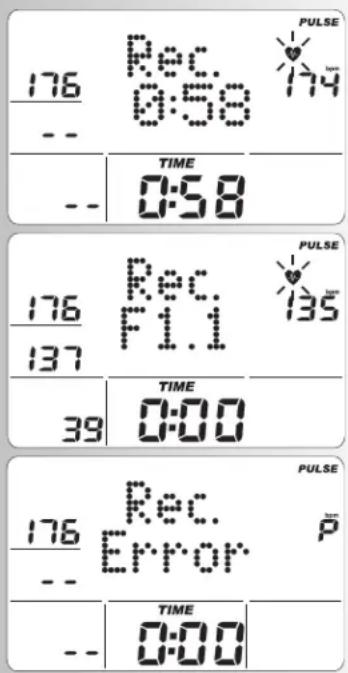
RECOVERY - Function
Recovery pulse measurement
At the end of training press "RECOVERY".
The electronic equipment measures your pulse reversing for 60 seconds.
If you press "RECOVERY", the current pulse value is stored under "RPM"; under "SPEED", the pulse value after 60 seconds is stored. Under "Power", the difference of both values is displayed. From this, a fitness grade is calculated (for example F 1.1). The display is ended after 20 seconds.
"RECOVERY" or "RESET" interrupts the function. If at the beginning or end of the time rewind no pulse is recorded, an error message is displayed.

Recovery
Entries and functions
| Training Stillsand | 1 | 2 | 3 | 4 | 5 | 6 | 7 | 8 | |
| Load | Load | ✓ | ✓ | ||||||
| Profile | Profile | ✓ | ✓ | ✓ | ✓ | ✓ | |||
| Time | ✓ | ✓ | |||||||
| Energy | ✓ | ✓ | |||||||
| Distance | ✓ | ✓ | |||||||
| Max. Pulse or Fat burning 65% or Fitness 75% or Manual 40-90% | ✓ | ✓ | ✓ | ✓ | ✓ | ✓ | ✓ | ✓ | |
| Target pulse 40-200 | ✓ | ✓ | ✓ | ✓ | |||||
| Time/Distance switchover | ✓ | ✓ | ✓ | ✓ | ✓ | ||||
| Recovery | ✓ | ✓ | ✓ | ✓ | ✓ | ✓ | ✓ | ✓ | |
Display for pulse events
| Value / Input % MAX | Exceeding | ||||
| HI | LO | √ | |||
| Maximum pulse 80-210 Off | ✓ | +1 +1 | 1 +1 | ||
| Target pulse Fat burning 65% or Fitness 75% or Manual 40-90% | ✓ | +11 -11* | |||
| → Target pulse 40-200 +11 -11* | |||||
For undercutting the entered target pulse (-11 beats), the symbol "LO" is displayed.
For exceeding (+11 beats), the symbol "HI" is displayed.
For exceeding the maximum pulse, the "HI" arrow is blinking and the lettering MAX is displayed.
Training and Operating Instructions
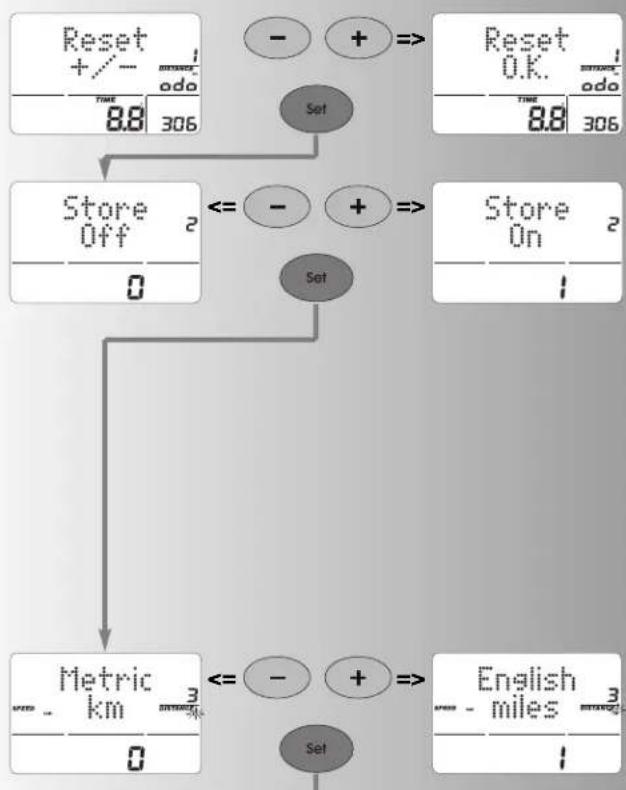
Individual settings
Proceed according to the scheme: press "Reset"
Display: all segments now press "SET" longer: menu: Individual Settings
Display: Reset +/-, total kilometers and training time
1. Delete total kilometers and training time
Jointly press "Plus" + "Minus"
Function: Delete display: "Reset O.K."
Press "Set": switchover to next setting
Display: Store
Or: Skip deletion of total values by just pressing "SET"
Display: Store
2. Storage of defaults
Press "Plus" or "Minus"
Defaults time, energy, distance, age, target pulse are permanently stored
Function:
ON = Storage also after "Reset"
Off = Storage until next "Reset"
Press "Set":
Switchover to next setting
Display: Metric or English
3. Display of the unit in kilometers / miles
Press "Plus" or "Minus"
Function: selection of kilometer or miles display Press "Set": selected unit is accepted and switchover to the next setting
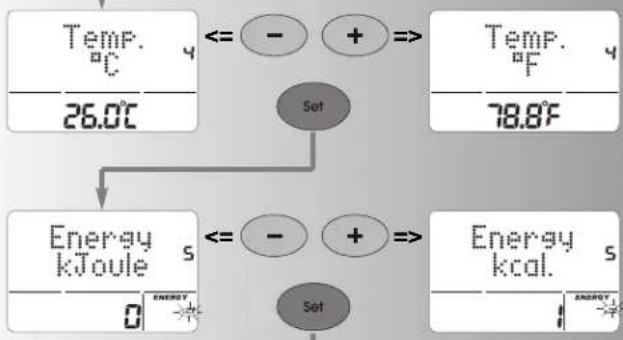
Display: Temp.
4. Display of temperature in ^ C / ^ F (display of the room temperature only SD4-9)
Press "Plus" or "Minus"
Function: Select ^ C or ^ Press "Set": selected unit is accepted and switchover to the next setting
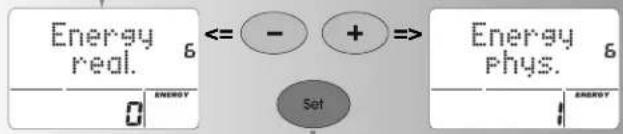
Display: Energy.
5. Display of energy consumption kjoule / kcal
Press "Plus" or "Minus"
Function: Selection of the energy consumption display Press "Set": selected unit is accepted and switchover to the next setting
Display: Energy
6. Display of mechanical / human energy turnover
Press "Plus" or "Minus"
Function: selection of the energy turnover display
real.: the energy turnover of the training person with 25% efficiency.
phys.: the energy turnover of the device, calculated purely physically.
Press "Set": selected unit is accepted and switchover to the next setting
Display: Alarm sound ON/OFF
7. Alarm sound for exceeding maximum
Press "Plus" or "Minus"
Function: switch on or off alarm sound.
Press "Set": selected setting is accepted and "New Start" of display
General notes
System sounds
Switching on
On switching on, a short sound is emitted during the segment test.
End of program
An end of program (profile programs, countdown) is signaled by a short sound.
Maximum pulse exceeding
If the set maximum pulse is exceeded by one pulse beat, 2 short sounds are emitted every 5 seconds.
Error output
For errors, e.g. recovery not executable without pulse signal, 3 short sounds are emitted.
Automatic scan function switching on and off
On activation and deactivation of the automatic scan function, a short sound is emitted.
Recovery
In the function the centrifugal mass is slowed down automatically. Further training is unsuitable.
Calculation of the fitness grade (F):
$$ \text {G r a d e} (F) = 6. 0 - \left(\frac {1 0 \times (P 1 - P 2)}{P 1}\right) ^ {2} $$
P1 = load pulse, P2 = recovery pulse
F1.0 = very good, F6.0 = insufficient
Switchover time/distance
For the programs 1-6, the profile per column can be switched over from the time mode (1 minute) to the distance mode (400 meters or 0.2 miles) in the defaults section. Cross trainer ergometer: (200 meters or 0.1 miles)
Profile display during training
At the beginning, the first column is blinking. After completion, it moves on to the right.
For profiles over 30 minutes up to the middle (column 15), then the profile is shifted from the right to the left. If the profile end appears in the last column (column 30), the blinking column moves further to the right until program end.

Speed-independent operation
(constant power)
The electromagnetic eddy-current brake regulates the braking torque for changing pedal speed to the set power.
Arrows up/down (Speed-independent operation)
If a power rate cannot be achieved with speed (e.g. 400 Watts with 50 pedal revolutions), the up or down arrow prompts faster or slower pedaling.
Speed-dependent operation (running ergometer)
(constant braking torque)
The electromagnetic eddy-current brake sets a constant braking torque.
Average value calculation
The average value calculation takes place per training unit.
Notes on pulse measurement
Pulse calculation starts, when the heart in the display is blinking simultaneously to your pulse beat.
With ear clip
The pulse sensor works with infrared light and measures the alterations of the translucency of your skin, which are caused by your pulse beat. Before you clamp the pulse sensor to your earlobe, rub it well 10 times to increase circulation.
Avoid disturbing pulses.
- Attach the ear clip carefully to your earlobe and search for the most suitable point for measuring (heart symbol blinking without interruption).
- Do not execute your training directly under strong incidence of light e.g. neon light, halogen light, spot, sun light.
- Completely exclude vibrations and wobbling of the ear sensor including the cable. Always fix the cable to your clothing by means of the clip or even better to a headband.
With chest strap (accessory)
Not always included in delivery, available from authorised dealers. The Cardio-Pulse-Set with Polar chest strap and plug-in is available as an accessory (item no. 07937-600). If you already have the Polar chest strap, you will only need the plug-in (item no. 07937-650).
Interferences at the training computer
Press the reset key
With hand pulse
An extra-low voltage generated by contraction of the heart is
Training and Operating Instructions
recorded by the hand sensors and analyzed by the electronic equipment
Always grip the contact surfaces with both hands
- Avoid jerky gripping
- Keep your hands still and avoid contractions and rubbing on the contact surfaces.
Notes on the interface
The program "ERGO concept" ["ERGO-Konzept"], item No. 7926-500, available at your specialist dealer, allows you controlling of the KETTLER ergometer with a commercially available PC via this interface.
On our homepage www.kettler.de you will find notes on further possibilities with the interface.
Training instructions
Sports medicine and training science use bicycle ergometry, among others, for examination of the functionality of the cardiovascular and respiratory system.
Whether your training achieved the desired effects after some weeks you can determine as follows:
- You achieve a certain stamina with lower cardiovascular performance than before
- You keep a certain stamina with the same cardiovascular performance over a longer period.
- After a certain cardiovascular performance you recover faster than before.
Guide values for the stamina training
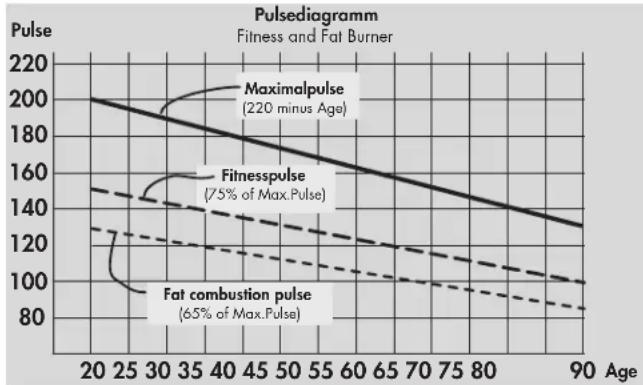
Maximum pulse: maximum load means the achievement of the individual maximum pulse. The maximally achievable heart rate depends on the age.
To that applies the empirical formula: the maximum heart rate per minute corresponds 220 pulse beats minus years of age. Example: age 50 years >220 - 50 = 170 pulse/min.
Weight: a further criterion for determination of the optimal training data is the weight. The nominal default for maximum load is 3 Watts/kg body weight for men and 2.5 for women. Furthermore, it must be observed, that from age 30 on capability decreases: for men approx. 1% and for women 0.8% per year of age.
Example: man; 50 years; weight 75kg
>220 - 50 = 170 pulse/min. maximum pulse
>3 Watts × 75kg = 225 Watts
Minus "age discount" (20% of 225 = 45 Watts)
225-45=180Watt (nominal default for maximum load) Load intensity
Load pulse: the optimal load intensity is achieved at 65 - 75% (comp. diagram) of the individual cardiovascular performance. This value changes depending on the age.
Scope of load
Duration of a training unit and its frequency per week:
The optimum scope of load is given, when over a longer period 65 - 75% of the individual cardiovascular performance is achieved.
Empirical rule:
Training frequency Duration of training
daily 10 minutes
2-3 times a week 20-30 minutes
1-2 times a week 30-60 minutes
You should choose the Watts power such that you are able to stand the muscle load over a longer period.
Higher powers (Watt) should be yielded in connection with an increased pedaling frequency. A too low pedaling frequency of less than 60 rpm results in a pointedly static load of the musculature and thus to early exhaustion.
Warm-up
At the beginning of each ergometer training unit, you should for 3-5 minutes pedal with a slowly increasing load to warm and to get your heart/circulation and your musculature moving.
Cool-down
The same importance has the so-called "cooling down". After each training unit you should continue pedaling against a slight resistance for approx. 2-3 minutes.
The load for your further stamina training should basically be increased over the scope of load, e.g. instead of 10 minutes your training is 20 minutes or instead of 2 times a week 3 times a week. Beside individual planning of your cardio training you can fall back on the training programs integrated in the training computer (comp. page 9 cont.).
Glossary
Age
Entry for calculation of the maximum pulse.
Dimension
Units for display of km/h or mph, kjoule or kcal, hours (h) and power (Watt)
Speed-independent/speed-dependent operation (running ergometer)
Speed-independent operation
Initially, the ERGORACER always works speed-independent.
Only during the training the user can select between speed-independent and speed-dependent operation with the "SET" key. If both direction arrows are displayed, speed-dependent operati
on is selected. Pressing the "SET" key again switches operation back to speed-independent. If the training is interrupted, the display computer automatically switches back to speed-independent operation.
For speed-dependent operation, power has no upper or lower limit. If with a power of over 600W , operation is switched back to speed-independent, the power display is set to 600W and the braking torque is changed respectively. If with a power display of below 25W , operation is switched back to speed-independent, power is set to 25W , and the braking torque is changed.
Speed-dependent operation (Count Up, Count Down)
Speed-dependent operation is available during training only. If there is a switchover to speed-dependent operation, the braking torque is kept constant. The displayed power is not changed, until the pedaling speed is changed. With a change in speed, the current power is calculated from the (constant) braking torque and the current pedal speed, and displayed respectively. If the power displayed in speed-independent operation is not settable (arrow symbols are shown), the actual power value is displayed in the moment of switchover. The power can be changed by means of the "+" and "-" keys or by means of speed.
During training, the displayed power is increased or decreased in 5 W (or 25 W, respectively) steps with the "+" or "-" keys, respectively. For that, the current power is taken as standard. The new braking torque is calculated and set. Then the braking torque is kept constant, and the power display is calculated anew for changing pedal speed like described above.
A change of the ergometer power by means of the "+" and "-" keys is only possible in the range from 25 W to 600 W. If a key outside this range is pressed, the display jumps to the next possible value within the determined limits and the braking torque is changed respectively.
Energy
Calculates the energy turnover of the body with an efficiency of 25% to provide the mechanical power. The remaining 75% does the body convert to heat.
Fat burning pulse
Calculated value of: 65% MaxPuls
Fitness pulse
Calculated value of: 75% MaxPuls
Glossary
A collection of attempts for explanation.
HI symbol
With "HI" displayed, a target pulse is too high by 11 beats.
With HI blinking, the maximum pulse is exceeded.
LO symbol
With "LO" displayed, a target pulse is too low by 11 beats.
Manual -
Calculated value of: 40 - 90% MaxPuls
MaxPulse(s)
Calculated value of 220 minus years of age
Menu
Display in which values are to be entered or selected.
Power
Current value of the mechanical (braking) power in Watts, which the ergometer converts into heat.
Profile
Change of performance over time or distance represented in the points field.
Programs
Training possibilities requiring manual or program-determined performances or target pulses.
Percent scale
Comparison display between current power and maximum power (400/600W).
Points field
Display area with 30 × 16 points for representing performance profiles as well as text and value displays.
Pulse
Recording of the heartbeat per minute
Recovery
Recovery pulse measurement at the end of training. From start and end pulse of one minute the deviation and a fitness grade are determined. For the same training, the improvement of this grade is a measure for increase in fitness.
Reset
Deletion of display contents and restart of display.
Interface
9-pole SUB-D socket (RS232/serial) for data exchange with a PC.
Control
The electronic equipment controls the power or the pulse for manually entered or default values.
Target pulse
Manual or program-determined pulse value, which is to be achieved.

Sommaire
HRC1 - Count-Up 42
HRC2-Count-Down 42
Electronic by SIEMENS
CARDIO FITNESS
SD4X / SD8X / SDCX / SDEX
Programmes : Count up / Count down
- (PROGRAM) "Count Up"
- (PROGRAM) "Count Down"
b) Profils de performance
- (PROGRAM) "1" - "6"
- (PROGRAM) "HRC1 Count Up"
- (PROGRAM) "HRC2 Count Down"
(PROGRAM) "Count Up"
(PROGRAM) "Count Down"
(PROGRAM) "HRC1 Count Up"
(PROGRAM) "HRC2 Count Down"
HRC1-Countup 59
HRC2-Countdown 59
Trainingsfuncties

Electronic by SIEMENS
CARDIO FITNESS

Recovery


SD4X / SD8X / SDCX / SDEX
Snelstart (ter kennismaking)
Trainingsbegin:
- (PROGRAM) "count up"
- (PROGRAM) "countdown"
b. Vermogenprofiel
- (PROGRAM) "1" - "6"
- (PROGRAM) "HRC 1 count up"
- (PROGRAM) "HRC 2 countdown"
(PROGRAM) "count up"
- "PROGRAM" indrukken tot weergave: "count up". Training beginnen, alle waards tellen op.
of
(PROGRAM) "countdown"
(PROGRAM) "HRC 1 count up"
(PROGRAM) "HRC 2 countdown"
| Training Stilstand | 1 | 2 | 3 | 4 | 5 | 6 | 7 | 8 | |
| Belasting | Belasting | ✓ | ✓ | ||||||
| Profiel | Profil | ✓ | ✓ | ✓ | ✓ | ✓ | |||
| Tijd | ✓ | ✓ | |||||||
| Energie | ✓ | ✓ | |||||||
| Afstand | ✓ | ✓ | |||||||
| Max. polsslag of | ✓ | ✓ | ✓ | ✓ | ✓ | ✓ | ✓ | ✓ | |
| Vetverbranding 65% of Fitness 75% of Manueel 40-90% | ✓ | ✓ | |||||||
| Doelpolsslag 40-200 | ✓ | ✓ | ✓ | ✓ | |||||
| Tijd/afstand wisseling | ✓ | ✓ | ✓ | ✓ | ✓ | ||||
| Recovery | ✓ | ✓ | ✓ | ✓ | ✓ | ✓ | ✓ | ✓ | |
(constant remmoment)
Count-Up
- Count-Down
HRC1 - Count-Up 75
HRC2 - Count-Down 75
Electronic by SIEMENS
CARDIO FITNESS

Recovery


SD7/SDE/SDB

SD4X / SD8X / SDCX / SDEX
Programas: Count up / Count down
-
(PROGRAM) "Count Up"
-
(PROGRAM) "Count Down"
- (PROGRAM) "HRC1 Count Up"
- (PROGRAM) "HRC2 Count Down"
(PROGRAM) "Count Down"
(PROGRAM) "HRC1 Count Up"
(PROGRAM) "HRC2 Count Down"
HRC1-Count-Up 91
HRC2-Count-Down 91
Electronic by SIEMENS
CARDIO FITNESS
Programmi: Count up / Count down
PROGRAM"Count Up
- (PROGRAM) "Count Down"
- (PROGRAM) "HRC1 Count Up"
- (PROGRAM) "HRC2 Count Down"
(PROGRAM) "Count Up"
(PROGRAM) "Count Down"
(PROGRAM) "HRC1 Count Up"
(PROGRAM) "HRC2 Count Down"
HRC1 - Count-Up 106
HRC2-Count-Down 106
Funkcj treningowe
Electronic by SIEMENS
CARDIO FITNESS

Recovery


SD7/SDE/SDB
Pomiar pulsu z pasem na pieré
SD4X / SD8X / SDCX / SDEX
Programy: Count up / Count down
- (PROGRAM) „HRC1 Count Up"
- (PROGRAM) "HRC2 Count Down"
(PROGRAM) „HRC1 Count Up"
(PROGRAM) „HRC2 Count Down"
Nacisnac "plus" lub "minus"
Nacisnqc "plus" lub "minus"
Nacisnac "plus" lub "minus"

- Programme: Count up / Count down
- b)Leistungsprofile
- Short description 19
- Quick-start (to become acquainted) 23
- Training 24
- ... by load defaults
- ... by pulse defaults
- Training functions 27
- Entries and functions 29
- Individual settings 30
- General notes 31
- Training instructions 32
- Glossary 32
- Safety Instructions
- Note the following points for your own safety:
- For your safety:
- Short description
- Pulse measurement with chest strap
- Training and Operating Instructions
- Short instruction
- Function section
- SET (press shortly)
- SET (press longer)
- Reset
- Program
- Minus - / Plus + keys
- RECOVERY
- Comment:
- Pulse measurement
- (Chest straps are not always included in delivery)
- Display section / display
- Programs: Count up / Count down
- Programs
- Pulse-controlled programs: HRC1/HRC2
- Target pulse via time
- Interface
- Display values
- Quick start (to become acquainted)
- Start of training:
- End of training
- Snoopze mode
- Training
- Training by power defaults
- a)Manual power inputs
- b)Power profiles
- Training by pulse defaults
- Manual pulse defaults
- or
- (PROGRAM) "Count Down"
- Default section
- Time default
- Energy default
- Distance default
- Age entry
- Maximum pulse entry
- Target pulse selection
- Readiness for training
- Power
- b) Power profiles (PROGRAM) "1" - "6"
- Note:
- Program switchover time / distance
- 01
- Initial power
- Pulse
- Training functions
- Display switchover during the training
- Change of power profiles
- Change from speed-independent to speed-dependent operation
- (running ergometer)
- Interruption or end of training
- Resumption of training
- RECOVERY - Function
- Recovery pulse measurement
- Entries and functions
- Display for pulse events
- Individual settings
- Delete total kilometers and training time
- Storage of defaults
- Function:
- Display of the unit in kilometers / miles
- Display of temperature in ° C / ° F (display of the room temperature only SD4-9)
- Display of energy consumption kjoule / kcal
- Display of mechanical / human energy turnover
- Alarm sound for exceeding maximum
- General notes
- System sounds
- Switching on
- End of program
- Maximum pulse exceeding
- Error output
- Automatic scan function switching on and off
- Switchover time/distance
- Profile display during training
- Speed-independent operation
- (constant power)
- Arrows up/down (Speed-independent operation)
- Speed-dependent operation (running ergometer)
- Average value calculation
- Notes on pulse measurement
- With ear clip
- With chest strap (accessory)
- Interferences at the training computer
- With hand pulse
- Notes on the interface
- Training instructions
- Guide values for the stamina training
- Scope of load
- Duration of a training unit and its frequency per week:
- Empirical rule:
- Warm-up
- Cool-down
- Glossary
- Age
- Dimension
- Speed-independent/speed-dependent operation (running ergometer)
- Energy
- Fat burning pulse
- Fitness pulse
- HI symbol
- LO symbol
- Manual -
- MaxPulse(s)
- Menu
- Profile
- Percent scale
- Points field
- Control
- Target pulse
- Sommaire
- Programmes : Count up / Count down
- Trainingsfuncties
- Snelstart (ter kennismaking)
- Trainingsbegin:
- of
- Programas: Count up / Count down
- Programmi: Count up / Count down
- Funkcj treningowe
- Pomiar pulsu z pasem na pieré
- Programy: Count up / Count down
Brand : KETTLER
Model : CTR 3
Category : Exercise bike