
ESM1010 - Electric sander Ferm - Free user manual and instructions
Find the device manual for free ESM1010 Ferm in PDF.
| Product type | Random orbital sander |
| Brand | Ferm |
| Model | ESM1010 |
| Power supply | Mains 230 V ~ 50 Hz |
| Power input | 430 W |
| No-load speed | 5,000 - 13,000 min⁻¹ (adjustable, 6 positions) |
| Protection class | IP20 |
| Weight | 2.1 kg |
| Sound pressure level (Lpa) | 77 dB(A) |
| Sound power level (Lwa) | 88 dB(A) |
| Sound uncertainty (K) | 3 dB(A) |
| Vibration (ah) | 27.6 m/s² |
| Vibration uncertainty (K) | 1.5 m/s² |
| Materials that can be sanded | Wood, metal, plastic, painted surfaces |
| Main functions | On/off switch with lock, electronic speed control, dust extraction via collection bag |
| Abrasive paper attachment type | Hook and loop (Velcro) |
| Safety | Double insulation, quick stop, protection against contact with concealed cables |
| Maintenance and cleaning | Clean the housing with a soft cloth, clear the ventilation slots, replace worn sanding pad |
| Spare parts and repairability | Replaceable sanding pad (screw), standard abrasive paper |
| General information | Ferm random orbital sander 430 W, model ESM1010, conforming to European standards |
Frequently Asked Questions - ESM1010 Ferm
User questions about ESM1010 Ferm
0 question about this device. Answer the ones you know or ask your own.
Ask a new question about this device
Download the instructions for your Electric sander in PDF format for free! Find your manual ESM1010 - Ferm and take your electronic device back in hand. On this page are published all the documents necessary for the use of your device. ESM1010 by Ferm.
USER MANUAL ESM1010 Ferm
Thank you for buying this Ferm product.
By doing so you now have an excellent product, delivered by one of Europe's leading suppliers. All products delivered to you by Ferm are manufactured according to the highest standards of performance and safety. As part of our philosophy we also provide an excellent customer service, backed by our comprehensive warranty. We hope you will enjoy using this product for many years to come.
SAFETYWARNINGS

WARNING
Read the enclosed safety warnings, the additional safety warnings and the instructions.
Failure to follow the safety warnings and the instructions may result in electric shock, fire and/or serious injury.
Keep the safety warnings and the instructions for future reference.
The following symbols are used in the user manual or on the product:

Read the user manual.

Risk of personal injury.

Risk of electric shock.

Immediately remove the mains plug from the mains if the mains cable becomes damaged and during cleaning and maintenance.

Wear safety goggles. Wear hearing protection.

Wear a dust mask.

Double insulated.

Do not dispose of the product in unsuitable containers.
C
The product is in accordance with the applicable safety standards in the European directives.
Additional safety warnings for orbital sanders

Contact with or inhalation of dust coming free during use (e.g. lead-painted surfaces, wood and metal) can endanger your health and the health of bystanders. Always wear appropriate protective equipment, such as a dust mask. Always use proper dust extraction during use.
- Do not work materials containing asbestos. Asbestos is considered carcinogenic.
- Do not use the machine for sanding magnesium workpieces.
- Wear safety goggles. Wear hearing protection. If necessary, use other protective means, such as safety gloves, safety shoes, etc.
- Hold the machine by the insulated gripping surfaces where the accessory may contact hidden wiring or the mains cable. If the accessory contacts a,live' wire, the exposed metal parts of the machine can also become,live'. Risk of electric shock.
- Be very careful when sanding painted surfaces.
- Before use, remove all nails and other metal objects from the workpiece.
Make sure that the workpiece is properly supported or fixed. - Only use sanding paper that is suitable for use with the machine.
- Only use sanding paper with the correct dimensions. Make sure that the sanding paper is properly mounted.
- Inspect the sanding paper before each use. Do not use sanding paper that is worn because of prolonged use.
- Never put the machine down on a table or a workbench before it has been switched off.
Electrical safety

Always check that the voltage of the power supply corresponds to the voltage on the rating plate.
- Do not use the machine if the mains cable or the mains plug is damaged.
- Only use extension cables that are suitable for the power rating of the machine with a minimum thickness of 1.5mm^2 . If you use a extension cable reel, always fully unroll the cable.
TECHNICAL DATA
Mains voltage V~ 230
Mains frequency Hz 50
Power input W 430
No-load speed min 5,000-13,000
Protection class IP 20
Weight kg 2.1
NOISE AND VIBRATION
Sound pressure (_pa) dB(A) 77
Acoustic power (L_wa) dB(A) 88
Uncertainty (K) dB(A) 3
Vibration m/s 27.6
Uncertainty (K) m/s 2 1.5

Wear hearing protection.
Vibration level
The vibration emission level stated in this instruction manual has been measured in accordance with a standardised test given in EN 60745; it may be used to compare one tool with another and as a preliminary assessment of exposure to vibration when using the tool for the applications mentioned
using the tool for different applications, or with different or poorly maintained accessories, may significantly increase the exposure level
- the times when the tool is switched off or when it is running but not actually doing the job, may significantly reduce the exposure level
Protect yourself against the effects of vibration by maintaining the tool and its accessories, keeping your hands warm, and organizing your work patterns
DESCRIPTION (FIG. A)
Your orbital sander has been designed for sanding wood, metal, plastics and painted surfaces.
- On/off switch
- Dustbag
- Speed adjustment wheel
- Sanding pad
- Main grip
- Lock-on button
- Dustbag connection
ASSEMBLY

Before assembly, always switch off the machine and remove the mains plug from the mains.
Mounting and removing the sanding paper (fig. B)
Mounting
-
Mount sanding paper (8) with the required grain size onto the sanding pad (4). Make sure that the perforation in the sanding paper (8) corresponds with the perforation on the sanding pad (4).
-
Use coarse sanding paper (grain 50) for sanding rough, uneven surfaces.
- Use medium sanding paper (grain 80) for removing the remaining scratches from the coarse sanding paper.
- Use fine sanding paper (grain 120) for finishing surfaces.
Removing
- Remove the sanding paper (8) from the sanding pad (4).
USE
The On/Off switch Fig. A
- Switch the machine on by pressing the On/Off switch (1). When you release the On/Off switch (1) the machine will turn off.
Lock-on Button Fig. A
- You can lock the On/Off switch (1) by pressing the On/Off switch (1) and then pressing the lock-on button (6).
To release the switch-lock; shortly press the On/Off switch (1) again
Setting the speed (fig. A)
The speed adjustment wheel is used for setting the speed. The speed adjustment wheel can be set to 6 positions. The ideal speed depends on the required grain size and on the material to be worked.

Do not set the speed during use.
Dust extraction (fig. C)
- Insert the dustbag (9) into the dustbag connection (7).
- Turn the dustbag (9) clockwise until it locks into place.
Hints for optimum use
- Clamp the workpiece.
- Firmly hold the machine with both hands.
- Switch on the machine.
- Place the sanding pad with sanding paper on the workpiece.
- Slowly move the machine over the workpiece, firmly pressing the sanding pad against the workpiece.
- Do not apply too much pressure on the machine. Let the machine do the work.
- Switch off the machine and wait for the machine to come to a complete standstill before putting the machine down.
CLEANING AND MAINTENANCE

Before cleaning and maintenance, always switch off the machine and remove the mains plug from the mains.
Regularly clean the housing with a soft cloth.
- Keep the ventilation slots free from dust and dirt. If necessary, use a soft, moist cloth to remove dust and dirt from the ventilation slots
- Regularly clean the sanding pad to avoid inaccuracies during use.
Replacing the sanding pad (fig. D)
In case of wear, the sanding pad must be replaced.
If necessary, remove the sanding paper.
- Loosen the screws (10) from the sanding pad (4).
- Remove the old sanding pad (4).
- Mount the new sanding pad (4).
- Tighten the screws (10) to the sanding pad (4).
WARRANTY
Consult the enclosed warranty terms.
ENVIRONMENT
Disposal

The product, the accessories, and the packaging must be sorted for environmentally friendly recycling.
Only for EC countries
Do not dispose of power tools into domestic waste. According to the European Guideline 2012/19/EU for Waste Electrical and Electronic Equipment and its implementation into national right, power tools that are no longer usable must be collected separately and disposed of in an environmentally friendly way.
The product and the user manual are subject to change. Specifications can be changed without further notice.
BESCHRIJVING (FIG. A)
Smid参加会议, but he was not able to speak. Smid did not have the right to speak in the meeting. Smid did not have the right to speak in the meeting.
Odsavani prachu (obr. C)
IotppeBnmaMoHocbBT 430
CkopocTb 6e3 Harpy3KN MHN -1 5.000-13.000
Knacc 3auntbI IP20
Bec 2,1
UWM IN BUEPAUIN
3ByKOBoe daBneHne (_pa) 77
Akyctnuecka MoHoctb (Lw) 88
TporpeuHocb(K) 3
Bn6paunM/c 27,6
IporpeuHoctb (K) M/c2 1,5

Hadebaume cpecmba 3aumbl opzahoe cnya.
YpOBeHbBn6paun
YpOBeHb Bn6paunu, yka3aHHbI B KOHcpe DaHHORo pyKOBOCTBa nO 3KcnJIyataunu 6bl IN3MpeH B COOTBeTCTBUN CO CTAHdapTN3NPOBAHHbIM NcblTaHHeM, codepXaUmmcraB EN 60745; DaHHa XapaKTepNCtNa MoKe TcNOJb3OBaTbcr DnA cpABHeHn OndHO rNCHtpMeHTa C dpyHM, a TaKke IpnpeBapNTbHOn OueHKn BO3DeiCTBnB Vb6paunu pni NcNoJIb3OBaHn DAnHHOro IHCTpyMeHTa DnY kka3aHHbIX cJeI
-ПиИСПОЛБ3OBAHМИ ИСТPyMeHTAВДpyrHx
цELЯХИПСДPyRIMN/HENCnPaBHyIMN
BCPOMORAteJIbHbIMN ПИСПОСБЛЕнЯМN
урOBeHb BO3DEICTBnA Bn6paCmMoKet
ЗHAчNTeJIbHO NOBbIaTbCЯ
B nepnoDbI, KOrda INHCTpyMeHT OTKJIIOueH IIN ΦyHKUOHNpyet 6e3 φakTNUeCKoR OblONHeHnpa0bI, yPOBeHb BO3DeiCTBnB BNoPaun MoKeT 3HaUNTeJIbHO CHNXKaTbcra
3aunuatae ce6oT BO3deIcTBnB N6paun, PNDepKINBAHCTpymeHT n erO BCNOMOratEnbHbIe npncnocobneHnB INCnpabHom COCTOAHN, NOpeKINBa pyKn B TeNPe, a TaKKe npaBnBHO OrpaHn3OByra CBOI pa6oyn Ipocecc
ONUCAHNE (PNC.A)
BaOp6nTaIbHbI uNIOBaIbHbI cTahOK npedHa3HaueH nIe uNIOBaHnE depeBnHbIX, MeTaNuecknx, pIaCTMaCCOBbIX n OKpaJeHHbIX NOBepxHOcTei.
- BbIKIIOuATEJIb BKJ./BbIKJ.
- NtJIeBOm MEJOK
3.ДиckpepylnpoBknCKopoCTN - WnfoBaJIbHa nOyuKa
5.OchOBHpa pyKoRTka - Khonka 6noknpOBKn
- Pa3bem nbIeBOrO MeuKa
CEOPKA

Peped c6opkouee2da eblnouaume mawuhy u 38nekaume eunky cemeo20 w hypa u3 poemku.
YcTaHOBka n ChrTne HaxJaHOn 6yMaHn (pnc. B)
YCTaHOBka
- YctaHOBnTe HaxdauHyO 6ymary (8)doJxHoI 3epHnCTOCTn Ha uNIOBOaNbHyO NOdyuKy (4). PpOBepbTe, yTO6bl OTBepCTnB HaxdaunHoi
6ymare (8) COOTBETCTBOBANI OTBepCTnM B wJINFOBAJIbHOI NOyUKe (4).
3aMeHa 1nfoBaIbHOIOyKu (pnc. D)
B cnyuae n3Hoca ⅦnfoBaJIbHa na noDyka npndeknt 3ameHe.
- Пи Нeo6хоДиМОCTи ChИМЛTe HЯжdaЧHyIO 6умay.
Ocna6bTe BnHTbI (10) uNFOBaJIbHOJ NOyUKN (4).
CHIMMTE cTAPUo UINPOBaIbHyIO NDoUKy (4). - YcTaHOBnTe HOByIO UINFOBaIbHyIO NOyUkY (4).
3aTnHTe BnHTbI (10) uNFOBaJbHOJ noDyWK (4).
TAPAHTN
O6paTntecb K npnlaeraembim ycNoBnaRM rapaHTnn.
OXPAHA OKPYXIAIOUCEI CPEIbI
YTNIN3aIy

DanHoe n3dJIeNne, npHnAdJNeKHOCTn uYnaKOBka nOndJeKAT copTnpOBKe dIy nepepa6oTKe, 6e3onacHOI dIy OkpyKaIOUSeI cpebl.
Tonbko dIra cTpaH EC
He Bb6paBbIaIe 3JekTPOHNCtpymeHT BmecTe C 6bITOBbIM Mycopom. B COOTBeTCTBUN C EbponeiCKM pyKoBOdCTBOM 2012/19/EU no „YtINn3aCNI 3JekTpueckoro N 3JekTPOHORO O6OpyDobAHN" H NaIOHOJIbHbIMN 3aKOHOdaTeNbHbIMN aKTAMN 3JekTPOHNCtpymeHT KOtOpbI 6OJIbIe He IcNOJIb3yeTcR, Heo6XoDNMe Co6IpaTB OTdJIbHO N YtINn3HPOBaTb 6e3OnaChbIM dIg OKpykaIoSe cpebl Obpa3OM
H3dennne npKOBODCTBO noJIb3ObaTeJMAryT 6bITb n3MeHeHb. Texnueckne xapaKTepnCTNKu MoryT 6bITb n3MeHeHb 6e3 daJIbHeJWeero yBeDOMnEHn.
EKCUEHTPINKOBAIJIΦYBAJIbHA MAUNHA 430W
JaKyEMo Bam 3a KyniBnIO npOdykTy KomnaHii Ferm. 3diIChHOUCh KyniBnIO, BN OTpIMyTe BiDMHHN TOBap BID OndHO 3 BeDyuNX NOCTaHaNBHKIB y Cbponi. Yci npOdykTN BiD KomnaHii Ferm BnroTOBneHi y BiINOBiHDocTI DO HauBnux CTaHdaptTIB npOdykTHBHOCTI Ta 6e3NeK. Mn HadaemO nOKynuo Nocnyn HaBnIoY IAKoCTI, 3acBiJeHi rapaHTieHO Ha Bnpi6 y ciInOMy.
CnoiBaemocb, Bn 6yndeTe KOpNCTyBaTncr daHm npOdyKTOM npOTAROM 6araTbox pOKIB.
3ACTEPEXEHHBAIDHOCHO B6E3NEKIN

3ACTEPEXEHH
Ipoumaume Haeedehi 3acmepekeHH bIDHocHO 6e3neku, dOdamKOi 3acmepekeHH ma pekomehdaui.
Heukohnnkkaizok,haedeehux y3acmepekeHHx bihocho 6e3neku ma pekomehdauiX,MOKe npu3eecmu do ypaxehn eJekmpuHm cmpymom, nojexi ma/a0e aakko2o minechozo ywkodxeHH.
36epeximb 3acmepexeHHB iDHOCHO 6e3neku ma pekomehdaui dna nodaIbuOo buKOpucmaHHa.
Ynoci6Hky KopncTybau Ta Ha npOyKTI 3aCTOCOBYIOBcHAcTynHi CmBOHN:

Ipoumamae noci6nuk Kopucmyea.

He6e3neka minechozo yuKoKeHHa.

He6e3neka ypaXeHHn enekmpuHm cmpymom.

HezaHObuMimbwmencenb 3po3emku,kaio yko0dKeHO kaebIb XueHHa, a mako NiacuueHHa mexHiHOo o6cnyoByaHHa.

Hadraume 3axuciokynpu. Hadaume 3acobzaxucmy opaaincnyx.

Kopucmyumeb nuio3axuchoIO mackoIO.

IodaiHa iOJIaJia.

3a6bopohnembc ymuni3yamu npodykm HeeiDIOBIDHM uHOM.

Danu npodykm biOnoeida cmaHapmam 6e3neku, uO 3acmocoyombcra dupekmuama U C.
DodatkoBi 3actepexeHHB iDHOcH 6e3neKn npnpo60Ti 3 op6itaIbHIMN uNiΦyBaIbHIMN IHCTpyMeHTAMN

Kohm3 nunom abo bduxaHn nuny, 90 ymeopmbc8 npoueci KopucmyBaHH (HaPuknaD, noBepxHi 6Kpumi cBuHcem, depebuHa i Meman) MoKymb bymu Hebe3neuHmu dnn 6auo2o 3doopoe' i 3doopoe npucymhix. 3aekdu hadaaume HaneXhi 3axuchi 3acobu, maki k nuno3axucha macka. 3aekdu bukopucmoeyme HaneXhe bdaJIeHHn nuNy nid yac Kopucmyaehn.
He npaioTe 3 MaTePiAnAMn, IO MCTaTb a36ecr. A36ecr BBaxaetbcra KaHcpeoreHHo peOBOHOIO.
He BnKOpNCToBvIte iHCTpyMeHT dIy IJNIDyBaHHMaHIEBHX NOBepxOHB.
HaiaraTe 3axnChi OkyIpyn. HndraTe 3ac06n 3axncTy opraHcB cnyx. JkUo Heo6XiHo, KopnCTyTecr iHsIMN 3axnCHMn 3ac06amn, TaKIMN kpyKaBnKn, 3axncHe B3yTTa, I T.D.
TpmaTe npnla3a 3oJbObaHIOBepxHi dna 3axBaTy, kUo MOKINBE D0TOPKaHHa KOMNekTkyOoi Do npnxOBaHnx IpoTIB a6o Ka6eJIb KINBHeHHa. RaUo KOMNekTkyOua NotpanIae B KOtAKT 3 dpOTom NiHappyroIO, BiNobiHi He3axuueHi MeTaJIeBi YacTHNI npnA dy TakoK MoKyTB OINHHTnc b NiHappyroIO. He6e3neKa ypaKeHHa eJeKTpHcHm CTpyMOM.
- Bydte dyke o6epexkhi npn wliybaHHi ap6oBAHx noBepxOHb.
- IpeeBnKOpncTaHHaM BnMiTb 33arOTOBkUci UBXn Ta iHsi MeTaJIeBi IpeDMEtN.
- IpekeKaHTeCg, 3o 3aToBka npabunbHo 3aΦikCoBaHa.
BukopncToByte TlIbKn HauJaHn nnip, 10 npu3HaueHn dJa BkOpncTaHHa 3 daHm iHCTpyMeHTOM.
BnKOpncToByteIiueHaxdauHn nanip HaneXHoro po3mipy. PepekoHaTeC, 0
HajdaHnI napiB BCTaHOBHeHn HAneXHM YINOM.
- IpoBoIbTe orJIaH naKdauHOro nanepa nepei KOxHM BnKOpNCTaHHaM. He BnKOpNCTOBuYte HaxDaUHn nanip, 00 3HocNBcA uepe3 TpNbAJe BnKOpNCTaHHa.
- Iepw Hix NOKnactn iHCTpyMeHT Ha ctin a6o BepctaT, 06OB'3KOBO BUMKHITb Noro.
Ppabnla 6e3neKn npu po6oTi 3 eJektpnHmnpnlaamn

3aekdu nepebiprume biDnoBidHicmb Hnpyu dxepena XuehEnnHaedeHomy y nacnpmHi mabluu 3naeHHIO.
3a60pOHaETbcBnKOpNCtOByBaTn IHCTpyMeHT 3 yUkoJKeHm Ka6eJem a6o wTeNceJem.
BnKOpNCToByTe Ka6eJIb-NoOBoKyBaU, 3aDoBOIbHRe NOTyXHicTb IHCTpyMeHTy, PNOSeIO Nepepi3y He MeHwe 1,5 MM². RaKIO BnKOpNCToByEcTbcra NoOBoKyBaU 6apa6aHOro TIny, 3aBXdIO NobHicTTO PO3MOTuTe Ka6eJIb.
TEXHIYHI XAPAKTEPNCTIKN
BcTaHOBJIeHHa WbNdkocti (pnc.A)
KoniataKo peryIIOBaHHa WbNdkocTi BnKOpNCTOByeTbcra nHaJauTyBaHHa WbNdkocTi. KoniataKo peryIIOBaHHa WbNdkocTi MOxHa BCTaHOBHTB 6 No3nui. IdeanbHa WbNdkic7b 3aHexHb Bd Heo6xHOro po3Mipy 3epHa i BiD MaTepiany, 0o o6pO6JIeTbcra.

3abopohembc8cmaHOeamu uudkicnb nd yac pobomu.
BndaJIeHnI npIy (pnc. C)
BCTABTe NINOBNI MiOK (9) B nID'eDHaHHaNIOBOrO MiKa (7).
IIOBepTaIe NIIOBNI MiOK (9) 3a roDHHNKOBIO CTPIKIO, DOKN BIn He 3AMKHETbCnB NOTpHOMy NOJIOXeHHI.
IopaN3 BnKOpncTaHH
3aTnCHiB 3aROTOBky.
MiHou yTpmyIte iHCTpyMeHT dBOMa pykAmN.
BBIMKHITb IHCTpyMeHT.
- NocTabTe TpMaH HxJaHOro nanepa 3 HxJaHnM nanePOM Ha 3aRTOBky.
- NobinbHO pyxaIte iHCTpymEnT B3IOBx NOBepxHi 3aROTOBKN, UINbHO pNITnCKaOuN TpIMaHnKaDaHOro nanepa Do 3aROTOBKn.
He TnchItb Ha iHCTpyMeHT 3aHaTTo CnJIbHO. DainTe iHCTpyMeHTy BnKoHaTHn po6Oly.
BmKHTb IHCTpMEnI, npeD TUM YK NOKnactN Ioro,doueKaaiTeCb nobHOi 3ynHKn.
UHJYIOBVAHH

Peped yuueHHaM u mexHicHUM 6cny2o8y8aHHa3a8xdu bumkaume iHcmpymeHaBuMaune wmenceB 3 po3emku.
- Perynpno YnctbTe Kopnyc M'koHO TkaHNOHO.
- BeHTnJIaIHi OTBOpN MaOTb 6yTb BInbHIMN BiD 6pyDu Ta nIy. JaKIo Heo6xIDHo, BnKOpNCtOBuTe M'ky BOIry TkaHNHy dIra BnDaJIeHHa 6pyDu Ta nIy 3 BeHTnJIaIHHX OTBOpIB.
- PerynapHo YnctItb TpImaHnKaDaHoro panepa, uo6 yHnKHyTu nOxN6ok niJ qac po60Tu.
3amiha Tprmaa HauDaunoro nanepa (pnc. D)
JaKIO TpIMaHnKaJaUHO nanepa 3HocNBcJ, Ioro notpi6Ho 3amInTu.
- RaKuo Heo6xIDHO, 3HIMITb HaxdauHn nnip.
- Iocna6Te rBnHTn (10) Ha TpImaHi HaxJaHoro nanepa (4).
3HIMITb CTapn TpImaHaxJaUHO nanepa (4).
BctaHObitb HOBI TpIMaHJaDaHOro nanepa (4).
3aTnHbTBnHTn (10) Ha TpMaHi HaxJaHoro nanepa (4).
TAPAHTI
Kohcybtaia BIDHOCH TepmiHIB ydoaHir rapaHTii.
TwaPov diaTeE eva eaiptiko Tpoiov, kataaKeuaevo aTo evav aTo Touc utepouc TpounTheuteC ts Eupwns.
Ola ta Tpoiovta Tou TpoumEueote aToTn Ferm kataoKeuaZovtai ouwva uTa uynlotepa Tporuia aTIOooNc KAI aQaAeaIac. Oc epoc ts Cioooqic mac, TApexoue Etnics apiotn Eutnpetno n TLaWv, ouvoduOpEvn aTIO tv N pnyon mac.
Eaicoue oTg a eivete exxapiotnevoi ano Tn xpno autou tou pioovtoc ia toaaa xpvia.
IPOEIAOIOIHZEIEA ZΦAΛEIA

IIPOEIOHOIHsH
MeIeIeTcEoKleIOTeC npoeIoOnInoei OxETiKa e T aOaAeaia, tnc PooTeC
Hoceme Macka npomue npax.

BouHa u30Jaua.

He u3x8bpyme npodykma e Heno0dxoyu KoHmueHepu.

To3u npodykm om2o6apra Ha npunoXumme cmaHapmu 3a 6e3oIacnOc m e eeponeueckume dupeKmueu.
DonbHnTeHN npdeynpeXeHn 3a 6e3oNaChocT np pa60Ta c opBtAnHn WnaΦOBe

Kohmkm c unu bduwehe Ha npax,
obpa3yean no epeMe Ha pa6oma
(Hanp. noebpxhocmu, 6o4ucahu cbc
cbdojxauo ono8o 6ou, dopeo u Meman)
Mozam da 3acmpawam 3dpaeMo Bu
U moea Ha cmouume H6n3o xopa.
BuhaaHoceme nOdxodrao 3auumno
obopydeane kamo macka cpeuy npax.
BuhaaU u3non3eAume nOdxodya
cpedcmgo 3a u3ejuuane Ha npax no
epeMe Ha pa6oma.
He pa6oTeTe c MaTePnaJI, cbIbPkaJIa a36eCT. A36ecTbT ce cHTa 3a KaHcEporeHen.
He n3non3BaIte ypea 3a wlnfoBahe Ha MaHHe3nEBN DeTaun.
Hocete 3aunTH npkabu. Hocete aHTnfoH. Pnp Hjka n3noJ3BaTe 3aunTHn cpeJCTBa KaTO 3aunTHn pkbu, 3aunTHn o6yBkn N T.H.
- Pn pa6oTa C MaunHata Ha MeCTa, KbTeOn mMa OnaCHOCT npncnoc6JeHneTo Da 3aceTHe cKpnt Ka6eI, DpbXte MaunHata 3a n3OInpaHNTe NobbpxHOCTN. KONTbT C npOBODHK, NO KOITOTeue TOK, MOKe Da DOBeDe Do IpOTuHaHETo My No MetaHHTe Yactn Ha MaunHata. OnaCHOCT OT TOKOB yap.
БдTe MHOB BHMaTeJIHn, KOraTo ⅢNΦOBaTe 6oAUncaHn NOBbPxHOCTn.
- Ppei Da npemHete KbM pa6ota, OCTpaHete BCnKn rBO3eN n Dpyr MTeaJIHN ppeDMETn OT 06pa6oTBaHn dTaI.
- YBepTe ce, Ye o6pa6oTBaHnT DeTaIe eoDpRn nn 3actOnopeh npabuJHo.
- 3nnon3BaIe camo uKypka, noDxOJaua 3a pa6ota c MaunHata.
- 3no3BaTe cmo shkypka c npabnHnPe pa3mepu. YbepTe ce, ye shkypkata e npabnHO MOHTnpaHa.
- PpOBePbAaTe uKpyKaTa npEiN BCaKa yNoTpe6a. He n3nON3BaAte uKpyKa, n3HOceHa ot npoDbJxKtEnHa yNoTpe6a.
Hnkora He cnaarate MaunHaTa Ha Maca nppa6oTe Hte3rX, npedn da cTe y N3KnHouyIn.
EneKtpnuecka 6e3onacHocT

BuHau npoeepaume daNu HnpeXeHuEmo Ha eIekmpuueckama MpeXa om2oBapra Ha nocOeHomo ebpxy ma6enkama c ochOBume xapakmepucmuHa ypeda.
He n3non3BaIte MaunHata, ako eIeKtpnuecknT Ka6en nnu enceJbT ca nobpeJeH.
- I3noI3BaIte caMo yIbJInxIteJIHn Ka6eJI, NOxOJaIz 3a MoUHocTTa Ha MaUnHaTa n C MInHmAlHa De6eJIHa oT 1,5 mm². Ppi n3NoI3BaHe Ha makapa BnHaIpa3BnBaIte Ka6eJa n3qJIo.
TEXHNUECKN DAHHN
| Hansejehen Ha eilektpnueckata mpeka | V~ | 230 | |
| YeceToTa Ha eilektpnueckata mpeka | Hz | 50 | |
| BxOJa MoUHocT W 430 | |||
| CkorOcT Ha BbPteHe Ha npaTeH xoJ | min | -1 | 5.000 - 13.000 |
| 3aunTeH Klnac IP 20 | |||
| TerNo kg 2,1 |
UWM IN BUEPAUIN
| 3Bykobo налгане (Lpa) | dB(A) 77 | |
| 3Bykobo мошноct (Lwa) | dB(A) 88 | |
| Heopendeлесов (K) | dB(A) 3 | |
| Вибрацни m/s | 2 7,6 | |
| Heopendeлесов (K) | m/s | 2 1,5 |

Hoceme ahmuoh.
HnboHaBn6paun
HnBOTO Ha npedaenHe Bn6paun,OT6eJ3aHo Ha Tb6ha HToBa pKOBODCTBO 3a EKcPiOaTaun e N3Mepeno B CbOTBETCTBne CbC cTaNdaptu3npaHnTect,ONpeJeH B EN 60745; TO MoKe Da ce N3No13Ba 3a CpabHeHne Ha eINHnHCTpyMeNT CdpYr KATO npEdapntEnHa OueHka Ha NoDnaRaHeTO Ha Bn6paun npi N3No13BaHeTo Ha INHCTpyMeHTa 3a NocOueHInTe npINOxehn
- I3IIOJI3BaHETO Ha INCTpyMeHTa 3a pa3JIuYH NOT Te3N pInIOXeHn IIN C DpyrN, IIN IOIoTOIOIbPjAHH akCEcoApn MOKe 3HaunTeJHO da IOBUN HNBOTO HA KOETO CTIIOJIOXeHN
IepnoDnte OT Bpeme, KOraTo INHCTpyMeHa e N3KJIIOUeH INN CbOTBETHO BKJIIOUeH, HO C Hero
He ce pa6OTn B MOMeHTa MORat 3HaunTeJIHO Da HamaJIrH NHBOTO Ha KOETO CTe NOJIOXKeHN
PpeIa3BaIte ce ot efeKTe OT Bn6paunTe, KaTO POnDbpxKaTe INHCTpyMeHTa N akcecoapTe My, PAn3TE PbCte CN TOJIIN OprAHN3npate BaIITe MoJeN Ha pa6OT
ONUCAHNE (ФИ.А)
Baunr op6ntaneHnnae e npedha3nueH 3a nnfoBAHe Ha DbPBO, Metan, nlaCTmaca 6oAncnIOBbpxHOCTn.
- PpeBkIIOyBaTeJ 3a BkIIOyBaHe/N3KJIIOyBaHe
- Top6nukata 3a npax
- PerynaTop Ha ckopocTTa
4.Подложka 3a shkypkaTa - JIaBHa pKoXBaTka
- ByToH 3a 3akJIIOUbaHe
- Bpb3ka 3a Top6nKata 3a npax
CΓIIOБЯBAHE

Ppeu da npucmbnme KbM cNo6bahe, euHa2u u3KnHoueaume Maunama u u3eaXdaume uencena om KOhmaka.
MOHTnpaHne n cBaJIaHe Ha WkypKaTa (ΦnR. B)
MOHTIPAHe
-
IocTaBete Wkypka (8) cbc cbOTBeTHata eepnHa Ha 3bpHTo Bbpxy NDoNoxKata 3a Wkypkata (4). YBepTe ce, ye dynKnte B Wkypkata (8) cBoTBeTcBaT Ha Te3n Bbpxy NDoNoxKata 3a Wkypkata (4).
-
N3noJ3BaIe eJpa shKypka (eJpnHa Ha 3bphOTo 50) 3a WkypeHe Ha rpy6n, HepaBnIOBbpxHocTn.
- N3noJ3BaIte cpeHa Wkypka (eDpuHa Ha 3bphOTo 80) 3a oTcTaPahReBaHe Ha DpaKoTnH, OCTaHaJIOn OT ePaTa Wkypka.
- N3noJ3BaIte ΦnHa ⅢKypka (eDpHa Ha 3bpHTo 120) 3a DOBbPmTeJIHo 6pa6oTbaHe Ha NOBbPxOCTInTe.
CbaJHe
Cbaane Kypkata (8) ot noDnOxKata 3a. Kypkata (4).
YNOTPEBA
On/Off npBkNIOBaTeI ΦIr.A
- PpeBknIOyBaHe Ha MaunHaTa C HtNcKaHe Ha
On/Off npBkHouBaTeJ(1).Korato nychete 3a BKIOUcBAHe /n3KIOUcBAHe (1) Ha MaunHaTa Ⅲe Ce N3KIOUH.
3actonopBaHe Ha BbTbH Phr.A
Mokete da 3aKIOHTe 3a BkIOUbaHe / n3KIOUbaHe (1), KaTo HaTnCHete 3a BKIOUbaHe / n3KIOUbaHe (1) n CneI HATnCKaHe Ha 3aCTOnOpRABaHe Ha 6yToHa (6).
3a da ce OTnycheTe KIOUa 3a 3aKIOUbaHe; CKopo HaTnCHete On / Off npebKIOUbaTeI (1) OTHOBO
HactpoBaHe Ha ckopocTta (fur. A)
3a NaCTpOuBaHe Ha CKOpocTtA 3nON3BaNTepeyIaTopo Ha CKOpocTtA.
PerynataopbHaCKOpocTtma6no3nun.
IdeaHnataCKoPoCT3aBnCOnOTcBOTBeTHata
eepnHaHa3bpHOToNOTobpa60TaBaHHMaTepnaJ.

He hacmpoueuaime ckopocma no epeme Ha paoba.
N3BnueHa npaxa (pnr. C)
- ΠbXhTe Top6nUkata 3a npax (9) Bbb Bpb3kata 3a Top6nUkata 3a npax (7).
3abptete Top6nukkata 3a npax (9) no nocoka Ha YacOBHKOBaTa CTePknka, 3a Da 3actaHe Ha MxCTO.
CbBET 3a onTImmaJHa pa6oTa
3axbaheTe o6pa6oTBaHnJaTaJl.
- DpbkTe 3dpaBO MaunHaTc CDbete cn pue.
BkIIOUeMaUNHaTa
- NocTabete noDnOxKata 3a WkypKaTa C WkypKaTa Bbpxy 6pbx 6pa6oTBaHna DeTaN.
- DnKte 6abHO MaunHata No opa6oTBaHnA DeTaN, KaTo HaTnCKaTe 3DpaBO nOIOXkata 3a WKypKaTa KbM o6pa6oTBaHn DaTaN.
He ynpaxhnaBte TBbpDe rOJMa HATNCK Bbpxy MaunHaT. OctabeTe MaunHaTa da cn BBpUn pa6oTata.
- ɪənʌŋeTe MaɪnHaɪrɪŋɪaɪyɪeɪnɪyaɪeɪnɪeɪnɪpɑnɪbɪnɪHo,ɪpeɪnɪ Daɪrɪcɪoxknte Ha Mɑcaɪnɪpa6oTeH Te3rɪx.
ПОЧИСТВАЕ И ПОДРБЖKA

Ppeu npucmbnahe KbM noucmeane u nooppbkka eunhau u3knnoeaeMaushama u u3eaekdaume encena om KOHmakma.
- Почистовук Корпунca рedingвс Meka Kbpna.
- PoiDlbpxKaIe BeHTnlaaunOHHIne OTBOp NCTN
OT npax Mpbcotna. Ako e Heo6xOdmo, n3noJ3BaIte Meka, Bnajkha Kbpna, 3a da OTCTpaHITe npaxa N MpcoTnTa OT TxA.
- Почиствашип ретовно положкata зашкуркata, за на пенитbatite HeTochocnno ВсpeMe Ha pa60ta.
POnMaHa Na noJIOxKata 3a Wkypkata (fur. D)
B cnyuaynHa n3HocBaHe Tpr6Ba Da cMeHnte noIIOKKata 3a WkypKaTa.
- Ipn Huxda n3BaTe WkypKaTa.
Pa3BnIe BnHTOBete (10) OT NOJIOKkata 3a uKypkata (4). - ɪəbaɪte CTapata nɒdɪnɔːkæ 3aʌkypkata (4).
MoHTnpaIte HOBaTa noIIOxKa 3a UKypKaTa (4).
3aTeHHe TBnHTOBeTe (10) KbM nOДLOXKaTa 3a WkypKaT (4).
TAPAHZIN
PpOeTeTe npInoKeHnTe rapaHnOHn ycIOBna.
OKOJIHA CPEIa
N3XBbPnHe

PpOdykTbT, npnCTaBknte n onakOBkata Tpr6Ba da ce n3xBpIaT pa3deHNo c ceJ 6e3onacHo 3a OKoJHaTa CpeDa peuKInpaHe.
Camo 3a ctpaHnTe ot EC
He n3xBbPnIte eNEKtpnueckn HNCTpyMeHTn 3aEDNo CDOMaKNHCKN OTNaDbuN. CbflacHO Ebponeckata DnpeKtNbA 2012/19/EU OTHOCHO n3Jr3NO OT yNtpe6a eNEKtpnuecko N eNEKtpoHNO 6OpuyBaHe n pInlaHaTeO b HaaOnoHaHnTe 3aKoHOdaTeNCTBA, Heu3NoJI3BaEMITE eNEKtpOHnCTpyMeHTn CneDba Da ce n3XBbPnT pa3dEnHo n NO 6e3OnaceH 3a OkONHaTa cpeDa NaHH.
IpoodykTbT n pbkoBOdCTBOTO 3a pa6oTa MORaT da 6bDat npomeHn. TexHnuecknTe xapaKTePncTnKn MORaT da 6bDat npomeHn 6e3 npdeN3BeCTne.
EKCUEHTPNUHA BPYCUNKA 430W
Blaorapime 3a KnyBaHbTo Ha oBoj FERM npOn3BOJ.
CoToaImateOJINuHnPOn3BOD,NCnpaHaN OeHOn BODeUcknte Do6abyBaun Bo Ebpona.CTe npOn3BODNIOCTaBeHNoCtpaHa HaFERM ce npOn3BeHn CNOpeHajBnCOKte CTaHapn Ha nepOpMaHcN 6e36eHocT. KaKo DeN OJ HauataΦnO3Opnae o6e36eYBaHe Ha OJInueH cepBnc 3a KInneHTnte, Co NODrpka Co HauNTe CeonΦaTHn rapaHcN. Ce HaDeBaMe DeKa Ke yXNBATE KopNCtejKn ro OBOJ npOn3BOd MHOry HapeHNrOAnHH.
IPEdYIpEpyBAHbA 3A B636EДHOCT

PNEyNPEyBAHbE
Ipoqumajme zu npuJoxKeHume, donoJhumeJHume 6e36edHocHu npedynpedyba u ynamcmbama.
NopeuHOMo cnebe Ha 6e36edHcHume npeynpeybaHa u yamcmeama moke da doede do cmpyeu ydap, nokap u/unu meku noepdu. Yyeajme zu 6e36edHcHume npeynpeybaHa u ynamcmeama 3a da moxeme noepomno da zu npoumame.
CneHnTe CmboJIe KOpNCtAT BO yNaTcTBaTa nnHa npOn3BOoT:

Ipooumaj 20 ynamcmbomo.

Puzk oD noepdu.

Pu3uk oO cmpyeH yap.

Bedhaw u3aede me ja npuknyuuaama od cmpyja ako kaebom e owmemekako u 3a epeme Ha yucmebe u oopkybahe.

Hoceme 3aumumnu oyna. Hoceme 3aumuma 3a cnyxom.

Hoceme Macka 3a 3auumma od npauuHa.

Доюнua u3oiauja

He 20 denohupajme npou38odom 80 necooDBemHu caoBu.

Pou3bodom e 8o coaanacHocm co 8aeukme cmahdapdu 3a 6e36edHocm 8o Eeponckume cmepHuu.
DOnoHnTeHn 6e36eHocn npdynpeyBaHa 3a ekcueHTpnuHa 6pycnIka

Co konmku co 8duybahe Ha npauuHa 3a epeme Ha paboma (Ha npumep ono0-o0eHu noepuunu, dpoe u Meman) moxeme da 2o 3aapozume bawemo 3dpaeje u 3dpaejemo Ha dpyzume luca.
CekoraHocete3aWHTnTHoNpema,KakoMaKa 3a npaunHa.KopncTeOdBeyBaHu npaunHa.
He 6pa6oTybajTe MaTePnJaJI KOn CoOpXaT a36eCT. A36eCTOT e KapUHoreH.
He 6pyceTe MaHHe3nMckn napHbA.
Hocete 3aWtHTn OuHa. Hocete 3aWtTnTa 3a cnIyXoT.AKO e NOTpe6Ho, KopncTee n DpyrN 3aWtTHn CpeIcCTBa, KaKo paKaBUN, YEBNI nTH.
-Држete ja MaunHaTa 3a n30nnpaHnTe dpKn, aKO np6opOT MOKe Da Dojde BO KOHTaKT CO CKPmeHN XuN Co CONCTBeH Ka6en. Ako Onpemata Donpe „XuBa" XuNcA, MeTaNHTe DeNoBn Ha MaunHaTa NcTo TaKa CTAHyBaat „XuBn". Pn3NK oD CTpyEh yAp.
BundeTe MHORY BHHMaTeHN Kora 6pyCnTe 6oJocAHN NOBpHIN.
- Ppepa6oTa oD pa6oTHOTo napye OTCpaHete wajkn ndpyr MeTaNHN npedmetn.
- PpOBepeTo ro nOTnnpaHbeto nn CteraHbeto Ha napyeTo.
KopncTe6pycha xapTnja koja e npedBndeHa 3a OBaa MaunHa.
KopncTeTe 6pycha xapTuja co TOnHn DmHe3nn. PpOBepeTe daN e npaBnHo MOHTnpaHa 6pychata xapTuja.
- Ппд секе корисенье КОНТРОЛПAPAJTE ja 6рснataха.TЯ. He KOPINCTe nCtpoшЕHa 6рсnaха.Tя,ЗAWTO ja npOLOHnpa ynotpe6aTa.
Hikorau He ja oJnoKyBajTe MaunHaTa nped da ja ncknyuTe.
EneKtpnHa 6e36eHocT

Cekozau npoepybjme daNu HanoHom Ha HanojyeaHemo odoeapa Ha HabeDeHuom HANOHa NnOyKama.
He ja KopncTeMaunHaTa aKe oUTeTeH Ka6eIOT nn npKnyOkoT.
KopncTePe npoOJIHHn Ka6n KOn OJRObapaaHa MoKHOCT Ha MaUNHaTa, CO MNHMaJIeH nonpeuH npecek od 1,5 mm2. Ako KopncTe npoOJIKeH Ka6eN BO poHa, ZeNoCHO oDMOTajTe ro.
3aMeHa Ha MPeKeH npKnIyOc (cAmo 3a BB)
Ako 3-noHnO npKnyO npNKnyeH BO
eHNuata e OWTeTeH Tpe6a da ce 3aMeH,
BaxHO e npOncHd a ce yHHTN u da ce 3aMeHn
co oOobpen od cTpHa h BA 1363/3A
OCnpynteH npKnyO K n deKa ce 3ana3EH
CneHNte yNaTCTBa 3a OKnUyBaHe.
KunTe BO MPexHNOt Ka6eJ Ce 06oEHN BO COJIaCHOCT CO CNeHNOB KOI:
CnHa HeyTpAnHa
Kadepaaba
KINBA
Bnndejkn 60nte Ha XnCnTe BO MpeXnHOT Ka6en He Ondrobaaat Ha 06oEHnTe O3HaKn 3a NdENTnФnKaunja Ha TepMNHaInTe BO npNKnyOkOT, NOCTanTe Ha CJIeHNOT HauIN:
- KncaTa co cna 6oja Mopa da ce noBp3e co TepMnHaNoT uTo e o3HaueH co 6yKBaTa N nn e co uPHa 6oja.
- Kiuata co kapeaba 6oja da ce noBp3e co TepMHaJOT uTo e o3Hauyen Co 6yKbata L nn e co uPBeHa 6oja.
TEXHNUKNIODATOUN
MpeXHnOHT HAnOH V\~ 230
HomHaHaΦpeKBeHcuiJa Hz 50
Bne3Ha MOKHOCT W 430
Bp3nHa 6e3 onTepeTyBaHb e min -1 5,000-13,000
Klaca 3a 3aunTa IP 20
TeKHa kg 2.1
БУЧАВИВИБРAUПИ
| Hиво на 3ычен при Tinocok (Lpa) | dВ(A) | 77 |
| Акystуна мokhoct (Lwa) | dВ(A) | 88 |
| Отстanybahe (K) | dB(A) | 3 |
| Вибраци | m/s2 | 7.6 |
| Отстanybahe (K) | m/s2 | 1.5 |

Hoceme 3aumuma 3a cnyxom.
HnboHaBn6paun
HnBOTO Ha emcnjata Ha Bn6paunite, HabeJeHO BO yNaTCTBOBO, e n3MepeHO BO cOrnaCHOCT CO CTaHdapn3npan TeCT daenb EN 60745; Toj MOKe Da Ce KopncTu 3a CnpoeDyBaHe Ha eDen aNAT CO dpykako N 3a npenmHa npoceHa Ha n3IOXeHOCT Ha Bn6paun npKopncTeBe Ha aNATOT BO CNOMeHaNTte anlkaun
KOpNCTeHBeTo Ha aJaTOT 3a pa3JIuChn anJikaun nn Co pa3JIuChn nn Cna6o oDpxyBaH np6op, MoKe 3HaunTeHNo da ro 3roJeMn HNBOTO Ha n3IOXKeHOCT
BpeMeTo Kora anaTOT e NCKnyueH nn Kora pa60Tu HO He ja BpUn pa60TaTa, MoKe 3HaunTeJIHO Da ro HamaJIN HNBOTO Ha n3IOXeHOCT.
3aWNTteCe oD efeKTnTe Ha Bn6paunTe CO OdpKyuBaHBe Ha aIaNToT n npNbOpOT, paTe Da BN 6nDat TOnnn n opraHn3npajTe r np6oTHnTe HABNK.
ONIC (CJI.A
EkceHTpnuHaTa 6pyCnka e HameHeTa 3a 6pyceHe Ha npBO, MeTaj, PIACTnKa n OboeHn IOBpUHH.
- On/off npeknhya
- Bpeka 3a npaunHa
- TpkaNo 3a DoTepyBaHbe Ha 6p3nHa
4.ПолORA3a6pyceHbe
5.Главна дшka - konyu 3a 3aknyBahe
7.Прикниста вешка за пашина
MOHTAKA

Ipe Mohmaka ucknye me ja Maunama u u3eademe 20 npuknyokom od 2naeHuom HanoH.
MOnTnpaHe n demoHTnpaBe 6pycHa xapTnja (cJ.B)
- MoHTnpajTe ja 6pychata xapTnja (8) co nOTpe6hata rpaHyaunja, Bp3 6pychata noIOra (4). IpoBepTe daHn nepfopaujata ha 6pychata xapTnja (8) odroba co nepfopaujata Ha 6pychata noIOra (4).
KopncTeTe rpy6a xaptnja (rpaHnyaunja 50) 3a rpy6o 6pyceHe Ha Hepamn nOBpunn.
KopncTeTe cpeHa 6pycha xapTuja (rpaHyaunja 80) 3a otctpaHyBaHe Ha rpe6HaTHN octaHaTN oD rpy6aTa 6pycha xapTuja.
KopncTeTe fHa 6pycHa xapTuja (rpaHylaunja 120) 3a 3abpHNo 6pyceHe.
OcTpaHyBaHe
- OtctpaHete ja 6pychata xaptnja (8) od 6pychata noIora (4).
YNOTPEBA
ON/OFF npeknhyBaay Cn. A
Bknyte ja MaunHaTa co npntnckaBe Ha npkeHHyBaOT (1). Co otnytaBe Ha npkeHHyBaOT (1) MaunHata ce ncknyBa.
Konue 3a 3abpaByBaHe Cn. A
- Moxete Na ro 3a6paBnTe npeknHyBaoyt (1), co npuTnCKaHBe Bp3 Hero, a noToa Co npuTnCKaHBe Ha konyeto 3a 3a6paByBaHe (6).
3a OTnyuTaHbe, NOBtOpHo KpaTko npNTuChTe ro npeKnHyBaUOT (1).
№60pHa 6p3nHa (cI.A)
3a n36op Ha 6p3Ha ce Kopncn TpkaNoTo 3a n36op Ha 6p3Ha. Bp3HaT a MoKe da ce n36epe Bo 6 nOIOK6n. IDeaHnTa 6p3Ha 3aBnCn OI rpaHyaunjata n oD o6pa6otyBaHnOT MaTePnJal.

He u36upajme 6p3uHa 3a epeMe Ha pa6oma.
OdBeNyBaHe Ha npaunHa (cN. C)
- NocTaBeTe ja BpeKaTata 3a npaunHa (9) npnKnyOkoT (7).
BpTeJa BpeKaTa (9) Haecho DoeKa He 3a6paBn Ha MeTo.
Cobetn 3a ONTUMaJIHNO KOpIcTeHe
- Cterhete ro pa60THo napue.
- DpxTe ja MaunHaTa CbpcTo co DBe paue.
BknyeTe ja MaunHaTa. - IocTaBeTe ja 6pyChata noIora co 6pyChata xapTna Bp3 pa6oTHo napYe.
- Poneka DnKTe ja MaunHaTa npeky pa6oTHoTo napye, npuTnckajKn ja CnH0 6pycHata xapTuJa Bp3 napYeTo.
He npntnckajTe npemHory Bp3 MaunHaTa. OctabeTe MaunHaTaa ja 3aBpwn pa6oTaTa. - Ncknyute ja MaunHata n noyekajTe cenocho da ce conpe, nped da ja oDnoknte.
YnCTeHbE N ODPKxyBAHbE

Ipe duucmehe u odpxyeahe ucknyeme ja Mawunama u 3eademe 20 npuknyokom od anaHuom HanoH.
- PeioBHO YnCTeTe ro KyKnUTo co MeKaHa Kpna.
- UybajTe rN OTBOpNTe 3a BeHTnlaqJa YnCTn, 6e3 npaunHa. Ako e NOTpe6Ho, KopncTeMeKaHa, BnaJHa Kpna 3a OTCpaHyBaBe Ha npaunHa n HeuNCTOTmN Od OTBOpNTe 3a BeHTnlaqJa.
- Peiobho uicte te ja 6pychata noIora 3a da n36berHete HeTOUHOCTn npu pa6ota.
3aMeHa Ha 6pycha noJnora (Cn. D)
Bo cnuyaj ha a6ehe, Mopa da ce 3ameHn 6pychata noIora.
Ako e notpe6Ho, oTcTaHete ja 6pychaTa xapTuja.
- Ona6aBeTe rH 3aBpTKnTe (10) oD 6pyChata noJnora (4).
- Otrpahe ja ctapata 6pycha noiora (4).
- MoThnPajTe HOBa 6pycha noJnora (4).
- CterHeTe rI 3aBpTKnTe (10) Ha 6pychaTa noJnora (4).
TAPAHUNJA
BudTe r npnloKeHnte rapaHTn TePMHN.
OKOJIINHA
DenoHpaHe

Pon3BODOT, np60pOT n naKyBaHbeto MopaaT da ce copTnpaat 3a ekolowko peukklnpahe.
Cama 3a 3emjnoEY
He n deNoHnpajte anatnte BO domaueh otna. CnopeE Ebponckoto YnataCTBO 2012/19/EU 3a OTnadHa eNektpnua H eNektpoHcKa onpema H erOBata mnnneMeHTaunja BO HaUNOHJHOT npabo, eNektpuHnTe aanT KOn BeKe He ce ynotpe6bnuB Mopaat da ce cObpaat OndelHO n da ce OTcpanybaaT ha ekolowkn hauHH.
Pon3BOJOT yNaTCTBOTO ce npEaMeT Ha npomHa. KapakTepeNtKe Meoat Da CE npomeHAT 6e3 HataMoUHO 13BeCTyBaHe.
CE
DECLARATION OF CONFOMITY ESM1010, RANDOM ORBITAL SANDER
(EN) We declare under our sole responsibility that this product is in conformity with directive 2011/65/EU of the European parliament and of the council of 8 June on the restriction of the use of certain hazardous substances in electrical and electronic equipment is in conformity and accordance with the following standards and regulations:
(DE) Der Hersteller erklart eigenverantwortlich, dass这点 Produkt der Direktive 2011/65/EU des Europäischen Parlaments und des Rats vom 8. Juni 2011 über die Einschränkung der Anwendung von bestimmten gefährlichen Stoffen in elektrischen und elektronischen Geräten entspricht. den folgenden Standards und Vorschriften entspricht:
(NL) Wij verklaren onder once volledige verantwoordelijkheid dat dit product voldoet aan de conform Richtlijn 2011/65/EU van het Europees Parlement en de Raad van 8 Juni 2011 betreffende beperking van het gebruik van bepaalde gevaarlijke stoffen in elektrische en elektronische apparatuur en in overeenstem ming is met de volgende standaarden en reguleringen:
(FR) Nous déclarons sous notre seule responsabilité que ce produit est conforme aux standards et directives suivants: est conforme à la Directive 2011/65/EU du Parlement Européen et du Conseil du 8 juin 2011 concernant la limitation d'usage de certaines substances dangereuses dans l'équipment électrique etlectronique.
(ES) Declaramos bajo nuestra exclusiva responsabilidad que este producto cumple con las siguientes normas y estndares de configuracion: se encuesta conforme con la Directiva 2011/65/UE del Parliamento Europeo y del Consejo de 8 de junio de 2011 sobre la restriccion del uso de determinadas sustancias peligrosas en los equipos electricos y electronicos.
(PT) Declaramos por esta total responsabiliada-de que este produits está em conformidade e cumpre as normas e regulamentacoes que se seguem: está em conformidade com a Direactiva 2011/65/EU do Parlamento Europeu e com o Conselho de 8 de Junho de 2011 no que respeita a restricao de'utilização de determinadas substancias perigosas existentes em equipamento eletrico e电子rico.
(II) Dichiariamo, sulla la nostra responsabilità, che quello prodotto è conforme alle normative e ai regolamenti segunti: è conforme alla Direttiva 2011/65/UE del Parlamento Europeo e del Consiglio dell'8 giugno 2011 sulla limitazione dell'uso di determinate sostanze pericolose nelle apparecchiatte elettriche ed elettroniche.
(SV) Vi garanterar pe eget ansvar attenna produit uppyller och foljer fojande standarder och bestammelser: uppyller direktiv 2011/65/EU fran Europeiska parliamentet et EG-radet den 8 Juni 2011 om begransingen av anvandning av farliga substanser i elektrisk och elektronikn utrustning.
(FI) Vakuutamme yksinomaan omalla vastuillamme, etta tama tuote taytttae seuraavat standardit ja saadokset: taytttae Europon parlementin ja neuvoston 8. kesakuta 2011 päviyn direktivin 2011/65/VA vaumukset koskien vaarallisten aineiden kävton raiolista sähko- ja elektronississa laiteissa.
(NO) Vi erkräer und vart eget ansvar at dette produkt er i samsvar med folgende standarder og regler: er i samsvar med EU-direktivet 2011/65/EU fra Europa-parliamentet et Europa-radet, pr. 8 Juni 2011, om begrensning i bruken av visse farlige stoffer i elektrisk og elektronisk utysr.
(DA) Vi erkräder un eget ansvar, at dette produit er i overensstammelse med følgende standarder og bestemmelser: er i overensstammelse med direktiv 2011/65/EU fra Europa-Parliamentet og Rådet af 8, Juni 2011 om begraesning af anvendelsen af visse farlige stoffer i elektrisk og elektronik odystr.
(HU) Felelossaggunk teljes tutadaban kijelentjuk, hogy ez a termek teljes mertekben megfeile az alabbi szabvanyoknak es elorasoknak: je v souladu se smemici 2011/65/EU Evropskeho parlamentu a Rady EU ze dne 8. cerva 2011, ktera se tjkare omezeni pouziti urcitiy nebepeznch latek v elektrickych a elektronickych zaizenich.
(CZ) Na naši vlastni zodpovednost prohlasujeme,Že je tento vyrobek v souladu nasludujicimi standarda u normami: Je v sulade s normou 2011/65/EU Europskeho parliamentu a Rady 28. juna 2011 týkajúcej sa obmedzenia použivania určitych nebepečnéch yåket v elektriktona a elektronickom vybaveni.
(SK) Vyhlasujeme na nasu vyhradnu zodpovednost', ze tento vyrobok je v zhode a sulade s nasledujucim normala a predispim: Je v sulade s normou 2011/65/EU Europskeho parlamentu a Rady z 8. juna 2011 tskajucej sa obmedzenia pouzivania urciti ch nebezpechnych latok v elektrikom a elektronikom vybaveni.
(SL) S polno odgovornstjo izjavlamo, da je ta izdelek v skladu in da odgovarja nasledn-jim standardom terpredipisom: je v skladu z direktivo 2011/65/EU Evropskega parlementa in Sveta z dne 8. jun 2011 o mejevanju uporabe dolcenih nevarrin h novi v elektrichi in elektronski opremi.
(PL) Deklarujemy na wlasna odpowiedzialnośc, ze ten produkt spelnia wymogi zawarte w nastepujacych normach i przyepsich: jest zgodny z Dyrektywa 2011/65/UE Parla mentu Europejskiego i Rady z dnia 8 czerwca 2011 r. w sprawie ograniczenia stosowania niedtórchy niebezmiecznych substancj w spręcie elektrycznym i elektronicznym.
(LT) Prisiimdami visa atsakomybe deklaruojame, kad sis gaminys altitinka zemiau paminétus standartus arba nuostatus; attilinka 2011 m. birželio 8 d. Europos Parlamento ir Tarybos direktyva 2011/65/EB del tam tikru pavojingmu medziagu naudojoime elektrós ir elektroninéje jrangoe apribojimo.
(LV) Ir abiłośa Eiropas Parliamenta un Padomes 2011. gada 8. jünija Direktivai 2011/65/ES par daß zu bistamu vieu izmantośanas ierobeżośan eulektriskās um elektroniskās iekātkās.
(ET) Apgalvojam ar visu atbildibu, ka sis produits ir saskaan un atblist sekojsiem standartiem un nolikumim: ir atblistosa Eriopas Parlamenta un Padomes 2011. gada 8. junija Direktivai 2011/65/ES par da zu bistamu viel izmantoisanas ierobezosanenu elektriskas un elektroniskas lekartas.
(RO) Declarām prinacea tu raspunderea depinà cà produsul acesta este in conformitate cu urmátoarele standarde sau directive: este ∈ conformitate cu Direcva 2011/65/UE a Parliamentului Europeani.si a Consiliului din 8 iunie 2011 cu privire la interizcerea utilizārì anumitor substante peniculoase l'echipamente tele electrice si electronice.
(HR) Izjavljuemo pod vlastitom odgovornó, su da je strojem ukladan sa slijedesim standardima ili standardiziranim Dokumentina i u sklado sa odredbama: uskladeno s Direktivom 2011/65/EU europskog parlamenti i viječa izdanom 8. lipnja 2011. oograničenju konistenja odredenih opasinn tvaru i elektrčnoj i elektronickoj opremi.
(SRL)Pod punom odgovronscu izjavljume da je usaglasen sa sledecim standardima ili normama: usaglasen sa direktivom 2011/65/EU Evropskog parlamenta i Saveta od 8.juna.2011. godine za restrkciju upotrebe odredenih opasnih materija u elektrichnoj i elektronskoj opremi.
(RU) PnD CBOKOBETCTBEHNOCTb 3aABNREM, YTO DAHHOE H3dEINe COOTBETCTBYET CnEDyIOOM CTAHADPAM HOPMAM: COOTBETCTBYET Tpe6OBAHNM DInpekTMBbl 2011/65/EU EAponeckoro naplameHTA n COBETA 8 NIOHA 2011 r. no OprahmEHNO IONIbTOBAHnONpEneHbXb ONaChbX BeueCTB 3NeKTPnueCKOM 3NeKTPoHHOM 06OpYPOBAHm
(UK) Ha cboi Bnachy Bi nobiaIbHcIb 3aBnE mo, 10 da He obnHaHH bDnOBIae HacTyHmM CTAndaptam I HOPmatNBM: 3aDOBnHBe BmOHT DnpeKTHBN 2011/65/ EC CbponehCko TnpameHcy Ta PaDi B 8 UepBHa 2011 pOky Ha oMeKeHHB BNOKPCTAHN DEeKHX Hee3neHnx peoBHN B eNEKTPHOMy Ta eNEKTPOHOMy obnaadHHi.
(EL) kawoume utuOuvva on to pioov auto oukwvi kai npoei Tou paxakowavovoioukai npotua: ouuogwveia teyn ONYa 2011/6/EE tou Eupwtaikou Koovosouloukai tou SuBouliou n8n louviou 2011 vay toepiopiox npohns opiaevuvettikivovuvauoi ae naektpiko kaanekpoviko eoTAmio.
EN 55014-1, EN 55014-2, EN 62841-1, EN 62841-2-4 EN 61000-3-2, EN 61000-3-3
2006/42/EC, 2014/30/EU, 2012/19/EU, 2011/65/EU
Zwolle, 01-08-2020
H.G.F.Rosberg
CEO Ferm
Ferm · Lingenstraße 6 · 8028 PM · Zwolle The Netherlands
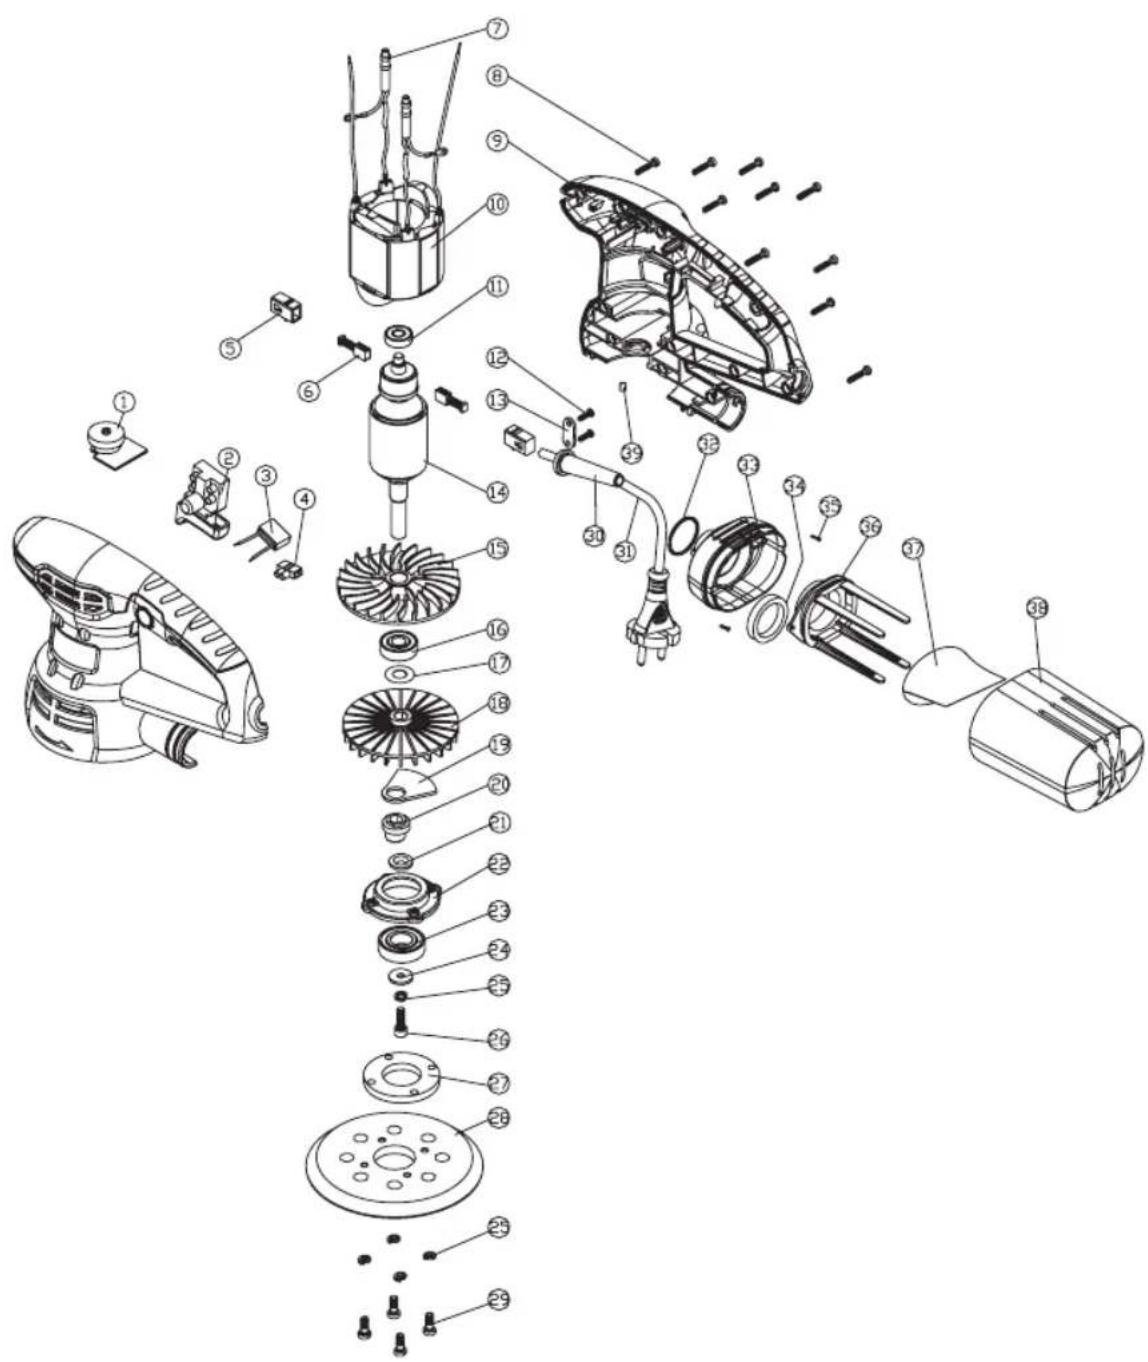
Spare parts list
No. Description Position
| 470238 | Speed controller 1 | |
| 470239 | Switch 2 | |
| 470240 | Carbon brush holder set (2pcs) 5 | |
| 470241 | Stator + inductors 6 | |
| 470242 | Top rotor bearing 607Z 7, 10 | |
| 470243 | Top rotor bearing 607Z 11 | |
| 470244 | Rotor + upper fan 14, 15 | |
| 470245 | Bottom rotor bearing 6000z + 16, 17 | |
| 470246 | Lower fan 18 | |
| 470247 | counterbalancer + eccentric 19..21 | |
| 470248 | Pad bearing 6002 RS 23 | |
| 470249 | Base pad with Velcro | 28 |
| 470250 | O-ring for dust bag | 32 |
| 470251 | Dust box complete | 32..38 |
Exploded view
- SAFETYWARNINGS
- WARNING
- C
- Additional safety warnings for orbital sanders
- Electrical safety
- TECHNICAL DATA
- NOISE AND VIBRATION
- Vibration level
- DESCRIPTION (FIG. A)
- ASSEMBLY
- Mounting and removing the sanding paper (fig. B)
- Mounting
- Removing
- USE
- The On/Off switch Fig. A
- Lock-on Button Fig. A
- Setting the speed (fig. A)
- Dust extraction (fig. C)
- Hints for optimum use
- CLEANING AND MAINTENANCE
- Replacing the sanding pad (fig. D)
- WARRANTY
- ENVIRONMENT
- Disposal
- Only for EC countries
- BESCHRIJVING (FIG. A)
- Odsavani prachu (obr. C)
- UWM IN BUEPAUIN
- YpOBeHbBn6paun
- ONUCAHNE (PNC.A)
- CEOPKA
- YCTaHOBka
- 3aMeHa 1nfoBaIbHOIOyKu (pnc. D)
- TAPAHTN
- OXPAHA OKPYXIAIOUCEI CPEIbI
- YTNIN3aIy
- Tonbko dIra cTpaH EC
- EKCUEHTPINKOBAIJIΦYBAJIbHA MAUNHA 430W
- 3ACTEPEXEHHBAIDHOCHO B6E3NEKIN
- 3ACTEPEXEHH
- DodatkoBi 3actepexeHHB iDHOcH 6e3neKn npnpo60Ti 3 op6itaIbHIMN uNiΦyBaIbHIMN IHCTpyMeHTAMN
- Ppabnla 6e3neKn npu po6oTi 3 eJektpnHmnpnlaamn
- TEXHIYHI XAPAKTEPNCTIKN
- BcTaHOBJIeHHa WbNdkocti (pnc.A)
- BndaJIeHnI npIy (pnc. C)
- IopaN3 BnKOpncTaHH
- UHJYIOBVAHH
- 3amiha Tprmaa HauDaunoro nanepa (pnc. D)
- TAPAHTI
- IPOEIAOIOIHZEIEA ZΦAΛEIA
- IIPOEIOHOIHsH
- DonbHnTeHN npdeynpeXeHn 3a 6e3oNaChocT np pa60Ta c opBtAnHn WnaΦOBe
- EneKtpnuecka 6e3onacHocT
- TEXHNUECKN DAHHN
- HnboHaBn6paun
- ONUCAHNE (ФИ.А)
- CΓIIOБЯBAHE
- MOHTnpaHne n cBaJIaHe Ha WkypKaTa (ΦnR. B)
- MOHTIPAHe
- CbaJHe
- YNOTPEBA
- On/Off npBkNIOBaTeI ΦIr.A
- 3actonopBaHe Ha BbTbH Phr.A
- HactpoBaHe Ha ckopocTta (fur. A)
- N3BnueHa npaxa (pnr. C)
- CbBET 3a onTImmaJHa pa6oTa
- ПОЧИСТВАЕ И ПОДРБЖKA
- POnMaHa Na noJIOxKata 3a Wkypkata (fur. D)
- TAPAHZIN
- OKOJIHA CPEIa
- N3XBbPnHe
- Camo 3a ctpaHnTe ot EC
- EKCUEHTPNUHA BPYCUNKA 430W
- IPEdYIpEpyBAHbA 3A B636EДHOCT
- PNEyNPEyBAHbE
- DOnoHnTeHn 6e36eHocn npdynpeyBaHa 3a ekcueHTpnuHa 6pycnIka
- EneKtpnHa 6e36eHocT
- 3aMeHa Ha MPeKeH npKnIyOc (cAmo 3a BB)
- TEXHNUKNIODATOUN
- БУЧАВИВИБРAUПИ
- ONIC (CJI.A
- MOHTAKA
- MOnTnpaHe n demoHTnpaBe 6pycHa xapTnja (cJ.B)
- OcTpaHyBaHe
- ON/OFF npeknhyBaay Cn. A
- Konue 3a 3abpaByBaHe Cn. A
- №60pHa 6p3nHa (cI.A)
- OdBeNyBaHe Ha npaunHa (cN. C)
- Cobetn 3a ONTUMaJIHNO KOpIcTeHe
- YnCTeHbE N ODPKxyBAHbE
- 3aMeHa Ha 6pycha noJnora (Cn. D)
- TAPAHUNJA
- OKOJIINHA
- DenoHpaHe
- Cama 3a 3emjnoEY
- CE
- DECLARATION OF CONFOMITY ESM1010, RANDOM ORBITAL SANDER
- EN 55014-1, EN 55014-2, EN 62841-1, EN 62841-2-4 EN 61000-3-2, EN 61000-3-3
- Spare parts list
- Exploded view
Brand : Ferm
Model : ESM1010
Category : Electric sander