USER MANUAL PL55 SCHEPPACH
natural_image
Exterior view of a modern office building (no signage)

PL55
PL55SE
| DE | Elektro-TauchsägeOriginalbetriebsanleitung | 7 |
| GB | Electric plunge sawTranslation of original instruction manual | 25 |
| FR | Scie plongeante électriqueTraduction des instructions d'origine | 40 |
| IT | Sega ad affondamento elettricaLa traduzione dal manuale di istruzioni originale | 56 |
| NL | Elektrische invalcirkelzaagVertaling van de originele gebruikshandleiding | 72 |
| ES | Sierra de inmersión eléctricaTraducción del manual de instrucciones original | 88 |
| PT | Serra de mergulho elétricaTradução do manual de operação original | 104 |
A
B

natural_image
Technical illustration of a saw cutting tool and its mechanical assembly (no text or symbols visible)
natural_image
Close-up of a metallic mechanical component with a curved recess and mounting holes, labeled L3L1 L2 (no other text or symbols)
natural_image
Person using a power saw on a metal workbench, no visible text or symbols
natural_image
Person using a power tool on a workbench, no visible text or symbols
Günzburger Straße 69
D-89335 Ichenhausen
Verehrter Kunde,
Homepage: https://www.scheppach.com/de/service
Explanation of the symbols on the product
The use of symbols in this handbook is designed to direct your attention to possible risks. You must make sure that you understand the safety symbols and explanations accompanying them. Warnings themselves cannot remove risks and cannot substitute correct action for the prevention of accidents.
 | Read instruction manual and safety instructions before starting up and pay attention! |
 | Wear ear protection! |
 | Wear a dust mask! |
 | Wear safety goggles! |
 | Protection Class II (double shielded) |
 | The product complies with the applicable European directives. |
| ⚠ ATTENTION! | In this operating manual, we have used this sign to mark all sections that concern your safety. |
 | The product complies with the applicable Serbian directives. |
Table of contents: Page:
- Introduction......27
- Device description (Fig. A - M) 27
- Scope of delivery 27
- Intended use 28
- Safety instructions 28
- Technical data.... 32
- Before starting the equipment 33
- Settings....33
- Commissioning 34
- Transport....36
- Cleaning and maintenance.... 36
- Storage 37
- Electrical connection 37
- Disposal and recycling.... 38
- Troubleshooting 39
- Declaration of conformity 122
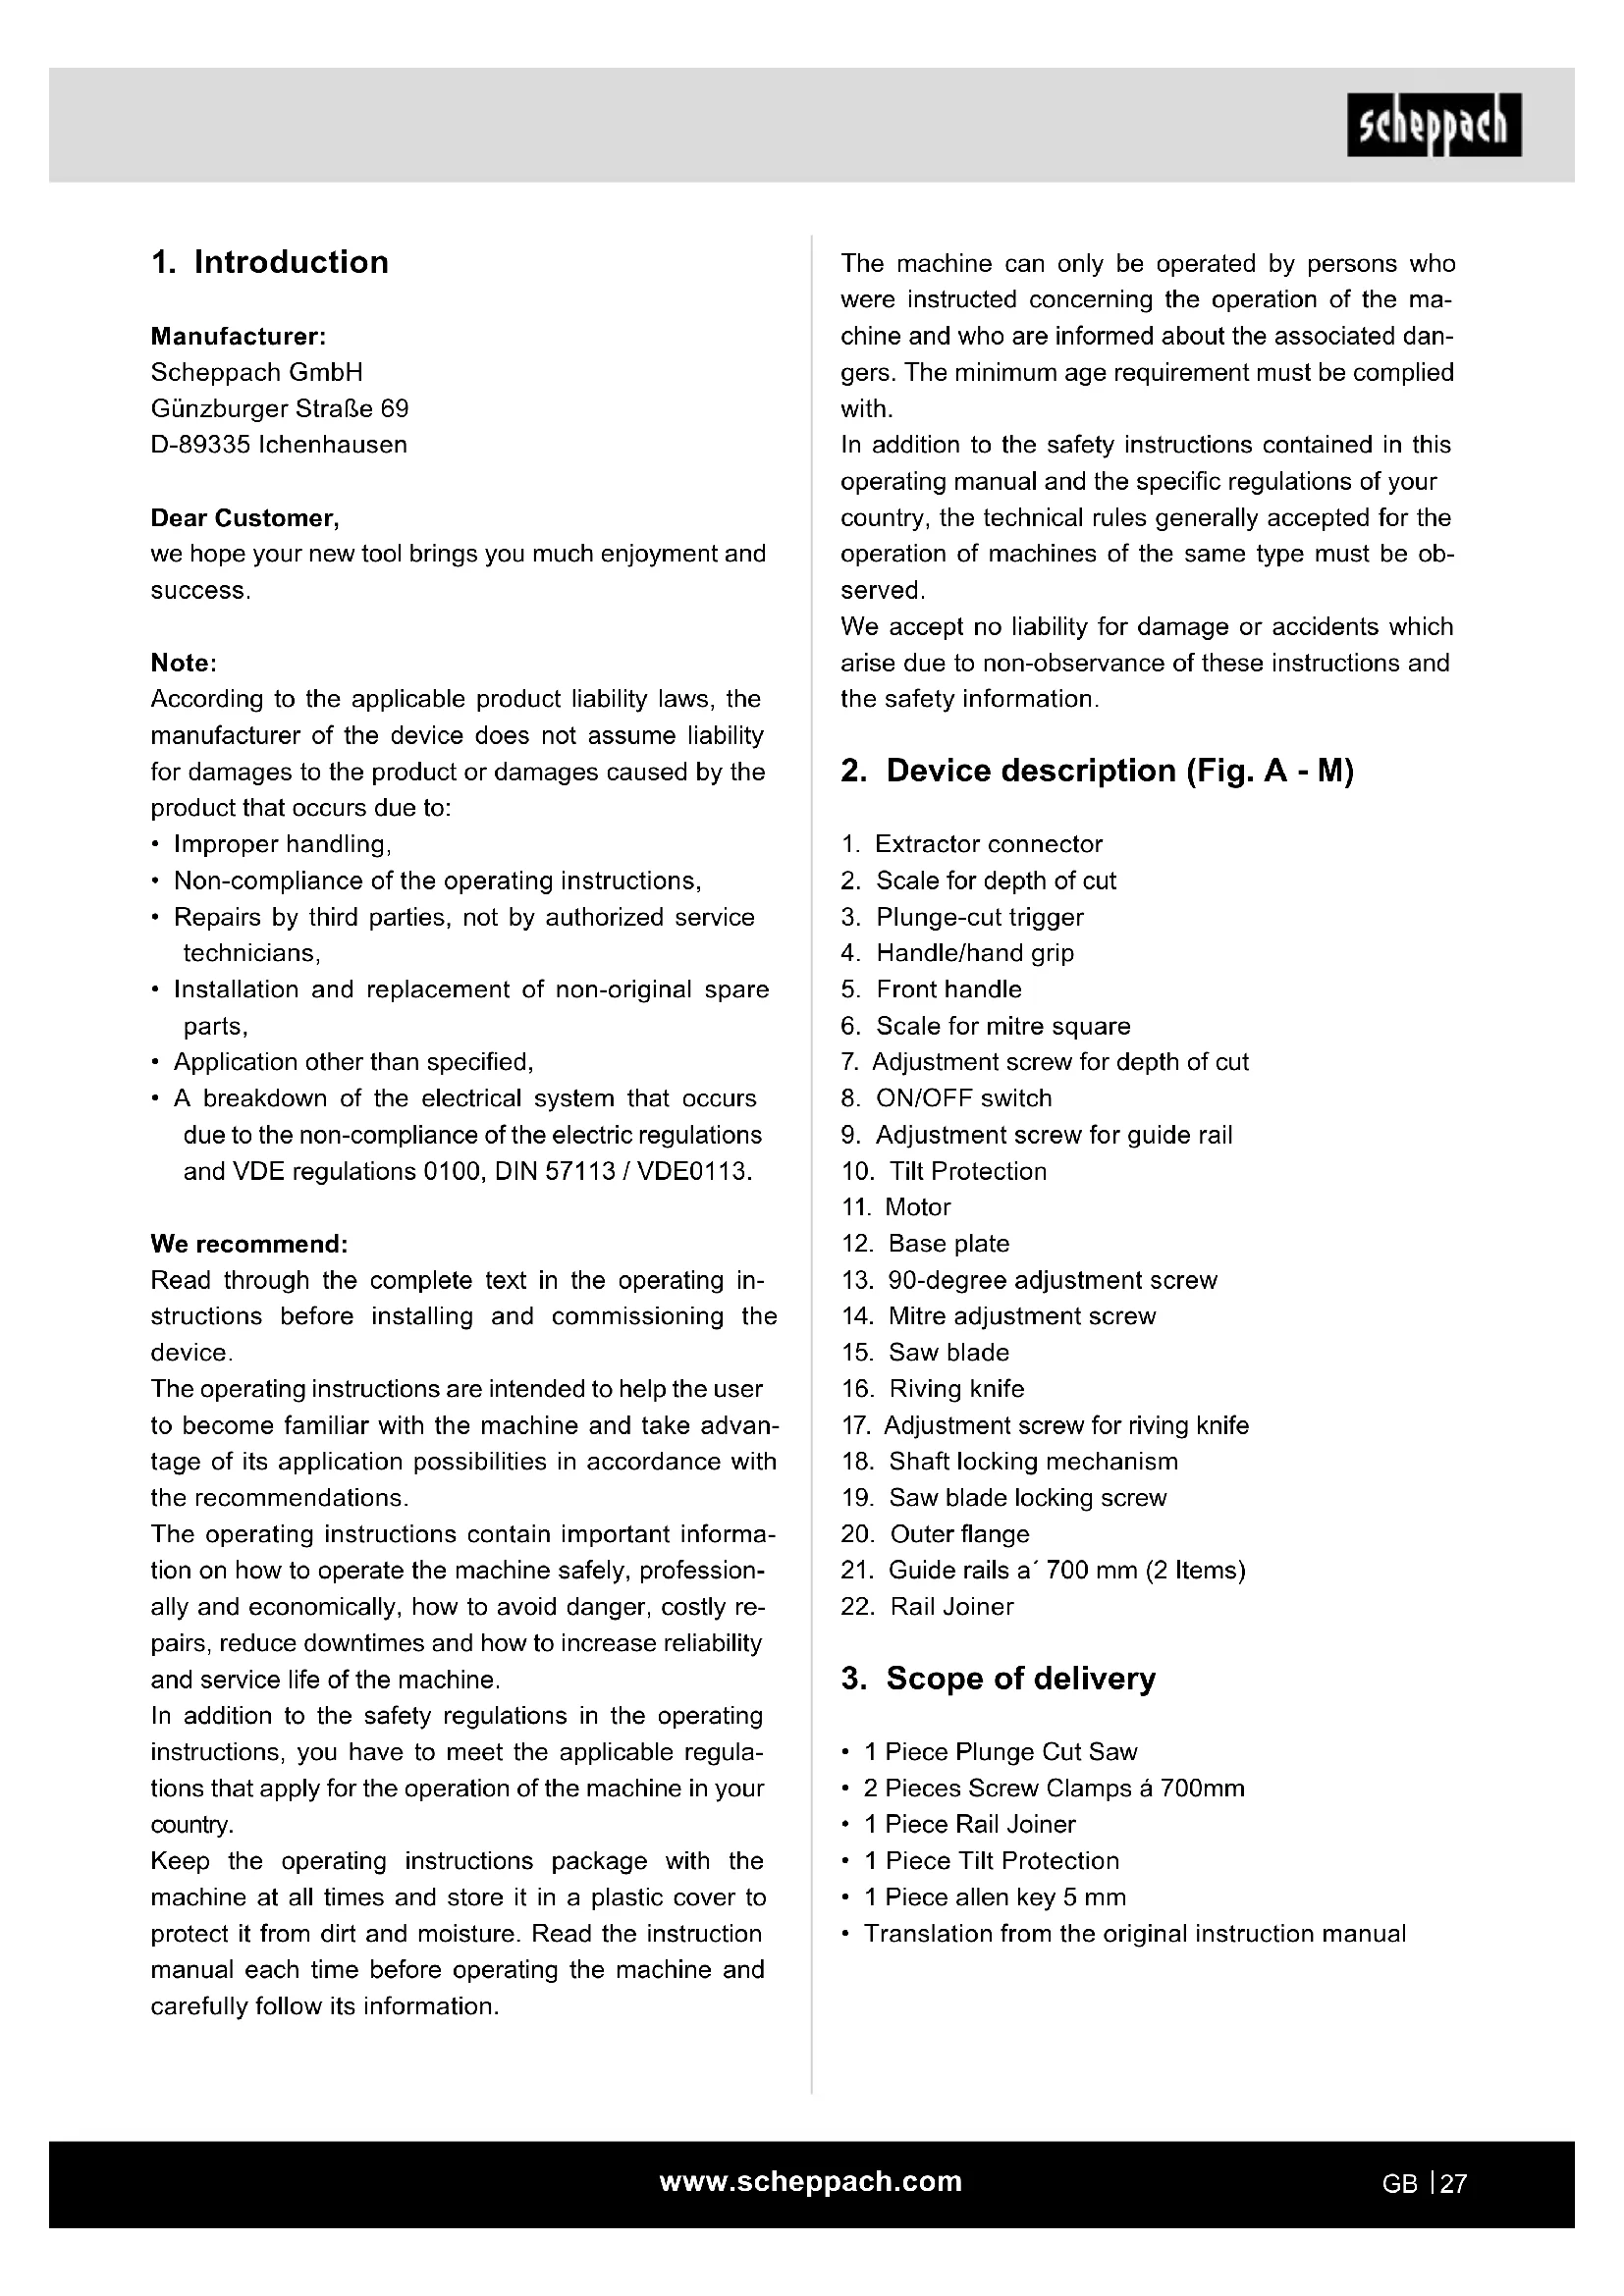
1. Introduction
Manufacturer:
Scheppach GmbH
Günzburger Straße 69
D-89335 Ichenhausen
Dear Customer,
we hope your new tool brings you much enjoyment and success.
Note:
According to the applicable product liability laws, the manufacturer of the device does not assume liability for damages to the product or damages caused by the product that occurs due to:
- Improper handling,
• Non-compliance of the operating instructions,
• Repairs by third parties, not by authorized service technicians,
• Installation and replacement of non-original spare parts,
• Application other than specified,
• A breakdown of the electrical system that occurs due to the non-compliance of the electric regulations and VDE regulations 0100, DIN 57113 / VDE0113.
We recommend:
Read through the complete text in the operating instructions before installing and commissioning the device.
The operating instructions are intended to help the user to become familiar with the machine and take advantage of its application possibilities in accordance with the recommendations.
The operating instructions contain important information on how to operate the machine safely, professionally and economically, how to avoid danger, costly repairs, reduce downtimes and how to increase reliability and service life of the machine.
In addition to the safety regulations in the operating instructions, you have to meet the applicable regulations that apply for the operation of the machine in your country.
Keep the operating instructions package with the machine at all times and store it in a plastic cover to protect it from dirt and moisture. Read the instruction manual each time before operating the machine and carefully follow its information.
The machine can only be operated by persons who were instructed concerning the operation of the machine and who are informed about the associated dangers. The minimum age requirement must be complied with.
In addition to the safety instructions contained in this operating manual and the specific regulations of your country, the technical rules generally accepted for the operation of machines of the same type must be observed.
We accept no liability for damage or accidents which arise due to non-observance of these instructions and the safety information.
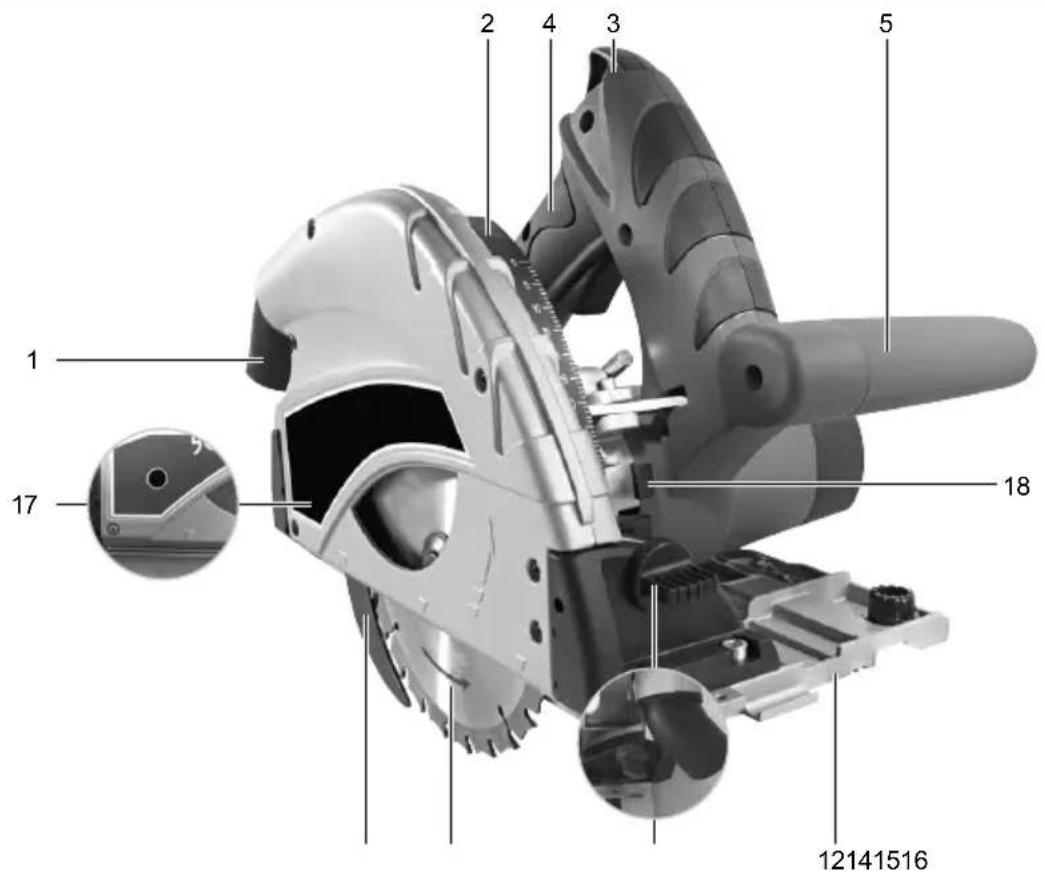
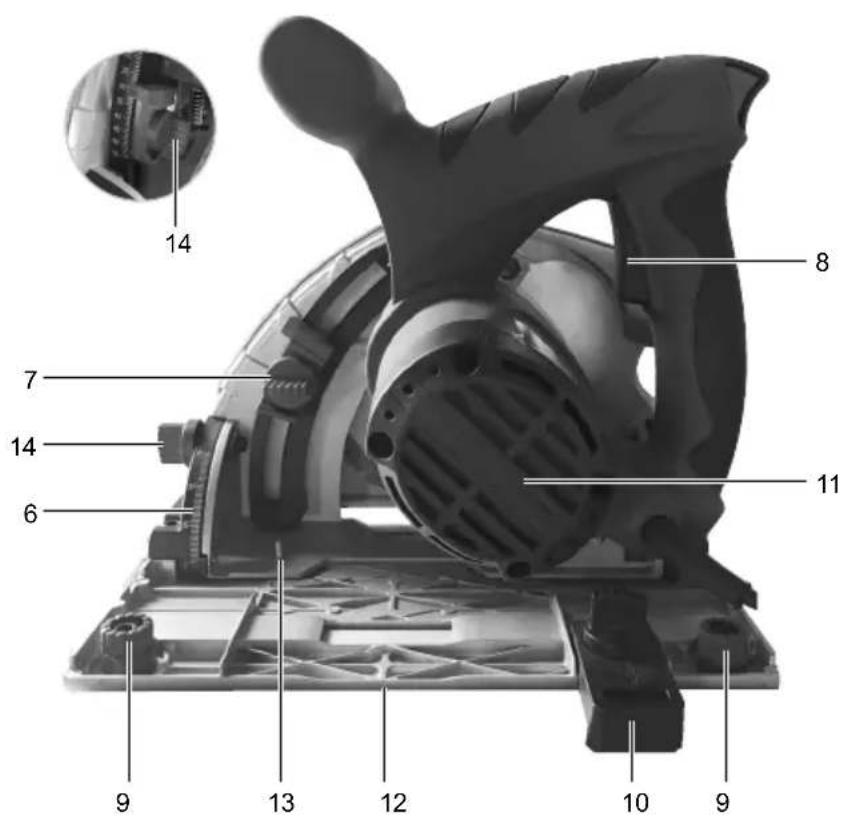
2. Device description (Fig. A - M)
- Extractor connector
- Scale for depth of cut
- Plunge-cut trigger
- Handle/hand grip
- Front handle
- Scale for mitre square
- Adjustment screw for depth of cut
- ON/OFF switch
- Adjustment screw for guide rail
- Tilt Protection
- Motor
- Base plate
- 90-degree adjustment screw
- Mitre adjustment screw
- Saw blade
- Riving knife
- Adjustment screw for riving knife
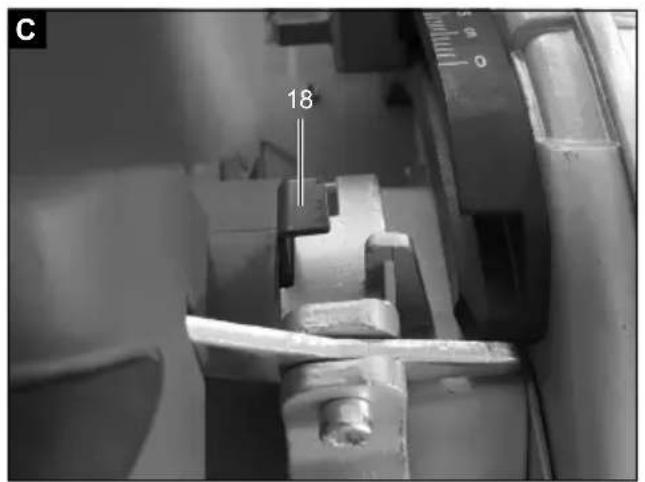
- Shaft locking mechanism
- Saw blade locking screw
- Outer flange
- Guide rails a' 700 mm (2 Items)
- Rail Joiner
3. Scope of delivery
• 1 Piece Plunge Cut Saw
• 2 Pieces Screw Clamps á 700mm
• 1 Piece Rail Joiner
• 1 Piece Tilt Protection
• 1 Piece allen key 5 mm
• Translation from the original instruction manual
4. Intended use
Plunge-cut saws are intended to be used for sawing wood, materials similar to wood and plastics.
The machine is designed and approved for use by trained persons or specialists only.
Only saw blades suitable for the machine (HM or CV saw blades) may be used. HSS saw blades or cutting discs of any kind may not be used.
Any other applications are expressly prohibited and are deemed improper use.
Neither the manufacturer nor the retailer can accept any responsibility for injury, loss or damage caused by misuse of this product of any kind.
Examples of misuse are given in the following non-exhaustive list:
Using the plunge saw for other purposes than those which are intended;
- Failure to observe the safety instructions and warnings as well as the assembly, operating, maintenance and cleaning instructions contained in this user manual;
- Failure to comply with any regulations relating to accident prevention, occupational medicine or safety which specifically and/or generally apply to the use of this plunge saw;
- Use of accessories or spare parts that are not intended for this plunge saw;
- Modifications to the plunge saw;
• Repairs to the plunge saw by parties other than the manufacturer or a qualified professional;
- Use of the plunge saw for commercial or industrial applications;
- Operation or maintenance of the plunge saw by persons not familiar with how to handle the plunge saw and/or who are not aware of the related risks.
To use the equipment properly you must also observe the safety information, the assembly instructions and the operating instructions to be found in this manual.
All persons who use and service the equipment have to be acquainted with this manual and must be informed about the equipment's potential hazards.
It is also imperative to observe the accident prevention regulations in force in your area.
The same applies for the general rules of health and safety at work.
The manufacturer will not be liable for any changes made to the equipment nor for any damage resulting from such changes.
Even when the equipment is used as prescribed it is still impossible to eliminate certain residual risk factors. The following hazards may arise in connection with the machine's construction and design:
- Touching the exposed areas of the saw blade;
- Reaching into the rotating saw blade (cut injury);
- Kickback of the workpieces and parts of the workpiece if used improperly;
- Saw blade breaks;
- Projection of defective hard metal parts of the saw blade;
- Hearing loss in the event of failure to use the required ear protection;
- Damage to the eyes if the required safety goggles are not used;
- Injury to health if the required dust mask is not used;
- Emission of wood dust that is harmful to health if used in enclosed spaces.
Please note that our equipment has not been designed for use in commercial, trade or industrial applications. Our warranty will be voided if the equipment is used in commercial, trade or industrial businesses or for equivalent purposes.
5. Safety instructions
⚠ WARNING! Read all safety warnings, instructions, illustrations and specifications provided with this power tool. Failure to follow all instructions listed below may result in electric shock, fire and/or serious injury.
Save all warnings and instructions for future reference.
The term “power tool” in the warnings refers to your mains-operated (corded) power tool or battery-operated (cordless) power tool.
1. Work area safety
a) Keep work area clean and well lit. Cluttered or dark areas invite accidents.
b) Do not operate power tools in explosive atmospheres, such as in the presence of flammable liquids, gases or dust. Power tools create sparks which may ignite the dust or fumes.
c) Keep children and bystanders away while operating a power tool. Distractions can cause you to lose control.
- Electrical safety
a) Power tool plugs must match the outlet. Never modify the plug in any way. Do not use any adapter plugs with earthed (grounded) power tools. Unmodified plugs and matching outlets will reduce risk of electric shock.
b) Avoid body contact with earthed or grounded surfaces, such as pipes, radiators, ranges and refrigerators. There is an increased risk of electric shock if your body is earthed or grounded.
c) Do not expose power tools to rain or wet conditions. Water entering a power tool will increase the risk of electric shock.
d) Do not abuse the cord. Never use the cord for carrying, pulling or unplugging the power tool. Keep cord away from heat, oil, sharp edges or moving parts. Damaged or entangled cords increase the risk of electric shock.
e) When operating a power tool outdoors, use an extension cord suitable for outdoor use. Use of a cord suitable for outdoor use reduces the risk of electric shock.
f) If operating a power tool in a damp location is unavoidable, use a residual current device (RCD) protected supply. Use of an RCD reduces the risk of electric shock.
- Personal safety
a) Stay alert, watch what you are doing and use common sense when operating a power tool. Do not use a power tool while you are tired or under the influence of drugs, alcohol or medication. A moment of inattention while operating power tools may result in serious personal injury.
b) Use personal protective equipment. Always wear eye protection. Protective equipment such as a dust mask, non-skid safety shoes, hard hat or hearing protection used for appropriate conditions will reduce personal injuries.
c) Prevent unintentional starting. Ensure the switch is in the off-position before connecting to power source and/or battery pack, picking up or carrying the tool. Carrying power tools with your finger on the switch or energising power tools that have the switch on invites accidents.
d) Remove any adjusting key or wrench before turning the power tool on. A wrench or a key left attached to a rotating part of the power tool may result in personal injury.
e) Do not overreach. Keep proper footing and balance at all times. This enables better control of the power tool in unexpected situations.
f) Dress properly. Do not wear loose clothing or jewellery. Keep your hair and clothing away from moving parts. Loose clothes, jewellery or long hair can be caught in moving parts.
g) If devices are provided for the connection of dust extraction and collection facilities, ensure these are connected and properly used. Use of dust collection can reduce dust-related hazards.
h) Do not let familiarity gained from frequent use of tools allow you to become complacent and ignore tool safety principles. A careless action can cause severe injury within a fraction of a second.
- Power tool use and care
a) Do not force the power tool. Use the correct power tool for your application. The correct power tool will do the job better and safer at the rate for which it was designed.
b) Do not use the power tool if the switch does not turn it on and off. Any power tool that cannot be controlled with the switch is dangerous and must be repaired.
c) Disconnect the plug from the power source and/or remove the battery pack, if detachable, from the power tool before making any adjustments, changing accessories, or storing power tools. Such preventive safety measures reduce the risk of starting the power tool accidentally.
d) Store idle power tools out of the reach of children and do not allow persons unfamiliar with the power tool or these instructions to operate the power tool. Power tools are dangerous in the hands of untrained users.
e) Maintain power tools and accessories. Check for misalignment or binding of moving parts, breakage of parts and any other condition that may affect the power tool's operation. If damaged, have the power tool repaired before use. Many accidents are caused by poorly maintained power tools.
f) Keep cutting tools sharp and clean. Properly maintained cutting tools with sharp cutting edges are less likely to bind and are easier to control.
g) Use the power tool, accessories and tool bits etc. in accordance with these instructions, taking into account the working conditions and the work to be performed. Use of the power tool for operations different from those intended could result in a hazardous situation.
h) Keep handles and grasping surfaces dry, clean and free from oil and grease. Slippery handles and grasping surfaces do not allow for safe handling and control of the tool in unexpected situations.
5. Service
a) Have your power tool serviced by a qualified repair person using only identical replacement parts. This will ensure that the safety of the power tool is maintained.
Safety instructions for all saws
a) △ DANGER: Keep hands away from cutting area and the blade. Keep your second hand on auxiliary handle, or motor housing. If both hands are holding the saw, they cannot be cut by the blade.
b) Do not reach underneath the workpiece. The guard cannot protect you from the blade below the workpiece.
c) Adjust the cutting depth to the thickness of the workpiece. Less than a full tooth of the blade teeth should be visible below the workpiece.
d) Never hold piece being cut in your hands or across your leg. Secure the workpiece to a stable platform. It is important to support the work properly to minimize body exposure, blade binding, or loss of control.
e) Hold power tool by insulated gripping surfaces when performing an operation where the cutting tool may contact hidden wiring or its own cord. Contact with a "live" wire will also make exposed metal parts of the power tool "live" and shock the operator.
f) When ripping always use a rip fence or straight edge guide. This improves the accuracy of cut and reduces the chance of blade binding.
g) Always use blades with correct size and shape (diamond versus round) of arbour holes. Blades that do not match the mounting hardware of the saw will run eccentrically, causing loss of control.
h) Never use damaged or incorrect blade washers or bolt. The blade washers and bolt were specially designed for your saw, for optimum performance and safety of operation.
i) Wear suitable protective equipment such as ear protection, safety goggles, a dust mask for work which generates dust, and protective gloves when working with raw materials and when changing tools.
Further safety instructions for all saws
Causes and operator prevention of kickback:
- kickback is a sudden reaction to a pinched, bound or misaligned saw blade, causing an uncontrolled saw to lift up and out of the workpiece toward the operator;
- when the blade is pinched or bound tightly by the kerf closing down, the blade stalls and the motor reaction drives the unit rapidly back toward the operator;
- if the blade becomes twisted or misaligned in the cut, the teeth at the back edge of the blade can dig into the top surface of the wood causing the blade to climb out of the kerf and jump back toward the operator.
Kickback is the result of saw misuse and/or incorrect operating procedures or conditions and can be avoided by taking proper precautions as given below.
a) Maintain a firm grip with both hands on the saw and position your arms to resist kickback forces. Position your body to either side of the blade, but not in line with the blade. Kickback could cause the saw to jump backwards, but kickback forces can be controlled by the operator, if proper precautions are taken.
b) When blade is binding, or when interrupting a cut for any reason, release the trigger and hold the saw motionless in the material until the blade comes to a complete stop. Never attempt to remove the saw from the work or pull the saw backward while the blade is in motion or kickback may occur. Investigate and take corrective actions to eliminate the cause of blade binding.
c) When restarting a saw in the workpiece, centre the saw blade in the kerf and check that saw teeth are not engaged into the material. If saw blade is binding, it may walk up or kickback from the workpiece as the saw is restarted.
d) Support large panels to minimise the risk of blade pinching and kickback. Large panels tend to sag under their own weight. Supports must be placed under the panel on both sides, near the line of cut and near the edge of the panel.
e) Do not use dull or damaged blades. Unsharpened or improperly set blades produce narrow kerf causing excessive friction, blade binding and kickback.
f) Blade depth and bevel adjusting locking levers must be tight and secure before making cut. If blade adjustment shifts while cutting, it may cause binding and kickback.
g) Use extra caution when making a "plunge cut" into existing walls or other blind areas. The protruding blade may cut objects that can cause kickback.
Safety instructions for plunge saws
a) Check guard for proper closing before each use. Do not operate the saw if guard does not move freely and enclose the blade instantly. Never clamp or tie the guard with the blade exposed. If saw is accidentally dropped, guard may be bent. Check to make sure that guard moves freely and does not touch the blade or any other part, in all angles and depths of cut.
b) Check the operation and condition of the guard return spring. If the guard and the spring are not operating properly, they must be serviced before use. Guard may operate sluggishly due to damaged parts, gummy deposits, or a build-up of debris.
c) Assure that the guide plate of the saw will not shift while performing the "plunge cut" when the blade bevel setting is not at 90^ . Blade shifting sideways will cause binding and likely kick back.
d) Always observe that the guard is covering the blade before placing saw down on bench or floor. An unprotected, coasting blade will cause the saw to walk backwards, cutting whatever is in its path. Be aware of the time it takes for the blade to stop after switch is released.
Additional safety instructions for all saws with riv- ing knife
a) Use the appropriate riving knife for the blade being used. For the riving knife to work, it must be thicker than the body of the blade but thinner than the tooth set of the blade.
b) Adjust the riving knife as described in this instruction manual. Incorrect spacing, positioning and alignment can make the riving knife ineffective in preventing kickback.
c) Always use the riving knife except when plunge cutting. Riving knife must be replaced after plunge cutting. Riving knife causes interference during plunge cutting and can create kick-back.
d) For the riving knife to work, it must be engaged in the workpiece. The riving knife is ineffective in preventing kickback during short cuts.
e) Do not operate the saw if riving knife is bent. Even a light interference can slow the closing rate of a guard.
Additional safety instructions
- Never use abrasive wheels in the machine.
- Make sure that the riving knife is adjusted so that the distance to the sprocket ring of the saw blade is not more than 5 mm and that the sprocket ring does not stick out more than 3 mm above the lower edge of the riving knife.
- Make sure that the dust catching mechanism is correctly installed, as is described in this manual.
- Wear breathing protection. Always wear ear protection.
- Only those saw blades recommended in the manual should be used.
- Replace the saw blades as described in this manual.
- If the electrical cable of this tool is damaged it must be replaced by the manufacturer or the customer service department or a similarly qualified specialist in order to avoid dangers.
- Only use the recommended saw blades which correspond to EN 847-1.
- Only use the manufacturer's original saw blades with the number ∅ 160 mm, 160 x 20 x 2.4.
- Do not use any saw blades which do not correspond to the characteristics described in these operating instructions. Saw blades may not be brought to a stop by pressure on the machine from the side.
- Make sure that the saw blade is tightly assembled and turns in the correct direction.
- Hold the equipment on the insulated handles, when you undertake work in which the tool being used could come into contact with hidden electrical wires, or its own cable. Contact with a live power source can electrify the metal parts of the tool and lead to an electrical shock.
⚠ WARNING! This electric tool generates an electromagnetic field during operation. This field can impair active or passive medical implants under certain conditions. In order to prevent the risk of serious or deadly injuries, we recommend that persons with medical implants consult with their physician and the manufacturer of the medical implant prior to operating the electric tool.
Residual risks
The machine has been built according to the state of the art and the recognised technical safety requirements. However, individual residual risks can arise during operation.
- Health hazard due to electrical power, with the use of improper electrical connection cables.
• Furthermore, despite all precautions having been met, some non-obvious residual risks may still remain.
- Residual risks can be minimised if the „safety instructions“ and the „Proper use“ are observed along with the whole of the operating instructions.
- Do not load the machine unnecessarily: excessive pressure when sawing will quickly damage the saw blade, which results in reduced output of the machine in the processing and in cut precision.
- When cutting plastic material, please always use clamps: the parts which should be cut must always be fixed between the clamps.
- Avoid accidental starting of the machine: the operating button may not be pressed when inserting the plug in an outlet.
- Use the tool that is recommended in this manual. In doing so, your machine provides optimal performance.
- Hands may never enter the processing zone when the machine is in operation.
- Release the handle button and switch off the machine prior to any operations.
6. Technical data
Supply voltage 230 - 240 V\~ 50Hz
| Power (W) 1200 |
| Protection class II |
| Idle speed n_o (min ^-1 ) | 5500 |
| Carbide saw blade dimen-sions (mm) | 160 x 20 x 2.4 |
| Number of teeth | 24 (pre-assembled) |
| Riving knife (Thickness) (mm) | 2 |
| Cutting depth max. 90° (mm) | 55 |
| Cutting depth max. 45° (mm) | 41 |
| Inclination steplessly 0 - 45° |
| Suction connection ø (inner) 35 mm /ø (outer) 38 mm |
| Weight (without attachments) (kg) | 4,9 |
| Dimensions L x W x H (mm) 340 x 260 x 235 |
Subject to technical changes!
⚠ WARNING! Health hazard!
Working without ear protection and suitable protective clothing poses a health hazard.
- Wear ear protection and suitable protective clothing when working with the device.
Measured in accordance with EN 62841-2-5 & EN 62841-1. The noise at your workplace may exceed 85 dB; protective measures are necessary in this case (wear suitable ear protection).
Sound power level L_WA 89,5 dB
Sound pressure level L_pA 78,5 dB
Uncertainty K_wa/pA 3 dB
The aforementioned values are noise emission values and therefore, do not necessarily represent safe values for the workplace at the same time. The correlation between emission and immission levels cannot reliably provide for a conclusion as to whether additional cautionary measures are necessary or not.
Factors that could affect the respective immission level present at the workplace involve the specification of the work area, the surrounding area, the duration of exposure, other noise sources etc.
You must also observe any divergences in national regulations with respect to permissible workplace levels. The aforementioned information does, however, allow the user to better assess dangers and risks.
Vibration emission value ah (vector sum for three directions) and uncertainty K measured in accordance with EN 62841-2-5 & EN 62841-1:
Vibration emission level (3 directions)
Typical weighted vibrations a_h F: 1.239 m/s ^2 , R: 1.108 m/s ^2
Uncertainty K 1.5 m/s²
7. Before starting the equipment
- Open the packaging and remove the device carefully.
- Remove the packaging material as well as the packaging and transport bracing (if available).
- Check that the delivery is complete.
- Check the device and accessory parts for transport damage.
- If possible, store the packaging until the warranty period has expired.
ATTENTION!
The device and packaging materials are not toys! Children must not be allowed to play with plastic bags, film and small parts! There is a risk of swallowing and suffocation!
- It must be possible for the blade to run freely.
- When working with wood that has been processed before, watch out for foreign bodies such as nails or screws, etc.
- Before you press the ON/OFF switch check that the saw blade is fitted correctly. Moving parts must run smoothly.
- Before you connect the equipment to the power supply make sure the data on the rating plate are identical to the mains data.
- Only connect the machine to a correctly installed protective contact socket, with fuse protection of at least 16A.
Electrical connections
Check that the electrical system to which the machine is connected is earthed in compliance with current safety regulations and that the current socket is in perfect condition.
The electrical system must be fitted with a magneto-thermal protective device to safeguard all conductors from short circuits and overload.
The selection of this device should be in line with the following electrical specifications of the machine stated on the motor.
NOTE: Your plunge saw's electrical system is equipped with an under-voltage relay which automatically opens the circuit when the voltage falls below a minimum pre-established limit and which prevents the self-reset of machine functions when voltage returns to normal levels.
If the machine stops involuntarily, do not be alarmed. Make sure that there has not been a voltage failure in the electrical system.
8. Settings
⚠ WARNING! Risk of injury! Electric shock
Always pull the mains plug out of the socket before performing any type of work on the machine!
Adjusting the cutting depth (Fig. F)
The cutting depth can be adjusted from 0 to 55 mm.
Unfasten the cutting depth adjustment screw (7) and set the required depth using the scale for depth of cut (2) and retighten the screw.
The sawing unit can now be pressed down to the set cutting depth.
The dimensions on the scale for depth of cut (2) shows the cutting depth without rail.
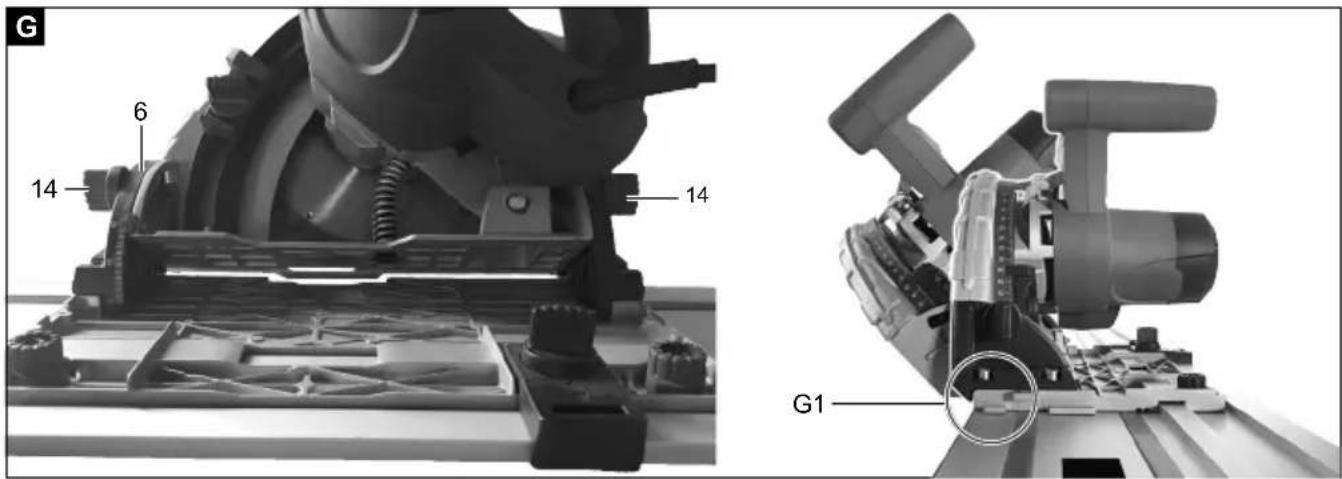
Adjusting the cutting angle between 0^ and 45^ (Fig. G)
The mitre square can be set from 0° to 45°.
Unscrew the mitre adjustment screws (14) on both sides.
Swivel the sawing unit to the desired cutting angle (Scale for mitre square (6)).
Tighten the mitre adjustment screws (14) on both sides.
Note: Both positions ( 0^ and 45^ ) are set at the factory and can be readjusted by the after-sales service team.
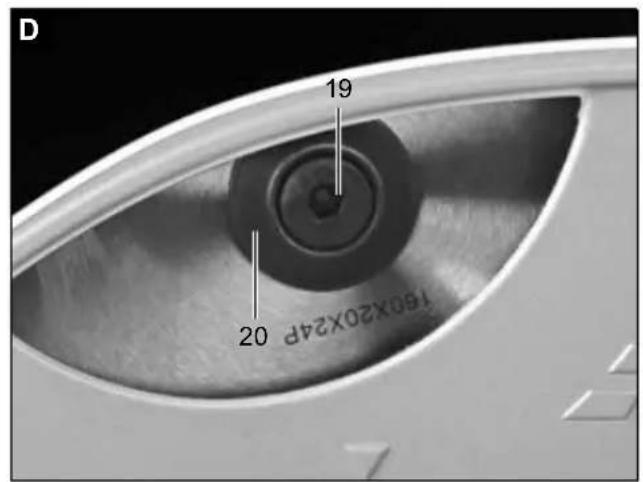
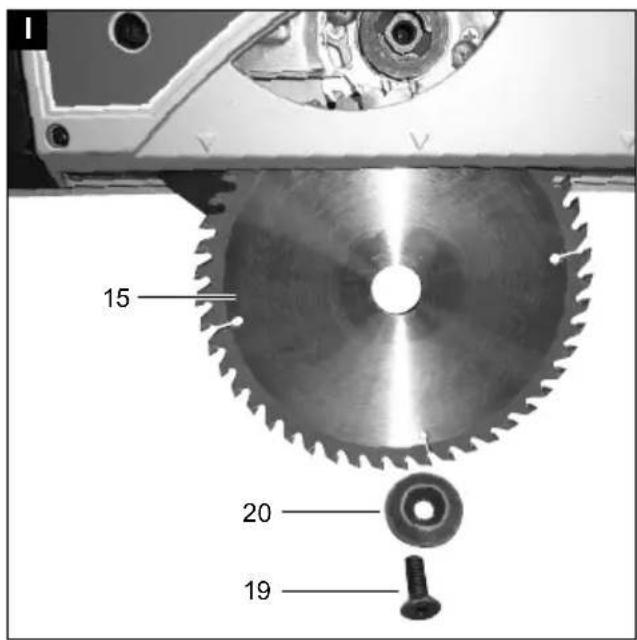
Changing the saw blade (Fig. A-D, H, I)
Do not use insert tools that are blunt or defective. Wear protective gloves.
⚠ Warning! Risk of injury! Electric shock
Always pull the mains plug out of the socket before performing any type of work on the machine!
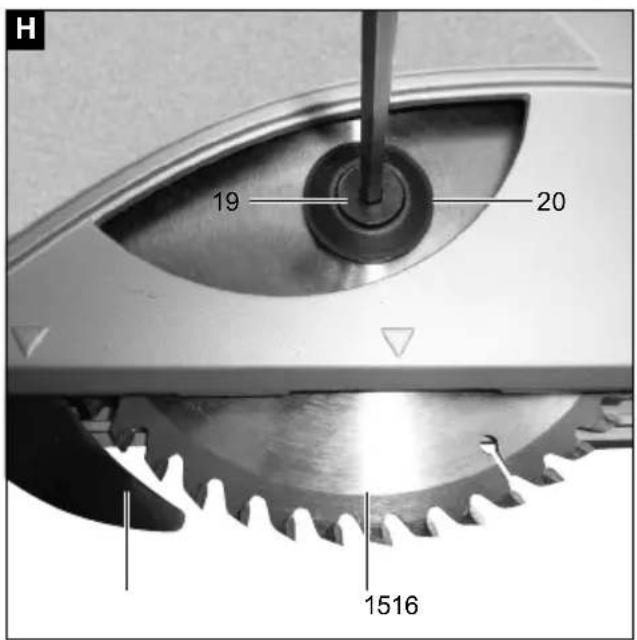
- Press the plunge trigger (3), bring the saw blade into the blade-change position (Adjustment screw for depth of cut (7) shall be adjusted to 25 mm) and insert the hex wrench into the saw blade locking screw (19).
- Press on the shaft lock (18) and rotate the saw blade (15) until the lock clicks into place.
- Hold down the locking shaft (18) and open the saw blade locking screw (19) counter clockwise, while keeping the blade in the blade-changing position.
- Remove the outer flange (20) and the saw blade (15).
⚠ Caution! Risk of injury!
Wear protective gloves
- Insert the new blade and outer flange (20).
- Screw in and tighten the saw blade locking screw (19) while keeping the shaft locking mechanism pressed again.
- Set the plunge saw to its original position (0°).
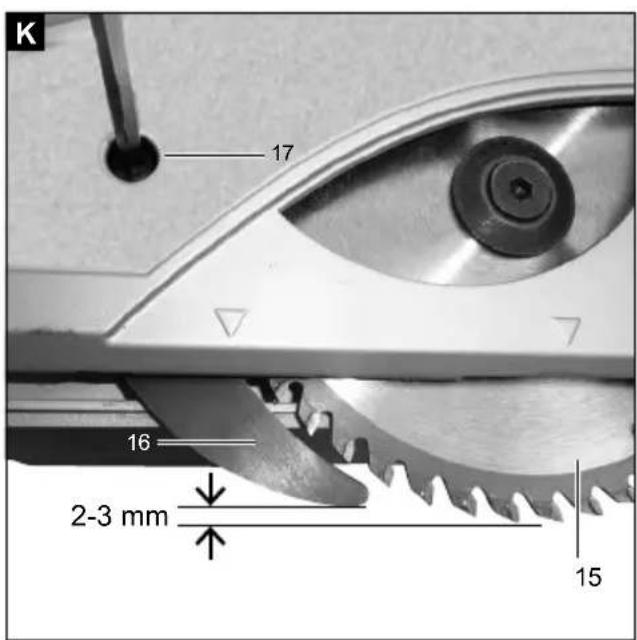
Adjusting the riving knife (16) (Fig. A + K)
Adjust the distance between saw blade (15) and riving knife (16) after a saw blade replacement, or whenever necessary.
Put the saw in the same position as you do when replacing a saw blade.
Unfasten the adjustment screw for riving knife (17) using an Allen key and set the riving knife (16) 2-3 mm higher than the saw blade, then re-tighten the adjustment screw for riving knife (17).
A normal household vacuum cleaner is not a suitable extraction device.
A extraction device with an extractor hose diameter of 38 mm (38 mm recommended due to the reduced risk of clogging) can be connected to the extractor connector (1).
⚠ WARNING! Dust hazard
Dust can be hazardous to health. Always work with a dust extractor.
Always read applicable national regulations before extracting hazardous dust.
9. Commissioning
⚠ Attention!
Always make sure the device is fully assembled before commissioning!
⚠ Warning! Risk of injury!
Improper assembly of the plunge saw can result in serious injury.
- Before switching the plunge saw on, make sure the saw blade is correctly mounted and that mobile parts can move freely.
After switching on the saw, you must wait until the saw blade (15) has reached the maximum speed before you perform the cut.
Switching the plunge saw on and off
- To switch on the plunge saw, press the ON/OFF switch (8). The motor will start.
- To switch off the plunge saw, release the ON/OFF switch (8).
After having performed all the above procedures and operations, you may begin cutting.
⚠ CAUTION!
Always keep hands away from the cutting area and do not try to approach it when the machine is running.
Working with the machine
⚠️ ATTENTION! Please observe all mentioned safety informations and the following rules when working:
- Only guide the machine against the workpiece when it is switched on.
• Always secure the workpiece in such a manner that it cannot move while being processed.
• Always push the machine forwards, never draw the machine towards yourself.
- Adapt the fast-feed speed to prevent the cutters on the saw blade from overheating and prevent plastic materials from melting during cutting.
- For work that generates dust, wear a dust mask.
- Grip the saw tightly with both hands ensuring that one hand is placed on the main handle and the other on the front handle.
- When using a guide rail, it must be fastened with screw clamps.
- Make sure the power cable is not placed in the sawing direction.
Sawing along the scribe mark
The cutting indicator (Fig. G Pos. G1) displays the cutting line for 0° and 45° cuts (without guide rail).
Cutting sections
- Place the machine with the front part of the saw table on the workpiece.
- Switch the machine on using the ON/OFF switch (8).
- Press the plunge-cut trigger (3).
- Push the saw downwards to reach the sawing depth.
- Push the saw forward evenly.
- After finishing the sawing cut, switch the machine off and move the saw blade upwards.
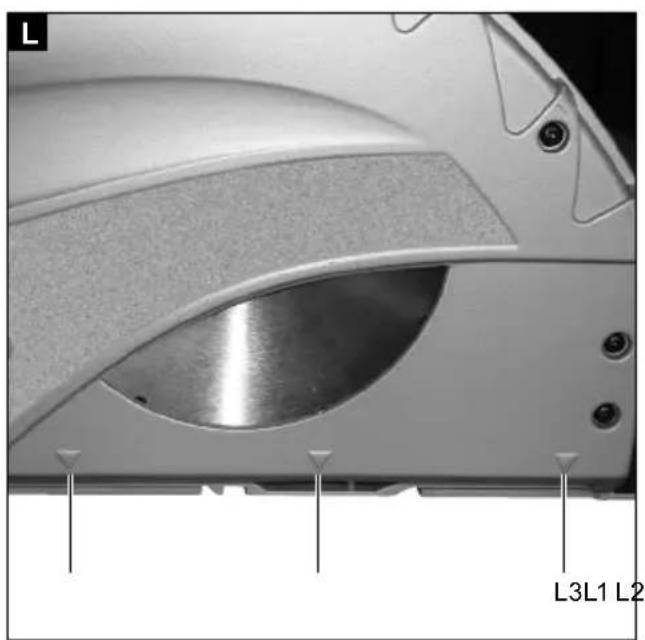
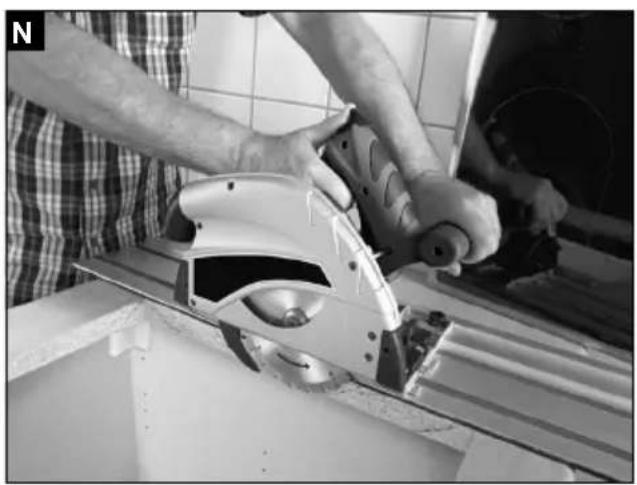
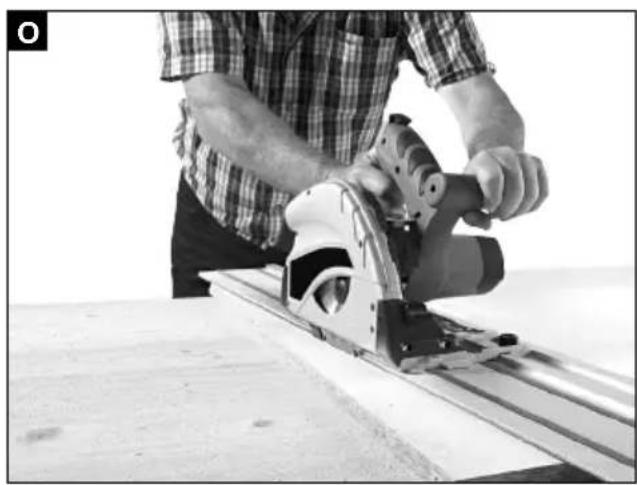
Sawing cut outs (plunge cuts) (Fig. L - O)
△ ATTENTION! In order to avoid kickbacks, the following instructions must be observed without fail when plunge cutting:
• Always place the machine with the rear edge of the saw table against a fixed stop.
- When working with the guide rail, place the machine against the kickback stop (M2 / not included) clamped to the guide rail.
Procedure
- Place the saw onto the work piece.
- Place the cutting indicator with the rear arrow (L1) on the marked plunge-cut position.
Note: The markings (L1/L2/L3) indicate the absolute front and the absolute rear cutting points of the saw blade (dia. 160 mm) when using the saw at maximum cutting depth with the guide rail.
- Switch the machine on and push the saw downwards until you reach the set cutting depth.
- Move the saw forwards until the cutting indication (L3) has reached the marked point.
- After completion of the plunge-cut, move the saw blade upwards and switch the saw off.
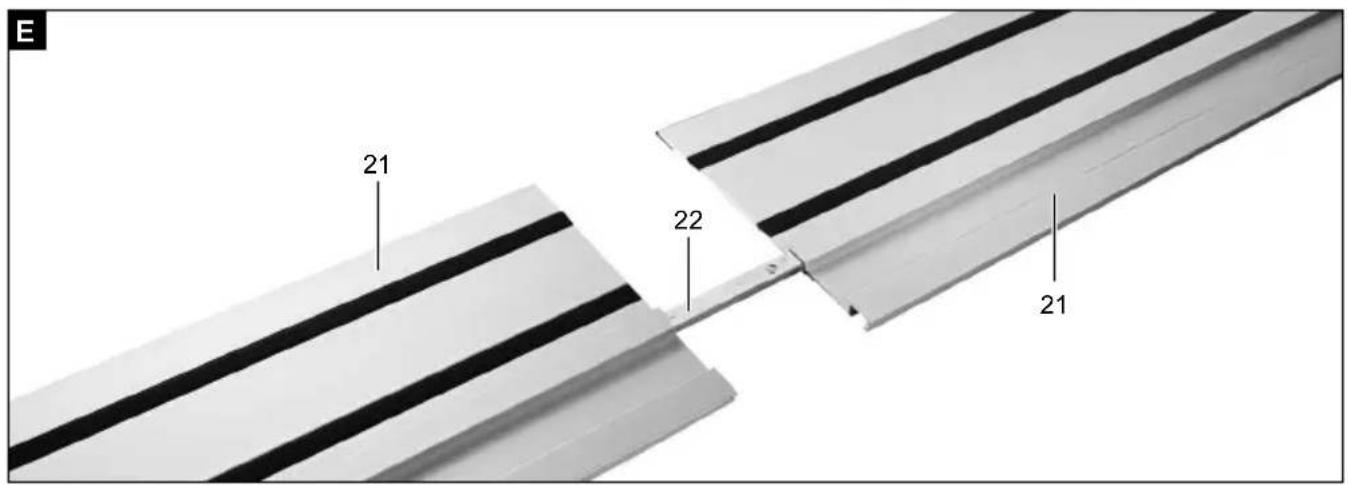
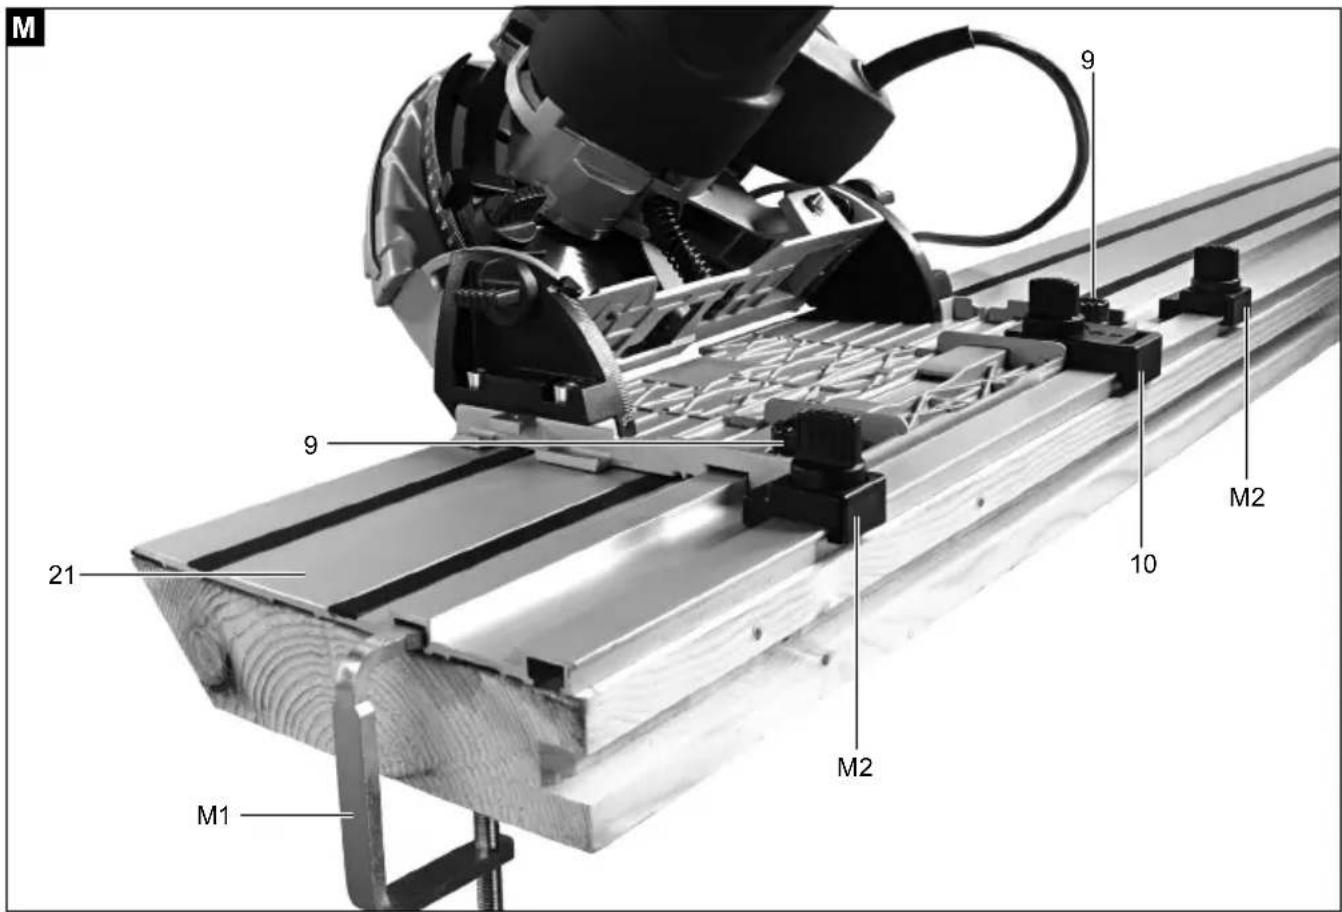
Guide rails (Fig. E + M)
The guide rails (21) enable clean, precise cuts and protect the surfaces from damage.
Note: When sawing with the guide rail, the cut depth is 4.5 mm less than the scale value on the machine.
For safety, the guide rail can be secured with screw clamps (M1) (not included).
The tilt protection (10) prevents the plunge saw from tilting during miter cuts and adjustment work.
The rebound protection (M2 / not included) ensures a safe guiding during plunging into the workpiece (not included).
By means of the rail joiner (22), 2 guide rails can be connected and allow long, precise cuts.
The guide clearance of the assembly on the guide rail can be regulated with the two adjustment screws (9).
With the offered accessories, miter cuts, corner cuts and other fitting tasks can be carried out.
When first using this saw on the optional guide rail, it will need to be adjusted to slide with minimal side movement on the guide rail. Adjustable cams (9) are fitted to do this.
- Place saw on guide rail.
- Turn adjustment screw for guide rail (9) anti-clockwise until tight.
- Then clockwise slightly to allow clearance.
- While holding dials in position lock in place by screwing down the Socket head Cap screws in the middle of each Cam (5mm allen key supplied with machine)
- Pull saw back and forth along rail ensuring it slides smoothly - Re-adjust as needed.
- Future adjustment may be needed depending on use of saw.
Splinter Protection
The guide rail comes with a splinter guard, which must be fitted before the first use.
- Secure rail with the screw clamps (not included) to a piece of scrap lumber.
- Adjust the guide clearance on the rail with the two adjustment screws (9).
- Set the plunge saw to ca. 6mm cut depth
- Set up the saw at the back end of the rail.
- Switch on the machine, press down to the set cut depth and fit the splinter guard along the whole length in one pass without stopping. The edge of the splinter guard now corresponds exactly to the cutting edge of the saw blade
Cutting with guide rails (Fig. A, B, E, M)
- Place the machine in the guide rails.
- Turn on the machine by pressing the ON/OFF switch (8).
- Press the plunge-cut trigger (3).
- Press the saw downwards to reach the sawing depth.
Note: During first use the rubber lip is sawn off and thus splitter protection is guaranteed up to the saw blade.
-
Push the saw uniformly forwards.
-
Turn off the machine and tilt the saw blade to the top when the saw cutting is complete.
Plunge Cuts with guide rails
- Set the saw on the guide rail at the marked cutting point
- Secure the rebound protection or fence (accessory not included) at the back and front cut points on the guide rail.
- Switch on the machine.
- Press the saw down slowly to the set cut depth and move this forward evenly on the rail up to the front cutting point.
Tilt Protection
For miter cuts, it is advisable to install a tilt protection. This prevents the machine from tilting to one side while in an oblique position.
Injuries to the body or damage to the machine can be avoided thereby.
When you are finished cutting
- First turn the plunge saw off and then the dust extractor. The saw blade will continue to rotate for some time.
- Remove the cutting waste from the saw blade when the saw blade returns to the resting position.
- Disconnect the plunge saw from the power supply by pulling the mains plug out of the socket.
- Let the plunge saw cool off completely.
Removing jammed material
⚠ Warning!
Incorrect handling of the plunge saw poses a risk of serious injury.
- Immediately switch the plunge saw off and pull the mains plug out of the socket if the saw blade catches in the workpiece or any other blockages occur.
- Use protective gloves. Do not touch the saw blade with your bare hands.
10. Transport
Always switch off the electric tool before transport and disconnect it from the power supply.
To transport the electric tool, lift it by the Handle/hand grip.
Protect the electric tool against impacts, shocks and severe vibrations, e.g. during vehicular transport.
Secure the electric tool against toppling and slipping.
11. Cleaning and maintenance
⚠ WARNING!
Prior to any adjustment, maintenance or service work disconnect the mains power plug!
General maintenance tasks
- To ensure constant air circulation, always keep the cooling openings in the housing unobstructed and air accessible.
- Use an extractor on all the openings of the machine to remove wood chips and splinters.
- Rub the device clean with a clean cloth or blow it off with compressed air at low pressure.
• We recommend that you clean the device directly after every use.
- Clean the device at regular intervals using a damp cloth and a little soft soap. Do not use any cleaning products or solvents; they could attack the plastic parts of the device. Make sure that no water can penetrate the device interior.
- Oil the rotating parts once monthly to extend the life of the tool. Do not oil the motor.
Carbon brushes
- If excessive sparks are generated, have an electrician check the carbon brushes.
⚠️ ATTENTION! The carbon brushes must be replaced by an electrician exclusively.
⚠ WARNING!
Incorrect handling of the plunge saw poses a risk of serious injury.
- Before cleaning or maintenance, switch the plunge saw off and pull the mains plug out of the mains socket.
- Wear suitable protective gloves when working on the plunge saw.
- There are no parts that can be repaired by the user inside this plunge saw. Never attempt to repair the plunge saw yourself. Always contact a qualified workshop for this.
⚠ WARNING!
The saw blade may become hot during operation, you could burn yourself on it.
Always let the saw blade cool off completely before cleaning.
Notice!
Water that has penetrated the housing may cause a short circuit, improper cleaning could damage the plunge saw.
- Do not wash the plunge saw and also do not spray it off with a water jet.
- Never immerse the plunge saw in water.
• Make sure that no water penetrates the housing.
-
Do not use any aggressive cleaners, or sharp or metallic cleaning utensils such as knives, hard scrapers or similar. They could damage the surfaces.
-
Clean the plunge saw directly after each use.
- Keep the protective devices as free of dust and dirt as possible.
- Rub the plunge saw off with a clean cloth or blow it off with low-pressure compressed air. Wear protective goggles when using compressed air.
- Use a damp cloth and a small amount of soft soap if it is heavily soiled.
Note: Proper, regular care is not only important for safe use, but also helps to extend the service life of the plunge saw.
Replacing the connector cord
If the mains connection line of the plunge saw is damaged, it must be replaced by the manufacturer, its after sales support or a similarly qualified person in order to prevent risks.
Checking the plunge saw
Regularly check the condition of the plunge saw. Among other things, check to make sure:
• that the switches are not damaged,
• that the accessories are in proper condition,
- that the mains connection line and the mains plug are not damaged,
- that the vents are unobstructed and clean. If applicable, use a soft brush to clean them.
If you identify any damage, you must have the plunge saw repaired by a specialist workshop to prevent risks.
Please note that the following parts of this product are subject to normal or natural wear and that the following parts are therefore also required for use as consumables.
Wear parts*: Carbon brush, saw blade
* Not necessarily included in the scope of delivery!
Spare parts and accessories can be obtained from our service centre. To do this, scan the QR code on the cover page.
12. Storage
Store the device and its accessories in a dark, dry and frostproof place that is inaccessible to children. The optimum storage temperature is between 5 and 30°C. Store the electrical tool in its original packaging.
Cover the electrical tool in order to protect it from dust and moisture.
Store the operating manual with the electrical tool.
13. Electrical connection
The electrical motor installed is connected and ready for operation. The connection complies with the applicable VDE and DIN provisions. The customer's mains connection as well as the extension cable used must also comply with these regulations.
In the event of an overloading the motor will switch itself off. After a cool-down period (time varies) the motor can be switched back on again.
Damaged electrical connection cable
The insulation on electrical connection cables is often damaged.
This may have the following causes:
• Passage points, where connection cables are passed through windows or doors.
- Kinks where the connection cable has been improperly fastened or routed.
- Places where the connection cables have been cut due to being driven over.
• Insulation damage due to being ripped out of the wall outlet.
- Cracks due to the insulation ageing.
Such damaged electrical connection cables must not be used and are life-threatening due to the insulation damage.
Check the electrical connection cables for damage regularly. Make sure that the connection cable does not hang on the power network during the inspection.
Electrical connection cables must comply with the applicable VDE and DIN provisions. Only use connection cables with the marking „H05VV-F“.
The printing of the type designation on the connection cable is mandatory.
AC motor
- The mains voltage must be 230-240 V\~50 Hz.
- Extension cables up to 25 m length must have a cross section of 1.5 mm ^2 .
Connections and repairs of electrical equipment may only be carried out by an electrician.
Please provide the following information in the event of any enquiries:
• Type of current for the motor
• Machine data - type plate
Connection type Y
If the mains connection cable of this device is damaged, it must be replaced by the manufacturer, their service department or a similarly qualified person to avoid dangers.
14. Disposal and recycling
Notes for packaging


The packaging materials are recyclable. Please dispose of packaging in an environmentally friendly manner.
Notes on the electrical and electronic equipment act [ElektroG]
![SCHEPPACH PL55 - Notes on the electrical and electronic equipment act [ElektroG] - 1](/content/2026/03/435317/images/f2e1b50643a92b138347ef8384e92a64b3e6bd1ea240a2b474944e5326a13bcf.jpg)
Waste electrical and electronic equipment does not belong in household waste, but must be collected and disposed of separately!
- Used batteries or rechargeable batteries that are not installed permanently in the old appliance must be removed non-destructively before disposal. Their disposal is regulated by the battery law.
- Owners or users of electrical and electronic devices are legally obliged to return them after use.
-
The end user is responsible for deleting their personal data from the old device being disposed of!
-
The symbol of the crossed-out dustbin means that waste electrical and electronic equipment must not be disposed of with household waste.
- Waste electrical and electronic equipment can be handed in free of charge at the following places:
- Public disposal or collection points (e.g. municipal works yards)
- Points of sale of electrical appliances (stationary and online), provided that dealers are obliged to take them back or offer to do so voluntarily.
- Up to three waste electrical devices per type of device, with an edge length of no more than 25 centimetres, can be returned free of charge to the manufacturer without prior purchase of a new device from the manufacturer or taken to another authorised collection point in your vicinity.
- Further supplementary take-back conditions of the manufacturers and distributors can be obtained from the respective customer service.
- If the manufacturer delivers a new electrical appliance to a private household, the manufacturer can arrange for the free collection of the old electrical appliance upon request from the end user. Please contact the manufacturer's customer service for this.
• These statements only apply to devices installed and sold in the countries of the European Union and which are subject to the European Directive 2012/19/EU. In countries outside the European Union, different regulations may apply to the disposal of waste electrical and electronic equipment.
15. Troubleshooting
| Problem Possible Cause Help |
| The motor does not run. Faulty motor, power supply cable or plug. Burned out fuses. | Have the machine checked by skilled personnel. Do not try to repair the machine yourselves as it may be dangerous. Check the fuses and replace them if necessary. |
| The motor starts slowly and does not reach running speed. | Low power supply voltage. Damaged windings. Burned out capacitor. | Ask for the Electricity Board to check the voltage available. Have the machine motor checked by skilled personnel. Have the capacitor replaced by skilled personnel. |
| Excessive motor noise. | Damaged windings. Faulty motor. | Have the motor checked by skilled personnel. |
| The motor does not reach full power. | Overloaded circuit due to lighting, utilities or other motors. | Do not use other utilities or motors on the circuit to which the track saw is connected. |
| Motor overheats easily Overload of | the motor; inadequate cooling of the motor | Prevent overloading the motor when cutting; remove dust from the motor to ensure an optimum cooling of the motor |
| Decrease in cutting power when sawing | The saw blade is too small (sharpened too often) | Re-adjust the end stop of the saw unit |
| The saw cut is rough or wavy The saw blade is dull; the tooth shape is not suited to the thickness of the material | Re-sharpen the saw blade or use an appropriate saw blade |
| The work piece rips or splinters The cutting pressure is excessive or the saw blade is not suited to the application | Use the correct saw blade |
Günzburger Straße 69
D-89335 Ichenhausen
Cher client,
Günzburger Straße 69
D-89335 Ichenhausen
Egregio cliente,
Günzburger Straße 69
D-89335 Ichenhausen
Geachte klant,
Günzburger Straße 69
D-89335 Ichenhausen
Estimado cliente,
Günzburger Straße 69
D-89335 Ichenhausen
Estimado cliente,
| 2000/14/EG_2005/88/EG |
| Noise: measured LWA= xx dB; guaranteed LVIA= xx dB |
| Annex V |
| Annex VI |
| x 2006/42/EG |
| Annex IV
Notified Body:
Notified Body No.:
Certificate No.: |
| 2016/1628/EU |
| Emission. No: |
Standard references:
EN 62841-1:2015/A11:2022; EN 62841-2-5:2014;
EN IEC 55014-1:2021; EN IEC 55014-2:2021; EN IEC 61000-3-2:2019/A2:2024; EN 61000-3-3:2013/A2:2021
This declaration of conformity is issued under the sole responsibility of the manufacturer.
The object of the declaration described above fulfils the regulations of the directive 2011/65/EU of the European Parliament and Council from 8th June 2011, on the restriction of the use of certain hazardous substances in electrical and electronic equipment.
Subject to change without notice
Documents registrar: Georg Kohler
Günzburger Str. 69, D-89335 Ichenhausen
Garantie DE
Apparent defects must be notified within 8 days from the receipt of the goods. Otherwise, the buyer's rights of claim due to such defects are invalidated. We guarantee for our machines in case of proper treatment for the time of the statutory warranty period from delivery in such a way that we replace any machine part free of charge which provably becomes unusable due to faulty material or defects of fabrication within such period of time. With respect to parts not manufactured by us we only warrant insofar as we are entitled to warranty claims against the upstream suppliers. The costs for the installation of the new parts shall be borne by the buyer. The cancellation of sale or the reduction of purchase price as well as any other claims for damages shall be excluded.
Garantie FR