
ASI200 - Compressor BLACK & DECKER - Free user manual and instructions
Find the device manual for free ASI200 BLACK & DECKER in PDF.
| Brand | Black & Decker |
| Model | ASI200 |
| Product type | Inflation compressor |
| Supply voltage | 12 V DC |
| Input current | 8 A |
| Maximum pressure | 827 kPa / 120 psi / 8.27 bar |
| Weight | 1.12 kg |
| Main functions | Tire inflation, balls, etc.; pressure indicator; work area lighting |
| Automatic shut-off | Yes, on pressure preset |
| Included accessories | Cone adapters, needle adapter, 12 V adapter, air hose with universal valve adapter |
| Lighting bulb type | 12 V / 5 W |
| Fuse in 12 V adapter | 8 A / 250 V |
| Maintenance and cleaning | Clean ventilation openings with a soft brush; clean motor compartment with a damp cloth; no abrasive products |
| Safety | Do not use in explosive environment; do not direct air at yourself or others; disconnect before maintenance; do not leave unattended |
| Repairability | Repairable parts: fuse, bulb; other repairs by an authorized center |
| Intended use | Domestic, for inflating bike/car tires, balls, pools |
| Warranty | 24 months, covers material and workmanship defects |
Frequently Asked Questions - ASI200 BLACK & DECKER
User questions about ASI200 BLACK & DECKER
0 question about this device. Answer the ones you know or ask your own.
Ask a new question about this device
Download the instructions for your Compressor in PDF format for free! Find your manual ASI200 - BLACK & DECKER and take your electronic device back in hand. On this page are published all the documents necessary for the use of your device. ASI200 by BLACK & DECKER.
USER MANUAL ASI200 BLACK & DECKER
Your Black & Decker inflator is designed to be used in most vehicles from the standard 12 Volt socket to inflate car and bike tyres, balls, rafts, swimming pool floats etc. This product is intended for household, consumer use only.
Safety instructions
Warning! When using battery-powered appliances, basic safety precautions, including the following, should always be followed to reduce the risk of fire, leaking batteries, personal injury and material damage.
Read all of this manual carefully before using the appliance.
The intended use is described in this manual. The use of any accessory or attachment or the performance of any operation with this appliance other than those recommended in this instruction manual may present a risk of personal injury.
- Retain this manual for future reference.
Using your appliance
Always take care when using the appliance.
- This appliance is not intended for use by young or infirm persons without supervision.
The appliance is not to be used as a toy.
Use in a dry location only. Do not allow the appliance to become wet.
Do not immerse the appliance in water.
Do not open body casing. There are no user-serviceable parts inside.
Do not operate the appliance in explosive atmospheres, such as in the presence of flammable liquids, gases or dust. - Only use the appliance in a well ventilated area.
To reduce the risk of damage to plugs and cords never pull the cable to remove the plug from a socket.
Safety of others
This appliance is not intended for use by persons (including children) with reduced physical, sensory or mental capabilities, or lack of experience and knowledge, unless they have been given supervision or instruction concerning use of the appliance by a person responsible for the their safety.
Children should be supervised to ensure that they do not play with the appliance.
After use
-
When not in use, the appliance should be stored in a dry, well ventilated place out of the reach of children.
Children should not have access to stored appliances. -
When the appliance is stored or transported in a vehicle it should be placed in the boot or restrained to prevent movement following sudden changes in speed or direction.
The appliance should be protected from direct sunlight, heat and moisture.
Inspection and repairs
Before use, check the appliance for damaged or defective parts. Check for breakage of parts, damage to switches and any other conditions that may affect its operation.
Do not use the appliance if any part is damaged or defective.
- Have any damaged or defective parts repaired or replaced by an authorised repair agent.
- Never attempt to remove or replace any parts other than those specified in this manual.
Additional safety instructions for inflators
For home and car use only. Inflate car and bike tyres, balls, swimming pool floats and more in and around the home.
The compressed air from your inflator is not safe for breathing. Never inhale air from your inflator or from a breathing device connected to the inflator.
Inflate items only to their manufacturer's recommendations. Exceeding the pressure rating could cause them to explode resulting in personal injury.
Do not leave the inflator running unattended. It could burst tyres or other items.
- Since the vibrations produced by the inflator may cause it to "walk", do not operate on a high shelf or other surface. Operate at ground or bench level only.
Do not modify or attempt to repair. Never drill into, weld, or make any modifications to the inflator or its attachments.
- Do not operate the inflator when the engine is running.
Operate only with the accessories included or those rated for 8.28 bar/120 psi or higher. The use of any accessory not recommended for use with this tool could be hazardous.
Do not play with the tool. High pressure air is dangerous. Do not direct air-flow at yourself or others.
The inflator can become hot during use. Allow the inflator to cool for 30 minutes before storing away.
- Never carry the inflator by the hose.
Do not direct the nozzle or hose at animals or bystanders.
- Store the inflator out of reach of small children.
The gauge is intended as a guide only. Tyre pressures should be regularly checked with a certified gauge.
ENGLISH
Before use, check the power supply cord for signs of damage, ageing and wear.
Do not use the appliance if the power supply cord or mains plug is damaged or defective (where applicable).
Labels on tools
The following pictograms are shown on the tool:

Warning! To reduce the risk of injury, the user must read the instruction manual.

Do not expose the appliance to rain or high humidity
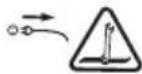
Before performing maintenance or cleaning on the appliance, unplug the supply cord.

Do not leave the inflator unattended.
Features
- Area light
- Pressure gauge
- Storage location for air hose and 12 Volt adaptor
- Air hose with universal valve adaptor
- On/off switch
6.12 Volt adaptor - Area light on/off switch
Use
Air hose and cord storage (fig. A)
Wrap the dc cord around the base of the unit and then put the air hose (4) and the 12 Volt adaptor (6) into the storage location (3).
Fitting the accessories (fig. B and C)
Your inflator is supplied with the standard tapered nozzles and the needle inflator nozzle, these are located on the base of the unit (fig. C).
To use the universal valve adaptor, make sure that the lever is in the up position.
Place the valve adapter over the stem of the inflation needle or tapered nozzle (fig. B).
Press the lever on the valve adapter down to lock it in place.
- Place the inflation needle or tapered nozzle into the item to be inflated.
Note: Always make sure that the lever is in the up position when not in use.
Operate your Inflator only with the universal valve adaptor or with the included nozzles.
Note: Make sure that the universal valve adaptor is firmly locked in place before turning the Inflator on.
Many inflatable have an internal flap that prevents air loss during inflation. Unless this flap is displaced by the nozzle the inflatable will not inflate. Push the nozzle firmly into the valve to make sure that you push this flap out of the way.
Store the inflation needle inside one of the tapered nozzles and snap the tapered nozzles into the storage slots located on the bottom of the Inflator (fig. C).
Warning! Excessive air pressure may cause a hazardous risk of bursting or personal injury. Check the manufacturer's maximum pressure rating for the items being inflated.
Note: If the pressure rating for the item being inflated is above 100 psi, note that the maximum run time is 10 minutes, leave to rest for 20 minutes before re-use.
Operating the inflator
Warning! Do not operate the inflator when the car engine is running.
Note: Make sure that your 12 Volt accessory socket is live. On some vehicles the accessory socket may only become live when the ignition key is in the accessory position.
To power the display
Always fully extend the 12 Vdc cord before each use.
Connect the 12 Volt adaptor (6) into the vehicle's 12 Volt accessory socket.
To enable the inflator to operate you must set the required units (psi, bar or kPa) and a pressure valve.
Setting the required pressure (fig. D)
Warning! Do not leave the inflator running unattended. It could burst tyres or other items.
Note: You must set the automatic shut-off feature before the unit will operate.
To switch between the different units (kPa, psi or bar), press buttons 8 & 9 at the same time until the required units are displayed.
Press and hold button 8 or 9 for 3 seconds until the display flashes.
While the display is flashing press the - or + buttons (8 & 9) until the required pressure is displayed.
After 3 seconds the display will flash and return to a reading of "0.0". This is normal.
Connect the universal valve adaptor and accessories, if required, to the item to be inflated, making sure that the lever of the valve adaptor is in the down position to lock it in place.
To turn the inflator on, press the on/off switch (5) to the I position.
- When the item to be inflated has reached the preset value the unit will automatically turn off.
To turn the inflator off press switch (5) to the 0 position.
Remove the valve adaptor or accessory from the inflated item and the 12 Volt adapter (6) from your vehicle's 12 Volt accessory socket.
Note: If the 12 Volt adapter is removed from the vehicles 12 Volt accessory socket, all settings will be lost and will need to be re-entered following the instructions under the heading 'Setting the required pressure'.
Operating the area light
To operate the area light (1), make sure that the 12 Volt adaptor (6) is plugged into the vehicle's 12 Volt accessory socket.
Note: Make sure that your 12 Volt accessory socket is live. On some vehicles the accessory socket may only become live when the ignition key is in the accessory position.
To turn the area light on, press the area light on/off switch (7) located on the side of the unit to the I position.
To turn the area light off, press the area light on/off switch (7) located on the side of the unit to the 0 position.
To replace the bulb (fig. E)
Warning! Make sure that the 12 Volt adaptor is not connected before starting this procedure.
Remove the screw (10) from the top of the lens cover (12).
Pull the lens cover (12) down using the tab (11) to get access to the bulb (13).
To remove the bulb, push in and turn clockwise (fig. E).
Replace the bulb (13) with a one of the same type and wattage (12V/5W).
Fit the lens cover (12) and secure with the screw (10).
Using your inflator as a pressure gauge
Make sure that the unit is powered as described in the section 'Operating the Inflator'.
Connect the universal valve adaptor and accessories if required to the item to be inflated making sure that the lever of the valve adaptor is in the down position to lock it in place.
The display will now show the actual pressure value in the item.
Maintenance
Your Black & Decker corded/cordless appliance/tool has been designed to operate over a long period of time with a minimum of maintenance. Continuous satisfactory operation depends upon proper tool care and regular cleaning.
Warning! Before performing any maintenance on corded/ cordless power tools:
Switch off and unplug the appliance/tool.
- Or switch off and remove the battery from the appliance/tool if the appliance/tool has a separate battery pack.
Or run the battery down completely if it is integral and then switch off.
Unplug the charger before cleaning it. Your charger does not require any maintenance apart from regular cleaning.
Regularly clean the ventilation slots in your appliance/tool/ charger using a soft brush or dry cloth.
Regularly clean the motor housing using a damp cloth. Do not use any abrasive or solvent-based cleaner.
Regularly open the chuck and tap it to remove any dust from the interior (when fitted).
Troubleshooting
| Problem Possible cause Possible solution | ||
| Inflator will not operate | 12 Volt adaptor not connected | Connect the 12 Volt adaptor |
| Accessory socket not live | Turn key to accessory position | |
| No preset valve set | Set preset value | |
| The fuse in the 12 Volt adaptor is blown | Replace the fuse with one of the same size and type (8A/250V) | |
| Cord or switch is damaged. | Have the cord or switch replaced at a Black & Decker Service Centre or Authorized Service Centre. | |
Replacing the fuse in the vehicle dc accessory plug
Remove the cap by turning it counter-clockwise.
Loosen the cap and centre pin.
Remove the fuse.
Fit a new fuse of the same type and size (8A/250V).
Refit the cap and centre pin.
- Tighten the cap by turning clockwise onto the plug.
ENGLISH
Protecting the environment

Separate collection. This product must not be disposed of with normal household waste.
Should you find one day that your Black & Decker product needs replacement, or if it is of no further use to you, do not dispose of it with household waste. Make this product available for separate collection.

Separate collection of used products and packaging allows materials to be recycled and used again. Re-use of recycled materials helps prevent environmental pollution and reduces the demand for raw materials.
Local regulations may provide for separate collection of electrical products from the household, at municipal waste sites or by the retailer when you purchase a new product.
Black & Decker provides a facility for the collection and recycling of Black & Decker products once they have reached the end of their working life. To take advantage of this service please return your product to any authorised repair agent who will collect them on our behalf.
You can check the location of your nearest authorised repair agent by contacting your local Black & Decker office at the address indicated in this manual. Alternatively, a list of authorised Black & Decker repair agents and full details of our after-sales service and contacts are available on the Internet at: www.2helpU.com.
Batteries

At the end of their useful life, discard batteries with due care for our environment:
Do not short-circuit the battery terminals.
Do not dispose of the battery(s) in a fire as this may result in a risk of personal injury or an explosion.
Run the battery down completely, then remove it from the tool.
- Batteries are recyclable. Place the battery(s) in a suitable packaging to ensure that the terminals cannot be short-circuited. Take them to any authorised repair agent or a local recycling station.
Technical data
ASI200
Input voltage Vdc 12
Input current A 8
Pressure (max) kPa / psi / bar 827 / 120 / 8.27
Weight kg 1.12
EC declaration of conformity
ASI200 H1
Black & Decker declares that these products conform to: Standards & Legislation. EN60335, 2006/95/EC
The undersigned is responsible for compilation of the technical file and makes this declaration on behalf of Black & Decker

Kevin Hewitt
Director of Consumer Engineering
Spennymoor, County Durham DL16 6JG
United Kingdom
09-07-2009
Guarantee
Black & Decker is confident of the quality of its products and offers an outstanding guarantee. This guarantee statement is in addition to and in no way prejudices your statutory rights. The guarantee is valid within the territories of the Member States of the European Union and the European Free Trade Area.
If a Black & Decker product becomes defective due to faulty materials, workmanship or lack of conformity, within 24 months from the date of purchase, Black & Decker guarantees to replace defective parts, repair products subjected to fair wear and tear or replace such products to make sure of the minimum inconvenience to the customer unless:
The product has been used for trade, professional or hire purposes.
The product has been subjected to misuse or neglect.
The product has sustained damage through foreign objects, substances or accidents.
Repairs have been attempted by persons other than authorised repair agents or Black & Decker service staff.
To claim on the guarantee, you will need to submit proof of purchase to the seller or an authorised repair agent. You can check the location of your nearest authorised repair agent by contacting your local Black & Decker office at the address indicated in this manual. Alternatively, a list of authorised Black & Decker repair agents and full details of our after-sales service and contacts are available on the Internet at: www.2helpU.com
Please visit our website www.blackanddecker.co.uk to register your new Black & Decker product and to be kept up to date on new products and special offers. Further information on the Black & Decker brand and our range of products is available at www.blackanddecker.co.uk.
DEUTSCH
Spennymoor, County Durham DL16 6JG
Royaume-Uni
09-07-2009
Garantie
Spennymoor, County Durham DL16 6JG
Regno Unito
09-07-2009
Garanzia
Spennymoor, County Durham DL16 6JG
Reino Unido
09-07-2009
Garantia
Spennymoor, County Durham DL16 6JG
Reino Unido
09-07-2009
Garantia
Director of Consumer Engineering
Spennymoor, County Durham DL16 6JG
Storbritannien
09-07-2009
Garanti
Spennymoor, County Durham DL16 6JG
Storbritannia
9.7.2009
Garanti
Black & Decker er trygg pa kvaliteten pa sineprodukter og tilbyr en enestående garanti. Denne garantierklæringenkommen i tillegg til dine lovbestemterettigheter og er ikke i konflikt med disse. Garantien er gyldig i EU- og EFTA-medlemsstatene.
Director of Consumer Engineering
Spennymoor, County Durham DL16 6JG
Storbritannien
09-07-2009
Garanti
Spennymoor, County Durham DL16 6JG
Iso-Britannia
9.7.2009
Takuu
Spennymoor, County Durham DL16 6JG
Hvwévo BaoiAeio
09-07-2009
Eyyunon
H Black & Decker eivai oiyoupyia tvn pioiota wv
Poiovtwv tnc kai npexei onmuavtik yyyunon. H napouoa
ypattn eyyunon anotele iipootheo dikaowpa oac kai de
zniwvei ta vopima diakawpata oac. H yyyunon ioxuei evtoc
tnc etikpateiaac twv Kpatuw Meawv nC Eupwnaikns
Evwns kai tnC Eupwnaiknc Zwoyn CEAeUthetaewv
Sigmaaayw.
Do not forget to register your product!
www.blackanddecker.co.uk/productregistration
Register your product online at www.blackanddecker.co.uk/productregistration or send your name, surname and product code to Black & Decker in your country.
DEUTSCH
www.blackanddecker.pt/productregistration
- Safety instructions
- Using your appliance
- Safety of others
- After use
- Inspection and repairs
- Additional safety instructions for inflators
- ENGLISH
- Labels on tools
- Features
- Use
- Air hose and cord storage (fig. A)
- Fitting the accessories (fig. B and C)
- Operating the inflator
- To power the display
- Setting the required pressure (fig. D)
- Operating the area light
- To replace the bulb (fig. E)
- Using your inflator as a pressure gauge
- Maintenance
- Replacing the fuse in the vehicle dc accessory plug
- Protecting the environment
- Batteries
- Technical data
- EC declaration of conformity
- Guarantee
- DEUTSCH
- Garantie
- Garanzia
- Garantia
- Garanti
- Takuu
- Eyyunon
- Do not forget to register your product!
- www.blackanddecker.co.uk/productregistration
- www.blackanddecker.pt/productregistration
Brand : BLACK & DECKER
Model : ASI200
Category : Compressor