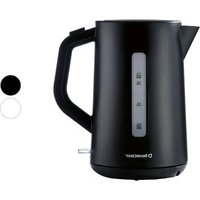
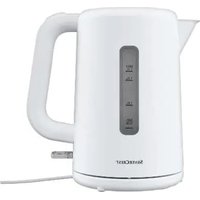
SWKD 2400 B2 - Kettle SILVERCREST - Free user manual and instructions
Find the device manual for free SWKD 2400 B2 SILVERCREST in PDF.
Frequently Asked Questions - SWKD 2400 B2 SILVERCREST
User questions about SWKD 2400 B2 SILVERCREST
0 question about this device. Answer the ones you know or ask your own.
Ask a new question about this device
Download the instructions for your Kettle in PDF format for free! Find your manual SWKD 2400 B2 - SILVERCREST and take your electronic device back in hand. On this page are published all the documents necessary for the use of your device. SWKD 2400 B2 by SILVERCREST.
USER MANUAL SWKD 2400 B2 SILVERCREST
DIGITAL-WASSERKOCHER
DIGITAL KETTLE
BOUILLOIRE ÉLECTRONIQUE SWKD 2400 B2
DE AT CH
DIGITAL-WASSERKOCHER
Bedienungsanleitung
FR BE
BOUILLOIRE ÉLECTRONIQUE
Mode d'emploi
CZ
DIGITALNÍ RYCHLOVARNA KONVICE
Návod k obsluze
PT
FERVEDOR DE ÁGUA DIGITAL
Operating instructions
NL BE
DIGITALE WATERKOKER
Gebruksaanwijzing
ES
HERVIDOR DIGITAL DE AGUA
Before reading, unfold the page containing the illustrations and familiarise yourself with all functions of the device.
FR BE
GB/IE Operating instructions Page 17
Information about these operating instructions 18
Copyright 18
Intended use 18
Safety information 19
Description of components 21
Use 22
Package contents and transport inspection 22
Disposal of packaging 22
Cable retainer 23
Control panel 24
Connecting the power supply 24
Before first use 24
Handling and use 25
Important preliminary remarks 25
Switching the appliance on/off 25
Boiling water 26
Heating the water to a specific temperature 26
Keep-warm function 27
Overheating protection 27
Cleaning 28
Cleaning the appliance 28
Dscaling the appliance 28
Inserting/removing the scale filter insert 29
Storage 29
Disposal 30
Appendix 30
Technical data 30
Kompernass Handels GmbH warranty 31
Service 32
Importer 32
Introduction
Information about these operating instructions
Congratulations on the purchase of your new appliance.
You have selected a high-quality product. The operating instructions are part of this product. They contain important information about safety, usage and disposal. Before using the product, please familiarise yourself with all operating and safety instructions. Use the product only as described and for the range of applications specified. Retain these instructions for future reference. Please also pass on these operating instructions to any future owner.
Copyright
This documentation is protected by copyright. Any copying or reproduction, including in the form of extracts, or any reproduction of images (even in a modified state), is permitted only with the written authorisation of the manufacturer.
Intended use
This appliance is intended exclusively for heating water. It is not intended for use with any other liquids or food products. The appliance is not intended for any other purpose, nor for use beyond the scope described. The appliance is not intended for use in commercial or industrial environments. Claims of any kind for damages resulting from misuse, improper repairs, unauthorised modifications or the use of unauthorised spare parts are excluded. The risk is borne solely by the user.
Safety information

DANGER - RISK OF ELECTRIC SHOCK!
-
Ensure that the base containing the electrical connections never comes into contact with water! Allow the base to dry completely if it accidentally becomes wet.
-
Use the appliance only with the supplied base.
-
Ensure that the power cable never becomes wet or damp when the appliance is in use. Route the cable so that it cannot be trapped or damaged in any way.
-
Arrange for defective power plugs and/or cables to be replaced as soon as possible by a qualified technician or by our Customer Service Department to avoid the risk of injury.
-
To disconnect the appliance completely from the mains power, the power plug must be removed from the mains socket. The appliance should be set up in such a way that you have unrestricted access to the mains socket at all times, and can pull out the plug immediately in an emergency.
-
Check the appliance for visible external damage before use. Do not operate an appliance that has been damaged or dropped.
-
All repairs on the appliance must be carried out by authorised specialist companies or Customer Service. Improper repairs may put the user at risk. It will also invalidate any warranty claims.
-
Do not allow any liquid to run over the appliance's plug connections.

Never immerse the appliance under water or any other liquids! There is a risk of fatal electric shock if residual liquids come into contact with live components during operation.
WARNING - RISK OF INJURY!
- Keep lid closed when boiling water, otherwise the automatic switch-off cannot work. Boiling water could then splash out over the rim.
- Bursts of hot steam may be released. The jug also becomes extremely hot during use. It is therefore always best to wear oven mitts when handling the jug.
- Ensure that the appliance is stable and vertical before switching it on. Boiling water can cause the appliance to fall over if it is not set up stably.
- Do not open the lid while the water is boiling.
- Appliances may be used by persons with reduced physical, sensory or mental capabilities, or a lack of experience and/or knowledge only if they are supervised or have been instructed how to use the appliance safely and have understood the potential risks.
- This appliance may be used by children aged 8 years or over, if they are supervised or have been told how to use the appliance safely and are aware of the potential risks. Cleaning and user maintenance tasks must not be carried out by children unless they are aged 8 years or over and are supervised. The appliance and its connecting cable must be kept away from children younger than 8 years old.
Children must not play with the appliance. - Fill the appliance only up to the MAX mark. Otherwise, boiling water may spill out!
- Do not operate the appliance without the scale filter insert.

WARNING - RISK OF INJURY!
After use, the surfaces of the heating elements will still have some residual heat.
Risk of injury if appliance is misused! Use the appliance only as described in the instructions!
CAUTION - PROPERTY DAMAGE!
- Do not use an external timer switch or a separate remote control system to operate the appliance.
- Never leave the appliance unattended during operation.
- Ensure that the appliance, the power cable and the plug do not come into contact with heat sources such as hotplates or naked flames.
Description of components
0 Lid
2 Lid release button
3 Control panel
4 Base
5 Cable retainer
Scale
Jug
Scale filter insert
Use
Package contents and transport inspection
The appliance is supplied with the following components as standard:
Digital Kettle
- Scale filter insert
- Base
- Operating instructions
NOTE
Check the package for completeness and signs of visible damage.
If any items are missing or damaged as a result of defective packaging or transportation, please contact the Service Hotline (see section Service).
Remove all parts of the appliance and the operating instructions from the box.
Remove all packaging materials from the appliance.
DANGER TO LIFE!
- Packaging materials should not be used as a plaything. Risk of suffocation.
Disposal of packaging
The packaging protects the appliance from damage during transport. The packaging materials have been selected for aspects of environmental friendliness and disposal, and they are therefore recyclable.
Returning the packaging to the material cycle conserves raw materials and reduces the amount of waste that is generated. Dispos of packaging materials that are no longer needed in accordance with applicable local regulations.
NOTE
If possible, keep the appliance's original packaging during the warranty period so that the appliance can be packed properly for return shipment in the event of a warranty claim.
Cable retainer
A cable retainer 5 is located on the base 4 of the appliance. This cable retainer 5 allows you to adjust the length of the cable to your local requirements.
CAUTION - PROPERTY DAMAGE!
- Ensure that you always guide the cable through the corresponding gap in the rear of the base for the sake of stability.
NOTE
Always wrap the power cable around the cable retaine 5 in a clockwise direction. This reduces the length of the cable to a minimum, allowing you to guide the cable through the gap in the base (4 see fig. 1).
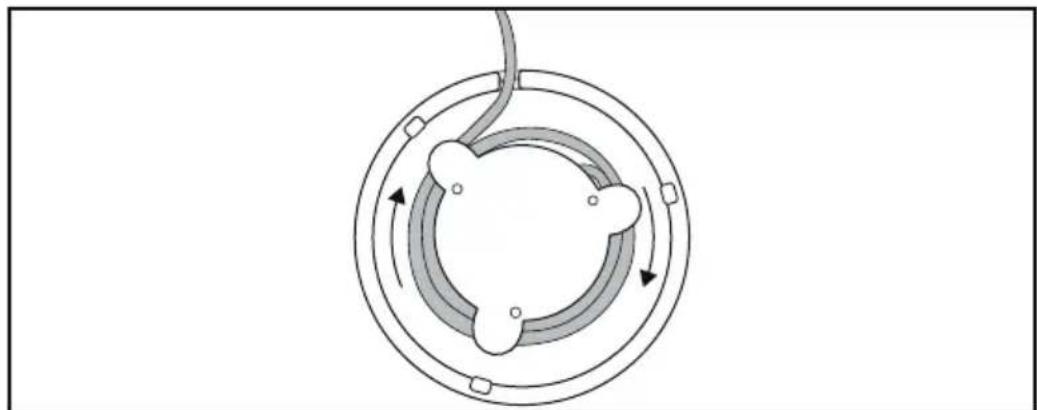
Fig. 1
Control panel
The control panel 3 made up of the following components:
Display: temperature display
Arrow buttons increase/decrease target temperature
C button: switch appliance on/off, start/cancel heating process
D button: switch keep-warm functionon/off
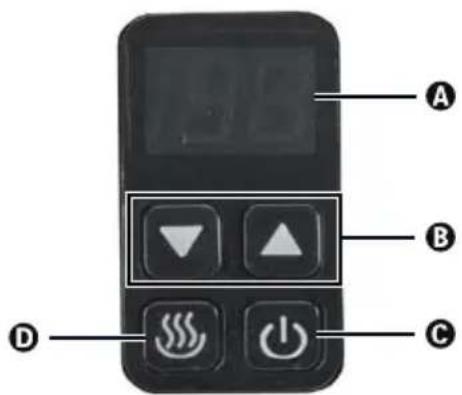
Fig. 2
Connecting the power supply
CAUTION - PROPERTY DAMAGE!
Before connecting the appliance, compare the connection data of the appliance (voltage and frequency) on the rating plate with that of your electrical supply. This data must correspond in order to prevent damage to the appliance.
Unwind the power cable from the cable retainer 5.
Guide the power cable through the gap in the back of the base.
Insert the plug into a mains power socket. Insert the plug into a mains power socket. If the jug 7 is placed on the base 4, the 1 button lights up and the current temperature of any water contained in the jug is then shown on the display AThe appliance is now in standby mode for around 30 seconds.
Before first use
Before starting to use the appliance, ensure that the appliance, the plug and the cable are in a fault-free condition and that all packaging materials are removed from the appliance.
Before preparing water for consumption for the first time, you need to clean the jug ①. Proceed as follows:
Open the lid by pressing the release button
Fill the jug up to the MAX mark. When filling, hold the jug upright. This allows you to read the scale correctly.
Close the lid by pushing it down until it clicks into place and allow the water to boil (see section Boiling water).
Once the water has boiled, pour it away.
Repeat the process.
The appliance may only be used for preparing drinking water.
Handling and use
Important preliminary remarks
DANGER - RISK OF ELECTRIC SHOCK!
Never bring the electrical base close to water!
WARNING - RISK OF INJURY!
Always use fresh drinking water. Do not consume water that has been in the appliance for longer than one hour. Do not reboil water that has cooled down. Always pour old water away. Germs may have built up!
CAUTION - PROPERTY DAMAGE!
- Do not put sugar or other food products into the appliance. Do not heat milk, alcohol or other liquids in the appliance. This will cause irreparable damage to the appliance.
NOTE
This appliance is fitted with overheating protection. If the appliance is unintentionally switched on without any water in the jug ⑦, the appliance switches itself off automatically.
Switching the appliance on/off
The appliance will remain in standby mode for about 30 seconds if the mains plug is plugged into a power socket. The appliance will then switch off automatically.
Press the (1) button twice to switch off the appliance. All buttons go out.
Press the (1) button to switch the appliance on again.
Boiling water
Lift the jug off the base fill it with water.
Open the lid by pressing the release button 2
Fill the kettle no further than the MAX mark, so that boiling water cannot spill out. When filling, hold the jug upright. This allows you to read the scale correctly.
Close the lid by pushing it down until it clicks into place.
Place the filled jug onto the base 4
Insert the plug into a mains power socket. The (1) button lights up and the current temperature of the water contained in the jug is then shown on the display
Press the (1) button to start the heating process. The display indicator A flashes, 100^ is displayed by default. The (1) button will light up during the heating process.
As soon as the water reaches the set temperature, you will hear a beep and the heating process will stops. The display indicator and all buttons go out after about 30 seconds.
WARNING - RISK OF INJURY!
Do not open the lid while the water is boiling or extremely hot. There is a risk of scalding.
NOTE
- You can stop the heating process at any time by pressing the button or removing the jug from the base display indicator and all buttons go out.
- When you replace the jug 7 on the base 4 he heating process will not be resumed until you press the 1 button 6 gain.
Heating the water to a specific temperature
The appliance has a setting allowing you to specify your desired water temperature. You can set the target temperature between 40^ and 100^ in 5^ stages.
If the appliance is deactivated, press the button C. The current temperature of the water contained in the jug is then shown in the display A.
Press one of the arrow keys to choose the desired target temperature. The heating process starts automatically. You can also change the temperature during the heating process.
As soon as the water reaches the set temperature, you will hear a beep and the heating process will stops. The display indicator and all buttons go out after about 30 seconds.
Keep-warm function
The keep-warm function allows you to keep heated water at a specific temperature for an extended period of time. As soon as the water temperature in the jug ⑦ sinks below the set temperature, the appliance will automatically heat it to that temperature again.
You can set the keep-warm function for temperatures between 40^ and 90^ in 5^ stages:
When the appliance is activated, press the button and use the arrow keys to set the required temperature. The display indicator ashes during the heating process, the button button light up.
Once the set target temperature has been reached, you will hear a beep and the display will stop flashing. The temperature is thus maintained at the desired level.
NOTE
If the water is already as hot or hotter than the selected temperature on the display Ahe signal will sound immediately. The set temperature will be maintained.
- The keep-warm function remains active for 2 hours. The appliance will then switch off automatically.
If you remove the jug from the base while the keep-warm function is activated, the keep-warm function will be cancelled. The display indicator A and all buttons go out.
To switch the keep-warm function off manually, press the button the button
Overheating protection
If the appliance overheats, the overheat protection automatically switches off the heating element inside the appliance. The overheating protection is activated if the appliance is switched on while the jug ⑦ contains no or not enough water. If the heating element has been switched off by the overheating protection, allow the appliance to cool down before using it.
Cleaning
Cleaning the appliance
DANGER - RISK OF ELECTRIC SHOCK!
Remove the plug from the mains socket before starting to clean the device.
Never submerge the appliance under water or other liquids! There is a risk of electric shock! The appliance may be irreparably damaged.
WARNING - RISK OF BURNSI!
- Allow the appliance to cool sufficiently before cleaning it.
CAUTION - PROPERTY DAMAGE!
- Do not use abrasive or caustic cleaning agents. These can attack the surface and damage the appliance beyond repair.
Clean all exterior surfaces and the power cable with a slightly dampened cloth. Always dry the appliance properly before using it again. For stubborn soiling, use a mild detergent on the cloth. Ensure that there is no detergent residue on or in the appliance before using it again.
Clean the inside of the jug with washing-up liquid, then rinse the jug with clear water.
If there are any deposits in the jug, wipe the interior surface with a dampened cloth or a washing-up/bottle brush. Then rinse the jug with clean water again.
Descaling the appliance
Scale deposits in the appliance lead to increased energy consumption and reduce the service life of the appliance. Descale the appliance as soon as scale deposits become apparent.
Use a descending agent that is suitable for food containers from a household goods shop (e.g. coffee machines). Proceed as described in the usage instructions for the descending agent.
After descending, rinse the appliance out with plenty of fresh water.
Inserting/removing the scale filter insert
The spout of the kettle is fitted with a scale filter insert which can become clogged with particles or scale over time. To clean the scale filter insert simply remove it from the appliance.
Open the lid 1.
Grip the scale filter insert by the tab and pull it out diagonally upwards toward the rear.
Clean the scale filter insert 8 with a slightly moistened dishcloth under running water.
After cleaning, replace the scale filter insert ⑧ in the appliance by inserting it into the guide rails for the scale filter insert and gently pushing it down until it clicks into place.
NOTE
If scale deposits have solidified in the scale filter insert, place the filter in a water-vinegar solution with a ratio of 6:1 for a few hours. The scale deposits will dissolve. Rinse the scale filter insert with plenty of fresh water.
- Alternatively, you can remove the scale filter holder by pushing down the upper retaining collar in the pouring opening from the front and pulling the scale filter holder to the rear. To reinsert the scale filter holder, push the lower retaining collar onto the edge, press the top retaining holder lightly downwards and allow it to click into the housing.
Storage
■ Allow the appliance cool down completely before putting it into storage.
■Wind the power cable around the cable retainer ⑤ underneath the base 4
NOTE
Always wrap the power cable around the cable retaine in a clockwise direction. This reduces the length of the cable to a minimum, allowing you to guide the cable through the gap in the base
Store the appliance in a dry location.
Disposal
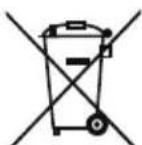
The symbol shown on the left of a crossed-out dustbin means that this device is subject to Directive 2012/19/EU.
This directive states that this appliance may not be disposed of in normal household waste at the end of its useful life, but must be taken to a specially set-up collection point, recycling depot or disposal company.
This disposal is free of charge for the user. Protect the environment and dispose of this appliance properly.
You can obtain further information from your local disposal company or the city or local authority.
Appendix
Technical data
| Input voltage 220 - 240 V | ~50 - 60 Hz |
| Power consumption 2000 - 2400 W | |
| Capacity max. 1.7 litres |

All parts of this appliance that come into contact with food are food-safe.
This appliance has a 3-year warranty valid from the date of purchase. If this product has any faults, you, the buyer, have certain statutory rights. Your statutory rights are not restricted in any way by the warranty described below.
Warranty conditions
The validity period of the warranty starts from the date of purchase. Please keep your original receipt in a safe place. This document will be required as proof of purchase.
If any material or production fault occurs within three years of the date of purchase of the product, we will either repair or replace the product for you at our discretion. This warranty service is dependent on you presenting the defective appliance and the proof of purchase (receipt) and a short written description of the fault and its time of occurrence.
If the defect is covered by the warranty, your product will either be repaired or replaced by us. The repair or replacement of a product does not signify the beginning of a new warranty period.
Warranty period and statutory claims for defects
The warranty period is not prolonged by repairs effected under the warranty. This also applies to replaced and repaired components. Any damage and defects present at the time of purchase must be reported immediately after unpacking. Repairs carried out after expiry of the warranty period shall be subject to a fee.
Scope of the warranty
This appliance has been manufactured in accordance with strict quality guidelines and inspected meticulously prior to delivery.
The warranty covers material faults or production faults. The warranty does not extend to product parts subject to normal wear and tear or fragile parts such as switches, batteries, baking moulds or parts made of glass.
The warranty does not apply if the product has been damaged, improperly used or improperly maintained. The directions in the operating instructions for the product regarding proper use of the product are to be strictly followed. Uses and actions that are discouraged in the operating instructions or which are warned against must be avoided.
This product is intended solely for private use and not for commercial purposes. The warranty shall be deemed void in cases of misuse or improper handling, use of force and modifications / repairs which have not been carried out by one of our authorised Service centres.
Warranty claim procedure
To ensure quick processing of your case, please observe the following instructions:
Please have the till receipt and the item number (e.g. IAN 12345) available as proof of purchase.
- You will find the item number on the type plate, an engraving on the front page of the instructions (bottom left), or as a sticker on the rear or bottom of the appliance.
If functional or other defects occur, please contact the service department listed either by telephone or by e-mail.
You can return a defective product to us free of charge to the service address that will be provided to you. Ensure that you enclose the proof of purchase (till receipt) and information about what the defect is and when it occurred.
You can download these instructions along with many other manuals, product videos and software on www.lidl-service.com.
Service
GB Service Great Britain
Tel.: 0871 5000 720 (£ 0.10/Min.)
E-Mail: kompernass@lidl.co.uk
IE Service Ireland
Tel.: 1890 930 034
(0,08 EUR/Min., (peak))
(0,06 EUR/Min., (off peak))
E-Mail: kompernass@lidl.ie
IAN 292034
Importer
Please note that the following address is not the service address. Please use the service address provided in the operating instructions.
KOMPERNASS HANDELS GMBH
BURGSTRASSE 21
DE-44867 BOCHUM
GERMANY
www.kompernass.com
Table des matieres
Introduction 34
Protection anti-surchauffe 43
Nettoyage 44
Protection anti-surchauff e
Chere cliente, cher client,
KOMPERNASS HANDELS GMBH
BURGSTRASSE 21
DE-44867 BOCHUM
ALLEMAGNE
www.kompernass.com
Inhoud
Inleiding 50
WAARSCHUWING - LETSELGEVAAR!
WAARSCHUWING - LETSELGEVAAR!
WAARSCHUWING-LETSELGEVAARI!
WAARSCHUWING - GEVAAR VOOR LETSEL!
KOMPERNASS HANDELS GMBH
BURGSTRASSE 21
DE-44867 BOCHUM
DUITSLAND
www.kompernass.com
Obsah
Uvod. 66
Informace k tomuto navodu k obsluze 66
Autorske pravo 66
Pouziti v souladu s urcenim 66
POZOR - HMOTNÉ ŠKODY!
POZOR - HMOTNÉ SKODY!
POZOR - HMOTNÉ SKODY!
POZOR - HMOTNÉ SKODYI
POZOR - HMOTNÉŠKODY!
KOMPERNASS HANDELS GMBH
BURGSTRASSE 21
DE-44867 BOCHUM
NÉMECKO
www.kompernass.com
Indices
Introduccion 82
KOMPERNASS HANDELS GMBH
BURGSTRASSE 21
DE-44867 BOCHUM
ALEMANIA
www.kompernass.com
Indice
Introducao 98
KOMPERNASS HANDELS GMBH
BURGSTRASSE 21
DE-44867 BOCHUM
ALEMANHA
www.kompernass.com
KOMPERNASS HANDELS GMBH
BURGSTRASSE 21
DE-44867 BOCHUM
GERMANY
www.kompernass.com