HWJ7510R - Soundbar SAMSUNG - Free user manual and instructions
Find the device manual for free HWJ7510R SAMSUNG in PDF.
Frequently Asked Questions - HWJ7510R SAMSUNG
User questions about HWJ7510R SAMSUNG
0 question about this device. Answer the ones you know or ask your own.
Ask a new question about this device
Download the instructions for your Soundbar in PDF format for free! Find your manual HWJ7510R - SAMSUNG and take your electronic device back in hand. On this page are published all the documents necessary for the use of your device. HWJ7510R by SAMSUNG.
USER MANUAL HWJ7510R SAMSUNG
Thank you for purchasing this Samsung product. To receive more complete service, please register your product at www.samsung.com/register
SAFETY INFORMATION
SAFETYWARNINGS
TO REDUCE THE RISK OF ELECTRIC SHOCK, DO NOT REMOVE THE COVER (OR BACK). NO USER-SERVICEABLE PARTS ARE INSIDE. REFER SERVICING TO QUALIFIED SERVICE PERSONNEL.
| CAUTION RISK OF ELECTRIC SHOCK. DO NOT OPEN. | 3 | This symbol indicates that high voltage is present inside. It is dangerous to make any kind of contact with any internal part of this product. | |
| 1 | This symbol indicates that important literature concerning operation and maintenance has been included with this product. |
| Class II product : This symbol indicates that a safety connection to electrical earth (ground) is not required. | |
| ~ | AC voltage : Rated voltage marked with this symbol is AC voltage |
| = | DC voltage : Rated voltage marked with this symbol is DC voltage. |
| i | Caution. Consult instructions for use : This symbol instructs the user to consult the user manual for further safety related information. |
WARNING : To reduce the risk of fire or electric shock, do not expose this appliance to rain or moisture.
CAUTION : TO PREVENT ELECTRIC SHOCK, MATCH WIDE BLADE OF PLUG TO WIDE SLOT, FULLY INSERT.
- This apparatus shall always be connected to a AC outlet with a protective grounding connection.
- To disconnect the apparatus from the mains, the plug must be pulled out from the mains socket, therefore the mains plug shall be readily operable.
CAUTION
- Do not expose this apparatus to dripping or splashing. Do not put objects filled with liquids, such as vases on the apparatus.
- To turn this apparatus off completely, you must pull the power plug out of the wall socket. Consequently, the power plug must be easily and readily accessible at all times.
PRECAUTIONS
ENG
Ensure that the AC power supply in your house complies with the power requirements listed on the identification sticker located on the back of your product. Install your product horizontally, on a suitable base (furniture), with enough space around it for ventilation (7 10~cm) . Make sure the ventilation slots are not covered. Do not place the unit on amplifiers or other equipment which may become hot. This unit is designed for continuous use. To fully turn off the unit, disconnect the AC plug from the wall outlet. Unplug the unit if you intend to leave it unused for a long period of time.
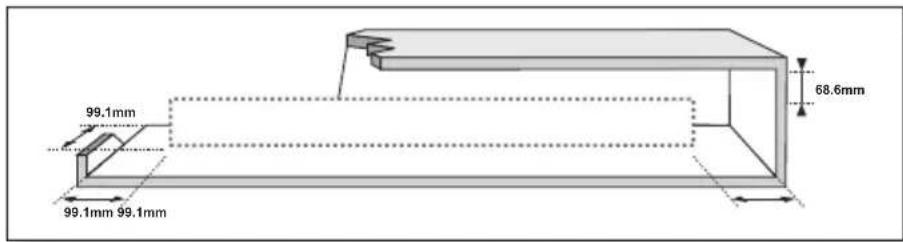
During thunderstorms, disconnect the AC plug from the wall outlet. Voltage peaks due to lightning could damage the unit.
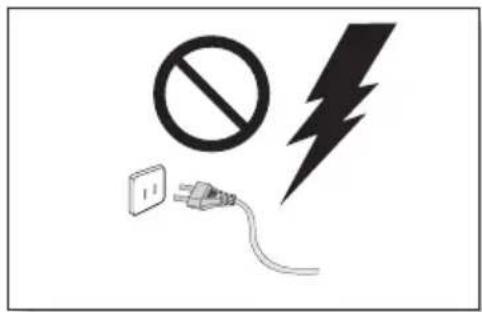
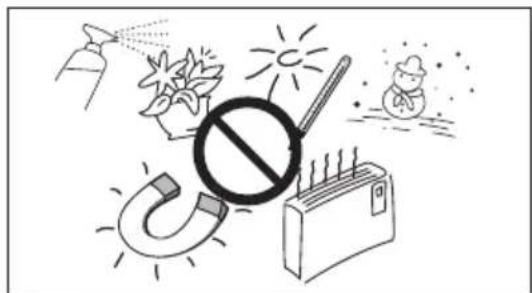
Protect the product from moisture (i.e. vases), and excess heat (e.g. a fireplace) or equipment creating strong magnetic or electric fields. Unplug the power cable from the AC wall socket if the unit malfunctions. Your product is not intended for industrial use. It is for personal use only. Condensation may occur if your product has been stored in cold temperatures. If transporting the unit during the winter, wait approximately 2 hours until the unit has reached room temperature before using.
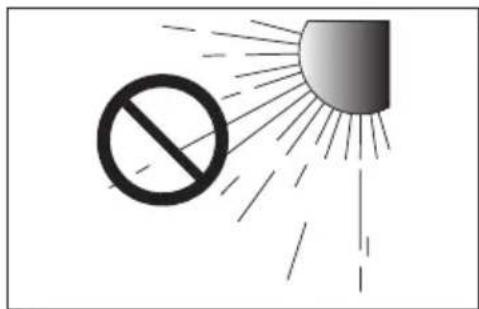
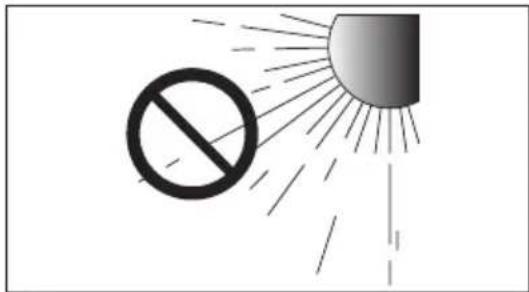
Do not expose the unit to direct sunlight or other heat sources. This could lead to overheating and cause the unit to malfunction.
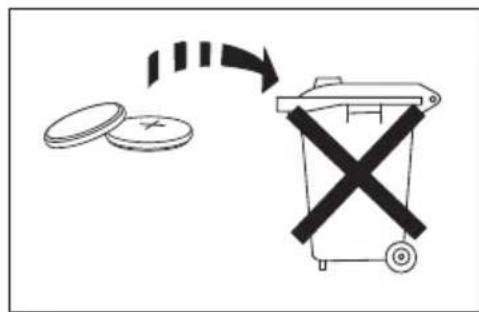
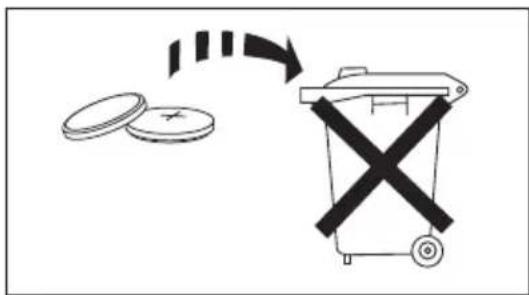
The battery used with this product contains chemicals that are harmful to the environment. Do not dispose of the battery in the general household trash. Do not expose the battery to excess heat, direct sunlight, or fire. Do not short circuit, disassemble, or overheat the battery. Danger of explosion if the battery is replaced incorrectly. Replace only with the same or equivalent type.

WARNING: DO NOT INGEST BATTERY. CHEMICAL BURN HAZARD. The remote control supplied with this product contains a coin/button cell battery. If the coin/button cell battery is swallowed, it can cause severe internal burns in just 2 hours and can lead to death. Keep new and used batteries away from children. If the battery compartment does not close securely, stop using the remote and make sure to
keep it away from children. If you think the battery might have been swallowed or placed inside any part of the body, seek immediate medical attention.
CONTENTS
2 GETTING STARTED
2 Safety Information
5 What's Included
6 DESCRIPTIONS
6 Top / Front Panel
7 Rear / Bottom Panel
8 Remote Control
10 INSTALLATION
10 Installing the Soundbar
10 Installing the Wall Mount
14 Placing the Soundbar on a TV stand
16 Installing the Soundbar as a Free-Standing Unit
16 Assembling the Clamp-Wire
17 CONNECTIONS
17 Connecting the Subwoofer
19 Connecting to a TV
19 TV SoundConnect
20 Connecting to a TV Using an HDMI (Digital) Cable
20 Connecting to a TV Using a Digital Optical Cable
21 Connecting to External Devices
21 HDMI Cable
22 Optical or Analogue Audio Cable
23 FUNCTIONS
23 Input Mode
24 Bluetooth
26 Using the Multiroom App
28 Using the Network Standby On Function
29 Software Update
31 TROUBLESHOOTING
31 Troubleshooting
32 APPENDIX
32 Specifications
- Figures and illustrations in this User Manual are provided for reference only and may differ from actual product appearance.
An administration fee may be charged if either
(a) an engineer is called out at your request and there is no defect with the product (i.e. where the user manual has not been read).
(b) you bring the unit to a repair centre and there is no defect with the product (i.e. where the user manual has not been read).
- You will be informed of the administration fee amount before a technician visits.
WHAT'S INCLUDED
BEFORE READING THE USER'S MANUAL
Note the following terms before reading the user manual.
Icons used in this manual
| Icon Term Definition | ||
| Caution | Indicates a situation where a function does not operate or settings may be cancelled. | |
| Note | Indicates tips or instructions on the page that help you operate a function. | |
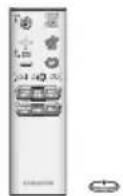
Check for the supplied accessories shown below.
Remote Control / Lithium Battery (3V:CR2032)
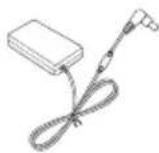
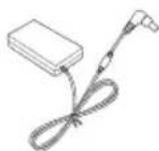
Power Cord:2 EA AC/DC Adapter
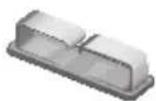
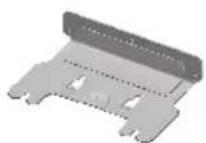

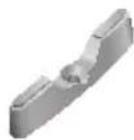
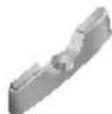
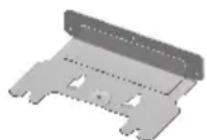
Clamp-Wire Wall-Mount Bracket Holder-Screw 1:4 EA


Holder-Screw 2:4 EA Holder-Fix Mount Holder-Foot:3EA
The appearance of the accessories may differ slightly from the illustrations above.
TOP / FRONT PANEL
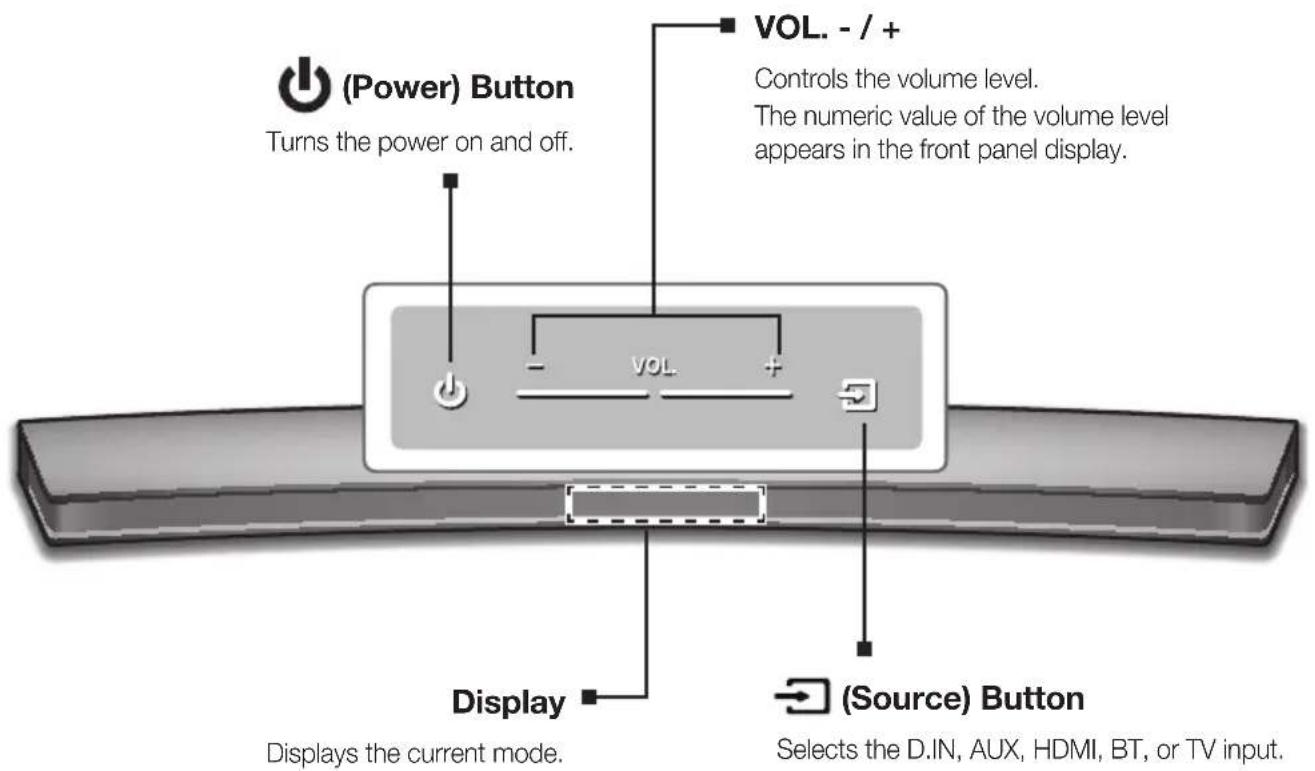
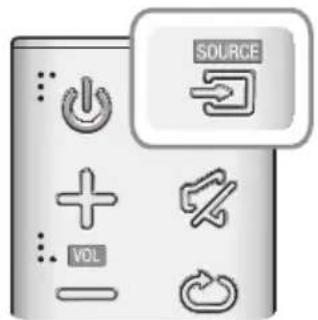
(Source)Button
Selects the D.IN, AUX, HDMI, BT, or TV input.
While the unit is powered on, pressing the button for more than 3 seconds sets the button to act as the (Mute) button. To cancel the (Mute) button setup, press the button for more than 3 seconds again.

- To clean this apparatus, unplug the power cord from the wall outlet and wipe the product using a soft, dry cloth. Due to aluminum being a positive electrostatic material, static discharge may occur.

- When you plug in the AC cord, the power button will begin working in 4 to 6 seconds.
- When you turn on this unit, there will be a 4 to 5 second delay before it produces sound.
- If you want to enjoy sound only from the Soundbar, you must turn off the TV's speakers in the Audio Setup menu of your TV. Refer to the owner's manual supplied with your TV.
REAR / BOTTOM PANEL


- When disconnecting the power cable of the AC power adaptor from a wall outlet, pull the plug. Do not pull the cable.
- Do not connect this unit or other components to an AC outlet until all connections between components are complete.
- Make sure to rest the AC/DC Adapter flat on a table or the floor. If you place the AC/DC Adapter so that it is hanging with the AC cord input facing upwards, water or other foreign substances could enter the Adapter and cause the Adapter to malfunction.
REMOTE CONTROL
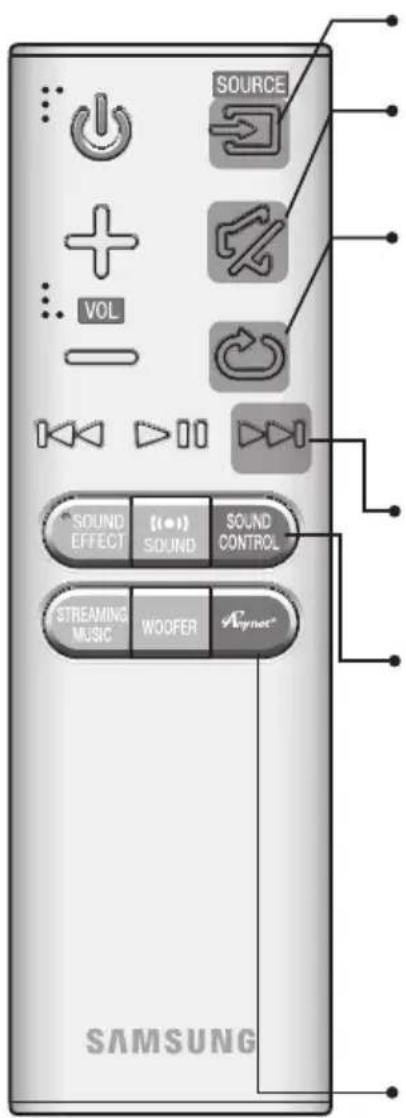
SOURCE
Press to select a source connected to the Soundbar.
Mute
You can turn the volume down to 0 with the push of a button. Press again to restore the sound to the previous volume level.
Repeat
The Repeat function is available only when playing back music from Songs on phone or DMS of Samsung Multiroom app.
OFF - REPEAT : Cancells Repeat Playback.
TRACK - REPEAT : Plays a track repeatedly.
ALL - REPEAT : Plays all tracks repeatedly.
Skip Forward
If there is more than one file on the device you are playing, and you press the button, the next file is selected.
SOUND CONTROL
Press to select TREBLE, BASS, or AUDIO SYNC. Then, use the 山山山 buttons to adjust the TREBLE or BASS volume from -3 +3
Press and hold the SOUND CONTROL button for about 5 seconds to adjust the sound for each frequency band. 150Hz , 300Hz , 600Hz , 1.2KHz , 2.5KHz , 5KHz , and 10KHz are selectable and each can be adjusted to a setting between -6 +6 .
If the Soundbar is connected to a digital TV and the video appears out of sync with the audio, press the SOUND CONTROL button to sync the audio with the video. Use the 山山山 buttons to set the audio delay between 0 ms 300 ms. In TV mode, and BT mode, the Audio Sync function may not available.
Anynet+
Press the Anynet+ button to turn the Anynet+ function on or off.
(Default:Auto Power Link OFF,ON-ANYNET+/OFF-POWERLINK or OFF
- ANYNET+ / ON - POWER LINK). The Anynet+ function lets you control the Soundbar with the remote from an Anynet+ compatible Samsung TV.
The Soundbar must be connected to the TV via an HDMI cable.
- Auto Power Link
Synchronizes the Soundbar to a connected Optical source via the Optical jack so it turns on automatically when you turn on your TV. (See page 21) Auto Power Link function is only available in the D.IN mode.
You can also activate Wi-Fi SETUP function by pressing and holding Anynet+ button on the remote for over 7 seconds.

- Operate the TV using the TV's remote control.
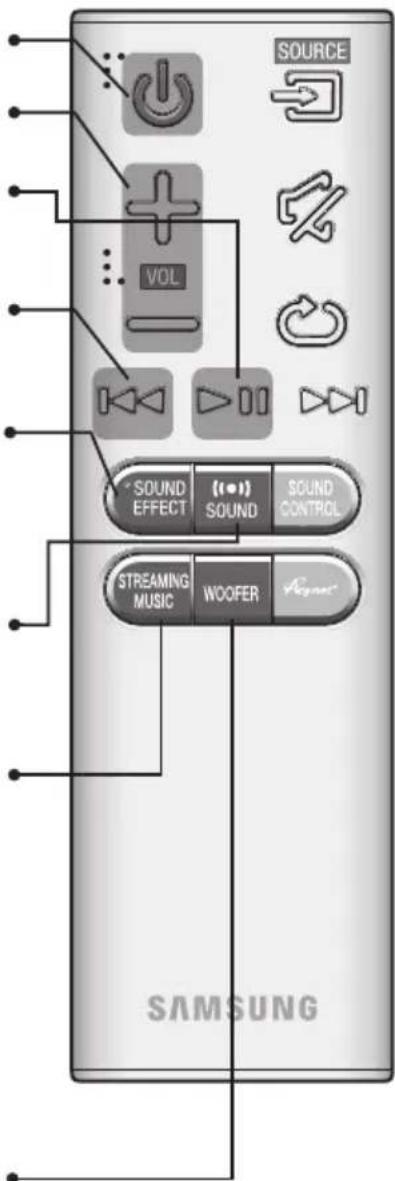
Turns the Soundbar on and off.
Volume
Adjusts the volume level of the unit.
Play/Pause
Press the button to pause a file temporarily. Press the button again to play the selected file.
Skip Back
If there is more than one file on the device you are playing, and you press the button, the previous file is selected.
SOUND EFFECT
You can select from 6 sound modes - STANDARD (Original Sound), MUSIC, CLEAR VOICE, SPORTS, MOVIE, and NIGHT MODE - depending on the content you want to listen to. Select the STANDARD mode if you want to enjoy the original sound.
(S1) SOUND
Surround Sound adds depth and spaciousness to the sound. Pressing the (SOUND button repeatedly cycles through the Surround Sound settings : ON - SURROUND SOUND, OFF - SURROUND SOUND
STREAMING MUSIC
Press STREAMING MUSIC button to listen to an Internet radio station. Each time you press this button, the Soundbar switches to the next default station, cycling through the 3 default stations. To use the STREAMING MUSIC function, the Soundbar must be connected to the Internet. (See page 28)
DRC (Dynamic Range Control)
Lets you apply dynamic range control to Dolby Digital. Press and hold the STREAMING MUSIC button to toggle the DRC (Dynamic Range Control) function ON and OFF.
WOOFER
Press the WOOFER button. Then, use the 山山山 buttons to adjust the Subwoofer volume from -12, -6 ~ +6.
You can also activate SPK ADD function of the Soundbar by pressing and holding WOOFER button of the remote for over 5 seconds.
INSTALLING THE BATTERY IN THE REMOTE CONTROL

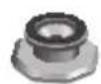
- Use a suitable coin to turn the remote control's battery cover counterclockwise to remove it as shown in the figure above.

- Insert a 3V lithium battery. Keep the positive (+) pole facing up when inserting the battery. Put the battery cover on and align the '●' marks side by side as shown in the figure above.
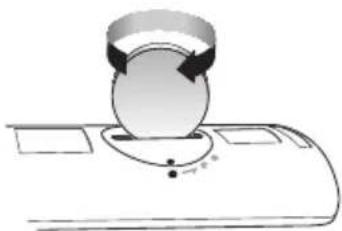
- Use a suitable coin to turn the remote control battery cover clockwise as far as it will go to fix it in place.
INSTALLING THE SOUNDBAR
INSTALLING THE WALL MOUNT
Installation Precautions
Install on a vertical wall only.
- For the installation, avoid a location with high temperature or humidity, or a wall that cannot sustain the weight of the set.
- Check the strength of the wall. If the wall is not strong enough to support the unit, reinforce the wall or install the unit on a different wall that can support the unit's weight.
Purchase and use the fixing screws or anchors appropriate for the kind of wall you have (plaster board, iron board, wood, etc.). If possible, fix the support screws into wall studs.
Purchase wall mounting screws according to the type and thickness of the wall you will mount the Soundbar on.
-Diameter : M5
-Length: 35mm or longer recommended.
- Connect cables from the unit to external devices before you install it on the wall.
Make sure the unit is turned off and unplugged before you install it. Otherwise, it may cause an electric shock.
Check for the supplied accessories shown below.


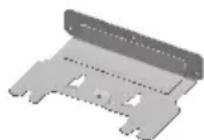

Holder-Screw 1:4 EA Holder-Screw 2:4 EA Wall-Mount Bracket Holder-Fix Mount
ENG
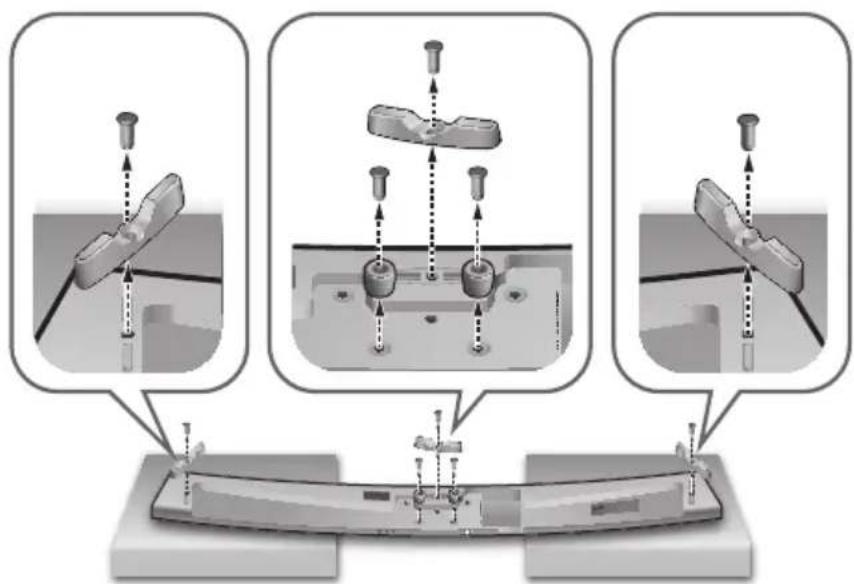
- Place the Soundbar as shown in the illustration, ensuring that none of the buttons touch the surface it is lying on.
- If the Holder-Foot (3 EA) and Holder-Support (2 EA) are attached, remove them.


Holder-Foot Holder-Support
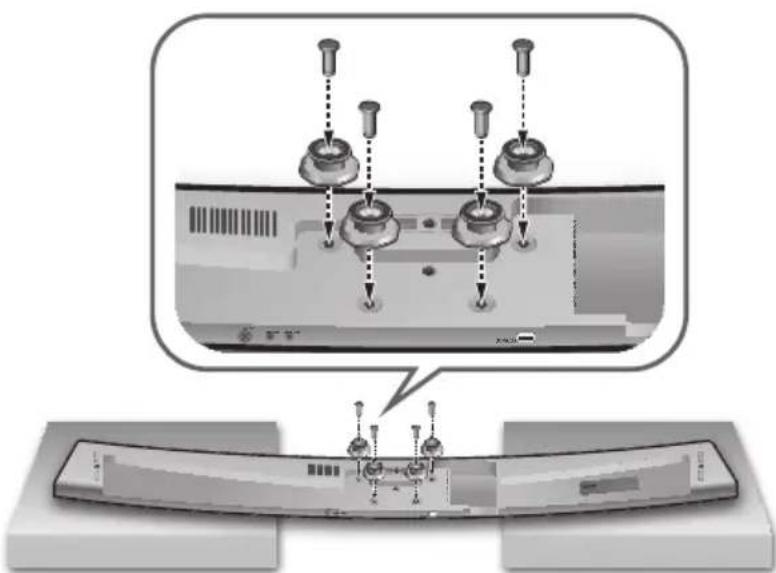
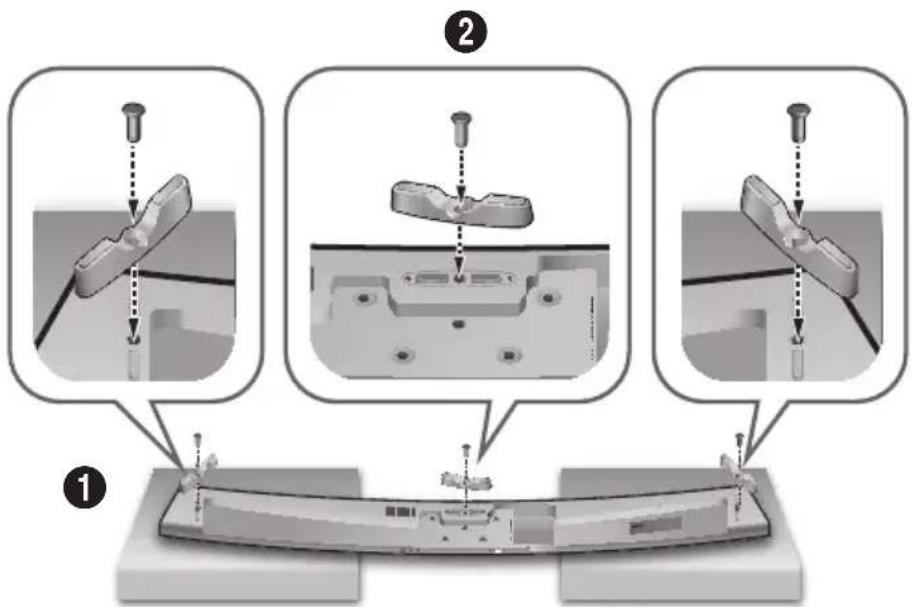
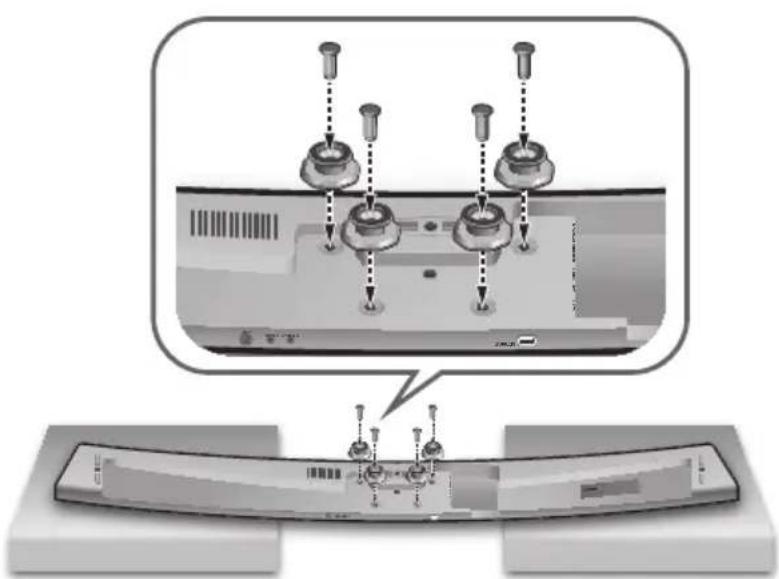
- Fix Holder-Screw 1 (4 EA) and Holder-Screw 2 (for main unit fixing) (4 EA) into the holes of the Soundbar tightly as shown in the illustration.
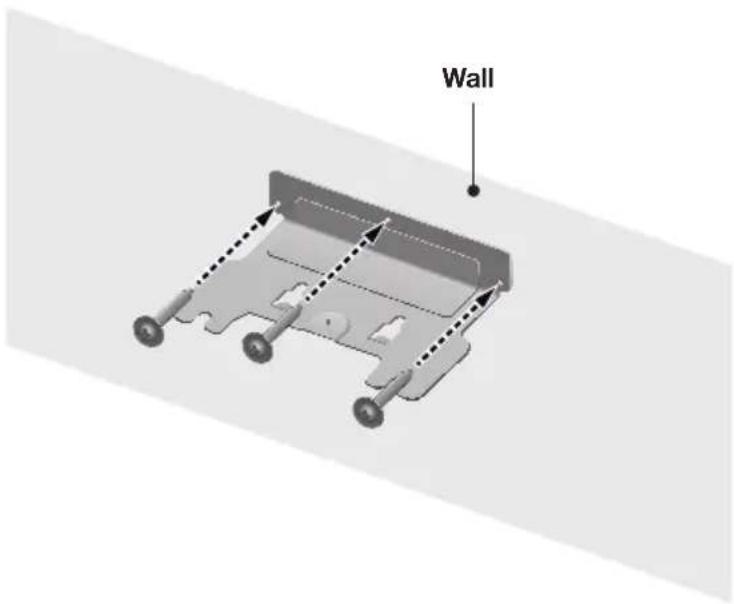
- Insert the Wall-Mount Screws into the 3 holes one by one to fix the Wall-Mount Bracket on the wall.

Recommended screw : M5
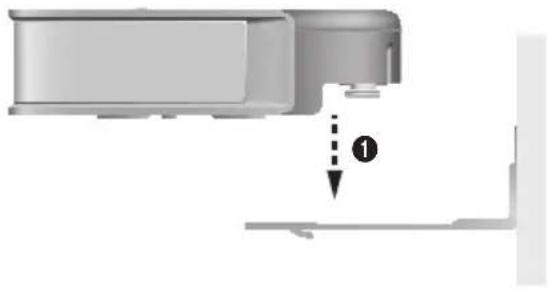
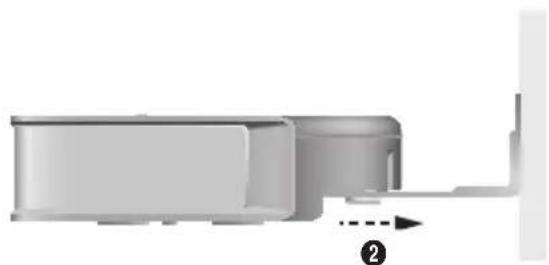
- Mount the Soundbar on the Wall-Mount Bracket in order of the following illustration (1 → 2).
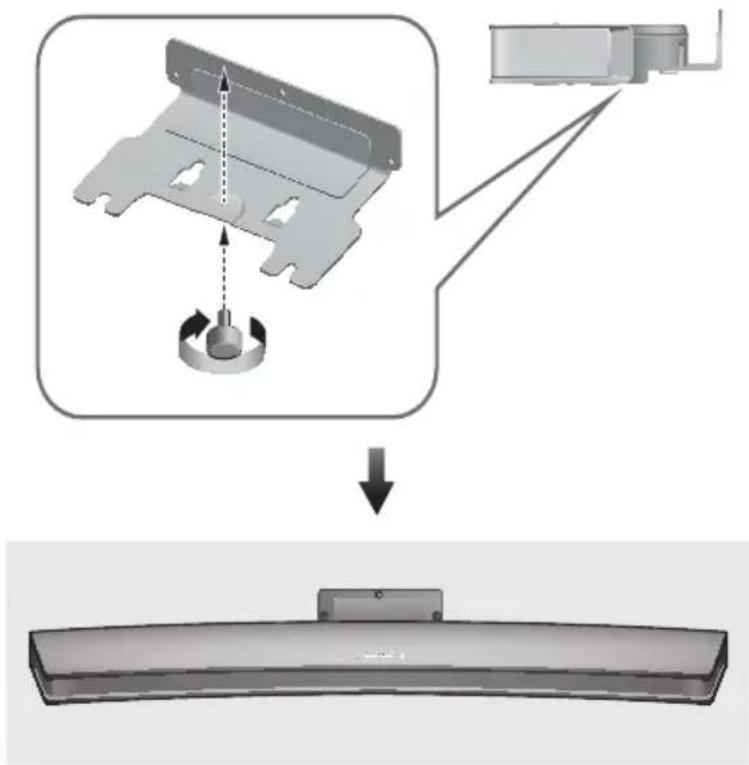
- Fix the Holder-Fix Mount (for wall-mount fixing) to join the Wall-Mount Bracket with the Soundbar.

- Wall-Mount Screws are not provided.
- Since different types of wall-mount screws are required depending on your wall, you should check your wall before installation and purchase the appropriate wall-mount screws to use.
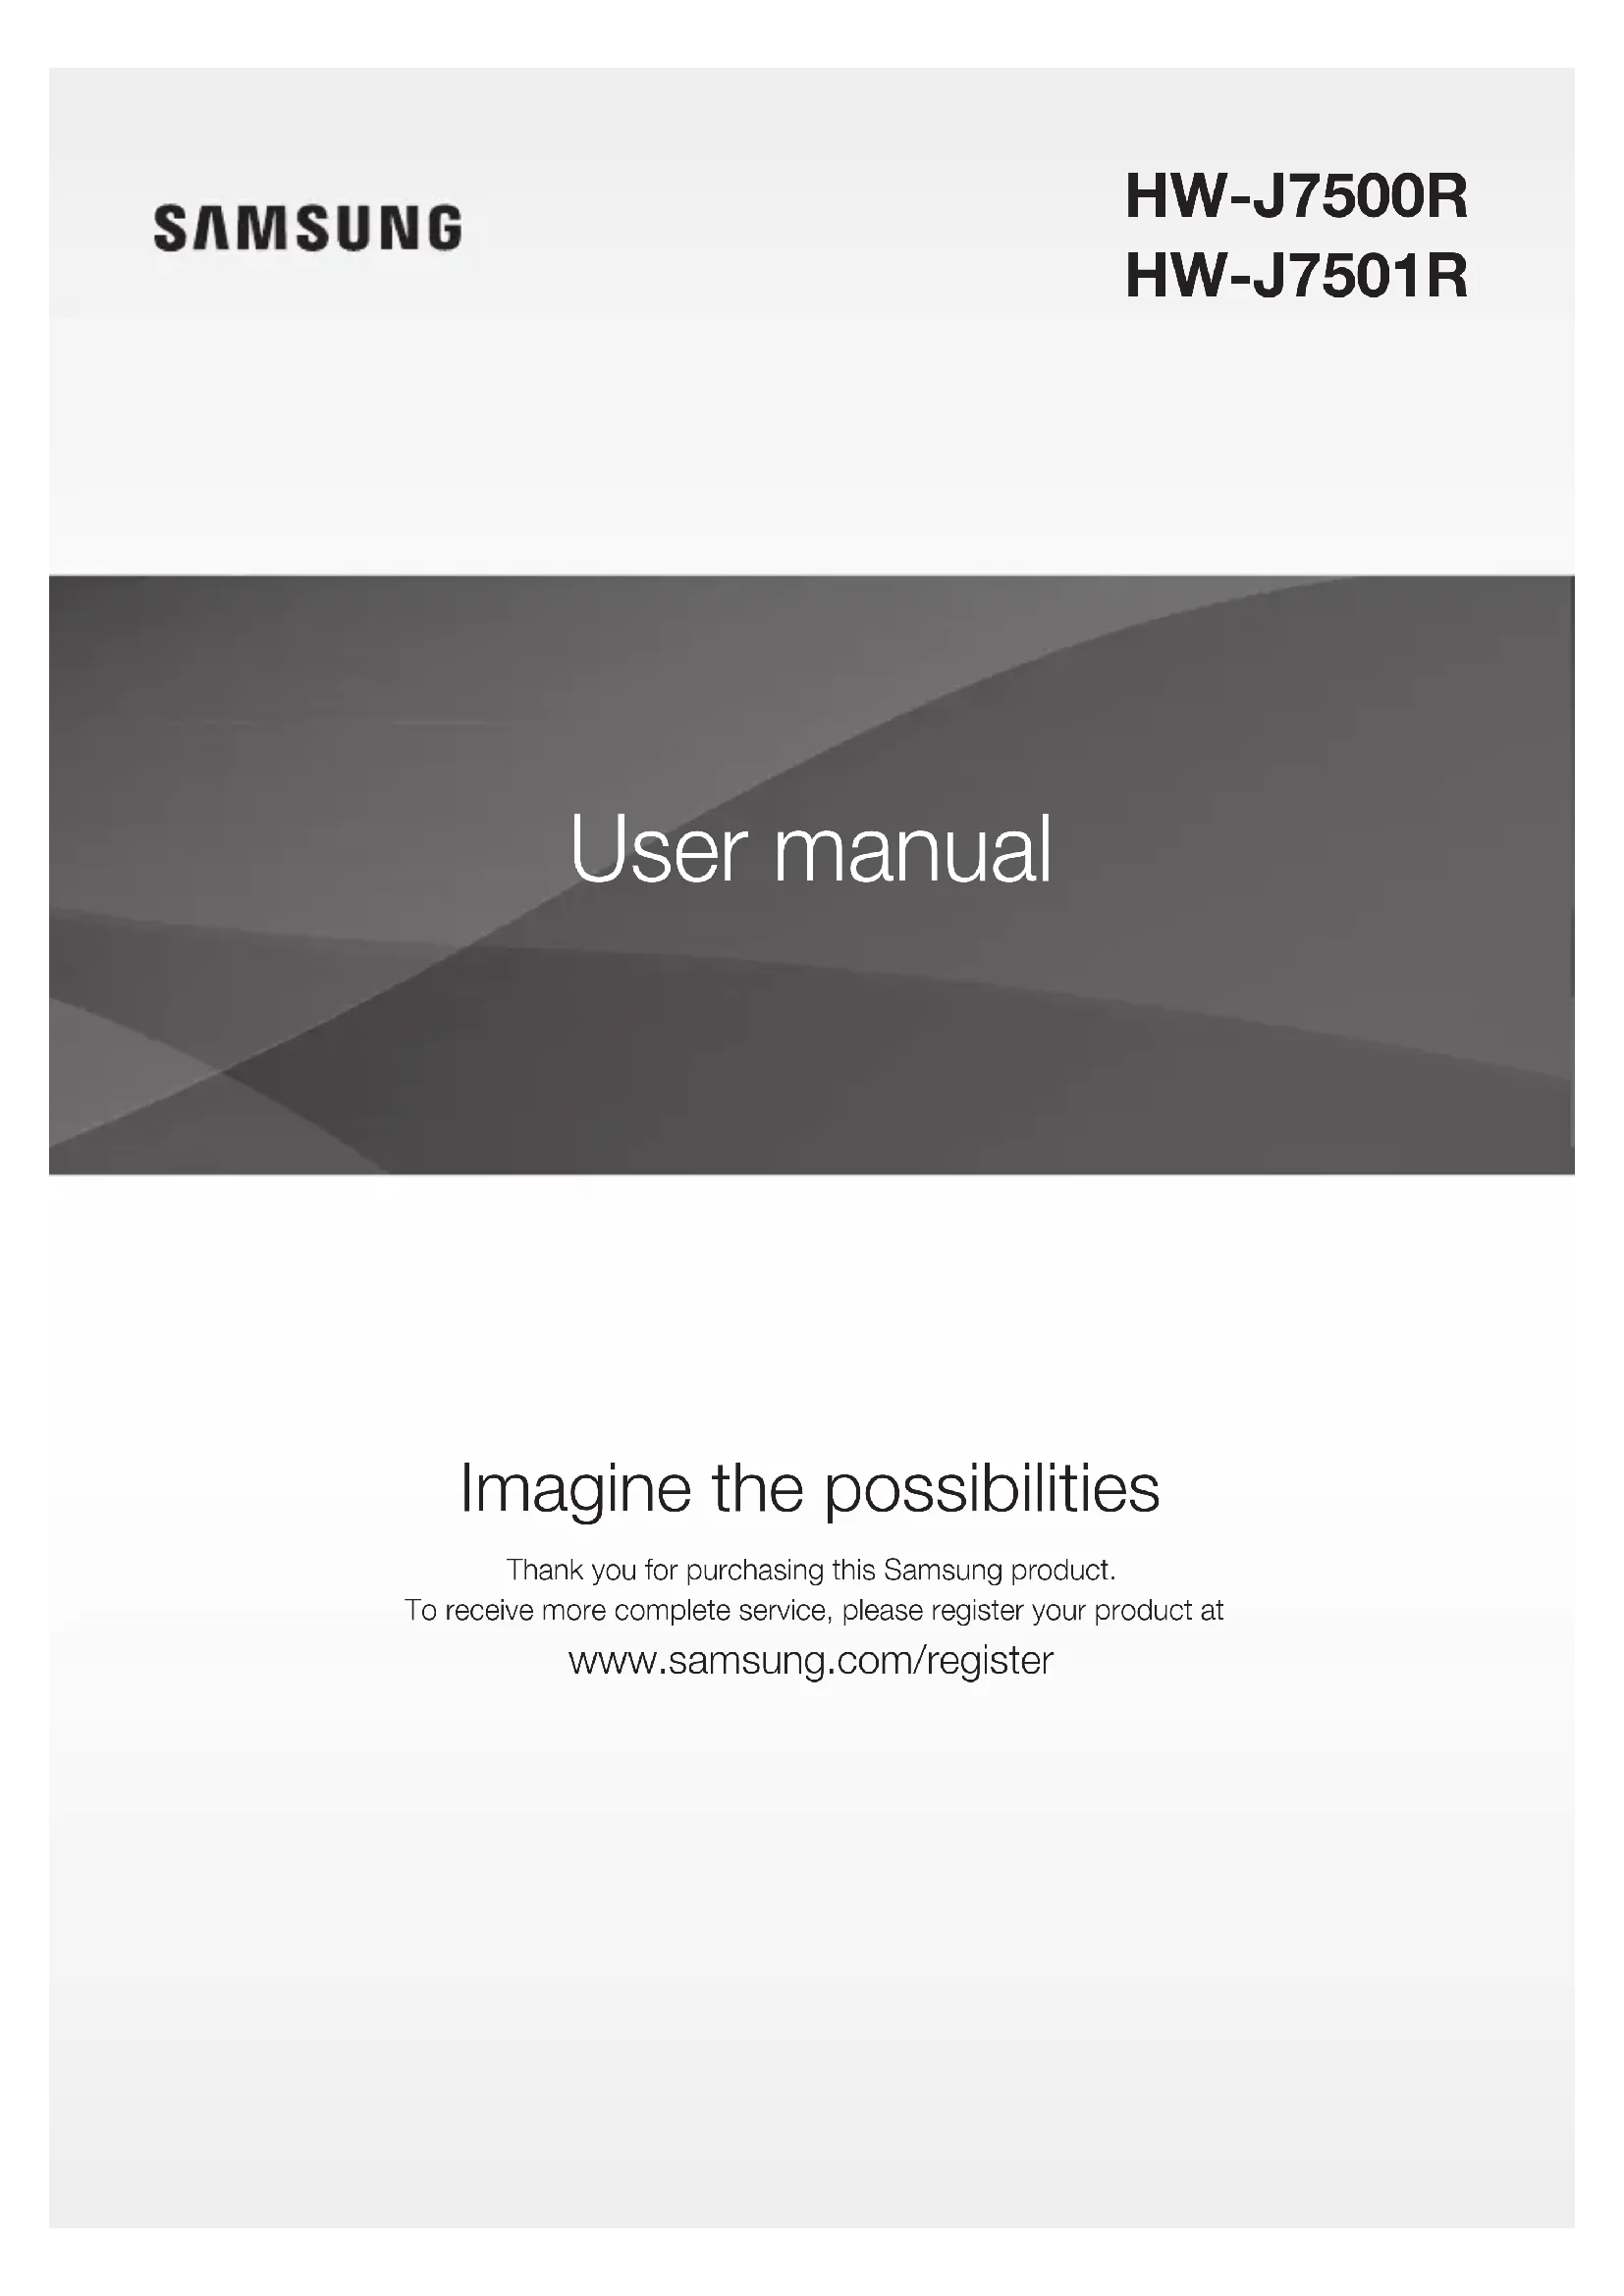
PLACING THE SOUNDBAR ON A TV STAND
Place the Soundbar on a TV stand.
Check for the supplied accessories shown below.

Holder-Foot : 3EA Holder-Screw 2 : 3EA
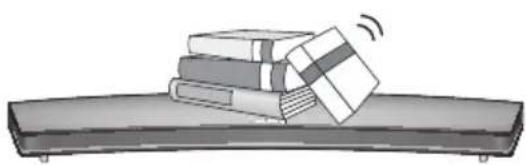
- Place the Soundbar as shown in the illustration, ensuring that none of the buttons touch the surface it is lying on. You can use the Soundbar's packaging to support its two ends.
- Attach the Holder-Foot (3 EA) to the Soundbar using 3 Holder-Screws 2 as shown in the illustration. Tighten the screws firmly.
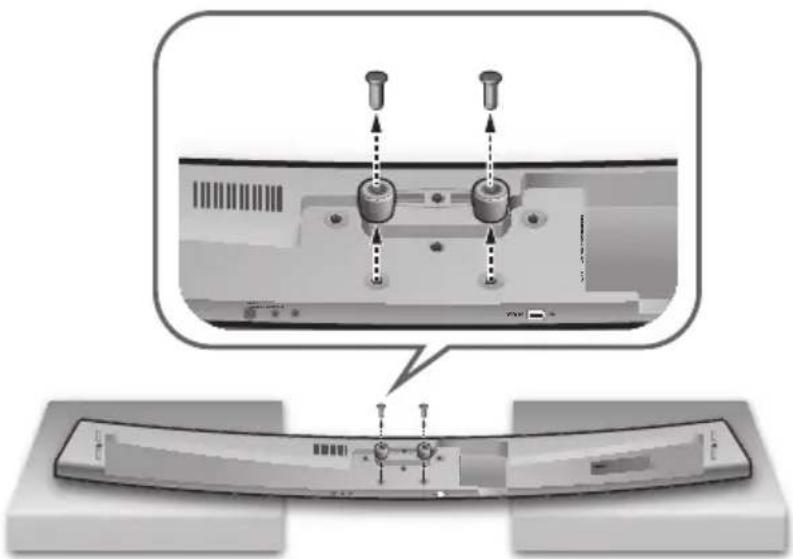
- Remove Holder-Support (2 EA) from the Soundbar as shown in the illustration.
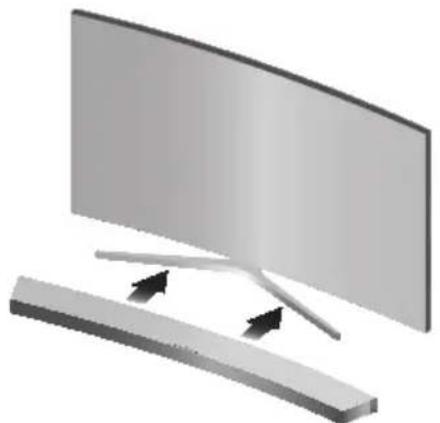
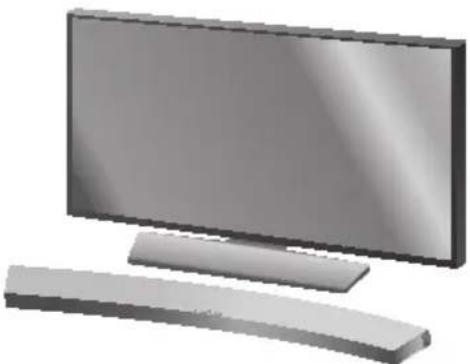
- Align the Soundbar's centre with the centre of the base of the TV, and then carefully push it onto the stand as far as it will go, as shown in the illustration. Be careful not to unbalance the TV.

- Do not place heavy items on the main unit. Do not step on the main unit.
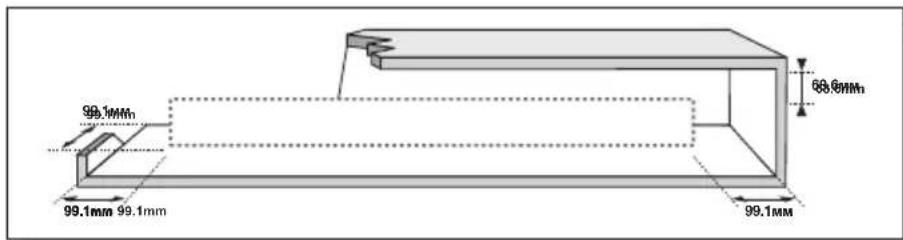
INSTALLING THE SOUNDBAR AS A FREE-STANDING UNIT
- Centre the Soundbar on the flat area in front of the TV.
ASSEMBLING THE CLAMP-WIRE
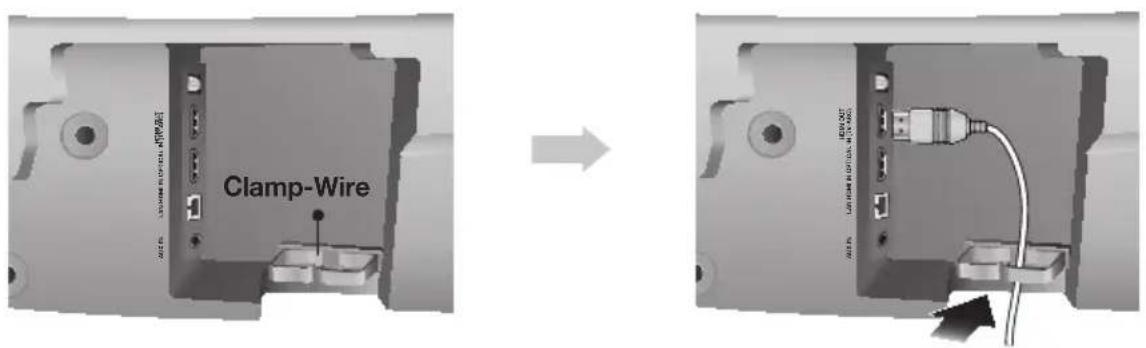
Attach the clamp-wire to the unit as shown, and then run the cables through the clamp-wire to keep them neat.

- Do not connect the power cord of this product or your TV to a wall outlet until all connections between components are complete.
- Before moving or installing this product, be sure to turn off the power and disconnect the power cord.
CONNECTING THE SUBWOOFER
CONNECTING TO THE SUBWOOFER AUTOMATICALLY
The Subwoofer's linking ID is preset at the factory and the main unit and subwoofer should link (connect wirelessly) automatically when the main unit and subwoofer are turned on.
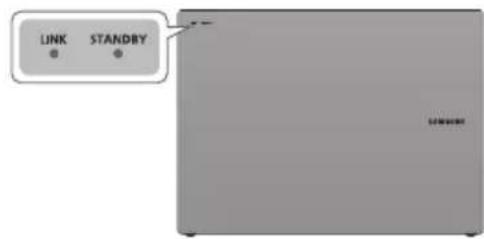
- When the subwoofer is completely connected, the blue LED Link Indicator on the subwoofer stops blinking and glows continuously.
CONNECTING TO THE SUBWOOFER MANUALLY
If the blue LED light does not stop blinking when the main unit and subwoofer are turned on, please set the ID by following the steps below.

- Important: Before you begin, put the battery into the remote. See page 9 for instructions.
- Plug the power cords of the main unit and subwoofer into an AC wall outlet.
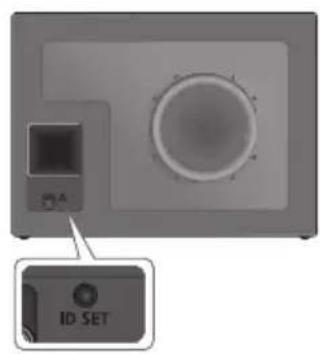
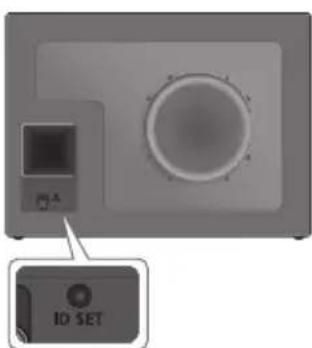
- Press the ID SET button on the back of the subwoofer with a small, pointed object for 5 seconds.
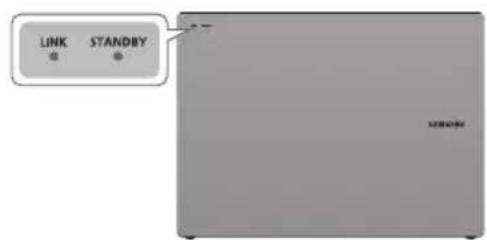
The STANDBY indicator turns off and the LINK indicator (Blue LED) blinks quickly.
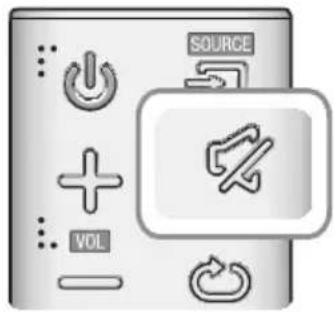
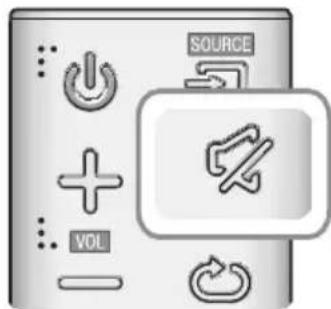
- While the main unit is powered off (in STANDBY mode), press and hold the × (Mute) on the remote control for 5 seconds.
- The ID SET message appears on the Soundbar's display.
- To finalise the link, turn the main unit's power on while the subwoofer's Blue LED blinks.
The main unit and the subwoofer should now be linked (connected).
The Link indicator (Blue LED) on the subwoofer should be glowing continuously and not blinking.
If the LINK indicator is not solid blue, the linking process has failed. Turn off the main unit and start again from Step 2.
- You can enjoy better sound from the wireless subwoofer by selecting a Sound Effect. (See page 9)

- Before moving or installing the product, be sure to turn off the power and disconnect the power cord.
- If the main unit is powered off, the wireless subwoofer will in standby mode and the STNDBY LED on the front will blink Red directly. (no blue LED).
- If you use a device that uses the same frequency (2.4GHz) as the Soundbar near the Soundbar, interference may cause some sound interruption.
- The maximum transmission distance of the wireless signal between the main unit and subwoofer is about 10 meters, but may vary depending on your operating environment. If a steel-concrete or metallic wall is between the main unit and the wireless subwoofer, the system may not operate at all, because the wireless signal cannot penetrate metal.
- If the main unit doesn't make a wireless connection, follow steps 1-5 on the previous page to re-set the connection between the main unit and wireless subwoofer.

- The wireless receiving antenna is built into the wireless subwoofer. Keep the unit away from water and moisture.
- For optimal listening performance, make sure that the area around the wireless subwoofer location is clear of any obstructions.
LED INDICATOR LAMP STATUS ON SUBWOOFER
| LED Status | Description Resolution | ||
| Red On | Standby (with the Soundbar main unit turned off) | Check the power supply to the Soundbar main unit | |
| Connection failed | Connect again (refer to the instructions on manual connection in the user manual) | ||
| Blue | On | Successfully connected (normal operation) | - |
| Blinking | Standby (with the Soundbar main unit turned off) | Check the power supply to the Soundbar main unit | |
| Connection failed | Connect again (refer to the instructions on manual connection in the user manual) | ||
| Red and blue Blinking Malfunction Contact the service centre. | |||
CONNECTING TO A TV

- Important: Before you begin, put the battery into the remote. See page 9 for instructions.
TV SOUNDCONNECT
You can enjoy TV sound through your Soundbar when it is connected to a Samsung TV that supports the TV SoundConnect function.
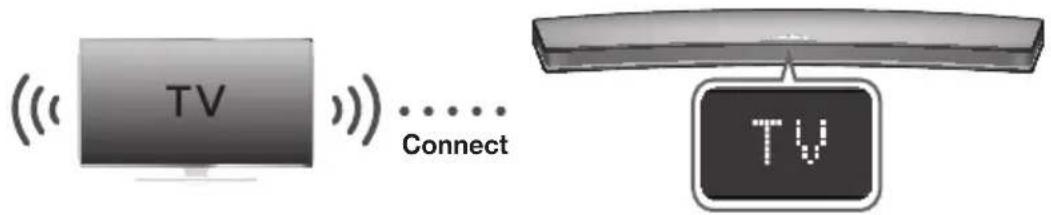
- Turn on the TV and Soundbar.
- Press the button on the main unit's top panel or the SOURCE button on the remote control to select the TV mode.
- On the TV, a message asking whether to enable the TV SoundConnect function appears.
- Select <Yes> using the TV's remote control to finish connecting the TV and Soundbar.

- If the TV SoundConnect linking process fails, navigate to SoundConnect in the TV's Sound menu, select Add New Device, and set Add New Device to ON. Then, try again.
- Switching the Soundbar's mode from TV to another mode automatically terminates TV SoundConnect.
- To connect the Soundbar to another TV, the existing connection must be terminated.
- To terminate the existing connection, press and hold the button on the remote for 5 seconds or switch to another mode. To connect to the other TV, follow Steps 1 through 4 above.

- The TV SoundConnect (SoundShare) function is supported by some Samsung TVs released from 2012 on. Check whether your TV supports the TV SoundConnect (SoundShare) function before you begin. (For further information, refer to the TV's user manual.).
- If your Samsung TV was released before 2014, check the SoundShare setting menu.
- If the distance between the TV and Soundbar exceeds 10 meters, the connection may not be stable or the audio may stutter. If this occurs, relocate the TV or Soundbar so that they are within operational range, and then re-establish the TV SoundConnect connection.
TV SoundConnect Operational Ranges: - Recommended pairing range: within 2 meters.
- Recommended operational range: within 10 meters.
The Play/Pause, Next, and Prev buttons on the Soundbar or Soundbar's remote do not control the TV.
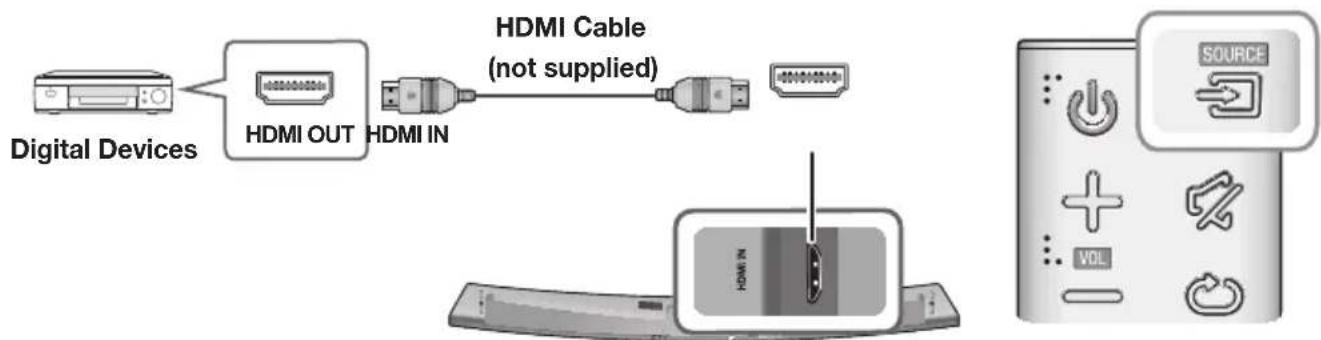
CONNECTING TO A TV USING AN HDMI (DIGITAL) CABLE
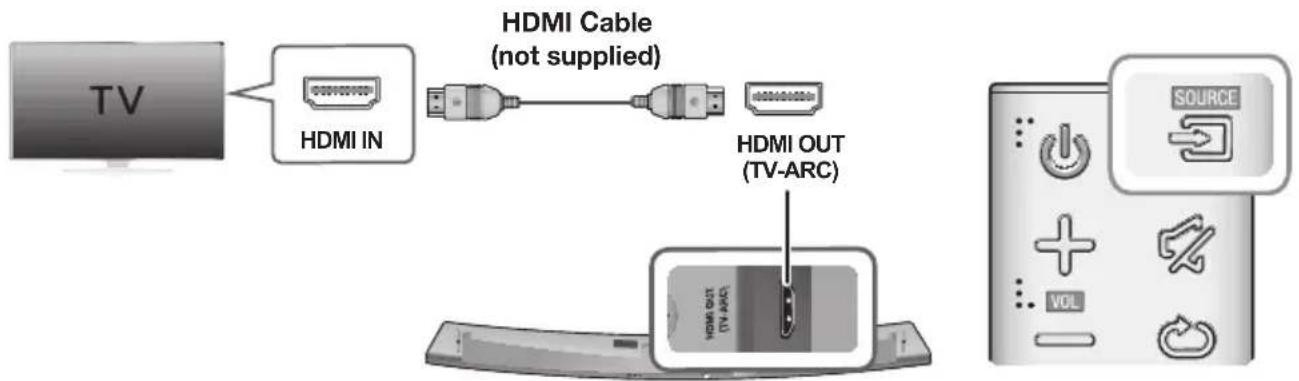
- Connect an HDMI cable (not supplied) from the HDMI OUT (TV-ARC) jack on the back of the product to the HDMI IN jack on your TV.
- Press the button on the top panel of the Soundbar or the SOURCE button on the remote control to select the D.IN mode.

- HDMI is an interface that enables the digital transmission of video and audio data with just a single connector.
- If the TV provides an ARC port, connect the HDMI cable to the HDMI IN (ARC) port.
-
We recommend you use a coreless HDMI cable if possible. If you use a cored HDMI cable, use one whose diameter is less than 14mm .
-
Anynet+ must be turned on.
-
This function is not available if the HDMI cable does not support ARC.
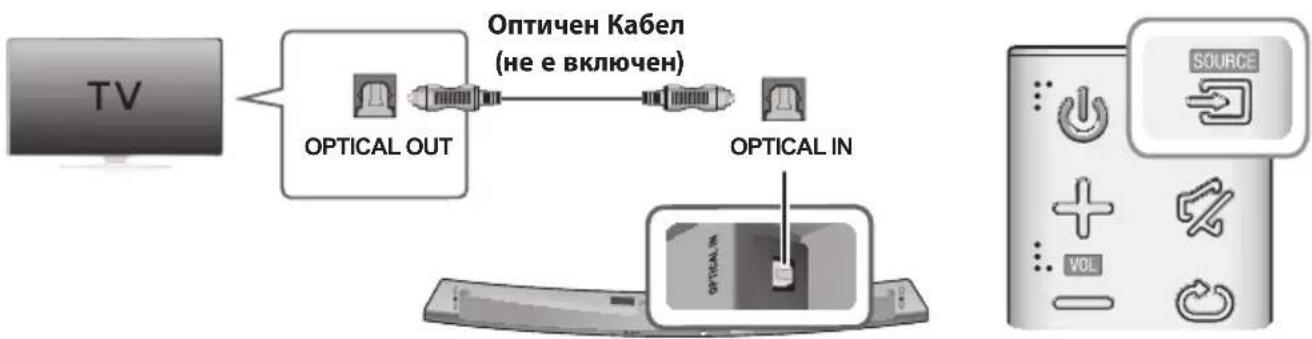
CONNECTING TO A TV USING A DIGITAL OPTICAL CABLE
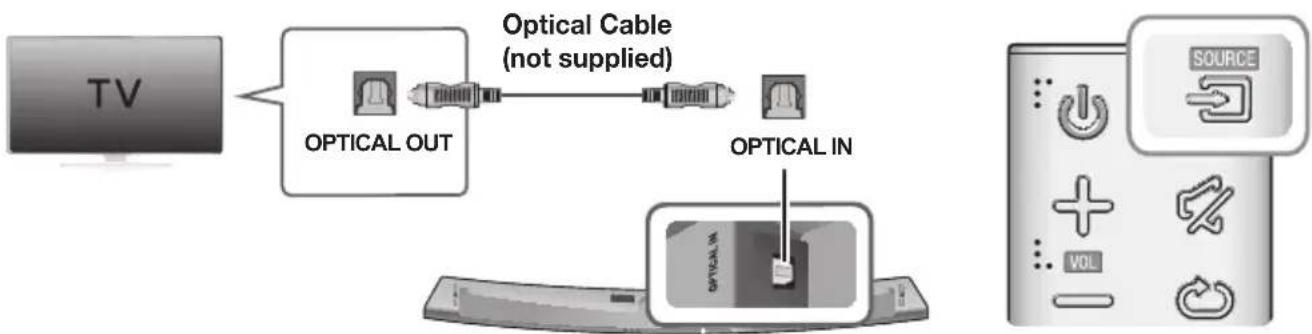
- Connect the OPTICAL IN (Audio) jack on the Soundbar to the OPTICAL OUT jack of the TV with a digital optical cable.
- Press the button on the top panel of the Soundbar or the SOURCE button on the remote control to select the D.IN mode.
Auto Power Link
If you have connected the main unit to a TV with a digital optical cable, you can set the Auto Power function ON to have the Soundbar turn on automatically when you turn the TV on.
| AUTO POWER LINK Display | |
| ON | OFF - ANYNET+ / ON - POWER LINK |
| OFF | ON - ANYNET+ / OFF - POWER LINK |
- Connect the Soundbar and a TV with a digital optical cable (not supplied).
- Press the button on the main unit's top panel or the SOURCE button on the remote control to select the D.IN mode.
- Press the Anynet+ button on the remote control to toggle the Auto Power Link function on and off.

- Depending on the connected device, Auto Power Link may not function.
CONNECTING TO EXTERNAL DEVICES
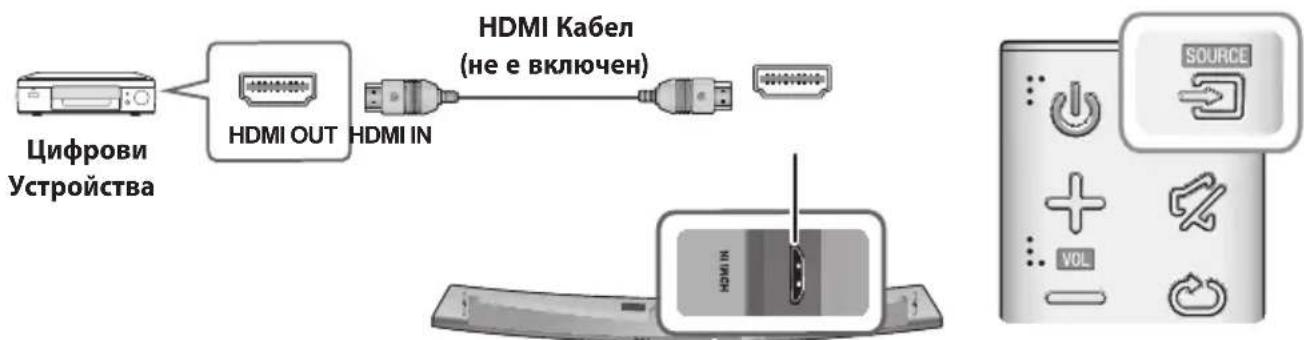
HDMI CABLE
HDMI is the standard digital interface for connecting to TVs, projectors, DVD players, Blu-ray players, set top boxes, and more.
HDMI prevents any degradation to the signal due to conversion to analogue and maintains the video and audio quality of the original digital source.
- Connect an HDMI cable (not supplied) from the HDMI IN jack on the back of the product to the HDMI OUT jack on your digital device.
- Press the button on the top panel of the Soundbar or the SOURCE button on the remote control to select the HDMI mode.
OPTICAL OR ANALOGUE AUDIO CABLE
This unit comes equipped with one digital optical in jack and one analogue audio (AUX) in jack, giving you two ways to connect it to external devices.
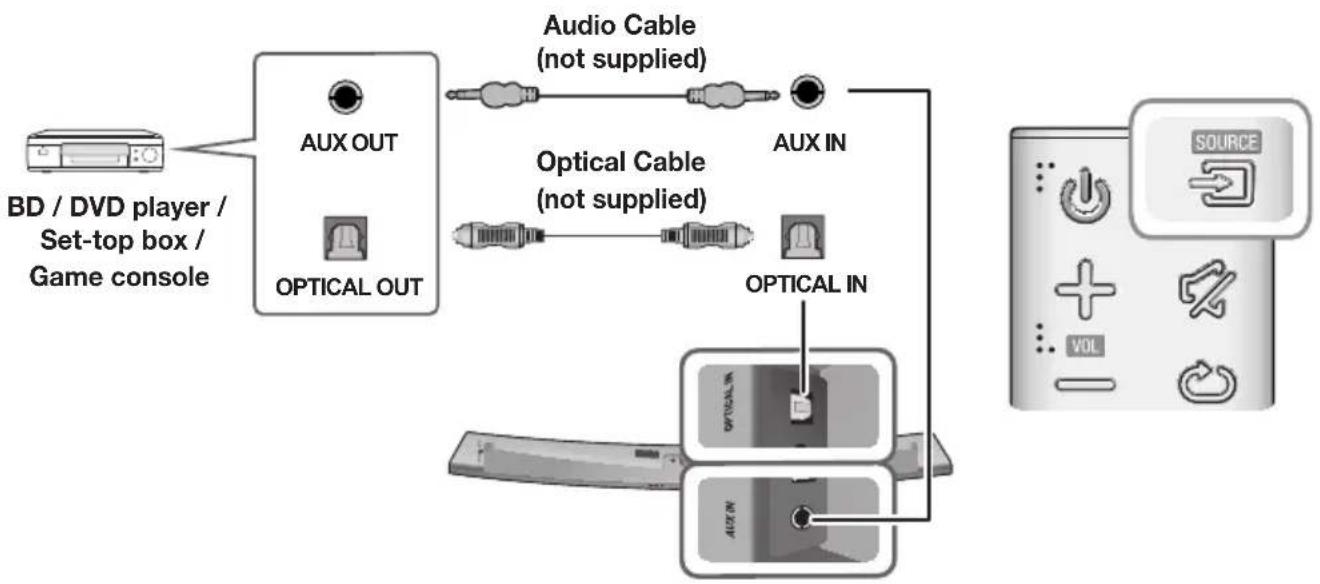
AUX Cable
- Connect AUX IN (Audio) on the main unit to the AUDIO OUT jack of the Source Device using an audio cable.
- Press the button on the top panel of the Soundbar or the SOURCE button on the remote control to select the AUX mode.
Optical Cable
- Connect OPTICAL IN (Audio) on the main unit to the OPTICAL OUT jack of the Source Device using a digital optical cable.
- Press the button on the top panel of the Soundbar or the SOURCE button on the remote control to select the D.IN mode.
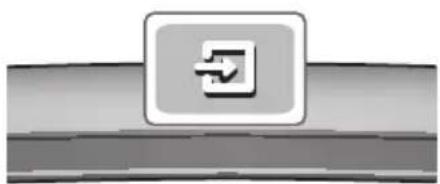
INPUT MODE
Press the button on the main unit's you want.
top panel or the SOURCE button on the remote control to select the mode
| Input mode Display | |
| Optical Digital input ARC (HDMI OUT) input | D.IN |
| AUX input | AUX |
| HDMI input | HDMI |
| BLUETOOTH mode | BT |
| TV SoundConnect | TV |
The unit turns off automatically in the following situations.
D.IN/HDMI/BT/TV Mode
-If there is no audio signal for 15 minutes.
AUX Mode
-If the AUX cable is disconnected for 15 minutes.
If there is no KEY input for 8 hours when the AUX cable is connected. (Auto Power Down function can be turned off only in that case.)
To turn off Auto Power Down function, while in AUX mode, press and hold the button for 5 seconds.
ON - AUTO POWER DOWN / OFF - AUTO POWER DOWN appears on the display.
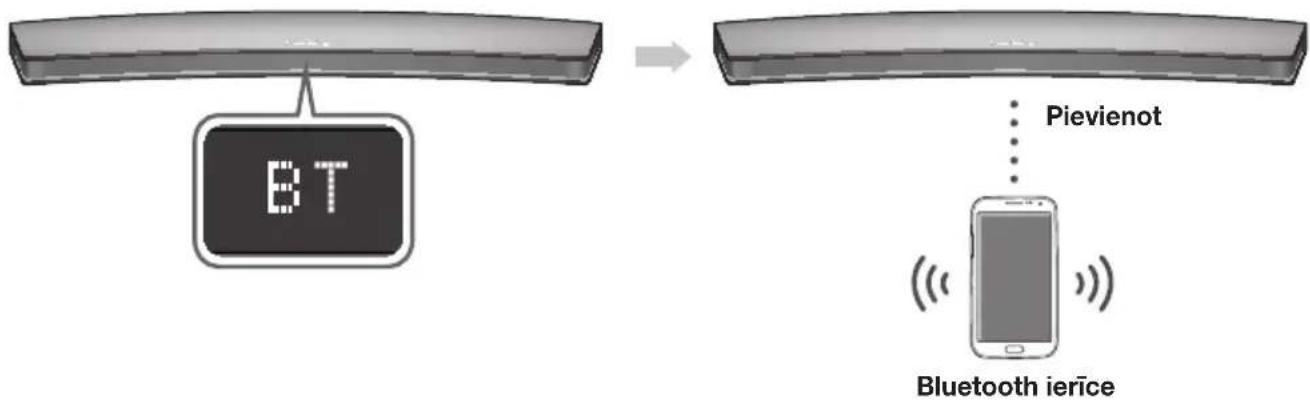
BLUETOOTH
You can connect a Bluetooth device to the Soundbar and enjoy music with stereo sound, all without wires!
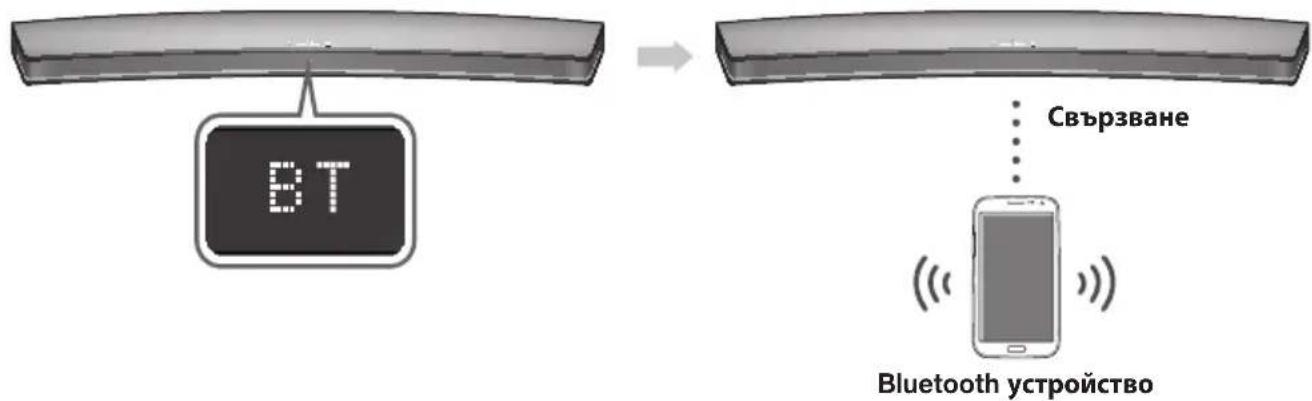
TO CONNECT THE SOUNDBAR TO A BLUETOOTH DEVICE
Check if the Bluetooth device supports the Bluetooth compliant stereo headset function.
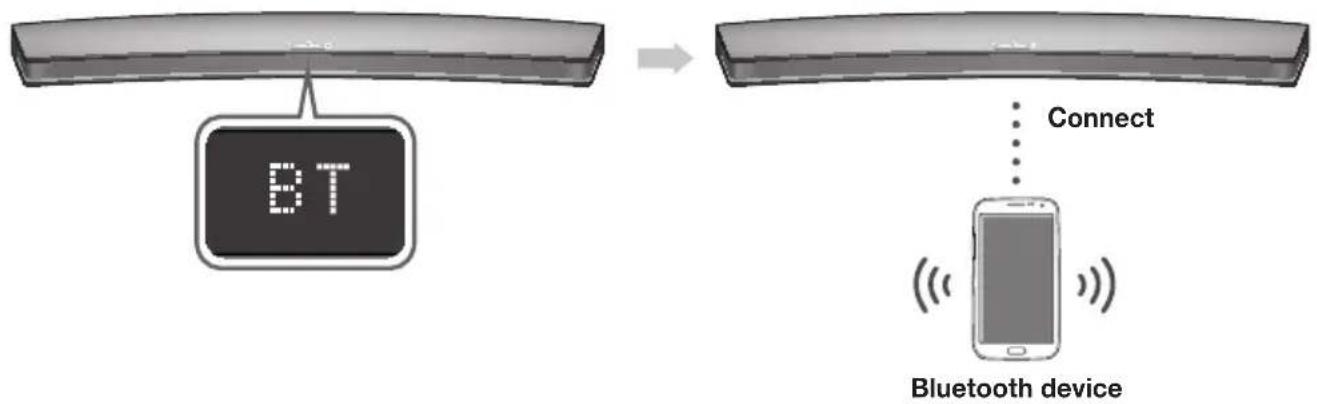
- Press the button on the main unit's top panel or the mode.
SOURCE button on the remote control to select the BT
-
You will see BT READY on the front display of the Soundbar.
-
Select the Bluetooth menu on the Bluetooth device you want to connect. (Refer to the Bluetooth device's user manual.)
-
Select "[Samsung] HW-Jxxxx" from the list.
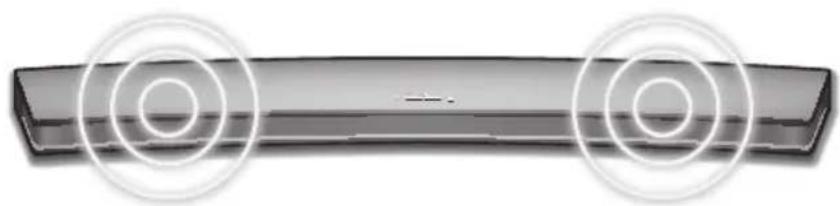
-
When the Soundbar is connected to the Bluetooth device, it will display [Bluetooth device name] BT on the front display.
- The device name can only be displayed in English. An underline " _ " will be displayed if the name is not in English.
-
If the Bluetooth device has failed to pair with the Soundbar, delete the previous "[Samsung] HW-Jxxxx" found by the Bluetooth device and have it search for the Soundbar again.
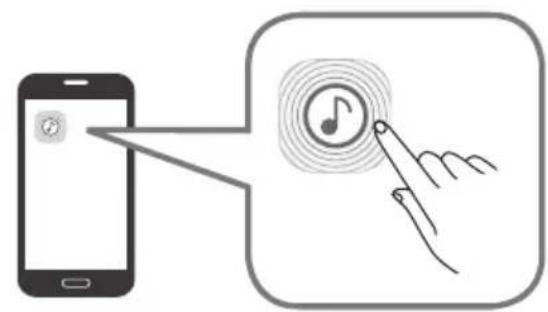
-
Play music on the connected device.
You can listen to the music playing on the connected Bluetooth device over the Soundbar.
- In BT mode, the Play / Pause / Next / Prev functions are not available. However, these functions are available on Bluetooth devices supporting AVRCP.

- If asked for a PIN code when connecting a Bluetooth device, enter <0000> .
- Only one Bluetooth device can be paired at a time.
- The Bluetooth connection will be terminated when you turn the Soundbar off.
- The Soundbar may not perform Bluetooth search or connection correctly under the following circumstances:
-If there is a strong electrical field around the Soundbar.
- If several Bluetooth devices are simultaneously paired with the Soundbar.
-
If the Bluetooth device is turned off, not in place, or malfunctions.
-
Note that such devices as microwave ovens, wireless LAN adaptors, fluorescent lights, and gas stoves use the same frequency range as the Bluetooth device, which can cause electric interference.
The Soundbar supports SBC data (44.1kHz, 48kHz).
- Connect only to a Bluetooth device that supports the A2DP (AV) function.
- You cannot connect the Soundbar to a Bluetooth device that supports only the HF (Hands Free) function.
- Once you have paired the Soundbar to a Bluetooth device, selecting "[Samsung] HW-Jxxxx" from the device's scanned devices list will automatically change the Soundbar to BT mode.
-
Available only if the Soundbar is listed among the Bluetooth device's paired devices. (The Bluetooth device and the Soundbar must have been previously paired at least once.)
-
Soundbar will appear in the Bluetooth device's searched devices list only when the Soundbar is displaying BT READY.
- In the TV SoundConnect mode, the Soundbar cannot be paired to another Bluetooth device.
TO DISCONNECT THE BLUETOOTH DEVICE FROM A SOUNDBAR
You can disconnect a Bluetooth device from the Soundbar. For instructions, see the Bluetooth device's user manual.
The Soundbar will be disconnected.
- When the Soundbar is disconnected from the Bluetooth device, the Soundbar will display BT DISCONNECTED on the front display.
TO DISCONNECT THE SOUNDBAR FROM A BLUETOOTH DEVICE
Press the SOURCE button on the remote control or the button on the product's top panel to switch from BT to another mode or turn off the Soundbar.
- The connected Bluetooth device will wait a certain amount of time for a response from the Soundbar before terminating the connection. (Disconnection time may differ, depending on the Bluetooth device)

- In Bluetooth connection mode, the Bluetooth connection will be lost if the distance between the Soundbar and the Bluetooth device exceeds 10 meters.
- The Soundbar automatically turns off after 15 minutes in the Ready state.
More About Bluetooth
Bluetooth is a technology that enables Bluetooth-compliant devices to interconnect easily with each other using a short wireless connection.
-
A Bluetooth device may cause noise or malfunction, depending on usage, if:
-
A part of your body is in contact with the receiving/transmitting system of the Bluetooth device or the Soundbar.
It is subject to electrical variation from obstructions caused by a wall, corner, or office partition. -
It is exposed to electrical interference from same frequency-band devices including medical equipment, microwave ovens, and wireless LANs.
-
Pair the Soundbar with the Bluetooth device while they are close together.
- The further the distance between the Soundbar and Bluetooth device, the worse the quality is. If the distance exceeds the Bluetooth operational range, the connection is lost.
- In poor reception areas, the Bluetooth connection may not work properly.
- The Bluetooth connection only works when it is close to the unit. The connection will be automatically cut off if the Bluetooth device is out of range. Even within range, the sound quality may be degraded by obstacles such as walls or doors.
- This wireless device may cause electric interference during its operation.
USING THE MULTIROOM APP
The Samsung Multiroom app lets you connect the Soundbar to a smart device, your network, and the Internet. Once the Soundbar is connected to a smart device that has the Multiroom App installed, you can also connect the Soundbar and multiple Samsung Multiroom devices together wirelessly and play audio through them.
BEFORE YOU BEGIN

Communication Basics
Requirements:
- A Wireless Router and a Smart Device.
- The wireless router must be connected to the Internet.
- The smart device must be connected to the router via a Wi-Fi connection.
INSTALLING THE SAMSUNG MULTIROOM APP
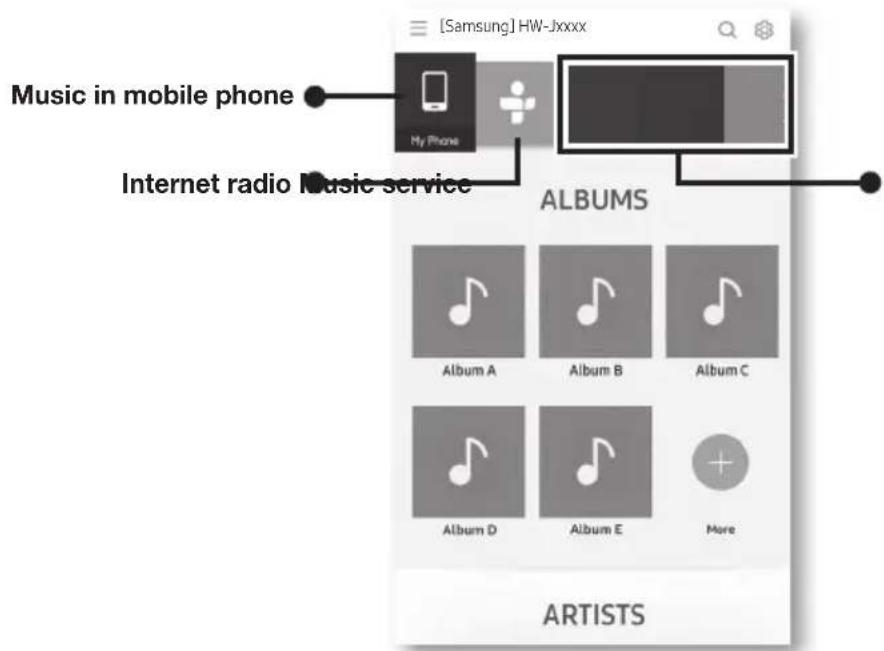
To use the Soundbar with the Samsung Multiroom App, you must download and then install the Samsung Multiroom App on your smart device. You can download the app from Google Play or the App Store. With the Samsung Multiroom App installed, you can play music on your Soundbar that is stored on your smart device, located on other connected devices, provided by other content providers, or streamed from Internet radio stations.
Android or iOS
Download the Samsung Multiroom app from Google Play or the App Store of your smart device.
- Market search : Samsung Multiroom


or
Launching the Samsung Multiroom App
To launch the Samsung Multiroom app, tap the Multiroom app icon on your smart device.
CONNECTING THE SOUNDBAR TO YOUR NETWORK
On your smart device, select the Samsung Multiroom app. Follow the directions on your smart device's screen. You can use the following music sources with the Samsung Multiroom app.
- Music files stored in your mobile phone, various music sources, and Internet radio.

-
Use Cat 7 (*STP Type) cable for the connection.
-
Shielded Twist Pair
USING THE NETWORK STANDBY ON FUNCTION
The Network Standby On function becomes available if a wireless connection has been properly established between a smart device and the Soundbar. This function turns on the Soundbar automatically when a smart device attempts to connect to the Soundbar via Bluetooth or Wi-Fi. If you turn the Soundbar on via a Bluetooth connection, its input mode is set to BT automatically. To turn the Soundbar on via Wi-Fi, you must have the Samsung Multiroom App installed on your smart device.
- Connect the smart device to your Soundbar.
- Turn the Network Standby On function on by pressing the button on the Soundbar remote for more than 5 seconds. You can turn the function off by pressing the button again for more than 5 seconds.

Network Standby On is available only if the Soundbar is listed among the smart device's paired devices. (The Smart device and the Soundbar must have been previously paired at least once.)
- Soundbar will appear in the smart device's searched devices list only when the Soundbar is displaying [BT READY] or [WiFi READY].
- In the TV SoundConnect mode, the Soundbar cannot be paired to another smart device.
-
If the Network Standby On function did not work:
-
The Network Standby On is set to Off. Set it to ON.
-
The Wi-Fi connection to the Soundbar will be terminated if the Soundbar's power cord is disconnected or the power is cut off. If the power is cut off, turn on the Soundbar and reconnect it.
SOFTWARE UPDATE
UPDATING WITH USB
Samsung may offer updates for the Soundbar's system firmware in the future.
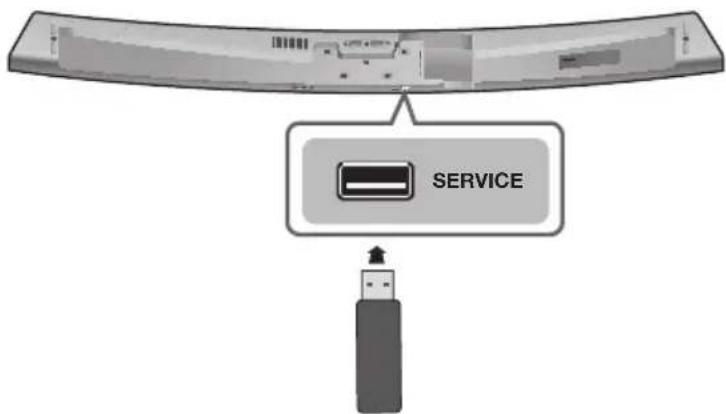
If an update is offered, you can update the firmware by connecting a USB device with the firmware update stored on it to the USB port on your Soundbar.
Note that if there are multiple update files, you must load them onto the USB device singly and use them to update the firmware one file at a time.
Please visit samsung.com or contact the Samsung call centre to receive more information about downloading update files.
Updating Procedure
- Follow the steps below to download the product software:
Go to the Samsung website at (samsung.com/sec) search for the model name - select the customer support option (the option name is subject to change) - Save the downloaded software to a USB stick and select "Extract to the folder name" to unzip the folder.
- Turn off the Soundbar and connect the USB stick containing the software update to the USB port.
- Disconnect the power cord, reconnect it, and then turn on the Soundbar.
- Turn on the Soundbar. Within 3 minutes, UPDATE is displayed and updating begins.
- After the update is complete, the Soundbar turns off and on again.
If UPDATE was not displayed
- Turn off the Soundbar, connect the USB storage device that contains update files to the Soundbar's USB port.
- Disconnect the power cord, reconnect it, and then turn on the Soundbar.

- Insert a USB device containing the firmware update into the USB port on the main unit.
- Updating firmware may not work properly if audio files supported by the Soundbar are stored in the USB storage device.
- Do not disconnect the power or remove the USB device while updates are being applied. The main unit will turn off automatically after completing the firmware update.
- After update is completed, the user setup in Soundbar is initialised. We recommend you write down your settings so that you can easily reset them after the update. Note that updating firmware resets the subwoofer connection too.
If the connection to the subwoofer is not re-established automatically after the update, refer to page 17. If the software update fails, check that the USB stick is not defective.
Mac OS users should use MS-DOS (FAT) as the USB format.
- Depending on the manufacturer, some USB devices may not be supported.
AUTO UPDATE
If the Soundbar is connected to the Internet, it will automatically check for the latest firmware and update when new firmware becomes available, even if it is turned off.

-
The Soundbar is configured to run Auto Update by default.
-
To use the Auto Update function, the Soundbar must be connected to the Internet.
- The Wi-Fi connection to the Soundbar will be terminated if its power cord is disconnected or the power is cut off. If the power is cut off, turn on the Soundbar and reconnect it.
TROUBLESHOOTING
Before requesting service, please check the following.
The unit will not turn on.
- Is the power cord plugged into the outlet?
Connect the power plug to the outlet.
A function does not work when the button is pressed.
Is there static electricity in the air?
Disconnect the power plug and connect it again.
Sound is not produced.
Is the Mute function on?
Press the (Mute) button to cancel the Mute function.
Is the volume set to minimum?
Adjust the volume.
The remote control does not work.
Are the batteries drained?
Replace with new batteries.
Is the distance between the remote control and main unit too far?
Move closer to the unit.
The TV SoundConnect (TV pairing) failed.
- Does your TV support TV SoundConnect?
TV SoundConnect is supported by some Samsung TVs released from 2012 on. Check your TV to see if it supports TV SoundConnect.
Is your TV firmware the latest version?
Update your TV with the latest firmware.
- Does an error occur when connecting?
Contact the Samsung Call Centre.
Reset TV SoundConnect and connect again. To reset the TV SoundConnect connection, press and hold the button for 5 seconds.
The red LED on the subwoofer blinks and the subwoofer is not producing sound.
- Your subwoofer may not be connected to the main unit of the product.
Try to connect your subwoofer again. (See Page 17)
The subwoofer drones and vibrates noticeably.
Try to adjust the vibration of your subwoofer.
Press the WOOFER button on your remote control to adjust the subwoofer's volume level (between -12, -6 ~ +6).
SPECIFICATIONS
| GENERAL | Weight | Main Unit | 4.0 kg |
| Subwoofer (PS-WJ7500R / PS-WJ7501R) | 6.8 kg | ||
| Dimensions (W x H x D) | Main Unit | 1230.0 x 47.5 x 170.0 mm | |
| Subwoofer (PS-WJ7500R / PS-WJ7501R) | 452.0 x 335.0 x 154.0 mm | ||
| Operating Temperature Range | +5°C to +35°C | ||
| Operating Humidity Range | 10 % to 75 % | ||
| AMPLIFIER | Rated Output Power | Main Unit | 20W x 8, 8 ohm, THD≤10% |
| Subwoofer (PS-WJ7500R / PS-WJ7501R) | 160W, 3 ohm, THD≤10% | ||
- Design, specifications and App screen are subject to change without prior notice.
-
Nominal specification
Samsung Electronics Co., Ltd reserves the right to change the specifications without notice.
-Weight and dimensions are approximate.
For more information about the power supply and power consumption, refer to the label attached to the product. -
Precaution : The product will restart automatically if you turn on/off Wi-Fi/Ethernet.
| Overall Standby Power Consumption (W) (All the network ports are “ON” condition) | 2.7W | |
| Wi-Fi/Ethernet Port deactivation method | Press Wi-Fi SETUP button on the product for 30 seconds to turn Wi-Fi/Ethernet On / Off. | |
| Bluetooth Port deactivation method | Press SPK ADD button on the product for 30 seconds to turn Bluetooth On / Off. | |
※ Open Source Licence Notice
- For further information on Open Sources used in this product, please visit the website: http://opensource.samsung.com

LSEPAH
- The Spotify Software is subject to third party licences found here: www.spotify.com/connect/third-party-licenses.
- For more information about Spotify Connect, please visit www.spotify.com/connect
LICENCES

DOLBY AUDIO
Manufactured under licence from Dolby Laboratories. Dolby, Dolby Audio and the double-D symbol are trademarks of Dolby Laboratories.


2.0 Channel
For DTS patents, see http://patents.dts.com. Manufactured under licence from DTS Licensing Limited. DTS, the Symbol, & DTS and the Symbol together are registered trademarks, and DTS 2.0 Channel is a trademark of DTS, Inc. © DTS, Inc. All Rights Reserved.
HDMI
The terms HDMI and HDMI High-Definition Multimedia Interface, and the HDMI Logo are trademarks or registered trademarks of HDMI Licensing LLC in the United States and other countries.
Wireless Models (including the frequency of 5.15GHz-5.35GHz)
Hereby, Samsung Electronics, declares that this equipment is in compliance with the essential requirements and other relevant provisions of Directive 1999/5/EC.
The original Declaration of Conformity may be found at http://www.samsung.com, go to Support > Search Product Support and enter the model name.
This equipment may be operated in all EU countries.
This equipment may only be used indoors.

Wireless Models (excluding the frequency of 5.15GHz-5.35GHz)
Hereby, Samsung Electronics, declares that this equipment is in compliance with the essential requirements and other relevant provisions of Directive 1999/5/EC.
The original Declaration of Conformity may be found at http://www.samsung.com, go to Support > Search Product Support and enter the model name.
This equipment may be operated in all EU countries.

Contact SAMSUNG WORLD WIDE
If you have any questions or comments relating to Samsung products, please contact the SAMSUNG customer care Centre.
| Country Contact Centre | Web Site | |
| ■Europe | ||
| UK 0330 SAMSUNG (7267864) www.samsung.com/uk/support | ||
| EIRE 0818 717100 www.samsung.com/ie/support | ||
| GERMANY | 0180 6 SAMSUNG bzw.0180 6 7267864* (*0,20 €/Anruf aus dem dt. Festnetz, aus dem Mobilfunk max. 0,60 €/Anruf) | www.samsung.com/de/support |
| FRANCE 01 48 63 00 00 www.samsung.com/fr/support | ||
| ITALA 800-SAMSUNG (800.7267864) www.samsung.com/it/support | ||
| SPAIN 3490217 2678 www.samsung.com/es/support | ||
| PORTUGAL 808 20 7267 www.samsung.com/pt/support | ||
| LUXEMBURG 261 03 710 | www.samsung.com/be_fr/support | |
| NETHERLANDS | 0900-SAMSUNG (0900-7267864) (€ 0,10/Min) | www.samsung.com/nl/support |
| BELGIUM | 02-201-24-18 | www.samsung.com/be/support(Dutch)www.samsung.com/be_fr/support(French) |
| NORWAY | 815 56480 | www.samsung.com/no/support |
| DENMARK | 70 70 19 70 | www.samsung.com/dk/support |
| FINLAND | 030-6227 515 www.samsung.com/fi/support | |
| SWEDEN | 0771 726 7864 (0771-SAMSUNG) | www.samsung.com/se/support |
| POLAND | 801-172-678' lub +48 22 607-93-33 * (koszt polaczenia wedlug taryfy operatora) | www.samsung.com/pl/support |
| HUNGARY | 0680SAMSUNG (0680-726-786)0680PREMIUM (0680-773-648) | www.samsung.com/hu/support |

[Correct disposal of batteries in this product]
(Applicable in countries with separate collection systems)
This marking on the battery, manual or packaging indicates that the batteries in this product should not be disposed of with other household waste at the end of their working life. Where marked, the chemical symbols Hg, Cd or Pb indicate that the battery contains mercury, cadmium or lead above the reference levels in EC Directive 2006/66. If batteries are not properly disposed of, these substances can cause harm to human health or the environment.
To protect natural resources and to promote material reuse, please separate batteries from other types of waste and recycle them through your local, free battery return system.
| Country | Contact Centre | Web Site |
| AUSTRIA | 0800-SAMSUNG (0800-7267864) [Only for Premium HA] 0800-366661 [Only for Dealers] 0810-112233 | www.samsung.com/at/support |
| SWITZERLAND | 0800 726 78 64 (0800-SAMSUNG) | www.samsung.com/ch/support (German) www.samsung.com/ch_fr/ support (French) |
| CZECH | 800 - SAMSUNG (800-726786) | www.samsung.com/cz/support |
| SLOVAKIA | 0800 - SAMSUNG (0800-726 786) | www.samsung.com/sk/support |
| CROATIA | 072 726 786 www.samsung.com/hr/support | |
| BOSNIA | 055 233 999 www.samsung.com/support | |
| MONTENEGRO | 020 405 888 www.samsung.com/support | |
| SLOVENIA | 080 697 267 (brezplačna števiška) www.samsung.com/si | |
| SERBIA | 011 321 6899 www.samsung.com/rs/support | |
| BULGARIA | *3000 Βeña a m Péxqara 0800 111 31, bēzniatna teneφонна пимmar | www.samsung.com/bg/support |
| ROMANIA | *8000 (apel in retea) 08008-726-78-64 (08008-SAMSUNG) Apel GRATUIT | www.samsung.com/ro/support |
| CYPRUS 8009 | 000 only from landline, toll free | |
| GREECE | 80111-SAMSUNG (80111 726 7864) only from land line (+30) 210 6897691 from mobile and land line | www.samsung.com/gr/support |
| LITHUANIA | 8-800-7777 | www.samsung.com/lt/support |
| LATvia | 8000-7267 | www.samsung.com/lv/support |
| ESTONIA | 800-7267 | www.samsung.com/ee/support |
Correct Disposal of This Product
(Waste Electrical & Electronic Equipment)
(Applicable in countries with separate collection systems)
This marking on the product, accessories or literature indicates that the product and its electronic accessories (e.g. charger, headset, USB cable) should not be disposed of with other household waste at the end of their working life. To prevent possible harm to the environment or human health from uncontrolled waste disposal, please separate these items from other types of waste and recycle them responsibly to promote the sustainable reuse of material resources.
Household users should contact either the retailer where they purchased this product, or their local government office, for details of where and how they can take these items for environmentally safe recycling.
Business users should contact their supplier and check the terms and conditions of the purchase contract. This product and its electronic accessories should not be mixed with other commercial wastes for disposal.
PbkoBODCTBO 3a noTpe6nteIa
IpeicTaBeTe cn Bb3MOXHOCTnTe
BlaarOaapm Bn, ye 3akynxTe npodukT ha Samsung.
3a da nonyuHTe no-nbIHo 6cbnyKBaHe, MoJIa, pernctpupaTe npOdykTa cn Ha aDpec
www.samsung.com/register
INHOPMAU3A B3OJACHOCT
MEPKI 3A BE3OПАСHOCT
3AДA HAMAJITE PNUCKA OT TOKOB yIAP, HE CBAJIYTE KAIKA (NII IN 3ADHNAK). BbTPE HRA M AACTN, IPEJHA3HAUEN 3A OBCJYXBAHE OT IOTPEBNTIEL. 3A CEPBN3HO OBCJYXBAHE CE OBPbAHTE KbM KBALINΦUINPAH CEPBN3EH NEPCOHJI.
| BHIMAHINE PNUCK OT TOKOB YIDAP DA HE CE OTBAPRA | To3N CINMBOL NOKA3BA, Que BvB BvTpeShocTTa Ha Пробектама Високи наразожения.Опасно e Да се прави кakbВTO и дa вило Контакс СВьТршнисту часту на To3N ProdukT. | ||
| To3N CINMBOL NOKA3BA, Que c To3N ProdukT e ВКлочера Вaxkhata ДOKументация, Опсваши разотау и подирьжката на produkta. |
| Пробукт от клac II: Този симboл пoka3ba,谁能 e He neobходima Врьзka 3a 6e3opacnoct Кьм Земта (заземаяне). | |
| ~ | AC наразжения: Този символ пoka3ba,谁能 HOMINAHLHOTO наразжения, Маркурано C_TOЗИ симвOL, e AC наразжения. |
| --- | DC наразжения: Този симвOL пoka3ba,谁能 HOMINAHLHOTO наразжения, Маркурано C_TOЗИ симвOL, e DC наразжabella. |
| i | Визманке, наразовете справka в Иструкципто за изпалзвано: Този симвOL Иструктура notpe6nteяда наразави справka в ръковodztbOTO на notpe6nteя за дожинейна информацияа за 6e3opacnoctта. |
IPEyPExEHE:3a Da HamaJIte pscKa OT NOxap IIN eJekTpueckn WOK, He n3laTe anapaTypaTa Ha DbXd IIN BnaIa.
BHIMAHNE:3A DA IN36ETETOKOB YIAP,IOCTABETE IENCEJA B IOXODJIKOHAKT,KATO TO BKIOUHTE JOKPAI.
Anapatpata Tpr6Ba BnHarn Da 6bde CBbp3aHa KbM npomeHJINBOTOKOB n3TOUHNK Ha 3axpaHbaHe Cbc 3aunTHa 3a3emTeHa Bpb3ka.
- 3a da n3KlouHte np6opa oT 3axpaHbAHeTo, n3dbpnaTe uencena oT KOHTaTa. Iopadn Ta3n npuHa, KOHTaKtBt Tpr6Ba da 6bde ydo6eH.
BHIMMAHNE
AnapaTbT He 6bBa da 6bIe n3naH Ha Kaene He nn npckn. He noctabTe npedMeTu, nbHn C TeuHocTu, Hapr. Ba3N, Bbpx ypeda.
- 3a da n3KIOUHTe HAnbHNO ypeDa, Tp86Ba da n3BaInte Icencena Ha 3axpaHbAunna Ka6en OT KOHTa. CneIOBAtENHO ⅢeNcEBT Ha 3axpaHbAunna Ka6en Tp86Ba da 6bJe IecHO DoCTbIeH NO BCaKO BpeMe.
ПЕДПАЗНМЕРКИ
Iorpnkete Ce npomehnIBOT OEKTPo3axpaHbAe BvB Baunr DOM Da CbOTBeTCTBa Ha IeHTNfKaUHOHHra CTnkep, KOTo e NoctabEn Ha Tbp6a Ha Baunr npOdyKT. HcTaInpaIte CBOr npOdyKT xOpN3OHTaIHO, BbpXy NDOxOJa OCHOBa (Me6en), CdoCTaTbHOr MAcTO OKOno Hero 3a BeHTnuaJr 7~10 cm. BHImaBaIte Da He 6bDat NOKPITN BEHTnauIOHHnte OTbOpn. He NoctabRy Te yCtpoiCTBOr BbpXy ycINBaTeIN INI pyrO o6OpYBaHe, KoETo MoKe Ja ce Haropeu. YcTPOiCTBOr e npEHa3NaHeHO 3a HenpeKbcHata YnOTpe6a. 3a Da n3KnIOuHrte HAnbHNOyCTPOICTBOTo, INBaTe aadTepa 3a npOMEHNIB TOK OT CTeHHnRA KOHTAKr. INBaTe uencena Ha yCtpoiCTBOTO OT KOHTAKr, aKO Bb3HaMEpRaBe Ta He rO IN3NoI3BaTe Dblr nepnoD OT Bpeme.

IIO BpeMe Ha rpbMOTeBnHn 6bpy n3BaXdaIte Ie enCeHa eNeKtpo3axpaHbHeTo OT KOHTaT. NIKOBe Ha HAnpExKeHne, DblKaun Ce Ha MblHn, MoTaT da NOBpeJrYpeJa.
Ia3e Te yepa ot Bnara (Hanp. Ba3n) n npekomepa TOnnHa (Hanp. Kamna), nn o6opydahe, Koeto Cb3daBa CnHH MarHTn nn eneKtpnueckn noJeTa. N3baTe uenceena ot KOtKaT ha eNeKtpo3axpaHbAHeTo. PnpdykTbT He e npdHa3Haueh 3a npomuShneHa ynotpe6a. N3non3BaTe To3n npOyKT cMo 3a nnH0 NoJ3BaHe. Ako npOyktBn nn DnCKbT ca 6nn CbxpaHraHn Ha CTyeHo, Bb3MOxHO e da ce o6pa3yBa KOHeH3. Ako TpaHCnOpTpate Yepa npe3 3mata, n3yaKaTe npin6n3ntEnHO 2 yaca DoKATO ypeBbT DoCTnrHc TcainHa TemnepaTypa, npdi Da rO n3no3BaTe.
He n3naTe ypeHa Ha npKa CbHueBa CBETnHa HnnpyIn n3TOuHnHa ToTnHa. TOba MoKe Da DoBoe DeOpnerpaBaHe n HeN3npabHOCT Ha ypeHa.
BaTePnIte, KOITo Ce n3NOJ3BaT B TO3N npOdyKT, CbIbpxkAT XIMMkaJI, KOITo Ca BpeHn 3a OKOIHaTa CpeJa. He n3XbBpJnTe 6aTePnIte C o6uInTe DOMAKINHcN OtnaDbU. He n3XbBpJnTe 6aTePnIte B orh. He cb3daBaIte KbCo HAnpeXeHne, He pa3rno6raBaIte N He npErpRaIte 6aTePnIte. Ako 6aTePnIte He ce cMeHr TpaBnH0, IMa OnaCHOCT OT eKcnIO3n. CmHnTe cAmo Cbc CbUra TnI nn EKBnBaJIeHTHi.

IPEyIPEXJEHHe, HE IOTbIaIe BATEPnRA, IMA ONACHOCT OT XIMNueCKO n3fAPRHE [InctanuOHTo yCtpoiCTBO, npedocabeHo c] To3n npoKyT cbbpka 6byOnHa/TnKONe 6atepna. Ako 6byHHata/TnKoIe 6atepna ce noBnHe, MoKe da npuHn CepNo3n BbTpEHN n3rapHn cAmo 3a 2 uaca n da IOBepe Do Cmbpt. DpbTe HOBnte n3NONBaHnTE 6atepnn daney ot deua. Ako OTdeneHneTo 3a 6atepnn He ce 3aTbOpn HapbHIO, CpPeTe n3NONBaHTo Ha npoKyTa n r dpxTe daJeu ot deua. Ako
MNCNTe, Ye e Bb3MOXHO 6aTePnnte da ca 6nn NOrbHaTn nn NoCTaBeHn B HraKaBb qact OT TAnOTo, BeHaRa NotbpcTe Iekapcka nOMo.
CbДbPЖAHNE
2 HauJIo
2 HΦopMaζηa 3a 6e3onacnoct
5 KaKBo e BkIoueHo
6 OINCAHNA
6 Topen/IIpeDen PAnen
7 3aHNo/ДолHo Ta6no
8ДиctaHUnOHyynpaBneHne
10 MOHTIUPAHE
10 MoHTuPaHe Ha Soundbar
10 INHCTaJImpaHe Ha CTeHaTa KOH3OJa
14 NoctabrHe Ha Soundbar Bbpxy cToiKa 3a TeIeBn3Op
16 MoHTnpaHe Ha Soundbar KaTo caMoCToTeHNO yCTpoIcTBO.
16 CrIIO6BaHe Ha Ka6eHnHa ta cKo6a
17 CBbP3BAHn
17 Cbbp3BaHe Ha cb6yepa
19 Cbbp3BaHe KbM TeIeBn3Op
19 TV SoundConnect
20 Cbbp3BaHe c TeIeBn3opa upe3 HDMI (unpob) Ka6en
20 Cbbp3BaHe KbM TeIeBn3Op Upe3 uHpOB ONTInueH Ka6eJ
21 Cbbp3BaHe KbM BbHsHH yCtpoiCTBa
21HDMI Ka6en
22 OnTnueH nnn aHaIorOB aydno ka6eN
23ФУHKUIM
23 BxoJen peKmM
24 Bluetooth
26 I3noJ3BaHe Ha npJIOXeHMeTo Multiroom
28 I3noI3BaHe Ha yHKuYra Network Standby On
29 Aktyaun3npaHe Ha coΦTyepa
31 OTCTPAHRAHE HA HEN3IIPABHOCTN
31 OToCTpaHbAHe Ha HEm3npaBHOctn
32 PUNIOXJEHNE
32 Cneunphikaua
- Κινφρητε ένησικτραύπιθε ΒΤΟΑ pьκοΒΟДCTBO 3a ποτρεδυτέλησα εἰπρεδόσιαβενης σαμο 3a συρανκα Α ΜΟγατ ἀς εραλίηναβατό το ἀεηχθυτηλήνι ΙπΓηει ἀς ένησινεύπετο.
- Je da ce Nauchcn TaKca 3a aDMHNcTpnpaHe, aKO:
(a) e n3BnKaH TexnK NO BaWe HaCToBaHe HHaMa DeΦeKT B npOdykTa (T.e. He cTe npOeyn pBkoBOcTBOTo 3a Notpe6nte)
(b) 3aHecTe UpeDa B cepBn3e HcHTbp N HMa DeΦeKT B npOdyKta (T.e. He cTe npOeuN pBkoBOCTBOTO 3a NOTpe6nten).
Cymata 3a Ta3n TaKca 3a aDMNHCTpnpaHe ue Bn 6bnde cbo6eHa, npedn da ce n3Bbpwn KaKBATO n da e 6nlo pa60ta nnnoceueHne BKbui.
KAKBO E BKJIIOUYEHO
ПЕДИ ДА ПОЧETЕ РБКOBODCTBOTO 3A NOTPEБNTЕЛЯ
Imaite npdeBnD cIeHNHe yCIOBn IpeN da npOeTeToBa pbKOBOCTBO 3a nOtp6uTeJIa.
■KoHn, KOnTo 6bDat n3PON3BaHn B pBkoBOdCTBOTO
| Икona YсlobиЕ OnpeДелене | |
| ! | Вниманne Показвситуаць, ри КОТо Дадена Функця He pa6OTи пи НастрочКITE могатда 6ьдАТ OTMeHEn. |
| Збенихka Тoba ВКлючВа СьБETи пи ИНСтруКци На CTpaHицаТа, КОТо ПOMага На BCЯКця на pa6OTи. | |
PpOBepeTe 3a npInloKeHnTe akceCoapn, Iokaahn No-dony.

Дистанцунно упраьленье /ЛNTNeBa 6aTePnA (3V:CR2032)
3axpaHbau Ka6e:2EAAC/DCaanTep
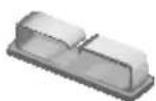
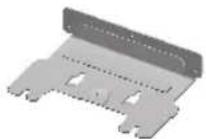

Ka6eHa cKo6a Cko6a 3a MOHTnpaHe Ha cTeHa DbpxaBnHT 1:4 EA


HaTnCHHe 6yToHa WOOFER.CneTOBa n3NON3BaTe 6yToHnTe I<,I 3a Da
perynipate cnilata Ha 3Byka Ha cb6yfepa B dnaana3oHa -12, -6\~ +6.
MoxTe CbIa da aKTHBnPaTe FyHKUra TSPK ADD Ha Soundbar, KaTo
HaTnCHTeI 3aIbpxKIne 6yToHa WOOFER Ha NCTaHIOHOHOTo ynpaBHeHne 3a
Ha5 ceKyHnI.
3aBbptTe Kaayeto Ha 6aTePNTe Ha
ДиСТанцИОНTOупразБЛЕNHIE
Ako CnHnAT CBeToDnOg He cnpe da Mna, KOraTO OCHOBHOTo yCTpoiCTBO n cy6yepa ca BKnIOueHN, MoJ, 3aJaTe Nkato CneDbATE CTbIKITE NO-dony.

Baxho: Ppei Da 3aOnuHete, noCTabete 6atepyTa B dntaHcnoHHoTo ynpabneHne. Bxke cTpaHua 9 3a INCHpyKUIN.
- BkIIOHte 3axpaHbuaa Ka6en Ha OCHOBHOTo yCTPOiCTBO Ha cb6yepa BA AC KOHTaKT.
-
Hatnche 6ytoHa ID SET OT3aHa Ha c6b6yepa C mAbk OcTbp npedMeT 3a 5 cekyHnI.
-
INHINKAtoPbT STANDBY ce n3KJIIOUba u INHINKAtoPbT LINK (CINHINrCBeToIDNO) 6bp3O Mira.
3.Дokato Галвно устюе e ИЗкlioquero (В ржим Ha STANDBY),натишип e 3aДрьхт (3aflnyшаваhe)Ha nCTaHцИоHTo ynpabNeHne 3a 5 cekyHn.
4. Cbo6eHneTo ID SET 1e ce noBn Ha nncnner Ha Soundbar.
5. 3a da fHannn3npaTe Bpb3KaT, BKNIOHTe 3axpaHbHeTO Ha TJIABHOTO yCTPOINCTBO, DOKATO MInra CnHnT CBETODNOHa Cb6yepa.
Cera ochoBHOTo yCTpoIcTBO n Cb6yeoepbT ca Cbbp3aHn (yctaHOBeHa e Bpb3ka).
- INДиКаTOpbT LInK (CINHЯr CBToDnOJ) Ha cy6yΦepa Tp86Ba Da CBETn HENpeKbCHaTO n Da He Mira.
Ako INdkaTopbT LINK He cBETn HnpeKbChato B CnHbO, npoecbT Ha cBbp3BaHe e HeycneweH. N3Klioute OCHOBHOTO yCTpOJCTBO n 3aNoUHete OTHOBO OT CtbNka 2.
- Moxe da ce paIaBate Ha no-do6bp 3Byk OT 6e3KnHnna Cb6yΦbp, KaTO n36epete 3BykoB ekeT. (Bx. ctp. 9)

- Ппдд д примсвate ИИннсалпау ectpoиctboto,Трбы HeпремeHHO DA IN3KJIIOHITe 3axpaHbaHTo NддИЗВАДИТЕ UIENCEla OT KOHTaTa.
- Ako ochobhoto yctpoiCTBO e n3knHoyeHO, 6e3KnHnT cy6yep ue 6bIe B pexm Ha n3aKaBaHe n CBeToNDobSTNADBY B npedHaT auct ue Mira dnpEeTHO b UcpBeo. (Hma cIn cBeToNDoI).
- Ako B 6n3ocT do Soundbar n3no3BaTe yctpoCTBO, KoETO n3no3Ba cbuaTa yeCTota (2,4 GHz) kaTo Soundbar, cmyueHra Ta MoKe da npuHrT npekbCbaHe 3a 3Byka.
Pa3CTOHNHe 3a npedabaHe Ha paINOBbHn e OKoNo 10 M, HO MOKe Ja Bapnpa B 3aBNCMOCT OT pa6OTHa TpeA. Ako MeJy OCHOBHn8 6IOK n 6e3KuHnI npEeMHnK IMa JKeJe3OeTOHHa IIn MeTaJIHa CTeHa, e Bb3MOXHO cnCTemata Da He yHKUOnHnpa, Tb' KaTo paINOBbHnTe He MoRat da npOHKnBt Ppe3 MeTaN. - Ako ochobhoto yctpoiCTBO He ocbsectBn 6e3xuHa Bpb3ka, cneBaTe CTbNk 1-5 Ha npednHaTa CtpaHua, 3a da ONiTate OTHOB Da OCbueCTBNTe Bpb3Ka Mekdy ochobhoto yctpoiCTBO n 6e3xuHna Cb6yΦbp.

- 6e3xuHaTa aHTeHa 3a npHeMahe e BrgpaedHa B 6e3xuHnna Cb6yep. Pa3e Te ype daJeu OT BOda n Bnara.
3a onTImaHNO kaueCTBO Ha 3Byka ce yBepTe, ye o6JIacTTa OKONO 6e3KnUHHra Cb6yΦbp He e 6IoKnpaHa OT npEpmTu.
CTATYC HA CBETOДЮДHATA ИДИКATOPHA JAMNA 3A CUBYΦEPA
| CBETODMOД Сатус Onисанne | Рeшени | |
| Черва Вк. | В рекIM на ratOBHOC (с ИЗКПЮчЕн оchenвен корпuc на Soundbar) | |
| HeycpeSHO CBp3BaHe | ||
| Синboro | Вк. | УсpeSHO CBp3BaHe (HopMaJIHa pa6ToA) |
| ПремИВa | В рекIM на ratOBHOC (с ИЗКПЮчЕн оchenвен корпuc на Soundbar) | |
| HeycpeSHO CBp3BaHe | ||
| Черва и синboro | ПремИВa Hey | ЗрavnoCTCBp3BaHe ce cbc sepbn3nЯцentbp. |
CbbP3BAHE KbM TEJIEBN3OP

- Baxho: Ппеди за започе, поста в досота улравлике. Вжто стравниça 9 за Инстукци.
TV SOUNDCONNECT
Mожete да се налajдавate Ha 3Byka Ha TeleBn3opaЧрз Soundbar, CBp3aHc TeteBn3op Samsung, кoTo noДьржа ФункцяТа TV SoundConnect.

- BkIIOUeTe TeJIeBn3Opa n Soundbar.
- Hatnche 6ytoHa ha rohpna nahe Ha oCHOBHOTo yctpoCTBO nIn 6yToHa SOURCE Ha ndctaHIOHHOTO ynpabJIeHne, 3a da n3bepete peKIma TV.
- Ha TeLeBn3opa Ce nOraBa cbo6ueHne, KoTo Bn IITa dAnI da ce aKTHBnpa fynKuTAt TV SoundConnect.
- 136epete < Da> , 3a da 3aBbPwnte Cbbp3BaHeTo Ha TeIeBn3Opa n Soundbar ype3 nictaHcnoHHOTo ynpabLeHne Ha TeIeBn3Opa.

- Ako npocebHa CBpb3BaHe Ha TV SoundConnect e HeycneWeH, npdBxKeTe ce do SoundConnect B MeHIOTo 3ByK Ha TeIeBn3Opa, n36epTe Do6aBHe Ha HOBO yCTPOIcTBO u 3aJaTe Do6aBHe Ha HOBO yCTPOIcTBO Ha BKl.. Cnej TOBa ONITaTe OTHOB.
- Пи певклioчbahe на рекIM Soundbar ot Teilebni3opa на дуг рекIM TV SoundConnect ce пекьса abTomatnHIO.
- 3a cBp3BaHe Ha Soundbarc npyTeneBn3Op,cbueCTbYBaAata Bpb3ka Tp8Ba da ce npeKbche.
3a da npekpatnte cbeceTByBaauata Bpb3ka,HaTncHeTe 3aipbXTe 5 cekyHn 6yToHa Ha dntaHIOHOto ynpabLeHne nnn npebKIOueTe Ha dpyr pexm. 3a da ce cbbpXeTe KbM dpyr TeneBn3Op, cneDbaiTe CtbKn 1-4 no-rope.

- ФункцятavSoundConnect(SoundShare)ce noДьрkaOTняКоTNeBn3OpnHaSamsung,nychaTnHa na3apa cIeD 2012r.IpOBepTe dAni TeneBn3OpbT Bn noДьрkaФункцятavSoundConnect (SoundShare),пpeNi Da 3aNoUHeTe. (3a NObeYe INΦopMaциВЖ. pБKOBOdCTBOTO Ha notpe6nteJHa TeleBn3Opa.)
- Ako BaishnT TeIeBn3Op Samsung TV e nycHa Na3apa npei 2014 r., HanpaBeTe cnpaBka B MeHIOTo 3a HactpoKn Ha SoundShare.
- Ako pa3CTOHNHeTo MExdy TeNEBn3Opa n Soundbar HAdBnIaBa 10 M, Bpb3KaT MoKe da He 6bJe cTa6nHa n 3ByKbT MoKe da npEkbCBA. B TaKbB cnUayai pa3MeCTe TeNEBn3Opa nIn Soundbar taKa, ye da ca B pa6OTHnA nepmTebp, u yctaHOBeTe OTHOBO Bpb3kata c TV SoundConnect.
Pa60TeH 0xbat Ha TV SoundConnect:
-ПpenOpbUHTeHdIaIa3OHHaCZBOrBaHe:Ha pa3CTOHHne 2M
-ПpenopbunTeHdnaHa3OH Ha n3nO3BaHe:Ha pa3CToHne do 10 M
- Bytonite Bb3np./Pay3a, Hanpei Ha3ad Ha Soundbar nH HeROBTo DnCTaHcNHO ynpabJeHne He KOHTpOJInap TeIeBn3opa.
CБьРЗBAHE C TEЛЕВИЗОРА Урз HDMI (ЦИФОН) KABELI
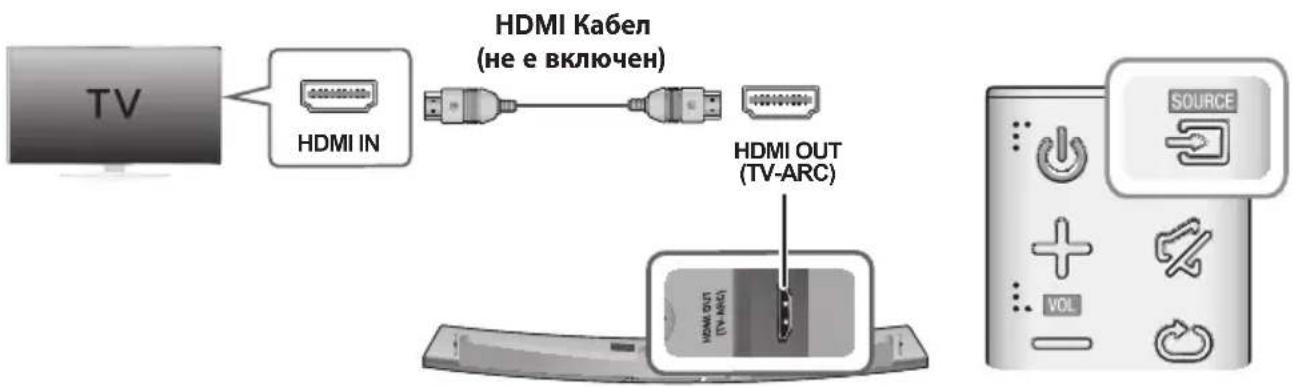
- CbpxkeHDMI ka6ena (He e BklnueH) ot n3BOda HDMI OUT (TV-ARC) Ha rbp6a Ha npoynKaBm n3BOda HDMINHa Baunr TeleBn3Op.
- Hatnche 6ytoHa Ha rohpnaHn Ha oCHOBHTo yCTpoNCTBO nn 6yToHa SOURCE Ha nctaHIOHHOT ynpabHe, 3a da n36epTe pexima D.IN.

HDMI e nHTepoeic, KOTo no3B0JbA npedabaHe Ha BnDo N ayDIO daHHc c eINH- eINHCTBeH KOHEKTOp.
- Ako TeleBn3OpbT nMa ARC nopT, CBpbXeTe HDMI KbM nopTa HDMI IN (ARC).
- IpenopbUba ce n3noJ3BaHeto Ha HDMI ka6eBcBpueBHa, aKo e Bb3MoXHO. Ako n3noJ3BaTe HDMI Ka6eCBcCbpueBHa, n3noJ3BaHTe TaKbC dJaMaTeBp no1 14 MM.
- DfHKUraTAnynet+ Tp6Ba da e BkIIOueHa.
Ta3nΦyHKpIa He eDocTbIHa,aKoHDMI ka6eJIbT He noIbpxaARC.
CBbP3BAHE KbM TEJIEBN3OP UPE3 UNΦPOB ONTNUVEH KABEJI
- CbpxkeTE OPTICAL IN (aynno) Ha Soundbar KbM rHe3doTo OPTICAL OUT Ha TeneBn3opa.
- Hatahe 6toHa ha rohna nHe Ha oCHOBHTo yctpoCTBO nn 6toHa S0URCE Ha dntaHIOHHOTynpabHe, 3a da n3bepTe pexkma D.IN.
Auto Power Link
Ako CbpxkTe rnaBnOTo yctpoIcTBO c TeleBn3Op ue3 uΦpO BOnTuH eKJIouTe fynKzIra Auto Power, 3a da MoKe Soundbar da ce BKIOUba ABTomuH O npn BKIOUbaHe Ha TeleBn3Opa.
| AUTO POWER LINK Дуспей | |
| ВКЛ. | OFF - ANYNET+ / ON - POWER LINK |
| ИЗКЛ. | ON - ANYNET+ / OFF - POWER LINK |
- Cbpxkete Soundbar n TeIeBn3opa c ontTuHcN Ka6en (He e BKnIOueH).
- Hatnche 6ytoHa Ha ropnnaHn Ha oCHOBHTo yctpoCTBO nn 6ytoHa SOURCE Ha nctaHIOHHOTO ynpabHe, 3a da n36peTe pexkma D.IN.
- Hatahe 6ytoHa Anynet+ Ha nctaHIOHHOT ynpabHe, 3a da BKIOUBAte u N3KIOUBAte fynkunra Auto Power Link.

B 3aBcMocT O T Cbbp3aHOTO yCTpOINCTBO Auto Power Link MoKe Da He pa60TN.
CbbP3BAHE KbM BbHsHn YCTPOICTBA
HDMI KABEJI
HDMI e uipob nItepeic cTnap3a Cbpb3BaHe Ha yctpoiCTBa KaTo TeBnOp, poeKTopn, DVD nnbpn, Blu-ray nIeBpn, set top box n npyrn.
TbI KaTo HDMI npedaba Hau-BnCOKOTO KaueCTBO uΦpOB CnHaN, MoXeTe Da ce paBATE Ha IpeBb3xOJHO BnJeO aydno - KaKTo e 6NIO nbPBOHaayalHO cb3daJeHO B uΦpOBnI3TOUHnik.
- CbpxeHDMI ka6ena (He e BknioueH) ot n3BOda HDMIN Ha rbp6a Ha yctpoiCTBOTO KbM n3BOda HDMI OUT ha BaWETo uΦpOBo yCTPOiCTBO.
- Hatnche 6ytoHa ha ropnnaHn Ha oCHOBHTo yCTpOInCTBO nnn 6yToHa SOURCE Ha nctaHIOHHOT ynpabHe, 3a da n3bepTe peKIma HDMI.
- Pekim D.IN/HDMI/BT/TV
-AKHOHMAaydnoCunHaJ3a15MHHyTN.
PeknAUX
-AKO AUX Ka6eJbT He e Cbbp3aH 3a 15 MNHyTN.
AkoB npoBnKeHne Ha 8 yaca Hma HatackaHe Ha KnaBn npn Cbbp3aH AUX. (OyHKuTa Auto Power Down MOKe Da 6bJe n3KnUoyeHa cMo B To3n Cnyua.)
3a da n3kn10uHTe fynkunra Auto Power Down,dokaTo CTe B pexnAUX,HatncHeTe 3aipbXte 6ytoHa II 3a5cekydn.Ha dincnpe Ce noBBA ON-AUTO POWER DOWN/OFF-AUTO POWER DOWN.
BLUETOOTH
Moxete da cBpXeTe Bluetooth yCTpoiCTBO kBM Soundbar n da ce hacnaKdaBaTe Ha My3nka Cbc Ctepeo 3Byk 6e3 HnkakBn ka6eni!
3A DA CBbPjKETE SOUNDBAR KbM BLUETOOTH YCTPOICTBO
IpoBepTe daJIu Bluetooth ycTpoiCTBOTo NOdNbPxa CbBMecTIma C Bluetooth fynKunia 3a ctepeo cnUanKn.
- Hatnche 6ytoHa ha rohna nane Ha oCHOBHOTO yCTPOIcTBO nn 6yToHa SOURCE Ha nctaHIOHHOTynpabHe,3a da n3bepete pexkma BT.
- Κιενιπε BT READY Ḥλίηςθυσίας ἀπερημή Ḥa Soundbar.
- 136epete MeHIOTo Bluetooth Ha Bluetooth yCTpoINCTBOTo, KOeTO nCKaTe Ja CBbpxKeTe. (npOBepTe pbKOBOcTBOTO 3a noTpe6nteHa Bluetooth yCTpoINCTBOTo.)
- N36epete " [Samsung] HW-Jxxxx" OT CnncbKa.
Korato Soundbar e cBbP3aH c Bluetooth yctpoiCTBOTo, Ha IInueBnI dncnIe Ie ce noka3Ba [Mme Ha Bluetooth yctpoiCTBO] BT.
- IMeTo Ha yCTPOINCTBOTO MOKe Da ce NOKa3Ba cAMo Ha aHrnnckn e3NK. Ako IMeTo He e Ha aHrnnckn e3NK, Iue Ce nOKaKe DoJHa YepTa " _".
- Ako Bluetooth yctpojCTBOTO He e cIbOeHO ycneuHc Soundbar, n3tpnTe npeduHTo HamepeHo
["Samsung] HW-Jxxxx" ot Bluetooth yctpojCTBOTO n ro HaKapaiTe oTHOBO da TbpCn Soundbar.
→ yBéniHcTe CnIaTa Ha 3ByKa.
DnCTaHcNoHHOTo He pa60tN.
BaTePnnte n3ToUeHn nn ca?
He eIIN TBbpIe roJIaMo pa3CTOAHnETo MeJy INCTaHcIOHHOTO ynpaBHeHne IOCHOBHOTO yCTPOICTBO?
→ CmeheTe rnc HOBN 6aTePN.
→ IpnemecTeCe no-6n3Ko do ypeja.
Heycneuho TV SoundConnect (TB cDboahe).
Baunr TeneBn3Op noDbpbka nn TV SoundConnect?
TV SoundConnect ce noДьрka ot HяКои TeLEBn3ори Ha Samsung, nychaTn Ha na3apa cIeI 2012 r. Поверете дani Baшиrt TeLEBn3op noДьрka TV SoundConnect.
- ΦbpyepbT Ha TeIeBn3Opa OT HaI-HOBaTa BepCnJn e?
→ Aktyaun3npaTe TeneBn3opa cn C haN-HOBnA _b pyep.
He e Jn Bb3HnKHa n rpeuKa BbB BpB3KaTa?
→ Cbpxte ce c ceHTbpa 3a o6cnykBaHe Ha Samsung.
→ HynipaiTe TV SoundConnect n cBbpxKeTe oTHOBo. 3a da hynpaTe cBbP3BaHeTo Ha TV SoundConnect, HATINCHETe n 3aDpXKeTe 5 cekyHn6byToHa II.
YeBHeHnT CBeToDnOHa cb6yΦbpa Mnra n cb6yΦbpbT He n3daBa 3Byk.
Cb6yΦbPbT MoKe Da He e CbP3aH KbM Kopnyca Ha npOdyKta.
OnnataTe da cBbpxKeTe oTHOBO cb6ybpaa. (Bx. ctp. 17)
Cb6yfepeBt ymnn Bn6pnpa 3a6enexmo.
- Onnata Te da perynipate Bn6pnpaHTo Ha cb6ybpaa.
→HaTnchete 6yToHa WOOFER Ha nCTaHcNoHHOT O npabIeHne,3a da perynipate cToHocTTa (MeKdy -12,-6~+6).
CNEUΦUKAUJRA
| ОвECTAчАСТ | Терло | Оснobно устroduстvo | 4,0 кг |
| Събуфьр (PS-WJ7500R / PS-WJ7501R) | 6,8 кг | ||
| Размeperи (Шх Вх Д) | Оснobно устroduстvo | 1230,0 x 47,5 x 170,0 мм | |
| Събуфьр (PS-WJ7500R / PS-WJ7501R) | 452,0 x 335,0 x 154,0 мm | ||
| Диапазон на paбOTна Temпepатура | +5 °C до +35 °C | ||
| Диапазон на paбOTна влажност | 10 %do 75 % | ||
| УСИВATEЛ | Изхордza мошност | Оснobно устroduстvo | 20W x 8, 8 OHM, THD≤10% |
| Събуфьр (PS-WJ7500R / PS-WJ7501R) | 160W, 3 OHM, THD≤10% | ||
Дизайнвт, сецифальпец и ekраньт на прилODEженяг подожаха на ромяна 6e3 п徳иЗовсп.
* HOMHaJIHa cIeUNΦKauZn
Samsung Electronics Co., Ltd cn 3ana3Ba npaboto da npomeHa cneuФикuaŋra 6e3 npedn3BecTne.
-TernoTo npa3mepnte ca pnp6n3ntenHn.
- 3a cneuHkaunTe Ha MOUHOCTTa IN KOHCymaunTa npOBepeTe etNKeTa Ha npOdyKta.
※ BHMMaHne:ПюдуКтБТ ec ce peçapTnpa aВTomaTnUHO, aKO BKlIOuHTe/N3KlIOuHTe Wi-Fi/Ethernet.
| Овicios постения на[eнергий] в рекима наrotob拱OT(W) (Вс neuropл мрекови постove са в поэцья "ВКЛ.") | 2,7W | |
| Wi-Fi/Ethernet | Реким на.Deakтubраие на пот | Наточе 6утона Wi-Fi SETUP на подукта за 30 cekyнд, за вbkючite/Nзкючite Wi-Fi/Ethernet. |
| Bluetooth | Реким на Deakтubраие на пот | Наточе 6утона SPK ADD на подукtega за 30 cekyнд, за вbkючite/Nзкючite Bluetooth. |
※ Bénelkka 3a liuèn3a 3a OTbOpeH KoI
Manufactured under licence from Dolby Laboratories. Dolby, Dolby Audio and the double-D symbol are trademarks of Dolby Laboratories.

dt
2.0 Channel
3a DTS nateHn Bx. http://patents.dts.com. Ipon3BeNo no liueH3 Ha DTS Licensing Limited. DTS, cmboIbT n DTS 3aeHcBc CmBoJa ca peHcTpnpaHn TbproBckn MapKn, a DTS 2.0 Channel e TbproBcka Mapka Ha DTS, Inc. © DTS, Inc. BcnuK npaba 3anaeHn.
HOMI
TepMNHTe HDMI n HDMI High-Definition Multimedia Interface, KaKTo n IJorOTo HDMI ca TbproBcKn MapKn nn peRnCTpnpaHn TbProBcKn MapKn Ha HDMI Licensing LLC B CAU n npytn cTpaHn.
Be3KnHm moe (BknHouHTeHno yeCToTa ot 5,15 GHz-5,35 GHz)
C ToBa Samsung Electronics DeKlnapipa, Ye ToBa yCTpoiCTBO OTROBapHa OCHOBHnTe N3NCKBaHnI n Dpyr CbOTBeTHn YCIOBnHa DInpeKTnBa 1999/5/EC.
OpunHaHata DeKnapaqna 3a CbOTBcTCTBne MoKe Ja ce HaMepn Ha http://www.samsung.com, otnde Ta H Ppckka > TbpceHe Ha npdpkka 3a npodykTa n BBeTe MeTo Ha MOne. To3n ypeJ MoKe Ja pa60Tu BvB BCnUKN CTpaHn OT EC. To3n ypeJ MoKe Ja ce N3PON3Ba cAmo Ha 3aKpNUTo.

Be3KuHmMoJenn (6e3 YecToTa ot 5,15 GHz-5,35 GHz)
C ToBA Samsung Electronics DeKnapa, Ye ToBA yCTpOcTBO OTROBApRA Ha OCHOBHnTE N3NCKBaHnRA IN Dpyrnc BcOTBeTHn YcNoBnRA Ha INpeKtINBa 1999/5/EC. OpunrHaHnHata DeKnapaunra 3a CbOTBeTCTBnE MoKe Da ce Hamepn Ha http://www.samsung.com, OTuDeTe Ha POnDpBxKa > TbpceHe Ha NOpDpBxKa 3a npOdykTa n BbBeTe MeTo Ha MoEna. To3n UpeM MoKe da pa60n BBB BCNUKn CTpaHn OT EC.

Cbpxe Ce cSAMSUNG NO LENCABT
Ako mATE Bbnpocn nn KomeHTapn 3a npOyKTITE Ha Samsung, ce o6bpHeTe KbM ueHbpa 3a o6cnyXbaHe Ha KIneHTn Ha SAMSUNG.
| Country Contact Centre | Web Site | |
| ■Europe | ||
| UK 0330 SAMSUNG (7267864) www.samsung.com/uk/support | ||
| EIRE 0818 717100 www.samsung.com/ie/support | ||
| GERMANY | 0180 6 SAMSUNG bzw.0180 6 7267864* (*0,20 €/Anruf aus dem dt. Festnetz, aus dem Mobilfunk max. 0,60 €/Anruf) | www.samsung.com/de/support |
| FRANCE 01 48 63 00 00 www.samsung.com/fr/support | ||
| ITALA 800-SAMSUNG (800.7267864) www.samsung.com/it/support | ||
| SPAIN 3490217 2678 www.samsung.com/es/support | ||
| PORTUGAL 808 20 7267 www.samsung.com/pt/support | ||
| LUXEMBURG 261 03 710 | www.samsung.com/be_fr/support | |
| NETHERLANDS | 0900-SAMSUNG (0900-7267864) (€ 0,10/Min) | www.samsung.com/nl/support |
| BELGIUM 02-201-24-18 | www.samsung.com/be/support(Dutch)www.samsung.com/be_fr/support(French) | |
| NORWAY 815 56480 www.samsung.com/no/support | ||
| DENMARK | 70 70 19 70 | www.samsung.com/dk/support |
| FINLAND 030-6227 515 www.samsung.com/fi/support | ||
| SWEDEN 0771 726 7864 (0771-SAMSUNG) www.samsung.com/se/support | ||
| POLAND | 801-172-678' lub +48 22 607-93-33 * (koszt polaczenia wedlung taryfy operatrice) | www.samsung.com/pl/support |
| HUNGARY | 0680SAMSUNG (0680-726-786)0680PREMIUM (0680-773-648) | www.samsung.com/hu/support |
[Праьнho n3XbPnHe Ha 6aTePNte B To3n npodykT]
(HaHnHOBCTpaHn CbCcnTeMn3a pa3dEnHo CmToC6bupaHe)
Toba 063NaueHHe Bbpy 6aTePnTa, pbKOBoDCTBOTo HnI ONaKOBkata, NOKA3Ba, Ye 6aTePnTE B To3n npOyKT He 6BaJa Ce n3XBpNAT C Dpyrnte 6bTOBn OTnAbuCn B KpaHa TExHH NoJeEH JxNtOT. KbTeO ca MapKnPAHn, XmMueCeNte CmBOnn Hg, Cd nnPi Pb NOKa3BaT, Ye 6aTePnTAcBbpxka XnBAK, KaDMn NnI ONoBO Ha KOHTpONHTe HnBA B DupeKTHBa 2006/66 Ha EO.
Ako 6aTepeHnTe He ce HxBbPnT nPaBnH0, Te3n BeIeCTBa MoTa Da npEiIN3BnKaT yBpExdHa YOBeKoTo 3JpaBe Nn Ha OKOnHata Cpda.
3a da ppeanate npnpoHnTe pecypcn 3a da cbdeNCTBaTe 3a MHOROKpatha YnoTpe6a Ha MaTePnAInHte pecypcn, MoJr OTdienIe 6aTePnTE Opynte BNDoe OTnaDbHn PPOyKTHn Tn peuKnpaIte NocpeDCTBOM Baata IokaHa cncTeMa 3a 6e3nnato Hbpbae He 6aTePN.
| Country Contact Centre | Web Site | |
| AUSTRIA | 0800-SAMSUNG (0800-7267864) [Only for Premium HA] 0800-366661 [Only for Dealers] 0810-112233 | www.samsung.com/at/support |
| SWITZERLAND | 0800 726 78 64 (0800-SAMSUNG) | www.samsung.com/ch/support (German) www.samsung.com/ch_fr/ support (French) |
| CZECH | 800 - SAMSUNG (800-726786) | www.samsung.com/cz/support |
| SLOVAKIA | 0800 - SAMSUNG (0800-726 786) | www.samsung.com/sk/support |
| CROATIA | 072 726 786 www.samsung.com/hr/support | |
| BOSNIA | 055 233 999 www.samsung.com/support | |
| MONTENEGRO | 020 405 888 www.samsung.com/support | |
| SLOVENIA | 080 697 267 (brezplačna številkaj) www.samsung.com/si | |
| SERbia | 011 321 6899 www.samsung.com/rs/support | |
| BULGARIA | *3000 Βeña B m Péxqata 0800 111 31, bēzniatna telenófonha πηνηρί | www.samsung.com/bg/support |
| ROMANIA | *8000 (apel in retea) 08008-726-78-64 (08008-SAMSUNG) Apel GRATUIT | www.samsung.com/ro/support |
| CYPRUS 8009 | 4000 only from landline, toll free | |
| GREECE | 80111-SAMSUNG (80111 726 7864) only from land line (+30) 210 6897691 from mobile and land line | www.samsung.com/gr/support |
| LITHUANIA | 8-800-7777 | www.samsung.com/lt/support |
| LATvia | 8000-7267 | www.samsung.com/lv/support |
| ESTONIA 800-7267 | www.samsung.com/ee/support | |
IpaBnHtpeTnpaHe Ha n3denneto cnd KpaHa EKcNlOaTaUOHnMy XHBOT
(OTnabu, npedctabnaBaun eneKtpnuecko n eneKtpoHNO o6OpyDahe)
(HaHnHO B CTpaHb CbC CnCTeMn 3a pa3dEnHo cmTeoc6bupahe)
To3n 3HaK, noctaben Bbpxu 3dEneIeTO, HerOBn npHnAeNEXHOCT NIN neaTHM MaTePnAn, O3HaUaBa, Ye npOpykTbT n npHnAeNEXHOCTNE (Hapmep 3apJHNO yCtpoCTBO, CnyuaanKn, USB ka6en) He 6NuBa da ce Ix3XbPjT 3aeJHO c DpyrInTE 6BnOte OTNaBtu, KOrato n3Teue EKcNIOaTaUOnHHNtMy XJBOT. OtDJIte Te3Nu YcTPOCTBA OT dpYrInTE BNDoBnO TNaBtu IN npEpaBaTe 3a peuKlnpaahe. Cna3BaKn TOBa npAbINO He n3NaIate Ha onAcHCT 3dpabeTo Ha npytn Xopa IN ppeNa3BaTe OKOIhata CpeDaT O3AmBpcBaHe, npEIN3BnKaHo Of 6e3KoHTpNO H3XbBpIHe HA ONaBtu. OCBEN TOBA, NOo6HO OTROBOPHO NOBeDeHne C3dABa B3MoKHOCT 3a NOBTOPHO (ekOJorHNO Cbo6pa3HO) IN3NONBaHe HA MaTePnAnHNTpe cypcn.
DomauHHTe NOTpe6nten Tp6Ba Da ce CbpxkTc TpbroBeua Ha dpe6HO,OT KOROTO ca 3akynnn IN3dieneto,INN CbC CbOTBeTHaMeCTHa DpKxABHa areHnra,3a da NOyTuAT NOpO6HN HhCTpyKuIN Kbde I KORA MORA Tda 3aHeCat Te3n yCTPOINCTBa 3a peuKNIPAhe, 6e3oNaCHO 3a OKONHATA cpea.
KopnpaTbHnTe nOtpe6nte cneBa da ce CbpxkTa CdoCTaBvNka cn Da npoBeprYcNoBtA Ha IOROBopa 3a NOKyNka. TObuI3JeIne HEROBITE eNEKTPoHNN pINHaDNeXHOCTN He 6NuBa da Ce CmecTBa T cdpyrte Otnabcn Ha TbproBCKOTO PpePnptnE.
Manufactured under licence from Dolby Laboratories. Dolby, Dolby Audio and the double-D symbol are trademarks of Dolby Laboratories.


2.0 Channel
Patente tvrtke DTS potražite na http://patents.dts.com. Proizvedeno pod licencom tvrtke DTS Licensing Limited. DTS, symbolism, & DTS i symbolism zajedno registrirani su zašitni znakovi, a DTS 2.0 Channel zašitni je znak tvrtke DTS, Inc. © DTS, Inc. Sva prava pridžana.
HOMI
Pojmovi HDMI i High-Definition Multimedia Interface i logotip HDMI zašitni su znakovi ili registrarani zašitni znakovi tvrtke HDMI Licencing LLC u Sjedinjenim Americkim Državama i drugim zempljama.
Bežični modeli (uključujuci frekvencije od 5,15 GHz - 5,35 GHz)
Tvrtka Samsung Electronics ovm izjavljupe da je ova oprema uskladena s bitnim zahtjevima i drugim važnim odredbama Direktive 1999/5/EZ.
Izvornu izjavu o sukladnosti možete pronači na adresi http://www.samsung.com, ako odaberete Podrška > Traži podršku za proizvod iunesete naziv modela.
Oprema se smije upotrebljavati u svim zemljama EU.
Ova oprema smije se upotrebljavati samo u zatvorenom prostoru.

TRACK - REPEAT: Opakovane prehravani stopy.
ALL - REPEAT: Opakovane prehravani vsech stop.
Preskocit Dopredu
Manufactured under licence from Dolby Laboratories. Dolby, Dolby Audio and the double-D symbol are trademarks of Dolby Laboratories.

Manufactured under licence from Dolby Laboratories. Dolby, Dolby Audio and the double-D symbol are trademarks of Dolby Laboratories.

dt
2.0 Channel
HOIATUS. ARGE NEELAKE PATAREID ALLA, KEEMILISE POLETUSE OHT.
www.spotify.com/connect/third-party-licenses.
- Lisateavet Spotify Connecti kohta vt veebisaidilt www.spotify.com/connect.
LITSENTSID

DOLBY AUDIO
Manufactured under licence from Dolby Laboratories. Dolby, Dolby Audio and the double-D symbol are trademarks of Dolby Laboratories.


2.0 Channel

Attache-cable Support de fixation murale

Vis du support 2: 4 pieces
Support de fixation murale


Pied de support Fixation de support
Manufactured under licence from Dolby Laboratories. Dolby, Dolby Audio and the double-D symbol are trademarks of Dolby Laboratories.


2.0 Channel
Manufactured under licence from Dolby Laboratories. Dolby, Dolby Audio and the double-D symbol are trademarks of Dolby Laboratories.
2.0 Channel
Tia tic eupoeitexviEc DTS, avatpeEte otn diaktuakn tootheoiia http://patents.dts.com. Kataokeuaetai katoniv adeiac ano tn DTS Licensing Limited. H ovopoaia DTS, to avtioyo ouipoao kai n ovopoaia DTS u to oupoolo evai onmuata kaataeovta kai to DTS 2.0 Channel evai enopiko onma tnc DTS, Inc. © DTS, Inc. Me tnv enipulaaen navtoc dikaiomegaatoc.
HOMI
Oi eWvupieHDMI, HDMI High-Definition Multimedia Interface kai to loyotuno HDMI eivai eptopka onmuata n onmuata kataeTheVTA tnc HDMI Licensing LLC otic H.I.A. kai aAec xwpEc.
Manufactured under licence from Dolby Laboratories. Dolby, Dolby Audio and the double-D symbol are trademarks of Dolby Laboratories.

dt
2.0 Channel
Premendo Anything to do is possible.
La TV supporta TV SoundConnect?
Manufactured under licence from Dolby Laboratories. Dolby, Dolby Audio and the double-D symbol are trademarks of Dolby Laboratories.


2.0 Channel
-Ja audio signals nav pieejams 15 minutes.
- Rezims AUX
-Ja AUX kabelis ir atvienots 15 minutes.
Ja AUX kabelis ir pievienots, bet KEY ivade nav pieejama 8 stundas. (Funkciju Auto Power Down var izslegt tikai saja gadijumā.)
Lai izslegtu fungciju Auto Power Down, kamir aktivizets rezims AUX, nospiediet un turiet nospiestu pogu 5 sekundes. Displejä tiek paradits zinojums ON - AUTO POWER DOWN / OFF - AUTO POWER DOWN.
BLUETOOTH
Var izveidot Bluetooth ierices un sistemas Soundbar savienojumu un baudit muziku ar stereo skanu, neizmantojot vadus.
SISTÉMAS SOUNDBAR UN BLUETOOTH IERICES SAVIENOJUMA IZVEIDOSANA
Pärbaudiet, vai Bluetooth ierice atbalsta ar tehnologiju Bluetooth saderigu stereo austinu funkciju.
- Nospiediet pogu galvenas ierices augsejapaneli vai talvadibas pults pogu SOURCE, lai atlasitu rezimu BT.
- Sistemas Soundbar prieksejā displejejā tiek paradits zinojums BT READY.
- Bluetooth 1erice, ar kuru velaties izveidot savienojumu, atlasiet izvelni Bluetooth. (Skatiet Bluetooth 1erices lietotaja rokasgramatu.)
-
Atlasiet sarakstā “[Samsung] HW-Jxxxx”.
-
Kad ir izveidots sistemas Soundbar un Bluetooth ierices savienojums, priekseja displeja tiek paradits zinojums [Bluetooth ierices nosaukums] BT.
- lerices nosaukumu var paradit tikai anglu valoda. Ja nosaukums nav anglu valoda, zinojums tiek paradits ar pasvitrajumu “.”
-
Ja Bluetooth ierices un sistemas Soundbar savienošana pār nav izdevusies, izdzësitet Bluetooth ierices atrasto ieprieksejo nosaukumu " [Samsung] HW-Jxxxx" un atkartojiet sistemas Soundbar meklešanu.
-
Atskanojiet muziku, izmantojot ieri ci, ar kurir izveeidots savienojums.
-
Izmantojot sistemu Soundbar, varat klausities Bluetooth ierie, ar kurir izveidots savienojums, atskanoto muziku.
- Režimā BT fungcjjas Atskanot/Pauze, Talak un lepriksejais nav pieejamas. Taču šis funkcjjas ir pieejamas Bluetooth ierēs, kas atbalsta AVRCP.

- Ja, izveidojot savienojumu ar Bluetooth ierici, tiek prasits ivadit PIN kodu, ivadiet <0000>.
- Vienlaicigi savienot pari var tikai venu Bluetooth erici.
Ja Sistema Soundbar tiek izslegta, Bluetooth savienojums tiek partraukts. - Bluetooth ierices meklešana vai pareiza savienojuma izveidosana ar sistemu Soundbar var nenotikt šados gadijumos:
Manufactured under licence from Dolby Laboratories. Dolby, Dolby Audio and the double-D symbol are trademarks of Dolby Laboratories.


2.0 Channel
Informaciju par DTS patentiem skatiet vietne http://patents.dts.com.
Izgatavts saskaar DTS Licencing Limited pieskirto licenci. DTS, ta symbols un DTS kopa ar simbolu ir registretas precu zimes, un DTS 2.0 Channel ir DTS, Inc. precu zime. © DTS, Inc. Visas tiesibas paturetas.
HDMI
Manufactured under licence from Dolby Laboratories. Dolby, Dolby Audio and the double-D symbol are trademarks of Dolby Laboratories.


2.0 Channel
Manufactured under licence from Dolby Laboratories. Dolby, Dolby Audio and the double-D symbol are trademarks of Dolby Laboratories.


2.0 Channel
Selecteazā intrarea D.IN, AUX, HDMI, BT, TV.
CONECTAREA MANUALA LA SUBWOOFER
Manufactured under licence from Dolby Laboratories. Dolby, Dolby Audio and the double-D symbol are trademarks of Dolby Laboratories.

dt
2.0 Channel
Pentr bve T, a 10. d t. f t d. t Dt-HD, Simbolul, & DTS-HD s Simbolul sunt mari ciale inrigeate s DTS 2.0 Chnnel este marca comciala a DTS, Inc. DTS, Inc. Toate drepturile rezervate.
HOMI
HDMI, High-Definition Multimedia Interface.si sigla HDMI sunt marmi commerciale sau marmi commerciale inregistrare ale HDMI Licensing LLC in Statele Unite ale Americii si alte tari.
Modele wireless (inclusiv freventa 5,15 GHz - 5,35 GHz)
SIGURNOSNE INFORMACije
SIGURNOSNA UPOZORENJA
DA BISTE SMANJILI OPASNOST OD ELEKTRICNOG UDARA, NE SKIDAJTE POKLOPAC (ILI ZADNJU PLOCU). UNUTRA SE NE NALAZE DELOVI KOJI SE MOGU SERVISIRATI. SERVISIRANJE POVERITE KVALIFIKOVANOM OSOBLJU SERVISA.
| OPREZ OPASNOST OD ELEKTRICNOG UDARA NE OTVARATI | Ovaj simbol označava da unutar proizvoda postoji visok napon. Opasno je na bilo koji način dodirivati bilo koji unutrašnji deo ovog proizvoda. | ||
| Ovaj simbol označava da je za ovaj proizvod obezbežena važna literatura koja se odnosi na rad i održavanje. |
| Proizvod klase II: Ovaj simbol označava da povezivanje na zašitno elektricno uzemljenjeicates nejne neophodno. | |
| ~ | Naizmenična struja: Ovaj simbol označava da naizmeničnu struju. |
| --- | Jednosmerna struja: Ovaj simbol označava da Jednosmernu struju. |
| Oprez, videti uputstva za upotrebu: Ovaj simbol upćuje korisnika da u korisnickom prisćniku pročita dodatne informacieme u vezi sa bezbednosću. |
UPOZORENJE : Da biste smanjili opasnost od požara ili elektricnog udara, ne izlažite ovaj proizvod kiši ili vlazi. OPREZ : DA BISTE SPREČILI ELEKTRICNI UDAR, ŠIROKI KONTAKT UTIKAÇA USKLADITE SA ŠIROKIM KONTAKTOM UTICNICE I UMETNITE DO KRAJA.
Manufactured under licence from Dolby Laboratories. Dolby, Dolby Audio and the double-D symbol are trademarks of Dolby Laboratories.

Za DTS patente, pogledajte http://patents.dts.com. Proizvedeno pod licencom kompanije DTS Licensing Limited. DTS, simbol, kao i DTS i simbol zajedno su registrovani zašitni znaci, a DTS 2.0 Channel je zašitni znak kompanije DTS, Inc. © DTS, Inc. Sva prava zadržana.
HDMI
Pojmovi HDMI, High-Definition Multimedia Interface i HDMI logotip su zašitni znaci ili registrovani zašitni znaci kompanije HDMI Licensing LLC u Sjedinjenim Americkim Državama i drugim zempljama.
Bezichn modeli (uključujuci frekvenciju 5.15 GHz - 5.35 GHz)
Samsung Electronics ovim izjavljupe da je ova oprema usaglašena sa suštinskim zahevima i drugim relevantnim odredbama directives 1999/5/EC.
Zvaničnu Izjavu o usaglasenosti možete naci na adresi http://www.samsung.com. Idite na Podrska > Traži podršku za proizvod iunesite naziv modela.
31 RIESENIE PROBLEMOV
31 Riesenie problemov
32 DODATOK
32 Technické udaje
Manufactured under licence from Dolby Laboratories. Dolby, Dolby Audio and the double-D symbol are trademarks of Dolby Laboratories.


2.0 Channel
Informáce o patentoch k DTS najdete na adrese http://patents.dts.com. Vyrobené pod licenciou od spolocnosti DTS Licensing Limited. DTS, symbol & DTS spolu so symbolom su registrované ochranné známky a DTS 2.0 Channel je ochranná známka spolocnosti DTS, Inc. © DTS, Inc. Vsetky práva vyhradené.
HDMI
Oznacenia HDMI a HDMI High-Definition Multimedia Interface a logo HDMI su ochranné známky alebo registrované ochranné známky spolocnosti HDMI Licencing LLC v Spojenych statóch a iních krajinách.
Bezdrotové modely (vrátane frekvencie 5,15 GHz - 5,35 GHz)
Spolocnost' Samsung Electronics tymto vyhlasuje, ze toto zariadenie je v sulade s nevyhnutnymi poziadavkami a d'alsimi relevantnymi cast'am smernice 1999/5/ES. Povodne vyhlasenie o zhode najdete na stranke http://www.samsung.com, prejdite na položku Podpora > H'adat' podporu k produktu a zadajte nazov modelu. Toto zariadenie je mozné pouzivat' vo vsetkych krajinach EU. Toto zariadenie je mozné pouzivat' iba v interieri.

Bezdrotové modely (okrem frekvencie 5,15 GHz - 5,35 GHz)
Spolocnost' Samsung Electronics tymto vyhlasuje, ze toto zariadenie je v sulade s nevyhnutnymi poziadavkami a d'alsimi relevantnymi cast'amir smernice 1999/5/ES. Povodne vyhlasenie o zhode najdete na stranke http://www.samsung.com, prejdite na položku Podpora > H'adat' podporu k produktu a zadaje nazov modelu. Toto zariadenie je mozné pouzivat' vo vsetkych krajinach EU.

Kontaktujte SAMSUNG WORLD WIDE
HRBTNA/SPODNJA PLOŠCA
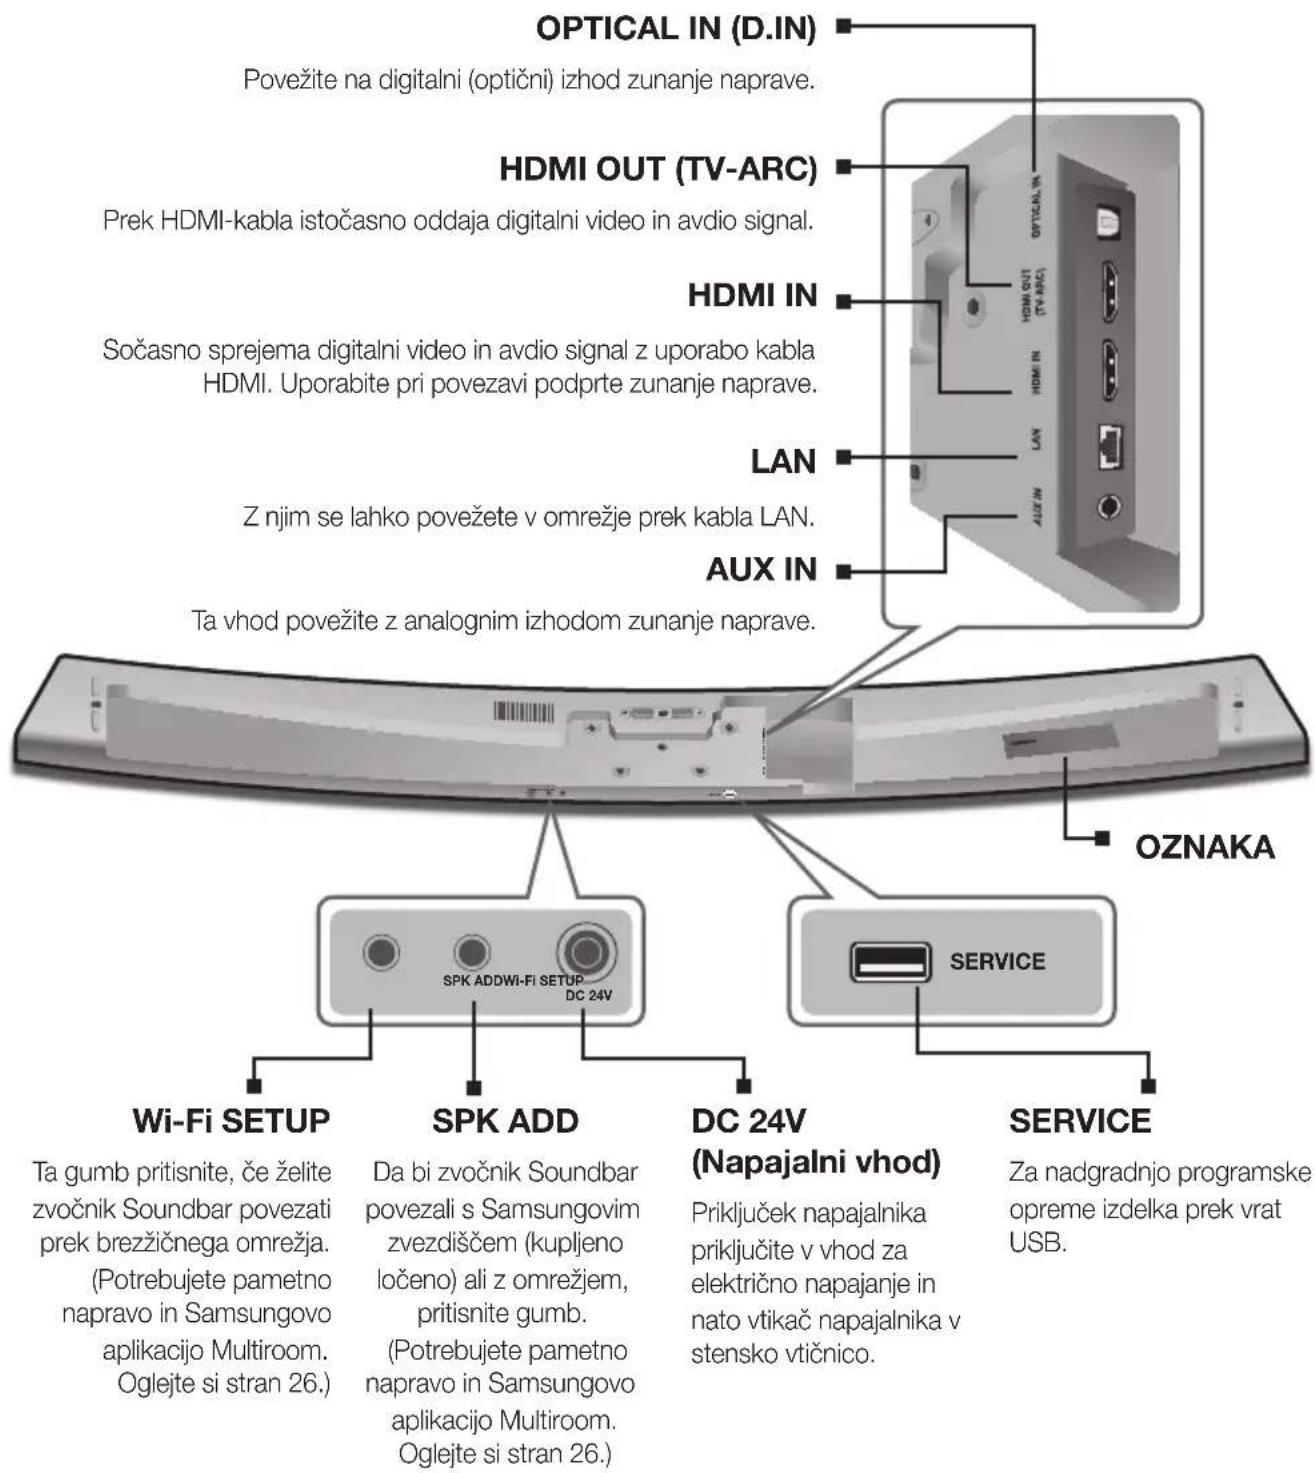

Manufactured under licence from Dolby Laboratories. Dolby, Dolby Audio and the double-D symbol are trademarks of Dolby Laboratories.

Patente za technologijo DTS najdete na http://patents.dts.com. Izdelano po licenci DTS Licensing Limited. Ime & oznaka DTS, navedena skupaj ali loceno, sta registrarani blagovni znamki, DTS 2.0 Channel pa je blagovna znamka družbe DTS, Inc. © DTS, Inc. Vse pravice pridžane.
Hami
Izraza HDMI, HDMI High-Definition Multimedia Interface in logotip HDMI so blagovne znamke ali registrirane blagovne znamke druzbe HDMI Licensing LLC v ZDA in drugih državah.