
Viva Deluxe RI8435 - Coffee machine GAGGIA - Free user manual and instructions
Find the device manual for free Viva Deluxe RI8435 GAGGIA in PDF.
| Product Type | Espresso Coffee Machine |
| Brand | Gaggia |
| Model | Viva Deluxe RI8435 |
| Category | Coffee Machine |
| Power Supply | 220-240 V, 50-60 Hz |
| Main Functions | Ground coffee, E.S.E. pods, steam, hot water, classic milk frother |
| Number of Cups | 1 or 2 cups simultaneously |
| Steam Wand | Rotating |
| Auto Shut-off | Yes, after 30 minutes of inactivity |
| Child Safety | Use by children over 8 years old under supervision |
| Descaling | Recommended every 3 months with Gaggia product only |
| Cleaning | Damp cloth, do not immerse, do not use abrasive products |
| Included Accessories | Ground coffee filter, pod filter, pressurized filter holder, milk frother, pod adapter, measuring spoon |
| Usage | Domestic only |
| Drip Tray | Removable |
| Warranty | Repairs by Gaggia authorized service center |
Frequently Asked Questions - Viva Deluxe RI8435 GAGGIA
User questions about Viva Deluxe RI8435 GAGGIA
0 question about this device. Answer the ones you know or ask your own.
Ask a new question about this device
Download the instructions for your Coffee machine in PDF format for free! Find your manual Viva Deluxe RI8435 - GAGGIA and take your electronic device back in hand. On this page are published all the documents necessary for the use of your device. Viva Deluxe RI8435 by GAGGIA.
USER MANUAL Viva Deluxe RI8435 GAGGIA
This coffee machine is suitable for preparing 1 or 2 cups of espresso coffee and is equipped with a swivel steam and hot water wand. The controls on the front of the machine are labeled with easy-to-read symbols. The machine has been designed for domestic use and is not suitable for professional, continuous use.
Clean cold water
Use clean cold water every day. If you have not used the coffee machine for one day, you have to flush it with clean cold water before you use it again. To flush the machine, fill the water tank with clean cold water, place a bowl or 2 cups under the coffee spout and brew hot water until the water tank is empty.
Energy saving
The RI8437, RI8435, RI8433 machines are equipped with an auto power-off function for energy saving. The auto power-off function automatically activates 30 minutes after setting the main switch to 'I'. To switch the machine back on, set the main switch back to 'I'.
Important safety information
This machine is equipped with safety features. Nevertheless, read and follow the safety instructions carefully and only use the machine as described in these instructions, to avoid accidental injury or damage due to improper use of the machine. Keep this safety booklet for future reference.
Warning
- Check if the voltage indicated on the machine corresponds to the local mains voltage before you connect the appliance.
- Connect the machine to an earthed wall socket.
- Do not let the power cord hang over the edge of a table or worktop and do not let it touch hot surfaces.
- To avoid the danger of electric shock, never immerse the machine, mains plug or power cord in water.
- If the mains cord is damaged, you must have it replaced by Gaggia, a service center authorized by Gaggia or similarly qualified person in order to avoid a hazard.
- Do not pour liquids on the power cord connector.
- To avoid the danger of burns, keep body parts away from hot water jets produced by the machine.
-
Do not touch hot surfaces. Use handles and knobs.
-
Switch off the machine with the main switch located on the back and remove the mains plug from the wall socket:
If a malfunction occurs.
If you are not going to use the appliance for a long time.
Before you clean the machine.
- Pull at the plug, not at the power cord.
- Do not touch the mains plug with wet hands.
- Do not use the machine if the mains plug, the power cord or the machine itself is damaged.
- Do not make any modifications to the machine or its power cord.
- Only have repairs carried out by a service center authorized by Gaggia to avoid a hazard.
- The machine should not be used by children younger than 8 years old.
- This machine can be used by children aged from 8 years and above and by persons with reduced physical, sensory or mental capabilities or lack of experience and knowledge if they have been given supervision or instruction concerning use of the machine in a safe way and if they understand the hazards involved.
- Cleaning and user maintenance shall not be made by children unless they are older than 8 and supervised.
- Keep the machine, its accessories and its cord out of the reach of children aged less than 8 years.
- Children should be supervised to ensure that they do not play with the machine.
- Be careful when you dispense hot water. Dispensing may be preceded by small jets of hot water. Wait until the end of the dispensing cycle before you remove the hot water dispensing spout.
-
To avoid the danger of burns, be aware that dispensing may be preceded by small jets of hot water. Never touch the classic milk frother with bare hands, as it may become very hot.
-
Only use this espresso maker for its intended use to avoid potential injury.
Caution
-
Always return the machine to a service center authorized by Gaggia for examination or repair. Do not attempt to repair the machine yourself, otherwise your warranty becomes invalid
-
The machine is intended for normal household use only. It is not intended for use in environments such as staff kitchens of shops, offices, farms or other work environments. Nor is it intended to be used by clients in hotels, motels, bed and breakfast and other residential environments.
-
Always put the machine on a flat and stable surface. Keep it in upright position, also during transport.
-
Do not place the machine on a hotplate or directly next to a hot oven, heater or similar source of heat.
-
When you clean the machine, let it cool down before you insert or remove any parts. The heating surface may retain residual heat after use.
-
Never fill the water tank with warm, hot or sparkling water, as this may cause damage to the water tank and the machine.
-
Never use souring pads, abrasive cleaning agents or aggressive liquids such as petrol or acetone to clean the machine. Simply use a soft cloth dampened with water.
-
Descale your machine every 3 months. Not doing this will make your machine stop working properly. In this case repair is not covered by your warranty.
-
Do not keep the machine at temperatures below 0^ / 32^ . Water left in the heating system may freeze and cause damage.
-
Do not leave water in the water tank when you are not going to use the machine for a long period of time. The water can become contaminated. Use fresh water every time you use the machine.
-
Never use any accessories or parts from other manufacturers or that Gaggia does not specifically recommend. If you use such accessories or parts, your warranty becomes invalid.
- Regular cleaning and maintenance prolongs the lifetime of your machine and ensures optimum quality and taste of your coffee.
- The machine is exposed continuously to moisture, coffee and scale. Therefore it is very important to regularly clean and maintain the machine as described in the user manual and shown on the website. If you do not perform these cleaning and maintenance procedures, your machine eventually may stop working. In this case repair is not covered by warranty.
- Never drink the solution dispensed during the descaling process.
- The machine shall not be placed in a cabinet when in use.
- After frothing milk, quickly clean the classic milk frother by dispensing a small quantity of hot water into a container. Then remove the external part of the classic milk frother and wash it with lukewarm water.
- Never pour any other liquid than clean cold water into the water tank.
- Do not clean the pressurized filter holder in the dishwasher. This will damage the pressurized filter holder.
Electromagnetic fields (EMF)
This machine complies with all applicable standards and regulations regarding exposure to electromagnetic fields.
Machine overview
1 Power-on light
2 Steam ready light
3 Machine ready light
4 Selection knob
5 Ground coffee filter
6 Pressurized filter holder
7 Brew unit
8 Drip tray cover (specific types only)
9 Drip tray
10 User interface
11 Cup holder rest
12 Water tank
10 English
13 Lid of the water tank
14 Ground coffee measuring scoop
15 Pod filter adapter (specific types only)
16 Coffee pod filter (specific types only)
17 Seat for accessories
18 Seat for coffee measuring scoop
19 Hot water/steam knob
20 Classic milk frother (specific types only)
21 Power cord
22 Main switch (RI8437, RI8435, RI8433) with energy saving switch)
First installation
1 Remove all packaging material from the machine.
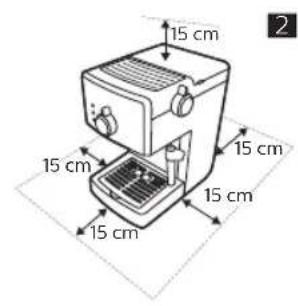
2 Place the machine on a table or worktop away from the tap, the sink and heat sources.
Note: Leave at least 15 cm of free space above,behind and on both sides of the machine (Fig. 2).
Preparing for use
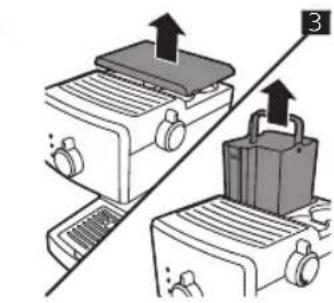
1 Remove the lid of the water tank and remove the water tank from the machine (Fig. 3).
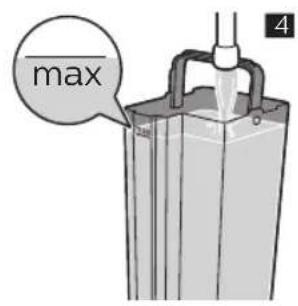
2 Rinse the water tank. Fill the water tank with fresh water up to the MAX indication (Fig. 4).
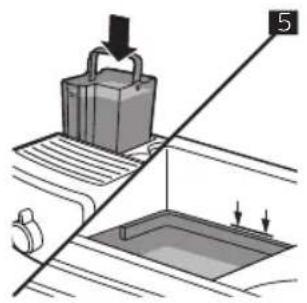
3 Place the water tank back into the machine and push it downwards until the reference marks are visible (Fig. 5).
4 Place the lid of the water tank back onto the machine.
Circuit priming
When you use the machine for the first time, after dispensing steam or when the water tank is empty, perform the following steps:
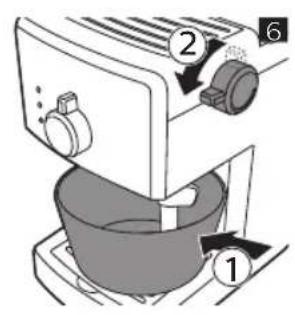
1 Place a container under the milk frother and turn the hot water/steam knob anticlockwise (Fig. 6).
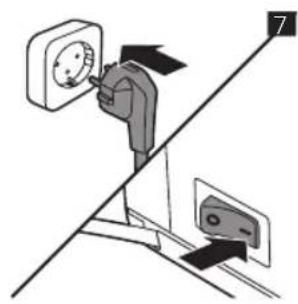
2 Insert the mains plug into a wall socket. Set the main switch to 'I' to switch on the machine (Fig. 7). - The power-on light lights up.
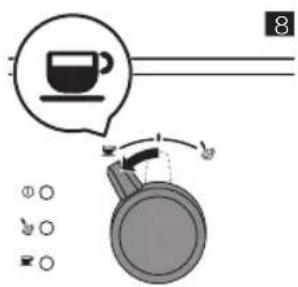
3 Turn the selection knob to the coffee position (Fig. 8).
Hot water comes out of the milk frother.
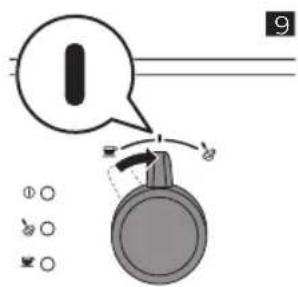
4 When the water tank is empty, turn the selection knob back to the standby position (Fig. 9).
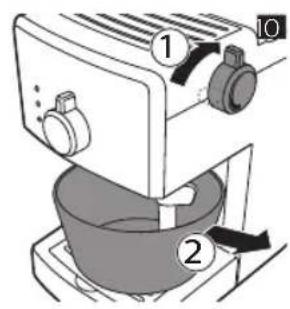
5 Turn the hot water/steam knob clockwise. Remove the container (Fig. 10).
Manual rinsing cycle
1 Rinse the water tank. Fill the water tank with fresh water up to the MAX indication (Fig. 4).
2 Place the water tank back into the machine and push it downwards until the reference marks are visible (Fig. 5).
3 Place a container under the classic milk frother and turn the hot water/steam knob anticlockwise (Fig. 6).
4 Turn the selection knob to the coffee position (Fig. 8). - Let the machine dispense water until the water tank is empty.
5 Turn the selection knob back to standby position (Fig. 9).
6 Fill the water tank with fresh water up to the MAX indication.
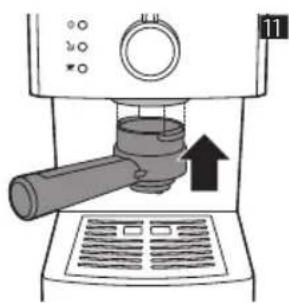
7 Insert the pressurized filter holder into the brew unit from below (Fig. 11).
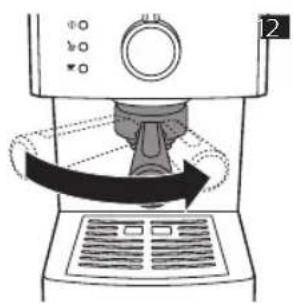
8 Turn the filter holder from left to right as far as possible and release the filter holder grip. The handle will automatically jump back to the left again (Fig. 12).
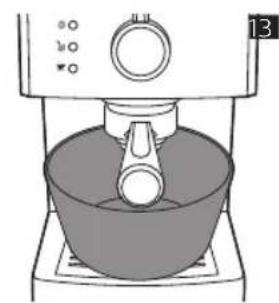
9 Place a container under the filter holder (Fig. 13).
10 Turn the selection knob to the coffee position (Fig. 8).
- Let the machine dispense water until the water tank is empty.
11 When the water tank is empty, turn the selection knob back to the standby position (Fig. 9).
12 Fill the water tank with fresh water up to the MAX indication and wait until the 'machine ready' light lights up.
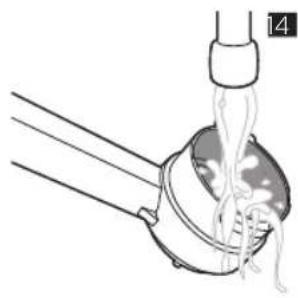
13 Turn the filter holder from right to left to remove it from the brew unit and rinse it with fresh water (Fig. 14).
The machine is ready for use.
Using the machine
Note: Clean the coffee pod filter and coffee pod adapter every time you have used it.
Brewing coffee with ground coffee
Warning: To prevent the risk of burns, do not turn the pressurized filter holder to remove it during brewing.
1 Preheat the pressurized filter holder before the first coffee brewing.
2 Insert the filter holder into the brew unit from below (Fig. 11).
3 Turn the filter holder from left to right until it locks into place and release the filter holder grip (Fig. 12). The handle will jump back to the left slightly.
4 Turn the selection knob to the coffee position until some water flows out of the coffee dispensing openings (Fig. 8).
5 Brew one cup of water. Turn the selection knob to the standby position to stop brewing (Fig. 9).
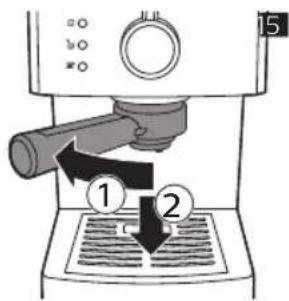
6 Turn the filter holder from right to left to remove it from the machine and pour out the remaining water (Fig. 15).
Note: Remove any coffee residues from the rim of the filter holder.
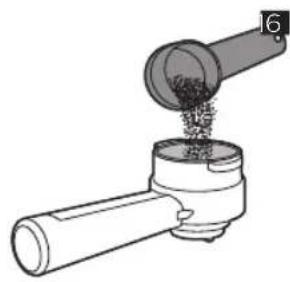
7 Use the measuring scoop to put the ground coffee into the pressurized filter holder.
- To brew one cup of coffee, add 1-1.5 measuring scoops of ground coffee.
- To brew two cups of coffee, add 2 measuring scoops of ground coffee (Fig. 16).
Note: The pressurized filter holder automatically tamps the ground coffee. There is no need to tamp the ground coffee yourself.
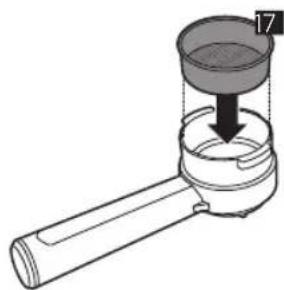
8 Insert the ground coffee filter into the pressurized filter holder (Fig. 17).
Note: When you use the machine for the first time, the ground coffee filter is already inserted.
9 Insert the filter holder into the brew unit.
10 Turn the filter holder from left to right until it locks into place and release the filter holder grip (Fig. 12). The handle will jump back to the left slightly.
11 Place one or two cups under the pressurized filter holder (Fig. 18).
Note: Make sure the cups are placed correctly under the coffee dispensing openings.
12 Turn the selection knob to the coffee position.
- The machine starts brewing coffee.
13 Turn the selection knob to the standby position when the cup(s) contain(s) the desired amount of coffee.
14 Remove the pressurized filter holder and empty it. Clean the pressurized filter under a running tap.
12 English
Brewing coffee with coffee pods
Note: Only use the coffee pod filter and coffee pod filter adapter with coffee pods
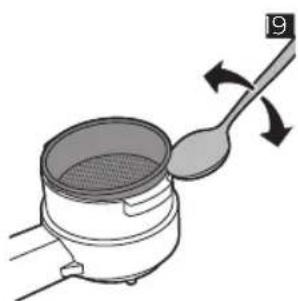
1 Use a teaspoon to remove the ground coffee filter from the pressurized filter holder (Fig. 19).
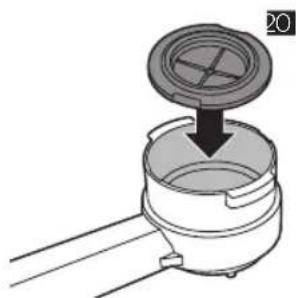
2 Insert the pod filter adapter with the convex side facing down into the pressurized filter holder (Fig. 20).
3 Place the coffee pod filter on top of the pod filter adapter in the filter holder (Fig. 21).
4 Insert the pressurized filter holder into the brew unit from below (Fig. 11).
5 Turn the filter holder from left to right until it locks into place and release the filter holder grip (Fig. 12). The handle will turn to the left slightly.
Note: For the first coffee brewing session, you need to preheat the pressurized filter holder.
6 Brew one cup of water. Turn the selection knob to the standby position to stop brewing (Fig. 9).
7 Turn the filter holder from right to left to remove it from the machine and pour out the remaining water (Fig. 15).
8 Insert a coffee pod into the filter holder (Fig. 22).
Note: Make sure the paper of the pod does not stick out beyond the edge of the filter holder.
9 Insert the filter holder into the brew unit from the below.
10 Turn the filter holder from left to right until it locks into place and release the filter holder grip. The handle will turn to the left slightly.
11 Place a cup under the filter holder.
12 Turn the selection knob to the coffee position (Fig. 8).
- The machine starts brewing coffee.
13 Turn the selection knob to the standby position when the cup contains the desired amount of coffee.
14 Remove the filter holder and throw away the used coffee pod.
Dispensing hot water
Warning: To avoid the danger of burns, be aware that dispensing may be preceded by small jets of hot water and only move the steam wand by means of the protective handle.
1 Place a container or a glass under the classic milk frother. Turn the hot/water steam knob anticlockwise (Fig. 6).
2 Turn the selection knob to the coffee position. (Fig. 8)
- The machine starts dispensing hot water.
3 Turn the selection knob to the standby position when the machine has dispensed the desired amount of water (Fig. 9).
4 Turn the hot/water steam knob clockwise. Remove the container or the glass (Fig. 10).
Frothing milk
Warning: To avoid the danger of burns, be aware that dispensing may be preceded by small jets of hot water and only move the steam wand by means of the protective handle.
1 Place a cup under the milk frother.
2 Turn the selection knob to the steam position
- The 'machine ready' light goes out.
3 Wait until the 'steam ready' light lights up. Then the machine is ready to dispense steam.
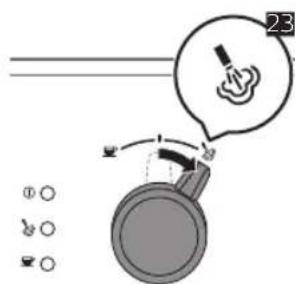
4 Turn the selection knob to the steam position to let out any water in the milk frother (Fig. 23).
5 Turn the selection knob back to standby position. Remove and empty the cup
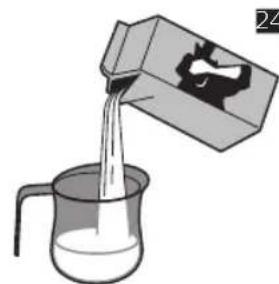
6 Fill 1/3 of a jug with cold milk (Fig. 24).
7 Place the jug under the milk frother.
8 Turn the hot water/steam knob anticlockwise. Gently stir the jug to create foam and turn the hot water/steam knob clockwise.
9 Remove the jug.
10 Place a cup under the milk frother, let the rest water and milk flow out of the milk frother. Remove the cup.
Cleaning
Regular cleaning and descending prolongs the lifetime of your machine and ensures optimum quality and taste of your coffee.
Warning: Do not immerse the machine in water or any other liquid.
Warning: Never use scouring pads, abrasive cleaning agents or aggressive liquids to clean the machine.
Warning: Always unplug the machine and let it cool down before you clean it.
Warning: Only use a soft, damp cloth to clean the machine.
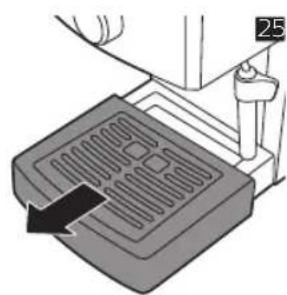
Cleaning the drip tray
1 Pull the drip tray out of the machine (Fig. 25).
2 Empty and rinse the drip tray under the tap.
3 Slide the drip tray back into the machine.
Cleaning the classic milk frother (specific types only)
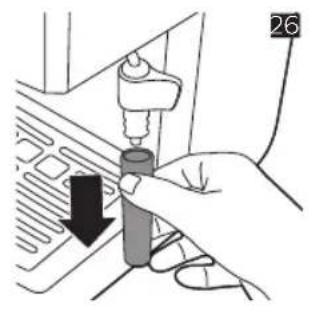
Note: After brewing milk-based beverages clean the classic milk frother.
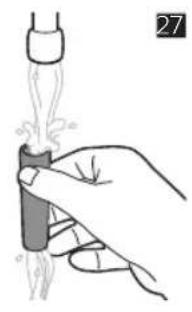
1 Remove the tube of the classic milk frother (Fig. 26).
2 Rinse it with fresh water (Fig. 27).
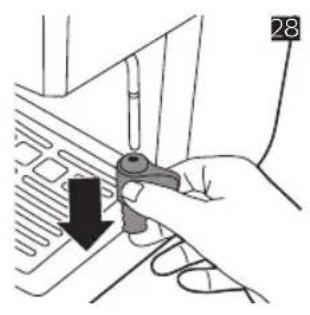
3 Remove the plastic handle of the classic milk frother from the steam wand and rinse it with fresh water (Fig. 28).
4 Clean the steam wand with a wet cloth.
5 Slide the plastic handle back onto the steam wand.
6 Slide the tube back onto the steam wand.
Cleaning the pressurized filter holder
1 Remove the ground coffee filter or coffee pod filter from the filter holder and rinse it thoroughly with hot water.
14 English
2 If present, remove the pod filter adapter from the filter holder and rinse it thoroughly with hot water.
3 Rinse the inside and outside of the pressurized filter holder with hot water (Fig. 14).
Caution: Do not clean the pressurized filter holder in the dishwasher. This will damage the pressurized filter holder.
Descaling
Please use Gaggia descaler only. Under no circumstances should you use a descaler based on sulfuric acid, hydrochloric acid, sulfamic or acetic acid (vinegar) as this may damage the water circuit in your machine and not dissolve the limescale properly. Not using the Gaggia descaler will void your warranty. Failure to descale the appliance will also void your warranty.
Descaling procedure
1 Insert the pressurized filter holder in the brew unit.
2 Remove and empty the water tank.
3 Pour half of the descending solution into the water tank. Fill the water tank with fresh water up to the MAX indication. Place the water tank back into the machine.
4 Set the main switch to 'I' to switch on the machine. Turn the selection knob to the standby position.
5 Place a container under the classic milk frother.
6 Wait until the coffee ready light lights up and brew two cups (of approx. 150ml each) of water.
7 Set the main switch to 'O' to switch off the machine.
8 Let the descending solution work for 15-20 minutes with the machine switched off.
9 Set the main switch to 'I' to switch the machine back on.
10 Fill two cups (of approx. 150ml each) with hot water from the classic milk frother.
11 Set the main switch to 'O' to switch off the machine and wait 3 minutes.
12 Repeat steps 9-11 until the water tank is empty.
13 Rinse the water tank and fill it with fresh water up to the MAX indication.
14 Place a container under the filter holder.
15 Set the main switch to 'I' to switch on the machine and turn the selection knob to the standby position.
16 Let the machine dispense water until the water tank is empty. Set the selection knob to the standby position.
17 Fill the water tank with fresh water up to the MAX indication.
18 Place a large container under the classic milk frother. Turn the hot water/steam knob anticlockwise.
19 Turn the selection knob to the coffee position and let the machine dispense water until the water tank is empty.
20 Turn the selection knob to the standby position.
21 Turn the hot water/steam knob clockwise.
22 Rinse the machine by repeating steps 13-20 one more time.
23 Remove the filter holder from the brew unit by turning it from right to left and rinse it with fresh water.
24 Fill the water tank with fresh water up to the MAX indication.
The machine is now ready for use.
Troubleshooting
This chapter summarizes the most common problems you could encounter with the machine. For support, contact your local dealer or an authorized service center. Contact details are included in the warranty booklet supplied separately or visit www.gaggia.com/n-m-co/espresso/world-wide or www.gaggia.it/n-m-co/espresso/contact.
Problem Possible cause Solution
| The machine does not switch on. | The machine is not connected to a wall socket. | Connect the machine to a wall socket. |
| The main switch is in off position. | Make sure the main switch is in on position. | |
| The pump is very noisy. There is no water in the water tank. | Fill the water tank with water. | |
| The water tank is not positioned correctly. | Place the water tank back into the machine and push it downwards until the reference marks are visible. | |
| The coffee is too cold. The filter holder is not inserted for preheating. | Preheat the filter holder. | |
| The 'machine ready' light was off when you turned the selection knob to the coffee position. | Wait until the 'machine ready' light lights up. | |
| The cups are cold. Preheat the cups with hot water. | ||
| The milk does not froth. You used a type of milk that is unsuitable for frothing (powdered milk or low-fat milk). | Only use cold whole milk for frothing. | |
| It is not possible to prepare a cappuccino. | The classic milk frother is not clean. | Clean the classic milk frother. |
| There is no steam left in the boiler. | Prime the circuit. | |
| No coffee or only drops of coffee come out of the machine. | The hot water/steam knob is in the 'open' setting (turned anticlockwise). | Turn the hot water/steam knob to the 'closed' setting (turned clockwise). |
| Scale has built up inside the machine. | Descale the machine | |
| The ground coffee filter or coffee pod filter in the filter holder is clogged. | Clean the ground coffee filter or coffee pod filter. | |
| You used an unsuitable coffee pod. | Use a coffee pod suitable for this machine. | |
| The ground coffee you use is ground too finely. | Use ground coffee with a coarser grind. | |
16 English
Problem Possible cause Solution
| The ground coffee was pressed into the ground coffee filter | Make sure you do not press the ground coffee into the ground coffee filter. | |
| There is too much ground coffee in the ground coffee filter. | Reduce the quantity of ground coffee in the ground coffee filter. | |
| Coffee flows out along the edges of the filter holder. | You have not attached the filter holder to the brew unit properly. | Attach the filter holder correctly. |
| The upper edge of the filter holder is not clean. | Clean the upper edge of the filter holder. | |
| The coffee pod is not inserted correctly. | Insert the coffee pod correctly. Make sure its edges do not stick out beyond the edge of the filter holder. | |
| There is too much ground coffee in the ground coffee filter. | Reduce the amount of ground coffee in the ground coffee filter with the measuring scoop. | |
| The machine switches off while brewing coffee or dispensing hot water (RI8437, RI8435, RI8433). | The energy saving modus is on | Set the main switch to 'I' to switch the machine back on. |
Warranty and support
For support, contact your local dealer or an authorized service center. Contact details are included in the warranty booklet supplied separately or visit www.gaggia.com/n-m-co/espresso/world-wide orwww.gaggia.it/n-m-co/espresso/contact.
Recycling
This symbol means that this product shall not be disposed of with normal household waste (2012/19/EU) (Fig. 29).
- Follow your country's rules for the separate collection of electrical and electronic products. Correct disposal helps prevent negative consequences for the environment and human health.
Introduktion
Inledande installation
Pnp6op COOTBeTCTByET BcEM PpIMeHmblm CtaHdapTaM IN HOpMaM NO BO3deICTBIO 3NeKtpoMaHHTbIX Nonei.
O630p KoΦeMaʌnHbI
1 INHdkaTop nHTaHn
2 INHnkaTop roTOBHOCTn npa
3 INIINKaTOp rTOBHOCTN KOfemaLIHHbI
4IpeekIOUaTeJB BbIbopa peKIma
5ΦnIbTp MOnToTkoΦe
6FepMeTnHbI dpKaTeJIb fNbTpA
7Bapouhanypynna
8 KpbIuKa noDOnHa IJIa KaIeJIb (TOLbKO IJIa HeKOTOpbIX MoJeIeI)
9 POnDOnIg KapeIb
10ПользовateлбскийИнтерфein
11PonctabKa nOu yaUKN
12 Pe3epByap nla Bovbi
13 Kpbiuka pe3epByapa dny BODbi
14 Mepna loxka dnn MOtoTOKoe
15AaTepnIbTpna nnaKeTnKOB(TonbKO nHeKOToPbIX MoJeNe)
16 Φινλτρ ἀπη πακετικόν κοφε (ΤοῦκΟ ἀπη ἡκοτοβρόν Μομηη)
17ГнздяakceccyapOB
18 He3do dIy MePHo IooKu dIy Kofo
19 PpeekIIOuateIb ropuey BoDbl/napa
20 Klaaccnueckn BCHeHbAteIb MONoka (ToIbKO IJRA HeKOTOpbIX MoJeNei)
21 Lhyp nitaHn
22 PpeekuateJIb nIaHnB (B moJeIax RI8437, RI8435, n RI8433 c peekuOaTeJem peKIma 3Heproc6epeKeHH)
Перва установka
1CHIMNTe C KOfemaHHb BeCb ynaKOBouHbMaTePnAJI.
2 YcTaHOBnTe KofoMaUHHy Ha CToIe IIN pa6OeuN IOBepXHOCTHa IOCTaTOUHOM paCCToHNN OT BOIOPOBOJHO TKeHa, paKOBnHi NICTOuHKnOB TeJIa.
IpimueaHHe. Hnd KofoemaunHo, 3a Hei n o6eHM CTOpOHAM DoJHKHO OCTaBaTbCn He MeHee 15 cm Cbo6oHoro npoctpaHCTBa.
Poirotovka npnbopa K pa6ote
1 CHIMTe KpbIuKy pe3epByapa Inra BoNbi N3BneKNTe pe3epByap IInra BObI n3 KOfemaunHbI (Pnc. 3).
2 CnoonocnTe pe3epByap. HanoHnTe pe3epByap NITbeBOB BOdo IO OTMeTKn (Pnc. 4) MAX.
3IomeTepeepByapIINBOnbIO6paTHOBKOfemaunHyHnHaabNTeHaHrO Bn3,NOKa He 6yUT BnHbI(Pnc.5)OTMeTKN-Yka3aTeNI.
4 3aKpoIe pe3epByap IJI BODbl KpbIuKOJ.
3aNoJIHeHne KOHTypOB
Pn nepBOM nCnoB3OBAHn KofoMaunHbI, noCne noaun npa nnecn pe3epByap Iyra Boblnyct, BbINOHHTe CneDyUoUne DeiCTBn.
1NoctabTe COcyIIOB BCIEHINBaTeIe MoJIoka I NOBepHITe IpeKJIIOUaTeIb rOpJeuB BOIbl/napa npOTNB YacBOB ONPeJIKN (Pnc.6).
2 BcTaBbTe Bnky B po3eKy 3neKtpocetN. YcTaHOBtE nepeKIOuAteIb NITaHIN B NOIOKeHne (l), UTO6bl BKIOUHTb KOfemaunHy (Pnc.7).
- 3aogopntcHndkaTOp nTaHn.
3 NopepHnTe nepeKlIOuTaIeB BbIbopa peKmAb nolOnKeHne (Pnc.8) «kofoe
- 13 BCnHnBaTeIa MoIoka HaUHeT BbITeKaTb Ropuay Boda.
4 Kornda pe3epByap IINB OdbI ONycteeT, NOBepHnTe nepeKIOuAteIb Bbl6opa peKIMa 0paTHO B noloxHeHne (Pnc.9) oXnuaHna.
5 NopBepHnTe nepeKIOuAteIb rOpaue IBObl/napa no yacOBoi CTpeKe. Y6epHTe cocyD (Pnc. 10).
LnkI npomblBbpyHyIO
1 CnoJIOCHnTe pe3epByap. HAnOJIHnTe pe3epByap NITbEBoB BOIoI Do OTMeTKN (Pnc. 4) "MAX" (MAKC.).
2 NomeCTte pe3epByap IJI B0bI O6paTHO B KOeMaUNHy HnHaNaBNTe Ha HeRo BHN3, NOKa He 6yUT BnHbI (Pnc.5) OTMeTKu-Yka3aTeJIN.
3 NocTaBbTe COCyI, NOI KNaCCnueCKIM BCneHNBaTeIeM MONoka I NOBepHIne nepeKIIouaTeIb ropaeH BoDbl/napa npOTNb YacOBOn CTpeIKN (Pnc. 6).
4 NopBepHnTe npeKJIouaTeIb BbIbopa peXIMa B IIOJIOKeHne (Pnc. 8) "Coffee" (kofoe).
- 103BOJIbTe KoΦeMaUHHe IOnaBaTb BOny Do Tex NOp, Noka pe3epByap He 6yJeT onyctOuH.
5 NopBepHnTe nepeeknOucaTb Bb6opa peKIMa 6paTHo B nOIOKeHne (Pnc.9) OxuaHa
6 HanolHnTe pe3epByap nITbeBOB BOoI IO OTMeTKn "MAX" (MAKC.).
7 YcTaHOBnTe repMeTnHbI IepKaTeIb FInIbTpBa BapOHyI rpynny Cn3y (Pnc. 11).
8 NOBepHnTe DepeKatEnb HnIbTpca CneBa HanpaBo Do ynpa HOTNcyTte pyKOy TepKaTeJI. Puyka aBTOMaTnueckn OTCKoHT o6paTHO (Pnc. 12) BneBO.
9 NocTaBbTe cocyd noD depKkaTeNb (Pnc. 13) fNlbTpa.
10 NopBepHnTe nepeKIOUaTeNb BbIbOpa peKIMa B noIOJKeHne (Pnc.8) "Coffee"(koPe). -No3BOJIbTe KoΦeMaUNHe NOJaBaTb BOy Do Tex Nop, Noka pe3epByap He 6ydt OpyToWeH.
11 Korda pe3epByap IINB BOIbI ONyCTeET, NOBepHnTe nepeKIOuATenb Bbl6opa peKIMa o6paTHO B noJokHeNc (Pnc. 9) OxuaHn.
12 HanoHnTe pe3epByap NITbEBoB BOIOI Do OTMeTKN "MAX" (MAKC.) ndoJNTecb BKIOUeHn IHNiKaTopa rTOBHOCTN KoΦemaunHbl K pa6Ote.
13 NOBepHnTe DepeKaTeIb FInbTpca CnpaBa HaneBO, YTo6bI INBLeuey erO IN3 BapouHOr rpynnbl, n cnoLoCHnTe erO nITbeBOB BOdoi (Pnc. 14). KoFemaunHa rOToBA K IcNoIb3OBaHIO.
PnroToBJIeHne HApNTka n3 MoNtOrO Kofo
IpeynpekdeHne! B npouecce npiroTOBHeHnHTka He nbTaTeCb NOBepHyTb n ChrTb repMeTuHbI DePkaTeIb PhIbTpA, qTo6bl He o6KeYbcra.
1PppeTe repMeTnHbI depKaTeIb foeped NaJOM npriTOBJIeNIA KOfe.
2 YcTaHOBInTe IepKaTeIb 0nIbTpBa BapOHyIO rpynnny Cn3y (Pnc.11).
3 NopepHnTe depKaTeIb fIJIbTpca CneBa HAnpaBO Do UeJIyka N OTNcyTnTe pyKoRTky (Pnc. 12) depKaTeJIa. Pyka cIerka otCKOHT o6paTHO BNeBO.
4 NOBepHnTe nepeKJIIOuATEIb BbIbopa peKIMa B IIOJIOKeHne «KOe», n rOpayar BOJa HauHET BbITEKaTb IV3 OTBepCTn (Pnc. 8) dIy BixOda KoFe.
5 PnroToBbTe OHy ChaKy ropuey BoBbl. NOBepHnte nepeKIOuataIb Bbl6opa peKIma 6paTHO BNoIOKeHHe OxHaHry, YTObbl OCTaHOBHTb npoecc npiroTOBneHry (Pnc.9).
6 NOBepHnTe depKatEn b nIbtpa cnpaba HaneBO, UTo6bl n3Bney erO n3 KoΦeMaunHbl, N BblneTe octabuioCBAOy (Pnc. 15).
PnmuueaHne. YdaJIte Bce octaTK KoPe c KpaJepKaTeJI FnIbTpa.
7C NOMOJIbIO MepHOI NOJKN I NOMeCTHcTe MONOTbIK KOeB REpMeTnUHbI DEpKaTeJIb ΦJIbTpA.
- UTo6bl npnroTOBnTb OndHy ChaShky Kofo, nCNoJb3yIte 1-1,5 MepHbIX loJHKM MoIToTOr Kofoe.
- UTo6bl npnroTOBnTB DBe vaUkN Kofoe, nCnoJIb3yIe 2 MepHbIX loKKn MoJIoTOrO Kofoe (Pnc.16).
IpimueaHne. FepMeTnUHbIepeKHaTeB fNtpa aBTOMaTnueckn yTpam6oBbIBaet MoToBIO KoFe. Het Heo6xOJIMOCr TEJaTb 3TO CaMOCToTeJbHO.
8 BctaBbTe fNJIbTp IINI MOIOTOro Kofo B rpeMteuHbI depKaTeNb (Pnc. 17) fNJIbTpa.
IpiMeaHne.Ipi nepBOM nCnOJIb3OBaHn KoΦeMaUHbI ΦNJIbTp IJRA MOnOTOro KoΦe yKe yCTaHOBNeH.
9 YctaHOBnTe IepKaTeIb 0JIbTpBa BApOHyIOpyPiIy.
10 NopBepHnTe depKaTeIb fIbTpA cIeBa HappBO Do IeJyKa n OTNcyTnTe pyKoRTKy (Pnc. 12) depKaTeJIy.Pyka cIerka OTCKOHT o6paTHO BneBO.
11 NomeCTnTe OndHy nIIN DBe YauIKN NOI repMeTnHbI depKaTeJIb (Pnc. 18) fNlbTpA.
PnmuueaHne. Y6eNTecb, yTO qAaIK paCnoJIOKeHb TOUHO NOI OTBepCTNAM IJI POJaH Kofoe.
12 NObepHnTe nepeKIOUoateIb Bbl6Opa peKIMa B NOIOKeHne KoFe. - KoFemaunHa NaHET npiroTOBHeHne KoFe.
13 KaT TOnbKO ChaWK N6 ByyDyT 3aONHeHbI HxKbIM KOINueCTBOM KoOe, NOBepHInTe NepeKIOUaTeJIb BbIbopa peKIMa o6paTHo B IIOJOKeHne OxNJaHn.
14 N3BnKeHte repMeTnHyb IepKaTeIb FInbTp a n onyctouHte erO. PpOMoTe repMeTuHbI depKaTeIb FInbTp a nD KpaHOM.
PnroToBJIeHne HAnNTka n3 NaKeTNIKOB Kofo
PnmuemueaHne. C naketukamn Kofoe nCnoB3yIe ToIbKO fNlbTp IJnaKetIKOB Kofoe n aanTep dJra naKetIKOB Kofoe.
1C nOMOu bU qaHON IIOKKN N3BnEKeNTe fNbTp dIa MOnOTOro KoFe I3 repMeTuHoro DepeKaTeNa (Pnc. 19) fNbTpA.
2 UctaHOBtE aIaITep fNbTpTa IJIa NaKeTnKOB BbIyKIOI CTOpOH BHN3 B rEpMeTuHbI depKaTeIb (Pnc. 20) fNbTpA.
3 PomeCTIe fNbTp IJIra naKeTnKOB Kofoe B DepeKaTeIb (Pnc. 21) fNbTp aIOBepx aAnaTepa IJIra naKeTnKOB Kofoe.
4 UctaHOBnTe repMeTnHbI depKaTeJIb fNJIbTpBa BapOHyIO rpynny Chn3y (Pnc. 11).
5 NopepHnTe depKaTeIb fIbTp a CneBa HnpaBO Do IeJyKa n OTnyCTnTe pyKoTky (Pnc. 12) depKaTeJI. Pyka cnEgKa noBepHETcBneBO.
IpimechaHne. Ipeed npiroToBnHeHem nepBoi ChaAkn KoFe Heo6xOIMo nporpeTb repMeTuHbI depKaTeIb fInlbTpA.
6 PnroToBbTe OHy ChaKy ropuee BoDbI. NOBepHnte nepeKIOuateBbIbopa peKIma o6paTHo B NoIOKeHHe OxNdaHn, YTObbl OCTaHOBNTb npOceC pnpiroTOBneHn (Pnc. 9).
7 NopBepHnTe IepKaTeJIb fIJIbTpca Cnpaba HaneBO, YTO6bl N3BJIeYb eRO n3 KOΦeMaunHbI, N BblneTc octabuioCBAOy (Pnc. 15).
8Помecntte NaKeTnK KoFe BДерЖaTeJIb (Pnc.22)ФиЛьТpa.
PpmeHne. PpOBepbTe, yTo6bI 6ymara naketnKa He BbIXOJNa 3a KpaJ epKataJIy fJIbTpa.
9 YcTaHOBnTe DepeKaTeJIbФIJIbTpBa BApOHyIO rpynny CHN3Y.
10 NopBepHnTe IepKaTeIb fIInbTpca CneBa HnpaBO nO UeUcKa IOTnyCTHe pyKoTky IepKaTeJIa. Puyka cIerKa IOBepHETcBJIeBO.
11 NocTaBbTe yawky nOJ depKaTeJb 0nJbTpa.
12 NOBEPHNTe nepeKIOUOaTeIb BbIbopa peKIMa B noJoxHeNc (Pnc. 8) «kofoe》. - KoFemaunHa NaHET npnroTOBJIeHne Kofoe.
13 KaT TOnbKO uAaKa 6ydt 3aONHeHa HxKhbIM KOJIueCTBOM KoFe, NOBepHnTe nepeKnIOuTaTeNb BbIbopa peXIma 6paTHo B nOLOKeHne OxNJaHn.
14 BbHbTe depKaTeIb fNbTp a yTnIu3npyIte nCNoIb3OBAHHbI naKeTnK KoFe.
PoaayraopaeBodbl
IpeynpejdeHne! Bo n36eJHne OXoROB He 3a6bIBaITe, yTO nepei noJaeyr opeyen BObl n3 np6opora mOryT 6pbI3raTb TOHKne cTpyn rOpaye BODbl, n pRn nepemeuen Tpy6Kn BbIXOda npapa depKHTe ee ToIbKO 3aAunTHyIO pykY.
1NoctaBbTe cocyud nn nCtKaH noJ knaccnueckn BcneHbAteIb MoNoka. NObepHnte IpeekuOHTeJIb ropayeB BOdbI/napa npotNB yacOBoCTpeJIKN (Pnc.6).
2 NopBepHnTe nepeKlIOuTaTeIb BbIbOpa peKmAb nIoXKeHne (Pnc.8) «KoΦe»
KofoemaunHa haHET noauly ropeuBbI.
3 KaK ToIbko Yauka 6yJeT 3aONHeHa HxHbIM KOINueCTBOM BoDbI (Pnc. 9), NOBepHnTe NepeKluOaTeJIb BblOpa peKIma o6paTHo B nIoJKeHne OxNJaHn.
4 Nobeprnte nepeeknouateIb ropueB BOIb/napa no yacobon cTpeNke. Y6epnte cocy, nnn cTaKaH (Pnc. 10).
PnroToBJIeHne MoNoHOn NeHKn
IpeDynpexdHne! Bo n36eXaHne OxOroB He 3a6bIBaITe, yTo nepei npdauei ropayei BObl n3 np60pa MOyT 6pbI3raTb TOHKe cTpyn rOpayei BObl, i npri nepemeuhen Tpy6Kn BbIXoDa npapa depKHTe ee ToIbKO 3aAunTHyIO pykY.
1NoctaBbTe YaUk Ky NOI BCNeHnBaTeJb MOnoka.
2 NObepHnTe nepeKIOuOaTeJIb BbIbopa peKIMa B NoIOXeHne «nap. - INHnKaTOp rOTOBHOCTN KOfemaUNHb I BbIKIOUHTCJ.
3 POnOxIInTe, noka 3aTogntc HnDnKaTOp rTOBHOCTn npa. Tenepb KoPeMaunHa rTOBa K noJaue npa.
4 NOBepHnTe IpeekIIOuateJIb BbIbopa peXIMa B nIOJIOKeHne «Iap», YTO6bl BOJa BbITEKJIa 13 BCNEHBaTeJIa (Pnc.23) MOnoKa.
5 NOBepHnTe nepeKJIouaTeIb Bbl6opa peKIMa o6paTHO B nIoJKeHne OKnJaHn. Y6epnte yauKy I BblNeIte n3 Hee KUnIKoCTb
6 3aONHInTe KByBUnH XOIOINbIM MOJOKOM (Pnc.24) Ha 1/3.
7 NocTaBbTe KByuHn IOB BCNeHbBaTeJIb MOJIOka.
8 NOBepHnTe nepeKIOuAteJIb ropueB BOIy/napa npOTNB YacBOB CTpeJIKN. AkkypaTHO NOBOPaHBAIe KUBIIN H DnI CO3DAHNI PeHbI N NOBepHnTe NepeKIOuAteJIb rOpueB BOIy/napa No YacBOB CTpeJIke.
9 Y6epeNTe KyBLuH.
10 Nocabte yawky noB CneHnBaTeJb MOJOKa nnoOJNTe, NOKA OCTaTKN BOdbI MOnJOKa BbITEKY IN3 BCNEHnBaTeJIr MOJOKa. Y6epnte yawky.
OuNTka
PeyraHn aOnctKa n ydaIeHne haknn npoJIeBaIc pOK cnjXkbI KoΦemaunHbI n rapaHTnpyIO TONIMAbHoE KaueCTBO N BKyc KoFe.
Ipeynpejckdne! 3anpeaetcno pykaB KoemauHb B Ody nI IIO6yIO npryu JIKKOCTb.
IpeynpeKdHne! He nCnoB3yIe IJRA OUncTK KoΦemaUNHbI r6KN C a6pa3NBbIM NOKpbITHeM, a6pa3NBbIe NN arpeccNBbIe YNCTaUcne CpeDCTBa.
IpeynpeKdHne! Npea TeM KaK npCTyNTb K OuchTe KoΦeMaunHbI, 063aTeJbHOOTKIOUHTe ee OT 3JeKTPocetn I daTe eN OCTbTb.
IpeDynpexKdEHe! IJRA ONUCTKN KOeMaunHbI NOLb3yITecb TOnbKO MrgKo BnaXHOI TKaHbIO.
142 Pycckn
OuNTka PoiDIOHa IJRA KaIeJIb
1BbITAHHTe NOIDHOJ KAneJIb I3 KOfemaunHbI (Pnc. 25).
2OuCTHTeNoDDOHJIAKaIeNBINPpOMoTe eeroNDCTpyeBOdbI.
3 3aBnHbTe POnDnOH nJa KapeJIb o6paTHo B KoΦemaunHy.
OuNTka KlaaccnueckoRO BCpeHnBaTeJRA MOLOKA (ToJIbKO IJIa HeKOTOpbIX MoJeIeI)
PpimueaHne. Pocne npriTOBHeHn HaPiNTka Ha MOnOuHO OCHOBE OChTe KlaaccNueckn BCpeHbATEJIb MOJoka.
1CHNMMTe Tpy6ky KJIaccnueckoro BCnEHNBaTeIa (Pnc. 26) MoJIOka.
2PpOMoIe ee NITbEBoB BOIO (Pnc. 27).
3 OToe,INHHe TnactIKOByIO pyky Knaaccnueckoro BcneHbTeNa MoIoka OT Tpy6Kn BbIXoJa npa n IpomOnTe ee NITBeBOB BOIoN (Pnc. 28).
4IpoTpnte Tpy6ky BbIXOJa napa BaJAAHHo TKaHbIO.
5 BCTaBbTe nlaactNKOByIO pyky o6paTHo Ha Tpy6Ky BbIXOJa npa.
6 YctaHOBnTe Tpy6ky 6bpaTHo Ha Tpy6Ky BbIXOda napa.
OuNTka repMeTnHOro depKaTeIaΦnIbTpα
1N3BnKeNTe fHbTp dIy MoIToTO KoFe IIN FInbTp IJI NaKeTNIKOB KoFe I3 IepXaTeJIa HnIbTp a N TUsaTeNbHO npOMOIte ropuee BOIOJ.
2 N3BneKeNte aanTep fNbTpA nn naKeTkoB KoFe (ecn OH yCTaHOBneH) n3 epKaTeJn FnbTpA n TuaTeNo npomOte ero Tropyue BoDOn.
3 TuaTeNbHO npOMoIe rePMeTnHbI depKaTeNb fInbTp a ropaye Bdoi (Pnc. 14) n3Hytpn n ChapyKn.
BHMaHne! He cJeIyET ouHuaTb repMeTuHbI depXkAteIb fNlbTpBa B NocyDoMoeHoi MaHHe, UTo6bI He NOBpeDnTb erO.
OuNTka OT HaKIN
OuNCTka OT HaKINI
IcnoJb3yIe ToJIbKO cpeCTBO OunchTNO tHaKINn Gaggia. Hn npK KaKx o6ctOaTeJBCTBax He IcNoJb3yIe CpeCTBA OunchTNO OT HaKINn HA OCHOBE cepHO KNCOTbl, COJHO KNCOTbl, CyIbΦAMINOBOI KNCLOTBI INI YKCycHoi KNCLOTBI (YKCyc), NocKoJIbKY 3TO MOKeT pInBeCTNI K IOBpeJKeHIO KOHTpya UINPKUJIaCNI B OdbI B BaUeI KoΦeMaUHHe I He paCTBOpReT HaKINb DOJHKbIM O6pa3OM. IcNoJb3OBaHne dpyrOro CpeCTBa, OTIIuHoro OT CpeCTBa OunchTNI OT HaKINn Gaggia, npInBeTeK aHHyIpOBaHIO rapaHTNI. HeBbIOnHeHne npOeDypbl OunchTNI npInbopa OT HaKINn TaKke npInBeTeK aHHyIpOBaHIO rapaHTNI.
Ppocecc ounstkn OT haKnPi
1YCTaHOBnte repMeTHnHbI depKaTeJIb fNJIbTpBa BApOHyIO rpyiNy.
2 CHIMnTe pe3epByap IIN BOIbI IN CJIeITe BOyIy.
3 HaneTe noNoBHy paCTbopa dny ydaJeHnaKaHnB pe3epByap dny BoDbI. HanOnHnTe pe3epByap nITbeBOB BOIOI DO OTMeTkn «MAX» (MAKC.). YcTaHOBtpe pe3epByap dny BoDbI o6paTHO B MaShHy.
4 TTo6bl BKNIOUHTb KOfemaunHy, yCTaHOBNTe NpeKIOUOaTeIb NITaHnB NIOJOKeHne «I». NOBepHInTe nepeKIOUaTeIb BbIbopa peKIMa B NOIOJOKeHne OKKINDaHnA.
5 NocTaBbTe COCyD NOI KNaCCnueckn BCneHnBaTeJb MOIoka.
6Iokntecb, KOrda 3aRopntc HnHikKaTOp rTOBHOCTN KofoMaunHbIK npiroTOBHeHIO Kofo IN npiroTOBbTe DBe yauKu (Osbemom npimepHo 150 m) ropee BOnbl.
7 BbIKIOHTe KOfemaHHy, yCTaHOBnB nepeKIOUaTeIb nITaHnB b NOIOKeHne (O).
8 IOnOxHnTe 15-20 MNHyT, He BkIIOuAra KofoMaunHy, UTo6bI paCTBOp dIra OUnCTKn OT HaKINPiNoJeICTBoBaJ.
9 YTo6bI CHOBa BKNIOUHTb KOΦeMaUNHy, YCTaHOBNTe NepeKIOUaTeNb NITaHnO 6paTHo B NOLOXKeHne «|».
10 HanoJIHHTe KINITKOM DBe YaSHKn (Osbemom npIMepHO 150 MJI) n3 KJIaCCNUeCKoTO BCNEHBaTeJAMOJOKa.
11 BbIKIOUHTe KoΦeMaUSHHy, yCTaHOBnB nepeKIOUaTeIb nITaHnB nOIOKeHne «O», n noIOJHnTe 3 MInHyTbl.
12 NOBTOPaTe DeicTBn 9-11, noka pe3epByap IJRA BObl He onycteeT.
13IpomOHTe pe3epByap IJIa BOdbI HAnoJHnTe ero NITbeBOB BOOnI OOTMeTKn (MAX) (MAKC.).
14 NocTaBbTe cocyd noi depKaTeIb 0nIbTpa.
15 YcTaHOBnTe NepeKJIIOUaTeNb NITaHnB NIOJoxHeHne (I), YTObbl BKNIOuHTb KOeMaUNHy, INOBepHnTe NepeKJIIOUaTeNb BbIbopa peKIma B NIOJoxHeHne OXnDaHn.
16 No3BOJIbTe KOfemaUNHe NOIaBaTb BOny IOn Tex NOp, Noka pe3epByap He 6yJeT onyCTOWeH. YcTaHOBInTe NepeKJIIOuATeJIb BbIbopa peKIMa B NIOJKeHne OxNiuaHn.
17 HanonHnTe pe3epByap NITbeBOB BOIOI DO OTMeTKn «MAX» (MAKC.).
18 NocTaBbTe 6oIbWoOn cocSy nOJ KNaCCnueckn BcneHnBaTeJIb MoNoka. NObepHnte NepeKIOUaTeNb rOpaye BoIbl/napa npOTnB YacOBOn CTpeJIKN.
19 NopBepHnTe nepeKIOuataIb Bbl6opa peKIMa B noIOJKeHne KoFe) I nO3BOJIte KoFemaUHe NOdaBaTb BOy IO Tex nop, noka pe3epByap He 6yJeT ONyCToUHe.
20 NobeprHnTe IepeKJIouaTeIb BbIbopa peXIMMa BIOJIOKeHne OxNJaHnA.
21 NobepHnTe napeKIOUOaTeIb IopRne BOdbI/napa No yacBOB CTpeJIke.
22 NOBTOPNE npoceDpy npombIKBn, BblnoJIHb eue pa3 neCTBn 13 n0 20.
23 CHIMITE DepeKaTeIb fHJIbTp a C BapOuHOI rpynnbl, NOBepHyB erO cnpaBa HAIeBO, IN CNOIOCHNT eRO NITBeBOI BOIOI.
24 HanoHnTe pe3epByap nITbEBoB BOoI Do OTMeTKn (MAX) (MAKC.).
Teneb KofoemaHnHa rTOBa K EKnIyatauN.
Понск и устараенье несправност
JaHbI pa3eI nocBraueH ha6oJe paCnpocTpaHeHHbIM npo6nMaM, C KOTOpbIMN Bbl MoKeTe CTOLKHyTcR pIN NCIOJIb3OBAHN DaHHOr yCTpoiCTBa.
PpO6JIeMa Bo3MOxHna npuynHa Cnoc6bpeuHnA
YnakoBouHbI MaTePnAJIbI, n3rOToBNeHHbI He n3 pNactMaCCbI, coJepeKaT bMyI KApTOH.
一
1
一
1


29
一
1
一
1
一
1
一
1
GAGGIA S.p.A. reserves the right to make any necessary modification.
Sede Legale/Registered Office
Piazza A. Diaz, 1
20123 MILANO
Sede Amminstrativa/AdminISTRATIVE Office
Via Torretta, 240
40041 Gaggio Montano (BO)
+39053477111
www.gaggia.com
GAGGIA
MILANO
- Clean cold water
- Energy saving
- Important safety information
- Warning
- Caution
- Electromagnetic fields (EMF)
- Machine overview
- English
- First installation
- Preparing for use
- Circuit priming
- Manual rinsing cycle
- Using the machine
- Brewing coffee with ground coffee
- Warning: To prevent the risk of burns, do not turn the pressurized filter holder to remove it during brewing.
- English
- Brewing coffee with coffee pods
- Dispensing hot water
- Warning: To avoid the danger of burns, be aware that dispensing may be preceded by small jets of hot water and only move the steam wand by means of the protective handle.
- Frothing milk
- Cleaning
- Cleaning the drip tray
- Cleaning the classic milk frother (specific types only)
- Cleaning the pressurized filter holder
- English
- Descaling
- Descaling procedure
- Troubleshooting
- English
- Warranty and support
- Recycling
- Introduktion
- Inledande installation
- O630p KoΦeMaʌnHbI
- Перва установka
- Poirotovka npnbopa K pa6ote
- 3aNoJIHeHne KOHTypOB
- LnkI npomblBbpyHyIO
- PnroToBJIeHne HApNTka n3 MoNtOrO Kofo
- IpeynpekdeHne! B npouecce npiroTOBHeHnHTka He nbTaTeCb NOBepHyTb n ChrTb repMeTuHbI DePkaTeIb PhIbTpA, qTo6bl He o6KeYbcra.
- PnroToBJIeHne HAnNTka n3 NaKeTNIKOB Kofo
- PoaayraopaeBodbl
- IpeynpejdeHne! Bo n36eJHne OXoROB He 3a6bIBaITe, yTO nepei noJaeyr opeyen BObl n3 np6opora mOryT 6pbI3raTb TOHKne cTpyn rOpaye BODbl, n pRn nepemeuen Tpy6Kn BbIXOda npapa depKHTe ee ToIbKO 3aAunTHyIO pykY.
- PnroToBJIeHne MoNoHOn NeHKn
- OuNTka
- Pycckn
- OuNTka PoiDIOHa IJRA KaIeJIb
- OuNTka KlaaccnueckoRO BCpeHnBaTeJRA MOLOKA (ToJIbKO IJIa HeKOTOpbIX MoJeIeI)
- OuNTka repMeTnHOro depKaTeIaΦnIbTpα
- OuNTka OT HaKIN
- OuNCTka OT HaKINI
- Ppocecc ounstkn OT haKnPi
- Понск и устараенье несправност
Brand : GAGGIA
Model : Viva Deluxe RI8435
Category : Coffee machine