TKG WCL 4 - Refrigerator KALORIK - Free user manual and instructions
Find the device manual for free TKG WCL 4 KALORIK in PDF.


| Brand | Kalorik |
| Model | TKG WCL 4 |
| Product type | Refrigerator |
| Total volume | 155 litres |
| Bottle capacity | 44 bottles (750 ml) |
| Temperature range | 4 °C to 16 °C |
| Number of temperature zones | 2 zones |
| Interior lighting | LED |
| Defrost | Automatic |
| Control panel lock | Yes (automatic or manual) |
| Adjustable feet | Yes (front) |
| Installation | Freestanding or built-in |
| Built-in depth | 610 mm |
| Minimum ventilation distance | 10 cm sides, 8 cm rear |
| Refrigerant | CFC-free |
| Door gasket | Magnetic |
| Shelves | 6 removable chrome shelves |
| Display | Digital (real-time temperature) |
| Standby function | Yes |
| Display in °C or °F | Yes (switchable) |
| Door | Glass |
| Cleaning | Damp cloth, mild detergent, do not immerse |
| Safety | Do not use by children or irresponsible persons |
Frequently Asked Questions - TKG WCL 4 KALORIK
User questions about TKG WCL 4 KALORIK
0 question about this device. Answer the ones you know or ask your own.
Ask a new question about this device
Download the instructions for your Refrigerator in PDF format for free! Find your manual TKG WCL 4 - KALORIK and take your electronic device back in hand. On this page are published all the documents necessary for the use of your device. TKG WCL 4 by KALORIK.
USER MANUAL TKG WCL 4 KALORIK
1 Interior light
2 Removable chrome wired shelves
3 Zone partition
4 Control panel
5 Magnetic partition gasket
6 Tempered glass door
FR
Please read these instructions carefully before using the appliance.
Important: People (including children) who are not able to use the appliance in a safe way, due to their physical, sensorial or mental capacity or their lack of experience or knowledge, must never use the appliance except if they are supervised by a person responsible for their safety or if they previously received instructions concerning the safe use of the appliance. Close supervision is necessary to prevent children from using the appliance as a toy.
Check that your mains voltage corresponds to that stated on the appliance.
Never leave the appliance unsupervised when in use.
This beverage cooler is an electrical appliance. Therefore, do not operate it with wet hands, while standing on a wet surface or while standing in water.
Never leave the appliance unsupervised when taking beverages out or putting them in the cooler. Keep out of reach of children or incompetent persons.
From time to time check the cord for damages. Never use the appliance if cord or appliance shows any signs of damage.
Never move the appliance by pulling the cord. Make sure the cord cannot get caught in any way. Do not wind the cord around the appliance and do not bend it. Keep the power cord away from sources of heat.
Only use the appliance for domestic purposes and in the way indicated in these instructions.
Should the cord be damaged, it must be replaced by a competent qualified service!
Never use the appliance near hot surfaces or in the sunlight.
Never use the appliance outside and always place it in a dry environment.
Stand the appliance on a table or flat surface in order to avoid its fall. Ensure that there is at least a 10cm clearance at the sides, a 8cm clearance at the back of the cooler in order to allow adequate ventilation. Kitchen units (cupboards) should be at least 5cm away from the appliance in order to assure adequate ventilation.
Do not place any other object on top of the appliance
Never use accessories that are not recommended by the producer. They could constitute a danger to the user and risk to damage the appliance.
Plug the appliance immediately into the power outlet, do not use any extension cord or multiple power socket.
This cooler is designed to store wine bottles, however, if placing food inside, ensure that there is sufficient airflow between items.
Do not place hot beverages into the appliance but let them cool down to room temperature before.
Close the cooler door immediately after putting in any items so the inside temperature will not rise dramatically.
When positioned or if moving the appliance, ensure that it is not set horizontally or declined less than 45° or turned upside down.
Should you notice any kind of damage on the appliance, please unplug it immediately and contact a competent qualified service (*)
All repairs should be made by a competent qualified service
Unplug the appliance before cleaning or when it is not in use.
To avoid risk of child entrapment, leave the shelves in place so children can not easily climb inside even when the appliance is in routine use or not in use at home.
Competent qualified service: after sales department of the producer or importer or any person who is qualified, approved and competent to perform this kind of repairs in order to avoid all danger. In any case you should return the appliance to this service.
TECHNICAL DATA
Volume 155 litres
Capacity 44 bottles of 750ml
Adjustable temperature 4°C - 16°C
Without CFC
INSTALLATION
Free-standing or built-in
The appliance can be installed either free-standing or built-in.
Place the wine cooler away from direct sunlight and sources of heat (e.g. stove, heater...) as direct sunlight may affect the acrylic coating and heat sources may increase the consumption of electricity. An ambient temperature below 16°C or above 25°C will hinder the performance of this appliance. Do not install the appliance in a garage or outside. Avoid moist areas.
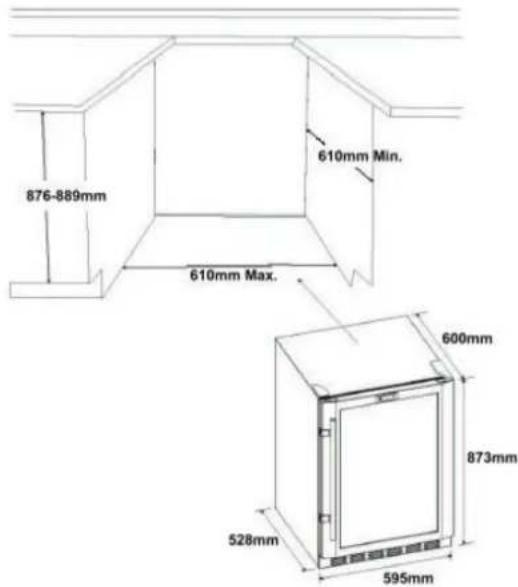
If you want to build it in, respect the dimensions of the illustration. The depth must be 610mm . If you respect these dimensions, you will be able to open the door and to place or remove the shelves.
If the appliance is installed between cabinets, you may need to put a 13 mm wide filler strip or a side panel on the hinge side to prevent the doors of the cabinets from slamming into the wine cooler.
The door of the wine cooler should protrude at least 25mm compared to the surrounding cabinets.
Placing the self-standing appliance
Place the appliance firmly on a solid base. Some appliances have adjustable feet on the front side; use them to level the appliance.

Shelves
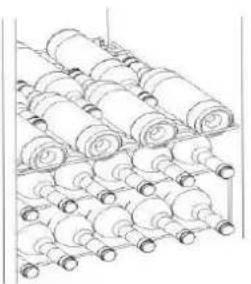
All wine shelves of full depth (i.e. the shelves for 8 bottles) have tabs on both sides which should lock into place when the shelves are put in the wine cooler. To put the shelves in the wine cooler, place the sides of the shelves on the supporting guides in the wine cooler and push back until the tabs slide into place.
You can remove any wine shelf to be able to put larger bottles in the wine cooler. To remove a shelf, first remove all bottles from the shelf, then lift the shelf up and pull it gently out.
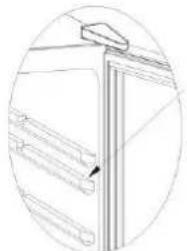
The second supporting guide in the upper zone (counted from the top) is not intended for wine shelves.
OPERATION
CAUTION: Before connecting the appliance to electrical power supply, leave it to stand for about 4 hours, which will reduce the possibility of malfunctions in the cooling system due to transport handling.
Before use, clean the appliance thoroughly, especially in the interior (see Cleaning and Maintenance).
In case the interior accessories are not correctly placed, rearrange them properly (see p. 2). The shelves for 8 bottles have tabs which should lock into place when the shelves are put in the wine cooler.
Make sure that your mains voltage corresponds to that stated on the appliance.
- Stand the appliance on a stable surface near a power socket.
Plug in the appliance to an earthed wall outlet and let it cool down for 3 to 4 hours before putting in wine bottles.
Two temperature zones
The appliance has two temperature zones which are divided by the zone partition. The temperature can be set for each zone independently, and the temperatures are shown on separate displays.
The upper zone has two shelves for 8 bottles each (16 bottles in total).
The lower zone has two shelves for 6 bottles each and two shelves for 8 bottles each (28 bottles in total).
Temperature control and display

The temperature range of both temperature zones is intended for 4°C to 16°C (+/- 3°C) . Average temperature for red wine is 12°C to 16°C .
Average temperature for white wine is 6°C to 10°C .
The displays usually show the average temperature of the temperature zones at that moment. The left display shows the temperature for the upper temperature zone (indicator ) and the right display shows the temperature for the lower temperature zone (indicator ). The pads and indicators on the left are used for the upper zone and the pads and indicators on the right are used for the lower zone. The [Light] pad and the [Lock] pad and the indicators "Lock" and "Stand by" are for both zones.
When the appliance is switched on, all displays and indicators will light up during 3 seconds and a beep will sound. Then the appliance will automatically resume the previous setting (before it was switched off). If the appliance was in the stand-by mode, the "Stand by" indicator will light up.
Manual temperature setting
The temperature of either temperature zone can be set anywhere between 4°C to 16°C by pressing the corresponding temperature up and temperature down pads as follows:
1) Press the pads to increase or decrease the desired temperature in increments of one degree. If you keep one of the pads pressed for 2 seconds, one degree will be added or deducted every half second. When the temperature of a zone is being set, the corresponding display flashes.
2) If no pad is pressed within 3 seconds, your choice will be automatically confirmed. The display does not flash any more.
NOTES: If no setting process is going on (and the display does not flash), the temperature displays can be changed between Celsius and Fahrenheit by pressing and holding the pads on the left at the same time for approximately 3 seconds.
If no setting process is going on (and the display does not flash), you can set the appliance in stand-by mode by keeping the pads on the right pressed at the same time for approximately 3 seconds. The "Stand by" indicator will light up to confirm the setting.
Lock and unlock
If no pad is pressed within one minute, the control panel is locked automatically. You can also lock the control panel yourself by pressing the [Lock] pad. The "Lock" indicator goes on to indicate that the control panel is locked.
To unlock the control panel, keep the [Lock] pad pressed for 3 seconds until the "Lock" indicator goes out.
Refrigeration indicators
The indicator indicates the status of the refrigeration cycle of the corresponding temperature zone as follows:
1) It remains ON during the refrigeration cycle;
2) It goes OFF when the set temperature is reached.
Interior light
Each zone has its own interior light. LED lights are used for durability and energy saving.
To switch the interior lights ON/OFF, simply press the [Light] pad when no setting process is going on (and the display does not flash).
DEFROSTING
Automatic defrosting of the appliance
There is no need to defrost the cooler, because ice depositing on the inner back wall is defrosted automatically. Ice build-up on the inner back wall during the compressor operation will defrost automatically (when the compressor has cycled off). During the
defrosting process, the indicators will go out and the circulation fans will run. Defrost water will drain out passing through the drain outlet in the inner back wall into a drain pan situated above the compressor, from where it evaporates.
Defrost Water Outlet
The interior of the appliance is cooled with a cooling plate mounted in the rear wall. Under the plate there is a channel and an outlet for defrost water. Regularly check the defrost water outlet and the drain channel for blockage. They should always be kept free and clean of particles.
In case ice formation is increased (3-5mm), ice should be manually defrosted: Unplug the appliance and leave the door open to defrost. Never use electric device for defrosting and do not scrape the ice or frost layer with sharp objects.
TROUBLESHOOTING
| Symptoms | Possible cause | Solutions |
| The appliance fails to operate after connecting to electrical power supply. | - There is a power failure.- A house fuse or a circuit breaker has blown. | - Check the power cord is properly connected.- Check the power supply in the electrical outlet |
| The cooling system operates continuously. | - The door is frequently opened or left open for too long.- The door is not properly closed (the door may sag, the gasket may be polluted or damaged).- The appliance is overloaded.- No sufficient ventilation | - Close the door tightly and do not open the door too frequently or for a long period of time.- Take some bottles out of the appliance- Check the air circulation. |
| Water is leaking from the appliance | - The discharge water outlet is clogged.- The defrost water drips over the channel. | - Clean the clogged outlet.- Manually defrost the increased ice layer (see Defrosting). |
| The appliances makes loud and unusual noise | - The appliance is not installed properly.- The accessories or the bottles inside the cooler are not placed correctly. | - Level the appliance and install it on a firm solid base / floor.- Check the appliance does not touch the wall or the kitchen units standing next to it.- Check accessories placed correctly in their position.- Check bottles, tins and other vessels are not touching each other causing rattling and/or vibrations. |
| Frost forming in inner rear wall of the cooler | - The door does not seal well- The door is frequently opened or left open too long.- The content stored in the appliance was warm.- The contents are touching the inner back wall. | - Clean the gasket if it is contaminated or replace it if it is damaged.- Close the door tightly and do not open the door too frequently or for a long period of time.- Do not store warm contents in the cooler.- Do not place contents touching the inner back wall. |
CLEANING
- Unplug the appliance before cleaning it.
Clean the exterior of the appliance with a damp cloth. - Clean the interior of the appliance with a warm damp cloth.
- Dry the exterior and the interior with a soft cloth.
- Remove the detachable accessories in the interior of the appliance and clean with water and liquid detergent. Do not put any part in the dishwasher.
Make sure to keep the gasket clean. - Dust blocking the vents may be removed with a vacuum cleaner.
- Never use metal utensils or abrasive products to clean the appliance.
- Never immerse the appliance in water or any other liquid.
CAUTION: the cooling system of the appliance is filled with refrigerant and insulating substances which should be separately treated and processed. Call your nearest authorised service agent. Be careful not to damage the tubes on the rear wall of the appliance (danger of pollution).
VACATION TIME
- Turn off the appliance and unplug it from the wall outlet.
- Remove all stored foodstuffs.
Clean the appliance (see section "Cleaning").
Leave the door slightly open to avoid condensation, mold or odours.
For short vacations (less than three weeks): leave the appliance operating. - For long vacations (several months): remove all content and unplug the appliance. Clean and dry the interior thoroughly. Leave the door slightly open to prevent odours and mold growth; block the door if necessary.
MOVING THE APPLIANCE
- Turn off the appliance and unplug it from the wall outlet.
- Remove all stored foodstuffs.
- Tape the shelves inside the appliance.
- Tape the door shut.
ENERGY SAVING TIPS
- Install the appliance in the coolest area of the room, away from direct sunlight and heat producing appliances.
Make sure that the door is closed when the appliance is turned on.
PROTECTION OF THE ENVIRONMENT- DIRECTIVE 2002/96/EC
In order to preserve our environment and protect human health, the waste electrical and electronic equipment should be disposed of in accordance with specific rules with the
implication of both suppliers and users. For this reason, as indicated by the symbol the rating label or on the packaging, your appliance should not be disposed of as unsorted municipal waste. The user has the right to bring it to a municipal collection point performing waste recovery by means of reuse, recycling or use for other applications in accordance with the directive.
FR MODE D'EMPLOI
POUR VOTRE SECURITE

- FR
- TECHNICAL DATA
- INSTALLATION
- FREE-STANDING OR BUILT-IN
- PLACING THE SELF-STANDING APPLIANCE
- SHELVES
- OPERATION
- TWO TEMPERATURE ZONES
- TEMPERATURE CONTROL AND DISPLAY
- MANUAL TEMPERATURE SETTING
- LOCK AND UNLOCK
- REFRIGERATION INDICATORS
- INTERIOR LIGHT
- DEFROSTING
- AUTOMATIC DEFROSTING OF THE APPLIANCE
- DEFROST WATER OUTLET
- CLEANING
- VACATION TIME
- MOVING THE APPLIANCE
- ENERGY SAVING TIPS
- PROTECTION OF THE ENVIRONMENT- DIRECTIVE 2002/96/EC
- FR MODE D'EMPLOI
- POUR VOTRE SECURITE
Brand : KALORIK
Model : TKG WCL 4
Category : Refrigerator