Multiquick 5 Vario MQ 5037 Sauce+ - Blender BRAUN - Free user manual and instructions
Find the device manual for free Multiquick 5 Vario MQ 5037 Sauce+ BRAUN in PDF.
| Product type | Multifunctional immersion blender |
| Brand | Braun |
| Model | Multiquick 5 Vario MQ 5037 Sauce+ |
| Power supply | Mains, voltage varies by country |
| Speed control | Variable speed regulator (1-21) and turbo button |
| Main functions | Blending, chopping, whisking, kneading, slicing, grating, french fries, pureeing |
| Included accessories | Blending foot, whisk, measuring cup, 500 ml chopper, food processor (blade, kneading accessory, slicing/grating blades, french fry tool), puree accessory |
| Max chopper capacity | 500 ml |
| Max whisk capacity | 400 ml cream, 4 egg whites |
| Max kneading capacity | 250 g flour |
| Blade material | Stainless steel |
| Cleaning | Motor unit and gear boxes: damp cloth; other parts (except lids): dishwasher |
| Safety | Unlocking buttons, very sharp blades, do not immerse motor unit |
| Usage | Household use only |
| Max usage time (chopper) | 2 minutes, then 4 minutes cooling |
| Country | Made in Germany (probable) |
Frequently Asked Questions - Multiquick 5 Vario MQ 5037 Sauce+ BRAUN
User questions about Multiquick 5 Vario MQ 5037 Sauce+ BRAUN
0 question about this device. Answer the ones you know or ask your own.
Ask a new question about this device
Download the instructions for your Blender in PDF format for free! Find your manual Multiquick 5 Vario MQ 5037 Sauce+ - BRAUN and take your electronic device back in hand. On this page are published all the documents necessary for the use of your device. Multiquick 5 Vario MQ 5037 Sauce+ by BRAUN.
USER MANUAL Multiquick 5 Vario MQ 5037 Sauce+ BRAUN
natural_image
Exterior view of a modern BHAUN brand brush tool (no text or symbols visible on body)Type 4191
www.braunhousehold.com
MQ 5007 Puree+
MQ 5037 Sauce+
MQ 5077 Buffet+
| Deutsch | 6 |
| English | 11 |
| Français | 16 |
| Español | 21 |
| Português | 26 |
| Italiano | 31 |
| Nederlands | 36 |
| Dansk | 41 |
| Norsk | 45 |
| Svenska | 49 |
| Suomi | 53 |
| Polski | 57 |
| Český | 62 |
| Slovenský | 66 |
| Magyar | 70 |
| Hrvatski | 75 |
| Slovenski | 79 |
| Türkçe | 83 |
| Română (RO/MD) 87 | |
| Ελληνικά | 92 |
| Κασακ | 97 |
| Русский | 102 |
| Українська | 107 |
| عربي | 116 |
De'Longhi Braun Household GmbH
natural_image
Illustration of a hand placing a small object into a jar with a downward arrow (no text or symbols)
natural_image
Cross-sectional diagram of a mechanical device with internal components and directional arrows (no text or labels)
natural_image
Illustration of a hand inserting a plug into a microwave oven (no text or symbols)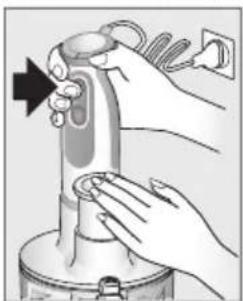
natural_image
Illustration of hands using a handheld device to clean or install a cylindrical component (no text or symbols visible)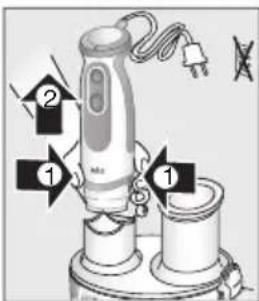
natural_image
Diagram of a coffee maker with a lid and spout, showing a pile of food (no text or symbols)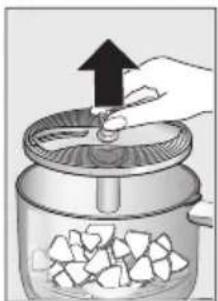
natural_image
Illustration of a hand placing food into a jar with an upward arrow, containing small pieces (no text or symbols)J
| 14a | 1 - 9 | 13 - 11-799 | - 13 | 9 - 13 | 13 - 21 | 9 - 13 | 13 - 21 | ||
| 14b | 1 - 9 | 1 - 9 | 13 - 21 | 9 - 13 | 9 - 13 | 13 - 21 | turbo | ||
| 15 | 9 - 13 | 9 - 13 | 5 - 9 | 9 - 13 | 9 - 13 | 9 - 13 |
Deutsch
Our products are engineered to meet the highest standards of quality, functionality and design. We hope you thoroughly enjoy your new Braun appliance.
Before use
Please read the use instructions carefully and completely before using the appliance.
Caution
- The blades and the tools are very sharp! To avoid injuries, please handle them with utmost care.
- Before plugging into a socket, check whether your voltage corresponds to the voltage indicated on the appliance.
- This appliance is designed for household use only and for processing normal household quantities.
- Always disconnect the appliance from the supply if it is left unattended and before assembling, disassembling or cleaning.
- Switch off the appliance and disconnect from supply before changing accessories or approaching parts that move in use.
- This appliance shall not be used by children. Keep the appliance and its cord out of reach of children.
- This appliance can be used by persons with reduced physical, sensory or mental capabilities or lack of experience and/or knowledge if they have been given supervision or instruction concerning use of the appliance in a safe way and if they understand the hazards involved.
-
Braun electric appliances meet applicable safety standards. Repairs or the replacement of the mains cord must only be done by authorized service personnel. Faulty, unqualified repair work may cause considerable hazards to the user.
-
Be careful if hot liquid is poured into the food processor or blender as it can be ejected out of the appliance due to a sudden steaming.
- The beaker (8) and the bowls (10c, 11f) are not microwaveproof.
Description
1 Variable speed regulator
2 Variable speed button (on/off)
3 Turbo button
4 Motor part
5 Release buttons
6 Blender shaft
7a Whisk gearbox
7b Whisk
8 Beaker
9 Puree accessory
| 9a | Gearbox | |
| 9b | Puree | shaft |
| 9c | Paddle |
10 500 ml chopper «ca»
| 10a | Lid | |
| 10b | Blade | |
| 10c | Bowl | |
| 10d | Anti-slip | ring |
11 Food processor accessory «fp»
| 11a | Lid |
| 11b | Coupling for motor part |
| 11c | Pusher |
| 11d | Filling tube |
| 11e | Lid interlock |
| 11f | Bowl |
| 11g | Anti-slip ring |
12 Blade
13 Kneading tool
14 Tool holder
14a Slicing tool
14b Shredding tools (fine, coarse)
15 French fry tool
Please clean all parts before using for the first time (see paragraph «Cleaning» / C).
Setting the speed
When activating the variable speed button (2), the processing speed corresponds to the setting of the variable speed regulator. The higher the setting, the faster the chopping results. You can adjust the speed conveniently during operation by turning the speed regulator using your thumb or index finger. Maximum processing speed can be achieved by pressing the turbo button (3). You may also use the
turbo button for instant powerful pulses without having to manipulate the speed regulator.
Hand blender (A)
The hand blender is perfectly suited for preparing dips, sauces, soups, mayonnaise and baby food as well as for mixing drinks and milk shakes. For best blending results use highest speed.
- Click the motor part (4) into the blender shaft (6).
- Position the hand blender deep in a beaker or bowl. Then switch the appliance on as described above.
- After use unplug and press the release buttons (5) to detach the motor part. When blending directly in the saucepan while cooking, remove the pan from the stove first to avoid splashing of the boiling liquid (risk of scalding).
Recipe example: Mayonnaise 250 g oil (e.g. sunflower oil), 1 egg and 1 extra egg yolk, 1–2 tbsp. vinegar (approx. 15 g), salt and pepper to taste
Place all ingredients (at room temperature) into the beaker in the order as mentioned above. Place the hand blender on the bottom of the beaker. Operate the hand blender by pressing the turbo button, keep it in this position until the oil starts emulsifying. Then without switching off slowly raise the shaft to the top of the mixture and back down to incorporate the rest of the oil. Processing time: from 1 minute (for salad) up to 2 minutes for more stiffness (e.g. for dip).
Whisk (A)
Use the whisk only for whipping cream, beating egg whites and mixing sponges and ready-mix desserts.
- Insert the whisk (7b) into the whisk gear box (7a) then click the motor part (4) into the gear box.
- Place the whisk in a bowl and only then switch the appliance on.
- After use, unplug and press the release buttons (5) to detach the motor part. Then pull the whisk out of the gearbox.
Tips for best results
- Use a medium-sized bowl.
- Move the whisk clockwise, holding it slightly inclined.
- Whipped cream (max. 400 ml chilled cream, min. 30% fat content, 4–8 °C):
Start with low speed and increase the speed while whipping. - Beaten egg whites (max. 4 eggs): Start with a medium speed and increase the speed while whipping.
Chopper (D)
The chopper (10) is perfectly suited for chopping meat, hard cheese, onions, herbs, garlic, carrots, nuts, almonds etc.
Always chop hard food at full speed (e.g. parmesan, chocolate).
For best results see processing tables (E,H,J) Maximum operation time for the chopper: 2 minutes.
Before chopping ...
- Pre-cut meat, cheese, onions, carrots.
- Remove stems from herbs, shell nuts.
- Remove bones, tendons and gristle from meat.
- Always make sure that the anti-slip ring is attached to the bowl.
Caution: The blade is very sharp! Always hold it by the upper plastic part and handle it carefully.
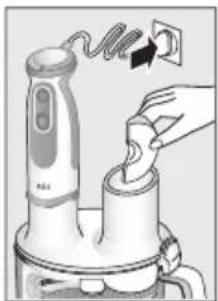
- Carefully remove the protective cover from the blade.
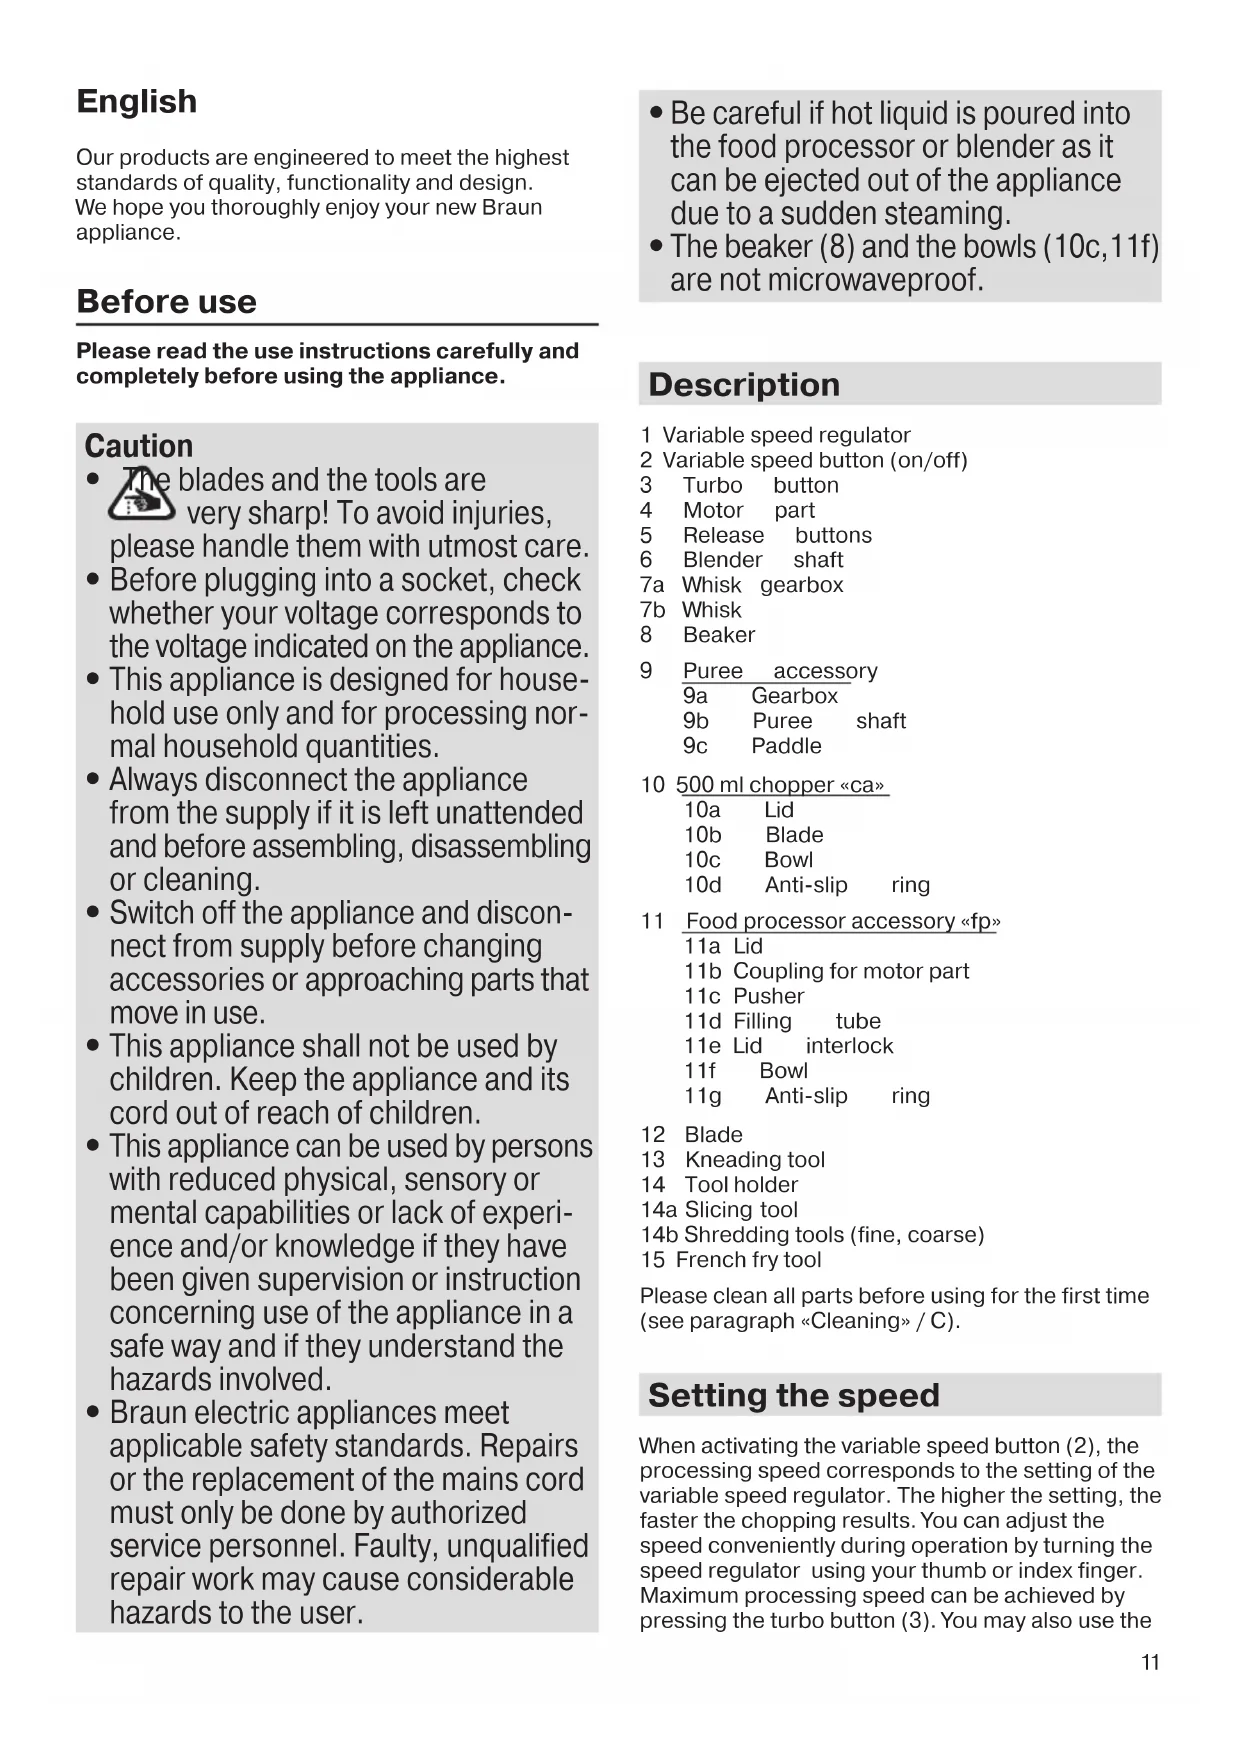
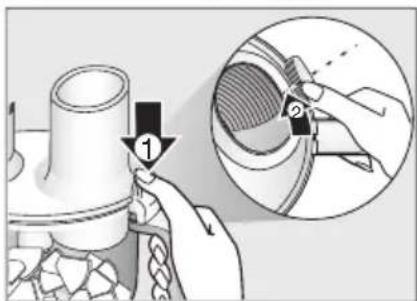
- Place the blade on the centre pin of the bowl, push it down and give it a turn so that it locks.
- Fill the chopper bowl with food and put on the lid.
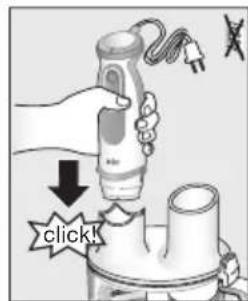
- Click the motor part onto the lid.
- Press switch (2) or (3) to operate the chopper. During processing, hold the motor part with one hand and the bowl with the other.
- After use, unplug and press the release buttons (5) to detach the motor part.
- Remove the lid.
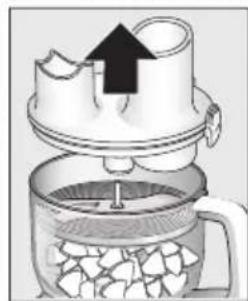
- Carefully take out the blade before removing the processed food. To remove the blade, slightly turn and pull off.
Food processor accessory (F)
The food processor accessory (11) is perfectly suited for
- chopping and blending
- kneading dough (based on max. 250 g flour)
- slicing, shredding, french fries
For best results see processing tables (H + J).
Chopping
Using the blade you can chop meat, cheese, onions, herbs, garlic, carrots, walnuts, hazelnuts, almonds etc.
For best results, please refer to the maximum quantities and speed settings indicated in the processing table of section H.
Do not chop extremely hard food, such as ice cubes, nutmeg, coffee beans or grains.
Before chopping ...
- pre-cut meat, cheese, onions, garlic, carrots, chillies
- remove stems from herbs, shell nuts
- remove bones, tendons and gristle from meat
- always make sure that the anti-slip ring is attached to the chopper bowl
Caution: The blade is very sharp! Always hold it by the upper plastic part and handle it carefully.
Carefully remove the plastic cover from the blade.
- Place the blade (12) on the centre pin of the bowl and give it a turn so that it locks.
- Fill the bowl with food. Attach the lid onto the bowl with the interlock (11e) positioned next to the bowl handle.
- To lock the lid, turn it clockwise so that the interlock engages with a «click» above the handle.
- Insert the motor part (4) into the coupling (11b) until it locks.
- Plug in the appliance and make sure the pusher is in place.
- Switch the appliance on and hold the bowl with the other hand.
- After use unplug and press the release buttons (5) to remove the motor part. Remove the pusher.
- Press the lid interlock (11e) and hold it. Turn the lid (11a) counter-clockwise to unlatch it.
- Lift the lid up.
- Carefully take out the blade before removing the processed food. To remove the blade, slightly turn it then pull it off.
Mixing light dough
Using the blade (12), you may also mix light dough like a pancake batter or a cake mixture based on up to 250g flour.
Recipe example: Pancake batter
First pour 375 ml milk into the bowl, then add 250 g flour and finally 2 eggs. Using full speed, mix the batter until smooth.
Kneading dough
Picture section F also applies for the use of the kneading tool.
The kneading tool (13) is ideal for kneading different types of dough like yeast dough or pastry (based on max. 250 g flour).
- Place the kneading tool into the bowl (11f).
- Fill the bowl with max. 250 g flour, then add the other ingredients except liquids.
- Turn the appliance on at speed 21.
- Add liquids through the filling tube while the motor is running.
- Maximum kneading time: 1 minute – then allow the motor part to cool down for 10 minutes.
Recipe example: Pizza dough
250 g flour, 12 tsp salt, 12 tsp dried yeast, 5 tbsp olive oil, 150 ml water (lukewarm).
Recipe example: Pastry
250 g flour, 170 g butter (cold/hard, small pieces), 80 g sugar, 1 vanilla sugar, 1 small egg, 1 pinch salt. For good results, do not use warm, soft butter.
Stop kneading shortly after dough has formed a ball. Dough will become too soft from excessive kneading.
Slicing / shredding / french fries
Using the slicing tool (14a) you can slice e.g. cucumbers, onions, mushrooms, apples, carrots, radishes, raw potatoes, courgettes, cabbage. Using the shredding tools (14b), you can shred e.g. apples, carrots, raw potatoes, beetroot, cabbage, cheese (soft to medium).
Use the french fry tool (15) to prepare french fries.
- For slicing / shredding place a tool (14 a,b) into the tool holder (14) and snap into position. Place the tool holder (14) or french fry tool (15) on the centre pin of the bowl (11f) and make sure it locks into place.
- Attach the lid (11a) onto the bowl with the interlock (11e) positioned next to the bowl handle.
- To lock the lid turn it clockwise so that the interlock engages with a «click» above the handle.
- Insert the motor part into the coupling (11b) until it locks.
- Plug in the appliance and insert the food to be processed into the filling tube.
- Switch the appliance on to operate. Never reach into the filling tube when the appliance is switched on. Always use the pusher (11c) to feed in food.
- After use unplug and press the release buttons (5) to detach the motor part.
- Press the lid interlock (11e) and hold it. Turn the lid (11a) counter-clockwise to unlatch it.
- Lift the lid up.
- Take out the tool holder or french fry tool before removing the processed food. To remove the tool (14a,b), push it up at the one end that protrudes at the bottom side of the tool holder.
Puree accessory (B)
The masher can be used to mash cooked vegetables and fruits such as potatoes, sweet potatoes, tomatoes, plums and apples.
Before use
Don't mash hard or uncooked food; you may damage the unit. Remove hard parts such as peel, stones and stems, then cook and drain.
Important
- Never use the puree accessory in a saucepan over direct heat.
- Always remove the saucepan from the heat and allow to cool slightly.
- Do not tap the puree accessory on the side of the cooking vessel during or after using. Use a spatula to scrape excess food away.
- For best results when mashing never fill a saucepan etc., more than half full with food.
- Do not process more than 1 batch without interruption.
- Let the appliance cool down for 4 minutes before you continue processing.
How to use the puree accessory
- Fit the gear box (9a) to the shaft (9b) by turning in a clockwise direction.
- Turn the puree accessory upside down and fit the paddle (9c) over the central hub and turn anticlockwise to locate. (If the gear box isn't fitted then the paddle doesn't secure in place).
- Fit the motor part to the puree accessory and push to lock. Plug in.
- Place the puree accessory in the saucepan or bowl etc., and switch on the appliance. Move the puree accessory in an up and down movement throughout the mix until the desired result is achieved.
- After use unplug and press the release buttons (5) to remove the puree accessory.
- Remove the paddle by turning clockwise and detach the gear box from the shaft.
Recipe example: Mashed potatoes
- Put 1 kg cooked potatoes in a bowl
- Mash 30 s with speed 21
- Add 200 ml warm milk
- Resume mashing for about 30s
Cleaning (C)
Clean the motor part (4), the gear boxes (7a,9a) with a damp cloth only.
The lids can be cleaned under running water but do not immerse them in water, nor clean it in a dishwasher. All other parts can be cleaned in a dishwasher.
If food has been allowed to dry onto the puree accessory, remove the paddle. Soak the paddle and bottom of the puree accessory shaft in warm water to soften and then wash thoroughly.
You may remove the anti-slip rings from the chopper bowls for extra thorough cleaning. When processing foods with a high pigment content (e.g. carrots), the plastic parts of the appliance may become discoloured. Wipe these parts with vegetable oil before cleaning them.
Accessories
(can be bought individually, not available in every country)
| MQ 10: Whisk for whipping cream, beating egg whites |
| MQ 20: 350 ml chopper to chop herbs, carrots, etc. |
| MQ 30: 500 ml chopper to chop carrots, meat, onions, etc. |
| MQ 40: 1250 ml chopper to chop, mix, blend and crush ice |
| MQ 50: puree accessory to puree cooked vegetable and potatoes |
| MQ 70: food processor accessory for chopping, blending, kneading and shredding |
Subject to change without notice.
Please do not dispose of the product in the household waste at the end of its useful life. Disposal can take place at a Braun Service Centre or at appropriate collection points provided in your country.

For UK Only
Guarantee Information
All Braun Household products carry a minimum guarantee period of two year. The rights and benefits under this guarantee are additional to your statutory rights which are not affected.
Please keep your receipt as this will form the basis of your guarantee.
In the unlikely event of a breakdown you have access to professional help from our team simply by calling: 02392 392333
For service in the Republic of Ireland please call: 012475471
Braun Household undertakes within the specified period to repair or replace any part of the appliance, free of charge (with the exception of any glass or porcelain-ware incorporated in the product) found to be defective provided that;
• We are promptly informed of the defect.
- The product is used and maintained in accordance with the User Instructions.
- The appliance has not been altered in any way or subjected to misuse or repair by a person other than an authorised service agent for Braun Household.
- No rights are given under this guarantee to a person acquiring the appliance second hand or for commercial or communal use.
- Any repaired or replaced appliance will be guaranteed on these terms for the unexpired portion of the guarantee.
- The need for repair has not been caused by insufficient aftercare or cleaning: or damage caused by the chemical or electrochemical effects of water.
Under no circumstances shall the application of this guarantee give rise to the complete replacement of the appliance or entitle the consumer to damages.
Braun Household, New Lane, Havant, Hampshire PO9 2NH
www.braunhousehold.co.uk
Français
Varilla monta-claras (A)
11g Base anti-deslizante
11g Base anti-scivolo
2 Variabel hastighetsknapp (on/off)
3 Turbo-knapp
4 Motordel
5 Utlösarknappar
6 Mixerskaft
2 Gumb za hitrost (on/off)
3 Turbo gumb
4 Enota z motorjem
Country of origin: Romania Year of manufacture
To determine the year of manufacture, refer to the 5-digit production code located near the type plate. The first digit of the production code refers to the last digit of the year of manufacture. The next 2 digits refer to the calendar week in the year of manufacture. And the last 2 digits show the print date automatically calculated since 1992.
Example : 30421 - The product was .manufactured in week 4 of 2013