
EY3640 - Caulking gun PANASONIC - Free user manual and instructions
Find the device manual for free EY3640 PANASONIC in PDF.
| Product Type | Caulking Gun (Sealant Gun) |
| Brand | Panasonic |
| Model | EY3640 |
| Motor | 14.4 V DC |
| Ejection Pressure | 4410 N (450 kgf, 990 lbs) |
| Overall Length (max.) | 615 mm |
| Overall Length (min.) | 424 mm |
| Weight (with battery) | 2.6 kg |
| Battery Type | Li-ion 14.4 V, 3.3 Ah (model EY9L41) |
| Charger Model | EY0L80 |
| Charge Time (usable) | 45 minutes |
| Charge Time (full) | 60 minutes |
| Adjustable Speed | Yes, via application speed control (5 positions + lock) |
| Compatible Material Types | Cartridges and Sausage Packs |
| Anti-drip Function | Yes, automatic rack retraction upon release |
| Tube Holder Rotation | Yes, for easier application in tight spaces |
| Maintenance | Clean with a dry, soft cloth; remove hardened sealant from the rack |
| Safety | Use only dedicated Panasonic battery; do not expose to excessive heat; do not short-circuit terminals |
| Included Accessory | Sausage Pack Adapter EY9X013E10 |
| Recycling | Battery and device must be recycled in accordance with local regulations |
Frequently Asked Questions - EY3640 PANASONIC
User questions about EY3640 PANASONIC
0 question about this device. Answer the ones you know or ask your own.
Ask a new question about this device
Download the instructions for your Caulking gun in PDF format for free! Find your manual EY3640 - PANASONIC and take your electronic device back in hand. On this page are published all the documents necessary for the use of your device. EY3640 by PANASONIC.
USER MANUAL EY3640 PANASONIC
natural_image
Line drawing of a handheld device with cylindrical body and attached base (no text or symbols on the device itself)| (A) | Front capFrontkappeCapuchon avantTappo anterioreVoorkapTapa frontalFronthaetteFrämre lockFrontdekselEtukansiПередняя крышкаПередня кришка | (B) | Tube holderPatronenstutzenSupport de tubeSupporto del tuboAfdichtmiddelhouderSoporte del compuestoMassebeholderHållare för fogmassaRørholderenMassasäiliöТрубка-обоймаТрубка-rilьза |
| (C) | ScrewSchraubeVisViteSchroefTornilloSkrueSkruvSkrueRuuviВинтГвинт | (D) | Sausage pack adapterFolienbeuteladapterAdaptateur de pocheAdattatore del sacchetto trasparenteSausage pack-adapterAdaptador del empaque transparenteFugespids adapterKorvpatronadapterPølsepakkeadapterKalvopakkausПереходник для мягкой оболочкиПерехідник для м`якої упаковки герметика |
| (E) | Piston jointKolbenverbindungJoint de pistonPistone di congiunzioneZuigerverbindingJunta del pistónStempelledKolvförbnidningStempelledMännän pesäСоединение поршняШарнір поршня | (F) | RackZahnstangeCrémaillèreCremaglieraHeugelCremalleraTandstangKuggstångTannstangHammastankoРейкаРейка |
| (G) | Rack knobZahnstangenknaufBouton de crémaillèrePomello della cremaglieraHeugel-eindknopPerilla de la cremalleraTandstangs-håndtagKnoppTannstangshåndtakHammastangon nuppiРукоятка рейкиРучка рейки | (H) | Alignment marksAusrichtmarkierungenMarques d'alignementMarcature allineamentoUitlijntekensMarcas de alineaciónFlugtemærkerAnpassningsmärkenOpprettingsmerkeSovitusmerkitМетки совмещенияМітки вирівнювання |
| (I)(K) | Battery pack (EY9L41)Akku (EY9L41)Batterie autonome (EY9L41)Pacco batteria (EY9L41)Accu (EY9L41)Batería (EY9L41)Akku (EY9L41)Batteri (EY9L41)Batteripakke (EY9L41)Akku (EY9L41)Батарейный блок (EY9L41)Батарейний блок (EY9L41)Application speed controlGeschwindigkeitsreglerCommande de vitesse d'applicationRegolazione velocità applicazioneSnelheidsregelaarControl de velocidad de aplicaciónHastighedskontrolReglage för frammatningshastighetBrukshastighetskontrollKäyttönopeussäädinPegулятор скорости подачиPegулятор швидкості подачі | (J)(L) | Battery pack release buttonAkku-EntriegelungsknopfBouton de libération de batterie autonomeTasto di rilascio blocco batteriaOntgrendelknop voor accuBotón de liberación de la bateríaUdløserknap til batteripakningFrigöringsknapp för batteriFrigjøringsknapp for batterietAkun vapautuspainikeКнопка освобождения батарейного блокаКнопка вивільнення батарейного блокуSwitchAbzugInterrupteurInterruttoreSchakelaarInterruptorAftrækkerAvtryckareAvløserKytkinСпусковой крючокСпусковий гачок |
| (M) | Battery chargerLadegerätChargeur de batterieCaricabatterieAcculaderCargador de la bateríaBatteriopladerBatteriladdareBatteriladerAkkulaturiЗарядное устройствоЗарядний пристрій | (N) | Li-ion battery pack dockLi-Ion-AkkuladeschachtPoste d'accueil de la batterie autonome Li-ionSpazio raccordo pacco batteria Li-ionHouder voor Li-ion accuEnchufe de carga de batería Li-iónLi-ion batteripakningsdokDocka för litiumjonbatteriLi-ion batteriholderLi-ioniakun latauspesäУглубление для установки литий-ионного батарейного блокаЗаглиблення для встановлення літій-іонного батарейного блоку |
| (O) | Ni-MH/Ni-Cd battery pack dockNi-MH/Ni-Cd-AkkuladeschachtPoste d'accueil de la batterie autonome Ni-MH/Ni-CdSpazio raccordo pacco batteria Ni-MH/Ni-CdHouder voor Ni-MH/Ni-Cd accuEnchufe de carga de batería Ni-MH/Ni-CdNi-MH/Ni-Cd batteripakningsdokDocka för NiMH/NiCd-batteriBatteriholder for Ni-MH/Ni-Cd batteriNi-MH/Ni-Cd-akun latauspesäУглубление для установки никель-металлогидридногобатарейного блока/никель-кадмиевого батарейного блокаЗаглиблення для встановлення нікель-метал-гідридногобатарейного блоку/нікель-кадмієвого батарейного блоку | (P) | Pack coverAkkuabdeckungCouvercle de la batterie autonomeCoperchio paccoAccudekselCubierta de bateríaPakningsdækselBatteriskyddPakkedekselAkkukotelon kansiКрышка блокаКришка блоку |

natural_image
Technical line drawing of a mechanical device with two circular components and a shaft, showing no text or symbols.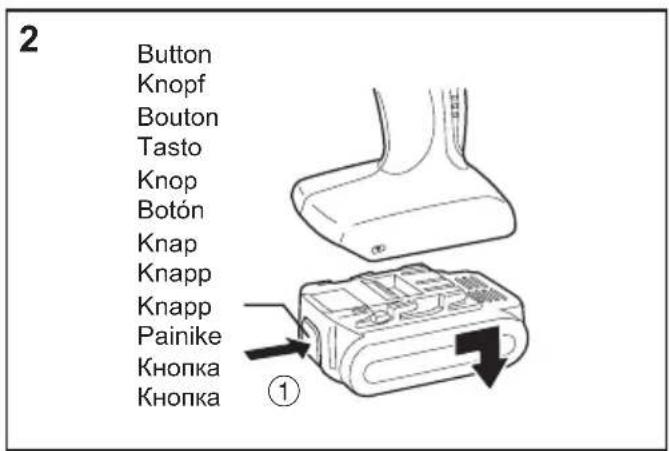
natural_image
Diagram showing two mechanical components with directional arrows, no text or symbols present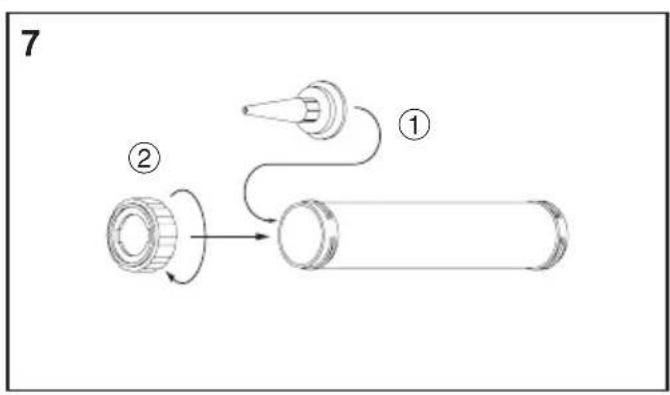
flowchart
graph TD
    A["①"] --> B["②"]
    B --> C["Cartoon Box"]
    style A fill:#f9f,stroke:#333
    style B fill:#ccf,stroke:#333
    style C fill:#cfc,stroke:#333
natural_image
Line drawing of a handheld electric gun with lever and trigger, no text or symbols present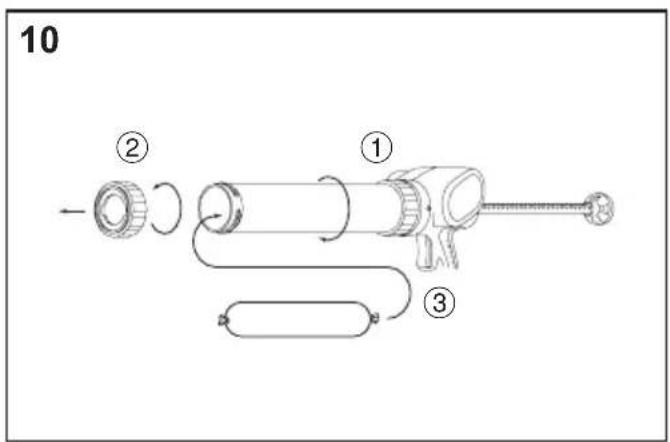
natural_image
Technical line drawing of a mechanical component with no visible text or symbols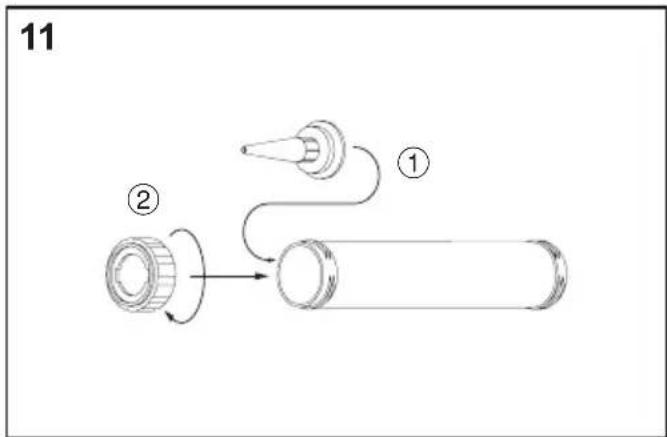
flowchart
graph TD
    A["①"] --> B["②"]
    B --> C["Cartoon Tube"]
    style A fill:#f9f,stroke:#333
    style B fill:#ccf,stroke:#333
    style C fill:#cfc,stroke:#333

natural_image
Isometric illustration of a handheld electronic device with a button and arrow, labeled '16' in top-left corner (no text or symbols on device itself)I. INTENDED USE
Thank you for purchasing the Panasonic Sealing Gun. This Sealing Gun is for pushing the sealing compounds. Sausage type and cartridge type are applicable for this model. The speed can be adjusted according to work.
II. ADDITIONAL SAFETY RULES
1) Be aware that this tool is always in an operating condition, since it does not have to be plugged into an electrical outlet.
2) Be careful not to get your ties or wide cuffs rolled into the rack.
3) Stop using the tool if you notice something abnormal.
4) During charging, the charger may become slightly warm. This is normal. Do NOT charge the battery for a long period.
5) The appliance is not intended for use by young children or infirm persons without supervision.
6) Young children should be supervised to ensure that they do not play with the appliance.
WARNING:
- Do not use other than the Panasonic battery packs that are designed for use with this rechargeable tool.
- Do not dispose of the battery pack in a fire, or expose it to excessive heat.
- Do not drive the likes of nails into the battery pack, subject it to shocks, dismantle it, or attempt to modify it.
- Do not allow metal objects to touch the battery pack terminals.
- Do not carry or store the battery pack in the same container as nails or similar metal objects.
-
Do not charge the battery pack in a high-temperature location, such as next to a fire or in direct sunlight. Otherwise, the battery may overheat, catch fire, or explode.
-
Never use other than the dedicated charger to charge the battery pack. Otherwise, the battery may leak, overheat, or explode.
• After removing the battery pack from the tool or the charger, always reattach the pack cover. Otherwise, the battery contacts could be shorted, leading to a risk of fire.
Preparing the sealing gun
For preparation of sealing compound, such as cutting the opening to the desired diameter, follow the instructions of the cartridge / sausage pack.
III. ASSEMBLY
Attaching or Removing Battery Pack
CAUTION:
Before inserting battery pack, check that the power switch in the tool actuates properly and returns to the "OFF" position when released.
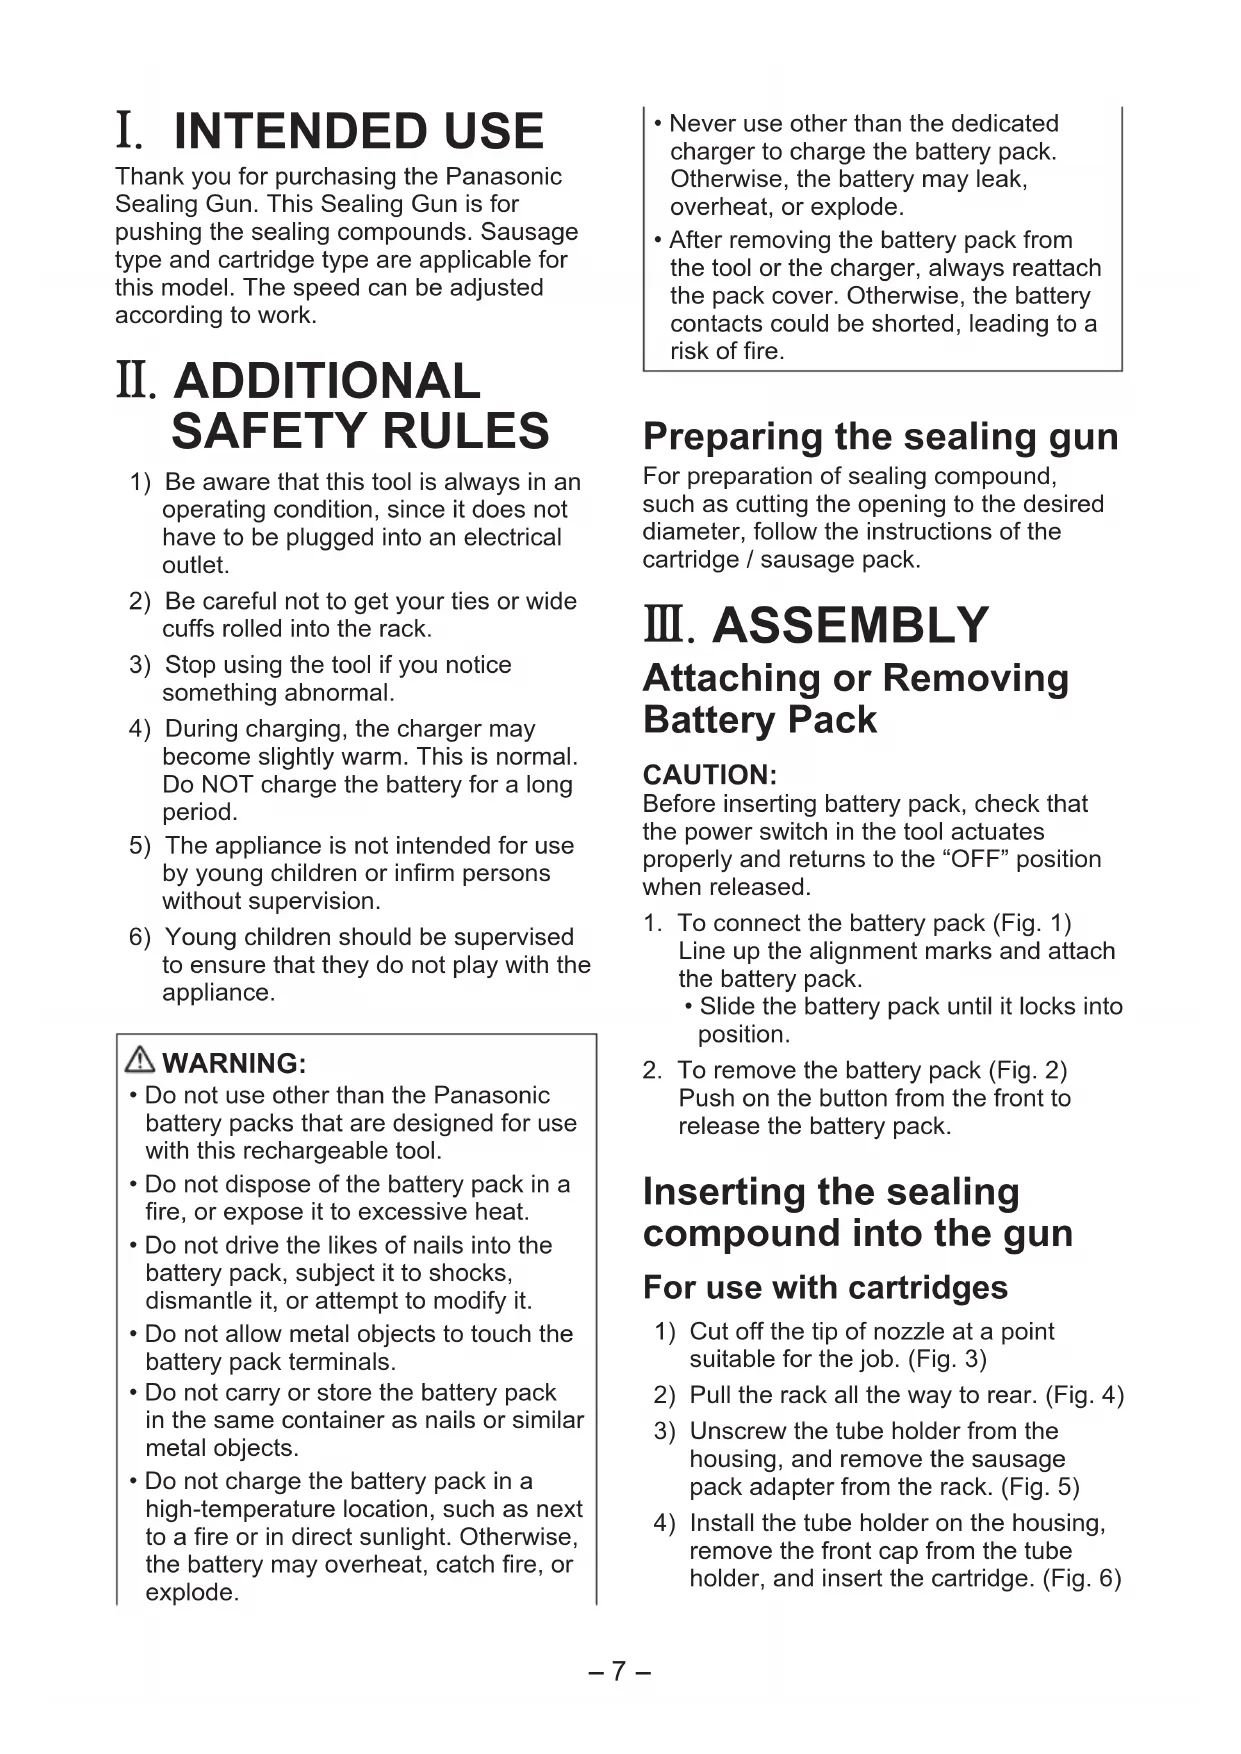
- To connect the battery pack (Fig. 1) Line up the alignment marks and attach the battery pack.
- Slide the battery pack until it locks into position.
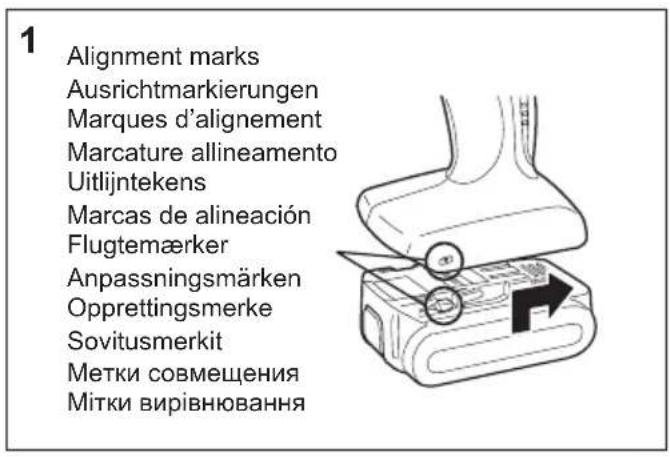
- To remove the battery pack (Fig. 2) Push on the button from the front to release the battery pack.
Inserting the sealing compound into the gun
For use with cartridges
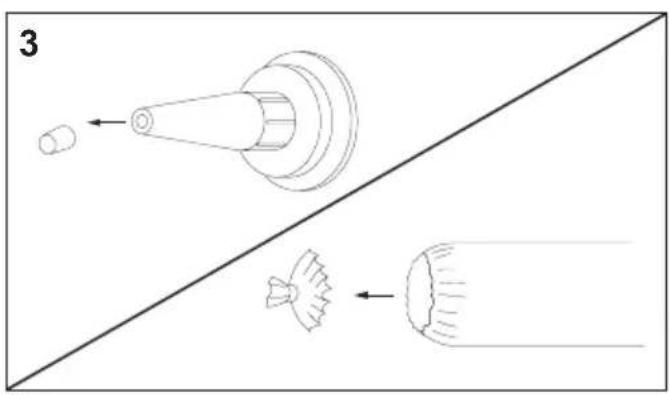
1) Cut off the tip of nozzle at a point suitable for the job. (Fig. 3)
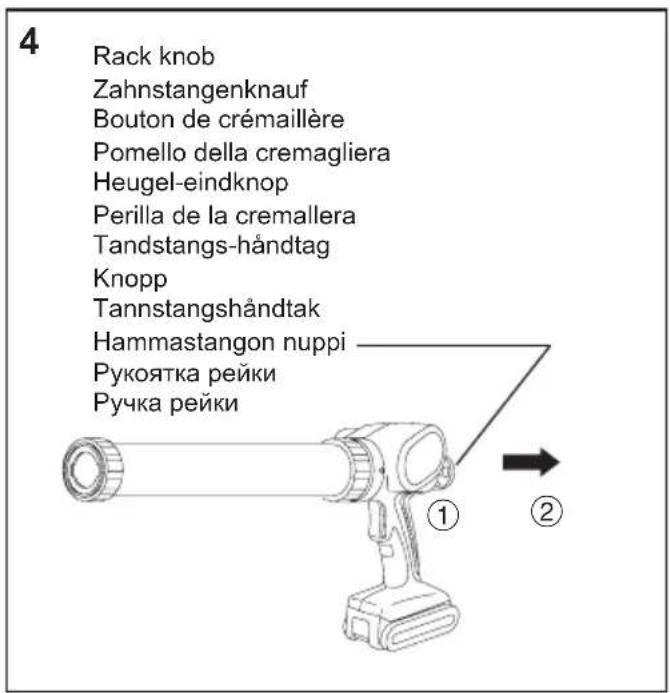
2) Pull the rack all the way to rear. (Fig. 4)
3) Unscrew the tube holder from the housing, and remove the sausage pack adapter from the rack. (Fig. 5)
4) Install the tube holder on the housing, remove the front cap from the tube holder, and insert the cartridge. (Fig. 6)
5) Set the nozzle and install the front cap on the tube holder. (Fig. 7)
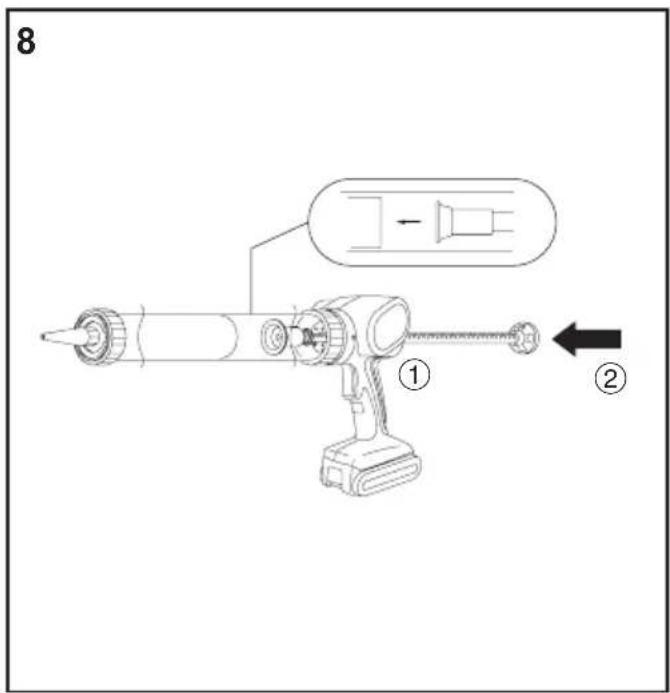
6) Push the rack until touching the cartridge. (Fig. 8)
For use with sausage pack
1) Cut off the tip of nozzle at a point suitable for the job. (Fig. 3)
2) Pull the rack all the way to rear. (Fig. 4)
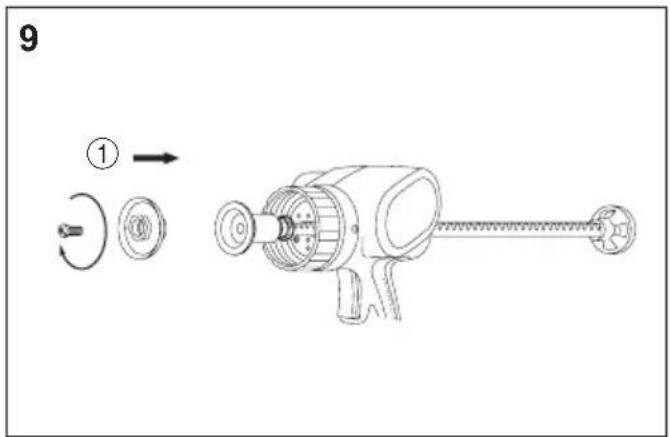
3) Unscrew the tube holder from the housing.
4) Screw sausage pack adapter on to piston joint. (Fig. 9)
NOTE:
- Make sure that the plunger rotates smoothly.
5) Install the tube holder on the housing, remove the front cap from the tube holder, and insert the sausage pack. (Fig. 10)
6) Set the nozzle and install the front cap on the tube holder. (Fig. 11)
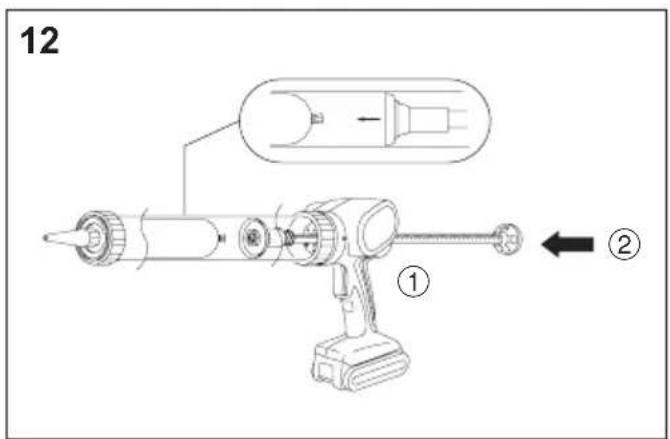
7) Push the rack until touching the sausage pack. (Fig. 12)
IV. OPERATION How to use the sealing gun
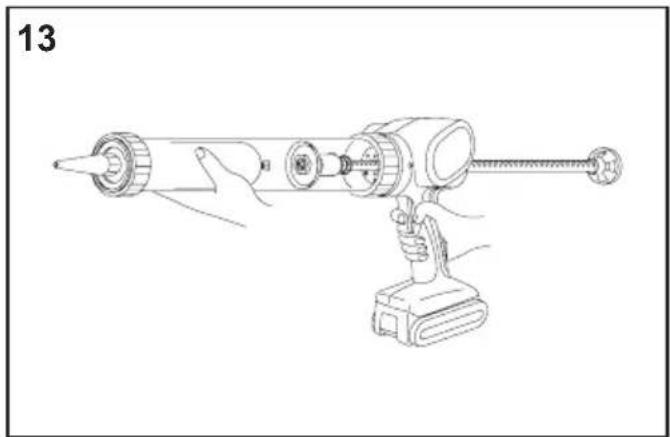
1) Hold the grip while holding the tube holder. (Fig. 13)
2) Set the nozzle in the groove, then squeeze the switch (L). The rack will move forward.
3) The tube holder can be rotated. This makes sealing application even easier in hard-to-work places.
4) Set rack speed according to work. You can easily change speeds while working by rotating application speed control (K) by finger.
CAUTION:
- Be sure to lock the trigger ("0" position) when finished working.
Speed rate adjustment
0 1 Slow Fast 5 Lock
5) The rack will retract slightly when you release the trigger, so as to prevent dripping.
CAUTION:
- Dripping can occur with small nozzle openings or exceptionally soft sealing compounds.
6) You can pull the trigger repeatedly to dispense small shots of compound. As long as you pull the trigger within 1 second of each shot, the rack will move forward slowly without retracting.
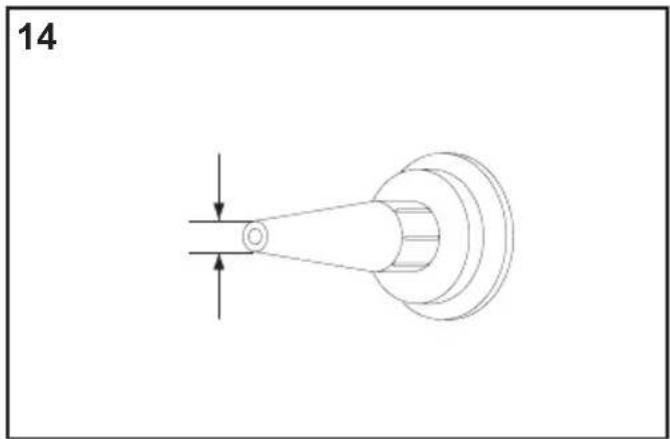
For hard compounds
- Warm the sealing compounds until the compounds become soft.
- Slow down the speed by selecting the application speed control.
- Make the nozzle cut diameter bigger. (Fig. 14)
CAUTION:
- Make sure the front cap is tightened securely when working.
- Do not touch the rack to avoid getting your fingers pinched.
- Use the tool only for its intended purpose, and do not operate it for long periods of time without interruption, since this may damage the sealing gun or cause the cartridge to jam. Do not insert a cartridge if it is wet, or if the sealing compound has hardened.
- If the tool is operated for long periods of time, the motor may overheat. It is therefore recommended to switch it off from time to time.
- The use of flammable materials, even for cleaning purposes, is not permitted.
[Battery Pack]
For Appropriate Use of Battery pack
Li-ion Battery pack (EY9L41)
- For optimum battery life, store the Li-ion battery pack following use without charging it. - When charging the battery pack, confirm that the terminals on the battery charger are free of foreign substances such as dust and water etc. Clean the terminals before charging the battery pack if any foreign substances are found on the terminals.
The life of the battery pack terminals may be affected by foreign substances such as dust and water etc. during operation.
- When battery pack is not in use, keep it away from other metal objects like: paper clips, coins, keys, nails, screws, or other small metal objects that can make a connection from one terminal to another.
Shorting the battery terminals together may cause sparks, burns or a fire.
- When operating the battery pack, make sure the work place is well-ventilated.
- When the battery pack is removed from the main body of the tool, replace the battery pack cover immediately in order to prevent dust or dirt from contaminating the battery terminals and causing a short circuit.
Battery Pack Life
The rechargeable batteries have a limited life. If the operation time becomes extremely short after recharging, replace the battery pack with a new one.
Battery Recycling
ATTENTION:
For environmental protection and recycling of materials, be sure that it is disposed of at an officially assigned location, if there is one in your country.
[Battery Charger] Charging
Common Cautions for the Li-ion/Ni-MH/Ni-Cd Battery Pack
- If the temperature of the battery pack falls approximately below -10^ (14°F), charging will automatically stop to prevent degradation of the battery.
- The ambient temperature range is between 0^ (32°F) and 40^ (104°F). If the battery pack is used when the battery temperature is below 0^ (32°F), the tool may fail to function properly.
- When charging a cool battery pack (below 0^ (32°F)) in a warm place, leave the battery pack at the place and wait for more than one hour to warm up the battery to the level of the ambient temperature.
- Cool down the charger when charging more than two battery packs consecutively.
- Do not insert your fingers into contact hole, when holding charger or any other occasions.
CAUTION:
To prevent the risk of fire or damage to the battery charger.
- Do not use power source from an engine generator.
- Do not cover vent holes on the charger and the battery pack.
- Unplug the charger when not in use.
Li-ion Battery Pack
NOTE:
Your battery pack is not fully charged at the time of purchase. Be sure to charge the battery before use.
Battery charger (EY0L80)
- Plug the charger into the AC outlet.
NOTE:
Sparks may be produced when the plug is inserted into the AC power supply, but this is not a problem in terms of safety.
-
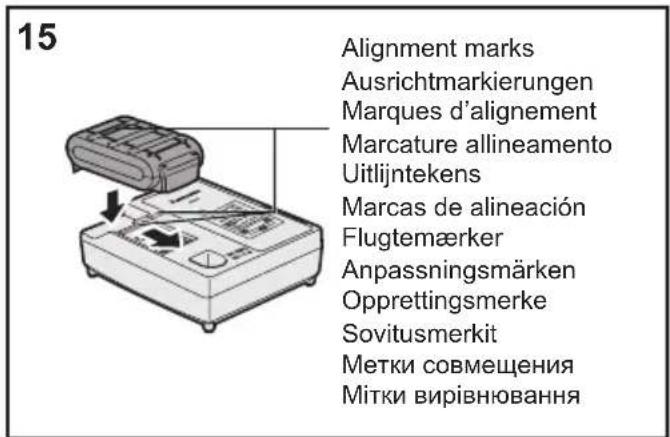
Insert the battery pack firmly into the charger. (Fig. 15)
-
Line up the alignment marks and place the battery onto the dock on the charger.
-
Slide forward in the direction of the arrow.
-
During charging, the charging lamp will be lit.
When charging is completed, an internal electronic switch will automatically be triggered to prevent overcharging.
- Charging will not start if the battery pack is warm (for example, immediately after heavy-duty operation). The orange standby lamp will be flashing until the battery cools down. Charging will then begin automatically.
-
The charge lamp (green) will flash slowly once the battery is approximately 80% charged.
-
When charging is completed, the charging lamp will start flashing quickly in green color.
-
If the temperature of the battery pack is 0^ C or less, charging takes longer to fully charge the battery pack than the standard charging time.
Even when the battery is fully charged, it will have approximately 50% of the power of a fully charged battery at normal operating temperature.
-
If the power lamp does not light immediately after the charger is plugged in, or if after the standard charging time the charging lamp does not flash quickly in green, consult an authorized dealer.
-
If a fully charged battery pack is inserted into the charger again, the charging lamp lights up. After several minutes, the charging lamp may flash quickly to indicate the charging is completed.
Ni-MH/Ni-Cd Battery Pack
NOTE:
When you charge the battery pack for the first time, or after prolonged storage, charge it for about 24 hours to bring the battery up to full capacity.
Battery charger (EY0L80)
- Plug the charger into the AC outlet.
NOTE:
Sparks may be produced when the plug is inserted into the AC power supply, but this is not a problem in terms of safety.
-
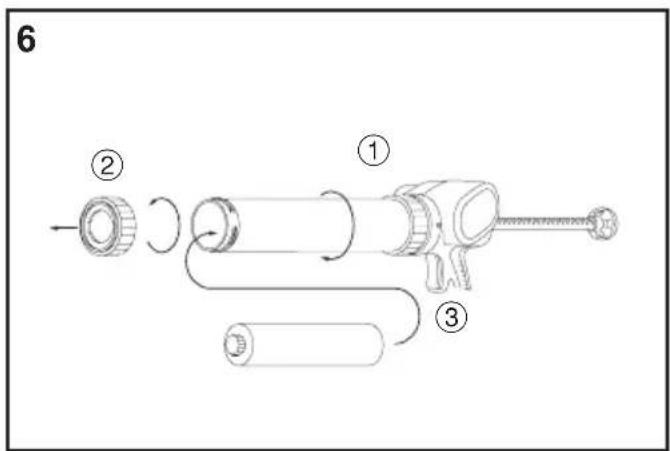
Insert the battery pack firmly into the charger. (Fig. 16)
-
During charging, the charging lamp will be lit.
When charging is completed, an internal electronic switch will automatically be triggered to prevent overcharging.
- Charging will not start if the battery pack is warm (for example, immediately after heavy-duty operation). The orange standby lamp will be flashing until the battery cools down. Charging will then begin automatically.
-
When charging is completed, the charging lamp will start flashing quickly in green color.
-
If the charging lamp does not light immediately after the charger is plugged in, or if after the standard charging time the charging lamp does not flash quickly in green, consult an authorized dealer.
-
If a fully charged battery pack is inserted into the charger again, the charging lamp lights up. After several minutes, the charging lamp may flash quickly to indicate the charging is completed.
LAMP INDICATIONS


Green Lit
Charger is plugged into the AC outlet.
Ready to charge.
Green Flashing Quickly
Charging is completed. (Full charge.)
Green Flashing
Battery is approximately 80% charged. (Usable charge.
Li-ion only.)
Green Lit
Now charging.
Orange Lit
Battery pack is cool.
The battery pack is being charged slowly to reduce the load on the battery. (Li-ion only.)
Orange Flashing
Battery pack is warm. Charging will begin when temperature of battery pack drops.
If the temperature of the battery pack is -10^ or less, the charging status lamp (orange) will also start flashing. Charging will begin when the temperature of the battery pack goes up (Li-ion only).
Charging Status Lamp
Left: green Right: orange will be displayed.
Both Orange and Green Flashing Quickly
Charging is not possible. Clogged with dust or malfunction of the battery pack.
Information for Users on Collection and Disposal of Old Equipment and used Batteries
These symbols on the products, packaging, and/or accompanying documents mean that used electrical and electronic products and batteries should not be mixed with general household waste.
For proper treatment, recovery and recycling of old products and used batteries, please take them to applicable collection points, in accordance with your national legislation and the Directives 2002/96/EC and 2006/66/EC.
By disposing of these products and batteries correctly, you will help to save valuable resources and prevent any potential negative effects on human health and the environment which could otherwise arise from inappropriate waste handling.
For more information about collection and recycling of old products and batteries, please contact your local municipality, your waste disposal service or the point of sale where you purchased the items.
Penalties may be applicable for incorrect disposal of this waste, in accordance with national legislation.
For business users in the European Union
If you wish to discard electrical and electronic equipment, please contact your dealer or supplier for further information.
[Information on Disposal in other Countries outside the European Union]
These symbols are only valid in the European Union. If you wish to discard these items, please contact your local authorities or dealer and ask for the correct method of disposal.
Note for the battery symbol (bottom two symbol examples):
This symbol might be used in combination with a chemical symbol. In this case it complies with the requirement set by the Directive for the chemical involved.
V. MAINTENANCE
- Use only a dry, soft cloth for wiping the unit. Do not use a damp cloth, thinner, benzine, or other volatile solvents for cleaning.
- If sealing compound adheres to the rack, remove the compound before it hardens.
VI. ACCESSORIES
CAUTION:
To prevent the risk of injury, only use accessory or attachment for its stated purpose.
Sausage pack adapter
- EY9X013E10
If you need any assistance for more details regarding these accessories, ask your local service center.
VII. SPECIFICATIONS
MAIN UNIT
| Model EY3640 EY3641 | ||
| Motor 14.4 V DC | ||
| Ejection pressure | 4410 N (450 kgf, 990 lbs) | |
| Overall length | max. 615 mm (24-7/32")min. 424 mm (16-11/16") | max. 884 mm (34-13/16")min. 560 mm (22-1/16") |
| Weight (with battery pack: EY9L41) | 2.6 kg (5.7 lbs) 2.75 k (6 lbs) | g |
| Noise, Vibration See the included sheet. | ||
BATTERY PACK
| Model EY9L41 | |
| Storage battery Li-ion | Battery |
| Battery voltage 14.4 V | DC (3.6 V × 4 cells) |
| Capacity 3.3 Ah |
BATTERY CHARGER
| Model EY0L80 | |
| Electrical rating See the rating plate on the bottom of the charger. | |
| Weight | 0.95 kg(2.1 lbs) |
[Li-ion battery pack]
| Charging time | 3 Ah | 14.4 V 21.6 V 28.8 V | |
| EY9L40 EY9L60 EY9L80 | |||
| Usable: 35 min. Usable: 45 min. Usable: 55 min. | |||
| Full: 50 min. Full: 60 min. Full: 70 min. |
| Charging time | 3.3 Ah | 14.4 V 21.6 V 28.8 V | |
| EY9L41 EY9L61 EY9L81 | |||
| Usable: 45 min. Usable: 55 min. Usable: 65 min. | |||
| Full: 60 min. Full: 70 min. Full: 80 min. |
[Ni-Cd/Ni-MH battery pack]
| Charging time | 7.2 V 9.6 | V 12 V 15.6 | V 18 V 24 V | ||||
| 1.2 Ah | EY9065 | EY9080 | EY9001 | ||||
| EY9066 | EY9086 | ||||||
| 20 min. | |||||||
| 1.7 Ah | EY9180 | EY9101 | |||||
| EY9182 | EY9103 | ||||||
| 25 min. | |||||||
| 2 Ah | EY9168 E | Y9188 | EY9106 | EY9136 | EY9116 | ||
| EY9107 | EY9117 | ||||||
| 30 min. | 60 min. | ||||||
| 3 Ah | EY9200 E | Y9230 EY9210 | |||||
| 45 min. 90 min. | |||||||
| 3.5 Ah | EY9201 E | Y9231 EY9251 | |||||
| 55 min. | 65 min. | ||||||
NOTE: This chart may include models that are not available in your area.
Please refer to the latest general catalogue.
NOTE: For the dealer name and address, please see the included warranty card.
ONLY FOR U. K.
VIII.ELECTRICAL PLUG INFORMATION
FOR YOUR SAFETY PLEASE READ
THE FOLLOWING TEXT CAREFULLY
This appliance is supplied with a moulded three pin mains plug for your safety and convenience.
A 5 amp fuse is fitted in this plug.
Should the fuse need to be replaced please ensure that the replacement fuse has a rating of 3 amp and that it is approved by ASTA or BSI to BS1362.
Check for the ASTA mark or the BSI mark on the body of the fuse.
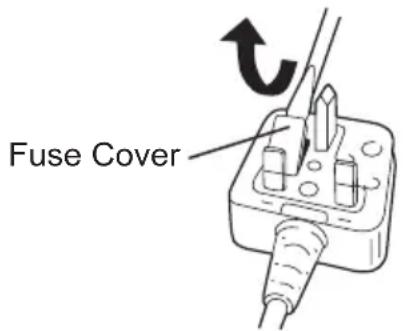
If the plug contains a removable fuse cover you must ensure that it is refitted when the fuse is replaced.
If you lose the fuse cover the plug must not be used until a replacement cover is obtained.
A replacement fuse cover can be purchased from your local Panasonic Dealer.
IF THE FITTED MOULDED PLUG IS UNSUITABLE FOR THE SOCKET OUTLET IN YOUR HOME THEN THE FUSE SHOULD BE REMOVED AND THE PLUG CUT OFF AND DISPOSED OF SAFELY.
THERE IS A DANGER OF SEVERE ELECTRICAL SHOCK IF THE CUT OFF PLUG IS INSERTED INTO ANY 13 AMP SOCKET.
If a new plug is to be fitted please observe the wiring code as shown below.
If in any doubt please consult a qualified electrician.
IMPORTANT:
The wires in this mains lead are coloured in accordance with the following code:
Blue: Neutral
Brown: Live
As the colours of the wire in the mains lead of this appliance may not correspond with the coloured markings identifying the terminals in your plug, proceed as follows. The wire which is coloured BLUE must be connected to the terminal in the plug which is marked with the letter N or coloured BLACK.
The wire which is coloured BROWN must be connected to the terminal in the plug which is marked with the letter L or coloured RED.
Under no circumstances should either of these wires be connected to the earth terminal of the three pin plug, marked with the letter E or the Earth Symbol 12
How to replace the fuse: Open the fuse compartment with a screwdriver and replace the fuse and fuse cover if it is removable.
This apparatus was produced to BS800.
I. VERWENDUNGSZWECK
Sausage pack-adapter
- EY9X013E10
- INTENDED USE
- ADDITIONAL SAFETY RULES
- WARNING:
- Preparing the sealing gun
- ASSEMBLY
- Attaching or Removing Battery Pack
- CAUTION:
- Inserting the sealing compound into the gun
- For use with cartridges
- For use with sausage pack
- NOTE:
- OPERATION How to use the sealing gun
- For hard compounds
- [Battery Pack]
- For Appropriate Use of Battery pack
- Li-ion Battery pack (EY9L41)
- Battery Pack Life
- Battery Recycling
- ATTENTION:
- [Battery Charger] Charging
- Common Cautions for the Li-ion/Ni-MH/Ni-Cd Battery Pack
- Li-ion Battery Pack
- Ni-MH/Ni-Cd Battery Pack
- LAMP INDICATIONS
- Information for Users on Collection and Disposal of Old Equipment and used Batteries
- For business users in the European Union
- [Information on Disposal in other Countries outside the European Union]
- Note for the battery symbol (bottom two symbol examples):
- MAINTENANCE
- ACCESSORIES
- SPECIFICATIONS
- ONLY FOR U. K.
- VIII.ELECTRICAL PLUG INFORMATION
- FOR YOUR SAFETY PLEASE READ
- THE FOLLOWING TEXT CAREFULLY
- IMPORTANT:
- VERWENDUNGSZWECK
Brand : PANASONIC
Model : EY3640
Category : Caulking gun