
32QK500 - Monitor LG - Free user manual and instructions
Find the device manual for free 32QK500 LG in PDF.
| Product Type | LCD LED Monitor |
| Brand | LG |
| Model | 32QK500 |
| Screen Diagonal | 31.5 inches (80 cm) |
| Native Resolution | 2560 x 1440 (WQHD) |
| Panel Technology | IPS (In-Plane Switching) |
| Typical Brightness | 350 cd/m² |
| Static Contrast | 1000:1 |
| Response Time | 5 ms (Gray to Gray) |
| Max Refresh Rate | 75 Hz |
| Viewing Angle (Horizontal/Vertical) | 178° / 178° |
| Connectivity | 1 x HDMI, 1 x DisplayPort, 1 x Headphone Jack |
| Dimensions with Stand (W x H x D) | 728 x 504 x 230 mm |
| Weight with Stand | 8.5 kg |
| Power Supply | 100-240 V AC, 50/60 Hz |
| Power Consumption (Typical) | 40 W |
| Power Consumption in Sleep Mode | < 0.5 W |
| Power Consumption when Off | 0 W |
| Ergonomic Adjustments | Tilt (-5° ~ 15°) |
| Features | DPMS (Energy Star), DDC (Display Data Channel), Flicker Safe, Reader Mode |
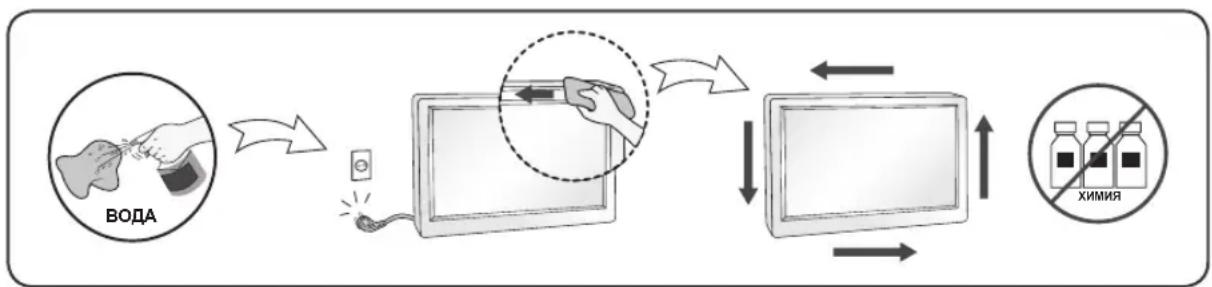
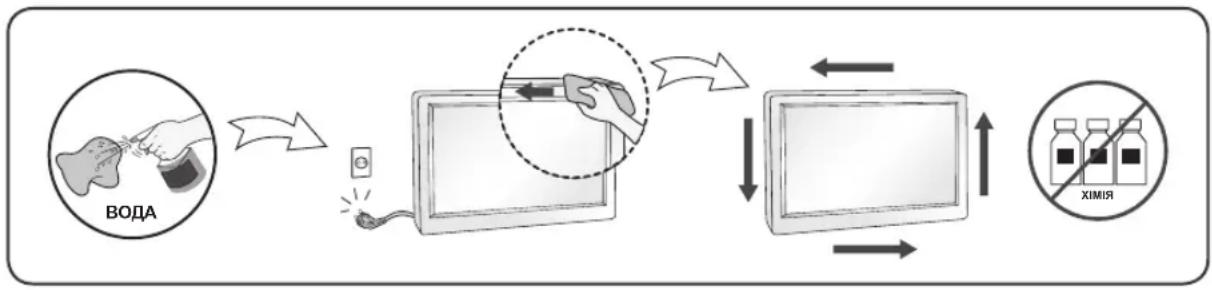
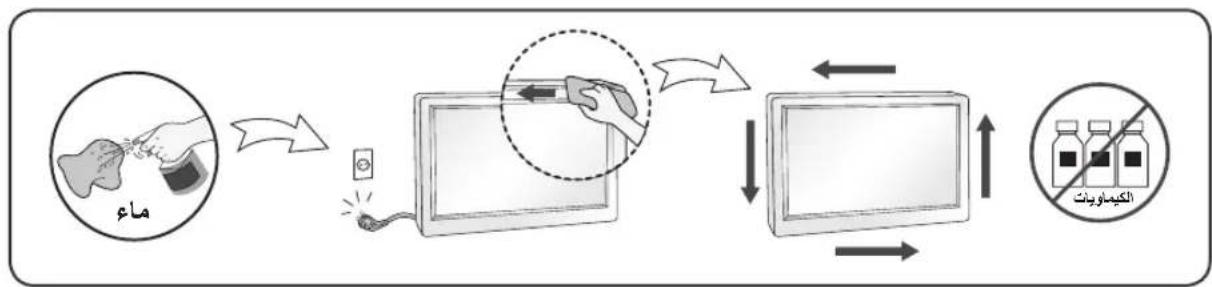
| Maintenance and Cleaning | Unplug before cleaning; use a slightly damp soft cloth; do not use chemical products (benzene, thinner, alcohol). |
| Safety | Do not open the monitor (high voltage); use only the supplied cables; avoid humidity and high temperatures. |
| Spare Parts and Repairability | No user-serviceable parts; contact an authorized service center for any repairs. |
| General Information | Warranty does not cover burn-in from prolonged static display; recycle according to local regulations. |
Frequently Asked Questions - 32QK500 LG
User questions about 32QK500 LG
0 question about this device. Answer the ones you know or ask your own.
Ask a new question about this device
Download the instructions for your Monitor in PDF format for free! Find your manual 32QK500 - LG and take your electronic device back in hand. On this page are published all the documents necessary for the use of your device. 32QK500 by LG.
USER MANUAL 32QK500 LG
(LED Computer Monitor*)
- Disclaimer: LG LED Monitor applies LCD screen with LED backlights.
This product is a computer monitor and not for television purpose.
Please read this manual carefully before operating your set and retain it for future reference.
32QK500
32BK50Q
www.lg.com
Copyright © 2018 LG Electronics Inc. All Rights Reserved.
TABLE OF CONTENTS
ENGLISH
LICENSE 2
ASSEMBLING AND PREPARING 3
USING THE MONITOR. 10
USER SETTINGS 11
TROUBLESHOOTING 18
PRODUCT SPECIFICATION 20
LICENSE
Each model has different licenses. Visit www.lg.com for more information on the license.

The terms HDMI and HDMI High-Definition Multimedia Interface, and the HDMI Logo are trademarks or registered trademarks of HDMI Licensing Administrator, Inc. in the United States and other countries.
ASSEMBLING AND PREPARED
CAUTION
Always use genuine LG components to ensure safety and product performance.
The product warranty will not cover damage or injury caused by the use of unauthorized components.
It is recommended to use the supplied components.
- If you use generic cables not certified by LG, the screen may not display or there may be image noises.
- Illustrations in this document represent typical procedures, so they may look different from the actual product.
- Do not apply foreign substances (oils, lubricants, etc.) to the screw parts when assembling the product. (Doing so may damage the product.)
- Applying excessive force when tightening screws may cause damage to the monitor. Damage caused in this way will not be covered by the product warranty.
- Do not carry the monitor upside down by just holding the base. This may cause the monitor to fall off the stand and could result in personal injury.
- When lifting or moving the monitor, do not touch the monitor screen. The force applied to the monitor screen may cause damage to it.
TO PREVENT ELECTRIC SHOCK,DO NOT REMOVE COVER.
NO USER-SERVICEABLE PARTS INSIDE. REFER SERVICING TO QUALIFIED SERVICE PERSONNEL.
NOTE
The components may look different from those illustrated here.
- Without prior notice, all product information and specifications contained in this manual are subject to change to improve the performance of the product.
- To purchase optional accessories, visit an electronics store or an online shopping site, or contact the retailer from which you purchased the product.
The power cord provided may differ depending upon the region.
Supported Drivers and Software
You can download and install the latest version from the enclosed CD or from the LGE website (www.lg.com).
| Drivers and Software Installation Priority |
| Monitor Driver Recommended |
| OnScreen Control Recommended |
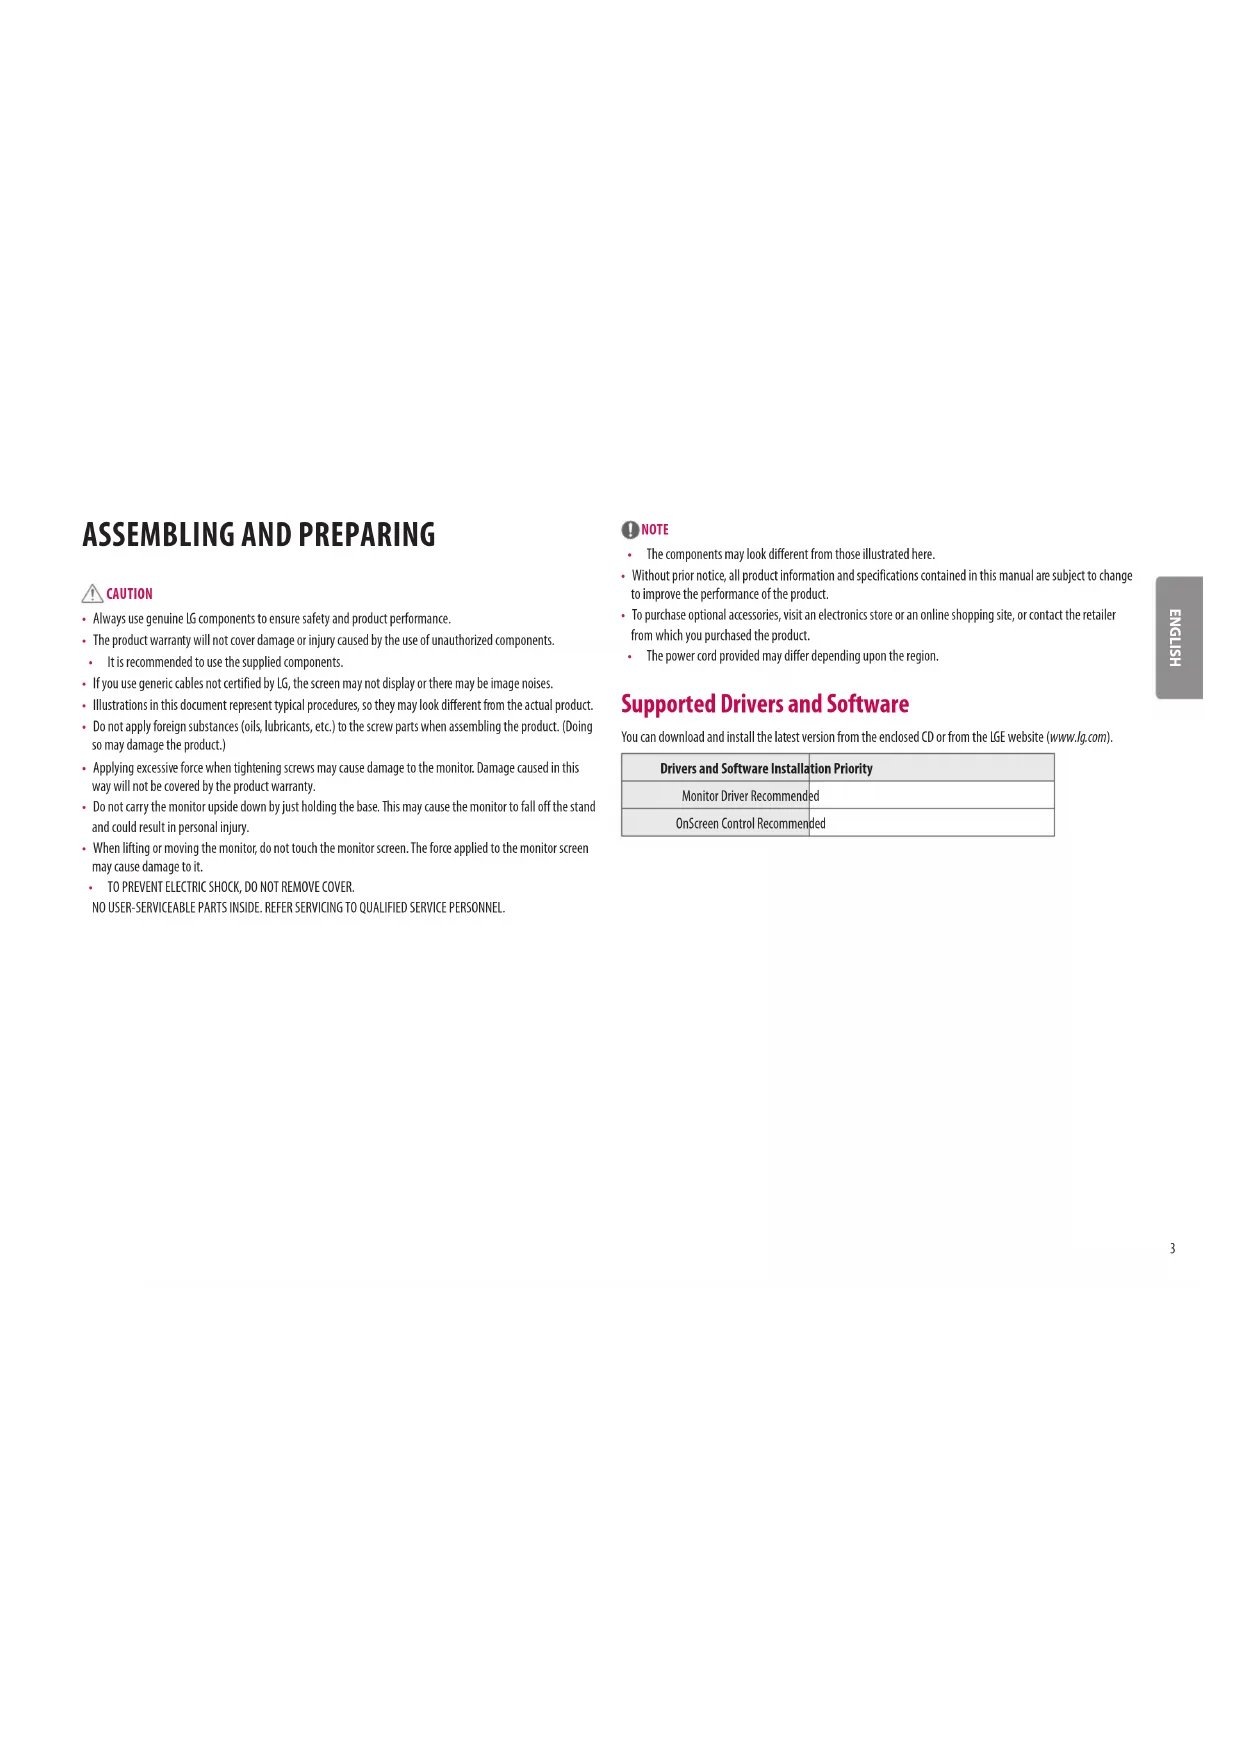
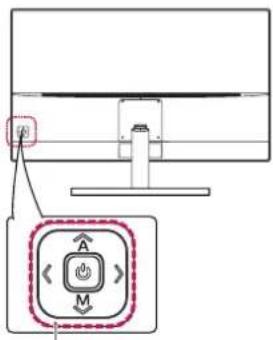
Product and Button Description

Power LED
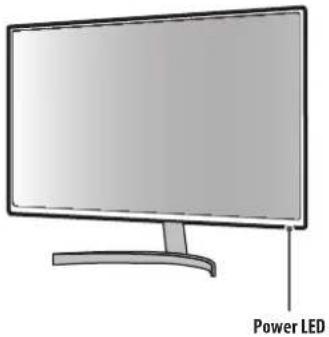
How to Use the Joystick Button
You can easily control the functions of the monitor by pressing the joystick button or moving it left/right/up/ down with your finger.
Basic Functions
| Power on/off | Press the joystick button once with your finger to turn on the monitor. Press and hold the joystick button once more than 5 seconds with your finger to turn off the monitor. |
| Volume control | You can control the volume by moving the joystick button left/right. |
| Menaus / Settings | When the power is on,press the button to adjust the menu and settings. Move the joystick button up/down/left/right to set the options. |
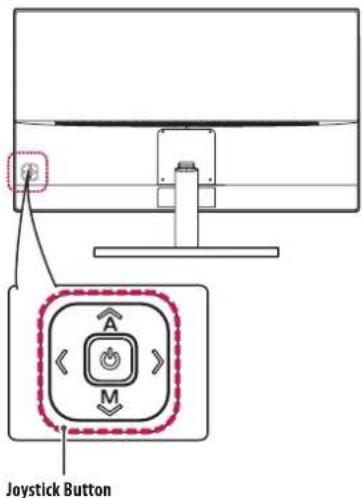
Moving and Lifting the Monitor
When moving or lifting the monitor, follow these instructions to prevent the monitor from being scratched or damaged and to ensure safe transportation, regardless of its shape or size.
- Place the monitor in the original box or packing material before attempting to move it.
- Before moving or lifting the monitor, disconnect the power cord and all other cables.
- Hold the bottom and side of the monitor frame firmly. Do not hold the panel itself.
- When holding the monitor, the screen should face away from you to prevent it from being scratched.
- When transporting the monitor, do not expose the monitor to shock or excessive vibration.
- When moving the monitor, keep it upright and never turn the monitor on its side or tilt its sideways.
CAUTION
- Avoid touching the monitor screen as much as possible.
- This may result in damage to the screen or some of the pixels used to create images.
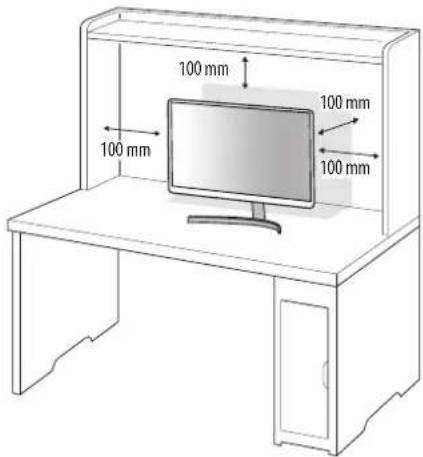
Installing on a Table
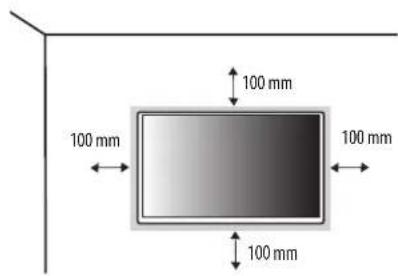
- Lift the monitor and place it on the table in an upright position. Place the monitor at least 100mm away from the wall to ensure sufficient ventilation.
CAUTION
- Unplug the power cord before moving or installing the monitor. There is risk of electric shock.
- Make sure to use the power cord that is provided in the product package and connect it to a grounded power outlet.
- If you need another power cord, please contact your local dealer or the nearest retail store.
Adjusting the Angle
1 Place the monitor mounted on the stand base in an upright position.
2 Adjust the angle of the screen.
The angle of the screen can be adjusted forward or backward from -5^ to 15^ for a comfortable viewing experience.
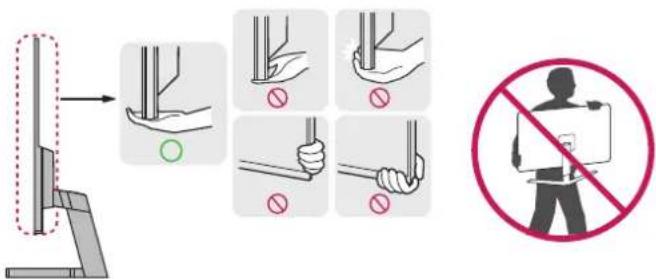
WARNING
To avoid injury to the fingers when adjusting the screen, do not hold the lower part of the monitor's frame as illustrated below.
- Be careful not to touch or press the screen area when adjusting the angle of the monitor.

Installing the Wall Mount Plate
This monitor meets the specifications for the wall mount plate or other compatible devices.

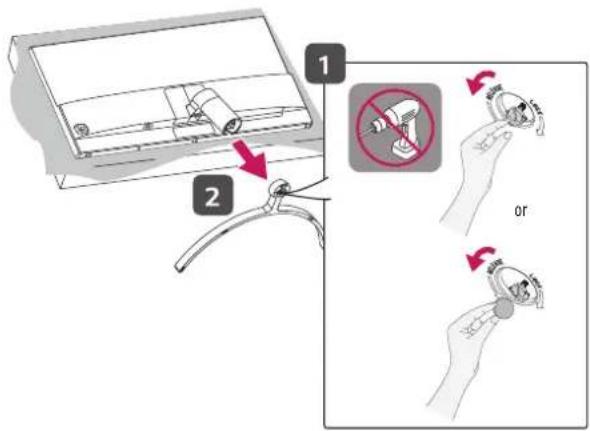
CAUTION
- Place the monitor's screen face down. To protect the screen from scratches, cover the surface with a soft cloth.
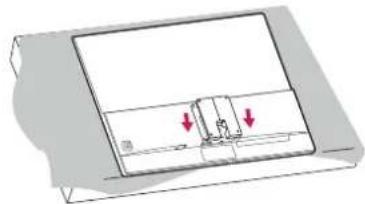
1 Remove the stand base by unscrewing it as shown in the illustration below.
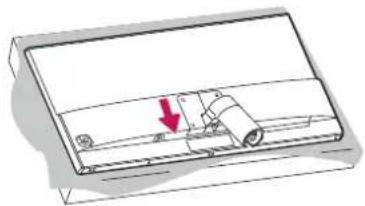
2 Slide the stand cover down as shown in the illustration below.
3 Remove the screws from the stand and separate the stand from the monitor.
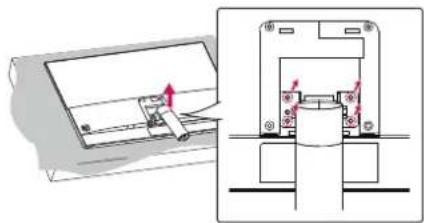
4 Reattach the stand cover.
5 Install the separately purchased the wall mount plate in combination with the monitor.

The wall mount plate is sold separately.
For more information on installation, refer to the wall mount plate's installation guide.
- Be careful not to apply too much force while mounting the wall mount plate as it may cause damage to the screen.
Installing on the Wall
Install the monitor at least 100mm away from the wall and leave about 100mm of space at each side of the monitor to ensure sufficient ventilation. Detailed installation instructions can be obtained from your local retail store. Alternatively, please refer to the manual for how to install and set up a tilting wall mounting bracket.
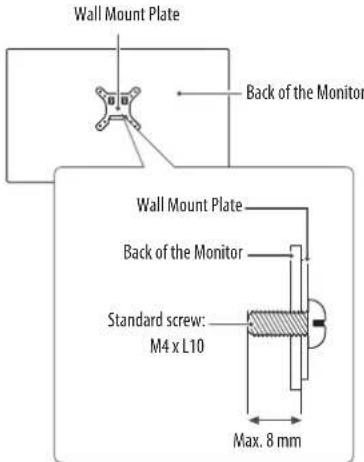
To install the monitor to a wall, attach a wall mounting bracket (optional) to the back of the monitor.
Make sure that the wall mounting bracket is securely fixed to the monitor and to the wall.
| Wall Mount (mm) 100 x 100 | |
| Standard screw M4 x L10 | |
| Number of screws 4 | |
| Wall Mount Plate (Optional) RW120 |

NOTE
- A non-VESA standard screw may damage the product and cause the monitor to fall. LG Electronics is not liable for any accidents relating to the use of non-standard screws.
- The wall mount kit includes the installation guide and all necessary parts.
- The wall mounting bracket is optional. You can obtain optional accessories from your local dealer.
- The length of the screw may differ for each wall mounting bracket. If you use screws longer than the standard length, it may damage the inside of the product.
- For more information, please refer to the user manual for the wall mounting bracket.

CAUTION
- Unplug the power cord before moving or installing the monitor to avoid electric shock.
- Installing the monitor on the ceiling or on a slanted wall may result in the monitor falling off, which could lead to injury. Use an authorized LG wall mount and contact the local dealer or qualified personnel.
- To prevent injury, this apparatus must be securely attached to the wall in accordance with the installation instructions.
- Applying excessive force when tightening screws may cause damage to the monitor. Damage caused in this way will not be covered by the product warranty.
- Use the wall mounting bracket and screws that conform to VESA standards. Damage caused by the use or misuse of inappropriate components will not be covered by the product warranty.
- When measured from the back of the monitor, the length of each installed screw must be 8mm or less.
USING THE MONITOR
- Illustrations in this manual may differ from the actual product.
Press the button, go to [Input] and then select the input option.
CAUTION
- Do not press the screen for a prolonged time. This may cause image distortion.
- Do not display a still image on the screen for a prolonged time. This may cause image retention. Use a PC screenshotaver if possible.
- When connecting the power cord to the outlet, use a grounded (3-hole) power strip or a grounded power outlet.
- The monitor may flicker when turned on in an area where the temperature is low. This is normal.
- Sometimes red, green, or blue spots may appear on the screen. This is normal.
Connecting to a PC
This monitor supports the Plug and Play feature.
Plug and Play: A feature that allows you to add a device to your computer without having to reconfigure anything or install any manual drivers.
HDMI Connection
Transmits digital video and audio signals from your PC to the monitor.
CAUTION
- Using a DVI to HDMI / DP (DisplayPort) to HDMI cable may cause compatibility issues.
- Use a certified cable with the HDMI logo attached. If you do not use a certified HDMI cable, the screen may not display or a connection error may occur.
Recommended HDMI cable types - Using a DVI to HDMI / DP (DisplayPort) to HDMI cable may cause compatibility issues.
- Use a certified cable with the HDMI logo attached. If you do not use a certified HDMI cable, the screen may not display or a connection error may occur.
Recommended HDMI cable types
-High-Speed HDMf/cable
-High-Speed HDMF /m cable with Ethernet
DisplayPort Connection
Transmits digital video and audio signals from your PC to the monitor.

NOTE
- There may be no video or audio output depending on the DP (DisplayPort) version of the PC.
Connecting Headphones
Connect peripherals to the monitor via the headphones port.

NOTE
Peripheral devices are sold separately.
Depending on the audio settings of the PC and external device, headphones and speaker functions may be limited.
- If you use angled earphones, it may cause a problem with connecting another external device to the monitor. Therefore, it is recommended to use straight earphones.

Angled Straight

(Recommend)
CAUTION
-High-Speed HDMf/cable
-High-Speed HDMF /m cable with Ethernet
USER SETTINGS
NOTE
- Your monitor's OSD (On Screen Display) may differ slightly from that shown in this manual.
Activating the Main Menu
1 Press the button on the back of the monitor.
2 Move the joystick button up/down/left/right to set the options.
3 Press the button once more to exit the main menu.
Joystick Button
| Button Menu Status Description | |||
| Main menu disabled Enables the main menu. | |||
| Main menu enabled | Exists the main menu. (Holding down the button more than 5 seconds to turn off the monitor. You can turn off the monitor this way at any time, including when the OSD is on.) | ||
| Main menu disabled Adjusts the monitor volume level. | |||
| Main menu enabled Enters the [Input] features. | |||
| Main menu disabled Adjusts the monitor volume level. | |||
| Main menu enabled Enters the [Settings] feature. | |||
| Main menu disabled Displays the information on the current input. | |||
| Main menu enabled Turns off the monitor. | |||
| Main menu disabled Displays the information on the current input. | |||
| Main menu enabled Enters the [Picture Mode] feature. | |||
Main Menu Features

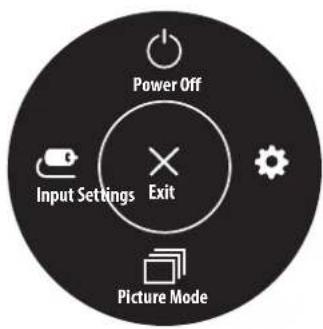
| Main Menu Description | |
| [Input] Sets input mode. | |
| [Power Off] Turns off the monitor. | |
| [Settings] You can adjust the various settings. | |
| [Picture Mode] You can select the various picture mode. | |
| [Exit] Exits the main menu. |
Customizing settings
[Quick Settings]
| [Settings] > [Quick Settings] Description | |
| [Brightness] | Adjusts the contrast and brightness of the screen. |
| [Contrast] | |
| [Volume] Adjusts the volume. | |
| NOTE ·You can adjust [Mute] / [Unmute] by moving the joystick button to ⊙ in the [Volume] menu. | |
[Input]
| [Settings] > [Input] Description | ||
| [Input List] Selects the input mode. | ||
| [Aspect Ratio] | Adjusts the aspect ratio of the screen. | |
| [Full Wide] Displays the video in wide | screen, regardless of the video signal input. | |
| [Original] Displays video according to the aspect ratio of the video signal input. | ||
[Picture]
| [Settings] > [Picture] Description | ||
| [Picture Mode] | [Custom] | Allows the user to adjust each element. The color mode of the main menu can be adjusted. |
| [Reader] | Optimizes the screen for reading documents. You can brighten the screen in the OSD menu. | |
| [Photo] Optimizes the screen to view photos. | ||
| [Cinema] Optimizes the screen to improve the visual effects of a video. | ||
| [Game] Optimizes the screen for gameplay. | ||
| [Picture Adjust] | [Brightness] | Adjusts the contrast and brightness of the screen. |
| [Contrast] | ||
| [Sharpness] Adjusts the sharpness of the screen. | ||
| [Black Level] | Sets the offset level. • Offset: as a reference for a video signal, this is the darkest color the monitor can display. | |
| [High] Keeps the current contrast ratio of the screen. | ||
| [Low] Lowers the black levels and raises the white levels from the current contrast ratio of the screen. | ||
| [DFC] | [On] Adjusts the brightness automatically according to the screen. | |
| [Off] Enables the feature. | ||
| [Settings] > [Picture] Description | |||
| [Game Adjust] | [Response Time] | Sets a response time for displayed pictures based on the speed of the screen. For a normal environment, it is recommended that you use [Fast]. For a fast-moving picture, it is recommended that you use [Faster]. Setting to [Faster] may cause image sticking. | |
| [Faster] Sets the response time to [Faster]. | |||
| [Fast] Sets the response time to [Fast]. | |||
| [Normal] Sets the response time to [Normal]. | |||
| [Off] Enables the feature. | |||
| [FreeSync] | Provides seamless and natural images by synchronizing the vertical frequency of the input signal with that of the output signal. CAUTION • Supported Interface: HDMI, DP, mDP • Supported Graphic Card: A graphic card that supports AMD's FreeSync is necessary. • Supported Version: Make sure to update the graphic card to the latest driver. • For more information and requirement, refer to AMD website at http://www/amd.com/FreeSync. | ||
| [On] [FreeSync] function on. | |||
| [Off] Enables the feature. | |||
| [Black Stabilizer] | You can control the black contrast to have better visibility in dark scenes. Increasing the [Black Stabilizer] value brightens the low gray level area on the screen. (You can easily distinguish objects on dark game screens.) Reducing the [Black Stabilizer] value darkens the low gray level area and increases the dynamic contrast on the screen. | ||
| [Cross Hair] | Cross hair provides a mark on the center of the screen for First Person Shooter (FPS) games. Users can select the cross hair that fits their gaming environment among four different cross hairs. • When the monitor is off or enters energy saving mode, the cross hair feature is automatically turned off. | ||
| [Settings] > [Picture] Description | |||
| [Color Adjust] | [Gamma] | [Mode 1], [Mode 2], [Mode 3] | The higher the gamma value, the darker the image becomes. Likewise, the lower the gamma value, the lighter the image becomes. |
| [Mode 4] if you do not need to adjust the gamma settings, select [Mode 4]. | |||
| [Color Temp] | [Custom] The use can adjust it to red, green, or blue by customization. | ||
| [Warm] Sets the screen color to a reddish tone. | |||
| [Medium] Sets the screen color to between a red and blue tone. | |||
| [Cool] Sets the screen color to a bluish tone. | |||
| [Red/Green/Blue] You can customize the picture color using red, green, and blue colors. | |||
| [Six Color] | Meets the user requirements for colors by adjusting the hue and saturation of the six colors (red, green, blue, cyan, magenta, and yellow) and then saving the settings. | ||
| Hue Adjusts the tone of the screen colors. | |||
| Saturation | Adjusts the saturation of the screen colors. The lower the value, the less saturated and brighter the colors become. The higher the value, the more saturated and darker the colors become. | ||
| [Picture Reset] | [Do you want to reset your settings?] | ||
| [No] Cancel the select. | |||
| [Yes] Returns to the default setting. | |||
[General]
| [Settings] > [General] Description | ||||
| (Language) Sets the menu screen to the desired language. | ||||
| [SMART ENERGY SAVING] | Conserve energy by using luminance compensation algorithm. | |||
| [High] Saves energy using the high-efficiency [SMART ENERGY SAVING] feature. | ||||
| [Low] Saves energy using the low-efficiency [SMART ENERGY SAVING] feature. | ||||
| [Off] Enables the feature. | ||||
| NOTE ·The value of energy saving data may differ depending on panel and panel suppliers. ·If you select the option of [SMART ENERGY SAVING] is [High] or [Low], monitor luminance become lower or higher depend on source. | ||||
| [Power LED] | ·When the Power LED function is turned on, it operates as follows: -On Mode: White -Sleep Mode: White Blinking -Off Mode: Off | |||
| [Automatic Standby] | Feature that automatically turns off the monitor when there is no movement on the screen for a period of time. You can set a timer for the auto-off function. ([Off], [4H], [6H], and [8H]) | |||
| [Settings] > [General] Description | ||||
| [OSD Lock] | This feature disables the configuration and adjustment of menus. | |||
| [On] Enables [OSD Lock]. | ||||
| [Off] Enables [OSD Lock]. | ||||
| NOTE • The menus except the menus below are disabled. - [Quick Settings] - [Brightness], [Contrast], [Volume] - [Input] - [General] - [OSD Lock], [Information] | ||||
| [Information] | The following display information will be shown; [Model], [Total Power On Time], [Serial Number], [Resolution]. | |||
| [Reset] [Do you want to reset your settings?] | ||||
| [No] Cancel the select. | ||||
| [Yes] Returns to the default settings. | ||||
TROUBLESHOOTING

| Nothing is displayed on the screen. | |
| Is the monitor's power cord plugged in? | Check if the power cord is correctly plugged into the power outlet. |
| Is the monitor's adapter plugged in? | Make sure to use the adapter that is provided in the product package. |
| Is the power LED on? | Check the power cable connection and press the power button. |
| Is the power on and the power LED displaying White? | Check that the connected input is enabled ([Settings] →[Input]). |
| Is the [Out of Range] message being displayed? | This occurs when signals transferred from the PC (graphics card) are out of the horizontal or vertical frequency range of the monitor. Please see the Product Specification section of this manual to set the appropriate frequency. |
| Is the [No Signal] message being displayed? | This is displayed when the signal cable between the PC and the monitor is missing or disconnected. Check the cable and reconnect it. |
| Screen display is unstable and shaky. / Images displayed on the monitor leave shadow trails. | |
| Did you select the appropriate resolution? | If the selected resolution is HDMI 1080i 60/50 Hz (interlaced), the screen may be flickering. Change the resolution to 1080p or the recommended resolution. Not setting the graphics card to the recommended (optimal) resolution may result in blurred text, a dimmed screen, a truncated display area or misalignment of the display. The setting methods may be different depending on the computer or operating system, and some resolutions may not be available depending on the performance of the graphics card. If this is the case, contact the manufacturer of the computer or graphics card for assistance. |
| Does image sticking occur even when the monitor is turned off? | Displaying a still image for a prolonged time may cause damage to the screen, resulting in the retention of the image. To extend the lifetime of the monitor, use a screensaver. |
| Are there spots on the screen? | When using the monitor, pixilated spots (red, green, blue, white, or black) may appear on the screen. This is normal for an LCD screen. It is not an error, nor is it related to the monitor's performance. |
| Some features are disabled. | |
| Are some functions not available when you press the Menu button? | The OSD is locked. Disable [OSD Lock] in [General]. |
| Do you see an "Unrecognized monitor, Plug and Play (VESA DDC) monitor found" message? | |
| Have you installed the display driver? | Be sure to install the display driver from the display driver CD (or diskette) that comes with your display. Or, you can also download the driver from our website: http://www.lg.com.Make sure to check if the graphics card supports Plug and Play function. |
| No sound from the headphone port. | |
| Are images displayed without sound? | Make sure that the headphone port connections are made properly.Try increasing the volume with the joystick.Set the audio output of the PC to the monitor you are using. (The settings may differ depending on the operating system (OS) you use.) |
PRODUCT SPECIFICATION

| Color Depth 10-bit color is supported. | |||
| Resolution | HDMI1, HDMI2 | Max Resolution 2560 x 1440 @ 75 Hz | |
| Recommended Resolution 2560 x 1440 @ 60 Hz | |||
| DP, mDP | Max Resolution 2560 x 1440 @ 75 Hz | ||
| Recommended Resolution 2560 x 1440 @ 60 Hz | |||
| Power Sources | Power Rating 19 V 2.5 A | --- | |
| Power Consumption | On Mode: 46 W (Typical) (Outgoing condition)*Sleep Mode: ≤ 0.5 W**Off Mode: ≤ 0.3 W | ||
| AC/DC Adapter | DA-48F19, manufactured by APDOutput: 19 V -2.53A | ||
| Environmental Conditions | Operating Conditions Temperature 0 °C to 40 °C | ||
| Humidity Less than 80 % | |||
| Storing Conditions Temperature -20 °C to 60 °C | |||
| Humidity Less than 85 % | |||
| Dimensions | Monitor Size (Width x Height x Depth) | ||
| With Stand 724.3 x 519.2 x 219.9 (mm) | |||
| Without Stand 724.3 x 424.2 x 42.5 (mm) | |||
| Weight (Without Packaging) | With Stand 5.7 kg | ||
| Without Stand 5.4 kg | |||
Specifications are subject to change without notice.
The On Mode of Power Consumption is measured with LGE test standard. (Full White pattern, Maximum resolution)
The Power Consumption level can be different by operating condition and monitor setting.
* The monitor goes into the Sleep Mode in a couple of minutes. (Max 5 minutes)
Factory Support Mode
(Preset Mode, HDMI/DisplayPort PC)
| Preset Mode Horizontal | Frequency (kHz) Vertical Frequency (Hz) Polarity (H/V) Remarks | |||
| 640 x 480 | 31.469 59.94 +/- HDMI/ DisplayPort | |||
| 37.5 75 +/- HDMI/ DisplayPort | ||||
| 800 x 600 | 37.879 60.317 +/-+ HDMI/ DisplayPort | |||
| 46.875 75.0 +/-+ HDMI/ DisplayPort | ||||
| 1024 x 768 | 48.363 60.0 | -/- HDMI/ DisplayPort | ||
| 60.123 75.029 +/-+ HDMI/ DisplayPort | ||||
| 1152 x 864 | 54.347 60.05 | +/-+ HDMI/ DisplayPort | ||
| 1280 x 720 | 45 | 60 | +/-+ HDMI/ DisplayPort | |
| 1280 x 1024 | 63.981 60.02 | +/-+ HDMI/ DisplayPort | ||
| 79.976 75.025 +/-+ HDMI/ DisplayPort | ||||
| 1680 x 1050 | 65.29 | 59.954 | -/+ | HDMI/ DisplayPort |
| 1920 x 1080 | 67.50 | 60 | +/- | HDMI/ DisplayPort |
| 2560 x 1440 | 88.79 59.95 | +/- | HDMI/ DisplayPort | |
| 110.95 74.96 | +/-+ HDMI | |||
| 111.86 74.97 | +/- | DisplayPort |


Life's Good
This device can be used in all regions. Read the owner's manual (CD) carefully and keep it at hand.
Please note that the label attached to the product provides information for technical support.
Model
Serial No.
IMPORTANT PRECAUTIONS
This unit has been engineered and manufactured to ensure your personal safety, however improper use may result in potential electrical shock or fire hazards. In order to allow the proper operation of all safeguards incorporated in this display, observe the following basic rules for its installation, use, and servicing.
On Safety
Use only the power cord supplied with the unit. In case you use another power cord, make sure that it is certified by the applicable national standards if not being provided by the supplier. If the power cable is faulty in any way, please contact the manufacturer or the nearest authorized repair service provider for a replacement.
The appliance coupler is used as the disconnect device.
Please make sure the device is installed near the wall outlet to which it is connected and that the outlet is easily accessible.
Operate the display only from a power source indicated in the specifications of this manual or listed on the display. If you are not sure what type of power supply you have in your home, consult with your dealer.
Overloaded AC outlets and extension cords are dangerous. So are frayed power cords and broken plugs. They may result in a shock or fire hazard. Call your service technician for replacement.
As long as this unit is connected to the AC wall outlet, it is not disconnected from the AC power source even if the unit is turned off.
Do not Open the Display:
- There are no user serviceable components inside.
- There are Dangerous High Voltages inside, even when the power is OFF.
- Contact your dealer if the display is not operating properly.
To Avoid Personal Injury :
- Do not place the display on a sloping shelf unless properly secured.
- Use only a stand recommended by the manufacturer.
- Do not drop an object on or apply impact to the product. Do not throw any toys or objects on the product screen.
It can cause injury to human, problem to product and damage the display.
To Prevent Fire or Hazards:
- Always turn the display OFF if you leave the room for more than a short period of time. Never leave the display ON when leaving the house.
- Keep children from dropping or pushing objects into the display's cabinet openings. Some internal parts carry hazardous voltages.
- Do not add accessories that have not been designed for this display.
- When the display is to be left unattended for an extended period of time, unplug it from the wall outlet.
- In the presence of thunder and lightning, never touch the power cord and signal cable because it can be very dangerous. It can cause electric shock.
On Installation
Do not allow anything to rest upon or roll over the power cord, and do not place the display where the power cord is subject to damage.
Do not use this display near water such as near a bathtub, washbowl, kitchen sink, laundry tub, in a wet basement, or near a swimming pool.
Displays are provided with ventilation openings in the cabinet to allow the release of heat generated during operation. If these openings are blocked, built-up heat can cause failures which may result in a fire hazard.
Therefore, NEVER:
- Block the bottom ventilation slots by placing the display on a bed, sofa, rug, etc.
- Place the display in a built-in enclosure unless proper ventilation is provided.
- Cover the openings with cloth or other material.
- Place the display near or over a radiator or heat source.
Do not rub or strike the Active Matrix LCD with anything hard as this may scratch, mar, or damage the Active Matrix LCD permanently.
Do not press the LCD screen with your finger for a long time as this may cause some afterimages.
Some dot defects may appear as Red, Green or Blue spots on the screen.
However, this will have no impact or effect on the display performance.
If possible, use the recommended resolution to obtain the best image quality for your LCD display. If used under any mode except the recommended resolution, some scaled or processed images may appear on the screen. However, this is characteristic of the fixed-resolution LCD panel.
Displaying a still image for long time on the monitor may leave persistent image or stain on the monitor screen. To avoid this problem, use a screen saver and power off when this product is not used. Persistent image or stain caused by long time usage are not covered by the warranty on this product.
Do not shock or scratch the front and sides of the screen with metallic objects.
Otherwise, it may cause damage to the screen.
Make sure the panel faces forward and hold it with both hands to move. If you drop the product, the damaged product can cause electric shock or fire. Contact an authorized the service center for repair. Avoid high temperatures and humidity.
Do not install this product on a wall if it could be exposed to oil or oil mist.
- This may damage the product and cause it to fall.
For displays with glossy bezels the user should consider the placement of the display as the bezel may cause disturbing reflections from surrounding light and bright surfaces.
Do not use products using high voltage around the Monitor. (ex. Electrical Swatter)
- Monitor may have malfunction as its electrical shock.
Precautions to the AC Adapter and Power
If water or any foreign substance goes inside the product (TV, monitor, power cord, or AC adapter), disconnect the power cord immediately and contact the service center.
- Otherwise, this may cause a fire or electric shock due to damage to the product.
Do not touch the power plug or AC adapter with wet hands. If the pins of the plug are wet or dusty, wipe and dry them before use.
- Otherwise, this may cause a fire or electric shock.
Make sure to completely insert the power cord into the AC adapter.
- If loosely connected, the poor connection may cause a fire or electric shock.
Be sure to use power cords and AC adapters provided or approved by LG Electronics, Inc.
- The use of non-approved products may cause a fire or electric shock.
When unplugging the power cord, always pull it by the plug. Do not bend the power cord with excessive force.
- The power line can be damaged, which may cause electric shock or fire.
Be careful not to step or place heavy objects (electronic appliances, clothing, etc.) on the power cord or AC adapter. Be careful not to damage the power cord or AC adapter with sharp objects.
- Damaged power cords may cause a fire or electric shock.
Never disassemble, repair or modify the power cord or AC adapter.
- This may cause a fire or electric shock.
Be sure to keep the outlet, AC adapter, and pins of the power plug clean from dust and etc.
This may cause a fire.
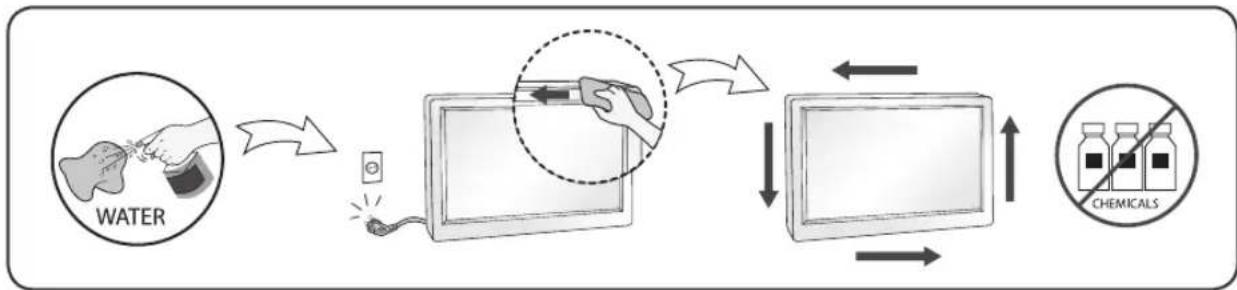
On Cleaning
- Unplug the display before cleaning the face of the display screen.
- Use a slightly damp (not wet) cloth. Do not use an aerosol directly on the display screen because over-spraying may cause electrical shock.
- When cleaning the product, unplug the power cord and scrub gently with a soft cloth to prevent scratching. Do not clean with a wet cloth or spray water or other liquids directly onto the product. An electric shock may occur. (Do not use chemicals such as benzene, paint thinners or alcohol)
- Spray water onto a soft cloth 2 to 4 times, and use it to clean the front frame; wipe in one direction only. Too much moisture may cause staining.
On Repacking
- Do not throw away the carton and packing materials. They make an ideal container in which to transport the unit. When shipping the unit to another location, repack it in its original material.
On Disposal(Only, LCD Monitor with Hg lamp)
- The fluorescent lamp used in this product contains a small amount of mercury.
- Do not dispose of this product with general household waste.
- Disposal of this product must be carried out in accordance to the regulations of your local authority.
MASA TÉ RÉNDÉSISHME PARAPRAKE
Ky aparat ᵓshte inexhinieruar dhe prodhuar né MENyre qē tē garantojë sigurine tuaj personale,sidoqofté, pērdorimi i gabuar mund tē shkaktojë elektroshok ose zjarr. Ně MENyre qē tē lejoni funkSIONimin e saktek tē tē githa siguresave tē brendatrupëzuara nè kétē tevizor, vēzhgoni rregullat bazē tē mēposhtme pēr instalimin, pērdorimin dhe mirembajtjen e tij.
Rrethsigurise
Pērdorni vetēm kordonin elektrik qè jepet me aparatin. Nèse pērdorni njè kordon tjeter elektrik, sigurohuni qè ᵓshte i vertetuar nga standardet kombëtare né fuqi nèse nuk ju ᵓshte ofruar nga furnizuesi. Nèse kabloja elektrike ᵓshte me defekt, lutemi tè kontaktoni me prodhuesin ose ofruesin e autorizuar tè sherbimit tè riparimit mè tè afert per ta zëvendésuar.
BAJHIN PPEIa3HN MEPKN
ToBa yctpoiCTBO e KOHcTpyuPaHO n npo3BedeHo c ceIa Ce rapaHTnpa BaWaTa InuHa 6e3OnacHocT, HO HnnpabUNHOTIO n3NOJ3BaHe MOKe Da IOBeDe Do TOKOB ydap IIN pNCK OT Bb3NHkBaHe Ha nojkap. 3a Da CE NO3BOJIn npabUNHOTIO npnIOXeHne HA BCNUKN PpeJNa3HN MepKn, BKNUOeHN B HAcTOJUM MoDyIn, Cna3BaTe CJIeDNITE OCHOBNI npabNJa 3a HerOBOTO INHCTaJIIPAHe, n3NOJ3BaHe N NOJDPbJxKa.
HΦopMaζη OTHOCHO 6e3ONaCHOCCTTa
I3noI3BaIte cAmO 3axpaHbAunKa6eJ, npeIOCTaBeH 3aeIDHO C yCTPOINCTBOTo. Ako I3noJI3BaTe dpyr 3axpaHbAUn Ka6eJ, npOBepTe daIIe e cepTnΦuNpAr oT cbOTBeHTHe npINOxIMn HaUHOHaHN CTaHApTN B cIyuaHTE, KORAto He ca ocNpyeHn OT IOCTaBvHka. Ako 3axpaHbAunKa6eI e NobpeDeH, ce OsbPHeTe KbM npON3BODInTeJI nn Hau-6bn3Km OTOpN3pAn pPeDCaBNTe 3a CMHa.
CbeHnTeJrHa yCTpoNCTBOTO Ce 3nON3Ba KaTO yCTpoNCTBO 3a npeKbCbaHe Ha Bpb3KaTa.
YBepete ce, Ye yctpoiCTBOTo e HcTaNpaHO B 6JIIN3OCT Do CTeHHN KONTAKT, B KOITo E BKJIOUeHO, N Ye KOHTaKTbT e JeCHO DoCTbNeH.
BknuBaTe nncnne CaMo B n3ToUHKn Ha 3axpaHbaHe, nocOeH B cneunkaunte Ha HactoIto pboKOBODTO BO nnn noCooHn Ha nncnne. Ako He CTe cnrypHn KaKB e TnblT Ha eJeKTpuYeCKOTO 3axpaHbaHe, c KOeTO pa3noJarate B DomA CN, ce KOHCyTNipaTne CbC CBOA nnbp. PpeTOBapeHnTE npOMEHNBOTOKOBn KONTAKTN yDJIJKNTeIN ca onachn. IpotPNTte KaBeIN n ChyNeHnTe ueCeJIn cbIo npedCTaBnBaT onachOCT. Te MORAT Da DOBeDaT Do TOKOB ydap nnn OnaCHOCT OT BB3NkBaHe Ha noXkap.
06aTe ce Ha cepBn3eH TexHnK, 3a Da n3BbPwn CmHa.
Iokato TOBa yCTpoiCTBO e BKJIIOUeHO B CTeHeH KOHTaKT 3a IpOMeHJINB TOK, BpBJ3KaTa C N3TOUHnka Ha 3axpaHbAHeto He Ce IpeKbCBA, DOpN KOraTO N3KJIIOUHTe YCTPOiCTBOTo OT KOHTaKTa.
He otBaprTe dncnpe:
B HrO He ce cBdIbpxaT KOMNoHeHTN, KOITo MOraT Da ce 0cbJyXBaT OT Ntpe6nteJI.
B Hero ca 3aIoxKeHn onachn HanepeKeHn BnCOKOBbTppe, DOpn KOrato 3axpaHbaHeTo e N3KnUOeHO.
Cbpxte ce cbc CBOI pndTaBnteJ, aKo dncnpeT He pa60TN npabNJHO.
3a da n36erHeTe TeleChn nobpei:
He noctabyte dncnpe Ha haknoheH npafoBe, oCbeH aKO nocneHnTe He ca yctOnuBO 3actonopeHn.
- I3non3BaIte cAmO cToiKN, npenopbuaHn OT npon3BOIDTeJIa.
- He n3nyckaIte npedMeTn H He ynpaxHraBaIe H aTnCK Bbpyx ycToPcIcTBOTo. He noCTaBnTe irpaKn nnDpyr npedMeTn Bbpyx ekpana Ha ycToPcIcTBOTo. Toba moKe da npuHn HapaHraBaHe Ha xopa, npobJIemn C ycToPcIcTBOTO n NobpeHa Ha dinCIIeJ.
3aДа пpeIoTbpaTnte риcka OT ВьзнКBaHe Ha пожар Илдругп onacHOCTN:
BnHaH N3KIOUBAIte Dncnpe, ako n3ne3eTe OT cTaTa 3a npOdbJnxntHo BpeMe. HNKora He octabraIte dncnpe BKIOUCHE, ako HanycheTe Doma cn.
- PpeIpa3BaIte Deaata OT nI3nyckaHTo IIN npOKapBaHTo Ha ppeMTe Ipe3 OTbOpTe Ha shkaP aHa dncnpe. HkON BbTpewHn Yactn ca HocnteHn Ha onachn HanpeXeHn.
He doabayte npnaadnHexno, KOTo He ca npedha3nueH 3a To3n Tn DnCnne.
Korato nncnneT cneBa da 6bIe octaBeH 6e3 Na6JIIOHeHne 3a npOdbJXKeTeH nepNOd OT BpeMe, To n3KJIIOuBaIte OT CTeHHN KONTAKT.
-При налінчието на ГьмOTeВИЧа 6уря И CBETКавиц,нИКORA He ДOKOCBAITE 3axpaHbaциЯ И сгнання kaбел,зauOTO TOBa може да ce OKаже MHoro onaCHO.ТOba може дa ппунин TOKOB ydap.
Pn nHcTaJaCn
He no3B0JBAIte Ha HnIO Da npNTNcKa IIN Da ce TbPKaJIy BbPxy 3axpaHbauNIG Ka6eN He pa3noJaTe DInCIIe Ha MeCTa, Ha KOnTO 3axpaHbauNIT Ka6eN MoKe Da 6bJe nobpeDen.
He n3n013BaIte To3n DucnJeB 6n3OCT Do BOJa, HApnpMeP BaHa, Dyu-Ka6nHa, KxHcNcKa MNBka, KopITo 3a npaHe, B MOKpo NomeeHne nn 6n3o Do npyBeH 6aceH.
IinCnJIeNTe Ce npedocTabrT 3aeEDHO C BENTINaUHNOHH OTBOPN B WkaΦa C ceJda Ce OTdEJI rHepePpAHOHarpaBaHe no BpeMe Ha pa6Ota.
Ako Te3n OTBOpN 6bDaT 6IOKIPAHn, HATpynaHOTo HarpBaHe MoKe Da npuHHn Heu3npaBHOCTN, BOeun Do nopaxdaHe Ha pNCK OT Bb3HnKBAHe Ha noXap.
3aToBa HNKORA HE:
BnokpaTe DOnHnTe BeHTnnaCNoHHn N3BOOn, KaTo NoCTaBTe DnCnpe Bbpxy JereN, DnBaH, KInm n dp.
-Посавг Te Дспгя Bвв Врадн Wkaф,ОCBEN aKO He e OcngypeH NOxOJaCpeICTBO 3a BEHTnlaц.
- POKPBAIte OTBOPHe C Kbpna Unn Dpyra MaTepeia.
- NocTabaIte dncnner 6nn3o do nnn Bbpxy paadnatop nn TOnnnHeH n3ToHHK.
Tbpkai Te nn oBtpnBaTe Active Matrix LCD ekpaHbT C HnIO TBbpDO, Tb KaTO TOBA MoKe da HaIpaKa, 3aana nn noBpei TpaHNo Matrix LCD ekpHa.
He Hatackai Te LCD ekpana c npbct npoBnKeHNo BpeMe, Tb KaTo TOBa MoKe da npedn3BnKa nocleDbauu n3o6paKehn.
HЯко ДeфсКTHN TOn KmoRaT Da ce npeBbPHaT B UepBHeH, 3eJIeH NII CInH ToKn NO ekpaHa.
Ho Te He ce OTPa3BaT He6laorponpIHO Bbpxy KaYeCTBOTO Ha KapTuHaTa.
No Bb3MOxHOCr 13noJ3BaIte npenopbUHTeHaTa pa3JeIITeHa cnoc6HocT 3a noJyAbaHe Ha HauDobpo KaueCTBO Ha 13o6paKeHHeTo 3a CBOA LCD dncnnei.
Ako ce n3noJ3BaT noD npyr pexKIM c n3KnHoueHne Ha npenOpbHaHata pa3deJIHTeHa cnoc6HOCT, HApKaHa MoKe Da ce NoBRT HkON MaaAsbpaHn nn O6pa6ToHn 306paKeHna.
Ho ToBa e xapaKTePncTnka Ha LCD nahena c fKnCnpaHa pa3dJIteJHa cnco6HocT.
Ioka3BaHTo Ha HeNoDbNkHo 3o6paXeHne npOdbNkHTeHb BpeMe Ha MOHtopa MoKe da npuHN HcKcapaHe Ha 3o6paXeHne nn PeTHo Ha ekpHa. 3a Da n36erHete To3n npo6Je, n3no13BaTe CkpHcEINBbp IN3KnIOUbaIte yCTpoiCTBOTo BNHaR, KOrato He Bn e Heo6xOJMo. NocToHHOTO 3o6paXeHne nn PeTHo, npuHNHeN O T npOdbNkHTeHna ynotpe6a, He ce 0xbAcaT ot rapaunOHHaTa IODpbXka HA TOBa yCTpoiCTBO.
He ydpnTe n He dpackaTe npedHaT a ctpaHnHTe qactn Ha ekpaHa C MeTaHn PpeDMeTn.
B npotuben cnuyaToba moKe da doBeDe do nobpeHa ha ekpaHa.
Korato npemecTBate ycTpoiCTBOTo, npOBepTe daHn nAHeNbT cTOn C IInue HAnpe N rO dpXkTe C DBeTe cn pBte. Ako n3nycheTe ycTpoiCTBOTo, NOBpeDeHNrT npOdyKT MOKe Da npuHnT TOKOB yDap nn nojkap.
CbpxKeTe ce cbc ynbHOMOeH cepBn3eH ueHTbp 3a nonpaBA. N36raBte BnCOKn TeMnepaTypn n BlaxKHOCT.
He nocTae Te npOyKta Ha cTeHa, KbDeTo Da 6bJe N3IOXeH Ha N3napEnr O T Ma3HnHa IIN npBcKn OT OJNO.
ToBa moKe Da noBpei npOdyKta IJn Da npuHn naHaHe nopAaXJIb3raHe.
3a ekpaHnte c nbckabn pHHn notpe6ntjT tr6Ba da o6mncJ 3a nocTabraHTo Ha ekpaHa, 3aTO pHHrTe MOKe Da IOBeDaT DO cmUzabauu OTpaxeHnO T OKoJIHaTa CBETnHa N CBEtJIOBbpxHOCTN.
He n3noI3BaIte yCtpoIcTbC BncoKo HanpeXeHne OKoLo MOHITopa. (HaNP. eJeKeTpuecka MyxOboiKa)
- MoHITOpbT MoKe Da Ce NOBpeiN, HApPIMeP Da Bb3HNKHe TOKOB yIap.
IpeDnA3Hm MepKn, CbBp3aHn c AC aAnTepa n 3axpaHbauJna Ka6eJ
AkoB npOyKta (TeJeBn3Op, MOHITop, 3axpaHbAs Ka6e Nn AC aanTep) HABJe3e B0da nIpyra yJda cy6ctaunia, He3a6abHo n3KnIOueTe 3axpaHbAs Ka6e N ce CbPjKeTe cbc cepBn3n IeHTbp.
B npotnbEN cnuyaToba moKe da doBeDe do noXap nIIN TOKOB yIap,napnIOBpeHa npOdykTa. He DOKocBaIe Tcncce na IIN AC aIanTepa C Mokpn Pbue. Ako uNTOBete Ha Ucncce na Ca MOKpn IIN npaunH, n36bpwe Te r n r n 3cywete npdeynynotpe6a.
B npotnbEn cnyaT OBa moKe da doBepe do noxap nIu TOKOB ynap.
YBepTe ce,Ye cTe BkapaIIN DokpaN 3axpaHbauNJa6eJ N AC aanTepa.
Ako exna6abo Cbbp3aH, looTo CBbp3BaHe MoKe Da doBeDe Do noXap Nn TOKOB ynap.
YBepete ce, ye n3no3BaTe 3axpaHbaun Ka6eIn AC aanTepn, npedocTaBeHN nn odo6peHn ot LG Electronics, Inc.
- YnoTe6aTa Ha HeoO6peHn npOdyKT MoKe Da DOBeDe Do noXap nn TOKOB yIap.
Korato n3kIIOvBaTe 3axpaHbAunKa6eI, BnHaRn n3dBpNBAitE cencela. He orbBaIte 3axpaHbAun Ka6e IpekaJeHo cnIHO.
3axpaHbauyne moe da ce nobpeu, KOeTo da doBeDe Do TOKOB yap nnn nokap.
BnHmabaiTe da He cTbNaTe n da He noCTaBAre TeKKn npEmdTe (eJeKeTpoHH yCtpoiCTBa, dpexn n T.H.) Bbpxy 3axpaHbaunia Ka6en nnn AC aanTepa. BnHmabaiTe da He nobpeDnte 3axpaHbaunia Ka6en nnn AC aanTepa c ocTpr npEmdTe. - NOBpeHEn 3axpaHbau Ka6e MoKe Da NOBeDe Do noXap nn TOKOB yIap.
Hnkora He demoHTnpaTe, He nonpaBraTe n He moNcHnpuaTe 3axpaHbauJna Ka6eJ nn AC aanTepa.
ToBaMoKe Da DoBeNe Do NoXap Nn TOKOB yap.
IopdbpkaTe KOHTaTa, AC aanTepa u nuTOBeHa uenceLa uCTn OT npax n T.H.
ToBa MoKe Da npeDn3BnKa noXap.
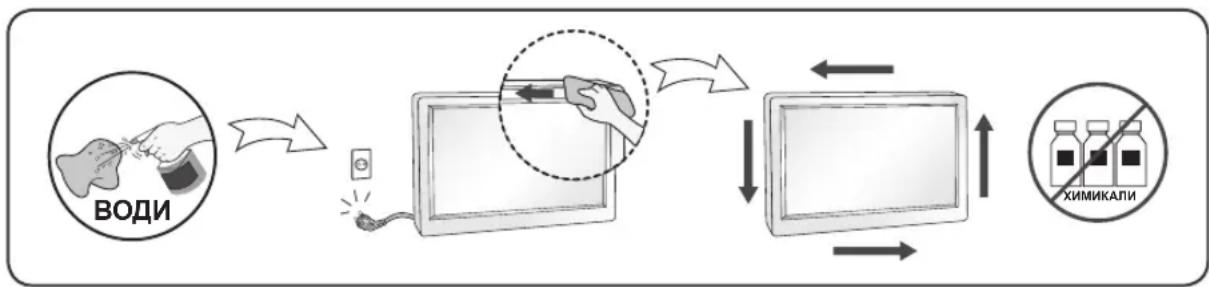
Pn nouchTbaHe
- ɪəʌnʌbʌyərʌeɪnʌcʌnærɪpɛdɪ nʌa noʊnctɪte nɒbʌpɔxHocCTT a H a ekpaHa My.
- ɪənərəbʌaɪte Jæko Ḥæbʌkʌhɛha (He Mɔkpa) KbPna. He npbckaɪte ekpɑha Naɪncnne r c aepoʒɔn, 3aʊtO TpeKOMePHO TpBcKaH e Moke Da npuynH TOKOB yɪap.
- Pn nouctbahe Ha yctpoictBOTo n3BaTee eenceJa Ha 3axpaHbunna Ka6eJ OT KOHTaHa n36bpwe Tc MeKa Kbpna, 3a Da npedotBpataTne HApackBaHe. He nouctbaite C Bnaxha Kbpna Hn pbckaite yctpoictBOTo c B0da nn dpyn TeuhoTn. B npotnbEN cnuyan MoKe da Bb3HkHe TOKOB yap. (He n3non3BaTe xmmueckn BeueCTBa KaTO 6eH3eH, pa3peNTeIN nn ankoXoN.)
- HanpbckaTe Meka Kbpna C Boda ot 2 do 4 nbTu n y n3non3BaIte 3a nouchTbAHe Ha npedHaTa pamka; 3abpcBaIte caMoB eJha nocoka. IpekomepHaTa Bnara MoKe da npuHn 3aunBaHe.
- Mohlo by DOJIT K POZÁRU.
Cisteni
- MoHHTOP TOK COFY CnAeTbI DpypbIC KymbIC Xacamaybl MymkiH.
AinbimabTOK aanTepi MeH KyaTka 6aJnAbICTbI CaKtbIK shapapanapbl
Erep cy Hemece 6eIe 3aTTap eHIMHIN (TeleIuIapdbH, MOHTOpdbH, KyaT cbIMbIHbH Hemece aHbMaJIbI Tok aadantepiH) iHKePCE, KyaT cbIMbH bipdeh axkbpTaBn, KbI3MeT KepeTy opTaNbIFbHa xa6apNaCbHbI3.
BAJKH N MEPKN HA IPNETNA3JINBOCT
Oboj ypeE KOHCTpyuPAn H npOn3BeDeH 3a da ja ocInyprn BaWata JInuHa 6e36eHocT, HO cenak, He npabnHata ynoTe6a MoKe Ja npEnzBnka NoteHunJaEN eJeKtpueH yap nIIN ONaCHOCT oN noXap. Co neI da ce ob63eDn npabnH0 cyHKUHOHpaHe Ha CNTe MePKn Ha 3aHTTa BrpaDeHN BO OBOJ ekpaH, PnpdpxyBaJte CE KOH CneHNTE OCHOBn npabnHa 3a HeroBOTo INcTaIIpaHe, ynoTe6a I cepBncupaHe.
OkoIy 6e36eHocTa
KopncTeTe ro camo ka6eIOT 3a HanojyBaHe koJ e IcnpaHaC oypeIoT. DOKoNky KopnCTnte dpyr Ka6eI 3a HanojyBaBe KOJ He e o6e36eHd Ond CtpaHa Ha do6abvBaOTo, npOBepTe daHIMa cepTNpkiKaT 3a npImeHINBtE MeYHapOnHc TcHApDIn. DOKoNky Ka6eIOT 3a HanojyBaBe e OwTeTeH Ha KOJ 6NIo HauHH, Be MOJIme ObpaTeTe Ce Do npOn3BOAnTeIOT INH Haj6ncknOT OBnacteH cepBnC 3a NOpPABKn 3a da Ro 3aMeHInTe.
CnojHncaTHa anapatOT ce Kopncn kako ype3a ncknyybahe. Be moIme ocNpyajTe ce deka ypeodTo e nHctanpaH BO 6JIn3Ha Ha wTekepOT Ha sIdOT Bo KoJ e npNKnyeH n deKa do wTekepot IMa Jnecen npictan.
EkpaHOT npKnyyBajTe ro eDInHCTBeHO Ha n3BOp Ha eJleKtpuHa eHeprJa kako IToe Ha3NaYeHo BO CneUcNkauNTe Ha OBA yNaTCTBO nIHa ekpaHOT. Ako He cTe cnrypHi KaKOB TnHa HanojyBaHe ImaTe BO BAHNOT DOM, o6patete Ce Do BAHNOT npOdaBaY.
IpeontobapeHnte npnknyoun 3a ctpya n npodonknteHNTE ka6n ce onachn. NcTOTO Baxn n 3a OwTeHNTe Ka6n 3a HanojyBaBe n npnknyooun. Oba moke da npedn3Bnka onacnoct od eJeKtpueh ydap nn noxap. ObpaTeTe ce do Baunot cepBucep 3a 3ameHa.
Cé Dojeká ypeoT e Nobp3aH Ha sIneH wTekep Ha Hau3MeHnUHa cTpyja, Toj e NOBp3aH Ha I3BOp Ha HanojyBaHe n NOKpaj Toa wTo MoKe6n e NCKJnyeH.
He otbopajte ro ekpahot:
Bhatpe Hema DeNoBN KOJ MOXaT Da ce nonpaBaat od KopnCHNuTe.
- Iocton onachoct od BnCOK HanoH, dypn n Kora hanojyBaHbTe o NCKJnyEHO.
-Дokолу ekpaHOT He pa6Otn npaBnIO Oh o6paTe ce kaj BaIInOT npoDaBaY.
3a da ce n36erHe InuHa nobpeda:
He noctabvajte ro ekpaHOT ha 3akocena nolnca oCBeH BO cnyuj kora Toj e npabunno 06e36eJen.
KopncTeTe eDInHCTBeHO dpKaJ KOe npenopaHaN OJ pOn3BOOHTeJOT.
He ncyuutajte npedmetn Bp3 npo3boodt He npimeHybajte cnla Bp3 nctnoT. He ppaKn nn npedmetn KOH ekpaHOT.
PnToa MoKe Da DoJne Do NOBpeHa NyeTeO, npo6IeMn Co npOn3BOoT n OwTeTyBaHe Ha ekpaHOT.
3a da ce cnpeu noxap n dpyrn onacnoctn:
- Cekoraw kora no donro ke ja hanywntte co6ata NCKJyETE ro ekpaHOT. Hnkoraaw he octabajTe ro ekpaHOT BKJYUEH kora ro hanywTaTe domot.
He do3BOyBajTe Dea Da HcnyuTaaT npEdMeTN Bp3 ekpaHOT nn Da TypKaat npEdMeTN BO OTbOpHT Ha Kyknteto. Hekon BhatpeuHn DeIOBn ce nD Bucok HanOH.
He Kopnctete DoataoOn KOn He Ce Dn3ajHnpaHn 3a OBoj ekpaH.
Kora ekpahot Tpe6a da ro octabnte 6e3 na3op nooJro Bpeme, ncknyte To oD snHnOT ITekep. - Ppi nojaba Ha rpoMOBn HMOHb, HNKORAa He DonnpajTe rKa6NITE 3a HanojyBaHe n CnHaI 6bnjeKn Toa MoKe Da 6nne MHOry OnaCHO. Toa MoKe Da npedn3Bnka eJektpuHeyap.
OkoIy nHcTaJInpaHeTo
He cmeete HnIto Da noctabyBate Bp3 Ka6eIOT 3a HanojyBaIbe IIN da ro octabate npOn3BOJOT Ha MeCTa HA KO E MOXHO OwTeTyBaIbe Ha Ka6eIOT.
HemojTe da ro nocTabyBaTe ekpaHOT BO 6n3nHa Ha BODa KaO Ha npimep, 6ncky do kaJaJIHK, nepaHa, BnaKeH NOpym nn Bo 6n3nHa Ha 6a3eH.
EkpaHnte mHaat OTBOpn 3a BeHTnlaunja Ha KyKmTeTO KOn OBO3MOxyBaAT da ce ocNo6oN ToPnHaTa KoJa ce Co3daBa npn HNBHOTo pa6OteHe. DOKoIky OTbOpnte Ce 6IOknpaHn, aKymuInpHaTa ToPnHa MoKe Da npEdu3Bnka OWTeTyBaHa KaON MOKe Da DOBeDaT Do ONaCHOCT Ond NOKap.
3apaNi oBa, HNKOFAU:
He 6noknpajte rno OTBOpnte 3a BaHTnlaucija co nocTabyBaHbe Ha ekpaHot Ha KpeBET, cOfa, KNIM, nTH.
He nocTaByBajTe ro ekpaHot BO 3aTBopeHn eIemEn 3a BrpaDyBaHe, ocBeH kora e o6e36eHa npabunHa BeHTunauJa.
He nokpmbajte rno tBopnte co TkaehnHa nn npMaTepnjai.
He noctabyBajTe ro ekpaHOT BO 6n3Ha Ha paJiaTop nn npn Dpyn n3BOp Ha TOnnHa.
HemojTe da ro TpneTe nnn ydnpatc LCD ekpaHot co aKTHBHa MaTpuca co cBpctn ppeMeTb 6ndejkn Toa Moke da npedn3Bnka rpebeHe n TpaJHO OwTeYBaHe Ha LCD ekpaHot co aKTHBHa MaTpua.
Hemojte da npitnckate Ha LCD ekpaHot co npctot nooJiro BpeMe 6nJeKn Oba Moxe da npedn3Bnka OwTeTyBaHe Ha cnKaTa. Moxe da ce nojabat deeKtHa TochKeTb ObIHKn Ha CpBeHN, 3eJIeHN nn CnHN TOkN Ha ekpaHot.
Cenak, Oba Hema Da Bnjae Bp3 nepoopmaHCnte Ha ekpaHOt.
Дokолу e можно, корисе ja npenopupaана тpeолуциа 3aда добитehajdoбap KBaHITet Ha cnkaT ha LCD ekpaHot.Дokолу ekpaHot ce kopnstn BO pexnm co peoIouzju Koja OTCTanyBa od npenopupaanata, може дсе поави снka co npilarOdeHa rolemna Или перабoteHa cnika. Oba cenaK e kapakterpcntka ha LCD ekpaHnte co Фнсна peoIoyuzja.
Долготравно ппakувае Ha HeNoDnЖHa Cnka Ha MOHtOpOT MOnke Da Пpei3BnKa nojaBa Ha BpexKaHa Cnka Ипдамк Ha ekpaHot Od MOHtOpOT. 3a DA ro n36erHete OBOJ npo6IeM, KOpIcTeTe 3aHTNtHnK Ha ekpan И nckIyUyBajTe ro npoIN3BOJOT KORA He CE yN0Tpe6yBa. TpaJHO BpexKaHaTa Cnka ИпдамКte кОп CEпeDiu3BnKaHn CO DoIngroTpajHo KOpIcTeHbe He CE onФaTeHn co rapaHunJaTa Ha OBOJ npOIN3BOd.
He ydnapjte n He rpe6eTe n npedHnOT n ctpaHnUHnTe deNoBn Od ekpaHOT co MetaJIHN npeDMtN.
Bo cnpoTnBeH cnyaj, MoKe Da doJde Do oWTeTyBaHe Ha ekpaHot.
3a nomectybahe Ha npoun3bodot noctabete ro anapatot co naheJOT KOH Hanpei nd pjkTe ro co dBeTepaue. Ako ro nCnyuHTte npoun3bodot, oWTeTEHNOT npoun3bOD MOxe da npedn3Bnka cTpyeH yad napinokap. 3a nonpaBkA o6pateTe ce do OBnactEHNOt cepBuceH ueHTap. N36erHyBaJte BnCOKn TemnepaTynpI rOJIema BnaxHOCT.
He nHCTaInpajTe ro OBOj npOn3BoD Ha SND,doKoJky TaMy MoKe Da ce N3IOxN Ha MacNo IIN MaCHN YECTNUKN.
Toa moKe da npedn3Bnka oWTeTyBaHe n naFaHe Ha npOn3BODoT.
3a dincnne co CBETHaTn PNHn KOpncnKOT Tpe6a da pa3mncna 3a nocTaByBaHe Ha ekpaH, 3aToa To PNHra MoKe Da npEiN3BnKa BO3HemnpyBauchn O6lecou OD OKoHNHTe CBETnHn INCBETn NOBpHHN.
HemojTe Da KOpuctte npOn3BoDn KOI KOpCTaT BnOcK HAnOH Bo 6JIn3Ha Ha MoHITopoT.
(Ha np. eJektpnHa TeNaJa 3a MyBn)
- MoHITOPOT MOKeJa He pa60Tu nCnpaBNo KaKo NocJeNuHa cTpyeH ydap.
MepknHa npetna3nBocT 3a AC aanTepot n hanojyBaHeto
Iokonky BO npou3BOoT (TeeneBn3Op, MOHITOP, Ka6e 3a HanojyBaHe uN AC aanTpep) Bne3e BoDa nn HeKaBa HauBopeuHa cyntaHua, BeNaU OTKaueTe ro Ka6eJOT 3a HanojyBaHe n KOHTaKTnpajTe co cepBnCHnOT ueHTap.
- Bo cnpoTnBHO, OBA moKe da doBeDe do noXkap nnn eJekTpueH yap npaDi oWTeYBaHeTo Ha npOn3BOIoT.
He donnpajte ro ctpyjhnot ka6en nnn AC aadantepot co bnaekn paue. Dokokny npnknyoounte ha eNktpnuHnOT ka6en ce bnaekn nn npaunBn, n36pnwete r n n cywete r nped ynoTpe6a.
- Bo cnpotnbHO, oba moKe da npedn3Bnka nokap nIeKtpueH ydap.
PpOBepeTe daJIu cIeIOcHcTe ro BMeTHaJIe Ka6eIoT 3a HanojyBaHbe Bo AC aIaITePoT.
-Дokолу He e DoBoJHo Do6po npuBpcTeH, cna6OTo nOBp3yBaHbe MoKe Da npeDn3BnKa noXap nnneKtpuH eJektpuH eYdap.
BnHmabajTe da Kopucntte Ka6nn 3a HanojyBaBe n AC aanTepn OBO3MOKeHN nn OdopeHn od cTpaHa Ha LG Electronics, Inc.
KopncTeHbTo Ha HeoO6peHn IpOn3BoHm MoKe Da npEiN3BnKa nOpK ap IIneEJIeKtpuH eYdap.
Kora ro otkauybate ka6enot 3a HanojyBaHe, BneyeTe ro 3a npNKnyOkOT. He npBeBnTKyBajTe ro Ka6enot 3a HanojyBaHe KopncTejk npeKymepHa cnna.
- Moxe da ce ouwTeTn XucaTa 3a cTpyja, To Moxe da npedn3Bnka eNeKtpueH yap nIIN noxkap.
BnHmabajTe da He ro 3ra3HeTe nn Da He NoCTaByBaTe TeWKn npEdMeTn (eNeKtpoHcN ypeDi, oBneKa nTH.) Ha Ka6enot 3a HanojyBaBe nn Ha AC aanTepot. BnHmabajTe da He ro ouTeTnte Ka6enot 3a HanojyBaBe nn AC aanTepot co ocTpni npEdMeTn.
- OùteteHNTe Ka6bln 3a HanojyBaHbe MoXe Da npedn3BnKaat nOxap nIeKtpuYe hAp.
HemojTe da ro packlonnyBaTe, nonpaBaTe nn MeHyBaTe ka6eNoT 3a HanojyBaHe nn AC aDantepot.
Oba moKe da npEdu3Bvka noKap uH eNektpuueH ydap.
BnImabajte uTekepoT, AC aanTepoT n npKnyuOuTe Ha eNeKtpuHnot Ka6eI da He coOpXaT npaunHa n HaDbopeuHN cyntCTAHU.
- Oba moke da npedn3Bvka nokap.
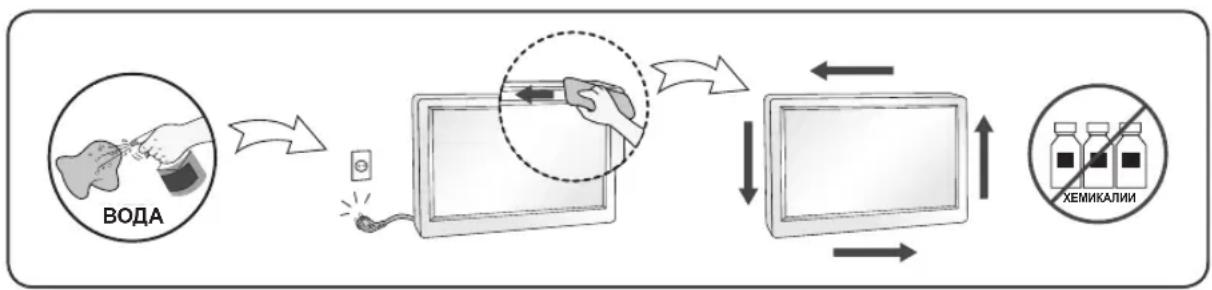
OkoJy uHcTeHbeto
- Ппд чьтенье на прднатастара od ekpaHOT, Иcknyte Te ekpaHOT od WTeKep.
KopncTeMaJky HabnaXHeTa (He BoeHa) Kpna. He KopncTe AePOcoN dIpeKTHO Ha ekpaHOT 6ndejKn ppeKymepHTo npckaHBe MoKe Da npeDn3BnKa eNeKTPuHcYdap. - Пи чс-teье на поизвдот, Исклучete Г остунот кбел и Исчстete co Meka TkaeHnHa 3a Да He dojde do rpebehe. He чс-teе co Baxha TkaeHnHa n He npckajte BOda npyrtn Teuhoctn dinpeKTHO ha поизвдот. Може дdojoide do eNeKtpuhen ydap. (Hemojte da KOpncntte xemnckn cpeoctba kaoko 6eH3oI, pa3peyBaau Ha 6oja nnn ankoXoJ.)
- Icnpckajte Meka Kpna 2 do 4 natn co Boda, n co Hea nchnte je ja npedHaTa pamka; 6pnueTe cmo BO eHa Hacoka. PemHory Bnara Moke da nped3Bnka nojaba Ha damkn.
OkoIy IOBTOPO NaKyBaHbE
He pnpajte ng kaptoHnTe n MaTepnjAnot 3a nakyBaHe. Tne ce nideaJHo npkyBaBe 3a npheecyBaHe Ha ypeoT. Pnp npemecTyBaHe Ha dpyra Iokaunja, nobTopHO cnaKyBajTe ro ypeoT BO opnHaHaHaTa am6anaXa.
OkoIy otctpaHyaBeTo (Camo 3a LCD npOn3BODn KOn KOpNCTaT Hg lamna)
- ΦύopecHTHaTa CBetnKa KoJa Ce KOpIcTn BO npOn3BODOT COpXn MaNo KOJIInueCTBO Ha XnBa.
He oTcpanhybajTe ro npou3BOoT CO OCTaHaTnOT OTnaO IDOMaKInHCTBaTa. - OtrtpaHyBaHbETo Ha OBOj npOn3BoD Mopa Da ce BpShn BO corlnacHOCT CO npOnncHTe Ha JOKaJIHNTe BJIaCTN.
BELANGRIJKE VOORZORGSGMAATREGELEN
Ho 3TO He BnIaReT Ha KaueCTBO pa60tbi MOHITopa.
EcnB03MOxHo, nCnOJIb3yIte peKOMeHdyEmoe pa3peSeHne IJn DOCTNXeHnaHnyUeero KaueCTBa n3o6paXeHn JKK-DncnJe. Pn nCnOJIb3OBaHHn C dpYrIM, OTNNUHbIM OT peKOMeHIOBAHHoro, pa3peSeHnEM, Ha 3kpaHe Moryt 6bITb 3aMeTHbl CneIb MaCuTa6bOpOBaHHu N o6pa6OTKn N3o6paXeHnHa Ho 3TO KAueCTBO npcCyUe Bcem JKK-DncnJeM C fHKCuPOBaHHbIM pa3peSeHnEM.
OTo6paXeHHe HEnoDbNkHOrO I3o6paXeHnHa MoHTope B TeYeHne JInTeJbHorO BpEmHn MoKet npBecTn K NOBpeXeHnIO 3KpaHa N IOBNeHnO cTaTOHOrO I3o6paXeHn.
YTo6bI n36ExKaTb 3ToI npo6nembl, nCNoJIb3yIte 3KpaHHyIO 3aCTaBky I BBIKIIOuHaTe yCTpoiCTBO, KOrda OHO He nCNoJIb3yETc. IapaHTna dIra daHoro yCTpoiCTBa He paCnpocTpaHareTCa Ha noRbIeHne ocTaTOHORO n3o6paxKeHn.
He noDBepraIte yCTpOInCTBO BCTPcKKe n He capanaiTe MeTaIIuYeCKIMn IpeDMeTAMn IpeDHHIO u 6okobIe Yactn Dncnnner.
3TO MOKET Bbl3BaTb NOBpeKdEHe 3kpaHa.
PnpeHocke depKnte yctpoictBO Bymra pykam nanehIbIO Bnepei. NaJeHne ycTpoIcTBa moKet npBeCTN K npaKeHHIO 3JekTpueckIM TOKOM IIN BO3rOpaHHIO. O6paTInTeCB cepBnCHbI ueHTp dJa peMOHTa. He noDBepraite yctpoictBO BicOKIM TemnepaTypam IN BnaXHOCTN.
He yctHaBnBaIte 3To ycTpoiCTBO Ha CTeHy, Ie OHO MoKet 6bITb IOBepKeHO BO3dEiCTBnIO Macna nIM MACJHOrO TymaHa.
- 3TO MOKTe NOBpeiNbYcTpoiCtBO IN pUBeCTN K eTo NaDeHnIO.
IINCnneB C rHueBOB paMKo, npy yCTaHOBKe NOJb3OBaTeNb DOJXeH yYeCTb BO3MOXHbIe 6NIKN Ha paMKe TB ot OKpykaUoero OCBeueHn.
He nCnoB3yIe npOdyKtbl, noD BbICOKM HAnpJxKeHnEM, B6N3M MoHITopa. (HaNPmep, 3JIeKTPnueckyo Myxo6oIky)
- 3TO MOKET pRnBecT N K HEnOJaKam MOHITOPA BCNeDCTBNE BO3JeCtCBN 3JeKTpUeCKORO TOKA.
Mepblnpedoctoopoxhoctn pni nCnoB30BaHnn aanTepa nepemehnHO Toka N 3JeKTPoNTaHn
Pn nonaahn B ycTpoBCTBO (TeNEBn3Op, MOHtOp, Ka6eNb NHTAHN aanTep nepemehoro ToKa) BObl nIIN IIObIX npOToPOHHX BeueCTB HemeJeHNO OTKIIouHr Ke6eNb NHTAHN o6paNTecb B cepBnchbI ueHtp.
B npotnbHOM cnuyae, 3TO MOKeT npuBeCTN K noXapy NIN nopaxeHHO 3NeKtpnueckm TOKOM BCJIeIcTBne NOBpeXdEHHY ycTpoiCTBa.
He npikacaiTecb K BNKe nHTaHn a adanTepy nepemEHoro TOKa MOKpbIM pykam. EcIn uTbipn BnKn BlaxKhIe nn NOKpbITbl nbIbIO, npOTpnte nx nepeid nCNOJIb3OBAHNEM.
B npotnbHOM cnyae 3TO MOKeT npBeCTN K NOkApy NIN nopaxKeHHIO 3JeKtpueeCKM TOKOM.
Y6eNTecb B TOM, YTO Ka6eJIb NITAHIN BCTaBnEH B aadntep nepemehHoro Toka do KOHua.
- Henlnothoe coeHHe Hne MOKeT npBecTN K noKapy nJn nopaxKeHHo 3JIeKtpueeCKM TOKOM.
Y6eIITecb, YTO NcNoJIb3yEmbIe Ka6eJIIN NITaHnI aIaIaTepbl IepemEHHO TOKa IpOu3BeDeHbI INN Odo6peHbI KOMNaHnei LG Electronics, Inc.
- IcnoIb3OBAHHe HeYTBepKdEHHbIX pOdyKTOB MOKeT npuBecTu K NOxApy NIN NopaxKeHIO 3JIeKTPnueckm TOKOM.
Pn OTCoeDHeHn Ka6eI NtAHN TAHNTe 3a BNkY. He nepeu6aTe Ka6eIb NtAHN C n3NIWHM yCNIHm.
- ΘTo MoKeT npUBeCTn K nOxApy.
OuNTka
- OTKIIOHTe yCTPOINCTBO nepeo ouNcTKoN 3KpaHa DNcPJIe.
- IcnoIb3yIe cIerka BnaJxHyO (He Mokpyo) TkaHb. He HanpaBnTe a3pO30nb npraMo Ha 3kpaH, T.K. 3TO MOKET pINBECTN K NopaxKeHHIO 3JIeKTPNueCKIM TOKOM.
- PnO uOHCKe NOBepxHocTn 3dEeNn OTKIouHTe Ka6eNb NITaHn, OUYaAte MRAKo TKAHbO dI npEoTbpaueHn IOBJIeHn capaHn. He nCNoJb3yTe BIAxHyTO TKaHb, He paCnbIyIe BOdy I dpyrHe JxIDKOCTn. HecobLIOeHne 3tOro npaBnla MoKet pnpBeCTn K nopaxeHIO 3JeKtpUeCKm TOKOM. (He nCnoJb3yIte XIMNUeCKne BeIecTBa, HAnpMep, 6EH3IN, pa36abNTen nn Cnpt)
PacnbInTe BODy Ha MraKyIO TkaHb Dba-yeTbIpe pa3a, HcNoJIb3yIe ee IJRA OUCSTKN NpeDHe npAMKn. OctopoxHO npOTpaIte B ODNOM HApPaBJeHN. OT n3nUHeB ODbI Ha NOBepXHOCTN MOYrOCTaTbcR pa3BObl.
IpeeynaKOBka
- He bly6pa8baiTe KOp06ky uynakobOuHbIe MaTePnJIbI. 3To Han6oJee nOxOaIuN KOHTeHep dIy TpaHcnpOpTuOpBKn yctpoiCTBa. Ppi nepeBo3Ke ycTpoiCTBa B dpyrOe MeCTo, ynakyTe erO B opunHaJIbHyIO ynaKOBKy.
YTNIN3aunr (Tolbko KK-MOHITOP c pTyTHbIMn Iamnamn)
- Φлуоpecсentная Лампа, пимеоньема в стом усточь, соржп.T He6oJbшоe KOniueCTBO pTyTN.
He BbI6paBbIaBnTe yCTpoCTBO BmecTe C bItOBbIM Mycopom. - YtIN3aIg IaHHOrO yCTpOInCTBa DOJXHa IPOU3BOIDITbC8 B COOTBETCTBIM C MECTHbIMN HOpMaTINBaMn.
VAŽNE MERE PREDOSTROžNOSTI
BAJKINBI 3ACTEPEXEHH
Lepnctpi np3p6oNeHO Ta BnroTOBneHO 3 ypaxyBaHHm BaWo i 6e3neKn, aie noro HeHaJIeKHe BnKOpNCTaHH MoKe np3BeCTn Do ypaXeHH eNEKtpuHm CTpyMOM a60 nOkeKi.
Ina HaneJHoIO pOBoTn Bcix 3aNo6iXHHx 3ac06IB cboRo Bnpo6y dOtpmUyTeCg OCHOBHX npabNJnOro BCTaHOBHeHH, BnKOpNCTaHH Ta o6cnyROByBaHH, 0o BnKJaDeHi HIXue.
3axoDi 6e3neKn
BnKOpNCTOByIe NIIe ToI Ka6eJIb KINBNeHn, IIO NoCTaueTbcR B KOMPiNEkTI 3 BnPo6om. RaKIO BnKOpNCTOByEbCg IHsHn Ka6eJIb KINBNeHn, He HAdAHn NOCTaueJbHNKOM, BiH Mae 6yTN cepTHoKIOBAHn 3rIHO 3 BiINOiDHMn HaioHaJIbHUMn CTAHdApTaMn. RaKIO Ka6eJIb KINBNeHHra NowKOJKeHO 6yDb-IAHM 3BepHiTbCg DO BnOBo6HnKa aBO NaH6NkQHorO ABTOPn3OBaHOrO cEpBICHOrO ceHTpy dIra 3aMIHn Ka6eIIO.
IyBID'EDHaHH npictpoIO BiEJeKtpomepeXi BnKOpncTOByte uTekep KaBeJIO XNBHeHH. Ipnctpii cnid BCTaHOBNIIBaTIN nopA i3 po3ETKOIO, yKa 3HaxOuNTbCBA JERKOIOcTyNHOMy Micci.
IiEHyTe nCnne Nnue do Dxepea XNBHeHH, Ake Bka3aHe B po3dini "TexHiX xapaKepntuKn" Uboro noc6Hka a6o Ha dncnne. RaUO Bu He BneBHeHi, kN Tn Mepexi XNBHeHH y BaWOMy Domi, 3BepHtbcra do npodabua Bnp6y.
BnKOpncTObYBaTn nepeHaBaHTaKeHi eJekTpUHHi po3eKn 3MiHHoro ctpMy Ta noOBkyBaui He6e3neuHO.
Takok He6e3neuHmE noTepti Ka6eni Ta 3nAmahi TeKeepn.BoH MoKyTB cnpuHHTn ypaXeHHeNEKTPnuHm CTpyMOM Ta noXeKy.3BepHiBcB cepBicHn ceHTp,io6 3amHInn NOWKoJKeHI Detani.
Pnncpi 3aHuaetbca nIDeHaHm do dkepeNa 3miHHoro cTpyMy nociHo, KOJI BIn yBIMKHeHn B PO3ETKy 3miHHoro cTpyMy-HabItb TOni, KOJI JKNBHeHHn PnncTPOHO BMKHeHO.
He BIDKpNBaIe Incnpei
BcepeunHHeMaekomnoeHTiB,aki nTpe6yOtb 06cIyROyBaHHKOpNCtYBaayem.
BcepeHnHc e t aJI niD BucKOHO Hanpyo, HabITb Toi, KOJI KINBHeHHB BMMKHEHO.
- JaKuo DnCnne He npaHoe HaneXHM YINOM, 3BepHiTbcra do npoDaBcra.
Ioo6 yHnKHyTn TpaBMyBaHHaJIoDei:
He CTABTe DnCnne Ha noxuni nobepxhi 6e3 HaneKHO raiHoro 3akipInenHra;
BVKOpncToByTe Nnue nidaTabky, peKOMeHDoBaHy Bnpo6HnKOM;
- obepiraTe BnpiB biD ynapiB Ta naDiHHa HbOrO iHux npedMeTIB; He KndaTe irpaXkTu ta iHui npedMeTHa ekpan Bnpo6y.
Lc moKe cnpuHHnT TpaBMyBaHH JIOe Ta npuyehn FyHKUioHyBaHH a6o noKoJKeHH Bnpo6y.
Uo6 yHnKHyTn noxexi Ta iHux He6e3neK:
3abxBIMKAITE XINBnHnI DnCnIeIO, KOJI BIXOOnTe 3 KIMHaTI Ha TpNBaIIy c; HIKOI He 3aIIuAaTe dncnney YBIMKHEHM, KOJI BIXoOnTe 3 domy;
cniKyuTe, 06 dITn He KnaJIn Ta He BknaJauN iHx npedMeTIB O TBOpN Ha Kopnyci Bnpo6y; deaKi BHyTpIshu YactuHn nepe6ybaKb nD He6e3neHoo Hanpyroio;
- He BnKOpncTOBnyTe DoaTkoBI akcecyapn, kki He npn3HaueHo nla uboro dincnneio;
3aIINsauOuHnCnneHa TpBaan Yac, BiEeHaHTe Ka6eJIb XJNBLHeHH BId po3eTK;
- iid yac rpo3n 3 6nnckabkam Ta rpoom Hikon He TopkaTecra KaebIO XNBHeHHa Ta KaebIO nodaui ciHany, ockibkn ce moke 6yTu dYxhe He6e3neuHO. Taki di MOkyTB npn3BecTu do ypaXeHHa eJIeKTPnuHm CTpyMOM.
BctaHOBJIeHHa
He CTaBTe Ta He nepeKoyuIe npEmdEtu Chepe3 Ka6JIb XnBJIeHHra, He CTaBTe DnCnJIeY MlCzX, De Ka6JIb XnBJIeHHra MOxHa JERKO NOnIKoDHTN.
He Kopnctyntecn nncnneem no6n3y BOnn, Hanpknad, 6iB aHHN, yMaBbHnka, KxohHOI cy npalbHOI MnKn, y BoNOrOmy niDaJI a6o no6n3y 6aceHy.
IinCnJIeMaHOy KOpNcYBeHTnJruiHi OTBOp nIg BIDBeHHeHr TeNla, 0o yTBopIOCTbCnIac pO6OT npICrpoI. JaKIO nepeKpHTn ci OTBOp, HAKONuHHeHr TeNla MoKe CnpuHHTn HeCnpaBHocTi Ta npn3BecTn do noXeki.
Tomy HIKOJI:
He nepekepnBaIte HIXKII BeHTUNJI Hi OTBOpN, CTaBnYn DnCnNe Ha LiXKO, DNBAH, KINIM TOIO;
He CTaBTe DnCnneBcepeDnHy Me6JIIB, RkUo B Hnx He 3a6e3neuCyTbcra HaIexKHOI BEHTnIaIi;
He HAKPINAte OTBOPn TKAHINHO YN iHINMaTepiaJOM;
He CTABTe DnCnnei no6n3y uH 3Bepxu Haid 6aTapeeIO onaeneHHA a6o iHsIM dKepeJOM TeJIa.
He TpiTb i He BdapnTe PK ekpaH Active Matrix 6yNb-ramu TBepnM npedMeTamu, OcknbTuKm UHHOM MoJHa noopraNaTP PK ekpaH Active Matrix, zincyBaTu Noro 3OBHiH HBrIa a6o HenonpabHo nOshkoDHTn ekpaH.
He HatackaTe naIbIeM TpIbAIIu Yac Ha PK ekpaH, aJke Ye MoKe CnpuHHTn NOBBy 3aIIWkoBx 3o6paKeHb. DeRi DepeKtN MOKyTb BnRAJIaTncb y BnIJIaDi YepBOHIX, 3eNeHIX abO cIHIX ToOcK Ha ekpaHI. Odnak ce He BnIINBaE Ha po60Ty dIcnPner.
KIO MOKINBO, BIKOPNCOTByTe peKOMHeDObAHy po3dInbHy 3daTHicTb IJr 3a6e3neueHHr ONTMaJIbHOI
KoCTI 3O6paKeHHHa PK dncnnei. KaIO BIKOPNCOTByETbcra IHsH, He peKOMHeDObAHn peXIM
po3dJIbHOI 3daTHocTi, DeRki 3O6paKeHHHa ekpahi MOKyTB BNIRJaTaN CTCHyTUMn, PO3THiHTMn a60
IHWM UNHOM 3mHeHMM. Ondak ue xapakTePHo dner PK ekpahy 3 fikcoBaHOIO po3diNbHOIO 3daTHicTIO.
KaHnHaekpaHIMOHITOPaDobrnnuac3aJIINsAeTbcHepyXome 3o6paXeHHN,ce MoKe npn3BecTNdoIIOBn 3aIIINKOBHX 3o6paXeHb aO IIaM Ha ekpaH.Ioo yHNKHytn cIbOrO,BNKOpNCTOBye EkaHpy 3actaKy Ta BmIKaIte Bpi6, KOIN Bin He BnKOpNCTOByeTcR. IapaHTiHa Bpi6 He NoWnIPoETbCn Ha 3aIIINKOBi 3o6paXeHHa oIpaH, cnpuHHHe TpnuBaIIM BiO6paXeHHM HepyXOMNX 3o6paXeHb.
HeBdapraTe Ta He dpraaTe nepedHTo 6iHy nane Hn eKpaHa MeTaJIeBmM npedMeTaMn.
Taki II MOKByI NOUKOJNTN eKpaH.
Ioo6 nepeMICHTN Buip6, Bi3bMItb Ioro DbOMa pykAmnepeHbOIO naHeJIIO BID ce6e. JaKIO Buip6 Bnade, N0wKOJKeHH Buip6 MoKe npu3BecTn Do ypaKeHH eJeKTPnuHm CtpyMOM a6o nOkeKi.ДЯ peMOHTy 3BepHiTbC4 Do MlCuEBOrAO ABTopu3OBAHOrO cepBicHOrO cHTpy.ObepiraTe Buip6 BiD BnINBy BnCOKnx TemnepaTyp i HaMipHOI BOJorOCTi.
He BCTaHOBnIOte BNi6 Ha CTiHi y Micci, De Ha HbORO MOKe IOTpanNTu JNp Ta JIKPOBI BNnap.
BoHH moKytb noIkoHTn Bpi6 i cnpuHHTn naIHHa.
IINCnneB 3 rnaHueBMn o6paMJIeHHaKOpNCyBaU NOBHeH po3rJHyTu PO3MIeHHaNcJIe naHeJI MOKe BnKNkATn TpNBOXHi BiDzepKaJIeHb BiD HABKOJIuShbOro CbITNa I aCKpABNX nobepxOHb.
He BnKOpNCToBvIe nO6JIn3y MoHITopa npNCTpoI 3 BnCOKoIO HAnpyroIO (HaNPnKnaD, eJeKTpNHi MyxO6oNkn).
- EneKtpuHn po3pJd MOxE cPunHHTn HeCnpaBHCt b MoHITopa.
3aTepeKeHnI 10o o aanTepa 3MiHHoro cTpyMy i Ka6eJIO KINBHeHnI
Kkuo BcepeDHy Bnp6y (TeNebi3opa, MoHITopa, Ka6eHIO KINBJIeHHa aanTepa 3MiHoro ctpmy) Notpanntb BOda a60 IHwa CTOpOHnpeOBOHn, HeraHNO BiD'EDHaIte Ka6eNb KINBJIeHHa i 3BepHiTbcra do ceHTpy o6cnyrobyBaHH.
- HexTyBaHnIeIO BmOrOIO MoKe Ipn3BecTn Do 3aImaHHa 6o ypaXeHHa eNeKtpuHIM CTpyMOM Upe3 noIkoJKeHHa Bnpo6y.
He TopkaTecra Tekepa Ka6eJIO XINBLeHnA 6o aanTepe 3miHoro cTpmy BOnorum pykamn. RaKcO KOHTAKTN WTEkepa BOJOrI YN 3aunneHi, BNTpItb i x I BucywiB, nepu HIX BnKOpNCTOByBaTn.
- HexTyBaHHI ZIeIO BmOrOIO MoKe npN3BecTn Do 3aMmaHnA bO ypaKeHHN eIeKTpUHIM cTpymOM.
O6OB'3KOBO DO KINZA BCTABJYTE Ka6eJIb XNBJEHHB aadITeP 3MIHHORO cTpyMy.
Cna6ke 3'edHaHH MoKe CTaTn npuHHO 3aMaHnA aO ypaKeHH eNeKtpuHm CtpyMOM.
O6OB'3KOBO BnKOpNCToByTe Ka6eJI XNBLeHHa i aanTepn 3MiHOro CtpMy HaanHi abo CXBaJIeHI KOMNaHIEo LG Electronics, Inc.
BukopncTahn HecxBaHEnx Bnpo6iB MoKe np3BeCTn Do 3aImaHHa bO ypaXeHHa eJIekTpUHM CTpyMOM.
BiD'edHyoun Ka6eJb XNBJIeHNa, TgHiTb NOro 3a WTeKeP. He 3rHaIte Ka6eJb XNBJIeHNa 3 HaMipHOcNIOIO.
Le MoKe IOnsKoDHTn 1Hyp XnBJIeHHra i npu3BeCTn Do ypaXeHHra eJeKtpnHm cTpymom a60 BnHNKHeHHra 3aMmaHHra.
HamaraTecn He CtyaTuHa CTabTu Ha Ka6eB XuBHeHnA u aDaTep 3MiHHoro cTpyM y BaxKi npEaMeTu (eJeKtpoPncTpoI, OaRr ToO). BybTe oBepeXHi, Uo6 He nouKoDtu Ka6eB XuBHeHnA u aDaTep 3MiHHoro cTpyM y roCtpyM npeDMeTam.
- Пошкokedен КабелхиьнehнгmoKe CTaTN npuHIO 3aIMaHHЯ ypaXeHHЯ eJIeKTpUHM CTpyMOM.
He po3bnpaIte, He pemOnTyIe i He 3miHIOIte Ka6eJIb XJBLeHnHa a6o aadantep 3miHHoro cTpyMy.
HextyBaHHaIO BmoroIO MoKe np3BecTu Do 3aMaHHa YpaXeHH eNeKtpnHm CTpyMOM.
CniikkyTe, oob po3etka, aanTep 3miHHoro ctpym Ta KOHTaKTn WTekepa 6yIn YNCTmMn, 6e3 NJIy TOIO.
- HexTyBaHHN 1eIO BmMOrO MoKe npu3BecTn Do 3aMaHHN.
UH
Bid'edhaite ducnnei Bid eJeKtpomepeksi nepd BuTnpaHm ekpaHy.
BttnpaTe ekpan 3Jerka 3BOJIOKeHO (He MOKpoI) raHupkoIO. He po3nnIIOte aepo30nb 6e3nocepEnbO Ha ekpan, ockinbkn HAdMipHe po3nnJIeHHra MoKe cnpuHHHTn ypaXeHHr eJeKtpnuHm Ctpymom.
Ha yac uuueHHBnpo6y BiD'EnHyTe Ka6eIb XNBHeHH. IerKo BuTnpaTe KOpNc M'koIO raHhipKOIO, 0o6 He noopnataH Bpi6.He NCTbTe Bpi6 MoKpOIO raHypKoIO Ta He po3nnIOte Body iHwi piINH 6e3nocepeHbHO Ha Bpi6. Lc MoKe np3BeCTn Do ypaXeHH eNeKtpnHm Ctpymom. (He BnKOpNCToByTe ximHi peOBOHN, HAnpNKlaIad, 6eH3NH, PO3nuHHKn dJa qap6 Yn cInpt).
- Bpns3HtB BOIOHO Ha M'kyraHcy 2-4 pa3i i uNCTbTe Heo nepeHIO naHeIb Bnpo6y; BuTnpaIte IINe B ODHOMy HAnpMky. HAdmipHa BOJORA MoKe cnpuHHHTN NOBy nJAM.
NakyBaHHa
He BnKdaiTe KapToH Ta nakyBaJIbHi MaTepiAn y cmITra.BoHn HauKpaIe npictocobHi dIra TpAHcNopTyBaHHaBorO Bnpo6y. IpeEBo3aYn a6o HaDCnnaUOnu Bnpi6, 3anaKyte Noro B opriHaJIbHi nakyBaJIbHi MaTepiAn.
Ytni3aia (Iiue pTuHa lamna, 0o BnKOpNCTOByeTbcy y piKOKpncTaJIiHOMy npncTpoi)
MUHIM EHTIYOT CHORALARI
Shaxsiy shikastlanishlarning oldini olish:
-
临床医学研究资料
-
一樂樂樂樂樂樂樂樂樂樂樂樂樂樂樂樂樂樂樂樂樂樂樂樂樂樂樂樂樂樂樂樂樂樂樂樂樂樂樂樂樂樂樂樂樂樂樂樂樂樂樂樂樂樂樂樂樂樂樂樂樂樂樂樂樂樂樂樂樂樂樂樂樂樂樂樂樂樂樂樂樂樂

的
賊音在兒者賊藥日成的
alba el jy y. syyally Cwad aed 3d yjdo aie yaiy baiy Lg y . Jzlll o z
claa Jia tlaal al jay l k y. Aaii i yaiy caii yaiy yaiy yaiy yaiy yaiy yaiy yaiy yaiy yaiy yaiy yaiy yaiy yaiy yaiy yaiy yaiy yaiy yaiy yaiy yaiy yaiy yaiy yaiy yaiy yaiy yaiy yaiy yaiy yaiy yaiy yaiy yaiy yaiy yaiy
J
ailll aalll llll 100000000000000000000000000000000000000000000000
aull
i 1
Jaa aae aee aee ae aee aee aee aee aee aee aee aee
aalalalalalalalalalalalalalalalalalalalalal
.LCD
aBbBbBbBbBbBbBbBbBbBbBbBbBbBbBbBbBbBbBbBbBbBbBbBbBbBbBbBbBbBbBbBbBbBbBb
1gj 1
aill s jw dail,
a
.
a a
LG Electronics, Inc.
Aa jaa aallll 1
a a a a a a a a a a a a a a a a a a a a a a a a a a
a a a a a a a a a a a a a a a a a a a a a a a a a a a
a
4g ! jieaiiej
1 1 1 1 1 1 1 1 1 1 1 1 1 1 1 1 1 1 1 1 1 1 1 1 1 1 1 1
a
(LCD)
jie jieiall iie jieiiali jiei
.
Aolal al jall
jai 1
ENGLISH
DDC(Display Data Channel)
DDC is a communication channel over which the monitor automatically informs the host system (PC) about its capabilities.
DDC protocol
① DDC1/DDC2B
An uni-directional communication channel.
② DDC 2AB/DDC2B+/DDC2Bi
A bi-directional communication channel.
Note
- PC must support DDC functions to do this.
E-DDC (Enhanced DDC)
A protocol based on I^2C and used on a bidirectional data channel between the display and host. This protocol accesses devices at I^2C address of A0/A1 as well as the address 60. The 60 address is used as a segment register to allow larger amounts of data to be retrieved than is possible using DDC2B protocols. The protocol is compatible with DDC2B protocols.
DEUTSCH
DDC(Display Data Channel)
② DDC 2AB/DDC2B+/DDC2Bi
② DDC 2AB/DDC2B+/DDC2Bi
Canal de communication bidirectionnel.
Remarque
② DDC 2AB/DDC2B+/DDC2Bi
② DDC 2AB/DDC2B+/DDC2Bi
② DDC 2AB/DDC2B+/DDC2Bi
② DDC 2AB/DDC2B+/DDC2Bi
BvCyTOPOHHKaHcCBa3N.
ПРИМЕЧАНЕ
-П汞ueанue:ДЯ paobmy 8 mom pekume Heo6xodumo 3a2py3umb coombemcmeyuuu dpauep komnbomepa.
E-DDC (PacunpeHbI KaHaJI nepedaUn daHHbIX)
IpoTOKoJ, OCHOBaHHbI Ha TexHONOrn I2C, KOtOpbI NcNoB3yEtCra IJa DBycTOpOHHei nepeDaun DaHHbIX MExdy DIncPneem INCTOuHNKOM BnDeOdaHHbIX. IJa DoCTyna K yCTpOJCTBaM NcNoB3yOTcR 6Ntbl aApceca I2C (A0/A1), a TaKKe aApcec 60.
Adesc 60 yka3bIbaeHa peHcTp cerMeHTOB, KOtOpBn PO3BOJraTe NOJyauTb 6OJIbUWe o6bEmbl DaHHbIX, Yem npu NcNOJb3OBAHN npOTOKoJa DDC2B. 3TOT npOTOKoJ COBmecTM c npOTOKoJam DDC2B.
中国
② DDC 2AB/DDC2B+/DDC2Bi
皂藻皂 藻土,
平
This program is designed to have computer equipment manufacturers build circuitry into their products to reduce power consumption when it is not in operation.
When this monitor is used with a PC on which a screen blanking software complying with the VESA Display Power Management Signalling (DPMS) Protocol is installed, it can conserve significant energy by reducing power consumption when it is not in operation.
There are 2 signal lines, 3 modes of operation. : On Mode, Sleep Mode, Off Mode.
| Mode Definition | |
| On mode | The normal operation. When the monitor is on mode, being connected to a power source, it displays an image. |
| Sleep Mode | The reduced power state. returns to on mode when the user moves the mouse or presses a key on the keyboard. |
| Off Mode | The lowest power consumption state. returns to on mode when the user pushes a power switch. |
Note
- The energy saving Design monitors only work while connected to the computers that have energy saving features.
aaii aaiy yie jgss k jgs eo aaiia oia iiaai iiaai iaiia aaiia aaiia aaiia aaiia aaiia aaiia aaiia aaiia aaiia aaiia aaiia aaiia aaiia aaiia aaiia aaiia aaiia aaiia aaiia aaiia aaiia aaiia aaiia aaiia aaiia aaiia aaiia aaiia aaiia aaiia aaiia aaiia aaiia aalaae VESA 1000000000000000000000000000000000000000000000000000000000000000
J 1
Unplug the monitor from the wall outlet and refer servicing to qualified service personnel when :
- The power cord or plug is damaged or frayed.
- Liquid has been spilled into the monitor.
- The monitor has been exposed to rain or water.
- The monitor does not operate normally following the operating instructions. Adjust only those controls that are covered in the operating instructions. An improper adjustment of other controls may result in damage and often requires extensive work by a qualified technician to restore the monitor to normal operation.
- The monitor has been dropped or the cabinet has been damaged.
The monitor exhibits a distinct change in performance. - Snapping or popping from the monitor is continuous or frequent while the monitor is operating. It is normal for some monitors to make occasional sounds when being turned on or off, or when changing video modes.
Do not attempt to service the monitor yourself, as opening or removing covers may expose you to dangerous voltage or other hazards. Refer all servicing to qualified service personnel.
DEUTSCH
Wartun
Please read this manual carefully before operating your set and retain it for future reference.
FCC COMPLIANCE STATEMENT
This equipment has been tested and found to comply within the limits of a Class B digital device pursuant to Part 15 of the FCC Rules. These limits are designed to provide reasonable protection against harmful interference in a residential installation.
This equipment generates, uses, and can radiate radio frequency energy and if not installed and used in accordance with the instructions, may cause harmful interference to radio communications. However, there is no guarantee that interference will not occur in a particular
installation.
If this equipment does cause harmful interference to radio or television reception (which can be determined by turning the equipment on and off), the user is encouraged to try to correct the interference by using one or more of the following measures:
Reorient or relocate the receiving antenna.
- Increase the separation between the equipment and the receiver.
- Connect the equipment into an outlet on a circuit different from that to which the receiver is connected.
- Consult the dealer or an experienced radio/TV technician for help.
Caution: Any changes or modifications in construction of this device are not expressly approved by the party responsible for compliance could void the user's authority to operate the equipment.
INFORMATION FOR ENVIRONMENTAL PRESERVATION
English
Information for Environmental
Preservation
LGE. announced the 'LG Declaration for a Cleaner Environment' in 1994, and this ideal has served as a guiding managerial principle ever since. The Declaration is a foundation that has allowed us to undertake environmentally friendly activities in careful consideration of economic, environmental, and social aspects.
We promote activities for environmental preservation, and we specifically develop our products to embrace the concept of environment-friendly.
We minimize the hazardous materials contained in our products. For example, there is no cadmium to be found in our product.
Information for recycling
This product may contain parts which could be hazardous to the environment. It is important that this product be recycled after use.
LGE. handles all waste product through an environmentally acceptable recycling method. There are several take-back and recycling systems currently in operation worldwide. Many parts will be reused and recycled, while harmful substances and heavy metals are treated by an environmentally friendly method. If you want to find out more information about our recycling program, please contact your local LG vendor or a corporate representative of LG.
We set our vision and policies on a cleaner world by selecting the issue of the global environment as a task for corporate improvement. Please visit our website for more
information about our 'green' policies.
http://www/lg.com/global/sustainability/environment/
take-back-recycling.jsp
Deutsch
http://www/lg.com/global/sustainability/environment/ take-back-recycling.jsp
François
http://www/lg.com/global/sustainability/environment/ take-back-recycling.jsp
Italiano
http://www/lg.com/global/sustainability/environment/ take-back-recycling.jsp
Espanol
http://www/lg.com/global/sustainability/environment/ take-back-recycling.jsp
Português
http://www/lg.com/global/sustainability/environment/ take-back-recycling.jsp
Nederlandss
http://www/lg.com/global/sustainability/environment/ take-back-recycling.jsp
Pycckn
IHHOpMaunno oxpaHe OkpykaIoUeN Cpebl
B 1994 rody koprnapaia LG ony6nkoBana «Дeknapauo LG no oxpane okpykaiouei cpebl》, KOTOPa C Tex nop Cnyknt OCHOBbIM npHcINOM ynpablenna. Ha ochobe tToJ deKnapauuMbI CMORNI ppePnPnHrTb DeiCTBnA, oBeceneuBaIOUne 6e3OanacHOCTb OKpykaIOUe i cpebl, ydeJeY npN 3TOM DOLXHOE BHIMAHNE 3KOHOUMueCKM, 3KOLOTueCKM IN COUaJIbHbIM acNeKTam.
Mbl CTmmynpyem DeTeIbHocTb no oxpaHe Okpykaioe Cpebl, ydenya oc6oe BHNMaHne pa3pa6OTKe Haei npOdyKcnn B COOTBeCTBnC KOHcENuek EKOJOrnuecko 6e3onacHOCTN.
Mbl CBOIMK MHNmMy CoepXaHne onacbIX BeueCTB HnWei npOyKu. HApImep, B HaNX npOyKTax Bbl He HaIeTe KaDMna.
HOpMaun no ytnn3aun OTXoOB.
3TOT npOdyKT MoKET COepeKxAteb KOMnOHeHTbl, KOToPbIe MOrY T HaHeCTN yUeP6 OkpyKaIOuSei cpeTe. Heo6xoIMMo yTuIN3uPoBaT npOdyKT nocne IcNoJIb3OBaHnI.
Kopnpaia LGE nepepa6aTaBAeT BCE 6paKaOBaHbIe npOyKtblc NOMoUbIO kONOrnueckN pInemMeMOro MeToa yTNIN3aun OTxOob. IIO BCEMy Mpy DeICTBYOT CNCTeMbI yTNIN3aun OTxOob IN BO3BpaTa NCNoJb3ObaHHo npOdykUn. MHOrne KOMnoHEThbl 6yDyTBOpuHO NcNoJb3ObaHbI IN yTNIN3nPoBaHbI, B TO BpeMa KaK BpeHbIe BeUeCTBa IN TAgKeJIbIe MeTaJIbI b 6yDyT o6pa6OtaHbI c NOMoUbIO kONOrnueckN npInemMeMOro MeToa.
3a 60nee noJpO6Hoi HOpMaueJe no Hawe nporpaMMe yTnIIN3aunn OTXoDob o6paauTecb K MeCTHOMy NOCTaBUNky IIN npeCDtABUTeIO kOpnpaun LG.
Mbl opneHTnpyemcHa o6ecneueHnE 3KoIOnuYeCKO 6e30NaChocTn, cTbA ce6e ue bIO rnoBaIbHyIO 3aunTy OkpykaUoSe CpeB. DOnonHITeNbHyIO nHΦOpMaunIO HaWe NOnTIke No OxaHe OkpykaUoSe CpeBb Bbl MoKeTe HaTn Ha HaWe m CaTe:
http://www/lg.com/global/sustainability/environment/ take-back-recycling.jsp
HANKHO
韓經報報
http://www/lg.com/global/sustainability/ environment/take-back-recycling.jsp
VCCI (for Japan)
NOM MARK (Mexico only)

UKRAINE only
IHO3eMHe NiI npnEMCTBO «JIOH»
03113, M. KniB, np-T Nepemorn, 6yD.62-B
Ten.: +38 (044) 391-53-91
06MexeHHa HaeBHe He6e3neHnx peOBHH
YcTaTkyBaHHB BIDNOBIDAe BUMORAm TexHCHOPERaMeHTy 0do O6MeXeHO RIKOpNCTaHHHe6e3neuHnx peOuBH EeneKtpnHOMy iEeKTPoHHOMy 06naHaHHI.
Ukraine Restriction of Hazardous Substances
The equipment complies with requirements of the Technical Regulation, in terms of restrictions for the use of certain dangerous substances in electrical and electronic equipment.
EPEAT

"EPEAT registered where applicable/supported. EPEAT registration varies by country - see www.epeat.net for registration status by country."
GREEN MARK (for Japan)

http://www.lg.com/jp/eco/j-moss
CU CONFORMITY NOTICE
(EURASIAN CUSTOMS UNION ONLY)
EAC
PACKING INFORMATION (CUSTOMS UNION)
PYCCKN
CIMBOL «NetTMe6uca» yka3bIbaeHa BO3MOXHOCTb yTuIN3aun yNaKOBKn. CIMBOI MOKeT 6bITb DOnOJIHeN 6o3HaueHnem MaTePnala yNaKOBKn B VnDE uΦpOBOrO n/nn 6yKBeHHoro 06o3HaueHn.
KA3AKUJA

CnMBOI KANTamaHbIXOHO MymkiHirih KepceTei.
CnMBOI caHbIK KOJXaHe/Hemece apin
6enriJIepi TypiHderi KaNTama MaTePnaJIbIHbIH
6enricimeH ToBikTbIPbIybl MymkiH.
WEEE
ENGLISH
Disposal of your old appliance
1 This crossed-out wheeled bin symbol indicates that waste electrical and electronic products (WEEE) should be disposed of separately from the municipal waste stream.
2 Old electrical products can contain hazardous substances so correct disposal of your old appliance will help prevent potential negative consequences for the environment and human health. Your old appliance may contain reusable parts that could be used to repair other products, and other valuable materials that can be recycled to conserve limited resources.
3 You can take your appliance either to the shop where you purchased the product, or contact your local government waste office for details of your nearest authorised WEEE collection point. For the most up to date information for your country please see www/lg.com/global/recycling
DEUTSCH
Disposal of your appliance
The symbol indicating separate collection for electrical and electronic equipment consists of the crossed-out wheeled bin.
上
WEEE
Disposal of your old appliance (as per e-waste Rules)
- When this crossed out wheeled bin symbol is depicted on the product and its operator's manual, it means the product is covered by the e-waste Management and Handling Rules, 2011 and are meant to be recycled, dismantled, refurbished or disposed off.
2. Do's:
a. The product is required to be handed over only to the authorized recycler for disposal.
b. Keep the product in isolated area, after it becomes non-functional/unrepairable so as to prevent its accidental breakage.
Don't:
a. The product should not be opened by the user himself/herself, but only by authorized service personnel.
b. The product is not meant for re-sale to any unauthorized agencies/scrap dealer/kabariwalah.
c. The product is not meant for mixing into household waste stream.
d. Do not keep any replaced spare part(s) from the product in exposed area.
- Any disposal through unauthorized agencies/person will attract action under Environment (Protection) Act 1986.
- "This product is complied with the requirement of Hazardous Substances as specified under Rule 13 (1) & (2) of the E-Waste(Management & Handling) Rules, 2011".
- To locate a nearest collection centre or call for pick-up (limited area only) for disposal of this appliance, please contact Toll Free No. 1800-315-9999 / 1800-180-9999 for details. All collection centre and pick up facilities are done by third parties with LG Electronics India Pvt. Ltd. Merely as a facilitator.
For more detailed information, please visit : http://www/lg.com/in
中
Aepnne Puroanen nipatran k 4pkr ( --3p
-
Jab 2345678901234567890123456789012345678901234567890123456789012345678901234567890123456789012345678901234567890
-
等式:
k. Uppkkrn k o sip 3 Aikuk k p: nolniokarakkarkt k o h i nipataray kkrne he t Hsrt aalr
x. Jzab Upokarpa Kaayravat n h o i s e Aalga kote r me r y t aikc Upokarpa se h o ne valloi duyctnatao sae bchva jia sak
k. 1 1 1 1 1 1 1 1 1 1 1 1 1 1 1 1 1 1 1 1 1 1 1 1 1 1 1 1 1 1 1 1 1 1 1 1 1 1 1 1 1 1 1 1 1 1 1 1 1
x. 2015
g. 2
H. 3
-
3.
-
4.
-
Upparokat Padaoyake nipotaranke lirn Jnajadikni nipotaran Samsaogan (sakpan kare) Aichik jaojankarai ke lih Hmara teol 1800-315-9999 / 1800-180-9999 pkr kal kare. skiy saayagpa kdt v mikk- aep koi sivghaeg
kisri - patai LG Electronics India Pvt. Ltd. ko aepnni serevapr ad pradana knr rhi h, se kovabare |
Jyadada jaojankarai ke lirp dveeavob:saiecet : http://www/lg.com/in
LG Take-back & Recycling Policy
(For USA)
LG Electronics offers a customized e-waste take-back & recycling service that meets local needs and requirements in the countries where e-waste regulations are in place, and also provides product take-back & recycling service voluntarily in some regions. LG Electronics evaluates products' recyclability at the design step selectively, with the goal of improving recyclability where practicable. Through these activities, LG Electronics seeks to contribute to conserving natural resources and protecting the environment. For more information, please visit our global site at
https://www/lg.com/global/recycling
FOR SAUDI ARABIA
PRODUCT WITH BATTERY ONLY
1 All batteries should be disposed separately from the municipal waste stream via designated collection facilities appointed by the government or the local authorities.
2 The correct disposal of your old batteries will help to prevent potential negative consequences for the environment, animal and human health.
3 For more detail information about disposal of your old batteries, please contact your city office, waste disposal service or the shop where you purchased the product. Also You can contact our LG Support Representative Call center from below Link https://www/lg.com/sa_en/support/contact/ telephone
aagaa aee aess (baa ybys
J 1
L 2
L 3
L 4
https://www/lg.com/sa_en/support/contact/telephone
CONFORMITY NOTICE

ENGLISH
Hereby, LG Electronics European Shared Service Center B.V., declares that this product is compliant with the essential requirements. The complete Declaration of Conformity may be requested through the following postal address:
LG Electronics European Shared Service Center B.V., Krijgsman 1, 1186 DM Amstelveen, The Netherlands
or can be requested at our dedicated DoC website: http://www.lg.com/global/support/cedoc/cedoc#
DEUTSCH
yj jial jiall Jx jao aal ball jao JalSll jle yj lby
. B.V 1186
:uaa DoC liu y u b Su
http://www/lg.com/global/support/cedoc/cedoc#
HANMEHOBAHNE IN ADPEC PON3BOJNTELA/ ATAYbl JXHE OHNIPUSSIHH MEKEHXAIBI/HaIMEHYBAHHRA TA ADPECA BnPOBHKA
FCC Compliance Statement
This equipment has been tested and found to comply with the limits for a Class B digital device, pursuant to Part 15 of the FCC Rules. These limits are designed to provide reasonable protection against harmful interference in a residential installation. This equipment generates, uses, and can radiate radio frequency energy and, if not installed and used in accordance with the instructions, may cause harmful interference to radio communications. However, there is no guarantee that interference will not occur in a particular installation. If this equipment does cause harmful interference to radio or television reception, which can be determined by turning the equipment off and on, the user is encouraged to try to correct the interference by one or more of the following measures:
- Reorient or relocate the receiving antenna.
- Increase the separation between the equipment and the receiver.
- Connect the equipment to an outlet on a circuit different from that to which the receiver is connected.
- Consult the dealer or an experienced radio/TV technician for help.
This device complies with part 15 of the FCC Rules. Operation is subject to the following two conditions: (1) this device may not cause harmful interference and (2) this device must accept any interference received, including interference that may cause undesired operation. Any changes or modifications in construction of this device which are not expressly approved by the party responsible for compliance could void the user's authority to operate the equipment.
FCC Radio Frequency Interference
Requirements (for UNII devices)
High power radars are allocated as primary users of the 5.25 to 5.35 GHz and 5.65 to 5.85 GHz bands. These radar stations can cause interference with and/or damage this device. This device cannot be co-located with any other transmitter.
FCC RF Radiation Exposure Statement
[For having wireless function (WLAN, Bluetooth,...)] This equipment complies with FCC radiation exposure limits set forth for an uncontrolled environment. This transmitter must not be co-located or operating in conjunction with any other antenna or transmitter. This equipment should be installed and operated with minimum distance 20cm (7.8 inches) between the antenna and your body. Users must follow the specific operating instructions for satisfying RF exposure compliance.
For CANADA (Pour le Canada)
Industry Canada Statement
[For having wireless function (WLAN, Bluetooth,...)]
This device contains licence-exempt transmitter(s)/receiver(s) that comply with Innovation, Science and Economic Development Canada's licence-exempt RSS(s). Operation is subject to the following two conditions:
(1) This device may not cause interference.
(2) This device must accept any interference, including interference that may cause undesired operation of the device.
IC Radiation Exposure Statement
[For having wireless function (WLAN, Bluetooth,...)] This equipment complies with IC radiation exposure limits set forth for an uncontrolled environment. This equipment should be installed and operated with minimum distance 20 cm (7.8 inches) between the antenna & your body. NOTE: THE MANUFACTURER IS NOT RESPONSIBLE FOR ANY RADIO OR TV INTERFERENCE CAUSED BY UNAUTHORIZED MODIFICATIONS TO THIS EQUIPMENT. SUCH MODIFICATIONS COULD VOID THE USER'S AUTHORITY TO OPERATE THE EQUIPMENT.
[For product having the wireless function using 5 GHz frequency bands]
i. the device for operation in the band 5150-5250 MHz is only for indoor use to reduce the potential for harmful interference to co-channel mobile satellite systems;
ii. for devices with detachable antenna(s), the maximum antenna gain permitted for devices in the bands 5250-5350 MHz and 5470-5725 MHz shall be such that the equipment still complies with the e.i.r.p. limit;
iii. for devices with detachable antenna(s), the maximum antenna gain permitted for devices in the band 5725-5850 MHz shall be such that the equipment still complies with the e.i.r.p. limits as appropriate; and
iv. [for devices operating in the band 5250-5350 MHz having an e.i.r.p. greater than 200mW ] antenna type(s), antenna models(s), and worst-case tilt angle(s) necessary to remain compliant with the e.i.r.p. elevation mask requirement set forth in section 6.2.2.3 of RSS-247 shall be clearly indicated.
Users should also be advised that high-power radars are allocated as primary users (i.e. priority users) of the bands 5250-5350 MHz and 5650-5850 MHz and that these radars could cause interference and/or damage to LE-LAN devices.
RF Radiation Exposure Statement
This equipment should be installed and operated with minimum distance 20cm between the radiator and your body
Japan
VCCI (for Japan)
CU Conformity Notice
(Eurasian Customs Union only)
EAC
DECLARATION OF CONFORMITY
CE
English
[For Equipment Under Radio Equipment Directive]
Hereby, LG Electronics declares that the radio equipment type [Monitor] is in compliance with Directive 2014/53/EU. The full text of the EU declaration of conformity is available at the following internet address:
http://www-lg.com/global/support/cedoc/cedoc#
LG Electronics European Shared Service Center B.V.
Krijgsman 1
1186 DM Amstelveen
The Netherlands
The use of the 5150 - 5350 MHz band is restricted to indoor use only. This restriction exists in the countries Belgium (BE), Bulgaria (BG), Czech Republic (CZ), Denmark (DK), Germany (DE), Estonia (EE), Ireland (IE), Greece (EL), Spain (ES), France (FR), Croatia (HR), Italy (IT), Cyprus (CY), Latvia (LV), Lithuania (LT), Luxembourg (LU), Hungary (HU), Malta (MT), Netherlands (NL), Austria (AT), Poland (PL), Portugal (PT), Romania (RO), Slovenia (SI), Slovakia (SK), Finland (FI), Sweden (SE), United Kingdom (UK), Switzerland (CH), Iceland (IS), Liechtenstein (LI) and Norway(NO). (For Wi-Fi/Bluetooth built-in model or Wi-Fi built-in model)
Deutsch
LG Electronics European Shared Service Center B.V.
Krijgsman 1
1186 DM Amstelveen
The Netherlands
LG Electronics European Shared Service Center B.V.
Krijgsman 1
1186 DM Amstelveen
The Netherlands
LG Electronics European Shared Service Center B.V.
Krijgsman 1
1186 DM Amstelveen
The Netherlands
LG Electronics European Shared Service Center B.V.
Krijgsman 1
1186 DM Amstelveen
The Netherlands
El uso de la banda de 5150 - 5350 MHz está restr挂钩o unicolementa a interiores.Esta restriccionexiste en los seguides paises: Bulgica (BE), Bulgaria (BG), Republica Checa (CZ), Dinamarca (DK), Alemania (DE), Estonia (EE), Irlanda (IE), Grecia (EL), Espana (ES), Francia (FR), Croacia (HR), Italia (IT), Chipre (CY), Letonia (LV), Littuania (LT), Luxemburgo (LU), Hungria (HU), Malta (MT), Paises Bajos (NL), Austria (AT), Polonia (PL), Portugal (PT), Rumania (RO), Eslovenia (SI), Eslovaquia (SK), Finlandia (FI), Suecia (SE), Reino Unido (UK), Suiza (CH), Islandia (IS), Liechtenstein (LI) y Noruega (NO). (Para el modelo con Wi-Fi/ Bluetooth incorporado o el modelo con Wi-Fi incorporado)
Portugues
LG Electronics European Shared Service Center B.V.
Krijgsman 1
1186 DM Amstelveen
The Netherlands
LG Electronics European Shared Service Center B.V.
Krijgsman 1
1186 DM Amstelveen
The Netherlands
LG Electronics European Shared Service Center B.V.
Krijgsman 1
1186 DM Amstelveen
The Netherlands
H xpnon Tnc zwvc 5150 - 5350 MHz emtpentai mvo oEeotepikoocxwpouc.Autoc o nepioooc ix yia tic napakatw xwpeC: Bélyio (BE), Boulyapia (BG), Λnokpatia tnc Toexiac (CZ), Avia (DK), ερμavia (DE), Eoovia (EE), Ipavδia (IE), Eλáδa (EL), Iopavia (ES), Γaλla (FR), Kpoatia (HR), Italia (IT), Kπipoc (CY), Λetovia (LV), Λθouavia (LT), Λouεμβóρyo (LU), Ouyapia (HU), MaTa (MT), Oλavδia (NL), Auotpia (AT), Nλωvia (PL), Noptoyαia (PT), Pouavia (RO), Σloεvia (SI), Σλoβαia (SK), Φivλavδia (FI), Σounδia (SE), Hvωμevo Baoiεio (UK), Eβετia (CH), Ioλavδia (IS), ΛiXteVOTaIV (LI) κai Nopβηyia (NO). (Tia to μovτέλο με evωμawμενo Wi-Fi/Bluetooth ἡι το μοντέλο με evωμawμενo Wi-Fi)
Magyar
LG Electronics European Shared Service Center B.V.
Krijgsman 1
1186 DM Amstelveen
The Netherlands
LG Electronics European Shared Service Center B.V.
Krijgsman 1
1186 DM Amstelveen
The Netherlands
LG Electronics European Shared Service Center B.V.
Krijgsman 1
1186 DM Amstelveen
The Netherlands
Pásmo 5 150 - 5 350 MHz je povolné používat iba v interéri. Toto obmedzenie platí pre krajiny: Belgicko (BE), Bulharsko (BG), Česká republica (CZ), Dánsko (DK), Nemecko (DE), Estónsko (EE),Írsko (IE), Grécko (EL), Španielsko (ES), Francúszko (FR), Chorovátsko (HR), Taliansko (IT), Cyprus (CY), Lotyško (LV), Litva (LT), Luxembursko (LU), Mad'arsko (HU), Malta (MT), Holandsko (NL), Rakúsko (AT), Pol'sko (PL), Portugalsko (PT), Rumunsko (RO), Slovinsko (SI), Slovensko (SK), Físko (FI), Švédsko (SE), Spojené král'ovstvo (UK), Švajčiarsko (CH), Island (IS), Lichtenštajnsko (LI) a Nórsko (NO). (Pre model so jabudovaným Rozhranim Wi-Fi/Bluetooth alebo model so jabudovaným Rozhranim Wi-Fi)
Româna
LG Electronics European Shared Service Center B.V.
Krijgsman 1
1186 DM Amstelveen
The Netherlands
Banda de 5150 - 5350 MHz este restric tionata doar la utilizesaia in interior. Aceastre restrictie exista n tarele Belgia (BE), Bulgaria (BG), Republica Ceha (CZ), Danemarca (DK), Germania (DE), Estonia (EE), Irlanda (IE), Grecia (EL), Spania (ES), Franca (FR), Croatia (HR), Italia (IT), Cipru (CY), Letonia (LV), Lithuania (LT), Luxemburg (LU), Ungaria (HU), Malta (MT), Olanda (NL), Austria (AT), Polonia (PL), Portugalia (PT), Romania (RO), Slovenia (SI), Slovakia (SK), Finlanda (FI), Suedia (SE), Regatul Unit (UK), Elvetia (CH), Islanda (IS), Liechtenstein (LI) si Norvegia (NO). (Pentru modelul integrat Wi-Fi/Bluetooth Sau modelul integrat Wi-Fi)
Блгарский
[3a 6opdyBaHe, 6xbHaTo OT DnpeKtNbBata 3a paDnOo6OpyDaHe]
C hactoio LG Electronics deKnapupa, He To3n TnnpaiaocbopbxKeHne [MoHTOp] e B cBoTBeTCTBne C DnpeKTnBa2014/53/EC. LAnocTHnT TeKCT Ha EC deKnapaunTa 3aCbOTBeTCTBne MOxke da ce HamepHa cIeDnHa INTEpHet aIpec:
http://www-lg.com/global/support/cedoc/cedoc#
LG Electronics European Shared Service Center B.V.
Krijgsman 1
1186 DM Amstelveen
The Netherlands
YeCToTHaTaJeHTaOT5150-5350MHzeOpaHnueHa3a
m3no3BaHe cAmo Ha 3aKpITo.ToBa OrpaHnueHne CbIeCTByBa
BcIeHNITEcPAnHbEbnRBA(BE),BbIrpAraBG,YeIka
peny6nka(CZ),DaHnRA(DK),FepMaHnRA(DE),EcTOnnRA
(EE),UplanDnRA(IE),TbpCnRA(EL),NcpannRA(ES),OpaHnRA
(FR),XbPbATnRA(HR),ITaJIra(II),KnIbP(CY),LaTBnRA(LV),
JITBa(LT),IIOKcEM6pyr(LU),YNrApnRA(HU),MaIra(MT),
HndeplanDnRA(NL),AbCTPnRA(AT),PiOnsA(PL),IpOpTuRaII
(PT),PyMbHnRA(RO),CNoBeHnRA(SI),CNoBaKnRA(SK),ΦnHlaHnRA
(FI),UBeuRA(SE),O6eINHeHO KpALcTBO (UK),UBeiucapnRA(CH),
NcIaHnRA(IS),JnxTeHauAH(LI) n HopBerna(NO). (3a Moden C
Bpraden Wi-Fi/Bluetooth nnn moen c Bpraden Wi-Fi)
Svenska
LG Electronics European Shared Service Center B.V.
Krijgsman 1
1186 DM Amstelveen
The Netherlands
LG Electronics European Shared Service Center B.V.
Krijgsman 1
1186 DM Amstelveen
The Netherlands
LG Electronics European Shared Service Center B.V.
Krijgsman 1
1186 DM Amstelveen
The Netherlands
LG Electronics European Shared Service Center B.V.
Krijgsman 1
1186 DM Amstelveen
The Netherlands
LG Electronics European Shared Service Center B.V.
Krijgsman 1
1186 DM Amstelveen
The Netherlands
LG Electronics European Shared Service Center B.V.
Krijgsman 1
1186 DM Amstelveen
The Netherlands
LG Electronics European Shared Service Center B.V.
Krijgsman 1
1186 DM Amstelveen
The Netherlands
5150 - 5350 MHz josla ir paredzeta tikai lietošanai iekstelpas. Sis ierobežojums pastav šadās valstīs: Belgija (BE), Bulgārijja (BG), Čehija (CZ), Dānija (DK), Vacija (DE), Igaunija (EE), Ārija (IE), Griekija (EL), Spanija (ES), Francija (FR), Horvatija (HR), Itālija (IT), Kipra (CY), Latvija (LV), Lietuva (LT), Luksemburga (LU), Ungārijia (HU), Malta (MT), Niderlande (NL), Austrija (AT), Polija (PL), Portugäle (PT), Rumānija (RO), Slovenija (SI), Slovakija (SK), Somija (FI), Zviedrja (SE), Apvienotā Karaliste (UK), Šveice (CH), Islande (IS), Lihtensteina (LI) un Norvegija (NO). (Modelim ar iebūvētu Wi-Fi/Bluetooth vai iebūvētu Wi-Fi)
Slovenscina
LG Electronics European Shared Service Center B.V.
Krijgsman 1
1186 DM Amstelveen
The Netherlands
Uporaba pasu od 5150 od 5350 MHz je omejena na uporabo v zaprtih prostorih. Ta omejitev velja v naslednjih državah: Belgija (BE), Bolgarija (BG), Češka (CZ), Danska (DK), Nemčija (DE), Estonija (EE), Irska (IE), Grčija (EL), Španija (ES), Francija (FR), Hrvaška (HR), Italija (IT), Ciper (CY), Latvija (LV), Litva (LT), Luksemburg (LU), Madžarska (HU), Malta (MT), Nizozemska (NL), Avstrija (AT), Poljska (PL), Portugalska (PT), Romunija (RO), Slovenija (SI), Slovaska (SK), Finska (FI), Švedska (SE), Zdruzeno kraljestvo (UK), Švica (CH), Islandija (IS), Lihtenstajn (LI) in Norveška (NO). (Za modele z vgrajenima vmesnikoma za Wi-Fi in Bluetooth ter modele z vgrajenim vmesnikom za Wi-Fi)
Srpski
[ZA opremu na koju se odnosi Direktiva o opremi koja proizvodi radio talase]
LG Electronics European Shared Service Center B.V.
Krijgsman 1
1186 DM Amstelveen
The Netherlands
Opseg frekvencije 5150-5350 MHz predviden je samo za upotrebu u zatvorenim prostorima. Ovo ograničenje postoji u sledecim zemljama: Belgija (BE), Bugarska (BG), Češka Republika (CZ), Danska (DK), Nemačka (DE), Estonija (EE), Irska (IE), Grčka (EL), Španija (ES), Francuska (FR), Hrvatska (HR), Italija (IT), Kipar (CY), Letonija (LV), Litvanija (LT), Luksemburg (LU), Mažarska (HU), Malta (MT), Holandija (NL), Austrija (AT), Poljska (PL), Portugal (PT), Rumunija (RO), Slovenija (SI), Slovačka (SK), Finska (FI), Švedska (SE), Ujedinjeno Kraljevtvo (UK), Švajcarska (CH), Island (IS), Lihtenstajn (LI) i Norveška (NO). (Za modele koji imaju ugraden Wi-Fi/Bluetooth ili modele koji imaju ugraden Wi-Fi)
Hrvatski
[Za opremu na koju se odnosi Direktiva o radijskoj opremi] LG Electronics ovime izjavljube da je radijska oprema tipa [Monitor] u skladu s Direktivom 2014/53/EU. Cjeloviti tekst EU izjave o sukladnosti dostupan je na sljedecoj internetskoj adresi:
http://www.lg.com/global/support/cedoc/cedoc#
LG Electronics European Shared Service Center B.V.
Krijgsman 1
1186 DM Amstelveen
The Netherlands
LG Electronics European Shared Service Center B.V.
Krijgsman 1
1186 DM Amstelveen
The Netherlands
Pérdorimi i brezit 5150-5350 MHz lejohet vetém né ambiente t émbyllura. Ky kufizim ekziston né vendet si né vijim: Belgjike (BE), Bullgari (BG), Republka Ceke (CZ), Danimarke (DK), Gjermani (DE), Estoni (EE), Irlandé (IE), Greqi (EL), Spanjë (ES), Fracë (FR), Kroaci (HR), Itali (IT), Qipro (CY), Letoni (LV), Lituani (LT), Luksemburg (LU), Hungari (HU), Malte (MT), Holandë (NL), Austri (AT), Poloni (PL), Portugal (PT), Rumani (RO), Siloveni (SI), Sllovaki (SK), Finlanda (FI), Suedia (SE), Mbretëria e Bashkuar (UK), Zvicërr (CH), Islanda (IS), Lighthshtajn (LI) dhe Norvegjia (NO). (Pér modelet me Wi-Fi/Bluetooth osè Wi-Fi tê integruar)
Bosanski
[Za opremu na koju se odnosi Direktiva o radijskoj opremi]
LG Electronics ovim putem izjavljupe da je radija s oprema za [Monitor] usklażena s Direktivom 2014/53/EU. Cjelokupni tekst izjave o usklażeni za EU dostupan je na sljedećoj internetskoj adresi:
http://www-lg.com/global/support/cedoc/cedoc#
LG Electronics European Shared Service Center B.V.
Krijgsman 1
1186 DM Amstelveen
The Netherlands
Frekvencijski opseg 5150 - 5350 MHz predviden je samo za upotrebu u zatvorenim prostorima. To ograničenje važi u sljedćim zemljama: Belgija (BE), Bugarska (BG), Češka Republika (CZ), Danska (DK), Njemačka (DE), Estonija (EE), Irska (IE), Grčka (EL), Španija (ES), Francuska (FR), Hrvatska (HR), Italija (IT), Kipar (CY), Latvjia (LV), Litvanija (LT), Luksemburg (LU), Madarska (HU), Malta (MT), Holandija (NL), Austrija (AT), Poljska (PL), Portugal (PT), Rumunija (RO), Slovenija (SI), Slovačka (SK), Finska (FI), Švedska (SE), Ujedinjeno Kraljevstvo (UK), Švicarska (CH), Island (IS), Lihtenstajn (LI) i Norveska (NO). (Za model s Upgrade nom funkcjom Wi-Fi/Bluetooth ili model s Upgrade nom funkcjom Wi-Fi)
MaKeDoHcKn
[3a onpema koja cnafao noid NipekntBaTa 3a paNIO onpeMa] Co Oba, LG Electronics n3jabyBa deKa TnOt Ha paNIO onpeMa [MoHITop] e BO corIacnoCT co NipeKtnBaTa 2014/53/EU. ZeNoCnHOT TeKT Ha DeKnapaunjata 3a yCorIaceHoCT Ha EY MoXeTe da ja hajDeTe ha CneHaTaNHTepHeT aDpeca:
http://www-lg.com/global/support/cedoc/cedoc#
LG Electronics European Shared Service Center B.V.
Krijgsman 1
1186 DM Amstelveen
The Netherlands
KopncTeHcTo Ha nojacot 5150-5350 MHz e orpaHueHo cmo 3a Bo 3aTbOpeHn IpocToHn. Oba orpaHnUyBaHe nocToH BO 3emJnte: BEnrJa (BE), Byrapna (BG), Peny6nka YeeKa (CZ), DaHcKa (DK), TepMaHnja (DE), EctOnHa (EE), Npcka (IE), TpnuJa (EL), UNaHnja (ES), PhaHnju (FR), XpBaTcKa (HR), NtAnJa (IT), KInap (CY), IatBnja (LV), NtBaHnja (LT), LyKcem6ypr (LU), YHrapnja (HU), MaTa (MT), XoHaHnJa (NL), ABCTpnJa (AT), POncka (PL), NopTyraHnja (PT), PomaHnja (RO), CNoBeHnJa (SI), CNoBauchka (SK), FInhcka (FI), WBeDcKa (SE), O6eHnHeToTO KpaIcTBo (UK), WbajucarJa (CH), NcAnaHd (IS), LnxTeHuTajN (LI) HOpBvEka (NO). (3a MoJeIoT co BrpaDeH Wi-Fi/Bluetooth mnn MoJeIoT co BrpaDeH Wi-Fi)
Ka3akwa
[PaHIO6aHbIC KpyIbIbIaPbHa KaTbICTbI dNpeKTNaTaIaNTapbHa JyriHeTI Hka6DbIK YwiH] OcbIMe LG Electronics KomnaHrcbl [MoHTop] aTTbI paIIO ka6dbIK TypiH 2014/53/EU dNpeKTBaCbHa cKeKc KeTeIHirJXapraHaNbI. EO cKeKctiik DeKnapauncBbHbT ToBbIK MAtHi KeNci Be6-MeKeHka BoHbHa KonKetIMDi:
http://www-lg.com/global/support/cedoc/cedoc#
LG Electronics European Shared Service Center B.V.
Krijgsman 1
1186 DM Amstelveen
The Netherlands
5150-5350 MfJxinirih TeK 6eHMeHH iWInde naDanahyra pyKcat etinei. Byn wektey mbHa eIepde KOnDaHbIaIbI: BEnBra (BE), Bonrapra (BG), Yex Pecny6nKacbi (CZ), DaHna (DK), TepMaHna (DE), 3cToHna (EE), NpNaHnra (IE), TpeKna (EL), NcNaHna (ES), PhaHnra (FR), XopBaTnra (HR), IT, Knnp (CY), NaTBnra (LV), NtTa (LT), NIOKcEm6pyr (LU), BeHrpna (HU), ManbTa (MT), HndepnAn (NL), ABCTPnA (AT), Nolbaa (PL), NopTyraHnra (PT), PyMbHnra (RO), CNoBeHnra (SI), CNoBaknra (SK), FHNHLnra (FI), UBeuHnra (SE), Ybl6pntanra (UK), WBeuCapra (CH), NcNaHnra (IS), JnxTeHnTeHH (LI) xeHe HopBerna (NO). (Wi-Fi/ Bluetooth kipictipinreH ylrici hemce Wi-Fi kipictipinreH peKmMi ywiH)
Pycckn
[Для оборудань,在а КOTOPoe paCnpoCTpaHЯETcA DeIeCTBue ДИpeKTbbl O padwoobopydOBAHm.]
Hactoim Komna Hg Electronics 3aBniet, TTO npaioooopoyobnna [MoHTop] cootbetCTbYet DmuekTInBe 2014/53/EC. POnHb TeKT deKnapauin EC o cootbetCTBnIOctynen no cIeDyOuemy aApcey BcTeN VHTepHeT:
http://www/lg.com/global/support/cedoc/cedoc#
LG Electronics European Shared Service Center B.V.
Krijgsman 1
1186 DM Amstelveen
The Netherlands
Ionoca yactot 5150-5350 MTo npednaHaNaeHdI NcnoB3ObaHnra TOnbKOB nOmeuHnx.3To orpaHnueHne DeiCTByET B CneDyUoux x cTpanhax:BeIbTgN (BE),BoIrapn (BG),YeUckaPeCny6nka (CZ),DaHnA (DK),FepMaHn (DE),3ctOnn (EE),UnpAnn (IE),Tpeun (EL),NcAnn (ES),ΦpaHn (FR),XopBaTn (HR),ITAN (IT),Knnp CY),LaTBn (LV), IInTa (LT),IIOKcem6pyr (LU),BeHrpn (HU),MaIbTa (MT),HndepNaHdbi (NL),ABCTPn (AT),PiNbua (PL),IpOpyraHn (PT),PyMbHn (RO), CNoBHeHn (SI),CNoBaKn (SK),OHHaHn (FI),IIBeu (SE), BeNko6puTahn (UK),IbWeuapn (CH),NcAndu (IS),JIxTeHwTeH (LI) HOpBern (NO).(ДЯ moJeNe co BCTpoEHbIM Wi-Fi/Bluetooth mnc BoCTpoEHbIM Wi-Fi)
YkpaHcbKa
[Дяобладнань,яke BiinobiJaE [IpeKtBbI zuo do paioo6nadnHn] CnpabxHIM LG Electronics 3a8BnE, zu Tn np paioo6naHnHa [MoHITop] BiinobiJaE TexhiuHomy pernaenty paioo6naHnHn;
noBn TeKCT DeKnapaui npo BiinobiHicb DocTyHnHa Be6-caTi 3a TaKOIO aDpecoIO:
http://www.lg.com/global/support/cedoc/cedoc#
Диаэончстό 5150-5350 MГцпpresнчehnmTiibknдя ВИКОПСТАНHAуnpIMiшни.(ДЯ модели i3 B6ydoBaHOФункciEIO Wi-Fi/Bluetooth a6o Wi-Fi)
Türkce
LG Electronics European Shared Service Center B.V.
Krijgsman 1
1186 DM Amstelveen
The Netherlands