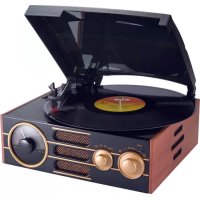
TD104 - Turntable BIGBEN - Free user manual and instructions
Find the device manual for free TD104 BIGBEN in PDF.

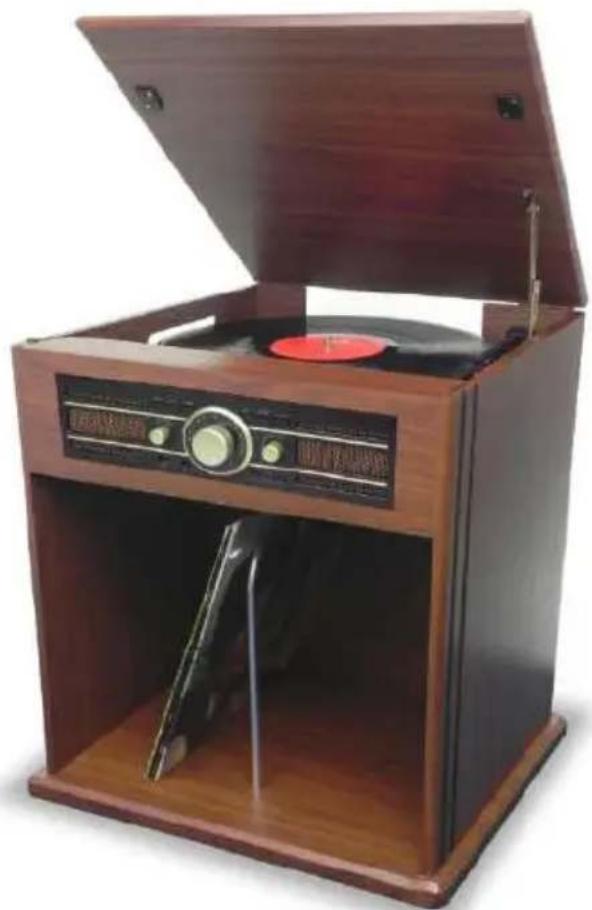
| Product type | Turntable with FM radio, USB and MP3 encoder |
| Brand | Bigben |
| Model | TD104 |
| Power supply | AC mains (power cable) and batteries (not included) |
| Rotation speed | 33 1/3 and 45 RPM |
| Functions | Vinyl playback, FM radio, MP3 playback via USB, Aux input, Phono/Aux to MP3 encoding on USB |
| Speakers | Built-in |
| Connectivity | USB port, 3.5mm Aux input, headphone output, RCA Line out, FM antenna |
| Remote control | Yes, infrared (AAA batteries not included) |
| Included accessories | Line input cable, mounting kit (screws, metal bracket, panels), user manual |
| Safety | Adjustable auto-stop, automatic standby after 15 minutes |
| Maintenance | Unplug before cleaning, soft damp cloth, no harsh chemicals |
| Environment | Complies with European directives (WEEE, batteries) |
| Customer service | Bigben Interactive, Crystal number 09 69 39 79 59, email sav.audio@bigben.fr |
Frequently Asked Questions - TD104 BIGBEN
User questions about TD104 BIGBEN
0 question about this device. Answer the ones you know or ask your own.
Ask a new question about this device
Download the instructions for your Turntable in PDF format for free! Find your manual TD104 - BIGBEN and take your electronic device back in hand. On this page are published all the documents necessary for the use of your device. TD104 by BIGBEN.
USER MANUAL TD104 BIGBEN
Installation des piles (piles non fournies)
customerservice@bigben-interactive.be
ESPANA, sat@bigbeninteractive.es
ITALIA. support@bigbeninteractive.it
www.bigben.eu
| Getting Started | 1 | Listen to the Radio | 4 |
| Safety and notice | 1 | Listen to the record player | 4 |
| Care of your product | 2 | Aux-in connection | 5 |
| Care of the environment | 2 | Playback MP3 | 5 |
| What's in the box | 2 | Encode Phono/Aux | 6 |
| Description of Parts | 3 | Remote control | 7 |
| Connection | 4 | Remarks | 8 |
Getting Started
- Remove the appliance from the box.
- Remove any packaging from the product.
- Place the packaging inside the box and either or dispose of safely.
Safety and Notice
Read and understand all instructions before you use this product. If damage is caused by failure to follow the instructions, the warranty does not apply.
Safety
Warning
- Never remove the casing of this apparatus.
- Never lubricate any part of this apparatus.
- Never place this apparatus on other electrical equipment.
- Keep this apparatus away from direct sunlight, naked Fames or heat.
- Never look into the laser beam inside this apparatus.
- Ensure that you always have easy access to the power cord, plug or adaptor to disconnect this apparatus from the power.

- Read these instructions.
- Keep these instructions.
- Heed all warnings.
- Follow all instructions.
- Do not use this apparatus near water.
- Clean only with dry cloth.
- Do not block any ventilation openings. Install in accordance with the manufacturer's instructions.
- Do not install near any heat sources such as radiators, heat registers, stoves, or other apparatus (including amplifiers) that produce heat.
- Protect the power cord from being walked on or pinched, particularly at plugs, convenience receptacles, and the Point w here they exit from the apparatus.
- Only use attachments/accessories specified by the manufacturer.
- Use only with the cart, stand, tripod, bracket, or table specified by the manufacturer or sold with the apparatus. When a cart is used, use caution when moving the cart/apparatus combination to avoid injury from tip-over.
-
Unplug this apparatus during lightning storms or when unused for long periods of time.
-
Refer all servicing to qualified service personnel. Servicing is required when the apparatus has been damaged in anyway, such as power-supply cord or plug is damaged, liquid has been spilled or objects have fallen into the apparatus, apparatus has been exposed to rain or moisture, does not operate normally, or has been dropped.
- Apparatus shall not be exposed to dripping or splashing.
- Do not place any sources of danger on the apparatus (e.g. liquid filled objects, lighted candles).
- Where the MAINS plug or an appliance coupler is used as the disconnect device, the disconnect device shall remain readily operable.
- Make sure there is enough free space around the product for ventilation.
- Batteries (battery pack or batteries installed) shall not be exposed to excessive heat such as sunshine, fire or the like.
Care for your product
- Always unplug the appliance when not in use and before cleaning.
- Do not play music at excessive volume levels as damage to hearing and or the equipment may occur.
- Do not use this unit in wet or damp conditions.
- Always disconnect the unit from the mains power supply before cleaning. Clean the appliance with a soft, damp, lint free cloth. Do not use abrasives or harsh cleaners.
Care of the environment

Your product is designed and manufactured with high quality materials and components, which can be recycled and reused.
Your product contains batteries covered by the European Directive 2006/66/EC, which cannot be disposed with normal household waste. Please inform yourself about the local rules on separate collection of batteries because correct disposal helps to prevent negative consequences for the environmental and human health.
When this crossed-out wheeled bin symbol is attached to a product it means that the product is covered by the European Directive 2002/96/EC. Please inform yourself about the local separate collection system for electrical and electronic products. Please act according to your local rules and do not dispose of your old products with your normal household waste. Correct disposal of your old product helps to prevent potential negative consequences for the environment and human health
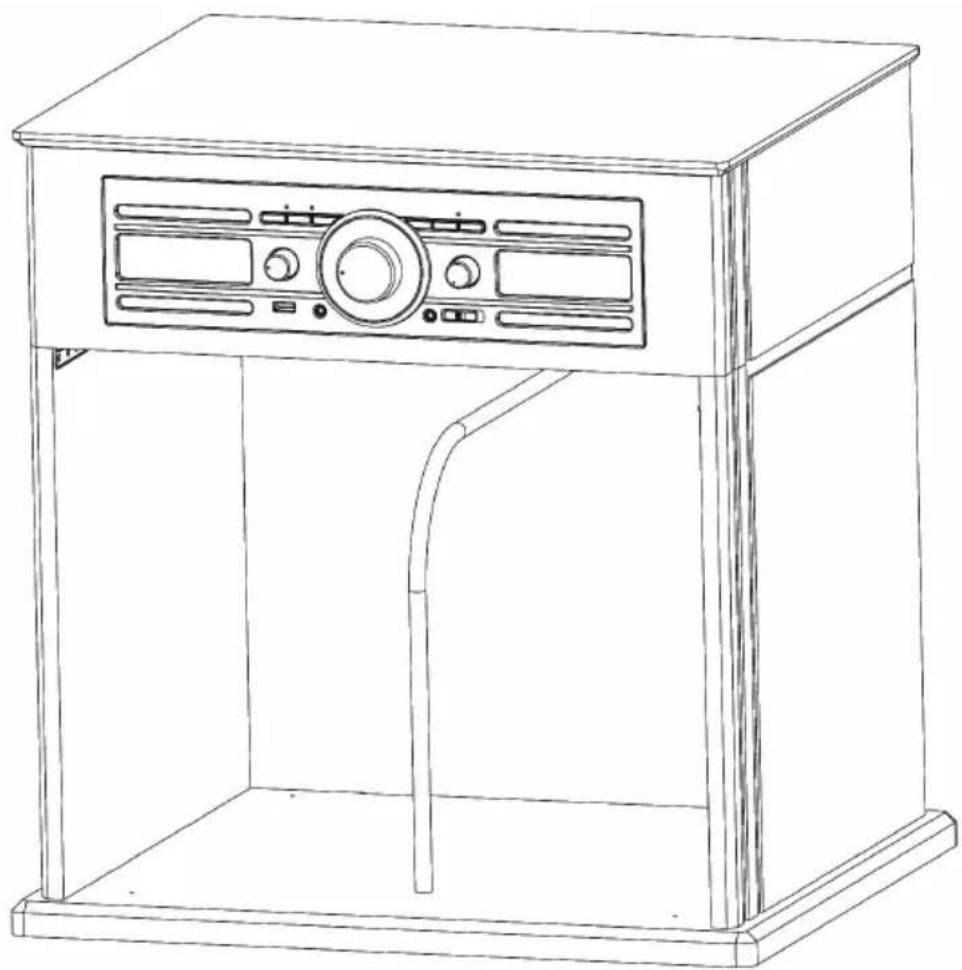
What's in the box
Check and identify the contents of your package:
- Main unit
Remote control - User manual
Line-in cable
Assembly kit (Screws, Metal bracket, Back board, Bottom board)
Assembly instruction manual
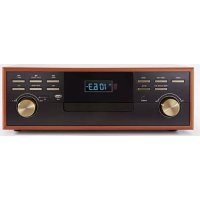
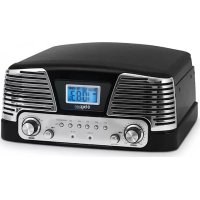
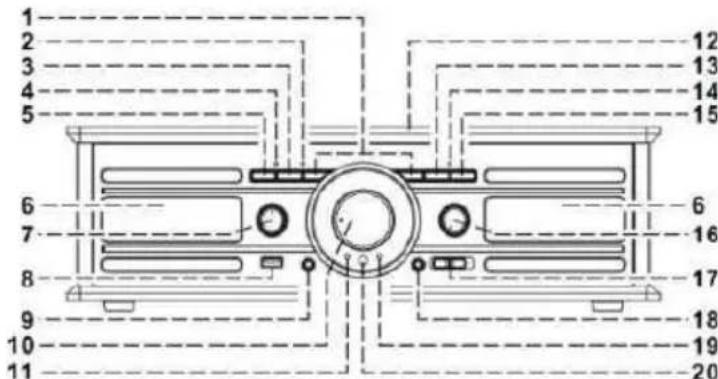
Description of Parts
- Skip / Down button
- Repeat/Random LED indicator
- Repeat/Random button
- Record LED indicator
- Record● button
- Speaker
- Function knob
- USB socket
- Earphone jack
- Tuning knob
- Power LED indicator
- Dust cover
- Play/Pause/Stop button
- Play LED indicator
- Folder up button
- Power On/Off-Volume knob
- FM mode sw itch
- 3.5mm Aux-In Jack
- FM Stereo LED indicator
- Remote sensor
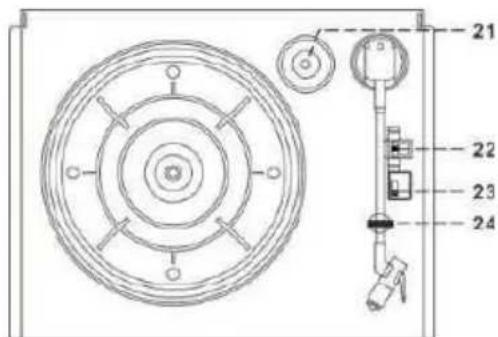
- Spindle adaptor
- Turntable speed selector
- Auto Stop On/Off switch
- Pick-Up holder
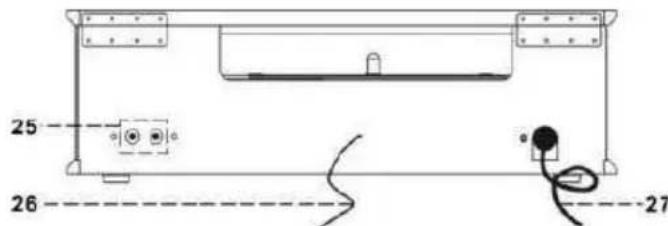
- Line Out socket
- FM Wire antenna
- AC Power cord
Power
CAUTION
- Risk of product damager! Make sure that the power voltage corresponds to the voltage printed on the back label.
- Risk of electric shock! When you unplug the AC power cord always pull the plug from the socket. Never pull the cord
Before connecting the AC power cord, ensure you have completed all other connections
Place the unit in the desired position and unravel the mains cable. Insert the cable into the supply socket and sw itch on if applicable.

Auto standby
When playing media from a connected device, the product automatically switches to standby if:
- No button is pressed for 15 minutes,
- No audio from a connected device for 15 minutes.
Battery power:
Be sure that the batteries are inserted correctly to avoid damage to the appliance. Always remove the batteries when appliance will not be used for a long period of time, as this will cause leakage to the batteries and subsequently damage to your set.
Use batteries of the same type. Never use different types of batteries together.
Do not throw the battery into the fire, or exposed to sunshine or the like.
If the liquid contained in the batteries comes in contact with eyes or skin, wash the area immediately and carefully with clear water and consult a doctor.
Connection
- Connect the Power Cord (27) to the AC outlet.
- Turn the Power On/Off knob (16) clockwise until the Power LED indicator (11) lights up. This means the power supply is normal. Now your system is ready to play music.
Listening to the radio
Manual tuning
- Turn on the Power (16) and switch the Function knob (7) to the "Tuner" position.
- Tune to the required station by turning the Tuning knob (10).
- Adjust the Volume knob (16) to the desired volume level.
FM & FM-stereo reception
- Set the FM mode switch (17) to the "FM" position, programs are received in Mono mode. In particular when stereo signal are weak. It is preferable to receive the program in Mono.
- Set the FM mode switch (17) to the "FM-ST" position to receive stereo programs. The FM-Stereo LED indicator (19) will light up to show an FM Stereo program is being received.
Hints for best reception:
- FM: The receiver has a built-in FM Wire antenna (26) hanging from the rear cabinet. This wire should be totally unraveled and extended for best reception.
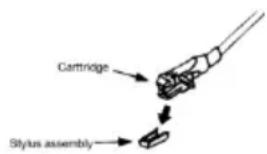
Listening to the record player
NOTE:
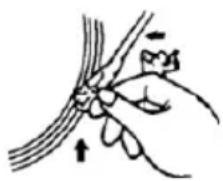
- Remove the stylus protector.
-
Be sure that the tone arm is detached from the tone arm rest before operating and re-secured again afterwards.
-
Sw itch to the "Phono" function on the Function knob (7)
- Set the speed selector (22) to the right position depending on the record to be played.
- Place the record on the platter (use the Spindle adaptor (21) if required).
- Lift the tone arm from the rest and slowly move it to the side of the record. The platter will start to rotate.
- Place the tone arm in the desired position on the record.
- Adjust the volume (16) to the desired level.
- At the end of the record, the platter will automatically stop rotating. Lift the tone arm from the record and return to the rest.
- To stop manually, lift the tone arm from the record and return it to the rest.
NOTE: As some kinds of records have an auto-stop area outside of the unit setting, it will stop before the last track finishes. In this case, change the Auto-Stop switch (23) to the "Off" position. Then it will run to the end of the record but will not stop automatically. (Turn off the unit using the power button or switch the Auto-Stop switch (23) back to the "On" position to stop the platter rotating). Then put the tone arm back in the rest position.
NOTE: Due to Aux and Phono being designed in the same position on this system. When a 3.5mm plug is plugged in to the Aux in jack (18), the channel will change to Aux automatically and the turntable will stop rotating. Please ensure the Aux in jack (18) has nothing plugged in before playing the record player.
Aux-in connection
Connect the unit to another device by connecting the Aux in jack (18) using a 3.5mm cable (provided) and connect the other end to the external device such as a Discman/MP3 player to perform the music playback or encoding function etc.
- Slide the Function knob (7) to the Phono/Aux position.
- Adjust the Power ON-OFF/ Volume Control knob (16) to the desired volume level.
- Start to play your external device.
Playback of MP3 songs via USB storage media connection
The system is able to decode and playback any MP3 file stored on memory media with the USB connection port.
Please note that only the USB keys with format FAT32 and under a capacity of 16Gb can be read by the unit.
- Turn the Function knob (7) to USB or SD mode.
- Plug-in the USB with the face up and make sure it is fully inserted or insert the memory card in the direction of the arrow as shown in the label on the top.
Connecting the USB upside down or backwards could damage the audio system or the storage media. Check to make sure the direction is correct before connecting.
- The system will start reading and playing back the file in the storage media automatically after connecting and the Play LED indicator (14) will light up.
Note: The USB port does not support connection to a USB extension cable and is not designed to communicate directly with a computer.
Play / Pause / Stop mode
- To interrupt, press the "Play/Pause/Stop" button (13) once, the Play LED indicator (14) will flash. Press again to resume normal playback.
- If you press and hold the "Play/Pause/Stop" button (13) for two seconds during playback mode, the system will go into stop mode.
- To start playback again, press the "Play/Pause/Stop" button (13) to start playback, the first track will start playing and the Play LED indicator (14) will light up.
Skip/Search mode (skip/search up / skip/search down
- During play or pause mode, if the "Skip Up" button (1) is pressed, it will go to the next track and then remain in play or pause mode.
- During play or pause mode, if the "Skip Down" button (1) is pressed, it will go back to the beginning of the track and remain in play or pause mode.
- After step 2, pressing the "Skip Down" button (1) again will go to the previous track and remain the play or pause mode.
- If you press and hold the "Skip Up/Down" button (1) during playback, the track playing will fast forward or rewind until the button is released.
Folder up control
- Press the "Folder Up" button (15), the system will go to play the next folder
Note
- The system can detect and read files in MP3 format only though the USB port or SD Card slot.
- If you connect the system to an MP3 player via the USB socket, due to variances in MP3 encoding formats, some MP3 player may not be able to play via the USB socket. This is not a malfunction of the system.
MP3 track format requirement:
- MP3 bit rate: 32 KBPS~256 KBPS.
Repeat/random mode
By pressing the Repeat/Random button (3) before or during playback, a single track, single folder or all the tracks can be played in different modes as follow:
PLAY MODE
REP/RAN LED INDICATOR STATUS
REPEAT SINGLE TRACK FLASHES RED
REPEAT ALL TRACKS LIGHTS UP RED
REPEAT SINGLE FOLDER FLASHES GREEN
RANDOM MODE LIGHTS UP GREEN
OFF MODE
Repeat play
You can listen to the desired track, folder or all tracks repeatedly using this function.
Random play
You can listen to all the tracks in a random order using this function.
Encoding Phono/Aux into an MP3 file
The system is able to encode Phono into MP3 format and record on memory media with the USB connection port. (Accepts up to 16GB maximum memory size).
A) Phono encoding
- Set the Function knob (7) to "Phono/Aux" and then press the "Rec" button (5).
- The Record LED indicator (4) will light up for a few seconds, then flash. Now the system is ready to start encoding.
- Start Phono playback of the track which you want to record to USB.
- After you finish recording, press the "Rec" button (5) again during recording mode.
NOTE:
- The recording speed is 1:1 and depends on the actual playing time of the record.
- The system will create an "AUDIO" folder and then store the encoded track in it.
The recording format is preset at - MP3 bit rate: 128 KBPS, sampling rate: 44.1kHz. - To interrupt the recording, press the "Rec" button (5) again during recording mode.
B) Aux encoding
- Connect the unit to another device by connecting the Aux in jack (18)
- Set the Function knob (7) to "Phono/Aux" and then press the Rec button (5).
- The Record LED indicator (4) will light up for a few seconds, then flash. Now the system is ready to encoding.
- Start playback of your external device to record to USB.
- After you finish recording, press the "Rec" button (5) again during recording mode.
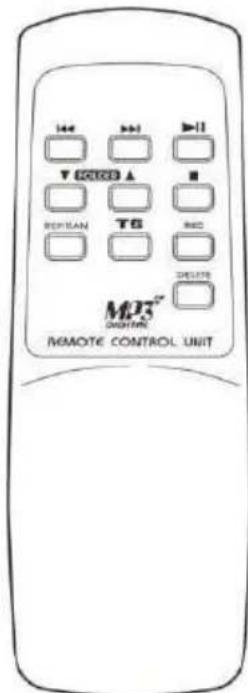
C) Track separation (by remote control)
You can divide the music recording from Phono/Aux to USB track by track during encoding. Every time when you press the "T6" (Track Separation) button once on the remote control during encoding from Phono/Aux to USB, the system will generate a new track and continue the Record LED indicator (12) will stop flashing for a while. This means the unit is creating a new track successfully.
D) File delete (on remote only)
You can delete the current MP3 file during playback of your USB using this function. Press and hold the Delete button for a w hile during USB playback mode, the current track will be deleted and the system will jump to the next track to continue playback.
Removing the USB
To remove the USB/Memory Card, turn off the power or switch the function mode to either Phono or Tuner first. For the USB port -- unplug it by pulling out the USB socket directly.
Line out connection
You can connect the system to your whole Hi-Fi system by connecting the Line out Socket (25) to the auxiliary input socket with a RCA cable (not included).
Remote control transmitter
Battery installation (battery not provided)
The Infra-Red transmitter requires 2 AAA size batteries for operation.
Button description
1) Skip/Search forward Press once to skip to next track, press & hold to search forward
Skip/Search backward Press once to skip to previous track, press & hold to search backward
2) Play/Pause Press once to start playback. Press again to enter pause mode
3) Folder up /down Press to select folder up or down
4) Stop Press to stop playback or cancel the stored program
5) Rep/Ran Press to activate the Repeat/Random function
6) Track separation Press to divide the record player tracks one by one during recording
7) Rec Press to activate the recording function
8) Delete Press and hold to delete the current track
WARNING! Risk of hearing impairment
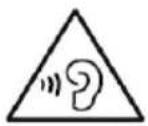
- Set a low volume on the playback device before connecting the headphones to the sound source.
- Avoid excessive volume, particularly over extended periods or frequent use. Excessive volume can result in permanent hearing impairment.
Remarks:


-
Don't discard the electrical and electronic appliances in the regular waste disposal.
a) Take them to a collection point.
b) Some components in these appliances may be hazardous to health and the environment. -
In order to save energy when the unit has no sound output for a while, the unit will be switched to stand-by automatically. It can be sw itched ON by using the POWER selector again.
- You can find the information on the plate located at the back of the unit.
To download the full statement, please visit our website: http://www/bigben-interactive.co.uk/support and the section "declaration of conformity".
Manufactured by BIGBEN INTERACTIVE SA
396, Rue de la Voyette
CRT2-FRETIN
CS 90414
59814 LESQUIN Cedex - France
www/bigben.eu
Made in China


REACH

bigben
Fabricant: Bigben Interactive FRANCE
- Rue de la Voyette, C.R.T. 2 Fretin, CS 90414-59814 LESQUIN Cedex
customerservice@bigben-interactive.be
ESPANA, sat@bigbeninteractive.es
ITALIA. support@bigbeninteractive.it
www.bigben.eu
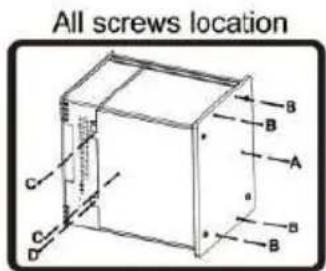
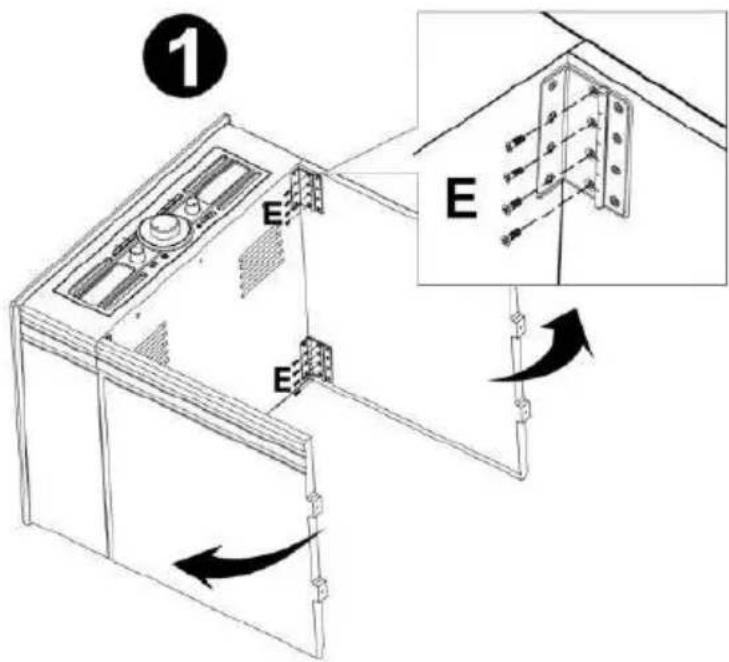
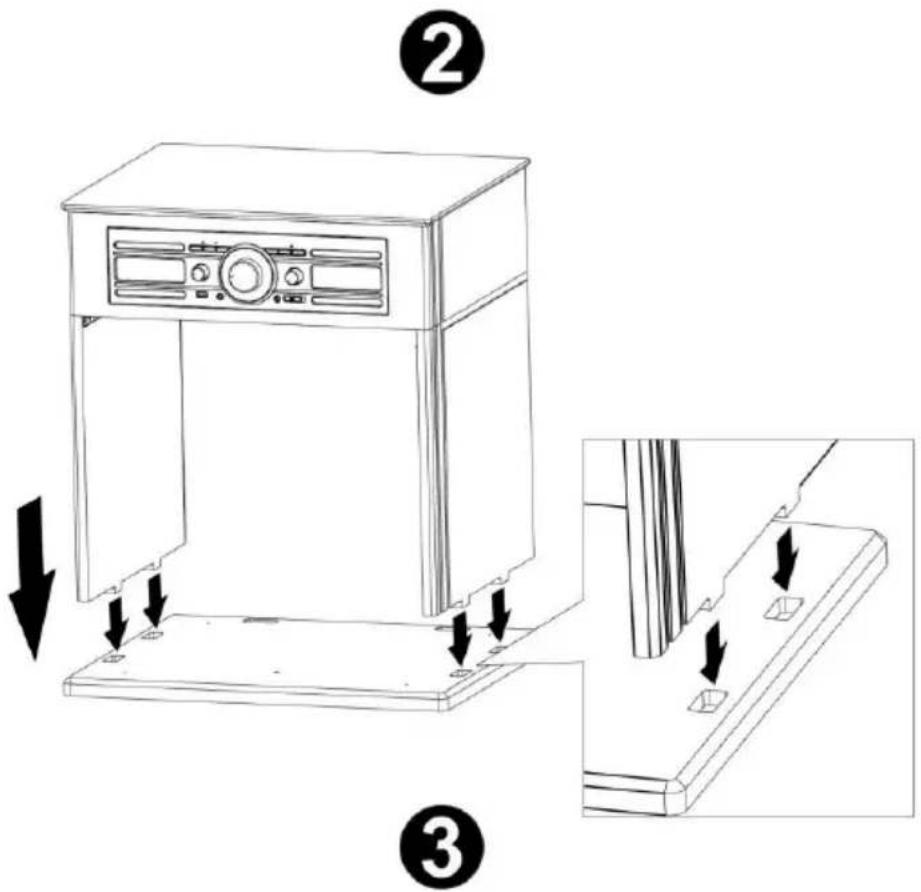
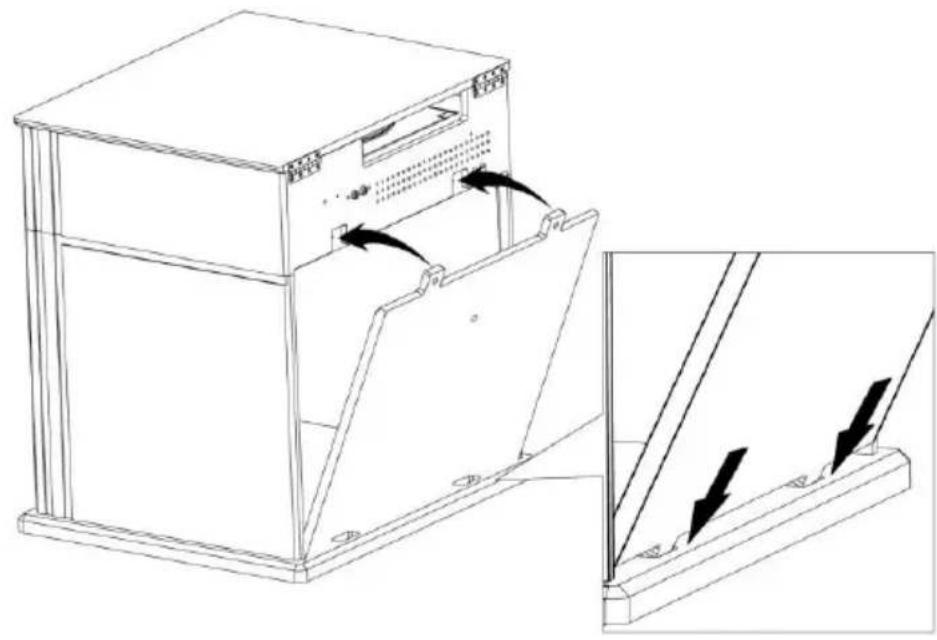
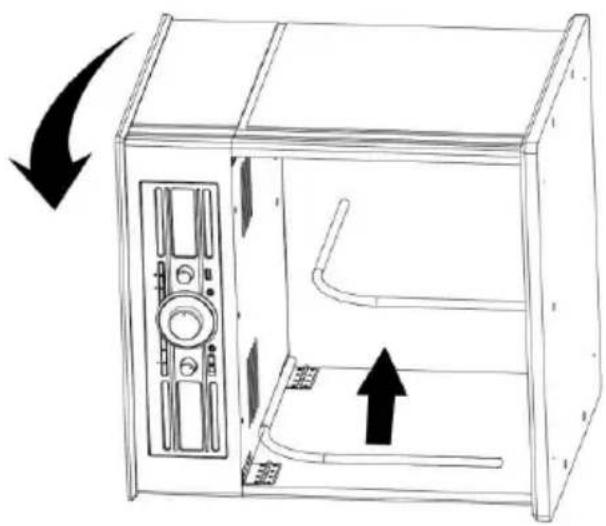
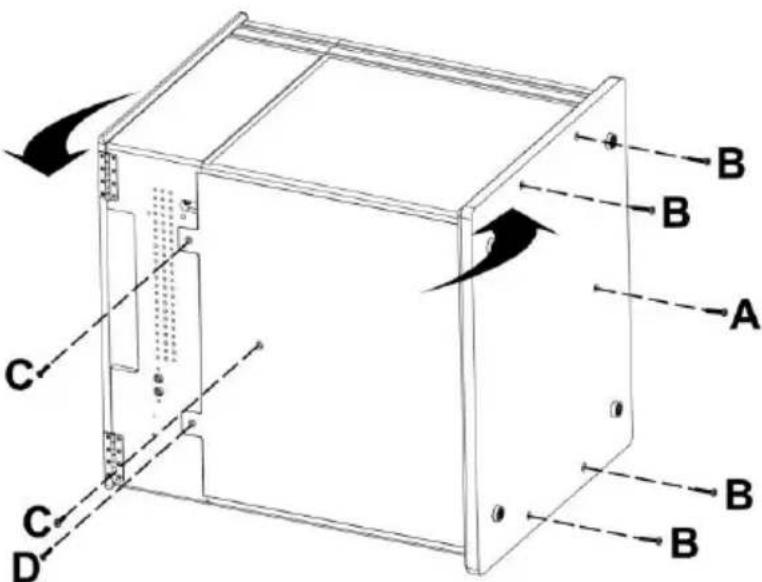
Instruction For Assembly
TD104
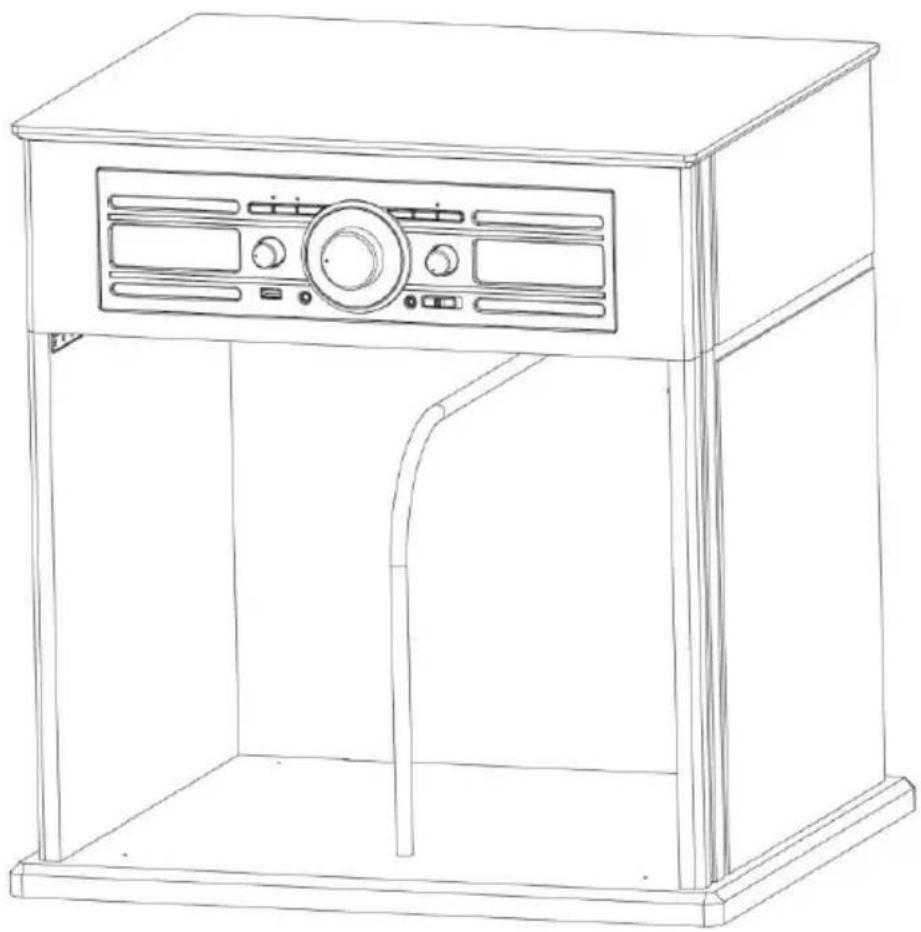
Assembly Kit
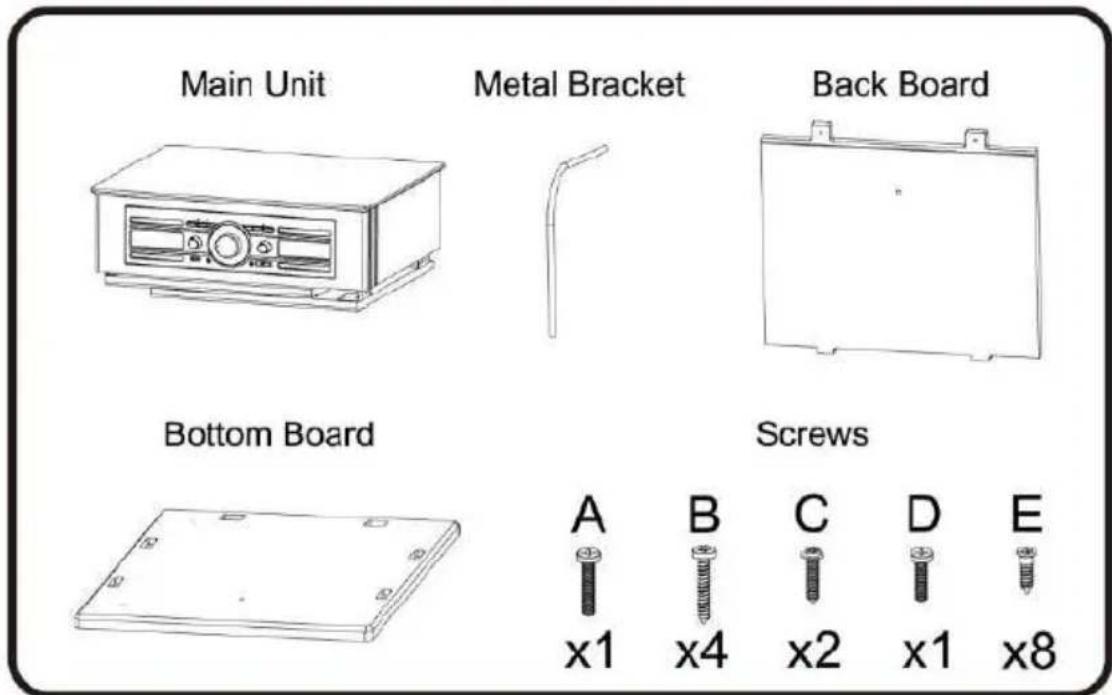

Required Tool: Phillips-Head screwdriver (not included)
4
5
TD104
TOCADISCOS CON COMPARTIMENTO PARA DISCOS, RADIO ESTÉREOY CODIFICADOR USB
Estamerican, he has been a good candidate for the position of his current president.
customerservice@bigben-interactive.be
ESPANA, sat@bigbeninteractive.es
ITALIA. support@bigbeninteractive.it
www.bigben.eu
customerservice@bigben-interactive.be
ESPANA, sat@bigbeninteractive.es
ITALIA. support@bigbeninteractive.it
www.bigben.eu
Reproducao repetition
customerservice@bigben-interactive.be
ESPAN, sat@bigbeninteractive.es
ITALIA. support@bigbeninteractive.it
www.bigben.eu
customerservice@bigben-interactive.be
ESPANA, sat@bigbeninteractive.es
ITALIA. support@bigbeninteractive.it
www.bigben.eu
Montageanleitung
TD104

Montage-Set
customerservice@bigben-interactive.be
ESPAN, sat@bigbeninteractive.es
ITALIA. support@bigbeninteractive.it
www.bigben.eu
Montagehandleiding
TD104