USER MANUAL ACX 40 G DOMETIC
S, UK, F, IT, NL, ES, CZ, SK, PT
DK, FI
8
Please read this operating manual carefully before starting the device. Keep it in a safe place for future reference. If the device is passed on to another person, this operating manual must be handed over to the user along with it.
The manufacturer cannot be held liable for damage resulting from improper usage or incorrect operation.
Table of contents
1 Explanation of symbols. 11
2 Safety instructions 11
3 Scope of delivery 15
4 Intended use 15
5 Technical description 15
6Operation 17
7 Cleaning and maintenance. 23
8 Warranty 23
9 Troubleshooting 24
10 Disposal. 25
11 Technical data 25
1 Explanation of symbols

WARNING!
Safety instruction: Failure to observe this instruction can cause fatal or serious injury.

CAUTION!
Safety instruction: Failure to observe this instruction can lead to injury.

NOTICE!
Failure to observe this instruction can cause material damage and impair the function of the product.

NOTE
Supplementary information for operating the product.
2 Safety instructions
2.1 General safety

WARNING!

CAUTION!
-
Disconnect the cooler from the electricity and gas supplies.
-
Before cleaning and maintenance
-
A f t e r u s e
-
Food may only be stored in its original packaging or in suitable containers.

NOTICE!
- Do not open the refrigerant circuit under any circumstances.
-
The refrigerant in the refrigerator circuit is highly flammable. In the event of any damage to the refrigerator circuit:
-
Avoid naked flames and sparks.
Air the room well.
-
Check that the voltage specification on the type plate is the same as that of the power supply.
-
Only connect the cooler as follows:
-
Plug the DC connection cable into the DC on-board socket (e.g. cigarette lighter) in the vehicle
-
Or plug the AC connection cable into the AC mains
-
Never pull the plug out of the socket by the connection cable.
-
If the cooler is connected to the DC socket: Disconnect the cooler and other power consuming devices from the battery before connecting the quick charging device.
- If the cooler is connected to the DC socket: disconnect the cooler or switch it off when you turn off the engine. Otherwise you may discharge the battery.
- The cooler is not suitable for transporting substances which are caustic or contain solvents.
- This cooler contains combustible cyclopentane in the insulation. The gases in the insulation material require special disposal procedures. At the end of its service life, ensure that the cooler is properly disposed of.
2.2 Operating the cooler safely

CAUTION!
- Before starting the device, ensure that the power supply line and the plug are dry.
- Only use the appliance where there is good ventilation.
- Do not let the appliance operate unattended.
- Only operate the cooler from a single energy source.

NOTICE!
- Do not use electrical devices inside the cooler unless they are recommended by the manufacturer for that purpose.
- Do not place the cooler near naked flames or other heat sources (heaters, direct sunlight, gas ovens etc.).
- Danger of overheating!
Always ensure sufficient ventilation so that the heat generated during operation can dissipate. Make sure that the cooler is sufficiently far away from walls and other objects so that the air can circulate.
- Ensure that the ventilation openings are not covered. Keep the following spaces (fig. 1, page 3).
- Do not fill the inner container with ice or fluid.
- Never immerse the cooler in water.
- Protect the cooler and the cable against heat and moisture.
- To enable the refrigerant to circulate properly, the cooler may not tilted by more than 3^ . Use a spirit level to make sure the cooler is level.
2.3 Safety when operating with DC power

NOTICE!
- Only select DC operation (battery mode) if you are using a battery monitor or if the alternator in your vehicle provides sufficient voltage.
- Only use cables with an appropriate cross section.
2.4 Safety when operating with AC power

NOTICE!
- Check that the voltage specification on the type plate is the same as that of the power supply.
- Only use the cable supplied to connect the cooler to the AC mains.
- Never pull the plug out of the socket by the connection cable.
2.5 Safety when operating with gas

WARNING!
Beware of suffocation!
Operating the device with gas in an unventilated area will reduce the amount of oxygen in this area.
- Make sure that the area is sufficiently ventilated when the device is being operated.
- Do not operate the device in unventilated areas such as enclosed premises, tents, motor vehicles, motor homes, caravans, ships, yachts, boots and truck cabs.
- Never place the device near flammable materials (paper, dry leaves, textiles).
-
Keep flammable objects away from the burner.
-
The cooler may only be operated with the pressure stated on the type plate. Use a DIN-DVGW-approved pressure regulator with a fixed setting in accordance with DIN EN 16129.
- Never store liquid gas cylinders in unventilated areas or below ground level (funnel shaped holes in the ground).
- Keep liquid gas cylinders away from direct sunlight. The temperature may not exceed 50^ .
- Never use a naked flame to check the cooler for leaks.
If you smell gas:
- Close the gas supply cock and the valve on the cylinder.
- Do not press an electric switch.
- Put out any naked flames.
- Have the gas system checked by a specialist.

NOTICE!
- Only use propane or butane gas (not natural gas).
3 S C O P E O F D
Quantity Description
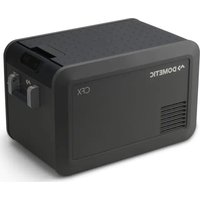
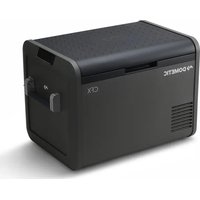
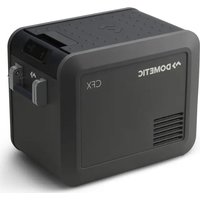
1 Absorber cooler
1 Tray with cover for making ice cubes
1 Operating manual
4 Intended use
The absorber cooler is ideal for cooling foodstuffs.
The cooler can be operated with DC power, AC power or gas.
It can also be used for camping. The device may not be exposed to rain.

CAUTION! Health hazard!
Please check if the cooling capacity of the device is suitable for storing the food you wish to cool.
5 Technical description
The cooler is portable. It can keep goods cool up to max. 30^ below ambient temperature.
If using gas, the cooler may only be operated outdoors.
If using electricity, the cooler may also be operated in enclosed spaces.
5.1 Connections
| No. in
fig. 2, page 4 | Description |
| 1 AC connection cable |
| 2 DC connection cable |
| 3 Cover for control elements |
| 4 Gas connection port (ACX35, ACX40 only) |
| 5 Gas cartridge (ACX40G only) |
| 6 Pilot light sight glass |
5.2 Control elements
| No. in
fig. 3, page 5 | Description |
| 1 Cooling level controller |
| 2 Temperature controller |
| 3 | I | g | n | i | t | i |
When the cooler is connected to the AC mains, the required cooling level is set using the cooling level controller (1).
To increase the cooling level, turn the cooling level controller (1) clockwise. For the maximum cooling level, turn the cooling level controller (1) clockwise as far as it will go (position "7").
To decrease the cooling level, turn the cooling level controller (1) anticlockwise.
To switch the cooler off, turn the cooling level controller (1) anti-clockwise as far as it will go (position "0").
When the cooler is connected to the DC power socket the cooling level cannot be adjusted.
When the cooler is operated with gas, the required cooling level is set using the temperature controller (2).
To increase the cooling level, turn the temperature controller (2) clockwise. For the maximum cooling level, turn the temperature controller (2) to the maximum position.
To decrease the cooling level, turn the temperature controller (2) anticlockwise.
To switch the cooler off, turn the temperature controller (2) anti-clockwise as far as it will go (position "O").
6 O p e r a t i o n

CAUTION! Health hazard!
Food may only be stored in its original packaging or in suitable containers.

NOTICE! Beware of damage
- Ensure that the items placed in the cooler are suitable for cooling to the selected temperature.
- Ensure that food or liquids in glass containers are not excessively refrigerated. Liquids expand when they freeze, and can therefore destroy glass containers.
- Ensure that your refrigerated container is well ventilated so that any heat created can dissipate. Otherwise proper functioning cannot be ensured. It is especially important not to cover the air vents.

NOTE
– the amount of food to be conserved
-
how often the lid is opened.
-
A few water drops may form inside the cooler if it has been cooling for a lengthy period. This is normal because the moisture in the air condenses to water when the temperature in the cooler falls. The cooler is not defective. Wipe it out with a dry cloth if necessary.
Press the control element cover (fig. 2 3, page 4) to open it.
To close the control element cover (fig. 2 3, page 4), push it towards the lid until it latches.
6.1 Energy saving tips
- Choose a well ventilated installation location which is protected against direct sunlight.
- Allow warm food to cool down first before placing it in the cooling device to keep cool.
- Do not open the cooling device more often than necessary.
- Do not leave the cooling device open for longer than necessary.
6.2 Using the cooler in DC mode
Place the cooler on a firm, level surface.
Plug the DC connection cable (fig. 2, page 4) into the cigarette lighter socket in the vehicle.
√The cooler starts cooling the interior.
Pull out the DC connection cable to switch off the cooler.
6.3 Connecting to vehicle power

NOTE
If you connect the cooling device to the vehicle power, remember that you may have to turn on the ignition to supply it with power.
6.4 Using the cooler in AC mode
Place the cooler on a firm, level surface.
Plug the AC connection cable (fig. 2 1, page 4) into the AC mains.
Turn the cooling level controller (fig. 3 1, page 5) to the required position.
The cooler starts cooling the interior.
6.5 Connecting the ACX35 or ACX40 cooler to an external gas supply (DE, A, CH)

WARNING!
There must be a shut-off device in the gas line so that the cooler can be cut off separately. The shut-off device must be easily accessible.

NOTICE!
EN 437:2003+A1:2009.
- The cooler may only be operated with hose lines in a perfect technical condition. Replace any porous or damaged hose lines.

NOTE
- Use a gas pressure controller to match the gas pressure that is specified on the type plate.
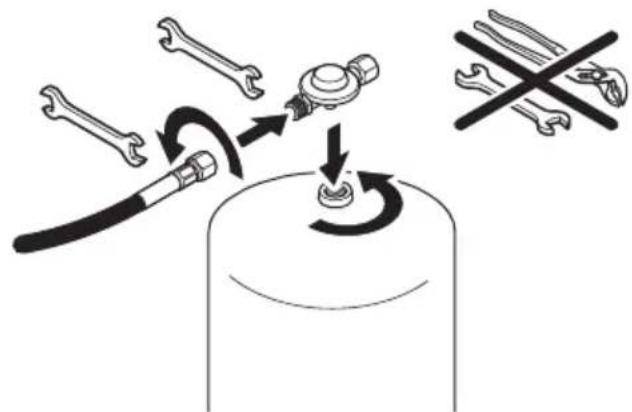
Proceed as follows (fig. 4, page 5):
Place the cooler on a firm, level surface.

WARNING!
Only use approved hose lines (DIN 4815, part 2) with a maximum length of 1.5m .
Connect the hose line (3) to the gas connection port (2) of the cooler.
To do this, use two open-end spanners (1) of 13mm and 17mm .
Make sure that the hose line
Take the safety cap (4) off the safety coupling (5) of the gas port.
Push the sleeve of the hose line (3) into the safety coupling (5) until you hear it latch.
Open the valve (6) on the safety coupling (5).
Open the valve of the gas cylinder or container.

WARNING!
Never check for leaks with an open flame or near sources of ignition.
Check all connections with leak spray.
There are no leaks at the connections if no bubbles form.
Disconnecting the cooler from the external gas supply
Close the valve (6) of the safety coupling (5) of the gas port.
Disconnect the hose line (2) by pushing the sleeve towards the valve handle.
Put the cap (4) onto the safety coupling (5).
Turn the temperature controller (fig. 3 2, page 5) to "O".
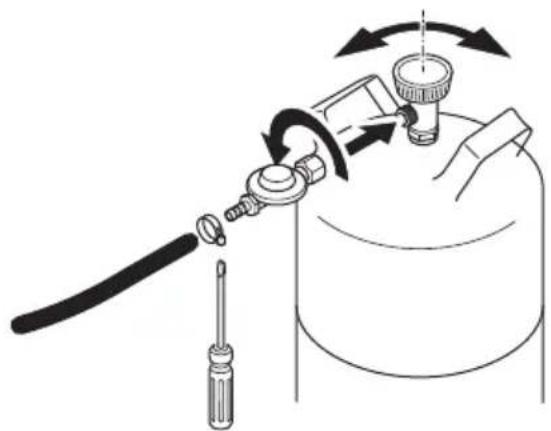
6.6 Connecting the ACX35 or ACX40 cooler to a gas cylinder
Note the following country-specific gas type and gas pressure categories:
Country Device categories
Denmark, Finland, Hungary, Norway, Poland, Sweden | 3B / P - 30 mbar
Belgium, Czech Republic, France, Italy, The Netherlands I_3 + - 28 - 30 / 37 mbar lands, Portugal, Slovakia, Spain, United Kingdom
Austria, Germany, Luxembourg, Switzerland 3B/P-50 mbar
Connect the ACX35 or ACX40 cooler to the gas hose (fig. 6, page 7) and the gas cylinder (fig. 7, page 8).

NOTICE!
- After connecting the device to the gas supply, check the gas pipe for leakage at all the connection points (all threaded connections, hose connections with clamps, connection to the gas cylinder) using a foaming agent, e.g. with soap.
- In addition, perform a visual inspection of the hose (for cracks, weathering, damage).
- Replace any faulty hoses immediately with a new one.
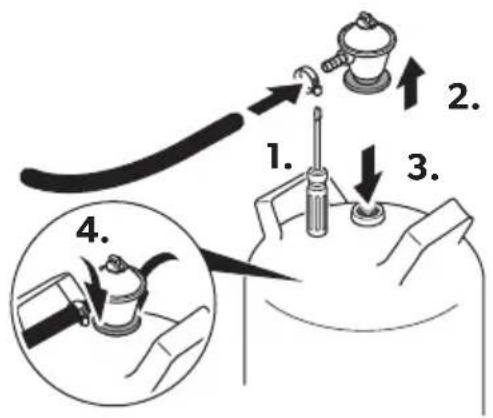
6.7 Connecting a gas cartridge to the ACX40G cooler

WARNING!
- Observe the handling and storage instructions for the gas cartridge.
- Make sure that the ports on the cartridge and the cooler are free of dirt.

NOTE
The cooler is suitable for operation with self-sealing gas cartridges of the type CAMPINGAZ CP250.
Push the gas cartridge up into the port on the cooler (fig. 5, page 6).

WARNING!
Never check for leaks with an open flame or near sources of ignition.
Check all connections with leak spray.
There are no leaks at the connections if no bubbles form.
Any time you move the cooler:
take out the gas cartridge first.
6.8 Using the cooler in gas mode
Turn the temperature controller (fig. 3 2, page 5) to the maximum position.
Press and hold the temperature controller.
After 10 seconds, press the ignition button (fig. 3 3, page 5) several times quickly in succession until the flame is lit.
After ignition, you can see the flame in the sight glass (fig. 2 6, page 4).
Hold down the temperature controller for another 20 seconds.
6.9 Switching off the cooler
Close off the gas valve on the device and on the gas cylinder
6.10 Defrosting the cooler

NOTICE!
Never use mechanical tools to remove ice or to loosen objects stuck to the device.

NOTE
Over time, frost builds up on the cooling fins inside the cooler. If this layer of frost is about 3 mm thick, you should defrost the cooler.
Disconnect the voltage and gas supply.
Empty the cooler.
Put a cloth in the refrigerator compartment to absorb any excess water.
Leave the lid open.
Wipe the refrigerator compartments dry with a cloth.
7 Cleaning and maintenance

WARNING!
Always disconnect the device from the power supply before you clean and service it.

NOTICE! Risk of damage
- Never clean the cooler under running water or in dish water.
- Do not use abrasive cleaning agents or hard objects during cleaning as these can damage the cooler.
Occasionally clean the device interior and exterior with a damp cloth.
Make sure that the air inlet and outlet vents on the device are free of any dust and dirt, so that heat can be released and the device is not damaged.
8 W a r r a n t y
The statutory warranty period applies. If the product is defective, please contact the manufacturer's branch in your country (see the back of the instruction manual for the addresses) or your retailer.
For repair and guarantee processing, please include the following documents when you send in the device:
- A copy of the receipt with purchasing date
- A reason for the claim or description of the fault
9 Troubleshooting
| Problem Possible cause Suggested remedy |
| The cooler does not work. | The cooler has not been set up properly. | Check if the device is horizontal.
Check if the ventilation of the device is sufficient. |
| The refrigerant circuit is defective. | This can only be repaired by an authorised repair centre. |
| IN DC mode:
The cooler is not working (plug is inserted). | No voltage is flowing from the DC power socket in your vehicle. | The ignition must be switched on in most vehicles to supply current to the DC power socket. |
| The DC socket is dirty.
This results in a poor electrical contact. | If the plug of your cooler becomes very warm in the DC socket, either the socket must be cleaned or the plug has not been assembled correctly. |
| The fuse of the DC plug has blown. | Replace the fuse of the DC plug (fig. 6 1, page 7) with one of the same rating. |
| The vehicle fuse has blown. | Replace the vehicle fuse in the DC socket (usually 15 A) (Please refer to the operating manual of your vehicle). |
| In AC mode:
The cooler is not working (plug is inserted). | No voltage present in the AC socket. | Try using another plug socket. |
| In gas mode:
The cooler is not working (to cooler is connected to the gas). | The cooler is not properly connected to the gas. | Check if the gas supply is in full working order.
Check if the valve on the gas bottle is open.
Check if there is still gas in the bottle.
Check if several energy sources are connected at the same time.
Hold down the temperature controller longer to ignite the flame. |
| The cooler does not start up after a long period of inactivity. | - Disconnect the device from the power supply, turn it upside down and wait for five minutes.
Turn the cooler the right way up again and switch it on again. |
10 Disposal
Place the packaging material in the appropriate recycling waste bins wherever possible.
If you wish to finally dispose of the product, ask your local recycling centre or specialist dealer for details about how to do this in accordance with the applicable disposal regulations.
11 Technical data
| ACX35 ACX40 ACX40G | |
| Nominal heat input
Butane: 144 W | |
| Minimum heat input
Butane: 123 W- | | |
| Voltage: 12 V= | 220 - 240 V~, 50/60 Hz |
| Power consumption: | 75 W | 85 W |
| Cooling capacity: | max. 30 °C below ambient temperature |
| Gross capacity: | 33 I | 41 I |
| Capacity: | 31 I | 40 I |
| Power consumption: | 1.4 kWh/24 h | 1.6 kWh/24 h |
| Climate class: | N |
| Ambient temperature: | 16 to 32 °C |
| Noise emission: | >0 dB |
| Refrigerant | 159 g H2O + 86 g NH3 |
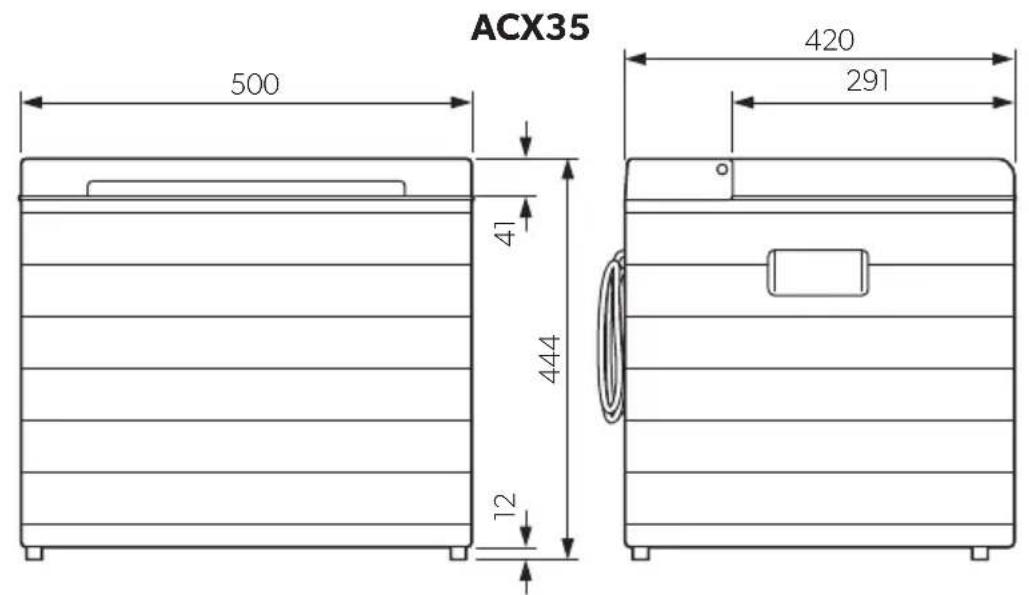
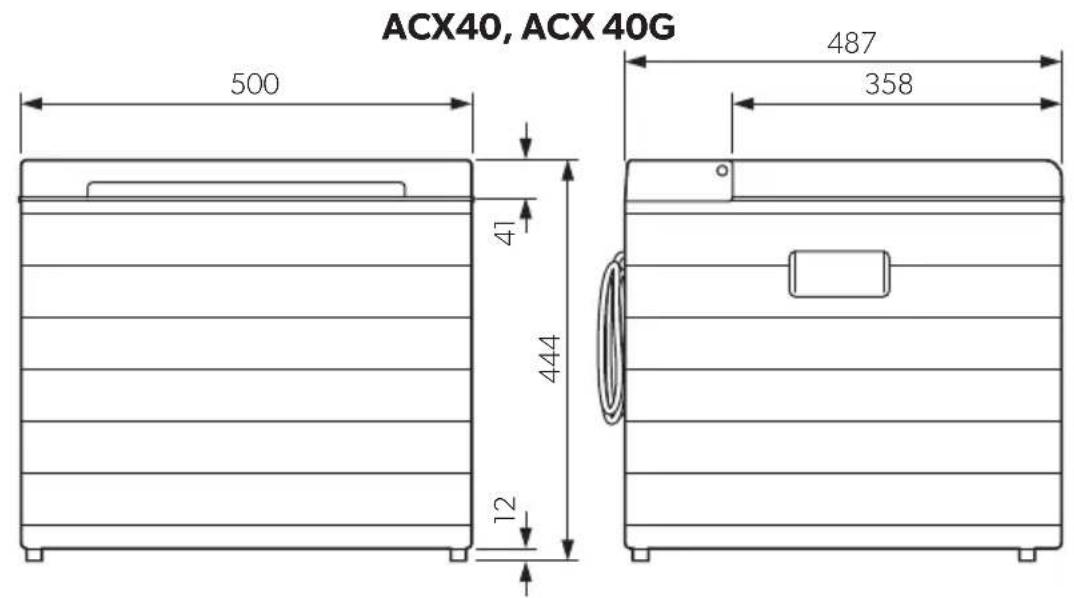
| Dimensions
(W x H x D) in mm: | see fig. 7, page 8 |
| Weight: | Approx. 15 kg | Approx. 14 kg | Approx. 15 kg |
| Inspection/certification: | CE E7 |
| ACX35 ACX40 | 28-30 mbar,30 mbar,37 mbar | 50 mbar |
| 28-30 mbar,30 mbar,37 mbar | 50 mbar |
| Ref. no.: 9105204280 | 910520428191052042829105204290 | 9105204279 | 9105204285910520428791052042869105204288 | 9105204284 |
| Gas consumption: 10.5 g/h 9.9 g/h 10.5 g/h 9.9 g/h |
| ACX40G |
| Ref. no.: 9105204291 | 9105204289 |
| Gas consumption: 10.5 g/h |
Risque de surchauffe!
5 Description technique
Fare for overphedning!
Fare for overopbehing!
6.1 Tips for energisparing
Dometic Australia Pty. Ltd.
1 John Duncan Court
Varsity Lakes QLD 4227
1800212121
+61755076001
Mail: sales@dometic.com.au
AUSTRIA
Dometic Austria GmbH
Neudorferstraße 108
A-2353 Guntramsdorf
+432236908070
+43223690807060
Mail: info@dometic.at
BENELUX
Domatic Branch Office Belgium
Zincstraal 3
B-1500 Halle
+3223598040
+3223598050
Mail: info@dometic.be
BRAZIL
Dometic DO Brasil LTDA
Avenida Paulista 1754, conj. 111
SP 01310-920 Sao Paulo
+551132513352
+551132513362
Dometic Group Asia Pacific
Suites 2207-11 - 22/F - Tower 1
The Gateway 25 Canton Road
Tsim Sha Tsui·Kowloon
+85224611386
+85224665553
Mail: info@waeco.com.hk
HUNGARY
Dometic Zrt. Sales Office
Kerekgyarto u.5.
H-1147 Budapest
+3614684400
+3614684401
Domatic Italy S.r.l.
Via Virgilio, 3
F47122 Fori (FC)
+390543754901
390543754983
Mail: vendite@dometic.it
IAPAN
Domatic KK
Maekawa-Shibaura,Bldg.2
2-13-9 Shibaura Minato-ku
Tokyo 108-0023
+81354453333
+81354453339
Mail: info@domestic.jp
MEXICO
Domatic Mx, S. de R. L. de C. V.
Circuito Médicos No. 6 Local 1
Colonia Ciudad Satélite
CP 53100 Naucalpan de Juarez
Estado de Mexico
+52553744108
+525553934683
Mail: info@dometic.com.mx
NETHERLANDS
Dometic Benelux B.V.
Ecustreaat 3
NL-4879 NP Etten-Leur
+31765029000
+31765029019
Mail: info@dometic.nl
NEW ZEALAND
Dometic New Zealand Ltd.
PO Box 12011
Penrose
Auckland 1642
+6496221490
+6496221573
Mail: customerservices@dometic.co.nz
NORWAY
Dometic Norway AS
Osteroyveien 46
N-3232 Sandefjord
+4733428450
+4733428459
Mail: firmapost@dometic.no
POLAND
Dometic Poland Sp. z o.o.
Ul. Puławska 435A
PL02-801 Warszawa
+48224143200
+48224143201
Mail: info@dometic.pl
PORTUGAL
Dometic Spain, S.L.
Komsomolskaya square 6-1
RU-107140 Moscow
+74957807939
+74959165653
Mail: info@dometic.ru
SINGAPORE
Dometic Pte Ltd
18 Boon Lay Way 06-140 Trade Hub 21
Singapore 609966
+6567953177
+6568626620
Mail: dometic@dometic.com.sg
SLOVAKIA
Domatic Slovakia s.r.o. Sales Office Bratislava
Nádražná 34/4
900 28 Ivanka pri Dunaji
/+421245529680
Mail: bratislava@dometic.com
SOUTH AFRICA
Domicic (Pty) Ltd.
Regional Office
South Africa & Sub-Saharan Africa
2 Avalon Road
West Lake View Ext 11
Modderfontein 1645
Johannesburg
+27114504978
+27114504976
Mail: info@dometic.co.za
SPAIN
Domatic Spain S.L.
Avda. Sierra del Guadarrama, 16
E-28691 Villanueva de la Canada
Madrid
+34918336089
+34900100245
Mail: info@dometic.es
SWEDEN
Dometic Scandinavia AB
Gustaf Melins gata 7
S-42131 Västra Frolunda
+46317341100
+46317341101
Mail: info@dometicgroup.se
SWITZERLAND
Dometic Switzerland AG
Riedackerstrasse 7a
CH-8153 Rumiang
+41448187171
+41448187191
Mail: info@dometic.ch
UNITED ARAB EMIR
Dometic Middle East FZCO
P.O.Box17860
S-D 6, Jebel Ali Freezone
Dubai
+97148833858
+97148833868
Mail: info@dometic.ac
UNITED KINGDOM
Dometic UK Ltd.
Dometic House, The Brewery
Blandford St. Mary
DorsetDT19LS
+443446260133
+443446260143
Mail: customerservices@dometic.co.uk
USA
Dometic RV Division
1120 North Main Street
Elkhart, IN 46515
+1574-264-2131