
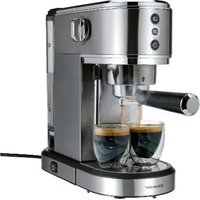
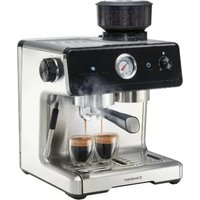
SKML 1000 A1 - Coffee machine SILVERCREST - Free user manual and instructions
Find the device manual for free SKML 1000 A1 SILVERCREST in PDF.
| Product type | Coffee machine with built-in grinder |
| Brand | SilverCrest |
| Model | SKML 1000 A1 |
| Mains voltage | 220-240 V ~ / 50 Hz |
| Rated power | 1000 W |
| Water tank capacity | Up to 10 cups (MAX mark) |
| Bean hopper capacity | Approx. 250 g (MAX mark) |
| Grind fineness | Adjustable via rotary knob (coarse to fine) |
| Grinding function | Yes, with option to use pre-ground coffee |
| Keep warm | Yes, via hot plate |
| Automatic shut-off | After 35 minutes (standby mode) |
| Light strip | Indicates operation |
| Paper filter required | Yes, size 1x4 |
| Carafe included | Yes, glass |
| Measuring spoon included | Yes |
| Cleaning of removable parts | Dishwasher safe (filter holder, gasket, spoon) |
| Descaling recommended | Every 30 to 60 uses depending on water hardness |
| Warranty | 3 years |
| Country of origin | Germany (Kompernass Handels GmbH) |
| Customer service France | 0800 919270 |
| Customer service Belgium | Contact the French service |
Frequently Asked Questions - SKML 1000 A1 SILVERCREST
User questions about SKML 1000 A1 SILVERCREST
0 question about this device. Answer the ones you know or ask your own.
Ask a new question about this device
Download the instructions for your Coffee machine in PDF format for free! Find your manual SKML 1000 A1 - SILVERCREST and take your electronic device back in hand. On this page are published all the documents necessary for the use of your device. SKML 1000 A1 by SILVERCREST.
USER MANUAL SKML 1000 A1 SILVERCREST
natural_image
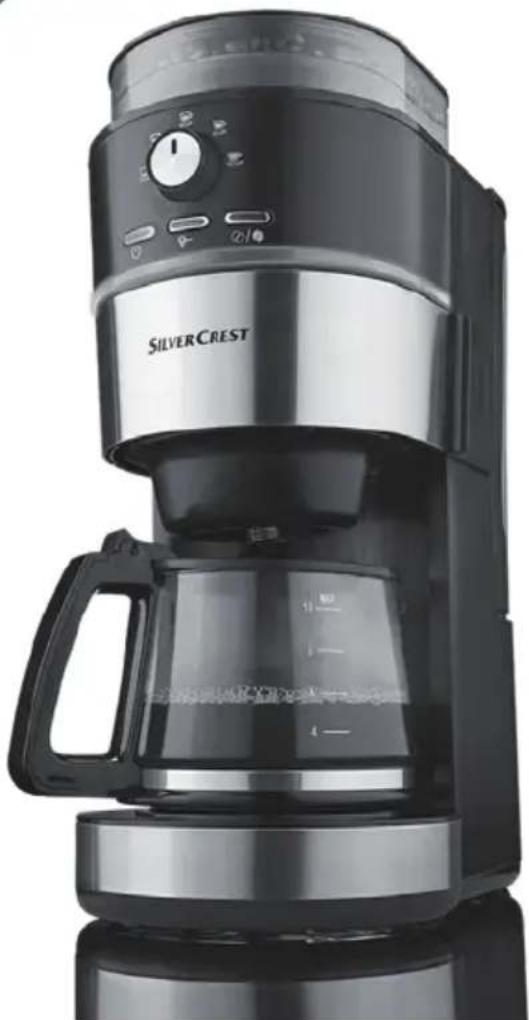
Exterior view of a Silver Crest coffee maker with clear glass and control knobs (no visible text or symbols on the device itself)KAFFEEMASCHINE
COFFEE MACHINE
CAFETIÈRE ÉLECTRIQUE SKML 1000 A1
DE AT CH
KAFFEEMASCHINE
Bedienungsanleitung
FR BE
Operating instructions
NL BE
KOFFIEZETAPPARAAT
Gebruiksaanwijzing
ES
CAFETERA
Before reading, unfold the page containing the illustrations and familiarise yourself with all functions of the device.
FR BE
GB/IE Operating instructions Page 19
Inhaltsverzeichnis
Einführung 2
Urheberrecht....2
natural_image
Simple diagram showing concentric circles with curved arrows indicating rotation or movement, no text or symbols present.Abb. 1
KOMPERNASS HANDELS GMBH
BURGSTRASSE 21
DE-44867 BOCHUM
DEUTSCHLAND
www.kompernass.com
Contents
Introduction 20
Copyright 20
Limitation of liability 20
Proper use. 20
Package contents / transport inspection 21
Disposal of the packaging 21
Safety information 22
Appliance elements 24
Set-up and connection 25
Before first use 25
Brewing coffee with the grinding function 26
Adding beans 26
Filling the appliance with water 27
Starting the brewing process 28
Brewing coffee with ground coffee 29
Adding ground coffee 29
Filling the appliance with water 29
Starting the brewing process 30
Cleaning and care 31
Cleaning 31
Descaling the appliance 32
Storage 32
Troubleshooting 33
Disposal 33
Technical data 33
Kompernass Handels GmbH warranty 34
Service 35
Importer 35
Introduction
Congratulations on the purchase of your new appliance.
You have selected a high-quality product. The operating instructions are part of this product. They contain important information about safety, usage and disposal. Before using the product, please familiarise yourself with all operating and safety instructions. Use the product only as described and for the range of applications specified. Please also pass these operating instructions on to any future owner.
Copyright
This documentation is protected by copyright.
Any copying or reproduction, including in the form of extracts, or any reproduction of images (even in a modified state), is permitted only with the written authorisation of the manufacturer.
Limitation of liability
All technical information, data and information for installation and operation contained in these operating instructions corresponds to the latest version(s) at the time of printing and, to the best of our knowledge, takes into account our previous experience and expertise.
No claims can be derived from the details, illustrations and descriptions in these instructions.
The manufacturer assumes no responsibility for damage caused by failure to observe these instructions, improper use, incompetent repairs, unauthorised modifications or for the use of non-approved replacement parts.
Proper use
This appliance is intended exclusively for preparing coffee in domestic households. It is exclusively intended for use in private households. Do not use it for commercial applications.
The appliance is not intended for any other purpose, nor for use beyond the scope described.
WARNING
Danger if not used as intended!
Failure to use the appliance for its intended purpose and/or any other type of use can be hazardous.
▶ Use the appliance only for its intended purpose.
▶ Observe the procedures described in these operating instructions.
No claims of any kind will be accepted for damage arising as a result of incorrect use.
The risk shall be borne solely by the user.
Package contents / transport inspection
WARNING
Risk of suffocation!
▶ Do not allow children to play with packaging materials. There is a risk of suffocation.
The appliance is supplied with the following components as standard:
- Coffee Machine
- Coffeepot
- Filter basket with attachment
- Measuring spoon
- Operating instructions
NOTE
▶ Check the package for completeness and signs of visible damage.
▶ If the contents are incomplete or damaged due to defective packaging or through transportation, contact the Service Hotline.
Disposal of the packaging
The packaging protects the appliance from damage during transport. The packaging materials have been selected for aspects of environmental friendliness and disposal, and they are therefore recyclable.

Returning the packaging to the material cycle conserves raw materials and reduces the amount of waste that is generated. Dispose of packaging materials that are no longer needed in accordance with applicable local regulations.
NOTE
If possible, keep the original packaging during the warranty period so that the appliance can be properly packed for returning in the event of a warranty claim.
Safety information
To ensure safe operation of the appliance, follow the safety guidelines set out below:
⚠ WARNING – RISK OF INJURY!
■ Before use, check the appliance for visible external damage. Do not use an appliance which has been damaged or dropped.
■ This appliance may be used by persons with limited physical, sensory or mental capabilities or lack of experience and knowledge, provided that they are under supervision or have been told how to use the appliance safely and are aware of the potential risks.
■ This appliance may not be used by children. The appliance and its connecting cables must be kept away from children.
■ Cleaning and user maintenance tasks may not be carried out by children.
■ Do not allow children to use the appliance as a toy.
■ All repairs must be carried out by authorised specialist companies or by the Customer Service department. Improper repairs can pose significant risks to the user. It will also invalidate any warranty claims.
Never submerse the appliance in water or other liquids! Risk of electric shock!
■ Never touch the appliance with wet or moist hands.
■ Arrange for defective power plugs and/or cables to be replaced as soon as possible by a qualified technician or by our Customer Service Department to avoid the risk of injury.
■ Risk of burns! Some parts can become very hot during use!
■ Risk of injury if appliance is misused.
⚠ WARNING - RISK OF INJURY!
■ Never use the appliance for purposes other than those described in these instructions.
■ Use the appliance only for the intended purpose. Risk of injury if appliance is used incorrectly.
■ After use, the surfaces of the heating elements will still have some residual heat.
■ Hot steam is produced while using the appliance. Ensure that you do not scald yourself! Keep a safe distance away from the steam.
■ The appliance should only be connected to correctly installed and earthed mains power sockets.
■ The appliance must always be disconnected from the mains when left unsupervised and before assembly, disassembly or cleaning.
■ Before changing any accessories or additional parts that move during operation, the appliance must be switched off and disconnected from mains power.
■ Treat the appliance grinder with great care. Do not attempt to push your fingers or any other objects into the grinder. If you have any problems, contact Customer Service.
■ Be careful when handling the sharp cutting blades of the grinder as well as when emptying the coffee bean container and during cleaning.
CAUTION - PROPERTY DAMAGE
■ Defective components must always be replaced with genuine replacement parts. Compliance with safety requirements can only be guaranteed if original replacement parts are used.
■ Protect the appliance from penetration by moisture and liquids.
■ Protect the appliance against knocks, dust, chemicals, extremes of temperature, etc. and keep it away from sources of heat (ovens, radiators).
■ Always remove the mains adapter from the mains outlet; never pull on the power cable.
■ Do not use an external timer switch or a separate remote control system to operate the appliance.
■ Never operate the appliance outdoors. This appliance is intended for indoor use only.
Appliance elements
① Dial for setting the grinding fineness
② Coffee bean container lid
③ Steam outlet
4 Coffee bean container
⑤ Water tank lid
6 Water tank
⑦ Fill level indicator
8 @ / button
9 button
10 button
⑪ Cable storage compartment
12 Hotplate
13 Measuring spoon
14 Coffee pot
15 Filter basket holder
16 Light element
17 Dial
18 Filter basket
19 Filter basket lid
Set-up and connection

DANGER
Electric shock!
▶ Do not set up the appliance near water contained in a sink or other containers. Always place the appliance on a dry surface. Proximity to water is hazardous, even if the appliance is switched off. Always disconnect the plug from the mains power socket after use.
CAUTION
Property damage!
- Never place the appliance near sources of heat. - Always place the appliance on a level, heat-resistant surface in order to prevent damage to the appliance and surface.
1) Place the appliance on a level and heat-resistant surface.
2) Place the coffee pot 14 in the appliance.
3) Insert the plug into the mains power socket. You will hear a beep, the Ⓞ/¶ 8, 🔊-9 buttons and the light element 16 light up blue briefly, the ⏻ button 10 lights up continuously blue.
Before first use
CAUTION - PROPERTY DAMAGE!
▶ Never fill the water tank ⑥ to more than the total amount required for 10 cups (MAX marking). When carrying out a run through with water only, e.g. before first use or for cleaning, do not exceed the marking for 8 cups on the fill level indicator ⑦!
▶ Never fill the water tank ⑥ with less than 2 cups of water. Use the fill level indicator ⑦ on the water tank ⑥ for reference.
1) Rinse out the coffee pot ⑭ carefully with water and place it in the appliance.
2) Open the filter basket holder 15 by pulling the handle on the right side of the appliance forwards. Remove the filter basket lid 19 and the filter basket 18 from the appliance.
3) Rinse the filter basket ⑱ and the filter basket lid ⑲ in clean water. Replace both in the appliance again and close the filter basket holder ⑳ by pushing it backwards until it clicks into place.
4) Remove the water tank ⑥. The best way to do this is to first open the lid on the water tank ⑤ and pull the water tank ⑥ upwards. Rinse it out with clear water.
5) Fill the water tank ⑥ with enough water for 8 cups and replace it in the appliance.
6) Insert the plug into a mains power socket.
7) Press the button ⑨ to switch off the grinder. The button lights up. Press the button ⑩.
8) The light element 16 lights up; the ⏻ button 10 flashes. Wait until the brewing process finishes, you will hear a beep and the ⏻ button 10 stops flashing. Press the ⏻ button 10 again to stop the keep warm process.
9) Empty the coffee pot 14 and rinse it with clean water again.
10) Wait until the appliance has cooled down, then rinse the filter basket ⑱ with clean water again.
The appliance is now ready for use. The ⏻ button ⑩ lights up permanently.
Brewing coffee with the grinding function Adding beans
1) Open the lid of the coffee bean container ② and add coffee beans. Do not exceed the MAX marking on the coffee bean container ②.
2) Close the lid of the coffee bean container ② again.
3) Set the grinding fineness setting for the coffee beans: Turn the dial for setting the grinding fineness ① anticlockwise for a coarse result, clockwise for a fine grinding result (fig. 1). The finer the grinding result, the stronger the coffee.
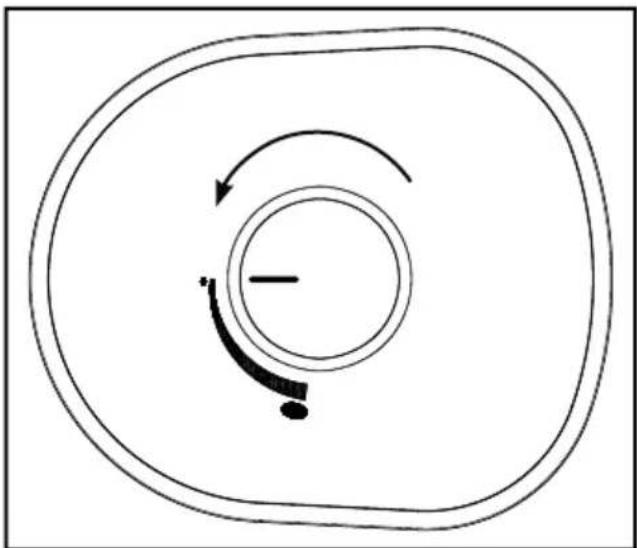
natural_image
Simple diagram showing concentric circles with curved arrows indicating rotation or movement, no text or symbols present.Fig. 1
4) Open the filter basket holder 15 and take the filter basket lid 19 off the filter basket 18.
5) Take a paper coffee filter (size 1 x 4) and fold its sides over. Insert the paper filter into the filter basket ⑱.
6) Replace the filter basket lid ⑲ back on the filter basket ⑱ and close the filter basket holder ⑮.
Filling the appliance with water
WARNING
Health hazard!
▶ Use only drinking water for your coffee!
1) Open the lid of the water tank ⑤ and fill the water tank ⑥ with water. To do so, use the coffee pot ⑭ or remove the water tank ⑥ as described in the section "Before first use" and fill it directly. Select a quantity of water corresponding to the required amount of filter coffee. Use the fill level indicator ⑦ on the water tank ⑥ for reference. Close the lid of the water tank ⑤ again.
2) Place the coffee pot 14 back in the appliance.
CAUTION
Property damage!
▶ Never fill the water tank ⑥ to more than the total amount required for 10 cups (MAX marking). When carrying out a run through with water only, e.g. before first use or for cleaning, do not exceed the marking for 8 cups on the fill level indicator ⑦!
▶ Never fill the water tank ⑥ with less than 2 cups of water. Use the fill level indicator ⑦ on the water tank ⑥ for reference.
NOTE
▶ During the brewing process, the amount of water decreases: some evaporates and the coffee grounds also retain some water. This is why the volume of coffee in the coffee pot 14 is always slightly less than the amount of water you filled into the water tank 6.
Starting the brewing process
WARNING
Risk of scalding!
Hot steam escapes from the steam outlet ③ in the water tank ⑥! There is a risk of scalding!
▶ Never open the filter basket holder 15 during the brewing process! Bursts of hot steam may be released or hot water may spray out. There is a risk of scalding!
WARNING
Risk of burns!
▶ After the brewing process, the hotplate 12 under the coffee pot 14 starts the keep warm process and heats up significantly. There is a risk of burns!
1) Use the dial ⑰ to select the required number of cups. Ensure that the corresponding amount of water is in the water tank ⑥.
NOTE
▶ Pressing the 📞/💡 button ⑧ will cause more coffee to be ground and the coffee will be stronger. When the ⚫/💡 button ⑧ is activated it lights up.
2) Press the button 10. The appliance starts the grinding and brewing process, the light element lights up, the button 10 starts to flash.
3) When the coffee has finished running through, you will hear a beep. The ⏻ button Ⓑ stops flashing.
NOTE
▶ You can stop the brewing process at any time by pressing the button 10.
4) The hotplate 12 under the coffee pot 14 keeps the coffee warm until you press the ⏻ button 10 again.
NOTE
The appliance switches itself into standby mode automatically after 35 minutes. Press the ⏻ button 10 to reactivate the appliance.
Brewing coffee with ground coffee
Adding ground coffee
1) Open the filter basket holder ⑮ and take the filter basket lid ⑲ off the filter basket ⑱.
2) Take a paper coffee filter (size 1 x 4) and fold its sides over. Insert the paper filter into the filter basket ⑱.
3) Fill the measuring spoon ⑬ with ground coffee.
4) Close the filter basket holder ⑮.
NOTE
- Add around one level measuring spoon Ⓔ of ground coffee for each cup of filter coffee. If the filter coffee is too strong, reduce the amount of ground coffee per cup.
The lid 19 is not required for the brewing process using ground coffee.
Filling the appliance with water
WARNING
Health hazard!
▶ Use only drinking water for your coffee!
1) Open the lid of the water tank ⑤ and fill the water tank ⑥ with water. To do so, use the coffee pot ⑭ or remove the water tank ⑥ as described in the section "Before first use" and fill it directly. Select a quantity of water corresponding to the required amount of filter coffee. Use the fill level indicator ⑦ on the water tank ⑥ for reference. Close the lid of the water tank ⑤ again.
2) Place the coffee pot 14 back in the appliance.
CAUTION
Property damage!
▶ Never fill the water tank ⑥ to more than the total amount required for 10 cups (MAX marking). When carrying out a run through with water only, e.g. before first use or for cleaning, do not exceed the marking for 8 cups on the fill level indicator ⑦!
▶ Never fill the water tank ⑥ with less than 2 cups of water.
NOTE
▶ During the brewing process, the amount of water decreases: some evaporates and the coffee grounds also retain some water. This is why the volume of coffee in the coffee pot 14 is always slightly less than the amount of water you filled into the water tank 6.
Starting the brewing process
WARNING
Risk of scalding!
Hot steam escapes from the steam outlet ③ in the water tank ⑥! There is a risk of scalding!
▶ Never open the filter basket holder 15 during the brewing process! Bursts of hot steam may be released or hot water may spray out. There is a risk of scalding!
WARNING
Risk of burns!
After the brewing process, the hotplate 12 under the coffee pot 14 starts the keep warm process and heats up significantly. There is a risk of burns!
1) Press the button ⑨ to switch off the grinder. The button ⑨ lights up.
2) Press the button 10. The appliance starts the brewing process, the light element lights up, the button 10 starts to flash.
3) When the coffee has finished running through, you will hear a beep. The ⏻ button Ⓑ stops flashing.
NOTE
▶ You can stop the brewing process at any time by pressing the button 10.
4) The hotplate 12 under the coffee pot 14 keeps the coffee warm until you press the ⏻ button 10 again.
NOTE
The appliance switches itself into standby mode automatically after 35 minutes. Press the ⏻ button 10 to reactivate the appliance.
Cleaning and care
Cleaning

DANGER
Electric shock!

Never immerse the appliance in water or other liquids. Risk of electric shock!

WARNING
Risk of injury!
▶ Always remove the plug from the mains power socket before you clean the appliance. Danger of electric shock!
▶ Always allow the appliance to cool down before cleaning it. Risk of burns!
CAUTION
Property damage!
▶ Never use abrasive, aggressive or chemical cleaning agents to clean the appliance. These could damage the outer surfaces of the appliance.
1) Remove the plug from the power socket and allow the appliance to cool down completely.
2) Open the filter basket holder 15 and remove the filter basket 18. Dispose of the paper filter if necessary.
3) Rinse the filter basket ⑱ and the filter basket lid ⑲, the coffee pot ⑳ and the measuring spoon ⑰ in mild washing-up water. Rinse all parts thoroughly afterwards with plenty of clean water.
NOTE
The filter basket 18, the filter basket lid 19 and the measuring spoon 13 can be cleaned in the dishwasher. Make sure that the parts do not get jammed in the dishwasher.
4) Wipe off the swing-out filter basket holder ⑮ with a damp cloth.
5) Wipe the appliance with a damp cloth. If required, use a mild washing-up liquid on the cloth. Ensure that there are no detergent residues on the appliance, and that the appliance is completely dry before using it again.
Descaling the appliance
Descale the appliance at regular intervals.
NOTE
▶ Depending on the hardness of your water, the necessary descaling intervals may vary considerably. If your water is very hard, descaling is generally necessary after approximately 30 uses, while less hard water only requires you to descale your appliance after approximately 60 uses. Your local water supplier can tell you about the hardness of your water.
Use only descaling agents that are specifically suitable for coffee machines and follow their usage instructions closely.
Proceed as follows to descale:
1) Add the descaling agent to the water tank ⑥.
2) Add the amount of water as specified in the usage instructions for the descaling agent, but do not exceed the MAX mark (8 cups) on the fill level indicator ⑦!
3) Press the button to switch off the grinder. The button lights up.
4) Press the button to start the brewing process. The light element lights up; the button flashes.
5) Wait until enough water for approximately 2 cups has run through the machine, then stop the brewing process by pressing the ⏻ button Ⓤ again.
6) Allow the descaling agent to take effect for 15 minutes.
7) Repeat steps 3 to 5 twice.
8) Then start the brewing process and wait until the water has run through completely.
9) Allow the coffee machine to brew three times with the maximum amount of clean water. After three brewing cycles, all residues of the descaling agents are removed and you can use your coffee machine again.
Storage
If you do not intend to use the appliance for long periods, ensure that no coffee grounds remain in the appliance.
■ Clean the appliance again as described in "Cleaning and care".
Place the mains cable into the cable storage compartment ⑪.
■ Store the dry appliance in a clean and dust-free location.
Troubleshooting
This section contains important information on fault identification and rectification. The following table will help you to identify and rectify minor malfunctions.
| Fault Possible cause Remedy | ||
| The plug is not connected. | Connect the mains adapter correctly to the appliance. | |
| The appliance will not switch on. | The socket is not supplying any power. | Check the house mains fuse. |
| The appliance is damaged. | Contact the Customer Service department. | |
NOTE
If you are unable to resolve the problem by applying any of the methods mentioned above, please contact the Customer Service department.
Disposal
Never dispose of the appliance in your normal domestic waste. This product is subject to the provisions of European Directive 2012/19/EU-WEEE (Waste Electrical and Electronic Equipment).
Dispose of the appliance via an approved disposal company or your municipal waste facility. Please observe the currently applicable regulations. Please contact your waste disposal facility if you are in any doubt.
Technical data
| Power supply 220 - 240 V ~ / 50 Hz | |
| Rated power 1000 W | |
 | All of the parts of this appliance that come into contact with food are food-safe. |
This appliance has a 3-year warranty valid from the date of purchase. If this product has any faults, you, the buyer, have certain statutory rights. Your statutory rights are not restricted in any way by the warranty described below.
Warranty conditions
The validity period of the warranty starts from the date of purchase. Please keep your original receipt in a safe place. This document will be required as proof of purchase.
If any material or production fault occurs within three years of the date of purchase of the product, we will either repair or replace the product for you at our discretion. This warranty service is dependent on you presenting the defective appliance and the proof of purchase (receipt) and a short written description of the fault and its time of occurrence.
If the defect is covered by the warranty, your product will either be repaired or replaced by us. The repair or replacement of a product does not signify the beginning of a new warranty period.
Warranty period and statutory claims for defects
The warranty period is not prolonged by repairs effected under the warranty. This also applies to replaced and repaired components. Any damage and defects present at the time of purchase must be reported immediately after unpacking. Repairs carried out after expiry of the warranty period shall be subject to a fee.
Scope of the warranty
This appliance has been manufactured in accordance with strict quality guidelines and inspected meticulously prior to delivery.
The warranty covers material faults or production faults. The warranty does not extend to product parts subject to normal wear and tear or fragile parts such as switches, batteries, baking moulds or parts made of glass.
The warranty does not apply if the product has been damaged, improperly used or improperly maintained. The directions in the operating instructions for the product regarding proper use of the product are to be strictly followed. Uses and actions that are discouraged in the operating instructions or which are warned against must be avoided.
This product is intended solely for private use and not for commercial purposes. The warranty shall be deemed void in cases of misuse or improper handling, use of force and modifications / repairs which have not been carried out by one of our authorised Service centres.
Warranty claim procedure
To ensure quick processing of your case, please observe the following instructions:
■ Please have the till receipt and the item number (e.g. IAN 12345) available as proof of purchase.
■ You will find the item number on the type plate, an engraving on the front page of the instructions (bottom left), or as a sticker on the rear or bottom of the appliance.
If functional or other defects occur, please contact the service department listed either by telephone or by e-mail.
■ You can return a defective product to us free of charge to the service address that will be provided to you. Ensure that you enclose the proof of purchase (till receipt) and information about what the defect is and when it occurred.
You can download these instructions along with many other manuals, product videos and software on www.lidl-service.com.
Service
GB Service Great Britain
Tel.: 0871 5000 720 (£ 0.10/Min.)
E-Mail: kompernass@lidl.co.uk
IE Service Ireland
Tel.: 1890 930 034
(0,08 EUR/Min., (peak))
(0,06 EUR/Min., (off peak))
E-Mail: kompernass@lidl.ie
IAN 290939
Importer
Please note that the following address is not the service address.
Please use the service address provided in the operating instructions.
KOMPERNASS HANDELS GMBH
BURGSTRASSE 21
DE-44867 BOCHUM
GERMANY
www.kompernass.com
Table des matières
Introduction 38
Droits d'auteur 38
12 Plaque chauffante
13 Cuillère doseuse
14 Verseuse
Installation et raccordement

DANGER
natural_image
Simple diagram showing concentric circles with curved arrows indicating rotation or movement, no text or symbols present.Fig. 1
KOMPERNASS HANDELS GMBH
BURGSTRASSE 21
DE-44867 BOCHUM
ALLEMAGNE
www.kompernass.com
Inhoud
Inleiding 56
Auteursrecht 56
⚠WAARSCHUWING - LETSELGEVAAR!
⚠WAARSCHUWING - LETSELGEVAAR!
natural_image
Simple diagram showing concentric circles with curved arrows indicating rotation or movement, no text or symbols present.Afb. 1
KOMPERNASS HANDELS GMBH
BURGSTRASSE 21
DE-44867 BOCHUM
DUITSLAND
www.kompernass.com
Obsah
Úvod 74
Autorské právo 74
POZOR - HMOTNÉ ŠKODY!
natural_image
Simple diagram showing concentric circles with curved arrows indicating rotation or direction, no text or symbols present.Obr. 1
KOMPERNASS HANDELS GMBH
BURGSTRASSE 21
DE-44867 BOCHUM
NĚMECKO
www.kompernass.com
Índice
natural_image
Simple diagram showing a circular path with arrows indicating clockwise motion, no text or symbols present.Fig. 1
KOMPERNASS HANDELS GMBH
BURGSTRASSE 21
DE-44867 BOCHUM
ALEMANIA
www.kompernass.com
Índice
Introdução....110
natural_image
Simple diagram showing concentric circles with curved arrows indicating rotation or movement, no text or symbols present.Fig. 1
KOMPERNASS HANDELS GMBH
BURGSTRASSE 21
DE-44867 BOCHUM
ALEMANHA
www.kompernass.com
KOMPERNASS HANDELS GMBH
BURGSTRASSE 21
DE-44867 BOCHUM
GERMANY
www.kompernass.com
Stand der Informationen · Last Information Update · Version des informations
Stand van de informatie · Stav informací · Estado de las informaciones · Estado das informações:
09 / 2017 · Ident.-No.: SKML1000A1-082017-3


- KAFFEEMASCHINE
- COFFEE MACHINE
- CAFETIÈRE ÉLECTRIQUE SKML 1000 A1
- KOFFIEZETAPPARAAT
- CAFETERA
- FR BE
- Inhaltsverzeichnis
- Einführung 2
- Contents
- Introduction 20
- Safety information 22
- Appliance elements 24
- Set-up and connection 25
- Before first use 25
- Brewing coffee with the grinding function 26
- Brewing coffee with ground coffee 29
- Cleaning and care 31
- Storage 32
- Troubleshooting 33
- Disposal 33
- Technical data 33
- Kompernass Handels GmbH warranty 34
- Introduction
- Copyright
- Limitation of liability
- Proper use
- WARNING
- Danger if not used as intended!
- Package contents / transport inspection
- Risk of suffocation!
- NOTE
- Disposal of the packaging
- Safety information
- ⚠ WARNING – RISK OF INJURY!
- ⚠ WARNING - RISK OF INJURY!
- CAUTION - PROPERTY DAMAGE
- Appliance elements
- Set-up and connection
- DANGER
- Electric shock!
- CAUTION
- Property damage!
- Before first use
- CAUTION - PROPERTY DAMAGE!
- Brewing coffee with the grinding function Adding beans
- Filling the appliance with water
- Health hazard!
- Starting the brewing process
- Risk of scalding!
- Risk of burns!
- Brewing coffee with ground coffee
- Adding ground coffee
- Cleaning and care
- Cleaning
- Risk of injury!
- Descaling the appliance
- Storage
- Troubleshooting
- Disposal
- Technical data
- Warranty conditions
- Warranty period and statutory claims for defects
- Scope of the warranty
- Warranty claim procedure
- Service
- Importer
- Table des matières
- Introduction 38
- Installation et raccordement
- Inhoud
- Inleiding 56
- ⚠WAARSCHUWING - LETSELGEVAAR!
- Obsah
- Úvod 74
- POZOR - HMOTNÉ ŠKODY!
- Índice
- Introdução....110
Brand : SILVERCREST
Model : SKML 1000 A1
Category : Coffee machine