
SEMS 1350 A2 - Coffee machine SILVERCREST - Free user manual and instructions
Find the device manual for free SEMS 1350 A2 SILVERCREST in PDF.

| Product Type | Espresso Machine |
| Brand | SilverCrest |
| Model | SEMS 1350 A2 |
| Power | 1350 W |
| Pressure | 19 bars |
| Water Tank Capacity | 250 ml to 1000 ml |
| Mains Voltage | 220 – 240 V ~ 50 – 60 Hz |
| Protection Class | I |
| Automatic Shut-off | ≤ 30 minutes |
| Standby Power Consumption | ≤ 0.5 W |
| Coffee Types | Single and Double Espresso |
| Milk Frother Function | Yes (Steam Wand) |
| Hot Water Function | Yes |
| Included Filters | Single (1-cup) and Double (2-cup) Filters |
| Tamper | Included |
| Drip Tray | With Level Indicator (Float) |
| Cup Warming Plate | Yes |
| Automatic Descaling | Yes (Integrated Program) |
| Water Hardness Adjustment | Yes (3 levels: soft, medium, hard) |
| Espresso Temperature Adjustment | Yes (3 levels: low, medium, very hot) |
| Espresso Volume Adjustment | Yes (Memory, via Brew Time) |
| Automatic Rinse | Yes |
| Warranty | 3 years |
Frequently Asked Questions - SEMS 1350 A2 SILVERCREST
User questions about SEMS 1350 A2 SILVERCREST
0 question about this device. Answer the ones you know or ask your own.
Ask a new question about this device
Download the instructions for your Coffee machine in PDF format for free! Find your manual SEMS 1350 A2 - SILVERCREST and take your electronic device back in hand. On this page are published all the documents necessary for the use of your device. SEMS 1350 A2 by SILVERCREST.
USER MANUAL SEMS 1350 A2 SILVERCREST
natural_image
Exterior view of a modern stainless steel coffee maker with two glass cups (no visible text or labels)ESPRESSOMASCHINE SEMS 1350 A2 ESPRESSO MACHINE SEMS 1350 A2 MACHINE À EXPRESSO SEMS 1350 A2
GB IE NI Operating instructions ESPRESSO MACHINE
Inhalt
natural_image
3D diagram of a mechanical component with an arrow indicating rotation or assembly (no text or symbols)natural_image
Line drawing of a modern kitchen blender with control panel and buttons (no text or symbols)natural_image
Diagram of a mechanical device with an open lid and lever mechanism, showing motion arrows (no text or symbols)natural_image
Illustration of a coffee maker using a pour-over presser (no text or symbols visible)natural_image
Diagram of a funnel pouring granular material into a container (no text or symbols)natural_image
Diagram of a mechanical device with a lever and handle (no text or symbols)natural_image
Diagram of a mechanical device with a downward arrow indicating force or direction (no text or symbols present)HINWEISE:
natural_image
Illustration of a coffee maker using a lathe machine to press coffee beans (no text or symbols visible)natural_image
Illustration of a coffee maker using a pour-over machine, showing the cup and handle (no text or symbols)natural_image
3D diagram of a circular mechanical component with internal holes and a highlighted circular feature (no text or symbols)natural_image
3D diagram of a robotic vacuum cleaner with directional arrows indicating motion (no text or symbols)natural_image
Diagram showing a pipe inserted into a tank with a cylindrical component inserted, indicating fluid flow or movement (no text or symbols present)- Overview 31
- Intended purpose 32
- Safety information 32
- Items supplied 35
- Unpacking and setting up 35
- LED ring displays 36
- Preparing an espresso - the most important steps 37
- Preparation 37
8.1 Filling the water tank 37
8.2 Inserting/replacing the filter 38
8.3 Connecting and switching on/off 39
8.4 Rinsing the device 39
8.5 Preheating the cups 40
8.6 Preheating the filter and brewing head (flushing) 40
-
Measure and tamp the espresso powder 40
-
Preparing an espresso 41
10.1 Extracting a single espresso 41
10.2 Extracting a double espresso 42
- Tips for the perfect espresso 43
- Extracting hot water 43
- Frothing the milk 44
- Settings 45
14.1 Selecting the menu 45
14.2 Water hardness 46
14.3 Espresso temperature 46
14.4 Adjust espresso volume 47
14.5 Reset to factory settings 47
- Cleaning 48
- Descaling 50
- Storage and transport 51
- Disposal 51
- Trouble-shooting 52
- Technical specifications 53
- Warranty of the HOYER Handel GmbH 54
1. Overview
1 Filter for double espresso
2 Filter for single espresso
3 Hot plate for cups
4 OFF / / Dial for steam and hot water production
5 Lid (of the water tank)
6 Water tank (filling volume: MIN 250 ml - MAX 1,000 ml)
7 Power cable with mains plug
8 On/off switch
9 Tamper
10 Steam nozzle
11 Float (indicator: empty drip tray)
12 Drip tray
13 Drip grid
14 Brewing head
15 Control elements (front panel)
16 Notch in the edge of the portafilter
17 Portafilter
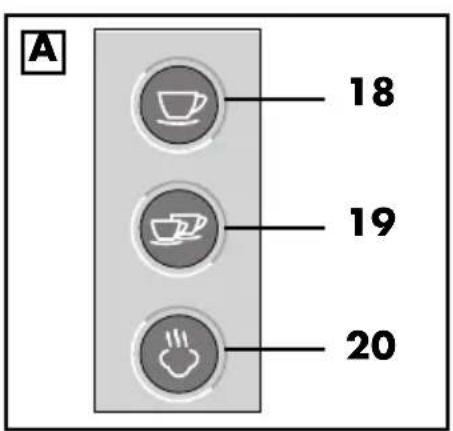
Figure A: control elements (front panel)\*
18 Button/LED ring for single espresso
19 Button/LED ring for double espresso
20 Button/LED ring for steam production
* The control elements have other functions that are explained in these user instructions.
Thank you for placing your trust in our products!
We congratulate you on your new slim espresso machine.
For safe handling of the device and in order to get to know the entire range of features:
- Read these user instructions thoroughly prior to initial use.
- Above all, observe the safety information!
- The device should only be used as described in this copy of the user instructions.
- Keep this copy of the user instructions for reference.
- If you pass the device on to someone else, please include this copy of the user instructions. The user instructions are a part of the product.
We hope you enjoy your new slim espresso machine!
Symbols on your device
This symbol warns you against touching the hot surface.

The food-safe material of devices with this symbol will not change the taste or smell of food.
2. Intended purpose
The slim espresso machine is intended exclusively for the following uses:
- for preparing espresso from ground espresso powder,
- for drawing hot water or steam from the steam nozzle.
The device is designed for private, domestic use. The device must only be used indoors. This device must not be used for commercial purposes.
Foreseeable misuse
WARNING! Risk of material damage!
- Never put liquids other than fresh, cold drinking water into the water tank!
3. Safety information
Warnings
If necessary, the following warnings are used in this copy of the user instructions:

DANGER! High risk: failure to observe this warning may result in injury to life and limb.
WARNING! Moderate risk: failure to observe this warning may result in injury or serious material damage.
CAUTION: low risk: ignoring this warning may result in minor injuries or damage to property.
NOTE: circumstances and specifics that must be observed when handling the device.
Instructions for safe operation
- This device can be used by children from the age of 8 and people with restricted physical, sensory or intellectual abilities or a lack of experience or knowledge if they are supervised or have been instructed in how to use this device safely and if they have understood the resulting dangers.
- Children must not play with the device.
- Cleaning and maintenance by the user must not be carried out by children unless they are 8 years or older and are supervised.
- Children under the age of 8 must be kept away from the device and the power cable.
- This device is equally intended for use in the home and in applications similar to the home, such as for example...
... in kitchens for staff in shops, offices and other commercial settings;
... on agricultural properties;
… by customers in hotels, motels and other residential facilities;
... in bed-and-breakfast establishments.
- Do not touch any hot parts of the device, such as the filter and portafilter, brewing head, steam nozzle and hot plate. Only touch the steam nozzle and portafilter by their handles.
- Be careful not to put your hands into the hot steam,...
... which emerges during the production of steam (e.g. during milk foaming). ... which escapes from the brewing head during the preparation of the espresso.
- This device is not intended to be operated using an external timer or a separate remote control system.
- The espresso machine, the power cable and the mains plug must not be immersed in water or other liquids.
- If the power cable of this device should become damaged, it must be replaced by the manufacturer, the manufacturer's customer service department or a similarly qualified specialist in order to avoid any hazards.
- Please take note of the chapter on cleaning (see "Cleaning" on page 48).
- Make sure that no liquid overflows onto the device plug connection.
- Please note that the surface of the heating element still has residual heat after use. The following surfaces may still be hot after use: filter and portafilter, brewing head, steam nozzle and hot plate.
- The device must not be placed in a cupboard when in use.
- Please observe the safety information in these instructions, as injuries are possible if the device is used incorrectly.

DANGER for children!
- Packing materials are not children's toys. Children should not be allowed to play with the plastic bags. There is a risk of suffocation.

DANGER to and from pets and livestock!
Electrical devices can represent a danger to pets and livestock. In addition, animals can also cause damage to the device. For this reason you should keep animals away from electrical devices at all times.

DANGER! Risk of electric shock due to moisture!
- Protect the device from moisture, water drops and water splashes: failure to observe this instruction may result in an electric shock hazard.
- Fill the water tank at most up to the MAX marking.
- Empty the drip tray at the latest when the float indicates that it is needed.
- If liquids get into the device, remove the mains plug immediately. Have the device checked before reusing.

DANGER! Risk of electric shock!
- Do not use the device if the device or the power cable has any visible damage, or if the device has previously been dropped.
- Only connect the mains plug to a properly installed and easily accessible wall socket with earthing contact whose voltage corresponds to the specifications on the rating plate. The wall socket must still be easily accessible after the device is plugged in.
- Ensure that the power cable cannot be damaged by sharp edges or hot spots.
- The device is not fully disconnected from the power supply, even after it is switched off. In order to fully disconnect it, pull out the mains plug.
- When using the device, ensure that the power cable cannot be trapped or crushed.
- When removing the mains plug from the wall socket, always pull on the plug and never the cable.
-
Pull the mains plug out of the wall socket:
-
when a malfunction occurs
- when you are not using the espresso machine
- prior to cleaning the espresso machine
- during thunderstorms
- In order to avoid any hazards, do not make modifications to the device.

DANGER! Risk of injury through scalding!
- Do not touch the hot parts of the device.
- During the preparation of espresso, hot steam is released from the brewing head. The brewing head is still hot even
after preparation. Do not touch it or put your hands or other body parts in the steam under any circumstances.
Hot steam and hot water are released when using the steam nozzle. The steam nozzle becomes very hot. Only touch the steam nozzle by the plastic handle. Never put hands or other parts of your body in the steam.
- When frothing milk with the steam nozzle: dip the steam nozzle into the milk before you start the steam function. And stop the steam function before you pull the steam nozzle out again.
WARNING! Risk of material damage!
The device is equipped with silicon suction feet. Because furniture can be coated with a wide variety of varnishes and plastics, and treated with various care products, the possibility cannot be excluded that some of these substances have components that may attack and soften the silicon feet. If necessary, place a non-slip mat under the device.
- Under no circumstances pour liquids other than fresh, cold drinking water into the espresso machine!
- To prevent damage to the heating element, do not operate the device without water in the water tank.
- Only use the device with the original accessories.
- Place the device on a stable, level surface.
- During operation, (hot) water and steam, espresso and espresso powder can accumulate on the base. Therefore, place the device on a waterproof, heat-resistant worktop.
- Do not use any astringent or abrasive cleaning agents.
- Do not expose the device to temperatures below the freezing point.
4. Items supplied
1 espresso machine
1 portafilter 17
1 filter for single espresso 2
1 filter for double espresso 1
1 tamper 9
1 complete copy of the operating instructions
5. Unpacking and setting up
- Remove all packing material.
- Check to ensure that all parts are present and undamaged. Accessories may also be included in the packing material.
-
Remove adhesive strips and stickers, but not the displayed warning sign and rating plate.
-
Clean all parts before the first use (see "Cleaning" on page 48).
- Please remove the protective cap between the water tank and the device connection underneath the tank, otherwise the machine cannot be switched on.
- Place the device on a dry, level, non-slip surface. A smooth work surface onto which the suction feet can stick is recommended.
WARNING! Risk of material damage!
- During operation, (hot) water and steam, espresso and espresso powder can accumulate on the base. Therefore, place the device on a waterproof, heat-resistant worktop.
6. LED ring displays
The 3 LED rings 18/19/20 on the buttons at the front of the device indicate different operating modes or programming steps. The following table shows the respective meaning. Please note that the LED rings can display 3 different states:
- permanently lit
- regularly flashing
- rhythmic flashing (flash 3 times - pause - flash 3 times - etc.)
| LED ring displays | Meaning | ||
 18 18 |  |  | |
| All LED rings light up one after the other. | The device carries out a self-diagnosis after it is switched on. | ||
| regularly flashing — The device is heating up to prepare espresso. | |||
| permanently lit — The device is ready to prepare espresso. | |||
| flashes — | A single espresso is being prepared. | ||
| Dial 4 opened: hot water production | |||
| — flashes — A double espresso is being prepared. | |||
| — — flashes Device preheats for steam production. | |||
| — | — | permanent-ly lit | The device is ready for steam production. |
| — | — | flashes | Dial 4 opened: steam production |
| — — flashes during the descaling process | |||
| All LED rings flash twice in turn, one after the other. | The settings menu is activated. | ||
| rhythmically flashing — | Turn the dial 4 all the way to OFF. | ||
| The device must cool down (e.g. after steam production) | |||
| when the steam function is activated: the device has automatically switched to cooling mode. Press the button 🎨 20 again to reactivate the steam function. | |||
| All LED rings are permanently lit | The device needs to be descaled. | ||
| All LED rings flash rhythmically | Error message for the heating element. Contact the Service Centre. | ||
7. Preparing an espresso - the most important steps
Before you get to know the individual preparation steps and all the tips and tricks in the following chapters, here is an overview of the steps you need for every good espresso:
- Select and insert the filter 1/2
- Preheat the cup, filter 1/2 and brewing head 14 (flushing)
- Dry the portafilter 17 and the filter 1/2
- Measure, flatten and press the espresso powder (tamping)
- Remove espresso powder residues from the edge
- Insert the portafilter 17
- Extract a single or double espresso
- As desired: froth the milk
8. Preparation
8.1 Filling the water tank
WARNING! Risk of material damage!
- Never put liquids other than fresh, cold drinking water into the water tank 6!
NOTE: some water accumulates in the recess under the water tank 6. Remove this regularly with a dry, clean cloth.
Use fresh water every day.
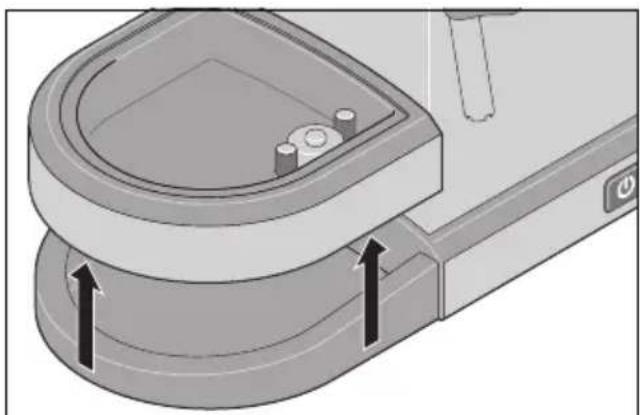
-
Remove the water tank 6 upwards.
-
Open the lid 5 of the water tank 6.
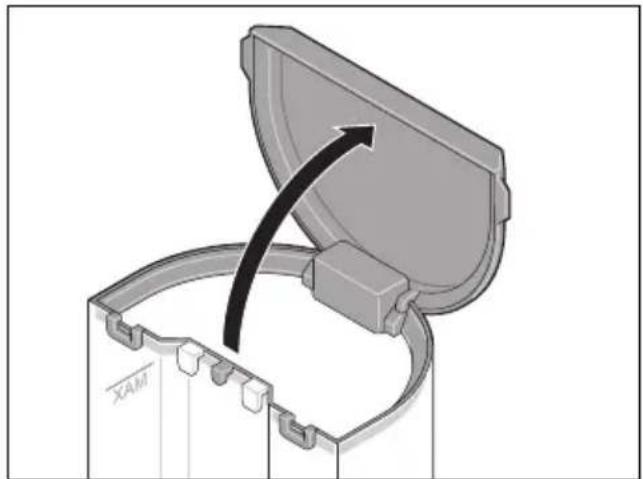
natural_image
3D diagram of a mechanical component with an arrow indicating a process or transformation, no text or symbols present.- Pour out any remaining water from the water tank 6 and rinse the water tank several times thoroughly with clean water.
- Fill the water tank 6 with fresh, cold tap water at least up to the MIN marking and at most up to the MAX marking.
- Put the water tank 6 back in the machine. Please note that the two hooks on the water tank must be placed in the holder on the back of the device.
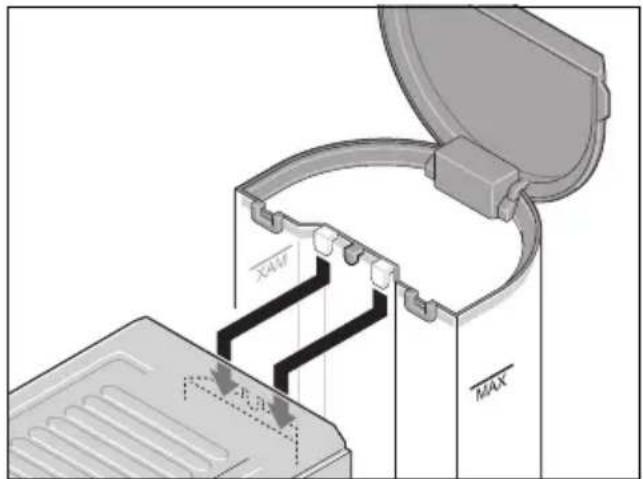
- The water tank 6 must sit correctly at the bottom. Press it down a little if necessary.
natural_image
Line drawing of a modern kitchen blender with control panel and buttons (no text or symbols)- Close the lid 5 of the water tank 6.
Refilling the water
WARNING! Risk of material damage!
To prevent damage to the heating element, do not operate the device without water in the water tank 6.
Always make sure that the water tank 6 is filled to at least the MIN marking.
The water tank 6 can remain in the device for refilling.
- Open the lid 5 of the water tank 6.
- Fill the water tank 6 with fresh, cold tap water at most up to the MAX marking.
- Close the lid 5 of the water tank 6.
8.2 Inserting/replacing the filter
Your espresso machine comes with two filters:
| Filter for single espresso 2 | Filter for double espresso 1 |
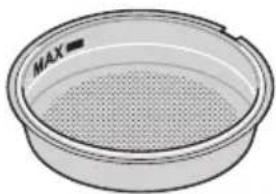 | 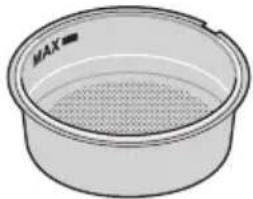 |
| Print on the underside: | |
| 1-cup 2-cup | |
Inserting the filter
- Select the desired filter 1 or 2.
- Press the filter 1/2 into the portafilter 17. This is somewhat difficult because the filter has to sit firmly in the portafilter.
Removing the filter
As the filter 1/2 is firmly seated in the portafilter 17, there is a little trick to remove it.
- Place the unused filter 1/2 on the notch 16 on the portafilter 17 as shown.
- Use this filter to pry the other one out of the portafilter.
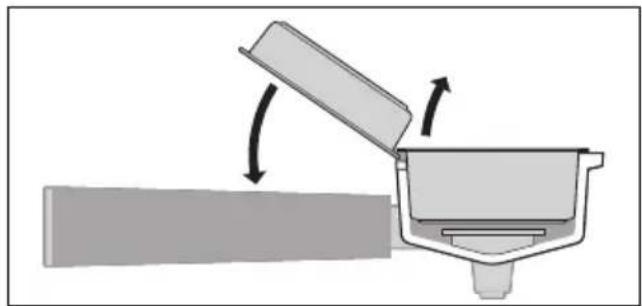
natural_image
Diagram showing a mechanical device with an open lid and a lever mechanism, no text or symbols present8.3 Connecting and switching on/off

DANGER! Risk of electric shock!
- Only connect the device to an easily accessible wall socket with earthing contacts whose voltage corresponds to the specifications on the rating plate. The wall socket must still be easily accessible after connection.
The on/off switch ⏻ 8 has two positions:
- slightly pushed in = on
-
slightly protruding = off
-
Ensure that the on/off switch ⏻ 8 is switched off.
- Set the dial 4 all the way to OFF.
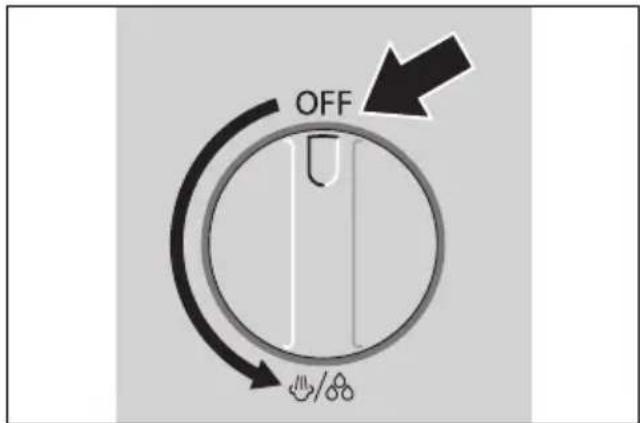
- Connect the mains plug 7 to a wall socket.
-
Press the on/off switch 8!
-
All LED rings 18, 19, 20 light up one after the other.
- The LED rings 18, 19 flash regularly. The device heats up.
NOTE: if the LED rings 18, 19 flash rhythmically, turn the dial 4 all the way to OFF.
When the LED rings 18, 19 are continuously lit, the device is ready to be used.
- To switch off, press the on/off switch again ⏻ 8. All LED rings 18, 19, 20 go out.
NOTES:
- The espresso machine heats up again if it is left ready for use for a long time. The LED rings 18, 19 flash briefly. Wait until the LED rings 18, 19 are again continuously lit.
- The espresso machine switches off automatically if no buttons have been pressed for 30 minutes.
8.4 Rinsing the device
If you have not used the device overnight, for example, or if you are using it for the first time, we recommend that you flush the device once to fill the pipes with fresh water.
Requirement: the device is ready to be used. The LED rings 18, 19 are permanently lit.
- Pour fresh tap water into the water tank 6.
- Place a container under the steam nozzle 10.
- Turn the dial 4 in the direction of the symbol 🎨 and allow approx. 100 ml of water to run through. The LED ring 18 flashes. Water is rhythmically pumped through the device.
- Set the dial 4 back to OFF.
- Wait until the LED rings 18, 19 are lit continuously.
- Place a container under the brewing head 14 and press the button 📋 19 to rinse the brewing head.
- When the process is complete, the LED rings 18, 19 will again be lit continuously.
NOTE: when you use the device for the first time, make approx. 5 cups of espresso and pour them away. The first cups will not taste very good.
8.5 Preheating the cups
When the device is ready for use, the hot plate 3 will be heated up.
- Place the cups on the hot plate 3 to preheat them.
Alternatively, you can use the cup you want to preheat for flushing. This allows you to preheat the brewing head 14, filter 1/2 and portafilter 17 and the cup in one step.
Another possibility is preheating with hot water from the steam nozzle 10 (see "Extracting hot water" on page 43).
8.6 Preheating the filter and brewing head (flushing)
Rinse the filter 1/2 and the brewing head 14 with hot water right before preparation. This preheating of the filter and brewing head (flushing) improves the taste of the espresso.
NOTE: when preparing multiple espressos in succession, flushing is only required before the first one.
Requirement: the device is ready to be used. The LED rings 18, 19 are permanently lit.
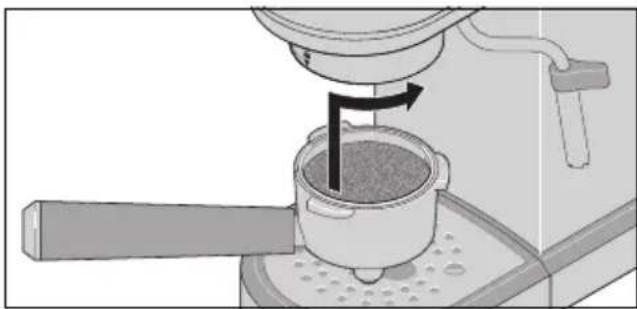
- Insert the portafilter 17 with the selected filter 1/2 without espresso powder under the brewing head 14.
- Insert the portafilter 17 with the handle at ▼.
- Turn the handle of the portafilter 17 to the right as far as ▼ 🔒
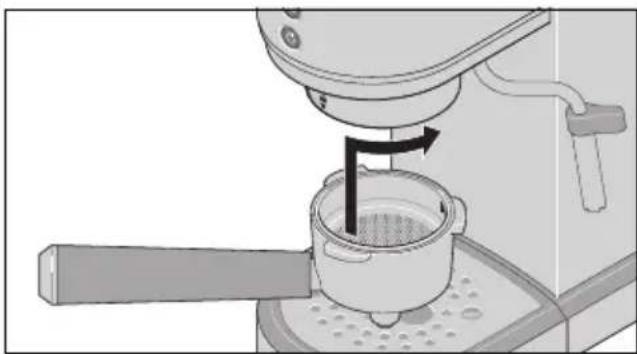
natural_image
Illustration of a coffee maker using a pour-overpan with a hand mixer (no text or symbols)-
Place a cup under the portafilter 17.
-
Press the button 12
- The LED ring 📁 19 flashes.
- The LED ring 📄 18 goes out.
- Hot water flows through the portafilter 17 into the cup.
-
When the process is complete, the LED rings 18, 19 will again be lit continuously.
-
Turn the handle of the portafilter 17 to the left as far as ▼ and remove it downwards.
-
Leave the hot water in the cup to pre-heat and pour it out immediately before the brewing process.
-
Dry off the portafilter 17 with filter 1/2.
9. Measure and tamp the espresso powder
NOTES:
- When buying espresso powder, make sure that the degree of grinding is suitable for portafilter machines. The degree of grinding must be fine. This is often indicated on the packaging.
- For a single espresso you need approx. 7 - 9 g of espresso powder, for a double espresso approx. 14 - 18 g.
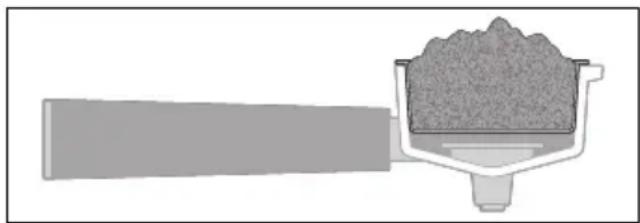
The aim of tamping is to compress the espresso powder evenly in the filter 1/2. The surface of the espresso powder should be even and free from cracks so that the water is pressed evenly through the espresso powder during production. Cracks or thin spots mean that the water can find its way more quickly here ("channelling") - at the expense of taste.
- Place espresso powder into the filter 1/2 until it is full and slightly heaped.
natural_image
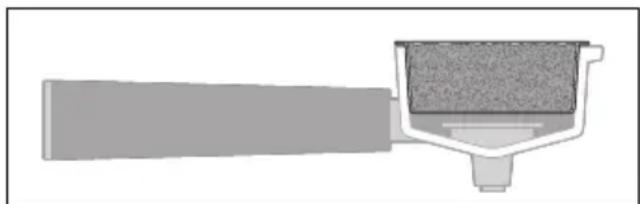
Illustration of a granular material being poured into a container (no text or symbols)- Distribute the espresso powder evenly in the filter 1/2 without pressing on it. To do this, you can easily tap the portafilter 17 onto the work surface and spread it out without pressure, for example with a teaspoon.
natural_image
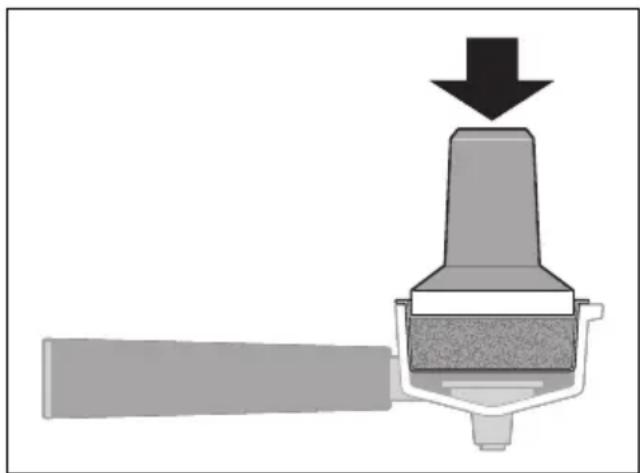
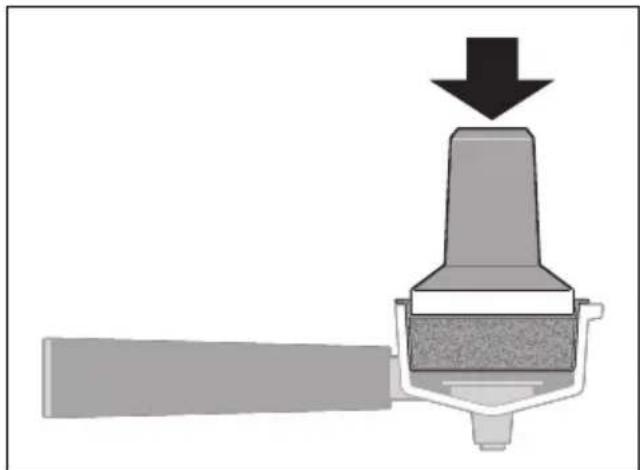
Diagram of a mechanical device with a lever and textured component (no text or symbols)- Now place the tamper 9 straight down onto the espresso powder. Press evenly on the espresso powder until it reaches approximately the MAX marking in the filter 1/2.
natural_image
Diagram of a mechanical device with a downward arrow indicating force or direction (no text or symbols present)NOTES:
• Even pressure is more important than strong pressure!
- A pressure of approx. 15 kg is optimal. You can practice this using a personal scale.
- To avoid cracks: never knock on the portafilter 17 after tamping!
- Carefully lift off the tamper 9.
- Wipe off any loose espresso powder from the edge of the filter 1/2.
10. Preparing an espresso

DANGER! Risk of injury through scalding!
- During the preparation of espresso, hot steam is released from the brewing head 14. The brewing head is still hot even after preparation. Do not touch it or put your hands or other body parts in the steam under any circumstances.
NOTES:
- If you wish to use a taller container, you can remove the drip grid 13 and place the container directly into the drip tray 12.
- This device has a pre-brewing function. For this reason, the device briefly pauses at the start of espresso extraction.
10.1 Extracting a single espresso
Requirement: the device is ready to be used. The LED rings 18, 19 are permanently lit.
- For a single espresso, use the filter 2.
-
Insert the prepared portafilter 17 with the handle at ▼ under the brewing head 14.
-
Turn the handle of the portafilter 17 to the right as far as ▼ 🔒 The portafilter must be tight.
natural_image
Illustration of a coffee maker using a lathe machine to press or brush into a pot (no text or symbols visible)-
Place the preheated cup under the spout of the portafilter 17.
-
Press the button 18.
- The LED ring 18 flashes.
- The LED ring 19 goes out.
- The espresso flows slowly into the cup and stops automatically.
- If you want to cancel the process, press the button ☐8 again.
NOTE: you can change the amount of water stored for a single espresso (see "Adjust espresso volume" on page 47).
-
When the process is complete, the LED rings 18, 19 will again be lit continuously.
-
Turn the handle of the portafilter 17 to the left as far as ▼ and remove it downwards.
-
Knock the espresso powder out of the filter 2 and dispose of it in an organic waste bin. If necessary, you can remove residues with a teaspoon.
-
Clean the filter 2 and the portafilter 17 and then dry them.
10.2 Extracting a double espresso
Requirement: the device is ready to be used. The LED rings 18, 19 are permanently lit.
-
For a double espresso or two cups of espresso, use the filter 1.
-
Insert the prepared portafilter 17 with the handle at ▼ under the brewing head 14.
-
Turn the handle of the portafilter 17 to the right as far as ▼ 🔒. The portafilter must be tight.

natural_image
Illustration of a coffee maker using a lathe machine to press coffee beans into a pot (no text or symbols visible)-
Place one or two preheated cups under the spout of the portafilter 17.
-
Press the button 19
- The LED ring 12 flashes.
- The LED ring 18 goes out.
- The espresso flows slowly into the cups and stops automatically.
- If you want to cancel the process, press the button 📁 again.
NOTE: you can change the amount of water stored for a double espresso (see "Adjust espresso volume" on page 47).
-
When the process is complete, the LED rings 18, 19 will again be lit continuously.
-
Turn the handle of the portafilter 17 to the left as far as ▼ and remove it downwards.
-
Knock the espresso powder out of the filter 1 and dispose of it in an organic waste bin. If necessary, you can remove residues with a teaspoon.
-
Clean the filter 1 and the portafilter 17 and then dry them.
11. Tips for the perfect espresso
Preparing the perfect espresso is not always easy right away. So feel free to experiment a little until the result suits your taste. Here are a few tips on what you can pay attention to:
- There are big differences in the quality and taste of espresso powder. Try out different types for yourself.
- When buying espresso powder, make sure that the degree of grinding is suitable for portafilter machines. The degree of grinding must be fine. This is often indicated on the packaging.
- Only change one thing at a time, e.g. only the pressure when tamping or only the amount of espresso powder, so that you can see the effect of this change.
- You can recognise the perfect production by the following points:
- The production takes approx. 30 seconds.
- The espresso flows slowly into the cup.
• Under-production can be recognised by the fact that the espresso flows quickly like water into the cup. It tastes watery, maybe a little sour.
Remedy:
- Check that the espresso powder is ground finely enough.
- Use more espresso powder.
- Make sure that the espresso powder is evenly compacted without cracks.
- Exert more pressure when tamping.
• Over-production can be recognised by the fact that the espresso drips slowly into the cup and tastes bitter.
Remedy:
- Use less espresso powder.
- Do not exert too much pressure when tamping.
- Different types of espresso require different water temperatures to develop
the optimum flavour. For dark roasting the temperature should be lower and for light roasting higher.
- Clean your espresso machine regularly. Coffee residues or clogged pores alter the taste.
• Always use fresh tap water that is not too hard. If your tap water is hard, you can use filtered water from a commercially available water filter.
12. Extracting hot water

DANGER! Risk of injury through scalding!
Hot steam and hot water are released when using the steam nozzle 10. The steam nozzle becomes very hot. Only touch the steam nozzle by the plastic handle. Never put hands or other parts of your body in the steam.
You can draw hot water (approx. 80 °C) from the steam nozzle 10, for example for an Americano or to preheat cups.
You can turn the steam nozzle 10 back and forth.
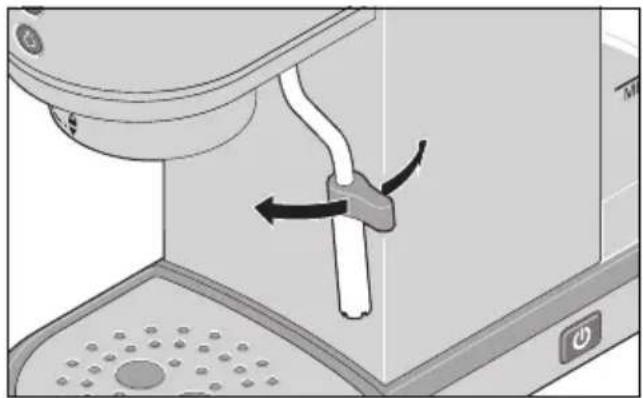
natural_image
Diagram of a coffee machine with a valve and control panel, showing directional arrows (no text or symbols)Requirement: the device is ready to be used. The LED rings 18, 19 are permanently lit. 1. Place a container under the steam nozzle 10.
- Turn the dial 4 in the direction of the symbol 🎨/💡.
- The LED ring 18 flashes.
- The LED ring 19 goes out.
- Hot water flows from the steam nozzle 10.
- Finish the operation by turning the dial 4 back to OFF.
When the LED rings 18, 19 are flashing, the device is heating up.
When the LED rings 18, 19 are permanently lit, the device is ready to prepare espresso again.
NOTE: the maximum time for hot water production is 120 seconds. The function then stops automatically. Set the dial 4 back to
OFF. You can then immediately use the function again.
13. Frothing the milk

DANGER! Risk of injury through scalding!
Hot steam and hot water are released when using the steam nozzle 10. The steam nozzle becomes very hot. Only touch the steam nozzle by the plastic handle. Never put hands or other parts of your body in the steam.
- When frothing milk with the steam nozzle 10: dip the steam nozzle into the milk before you start the steam function. And stop the steam function before you pull the steam nozzle out again.
You can froth milk with the steam nozzle 10. This requires a bit of practice.
Tips:
- Try milk from different producers.
-
Milk with higher protein content foams more.
-
A higher fat content results in a creamier foam.
• Always use cold milk from the refrigerator (approx. 5 °C). - When foaming, the milk should not become boiling hot. Higher temperatures change the taste and cause the milk foam to disintegrate. An indication: if you use a metal pot, the right temperature is reached when the sides of the pot are too hot to hold in your hand.
- When the milk has finished foaming, do not wait too long. Otherwise some of the milk foam will begin to dissolve again.
Requirement: the device is ready to be used. The LED rings 18, 19 are permanently lit.
-
Fill a container at most up to half way with cold milk.
-
Press the button 20.
-
The LED ring 20 flashes.
-
The device heats up for steam production.
-
When the device is ready for steam production, the LED ring 🔊 20 is lit continuously.
NOTE: when the device is ready for steam production, continue working quickly. Otherwise the device switches to cooling mode after a short time (the LED rings 18, 19 flash rhythmically). This is a protective function against overheating. In this case, press the button 🎨 20 again to reactivate the steam function.
- Hold another container under the steam nozzle 10 and turn the dial 4 in the direction of the symbol 🎨.
- The LED ring 20 flashes.
-
Steam flows out.
-
Let some steam come out and then pause by setting the dial 4 to OFF.
-
Immerse the steam nozzle 10 into the milk and turn the dial 4 back towards the symbol ♦. ⚙️
Tips:
- Immerse the steam nozzle 10 just below the surface so that air is introduced into the milk ("drawing phase").
-
Do not dip the steam nozzle into the centre of the jug, but to the side, so that a vortex is created.
-
When the volume of the milk has visibly increased (approx. 50%), immerse the steam nozzle 10 a little deeper. The vortex should remain. Now the air bubbles are distributed more finely ("rolling phase").
-
When the milk foam has the desired consistency, set the dial 4 to OFF.
NOTE: the total maximum time for steam production is 120 seconds. The function then stops automatically. Set the dial 4 back to OFF. Afterwards, the device switches to cooling mode (the LED rings 18, 19 flash rhythmically).
- Add the milk foam to the espresso as quickly as possible.
- Wipe the steam nozzle 10 with a clean cloth immediately after foaming milk to remove any milk residue.
- Turn the dial 4 again briefly in the direction of the symbol 🚗 until steam emerges. This removes milk residues from inside the steam nozzle 10.
- Finally, set the dial 4 to OFF.
- The LED ring ⏻ 20 is lit permanently.
-
Press the button 20.
-
The LED ring 20 goes out.
- The LED rings 18, 19 flash rhythmically.
- The device cools down.
When the LED rings 18, 19 are permanently lit, the device is ready to prepare espresso again.
NOTE: this cooling process takes a few minutes. If you want to quickly prepare another espresso, you can speed up the cooling process by drawing hot water from the device:
-
While the LED rings 18, 19 are flashing rhythmically, turn the dial 4 in the direction of the symbol 🎨. 🔊
-
The LED ring 18 flashes.
-
First steam escapes, then water, then the process stops.
-
When the LED rings 18, 19 are again flashing rhythmically, turn the dial 4 back to OFF.
The LED rings 18, 19 are permanently lit. The device is ready to prepare espresso.
14. Settings
You can adjust various settings on your espresso machine. For most settings, you must first select the menu.
14.1 Selecting the menu
Requirement: the device is ready to be used. The LED rings 18, 19 are permanently lit.
- Press and hold the button 🎨 20 for approx. 5 seconds until the 3 LED rings 18, 19, 20 flash twice in succession. You can now configure the settings as described in the following sections.
NOTE: after approx. 30 seconds without activity, the process is aborted without saving.
14.2 Water hardness
Like any hot water appliance, this espresso machine must be descaled regularly. Lime deposits form inside the device and on small openings (e.g. on the steam nozzle 10).
This impairs the functionality and damages the device in the long run.
This machine automatically determines when it is time to descale. When this time is reached, all LED rings 18, 19, 20 are permanently lit. You will not be able to continue working with the device. It needs to be descaled first.
To ensure that this happens at the right time, you can adjust the water hardness setting to match your tap water. You can get information about your tap water from your water supplier (e.g. on their website). If you use filtered water, you can adjust the water hardness accordingly. Please follow the instructions of your water filter manufacturer. You can choose between three hardness ranges: soft, medium, hard.
The default setting on delivery is hard. All information on descaling can be found in chapter "Descaling" on page 50.
Requirement: the menu is selected. The 3 LED rings 18, 19, 20 flash twice in turn, one after the other.
- Press the button 19 The LED rings 18, 19, 20 briefly indicate the current hardness range once:
| Hardness range: | soft medium hard | |||
 | X | X | X | |
 | — | X | X | |
 | — | — | X | |
- When the LED rings alternately display the different hardness levels, press the button for the desired hardness level:
| Hardness range: | soft medium hard | ||
 | X | ||
 | X | ||
 | X | ||
When the LED ring 19 flashes 3 times, the new setting is saved.
14.3 Espresso temperature
The temperature of the water when extracting the espresso can be modified to adapt it to different types of coffee and to your taste. For dark roasting the temperature should be lower and for light roasting higher.
You can choose between three temperature ranges: low, medium, hot.
The default setting on delivery is medium.
Requirement: the menu is selected. The 3 LED rings 18, 19, 20 flash twice in turn, one after the other.
- Press the button 18. The LED rings 18, 19, 20 briefly indicate the current temperature range once:
| Temperature range: | low medium hot | ||
 | X | X | X |
 | - | X | X |
 | - | - | X |
- When the LED rings alternately display the different temperature ranges, press the button for the desired temperature setting:
| Temperature range: | low medium hot | |||
 | X | |||
 | X | |||
 | X | |||
When the LED ring 📋 18 flashes 3 times, the new setting is saved.
14.4 Adjust espresso volume
NOTE: the volume of espresso dispensed is also influenced by the quantity and the compression of the espresso powder.
This memory function allows you to adjust the amount of espresso dispensed according to your cups and preferences. The setting is made indirectly via the preparation time.
NOTE: the preparation time can be between 20 and 75 seconds. If you select a shorter or longer time, the previously saved time is retained.
Single espresso
Requirement: the device is ready to be used. The LED rings 18, 19 are permanently lit.
- Prepare the filter 2, portafilter 17 and espresso powder for a single espresso and clamp the portafilter under the brewing head 14.
-
Place the desired espresso cup under the brewing head 14.
-
Press and hold the button 📋 18. The espresso preparation begins.
- When the LED ring 19 flashes quickly and the desired quantity has been reached, let go of the button 18.
The process stops.
When the LED ring 📋 18 flashes 3 times, the new preparation time for single espresso is saved.
When the LED rings 18, 19 are lit continuously, the device is ready to use again.
Double espresso
Requirement: the device is ready to be used. The LED rings 18, 19 are permanently lit.
- Prepare the filter 1, portafilter 17 and espresso powder for a double espresso and clamp the portafilter under the brewing head 14.
- Place the desired espresso cup(s) under the brewing head 14.
- Press and hold the button 19. The espresso preparation begins.
- When the LED ring 📋 18 flashes quickly and the desired quantity has been reached, let go of the button 📋 19.
The process stops.
When the LED ring 📁 19 flashes 3 times, the new preparation time for double espresso is saved.
When the LED rings 18, 19 are lit continuously, the device is ready to use again.
14.5 Reset to factory settings
This function allows you to reset all settings to the factory settings.
Requirement: the menu is selected. The 3 LED rings 18, 19, 20 flash twice in turn, one after the other.
-
Place a container under the steam nozzle 10.
-
Turn the dial 4 in the direction of the symbol 🎨/💡.
-
Press the button 18.
The 3 LED rings 18, 19, 20 flash several times simultaneously. The settings have been reset to the factory settings.
- If the LED rings 18, 19 flash rhythmically, turn the dial 4 back to OFF.
When the LED rings 18, 19 are lit continuously, the device is ready to use again.
15. Cleaning

DANGER! Risk of electric shock!
The espresso machine and the power cable with mains plug 7 must not be immersed in water or other liquids.

DANGER! Risk of injury through scalding!
- Many components and accessories of the espresso machine become very hot during operation. Allow them to cool down before cleaning.
WARNING! Risk of material damage!
- Do not use any astringent or abrasive cleaning agents.
NOTES:
- The following accessories can be cleaned in the dishwasher or by hand: - the filters 1/2
• The following accessories can be washed by hand with mild detergent:
- the water tank 6 with lid 5
- the drip grid 13
- the drip tray 12
- the portafilter 17
- the spout of the steam nozzle 10
- the tamper 9
- If the accessories that come into contact with water, espresso or milk have residues of detergent, the taste of the espresso will be negatively affected.
Therefore, rinse these parts thoroughly with clean water if cleaning with detergent is necessary.
After every espresso
-
Remove the portafilter 17 from the brewing head 14.
-
Knock the espresso powder out of the filter 1/2 and dispose of it in an organic waste bin. If necessary, you can remove residues with a teaspoon.
-
Rinse the filter 1/2 and the portafilter 17 under hot water and then dry them.
After frothing milk
NOTE: always ensure that the opening of the steam nozzle 10 remains clean. Remaining milk residue is not only unhygienic. It can also quickly clog the small opening.
-
Wipe the steam nozzle 10 with a clean cloth to remove any milk residue.
-
Turn the dial 4 again briefly in the direction of the symbol 🎨 until steam emerges. This removes milk residues from inside the steam nozzle.
Drip tray
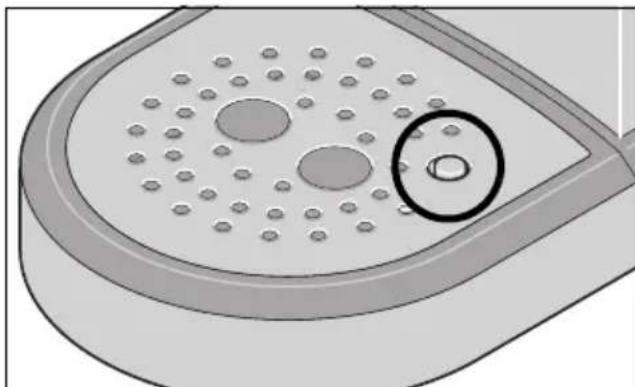
When the float 11 becomes visible (see illustration), the drip tray 12 must be emptied. In any case, you should clean the drip tray once a day.
natural_image
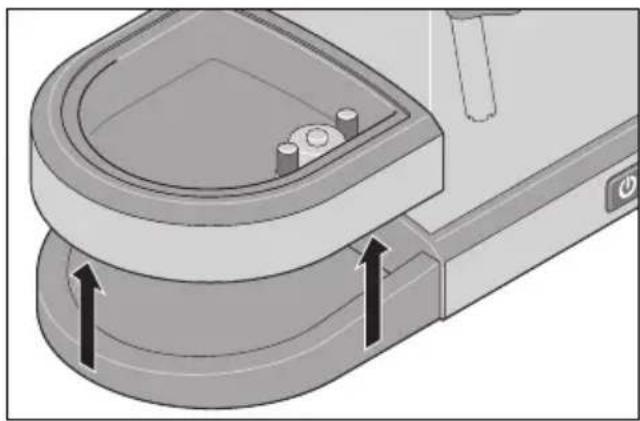
3D diagram of a circular mechanical component with perforated surfaces and a circled feature (no text or symbols)-
Remove the drip grid 13.
-
Lift the drip tray 12 upwards and out.
natural_image
3D diagram of a mechanical device with internal components and directional arrows indicating movement (no text or symbols)-
Empty and clean these accessories by hand with mild detergent.
-
Dry all parts before reinserting them.
Daily

DANGER! Risk of electric shock!
- Unplug the mains plug 7 from the wall socket before cleaning the espresso machine.
-
Empty the water tank 6 and rinse it several times with clean water.
-
Wipe the brewing head 14 with a clean, damp cloth. Also clean the rim around the brewing head.
NOTE: if necessary, use a little detergent. Clean thoroughly several times with a cloth moistened only with clear water.
-
Wipe the outside of the device with a damp cloth.
-
Dry all parts with a cloth.
Steam nozzle
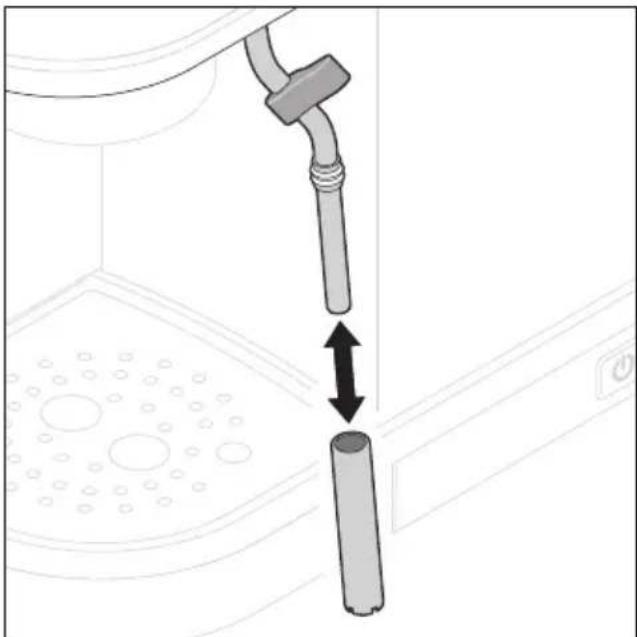
You should disassemble the steam nozzle 10 once a day and clean it thoroughly.
-
Let the steam nozzle 10 cool down.
-
Pull the spout off the steam nozzle 10.
natural_image
Diagram showing a pipe inserted into a tank with a cylindrical component inserted, indicating fluid flow or movement (no text or symbols present)-
Clean the spout thoroughly by hand with a mild detergent. Rinse several times with clear, hot water.
-
Wipe the inner tube of the steam nozzle 10 thoroughly with a damp cloth.
NOTE: if necessary, use a little detergent. Clean thoroughly several times with a cloth moistened only with clear water.
- Slide the spout back onto the steam nozzle 10.
Filter and portafilter
-
Even if you always use the same filter 1/2, you should remove it from the portafilter 17 at least once a week.
-
Rinse the portafilter 17 thoroughly by hand with mild detergent. Rinse several times with clear, hot water.
-
You can put the filters 1/2 in the dishwasher.
-
Dry both parts thoroughly before reassembling them.
Water tank
- You should clean the inside of the water tank 6 with a little mild detergent approx. every 2 weeks.
- Afterwards, rinse it thoroughly with clear tap water.
- Dry the water tank 6 from the outside before inserting it.
NOTE: some water accumulates in the recess under the water tank 6. Remove this regularly with a dry, clean cloth.
16. Descaling
Like any hot water appliance, this espresso machine must be descaled regularly. Lime deposits form inside the device and on small openings (e.g. on the steam nozzle 10). This impairs the functionality and damages the device in the long run.
This machine automatically determines when it is time to descale. When this time is reached, all LED rings 18, 19, 20 are permanently lit. You will not be able to continue working with the device. It needs to be descaled first.
NOTES:
- You can adjust the water hardness setting to suit your tap water so that the prompt for descaling comes at the right time (see "Water hardness" on page 46).
- You can also start the descaling programme separately at any time.
- During each process (descaling and rinsing), a large quantity of descaling solution or water is rhythmically pumped through the device for approx. 5 minutes.
Descaling process
You can use a commercially available des- caling agent for espresso machines. Please follow the manufacturer's instructions.
Prerequisite when prompted to descale: all LED rings 18, 19, 20 are permanently lit. Prerequisite when not prompted to descale: the device is ready to be used. The LED rings 18, 19 are permanently lit.
- Empty the water tank 6.
- Mix the descaling agent with fresh, cold tap water according to the manufacturer's instructions to prepare 1 litre of descaling solution.
- Fill the water tank 6 with the descaling solution up to the MAX marking.
- Insert the water tank 6.
- To collect the descaling solution, place a larger container (approx. 1 litre) under the steam nozzle 10 and another container (approx. 500 ml) under the brewing head 14.
- Press and hold the button 🎨 20 for approx. 5 seconds until the 3 LED rings 18, 19, 20 flash twice in succession.
NOTE: the process is cancelled after 30 seconds without activity.
- Turn the dial 4 in the direction of the symbol 🎨/💡.
- Press the button 20.
- The device pumps hot descaling solution through the steam nozzle 10.
- When about 450 ml of descaling solution have passed through, turn the dial 4 to OFF.
- The descaling solution is pumped through the brewing head 14 with pauses.
When the descaling programme has been completed, the LED rings 18, 19 are lit continuously.
Rinsing process
- Remove the water tank 6 and pour away any excess descaling solution.
- Rinse the water tank 6 several times with clean water.
- Fill the water tank 6 with fresh, cold tap water up to the MAX marking and insert it.
- Empty the containers for collecting the pumped liquid and place them back under the steam nozzle 10 and the brewing head 14.
- Press and hold the button 🎨 20 for approx. 5 seconds until the 3 LED rings 18, 19, 20 flash twice in succession.
NOTE: the process is cancelled after 30 seconds without activity.
- Turn the dial 4 in the direction of the symbol 🎨/💡.
- Press the button 20.
- The device pumps hot water through the steam nozzle 10.
- When about 450 ml of water have passed through, turn the dial 4 to OFF.
- Water is pumped through the brewing head 14 with pauses.
When the process is complete, the LED rings 18, 19 will be lit continuously. - Fill the water tank 6 with fresh, cold tap water up to the MAX marking.
The device is ready to prepare espresso again.
17. Storage and transport

DANGER for children!
- Keep the device out of the reach of children.
WARNING! Risk of material damage!
- Do not expose the device to temperatures below the freezing point.
- Leave the cleaned espresso machine and the cleaned accessories to dry before you assemble them and put them away.
- If you want to transport the espresso machine, empty the water tank 6 and the drip tray 12.
18. Disposal
This product is subject to the provisions of European Directive 2012/19/EC. The symbol showing a wheelie bin crossed through indicates that the product requires separate refuse collection in the European Union. This applies to the product and all accessories marked with this symbol. Products identified with this symbol may not be discarded with normal household waste, but must be taken to a collection point for recycling electric and electronic appliances.
This recycling symbol marks e.g. an object or parts of the material as valuable for recycling. Recycling helps to reduce the consumption of raw

materials and protect the environment.
Packaging
When disposing of the packaging, make sure you comply with the environmental regulations applicable in your country.
19. Trouble-shooting
If your device fails to function as required, please try this checklist first. Perhaps there is only a minor problem, and you can solve it yourself.

DANGER! Risk of electric shock!
- Do not attempt to repair the device yourself under any circumstances.
| Fault Possible causes / Action | |
| No function | Has the device been connected to the power supply?Check the connection. |
| Flashing LED displays, but no function | For information on the LEDs, refer to the chapter “LED ring displays” on page 36. |
| Poor quality espresso | You will find tips on preparing espresso in the chapter “Tips for the perfect espresso” on page 43. |
| The espresso is too cold. • Cup not preheated?Adjust the temperature of the coffee in the settings (see “Espresso temperature” on page 46). | |
| Espresso only drips out of the portafilter 17 or also flows over the edge of the portafilter. | Espresso powder ground too fine? Too much espresso powder? Too firmly tamped?Espresso powder on the edge of the filter 1/2?Check the hole on the underside of the filter 1/2 for blockages.Does the machine / brewing head 14 need to be descaled? |
| Espresso flows out of the portafilter 17 too quickly and is too thin. | Espresso powder ground too coarsely? Not enough espresso powder? Not tight enough or unevenly compressed? |
| All LED rings 18, 19, 20 are permanently lit. No espresso preparation possible. | The device needs to be descaled. |
| The portafilter 17 cannot be completely turned to ▼ 🔒 | Too much espresso powder?Espresso powder on the edge of the filter 1/2? |
| Unusual pump sounds | Is the water tank 6 empty?Is the water tank 6 inserted incorrectly? |
| No water or steam comes out of the steam nozzle 10. | Is the water tank 6 empty?Is the steam nozzle 10 clogged?Does the machine / steam nozzle 10 need to be descaled? |
| No more water/steam comes out of the steam nozzle 10 after 120 seconds. | This is normal. This is a protective function. Set the dial 4 back to OFF. Check that there is enough water in the water tank 6. You can then immediately use the function again. |
20. Technical specifications
| Model: SEMS 1350 | A2 |
| Mains voltage: 220 | -240 V ~ 50 - 60 Hz |
| Protection class: I | |
| Power rating: 1350 | W |
| Filling volume of the water tank: | at least 250 ml (MIN) maximum 1000 ml (MAX) |
| Pressure: 19 bar | |
| Automatic switch to off mode: ≤ 30 minutes | |
| Power consumption when switched off: ≤ 0.5 W | |
Symbols used
 | Geprüfte Sicherheit (certified safety): devices must comply with the generally acknowledged rules of technology and the German Product Safety Act (Produkt-sicherheitsgesetz - ProdSG). (Not for UK) |
 | With the CE marking, HOYER Handel GmbH declares the conformity with EU guidelines. |
 | This symbol reminds you to dispose of the packaging in an environmentally friendly manner. |
 | Recyclable materials are marked with the recycling symbol (3 arrows). The material can be specified by the recycling number in the centre (here: 21) and/or an abbreviation (here: PAP). |
| ~ | AC voltage |
 | The symbol identifies parts that can be cleaned in the dishwasher. |
 | It is a recyclable product which is subject to an extended producer responsibility and for which the rules of waste separation apply. |
 | With the UKCA marking, HOYER Handel GmbH declares that the product is in conformity with the UKCA requirements. |
 | The symbol identifies the product manufacturer. |
Subject to technical modifications.
21. Warranty of the HOYER Handel GmbH
Dear Customer,
your device is provided with a 3 year warranty starting with the purchase date. In the event of product defects, you are entitled to statutory rights against the vendor. These statutory rights are not restricted by our warranty presented in the following.
Warranty conditions
The warranty period starts with the purchase date. Please keep the original purchase receipt in a safe place. This document is required to verify the purchase.
If within three years from the purchase date of this product a material or factory defect occurs, the product will be repaired or replaced by us – at our discretion – free of charge to you, or the purchase price will be refunded. This warranty implies that within the period of three years the defective device and the purchase receipt are presented, including a brief written description of the defect and the time it occurred.
If the defect is covered by our warranty, the repaired or a new product will be returned to you. No new warranty period starts with a repair or replacement of the product.
Warranty period and statutory claims for defects
The warranty period is not extended when the warranty has been claimed. This also applies to replaced and repaired parts. Any damages and defects already existing at the time of purchase must be reported immediately upon unpacking. Repairs arising after the expiration of the warranty period are subject to a charge.
Warranty coverage
The device was produced carefully according to strict quality guidelines and tested diligently prior to delivery.
The warranty applies to material or factory defects.
Excluded from the warranty are wear parts subject to normal wear and damages to fragile parts, e.g. switches, lamps or other parts manufactured from glass.
This warranty expires if the product is damaged, not used as intended or not serviced. For the proper operation of the product, all instructions listed in the operating instructions must be observed carefully. Any form of use and handling that is advised against in the operating instructions or warned against must always be avoided.
The product is only intended for private and not for commercial use. In the case of incorrect and improper treatment, use of force and interventions not performed by our authorised Service Centre, the warranty shall cease.
Handling in case of a warranty claim
In order to ensure prompt processing of your matter, please observe the following notes:
- Please keep the article number
IAN: 496916_2510 and the purchase receipt as a purchase verification for all inquiries.
- The article number can be found on the rating plate, an engraving, the title page of your instructions (in the bottom left), or as a label on the rear or underside of the device.
- If faulty operation or other defects occur, first contact the Service Centre listed in the following by telephone or email.
- Then, you are able to send a product reported as defective free of charge to the service address specified to you, including the purchase receipt and the information on the defect and when it occurred.
At www.lidl-service.com you can download this and many other manuals, product videos and installation software.

This QR code takes you directly to the Lidl Service website (www.lidl-service.com), where you can enter the article number (IAN)
496916_2510 to open your user instructions.

Service Centre
GB Service Great Britain
Tel.: 0800 404 7657
E-Mail: hoyer@lidl.co.uk
IE Service Ireland
Tel.: 1800 101010
E-Mail: hoyer@lidl.ie
MT Service Malta
Tel.: 80062230
E-Mail: hoyer@lidl.com.mt
IAN: 496916_2510

Supplier
Please note that the following address is no
service address. First contact the aforementioned Service Centre.
HOYER Handel GmbH
Kühnehöfe 12
22761 Hamburg
GERMANY
Sommaire
natural_image
3D diagram of a mechanical component with an arrow indicating a process or transformation, no text or symbols present.natural_image
Illustration of a kitchen electric shaver with control panel and buttons (no text or symbols)natural_image
Diagram of a mechanical device with an open lid and lever mechanism, showing motion arrows (no text or symbols)natural_image
Illustration of a coffee maker using a pour-overpan over a pot, showing mechanical components and motion arrows (no text or symbols)natural_image
Illustration of a granular material being poured into a funnel (no text or symbols)natural_image
Diagram of a mechanical device with a lever and textured component (no text or symbols)natural_image
Diagram of a mechanical device with a downward arrow indicating force or direction (no text or symbols present)REMARQUES :
natural_image
Illustration of a coffee maker using a lathe machine to press coffee beans (no text or symbols visible)natural_image
Illustration of a coffee maker using a lathe machine to press coffee beans into a pot (no text or symbols visible)natural_image
Diagram of a coffee maker's side panel showing lever mechanism and control buttons (no text or symbols)natural_image
3D diagram of a circular mechanical component with perforated surfaces and a highlighted circular feature (no text or symbols)natural_image
3D diagram of a robotic vacuum cleaner with directional arrows indicating motion (no text or symbols)natural_image
Diagram showing a pipe inserted into a tank with a cylindrical component inserted, indicating fluid flow or movement (no text or symbols present)natural_image
3D diagram of a mechanical component with an arrow indicating rotation or assembly (no text or symbols)natural_image
Technical line drawing of a kitchen electric shaver with control panel and buttons (no text or symbols)natural_image
Diagram of a mechanical device with an open lid and a funnel, showing rotational motion (no text or symbols)natural_image
Illustration of a coffee maker using a pour-overpan over a pot, showing mechanical components and motion arrows (no text or symbols)natural_image
Diagram of a granular material being poured into a container (no text or symbols)natural_image
Diagram of a mechanical device with a lever and textured component (no text or symbols)natural_image
Diagram of a mechanical device with a downward arrow indicating force or direction (no text or symbols present)AANWIJZINGEN:
natural_image
Illustration of a coffee maker using a pour-over presser (no text or symbols visible)natural_image
Illustration of a coffee maker using a lathe machine to press coffee beans (no text or symbols visible)natural_image
3D diagram of a circular mechanical component with internal holes and a highlighted circular feature (no text or symbols)natural_image
3D diagram of a mechanical device with internal components and directional arrows indicating movement (no text or symbols)natural_image
Diagram showing a pipe inserted into a sink with a cylindrical component inserted, no text or symbols presentnatural_image
Mechanical assembly diagram showing a clamping mechanism with an arrow indicating motion (no text or symbols present)natural_image
Illustration of a modern kitchen blender with control panel and buttons (no text or symbols)natural_image
Diagram showing a mechanical device with an open lid and a lever mechanism, no text or symbols present.natural_image
Illustration of a coffee maker using a pour-over presser (no text or symbols visible)natural_image
Illustration of a granular material being poured into a funnel (no text or symbols)natural_image
Diagram of a mechanical device with a lever and textured component (no text or symbols)natural_image
Illustration of a coffee maker using a pour-over machine, showing the lid and handle (no text or symbols)natural_image
Illustration of a coffee maker using a lathe machine to press coffee into a pot (no text or symbols visible)natural_image
Diagram of a coffee maker's side view showing valve mechanism and control panel (no text or symbols)natural_image
3D diagram of a circular mechanical component with perforated surfaces and a circled feature (no text or symbols)natural_image
3D mechanical component diagram showing a circular housing with internal components and directional arrows indicating movement (no text or symbols)natural_image
Diagram showing a pipe inserted into a tank with a cylindrical component inserted, indicating fluid flow or movement (no text or symbols present)natural_image
3D diagram of a mechanical component with an arrow indicating rotation or assembly (no text or symbols)natural_image
Illustration of a modern kitchen or shower unit with control panel and handle (no text or symbols visible)natural_image
Diagram of a mechanical device with an open lid and lever mechanism, showing motion arrows (no text or symbols)natural_image
Illustration of a coffee maker using a pour-overpan over a pot, showing mechanical components and motion arrows (no text or symbols)natural_image
Simple line drawing of a funnel pouring granular material into a container (no text or symbols)natural_image
Diagram of a mechanical component with a handle and central shaft (no text or symbols)natural_image
Diagram of a mechanical device with a downward arrow indicating force or direction (no text or symbols present)UPOZORNĚNÍ:
natural_image
Illustration of a coffee maker using a pour-over presser with a hand operating the cup (no text or symbols visible)natural_image
Illustration of a coffee maker using a pour-over presser to press coffee into a pot (no text or symbols visible)natural_image
Diagram of a coffee machine with a valve and control panel, showing directional arrows (no text or symbols)natural_image
3D diagram of a circular mechanical component with perforated surfaces and a highlighted circular feature (no text or symbols)natural_image
3D diagram of a robotic device with two arrows indicating movement or force, no text or symbols presentnatural_image
Diagram showing a pipe inserted into a tank with a cylindrical component inserted, indicating fluid flow or movement (no text or symbols present)natural_image
3D diagram of a mechanical component with an arrow indicating rotation or assembly (no text or symbols)natural_image
Illustration of a modern kitchen blender with control panel and side arm (no text or symbols)natural_image
Diagram of a funnel pouring liquid into a container with an arrow indicating direction (no text or symbols)8.3 Pripojenie a zapnutie/vypnutie

natural_image
Illustration of a coffee maker using a pour-over presser (no text or symbols visible)natural_image
Simple line drawing of a funnel pouring granular material into a container (no text or symbols)natural_image
Diagram of a mechanical component with a handle and central shaft (no text or symbols)- Teraz umiestnite zatláčadlo 9 priamo zhora na mletú kávu. Rovnomerne zatlačte na mletú kávu, kým nebude sia-hať približne po značku MAX v sitku 1/2.
natural_image
Diagram of a mechanical device with a downward arrow indicating force or direction (no text or symbols present)UPOZORNENIA:
natural_image
Illustration of a coffee maker using a lathe machine to press or brush into a pot (no text or symbols visible)natural_image
Illustration of a coffee maker using a lathe machine to press or brush into a pot (no text or symbols visible)natural_image
Diagram of a mechanical device with a lever and directional arrow, no readable text or symbols presentnatural_image
Diagram of a circular mechanical component with perforated surfaces and a circled feature, labeled 'ni' in the corner (no text or symbols on the component itself)natural_image
3D diagram of a robotic device with a circular base and directional arrows indicating movement or force (no text or symbols)natural_image
Diagram showing a pipe inserted into a tank with a cylindrical component inserted, indicating fluid flow or movement (no text or symbols present)natural_image
3D diagram of a mechanical component with an arrow indicating rotation or assembly (no text or symbols)natural_image
Illustration of a modern kitchen blender with control panel and handle (no text or symbols)natural_image
Diagram showing a mechanical device with an open lid and a lever mechanism, no text or symbols presentnatural_image
Illustration of a coffee maker using a pour-over presser, showing mechanical components and motion arrows (no text or symbols)natural_image
Diagram of a granular material being poured into a container (no text or symbols)natural_image
Diagram of a mechanical device with a lever and textured component (no text or symbols)natural_image
Diagram of a mechanical device with a downward arrow indicating force or direction (no text or symbols present)NOTAS:
natural_image
Illustration of a coffee maker using a pour-over machine, showing the cup and handle (no text or symbols)natural_image
Illustration of a coffee maker using a lathe machine to press coffee beans (no text or symbols visible)natural_image
Diagram of a coffee maker's side view showing valve mechanism and control panel (no text or symbols)natural_image
3D diagram of a circular mechanical component with perforated surfaces and a highlighted circular feature (no text or symbols)natural_image
3D diagram of a robotic device with two arrows indicating movement or force, no text or symbols presentnatural_image
Diagram showing a pipe inserted into a basin with a cylindrical component inserted, indicating fluid flow or movement (no text or symbols present)natural_image
3D diagram of a mechanical component with an arrow indicating rotation or assembly (no text or symbols present)natural_image
Line drawing of a modern kitchen blender with control panel and buttons (no text or symbols)- Luk vandtankens 6 låg 5.
natural_image
Diagram showing a mechanical device with an open lid and rotating arrows indicating motion (no text or symbols)natural_image
Illustration of a coffee maker using a pour-over presser (no text or symbols visible)natural_image
Diagram of a granular material being poured into a container (no text or symbols)natural_image
Diagram of a mechanical device with a lever and textured component (no text or symbols)natural_image
Diagram of a mechanical device with a downward arrow indicating force or direction (no text or symbols present)ANVISNINGER:
natural_image
Illustration of a coffee maker using a lathe machine to press coffee beans (no text or symbols visible)natural_image
Illustration of a coffee maker using a pour-over machine, showing mechanical components and a rotating arrow (no text or symbols)natural_image
Diagram of a coffee maker with a handle and control panel, showing mechanical components without any text or symbols.natural_image
3D diagram of a circular mechanical component with perforated surfaces and a highlighted circular feature (no text or symbols)- Fjern drypgitteret 13.
- Løft drypskålen 12 ud opad.
natural_image
3D diagram of a robotic vacuum cleaner with two directional arrows indicating movement or force (no text or symbols present)natural_image
Diagram showing a pipe inserted into a basin with a cylindrical component inserted, indicating fluid flow or drainage (no text or symbols present)natural_image
3D diagram of a mechanical component with an arrow indicating rotation or assembly (no text or symbols)natural_image
Line drawing of a modern kitchen electric shaver with control panel and buttons (no text or symbols)natural_image
Diagram of a mechanical device with an open lid and lever mechanism, showing motion arrows (no text or symbols)natural_image
Illustration of a coffee maker using a pour-over machine, showing mechanical components and a rotating arrow (no text or symbols)natural_image
Illustration of a funnel pouring granular material into a container (no text or symbols)natural_image
Diagram of a mechanical device with a lever and textured internal component (no text or symbols)natural_image
Diagram of a mechanical device with a downward arrow indicating force or direction (no text or symbols present)NOTE:
natural_image
Illustration of a coffee maker using a lathe machine to press or brush into a pot (no text or symbols visible)natural_image
Illustration of a coffee maker using a pour-over presser with a hand operating the cup (no text or symbols visible)natural_image
Diagram of a coffee maker's side panel showing lever mechanism and control buttons (no text or symbols)natural_image
3D diagram of a circular mechanical component with perforated surfaces and a highlighted circular feature (no text or symbols)natural_image
3D diagram of a robotic device with a circular base and directional arrows indicating movement or force (no text or symbols)natural_image
Diagram showing a pipe inserted into a sink with a cylindrical component inserted, indicating fluid flow or movement (no text or symbols present)natural_image
3D diagram of a mechanical component with an arrow indicating a process or transformation, no text or symbols present.natural_image
Technical line drawing of a kitchen or shower unit with control panel and handle (no text or symbols)natural_image
Diagram showing a mechanical device with an open lid and a lever mechanism, no text or symbols presentnatural_image
Illustration of a coffee maker using a pour-overpan on a steamer (no text or symbols visible)natural_image
Illustration of a granular material being poured into a container (no text or symbols)natural_image
Diagram of a mechanical device with a handle and central component (no text or symbols)natural_image
Diagram of a mechanical device with a downward arrow indicating force or direction (no text or symbols present)MEGJEGYZÉSEK:
natural_image
Illustration of a coffee maker using a lathe machine to press coffee beans (no text or symbols visible)natural_image
Illustration of a coffee machine being poured into a pot (no text or symbols visible)natural_image
Diagram of a coffee machine with a valve and directional arrows indicating flow or movement (no text or symbols)natural_image
3D diagram of a circular mechanical component with perforated surfaces and a highlighted circular feature (no text or symbols)natural_image
3D diagram of a robotic device with two arrows indicating motion or force direction (no text or symbols)natural_image
Diagram showing a pipe inserted into a sink with a cylindrical component inserted, indicating fluid flow or movement (no text or symbols present)natural_image
3D diagram of a mechanical component with an arrow indicating rotation or assembly (no text or symbols)natural_image
Line drawing of a modern kitchen blender with control panel and buttons (no text or symbols)natural_image
Diagram showing a mechanical device with an open lid and rotating arrow, no text or symbols present8.3 Conectar e ligar/ desligar

8.5 Pré-aquecer as chávenas
natural_image
Illustration of a coffee maker using a pour-overpan over a pot, showing mechanical components and a black arrow indicating motion (no text or symbols present)natural_image
Illustration of a granular material being poured into a container (no text or symbols)natural_image
Diagram of a mechanical device with a shaft and granular component (no text or symbols)natural_image
Diagram of a mechanical device with a downward arrow indicating force or direction (no text or symbols present)NOTAS:
natural_image
Illustration of a coffee maker using a pour-over presser to press coffee beans (no text or symbols visible)natural_image
Illustration of a coffee maker using a lathe machine to press coffee beans (no text or symbols visible)natural_image
3D diagram of a circular mechanical component with perforated surfaces and a highlighted circular feature (no text or symbols)natural_image
Mechanical component diagram showing a base with internal components and directional arrows indicating movement (no text or symbols)natural_image
Diagram showing a pipe inserted into a basin with a cylindrical component inserted, no text or symbols present


- ESPRESSOMASCHINE SEMS 1350 A2 ESPRESSO MACHINE SEMS 1350 A2 MACHINE À EXPRESSO SEMS 1350 A2
- Inhalt
- HINWEISE:
- Overview
- Figure A: control elements (front panel)\*
- Thank you for placing your trust in our products!
- Symbols on your device
- Intended purpose
- Foreseeable misuse
- WARNING! Risk of material damage!
- Safety information
- Warnings
- Instructions for safe operation
- DANGER for children!
- DANGER to and from pets and livestock!
- DANGER! Risk of electric shock due to moisture!
- DANGER! Risk of electric shock!
- DANGER! Risk of injury through scalding!
- Items supplied
- Unpacking and setting up
- LED ring displays
- Preparing an espresso - the most important steps
- Preparation
- Filling the water tank
- Refilling the water
- Inserting/replacing the filter
- Inserting the filter
- Removing the filter
- Connecting and switching on/off
- NOTES:
- Rinsing the device
- Preheating the cups
- Preheating the filter and brewing head (flushing)
- Measure and tamp the espresso powder
- Preparing an espresso
- Extracting a single espresso
- Extracting a double espresso
- Tips for the perfect espresso
- Extracting hot water
- Frothing the milk
- Tips:
- Settings
- Selecting the menu
- Water hardness
- Espresso temperature
- Adjust espresso volume
- Single espresso
- Double espresso
- Reset to factory settings
- Cleaning
- After every espresso
- After frothing milk
- Drip tray
- Daily
- Steam nozzle
- Filter and portafilter
- Water tank
- Descaling
- Descaling process
- Rinsing process
- Storage and transport
- Disposal
- Packaging
- Trouble-shooting
- Technical specifications
- Symbols used
- Warranty of the HOYER Handel GmbH
- Warranty conditions
- Warranty period and statutory claims for defects
- Warranty coverage
- Excluded from the warranty are wear parts subject to normal wear and damages to fragile parts, e.g. switches, lamps or other parts manufactured from glass.
- Handling in case of a warranty claim
- Service Centre
- Supplier
- Sommaire
- REMARQUES :
- AANWIJZINGEN:
- UPOZORNĚNÍ:
- Pripojenie a zapnutie/vypnutie
- UPOZORNENIA:
- NOTAS:
- ANVISNINGER:
- NOTE:
- MEGJEGYZÉSEK:
- Conectar e ligar/ desligar
- Pré-aquecer as chávenas
Brand : SILVERCREST
Model : SEMS 1350 A2
Category : Coffee machine