
BS 1286 - Vacuum Cleaner CLATRONIC - Free user manual and instructions
Find the device manual for free BS 1286 CLATRONIC in PDF.
| Product type | Bagless cyclone vacuum cleaner |
| Brand | Clatronic |
| Model | BS 1286 |
| Power supply | 220-240 V~, 50/60 Hz |
| Nominal power | 1800 W |
| Maximum power | 2200 W |
| Protection class | II |
| Net weight | approx. 5.25 kg |
| Filtration system | Cyclone, HEPA filter, motor protection filter |
| Telescopic tube | Yes, height adjustable |
| Power adjuster | Yes, integrated into the On/Off switch |
| Included accessories | 2-in-1 crevice nozzle, floor brush, parquet brush |
| Cable rewinder | Yes, with button |
| Parking hook | Yes |
| Filter maintenance | Washable filters (HEPA filter: replace every 6 months) |
| Safety | Motor protection via protection filter; do not use without filter |
| Repairability | Repair by qualified personnel recommended |
Frequently Asked Questions - BS 1286 CLATRONIC
User questions about BS 1286 CLATRONIC
0 question about this device. Answer the ones you know or ask your own.
Ask a new question about this device
Download the instructions for your Vacuum Cleaner in PDF format for free! Find your manual BS 1286 - CLATRONIC and take your electronic device back in hand. On this page are published all the documents necessary for the use of your device. BS 1286 by CLATRONIC.
USER MANUAL BS 1286 CLATRONIC
Thank you for selecting our product. We hope that you will enjoy use of the appliance.
Symbols in these Instructions for Use
Important information for your safety is specially marked. It is essential to comply with these instructions in order to avoid accidents and prevent damage to the machine:
WARNING:
This warns you of dangers to your health and indicates possible injury risks.
CAUTION:
This refers to possible hazards to the machine or other objects.
NOTE:
This highlights tips and information.
General Safety Instructions
Read the operating instructions carefully before putting the appliance into operation and keep the instructions including the warranty, the receipt and, if possible, the box with the internal packing. If you give this device to other people, please also pass on the operating instructions.
- The appliance is designed exclusively for private use and for the envisaged purpose. This appliance is not fit for commercial use.
Do not use the appliance outdoors. Keep it away from sources of heat, direct sunlight, humidity (never dip it into any liquid) and sharp edges. Do not use the appliance with wet hands. If the appliance is humid or wet, unplug it immediately. - When cleaning or putting it away, switch off the appliance and always pull out the plug from the socket (pull the plug itself, not the lead) if the appliance is not being used and remove the attached accessories.
- Do not operate the machine without supervision. If you leave the room you should always turn the device off. Remove the plug from the socket.
- The device and the mains lead have to be checked regularly for signs of damage. If damage is found the device must not be used.
- Do not try to repair the appliance on your own. Always contact an authorized technician. To avoid the exposure to danger, always have a faulty cable be replaced only by the manufacturer, by our customer service or by a qualified person and with a cable of the same type.
- Use only original spare parts.
- Pay careful attention to the following "Special Safety Instructions".
Children and Frail Individualsi
- In order to ensure your children's safety, please keep all packaging (plastic bags, boxes, polystyrene etc.) out of their reach.
WARNING!
Caution! Do not allow small children to play with the foil as there is a danger of suffocation!
- This device is not intended to be used by individuals (including children) who have restricted physical, sensory or mental abilities and/or insufficient knowledge and/or experience, unless they are supervised by an individual who is responsible for their safety or have received instructions on how to use the device.
Children should be supervised at all times in order to ensure that they do not play with the device.
Special Safety Instructions
- Do not suck up liquids!
- Do not suck up hot ashes or pointed or sharp objects!
- Do not use the device in damp rooms!
- Never use without the filter. Check that the filter is inserted correctly!
- Hair, clothing and body parts away from the vacuum nozzle during use!
- Keep the vacuum cleaner away from sources of heat like radiators, ovens, etc..!
Overview of the Components
1 Release button for telescopic tube
2 Telescopic suction tube
3 Vacuum hose
4 Connection head of the suction hose
5 Base plate of the dust container
6 Bottom part of the cyclone unit
7 Top part of the cyclone unit
8 Cover of the cyclone unit
9 Button for opening/emptying the dust container
10 Cable winding button
11 Carrying handle and dust container handle
12 Dust container release button
13 On/Off switch with integrated suction power regulator
14 Parking hook mount
15 HEPA filter
16 Dust container with two-part cyclone unit
17 Hose connection
21 Floor nozzle (with hook (not shown))
Accessories
18 Groove and brush nozzle
19 Parquet brush
20 Lever for switching between smooth floors / carpets
Not shown:
Accessory holder
Start-up
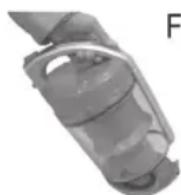
- Put the connection head of the suction hose (4) into the hose connection (17) until it mechanically engages. Simultaneously press the buttons on the connection head to do so. To detach the hose again, press the buttons again and pull the connection head out at the same time.
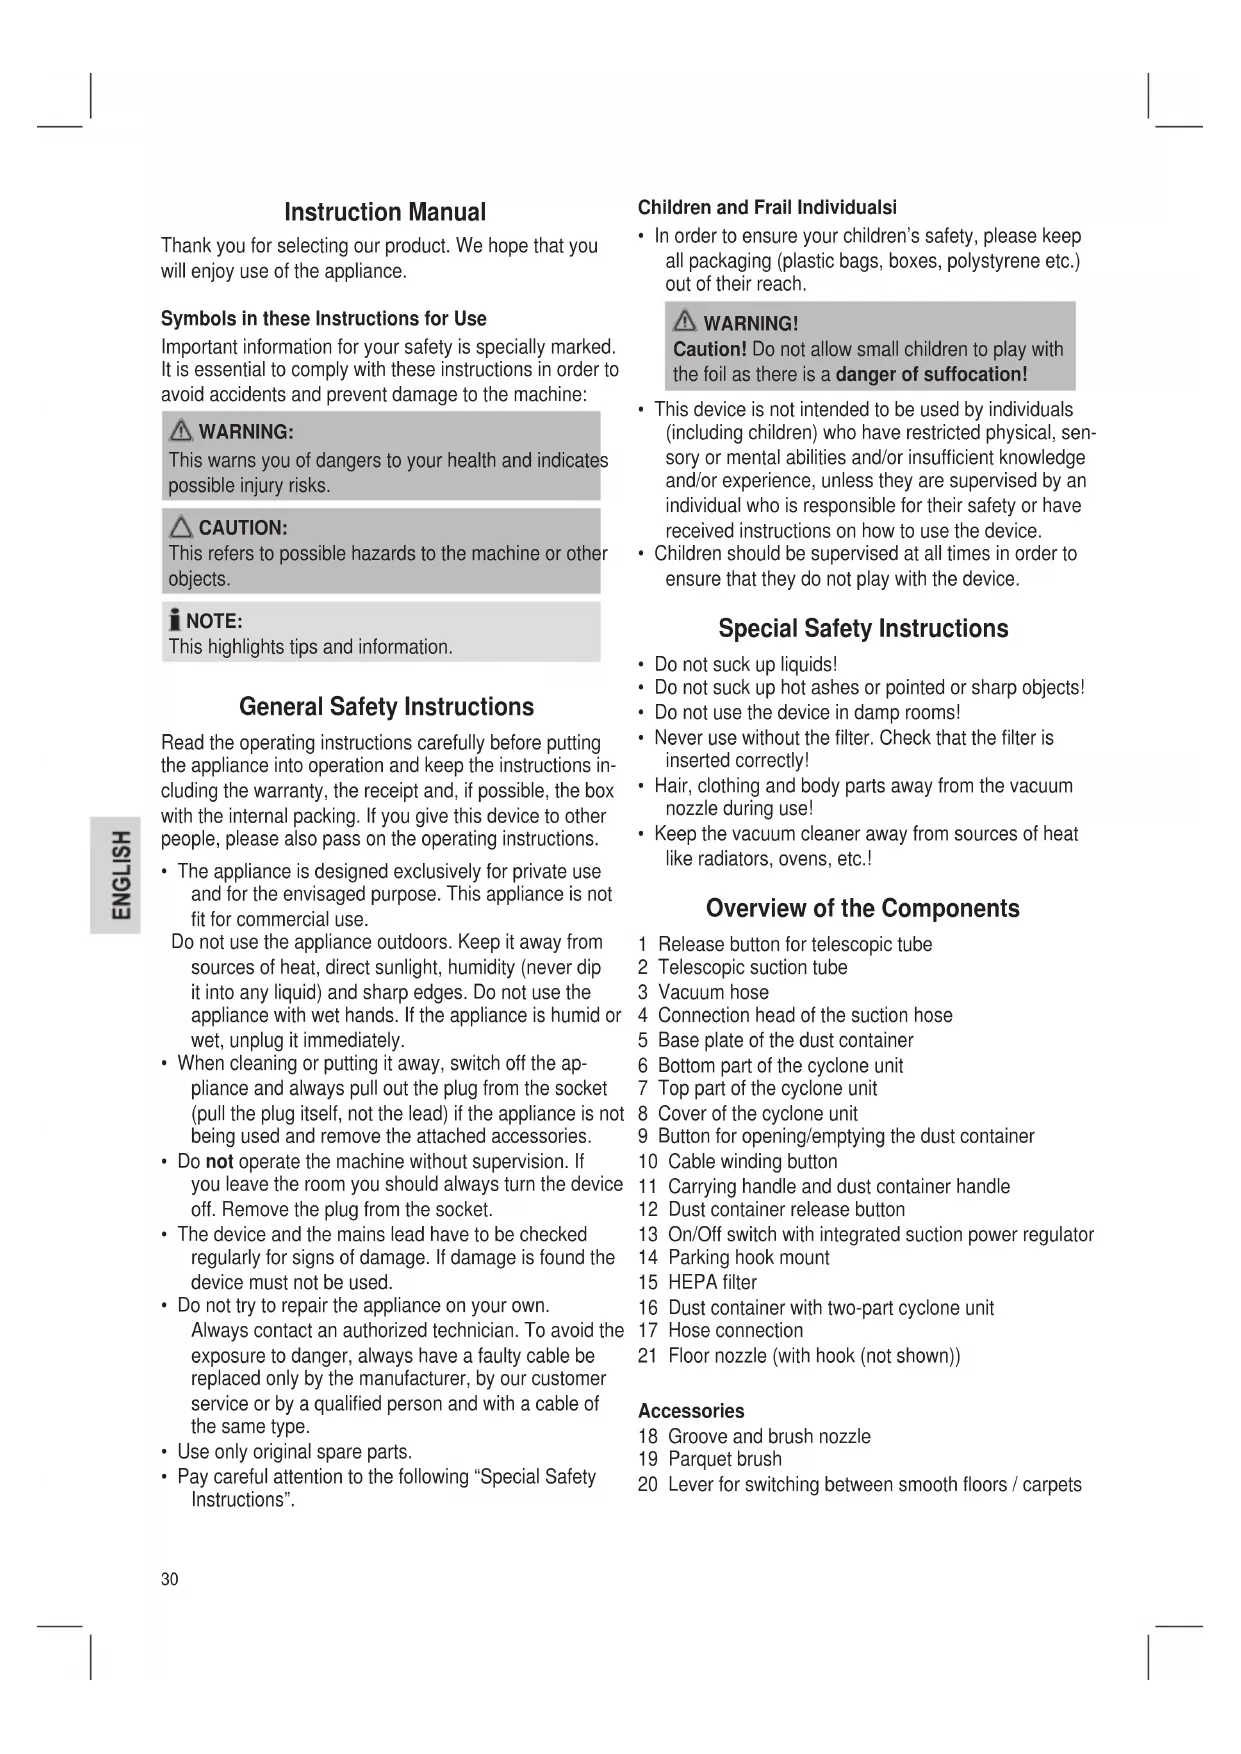
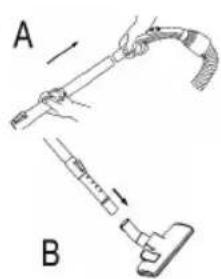
- Insert the vacuum tube into the handle if required. (Fig. A)
-
Then assemble the floor nozzle and/or the accessories. (Fig. B)
-
Fasten the accessory holder on the suction hose. Stick the crevice and brush nozzle (18) from above into the holder. You will therefore always have them ready to hand.
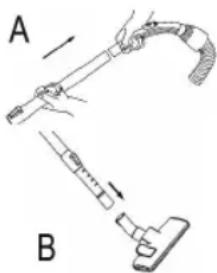
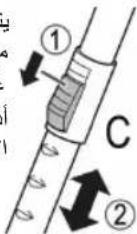
Telescope Vacuum Pipe (Fig. C)
The height-adjustable vacuum pipe enables individual alignment to your height. Unlock the coupling by pressing the key in the direction of the arrow. Slide the vacuum pipe to the desired length. To lock the device, release the key until you hear it lock in place.
Using the Appliance
- Unwind the length of cable you require.

CAUTION:
- Pull out the cable up to the maximum length indicated with the yellow mark.
- Never pull the cable out up to the red mark as the cable winding can be damaged.

NOTE:
If the red mark is visible, pull in the cable with the help of the cable winding button back to the yellow mark.
- Insert the mains plug into a correctly installed power socket. Turn the vacuum cleaner on by pressing the on/off switch down with your foot.
- A suction power regulator is integrated in the on/off switch. Turn the regulator to adjust the suction performance.
Smallest point = Minimum
Biggest point = Maximum
- Vacuum at a steady speed. There is no need to exert pressure.

CAUTION:
Pay attention to the range that can be covered with the cable length!
Vacuum power regulator
Low vacuum power: For curtains and delicate fabrics.
Medium vacuum
For long-pile velour carpets and
textile flooring.
High vacuum power: For sturdy rugs and floor.
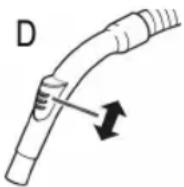
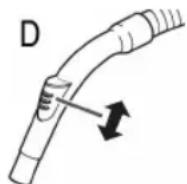
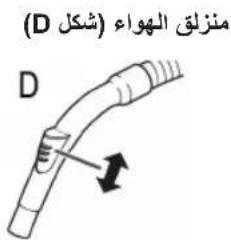
Air Slide (Fig. D)

Open the air slide on the hose handle in order to regulate the airflow or to clear any particles sticking to the nozzle.
Switching off and Winding up the Mains Lead
- Turn the vacuum cleaner off by the on/off switch and remove the plug from the socket.
- Keep the plug in your hand.
- Press the cable winding button and guide the cable. Hold the cable to avoid wrapping.
Nozzle Attachment
Crevice and jointed nozzle:
For vacuuming upholstery, curtains and in corners and crevices etc.

OTE: "2 in 1" nozzle:
When this is folded together it can be used as a groove nozzle. If you would like to use the brush nozzle, pull the brush section in the direction of the arrow until it locks in place.
Floor nozzle:
The floor nozzle is fitted with rollers for improved manoeuvrability.
To clean carpets or smooth surfaces
- Smooth
Press your foot onto the brush symbol
floors:
of the lever (20). The brushes are now visible.
- Carpet: Use your foot to switch the lever to the
symbol. The brushes are
now retracted.
Parquet brush:
For large areas such as parquet, laminate or tiles etc.
Releasing the nozzles:
Pull these off while turning slightly.
Maintenance
Filter
Your machine has five filter systems. The traditional dust bag system has been replaced by a transparent dust container. In this, coarse dirt particles and tiny particles floating in the air are swirled out of the suction air by the high speed of the air current.
It is therefore unnecessary to buy dust bags.
Emptying the dust container
You can easily recognize when the transparent dust container must be emptied:
Turn the device on with the on/off switch. If the dust is whirled up to the lower edge of the perforated surface of the cyclone unit, empty the dust container.
Proceed as follows:
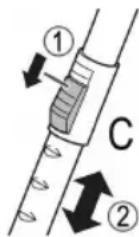
- Remove the mains plug from the socket.
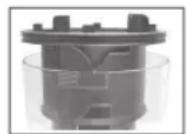
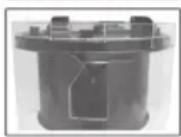
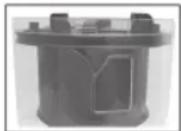
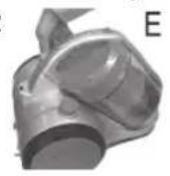
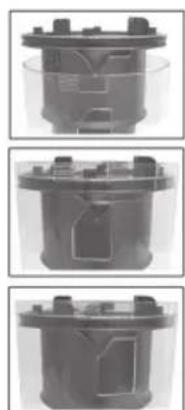
E 2. Press the button (12) to release the dust container and remove the dust container (Fig. E).
F 3. Hold the dust bag over a rubbish bin. Empty the contents of the dust bag. To do so, press the button for the opening / emptying of the dust container (9) (Fig. F).
- Close the base plate again so that it is heard to lock into place.
- Place the dust container back into the device, with the lower side first. Press the dust container downwards. The hook on the rear side of the dust container has to engage audibly.
- Check the firm fit of the dust container by briefly lifting the device by the carrying handle (11).
Cleaning the filter (Cyclone unit)
- Empty the dust container as previously described.
- Unlatch the cover (8) of the dust container. Twist it counter-clockwise in the "release" direction. Remove the lid.
- Remove the motor protection filter and clean it by shaking it out. In case of heavier soiling wash it out as described below.
-
Unlatch the cyclone unit. Twist it counter-clockwise in the "release" direction. Pull the cyclone unit out of the dust container.
-
Hold the cyclone unit so that the perforated top part (7) is showing downwards. Twist the bottom part (6) of the cyclone unit off in counter-clockwise direction.
- Empty the content of the top part into a garbage can.
- Reassemble the two parts of the cyclone unit. Set the locking tab of the bottom part into the guide of the top part. Firmly tighten the parts up to the stop.
-
Place the cyclone unit back into the dust container. Observe the illustrations on the left. Hold the dust container so that you can see the opening of the air outlet in front of you. Press the locking tabs of the cyclone unit into the recesses of the dust container. Tighten the cyclone unit in the direction "lock" up to the stop.
-
Place the motor protection filter into the dust container. While doing so, look for the arrow markings on the cyclone unit and on the motor protection filter. Place the areas that are marked with the arrows above each other.
-
Place the lid onto the dust container so that the arrow on the cover points to the symbol "open lock" on the dust container. Press the locking tabs of the cover into the recesses of the dust container.
- Tighten the lid in clockwise direction. The arrow on the lid must be located above the symbol "closed lock" on the dust container.
- Place the dust container back into the device. The hook on the rear side of the dust container must audibly engage.
- Check the firm fit of the dust container by briefly lifting the device by the carrying handle (11).
Motor protection filter (in the dust container)
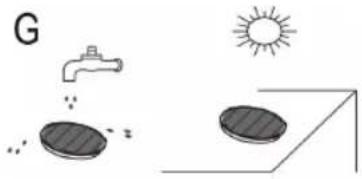
Every third time the dust container is emptied, or in the case of severe soiling, clean the filter by allowing water to flow through the filter fabric against the direction in which the vacuum cleaner blows.
You can remove the foam and wash it separately with clear water.
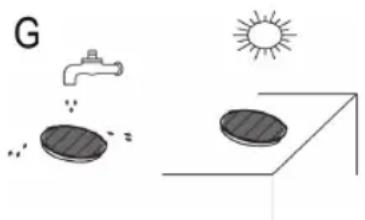
Allow the foam and the fleece filter to dry completely in the open air. Place the foam back onto the fleece filter before you insert the motor protection filter into the dust container.

CAUTION:
Never wash the filter in the washing machine, and please do not use a hairdryer to dry it.
HEPA filter (15)
Your appliance also has a HEPA filter. It is located on the rear side of the device beneath the parking hook mount. In order to ensure that the filter works correctly, we recommend that you replace it every six months.
- Remove the mains plug from the socket.
- Press the lever to the left and remove the ventilation grid.
- Remove the filter insert and clean it just like the fleece filter of the motor protection filter (description see above).
- Set the filter insert back into the device in completely dried condition.
- Fasten the ventilation grid on the device. First press the lever to the left again while doing so. Release it as soon as the ventilation grid is completely mounted. It has to audiably click in.

CAUTION:
Important note!
Cleaning may become necessary after a shorter time, depending on the conditions of use, e.g. when vacuuming fine dust.
If the suction power of your vacuum cleaner diminishes please clean the filters as described.
If the suction power suddenly diminishes during operation this may be due to the filters being locked.
Cleaning & maintenance

WARNING:
- Always remove the mains lead before cleaning!
- Under no circumstances should you immerse the device in water for cleaning purposes. Otherwise this might result in an electric shock or fire.

CAUTION:
- Do not use a wire brush or any abrasive items.
- Do not use any acidic or abrasive detergents.
Clean the casing with a dry cloth.
Storage
- Let the device cool down completely.
- Wind the cable completely.
- You may use the parking hook mount (14) on the rear
side of the device once you have installed the floor nozzle (21) on the telescopic suction tube. Hang the hook of the floor nozzle into the parking hook mount.
Troubleshooting
The Device Does Not Work.
Renedy:
Check the connection to the mains.
Check the position of the switch.
The device does not suck up anything.
Possible Cause:
The suction power is set too low.
Remedy:
Check the position of the control switch.
or
Possible Cause:
The dust container or the filters are dirty.
Remedy:
Empty or clean the components.
or
Possible Cause:
There is a foreign body in the suction tube or the nozzle.
Remedy:
Check the accessories for foreign bodies.
Noise development
The sound pressure level in the ear of an operator (LpA) was measured according to DIN EN ISO 3744.
Sound pressure level detected: 83.0dB(A) (no limit)
Technical Data
Model: BS 1286
Power supply: 220 -240 V\~, 50/60 Hz
Power consumption:
P nom: 1800 W
P max: 2200 W
Protection class:
Net weight: approx. 5.25 kg
The right to make technical and design modifications in the course of continuous product development remains reserved.
This device has been tested according to all relevant current CE guidelines, such as electromagnetic compatibility and low voltage directives, and has been constructed in accordance with the latest safety regulations.
Disposal
Meaning of the "Dustbin" Symbol
Protect our environment: do not dispose of electrical equipment in the domestic waste.
Please return any electrical equipment that you will no longer use to the collection points provided for their disposal.
This helps avoid the potential effects of incorrect disposal on the environment and human health.
This will contribute to the recycling and other forms of reutilisation of electrical and electronic equipment.
Information concerning where the equipment can be disposed of can be obtained from your local authority.
Instrukcje obslugi
Regulator sily ssania
Niski stopien ssania: Do firanek, materialów delikatnych.
CTC Clatronic Sp. z o.o
TeleckoniuHa Tpy6a dna BCMOKTyBaHHa (MaI. C)

Tpy6dBcMoKtByBaHHeTeNecko-niH0IOIMOKe npNCTOCOByBaTuCAHO BaworoIHdbiy-anbHOrO3pocTy.DnnepeCyBaHHr Tpy6 cnId HATNCHTN KlaBiW B HAprrMky, 10 nokazHo CTrpinKOIO,i nepeCTaHTN Tpy6 Do IOBKnHN, 10 Bam notpi6Ha. Dn6bOKyBaHHr Tpy6 cnId BiDnyCTHTN KlaBiW, KnaaHnKpInHeHH O3Haue, 10 Tpy6 BCTaJIH Na Micue HaneJHKHM YINHOM.
KopncTyBaHH npHnAdom
- BntaHrHt b Ka6eB ha noBxHHy, 0o Bam notpi6Ha.
YBATA.
ДоЗВОЯБТСВИТУВАн Kaбь eNEKTPNUHoi Мереки MaKcIMaJIbHo Do JxOBToI N03HaUKN.
3a6oP0H8cBnTByBaTHKa6eJIb Do YepBoHOI N03HaKNI - CE MOKe N0WKoDHTN CnCTEmy 3MOTyBaHHa Ka6eJIIO!
IINPMMITKA.
KuO Bn noaunnyepBOHy no3HaKy,HaTNCiTB KlaBiw dnn 3MOTyBaHHKa6eIIO i BTRHITb NOro Do KOBTOI no3HaQKn.
- BCTaBte BnKy B po3eTky, 0o BiDnOBiAc BmOram 3axHcTy eNeKtpnHnx npnlaIb i Mac Hanpyry. HINO-COC BMnKaEtbcr HaTNCyBaHHM nepemHKaHa dNBA BMnKaHHra/BmMKaHHra, npnuOmy nepemHKaMuKHa HaTNCyBaTu HOHO.
- PerjTOp notyKHOCTI BCMOKTyBaHHo6'EdHaHm 3 BIMnKaHe.MnpeRyIOBaHHNoTpyKHOCTI BCMOKTyBaHHnCnId nobepHyTN peRyTOp.
HaMeHuaToUka MiHiMyM
Haibbwa toka = MaKcMym
- BeiB conIIO no niIIO3i pIBHomipHo, 6e3 HATNCKyBaHHJ.
YBAGA.
Iiuc npaui 3BepTaTe yBaIy Ha doBxHHy Ka6eIIO I He nepeBnUyTe 6e3neuHy dIy npnaNy Bi-CTaHb!
PeryJrTop iHTeHCBHOCTi BCMOKTyBaHHA
HxnnCTynihb:IaIuTOpimatepiianB,io
JIERKOMOKHNAIOUKOJNTN.
Cepedra CtyinHb: DnB BnCOKOKiCHoro
KNIMMOBOI NOKpTTI NIOI
TaIHUNX TEKCTINbHNX NOKpNTb.
BncoKa CtyiHb: JIJI MIIHHK KINIMIB i niIDnor.
3acnlnka nna nobitpa (MaI. D)
BiKpnTe 3acInkny dna nobitra Ha pyuui uHaHy, o6b BiDperyIIOBAtn Nobitp a6o BuaHITn npedmetn 3 conla.
BmHKaHHi 3MOTyBaHHKa6eJIHO
- BmHKHtB nINOCoc HaTCKyBaHHM nepemKaua DnBA MKNKaHHBmNKaHHB, BNTARHTb BNJKy 3 pO3ETKn.
- TpmaTe Bnky B pyu.
- HATNCiB KnaBiiI 3MOTyBaHHa Ka6eIIO i npITpMyIte Ka6eIb, 0o6 3a6e3neuHTn HadiH e I 6e3neue He 3MOTyBaHHa.
YcTaHObKa npHaJaHa conNo
CamaaMaJIeHbKaTouka=MHIMYM
Cama 60nbwa Touka = MaKcHMyM
4.ПоиЗВОДИТЕЧИСТКУСЮСТOrHнОСКОРСТБИ.ПиKlaDbIbA TbДaBNeHne He Tpe6yETcH.
BHIMAHNE:
Cneinte 3a nlouaabio, KOtopyo Bbl MOKeTe OXBaHTb npn daHHOn dInHe Ka6eI!
PeryJrTop MoUHcTn BCacbHaHn
Hn3ka MouHocb ⅡIa UTOHKnx TkaHeBcAcbAHN:
CpeHnMOLHOCTb IJIaBENIOPOBbIX KObPoBC BCacbIBaHr: IINHHbIM BOPCOM NTKaHeBbIX NOKpbITNI.
BbICOKaMOHOCbIINTOJCTbIXKOBPOB INNOOB. BcCabBaHH:
Pon3yHOK nIa 3anycka Bo3dyxa (Pnc. D)
IOn3yHOK dIa 3ayncKa BO3dyxa Ha pyuKe IuaHa rOtKpbIbAeTCr dIpeYIInpOBKn NOTOKa BO3dyxa IIIN dIra ydaJIeHn 3acTpRB- IxN B cONIIe npEIMETOB.
BbIKIOeHHe n CMOTKa CeTeBOrKa6eJr
- BbIKIOHTe nbIEcOC nepeKIOUaTeIeM BKIOUeHn/ BbIKIOUeHn BBHbTe BNJKy n3 pO3ETKn.
2.ДерхиTe BnIky Ka6eYa pyKe. - HaxMMTE KhoNkY CMOtKN Ka6eI N HAnpaBnIte Ka6eIb. PnpIepKuBaIte Ka6eIb, YTO6bl OH He 3aKpyuBaIcR.
PpHnaeraemble HacaKn
LJIeJIeBaHacaKa cCOnIOM:
ДлчNTКиOBnBKN,WTOp,yTNOB,ZeIeN TД.
I INPIMEUYAHNA: HacaKa "2B1"
B cnoxehHom noloxhen OHa moKet nCnOJb30- Batbcn KaHacadka dnn 7eNei. Korda Tpe6yETc Hacadka-TeTka, BbITAHnte Yactb CO UeTKoB HappaBLeHHn CTpeKN Do ee Kcaun.
HacaKa dna noJa:
HacaKaIJIa O6OpyIOBaHa polnKamN IJIa Lyu-We MaHeBpeHHocTn.
IIYHCTKNKOBPOB INIaIKNXIIOJOB.
-Γaikne HaKMITE HOrOHa CmBOJ ζeTKn noJIb: Ha pbUare (20).IorBraTcA ζeT-KN.
-Kobep:CnomoouHOHnpeKIOUHTe pbyar Ha CnMBOJ LcETKN BTAHyTc.
NapKeTHaH 1eTka:
Длбьши nloша徳,Taknx kak napket,laMnHaT, Kepamueckar nltka n T.Д.
CHTHe HacaDok:
CHIMaTe HacaDkn, CnerKa noBopaunBa.
06cnyKbHne
ΦnIbTp
YcTPOIcTB OHeET 5 CnCTeMb fHbTpOB. TpaNIOH-Ha CnCTeMa C NblEeBbIM MeWKOM 3aMeHeHa npO3paHbIM NblIec6OpHNKOM. B DaHHOM cnyae KpyNHbIe qactNcbl NblIN MEnKHe qACTNcbl, B3BeWeHHbIe B BO3DyXe, 3aKpyNBaOTcB bICOKOCKOPoCTHbIM NOTOKOM BCAcBiBaHOero BO3dyxa.
TakIM 06pa3OM, He HxKHO NOKyNaTB nbIeBbIe MeuKN.
OnyctoWeHne nbIecec6opHnka
OnpeDenTb, KOrda Heo6xOaMo OnopoxHnTb np03paHbI nbIeScOpHNK, Ierko:
BkIOUHTe yCTPOIcTB O C NOMOUIBO BbIKIOuATEEN. Ecnn IIbIB B3BnBAeTcK HIXHEmy KpaIO nepOpnpoBaHHoN NOBepxHOCTN UKNIOHHOY YCTaHOBKn, TO IIneC6OpHNK cNeDyET ONOPOKHNTb.
BbIOnHnTe cIeDyUoUee:
- BbIHbTe cTeByIO BnIKy n3 p03eTKN.
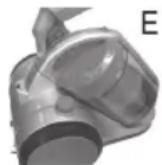
E 2. HaKMITE KhoNky (12) ДЯ OcBO-60XdEHnЯ nbIeC6OpHnka n CHMITE nbIeC6OpHnK (Pnc.E).
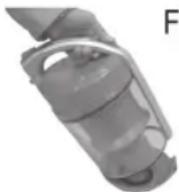
F 3. PacnoJIOXnTE nbIe6bOpHnK nAd yphoN dnn Mycopa. BItpaxnTe cOdePkmoe nbIe6bOpHnKa. YTo6bl CdeIaTb 3TO, HAnMnTe KHOINy dnn OTkpBTHn/ONopoxHeHnRA nbIe6bOpHnKa (9) (Pnc.F).
- 3akpoTe KpbIuKy nbJIeScbOpHnKa, YTO6bl 6bl Cnbl-WeH IeYOK fNkCaun.
- BepHnTe nbIeScbOpHnB yctpoiCTBO,HaunHa C HnKHe CTopoHb.IpnKMnTe nbIeScbOpHnK.KpIOK Ha 3aJHe CTOpOHe nbIeScbOpHnKa DOJKeH BOHTN B 3auePJIeHne CO 3ByKom.
- Поберп Te ПOTHOCTb yctaHOBKN nbIe6bOpHnKa, cIeRka npINODHb INp6op 3a pyuKy dIЯ nepeHocKn (11).
- YcTpoNCTBO He pa6oTaet.
- YcTpoNCTBO He BCacbBaet HnUeRo.
Bo3MOxHa npuHa: MoHOCb BCaCbBAHc CnUkOM ana.
JeIcTBnA:
PpOBepbTe noloxeHne nepeKIOUaTeNn ynpabNeHH.
NIN
Bo3MOxHa npuHa:
YnCTbI BeC: npn6.5,25 Kr
CoxpaHeNo npaBO Ha TexHnueeCKne I KOHCTpyKUHOHHbIe H3MeHeHnB pAMkax npoDoJIkaHOUsEcn pa3pa6OTKn npOdyKTa.
3To n3dJeHHe npoJIO BCE Heo6xOaMbIe I aKtyaJIbHbIe npOBepKn, npEaNcaHHbIe DnpeKTHBOI CE, K npIM. Ha 3JIeKTPo-MaHHTHyO COBMeCTHMOCt b COOTBeTCTBNE Tpe6o-BaHmK Hn3KOBoThOH TexHKe, OHO 6blNo TaKJke CkOH-CTpyHpObaHO n NOcTpoEO c yUeTOM NocJeDHNX Tpe6oBaHm IO TexHKe 6e3OnaCHOCTn.
a
BS 1286
60/50 24020
· = 0
1800
12,2200 1
II
5.25 1
y j 1
jai jai jai
aaii
aaii i aiee
AaDall 1
aalgl a
y = - ( x - 2) ^2 + 9 = - x^2 + 4x + 5
- jbiill jj jgiil jS Jaiia laia
S_ OBC = 12 · CO · BC = 12 × CD × 3
abtsclalgslslo
alil
AaBaaBaaBaaBaaBaaBaaBaaBaaBaaBaaBaaBaaBaaBaaBaaBaaBaaBaaBaaBaaBaaBaaBaaBaaBaaBaaBaaBaaBaaBaaBaaBaaBaaBaaBaaBaaBaaBaaBaaBaaBaaBaaBaaBaaBaaBaaBaaBaaBaaBaaBaaa
.
JSLy JSLI 1
jlll (14) jalil alas
Jalillll bll l (21) 1
y
Lg
Ja = 2 jb = 1
c > 1
aill jai jai jai
Laiall
:laai/
Aaisial oall aab yaaan baiil s
c > 1
aill liiae gao
山
:Jaiiaolll
A
2^l = 1
91
1
a aal baaal
c > 1
a a
gall glll ggl 11
"Jglal gl Jglal Jglal 12
gall gl jglj gl Jglal Jglal 13
glgolig Jglal Jglal Jglal 14
Jglal Jglal Jglal Jglal 15
.11
()
g 1. jlll al gll lalai liy jilll g sge ll i jil
i
(15)(HEPA) 0e aie eae ee eae eae eae eae eae eae eae eae eae eae eae eae eae eae eae eae eae eae eae eae eae eae eae eae eae eae eae eae eae eae eae eae eae eae eae eae eae eae eae eae eae eae eae eae eae eae eae eae eae eae eee
1 1
(12)jla (E
all j 1
j j 1 (F) (9)
a 4
g jaii i g aai y s jaiy siaai jai.
jaii jaii jaii jaii jaii jaii jaii jaii jaii jaii jaii jaii jaii jaii jaii jaii jaii jaii jaii jaii jaii jaii jaii jaii jaii jaii jaii jaii jaii jaii jaii jaii jaii jaii jali jali jali jali jali jali jali jali jali jali jali jali jali jali jali jali jali jali jali jali jali jali jali jali jali jali jali jali jali jali jali jali jali jali jali jali jali jali jali jali jali jali jali jali jali jali jali jali jali jali jalli
()
1
1
.1
.2
.
3
4
5
6
7
yjg jn kJLs sss y 1e aagaa gll pss Jy. jll
clk y jll aJgla glal . Jyll
jolal alglal qiaq
oasgsall gyl 1g 1
jll ayglajg 1g 1
"lock" oJg 1gKJLs sss y 1y
1
aall 1.9
g 0k 0 0 0 0 0 0 0 0 0 0 0 0 0 0 0 0 0 0 0 0 0 0 0 0 0 0 0 0 0 0 0 0 0 0 0 0 0 0 0 0 0 0 0 0 0 0 0 0 0 0 1
g aag aag aag aag aag aag aag aag aag aag aag aag aag aag aag aag aag aag aag aag aag aag aag aag aag aag aag aag aag aag aag aag aag aag aag aag aag aag aag aag aag aag aag aag aag aag aag aag aag aag aeg
a aag aal gall jia 10 10 10 10 10 10 10 10 10
1/2 1234567890
Jyogill 1
J 1
aall jaojllg jil
a 2
iJ 3
a. gali (gali)
a
"1 2" a gall: abgol
S OBC = S COD + S_ BOC
0jglialg 0jral jusilil cll sss jia ciuaa jla a
sall jrae cdoa haoal Cuiy 1
.20) eJ
j 1
a
Ig bI g aiaaai i aiaaa 11
1
aill
1
aaii aaiiaai iaiii aiai iaiai iaiai iaiai
1
1
Jzll 1
Jus 1s 1 Jus 1 Jus 1 Jus 1 Jus 1 Jus 1 Jus 1 Jus 1 Jus 1 Jus 1 Jus 1
111 1
aagjll aegs j. baiill gbsjy ciaal all Jglia glll lae iu. ciaalall jle (18) al
(CJ)
gaii aie jy kai ydi bai i jy 1 1 1 1 1 1 1 1 1 1 1 1 1 1 1 1 1 1 1 1 1 1 1 1 1 1 1 1 1 1 1 1 1 1 1 1 1 1
1.4:5 2
jie 1
1
Jbll 11 Jn Jn Jn Jn Jn Jn Jn Jn Jn Jn Jn Jn Jn Jn Jn Jn Jn Jn Jn Jn Jn Jn Jn Jn
:abla
j 1
$$ \therefore \text {a b a} \text {j i n d} = \text {g i d} \therefore \text {d i f} $$
$$ a b \overline {{a}} \overline {{b}} \overline {{a}} \overline {{b}} \overline {{a}} \overline {{b}} \overline {{a}} \overline {{b}} \overline {{a}} \overline {{b}} \overline {{a}} \overline {{b}} $$
aill 1y jia y
y = - ( x - 2) ^2 + 9 = - x^2 + 4x + 5
1
a
aiaiial biail saiuail aiai
aIbIaIbIaIbIaIbIaIbIaIbIaIbIaIbIaIbIaIbIaIbIaIbIaIbIaIbIaIbIaIbIaIbIaIbIaIbIaIbIaIbIaIbIaIbIaIbIaIbIaIb
i
Aaill Iaill aaiy
(17)jz jll (4) 10000000000000000000000000000000000000000000000000000000000000000000
Lalal
jieil plisily giaini j Jai liia i Jai ic
alssuilll cllai jga
Ie Ilaal Laiai ialeell cloglall oie Ic laoe gao p
Egoguii Caiail Ogi Jiaoyuoi jua. 1000
:
A
i
aaleal aaleal caleel
Lai Lai Jia Li Bai Jia Jia Jia Jia Jia Jia Jia Jia Jia Jia Jia Jia Jia Jia Jia Jia Jia Jia Jia Jia Jia Jia Jia Jia Jia Jia Jia Jia Jia Jia Jia Jia Jia Jia Jia Jia Jia Jia Jia Jia Jia Jia Jia Jia Jia Jia Jia Jia Jia Jia JIAJIAJIAJIAJIAJIAJIAJIAJIAJIAJIAJIAJIAJIAJIAJIAJIAJIAJIAJIAJIAJIAJIAJIAJIAJIAJIAJIAJIAJIAJIAJIAJIAJIAJIAJIAJIAJIAJIAJIAJIAJIAJIAJIAJIAJIAJIAJIAJIAJIAJIA
eannnnnns
()LolSj.8gall bia 8iillabai jaiai Jglioe (la g, g juiu g, guiuall g
1


C
CLATRONIC
INTERNATIONAL GMBH
Internet: http://www.clatronic.de

- Symbols in these Instructions for Use
- WARNING:
- CAUTION:
- NOTE:
- General Safety Instructions
- Children and Frail Individualsi
- WARNING!
- Special Safety Instructions
- Overview of the Components
- Accessories
- Not shown:
- Start-up
- Telescope Vacuum Pipe (Fig. C)
- Using the Appliance
- Vacuum power regulator
- Air Slide (Fig. D)
- Switching off and Winding up the Mains Lead
- Nozzle Attachment
- Floor nozzle:
- Parquet brush:
- Maintenance
- Filter
- Emptying the dust container
- Cleaning the filter (Cyclone unit)
- Motor protection filter (in the dust container)
- HEPA filter (15)
- Important note!
- Cleaning & maintenance
- Storage
- Troubleshooting
- The Device Does Not Work.
- The device does not suck up anything.
- Noise development
- Technical Data
- Disposal
- Meaning of the "Dustbin" Symbol
- Instrukcje obslugi
- Regulator sily ssania
- TeleckoniuHa Tpy6a dna BCMOKTyBaHHa (MaI. C)
- KopncTyBaHH npHnAdom
- YBATA.
- IINPMMITKA.
- YBAGA.
- PeryJrTop iHTeHCBHOCTi BCMOKTyBaHHA
- 3acnlnka nna nobitpa (MaI. D)
- BmHKaHHi 3MOTyBaHHKa6eJIHO
- YcTaHObKa npHaJaHa conNo
- BHIMAHNE:
- PeryJrTop MoUHcTn BCacbHaHn
- Pon3yHOK nIa 3anycka Bo3dyxa (Pnc. D)
- BbIKIOeHHe n CMOTKa CeTeBOrKa6eJr
- PpHnaeraemble HacaKn
- I INPIMEUYAHNA: HacaKa "2B1"
- HacaKa dna noJa:
- NapKeTHaH 1eTka:
- CHTHe HacaDok:
- 06cnyKbHne
- ΦnIbTp
- OnyctoWeHne nbIecec6opHnka
- BbIOnHnTe cIeDyUoUee:
- a
- aalgl a
- Lg
- ()
- Lalal
- alssuilll cllai jga
- aaleal aaleal caleel
- eannnnnns
Brand : CLATRONIC
Model : BS 1286
Category : Vacuum Cleaner