940UX - Monitor SAMSUNG - Free user manual and instructions
Find the device manual for free 940UX SAMSUNG in PDF.

Frequently Asked Questions - 940UX SAMSUNG
User questions about 940UX SAMSUNG
0 question about this device. Answer the ones you know or ask your own.
Ask a new question about this device
Download the instructions for your Monitor in PDF format for free! Find your manual 940UX - SAMSUNG and take your electronic device back in hand. On this page are published all the documents necessary for the use of your device. 940UX by SAMSUNG.
USER MANUAL 940UX SAMSUNG
USB Monitor Installation Guide
SAMSUNG
Thank you for purchasing a Samsung product.
To receive a more complete service, please register your product at
www.samsung.com/global/register
USB MONITOR INSTALLATION GUIDE
You can use this product as a monitor simply by connecting the power cable and the USB cable to your PC.
Minimum hardware requirements
- When connecting one (1) or two (2) USB monitors
Minimum hardware requirements: 1.2 GHz CPU / 512 MB memory
Display: One monitor can support DVD quality resolution in full screen mode.
( It may not support a sufficient frame speed during playback.) - When connecting three (3) USB monitors
- Minimum hardware requirements: 1.8 GHz CPU / 1GB memory
- Display: One monitor can support DVD quality resolution in full screen mode.
- (It may not support a sufficient frame speed during playback.)
- Monitor connection: Multiple screens of 6 monitors Minimum hardware requirements: 1.6 GHz Dual core CPU / 1 GB memory Display: One monitor can support DVD quality resolution in full screen mode. ( It may not support a sufficient frame speed during playback.)
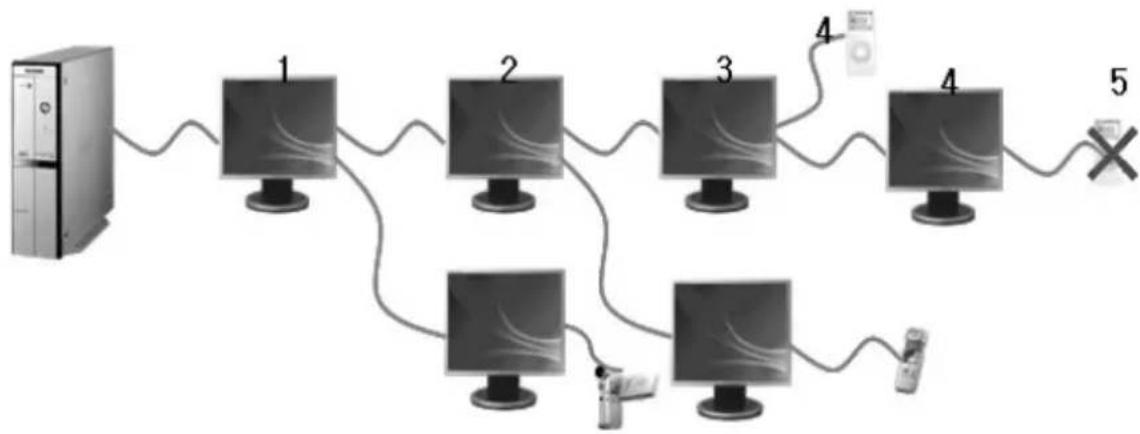
When connecting serially
You can connect up to four (4) USB monitors serially.

When connecting in parallel
You can connect up to six (6) USB monitors in parallel.
When connecting external devices to the USB monitor, you can only connect up to four (4) devices.
1_English

- Make sure to connect the USB cable and begin the installation after your PC has booted.
- The auto installation will take about one minute. If you turn off your monitor or remove the USB cable while the installation is in progress, it may cause a problem with your PC and Windows OS.
- For the recommended resolutions, refer to the user manual provided in the CD.
Installation(Auto&Manual)
-
The installation method is subject to change without prior notice for product enhancement purposes.
-
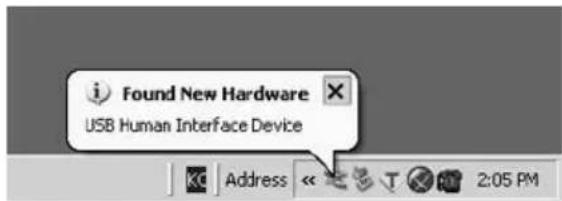
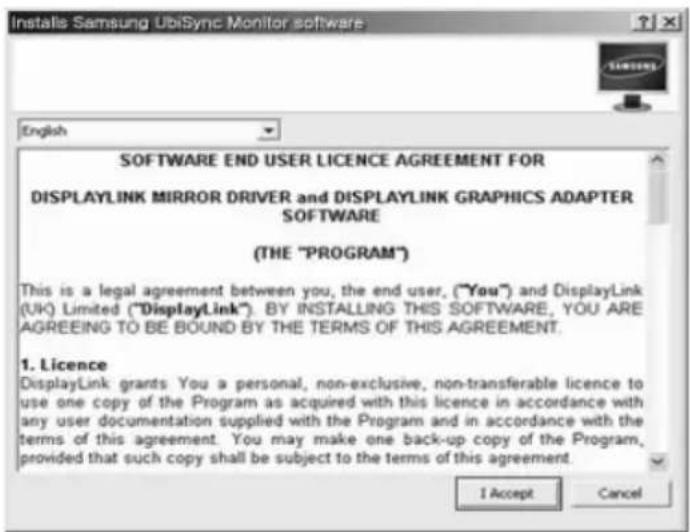
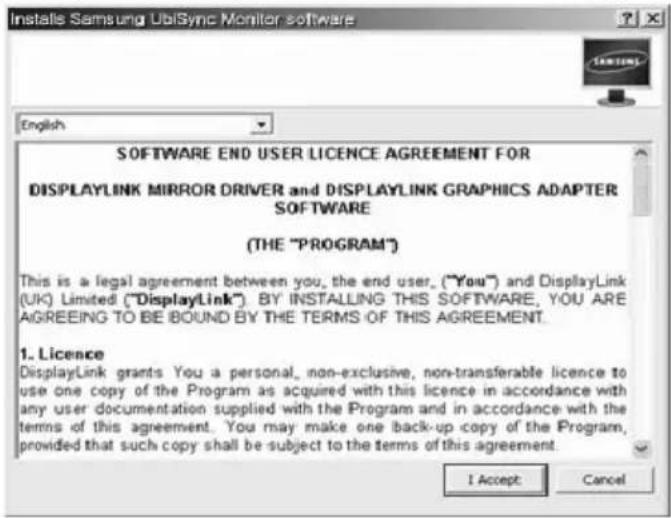
If you connect your USB monitor to your PC, it recognizes the monitor and the "Found New Hardware" wizard is displayed, as shown in the figure below.
2.Click I Accept.
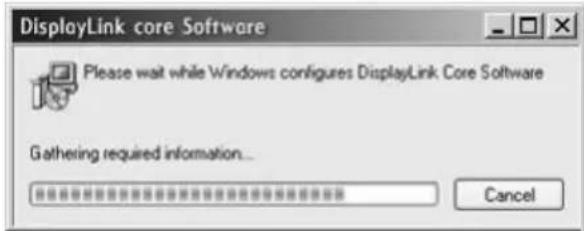
-
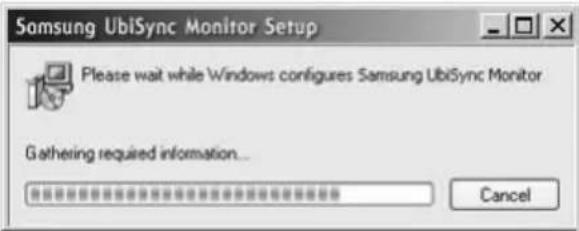
The installation is started automatically and the installation progress window is displayed, as shown in the figure below.
-
Manual Installation: If the USB driver is not installed automatically, insert the provided USB Monitor Install CD into the CD-ROM drive of your PC. Double-click 'My Computer on the Windows Desktop' and click on 'User Manual (I:)'. The volume name of the removable storage disk (for example, E:, F:, G:) may be different depending on your computer environment.
Right-click it and select 'Open' from the displayed menu. Double-click the 'Setup' file and an installation progress window is displayed, as shown in the figure below. The remaining steps are the same as for the automatic installation.
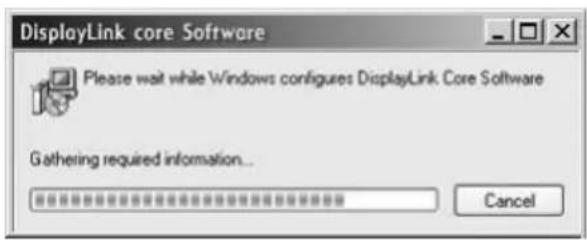
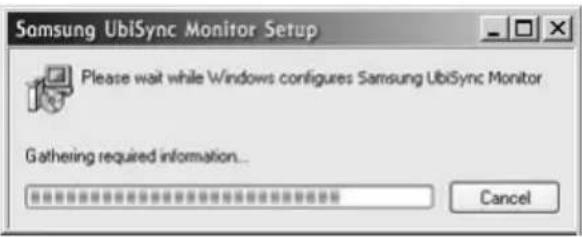
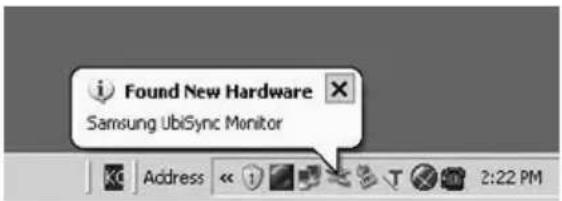
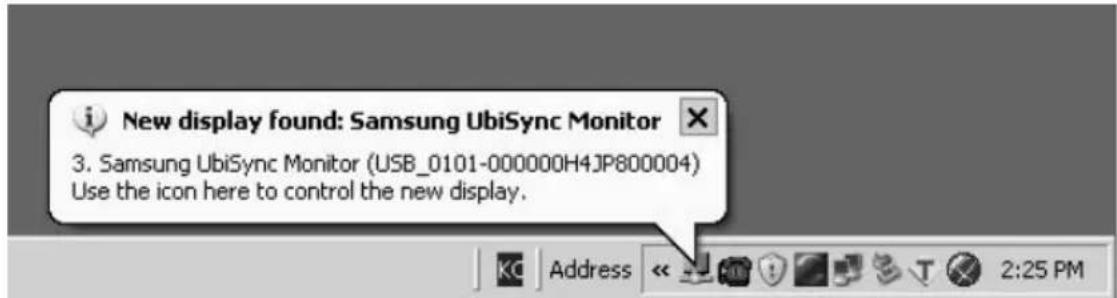
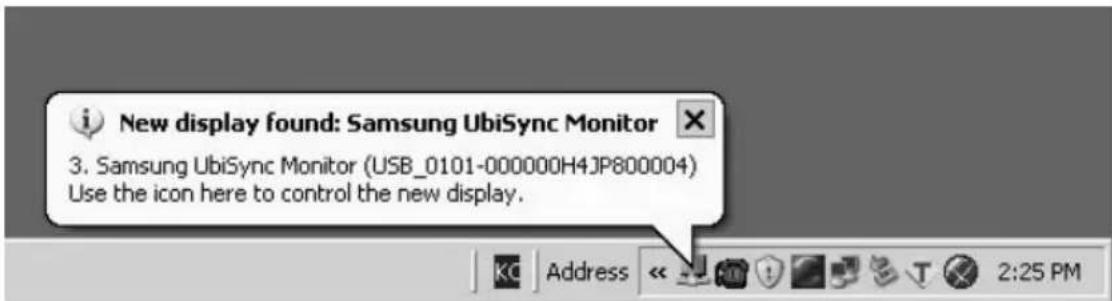
- When setup is finished, a monitor icon is created in the system tray at the bottom of the monitor screen, and the information for the installed USB monitor is displayed.
- When the installation is completed, configure the following settings to use multiple monitors.
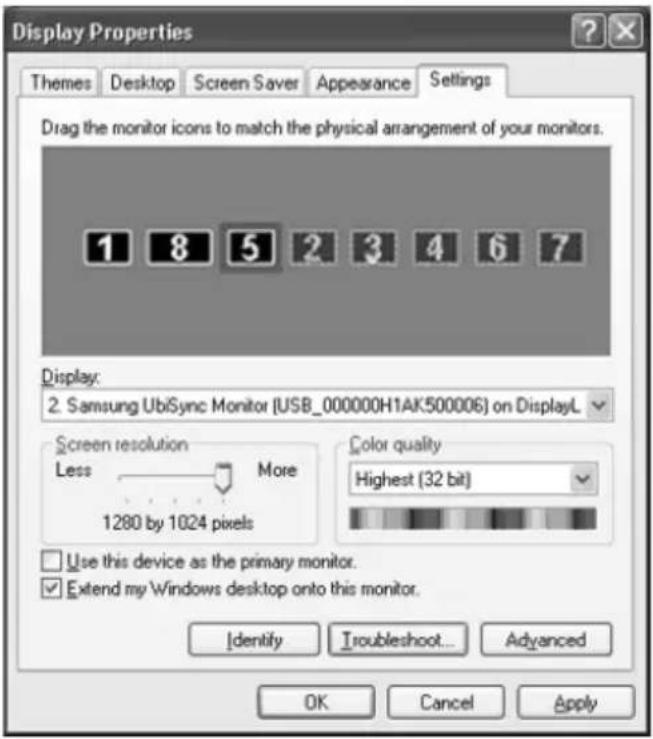
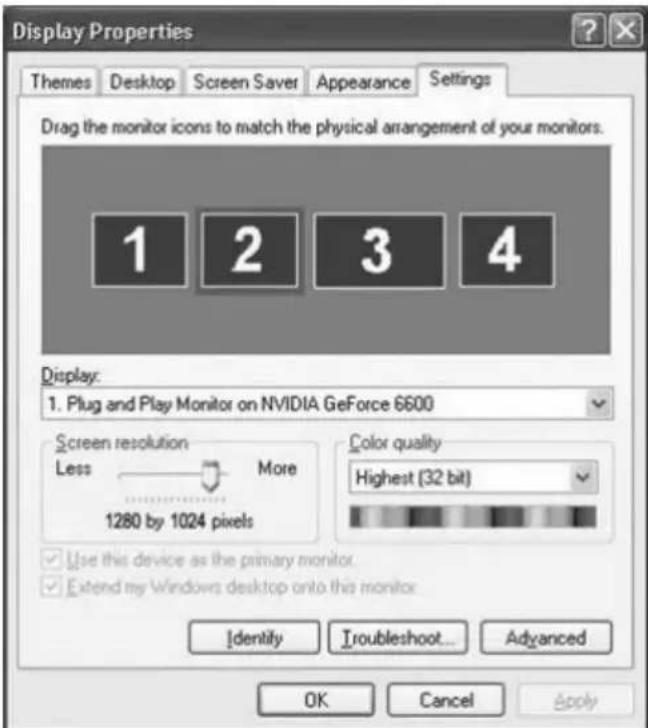
5-1. Right-click on the 'Windows Desktop' and select 'Properties' from the displayed menu. The "Display Properties" window appears.
5-2. Select the "Settings" tab. A list of connected USB monitors is displayed.

5-3. Arrange the monitors displayed in the 'Display Properties' window in the order they are actually used.
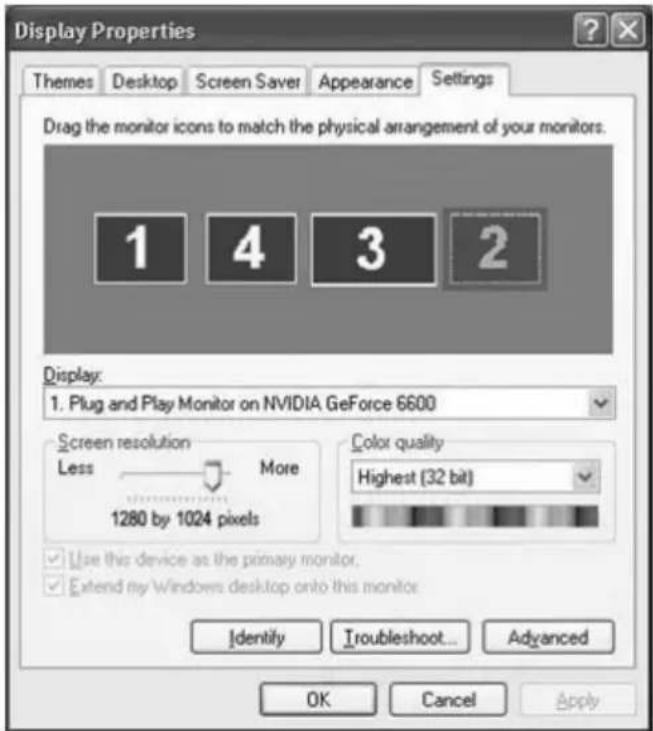
5-4. Then click "OK" button.
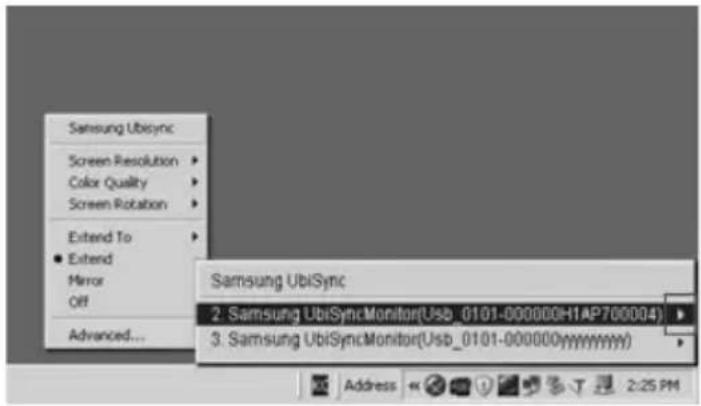
Configuring the USB Monitor Display Information
- When the driver setup for the USB monitor is finished, a monitor icon is created in the system tray at the bottom of the monitor screen.

- Click the monitor icon to display a list of connected USB monitors.
Example) The following figure shows when two USB monitors are connected.
- Select the monitor for which you want to configure the display settings. You can configure the "Screen Resolution", "Color Quality" and "Screen Rotation" settings for your monitor.
Applicable mode: Extend mode
Mode position: To the right of the primary screen
Mode rotation: 0^
USB Monitor - Limitation
Supported OS (Operating Systems)
Windows XP
- Service Pack 1 or earlier:Unsupported
- Service Pack 2 or later: Supported
Windows 2000
- Service Pack 3 or earlier: Not Supported
- Service Pack 4 or later: Supported
Windows Server 2003
-NotSupported
Windows Vista
- Supported(64bit Not Supported)

- To check the information on the operating system of your PC, right-click 'My Computer' on the 'Windows Desktop' and select 'Properties' from the displayed menu. Check the information in the 'General' tab of the 'Computer Properties' window.
Because this USB monitor is recognized as a USB device, the DOS screen that appears for general monitors when a PC is booting up is not displayed.
- If you want to use your USB monitor as the Primary Monitor, connect a D-Sub cable (for analog signals) or a DVI cable (for digital signals) as well.
You cannot use the USB monitor for software using 3D hardware acceleration.
- Real Player (Expansion mode is not supported.)
- For most 3D games
- Programs running on the base of Direct X
Supported movie programs
- Power DVD
- Win DVD(Version 5 onwards)
-VLC
This monitor does not support the MagicTune program.
- The MagicRotation function may not function normally.
- If the MagicTune program is installed on your PC, it may not be compatible with this monitor.
The USB monitor does not support the Auto Pivot function.
- The function may not be supported depending on the model. For more information, refer to the user manual.
The USB monitor turns on automatically whenever the power cord is connected.
- The function may not be supported depending on the model.
The USB monitor may not work normally with USB 1.0.
If you connect multiple USB monitors, a blank screen is displayed while your PC recognizes them.
Screens are displayed on your USB monitors after your PC has recognized them.
If the graphics card of your PC does not support WDDM, the extended mode may not be available in Windows Vista.
Example) Some versions of the Matrox Card
Check List

Before calling for assistance, check the information in this section to see if you can remedy any problems yourself. If you do need assistance, please call the phone number on the Information section or contact your dealer.
There is no image on the screen. I cannot turn on the monitor.
If you quickly and repeatedly turn your USB monitor off and on, it may not work normally.
Your USB monitor is recognized as a general USB device on your PC. Therefore, please refer to the troubleshooting information for USB devices by visiting Microsoft's customer support site.
- Right-click the My Computer and click on Properties.
- The Device Manager is displayed.
- From the "Action" menu, click "Scan for hardware changes".
- If the problem persists, you have to restart your computer.
The screen of the USB monitor freezes.
Set the 'Hardware acceleration' value to 'Full'. For more information on how to configure the settings, click here.
Set the 'Hardware acceleration' value to 'Full'.
- Right-click the 'Windows Desktop' and click on 'Properties'.
- The "Display Properties" window appears. Select the "Settings" tab and click on "Advanced".
- If the "Properties" window for your monitor is displayed, select the "Troubleshooting" tab. Move the "Hardware acceleration" slide to "Full".)
My computer is on and the LED is blinking. However, only a blank screen is displayed on the monitor.
Check whether the USB cable is connected correctly.
Connect the USB cable again.
My USB monitor is connected but the screen is blank.
Does the Auto Installation program run when your USB monitor is connected?
Check your user account in the Control Panel.
- Click Start - Control Panel - User Accounts - Change an account - Admin: Computer administrator - Change my account type. In the displayed window, Computer administrator (Power User or higher) must be selected. - For Windows XP computers.
- Set your account type as directed above.
- Then turn the Power button at the front of your USB monitor off and on or reconnect the USB cable connected to the monitor.
- If the problem persists, install the "USB Monitor Installation Driver" from the provided CD.
- For more information, refer to the Manual Installation section.
- When the installation is finished, reboot your PC.
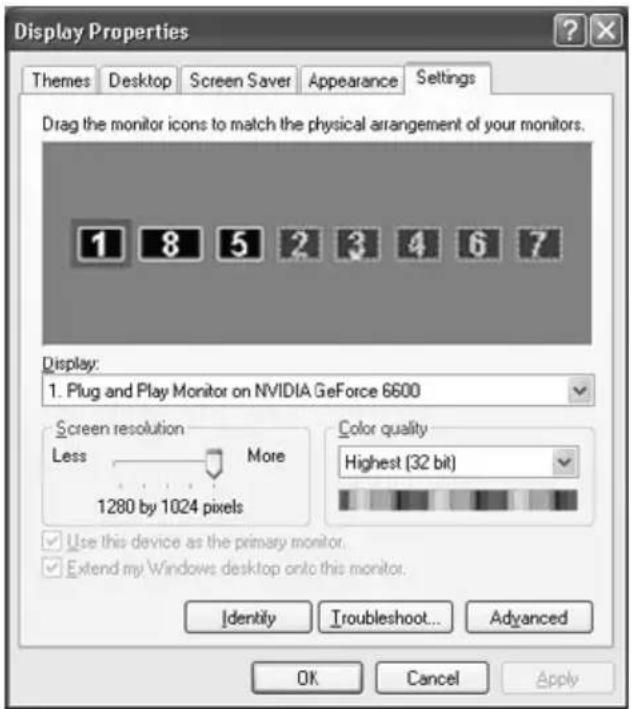
How I can clone or extend screen mode?
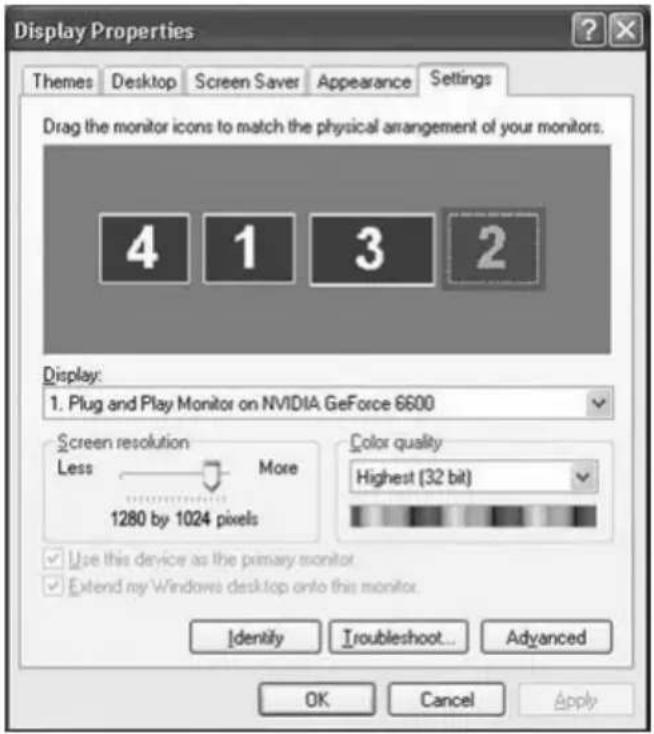
- After the automatic installation of your USB monitor is finished, right-click on the Windows Desktop and click "Properties" from the displayed menu to show the "Display Properties" window.
- Select the "Settings" tab. A list of connected USB monitors is displayed. The default mode for the USB monitor is Extended mode.
- Select the monitor to change to Clone mode.
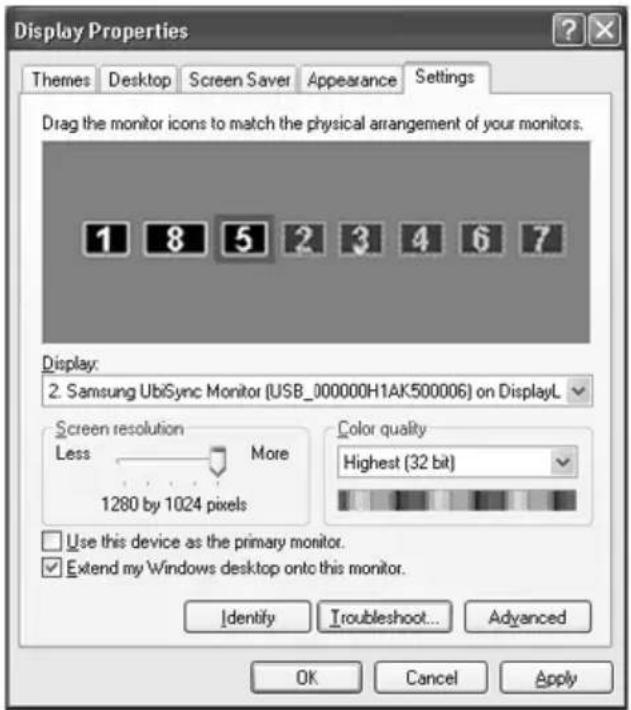
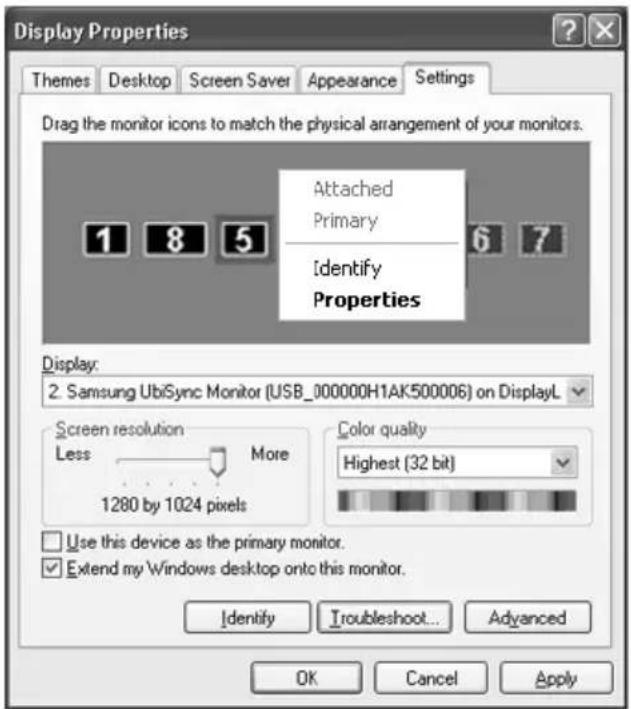
- Click the right mouse button and then click the v mark to the left of "Connection" at position 1 to remove it.(Or, remove the v mark at position 2.)
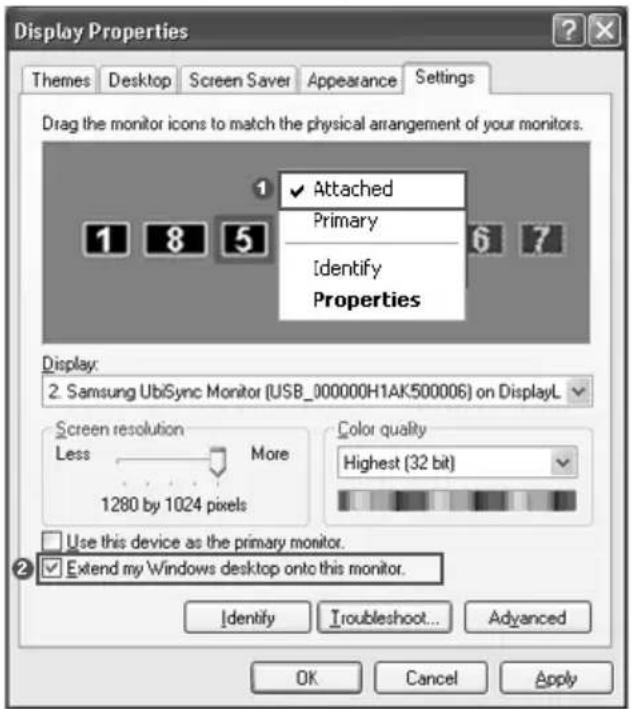
- The selected USB monitor is changed to Clone mode and is also displayed as deactivated.
How can I remove the "USB Monitor Installation Program" completely?
- Click 'Add/Remove Programs' in the 'Control Panel'. A list of 'currently installed programs' is displayed.
- Select 'Samsung UbiSync Monitor' from the list and click 'Remove'.
There is no response when I right-click "Samsung image (P:) (USB Monitor)" in the "My Computer" window and click "Eject" in the displayed menu.
Though your USB monitor is recognized as a drive by your PC, it has been designed so that the context menu usually displayed when right-clicking on the "My Computer" window does not work.
The screen size of the USB monitor is larger than the actual monitor size.
If the primary monitor has a high resolution, screens are expanded beyond the recommended resolution in Clone mode (USB monitor). (For the recommended resolutions, refer to the user manual provided in the CD.)
The screen size of the USB monitor is smaller than the actual monitor size. The screen is centered on the monitor.
If the primary monitor has a high resolution, screens are smaller than the recommended resolution in Clone mode (USB monitor). (For the recommended resolutions, refer to the user manual provided in the CD.)
I disconnected or turned off my USB monitor but my PC still displays the old monitor information in the Display Properties window.
The deactivated USB monitors are such that the power to them is turned off or their USB cables are disconnected. To remove this information, you have to remove the 'Samsung Ubisync Monitor' program from 'Add/Remove Programs' in the 'Control Panel'. If you remove the program you cannot use all the connected USB monitors. If you want to use the USB monitor again, you have to setup the installation program again.
Icons and photos are broken or jagged in Clone mode (USB monitor).
This occurs because Windows does not send the screen updating information to Clone mode if Extended mode is active on a single PC. We recommend using the monitor in Extend mode.
GUIDE D'INSTALLATION DU MONITEUR USB
2.BbIbepuTe "I accept the terms in the License Agreement" n HaxkMTe KhoNky "Next".
- ABTOMATUeCKn HaHHeTcra YCTaHOBka, n OTo6pa3NTcra OKHO BbINONHeHna YcTaHOBKn, KaK NOKa3aHO Ha pncyHke HnKe.
PyuHa yCTaHOBka: Ecn npaBep USB He 6bl yCTaHOBneH aBTOMaTueckn, BCTaBBte npnlaeraembIy YCTaHOBOUHbIK KOMNaKT-dNCK dJa MOHTOPa USB B DnCKOBOD KOMnAKTDnCKOB B KOMNbIOTepe. DBaXdbI UeKNHite My Computer on the Windows Desktop', a 3aTe HaxMnte 'User Manual (I):'. Nmra CbEMHoro DNCKA (HanpImep, E:, F:, G:) MoKeT OTnuaTbcBcB V 3aBNCIMOCTn OT KOHOFnrgpaCIn KOMNbIOTepa.
IeKHTe eropabon KhoNko Mblu N Bb6epnte Open'B OTo6paXaEMOM MeHIO. DbaXdbI
IeKHTe pain 'Setup', nocne yero oTo6pa3nTcK OKHO BbINONHeHryCTaHOBKN, KaK
Noka3aHO Ha npCuyKe Hxke. OctaJIbHbIe 7aHn aHaJOnUHbI DeiCTBnM npn ABTOMaTHueCKOyCTaHOBKe.
- No 3aBepWeHn yCTaHOBKn B nAHeJIn 3aJaU B HxKHe YacTn 3KpaHa NOrBntc 3HaQOK MOHTopa I OTO6pa3ntc INΦOpMaζησιo6 yCTaHOBneHHOM MOHTope USB.
- Nocne 3aBepWeHn yCTaHOBKn HacTpOte CJeDyUoNne npaMeTpbl DJI NcNoJb3OBaHn HeCKOJIbKnx MOHITOpOB.
5-1. Μελκητην παρον Κλόκου Μβιχι Σλαύκον Paδούγι Πθοι Windows n BbI6eριte B MeHΟ nyHKT CθοιCTBa. OTo6pa3ntc ἄκρaπ H CθοιCTBa ἄκρaHa.
5-2. Bb6epnte BknaIky NapaMeTpbl. POBNTcCnICOK NOKJIIOyeHHbIX MOHITopoB USB.
5-3. Pacnoonoknte MOHToPbI, KOToPbIe OTo6paKaIoTcB OkHe "Display Properties" (CBoiCTBa: dinpne), B ToI nocNeDoBaTeNbHOCTn, B KToPoI OH Na camOM DeIe NcNoJb3yIOtca.
5-4. 3aTeM HaxMMTe KHOKNy OK.
Hactpoika oTo6paXeHn HΦopMaun Ha MOHTope USB
MoHTop USB moXeT pa6oTaB He npnCnoJb3ObaHnn USB 1.0.
Ecnn BbINOJIHReTcnoKJIIOUeHne HeCKoJIbKnx USB-MOHHTOpOB, B TOT MOMeHT, KOrda PC
pacno3HaET nx, 6ydt OTo6paKaTbcr nycToi kpaH.
Iocne toro ka NK pacno3Haet nx, 3kpaHbI 6ydyT OTo6paKeHbI Ha USB-MOHHTopax.
Ecn rpaqnecka nata kOmnbioTepa He nopeKnaeT WDDM, paunpeHbI pexm moKeT 6bIb HeocTyneB Windows Vist.
OtcytCTByeT n3o6paXeHne Ha 3KpaHe. He ydaetcBkIIOHTb MOHtOp.
EcJIN 6bICtpo HnHeCKoJIbKO pa3 BBIKJIIOuHTb N CHOBA BKIIIOuHTb MOHITOp USB, OH MoXeT pa6OtaTb HenpaBUNbHO.
MoHntOp USB pacno3HaetcKaK obuHoe ycTpoIcTBo USB Ha KOMnbItepe PC. N03Tomy cm. CBeHeHnO o noncke u yctpaHEnn HeucnpaBHOCTe dIy ycTPOIcTB USB. Ira 3TOrO nocTeNe Be6-y3eN noDnepKKn noIb3OBaTeJe Microsoft.
- Κεικητε πραθουν Κλοπικού Μβιδην 'My Computer'(Mон кOMпьЮтep) и BBБерпге pyнкт 'Properities'(Свовсба).
- OTo6paKaetcI nIcneTuepeyycTpoiCTB.
-B MeHIO 'DcIeCTBnE' BbI6epnte 'O6HOBnTB KOHcHpyaunIO o6OpyDoBaHnI'. - Ecni npo6nema coxpaHntcra, noTpe6yeTcnape3arpy3ntb KOMnbIOTep.
I3o6paXeHne Ha 3KpaHe USB-MOHHTopa 3acTbIBaet.
OTMeTbTe 7naxKOM napaMeTp "Hardware acceleration" (AnnapaTHoe yckopeHne) nla USB -MOHTopa B OKHe "Display Properties" (CBoiCTBa 3kpaHa).
YctaHOBNTe dIy napametpa "Hardware acceleration" (AnnapaTHoe yckopeHne) 3NaYeHne "Full" (NoHoe).
- Μελκητε πραοῦ ΚΚΟΝΚΟ Μβιδη ἀν αρόθεμ ΚΤόλe Windows n BBεδεριte "CΒούχΤΑ".
- OTo6pa3ntcA kpaH 'CBoiCTBa 3kpaHa'.BbI6epNTe BknaKy 'IapamETpb' n HaxMMTe KHOIIky 'DOnoJIHnTEJIbHo'.
- Ecni OTo6pa3ntc8 OkHO 'Properties' (CBoiCTBa)ДЯ BaWero MOHITopa, BbIbePte BKNaKy 'Troubleshoot' (ПоИСи uYcTpaHene HeuCnPaBHoCTe).YcTaHOBtpe ДяnapaMeTp a'Hardware acceleration' (AnnapaTHoe yckOpHe) 3HaueHne 'Full' (Полhoe).
KoMnIbIeP BkIIOueH, a HndNkaTOp LED Muraet. OndaKo Ha MoHTope oTo6paXaETcnyctOJ 3KpaH.
PpOBepbTe npaBnIbHocTb nOcOeDnHeHHKa6EJa USB.
PoiKniOuHTe Ka6eNb USB eue pa3.
3anyckaetc Jn nporpaMa aBTOMaTHuecko yCTaHOBKn npn NOKJIooHeHH MoHtopa USB?
PpOBepbTe yUeTHyIO 3aINcB NOnb3ObaTeJI B NaHeI ynpaBJeHn.
- Haxmnte Start (Iyck) - Control Panel (Haneh ynpaBHeH) - User Accounts (UyeTHbe 3aNcN noBzOBaTeJe) - Change an account (H3MeHb yueHTHyO 3aNcB)- Admin: (AdmnHCTpaTOp:) Computer administrator (AdmnHCTpaTOp KOMbTope) - Change my account type (H3MeHb TIN yueTHoN 3aNcN). B oTo6paXaEMOM OKHe DOnJKeH 6bIt bBbpaH npaMeTp Computer administrator (AdmnHCTpaTOp KOMbTope) (Power User (OnbIHb NOnb3OBaTeH) nIn BBiue). -DJa KOMbIOTePOB C Windows XP.
- Bbiklouhnte n CHOba BkIIOHTe MOHITop USB KHOKoHa nepedne NaHeN nn OTOeHNHTe n CHOba npncoeDnHtete Ka6enb USB MOHITopa.
- Ecnn npo6nema He yctpaHeHa, ycTaHOBnTe "DpaBep ycTaHOBm MOHToPa USB" c npnlaeremo CD.
-Длг полученя дононтельногинфорmaци CM. pa3deJ "PykoBoDCTBO no yctahOBke".
-Послесаевшениya установки поразугerte PC.
Bonpocei NTBeTbi
Kak moxho kloHpoBaTb nI npacwnpntb peXm 3kpaHa?
- BbIepeHTe MOHToP dIa nepeKJIIOUeHnB peXm KNoHnpOBaHnA.