
Apollo Compact AAA AS3191 - Vacuum Cleaner SOLAC - Free user manual and instructions
Find the device manual for free Apollo Compact AAA AS3191 SOLAC in PDF.
| Brand | Solac |
| Model | Apollo Compact AAA AS3191 |
| Product type | General purpose dry vacuum cleaner |
| Technology | Cyclonic |
| Power supply | Mains (power cord) |
| Suction power | Electronically and mechanically adjustable |
| Dust container capacity | With fill level indicator |
| Filters | Cyclone filter, motor protection filter, HEPA exhaust filter |
| Included accessories | Curved hose, telescopic metal tube, universal floor/carpet brush, crevice tool, temporary stop hook |
| Features | Retractable brush, suction regulation, automatic cord rewind, horizontal parking position |
| Usage | Hard floors, carpets, rugs, furniture, fabrics |
| Maintenance | Empty dust container regularly; clean filters with water and dry completely; clean exterior with a damp cloth |
| Filter replacement | 1 to 2 times per year depending on usage |
| Safety | Do not vacuum liquids, ashes, sharp objects; disconnect before maintenance; use only recommended parts |
| Standards | Complies with directives 2014/35/EU, 2014/30/EU, 2011/65/EU, 2009/125/EC |
| Usage | Household only |
| Instruction manual pages | 64 pages |
Frequently Asked Questions - Apollo Compact AAA AS3191 SOLAC
User questions about Apollo Compact AAA AS3191 SOLAC
0 question about this device. Answer the ones you know or ask your own.
Ask a new question about this device
Download the instructions for your Vacuum Cleaner in PDF format for free! Find your manual Apollo Compact AAA AS3191 - SOLAC and take your electronic device back in hand. On this page are published all the documents necessary for the use of your device. Apollo Compact AAA AS3191 by SOLAC.
USER MANUAL Apollo Compact AAA AS3191 SOLAC
Solac is a registered Trade Mark


ESPANOL ES
- Lea Completely把这些 instrucciones antes de utiliser su aparato.
- Read these instructions carefully before using the appliance.
This manual is an integral part of the product.
Keep it in a safe place for future reference.
CAUTION
Bear in mind the warnings described below, failure to follow these warnings may cause accidents resulting in injury or damage.
GENERAL SAFETY INSTRUCTIONS
- This appliance can be used by children aged from 8 years and above and persons with reduced physical, sensory or mental capabilities or lack of experience and knowledge if they have been given supervision or instruction concerning use of the appliance in a safe way and understand the hazards involved.
This appliance is not a toy. Children should be supervised to ensure that they do not play with the appliance.
. Cleaning and user maintenance shall not be made by children without supervision.
Always unplug the appliance after use and before assembling or removing parts, and performing any maintenance or cleaning operations. Also unplug it in the case of a power cut. The appliance must be switched off before plugging or
unplugging it into the mains.
If the power cord is damaged, it should be replaced by the manufacturer or by your after-sales service shop or similar qualified personnel to prevent possible hazards.
- This vacuum cleaner belongs to the "general purpose vacuum cleaner" group, it has a brush designed for cleaning both carpets and wooden floors.
- This vacuum cleaner is a dry vacuum designed to collect only dry dirt (dust, fibres, threads).
- This appliance is exclusively for household use and not for industrial use. It is dangerous to use it for any purpose other than the one indicated (e.g. vacuuming liquids, dust from construction work, cement, etc.).
Do not make any modifications or repairs to the appliance. In the event of any anomaly in the cord or any other part of the appliance, do not use it and take it to an authorised service centre. - Do not use any parts or accessories not supplied or recommended by SOLAC.
- Do not use the vacuum cleaner to clean animals.
- Never vacuum live ash, splinters, sharp objects, or liquids.
- Never vacuum lit matches or cigarette butts.
Do not vacuum toxic material (ammonia, etc.). - Do not vacuum clean toner powder. The toner that is used in printers and photocopiers, for example, can be a conductor of electricity.
Before plugging the appliance into the mains, check that the indicated voltage is the same as in your home.
Do not use the cord to hang up the appliance. Always unplug the appliance by pulling on the plug, and not the cord. - Make sure the cord does not come into contact with sharp edges or hot surfaces.
- Do not leave the cord hanging over the edge of a table or worktop, to prevent children from pulling it and causing the appliance to fall.
Do not immerse the appliance in water or any other liquid.
ENGLISH EN
- Never handle the vacuum cleaner or the plug with wet hands.
- Do not leave the appliance plugged into the mains unattended.
- Keep your vacuum cleaner away from heat sources.
- Never use the vacuum cleaner without the dust container or the protective filters correctly fitted.
- Always keep the air intakes and outlets clear.
- Keep hair, clothes, fingers or any other body part away from the air intakes and outlets.
- Be very careful when using the vacuum cleaner on stairs.
- Do not use the appliance in confined spaces where explosive or toxic vapours can build up.
- Do not use the appliance above the height of the power cord.
- Carry out the maintenance operations indicated in the CLEANING AND STORAGE section to prolong the life of the appliance.
- Remove all elements from the inside or outside of the appliance used for protection during transport or for sales promotions, such as paper or plastic bags, plastic sheets, cardboard and stickers.
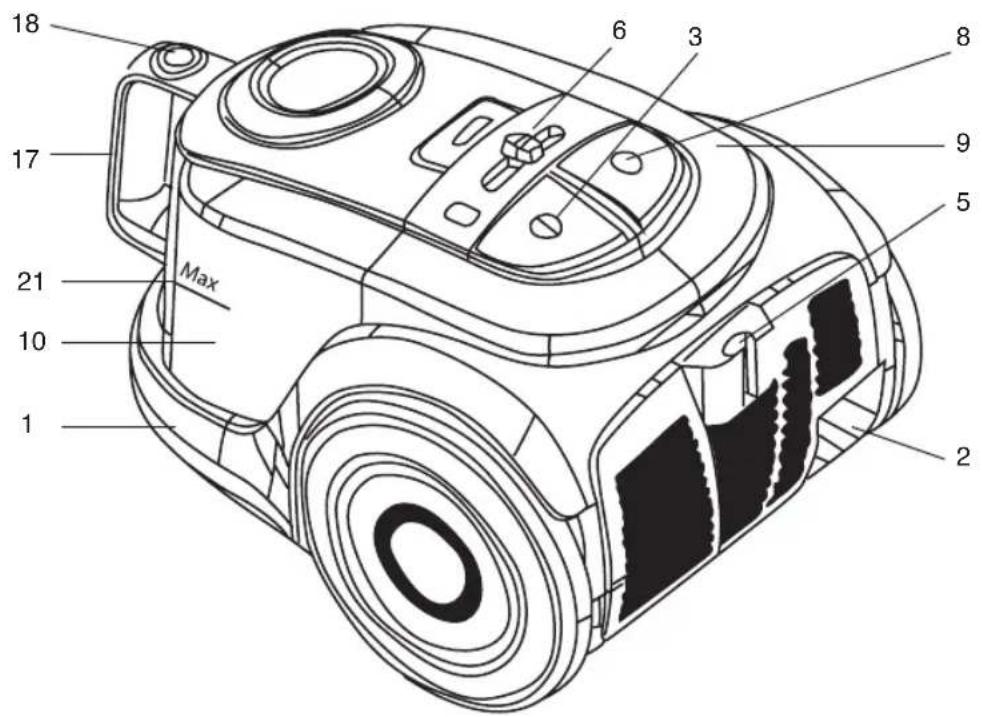
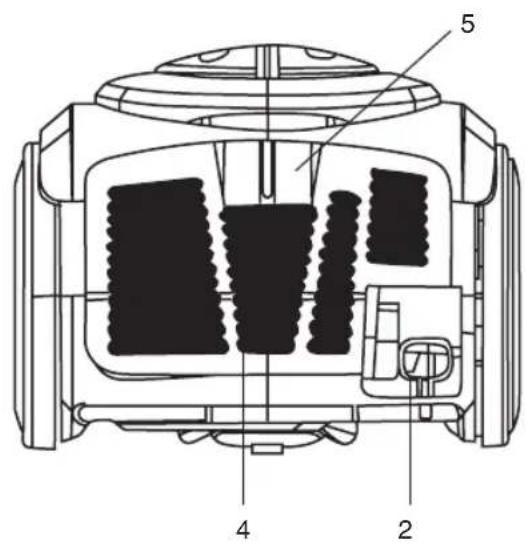
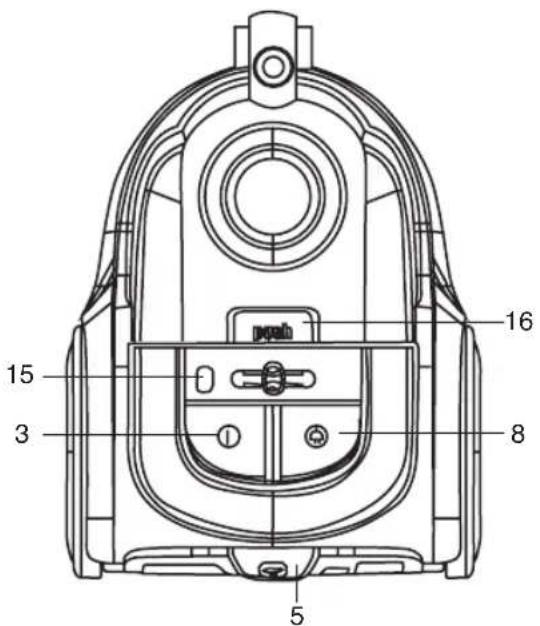
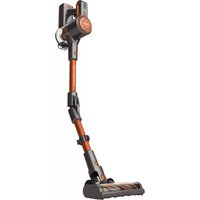
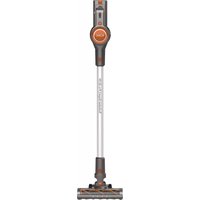
MAIN COMPONENTS
1 Main body.
2 Power cord.
3 On/Off pedal switch.
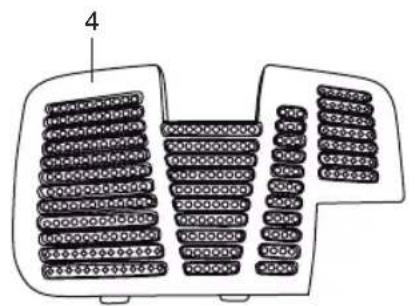
4 Air outlet filter grille.
5 Groove for attaching the brush during a temporary stop.
6 Electronic suction regulator.
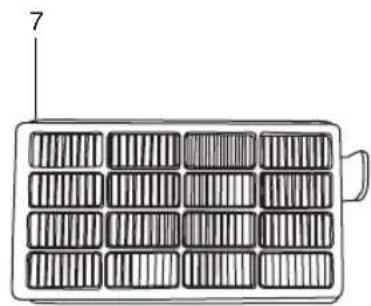
7 Air outlet HEPA filter.
8 Cord-winder pedal button.
9 Carry handle.
10 Dust container.
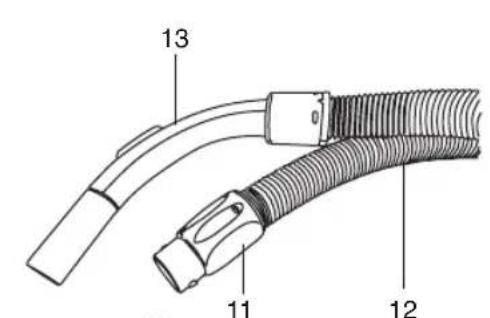
11 Flexible hose connection.
12 Flexible hose.
13 Mechanical suction regulator.
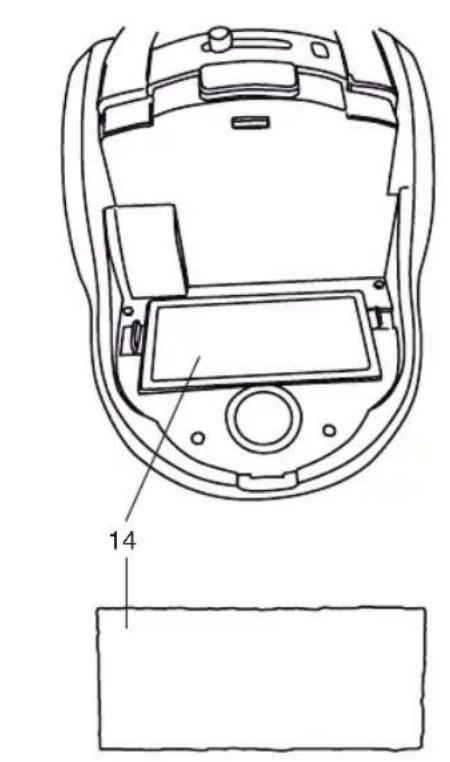
14 Motor protection filter
15 Container full indicator light.
16 Dust container removal button.
17 Dust container handle.
18 Dust container cover opening button.
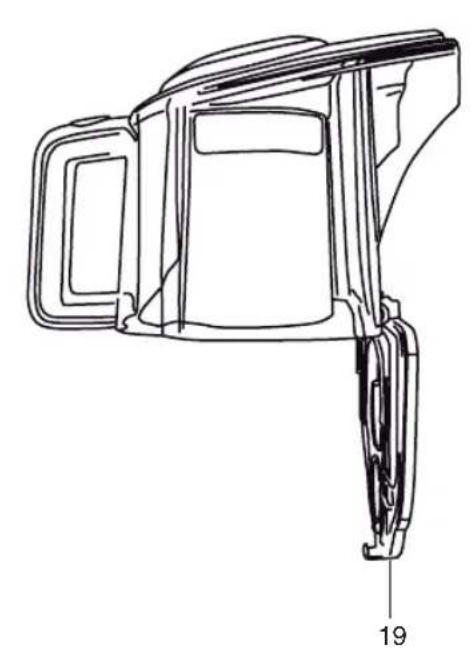
19 Dust container cover.
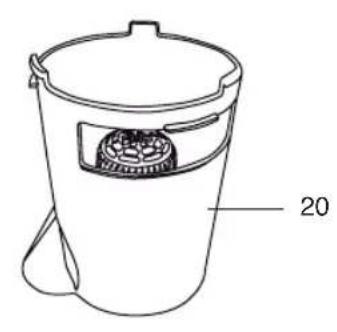
20 Cyclone filter.
21 Maximum fill level of the container.
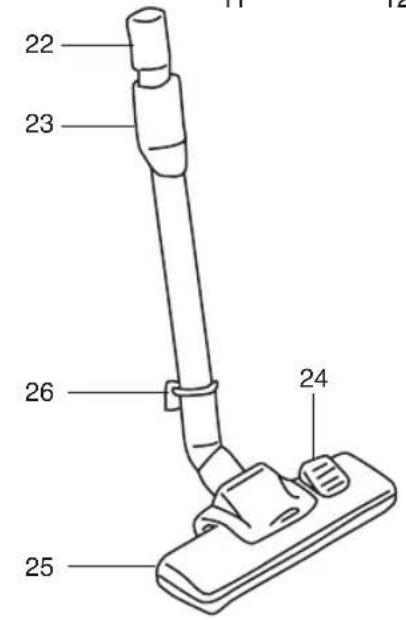
22 Telescopic metal tube.
23 Height adjustment for the telescopic tube.
24 Retractable brush button.
25 Universal floor and carpet brush.
26 Hook for temporary stop.
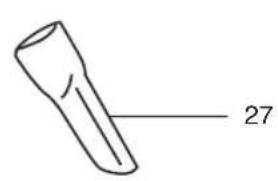
27 Suction head for vacuuming grooves and corners.
USE
CYCLONE TECHNOLOGY
Suctioned dirt enters the dust container (10) and remains in suspension thanks to cyclone technology. The dirt particles that escape from the exterior chamber of the dust container are retained by the cyclone filter (20) before going through the motor protection filter (14), thereby assuring that exhausted air is free from dust particles. This appliance has been designed exclusively for vacuuming floors, carpets, furniture and fabrics. Do not use it for any other purpose.
1 Check that the dust container (10) and the filters (20, 14 and 7) are installed correctly. See the following section (Cleaning and Maintenance).
2 Insert the flexible hose (12) at the connection (11) by turning it clockwise. Whenever you want to remove the hose, turn it counter-clockwise and pull it outwards.
3 Attach the telescopic metal tube (22).
4 Prepare the appropriate attachments for the surface you want to clean. Put the desired attachment on the telescopic metal tube (22).
Universal floor and carpet brush (25)
You can use it for all kinds of floors, given that it is retractable so that it can be adapted to the surface to be vacuumed. To change the cleaning position, press the brush button (24) with your foot. We recommend cleaning hard floors, wood and parquet with the fibre brush extended, and cleaning carpets and rugs with the fibre brush retracted.
Suction head (27)
For cleaning narrow places, grooves and corners.
You can adjust the length of the telescopic tube (22). Slide the adjustment device (23) downwards to release the top part of the tube. Simultaneously pull upwards or downwards on the top part until the desired tube length is reached.
5 Pull out the cord (2) to the yellow mark (ideal length). If necessary, the cord can be pulled out to the red mark, but not any further.


EN
6 Plug it into the mains.
7 Turn on the vacuum by pressing the pedal switch (3), and adjust the suction power by opening or closing the regulator on the handle (13). (The suction power is decreased by opening the valve, and it is increased by closing the valve). You can also adjust the suction power using the electronic regulator (6). Slide the regulator between the MIN. and MAX. positions, depending on the desired suction power.
If you hear a sharp whistling sound that is different from the normal sound when using the vacuum, turn it off and unplug it. Check to see if the air inlets and outlets or the filters are obstructed. If they are obstructed, eliminate the cause.
1 When using the vacuum, pull it behind you as if it were a cart. The handle (9) can also be used to carry the vacuum cleaner.
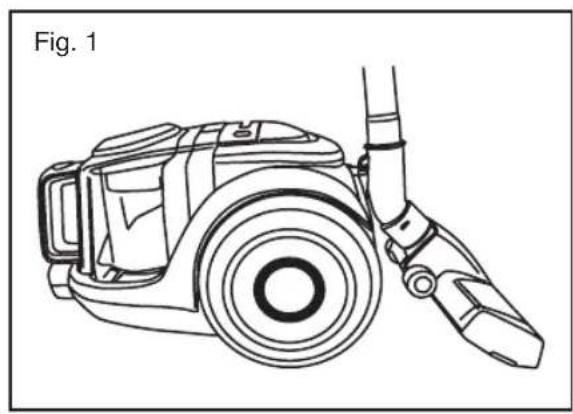
This appliance has a position called the "horizontal parking" position, which can be conveniently used during stops while cleaning. To put it in this position, insert the hook of the telescopic tube in the groove (5) of the vacuum cleaner body (Figure 1).
8 When finished, switch the appliance off by pressing the On/Off button (3). Unplug it, and press the button (8) to wind up the cord. Hold the cord plug in your hand to prevent it from banging against the vacuum cleaner housing.
CLEANING AND MAINTENANCE EMPTYING THE DUST CONTAINER (10)
1 The dust container (10) has a maximum level mark. Be sure that dirt does not exceed this level.
1 The dust container has a container full indicator light (15). Empty the dust container if this light comes on. To do so:
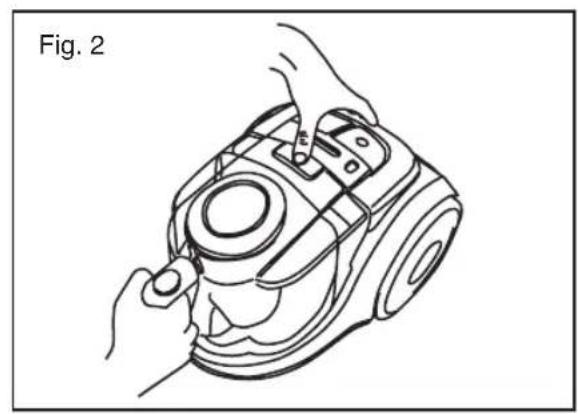
1 Pull upwards on the handle (17) while pressing the open button (16) (Figure 2).
2 Remove the dust container and hold it over a rubbish bin. Press the release button (18), and empty its contents into the rubbish bin (Figure 3).
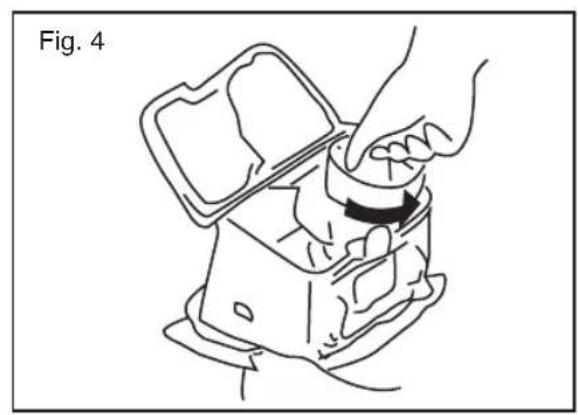
3 Remove the cyclone filter (20) from the interior of the dust container by turning it counter-clockwise (Figure 4). Empty its contents, rinse the filter with tap water, and be sure that all washed elements are completely dry before installing them again.
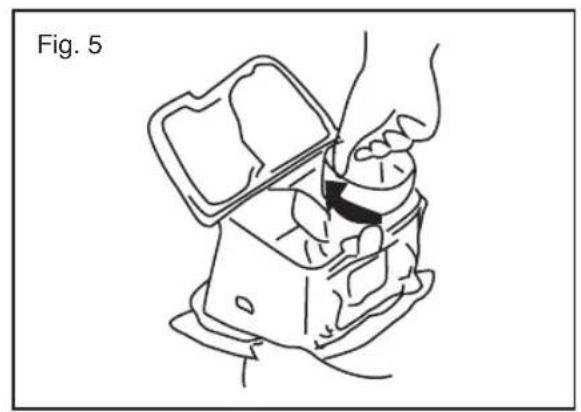
4 Insert the cyclone filter in the container, and turn it clockwise until the fastening tab is seated in the dust container (Figure 5).
5 To close the dust container, tilt the bottom cover of the container (19), and press until you hear a click, indicating that the cover is closed correctly.
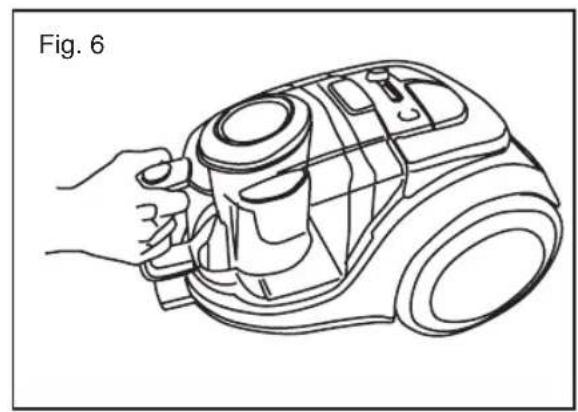
6 Place the dust container in the body of the appliance. Press on the container until you hear a click, which indicates that the container is seated correctly (Figure 6).
1 The container full pilot light (15) may come on at times if something becomes lodged in the flexible tube, suction opening or accessory. To find out if that is the case, unplug the vacuum cleaner, remove the flexible tube, and turn the vacuum cleaner on again. If the pilot light does not come on, clean the flexible tube and its attachment.
FILTER CLEANING AND REPLACEMENT
We recommend that you periodically check the air filters to make sure that they work correctly. Clean the filters if you detect that the appliance's suction capacity has decreased.
Clean the filters using tap water, and allow them to dry completely. Do not use a hair dryer to dry the filters.
It is advisable to replace the filters once or twice a year, depending on how often the appliance is used.
HEPA Air outlet filter (7)
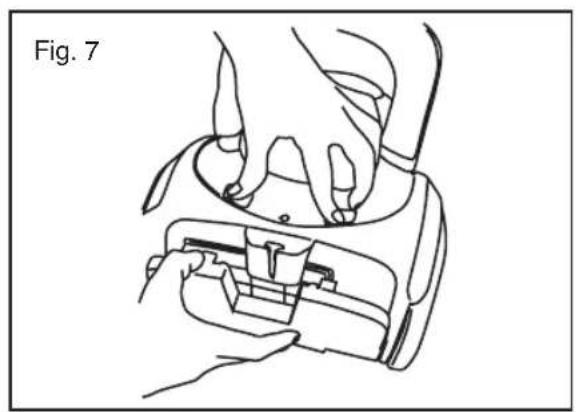
1 Remove the HEPA air outlet filter cover (4) by pressing on the two buttons of the top (fig. 7).
2 Remove the HEPA outlet filter (7) from its housing to clean it.
3 Put the filter back in after it is clean.
4 Put the cover back in place. To do so, align the tabs on the air outlet filter cover with the holes located in the bottom of the vacuum cleaner; press down on the filter cover until you hear a click.
1 Never use the vacuum cleaner without the air outlet filter.
Motor protection filter (14)
1 Empty the dust container before cleaning the motor protector filter. See "Emptying the dust container (10)".
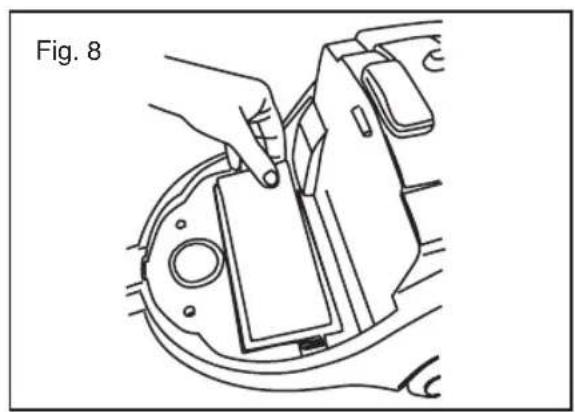
1 Remove the dust container.
2 Remove the filter by pulling the top upward (Figure 8).
EN
3 Shake the motor protector filter over a rubbish bin, and bang it gently against the sides of the bin until no more dust falls off.
4 Rinse the motor protector filter in warm water, and allow it to dry completely.
CLEANING THE APPLIANCE
Before cleaning the appliance, unplug it from the mains. Check that no water gets into the appliance.
Clean the appliance before using it for the first time, immediately after each use and after not using it for a long period of time. You will thus ensure the correct operation of the appliance and prolong its useful life.
1 Clean the outside of the appliance with a damp cloth. Do not use any abrasive products or solvents.
CAUTION! When you want to dispose of the appliance, NEVER throw it in the rubbish bin. Take it to the CLEAN POINT or waste collection centre closest to your home for processing. You will thus be helping to take care of the environment.
ECOLOGICAL DESIGN
INFORMATION ON COMPLIANCE WITH ECOLOGICAL DESIGN REQUIREMENTS
- This vacuum belongs to the "general purpose vacuum cleaner" group: It has a brush designed for cleaning both carpets and wooden floors.
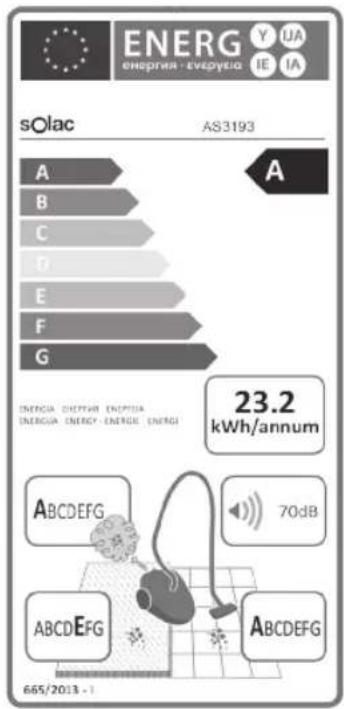
- This vacuum cleaner meets the ecological design requirements as set out in Annex I of the EU regulation (666/2013) through which directive 2009/125/EC applies.
European standards EN 60312-1, EN 60704-2-1 y EN 60335-2-2 are referenced in order to determine compliance with the ecological design requirements and to calculate the energy labeling parameters. - The indicative annual energy consumption (kWh per year) calculated on the basis of 50 cleaning sessions. Actual annual energy consumption will depend on how the appliance is used.
This appliance complies with Directive 2014/35/EU on Low Voltage, Directive 2014/30/EU on Electromagnetic Compatibility, Directive 2011/65/EU on the restrictions of the use of certain hazardous substances in electrical and electronic equipment and Directive 2009/125/EC on the ecodesign requirements for energy-related products

FRANÇAIS FR
Ochranny filter motora (14)
Pred cistenim Ochranny filter moto
SK
jaii iiaai jie aill gaii daiyai yai 50 wai ie (gaii kaiu baiy) aiai
E 1001/654 EU/2014/30 4 EU/2014/35
Ae 1209/125

AR
(2) (16) 15
(35) 2444444444444444444444444444444444444444444444444444444444444444444
1 20 (20)
1
(5) 100000000000000000000000000000000000000000000
(6)
A
1
yaii iaii iiaipiaipiaipiaipiaipiaipiaipiaipiaipiaipiaipiaipiaipiaipiaipiaipiaipiaipiaipiaipiaipiaipiaipiaipiaipiaipiaipiaipiaipiaipiaipiaipiaipiaipiaipiaipiaipiaipiaipiaipiaipiaipiaipiaipiaipiaipiaipiaipiaipiaipia
jaii piaiai ci jie cia i jy jy jiy jiy jiy jiy
(7) 12 的
(7) (4)
aaii 7)
AaBui 4uS u jilu 3
Jzll Jzla Jzla pae Jzla Jzla Jzla Jzla Jzla Jzla
y 1
1
图
y
AR
1
aagaaalgagagaii
j 10) j 10
jll 14) jgall
()y(71420)(10)
1 2
(22) 3
(25) 14
(25) a
aai (24) 1j jie biu iuii iuii iuii iuii iuii iuii iuii iuii iuii iuii iuii iuii iuii iuii iuii iuii iuii iuii iuii iuii iuii iuii iuii iuii iuii iuii iuii iuii iuii iuii iuii iuii iuii iuii
ylll lal baaa y aaiy y aaiy y aaiy y aaiy
(27)
yj jg jg jg jg jg jg jg jg jg jg jg jg jg jg jg jg jg jg jg jg jg jg jg jg jg jg jg jg jg
1
1
15 15
6
1 7
(panal)
8JgJlaljI jnJnJnJnJnJnJnJnJnJnJnJnJnJnJnJnJnJnJnJnJnJnJnJnJnJnJnJnJnJnJnJnJnJnJnJnJnJnJnJnJnJnJnJnJnJnJnJn
jglally jgaly y gaj no slll jiebai aaiy aai jgi jia
a
Ailuy, yolal Laiy, ydi, Sbiu luy, ldy
(..y) 1 y
y
aaiy
what we do, we do well
Espanol / ES
English / EN
Français / FR
Deutsch / DE
Portugues / PT
Italiano / IT
Nederlands / NL
Cesky/CS
Polski / PL
Slovenský / SK
Magyar/HU
6bIrapc / BG
Româna / RO

Model: AS3193
Rated Power: 220-240V~
50/60Hz
600W
www.solac.com


- ESPANOL ES
- CAUTION
- GENERAL SAFETY INSTRUCTIONS
- ENGLISH EN
- MAIN COMPONENTS
- USE
- CYCLONE TECHNOLOGY
- Universal floor and carpet brush (25)
- Suction head (27)
- EN
- CLEANING AND MAINTENANCE EMPTYING THE DUST CONTAINER (10)
- FILTER CLEANING AND REPLACEMENT
- HEPA Air outlet filter (7)
- Motor protection filter (14)
- CLEANING THE APPLIANCE
- ECOLOGICAL DESIGN
- FRANÇAIS FR
- Ochranny filter motora (14)
- SK
- AR
Brand : SOLAC
Model : Apollo Compact AAA AS3191
Category : Vacuum Cleaner