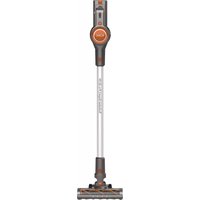
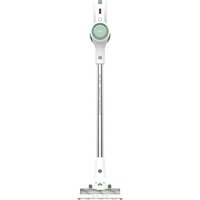
Turbobat Digital Flex 29.6V AE2515 - Vacuum Cleaner SOLAC - Free user manual and instructions
Find the device manual for free Turbobat Digital Flex 29.6V AE2515 SOLAC in PDF.
| Product Type | Cordless Stick Vacuum |
| Brand | Solac |
| Model | Turbobat Digital Flex 29.6V AE2515 |
| Rated Voltage | 29.6 V |
| Battery Type | Rechargeable Lithium-ion |
| Runtime (estimated) | Variable depending on speed, up to 40 min |
| Charging Time | Approximately 4 to 5 hours (first charge 6 hours) |
| Suction Power | 2 speeds (MIN/MAX) |
| Filter Type | HEPA (motor filter and exhaust filter) |
| Dustbin Capacity | Approximately 0.6 L (estimate) |
| Usage Modes | Stick vacuum, hand vacuum |
| Included Accessories | Spiral motorized brush, crevice tool and furniture brush, extra-long crevice tool, flexible hose (Flex), wall mount with charging base |
| Flexible Hose | Yes, foldable tube for hard-to-reach areas |
| Weight (estimated) | Approximately 2.5 kg |
| Dimensions (L x W x H) | Approximately 25 x 20 x 110 cm (assembled) |
| Noise Level | Not specified, approximately 75 dB (estimate) |
| Filter Maintenance | Wash with water and air dry, replace every 50 hours |
| Battery Charge Indicator | 3 LED lights on the body |
| Wall Mount | Yes, with integrated charging base |
| Warranty | Complies with current legislation, Solac technical support |
Frequently Asked Questions - Turbobat Digital Flex 29.6V AE2515 SOLAC
User questions about Turbobat Digital Flex 29.6V AE2515 SOLAC
0 question about this device. Answer the ones you know or ask your own.
Ask a new question about this device
Download the instructions for your Vacuum Cleaner in PDF format for free! Find your manual Turbobat Digital Flex 29.6V AE2515 - SOLAC and take your electronic device back in hand. On this page are published all the documents necessary for the use of your device. Turbobat Digital Flex 29.6V AE2515 by SOLAC.
USER MANUAL Turbobat Digital Flex 29.6V AE2515 SOLAC
Turbobat Power 29.6V Turbobat Digital Flex 29.6V
ES. Instrucciones de uso
EN. Instructions for use
FR. Mode d'emploi
PT. Instruções de uso
IT. Istruzioni per l'uso
CA. Instruccions d'us
DE. Gebrauchsanleitun
NL. Gebruiksaanwijzing
RO. Instruetioni de'utilizare
PL. nstrukcja obslugi
BG. INHctpyKzna 3aynoTpe6a
EL. Odyiecs xphons
CS. Navod k pouziti
AR.
sOlac
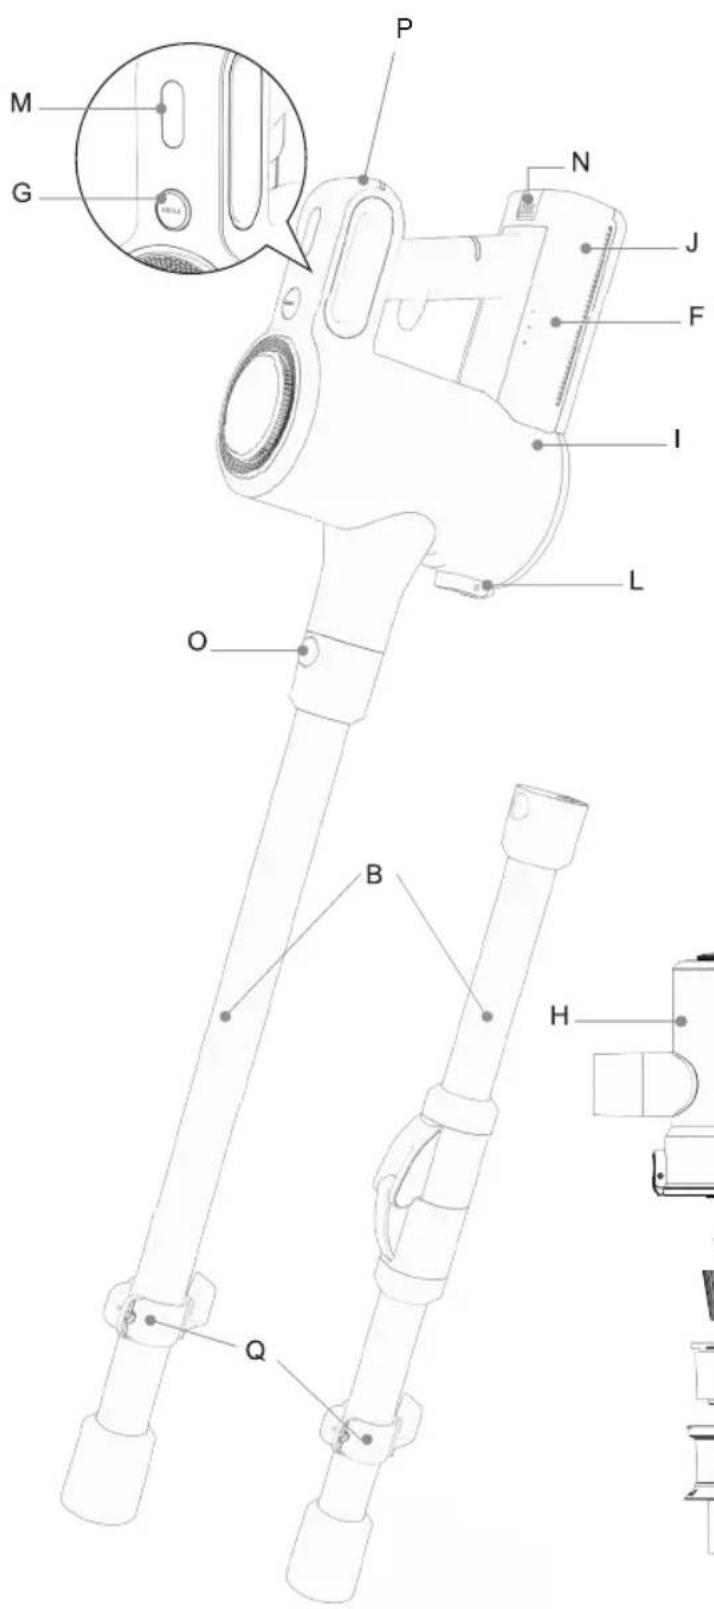

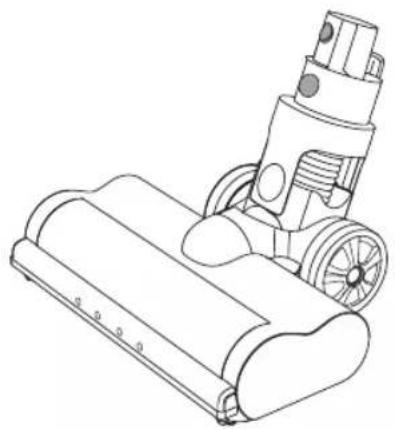
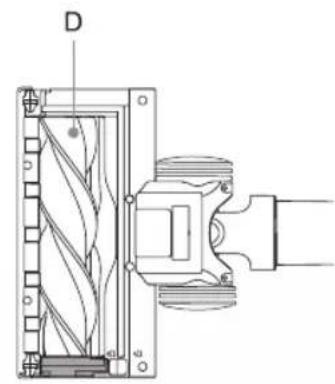
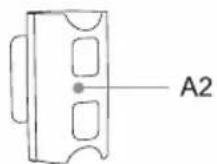
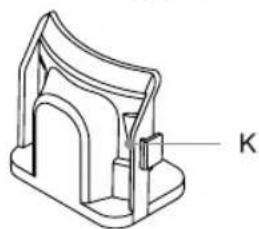
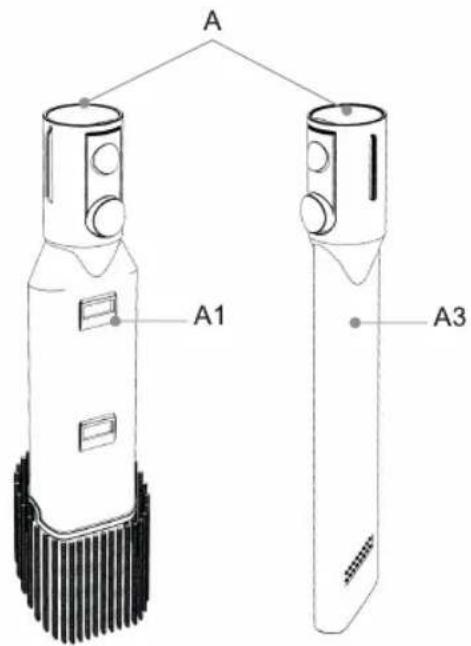
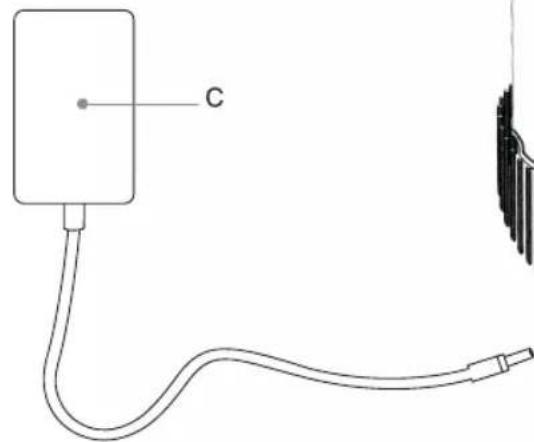

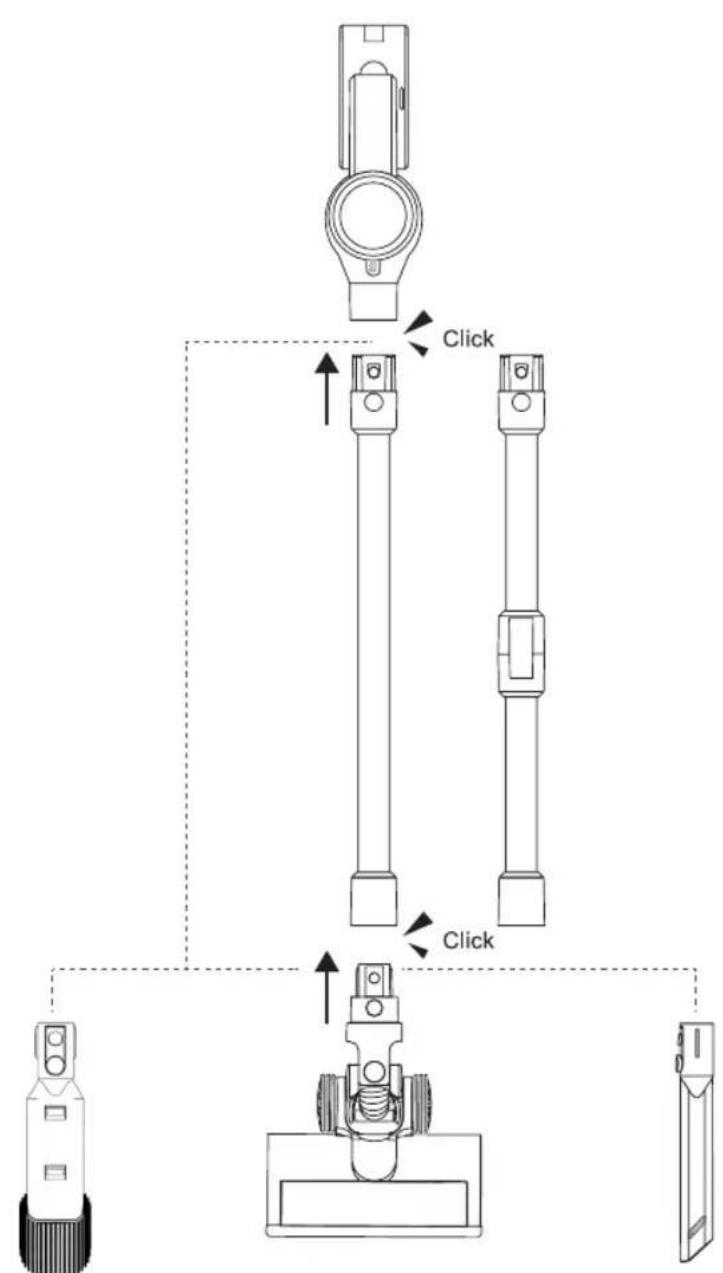
Fig. 1

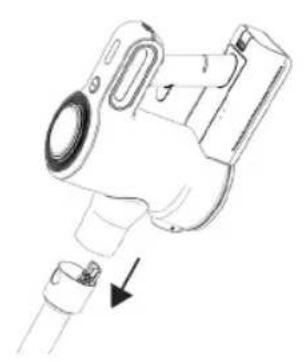
Fig. 2
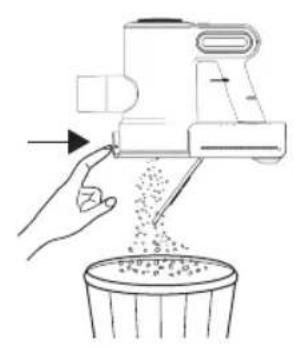
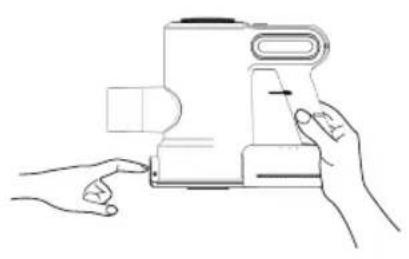
Fig. 3
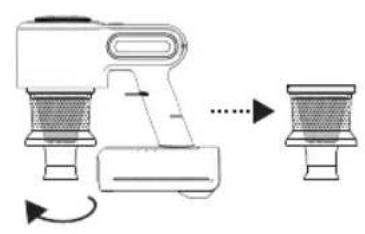
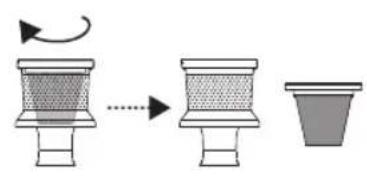
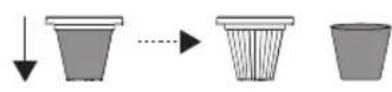
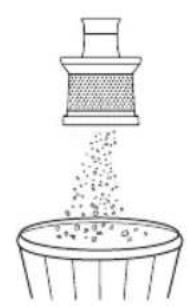
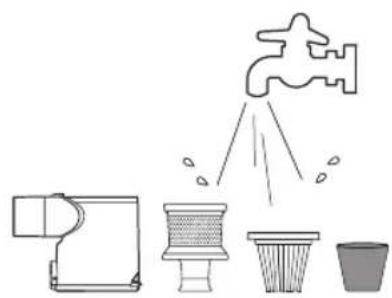
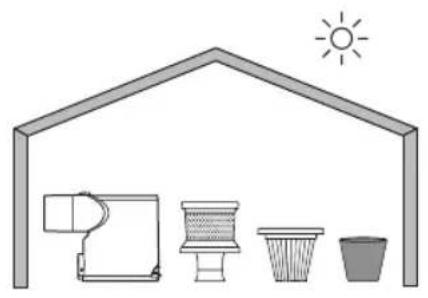
Fig. 3
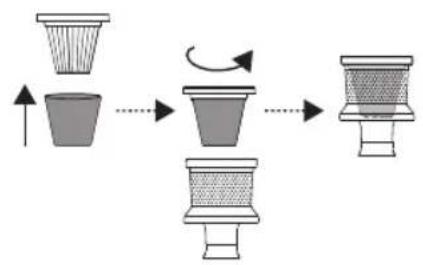
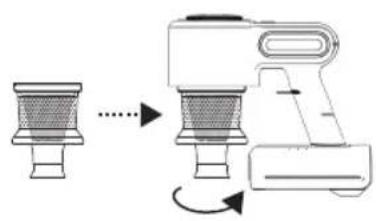
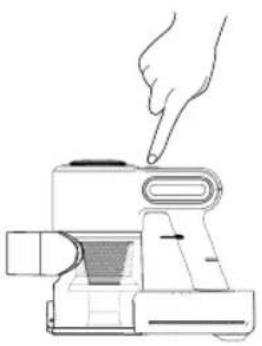
Fig. 4
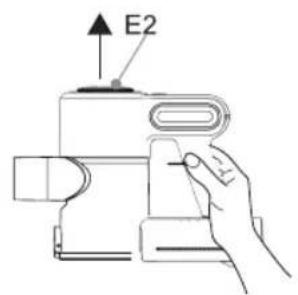
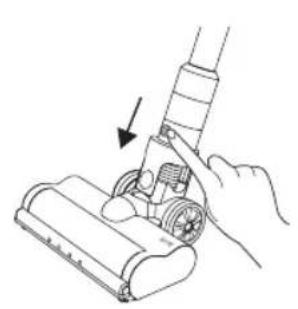
Fig. 5
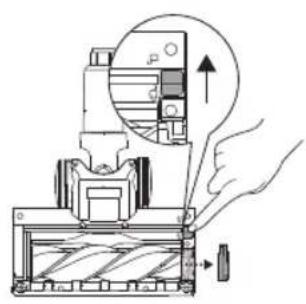
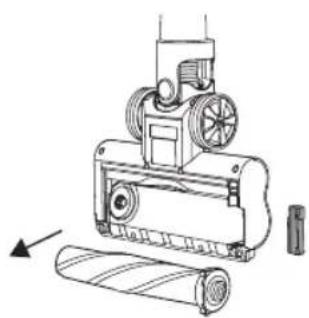
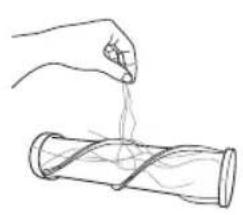
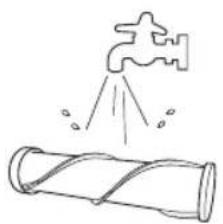
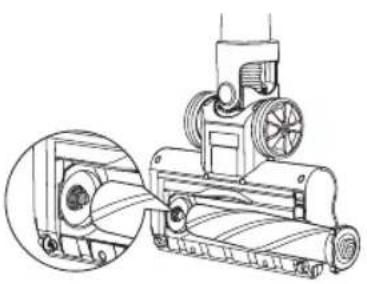
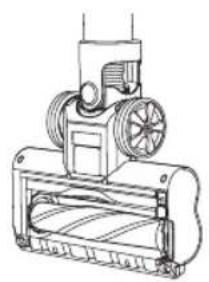
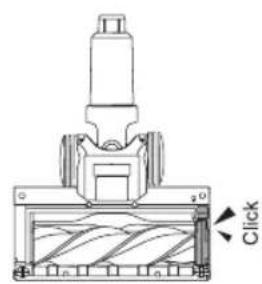


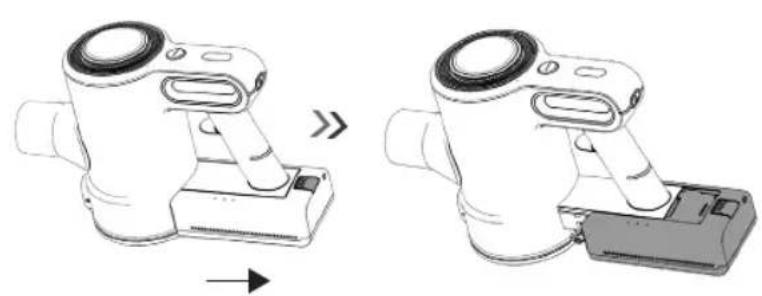
Fig. 6

Fig. 7


ES
(Original instructions)
AE2505 - AE2515
STICK VACUUM CLEANER
DESCRIPTION
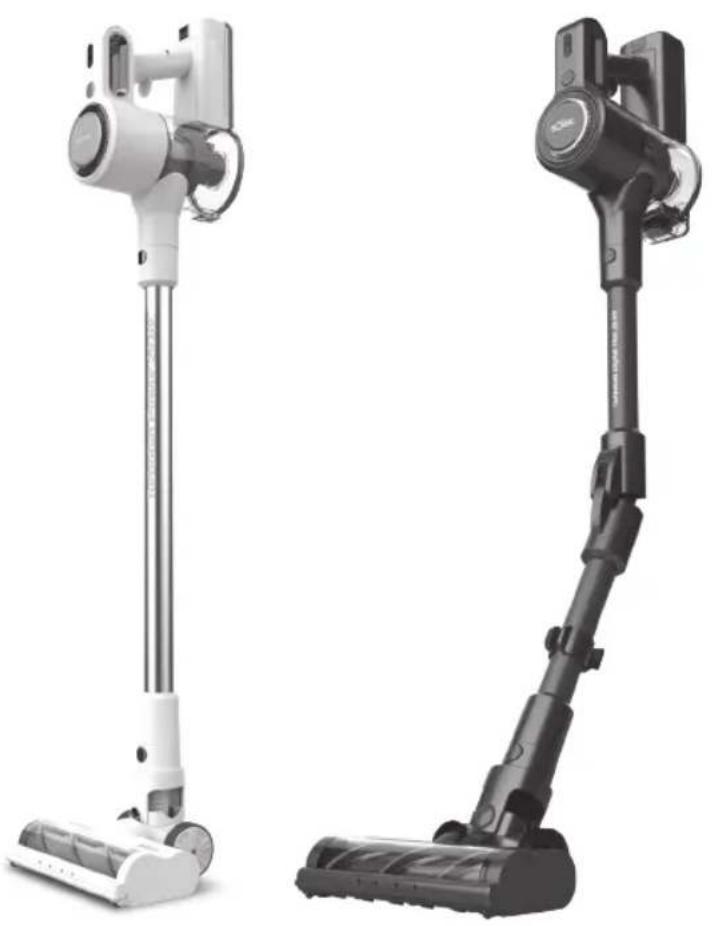
A. Accessories:
A1 Lance and multiuse brush
A2 Tube accessories support
A3 Extralong lance
B. Extension tube/ Flexible extension tube (^*)
C. Power supply
D. Motorized turbobrush Spiral
E. Filter
E1 Motor filter
E2 Outlet filter
F. Battery indicator
G. Button to open outlet filter
H. Body
I. Dust tank
J. Lithium batteries
K. Wall bracket and charging base
L. Button to open the lower lid of the tank.
M. Speed indicator button MIN/MAX
N. Battery removal button
O. Button to remove the extension tube
P. ON/OFF and speed selector button
Q. Battery holder
(*) Includes in model Turbobat Digital Flex 29.6V If the model of your appliance does not have the accessories described above, they can also be bought separately from the Technical Assistance Service.
USE AND CARE:
- Do not use the appliance if the parts or accessories are not properly fitted.
- Do not use the appliance if the accessories or consumables attached to it are defective. Replace them immediately.
-
Do not use the appliance to gather up water or any other liquid.
-
Do not use the appliance if the on/off switch does not work.
- Respect the MAX level indicator.
- Store this appliance out of reach of children and/or persons with physical, sensory or reduced mental or lack of experience and knowledge.
- Do not work on areas where there are metal objects, such as nails and/or screws.
- Never vacuum hot or sharp objects (cigarette butts, ashes, nails, etc.).
- Do not open the battery/ies under any circumstances whatsoever.
- The battery/ies should be stored at a temperature of below 40^ .
- Never leave the appliance connected and unattended if is not in use. This saves energy and prolongs the life of the appliance.
- Do not use the appliance on any part of the body of a person or animal.
- Do not use the appliance with pets or animals.
- Recharge the battery/ies only with the charger supplied by the manufacturer. A charger that is suitable for one type of battery may cause explosion or fire hazard when used with other battery/ies.
- Use the device only with the battery/ies for which has been specifically designed. The use of any other battery/ies can cause an explosion or fire hazard.
INSTALLATION
- Be sure to remove all packaging material from inside the appliance.
ASSEMBLING THE WALL BRACKET:
- The appliance has a charging base (K) which must be fixed to the wall.
- Fix the wall bracket as you think appropriate, using plugs, screws, and adhesive...
- Make sure that the bracket is firmly fixed; it should be able to support twice the weight of the appliance.
- Fit the appliance into the wall support.
CHARGING THE BATTERY:
- Caution: A new battery is not fully charged and must therefore be charged before the appliance is used for the first time.
- Charge the battery at an atmospheric temperature of between 4 and 40^ .
- Connect the power supply in the product


connector located in rear part above the handle.
- A pilot light will come on to indicate that the charger is ready to begin charging the battery.
- Approximately 4 to 5 hours are needed for a complete charge of the battery. Never attempt to over-charge the battery (although it is recommended that the first charge of the battery be of 6 hours in duration).
- The pilot light will come on to indicate that the charger is charging the battery.
- When the battery is charged disconnect the charger from the mains supply.
- NB: Do not use the appliance while it is connected to the charger.
HOW TO CHECK THE BATTERY'S CHARGE LEVEL:
- Press the ON/OFF button (P), the pilot lights that indicate if it is charged will light up.
- If all three pilot lights come on this means that the appliance is fully charged.
- If no pilot light lights up, this means that the battery is completely flat.
- NB: For a long battery life, it is advisable to charge the battery, only, when it has run out completely.
INSTRUCTIONS FOR USE
BEFORE USE:
- Make sure that product's packaging has been removed.
- Before using this product for the first time, it is important to make a full charge of batteries.
- Prepare the appliance according to the function you wish to use:
USE:
- Turn the appliance on, by using the on/off button.
- Select the desired speed pressing repeatedly the speed selector (P). This function is very useful, as it makes it possible to adapt the speed of the appliance to the type of work that needs to be done.
FITTING AN ACCESSORY TO THE HAND VACUUM:
-
The hand vacuum is designed in such a way that it allows the following accessories to be fitted: (use the combination that best meets your requirements). (Fig.1).
-
Furniture brush: Equipped with a brush at the end, which brushes the surface as it is used.
- Crevice nozzle: Specially designed for getting into cracks and difficult corners.
- We can insert the accessories into the tube.
(*) Press the button to bend the flexible tube and access hard-to-reach areas. (Fig.7)
ONCE YOU HAVE FINISHED USING THE APPLIANCE:
- Turn the appliance off using the on/off button.
- Clean the appliance.
- Remove the battery and leave it in its battery holder (Q).
CLEANING
- Disconnect the battery charger from the mains and allow it to cool before undertaking any cleaning task.
- Clean the equipment with a damp cloth with a few drops of washing-up liquid and then dry.
- Do not use solvents, or products with an acid or base pH such as bleach, or abrasive products, for cleaning the appliance.
- Never submerge the appliance in water or any other liquid or place it under running water.
EMPTYING THE DUST BOX: (FIG.2)
- Empty the dust box when it is full (observation facilitated by transparent windows), or when vacuuming power is notably reduced.
- First detach the extension tube by pressing the button (O).
- Open the lid of the dust box press the button to open the lower tank cover (L) located in the front of the handle and empty the contents into the appropriate waste disposal receptacle. (Fig. 2)
- Check the condition of the dust box filter.
CHANGING THE FILTERS:
- Dust tank HEPA filter (high efficiency air filter that efficiently retains spores, ash, sawdust, pollen...), it is advisable to change it a least once a year or after every 50 hours of use, or if its potency diminishes remarkably.
TO REMOVE THE FILTERS:
MOTOR FILTER: (FIG.3)
- Open the dust bin by pressing the dust tank
opening button (L)
- Extract the cyclone by turning to the left, as indicated by the arrow and the padlocks located on the cyclone.
- Remove the HEPA filter from its anchor by turning the filter to the left, as indicated by the arrow and the padlocks.
- Wash the different filters and let them air dry.
- To reassemble the filter, proceed with the above instructions, in reverse order.
OUTLET FILTER: (FIG.4)
- Press the button to open the outlet filter lid (G) and pull out the filter from the anchorage
- Wash the filter and let it air dry.
CLEANING THE ROTARY BRUSH:
- To remove the brush:
- At the bottom of the brush, move the tab located at the bottom of the brush towards the open padlock to disengage the roller and pull to remove it. (Fig. 5).
- Remove the brush and clean.
- To reassemble, follow the above instructions but in reverse.
SUPPLIES:
- Supplies can be acquired from distributors and authorised establishments (such as filters, shoe brush and battery set) for your appliance model.
- Always use original supplies, designed specifically for your appliance model.
- These supplies are available in specialist shops.
HOW TO REMOVE THE BATTERIES FROM THE DEVICE:
- CAUTION: It is important that the batteries are fully discharged prior to its withdrawal from the apparatus.
- CAUTION: the appliance must be disconnected from the supply mains when removing the batteries.
To remove the batteries, once the life of the appliance, proceed as follows:
- Remove the battery from the product by pressing the battery removal button (N) and pulling it out. (Fig.6)


FR
FILTRO USCITA: (FIG. 4)
(*) Se include in modelul Turbobat Digital Flex 29.6V
3APEXDAHE HA BATEPURA
-BHIMAHHe: Hobata 6aTePnHa e HAnbJHo 3apeDeHa; npEn n3noJ3BaHeTo Ha ypeJa 3a npBb NbT, TcCneDbA da ce 3apeN HAnbJHO.
- 3apeTe 6aTePnTa npi TempeTaPyHa OKoHnHaTcpeJa MeJy 4 n 40^
-BkHouTe 3aprHOTO yCTPOIcTBo KbM 3axpaHbAaTa MPexKa n 3aHaTa qact Ha 6aTepyTa.
- Lüe cBeTHe 6yToH, KoITo 1e Bn NokaKe, Ye 3apAHHOTO yCTPOINCTBO e rTOBO Da 3aNoUHe 3apeXdHaHTo Ha 6aTepeYra.
- Heo6xOIMOTO 3a 3apejdahe BpeMe e npnbnteHNo MeKdy 4 n 5 yaca. Hnkora He ce onnTbaIte Da 3apejdaTe ypeDa 3a noDbIro OT npenopbuaHTo BpeMe (BbpkeN, ye e npenopbUHTeHNO nbpBOTO 3apejdaHe da ce N3BbpWn BnpobJKeHne Ha 6 - yaca).
-Дokato 6aTePnraTce3apeKda CBetn uePbeHa CBETnHa, yka3BaUa, ye 3apJHOTO yCTPOINCTBO e BKIOHeHO; a KOrAto CBETnHaTa CtaHe 3eIeHa, 3apJHOTO yCTPOINCTBO e N3uNo 3apeDeHO.
- Cnéi kpa ha 3apexdaheTo, n3KJIHOte YeCTpoiCTBOTO OT eJNEKTpnuYeCKaTa MpeXa.
-Белека: He u3noI3BaIte ypeIa,doKaTo e BKNIOueH B 3apAHOto YcTPOINCTBO.
KAK DA IPOBEPM CTENEHTA HA 3APEDEHOCT HA BATEPNYTA:
- HaTnCHHe 6yToHa nysck/cton (P). CBeTnHHnTe HnDnKaTopn 3a 3apeKdahe CBeTBat.
-AKO Tpnte CBETJINHHN INHdNKaTOPa CBETHaT, TOBa O3NaUaBa, Ye 3apeXdaHETo e NbIHO.
-AKO HIKOJ OT CBETJIINHHNTE INHUNKaTOPn He CBETHe,TOBa O3Haayaba,Ye 6aTepya e pa3peDeHa.
-Белекка:3a da ydBJKNTe KINBota Ha 6atepna, npenopbUba ce 6atepna Ta da 6bde 3apekdaHa, eDHHCTBeHO KOraTo e HAnbIHo n3TOuEHa.
HAUYH HA YNOTPEBA
BEJIEXKIN PPEIN YNOTPEBA:
- YBepete ce, Ye n3zraIO CTe OTCTpaHnll
ONaKOBKaTa Ha ypea.
-ПпeДиуNotpe6a3aNBpBn NBt e BaxHDo a 3apeDnte n3qIIO batePInTe.
- PoirotBeTe ypeBa B 3aBnCmOCT OT cyHKuYrTa KOrTo XeJaTe Da n3NoJ3BaTe:
YNOTPEBA:
-BkHouTe ypeJa ype3 npKeBcBaaya 3a BKNUyBaHe/U3KIOUyBaHe.
-Изберете щелана тскорост, катоMHOROKpaTHO
натиcke 6утона зстарпанe/сто (P).
Таи Фуньця e много полесна, Тьк КATO
Ви поьюва дa Изберете схорочтta в
Звисмост OT Вда paбota, каяхжелаete Дa
ИзБыршITE.
BKAPBAHE HA AKCECOAP B PbHnA ACNIPATOP:
- Pьчнят acnnpaTop e n3rotbeh Taka, che no3BOJRAЯ npKauBaHeto Ha cNeiHInTe akcecoapn: (n3noN3BaIte KOM6nHaCuaTAta, KoTo NaH-do6pe OTROBApra Na BaUInTe HuxkDn): (Fig.1).
- HakpaHnK YeTka: B KpaJ e Cha6deH C YeTka, KOrTO N03BOJRA N3yTeKBAHeTo Ha NOBbPxHOCTTa, DOKaTO Ce DeiCTBa.
- HakpaHnK TIN KONHe: CneuaHNO npedHa3NaueH 3a cb6bupaHe Ha npax OT TECHMecTa I TpydHOIOCTbHn TbIi.
-ПистаКиTe MOraT Да 6БДТ ВкapаниВ НakрнИкA Na Tpb6aTa.
(*) HaTnchHeTe 6yToHa, 3a DaorbHeTe rBkBaTa Tpb6a n DOCTnHHeTe Do TpydNoocTbNtMeCTa. (Fig.7)
CJIENIPIKJIIOUBAHE HA PABOTATA C YPEDA:
- Cnpete ypeetaye3 6yToHa 3a BkNoUbaHe/ nKJIIOUBAHe.
-ПоунICTeурда.
-Изва对接еьа对接eв对接Вдьржачан(Q).
ПОУNTBAHE
-ИЗкlioуeteуpedaOT3axpaHbauataMpeka nIroocTaBeTe da ce oxnaDN ppeDN npICtBnITE KbM NOUcTBAHeTo My.
-Почисте урета с влжнад Кьрna, наоета с
Няковский Мпец пpenapat, сдд Коетог
норсуштete.
- 3a NOUHCTBaHTo Ha ypeHa He H3non3BaHTe


pa3TBOpntIIN npenapaTn C KnceHHeH nIOCHOBeh pH pakTop, KaTO HApimep 6eHNa n a6pa3NBn npOdykTN.
- He notanayte ypeda BbB BOda nIIN dpyrn TeuHOCTN, IN He IIOCTABYTe NOd Teuaa BOda.
N3IPAA3BAHE HA KOHTENHEPA 3A INPAX: (FIG.2)
-Изпразаэгетe контейнера 3a прах ce Изпраза3ва, korato 3абелжITE пез прозрачноТпозорч, Ye сьшит e nbлен ИлиakO 3абелжITE habаляbaHe Ha CMykaTeHnHaTa cnla.
-OTdeneTe ydbjNKeHnHaTa Tpb6a, KaTo HATNCHe 6yToHa (O)
- OTBopete KaNaka 3a n3npa3BaHe Ha xpaHnIuIeTo, HATnCKaIK N 6yToHa 3a OTBapAHe Ha DoJIHnKaKanak Ha XpaHnIuIeTo (L), pa3noJoxeHa B Ha n3deJIeTeO, Cnei KoETo n3CunIeTe CbIbPjxAHNeTO B NOxDxOJaK KOHTeHep 3a OTnaIbU. (Fig.2)
-Поберете CBCTОнeto Ha ФиNTыра на pe3epBoapa.
IOMRAHA HAΦNTPN:
-ФиntbpHa xpaHnIuTeO ot Tn "HEPA" (BncoKooepeKtUBeH Bb3dUweH φnItbp, KOITo eepHKacHO 3aDbPxa CnpN, nenei, akapn, nohen I.T.H....).ПрелорьBa ce ПрелорьBa ce fHnTbpT Ha npaxoxpauHnIuTeTo Da ce pereJexda nepnoDnHyCbuiR T cneBa da ce NouchTba nIn 3aMeHn Ha BCEkn 50 yaca ynoTppe6a, nIn aKOe 3a6eJexx 3NaHTenHo HamaJIraBaHe Ha cmYaKaTeJHaTa cnJa Ha ypeDa.
3A IOMDMA HA ΦNJTPTNE:
ФИЛТьРHA MOTOPA: (FIG.3)
- OTBOpTe KOUChTe 3a npax, KaTo HaTnChHeTe 6yToHa 3a OTBaprHe Ha KOUChTe (L).
-ИЗbaДeTe ζИКЛоHA, KaTO 3aBbPТITE HaJIЯBO, KaKTo e NOKa3aHo OT CTpeJIkATAи KJIIOUaJIKNITE, pa3NoJIoKHeH NaIcKЛоHa.
-ИзbaTe HEPA Фиntьра OT KOTbata My, KaTO 3aBbPNTe Фиntьра HaJIЯBO, KAKTO e NOKa3aHO OT CTpeJIkATA И KJIIOUaJIKNITE.
-ИзмиTe Φилтпг Te n octaBeTe Da n3cbxHaT Ha Bb3dYx.
-3a nocTabaHe Ha qntbpa, cneDbaiTe o6aCHeHnraTa OT npEduHnpa3dEeB o6paTeH peI.
N3XOJRAU,ΦNJITbP:(FIG.4)
- Hatnche 6ytoHa 3a OTbapHe Ha Kanaka Ha n3XoHnI nITbp (G) n 3BaJeTe nITbpa ot KOTBaT.
N3MnIteΦnITbpa IroOCTaBeTe Da N3cbXHe Ha Bb3dYx.
3A N3BAJDAHE HA YETKATA HANPABETE CJIENHOTO:
-BdoHnHaTaYacHTHaO6yBkata Tp86Ba Da aKTHBnPaTeNoCTa,pa3noJoxeHOTcTpaHN,3a DaOTkaUHeYactTa,KoTToDbpxNYeTkata N CNeI TOBa DaЯ n3dbpNaTe,3a DaЯ n3BaAnTe (fur.5)
-ИЗbaTeTeЧткATAЯ NOUHCTeTe.
-3a nocTaBHe Ha yetKaT, nocTbneTe no ropeoIncAHnHaunH, Ho B o6paTeH pei.
KOHcymATNB
-KoHcyMaTHBnTE3aBaunmaMoJeIypeI (HaNPmep,fntprnT.H.)MOrat da 6bDat3akynenPiN dncptpnbyTopnte n OToPn3npaHn fnpMN.
-BinHn n3noJ3BaIte opunHaHn KOHCymaTbN, npedha3NaeHn ToH0 3a Baunr moJe ype.
-To3n BnD KOHCymuBMOxTe Da B CneuaJIN3npaHm MaRa3Hn.
KAK DA N3BAIDM BATEPNTE OT HA YPEDA:
-BHIMAHHe: N3BaXdAaTe 6aTeepnTe OT ypea caMo, aKo ca HAnbJHo pa3peDeH.
-BHIMaHHe: BaTePnIte cIeIbA da ce I3BaJdAt camo npn n3KnIOUeH ot 3axpaHbHeTo ypei
3a otctpaHbAhe Ha 6aTepeHrTe cNei H3TuHaHe Ha eKcnIooTaUHOHHn XNBOT Ha ypeDa, noCtBneTe No cJeHNHaunH:
-ИЗваде Te 6atepyTa OT npOdyKta, KaTo HATUCHETe 6yToHa 3a OcBObOxJaBaHe Ha 6atepyTa (N)ии3dIbprnate. (ФИr.6)
EL
aal jj gl bally a yla (L).
Jusy Jusy Jusy Jusy Jusy
al gllg lgsjgl
aill o jaii g aia 80
(Fig. 4)
j 1 (G) jilai all j
a1 = 12,a2 = 35,a3 = 48,a4 = 710.
all all
gaaa aai jll aytae style . ciai jao iaed e jall
5 (kill) kill jy kss sas jell Jss gill aabll (al lq)
LaBai, oLi jali all ji pi.
aillblilil g iioy o la uoe yiaassill.
S AOB = S COD + S BOC - S BOC
a 1
jaiiall, cXsall iic ay jaii jaiil (a) jaiill aq
jll jll jll lai aaaal alal alal
jaiai jaii jaiiaai ai gai jgai iai
a
jzjj 1
Lalai jia jia zj 1000000000000000000000000000000000000000000
jgllll 15ll jggs
all jiyaiLioic yjySll jyill jjell Jia:
y j 1 y
jbjj jbj jbj jbj jbj jbj (N)
6.
Jaaa aai jaaa aai jaaa aai jaaa Jaaal
Jggl lgl jgl glll uuaa auiu:gs
y
jiei jiee iie jiee 2
j1j jj j j j j j
jiee 1
Ldla 15
#
y 1 1 1 1 1 1 1 1 1 1 1 1 1 1 1 1 1 1 1
i 100
jiaie clll laiial y, ciiall pinaivy pH gicg jaii jaiil aai aiai iaiii 2 gciuaaill
jsslll ci aai 2g jil jilu g clal jglall
(Fig.2)
i 1
jiaell lae o 8y jss jalilil ydo lao.
jll 1
Jia xue xue jie liang
ciall jia lalil yailll 1g aess allj n
Jalll jaiill Jae aall no iia Jgiall alil
y
Jaeunil:
jaiy/1jaii jie baidly s, jaii
1 / 124 125 126 127 128 129 130 131 132 133 134 135 136 137 138 139 140 141 142 143 144 145 146 147 148 149 150 151 152 153 154 155 156 157 158 159 160 161 162 163 164 165 166 167 168 169 170 171 172 173 174 175 176 177 178 179 180
4.4.4.4.4.4.4.4.4.4.4.4.4.4.4.4.4.4.4.4.4.4.4.4.4.4.4.4.4.4.4.4.4.4.4.4.4.4.4.4.4.4.4.4.4.4.4.4.4.4.4
a a a a a a a a a a a a a a a a a a a a a a a a
1/2 1
sll jilwll jiej (j) a 1 aag gao pluji baiy 2
40 48
gai 1i jao yj gao jao jao jao jao jao jao jao jao jao jao jao jao jao jao jao jao jao jao jao jao jao jao jao jao jao jao jao jao jao jao jao jao jao jao jao jao jao jao jao jao jao jao jao
j 1
Clllgl 1 aaiyll Clllgl 1 g jgjia
a 11111111111111111111111111111
Laiyai Laiyai ai yll Cyl Jull Ayl Jull eao kai jolal Jaiin
#
jgl jla jao jia jil go gao all jj no sli.
jzai
jssie jess (K).
y 1 1 1 1 1 1 1 1 1 1 1 1 1 1 1 1 1 1 1
a 1 1 1 1 1 1 1 1 1 1 1 1 1 1 1 1 1 1 1 1 1
jall lal yuul E jaiy
jil jilu gil clal gzl jzll Jaae 2.
Jaa Jaiy/Je aill aiis 1jaoaia
sallaoeolj MAX.
juaa 1 jiaai jiai jiaai i
This product enjoys the recognition and protection of the legal guarantee in accordance with current legislation. To enforce your rights or interests you must go to any of our official technical assistance services.
You can find the closest one by accessing the following web link: http://solac.com
You can also request related information by contacting us by phone.
You can download this instruction manual and its updates at http://solac.com
FR) GARANTIE ET ASSISTANCE TECHNIQUE
Aiiil oclal g lai (AR
jaiall jiaolal g jic yj iial Ia 12
g jia gao lbl .diJI lI JyJiill Lg g jigolll
S_ ACD = 12 · AC · PD = 12 × CD × PD = CD.
aaii iiaii oiei iolai li jso jso
1
Unit 25 & 26, San Croy Office Park, Die Agora Road,
Croydon, Kempton Park, 1619
Johannesburg
(+27) 0113925652
sOlac
www.solac.com
15/12/2022