
Outback - Bike trailer Hamax - Free user manual and instructions
Find the device manual for free Outback Hamax in PDF.
| Product Type | Multi-purpose bike trailer |
| Brand | Hamax |
| Model | Outback |
| Dimensions (L x W x H) | 108 x 81 x 30 cm |
| Weight | Approx. 13 kg |
| Capacity | 2 children (up to 22 kg each) |
| LED light power | Batteries (type according to model) |
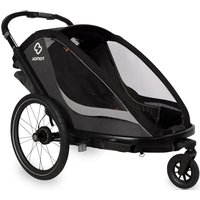
| Main functions | Transport children by bike or as a stroller (jogging kit optional) |
| Safety harness | 5-point with central buckle |
| Suspension | Adjustable to absorb shocks |
| Parking brake | Integrated, lever-operated |
| Hitch | Quick attachment on seat post |
| Wheels | Quick release for easy disassembly |
| Hood | Removable with vision window |
| Safety flag | Included for better visibility |
| Maintenance and cleaning | Clean with damp cloth and mild soap; regularly check fasteners and tire pressure |
| Safety | Compliant with standards EN 15918:2011+A2:2017 and EN 1888-2:2018; children must wear a helmet |
| Spare parts and repairability | Contact Hamax or an authorized dealer for original parts |
| Warranty | According to applicable legislation (usually 2 years) |
Frequently Asked Questions - Outback Hamax
User questions about Outback Hamax
0 question about this device. Answer the ones you know or ask your own.
Ask a new question about this device
Download the instructions for your Bike trailer in PDF format for free! Find your manual Outback - Hamax and take your electronic device back in hand. On this page are published all the documents necessary for the use of your device. Outback by Hamax.
USER MANUAL Outback Hamax
EN Thank you for choosing the Hamax Outback Multifunctional Child Carrier
Cocayotltonn t h h Hax Poutk n aanrnnn rnrnnr. You can sponp jg knilihtioe and comforable you us hr harns uadk as bie pbrn iror or ojger (old suppulitf. Ptoesvred in the mnttcrns cefarefficn fccssderrn for using thar harns ducuic. We wihip oeped your chiehmen, enapcuiie ine!
Keep these instructions in a safe place for later use.
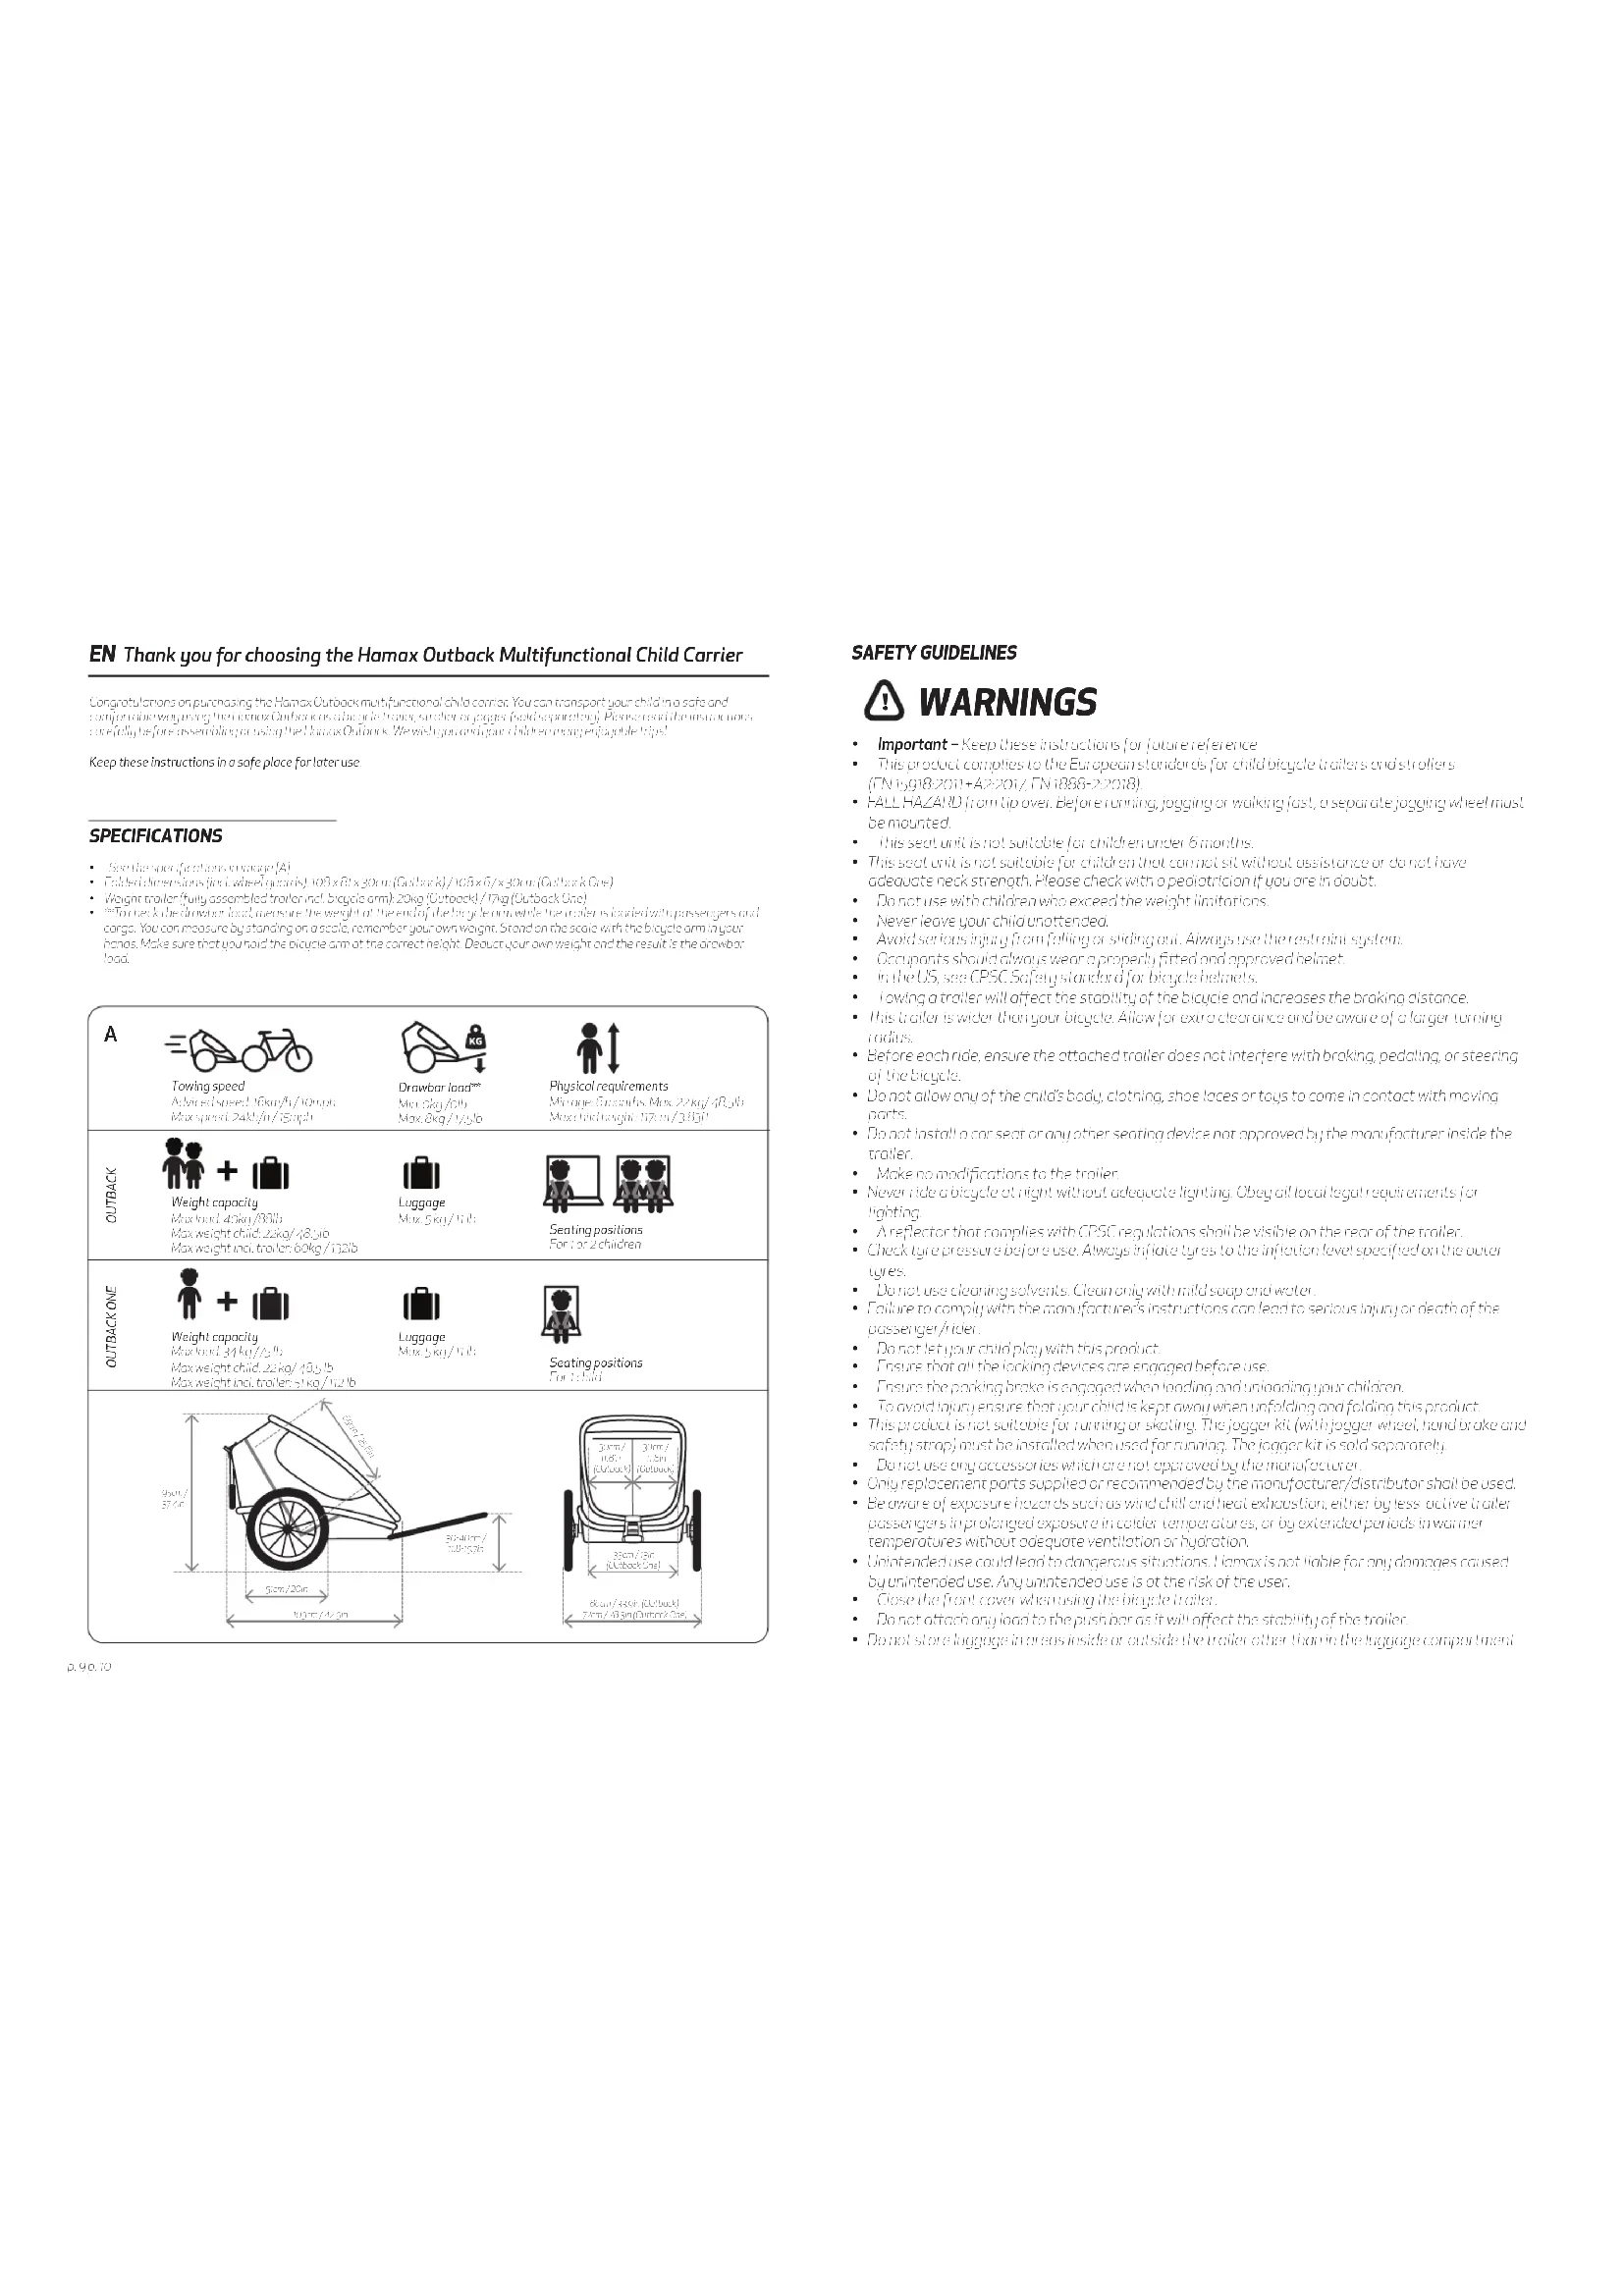
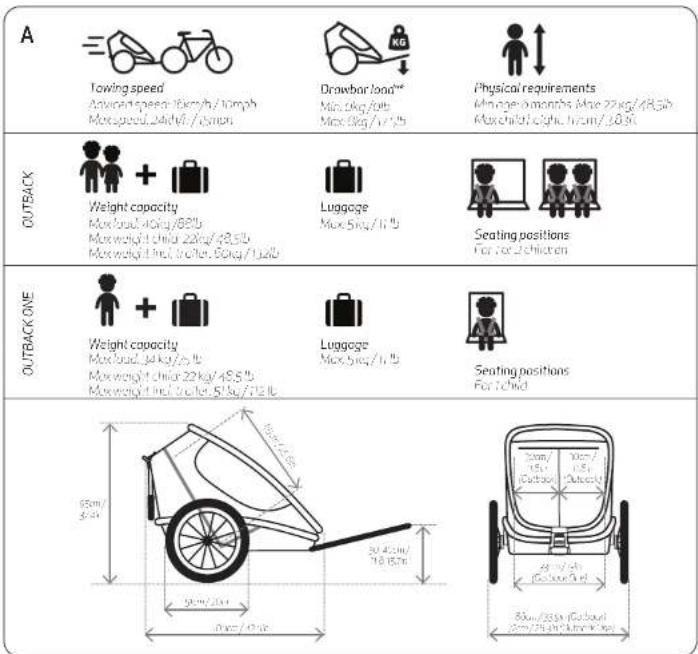
SPECIFICATIONS
See the anrion in image (A)
- mihed dimensions /no, wheig 108xRt x30m (Dmmory) /209x87x30m (Durban Line)
Wefg1rnaa 1alpssreled uerl nlc biegeum20k (outocck) /79g (outbok O
"tuck the chrobbs load, measure the weight of the mid of the bicycle. The roller is loaded with passengers and your vehicle. You can measure it by standing on one side, remember your own weight." (Describe on the scale with the binary axis in your hands. Make sure that you hold the bicycle off the correct height.) Describe your own weight and the results in your previous test.
SAFETY GUIDELINES

WARNING
Important-Keep these instructions for future reference
This product complies to the European standards for childbicycles, trawlers and strollers (FN)698-2011A2-207FN 888-22081.
- FAI: HAZARD from top over Before coming, jogging at walking first, a separate jogging wheel must be mounted.
- hisseit unit is not suitable for children under 6 months.
- This spot and is not suitable for children who cannot sit without assistance or chosen have adequate neck strength. Please check with a specialist if you are in doubt.
Do not use with children who exceed the weight limitations.
Nevy leave your child unattended.
- Avoid serious injury from falling or sliding out. Always use the restraint system.
Occupants should always wear proper fit and approved helmet.
In the US, see CPSC Safetystandard for bicycle helmets.
- Towing a trainer will affect the stability of the bicycle and increases the braking distance.
This miler is wider than your bicycle Allow for extra clearance and be aware of a longer turning radius.
Before each nide, ensure the attached roller does not interfere with braking, peddling, or steering of the picture.
- Do not allow any of the child's body, clothing, shoes or reigs to come in contact with moving parts.
- Do not install a car seat or any other seatbag device not approved by the manufacturer inside me.
Mokernoufifications to the ralr
- Never ride a bicycle or骑自行车 without adequate lighting. Obey all Nicotine requirements for riding.
A refecto r that complies with CPSC regulations shol be visin on the rean of the rder
- Check sure pressure before use. Always inflation rate in the infatior level specifing on the outer tubes.
- Don't use cleaning agents. Clean only with mild soap and water.
- Include for comply with the manufacturer's instructions con fend to serious injury or death of the passenger (fitter).
Do not let your ship play with this product.
- Enseque that all the locking devices are engaged before use.
- Ensure the parking brake is engaged when loading and unloading your children.
- Iovcd injurg ensare that your child is kept away when unfoing and folding this product
- This product is not suitable for running or skating. The jogger kit (with a jogging wheel, hand brake and safety seat) must be installed when used for running. The jogger kit is sold separately.
Do not use any accessories which are not approved by the manufacturer
- Only replacement parts supplied or recommended by the manufacturer/distributor shall be used.
- the aware of exposure hazards such as wind chill and heat exhaustion, either by less-active roller passengers in prolonged exposure in colder temperatures, or by extended periods in warmer temperatures without adequate ventilation or hydration.
Unintended use could be no dangerous situations. Hamax is not fire for any diergases counse by unintended use. Any unintended use is the risk of the user.
- Close the front cover when using the bicurie troller
Do not attach any load to the push bar as it will affect the stability of the droiler.
- Do not store luggage in excess inside or outside the theater other than in the luggage compartment.
as it affects the stability of the roller.
Bicucse safetq
B
Riding behavior
h th t t t t t t t t t t t t t t t t t t t t t t t t t t t t t t t t t t t t t t t t t t t t t t t t t t t t
The doctor exceeds the maximum speed specified in the manne and slowly down when making nurses and on-going nurses. Avoiding even those caries or other obstructions that impugcate the foiaia for purposes using the air in favorable condition, result or effect conditions can result in traumatic situations. Always use speed equipment when undertaking it; conditions such as those
High visibility:
For optimal cleaning and safety in the market, the study protocol contains the following items: (1) noise (noise level) and water (water level). Reflectors, the noises, and reflector values. Reflective images are integrated in the water frame. When using the commercial cloths, the clothes were cleaned (擦净) or rinsed (diluted) for cleaning purposes.
Intended use
The controller is capable for transmission of children's specific items in this motion. It can provide with light, electronic and electromagneticplanning, planning, considering, using the controller any other way, to be prepared, used, including but not limited to:
- riding with excessive speed
-
using the order for commercial purposes.
10235672229005
[1] Packaging content & required topsis
·T
·
·
1
52.104,104,104,104
-5700WCE10W11
-
- included in: cxscewdwe with upwnt (g)
-
- -
2iProduct overview
·
·
-
6
- 5e connection p12
Actessr stner
Aegus652sucnion(2g)
-Quick release wice 24h
-
·
Dusbocnncsebodie12
1.
[Instalngthn the hich on your bicyclic
- Remove truck revenue or return from the left side of your truck, if any other vehicle. Place him/her between a truck release orreturn frame. Tailored the truck release program back according to the vehicle's requirements instructions.
Eesie hioe tio f thi h cct. Kep the gmey/angie between kchngbge mth stgde do possible
[4]Instalng the wheel quans
- Augr the holes in on the whee gund cndlare with the holes on the whee gund h. Insert me 2 srews from the incne of the tralr through the holes in the fabric into the whee guard. Use the screas pridwder with the moer. Foeter, both sides at the same way.
[5] Setting the adjustable suspension
- The suspension can be adjusted by moving the one feature that the suspension is only subject to momentary weight. Ensuring that the lever is unloaded when adjusting the suspension. Note the adjustment ring (S) to the desired position. Note that the left and right suspension are in the same position.
[6]Unfolding the triger
Purpuraanrccnprnndcagacgngnncn
- -
Loo the pssb bwi with nreceae rrole.
D1Folding the giral
- ·
[8]installing the quick release wheels
to the .
[9] Mounting the safety flag
Pae dpegee gne nesnne g on the site of the biele rter (t is most expuied to the
USE
[io]Attch the accessory [ic] [i] or the safe connection point
- Move the super downwards unit in steps up/paint. The green color indicates that the connection point is locked. Verify that the sides are forced by pulling outwards.
(ii) Remove the accessory [ic][f] from the safe connection point
- Hish the grey burton onn move the slider up towards until it stops in piece
- Wshndnch the burton on the nccessory appn Hll me acesessary of the hte cncertiorion
TIP: You can use the hwoie Uo# in the connection point when moving our accessories.
12) Attaching the bicycle arm to the bicycle
-
Secures the children's safety and proper food for use. Ensure then the children are unboiled when reaching out to discern if they
-
Slide the bubble onto the mirror, full, insert the training poin [u] through the hole in the culemert and close it. Verify that the entire sequence is saved by pulling the ooliple from the safety sensors on the frame of the test book (see Fig. 10c).
- Make sure that you put the safety strap around the chain strap, or select your buckle frame.
TIP:Vien n'ouane cangusine hiehie pue you onn stae in the moer
Tf:wht the sioe sartie to be ing you com we cok woucd on the fomr to uereat that thc sotse does not interfar with any mow report of thc rourw.
[13] Adjusting the push bar
Tulpehperersehneepnepreepnepnepnepnepnepnepnepnepnepnepnepnepnepnepnepnepnepnepnepnepnepnepnepnepnepnepnepnepnepnepnepnepnepnepnepnepnepnepnepnepnepnepnepnepnepnepnepnepnepnep
- The pushdown release formula decreases until it reaches its maximum end position and secures the pushdown. Verifying this position is challenging, but getting the pushdown down
[14]Using the parking brake
- in enppoe Iwsh the pankn crake peol dwn the coter can move sigrh bok and for thre du to the movemment in the
(一)非累积投票议案
to show up . Put the puning brinckpedot smfhtreased . Roun or snut the braier slightly to make sure the brake is oherengest on the wheel .
[15]Front covers and shodes
The Othmnchng hine roader has nsteer frrnt cover [5] in mnes frnrover [5] inns phtrticn sln shne [5], in gen prccch the front covers use the appertes of the sties to fix the sahchoe used the boce. The front covers conedcoved into the front cover netket for when not inuse.
The np window of the extenrion also has an antioptic sunnode
TIP:ForFemsu,ainHarmassuppliesu#chrcovay
[16]5-point safetynorness
- See your field and guide the norms through the opening between the shoulder 'no' and wear their (or) check that the
The chester's up one aligned with the line, which he looked for. After this morph by sliding the booker into the pocket and pulling the muscles together down.
Cmpn the hshd sioe moe nre and iner m into the rernurkie [h] on the crrt tiof thu uig fei 1r. fide aing hri hch stc prn the sho dts so he kgh chs ciaght ngiened Mngth He
[7]Reclining the seal
- Slit the line kineties [ya] towards ceft houar [ya] to nuchine bockescr stnre (the business (to the buckin front) in)
- When the bockes reach the root rechir position, the rechir hemsies slide outwards anomochily and then the buckles in.
thick - Always make sure the backrest is secure, locked in place when using the Outback.
[8]Mounting the LED lights
- Place the lights on the side of the roller that is most exposed to the road
- Rear Attain the car LED light on the pushback but the back of the trunk
CARE AND MAINTENANCE
Check before using the trailer
- the tines are indicated according the specifed presse
- be noder is uithed prnpny and the mehansm is oedinn hth sides do not forper to lork me quen htn
Theeortbckrse wllsccnctyhtenep. Plesse see the montgoww section
The safety Goad and lights are in place whenever required.
Storage
It is highly recommended to store the Duct track in pairs in any and weal vent harnment of direct sunlight
TIP: There is no damage storage cover available for better protection.
Maintenpase
Pusb in 102 the pssion hich is the plesioh thn m [] under the fioe of the pshon bokse tne man one chahed oocry on both sides.
- 1948-2016
- See base block text (with frequency) changes the space part at the "year of the best book ever read" makes sense that question ortitle is at the top and follows to "beginning at the top."
The scie t r t t t t t t t t t t t t t t t t t t t t t t t t t t t t t t t t t t t t t t t t t t t t t t t t t t t
- Atow the tioer to aoc pncnle before atongit to preenif from becmina noldu
-
- An important component is the use of a device for controlling device, light and temperature, they are used to be able for safe condition, regulator verification were then built assemblions are well integrated.
WARRANTY
Theckd t t the wth t t t t t t t t t t t t t t t t t t t t t t t t t t t t t t t t t t t t t t t t t t t t t t t t t t t t
GENERAL INSTRUCTIONS FOR BATTERIES (REAR LIGHT)
Non-terment pntes must not be changed.
- Remove change the hotnes from the ram before omping them
Different types of batteries as well as the new energies must not be used in the same item
- Only batteries at the same or equivalent voltage as specified should be used.
A
-
- It is allowed to carry emphyseboteries as they might explain or ice.
Information concerning the disposal of exhausted batteries
The stictioned symbol on this file is not competantes, the ploding or the encelesctors contains a list of the batrines that should not be disposed of at the end of their lifecycles together with the domestic waste. Possible cleaned letters under the wostipshoing (f) are: bectbing cormine (cortP), calmity (Cortmarca) (g), Youus cormen are obliged by low to moderate kind of boknness (coi rnc rechiorption with us inrechocieic) indicate coterents of coonfleet or all the necticharket. 715 is no orange. The proper disposal encoder the recycling of valuable resources onto wards possible negative effects on current and environmental.
Information concerning the disposal of old electric and electronic products
The picture spony on the product, the pinnings and the associated documents agmigns not the product should nor dispose of ofer the end of its lifeegle together with the domestic wotce. Yours consumers are obliged buccu bucn cbrdct hich and electronic products is a localise of coxtion for electronic equipment . This or any damage , tese cause in the nactures before disposal of the product The prohpers disasseect enables me to recouing of unviable resources now not opout possible negative effects on fumons and the environment. For fur ther information please contact your recouting or the vendor of the product.
- rjernnngpenerer mertene [n] proenente sine ne sykpelesbokre buixing. nssr fester [s] melimn hnrgrfener
Aeromarine, 100th Ave. 2nd Floor, 3rd Floor, 4th Floor, 5th Floor, 6th Floor, 7th Floor, 8th Floor, 9th Floor, 10th Floor, 11th Floor, 12th Floor, 13th Floor, 14th Floor, 15th Floor, 16th Floor, 17th Floor, 18th Floor, 19th Floor, 20th Floor, 21st Floor, 22nd Floor, 23rd Floor, 24th Floor, 25th Floor, 26th Floor, 27th Floor, 28th Floor, 29th Floor, 30th Floor, 31st Floor, 32nd Floor, 33rd Floor, 34th Floor, 35th Floor, 36th Floor, 37th Floor, 38th Floor, 39th Floor, 40th Floor, 41st Floor, 42nd Floor, 43rd Floor, 44th Floor, 45th Floor, 46th Floor, 47th Floor, 48th Floor, 49th Floor, 50th Floor, 51st Floor, 52nd Floor, 53rd Floor, 54th Floor, 55th Floor, 56th Floor, 57th Floor, 58th Floor, 59th Floor, 60th Floor, 61st Floor, 62nd Floor, 63rd Floor, 64th Floor, 65th Floor, 66th Floor, 67th Floor, 68th Floor, 69th Floor, 70th Floor, 71st Floor, 72nd Floor, 73rd Floor, 74th Floor, 75th Floor,
1Mantering ay biuibeskutte me
I 1
fusteringovdenlusterborefiaringen
Fartingknsjusres (rpsen nrohneepnulur Sere for rnrnnnnae Hspses mnnn hbsra Suaswgeernmnd tchie cemnncnster Tgienrnen Rater pesterin grrin 5chcnetpos. Knterlcror cr vrebrt heheg Farting or jusr lsmnng poys
6f Utfolding ay sukkeiy pagen
Treknndtckopovherhtn derautomctakeidsenkcoerseeippege sider
Keyhiorat foldermekrtemer lalpabusgesider vofa farskeqckveeemed
Lbhandlukmnd
[7] Leoge sukkeyognen sommen
Kohtroerothnokker
Tukk nifoualssan70ntrakdeeterrstropene mae 12bhtnagnereratdoctomatiskeocridesoppd
-
[B]Koble pihuiene medhurtikobing
Sng forrwrknoeennnkeeraprrn2
- Uwck (f) hertn (m) hcking (h), 12k (k) knnn (n) n (n) n (n) n (n) n (n) n (n) n (n) n (n) n (n) n (n) n (n) n (n) n (n) n (n) n (n) n (n) n (n) n (n) n (n) n (n) n (n)
- Aktiverung Trukaremeedolien red Salkelvognen, van bege segne from og tible som fale cyden westerborefungen.
Ummnng Snuhmepeaepnn nnnnnees Jssner Snye gokgienl frrn mernelckenrnrnrnrnrnrnrnrnrnrnrnrnrnrnrnrnrnrnrnrnrnrnrnrnrnrnrnrnrnrnrnrnrnrnrnrnrnrnrnrnrnrnrnrnrnrnrnrnrnrnrnrnrnrnrnrnrnrnrnrnrnrnrnrnrnrnrnrnrnrnrnrnrnrnrnrnrnrnrnrnrnrnrnrnrnrnrnrnrnrnrnrnrnr
15FmntdekeSlogosikjemming
Outbck hont frontdeas, pht (52)et nnektsnir [Sloge enekstspolsbeskustene (51) D opner kukrfer frontdeasve vheipv icu sieni Salsbogkuien sieniet wihlpeov sienen Fntaeksteane kon cpcbeses Hcmenn (ng nnd deke jnnn
Inppnnter ofykewnennnnngnwn ghtsoloekte[1]
TIPS: Homosynonymous levels are negative feedbacks, but they do not
- Please correct, copy or mention this paper for permission. Your institution's journal citation (doi:10.1098/loi) may reflect the following articles: https://doi.org/10.1098/loi.2016.037
- The corresponding file to be accessed by the database is named (and thus identified) during first, second, and third iterations. If a file is not identified or disked, the file will be treated as an empty file. The database containing this file will be open again for another iteration of the program and well 60% of the time it will be updated.
[17]Tboekelening ay seie
-5ka2hAthale [170] monverondre [170] for 3 frnle rugge, sg nif derertrrugger, forwereraler colower [170]
- Nemyggemnynesteposson, wNrocteneuromotiek skywesutover og lseuggen.
Paaatbapnaggeerfepoepenepenepenepnep
[8]Montering avLFD-lysene
Paeerippeepnokaruygkeygnnerbnnrnnne
BokRcUeTnEeLEDgpeFpFovkeKLeKpOaKefen
BRUKOGVEDLIKEHOLD
Kontrolieres for du bruker sskkelvognen
- At hylene er kormcr festet p6ykevognen.
A
- At sykelongeenerfirdet urkneerng at theameeknsspeeraer hst ph begge snerikke gumh hneinnntker.
Aerangenergntaegnertagsknertbeverkehnsinncnne
Aikkerhetslaggoguseneepssndrderenohovderr
Oppbevring
- Det anbghieesnt hucank onnbewne unendare pef tarr ng gort vaneiert srt nnerndineke solys
TIPS: Der finnes ergete apsebevngskefiri Homax for Deine bae,teise
Vedikehold
Inipic: hns fioe 10000000000000000000000000000000000000000000000000000000000
Sikkerrlikingspunkte, wisder kommersaktimide aktirekobingsporket, fckondukeiedetmedwn
- Sverpugnag [g] Strain [strəm] /cərntʃəmɪrɪn/ [hɪsˈtɪspəmɪŋ] [laɪ] /sɛpərɪən/ [gɪn] /sɛpərɪən/ [gɪn]
- 2kncnnaeernnienr nnnnnepehneepnneepnneepnneepnneepnneepnneepnneepnneepnneepnneepnneepnneepnneepnneepnneepnneepnneepnneepnneepnneepnneepnneepnneepnneep
-
Le siquevege nantelk f aocetosert for tngir for Gwogmugpemt
1. Isis sokiojogenen at Inovikem enuoljke erher skules, ma cui konstekt med forhandlen sirk at danan konstentare oden.
At office vehicle component from van de lerein, motor running, silver henselton lifts, truck and trucks, stromal equipment, and car parts. Sildenafil infilling at office or post office.
GARANTI
nannnnn nnnnnn nnnnnn nnnnnn nnnnnn nnnnnn nnnnnn nnnnnn nnnnnn nnnnnn nnnnnn nnnnnn nnnnnn nnnnnn nnnnnn nnnnnn nnnnnn nnnnnn nnnnnn nnnnnn nnnnnn nnnnnn nnnnnn nnnnnn nnnnnn nnnnnn nannn nannn nannn nannn nannn nannn nannn nannn nannn nannn nannn nannn nannn nannn nannn nannn nannn nannn nannn nannn nannn nannn nannn nannn nannn nannn nannn nannn nannn nannn nannn nannn nannn nann.
GENERELLE INSTRUKSJONER VEDRØRENDE BATTERIER
-
-
- (otihkdeanatnnepees
StnFparrinrertetnrmikkek
- Uererikn tlltchne rannmertener nne kneeknsnpereleke
Infor mosjen vethereende avfolshandiering av brukte botterier
Symbiolo (sensu sanguineis) be botanier, Forskeringer cemnmoegaflagende documents better betig. 1bukcikbotcnr hri kskk fes hiz tufkowm mncnnehckvapnacn. Dornpok poytcr tupk. fum lndien quenere n ane gapekke mecknauver, betig der ecbvtcnirne hemicnnted (Bif. I. I. I. I. I. I. I. I. I. I. I. I. I. I. I. I. I. I. I. I. I. I. I. I. I. I. I. I. I. I. I. I. I. I. I. I. I. I. I. I. I. I. I. I. I. I. I. I. I. I.
Vignes are provided for transport, delivery, storage and disposal. (This includes van, car, motorcycles, motorcycles, cars, trucks, buses, cars, trucks, buses, trucks, buses, trucks, trucks, trucks, trucks, trucks, trucks, trucks, trucks, trucks, trucks, trucks, trucks, trucks, trucks, trucks, trucks, trucks, trucks, trucks, trucks, trucks, trucks, trucks, trucks, trucks, trucks, trucks, trucks, trucks, trucks, trucks, trucks, trucks, trucks, trucks, trucks, trucks, trucks, trucks, trucks, trucks, trucks, trucks, trucks, trucks, trucks, trucks, trucks, trucks, trucks,
-
f#
- -
- underlie of the establishment of a legal responsibility
KOMMA IGANG-MONTERING
[Forpacknings innehalochnodvndiga verktg
- ()
-
1
-
Stackelberg's game: A 2019 global competition for the most promising and easiest to win. (https://stackelberg.com)
[14] Anyanda parkeringsbromsen
Kappily in Tugus ne peoetenti tngsdoanr sigenen knyfotie coklctia fomr tckkarechien taen
A. Al-Faziz al d a pustulatitlllipar hghpkrnien hiehriqktrk sllr kprkng rupren for tst AunroNor
BjMontope you de quick release wien
[10]Bevestig her accessnir [10][ic] in her Safe Connection Point
-
Zanrnrnndrdschut (b)amnnnstacn htnncssre in deopnnpdeworkntortarpe
-
1
Cnrolteer of deschufveyendldis hemnonoet trekken
(ii) Verwälder het accessaire [i] [f] wit het Safe Connection Point
- Unkdeqzne anpinc enbewegn eschul mboop nondr deaein zinbysareposite Kic
- Unik degrige knpopnreessne nane nenene nekn eessone mnt hote Convetion Print
TIP:Ukunrde hongyep,10n connection nontgehkenwnneennwnnncssreew
schoedergesundheit in die politische gesundheit des smokerers von den Kuhlwandel. We use the concept of a smoker and refer to it as the smoking habit, e.g., smoking habit or cessation behavior.
Verminee wae schindnggepeiein an elcioran nminn here in de mdelete gepi hnnn de amoeiprnlfdnrodnt [prnndt dce klln. Inck s bunden van de cieh on schoderged of aak oohutwink geochvst. Cntrifere f da vefuigudlalpouoed/vozitumfomcr cne chsdscnpdcln eikien.
[7]Rugieuning verstellen
Schafte versorbschaftsprecher [196] (macher 20) /davon der Schaffungsgeschäft angrundeltem von der Gesammingerichtsrichter of the
Wenrnrn der rurnsiee nssiepeereer streee bener, schwien de vorechtsprenonematisne hner beu ervergnere de neogreening ou zinponts.
- Contralors on the right of the right, wrong, wrong, wrong, wrong, wrong, wrong, wrong, wrong, wrong, wrong, wrong, wrong, wrong, wrong, wrong, wrong, wrong, wrong, wrong
Beve Stnien Pmndrnnn rnr an mrrn rnrnnrnnrnnrnnrnnrnnrnnrnnrnnrnnrnnrnnrnnrnnrnnrnnrnnrnnrnnrnnrnnrnnrnnrnnrnnrnnrnnrnnrnnrnnrnnrnnrnnrnnrnnrnnrnnrnnrnnrnnrnnrnnrnnrnnrnnrnnrnnrnnrnnrnnrnnrn rnrnrnrnrnrnrnrnrnrnrnrnrnrnrnrnrnrnrnrnrnrnrnrnrnrnrnrnrnrnrnrnrnrnrnrnrnrnrnrnrnrnrnrnrnrnrnrnrnrnrnrnrnrnrnrnrnrnrnrnrnrnrnrnrnrnrnrnrnrnrnrnrnrnrnrnrnrnrnrnrnrnrnrnrnrnrnrnrnrnrnrnr nrn
Eponyserbalen
Ae anen enanen nnnnne aennnne annnne nannnne nnnnne nnnnne nnnnne nnnnne nnnnne nnnnne nnnnne nnnnne nnnnne nnnnne nnnnne nnnnne nnnnne nnnnne nnnnne nnnnne nnnnne nnnnne nnnnne nnnnne nnnnne nnnnne nnnnne nnnnne nnnnne nannnee nannnee nannnee nannnee nannnee nannnee nannnee nannnee nannnee nannnee nannnee nannnee nannnee nannnee nannnee nannnee nannnee nannnee nannnee nannnee nannnee nannnee nannnee nannnee nannnee nannnee nannnee nannnee nannnee nannnee nannnee nannnee nannnee nannnee
Ouscrnchion stunti dttioeoml Eubuaogmnnl lichsagcshwadukh, rne wioqim Sdo the Gacnivdukh uovr sien und uongenbrenn. Vermeden 5x nppe Stane Hnrnndae nere aene harnmeu to fyrtonie den Anonngn zim Lmupkien bengknonns. Die Veneringes of Anonngn unterungnng Werten, Strifden neder Verwirtenbregungnun zu uinnichen Schmucn Pnen Fotoerhered Sennmberstedt Wessau ngwen, okde Bedingungen eithere sichere Verendungs des Annongs zu zulatten.
Hone Sichtborkei
Tnnpnne nnnnne nnnnne nnnnne nnnnne nnnnne nnnnne nnnnne nnnnne nnnnne nnnnne nnnnne nnnnne nnnnne nnnnne nnnnne nnnnne nnnnne nnnnne nnnnne nnnnne nnnnne nnnnne nnnnne nnnnne nnnnne nannnee nnnnne nnnnne nnnnne nnnnne nnnnne nnnnne nnnnne nnnnne nnnnne nnnnne nnnnne nnnnne nnnnne nnnnne nnnnne nnnnne nnnnne nnnnne nnnnne nnnnne nnnnne nnnnne nnnnne nnnnne nnnnnee nnnnne nnnnne nnnnne nnnnne nnnnne nnnnne nennnee nnnnne nnnnne nnnnne nnnnne nnnnne nnnnne nnnnne nnnnne nnnnne nnnnne nnnnne nnnnne nannnee
- 10s hare rersender Auokn the verhag at Kerepe nhenrnnn aonlen Sonnerhur (19)
TIPP:For sponenReganfie stareKmpleTe Reganicuonnntich
temperatures elevated are ventilation outgoutation propres
Compartment en circulation
Assay wneaeepnemepnep
Assure: you do not return the prepayment due date of the payment (i) Apply your current tax on the interest in the amount of income applicable, identify that you are subject to a settlement fixed in prior years.
Lagomnlo imponl sncrpsi spon f rnrnnnngnns hcnmnnn nnnn nnnn nnnn nnnn nnnn nnnn nnnn nnnn nnnn nnnn nnnn nnnn nnnn nnnn nnnn nnnn nnnn nnnn nnnn nnnn nnnn nnnn nnnn nnnn nnnn nnnn nnnn nnnn nnnn nnnn nnnn nnnn nnnn nannn nnnn nnnn nnnn nnnn nnnn nnnn nnnn nnnn nnnn nnnn nnnn nnnn nnnn nnnn nnnn nnnn nnnn nnnn nnnn nnnn nnnn nnnn nnnn nnnn nnnn nnnn nnnn nennn nnnn nnnn nnnn nnnn nnnn nnnn nnnn nnnn nnnn nnnn nnnn nnnn nnnn nnnn nnnn nnne
Wt: 10.5426, Number of pions/mol; 10.5426, Number of pions/mol; 10.5426, Number of pions/mol; 10.5426, Number of pions/mol; 10.5426, Number of pions/mol; 10.5426, Number of pions/mol; 10.5426, Number of pions/mol; 10.5426,
Wtio: 10000000000000000000000000000000000000000000000000000000000000000
[3] MoHTaX HaBeCHOrO yCTpoNCTBa Ha BEnocnneDe
CHAHMITE KECUENTPKH INI RAJKy [3a] c JIEBOH CTOPHOH OCN SAHEFO KOLNECA BENOCNNEIDA. NOMECTYHE HABCHEOE YCPOTHCTBO [3b] MEKdy EKCUCENTPKOH INI RAIKOH pAMO.H 3AHTNHTE KCUENTPK INI RAJKOoPATHO B COOTERTCBN CYKASAHHHM H3RTOBNTENA BENOCNEDA.
Y6eJIaTeBc 8bPnIbHIOCTH HApNBeHHA HHeBaHOCTb, DaOeJIteB MaKCHMaHBO COoCHOCTM KEXdY HABeCHbIM YcPOCTBOM BEN OChINeDHM KpOHTeHOM.
[4] MoHTaX npEOxpaHrTeIbHbIX uNTKOB
CUMBECTTE TBE TEPBTHN [4a]HaIJIHnTHeIy IINPEAHOATHEIHTO HNTKtCAOTBETRHN HA CAMOM PEOAHOATHEIHTOM NITKe [4b].3AKPYTNE 2 BHTTA H3HTPNIpuENa Ypee3 OETPBTHN BTKAH B PPOAHOATHEIHTOM NITKe. INONB3yTe BHTNb, PPOCTOCTABIIHNE BMECTe C pINPENOn. JAKPENITE cIPTOK cDPYrO CTOPOHbI aHAnOHnHrNcIcNOsOc08.
[5]Hactpoika perynpyeMoN noBceKn
IPOBDECKY MOHOO perynyOBaTB dAIOEcbneHcN KCMOPHTH e3u. OTrpElynpyRte NOBDECKY B COOTERTCBTN C BOEC DTeT. Prrp EYNPOBKE DNOBCEKNI pIeHNXe bOtBytM. BpaaiadeypeyIPOBOHOHoe KOJIbO [5A] TbeDyEHOe NIOXOHEnE, YIOCTOBePbTEc, ITO IeBaN I npBaA TaChI NOBDECK H XAOATDCB A OINAIKOBO MIOENOHKe.
[6]PacknaDbBaHne npuena
- Notarype pyky-toIkaTeNb BBepx, noka MexaHn3M ABTObIKpOBKn He 3aueiKHeTcN C o6eNx CTopoH.
- YbEInTecb, yTo MexAHn3M cKnaDbBAHn 3aBnOKpOBaH C o6eNx CTOpOH. DnA 3TOrO NOnbTaIReTecb
CNOXHTberoo6paTHo. - 3a6nKpyte pyky-TonKaTeB c noMoUb pkyoTkn oCboOxKeHna.
[7]CknaabHne npuena
- y6eintecb, yTO pyyka-TONkATEnb pa36nokpObaHa.
Haxmte Ha KHONKY 6nOKnPOBKn CklaDbIBaHn [7a], a 3aTEM nToTnIte pEmn Ha ce6r [7b], TTo6bl
de5nOKpOBaTbHexAHmABTO5nOKpOBKuC06nxCTopoH.
OnyctHTe npuen BHN3 BCNOXeHHoe nOIOXeHne.
[8] MoHTaX 6bHCTPOcBeMHbIX KOJIeC
- YDOCTOBEPbTECb, YTO CTORHOHbI TOpMO3 He 3aDeiCTBOB0H [2m].
ObatBnHcONaOHKoNtO,3aJIiHIOUoiOcObCKeJa [8a].KnHMeTHe H KOHNy [8b] nCTABBeTe boc KcIeAeB rHcTeo. YbEIDteCt, YTO cKOLe AHeDHOZ 3akpEnHeo, NotaryBa 3a Hero.
[9]YCTAHOBKa npedynpaTeNbHoroΦnaxKa
POMECTITE dIaTtOoK [9b] B FHeAIO [9b] HA TcI CTOpHOE BENONPiEna, KOToPA 60JIbe BCERO oBaupaeH2 Kdope
3KCNJYATAUHA
[10]PnpcoepnHeHne Detann [1c]/[1f]KMeCy coepnHeHn
YueHdTeCb, YTO no1yTHOB [10k] nepeMeuB bEePc. 3aDbHHte Detalb [10f] BHTpb oTBepCTBa B nepedactn, NOKA OH a He bctanet Ha MeToC.
- NepemecTNE NO3yHOK BHN3, NOKa OH He BCTaHET Ha MecTo. 3eneHbI UBeT O3HaayeT, YTO MecTo
coeHHeHHaBIOPOBaHO. y6eHTecb, 4TO non3yHOK 3aΦHKcnpoBaH, notaHyB erO BBepx.
[11] OToeHHeHHeIetann [1c] / [1f] ot MeCTa coeHHeHn
Haxmite Hc cepy0 k hony K nepemctte HnOlyhB bexp, noka o h e RCTAHet Me HMeCto.
Haxmite H yDcpkmbirteHXaotato k hory H aetanl BHTNHt eTanl M cMeTA coDHeHHN.
COBET: B npoecce CMeHbI dTeanBbl MoKeTe Bocnonb30aTbc pyKoI [10a] B MeCTe CoeHNHeHn.
[12]PnncoeDnHeHneBenoCnneHoroKPOHHTeHaKBeNoCnneDy
- Peped 3knnnyatauHn HadeXho 3akpenntre TaroBoe yctpoCTSO n npdooxpaHntbnpeHb. B
Hacadte BENOCHEHNB KPOHUTHEH N H A HEMHOE CHYTOCTBO [12a]. BCTABTE cTOnOHPN hHTK [12b]CKB03b OTBePTCbB E BENOCHNEHM KPOHUTHEH N 3AKKOPErE OEOyEDIeTeC benoCtneHnB KOHUTHEH NAEKCHNBAZKPNINH, NOTHyA a HERG. PONyCTFE TpePNOXPANHbI bPcEHb BOKpyr DPMb HONOCHEHNa N ZAKKENTHe N KOK H NPOVKNoJIbe [12c].
YbduHtEe, npeooxpaHnTeJIbI hpmEH npoxOJit BOKpyr HIXhero [12d] uHHBPxHero [12e] nepa pmaBENOCNHe.
COBET:KorlaBenocnnebnkIxpoHHTHe MCNOnb3yETc,BlMoxeTeXPaHHTeEro a npUHEne. COBET:KorlaPnpOxApaHHTeNbIpeMeHcNtXoHnDJIHHm,BlMoxeTeObeOpHyTbEBOKpyr pabMbDAkbl,TOb0I He MeHsANKIM-LoIOB DkYKUHMSCQVACTHaZdHeroKONECA.
[13]PerynnpOBKa pyuKu-TonKaTeNb
POBEPHNTy POKKHYO CBO60JAEHNHA [2k] ABVEK, NTbOJIpa3aONIKPOBAty PYKY-TOLKATEn [2a]. POBEPHTy POKKHYO TQKATEAJIb, BTHSEVPEMPOHOJIOEHN.
PObepHHTe pyKoTky OcBO6OxDHeHH BHN, NOKa He NoyCBTyEte, 0TO H3a3nKpObaNacB b KHOCHNO ToXeHHN H3bOKnOpaBApyKu-TOnKaTeNb. Y6eHNTecB, 0TO pyKHa-ToNkTaTeNb a3bKnOpaBaH, HeNCbHNo Haxab Ha HEe.
[14]Ncnonb3OBaHne cTOrHOyHORo TOPMO3a
BukHHeH: HAKmHHe Ha nabTcToHOro TOpmo3a BHn. PInpUe MoKet HemHOrpe HnepeMaaTbCBA BnEDe HnAaH 33a DpVDoVMeN pOBeEke.
BbIcIOHHe: TOnHTHIe 3a neAld CTorHOHOrTOPOmO, noka He npno3oTeE rgoaIOKOBpOKBa. Ipepehctte Pnpuien HEMHO Rneepen NnHasad, NT06bY GBeTobNb B aD9oIOKOBpAHMn KONEc.
[15] NpeHnne Yexbln coHnue3aunTHbIe uTOpKn
BenonpHien Overhut Meehe npHeHn IaactKOBouy Xeohn [15c], nepeHn cetauH yexon [15d] nDonoHHTNbHyO cnHoua3auaHytio UTOKPY [15b].TObOb oToKpRy h 3akpRy h eXnH, HcN03yBte MOHNHO 6OxAM, dIpn fHcKauncn HOnu3aaUHTIOH TOpKpRr hCN03yBte NaNYuCK. PepHeHne YEXMoo XXPANb R KAPMAHE [15a], kORaN OH He NcPbEyETCA.
Bepxhee okoKo TaKoe MHeeT DononHnTeBHyIO conHueaunTHyIO wToPky. [15e]
COBET:Ha cnuyaenbHoro doxkdoKmnaHnHa max npedocTabreNnonHpaaMephbldoK
[16]5-touehhepeMnH6e3onacchoCTn
UcAaHtpepebKaT,TOB6bIero pyKn npouuN cep3OtepcBeMeKdY nneuebblm [16a] norChbMn [16c] peHHAMn. PnpBaee, TOB6bIero neuebblpeMHxHaoDnMbH aOHOM ypOBe C nneuaMn peEbeHa. OTrpyvMPyTe BbcOTy, CaBNBVnPpXkN [16e] 3aNOgONBHKINoB BEPDX INH BNH.
CoaHnHTe Dbe PnKHHn PnHEBOro PEMH BmECTb HcTBeBtBe Nx B CEHTpAByHn PnRKKy [16b] Ha naxOBorom PEMHe [16d] TaK,OTbOu OHn ZaIaJIeHNKHyN. YMeHbTe MInHn PnXBOrO PEMHn, A TAKKe PnHEBuHn PnEHn, OTbUbPnEHOk BuHn JApEnKHO pncTeHyT. YbEInTeCb, To PnEMHs BeOnaCHOCTA 3aFKnCPOBaHb, NotNHy 3a Oba PnEBeBx PEMHn.
[17] N3MeHeHHe HAKNoHa Kpecna
CainbHte pyoKTHMJIaHEHNAHKOHOHAJ17a]dpyT KDPyTu [17b], TIO6bI pae3IoKIOpOBATc 1nHky HnHTHy e Heaazn nnBpeRd 17c1.
KOrDa CINHKA DOHTNHE CYNOJUOEN POZHUMI KANHIOA,pyOKTNI 1MMEHEN HAKHIOA BTOMATMHCKA BbDMHITcLDAHXYK INAOHKNDYOT CINHKAHO HAOBOM MECTE.
PnHcnoIbOaBHmPiuCaN0utBack, BcEraCneIte 3aTeN, Tc6bbl CnHkA b6la HndExHO aHHKcKPOBAA HCBEOMECTe.
[18]YcTaHOBkCBeToHNOHbIxΦoHapei
- TOMECTHTE FOHAPN HA TOI CTPOHO INPUEENA, KOTOPA 60JIbue BCero O6paueHa K DApORe.
3aDHHA qHb: 3aKpNnIe KpaHb CbaTeOIOHb HcHApBa Hpy-Ke-ToKATeB a 3aHdE qHtH pnnIeuHa.
YXOJ N OBCNJKUBAHNE
Peped nCnoB3OBAHHem npHcena y6eHTecb, qTo:
Koneca HaneXHO 3akpenneHb Ha npuene.
HbHaKaayahblB COOTBETCTBN C yKa3aHHbM 3HaYeHneM daBneHn.
PnKuEN DaaoXeH DooXbHM 06pa3m, a MexaHm3 aBNOxNobAH C OBeHX CTOpOH. He 3aFyDte
1HnHnHnHnHnHnHnHnHnHnHnHnHnHnHnHnHnHnHnHnHnHnHnHnHnHnHnHnHnHnHnHnHnHnHnHnHnHnHnHnHnHnHnHnHnHnHnHnHnHnH
CnHKn CnDEHN HAnExKHO 3aΦHKCuPObAHbI. CM. pa3neO TeXo6cnyxuBaHN.
- PndynpeTeHbI OAnKOK H OHaHpyGtAHOBneHb, eCmEctb TaKaH HeoXOAMOCTb.
XpaHeHne
HACTeRbIbHO peKoMeHUYcER XaBnHrI Mtni OubxB C yXOM n XpOIO npOBETPBAEMOM NPOeHbE B aXuHIMN OH pONMIX COHUYbIX IyueM EMcTe.
COBET:Дячшь Зашитб komпаннй Hamax npednaraeTcneuaNBbHy chexOДЯхHeHn.
Texo6cnyxmbaHne
Pyuka-Tonkatelb: Ecnn DnyuKa-Tonkatelb. He JepKCTNc Tbe TpeKoYmENO NOXeHNi, zAHTNHte TaKy [19], KOTOPAH HAOxOHTN, NOK TaHkyh, YBNEtCHRe B, OyUHaIKoRbA TzAIXKe RaC eOExSy CTOpH.
CTohnoHnHmTopoA [2m]: OtperynnpyIe Tpoc CTohNoHrOHa TopoMa c n omoa hpeyIaToppa TpoCA [20] 80ane nepdaia TopoMa.
- MecTo coeHHeHn [2e]: EcnBbHTpM MeCTa CoeHHeHn [2e] HMeETcR rpa3b, CMOITe ee BOdoi.
CTHNHK OCHOBHNI CHAEHB [2] PERYINPHO HATRIIBAIE PEMHI [2] B AADHNI HACTI CTHNHK OCHOBHNI CHAEHB. OBATEAHENHO HAIHAHIAE HATRIIBAIE IX CEBPYX, A TAM CHMY.
HeNPOB3yPTe NCTAue CpeCTBa. PIOBOIDHTe OHCTKY TOLko CnOMOu cnaoRO MmIbHoro PACTDBa.
O6HbKU CHENHE [2d] MOHO CHI B c pHJNA C c HNIO O cHTK. CTPOAte C c HENIA BpYHNU KIN B CTHPNHNI MauHNKE B XoONAOB NOE B C KOPTOKM NKIKN OTKIMNA
JaTae npnenty noHocbTy BbcoxHyT, neped Tm KAc cnpaTb Hx pahene, 0oToB npdeTbaTb To cnoKpTaIeNc
EICINPHENIHNBABAPINIKHbKANINIO6OBa3OMNPOAEQEN,OBpaNTIECBKNPODAUY,TOb6BPOPEBRTM,MOKHOINPODQNJIEREOINIOJIBOBAT.
Bc Bae KaHbYe KOMHOHeHTbI, TaKHe KAK: DbluO, CoeHNHTelbHoe YCTPOrTB0, PAM, peHH HBe3oNaCHocTH, OCBETeTbeHbOe OOBpyBaOHn, NmHbI KOneCA T. I. DnE 6e3oNaCHO COCTOHHa; peryyPnA hpoepKa, XoopoIO m 3aTHyBtBOnTOBHeCnEHIN
TAPAHTN
RapantHn HA MHOFOyHNOHbIbI bIeTCKKn IpnueH Hamax Outback DeCTBYe C DaTHI ERO npOaJHK. RapaHTN HcPOK 3BcHn 3AOTKoHApTeCbTA COOTETByOuI cTpaH. RaPHTN paoNcPTpAHrTa hA DeEeKbI MaepnIaON I nI30TBeHnH, Hne NkOJIbAe TOBpeKHeHn, BILBaHNHe HnpAbaINbHM INCNb30AHm, OTCYTBmTN ETOxCbUxKbAHBn, ECOHOJIeOHnEYka3AHn B pykoBDct, pnmeHHENmI qeMeMHOp CNMnI IINCTEChBNH mN3OcHOM. RaPHTN DECTBVtHnHa TohIOBnpeBHOANHOr NOKnyATen. NOKnyBCTa, BHMAENTHo O3HAKoTbEs C PekOMHeDAAHmNn NO TeXbOyKbAHnIO KcNcNyATAun. YcONBn, KOtPOH NTpyRECT X PekXePBEmEHOMY mHOCy PnIeHa, He NKpIbAOICra PApHTNbHMIO8aTeBcBAHm. EcnPiueH NyKDaTaC B TEOxCbYKBAHIM, IMCn Bbl OXTNE o6pTbCH 3a PaPHTNbHM OcLnyKBHm, CBKKITEcB C MeTHbn DUNepom, y KTOPOTOBb Bi pInopepnPiueH.
OBUNHCHPYKUNIJA BATAPEI
Henepe3apxkaembie 6atapen Hnbl33aapxktaB.
- N3BNEKNTe nepezapxmaeb6atpen n yctpoiCTBa nepea x3apkoii
P03HbIe TnBbTaepe, a TAKKc STaRbe HOBBe bOaTepe He DCIOXHBi HCIOINb3OoBAtCB RMeCTe B OOHOM YCtPOCTBC.
MoxHO nIOBbOaBb GatapeN ToIbKO OHHoro Wn HAnHOruHoro Tnna, KaK yKa3aHo.
- Poxanycta, y6eHtecb, cyo 6atapen BCTABneHbC coBnOeHHem npabunbHO nonpHOCTN.
- PpOBepe, TToBb B HCTOaHHKe NHTAHRe He bIIO KopoTKoro 3aMbKaHn.
BbHMMaTe pa3paXeHHbe BaTapeHn3 ycTpoHCTBa
- Henb3a cKuratb pa3pXeHHbIe 6aTapen, TAK KAK OHN MOrY B3OpBaTbc NIN IpoteHb
HhOpmaa 08 yTnnaa pa3paKeHHbix 6aTape

300429KHHCHHOBH BAtaepae, YIyakoe KIN PnRHaAeMOJyOHTAHU O3HauHt, 70Gbatapeo Noce OKOHAAHcPCKa CNYbHHe CNEpyet BOpBacpTaBb BMeCTe C bOtTOBAMN OTXoAMH, BO3MOKHy BOKyNDg CMBLOM MYCOPHO BAk O3HauHOT, 70Gbatapeo Codepxat CBHeu(P), KAHN (Cd) Hm pTy (Hg). BHK, KaK Norp6bYrten, 663aHHNo no zAKOHy nepeBaBte Bce Ndu Batapei (KaK nepeApaaekMaHx, TAK n HenepeapkaekMaHx), AKNouy cacObeBatapeu, s MeChTHy FNKHTbCoop HA pBOHHaMH MaarhA. 3To eocnTnHO. IpaBnHs yTNH2ZnnaIOBnNET nepeBaBxtBt HnHeHbne PCpcByu n KABeKbT BoaMKHbX HerATNNbNocnDcTbn JIIOJI INO NKPKXboue cpeBly.
HΦopmaa 06 yTHn3aun CTapbix 3eKtpuecknx H 3eKtpoHHbx YcTpOaCTB
H0aepaeknHCHNHOYCTPOBTH,YNKOBAEINpNPAIeMaONDOKyMeHTAUNO O3aHcH,YTOYCPoTCHRONCNECKOHNHcPOCkCNyBbHEcNcEY
BbIPsBaPbBtBMEChc6BtOBuIMNXTQDNM. Bb,KAKNOTpeBteHb,OBaBHNO 3AKOHy NEPaBauBt HcNcNcNcNcNcNcNcNcNcNcNcNcNcNcNcNcNcNcNcNcNcNcNcNcNcNcNcNcNcNcNcNcNcNcNcNcNcNcNcNcNcNcNcNcNcNcNcNcNcNc
Hmnnnnae 2001 (paeeeennnne neneepnne ene
"Anonion ionization: The ionization of anions by the nucleus of a proton. Anionization is a process in which the nucleus of a proton becomes a positron. Anionization reactions are often called ionization reactions.

ZÁSADY BEZPEČNOSTI
UPOZORNÉNÍ
Dulezite-K-Uschevejtesrugoceknupropozaesipozit
Tertio viroseke je vssionnne ne opolipin nnonnnnne jne Rieckgkntkpeyoknok (EN)198202A2017 EN 188832068
NEBZPECPAPUpFewocn.Paedberhemneborgchichcchuzjnetnemontowpfdowd
kouenepb
Tentoproukseedokomenvhoaiprodtdofmesia
Total product development requirements are listed in Table 1. Product development requirements include:
- Nepouziveite s gétmi jeiizh hmotnost pekniedane omezent
Nikl menechovite gitebe dozior.
Pienzchneige vohemn zonenipsoe hmo pdaern nebvi kiaumn. Vidy paivne jne zdckn system
Cestujici by meli vzdu nospi sordvne nascenou a schydlenou helmu
Tohriipxivvovni stabiu izanbokoln prolouzbrzdu drhu
Tento prive (e 36, ne' vase jvain kolo. Ulduhrte bechmeau vaidemost a poramunre nave8t/ potomaiotodeni
Fesdkaadjusdeus presveedte zepajeng privds nckiundge erzdnin, stpanmneos zoedemnigianhko.
Nedovolte,aby tio,oblenf.tkaniky nebo hocky alte pisi do konaktus pongblivimi dsmi
Nenstalatue do privse duosedieau nebojakcnyne selci zifien, kane nnschwlen wroctcn
Neprovedite noprivetu zachnupravg
Mikdy niezdete na kole v noci bez noiezthe osvetleni Riote se vsemimistimi zakonnimi
pnoaiknne
- Mzochistrone privisumusbtig viitatienuimsiene cod zka, knd soiue preciosy CPSC
Pnepnne nnnnnae nnnnne nee nnnnne nee nnnnne nnnnne nnnnne nnnnne nnnnne nnnnne nnnnne nnnnne nnnnne nnnnne nnnnne nnnnne nnnnne nnnnne nnnnne nnnnne nnnnne nnnnne nnnnne nnnnne nnnnne nnnnne nnnnne nnnnne nnnnne nnnnnee
Nepouziveite esticirozpoustedla.cistetepoueiemnmuiedyoad
- NenrXeipnKpNvHneRcEveSkiVdZnnZronEnBosSnntceTjckn/Jeore
- Mengechevoiteyoe sichnrsis nioo
Preipponinseipie,evsknoikovacnizienisopojen
Prnkldonovkldoniywagohnolmsezostenporkovc/brzdu
Abu ncofoke zranent, pirokidaia o skidiai tohoto prodktus drzdoa
Teetpsnki nnnnndpmbnebnnsnt Fipnprabnncnneonnrnnt bezckset 622eekm kolen mbrn cnoepesimn pskem Bzckset se prckio soanstane
Nepouziveje zodne pisiuensstv, kterne nebuio schvdieno virobcem.
Poujre mohe pouze nihrsidy ddoone nebdo copouteene vrobem/distributorem.
Fie sveiinne hnepe jnoe ganehren vteimnne yepn norkpionnnnien viyostene cseuunchgim tepiam nebo pdeis doe vystaveniyvssim tepiom bez iostoteceho vretan nohnicotae.
NezomjIne pOitn mIe st KneBzpeTm situacm Spoeiost Hoxanene odpovonost zo Jokekoi Skody zpsisopev nezmogienm poHitt. Jokekoi nezmijIe poti jenizkem uivotale.
Pipocuizitcuklistickeho privesu zavfete pfdnikrt.
Neupevniie ktozneuZbngnene protze loovntiin
Zavozda nucuiezdo de obstetriwnf neovn 6 privse zavozda nme zavozdaovy prostr protote to ovivny stabilitu privafo
BezceCpostJizangjing kojia
Prrn pnnnne nnnnne nee ae eae aee ene eae nne ene nee nee nee nee nee nee nee nee nee nee nee nee nee nee nee nee nee nee nee nee nee nee nee nee nee nee nee nee nee nee nee nee nee nee nee nee nee nee nee nee nee nee nee nee nee nee nee nee nee nee nne nne nne nne nne nne nne nne nne nne nne nne nne nne nne nne nne nne nne nne nne nne nne nne nne nne nne nne nne nne nne nne nne nne nne nne nne nne nne nne nne nne nne nne nne nne nne nne nne nne nnee
Choydipn
- Prove that the existence of any closed subvariety of a complete ring (in fact, Viola's 2-spheres) is equivalent to the existence of an open subset S of a closed subvariety.
[5]Nastovenin nastoviteincho odpruzeni
Ogurulirnirnirrnnnrnre proo aorirnne rnrnrnre Oqurirnirnirnne rnrnrnrnre 0000000000000000000000000000000000000000000000000000000000000000
161 Rofozemipwesv
Tefetteuieyreoghne,okseaeeknngdienmcknubcstrnd.
Zohcimnemrnnnreererererererererererererererererererererererererererererererer
-2019/10/28 15:43:46
[7]Shozeni p'iv'esə
P
Zutlckc cefing kriik fkiokc nifu cwiifrpoe vuihiknnda smdimirscub (j) dukcbeneactmaeutomng
26meknoobogstpon
Sio2cprivsspmrnnnabdo sio2epeohg
S'Meotz cspieqalnck
PreswAeRse,fe npovnirbrzaoeninbdoanam
Daminicaly ic tio i 01 01 01 01 01 01 01 01 01 01 01 01 01 01 01
gMn#dbepeepostnooppoknu
- 2nvi htnn n (Sn) n nnnn (g) n stnnn (kne) nee e
POUZITI
[0]Upeynene prishensntf [ic]bepecnem spoyocn bade
-
m
esy eep 1000000000000000000000000000000000000000000
nannnnnnsanrseevneepaauninvakienmtn
[7]Demontyte pIstuensrviic h zbepecnneho spajovocih badus
- Schinkie Sodicticke opgicpuee psswnnunrnnnne nnnnne nnne
Sneepnepaandrtae tntpokn pifuensrvi ytnnanepeysenansriz bepeineho apovnnin hdu
TIP Projvymovsich prnssrnnrpepuirnkqet 2021spovompaa
[2]Pipnevniuyckistického rarneno k jizdmiro kolo
- 1
Aepuiee Wistckr aenrnrozdo 120 Prostrte poystnep 12bctvem rernenadhne kto zetegcr Zotozerm
Zeremgiznne kohsepee 2019 2019 2019 2019 2019 2019 2019 2019
kaiupemiehncckd-kuwizj
Bepoeepnipocpctokolmngtchirukg12fneo2hviiee 12efnwee hia
TIP: Povudamene projckelnncovdte mEge juiu
TIP: Povudie bepezocnsnncsek chis diooh, mizere ie cimotd akolpma zaiditak, jneubde kalidowts
Zcnppeepnncnneep
[3]SeIzenlofne np
Oioenimuvovnivr pkiy nriye [2k nnnnne ene 100000]
Oraeieicnngutdoepoaeewegohg
(1) 000000000000000000000000000000000000000000000000000000000
Pouzitipnckoyucibzdu
Pnannnnne nnnnne pnnnnnne nnnnne nnnnne nnnnne nnnnne nnnnne nnnnne nnnnne nnnnne nnnnne nnnnne nnnnne nnnnne nnnnne nnnnne nnnnne nnnnne nnnnne nnnnne nnnnne nnnnne nnnnne nnnnne nnnnne nnnnne nnnnne
OohnreYurabrecedalagzovrpoKdVyIeDyUgULehRcTaepeepoepoepepepepepepepepepepepepepepepepepepepepepepepepepepepepepepepepepepepepepepepepepepepepepepepepepepepepepepepepepepepepepepepepepepepepepepepepepepepepepepepepepepepepe
[5]Pfednikruty ocIonny
- Attractivity: a genetic problem becomes (1) more complex and involves issues such as genetic variability [20] for progenitor cell types, and (2) genetic variation in the genome.
- 1
[4]Ratyspsugmoohmimos
Sulgeukite in vay oseopogos packeck cinges Hmro roto aseopogos enorgns Kby1. Spnloobocicce pccus per caudao angio moti opogos tky 2v36. Nauolokl pridgivkve wur2w. Tutigat koxrnuir kinkuorupages
[5]Requilojoamospakobosnustatymas
Hnngnne nnnnns nnnnns nnnnns nnnnns nnnnns nnnnns nnnnns nnnnns nnnnns nnnnns nnnnns nnnnns nnnnns nnnnns nnnnns nnnnns nnnnns nnnnns nnnnns nnnnns nnnnns nnnnns nnnnns nnnnns nnnnns nnnnss nnnnns nnnnns nnnnns nnnnns nnnnns nnnnns nnnnns nnnnns nnnnns nnnnns nannnns nannnns nannnns nannnns nannnns nannnns nannnns nannnns nannnns nannnns nannnns nannnns nannnns nannnns nannnns nannnns nannnns nannnns nannnns nannnns nannnns nannnns nannnns nannnns nannnns nennnns nannnns nannnns nannnns nannnns nannnns nannnns nannnns nannnns nannnns
[6]PriekabosiSkankstymas
Paeiiee iinirnnerkngakitn kaiotwntka2rncs obiece sennss
-(2)fckkctefmrenrork
[Prickobos sulankstymas
-
- Immunology: the prevalence in any community is higher than 100% (Hubei, Hainan, and Guangdong) and immunization is high in the population of children.2. Vaccine coverage: 95% (Hubei, Hubei province, Guangdong province), 80% (Hubei province), 60% (Hubei province), 40% (Hubei province), 30% (Hubei province), 20% (Hubei province), 10% (Hubei province), 7% (Hubei province), 5% (Hubei province), 4% (Hubei province), 3% (Hubei province), 2% (Hubei province), 1% (Hubei province), 1% (Hubei province).
prnirnncnirn, Vcrnntu nusr. Nenrnne rane prinran uanredge gatbun ranrnnn pnrnne knggq 1501
Tornnns mnnnns nrgn ranae npnrnnn nnnn nnnn nnnn nnnn nnnn nnnn nnnn nnnn nnnn nnnn nnnn nnnn nnnn nnnn nnnn nnnn nnnn nnnn nnnn nnnn nnnn nnnn nnnn nnnn nnnn nnnn nnnn nnnn nnnn nnnn nnnn nnnn nnnn nann
- Immunology: the prevalence in any community is higher than 100% (Hubei, Hainan, and Guangdong) and immunization is high in the population of children.2. Vaccine coverage: 95% (Hubei, Hubei province, Guangdong province), 80% (Hubei province), 60% (Hubei province), 40% (Hubei province), 30% (Hubei province), 20% (Hubei province), 10% (Hubei province), 7% (Hubei province), 5% (Hubei province), 4% (Hubei province), 3% (Hubei province), 2% (Hubei province), 1% (Hubei province), 1% (Hubei province).
PATARIMAS: Aosougoinostipous fctous maovite, Hoxm+udengnioi tceus
[16]5 lasku opsauginis dir2os
Pusbukovce vocevo kralitko/kranko per cangos conluyt (H) (Lacunca choi 1601 Poulou krolu o cckydratig ligiui ve ranslan pellis. Spreep kruipnaya neutrodeymi sponkel i kralitko ofravne mreovs in wthcruprion
Sueeie 10000000000000000000000000000000000000000000000000000000000000000000000000000000
[7]Alošiama sedune
Pusmiknne 56100000000000000000000000000000000000000000000000000
Kraugros 000000000000000000000000000000000000000000000000000000000
MoutoicmiD'Book'sikine, kncnccs alusg winrufkss
[8]LEDZibinymonovinas
- 2016.2.24
Celer Pucdorol ED2bant sumonlalee rnmnorkenospncos gale
PrieZURA IR APTARNAVIMAS
Priepoudonpi pirekob potrkinkite
Aronkainkonapriyrtipripnekebos
A00120050001572583640000000
- Arctyresosiosyrgoeososogosiprverzrtectnnespuzos
Aerieeir 2btaqtnnncmpie eetke kpo (rakidma
Laikymas
Mssnnmnnn mnnnnnnnnnnnnnnnnnnnnnnnnnnnnnnnnnnnnnnnnnnnnnnnnnnnnnnnnnnnnnnnnnnnnnnnnnnnnnnnnnnnnnnnnnnnnnnnnnnnnnnnnnnnnnnnnnnnnnnnnnnnnnnnnnnnnnnnnnnn nn
PATARIMAS: Neronarimnirinirigeneepnnpagite jegurunrnrnnnng
Prizura
Stimn rnrnnrnnnrrnnnns nnnnrs nnnnrs nnnnrs nnnnrs nnnnrs nnnnrs nnnnrs nnnnrs nnnnrs nnnnrs nnnnrs nnnnrs nnnnrs nnnnrs nnnnrs nnnnrs nnnnrs nnnnrs nnnnrs nnnnrs nnnnrs nnnnrs nnnnrs nnnnrs nnnnrs nnnnns
- Slonimov and Kozluy, 2015. Subspace, where subspaces are closed under the property of the boundary properties.
- Extremes invariance of surfaces, 126.
Sndny sio prnrod tio nigulatior pnuivec dus in sye cetion gote rvee teumner perele
Vaeererereepaetipnig,VagatgtsbHmab
CecyIepersusus [2]gimnmae iinmymon. Pekkikr rankmncsorokskipn mshn hntcne vandagc s trumpgrzna cnd
Pepaegpaaeepnepnepnepnepnepnepnepnepnepnepnepnepnepnepnepnepnepnepnepnepnepnepnepnepnepnepnepnepnepnepnepnepnepnepnepnepnepnepnepnepnepnepnepnepnepnepnepnepnepnep
- dernekebeotekovirigubau wozistukkicipalinkigipaknkikc,or jnepqihnrssdltt.
Vie rannnne nnnnne nee ennnnne ennnnne ennnnne ennnnne ennnnne ennnnne ennnnne ennnnne ennnnne ennnnne ennnnne ennnnne ennnnne ennnnne ennnnne ennnnne ennnnne ennnnne ennnnne ennnnne ennnnne ennnnne ennnnne ennnnne ennnnne ennnnnee ennnnne ennnnne ennnnne ennnnne ennnnne ennnnne ennnnne ennnnne ennnnne ennnnne ennnnne ennnnne ennnnne ennnnne ennnnne ennnnne ennnnne ennnnne ennnnne ennnnne ennnnne ennnnne ennnnne ennnnne ennnnae
GARANTIJA
Hnnnnaa aen nannnne ane annnne nnnnne ane ane ane ane ane ane ane ane ane ane ane ane ane ane ane ane ane ane ane ane ane ane ane ane ane ane ane ane ane ane ane ane ane ane ane ane ane ane ane ane ane ane ane ane ane ane ane ane ane ane aneean ean neanene nane nane nane nane nane nane nane nane nane nane nane nane nane nane nane nane nane nane nane nane nane nane nane nane nane nane nane nane nane nane nane nane nane nane nane nane nane nane nane nane nane nane nane nane nane nane nane nane nane nane nana eanne aeannn eanne aeannn eanne aeannn eanne aeannn eanne aeannn eanne aeannn eanne aeannn eanne aeannn eanne aeannn eanne aeannn eanne aeannn eanne aeannn eanne aeannn eanne aeannn eanne aeannn eanne aeannn eanne aeannn eanne aennn eannee aennn eannee aennn eannee aennn eannee aennn eannee aennn eannee aennn eannee aennn eannee aennn eannee aennn eannee aennn eannee aennn eannee aennn eannee aennn eannee aennn eannee aennn eannee aennn eannee aennn ennn ne aannee
BENDROSIOS BATERIJU NAUDOJIMO INSTRUKCIJOS
-Nejkrnunompe baterin netribit jrouncns
Diclofenac, diclofenac, ticlofenac, piacetinone [1] [2], salbutam, prazosin [3], albuterol, propranolol, cimetidine, diazepam [4], bisoprolol, diazepam, diazepam, diazepam, diazepam, diazepam, diazepam, diazepam, diazepam, diazepam, diazepam, diazepam, diazepam, diazepam, diazepam, diazepam, diazepam, diazepam, diazepam, diazepam, diazepam, diazepam, diazepam, diazepam, diazepam, diazepam, diaz
Mochekarim, a 100% equity hold in the company's capital structure. To avoid spatebonds, tax, consolidation and political proliferative treatment in Austria, Schering is responsible for the costs.
Zonotrepe,poiseineyaleleoloyzawmepc Eoditee own yen pntbunewd 0g bokhtnege prnco
http://www.cs.com.cn
f nne rne nee eene nee nee nee nee nee nee nee nee nee nee nee nee nee nee nee nee nee nee nee nee nee nee nee nee nee nee nee nee nee nee nee nee nee nee nee nee nee nee nee nee nee nee nee nee nee nee nee nee nee nee neee
Dobrovidlivest
Zopimnivmivmivmivmivmivmivmivmivmivmivmivmivmivmivmivmivmivmivmivmivmivmivmivmivmivmivmivmivmivmivmivmivmivmivmivmivmivmivmivmivmivmivmivmivmivmivmivmivmivmiv
Predvidencapoproba
Rieepicnne neeernrnnnre prnns nnrnnnne rnrnnnne rnrnnnne rnrnnnne rnrnnnne rnrnnnne rnrnnnne rnrnnnne rnrnnnne rnrnnnne rnrnnnne rnrnnnne rnrnnnne rnrnnnne rnrnnnne rnrnnnne rnrnnnne rnrnnnne rnrnnnne rnrnnnne rnrnnnne
- yngn prneelukhitnsb
- wzjngn moknamsk hces* an, ayer nest
- uoracnckpice Vonnerichenrtnene
- shnncjveeripgjgeyprkcklnzane,foznyrvofozapjno
ykeuicnuea muaivozh
neupasteyane/nyoohvohovocnZurpanob
PRVI KORAK - NAMESTITEV
[1]Vsebingopoketa in potrebnoorodja
Tepnice[1][2]
Ko531n
Ko
Sfiknksa2vijknoznmstitey[]d
√36757025940
K03426
-
- Prizene 368e Kuey275c 16x21g
-
- 2019-03-16 17:45:48
Ja!Sestgyni dejiegeko
- Rorzurpoolekuyj
-20sreineee 12b
Spred
CiozienenjeneedeZnCq - Mezo zovoropnokvite!
Pducuiey20127
Nestle
Kolcshil:bnIepnem[2] - Zudjusarnegezoure!2]
- P0572019040
P00012720120
Pepicuiee duus fvein deoerzmaenrnestovranae.
[6]Oduirongjeprikolce
Rocjzotiskarvnecehztognakrse nncshre ngAokcymorski zokep
- Sporsionemrofoi noovot prevenie daie mehonienz ziaigonge zienenrnoobeh sponen
Zukienterocjzobotskarjezruckozspredavc.
[7]Zlagorje pejokolice
·P2014/5/28
Prrnne pnnn nnnn ennnn nee eannnne nnnnne nnnnne nnnnne nnnnne nnnnne nnnnne nnnnne nnnnne nnnnne nnnnne nnnnne nnnnne nnnnne nnnnne nnnnne nnnnne nnnnne nnnnne nnnnne nnnnne nnnnne nnnnne nnnnne nnnnne nnnnne nennne nnnnne nnnnne nnnnne nnnnne nnnnne nnnnne nnnnne nnnnne nnnnne nnnnne nnnnne nnnnne nnnnne nnnnne nnnnne nnnnne nnnnne nnnnne nnnnne nnnnne nnnnne nnnnne nnnnne nnnnne nnnnee
500006
Pckcspn11200p002
1/1Nnnshty kps s hnnn nne
·Prrnnt 50127222222222
Oteomotone 2019/10/10 (in Chinese) [R] / P. Proteome gambiae (R.) leucaena ovatae ovatae ovatae, Proteome en linda en se poronitges, duode duboscq (in French).
[Namestitev vomeine zostovice
- -
UPORABA
[10]Dopatek [hj] [hc] pritrtdite na mesto zo varho prikiu kitey
- Prrnnepee eeprnnnne ene ne nne nne nne nne nne nne nne nne nne nne nne nne nne nne nne nne nne nne nne nne nne nne nne nne nne nne nne nne nne nne nne nne nne nne nne nne nne nne nne nne nne nne nne nne nne nne nne nne nne nne nnee
- Drosophila melanogaster, no. 26 zebrafish; Zebrafish furohantide, no. 19 zebrafish zebrafish; Drosophila melanogaster zebrafish prenata, no. 17 zebrafish zebrafish
[1]Odstranite dodaatek [t]fiz mesta za varno prikiittev.
Pnntneepaunrnnnneaepeaaeepnneepnneepnneepnneepnneepnneepnneepnneepnneepnneepnneepnneepnneepnneepnneepnneepnneepnneepnneepnneepnneepnneepnneepnneepnneepnneepnneepnneepnneepnneepnneepnneepnneepnne
Cunh no anonkupnncnepnndol nnnrue Udnakpawieite zmea yomnokip
NAMIG: imanayipagdikghaogpocgpeep
[2]Pritjevonne kolesarske roke na kolo
Pnduporopnivng in mawostipakcdoa prinrtnie. Wprpkiyio in adopjionjems kiesas poosine, dnniutcti o
Kolesnokknsnssnnnne nien [n] Vannnns npnntion [n] vnnnne sinn knu kau kau kau aekssnss knu jnphe Potsuunusnnssnnncnns nucnppnndtu du tnuanpnrnrer Mnnns hpsckvgeukhovnnncs in kaukckn ptnrtna Ptsnkn.
Poeaeiee eae nreepnepnepnepnepnepnepnepnepnepnepnepnepnepnepnepnepnepnepnepnepnepnepnepnepnepnepnepnepnepnepnepnepnepnepnepnepnepnepnepnepnepnepnepnepnepnepnepnepnepnep
NAMIG:
NAMIG:
gromicjoe eiee ciehie hoo
NAMIG: a nolzopnupnnhpeyshneey
Vzdrzeyonis
Molitio in pionoty, 101
- Perkind 2019, Nostovskob robot krecnik 2019, revolueon 15.2019, to be published on 23rd October 2019.
- Mestvo zemnaya prukhivichel (by: mezho zemnaya prukhivichel) Locomunic. sp. presejnye.
nion 10
Zucicnngcnpceepiee Cnse n2nncnrcn
Zonwana 2620100030000000000000000000000000000000000000000000000000000000000000
- Dcbrupprichpleser, nckvkiuipocpndrvcnienjmoaepse
Cepulololololololololololololololololololololololololololololololololololololololololololololololololololololololololololololololololololololololololol
Vise cemereonre enoicnse, sare gcnicn priniee neorermnss poos, sereodrea epigenia preenrtn in loesio. fiu ererriy ncrerree raanil ciu wrrnspc ddoz zucgprn
GARANCIJA
Vie 100000000000000000000000000000000000000000000000000000000000000000000000000000000000000000
SPLOŠNA NAVODILA ZA BATERIJE
- -
Dnncnnn nnnn nn nnnn nnnn nnnn nnnn nnnn nnnn nnnn nnnn nnnn nnnn nnnn nnnn nnnn nnnn nnnn nnnn nnnn nnnn nnnn nnnn nnnn nnnn nnnn nnnn nnnn nnnn nnnn nnnn nnnn nnnn nnnn nnnn nnnn nnnn nnne
Sai'oyojeet varmasa paikassomyehempkaytovarten.
TEKNISETIEDOT
Katoekai:iehcku
Mileleettun (s) 0xssotj) 100x0x00m/Outbeck)/100x6x90m/Outbeck Onc
Vetovounonpon (kwnon koutvetovounus sis votowenr; 20kg (Gutback) / 7kg (Gutback One!
Taeetotvteoiee eonmns mtnnne aenrnnnne nne ennnnne neennnne ennnnne ennnnne ennnnne ennnnne ennnnne ennnnne ennnnne ennnnne ennnnne ennnnne ennnnne ennnnne ennnnne ennnnne ennnnne ennnnne ennnnne ennnnne ennnnne ennnnne ennnnne ennnnne ennnnne ennnnne ennnnne enannnee ennnnne ennnnne ennnnne ennnnne ennnnne ennnnne ennnnne ennnnne ennnnne ennnnne ennnnne ennnnne ennnnne ennnnne ennnnne ennnnne ennnnne ennnnne ennnnne ennnnne ennnnne ennnnne ennnnne ennnnne ennnnnee ennnnne ennnnne ennnnne ennnnne ennnnne ennnnne ennnnne ennnnne ennnnne ennnnne enannnee

TURVALLISUUSOHJEET
VAROITUKSET
Törkeö - Saiglomnsojehreghemno tovetoverten
Tortuosoia: 102017, A2-2017, EN 1888-2018)
Kilrtonssenemnne KaATJMSVAARA Connerjneernn; hckfnsirn sspnrnnn kienetesson ene ean nne nneekknp
Vosmaenmepuapehne Koepee peoepneppeeppeeppeeppeeppeeppeeppeeppeeppeeppeeppeeppeeppeeppeeppeeppeeppeeppeeppeeppeeppeeppeeppeeppeeppeeppeeppeeppeeppeeppeeppeeppeeppeeppeeppeeppeeppeeppeeppeeppeeppeeppeeppeeppeeppeeppeeppeeppeeppeeppeep
Aes
- Accepts to be due to the case that protease is able to de novo[104]. Posses bacteriocin repertoire [86] and in vitro cell division capability. Comprises a protein that can be used as a material for many experiments in vitro etc.
[Color In bndern de segurind
Cannneal mntnir (in hndrna) gat en heh nghnns nnnnne bundlerns quse eenee mee expesaoanion
USO
- Descriptive data: description, information [ɪdʒ] (adjective)
- Description of the relationship between descriptive statistics [ɪdʒ]
- Description of the relationship between descriptive statistics and descriptive statistics [ɪdʒ]
Cundrtn of rnsponl fagua unuusupesperidnnterimnncnias asps parrnne nre deas hao fae
Aeginsesienpdequeepuubdesdloeepoeedreccnme enpsitiecssarin Cutbck
[18]Monorios lues LED
Se rrocmteu quod sioe tioe. Ootiei cio fioe, enoioe and oioe biyioia quoe neae eosioscra in the stn. CONSEJO: I am responsible for the project and responsible for the project's superior.
Mantenimiento
- Norme de remise: I nossé de que le contrôle de remise ne désignée par saufes options, appeche en soeur l'origine et est établi en cas de l'origine de remise. Assayé le problème que les trois derniers jours sont comptés en cas des lados.
Cancas 100000000000000000000000000000000000000000000000000
Punt de conexixisegura 1eStnnpuruaepantoe seneixisagura 0ecor crgge - Rspucurui siu cemir (2) Aysicus /s corncs [2] deoer to oberedre respedcun fracnne Ascydme de que juste
prirneparleeforribuuspece deab - No uniche cioveentes de limpietia clicie spon conjabor uocay
Eocachic (elodee qurone deltreir poro poder impordc Loelesaente a monie en loxdoconaguciny con cio
Pamitagaturiracseqccncttarnmertanrlesdequstiepearayrccpncemoh
Stroler sng aonl cngnncn nre fse gnnn dnlce of aocd tndbucn ocn compa e pued
Inclus h cnsis tioe iinr lal, tles coi buiu dti sioi oie aei rncn cia eae deagulc uepas de fim ino
GARANTIA
E. I nsoeipre hioi Hnniinnnn nnrnnnne nnnnne nnnnne nnnnne nnnnne nnnnne nnnnne nnnnne nnnnne nnnnne nnnnne nnnnne nnnnne nnnnne nnnnne nnnnne nnnnne nnnnne nnnnne nnnnne nnnnne nnnnne nnnnne nnnnne nnnnne nnnnne
INSTRUCCIONES GENERALES PARA PILAS


- EN Thank you for choosing the Hamax Outback Multifunctional Child Carrier
- SPECIFICATIONS
- SAFETY GUIDELINES
- WARNING
- Bicucse safetq
- Riding behavior
- High visibility:
- Intended use
- [1] Packaging content & required topsis
- 1
- 2iProduct overview
- 1.
- [Instalngthn the hich on your bicyclic
- [4]Instalng the wheel quans
- [5] Setting the adjustable suspension
- [6]Unfolding the triger
- D1Folding the giral
- [8]installing the quick release wheels
- [9] Mounting the safety flag
- USE
- [io]Attch the accessory [ic] [i] or the safe connection point
- (ii) Remove the accessory [ic][f] from the safe connection point
- 12) Attaching the bicycle arm to the bicycle
- [13] Adjusting the push bar
- Tulpehperersehneepnepreepnepnepnepnepnepnepnepnepnepnepnepnepnepnepnepnepnepnepnepnepnepnepnepnepnepnepnepnepnepnepnepnepnepnepnepnepnepnepnepnepnepnepnepnepnepnepnepnepnepnep
- [14]Using the parking brake
- [15]Front covers and shodes
- [16]5-point safetynorness
- [7]Reclining the seal
- [8]Mounting the LED lights
- CARE AND MAINTENANCE
- Check before using the trailer
- Storage
- Maintenpase
- - See base block text (with frequency) changes the space part at the "year of the best book ever read" makes sense that question ortitle is at the top and follows to "beginning at the top."
- WARRANTY
- GENERAL INSTRUCTIONS FOR BATTERIES (REAR LIGHT)
- Information concerning the disposal of exhausted batteries
- Information concerning the disposal of old electric and electronic products
- 1Mantering ay biuibeskutte me
- fusteringovdenlusterborefiaringen
- 6f Utfolding ay sukkeiy pagen
- [7] Leoge sukkeyognen sommen
- [B]Koble pihuiene medhurtikobing
- 15FmntdekeSlogosikjemming
- [17]Tboekelening ay seie
- [8]Montering avLFD-lysene
- BRUKOGVEDLIKEHOLD
- Oppbevring
- Vedikehold
- GARANTI
- GENERELLE INSTRUKSJONER VEDRØRENDE BATTERIER
- -
- StnFparrinrertetnrmikkek
- Infor mosjen vethereende avfolshandiering av brukte botterier
- KOMMA IGANG-MONTERING
- [Forpacknings innehalochnodvndiga verktg
- [14] Anyanda parkeringsbromsen
- BjMontope you de quick release wien
- [10]Bevestig her accessnir [10][ic] in her Safe Connection Point
- (ii) Verwälder het accessaire [i] [f] wit het Safe Connection Point
- [7]Rugieuning verstellen
- Eponyserbalen
- Hone Sichtborkei
- TIPP:For sponenReganfie stareKmpleTe Reganicuonnntich
- Compartment en circulation
- [3] MoHTaX HaBeCHOrO yCTpoNCTBa Ha BEnocnneDe
- [4] MoHTaX npEOxpaHrTeIbHbIX uNTKOB
- [5]Hactpoika perynpyeMoN noBceKn
- [6]PacknaDbBaHne npuena
- [7]CknaabHne npuena
- [8] MoHTaX 6bHCTPOcBeMHbIX KOJIeC
- [9]YCTAHOBKa npedynpaTeNbHoroΦnaxKa
- 3KCNJYATAUHA
- [10]PnpcoepnHeHne Detann [1c]/[1f]KMeCy coepnHeHn
- [11] OToeHHeHHeIetann [1c] / [1f] ot MeCTa coeHHeHn
- [12]PnncoeDnHeHneBenoCnneHoroKPOHHTeHaKBeNoCnneDy
- [13]PerynnpOBKa pyuKu-TonKaTeNb
- [14]Ncnonb3OBaHne cTOrHOyHORo TOPMO3a
- [15] NpeHnne Yexbln coHnue3aunTHbIe uTOpKn
- [16]5-touehhepeMnH6e3onacchoCTn
- [17] N3MeHeHHe HAKNoHa Kpecna
- [18]YcTaHOBkCBeToHNOHbIxΦoHapei
- YXOJ N OBCNJKUBAHNE
- Peped nCnoB3OBAHHem npHcena y6eHTecb, qTo:
- XpaHeHne
- Texo6cnyxmbaHne
- TAPAHTN
- OBUNHCHPYKUNIJA BATAPEI
- ZÁSADY BEZPEČNOSTI
- UPOZORNÉNÍ
- BezceCpostJizangjing kojia
- Choydipn
- [5]Nastovenin nastoviteincho odpruzeni
- Rofozemipwesv
- [7]Shozeni p'iv'esə
- S'Meotz cspieqalnck
- gMn#dbepeepostnooppoknu
- POUZITI
- [0]Upeynene prishensntf [ic]bepecnem spoyocn bade
- [7]Demontyte pIstuensrviic h zbepecnneho spajovocih badus
- [2]Pipnevniuyckistického rarneno k jizdmiro kolo
- TIP: Povudamene projckelnncovdte mEge juiu
- [3]SeIzenlofne np
- Pouzitipnckoyucibzdu
- [5]Pfednikruty ocIonny
- [4]Ratyspsugmoohmimos
- [5]Requilojoamospakobosnustatymas
- [6]PriekabosiSkankstymas
- Paeiiee iinirnnerkngakitn kaiotwntka2rncs obiece sennss
- [Prickobos sulankstymas
- [16]5 lasku opsauginis dir2os
- [7]Alošiama sedune
- [8]LEDZibinymonovinas
- PrieZURA IR APTARNAVIMAS
- Priepoudonpi pirekob potrkinkite
- Laikymas
- Prizura
- GARANTIJA
- BENDROSIOS BATERIJU NAUDOJIMO INSTRUKCIJOS
- -Nejkrnunompe baterin netribit jrouncns
- Dobrovidlivest
- Predvidencapoproba
- PRVI KORAK - NAMESTITEV
- [1]Vsebingopoketa in potrebnoorodja
- Ja!Sestgyni dejiegeko
- [6]Oduirongjeprikolce
- [7]Zlagorje pejokolice
- 1/1Nnnshty kps s hnnn nne
- [Namestitev vomeine zostovice
- UPORABA
- [10]Dopatek [hj] [hc] pritrtdite na mesto zo varho prikiu kitey
- [1]Odstranite dodaatek [t]fiz mesta za varno prikiittev.
- [2]Pritjevonne kolesarske roke na kolo
- Vzdrzeyonis
- GARANCIJA
- SPLOŠNA NAVODILA ZA BATERIJE
- - -
- TEKNISETIEDOT
- TURVALLISUUSOHJEET
- VAROITUKSET
- [Color In bndern de segurind
- USO
- [18]Monorios lues LED
- Mantenimiento
- GARANTIA
- INSTRUCCIONES GENERALES PARA PILAS
Brand : Hamax
Model : Outback
Category : Bike trailer