HF 1500 - Battery charger NORAUTO - Free user manual and instructions
Find the device manual for free HF 1500 NORAUTO in PDF.
Frequently Asked Questions - HF 1500 NORAUTO
User questions about HF 1500 NORAUTO
0 question about this device. Answer the ones you know or ask your own.
Ask a new question about this device
Download the instructions for your Battery charger in PDF format for free! Find your manual HF 1500 - NORAUTO and take your electronic device back in hand. On this page are published all the documents necessary for the use of your device. HF 1500 by NORAUTO.
USER MANUAL HF 1500 NORAUTO
Wisselstroom stopcontact
Herconditionering batterij
Icon A will flash) for three seconds:
G. Using the Engine Start Function
IpeDMeTa Ha aKKymyJrTop nII BHyTpB erO. CyuecTByeT ONaCHOCTb KOpOTKOrO 3aMbIKaHnA, BnIOrB Do B3PbIBa, I NOlyUeHn TJaKeJIbIX OXOROB.
- O6a3aTeIbHNO HOseHne 3aUHTbIX npncnocO6JIeHn IJRA Tna3 IN COOTBeTCTByIOUSeI ODeXdbI, PpeOxpaHraIOUSeI OT COpNIKOCHOBENr C aKKyMylrTOpHOJ XnIDKOcTBIO. Ppi paBoTe C aKKyMylrTOpOM CTapaTbcr He pRkacatbcr K Tna3am. KncIota, YactuCbI KNCNtBtI NII IN PjKaBUnHbIMoYr Tnonactb B Tna3a.
-При He6laoropnraTHbIX yCIOBnX BO3MOxH BbIbPoC XnIDKOCTn I3 aKKymyJrTopa; He DoNYcKaIte ee nonaDaHnHa Koxy. Prn CnyaHOM COprNKOCHOBeHN C XnIDKoCTbIO npOMOHTe MeTO BODo: PPr nOnaHaHn XnIDKOCTN B rJa3a O6paTNTecb DOnONHITeNbHO 3a MeduHcKoN NOMOUsbIO. BblPecHyBwaJcRn3 aKKymyJrTopa XnIDKOCTb MoKeT Bbl3BaTb pa3dpaXeHnI OxKOrn. - 063aTeIbHo n36abIaITeCb OT OTCnyKINBux aKKymyIaTOPOB.ДЯ NOJUyeHnRA DOnOJIHnTEJIbHbIX CBeDeHn, KacaIOuXcra IOBTOpHO IcNoJIb3OBaHnRA N 3aIHTbl OKpykaIooJe cpebl o6paTITeCb K rIaBe «I36abIeHne ot npIbopa».
- CobIoJaTe Tpe6OBAHnK TexHnuecknM XapaKTepeNCTnKaM 3apJxAeMOro aKKymyIaTopa n OcObbie K Hemy Tpe6OBAHn (Ha npImep: yctaHOBka n ChrTne aKKymyIaTopa, TOK 3apJdkn n T.d.).
- 3anpeuetaetc3apjkaTb cyxne 6aTapei, nCnoJb3yeMble B domaunHnx npnbopax. 3To moKet npNBecTN K noXapy I TpaBMam.
- Pa3peShaetcI NCNoIb3OBAHne np6opa NCKJIOHTeIbHO IJIa 3apIaIK TpaHCnOpTHbIX CpeICTB C DBNrAteJeM HApJxHeHem 6oPTOBoi CETn 12 B nocT. Toka. 3aPeeHaETcI NOKJIooHene np6opa K dpyrIM cncTeMaM (6 B nocT. Toka, 24 B nocT. Toka n T.d.).
ОПИСАНЕ ПИБОРА
A. TexHnueckne xapaKTepeNCTnKN
No BO3MOXHOCTN BcERda NMeTb npi Ce6e NHCTpyKcHIO Ha 3apjkaembl aKKymyIaTOP.
B HeM MoryT npuBoNDtbcra OcObIe peKOMeHdaUIN NO 3apJKe (HaNPmEp, ydaJIeHne 3aUHTbIX KOJINaUcKB O T.D.).
YctaHOBtB np6op Ha nnocko ycToHBOI NOBepxHOCTn. OCTaBtB doCTaTOHOMecTa BOKpyr np6opa dna CBO6OHDHOUIKpUJRAuIN BO3dyxa I NOkJIIOUeHnA.
BHIMAHNE: KneMMy akKymyIaTopa, He noKlnHcyHnyo K Kopnycy, cJeDyeT NOKJIIOuATb nepBoi. Dpyroe noKNIouHne BblNOJHraTb K Kopnycy Ha pacCTOaHHN OT aKKymyIaTopa n 6eH3OpnoBODOB.
3aTeM noKnHouHTb 3Y K eJneKtpocetn.
Iocne onepaun 3apnKOn OTKJIOHTb 3Y OT 3JeKTPoCeTn, 3aTeM OT KOpnyca n, HakoHeu,OT AKKMyJIrTOpa - CToPOB TAKOM NopraKe.
EcH He noKIOueH H0dH aKKMyJrTOP, HnAaKcMyJrTOp NOKIOUeH He npabNbHO (OTcyTCTBNE KOHTAKTa MeKdy 3aXIMOM IN KOHHKeTOpOM), NIKTORpaMMbl
"3axmbi" Vn «COCTOHNHe

akymyIaTopa》-He3apJxHbMyT MnraTb Ha DnCnnee.

- EcIn NOJrPHOCTb NOKJIHoueHHbIX 3aXIMOB HeBepHa, INdNKaTop
IIOJIaRHOCTN I NIKTORpaMMbI“+”N “-”BHyTpN aKKymyTopa 6ydyT MmraTb Ha dncnnee:
B TAKOM Cnyuae OTKIOUHTb 3Y n Ka6eH. NOBTOPuTb OepaCIO C co6IIODeHnEM NOPdKa NOkKIOUeHn I NOJrPHoCTN Ka6eNei.
BbI6paTb XeJaembl peKm
KHONKOI

- 3apяДkaakymyIaTopa moneda
- 3apяДka aKKуMnyTopa aBTOMO6nIa
-3apdkaakkymyIaTopa cneu.TC
Pexm Monea 2 A (OndokpaTHe HaKatae): To pekm dna 3apKn aKmyTopoB Maon EMKocTn. Ha BixOe 3y NOBtCMAkCmAlbHbI TO 3apKn B 2A. Pocne BKnUoyehnpekmMa "2,0A" (B BepxHe yacTn
KK-DCNJIe) N IOROTIN 《MOTOUKN》 6 BydyT MIRATb. B HIXKHe YAcTn DInCNIe 6yDet NOKa3bIBaTBcA3apdHoe HanpJxKeHne NOkNIOueHHoro aKKMyJIrTopa. Nepei HaayIOM 3apRKn INKTOrpaMMbI 3axIMOB, CTpeNOK i AKKMyJIrTopa 6yDyT B TeueHne 3 ceKyHd NOKa3AHbI Ha DInCJIee:

- Pexim aBTOMo6nJIa 6 A (dByKpaTHoe
Haxatne):3To pexmIgIa3apIkn aKymyIaTOPOB dIa ABTomO6nJa Ha bIXoJe 3Y NOABITcMaKcImaIbHbIi TOK 3apIKn B6A. Iocne BkNIOueHnna peKIma "6,0A" (B BepxHei YacTn KK-dncJIe) nIorOTn «ABTomO6nIb»
6ydyT MntaTb. B HnKHeu actn
DnCnIe 6yDet NOKa3bIbA Tbcra 3apdHoe HnprjKeHne NODKnIOueHHoro aKKymIaTopa. Ipeq Haayanom 3aprakn NIKTORpaMMbl 3axmOB, CTpeNOK n aKKymIaTopa 6ydyT B TeueHne NOKa3aHbHa DnCnIee:

UZYTKOWANIE
- Pexm cneu. TC 15 A (TpexkpaThoe haxaTne):3To pexm dIy 3apAkn aKymyIATOPOB dIy cneu. TC Ha bIxOde 3Y NOBITcMAKcIMaNbHbI TOK 3apAKn B 15 A. Iocne BKNIOUeHnpexma "15,0A" (B BepXHe yactn KK-dncnpe) n ITOTNI ABTOMO6nbl

6ydyT MntaTb. B HnKHe yactn
DnCnJee 6yDeT NOKa3bBaTbc8 3apAHOe HAnpJxKeHHe NOKNIUOeHHORo aKKymJIrToPA. IpeE HaayIOM 3apAKn NIKTORpAMMbI 3axIMOB, CTpeNOK i aKKymJIrToPA 6yDyT B TeueHne 3 cekyHn NOKa3AhI Ha DnCnJee:
3apraHaKaTb KHOIky CHarge N Bbl6paTb
HIOH peKIM, INN OTKIOUHTb 3Y, cJeDyA HIXeIPnBBeDEHHbIM INHCTpyKUNM:
-OTKJIIOUHTb 3Y OT cETN.
- Chayana OTKJIIOHTb YepHbI 3axm
NII KpyrIyIO KNeMMY
(OTpuCaTeNbHbIe -).
-3aTeM NOcOeINHHTb KpaCHbI 3aXIM NJI Kpyrnyo KneMMy
- Pn Heo6xOuMocTn HaTeb Ha aKKyMyJrTOP 3aUHTbIe KOJNaKn.
- Hn3KoTeMnepaTypHbI peXm: 3Y
abTOMaTnueckn nepexoNT B HN3KOTeMnePaTpHbI peXHM " ” npu TemnepaType BO3dyxa HnKe 0 rpaYcoB. Pnp6Op KOMHeHCpyET CnUkOM Hn3KyO TemnepaTypy.
Pn BO3BpaTe TemnepaTpyb BO3dyxa K HopMaIbHOH HN3KOTemnepaTpyHbI peXIM aBTOMaTNUeCKN OTKNUOyaeTcR.
PpmeHHe: BcTpoeHHbB eHTnIaTOp 6yET BKNIOUaTbCra Ype3 OnpdeJeHHbIe npomexyTKn BpeMeHN dIg N3MepEnHn HapxKHO TEmNepaTypbI NHaUNyUwei aanTaun HAnpJKeHn 3apAkn.
E.ФункцяТ ecta rehepaTopa
BHUMAHNE: nepei npoBeJeHneM Tecta rehepaTopa aKKymyIaTOp DOJIKeH 6bITb NOJHOCTbIO 3apJKeH. 3aTeM 3anyCTNb DBuRaTeJb, Kopo6Ka nepeaHa HeHTpann.
TecT «6e3 HaRpy3Kn»
TOT NepBbI TcT NO3BOJNT ONpeDeNITb, HOpMaJIbHO JI rHepaTOP BaUero aBTOMO6nIaNTaET erO aKKyMUYJrTOP.
OTKNUOHTB BCE DOONJIHNTeJIbHOe 60bOpyOBAHne aBTOMo6nJ.
1.ПодкнючntbЗарянhoeустовКakkymyЯTopy(kaK onncaHo Hnke)
2. Bb6paTb peKm TecTa reHepaTopa, TpoekpaTHO Haxab KhONKy
Ipeud uocKo np6op cneyet nonHOCTbO OTKIOHTb, BbIKIOHTb n3 CeTN IaTb emy OCTbITb.
3anpeaetc npoun3bOuNTb uNCTky npnbopa B nocydomoeuHm MaunHe!
Дячstkn npo6opa npotepeb ero nobepxhoctb cyxon mrgkO TpnoKoN.
B. 06cnyxmbaHne
Pnp6op He Tpe6yeT 0cbnykBaHn. Ppi IIO6o HEO6xOIMocTn 06cnykBaHn obaaatbca K KBaIINΦuNpOBaHHOMy CneuaJIInCTy.
C. XpaHeHne
Bo n36eKahne HeecactHOrO cnyae, B yactHOCTn C DeTbMn, a TaKKe yTePn npHaIeXHocTeen, XpaHHT npNbOp n npHaIeXHocTn K Hemy B cyXOM npoxnaHOM MeTe, 3aunueHHom OT BlaRn N BHe DoCraemocTn DeTei.
PYKOBODCTBO NO YCTPAHEHIO HENCINPABHOCTEIN
HnKeepBHeEHNa Ta6Iuca MoKeT NOMOy npN BO3HKnHOBeHN HeNCpPaBHOCTe 3apAHorO yCTPOnCTBa.
Ecn npednoxeHoe peeHne He ycTpaHre HncnpaBHOCTb, cJeDyET OTHeCTn np6op B cepBnchbl ueHTp dIpy OCMOTpa. CamocToTeNbHoe TexO6cnyKuBaHne nn peMOHT 3anpeueHbl.
IJIyOnyuHnpeKoMeHdaaunno yTuInnaaun no6paTntbcra K CBOeMy nucTpnbTopy nIIN ppeCTaBNTeJIIO MeCThIx BlaacteN.
Otcnykmbune akkymylantopbIMoYrHMeTbHeratNBbIe NocJeCTBnIg OkpykaUoien Cpebln3DOpOBbJIIODeBBNdyPncyTCTBnB HNXJIOBNTbIXBeIecTB.OTcnykmbune akkymylantopbICneDyeETyTNJIN3uPoBaTb pa3dEJIbHO INco6npaTb B CneuaJbHO npedycMOtpeHHbIX Mectax c6opa.
IJIyONUyeHnpeKOMeHdaaunno yTNIn3aunn o6paTntbcra K CBOeMy nCTpn6bIoTopy nIN npEcdTabNTeHIO MeCThix BnaCTeN.
IocTyna TaKIM o6pa3OM, Bbl npHnMaTe yuactne B 3aunTe OkpykaUoien cpebl.
FOREWORD
Read this instruction manual and follow the instructions carefully before using your new battery charger.
Congratulations on purchasing your new battery smart charger HF1500. HF1500 is a fully automatic multistep battery charger that delivers selectable 2/6/15 Amp to 12 V batteries from 6 to 250 Ah (260 Ah for maintenance).
The main functions can be selected through front panel button :
- Moto / Vehicle / Van battery charge
- Alternator test
Battery recondition
-Engine Start
You should check the device for damage immediately after unpacking it.
Thanks to keep this manual for future reference.

Complies to appropriate safety standards.

This battery charger is intended for indoor use only.

This appliance is double insulated; therefore no earth wire is required. Always check that the power supply corresponds to the voltage on the rating plate.

Warning! To reduce the risk of injury, the user must read the instruction manual.
Do not throw away electrical appliances with household waste.
SUMMARY
- NOTES ON SAFETY 123
2.SAFETYINSTRUCTIONSREGARDINGBATTERIES 125
3.PRODUCT PRESENTATION 126
A. Technical information 126
B. Product description 127
- INSTALLATION 128
A. Installation 128
B. Connecting the battery charger 128
C. Disconnect the battery charger 128
D. Charging the battery using the battery clamps 129
E. Checking the Alternator 131
F. Reconditioning the Battery 132
G. Using the Engine Start Function 132
5.CLEANING, MAINTENANCE AND STORAGE 134
A. Cleaning 134
B. Maintenance 134
C.Storage 134
6.TROUBLESHOOTING 134
7.DISPOSAL OF THIS PRODUCT 135
NOTES ON SAFETY
BEFORE CHARGING, READ THE INSTRUCTIONS.
FOR INDOOR USE, OR DO NOT EXPOSE TO RAIN.
- DISCONNECT THE SUPPLY BEFORE MAKING OR BREAKING THE CONNECTIONS TO THE BATTERY.
- WARNING: EXPLOSIVE GASES. PREVENT FLAMES AND SPARKS. PROVIDE ADEQUATE VENTILATION DURING CHARGING.
- Use this appliance only as described in this instruction manual. Any misuse of the appliance, or different from what is explained in the manual, will not engage the liability of the manufacturer nor of the reseller.
- Vehicles may have electrical and electronic systems (e.g. engine management systems, mobile phones) that may be damaged if subjected to high starting voltages and voltage peaks. Before connecting the appliance to the vehicle, read the vehicle's owner's manual to confirm that external charging is allowed.
- The disrespect of the safety instructions can cause electric shock, fire and/or injuries to persons.
- Follow the instructions for connecting and disconnecting the battery charger leads or battery terminals.
- This appliance is meant for domestic and indoor use only.
- Do not use any accessory not recommended by the manufacturer/reseller! They may damage the appliance and/or cause injuries to persons.
- CHOCKING HAZARD! Keep the appliance and its packaging elements out of reach of children.
- This appliance is not intended for use by persons (including children) with reduced physical, sensory or mental capabilities, or lack of experience and knowledge, unless they have been given supervision or instruction concerning use of the appliance by a person responsible for their safety.
- Children should be supervised to ensure that they do not play with the appliance.
- Do not operate the appliance in explosive atmospheres, such as in presence of flammable liquids, gases or dust.
- Avoid naked flames, hot surfaces and sparks area during the use of this appliance. Do not smoke when using the appliance.
- Operate the appliance in a well-ventilated area.
- Keep the appliance dry. Do not immerge it into water nor
NOTES ON SAFETY
into any other liquid.
- Keep the appliance away from water and spatters.
- Do not operate the appliance in a humid environment. Do not use in wet places.
- No object containing liquid should be kept around this appliance.
- Do not cover the appliance with objects like paper, towel, curtain, etc.
- Do not expose the appliance directly to the sun, nor to hot temperatures.
- Do not let supply cord hang from a table edge, not touch any hot surface.
- When you unplug the appliance, always pull on the plug itself, never pull on the supply cord.
- If the supply cord or the clamps are damaged, do not use the appliance.
- The supply cord cannot be replaced. If the cord is damaged, the appliance should be scrapped.
- Do not modify the supply cord nor the plug. If the cord and/or the plug do not match your electrical installations, contact a qualified technician.
- An extension cord should not be used unless absolutely necessary. Use of an improper extension cord could result in a risk of fire and electric shock.
- Do not let the red and black clamps touch each other, as it may lead to sparks, explosion and cause damages.
- Before making any electrical connection, check that: The appliance and its components are not damaged. In which case, do not use the appliance but bring it back to your reseller for inspection and fixing. The indicated voltage on the rating label match with your electrical installations.
- Position the battery charger as far away from the battery as the leads will allow.
- Explosive gases may collect near the ground. Locate the battery charger as high as possible above ground level.
- Do not proceed to any maintenance operation by yourself. Any check, disassembling, fixing has to be operated exclusively by a qualified person.
- Do not open body casing. There are no user-serviceable parts inside.
- Do not place the battery charger above or stand the battery
NOTES ON SAFETY
charger on top of the battery.
- The battery terminal not connected to the chassis has to be connected first. The other connection is to be made to the chassis, remote from the battery and fuel line. The battery charger is then to be connected to the supply mains. After charging, disconnect the battery charger from the supply mains. Then remove the chassis connection and the battery connection.
SAFETY INSTRUCTIONS REGARDING BATTERIES
- WARNING: Risk of explosive gas mixtures. Working in the vicinity of a lead-acid battery is dangerous. Batteries generate explosive gases during normal battery operation.
For this reason, it is of utmost importance that each time, before using your battery charger, you read this manual and follow the instructions exactly. - Thanks to check that your batteries can be recharged with this charger. To know this, refer to the manufacturer's instruction manual of the battery.
- Make sure that the initial charging rate does not exceed the battery manufacturer's requirement.
- Do not put batteries in use during the charge! Do not start the engine during the charge.
- Non-rechargeable batteries cannot be recharged.
- Never attempt to charge a frozen battery!
- Wear complete eye protection and suitable clothing to give protection from contact with battery fluid. Avoid touching the eyes while working with a battery. Acid, acid particles or corrosion may get into the eyes.
- Remove personal metal items such as rings, bracelets, necklaces and watches when working with a lead-acid battery. Be extra cautious to reduce the risk of dropping a metal object onto the battery. This might cause sparks or short-circuit the battery or other electrical part, and lead to an explosion or severe burn.
- In wrong circumstances, some fluid can be ejected from the battery. Battery fluid can cause irritations and/or burns. Avoid any contact with it. In case of accidental contact, rinse with water. If fluid enters your eye, immediately rinse the eye with plenty of fresh water and contact a doctor.
SAFETY INSTRUCTIONS REGARDING BATTERIES
- Worn-out batteries must be safely scrapped. Read the "Disposal of this product" chapter in this manual to learn more about recycling and environment protection.
- Respect the technical specifications of the batteries that you want to charge, along with the corresponding specific recommendations (for example: how to insert and connect the battery, charge rate, etc.).
- Do not recharge dry-cell batteries commonly used in household appliances. It may cause a fire and damage to persons.
- This appliance must be used exclusively on automotive vehicle batteries with 12Vdc voltage. Do not connect the appliance to other type of systems (6Vdc, 24Vdc, etc.).
PRODUCT PRESENTATION
A. Technical information
| Model | HF1500 |
| Input | 220-240V AC, 50/60Hz, 1.4A |
| Output | 12Vdc, 2A, 6A,15A |
| Fuse | 6.3A |
| Battery type | Lead Acid, WET, GEL, AGM |
| Charging current | 2A, 6A, 15A |
| Capacity | 12V batteries / 6Ah to 250 Ah (up to 260Ah in floating mode) |
- Multi-step microprocessor controlled charge.
- Charge with clamps.
- Reverse polarity indicator.
- Automatic power outage recovery.
- Automatic floating mode at the end of the charging process
- Short circuit protection
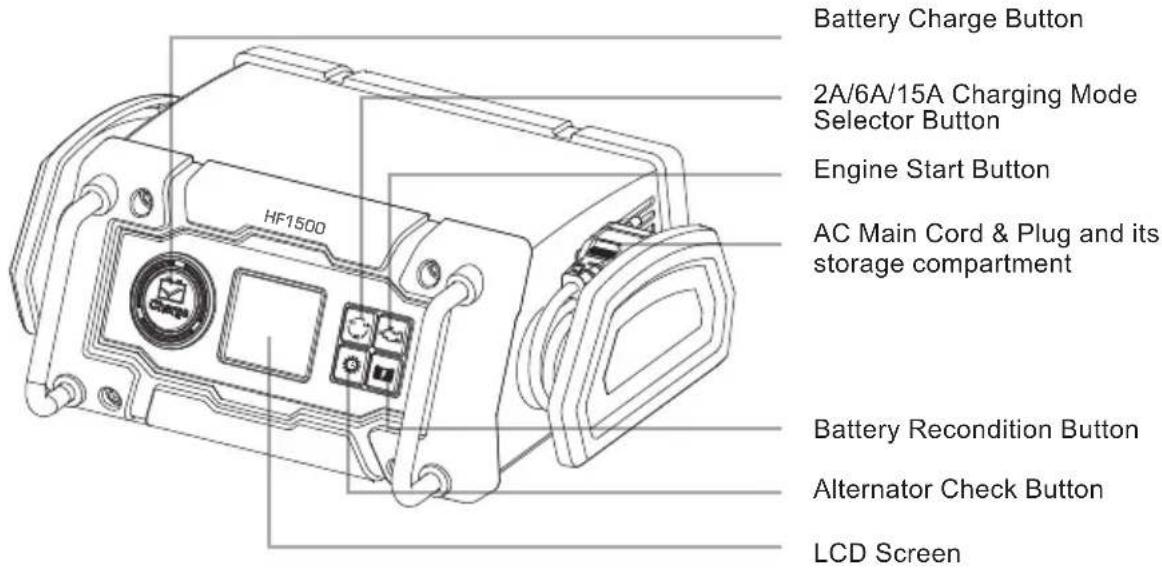
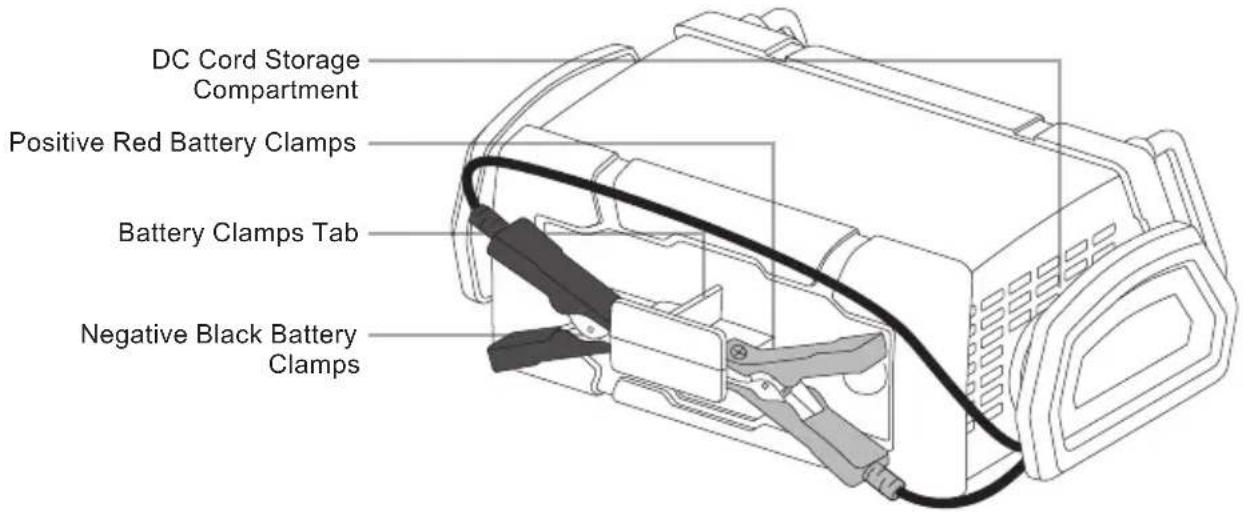
B. Product description
A. Installation
IMPORTANT SPECIFICATION NOTE: This power system is to be used ONLY on vehicles with 12V DC battery system. Do NOT connect to a 6V DC or 24V DC battery system.
Never alter the AC cord or plug. If it will not fit, have a proper outlet installed by a qualified electrician. Improper connection may result in an electric shock. If the supply cord is damaged, it must be replaced by the manufacturer in order to avoid a hazard. Before charging, confirm that the voltage of the battery is 12V by referring to the label on the battery or from the information available relating to its application e.g. car user manual.
When using this charger in proximity to the vehicle's battery and engine, stand the charger on a flat, stable surface and be sure to keep all clamps, cords, clothing and body parts away from moving parts of the vehicle. Keep enough space around the appliance for allowing adequate ventilation.
ATTENTION: The battery terminal not connected to the chassis has to be connected first. The other connection is to be made to the chassis, remote from the battery and fuel line. The battery charger is then to be connected to the supply mains.
After charging, disconnect the battery charger from the supply mains. Then remove the chassis connection and the battery connection.
Incorrect connection, battery short circuit, location of battery and location of the battery charger may create a hazard. Make sure that adequate preparation has been made before proceeding.
B. Connecting the battery charger
If necessary, remove the battery from the vehicle, by following battery manufacturer instruction manual.
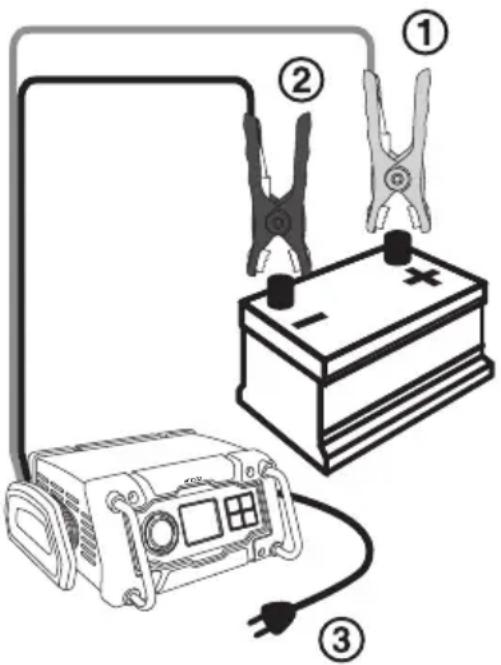
Check the polarity of the battery posts. A positive (POS, P, +) battery post usually has a larger diameter than the negative (NEG, N, -) battery post.
Follow the manufacturers' instructions to remove any insulating covers from the battery posts.
- Connect the positive (red) clamp from the battery charger to the positive (POS, P, +) post of the battery ①.
- Connect the negative (black) clamp from the battery charger to the negative (NEG, N, -) post of the battery ②.
- Then, connect the AC plug of the battery charger into the AC mains socket ③.
If the fault indicator light on, unplug the charger from main power, and connect clamps by respecting the polarity.
C. Disconnect the battery charger
Always disconnect the battery charger by following below indications :
- Unplug the battery charge from the main socket.
- Disconnect the black clamp.
- Disconnect the red clamp.
- If necessary. put back battery terminal protections.
INSTALLATION
D. Charging the battery using the battery clamps .
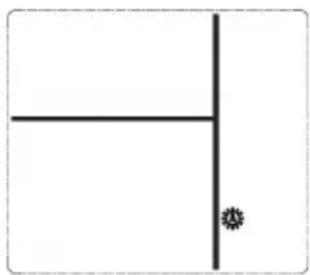
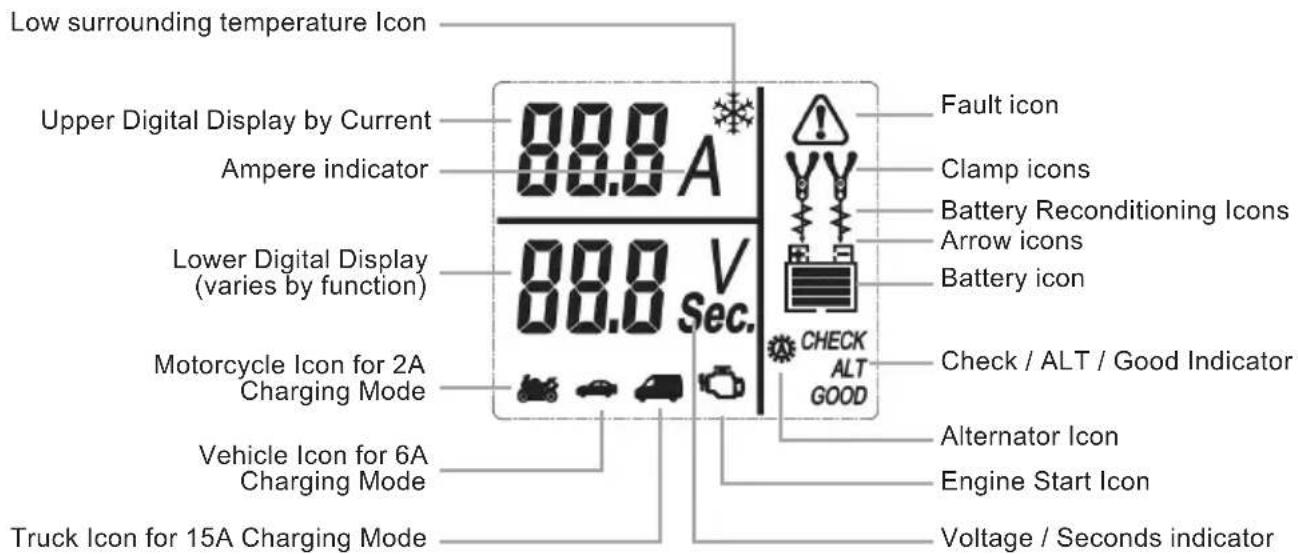
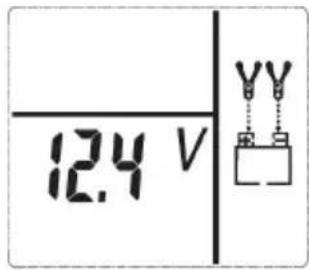
When the charger is properly connected to the battery and the charger is plugged in to a functioning ac mains socket, the charger will be in Standby mode and the LCD screen will display the following (The lower digital display shows the voltage of the connected battery. The Clamp Icons, Arrow Icons and the Battery Icon will light solid.), indicating the unit is ready to use:
Note:
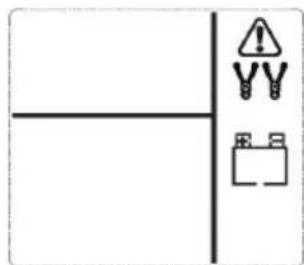
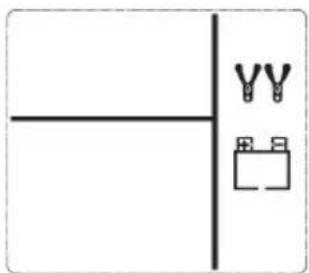
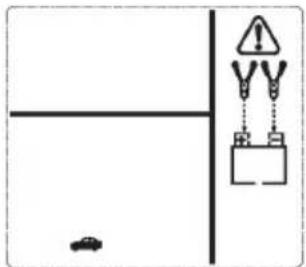
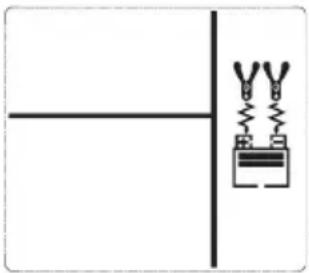
- If the charger's battery clamps have a bad connection or are disconnected to the battery, the LCD screen will display the following (The Clamp Icons will flash and the empty Battery Icon will light solid.), indicating the battery clamps are not yet connected to the battery:
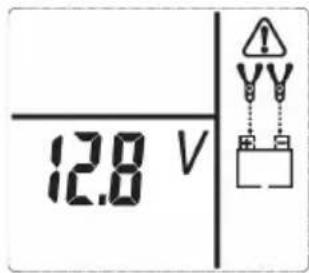
- If the charger's battery clamps are connected incorrectly with regard to polarity, the LCD screen will show the following (The Fault Icon and "+" and "-" inside the Battery Icon will flash. The Clamp Icons and the empty Battery Icon will light solid) and a Warning will continuously sound until the clamps are disconnected:
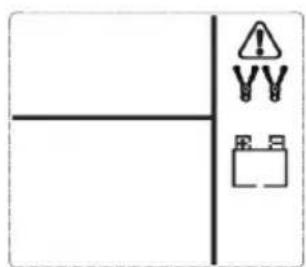
Disconnect the charger's ac plug from the ac mains socket; then disconnect the clamps. Reconnect the clamps with correct polarity and plug the charger back in at the ac mains socket.
1. When the charger is properly connected, cycle through to choose the following operation mode by pressing the Mode
Selector Button

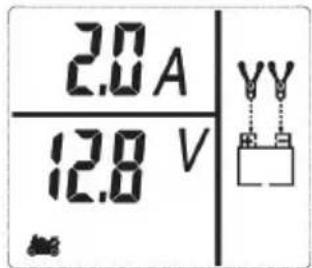
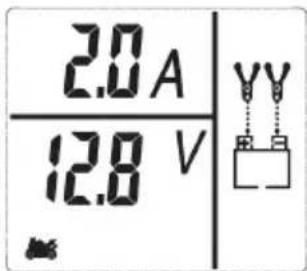
- Moto 2A Charging Mode (Press once): In this mode, the unit charges the battery at a lower rate of charge with the maximum current output to approximately 2A and the LCD screen will display the following (The upper digital display will
blink "2.0A" and the Motorcycle Icon

will flash. The lower digital display shows the voltage of the connected battery. The Clamp Icons, Arrow Icons and the Battery Icon will light solid):
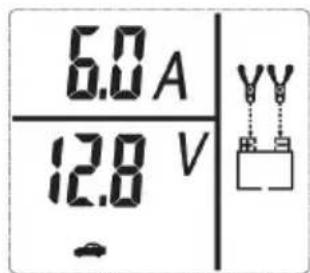
- Vehicle 6A Charging Mode (Press twice): In this mode, the unit charges the battery at a higher rate of charge with the maximum current output to approximately 6A and the LCD screen will display the following (The upper digital display will
blink "6.0A" and the Vehicle Icon

will flash. The lower digital display shows the voltage of the connected battery. The Clamp Icons, Arrow Icons and the Battery Icon will light solid):
UTILISATION
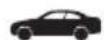
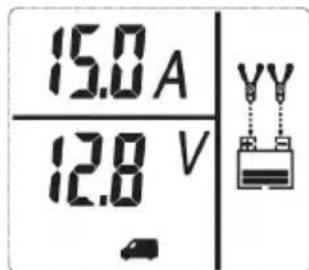
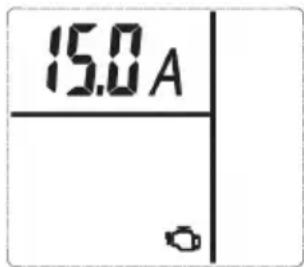
15A Charging Mode: In this mode, the unit charges the battery at a higher rate of charge with the maximum current output to approximately 15A and the LCD screen will display the following (The upper digital display will blink "15.0A" and the
Truck Icon will flash. The lower digital display shows the voltage of the connected battery. The Clamp Icons, Arrow Icons and the Battery Icon will light solid.)

2. When the desired charging mode is chosen, press the button to begin the charging process.
For example, if the 15A Charging Mode is selected, the LCD screen will display the following (The upper digital display shows the output current that is charging the battery. The lower digital display indicates the voltage of the connected battery. The Truck Icon, Clamp Icons and the Battery Icon will light solid. The bars on the Battery Icon will change from empty to solid (bottom to top) repeatedly and the Arrow Icons will gradually and repeatedly move downward to the Battery Icon.), indicating the unit is in charging mode:
Notes:
The only difference of the LCD representation between each charging mode is the appearance of the Motorcycle Icon for 2A, Vehicle Icon for 6A and the Truck Icon for 15A.
- If the charger is overheated, the charging process will automatically terminates and the LCD screen will display the following (The Fault Icon will flash. The Clamp Icons, Arrow
Icons and the empty Battery Icon will light solid. The lower digital display shows the voltage of the connected battery):
Disconnect the charger and allow the charger to cool for several minutes. Make sure there is adequate ventilation around the unit before attempting to charge again.
- The charger will automatically detect the battery condition. If it detects a problem with the battery, the charging process will automatically terminates and the LCD screen will display the following (The Fault Icon and the empty Battery Icon will flash, the Motorcycle or Vehicle or Truck Icon, Clamp Icons and the Arrow Icons will light solid).
- Disconnect the charger and have the battery checked by a qualified technician.
If the charger detects the battery is sulfated, the charging process will automatically terminates and directly goes into the Battery Recondition mode. See the "Reconditioning the Battery" section.
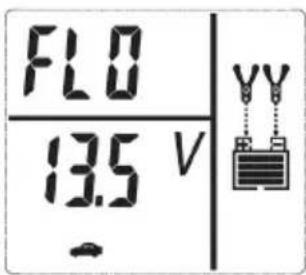
When the battery is completely charged, the unit automatically goes into float charge mode. In this mode, the unit monitors the battery voltage and charges as necessary to assure the battery maintains a full charge. The unit remains in Float Charge Mode as long as the charger is connected to the battery and plugged into a functioning AC outlet. The LCD screen will display the
UTILISATION
following (The upper digital display shows "FLO". The lower digital display indicates the voltage of the connected battery. The
Motorcycle Icon , Vehicle Icon or Truch Icon , Clamp Icons and the Full Battery Icon will light solid. The Arrow Icons will gradually and repeatedly move downward to the Battery Icon), indicating the unit is in Float Charge Mode.
Press either the Battery Charge Button or the 2A/6A/15A Charging Mode Selector Button will return to the Standby mode. When disconnecting the charger, do so in the following order: Disconnect the AC plug from the AC mains socket, remove the negative black (-) clamp from the negative (marked N or - ) post of the battery OR from the vehicle chassis, and then remove the positive red (+) clamp from the battery terminal.
- Temperature compensation: The "Icon will appear if the surrounding ambient temperature is lower than 0^ . This is not a fault code, but indicates that the unit's temperature compensation feature is operating.
E. Checking the Alternator
IMPORTANT: This check may not be accurate for every make, manufacturer and model of vehicle. Check only 12 volt systems.
Part 1 No Load (turn OFF all vehicle's accessories): The battery must be fully charged before testing the alternator. This test No load allows you to check if the alternator is able to supply enough current to the battery. Run the engine long enough to achieve normal idle speed and verify there is a no-load voltage.
-
Setup the battery charger and connect to the battery following steps 1 through 2 in the "Charging the Battery" section.
-
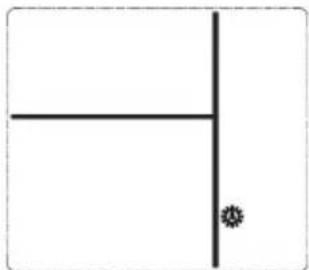
Press the Alternator Check button a third time and the LCD screen will show the following (The Alternator Icon will flash) for three seconds:
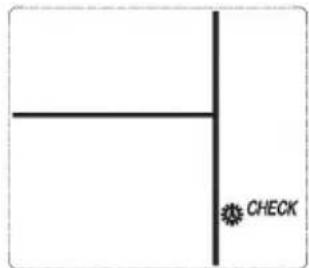
- After 3 seconds, the LCD screen will automatically start the check and display the following ("CHECK" will flash and the Alternator Icon will light solid), indicating the unit is analyzing the alternator:
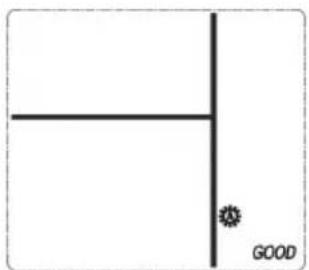
- If the unit detects that the alternator is good, the LCD screen will display the following ("GOOD" and the Alternator Icon will light solid):
- If the unit detects that the alternator is out of typical voltage range, the LCD screen will display the following (The Fault Icon will flash. "ALT" and the Alternator Icon will light solid):

UTILISATION
- Press the Alternator Check button again to stop the test and return to the Standby mode.
Part 2
Under Load (accessories ON): Next, load the alternator by turning on as many accessories as possible (Front light, wiper blade, A/C, fan....). This test under load allows you to check if the alternator is able to supply enough current together to the battery and electrical accessories of your vehicle.
Refer to the operation as described above.
F. Reconditioning the Battery
Periodic reconditioning is recommended to maintain a battery's optimum performance. Battery recondition sends a series of electrical pulses to break up the crystalline form of lead sulfate and turn these chemicals into useful battery electrolytes.
- Setup the battery charger and connect to the battery following steps 1 through 2 in the "Charging the Battery" section.
- Press the Battery Recondition Button once and the LCD screen will show the following (The Battery Recondition Icons will flash. The Clamp Icons and the Battery Icon will light solid. The bars on the Battery Icon change from solid to empty (top to bottom) repeatedly.).
Notes:
- The process stops automatically after 24 hours. More than 24 hours may be needed to restore performance on some batteries. If so, repeat the process. To end the process sooner, press the Battery Recondition Button once again to turn it off and return to the Standby mode.
-
IMPORTANT: If 5 cycles of reconditioning does not improve battery performance, discontinue and recycle the battery.
-
When disconnecting the charger, do so in the following order: Disconnect the ac plug from the ac mains socket, remove the negative black (-) clamp from the negative (marked N or - ) post of the battery OR from the vehicle chassis, and then remove the positive red (+) clamp from the battery terminal.
G. Using the Engine Start Function
- Setup the battery charger and connect to the battery following steps 1 through 2 in the "Charging the Battery" section.
- Press the Engine Start Button. The LCD screen will display the following for three seconds (The Engine Start Icon and the "15.0A" that was shown on the upper digital display will flash:
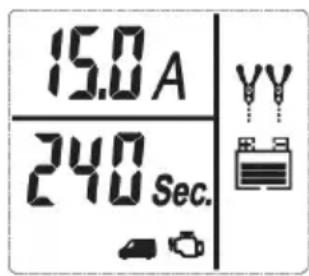
- After 3 seconds, the LCD screen will automatically display the following (The upper digital display shows the output current that is charging the battery. The lower digital display shows the countdown from "240" to "0". The Engine Start Icon, Truck Icon, Clamp Icons and the Battery Icon will light solid. The bars on the Battery Icon will change from empty to solid (bottom to top) repeatedly and the Arrow Icons will gradually and repeatedly move downward to the Battery Icon.), indicating the unit is in Engine Start mode:
UTILISATION
Notes:
- The Engine Start function may not be terminated if the battery charger detects that the battery is at full capacity (fully charged).
-
The Engine Start countdown process can be terminated by pressing the Engine Start Button again to stop the function. The unit will revert to the Standby mode.
-
When "0" is reached, a beep will sound. The LCD screen Display will show the following (The upper digital display shows the output current that is charging the battery. The lower digital display shows "0 sec". The Pump Engine Icon flashes and the Truck Icon, Clamp Icons and the Battery Icon will light solid. The bars on the Battery Icon will change from empty to solid (bottom to top) repeatedly and the Arrow Icons will gradually and repeatedly move downward to the Battery Icon), indicating the vehicle is ready to start.
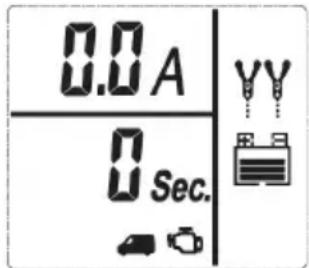
- Crank the engine using manufacturer's guidelines, typically in 3 to 5 second bursts. The lower digital display shows "0 sec" (a 5-second countdown to use as a timer when cranking the engine).
- After cranking, the unit will automatically adjust the charging current to 2A for 5 minutes, and then revert to the Charging Mode previously selected or to keep the charging current for 2A if there is no Charging Mode previously selected. IMPORTANT: The Engine Start function requires a resting/cooling period between attempts. Wait 5 minutes before a second attempt at starting the engine, if needed.
- When disconnecting the charger, do so in the following order: Disconnect the ac plug from the ac mains socket, remove the negative black (-) clamp from the negative (marked N or - ) post of the battery OR from the vehicle chassis, and then remove the positive red (+) clamp from the battery terminal.
CLEANING, MAINTENANCE AND STORAGE
A. Cleaning
WARNING ! . Do not use any abrasive or solvent-based cleaner. Do not immerse the appliance in water.
Before clearing, the appliance must be switch off, unplug from main socket and already cooled down.
From time to time, wipe the appliance with a dry and soft cloth.
B. Maintenance
No maintenance is necessary. The equipment is only to be repaired by qualified specialists.
C. Storage
Always store your product in a fresh and dry room, away from humidity. To avoid any accident, make sure children can't reach it.
TROUBLE SHOOTING
If you face some technical problem with your charger, please refer to below table for any help.
If below solutions do not provide any help, thanks to bring back your appliance where you purchased it, to be checked by after-sales service.
Never repair or modify the product yourself.
| PROBLEM POS SIBLE REASON | SOLUTION |
| Charger is not working | The plug is not well connected on main socket. |
| Your electrical system have some problems | |
| Cables are damaged | |
| Voltage not correct (12V) | |
| 12V Battery voltage level is under 4V | |
| Appliance can switch on, but can't be used | Settings problem |
| Overheat | Appliance have been used too long |
DISPOSAL OF THIS PRODUCT
This marking indicates that this product should not be disposed with other household wastes throughout the EU. To prevent possible harm to the environment or human health from uncontrolled waste disposal, recycle it responsibly to promote the sustainable reuse of material resources. To return your used device, please use the return and collection systems or contact the retailer where the product was purchased.
They can take this product for environmentally safe recycling.
Separate collection of used products and packaging allows materials to be recycled and used again. Re-use of recycled materials helps prevent environmental pollution and reduces the demand for raw materials. Local regulations may provide for separate collection of electrical products from the household, at municipal waste sites or by the retailer when you purchase a new product.
Norauto France 511/589 rue des Seringats 59262 Sainghin-en-Melantois
Auto 5 Bld Paepsem 20-1070 ANDERLECHT BELGIQUE
Noroto España SAU Centre Comercial Alban Carretera de Ademuz
km 2,9 46100 BURJASSOT
Norauto Italia SPA Corso Savona 85/10024 MONCALIERI
Norauto Portugal LDA Av. dos Cavaleiros, n°49 Alfragide 2794-057 CARNAXIDE
Norauto Romania nr.7, corp Z, et.1, Sector 6, Bucuresti, 061072
Norauto Polska SP Z.O.O.UI. Jubilerska 1004-190 WARSZAWA
HOPABTOPOCCn127051,MockBa,LBeTHoB6yIbBap,11cTpoEHe6,3TaX2 NGTS
Made in China / Fabricado en/na China / Fabrique en Chine