
Mehes - Office Ahrend - Free user manual and instructions
Find the device manual for free Mehes Ahrend in PDF.
| Brand | Ahrend |
| Model | Mehes |
| Product type | Desk |
| Fixed height | 72 cm (people 160 to 175 cm) or 74 cm (people 160 to 180 cm) |
| Adjustable height | HI models: manual adjustment with handle, 2 cm steps; HVE models: electronic control (separate manual) |
| Foot adjustment range | Up to 15 mm for leveling |
| Electrification | Multiple outlets (triple, quadruple, master/slave, power cleaner), openable technical boxes, vertical and horizontal cable guidance |
| Electrical standards | BS 6396/2002, DIN VDE 0100-724 |
| Drawer units | Mobile (with retractable handle), suspended under worktop, fixed |
| Max drawer load | Pencil drawer: 5 kg; single drawer: 20 kg; telescopic drawer: 39 kg |
| Roll-front cabinets | Desk height (72/74 cm); max worktop load: 39 kg; shelf: 39 kg; shelf for suspended files: 78 kg; telescopic frame: 40 kg |
| Safety | Anti-tip locking: when a drawer or frame is open, others are locked; locking key included; replaceable cylinder |
| Worktop maintenance | Soft damp cloth for common dirt; alcohol for stubborn stains (organic solvents); avoid gasoline, acetone, abrasives |
| Maintenance of plastic parts | Soft cloth, possibly damp; warm water or mild soap |
| Maintenance of chrome parts | Soft damp cloth; warm water with mild soap or alcohol |
| Maintenance of locks | Special lubricant sprayed into the cylinder |
| Specific tools | Ahrend tool set for Mehes, reference 01609714 |
| A4 drawer accessories | Frames for suspended filing (parallel or perpendicular); A6/A7 drawers with adjustable dividers |
| Moving | Empty the cabinet, open the door, secure interior accessories with adhesive tape |
Frequently Asked Questions - Mehes Ahrend
User questions about Mehes Ahrend
0 question about this device. Answer the ones you know or ask your own.
Ask a new question about this device
Download the instructions for your Office in PDF format for free! Find your manual Mehes - Ahrend and take your electronic device back in hand. On this page are published all the documents necessary for the use of your device. Mehes by Ahrend.
USER MANUAL Mehes Ahrend
Cisteni plastovych casti
Instructions for use and maintenance
The Mehes desking system has been designed and manufactured to ensure that you can work comfortably and effectively.
This manual tells you all about your Mehes workstation and explains how to use it safely. We hope you will enjoy using your furniture.
Keep this manual at your workstation for future reference.
British Standards
Mehes is designed to comply with the European and International standard EN ISO9241-5: 1999, both for Ergonomic design and use of visual display terminals (VDTs) for office tasks. Mehes also complies with BS 4875 for Strength and stability of office furniture and BS 6396 for Electrical systems in office furniture. For further information about these and other British standards for office furniture, please contact Ahrend Customer Services.
English
Table height
A range of leg models
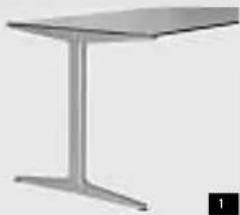
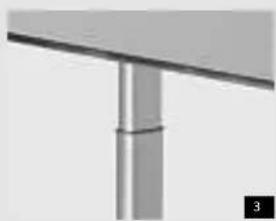
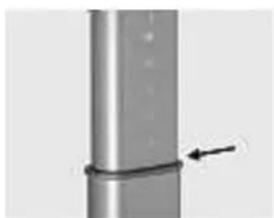
Mehes tables are available as fixed height models or in one of two height-adjustable versions. You can see the difference in the vertical part of the table legs (figs. 1, 2 and 3).
Fixed table height
A fixed height Mehes table (fig. 1) is ideal for the great majority of users engaged in normal office work and for meeting and conference tables.
A fixed height of 72 cm is correct for people who are between about 1.60 and 1.75 m tall (5ft 3ins to 5ft 9ins). A fixed height of 74 cm is correct for people who are between about 1.65 and 1.80 m tall (5ft 5ins to 5ft 11ins).
Shorter people are advised to use a footrest; taller people should have a height-adjustable table.
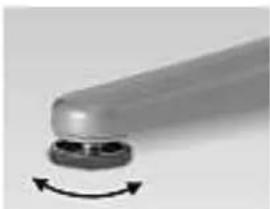
Levelling
Every table leg in the Mehes range has adjustable feet for levelling the table. Turn the foot clockwise to raise it. The maximum adjustment height is 15mm .
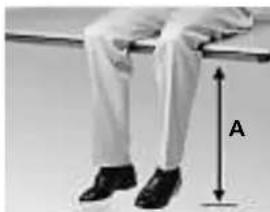
Working out the correct table height
Sit on a table in a relaxed manner with the backs of your knees against the edge of the table. Three important dimensions can now be measured:
Dimension A: the distance from the bottom of the heel of the shoe to the top of the table.
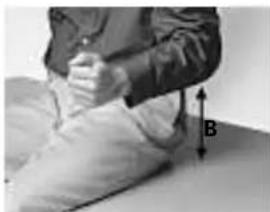
Dimension B: the distance from the top of the table to the underside of the elbow, sitting upright, with the arm alongside the body and bent at an angle of 90^ .
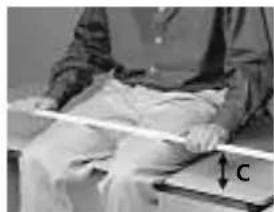
Dimension C: the distance between the top of the table and a ruler placed across the thighs, plus 5 cm. If this is greater than dimension B, you should use dimension C instead of dimension B.
The right work surface height for you is the sum of dimensions A and B (or A and C) rounded off to the nearest even number.
English
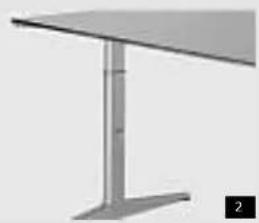
Height-adjustable tables (HI)
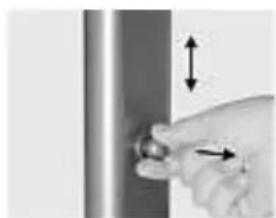
A height-adjustable Mehes table (fig. 2) can be adjusted to suit your personal requirements. The height can be adjusted from 62 to 82cm in increments of 2cm . As a rule the table will be adjusted only once, by the user of the workstation.
Variable height tables (HVE)
A variable height Ahrend 22 table (fig.3) lets you adjust the height of the work surface electrically to suit your own height and posture at any time. This means that different people can use the same work table at different times in maximum comfort. An electronic switch on the table edge operates the mechanism that adjusts the table height between 62 and 82~cm . Several preferred positions can also be stored in the memory.
The height of your chair
Adjust the height of your chair seat to your dimension A (see Working out the correct table height).
Measure from a point in the middle of the front edge of the seat.
Footrest
In practice a low table height is often disliked, perhaps because a person does not want to be sitting lower than his or her colleagues.
In this case an ergonomically correct sitting posture can still be achieved with the aid of a footrest.
Adjust the table and chair by raising them a distance equal to the average height of the footrest.
Height-adjustable tables (HI)
You can read off the preset height above the edge of the lower part of the leg.
Note! If you are making a major adjustment to the height of a w station with three or more supp ing legs, you will have to adjust heights of the different legs in steps to ensure that tops or contors are not distorted.
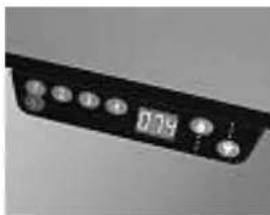
Variable height tables (HVE)
Tables with an electronic switch are delivered with a separate manual for use of the switch.
Adjusting the height
Leg type in fig.2) Pull out the disengage knob*. Keeping it pulled out, carefully adjust the table to a different height. Then release the knob and allow it to click into the desired position. The leg can be adjusted in 2 cm increments.
- Note! The table may drop under its own weight when the knob is pulled out.
English
Wiring the workstation (instructions for electricians)
The instructions for wiring a Mehes workstation are split up into two sections - this section for electricians and a section for the users of the workstation (see pages 6 and 7 for the users' section).
The connection of the workstation to the electricity supply and to data and communications systems must be done by a qualified electrician.
Standards
All Mehes furniture elements and accessories comply with the regulations in wiring standards BS 6396/2002 and DIN VDE 0100-724.
Cable management
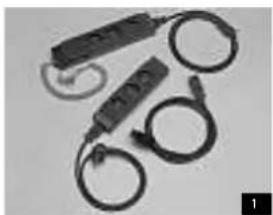
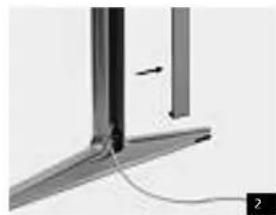
A Mehes workstation can be connected to the power supply with system extension cables and sockets (fig. 1). These accessories can be concealed tidily in the vertical and horizontal cable guides, cable trays and cable dumps.
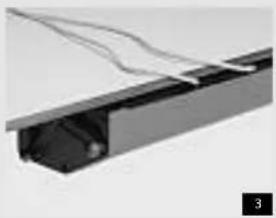
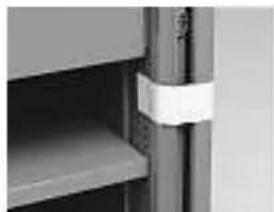
Vertical guides
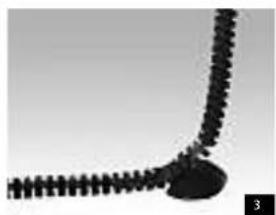
Cables can be led upwards from the floor through a Mehes leg via a cover clicked on to the inner side of the leg (fig. 2). The vertical wiring set is concealed behind the leg cover (this accessory should be ordered separately). This consists of a cable clamp (which grips the cables at the bottom of the Mehes leg to relieve any strain), and a duct with three segregated channels through which cables can be led. As an alternative a special vertical cable guide, separate from the leg, may be used, for example with variable height workstations (fig. 3).
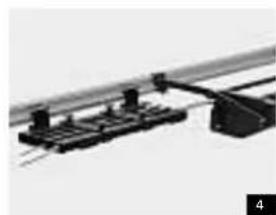
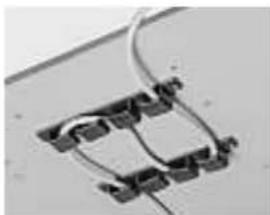
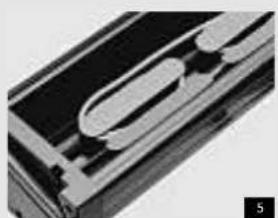
Horizontal guides and securing cables
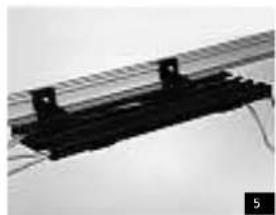
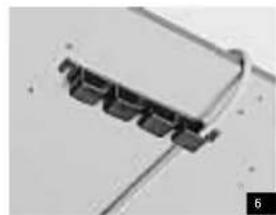
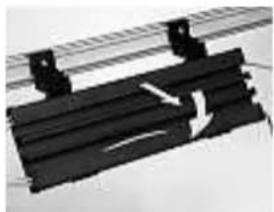
The cables emerging from the vertical cable guides in a leg can be led through cable trays or dumps (fig. 4) that can be attached to the beam of the table. The cable trays can run behind cable dumps, so that these dumps can be added independently of cable trays. Some cable trays can be opened to give access to the cables (fig. 5). Work surface cable holders can be attached anywhere on the underside of a table top to guide the cables (fig. 6).
Drawer pedestals
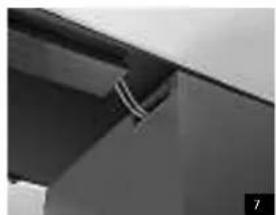
Desk-height pedestals are available with a cable routing duct. This duct can be used as part of the horizontal cable guide system (fig. 7).
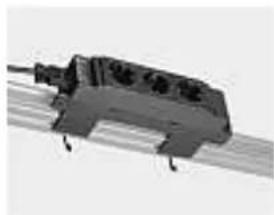
Connections
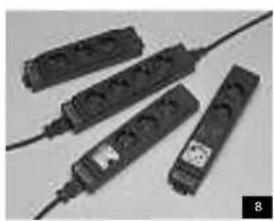
Ahrend supplies various types of electrical sockets, standard 3- or 4 gang, or with additional functions such as a master/slave switch, high-voltage fuse and power cleaner (fig.8).
Fitting sockets
There are several different ways to fit a Mehes table with system sockets.
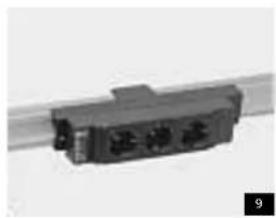
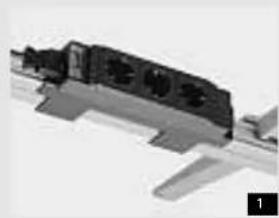
The simplest method is to attach a socket directly to the frame using a mounting clip (for 3-gang sockets) (fig. 9).
Hinged cable dumps
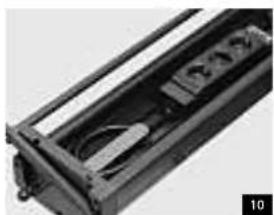
Cable dumps provide space in which the excess length of equipment and power cables can be tidily concealed. The system power sockets also fit in these dumps (fig. 10).
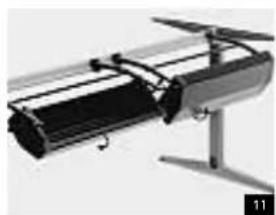
There is a range of lengths, so that an appropriate solution can be found in any situation. The number of sockets that can be mounted in the dumps depends on the type of socket and the length of the cable dump. These dumps open on both sides for ease of access to the cables in them (fig. 11).
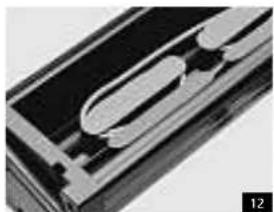
Cable separators clicked into the bottom help to keep cables tidy and separate (fig. 12).
Planning cabling
Position the cable dump as close as possible to the place on the work surface where most of the equipment to be connected is located.
English
The user and the wiring
Users may themselves sometimes want to change some aspect of the wiring of their Mehes workstation. For example plug an item of equipment into a socket or unplig it, or conceal surplus lengths of cable tidily.
Safety
Safety must be the prime concern in the wiring of a workstation. For this reason, every component that comes into contact with wires and cables has rounded edges and the item of furniture can be earthed as a whole.
Accidents caused by tripping over cables and flexes on the floor can be prevented by concealing the cables in the facilities specifically provided by the Mehes range. Concealed cables make the workstation safer, it looks much tidier and it is easier to clean.
Connections
Your workstation can be fitted with connections to the power supply and to computer networks in a variety of ways:
-
S oickets can be mounted directly on the support beam (fig. 1).
-
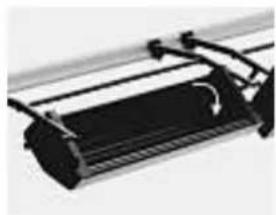
One or more cable dumps can be suspended under the workstation (fig. 2). In that case, the workstation hardware is plugged into sockets in these dumps, and you can also conceal excess cable in them.
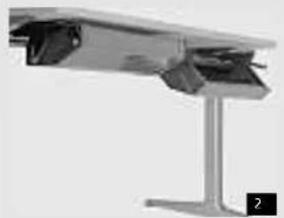
Workstations with socket mounting plate/brackets
It is easy to plug in and unplug equipment.
Surplus lengths of cable can be secured in or on cable trays. Start by removing the cable clamps, tuck in the cables and then close the tray again with the cable clamps.
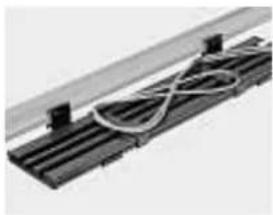
You can also loop cables around the cable clamps.
Work surface cable guides can also be used for this purpose.
Moving sockets
Sockets mounted on a plastic mounting plate can be clicked on to a different part of the support beam. Pull the two lips downwards slightly, slide the whole thing forward, remove it and push it back on to the beam in a different position. Make sure the cable is long enough! If a green and yellow earth wire has been fitted, do not move the socket!
English

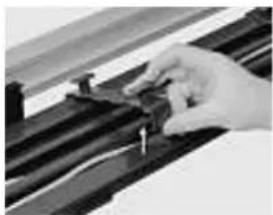
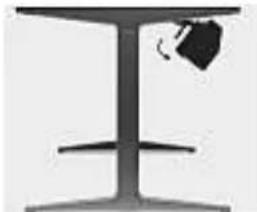
Leading cables along the edge of the work surface Equipment cables are led around the edge of the work surface and fed straight into cable trays or cable dumps (fig.3). If required, cables can also be pushed into cable guides on the underside of the top so that they are held by the hooks and do not dangle (fig.4).
Organizing and separating cables in dumps The cables in hinged cable dumps can be organized with blue cable separators, which click into the bottom of the dump (fig. 5).
Workstations with hinged cable trays
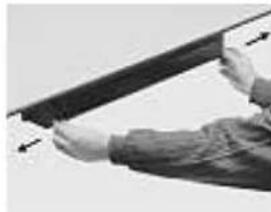
Lift the cable tray slightly, pull forward and open. When work is finished, close cable tray and push back under the table.
Workstations with hinged cable dumps
It may sometimes be necessary to wheel a mobile drawer pedestal out of the way first. The cable dumps under free-standing tables open towards the front of the table.
The cable dumps under tables that are placed against a wall or against each other open towards the side of the table at which people sit. They can then be reached under the work surface.
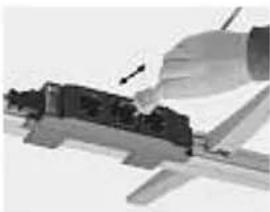
The cable dump is opened by simultaneously pulling out the knobs at the two opposite ends, on the side of the dump nearest to you.
The dump will then drop open. Caution! If all four knobs are pulled out, the whole cable dump will come out of the suspension brackets!
Remove any cable dump clamps used to retain the cables in the dump.
After the necessary changes have been made, the cable dump is closed again. Make sure that the cable clamps have been replaced and that the knobs on each side click back into place.
English
Drawer pedestals
There are several types of drawer pedestals - desk-height pedestals for use alongside a table, two types of pedestals on castors that can be wheeled under a table, trolleys and suspended drawer pedestals.
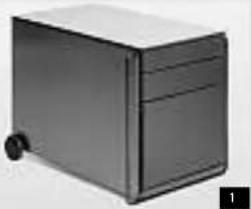
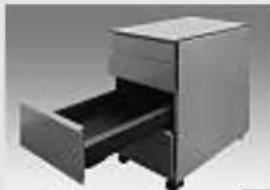
Mobile drawer pedestal
The mobile drawer pedestal with push-handle is easy to move over relatively long distances, for example in an office with flexible workstations (fig. 1).
Suspended drawer pedestal
The suspended drawer pedestals can be used under tables with C legs as well as N legs. They are hung on the beam, directly under the top (fig. 2). The drawer pedestals are 60~cm deep.
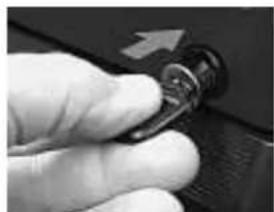
Keys
Drawer pedestals are supplied with two keys, one of which has a hinged plastic grip.
The number on the key corresponds to the number on the lock. You will need to quote this number when re-ordering keys. The whole cylinder of the lock, with key, can also easily be replaced so that the unit can be locked (and unlocked) with a different key.
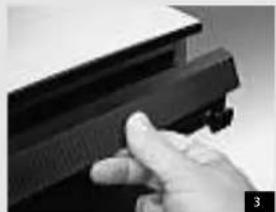
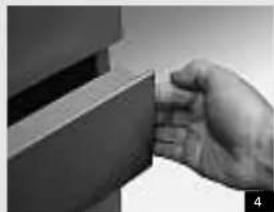
Drawer handles
The drawer fronts either have a handle over the full width (fig. 2) or side grips on each side of the drawer (fig. 3).
Drawer types
Only telescopic drawers can be pulled all the way out of the unit.
Maximum drawer loads
Materials drawer 5 kg
Single drawer 20kg
Telescopic drawer 39 kg
Never stand or sit on an open drawer.


Moving the mobile drawer pedestal
Lock the unit first so that the drawers cannot slide open while it is being moved. This pedestal can be either pushed or pulled as required.
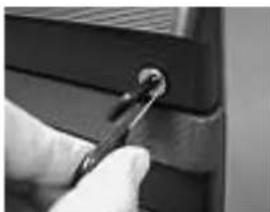
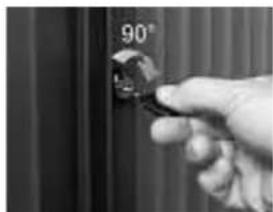
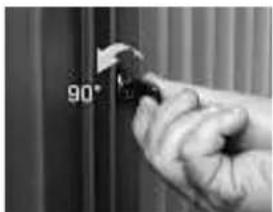
Unlocking the unit
Insert the key into the lock and turn it 90 degrees clockwise. Any desired drawer can now be opened. When this has been done, the other drawers are all immobilised. The key can be left in the lock or removed.

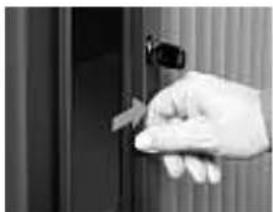
Locking the unit
Close all drawers. Insert the key in the lock and turn it 90 degrees anticlockwise. The drawers are now locked, and the key can be removed.
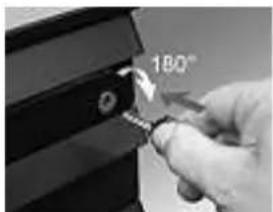
Changing the cylinder
Lock the unit. Now turn the key slightly to the right, till the notch on the edge of the cylinder is at '3 o'clock'. A deblocking pin can be inserted in the notch in this position. Pull the cylinder, with key and deblocking pin, from the barrel of the lock.
Insert the new cylinder, with the key in it, into the barrel and push it in until it clicks in place.
English
Accessories for drawer pedestals 42.5 cm wide
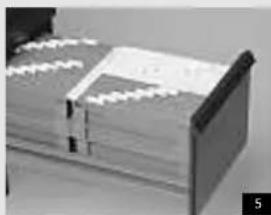
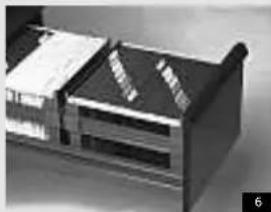
Suspension file supports in A4 drawers
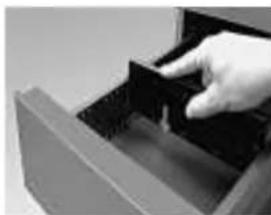
The A4 drawers have a 30 cm high front. The telescopic version of the drawer is supplied with two A4 format plastic suspension file supports (see the enclosed assembly instructions for how to put the supports together). The supports can be installed in the drawer in one of two ways: either next to each other (fig. 5) or one behind the other (fig. 6). This depends entirely on your own personal preference. The suspension file supports may be removed from the drawer when full.
The single runner drawer (which cannot be fully pulled out) is fitted with a metal suspension file support in which A4 suspension files may only be kept one behind the other.
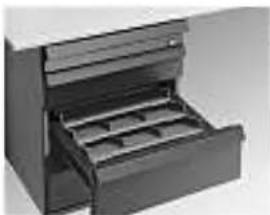
A6/A7 drawers
You can split these drawers up into compartments to suit your own needs with the aid of straight dividers or angled stationery slopes.
7
Accessories for drawer pedestals 31.5 cm wide
Suspension file supports in A4 drawers
The A4 drawers are supplied with a suspension file support with two movable suspension rails that can be shifted to take suspension files of different sizes such as A4, folio and foolscap.
A6/A7 drawers
These drawers can be split up into compartments with the aid of dividers (fig. 7).
Built-in safety in all drawer pedestals
When one drawer is open, the other drawers cannot be opened. They are blocked to prevent the drawer pedestal from tipping over. The materials drawer (if fitted) can always be opened, even when another drawer is open.

Mounting straight drawer dividers Depress the divider at one end. Place at desired position in drawer and release.
The divider will lock itself in position.
Mounting angled drawer dividers
The stationery slopes can be fixed in different positions, so that the number fitting into a drawer will vary.
Mounting straight drawer dividers
The dividers are provided with springy lugs on the sides, which engage with the slots in the walls of the drawers.
English
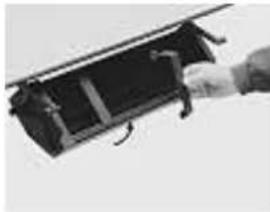
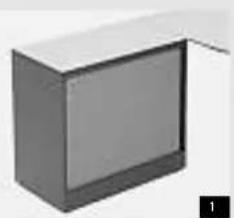
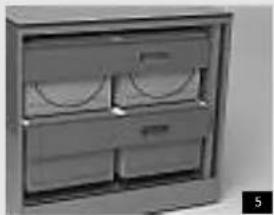
Desk-height tambour door cabinet
A workstation may include a desk-height tambour door cabinet either 72 or 74~cm high (average table height) (fig. 1).
Keys
Tambour door cabinets are supplied with two keys, one of which has a hinged plastic grip. The number on the key to the tambour door cabinet corresponds to the number on the cylinder of the lock. You will need to quote this number when re-ordering keys. The whole cylinder of the lock, with key, can also easily be replaced so that the unit can be locked (and unlocked) with a different key. For details of changing the cylinder, see 'draver pedestals' on the previous page.
Maximum loads
A tambour door cabinet is capable of carrying a maximum load of 39kg distributed evenly over the top.
The maximum permissible weights in or on interior accessories are well in excess of the minimum requirement in DIN 68874.
A shelf in an 80 cm wide tambour door cabinet is capable of carrying a maximum load of 39 kg distributed evenly; a suspension file shelf can hold 78 kg, and a suspension file frame or pull-out tray no more than 40 kg.
This means that nobody may stand or sit on the cabinet, shelves or pulled-out suspension file frames.
Levelling
Tambour door cabinets must be levelled by hand or with an Ahrend levelling spanner in order for the tambour door and the pull-out frames to work properly.
Unlocking the unit
Insert the key into the lock and turn it a half turn to the right. The key can be left in the lock or removed.
You can then open the tambour door by sliding it all the way to the right with the aid of the vertical handle.
You can now pull out the suspension file frames or pull-out trays you want with the aid of the handle.
Closing
All suspension file frames must be pushed all the way back into the cabinet before the door can be slid to the left and closed. Insert the key in the lock and turn it a half turn to the left. The key can now be removed.
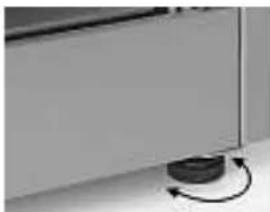
Levelling
The height of the cabinet can be adjusted by approximately 15mm using the adjustable foot under
each corner of the cabinet. You can do this by hand or with the cabinet levelling spanner.
Turning the adjustable foot clockwise will raise the cabinet.
Moving
Before moving the cabinet, remove all the items stored in it.
The door must always be fully open when the cabinet is moved.
Tape the door and all the interior accessories firmly with removals tape.
English
Interiors
Cabinets are usually supplied with a predetermined interior lay-out specifically ordered for the workstation.
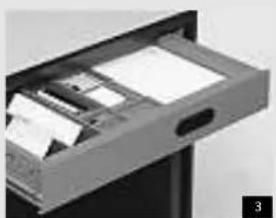
Pull-out drawer
In a 33~cm deep pull-out drawer (fig. 3) you can use the same accessories as in A6/A7 drawers in drawer pedestals (see page 9).
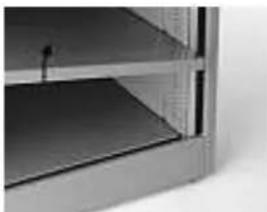
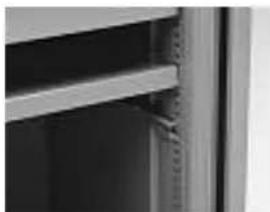
Shelves for lateral suspension files
The shelves for suspension files have extra ridges under the front and back edges from which you can hang lateral suspension files (fig. 4). You can hang them at any height in the cabinet you wish.
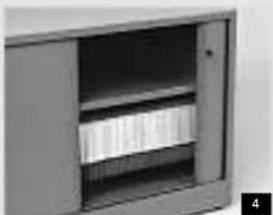
Suspension file frames
The cabinet is supplied with the suspension file frames (fig. 5) mounted such that you can hang A4 suspension files in them. You may, however, have them fitted at any height you require in the cabinet. If a pull-out frame slides forward on its own, it means that the cabinet is not level and must be readjusted (see page 10).
Safety
When one suspension file frame is pulled out, you will not be able to pull out any of the other frames. They are blocked to prevent the cabinet from tipping over. Two pull-out frames and drawers may be opened at the same time. Be aware of the risk of tipping if the drawers are heavily loaded.
When the position of pull-out frames and drawers in the cabinet is changed, the locking paws on the anti-tilt bar will also have to be moved for safety reasons. This has to be done by a specialist fitter.

After delivery
Cabinets are delivered with pullout frames, trays and drawers blocked. The anti-tilt bar has to be pushed down so that they can be pulled out for the first time - on the right side only in the case of 80 cm wide cabinets and on both sides on 120 cm wide cabinets.
Transport clamps may be removed once the cabinet has been installed.
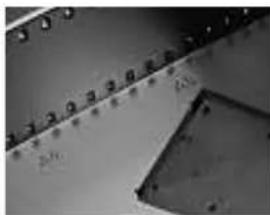
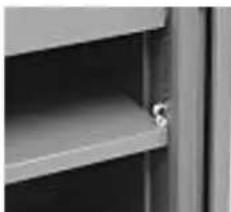
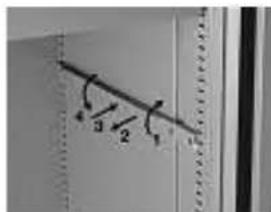
Adjusting the shelves
Shelves can be placed at any height in the cabinet. To adjust the height, open the cabinet fully, lift the shelf at an angle and pull it towards you out of the cabinet.
Twist the shelf supports out of the slots (1,2) and reposition them at the height you require (3,4).
Make sure that they are at the same height at the front and back and on both sides. Use the round holes next to the slots as points of reference.
Tilt the shelf at an angle again, return it to the cabinet and place it on the two supports.
English
Maintenance
These instructions for maintenance are intended for both the professional cleaner and the user of the workstation. Never use benzine, acetone, turpentine, petrol or other aggressive substances, solvents or abrasive cleansers.
Service
We advise you to contact your supplier when moving offices or reconfiguring the workstation.
Maintenance-free parts
With normal use the runners of the drawers and pull-out frames should not require any maintenance.

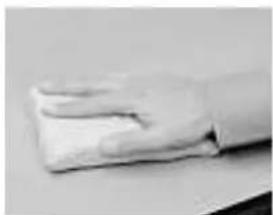
Cleaning work surfaces
Normal stains (coffee, tea, pencil, lipstick, finger marks, grease, water soluble glue, felt tip pen ink etc.) can be removed with a clean, damp cloth. If necessary, a little soft soap may be added to the water and a soft nylon brush may be used to treat more stubborn stains.
Solvent-based lacquer, glue, nail varnish, ballpoint pen ink etc. should be removed with an organic solvent, such as methylated spirits.
Cleaning vengeered work surfaces. Wipe with a clean, damp cloth if necessary. A little soft soap may be added to the water to treat more stubborn stains.
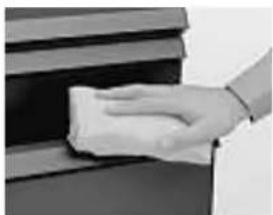
Cleaning plastic parts
All plastic parts may be cleaned with a soft cloth, dampened if necessary. More stubborn stains caused by glue, felt tip pens, ballpoints etc. can be treated with lukewarm water and a little soft soap, if necessary.
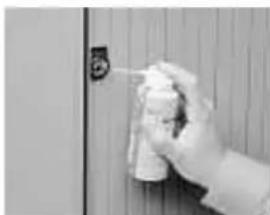
Locks
The efficient working of locks can be promoted by spraying a special lubricant (such as Lubrikote) sparingly into the cylinder.
Tools
A service kit containing the tools required for Mehes is available from Ahrend. Ahrend code 0160 9714.
Cesky Deut
English Francais
derlands
Espanol
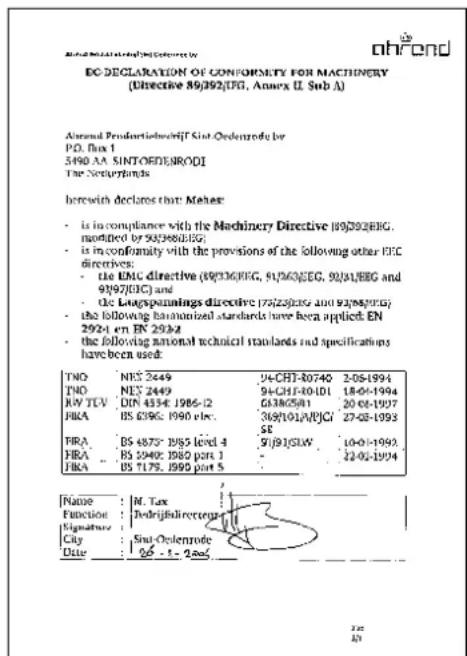
Declaración CE
Mehes
Manual de'utilisation y mantenimiento
Hangmappenrekken in A4 laden
Hangmappenrekken in A4 laden
Ahrend. Always ready for things to come


- Cisteni plastovych casti
- British Standards
- English
- Table height
- A range of leg models
- Fixed table height
- Levelling
- Working out the correct table height
- Wiring the workstation (instructions for electricians)
- Standards
- Cable management
- Vertical guides
- Horizontal guides and securing cables
- Drawer pedestals
- Connections
- Fitting sockets
- Hinged cable dumps
- Planning cabling
- The user and the wiring
- Safety
- Workstations with hinged cable trays
- Workstations with hinged cable dumps
- Mobile drawer pedestal
- Suspended drawer pedestal
- Keys
- Drawer handles
- Drawer types
- Maximum drawer loads
- Moving the mobile drawer pedestal
- Unlocking the unit
- Locking the unit
- Changing the cylinder
- Accessories for drawer pedestals 42.5 cm wide
- Suspension file supports in A4 drawers
- A6/A7 drawers
- Accessories for drawer pedestals 31.5 cm wide
- Built-in safety in all drawer pedestals
- Mounting straight drawer dividers Depress the divider at one end. Place at desired position in drawer and release.
- Mounting angled drawer dividers
- Mounting straight drawer dividers
- Desk-height tambour door cabinet
- Maximum loads
- Closing
- Moving
- Interiors
- Pull-out drawer
- Shelves for lateral suspension files
- Suspension file frames
- After delivery
- Adjusting the shelves
- Maintenance
- Service
- Maintenance-free parts
- Cleaning work surfaces
- Cleaning plastic parts
- Locks
- Tools
- Declaración CE
- Mehes
- Hangmappenrekken in A4 laden
Brand : Ahrend
Model : Mehes
Category : Office