Allure 1862356 - Coffee machine RUSSELL HOBBS - Free user manual and instructions
Find the device manual for free Allure 1862356 RUSSELL HOBBS in PDF.

Frequently Asked Questions - Allure 1862356 RUSSELL HOBBS
User questions about Allure 1862356 RUSSELL HOBBS
0 question about this device. Answer the ones you know or ask your own.
Ask a new question about this device
Download the instructions for your Coffee machine in PDF format for free! Find your manual Allure 1862356 - RUSSELL HOBBS and take your electronic device back in hand. On this page are published all the documents necessary for the use of your device. Allure 1862356 by RUSSELL HOBBS.
USER MANUAL Allure 1862356 RUSSELL HOBBS
Read the instructions, keep them safe, pass them on if you pass the appliance on.
Remove all packaging before use.

IMPORTANT SAFEGUARDS
Follow basic safety precautions, including:
1 This appliance must only be used by or under the supervision of a responsible adult. Use and store the appliance out of reach of children.
2 Take care - this appliance uses steam under pressure.
3 Don't put the appliance in liquid, don't use it in a bathroom, near water, or outdoors.
4 Sit the appliance on a stable, level, heat-resistant surface.
5 Keep the appliance and cable away from the edges of worktops and out of reach of children.
6 Don't leave the appliance unattended while plugged in.
7 Unplug the appliance when not in use, before moving and before cleaning.
8 Don't use accessories or attachments other than those we supply.
9 Don't use the appliance for any purpose other than those described in these instructions.
10 This appliance must not be operated by an external timer or remote control system.
11 Don't use the appliance if it's damaged or malfunctions.
12 If the cable is damaged, it must be replaced by the manufacturer, its service agent, or someone similarly qualified, in order to avoid hazard.
household use only
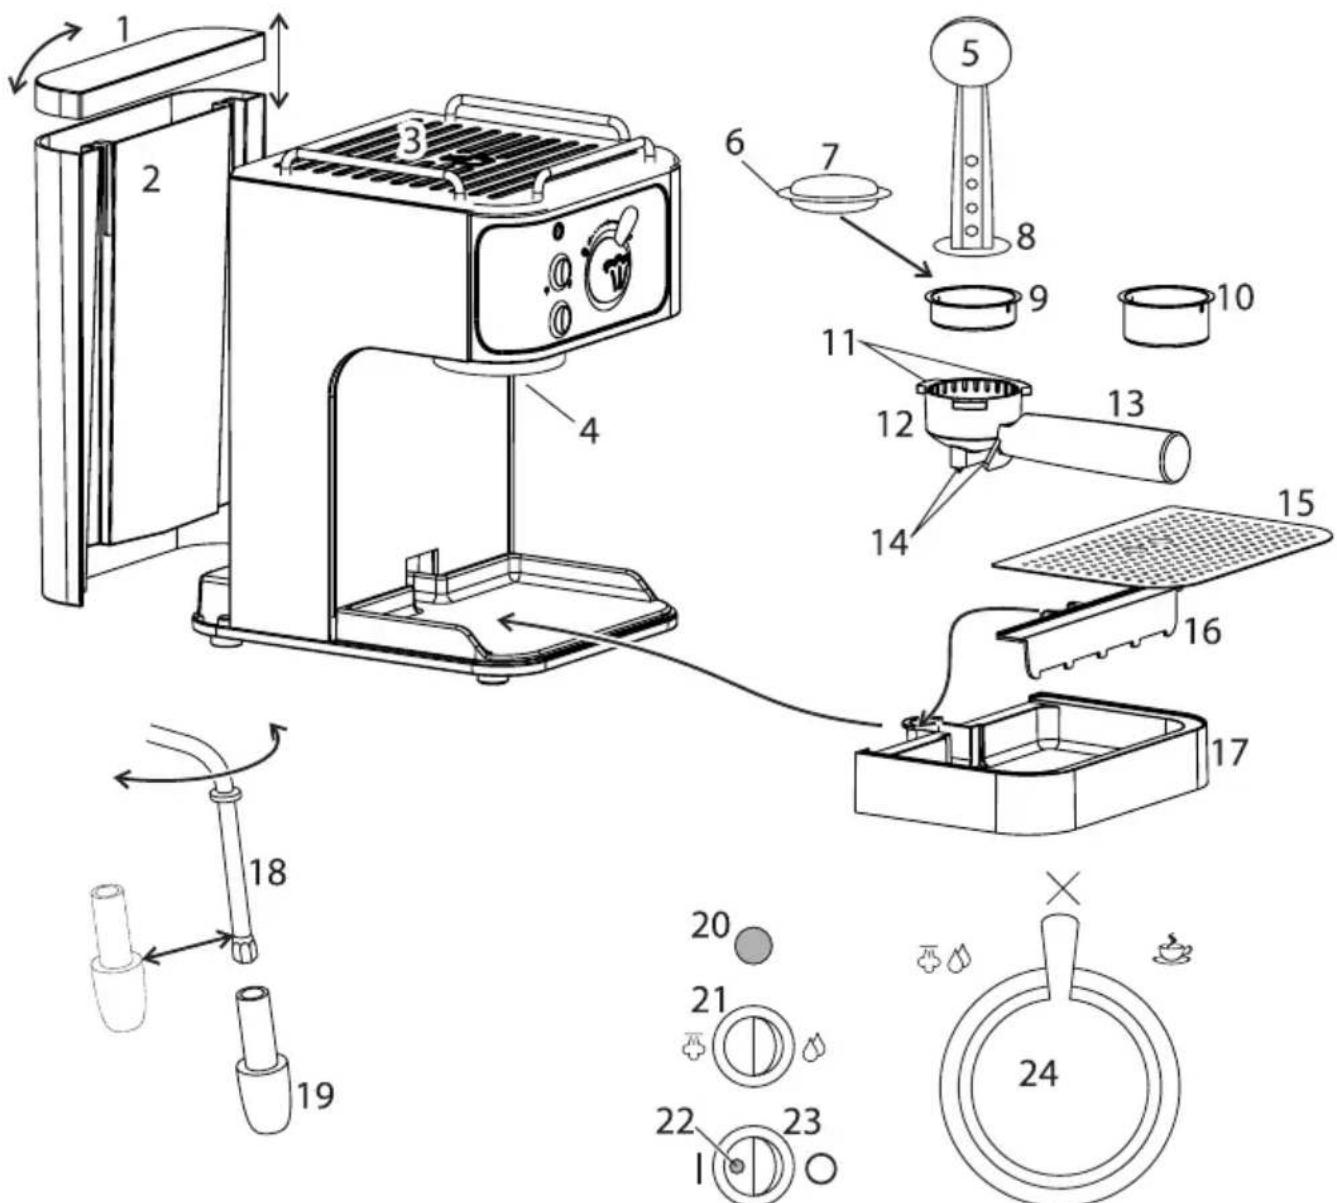
| diagrams | 9 small filter | 18 steam pipe |
| 1 reservoir lid | 10 big filter | 19 frother |
| 2 reservoir | 11 lugs | 20 thermostat light |
| 3 cup warmer | 12 filter holder | 21 frother control |
| 4 brewing head | 13 handle | 22 power light |
| 5 scoop | 14 nozzles | 23 switch |
| 6frill | 15 cover | ○ off |
| 7pod | 16 guard | | on |
| 8tamper | 17 drip tray | 24 steam control |
WATER FILL
1 Lift the lid up, and rotate it back, to expose the reservoir.
2 Fill the reservoir with water.
3 Alternatively, you may lift the reservoir off the appliance, fill it in the kitchen, and carry it back to the appliance.
4 Replace the reservoir in the appliance.
5 Slide it down the rear.
PREPARATION
6 For one espresso cup, use the small filter, for two cups, use the big filter.
7 Put your cup/cups on the cup warmer.
8 Put the filter into the filter holder, and press it down, to lock it in place.
9 Align the filter holder handle with the front left corner of the appliance.
10 The lugs on top of the filter holder should engage in the lugs round the brewing head.
11 Move the handle to the right as far as it will go, to lock the filter holder in place.
12 Put a large container under the nozzles on the filter holder.
13 Put the plug into the power socket.
14 Move the switch to I.
15 The power light will glow as long as the appliance is connected to the electricity supply.
16 The thermostat light will glow, then cycle on and off as it works to maintain the temperature.
17 Wait till the thermostat light goes off.
18 Set the steam control to
19 Let a couple of cups of water drain into the container.
20 Set the steam control to ×
21 Everything is now warm and ready for use.
COFFEE FILL
22 Move the filter holder handle left, till it reaches the front left corner of the appliance, then lower the filter holder from the brewing head.
23 Wipe the filter and filter holder with a piece of kitchen paper.
24 Fill the filter to the rim with coffee.
25 Tamp the coffee down with the tamper.
26 It needs to be firmly tamped down, but not compacted.
27 Clear any coffee grounds from the rim, otherwise it won't seat properly in the brewing head.
PODS
28 If you want to use a pod, put it into the small filter. Most pods will fit.
29 Check that the frill round the edge of the pod is completely inside the filter.
LOADING
30 Align the filter holder handle with the front left corner of the appliance.
31 The lugs on top of the filter holder should engage in the lugs round the brewing head.
32 Move the handle to the right as far as it will go, to lock the filter holder in place.

MAKING ESPRESSO
33 Put one cup under both nozzles on the filter holder, or, for two cups, put one cup under each nozzle.
34 Wait till the thermostat light goes off.
35 Set the steam control to
36 You'll hear the pump operating, and coffee will come out of the nozzles.
37 Watch the level in the cup(s).
38 Set the steam control to ×
39 This will stop the pump.
Stop the pump just before the cups are filled to the level you want (25-30ml per shot), as the liquid trapped in the filter will still have to come out
40 If you're making cappuccino, go to CAPPUCCINO.

MORE?
41 Move the filter holder handle left, till it reaches the front left corner of the appliance, then lower the filter holder from the brewing head.
42 Empty the filter.
43 Wait till they cool, then pris the filter out of the filter holder.
44 Clean them with fresh, clean water.
45 Check the reservoir, and top up as necessary.
46 Jump to point 6.

FINISHED?
47 Move the switch to
48 Unplug the appliance.

CAPPUCCINO
49 Cappuccino is espresso with a frothy milk top.
50 You'll need a mug containing cold milk, and a cup to collect drips.
51 To allow room for the froth, don't fill the mug more than two thirds full.
52 Ideally, the mug should be tall and narrow, as the milk must be deep enough to cover the end of the frother without it hitting the bottom of the mug.
53 We've found that semi-skimmed milk gives better results than whole milk. You'll need to experiment to find which type works best for you in your area.
54 Don't try to make too much froth at one time. Too much steam will flatten the milk, leaving you with nothing but hot, watery milk.

FROTHING
55 Do the frothing immediately you have made your coffee, while the appliance is still hot.
56 Swing the frother round so it's clear of the drip tray.
57 Bring the mug containing the milk up to the frother and hold it so that the end of the frother is just under the surface of the milk.
58 Move the frother control to
59 Set the steam control to
60 Steam will issue from the frother.
61 Move the jug up and down slightly, keeping the end of the frother just below the surface of the milk.
62 Don't lift the end of the frother out of the milk, or it'll spatter.
63 Carry on till you have as much froth as you need.
64 Set the steam control to ×
65 Swing the frother back over the drip tray.
66 Spoon the froth on top of the cup(s) of espresso.

CLEAN THE FROther
67 Clean the frother and steam pipe immediately after use, to prevent milk deposits blocking them.
68 Hold a cup under the frother, so that the end of the frother is well inside the cup.
69 Set the steam control to
70 Let a little steam through, to remove any milk from inside the frother.
71 Set the steam control to ×

WARMING MILK
72 Follow the procedure for making froth, but immerse the frother fully in the milk. Watch the milk carefully. If you use too much steam, you'll get watery milk.

HOT WATER
73 To generate hot water for tea, or any other drink, follow the procedure for making froth, but:
74 Hold the steam tube with a cloth, to protect your fingers from the heat, and pull the frother off the end.
75 Move the frother control to
76 When you move the steam control to , hot water will issue from the steam tube.

CARE AND MAINTENANCE
77 Unplug the appliance.
78 Move the filter holder handle left, till it reaches the front left corner of the appliance, then lower the filter holder from the brewing head.
79 Empty the filter.
80 Wait till they cool, then pris the filter out of the filter holder.
81 Lift the cover off the drip tray.
82 Slide the drip tray out
83 Put a finger into the hole at the rear of the guard, and pull gently towards you and upwards, to release it.
84 Hold the steam tube with a cloth, to protect your fingers from the heat, and pull the frother off the end.
85 Clean the outside surfaces of the appliance with a damp cloth.
86 Wash the removable parts in warm soapy water, rinse well, drain, and air dry.
87 Lower the rear of the guard into place, then lower the front.
88 Slide the drip tray into the bottom of the appliance.
89 Replace the drip tray cover.
90 Push the frother on to the steam pipe till the middle of the frother is troughly level with the top of the nut at the end of the steam pipe.
91 Don't put any part of the appliance in a dishwasher.

DESCALING
92 Descale regularly. Use a proprietary brand of descaler suitable for use in plastic-bodied products. Follow the instructions on the package of descaler.
Products returned under guarantee with faults due to scale will be subject to a repair charge.

ENVIRONMENTAL PROTECTION
To avoid environmental and health problems due to hazardous substances in electrical and electronic goods, appliances marked with this symbol mustn't be disposed of with unsorted municipal waste, but recovered, reused, or recycled.

BEHANDLING OG VEDLIKEHOLD
BAKHbIE MEPbl IPEIOCTOPOXHOCTN
CneyuTe OCHOBbIM INHCTpyKcIyAM NO 6e3ONaCHoCTN, BKJIouaY cNeDuIuIe:
1 DeTAM pa3peSeHNOJb3OBaTbC8 yCTPOINCTBOM TOJbKO NOI pNcMOTpOM B3PocJIbIX. IcnoJIb3yIte n xpaHInTe np6Op B MeCTax HeoCTynHbIX dIra DeTei.
2 BybTe octopoknbl - np6op nCnoB3yeT nap noD daBneHnem.
3 He norpykaite np6op B kakyio-lno6o kndkoctb; He nCNoIb3yIte erO B BaHHO KOMHaTe, OKOLO BObl IIN BHe NOMEeHNI.

4 UctaHaBnBaIe np6Op Ha yCTOuHBYIO, rOpN3oHTaIbHyIO, TepMOCToKyIO NOBepxHOCTb.
5Держnte npi6op BdaIи OT kpaeb pa6oey nobepxHocTn IN B HeIoCTyInbIX dIЯ DeTeMecTax.
6 He octablaIte BkIoueHbI np6Op 6e3 npncMoTpa.
7 OtklouaIte np6op ot cetn, kOrda He nCnoJb3yeTe ee, nepei nepeHocKoi nnu ChTko.
8 IcnoIb3yIte ToIbKO npHnAdJnxHocTn HacadKn OT npOn3BoDnteJIa.
9Пибор He может paботаь OT BHeшнero Taïмepa ИлДиCTaHцINHOHоСИСТeMbI ynpaBNeHЯ.
10 IcnoIb3yIe npi6Op TOnbKO no Ha3HaueHIO.
11 He nCnoB3yIe np6Op, ecn OH noBpeKdE nn pa6oTaT c nepe6oAm.
12 Ecn Ka6enb NOBpeXdeH, OH DoJxHe 6bItb 3aMeHn IpOn3BODnteJeM, cepBnchbIM areHTOM nn npyrrm KBaJIHcNUPOBAHbIM IInC0m IInpOeTbpaueHn ONaCHOCTn.
TOlbKO Dnla 6bITOBORIO NcNoIb3OBAHnA

ПОДАЧАВODы
1 POnHnMnte KpbIuKy n NOBepHnTe ee Ha3a, yTO6bI NOpUynTb DocTyn Kpe3epByapy.
2 Hanolnhte pe3epByap Bdoi.
3 Bbl TaKxpe MoKeTe cHrTb pe3epByap C npu6opa, 3aNoJnHTb erO Ha KyxHe n yCTaHOBtB erO o6paTHo Ha npu6op.
4 BctaBbTe pe3epByap o6paTHo B npu6op.
5Onyctnte ero BHN3 no 3aHne CTeHKe.

ПРИГOTOBЛЕNHUE
6Дя OndHou yawkn 3cnpecco nCnoJb3yIte MaIbIyIbTp,ДЯ DByx yawek-6OJIbIwoi.
7 NocTaBbTe yawKy/yawKn Ha noDorpeBaTeIb Ira yawek.
8 BCTaBbTe ΦnIbTp B DepeKataJIb ΦnIbTppa N HaxMnte Ha Hero, YTO6bl 3aKpeNtB erO Ha MeCTe.
9 UctaHOBIne pykny depkaTeJy fNbTpa BPOBeHc nepeHNm neBbIM yrnom npnbopa.
10 Ⅲnbl Ha BepxHei qactn depkaTeIaBtpa DOLXHbI 3aueENTbcra 3a Ⅲnbl BOKpyr pa3daTOUHO rpynnbl.
11 NObepHnTe pyuKy BnpaBO do ynpa, TTo6bl 3aΦNKcnpoBaTb DepxKaTeNb ΦnBtpa.
12 NomeCTnTe 6oIbwo KOnTeHep nO naTpy6Kn depKataeY fNlbTpa.
13 BcTaBbTe BnIky Bpo3eTKy.
14 YctaHOBnte nepeKIOUaTeJIb B NOIOXeHne I.
15 INnkaTop nntaHna 6ydt CBeTtBcra Bce Bpem, noka npnbop noKnloueK 3neKTpoceTn.
16 3acBETTcHnDnKaTOp TepMoCTata, nocne yero OH 6ydt rachyTB, n 3aropatbC no Mepe npndepKahnra TepMOCTaTOM TemnepaTypbl.
17 NdojKdTe, noka HndkaTOp TepmoCTaTnoracHeT.
18 YctaHOBnTe pykpepylnpoBkn npaHa
19 Nycb B KOHTeHep CTeueToHa-DbVe ChaUKN BOIbl.
20 YctaHOBnTe pyKy perynipOBKn npa Ha X.
21 Tenepb Bce nporpelenocb n rotoBO K nCnOJIb3ObaHIO.
IpoodykTn noJ rapaHcN, BbPHaTn C nobpeiB pe3yUItaT OT HaTpyuBaHe Ha KOTJIeH KaMbK, NoJnxKaT Ha TaKca 3a peMOHT.
OIIA3BAHE HA OKOIHATA CPEDA
3a da ce n36erHaT ekOJorHn H 3dpaBn npoBn nopAaHa HAnuue Ha OnaChn cy6ctaHn B eJeKtpnuecknte n eJeKtpoHHn CTOKn, ypeNte, o603NaueHn C To3n CmBOn, He Tp8Ba da ce n3xBbPnT 3aeDnC HecOpTnpaHn O6uHnCKn OTnaDbu, a CneDba da Ce BbpHaT o6paTHO, da ce n3NON3BaT OTHOBO Nnn peunKnipaT.

J 1
1
67
68
69
. 70
X 71
1
72
:Jg jj Jg j g j 73
1 74
75
76
a
77
a + b = 1
jll Jolz 6d gall lal gall cai 1yS e 12
13
14
15
a 16
17
18
e 19
X 20
J 21
22
.
23
.0 geall liol 1 jilal 24
25
16 26
27
y = x^2 + 1
a 28
Jnaiy1 pae jll jgall 6
.152
8
9
10
1 11
12
.
baa jiaai Jaaui
1
2
jll 1 j 3
J 4
5
6
7
aL 8
9