VPLEX230 - Projector SONY - Free user manual and instructions
Find the device manual for free VPLEX230 SONY in PDF.
Frequently Asked Questions - VPLEX230 SONY
User questions about VPLEX230 SONY
0 question about this device. Answer the ones you know or ask your own.
Ask a new question about this device
Download the instructions for your Projector in PDF format for free! Find your manual VPLEX230 - SONY and take your electronic device back in hand. On this page are published all the documents necessary for the use of your device. VPLEX230 by SONY.
USER MANUAL VPLEX230 SONY
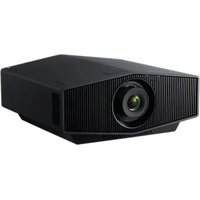
VPL-EW295/EW255/EW235 VPL-EX295/EX290/EX255/EX250/EX235/EX230
图上(九)范志志04号
警告
© 2014 Sony Corporation

安全のたてに
Projector Station for Network
Presentation 4
(CD-ROM) (1 枚)
CD-ROM 取叢説明書の見た
http://PWPresenterpixelworks.com

To reduce the risk of fire or electric shock, do not expose this apparatus to rain or moisture.
To avoid electrical shock, do not open the cabinet. Refer servicing to qualified personnel only.
WARNING
THIS APPARATUS MUST BE EARTHED.
WARNING
When installing the unit, incorporate a readily accessible disconnect device in the fixed wiring, or connect the power plug to an easily accessible socket-outlet near the unit. If a fault should occur during operation of the unit, operate the disconnect device to switch the power supply off, or disconnect the power plug.
CAUTION
About the LAN connector
For safety, do not connect the connector for peripheral device wiring that might have excessive voltage to this port.
WARNING: THIS WARNING IS
APPLICABLE FOR USA ONLY.
If used in USA, use the UL LISTED power cord specified below.
DO NOT USE ANY OTHER POWER CORD.
Plug Cap Parallel blade with ground pin (NEMA 5-15P Configuration)
Cord Type SJT, three 16 or 18 AWG wires
Length Minimum 1.5m (4 ft. 11 in.), Less than 4.5m (14 ft. 9 in.)
Rating Minimum 10 A, 125 V
Using this unit at a voltage other than 120V may require the use of a different line cord or attachment plug, or both. To reduce the risk of fire or electric shock, refer servicing to qualified service personnel.
WARNING: THIS WARNING IS APPLICABLE FOR OTHER COUNTRIES.
1 Use the approved Power Cord (3-core mains lead) / Appliance Connector / Plug with earthing-contacts that conforms to the safety regulations of each country if applicable.
2 Use the Power Cord (3-core mains lead) / Appliance Connector / Plug conforming to the proper ratings (Voltage, Ampere).
If you have questions on the use of the above Power Cord / Appliance Connector / Plug, please consult a qualified service personnel.
IMPORTANT
The nameplate is located on the bottom.
For kundene i Norge
Dette utstyret kan kobles til et ITströmfordelingsystem.
For the customers in the U.S.A.
This equipment has been tested and found to comply with the limits for a Class B digital device, pursuant to part 15 of the FCC Rules. These limits are designed to provide reasonable protection against harmful interference in a residential installation. This equipment generates, uses, and can radiate radio frequency energy and, if not installed and used in accordance with the instructions, may cause harmful interference to radio communications. However, there is no guarantee that interference will not occur in a particular installation. If this equipment does cause harmful interference to radio or television reception, which can be determined by turning the equipment off and on, the user is encouraged to try to correct the interference by one or more of the following measures:
- Reorient or relocate the receiving antenna.
- Increase the separation between the equipment and receiver.
- Connect the equipment into an outlet on a circuit different from that to which the receiver is connected.
- Consult the dealer or an experienced radio/TV technician for help.
If you have any questions about this product, you may call; Sony Customer Information Service Center 1-800-222-7669 or
http://www.sony.com/
Declaration of Conformity
Trade Name : SONY
Model : VPL-EW295
VPL-EW255
VPL-EW235
VPL-EX295
VPL-EX290
VPL-EX255
VPL-EX250
VPL-EX235
VPL-EX230
Responsible party : Sony Electronics Inc.
Address: 16530 Via Esprillo,
San Diego, CA
92127 U.S.A.
Telephone Number: 858-942-2230
This device complies with part 15 of the FCC Rules. Operation is subject to the following two conditions: (1) This device may not cause harmful interference, and (2) this device must accept any interference received, including interference that may cause undesired operation.
You are cautioned that any changes or modifications not expressly approved in this manual could void your authority to operate this equipment.
All interface cables used to connect peripherals must be shielded in order to comply with the limits for a digital device pursuant to Subpart B of part 15 of FCC Rules.
This device complies with part 15 of the FCC Rules. Operation is subject to the following two conditions: (1) This device may not cause harmful interference, and (2) this device must accept any interference received, including interference that may cause undesired operation.
For the customers in Canada
CANICES-3 (B)/NMB-3(B)
For the customers in Europe
This product has been manufactured by or on behalf of Sony Corporation, 1-7-1 Konan Minato-ku Tokyo, 108-0075 Japan. Inquiries related to product compliance based on European Union legislation shall be addressed to the authorized representative, Sony Deutschland GmbH,
Hedelfinger Strasse 61, 70327 Stuttgart, Germany. For any service or guarantee matters, please refer to the addresses provided in the separate service or guarantee documents.
For the customers in Taiwan only

廢電池請回收
For the State of California, USA only
Perchlorate Material - special handling may apply, See www.dtsc.ca.gov/hazardouswaste/ perchlorate
Perchlorate Material : Lithium battery contains perchlorate.
For the Customers in Brazil only DESCARTE DE PILHAS E BATERIAS
- Check that the operating voltage of your unit is identical with the voltage of your local power supply. If voltage adaptation is required, consult with qualified Sony personnel.
- Should any liquid or solid object fall into the cabinet, unplug the unit and have it checked by qualified Sony personnel before operating it further.
- Unplug the unit from the wall outlet if it is not to be used for several days.
- To disconnect the cord, pull it out by the plug. Never pull the cord itself.
- The wall outlet should be near the unit and easily accessible.
- The unit is not disconnected from the AC power source (mains) as long as it is connected to the wall outlet, even if the unit itself has been turned off.
- Do not look into the lens while the lamp is on.
- Do not place your hand or objects near the ventilation holes — the air coming out is hot.
- Be careful not to catch your fingers by the front feet (adjustable) when you adjust the height of the unit. Do not push hard on the top of the unit with the front feet (adjustable) out.
- Avoid using an extension cord with a low voltage limited since it may cause the short-circuit and physical incidents.
- Do not catch your finger between the unit and surface of the floor when moving the projector installed on the floor.
- Do not move the projector when it is turned on and the cabinet cover is open.
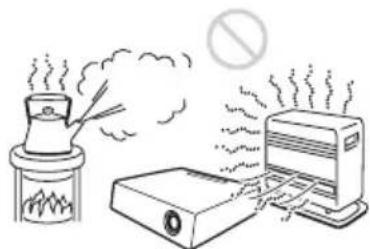
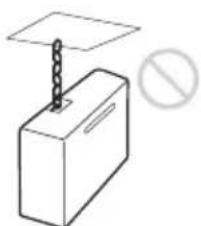
- Do not install the unit in a location near heat sources such as radiators or air ducts, or in a place subject to direct sunlight, excessive dust or humidity, mechanical vibration or shock.
-
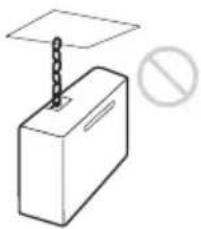
Never mount the projector on the ceiling or move it by yourself. Be sure to consult with qualified Sony personnel (charged).
-
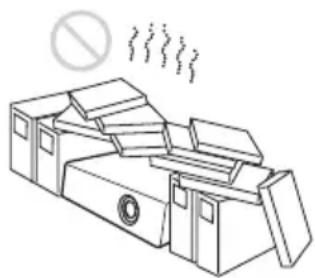
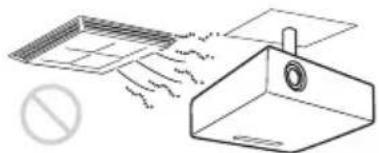
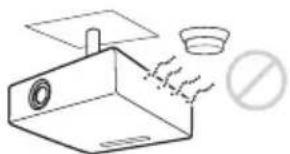
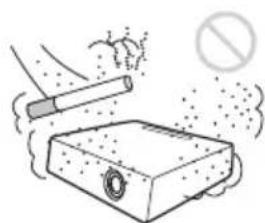
If the ventilation holes are blocked, internal heat builds up, and it may cause a fire or damage the unit. To allow adequate air circulation and prevent internal heat build-up, follow the items below:
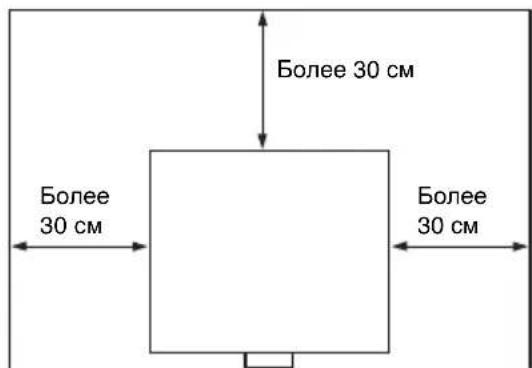
- Leave space around the unit (page 6).

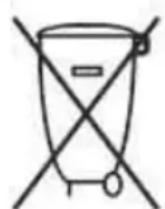
- Avoid using something to cover the ventilation holes (exhaust/intake).
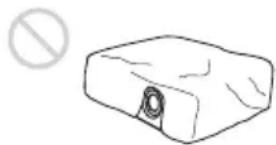
- Do not place the unit on surfaces such as an original packing sheet, soft cloth, papers, rugs, or scraps of paper. The ventilation holes may take in such materials.
- Do not place any object just in front of the lens that may block the light during projection. Heat from the light may damage the object. Use the picture muting function to cut off the picture.
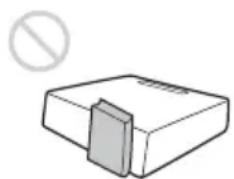
- Do not use the Security bar for the purpose of preventing theft for transporting or installing the unit. If you lift the unit by the Security bar or hang the unit by this bar, it may cause the unit to fall and be damaged, and may result in personal injury.
For dealers
- Be sure to secure the cabinet cover firmly when installing to the ceiling firmly.
Safety precautions for installing the unit on a ceiling
-
Never mount the projector on the ceiling or move it by yourself. Be sure to consult with qualified Sony personnel (charged).
-
When installing the unit on a ceiling, be sure to use a safety wire, etc., to prevent the unit from falling. Entrust the installation to an experienced contractor or installer.
On Installation
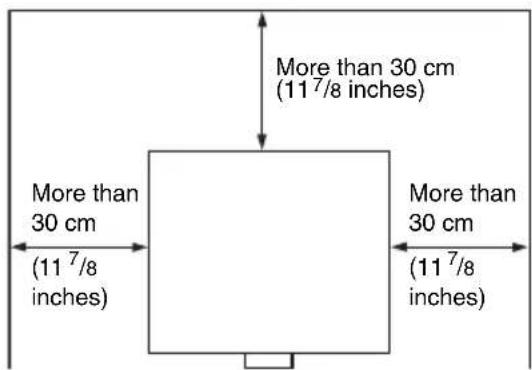
- When installing the unit, leave space between any walls, etc. and the unit as illustrated.
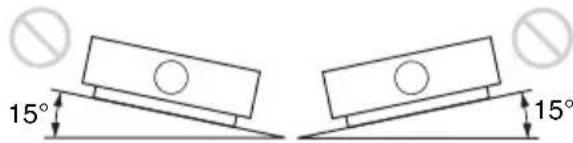
- Avoid using if the unit is tilted more than 15 degrees horizontally.
- Avoid using the unit in a location where the temperature or humidity is very high, or temperature is very low.
- Avoid installing the unit in a location subject to direct cool or warm air from an air-conditioner. Installing in such a location may cause malfunction of the unit due to moisture condensation or rise in temperature.
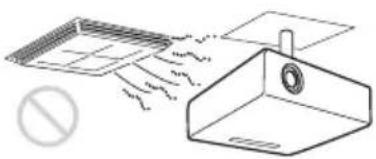
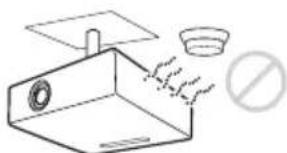
- Avoid installing the unit in a location near a heat or smoke sensor. Installing in such a location may cause malfunction of the sensor.
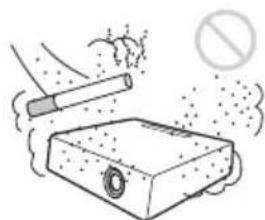
- Avoid installing the unit in a very dusty or extremely smoky environment. Otherwise, the air filter will become obstructed, and this may cause a malfunction of the unit or damage it.
- When using the unit at an altitude of 1,500 m or higher, set "High Altitude Mode" to "On" in the Installation menu. Failing to set this mode when using the unit at high altitudes could have adverse effects, such as reducing the reliability of certain components.
- Set "Installation Attitude" on the Installation menu correctly to suit to the Installation angle. Continuing to use the wrong setting may affect component reliability.
On cleaning the lens and the cabinet
- Be sure to disconnect the AC power cord from the AC outlet before cleaning.
- If you rub on the unit with a stained cloth, the cabinet may be scratched.
- If the unit is exposed to volatile materials such as insecticide, or the unit is in contact with a rubber or vinyl resin product for a long period of time, the unit may deteriorate or the coating may come off.
- Do not touch the lens with bare hands.
- On cleaning the lens surface: Wipe the lens gently with a soft cloth, such as a glass cleaning cloth. Stubborn stains may be removed with a soft cloth lightly dampened with water. Never use solvent such as alcohol, benzene or thinner, or acid, alkaline or abrasive detergent, or a chemical cleaning cloth.
- On cleaning the cabinet: Clean the cabinet gently with a soft cloth. Stubborn stains may be removed with a soft cloth lightly dampened with mild detergent solution and wrung, followed by wiping with a soft dry cloth. Never use solvent such as alcohol, benzene or thinner, or acid, alkaline or abrasive detergent, or a chemical cleaning cloth.
On Illumination
To obtain the best picture, the front of the screen should not be exposed to direct lighting or sunlight.
On Screen
When using a screen with an uneven surface, stripes pattern may rarely appear on the screen depending on the distance between the screen and the unit or the zooming magnifications. This is not a malfunction of the unit.
On Fan
Since the projector is equipped with fans inside to prevent internal temperature from rising, there may be some noise. This is a normal result of the manufacturing process and does not indicate a malfunction. If, however, in a case of abnormal noise, consult with qualified Sony personnel.
On Lamp
The lamp used as a light source contains mercury that has high internal pressure. A high-pressure mercury lamp has the following characteristics:
- Brightness of the lamp will be lowered as the elapse of time used.
- The lamp may break with a loud noise as a result of shock, damage, or deterioration caused by the elapse of time. The lamp may become unlit and may burn out.
- The lamp life varies with individual differences or usage conditions of each lamp. Therefore, it may break or will not light even before the specified replacement time.
- It may possibly break after the replacement time has elapsed. Replace the lamp with a new one as soon as possible if a message displayed on the projected image, even if the lamp normally lights.
For carrying
This unit is precision equipment. When carrying the unit, do not subject the unit to shocks, or fall. It may damage the unit.
On LCD Projector
The LCD projector is manufactured using high-precision technology. You may, however, see tiny black points and/or bright points (red, blue, or green) that continuously appear on the LCD projector. This is a normal result of the manufacturing process and does not indicate a malfunction. Also, when you use multiple LCD projectors to project onto a screen, even if they are of the same model, the color reproduction among projectors may vary, since color balance may be set differently from one projector to the next.
On Condensation
If the room temperature where the projector is installed changes rapidly, or if the projector is moved suddenly from a cold to a warm place, condensation in the projector may occur. As the condensation may cause malfunction, be careful in adjusting temperature settings of the air conditioner. If condensation occurs, leave the projector turned on for about two hours before use.
SONY WILL NOT BE LIABLE FOR DAMAGES OF ANY KIND RESULTING FROM A FAILURE TO IMPLEMENT PROPER SECURITY MEASURES ON TRANSMISSION DEVICES, UNAVOIDABLE DATA LEAKS RESULTING FROM TRANSMISSION SPECIFICATIONS, OR SECURITY PROBLEMS OF ANY KIND.
Notes
-
Always verify that the unit is operating properly before use. SONY WILL NOT BE LIABLE FOR DAMAGES OF ANY KIND INCLUDING, BUT NOT LIMITED TO, COMPENSATION OR REIMBURSEMENT ON ACCOUNT OF THE LOSS OF PRESENT OR PROSPECTIVE PROFITS DUE TO FAILURE OF THIS UNIT, Either DURING THE WARRANTY PERIOD OR AFTER EXPIRATION OF THE WARRANTY, OR FOR ANY OTHER REASON WHATSOEVER.
-
SONY WILL NOT BE LIABLE FOR CLAIMS OF ANY KIND MADE BY USERS OF THIS UNIT OR MADE BY THIRD PARTIES.
-
SONY WILL NOT BE LIABLE FOR THE TERMINATION OR DISCONTINUATION OF ANY SERVICES RELATED TO THIS UNIT THAT MAY RESULT DUE TO CIRCUMSTANCES OF ANY KIND.
Checking the Supplied Accessories
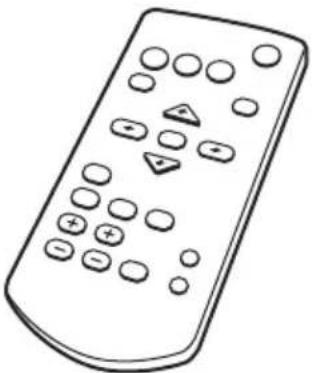
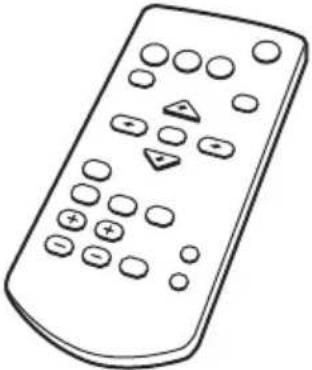
RM-PJ8 Remote Commander (1) Lithium battery (CR2025) (1) The battery is already installed. Before using the remote commander, remove the insulation film.
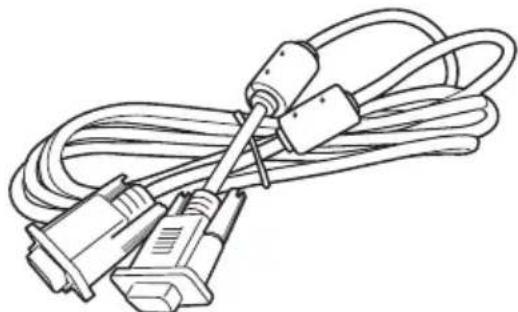
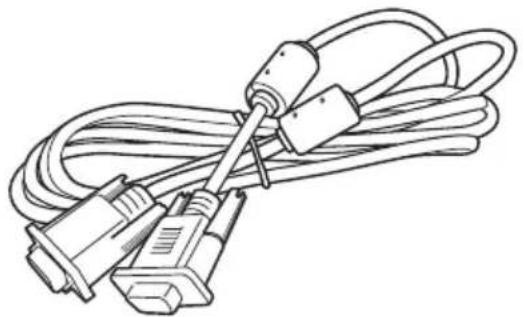
AC power cord (1) Mini D-sub 15 pin cable (1.8m) (1)
Quick Reference Manual (this manual) (1)
Operating Instructions (CD-ROM) (1)
Projectile Station for Network Presentation
application (CD-ROM) (1)
Using the CD-ROM Manuals
Insert the supplied CD-ROM into the CD-ROM drive of your computer, and the CD-ROM will start automatically in a few moments. Select the Operating Instructions you want to read. If the CD-ROM does not start automatically, open the "index.htm" file on the CD-ROM. You must have Adobe Acrobat Reader 5.0 or higher installed in your computer to read the Operating Instructions stored on the CD-ROM.
Installing Projector Station for Network Presentation
1 Close all running applications.
2 Insert the supplied CD-ROM into the CD-ROM drive of the computer.
3 Open the CD-ROM and double-click the .exe file. When the message "User Account Control" is displayed, click "Allow" or "Yes."
4 Follow the on-screen instructions to install the software.
Installing Batteries
1 Pull out the lithium battery compartment. Pull out the battery compartment with a stick as shown in the illustration.
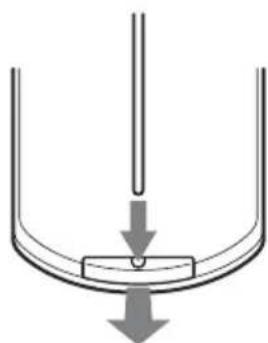
2 Insert a lithium battery.
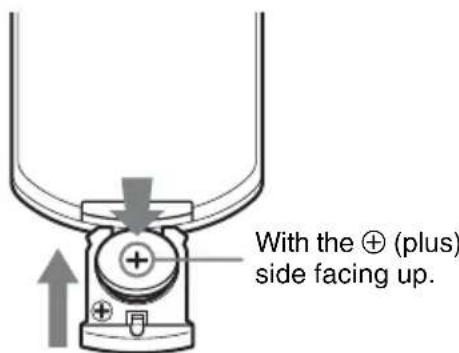
3 Close the lithium battery compartment.
CAUTION
Danger of explosion if battery is incorrectly replaced.
Replace only with the same or equivalent type recommended by the manufacturer.
When you dispose of the battery, you must obey the law in the relative area or country.
Installing batteries
One lithium battery (CR2025) is supplied for the RM-PJ8 Remote Commander. To avoid risk of explosion, use a lithium battery (CR2025).
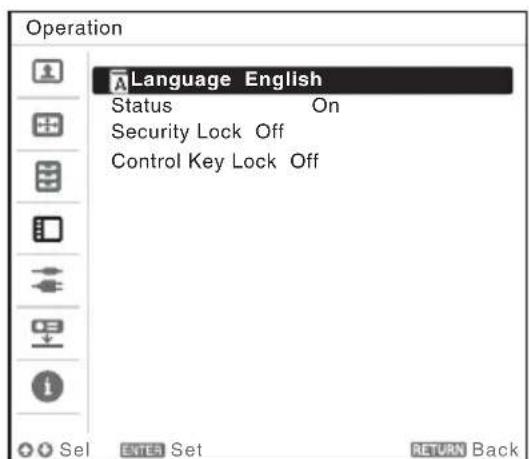
Selecting the Menu Language
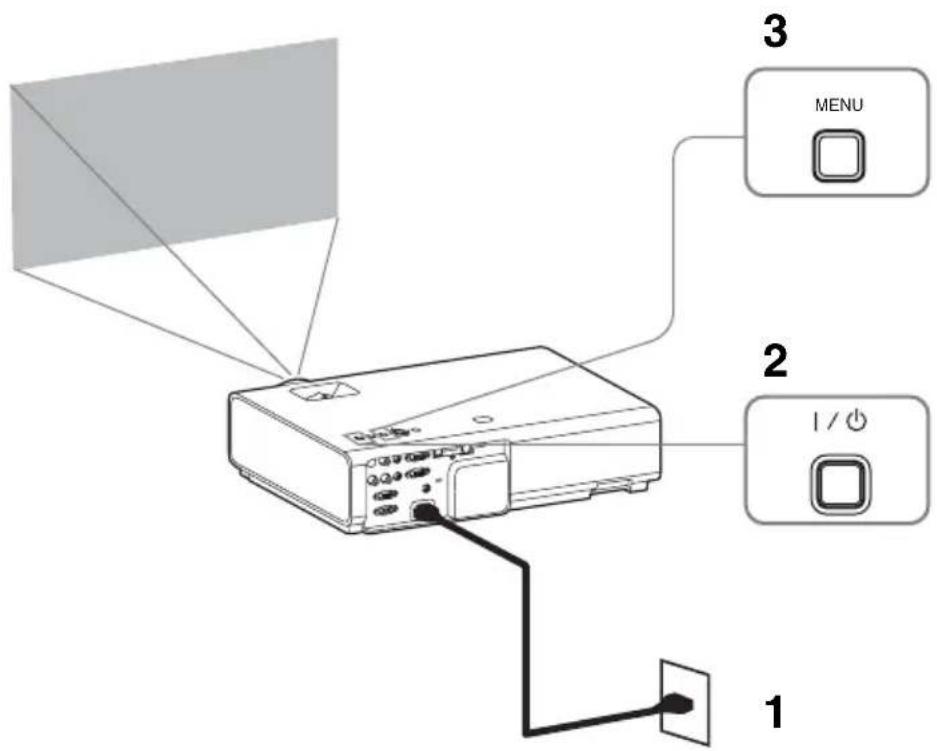
The factory setting for the language for displaying menus, messages, etc. is English. To change the on-screen language, proceed as follows:

1 Plug in the AC power cord into a wall outlet.
2 Turn on the projector. Press the I/ key.
3 Press the MENU key to display the menu. If the display cannot be properly seen, adjust the focus, size, and position of the projected image (page 16).
4 Select the menu language.
① Press the or key to select the Operation ( menu then press the ENTER key.
② Press the or key to select "Language (A then press the ENTER key.
③ Press the / / / key to select a language, then press the ENTER key.
5 Press the MENU key to turn off the menu screen.
Connecting the Projector
You can connect the projector to external devices with an RGB or HDMI output connector. In addition, you can use the following methods to connect the projector to external devices:
USB connector (Type B) ( )
For connecting to a computer with a USB connector ("Projecting an Image using USB Connection").
USB connector (Type A) ( )
For connecting a USB memory device ("Using USB Media Viewer").

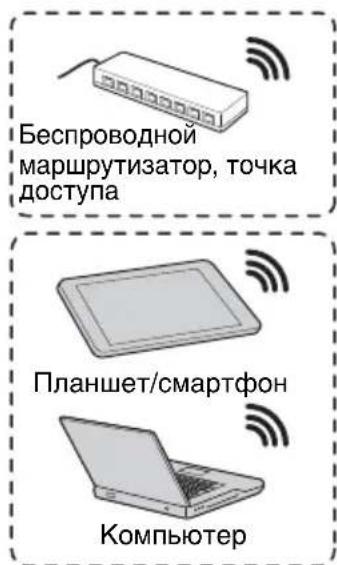
LAN connector
For connecting to a computer, tablet PC, or smartphone via a hub or router ("Presentation Function via Network").
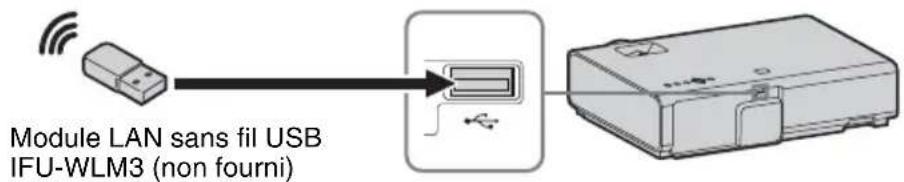
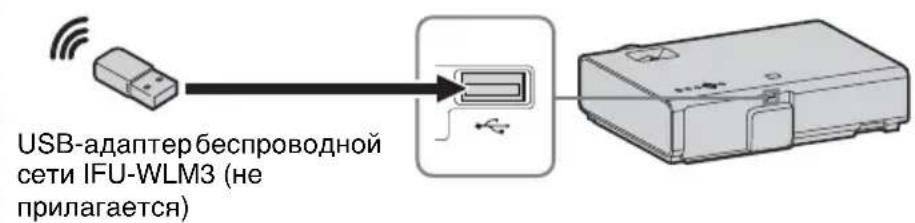
USB connector (Type A) ( )
For connecting a USB wireless LAN module IFU-WLM3 (not supplied) ("Presentation Function via Network").
Wireless router, access point

Tablet PC/Smartphone
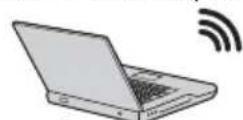
Computer

Notes
- Undesignated USB wireless LAN modules do not work.
- When connecting/disconnecting the USB wireless LAN module, make sure that the projector is in Standby mode (Standby Mode: "Low"), or the AC power cord is unplugged from the wall outlet.
- When wirelessly connecting a tablet PC/smarphone to the projector via USB wireless LAN module IFU-WLM3 (not supplied), set "WLAN Network" to "Access Pt. (Manual)" in the projector's "WLAN Settings".
- For connecting to the access point, access to the Web browser, and input the settings for the access point to connect. For details, see "Setting the WLAN Network of the projector".
- The factory default settings for "Manual" are as follows.
SSID: VPL + MAC address for LAN
Security Method: WEP(64bit)
Password:sonyl
Projecting an Image
The size of a projected image depends on the distance between the projector and screen. Install the projector so that the projected image fits the screen size. For details on projection distances and projected image sizes, see "Projection Distance".
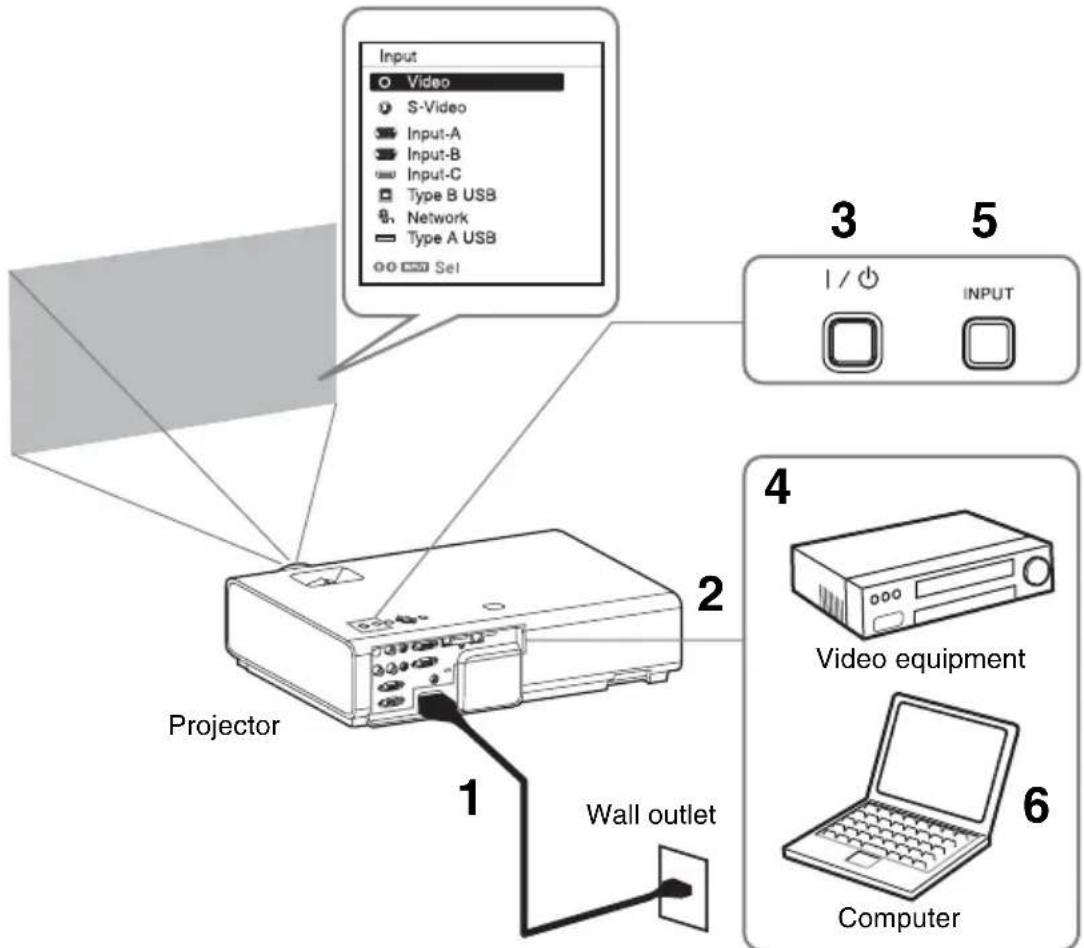
1 Plug the AC power cord into the wall outlet.
2 Connect all equipment to the projector.
3 Press the / key to turn on the unit.
4 Turn on the connected equipment.
5 Select the input source. Press the INPUT key on the projector to display the menu for switching input signal on the screen. Press the INPUT key repeatedly, or press the / key to select an image to be projected.
6 When projecting a computer image, switch your computer's output to external display.
The method to switch the output varies depending on the type of computer.
(Example)

To project image files stored in a USB memory device, see "USB Media Viewer". To play video and audio using USB Connection, see "Playing Video and Audio using USB Connection". To use Presentation Function via Network, see "Presentation Function via Network".
7 Adjust the focus, size and position of the projected image (page 16).
Displaying Images or Files Sent from a Tablet PC/ Smartphone
You can project JPEG images, PDF files, etc. stored in a tablet PC/smarphone wirelessly by using a specific application.*1
For downloading ^*2 or detailed method of using the application, access the following URL.
http://PWPresenterpixelworks.com

*1: To use the application, one of the following conditions is required.
- Connected to network where wireless connection can be established (page 12).
- Connected to a wireless network via USB wireless LAN module IFU-WLM3 (not supplied) that is connected to the projector (page 13).
*2: Depending on your Internet connection, a data communication fee for downloading the application may apply.
Adjusting the Projected image
| Focus Size (Zoom) | Position | |
| Focus ring | ||
Adjusting the tilt of the projector with the front feet (adjustable)
By changing the tilt of the projector with the foot adjust buttons/front feet (adjustable), you can adjust the position of the projected image.
How to adjust the angle
1 Press and hold the foot adjust buttons.
2 Lift up the front of the projector to adjust the angle.
3 Release the foot adjust buttons.
4 Turn the front feet (adjustable) to set the angle of the projector precisely.
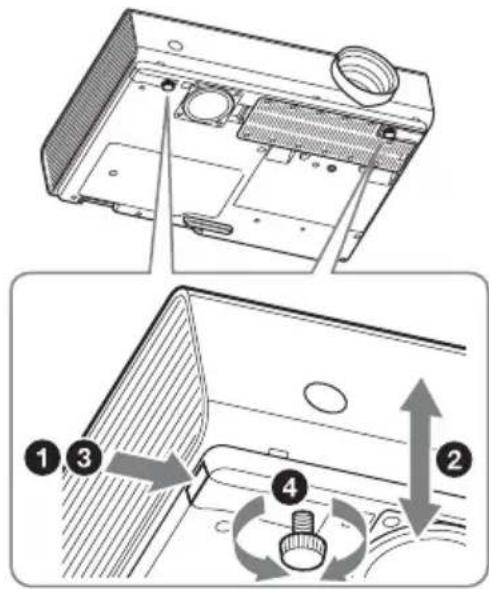
Notes
- Be careful not to let the projector down on your fingers.
- Do not push hard on the top of the projector with the front feet (adjustable) extended.
Changing the aspect ratio of the projected image
Press the ASPECT key on the remote commander to change the aspect ratio of the projected image. You can also change the setting in Aspect of the Screen menu.
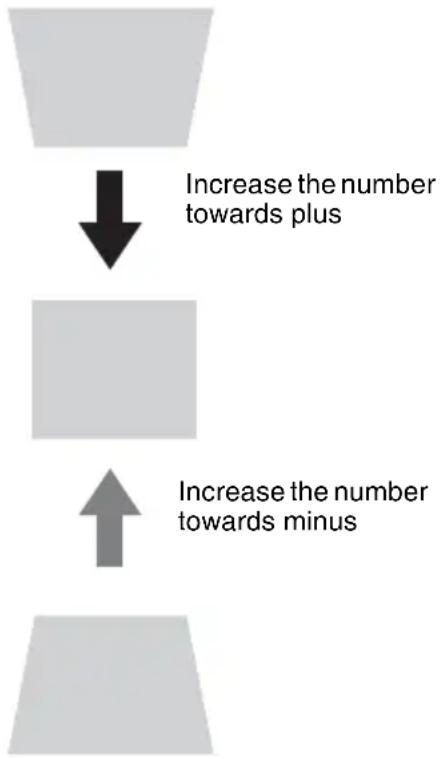
Correcting trapezoidal distortion of the projected image (Keystone feature)
Normally the Keystone feature automatically adjusts the projected image. The Keystone feature may not work automatically if the screen is tilted. In this case, set Keystone manually.
1 Press the KEYSTONE key on the remote commander or select V Keystone in the Installation menu.
2 Use the / / / keys to set the value. The higher the value, narrower the top of the projected image. The lower the value, the narrower the bottom.
Note
Since the Keystone adjustment is an electronic correction, the image may be deteriorated.
Displaying a pattern
You can display a pattern for adjusting the projected image or a grid pattern with the PATTERN key on the remote commander. Press the PATTERN key again to restore the previous image. You can use a grid pattern as a guide to write text or to draw lines and shapes on the whiteboard or blackboard without using a computer.
Note
You cannot use this key when "Type A USB", "Type B USB" or "Network" is selected as the input.
Automatically adjusts Phase, Pitch and Shift of projected image while a signal is input from a computer (APA (Auto Pixel Alignment))
Press the APA key on the remote commander. Press again to cancel adjusting during the setting. You can also set APA in the Screen Menu. If Smart APA in the Function menu is set to "On", executes APA automatically when a signal is input.
Turning Off the Power
1 Press the I/ key on the unit or the remote commander.
The projector starts shutdown and turns off. If you press the I/ key within 10 seconds again, shutdown is cancelled.
Note
Do not turn off the projector soon after the lamp lights. It may cause a malfunction of the lamp (does not light, etc.).
2 Unplug the AC power cord from the wall outlet.
To turn off without displaying confirmation message
Press and hold the / key on the unit for a few seconds.
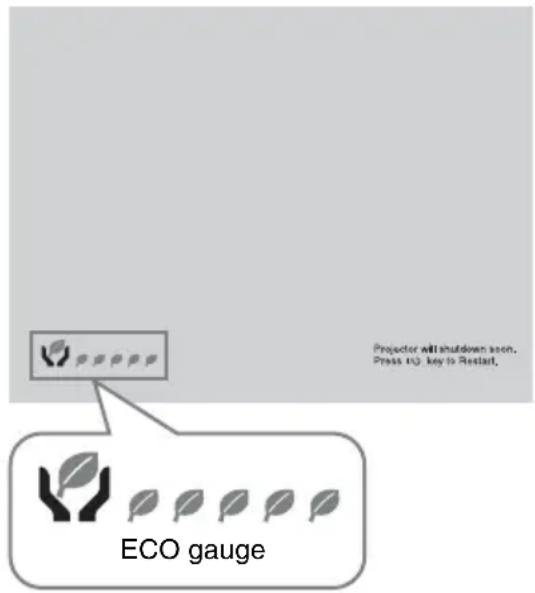
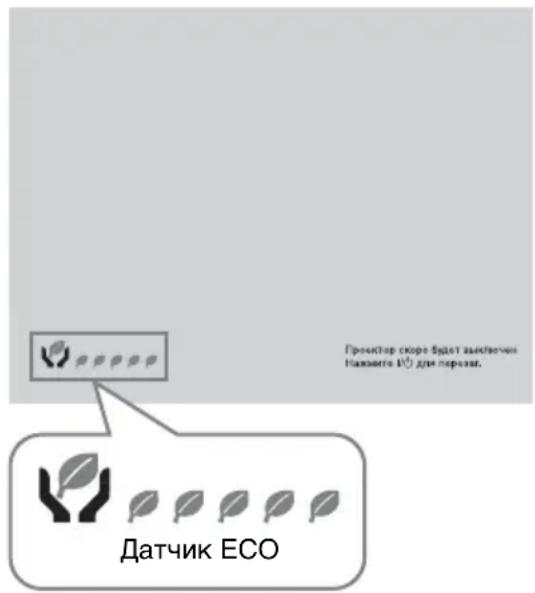
ECO gauge
This gauge indicates the current effectiveness of the projector's ECO function. (For details on the ECO function, see "ECO MODE key" and "ECO".)
The leaf icons are displayed when the projector is shut down. The number of displayed icons varies according to how much energy is saved as a result of using the ECO function.
Indicators
The indicators allow checking the status and notify you of abnormal operation of the projector. If the projector exhibits abnormal status, address the problem in accordance with the table below.
ON/STANDBY indicator
Status Meaning/Remedies
Lights in red The projector is in Standby mode.
Flashes in green • The projector is ready to operate after having been turned on.
- The lamp cools after the projector is turned off.
Lights in green The projector's power is on.
Lights in orange The projector is in With No Input (Lamp Cutoff).
Flashes in red The projector is in abnormal status. Symptoms are indicated by number of flashes. Address the problem in accordance with the following. If the symptom is shown again, consult with qualified Sony personnel.
Flashes twice The internal temperature is unusually high. Check the items below.
- Check if nothing is blocking the ventilation holes.
- Check if the air filter is not clogged (page 23).
- Check if the Installation Attitude in the Installation menu is set correctly.
Flashes six times Unplug the AC power cord from a wall outlet. After checking that the ON/STANDBY indicator goes out, plug the power cord to a wall outlet again then turn on the projector.
Other number of Consult with qualified Sony personnel. flashes
LAMP/COVER indicator
Status Meaning/Remedies
Flashes in red Symptoms are indicated by number of flashes. Address the problem in accordance with the following.
Flashes twice The lamp cover is not attached securely (page 21).
Flashes three times The temperature of lamp is unusually high. Turn off the power and wait for lamp to cool then turn on the power again. If the symptom is shown again, the lamp may be burnt out. In this case, replace the lamp with a new one (page 21).
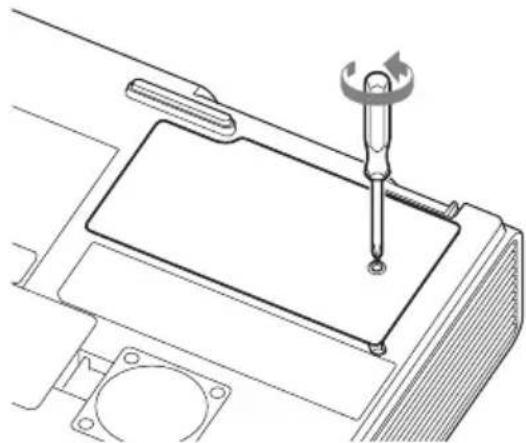
Replacing the Lamp
Replace the lamp with a new one if a message displayed on the projected image (page 20). Use an LMP-E212 projector lamp (not supplied) for replacement.
Caution
- The lamp remains hot after the projector is turned off. If you touch the lamp, you may burn your finger. When you replace the lamp, wait for at least an hour after turning off the projector for the lamp to cool sufficiently.
- Do not allow any metallic or inflammable objects into the lamp replacement slot after removing the lamp, otherwise it may cause electrical shock or fire. Do not put your hands into the slot.
Notes
- If the lamp breaks, contact qualified Sony personnel. Do not replace the lamp yourself.
- When removing the lamp, be sure to pull it out straight, by holding the designated location. If you touch a part of the lamp other than the designated location, you may be burned or injured. If you pull out the lamp while the projector is tilted, the pieces may scatter if the lamp breaks any may cause injury.
1 Turn off the projector, and disconnect the AC power cord from a wall outlet.
2 When the lamp has cooled sufficiently, open the lamp cover by loosening 1 screw.
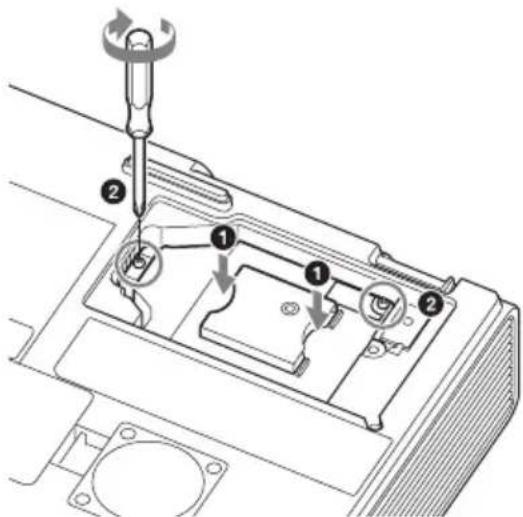
3 Loosen the 2 screws on the lamp then pull out the lamp by its grab.

4 Insert the new lamp all the way in until it is securely in place. Tighten the 2 screws.
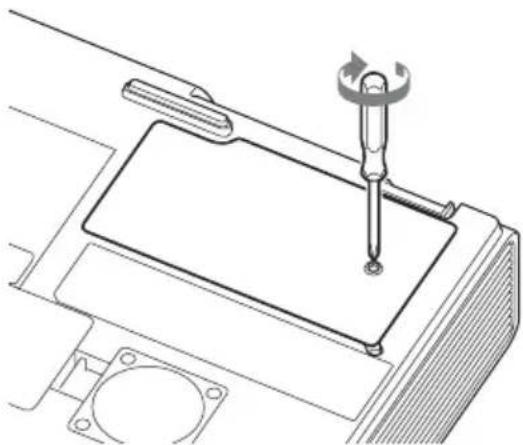
5 Close the lamp cover and tighten the 1 screw.
Note
The power will not turn on if the lamp is not secured properly.
6 Connect the AC power cord to a wall outlet and turn on the projector.
7 Reset the lamp timer for notification of the next replacement time. Select "Lamp Timer Reset" on the Function menu then press the ENTER key. When a message appears, select "Yes" to reset the lamp timer.
Caution
Disposal of the used lamp For the customers in the USA
Lamp in this product contains mercury. Disposal of these materials may be regulated due to environmental considerations. For disposal or recycling information, please contact your local authorities or the Telecommunications Industry Association (www.eiae.org).
Cleaning the Air Filter
When a message appears on the projected image indicating time for a filter cleaning, clean the air filter (page 20).
If the dust cannot be removed from the air filter even after cleaning, replace the air filter with a new one. For details on a new air filter, consult with qualified Sony personnel.
Caution
If you neglect to clean the air filter, dust may accumulate, clogging it. As a result, the temperature may rise inside the unit, leading to a possible malfunction or fire.
1 Turn off the projector, and disconnect the AC power cord from the AC outlet.
2 Slide out and remove the air filter cover from the unit.
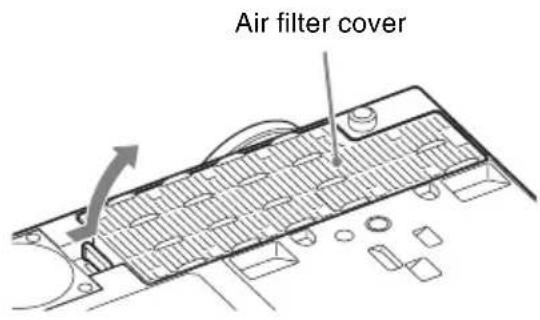
3 Clean the air filter with a vacuum cleaner.
Pull out and remove the air filter cover, and clean it with a vacuum cleaner.
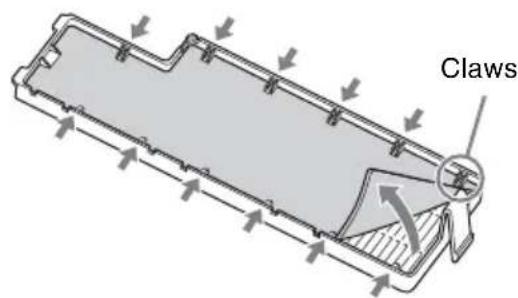
4 Reattach the air filter cover to the unit.
Note
Be sure to attach the air filter cover firmly, otherwise it may cause a malfunction.
AVERTISSEMENT
Application Locator Station for Network Presentation (CD-ROM) (1)
Installation de Projector Station for Network Presentation
Tablette PC/Smartphone

Ordinateur
Remarques
http://PWPresenterpixelworks.com

- La lampara permanece caliente despues de haber apagado el projector. Si toca la lampara,uede quemarse los dedos.Antes de sustituir la lampara,espere al menos una hora afterwards de haber apagado el projector para que se enfiree lo suficiente.
- No permitted that you can introduce objects into the apparatus.
- No permit to use objects in the apparatus without the consent of the owner.
- No permit to use objects in the apparatus without the consent of the owner.
- No permit to use objects in the apparatus without the consent of the owner.
- No permit to use objects in the apparatus without the consent of the owner.
- No permit to use objects in the apparatus without the consent of the owner.
- No permit to use objects in the apparatus without the consent of the owner.
- No permit to use objects in the apparatus without the consent or permission of the owner.
- No permit to use objects in the apparatus without the consent or permission of the owner.
- No permit to use objects in the apparatus without the consent or permission of the owner.
- No permit to use objects in the apparatus without the consent or permission of the owner.
- No permit to use objects in the apparatus without the consent or permission of the owner.
- No permit to use objects in the apparatus without the consent or permission of the owner.
Notas
http://PWPresenterpixelworks.com

Projector Station for Network
安装Projector Station for Network Presentation
http://PWPresenterpixelworks.com

BHHMaTeJIbHO IIpoUHTHe HAcToIeepyKOBODCTBO IpeEHaJaIOM3KIIJyaTaIINnAIIapaTaN COxpaHITeeroIJIaCpABKn Ha 6yNyIee.
ПЕДУПЕЖDEHNE
Длг chнжehн риcka BO3ROPaHnИ NopaxeHn 3JIeKtpnueckn M TOKOM He DonyckaIte BO3dIeCTBnHa aannapat BnIu N cbIpocTn. 4To6bl NCKJIIOUHTb pnc Knapxehn 3JIeKtpnueckn M TOKOM, He BCKpbIbAitc Kopnyc. 06clyxNbAHne annapaTa DoJXhbl BbINOJIHrTb TOnbKO KBaIIΦnIupOBaHHbIe CneuHaNCTbl.
ПЕДУПЕЖДECHNE DAHHOE YCTPOICTBO DOJXHO BbITb 3A3EMJIENO.
PPEyPPEXDEHNE
Ipru yctaHOBe ycTPOcTBa
HcIOJIb3yIeJeIeKoIOcTyIHbI
IIpepbIbATEJIb IIITaHHa C
ΦHKcnpOBaHHOIIPOBOIKOHNJ
IOJKIIOHTe IIPOBOI IIITaHHa K
JIeKoIOCTUHHoHaCTeHHoP0eTKa,
pacIOJOKeHHoI pAOM cycTPOCTBOM.
EcINB IIpoceCE 3KcIIpyaTuIN6JIOKa
BO3HKNHeT HeHCIIpaBHOCtB, C IIMOIObIO
IIpepbIBaTeJIaOTKJIIOHTe IIITaHHe, JIN
OTcoEINHHTe IIPOBOI IIITaHHa.
OCTOPOXHO
Pa3bem LAN
B IeJx OBeCneueHn 6e3oIacHOCTn He
IOJKJIIOUaHTe K 3TOMy IOpTy
coEINHHTeJIbHbIE pa3bEmbl
JIeKTPOIIpOBOIKN IIepHΦepHueCKHX
ycTPOIcTB, KOToPbIe, BO3MOXHO, HMeIOT
Ype3MepHO BbICOKOE HaIPJKeHHe.
NPEdynPExkDeHne
1 NcIOJIb3yIte pa3peHHeHbIe K IIpIMHeHHIO IHHyp IITaHHa (c 3-KNJbHbIM cNIOBbIM IPOBOOM) / pa3beM JJIa IIOJKIIOUeHHra 6bITOBbIX IINbOpOB / IITeIeJIbHyIO BNIJKy c 3a3eMIJOUHMK OHTaTM, COOTBeTCTByIOIIHe JeICTBYIOHM HOPMaM TexHNKn 6e3OJaCHOCTn KaJIOJ OTJeJIbHOJ CTpaHbI.
2 NcIOJIb3yIte IHHyp IITaHnI (c 3-KNJbHBIM CNIOBbIM IPOBOOM)/ pa3bem IJIa IOIKJIIOUeHnI 6bITOBbIX IIpIbOpOB / IITeINCeJIbHyIO BNIJKy, COOTBeTCTBYIOIIne IOnYCTHMbIM HOMHaJIbHBIM XapAKTePNCHTKam (HaIppJxKeHHe, cnJa TOKa).
B cIyuae BOIIpOCOB OTHOCHTbHO HcIOJIb3OBAHHa YIOMaHyTBIX BbIIIE IIHypa IITaHHa / pa3bema IJIa IIOKJIIOUeHHa 6bITOBbIX IprH6OpOB / IIITeIICcJIbHOI BUNK, IOXaJIyIcTa, O6paIaIteCb K KBaJINΦHIIuPoBaHHbIM CIIeIIHaJIInCTAm IIO cepBnCHOMy O6cJIyXKNBaHHIO.
BAXHO
HΦopMaIIHOHHa Ta6JIINuKa paIOJOKeHa BHN3y.
HMIIOPTep Ha TeppHTopHH TaMOXeHHOro coIO3a: 3AO "CoHH 3JIeKTPoHHKc", 123103, MockBa, KapambIiEBCkH IIpoe3d, 6, PocCnA
JaHHoe yctpoIcTBO He IpeJHa3HaueHo JJIa HIOJIb3OBaHnB B IOMaIIHNX YCIOBHX.
TOnIPOH3BOIDCTBa:cm.IaCIOpTHyU Ta6JIuKyuHaN3JeJIN.
ПиМер: (2013-01) 2013: oЗнayaet roД 01: oзнayaet Meс rainy
CneJiaHO B KHTae
TO yCTPOIcTBO YBJIeTcI IIPOEKTOpOM IJIa IIPOeIINPOBaHnI H3O6paXKeHn C IOJKIIOUChEHORO KOMIIbIOTePa IJIH BnDEOO6OpyIOBaHnI.
OpraHn3auny, yIOJIHOMOueHHa npHHMaTb IIpeTeH3nn OT nOTpe6nteJe Na TeppHTOpn Ka3axCTaHa
3AO «CoHH 3JIeKtpoHnKc>
PipeCTaBHTeJIbCTBO B Ka3axCTaHe,
050059,AJMaTbI,yJIuHa NBaHHIOBa,
II.58
RU
MepbI npeOCTOpOXHOCTHI
CbeHnO 6e3oNaChOCTN
- Y6eIITecb, YTO pa6Ouee HaIIpJxKeHne ycTPOcTBa HJeHTuHO HaIIpJxKeHHIO MeCTHOJIeKTPocetN. IIpn Heo6XoINMOcTH aJaTTaIHn HAIIpJxKeHHaOBaTHeCb K KBaJIHΦHIpOBAHHOMy IepCOHaJIy KOMIIaHHS Sony.
B cIyuae IIOIaIaHnB HByTpB KOpIyca yCTpOuCTBa NOCTOPOHHx IIpeIMMeTOB HJIN XNIOKoCTe OTKJIIOHTe eRO OT 3JIeKTPuYeCKoI ceTn IIpeJ IaJIbHeIIHIM NcIOJIb3OBaHHem IIpeJaIte Ha IIpoBepKy KBaJIHΦHIIHpOBaHHOMy IIepcoHaJIy KOMIIaHHI Sony. - EcJn ycTpoNcTBO He 6yJeT HcIOJIb3OBaTbcra Ha IIPOTeKHeHn HeCKOJIbKHX IHe,OTKJIIOUHTe eRO OT 3JIeKTPnueckoI p03eTKI.
- ΠЯ OTOeHHeHnI HHypa 6epNTecb 3a IITeIcJIb. HNKOrIa He TAHnTe 3a IHHyp.
- YcTPOIcTBO cJIeIyEeTIIOJIKJIHOaTB K paCIOJIOXeHHoH pAIOm 3JIeKTPnueckoIpo3eTKe,IOCTyII K KOtOpOHNHe 3aTpUdHeH.
- YcTpoIcTBOocTaetCnIOKJIIOUeHHbIM K NCTOuHNU Ky IINTaHnI IepMeEHNO TOKa,IOKA OHO IOKJIIOUeHO K 3JIeKTpNueckoI p03eTKe,JaXe ecJIN caMO ycTpoIcTBO BbIKJIIOUeHO.
He cmOTpHTe BO6bEKTHB, KOrJa JiamHa CBeHTTCr.
HeIOINOCHTe pyKN HJIN KaKne-JIN6o IpeIMTeBIK BEHTNJRAIIOHOHBIM OTBepCTNAM-H3 HNX BbIXOINT FOPaH N BO3dYX. - ByIbTe ocTOPOXHbI BO BpeMpeRyJIInpOBKn BbICOTbI IIpoEeTOpa IIpnIHOOMOIIINepeIHnX HOKeK(peryJIInpyeMbIX), YTO6bI He OIIyCTHTBIIpoeKToP Ha IaJIbIbI. He JaBHTeCNJIbHO Ha BcpxHIOI IaHeJIbIIpoEeTOpa IIpr N BblBnHyTbIXIpeHNHX HOKKax (peryJIInpyeMbIX).
He HcnoJb3yIte yIINHHTeJIb BycIOBHX Hn3KOrO HaIIpXKeHHa-TO MOKeT BbI3BaTb KOpOTKoe 3aMbIKaHHe H IIpNBecTH K TpaBMam.
- ByIbTe OcTOpOxHbI, YTO6bI He IIpNtEeMHTb IIaJIbIbI, IpeEiBnraI IIPOeKToP, yCTaHOBJeHHbI Ha IIOJIy.
He npepBnraTe BKJIOueHHbI npoeKTop,ecJn cHrTa KpbIIka Kopnyca.
He yctHaBJIbBaIte IpoeKTop BO3JIe HcToHnKOB TeIIJa,HaIIpHMepe6aTapei JIN TpyoONPOBOIOB TOpyeRO BO3Jyxa,a TaKKe B MeCTax,He 3aIIHIIeHHbIX OT IIpMbIX COJIHeuHBIX JIyE,B YcJIOBHX Upe3MepHOJ 3aIIbJIeHHOCTN NIN BJIaXHOCTN, MExaHnueckNX BIOpaIIH NJIN TOJUKOB.
- CaMoCToTeJIbHaJa ycTaHOBKa IpoeKTopa Ha IIOToJIke HJIn eRo IepeMeIeHne 3aIIpeIaEtcr. O63aTeJIbHo o6paTHTecb K KbAlnΦHIInpOBAHHOMy IepcoHaJIy Sony (ycJyra IIaTHa).
B cIyuae 6IOKnpOBKn BeHTHJIaHNOHHbIX OTBepCTn BHyTpeHHra TeMIIepaTypa ycTpoNCTBa IIOBbIHaETCra, YTO MOKeT CtaTB IIpyHHoI IOXapa HJIN IOBpeKJeHHa ycTPOcTBa. BbIIOJIHNte cJeNyIOJIne DeNCTBna, YTObI OBeCneHTb HeO6xOIMMyIO IHPKUYIAUIO BO3dYxa I IpeIO TBpaTNTb IOBbIHeHne BHyTpeHHe TEmIepaTypbI ycTPOcTBa.
BokpyI IpoeKTopa J0JXHa 06ecIeYBaTbcra CBO6OHa ⅢnpKyJIaIIa BO3duYa (cTp.5).
HnueM He HaKpbBaIte BeHTNJIAUHOHHbIE OTBepCTN (BbIXOHNbIE/BXODHBie).

HeIOKJIaIbIBaIte IOJ yCTPOcTBO yIaKOBOHbIMaTePnaJI, MArKyIO TkaHb, KOBpIKN, JINCTbI IIN O6pe3KN 6yMaH. TaKHe MaTePnaJIbIMoYr TIOIacTb B BeHTNJIAUHOHHbIE OTBepCTnI.
He pacnoJIaIaTe HeIOceIcTBeHNO IpeJINH30KakHe-JIN6O IpEIMeTbI, KOToPbIE MOryT 3aRopaxHBaTb CBeT BO Bpem IpoeIIpOBaHH. H3JyuAeMoE TeIIIO MoKeT IOBpeIHTb IpEIMet. HcIOJIb3yIte yHKnIO 6JIOKNPOBKn IIo6paKeHHa, YTO6bI IpepBaTb OTo6paKeHne.
- Pn TpaHcHOpTnpOBKe HJIn yCTaHOBKe yCTPOcTBa He HcIOJIb3yIte 3aHTHyIO IIaHeJIb IJIa IpeOTBpaIeHHK KpaJN yCTPOcTBa. He IOHNMaTe N He IOJBeINBaIte yCTPOcTBO 3a 3aHTHyIO IIaHeJIb -TO MoKET IIpNBecTH K IIaJeHHIO IIOBpeJdeHHIO yCTPOcTBa, a TaKKe TpaBMam.
HΦopMaunAДЯДnJIePoB
- PpH yCTaHOBKe Ha IIOTOJOK IIIOTHO 3aKpbIbAaTe KpbIiKy Kopnyca.
Mepbl npedoctopoXHocTn npu yctaHOBKe ycTpoiCTBa Ha notolke
He IIbITaIITecb yctaHOBHTb IPOeKTop Ha IIOToJIke HJIN IepMeCTHTb eRO camOcTOrTeJIbHO. O6raTeJIbHO IPOKOHcyJIbTHpyIITecb c KBAJIHΦHIINPOBaHHbIM IepCOHaJIOM KOMIIaHHN Sony, KOMIeTcHTHBIM B JaHHOM BOIIPOce.
- YcTaHaBJIbBa yCtPoIcTBo Ha IIOToJIke, O6aTeJIbHO HcIOJIb3yHTe CtpaXOBOuHbI IIHyp NJI INpyrnc CpeICTBa IIJa IIpeIoTbpaIIeHnI IaIeHnY yCtPoIcTBA. IOBepbTe yCTaHOBky OIIbITHOMy cIeIIHaJIHCTy IIO MOHTaKy.
HΦopMaζη no yctaHOBKe
- YcTaHaBJIINBaIte yCtpoIcTBO Ha paCCToHnO T cTeH n Ipyrnx 06BeKTOB, KaIIOKa3aHO Ha pncyHKe.
YroJI HaKIOHa IpoeKTopa He IOJIKeH IpeBbIaTb 15 rpaIycob B TOpH3OHTaJIbHOIIOCKOCTH.

He yctaHaBJIbBaIte ycTPOcTBO B IOMeHnX C IOBbIeHHoI TeMIIepaTyPoI N BJIaJxHOcTbIO, HJN IOHNKeHHoI TeMIIepaTyPoI.

He yctaHaBJIbBaIte ycTpoIcTBO B6JIN3KoHdNIOHOpe,IOI IIpRMBIM IOTOKOM XOJOIDHOrO HJIN TEJILOFO BO3Jyxa.YCTaHOBka B TaKHX MeCTax MOKeT IIpNBecTN K HeNCIIpaBHOCTH YcTPOIcTBa BCJIeIcTBnE KOHdHcaIHH BJIaRn HJIN IOBbIIIEHNr TEMIIepaTypbl.
He yctHaBJIbAaTe ycTPOINCTBO B6JIN3n DaTtHKOB TeMIIePaTypbI INJIN DbIMa. 3TO MOKeT cTaTB IIpNHHoH HeNCIIpaBHOCT N aTtHKa.
He yctaHaBnBaHTe yctpoCTBO By ycIOBHX KpaHHe 3aIbJIeHHOCTH HJN 3aIbIMJeHHOCTH. Bo3yIHbI qNJbTp MoKeT 3acOpHTbcra, YTO IIpNBcTeK HeNCIIpaBHOCTn yCTPOCTBA HJN erO IOBpeKdEHHIO.
B CJIyuae HcIOJIb3OBAHnHa yCTPOIcTBA Ha BbICote OT 1500 MycTaHaBJIHbAHTe IJIa IapAmTepa "PexHM BbIC.IoJ" 3HaueHHe "BkJ" B MeHIO yCTaHOBKn.
Ecn npn 3KcIIyataHn Ha
3HaHTeJIbHOB Blicote He yCTaHOBTb
daHHbI peXHM, MOryt BO3HNKaTb
HexeJIaTeJIbHbIe 0fpeKTbI, TaKHe KaK
CHHXeHc HAdEJXOCTH HeKOTOpbIX
KOMIOHETOB.
3aIaIte Heo6xOJHMOe 3HaueHne IJIa Iapametpa "TIOJox. YcTaH." B MeHIO yCTaHOBKN B COOTBCCTCBN C yTJOM ycTaHOBKn. NcIOJIb3OBaHne HeIIpaBnJIbHbIX HaCTPOeK MOKeT IOBJINrTB Ha HaeXHOCTb KOMIOHCHTOB.
OuNcTKa IINH3bl N KOpnyca
- IpeI OuHcTKoI OTKJIIOHTe IIHyp IITaHnI IepMeHHOTo TOKaOT 3JIeKTPnueckoI p03eTKn.
He BbITnpaTe ycTpoNcTBO rpa3HO TkaHbIO - 3TO MOKeT IIpNBecTN K IOBJIeHHIO IapaHH Ha Kopnyce.
-JIITcJIbHbI KOHTaKT cJIcTuyHMn BeIeCTBaMn (HaIIpIMep, cpeIcTBO OT HaceKOMbIX), a TaKKe I3JeJIINrMn I3 pe3HHbI JIn BUNHJa MOKeT IIpNBecTH K N3MeHeHHIO BHeIHIero BNda ycTroPoiCTBa I IOBpeJKeEHIO IOKpbITIA.
He kacaTecb JHH3BI ROJbIMn pyKaMn.
OuHCTKa IIOBepxHOCTN JINH3bI: AKKypaTHo IIpoTpHTe JINH3y MmRKOJ TKAHBIO, HAnpIMep TKaHBIO JIIA OUHCTKN CTekJIa. 3aqr3HeHne, KOTOpoe He ydaCTcY cTpaHNTb, MOXHO OUHCTNTb, CJeTKa CMOUHB TKAHB BOIO. He NcIOJIb3yIte paCTBOPHTeJIN, CnIPT, 6eH3HH JIN KNCJOTy, IeJOUHbIE n a6pa3NBbIE MOIOJIne cpeIcTBA JIN IIPOITaHHYIO TKAHB JIIA OUHCTKN.
OuHCTKa KOpIyCa: AKKypaTHO OUHCTHTe KOpIYc MRAKoT KaHbIO. 3aRpy3HeHH, KOToPbIE He yJaCTcYcTpaHHTb, MoXHO OUHCTHTb, cJIeTKa CMOH TB KaHb CJIa6bIM pactBOPOM MOIOIeRO cpeIcTBa, IIpeIBaHPTEJbHO OTKaB ee, a 3aTeM IIPOTepeB KOpIYc cyXoN MRAKO TKAHBIO. He nCIOJIb3yInTe pactBOPHTeJIN, cINnPT, 6eH3HH HJIN pa36aBHtJEb, KHCJOTY, IJIeJOuHbIE H
a6pa3nBhble cpeTBA nJIN IIpoIITaHHyIO TkaHb IJIa OChcTKN.
OcBeueHne
IIЯ NOJyuHnI H3O6paXeHnI XopoIIErO KaueCTBa Heo6xOIMo, YTO6bI 3KpaH 6bl 3aUHHe OT IprMOrO OCBeIeHN IIN COJIHeuHOrO CBeta.
3KpaH
Pn HcIOJIb3OBaHHN 3KpaHa c HeJIaIKoI IOBepXHOCTbIO Ha 3KpaHe MOrYT INHOrIa IIOBBAITbcI IOJIOcbI, B 3aBHCIMOCTH OT paCCTOHHM MeKdy 3KpaHOM N yCTPOINCTBOM, a TaKKe 3NaueHHN IIpNoJIuXKeHH. To He 3JIaeTcH HeNCIIpaBHOCTbIO yCTPOINCTBa.
BentnlaTOp
IpoeKTop ochaIIeH BHyTpEHHM BeHTJIaTOpOM, KOTOpbI cJIyXHT IIJI CHHXeHNA BHYTpEHHe TEmIIepaTypbI. Pa6ota BeHTJIaTOpa MoKeT COIIPOBOXJaTbcra JIErKHM IYUMOM. 3TOT aΦΦeKT YBJIaTeC HOpMaJIbHbIM pe3yJIbTaTOM IIPOH3BOJCTBeHHOTo IIPOUecca H He CBnIeTeJIbCTByeT O HeINcIIpaBHocTH. OJHaKO, IIPI N BbICOKOM yPoBHe IIIyMa cJIeIyET o6paHTbCRA K KBaJIInΦNlupOBaHHOM YepcoHaJIy KOMIIaHHN Sony.
CbeHnO lamne
B IIpoeKTope B KaueCTBe HcToUHnKa CBeta HcIOJIb3YeTcra pTyTHa JIaMIIa BBICOKO rJaBJIeHNr. XapaKTepHCTNKn pTyTHoJ IaMIbI BBICOKO rJaBJIeHNr Yka3aHbI HNXe.
-RpKoCTb JIaMIIbI NocTeHHeCHnXkaTcB TteUeHne cPoka 3KcIIJIyatauIN.
JaAMIIa MoKcET JIOHHyTb c rPOMKHM 3ByKOM Bpe3yJIbTaTe yIapa, IOBpeKJcHnRA HJIN H3HOca IIO HCTeueHHn Cpoka KcIIJyaTaIHH. JaAMIIa MoKcET IIpeEcTaTb CBeHTbcr H IpePeOpTeB.
CpOK cJyK6bI JaMnbl 3aBnCTOT INHINBnDyaJIbHbIX XapaKTepnCTNK JaMnbl INJYcIOBn 3KCIJIyatauNN. IIO tOINPnHHe JaAMIIa MoKeT JONHyTB INJN IIpeEROpETb IO yKa3aHHORo Cpoka 3aMeHbl.
JaMIIa TaKKe MoKeT JIOHNyTB HocJIe HCTeueHncaPoka 3aMeHbI.3aMeHHTe JaMIIy IpoeKTopa cpa3y HocJIe IOBJIeHnra COO6uHnHa IIpoeUnpyeom H3O6paXKeHn,JaXe ecJIN JaMIIa IpoIoJXkaet HOpMaJIbHO pa6oTaTb.
Mepbl npedocTopoXHocTn np TpaHcnpTnpOBKe
JaHHoe yctpoIcTBO OTHOCITcK TOUHOMy o6OpYIOBAHIO. Iprn TpaHCIOpTNPOBKe 6epeIHTe yCTPOIcTBO OT yIapOB HJIN IaJeHnJ. YIapbI JIIN IaJeHHe MOrTy IOBpeIITb yCTPOIcTBO.
KndKOKpncTaJIInuYeCKn npoeKTop
KK-ⅡpoeKTop co3aH c
HIOJIb3OBaHHem BBICOKOTOHbIX
TexHOJIOrn. OHaKO, Ha əKpaHe KK
IIpoeKTopa MOryT IepNoIuYeCKN
IOABJIaTbcr MeJIKe HcpeHbIe N/IIIN
IrpKHe (KpaCHbIe, CInHe NJIIN 3eJIeHbIe)
TOUKn. 3TOT 30fKeT YBJIaETcR
HOPMaJIbHbIM pe3yJIbTaTOM
IPOIN3BOJCTBeHHORO IpoIecca H He
CBnTeJIbCTByet O HeNCIIpaBHOCTN.
KpOME TORO, IIpn HCIOJIb3OBAHH NJIa
IpoeIIPoBaHHa OOnN 3KpaH
HeCKOJIbKHX KK-ⅡpoeKTopoB, JaXe
OHN MOJeJI, IBEToNEpeJaY pa3HBIX
IpoeKTopoB MoKeT OTJInuATbcR, TaK
KaK BaJIaHc ⅢBeTa Ha HNX MoKeT 6bITb
HaCTPoEH IO-pa3HOMy.
OKoHdEHaCuN
IIpn6bICTpOM H3MeHeHH TeMnepaTpybl B IIOmeIeHH, B KOTOPOM yCTaHOBJeH IIPOeKTop, IIIN IIpi ObICTpOM IIpeMeIeHH IIPOeKTopa H3 XOJIOnHOBO TcIIIOe MeTO BHyTPn HEo MOKeT O6pa3OBaTbcr KOHdEHCAT. TaK KaK KOHdEHCAT MOKeT IIpNBecTH K HeNCIIpaBHOCTH, CO6JIIOJaTe OCTOpOXHOCTb IIpi H3MeHeHH HaCTPOeK TeMIIePaTpybl KOHdUIOHepa. IIpi O6pa3OBaHH KOHdEHCata Tpei NcIOJIb3OBaHHem IIPOeKTopa OCTaBBte eTo BKJIIOueHHbIM IIpN6JIIN3HTeJIbHO Ha IBa Yaca.
KOMIIAHNIASONYHE HECET OTBETCTBEHHOCTNI3A KAKONbI TO HN bBJIO YIIEP6,BO3HNKIIIN BCJIIECTBNE HECOBJIOJEHNA MEP IPEIOCTOPOXHOCTNIPI NCSIOJB3OBAHNN UCTPOICTVBIEPEDAU IN DAHHbIX,HEN3BEXKHbIX YTEUEKNHFOPMAUIN, CBRAHHbIX CO CNEIINPHKAIINMI IPEDAUYIADHHbIX,NJIN IPOBJEMBE3OPIACHOCTNI JIOBOIPOPOJA.
PpMMeaHnA
BceTgIa IIPOBepnTe HcIIpaBHocTb yCTpOcTBa, IpeXJde Yem ero hCIOJIb3OBaTb. KOMIIAHN ASONY HE HECET OTBETCTBEHHOCHTN 3A KAKOI Bbl TO HN BblIO YIePB, BKJIIOUyA, B YACTHOCTN, KOMIIEHCAUHIO NJIH BO3MEIeHNE YbBITKOB B CBJ3N C UTPATOINJIN HEIOIOJUYEHNEM IPIIBJIEN I3-3A HEPA6OTOCIOCO6HOCTN 3TOI0 OBOPUIOBAHNA, KAK HA IIPOTJKEHNI TAPAHNTINHOI IOPENOJA, TAK INIOCSJE NCTEUEHNA TAPAHNTINHOI OCPOKA, A TAKJXE BCJIeICTBNEJIIObIX INHBIX BO3MOJHXI PPUNH.
KOMIIAHN JONY HE HECET OTBETCTBEHHOCTN 3A IPIPENEH3NI JIOBOTOPOJA, IPIPJIIBJEHHBIE IOJIb3OBATEJIAIMN 3TOFO IPIPUBOPA INI TPETbIMN JINUAMN.
KOMIIAHNIA SONY HE HECET OTBETCTBEHHOCTN 3A IPEKPAIeHNE INI INPNOCTAHOBKY IPEIOCTABJIeHnRA KAKNX-JINBO YCJYr, CB83AHHBIX C 3TIM IIPIbOPOM,BHE 3ABNCIMOCTNOT OBCTOReTJIbCTB.
BxOJaIe B KOMPJIeKT npHaIeJXHOCTN
IyJIbT IInCTaHUnOHHO yIpaBJIeHHRAm-PJ8 (1)
JIHTHeBaJaTapeKa (CR2025) (1) BaTapeKa IpeBapHTeJIbHo ycTaHOBJIeHa.IpeEINcIOJIb3OBaHHem IIyJIbTa IInCTaHUnOHHO yIpaBJIeHHYdJIHTe N3OJIaIIHOHHYo IIJeHKy.
Ka6eJIb nHTaHnI nepeMeHHoro TOka(1) Ka6eJIb c 15-KoHTaKTHbIM MHHpa3beMOM D-sub (1,8 M) (1)
KopoTkoe cIIpaBOuHoe pyKOBoIcTBO (HaHHOe pyKOBoIcTBO) (1)
PyKOBoIcTBo IIO 3KcIIlyaTaUHn (Ha IIncKe CD-ROM) (1)
IIpHIOxKHe projector Station for Network Presentation (Ha IIncKe CDROM) (1)
IcnoJb3OBAHne pyKOBODCTBa no 3KcJIyaTaCnHa DnCKe CD-ROM
BcTaBbTe npHJaRaembI INCK CD-ROM B yCtpoNCTBO YTeHnA INCKOB CD-ROM BaIIeRO KOMIIbIOTepa. CD-ROM
3aIyCTTcA aBTOMaTHuecknYepe3 HeCKOJIbKO ceKHyI. BbI6epHTe Heo6XoIMOE pyKOBoCTBO IIO 3KcIIyatauIN. EcIN CD-ROM He 3aIyCTHJcA aBTOMaTHueckN,OTKpOIte fai "index.htm" Ha CD-ROM. TTo6bI IIpoHTaTB pyKOBoCTBO IIO 3KcIIyatauIN Ha CD-ROM,Ha BaIIiem KOMIIbIOTepe IOJIxHa 6bITb ycTaHOBJIeHa IIporpaMMA Adobe Acrobat Reader 5.0 HIn 6oJIee HOBOB BepCHN.
YcTaHOBKa npNIOJKeHnA Projection Station for Network Presentation
1 3aKpoIe Bce 3aIyIeHHbIe IpiJIoxKeHn.
2 BcTaBbTe IprHJIaIraeMbIi CD-ROM BycTpOINCTBO YTeHHJIINCKOB CD-ROM BaIIIErO KOMIIbIOTepa.
3 OTKPOIte IBOHbIM IeJIyKOM .exe-paJI Ha KOMIIaKT-DnCKe. IIpIIOBJIeHNII IHaJIIOROBOrO OKHa "YIIpaBJIeHHe yYeTHoN 3aINcblIO IOJIb3OBaTeJIa" HAXMITE KHOIIKy "Pa3peIITb" IJIn "Ja".
4 TTo6bI BbIOJIHITb yCTaHOBky IporpaMMHO O6cneueHnA, CJeJyTe yka3aHnM Ha əKpaHe.
YcTaHOBka 6aTapeek
1 IOTaHHTe Ha ce6aTaapeHHbIOTceK. IOJIeHbTe 6aTaapeHHbI OTceK OCTpbIM IIpeIMETOM, KaK IOKa3aHO Ha pncyHKe.
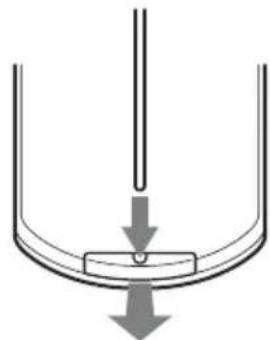
2 BcTaBbTe JHTHeByIO 6aTapeKy.
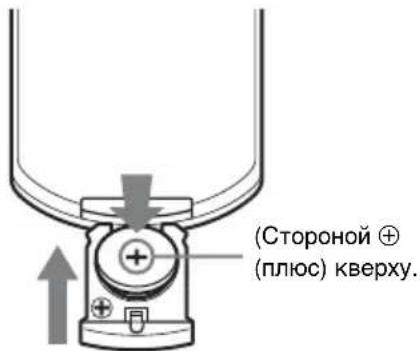
3 3aKpoTe 6aTapeHbI OtceK.
PPEyPExKdEHN
Ipn HeIpaBnJIbHOy yCTaHOBKe
6aTapeKn cyIeCTByeT OIIaHocTb
B3pbIBa.
3aMeHnTe 6aTapeKny TOJIbKO Ha TaKyIO
Ke HJn aHaIIOrHuHO rTOIIa,
peKOMeHIOBaHHO rIpOn3BOJnTeJIeM.
Piyn yTHJIN3aIIH 6aTapeKn cJeNyIte
HopMaM MeCTHO rAkoHOJaTeJIbCTBa.
YctaHOBka 6atapeek
B KOMIIJEKT IOCTaBKN IIYJIbTa IINCTaHIOHOHOrO yIpaBJeHnR M-PJ8 BXOINT OHa JINTHeBa 6aTapeKa (CR2025).Bo N36eKaHne ONaCHocTH B3pbIBa HcIOJIb3yIte JINTHeByIO 6aTapeKy (CR2025).
Bb6opЯ3bika MeHIO
Iyo yMOJIyAHIO IJIa OTO6paKaembIX MeHIO, COO6IeHN H T. I. BbI6paH aHrJIHcKn J3bIK.
JIa H3MeHeHHra 3bIka 3KpaHa BbHIOJHNTe CJIeYIOUne IeHCTBnA:
1 BcTaBbTe IIHyp IITaHnIe IepemEHOro TOKa B pO3eTKy.
2 BkJIOHTe IpoEeTOp. HaKMITE KJIaBnIy I/
3 HaXMTe KJIaBnIy MENU JIЯ OTo6paJxHnMaMeHIO. EcJIN 3KpaH OTo6paJxHaTcHHeYeTKO, OTPeryJInpyIte fOKyc, pa3Mep H IOJOxKeHne IIpoEeKTHpyEmoTO N306paJxHnA (Ctp.16).
4BbI6epHTe 3bIK MeHIO. ① HaKMITE KJIaBNIIy HJIN YTO6bIBbI6paTb MeHIO Operation (3aTeM HaKMITE KJIaBNIIY ENTER.
② HaKMITE KJIaBbHbIy HJIN , TTo6bI BbI6paTb "Language (A, a 3aTeM HaKMITE KJIaBbHbIy ENTER.
③ Haxmatae KlaBnHiy / / ⅡIa BbOpa a3bika, a 3aTe HaxmTe ENTER.
5 HaXMTe KJIaBnIy MENU, TTO6bI OTKJIIOHTb 3KpaH MeHIO.
Pa3bem USB (Ttn A) (
IcnoJIb3yeTcra IJRA IOIKJIIOueHnHaKoINTeJIbHOro yCTpoiCtBa USB (CM. pa3JeI "IcnoJIb3OBAHne npNJIOxKeHn USB Media Viewer").

Pa3bem LAN
IIJI IIOIKJIIOUeHnK KOMIbIOTepy, IIJAHsEty HIN cMapTfoHy uepe3 KOHcHTpaTOP IIN MapIpyTHaTOP ("ФункиЯпpe3eHTaHn NO ceTN").

Pa3bem USB (Ttn A)
IcnoJIb3yeTcI IIOKJIIOHeH N USB-aIaITepa 6ecnpoBOHO cETN IFU-WLM3 (He npIIaTaEc) ("FyHKuI INpe3eHTaIIN NO cETN").
PpimmeaHnA
USB-aaantepb6ecnpoBOHOcTn,He IpeHa3HaYcHHbIe IIra HcIOJB3OBaHnC JaHHbIM IPOEKTOPOM,pa6OTaTB He 6VIVT.
- Pn IIOKJIIOUeHnn HJN OTKJIIOUeHNN USB-aIaIITEpa 6ecippoBOHOJ cTn y6eINTEcB, YTO IIPOeKTop HaxoIHTCs B peXHMe OxHJaHHa (PexHM OxHJaHHa: “Hn3Kn”) HJN Ka6eJIb IIHTaHn IIEpeMeHHOTo TOKa OTcoEHHHeOT PO3eTKn.
-ПрнбспpoBOHOM IOДКЛIOUeHHN ПJIaHIIeTa ИИсмApTФОHa K IIpoeKTOpy Yepe3 USBAIaIITep 6ecspOBHOcETn IFU-WLM3 (He IIpHJIarAeTc) yctAHOBHTe IJIЯ NapaMeTpap "Cetb WLAN" 3HAueHHe "T-Ka Iocr. (pyu.)" B MeHIO IIpoeKTopa "IpaMaTePbI WLAN"
-Дя IOДКЛIOUeHЯ KTOUKe IOCTyHa BOINHTe B Be6-6pay3ep IN BBeJNTe IapaMeTpbl TOOKI NOCTyHa IIЯ IOIKJIIOUeHЯ.ПОДpo6HocTHcM.Bpa3Je "HactpoNka cetu WLAN IPOEKTopa".
-IIpapeKHaMa "BpyHyO" 3aIaHbI cJIeIyIOIne craHapTHbIe 3aBOIckHe HacrpoKn: SSID: VPL + MAC-aIpec IIJaIOKaJIbHOcETn MeToI 6e3oIacHocTn: WEP(64bit) IapoiIb: sony1
HaXMMTe KJIaBnIy INPUT Ha IIpoeKTOpe, YTO6bI OTO6pa3HTb MEHIO IJIa IIpeKJIIOueHEN BxOJHOro CnIHJa HA 9KpaHe. HaXkMaIte KJIaBnIy INPUT IIIN KJIaBnIIH / YTO6bI Bb16paTb H3O6paKeHN IJIa IIpoeUPOBaHN.
6ПипрoeинрOBaHHn 3O6paKeHnC KOMIbIOTepa IpeKJIIOHTe BbIBoI cNHaJa KOMIIbIOTepa Ha BHeIHHH INcIIJe.
Cnoc06 nepckJIOUeHnBbIBOJa CnHaJa MOKeT OTJNuAaTbcR B 3aBnCHMOCTN OT TIIa KOMIbIOTepa.
(Приимер)

IIJIIIOEUIPOBAAHNA3OBpaKeHH, COJIepKaIINXcRAHa HAKOIINTeJIbHOM ycTpoNCTBE USB,cm.pa3JeI“USB Media Viewer".IIJ IBOCIIPOIN3BeIeHNBAIeO IN 3Byka c IIOMOIbIO USB-coeINHeHHa CM. pa3JeI“BOcIpOn3BeIeHNBE BInCeO IN 3BykaYepe3 USB-coeINHeHHe”. IIOIPO6Heo OfynKuINPipe3eHTaUNI IO CeTH CM.B pa3JeIe "IcIOJIb3OBaHne dyHKUIN IIpe3eHTaUNI IO CeTH".
7HacTpoITeΦOKyCnPOBky,pa3Mep n paCIOJIOXeHne IpOeIUPyeMOrO n3o6paXeHn (cTp.16).
OTo6paXeHne n3o6paXeHn nn paIOB,OTnpaBJeHHbIX c pIaNweta/cmapTfoHa
H3o6paXeHHBΦopMaTe JPEG, IOKyMeHTbIBΦopMaTe PDF HIOIO6HbIe aJIbI, KOTOpbIe XpaHrTcHa IIaHIte HeIN cMapTfoHe, MoxHO IIpoeIIpOBaTB Yepe3 6ecIIPOBOIHoe COeINHeHne C IOMOIIbIO cIEIIaJIbHO rPiJIOXeHH. *1 YTO6bI 3aRpy3HTb *2 IIpNJIOXeHne HIn y3HaTb IIOIpO6Hee o erO HcIOJIb3OBAHH, IpeEINTE IO cJeIyIOIeMy URL-aIpcy: http://PWPresenterpixelworks.com

*1:Дя pa6OtBi II IIJIIOJKeHnI Heo6XoIIHMO BbIIOJIHeHc OJHO r3 CJeIyIOIIx YCJOBHN:
- IOJKJIIOUeHHe K CeTH, B KOtOpO' BO3MOxHNo 6ecIIpOBoIHOe coeINHeHne (ctp. 12);
-IOJKJIIOUeHHe K 6ecIPOBOJHOcTeH uepe3 USB-aIaItep IFU-WLM3 (He IIpuJIaRaEcTc),IOJKJIIOUeHHbIK IIpoekTopy (ctp.13).
^*2 3a IepeIaCy IaHHbIX MoKeT B3IMaTbcra IIaTa - 3TO 3aBnCHT OT coeINHeIIc NHTepHeTOM.
I3meHHe Ipoeunpyemoro n3o6paXeHnA
Ta KJIaBIIHa He MoJKeT HcIOJIb3OBA Tbcb,ecIIN B KaYeCTBe HcToUHnKa BbI6paHo "USB TIIa A", "USB TIIa B" IIIN "CeTb".
A B T O M a T h u e c k a p e r y l n o p o B k a h a c t p o e K P a 3 a, I s a n C d b i r n p o e u p y e m o r o n 3 0 6 p a x j e H N P n p o l y e H N C n r h a J C K o m n b i o T e p a (A P A (a B T O M a T h u e c k oe B b i p a B H N B a H N e n o n k c e l j a M))
HaKMTe KJIaBnHbIy APA Ha IIyJIbTe IINCTaHIOHO yIIpaBJIeHn. JJIa OTMeHbI peryJInpOBKn BO BpeM yCTaHOBKn HaKMITE KJIaBnHbIy eIe pa3. Kpome TOrO, fYHKnIO APA MoXHO HAcTPOINTb B MeHIO "3KpaH". EcJIN IIJIA npaMeTp a"APA BbIC.yETK." B MEHIO "fYHKnIy" yCTaHOBJIeHO 3NaueHHe "BkJI", fYHKnIg APA BBIOJIHReTc aBTOMaTHueCKN IIpi IIoJaYe BXODJIeTO cINHaJa.
BbIKIIOUeHHe NITaHnA
1 HaKMnTe KJIaBnIy I/Ha OCHOBHOM ycTpoNCTBe HJH Ha IIyJIbTe INCTaHIIHOHHOrO yIIpaBJIeHN.
IpoekTop haHET bblKJIIOHaTbCra, IocJIe Yero OTKJIIOHTcra IIHTaHHe. EcJIN HaKaTb KJIaBnHy I/O B TeUeHne 10 ceKyHd, OTKJIIOUeHne 6yJeT OTMeHHeO.
PpMpeaHne
He BbIKJIOaHTe IPOeKTop BCKOpe IIOcJIe BKJIOueHnJAAMIIb. 3TO MOKeT IIpNBecTH K HeHCIIpaBHOCTH JAMIIb (JAMIIa MOKeT He 3aRopatbcr H T.II).
2 OToeHnHte Ka6eJIb IHTaHnI IepMeHHoro TOka OT 3JIeKTpHuYeCKoI pO3eTKn.
BbIKIIOUeHne 6e3 OTo6paXeHnA COo6uEHHa 3aInpocm Ha NOdTBePKeDeHne
HaXMMTe H yIePxNBAaTe HaXaToH KJIaBnHbNy I/Ha ycTpoHcTBe B TeueHHe HeCKOJIbKHX CeKHyI.
Датунк ECO
TO T IaTnK IIOKa3bIBaet 3ΦΦeKTINBHOCTb pa6oTBI ΦyHKIIH ECO IIpoeKTopa. (ПоДрОбHee oФунКИH ECO cm.В pa3deJIax "КЛаВиHа ECO MODE" n "ECO"). _P IYBIKJIIOyeHHOM IIpoeKTope OTO6paJxIoTc3HaUKN JInCTbeB. Yem 6OJIbIe JInCTbeB OTO6paJxAcTc, TEm 6OJIbIe 3HEpRHN 3KOHOMHTc C IIOMOIbI OФунКИH ECO.
ИнданkaTopbl
Индikatopbl IO3BOJIaIOT IPOBepNTb COCTOAHne N BbIBBHTb HeHcIIpaBHOCTHn B pa6Ote IIpoekTopa.
EcIIIO OTO6paXaETcH HeOpMaJIbHOe COCTOaHHe IIPOeKTopa, BbIIOJIHHTe IeIcTBnA, yKa3aHHbIe B cJIeJyIOIIeT Ta6JIuIe.