VacSy Sealing Unit VSS - Vacuum packaging machines Zepter - Free user manual and instructions
Find the device manual for free VacSy Sealing Unit VSS Zepter in PDF.
Frequently Asked Questions - VacSy Sealing Unit VSS Zepter
User questions about VacSy Sealing Unit VSS Zepter
0 question about this device. Answer the ones you know or ask your own.
Ask a new question about this device
Download the instructions for your Vacuum packaging machines in PDF format for free! Find your manual VacSy Sealing Unit VSS - Zepter and take your electronic device back in hand. On this page are published all the documents necessary for the use of your device. VacSy Sealing Unit VSS by Zepter.
USER MANUAL VacSy Sealing Unit VSS Zepter
EN - ISTRUCTION MANUAL 2
VacSy® Sealing Unit VACUUM PACKING MACHINE
SR - UPUTSTVO ZA UPOTREBU 210
VacSy® aparat ZA VAKUUMIRANJE
1 SAFETY INSTRUCTIONS AND INTRODUCTION 6
1.1 OPERATING CONDITIONS 6
1.2 IMPORTANT SAFETY INSTRUCTIONS 6
1.3 TIME INTERVALS EACH VACSY® SEALING UNIT USE
1.4 FOOD SAFETY 9
1.5 DISPOSAL
2 MAINTENANCE AND CLEANING 10
3 VacSy ^® SEALING UNIT SET 11
4 VacSy ^2 SEALING UNIT 12
5 TECHNICAL DATA 15
5.1 FOIL ROLLS AND BAGS USED FOR VACUUM PACKAGING 15
6 INSTRUCTIONS FOR USE 16
6.1 AUTOMATIC PACKING FUNCTIONS 16
6.2 MANUAL PACKING FUNCTIONS 19
6.3 VACUUM PACKING USING VACUUM CONTAINERS AND LIDS 20
7 VACUUM PACKING OF DIFFERENT TYPES OF FOOD 21
8 TROUBLESHOOTING 22
9 COMPARATIVE STORAGE TABLES 23
9.1 COMPARATIVE TABLE OF FOOD STORAGE IN THE REFRIGERATOR 23
9.2 COMPARATIVE TABLE OF FOOD STORAGE IN CUPBOARDS AND ON SHELVES 23
9.3 COMPARATIVE TABLE OF FOOD STORAGE IN THE FREEZER 24
10 WARRANTY 25
11 DECLARATION OF CONFORMITY 27
12 DISPOSAL INFORMATION 27
ENEN
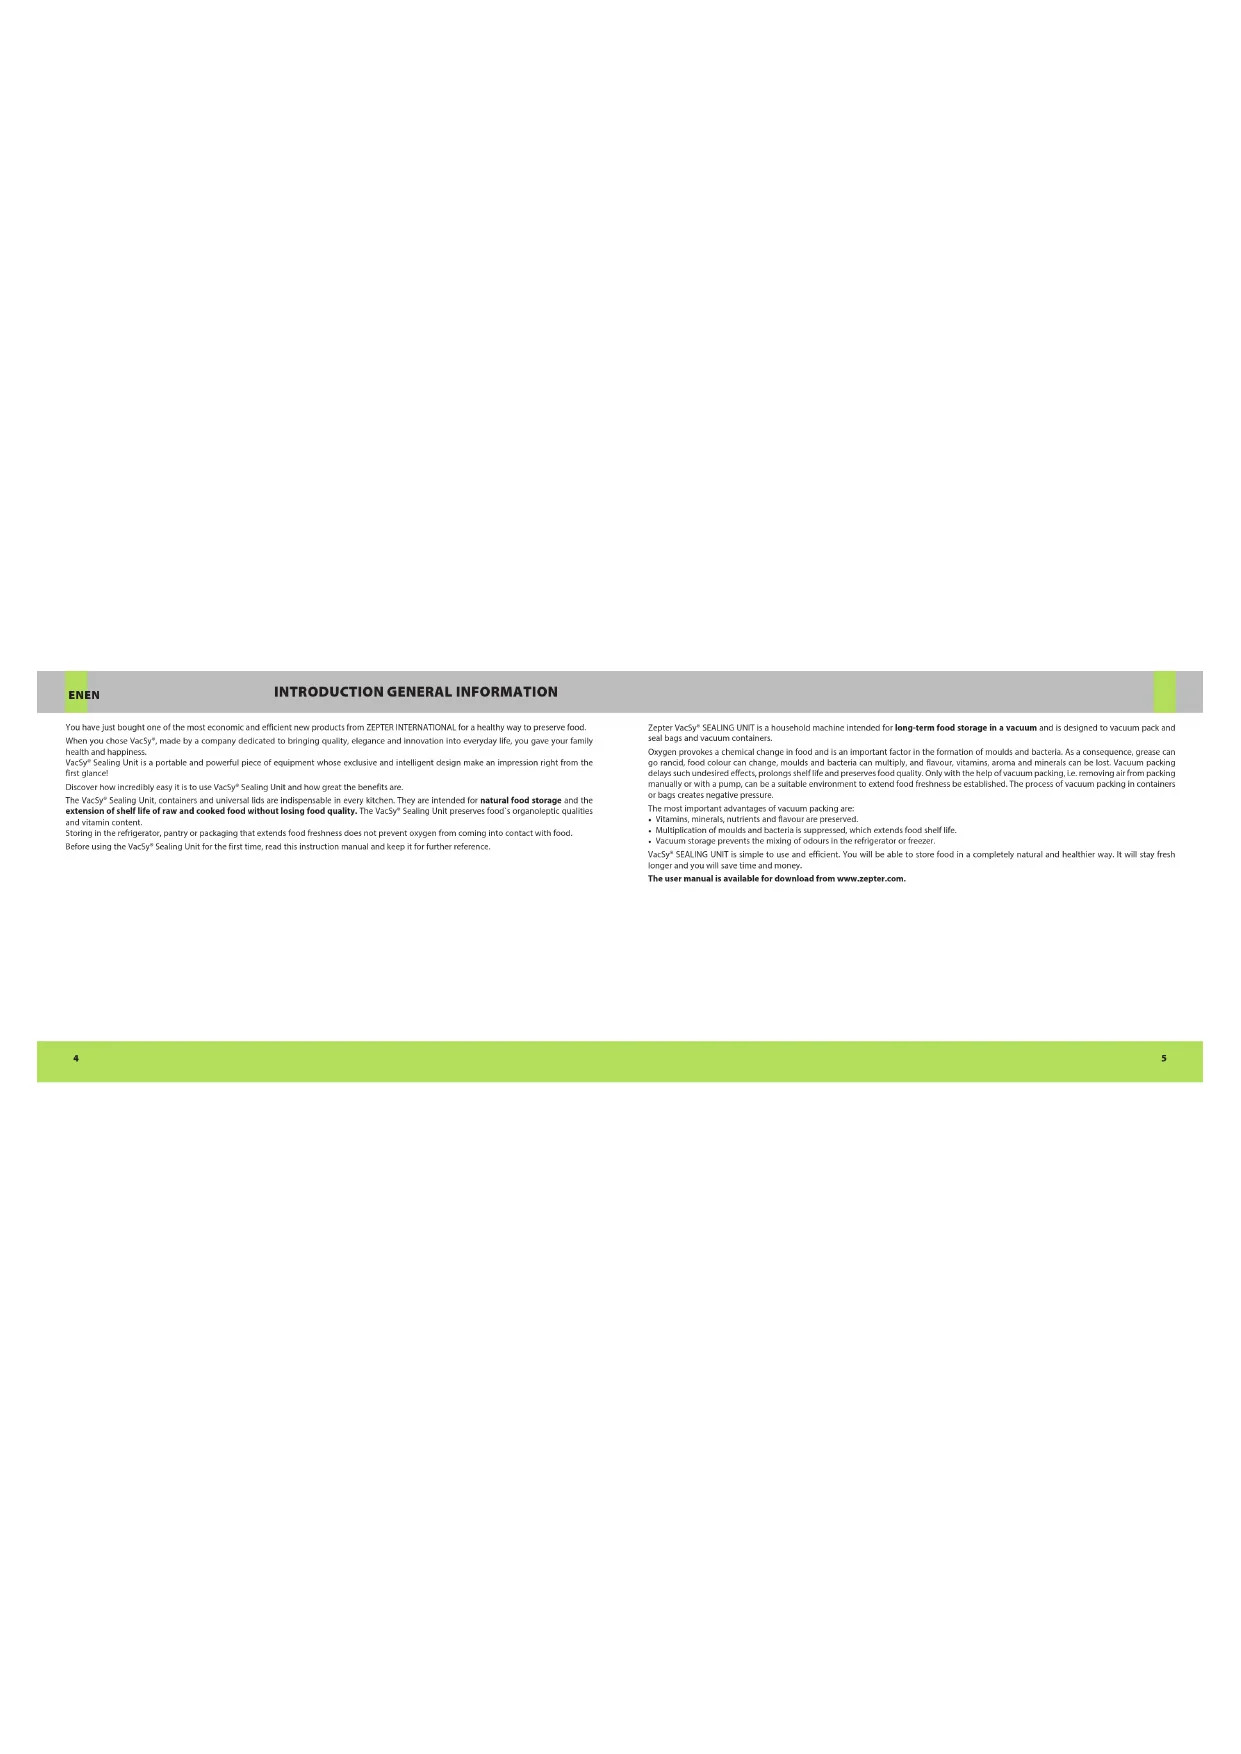
INTRODUCTION GENERAL INFORMATION
You have just bought one of the most economic and efficient new products from ZFPTER INTERNATIONAL for a healthy way to preserve food. When you chose VacSy®, made by a company dedicated to bringing quality, elegance and innovation into everyday life, you gave your family health and happiness. VacSy® Sealing Unit is a portable and powerful piece of equipment whose exclusive and intelligent design make an impression right from the first glance! Discover how incredibly easy it is to use VacSy® Sealing Unit and how great the benefits are. The VacSy® Sealing Unit, containers and universal lids are indispensable in every kitchen. They are intended for natural food storage and the extension of shelf life of raw and cooked food without losing food quality. The VacSy® Sealing Unit preserves food's organoleptic qualities and vitamin content. Storing in the refrigerator, pantry or packaging that extends food freshness does not prevent oxygen from coming into contact with food. Before using the VacSy® Sealing Unit for the first time, read this instruction manual and keep it for further reference.
Zepter VacSy® SEALING UNIT is a household machine intended for long-term food storage in a vacuum and is designed to vacuum pack and seal bags and vacuum containers.
Oxygen provokes a chemical change in food and is an important factor in the formation of moulds and bacteria. As a consequence, grease can go ranged, food colour can change, moulds and bacteria can multiply, and flavour, vitamins, aroma and minerals can be lost. Vacuum packing delays such undesired effects, prolong shell life and preserves food quality. Only with the help of vacuum packing, i.e. removing air from packing manually or with a pump, can be a suitable environment to extend food freshness be established. The process of vacuum packing in containers or bags creates negative pressure.
The most important advantages of vacuum packing are:
- Vitamins, minerals, nutrients and flavour are preserved.
- Multiplication of liquids and bacteria is suppressed, which extends food and - Vacuum storage prevents the mixing of odours in the refrigerator or freezer.
VacSy® SEALING UNIT is simple to use and efficient. You will be able to store food in a completely natural and healthier way. It will stay fresh longer and you will save time and money.
The user manual is available for download from www.zepter.com.
ENEN
1 - SAFETY INSTRUCTIONS AND INTRODUCTION
The manual uses specific way to draw your attention to some details:
WARNING! For safety reasons, be careful.
ATTENTIONI This note contains additional information and useful advice for the appropriate use of the appliance.
1.1 OPERATING CONDITIONS
Maximum ambient temperature for normal use is +40°C; the average temperature over a 24-hour period should not exceed +35°C. Minimum ambient temperature recommended is -5°C. Surrounding air should be clean; relative humidity should not exceed 50 % at the maximum temperature of +40°C. Higher relative humidity is acceptable at lower ambient temperatures (e.g. 90 % at +20°C).
1.2 IMPORTANT SAFETY INSTRUCTIONS
- This user manual is an integral part of the appliance. Read all the instructions and safety notices contained in the present manual carefully, as they give important information on the device use and maintenance. Keep the manual for future reference!
- After removing the packaging, make sure the machine is intact.
- If you do not understand the information, do not use the appliance and refer to professionally qualified Zepter personnel.
-
Before connecting the appliance to the mains, make sure the data on the rating label match those of your electricity mains.
-
The use of adaptors, multiple sockets and/or extension leads is generally to be avoided; if you cannot do without them, make sure that only standard or multiple adaptors and extension leads, which conform to current safety regulations, are used.
- If the supply cord is damaged, it must be replaced by authorised Zepter Service in order to avoid a hazard. For any repairs, refer only to your Zepter Repair Centre.
- Do not plug or unplug the device with wet hands.
- In case of emergency disconnect the device from the mains.
- Do not expose the sealing unit to severe weather elements, such as rain, hail, snow, wind, etc.
- Do not use the sealing unit in the presence of explosive, highly flammable materials, gas or naked flames.
- This appliance can be used by children from 8 years and above and persons with reduced physical, sensory or mental capabilities or lack of experiences and knowledge under supervision or if they have been instructed about how to use the appliance safely and about the hazards involved. Children shall not play with the appliance. Cleaning and maintenance shall not be performed by children without supervision.
- This device can only be assigned to functions it has been designed for (e.g. food preservation) and those described in the user manual. The producer cannot be held responsible for any damage deriving from improper, incorrect or unreasonable use.
- The work surface must be dry, normal temperature (not hot) and clear from obstructions.
ENEN
- The machine should only be cleaned with a dry or slightly damp cloth. Never use abrasives, alcohol or other solvents. Always allow the appliance to dry completely before putting it away.
- Never touch the Sealing Strip when using the machine (pos. 9) – it may be hot.
- Make sure that vacuum channels are unobstructed. If necessary, clean with a dry cloth.
- Use original VacSy ^® accessories only.
- Never consume food kept in bags that are not sealed properly or have become swollen! The food may have gone bad and could be harmful to your health.
1.3 TIME INTERVALS BETWEEN EACH VACSY® SEALING UNIT USE
For the proper operation of the machin e there should be at least a 20-se cond time interval between individual cycles of sealing or vacuum packing.
When the cycles follow each other too quickly, the machine automatically stops. The Overheating indicator lights up (pos. 6).
Wait for the machine to cool down (approximately 45 minutes). When the Overheating indicator goes off, you can carry on using the machine as normal.
WARNING! While the machine is cooling down, do not unplug it!
1.4 FOOD SAFETY
Always follow the usual rules of safe food preservation:
a) Never freeze meat after it has defrosted
b) Never mix raw and cooked foods
c) Always vacuum-pack leftovers immediately
d) Do not reheat milk or other dairy produce
VacSy ^3 is a system for food preservation only and should not be used for cooking.
1.5 DISPOSAL
At the end of its lifecycle, we recommend making the machine safe by cutting the power cord. Do so only after unplugging it from the mains! Do not dispose of the machine as ordinary rubbish, but leave it with personnel qualified to collect such material. In this way, it will be properly disposed of and recycled.
This is a valuable aid for safeguarding our environment!
ENEN
2 - MAINTENANCE AND CLEANING
3 - VACSY® SEALING UNIT SET
a) Unplug the machine.
b) Use a soft, damp cloth to clean the machine. Do not use anything that could scratch or damage the surface. Never submerge the machine in water or place it under run ning water. Never squirt detergent directly onto or into the machine.
c) Before using the machine, make sure that it is completely dry.
d) The Sealing Strip has a Teflon coating. Remove any plastic residues using a soft cloth.
e) You can only clean the Sealing Strip when the machine has cooled down. Never try to clean the sealing strip using a sharp object.
f) If the black foam seals become contaminated with grease or liquid, you can wash in soapy water, rinse and dry them before refitting them. This will increase their lifespan.
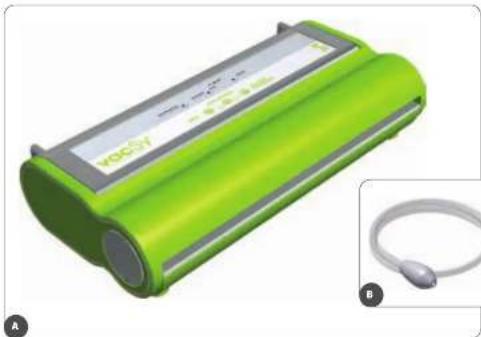
The set includes
A 1 ZEPTER VacSy® SEALING UNIT machine
B 1 Adapter used for the vacuum sealing of containers
C 1 Manual Cutter used for cutting foil
D 1 User Manual
natural_image
Green electronic device with a circular cable and a label showing 'VOCY' (no text or symbols on the device itself)
natural_image
Two product images: a gray plastic container labeled 'VOCY' and a green battery pack labeled 'Fully Solder Solid', both without any visible text or symbols.ENEN
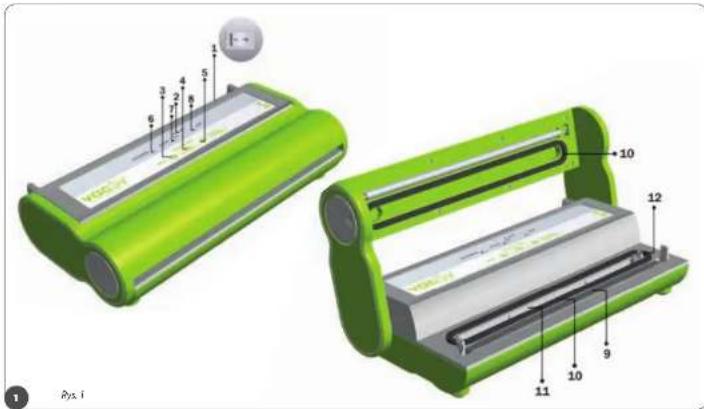
4 - VACSY® SEALING UNIT
text_image
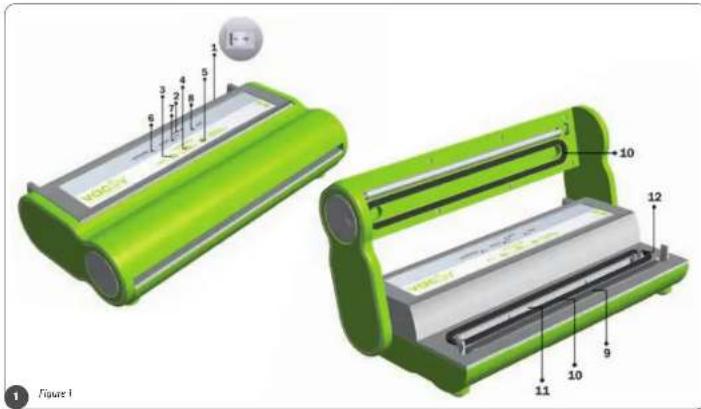
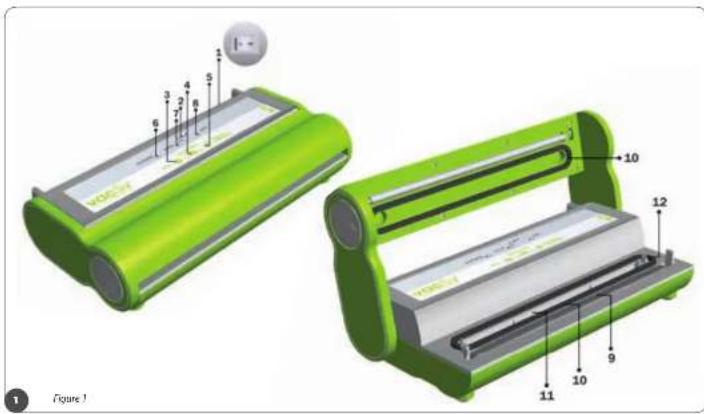
1 2 3 4 5 6 7 8 9 10 11 12 Figure 112
Position
1 On/Off Button
To switch on/switch off the Vacsy sealing unit.
2 On/Off Indicator
When the machine is connected to electrical power, the indicator light is green.
3 Seal Button
Starts the sealing process (without vacuum packing). You can use this to seal the open end of a roll.
- Vacuum Packing of Bags / Start / Stop Button
Start of vacuum packing and sealing process. The bag will first be vacuum packed and then automatically sealed. Also for vacuum packing
of softer and moister foods. Press this button again at any time during the vacuum packing process to activate the sealing process manually.
5 Vacuum Packing of Container Button
Vacuum packing of containers with Accessory Port and Hose. Vacuum packing process automatically stops when the correct vacuum
is reached.
6 Overheating
Automatic overheating protection. The indicator lights up if the time interval between individual processes of vacuum packing is not long enough (at least 20° between individual cycles or after sustained use). Wait 45 minutes until the indicator goes off and carry on using the machine as normal.
- Vacuum & Seal Indicator
While the machine is vacuuming, the indicator light is on. During the sealing process, the indicator blinks.
8 Liquid Block
The indicator is lights up the machine has sucked liquid out of the vacuum bag during vacuum packing.
9 Sealing Strip
The Sealing Strip is covered with a Teflon foil that should in no case be removed.
10 Vacuum Channel Gasket/Foam Seal
- Vacuum Channel with Tray
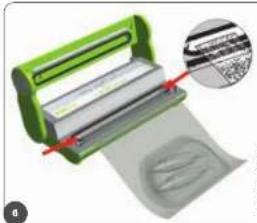
During vacuum packing, the edge of the bag must be set between the gaskets in the middle of the Vacuum Channel (Figure 6). In case of Improper vacuum packing, any excess liquid is stopped here and the "Liquid" indicator lights up. You can read more about this in our line on page 19.
12 Accessory Port used for vacuum packing with containers
13
ENEN
5 - TECHNICAL DATA

SEAL BUTTON (pass 31"
Complete cycle of sealing bags

VACUUM PACKING OF BAGS / Start / Stop BUTTON (box 4)
- Complete automatic cycle of vacuuming and sealing bags - Cycle for manual vacuuming and sealing bags

VACUUM PACKING OF CONTAINER BUTTON (p.e. 5) Complete cycle of vacuuming containers
*Positions refer to Figure 1 page 12

flowchart
graph LR
    A["overheating"] --> B["vacuum"]
    B --> C["seal"]
    C --> D["liquid"]
    D --> E["VACUUM CONTAINER"]
    E --> F["start"]
    E --> G["stop"]
    F --> H["SEAL"]
    G --> I["VACUUM BAG"]


RED LIGHT FLASHING
Sealing and cooling
Dimensions Width: 396 mm - Depth: 201 mm - Height: 91 mm
Weight Approx. 3.4 kg
Material ABS plastic (outer casing)
Pump Integrated vacuum pump (self-olling - no maintenance necessary)
Vacuum pressure rca -750 mbar
Motor
230 V AC, 50 Hz
Automatic cut-off in case of overheating
Max RPM 2900
Transformer
220V AC, 50Hz/24V AC 0.8A
712V AC 0.4A Automatic cut-off in case of overheating
Pump volume 14 litres/min
Controls Electronic
Machine rated power and voltage 200W, 220-240V AC
Country of origin Slovenia
Model VS 6
5.1 FOIL ROLLS USED FOR VACUUM PACKING
Foil roll 4-ply foil (PA/PE) - length 3000 mm x width 280 mm or 200 mm
Foil thickness
100 μm (smooth, unribbed part) /130 μm (structured, ribbed, part of the foil)
Foil quality
Impermeable, 4-ply, germ-free, with neutral flavour and odour, can be reused, suitable for microwave and boiling
Time and temperature of treatment and contact with the food:
For a brief temperature treatment, up to +70°C (maximum 2 hours); Alternatively, up to +100°C (maximum 15 minutes).
ENEN
6 - INSTRUCTIONS FOR USE
- When taking the machine out of its packaging check that all components are included and undamaged.
- Read the User Manual before you use the machine for the first time.
- VacSy ^® SEALING UNIT is a professional machine whose technology and capacity has been adjusted for use in households. Given its uses, the machine is suitable for storage on the kitchen top where it can be used conveniently every day.
- Place it on an even, smooth surface with enough space for placing food into bags.
6.1 AUTOMATIC VACUUM PACKING FUNCTIONS
Use the machine according to the following instructions:
1. Plug in the machine, switch it ON (pos. 1) and prepare Vacsy sealing unit for operation.
Check if the On / Off Indicator lights up (pos. 2).
WARNING! If the sealing unit has not been used for a long time (e.g. 1 week) perform a test-run of the appliance.
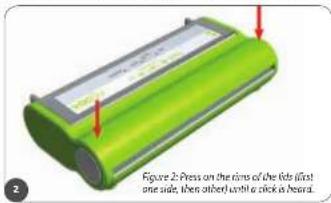
2. Lower the lid of the machine. Press on the rims of the lids (first one side, then other) until a click is heard (Figure 2).
text_image
Figure 2: Press on the time of the risks (first one side, then added until it click as hours.- Press the Vacuum Packing of Bags but ton (pos. 4). Wait for the Vacuum & Seal Indicator to stop blinking (pos. 7).
- The Scaling Strip has warmed up and the machine is ready for use. To lift the lid, press in the same place as you lock the machine and with your fingers lightly push the round plate, which is on the side of the machine (Figure 3).
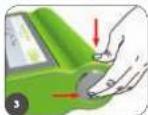
Figure 3: First push with the wrist on the top of the machine (at the same place as when looking), and then press against the inside round plate with the fingers, which is on the side of the machine.
- Make a bag from the roll as follows:
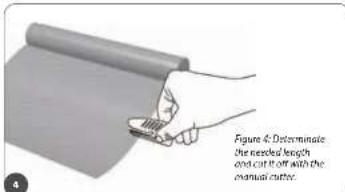
a.) Determine the length needed. A bag should be about 5 cm longer than the item to be vacuum packed. To reuse the bag, leave additional 2.5 cm
of bag material for each time you plan to reuse it, or next time use the bag for smaller items.
b.) Cut off the desired length with the included cutter (Figure 4).
c.) Place the roll on the Sealing Strip and extend it to the Black Gasket (Figure 5). Make sure that the edge is straight and level.
ATTENTION! Pay attention how the roll is placed when sealing function is in use.
d.) Lower the lid of the machine. Press on the rims of the lid (first one side, then the other) until a click is heard.
e.) Press the Seal button (pos. 3). During scaling, the light (Vacuum & Seal Indicator) will be blinking
text_image
Figure 4: Determine the needed length and cut it off with the manual cutter.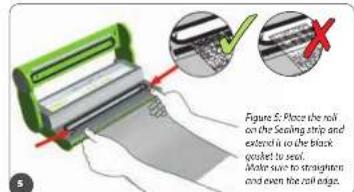
text_image
Figure 5. Place the roll on the Sealing strip and extended it to the black gasket to seal. Make sure to straighters and even the collar edge.RECOMMENDATION: If the machine does not start with the sealing process right after you press the Seal button, then press gently on the middle of the lid with your finger.
f. When the indicator is no longer blinking, lift the lid. Press in the same place as you do to lock the machine and lightly push the round plate on the side of the machine with your fingers (Figure 3). Check the sealing edge on the bag. It should be smooth and even across its width and not creased.
EN
EN

WARNING! The bag should always be at least 5 cm longer than the space occupied by the item to be vacuum packed.
- Put food into it and vacuum pack.
Make sure that inner surfaces (for the sealing edge) are clean, dry and free of food materials.
natural_image
Green and gray plastic roller with paper roll, showing a magnified inset of the roller (no text or symbols visible)Figure 6: For vacuum packing place the filled bag in the middle of the vacuum channel (between the black foam seals).
RECOMMENDATION:
When vacuum packing greasy products (especially bacon) it is strongly recommended to reverse the outside edges of bag, put the food item inside, and flip the edges back out again. This keeps the area to be sealed free of grease.
-
Place the filled bag on the work surface in front of the machine and pull it to the middle of the Vacuum Channel (between black gaskets, see Figure 6 – pos. 10). Make sure that the bag placed on the Sealing Strip is completely smooth (not creased).
-
Press on the rims of the lid (first one side, then the other) until a click is heard.
-
Press the Vacuum Packing of Bags button (pos. 4).
RECOMMENDATION: If the machine does not start the process right after you press the Vacuum Packing of Bags button, then press gently on the middle of the lid with your finger.
WARNING! The bag will be vacuum packed and sealed automatically. Due to high vacuum pressure, the lid stays closed while the machine is in operation.
-
After the procedure (when the indicator no longer blinks), press the top of the machine with your wrist (at the same place as when locking), and then with your fingers against the inside round plate on the side of the machine.
-
Check the vacuum-packed bag. The sealing edge should be smooth and clean.
-
If Vacsy scaling unit will be not in use for a long time, switch the machine OFF (pos. 1);
TIP!
WHAT TO DO IN CASE THE MACHINE STARTS TO SUCK LIQUID OUT OF THE BAG DURING VACUUM PACKING
If you notice that the machine starts to suck liquid out of food during vacuum packing, IMMEDIATELY interrupt the process of vacuum packing by pressing the Stop button [pos. 4].
ATTENTION! The Stop button can be pressed only while the machine is vacuum packing (the button no longer works when the machine is sealing). If you do not stop the process of vacuum packing in time and liquid enters the Vacuum Channel, the machine will stop automatically, and the "Liquid Block" Indicator will light up.
To open the lid, press the top of the machine with your wrist (at the same place as when locking), and then press your fingers against the inside round plate, which is on the side of the machine (Figure 3).
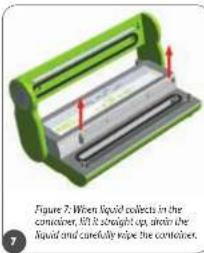
There is a container between the gaskets that you lift straight up (Figure 7). Drain the liquid and carefully wipe the whole container. If the liquid enters the channel with the container, wipe and dry the channel as well. Set the container back into its place and carry on with vacuum packing.
text_image
Figure 2: When liquid collects in the container, IPI is straight up, drain the liquid and carefully rope the container.6.2 MANUAL VACUUM PACKING FUNCTIONS
When vacuum packing foods that are easily crushed or contain a lot of water (fresh fruit, salads, mushrooms, bread, pastry) less vacuum should be used (from 0 to -300 mbar).
With manual vacuum packing you can interrupt the process of removing air as soon as you assess that enough air has been sucked out of the bag or that further removal of air could damage foods that are easily crushed.
18
19
ENEN
The process of manual vacuum packing is very similar to the above-described automatic vacuum packing, with only two main differences. Keep in mind that with soft and moist foods you have to pay extra attention to what is happening in the bag during vacuum packing. Always place the bag so that you set the edge of the bag between the gaskets in the Vacuum Channel pos. 111.
ATTENTION! When you assess that enough air has been removed (pay attention to what is happening with the food, if liquid is starting to slip toward the machine or if further removing of air could damage soft foods), press the Stop button (pos. 4). The pump stops and sealing is activated.
You can always stop the vacuum packing process by pressing the Stop button (if you, for example, determine that the food contains more liquid than you had assessed).
TIP!
The easiest way to vacuum pack the majority of fruits and vegetables, fresh meat and mushrooms is to put it into the freezer for 1-2 hours beforehand. It will keep its form and you will avoid the danger of liquid entering the Vacuum Channel during vacuum packing.
text_image
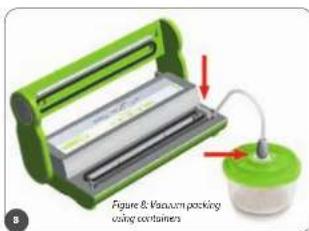
Figure & Vacuum packing using containers6.3 VACUUM PACKING USING VACUUM CONTAINERS AND LIDS
VacSy® SEALING UNIT includes an Accessory adapter (hose and port), which can be used for the vacuum packing of VacSy® line vacuum containers and lids.
1. Insert the opening of the Accessory Hase into the Accessory Port (see Figure 8) on the right side of the Vacuum Channel.
2. Attach the Accessory Hose and Port to the valve of the chosen vacuum container.
3. Press the Vacuum Packing of Container button (pos. S) to vacuum the container. When the correct negative pressure is reached, the process stops automatically.
WARNING! When vacuum packing liquid foods (soups, sauces, etc.) there should be at least 1.5 cm between the surface of the liquid and the lid.
7 - VACUUM PACKING OF DIFFERENT TYPES OF FOOD

WARNING! Vacuum packing is not a substitute for freezing or refrigeration.
Despite being vacuum packed foods still have to be stored in the refrigerator or freezer or in a cool place (e.g. dried meat products in a cellar).

ATTENTION! Do not use bags or rolls for packing foods that contain a lot of liquid.
Soups, sauces and liquids should either be pre-frozen before packing in a vacuum bag or vacuum packed in an acrylic container.
Cooked meat, raw meat and fish
For best results, we recommend pre-freezing meat and fish for 1-2 hours prior to vacuum packing to ensure the retention of juices and shape, and to help guarantee a good seal. If pre-freezing is not possible, place a folded paper towel between the meat and the top of the bag, avoiding the area to be sealed. Leave the paper towel in the bag when vacuum packing to absorb excess moisture and juices.

ATTENTION! Beef may appear darker after vacuum packing due to the removal of oxygen. However, this does not indicate it is spoiled.
Vegetables should be blanched prior to vacuuming.
- 1 to 2 minutes is enough for fresh leaf vegetables or beans.
- 3 to 4 minutes for chopped zucchini or broccoli and other cruciferous vegetables.
- 5 minutes for carrots.
• 7 to 11 minutes for cereals.
The process of blanching stops the enzyme action and preserves flavour, colour and texture. After blanching, submerge the vegetables in cold water to stop the process, and then dry them with a paper towel prior to vacuum packing.
We recommend storing leaf vegetables in vacuum containers. They should first be washed and dried with a paper towel, and then stored in a vacuum container. This way, spinach and lettuce will stay fresh up to 2 weeks when refrigerated.
Mushrooms, raw garlic and raw potatoes
We do not recommend vacuum packing. If you want to do it anyway, follow the instructions for the "manual vacuum packing" function carefully. WARNING! Defrosting of vacuum packed foods: Foods should always be defrosted in the refrigerator to preserve quality.
ENEN
8 - TROUBLESHOOTING
9 - COMPARATIVE STORAGE TABLES
Senior manufacture's development dept
| PROBLEM: WHAT TO DO: | |
| VacSy® SEALING UNIT does not respond when I press the buttons. | Make sure the machine is switched on and plugged in.If the socket is on but you have no power, check the socket with another appliance that you know works.Check the power card for any damage - e.g. crude or splitting.- Your machine may switch off automatically to avoid overhealing. Allow it to cord down for 15 minutes and then carry on as normal. We strongly recommend you leave 20 seconds between each vacuum packing.Pressing a function button must last at least one second for the machine to react. |
| Air remains in the bag. | Make sure you have fully shared the open end of the bag in the middle of the Vacuum Compartement.Ensure that the bags you are using here at least 100/130 um thickness.Check your bag for any damage - e.g. splits, perforations or bubbles.Test Seal bag and subwange the water. At the points where a bag is damaged, bubbles will appear.When using continuous rolls make sure that the first sealing edge is firmly sealed.Make sure you have pressed on both sides on the rims of the lid tightly enough before vacuum packing. You must hear two clicks. |
| The vacuum does not hold on the bags. | Check the sealing areas of the lid are free from any dirt, grease or food particles, and that it is timely in place.Ensure that the bags is totally clean on the edges - thoroughly remove any food particles or liquid and ensure the bag is completely dry.If you are sealing anything with sharp edges (e.g. bones) make sure they cannot pierce the bag during the vacuum process.Note cover sharp edges with a paper towel, or similar, prior to scaling. |
| Bag melts or cannot be sealed completely. | Make sure you are using bags that are at least 100/130 um thickness and 4 ply.Before the sealing ensure that, the edges of the bag are clean and dry. |
| The vacuum does not hold when using a container. | Ensure that the hose is correctly inserted as shown in Figure 8.Make sure container lid is clean and dry and in the correct position.Make certain that the container valve is clean and dry. |
| ZEPTER VacSy® SEALING UNIT sealed several bags (up to 5 items) and it seems it is not working anymore. Important note about vacuum bags: | We strongly recommend vacuum bags of thickness at least 100/130 μ. There are many different types of vacuum bags available on the market, so pays special attention to quality. Our recommendation is to use original vacuum bags from zepter, which are 4 ply and 100/130 μ thick. |
9.1 Comparative table of food storage IN THE REFRIGERATOR
| TYPE OF FOOD | REGULAR STORAGE | VACUUM STORAGE |
| Cooked food 2 days 10 days | ||
| Fresh meat 2 days 6 days | ||
| Fresh poultry 2 days 6 days | ||
| Cooked meat 4-5 days 8-10 days | ||
| Fresh fish 2 days 4-5 days | ||
| Cold meats 3 days 6-8 days | ||
| Smoked sausages 90 days | 305 days | |
| Hard cheeses | 12-15 days | 50-55 days |
| Soft cheeses | 5-7 days | 13-15 days |
| Fresh vegetables | 5 days | 18-20 days |
| Fresh herbs | 2-3 days 7-14 days | |
| Washed lettuce | 3 days 6-8 days | |
| Fresh fruit 3-7 days 8-20 days | ||
| Desserts | 5 days | 10-15 days |
TIP!
Before vacuum packing properly chill the food
9.2 Comparative table of food storage IN CUPBOARDS AND ON SHELVES
| TYPE OF FOOD | REGULAR STORAGE | VACUUM STORAGE |
| Bread/rolls | 2-3 days | 7-8 days |
| Pastry | 120 days | 300 days |
| Dried food 10-30 days | 30-90 days | |
| Raw rice/pasta | 180 days | 365 days |
| Coffee/tea | 30-60 days | 365 days |
| Wine | 2-3 days | 20-25 days |
| Non-alcoholic beverages (soaled) | 7-10 days | 20-25 days |
| Non-alcoholic beverages in a vacuum jar | 2-3 days 7-10 days | |
| Baked goods | 2-3 days 7-10 days | |
| Hazelnuts, walnuts etc. | 30-60 days | 120-180 days |
| Crackers/potato chips | 5-10 days | 20-30 days |
ENEN
10 - WARRANTY
9.3 COMPARATIVE TABLE OF FOOD STORAGE IN THE FREEZER
| TYPE OF FOOD | REGULAR STORAGE | VACUUM STORAGE |
| Fresh meat 6 months 18 months | ||
| Ground meat 4 months 12 months | ||
| Poultry 6 months 18 months | ||
| Fish 6 months 18 months | ||
| Fresh Vegetables (TIP number 1) | 8 months 24 months | |
| Mushrooms (TIP number 3) 8 months 24 months | ||
| Herbs (TIP number 4) 3-4 months 8-12 months | ||
| Fruit 6-10 months 18-30 months | ||
| Cold meats 2 months 4-6 months | ||
| Baked goods 6-12 months 18 months | ||
| Coffee beans | 6-9 months | 18-27 months |
| Ground coffee (TIP number 2) | 6 months 12-34 months | |
| Bread/rolls | 6-12 months 18-36 months | |
Note: Only approximate time of preservation is indicated in the tables, as it depends on the initial state (freshness) and food preparation method. The storage of food is considered at +3 °C / -5°C in the refrigerator and at -18 °C in the freezer.
TIPS!
- Blanch before freezing or wash food before storing it in the refrigerator. Chopped food containing a lot of water is not suitable for vacuum packing (cucumbers, zucchini etc.).
- If you want to vacuum pack coffee or other ground food properly with VacSy® SEALING UNIT, leave the items in their original packaging and place them into the VacSy® bag. If you do not have the original packaging, use a regular bag and insert it into the VacSy® bag. This way you can prevent beans or ground items from being sucked into the machine.
- Mushrooms: We strongly recommend the "manual vacuum packing" function. Only hard, meaty and fresh mushrooms are suitable for vacuum packing and freezing. First wash and dry the mushrooms, then chop them with a fine knife and store them in small quantities. Almost all types of mushrooms should be blanched. We recommend that you put them in the freezer for half an hour before vacuum packing. Do not thaw the mushrooms before cooking with them. Roll frozen mushrooms in hot salty water or add them to sauces.
- Herbs containing a high proportion of essential oils, such as sage, thyme, rosemary or peppermint are not suitable for vacuum packing but only for drying. Basil, tarragon, garden dill, parsley and chives should be frozen. If dried, they lose too much flavour.
This appliance can only be assigned to the functions it has been designed for, i.e. food preservation. The manufacturer cannot be held responsible for any damage deriving from improper, incorrect or unreasonable use.
All our appliances have undergone strict inspection tests and are guaranteed against manufacturing defects. The guarantee starts from the date of purchase. The date of purchase is the date shown on the invoice issued by the dealer upon the delivery of the appliance. Evidence of original purchase is required for warranty services, so it is important to keep your sales receipt.
The warranty period is applicable according to the local laws and regulations in force.
The manufacturer undertakes to repair or replace those parts that prove to have manufacturing defects cost free, within the warranty period. Those defects that are not clearly attributable to either material or manufacturing will be examined at one of our ZEPTER Service Centres or at our headquarters and charged according to the outcome.
The warranty is only valid if:
• The device shows material or manufacturing defects.
+ No signs of damage by the customer or presence of non original pieces fit by other people has been found.
• Accessories designed for the VacSy® line have been used.
• The scaling unit has not been overloaded or smashed.
The warranty does not include:
• Normal wear and tear on parts.
• Damage caused by transport, inadequate use, negligence and/or incorrect use.
• Machines that have been tampered with.
+ Machines that have been used for unintended purposes.
- Damage as a result of failure to respect safety regulations and not following the instructions in the User Manual.
- Any damage to the product resulting from repairs and/or maintenance carried out by unauthorised repair centres.
ENEN
11 - DECLARATION OF CONFORMITY
This guarantee does not affect consumer statutory rights under applicable national legislation in force, nor customer rights in relation to the retailer arising from the sales/purchase agreement.
In the absence of applicable national legislation, this guarantee will be the consumer's sole and exclusive legal remedy, and the manufacturer shall not be liable for any incidental or consequential damages for breach of any express or implied guarantee of this product.
The liability of the manufacturer is limited to and shall not exceed the purchase price of the product actually paid by the consumer.
ATTENTIONI If, after the purchase of the product, its serial number label is removed or is not recognisable, the manufacturer reserves the right to refuse the warranty service. If you have any comments or questions concerning the functioning of the machine or warranty, please contact ZEPTER Sales Representatives.
The VacSy® sealing Unit VS-S complies with European directives:
a) Directive on electrical equipment designed for use within certain voltage limits 2006/95/EC and its amendments.
b) Regulation on electromagnetic compatibility Directive 2004/108 EC and its amendments.
EC declaration of conformity guarantees that the machine is safe and has been inspected and tested to meet all the requirements specified in the applicable standards, directives and regulations.
Serial production meets the requirements of:
• Technical Regulations of the Customs Union 010/2011
"Technical regulations on safety of mechanisms and equipment",
approved by the decision of Customs Union Commission N° 823 from October 18, 2011
• Technical Regulations of the Customs Union 020/2011
"Electromagnetic compatibility of technical means",
approved by the decision of Customs Union Commission № 879 from December 09, 2011
CE EAC
12 - DISPOSAL INFORMATION
The symbol on the product or its packaging indicates that at the end of its life, the product should not be treated as ordinary household waste and must be disposed of in accordance with your local authority's instructions and at properly designated sites. You can also use an official WEEE collection service provider in accordance with directive 2002/96/EC.
Separate collection of individual components of EE equipment prevents negative effects of environmental pollution and minimises danger to human health, which may occur as a result of improper product disposal. In addition, it enables reuse and recovery of the material, thus saving energy and raw materials. For detailed information on collecting, sorting, reuse and recycling of the product contact the provider of WEEE collection services or the shop where you bought the equipment.

EINLEITUNG 30
ALLGEMEINE INFORMATIONEN 31
natural_image
Product image of a green VACV battery with labeled components (no text or symbols on main body)DEDE
natural_image
Green and gray plastic roller being cut with a magnified inset showing internal texture (no text or symbols)11 DÉCLARATION DE CONFORMITÉ 79
12 INFORMATIONS SUR LA MISE AU REBUT 79
FRFR
INTRODUCTION GÉNÉRALITÉS
natural_image
Green cylindrical electronic device with a metallic tab and a connected cable (no visible text or symbols)
natural_image
Two product images: a gray plastic container and a green battery pack, both labeled with 'C' and 'D' (no text or symbols on the devices themselves)FRFR
4 - APPAREIL DE MISE SOUS VIDE VACSY®
text_image
Figure 164
Position
- Touch On/Off
Curla automatic vehicle
m = 311
'bloca
(10.3.10)
1
( )
(1)
m = 311
This image contains no text. The horizontal line is a stylistic or background element and must be ignored according to the rules.
(1)
(No text)
-
1
1.20.10
L
UMIÈRE ROUGE
-
LUMIÈRE ROUGE
1
LLUMER
arch av
•
ALLUMEE
(No text)
-
ALLUME
=
•
urchauffa
(1)
m = 311
lete
opict
t Con

LUMIÈRE ROUGE
CLIGNOTANTE
natural_image
Green and silver cleaning machine with paper roll, showing a magnified inset of the blade (no text or symbols visible)11 - DÉCLARATION DE CONFORMITÉ
natural_image
Green cylindrical electronic device with a metallic tab and a connected cable (no visible text or symbols)
natural_image
Two product images: one showing a VACOY tool, the other showing a green battery labeled 'Fully Solder Solid' (no text or symbols on the devices themselves)ITIT
4 - SIGILLATRICE VACSY®

text_image
Figure 190
Posizione
1 Tasto On/Off
File contains an external
natural_image
Green and silver cleaning machine with paper roll, showing mechanical components (no text or symbols visible)natural_image
Green electronic device with a circular cable and a label showing 'VOCY' (no text or symbols on the device itself)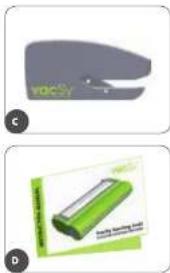
natural_image
Two product images: a gray plastic container labeled 'VOCY' and a green battery pack labeled 'Fully Solder Solid', both without any visible text or symbols.115114
CSCS
4 - SVÁŘEČKA SÁČKŮ VACSY®

text_image
1 2 3 4 5 6 7 8 9 10 11 12 13 14 15 16 Obnižek 7Pozice
natural_image
Green and gray plastic roller with paper roll, showing a magnified inset of a textured surface (no text or symbols visible)natural_image
Green cylindrical electronic device with a white label and a gray cord, shown with an inset image of a mouse (no text or symbols visible)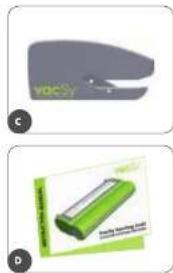
natural_image
Two product images: one showing a VACOY tool, the other showing a green battery labeled 'Fully Solder Solid' (no text or symbols on the devices themselves)141140
HUHU
4 - VACSY® VÁKUUMFÓLIÁZÓ EGYSÉG

text_image
1 2 3 4 5 6 7 8 9 10 11 12 13 14 15 16 17 18 19 20 21 22 23 24 25 26 27 28 29 30 31 32 33 34 35 36 37 38 39 40 41 42 43 44 45 46 47 48 49 50 51 52 53 54 55 56 57 58 59 60 61 62 63 64 65 66 67 68 69 70 71 72 73 74 75 76 77 78 79 80 81 82 83 84 85 86 87 88 89 90 91 92 93 94 95 96 97 98 99 100A készülék részei
[vacuum seal indicator]
natural_image
Green and gray plastic roller roller with a magnified inset showing a textured surface (no text or symbols)WSTĘP INFORMACJE OGÓLNE
natural_image
Green cylindrical electronic device with a metallic tab and a connected cable (no visible text or symbols)
natural_image
Two product images: a gray plastic container and a green battery pack, both labeled with 'C' and 'D' (no text or symbols on the objects themselves)PLPL
4 - URZĄDZENIE VACSY® DO PAKOWANIA PRÓŻNIOWEGO Z FUNKCJĄ ZGRZEWANIA
text_image
Technical diagram of a green battery pack with numbered components and labeled partsPozycja
- Przycisk on/off
The Ground Truth image displays a single, solid horizontal line. According to Rule 2 (UNDERSCORE & LINE RULES), this is a stylistic or background line, not a placeholder underscore. Therefore, the OCR result must ignore it and output nothing or only meaningful text.
(no text)
natural_image
Green cylindrical electronic device with a white label and a gray cord, shown with an inset image of a mouse (no text or symbols visible)
natural_image
Two product images: a gray plastic container and a green battery pack, both labeled with 'C' and 'D' (no text or symbols on the devices themselves)RURU
natural_image
Green and gray plastic roller dispenser with paper roll, showing mechanical components and a magnified inset of a textured surface (no text or symbols visible)1 MERE BEZBEDNOSTI I UVOD 214
1.1 USLOVI RADA 214
1.2 MERE BEZBEDNOSTI 214
1.3 PAUZE TOKOM KORIŠĆENJA VACSY ^9 APARATA ZA VAKUUMIRANJE 216
1.4 BEZBEDNOST HRANE 217
1.5 ODLAGANJE STARIH I NEISPRAVNIH APARATA 217
2 ODRŽAVANJE I ČIŠČENJE 218
3 VacSy ^® SET ZA VAKUUMIRANJE 219
4 VacSy ^2 APARAT ZA VAKUUMIRANJE 220
5 TEHNIČKI PODACI 223
5.1 FOLIJA U ROLNI KOJA SE KORISTI ZA VAKUUMIRANJE 223
6 UPUTSTVO ZA UPOTREBU 224
6.1 FUNKCIJA AUTOMATSKOG VAKUUMIRANJA 224
6.2 FUNKCIJA RUCNOG VAKUUMIRANJA 227
6.3 VAKUUMIRANJE UZ KORISCENJE VAKUUM POSUDA I POKLOPACA 228
7 VAKUUMIRANJE RAZLIČITIH VRSTA HRANE 229
8 REŠAVANJE PROBLEMA 230
9 UPOREDNE TABELE TRAJNOSTI NAMIRNICA 231
9.1 UPOREDNA TABELA TRAJNOSTI NAMIRNICA KOJE SE ČUVAJU U FRIŽIDERU 231
9.2 UPOREDNA TABELA TRAJNOSTI NAMIRNICA KOJE SE ČUVAJU U OSTAVI I NA POLICAMA 231
9.3 UPOREDNA TABELA TRAJNOSTI NAMIRNICA KOJE SE ČUVAJU U ZAMRZIVAČU 232
10 GARANCIJA 233
11 DEKLARACIJA O USAGLAŠENOSTI 235
12 INFORMACIJA O ODLAGANJU STARIH I NEISPRAVNIH APARATA 235
SRSR
UVOD OPŠTE INFORMACIJE
Kupili ste jedan od najekonomičnijih i najefikasnijih novih proizvoda kompanije ZEPTER INTERNATIONAL za čuvanje hrane na zdrav način.
Proizvodi kompanije Zepter unose kvalitet, eleganciju i Inovaciju u naš svakodnevni život. Izborom VacSy⁴-Ja, učiničete svoju porodicu zdravom i srečnom.
VacSy ^™ aparat za vakuumiranje je prenosiv, moćan uredaj ekskluzivnog i inovativnog dizajna, koji na prvi pogled ostavlja jak utisak! VacSy ^™ sistem za vakuumiranje hrane je neverovatno jednostavan za upotrebu, a njegove prednosti su ogromne.
1 - MERE BEZBEDNOSTI I UVOD
Da bismo vam skrenuli pažnju na određene delove teksta, u uputstvu za upotrebu korišćene su sledeće oznake:
natural_image
Green cylindrical electronic device with a white label and a gray cord, shown with an inset image of a mouse (no text or symbols visible)
natural_image
Two product images: a gray plastic container labeled 'VOCY' and a green battery pack labeled 'Fully Solder Solid', both without visible text or symbols.219218
SRSR
4 - VACSY® APARAT ZA VAKUUMIRANJE

text_image
Technical diagram of a green battery pack with numbered components and a circular indicator on topPozicija
(SEAL) (max. 11 ^a )
- Komplician auto-haz, 34 children
Vakobi hiranja (Zavamvanja)
- CIVUS TUCHOQ VAKI
T Zavanvarija Kesa

DUGME ZA VAKUUMIRANJE POSUDA
(VACUUM CONTAINER) (spec. 5)
Kampatan siklu wukumismin
natural_image
Green handheld scanner with a magnified inset showing internal components (no text or symbols visible)Slika 6. Za vahuamiranje, stovite juicu napuvjene kese na srešinu vahuamskog kanala jizneču cmih troka ze vahuamiranje!
PREPORUKA:
Kada vakuumirate masne proizvode (posebno slaninu), preporučujemo da prevmete spoljne ćice kese, stavite proizvod unutra i zatim vratite ćice. Na taj način se površina kosc koju treba da zavarite noće izmastiti.
-
Stavite napunjenu kesu na radnu površinu ispred aparata i povučte je do sredine vakuumskog kanala lizmeđu crnih traka za vakuumiranje; vidi sliku 6 – poz. 10). Proverite da li je kesa koju ste stavili na traku za zavarivanje potpuno ravna (bez nabora).
-
Pritisnite spoljne ivice poklopca (prvo jednu stranu, ratim druqu), dok ne čujete „klik”.
-
Pritisnite dugme za vakuumiranje kesa (poz. 4).
PREPORUKA: Ako aparat ne započne vakuumiranje kada pritisnete dugme za vakuumiranje kesa, blago pritisnite prstom sredinu poklopca.
natural_image
Green cylindrical electronic device with a white label and a separate close-up of a metallic cable (no visible text or symbols)
natural_image
Two product images: one showing a VACOY tool, the other showing a green battery labeled 'Fully Solder Solid' (no text or symbols on the devices themselves)UKUK
natural_image
Green and silver cleaning machine with paper roll, showing mechanical components (no text or symbols visible)text_image
Illustration showing a hand holding a rolled document with Arabic script text below, likely indicating a copy or template.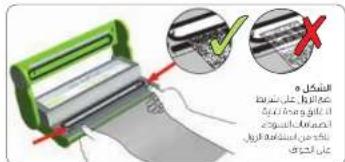
The following table is a table with the following columns: the first column contains '100' and the second column contains '100'. The third column contains '100' and the fourth column contains '100'.
-الإستعمال في الأ廈
nif, jul, jul, jul, jul, jul, jul, jul, jul, jul, jul, jul, jul, jul, jul, jul, jul, jul, jul, jul, jul, jul, jul, jul, jul, jul, jul, jul, jul, jul, jul, jul, jul, jul,
- V
The source image is illegible due to extreme pixelation and distortion. No characters, symbols, or punctuation can be reliably identified. Therefore, no valid OCR text can be generated that matches the visual content of the source image.
The following table is a simple formula:
- 1.2.3.4.5.6.7.8.9.10.11.12.13.14.15.16.17.18.19.20.21.22.23.24.25.26.27.28.29.30.31.32.33.34.35.36.37.38.39.40.41.42.43.44.45.46.47.48.49.50.51.52.53.54.55.56.57.58.59.60.61.62.63.64.65.66.67.68.69.70.71.72.73.74.75.76.77.78.79.80.81.82.83.84.85.86.87.88.89.90.91.92.93.94.95.96.97.98.99.100
N. 100000000000000000000000000000000000000000000
text_image
1 الشکل اnatural_image
Green battery pack with attached cable, shown in 3D view (no text or symbols on body)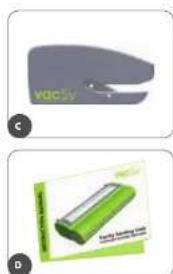
natural_image
Two product packaging images: a gray plastic clip labeled 'vacry' and a green battery pack labeled 'Sandy Holding reel', both without any visible text or symbols.11
10
AR AR