
ME 443 C - Lawn mower VIKING - Free user manual and instructions
Find the device manual for free ME 443 C VIKING in PDF.
| Product type | Electric lawn mower |
| Brand | Viking |
| Model | ME 443 C |
| Cutting width | 41 cm |
| Cutting height | 25 mm - 75 mm (6 positions) |
| Grass catcher capacity | 55 L |
| Motor type | Universal AC electric motor (Cleva) |
| Power consumption | 1500 W |
| Voltage and frequency | 230 V~, 50 Hz |
| Electrical protection | IPX4 (splash-proof protection) |
| Weight | 22 kg |
| Dimensions (L x W x H) | 138 x 49 x 108 cm |
| Wheels | Front: 180 mm, Rear: 200 mm |
| Blade rotation speed | 2900 rpm |
| Guaranteed sound level | 96 dB(A) |
| Handlebar type | Simple, height-adjustable (2 positions) |
| Cutting height adjustment | Centralized, notched lever |
| Safety | Cut-off bar, slowdown brake (<3s), two-hand operation, catcher lock |
| Cable holder | Yes, anti-disconnection |
| Catcher level indicator | Air flow indicator |
| Maintenance | Cleaning after each use, blade sharpening, checking screws and cables |
| Common spare parts | Cutting blade (ref. 63387020100), Blade fixing screw (ref. 63107602800) |
| Disposal | Recyclable, do not dispose of with household waste |
| Design year | 2015 |
Frequently Asked Questions - ME 443 C VIKING
User questions about ME 443 C VIKING
0 question about this device. Answer the ones you know or ask your own.
Ask a new question about this device
Download the instructions for your Lawn mower in PDF format for free! Find your manual ME 443 C - VIKING and take your electronic device back in hand. On this page are published all the documents necessary for the use of your device. ME 443 C by VIKING.
USER MANUAL ME 443 C VIKING
Thank you for choosing a VIKING quality product.
This product has been produced using state-of-the-art production methods and extensive quality assurance procedures, because our goal is only achieved if you, the customer, are satisfied with your machine.
If you have any questions concerning your machine, please contact your dealer or our sales agency directly.
I hope that your VKING machine will give you great enjoyment.

Dr. Peter Pretzsch
Management
1. Table of contents
Notes on the instruction manual 30
General 30
Instructions for reading the instruction manual 30
Country-specific versions 30
Machine overview 30
For your safety 31
General 31
Clothing and equipment 32
Transporting the machine 32
Before operation 32
Working with your machine 33
Maintenance, cleaning, repairs and storage 34
Storage for prolonged periods without operation 35
Warning - dangers caused by electrical current 35
Disposal 36
Description of symbols 36
Standard equipment 36
Preparing the machine for
operation 37
General 37
Installing the mono handlebar (ME 443 C) 37
Installing dual handlebar (ME 443) 37
Assembling the grass catcher box 37
Controls 37
Mono handlebar (ME 443 C) 37
Dual handlebar (ME 443) 38
Grass catcher box 38
Central cutting height adjustment 38
Level indicator 38
Notes on working with the
machine
General 39
Correct motor load
If the mowing blade blocks
Thermal motor overload protection
Safety devices
Safety devices 39
Two-hand operation 39
Motor run-down brake 39
Operating the machine
Electrical connection 40
Strain relief 40
Switching on the lawn mower 40
Switching off lawn mower 40
Emptying the grass catcher box 40
Maintenance 40
General 40
Cleaning the machine 40
Electric motor and wheels 41
Upper handlebar ME 443 41
Mowing blade maintenance 41
Removing and installing the mowing blade 42
Sharpening the mowing blade 42
Storage (winter break) 42
Transport 43
Transport 43
Minimising wear and preventing damage 43
Environmental protection 44
Standard spare parts 44
CE - manufacturer's declaration of conformity 44
Technical specifications 44
Troubleshooting 45
Service schedule 46
Handover confirmation 46
Service confirmation 46
2. Notes on the instruction manual
2.1 General
This instruction manual constitutes original manufacturer's instructions in the sense of EC Directive 2006/42/EC.
VIKING is continually striving to further develop its range of products; we therefore reserve the right to make alterations to the form, technical specifications and equipment level of our standard equipment.
For this reason, the information and illustrations in this manual are subject to alterations.
2.2 Instructions for reading the instruction manual
Illustrations and texts describe specific operating steps.
All symbols which are affixed to the machine are explained in this instruction manual.
Viewing direction:
Viewing direction when "left" and "right" are used in the instruction manual: the user is standing behind the machine and is looking forwards in the direction of travel.
Section reference:
References to relevant sections and subsections for further descriptions are made using arrows. The following example shows a reference to a section: (2.1)
Designation of text passages:
The instructions described can be identified as in the following examples.
Operating steps which require intervention on the part of the user:
- Release bolt (1) using a screwdriver, operate lever (2)...
General lists:
- Use of the product for sporting or competitive events
Texts with added significance:
Text passages with added significance are identified using the symbols described below in order to especially emphasise them in the instruction manual:

Danger
Risk of accident and severe injury to persons. A certain type of behaviour is necessary or must be avoided.

Warning
Risk of injury to persons. A certain type of behaviour prevents possible or probable injuries.

Caution
Minor injuries or material damage can be prevented by a certain type of behaviour.

Note
Information for better use of the machine and in order to avoid possible operating errors.
Texts relating to illustrations:
Illustrations relating to use of the machine can be found in the front of this instruction manual.
The camera symbol serves to link the figures on the illustration pages with the corresponding text passages in the instruction manual.

2.3 Country-specific versions
VIKING supplies chargers with different plugs and switches, depending on the country of sale.
Chargers with European plugs are shown in the illustrations. Chargers with other types of plug are connected to the mains in a similar way.
3. Machine overview

ME 443:
1 Upper handlebar
2 Quick-clamping devices
3 Lower handlebar
4 Motor hood
5 Front wheel
6 Handle, front
7 Identification plate
8 Housing
ME 443:
9 Rear wheel
10 Cutting height adjustment lever
11 Handle, rear
12 Grass catcher box
13 Level indicator (grass catcher box)
14 Motorstop lever
15 ON button
16 Mains connection
17 Strain relief
ME 443 C:
18 Upper handlebar
19 Handlebar detent lever
20 Handlebar console
21 Motor hood
22 Front wheel
23 Handle, front
24 Identification plate
25 Housing
26 Rear wheel
27 Cutting height adjustment lever
28 Handle, rear
29 Grass catcher box
30 Level indicator (grass catcher box)
31 Motorstop lever
32 Mains connection
33 Strain relief
34 ON button
4. For your safety
4.1 General

These safety regulations must be observed when working with the machine.
0478 121 9920 C - EN

Read the entire instruction manual before using the machine for the first time. Keep in the instruction manual in a safe future reference.
These safety precautions are essential for your safety, however the list is not exhaustive. Always use the machine in a reasonable and responsible manner and be aware that the user is responsible for accidents involving third parties or their property.
Make sure that you are familiar with the controls and use of the machine.
The machine must only be used by persons who have read the instruction manual and are familiar with operation of the machine. The user should seek expert and practical instruction prior to initial operation. The user must receive instruction on safe use of the machine from the vendor or another expert.
During this instruction, the user should be made aware that the utmost care and concentration are required for working with the machine.

Risk of death from suffocation!
Packaging material is not a toy - danger of suffocation! Keep packaging material away from children.
Only give or lend the machine, including any accessories, to persons who are familiar with this model and how to operate it. The instruction manual forms part of the machine and must always be provided to persons borrowing it.
Children, persons with impaired physical, sensory or mental faculties or those lacking the appropriate experience, or
persons who are not familiar with the instructions, must never be allowed to use the machine.
Never allow children under the age of 16 to use the machine.Local regulations may specify a minimum age for users.
The machine must only be operated by persons who are well rested and in good physical and mental condition. If your health is impaired, you should consult your doctor to determine whether working with the machine is possible. The machine should not be operated after the consumption of alcohol, drugs or medications which impair reactions.
The machine is intended for private use.
Caution - risk of accident:
The machine is only intended for mowing lawns. Its use for other purposes is not permitted and may be dangerous or result in damage to the machine.
Due to the physical danger to the user, the machine must not be used for the following applications (incomplete list):
- for trimming bushes, hedges and shrubs,
- for cutting creepers,
- for the care of lawn roofs and balcony boxes,
- for shredding or chopping tree or hedge cuttings,
- for clearing paths (vacuuming, blowing),
- for levelling earth mounds, e.g. mole hills.
- for transporting clippings, except in the grass catcher box intended for this purpose.
For safety reasons, any modification to the machine, except the proper installation of accessories approved by VKING is forbidden and results in voiding of the warranty cover. Information regarding approved accessories can be obtained from your VKING specialist dealer.
In particular, any tampering with the machine which increases the power output or motor speed is forbidden.
It is not permitted to transport objects, animals or persons, particularly children, on the machine.
Particular care is required during use in public green spaces, parks, sports fields, along roads and in agricultural and forestry businesses.

Caution: Danger to health due to vibrations!
Excessive exposure to
vibrations can result in damage
to the cardiovascular or nervous system, particularly in persons with cardiovascular problems. Please consult a physician if you experience symptoms that may have been caused by vibrational loads.
Symptoms of this kind principally affect the fingers, hands or wrists and include (incomplete list):
- numbness,
-pain, - muscular weakness,
- skin discolouration,
- unpleasant tingling sensation.
4.2 Clothing and equipment

Always wear sturdy footwear with high-grip soles when working. Never work barefoot
or, for example, in sandals.

Also always wear sturdy gloves and tie up and secure long hair (headscarf, cap, etc.) when performing maintenance and
cleaning work or when transporting the machine.

Wear suitable safety glasses when sharpening the mowing blade.
Always wear long trousers and tight-fitting clothing when operating the machine.
Never wear loose clothes which may become caught on moving parts (control levers) - do not wear jewellery, ties or scarves.
4.3 Transporting the machine
Always wear gloves in order to prevent injuries due to sharp-edged and hot components.
Switch off the machine prior to transport, disconnect the power cable and allow the blade to come to a standstill.
Only transport the machine once the motor has cooled down.
Take the weight of the machine into account and use suitable loading aids (loading ramps, lifters) if necessary.
Secure the machine and any machine components being transported (e.g. grass catcher box) on the load floor using fastening material of adequate size (belts, ropes, etc.).
Avoid contact with the mowing blade when lifting and carrying the machine.
Observe the information in the section "Transport". It describes how to lift and lash the machine. ( 13.1)
When transporting the machine, always observe regional legislation, especially regarding load security and the transport of objects on load floors.
4.4 Before operation
Make sure that only persons who are familiar with the instruction manual are permitted to use the machine.
Observe the local regulations regarding permitted operating times for gardening power tools with combustion engines or electric motors.
Carefully inspect the complete area on which the machine is to be used and remove any stones, sticks, wires, bones and other foreign objects which could be thrown up by the machine. Obstacles (e.g. tree stumps, roots) can be easily overlooked in long grass.
For this reason, mark all foreign objects (obstacles) which are hidden in the lawn and cannot be removed before commencing work with the machine.
All faulty, worn or damaged parts must be replaced before using the machine. Replace any illegible or damaged danger signs and warnings on the machine. Your
VIKING specialist has a supply of replacement stickers and all the other spare parts.
The machine must only be used in good operating condition. Before each use, check whether:
- The machine is properly assembled.
- The cutting tool and the entire cutting unit (mowing blade, fastening attachments, mowing deck housing) are in good condition. In particular check for secure fastening, damage (notches or cracks) and wear.
- The safety devices (e.g. discharge flap, housing, handlebar, motorstop lever) are in good condition and working properly.
- The grass catcher box is undamaged and correctly installed; a damaged grass catcher box must not be used.
- The run-down brake of the electric motor is functioning.
Carry out any necessary work or consult a specialist dealer. VIKING recommends VIKING specialist dealers.
Observe the instructions in section "Dangers caused by electrical current" ( 4.8) .
Never switch the motor on without a correctly installed blade. Risk of motor overheating.
4.5 Working with your machine

Never work when animals or persons, particularly children, are in the danger area.
The switch and safety devices installed in the machine must not be removed or bypassed. In particular, never secure the motorstop lever to the handlebar (e.g. by tying it).

Caution - risk of injury!
Never put hands or feet on or underneath rotating parts.
Never touch the rotating blade.
Always keep away from the discharge opening.
Always observe the safety distance provided by the handlebar. The handlebar must always be installed correctly and must not be modified. Never operate the machine with the handlebar folded down.
Never attach any objects to the handlebar (e.g. work clothing). Extension cables must never be wrapped around the handlebar.
Only work during the day or with good artificial light.
Do not work at ambient temperatures below +5^ (41^)
Do not operate the machine in the rain or during thunder storms, particularly when there is a risk of lightning strike.
The risk of accidents is higher if the ground is damp due to increased danger of slipping.
Particular caution should be exercised during working in order to prevent slipping. If possible, avoid using the machine when the ground is damp.
Do not leave the machine in the rain.
Switching on the machine:
Exercise care when switching on the machine and observe the instructions in the section "Initial operation of the
machine". ( 11.)
Keep your feet a safe distance from the cutting tool.
Place the machine on an even surface for before switching it on.
The machine must not be tilted before it is switched on or during switching-on.
Do not switch on the motor if the discharge chute is not covered by the discharge flap or the grass catcher box.
Avoid switching the machine on repeatedly within a short period of time; in particular avoid "playing" with the ON button. Risk of motor overheating.
Working on slopes:
Always work across and back on slopes, never up and down.
If the user loses control when mowing up and down, there is a risk of being run over by the machine.
Be particularly careful when changing direction on a slope.
Always ensure good stability on slopes and avoid mowing on excessively steep slopes.
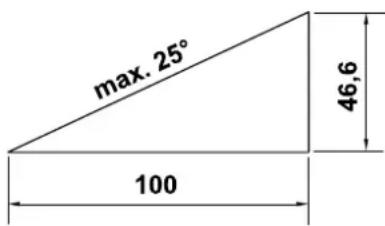
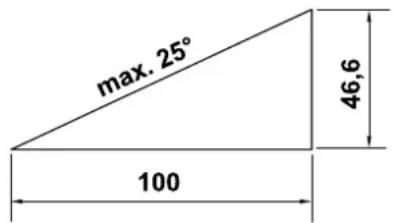
For safety reasons, the machine must not be used on slopes with an inclination of more than 25^ (46.6%) . Risk of injury! A slope inclination of 25^ corresponds to a vertical height increase of 46.6~cm for a 100~cm horizontal distance.
Working:
Caution - risk of injury! Never put hands or feet on or underneath rotating parts. Never touch the rotating blade.
Always keep away from the discharge opening. Always observe the safety distance provided by the handlebar.

Do not try to examine the blade while the machine is operating. Never open the discharge flap
and/or remove the grass catcher box when the mowing blade is running. Rotating blades can cause injury.
Only operate the machine at walking speed - never run when working with the machine. Working quickly with the machine increases the risk of injury due to stumbling, slipping, etc.
Be particularly careful when turning the machine around or pulling it towards you. Risk of stumbling!
Never lift or carry the machine with the motor running or the mains lead connected.
Objects hidden in the turf (lawn sprinkler systems, posts, water valves, foundations, electrical wires, etc.) must be avoided. Never run over any such foreign objects.
If the cutting tool or the machine hits an obstacle or a foreign object, the motor must be switched off, the power cable disconnected and an inspection performed by a specialist.

Beware of the cutting tool running on for several seconds before coming to a standstill. Switch off the motor,
- if tilting of the machine is necessary when transporting over surfaces other than grass,
- when pushing the machine to and from mowing areas,
- before removing the grass catcher box.
before adjusting the cutting height.

Switch off the motor, disconnect the mains plug and ensure that the cutting tool has come to a standstill
- before remedying blockages, including those in the discharge chute,
- if the cutting tool has hit a foreign object. The cutting tool must be checked for possible damage. The machine must not be operated with a damaged or bent blade shaft or motor shaft. Risk of injury through defective parts!
before you check, clean or carry out work on the machine (e.g. adjusting the cutting height, opening or adjusting the handlebar);
before leaving the machine unattended; - before lifting, or carrying the machine;
before transporting the machine. - after hitting a foreign object or if the machine begins to vibrate excessively. In these cases check the machine, in particular the cutting unit (blade, blade shaft, blade fastening) for damage and carry out the necessary repairs before restarting and working with the machine.

Risk of injury!
Strong vibrations are generally an indication of a fault. In particular, the machine must not be operated with a damaged or bent blade shaft or mowing blade. If you do not have the appropriate expertise, have the necessary repairs carried out by a specialist dealer (VIKING recommends VKING specialist dealers).
Owing to the voltage fluctuations caused by this machine during the run-up period, other devices connected to the same circuit may be subject to interference in the case of unfavourable power supply conditions. In this case, appropriate steps should be taken (e.g. connection to a different circuit than the one used by the affected device, or operation of the machine using a circuit with a lower impedance).
4.6 Maintenance, cleaning, repairs and storage

Before performing any work on the machine, before adjusting or cleaning the machine, or before
checking whether the electric cable is entwined or damaged, switch off the machine and disconnect the mains plug.
Allow the machine to fully cool down before storing it in enclosed places, performing maintenance on it or cleaning it.
Cleaning:
The complete machine must be cleaned thoroughly following use. ( 12.2)
Remove accumulated clipping deposits using a stick. Clean the underside of the mower with water and a brush.
Never use high-pressure cleaners and do not clean the machine under running water (e.g. using a garden hose).
Do not use aggressive cleaning agents. These can damage plastics and metals, impairing the safe operation of your VKING machine.
In order to prevent fire hazards, keep the area around the air vents between the motor hood and housing free from e.g. grass, straw, moss, leaves or escaping grease.
Maintenance operations:
Only maintenance operations described in this instruction manual may be carried out. Have all other work performed by a specialist dealer.
If you do not have the necessary expertise or auxiliary equipment, please always contact a specialist dealer.
VIKING recommends that you have maintenance operations and repairs performed exclusively by a VKING specialist dealer.
VIKING specialist dealers regularly attend training courses and are provided with technical information.
Only use tools, accessories or attachments approved for this machine by VKING or technically identical parts. Otherwise, there may be a risk of accidents resulting in personal injury or damage to the machine. If you have any questions, please consult a specialist dealer.
The characteristics of original VKING tools, accessories and spare parts are optimally adapted to the machine and the user's requirements. Genuine VKING
spare parts can be recognised by the VKING spare parts number, by the VKING lettering and, if present, by the VKING spare parts symbol. On smaller parts, only the symbol may be present.
Always keep warning and information stickers clean and readable. Damaged or missing stickers must be replaced by new, original plates from your VIKING specialist dealer. If a component is replaced with a new component, ensure that the new component is provided with the same stickers.
Only perform work on the cutting unit when wearing thick work gloves and exercising extreme care.
Ensure that all nuts, pins and screws (in particular the blade fastening screw) are securely tightened so that the machine is in a safe operating condition.
Check the complete machine and the grass catcher box for wear or damage on a regular basis, particularly before extended periods when the machine is not in use (e.g. over winter). For safety reasons, worn or damaged parts must be replaced immediately to ensure that the machine is always in a safe operating condition.
Components or guards that are removed for maintenance operations must be properly reinstalled immediately.
Regularly check that the mowing blade is securely fastened and is not damaged or worn.
4.7 Storage for prolonged periods without operation
Store the cooled machine in a dry and locked place.
Ensure that the machine is protected from unauthorised use (e.g. by children).
Thoroughly clean the machine before storage (e.g. winter break).
Store the machine in good operational condition.
4.8 Warning - dangers caused by electrical current

Warning: Risk of electric shock!
Particularly important for electrical safety are the power cable, mains plug, On/Off switch and electric cable. Damaged connectors and plugs, or cables that do not conform regulations must not be used to prevent any risk of electro

Therefore, check the electric cable regularly for signs of damage or ageing (brittleness).
Never use a damaged extension cable. Replace defective cables with new ones and never repair extension cables.
Never use the machine if the cables are damaged or worn. Check the power cable in particular for damage and ageing.
Maintenance and repair work on power cables must only be performed by specially qualified technicians.
Danger of electric shock!
Do not connect a damaged cable to the mains and only touch a damaged cable once it has been disconnected from the mains.
Danger of electric shock!
Damaged cables, connectors and plugs, or electric cables which do not conform with regulations may not be used.
Only touch the cutting units (blades) when the machine is disconnected from the mains.
Always ensure that the power cables used are adequately protected by a fuse.

Although the motor is splashproof, do not use the machine when it is raining or in wet environments.
Only use extension cables that are insulated against moisture for outdoor use which are suitable for use with the machine ( 11.1)
Keep the electric cable away from the blade when mowing.
Detach electric cables at the plug and socket and not by pulling on the electric cable.
It must be noted that current fluctuations can damage the machine when it is connected to a power generator.
Only connect the machine to a power supply that is protected by means of a residual current-operated protective device with a release current of a maximum of 30mA . Your electrician can provide further information.
For reasons of electrical safety, the electric cable must always be correctly installed on the handlebar.
4.9 Disposal
Ensure that old machines are properly disposed of. Render the machine unusable prior to disposal. In order to
prevent accidents, ensure that you remove the power supply cable or the electric cable to the motor.
Risk of injury due to the cutting tool! Always store an old machine in a safe place prior to scrapping. Ensure that the machine and the cutting tool are kept out of the reach of children.
5.Description of symbols
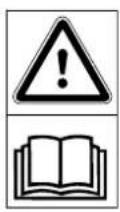
Caution! Read the instruction manual before initial use.
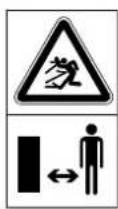
Risk of injury: Keep other persons out of the danger area.
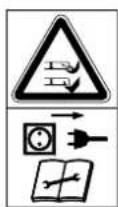
Risk of injury! Beware of the sharp mowing blade. The mowing blade runs on for several seconds after switching off (motor/blade brake). Before performing any work on the cutting tool, before carrying out maintenance and cleaning work, before checking whether the electric cable is entwined or damaged, or before leaving the machine unattended, switch off the motor and disconnect the plug.
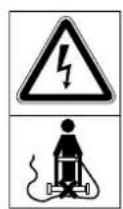
Danger of electric shock! Keep the electric cable away from the cutting tool.
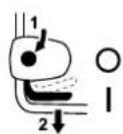
ME 443: Switch on the motor.
ME 443 C: Switch on the motor.
ME 443 C: Switch off the motor.
6. Standard equipment
ME 443, ME 443 C:

Item Designation Qty.
A Basic unit 1
B Upper part of grass catcher 1 box
C Lower part of grass catcher box
D Pin 2
-Instruction manual 1
ME 443:
E Quick-clamping device 2
F Screw 2
G Cable guide 1
H Cable clip 1
I Handlebar protection 2
ME 443 C:
J Sleeve 1
K Screw 1
L Washer 2
M Nut 1
The standard equipment may vary depending on the country and version type.
7. Preparing the machine for operation
7.1 General
Risk of injury! Observe the safety instructions in the section "For your safety" ( 4.)
- Place the machine on level and firm ground when performing all the operations described.
7.2 Installing the mono handlebar (ME 443 C)
- Insert the sleeve (J) in the bore on the handlebar (1).
- Fit the two washers (L) with the convex side facing inwards onto the sleeve in the handlebar (1).
-
Hold the sleeve (J) and washers (L) and insert together with the handlebar (1) into the holder on the handlebar console (2).
-
Insert the screw (K) from the outside inwards through the bores in the handlebar (1) and in the handlebar console (2). Screw on the nut (M) and tighten the screw (K) to a torque of 20-25 Nm.
Installing the electric cable:
- Insert the electric cable (3) in the holders (4) of the strain relief moulding on the handlebar console as shown.
7.3 Installing dual handlebar (ME 443)
- Insert the screw (F) through the bore in the cable guide (G).
- Fit the upper handlebar (2) onto the lower handlebar sections (1).
- Attach the cable guide (G) to the electric cable (3) and insert the screw (F) through the bore from the inside outwards.
- On the opposite side, insert the screw (F) from the outside inwards through the bores.
- Fit the handlebar protection (I) and screw the quick clamping devices (E) onto the screws (F) (the screw should project by about one screw thread turn) and fold upwards.
- Check correct assembly: The quick-clamping devices (E) must be sufficiently tightened so that they are pressed tightly against the handlebar and the upper handlebar is firmly connected to the lower handlebar. If the handlebar is not firmly installed or the quick-clamping devices are not correctly located, open the quick-clamping devices and turn them until they are securely fastened.
Installing cable clip:
Danger of electric shock! In order to prevent damage to the insulating layer on the handlebar, only press on the cable clips by hand. Do not use any tools (e.g. hammer or screwdriver).
- Fasten the electric cable (3) to the upper handlebar with the cable clip (H). Ensure a distance of 25 - 27 cm between cable clip and switch on upper handlebar.
- Insert the electric cable (3) into the holder (4) of the handlebar console as shown.
7.4 Assembling the grass catcher box

- Fit the upper part of the grass catcher box (B) onto the lower part of the grass catcher box (C). Ensure correct location in the guides.
- Push pin (D) through the bores provided from inside.
- Allow the upper part of the grass catcher box (B) to engage in the lower part of the grass catcher box using slight pressure.
- Attach the grass catcher box (⇒ 8.3).
8. Controls
8.1 Mono handlebar (ME 443 C)
The lawn mower ME 443 C is equipped with an adjustable mono handlebar.


Danger of electric shock!
The electric cable must always be attached to the quick-release clamp body and the handlebar console.

Danger of pinching!
Before actuating the detent lever (1), hold the upper
handlebar (2) with one hand at its highest point and lift (relieve load) slightly.
After actuation of the detent lever, the upper handlebar can fall to the lowest position under its own weight.
Never place your finger between the handlebar and the handlebar console (under the detent lever).
1 Folding down the handlebar:
Transport position (for cleaning, for space-saving transport and for storage of the machine):
- Press the detent lever (1) downwards and hold.
- Fold the handlebar (2) down forwards, ensuring that the electric cable is not damaged.
Working position (to push machine):
- Fold the handlebar (2) up rearwards and ensure that the handlebar is fully engaged.
2 Height adjustment:
The height of the mono handlebar can be adjusted to 2 levels:
- Press the detent lever (1) downwards and hold.
-
Move the handlebar (2) into the required position.
-
Release the detent lever (1) and ensure that the handlebar is again fully engaged.
8.2 Dual handlebar (ME 443)

Danger of pinching!
The upper handlebar can be folded down by releasing the quick release caps. For this reason, always hold the upper handlebar (2) with one hand at its highest point when you open the quick-release caps.
Transport position (for cleaning, for space-saving transport and for storage of the machine):
- Open the quick-clamping devices (1) - fold downwards - and fold the upper handlebar (2) forwards, ensuring that the electric cable is not damaged.
Working position (to push machine):
- Fold up the upper handlebar (2) rearwards and hold with one hand.
- Close the quick-clamping devices (1) - fold upwards.
8.3 Grass catcher box

Attaching:
- Open the discharge flap (1) and hold it open.
- Attach the grass catcher box (2) to the mountings (3) on the rear of machine by means of the locating lugs.
- Close the discharge flap (1).
Detaching:
- Open the discharge flap (1) and hold it open.
- Lift the grass catcher box (2) and remove it rearwards.
- Close the discharge flap (1).
8.4 Central cutting height adjustment

Six different cutting heights between 25mm and 75mm can be set.
Level 1 = lowest cutting height
Level 6 = highest cutting height
Setting cutting height:
- Hold the handle (1), pull the lever (2) upwards and hold.
- Set the required cutting height by moving the machine upwards and downwards. The current cutting height can be read off at the cutting height indicator (3) by means of the marking (4).
- Release the detent lever (2) and allow it to engage.
8.5 Level indicator

The upper part of the grass catcher box features a level indicator (1).
The flow of air that is created by the rotary movement of the mowing blade and is responsible for filling the grass catcher box raises the level indicator (2):
The grass catcher box is filled with clippings.
When the grass catcher box is full, this flow of air is reduced and the level indicator drops (3):
- Empty filled grass catcher box ( 11.5) .
9. Notes on working with the machine
9.1 General

Risk of injury!
Untangle any knots in the cable immediately.
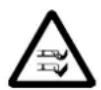
Guide the electric cable behind you when mowing. Electric cables can be inadvertently cut when mowing and present a tripping hazard. They therefore involve a high accident risk. For this reason, mow so that the electric cable is always visible in the area of grass that has already been cut.
To ensure a perfect, thick lawn, mow regularly and keep the grass short.
Do not cut the lawn too short in hot, dry conditions as it will dry out or burn in the sun and become unsightly.
The cutting pattern will be better with a sharp blade than with a blunt one; the blade should therefore be sharpened regularly (VIKING specialist dealer).
9.2 Correct motor load
Do not switch on the lawn mower in tall grass or at the lowest cutting height.
The lawn mower load must never cause the motor speed to drop significantly.
If the speed drops, select a higher cutting height setting and/or reduce the rate of feed.
9.3 If the mowing blade blocks
Switch off the motor immediately and disconnect the mains plug. Then eliminate the cause of the fault.
9.4 Thermal motor overload protection
If an overload of the motor occurs during operation, the built-in thermal overload protection device automatically switches off the motor.
Causes for an overload:
- mowing excessively high grass or cutting height adjusted too low,
excessive rate of feed, - inadequate cleaning of the cooling air guide (inlet slots),
- mowing blade is blunt or worn,
unsuitable or excessively long electric cable-voltage loss ( 11.1)
Recommencing operation
Resume normal operation of the machine following a cooling period of up to 10min (depending on the ambient temperature) ( 11.)
10. Safety devices
The machine is equipped with several safety devices for safe operation and for the prevention of improper use.

Risk of injury
If a safety device is found to be defective, the machine must not be operated. Consult a specialist dealer; VIKING recommends VIKING specialist dealers.
10.1 Safety devices
The lawn mower is equipped with safety devices, which prevent inadvertent contact with the mowing blade and with ejected clippings.
These include the housing, discharge flap, grass catcher box and correctly-installed handlebar.
10.2 Two-hand operation
The motor can only be switched on by pressing and holding the ON button with the right hand and then pulling the motorstop lever to the handlebar with the left hand.
10.3 Motor run-down brake
When the motorstop lever is released, the mowing blade comes to a complete standstill in less than three seconds.
An integrated motor run-down brake shortens the run-down time until the blade stops.
11. Operating the machine
11.1 Electrical connection

Danger of electric shock!
Observe the safety instructions in the section "For your safety" ( 4) .
If using a cable drum, the connection cord must be unwound completely, otherwise electrical resistance may cause loss of power and overheating.
Only electric cables which are no lighter than rubber sheathed cables H07 RN-F DIN/VDE 0282 may be used as electric cables.
Recommended minimum cross-section:
up to 25 m Length: 3 × 1.5 mm^2 up to 50 m Length: 3 × 2.5 mm^2
The connectors of the electric cable must be made of rubber or have a rubber cover and conform to the standard DIN/VDE 0620.
The mains voltage and mains frequency must correspond to the information on the identification plate and the information contained in the section "Technical specifications" ( 18)
The power cable must be adequately protected by a fuse ( 18)
This machine is intended for operation with a power supply having a system impedance of Z_max at the transfer point (house connection) of maximum 0.49 ohms (at 50Hz ).
The user must ensure that the machine is only operated with a power supply which meets this requirement. If necessary, this information can be obtained from the local electric power company.
11.2 Strain relief
During working, the strain relief prevents any unintentional disconnection of the electric cable and any resulting damage to the mains connection on the machine.
For this reason, the electric cable must be fed through the strain relief.
- Form a loop in the power cable (1) and guide it through the opening (2).
- Then push the loop over the hook (3) and pull it tight.
11.3 Switching on the lawn mower

Do not start the motor in high grass or when the mower is set to the lowest cutting height, as this makes switching on difficult.
- Press and hold down the ON button (1). Pull motorstop lever (2) to handlebar and hold.
The ON button (1) can be released once motorstop lever (2) is pressed.
11.4 Switching off lawn mower
- Release motorstop lever (1). Motor and mowing blade come to a stop after a short run-down time.

11.5 Emptying the grass catcher box


Risk of injury!
The motor must be stopped for safety reasons before removing the grass catcher box.
- Detach the grass catcher box. ( 8.3)
- Open the grass catcher box at the tab (1). Fold up the upper part of the grass catcher box (2) and hold. Fold the grass catcher box rearwards and empty the clippings.
- Close the grass catcher box.
- Attach the grass catcher box. ( 8.3)
12. Maintenance
12.1 General

Risk of injury!
Observe the safety instructions in the section "For your safety" (→ 4.).
Annual service by the specialist dealer:
The lawn mower should be inspected once annually by a specialist dealer. VIKING recommends VIKING specialist dealers.
12.2 Cleaning the machine
Maintenance interval: After each use
- Only clean the machine using water, with a brush or with a cloth. Remove accumulated clipping deposits using a stick. If necessary, use a special cleaner (e.g. STIHL special cleaner).

- Never spray water or high pressure cleaners onto switches, motor components, seals or bearing points.

Risk of injury!
Before tipping up the mower, place it on firm, level and flat ground. The machine may tip over when working on it in the cleaning position. Always stand to the side of the machine. Never work in front of or behind the mower.

To facilitate cleaning work, it is recommended to select the highest cutting level before placing the machine in the cleaning position.
Cleaning position ME 443:
- Detach the grass catcher box. ( 8.3)
- Hold the upper handlebar (1) and open the quick-clamping devices - fold downwards.
- Set down the upper handlebar (1) rearwards.
- Open the discharge flap (2) and hold it open.
- Lift up the machine at the front and place in the cleaning position as shown. Check that the machine is stable.
Cleaning position ME 443 C:

Danger of pinching!
After actuation of the detent lever, the upper handlebar can fall to the lowest position under its own weight.
Never place your finger between the handlebar and the handlebar console (under the detent lever).
- Detach the grass catcher box. ( 8.3)
-
Open the discharge flap (2) and hold it open.
-
Press the detent lever (3) downwards with the thumb and hold.
Hold the machine at the front handle and tilt it slowly rearwards. - Release the discharge flap (2) and check that the machine is standing securely.
12.3 Electric motor and wheels
The electric motor is maintenance-free. The wheel bearings are maintenance-free.
12.4 Upper handlebar ME 443
Maintenance interval: Before each use
The upper handlebar is coated with a insulating layer. Should this layer become damaged, the upper handlebar must be replaced.
12.5 Mowing blade maintenance
Maintenance interval: Before each use
- Tilt the mower upwards into the cleaning position. ( 12.2)
- Clean the mowing blade (1) and check it for damage (notches or cracks) and wear; replace if necessary.
-
Use a slide calliper (not included in standard equipment) to measure blade thickness at 5 points at least. In particular, the minimum thickness must also be ensured in the area of the blade wings.
-
Place a ruler (2) against the front blade edge and measure permissible grinding.

Risk of injury!
A worn or damaged mowing blade may break off and cause serious injuries. The instructions for blade maintenance must therefore always be observed.
Blades are subjected to differing degrees of wear depending on the location and duration of use. If you use the machine on sandy ground or use it frequently under dry conditions, the blade will be subjected to greater loads and will wear more quickly than the average.
Wear limits:
Distance A:
The cutting edges may not be ground back by more than 15mm
Distance B:
The minimum width of the mowing blade must not be less than 39mm
Distance C:
The blade thickness must be at least 2mm at any point.
The check should be performed using a slide calliper.
If the supplied standard blade is not installed in the lawn mower, but e.g. the multi-blade, which is available as a special accessory, different wear limits apply.
12.6 Removing and installing the mowing blade

In order to prevent damage to the blade fastening screw, use a suitable 22mm hexagon socket (not included in standard equipment).
1 Removing:
- Use a suitable wooden block (1) to counterchold the mowing blade (2).
- Tighten the blade fastening screw (3). Remove the mowing blade (2) and blade fastening screw (3).
2 Installing:
Risk of injury! The mowing blade (2) must only be installed as shown. The tabs (6) must face downwards (to the lawn) and the curved wings must point upwards (to the machine).
Observe the specified torque of 10 - 15 Nm when tightening the blade fastening screw, as the secure attachment of the cutting tool depends on this. Additionally secure the blade fastening screw (3) with Loctite 243.
The blade fastening screw (3) must be replaced each time the blade is replaced.
- Clean the blade contact surface and blade bushing.
-
Fit the mowing blade (2) onto the blade bushing with the curved edges pointing upwards. Locating lugs (4) must be located in bores (5) of the mowing blade.
-
Use a suitable wooden block (1) to counterchold the mowing blade (2).
- Screw in the blade fastening screw (3) and tighten to a torque of 10 - 15 Nm.
12.7 Sharpening the mowing blade
Risk of injury!
Check the blade for damage before installing. The blade must be replaced if notches or cracks are identified, if the cutting edges have been sharpened back by more than 15mm or if the blade is thinner than 2mm at any point ( 12.5) .
VIKING recommends having the mowing blade sharpened by a technician.
Operation of the machine is impaired in the case of an incorrectly sharpened blade (incorrect sharpening angle, imbalance etc.).
Sharpening instructions:
- Remove the mowing blade ( 12.6) .
Cool the mowing blade when sharpening, e.g. with water. The blade must not be allowed to display blue colouring, as this would reduce its cutting quality. - Sharpen the blade evenly to prevent vibrations due to imbalance.
- Observe a sharpening angle of 30^ .
After sharpening, remove any sharpening burr at the cutting edge using fine sandpaper if necessary.
12.8 Storage (winter break)
Store the machine in a dry and locked place that is generally free of dust. Make sure that it is kept out of the reach of children.
Only store the lawn mower in good operating condition, fold down the handlebar if necessary.
Keep all nuts, pins and bolts tightly fastened, replace danger signs and warnings on the machine that have become illegible, check the entire machine for wear and damage. Replace all worn or damaged parts.
Any machine faults must be completely remedied prior to storage.
Note the following points when storing the lawn mower for long periods (winter break):
- Clean all external parts of the machine with care.
- Thoroughly lubricate/grease all moving parts.
13. Transport
13.1 Transport


Risk of injury!
Observe the section "For your safety" before transporting. ( 4.)
Always wear suitable safety clothing when transporting (safety shoes, thick gloves).
Always disconnect the power cable before lifting or transporting. For safety reasons, VKING
recommends lifting or carrying the machine only with the aid of a second person.
Before lifting, note the weight indicated in the "Technical specifications" section.
Carrying the machine:
-
Two persons:
Only hold the machine at the front handle (1) and at the handlebar (3). Always ensure sufficient distance between the mowing blade and your body, particularly your feet and legs.
One person: -
Lift and carry the machine using both hands, with one hand at the upper transport handle (2) and the other hand at the lower transport handle (1).
Securing the machine (lashing):
- Secure the machine on the load floor using suitable fastening materials.
- Attach ropes or straps at the points marked (4).
14. Minimising wear and preventing damage
Important information on maintenance and care of the product group
lawn mower, manually-operated and mains-powered (ME)
VIKING assumes no liability for material or personal damage caused by the non-observance of information contained in the operating instructions, in particular with regard to safety, operation and maintenance, or which arise through the use of unauthorised attachment or spare parts.
Please always observe the following important information for the prevention of damage or excessive wear to your VKING machine:
1. Wearing parts
Some parts of the VIKING machine are subject to normal wear even when used properly and must be replaced in due time depending on type and duration of use.
These include:
- blades
2. Compliance with the information in this instruction manual
The VKING machine must be used, maintained and stored with the care described in this instruction manual. Any damage caused by non-compliance with the safety, operating and maintenance instructions is the sole responsibility of the user.
This applies in particular to:
-
inadequately dimensioned power cables (cross section),
-
incorrect electrical connection (voltage),
- product modifications not approved by VKING,
- the use of tools or accessories which are not approved or suitable for the machine, or are of inferior quality,
-improper use of the product, - use of the product for sporting or competitive events,
resultant damage due to continued use of the product with defective components.
3. Maintenance operations
All operations listed in the section "Maintenance" must be performed regularly.
If these maintenance operations cannot be carried out by the user, a specialist dealer must be commissioned to perform them.
VIKING recommends that you have maintenance operations and repairs performed exclusively by a VKING specialist dealer.
VIKING specialist dealers regularly attend training courses and are provided with technical information.
If these operations are neglected, faults may arise which are the responsibility of the user.
These include:
- damage to the motor as a result of inadequate cleaning of the cooling air guide (inlet slots),
corrosion and other resultant damage caused by incorrect storage,
damage to the machine through the use of inferior-quality spare parts,
damage due to untimely or inadequate maintenance or damage due to maintenance or repair work not performed in the workshops of specialist dealers.
15. Environmental protection
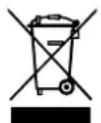
Lawn clippings should be composted and not disposed of in household waste.
The machine, its packaging and accessories are all produced
from recyclable materials and must be disposed of accordingly.
By disposing of materials separately, and in an environmentally friendly manner, valuable resources can be re-used. For this reason, the machine should be disposed of for recycling at the end of its useful life. Pay particular attention to the information in the "Disposal" section during disposal ( 4.9) .
Consult your recycling centre or your specialist dealer for information on the proper disposal of waste products.
16. Standard spare parts
Mowing blades
63387020100
Blade fastening screw
63107602800
The fastening elements for the mowing blade (e.g. blade fastening screw) must be replaced when replacing the blade, i.e. when installing the blade. Spare parts are available from a VKING specialist dealer.
17. CE - manufacturer's declaration of conformity
We,
VIKING GmbH
Hans Peter Stihl-Strasse 5
declare that the machine,
lawn mower, manually-operated and mains-powered (ME)
manufacturer's brand:
type:ME 443.1
VIKING
ME 443.1 C
Serial number 6338
conforms to the following EU directives: 2000/14/EC, 2011/65/EC, 2002/96/EC, 2004/108/EC, 2006/95/EC, 2006/42/EC
The products have been developed in conformance with the following standards: EN 60335-1, EN 60335-2-77
Applicable conformity assessment procedure: Appendix VIII (2000/14/EC)
Name and address of relevant, named location:
Compilation and storage of technical documentation: Johann Weiglhofer
VIKING GmbH
The year of manufacture and serial number appear on the identification plate of the machine.
Measured sound power level: 94.0 dB(A)
Guaranteed sound power level: 96 dB(A)
Langkampfen, 2015-01-02 (YYYY-MM-DD)
VIKING GmbH

Research and Product Development Manager
18. Technical specifications
ME 443.1 / ME 443.1 C:
Serial number 6338
Motor, design: Electric motor
Manufacturer: Cleva
type:Universal AC
electric motor
Voltage: 230V
Power input: 1500 W
Frequency: 50 Hz
Fuse: 7 A
Protection class: II
ME 443.1 / ME 443.1 C:
Type of protection: IPX 4
Cutting utilities: Cutter bar
Cutting width: 41 cm
Speed of cutting
utilities: 2900 rpm
Cutter bar drive: permanent
Tightening torque for
blade fastening
screw: 10 - 15 Nm
Wheel diameter
(front): 180 mm
Wheel diameter
(rear): 200 mm
Grass catcher box: 551
Cutting height: 25 - 75 mm
ME 443.1:
In accordance with Directive 2000/14/EC:
Guaranteed sound
power level L_WAd 96 dB(A)
In accordance with Directive 2006/42/EC:
Sound pressure level
at workplace L_pA 82 dB(A)
Uncertainty K_pA 2 dB(A)
Specified vibration characteristic in accordance with EN 12096:
Measured value _hw 1.40 m/sec2
Uncertainty K_hw 0.70 m/sec2
Measurement in accordance with EN 20643
L/W/H: 138/49/107 cm
Weight: 20 kg
Weight (Great Brit-ain only): 21 kg
ME 443.1 C:
In accordance with Directive 2000/14/EC:
ME 443.1 C:
Guaranteed sound
power level L_WAd 96 dB(A)
In accordance with Directive 2006/42/EC:
Sound pressure level
at workplace L_pA 82 dB(A)
Uncertainty K_pA 2 dB(A)
Specified vibration characteristic in accordance with EN 12096:
Measured value a_hw 1.30 m/sec²
Uncertainty K_hw 0.65 m/sec2
Measurement in accordance with EN 20643
L/W/H: 138/49/108 cm
Weight: 22 kg
19. Troubleshooting
If necessary, contact a specialist dealer; VIKING recommends VIKING specialist dealers.
Fault:
Motor does not start
Possible cause:
-
No mains voltage
-
Connection cable, plug, plug connector or switch defective
-
Start button not pressed
Motor is overloaded because the grass is too tall or too wet
-
Motor overload protection activated
-
Mower housing is blocked
-Fuse in plug faulty (GB version)
Remedy:
- Check fuse ( 11.1)
-
Check cable/plug/switch and replace if necessary (⇒ 11.1)
-
Press start button (⇒ 11.3)
- Do not switch on motor in high grass, adapt cutting height ( 8.4)
- Allow machine to cool down (⇒ 9.4)
Clean mower housing ( 12.2)
-Replace fuse in plug (x)
Fault:
Frequently tripped mains fuse
Possible cause:
- Unsuitable electric cable
Power overload
Machine is overloaded due to mowing grass which is too long or too wet
Remedy:
- Use suitable electric cable (⇒ 11.1)
- Connect machine to another circuit
- Adapt cutting height and mowing speed to mowing conditions ( 8.4)
Fault:
Excessive vibration during operation
Possible cause:
- Blade fastening screw is loose
- Blade is not balanced
Remedy:
-Tightenbladefasteningscrew ( 12.6)
- Re-sharpen (balance) or replace blade ( 12.7)
Fault:
Poor cut, lawn turning yellow
Possible cause:
- mowing blade is blunt or worn,
rate of feed is too high in relation to the cutting height
Remedy:
-
Re-sharpen or replace mowing blade ( 12.7)
-
Reduce rate of feed and/or select correct cutting height (⇒ 8.4)
Fault:
Problems switching machine on or deteriorating motor power.
Possible cause:
- Mowing grass which is too long or too wet
Mower housing is blocked
Remedy:
-Adapt cutting height and mowing speed to mowing conditions ( 8.4)
Clean mower housing (disconnect mains plug before cleaning) ( 12.2)
Fault:
Ejection chute blocked
Possible cause:
- Mowing blade is worn
- Mowing grass which is too long or too wet
Remedy:
-Replace mowing blade ( 12.7)
-Adapt cutting height and mowing speed to mowing conditions ( 8.4)
20. Service schedule
20.1 Handover confirmation
Model:
Serial number:

Date:
Next service
Date:
20.2 Service confirmation
Please hand this instruction manual to your VKING specialist dealer in the case of maintenance work.
He will confirm the service operations performed in the pre-printed boxes.

Service performed on

Next service date

Chere cliente, cher client,
Transport 62 Transport 62
J Huls 1
K Bout 1
L Ring 2
M Moer 1
Classification: IPX 4
Meting conform EN 20643
L/B/H: 138/49/107 cm
Gewicht: 20 kg
Meting conform EN 20643
L/B/H: 138/49/108 cm
Gewicht: 22 kg
19. Defectopsoring
2004/108/EC, 2006/95/EC, 2006/42/EC
2015-01-02 (AAAA-MM-DD)
VIKING GmbH

Weighlofer
8.1 Mono-style (ME 443 C)
Gressklipperen ME 443 C er utstyrt med et justerbart mono-styre.


Fare for elektrisk stot!
Strömkabelen ma alltid vare festet i styremansjetten og styrekonsollen.

Klemfare!
För du aktiverer lasearmen (1), tar du tak med en hand overst pa styreoverdelen (2) og løfter forsiktig opp (for avlasting).
2004/108/EC, 2006/95/EC, 2006/42/EC
Varning - risk for olycksfall!
2004/108/EC, 2006/95/EC, 2006/42/EC
Uppmatt ljdnivà: 94,0 dB(A)
Garanterad ljudniva: 96 dB(A)
Langkampfen,
2015-01-02 (AAAA-MM-DD)
VIKING GmbH

4.3 Transport of maskinen
Risiko for at snuble!
Undlad at lofte ellere maskinen med korende el-motor eller med tilsluttet ledning.
erklaerer, at maskinen
2004/108/EC, 2006/95/EC, 2006/42/EC
Anvendt procedure for
overensstemmelsesvurdering:
Tillaeg VIII (2000/14/EC)
Navn og adresse paa pagaeldende myndighed:
Motor, type: Elmotor
Producent: Cleva
Type: Vekselstrøms
universalelmotor
Spaending: 230 V~
Forbrugseffekt: 1500 W
Frekvens: 50 Hz
Sikring: 7 A
Kata tic epyaoiec 205
Suvnpn,KaOaipouoc,ETIOKEVc Ka aTIOHKeuon 207
AToOhKeUoN Oe yauTepa
delta nuaTn ta TnC TnC
LeitoupyiaC 208
Ipooox- Kivduvoi aTó nEeKtpiko 208
Atróppiη 209
E K K E V W O N T O U XOPTOUAAKKTN (11.5).
10.1 Pooataeutikc diataeic
To xlookottko mnxavma eivai
eotlaioevo ME TPOOATEUKEc SIATAEIC
Tou aOTpETOUV TM AOKOIA ETTaHm To
maxapi KOTNC KA TO UAIKO KOTNC. ^ autec tic diataleic TEPIAUABVetai to
TEPIBAAuTO tOtou EeynC, O
XoptouuAektnc kAI TO Owot
TOTIOETMEVO TUOVI.
10.2 Xeipiooic 8du xepia
O nEeKtpokivmpac mTpei va
evepyoointhe i movo eov to nKnpto
evepyooinon c npmtheta kKpantnei
nmaevo me to dexi xeipkai t
tpaBnxei te oapiotepo xepi n Tnpa
siakotnc tou kVntnpa poc to tiouvl.
METPnEvn OaOuOpouBou 94,0 dB(A)
Eyyunmuevn 0aθμn θopuβou: 96 dB(A)
Langkampfen, 2015-01-02 (EEE-MM-HH)
VIKING GmbH

Aieuvntc Epeuvac Kai EeEaIeN C Poiovw
- TeXvika oToiXeia
ME 443.1 / ME 443.1 C:
Ybaxaemble nokynateIn!
Bolbwoe cnacn6o 3a To, yTo Bbl Bbl6pann BBICOKOKaYeCTBeHHoe N3dEJIne KOMNaHm VIKING.
3To n3dJIne 6bIIO n3rOToBNeHO nO cambIM COBpeMeHHbIM TEXHOJOrnueckm MToDAM N B COOTBeTCTBn C MepaMn NO obecneHnK aueCTBa npOdyKun, BeDb Ha7a cJIb CHTaEeTcR DOCTnHyTOI TOIbKO B CJIyae NOJHOrO yOBoJIeTBOpEHnN POKynateJI.
Ecyny Bac mEmoTc BOnpocbI no Baewemy yctpoiCTby,To o6paauTecb, nOxayncta, K Baewemy dInepy nn HenoCpeDCTBeHHo BHauy KomnaHHO.
Mbl Haneemcra, cyTo pa60Ta c yCTpoiCTBOM KOMnAHIN VIKING doCTaBn Bam ydoBOJIbCTBne

Dr. Peter Pretzsch
DinpekTop
1. CodepkaHne
OIOJIb3OBaHm DaHHoI
HnCTpyknei no 3Kcnnyataun 222
O6sauHnHcpmaun 222
Yka3aHne no YTeHHIO HCTpyKcnnn no 3Kcnnyatau nn 222
BapnntbIpya3Hnhbix cTpaH 223
OncanHe yctpoCTBa 223
TexHnka 6e30nacHOCTN 223
Oe CbeHn 223
Pa6o7a oJekda n cpeIcTba 3aunTbI 224
TpaHcnpToPbKa yctpoiCTBa 225
IpepaaboToi 225
BoBpempa6oTbI 226
TexHueckoe 6cbJyKuBaHne, ouHCTka, peMOHT XpaHeHne 228
XpaHHeHne npn dJIInTeIbHbIX nepepbIbax B pa6Ote 229
IpeDynpexdEHe - onaCHOctb 3- 3a 3JIeKtpueckoro Toka 229
ytnn3aun 230
OncanHe CmBIOJOB 230
KomnneKt noCTaBkn 230
IoproToBka yctpOcnTbKa pa6oTe 231
OmbaHOpMaU 231
MOnTax OAnOCTOpOHHei BeDenpei pyuKn (ME 443 C) 231
MOnTaX DByxCTOpOHHe Bedyue pyuKn (ME 443) 231
C6opka TpaBoc6opHnka 231
3JementbI ynpaBJeHn 232
OndoctopoHHB BeDyua pyka (ME 443 C) 232
TeKCTbI C DOnOJIHHTeJIbHOJ 3HaUIMoCTbIO:
Pa3dJIbI TeKCTa C DonONHInTeJbHOIN 3HaUIMOCtBIO NOMEeHbIB INHCTpyKcIMN NO 3KcNlyatauO OHN Mn pNBedeHHbIX DaJe e CmBOJOB IJI oBaIeHn Ha Hx OC60rO BHMAMHn.

Onachoctb!
Ipeynpexkaetob onachoctn HeecactHbIX clyuaeB INoJyueHnra TjKeBbIX TpaBM dIaIIOeI. Tpe6yeTc co6JIoudaTb OnpeJeHbIe npaBnla NOBeHnN I BO3depKINBaTbcr OTHapUeHnI.

PpeynpekdeHne!
OnacHocTb TpaBMaTu3MaДIJI
JIIOeI. Co6JIoDeHne
onpeJeEHbIX npaBnIO NOBeHnI
npeOTbpaAaet BO3MOxHbIE INI
BepoTHbIe TpaBMbl.

OctopoxHo!
IOnyehnI IerKnx TpaBM NnHaHeceHnMaTepeNaIbHorO yuepe6a MoXHO n36eKaTb,co6nOaI onPeDeHenHbI npabuHa NoBeDeHn.

Yka3aHne
HOpMaunIOnTmAbHoNcNoB3OBaHnYcTPOINCTBa nnpoTbpaueHnBO3MOXhBIX OuM6ok ynpabHeHn.
TeKCTbI C CbILkAMn Ha pncyHKn:
PncyHKn, NOcHryUcIe NoIb3ObaHne yCTpOJCTBOM,HaxoJrTcB CaMOM HaaJIe HNCTpyKcIMn IO KcNlNyTaUcIM.
CnMBOJ fOToaannapata Cnyknt
IINB CBA3N pncyHKOB Ha CTpaHnuaX
C pncyHKAMN C COOTBeTCTByUoJe
YacTBIO TEKCTA B INHCTpyKcIM N0
3KcIIyatauM.

2.3BapnaTbI pnaPnHbIX cTpaH
VIKING noCTabJIeT 3apIbIe yCTpoINCTBa C pa3HbIMu ITeKepaMn IN nepeKnIOUaTeJIaMn, B 3aBNCIMOCTN OT cTaPbI Ha3HaueHIn.
Ha pncyHKax n3o6paxeHb 3apdNhe yCTpoiCTBa cEBPOwTekepaMn, NOKNIouHe N CcTn yCTpoiCTB C dpyrMM TINAMM wTEkepoB npoun3BOIDTCa HAnoruHo.
3. OnncaHne yctpoiCTBa

ME 443:
1BepxHraaactbBeDyue npykn
2 BbCTpOJeBcTByUoIuIuIuIuIuIuIuIuIuIuIuIuIuIuIuIuIuIuIuIuIuIuIuIuIuIuIuIuIuIuIuIuIuIuIuIuIuIuIuIuIuIuIuIuIuIuIuIuIuIuIuu
3 HxKHa qactb BeDyue npykn
4 Kanot DBuratena
5 PpeeJHee KOJIeCO
6 Puyka cnpedein
73aBoDcKa Ta6nUka
8 Kopnyc
93aJHee KOJIeO
10 PykoTka perynnpOBKn BbICOTbI Cpe3aHn
11 Puyka c3a
12 TpaBoc6opHnK
13 INdikatop 3aOnHeHnra TpaBoc6OpHnka (TpaBoc6OpHnK)
14 ByreIb octaHOBKn DnBraTeJIa
15 Khonka BkHIOueHHa
16 3neKtpopa3bem
17 OrpaHnUHTeJIb nnHbI Ka6eJra
ME 443 C:
18BepxHraaCtBeDyuee pyuKn
19ФИКСИРУОПМ pblar BeDyUeI pyuKn
20 KOncJIb BeDyuee pyuKn
21 Kanot dBuraTeIa
22 Perednee KoJIecO
23 Puchka cpepi
243aBODcKa Ta6nUka
25 Kopnyc
26 3aJHee Koneco
27 PykoTka perynnpOBKn BbICOTbl cpe3aHn
28 Puchka c3aДи
29 TpaBoc6opHnK
30 INdkaTop 3aONHeHn TaPbOc6OpHnKa (TpaBoc6OpHnK)
31 ByreIb octaHOBKn DnBaTaeTna
32 3nEeKtpopa3bEm
33OrpaHnUHTeJIbIINHbI Ka6eJIa
34 KhoNka BkHoueHHa
4. TexHnka 6e3oNaChOCTN
4.1 06üne cBedeHn

Pn pa6ote c yctpoiCTBOM Heo6xOJMo 06a3aTeIbHo
co6HdaTb daHHbIe
Tpe6oBaHnNo TeXnKe
6e30nacnoctn.

IpeepBbIM BBOOMBa60Tu HEO6XoUMO
BHNMaTeJIbHO IPOuHTaTb BCIO HNCTpyKUIO NO 3KcNlnyatau.
HnCTpykUIO NO 3KcnnyatauIN CneNyET 6epexHo coxpaHrTb dIaJIbHeuWero nOJIb3OBaHn.
Co6JIIODeHne 3Tnx Mep
npEOCTOPOXHOCTn Heo6xOJIMo Dnna
0e6CNEeHnBaWe 6e3OnaCHOCn,
ODHaKO IN nepeueHb He RaBnETCra
NOIHbIM. PImMeHrTB yCTPOINCTBO CNeDyET B COOTBECTBUN C yVBCTBOM 3dpaBOrO
CMblcNA n OTBeTCTBEHHOCtN, He 3a6bIBaR
PnI 3TOM, YTO NOJIb3OBaTeNB HeCet
OTBeTCTBEHHOCtB 3a HecuACTHbIe CnyuaN
C dpyHMn NlUaAMn UIn 3a INx
CO6CTBEHHOCtB.
O3HaKOMbTEcB C3JemeHTaMn ynpabHeHnIOOCoEHHocTmnpumHeHnycTpOcTba.
IVcnoB3oBaTb yCTpoiCTBO pa3peWaaTcra
ToIbKO INuCaM, N3yUHBIUM IHCTpyKUIO
NO 3KcNlYaTaUIN IMeIoUIM HaBBIKN
ynpabHeHryCtPOiCTBOM. Pepe,
nepBbIM BBODOM B pa60Ty NOlb3OBeTb
doJKeH No3a60TbCra O noJyueHIN
KBaIIuΦIuPobAHORO INpakTNHORO
IHCTpyKTaxA. NoIb3OBeTb DoJKeH
noJyHTb IHCTpyKTax Y npOdaBua INN
dpyrO rCneuaJINCtA NO BONPOcy
6e3OnaCHO o6paueHn C yCTPOiCTBOM.
Bo Bpem 3TOro INHCTpykTaKa
NoIb3OBeTJI DoJKeH, npExe BCero,
NoHrTb, YTO npn paBoTe C yCTpoiCTBOM
Heo6xOdMbl OcO6a TuaTeJIbHOCTb N
KOHcEHTpaUra.

Onachoctb dnn Kn3Hn BCneCTBne ydybja!
OnacHocTb ydybJa dIy DeTeB BO Bpem I rP C yNakOBOHbIM MaTePnAION. YNakOBOHybMaTePnA nCneJeT HnpeMeHHO xpaHHTb B HeIOCTynHom dIy DeTe MeCTe.
YcTpoIcTBco BCEM HabeChbIM
obOpyIOBaHnEM MOXHO IpeJaBaTb INN
OdaJIKNBaTb TOJbKO TEM IOJb3OBaTeJAM,
KOTOpBle,B npINuIe,3HaKOMbl C daHHoI
MOeIbIO N O6cIyKbAHnEM yCTpoIcTba. YcTpoIcTBO Heo6xOdmo nepeJaBaTb BCerDa C INHCTpyKuNe I NO 3KcIIpyataun.
Ctporo 3anpeaaetcnoJb30abTcB
yctpoiCTBOM DeTAM NnUaM C
fN3nueckmM,NCXnueckmNnN
ymCTBeHHbIMn HeoCTaTKam, a TaKke
JIuam, ObnAaHOUIIMn HeoOCTaTOHybIM
ONbITOM n 3HaHnAIMn, INI JInuAam,
KOTOpbl He O3HaKOMNeHbIC
Heo6xOdImbIMn IHCTpyKUmaM.
3anpeaetcnoB30BaTbcra
yctpoiCTbOM Detram NIN NOIPOCTkAM,He
IOCTnIM 16 IET.MecThbie
npencaHmOryT onpeJeTb
MNHMAbhBbI B03pact NoB30BaTeJI.
IoiB3oBaTbCyrCTpoiCTBOM
pa3pe7aetcTo1bKO,HaxOJaCb B
xopoWemΦn3NueeCKOM NcXnxueckOM
coCToHnn.Ecn y Bac nMeHTcR
np6nEMbI c 3DopOBBeM,TO CneJeYET
obpaNTbC K Bpauy N BbIaCHNtB,MOXHO
Jn Bam pa6oTaTB C yCTpOiCTBOM.
3anpe7aetcPa6oTaTB C yCTpOiCTBOM
IOcNe yNoTpe6JIeHnAJIkoROJIbHbIX
HaNNTKOB,HapKOTIKOB IIN npHeMa
JIekapCTB,KOTOpbIE MOyT OKa3aTb
HeratNBHOe BlInaHHe Ha peakUIN
pa6oTaHoero.
YCTPOINCTBOpa3pa6oTaHOIJIaIINHOrO nCNoB3OBaHH.
BHHMaHHe - onachocTb HecuaCThblx cnlyaeb!
YcTpoIcTBo npeHa3HaueHo TOJbKO dnnCKaWNBaHnra30HOB.NHOe npIMeHHe3anpeSeHO.OHO MOKeT npINBeCTN KONaCHbIM NocNeDCTBnM ININIOBpeXdHNO yCTpoIcTBa.
I3-3a onacnoctn nonyehn TpaBM noJIb3OBAteJeM yCTpoICTBO 3anpeaaetc npImMeHrT bIg cNeDyUoux pa60T (HeNoHoe nepeuCneHne):
ДЯ ПОДрЕЗКВЕТOK,3eJIeHbIXOrpaJKeHnI KycTOB,
-ДЯ NOДрс3KN BbIOUxxCpaCTeHn,
- yxOda 3a paCTeHmHa KpbIax n B JaNkax Ha BaJIkoHax,
-ДЯИЗМeЛьЧЕнЯOBpe3KOBДepeBbeB IN KCyCTaPnIKOB,
- ONUCTKN DOpOKeK (BCaCbIBaHnEM, npoDyBkoJ),
ДЯ Вьравиваня NOBepxHocTNNoYbI, HApnIpMep, npi HaJIuyn3eMЯHbIX XOJMNKOB, CdEJaHHbIXKpOTaMn,
-ДЯТранспортуровссретаHHоу TpaBbl,КрмЕ ПОдачи eeВ IpeДнaЗнayeHHь Дял 3TOrO TpaBoc6bOpHnK.
I3 coo6paKeHn 6e3onacHcTn
3aIpeuaeTcra IIO6oe N3MeHeHne Ha
yCTpOInCTBe, 3a NCKlnOueHEm
KbAINΦNtUPOBaHHoY cTaHOBKn
npHaJdLeXHocTei, DOnyUeHHbIX
KOMNaHnei VIKING. Kpome TOrO,
I3MeHenHn yCTpOInCTBa npuBojT K
JIINSeHnIO npaba HA rapaHTnHbI
peMOHT. CBeJeHnO p a3peUeHHbIX K
NCNoJIb3OBaHnIO npHaJdLeXHoCTx Bbl
IOnyUte B cneuaJIaN3UPOBaHHom
cepBnCHOM ceHTpe VIKING.
Bocobehnctn 3anpeuehehni 3meheny
yctpoicbTaCzelbUyBeiueHnra
MOuHOCTN INI YACTOTBI BpaeeHnra
3JIeKTPoDBrVaTeJIa.
3aPpeaaetcNcNoJIb3ObaHne yCTpOJCTBaIJaTpaHCnOpTnPOBKn IpeMeTOB, XMBOTbIX NIN JIOeB, B Ooc6eHHoCTN DeTei.
Ocobyo octopokhocb cneNyet npOBnTb npnpimHeHn yCTpoiCTBa B3OHax 3eIeHbIX hacKaJHn,napKax,Ha cnOpTnloaAdkax,Ha yNlaux n npedpnaTnx IecHO r N CeNbCKOrO X03rCTB.
BnHMaHHe!OnaChocTbIy 3dOpOBbBy BCJIeCTBVe Bn6paun!Upe3MepHa Harpy3Ka,Bbl3BaHHa
Bn6paunMn,MOKeT npBeCTn K
HaHeceHIO yUepe6a IJr CnCTeMbI
KpOo06paueHn HEPBHO nCtEmbl, B
OCo6eHHocn U Nluc C HApuyEHNAMn
KpOo06paueHn. Pn NoAIBeHN
CmNTOMOB, KOtopbIE MOyT NOBHTbcra
13-3a Bn6paunHOH Harpy3Kn,
Heo6xOIMO o6paTntbcra K BpaCy.
PiOno6HbIe CmNTOMbl, HAnpIMep,
No8BIAOTcB OCHOBHom B NaJIbcaX, Ha
pykax nn 3aIaNCTHBix CyCTabax
(HeONHOe nepeuNCneHne):
NOTepraCyBCTBnTeNbHOCHTN,
-60nn,
-Mnactehn,
-ДИСХРOMNЯKOЖИ,
-HePnAThbIe RaBHeHnФOpMnKaUm.
4.2 Pa6oay oJexka n cpeIcTBa 3aunTbI

Ppna pa6oTe Bcerda HocnTb npouHyIO o6yBc HecKoJb3KoI nooBo. HeJb3ra pa6oTaTb
6ocNKOMIINHapmepBcaHaJnX.

Kpome toro, BO Bpempa60 Tn texobcnyXnBaHnIO nOuNCTke, a TaKKe npn TpaHCnOpTnpOBKe yCtpoiCTBa CneNyET HaDeBaTb
npouhhe nepaTKn, He Hocntb
pacnyeHHbIMn DnHHbIe BONocbi N
NOKpbBaTb nx (NCNOJIb3OBaTb rOIOBHO
y6op, wanky n T. n.).

Pn3aTOUKe HOKa KOCUNKHeO6XoIMNoNb30BaTbcraNOxODAUMM3aUHTbIMN OUKAMN.
Pa6oTaTb c yctpoiCTBOM pa3pewaaetcTToIbKO B DIIINHHbIX 6pIOkax N B IIOTHOpnIeAIOUe oEkeJe.
Helen3o OeBaT CBO6OHyOeKdy, KOtopa MoKeT 3aueNtBc3a DnXyUncEca y3bl (pbuarrynpabNeHna), TaKHe Pa3peWaeTc Hocntb YkpaWeHn, rAnCTyk n Wapfbl.
4.3 TpaHcnpTIpOBKa yctpoiCTBa
ДлпnpedotbpaueHЯ TpaBM OCTpbIMN I ropaUMn yactmN yCTpoiCTBa CneNyET pa6oTaB B nepaTkax.
Ipeep TpaHcnpTupOBko CneNyET BbIKHouHTb yCTpoiCTBO,OTCOeHNHTb ceTeBOK Ka6JIb NdoXdaTbCn PONHO OCTaHOBKn HOxa.
YcTpoIcTBo CJIeNyET TpaHcnpTpipoBaTb TOJbKO PnO OCTbIBWEM 3JIeKToPdBnIraTeJe.
YuHTbIBaTb Bec yCTpoIcTB a npn Heo6xOAnMOCTn NcNoJIb3OBaTb dIa Norpy3Kn NoJXODaIe cpeIcTBa (Norpy3OHyIe INaTfOpMbI, NOBemHbIe npncnocobJeHna).
YcTpoIcTBo IN TpaHCnOpTnpyEmble y3Nbl YcTpoIcTBa (HAnpIMep, TpaBOc6OpHNK) DOJXHBb 6bITb 3aФNKCuPOBaHbHa
NORpy3OuHoi NnataOpme C NOMoUbHOIOCTaTOHOro KOJIuYeCTBa KpeNexKhbIX CpeICTB (pemHei, TPOcoB nT. d.).
Pn noDbemn nepeHoe He donyckaTb npNKoCHOBeHN KHOxkyKocuJKN.
Co6nDaTb yka3aHn,coepKaunecB rnaBe «TpaHcnOpTnpoBka».B Hei OncaHO,KAKnoHNMaTb INN 3aKpeJIyTa bycTpOuCTBO.( 13.1)
PtpaHcnpTnpoBke yctpoiCTBa HeoXoIMo coBIOdaTb MeCThBié 3aKoHOdaTeIbHbIe IpeDncaHn, B Ooc6eHHocTn no 6e3ONaChOCtN Norpy3KN I TpaHCnOpTnpoBKe IpeDMetOB Ha norpy3OHybIX natafOpMax.
4.4 Pered pa6oToi
CneNyET yOCTOBepntbCra, YTO C cytpoiCTBOM pa60aTOT ToIbKO Te IInuca, KOtOpBie 3HaKoMbIC INHCTpyKUneN NO 3KcNnyataun.
Дяустов no yxody 3a caobbIMnyuactkamM C DBuratelma BHytpeHeroCropaHnI INN 3NeKTPoDBuratelmaCneyet COsHDoTaMb MyHmUmaJIbHbIe npdncAHnNo npdoJOnKntBHoCTnpa60TbI.
TtataTeNbO OcMOTpeb yuaCTOK,Ha KOTOpOM 6ydt paBToTa bYCTPOIcTB, N Y6paTB BCE KAMHn, NaKn, PpOBIoKo, KOTn INhIe NoCTOPOHHe pEaMeTbI, KOTOpBe MOJIb 6bl 6bl 3axBaueHb BBepx. B BbICOKo TpaBe MoXHO He 3aMeTnB IpENrTcBn (HaPmep, HnN KOpHnepeBbe).
I03TOMy nped pa6bOt C yctpoCTBOM Ha ra3oHHom yactke cneJyET nometntB BCE CKpbTbe 6bekTBI (npenrTCTBn), KOtOpBe HeBO3MOxHO y6paTb.
Ipepe nCNoB3OBAHnem yCTpoiCTBa CneJeT 3aMeHbTb NOBpeKdEHHbIe N3HOWeHHbIe Detanl. NOBpeKdEHHbIe IIN HeUeTKHe HAKLeuKn Ha yCTpoiCTBe C npEduPexKeHnA Mm N Yka3aHnMn O6 IMeIOxXcR OAnCHocr X Heo6xoDImo BOBpEmo OBHbTb.HOBbIe HAKLeuKn U BCE DpyrNe 3aNaChbIe qactn ImeIoTCB CneuaJIn3NpOBaHHom CepBnCHOM ueHTpe VIkING.
yCTpoIcTBdoJNOxHO NcNoJIb3OBaTbcra ToJIbKO B TexHnueeCKn 6e3ONaCHOM COCToAHm. Npeep KaXdbIM NcNoJIb3OBaHnem yCTpoIcTBa CJIeNyET npOBepaTb,
BBeJeHO JN yCTpoIcTBO B pa6Ory B CMOHTnPOBaHHOM COCTOAHIN B COOTBeTCTBUN C ppeJIMCAHNAIM.
-6e3ynpeHNO nIcoCToHnpe pexyUero HNCTpyMeHTa NBCero pexyUero MexaHN3Ma (HOXA KOCNJKN, KpeJnxHbIX 3JIeMeHTOB, KOpnyCa KocNIOnyHO mExaHN3Ma).B OcOBeHHOCTn CneINt b 3a fKcnpoBaHHbIM NOIOKeHnEM, NOBpeXdEHNrMM (HaceYKn IIN TpeuHb), a TaKke IN3HOCOM.
-6e3ynpeHNOIIN COCTOHNHe IN npabNbHa IIN pa6oTa 3aunTHbIX yCTPOINCTB (HAnpIMep,OTKnDnaKpbuKa,KOpNc,Bedyua pyka, 6Byelb octahOBKn DnirataTeJ).
NIOHOCbIO JIN CMOHTUPOBaH TpaBOc6OpHN BHeNOBpeKdEHHom BnDE;3aPepaTeCnONoB3oBaTb NOBpeKdEHbI TpaBOc6OpHNK.
pa6oTaetIITOPMO3OCTaHOBKn 3JIeKToPdBuRatEnJ.
PnHHeo6xOaMocnBCE Tpe6yEmbI pa60tI dONKHbI NOpYaTbCn cneuAnN3NpOBaHHOMy cepBcHOMy
ZHTpy. Kompania VIKING pekomehyET CNEuaN3npoBaHHbI cepBnchbI ZHTp VIKING.
CneJeT co6JIIOaTb Tpe6OBAHnraIaBBI «OnaCHOCTn 13-3a 3NeKtpnueckoro ToKa» ( 4.8).
3aIpeuaeTcB KIIIOUaTb 3JIeKtpoDburatelb 6e3 npabunbHO ycTaHOBJEHORo HOxa. OnaCHOCTb neperpeBa 3JIeKtpoDburateln!
4.5 Bo Bpempa60tbl

He pa6oTaTb,ecnB onaChOH 3OHe haxoJrTcXINBOTHbIe IINI JIOU,OCo6eHNO DeTN.
3anpeaetc ydaTb nI nepeMbikatb yctaHOBnHbHe Ha yCTPOINCTBe nepeKIOUoUne I npEOxpaHnteHbIe yCTPOINCTBa. B uactHOCTn, H N B KOEM clyuae He qNKcnpoBaT b 6yreIb OCTaHOBKn DnIRaTeNa CTOKe BeNyue pykN (HaNPmep, PyTem CBaIBaHna).

BHMaHne -OnacHOCTb noJyueHn TpaBM!
Hikorda He KnaCTb pykn nn HOrn Ha Bpaauoounecr Detann
HIN NOHIX.3aPpeHNO npKacatbC K BpaauoemcHoxy.Heo6xOIMo BCERda HaxoHTbcHa HeKOTOPOM paCCTOHHN OT OBepCTn DnBbIPoca.
Heo6xoJMo Bcerda coxpaHnTb
6e30anachoe pacctOAHne OT yCTpoiCTBa,
obecneueHHoe BeyuJe pyKo.
Beyuaj pyka Bcerda DoJXHa 6blb
CMOHtnpoBaHa HndLejKaaUM o6pa3OM.
3anpeaaetc BheceHne N3MeHeHn B ee KOHCTpykUIO. 3anpeaaetc HaunHaTb
pa60Tu yCTpoiCTBa CO CNOKeHHoB
BeyuJe pyKoI.
HnB Koem cnyae He 3akpenIb
npedMeTbHa Bedyue pyuKe (HanpImep,
pa6oyu oJexdy).He donycKaTb
HamatbIBaHry yDInHHTeBHorO KaBeJIa
BOKpyr Bedyue pyuKn.
CneNyET pa6oTaT ToIbKO npn DHeBHom CBeTe INX OPOWEM NCKYCCTBEHHOM OCBeUeHN.
HeIb3pa6oTaTb npu Tempepatypax OkpykaHOue cpeblnke +5^
HeIb3pa6oTaB cyCTpoNCTBOM BO BpeMdoJnIpo3bl,OCO6eHNO Cnyae onaCHOCTyDapa MoHHN.
Pn HauHn BnaXHO NOBepxHocTn HeCyTOuHBOe NOnOKeHne NOnb3OBaTeJIyBEJIuHbAet ONaCHOCTb HeCuaCTHoro CnyaJ.
CneNyet pa6oTaB, co6IIOda oO6yIO octopoxHocTb, yTo6bl He NOckOJIb3HyTbcr. IIO BO3MOxHOCTn 136eRaTb npIMHeHnYcTPOJCTBa Ha BnaXHO IOBepxHOCTn.
He octabTb yctpoiCTBO IOIdoXdEm.
BkHIOueHne yCtpoiCTBa:
BkHouHeHne yctpoNCTBa npOn3BOaNTb C ocToPOxHocTbIO, co6nIOda yka3AHn rIaBBi «BBeHHeYcTpoNCTBa B pa6Oty>. (11.)
HorndoJXhbl HaxoDntbcra Ha
IOCTaTOOHpaCtOHHNOTpeKyuero
NHCTpyMeHTa.
PnBKNIOUeHm yCTPOIcTBO DOnXHO CToTb Ha POBHO NOBepxHOCTN.
IpeepBkIIOueHnEM IN IpoUeCEBkIOueHnHEJIb3a ONpOKnDbIBaTbycTPOIcTBO.
He npon3BODnTB BkIIOueHna 3JIeKtpoDnBnraTeTn,ecn KaHaN BbI6pOca He 3aKpBT OTKnIDHO KnBbIKoIN TpaBOc6OpHNKOM.
Heo6xoJMo n36eTaB yactbIX BkHoueHn B TeueHne KOpOTko nepNoDa BpeMeHn, B Oco6eHHocTn He dOnyckaIte «Irp» C KHONKo BKnHoueHn. OnaChocTb neperpeBa 3NeKtpoDburatena!
Pa60tbl Ha CKIOHAX:
HaKIOHbIe yUacTKn Bcerda
obpaBaTbIbAtbB nOpepeHOM
HaNPaBLeHIM, HN B KOEM Cnyae He B
npoJOnbHOM HaNPaBLeHIM.
EcNI Npbl30BaTeJIb npi Koc6Be B
npoJOnbHOM HaNPaBLeHIN NOtePReT
KOHTPOJIb, 3TO MOKeT pNBeCTN K TOMy,
yTO OH NOnaTeT NOd pa6OtaUoJe e
yCTPOINCTBO.
Bydte oocob octopoxhbl,ecn BbMeHareTe HnpabneHne DvXeHnaCKIOHe.
Bcerda cneInte 3a Tem, yTo6bl COCTOHNcKNOHOB 6bIIO XopoUIMM, IN36eraIte paobOT cyTPOINCTBOM Ha CJNlUKOM KpyTbIX CKIOHAX.
13 coo6paqhen 6e3onacnoctn 3anpeueHO nCNOJb3OBAb yCTpoiCTBO Ha CKNoHax KpyTn3Hoi 60nee 25^ (46,6%).
Onachoctb noJyehn TpaBM! YrOHa KaHJHO 25° COOTBeCTByeT BeptkaIbHomy noBemy 46,6 cm np1 100cm ropu3oHTaJI.
BoBpeMa pa60TbI:

BHMaHne - onachOCTb noJyueHn TpaBM!
HnB Koem Cnyae He KnaCTb pykn Hn Hor Ha
Bpaauouecra DeTALINIOIHOx.
3anpeeHn npkacaTbcn K
Bpaauoemycn HOxy.Heo6xoDIMO
Bcerda HaxoNTbCn Ha HeKOTOpOM
pacctOAHNOTOBepCTnIa Bbl6poca.
Heo6xoDIMO Bcerda COxpaHnTb
6e3onacHoe pacctOAHne OT yCTPOnCTBa,
0e6ceHNaEMoe BeyuSeI pykoJ.

He nbitaTbca OcMatpnbAtb HOK BO Bpempa60tbyyctpoiCTBa. 3anpeaetcOtkpbIbTaB
OTKnDHyO KpbIiKy N/IN CHMAtb TpaBoc6OpHnK Do NOnHO octaHOBKn HOka KocNIKn. BpaauounCra HOK MOKeT CTaTB npuHnOH nOnyueHn TpaBM.
IpeepBraTecb CytpoCTBOM ToIbKO B TeMe Wara - npaBoTe 6bICTpoe nepeBnKeHne 3anpeueHO. BcJeCTBne 6bICTPOrO nepemseHn BO3paCTaET ONaCHOCTb HeCuaCThBX CnyaeB N3-3a CNOTbKaHn, CKoJIbXeHn I T. D.
Будte ocobo octopoxhbl, ecn Bbl nobopaunBaete yctpoCTBO nnn nodBnraeTe erK ce6e.
OnachocThcNOTKHyTbca!
3anpeuaeTcnoHMaTb nI nepeHoCnTb yCTpoiCTBO cpa6oTaHouIm 3JeKToDnBnTeJEM nIc NOKNIOUeHHbIM K 3JeKTPocetN CeTeBbIM Ka6eJem.
Heo6xOIMMOOr6aTbHeBnIMbIe 06bekTbHaNyroBnHE(6pb3raHbHbIe yCTaHOBKnIgra3OHOB,3a6ntbIe B NoCyBy CBan,BOAHBIEBeHTnIN,ФyHdaMeHTbl, 3JeKtpnueckne Ka6enNt.n.).Hae3d Ha TaKne NOcToPOHHne 06bekTb 3aPpeuEh.
Ecπ npexyuiu HnctpymEn nyn yctpoiCTBO 3aJeIN Kakoe-nIb0 npenTCTBne INN NOCTOPOHNI pEmET, Heo6xoIMo BblkIOHTb 3JIeKtpoDBnIgATEJb, OTCOEduHITb ceTeBOI Ka6eNB I npou3BecTN OCMTp.

Cneintb3a INHePcHnHbIM DBrXeHMepeKUeero INCTpyMeHTa,KOTOpoeJNTcR HeCKoJIbKO CeKHyD IO NOHOB OCTaHOBKn.
HeoXoIMOBbIKNHOaTb 3JeKToDnBnTaTeNb,
ecn yctpOcTB Tpe6yETc CnEka HKnHOHTb npTpaHCnpTupOBKe no yactKy,JIiWeHHOMy TpaBbl,
ecn yctpoiCTBO nepemeaetcK ckaunbaemomyyactkyo6paTHO,
- Nepei TeM KaK ChrTb TpaBoc6OpHNK,
-пени.Tem Кадустанов ТьвICOTу Cpe3aHЯ.

BbIKIOUHTb 3JIeKTOpOdBnIaTeJIb, BbIHytb cTeBOI uTEKeP IN y6eINtbcR B IONHO OCTAHOBKe To IHCTpyMeHTA:
IpeepTeM KaK BbINOHNITb pa36IOKINPOBAHnE NmYcTpaHtB 3a6uBaHnB KaHaJIe BblOpoca;
ecn pekuyuHm INhctpyMeHT 3aJeN KaKoJ-Ni6o NocToPOHHn IpeMeT. Heo6xoJMo npOBepntb ero Ha BO3MOXHbIe NOBpeJxDeHn. 3aPpeuaetc npIBOaNTb B DeCTBne yCTPOICTBO C NOBpeJxDeHHbIM IIN IOTHyTbIM HOKeBbIM BAJIHKOM IIN BAON 3JIeKTPODBrIraTeJI.
Onachoctb noJyehn TpaBM n3-3a dekeKthbIX Detalei!
- nepei npOBepKoi yCTpoiCTBa, ouNcTKoI uIN BbInONHeHMe pa6OuX onepaun Ha HEm (HaNPmEp, nepei NaCTpoiKO BbICOTbl Cpe3AHn, OTKnDbIbAHMe/YctaHOBko BeDyuee pykN B 3aDaHHoe nOJoxKeHne);
- nepei TeM kaK octaBntb yCTpoiCTBO HIN ecNn ycTPOiCTBO HaxoDHTc8e3 HaI3Opa;
- nepei noiBemom nnnepeHOCOM yCTpOInCTBa;
- nepeTpaHcnpTnpOBkoN.
ecn3aTeNoCTOpOHn npEmetnn ecn yycTpoCTBa NOBnncb HeHopMaIbHbIe CnIbHbIe Bn6paun. B 3TNxCnyaX Heo6xOIMo npOBepnty ycTPOcTO,BOOCoBeHHocTHpeJyum MexAHm3M (HOK, HOKeBOB BaNk, KpenneHHe HOka) Ha OTCyTcTBne NOBpeXdEHn n CneJeYET BbINONHHTb Tpe6yembl peMOHT, npExde Yem CHOBA HauTaPabOTy cycTPOcTBOM.

Onachoctb noJyueHnra TpaBM!
HaHnue CnIbHOB BVbpaun, KaK npaBnIO, CBNdeTeJIbCTByeT O HeNCnpaBHOCTn.
3anpeaetcnpBODntb
yctpoCTBO BdeCTBne,
HaNPmep, C NOBpeJdeHHbIM IINI
NORHTbIM HOKeBbIM BaJIHKOM IINC
NOBpeJdeHHbIM IINI NOrHyTbIM
HOKOM KOCNIKN.
EcIn Bam He XbaTaet HyKbIX 3HaHn, npuyTe Tpe6yEmbI peMOHT CneuaJIncTy - KOMNaHnV VIKING peKoMeHdyet o6paaTbcB B CneuaJIINpOBAHHbI cepBnchbl ueTp VIKING.
Bpe3ynbTaTe Kone6aHn HAnpJxKeHn, Bbl3BaHHbIX 3TNM yCTpoCTBOM npn Nycke, B cnyae He6naoropnTbIX npamaTpO8
ceTNMOXHO NOBpeDnTb Dpyroe
obopyoDBaHne,NOKIOUeHHOe KTOJKe
3JIeKTPueeCKO CEHN.Bo n36ExKaHne
NoOboHcNtuaqHH Heo6xOIMo
npHHb COOTBeCTByUOuNE MepbI
(HanpImep,NOKIOUeHHe DaHHoro
obopyoDBaHnK DpyroN 3JIeKTPueeCKO CEHN,3KcNpyatauN yCTpoiCTBa B
3JIeKTPueeCKO CEHN C 60nee Hn3KM
noINbIM cOnpOtNBHeHEm).
4.6 TexHnueeckoe 06cnyxuBaHne, ouHCTka, peMOHT uXpaHeHne

Ipeep BCemnpa6oTAMnHa yCtpoiCTBe,peepyctaHOBKoI nn erO ouNCTKO, a TaKke
peepnpoBepko coeHHTbHoKa6enHa OTCyTCTBne nepenTeHn INIIOBpeJdeHn Heo6xOIMOB BIKIOHTb yCTpOINCTBO N BbIHyt BUNKy n3 cETn.
Ipejd yctaHOBko Ha xpaHene B 3akpbTOM NOMeueHH, nepei pa6oTaMn IO TexHueCKomy OcbnyKINBaHIO N OHCTKe CneJeT DoXdaTbCra OxJaXDeHHy YcTpoNCTBa.
OuHcTka:
Iocne pa6oTb BCE yCTpoNCTBO He06xOIMMO TuaTeNbHO OCHCTuB. ( 12.2)
YdaJIbTB OCTaTK TpaBbI DepeBHHoH naIOUkO. OChCTnT bIeTKoN BOIo HIXHIO IOBepXHOCTb KOCNIKIN.
3anpeaetcncnojb3oBaTbannapat
DnOYCTKNBbICOKO DaBJeHnA, aTaKKe
npOMbIbTb yCTpOiCTBO CTPyAMN BObl
(hanpImep, npn NMOu CaIOBORO
wnaHra).
HnB3a nCnoB3oBaTb arpeccNBbIe 1nCTaIue cpeCTBa. Tn CpeCTBa Moryr
NOBpeNTbPiactMaccyMeTann,HTOMoKeT Bbl3BaTb HapuWeHne 6e3onachOn3KcNpyataun yctpoCTbaVIKING.
CzIbIO NCKIIOUeHn BO3rOpaHn
OTBepCTN OXNAJKeHn MExNy KOKyXOM
3JIeKTPoDBIRAten IN KOPnyCOM DOJKNbl
6bITb YNCTbIMn, HAnPmEp, OT TpaBbl,
COJOMbl, MXa, JNCTBeB INN BbITEKWei
CMA3Kn.
Pa60tblnoTexHnueckomy 06cnykmbAHIO:
Pa3peaetcBbINONHtB TOnbKO Te pa60tI NO TexHnueckomy 06ClyxNBAHIO, KOTOpBIE ONICAHBI DAnHO IHCTpyKuIN No 3KcnJyatauIN. Bce dpyrne pa60tI DOJIHXbl npOIN3BOIDTBcB CneuaIN3InpOBaHHOM ueHTpe.
Длп поун Heo6xOuIMbIX cBeHeHn И OKa3aHn NOMOUs O6paauTecb Всeгдв CpeuaIaN3InpObaHbHbI YeHTp. Компаня VIKING peKOMeHnyet БblONJIHrTb pa6ToBt I NO TExHnueckOMy ОьСЛУЖИВaHnIO n peMOHT ToJbKO B СpeuaIaN3InpObaHbHcM CepBnCHOM цeHTpe VIKING.
CneuiaHn3npoBaHHbIe cepBncHbIe ceHTpbI VIKING peyIaRpHO ppeJnaRaOT KypcbI npeOCTabJIaOT TexHuecKyo INHopMaunIO.
CneIyETNCnOJIb3OBAbTToJIbKO
HnCTpyMeHTbl,IPnHaJdNExKHOCTNIIN
HabeChoeOBOpUdoBaHHe,OnyUeHHbIE
VIKINGdAanHoroYcTpoiCTBaINn
TexHueCKn aHaIOnuHbIe y3Nbl.BInHom
Cnyaae BO3MOXHbI HeCyaCTHbIe CnyaAN,
PnIBoJAAuE KNoIyUeHNIO TpaBM INn
NOBpeXDeHNIO YcTPOiCTBa.Ipn
BO3HKnHOBeHN BONpOCOB CneIyET
ObpaAaTbcraB CneUaIIIN3IpObaHHbI
ZeHTp.
OpunHaJIbHbIe INCTpyMeHTbl, npnHaJIeXHoCTn n 3anJaCTn VIKING no CBOIM CBOJCTBaM ONTImaJIbHO COOTBeTCTByOT yCTpoiCTBy n YIOBJIeTBOPaHT Tpe6ObaHnM NOIb3OBeTEn. OpunHaJIbHbIe 3anacHbIe qactn VIKING ono3HaOTcNo Homepy 3anachOn qactn VIKING, no HApNcN VIKING n B cIyae Heo6xOIMocTn no 3haky 3anachbIX qacteVIKING.Ha MaJIeHbKnX DeTaIax 3HaK MoKeT CTOrTb TaKke OTdeJIbHO.
HaKeiKc n ppeynpeKdEHHaMn yka3AHMaCneDyET Bcerda CoepKaTbB YCTOM XopoOo YoTa6eHbHom COCTOHN. NOBpeXdeHbIe IIN yTepeHHbIe HaKeiKn Heo6xOIMo 3aMeHHTb HOBbIM OpuHbHBIM, KOToPbIE MOKHO NOLyHTb B CneuaNIm3npoBaHOM cHTpe VIKING. Pn3aMeHe y3Na INI DeTaN HOBbIM y3lOM INI DeTaNbIO, CNeIITb, YTObbl HOBbIe qACTN NOLyUIn TAKNe Jek HaKeiKn, KaN i npexHne y3NbI N DeTaII.
Pn pa6oTe C pexyumM mexaHn3MOM Heo6xOIMo Bcerda Hocntb npouhble pa6o7ne nepuataK n co6JIOdaTb npedeIbHyIO octopoxHoCTb.
TTO T06bI yCTPOICTBO pa6oTANO HAdexKHO, CNeDyET 3aTnBAtb BCE raIKN, 6OJtBI IN BnHTbI Do yNopa, BOcOeHHOCTN BnHT HOXa.
PeryIpaHNo npOBepaTe BCE yCTpoiCTBO n TpaBoc6opHnK - oO6eHHo nepei yCTaHOBkoHa xpaHeHne (HanpIMep, B 3UMHn NepNO) - Ha OTCyTCTBnE N3HOca n NOBpeJckEni. IV3 coo6paXKeHn 6e3OnacHOCTn Heo6xOdmo cpa3y 3AmEHrTB N3HOseHHbE INI IOBpeJckEnHbE DeTaJI, OeCneuHBa TEM CaMbIM HAdExKHyOp pa60Ty yCTPOIcTBA.
B cnyae cHantna kaknx-Jn6o deTaJeu nn 3aunTHbIX npncnoc6neHn BO BpeM npOBeHeHn pa60T no TexHnueckomy o6cnykBaHNIO Hno Heo6xOIMO HemeJenHNO CHOBa YCTaHOBTb Ha MeCTo B COOTBeTCTBm C npEtnicaHnAMN.
Perynphno npoBepaTb HadeXHocTb KpennHeHHOXA KOCNJKN,OTCYTCTBne NOBpeJdeHn N3HOCA HaHEM.
4.7 XpaenHe npi dInTeIbHbIX nepepbBax B pa6oTe
OCTbIBWEE yCTPOIcTB Heo6xODnMo XpaHNTB B CyXOM N 3aKpbITOM NOMeUeHN.
HeoXoIMO NCKIIOHTb BepoTHOCtB NOJIb3OBaHnY yCTpoIcTBA NOCTOpOHnMn JInzamn (HanpImep, dTebmN).
IpeepyctaHOBKoHa xpaHeHne (Hanpimep,B 3mMnN nepnoj) yCtpoiCTBO CNeDyeT TuaTeNbHO OuHuaTb.
XpaHb yCTpoCTBO B COCTOHN IOTOBHOCTN K EKCNyatau.
4.8 PpeynpejdeHne - onachocTb n3-3a 3neKtpueckoro Toka

BHMaHne! OnachOcTb nopaxeHn 3JIeKtpuYeCKm TOKOM!
Oco6eHNO BaxhBIMn DnI
06ecneueHH
6e3onacnoctn
3JeKtpoo6OpyDobAHn
ABJHOCTc CeTEBOU
COeHNHTeNbHbN Ka6eN
BUNKa, BIKIOuATenb. Yr
136eKaTb ONaCHOCTn NOP
3JeKTPnueckm TOKOM, H
pa3pe7aetc NcONb3OB
Ka6eN, CoeHNHTeNn N
COeHNHTeNbHbIe Ka6eN
mMeoUne NOBpeXDeHn
HECOOTBeTCTByIOUne
npedncahm.
IOnToMy peryIpaHNo npOBepaTe coeHNHeBbHn Ka6bHa OTCyTCTBne pN3HaKOB NOBpeXdEHHn Hn H3HoCa (HaNue TpeuHn H3OJaun).
HnKoIa He nCnoJIb3yIte NOBpeJxHbIy ydInHInTeIbHbI KabeIb. NOBpeJxHbIe Ka6eIi CneJeT 3aMeHrTb HObIMN, HeJIb3a IpnOINBODITb peMOHT ydInHInTeIbHbIX Ka6eIe.
3anpeaaetcnoB3oBaTbcra
yctpoiCTbOM,ecnKabeNIOBpeXdeHbI
nINn3HOseHb.I BOC6eHNocTn
npOBepaTb CeTeBO CoeINHtTeNbHi
ka6eNbHaOTcyTCTBne npn3NaKOB
NOBpeXdeHn nCTapeHn.
Pa6oTbI no Texo6cnykBaHnIO npemOnTy ceTeBbIX ka6eNe pa3pe7aetcB bInOJIHrTb TOnbKO CneuaNaIbHO 06yueHHOMy nepcoHaNo.

Onachoctb nopaxhenia 3JIeKtpnueckm TOKOM! 3aIpeuHNO pKnIOuATb NOBpeJdeHHbIKabeN K cTeN IN pNkacTbcK NOBpeJdeHHOMy KaBeJIHO, Noka OH He oTcoeINHeH OT ceTu.
Onachoctb nopaxhenaJIektpnueckm Tokom! He pa3pe7aetcncnoIb3OBaTbc cTeBOKabe,coeINHTeIN INBUNKNIMeUOuNEIOBpeXdHnN HIn HeCOOTBeCTByUoUne npEtnscAHm.
KacaTbCpexyux MexaHn3MOB (HOKei) MOXHO JINb B TOM CInyae, KOrJa yCTpoNCTBO OTCoeDnHeO OT 3JeKTPocetn.
Bcerda CneiNb 3a Tem, TTo6bI
HcNoIb3yEmbIe CeTeBbIe KaBeJIu IMeJIu
DOCTaTOHyIO 3aUNTy.

XotraJnKtpoDburatEn 3aunuehOTBoDnHbIX6pbI3r, yctpoictBO3anpeuaeTcNcNoB30BaTbBOBpemddoKJa
a TaKke B yCIOBnIX BnaXHOCTN.
CneNyETNCnOJb30BaTbTObKO yNHNHTeNbHBe Ka6eIN BO BlaR03aUHTHom NcNOJIHeHHN, NOxOJaUHneIJI npIMHeHHN CycTroNCTBOM ( 11.1)
PnKoWeHn KaBebdoJXeH HaxOuNTbcra Ha ydaJIeHn OT HOxA.
Bnky coeHHTeBHO Ka6eJna Hdo BbIHMaTb N3 pO3eTKn, a He TReHyTb 3a coeHNHTeBHHk Ka6eJb.
Ecn yctpoCTBO NOKluOeHO K
NUCTOUYHKY NITAHN, TO HE06xOIMO
CJeNTb 3a TeM, YTO6bI He DOnyCTnTb erO
NOBpeXdHn n3-3a BO3MOXhBX
Kone6aHn ToKa.
YcTPOIcTB NIOKNHOaTB TOnbKO K6NOKy 3NeKTPoNTAHn, KOtOpB3aUHHe nABTomATNUeCKnM PpeOxpaHTbHBIM BbIKIOHaTeJEM, CpabTbIBaHOuUM npi NOBJeHN yTeKn TOKa (TOK OTKnOueHEN MaKc.30MA).Boone noDpO6HyIO NHOpMaUNHO MOXHO NOLyHTb y 3NeKTPoMOHTaXHnKa.
E BbICTpoJeCTByHouu 2 cnKcnpyUoun pbua
F BnHT 2
G DepekataeIb ka6eIa 1
H 3axm ka6e1
3aHTbIKoKxVBeNyUepe 2 pyKn
ME 443 C:
J BTuIka 1
K BuHT 1
LⅢa6a 2
M Taimka 1
KOMNIEKT NOCTaBKN 3aBNCNT OT CTpaHbI NOCTaBKN IN NCNOJIHeHnYcTPOINCTBa.
7. Побтовka устpoиства Кра6оTe
7.1 O6ua nHΦopMaun
Onachoctb noyuHn TpaBM CneJyert co6nIaTb npednicaHnno Texnike 6e3oNaChOCTn B rnaBe «Texnka 6e3oNaChOCTn» ( 4.).
- ⅡIЯ BbINONHeHrBCEX OINCAHHbIX pa60YCTPOJCTBO DOnKHO 6bITb rOpN3OHTaNbHO yCTaHOBNeHO Ha POBHOM N TBepdOM OCHOBAHIN.
7.2 MoHTaK OJHOCTOpOHHei BeyuIe pyu (ME 443 C)

BCTaBtB BTyNky (J) B OTBePCTne Ha BeDyuee pyUke (1).
- Oe wai6b1 (L) HaeTe b Ha BTyIky Beyuuey pyu (1) BInyKnOi CTOpHOH BHyTpB.
- YdepKINBaTb BTyIky (J) n WaiN6bl (L) n BMeCTe C BeDyUeepykoN (1) BCTaBnTB B DepKaeTeHb Ha KOHCOJI N BeDyUeepyKn (2).
BCTaBnTB BnHT (K) B OTBepCTna Ha BeNyuei pyuke (1) n Ha KOHcOni BeNyuei pyuKn (2) c HapyKHOI CTOpOHbI BHyTpB. BkpyTnTB raKy (M) n 3aTAYb BnHT (K) C MOMeHTOM 20-25 Hm.
MONTAX 3neKtpoka6eJIA:
BCTaBtB 3JKeTpKa6eJIb (3) B depKaeIIN (4) Ka6eIbHoro KaHaJaHa KOHC0NJ BeDyUeI pyuKn B COOTBeTCTBn C PNCyHKOM.
7.3 MoTaux DByxCTOpOHHeBeyuie pyuKn (ME 443)
BCTaBHT BINT (F) B OTBepCTne depKaTeNa6eNa (G).
- YdepxnBaTb BepxHIOU qactB Beyue pyu (2) npKtaoN K HxHMM qactm Beyu epyu (1).
- YctaHOBtB DepkatEnb Ka6eIg (G) Ha 3NeKtpoKa6eIe (3) IN BCTaBtB BnHT (F) B OTBepCTnC BHyTpHHei CTOpOHbI HApKy.
Ha npotBnOIOJXHoi CTOpOHe BCTaBHT BnHT (F) uepe3 OTbepCTna C BHyTpHen CIcTOPOHbI HApxky.
HaTe3aUHTbI KOxyBcNyuepykN (I) n HABHTb6bICTPOeJCTByOuIuI KcnpyOuI npHr (E) Ha BnHTb (F) (DJIkeh BbICTyNaTb NpIMepHO OINH BNTOK pe3b6bl) nOTKHyTb BBepx.
- PpOBepKa npaBnIbHocTn MOHTaJa: BbICTPOeJeCTByIOUne 0nkCpuyOuine pbyar (E) DOJXHbI 6bITb 3aTMyTb C TaKo CNIOJ, YTObI OH N IIOTHO npInerai K BeDyue pyKe, a ee BepxHra qactb 6blna npOHO coeHNHeHa C HIXHeY qactbIO. Ecn BeDyuaa pyka 3akpenJIeHa HeNPouHO INN 6bICTPOeJeCTByIOUne 0nkCpuyOuine pbyar yCTaHOJIeHbI HeNPaBnIbHo,OTKpbITb 6bICTPOeJeCTByIOUne 0nkCpuyOuine pbyar n PpOBepHyTB nx Do 0nkCaunn.
YctaHObKa 3axnMa Ka6eJr:
Onachoctb npaKeHnaeKtpueckm Tokom!TO6bI He NOBpeDnTb30IpyoOee NOKpbITne BeDyUeeyuKn,3axkIM Ka6eJI NaKImaTbTOJbKO pyKoN He IcNoB3OBaTbДЯ 3TOrO INHCTpyMeHTbl (HaNPIMep,MOJOTOK,OTBePTky).
3akpenTb 3neKtpokabeJb (3)HaBepxHeu qactu BeDyue pyKn3axmOM dIra Ka6eIaH. Ha BepxHeu qactu BeDyue pyKn co6nOdaTbpacctoAHne 25-27cm MeKdy3axmOM Ka6eN I BBKIOUaTeJIeM.
BCTaBtB 3JKeTpKa6eJIb (3) B depKaTeIb (4) KOHcONn BeDyIe npyKn B COOTBeTCTBn C pncyHKOM.
7.4 C6opka TpaBoc60pHnka
- UCTaHOBtB BepxHIOU qACTb TpaBOc6OpHnka (B) Ha HnKHOU qACTb TpaBOc6OpHnka (C).CneIITb 3a npaBnHbIM NOIOKeHnEM HappaJIHOuNX.
BolTbDcneIyETBdABuTb n3HyTpB npedeYCMOTpeHHbIe IINr 3TOO tBepCTn.
JIerKIM HaxKaTneM Ha BepxHIOu YacTb TpaBoc6OpHnka (B) 3aUeJKNHyTb ee B HnKHeu cactn TpaBoc6OpHnka. - YCTaHOBnTb TpaBOc6OpHnK ( 8.3).
8. 3JIeMeHtbl ynpabJeHnA
8.1 OndocTopoHHa Beyuza pyka (ME 443 C)

Ta30Hokocnka ME 443 C OshaetapepynpyemO ONoHOCTOPOHNHe Bedyue pykoN.

Onachoctb nopaxeHn 3Jektpueckm TOKOM!
3NeKtpoka6eNb DoJXeH 6bITb BcERda 3aФNKcnpoBaH MaHxTe BeDyueI pyuKN KOHC0NJ BeDyueI pyuKn.

Onachoctb 3aueemlennra!
Ipeep npBBeHnem B deiCTBne
fHKcnpyUoJero pbyura (1)
yuEpKuBaTb pyKoB cepXHIOu cAcbTb
BeNyuee pyuKn (2) B HauBbICwEM
noLoKeHH n CJIerKa npNNoDnTb
(pa3py3ntb).
IocJIe npBBeHnB DeIcTBne
fNkCnpyUoJero pbluara BepxHna
auctb BeDyue pyKu NOD
DeIcTBnEM CO6CTBeHHoro BEca
MOXKeT ONyCTNTbCBAcmoe
HIXKHe nIOJoxHeHne.
HnB KOem Cnyae He DonyckaTb nonaHaHna TaBceB B 06NaCTb MExdy BeDyuee pyKoN eE KOHCobIO (NoDΦNKcpyUOuM pbyarOM).
OTknDbBaHne Bedyue pyuK:
IonoXeHne npTpaHCnOpTnpOBe (dЯ OuNCTKn yCTpoNCTBa, yDObHo TpaHCnOpTnpOBKn N KOMNaKTHOro XpaHeHna):
-
PnKbTb cKcnpuOu npHar (1) BHN3 upeKuBaTb.
-
OTKHyTb BeDyUH pyuKy (2) BnpeE n CneDHTb 3a TEM, YTO6bl 3NeKtpoka6eB He 6bl NOBpeXdEh.
Pa6ooye noJoxeHne (nna
nepemeseHHy yctpoiCTBa BpyHyko):
- OTKINHTb BeDyUIO pyKy (2) H3aI IN npOKoHTpOJINPOBaTb, YTO6bl OHa NOJIHOCTbIO 3aUeIKHJyIacb.
2 PerylnpOBka BbICoTbI:
BbICota oNHOCTOPONHHe Bedyue pyuKMOKeT peYIupoBaTbCra DByXCTyneHHaTO:
- PnKbTb cKcnpuOu npBhar (1) Bn3 u depKuBaTb.
- UctaHOBtB BeDyUHpyKv (2) B Tpe6yEmoe noJoxKeHne.
OTnyctntb fKcnpuyu npar (1) npokoHTpoJnpoBaT, TTo6bl Bedyua pyka nIHOCTbIO 3aueJIKNHynaCb.
8.2 ByxctopOHnB Beyna pyka (ME 443)


Onachoctb 3aemlennia!
OTKHyTb BepxHIOU qACTb
BedyIe pykM MoXHO nyTEM
OTBHNBaHn
6bICTpoJeNCTByUOxNcoeHNHTeNe.Io3TOMy npnOTKpbIBAHIN 6bICTPOeNCTByUOxNcoeHNHTeNe Bcerda ydepXNBaTbpykoBepxHIOu cactb BeNyue pykN (2) B HAnBbICwEMnoTOKeHN.
IIOJoxHeHn Ipn TpaHCnOpTnOpOBke
(Дя OунсткУCTpoICTBa,yIO6HOn TpaHCnOpTIpOBKn I KOMNaKTHOrO xpaHeHnA):
OTKpbTb 6bICTpOeIcTByUoUn
fNkCnpyIOuPi pbUar (1)-OTKNHyTb
BHN3-OTKNHyTb BepXHIOu cACh
BeDyuSei pyKn (2) BnepeJ n CneDuTb
3a Tem, yTo6bl 3NeKtpoka6JIb He 6bl
noBpeJdeH.
Pa6ooye noJoxKeHne (Jn
nepemeseHn yctpoNCTBa BpyHyU):
OTKINHyB BepxHIOU yAcTb BeNyuei pyuKn (2)Ha3aN ydepXnBaTb ee pykoI.
3aKpbTb6bICTpOeIcTByUoUnΦKcnpuyuun pbiar(1)-OTKNHyTBBepx.
8.3 TpaBoc6opHnK
YCTaHOBka:
- OTKpbItb OTKnIHyIO KpbIuKy (1) n ydepKnBaTb ee.
- YCTaHOBtB TpaBOc6OpHNK (2), BCTaBnB ФнКсИpyUOJIne BbICTyNbI B KpeNexHbIe 3JIeMeHTbI (3) Ha O6paTHoI CTOpOHe yCTpoiCTBa.
3aKpbItb OTKnDHyu KpbIiKy (1).
CHRTME:
- OTKpbITb OTKNHHyo KpbIuKy (1) n ydepKnBaTbe.
- PpInoDnHb TpaBoc6OpHnK (2) n ChrTb Ha3a.
3aKpbItb OTKnIDHyu KpbIiKy (1).
8.4 LcHTpaNIM3OBaHHa
perynipOBkabICOTbCpe3aHn
Moxho yctaHaBnBaTb wectb pa3nHbIX ypOBHei BbICOTbI cpe3aHnO 25 MM Do 75 MM.

YpoBHe1=MHHmAlbHaB BbICota cpe3aHn
YpoBeHb6=MaKcMmaJIbHaB BbICOTa Cpe3aHn
YcTaHOBka BbICOTbI Cpe3aHn:
3axBaNTbpyky(1),NOTaHybpbuar(2)BBepxuYdepxnBaTbeOBTOMNOJIOKeHN.
Bb6paTb Tpe6yEmy Bbcoty Cpe3aHn, Dnra pyky BBepx n Bn3. Tekuyn ypoBeHb BbcOTbl Cpe3aHn MOxHO CHTaTb Ha NnKkaTope BbcOTbl Cpe3aHn (3) cNOMOu bOp MapKnupOBk (4).
-OTnyctntb qnknpuyu npbivar (2) 3aueKHyTb.
8.5Индкаторзанлесня
HaBepxHeJyactn TpaBoc6OpHnka yCTaHOBJeH INDnKaTOp 3anolHeHn (1).

Bo3duHbI NOtOK, Bo3HnKaIOUm 3a Cuet BpaueHnHa HOka KocuIKn I cnOCo6CTByOUs 3aONHeHHo TpaBOc6OpHnKa TpaBOi, npINOdHMaet HnDnKATop 3aONHeHHa (2): TpaBOc6OpHnK 3aONHaeTc Cpe3aHHo TpaBOi.
Ecnn TpaBoc6OpHnK 3aONHeH TpaBoi,TO BO3dyuHbI NOTOK yMeHbwaETcN, INHdkatop 3aONHeHnOnyckaetcN (3):
Onyctoumtb 3aONHeHHbI TpaBoc6OpHnK (11.5).
9. PekomeHdaun no pa6oTe
9.1 O6uaI INΦopMaun

Onachoctb nolyehn TpaBm! IoBriauoncepepeNeten Hna Ka6eI cneJyet paCyTbBaTb 6e3 npomeJeHn.
Bo BpemKoc6bI coeHNHTBnHbN Ka6En b DOJKeH hXoDNTBCnNo3aNnNoB30BaTeY. CoeHNHTBnHbE Ka6En MoJHo npN Koc6cnyaHNO nope3aTb INCnOTKhTyBCnO6 Hx.N CBa3n C 3TNM IMeTc60bn0uPnCK HeCuaCTHO cNyA.BcNeCTBne BbiweyKa3aHHoro cKaunBaHne npOn3BOiNbTOhkoB TaKnx ycNoRax, YTo6bI coeHNHTBnH Ka6En BcERda JexaJI BVdImbIM Ha yKe cKOWeHHOM yAcTke.
YTo6bIMEmTbKpaCnBbIra3OHcRyCTOITpABoHne6xOJIMO yactoNope3aTpaby,CKaunBaayeKopOTko.
PnKapKOM n CyXOM KImMaTe He CJIeNyET CImuKOM KOpOTKO NOpDe3aTb TpaBy, TaK KaK Ra3OH Ha CoINHc BblropaET n npno6petaT HEnpNBKeKaTeNbHbN BuI
Han60nee KpacnBbI BmIOCTpNKeHHOra30Ha 06ecneuBaetcB pe3yJbTaTeNCIOJIb3OBAHnOCTporo HOXa, NO3OMYero Heo6xOIMO peryIpaHO 3aTaUNBaTb(B CNEuaIN3npOBaHHOM IeHTpeVIKING).
9.2 PpaBnBna Harpy3ka 3NeKtpoDburataTeIa
He BKNIOHaTb Ra3OHOKOcNkY B BbICOKo TpaBe HIN pN CaMO Hn3KoB BbICOTe Cpe3AHJ.
TaoHokocunky pa3peuaaetcHarpykaTb TOnbKO TaKIM O6pa3OM, YTo6bl YaCTOTa BpaueHn 3JKeTPOBnBnTaTeJI npI 3TOM CHNkaNaCb He3HaUnTeNo.
PnCHNkaOuSeIcYacTeBpaueHnBb6pTaB 60JIe BbICOKn yPoBeHb BbICOTb Cpe3AHn N/INyMeHbUHTbCKOPoCTb DnJKeHn.
9.3 Pn6IokpOBKe HOka Kocnilkn
HemeJeHHo BbIKIOHTb 3JIeKTOBnBnAteIb N BblHyTb BNJky N3 ceTN. 3aTeM yCTpaHtB npuHny HeNCpabHOCTN.
9.4 TennoBaauna TneKpOdBnIaTeN O Tpeperpy3kn
Ecni npa pabote 3neKtpoDburatetbl
NCbIbTaBaeTpeperpy3ky,TO BCTpoeHHoe
yCTpoCTBO TENNOB3aunTbI
ABTomATnueCKN OTKNIOVAeTero.
PnunHbI neperpuy3kn:
KoWeHHe CnWbOM BbICOK TpaBbl NIN CnWbKom HN3KO yCTaHOBJeHHa BbICota Cpe3AHNA,
CINUKOM BlicOKaCKOPOCTb DnHexHn,
- HeKaueCTBeHHaOuNCTka KaHaIa OXJaXJaIOUeRO Bo3NyXa (KaHaI BCaCbIBaHnI)
HOK KOCUNIKI 3aTyNJIeH NIN N3HOUHeH,
HeNoDxOJaNm INn CnNJKOM DInHHbI CoeINHtEnbHbI Ka6eNb (naDeHne HAnpXKeHn) ( 11.1)
TOBTOHbI BBOd B3KcNpyaTaunHO
Pn6n3ntbHo yepe3 10 MN. OCTBbAHnna (3aBNCNT OT TemnpaTpybl OKpykaHoue Cpebl) CneNyET BHO8 O6bUHNO BKIOHTb YcTPOINCTBO ( 11)
10. 3aunthbte yctpoiCTBa
CcIbIO 630nacHOrO 06cIyKmbAHnI
3aNTbOT HePaBnBHO NOIb3OBaHn
yCTpOHCTBO OCHaUeHO
MHOROUCNEHHbIMN
npEOxpaHHTeNbHbIMN yCTpoICTBaMn.
Onachoctb nonyuhenra TpaBM!
Ecn y oDHoro n3
npedoxpahnteNbHbIX yCTpoiCTB
obhapuykmbaeTc depeekt,To
pa6ota yctpoiCTBa 3anpeuena.
CnejyET o6patnTBc B cepBncHyTO
cnyx6y, kOmnaHnY VIKING
pekomehdyET
cneuaJIIN3IrpOBAHHbI cepBncHbI
ceHTp VIKING.
10.1 3aunthbte yctpoiCTBa
Ta3OHOKOCUKA OCHASeHa 3aUHTbIMN UCTPOINCTBaMn, KOTOpBle IpeD0TbPaAaHOT HePpeHAmPeHHbIKoHTaKT C HOKOM KOCUNKN BbIbpaCbIbAeMoCpe3aHHoN TpaBOi.
3aunTHbIMN yCTpOINCTBaMn CHTaTOTcKopNyc,OTKnHNaH KpbIuKa, TpaBOc6OpHnKnHaJIeKaUm O6pa3OM yCTaHOBNeHHaBeDuua pyka.
10.2 YnpaBHeHne 6eum pykamn
3NeKtpoBnIaTeJIb MoXHO BKnIOaTb JINuB B TOM Cnyae,ecNI KHOJky BKIOUeHnHaXaTb npaBOy pyKOu N yDePknBaTb ee B HAXaTOM NOOKeHn, a 3aTeM neBOy pyKO notAHyTb 6yReIb OCTaHOBKn DnBraTeJIa K BeNuJeI pyKe.
10.3 TopMo3 octaHOBKn 3JIeKtpoDburataTeJIA
Iocne OTnyckaHn pbiura octaHOBKn DBNfAteJI HOX KOCNIKN NOJHOCTbO OCTaHaBNIBaETc MeHee Yem Hepe3 3 cekyHbl.
BCTpoeHHbMexaHn3M TopMo3a OCTaHOBKn 3NeKTPoDBuRaTeJcOkpaAaET Bpem DaBxKeHnNo HepuN Do NOnHoN OCTaHOBKn HOxa.
11.ВてнгьусрбваВ pa60у
11.1 PoiocoeiHHeNk 3JIeKtpuecko ceTu

Onachoctb nopaxeHHa3JIeKtpnuecknM TOKOM!
CneNyet c6nHOnaTb npEtnncAHHN NO TEXHKe 6e30NaChOCTu B rnaBe «TexHka 6e30NaChOCTu ( 4.)
Pn npmeHnn Ka6enbHoro
6apabHa coeHHntbHbI
Ka6en bdoJKeH 6blb nOHOCTb0
packpyeh, Hnue H3-3a
3JIeKTPnueCKOro cnpOTNBHeHnA
MOyT BO3HNKHyTb NOpTePn
MOuHocTN n nepepeB.
B KaueCTBe coeHnHTeNbHbIX Ka6eIeI pa3peWaeTcnpMeHrToTbKO Ka6eJI, KOtOpBle IMeOT N3OJauNHO He XyKe, cem npoBa D o6pe3nHeHHbIX Tpy6kax H07 RN-F DIN/VDE 0282.
MnHmAlbHoe nonepeHoe ceeHne: do 25 M dNHOH:3x1,5 MM² do 50 M dNHOH:3x2,5 MM²
CoeHnHteJn coeHnHteJbHoro kabeJia DOJIHKbI 6bITb BbINOJIHeHb I3 pe3INbI INI O6TMyTb pe3INHO n COOTBETCTBOBaTb CTaHApTy DIN/VDE 0620.
HanpexHe n yactota cTeI DoJHKbI COBnadaTb C daHHbIMn Ha 3aBODcKo Tabnue He nn daHHbIMn B rJaBe «Texnueckne daHHbe» ( 18.).
CeTeBOI coeHINHTeHBHkA6eNBdoJIKeH 6bITb DOCTaTOUHO 3auuueH( 18.).
JaHHoe yctpoiCTBO npeHa3HauheHO IJIa 3KcNpyatauINB CETN C NOHbIM COPTOBHeHem CNCTeMbZMaKc.B IyHKTe paCnpeJeHema(aOHeHTCKoe OTBeTBHeHne)CMKcMmaHBHM 3HaueHem0,49OM (npu50T).
I0nb3oBateNbdoJnkeH ydoctOBepntbca, 7TOyCTPOINCTBOpa6OtaeTTOlbKO B 3JeKTPnuecko ceTN, COOTBETCTBYIOUeYka3aHHbIM yCIOBnM. B cnyuae Heo6xOmoCTN noJIHOe cnpOTNBHeHc CNTEmbl MOXHO y3HaTB MecTHOH cnjk6e 3NeKTPoCHA6KeHn.
11.2 OrpaHnUHTeNb dInHbI ka6eJra
Bo Bpempa6oTbI orpaHnHTeB nnHb Ka6eI npDoTbPaUaet HepeHaMepeHHoe OTKIOueHne

coeHnHTeBHOKabEnI TEMcBIM B03MOxHoe NOBpeXDeHne 3JIeKTPopa3bemaHa yCTpOCTBe.
IIO3TOMy CoeINHHTeHBHy Ka6eNBdoJIKeH 6bITb BCTaBnE H OrpaHnHTeNBdINHb Ka6eJIA.
CoeHHTbHbI KaebIb (1) CNOxNtB B nTIO npOeTeB eB OTBepCTne (2).
HaNetb netTIO HA KpIcK (3) n 3aTAYtB.
11.3 BkIIOueHne ra3OHOKOCnIKn


He cIeNyET BKNIOUaTb 3JIeKTPoIIBVraTeIb B BbICOKOITpABe IINI pNcAMoHn3KOBBICOTcpe3aHn, TAK KaK 3TOOCLOXHNrEITPOUeCC BKNIOUeHn.
HaxKaTb KOnKy BkIIOueHnry (1) nydepXnBaTbe ee B HaxaTom noIOxKeHH. ByreIb octaHOBKn DnIraTeJIy (2) notHaHTb K BeDyuee pyuKe n ydepXnBaTb.
KHOKNKY BKNHOUeHnA (1)MOXHO OTNYCKaTb NOcNe HaxKaTn8 6yReNa OCTaHOBKn DnuratEn (2).
11.4 BbIKJIOueHne ra3OHOKOCNJIKN

- Otnyctntb 6yreIb octaHOBKn DBurateJIa (1).Nocne KpatKObpeMeHHoro DBNKeHnNo INHePcUN 3JeKToPOBBrAteJIb N HOK KOCINKN NOHOCtBuO OCTaHaBNIIBaIOTc.
11.5 OnycToWeHne TpaBoc6OpHnka

Onachoctb noJyehn TpaBm! Ipeed ChrTneM TpaBOc6OpHnka BbIKIOHTb 3NeKTPoDBnraTeNb n3 COOpaXeHn 6e3onacHOCTn.
- ChraTb TpaBoc6OpHnK. (⇒ 8.3)
- OTkpblb TpaBoc6opHnK 3a
ФнКсИpyHouIyO nIaHky (1). OTknHyTb
ВерхHIOu YacTh TpaBoc6opHnKa (2) И
УдрЖиBaTb ee. OnpOKnHyTb
Tpaboc6opHnK Ha3aI N BbIpy3ntb
cpe3aHHyO TpaBy.
3aKpbItb TpaBoc6OpHnK. - YctaHOBtB TpaBOc6OpHNK. ( 8.3)
12. TexHnueckoe 06cJyXnBaHne
12.1 O6ua HhOpMaun

Onachoctb noJyueHnraTpaBm! CneJeYer c6bnOdaTb npednncanHn noTexnke 6e3oNaChocTN B rnaBe «Texnka 6e3oNaChocTN» ( 4.)
ExeroDHOeTexHueeCKoe 06cnyXnBaHne B cneuaJIn3npoBaHHOM ceHTpe:
TaoHokocnky CneDyET ExeRoHNO npOBepaB B CneuaJIn3NpObaHHOM ceHTpe. KomnaHry VIKING peKomeHdyET cneuaJIn3NpObaHHbI ceHTp VIKING.

12.2 OuHcTka yCtpoHCTBa
INHepBaI TexHnueckoro 06cJyKnBaHHa: nocKe kKaDOrO npMHeHHa
OuHaaTb yCTpOcIbTO CNEyET TOBko BOIO, UeTKo INN TpAknK. YdaNTb OCTaTK TpaBbl DepeBHHo NaOnQKO. Pn Heo6XoIMOCtN cNoNb30BaT b CneuaNbHbO uNCTnteB (HanpImep, CneuaNbHbO uNCTnteB STIH).
HnB Koem Cnyae He HanpaBnTb CTpyN BObl Nn annapat IJRA ONUCTKN CTpyMn BbICOKO RaBHeHn Ha BbIKIOUaTeJIN, y3JIb DBrIaTeJn, ynIOTHENr INOpHbIe MeCTa.

Onachoctb noIyehnTpaBm! Npeed onpoknbibaHneM nocTaBtB kocnky Ha TBepdoe, ropn3oHTaIbHoe n poBhoe ochOBaHne. Ppi pa60tax B nOIOKeHHn dny OCHCTKN MOKET npON3oTN OnpOKnDbIBaHne yctpoiCTBa.CneDyET cToA T bCerda c60ky ot ycTpoiCTBa. HJIb3r BblonHrtb pa60tbl, haxOJaBpeed nn 3a KocnIKoN

Дяооблерецma pa6OT no OYnCTKe nepei yctaHOBKoi yCTpoiCTBa pekOMeHnyeTcBbIbpaTb MaKcIMMaJIbHbIypoBeHb Cpe3aHn.
PonoxeHne dny oucctk ME 443:
- ChaTb TpaBoc6opHnK. (⇒ 8.3)
- YdepKnBaTb BepXHIOu Actb BeDyue pyuKn (1) n OTKpbItb 6bIcTpOeJeCTBvUoUsn fNkCnpYUoUsn pbUar -OTKNHyTB BH3.
-
OTINOKHTB BepxHIOU qactb BeNyuepe pyu (1)Ha3a.
-
OTKpbITb OTKnHHyo KpbIuKy (2) n ydepXnBaTb ee.
- PpnoHnTb yctpoCTBO cnepeN u yctaHOBNTb eR O B NOJXeHne IJRA OuNCTKN B COOTBeTCTBN C pncyHKOM. IpoBepntb yCTOuHBoE noJIOXeHne yctpoNCTBa.
IonoXeHne dny ouNCTKm ME 443 C:

Onachoctb 3aueemlennra!
Iocne npBBeHn B DeCTBne
fNcnpyUoero pbuara BepxHna
aCTb BeDyuee pyKn NOD
DeiCTBnEM CO6CTBEHORO BECa
MOKeT ONyCTNbCB R CaMOE
HNKHe NOIOXKeHne.
Hn B KOem Cnyae He DOnyckaTb
nonaHaHn NaIbueB B O6NaCTb
MeKdy BeDu eey Puykoi ee
KOHCoNBIO (ND fNkCpYIOUM
pbuharom).
- ChЯть Травocборнк. (⇒ 8.3)
- OTkpblbOTKNHHyo Kpbilky (2) nyepxmbaTbe.
Bolbmm naIbIeM npKkaTb KcnpyUuHn pbUar (3) Bn3 uYdepXnBaTb erO B 3Tom NOJKeHHN.
3axBaTb yCTpoIcTBo 3a pyKy CnepeiN MeIeHHO npOKHyTb erHa3aJ.
OTnyCTnTB OTKNHHyKpbIuKy (2) npOBepnTb yCTOnHNoJIOKeHne yCTpoiCTBa.
12.3 ΘnEeTpoDnBraTeIb n KoJeca
3NeKtpoDnBraTeIb He Tpe6yEt TexHnueckoro 06cnyxmbaHn.
IoiuHnHKn KOJIe He Tpe6yHcTexHueckOrO ocbnyKaBaHa.
12.4 BepxHЯ qactb Bedyuei pyuKIME 443
InTepBaJI TexHnueckoro 06cIyKuBaHHa: nepeK kaxkbIM npImHeHHem
BepxHra qactb BeDyuee pyuKn IMeet 130JIpyUoee noKpbItne. Ppi BO3HNKHOBeHH NOBpeXDeHm BEpXHIOU qactb BeDyuee pyuKn Heo6xoIIMO 3aMeHtB.
12.5 Texnueckoe 06cIyKuBaHHe HoKa KocuKn

InTepBaI TexHnueckoro 06cIyKuBaHHa: nepeKaKdbIM npImHeHHem
-OTKHyTbra3OHOKOcNkYBnIOKeHne DnA ONUCTKn. ( 12.2)
OuHCTnTb HOX KOCJIKN (1) n npOBepNTb ero Ha HauNue ne NOBpeKdEHH (haceyeK nn TpeunH) n 3HOCA, B Cnyae Heo6xOIMOCTN 3aMeHnTb.
ToIuHy HoKa CneJeYe TnpOBepntb no MeHbWe Mpe B 5 MeCTax C NMOUBo pa3DnKHO KAn6pa (He BXoNTB KOMJIeKT NoCTaKn). IpEKeDe BCero DoJXHa 6bITb OecNeueHa MNHMaNbHa TOnUHa B Obnactn 3aKpbjIKOB HOKa.
- Пиюжпь Лины (2) Кпесдней Кромке HOЖа И замерпь размер CTaЧИВАИ.

Onachocb noJyHnra TpaBM!
I3HOweHHb IIN NOBpeXeHHb HOK KOCUNKMOKET CLOMaTbCra N CTaTB nPHuHOB NOJyHnRA cepbe3hBX TpaBM. PO3Tomy cJeYET CO6HIOdaTb INHCTpyKcNn NO TEXHNueckOMy O6CJyKnbAHnHOka.
B 3aBcMocTn OT MeTa n
IpOIOJXKeJIbHOCTN
3KcPnyatauHn HOKn NOBepKHebl
H3HOCy B pa3NHyOH CTeneHn. Pn
3KcPnyatauHn yCTpoIcTBa Ha
NEcCuHOM OCHOBaHn HnPi
YactoI pa6Ote B ycNoBnx Hn3KoB
BlaXHoCTN Harpy3Ka Ha HOX
ycnINBaETC, YTO pNIBOHT K
6Olee 6bICTpOMy H3HOCy.
PpeIbI n3Hoca:
PacCToRnHe A:
DonyckaetcTcTaunBaHneJe3BmMaKCMyMHa15MM.
PacctoHnB:
MHHMaBHa HnpuHa HOka KocnKHe DOJIkHa 6bTb MeHee 39 MM.
PacctoHnC:
ToIuHa HOKa Be3e DoJXHa COCTaBnTb He MeHee 2 MM. IpoBepka BbINOJIHReTCr C NOMOuHo pa3dBHXHO KaJIbpa.
EcHnHa ra3oHOKocnke yCTaHOBnH HOK, He BXOJRAU B KOMNKeT NOCTaBKn, a, HApnpMep, MHorOfoHyHKUHOHaNbHBHn HOK n3 CneuaJIbHbIX PnHaADJeXHOCTeN, TO COOTBeTCTBeHHO 3TOMy DeIcTBYIO TpyrHe HopMbI ppeDeJIbHOrO n3HOca.
12.6ДeMoHTaKIMoHTaKHOKa KocuIKn

C cenbI npedTbpaueHnI IOBpeJdeHn BnHTa HOka npi OTKpyuBaHn INN 3aTjKke pIMeHrTB nOxDoAuyIO HacaDky DnI WeCTnRpHaHHoro KInOHa pa3MePOM 22 MM (He BXoNTB KOMJIKeT NOCTaBK).
1 DeMOHTax:
Дяуджьаня Hoja Kocnkn (2) nOJIb3OBaTb NOxOJaUeI nepeBHHb 6pycok (1).
- OTKpyTnTB BnHT HOKa (3). CHrTb HOK KocuKn (2) n BnHT HOKa (3).
2 MoHTax:
Onachoctb nonyuehenraTpaBM! Hoxkocn(2)pa3peuaeTcmaHTnpoBaT TOJIbKO B COOTBeTCTBmC pncyHKOM. HaknaK (6)doJXHb6blb 06paueHb BHn3 (K r3OHy), a 30rHyTbe 3aKpbIKN HOxA-BBepx (K yctpoiCTBy).
ToHOb6nHaDaTb npEaNaCaHHbIMOMeHT 3aTAAKKBUNHTa HOXa10-15HM,TAKKAKOT3TOrO3aBNCHT HaJeXHOe KpeJIeHnepeJyUeRO INCTpyMeHTA.DonolHntBHo 3aΦNKCuPOBaTB BnHT HOxA (3)ΦnKcATOpOM pe3b6blLoctite 243.
Pn KaJDo3aMeHe HOKa BnHT HOka (3) TaIOKe NOJIeKNT 3aMeHe.
OuHCTnTb noBepxHOCTb KOHTaKTa HOKa IN BTyJIKy HOKA.
HOKOCUNK (2)YCTaHaHBNAbTaB N3OrHyTbIMN 3aKpbIKNKaMn BBepx Ha BTyIKy HOxa.ΦNKcnpyOuine BblCTynl (4)DOLKHbI HAXoINTBcR B OTBepCTnx (5).
-Дяуджьани HoKa Kocnkn (2) NcNoJIb3OBAt b NOxOJaUm DepeBraHHb 6pycok (1).
BkpyTb BnHT HOKa (3) 3aTMyb KpyTAM MOMENTOM 10-15HM.
12.7 3aToUka HOxa KocuJIkn
Onachoctb noIyueHn TpaBM! Ipeed yctaHOBko npOBepuTB HoX Ha oTCyTCTBne NOBPexKeHn. HoX nOJIeKNT 3aMeHe npi O6HApJxEHN Ha HEm HaceYeK nn TpeUHN, pN CTaYBaHN ne3Bn HOxa 60Jee Yem Ha 15 MM, a TaKKe B TOM Cnyae, ecNI TOIuHa HOxa XOTBA B ODHOM MecTe COCTABJREt MeHee 2 MM ( 12.5)
KoMaHnVIKINGpeKomeHnyeT nopyaTb 3aToky HOKa KocuJKn cneuaNCTy cepBnCHOn Cnyk6bl. HenpaBnJIbHO 3aToyeHHbI HOK (He npabunbHbI yroI 3aToykN, dnc6aIahc nT.n.) yxudaaet cyHKUOHNpOBaHne yctpoiCTBa.
PykoBOdCTBO no 3aToUKe:
-ДемоHTuPoBaTb HOx KocnKn( 12.6).
- Pπu 3aTOUKe HOK CNEyET OXnAaKaTaB, HApPImep, BOIoH. HeIb3a DOnyCKaTb NOBJIeHnCINHeBaTOrO UBeTa, TAK KAK B 3TOM Cnyuae CHNkaETcA DOJIROBEuHOCTb HOXA.
3aTaunBaTb HOXn paBHomepHo, YTo6bl npedOTbpaNTb BN6paun BCneCTBne dnc6aJHaHca.
- YrOJI 3aToUckn DOJKeH CoCTaBnTb 30^
Iocne 3aTOckn 3ayceHcbl,
6bpa3oBaBwneecn Ha pexkyue KpOMKe BO BpeMraTOckn, npn Heo6xOIMOCTN CNeDyET ydaTb MeIKoN HaxDaUHOb MyarO.
12.8 XpaHeHnB 3mMnI npNoD
YcXOM,3aKpbTOM HEnbJIbHOM NOMEeHN. YIOCTOBepbTEcB, YTO yCTPOIcTBO XpaHITCB HeIOCTyHOM dJr DeTe MeCTe.
Ta3OHOKOcNkCy CneJeYt yCTaHaBnBaTb
Ha xpaHeHHe TOIbKO B COCToHn
ROTOBHOCTN K 3KcnPyTaUu, PnI
HEo6XoIMOCt CNOXHTb BeyUyO
pyKy.
Cneyet 3aTnBbT Bce raKn,6oJIbI BNHTbIO OTKa3a,OBHOBJrCTaBUnHe Hepa36OpNBBIMN PpeDynpeJdeHnY kka3AHnO bMeHOUxCra ONaCHOCTAx, npOBepTb BcO MaunHy Ha OTCyTCTBne n3HOca nn NobpeJdeHn.3aMeHrTB n3HOWeHHBe nn NobpeJdeHHBe DeTaJIn.
Bo3MOxHbIe HEnCnpaBHOCTn Ha yCTpOInCTBe CneDyET BcERda yCTpaHrTb nepeJ yCTaHOBko ero Ha xpaHEHe.
PnDInTeBHom nepepbBe B pa6oTe ra3OHOKocnKn (B nepnoD 3mMhero xpaHeHna) co6JIoDaTb cNeyUOune nyHKtbl:
Bce HApyHbIe yactn yctpoiCTBa TuaTeJIbHOOCHNTb.
Bce noDbNkHbIe DeTaJIcNeJyET XopoOo Cma3aTb MaCnOM HIN CMA3KoI.
13. TpaHcnpTnPOBka
13.1 TpaHcnpTnpoBka


Onachocb noJyueHnra TpaBM!
PepaTpaHCnpOpOBko
co6noDaTb Tpe6oBaHNr InaBbl
HOcNTb NOxOJaUyIO 3aunTHyIO
OJeKdy (3aunTHBe 6OTNHKn,
IpoHbIe nepaTkn).
PepaNOBemOM NIN
TPaHCnpOpOBKO Bcerda
OTcoEInHArbTe CeTeBO KabEnb. IV3
COo6paxHen 6e3oNaChOCTN
KOMnHaHry VIKING peKomeHnyET
NoHNMaTb NIN NpeHocNTb
ycTroCTBO TOJIbKO BINOEM.
PepaNOBemOM yCTpoiCTBa
CneNyET yUnTBaTb Bec B rnaBe
Ipehenoc yctponctBa:
BIOE M: UcpoCTBO CneIyET PnINoHIMaTb TObKO 3a nepeHHIO pyKy (1) n3a BeNyUPOpyKy (3).NoIb3OBaTb Bcerda DOnJKeH HaxOHTbCra Ha DOCTaTOUHOM paCCTOHm OT HOKa KocuIKN,OCo6eHHO CneITb 3a NoIOXKeHHeM HOR n CTynHe.
B OOnHouky: PnIOJbEme nIpeHoce yCTpoiCTBa cJeNyET 6paTbcra ONoHpyKo3a UeHTpaJIbHyU qAcTb BepXHei TpaHCnOpTnpOBOuHOH pyKn (2), a BTOPOpyKo-3a HxNHO TpaHCnOpTnpOBOuHyO pyKy (1).
KpenenHe yctpoicBa:
- UCTPOINCTBO Heo6xOIMMO 3aKpePnIbHa NORpy3OCHN PNaTΦOpMe C NOMOuHIO NOXODaIcIX CpeDCTB KpePnIeHHIA.
TpocblnnpeMHndoJXhblnKcnpoBaTbCBA NOMEeHHbxTOckax (4).
14. CBeDeHne K MNHMMyu3HOca N npedOTBpaueHne NOBpeXdeHn
BaxhIe yka3aHn no TexHnueckomy 06cnykBaHnIO uXoDy dnn cNe dyuOux rpynn n3denn
Ta3oHokocnka,nepeMeaemar BpyHy np a6oTaiouaon ot cetn (ME)
KomnaHnVIKING He Hecet HnkaKoI OTBeTCTBHeHcOHT3a NOJyHeHne TpaBM n HaHeceHne MaTePnAlbHO rUepe6a, KOtOpBle IPOJIOuIN BCJeCDTBnE HecO6JIooDeHn INCHpyKuIN NO 3KcNpyatauIN, B OCo6eHHocTn B OTHoUeHN N6e3OnaChOCTn, ynpabLeHn IN TexHueCKOrO 06ClyXkBaHn, INN B pe3yNbTaTe NCNoJb3OBaHn HEoNyUeHHbIX HabeChbIX Y3NOB INN HeOpunHaJIbHbIX 3aIuaCTe.
ДлпnpedotbpaueHn BO3HKnHOBeHn NOBpeKdEHH nIu Ype3MepHOro n3HocA deTaleBawero yctpoiCTBaVIKING 6ob3aTeNbHO co6JIoudaIte CneDyUOuine BaxHbIe yKa3AHN:
1.БыICTpon3HaunBaIOUeNecKOMNoHeHTbl
HeKOTOpBie DeTAnI yCTpOietBaVIKING
Daxe npn nCNoJIb3OBaHm INx no
Ha3NaueHnIO NOBvepraOTc
HopMaJIbHOMy n3Hocy, INx Heo6xoJIMo
CBOeBpeMeHHO 3aMeHЯb B 3aBcNMOCTN OT BnDa I npoDoJxIteJIbHOCTN 3KcPnyatau.
KHIMOTHOCTCA:
-Hokm
2.Co6nOeHne npedncahn daHHo nHCTpyKuIN NO 3KcNlyatauIN
IcnoJb3oBAHne,Texnueeckoe
obcJyKuBaHne n xpaHeHne yctpoCTBa VIKINGdoJXhblOcUeCTBnTbCTOHOTAK,KaK OINCAHO BdaHHoNHCtpyKuNNo 3Kcnnyataun. IOnJb3oBaTeNb cam Hecet OTBeTCTBeHHocTb 3a BCE NOpeXJeHnur uyepe6,BblBaHHbIE Heco6JIKeHEm npedncaHn no Texnke 6e3OnacHOCTn, yka3AHnNo ynpabNeHHo yctpoCTBOM IN Texnueckomy o6cJyKuBaHnIO.
3ToBnepByuOuepeDb paacnpoctpaHaTcHa:
HeBepno onpeJeHnHbIe npaMeTpby yDnnHInTeJra (nonepueHoe ceYeHne).
- HenpaBnIbHoe nOikIIOUeHne K 3JIeKTPnuecko cTeN (HanpJKeHne).
-TexHnueckne n3MeHeHnI N3dJIIN, HecorJacOBaHHbIe cΦnpMoVIKING.
- PpIMHeHHe HnCTpyMeHTOB nIN npHaJnEKnHOCTeK, KOtOpBie He DOnyUeHb INI HE pNIOHb IyC TPOcTBA, INI YBJIOTc Hn3KOKaueCTBeHHbIMN.
IcnoJb3ObaHne H3dJIeNHe B COOTBETCTBnC Ha3HaYeHHeM.
- PpimmeHne n3dJIeNBA BoBpeMa CnoptnBbIX MeponpTaN NIO KOHKypCoB.
KocbeHHbIy6bITKNBpe3yNbTaTe nocJeDyUoEeroNCNOb3OBaHn N3dJIeNc HcncPabHbIMn DeTaJAMN.
3. Pa60tbl NO TexHnueckomy 06cnyxnbAHIO
Bce pa60tblnpueDeHHbIe Bpa3dene «TexHnueeCKoe 0cbnyxnbAHne»,doJXhbl BblONHrTbcpeynapHO.
Ecnn 3Tu pa6Obl noIb30BaTeJIb He MoKeT npOn3BOuNTb CaMOCToTeJIbHO,TO Heo6xoDIMO OpaTnTBcB CneuHaN3nPoBAHHbI YeHTp.
KOMnHaHnVIKINGpekomeHnyet BbINOJHrTa pa6Otbl NO Texo6cnyXnBaHIO n peMOHTy TOnbKO B CneuaaHn3npoBaHHom ueHTpe VIKING.
CneuHaIN3npOBaHbIe cepBcHbIeHTpbVIKINGperyIapnpeIpaHOT KpcblnpEOCTabJIOTTexHueckyoHOpMaUIO.
B cnyae yuepe6a n3-3a nobpekdeHn BCJIeCTBHe HeBbINOJHHeHbIX pa60 NTexHHueCKOMy 6cIyKUBaHIO OTBeTCTBeHHOCTb Hecet NOnb30BaTeNb.
KTAKIM NOBpeKdEHNMAOTHOCTCA:
-NoBpeKdEnH3JNeKtpoDbnIaTeTnBAeCTBHe HeKaueCTBeHHOuNcTKKaHana OxnaJaHOSeBO3dyxa(KaHana BCaCbBaHn)
Koppo3nHbIe noBpeXdEHNrN npyrne nocnE,CTBn HHeHa,IeXaUero xpaHEHra.
IobpeKdEHHyCtpoiCTBaB pe3yNbTaTe npMHeHn HeKaueCTBeHHbIX 3aIpaCTei.
-Повржденя BCJIeDCTBHe HecBOeBpeMeHHoCTn IIN HedOCTaTOUHOCTn TEXHueCKOrO obcIyKuBaHNr,IIN pa6Ot nO TEXHueCKOMy OcbIyKuBaHNIO peMOHTy,KOTbIe IPOU3BOIDINICb HeyONHOMOeHHbIMN CneuAn3IpOBaHHbIMN cepBUCbIMN UeHTpaMn.
15. OxpaHa OkpyXaIoUeN cpeIbI
CkoueHHa TpaBa He OTHOCITcK OTXoJaM, ee CNeNyET NcNoB3OBAbT Dn npiroTOBJIeHn KOMNocTa.
UcTpoIcTBo, npHuaJIeXHoCTn
KHeMy INx ynaKOBka IN3rOToBJIeHbI IN3 MaTePnAIOB,INpIROdHbIX INa BTOpNCHoro NCIOJIb3OBAHnI, INIOJNeKaT COOTBeTCTByIOUeYTuIN3aUN.
Pa3eIbHa yTnIIN3aunO cTaKOB MaTePnaIIOB, yIOBNeTBOPaUaJ 3KoIOnuYeCKN Tpe6oBaHnM, CnOCo6CTByeT Bo3MOxHocTn MHOrOkpaTHOrO npImeHeH MaTePnaIIO. ITOI npUInHe nocne NCTeueHnO obuHoro Cpoka CnyXbI yCtpoiCTBO CneDuYeT OTnpABJIb Ta HnyHKyTynlN3aun. Ppi yTnIIN3aun CneDuYeC6IIOdaT daHHbE B rIabe «YtnIIN3aun» (4.9).
O6paaTecb B BaW nyHKT npMeMa yTNbcbipBnN B CNEuaJIN3npOBaHHBm CEHTp, yTO6bl noJyUHTb INHOpMaunIO O npabuBHOYTNIN3aUNOTXoDB.
16. CtaHdapThbIe 3aunactn
HOKOKCNIKN
63387020100
BUNTH HOXA
63107602800

KpenkheIe 3JIeMeHTbI HOKa KocnIKn (HaNPmEp, BNHT HOKa) HeoXoIMMo 3aMeHrTp np3aMeHe IIN MoTAtke HOKa.3aNaChBle Yactn IMeHOTcB CneuAn3NpOBaHHOM cepBnCHOM ceHTpe VIKING.
17.ДeКларачиЯ
N3ROTOBNTeIaO COOTBeTCTBnI INPeKtNBaM EC
Mbl.
VIKING GmbH
COOTBeTCTByET CNeIyUOuIM MInpeKtNBaM
Ebponeckoro Coo6uecTba (EC):
2000/14/EC, 2011/65/EC, 2002/96/EC,
2004/108/EC, 2006/95/EC, 2006/42/EC
I3eJI8 6bln pa3pa6oTaHbB COOTBeTCTBnC O CNeDyUOuIMN HOpMaMn: EN 60335-1,EN 60335-2-77
PnmuHeHHbI MeToD oueHKn COOTBeTCTBnA DnpeKtVBam: PpnoXKeHne VIII (2000/14/EC)
Ha3BaHne n aDpec npHHMaBweyuactne HnCTaHcun:

- Table of contents
- Notes on the instruction manual 30
- Machine overview 30
- For your safety 31
- Description of symbols 36
- Standard equipment 36
- Preparing the machine for
- operation 37
- Controls 37
- Notes on working with the
- machine
- Safety devices
- Operating the machine
- Maintenance 40
- Transport 43
- Minimising wear and preventing damage 43
- Environmental protection 44
- Standard spare parts 44
- CE - manufacturer's declaration of conformity 44
- Technical specifications 44
- Troubleshooting 45
- Service schedule 46
- Notes on the instruction manual
- General
- Instructions for reading the instruction manual
- Viewing direction:
- Section reference:
- Designation of text passages:
- Texts with added significance:
- Danger
- Warning
- Caution
- Note
- Texts relating to illustrations:
- Country-specific versions
- Machine overview
- ME 443:
- ME 443 C:
- For your safety
- General
- Risk of death from suffocation!
- Caution - risk of accident:
- Caution: Danger to health due to vibrations!
- Clothing and equipment
- Transporting the machine
- Before operation
- Working with your machine
- Caution - risk of injury!
- Switching on the machine:
- Working on slopes:
- Working:
- Risk of injury!
- Maintenance, cleaning, repairs and storage
- Cleaning:
- Maintenance operations:
- Storage for prolonged periods without operation
- Warning - dangers caused by electrical current
- Warning: Risk of electric shock!
- Danger of electric shock!
- Disposal
- 5.Description of symbols
- Standard equipment
- Item Designation Qty.
- Preparing the machine for operation
- General
- Installing the electric cable:
- Installing dual handlebar (ME 443)
- Installing cable clip:
- Assembling the grass catcher box
- Controls
- Mono handlebar (ME 443 C)
- Danger of pinching!
- Folding down the handlebar:
- Height adjustment:
- Dual handlebar (ME 443)
- Grass catcher box
- Attaching:
- Detaching:
- Central cutting height adjustment
- Setting cutting height:
- Level indicator
- Notes on working with the machine
- General
- Correct motor load
- If the mowing blade blocks
- Thermal motor overload protection
- Recommencing operation
- Safety devices
- Risk of injury
- Safety devices
- Two-hand operation
- Motor run-down brake
- Operating the machine
- Electrical connection
- Recommended minimum cross-section:
- Strain relief
- Switching on the lawn mower
- Switching off lawn mower
- Emptying the grass catcher box
- Maintenance
- General
- Annual service by the specialist dealer:
- Cleaning the machine
- Maintenance interval: After each use
- Cleaning position ME 443:
- Cleaning position ME 443 C:
- Electric motor and wheels
- Upper handlebar ME 443
- Maintenance interval: Before each use
- Mowing blade maintenance
- Wear limits:
- Distance A:
- Distance B:
- Distance C:
- Removing and installing the mowing blade
- Removing:
- Installing:
- Sharpening the mowing blade
- Sharpening instructions:
- Storage (winter break)
- Transport
- Transport
- Carrying the machine:
- Securing the machine (lashing):
- Minimising wear and preventing damage
- Important information on maintenance and care of the product group
- lawn mower, manually-operated and mains-powered (ME)
- Wearing parts
- Compliance with the information in this instruction manual
- Maintenance operations
- Environmental protection
- Standard spare parts
- CE - manufacturer's declaration of conformity
- Technical specifications
- ME 443.1 / ME 443.1 C:
- ME 443.1:
- ME 443.1 C:
- Troubleshooting
- Fault:
- Possible cause:
- Remedy:
- Service schedule
- Handover confirmation
- Service confirmation
- Chere cliente, cher client,
- Transport 62 Transport 62
- Defectopsoring
- Mono-style (ME 443 C)
- Fare for elektrisk stot!
- Klemfare!
- Varning - risk for olycksfall!
- Transport of maskinen
- Risiko for at snuble!
- Pooataeutikc diataeic
- Xeipiooic t 8du xepia
- Ybaxaemble nokynateIn!
- CodepkaHne
- OIOJIb3OBaHm DaHHoI
- HnCTpyknei no 3Kcnnyataun 222
- OncanHe yctpoCTBa 223
- TexHnka 6e30nacHOCTN 223
- OncanHe CmBIOJOB 230
- KomnneKt noCTaBkn 230
- IoproToBka yctpOcnTbKa pa6oTe 231
- 3JementbI ynpaBJeHn 232
- TeKCTbI C DOnOJIHHTeJIbHOJ 3HaUIMoCTbIO:
- Onachoctb!
- PpeynpekdeHne!
- OctopoxHo!
- Yka3aHne
- TeKCTbI C CbILkAMn Ha pncyHKn:
- 2.3BapnaTbI pnaPnHbIX cTpaH
- OnncaHne yctpoiCTBa
- TexHnka 6e3oNaChOCTN
- 06üne cBedeHn
- BHHMaHHe - onachocTb HecuaCThblx cnlyaeb!
- BnHMaHHe!OnaChocTbIy 3dOpOBbBy BCJIeCTBVe Bn6paun!Upe3MepHa Harpy3Ka,Bbl3BaHHa
- Pa6oay oJexka n cpeIcTBa 3aunTbI
- TpaHcnpTIpOBKa yctpoiCTBa
- Pered pa6oToi
- Bo Bpempa60tbl
- BHMaHne -OnacHOCTb noJyueHn TpaBM!
- BkHIOueHne yCtpoiCTBa:
- Pa60tbl Ha CKIOHAX:
- BoBpeMa pa60TbI:
- BHMaHne - onachOCTb noJyueHn TpaBM!
- OnachocThcNOTKHyTbca!
- Onachoctb noJyueHnra TpaBM!
- TexHnueeckoe 06cnyxuBaHne, ouHCTka, peMOHT uXpaHeHne
- OuHcTka:
- Pa60tblnoTexHnueckomy 06cnykmbAHIO:
- XpaenHe npi dInTeIbHbIX nepepbBax B pa6oTe
- PpeynpejdeHne - onachocTb n3-3a 3neKtpueckoro Toka
- BHMaHne! OnachOcTb nopaxeHn 3JIeKtpuYeCKm TOKOM!
- F BnHT 2
- Побтовka устpoиства Кра6оTe
- O6ua nHΦopMaun
- MoHTaK OJHOCTOpOHHei BeyuIe pyu (ME 443 C)
- MONTAX 3neKtpoka6eJIA:
- MoTaux DByxCTOpOHHeBeyuie pyuKn (ME 443)
- YctaHObKa 3axnMa Ka6eJr:
- C6opka TpaBoc60pHnka
- 3JIeMeHtbl ynpabJeHnA
- OndocTopoHHa Beyuza pyka (ME 443 C)
- Onachoctb nopaxeHn 3Jektpueckm TOKOM!
- Onachoctb 3aueemlennra!
- OTknDbBaHne Bedyue pyuK:
- IonoXeHne npTpaHCnOpTnpOBe (dЯ OuNCTKn yCTpoNCTBa, yDObHo TpaHCnOpTnpOBKn N KOMNaKTHOro XpaHeHna):
- Pa6ooye noJoxeHne (nna
- PerylnpOBka BbICoTbI:
- ByxctopOHnB Beyna pyka (ME 443)
- Onachoctb 3aemlennia!
- IIOJoxHeHn Ipn TpaHCnOpTnOpOBke
- Pa6ooye noJoxKeHne (Jn
- TpaBoc6opHnK
- YCTaHOBka:
- CHRTME:
- LcHTpaNIM3OBaHHa
- perynipOBkabICOTbCpe3aHn
- YcTaHOBka BbICOTbI Cpe3aHn:
- 8.5Индкаторзанлесня
- PekomeHdaun no pa6oTe
- O6uaI INΦopMaun
- PpaBnBna Harpy3ka 3NeKtpoDburataTeIa
- Pn6IokpOBKe HOka Kocnilkn
- TennoBaauna TneKpOdBnIaTeN O Tpeperpy3kn
- TOBTOHbI BBOd B3KcNpyaTaunHO
- 3aunthbte yctpoiCTBa
- 3aunthbte yctpoiCTBa
- YnpaBHeHne 6eum pykamn
- TopMo3 octaHOBKn 3JIeKtpoDburataTeJIA
- 11.ВてнгьусрбваВ pa60у
- Onachoctb nopaxeHHa3JIeKtpnuecknM TOKOM!
- MnHmAlbHoe nonepeHoe ceeHne: do 25 M dNHOH:3x1,5 MM² do 50 M dNHOH:3x2,5 MM²
- OrpaHnUHTeNb dInHbI ka6eJra
- BkIIOueHne ra3OHOKOCnIKn
- BbIKJIOueHne ra3OHOKOCNJIKN
- OnycToWeHne TpaBoc6OpHnka
- TexHnueckoe 06cJyXnBaHne
- O6ua HhOpMaun
- OuHcTka yCtpoHCTBa
- PonoxeHne dny oucctk ME 443:
- IonoXeHne dny ouNCTKm ME 443 C:
- ΘnEeTpoDnBraTeIb n KoJeca
- BepxHЯ qactb Bedyuei pyuKIME 443
- InTepBaJI TexHnueckoro 06cIyKuBaHHa: nepeK kaxkbIM npImHeHHem
- Texnueckoe 06cIyKuBaHHe HoKa KocuKn
- InTepBaI TexHnueckoro 06cIyKuBaHHa: nepeKaKdbIM npImHeHHem
- PpeIbI n3Hoca:
- PacCToRnHe A:
- PacctoHnB:
- PacctoHnC:
- 12.6ДeMoHTaKIMoHTaKHOKa KocuIKn
- DeMOHTax:
- MoHTax:
- 3aToUka HOxa KocuJIkn
- PykoBOdCTBO no 3aToUKe:
- XpaHeHnB 3mMnI npNoD
- TpaHcnpTnPOBka
- TpaHcnpTnpoBka
- Ipehenoc yctponctBa:
- KpenenHe yctpoicBa:
- CBeDeHne K MNHMMyu3HOca N npedOTBpaueHne NOBpeXdeHn
- BaxhIe yka3aHn no TexHnueckomy 06cnykBaHnIO uXoDy dnn cNe dyuOux rpynn n3denn
- Ta3oHokocnka,nepeMeaemar BpyHy np a6oTaiouaon ot cetn (ME)
- 1.БыICTpon3HaunBaIOUeNecKOMNoHeHTbl
- 2.Co6nOeHne npedncahn daHHo nHCTpyKuIN NO 3KcNlyatauIN
- Pa60tbl NO TexHnueckomy 06cnyxnbAHIO
- OxpaHa OkpyXaIoUeN cpeIbI
- CtaHdapThbIe 3aunactn
- 17.ДeКларачиЯ
- N3ROTOBNTeIaO COOTBeTCTBnI INPeKtNBaM EC
Brand : VIKING
Model : ME 443 C
Category : Lawn mower