Tilt - Car seat Joie - Free user manual and instructions
Find the device manual for free Tilt Joie in PDF.
| Product type | Child car seat |
| Brand | Joie |
| Model | Tilt |
| Weight group | 0+ (0-13 kg) and 1 (9-18 kg) |
| Maximum child weight | 18 kg (approx. 4 years) |
| Main materials | Plastic, metal, fabric |
| Installation modes | Forward-facing and rear-facing |
| Certification | ECE R44/04 |
| Use of body support | Recommended from 0 to 6 months (rear-facing) |
| Recline adjustment | 4 positions (rear-facing) / 3 positions (forward-facing) |
| Harness | 5-point, with removable shoulder pads |
| Headrest | Adjustable height, removable |
| Textile cleaning | Machine wash at 30°C, no bleach, no tumble dry |
| Shell cleaning | Soft cloth with mild detergent |
| Recommended lifespan | 5 years after purchase |
| Manufacturer | Allison GmbH |
| Country of manufacture | China |
| Website | www.joiebaby.com |
Frequently Asked Questions - Tilt Joie
User questions about Tilt Joie
0 question about this device. Answer the ones you know or ask your own.
Ask a new question about this device
Download the instructions for your Car seat in PDF format for free! Find your manual Tilt - Joie and take your electronic device back in hand. On this page are published all the documents necessary for the use of your device. Tilt by Joie.
USER MANUAL Tilt Joie
You have purchased a high quality, fully certified child safety child restraint. This product is suitable for the use of children weighing up to 18kg (approximately 4 years old or under). Carefully read this Instruction Manual and follow the installation steps. This is the ONLY way to protect your child from serious injury or death in the case of an accident and to provide comfort to your child while using this product.
Please keep the Instruction Manual handy for future reference.
Visit us at joiebaby.com to download manuals and see more exciting Joie products!
Please Confirm
Make sure that your vehicle is equipped with a 3-point retractor safety belt. Seat belts may be different in design and length according to maker, manufacturing date, and the type of vehicle. This child restraint is only suitable for use in vehicles fitted with 3-point retractor safety belt, approved to European UN/ECE Regulation No. 16 or other equivalent standards.
Please keep the instruction manual in the bottom storage compartment located in the base of the child restraint for future reference.
For warranty information, please visit our website at joiebaby.com
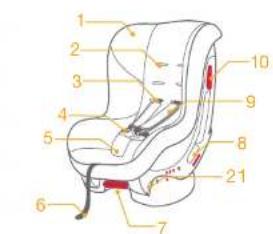
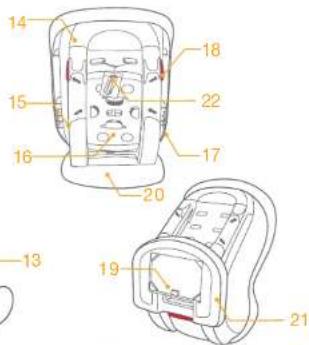
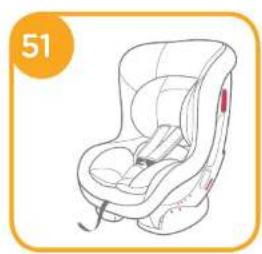
Parts List
Soft goods include Seat Pad, Shoulder Harness Covers, Crotch Pad, Head Support and Infant Body Support. Make sure all parts are available before assembly. If any part is missing, please contact local retailer. No tools are required for assembly. Please make sure all of the parts are assembled correctly.
1 Seat Pad
2 Shoulder Harness Slot
3 Shoulder Harness Straps
4 Buckle
5 Crotch Pad
6 Adjustment Webbing
7. Recline Adjustment Handle
8 Forward Vehicle Safety Belt Slot
9 Shoulder Harness Cover
10 Look-off Device
11 Head Support
12 Head Support Slot
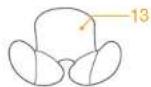
13 Infant Body Support
14 Seat Shell
15 Rear-Facing Vehicle Shoulder Belt Slots
16 Webbing Cover (may not be included)
17 Fabric Fastening Piece
18 Forward-Facing Vehicle Shoulder Belt Slot
19 Instruction Manual Storage Compartment
20 Base
21 Rear-Facing Vehicle Waist Belt Slot
22 Locking Clip
11 12
WARNING
! This child restraint is designed ONLY for a child weighing up to 18kg (approximately 4 years old or under).
! Any straps holding the restraint to the vehicle should be tight, that any straps restraining the child should be adjusted to the child's body, and that straps should not be twisted.
! After your child is placed in this child restraint, the safety belt must be used correctly, and ensure that any lap strap is worn low down, so that the pelvis is firmly engaged.
The child restraint should be changed when it has been subject to violent stresses in an accident. An accident can cause damage to the child restraint that you cannot see.
! Concern the danger of making any alterations or additions to the device without the approval of the Type Approval Authority, and a danger of not following closely the installation instructions provided by the Infant child restraint manufacturer.
! Please keep this child restraint away from sunlight, otherwise it may be too hot for the child's skin. Child restraint may become hot when left in direct sunlight. Always touch test seat before placing child in it.
! Child is not left in the child restraint system unattended.
! Any luggage or other objects liable to cause injuries in the event of a collision shall be properly secured.
The child restraint shall not be used without the soft goods.
! The soft goods should not be replaced with any other than the one recommended by the manufacturer, because the soft goods constitutes an integral part of the restraint performance.
! DO NOT use any load bearing contact points other than those described in the instructions and marked on the child restraint.
WARNING
! NO child restraint can guarantee full protection from injury in an accident. However, proper use of this child restraint will reduce the risk of serious injury or death to your child.
! DO NOT use or install this child restraint until you read and understand the instructions in this manual and in your vehicle owner's manual.
! Installing or using this child restraint without reading and following the instructions and warnings in this manual may put your child in serious risk of injury or death.
! DO NOT discard the webbing cover, for it must be assembled to the child restraint before using in forward facing mode.
! DO NOT use this child restraint if it has damaged or missing parts.
DO NOT have your child in large/over-sized clothes because this may prevent your child from being properly and securely fastened by the shoulder harness and crotch strap.
DO NOT leave this child restraint unbelted or unsecured in your vehicle because unsecured child restraint can shift and move around and may injure occupants in a sharp turn, sudden stop, or collision.
! Do not place this child restraint in seating positions where an active frontal airbag is installed if your child is still in rear facing mode.
NEVER use a second-hand child restraint or a child restraint whose history you do not know, because it may have structural damage that endangers your child's safety.
NEVER use ropes or any other substitutes to secure child restraint in vehicle or to secure child into child restraint.
! The parts of this child restraint should never be lubricated in any way.
WARNING
! Always secure child in child restraint while in the vehicle, even short trips, as this is when most accidents occur.
! DO NOT use this child restraint as a regular chair as it may fall down and injure the child.
! DO NOT put anything other than the recommended inner cushions in this child restraint.
! DO NOT carry this child restraint with a child in it.
! DO NOT put unsecured items in the vehicle because they can shift or move and may injure occupants in a sharp turn, sudden stop, or collision.
! Remove this child restraint from the vehicle seat when it is not in use.
! Consult the retailer for issues concerning maintenance, repair and part replacement.
! DO NOT install this child restraint under the following conditions:
- Vehicle seats with 2-point vehicle belts.
-
Vehicle seats facing sideward or rearward with respect to the running direction of the vehicle.
-
Vehicle seats unstable during installation.
! Be sure that the child restraint is installed in such a way that no part of it interferes with movable seats or with the operation of the vehicle doors.
! DO NOT use this child restraint for more than 5 years after the date of purchase, as the parts may degrade over time, or from exposure to sunlight, and may not perform adequately in a crash.
! Please do not use this child restraint if the child restraint has dropped from a significant height, hit the ground at a considerable speed, or has visible signs of damage. We are not responsible to replace if the child restraint has been damaged under these abnormal conditions. A new child restraint will need to be purchased when any of the aforementioned conditions occurs.
Emergency
In case of an emergency or accident, it is most important to have your child taken care of with first aid and medical treatment immediately.
Product Information
Read all the instructions in this manual before using this product. If you have any further questions, please consult the retailer. Some features may vary depending on model.
This is a "Universal" child restraint. It is approved to European Regulation No. 44, 04 series of amendments, for general use in vehicles and it will fit most, but not all, vehicle seats.
Product Child restraint
Suitable for Child weighing up to 18kg (approximately 4 years old or under)
Mass Group Group 0+/1
Materials Plastics, metal, fabrics
Patent No. Patents pending
Made in China
Brand Name Joie
Website www.joiebaby.com
Manufacturer Allison GmbH
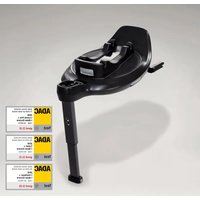
Installation Modes
| Group | Child's Weigh lit | Installation Mode | Figure for Installation | Reference Age | Seat Position | Instructions |
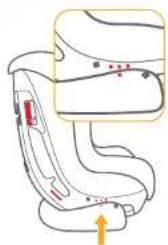
| 0*/1 | Less then 18kg | Rearward facing mode | Necessary for 0-6 months | Less then 4 years | Position 4: Align top blue diamond and bottom blue diamond | Infant Body Support shall be used from 0-6 months so as to help restrain the child tightly |
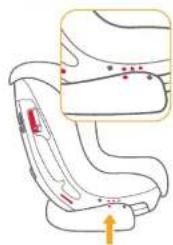
| 1 | 9-18kg | Forward facing mode | 1 year to 4 years | Positions 1-3: Align a top red dot and the bottom red dot for 3 adjustment positions | Do not use Infant Body Support for child over 6 months old |
Important
- DO NOT use forward facing mode until the child's weight exceeds 9kg. Child restraint in forward facing mode is dangerous for a child under 9kg.
- When the child is suitable for both forward and rearward facing modes, it is recommended to install this child restraint in the rearward facing mode as it is safer.
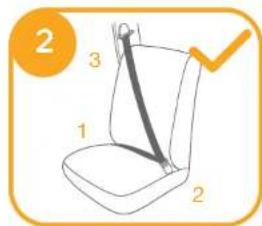
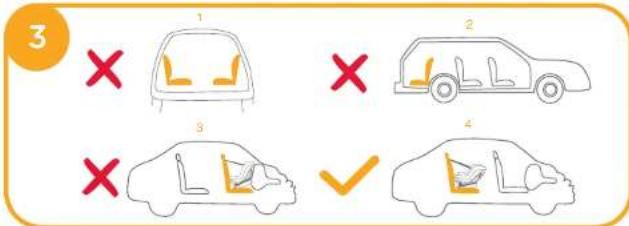
Installation Concerns
see images 1-8
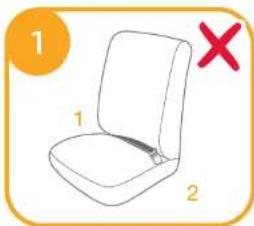
! DO NOT install this child restraint on vehicle seats with 2-Point Retractor Vehicle Belts.
This child restraint is only suitable for vehicle seats with 3-Point Retractor Vehicle Belts.
! DO NOT install this child restraint on vehicle seats that face sideward or rearward with respect to the moving direction of the vehicle.
! Do not place this child restraint in seating positions where an active frontal airbag is installed If your child is still in rear facing mode. Death or serious injury can occur. Please reference vehicle owner's manual for more information.
It is not recommended to install child restraint forward facing on front seat with airbag. Reference vehicle owner's manual for more information.
It is recommended to install this child restraint on a rear vehicle seat.
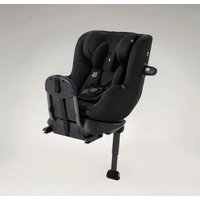
Installation for Rearward-Facing Mode
(for child under 18kg/Group 0 + / 1
Reference age newborn - 4 years old
Seat position Position 4: (with top blue diamond and bottom blue diamond aligned)
see images -
! Always install the child restraint on the vehicle seat first, and then place the child in the child restraint.
Proper Position of the Shoulder Harness Staps see images
Please choose the proper pair of shoulder harness slots according to the height of the child.
The shoulder harness slots should be at/or slightly below the child's shoulder. Shoulder harness straps that are too high or too low are not safe.
If the shoulder harness straps are not at the proper height, the child may be ejected from the child restraint during a crash.
Use of Inner Cushions
see images -
Note
- Inner cushions include head support and infant body support.
- Head support is suitable for child in all installation modes.
-
Infant body support is for child's protection. A child 0-6 months must use infant body support.
-
Pull the head support aside and thread the shoulder harness straps through the head support slot to fasten the head support onto shoulder harness straps. Before assembling the head support, please check whether the shoulder harness straps are at the proper height. Please refer to Proper Position of the Shoulder Harness Straps & Shoulder Harness Height Adjustment.
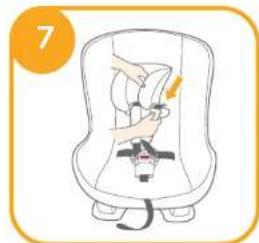
-
While pulling up on the webbing adjuster, pull out the shoulder harness straps to proper length.
-1 Webbing adjuster
9
10


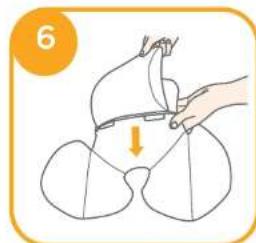
CLICK
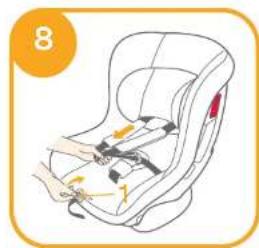
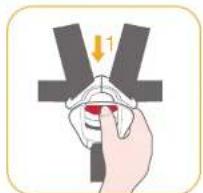
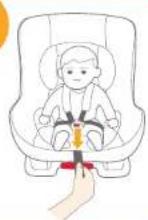
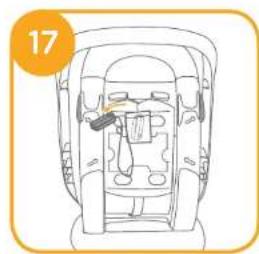
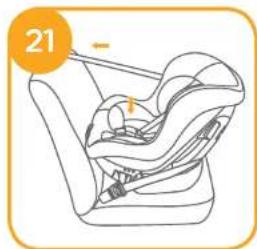
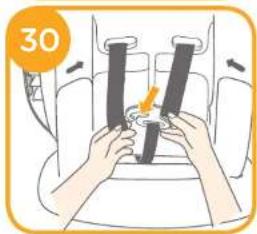
- Press the red button to disengage the buckle -1, and then place the infant body support in the child restraint.
- Engage the buckle until it clicks,
5.Pull the adjustment webbing tight.
11
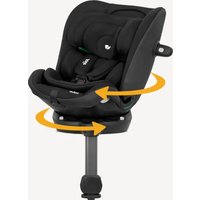
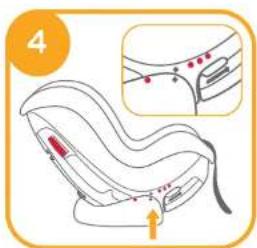
Rearward Reclining Angle Adjustment
see images
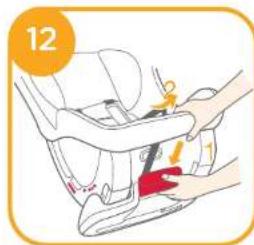
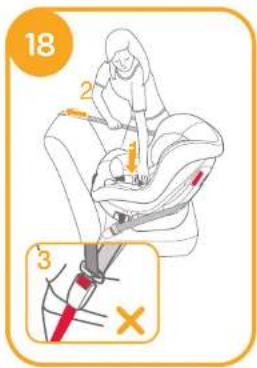
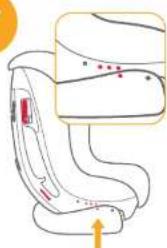
While pushing the reclining adjustment handle -1, pull the child restraint from the most upright position to the most reclined position.
Angle indication: The top blue diamond and bottom blue diamond are aligned (Position 4).
Note
- Make sure the shoulder harness is adjusted to proper height before installing this child restraint. Please refer to Proper Position of the Shoulder Harness Straps & Shoulder Harness Straps Height Adjustment.
- First adjust the angle of the child restraint to position 4. Angle indication: Align the top blue diamond and bottom blue diamond.
- When installing and adjusting the vehicle belts, make sure that both the shoulder belt and the waist belt are not twisted and will not prevent the vehicle belts from functioning properly.
Rearward-Facing Installation
see images -
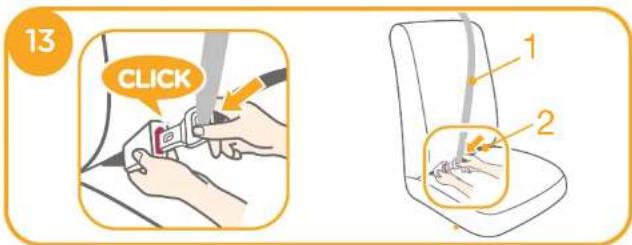
- Pull out the vehicle belt and engage the vehicle buckle tongue into the buckle.
-1 Vehicle shoulder belt
-2 Vehicle Waist belt
- Rotate the child restraint rearward and thread the vehicle waist belt through the two rear-facing vehicle waist belt slots underneath the shell.
-1&-2 Vehicle belt slot
The correctly assembled belt is shown in 16.
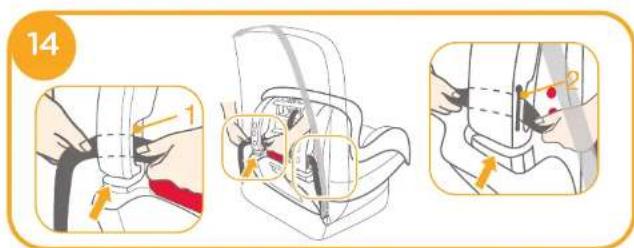
- Install the vehicle shoulder belt in the two rear-facing vehicle shoulder belt slots at the back of the seat shell.
Shoulder belt must pass through the rear-facing shoulder belt slots.
- Take the locking clip out of the bag.
- While pressing the child restraint firmly into the vehicle seat, pull the vehicle shoulder belt to fasten the child restraint tightly and securely.
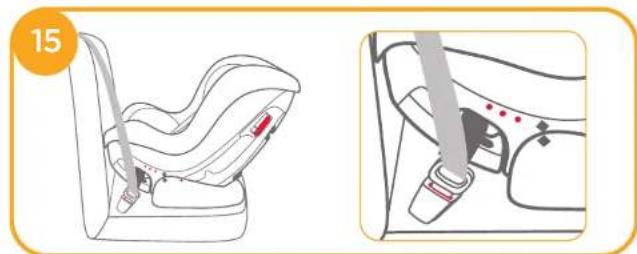
Please check if the child restraint is installed tightly by moving the child restraint back and forth at the vehicle belt path (child restraint should not move more than 25mm / 1
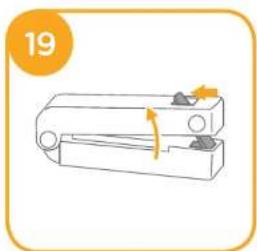
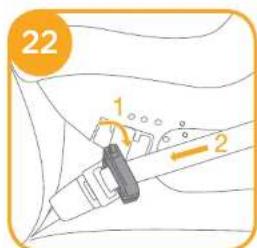
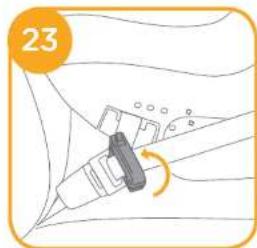
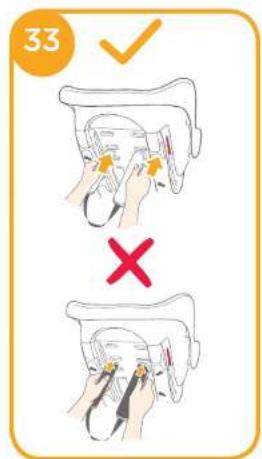
The child restraint cannot be used if the vehicle safety belt buckle (female buckle end) is too long to anchor the child restraint securely. -3 - Press button to open the locking clip.
- Thread the diagonal belt through the locking clip, and then fasten the locking clip.
- While pressing the Car seat, pull the belts to fasten the Car seat tightly and securely.
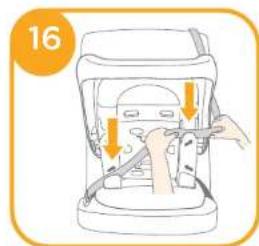
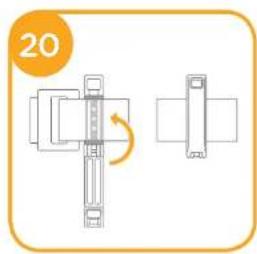
- Unlock the device first -1 and slip it as close as possible to the buckle. -2
- Refasten the locking clip.
C
Installation for Forward-Facing Mode
(for child under 9-18kg/Group 1)
Reference age
1-4 years old
Seat position
Position 1 - Position 3: top red dot and bottom red dot aligned, as shown in
see images -
27
! Please install the child restraint on the vehicle seat first, and then place the child in the child restraint.
Forward Reclining Angle Adjustment
see images
While pushing the reclining adjustment handle 1-1, push the child restraint to the desired position
-2 Angle indication: With a top red dot and the bottom red dot aligned.
The reclining positions are shown in
Proper Position of the Shoulder Harness Straps
see images
Please choose the proper pair of shoulder harness strap slots according to the child's height.
The shoulder harness strap slots should be at or slightly above the child's shoulder. Shoulder harness straps that are too high or too low are not safe.
If the shoulder harness straps are not at the proper height, the child may be ejected from the child restraint during a crash.
Shoulder Harness Height Adjustment
see images 2 - 19
Note
- DO NOT remove the shoulder harness covers as they are important for preventing slippage of the child during a collision.
- Please thread the shoulder harness covers first, and then thread the shoulder harness straps through shoulder harness covers.
- During assembly, make sure the shoulder harness straps are not twisted.
- Please reassemble the head support after assembling the shoulder harness straps.
- DO NOT discard the webbing cover, for it must be assembled to the child restraint before using in forward facing mode.
- Take off the head support and the small seat pad from the child restraint before disassembling the shoulder harness straps.
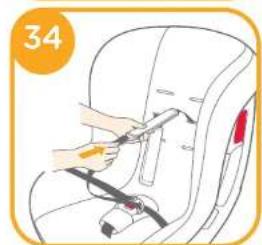
Disassembly of the Shoulder Harness
- Pull up the webbing adjuster, while pulling the shoulder harness straps to the proper position.
-1 Webbing adjuster - Remove the webbing cover from the body.
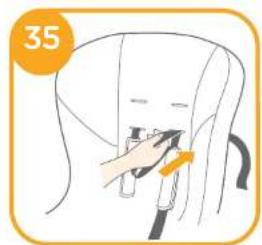
- At the back of the seat, disassemble the two shoulder harnesses from the T-shaped steel plate.
4.Pull out the shoulder harness straps. - Thread the shoulder harness covers through the shoulder harness strap slots.
Assembly of the Shoulder Harness
-
Choose the proper shoulder harness slots and thread the shoulder harness covers through them.
Always ensure that shoulder harness covers are assembled with rubber side facing down towards child. -
Thread the shoulder harness straps through the shoulder harness covers.
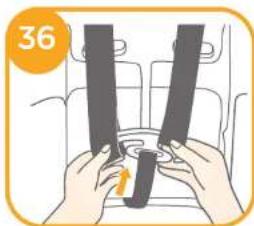
To avoid the shoulder harness from getting twisted, please engage the buckle first. - Thread the shoulder harness straps through the shoulder harness slots.
- Thread the two shoulder harness straps at the back of the seat onto the T-shaped steel plate.
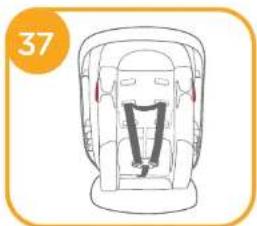
The assembled shoulder harness straps are shown in - Thread the shoulder harness straps through the head support slot to fasten the head support to the straps, and then pull the adjustment webbing tight.
- Reassemble the webbing cover to the body.
Note
- Please adjust the shoulder harness to proper height (at or slightly above the child's shoulder) before installing the child restraint. Please refer to Proper Position of the Shoulder Harness Straps & Shoulder Harness Straps Height Adjustment.
- Please adjust the child restraint to proper angle (3 possible positions for forward-facing mode). Angle indication: With a top red dot and the bottom red dot aligned, as shown in
! Recline angle must be selected before child restraint is installed in the vehicle. Adjusting the recline position while child restraint is installed in vehicle may loosen vehicle belts on child restraint, leading to serious injury or death in a crash.
3. When installing and adjusting the vehicle belts, make sure that both the shoulder belt and the waist belt are not twisted and will not prevent the vehicle belts from functioning properly.
Forward-Facing Installation
see images -
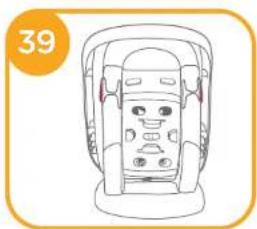
- Pull out the vehicle belt, rotate the child restraint forward and thread the belt through the two forward-facing vehicle waist belt slots at the back of the child restraint shell.

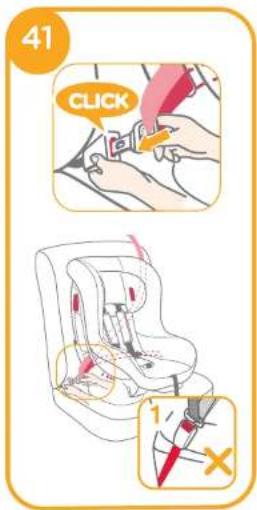
- Buckle the vehicle belt.
The child restraint cannot be used if the vehicle safety belt buckle (female buckle end) is too long to anchor the child restraint securely. -1
- While pressing the child restraint firmly into the vehicle seat, pull the vehicle shoulder belt toward the retractor to fasten the child restraint tightly and securely.
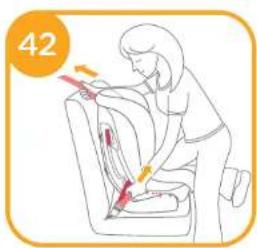
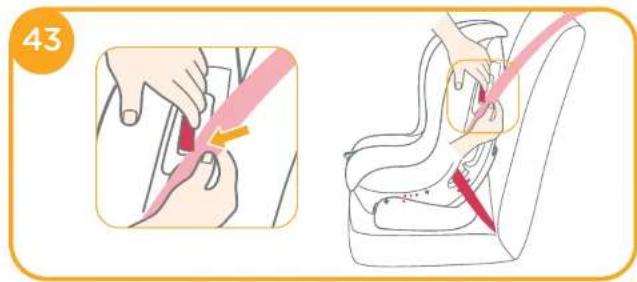
- Open the lock-off device and insert the vehicle shoulder belt through it. Close the lock-off device onto the vehicle shoulder belt.
! Please check if child restraint is installed tightly by moving the child restraint back and forth at the vehicle belt path. (Child restraint should not move more than 25mm/1").
44

The assembled vehicle safety belt is shown in
! Ensure vehicle shoulder belt passes through Lock-off Device, as shown in ④ - 1
! Ensure vehicle waist belt passes through the forward-facing vehicle waist belt slots, as shown in -2.
! Ensure that the vehicle buckle tongue is engaged with the buckle correctly, as shown in ⑥ -3.
Securing your Child in the Child restraint
see images
45
Note
- When installing the child restraint in the forward-facing mode, DO NOT use the infant body support.
- Please install the child restraint on the vehicle seat first, and then place the child in the child restraint.
-
After the child is placed into the child restraint, check whether the shoulder harness straps are at the proper height. Please refer to Proper Position of the Shoulder Harness Straps & Shoulder Harness Straps Height Adjustment.
-
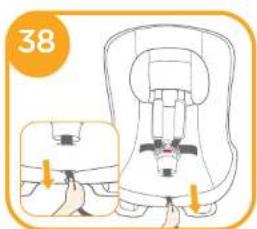
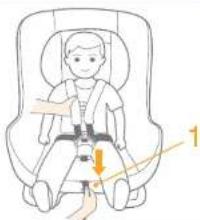
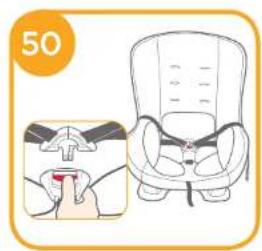
Pull up the webbing adjuster, while pulling the shoulder harness straps to the proper length.
-1 Webbing adjuster - Press the red button to disengage the buckle - 1, and then leave the harness straps on the left and right sides of the child restraint.
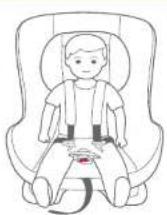
- Place the child in the child restraint and pass both arms under the shoulder harness straps.
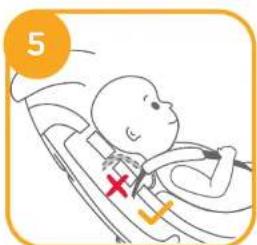
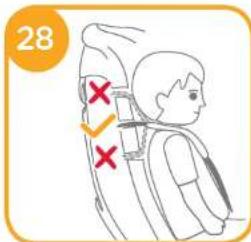
! After the child is seated, recheck whether the shoulder harness straps are at the proper height. Please refer to Proper Position of the Shoulder Harness Straps & Shoulder Harness Straps Height Adjustment.
- Pull down the adjustment webbing and adjust the harness so that your child is snugly secured.
Make sure the space between the child and the shoulder harness straps is about the thickness of one hand.
Care and Maintenance
! Please machine wash the soft goods with cold water under 30^
Do not iron the soft goods.
Do not bleach or dry clean the soft goods.
! Do not use undiluted neutral detergent, gasoline or other organic solvent to wash any part of the child restraint. It may cause damage to the child restraint. Use only mild detergent and water with a soft cloth to clean child restraint shell and harness.
Do not twist the soft goods to dry with great force. It may leave the soft goods with wrinkles.
Please hang dry the soft goods in the shade only. Do not use a clothes dryer to dry the fabric.
Please remove the child restraint from the vehicle seat if not in use for a long period of time. Place child restraint out of reach from your child.
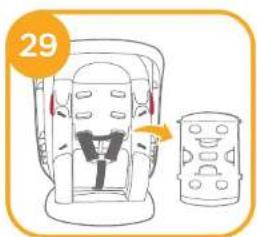
! Foam insert MUST be removed from infant body support before machine washing. To reinstall foam into infant body support, please reference 6.
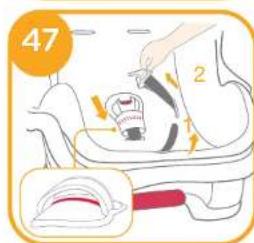
Soft Goods Assembly
see images -
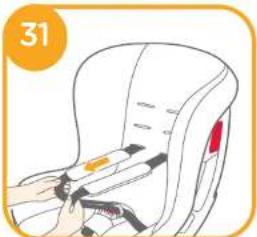
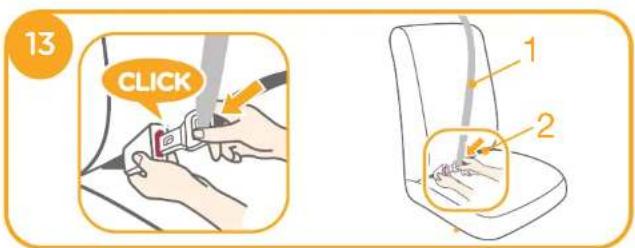
- Place the seat pad on the shell and thread the buckle through the seat pad slot.
- Wrap the buckle with the elastic on the inside of the crotch pad.
- Thread the adjustment webbing and harness on both sides through the seat pad respectively.
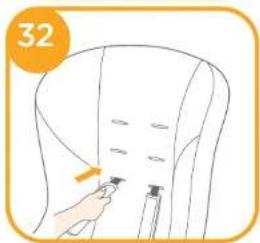
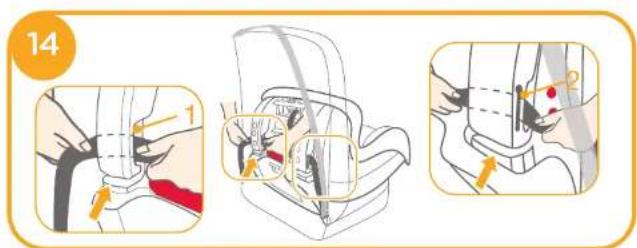
- Place the fastening pieces in front of the seat pad into the two slots on the bottom of the seat shell.
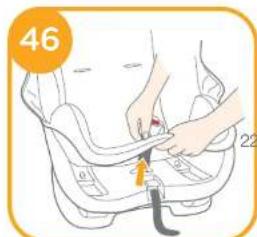
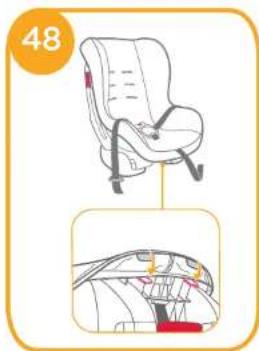
- Place the fastening pieces on sides of the seat pad into the two slots on both sides of the seat shell.
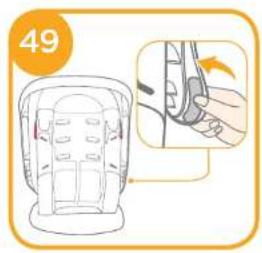
- Put the infant body support into the child restraint and engage the buckle.
- Refer to Assembly of the Shoulder Harness for the remaining steps.
The assembled soft goods are shown in

Parabéns!
consulte as imagens -
consulte as imagens 0 - 1
Nota
consulte as imagens -
consulte as imagens -
Nota
consulte as imagens -

- Engate a lingueta de seguranca.
consulte as imagens -
Asegürese de que su vehiculo está equipado con un 3 cinturón de seguridad retractor con 3 punto de anclaje. Los cinturones de sécuritéSEOSEOSEOSEOSEOSEOSEOSEOSEOSEOSEOSEOSEOSEOSEOSEOSEOSEOSEOSEOSEOSEOSEOSEOSEOSEOSEOSEOSEOSEOSEOSEOSEOSEOSEOSEOSEOSEOSEOSEOSEOSEOSEOSEOSEOSEOSEOSEOSEOSEOSEOSEOSEOSEOSEOSEOSEOSEOSEOSEOSEOSEOSEOSEOSEOSEOSEOSEOSEOSEOSEOSEOSEOSEOSEOSEOSEOSEOSEOSEOSEOSEOSEOSEOSEOSEOSEOSEOSEOSEOSEOSEOSEOSEOSEOSEOSEOSEOSEOSEO SEOEEOSEEOSEEOSEEOSEEOSEEOSEEOSEEOSEEOSEEOSEEOSEEOSEEOSEEOSEEOSEEOSEEOSEEOSEEOSEEOSEEOSEEOSEEOSEEOSEEOSEEOSEEOSEEOSEEOSEEOSEEOSEEOSEEOSEEOSEEOSEEOSEEOSEEOSEEOSEEOSEEOSEEOSEEOSEEOSEEOSEEOSEEOSEEOSEEOSEEOSEEOS EOOO OOOO OOOO OOOO OOOO OOOO OOOO OOOO OOOO OOOO OOOO OOOO OOOO OOOO OOOO OOOO OOOO OOOO OOOO OOOO OOOO OOOO OOOO OOOO OOOO OOOO OOOO OOOO OOOO OOOO OOOO OOOO OOOO OOOO Ooo