Xperia XL - Stroller HARTAN - Free user manual and instructions
Find the device manual for free Xperia XL HARTAN in PDF.

Frequently Asked Questions - Xperia XL HARTAN
User questions about Xperia XL HARTAN
0 question about this device. Answer the ones you know or ask your own.
Ask a new question about this device
Download the instructions for your Stroller in PDF format for free! Find your manual Xperia XL - HARTAN and take your electronic device back in hand. On this page are published all the documents necessary for the use of your device. Xperia XL by HARTAN.
USER MANUAL Xperia XL HARTAN
Suitable from 6 months, up to 15kg
Under 6 months only in connection with an appropriate carrycot.
Xperia XL
Suitable from 0 to 3 years, up to 15kg
Folding carrycot in conformity with DIN EN 1466:2008-09
Base length: 76,5 x 33,5cm.
The product is not suitable to be used when jogging or skating.

1 Handlebar
2 Handlebar catch
3 Safety turn lock
3a Adjustable handle safety lock
4 Handle-folding lock button
5 Wheel retention
6 Lock-type-swivel wheel
7 Parking brake
7a Parking brake adjusting screw
8 Adjustable suspension system
9 Readjustment of hand brake (optional)
9a Silently adjustable hood (optional)
10 Silently adjustable hood
11 Sun canopy
12 Hood and safety bar lock
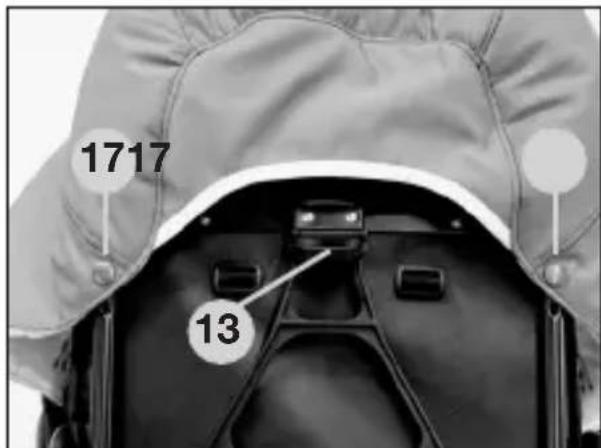
13 Tilt-adjustable backrest
14 Safety belt
15 Adjustable footrest
16 Footrest extension
17 Fall-out protection
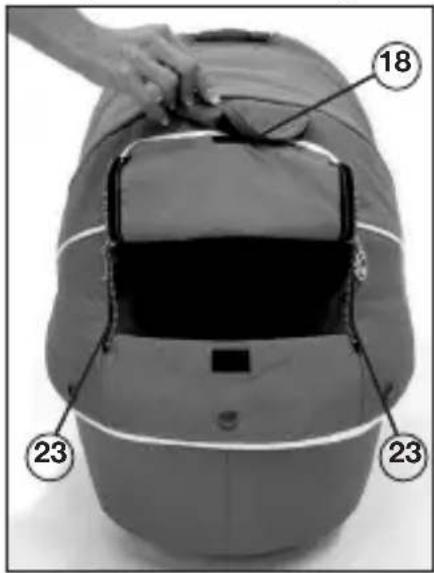
18 Ventilation zone
Automatic lock for upper section
20 Telescopic shock absorbers
21 Sun visor
22 Canopy attachment
Zip fastener for ventilation zone
24 Carrying handle
25 Security button
26 Washable lining
27 Folding handle
28 Internal clamp
29 Press-button fixing
Congratulations on your purchase
You want your baby to feel safe and secure, that's why you have purchased a Xantan high-quality product. You have made an excellent choice. Xantan products are manufactured with the greatest possible care and monitored constantly by rigorous quality control assuring that your pram will provide life-long satisfaction. The textiles used for our products have been tested for harmful substances (chemical residues) according to the industry's own, Oko-Tex-Standard 100' to guarantee that all the fabric parts of your pram are safe for your baby.
Importantly! Please do not use this pram before reading the instructions carefully, and keep these instructions for queries or future reference. Your child's safety may be affected if you do not follow these instructions.
If you do not understand the instructions or if you require more detailed information, contact your dealer.
Please ensure that other users are also informed about the functions of the carriage and the notes on safety.
For the safety of your child
WARNING! - Before use, conduct an initial check of the carriage, and do not use it if it is damaged or if parts are torn or broken.
WARNING! - Make sure when unfolding the pram and folding it together that your child is at a safe distance, to avoid any injuries
WARNING! - Never leave your child unattended in the pram.
WARNING! - Make sure before using it that the carrycot or the seat unit or the child's car seat is correctly latched into place.
WARNING! - Negotiating stairs or steps as well as overloading may damage the pram and endanger your child.
WARNING! - When parking the pram, make sure the brake is engaged. When using public transport, ensure the pram stands safely.
WARNING! - A pram, stroller or carrycot is not a substitute for a cradle or a bed. It is intended to be used exclusively as a means of transport.
For the safety of your child
WARNING! - Using this pram while jogging, skating, etc. can be dangerous and is therefore not allowed.
WARNING! - Do not allow children to play either near or with the pram.
WARNING! - Always use the restraint system.
WARNING! - Fix no bags, handbags or other loads to the handle, backrest or sides of the carriage, as this will affect its stability.
WARNING! - This model has been designed for 1 child.
WARNING! - A second child seat is not allowed for this model.
WARNING! - The seat unit and carrycot are not to be used for transporting in a car.
WARNING! - The rain cover may not be used when the hood is taken off (danger of suffocation). Never expose the rain cover hood to sun while the child is in the carriage (overheating).
WARNING! - Keep the carriage away from open fires or other sources of heat.
WARNING! - Remove immediately all film packaging, and do not allow your child to play with it (asphyxiation).
WARNING! - Accessories and spare or replacement parts not approved by the manufacturer must not be used.
WARNING! - Please ensure the swivel wheels are latched in place when you are using the pram with the reversible handlebar from the swivel wheel end.
WARNING! When opening out and folding down the frame and when adjusting the back-rest, pinch-points may be caused in which fingers etc. can be trapped unless care is exercised. Ensure that your child has plenty of clearance space.
Unfolding the pram
By pushing the lock buttons 4, unfold the upper section to bring the handle in horizontal position. Pull handle 1 upwards until handle catch 2 has engaged. WARNING! Before using the pram, make sure all catches are locked.
Folding the pram
Important: Swing the handlebar 1 that the white symbols on the twist grip 3 are visible from above. Turn rotating lock 3 inwards until the handle unlocks, then push the handle down. Then press retaining buttons 4 and fold the top part of the handle downwards.
Reversible handlebar
To reverse the handlebar, turn the twist grips 3a in the direction of the arrow. WARNING! When reversing the handlebar, take care that no movable parts jam the baby's limbs, or fingers, etc. Finally, make sure the hand lebar has reengaged properly, which is indicated by a click sound.
Height adjustment of handlebar
Press the two handle-folding lock buttons 4 to bring the upper section of the handlebar 1 in the desired position.
Removing the wheels
Release the parking brake 7. To remove or replace the wheels, press button 5. If replacing the wheel, make sure that it is correctly latched into place.
Lock-type-swivel wheels
To fix the swivelling wheel turn the caps 6 until the red spot appears; the wheel locks itself in place automatically as soon as it faces forwards. Turn the cap 6 so that the green point is visible to release the swivel lock. To remove, press the button in the centre of the cap 6 and withdraw the wheel from its seating. To fix the wheel in place, push the wheel with its fixing pin into the seating until it audibly clicks into place.
Instructions
Parking brake
To lock the wheels, depress the red securing button situated at the brake lever 7 and swing the lever down. The two toothed brake-crown wheels engage, which is indicated by a click sound. To release the brake, swing the lever up until it snaps into place.
Having parked the pram, try to push it to
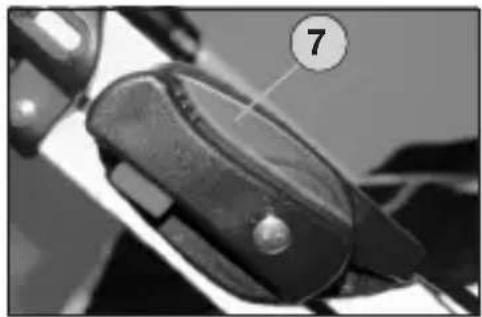
check the brake. WARNING! Make sure the brake is always closed when placing the baby in the carriage or taking it out of it.
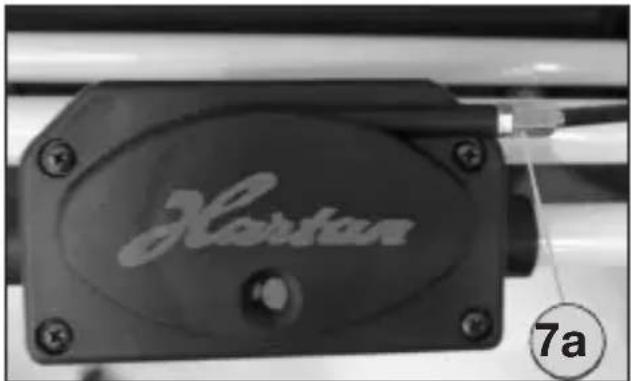
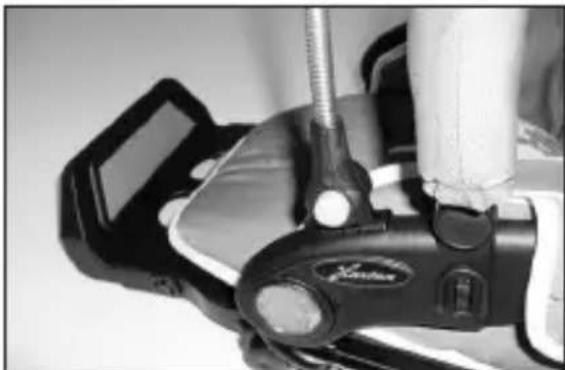
Adjusting the parking brake
After prolonged use, the wheels may cause a rattling noise. You can eliminate the problem by readjusting the setting screw 7a situated at the brake housing.
Sun canopy
Press the two front hood bows 10 together to adjust the hood. Adjusting the hood can be effected silently. By taking off the rear hood section 11, the hood can be converted into a sun canopy by means of a zip fastener.
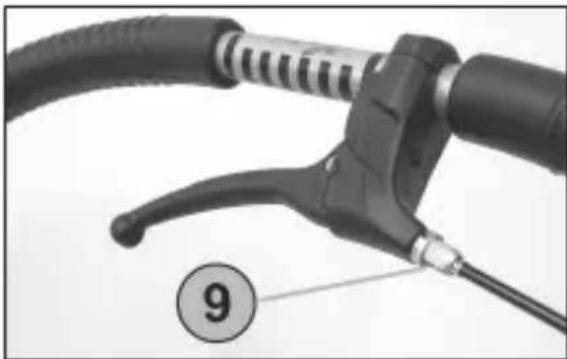
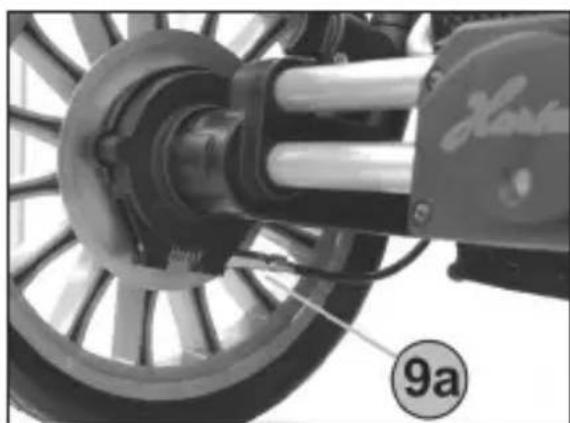
Adjust the handbrake
Readjust the hand brake by means of the cable adjusting barrel 9 (above). A different brake effect on the two rear wheels can be corrected by means of the cable adjusting barrel 9a (below).
Adjustable suspension system
By turning the selector 8, a "hard" or "soft" position can be selected for suspension.
Hood and safety bar
By pressing the bayonet joint 12, the hood or the safety bar can be pulled out. When inserting it, make sure the safety bar locks into place correctly and be careful not to pinch any of the fabric parts. By pressing the buttons, the safety bar position can be changed. WARNING! The hood bar 10 of the stroller and the safety bar are not suitable for carrying the pram.
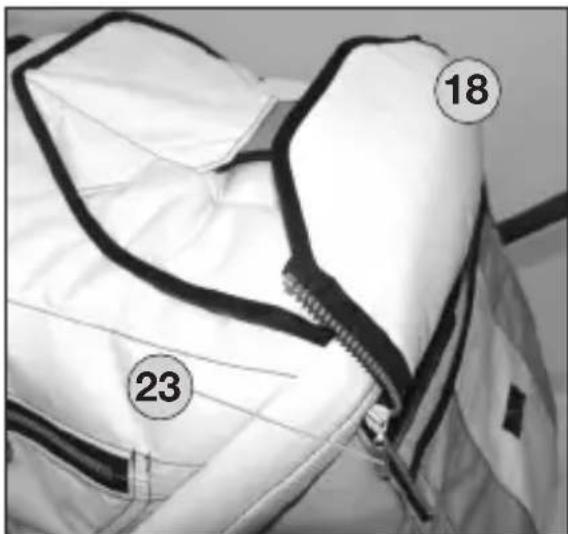
Climatic zone 18
To provide good ventilation to the hood and to prevent heat from accumulating inside, open the two zip fasteners 23 and fold up the hood flap. Use the Velcro band below the additional tap to secure the flap to the hood. As an additional protection, the sun visor 21 can be pulled out.
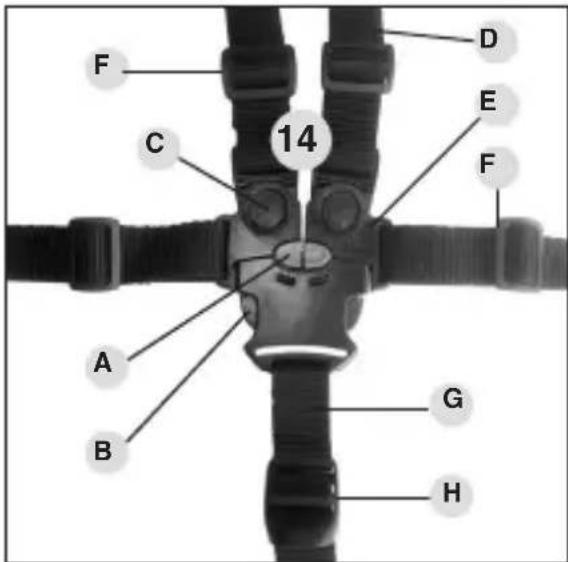
Safety belt WARNING!
Secure your child with the five-point harness system 14.
Make sure the shoulder straps D are plugged in and that the belt is securely fastened. The length of the belt can be adjusted with sliding buckle F, the length of the crotch strap G can be adjusted with quick-release slider H.
To undo the harness: press the two tongues B together using your thumb and forefinger, then press the red button A, so that you can pull the two plugs E out upwards. To undo the shoulder straps you then press button C.
Canopy attachment
Turn the canopy attachment clip so that the opening faces upwards. Remove the lower part of the canopy 22. Insert then the fixing peg of the canopy in the slot of the canopy attachment.
Instructions
Adjusting the footrest
By pressing the two red safety buttons 15 at the same time, the footrest can be lowered. When lifting it, adjustment of positions is effected automatically. The footrest can be lengthened. To do this, pull the two red pins 16 and turn the footrest by 180^ .
WARNING! In case the carrycot is attached to the frame, the footrest should always be in horizontal position, as an additional protection preventing it from slipping out. Secure the carrycot according to the operating instructions.
Automatic attachment locking
Place the seat unit on the frame in such a way that both locking handles are sitting on top of the support studs. The latches on both sides lock automatically as soon as you let go of the handles. WARNING! Check before use that the seat unit is securely fixed! To open the lock, pull the red knob out slightly, then the seat unit can be removed. The seat unit can also be turned round.
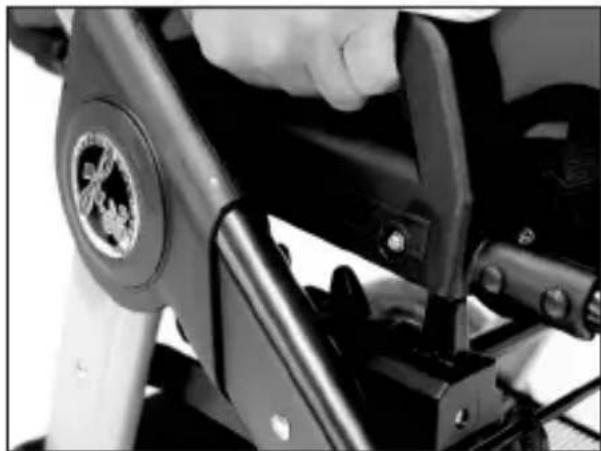
Adjusting the backrest
By raising adjustment lever 13 on the back, the seat-back can be precisely adjusted to any incline between an upright seated position and a lying position. WARNING! When adjusting the backrest, take care that no movable parts jam the baby's limbs, or fingers, etc. Finally, make sure the backrest has reengaged properly.
Protection from falling out WARNING!
As additional protection against falling out, fix the press Buttons 17 of the hood to the metal frame of the backrest.
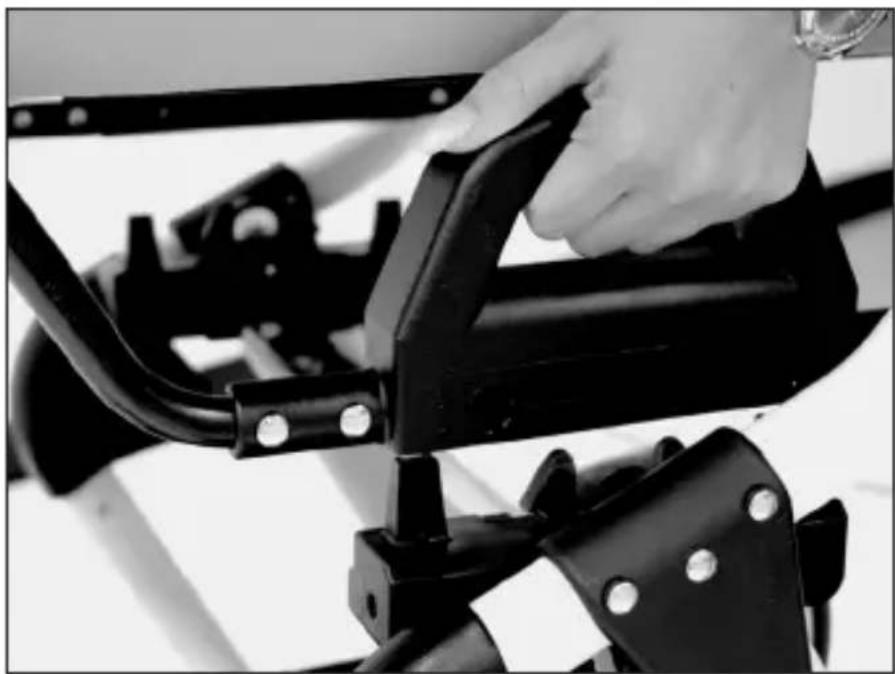
Fixing the carrycot to the frame
- Take the stroller unit off the chassis.
- Place the carrycot on the chassis in a way that the two lateral fixing pins engage in the slots of the fixing frame.
- When you apply slight pressure, the two locks engage with a clearly-audible .click".
- WARNING: Check that both locks are securely engaged by lifting the carrycot.
- Pull the two locking levers downwards until they snap into place to open the lock and to remove the carry cot unit.
WARNING: Do not use mattresses that have more than 2cm in depth.
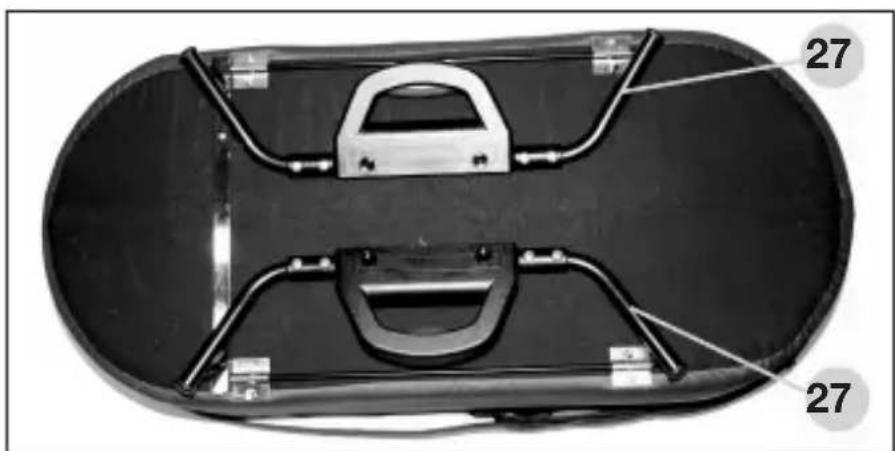
- To carry and put down the carrycot safely, the metal support bars must be folded against the base 27.
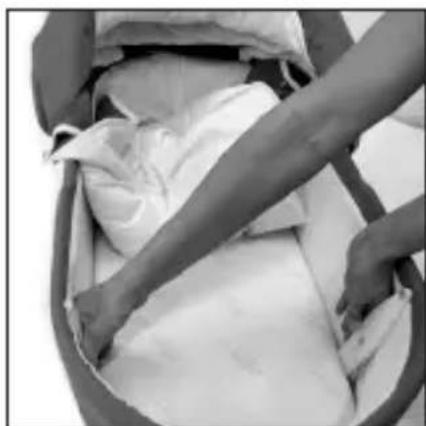
How the carrycot works
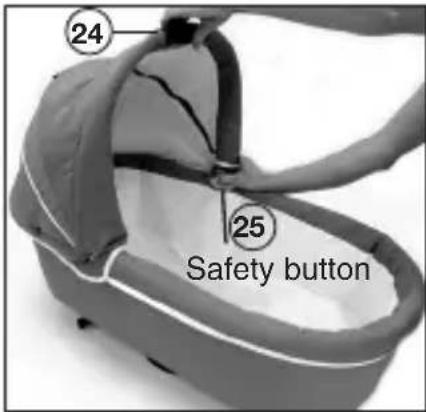
- The carrying handle 24 is designed for carrying the folding carrycot. Make sure the carrying handle is securely latched in the carrying position.
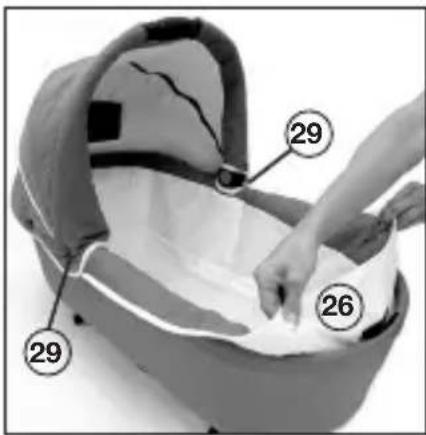
To fold the bar back, depress the two red safety buttons 25 and place the bar back, which can be done in several steps. - The underlining 26 of the carrycot can be removed and washed (follow the care and maintenance instructions). To remove it, open the frame press studs on the frame.
- The carry cot underlining can be washed (follow the care and maintenance instructions). To remove it, open the zip fastener 29.
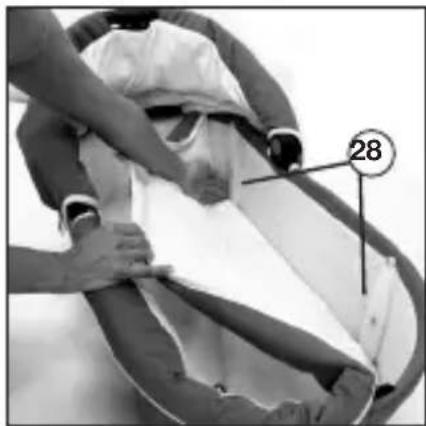
- The carrycot can be folded up flat. To do this, tip the four clamp clips 28 inward.
To unfold the carrycot, press the clamp clips 28 outward until they are engaged.
Folding
Unfolding
To open the hood flap
How the carrycot works
- You may open the hood flap to prevent heat from accumulating. To do this, open the zip fasteners 23 and fasten the hood flap below the tap 18 by means of the Velcro strip.
WARNING! Use no mattresses thicker than 2 cm!
WARNING! This carrycot is only suitable for a child not yet able to sit up or roll onto its side or support itself on hands and knees. Maximum weight of the child: 9 kg (20 lbs.).
WARNING! Never place this carrycot on a stand. Always place the carrycot on a solid, horizontal surface.
WARNING! Do not use the carrycot if any parts are torn or broken. Check the handles and the base regularly for damage or signs of wear.
WARNING! Be aware of the dangers posed by open fires, or other sources of heat such as electric heaters, gas flames etc., when they are in the immediate vicinity of the carrycot.
Suitability for the child
The seat unit is designed for a child from 6 months, and weighing up to 15kg (33 lbs).
WARNING! Only use the seat unit once your child can sit up on its own. For children under six months, only in conjunction with a suitable carrycot.
The XL carrycot is designed for children from 0-12 months, maximum weight 9kg .
Checking and care instructions
All the materials we use can easily be cared for.
Care of the fabric parts
Clean soiled fabrics when dry using a clothes-brush or lukewarm water (then use hair dryer). Do not rub fabrics extensively. Remove tenacious stains using a soft detergent. All removable fabric parts may be machine washed in lukewarm water at a gentle setting and reduced agitation, at 30^ . Let's say you have encountered a heavy rain shower. Dry your carriage with the hood still on in a dry and airy room using a cloth. This prevents marking as well as the underlining fabrics from moist soaking in through the seams. As a guaranteed protection against rain, we recommend that you use our rain cover, which is either included or can be purchased at your dealer's. Our fabrics have quite a number of distinctive features. However, they are very sensitive to excessive sunlight. That's why you should park your carriage in the shade whenever possible.
Care of the chassis
The chassis requires regular care. You should clean and slightly lubricate the wheel axles at a regular 4-weeks interval. Before oiling the wheels and push-in axles, make sure these are absolutely clean and free of sand etc., in order not to compromise the proper working of the locking mechanism. Use a silicone based lubricant spray for all moving plastic parts to maintain them in an operative condition. Keep all coated and chrome-plated metal parts in dry condition, and use a finish restorer or chrome paste if necessary. Remove smaller chassis paint damages by means of a touch-up applicator. Do not use high-pressure cleaners when cleaning your carriage, due to risk of damaging the ball bearings of the wheels (greased) and other functional parts (grinding and creaking noise). Wheels: Overpressure may result in accidents and personal injuries. Replace worn plain wheel bearings and springs in time. Replace worn plain wheel bearings and springs in time. Little stones in the thread, etc. may just as well damage the floor covering. When parking the carriage in the blazing sun or cramming it in the boot at temperatures of above 40^ , the semi pneumatic tires may flatten or become deformed.
For pneumatic tires
When using pneumatic wheels, make sure they have got enough air in the tire. Specified tire inflation pressure should be between 1.2 and 1.5bar max. WARNING! Max. tire pressure will be reached quickly. Tires tend to lose air over time. When blowing up a flat tire, inflate it only halfway first, and make sure the tire is evenly seated, to avoid "wobble". Replace worn plain wheel bearings and springs in time. Then continue to inflate it to the proper pressure.
2 YEARS WARRANTY
This product is guaranteed for a period of 2 years by your contract partner. For possible submission of proof, please keep your receipt, the completed warranty card as well as the hand-over check bearing your signature for the length of the warranty period. These documents must be submitted to qualify for service under the warranty.
IN CASE OF WARRANTY CLAIM
This product is warranted against defects in materials and workmanship that existed at the time it was handed over.
THIS WARRANTY DOES NOT COVER ....
We disclaim liability for defects in the object of purchase that are beyond our control. This especially applies to:
natural wear and tear (wear-related defects) and defects due to excessive stress
■ consequential defects, originally caused by neglect of defects/damages but developing into conditions necessitating a more difficult repair
defects due to improper or inappropriate use (see Instructions)
defects due to incorrect assembly or operation
defects due to negligent handling or lack of maintenance of the product
defects due to improper alteration of the product.
Quality agreement
WARRANTYCLAIM-YESORNO?
Rust: To provide a proper basic protection of the chassis, it has undergone a rustproofing treatment. However, rust-stains may be found when lacking maintenance. This case will not be covered by the warranty.
Scratches: Scratches caused by wear and tear will not be covered by the warranty.
Mould formation: Fabric parts, having become wet, should be dried properly to prevent mould formation (see Instructions). Mould formation will not be covered by the warranty.
Bleaching of the fabrics: We confirm that the fabrics comply with the established standards. It cannot be ruled out that colours of the fabrics may fade while the parts are exposed to direct sunlight, washed too frequently, come into contact with sweat and detergents, or suffer abrasive wear (especially on those parts where the pram is handled). Consequently, colour fading is excluded from the warranty. It is unavoidable that colours sometimes differ slightly from one individual batch to the next, which is why this case will not be covered under the warranty.
Knob formation on fabrics: We recommend that you apply general clothes care. As with woollen sweaters, the knobs can easily be removed by using a clothes-brush or burling machine.
Tearing of seams, fabrics, press studs : At the time of purchase, please check carefully that all the fabric parts, seams and snap fasteners have properly been sewn and fastened. In case of a possible complaint concerning seams/defective snap fasteners, a claim must immediately be reported to your dealer after the defect has been discovered.
Wheels: As wheels used on prams will not be balanced, they may show slight run-outs ("wobbles"). Worn tires will be regarded as natural wear and tear. No claim can be raised if your pram, using pneumatic tired wheels, has a "flat". This will be attributed to extraneous causes — a small hole caused by a pointed object, or pushing the pram about when it has not got enough air in the tire. This case will not be covered by the warranty.
WHAT TO REMEMBER WHEN BUYING YOUR PRAM
Check that your pram is complete when it is handed over and no parts are missing. Check the function of all parts and confirm this by signing the hand-over check. WHAT TO DO IN CASE OF A COMPLAINT
Call your dealer, from whom you bought the pram, to file the complaint and to discuss how to handle the matter. In case of defects concerning safety regulations, your complaint must be filed at your dealer within a 30 days period from the date the defects have occurred, otherwise these defects will not be warranted for. When handling your warranty claims, we will apply product-specific depreciation rates. We refer you to our general terms and conditions displayed at our premises.
Make sure that the pram is in a clean condition before being sent in for repair. Repairs will not be carried out on prams which are in a dirty condition.
USE, CARE AND MAINTENANCE
To maintain the original quality of your pram as a means of transportation for your child, it requires care and maintenance according to the instructions.

Xperia
Valbeveiling WAARSCHUWING!
Lamplighet for barnet
Sittenheden ar avsedd for barn fran 6 manaders alder upp till 15kg
Acceptance Certificate
Name / Name:
Straße / Road:
Stoff-Farbe (Design): Colour of fabric (design):
Zubehör / Accessories:
Kaufdatum / Date of purchase:
Salesperson (name in block letters)
Note: signing this acceptance certificate does not restrict the legal rights of the purchaser.
Handler/Dealer:
not applicable
2. Function check
Folding mechanism
checked/OK
not applicable
Road behaviour
checked/OK
not applicable
Wheels
checked/OK
not applicable
Adjusting mechanism
checked/OK
not applicable
■ Brakes check
checked/OK
not applicable
Suspension check
checked/OK
not applicable
3. Intactness
Frame check
checked/OK
not applicable
Fabric check
checked/OK
not applicable
Plastic parts check
checked/OK
not applicable
I have checked the product and have ascertained that it is supplied complete, has no external, visible faults and that all functions are intact.
I have received sufficient information concerning the product and its functions before purchase and have been instructed on care and maintenance.
Übergabe-Protokoll
Acceptance Certificate
Name / Name:
Straße / Road:
Stoff-Farbe (Design): Colour of fabric (design):
Zubehör / Accessories:
Kaufdatum / Date of purchase:
Salesperson (name in block letters)
Note: signing this acceptance certificate does not restrict the legal rights of the purchaser.
Handler/Dealer: