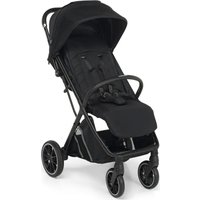
Chic - Stroller Foppapedretti - Free user manual and instructions
Find the device manual for free Chic Foppapedretti in PDF.
| Product type | Stroller |
| Brand | Foppapedretti |
| Model | Chic |
| Dimensions (unfolded) | Approximately 80 x 60 x 100 cm |
| Dimensions (folded) | Approximately 80 x 60 x 35 cm |
| Weight | Approximately 10 kg |
| Recommended age | From 6 months |
| Maximum child weight | 15 kg |
| Safety standard | EN 1888:2012 |
| Reversible seat | Yes, forward-facing or parent-facing |
| Reclining backrest | Yes, multiple positions |
| Adjustable footrest | Yes |
| Adjustable handlebar | Yes, height adjustable |
| Parking brake | Yes, on rear wheels |
| Canopy | Adjustable, with removable rear part for sun protection |
| Safety harness | 5-point, with crotch strap |
| Waist belt | With side rings for additional belt (standard BS 6684) |
| Swivel front wheels | Yes, with locking option |
| Rear wheels | Fixed |
| Car seat compatibility | Yes, with Chic 0-13 car seat (optional, group 0+) |
| Included accessories | Leg cover, rain cover |
| Fabric care | Sponge clean with mild detergent; do not use solvents |
| Warranty | 12 months (manufacturer's conventional warranty) |
Frequently Asked Questions - Chic Foppapedretti
User questions about Chic Foppapedretti
0 question about this device. Answer the ones you know or ask your own.
Ask a new question about this device
Download the instructions for your Stroller in PDF format for free! Find your manual Chic - Foppapedretti and take your electronic device back in hand. On this page are published all the documents necessary for the use of your device. Chic by Foppapedretti.
USER MANUAL Chic Foppapedretti
natural_image
Black and white photo of a baby stroller with two wheels and a canopy cover (no text or symbols visible)GB PUSHCHAIR - Assembly instructions
This seat is not suitable for children under 6 months, maximum weight 15kg - Complies with EN 1888:2012
D BUGGY - Montageanweisungen
GB. IMPORTANT! READ THE INSTRUCTIONS CAREFULLY AND KEEP FOR FUTURE REFERENCE
F. IMPORTANT! LIRE ATTENTIVEMENT ET CONSERVER SOIGNEUSEMENT A PORTEE DE MAIN POUR UNE UTILISATION ULTERIEURE
natural_image
Mechanical assembly with two workers installing components on a conveyor belt (no visible text or symbols)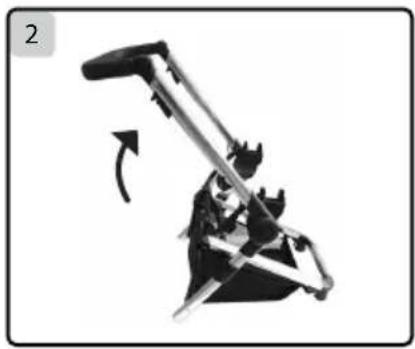
natural_image
Mechanical device with lever mechanism and rotation arrow (no text or symbols)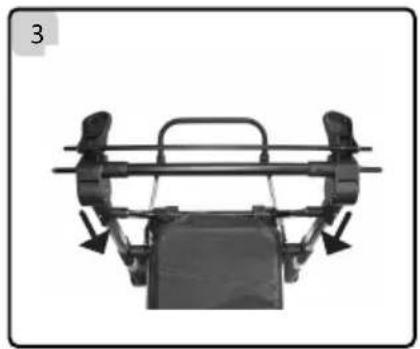
natural_image
Mechanical component with lever and frame structure (no visible text or symbols)
text_image
4 Click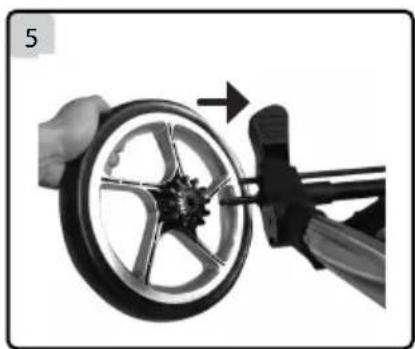
natural_image
Close-up of a hand adjusting a bicycle tire with a tool, showing mechanical components and an arrow indicating motion (no text or symbols)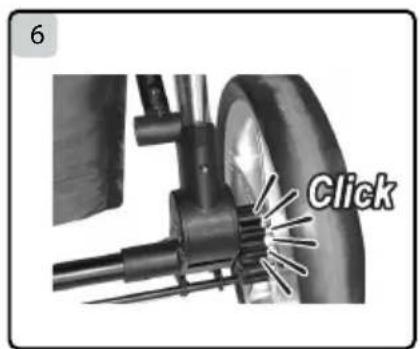
text_image
6 Click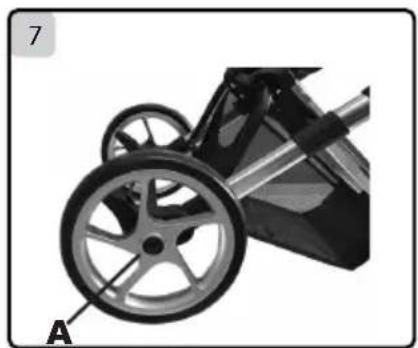
natural_image
Close-up of a car's wheel rim and suspension system (no text or symbols visible)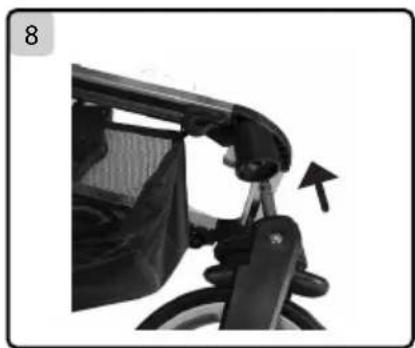
natural_image
Close-up of a person in a stroller seatbelt, showing the wheel and seat area with an arrow indicating motion (no text or symbols)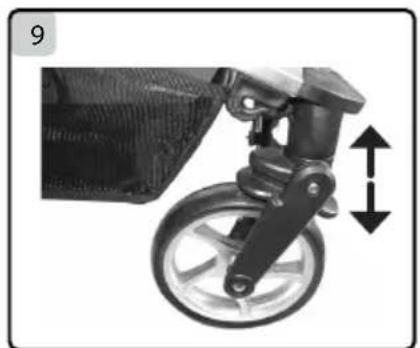
natural_image
Close-up of a bicycle steering wheel with a double-headed arrow indicating vertical motion (no text or symbols)
natural_image
Close-up of a mechanical component with a curved bracket and textured surface (no visible text or symbols)
natural_image
Mechanical stroller with wheels and a vertical double-headed arrow indicating motion (no text or symbols)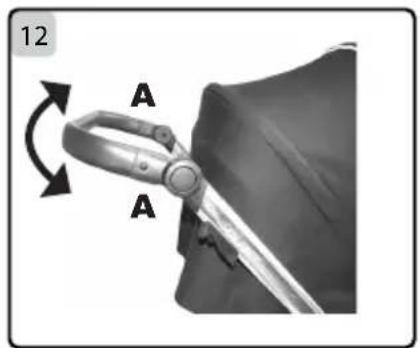
text_image
12 A A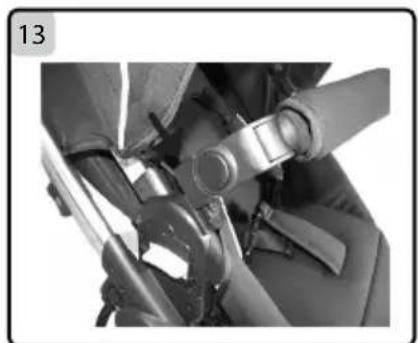
natural_image
Close-up of a car seatbelt buckle assembly (no text or symbols visible)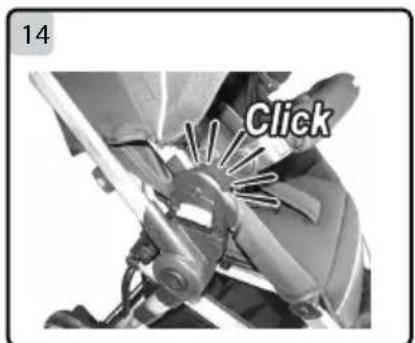
text_image
14 Click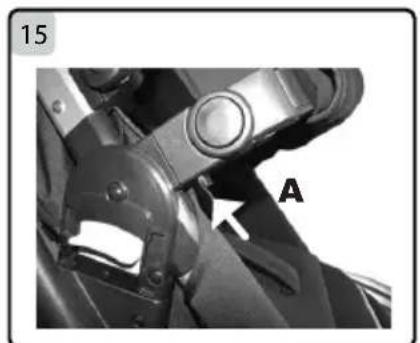
natural_image
Close-up of a motorcycle's grip and lever mechanism, labeled with letter A (no text or symbols beyond label)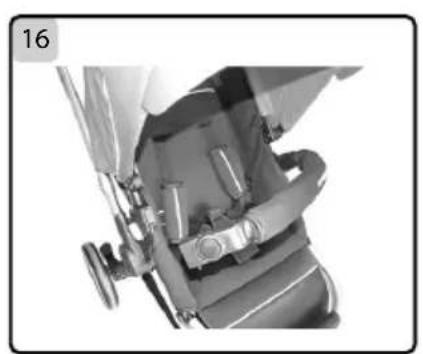
natural_image
Close-up of a mechanical device with no visible text or symbols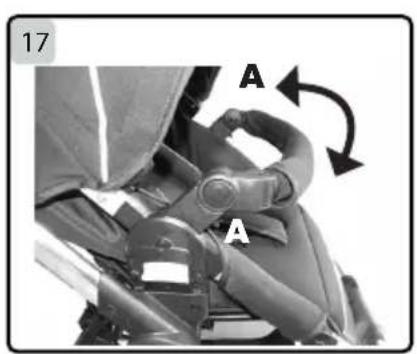
natural_image
Close-up of a car seatbelt mechanism with labeled parts A and directional arrows (no text or symbols beyond labels)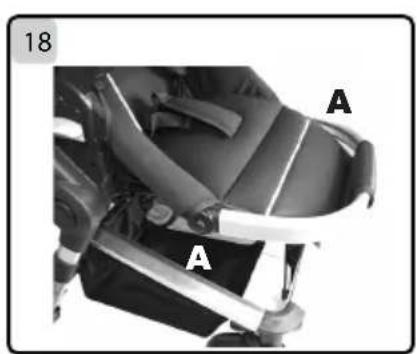
text_image
18 A A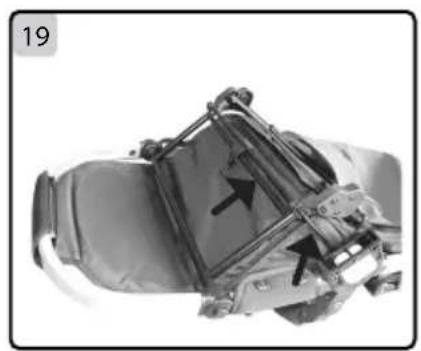
natural_image
Mechanical assembly diagram showing internal components with arrows indicating movement (no text or symbols)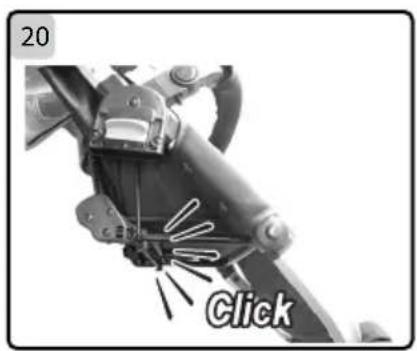
text_image
20 Click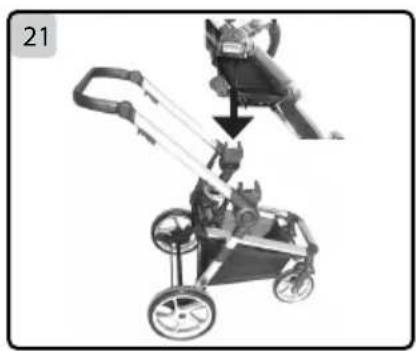
natural_image
Mechanical assembly diagram showing a stroller with handle and wheels, no text or symbols present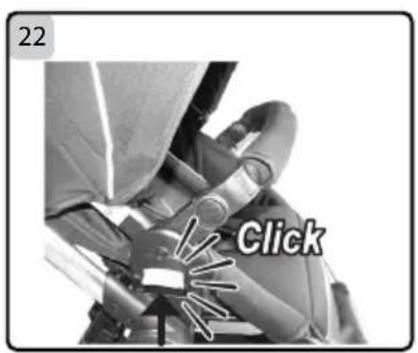
text_image
22 Click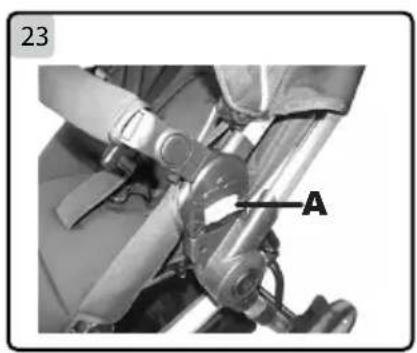
text_image
23 A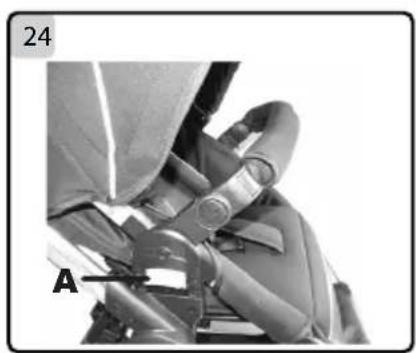
natural_image
Close-up of a mechanical device with labeled component 'A' and page number 24 (no readable text or symbols beyond labels)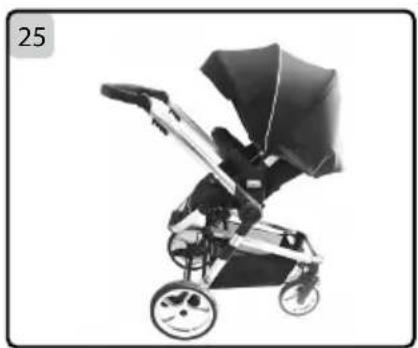
natural_image
Black and white photo of a baby stroller with a curved canopy and wheels (no text or symbols visible)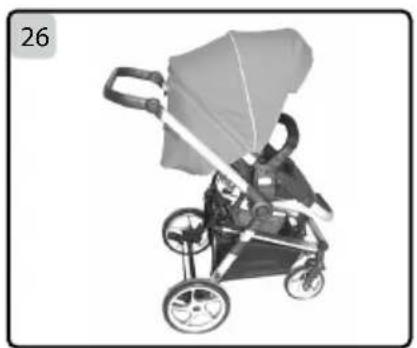
natural_image
Illustration of a baby stroller with a canopy cover and wheels (no text or symbols)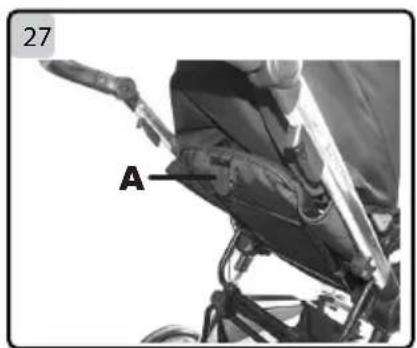
text_image
27 A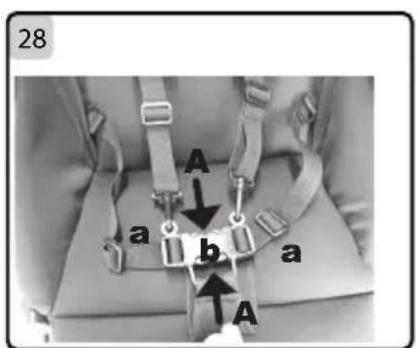
text_image
28 A a b a A
natural_image
Illustration of a baby stroller with a curved arrow indicating rotation (no text or symbols)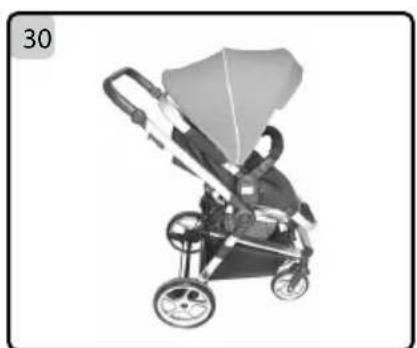
natural_image
Black and white photo of a baby stroller with wheels and canopy (no text or symbols visible)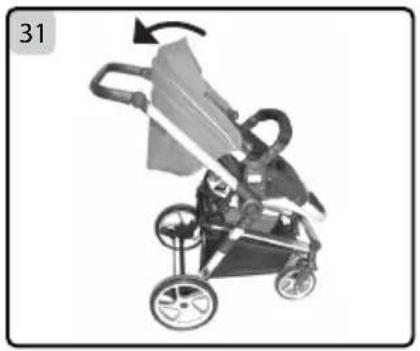
natural_image
Illustration of a stroller with wheels and a curved arrow indicating motion (no text or symbols)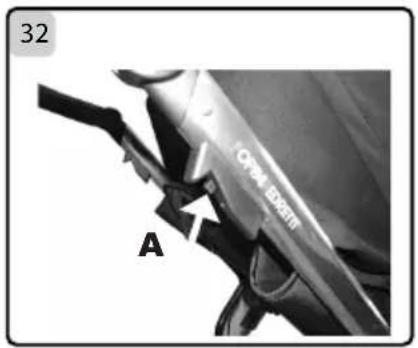
text_image
32 OPA EXCEL A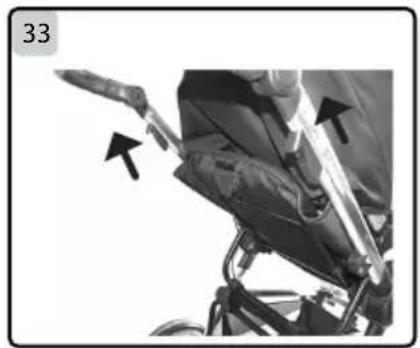
natural_image
Close-up of a person using a bicycle bike, showing the wheel and seat area with arrows indicating movement (no text or symbols)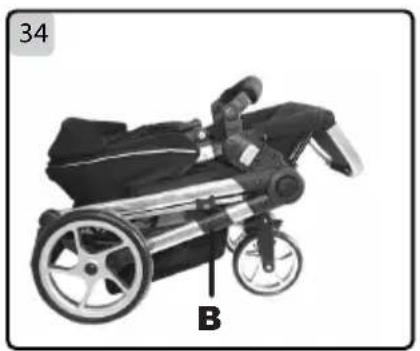
natural_image
Black and silver stroller with labeled parts B, shown in a photo (no text or symbols on the device itself)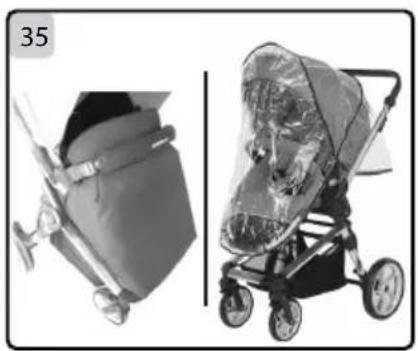
natural_image
Two grayscale photos of a stroller: one showing a bag and the other a full-size transparent bottle (no text or symbols visible)OPTIONAL:
text_image
36 NO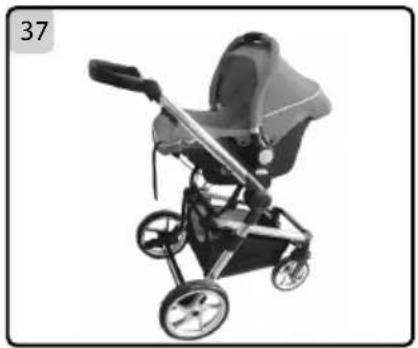
natural_image
Black and white photo of a baby stroller with wheels and a seat (no text or symbols visible)
natural_image
Close-up of a mechanical device with no visible text or symbolsIT
MONTAGGIO
natural_image
Illustration of a child stroller with crossed-out black X marks (no text or symbols)NON SOLLEVARE MAI IL PASSEGGINO CON IL BAMBINO AL SUO INTERNO
natural_image
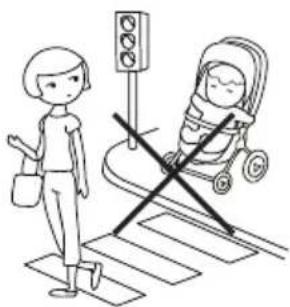
Illustration of a pedestrian crossing with a child in a stroller and a traffic light (no text or symbols)
natural_image
Simple line drawing of a baby stroller with a cross symbol crossed out (no text or labels)NON PERMETTERE MAI AL BAMBINO DI SOLLEVARSI IN PIEDI SUL PASSEGGINO
natural_image
Cartoon illustration of a character with wings and accessories (no text or symbols)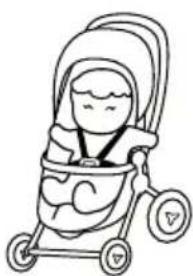
natural_image
Simple line drawing of a baby stroller with no text or symbolsASSICURARE SEMBRE IL BAMBINO CON LA CINTURA DI SICUREZZA
Important note: the images and instructions contained in this handbook refer to one version of the stroller; some components and functions described herein may vary according to the version of the stroller you have purchased.
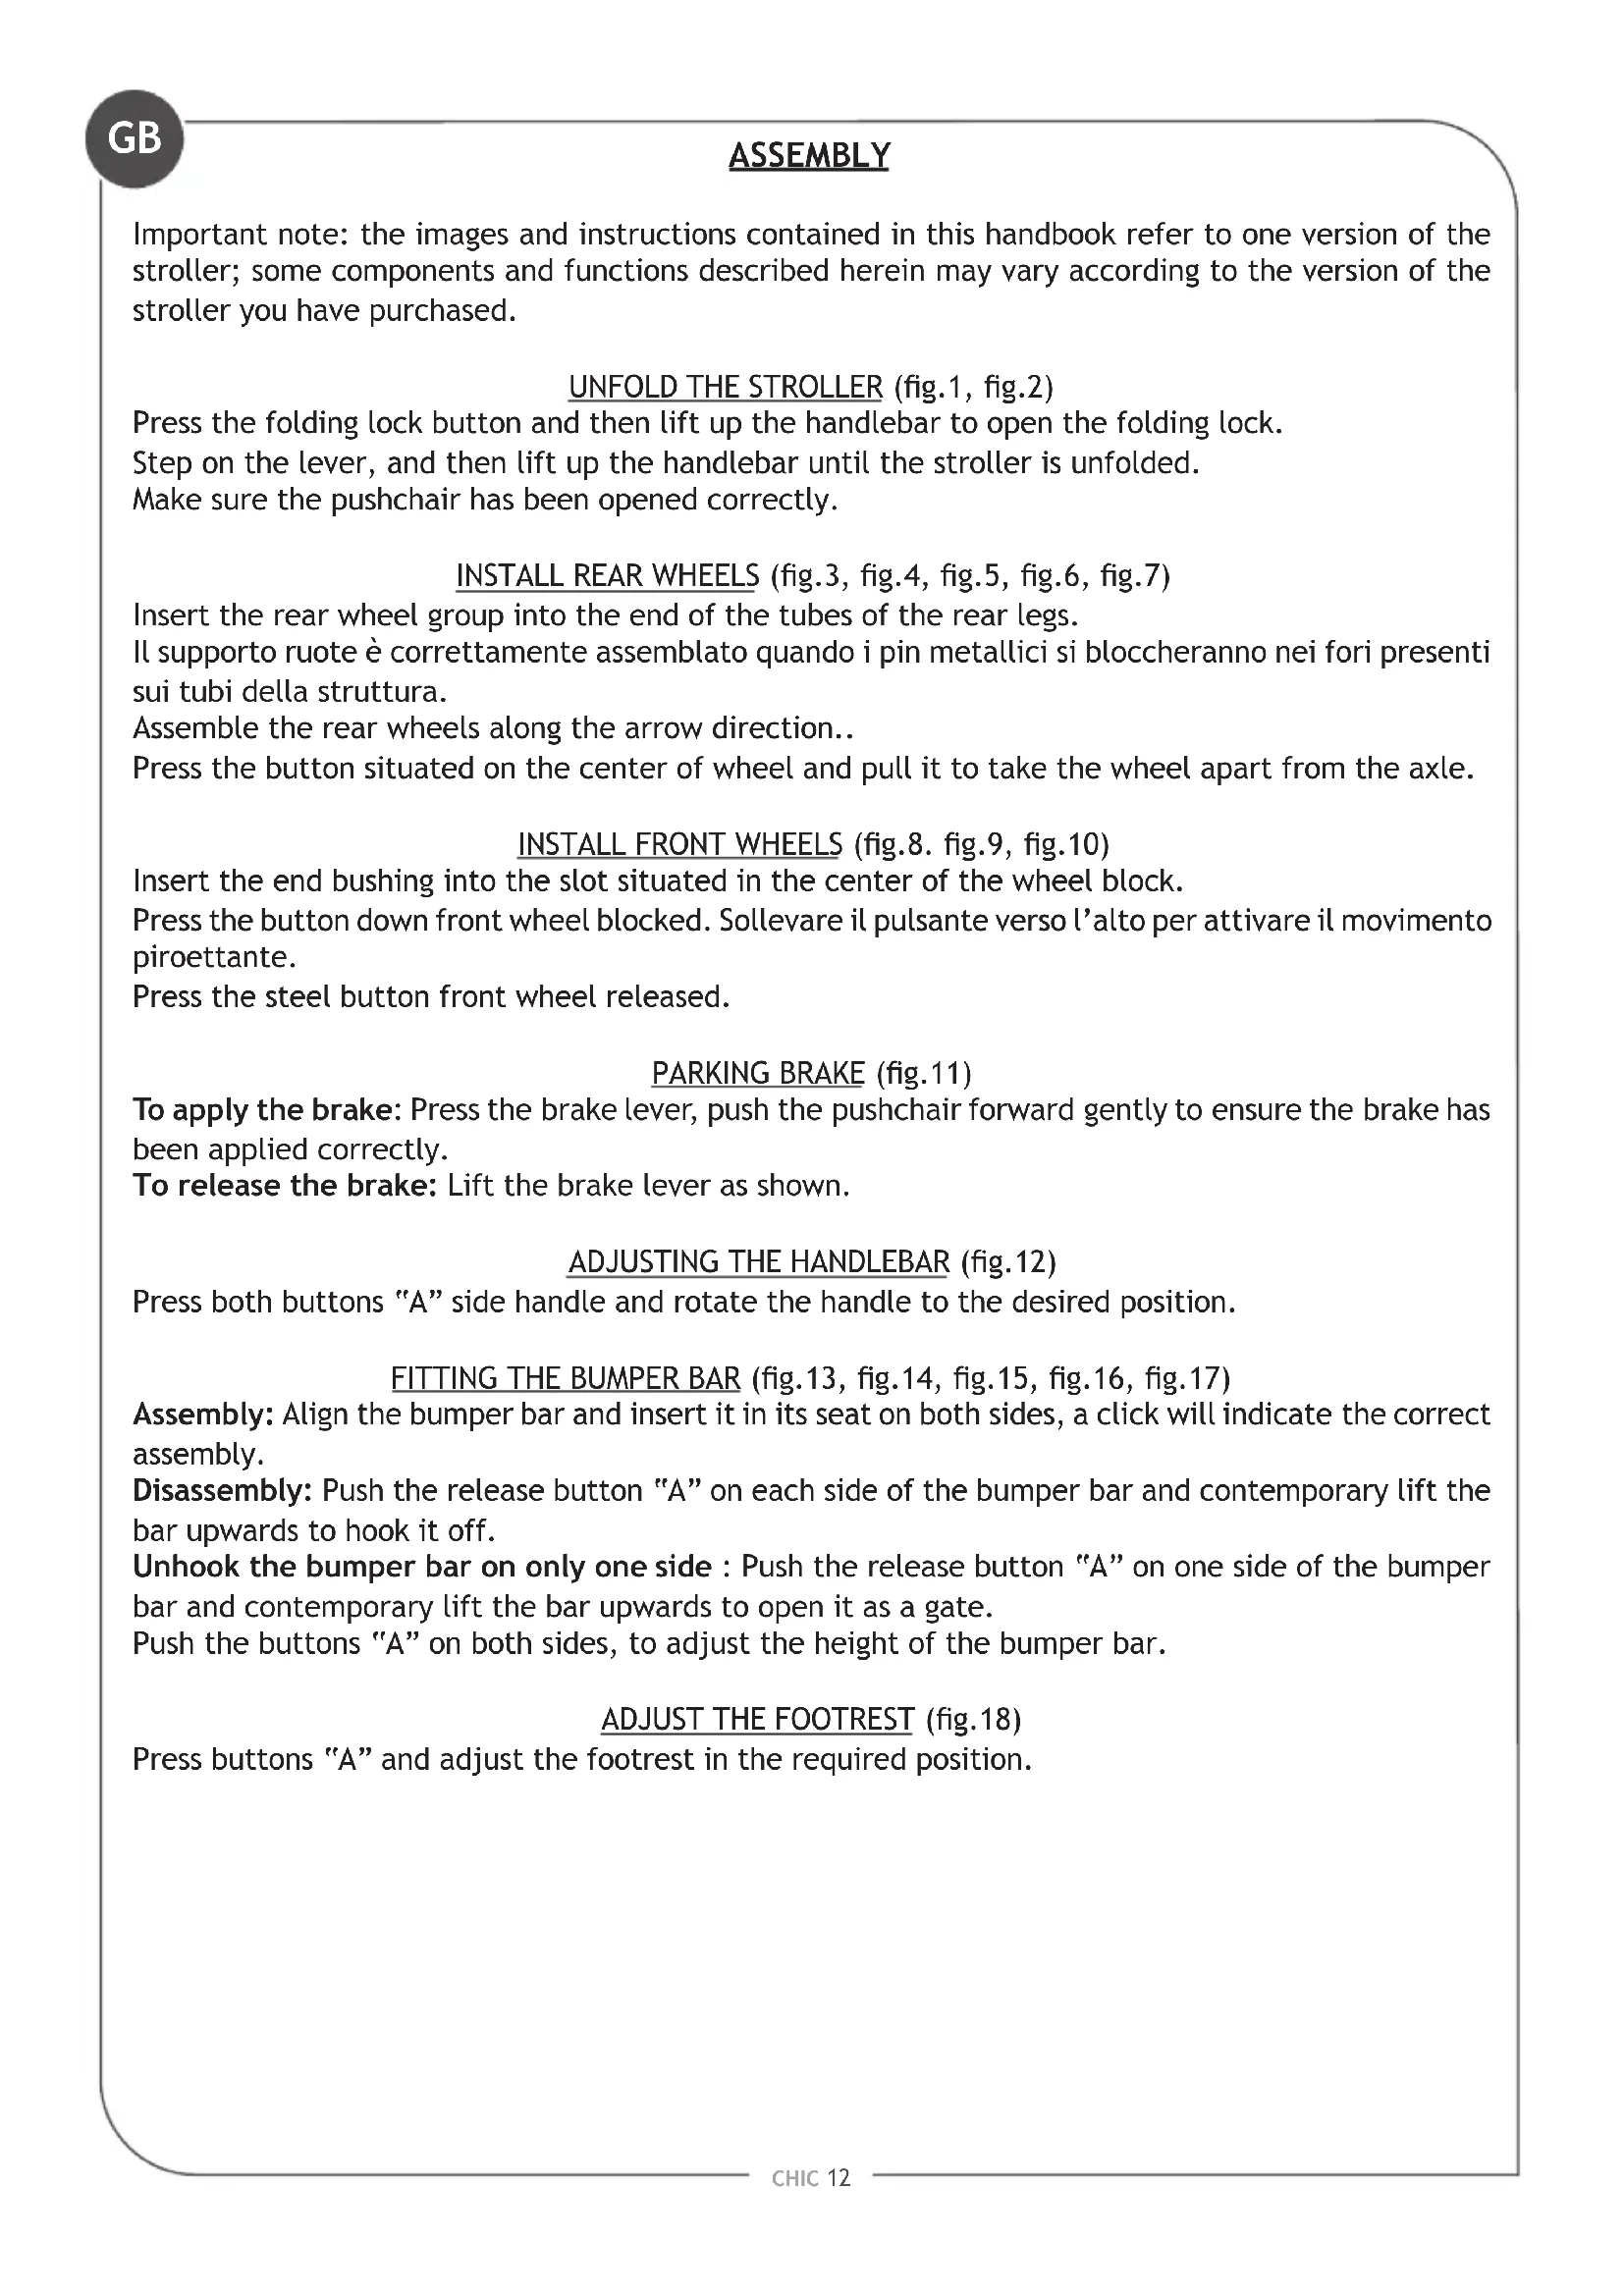
UNFOLD THE STROLLER (fig.1, fig.2)
Press the folding lock button and then lift up the handlebar to open the folding lock.
Step on the lever, and then lift up the handlebar until the stroller is unfolded.
Make sure the pushchair has been opened correctly.
INSTALL REAR WHEELS (fig.3, fig.4, fig.5, fig.6, fig.7)
Insert the rear wheel group into the end of the tubes of the rear legs.
Assemble the rear wheels along the arrow direction..
Press the button situated on the center of wheel and pull it to take the wheel apart from the axle.
INSTALL FRONT WHEELS (fig.8. fig.9, fig.10)
Insert the end bushing into the slot situated in the center of the wheel block.
Press the steel button front wheel released.
PARKING BRAKE (fig.11)
To apply the brake: Press the brake lever, push the pushchair forward gently to ensure the brake has been applied correctly.
To release the brake: Lift the brake lever as shown.
ADJUSTING THE HANDLEBAR (fig.12)
Press both buttons "A" side handle and rotate the handle to the desired position.
FITTING THE BUMPER BAR (fig.13, fig.14, fig.15, fig.16, fig.17)
Assembly: Align the bumper bar and insert it in its seat on both sides, a click will indicate the correct assembly.
Disassembly: Push the release button "A" on each side of the bumper bar and contemporary lift the bar upwards to hook it off.
Unhook the bumper bar on only one side : Push the release button "A" on one side of the bumper bar and contemporary lift the bar upwards to open it as a gate.
Push the buttons "A" on both sides, to adjust the height of the bumper bar.
ADJUST THE FOOTREST (fig.18)
Press buttons "A" and adjust the footrest in the required position.
ASSEMBLY
INSTALL THE SEAT (fig.19, fig.20, fig.21, fig.22, fig.23)
Align the seat with the adaptors and press until "click" sound.
Lift up the buttons of the adaptors with one finger at each side and lift up the seat to remove the seat.
REVERSIBLE SEAT(fig.24, fig.25, fig.26)
Lift buttons "A" on both sides and remove the seat by lifting it.
Position the seat so that it is forward facing or parent-facing.
Replace the seat on the chassis of the pushchair, see the paragraph "INSTALL THE SEAT" for correct assembly.
TO REGULATE THE BACKREST (fig.27)
Lift the regulating lever located behind the backrest and recline the backrest to the required position. Release the lever and make sure the backrest is secured in position.
SAFETY HARNESS (fig.28)
Apply the brake before placing your baby in the pushchair.
Release the buckle: press button "A" and remove the components
Fasten the buckle: by inserting part a in part b, a click will indicate that it has been fastened correctly.
WARNING: The lap belt is provided with 2 side rings to be used for additional belts in compliance with the standard BS 6684.
ADJUSTING THE CANOPY (fig.29, fig.30)
Extend the hood according to requirements to protect baby from the sun.
Note: babies' skin is very delicate. NEVER leave baby under direct sunlight. Always make sure that the hood has been adjusted correctly.
Remove the rear part of the hood to use it as a parasol.
FOLDING THE PUSHCHAIR (fig.31, fig.32, fig.33)
Before folding the pushchair, make sure that:
The seat is forward facing
The backrest is adjusted in the upright position
The canopy is folded
Push the button "A", on the lower side of the right lever and keep pressed while sliding the levers, left and right, downwards. Fold the stroller. Ensure the locking device "B" is correctly engaged.
Note: It is NOT possible to close the pushchair with the travel system accessories, the infant car seat and carrycot, fitted on the chassis.
FITTING THE FOOTMUFF (fig.35)
Insert the lower part of the footmuff on the seat of the chassis.
Secure the footmuff to the chassis of the pushchair using the press fasteners.
FITTING THE PUSHCHAIR RAINCOVER (fig.35)
Fit the raincover over the hood.
Fasten the front of the raincover to the chassis of the pushchair using the Velcro tabs.
ASSEMBLY
GB
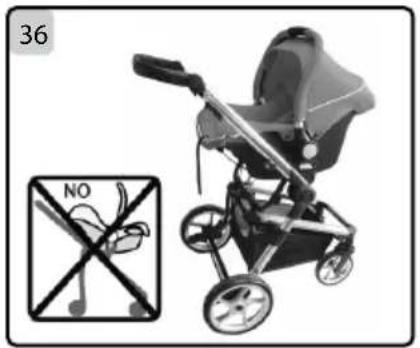
USING THE TRAVEL SYSTEM ACCESSORIES
WARNING: This vehicle has been designed for children of above 6 month age!
If you wish to use with your chassis the car seat CHIC 0-13 Group 0+ "OPTIONAL" developed for when your baby is small, pls. Operate it by following these instruction.
Remove the seat from the chassis (see the paragraph "INSTALL THE SEAT").
USING THE INFANT CAR SEAT TRAVEL SYSTEM ACCESSORIES (fig.36)
IMPORTANT: the travel system accessories must be secured to the chassis only in the parent facing position.
CAR SEAT(fig.37, fig.38)
MONTAGE
Align the carry cot with the adaptors at both side, and press until "click" sound.
REMOVE
Lift up the buttons of the adaptors with one finger at each side and lift up the seat to remove the car seat.
WARNING
WARNING: This stroller is not suitable for children under 6 months or children with a weight over 15 Kg.
WARNING: Ensure that the users are aware of the exact function of the stroller.
WARNING: Assembly and adjustments of the stroller have to be made only by adults.
WARNING: If using any complementary equipment, ensure that it is correctly fasten.
WARNING: Never leave the child in the stroller alone or unattended.
WARNING: Always secure the child with the proper belts.
WARNING: Adjust the belts at every use.
WARNING: Always use the crotch strap in combination with the waist belt.
WARNING: Ensure that children are distant before making any adjustments.
WARNING: Do not make any operation of closing or opening the stroller with a child in it.
WARNING: Do not transport more than one child at a time.
WARNING: Please ensure that the brakes are locked from both sides when parking the stroller.
WARNING: Pay attention when moving up or down any platforms.
WARNING: The brake does not guarantee an optimal hold in steep slopes. Therefore never leave the stroller on a sloping ground with a child sitting or lying in the stroller.
WARNING: Do not use if any part if broken, torn or missing.
WARNING: Any load attached to the handle affects the stability of the stroller.
WARNING: Do not use any components, accessories or spare parts not supplied by the supplier.
WARNING: Overloading or carrying too high and too wide items can lead to unexpected circumstances.
WARNING: Take out the child and fold/close the stroller when going up/down many stairs, escalators or steep slopes.
WARNING: Do not use the stroller differently from what it has been designed for.
WARNING: Do not let children play unattended near the stroller.
WARNING: Hold your stroller while travelling with public transportations on roads or railways. Even when the breaks are activated the movements of the vehicle could cause unexpected movements of the stroller.
WARNING: If you leave the stroller for long sun exposure, wait until it has been cooled before putting the child into it.
WARNING: Never leave the canopy raised with the rain cover fixed when inside, in a heated environment or close to a heat source. There is risk for the child suffering of excessive heat.
WARNING: Long sun exposure could cause colour changes of fabrics and materials.
WARNING: Store the stroller in a dry environment.
WARNING: Infants and young children can suffocate and die if their faces are in or next to a plastic bag. Discard the plastic bags immediately. Keep the plastic bags away from children, infants, crib beds, playpens or carriages.
WARNING: Avoid insert fingers into the mechanisms.
WARNING: Pay attention to the traffic when crossing the roads.
WARNING: Ensure that all screws are tightened.
WARNING Do not stand on the axles between the wheels. This is unsafe and could damage the stroller.
WARNING: Do not add a mattress thicker than 15 mm.
WARNING: Do not change the position of the seat while a child is seated. Prevent the child from falling and being injured.
WARNING: This stroller is designed as a walking stroller. We so not recommend running, roller blading, or other such activities with this stroller.
WARNING: Keep the stroller away from open flames and other heat sources, such as electrical or gas
WARNING
GB
heaters, etc.
WARNING: Ensure that the pram body, seat unit and complementary equipment (car seat group 0+) are correctly fasten before use.
natural_image
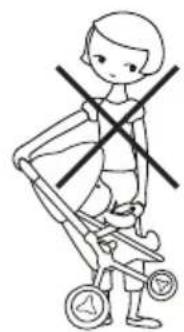
Illustration of a child using a stroller with crossed-out black lines indicating prohibition (no text or symbols)Even the stroller is unoccupied, it may cause to strumble.
NEVER LEAVE THE CHILD UNATTENDED
It may be dangerous to leave your child unattended.
natural_image
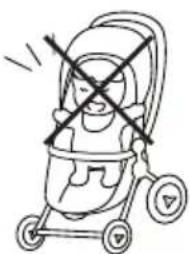
Simple line drawing of a baby stroller with a cross symbol crossed out (no text or labels)The stroller is only intended for carrting one child.
NEVER HANG THE GOODS ON THE HANDLEBAR OR THE SUN CANOPY
Otherwise, it will cause the shape of the sun canopy in changing and out of balance.
natural_image
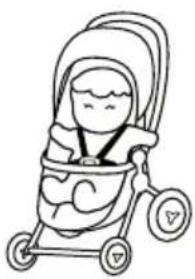
Simple line drawing of a baby in a stroller (no text or symbols)PLEASE FASTEN THE SEAT BELTS AT ALL TIME
The front handlebar cannot constraint a child effectively. The best way is fasten the seat belt and remaining 2 fingers width space.
natural_image
Illustration of a pedestrian crossing with a child stroller and traffic light (no text or symbols)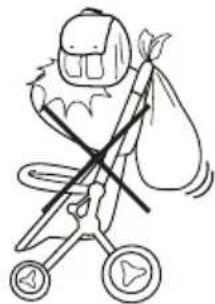
natural_image
Cartoon illustration of a person with a rifle and bow, holding a bag (no text or symbols)FORMAL GUARANTEE
The contents of this document as stated below will come into effect as from 01.01.2005 and replace, on every account and in full, any previous message referring to the guarantee provided by Foppa Pedretti S.p.A.
FORMAL GUARANTEE
Foppa Pedretti S.p.A. the head office of which is located at n. 11 Via Volta, Grumello del Monte (Italy), guarantees directly to the Consumer that this brand new product is free of faults with regard to the materials, design and manufacture and that it complies with the characteristics as declared by the manufacturer.
This formal guarantee is valid in all Member Countries of the European Union and it neither excludes nor limits the Consumer's rights in accordance with mandatory measures provided for by the law with regard to the Retailer of the Product.
To take advantage of this formal guarantee, the Consumer must return the faulty product to the Retailer, presenting to the same the proof of purchase of the Product which must clearly show the Retailer's address, the date of purchase of the Product with the Retailer's stamp and signature and an indication of the Product itself or, alternatively, the receipt which must not have been altered and which must clearly show the same information as that referred to above.
The formal guarantee is valid for twelve (12) months from the date of purchase of the Product. During this period, Foppa Pedretti S.p.A. will repair or replace the faulty product, at its own discretion. The formal guarantee is granted to the end buyer of the Product (Consumer) and it neither excludes nor limits the mandatory rights of the Consumer as provided for by the law and/or the rights that the Consumer may have with regard to the Dealer/Retailer of the Product.
EXCLUSIONS TO THE FORMAL GUARANTEE.
The formal guarantee is excluded in the case of damage caused to the Product for the following reasons: if the product is used in a way that does not comply with the information contained in the use and assembly instruction sheet, if the product is knocked or dropped, if the Product is exposed to humidity or extreme heat or environmental conditions, or to sudden changes in the same, corrosion, oxidization, unauthorized alterations or repairs to the Product, repairs using unauthorised spare parts, improper use, improper maintenance or failure to carry out the same, improper maintenance compared to the information given on the use and assembly instruction sheet, incorrect assembly, accidents, damage caused by food or drink, damage caused by chemical products, cases of force majeure.
In any case, Foppa Pedretti S.p.A. declines all responsibility for damage caused to persons or to property, other than the Product, when such damage is caused by a failure to comply with the instructions/advice/warnings cont a ined in the manual or, alternatively, in the use and assembly instruction sheet provided with each Product for the owner/user. (Purely as an example, in the case of a cot : "Check your baby constantly. Make sure that the sheets and blankets do not cover the baby's head...").
Furthermore, Foppa Pedretti S.p.A. declines all responsibility for damage to persons and to property when the breakage of its products is due to a deterioration in the components of the Product that are subject to wear. All the components of the Product made of plastic are considered to be components subject to wear.
MONTAGE
natural_image
Illustration of a child stroller with crossed-out black X marks (no text or symbols)NE JAMAIS SOULEVER LA POUSSETTE AVEC L'ENFANT À L' INTÉRIEUR
natural_image
Illustration of a pedestrian crossing a crosswalk with a child in a stroller (no text or symbols)
natural_image
Simple line drawing of a baby stroller with crossed-out arrows indicating no text or symbols (no text or symbols present)NE JAMAIS LAISSER L'ENFANT SEUL ET SANS SURVEILLANCE
natural_image
Cartoon illustration of a character with a bow and arrow, holding a bag (no text or symbols)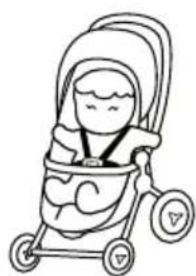
natural_image
Simple line drawing of a baby stroller with no text or symbolsATTACHER TOUJOURS L'ENFANT AVEC LA CEINTURE DE SÉCURITÉ
EXCLUSIONS DE LA GARANTIE CONVENTIONNELLE.
SICHERHEITSGURTE (fig.28)
natural_image
Illustration of a child stroller with crossed-out black X marks (no text or symbols)BUGGY NICHT MIT DEM KIND DARIN ANHEBEN
natural_image
Illustration of a child crossing a crosswalk with a stroller, accompanied by a pedestrian crossing (no text or symbols present)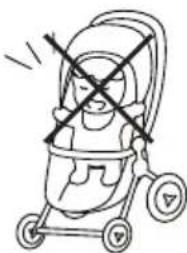
natural_image
Simple line drawing of a baby stroller with a cross symbol crossed out (no text or labels)ERLAUBEN SIE DEM KIND NIEMALS, SICH IM BUGGY AUFRECHT HINZUSTELLEN
natural_image
Cartoon illustration of a person with a rifle and bow, holding a bag (no text or symbols)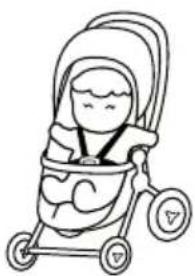
natural_image
Simple line drawing of a baby stroller with no text or symbolsSICHERN SIE DAS KIND STETS MIT DEM SICHERHEITSGURT
natural_image
Illustration of a child stroller with a cross symbol crossed out, no text or symbols presentnatural_image
Simple line drawing of a baby stroller with a cross symbol crossed out (no text or labels)NO DEJE NUNCA AL NIÑO SOLO Y SIN VIGILANCIA
natural_image
Simple line drawing of a baby stroller with no text or symbolsnatural_image
Illustration of a pedestrian crossing with a child in a stroller and a traffic light (no text or symbols)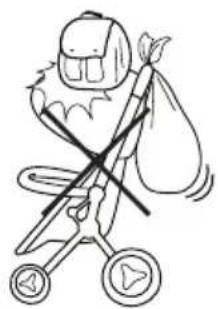
natural_image
Cartoon illustration of a person with a stroller and two wheels, carrying a sack (no text or symbols)DE WANDELWAGEN OPENEN (fig.1, fig.2)
- De rugleuning in de verticale stand geregeld is
natural_image
Illustration of a child stroller with crossed-out black X marks (no text or symbols)TIL DE WANDELWAGEN NOOIT OP WANNEER HET KIND ERIN ZIT
natural_image
Illustration of a pedestrian crossing with a child stroller and traffic light (no text or symbols)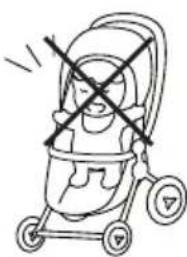
natural_image
Simple line drawing of a baby stroller with a cross symbol crossed out (no text or labels)STA HET KIND NOOIT TOE OM IN DE WANDELWAGEN TE GAAN STAAN
natural_image
Cartoon illustration of a character holding a bag and a pen, with no visible text or symbols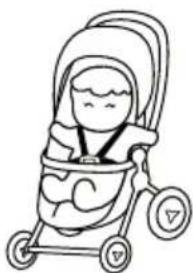
natural_image
Simple line drawing of a baby stroller with no text or symbolsZET HET KIND ALTIJD VAST MET DE VEILIGHEIDSGORDEL
CONVENTIONELE GARANTIE
CONVENTIONELE GARANTIE
P'YΘΜΙΣΗ ΤΗΣ ΠΛ'ΑΤΗΣ (fig.27)
natural_image
Illustration of a child stroller with a cross symbol crossed out, no text or symbols presentnatural_image
Simple line drawing of a baby stroller with crossed-out black X marks (no text or symbols)natural_image
Simple line drawing of a baby stroller with no text or symbolsMHN KPEM'ATE POTE THN TΣANTA ΣTH ΛΑΒΗ KAI MHN THN ΤΟΠΟΘΕΤΕ'ITE Π'ANΩ ΣTHN KOYKO'ΥΛΑ
text_image
Illustration showing a pedestrian crossing with a cross symbol indicating no crossing, accompanied by a child in a stroller.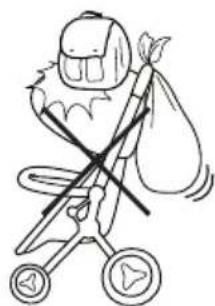
natural_image
Cartoon illustration of a character with scissors and bow, holding a bag (no text or symbols)ΣΥΜΒΑΤΙΚΗ ΕΓΓΥΗΣΗ
natural_image
Illustration of a child stroller with crossed-out black X marks (no text or symbols)NUNCA LEVANTE O CARRINHO SE A CRIANÇA ESTIVER NO SEU INTERIOR
natural_image
Illustration of a pedestrian crossing with a crosshair and a child in a stroller (no text or symbols)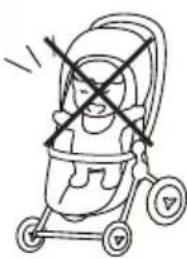
natural_image
Simple line drawing of a stroller with a cross symbol crossed out, no text or symbols presentnatural_image
Cartoon illustration of a person with a rifle and two suitcases (no text or symbols)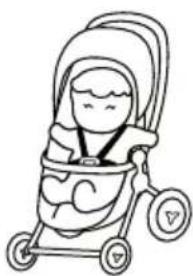
natural_image
Simple line drawing of a baby stroller with no text or symbolsCONTROLE SE A CRIANÇA ESTÁ A UTILIZAR O CINTO DE SEGURANÇA
natural_image
Illustration of a child stroller with crossed-out black cross symbol (no text or labels)text_image
Illustration showing a pedestrian crossing with a crosshair and a child in a stroller, indicating traffic safety or accessibility issues.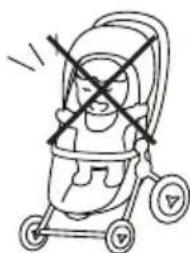
natural_image
Simple line drawing of a stroller with a cross symbol crossed out, no text or labels present.natural_image
Cartoon illustration of a character with wings and a bow, holding a bag (no text or symbols)natural_image
Simple line drawing of a baby stroller with no text or symbolsnatural_image
Close-up of a baby car seat with a visible safety patch and label (no text or symbols on the device itself)For children up to 13 kg - Complies with ECE R44-04
GB IMPORTANT! READ THE INSTRUCTIONS CAREFULLY AND KEEP FOR FUTURE REFERENCE
F IMPORTANT! LIRE ATTENTIVEMENT ET CONSERVER SOIGNEUSEMENT A PORTEE DE MAIN POUR UNE UTILISATION ULTERIEURE
natural_image
Illustration of a person wearing a backpack with a red lock icon on the chest (no text or symbols)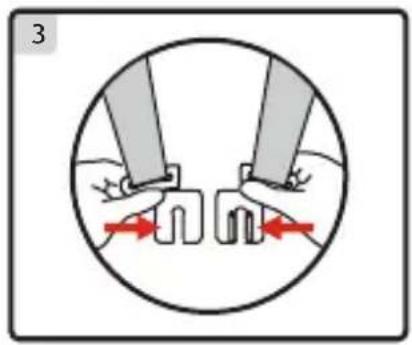
natural_image
Diagram showing two hands holding a U-shaped object with red arrows indicating movement or force, enclosed in a circle (no text or symbols)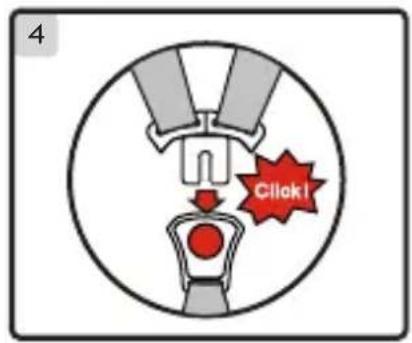
text_image
4 Click!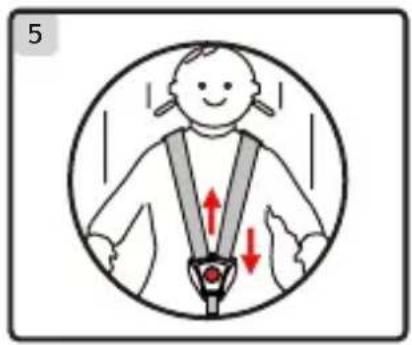
text_image
5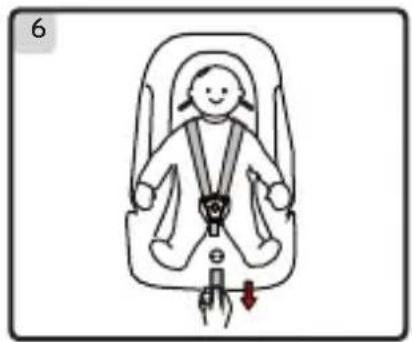
natural_image
Illustration of a baby in a car seatbelt with a red arrow indicating pressure or force (no text or symbols)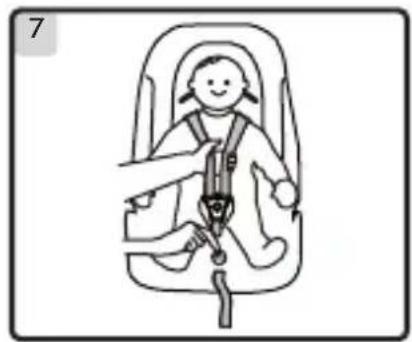
natural_image
Illustration of a baby in a car seat being lifted, showing the seatbelt and seat (no text or symbols)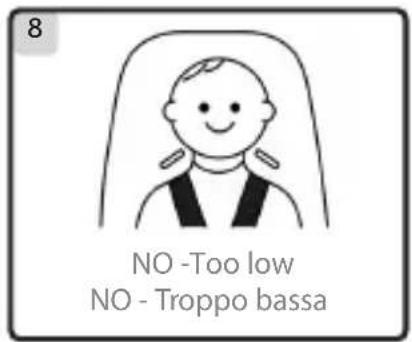
text_image
8 NO -Too low NO - Troppo bassa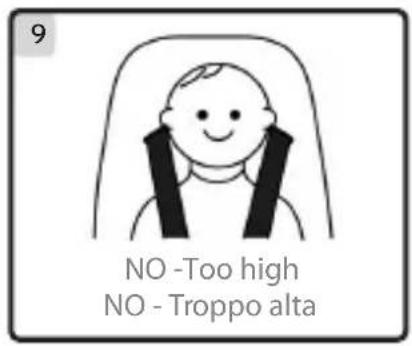
text_image
9 NO -Too high NO - Troppo alta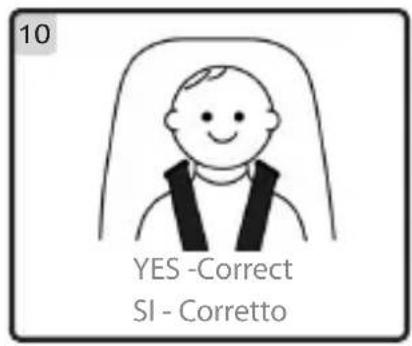
text_image
10 YES -Correct SI - Corretto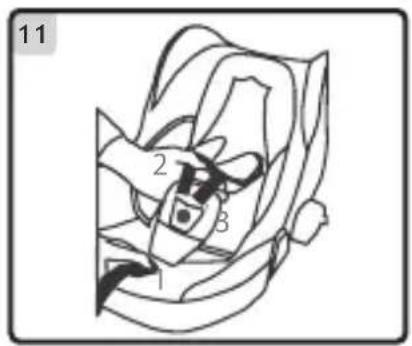
text_image
11 2 3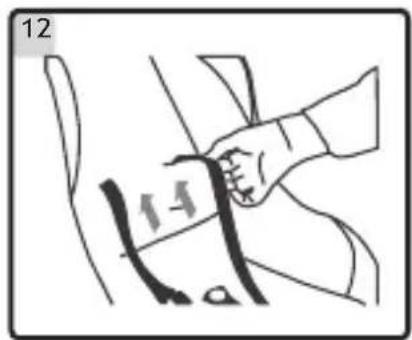
text_image
12
natural_image
Simple line drawing of a V-shaped mechanical component with three protruding pins (no text or symbols)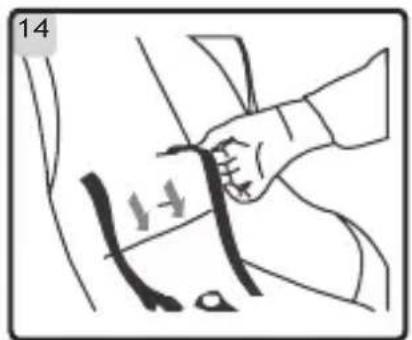
text_image
14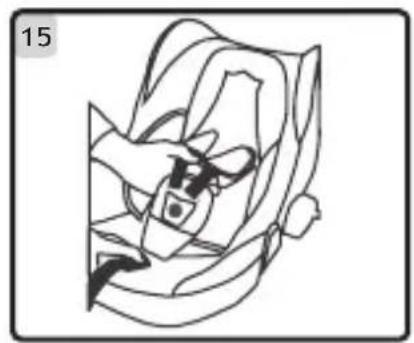
natural_image
Line drawing of a car seatbelt with a hand adjusting the seat (no text or symbols)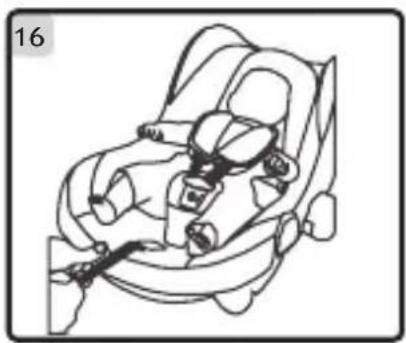
natural_image
Line drawing of a car seatbelt device (no text or symbols)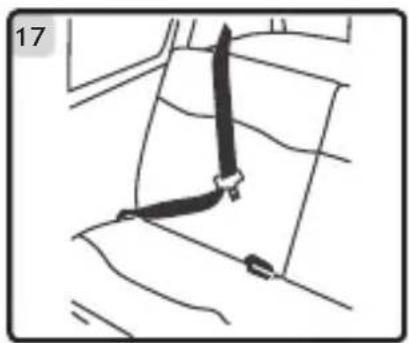
natural_image
Line drawing of a car seatbelt with a belt buckle, no text or symbols present
natural_image
Line drawing of a car seatbelt device (no text or symbols)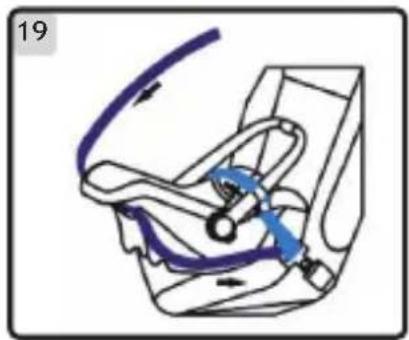
natural_image
Diagram of a car seatbelt mechanism with blue arrows indicating motion (no text or symbols)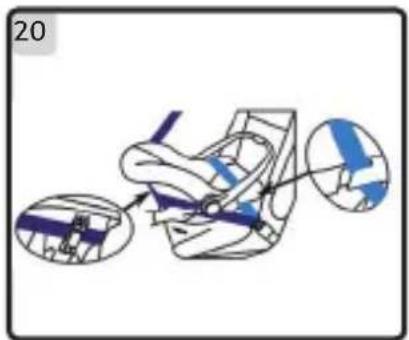
text_image
20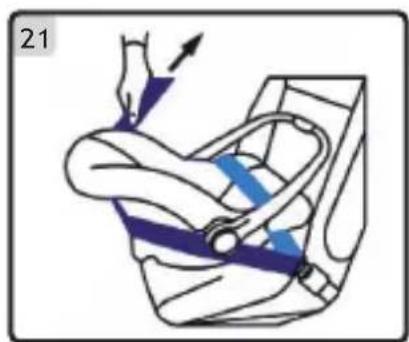
natural_image
Illustration of a person using a seatbelt device to lift a seatbelt, with no text or symbols present.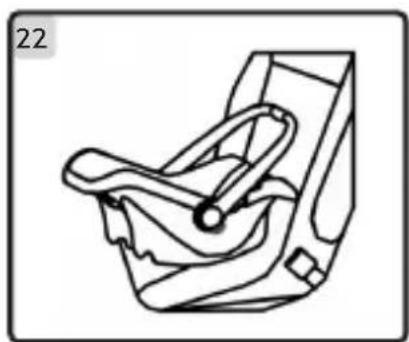
natural_image
Line drawing of a car seat assembly (no text or symbols)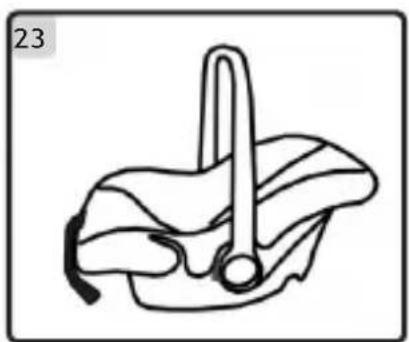
natural_image
Simple line drawing of a hand holding a tool, no text or symbols present
natural_image
Line drawing of a stylized helmet or mask with no text or symbols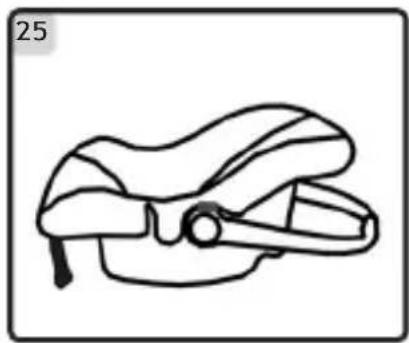
natural_image
Line drawing of a pair of animal heads and legs, no text or symbols present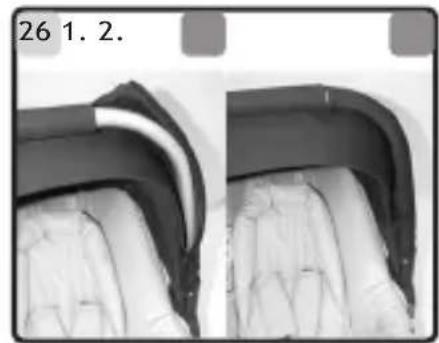
natural_image
Close-up of a car seat frame showing front and side views (no text or symbols visible)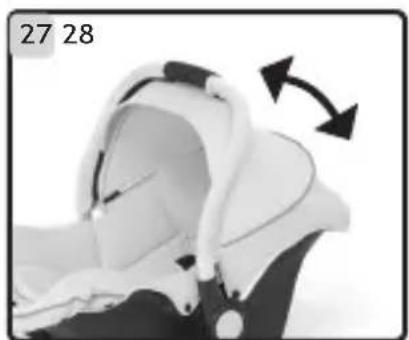
natural_image
Close-up of a white helmet with black arrows indicating rotation or movement (no text or symbols)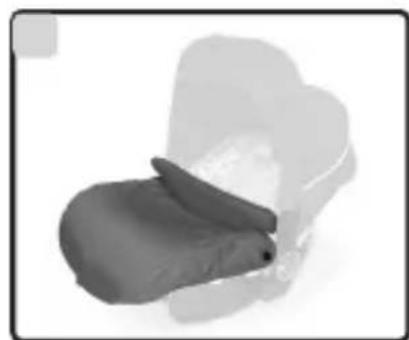
natural_image
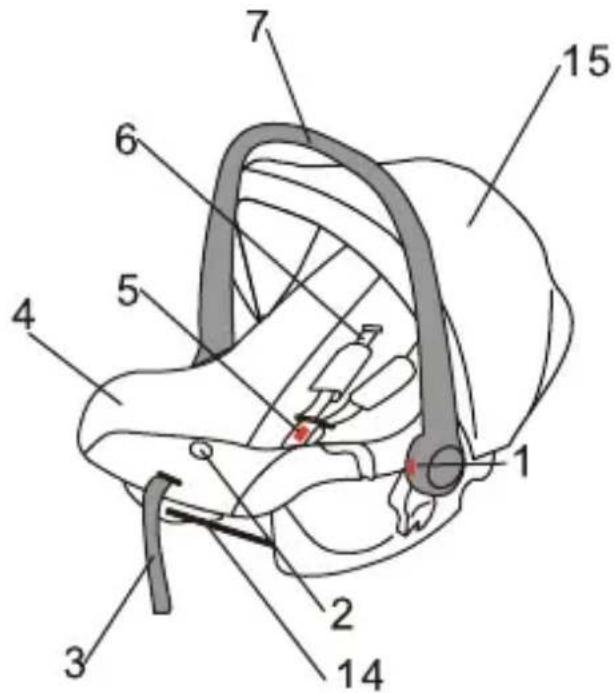
Close-up of a dark, textured object resembling a mitten or cushion, with no visible text or symbols.COMPONENTI
text_image
Anatomical diagram of a car's internal structure with numbered labels pointing to different parts.text_image
Technical diagram of a mechanical device with numbered parts labeled 8 through 13text_image
Safety warning illustration showing airplane seatbelt and no-dominant circle with traffic flow arrowsAVVERTENZA:
NON UTILIZZARE QUESTO SEGGIOLINO PER BAMBINI SU SEDILI DOTATI DI AIRBAG.
IMPORTANTE:
text_image
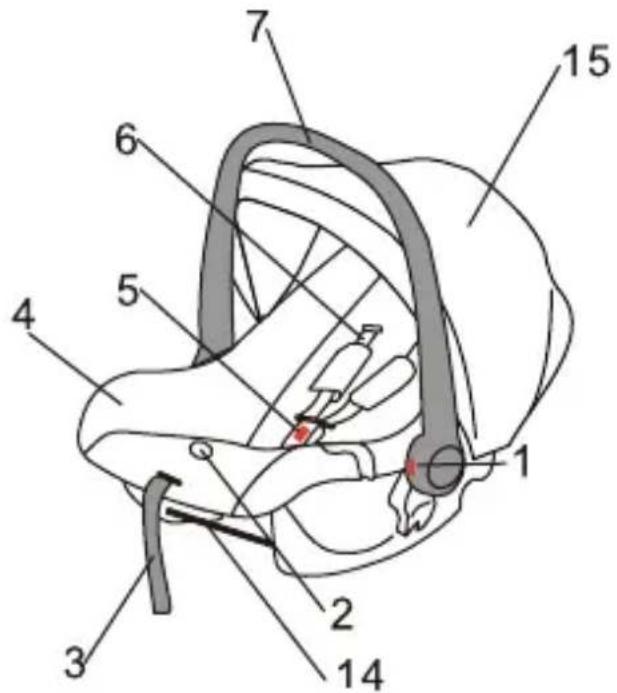
Anatomical diagram of a car's seat and wheel with numbered labels pointing to different parts.- Red Button Handle Adjuster
- Harness Adjuster under "Press"
- Harness Adjuster Strap
- Cover
- Harness Buckle
- Shoulder Straps
- Carry Handle
- Shoulder Harness Slots
- Dark Blue Diagonal Belt Guide
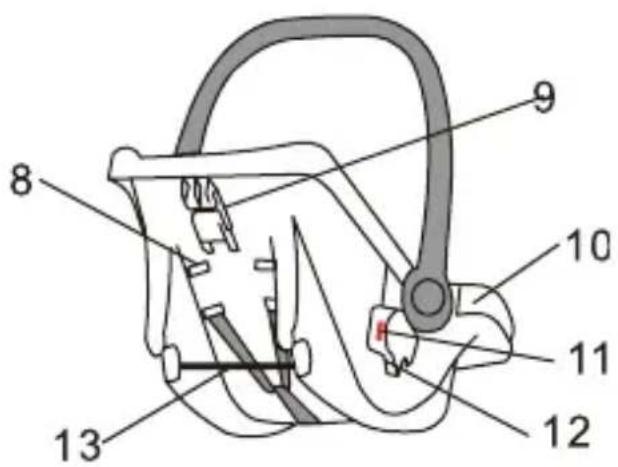
text_image
Technical diagram of a mechanical device with numbered parts labeled 8 through 13- Light Blue Lap Belt Guide
- Red switch
(for use with complements) - Coupler
(for use with complements)
13-14. Metal bar
(for use with complements) - Canopy
text_image
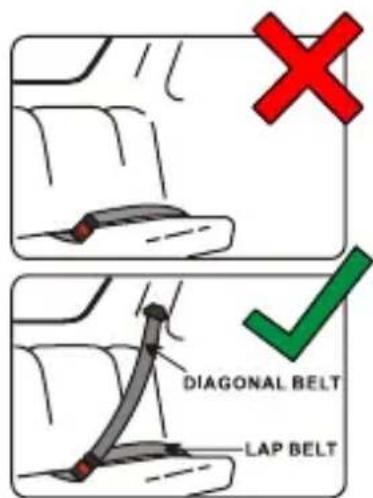
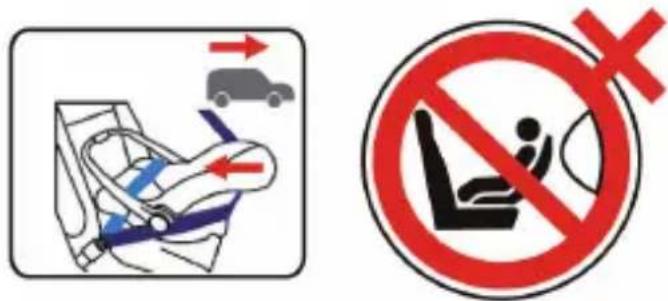
DIAGONAL BELT LAP BELTOnly suitable if the vehicle is fitted with 3-point static, 3-point retractor safety belts, approved to UN/ECE Regulation No. 16 or other equivalent standards.
DO NOT use on the vehicle seats that face the sides or rear of the vehicle (1a,1b). Use the child safety seat only on the vehicle seats that face forward. According to accident statistics, children are safer when properly restrained in the rear seating positions than in the front seating positions (1c,1d).
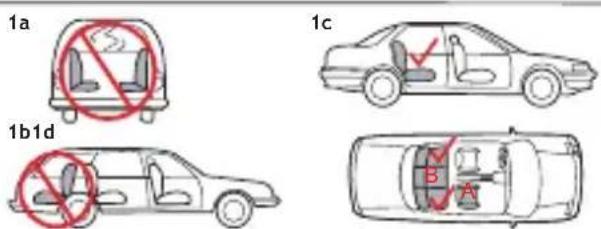
A: Only suitable for the seat without active airbag.
B: Only suitable for the seat with 3 point belt. Can not be used on seat with 2 point lap belt.
NOTICE
- This is a “Universal” child restraint; it is approved to ECE Regulation 44.04 for general use in vehicles and will fit most, but not all, vehicle seats.
- A correct fit is likely if the vehicle manufacturer has declared in the vehicle handbook that the vehicle is capable of accepting a “Universal” child restraint for this group.
- This child restraint has been declared “Universal” under more stringent conditions than those applied to earlier designs which do not carry this notice.
- If in doubt, consult either the child restraint manufacturer or the retailer.
text_image
Safety warning illustration showing airplane seatbelt and no-dominant circle with red X symbolWARNING:
Only suitable if the vehicle is fitted with 3-point static, 3-point retractor safety belts, approved to UN/ECE Regulation No. 16 or other equivalent standards.
EXTREME HAZARD:
Do not use in passenger seats equipped with airbags (SRS)
IMPORTANT:
Always ensure that the seat handle is locked in the vertical position before use.
SAFETY INSTRUCTIONS
WARNING:
- Read these instructions carefully before use and keep this guide in case you need to refer to it in the future. Failure to follow these instructions may affect your child's safety.
- To avoid any risk of falling, ensure that the handle of your Group 0+ is correctly locked and that your child's safety harness is always fastened.
- Only install your Group 0+ seat on a forward facing seat fitted with a 3 point safety belt.
DO NOT USE THIS CHILD SEAT ON A PASSENGER SEAT FASTEN WITH AN AIRBAG.
- The child seat must only be installed in the rearward facing position.
- Never use the child seat without fastening the child's harness correctly, and never attempt to use it without fastening it into the car as described in these fitting instructions.
- It is most important that the seat belt is correctly routed and the child seat tightened down on the upholstery as firmly as possible to ensure maximum protection - a recommended method is shown in these instructions.
- Do not add to or modify this product in any way.
- Never use this product if it has been in an accident, or if it has become badly worn. - Periodically inspect the harness for wear, paying particular attention to attachment points, stitching and adjusting devices.
- Do not leave a child in the seat unattended at any time.
- Ensure that no part of the seat or seat belt is trapped in a door or a folding seat. If your car has a folding rear seat, ensure that it is correctly latched in its upright position.
NOTICE
- Car interiors can become very hot when left standing in direct sunlight - it is therefore recommended that the child seat, when not in use, is covered by a towel etc. - This prevents components, particularly those attached to the child seat, becoming hot and burning the child.
- In the event of an emergency it is important that the child can be released quickly.
- This means that the buckle is not fully tamperproof and therefore your child should be persuaded never to play with the buckle.
- Luggage and other heavy objects should be secured in the car. Loose objects are liable to cause injury in the event of an accident.
- The child seat must not be used without the cover.
- Never place your child seat on a table or work surface.
- This seat can be used for children of 0-13kg in weight (approximately birth to 13/15 months of age) and is used in conjunction with a 3-point lap and diagonal safety belt in the rear-facing position only.
- When the child seat is not in use, it is recommended that it is fastened into the car with a seat belt to avoid it being thrown about in the event of an accident
- In an emergency your child can be released quickly by pressing the red button on the harness buckle.
- Store this child seat in a safe place when it is not being used. Avoid placing heavy objects on top of it.
- If you travel with passengers using both the front and rear passenger seats, the lighter occupants should be in the rear and the heavier occupants in the front of the vehicle.
- Do not allow your child seat to come into contact with corrosive substances e.g. battery acid.
- NO NOT use a second-hand child seat or child seat whose history you do not know.
- When it is not used in the car, it is dangerous to place the child car seat onto raised surfaces.
TO USE
THE HARNESS
UNFASTENING THE HARNESS
Press the red button on the buckle to release the shoulder straps and move them to the side Fig.1, Fig.2.
FASTENING THE HARNESS
- Slot the two plastic sections of the buckle connectors together Fig 3
- Slot the two connectors into the hole in the top of the buckle until they "click" into place Fig 4.
- Always check that the harness is correctly locked by pulling above and below the buckle Fig 5.
- The harness should be adjusted as tightly as possible without causing discomfort to the child. A loose harness is dangerous and should be checked each time that you use the seat. To tighten the harness, pull down on the adjustment strap (3) until the harness is the correct tightness Fig. 6.
- The harness is loosened by pulling on both straps at the same time press down on the harness adjuster that is located on the shell underneath the “Press” (2) word stitched on the cover Fig. 7.
UNFASTENING THE HARNESS
To release the harness, push the red button in the middle of the harness buckle inwards. You can now lift your child from the seat; ensure that the buckle connectors do not catch on clothing.
BEFORE YOU INSTALL THE CAR SEAT ADJUSTING THE SHOULDER HEIGHT
Before you install the car seat, it is very important that you make sure the shoulder straps are at the right height for your child. They should be level or just below your child's shoulders. The harness has 2 positions Fig.8, Fig.9, Fig.10.
Winter/Summer clothing can a make a difference to the size of your child.
Place the car seat on a level floor surface with the handle in the stable position see text The handle position.
Place your child in the car seat and identify the correct shoulder position.
Remove your child from the car seat.
Slacken the shoulder straps by pressing the harness release button (1) at the same time, pulling both shoulder straps forward with your other hand (2) Fig.11.
Press the red release button (3) and unhook the harness.
Remove the shoulder straps from the small seat, cover and chassis in plastic, by pulling each shoulder strap, including buckle, through its corresponding slot Fig.12.
Do not remove the shoulder straps from the loop of the harness adjuster strap.
Insert the shoulder straps into the chosen slots, passing through the slots of the chassis in plastic at first, then through the cover and at last the small seat Fig.13 Fig.14.
The harness has 2 positions. The straps should be put into the nearest slots above the shoulders of the child.
Make sure that there are no twists of the webbing and that the shoulder straps are correctly inserted in the loop of the harness adjuster strap Fig.13, Fig.15.
Now place your child in the car seat and check that the shoulder straps are in the correct position for your child's shoulder Fig.16.
TO USE
FITTING YOUR CAR SEAT INTO THE CAR
WARNING:
This car seat can only be fitted into the passenger seat of a car with a lap and diagonal seat belt and no air bag.
THE TYPE OF APPROVED SEAT BELT YOU MUST HAVE Fig. 17.
Your child seat can only be installed rearward facing using a lap and diagonal seat belt in the front or rear passenger seat of the car Fig.18.
INSTALLATION
- Push the child seat facing rearward firmly against the backrest of the car's seat Fig.18.
- Route the lap section of the adult safety belt through the lap belt guides and fasten the car seat belt Fig.19, Fig.20.
- Place the diagonal belt in the diagonal seat belt guide at the back of the seat Fig.20.
- Take out all the slack in the seat belt, ensuring that there are no twists or kinks in the seat belt Fig.21.
THE HANDLE POSITIONS
To adjust the handle from one position to another, pull out both sides of the handle on the swivel point; rotate the handle forwards or backwards into the desired position:
The carry handle has four positions:
- Forward in the car Fig.22.
- Straight up for carrying Fig.23.
- Against the car seat for rocking Fig.24.
- Stop rocking Fig 25.
Always ensure that the handle is locked in position and that the harness is correctly fitted and the buckle fastened before lifting your car seat.
CANOPY ASSEMBLY
FIG.26
ADJUST CANOPY
Press the buttons at both side to adjust he handlebar Fig.27.
FOOTMUFF
Fit the footmuff using the press fasteners Fig.28.
HINT: It may be helpful to detach side of seat pad to see keyholes.
This child seat can be installed into the appointed CHIC stroller as the travel system.
CARE OF YOUR PRODUCT
REMOVING THE COVER
The fabric cover can be easily removed for washing.
Remove the harness by gently feeding the harness straps through from the front to the back of the seat, the crotch strap including the buckle should be removed; turn the metal slide underneath the shell on its side and feed it through the shell until the strap is free.
Remove the cover and machine wash at 30°, line dry only.
To replace the fabric cover, follow reverse of the above.
CLEANING THE SEAT
The harness and plastic parts can be sponged with very mild detergent and warm water.
Do not use chemical cleansers, bleach or corrosives on any part of the seat.
FORMAL GUARANTEE
The contents of this document as stated below will come into effect as from 01.01.2005 and replace, on every account and in full, any previous message referring to the guarantee provided by Foppa Pedretti S.p.A.
FORMAL GUARANTEE
Foppa Pedretti S.p.A. the head office of which is located at n. 11 Via Volta, Grumello del Monte (Italy), guarantees directly to the Consumer that this brand new product is free of faults with regard to the materials, design and manufacture and that it complies with the characteristics as declared by the manufacturer.
This formal guarantee is valid in all Member Countries of the European Union and it neither excludes nor limits the Consumer's rights in accordance with mandatory measures provided for by the law with regard to the Retailer of the Product.
To take advantage of this formal guarantee, the Consumer must return the faulty product to the Retailer, presenting to the same the proof of purchase of the Product which must clearly show the Retailer's address, the date of purchase of the Product with the Retailer's stamp and signature and an indication of the Product itself or, alternatively, the receipt which must not have been altered and which must clearly show the same information as that referred to above.
The formal guarantee is valid for twelve (12) months from the date of purchase of the Product. During this period, Foppa Pedretti S.p.A. will repair or replace the faulty product, at its own discretion. The formal guarantee is granted to the end buyer of the Product (Consumer) and it neither excludes nor limits the mandatory rights of the Consumer as provided for by the law and/or the rights that the Consumer may have with regard to the Dealer/Retailer of the Product.
EXCLUSIONS TO THE FORMAL GUARANTEE.
The formal guarantee is excluded in the case of damage caused to the Product for the following reasons: if the product is used in a way that does not comply with the information contained in the use and assembly instruction sheet, if the product is knocked or dropped, if the Product is exposed to humidity or extreme heat or environmental conditions, or to sudden changes in the same, corrosion, oxidization, unauthorized alterations or repairs to the Product, repairs using unauthorised spare parts, improper use, improper maintenance or failure to carry out the same, improper maintenance compared to the information given on the use and assembly instruction sheet, incorrect assembly, accidents, damage caused by food or drink, damage caused by chemical products, cases of force majeure.
In any case, Foppa Pedretti S.p.A. declines all responsibility for damage caused to persons or to property, other than the Product, when such damage is caused by a failure to comply with the instructions/advice/warnings cont a ined in the manua l or, alternatively, in the use and assembly instruction sheet provided with each Product for the owner/user. (Purely as an example, in the case of a cot : “Check your baby constantly. Make sure that the sheets and blankets do not cover the baby’s head...”).
Furthermore, Foppa Pedretti S.p.A. declines all responsibility for damage to persons and to property when the breakage of its products is due to a deterioration in the components of the Product that are subject to wear. All the components of the Product made of plastic are considered to be components subject to wear.
COMPOSANTS
F
text_image
Anatomical diagram of a car's internal structure with numbered labels pointing to different parts.text_image
Technical diagram of a mechanical device with numbered parts labeled 8 through 13text_image
Safety warning illustration showing car safety instructions: one with airplane and car, another with no-dominant seatbelt.NE PAS UTILISER CE SIÈGE POUR ENFANTS SUR UN SIÈGE PASSAGER ÉQUIPÉ D'UN AIRBAG. IMPORTANT :
EXCLUSIONS DE LA GARANTIE CONVENTIONNELLE.
text_image
Anatomical diagram of a car's internal structure with numbered labels pointing to different parts.text_image
Labeled diagram of a mechanical device with numbered parts for identificationtext_image
Safety warning illustration showing car seatbelt usage and no-repetition prohibition symbolACHTUNG:
text_image
Anatomical diagram of a car's internal structure with numbered labels pointing to different parts.text_image
Technical diagram of a mechanical device with numbered parts labeled 8 through 13text_image
Safety warning illustration showing car seatbelt and no-dominant circle with traffic symbolsADVERTENCIA:
NO UTILICE ESTA SILLITA PARA COCHE EN ASIENTOS CON AIRBAG.
IMPORTANTE:
text_image
Anatomical diagram of a car's internal structure with numbered labels pointing to different parts.text_image
Technical diagram of a mechanical device with numbered parts labeled 8 through 13text_image
Safety warning illustration showing car safety instructions: one with airplane seat, other without stop signWAARSCHUWING:
GEBRUIK DIT KINDERZITJE NIET OP STOELEN DIE MET AIRBAGS UITGERUST ZIJN.