TicToc - Stroller Foppapedretti - Free user manual and instructions
Find the device manual for free TicToc Foppapedretti in PDF.
| Product type | Stroller |
| Brand | Foppapedretti |
| Model | TicToc |
| Use | From birth to 22 kg (about 4 years) |
| Maximum child weight | 22 kg |
| Stroller weight | Approximately 8.5 kg |
| Seat orientation | Reversible: forward-facing or parent-facing |
| Backrest adjustment | Multiple reclining positions up to horizontal (for under 6 months) |
| Adjustable handle | Yes, height adjustable |
| Canopy | Adjustable on 3 heights, sun visor |
| Swivel front wheels | Yes, with lock |
| Parking brake | Yes, on rear wheels |
| Safety harness | 5-point, height adjustable |
| Protection bar | Removable, side opening |
| Adjustable leg rest | Yes |
| Storage basket | Yes, capacity 3 kg |
| Accessory compatibility | Bassinet and car seat TicToc (sold separately) |
| Folding | Compact, can be transported like a trolley suitcase |
| Rain cover included | Yes |
| Maintenance | Clean with warm water and mild detergent; lubricate with WD-40 (except wheels) |
| Warranty | 12 months (standard) |
Frequently Asked Questions - TicToc Foppapedretti
User questions about TicToc Foppapedretti
0 question about this device. Answer the ones you know or ask your own.
Ask a new question about this device
Download the instructions for your Stroller in PDF format for free! Find your manual TicToc - Foppapedretti and take your electronic device back in hand. On this page are published all the documents necessary for the use of your device. TicToc by Foppapedretti.
USER MANUAL TicToc Foppapedretti
natural_image
Exterior view of a green baby stroller with black frame and front panel (no text or symbols visible)EN 1888-2:2018 +A1:2022
EN PUSHCHAIR - Assembly instructions
EN. IMPORTANT - READ CAREFULLY AND KEEP FOR FUTURE REFERENCE.
FR. IMPORTANT - A LIRE ATTENTIVEMENT ET A CONSERVER POUR REFERENCE ULTERIEURE.
natural_image
Illustration of a robotic arm gripping a mechanical component, with a blue arrow indicating the step (no text or symbols present)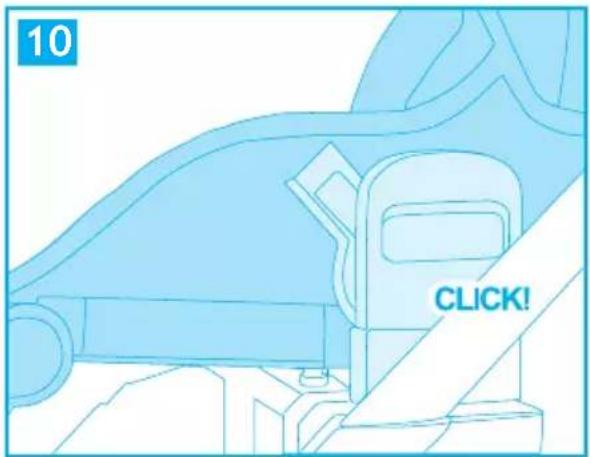
text_image
10 CLICK!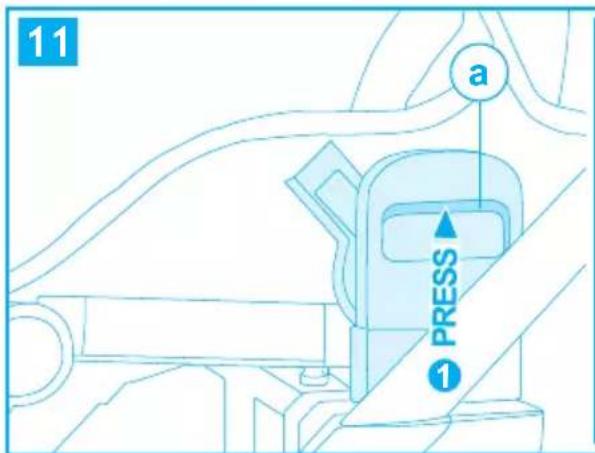
text_image
11 a PRESS 1
natural_image
Technical line drawing of a mechanical device with a numbered component (no text or symbols)
natural_image
Illustration of a stroller with a fan and a road symbol (no text or labels)
natural_image
Blue pictogram showing a woman standing next to a stroller (no text or symbols)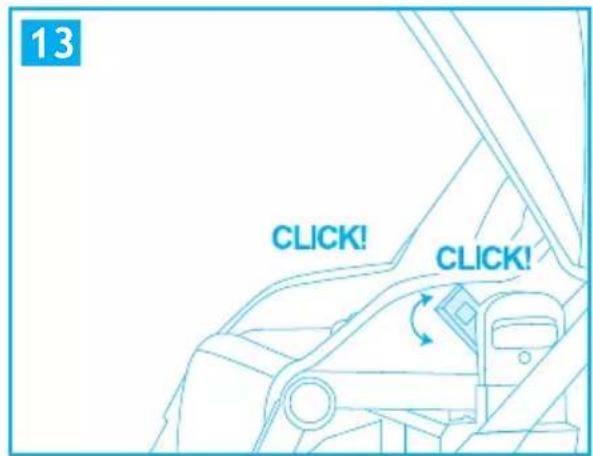
text_image
13 CLICK! CLICK!
natural_image
Line drawing of a hand holding a blue handheld device connected to a car intake manifold, with arrows indicating motion (no text or symbols)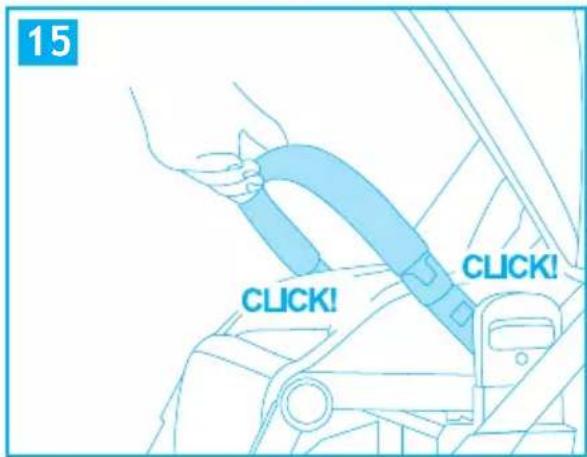
text_image
15 CLICK! CLICK!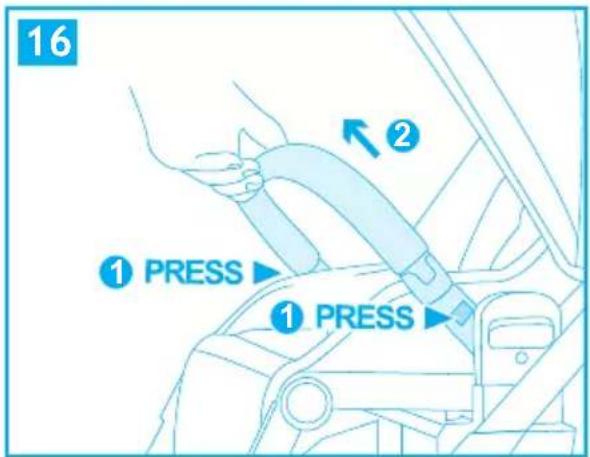
text_image
16 ① PRESS ▶ ① PRESS ▶
text_image
17 ① PRESS
natural_image
Line drawing of a hairpin tool with blue arrows indicating motion or movement (no text or symbols)
text_image
19 CLICK!
natural_image
Line drawing of a hairpin tool with blue arrows indicating force application (no text or symbols)
natural_image
Illustration of a baby stroller with two zoomed-in views showing internal components (no text or symbols)
text_image
ZIP
text_image
23 A
natural_image
Line drawing of a stroller with wheels and a handle, showing an upward arrow (no text or symbols)
text_image
24a b PRESS 1 2 CLICK!
text_image
CLICK! CLICK!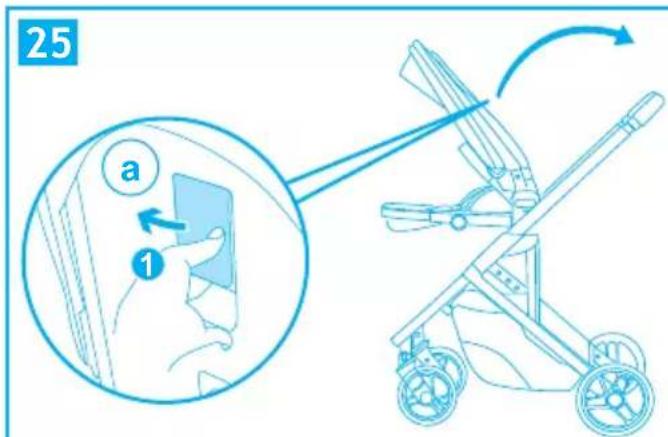
text_image
25 a 1
text_image
CLICK!
natural_image
Line drawing of a stroller with wheels and a fan, no text or symbols present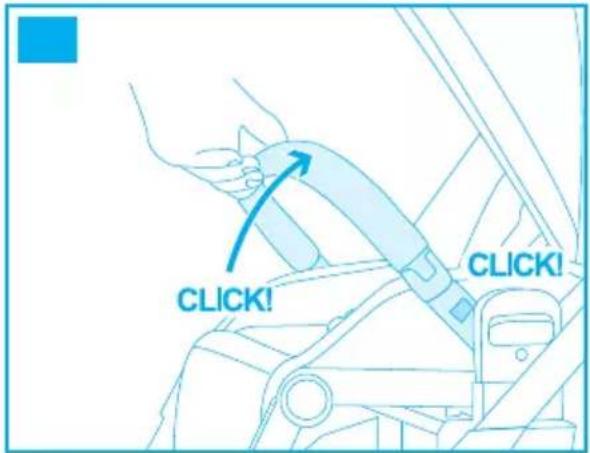
text_image
CLICK! CLICK!
natural_image
Line drawing of a baby stroller with wheels and handle (no text or symbols)
text_image
29 CLICK! CLICK!
text_image
30 b PRESS 1 2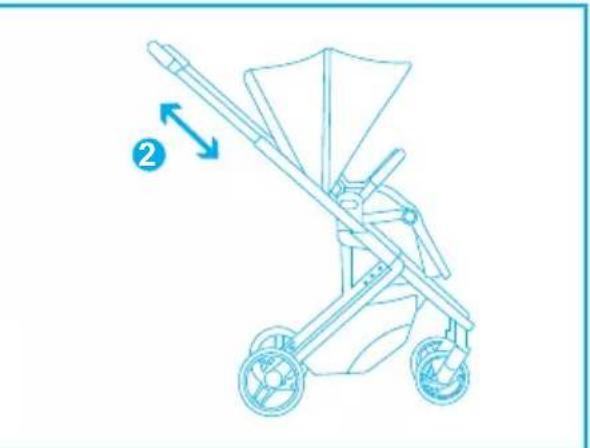
natural_image
Line drawing of a baby stroller with two wheels and a handle, no text or symbols present
text_image
31 a 1
natural_image
Technical diagram of a mechanical device with directional arrows indicating motion (no text or symbols)
text_image
32 < 6m
text_image
33 a a
text_image
34
text_image
35 ① PRESS a ②
text_image
36 a ① PRESS ②
natural_image
Diagram of a mechanical component with a blue shaded section and directional arrow, no visible text or symbols
natural_image
Diagram of a mechanical assembly with a blue shaded component and directional arrow, no text or symbols present
natural_image
Diagram of a folding or folding structure with a blue arrow indicating rotation (no text or symbols)
text_image
40 ! < 6m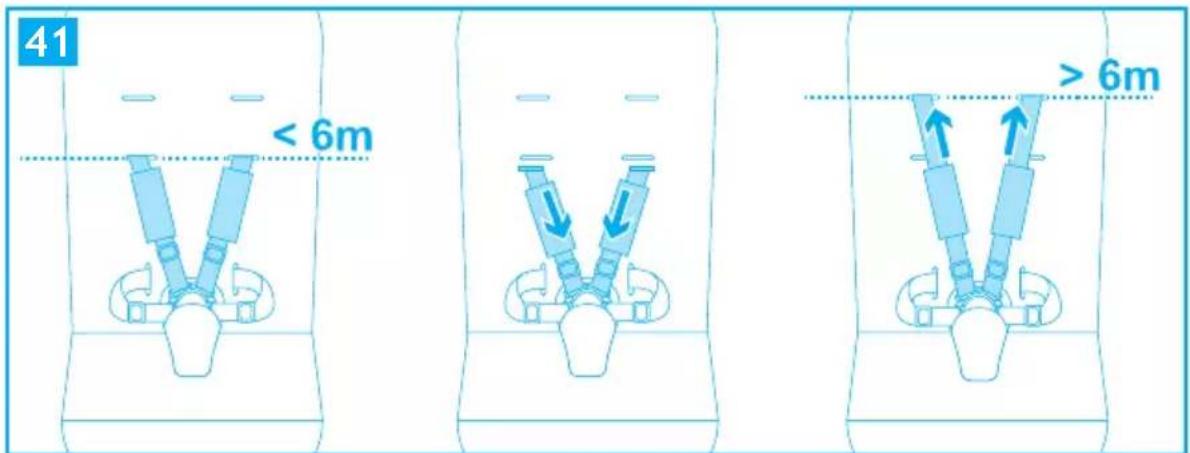
text_image
41 < 6m > 6m
natural_image
Line drawing of a bird's back with a blue arrow indicating direction (no text or symbols)
text_image
43 2 PRESS 1 3
text_image
44. OK!
text_image
a 2 2 1 PRESS ▶ PRESS 1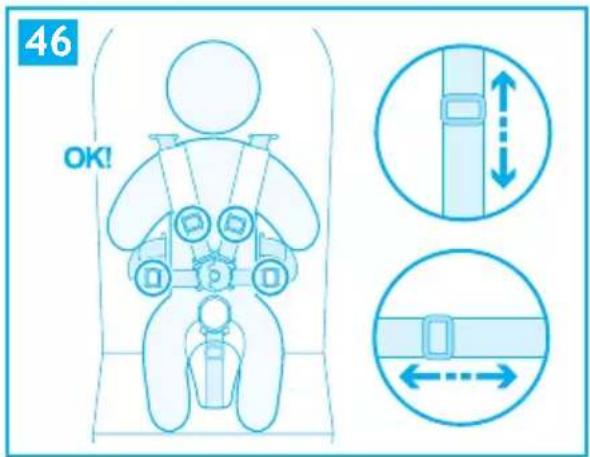
text_image
46 OK!
text_image
47 b1 b2 a1a2 a1 a2 c CLICK!
natural_image
Simple line drawing of a telescope and a road with a blue wave (no text or symbols)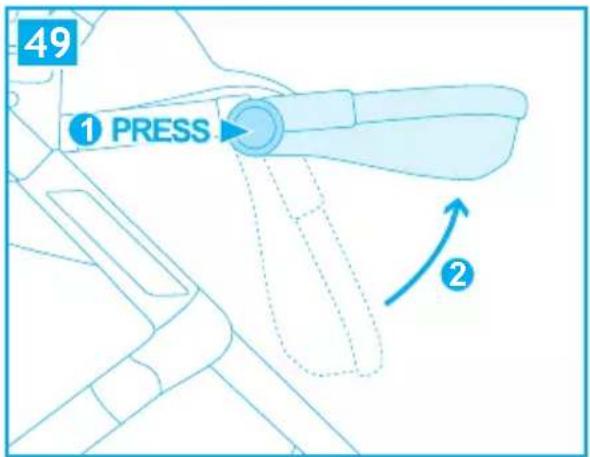
text_image
49 ① PRESS ②
text_image
50 CLICK!
natural_image
Diagram of a mechanical device with a blue component and directional arrow, no visible text or symbols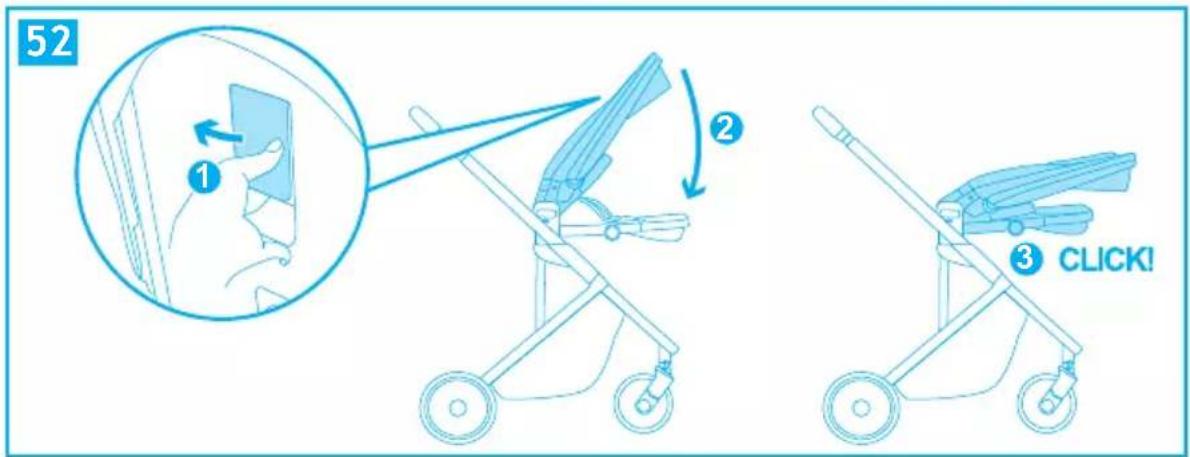
text_image
52 ① ② ③ CLICK!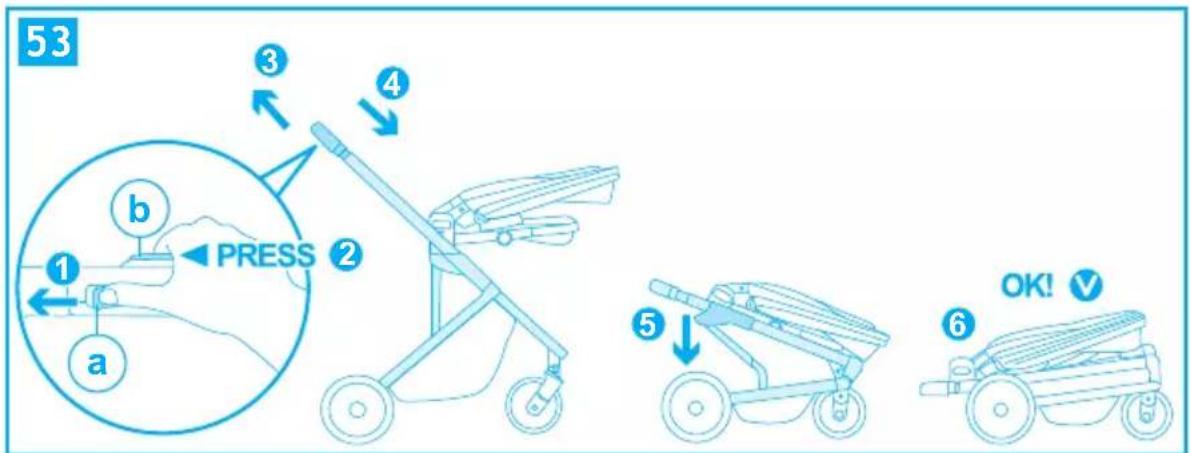
text_image
53 a b PRESS 3 4 2 5 OK! 6
natural_image
Blue icon showing a female gender symbol next to a stroller (no text or symbols)
natural_image
Diagram of a mechanical device with directional arrows indicating motion or force (no text or symbols)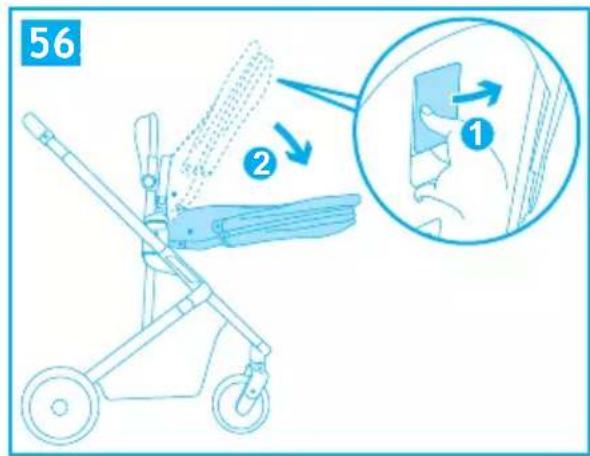
text_image
56 ② ①
natural_image
Diagram of a mechanical device with a lever and lever mechanism, showing motion direction (no text or symbols)
text_image
58 a b PRESS 3 4 2 5 OK! 6
natural_image
Line drawing of a hand pulling a small wheeled cart with wheels, labeled '59' and 'GOOD!' (no other text or symbols)
natural_image
Completely blank white image with no visible content, text, or symbols.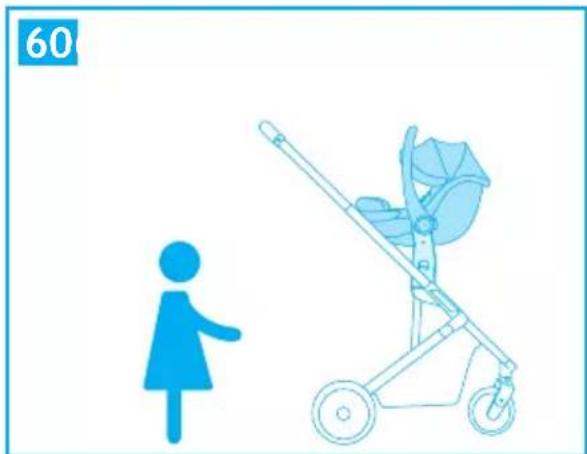
natural_image
Illustration of a woman standing next to a stroller with a baby in the background (no text or symbols)
natural_image
Illustration of a woman standing next to a baby stroller with a fan, no text or symbols present
natural_image
Diagram of a car interior showing seatbelt and seatbelt spine with directional arrows indicating movement (no text or symbols)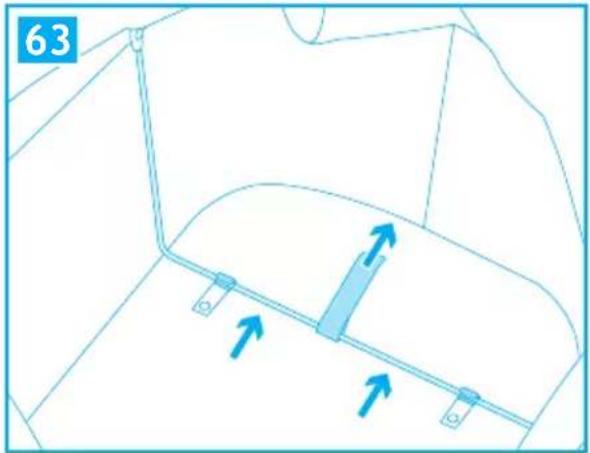
natural_image
Line drawing of a garment collar with blue arrows indicating movement or force direction (no text or symbols)
natural_image
Technical line drawing of a mechanical component with directional arrows indicating movement (no text or symbols)
natural_image
Diagram of a car interior with directional arrows indicating movement or force (no text or symbols)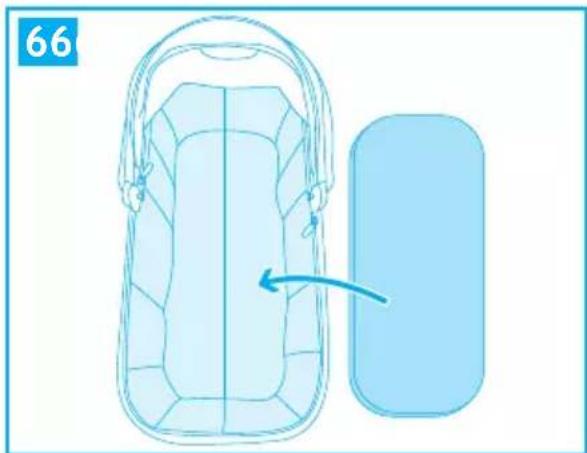
natural_image
Illustration of a baby bottle with a side panel and arrow indicating direction (no text or symbols)
text_image
① PRESS ②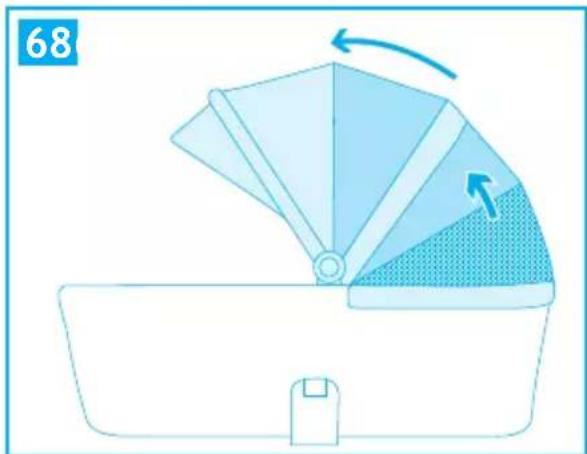
natural_image
Diagram of a fan-shaped device with directional arrows indicating rotation or movement (no text or symbols)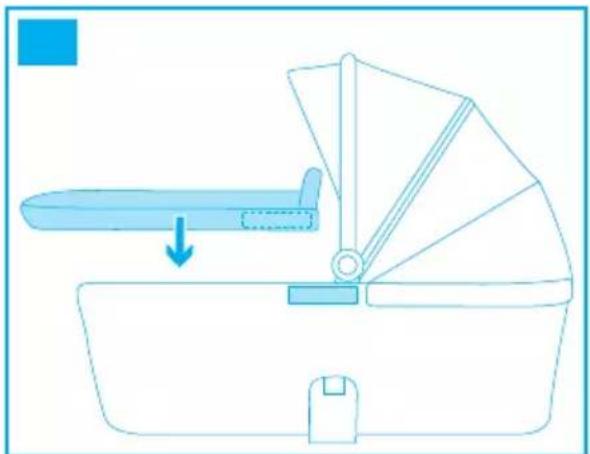
natural_image
Diagram of a mechanical device with a handle and fan assembly, showing a downward force or adjustment (no text or symbols)
text_image
70
natural_image
Diagram of a mechanical device with a lever and handle, showing internal components and motion direction (no text or symbols)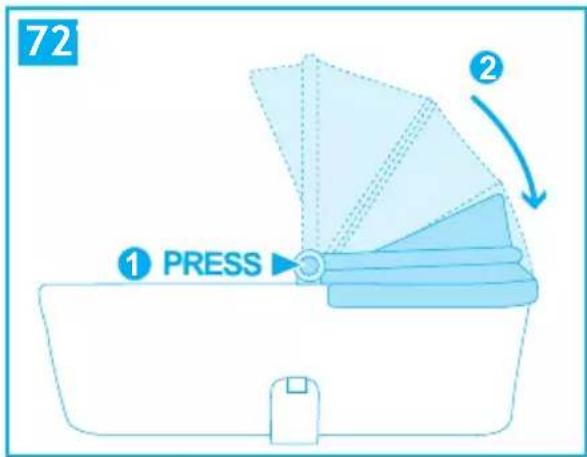
text_image
72 ① PRESS ②
natural_image
Diagram of a baby bottle with a side panel and arrow indicating direction (no text or symbols)
natural_image
Diagram of a car interior with directional arrows indicating movement or force (no text or symbols)
natural_image
Line drawing of a garment collar with blue arrows indicating downward motion (no text or symbols)
natural_image
Technical line drawing of a mechanical component with blue arrows indicating downward motion (no text or symbols)
natural_image
Diagram of a boat with a handle and side arm, showing two upward arrows indicating movement or force (no text or symbols present)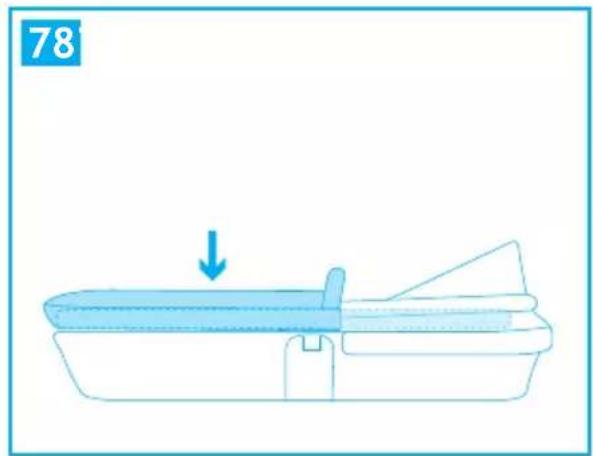
natural_image
Diagram of a boat with a downward arrow indicating motion or force (no text or symbols)
natural_image
Diagram of a mop handle with a fan blade and directional arrows indicating movement (no text or symbols)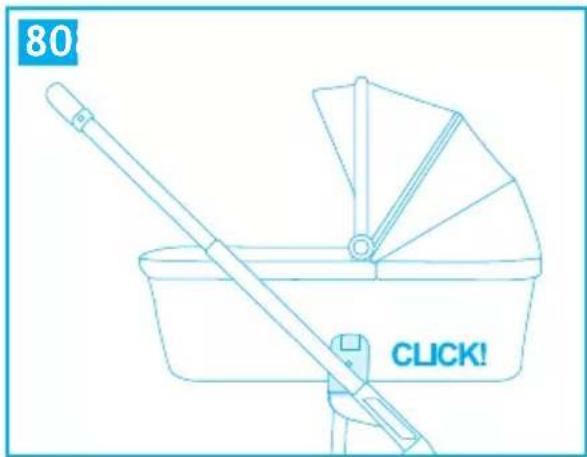
natural_image
Line drawing of a mop with a diagonal handle and fan blade, labeled '80' in top-left corner (no other text or symbols)
text_image
PRESS a
text_image
82 ① PRESS ▶ a
natural_image
Diagram of a lever mechanism with a hanging component and directional arrow (no text or symbols)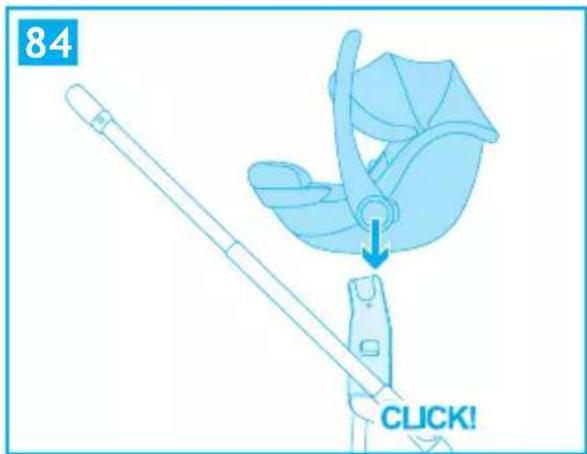
text_image
84 CLICK!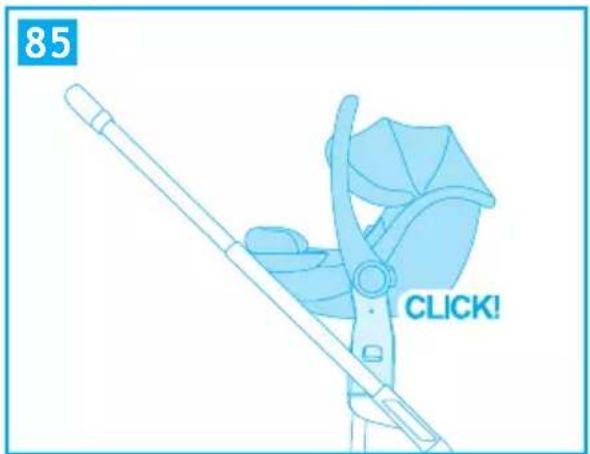
text_image
85 CLICK!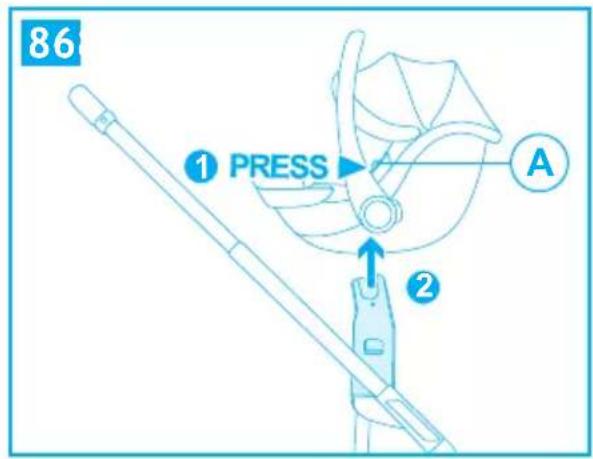
text_image
86 ① PRESS A ②
text_image
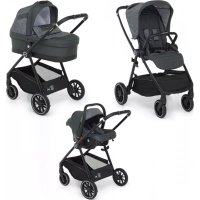
① PRESS a ②A. Canopy
B. Harness
C. Bumper bar
D. Buckle
E. Seat extension
F. Front wheels destra
G. Front wheels sinistra
H. Swivel wheel movement locking lever
1. Handlebar
J. Seat extension button
K. Closing lever
L. Rear wheels
M. Basket
N. Viewing window
0. "Canopy adjustment" lever
P. Parking brake
Q. Closing system (K+R)
R. Handlebar adjustment lever
S. Backrest adjustment lever
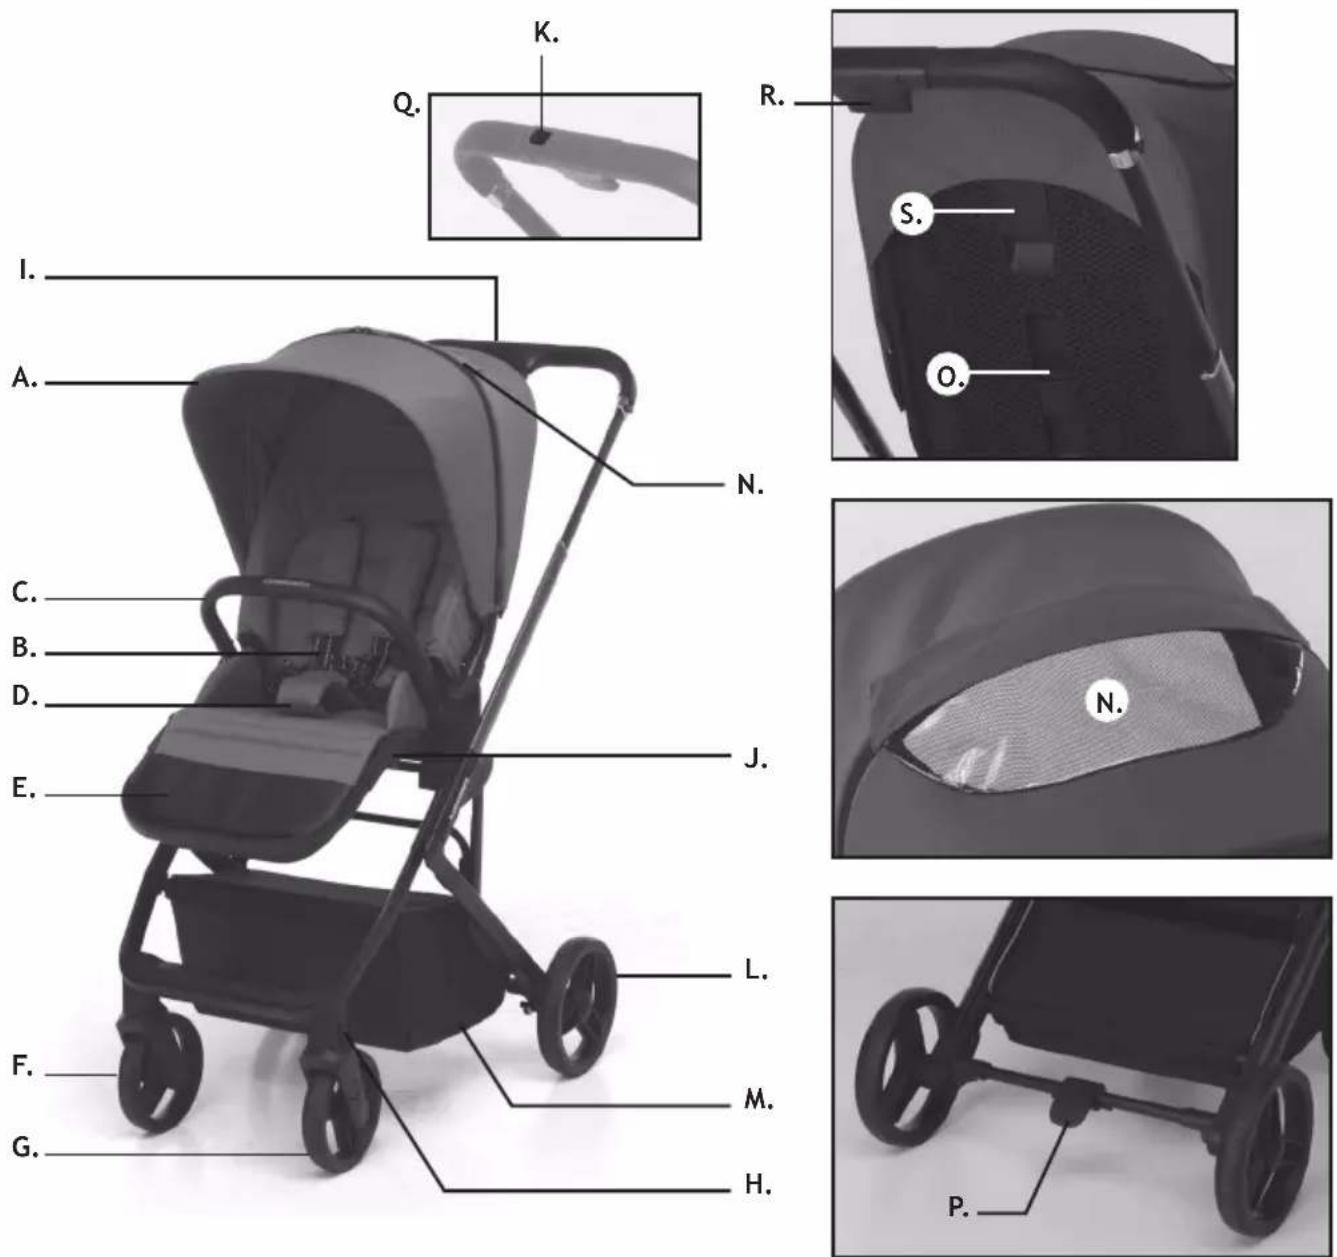
Important note: the images and instructions contained in this handbook refer to one version of the stroller; some components and functions described herein may vary according to the version of the stroller you have purchased.
UNFOLD THE STROLLER
CAUTION: make sure that the child, and any other children, are at a safe distance away when carrying out this step.
The moving parts of the stroller must not for any reason come into contact with the child's body.
FRAME OPENING (fig. 1. 2, 3, 4)
Press the folding lock button "a".
Press the button "b" (1) and extend the handlebar until its opens completely (2).
Lift the handlebar until the chassis opens completely. A click will indicate that is has been fastened (fig. 2).
Rotate the seat support to the horizontal position, as shown in the figure. A click will indicate that is has been fastened (fig. 4).
CAUTION: before use, make sure that all the locking mechanisms are correctly engaged.
INSTALL FRONT WHEELS (fig. 5)
Right wheel (R): Insert the end bushing into the slot situated in the center of the wheel block, with the locking lever facing outwards. A click will indicate that it is inserted correctly.
Left wheel (L): Insert the end bushing into the slot situated in the center of the wheel block, , with the locking lever facing outwards. A click will indicate that it is inserted correctly.
Check that both the wheels have been fastened correctly, if they are pulled downwards they should not be released.
Removing the front wheels (fig. 6): Press the steel button "b" front wheel released.
REAR WHEELS
Fitting the rear wheels (fig. 7): Insert the wheel pin in the hole, a click will indicate it has been fastened in place. Make sure that the wheel has been secured correctly, it should not come away when it is pulled outwards.
Removing the rear wheels (fig. 8): Pull the metal lever "a" on the wheel hub and, at the same time, remove the wheel.
FASTENING THE SEAT (for use as a pushchair)
Fitting the seat (fig. 9, 10): to fit the seat, place it in the position shown in the figure 22. Line up and insert the plastic connectors
of the seat in the slots provided on the pushchair chassis. Press until a click is heard indicating that it has been fastened correctly.
WARNING: Before use, always check that both the seat supports are fastened correctly to the chassis. When the seat is lifted upwards, it must not detach from the chassis.
Removing the seat (fig. 11): press button "a" on both sides and remove the seat by lifting it.
REVERSIBLE SEAT (fig. 12)
Remove the seat by lifting it, see the paragraph "Install the seat".
Position the seat so that it is forward facing or parent-facing.
Replace the seat on the chassis of the pushchair, see the paragraph "fitting the seat" for correct assembly.
Fitting the bumper bar (fig. 13, 14, 15): lift up the two attachment points for the handlebar, a CLICK will indicate that they are locked. Line the bumper bar up with the slots and press on both sides. A click indicates that it has been fastened correctly.
Removing the bumper bar (fig. 16): press button "a" on both sides of the bumper bar and at the same time pull to remove it.
Opening the bumper bar on just one side (fig. 17): press button "a" on one side of the bumper bar and pull to open it like a gate.
IMPORTANT: when the stroller is in use, the armrest must always be used and locked in position; if the armrest is removed, check that the armrest supports are lifted up and locked properly in the vertical position.
FITTING THE HOOD
Removing the hood (fig. 18, 19): fasten the hood support to both sides of the chassis.
Fitting the hood (fig. 20): pull and release the hood support from both sides of the chassis.
FITTING THE PUSHCHAIR RAINCOVER (fig. 21)
Fit the raincover over the hood.
Fasten the edges at the back of the raincover using the Velcro tabs.
Fasten the front of the raincover to the chassis of the pushchair using the press studs.
STORAGE BASKET (fig. 22)
Disassembly: The basket is fixed to the lower part of the frame with a zip: to remove it, unzip on both sides. The basket should be emptied before folding the pushchair.
Assembly: repeat this process in reverse order.
USE
HOW TO OPEN THE PUSHCHAIR (fig. 23, 24, 25, 26, 27, 28)
Press the folding lock button "A".
Press the button "b" (1) and extend the handlebar until its opens completely (2).
Lift the handlebar until the chassis opens completely. A click will indicate that is has been fastened (fig 24).
WARNING: Before use, pull the seat upwards to check that it has been fastened correctly to the chassis.
Lift up the seat until you hear a CLICK (fig. 25).
Lift up the lever “b” and at the same time push the backrest upwards until you hear a CLICK, this will indicate that it is in place correctly.
Lift up the protective armrest. A click will indicate that it is locked (fig. 27).
WARNING: Before use, pull the seat upwards to check that it has been fastened correctly to the chassis. Before using the stroller, make sure it is opened properly and the mechanisms are properly locked (fig. 28).
IMPORTANT: when the stroller is in use, the armrest must always be used and locked in position; if the armrest is removed, check that the armrest supports are lifted up and locked properly in the vertical position (fig. 29).
TO ADJUST THE HANDLEBAR (fig. 30)
Press the button "b" and extend the handlebar to the desired position. Make sure that the handlebar is properly locked in the new position.
TO REGULATE THE BACKREST (fig. 31)
Lift the regulating lever “a” located behind the backrest and recline the backrest to the required position. Release the lever and make sure the backrest is secured in position.
WARNING (fig. 32): For babies under 6 months of age, the backrest must only be in the fully reclined, horizontal position at all times.
TO DIRECT THE FRONT WHEEL (fig. 33)
Push the stroller forwards to direct the front wheels longitudinally.
Move the lever "1" downwards to activate the swivel movement, or upwards to lock the swivel movement.
PARKING BRAKE (fig. 34)
To apply the brake: Press the brake lever, push the pushchair forward gently to ensure the brake has been applied correctly.
To release the brake: lift the lever.
FOOTREST ADJUSTMENT (fig. 35)
Press buttons "a" and adjust the footrest in the required position.
USE
ADJUSTING THE HOOD (fig. 36, 37, 38, 39)
The hood can be adjusted to 3 different heights.
Press the button "a" on the back of the hood (fig. 36), on both sides, and raise or lower the hood to position it at the desired height.
Make sure that the hood is locked in the new position at both sides.
Unfold the hood according to your needs, to protect the child from sunlight.
CAUTION: babies' skin is very delicate. NEVER leave baby under direct sunlight. Always make sure that the hood has been adjusted correctly.
SAFETY HARNESS
Apply the brake before placing your baby in the pushchair (fig. 40).
IMPORTANTE:
- If baby is less than 6 months old, the harness belts must be inserted through the lower slots (fig. 41).
- If the child is over 6 months, the chest straps must be inserted into upper slot of backrest. (fig. 41, fig. 42, fig. 43).
- The chest straps must be inserted into the slots at the same height (fig. 44).
Release the buckle (fig. 45): press button "1" and remove the components
Place your child in the stroller and adjust the harness to fit him/her (fig. 46).
Fasten the buckle (fig. 47): insert component "b1" into component "a1", insert component "b2" into component "a2", a click will indicate that they are attached correctly. Place component "a2" on top of component "a1", place the buckle component "c", as shown in the image, on top of the component "a1-a2" a click will indicate that it is attached correctly.
WARNING: Never use the crutch strap without the lap belt.
WARNING: for babies under 6 months of age, the backrest must be only in the fully reclined, horizontal position at all times, seat reaward facing (fig. 40).
The seat can be oriented facing forwards or facing the parent.
Seat oriented facing forwards (fig. 48).
Before folding the stroller, ensure that:
- The footrest must be in the horizontal positio (fig.49, fig. 50);
- The hood must be set in the lowest position;
• The canopy is closed back up (fig. 51); - The handle must be adjusted to the least-extended position;
- The front wheels are in swivel mode.
Push the stroller forwards to direct the front wheels longitudinally.
Press the seat backrest adjustment lever and fold the backrest down towards the seat (fig. 52).
Press button "b" and adjust the handlebar to the least extended position, release the button.
Move the button "a", as shown in the image 53, and at the same time press the button "b", extend the handlebar slightly and keeping the button "a" and the button "b" pressed down at the same time, push the handlebar firmly forwards as shown in figure to fold up the frame, then release the buttons.
Make sure it is closed properly (fig. 53).
Seat oriented facing the parent (fig 54)
Folding the stroller (fig. 55, fig. 56, fig. 57, fig. 58).
Make sure it is closed properly (fig. 58).
THE STROLLER CAN BE WHEELED ALONG LUGGAGE-STYLE WHEN CLOSED (fig. 59)
Pull the stroller backwards to turn the front wheels lengthwise.
Adjust the handlebar to its widest position, see paragraph "Adjusting the handlebar".
Fold up the stroller, see paragraph "Stroller closure".
USING THE TRAVEL SYSTEM ACCESSORIES
The TicToc pushchair can be used with the following travel system accessories, TicToc carrycot and TicToc infant car seat. Remove the seat from the chassis (see the paragraph "Fitting the seat").
Engage the stroller parking brake (fig. 34).
USING THE INFANT CAR SEAT AND CARRYCOT TRAVEL SYSTEM ACCESSORIES (fig. 60, 61)
IMPORTANT: the travel system accessories must be secured to the chassis only in the parent facing.
CARRYCOT - EN 1466:2014 + AC:2015
ASSEMBLING THE FRAME
- Lift up the handle, a click will indicate that it is locked in the vertical position. Make sure that it is locked.
- Press the bottom of the carrycot downwards to raise the sides of the carrycot.
- Open the ZIP on the side (fig. 62).
- Pull the frame support brackets towards the outside of the carrycot, using the straps, until they lock into the 4 clips.
- Make sure that the brackets are locked into the 4 clips (fig. 63, 64).
- Fold the fabric, attach the velcro as shown in the figure, secure on the side with the ZIP. Make sure that the fabric is properly secured with the zip and that there are no openings along the side (fig. 65).
- Place the mattress inside the carrycot (fig. 66).
ADJUSTING THE HANDLE/HOOD
Press the side buttons and adjust the handle to the new position, release the buttons and make sure that it is locked (fig.67, 68).
COVER
Fix the cover along the sides, attach the flaps with the Velcro (fig. 69).
Lift up the front fabric flap of the cover for added protection, attach the press studs (fig. 70).
CLOSING THE CARRYCOT
- Remove the cover (fig. 71);
- Place the handle in a horizontal position (fig. 72);
• Take out the inner mattress (fig. 50); - Open the ZIP on the side and lift up the fabric along the side on the inside (fig. 74);
- Grasp the belt and, pulling towards the inside of the carrycot, release the support bracket from the clips and close it towards the inside of the carrycot. Repeat this process also on the second support bracket (fig. 75, 76).
- Fold the bottom of the carrycot upwards (fig. 77);
- Insert the mattress inside the carrycot;
- Place the cover on the frame and attach the flaps with the Velcro along the sides (fig. 78).
CARRYCOT COMPONENT
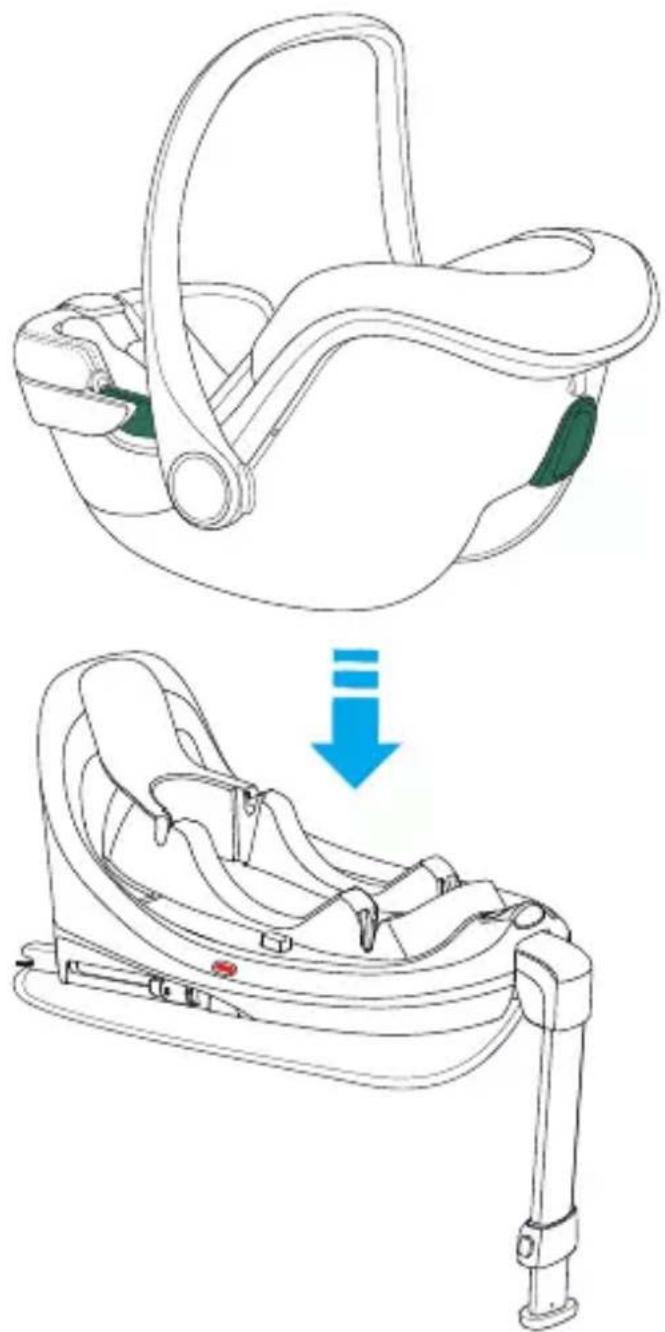
Fitting the accessory: Align the coupling device of the carrycot and press downwards, a click will indicate that the carrycot has attached correctly to the stroller frame. Make sure that the accessory has been fastened correctly on both sides. (fig. 79).
WARNING: Before use, always make sure that the accessory has been secured correctly. When the accessory is lifted upwards it must not detach from the pushchair chassis.
Removal of carrycot: PRESS the buttons "a", on both sides, and remove the carrycot by lifting it up using the handle (fig. 81, 82).
USE
CAR SEAT COMPONENT
Fitting the adapter (fig. 83): Align and insert the right and left adapter into their housing on the stroller frame.
Press until a click is heard indicating that the adapter has been secured correctly.
WARNING: Before use, always make sure that both the adapters have been secured correctly to the chassis. When lifted they must not detach from the chassis.
Removing the adapters (fig. 87): press button "a" to remove the adapter.
Fitting the accessory (fig. 84, 85): Align the coupling device of the car seat and press downwards, a click will indicate that the carrycot has attached correctly to the stroller frame. Make sure that the accessory has been fastened correctly on both sides.
WARNING: Before use, always make sure that the accessory has been secured correctly. When the accessory is lifted upwards it must not detach from the pushchair chassis.
Removal of car seat (fig. 86): Put the car seat handle in the upright position, pressing the buttons on the side. See the manual supplied with the car seat.
With one hand, grasp the car seat handle and, with the other, press button "A" alternately on both upper sides of the car seat and remove the car seat by lifting it using the handle.
CARRYCOT COMPONENT - PRODUCT MAINTENANCE
WARNING!
Check the carrycot regularly and make sure that there are no damaged or worn parts. Replace the carrycot if there are damaged parts.
Lining
- The fabric parts can be washed following the instructions on the washing label.
- Clean the fabric with water, a mild soap and a sponge.
- Never use abrasive or ammonia, bleach or white spirit-based cleaning products.
- Clean the fabric with a brush rather than washing it.
- Do not store the product if it is still wet and do not leave it in humid environments since mildew may form.
- Store the product in a dry place.
- Protect the product against weather agents, water, rain or snow; moreover, continuous and prolonged exposure to sunlight can cause changes in the colour of many materials.
- It is recommended to wash the lining separately from other items.
- Follow the lining washing instructions on the labels.
- Dry the textile lining completely before using or storing it.
- To prevent formation of mildew, it is advisable to air the carrycot periodically.
PRODUCT MAINTENANCE
- This pushchair requires a minimum amount of regular maintenance.
- The lifetime of the pushchair will be increased if the moving parts are lubricated and it will also make the opening and folding operations easier.
- If any of the parts of the pushchair should become stiff or difficult to operate, apply a small quantity of spray lubricant, for example WD 40. Do not use oil or grease. The WD 40 should not be used to lubricate the removable wheels. If necessary, the wheels must be removed and cleaned with a soft, dry cloth.
- Check the locking mechanisms, the brakes, the wheels, the harnesses, the levers, the seat regulators, the joints and the securing devices regularly to make sure that they are fastened correctly and in good operating order.
- The wheels are subject to wear and should be replaced if necessary.
- Carry out a careful inspection to check the pushchair is in good operating condition after 18 months of use, after a long period of storage and before using it for another baby.
- Clean the fabric with water, neutral detergent and a sponge. Clean the fabric using warm water, a sponge and a neutral detergent.
- The plastic and metal parts can be cleaned with warm water, a sponge and a neutral detergent.
- Never use abrasive products for cleaning or ammonia based products, bleach or turpentine.
WARNING
WARNING
- IMPORTANT – READ CAREFULLY AND KEEP FOR FUTURE REFERENCE.
• WARNING: NEVER LEAVE THE CHILD UNATTENDED. - WARNING: ENSURE THAT ALL THE LOCKING DEVICES ARE ENGAGED BEFORE USE.
- WARNING: TO AVOID INJURY, ENSURE THAT THE CHILD IS KEPT AWAY WHEN UNFOLDING AND FOLDING THIS PRODUCT.
- WARNING: DO NOT LET THE CHILD PLAY WITH THIS PRODUCT.
• WARNING: ALWAYS USE THE RESTRAINT SYSTEM. -
WARNING: CHECK THAT THE PRAM BODY OR SEAT UNIT OR CAR SEAT ATTACHMENT DEVICES ARE CORRECTLY ENGAGED BEFORE USE.
• WARNING: THIS PRODUCT IS NOT SUITABLE FOR RUNNING OR SKATING.
• WARNING: A CHILDS SAFETY IS YOUR RESPONSIBILITY. -
WARNING:! PEnsure that all the locking devices are engaged before use.
- WARNING: Always keep child in view when in stroller.
- WARNING: This product is suitable for child from birth up to 22 kg or 4 years whichever comes first.
- For babies under 6 months of age, only use the pushchair with the backrest fully reclined or fit the travel system accessory using the adapters provided.
- If the pushchair is used with the accessory, make sure it has been fastened correctly.
- WARNING: If the pushchair is used with the travel system accessory, make sure it has been fastened correctly.
- For new born baby, do not recline seat back to sitting position (should be in full reclining position) as the baby doesn't have ability to control its head.
- WARNING: Use seat belt, avoid serious injury from falling or sliding out Always.
- WARNING: Ensure your child wears a correctly fitted and adjusted harness at all times.
- Verify regularly that the safety belts are correctly fastened, not damaged or frayed.
- WARNING: Only one child for one stroller.
- WARNING: This product is not suitable for running or skating.
- WARNING: Check that the seat unit attachment devices are correctly engaged before use.
- WARNING: Do not place or hang parcels, bags or accessories on any part of the stroller including the handle. Failure to comply with this warning may cause, hazardous, unstable conditions to exist.
- WARNING: Always make sure that the brake is engaged when positioning the child into the stroller seat or taking him/her out.
- WARNING: Always use the parking brake, even when standing still for only a few moments.
-
WARNING: When parking check if the brake is properly engaged by moving forward/rearward the stroller.
-
WARNING: Never fold the stroller, not even partly, when your child is in it.
- CARE: Your pushchair has been designed to meet safety standards and with correct use and maintenance will give many years of trouble free performance.
- A basket is provided for the carriage of 3kg of goods, evenly distributed.
- The product must be assembled by an adult.
- Only the minder can operate the recline adjuster.
- Never use the stroller if any part of it is damaged or any component is missing.
- Do not allow children to play with or hang onto the stroller.
- This vehicle requires regular maintenance by the user.
- Do not use replacement parts or accessories other than those approved by the supplier as they may render the pushchair unsafe.
- Any load applied to the handle and/or the backrest and/or laterally to the product can compromise the stability of the product.
- Do not overload this pushchair with additional children, goods or accessories. Bags and other items must not be hung from the handle.
- Ensure all users are familiar with the products operation. It should always open and fold easy. If it does not, do not force the mechanism - stop and read the instructions.
- Do not use your pushchair in a manner for which it is not designed.
- Do not allow your child to climb unassisted into, play with or hang onto your pushchair.
- Hold on to your pushchair when close to moving road vehicles or trains. Even with the brake on the draught from the vehicle may move the pushchair.
- Exercise cau on when moun ng or dismoun ng a kerb.
- Remove your children and fold the pushchair when ascending or descending stairs or escalators.
- Ensure the folded pushchair is stored away from children so that it does not fall and cause injury.
- Do not use replacement parts or accessories, e.g. child seats, bags, hooks, trays, rain covers etc. other than those approved by the supplier, they may render the pushchair unsafe.
- Never carry a second child on your pushchair.
- Do not use any pla orms or a achments that allow transporta on of the child.
- The chassis is strong but will weaken should the back wheels be bumped down stairs or kerbs. con nual impact will cause damage.
- If your child wears hard shoes these might damage the so fabric.
- Storing a damp pushchair will encourage mildew to form.
- A er exposure to damp conditions, dry o with a so cloth, open fully and allow to dry thoroughly before storing.
- Store your pushchair in a dry, safe place.
- Do not leave the pushchair in sunlight for prolonged periods - some fabrics may fade.
- For car seats used in conjunc on with a chassis, this vehicle does not replace a cot or a bed. Should your child need to sleep, then it should be placed in a suitable pram body, cot or bed. The infant car seat is not designed for long periods of sleep..
CARRY COT
- WARNING: THIS PRODUCT IS ONLY SUITABLE FOR A CHILD WHO CANN UP UNAIDED.
- WARNING: ONLY USE ON A FIRM, HORIZONTAL LEVEL AND DRY SURFA
- WARNING: DO NOT LET OTHER CHILDREN PLAY UNATTENDED NEAR T
- CARRYCOT.
WARNING
- WARNING: DO NOT USE IF ANY PART OF THE CARRY COT IS BROKEN, TORN OR MISSING.
- WARNING: YOU ARE RESPONSIBLE FOR YOUR BABY'S SAFETY.
- WARNING: Never leave child unattended. Always keep baby under supervision when he is in the carrycot.
- WARNING: This product is suitable only for a child who cannot sit up unaided, roll over and cannot push itself up on its hands and knees. Maximum weight of the child: 9Kg.
- WARNING: Suitable for children under 6 months of age.
- WARNING: Make sure that all the locking devices have been fastened correctly before use.
- Do not use spare parts or accessories other than those supplied or approved by the manufacturer, as they may make the product unsafe.
• Make sure that everyone using the product is familiar with how it works. - WARNING - It is dangerous to bring the product close to heat sources (gas or electric appliances), which can create fire hazards.
- Before lifting or transporting the carrycot, check that the carrying handle is in a vertical position and correctly attached on both sides.
- Before use, make sure that the crib is correctly assembled, the internal support brackets must be attached to the 4 clips.
- Before use, make sure that the lining is correctly assembled on the frame, and that the internal support brackets are correctly attached to the clips on the bottom of the carrycot.
• To avoid injuries, make sure that the child is at a safe distance away when opening and closing the carrycot. - The handles and the bottom of the crib must be inspected regularly to check for signs of wear and damage.
- When the child is in the carrycot, their head must never be lower than their body.
- Do not add mattresses other than the one supplied with the carrycot or approved by the manufacturer.
- RISK OF SUFFOCATION: the carrycot could tip over on soft surfaces and suffocate the child. NEVER place the carrycot on beds, sofas or other soft surfaces.
- Check regularly that the crib is intact, do not use if a part is damaged, worn or missing.
- Only use the spare parts approved by the manufacturer.
RAINCOVER
WARNING!
- Use under an adult surveillance.
- When in use make sure the rain cover does not come in contact with the face of the child as it may cause suffocation
- Don't use the raincover on the product without a hood that can hold it.
- Never leave rain covers on indoors, in a hot atmosphere or near a heat source as the baby could overheat.
- Do not use on products other than those recommended by the Manufacturer.
- Hand wash at 30^ C .
Footmuff "TicToc" optional, sold separately.
The contents of this document as stated below will come into effect as from 01.01.2005 and replace, on every account and in full, any previous message referring to the guarantee provided by Foppa Pedretti S.p.A.
FORMAL GUARANTEE
Foppa Pedretti S.p.A. the head office of which is located at n. 11 Via Volta, Grumello del Monte (Italy), guarantees directly to the Consumer that this brand new product is free of faults with regard to the materials, design and manufacture and that it complies with the characteristics as declared by the manufacturer.
This formal guarantee is valid in all Member Countries of the European Union and it neither excludes nor limits the Consumer's rights in accordance with mandatory measures provided for by the law with regard to the Retailer of the Product.
To take advantage of this formal guarantee, the Consumer must return the faulty product to the Retailer, presenting to the same the proof of purchase of the Product which must clearly show the Retailer's address, the date of purchase of the Product with the Retailer's stamp and signature and an indication of the Product itself or, alternatively, the receipt which must not have been altered and which must clearly show the same information as that referred to above. The formal guarantee is valid for twelve (12) months from the date of purchase of the Product. During this period, Foppa Pedretti S.p.A. will repair or replace the faulty product, at its own discretion. The formal guarantee is granted to the end buyer of the Product (Consumer) and it neither excludes nor limits the mandatory rights of the Consumer as provided for by the law and/ or the rights that the Consumer may have with regard to the Dealer/Retailer of the Product.
EXCLUSIONS TO THE FORMAL GUARANTEE.
The formal guarantee is excluded in the case of damage caused to the Product for the following reasons: if the product is used in a way that does not comply with the information contained in the use and assembly instruction sheet, if the product is knocked or dropped, if the Product is exposed to humidity or extreme heat or environmental conditions, or to sudden changes in the same, corrosion, oxidization, unauthorized alterations or repairs to the Product, repairs using unauthorised spare parts, improper use, improper maintenance or failure to carry out the same, improper maintenance compared to the information given on the use and assembly instruction sheet, incorrect assembly, accidents, damage caused by food or drink, damage caused by chemical products, cases of force majeure.
In any case, Foppa Pedretti S.p.A. declines all responsibility for damage caused to persons or to property, other than the Product, when such damage is caused by a failure to comply with the instructions/advice/warnings cont a ined in the manua I or, alternatively, in the use and assembly instruction sheet provided with each Product for the owner/user. (Purely as an example, in the case of a cot: “Check your baby constantly. Make sure that the sheets and blankets do not cover the baby’s head...”).
Furthermore, Foppa Pedretti S.p.A. declines all responsibility for damage to persons and to property when the breakage of its products is due to a deterioration in the components of the Product that are subject to wear. All the components of the Product made of plastic are considered to be components subject to wear.
DÉPLIAGE POUSSETTE (fig. 23, 24, 25, 26, 27, 28)
EXCLUSIONS DE LA GARANTIE CONVENTIONNELLE.
text_image
I. A. C. B. D. E. J. L. F. G. M. H.
natural_image
Close-up of a dark garment with a mesh pattern and a circular mark labeled 'N.' (no other text or symbols)
text_image
P.ÖFFNUNG DES BUGGY (Abb. 23, 24, 25, 26, 27, 28)
ABERTURA DEL COCHECITO (fig. 23, 24, 25, 26, 27, 28)
ABERTURA DO CARRINHO (fig. 23, 24, 25, 26, 27, 28)
text_image
I. A. C. B. D. E. J. L. F. G. M. H.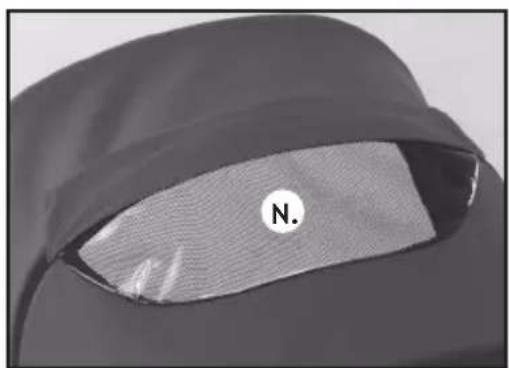
natural_image
Close-up of a dark garment with a mesh pattern and a circular mark labeled 'N.' (no other text or symbols)
text_image
P.text_image
I. A. C. B. D. E. J. L. F. G. M. H.
natural_image
Close-up of a dark fabric garment with a mesh pattern and a circular mark labeled 'N.' (no text or symbols on the garment itself)
text_image
P.SI TA HAPNI KARROCËN (fig.23, 24, 25, 26, 27, 28)
Shtypni butonin e hapjes "A".
SISTEMI I RRIPAVE SIGURUES
natural_image
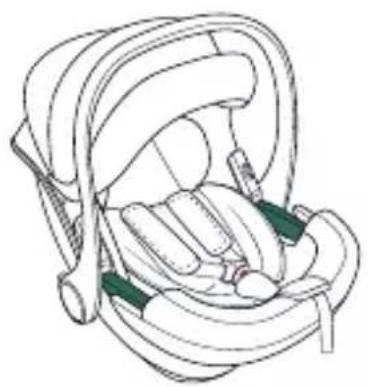
Product photo of a baby car seat with green accents and black straps (no visible text or symbols)IT SEGGIOLINO AUTO - Istruzioni di montaggio
EN CAR SEAT - Assembly instructions
FR SIÈGE-AUTO - Notice d'utilisation
DE AUTOSITZ - Montageanweisungen
ES SILLA DE COCHE - Manual de instrucciones
PT CADEIRA AUTO - Manual de instruções
EL ΠΑΙΔΙΚΟ ΚΑΘΙΣΜΑ ΑΥΤΟΚΙΝΗΤΟΥ - Οδηγιεσ χρησησ
SQ NDENJËSE PËR BEBE - Udhëzime montimi
ECE R129-03
IT. IMPORTANTE! LEGGERE ATTENTAMENTE E CONSERVARE PER FUTURO RIFERIMENTO
EN. IMPORTANT! READ THE INSTRUCTIONS CAREFULLY AND KEEP FOR FUTURE REFERENCE
FR. IMPORTANT! LIRE ATTENTIVEMENT ET CONSERVER SOIGNEUSEMENT A PORTEE DE MAIN POUR UNE UTILISATION ULTERIEURE
natural_image
Illustration of a baby car seat with a blue blanket and red directional arrows indicating motion (no text or symbols)
text_image
3 40-75 cm 76-87 cm
text_image
4.1
text_image
4.2
text_image
4.3
text_image
4.4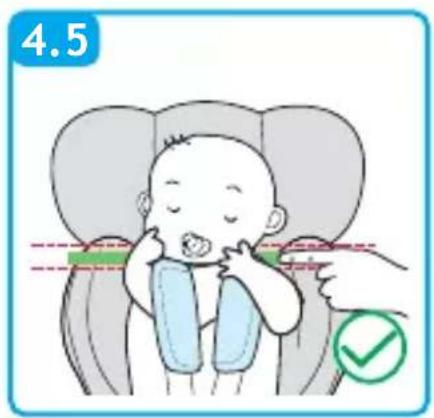
text_image
4.5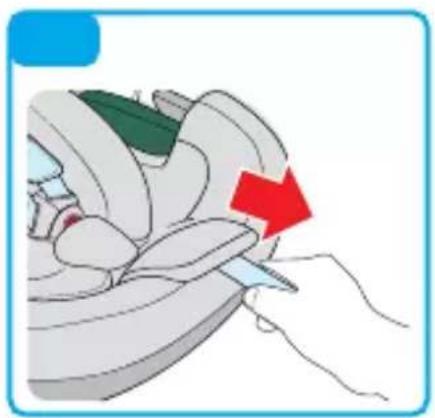
natural_image
Illustration of a hand holding a small object with a red arrow pointing to it, no text or symbols present.
text_image
5.1 10CM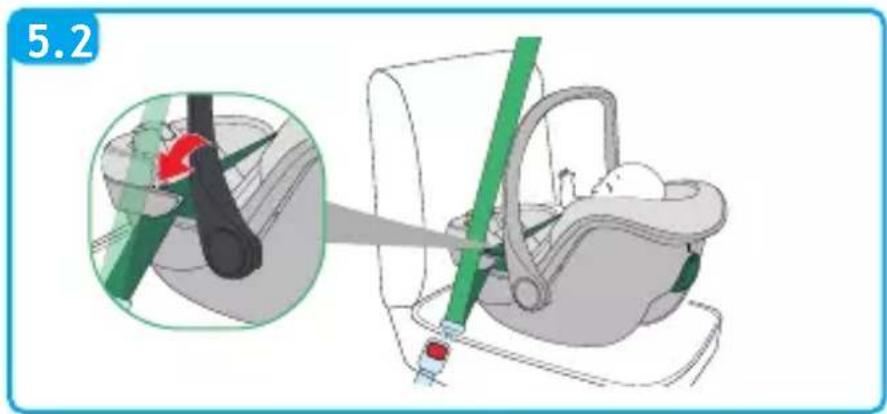
text_image
5.2
text_image
5.4
text_image
6.1
natural_image
Simple line drawing of a helmet and seat (no text or symbols)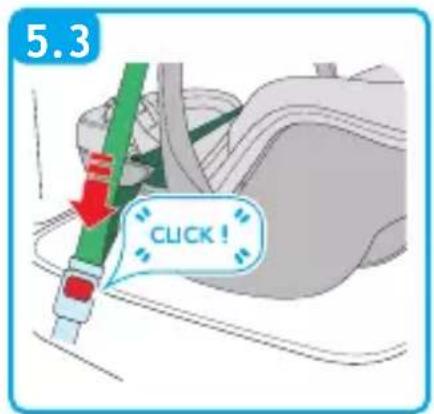
text_image
5.3 CLICK !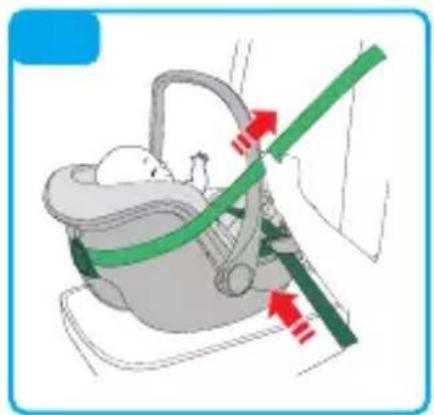
natural_image
Illustration of a baby seatbelt with green belt and red arrows indicating force or movement (no text or symbols)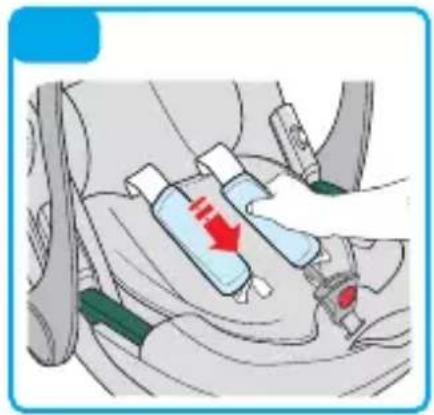
natural_image
Illustration of a car seatbelt with a red arrow indicating a specific component (no text or symbols present)
natural_image
Illustration of a baby car seat with blue bedding and gray straps (no text or symbols)
text_image
a b
natural_image
Illustration of a hand using a device to interact with bubbles, showing a red circular object on the screen (no text or symbols)
text_image
8.1
text_image
8.2 a b
natural_image
Illustration of a baby seat with a blue blanket and green buttons, showing a hand placed on the seat (no text or symbols)
natural_image
Illustration of a hand holding a curved object with red arrows indicating direction (no text or symbols)
natural_image
Medical illustration showing surgical tools and forceps on a patient's arm (no text or labels)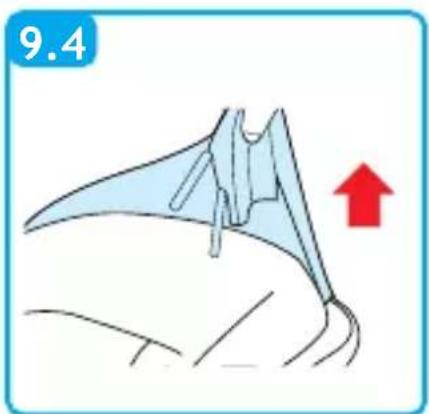
text_image
9.4natural_image
Line drawing of a baby car seat with straps and seats (no text or symbols)
natural_image
Line drawing of a medical helmet with a green visor and attached arm (no text or symbols)natural_image
Simple icon of a person sitting in a car seat, enclosed in a rounded square frame (no text or symbols)natural_image
Diagram of a mechanical component with orange and yellow parts, enclosed in a circular frame (no text or symbols)natural_image
Line drawing of a baby car seat with a blue arrow indicating the change from top to bottom (no text or symbols present)MANUTENZIONE
Car seat components PAG 25
Use - warning PAG 26
Checks before use PAG 30
Installation in the vehicle PAG 31
Adjust the handle PAG 33
Adjust canopy PAG 33
Using the newborn reducer PAG 33
Placing your child in the car seat PAG 34
To adjust the headrest and straps PAG 35
Fitting your car seat into the car PAG 35
Maintenance - Cleaning PAG 37
Formal guarantee PAG 38
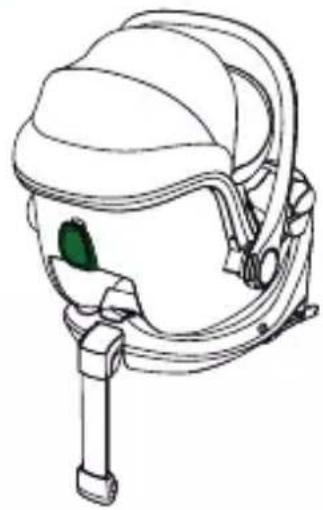
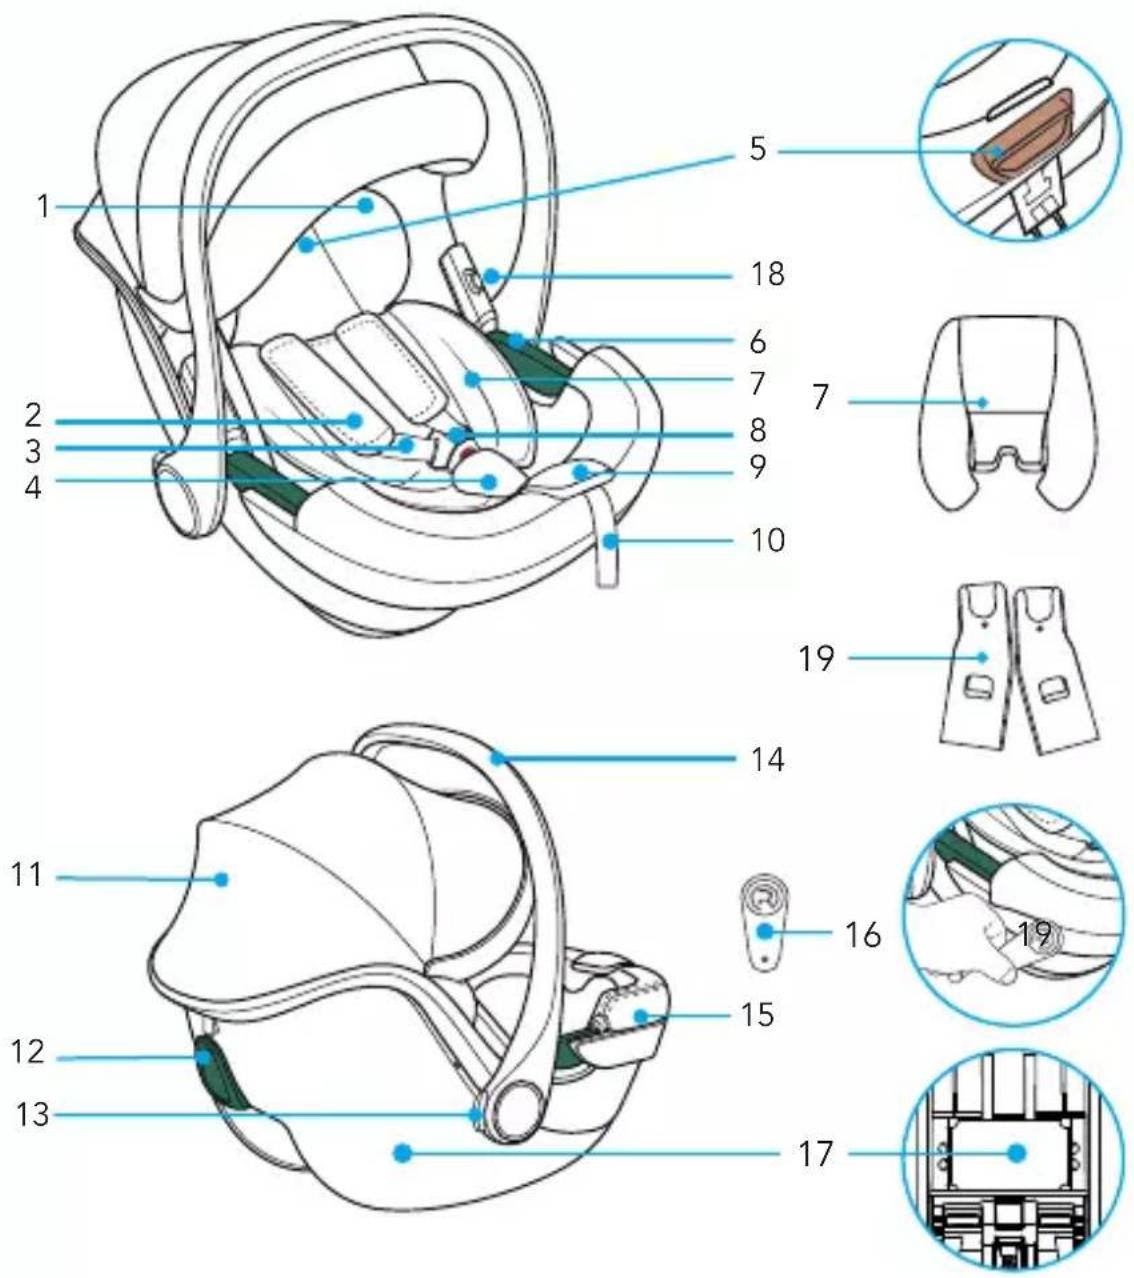
CAR SEAT COMPONENTS
text_image
1 2 3 4 5 18 6 7 8 9 10 7 19 14 11 16 19 12 15 13 17- Had support
- Shoulder pads
- Harness
- Buckle crotch pad
- "Adjusting headrest" lever
- Lap belt guide
- Infant pad
- Buckle
- Canopy
-
Adjuster strap
-
Canopy
- Shoulder belt guide
- Handle release
- Handle
- Lining
- R-eIF
- Instruction compartment
- Button to remove the adapters.
- Right and left adapter (*)
USE - WARNING
CATEGORIES OF USE
natural_image
Line drawing of a baby car seat with straps and seats (no text or symbols)
natural_image
Line drawing of a medical helmet with a green visor and attached arm (no text or symbols)| CAR SEAT"Car seat TicToc i-Size" | CAR SEAT"Car seat TicToc i-Size" with base "Tech i-Size" |
| The "Car seat TicToc i-Size" car seat is fixed in the car with the 3-point seat belt. | The "Car seat TicToc i-Size" car seat is attached to the "X i-Size" and fixed to the passenger seat with the ISOFIX connectors.Consult the "Tech i-Size" base instruction manual for correct installation in the car. |
Warning
-
This is an "i-Size" child restraint device approved in accordance with regulation no. 129 to be used on the passenger seats of "i-Size-compatible" vehicles, as indicated by vehicle manufacturers in the vehicle user manual.
-
If in doubt, contact the manufacturer of the child restraint device, or the retailer.

natural_image
Simple icon of a person sitting in a car seat, enclosed in a rounded square frame (no text or symbols)IMPORTANT: the "Car seat TicToc i-Size" car seat, together with the "Tech i-Size" Base, is an i-Size restraint system approved according to the ECE R129 Regulation, for children between 40 and 87~cm in height with a maximum weight of 13kg .
WARNINGS
IMPORTANT
Please read all instructions in this manual and in the vehicle owner's manual related to child safety seats carefully and understand them. Install and use the child safety seat as described in the instruction manual. Failure to do this could result in serious injury or death of your child. These operating instructions must be kept in the specific compartment in the car seat during the period of use for future reference.
IMPORTANTE
- Because of potential medical issues inherent in low birth weight and premature infants, always have a trained professional doctor, or hospital staff member assess the suitability of the child restraint prior to leaving the hospital or using the child restraint.
- WARNING! Install the "Car seat TicToc i-Size" car seat in the REAR-FACING POSITION ONLY.
- The “Car seat TicToc i-Size” car seat can be installed on the “Tech i-Size” base in i-Size compatible passenger seats, as indicated by the manufacturer in the vehicle manual.
- If the vehicle used does not have an i-Size-compatible passenger seat, the installation is approved on ISOFIX passenger seats in the vehicles indicated in the attached Vehicle List, also available on the website www.foppapedretti.it.
- The “Car seat TicToc i-Size” car seat alone can also be installed with the 3-point static or retractor seat belt alone, approved according to regulation UN/ ECE 16 or other equivalent standards.
- Before proceeding with the purchase, check that the car seat is compatible with your car. If in doubt, consult the manufacturer of the car seat or the dealer.
WARNINGS
WARNINGS
- Use the child safety seat only on the vehicle seats that face forward. According to accident statistics, children are safer when properly restrained in the rear seating positions than in the front seating positions.
- After an accident, the car seat may no longer meet the safety requirements because of the damage sustained, even if this is not immediately visible. It is therefore recommended that you replace it. Only the manufacturer can ensure that it complies with the safety requirements, provided it is an original product.
- Make sure that luggage or other objects inside the vehicle are secured, to reduce the risk of injury in the event of an accident.
- The rigid and plastic components on the child restraint must be positioned and secured so as not to get trapped between the passenger seats or in a car door during daily use of the product.
- DO NOT remove any labels on the child safety seat. Important information is contained on the labels.
- DO NOT use a child safety seat with damaged or missing parts.
- DO NOT use damaged or frayed harness straps or vehicle belt.
- DO NOT modify or attempt to modify the child safety seat in any way.
- DO NOT take apart or attempt to take apart this child safety seat except as instructed in this manual.
- DO NOT use a child safety seat that has been in a crash. A crash can cause damage to the child safety seat that you cannot see.
- DO NOT replace the child seat cover or harness with any other than the ones we recommend as these parts are integral to the child safety seat's performance.
- DO NOT use a second-hand child seat or child seat whose history you do not know.
- MAKE sure that the child safety seat does not become trapped by folding or moveable passenger seat or in the door of your car.
- DO NOT USE in any configuration not shown in the instructions.
- NEVER use this child safety seat with 2 point vehicle belts.
- DO NOT use belt routing methods not shown in these instructions.
- DO NOT allow children to play with or adjust the child safety seat.
• Always check the tightness of the restraint and the harness before each use. - DO NOT use this child safety seat in a passenger seat with an active airbag unless the vehicle manufacturer confirms that it is safe.
- This child restraint should be securely belted in the vehicle even when not in use. In a crash or sudden stop, an unsecured child safety seat may injure other occupants.
WARNINGS
- Make sure to properly secure any loose objects, such as luggage or books, in your car as they may cause injuries in the event of an accident.
- NEVER leave your child unattended in a car even for a short time.
- NEVER take your child out of the child safety seat when the vehicle is moving.
- NEVER use this child safety seat without the car seat cover.
- HOT! Cover the child safety seat when left in direct sunlight. Parts of a child safety seat may become too hot for the child's skin. Always check surfaces before placing a child in the child seat.
- DO NOT use any load bearing contact points other than those described in the instructions and marked in the child restraint.
- The rigid items and plastic parts of a child restraint must be so located and installed that they are not liable, during everyday use of the vehicle to become trapped by a movable seat or in a door of the vehicle.
- We recommended that any straps holding the restraint to the vehicle should be tight, that any straps restraining the child should be adjusted to the child's body, and that straps should not be twisted.
- IMPORTANT! Please ensure that any lap strap is worn low down, so that the pelvis is firmly engaged.
- NEVER use this child restraint with any other base except ones that the manufacturer permits.
- ALWAYS make sure all vehicle belts and harness straps are not twisted before each use.
- NEVER leave the child in the child seat when the harness straps are loose or undone.
- DO NOT leave your child in this child restraint for an extended period of time.
- ALWAYS install the child safety seat in a rear-facing position.
- NEVER install the child safety seat forward-facing.
- DO NOT use alternative routings not shown in these instructions.
- MAKE SURE all folding passenger seats are property latched.
- ALL occupants of the vehicle should be correctly restrained. Unrestrained passengers may be thrown into other passengers and cause serious injury or death in a crash.
- ALWAYS MAKE SURE the handle is properly locked in the upright carrying position before carrying a child in the child seat.
- NEVER place the car seat or infant carrier near the edge of an elevated surface or on a soft such as a seat cushion or mattress. The car seat or infant carrier could fall off these surfaces and cause serious injury or death.
- NEVER use the child safety seat with a shopping cart.
CHECKS BEFORE USE
Inspect:
• child restraint free of damage.
Verify Child within Size Range:
• weight between 0-13kg.
Install Child Restraint Rearward-facing in Safe Location in Vehicle:
- vehicle seats that face front of vehicle only;
• handle locked in specified position;
• child facing rear of vehicle;
• position with NO active AIRBAG;
• 3 point (shoulder/lap) belt used; - seat belt not twisted;
- belt path followed;
- tight against vehicle seat.
Secure Child Properly in Child Restraint:
• correct shoulder strap height;
- harness not twisted;
- harness low across hips;
- harness secure and tight.
USE IN THE CAR

text_image
AIRBAGDO NOT USE THE CAR SEAT PLACED ON A PASSENGER SEAT FITTED WITH AN AIRBAG.
Danger! If the airbag explodes it may hit the seat, and cause serious injury to the child, if not death.
Follow the instructions in the vehicle owner's manual for the use of child seats.
NEVER use a 2-point seat belt to fix the child's car seat to the passenger seat. Use only 3-point seat belts.

natural_image
Simple line drawing of a boat hull with orange hull and red hull, enclosed in a circular frame (no text or symbols)Comply with the regulations in force in your own country. NEVER use a 2-point seat belt to fix this child's car seat to the passenger seat.
Only suitable for use in vehicles equipped with 3-point static or retractor seat belts, approved according to regulation UN/ECE 16 or other equivalent standards.
Never use this car seat on a front passenger seat fitted with an active front AIRBAG.
INSTALLATION IN THE VEHICLE
WITH 3-POINT CAR SEAT BELT
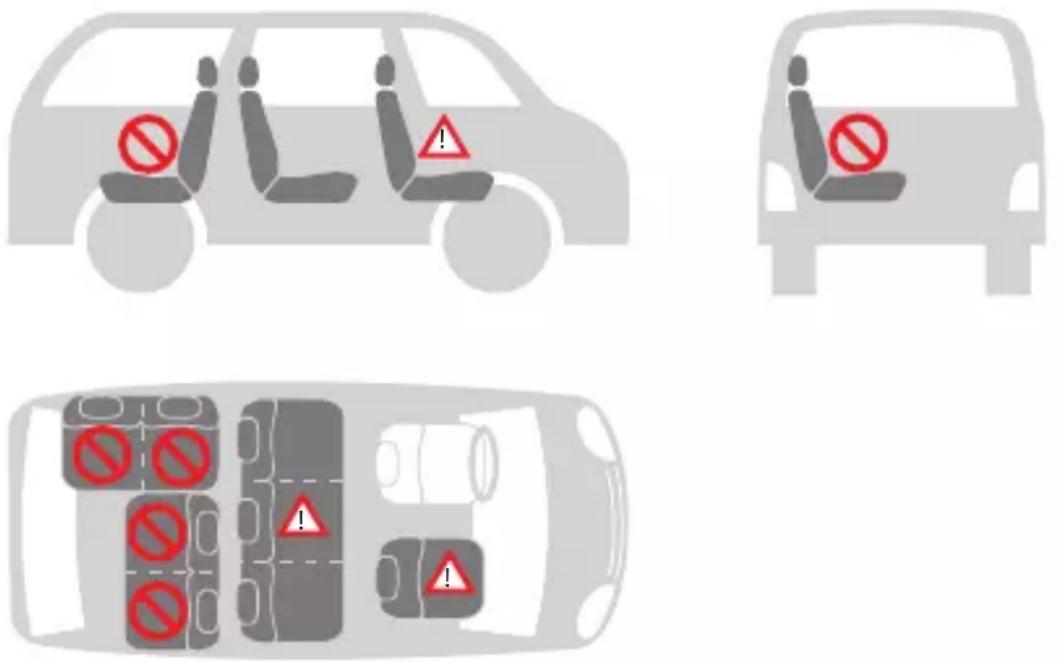
You can install the car seat as follows:
| in the direction of travel no | |
| in the opposite direction to the direction of travel | yes |
| with a 2-point belt | no 1) |
| with a 3-point belt | yes 2) |
| on the front passenger seat | yes 3) |
| on the side rear seat | yes |
| on the central rear seat | no 4) |
1) The use of a 2-point belt increases the risk of injury to the child in the
event of an accident.
2) The seat belt must be approved to ECE R 16 or to other equivalent standards.
3) Do not use on a front passenger seat fitted with an active front airbag.
4) It may be used if the central seat of the vehicle is equipped with a 3-point belt.
ADJUST THE HANDLE (fig. 1.1, fig. 1.2)
A. For use in the car and for transport;
B. For placing the child in the seat.
C. For use as a bouncer.
To adjust, squeeze handle release buttons on both sides, then rotate the handle.
The handle will lock into position.
WARNING:
Always make sure the handle is securely locked in the upright carrying position before carrying.
You should hear a click when the handle button is engaged and handle is locked into the upright carrying position.
ADJUST CANOPY (fig. 2)
The sun canopy is easily adjustable.
It enables your child to rest peacefully and gives protection from the sun's rays.
To open: pull the plastic edge of the hood.
To close: push the edge back to the initial position.
USING THE NEWBORN REDUCER (fig. 3)
The reducer gives your child greater support during the first months.
The reducer is used to ensure greater comfort to young children.
The complete reducer must be used until the child reaches 75 cm.
PLACING YOUR CHILD IN THE CAR SEAT
Loosening the straps (fig. 4.1): Press the adjuster button on the front center of the seat, and pull on both shoulder straps to loosen the harness.
To release the buckle (fig. 4.2): Press the red button on the buckle to release the shoulder straps and move them to the side.
Place child's bottom on the seat and the child's back flat against the back of the child restraint.
This will increase the child's comfort and allow the harness to properly secure the child.
Slide shoulder straps over the child's shoulders.
Make sure that the straps are at the same height and positioned just above the child's shoulders.
USING THE CAR SEAT
To attach the buckle (fig. 4.3): Join together the two ends/ tabs of the straps to form a single connector.
Insert the connector into the central buckle until you hear a click.
Make sure that the straps are not twisted.
Adjust the chest protectors to the centre of the child's shoulders.
To adjust the headrest and straps (fig. 4.4): Pull the harness adjustment lever upwards and at the same time slide the adjuster upwards or downwards until the chest straps are at the correct height.
Release the adjustment lever to lock the adjuster in the new position.
Make sure that the chest straps are properly locked and in the correct position.
Make sure the shoulder straps are positioned just above the child's shoulders and that there is a 1 finger (1cm) gap. (fig. 4.5).
A properly-adjusted headrest ensures the optimal position for the child sitting in the car seat.
Tightening the harness (fig. 4.6): Pull the harness adjustment strap so as to tighten it properly against the body of the child. The harness is correctly tightened when the gap between the harness and the child is no greater than the thickness of your finger.
IMPORTANT! Pull the end of the adjuster strap outwards, not upwards or downwards. During transport (especially when not in the car), the adjuster strap must be placed in the belt compartment.

Ensuring that your child is properly secured with the harness.
To ensure the safety of your child, check that.....
- The straps are adjusted correctly at the height of the child's shoulders.
• The straps are not twisted.
- The tabs are properly engaged in the harness buckle.
The straps are properly tightened, as the gap between the harness and the child must not be greater than the thickness of your finger.
FITTING YOUR CAR SEAT INTO THE CAR
This car seat can only be fitted into the passenger seat of a car with a lap and diagonal seat belt and no AIR BAG.
To secure the car seat in the vehicle with the 3-point seat belt, proceed as follows:
- Your child seat can only be installed rearward facing using a lap and diagonal
USING THE CAR SEAT
seat belt in the front or rear passenger seat of the car (fig. 5.1).
- Pass the horizontal seat belt (the lap belt) of the car through both belt guides (a) and fasten the buckle (b) (fig. 5.2, fig. 5.3).
- Pass the diagonal seat belt (the chest belt) of the car around the backrest of the car seat, passing through the diagonal belt guide (c) (fig. 5.4).
- If the vehicle's seat belt is too short, adjust its height to the lowest position. If it is still too short, try another passenger seat.
- Place the diagonal belt in the diagonal seat belt guide at the back of the seat (fig. 5.4).
- Take out all the slack in the seat belt, ensuring that there are no twists or kinks in the seat belt (fig. 5.5).
WARNING:
- DO NOT route the vehicle belt using any other path when using the child seat. For assistant contact our Customer Service team.
- DO NOT use 2 point vehicle belt to install this child seat.
- ONLY install the child restraint rear-facing on forward-facing vehicle seats.
- Make sure the child is properly secured in the child restraint, and the child restraint is tightly installed in the vehicle.
Check that the car seat has been installed correctly in the vehicle
• Always secure the child with the belt when placed in the car seat.
- Never leave the child unattended in the child seat when placed on high-up surfaces (such as tables, etc.).
- Make sure that the end of the belt does not get caught in moving parts (such as automatic doors, escalators, etc.).
- WARNING! The plastic parts of the car seat can heat up in the sun, causing burns to the child. Protect the car seat from excessive heat, for example, by using a light covering.
- The car seat has only one installation position in the car, leaving the child always semi-reclined.
- Take regular breaks when travelling on long journeys. Your child can get tired very easily. Avoid leaving the child in the car seat for too long.
OPTIONAL
Optional "Tech i-Size" base, sold separately
natural_image
Line drawing of a baby car seat with a blue arrow indicating the change from the base to the seat (no text or symbols present)MAINTENANCE
MAINTENANCE - Cleaning
The upholstery and seat belts can be cleaned using a clean cloth, warm water and soap.
The plastic parts can be cleaned with mild soap and warm water.
Do not use harsh detergents such as solvents.

The car seat must not be used without the lining.
REMOVING THE LINING (fig. 6.1, 6.2, 6.3, 6.4)
Press the red release button and unhook the harness.
Remove the shoulder straps from cover and chassis in plastic, by pulling each shoulder strap, including buckle, through its corresponding slot.
Do not remove the shoulder straps from the loop of the harness adjuster strap.
Remove the belt following the instructions in the "How to remove the harness buckle" paragraph and remove the buckle from the cover.
Pull out the cover from shell front.
To put the lining back on, follow the reverse procedure.
IMPORTANT! Make sure that it is correctly assembled, check that none of the belts are twisted.
How to remove the harness buckle (fig. 7.1, 7.2)
- Unclip the buckle (press the red release button).
- Locate the metal ring attached to the belt under the child lining.
- Rotate the metal ring and remove it through the shell and the padding.
How to replace the harness buckle
- Insert the metal ring and the crotch strap through the padding and the shell (a). The metal ring, fastened to the belt, must come out from the shell (fig. 8.1).
- Insert the metal ring and crotch strap through the shell (b). Make sure it is inserted and locked correctly (fig. 8.2).
- Pull the centre buckle to check that the crotch strap is correctly secured.
REMOVING THE CANOPY (fig. 9.1, 9.2, 9.3, 9.4)
The contents of this document as stated below will come into effect as from 01.01.2005 and replace, on every account and in full, any previous message referring to the guarantee provided by Foppa Pedretti S.p.A.
FORMAL GUARANTEE
Foppa Pedretti S.p.A. the head office of which is located at n. 11 Via Volta, Grumello del Monte (Italy), guarantees directly to the Consumer that this brand new product is free of faults with regard to the materials, design and manufacture and that it complies with the characteristics as declared by the manufacturer. This formal guarantee is valid in all Member Countries of the European Union and it neither excludes nor limits the Consumer's rights in accordance with mandatory measures provided for by the law with regard to the Retailer of the Product.
To take advantage of this formal guarantee, the Consumer must return the faulty product to the Retailer, presenting to the same the proof of purchase of the Product which must clearly show the Retailer's address, the date of purchase of the Product with the Retailer's stamp and signature and an indication of the Product itself or, alternatively, the receipt which must not have been altered and which must clearly show the same information as that referred to above.
The formal guarantee is valid for twelve (12) months from the date of purchase of the Product. During this period, Foppa Pedretti S.p.A. will repair or replace the faulty product, at its own discretion. The formal guarantee is granted to the end buyer of the Product (Consumer) and it neither excludes nor limits the mandatory rights of the Consumer as provided for by the law and/or the rights that the Consumer may have with regard to the Dealer/Retailer of the Product.
EXCLUSIONS TO THE FORMAL GUARANTEE.
The formal guarantee is excluded in the case of damage caused to the Product for the following reasons: if the product is used in a way that does not comply with the information contained in the use and assembly instruction sheet, if the product is knocked or dropped, if the Product is exposed to humidity or extreme heat or environmental conditions, or to sudden changes in the same, corrosion, oxidization, unauthorized alterations or repairs to the Product, repairs using unauthorised spare parts, improper use, improper maintenance or failure to carry out the same, improper maintenance compared to the information given on the use and assembly instruction sheet, incorrect assembly, accidents, damage caused by food or drink, damage caused by chemical products, cases of force majeure.
In any case, Foppa Pedretti S.p.A. declines all responsibility for damage caused to persons or to property, other than the Product, when such damage is caused by a failure to comply with the instructions/advice/warnings contained in the manual or, alternatively, in the use and assembly instruction sheet provided with each Product for the owner/user. (Purely as an example, in the case of a cot: "Check your baby constantly. Make sure that the sheets and blankets do not cover the baby's head...").
Furthermore, Foppa Pedretti S.p.A. declines all responsibility for damage to persons and to property when the breakage of its products is due to a deterioration in the components of the Product that are subject to wear. All the components of the Product made of plastic are considered to be components subject to wear.
natural_image
Line drawing of a baby car seat with straps and seats (no text or symbols)
natural_image
Line drawing of a medical helmet with a green visor and attached arm (no text or symbols)natural_image
Icon depicting a person sitting in a car seat, enclosed in a square frame (no text or symbols)natural_image
Diagram of a mechanical component with orange and gray parts, no visible text or symbolstext_image
Diagram showing car safety signs: no sign, warning sign, and warning triangle on front seats
natural_image
Silhouette of a car front with a red prohibition sign on the seat (no text or symbols)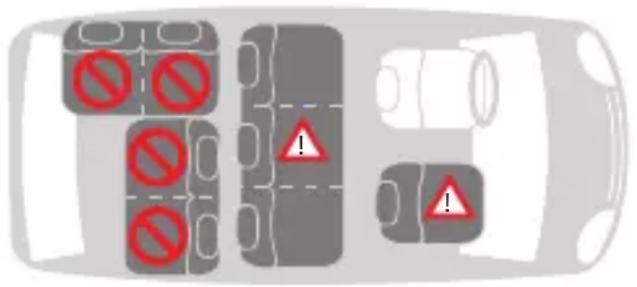
text_image
Diagram showing traffic warning signs and vehicle positions with red prohibition symbolsnatural_image
Line drawing of a baby seat with a handle and seatbelt, showing a blue downward arrow indicating a change or repair point (no text or symbols present)ENTRETIEN - Nettoyage
EXCLUSIONS DE LA GARANTIE CONVENTIONNELLE.
natural_image
Line drawing of a baby car seat with green buttons and straps (no text or symbols)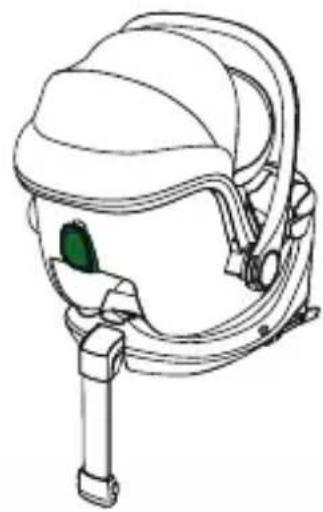
natural_image
Line drawing of a medical or surgical helmet with a green-tinted lens (no text or symbols)natural_image
Simple icon of a person sitting in a car seat, enclosed in a rounded square frame (no text or symbols)natural_image
Diagram of a mechanical component inside a circular frame, showing orange and yellow parts (no text or symbols)natural_image
Line drawing of a baby seat with a blue arrow indicating the change from the base to the seat (no text or symbols present)natural_image
Line drawing of a baby car seat with straps and seats (no text or symbols)
natural_image
Line drawing of a medical helmet with a green visor and attached arm (no text or symbols)natural_image
Simple icon of a person sitting in a car seat, enclosed in a rounded square frame (no text or symbols)natural_image
Diagram of a mechanical component inside a circular frame, showing orange and gray parts (no text or symbols)text_image
Diagram showing car safety signs: no sign, warning sign, and warning triangle on front seats
natural_image
Silhouette of a car front with a red prohibition sign on the seat (no text or symbols)
text_image
Diagram showing traffic warning signs on a car with no symbols indicating no incidents or invalid cases.natural_image
Line drawing of a baby car seat with a blue arrow indicating the change from the base to the seat (no text or symbols present)MANTENIMIENTO
Limpieza
natural_image
Line drawing of a baby car seat with straps and seats (no text or symbols)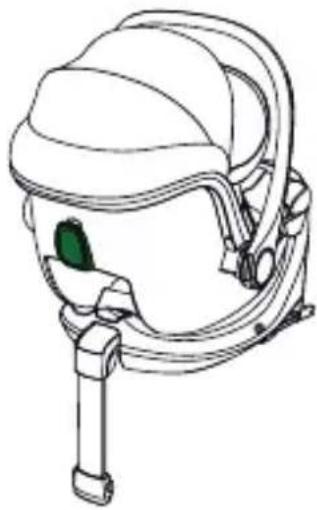
natural_image
Line drawing of a medical oxygen mask with a green visor (no text or symbols)natural_image
Icon of a person sitting in a car seat, enclosed in a rounded square frame (no text or symbols)natural_image
Diagram of a mechanical component with orange and yellow parts, enclosed in a circular frame (no text or symbols)natural_image
Line drawing of a baby car seat with a blue arrow indicating the change from the base to the seat (no text or symbols present)MANUTENÇÃO
Limpeza
natural_image
Line drawing of a baby car seat with straps and seats (no text or symbols)
natural_image
Line drawing of a medical helmet with a green visor and attached arm (no text or symbols)natural_image
Simple icon of a person sitting in a chair, enclosed in a square frame (no text or symbols)natural_image
Diagram of a mechanical component with orange and yellow parts, enclosed in a circular frame (no text or symbols)natural_image
Line drawing of a baby car seat with a blue arrow indicating the change from the base to the seat (no text or symbols present)ΣΥΝΤΗΡΗΣΗ
Καθαρισμός
natural_image
Line drawing of a baby car seat with straps and seats (no text or symbols)