Divo - Stroller Foppapedretti - Free user manual and instructions
Find the device manual for free Divo Foppapedretti in PDF.
| Product type | Stroller |
| Brand | Foppapedretti |
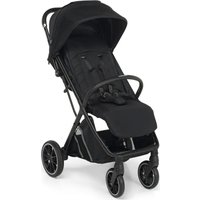
| Model | Divo |
| Maximum child weight | 15 kg |
| Recommended age | From birth to approx. 3 years |
| Reversible seat | Yes, forward-facing or parent-facing |
| Backrest position | Reclining to horizontal position for newborns |
| Canopy | Adjustable to 3 heights with inspection window |
| Leg rest | Adjustable to multiple positions |
| Front wheels | Swiveling with lock |
| Parking brake | Yes, foot-operated |
| Safety harness | 5-point, adjustable |
| Storage basket | Maximum capacity 4 kg |
| Compatibility | Bassinet and car seat (sold separately) |
| Folding | Compact and easy |
| Cleaning | Hand wash at 30°C, air dry |
| Safety | Multiple locking system, brake, crotch belt |
| Warranty | 12 months |
Frequently Asked Questions - Divo Foppapedretti
User questions about Divo Foppapedretti
0 question about this device. Answer the ones you know or ask your own.
Ask a new question about this device
Download the instructions for your Stroller in PDF format for free! Find your manual Divo - Foppapedretti and take your electronic device back in hand. On this page are published all the documents necessary for the use of your device. Divo by Foppapedretti.
USER MANUAL Divo Foppapedretti
natural_image
Black and white baby stroller with floral pattern design, no visible text or symbolsEN 1888-1:2018
EN PUSHCHAIR - Assembly instructions
This stroller is suitable for children with a maximum weight of 15 kg
EN. IMPORTANT - READ CAREFULLY AND KEEP FOR FUTURE REFERENCE.
FR. IMPORTANT - A LIRE ATTENTIVEMENT ET A CONSERVER POUR REFERENCE ULTERIEURE.
DE. WICHTIG - BITTE SORGFÄLTIG LESEN UND FÜR SPÄTERES NACHLESEN UNBEDINGT AUFBEWAHREN.
ES. IMPORTANTE - LEER DETENIDAMENTE Y MANTENERLAS PARA FUTURAS CONSULTAS. ΣΗΜΑΝΤΙΚΟ - ΚΡΑΤΗΣΤΕ
natural_image
Illustration of a hand operating a mechanical device with a blue arrow indicating direction (no text or symbols)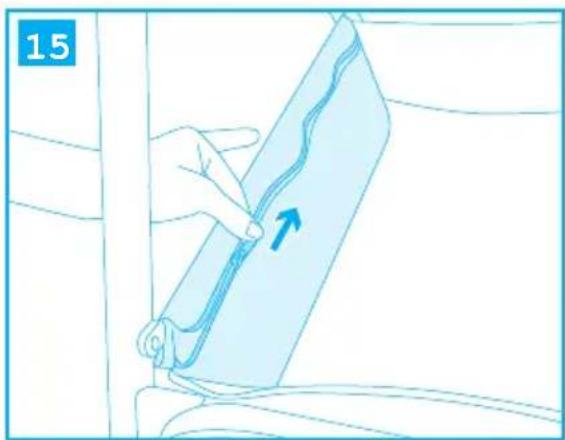
natural_image
Illustration of a hand pressing down on a blue mechanical component with an arrow indicating force (no text or symbols)
natural_image
Illustration of a person adjusting a seatbelt with a blue arrow indicating the angle (no text or symbols present)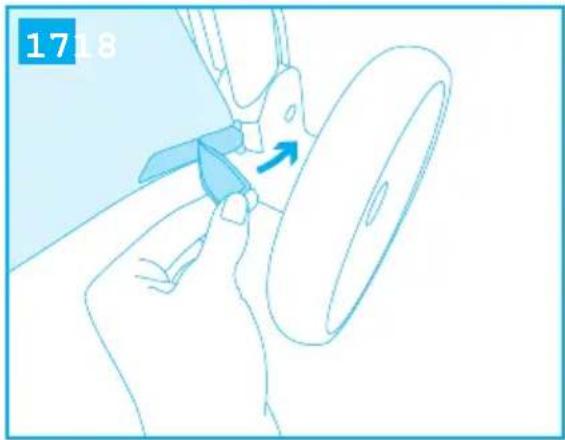
natural_image
Illustration of hands using a tool to adjust or install a mechanical component, with no visible text or symbols.
natural_image
Diagram of a medical procedure with catheter placement and magnified view of anatomical structures (no text or labels)
text_image
19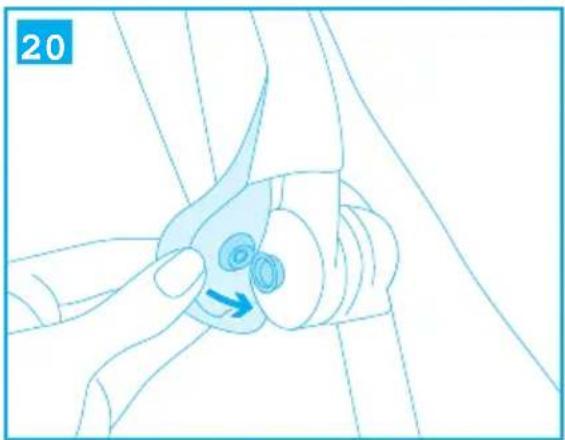
natural_image
Illustration of a hand holding a small mechanical component with a blue arrow indicating rotation (no text or symbols)
text_image
21 a a PRESS ① PRESS ①
natural_image
Diagram of a mechanical device with lever and pivot point, no text or symbols present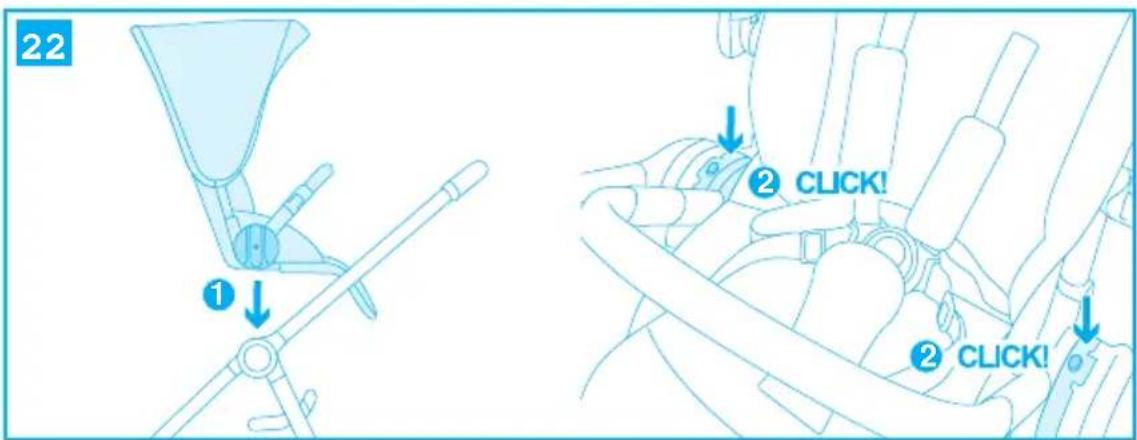
text_image
22 ① ② CLICK! ② CLICK!
text_image
23
text_image
a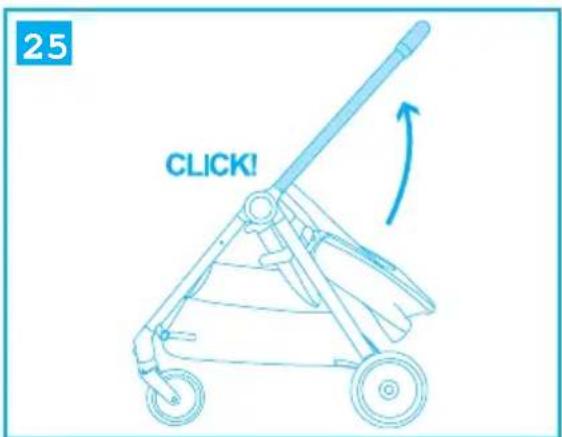
text_image
25 CLICK!
text_image
26 CLICK!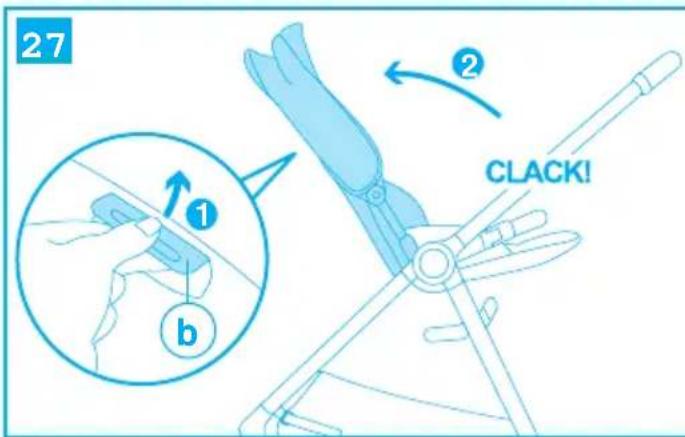
text_image
27 ① b ② CLACK!
text_image
CLICK!
text_image
28 ① a ②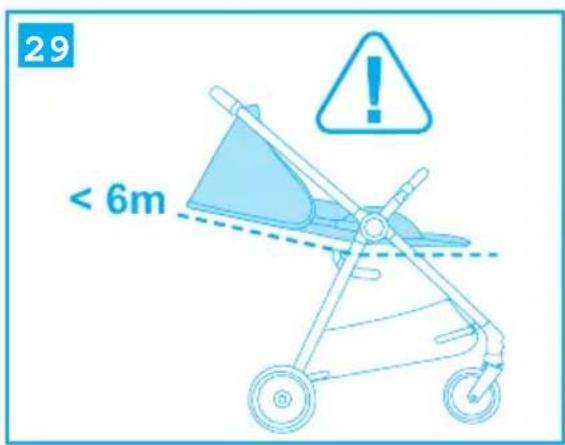
text_image
29 < 6m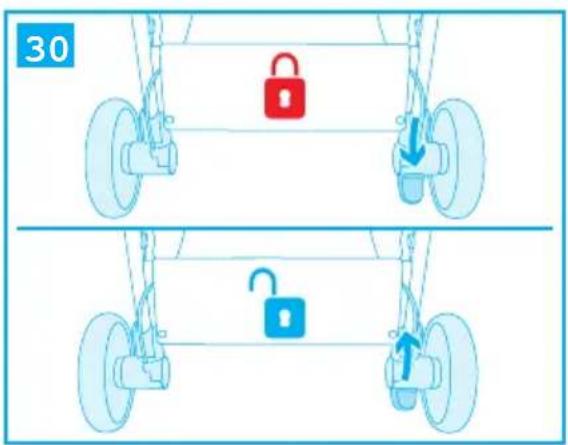
text_image
30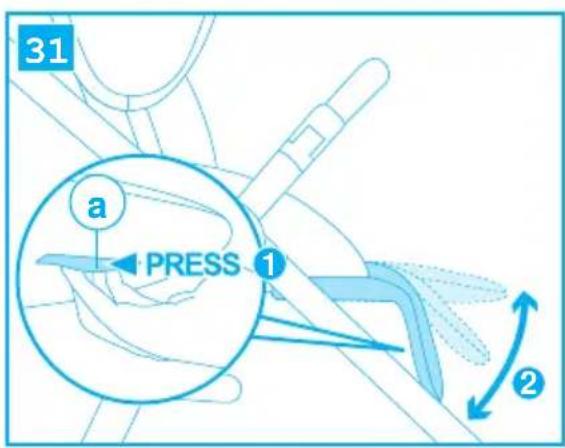
text_image
31 a PRESS ① ②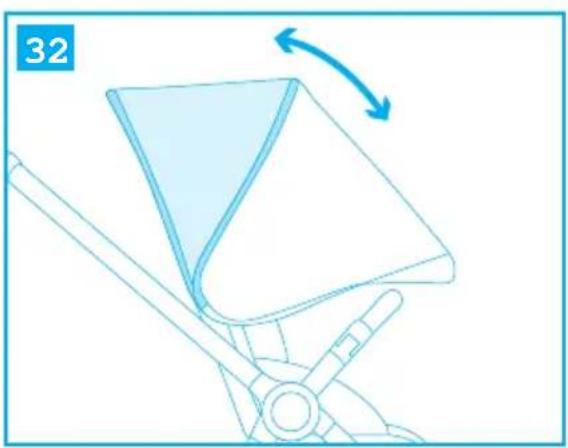
natural_image
Diagram of a mechanical device with a triangular component and directional arrow, no text or symbols present
text_image
33 a a PRESS ① PRESS ① 2
text_image
34 ! < 6m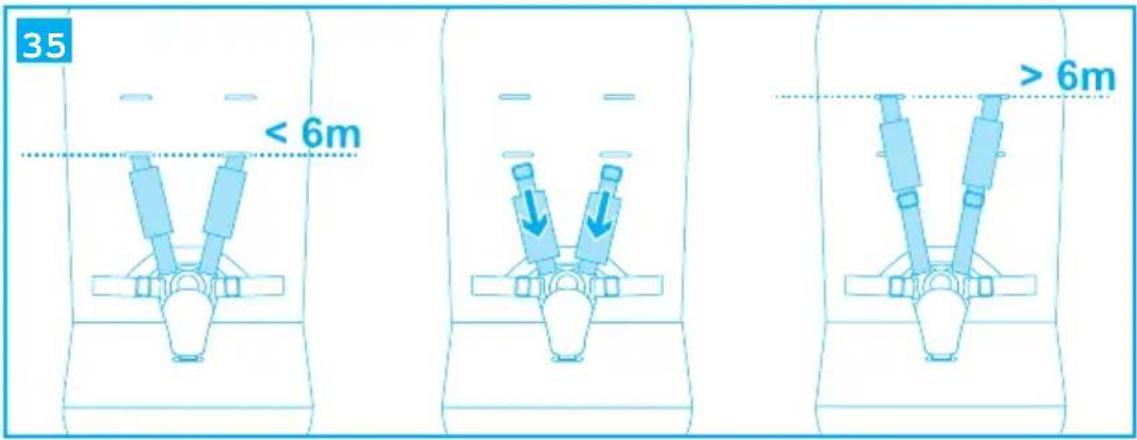
text_image
35 < 6m > 6m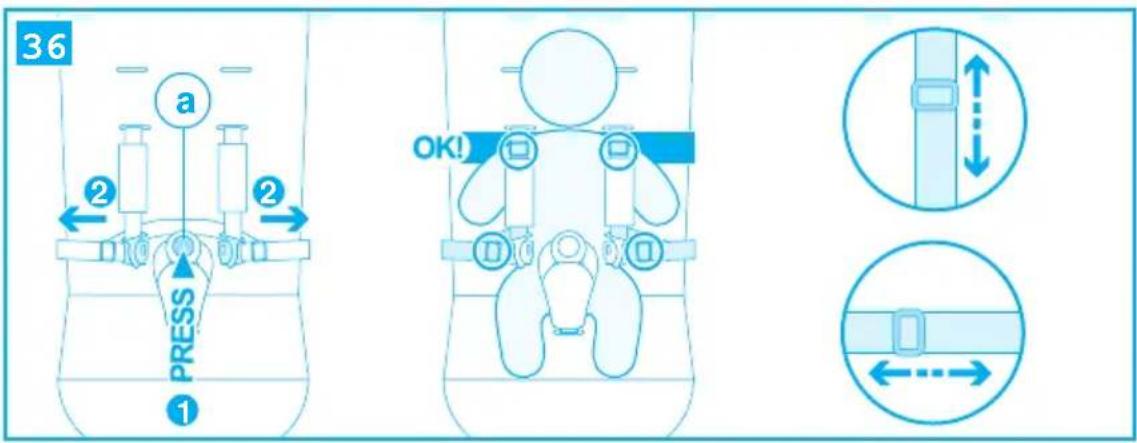
text_image
36 a 2 2 PRESS 1 OK! ← ← ←
text_image
37 a b CLICK!
text_image
38 ① a ② ③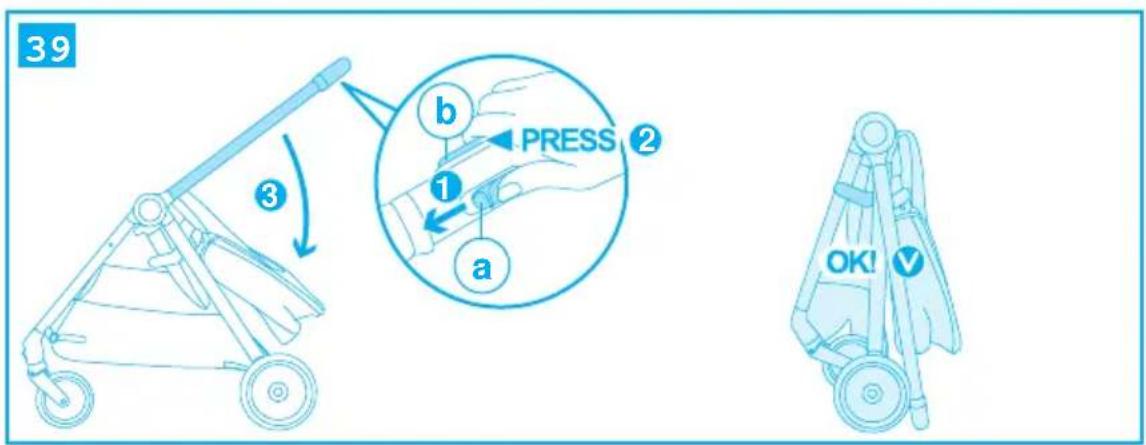
text_image
39 b PRESS ② ① a OK!
text_image
40 41
text_image
42 H. 43 CLICK!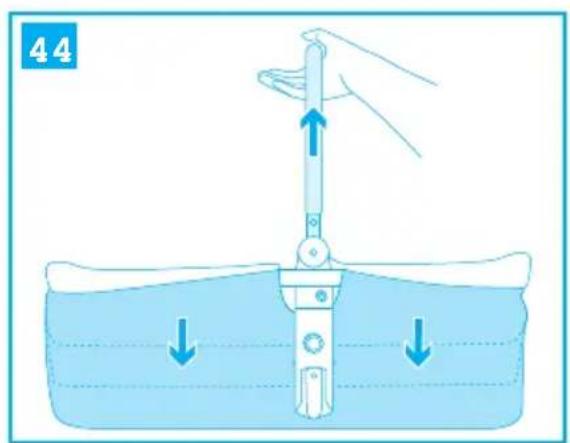
natural_image
Illustration of a hand using a tool to lift a submerged object, with arrows indicating force direction (no text or symbols)
natural_image
Line drawing of a vehicle interior with directional arrows indicating movement or flow (no text or symbols)
text_image
46
text_image
47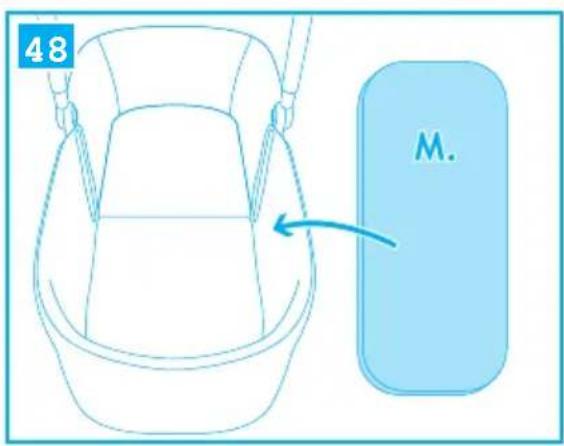
text_image
48 M.
text_image
49 L.
natural_image
Diagram of a mechanical device with a lever and base, showing a force or motion indicator (no text or symbols)
text_image
51 ② PRESS ① ① PRESS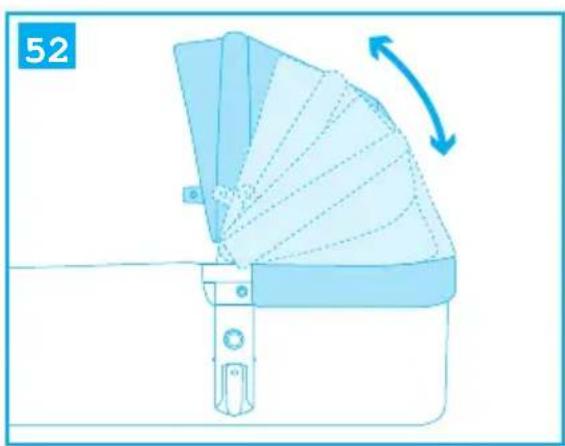
natural_image
Diagram of a folding fan mechanism with directional arrows indicating rotation (no text or symbols)
text_image
53 a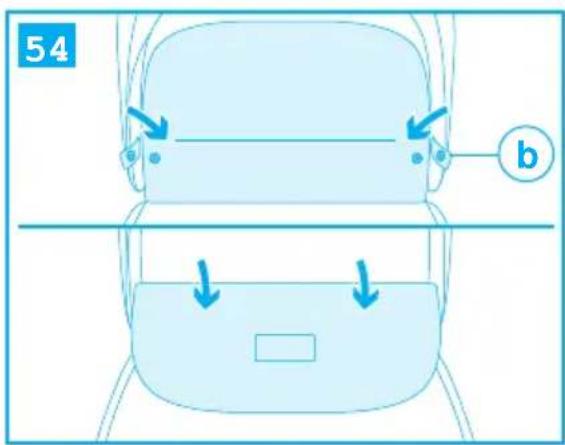
text_image
54 b
natural_image
Top-down line drawing of a stylized helmet or backpack with no text or symbols
natural_image
Line drawing of a baby seat with a hand adjusting the seat, showing no text or symbols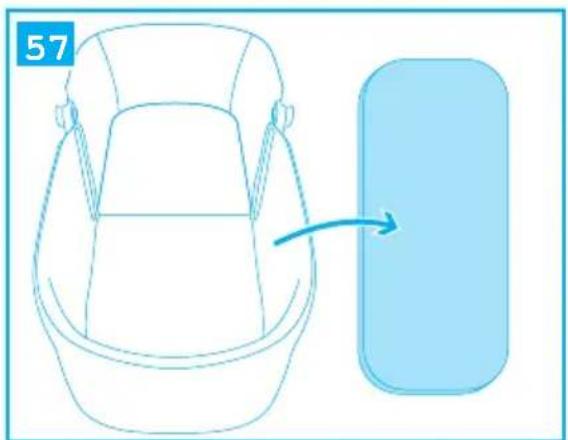
natural_image
Line drawing of a baby bathtub with a blue arrow pointing to a rounded rectangle (no text or symbols)
text_image
58
natural_image
Diagram of a vehicle interior showing a seatbelt and directional arrows indicating movement (no text or symbols)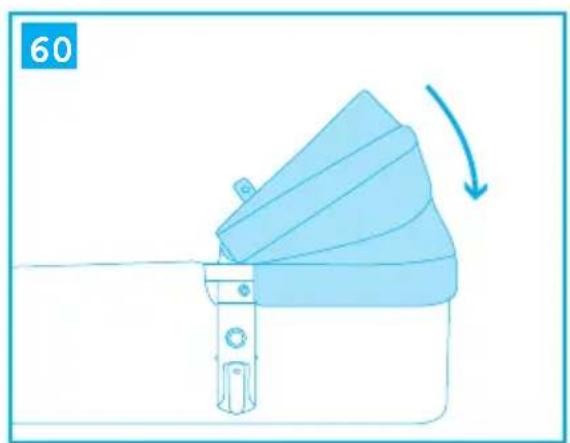
natural_image
Diagram of a mechanical device with a blue arrow indicating rotation (no text or symbols)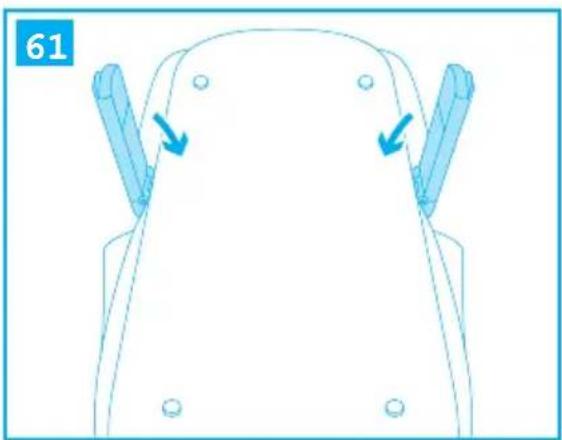
natural_image
Diagram of a mechanical component with two blue arrows indicating directional movement (no text or symbols)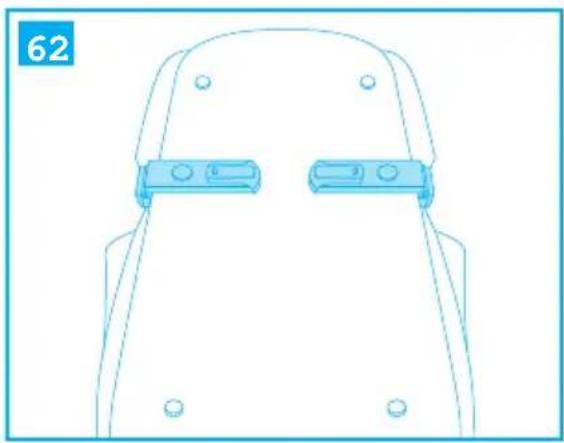
natural_image
Technical line drawing of a mechanical component with two flanges and mounting holes (no text or symbols)
natural_image
Diagram of a mechanical assembly with two upward arrows indicating motion or force direction (no text or symbols)
natural_image
Simple line drawing of a rectangular object with rounded ends and a central body, no text or symbols present.
natural_image
Diagram of a mechanical device with a blue base and a white panel, showing a step with an arrow indicating motion (no text or symbols)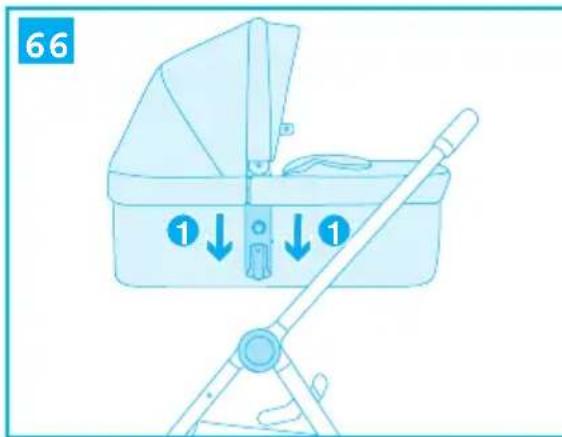
text_image
66 ①↓ ①↓
text_image
② CLICK!
text_image
67 a PRESS ① ② ↑ ② ↑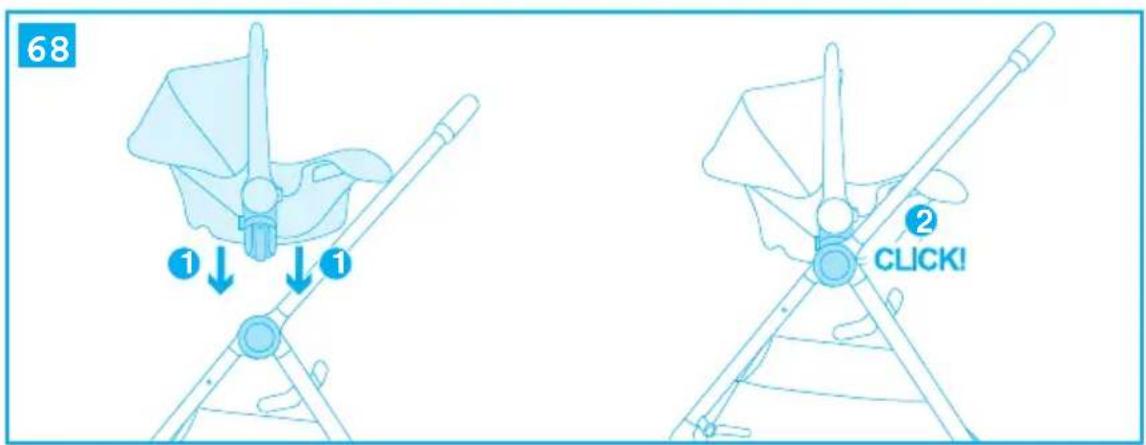
text_image
68 ① ↓ ① ② CLICK!
text_image
69 ① PRESS a ② ↑ ②natural_image
Close-up of a black stroller with a wheel and labeled part Q (no text or symbols on the object itself)A. Hood
B. Harness
C. Bumper bar
D. Buckle
E. Seat extension
F. Front wheels
G. Swivel wheel movement locking lever
H. Handlebar
- Seat extension button
L. Closing lever
M. Rear wheels
N. Basket
O. Viewing window
P. "Adjusting the hood" button
Q. Parking brake
R. Closing system

text_image
A. O. H. C. P. B. D. E. L. I. M. F. N. G.
text_image
R.
natural_image
Close-up of a black stroller with a wheel and labeled part Q (no text or symbols on the object itself)Important note: the images and instructions contained in this handbook refer to one version of the stroller; some components and functions described herein may vary according to the version of the stroller you have purchased.
ASSEMBLY
UNFOLD THE STROLLER
CAUTION: make sure that the child, and any other children, are at a safe distance away when carrying out this step.
The moving parts of the stroller must not for any reason come into contact with the child's body.
- Move the closing lever "a", as shown in the figure (fig.1).
- Lift the handlebar until the chassis opens completely. A click will indicate that is has been fastened.
- Lift up the seat until you hear a CLICK (fig. 2).
- Lift up the lever “b” and at the same time push the backrest upwards until you hear a CLICK, this will indicate that it is in place correctly.
- Before using the stroller, make sure it is opened properly and the mechanisms are properly locked
INSTALL FRONT WHEELS (fig. 3)
Fitting the front wheels (fig. 4): Insert the end bushing into the slot situated in the center of the wheel block.
A click will indicate that it is inserted correctly.
Check that both the wheels have been fastened correctly, if they are pulled downwards they should not be released.
Move lever "a" downward to block the swivel movement, and upward to activate the swivel movement (fig. 4).
Removing the front wheels (fig.5): Press the steel button "b" front wheel released.
REAR WHEELS (fig. 6)
Insert the wheel pin in the hole, a click will indicate it has been fastened in place. Make sure that the wheel has been secured correctly, it should not come away when it is pulled outwards.
Removing the rear wheels (fig. 7): Press the metal lever "a" on the wheel hub and, at the same time, remove the wheel.
Fitting the bumper bar (fig. 8, 9): Lift up the two attachment points for the handlebar, a CLICK will indicate that they are locked. Line the bumper bar up with the slots and press on both sides. A click indicates that it has been fastened correctly.
Removing the bumper bar (fig. 10): press button "a" on both sides of the bumper bar and at the same time pull to remove it.
Opening the bumper bar on just one side (fig. 11): press button "a" on one side of the bumper bar and pull to open it like a gate.
FITTING THE FOOTMUFF (fig. 12)
Insert the lower part of the footmuff on the seat of the chassis.
Fold the upper part of the footmuff around the bumper bar.
Secure the footmuff to the chassis of the pushchair using the press fasteners. Attach the press studs on both sides.
FITTING THE PUSHCHAIR RAINCOVER (fig. 13)
Fit the raincover over the hood.
Fasten the edges at the back of the raincover using the Velcro tabs.
Fasten the front of the raincover to the chassis of the pushchair using the press studs.
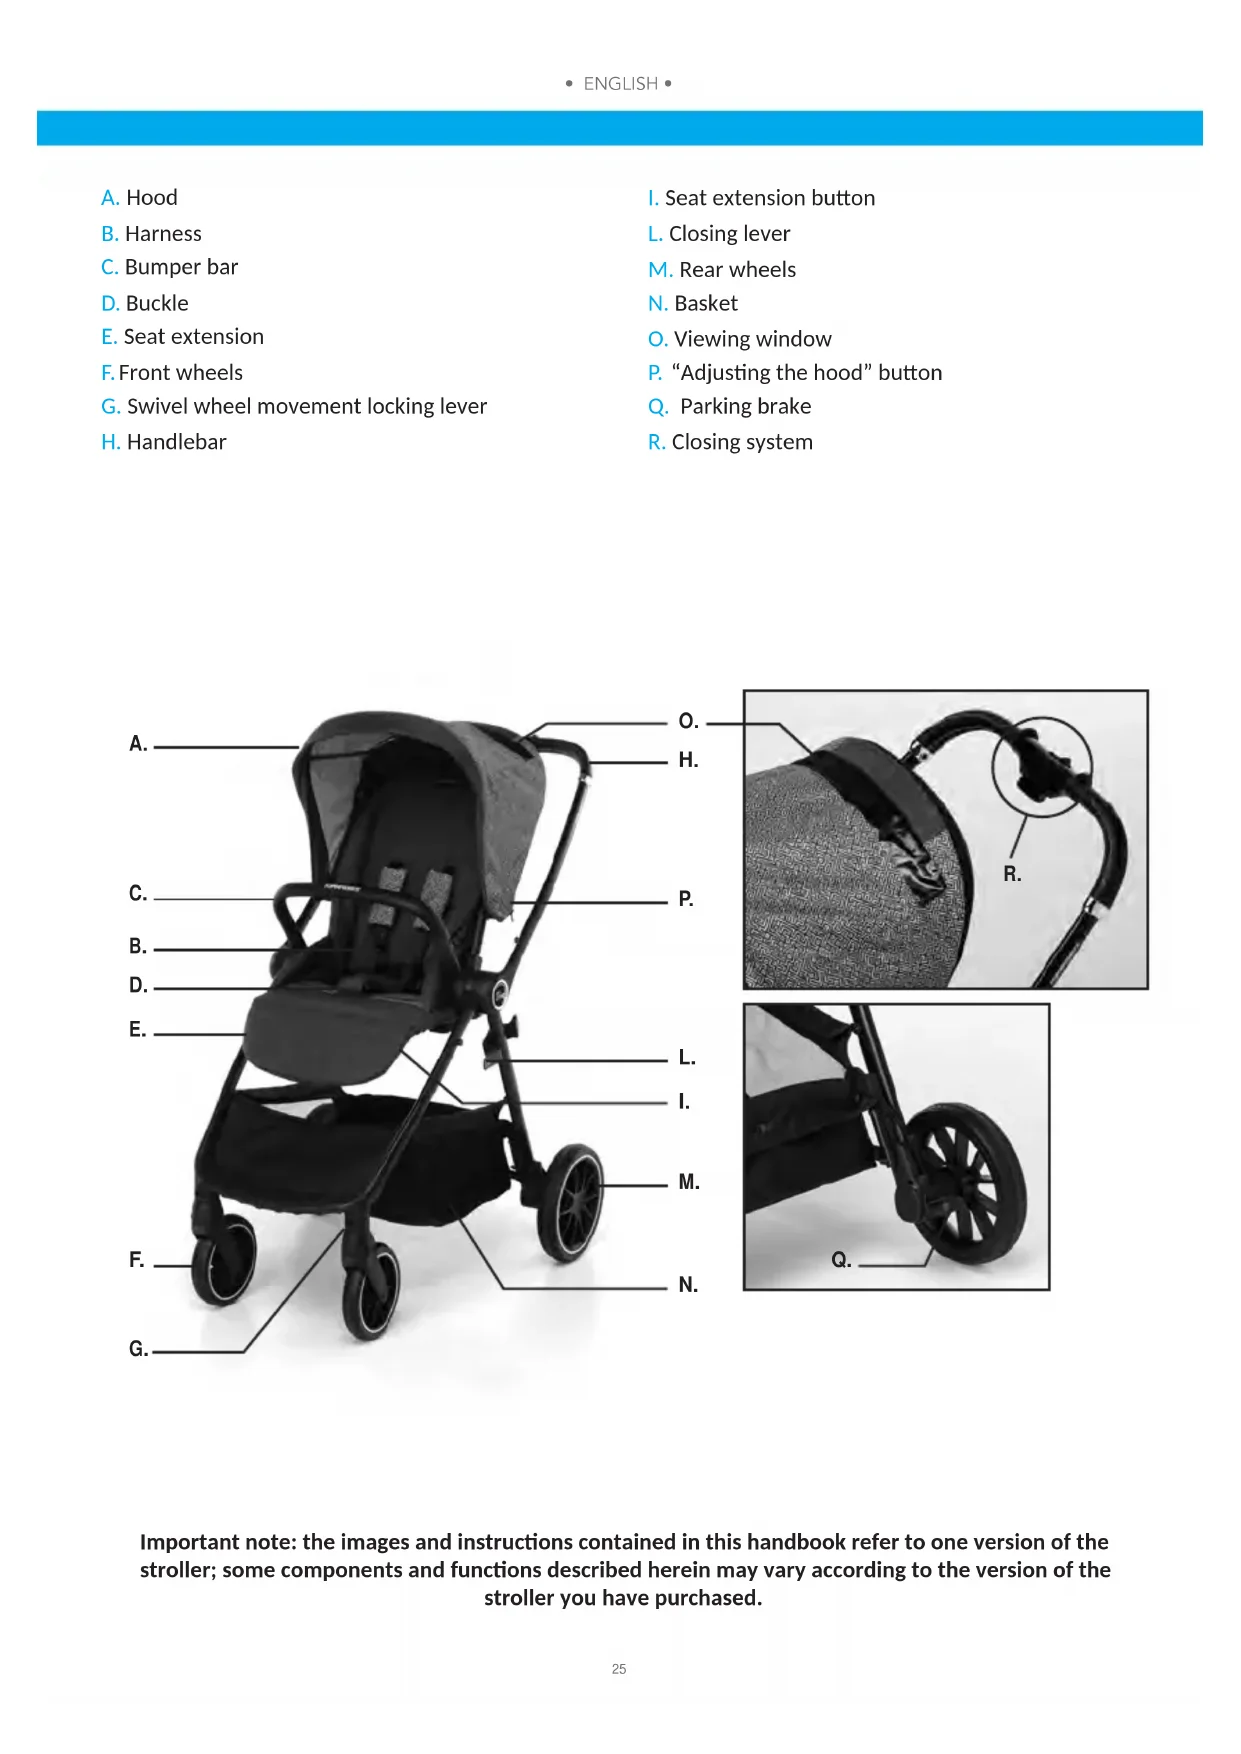
STORAGE BASKET
Disassembly: unhook the 2 rear press studs as shown in fig. 14.
Open the zips from both sides as shown in fig. 15.
Remove the front straps from the buckles as shown in fig. 16, then repeat this process for the straps on the back as shown in fig. 17.
Assembly: repeat this process in reverse order.
FITTING THE HOOD
Fitting the hood (fig. 18): fasten the hood support to both sides of the chassis.
Fasten the press fasteners of the hood behind the backrest.
Removing the hood (fig. 19, 20): pull and release the hood support from both sides of the chassis.
FASTENING THE SEAT (for use as a pushchair)
Disassembling the seat (fig. 21): press the buttons "a" on both sides and remove the seat by lifting it up.
Fitting the seat: to fit the seat, place it in the position shown in the figure 22. Line up and insert the plastic connectors of the seat in the slots provided on the pushchair chassis. Press until a click is heard indicating that it has been fastened correctly.
WARNING: Before use, always check that both the seat supports are fastened correctly to the chassis.
When the seat is lifted upwards, it must not detach from the chassis.
Removing the seat (fig.21): press button "a" on both sides and remove the seat by lifting it.
REVERSIBLE SEAT (fig. 23)
Remove the seat by lifting it, see the paragraph "INSTALL THE SEAT".
Position the seat so that it is forward facing or parent-facing.
Replace the seat on the chassis of the pushchair, see the paragraph "fitting the seat" for correct assembly.
USE
HOW TO OPEN THE PUSHCHAIR (fig. 24, 25, 26, 27)
- Move the closing lever "a", as shown in the figure (fig. 24).
- Lift the handlebar until the chassis opens completely. A click will indicate that it has been fastened (fig. 25).
- Lift up the seat until you hear a CLICK (fig. 26).
- Lift up the lever “b” and at the same time push the backrest upwards until you hear a CLICK, this will indicate that it is in place correctly. Lift up the protective armrest. A click will indicate that it is locked (fig. 27).
WARNING: Before use, pull the seat upwards to check that it has been fastened correctly to the chassis.
Before using the stroller, make sure it is opened properly and the mechanisms are properly locked (fig. 35).
TO REGULATE THE BACKREST (fig. 28)
Lift the regulating lever “a” located behind the backrest and recline the backrest to the required position. Release the lever and make sure the backrest is secured in position.
WARNING (fig. 29): For babies under 6 months of age, the backrest must only be in the fully reclined, horizontal position at all times.
PARKING BRAKE (fig. 30)
To apply the brake: Press the brake lever, push the pushchair forward gently to ensure the brake has been applied correctly. To release the brake: lift the lever.
FOOTREST ADJUSTMENT (fig. 31)
Press the lever "A", under the footrest, and adjust the footrest to the chosen position.
ADJUSTING THE HOOD (fig. 32)
The hood can be adjusted to 3 different heights.
Press the button “a” on the back of the hood (fig. 33), on both sides, and raise or lower the hood to position it at the desired height.
Make sure that the hood is locked in the new position at both sides.
Unfold the hood according to your needs, to protect the child from sunlight.
NOTE: babies' skin is very delicate. NEVER leave baby under direct sunlight. Always make sure that the hood has been adjusted correctly.
USE
SAFETY HARNESS
Apply the brake before placing your baby in the pushchair.
Release the buckle (fig. 36): press button "a" and remove the components
Fasten the buckle (fig. 37): by inserting part A in part B, a click will indicate that it has been
fastened correctly.
WARNING: Never use the crutch strap without the lap belt.
WARNING: for babies under 6 months of age, the backrest must be only in the fully reclined, horizontal position at all times, seat reaward facing (fig. 34).
WARNING: If baby is less than 6 months old, the harness belts must first be inserted through the lower slots and then through the rings of the harness regulating buckle (fig. 35).
FOLDING THE STROLLER (fig. 38, 39)
Before folding the stroller, ensure that:
- The backrest is adjusted to the vertical position
• The canopy is closed back up - The front wheels are in swivel mode.
Push the stroller forwards to direct the front wheels longitudinally.
Lift up the lever "a" and at the same time push downwards (fig. 38).
Move button "a" to the left, as shown in the figure, while pressing button "b" at the same time.
Fold the handlebar downwards(fig. 39). IMPORTANT: hold the handlebar until it is on the ground.
Bring the front wheel chassis towards the back.
Fold up the footrest.
Make sure it is closed properly.
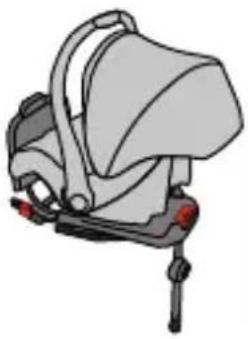
USING THE TRAVEL SYSTEM ACCESSORIES
The TALENT pushchair can be used with the following travel system accessories, TALENT carrycot and TALENT infant car seat. Remove the seat from the chassis (see the paragraph “Fitting the seat”).
USING THE INFANT CAR SEAT AND CARRYCOT TRAVEL SYSTEM ACCESSORIES (fig. 40, 41)
IMPORTANT: the travel system accessories must be secured to the chassis only in the parent facing.
NAVICELLA MORBIDA
EN 1466:2014 + AC:2015
ASSEMBLING THE FRAME
- Lift up the handle, a click will indicate that it is locked in the vertical position. Make sure that it is locked (fig. 43).
- Press the bottom of the carrycot downwards and at the same time pull the handle upwards to raise the sides of the carrycot (fig. 44).
- Pull the frame support brackets towards the outside of the carrycot, using the straps, until they lock into the 4 clips. Make sure that the brackets are locked into the 4 clips (fig. 45, 46).
- Fold the fabric on the side towards the inside of the carrycot, attach the Velcro in the lower part along the inner edge. Make sure that the fabric is properly secured with Velcro and that there are no openings along the side (fig. 47).
- Place the mattress inside the carrycot (fig. 48).
ASSEMBLING THE HOOD
Place the hood on the handle, wrap the front fabric of the hood around the handle, attach and close the zip. Attach the press studs (fig. 49, 50).
ADJUSTING THE HANDLE/HOOD
Press the side buttons and adjust the handle to the new position, release the buttons and make sure that it is locked (fig.51, 52).
COVER
Fix the cover along the sides with the press studs (a), attach the flaps with the press studs to the hood (b), (fig. 53, 54). Lift up the front fabric flap of the cover for added protection (c), attach the press studs (fig. 55).
CLOSING THE CARRYCOT
- Remove the cover (fig. 56).
• Take out the inner mattress (fig. 57). - Unhook the Velcro and lift up the fabric along the side on the inside (fig. 58).
- Grasp the belt and, pulling towards the inside of the carrycot, release the support bracket from the clips and close it towards the inside of the carrycot. Repeat this process also on the second support bracket (fig. 59).
- Place the handle in a horizontal position (fig. 60).
- Fold down the hinge inwards. Repeat this process also with the second hinge (fig. 61, 62).
- Fold the bottom of the carrycot upwards (fig. 63).
- Insert the mattress inside the carrycot (fig. 64).
- Place the cover on the frame and attach the press studs at the sides (fig. 65).
CARRYCOT COMPONENT
Fitting the accessory: Align the coupling device of the carrycot and press downwards, a click will indicate that the carrycot has attached correctly to the stroller frame. Make sure that the accessory has been fastened correctly on both sides. (fig.66).
WARNING: Before use, always make sure that the accessory has been secured correctly. When the accessory is lifted upwards it must not detach from the pushchair chassis.
Removal of carrycot: PRESS the buttons "a", on both sides, and remove the carrycot by lifting it up using the handle (fig.67).
CAR SEAT COMPONENT
Fitting the accessory: Align the coupling device of the car seat and press downwards, a click will indicate that the carrycot has attached correctly to the stroller frame. Make sure that the accessory has been fastened correctly on both sides. (fig.68).
WARNING: Before use, always make sure that the accessory has been secured correctly. When the accessory is lifted upwards it must not detach from the pushchair chassis.
Removal of car seat: PRESS the buttons "a", on both sides, and remove the carrycot by lifting it up using the handle. (fig.69).
PRODUCT MAINTENANCE
Check the carrycot regularly and make sure that there are no damaged or worn parts. Replace the carrycot if there are damaged parts.
Lining
- The fabric parts can be washed following the instructions on the washing label.
- Clean the fabric with water, a mild soap and a sponge.
- Never use abrasive or ammonia, bleach or white spirit-based cleaning products.
- Clean the fabric with a brush rather than washing it.
- Do not store the product if it is still wet and do not leave it in humid environments since mildew may form.
- Store the product in a dry place.
- Protect the product against weather agents, water, rain or snow; moreover, continuous and prolonged exposure to sunlight can cause changes in the colour of many materials.
- It is recommended to wash the lining separately from other items.
- Follow the lining washing instructions on the labels.
- Dry the textile lining completely before using or storing it.
- To prevent formation of mildew, it is advisable to air the carrycot periodically.
Removing the fabric:
- Release the support brackets from the clips.
- Unhook the Velcro and lift up the fabric along the side on the inside.
- Detach the press studs along the top edge and remove the metal frame from the fabric.
- To remove the rigid bottom from the fabric, unscrew the screws with a tool and remove the support feet.
- Remove the panel from the fabric.o
Replacing the fabric:
- If removed, insert the panel into the pocket on the fabric bottom and secure the 5 feet by tightening the screws. Make sure that the panel is inserted correctly. The side with the clips further away from the short side is the head side.
- Place the metal ring inside the fabric.
- Attach the press studs to the frame and fold the fabric, wrapping up the metal ring, from the outside to the inside.
- Fold the fabric along the inner side and attach the Velcro on the bottom.
- Place the mattress inside the carrycot (fig. 17).
WARNING
- IMPORTANT – READ CAREFULLY AND KEEP FOR FUTURE REFERENCE.
- WARNING: NEVER LEAVE THE CHILD UNATTENDED.
- WARNING: ENSURE THAT ALL THE LOCKING DEVICES ARE ENGAGED BEFORE USE.
- WARNING: TO AVOID INJURY, ENSURE THAT THE CHILD IS KEPT AWAY WHEN UNFOLDING AND FOLDING THIS PRODUCT.
- WARNING: DO NOT LET THE CHILD PLAY WITH THIS PRODUCT.
- WARNING: ALWAYS USE THE RESTRAINT SYSTEM.
- WARNING: CHECK THAT THE PRAM BODY OR SEAT UNIT OR CAR SEAT ATTACHMENT DEVICES ARE CORRECTLY ENGAGED BEFORE USE.
- WARNING: THIS PRODUCT IS NOT SUITABLE FOR RUNNING OR SKATING.
- WARNING: A CHILDS SAFETY IS YOUR RESPONSIBILITY.
- WARNING:! PEnsure that all the locking devices are engaged before use.
- WARNING: Always keep child in view when in stroller.
- WARNING: This product is suitable for child from birth up to 15 kg.
- For babies under 6 months of age, only use the pushchair with the backrest fully reclined or fit the travel system accessory using the adapters provided.
- If the pushchair is used with the accessory, make sure it has been fastened correctly.
- WARNING: If the pushchair is used with the travel system accessory, make sure it has been fastened correctly.
- For new born baby, do not recline seat back to sitting position (should be in full reclining position) as the baby doesn't have ability to control its head.
- WARNING: Use seat belt, avoid serious injury from falling or sliding out Always.
- WARNING: Ensure your child wears a correctly fitted and adjusted harness at all times.
- Verify regularly that the safety belts are correctly fastened, not damaged or frayed.
- WARNING: Only one child for one stroller.
- WARNING: This product is not suitable for running or skating.
- WARNING: Check that the seat unit attachment devices are correctly engaged before use.
- WARNING: Do not place or hang parcels, bags or accessories on any part of the stroller including the handle. Failure to comply with this warning may cause, hazardous, unstable conditions to exist.
- WARNING: Always make sure that the brake is engaged when positioning the child into the stroller seat or taking him/her out.
- WARNING: Always use the parking brake, even when standing still for only a few moments.
- WARNING: When parking check if the brake is properly engaged by moving forward/rearward the stroller.
- WARNING: Never fold the stroller, not even partly, when your child is in it.
- A basket is provided for the carriage of 4kg of goods, evenly distributed.
- The product must be assembled by an adult.
- Only the minder can operate the recline adjuster.
- Never use the stroller if any part of it is damaged or any component is missing.
- Do not allow children to play with or hang onto the stroller.
- This vehicle requires regular maintenance by the user.
- Do not use replacement parts or accessories other than those approved by the supplier as they may render the pushchair unsafe.
- Any load applied to the handle and/or the backrest and/or laterally to the product can compromise the
WARNING
stability of the product.
- Do not overload this pushchair with additional children, goods or accessories. Bags and other items must not be hung from the handle.
- Ensure all users are familiar with the products operation. It should always open and fold easy. If it does not, do not force the mechanism - stop and read the instructions.
- Do not use your pushchair in a manner for which it is not designed.
- Do not allow your child to climb unassisted into, play with or hang onto your pushchair.
- Hold on to your pushchair when close to moving road vehicles or trains. Even with the brake on the draught from the vehicle may move the pushchair.
• Exercise caution when mounting or dismounting a kerb. - Remove your children and fold the pushchair when ascending or descending stairs or escalators.
- Ensure the folded pushchair is stored away from children so that it does not fall and cause injury.
- Do not use replacement parts or accessories, e.g. child seats, bags, hooks, trays, rain covers etc. other than those approved by the supplier, they may render the pushchair unsafe.
- Never carry a second child on your pushchair.
- Do not use any platforms or attachments that allow transportation of the child.
- CARE: Your pushchair has been designed to meet safety standards and with correct use and maintenance will give many years of trouble free performance.
- The chassis is strong but will weaken should the back wheels be bumped down stairs or kerbs. continual impact will cause damage.
- If your child wears hard shoes these might damage the soft fabric.
- Storing a damp pushchair will encourage mildew to form.
- After exposure to damp conditions, dry off with a soft cloth, open fully and allow to dry thoroughly before storing.
- Store your pushchair in a dry, safe place.
- Do not leave the pushchair in sunlight for prolonged periods - some fabrics may fade.
- For car seats used in conjunction with a chassis, this vehicle does not replace a cot or a bed. Should your child need to sleep, then it should be placed in a suitable pram body, cot or bed. The infant car seat is not designed for long periods of sleep..
CARRY COT
- WARNING: THIS PRODUCT IS ONLY SUITABLE FOR A CHILD WHO CANNOT SIT UP UNAIDED.
- WARNING: ONLY USE ON A FIRM, HORIZONTAL LEVEL AND DRY SURFACE.
- WARNING: DO NOT LET OTHER CHILDREN PLAY UNATTENDED NEAR THE
- CARRYCOT.
- WARNING: DO NOT USE IF ANY PART OF THE CARRY COT IS BROKEN, TORN OR MISSING.
- WARNING: YOU ARE RESPONSIBLE FOR YOUR BABY'S SAFETY.
- WARNING: Never leave child unattended. Always keep baby under supervision when he is in the carrycot.
- WARNING: This product is suitable only for a child who cannot sit up unaided, roll over and cannot push itself up on its hands and knees. Maximum weight of the child: 9Kg.
- WARNING: Suitable for children under 6 months of age.
- WARNING: Make sure that all the locking devices have been fastened correctly before use.
- Do not use spare parts or accessories other than those supplied or approved by the manufacturer, as they may make the product unsafe.
• Make sure that everyone using the product is familiar with how it works.
- WARNING - It is dangerous to bring the product close to heat sources (gas or electric appliances), which can create fire hazards.
- Before lifting or transporting the carrycot, check that the carrying handle is in a vertical position and correctly attached on both sides.
- Before use, make sure that the crib is correctly assembled, the internal support brackets must be attached to the 4 clips.
- Before use, make sure that the lining is correctly assembled on the frame, and that the internal support brackets are correctly attached to the clips on the bottom of the carrycot.
• To avoid injuries, make sure that the child is at a safe distance away when opening and closing the carrycot.
- The handles and the bottom of the crib must be inspected regularly to check for signs of wear and damage.
- When the child is in the carrycot, their head must never be lower than their body.
- Do not add mattresses other than the one supplied with the carrycot or approved by the manufacturer.
- RISK OF SUFFOCATION: the carrycot could tip over on soft surfaces and suffocate the child. NEVER place the carrycot on beds, sofas or other soft surfaces.
- Check regularly that the crib is intact, do not use if a part is damaged, worn or missing.
- Only use the spare parts approved by the manufacturer.
RAINCOVER
WARNING!
- Use under an adult surveillance.
- When in use make sure the rain cover does not come in contact with the face of the child as it may cause suffocation
- Don't use the raincover on the product without a hood that can hold it.
- Never leave rain covers on indoors, in a hot atmosphere or near a heat source as the baby could overheat.
- Do not use on products other than those recommended by the Manufacturer.
- Hand wash at 30^ .
FORMAL GUARANTEE
The contents of this document as stated below will come into effect as from 01.01.2005 and replace, on every account and in full, any previous message referring to the guarantee provided by Foppa Pedretti S.p.A.
FORMAL GUARANTEE
Foppa Pedretti S.p.A. the head office of which is located at n. 11 Via Volta, Grumello del Monte (Italy), guarantees directly to the Consumer that this brand new product is free of faults with regard to the materials, design and manufacture and that it complies with the characteristics as declared by the manufacturer.
This formal guarantee is valid in all Member Countries of the European Union and it neither excludes nor limits the Consumer's rights in accordance with mandatory measures provided for by the law with regard to the Retailer of the Product.
To take advantage of this formal guarantee, the Consumer must return the faulty product to the Retailer, presenting to the same the proof of purchase of the Product which must clearly show the Retailer's address, the date of purchase of the Product with the Retailer's stamp and signature and an indication of the Product itself or, alternatively, the receipt which must not have been altered and which must clearly show the same information as that referred to above. The formal guarantee is valid for twelve (12) months from the date of purchase of the Product. During this period, Foppa Pedretti S.p.A. will repair or replace the faulty product, at its own discretion. The formal guarantee is granted to the end buyer of the Product (Consumer) and it neither excludes nor limits the mandatory rights of the Consumer as provided for by the law and/ or the rights that the Consumer may have with regard to the Dealer/Retailer of the Product.
EXCLUSIONS TO THE FORMAL GUARANTEE.
The formal guarantee is excluded in the case of damage caused to the Product for the following reasons: if the product is used in a way that does not comply with the information contained in the use and assembly instruction sheet, if the product is knocked or dropped, if the Product is exposed to humidity or extreme heat or environmental conditions, or to sudden changes in the same, corrosion, oxidization, unauthorized alterations or repairs to the Product, repairs using unauthorised spare parts, improper use, improper maintenance or failure to carry out the same, improper maintenance compared to the information given on the use and assembly instruction sheet, incorrect assembly, accidents, damage caused by food or drink, damage caused by chemical products, cases of force majeure.
In any case, Foppa Pedretti S.p.A. declines all responsibility for damage caused to persons or to property, other than the Product, when such damage is caused by a failure to comply with the instructions/advice/warnings cont a ined in the manua I or, alternatively, in the use and assembly instruction sheet provided with each Product for the owner/user. (Purely as an example, in the case of a cot: "Check your baby constantly. Make sure that the sheets and blankets do not cover the baby's head...").
Furthermore, Foppa Pedretti S.p.A. declines all responsibility for damage to persons and to property when the breakage of its products is due to a deterioration in the components of the Product that are subject to wear. All the components of the Product made of plastic are considered to be components subject to wear.
natural_image
Close-up of a black stroller with a wheel and labeled part Q (no text or symbols on the object itself)EXCLUSIONS DE LA GARANTIE CONVENTIONNELLE.
natural_image
Close-up of a black stroller with a wheel and labeled part Q (no text or symbols on the object itself)text_image
A. O. H. C. P. B. B. D. E. L. I. M. F. N. G. Q.natural_image
Close-up of a black stroller with a wheel and labeled part Q (no text or symbols on the object itself)natural_image
Close-up of a black stroller with a wheel and black frame, labeled 'Q.' (no other text or symbols visible)natural_image
Close-up of a black stroller with a wheel and labeled part Q (no text or symbols on the object itself)natural_image
Close-up of a black stroller with a wheel and labeled part Q (no text or symbols on the object itself)Važna napomena: slike i upute sadržane u ovom priručniku odnose se na jednu verziju kolica; neke komponente i funkcije opisane ovdje mogu varirati u skladu s verzijom kolica koju ste kupili.
SASTAVLJANJE
OTVARANJE KOLICA
KAKO OTVORITI KOLICA (sl. 24, 25, 26, 27)
natural_image
Black car comfort seat with adjustable straps and seatbelt (no text or symbols visible)ECE R44-04
IT SEGGIOLINO AUTO GRUPPO 0+ - Istruzioni di montaggio
EN CAR SEAT GROUP 0+ - Assembly instructions
FR SIEGE AUTO GROUPE 0+ - Notice d'utilisation
DE AUTOSITZ GRUPPE O+ - Manual de instrucciones
ES ASIENTO DE COCHE GRUPO 0+ - Manual de instruções
ΕΛ ΠΑΙΔΙΚΟ ΚΑΘΙΣΜΑ ΑΥΤΟΚΙΝΗΤΟΥ ΟΜΑΔΑΣ 0+ - Οδηγιεσ χρησησ
PT CADEIRA AUTO DO GRUPO 0+ - Instruções de montagem
RU АВТОКРЕСЛО ГРУППА 0+ - Инструкция по установке
HR AUTO-SJEDALICA GRUPA 0+ - Upute za sastavljanje
IT IMPORTANTE - LEGGERE ATTENTAMENTE E CONSERVARE PER FUTURO RIFERIMENTO
EN IMPORTANT! READ THE INSTRUCTIONS CAREFULLY AND KEEP FOR FUTURE REFERENCE
FR IMPORTANT! LIRE ATTENTIVEMENT ET CONSERVER SOIGNEUSEMENT A PORTEE DE MAIN POUR UNE UTILISATION ULTERIEURE
DE WICHTIG! AUFMERKSAM LESEN UND FUR ZUKUNFTIGE REFERENZEN AUFBEWAHREN
ES IMPORTANTE! LEER ATENTAMENTE Y CONSERVAR PARA FUTURAS REFERENCIAS
natural_image
Diagram showing two hands holding a U-shaped object within a circular boundary, with red arrows indicating direction (no text or symbols)
text_image
2 Click!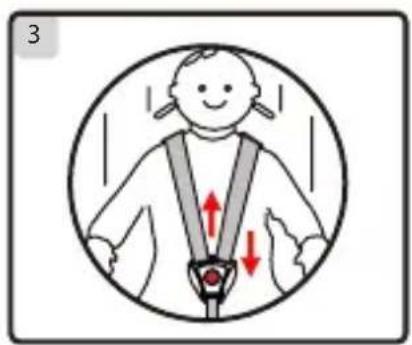
text_image
3
natural_image
Illustration of a baby car seat with a red downward arrow indicating pressure or adjustment (no text or symbols)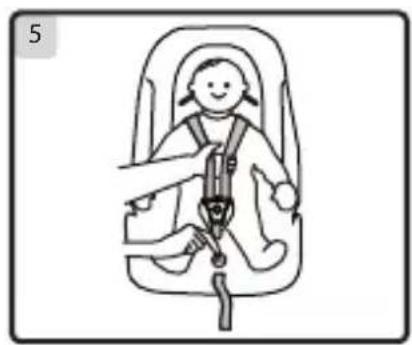
natural_image
Illustration of a baby wearing a car seatbelt, no text or symbols present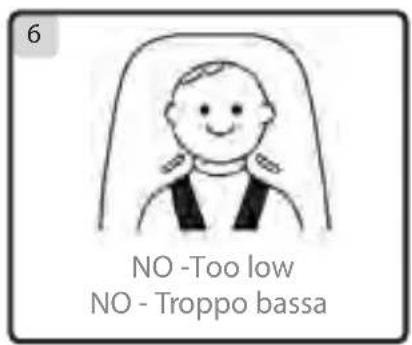
text_image
6 NO -Too low NO - Troppo bassa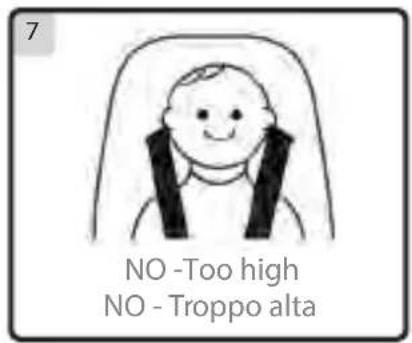
text_image
7 NO -Too high NO - Troppo alta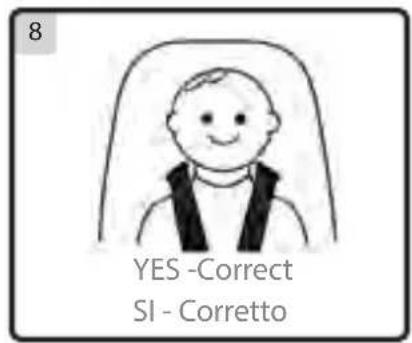
text_image
8 YES -Correct SI - Corretto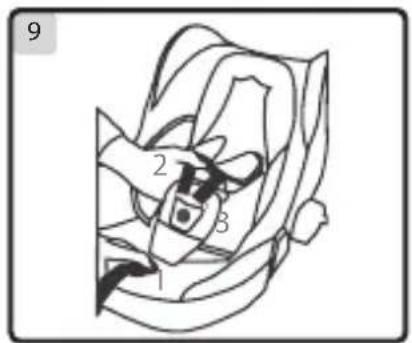
text_image
9 1 2 3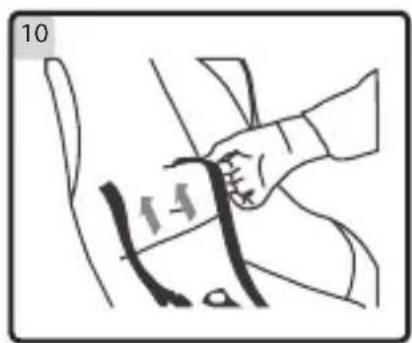
text_image
10 1-4
natural_image
Simple line drawing of a mechanical component with three vertical connectors (no text or symbols)
text_image
12
natural_image
Line drawing of a flower with petals and leaves, no text or symbols present
natural_image
Line drawing of a car seatbelt device (no text or symbols)
natural_image
Line drawing of a car seatbelt with a belt buckle, no text or symbols present
natural_image
Line drawing of a car seat with handle and seatbelt (no text or symbols)
natural_image
Diagram of a mechanical device with blue and purple components, no visible text or symbols
text_image
18
natural_image
Illustration of a person using a seatbelt device to interact (no text or symbols visible)
natural_image
Line drawing of a car seatbelt device (no text or symbols)
natural_image
Simple line drawing of a basket with a handle and a small object inside (no text or symbols)
natural_image
Simple line drawing of a stylized object resembling a helmet or mask, with no text or symbols present.
natural_image
Simple line drawing of a mechanical component or tool (no text or symbols)
natural_image
Illustration of a person performing a physical maneuver or exercise (no text or symbols present)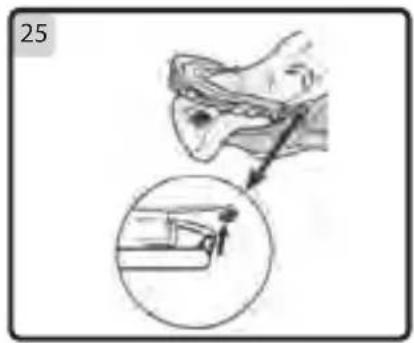
natural_image
Illustration showing a hand holding a tool above a magnified view of a mechanical component (no text or symbols)
text_image
5 4 2 3 7 15 6 1 10 13-14
text_image
9 8 13 13-14 12text_image
Safety warning signs for car seatbelt usage, showing no allowed seatbelt and vehicle collision with red arrowsAVVERTENZA:
NON UTILIZZARE QUESTO SEGGIOLINO PER BAMBINI SU SEDILI DOTATI DI AIRBAG.
IMPORTANTE:
text_image
ref. "Y-base" type AY-i001 ISOFIX 01- Red Button Handle Adjuster
- Metal bar
- Harness Adjuster Strap
- Harness Adjuster under "Press"
- Cover
- Harness Buckle
- Shoulder Straps

text_image
9 8 13 13-14 12- Carry Handle
- Canopy
- Light Blue Lap Belt Guide
- Dark Blue Diagonal Belt Guide
- Shoulder Harness Slots
- User guide storage pocket
- Adapter
text_image
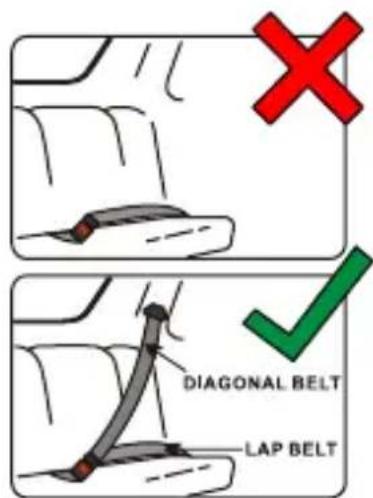
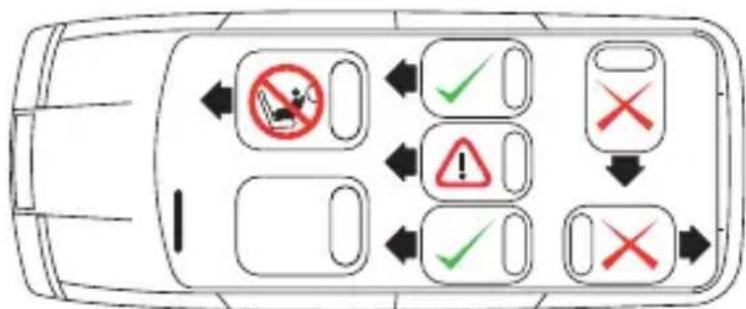
DIAGONAL BELT LAP BELTOnly suitable if the vehicle is fitted with 3-point static, 3-point retractor safety belts, approved to UN/ECE Regulation No. 16 or other equivalent standards.
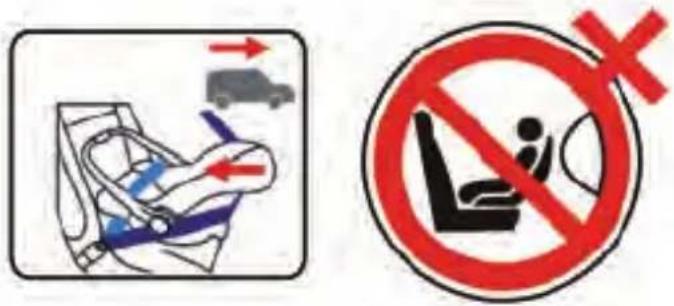
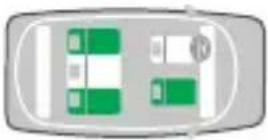
DO NOT use on the vehicle seats that face the sides or rear of the vehicle (1a, 1b). Use the child safety seat only on the vehicle seats that face forward. According to accident statistics, children are safer when properly restrained in the rear seating positions than in the front seating positions (1c, 1d).

text_image
1a 1b1d 1cA: Only suitable for the seat without active airbag.
B: Only suitable for the seat with 3 point belt. Can not be used on seat with 2 point lap belt.
NOTICE
- This is a "Universal" child restraint; it is approved to ECE Regulation 44.04 for general use in vehicles and will fit most, but not all, vehicle seats.
- A correct fit is likely if the vehicle manufacturer has declared in the vehicle handbook that the vehicle is capable of accepting a "Universal" child restraint for this group.
- This child restraint has been declared "Universal" under more stringent conditions than those applied to earlier designs which do not carry this notice.
- If in doubt, consult either the child restraint manufacturer or the retailer.
text_image
Traffic safety warning sign showing vehicle collision and no-discrimination prohibition symbolWARNING:
Only suitable if the vehicle is fitted with 3-point static, 3-point retractor safety belts, approved to UN/ECE Regulation No. 16 or other equivalent standards.
EXTREME HAZARD:
Do not use in passenger seats equipped with airbags (SRS)
IMPORTANT:
Always ensure that the seat handle is locked in the vertical position before use.
SAFETY INSTRUCTIONS
WARNING:
- Read these instructions carefully before use and keep this guide in case you need to refer to it in the future. Failure to follow these instructions may affect your child's safety.
- To avoid any risk of falling, ensure that the handle of your Group 0+ is correctly locked and that your child's safety harness is always fastened.
- Only install your Group 0+ seat on a forward facing seat fitted with a 3 point safety belt.
DO NOT USE THIS CHILD SEAT ON A PASSENGER SEAT FASTEN WITH AN AIRBAG.
• The child seat must only be installed in the rearward facing position.
- Never use the child seat without fastening the child's harness correctly, and never attempt to use it without fastening it into the car as described in these fitting instructions.
- It is most important that the seat belt is correctly routed and the child seat tightened down on the upholstery as firmly as possible to ensure maximum protection - a recommended method is shown in these instructions.
- Do not add to or modify this product in any way.
- Never use this product if it has been in an accident, or if it has become badly worn. - Periodically inspect the harness for wear, paying particular attention to attachment points, stitching and adjusting devices.
- Do not leave a child in the seat unattended at any time.
- Ensure that no part of the seat or seat belt is trapped in a door or a folding seat. If your car has a folding rear seat, ensure that it is correctly latched in its upright position.
NOTICE
- Car interiors can become very hot when left standing in direct sunlight - it is therefore recommended that the child seat, when not in use, is covered by a towel etc. - This prevents components, particularly those attached to the child seat, becoming hot and burning the child.
• In the event of an emergency it is important that the child can be released quickly. - This means that the buckle is not fully tamperproof and therefore your child should be persuaded never to play with the buckle.
- Luggage and other heavy objects should be secured in the car. Loose objects are liable to cause injury in the event of an accident.
- The child seat must not be used without the cover.
- Never place your child seat on a table or work surface.
- This seat can be used for children of 0-13kg in weight (approximately birth to 13/15 months of age) and is used in conjunction with a 3-point lap and diagonal safety belt in the rear-facing position only.
- When the child seat is not in use, it is recommended that it is fastened into the car with a seat belt to avoid it being thrown about in the event of an accident
- In an emergency your child can be released quickly by pressing the red button on the harness buckle.
- Store this child seat in a safe place when it is not being used. Avoid placing heavy objects on top of it.
- If you travel with passengers using both the front and rear passenger seats, the lighter occupants should be in the rear and the heavier occupants in the front of the vehicle.
- Do not allow your child seat to come into contact with corrosive substances e.g. battery acid.
- NO NOT use a second-hand child seat or child seat whose history you do not know.
- When it is not used in the car, it is dangerous to place the child car seat onto raised surfaces.
TO USE
THE HARNESS FASTENING THE HARNESS
- Slot the two plastic sections of the buckle connectors together Fig 1
- Slot the two connectors into the hole in the top of the buckle until they “click” into place Fig 2
• Always check that the harness is correctly locked by pulling above and below the buckle Fig 3 - The harness should be adjusted as tightly as possible without causing discomfort to the child. A loose harness is dangerous and should be checked each time that you use the seat. To tighten the harness, pull down on the adjustment strap (3) until the harness is the correct tightness Fig. 4
- The harness is loosened by pulling on both straps at the same time press down on the harness adjuster that is located on the shell underneath the “Press” (2) word stitched on the cover Fig. 5
UNFASTENING THE HARNESS
To release the harness, push the red button in the middle of the harness buckle inwards. You can now lift your child from the seat; ensure that the buckle connectors do not catch on clothing.
BEFORE YOU INSTALL THE CAR SEAT ADJUSTING THE SHOULDER HEIGHT
Before you install the car seat, it is very important that you make sure the shoulder straps are at the right height for your child. They should be level or just below your child's shoulders.
The harness has 2 positions Fig.6, Fig.7, Fig.8.
Winter/Summer clothing can a make a difference to the size of your child.
Place the car seat on a level floor surface with the handle in the stable position see text The handle position.
Place your child in the car seat and identify the correct shoulder position.
Remove your child from the car seat.
Slacken the shoulder straps by pressing the harness release button (1) at the same time, pulling both shoulder straps forward with your other hand (2) Fig.9.
Press the red release button (3) and unhook the harness.
Remove the shoulder straps from the small seat, cover and chassis in plastic, by pulling each shoulder strap, including buckle, through its corresponding slot Fig.10.
Do not remove the shoulder straps from the loop of the harness adjuster strap.
Insert the shoulder straps into the chosen slots, passing through the slots of the chassis in plastic at first, then through the cover and at last the small seat Fig.11 Fig.12.
The harness has 2 positions. The straps should be put into the nearest slots above the shoulders of the child.
Make sure that there are no twists of the webbing and that the shoulder straps are correctly inserted in the loop of the harness adjuster strap Fig.11, Fig.13.
Now place your child in the car seat and check that the shoulder straps are in the correct position for your child's shoulder Fig.14.
FITTING YOUR CAR SEAT INTO THE CAR
WARNING:
This car seat can only be fitted into the passenger seat of a car with a lap and diagonal seat belt and no air bag.
THE TYPE OF APPROVED SEAT BELT YOU MUST HAVE Fig. 15.
TO USE
Your child seat can only be installed rearward facing using a lap and diagonal seat belt in the front or rear passenger seat of the car Fig.16.
INSTALLATION
- Push the child seat facing rearward firmly against the backrest of the car's seat Fig.16.
- Route the lap section of the adult safety belt through the lap belt guides and fasten the car seat belt Fig.17, Fig.18.
- Place the diagonal belt in the diagonal seat belt guide at the back of the seat Fig.18.
- Take out all the slack in the seat belt, ensuring that there are no twists or kinks in the seat belt Fig.19.
THE HANDLE POSITIONS
To adjust the handle from one position to another, pull out both sides of the handle on the swivel point; rotate the handle forwards or backwards into the desired position:
The carry handle has four positions:
• Forward in the car Fig.20.
• Straight up for carrying Fig.21.
- Against the car seat for rocking Fig.22.
- Stop rocking Fig 23.
Always ensure that the handle is locked in position and that the harness is correctly fitted and the buckle fastened before lifting your car seat.
CANOPY ASSEMBLY
Insert frame through sleeve of canopy Fig.24.
NOTE: Curved side of canopy frame must Point towards canopy material.
Insert keys on both ends of canopy frame into keyholes on car seat casting located above handle hubs Fig.25.
Rotate canopy frame back.
HINT: It may be helpful to detach side of seat pad to see keyholes.
This child seat can be installed into the appointed stroller as the travel system "DIVO".
CARE OF YOUR PRODUCT
REMOVING THE COVER
The fabric cover can be easily removed for washing.
Remove the harness by gently feeding the harness straps through from the front to the back of the seat, the crotch strap including the buckle should be removed; turn the metal slide underneath the shell on its side and feed it through the shell until the strap is free.
Remove the cover and machine wash at 30^ , line dry only.
To replace the fabric cover, follow reverse of the above.
CLEANING THE SEAT
The harness and plastic parts can be sponged with very mild detergent and warm water.
Do not use chemical cleansers, bleach or corrosives on any part of the seat.
OPTIONAL

text_image
ref. "Y-base" type AY-i001 ISOFIX 01The contents of this document as stated below will come into effect as from 01.01.2005 and replace, on every account and in full, any previous message referring to the guarantee provided by Foppa Pedretti S.p.A.
FORMAL GUARANTEE
Foppa Pedretti S.p.A. the head office of which is located at n. 11 Via Volta, Grumello del Monte (Italy), guarantees directly to the Consumer that this brand new product is free of faults with regard to the materials, design and manufacture and that it complies with the characteristics as declared by the manufacturer.
This formal guarantee is valid in all Member Countries of the European Union and it neither excludes nor limits the Consumer's rights in accordance with mandatory measures provided for by the law with regard to the Retailer of the Product.
To take advantage of this formal guarantee, the Consumer must return the faulty product to the Retailer, presenting to the same the proof of purchase of the Product which must clearly show the Retailer's address, the date of purchase of the Product with the Retailer's stamp and signature and an indication of the Product itself or, alternatively, the receipt which must not have been altered and which must clearly show the same information as that referred to above.
The formal guarantee is valid for twelve (12) months from the date of purchase of the Product. During this period, Foppa Pedretti S.p.A. will repair or replace the faulty product, at its own discretion. The formal guarantee is granted to the end buyer of the Product (Consumer) and it neither excludes nor limits the mandatory rights of the Consumer as provided for by the law and/or the rights that the Consumer may have with regard to the Dealer/ Retailer of the Product.
EXCLUSIONS TO THE FORMAL GUARANTEE.
The formal guarantee is excluded in the case of damage caused to the Product for the following reasons: if the product is used in a way that does not comply with the information contained in the use and assembly instruction sheet, if the product is knocked or dropped, if the Product is exposed to humidity or extreme heat or environmental conditions, or to sudden changes in the same, corrosion, oxidization, unauthorized alterations or repairs to the Product, repairs using unauthorised spare parts, improper use, improper maintenance or failure to carry out the same, improper maintenance compared to the information given on the use and assembly instruction sheet, incorrect assembly, accidents, damage caused by food or drink, damage caused by chemical products, cases of force majeure.
In any case, Foppa Pedretti S.p.A. declines all responsibility for damage caused to persons or to property, other than the Product, when such damage is caused by a failure to comply with the instructions/advice/warnings cont a ined in the manual or, alternatively, in the use and assembly instruction sheet provided with each Product for the owner/user. (Purely as an example, in the case of a cot: “Check your baby constantly. Make sure that the sheets and blankets do not cover the baby’s head...”).
Furthermore, Foppa Pedretti S.p.A. declines all responsibility for damage to persons and to property when the breakage of its products is due to a deterioration in the components of the Product that are subject to wear. All the components of the Product made of plastic are considered to be components subject to wear.
COMPOSANTS

text_image
5 4 2 3 7 15 6 1 10 13-14
text_image
9 8 13 13-14 12text_image
Safety warning signs for car safety, showing seatbelt and no-dominant circle with red XNE PAS UTILISER CE SIÈGE POUR ENFANTS SUR UN SIÈGE PASSAGER ÉQUIPÉ D'UN AIRBAG. IMPORTANT :
text_image
ref. "Y-base" type AY-i001 ISOFIX 01GARANTIE CONVENTIONNELLE
EXCLUSIONS DE LA GARANTIE CONVENTIONNELLE.
text_image
Safety warning signs for car seat and seat lift, indicating no violations or restrictionstext_image
ref. "Y-base" type AY-i001 ISOFIX 01text_image
Safety warning signs for car seat lift and ride-hailing, showing vehicle collision and no-ditch optionADVERTENCIA:
NO UTILICE ESTA SILLITA PARA COCHE EN ASIENTOS CON AIRBAG.
IMPORTANTE:
text_image
ref. "Y-base" type AY-i001 ISOFIX 01text_image
Safety warning illustration showing car safety instructions with arrows and a no-smoking symbolΠΡΟΕΙΔΟΠΟΙΗΣΗ:
text_image
ref. "Y-base" type AY-i001 ISOFIX 01text_image
Safety warning illustration showing car seatbelt usage and no-dominant seatbelt without traffictext_image
ref. "Y-base" type AY-i001 ISOFIX 01text_image
Safety warning illustration showing vehicle safety instructions with arrows and a no-smoking symbolВНИМАНИЕ:
text_image
ref. "Y-base" type AY-i001 ISOFIX 01text_image
Safety warning signs for car seatbelting and no-dominant use, with arrows indicating directions and a red X symbol.IZNIMNA OPASNOST:
text_image
ref. "Y-base" type AY-i001 ISOFIX 01FORMALNO JAMSTVO
Sadržaj dolje navedenog dokumenta stupa na snagu 1.1.2005. i u potpunosti zamjenjuje sve prethodne poruke u vezi s jamstvom koje pruža tvrtka Foppa Pedretti S.p.A.
FORMALNO JAMSTVO
Foppa Pedretti S.p.A. ..čiji se glavni ured nalazi na adresi Via Volta 11, Grumello del Monte (Italija), jamči izravno Kupcu da je ovaj potpuno novi proizvod bez greške u vidu materijala, dizajna i proizvodnje, te da je u skladu s karakteristikama koje je objavio proizvođač.
natural_image
Illustration of a mechanical device with handle, clasp, and base (no text or symbols)
ISOFIX CLASS D
ECE R44/04
IT BASE (type AY-i001 ISOFIX) PER SEGGIOLINO AUTO GRUPPO 0+ (type AY-i001)
Istruzioni di montaggio - Per bambini fino a 13 kg - Conforme alla Norma ECE R44-04
EN BASE (type AY-i001 ISOFIX) FOR CAR SEAT GROUP 0+ (type AY-i001)
Assembly instructions - For children up to 13 kg - Complies with ECE R44-04
FR BASE (type AY-i001 ISOFIX) POUR SIÈGE-AUTO GROUP 0+ (type AY-i001)
Notice d'utilisation - Pour les enfants jusqu'à 13 kg - Conforme à la Norme ECE R44-04
DE BASE (type AY-i001 ISOFIX) FÜR AUTOSITZ GRUPPE 0+ (type AY-i001)
Montageanweisungen - Für Kinder bis 13 kg - Entspricht der Norm ECE R44-04
ES BASE (type AY-i001 ISOFIX) PARA SILLITA PARA AUTO DEL GRUPO 0+ (type AY-i001)
Manual de instrucciones - Para los niños de hasta 13 kg - Conforme a la Norma ECE R44-04
EL B'ΑΣΗ (type AY-i001 ISOFIX) ΓΙΑ ΠΑΙΔΙΚΟ ΚΑΘΙΣΜΑ ΑΥΤΟΚΙΝ'ΗΤΟΥ ΟΜΑΔΑΣ 0+ (type AY-i001)
Εγχειρίδιο χρήσης - Για τα και παιδιά έως 13 kg - Σύμφωνη με τον κανονισμό ECE R44/04
PT BASE (type AY-i001 ISOFIX) PARA CADEIRA AUTO GRUPO 0+ (type AY-i001)
Instruções de montagem - Para crianças até 13 kg - Em conformidade com a Norma ECE R44-04
RU БАЗА (мод type АУ-і001 ISOFIX) ДЛЯ АВТОКРЕСЛА ГРУППА 0+ (мод АУ-і001)
Инструкция по установке - Для детей до 13 кг - Соответствует стандарту ECE R44-04
IT. IMPORTANTE - LEGGERE ATTENTAMENTE E CONSERVARE PER FUTURO RIFERIMENTO
EN. IMPORTANT! READ THE INSTRUCTIONS CAREFULLY AND KEEP FOR FUTURE REFERENCE
FR. IMPORTANT! LIRE ATTENTIVEMENT ET CONSERVER SOIGNEUSEMENT A PORTEE DE MAIN POUR UNE UTILISATION ULTERIEURE
DE. WICHTIG - BITTE SORGFÄLTIG LESEN UND FÜR SPÄTERES NACHLESEN UNBEDINGT AUFBEWAHREN.
ES. IMPORTANTE! LEER ATENTAMENTE Y CONSERVAR PARA FUTURAS REFERENCIAS
text_image
1. Click! Click! ① ② Click! Click! ③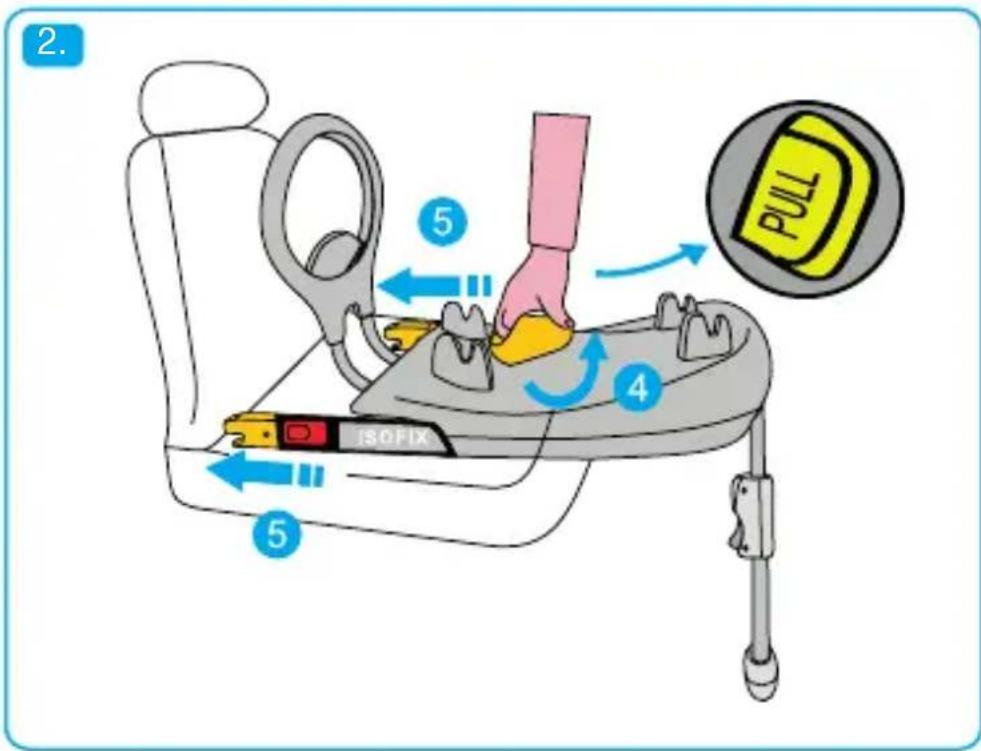
text_image
2. 5 4 PULL ISOFIX 5
text_image
6 Click! Click! Red Unlock Green Lock
text_image
Diagram illustrating car seat positioning and safety instructions, showing hand positioning and safety check icons.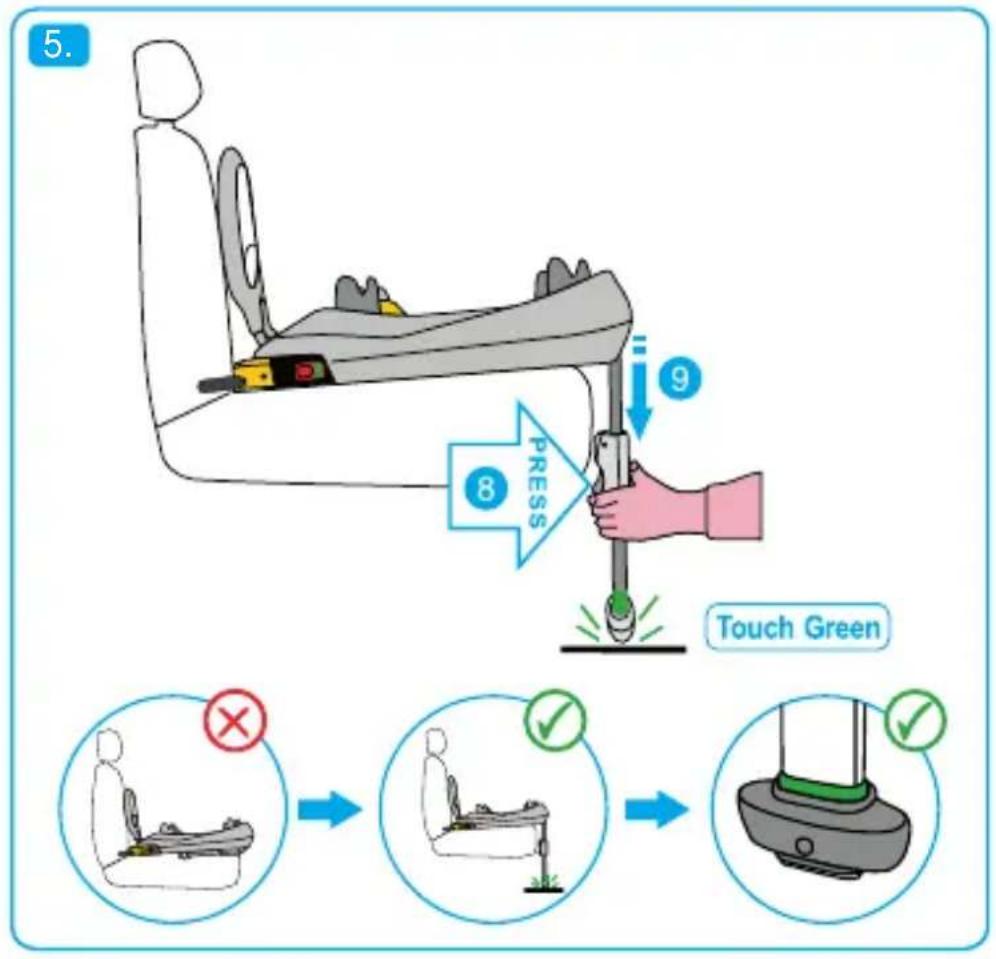
text_image
5. 8 9 PRESS Touch Green
flowchart
graph TD
    A["Step 1: Red Unlock"] --> B["Step 2: Press"]
    B --> C["Step 3: Push"]
    C --> D["Step 4: Green Lock"]
    D --> E["Step 5: Click!"]
    E --> F["Step 6: Click!"]
text_image
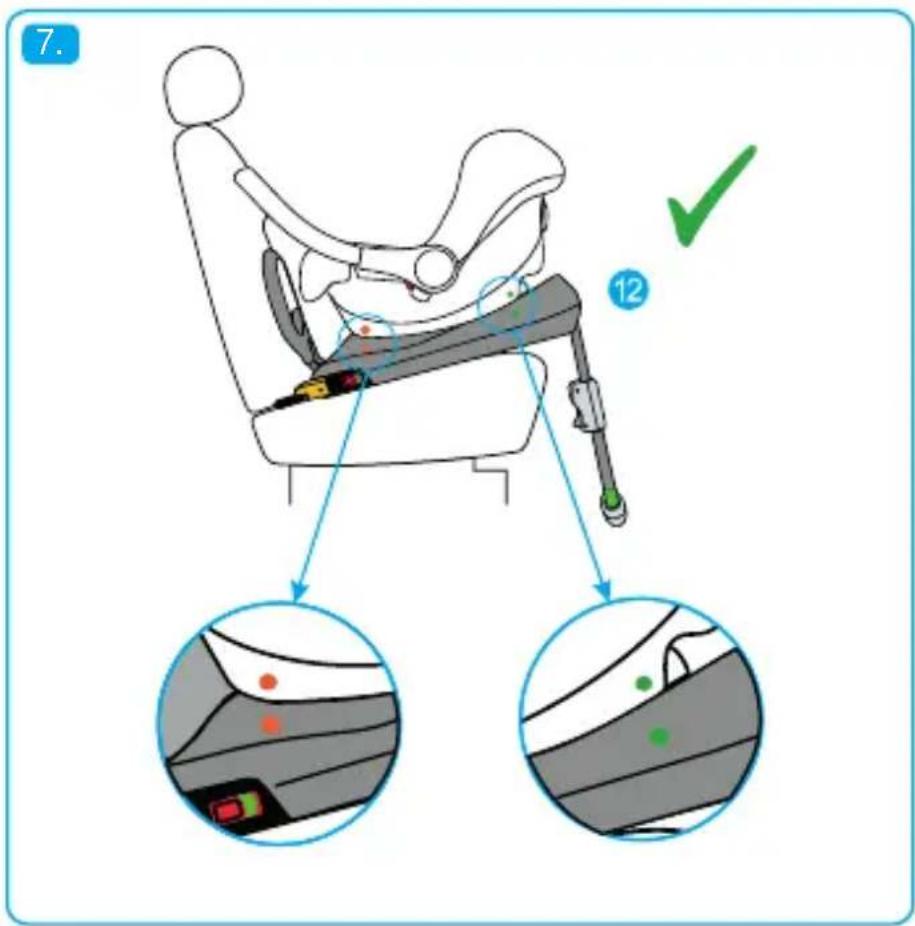
7. 12 ✓
text_image
8. CLICK
flowchart
graph TD
    A["Push"] --> B["Green Lock"]
    B --> C["Red Unlock"]
    style A fill:#f9f,stroke:#333
    style B fill:#ccf,stroke:#333
    style C fill:#cfc,stroke:#333
text_image
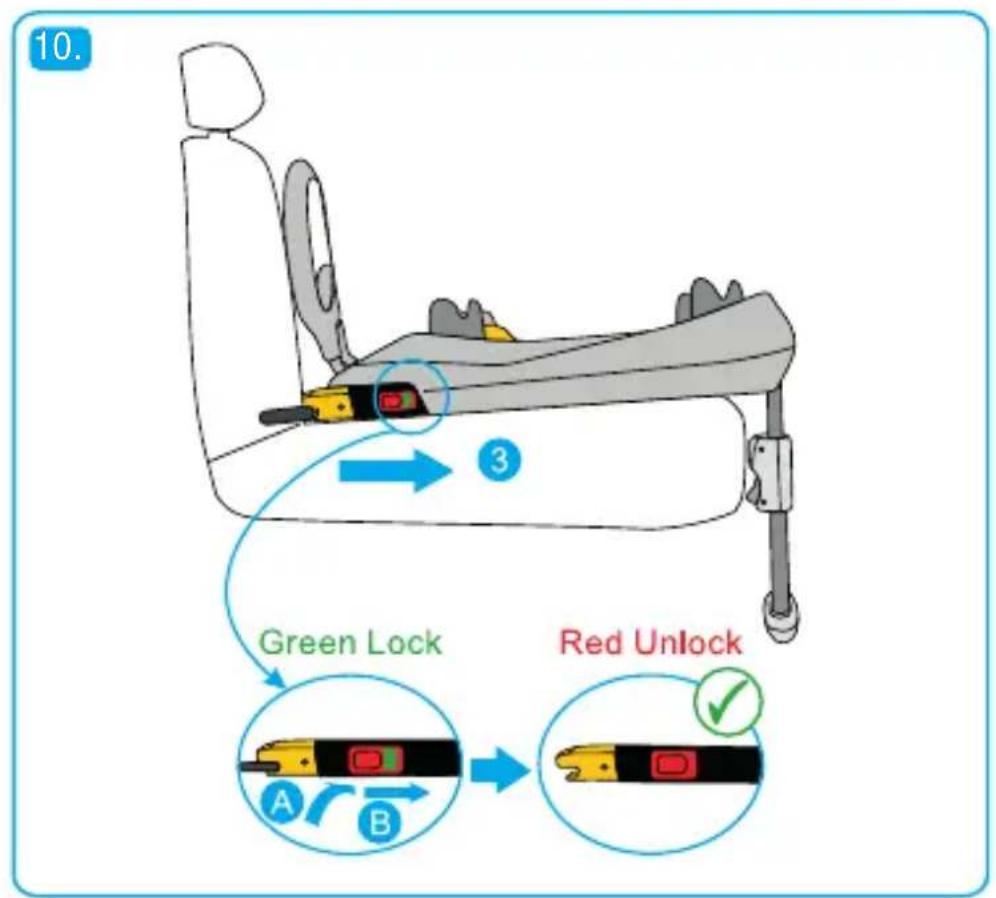
10. Green Lock Red Unlock A B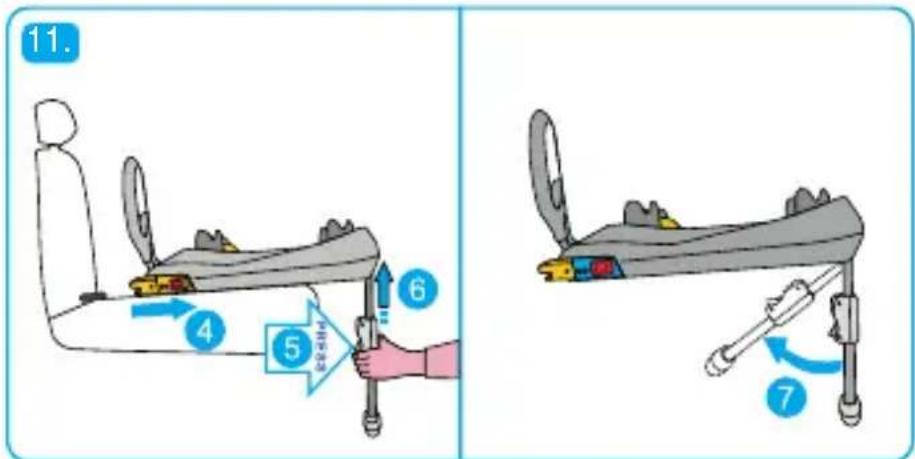
text_image
11. 4 5 6 7
text_image
12. 8 9 10INDICE
Avviso 12
Avvertenze 13
Lista componenti 15
Possible seating positions 28
Use in the car 29
Installing the isofix base 30
Removing the car seat from the isofix base 32
Maintenance 33
Guarantee 34
1. Note
- This is an ISOFIX child restraint device. It is approved to ECE R44/04 Standards for general use in vehicles equipped with ISOFIX safety anchorage systems.
- To use the SEMI-UNIVERSAL ISOFIX system, it is necessary to read the instructions in the vehicle handbook before installing the child car seat inside the car. The vehicle manual will indicate the seats compatible with the class and age group of the child car seat.
- The child mass group and ISOFIX size class for which the child restraint may be used are: GROUP 0+ (0-13+), Class D.
- It is a classified as a “Semi-Universal” device which is compatible for use in the vehicles indicated in the relative “List of approved vehicles” list.
- If in doubt, consult either the child restraint device manufacturer or your retailer.
| Car seat model | Conforms to regulation ECE R 44/04 | |||
| Child weightGroup | Semi-universal | |||
| DIVO (type AY-i001) + Y-BASE (type AY-i001 ISOFIX) |  | 0+ | 0 - 13 kg | Semi-universal |
| DIVO (type AY-i001) |  | 0 - 13 kg0+ | Universal | |
Note: About the car seat installation instructions, please refer to the car seats 0+ "Type AY-i001" installation manual.
WARNING: Read these instructions carefully before use and keep this manual for future reference. Failure to comply with these instructions may put your child's safety at risk.
NEVER use the Car Seat on a passenger seat fitted with a front air bag.
- The “base isofix Y-BASE-type AY-i001 ISOFIX” is standard approved according to the regulation ECE R44/04, the European regulation concerning the safety of infant car seats and it must only be used together with the infant car seat Group 0+ (DIVO type AY-i001). The model of the infant car seat is stated on the label fitted on the product.
- This approval will be invalidated if you make any modification or alteration to the base of the infant carrier. Any modification can be only be made by the manufacturer.
- Make sure that your vehicle/s is listed in the vehicle application list which is provided with this base.
- Read the whole instruction guide and make sure that you fully understand how to install and use the “base isofix Y-BASE-type AY-i001 ISOFIX” correctly.
- The car seat must only be installed in a rear-facing position.
- Never use the child restraint without first having attached it to the car as described in these instructions.
- To install the car seat and use it properly, carefully follow the user manual supplied with the car seat.
- Do not place anything such as a towel or cushion under the "base isofix Y-BASE-type AY-i001 ISOFIX". This could affect the performance of the base in an accident. Never buy a second hand base.
- Always replace a "base isofix Y-BASE-type AY-i001 ISOFIX" after an accident. It may have unseen damage.
WARNING
- Always secure the “base isofix Y-BASE– type AY-i001 ISOFIX” on the vehicles ISOFIX points. All occupants in the vehicle must be correctly restrained complying with the current law.
- Do not place any objects in the foot well in front of the "base isofix Y-BASE-type AY-i001 ISOFIX".
- Do not make unauthorized modifications or alterations to the "base isofix Y-BASE-type AY-i001 ISOFIX".
- Do not allow children to play with or adjust the "base isofix Y-BASE-type AY-i001 ISOFIX".
- Do not leave children alone in the vehicle.
- Never leave your child unattended in the car seat.
- Do not place the "base isofix Y-BASE-type AY-i001 ISOFIX" on a table or work top, always use the floor.
- Make sure your "base isofix Y-BASE-type AY-i001 ISOFIX" does not become trapped in the door of the vehicle or by a folding seat.
- Make sure that all folding vehicle seats are securely latched.
- Do not fix the “base isofix Y-BASE-type AY-i001 ISOFIX” on a side or rear facing vehicle seat.
- Always store the "base isofix Y-BASE-type AY-i001 ISOFIX" in a safe, dry place when it is not being used.
COMPONENT LIST

text_image
1 2 3 4 5 6 7 8 9 10 11 PULL PRESS PUSH PULL PULL 12- Anti-rebound bar
- Anti-rebound bar release button
- ISOFIX connectors
- ISOFIX release buttons
- "PULL" button
-
Adjustment button for the support leg
-
Safety leg
- Support leg
- "PUSH" button
- "PRESS" button
- Car seat fastening brackets
- Plastic guides for ISOFIX connectors
DANGER!!

text_image
AIRBAGDO NOT USE THE CAR SEAT POSITIONED ON A PASSENGER SEAT WHICH IS FITTED WITH AN AIRBAG.
The opening of the airbag against the car seat can cause serious, if not fatal, injury to the child. Consult the vehicle instruction manual with regard to the use of car seats.
POSSIBLE SEATING POSITIONS
- Before installation, check that the car is fitted with Isofix anchorage points, which will be found between the backrest and seat of the car.
- The "base isofix Y-BASE-type AY-i001 ISOFIX" is approved to "Semi-Universal" standards which means it is not compatible for use on all car models, but only those indicated in the "List of vehicles" booklet attached.
For advice as to the suitability of this "base isofix Y-BASE-type AY-i001 ISOFIX" please consult the vehicle application list before you purchase and install the base to make sure that the make, model and year of your vehicle/s is suitable.
Please consult the vehicle handbook to locate the vehicle ISOFIX points.
Never use the "base isofix Y-BASE-type AY-i001 ISOFIX" on a passenger seat fitted with a front airbag, It is very dangerous.
USE IN THE CAR
For the safety of your child
- Never leave your child unattended while in the car seat.
- Do not leave objects in the footwell in front of the ISOFIX.
For the safety of the passengers
In the event of sudden braking or in an accident, people or objects which are not secured or which are placed in an unsafe way could result in injury to the other passengers.
Always ensure that:
- the seatbacks are locked (e.g. the folding rear seats are clicked into place);
- all heavy or sharp objects inside the passenger compartment (e.g. on the parcel shelf) are positioned securely;
- all passengers in the car are wearing seat belts;
- the child car seat is always securely hooked on the passenger seat, even when not in use.
INSTALLING THE ISOFIX BASE
 |  | Installed on passenger seats fitted with Isofix anchoring points (positioned between the seat and the backrest of the passenger seat) and which have sufficient space for the support leg. | YES |
 | Isofix label | green | |
| ISOFIXCLASS D |  | Front airbagSide airbag | NOYES |
Make sure that your vehicle has ISOFIX anchor points and is approved in the vehicle application list which is supplied with the base.
Locate the vehicle ISOFIX points. if any problem please consult the vehicle manual. They are usually between the vehicle seat base and back.
PICTURE 1
Step 1. Lift up the "anti-rebound bar" to a vertical position until you hear a "CLICK" sound, indicating that it is correctly positioned.
Step 2. Fold the "support leg" downwards until it stops.
Step 3. Insert the two red plastic guides for the ISOFIX connectors and attach them to the ISOFIX points in the vehicle. The plastic guides help to identify the ISOFIX points on the vehicle, making installation easier. They also protect the vehicle passenger seats.
PICTURE 2
Step 4-5. Pull the yellow button located on the Isofix base upwards to extend the connectors outwards as far as possible.
PICTURE 3
Step 6. Position the Isofix base on the car seat, making sure that the Isofix connectors are perfectly aligned with the guides that you have just attached. Insert the two ISOFIX connectors into the red-coloured guides, and push to attach the two connectors to the ISOFIX hooks in the vehicle. You will hear a click once they have attached. Check that the indicators are green on both sides.
BASE
PICTURE 4
Step 7. Push the base, against the backrest of the passenger seat so that the anti-rebound bar adheres perfectly to the backrest.
PICTURE 5
Step 8-9. Press the button to adjust the support leg and lower it down so that it correctly touches the vehicle floor. The control device located at the base of the support leg should move from red to green, indicating that the leg has been placed correctly. Check that the support leg is positioned and adjusted correctly. Make sure that the support leg does not raise the base from the surface of the vehicle seat.
Do not place the front support leg on a floor storage compartment lid. The front support leg MUST make full and firm contact with the vehicle floor.
PICTURE 6
Step 10-11. Place the car seat onto the ISOFIX base in a rear-facing position.
Press the red "PRESS" button. A click will indicate successful comment. Check that the indicator has moved from red to green "LOCK".
IMPORTANT: After having attached the seat to the base, lift up the car seat to make sure that it has clicked into place correctly.
PICTURE 7
Step 12. Adjust the car seat carrying handle against the passenger seat backrest, referring to the car seat manual for how to recline the handle.
PICTURE 8
At this point you can place the child in the car seat, referring to the car seat user manual for the correct usage.
REMOVING THE CAR SEAT FROM THE ISOFIX BASE
Removing the car seat - PICTURE 9
To remove the car seat from the Isofix base, move the carrying handle into a vertical position, pull the redcoloured stationary stabiliser placed on the front of the Isofix base, and then lift up the car seat.
REMOVING THE ISOFIX BASE

Press and hold the red "PRESS" button while simultaneously pressing key button towards the inside of the base; once released, lift the car seat move from base. Step 1-2.
TOP TIP! When used on a daily basis you can leave the ISOFIX base mounted on board the car and simply remove the car seat.
REMOVING THE ISOFIX BASE
PICTURE 10
Step 3. Pull the plastic casing of the Isofix connectors until their indicators click onto the red. At this point the Isofix base is no longer attached to the Isofix anchoring points in the car.
PICTURE 11
Step 4. Remove the ISOFIX base from the seat.
Step 5-6. Press the button and lift up the support leg up to retract it.
Step 7. Fold up the retracted support leg, as in the diagram.
PICTURE 12
Step 8. Press the ISOFIX connectors towards the inside of the base.
Step 9-10. Press the button and release the anti-rebound bar. Place the anti-rebound bar on the base.
MAINTENANCE
DANGER! An accident causes strong stress to be applied. Due to this, it is strictly forbidden to hold your child on your lap, even if they are protected by your seat belt.
Always secure your child in the carseat before any journey!
The car seat must only be installed in a rear-facing position.
Danger! The opening of the airbag against the child car seat may cause serious, if not lethal, injury to the child.

DO NOT use the child car seat on passenger seats with an active airbag!
Follow the instructions shown in the user manual for information on using the car seat on passenger seats fitted with a side airbag.
The plastic parts may be cleaned with water and soap. DO NOT use harsh detergents (such as solvents).
The contents of this document as stated below will come into effect as from 01.01.2005 and replace, on every account and in full, any previous message referring to the guarantee provided by Foppa Pedretti S.p.A.
FORMAL GUARANTEE
Foppa Pedretti S.p.A. the head office of which is located at n. 11 Via Volta, Grumello del Monte (Italy), guarantees directly to the Consumer that this brand new product is free of faults with regard to the materials, design and manufacture and that it complies with the characteristics as declared by the manufacturer. This formal guarantee is valid in all Member Countries of the European Union and it neither excludes nor limits the Consumer's rights in accordance with mandatory measures provided for by the law with regard to the Retailer of the Product.
To take advantage of this formal guarantee, the Consumer must return the faulty product to the Retailer, presenting to the same the proof of purchase of the Product which must clearly show the Retailer's address, the date of purchase of the Product with the Retailer's stamp and signature and an indication of the Product itself or, alternatively, the receipt which must not have been altered and which must clearly show the same information as that referred to above. The manufacturer's formal guarantee is valid for twelve (12) months from the date of purchase of the Product. During this period, Foppa Pedretti S.p.A. will repair or replace the faulty product, at its own discretion.
The formal guarantee is granted to the end buyer of the Product (Consumer) and it neither excludes nor limits the mandatory rights of the Consumer as provided for by the law and/or the rights that the Consumer may have with regard to the Dealer/Retailer of the Product.
EXCLUSIONS TO THE FORMAL GUARANTEE.
The formal guarantee is excluded in the case of damage caused to the Product for the following reasons: if the product is used in a way that does not comply with the information
contained in the use and assembly instruction sheet, if the product is knocked or dropped, if the Product is exposed to humidity or extreme heat or environmental conditions, or to sudden changes in the same, corrosion, oxidization, unauthorized alterations or repairs to the Product, repairs using unauthorised spare parts, improper use, improper maintenance or failure to carry out the same, improper maintenance compared to the information given on the use and assembly instruction sheet, incorrect assembly, accidents, damage caused by food or drink, damage caused by chemical products, cases of force majeure.
In any case, Foppa Pedretti S.p.A. declines all responsibility for damage caused to persons or to property, other than the Product, when such damage is caused by a failure to comply with the instructions/advice/warnings contained in the manual or, alternatively, in the use and assembly instruction sheet provided with each Product for the owner/user. (Purely as an example, in the case of a cot: "Check your baby constantly. Make sure that the sheets and blankets do not cover the baby's head...").
Furthermore, Foppa Pedretti S.p.A. declines all responsibility for damage to persons and to property when the breakage of its products is due to a deterioration in the components of the Product that are subject to wear. All the components of the Product made of plastic are considered to be components subject to wear.
Avertissement 36
Avvertissement 37
Positions assises possible 40
POSITIONS ASSISES POSSIBLES
EXCLUSIONS DE LA GARANTIE CONVENTIONNELLE.
text_image
Safety warning symbols for seat and car, including no stop sign and pictogram of child inside seatNON UTILIZZARE SE IL SEDILE DEL PASSEGGERO E' DOTATO DI AIRBAG FRONTALE
CHECK
text_image
Diagram of a car with traffic sign icons and directional arrows indicating no or yes actionsVEHICLE APPLICATION LIST
Y-BASE can only be installed on seats in vehicles indicated on this list. Please note that this list undergoes ongoing revision procedures, with changes and additions of vehicles accordingly. The up to date list can be consulted on our web site: www.foppapedretti.it
Semi-Universal approved to ECE-R44.04 for use in the vehicles listed in the vehicle application list.
INFORMATION
- Do not place the front support leg on a floor storage compartment lid, the floor storage compartment lidsupport leg make a full&firm contact withthe veichle chassis.
- Please consult with the vehicle manufacturer regarding access to ISOFIX points.
- Because of the vehicle seat position care must be taken to correctly attach the child restraint system to the ISOFIX points.
- Vehicle seat (mid row) must be adjusted forward.
- Adjust the vehicle seat so that the base front support leg does not make contact
with the floor storage compartment.
- Vehicle seat has to be fully adjusted to the rear most position.

text_image
Safety warning symbols for car seat and passenger seat, including no stop sign and pictogram of child.DO NOT USE ON A PASSENGER SEAT WITH A FRONT AIRBAG
CHECK
WARNING: before purchasing, consult the vehicle Use and Maintenance Guide to ensure the ISOFIX anchor is present, as this could be an optional.
text_image
Diagram of a car with multiple directional and safety symbols indicating vehicle safety or hazard zones.text_image
Safety warning symbols for car seat and passenger seat, including no stop sign and pictogram of life.NO USAR EN UN ASIENTO DE PASAJERO CON AIRBAG FRONTAL
CHECK
text_image
Diagram of a car with traffic sign icons and directional arrows indicating lanes or stopsLISTE DER ZUGELASSENEN FAHRZEUGE
text_image
Prohibition sign showing a chair seat with a person sitting, enclosed in a red circle
natural_image
Illustration of a person sitting in a chair with a red figure inside, connected to a curved black shape and an arrow (no text or symbols)text_image
Diagram of a car with traffic sign icons and directional arrows indicating lanes or stopstext_image
Safety warning symbols for seat and car, including no stop sign and pictogram of person inside seatNO USAR EN UN ASIENTO DE PASAJERO CON AIRBAG FRONTAL
CHECK
text_image
Diagram of a car with multiple directional and safety symbols indicating vehicle safety or hazard zones.text_image
Safety warning symbols for seat and car, including no stop sign, pictogram of person falling, and directional arrow.text_image
Diagram of a car with traffic sign icons and directional arrows indicating stop, check, and collision warning signs.LISTA DE VEÍCULOS AUTOMÓVEIS HOMOLOGADOS
text_image
Prohibition sign showing a person sitting on a chair with a circle and partial sun symbol
natural_image
Illustration of a person sitting in a chair with a red abstract shape and black outline, no text or symbols present.text_image
Diagram of a car with multiple directional arrows indicating traffic or safety actions, including no-smoking, warning, and other symbols.ПРИЛАГАЕМЫЙ СПИСОК АВТОМОБИЛЕЙ
text_image
Prohibition sign showing a person sitting on a chair with no text or symbols
natural_image
Illustration of a person sitting in a chair with a red airplane and black abstract shapes (no text or symbols)text_image
Diagram of a car with multiple directional signs indicating traffic or safety, including no symbols for off-vehicle use and warning signs.| Since | 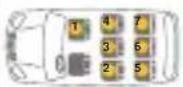 | |
| ALFA ROMEO | ||
| 159 | 2008-01 2, 4 | |
| Giulietta | 2010-06 2, 4 | |
| Giulietta | 2013-10 2, 4 | |
| AUDI | ||
| A1 (8X) 3 door | 2010-09 2, 4 | |
| A1 (8X) 5 door | 2012-02 2, 4 | |
| A2 (8P) | 1999 2, 4* | |
| A3 (8P) | 2003 2, 4 | |
| A3 (8P) | 2005 2, 4 | |
| A3 (8P) | 2008 2, 4 | |
| A3 (8P) | 2010 2, 4 | |
| A3 (8V) | 2012-08 1, 2, 3* | |
| A3 Limousin e (8V) | 2013-09 1, 2, 4 | |
| A3 Sportback | 2013-02 2, 4 | |
| A4 (B8) | 2007-12 1, 2, 4 | |
| A4 (B8) | 2011-02 1, 2, 4 | |
| A4 Avant (B8) | 2008-02 1, 2, 4 | |
| A4 Avant (B8) | 2011 1, 2, 4 | |
| A4 Cabrio (B6) | 2002 1, 2, 4* | |
| A5 (B8) | 2007 2, 4 | |
| A5 (B8) | 2011-11 2, 4 | |
| A5 Cabrio (B8) | 2009 2, 4 | |
| A5 Cabrio (B8) | 2011 2, 4 | |
| A5 Sportback (B8) | 2011 2, 4 | |
| A6 (C7) | 2011-04 2, 4 | |
| A6 Allroad Quattro (C7) | 2011-04 2, 4 | |
| A4 Avant (C7) | 2011-09 2, 4 | |
| Since | ||
| AUDI | ||
| A7 Sportback (4G) | 2011-08 1, 2, 4 | |
| A8 (4H) | 2010-02 2, 4 | |
| A8 (D3) | 2007 2, 4 | |
| A8 (D4) | 2010-02 2, 4 | |
| Q3 (8U) | 2011-10 2, 4 | |
| Q5 (8R) | 2009 2, 4 | |
| Q5 (8R) | 2012-09 2, 4 | |
| Q7 (4L) | 2009 1, 2, 4 | |
| BMW | ||
| 1 (E81) | 2007-05 2, 4* | |
| 1 (E87) | 2004 2, 4 | |
| 1 (E87) | 2007-03 2, 4 | |
| 1 (F20) | 2011-09 2, 4 | |
| 1 (F21) | 2012-06 2, 4* | |
| 1 Cabrio (E88) | 2011-03 2, 4* | |
| 1 Coupe (E82) | 2007-07 2, 4 | |
| 1 Coupe (E82) | 2011 2, 4 | |
| 3 (E90) | 2005 2, 4 | |
| 3 (E90) | 2008-09 2, 4 | |
| 3 (F30) | 2012-02 2, 4 | |
| 3 Cabrio (E93) | 2007-03 2, 4* | |
| 3 Cabrio (E93) | 2010 2, 4* | |
| 3 Coupe (E92) | 2006 2, 4 | |
| 3 Coupe (E92) | 2010-03 2, 4 | |
| 3 GT (F34) | 2013-06 2, 4 | |
| 3 Touring (E91) | 2005 2, 4* | |
| 3 Touring (E91) | 2008-09 2, 4* | |
| Spark | Since | |
| BMW | ||
| 3 Touring (F31) | 2012-09 2, 4 | |
| 5 (E60) | 2003-01 2, 4 | |
| 5 (F10) | 2010-03 2, 4 | |
| 5 GT (F07) | 2009-08 2, 4 | |
| 5 Touring (E61) | 2005-03 2, 4 | |
| 5 Touring (F11) | 2010-06 2, 4 | |
| 6 Grancoupe | 2012-06 2, 4 | |
| 6 Cabrio (6C) | 2011-03 2, 4 | |
| 6 Cabrio (6C) | 2011-11 2, 4 | |
| 7 (F01) | 2008-11 2, 4 | |
| 7 (F01) | 2012-07 2, 4 | |
| M5 (F10) | 2011-11 2, 4 | |
| X1 (E84) | 2009-06 2, 4 | |
| X3 (E83) | 2004-01 2, 4 | |
| X3 (F25) | 2010-11 2, 4 | |
| X5 (E70) | 2007-03 2, 4 | |
| X6 (E71) | 2008-06 2, 4 | |
| X6 (E71) | 2012-06 2, 4 | |
| CHEVROLET | ||
| Aveo (KL1T) | 2011-09 2, 4 | |
| Aveo (KLAS) | 2011-10 2, 4 | |
| Captiva | 2006-10 2, 4 | |
| Cruze | 2011-08 2, 4* | |
| Cruze SW | 2012 2, 4* | |
| HHR | 2008-02 2, 4 | |
| Orlando | 2011-03 2, 4* | |
| Spark | 2010-03 2, 4* | |
| Since | ||
| CHEVROLET | ||
| Spark | 2013-01 2, 4* | |
| Trax | 2013-04 2, 4* | |
| Volt | 2011-10 2, 4 | |
| CHRYSLER | ||
| 300 C | 2004 2, 4 | |
| 300 C Touring | 2004 2, 4 | |
| Grand Voyager | 2008-03 6 | |
| Voyager | 2001-03 6 | |
| CITROEN | ||
| C1 3 door | 2005 2, 4* | |
| C1 5 door | 2005-07 2, 4* | |
| C2 | 2008-04 2, 4* | |
| C3 | 2005 2, 4* | |
| C3 | 2010-01 2, 4* | |
| C3 Picasso | 2013-01 2, 4 | |
| C3 Picasso | 2009 2, 4 | |
| C4 | 2004 2, 4 | |
| C4 | 2010-10 2, 4 | |
| C4 Aircross | 2012-06 2, 4 | |
| C5 | 2008-01 1, 2, 4 | |
| C5 | 2010-12 2, 4 | |
| C5 Tourer | 2008 1, 2, 4 | |
| C5 Tourer | 2010-12 2, 4 | |
| C6 | 2005-11 2, 4 | |
| C8 | 2008 2, 4 | |
| C-Crosser | 2007-06 2, 4 | |
| DS3 | 2010-03 2, 4 | |
| Spark | Since | |
| CITROEN | ||
| DS3 Cabrio | 2013-03 2, 4* | |
| DS4 | 2011-03 2, 4 | |
| DS5 | 2012-03 2, 4 | |
| Grand C4 Picasso | 2013-10 2, 3, 4* | |
| Nemo | 2007 2, 4 | |
| DACIA | ||
| Dokker | 2013-02 2, 4 | |
| Duster (SD) | 2010-04 2, 4 | |
| Lodgy (SD) | 2012-06 2, 3, 4 | |
| Logan MCV (SR) | 2013-06 2, 4 | |
| Sandero (SD) | 2008-06 2, 4 | |
| Sandero (SR) | 2012-11 2, 4 | |
| FIAT | ||
| 500L | 2012-10 2, 4 | |
| Bravo | 2007-07 2, 4* | |
| Doblo | 2010-02 2, 4 | |
| Freemont | 2011-09 2, 4* | |
| Multipla | 2004 2, 4 | |
| Panda | 2012-03 2, 4* | |
| Qubo | 2008-02 2, 4 | |
| FORD | ||
| B-Max | 2012-10 2, 4 | |
| C-Max (DM2) | 2010 2, 4 | |
| C-Max (DXA) | 2010-12 2, 4 | |
| Fiesta 3 door | 2008-06 2, 4* | |
| Fiesta 5 door | 2008-10 2, 4 | |
| Fiesta 5 door | 2013-01 2, 4 | |
| Since |  | |
| FORD | ||
| Focus 4 door | 2011-04 2, 4 | |
| Focus 5 door | 2011-03 2, 4 | |
| Focus turnier | 2008-02 2, 4 | |
| Focus turnier | 2011-05 2, 4 | |
| Galaxy | 2006 3 | |
| Galaxy | 2010-05 3 | |
| Grand C-Max | 2010-12 2, 4 | |
| Kuga | 2008-02 2, 4 | |
| Kuga | 2013-03 2, 4 | |
| Mondeo | 2010-12 2, 4 | |
| Mondeo turnier | 2007 2, 4 | |
| Mondeo turnier | 2010-11 2, 4 | |
| S-Max | 2006 3 | |
| S-Max | 2010-04 3 | |
| Tourneo Custom | 2012-07 2, 3, 6 | |
| Transit Kombi | 2011-11 2, 3 | |
| HONDA | ||
| Civic 9 | 2012-02 2, 4 | |
| CR-V 3 | 2007 | |
| HYUNDAI | ||
| i10 | 2008 2, 4 | |
| i10 | 2011-02 2, 4 | |
| i10 | 2013-11 2, 4* | |
| i20 | 2012-06 2, 4 | |
| i20 | 2012-06 2, 4 | |
| i30 | 2010-07 2, 4 | |
| i30 | 2013-03 2, 4 | |
| Spark | Since |  |
| HYUNDAI | ||
| i30 CW | 2012 2, 4 | |
| i40 | 2011-10 2, 4 | |
| i40 CW | 2011-06 2, 4 | |
| ix20 | 2010-11 2, 4 | |
| ix35 | 2013-10 2, 4 | |
| ix35 | 2010-03 2, 4 | |
| Santa Fe | 2010-01 2, 4 | |
| Santa Fe | 2012-09 2, 4 | |
| JAGUARD | ||
| XF | 2008-03 2, 4 | |
| XJ | 2009-11 2, 4 | |
| JEEP | ||
| Compass | 2013-06 2, 4 | |
| Compass | 2007-01 2, 4 | |
| Grand Cherokee | 2013-06 2, 4 | |
| Grand Cherokee | 2010-12 2, 4 | |
| Wrangler Unlimited | 2011-11 2, 4 | |
| KIA | ||
| Cee’d | 2010-10 2, 4 | |
| Cee’d SW | 2007 2, 4 | |
| Optima | 2013-12 2, 4 | |
| Picanto | 2004-04 2, 4* | |
| Pro Cee’d | 2008 2, 4 | |
| Pro Cee’d | 2011-01 2, 4 | |
| Pro Cee’d | 2013-03 2, 4* | |
| Rio 3 door | 2012-02 2, 4 | |
| Soul | 2008 2, 4 | |
| Since | ||
| KIA | ||
| Soul | 2011-10 2, 4 | |
| Sportage | 2010-08 2, 4 | |
| Venga | 2010-01 2, 4 | |
| LANCIA | ||
| Delta | 2008 2, 4 | |
| Delta | 2011 2, 4 | |
| Thema | 201-11 2, 4 | |
| Voyager | 2011-11 6 | |
| Ypsilon 4 seater | 2011-07 2, 4* | |
| Ypsilon 5 seater | 2011-07 2, 4* | |
| LAND ROVER | ||
| Discovery | 2011-10 2, 4 | |
| Freelander | 2006 2, 4 | |
| Freelander 2 | 2011-03 2, 4 | |
| Freelander 2 | 2013 2, 4 | |
| Range Rover | 2012-10 2, 4 | |
| Range Rover Evoque | 2011-09 2, 4 | |
| Range Rover Sport | 2010 2, 4 | |
| LEXUS | ||
| CT 200h | 2011-03 2, 4* | |
| MAZDA | ||
| 2 | 2007 2, 4 | |
| 2 | 2010-10 2, 4 | |
| 3 | 2009 2, 4* | |
| 3 | 2011-09 2, 4* | |
| 3 | 2013-10 2, 4* | |
| 6 | 2010 2, 4 | |
| Spark | Since | |
| MAZDA | ||
| 6 | 2013-03 2, 4 | |
| 3 Estate | 2011-09 2, 4* | |
| 5 | 2010-10 2, 4 | |
| 5 | 2013 2, 4 | |
| 5 | 2008 2, 4 | |
| 6 Estate | 2010 2, 4 | |
| 6 Estate | 2013-02 2, 4 | |
| 6 Hatchback | 2010 2, 4 | |
| CX-5 | 2012-04 2, 4 | |
| CX-7 | 2009-10 2, 4 | |
| MERCEDES | ||
| A | 2004 2, 4 | |
| A | 2008-06 2, 4 | |
| A | 2012-09 2, 4 | |
| B | 2011-11 2, 4 | |
| C Coupe | 2011-06 2, 4 | |
| C Estate | 2011-06 2, 4 | |
| C Limousine | 2011-06 2, 4 | |
| Citan Combi | 2012-10 2, 4** | |
| E Coupe | 2009-05 2, 4 | |
| E Model T | 2013-04 2, 4 | |
| GLK | 2008-10 2, 4 | |
| MINI | ||
| Clubman | 2007-11 2, 4 | |
| Countryman | 2010-09 2, 4* | |
| Countryman | 2012-10 2, 4 | |
| Mini | 2006-11 2, 4* | |
| Since | | |
| MINI | ||
| Mini 2 | 2010-08 2, 4* | |
| One | 2004-08 2, 4* | |
| Paceman | 2012-06 2, 4 | |
| MITSUBISHI | ||
| ASX | 2010 2, 4 | |
| ASX | 2012-10 2, 4 | |
| Colt | 2008-11 2, 4* | |
| Outlander | 2006 2, 4 | |
| NISSAN | ||
| Juke | 2010-10 2, 4 | |
| Micra | 2010-11 2, 4 | |
| Pixo | 2009-06 2, 4 | |
| Qashqai+2 | 2010-03 2, 4 | |
| OPEL | ||
| Adam | 2013-01 2, 4 | |
| Agila | 2008-04 2, 4* | |
| Ampera | 2011-11 2, 4 | |
| Antara | 2010 2, 4 | |
| Astra J | 2009-12 2, 4 | |
| Astra J | 2012 2, 4 | |
| Astra J GTC | 2012-01 2, 4 | |
| Astra J Sedan | 2012-09 2, 4* | |
| Astra J Sports Tourer | 2010-11 2, 4 | |
| Cascada | 2013-04 2, 4 | |
| Corsa C | 2003-08 2, 4 | |
| Corsa D | 2011-01 1, 2, 4 | |
| Insignia | 2008 2, 4 | |
| Spark | Since |  |
| OPEL | ||
| Insignia | 2011-08 2, 4 | |
| Insignia | 2013-09 2, 4 | |
| Insignia Countru Tourer | 2013-10 2, 4 | |
| Insignia Sports Tourer | 2013-09 2, 4* | |
| Insignia Sports Tourer | 2009 2, 4 | |
| Insignia Sports Tourer | 2011-08 2, 4 | |
| Swift | 2010-09 2, 4* | |
| SX4 | 2010-12 2, 4* | |
| TOYOTA | ||
| Auris 3 door | 2007 2, 4* | |
| Auris 3 door | 2010-03 2, 4* | |
| Auris 5 door | 2013-10 2, 4 | |
| Auris Hybrid | 2010-09 2, 4 | |
| Auris Touring Sports | 2013-07 2, 4 | |
| Avensis | 2009 2, 4 | |
| Avensis | 2012-01 2, 4 | |
| Avensis Combi | 2009 2, 4 | |
| Avensis Combi | 2012-01 2, 4 | |
| Aygo 3 door | 2005-11 2, 4* | |
| Augo 5 door | 2005-11 2, 4* | |
| GT86 | 2012-09 2, 4* | |
| Land Cruiser | 2012-04 2, 4 | |
| Prius 3 | 2009-01 2, 4 | |
| Prius 3 | 2012-04 2, 4 | |
| Prius + | 2012-06 2, 4 | |
| RAV4 | 2006 2, 4 | |
| RAV4 | 2010-05 2, 4 | |
| Since | ||
| TOYOTA | ||
| RAV4 | 2013-04 2, 4 | |
| Verso | 2013-04 2, 4* | |
| Verso | 2009-03 2, 4** | |
| Verso S | 2011-03 2, 4 | |
| Yaris 3 3 door | 2011-10 2, 4 | |
| Yaris 3 5 door | 2011-10 2, 4 | |
| Yaris Hybrid | 2012-06 2, 4 | |
| VOLVO | ||
| C70 | 2009-11 2, 4 | |
| S40 | 2007-06 2, 4 | |
| S60 | 2010-03 2, 4 | |
| S80 | 2013-06 2, 4 | |
| V40 | 2012-09 2, 4 | |
| V50 | 2007-04 2, 4 | |
| V60 | 2010 2, 4 | |
| V70 | 2007 2, 4 | |
| V70 | 2011-08 2, 4 | |
| XC60 | 2008-01 2, 4 | |
| XC70 | 2011-08 2, 4 | |
| XC90 | 2006 2, 4 | |
| XC90 | 2011-12 2, 4 | |
| VW | ||
| Amarok | 2010-09 2, 4 | |
| Beetle | 2011-11 2, 4* | |
| Beetle Cabrio | 2012-11 4* | |
| Caddy | 2010-09 2, 4 | |
| Caddy Life | 2010 2, 4 | |
| VW | ||
| CC | 2012-01 2, 4 | |
| Golf 5 | 2004 2, 4 | |
| Golf 5 GTI | 2004 2, 4 | |
| Golf 5 Plus | 2005 2, 4 | |
| Golf 5 Variant | 2007-06 2, 4 | |
| Golf 6 | 2008-10 2, 4 | |
| Golf 6 Cabrio | 2011-06 2, 4* | |
| Golf 6 Plus | 2009 2, 4 | |
| Golf 6 R | 2009-11 2, 4 | |
| Golf 6 Variant | 2009-05 2, 4 | |
| Golf 7 | 2012-11 2, 4 | |
| Golf 7 GTI | 2013-03 2, 4 | |
| Golf 7 Variant | 2013 2, 4 | |
| Jetta 5 | 2005 2, 4 | |
| Jetta 6 | 2011-01 2, 4 | |
| Jetta Hybrid | 2013-03 2, 4 | |
| Passat (B6) | 2005-03 2, 4 | |
| Passat (B7) | 2010-10 2, 4 | |
| Passat Alltrack (B7) | 2012-02 2, 4 | |
| Passat CC | 2008 2, 4 | |
| Passat Variant (B6) | 2005-08 2, 4 | |
| Passat Variant (B7) | 2010-11 2, 4 | |
| Phaenton | 2007 2, 4 | |
| Phaenton | 2010-04 2, 4 | |
| Polo 5 | 2009-03 2, 4 | |
| Scirocco | 2008-07 2, 4* | |
| Sharan 2 | 2010-09 2, 3, 4, 5, 7 | |
| Since | ||
| VW | ||
| Tiguan | 2007 2, 4 | |
| Tiguan | 2011-07 2, 4 | |
| Touareg | 2010-04 2, 4 | |
| Touran | 2005 2, 4 | |
| Touran | 2010-09 2, 4 | |
| Up 3 door | 2011-12 2, 4* | |
| Up 5 door | 2012-05 2, 4* | |
* Regolazione ridotta del sedile anteriore
Reduction of front seat adjustability
Réduction du réglage des sièges avant
Reduzierung der Verstellbarkeit der Vordersitze
Reducción de la capacidad de ajuste del asiento delantero
Μείωση της δυνατότητας προσαρμογής των
μπροστινών καθισμάτων
Redução do ajuste do banco dianteiro
Уменьшение регулировок передних сидений.
** Vano portaoggetti a pavimento opzionale, possibile posizione sotto la gamba di supporto Optional floor storage compartment, likely below support leg
Compartiment de rangement au sol en option, probablement sous la jambe de force
Optionales Bodenstaufach, wahrscheinlich unter dem Stützbein
Compartimento de almacenamiento opcional en el piso, probablemente debajo de la pata de apoyo
Προαιρετικός χώρος αποθήκευσης δαπέδου,
πιθανότατα κάτω από το πόδι στήριξης
Compartimento de armazenamento opcional no piso, provavelmente abaixo da perna de apoio
Дополнительный отсек для хранения на полу, вероятно, под опорной ногой
Importato da: