Warhead 7.1 - Headphones TRITTON - Free user manual and instructions
Find the device manual for free Warhead 7.1 TRITTON in PDF.
Frequently Asked Questions - Warhead 7.1 TRITTON
User questions about Warhead 7.1 TRITTON
0 question about this device. Answer the ones you know or ask your own.
Ask a new question about this device
Download the instructions for your Headphones in PDF format for free! Find your manual Warhead 7.1 - TRITTON and take your electronic device back in hand. On this page are published all the documents necessary for the use of your device. Warhead 7.1 by TRITTON.
USER MANUAL Warhead 7.1 TRITTON
[F EN] 2x Rechargeable Battery Packs
[FR] 2 batteries rechargeable
[□E] 2 Akkus
[IT] 2 gruppi batterie ricaricabili
[EN] Optical Cable
[FR] Câble optique
[□E] Optisches Kabel
[IT] Cavo ottico
Microphone Insertion Directions 6
6
Batteries 7
Headset Controls 8
Base Station 10
Digital Audio Setup 12
Analog Audio Setup. 14
Power Save Mode 15
Wireless Range 15
15
Stereo Input Modes 16
Dolby Digital/EX Input Modes 17
Matching with Controllers 18
Troubleshooting 18
Warranty 19
Technical Support 19
FRANCAIS
Before using this product, read the manuals for this accessory and the Xbox 360 console (and any other applicable manuals) for important safety and health information. Keep all manuals for future reference.
For replacement Xbox manuals, see www.xbox.com/support or call Xbox Customer Service.
PREVENTION OF HEARING LOSS
CAUTION - Permanent hearing loss may occur if earphones or headphones are used at high volume for prolonged periods of time.
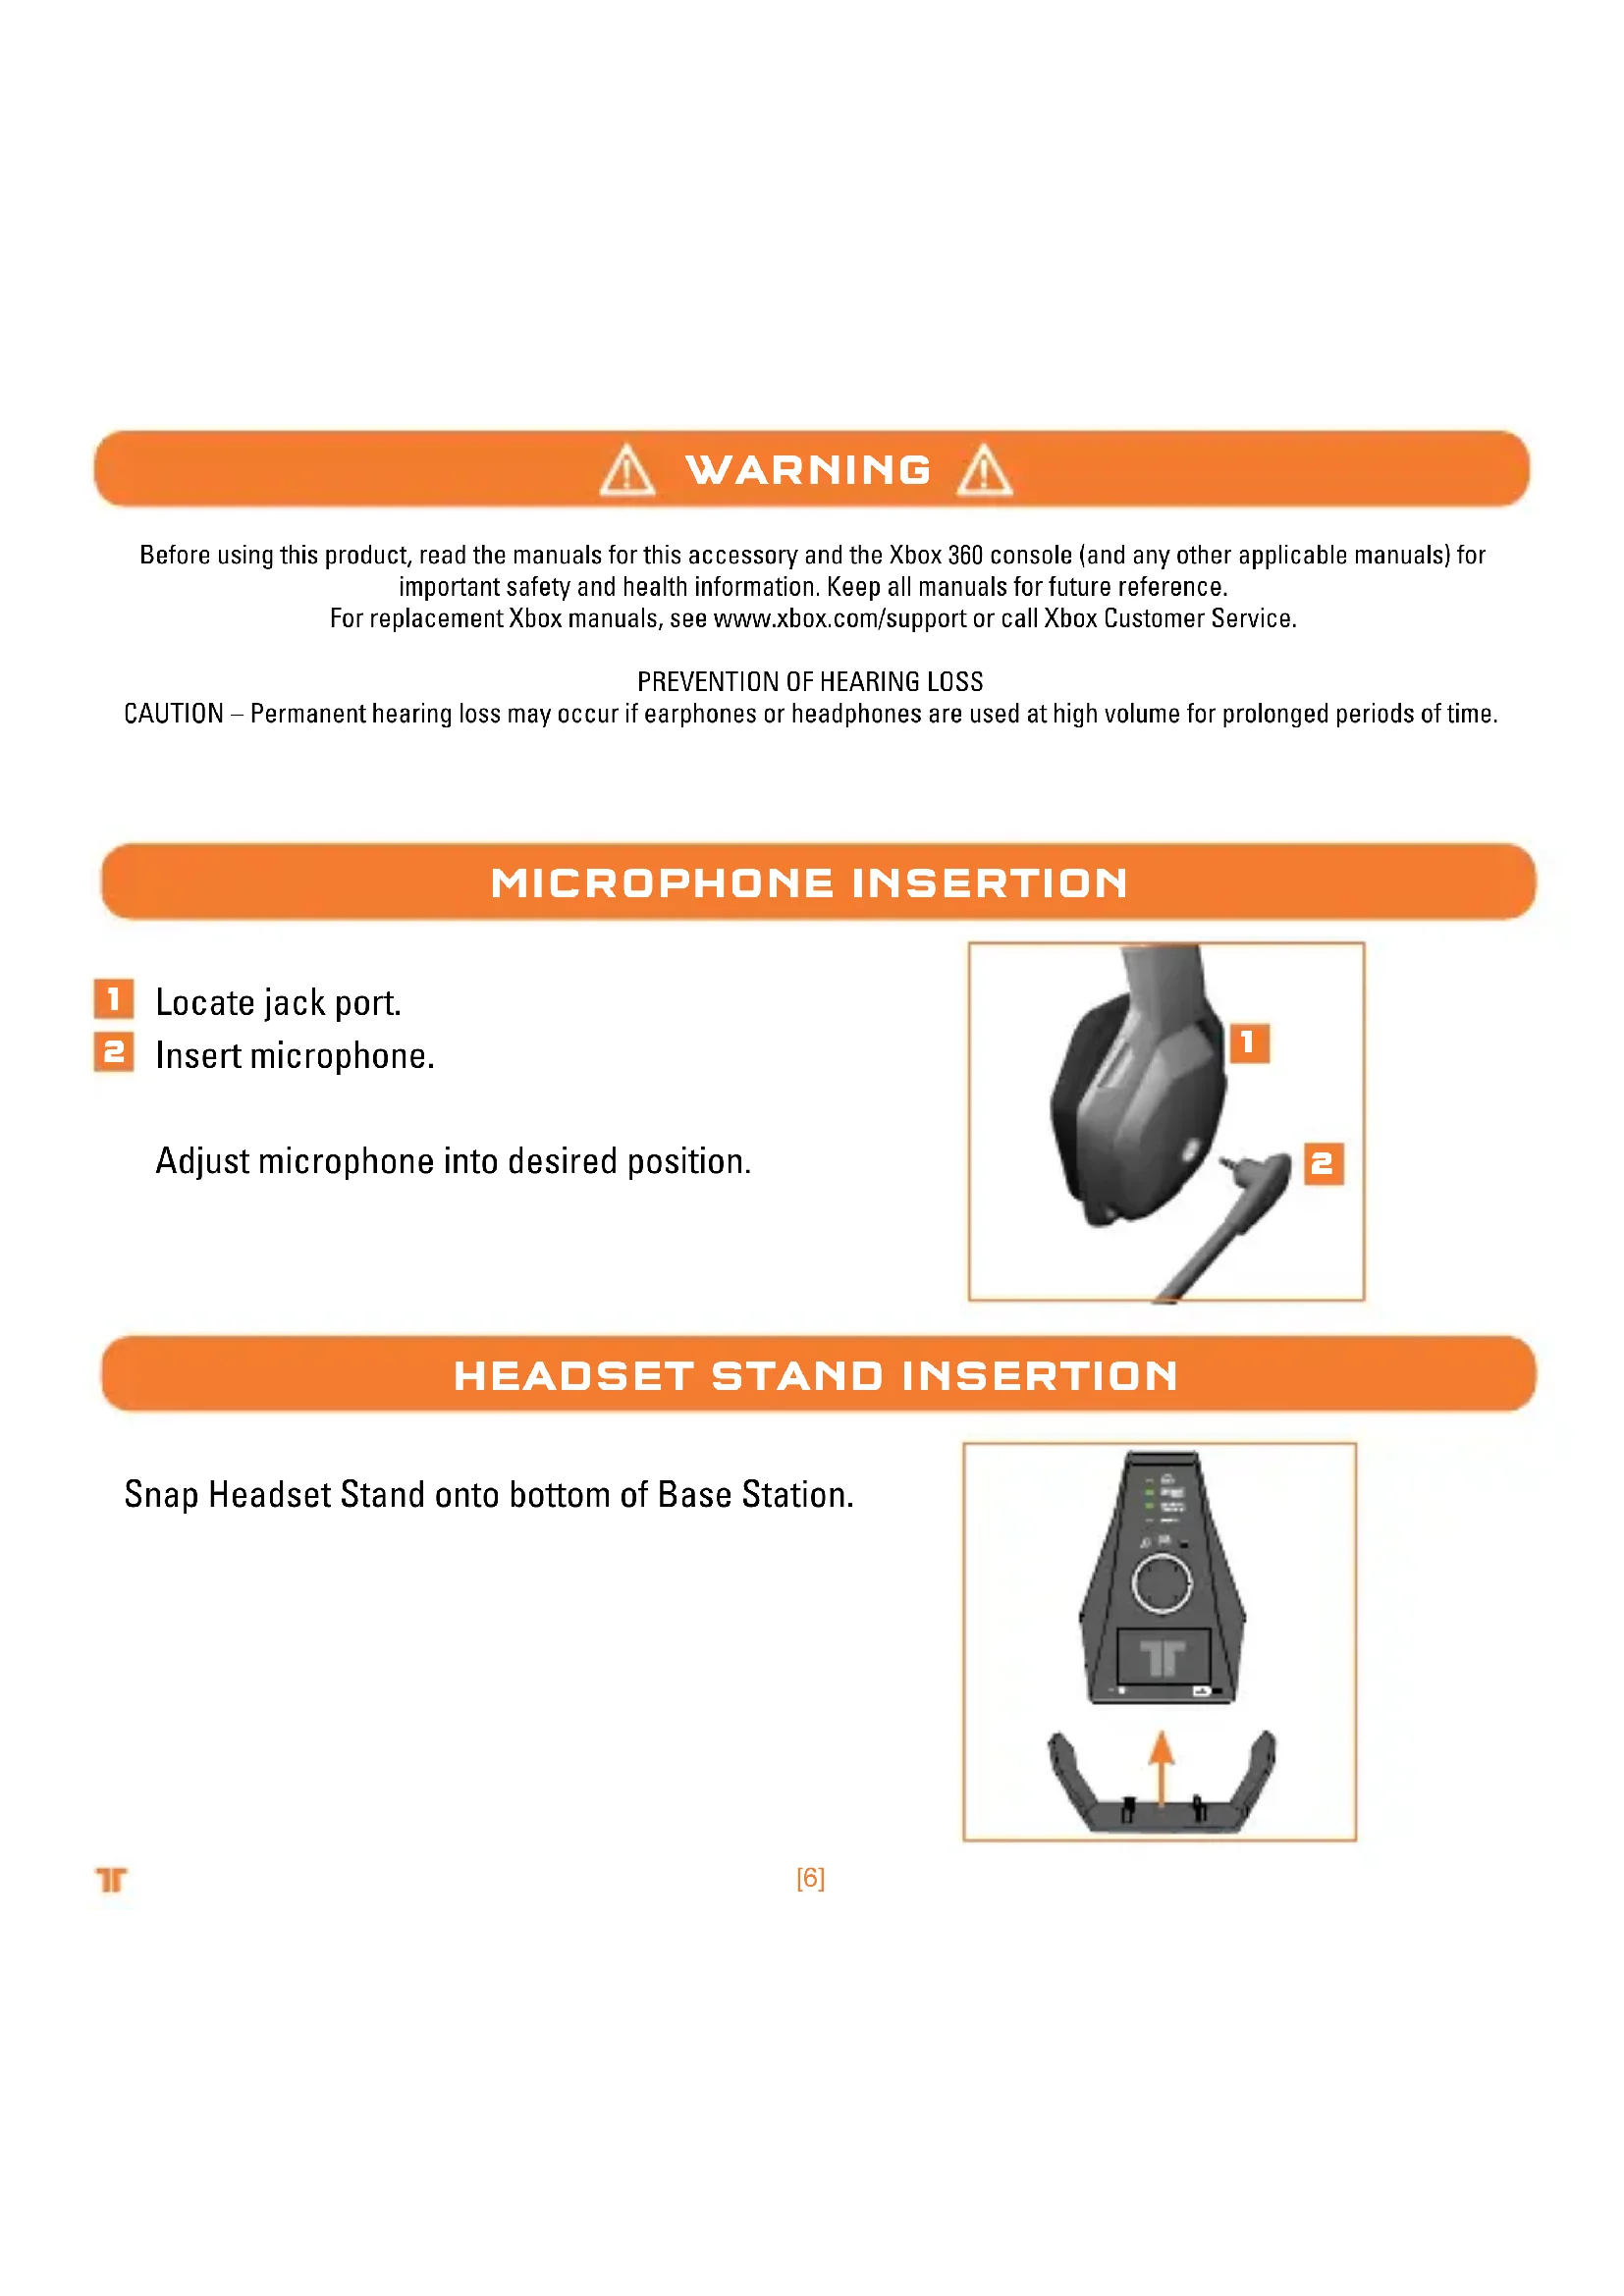
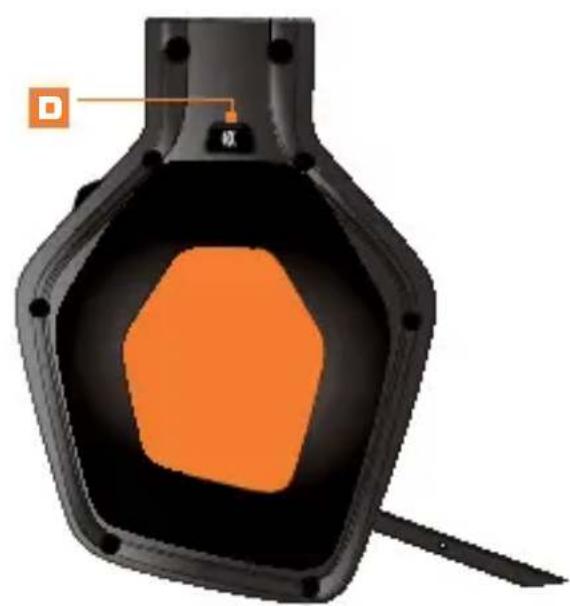
MICROPHONE INSERTION
Locate jack port.
2 Insert microphone.
Adjust microphone into desired position.
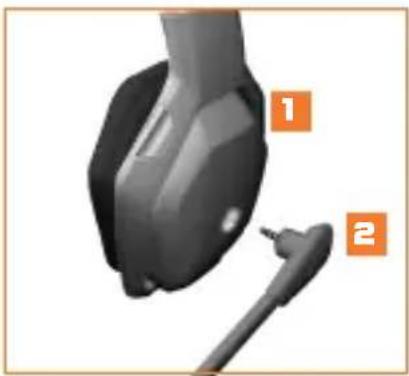
HEADSET STAND INSERTION
Snap Headset Stand onto bottom of Base Station.
T
[6]
BATTERIES
Charge your Warhead 7.1 Wireless Surround Headset batteries before first-time use, and whenever either battery is depleted. To charge or recharge the battery:
1 Place the battery in the charging slot on the Base Station.
2 While the battery is charging, the Battery Charge Indicator will illuminate Red. Once charging is complete, the Battery Charge Indicator will illuminate Green.
Once the battery is charged, insert it into the Headset by removing the battery cover from the right earcup and placing the battery into the compartment.

To check the current charge level of the battery in the Headset, press and release the Xbox Guide Button. The charging status will be displayed on screen.

Notes:
- Fully charging a battery can take up to 8 hours.
If the battery is unused for a long time, the battery may lose its charge. If this occurs, simply recharge the battery normally. - The battery and Base Station may become warm while charging.
HEADSET CONTROLS·LEFT SIDE
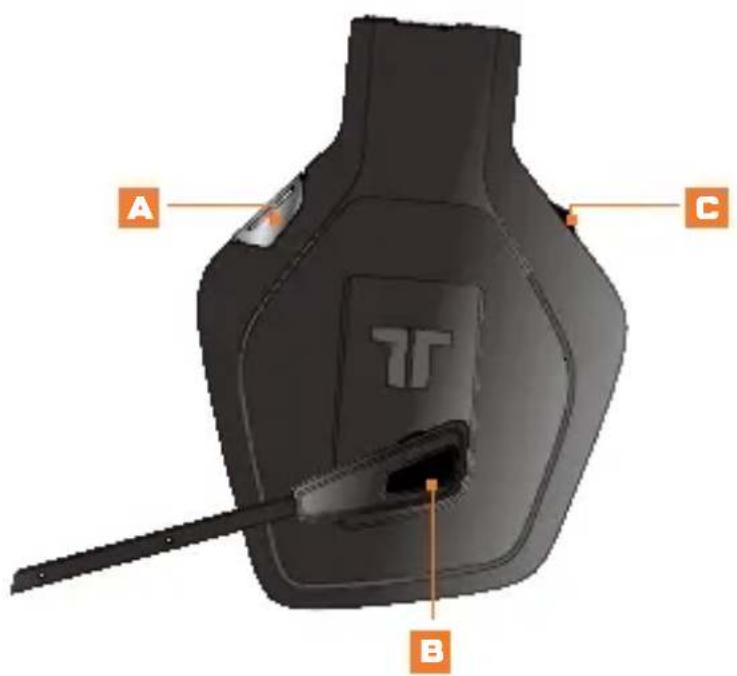
A Input: Push this button to toggle between the Analog and Digital (optical) inputs. Press and hold this button for 0.5 seconds.
B Mic Mute: Press the mic mute button so that others cannot hear you. The LED at the end of the microphone will illuminate when the mic is muted.
Voice Communication Volume and SVM Control: Use to adjust the volume of the voices of other players. SVM = Selectable Voice Monitoring. SVM allows the user to hear his or her own voice through the Headset. Push in to turn SVM ON/OFF.
Connect Button: Push and release this button to match the Headset to the controller. Press and hold this button for 3 seconds to connect Headset to the console.
Game Audio Volume and Mute: Use to adjust the volume of the game audio. Push in to mute/unmute game audio.
F Dolby Mode: Push to select between the various Dolby modes. Press and hold this button for 0.5 seconds. See pages 16-17 for more information.
G Power/Sync: Push and release to turn Headset ON/OFF. Hold for 5 seconds to put Headset in Sync mode. See page 15 for more information on Syncing the Headset to the Base Station.
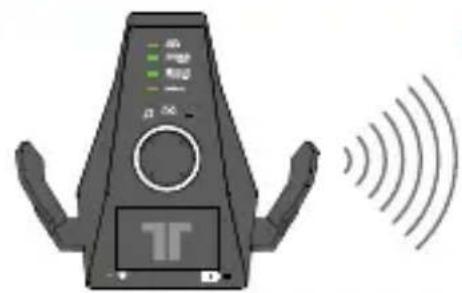
BASE STATION
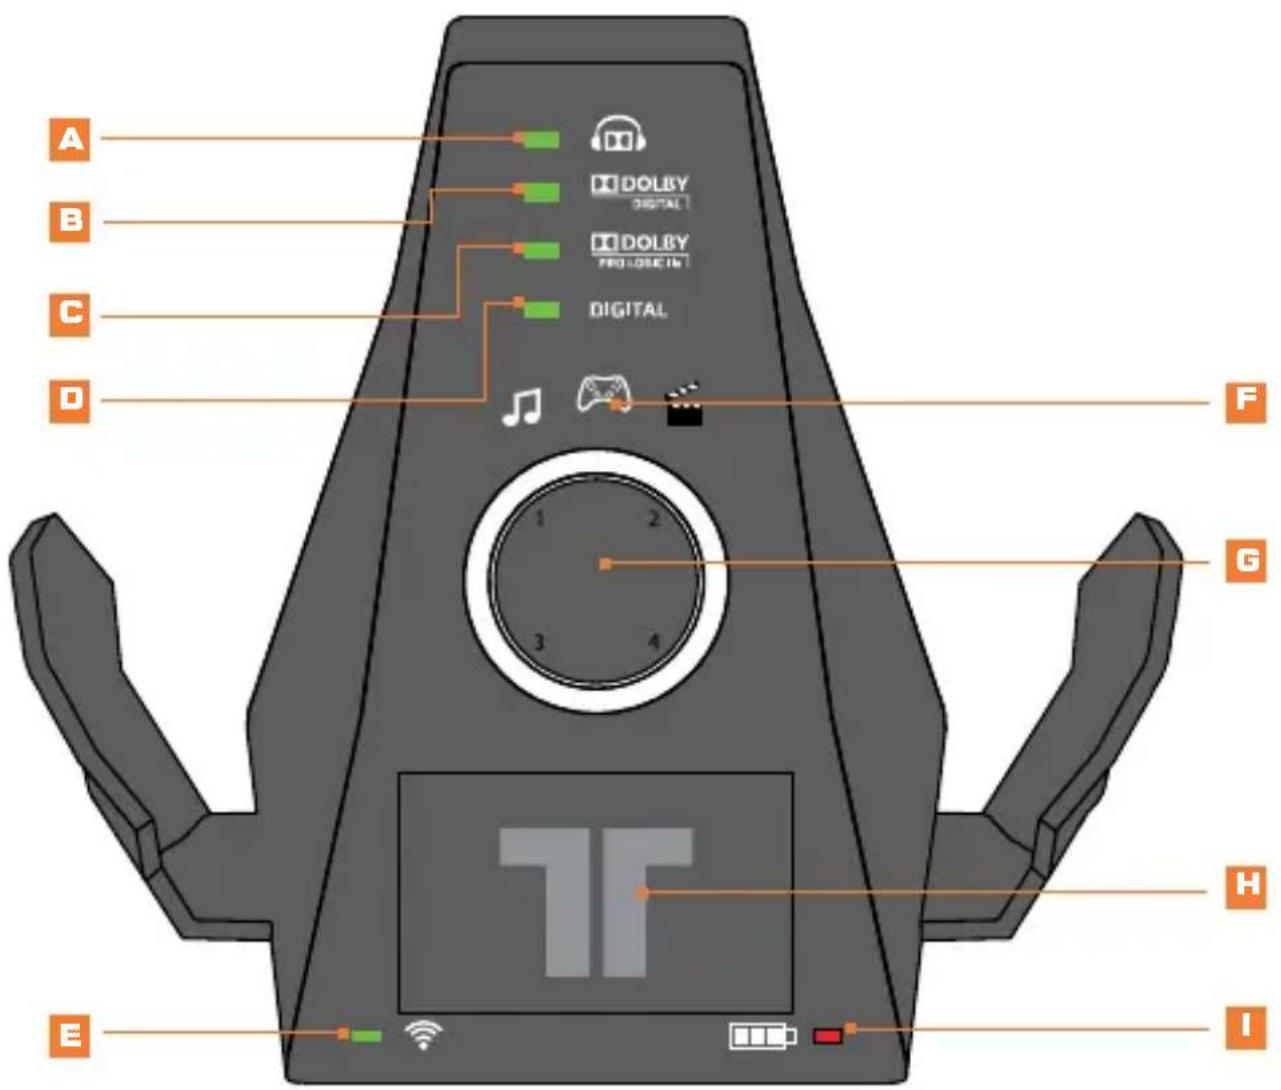

BASE STATION
A Dolby Headphone Indicator: Illuminates when Dolby Headphone mode is enabled.
B Dolby Digital Indicator: Illuminates when a Dolby Digital signal is received.
Dolby Pro Logic IIx Indicator: Illuminates when Dolby Pro Logic IIx is enabled.
Digital Indicator: Illuminates when the Digital (optical) input is selected. The LED will turn OFF when the analog input is selected.
Power/Sync Status Indicator:
a. Flashing: Syncing or searching for Headset.
b. Solid: Connected to a Headset while Base Station is powered ON.
c. OFF: Base Station is powered OFF.
EQ Mode Indicator: Indicates if Music, Movie or Game mode is selected.
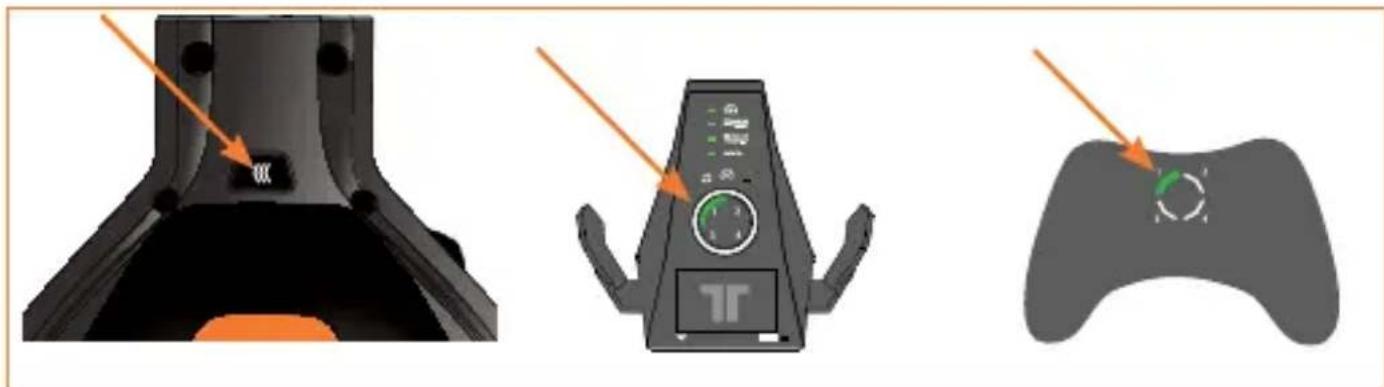
Ring of Light: Indicates the quadrant to which the Headset is associated. See page 18 for more information.
Battery Charging Slot: Insert battery here for charging.
Battery Charge Indicator: Red when charging, Green when fully charged.
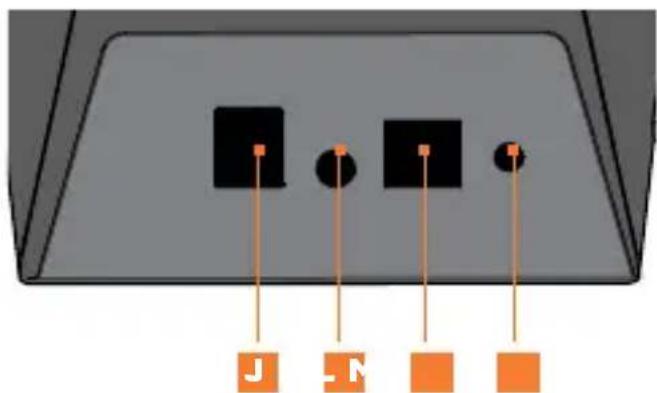
REAR OF BASE STATION
AC Power Input
K Line In
Digital Optical input
M Sync Button: Press and hold for 2 seconds to put Base Station in Sync mode. See page 15 for more information.
T
[11]
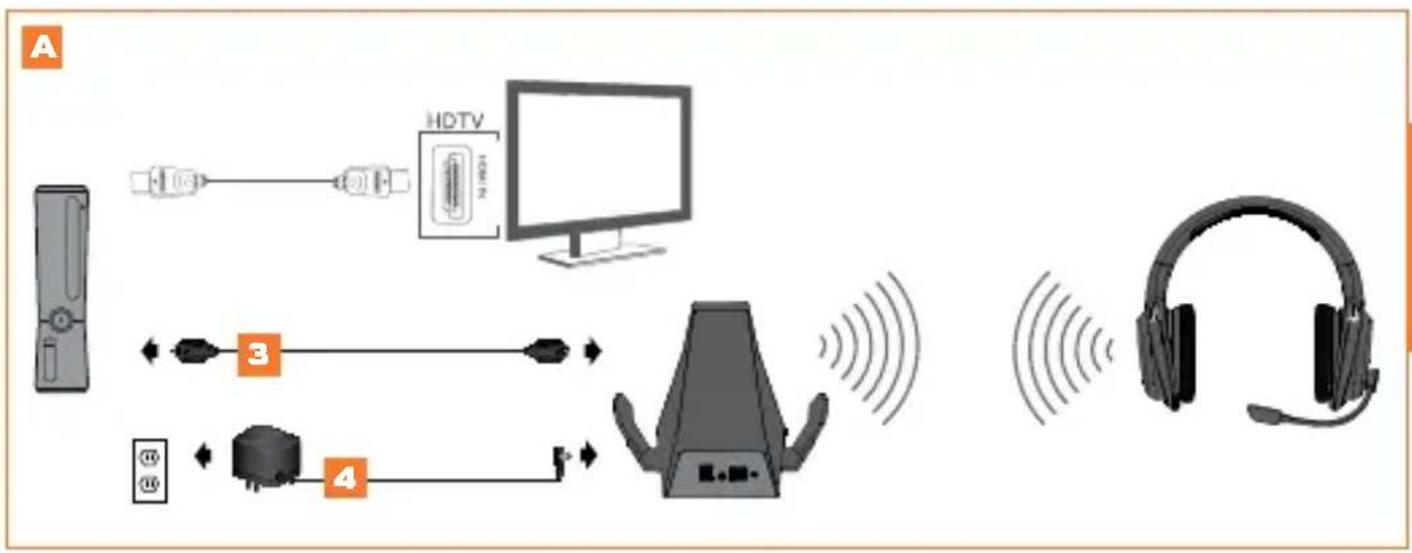
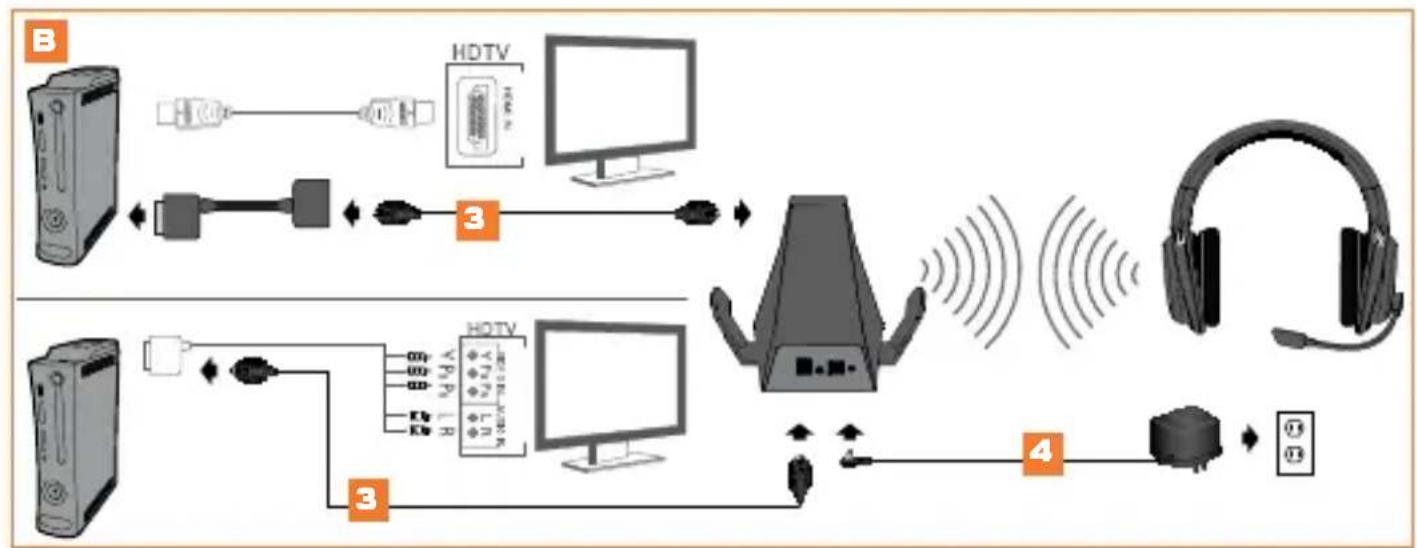
DIGITAL AUDIO SETUP
Charge the battery and insert it into the Headset. See page 7 for more information.
Remove protective caps from the Optical Cable.
A- Plug one end of the Optical Cable into the optical port on the rear of the Xbox 360® S Console. Plug the other end of the Optical Cable into the wireless Base Station.
OR
B- If using the Xbox 360 Console (Original) with HDMI, connect the Optical Cable to the Digital Audio Adapter, and then connect the Digital Audio Adapter to the AV port on the rear of the Xbox 360.
If using the Xbox 360 Console (Original) with Component/VGA/Composite AV cable, connect the Optical Cable to the optical port on the Component/VGA/Composite AV cable.
4 Connect Power Adapter to Base Station. Plug Power Adapter into wall outlet.
5 Power ON the Xbox 360 Console and Headset.
In the Xbox dashboard, select System Settings > Console Settings > Audio > Digital Output and select "Dolby Digital 5.1." Watch to ensure that the "Dolby Digital" light on the Base Station illuminates as a game or movie starts.
To confirm Xbox LIVE settings, press the "Xbox Guide Button" when a game is loaded, and go to Personal Settings > Voice. Ensure that "Headset Only" is selected.
Press the connect button on the Xbox 360. Press and hold the connect button on the headset for 3 seconds.
Match the Base Station quadrant to the controller by pressing the Connect Button. See page 18 for more information.
Press the Input button on the Headset to select the digital input. The "Digital" LED on the Base Station will illuminate when the digital input is selected.
DIGITAL AUDIO SETUP
*HDMI cable and Component/VGA/Composite AV cable not included
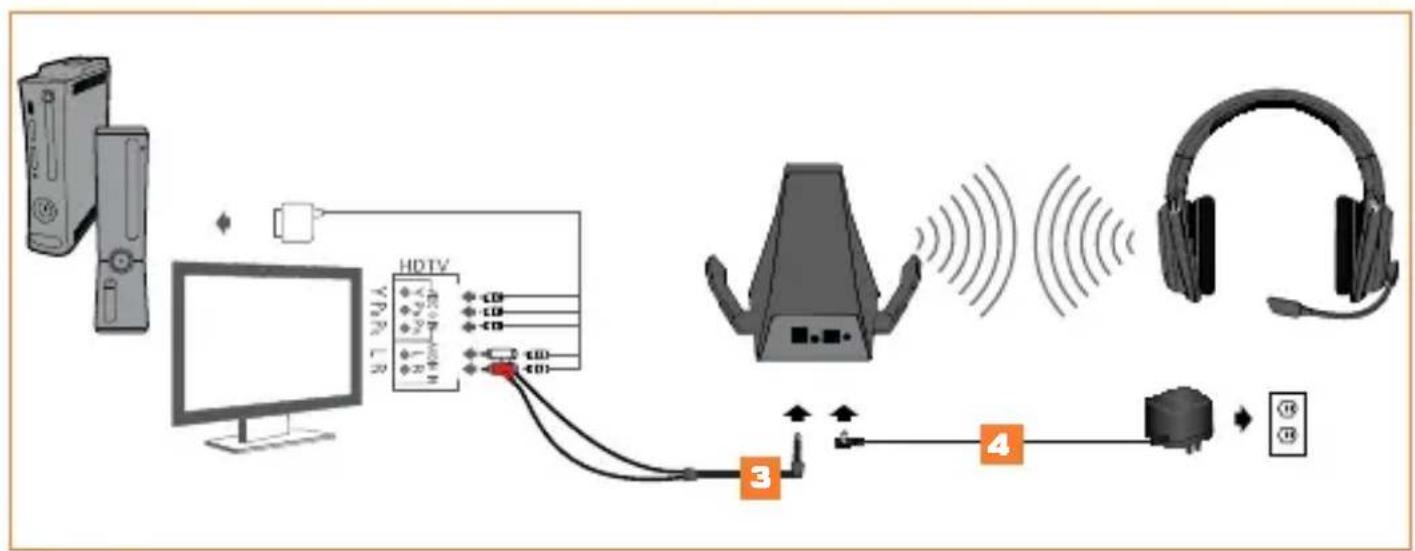
ANALOG AUDIO SETUP
Charge the battery and insert it into the Headset. See page 7 for more information.
Plug the 3.5mm stereo audio connector of the RCA Adapter Cable into the Line In input of the Base Station.
3 Connect the Red/White RCA cables from the RCA Adapter Cable to the Red/White RCA cables on the Component/VGA/Composite AV cable. Optional: Connect the male ends of these cables to the RCA audio inputs on the display.
4 Connect Power Adapter to Base Station. Plug Power Adapter into wall outlet.
5 Power ON the Xbox 360 Console and Headset.
To confirm Xbox LIVE settings, press the "Xbox Guide Button" when a game is loaded, and go to Personal Settings > Voice. Ensure that "Headset Only" is selected.
Press the connect button on the Xbox 360. Press and hold the connect button on the headset for 3 seconds.
Match the Base Station quadrant to the controller by pressing the Connect button. See page 18 for more information.
Press the Input button on the Headset to select the analog input. The "Digital" LED on the Base Station will turn OFF when the analog input is selected.
POWER SAVE MODE
If the Headset receives no audio for 15 minutes, the Headset will power down to save battery power. Press the Power/Sync button to turn the Headset back ON.
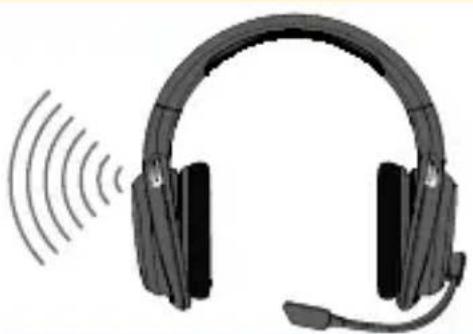
WIRELESS RANGE
The Warhead 7.1 Headset transmits audio via digital radio frequency (RF) and has an operating range of 33 feet/10 meters in any direction. Please remain within this range for optimal performance. Avoid placing the Base Station on top of a metal surface or behind other devices that use RF. If the Headset is not operating properly within the 33-foot/10-meter range, try moving the Base Station to a different location for improved performance.
33ft/10m
SYNCING HEADS TTOBASESTATION
Note: Headsets are paired to the Base Station at the factory. This step is only necessary when Syncing a new Headset.
With the Base Station powered ON, press and hold the Power/Sync button on the Base Station for 2 seconds. The Power/Sync LED on the Base Station will flash slowly.
On the Headset, quickly press and hold the Power/Sync button for 5 seconds. The Headset and Base Station will Sync, and the LED on the Base Station will illuminate solid when the Syncing is successful.
STEREO INPUT MODES
| LED lights ONMode | |
| Stereo | No LEDs |
| Pro Logic IIx Game 7.1 audio | DOLBY PRO LOGIC IIx |
| Pro Logic IIx Movie 7.1 audio | DOLBY PRO LOGIC IIx |
| Pro Logic IIx Music 7.1 audio | DOLBY PRO LOGIC IIx |
DOLBY DIGITAL/EX INPUT MODES
| LED lights ONMode | |||
| Stereo | DOLBY DIGITAL | ||
| Pro Logic IIx Game 7.1 audio | DOLBY DIGITAL | DOLBY PRO LOGIC IIx | |
| Pro Logic IIx Movie 7.1 audio | DOLBY DIGITAL | DOLBY PRO LOGIC IIx | |
| Pro Logic IIx Music 7.1 audio | DOLBY DIGITAL | DOLBY PRO LOGIC IIx | |
| Dolby Digital Game 5.1 audio | DOLBY DIGITAL | ||
| Dolby Digital Movie 5.1 audio | DOLBY DIGITAL | ||
| Dolby Digital Music 5.1 audio | DOLBY DIGITAL | ||
MatchingWith controllers
If a controller is connected to quadrant 1, the Xbox 360 will associate the Headset with quadrant 1 on the Ring of Light. If another wireless Headset is already associated with quadrant 1, the Headset will be associated with quadrant 2.
Press the Connect button on the Headset repeatedly to match the quadrant of the Headset to the quadrant of the controller in use. For example, if the controller on the Xbox 360 is assigned to quadrant 3, press the Connect button on the Headset until quadrant 3 lights up on the Base Station.
troubleshootIng
Chat isn't working:
- Make sure your console is connected to Xbox LIVE. For information about Xbox LIVE, visit www.xbox.com/live.
Make sure the battery is freshly charged. - If you have 4 wireless controllers connected to your console, you will need to disconnect one of them in order to connect a wireless Headset. To disconnect a wireless controller, press and hold the Xbox Guide Button for 3 seconds, and then turn the controller OFF.
No Sound:
- Check that the game audio mute switch is not enabled.
- Check that the Base Station is plugged in, powered ON, and paired to the Headset.
- Check that the Optical or Analog Audio Connection Cable is connected between the Base Station and the Xbox 360, and that the correct input is selected on the Base Station. Check to ensure that the plastic protective caps on the Optical Cable have been removed.
- Move the Headset closer to the console.
Make sure the battery is freshly charged.
WARRANTY
Register your product at TRITTONUSA.COM to receive warranty coverage, news, events and updates.
If you have any issues using this product, please try the following before returning this product to the store: If people cannot hear you talk, make sure that the mute switch is not enabled.
To confirm Xbox LIVE settings, press the Xbox Guide Button when a game is loaded, and go to Personal Settings > Voice. Ensure that "Headset only" is selected.
- For immediate support, visit http://www.trittonusa.com to find the latest documentation, Knowledge Base articles, and software for your device. You can also chat live with a support technician or submit a trouble ticket.
2-year limited warranty
Mad Catz warrants this product to be free from defects in materials and workmanship for the warranty period. This non-transferable, two- (2) year limited warranty is only to you, the first end-user purchaser. If a defect covered by this warranty occurs AND you have registered your product with Mad Catz AND you provide proof of purchase, Mad Catz, at its option, will repair or replace the product at no charge.
The Mad Catz two- (2) year limited warranty is available to North American and European customers. Your sole and exclusive remedy is repair or replacement of your Mad Catz product. In no event shall Mad Catz liability exceed the original purchase price of the product. This warranty does not apply to: (a) normal wear and tear or abusive use; (b) industrial, professional or commercial use; (c) if the product has been tampered with or modified.
To receive warranty service you must:
- North America: call Mad Catz Technical Support at 1.800.659.2287 or 1.619.683.2815
- Europe: call Mad Catz Technical Support at +44 (0) 8450-508418
- Obtain a Return Authorization Number from Mad Catz Technical Support
- Ship the product to Mad Catz at your expense for service
- Enclose a copy of the original sales receipt showing a purchase date
- Enclose a full return address with daytime and evening phone numbers
TECHNICAL SUPPORT
Online Support and User Guides: www.trittonusa.com
North American E-mail: techsupport@madcatz.com
North American telephone: Available 8am - 12pm, 1 - 4pm Pacific Standard Time, Monday
through Friday (excluding holidays) at 1.800.659.2287 (US only) or 1.619.683.2815 (outside US).
European E-mail: techsupporteurope@madcatz.com
European telephone: Available 9 A.M. to 5 P.M. Greenwich Mean Time, Monday through Friday (excluding bank holidays) at +44 (0) 8450-508418
CAUTIONS
- Long-term exposure to loud music or other sounds in headphones may cause hearing damage. It is best to avoid extreme volume levels when using headphones, especially for extended periods.
Use this unit only as intended. - To prevent fire or shock hazard, do not expose this unit to rain or moisture. Do not use within 30^ of any water such as swimming pools, bathtubs, or sinks.
- To avoid electrical shock, do not disassemble. Refer servicing to qualified personnel only.
-
Never insert objects of any kind, other than authorized items, into the product as they may touch dangerous voltage points or short out parts that could result in fire or electrical shock.
-
Stop using this unit immediately if you begin to feel tired or if you experience discomfort or pain in your hands and/or arms while operating the unit. If the condition persists, consult a doctor.
- Avoid prolonged use of this unit. Take breaks every 30 minutes.
- Route all cords so that they are not likely to be walked on or tripped over. Make sure that cords are not placed in a position or areas where they may become pinched or damaged.
- Do not wrap cords around any part of anyone's body.
- Do not allow children to play with cords.
This unit should be operated only from the power source indicated on the unit. If you are not sure of the type of electrical power supplied to your home, contact your local power company. - Do not overload wall outlets or extension cords beyond their capacity, since doing so can cause fire or electric shock.
- Misuse of batteries within this unit may cause batteries to leak and/or explode and lead to personal injury.
This product contains small parts that may cause choking if swallowed. Not intended for use by children under 3 years of age.
WARNING
- Non-rechargeable batteries are not to be recharged.
- Do not mix old and new or different types of batteries.
- Batteries are to be inserted with the correct polarity.
- Remove exhausted batteries from the product.
Supply terminals are not to be short-circuited. - Rechargeable batteries are to be removed from the product before being charged.
- Rechargeable batteries are only to be charged under adult supervision.
- The packaging must be retained since it contains important information.
United States and Canada:
As required, certain of these class B digital devices (the headsets) have been tested by Mad Catz, Inc., 7480 Mission Valley Road, Suite 101, San Diego, CA 92108, and found to comply with part 15 of the FCC rules and the Canadian RSS-210 which sets forth limits designed to provide reasonable protection against harmful interference in a residential installation. These device(s) use, generate and can radiate radio frequency energy and, if not assembled, installed and used in accordance with the instructions, may cause harmful interference to radio communications. There is no guarantee that interference will not occur in any particular location or use. Operation is subject to the following two conditions: (1) this device may not cause harmful interference and (2) this device must accept any interference received, including interference that may cause undesired operation.
FCC Part 15 section 15.105
Warning: Any changes or modifications made on the system not expressly approved by the manufacturer could void the user's authority to operate the equipment.
Exposure to Radio Frequency Radiation:
The radiated output power of the headset is well within FCC radio frequency exposure limits for this type of device when unaltered and used as described in our instructions and the controller operates within guidelines found in radio frequency safety standards, which reflect the consensus of the scientific community and therefore, the manufacturer believes the device's internal wireless radio is safe for use by consumers. The level of energy emitted is far less than the electromagnetic energy emitted by wireless devices such as mobile phones. However, the use of wireless radios may be restricted in some situations (e.g., on airplanes). If you are unsure of restrictions that may apply in any situation, you must ask for authorization before turning on, connecting or using the controller.
EU DECLARATION OF CONFORMITY:
As required, certain of these products have been tested and conform to the requirements of the European Union Directives 1999/5/EC, 2002/95/EC, 2002/96/EC, and 2004/108/EC. Authorized signatory of the manufacturer is Mad Catz, Inc., 7480 Mission Valley Road, Suite 101, San Diego, CA 92108.
CAUTION
RISK OF EXPLOSION IF BATTERY IS REPLACED BY AN INCORRECT TYPE. DISPOSE OF USED BATTERIES ACCORDING TO THE INSTRUCTIONS.
12/11
T
[20]

NOTES
T
[21]
AVENTISSEMENT
DOLBY DIGITAL/EX-EINGANGSGMODI
| LED-Leuchten EINModus | |||
| Stereo | DOLBY DIGITAL | ||
| Pro Logic IIx Game 7.1-Audiosignal | DOLBY DIGITAL | DOLBY PRO LOGIC IIx | |
| Pro Logic IIx Movie 7.1-Audiosignal | DOLBY DIGITAL | DOLBY PRO LOGIC IIx | |
| Pro Logic IIx Music 7.1-Audiosignal | DOLBY DIGITAL | DOLBY PRO LOGIC IIx | |
| Dolby Digital Game 5.1-Audiosignal | DOLBY DIGITAL | ||
| Dolby Digital Movie 5.1-Audiosignal | DOLBY DIGITAL | ||
| Dolby Digital Music 5.1-Audiosignal | DOLBY DIGITAL | ||
CONTROLLERN ZUORDNEN
MODALITA DI INGRESSO DOLBY DIGITAL/EX
| II LED si accendeModalità | |||
| Stereo | DOLBY DIGITAL | ||
| Audio Pro Logic Ilx gioco 7.1 | DOLBY DIGITAL | DOLBY PRO LOGIC IIx | |
| Audio Pro Logic Ilx film 7.1 | DOLBY DIGITAL | DOLBY PRO LOGIC IIx | |
| Audio Pro Logic Ilx musica 7.1 | DOLBY DIGITAL | DOLBY PRO LOGIC IIx | |
| Audio Dolby Digital gioco 5.1 | DOLBY DIGITAL | ||
| Audio Dolby Digital film 5.1 | DOLBY DIGITAL | ||
| Audio Dolby Digital musica 5.1 | DOLBY DIGITAL | ||
©2012 Mad Catz, Inc. 7480 Mission Valley Road, Suite 101, San Diego, CA 92108 U.S.A. Mad Catz, TRITTON, Warhead, the Mad Catz logo and the TRITTON logo are trademarks or registered trademarks of Mad Catz, Inc., its subsidiaries and affiliates. The shape and design of this product are a trade dress of Mad Catz. This product is manufactured under license from Microsoft Corporation. Microsoft, Kinect, Xbox, Xbox LIVE, Xbox 360, and the Xbox logos are trademarks of the Microsoft group of companies. Manufactured under license from Dolby Laboratories. Dolby, Pro Logic, and the double-D symbol are trademarks of Dolby Laboratories. All rights reserved. All other product names and images are trademarks or registered trademarks of their respective owners. Made in China. All rights reserved. Product features, appearance and specifications may be subject to change without notice. Please retain this information for future reference.