K 7.450 - Pressure washer Kärcher - Free user manual and instructions
Find the device manual for free K 7.450 Kärcher in PDF.
Frequently Asked Questions - K 7.450 Kärcher
User questions about K 7.450 Kärcher
0 question about this device. Answer the ones you know or ask your own.
Ask a new question about this device
Download the instructions for your Pressure washer in PDF format for free! Find your manual K 7.450 - Kärcher and take your electronic device back in hand. On this page are published all the documents necessary for the use of your device. K 7.450 by Kärcher.
USER MANUAL K 7.450 Kärcher
K7.300
K7.400
K7.410
K7.450

Deutsch 5
English 15
Français 24
Italiano 34
Nederlands 44
Espanol 54
Portugues 64
Dansk 74
Norsk 83
Svenska 92
Suomi 101
EayniKa 110
Türkce 120
Pycckn 129
Magyar 139
Cestina 148
Slovenscina 157
Polski 166
Romaneste 176
Slovencina 185
Hrvatski 194
Srpski 203
BbIrapckn 212
Eesti 222
Latviešu 231
Lietuviskai 240
YkpaHcbka 249
Regi ster and win! www.karcher.com
Inhaltsverzeichnis
S. Reiser
Head of Approbation
71364 Winnenden (Germany)
Tel.: +49 7195 14-0
Fax: +49 7195 14-2212
Winnenden, 2011/06/01
Technische Daten
Safety instructions. EN 6
Operation EN8
Transport. EN 11
Storage. EN 11
Maintenance and care . EN 11
Troubleshooting EN 11
CE Declaration EN 12
Technical specifications EN 13
General information
Dear Customer,

Please read and comply with these original instructions prior
to the initial operation of your appliance and store them for later use or subsequent owners.
Proper Use
This high-pressure cleaner is designed for domestic use only:
- to clean machines, vehicles, buildings, tools, facades, terraces, garden equipment etc. using a high-pressure water jet (and detergents if required).
with accessories, replacement parts and detergents approved by KARCHER. Observe the instructions provided with these detergents.
Symbols on the machine

The high pressure jet may not be directed at persons, animals, live electrical equipment or at the appliance itself. Protect the appliance against frost.
Symbols in the operating instructions
Danger
Immediate danger that can cause severe injury or even death.
Warning
Possible hazardous situation that could lead to severe injury or even death.
Caution
Possible hazardous situation that could lead to mild injury to persons or damage to property.
Environmental protection

The packaging material can be recycled. Please do not place the package to the ordinary refuse for disposal, but go for the proper recycling.

Old appliances contain valuable materials that can be recycled. Please arrange for the proper recycling of old appliances. Please dispose your old appliances using appropriate collection sys
Notes about the ingredients (REACH)
You will find current information about the ingredients at:
www.kaercher.com/REACH
Warranty
The warranty terms published by the relevant sales company are applicable in each country. We will repair potential failures of your appliance within the warranty period free of charge, provided that such failure is caused by faulty material or defects in manufacturing. In the event of a warranty claim please contact your dealer or the nearest authorized Customer Service centre. Please submit the proof of purchase. (See address on the reverse)
Safety instructions
Danger
- Never touch the mains plug and the socket with wet hands.
The appliance must not be used if the power cord or important parts of the appliance, e.g. high-pressure hoses, trigger gun or safety devices are damaged.
Check the power cord and mains plug for damage before every use. If the power cord is damaged, please arrange for it to be replaced immediately by an authorised repair agent or a skilled electrician
Check the high-pressure hose for damage before every use. Please arrange for the immediate replacement of a damaged high-pressure hose.
The appliance may not be used in areas where a risk of explosion is present.
If the appliance is used in hazardous areas (e.g. filling stations) the corresponding safety provisions must be observed.
High-pressure jets can be dangerous if improperly used. The jet must not be directed at persons, animals, live electrical equipment or at the appliance itself.
The high-pressure jet must not be directed at other persons or directed by the user at him/herself to clean clothing or footwear. - Never use the appliance to clean objects containing hazardous substances (e.g. asbestos).
Vehicle tyres or tyre valves are susceptible to damage from the high-pressure jet and may burst. The first indication of this is a discolouration of the tyre. Damaged vehicle tyres/tyre valves are highly dangerous. Ensure that a distance of at least 30~cm is observed when cleaning with the jet!
■ Risk of explosion! Do not spray flammable liquids. Never draw in fluids containing solvents or undiluted acids and solvents! This includes petrol, paint thinner and heating
oil. The spray mist thus generated is highly inflammable, explosive and poisonous. Do not use acetone, undiluted acids and solvents as they are damaging to the materials from which the appliance is made.
Warning
The mains plug and the coupling of an extension cable must be watertight and must never lay in the water.
Unsuitable extension cables can be hazardous. Only use extension cables outdoors which have been approved for this purpose and labelled with a sufficient cable cross-section: 1 - 10 m: 1.5 mm²; 10 - 30 m: 2.5 mm²
Always fully unroll electrical cables from the cable drum.
High-pressure hoses, fixtures and couplings are important for the safety of the appliance. Only use high-pressure hoses, fixtures and couplings recommended by the manufacturer.
This appliance is not intended for use by persons with reduced physical, sensory or mental capabilities.
The appliance must not be operated by children or persons who have not been instructed accordingly.
Children should be supervised to prevent them from playing with the appliance.
The operator must use the appliance correctly. When working with the appliance, he must consider the local conditions and pay due care and attention to other persons, in particular children, who are nearby.
Do not use the appliance when there are other persons around unless they are also wearing safety equipment.
Wear protective clothing and safety goggles to protect against splash back containing water or dirt.
Caution
In case of extended downtimes, switch the appliance off at the main switch / appliance switch or remove the mains plug.
Do not operate the appliance at temperatures below 0^ .
Observe a distance of at least 30~cm when using the jet to clean painted surfaces to avoid damaging paintwork.
- Never leave the appliance unattended when it is in operation.
Make sure that the power cable or extension cables are not damaged by running over, pinching, dragging or similar. Protect the power cable from heat, oil, and sharp edges.
All current-conducting parts in the working area must be protected against jet water.
The appliance may only be connected to an electrical supply which has been installed in accordance with IEC 60364.
The appliance may only be connected to alternating current. The voltage must correspond with the type plate on the appliance.
For safety reasons, we recommend that you operate the appliance only via a earth-leakage circuit breaker (max. 30 mA).
Cleaning operations which produce oily waste water, e.g. engine washes, underbody washes, may only be carried out using washing stations equipped with an oil separator.
This appliance was designed to be used with detergents which are supplied or recommended by the manufacturer. The use of other detergents or chemicals may compromise the safety of the appliance.
Safety Devices
Caution
Safety devices protect the user and must not be modified or bypassed.
Power switch
The appliance switch prevents unintentional operation of the appliance.
Lock trigger gun
This lock locks the lever of the trigger gun and prevents the inadvertent start of the appliance.
Overflow valve with pressure switch
The overflow valve prevents the permissible working pressure from being exceeded. If the lever on the trigger gun is released the pressure switch turns off the pump, the high-pressure jet is stopped. If the lever is pulled the pump is turned on again.
Prerequisites for the appliance's stability
Caution
Create stability for the appliance prior to all work on or with the appliance to prevent accidents or damage.
- The stability of the appliance is warranted when it is placed onto an even surface.
Operation
Scope of delivery
The scope of delivery of your appliance is illustrated on the packaging. Check the contents of the appliance for completeness when unpacking.
In the event of missing accessories or any transport damage, please contact your dealer.
Description of the Appliance
These operating instructions describe the basic models of the high pressure cleaners shown on the front cover.
These operating instructions describe the maximum equipment. Depending on the model, there are differences in the scopes of delivery (see packaging).
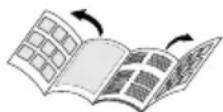
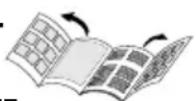
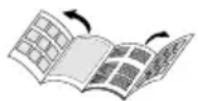
Illustrations on fold-out pages!
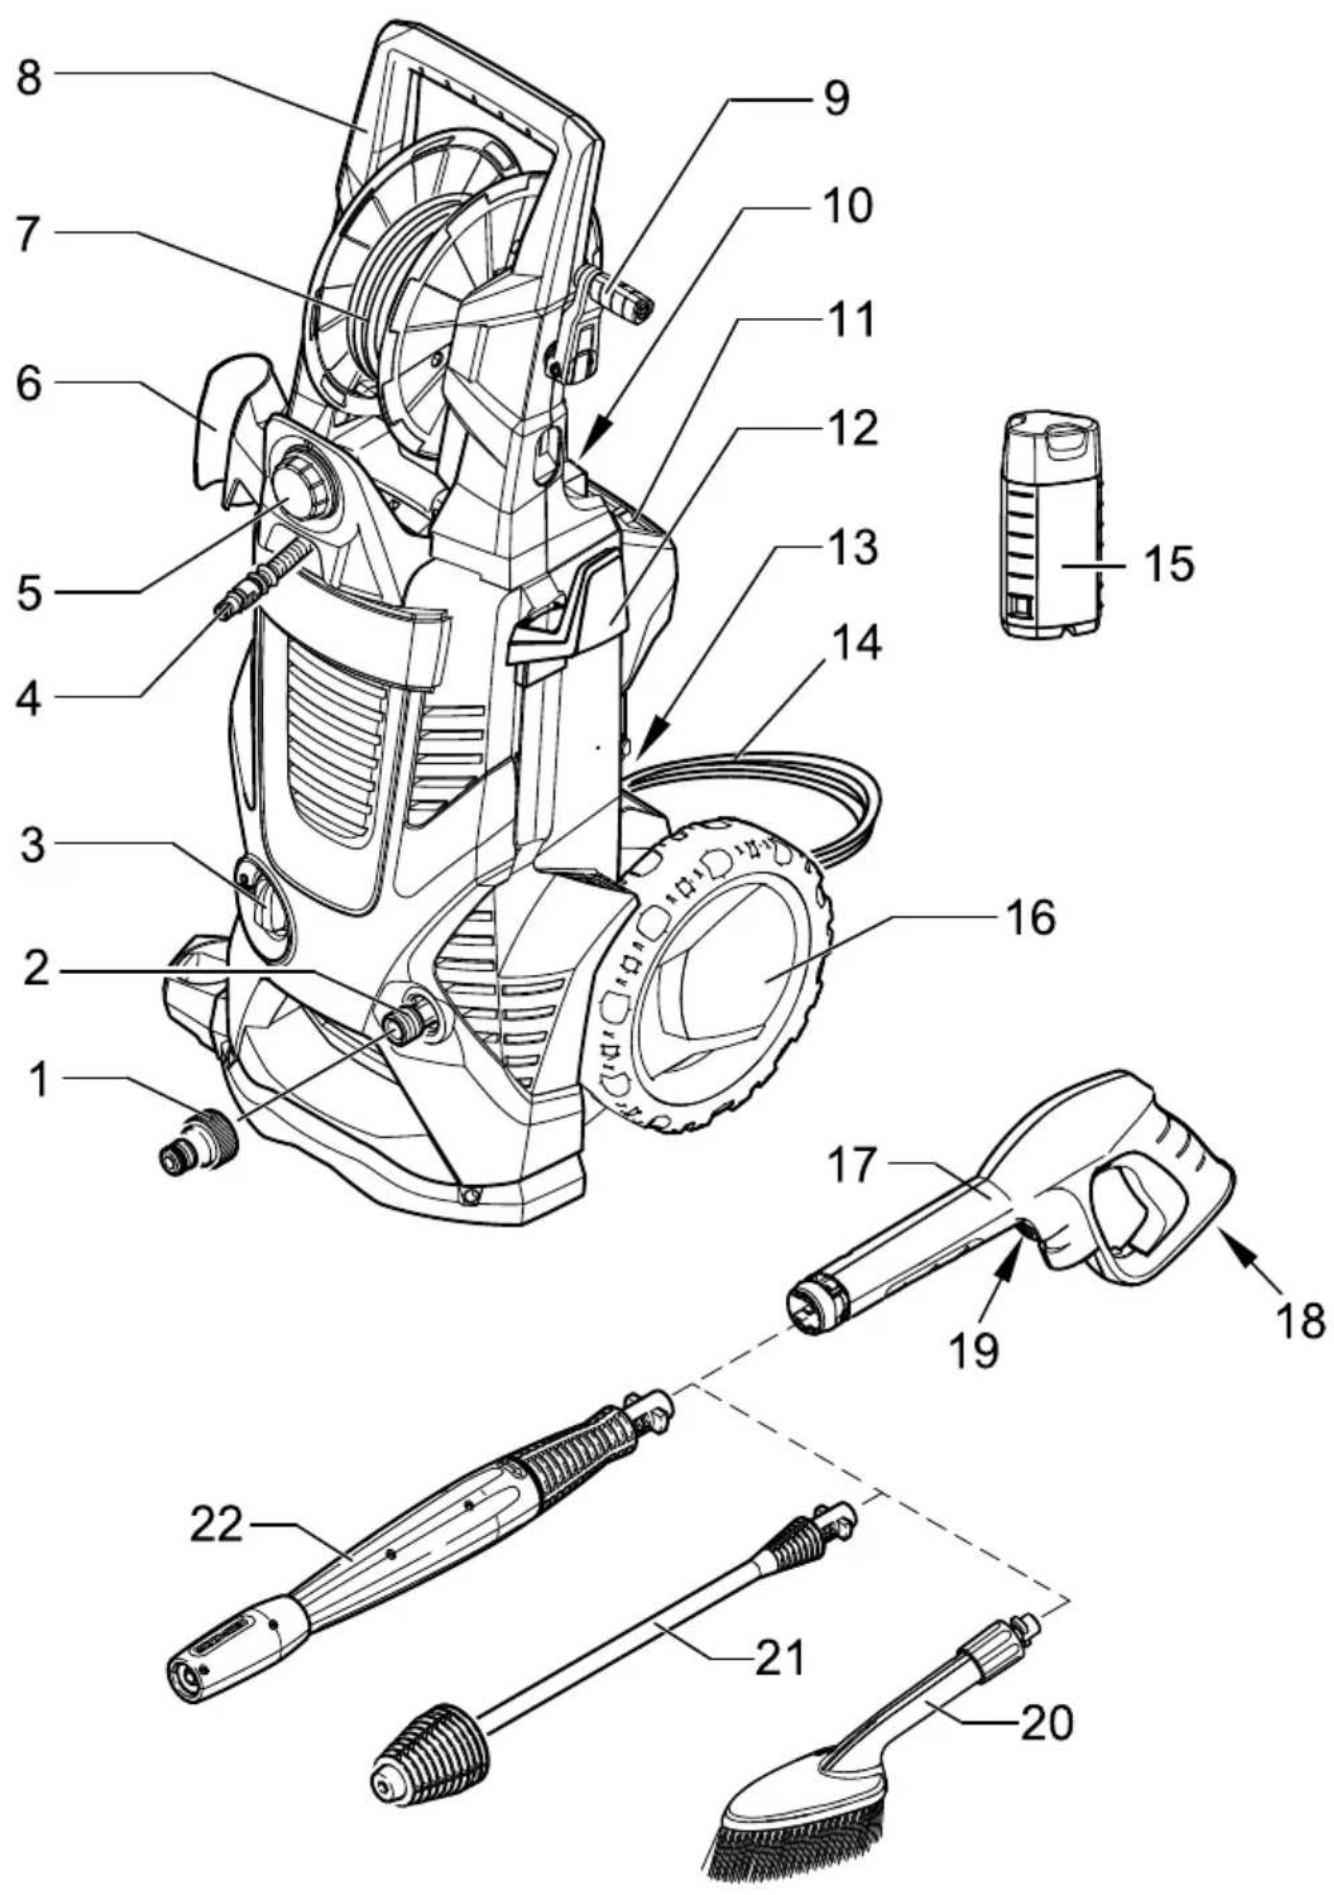
1 Coupling element for water connection
2 Water connection with integrated sieve
3 Appliance switch "0/OFF"/,I/ON"
4 High pressure hose
5 Dosage regulator for detergent
6 Storage for trigger gun
7 High-pressure hose drum
8 Transport handle
9 Hand crank for hose drum
10 Storage of Plug 'n' Clean detergent bottle with detergent connection
11 Storage for accessories
12 Option
Storage hook for mains connection cable
13 Option
Automatic coiling for mains cable
14 Mains cable with mains plug
15 Plug 'n' Clean detergent bottle with locking lid
16 Wheels
17 Trigger gun
18 Lock trigger gun
19 Key to detach the high pressure hose from the trigger gun
20 Washing brush
21 Spray lance with Dirtblaster
22 Spray lance with pressure regulation (Vario Power)
Special accessories
Special accessories expand the possibilities of using your appliance. Please contact your KÄRCHER dealer for further information.
Before Startup
Mount loose parts delivered with appliance prior to start-up.
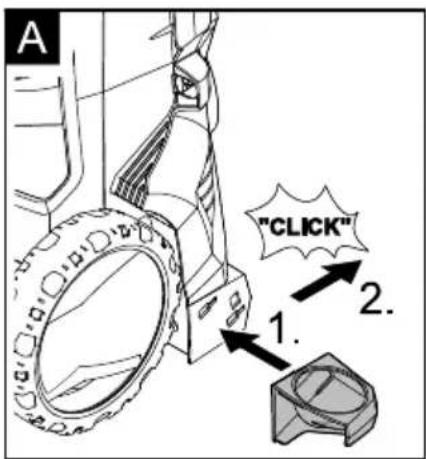
Install the storage for hand-spray gun Illustration A
Place the bottom holder into the recesses and push forward until it audibly locks in.
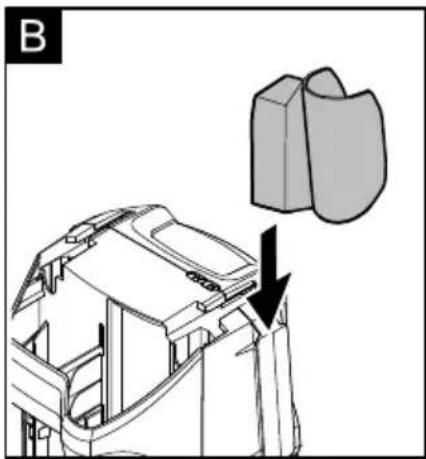
Illustration B
Insert the top holder and push down all the way.
Install the storage hook for the mains connection cable
Option
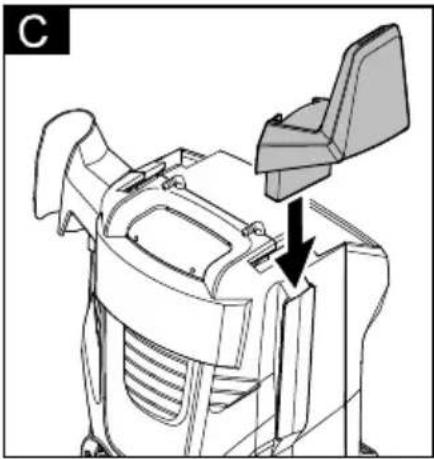
Illustration C
Install the top storage hook.
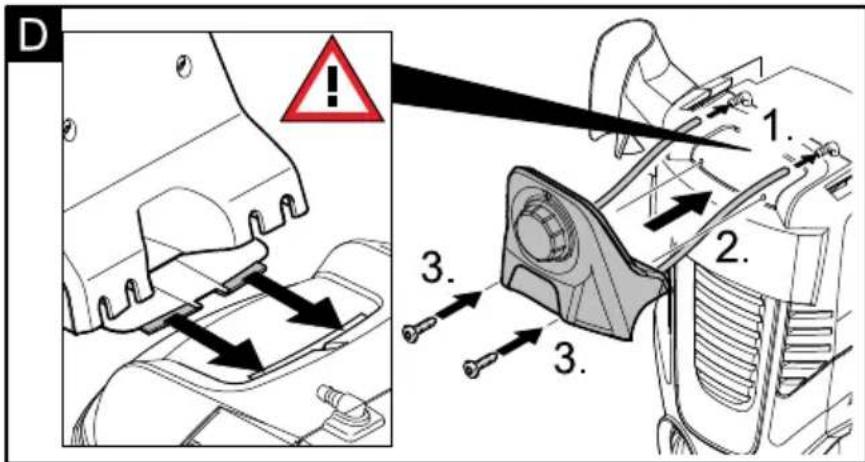
Install the dosage regulator for detergent
You will need the 2 included screws as well as a Philips screwdriver PH 2.
Illustration D
Insert both detergent hoses onto the hose fittings.
Install the dosage regulator and connect using 2 screws.
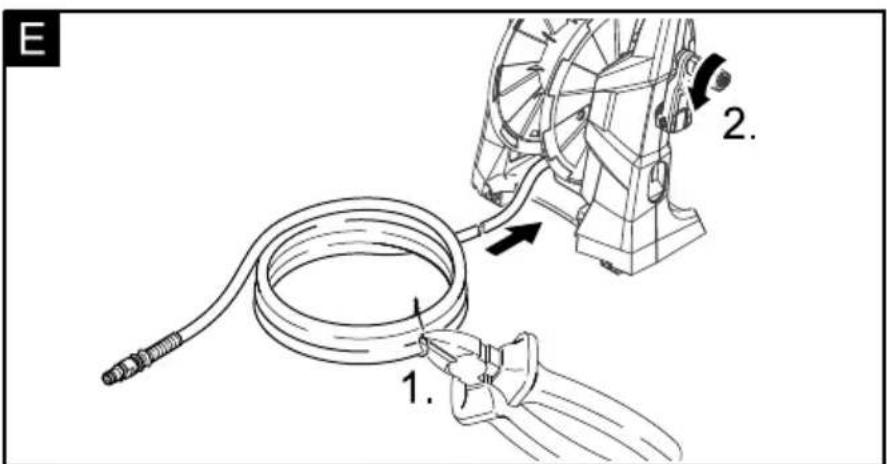
Install the transport handle
Illustration E
Wind up the high-pressure hose on the hose drum.
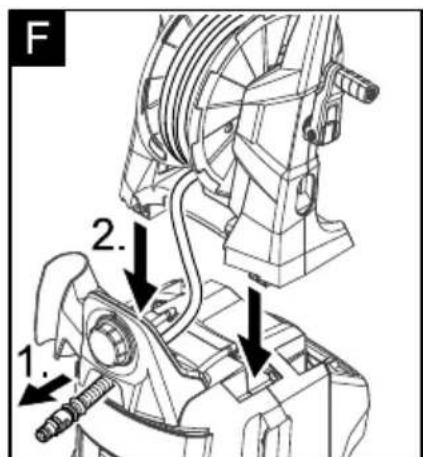
Illustration F
Slide the free end of the coiled high pressure hose through the recesses on the dosage regulator.
Illustration
Attach the transport handle, insert the bolts into the bores and screw them in.
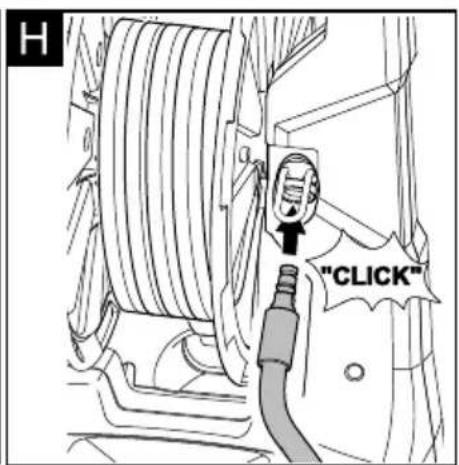
Illustration H
Press the connecting fitting from the short high pressure hose into the brass intake until it locks into place audibly.
Check the secure connection by pulling on the high pressure hose.
Connect the high pressure hose to the hand spray gun
Illustration 1
Push the high pressure hose into the trigger gun until it locks audibly.
Note: Make sure the connection nipple is aligned correctly.
Check the secure connection by pulling on the high pressure hose.
Water supply
Warning
According to the applicable regulations, the appliance must never be used on the drinking water supply without a system separator. Use a

suitable system separator manufactured by KÄRCHER; or, as an alternative, a system separator as per EN 12729 Type BA. Water flowing through a system separator is considered non-drinkable.
Caution
Always connect the system separator to the water supply, never directly to the appliance!
Note: Impurities in the water can damage the high-pressure pump and accessories.
For protection, the use of the KÄRCHER water filter (optional accessory, order no. 4.730-059) is recommended.
Water supply from mains
Observe regulations of water supplier.
For connection values, see type plate/technical data.
Use a fibre-reinforced water hose (not included) with a standard coupling.
(Minimum diameter 1/2 inch (13 mm), minimum length 7.5 m).
Illustration J
Screw the supplied coupling element to the water connection on the appliance.
Push the water supply hose onto the coupling unit, then connect it to the water supply.
Drawing in water from open reservoirs
This high-pressure cleaner is suited to work with the KÄRCHER suction hose with back
flow valve (Optional accessory, order no. 4.440-238) to draw in surface water, e.g. from water butts or ponds (see specifications for max. suction height).
Fill the KÄRCHER suction hose with backflow valve with water, screw to water supply and hang into the water butt.
Remove air from appliance before operation.
Switch on the appliance without connection the high-pressure hose (max. 2 minutes) and run it until the water discharging from the high-pressure outlet is free of bubbles. Switch off appliance and reconnect high-pressure hose.
Start up
Caution
Dry runs lasting longer than two minutes lead to damages to the high pressure pump. If the appliance does not build up pressure within two minutes, switch it off and proceed as instructed in the Chapter "Troubleshooting".
Illustration K
Push the spray lance into the trigger gun and fasten it by turning it through 90^ .
Illustration L
Unwind the high pressure hose from the hose drum. Hold on to the transport handle during this procedure.
Note: If the hand crank is in its secured position, fold it up first.
Completely open the water tap.
Completely uncoil the mains cable.
Insert the mains plug into the socket.
Turn on the appliance "I/ON".
Operation
Danger
The trigger gun is subjected to a recoil force when the water jet is discharged. Make sure that you have a firm footing and are also holding the trigger gun and spray lance firmly.
Caution
Prior to cleaning, make sure that the high pressure is placed safely on level ground.
Wear protective goggles and protective clothing during the cleaning process.
Unlock the lever on the trigger gun.
Pull on the lever of the trigger gun; the device will switch on.
Note: Release the lever of the trigger gun; the device will switch off again. High pressure remains in the system.
Spray lance with pressure regulation
Carrying out the most common cleaning tasks. The work pressure can be stagelessly regulated between "Min" and "Max".
Release the lever on the trigger gun.
Turn the spray lance to the desired position.
Note: Suitable for working with detergent; for this, turn the spray lance to the "Mix" position.
Spray lance with Dirtblaster
For particularly dirty items or areas.
Caution
Car tyres, paint or sensitive surfaces such as wood should not be cleaned with the dirt blaster, as there is a risk of damage.
- Not suitable for use with detergents.
Washing brush
- Note: Suitable for use with detergents.
Working with detergent
Please use exclusively KARCHER detergents and care products to carry out the respective cleaning task, as these were specifically developed for your appliance. The use of other detergents and care products may lead to premature wear and can invalidate your warranty claims. Please obtain information at your local dealer or request information directly from KARCHER. Notes regarding the detergent: The most commonly used KARCHER detergents can be purchased ready to use in their Plug 'n' Clean detergent bottles with locking lids. This will make the pesky refilling and filling processes redundant.
Illustration M
Remove the lid from the Plug 'n' Clean detergent bottle and press the detergent bottle into the detergent connection with the opening facing down.
Illustration N
Adjust the suction volume of the detergent solution by means of the dosage regulator for detergents.
Use spray lance with pressure regulation (Vario Power).
Turn the spray lance to "Mix" position.
Note: This will mix the detergent with the water stream.
Note: If required, the washing brushes can be used to work with detergent.
Recommended cleaning method
Spray the detergent sparingly on the dry surface and allow it to react, but not to dry.
Spray off loosened dirt with the high-pressure jet.
Interrupting operation
Release the lever on the trigger gun.
Lock the lever on the trigger gun.
During longer breaks (more than 5 minutes), also turn the appliance off using the "0/OFF" switch.
Finish operation
Caution
Only separate the high-pressure hose from the trigger gun or the appliance while there is no pressure in the system.
Remove the Plug 'n' Clean detergent bottle from the intake and close it with the lid. To store, place into the intake rotated by 180^
Release the lever on the trigger gun.
Turn off the appliance "0/OFF".
Turn off tap.
Press the lever on the trigger gun to release any remaining pressure in the system.
Detach the appliance from the water supply.
Caution: When disconnecting the supply or high pressure hose, warm water may leak from the connections after operation.
Lock the lever on the trigger gun.
Pull out the mains plug.
Transport
Caution
In order to prevent accidents or injuries, keep in mind the weight of the appliance during transport (see Specifications).
When transporting by hand
Pull the appliance by its transport handle.
When transporting in vehicles
Prior to horizontal transport: Remove the Plug 'n' Clean detergent bottle from the intake and close it with the lid.
Secure the appliance against shifting and tipping over.
Storage
Caution
In order to prevent accidents or injuries, keep in mind the weight of the appliance when selecting a storage location for it (see Specifications).
Storing the Appliance
Park the machine on an even surface.
Wind the entire high pressure hose onto the hose drum by rotating the hand crank counter-clockwise.
Insert the hand spray gun with the spray lance into the holder for the hand spray gun.
Illustration
Stow away the mains cable, the high-pressure hose and accessory at the appliance.
Option
Pull on the mains cable briefly.
The mains cable is coiled automatically. Prior to extended storage periods, as during the winter, also observe the instructions in the Care section.
Frost protection
Caution
Protect the appliance and its accessories against frost.
The appliance and its accessories can get destroyed through frost if there are any water residues in them. To avoid damage to them:
Completely drain all water from the appliance:
Detach spray lance from the trigger gun. Switch the appliance on ("I/ON"), press the trigger gun lever until no further water is discharged (approx. 1 min).
Turn off the appliance.
Store the appliance and the entire accessories in a frost-safe room.
Maintenance and care
Danger
Turn off the appliance and remove the mains plug prior to any care and maintenance work.
Care
Prior to longer periods of storage, e.g. in the winter:
Illustration P
Pull out the sieve in the water connection using flat-nose pliers and clean under running water.
Maintenance
The appliance is maintenance-free.
Spare parts
Use only original KÄRCHER spare parts.
You will find a list of spare parts at the end of these operating instructions.
Troubleshooting
You can rectify minor faults yourself with the help of the following overview. If in doubt, please consult the authorized customer service.
Danger
Turn off the appliance and remove the mains plug prior to any care and maintenance work.
Repair works may only be performed by the authorized customer service.
Appliance is not running
Pull on the lever of the trigger gun; the device will switch on.
Check whether the voltage indicated on the type plate corresponds to the voltage of the mains supply.
Check the mains connection cable for damages.
Pressure does not build up in the appliance
Check setting at the spray lance.
Appliance ventilation. Switch on the appliance without connection the high-pressure hose (max. 2 minutes) and run it until the water discharging from the high-pressure outlet is free of bubbles. Switch off appliance and reconnect high-pressure hose.
Check the water supply.
Pull out the sieve in the water connection using flat-nose pliers and clean under running water.
Appliance does not start, motor hums
Cause: Voltage reduction due to weak mains supply or when using an extension cable.
When switching on, first pull the lever of the trigger gun and then switch the appliance switch to "I/ON".
Strong pressure fluctuations
Clean high-pressure nozzle: Remove dirt and debris from the nozzle bore, using a needle and rinse through with water from the front.
Check water flow quantity.
Appliance is leaking
Slight leakage from the appliance pump is normal. If the leakage increases contact the authorized customer service.
No detergent infeed
Use spray lance with pressure regulation (Vario Power). Turn the spray lance to "Mix" position.
Check the settings at the dosage regulator for detergent.
Check the detergent suction hose for kinks.
CE Declaration
We hereby declare that the machine described below complies with the relevant basic safety and health requirements of the EU Directives, both in its basic design and construction as well as in the version put into circulation by us. This declaration shall cease to be valid if the machine is modified without our prior approval.
Product: High-pressure cleaner
Type: 1.168-xxx
Relevant EU Directives
2006/42/EC (+2009/127/EC)
2004/108/EC
2000/14/EC
Applied harmonized standards
EN 55014-1: 2006 + A1: 2009
EN 55014-2: 1997 + A2: 2008
EN 60335-1
EN 60335-2-79
EN 61000-3-2: 2006 + A2: 2009
EN 61000-3-3: 2008
EN 62233: 2008
Applied conformity evaluation method
2000/14/EC: Appendix V
Sound power level dB(A)
Measured: 89
Guaranteed: 93
The undersigned act on behalf and under the power of attorney of the company management.


Authorised Documentation Representative S. Reiser
71364 Winnenden (Germany)
Phone: +49 7195 14-0
Fax: +49 7195 14-2212
Winnenden, 2011/06/01
Technical specifications
| K 7.300 | K 7.400 | K 7.410 | K 7.450 | K 7.400 CH | ||
| Electrical connection | ||||||
| Voltage V | Hz | 2301~50 | ||||
| Connected load kW 3,0 2,2 | ||||||
| Protection class IP X5 | ||||||
| Protective class I | ||||||
| Mains fuse (slow-blow) A 16 10 | ||||||
| Water connection | ||||||
| Max. feed pressure MPa 0,6 | ||||||
| Max. feed temperature °C 60 | ||||||
| Min. feed volume l/min 11 | ||||||
| Max. Suction height m 1,0 | ||||||
| Performance data | ||||||
| Working pressure | MPa | 15 13 | ||||
| Max. permissible pressure MPa | 16 16 | |||||
| Water flow rate | l/min | 9,2 8,2 | ||||
| Detergent flow rate | l/min | 0 - 0,3 | ||||
| Recoil force of trigger gun | N | 22 19 | ||||
| Dimensions and weights | ||||||
| Height | mm | 972 | ||||
| Length | mm | 407 | ||||
| Width | mm | 447 | 459 | 447 | 459 | |
| Weight, ready to operate with accessories | kg | 22,4 | 23,2 | 24,4 | 24,4 | 21,2 |
| Values determined as per EN 60335-2-79 | ||||||
| Hand-arm vibration valueUncertainty K | m/s2m/s2 | < 2,50,3 | ||||
| Sound pressure level LpA | dB(A) | 75 | ||||
| Uncertainty KpA | dB(A) | 3 | ||||
| Sound power level LWA + Uncertainty KWA | dB(A) | 972 | ||||
Subject to technical modifications!
Table des matieres
Consignes generales FR 5
www.kaercher.com/REACH
Garantie
Illustrations, cf. côtes escamotables!
Head of Appropriation
Responsible de la documentation:
S. Reiser
71364 Winnenden (Germany)
Telephone: +49 7195 14-0
Winnenden, 2011/06/01
\section*{Caracteristiques techniques}
www.kaercher.com/REACH
Garanzia
2006/42/CE (+2009/127/CE)
2004/108/CE
2000/14/CE
71364 Winnenden (Germany)
Tel.: +49 7195 14-0
Fax: +49 7195 14-2212
Winnenden, 2011/06/01
Dati tecnici
www.kaercher.com/REACH
Garantie

S. Reiser
Head of Approbation
71364 Winnenden (Germany)
Tel.: +49 7195 14-0
Fax: +49 7195 14-2212
Winnenden, 2011/06/01
Technische gegevens
www.kaercher.com/REACH
Garantía
2006/42/CE (+2009/127/CE)
2004/108/CE
2000/14/CE
71364 Winnenden (Germany)
Tfno.: +49 7195 14-0
Fax: +49 7195 14-2212
Winnenden, 2011/06/01
Datasétécnicos
2006/42/CE (+2009/127/CE)
2004/108/CE
2000/14/CE
71364 Winnenden (Germany)
Tel.: +49 7195 14-0
Fax: +49 7195 14-2212
Winnenden, 2011/06/01
Dados技术和
www.kaercher.com/REACH
Garanti
Montering at transportgrebet
Figur
2006/42/EF (+2009/127/EF)
2004/108/EF
2000/14/EF
71364 Winnenden (Germany)
TIf.: +49 7195 14-0
Fax: +49 7195 14-2212
Winnenden, 2011/06/01
Tekniske data
CE-erklaering. NO 12
Tekniske data. NO 13
Generelle merknader
Kjarekunde,
www.kaercher.com/REACH
Garanti
Head of Appropriation
71364 Winnenden (Germany)
TIf: +49 7195 14-0
Winnenden, 2011/06/01
Tekniske data
www.kaercher.com/REACH
Garanti
71364 Winnenden (Germany)
Tel.: +49 7195 14-0
Fax: +49 7195 14-2212
Winnenden, 2011/06/01
Tekniska data
www.kaercher.com/REACH
Takuu
71364 Winnenden (Germany)
Puh.: +49 7195 14-0
Winnenden, 2011/06/01
Tekniset tiedot
www.kaercher.com/REACH
Eyyúnón
71364 Winnenden (Germany)
Tnλ: +49 7195 14-0
Φαξ: +49 7195 14-2212
Winnenden, 2011/06/01
Texvika xapakntpiotiká
www.kaercher.com/REACH
Garanti
71364 Winnenden (Germany)
Tel.: +49 7195 14-0
Winnenden, 2011/06/01
Teknik Bilgiler
www.kaercher.com/REACH
TapaNTna
B kaqdoi ctpane DeiCTbYOT COOTBeTCTBeHNO rapaHTnHbIe ycIOBnI, n3daHHbIe yN0JIHOMOueHHo opraHn3aCnei C6bITa HaWei npOdyKuIN B daHHo CTpaHe. Bo3MOxKnIe HncnpaBHOCTn np6opBa TteUHe rapaHTnHoro cPoka Mbl YcTpaHReM 6ecpNaTHo, ecnn npuHa 3akIouaEcTcB DdeEeKTax MaTePnaIob uIN OwN6kax npn N3rOToBJeHIn. B cnyae BO3HnKHOBeHn IpeTeH3N B TeUeHne rapaHTnHoro cPoka npoc6b6a o6paatbcra, mMe prn ce6e Queo nokyKe, B ToproByo opraHn3aCIO, npOdaBswyo Bam np6bOp nIN B 6lnXaMHyIO
yIIOJIHOMOeHHyO cIyK6y cepBnCHoro o6cIyJXIBAHNIA.
(Adpeyka3aHa o6oPoTe)
Yka3aHnI NO TexHnKe 6e3OnacHoCTn
Onachocmb
He npukacambcK cemeoB uIke u po-3emKe MOKpbIMu pyKaMu.
Bknouehue annapama 3anpeaemcra, ecnu cemeoou kabeIb uIu cyuecmeeHHbIe KOMnoHeHmbI annapama, Hnnpumep, UnaH2 blicokozO daBneHua, pyHou nucmonem-pacnbunumelb uU 3auumhble ycmpoucmea noepexdeHbl.
Ipeod hauanom paobombc annapamom npoepumb cemeoou kabebu uwmencelhyu buky ha noepexdeHua. NoepexdeHbui cemeoou kabel doJxhen 6bimb He3ameDnumelbHO 3aMeHen ynoHMOueHHou cnykboepeucho2o obcnykaaHua/cneuauncmom-3JeKmpukom.
Ipeh haanom paombb bicoKoHApn Hui uHa Heo6xodmo 8ce2a npoeepmha nopekdeHua. NopekdeHHu EboKoHaOpHui uHa nOdHexum He3aMednumelbHO 3ameHe.
3Kcnyamaa npubopa 60 63pbioonacHbIX 3OHx 3anpeuzaemcra.
Ipu ucnno3oBaHuu npubopa e onachbix 3ohax (HaNPumep, Ha aem03anpa8OHybIX cmaHuaX) cneyem co6JIOdAmb coom eemcmeyuue npaBuna mexHuKu beo-nachocmu.
Haxodaaacnod bICOKm daeneHuemcmpy eobmoKem npu HnpaBbHomucnonb3oaeHu npedcmaenb onacHocmb.3anpeuaemca HnpaBnMcbpyo 0dbHa nOdeu, KueomHbIX, EKNUeHHoe 3neKmpuueckoe obopydoaHueUU Ha cam bICOKOHOpHbIM MOUu annapam.
He pa3pewaemc maKxe HnpaBnMb cmpyio bOdbI, HaxoOaUIOc NOB bICOKUM daBneHueM, Ha dpyzux unu c6b dny uucmku odekobu unu obyeu.
He yucmumbcmpyeu eodblnpedMembl,co-depkaue eeueecmba,epehble dna 3do-po8bna (Ha npumep,acbecm).
AemomobunbHie uHbI/uuHbI eHmUu Mozym bimb noepekdehcbmpye oodb I nod daaeneuem u nonHymb. Npebbim npu3HaKOM 3mo2o cnykum u3MeHeHue ueema uHbI. NoepekdeHbIe aemomobunbHie uHbI/uuHbIe eHmUu npedcmaenrion onachocmb dna xu3Hu. Bo epMa Yucmku uHn Heobxodmo bidepkuaambpaccmora Hue MeKdy fopcyHKou u uHo, kak MuHUMM, 30 cm!
Opanchocmb 63pbieba! He pacnbimmb zoipouue kudkocmu. Bcacbuehue annapamom kudkocmeu, co-depkauxx pacmbopumenu, a makke Hepa36aeHnBix Kucnom unu pacmbopumeneu He donyckaemc! Kmakum beuecebm omHocmcr, Hanpumep, 6eH3un, pacmbopumenu Kpacok u ma3ym. Obpa3youuucr u3 makx eeuecmmyMan ne2ko8ocnIaMeHem, 63pbioonaceu u ydoobum. He uonb3oabmb auemoh, Hepa36aeHnBie Kucnombu pacmbopumenu, mak kaKOn pa3pyuauom Mamepuanbl, u3 komopbix u320omoeiH npubop.
IpeynpekdeHue
Ummencelbnaeunka u coedunhumenbHbui 3JIemehm ydUnhumenra doJXhbl 6bimb zep MemuHbIMU u He haxodumbc8 oode.
Henoxdoxoayue ydunhumenu moym npedcmaenmb onachocmb. Bhe nomeenu cledyem uonb30abm monko donyu-uenbte dna uonb30aHu u coomembmehno MapkuobAHbIe yduHumeu cdocmamouhBM nonpeuybIM ceehuemnpoeoda:1-10M:1,5MM2,10-30M:2,5 MM2
YdunHumeB cneDyem ece2a nonHocmbio pa3MaMbIeambc kamyuKU.
BbICOKoHaOpHbIe WnHa2u, apMaMypa u MyfmbI UMeIOM 6OJIbWoe 3NaueHue dna 6eOnacHocMu npubopa. B 3moU c8ra3u cnedyem npumehm b moIbKO bICOKoHa-nOpHbIe WnHa2u, apMaMpy u MyfmbI, peKOMeHOBaHHbIe U3ZomOuemen m npubopa.
3mu npubopbI He npedHa3HaeHbI dna ucNoJIb306aHua JIOdbMu C OspaHuueHHbIMU u3ueCK MU, ceHCOPHBIMU UUN yMcmEHNbIMU cnoC6HocmAmU.
3Kcnnyamaua npubopa dembmu unu lu-
cuamu, He npowedwumu uHcmpykmaxk, 3a-
npeuzaemcra.
Heobxodumo cneidumb 3a dembmu, ymo6bl
OHU He upaunu c npubopom.
■ POnb3oBamEnb doJxH uCnObn3oEamb npubop e coombemcmeu c Ha3HaueHuem. OHdoJxH yumbIeamb MecmHbIe oc6eHnocmu u obpaamb bHumahue npu pa6ome c npubopom Ha dpyaux nuu, haxodauxca no6nuzocmu.
He ucnolb30aamb annapam, kozda 3ohe deucmbua haxodmca dpyue Iodu, ecnu molbo Ko OH He Hocm 3auumhyo oedxoy.
Дязшь om pa3nemaiouxc6pb13-208 60dbu u 2p3u cneyem Hocumb coom-eemcmeyuoyo 3aumhyo odexdyu u 3aumhbie ouku.
BHumaHue!
Bo epem npodjxumelhbx npepbboe 3knpnyamauu cneyem biknoumb npubop c nomoubu 2na8ho2o biknoyamena / ebiknoyamela npubopa unu omcoedunmb ezo om 3nekmposemu.
He pa3pewaemcra kcnnyamaua npubopa npu memnepamype huxe 0^
IpuMouke NaKupoBaHbI NoeepxHocmeu cedyem bidepXueambpaccmoraHue 30 cm om fopcyHKUdo NoeepxHocmu,ymobu u36exambNoepeKeHuaNaKupoeku.
3aPepaemcOcmaBnMbpaBOMauu npubop6e3npucmoppa.
Heobxodumo cedumb 3a mem, ymo6bi cemeou u hypu yduunhumenu He 6bln nopekdehbl nymem nepee3da uepe3 hux, cdaenueahur, pacmxeHu r m.n. Cemebe wHypbl cledyem 3auuuaamb om 603- deucmbujarbI, macna, a makke om noepekdeHura ocmpbuMu kpaMlu.
Bce mokonpooOaue 3IeMeHmbI e pa60yeu 30He oJXhbl 6bImb 3auuueHbI omcmpyueoobI.
Ipu6op moxno nooknouamb monbko K 3neMeHmy 3neKmpoNODKnOueHu, uCnonHeHHomy 3neKmpomOHmepom 8 coom- eemcmeuu co cmaHdapmom MekdynapodHou 3neKmpomexHuueckou komuccuu (M3K) IEC 60364.
Ipu6op cneodyem eknoyamb moIbko e cemb nepemeHHo2o moka. HanpJxKeHue doJxHo coomeemcmeoeamb yka3aHnM 3aodckou ma6nuque npubopa.
13 coo6paXeu 6e30nacHocmu peKomeHdyemca uCnoB3o8amb ycmpoucmeo c aemomam 3auumbl om moka ymeku (MaKc. 30 mA).
Moouue pa6ombi, npu komopbix no8nIyomcra cmochhie bodbl, codepkaue MaWunHoe Macno, Hanpumep, Moika deusameneu, dhuua aemomobunpa3peuwaemca npoobummb monbko e cneuaJIbHbIX mecmax, obopydoaHHbIX macnoomdeNumem.
Дань npubop 6bl pa3pa6omah dna ucnoIb30aHua MOUux cpedme, komopbie nocma8nIOMc uu 6blpu peKomeHdoBaHbI u32oMoEumem npubopa. IcNoIb3OeHue dpyux MOUux cpedme unx umukamoe MoXem HeZamUHNoNobnMb Ha 6e3onacHocmb npubopa.
3auntbIe yctpoiCTBa
BHUMAHue!
3aumhble ycmpoucmea cnykam dna 3aumbI noB3oBamee. Budou3MeHeue 3aumHbIX ycmpoucme uu npHe6pExe Hue um He donyckaemcra.
BknioyataeIb annapata
IaBbI BbIKIOUaTeIb npenTCTByeT HenpoN3BOJbHO pa6Ote annapata.
YcnoBnI dIy oecneueHny CTOnuNBOCTN
BHUMAHue!
Ipeod bInonHeuem IIObix deucmeu c npu bopor unu y npubopa Heoxbodmo obecneyumb ycmoUHocmb 0u u36eXaHue Hecyaemhbx cnyaeB unu noepexdeHu.
- YcToHnBOCTb np6opa rapaHTnpoBaHa ToIbKO B TOM Cnyae, eCIn OH yCTaHOBJIeH Ha POBHOJ NOBepxHOCTN.
YnpabJIeHne
KOMnJIeKT NOCTaBKn
KOMnKeTauHg np6opa yka3aHa Ha ynaKOBke.
PpN pacnakOBke np6opa npOBepntb KOMnKeTauHg.
IpnOBnApUxHnHeOCTaUxN PrnHaJNeX HocTei NII NOBpeXDeHNI, NOyueHHbIX BO Bpemr TpaHcnpTnpOBKn, CJeDyeT yBeDoMTb TOPROByIO opraHn3aCNU, IpoDaBswu np6op.
Oncanhe npnbopa
B daHno nHcTpyKuNn no 3KnnyatauNn npNBe DeHO onNCaHne 6a3OBbIX MoJeNe BbICOKOHa-nOpHbIX MOUx AnnapaTOB, npEdCTaBHeHHbIe Ha o6NoXke.
B daHHom pyKOBoDCTBe no ekCnIyatauIN daHo onUcaHne np6bopa c MaKcImaJIbHOJ KOMNKeTatauNe. KomNKeTauNra OTnuaeTcR B 3aBNCmOCTN OT MOnEJI (CM. yNaKOBky).
N3o6paXeHnA cm. Ha pa3Bopo-tax!
1 C oeINHITeIbHbI 3JIeMeHT IJRA NOIKJIIOUeHnB BObl,
2 ΘЯмп ДЯ ПОДКПЮЧЕНЯ BOДОСHAбжЕня CO BCTPOEHHbIM CEТаMbIMФИьТрOM
3 ΓλaBhbl BbIKIouaTeIb „0/OFF“ / „I/ON“ (0/BbIKI / I/BKJI)
4 WlaHr BbICOKO DaBHeHra
5 PerynTOp Do3npOBK MoOuero CpeIcTba
6 XpaHHepe pyHOro nCToJeTa-pacbIInTeJIa
7 Bapa6aH dIy IuaHaBra BbICOKO daBJIeHnA
8 P ykoTka
9 KpmbouHHa pykoTka dna 6apabaHa co UHaHrom
10 XpaHeHne 6byTbIKn C MOIOUIM cpeCTBOM Plug'n'Cleanc 3JIeMeHTOM nOdkIoueHn IJRA MOIOUero cpeCTBa
11 Mecto dIy xpaHEnI npHaJnEKeKHOCTe
12 NapameTp Kpoukni dny xpaheHnca cTeBOrO shHypa
13 NapameTp ABTOMaTnuecka HAMOTka cTeBOrO KaBe IJIa
14 CeTeBoN Ka6eNb co 7TeNCeNbHOB BNJKoN
15 BytbIka c MOIOUIM cpeIcTBOM Plug'n Clean c 3aOpHoi KpbIuKoI
16 Kojeca
17 Puyho nctoet-pacnbnteIb
18БлokировkapyHoro nuctoJe-t-pacbIIN-TeIa
19 KhoNka DnA OTCoeDnHeHnI ShNaHra BblcKoro DaBHeHnO TpyHOro NCTOneTa-pacNbJIInTeJr
20 Mojuəa ətKa
21 CtpyHnay Tpy6ka c fpe3oJ dny ydaJeHnra rpa3n
22 CtpuHnA Tpy6ka cpeYJrTOpOM daBHeHn (Vario Power)
CneuaJIbHbIe npHaIaIeXHoCTn
CneuHbIe npHaJnxHocTn pacuipraIOT BO3MOxHocTn npImeHEnr np6opa. Bolee DeTaIbHyIO INΦopMaUHO MOxHo NOnyHTb y ToproBoi opraHn3aUIN φnpMbI KARCHER.
Ipeed hauanom pa6oTbI
IpeNdHaJOMKcNpyatauAnnapaTa yCTaHOBNTb npnlaeraMble He3aKpenHhbie YaactN.
YcTaHOBka KpUoyKOB dIy XpaHeHnCeTeBOrO shypa
NapaMeTp
PncyHok C
YCTaHOBnTB BepXHHe KpOuKn.
YcTaHOBKa peryIaTopa Do3nPoBKn MOUoIero CpeIcTBa
Для пpoBeDEHnY yCTaHOBKn nOTpe6yIOTcR 2 npInIOxEHbIX BnHTa N OdHa KpeCTOBa OTBep Tka PH 2.
PncyHOK D
YcTaHOBnTb B 3JIeMeHTbI NOdkIIOueHnO6a UHaHra dIy MOUoero cpeDCTBa.
YcTaHOBnTbpeRyIaTOpdo3nPoBKnN3akpe-nITberoPiNOMOuN2BVHTOB.
YcTaHOBka pyKoTKn IJa TpaHcNoptnpoBKn
PncyHOK
→HamotatbIaHr BbICOKOrO daBneHnHa 6apa6an.
PncyHok F
→ Cbo6oHbI KOHeI HAmOtaHHOrO BbICOKoHaNoPHorO ⅦnAHaIra IpoTaytB Yepe3 BbIeMKN Ha peryJrTope Do3nPoBKn.
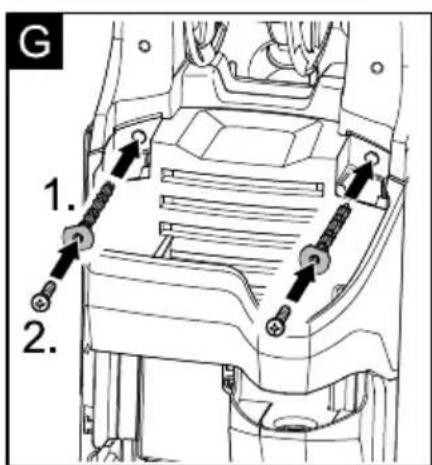
PnCyHok G
HacaHTb pykU TpaHCnOpTnpOBKn, BCTaBNTb 60JTB I BOTBepCTnI 3aBHTNb.
PncyHok H
BCTaBHTb coeHHTeHbHn HnHneIb dJI KOpOTKOro BbICOKHaOpHOrO IHaHra B NaTyrHHoe KpeJIeHHe Do UeJUka.
IpoBepuTb HaeXHocTb KpePJIeHn,NOTaHyB 3a WlaHr BblcOKOrO DaBHeHn.
CoeHHeHne BbICOKoHaOpHoro ⅢaHra c pyHbIM NICTOJeTOM-pacNbIInTeJem
PncyHok
BCTaBnTb IJNaHr BbICOKOro DaBHeNra BpyuHOH nIcToJeT-pacNbIInTeJIb Do UeJIyka.
Yka3aHne: CobnOdaTb npabNtBHOCTb paCnOIOKeHncoeINHTeBHOrO HnIpeIa.
PpOBepuTb HaeXHocTb KpeIeHn,NotyHyB 3a WlaHr BblcOKOr DaBHeHn.
Iopaa BObl
IpeynpeKdeHue
CoaIacHo deucmbuyouum npednucanHuaM ycmpoUcmeo 3anpeuzaemcra
3Kcnnyamupo8amb6e3cucmemH020
pa3deIumen8 mpy6oipoeode c nu
mbeou bdou. Cneyem ucnno3oamb coomembmyu cummemhcu napamop fupMb KARCHER unu anbmehpamuehbu cuemehcu napamop, coomembmyu EN 12729 mun BA. Boda, npoweua ype3

cucmemhbu cenapamop, cumaemca Hnpu- zoohdna numba.
BHumaHue!
Cucmemhbu pa3denumeIb ece2a nodknu yamb K cueme bodocha6xue, u Huko2da HenocepdmbeHNO K npubopy!
Yka3aHHe: 3arpa3HeHn, CoepKaUneC B BODe, MOryT Bbl3BaTb NOBpeJxHeHn HaCOcA BbICOKo Ro DaBHeHn I npHaAdnEeKHoCTe. Dna 3aunTbI peKOMeHdyETcN CNOJIb3OBA Tb BOJaHOn FInbTp KARCHER (cneuaNbHbIe npHaAdnEeKHOCTn, Homep 3aKa3a 4.730-059).
Iopaa BObbln3 BoDOnpOBoDa
CobnoaTe npedncaHnnpednpnTn BO dochabxhen.
IapametpbI DnI NOkNIOUeHnYka3aHbI Ha 3aBODCKoTabniuKe n B pa3dene "TexHueckne daHHble".
IcnoIb3yIte BOJHOH UJHaHr I3 npOuHOro MaTePnJaA (B KOMJIeKT NocTaBKN He BXO-DIT) C obUHHO CoEINHHTeJIbHOH MyToH. (DnaMeTp: MInHMym 1/2 DIOJMa INN 13 MM; peKOMeHdyeMa JnHa 7,5 M).
PncyHOK J
HaxoJyocB KOMnKeTe coeHNHTeJIbHyO MyfTy NOcOeHNHTe K 3JeMeHTy annapata DnI NOaU BObl.
HaedeHbTe BOJHOH WJaHr Ha coeHNHTeIbHyIO MyOTo annapata, noCne Yero NOdCOeHNHTe erO K BODOpOBdy.
Iopaa BObI IN 0TKpbITbIX BOIOEMOB
DaHHbI BblcOKoHaOpHbI MOIOuN annapat co BCacsbIbAIOUIM IJnaHrom KARCHER n o6paTHbIM KJIaNaHOM (CneuaJIbHbIe npHaJNeX-HocTn, Homep 3aKa3a. 4.440-238)
PpeHa3NaueH DnB BcAcbBaHnB ODbI N3 OT-KpbTbIX pe3epByapOB, Hnnpimep, n3 6oueK dIy DOxKDeBOB BObl INI npyIDOB (MaKcImaJIbHyIO BBICOTy BCacBbAHnCm. B pa3dene "TexHueckne DaHHble").
→ HanoHnTb BCacbIbAIOuN mHaHr KARCHER c o6paTHbIM knaHOM BOoN, npBnHTtB K 3JIeMeHTy NOKNIouHnRA BObl I NOBeCtB B DOxKDeByO 6Ouy.
Pered 3KcnpnyatauneydaNTb BO3dyx n3 annapata.
BknouHTb np6op 6e3 noDCOeHHeHHoCtpyHO Tpy6Kn n DaTb emy nopaoToTaB(He 6oJee 2 MNHyT),noka n3 nNCTOJeTa He
HaHHe TBbIXOHTb BOda 6e3 Ny3bIPbKOB BO3- dya. BbIKIIOHTb npIbOp n cHOa noCo- eDINHTb CtpyHHyTO Tpy6ky.
Haayano pa60tbi
BhumaHue!
Paboma ecxyo e meueHue 60lee 2 MuHym npueodum K bixody u3 cmpo BbICOKHaOpHno Hacoca. Ecnu npubop e meueHue 2 MuHym He Habupaem daBeneHue, mo ezo cneedyem bIKIOUumb u deucmeobamb e coombemcMeuu c ykaaHuaM, Komopbie npueodmcae 2naabe ,Pomoucb cnyae Henonadok".
PncyHok K
→HaedeHbTe Ha puHoi nIcToIeT-pacbIIN-TeJIb cTpYnHyIO Tpy6ky I 3aΦnKcnpyIe ee, NOBepHyB Ha 90^
PncyHOK L
→ПОЛНOCью pa3MOtaTb BbICOKOHaNoPHyBIMIJIaHr c 6apabHa. Пи 3Tom npNdepKINBaTb pykoTky dЯн TpaHCnOpTnpOBKn.
Yka3aHne: EcIn npINBOHnay pyKoTka HaXODITcB 3aCTOnOpEHHom NIOJKeHN, To ee cJeDyET npeDbapNTbHO OTKNHyTb KBepxv.
→Полноctью OTKpoIte BOДОпрOBДнblй Кран.
Поннocью pa3MOTaTb ceTeBOi Ka6eJIb.
BCTaBnTb ceTeByIO uTeNceIbHyIO BUNKy Bpo3eTKy.
BknIOuHTb annapaT ,I/ON" (I/BKJI).
3Kcnnyatauia
Onachocmb
BbIXoDaJ u3 bICOKHaOpHou fOpcyHKu cmpy 0oBi 6bIbIeam omdauy pyHo2o nu-monema-pacblumen. Ito mou npuune He- oxbodmo 3aHmY cMoUueyIO no3uio, Kpenko depkambpyHOu nuomem-pacblunmeB co cmpuHou mpy6ko.
BHumaHue!
Ipeod hauanom moikcu cneyem ybedumbcra e mom, ymo moouu npubop bicoko2o daeneHua ycmouueo ycmaHOBnHa poeHou noepxHocmu.Bo epmra moku uonb3yume 3aunhble ouku u 3aunmHyio odexdy.
Pa36nokupobatb pbiur pyuHoro nucToeta-pacnbilnteJ.
→ Notaryt b 3a pbiur, annapat BkIIOuHTcra.
Yka3aHne: Ecnn pbIur cHOBa OCBO6OuNTcraannapat cHOBA OTKIIouHTc.BbICOKoe daBHeHne coxpaHReTcB CnCTeMe.
Pa6ota c MOUzIM CpeDCTBOM
Дя Виллгяим Задачи по чinctе Испь-ун Te NCKПОчNTьНо чinctа СрдТВИ срдТВИ NO yxOу PhИРМы KARCHER,Тak кak OHI pa3pa6OTahbl CpeцmaHbNO ДЯ пIMHeHnB VAWe m np6ope. ПрIMeHne Dpynx ChTaux CpeDCTB И срдСТВ NO yxOу мОжET PpIBeCTN K YCKOPEHHOM U3HOCU И NOTepn IpaBa Ha rapaHTnHoe obcnyKuBaHne. ПODpo6Hy IO INФOPMaIQU MOxHO y3HaTb CBeIaIIIN3INPOBaHHom MeCTe TOPROBII INI NOJyHTb HENOCpeDCTBEHNO B INPeDCTaBNTeJIbC- TBe KARCHER.
Yka3aHnno moOuum cpeCTBaM: Han6o-nee ynoTpe6JIeEMoe MOUee cpeCTBO mapKn KARCHER nIra 3toro ycTpoiCTBa MoKHO npNoobpeCTn B rOtOBom K npImeHeHIO BVde B 6yTbJIke dIЯ moUoero cpeCTBa Plug'n' Clean,
OchaueHHo3aOpHoKpbIkwOi. TaKIM 6pa3OM NCKJIuOyaeTc8 O6peMeHHTeJbHa8 O63aHHocTb IIO CINBaHnIO JIN HAnOpHeHIO 6aKa.
PncyHok M
3aunTa OT 3amep3aHnA
BhumaHue!
3auiuambb annapam u npuhaednHexocmu om Mop03a.
Pnp6op n npHaJnEJXHocT MOryT 6bITb NOBpeXeHbI MOpO3OM,ecnN ecnN n3 Hx NOnHOcTbIO He ydaJeHa Boda.Bo n36eKaHne NOBpeXeHn:
N3 yctpoiCTBa cneDyeT noHocTbIO ydaJIITb BODy.OTdEJIITb CtpyHHyTO Tpy6ky OT pyuHoro NiToJeta-pacNbIINTeIa.
BknIOuHTb npnbop (1/ON) n HaxnMaTb Ha pblur pyHoro nIcToIeTa-pacNbIInTeIa, noka He npekpaITbcra BbITEkAHne BOdbi (ok. 1 MNHyta).
BbiklIOuHTe np6Op.
XpaHnTe np6op n Bce npHaJneKHOCTn B 3aunueHHOM OT MOp03a NOMEeHN.
yXoN TeXHnueckoe 06cnyxnbHne
Onachocmb
Ipu npoeedeenu IIO6bIX pa6om no yxody u mexHuYeCKOMy o6cnyKuaHuo annapam cJe- dyem bIKNoumb, a cemeoU wHyp - bIHymu3 po3emku.
yxo
IpeD dIITeIbHbIM xpaHeHnEm, HApPImep, 3IMoI:
PnCyHok P
BbHbTe C nOMOuBu NIOCKoY6ueB CeTeBOI pNlTp u3 3JIeMeHTa DnRA BOOCh6KeHn I npOMOIte erO npOTOHo BDOJ.
TexHnueckoe o6cnyxnbAHne
AnnapaT He HuykdaetcB InpoΦnIaKTnueckOM 06cnykBaHn.
3anachbyleyactn
IcnoJb3yIe ToJIbKO opnHHaJIbHbIe 3aNaChbIe
actn fmpbl KARCHER. OncanHe 3aNaChbIX
acteH hXoNTcB KOHcE daHHoN IHCTpyKcIn
No ekCnLyatauN.
POMOuB BCnyae HenoJaDoK
He6oJIbUne HeuCnpaBHOCTM MOxHO ycTpaHNTb camOCTOaTeJIbHO C NOMOUsbIO CJeDyUoIeRo ONICAHNA.
B cnyuae comHeHnA cIeDyET o6paaTbcra B ynoHOMOeHHyU cIyK6b cyBPncHOro 6cnyKuBaHn.
Onachocmb
Ipu npoeedeHuu IIO6bix pa6om no yxody u mexHueckomy o6cnykuaHuo annapam cdeyem bIKIOUmb, a cemeoU wHyp - bIHymb u3 po3emku.
Pemohmhbie paobmbu paobmbic 3nekmpu-yeckumu y3namu moym npou3bodmbcmoIbKO ynoHOMOeHHo cnyxbo cepuecho20 o6cnyxueaHua.
Pp6op He pa6oTaet
→ BbIyHyb pbIyar pyHoro nIcToIeta-pac- nblnteIa, np6op BKIOuHTc.
ПоверпсоOTBeTCTBnE HanpЯжен, yka3aHHOrO B 3aBOdCKoI Ta6nUKe, HanpЯженIO nCTOCHNka 3JIeKTPo3HeprIn.
→Проверпь сею кабел ha nobpeжденя.
DablenHe B npnbope He yBEnnUbaeTcA
→Поверпь HabТpoику cTpyноT py6kn.
YdaJIeHHe BO3dUxHa n3 npi6opa. BKnIOuHTb npi6Op 6e3 noDcoEINHeHHoI cTpyHOH Tpy6Kn I DaTb Emy nopA6OtaTb (He 60Jee 2 MInHyT), noka n3 nIcToIeTa He NaHHeT BbIXOAnTH BoDa 6e3 ny3bIPbKOB BO3- dYxa. BblIOuHTb npi6Op n cHOba noDcoEINHTb CtpyHNo Tpy6Ky.
→Проверпь подачу Вобл.
BbInbTe c NOMOuH NoNIOCKORY6ueB ceTeBOI nIbTp n3 3JIeMeHTa dJa BOOChA6KeHn I npOMoTE ero npOTouHO BDOJ.
Pn6op He BkIIOaETcA, DnraTeIb rYdnt PpuHa: PaedHue HapJxHeu u3-3a cna6o 3neKmpocemu un npu uCnoB30aHu yDnu-Humela.
→Пи ВьIKIIOueHnnpexJe BCero BbIHyTb pbIurpyHOro nIcToIeTa-pacblIInTeJI, 3aTeM yCTaHOBNTb BvIKIIOuAteJb annapaTa B noLoXeHne ,I/ON" (I/BKJI).
CnIbHbIe nepenaIaBneHna
OuHCTnITb fOpcyHKy BbICOKoTo DaBHeHna: IroJkoYdaJIITb 3aRpa3HeHne n3 OTBepcTnA fOpcyHKn n Ipomblb ee CpeEi BO-DoI.
PpOBepbTe KOJIuYeCTBO NODaBaEMoB BoDbl.
Pn6op HereepMeTuH e
He3HaHTeJIbHaj HeRpeMeTnUHocTb aInpaTa obycIOBHeHa texHnueCKmM OcO6EHOCrMn. Pn CInbHOJ HeRpeMeTnUHocTu 6paTntecb B aBTOpn3OBaHHyO cnyk6by cepBnCHOrO 06cnyKnBaHnJ.
Ynctraee cpeDCTBO He BCacbIbAeTc
IcnoIb3ObaTb ctpuHnyTOpy6ky C peryIaTOpOM daBHeHnA (Vario Power).IobepHyTB ctpuHnyTOpy6ky B noIooKeHne „Mix".
Поверпь рergyлардоэрвкmoюцero cpeДCTBa.
→Проверпь BCacbIbAIOUишlaHrДЯ MOJUоero cpeIcTBAHa nepern6bl.
3aBHeHne o COOTBeTCTBn Tpe6oBaHnA M CE
HactoIIMMb3aABJem,HTOHNKeyka3aHnBHy np6Op nO CBOe KOHcEJIuN IN KOHcTpyKUIN,a TaKke B OcyIeCTBJeHHOM IDONyueHHOMHAMNKpOdaXeNCNOJIHeHINOTBeuaET COOTBetCTByIOUIMOCHOHBIM Tpe6OBaHnM NO 6e30NaCHOCTNU3DopOBbIO CoRnacHOInpeKTiBaEMEC.PnBHeCEHNI N3MeHeHNI,HE CoRnACOBaHHbIX CHAMN,DaAHHOe 3aABJeHne TePReT CBOIO CNIy.
PpOdyKT BbICOKOHAnOpHbIM MOUcIN np6op
Tun: 1.168-xxx
OchOBhble DnpeKTHBbI EC
2006/42/EC (+2009/127/EC)
2004/108/AN
2000/14/EC
PpimHeHHbIe rapMOHn3HnpOBaHHbIe HOpMbI
EN 55014-1:2006 + A1:2009
EN 55014-2: 1997 + A2: 2008
EN 60335-1
EN 60335-2-79
EN 61000-3-2: 2006 + A2: 2009
EN 61000-3-3:2008
EN 62233: 2008

S. Reiser
Head of Appropriation
yIOnHOMOeHHbI NO DOkymeHTaUN: S. Reiser
71364 Winnenden (Germany)
Ten.: +49 7195 14-0
ΦaKc: +49 7195 14-2212
Winnenden, 2011/06/01
TexHnueckne daHHbIe
www.kaercher.com/REACH
Garancia

S. Reiser
Head of Appropriation
71364 Winnenden (Germany)
Tel.: +49 7195 14-0
Fax: +49 7195 14-2212
Winnenden, 2011/06/01
Muszaki adatok
www.kaercher.com/REACH
Záruka
2006/42/ES (+2009/127/ES)
2004/108/ES
2000/14/ES
71364 Winnenden (Germany)
Tel.: +49 7195 14-0
Fax: +49 7195 14-2212
Winnenden, 2011/06/01
Technické udaje
www.kaercher.com/REACH
Garancija
Zadevne ES-directive:
2006/42/ES (+2009/127/ES)
2004/108/ES
2000/14/ES
Head of Appropriation
71364 Winnenden (Germany)
Tel.: +49 7195 14-0
Winnenden, 2011/06/01
Tehnični podatki
| K 7.300 | K 7.400 | K 7.410 | K 7.450 | K 7.400 CH | ||
| Elektrichi priključek | ||||||
| Napetost V | Hz | 2301~50 | ||||
| Priključna moč kW 3,0 2,2 | ||||||
| Stopnja zaščite IP X5 | ||||||
| Razred zaščite I | ||||||
| Omrežna varovalka (inertna) A 16 10 | ||||||
| Vodni priključek | ||||||
| Pritisk dotoka (maks.) MPa 0,6 | ||||||
| Temperatura dotoka (maks.) °C 60 | ||||||
| Količina dotoka (min.) l/min 11 | ||||||
| Max. sesalna višina m 1,0 | ||||||
| Podatki o zmogljivosti | ||||||
| Delovni tlak MPa 15 13 | ||||||
| Maks. dovoljeni tlak MPa 16 16 | ||||||
| Črpalna količina, voda | l/min | 9,2 | 8,2 | |||
| Črpalna količina, Čistilno sredstvo | l/min | 0 - 0,3 | ||||
| Povratna sila ročne brizgalne pištole | N | 22 | 19 | |||
| Mere in teža | ||||||
| Višina | mm | 972 | ||||
| Dolžina | mm | 407 | ||||
| Širina | mm | 447 | 459 | 447 | 459 | |
| Teža, pripravljeno za uporabo s priborom | kg | 22,4 | 23,2 | 24,4 | 24,4 | 21,2 |
| Ugotovljene vrednosti v skladu z EN 60335-2-79 | ||||||
| Vrednost vibracij dlan-rokaNegotovost K | m/s2m/s2 | < 2,50,3 | ||||
| Nivo hrupa LpANegotovost KpA | dB(A)dB(A) | 753 | ||||
| Nivo hrupa ob obretenitviLwA + negotovostKwA | dB(A) | 972 | ||||
Pridrzana pravica do tehnicnih spre-memb!
Spis tresci
www.kaercher.com/REACH
Gwarancja
2006/42/WE (+2009/127/WE)
2004/108/WE
2000/14/WE
71364 Winnenden (Germany)
tel.: +49 7195 14-0
faks: +49 7195 14-2212
Winnenden, 2011/06/01
Dane techniczne
Mult stimate client,

www.kaercher.com/REACH
Garantie
Transportul in vehicule
Inaintea transportarii in stare ortontala: Scoatei flaconul de solutie de curatat Plug'n Clean din suport si puneti capacul la loc.
Asiguraşi aparatul contra alunecarii si rasturnarii.
Depozitarea
Atentie
Directive EG respectate:
2006/42/CE (+2009/127/CE)
2004/108/CE
2000/14/CE
Norme armonizate utilize:
EN 55014-1: 2006 + A1: 2009
EN 55014-2: 1997 + A2: 2008
EN 60335-1
EN 60335-2-79
EN 61000-3-2: 2006 + A2: 2009
EN 61000-3-3: 2008
EN 62233: 2008
71364 Winnenden (Germany)
Tel.: +49 7195 14-0
Fax: +49 7195 14-2212
Winnenden, 2011/06/01
Date tehnice
www.kaercher.com/REACH
Záruka
2006/42/ES (+2009/127/ES)
2004/108/ES
2000/14/ES
2000/14/ES: Priloha V
71364 Winnenden (Germany)
Tel: +49 7195 14-0
Fax: +49 7195 14-2212
Winnenden, 2011/06/01
Technické udaje
www.kaercher.com/REACH
Jamstvo
U svakoj zemplji vaze jamstveni uvjeti koje je izdala naša nadležna organizacija za distribuciju. Eventualne smetnje na stroju za vrijeme trajanja jamstva uklanjamo besplatno ukoliko je uzrok greška u materijalu ili proizvodnji. U slučaju koji podliježe garanciji obratite se, uz preraganje potvrde o kupnji, Vašem prodavaču ili njblžojovlaštenoj servisnoj sluzbi.
(Adresu cete naci na poledini)
Sigurnosni napuci
Opasnost
2006/42/EZ (+2009/127/EZ)
2004/108/EZ
2000/14/EZ
Primijenjene uskladene norme:
EN 55014-1:2006 + A1:2009
EN 55014-2: 1997 + A2: 2008
EN 60335-1
EN 60335-2-79
EN 61000-3-2: 2006 + A2: 2009
EN 61000-3-3: 2008
EN 62233: 2008
Head of Appropriation
71364 Winnenden (Germany)
Tel.: +49 7195 14-0
Winnenden, 2011/06/01
Tehnicki podaci
| K 7.300 | K 7.400 | K 7.410 | K 7.450 | K 7.400 CH | ||
| Elektrichi priključak | ||||||
| Napon V | Hz | 2301~50 | ||||
| Priključna snaga kW 3,0 2,2 | ||||||
| Stupanj zašite IP X5 | ||||||
| Stupanj zašite I | ||||||
| Strujna zašita (inertna) A 16 10 | ||||||
| Priključak za vodu | ||||||
| Dovodni tlak (maks.) MPa 0,6 | ||||||
| Dovodna temperatura (maks.) °C 60 | ||||||
| Dovodni protok (min.) l/min 11 | ||||||
| Maks. usisna visina m 1,0 | ||||||
| Podaci o snazi | ||||||
| Radni tlak | MPa | 15 13 | ||||
| Maks. dozvoljeni tlak | MPa | 16 16 | ||||
| Protok vode | l/min | 9,2 8,2 | ||||
| Protok sredstva za Čišćenje | l/min | 0 - 0,3 | ||||
| Povratna udarna sila ručnog pištolja za prska-nje | N | 22 | 19 | |||
| Dimenzije i težine | ||||||
| Visina | mm | 972 | ||||
| Duljina | mm | 407 | ||||
| Širina | mm | 447 | 459 | 447 | 459 | |
| Težina u stanju pripravnosti za rad, s priborom | kg | 22,4 | 23,2 | 24,4 | 24,4 | 21,2 |
| Utvržene vrijednosti prema EN 60335-2-79 | ||||||
| Vrijednost vibracije na ruci | m/s2 | < 2,5 | ||||
| Nepouzdanost K | m/s2 | 0,3 | ||||
| Razina zvučnog tlaka LpA | dB(A) | 75 | ||||
| Nepouzdanost KpA | dB(A) | 3 | ||||
| Razina zvučne snage LwA + nepouzdanost KwA | dB(A) | 972 | ||||
www.kaercher.com/REACH
Garancija
U svakoj zemlji vaze garantni uslovi koje je izdala naša nadležna distributivna organizacija. Eventualne smetnje na ureăju za vreme trajanja garancije uklanjamo besplatno, ukolko je uzrok greška u materijalu ili proizvodnji. U slučaju koji podleže garanciji obratite se sa potvrdom o kupovini Vašem prodavcu ili najblžoj ovlasćenoj servisnoj sluzbi. (Adresu cete naci na poledini)
Sigurnosne napomene
Opasnost
Mrežni utikač in uticnicu nikada ne dodirujte vlažnim rukama.
UrejnePokreciteako suostecenistrujni prikljuchni kablli vaznideloviuredaja,npr. crevo visokog pritiska,ručna prskalica ili sigurnosni elementi.
Pre svake upotrebe proverite da li na strujnom priključnom kablu sa utikačem ima ošćenja. Ošćen strujni priključni kabl odmah dajte na zamenu ovlášćenoj servisnoj sluzbi/elektricaru.
Pre svakogPokretanja proverite da li na crevu visokog pritiska ima ostecenja. Osteceno crevo visokog pritiska odmah zamenite.
Zabranjen je rad u područjima ugroženim eksplozijom.
Kod upotrebe uredaja u opasnim podrucjima (npr. benzinskim pumpama) treba da se postuju odgovarajuci sigurnosni propisi.
Mlazovi pod visokim pritiskom mogukod nestručne upotrebe biti opasni.Mlaz se ne sme da usmerava premaIjudima,životinja,aktivnoj elektricnojopremi ili samom ureăju.
Mlaz pod visokim pritiskom neusmeravajte prema drugima ili sebi kako biste očistili odeću ili obću.
- Parom ne prskajte predmete koji sadrze materijale opasne za zdravlje (na pr. azbest).
Automobilske gume/ventili guma se mogu ošetiti mlazom pod visokim pritiskom i puci. Prvi znak toga je promena boje gume: Oštecene automobilske gume/ventili guma su opasni poŽivot. Kod cisćenja odžavajte majmanje 30 cm razmaka!
Opasnost od eksplozije! Nemojte rasprskavati zapaljive tecnosti. Nikada ne usisavajte tecnosti sa rastvaračima ili nerazredene kiseline i rastvarače! U to se na primer ubrajaju benzin, razreživači za boje ili mazut.
Raspršena magla je lako zapaljiva, eksplozivna i otrovna. Ne koristite aceton, nerazrečene kiseline i rastvarace, jer mogu nagristi materijale upotrebljene na urežaju.
Upozorenje
Strujni utikač i spojnica primenjenog produžnog kabla moraju biti vodonepropusni i ne smeju da leže u vodi.
Neodgovarajuci produkti kablovi mogu biti opasni. Na otvorenom koristite samo za tu namenu odobrene i na odgovarajuci način oznacene produktekablove dovoljno velikog poprečnog preseka: 1 - 10 m: 1,5 mm2; 10 - 30 m: 2,5 mm2
Produzni vod uvek do kraja odvijte od bubnja za namatanje.
- Creva visokog pritiska, armature i spojnice su važni za sigurnost uredaja. Upotrebljavaje samo creva visokog pritiska, armature i spojnice koje preporucije proizvodač.
- Ovaj urejad nije predviDEN da njime rukuju osobe sa smanjenim fizickim, senzornim ili mentalnim mogucnostima opažanja. Urejadem ne smeju da rukuju deca, maloletne ili neosposobljene osobe. Deca se moraju nadgledati kako bi se spreciLO da se igraJu s urejadem.
Korisnik mora uredaj upotrebljavati u skladu sa njegovom namenom. Mora voditi računa o lokalmim uslovima i kod rada sa uredajem paziti na ljude u okolini.
Nemojte raditi sa uredajem ako se u njegovom dometu nalaze osobe, osim ako one nose zašitnu odeću.
Za zašitu od prskanja vode ili prljavstine nosite primerenu zašitnu odeću i zašitne načare.
Oprez
2006/42/EZ (+2009/127/EZ)
2004/108/EZ
2000/14/EZ
Primenjene uskladene norme:
EN 55014-1: 2006 + A1: 2009
EN 55014-2: 1997 + A2: 2008
EN 60335-1
EN 60335-2-79
EN 61000-3-2: 2006 + A2: 2009
EN 61000-3-3:2008
EN 62233: 2008
71364 Winnenden (Germany)
Tel.: +49 7195 14-0
Winnenden, 2011/06/01
Tehnicki podaci
| K 7.300 | K 7.400 | K 7.410 | K 7.450 | K 7.400 CH | ||
| Elektrichi priključak | ||||||
| Napon V | Hz | 2301~50 | ||||
| Priključna snaga kW 3,0 2,2 | ||||||
| Stepen zašite IP X5 | ||||||
| Klasa zašite I | ||||||
| Mrežni osigurač (inertan) A 16 10 | ||||||
| Priključak za vodu | ||||||
| Dovodni pritisak (maks.) MPa 0,6 | ||||||
| Dovodna temperatura (maks.) °C 60 | ||||||
| Dovodni protok (min.) l/min 11 | ||||||
| Maks. usisna visina m 1,0 | ||||||
| Podaci o snazi | ||||||
| Radni pritisak | MPa | 15 13 | ||||
| Maks. dozvoljeni pritisak | MPa | 16 16 | ||||
| Protok vode | l/min | 9,2 8,2 | ||||
| Protok sredstva za Čišćenje | l/min | 0 - 0,3 | ||||
| Povratna udarna sila ručnog pištolja za prskanje | N | 22 | 19 | |||
| Dimenzije i težine | ||||||
| Visina | mm | 972 | ||||
| Dužina | mm | 407 | ||||
| Širina | mm | 447 | 459 | 447 | 459 | |
| Težina u stanju spremnom za rad, sa priborom | kg | 22,4 | 23,2 | 24,4 | 24,4 | 21,2 |
| Izračunate vrednosti prema EN 60335-2-79 | ||||||
| Vrednost vibracije na ruci | m/s2 | < 2,5 | ||||
| Nepouzdanost K | m/s2 | 0,3 | ||||
| Nivo zvučnog pritiska LpA | dB(A) | 75 | ||||
| Nepouzdanost KpA | dB(A) | 3 | ||||
| Nivo zvučne snage LWA + nepouzdanost KWA | dB(A) | 972 | ||||
www.kaercher.com/REACH
TapaHczna
BbB BcRAKa CTrpaHa BaXaT rapaHcIOHHnTe ycIOBnA, Ny6IkyBaHn OT OTOpN3npaHaTa OT Hac DnCTpr6yTopsKa cHpMa. EBeHTyaJIHn NOBpeDi Ha Ba7nra YpeD 1e OTCTpaHm B pamKnte Ha rapaHcIOHHn CpOK 6e3PnAthO, aKO ce Kacae 3a DeΦeKT B MaTePnaJIte NIn npn Ipn3BOdCTBO. B rapaHcIOHEn CnyaJ ce O6bPheTe KbM DnCTpr6yTopa NIn Hai-6IIN3Knr OToPi3npaH cepBn3, KaTO ppeIcTabHe TKeKocBaTa 6eJIexKa. (Adpecnte ige HamePte Ha 3aHaTa CTpaHnua)
Yka3aHnna 3a 6e30nacHOCT
Onachocm
Hukozha He dokocbaume konmau u uen-cena c enaxHu pbue.
He pa6omeme c ypeda, ako 3axpaheauuym Ka6en unu baxnu yacmu Ha ypeda, Hapumep Mapkyb m 3a pa6oma nod Hnraane, nucmonema 3a pbyho npbckaHe unu npedna3Hume npucnocobneHua ca noepedeHu.
Ipedu eca ynompe6a npoepebaume Mpeko8a 3axpaHbau, Ka6e n c uencela 3a nopedu. Iopepehenmpekoo 3axpanbau Ka6e mpr6ea He3abaeHo da ce 3aMeHu om omopuzupan cepu3/cneuaanucm - enekmpomexnuk.
Ipedu 6cya ekcnnoamaun npoepebau me Mapkya 3a pa6oma nohnahe 3a nopedu. He3abaeNo nOmeHeme nope deHua Mapkyu.
3a6paHa e pa6omama 6b8 63puoOnacHu NOMEueHua.
Ja ce cna3bam Mepkume 3a 6e3oNaChocm npu pa6oma c ypeda e onacHu 30Hu (Ha- npumep Ha 6eH3uHocmaHuu).
Cmpyma nod bucoko hanahe moxe da 6bde onacha npu Hnpaunha ynompe6a. He hacoubaume cmpyma KbM xopa, Ku- oomHu, akmuHuelekmpueecku ypeDu unu KbMa camur ypeD.
He hacoubaume cmpyma nod bucoko ha-njahe KbM dpyu unu KbM cebe cu, 3a da noucmume obneknomo cu unu obyekume cu.
Ja He ce obnueam npedMemu, Koumo cb- dbpxam onacHu 3a 3dpaeemo eewecmea (Hap. a36ecm).
I Yumme Ha aemomobunme u behmunme Ha aemomobunHume ymu mosam da ce noepedm unu cnkyam om bucokomo hanahe. Ibpeum npuzhak 3a moea e obezueemraehmo Ha yymama. NoepedeHume aemomobunHu ymu u behmunMo zam da dozedam do pfamnu nocneduu. Ppu noucmeane ocmaeme paacmoHue om none 30 cm!
Onachocm om ekcnno3ua!
He npbckaume eb3nnaMeHReMu meuHo cmu.
Hukoza He 3acMykeaume meuHocmu, cb- dbpkau pa3mboopumenu, uuu Hepa3pe deHu KucenuHu u pa3meOpumenu! Tauea ca HanpuMebH3un, pa3pedumenu 3a bou ulu Ha ma. Cunho pa3npbckeaHama cmpy e IecHO eB3nnaMeHuma, ekCnno3ueHa u ompoHa. He u3non3aume auemoh, Hepa3peDeHu KucenuHu u pa3meOpumenu, 3auomo me amakyeam u3non3aHume e ypeda Mamepuanu.
IpeynpeKdeHue
Uencenb m u kynnyheb m Ha yobnxumena mpra6ea da 6bdam eodoycmouueu u He 6uea da ce hamupam b8e oda.
Henoxdoxumyeobjxumenu Moa ma ca onachu. Ha omkpmo u3non3aume camo cboomeemno pa3peweHume u cbom- eemHO o603naeHue yobjxumenu c docmabuHO haneuho ceeyue:1-10M:1,5 MM2;10-30M:2,5MM2
Bunau pa3bueaume yobnxumena dokpaumapababa.
Mapkyuime 3a pa6oma nohnahe, apmamypama u 6pb3kume ca baxhu 3a 6e30nacnocma Ha ypeda. N3non3eaume camOpnpb4haume om npou3oodumenpaKyu 3a pa6oma nohnahe, apmamyu u 6pb3ku.
To3u ypeD He e npedHa3NaueH 3a o6cnyK-
eHe om luca c O2paHueHu fU3uYeCKU,
ceH3OpHu Unu YmcmEHU cnocobHocMu.
YpeBm He mPraBe da ce u3non3Ba om de
ua, MnaDeXku Unu Heomopuzupanu luua.
Deuama mPraBe da 6bdam noh had3op, 3a
da ce zapaHmupa, ye Hma da upaam C
ypeDa.
Iompebumenmmp6ea da u3noJ3ea ypeda cnped npednucanma.Tou mpe6ea da ce cbobpa3ea c daedeHocmume Ha Mncmo u da eHumaepa npu paoba ma cypeda daNu HAOKOHO HAma xopa.
He u3non3eaume ypeda, ako e obceaa ce Hamupam dpyu luua, ocbeH aKO He Hocam 3auumHo oBneKno.
3a 3auuma om Hanpbckeahe c eoda unu Mpbcomua Hoceme nodxodrao npedna3Ho obnekno u npedna3Hu ouuna/Macka.
BhumaHue
Ipu no-npodbnxkumenu nay3u u3knioye me ypea om 2naBnua npekbcaw/npekbc- eaya ha ypea unu zo u3eademe om uecnena.
He u3non3eaume ypea npu memnepamypu no0 ^ C
3a da u36e2heme nopeu, npu noucmeaHe ocusepeme MuHMaHNo pa3cmOraHue om 30 cm mejdy cmpyma u bouducahume no8bpxHocmu.
I IopemeHa paoboma ypebmda He ce oc-mae6e3 HAd3Op.
Bhumabaume kaeblm ha ypea unu yobnxumela He ce nopeam unu ckbcam nopadu hacmbneane, npezbahe, onbbahe unu dpya. Naeme kaeba om monnuha, macna u ocmpu pboee.
Bcuku enekmpuecku yacmu u enemmu 6 o6ce2 ha pa6oma mpa6ba da ca 3aumuenu om bodhama cmpy.
Ypeobm moxe da ce ekIIOyea cAmo KbM eIeKmpuuecku KOHmaKm, u3IbHeH om eIeKmpomexHuk cbJnacHo IEC 60364.
Cepb3eaume ypeda cmo KbM npomeHnue mok. HanpexeHuemo mp6ea da cbom- bemcmeha uumupaHomo ebpymaben kama Ha ypeda HanpexeHue.
I IopuunHa cuayphocma npunuunno npenopbueame 3adeucmbaHemo Ha ypea npes 3auumno npucnocobneHue 3a nao be e HnpejexHuemo (MaKc. 30 mA).
I OucmeaHe, npu Koemo ce omdeenm MacnoocbOpxauu omnaobyu HOp.. npu Muehe Ha deusameu u dohama Yacm Ha Kopnyca,mpraea da cmaea camo Ha MuKc Cbc cenapamop 3a Macna.
To3u ype e pa3pa6omeH 3a non3eAne Ha npenapamu 3a noucmeAne, Koumo ce docmaem unu npenopbyeam om npou38o dumena. H3no3eaHemo Ha dpyu npenapamu 3a noucmeAne unu xumkaJU MOKe da eNoWu hadekdHocmma u be3onac Hocmma Ha ypeda.
PpeDn3Hn npncnoc6neHna
BhumaHue
IpeNa3Hume npucnocobneuca nykam 3a 3a uuma Ha nompe6umela u He mpr6ba da ce npomeharn unu 3ao6ukanm.
KlouHa ypea
IpeKbCBAuT Ha ypeDa IpeDoTbpaTЯBa He IpeDHaMepeHTo NyckaHe B EKcNloaTaun Ha ypeDa.
IpeINBeH BeHTnC nHeBMaTnueH npeKbCbay
IpeJIbHnT BeHTNJ IpeDoTbPaTaBA HaBnSha BaHeTo HA DoNyCTMOTO pa6oTHO HAnraHe. Ako ce OcBO6OJNIOCTbT Ha NtCOnTea 3a pbu HO npbCKBaHe, INHEBMAtNUHnT KOHTaKT n3- KInOyBa NOMnata, CTpyr BnCOKO HaJRAHe IpeKbcBA.AKO IOCTbT Ce pnpdbpna,OTHOBO BKIOUBy NOMnata.
PpeIIOCTaBKn 3a yCTOuNBOcT
BhumaHue
Ipedu bcuku deu hocmu cypeda ycmahobeme Hezoeama ycmouubocm, 3a da u3bezheme 3nonolyku unu yepexdahanur.
- YcToHnBOCTTa Ha ypeHa e rapaHTnpaHa, aKO Toi 6bJe OCTaBeH Ha paBHa NOBbpxHOCT.
06cJyXBaHe
Обем на досстакота
O6embT Ha DocTaBka Ha ypea e n3o6pa3eH Ha onakOBkata. Ppi pa3onakOBaHe npOBepTe daJIc bApKHaHneTo e NbIHO.
Pn IINCBauu npHaJNeXHocTu nn npn TpaHCnOpTHu eTu MoJa yBeDoMeTe Baunr TbproBeu.
OncanneHa ypeda
ToBa YnBtBaHe 3a yNoTpe6a OINcBa OCHOBHnTe MoDeJIHa NocOeHNte Ha IpeHnTa O6JIOKka ypeDN 3a NOuCTBaHe IOD BnCOKo HJaRaHe.
B Ta3n HnCtpyKzna 3a yNoTpe6a e onNcaHOMakcImaJIHO TO O6OpyDbaHe. B obema Ha dOCTaBka mMa pa3NIkN B 3aBVCIMoCT OT MOneJa (BVXTe OnaKOBkata).
BuxTe cxemnte Ha cTpaHnte Ha OTbaprHe!
1 KynnyHr 3a Cbbp3BaHe KbM 3axpaHbAe C Boda
2 Bpb3ka 3a BOda c BpdaeHa Zedka
3Ппекьсвачни hypeда „0/OFF“/ „I/ON“
4 Mapky 3a pa6oTa noi Hana rHaHe
5 PerynatoPdo3npaHe 3a nouchTbaoTo cpeDCTBO
6 MrcTo 3a cbxpaHHe Ha nIcToJeTa 3a pbUHO npbCKaHe
7Баразанзamapkya3a pa6oTa noD BncoKo HanaRaHe
8Дрьжka3aТранспортуранe
9 MaHnBeJa 3a 6apabHa Ha MapkyuHa
10 Cbxpahene Plug'n'Clean 6ytuIka c no- uNCTBaU npenapat c n3BOD 3a nouchTbaU npenapaT
11 MЯсто 3a cxbxpanHeHne Ha npHaIeJXHOCTNTe
12 Onzna
Kya 3a cbxpanHeHne Ha 3axpaHbau nKa-6en
13 Onzna
AByTOMaTuHNo pa3BnBaHe 3a MpeXkoBn 3aXpaHbau Ka6eI
14 Mpekobn 3axpaHbau Ka6eI c uenen
15 Plug'n'Clean6yTnIka c nouNCTBaa npena- paTcbc 3aTBapraK KaNAK
16 Kojena
17Пистолетзapbчнпрьсканe
18 BLOKIpOBKa NnCToJET 3a pBHyNo npbckaHe
19 ByToH 3a OTdEJIHe Ha MapKyuHa 3a pa6oTa NOI HAJIraHe OT NcTOneTa 3 pBHyO npb cKaHe
20 YeTka 3a MneHe
21 Tpb6a 3a pa3npbckBaHe c MeJaKa 3a MpbCOTnra
22 Tpb6a 3a pa3npackBaHe c perylnipaHe Ha haJraHTo (Vario Power)
ElenentnOT CneuaHaTa OKOMJIeKTOBka
ElenentteOTcneuaHaTaOKOMnKeTObKa pa3uPraBaT Bb3MOxHocTe 3a N3NoI3BaHe Ha Baunya ypeI. Po-noDpo6Ha nHΦopMaucy
Ie noyuHte OTOpN3npaHnI npedCTaBnteI 3a ypeDInTe KARCHER.
Ppei nyskaHe B ekcnloataunia
MoHTnpaIte npInIOxHnTe cB6oJHo KbM ype Da qactn npedn nyskahe B eKcnIpoataun.
MoHTaK Ha MЯcTOTO 3a CbXpaHHe Ha nCTOJeta 3a pBHyO npbCKaHe
Φnrgya A
IocTaBeteIOnHnHnHOcauBrHe3aTaNTo n36yTaIte HAppei,yyBa ce HeRoBOToΦnKcnpaHe.
Φnrgpa B
Пoctabete rophnia hocay n ro npntucheTe dokpaH aDony.
Mоnt tax Na Kykata 3a cxbxpaHne Ha 3axpaHbau nka6eI
Onzna
Φnrgpa C
MOnTnpaTe rophata kyka 3a cbxpaHeHne.
MoNTaJHa peryJaTOp Do3npaHe 3a NouchTaBauJn PpenapaT
Heo6xOIMn ca Dbata DoCTaBeHn 60IHa n OT BepTka C Kpbctata rnaBa PH 2.
Φnrgya D
IocTaBete Dbata Mapkya 3a nouNCTBaU npenapaT Ha n3BOdnte.
IocTaBeTe peryIaTOp Do3npaHe n ro 3aK penete c 26oIta.
MoHTaK Ha TpaHcnpThaTa dpbXkKa
Φnrgpa E
→ HabnIte Mapkya 3a pa6oTa noJ haJIraHe Ha 6apabHa 3a Mapkya.
Φnrgpa F
→ Cbo6oHnT KpaH Ha 3aBHTnMa Mapkyu 3a pa6ota noi HaIraHe n36yTaIe npes OTBOPTe Ha peryIaTOPdo3npaHe.
Φnrgpa G
IocTaBeTe TpaHcOpTHaTa IpbXka, PbXHe-Te 6oJTOBte B OTBOpIte n rN 3aBnHTeTe.
H
→ПиТиСHTe CBbP3BaUЯ HnIeJI Ha KbCnI MaPkYu 3a pa6Ota nOД hAJaRaHe B MecHrOВЯ OTBOp,ДOKaTO ce Uye ФИКсИpaHeto My.
PpOBepTe cnpyhTo CBbp3BaHe KaTo dpbHHeTe Mapkya 3a pa6Ota noD haIraHe.
Cbbp3BaHe Ha Mapkya 3a pa6oTa noiHaJIraHe C nIcToJeTa 3a pbHOPa3npbCKBaHe
Φnrgpa 1
Mapkyua 3a pa6ota noiHaIraHe da ce noctabn B nIcToIeta 3a pbuHo npbckaHe,doKaTO ce yye HrOBOTo qKcnpaHe.
Yka3aHne:BnMaBaTe 3a npabInHaTa noCoka Ha npicBeDnHTeHnHn HnpeI.
PpOBepTe cnHyphTo CBbp3BaHe KaTo DpbHHeTe Mapkya 3a pa6Ota nOd Hajra He.
3axpaHbHe c Boda
IpeynpeKdeHue
Cbanacho bauuHume pa3nope6u He ce n038oJra u3noJ3eHa Ha ype- da empKama 3a numeuHa 6da 6e3 pa3denumen Ha cucmemama. H3- noJ3eaume noDxodya pa3denumen Ha cucmemama Ha qupma KARCHER unu kamo anmephamueba pa3denumen Ha cucmemama cban. EN 12729 mun BA. Ipemunana ma npes pa3denumera Ha cucmemama 6da ce onpeJen kamo HezOdHa 3a nuHe.
BhumaHue
Pa3deNumenHa cucmemama mpa6ea da 6bde c6bp3eaH buhau KbM 3axpahehemo C 6oda, Hukoza dupekmno KbM ypeda!
Yka3aHHe: 3aMbpCraBaHnTa BbB BoDaTa MoRat Da NOBpeJr NOMnTa NOD BnCOKo HAnra He I npHaIeXHoCTnTe. 3a 3aUHTa Cn npenOpbUba n3NoI3BaHeto Ha BOeH PhIITbP Ha KARCHER (cneuaHa npHaIeXHoCT, No 3a npbUka 4.730-059).
3axpaHbHe c B0da OT BOOnpoBOda
Cb6IIOdaBaIte pa3nope6nte Ha BODOHa6 dIteJIHaTAKOMnaHn.
3a napametpnte 3a Cbbp3BaHe Bux Ta6ekkata Ha ypea/TexHnuecknte napameTpni.
Tp6a 3a pa3npackBaHe c perylnpaHnHaIraHeTo (Vario Power)
3a Han-06uayHnTe pa6oTn no nouchTahe. Pa6oTHOTO HnraHe moKe da ce perylnpa 6e3cteneHHo MeKdy Min" n,Max".
OtnycheTe loCTa Ha nuctoJeTa 3a npbcka He Ha pbka.
Tp6ata 3a pa3npackBaHe da ce 3aBbptn BKeJahOTO NOJXeHne.
Yka3aHne: POnxOJa, 3a pa6oTa C NouNCTBa- u n npenapatn, 3a ceI-Ta 3aBbPteTe CTomaHeHata Tpb6a Ha noIoXeHne „Mix".
Tp6a 3a pa3npbckBaHe c MeJaUka 3a MpbcOTnTa
3auntataOT 3ampb3BaHe
BhumaHue
Ypea u npuHadnexHocmme da ce na3am om 3aMpb38aHe.
YpeIbT n npHaadJIeXHoCTnTe ce pa3pyuBaTa npn 3aMpB3BaHe, aKO ca HAnbJIno N3npa3HeHn OT B0da. 3a da ce n36eHnat yBpeKdAHHa:
3npa3HeTe ypeHa HnblHo OT BODaTa: OtdeneTp6ata 3a pa3npbckBaHe OT nictoIeta 3a npbckaHe Ha pbka.
Bknuoyete ypeda (I/ON) n npntncheTe locta Ha nucToJeTa 3a npbckaHe Ha pbka,doKaTo npceTaHe da n3n3a Boda (okono 1 MInH.).
I3KIOUeTe ypeHa.
Ypeda N BCNUKn PpHaNDLeXHOCTu Da ce CbXpaHRABaT B 3aUHTeHO OT 3aMpb3BaHe MRCTO.
PnJn n noDnpbXka
Onachocm
Ipeu ecakeu paobum no nodopbkkama ypeobm da ce u3knouya u uencenb m da ce u3 baxda om konhma.
PoaepbXka
IpeNi no-npoDbJxKnteJHo cxbxaHHe,Ha npimep npe3 3mata:
Φnγpα
N3TerIeTe ueKaTa OT Bpb3KaTa 3a KpaHa 3a BOda C NOMOuTa Ha IIOCKN KneuN I a NOUcTeTe IOd TeuaBa BOda.
Poaepbxxka
YepeBt He ce HxKdae OToNDpBkka.
Pe3epBn yacTn
I3noJ3BaIte cAmO opuRnHaJIHn pe3epBHi qac Tn Ha KARCHER. CnncbK Ha pe3epBHTe qactN Ie HamepIte B Kpa Ra Ha HactoTo YnbTbaHe 3a pa6ota.
Pomou npn Henn3npaBHOCTN
MokTe camn da otctpaHnte dpe6Hnte noBpe DN, KaTO cIeDbate daJeHnte NO-dOly onNcaHNIA.
B cnyuah na cbmheHne ce obbphete KbM OTO np3npaH cepBu3.
Onachocm
Ipeu ecakeu paobum no nodopbkkama ypeobm da ce u3knouya u uencenb m da ce u3 baxda om konhma.
Pemohmhu pa6omu u pa6omu no eJekmpueckume enemehmu mozam da ce u3ebpuwa camo om omopu3upaan cepu3.
YpeBt He pa60Tu
→ИздьрайтлостаHa nuctoileta 3a рьно npвскаHe,урдьт ce BKПчBa.
→Провере Дади пооченTo Ha TINOBaTa Ta6eJkata HanpeXeHne CbBnada c Hanpe XeHHeTO Ha N3TOUHnKa Ha TOK.
Поберете зхсаньшия кабел за врекдаHe.
YpeBt He doCTnra Hana rane
Пюовере Тангтойкata На Трьбата 3а paэпрьсКВаHe.
O6e3Bb3dnyuwaBaHeHa ypeJa.
BknHouTe ypea 6e3 Tpb6a 3a pa3npbc KBaHe nTo octaBeTe da pa6oTn (MaKc.2 MNHyTu), DOkATO BODATA 3anOChne Da n3nN3a OT NnCTOneta 6e3 MexypueTa. N3KnHouTe ypea nOTHO BO NOdBbPjKeTe Tpb6a 3a pa3 npbCKBaHe.
→ПpoBepeTe 3axpaHbAHeTo C BOJa.
N3terIeTe ueKaTa OT Bpb3KaTa 3a KpaHa 3a BOda C NOMOuTa Ha NIOCKN KNeuN I a NOUcTeTe IOd TeuAa BOda.
UpeBt He noterna, MOTOpbT 6pbMm
PpuuHa: Cnadahe Ha HapexeHuemo nopaducna6a eNeKmpueckaMpexa unu npu u3non3BaHe Ha yobnxkumen.
→Првьключвано nbpBO n3дьрnaite lo cTa Ha nICToJeTa 3a pbUHO npbCKaHe, cIeД TOBa nOCTaBeTe npeKbcBauHa ype Da Ha ,I/ON".
CnJIH KOJIe6aHnB HJaIraHeTo
→Почистване на ДIO3a BINGOKO HAJIraHe: MaxHete 3ambpcBaHnIa T O OTBOPa Ha DIO3aTa C NOMOuTа Ha INIa N IN3PJIaKHeTe C BOda HAppeI.
→Поверете ДебиТа на ВODаТa.
YpeBt He e xepMeTnueH
→ MaJIkaTaNINca Ha xepMeTNUHOCHT Ha ypeJa e obycnOBeHa TexHnueCKn. Pn CInHa JINca Ha xepMeTNUHOCCT Ce oBbPHeTe KbM OTO pN3IpaH cepBn3.
Почиствашито средостwo He ce 3acmykba
Да ceизпольва Трба 3a pa3пpackBaHe c perулларе на habяганeto (Vario Power) TрбаТа 3a pa3пьсКВанe Дa ce 3abpTnВ noLOXeHne „Mix".
Поберете настpoикata Ha perуларopdo 3иране 3a NOUNCTBaцOTO cpeДСТВО.
Поверете BCmykaTeJHnЯ МарКуч 3a no
ЧИСТВАЦО СрЕДСТВО 3a ORБНАМecта.
CE-Деклараша
C HACTOJTO DeKnappame, Ye cHTnpaHaTa NO-DOJy MaHnHa CbOTBeTCTBa N O KOHcEPluN I KOHCTpyKzra, KaKTo N IO Haunn Ha IpON3BODCTBO, PnIpaHr OT HAc, Ha CbOTBeTHnTe OCHOBHN 3a TexHnuecka 6e3oNaChocT IN 6e3BpeDnOCT Ha DnpeKTNBte Ha EO. Ppi npomeHn Ha MaHnHaTa, KOnTO He ca cbrAcyBaHn C HAc, HactoJata DeKnapaunr ryn BaIndHOCT.
IpoDyKT: IapOuNcTaUka/napocTpuyka 3a pa6Ota nOd HaNJaRaHe
Tun: 1.168-xxx
Hamnpaun npnloxehne DnpekTbnu Ha EO:
2006/42/EO (+2009/127/EO)
2004/108/AI
2000/14/EO
Hamepnn npnloxkeHne xapMOHN3npaHn
CTaHdapTn:
EN 55014-1:2006 + A1:2009
EN 55014-2: 1997 + A2: 2008
EN 60335-1
EN 60335-2-79
EN 61000-3-2: 2006 + A2: 2009
EN 61000-3-3:2008
EN 62233: 2008
PpHIOXeH MeToD 3a OueHka Ha CbOTBet
CTBNETO:
2000/14/EO:Прилженье V
HnBO Ha um dB(A)
U3MepeHo: 8 9
TapaHTnpaHo: 93
IopnncanTe DeiCTBaT NO Bb3IOxKeHne N KaTo IbNHOMOuHnU Ha ynpaBnteHOTo TAnO.


ПьЛHOMOДИК NOДOKУМЕТацЯТа:
S. Reiser
71364 Winnenden (Germany)
Tei.: +49 7195 14-0
ΦaKc: +49 7195 14-2212
Winnenden, 2011/06/01
TexHnueckn daHHN
| K7.300 | K7.400 | K7.410 | K7.450 | K7.400 CH | ||
| Еlektrichiесko 3axpaNBaHe | ||||||
| Hanpexegenie V | Hz | 2301~50 | ||||
| ПрисьедиNTeJNa MoUHocT KW 3,0 2,2 | ||||||
| ГрадUC на зашита IP X5 | ||||||
| Клас зашита | | ||||||
| ПрedingзITEел (иертын) A 16 10 | ||||||
| 3axpaNBaHe c BODa | ||||||
| Налягане на постьпвашада ворda (макс.) | MPa | 0,6 | ||||
| Tempeparatura на постьпвашада ворda (макс.) | °C | 60 | ||||
| Дебит за постьпвашада ворda (Min.) | Л/Мин | 11 | ||||
| Мakc. Височина на заимукваhe | M | 1,0 | ||||
| Данни за мошноctta | ||||||
| РавOTNO на палганe | MPa | 15 | 13 | |||
| Мakсимално дожUCTIMо на палганe | MPa | 16 | 16 | |||
| Дебит, ворda | Л/Мин | 9,2 | 8,2 | |||
| Дебит, пеларати за поочтваhe | Л/Мин | 0 - 0,3 | ||||
| Сила на оТпора на пистолета за рычно прьсканe | N | 22 | 19 | |||
| Мерки и Тergla | ||||||
| Височина | MM | 972 | ||||
| Дължина | MM | 407 | ||||
| Широчиna | MM | 447 | 459 | 447 | 459 | |
| Тerglio, вgotовноct за работа с п riонадпексти | Кт | 22,4 | 23,2 | 24,4 | 24,4 | 21,2 |
| Установен STOй�остпс StByласно EN 60335-2-79 | ||||||
| Стойост на вибраци ITE в облacrTTа на дplaHTA - рькata | M/cek2M/cek2 | < 2,50,3 | ||||
| Несигуrchост K | ||||||
| НИВО на звуka LpA | dB(A) | 75 | ||||
| Невтойчвост KpA | dB(A) | 3 | ||||
| НИВО на звукова мошноct LWA + неухтойчвost KWA | dB(A) | 972 | ||||
3ana38ame cu npabomo ha mexHuYeCKu u3MeHeHua!
Sisukord
Uldmärkusi ET 5
Ohutusalased markused ET 6
Kasitsemine ET7
Transport. ET 10
Hoiulepanek ET 10
www.kaercher.com/REACH
Garantii
Veevarustus veevargist
Toode: Körgsurveyesur
Tüüp: 1.168-xxx
71364 Winnenden (Germany)
Tel: +49 7195 14-0
Winnenden, 2011/06/01
Tehnilised andmed
www.kaercher.com/REACH
Garantija

S. Reiser
Head of Approbation
Par dokumentaciju sastadisanu atbildigapersona:
S. Reiser
71364 Winnenden (Germany)
Tālr.: +49 7195 14-0
Fakss: +49 7195 14-2212
Winnenden, 2011/06/01
Tehniskie datum
www.kaercher.com/REACH
Garantija

S. Reiser
Head of Appropriation
71364 Winnenden (Germany)
Tel.: +49 7195 14-0
Faksas: +49 7195 14-2212
Winnenden, 2011/06/01
Techninai duomenys
www.kaercher.com/REACH
Tapaantī
Y KOKHI KpaHl DiIOb yMOBn rapaHTII, HadaHOI BIDNOBIDHOO fipMOH-npOaBcEeM. HenoJadKn Bpo60TI npICrpoMu MN ycBaECMo 6e3PNaTHO npOTAROM TepMHy DII rapaHTII, kKIO BOHN BnKlnKaHI 6paKOM MaTePIaNy Chn NOMIKAMN BnROTOBHeHNA. Y BnPaDKy UHHOCTI rapaHTII 3BepTiTbcra Do npOdaBcA qN B HaibnKChn ABTOPIN3OBAHNI cepBicHNI ueHr3 DOkUMeHTaJIbHM NiITBepDxKeHHaM NOKyKNi. (AdpeCn DnB. Na 3BOpoti)
Ppabnla 6e3neKn
O6epeXHo!
Hikonu He mopkaumecb MepexHo2o umekepy ma po3emku eoIoozmu pykamu.
YeimKHeHnAnapamy 3a6oPOncMbcs,
kUo MepeXeBu KaBb Yu cymmcEi
KomnoHeHmu anapamy, HApuKnad, uHaH2
eucok0zo mucky, pyHu niCmonem-
po3nulOBa a6o 3axucHi npucmpoi
nowkoJxHo.
Ipeod noyamkom pobomu 3 anapamom nepeepumu Mepexeueu Kaeb ma umencbHy bunky Ha nowkoedhen. Nowkodxeu cunoeu Kaeb mac Heaunho 3amHmu ynoeHobaeHu cnyxbo1 cepicchozo obcny2oeybaHH/ qaxibem-eneKmpukom.
Ipebeipmu una Ha npedMem nowkoxdxeHHnpepd koxhum eukopucmaHHm. HeauiHo 3amHimb defeekmhu uHaHa.
Poboma y eubyxOhe6e3neuHux yMOaX He do3eONyEmbcra.
Ipu 3amhi npucmpoio e He6e3neuHomy Micui (HaPpukna, 6eH30KoJOnKa) Heobxio npumpumyeamucb cneuaJIbHuX nopad no mexHi ci 6e3neku.
Cmpymeni niD muckom moxymb 6ymu Hebe3neuHmu y buaadky Heidnoeidozo ix 3acmocyeaHa. He moKHa HnpaBnaMu cmpymh Ha IIOdeu, meapun, yeimkhyme eIekmpo0bnaadhaHH a6o Ha cam npunaad.
Takox He do3boJembc8 ckepoByamu cmpymh b odu, uo nepe6ybac nd bucokum muckom, Ha iHux JIOdeu Yu Ha ce6e dnyuue Hnna 6ymmra yOdya.
He Mumu npedmemu, uo Micmmbukidnuei dny 3dopeoe' peoeunu (Hapukna, a3becm).
Cmpymehm nid muckom mojymb 6ydu nowkodxehi abo nonhymu koneca aemomobinie. Nepuo o3haokoio nowkodxehnra 3MiHa KOIbOpy Koneca. Nowkodxehi koneca cmaHObnmb He6e3neky dny 3doopoe'B Xodi ouuueHna cnid 36epizamu ducmauio uohaimehe 30 cm!
He6e3neka 6u6yxy!
He po3nunmu zojuqi pidunu.
BcmoKmyBaHnAnapamom pidun, uO
Micmmb po3yuHnku, ma Hepo3eDehux
Kucnom Yu po3yuHnki8 3abopohmcbc!
Do maKux peoBuH Hanexkamb, HappuKnad,
6eh3Un, po3yuHnku fapb ma Ma3ym.
Tymah, uO yMeOpIOEmbcra 3 maKux
peoBuH, ne2ko3aumcuu,
eboxohe6e3neHu ma ompyuHui. He
BukopucmoByaamu auemOH, Hepo3eDehi
Kucnomu ma po3yuHnku, 60 BOHU
pyuHyomb MamepiJU, 3 kux
BuzomoeNo anapam.
Nonepedxehn
UmwencelbHa eunka ma 3'odhyeabHu elememn noobkyea naobuHni bymu zerpmenuhi ma He nepebyamu y odi.
HeniOxKi nodoexyBaui moKymb Aenmu He6e3neky. N03a npumiueneHnmu cnid eukopucmooyamau minbku donyuuehi do eukopucmaHna ma biDnoBIDHO nomuehi nodoexyBaui 3 docmamHim nonepeuHm nepepiom npooba: 1-10M:1,5MM2,10-30M:2,5 MM2
IopoOeKyuEaH noBuHeH 3aeXdu 6ymu noEhicmIO po3kpyeHUM 3 Ka6enbHo2o 6apabHy.
UlnaHsu, apmamypu ma 3'edhaHHa - Maemb baxnue 3naeHHa dna 6e3neku pobomu 3 npunaDom. Do3oJMaBcB uKOpucmaHHa HuaHie, apmamyp ma 3'edHaHb, donyuueHux dna buKOpucmaHHa Bupobhukom.
LipnpoHHe npuzhaeHi dna buKOpucmaHHJIobMu 3 OmbexHmu fizuHmu, cHcOpHmu abo pozymoBuMu 3di6Hocmmu. 3abopohembcraekcnnyamaia npucmpoO dimbu abo HekeanifikoehumU ocobmu. Heobxiohcmkumu 3a dimbu, oob eohu He 2paIu i3 npucmpoM.
Kopucmyeaqu noBuHEn buKOpucmoeyamu npucmpiu y biNoeiHocmi do iHcmpykuii. Bin noBuH en bpaXooyama yMoBu Micuebocmi ma 3eepmamu yeaay Ha mpemix oci6 nid yac po6omu 3 npucmpoeM.
■ Ppucmpiu He bukopucmoyume, konu 30hi docxnocmi e ihuji nodu, ocobueo, kkuo BOHU He Maomb 3axucno 0drey.
Odaume 3axuchy odekmy ma 3axuchi okjnapu dna 3axucmy eid bodu ma 6pydy, uo biobpu3kyombcra.
yeaa!
Iid yacmpueanux npepe e ekcnnyamauii cnid buknluum npucmpiu 3a donomozo 20noBHOZ BUMUKa / BUMUKa a npucmpo afo bi'd'edhamu uo zo biD eNeKmpomepexi.
He do3b0nembc8 ekcnnyamaia npucmpo npu memnpamypi huxue 0^
Дялгзлбиангпошкдженгпру ouuцehni cnid 36epizamu eidcmaHB uohaumhe 30 cm bid nakoahux noeprxohb.
He moxha 3anuamu npucmpiu 6e3 haayid y nd yac po6omu.
Cniokyuime 3a mum, uo6 mepexhi kaebi abo nodoexybaui He moxha byno nowkodumu hacymnuewu Ha Hux, y pezynbmani nepezuHaHH, po3ipeaHH abo nodibzo ywkodxeHH. 3axuaume mepexehui kaebi bid jaku, macna ma 2ocmpux noeepxohb.
Bci yacmuu, uo npobodmb cmpym y po6oui 30hi, noBuHni 6ymu 3axuuehi 6id nompannHHKpaneB 6odu.
Ipucmpiu moke bymu nioeHaHn uwe do eekmpuHoi mepeki, 0noBunHa 6ymu cmaHOBHeHa eekmpoMoHmepom 32iHo 3 IEC 60364.
Ipncmpiu cnid emukamu nuwe do 3minhoocmpymy. Hanpya noobnha eiodnoeidamu bka3aHUM Ha fipmoi mabnuci npucmpoio daHUM uodo Hanpyu.
3 mipkyeaHb 6e3neku padumo ckopucmamucb npucmpoem 3 aemomamom 3axumy bi cmpymy eumikaHn (MaKc. 30 mA).
Pobomu 3 ouuueHn, 6 xodi kux 3'raombcr cmiuhi bdu 3 BMcmon Macmuna, HanpuKna, MummMomopie, dhuza, cnid bukohyeamu minbku e CneuaIbHux Micx dnMumma 3 MacmunbHUM cenapamopor.
Leu npua6yno po3p0bneho dna bukopucmaHH y HbOMy MuOuyx 3acobie, uo nocmaaioMbca abo peKomeHdyombcu bupobhukom. BuKOpucmaHH ihuux
3acobie moxe ennuhymu Ha 6e3neky npuna.
3axnchi 3ac06n
Yeasa!
3axuchi npucmpoi cnyayiomb dna 3axucmy Kopucmyaue. Budo3miHa 3axuchux npucmpoie yu HexmybaHn Hmu He donyckaembcra.
AnapatHn BmNkau
TOnOBHn BmNkauch 3anobira cAmoBilbHi np60ti anapaty.
BcTaHOBnTn BepXhi TpIma Ta HaTnCHyTu NOro Bn3 Do yNopy.
BcTaHOBLeHnRAuKIBdIy36epirAHnMepeXeBOro shypa
Onci
MaJIIOHOK
BcTaHOBHTBepXHi rauKn dIy 36epirAHn.
BcTaHOBJIeHnpeRyIaTOpydo3yBaHnMmHoro 3ac06y
ДляВстановпенябуде notpi6Ho 2 прикладени Гинты i odna xpecToBa BnKpyTka PH 2.
MaJIIOHOK D
BCTaHOBNTu B eIeMeHTn PdKlnOueHn o6nDa 7naHn DnMnHOro 3ac06y.
BcTaHOBnTn peYJrTop 03yBaHHa Ta 3akpinTu Ioro 3a DOnOMoIO 2 rBnHTiB.
BcTaHOBJIeHHa pyKoTKn dJa TpaHCnOpTyBaHHa
MaJIIOHOK
→ Hamotatni IJIaHr BnCOKOTo TnCKy Ha 6apaban.
MaJIIOHOK F
BilbHn KHeCb HAMOTaHOro BucOKoHaipHO RoJHaHra npotrHyTu Chepe3 BIMKn Ha peryIaTOpy Do3yBaHHa.
MaJIIOHOK
HacaHTn pyky IJRA TpaHCnOpTyBaHH, BCTaBHTN TBHNTN B OTBOPN i 3a'BHHTNTN.
MaJIIOHOK H
BCTaBtN 3'EdHaJIbHn HIneJIb dIy KOpOTKOro BvCOKOHaIpHOro UJaNHaRb B NaTyHHe KpinJIeHHr Do KnaUaHHr. IpeBipTu HaiHicTb KpinJIeHHr, NotaHyBUn 3a UJaNrH BrvCOKOrTo TnCKy
3'εdHaTn BucokOHaipHn ⅢpaHr i3 pyHm niCToJeTOM- p03nIIIOBaYe
MaJIIOHOK
BCTaBnTn ⅢNaHr BnCOKOro TnCKy BpyHni nictOJeT-p03nNIOBaUdo KnaCaHHra.
Bka3iBka: DToPmUyBaTncb npaBnIbHoro po3MiueHnra 3'edHyBaIbHoro HineJIIO.
IpebipnHaDiHicTb KpInnHeHH, NotrHyBUn 3a UNaHr BNCOKO TnCKy.
IopabAHBaBDO
Nonepedxehn
Biodoioho do dioux dupekmue 3abopohembcj ekcnnyamaia npunady be3 cenapamopy cuscem y cuscemi bodonocmaaHn numhoi
bodu. Cnid bukopucmooyamu bidnoeiHui cenapamop cucmem φipmu KARCHER a6o anbmephamuehu cenapamop cucmem, 3zio EN 12729 muny BA. Boda, uo npouwna uepe3 cucmemhu cenapamop, ebaacmbcna Hnpudamno do na numma.

yeaa!
CucmemHu po3oIbHuk 3aexdu nioKIOUamu do cucmemu bOdoNocmaaHn, i HikOnu 6e3nocepedhbo do npuna!
Bka3iBka:BoaHi 3a6pydHeHHa MoKyb cnpuHHTn POWKoJxHeHH HaCOCy BUCOKOTNCKy Ta npIaDJa. Ipa 3axncty paIMO ckopncTaTNCb BOaHNm φInbTpom KARCHER (cneiaJIbHe npIaDJa, Homep 3amOBJIeHHa 4.730-059).
IopabanHbOIN3BODorohy
IOTpIMyIeTcB npaI niInpnEMCTBa BOIOIOCTaayHn.
IotyKHiCTb DnB. Ha 3BODcbKi TabNmu/ B TexHiuHx DaHnx.
→ CkopncTaITeCb BOJAHM UJHaHROM 3 MiUHO MaTePiAly (B KOMJIneKT NOCTaUHH He BXOHTb) 3i 3BNUaHIO 3'EDHyBaIbHOIO MyTOIO. (diametp: MIHIMy 1/2 dIOIMA a6o 13 MM; peKOMeHNDoBAHa DOBXINHa 7,5 M).
MaJIIOHOK J
3'εнувалыну MyФТу 3 KOMnneKTy πiД'снай Te Do eJemeHTy anapata Дпя NOДаВань ВODи.
HaInbTe BODaHOJ UHa H3'EDHyBaJIbHy MyfTy anapaty, nicra Yoro NiD'EnHaIte Ioro Do BOdOrOHy.
IopabahnBaOn3BipKpntNXBOOIMN
Дань Високонлірній Мінні anapat 3i BCMOKТУВaJIbHIM UJIaHROM KARCHER Ta 3ВОРТНИМ KIлAnAHOM (cneцiaJIbHe npUlaДЯ, Homep 3amOBJIeHHry. 4.440-238) npu3NaYeHO DЯ BCMOKТУВaHHry BOdN 3 BiДКрNTnx pe3epByapiB, npuMipOM, 3 dIXKOK dЯdoшоBoI BOdN YI CTaBKiB (MaKcImaJIbHy BnCOTy BCMOKТYBaHHry DINB. y po3diJI "TexHicHi daHI").
→ HanOBHHTN BCMOKTyBaJIbHnI ShNaHr KARCHER 3i 3BOpOTHM KlaIaHOM BODoIO, npI'BnHTNTn Do eIeMeHTy NiD'EDHaHHa BOI Ta NOBicHTN y DoOObY dIXKy.
→Перед ВИКОРИСТАНХМ ВИКаЧАТи NOВИТРЯ i3 npИСТЮ.
BbIMKHyTn npncpti 6e3 npneDHaHOI ctpymHHOITpy6Kn Ta DaTu NOMy nonpaIOBaTu (He 6iNbwe 2 XBUNH),NOKn 3 niCToJeTa He NoUHe BVXODHTu BOa 6e3 6yIb6aWok nobitpy.BbIMKHyTn npncpti Ta 3HOBy npueDHaTu ctpymHHy Tpy6Ky.
BVeDeHnB eKcnIyataciIO
yeaaa!
Poboma ecyx npomzom 6inbwe 2 xeunn npueodumb do euxody 3 nady bucokohanipnozo hacoca. Kaio npucmpiu npomzom 2 xeunu Hne Habupaec muck, mo uo0c nd Bumkhymu i diyu eidnoeido kkaizekam, kpi npueodmcb8 2naei "DonoMoa y eunadky Heonadok".
MaJIIOHOK K
→Hadihhe Ha pyuHni nicToJeT-po3nIIOBauchtpymHHy Tpy6ky Ta 3aΦikcyiTe ii, NOBepHyBwHa 90^
MaJIIOHOK
Lijkom po3MOTaN BUCOKOHanipHn IJnAHr 36apabany. Pnp cboMy npntpymyBaTn pykoRTky dIra TpaHCnOpTyBaHHr.
PpIMtKa:JaKo npuBida pykoTka 3HaxOHTbCBA3actOnopeHomy noLoXeHHI, To ii cnId nonpeEd BIDKNHyTu Habepx.
Lijkom BiKpnTe BoDorHnn KpaH.
→ NobHicTIO po3MOTaTN MepeXHHIshHyp.
BcTaBTe MepeKeBn uTeKepe y po3eTkY.
→ YbIMKhItb anapaT, I/ON" (I/YBIMK.).
Ekcnnyatazaia
O6epeXHo!
Cmpymnb bodu, uo buxodumb 3 fopcyku nid bucokum hanoPOM, cnpuunac bdday pyhzo nicmonemy-p03nuloea. 3 iicipnuHcu cnid 3auHmu cmiuke noIooKeHHa, MiHO mpumamu pyHu nicmonem-p03nuloea 3i cmpymuHIO mpy6koio.
yeaaa!
Ipeod noyamkom Mumm Heo6xio Hnepekohumc8 momy, uo muouu npulad bucoko2o mucky cmiu kocmaHOHa piehiu noeepxHi. Pid yac Mumm bukopucmooyme 3axuchi okyjpa ma 3axuchu oya.
Po36nokyBaTn BaXiNb pyHOro nicToJeTypo3nnIbBaaya.
→ NotaryntaBaKijb,anapaTyBIMKHeTbcra.
Bka3ibka: RaKIO BaxiNb 3HOBy 3BiJIbHHTbcra, anapaT 3HOby BUMKHeTbcra. BucOKn TnCK 3aIIuwaCTbcra B CnCTeMI.
Струмени Трубka 3 рерулованham ТUCКY (Vario Power)
He yucmum aemomobinbhi wuHu, naKoe neKpmmra6o yumnuei noepxHi (HanpuKnad, 3 depeBuHu) i3 3acmocyeaHnM fpe3u dna budaleHHB 6pydy. IcHyc 3a2po3a nowkodxehnHa
He npn3naueho dny po60Tu 3 MmHm 3ac06om.
MnHa Ⅲtka
- Ppimitka: PpH3HaueHa dIpa06OTn 3 MmHm 3acobom.
Po6Ota 3 MmHmM 3ac06oM
Дя ВИКОHYBAHOrO 3aBdaHHЯ NO YIицEHIO BИКOPICTOBYte BИКЛIOUHO 3acobn DЯ
YHJH HJH T a 3ac06n no DORJy fipMn
KARCHER, ockjIbKn BOHn po3po6JIeHi
CneiJIbHO dJRA 3aCTOCyBaHHy y BaIHX
PnIcTPOx. 3actocyBaHHn iHnx 3ac06IB dJa
YHJH HJrTa 3ac06IB no DORJy MoKe
PnI3BeCTn Do npNcKOpEHO 3HOCy Ta BtpaTH
PpBaHa rapaHTiHe o6cIyROBvBAHHn.
DoklaHy IHOpMaio MOXHa OepKaTH B
CneiJIaI3OBAHOMy Micu TopriBni a6o
6e3nocepEnbO B npedCTabHNtBi KARCHER.
Bka3IBKn no MnHm 3ac06am: MnHn 3aci6
Mapkn KARCHER nJra cboRo npncTroIO, uO
HaIbIbW BxINBaCTbcra, MOXHa npd6aTH B
ROTOBOMy DO BxINBaHHn BnIgIa I B pIaUzI 3
MNHN M3ac06om, uO o6NaHaHa 3aIipHOIO
KpiUkoIO. TaKIM YIHOM BnKlIOuaETbcra
OBTJKNBn OB'zOK nO 3JIbAHHHIO a6o
HaNOBHeHHIO.
MaJIIOHOK M
3nT KpNkUy 3 nlauCi 3 MmHm 3acobom Plug'n'Clean Ta BCTaBntu BiKpTu nlauKy Bn3 B 3'EdHaJIbHm eIeMeHT dJa MmHoro 3acoby.
MaJIIOHOK N
YCTaHOBtN O6'EM BCMOKTyBaHHr po3uHMy MmHoro 3acO6y 3doNOMoroIpeYJrTopa Do3yBaHHr MmHoro 3acO6y.
BukopncToBvBaTn CtpymeHeBy Tpy6ky 3 peryIIOBAHHm TnCKy (Vario Power)
Повернту CTpyMHHy Tpy6ky B
ПОLOЖЕНЯ „Mix“.
Вka3iBka: Так imm ChINOM, Рп ecknnyataцii
po3HH MmHOrO 3acOby 3MiUyETbcr 3i
CTpyMeHem BOIN.
Ppimitka: Y pa3i notpe6n uTkn dIy MNTT TaKoX MoXHa BnKOpNCTOBvBaTN dIy po6OTN 3 MNHm 3acO6om.
PekomeHdoBaHi MeToOn OuyuSeHHa
→ P03nHnTn HeBEnk Ky KInbKicTB 3acO6y dnyuHnEHHa cyxu nobepxHIO Ta 3anHnTn DiYrN (He Bucnxatn).
→ 3MnIte po3uHHeHn 6pyd cTpyMeHem BNCOKO TUCKy.
Ppnnnntn ekcnnyataciio
→ 3BinbHITb BaXJIb 3 pyuHm po3nJIIOBaUeM
3a6nokyBaTn BaXiNb pyHOro nicToJeTypo3nnIOBaua.
Pnncptpi He npaioe nid Tnckom
IpeBipNTn HacTpoIOBaHHaCTpyMmHHOITpy6Kn.
→Budanitb nobitpr i3 npnctpoio. Bvmkhytn npncptpi 6e3 npneDHaHOI ctpymHHOiTpy6kn Ta daTn HOMy nonpaHOBaTN (He 6ilbwe 2 XBnlnH), nOKn 3 nicToJeta He noUHe BVXODHTN BOda 6e3 6yIb6aWok nobitpr.Bvmkhytn npncptpi Ta 3HOBy npneDHaTN ctpymHHy Tpy6ky.
→Перевіптулійдіванія ВODи.
→ BntaHitb 3 donomoro npockory6iB MepeXeBn fInbTp 3 eIemaHTy dJa BOIONoCTauaHH Ta npomuTe Ioro y npotoHi Bodi.
Anapat He BMnKaeTbcra, DBNrHy rYdntb
PpuuHa: PadiHnHa npyu uyeep3 cna6ky eIekmpoMepexy abo npu buKOpucmanHi nodoexyBa4a.
→Прии ВIMКнEHнI Hacampeed BHTIIN BaxiNb pyHoro NiCTOteTy-po3nIIOBa4a, NOTIM yCTaHOBITb BIMKau anapaty B noJoxeHHra "I/ON" (I/YBIMK.).
Benniki nepenadyn Tncky
OuHCTnTnФOpcyHky BnCOKOro TnCKy: TOnKOIO npN6paTn 6pyd3 OTBOPyΦOpcyHKn Ta npOMTu II CpepeDy BOdoI.
→IpebeipTe KijbKiCTb NogabaHOI BOHn.
Anapat HerepMeTuHn
He3NaHy HerepMeTnHiCtB anapaty 3yMOBHeHO TexHicHMN OcO6JIbBOCTaMn. Ppi CInbHni HerepMeTnUHocTi 3BepHiTBcA Do aBTOpn3OBaHOi cnyK6n cepBichoro 06cnyroByBaHHra.
OuChn 3acio He BcMOKTyEcTbcra
71364 Winnenden (Germany)
Ten.: +49 7195 14-0
ΦaKc: +49 7195 14-2212
Winnenden, 2011/06/01
Texhihixapaktepnctnkn
| K 7.300 | K 7.400 | K 7.410 | K 7.450 | K 7.400 CH | ||
| Еlektrichi Di EdnHaHа | ||||||
| Hanpyra V | Hz | 2301~50 | ||||
| ЗагалыnotужнICTb kW 3,0 2,2 | ||||||
| Стулінь захисту IP X5 | ||||||
| Клас захисту | | ||||||
| Запбіжник (iHerційни) A 16 10 | ||||||
| Подачы Вodи | ||||||
| Тиск, сio notаэсыя (макс.) | MПа | 0,6 | ||||
| Temпературастуmenя (макс.) °C 60 | ||||||
| ОБ\'ем, сio notаэсыя (mH). | л/xВ. | 11 | ||||
| Макс. висота васуваши M 1,0 | ||||||
| Робочи xарakтөрөдөнгii | ||||||
| Робочи ТИС | MПа | 15 | 13 | |||
| Макс. дoюстими ТИС | MПа | 16 | 16 | |||
| Пробкүлбүмүүү halocа, Вора | л/xВ. | 9,2 | 8,2 | |||
| ОБ\'ем поадч, засовдд чишени | л/xВ. | 0 - 0,3 | ||||
| Peak'tibna сили руногу розпilювачa | H | 22 | 19 | |||
| Pozemirп ta Bara | ||||||
| Висota | MM | 972 | ||||
| Довжина | MM | 407 | ||||
| ШирINA | MM | 447 | 459 | 447 | 459 | |
| Bara, у rotobностд do розоти та з akcescuapamn | КГ | 22,4 | 23,2 | 24,4 | 24,4 | 21,2 |
| Занewsня Bстановлени 3rigдно.stan'dar'ty EN 60335-2-79 | ||||||
| Занewsня Bстановлени ружа-п leчe | M/c2 | < 2,5 | ||||
| Небезпека K | M/c2 | 0,3 | ||||
| РIVENь shumy LpA | дБ(A) | 75 | ||||
| Небезпека KpA | дБ(A) | 3 | ||||
| РIVENь пotужностд shumy LWA + небeзпека KWA | дБ(A) | 972 | ||||
Moxnuei 3miHu y koHcmpykuji npucmpoio!
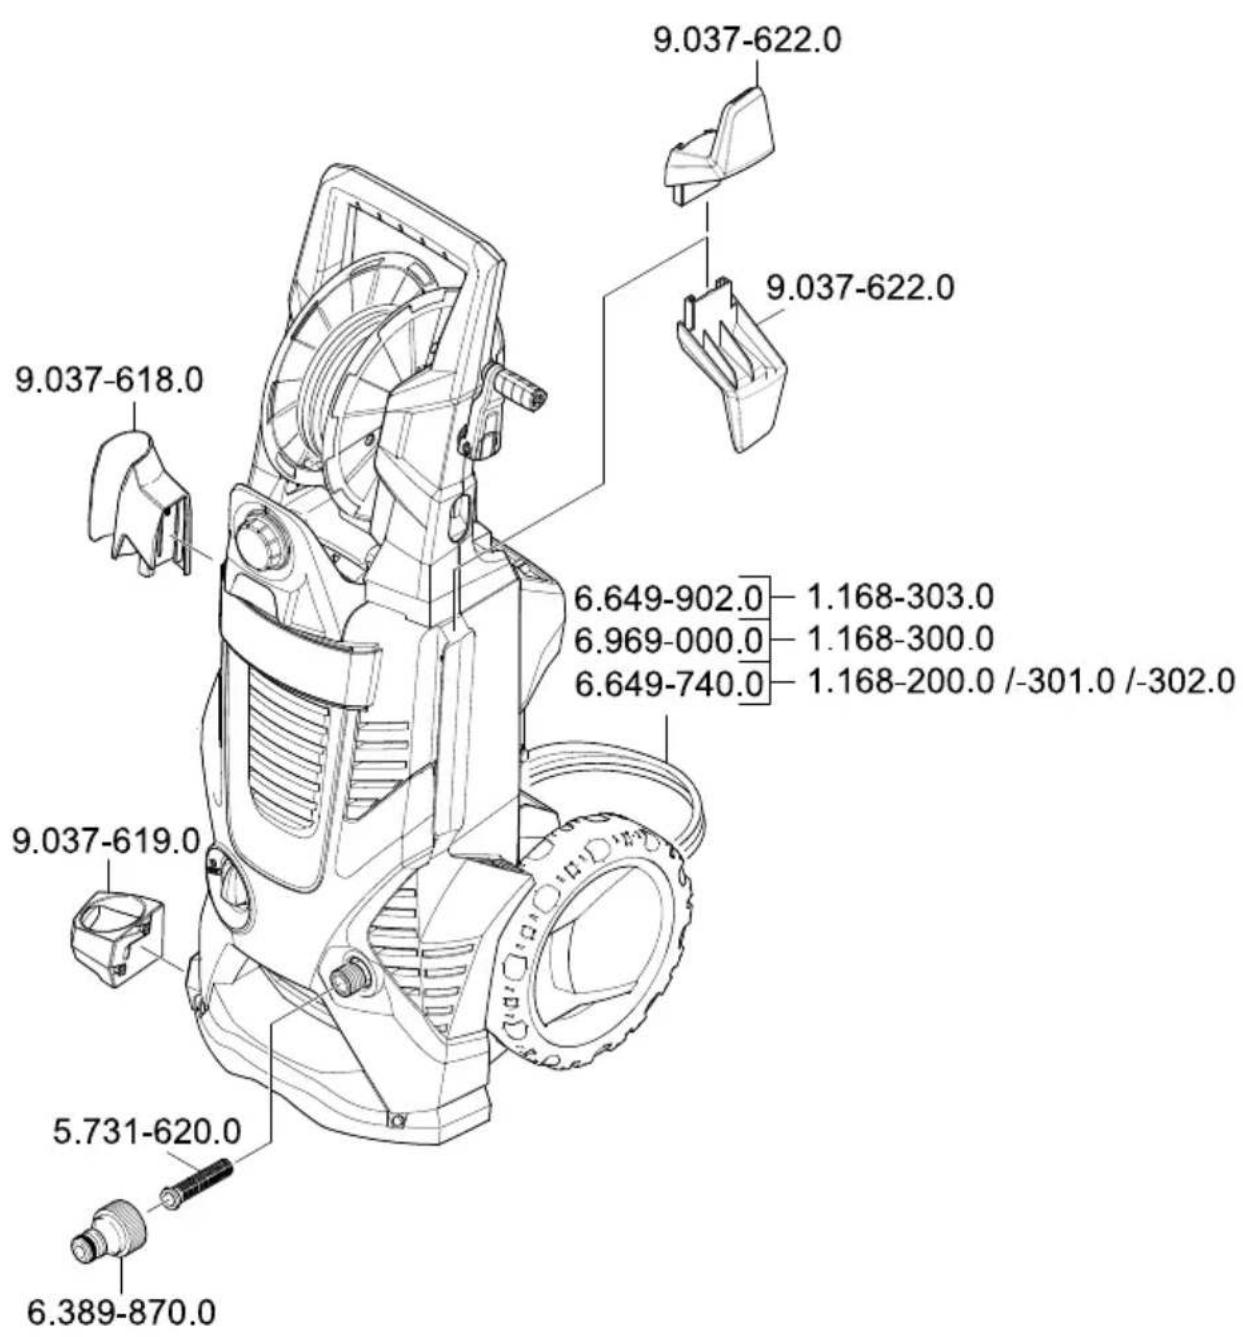
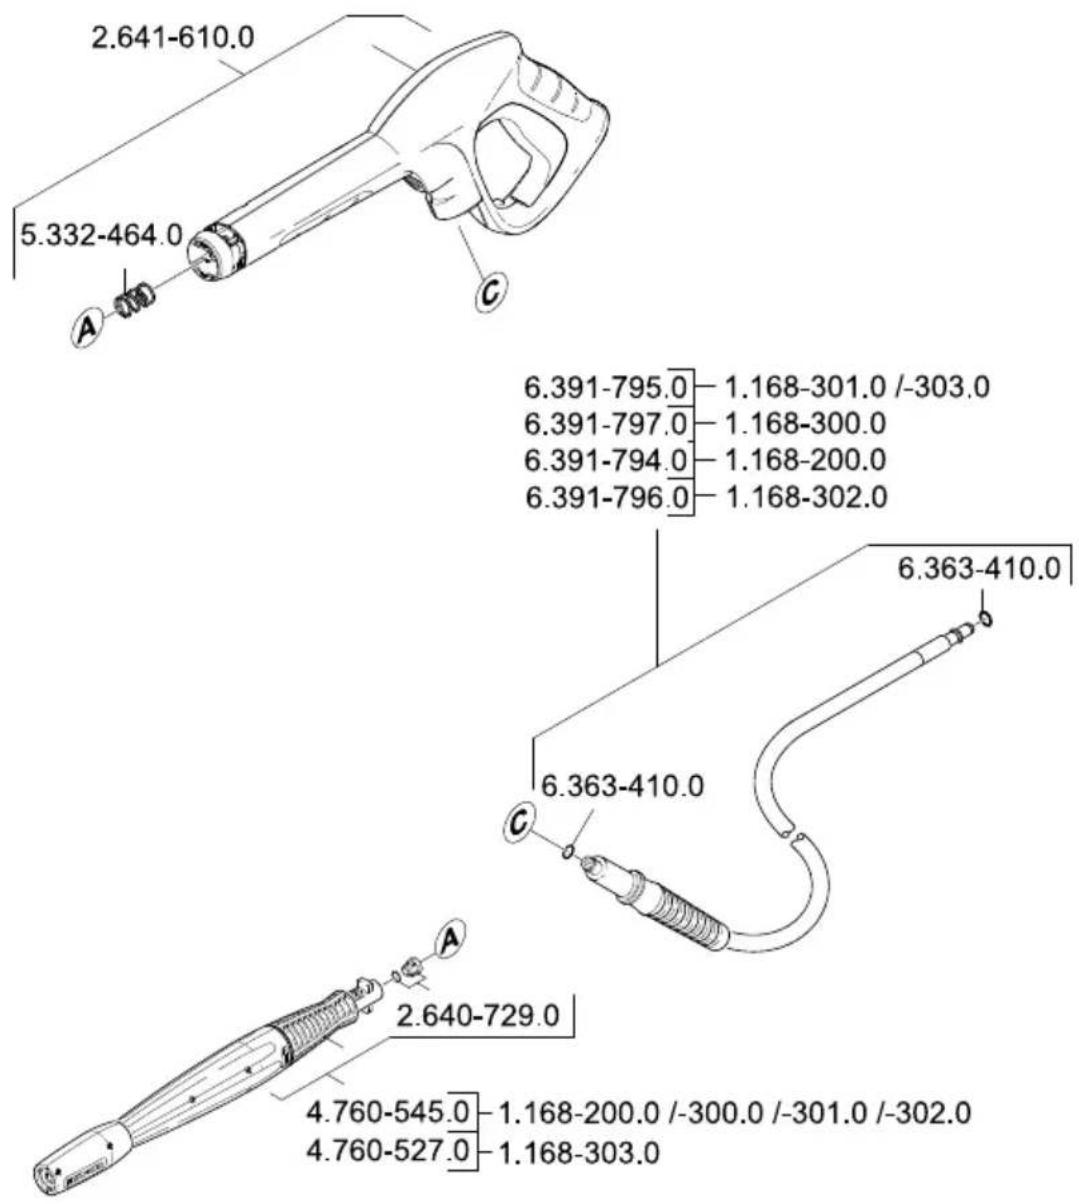
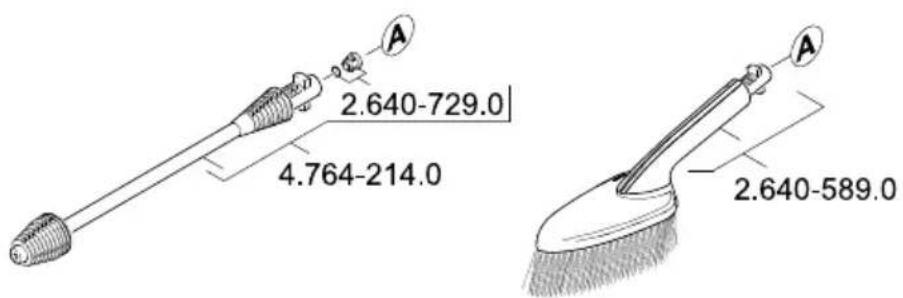
5.963-615.0 02/11

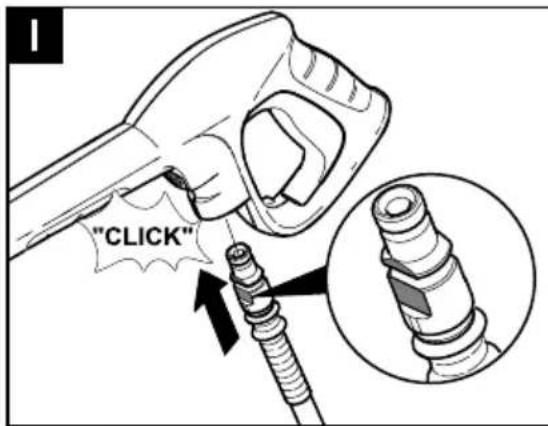


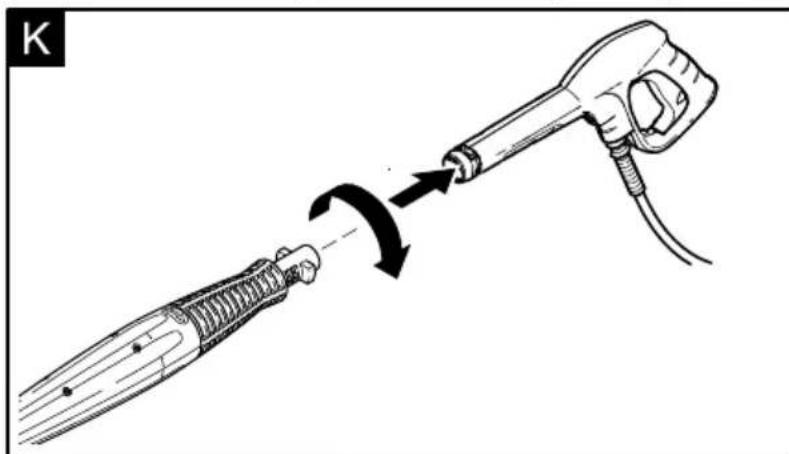

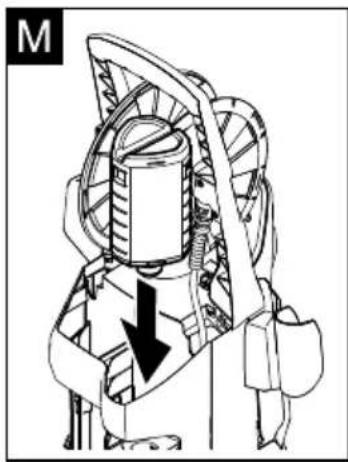
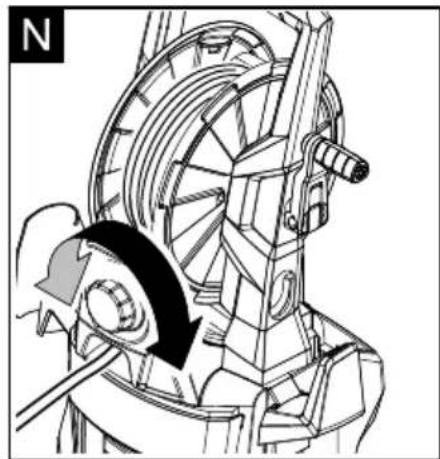
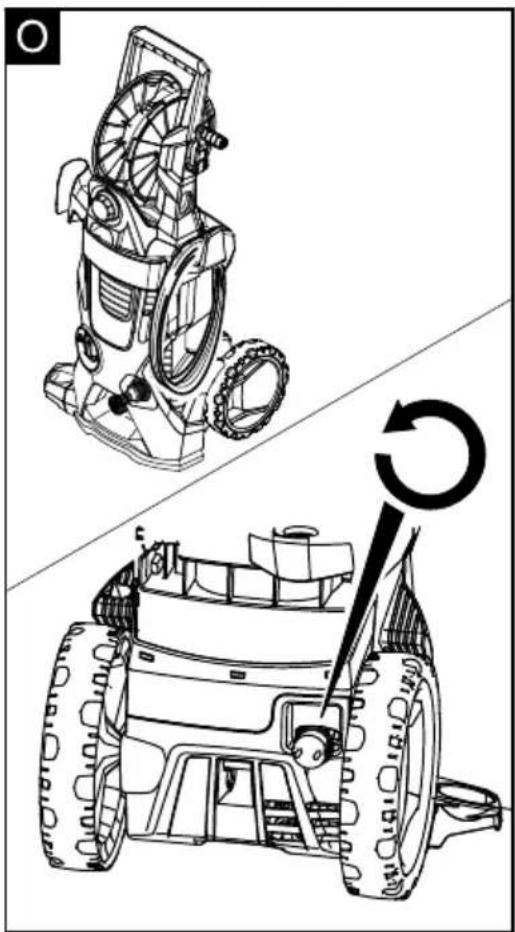
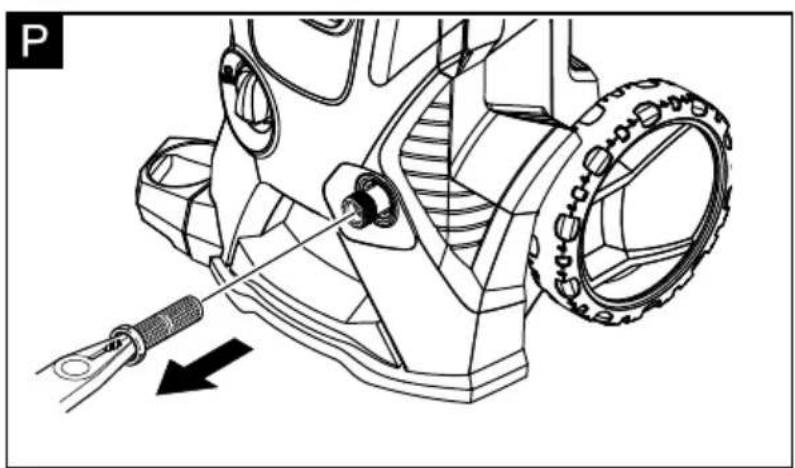
A Alfred Karcher Ges.m.b.H. Lichtblaustrasse 7 1220 Wien (01)250600
AUS
Kärcher Pty. Ltd.
40 Koornang Road
Scoresby VIC 3179
(03) 9765 - 2300
B/LUX
Kärcher N.V.
Industriebweg 12
2320 Hoogstraten
B:0900 10027
LUX:0032 900 10027
BR
Kärcher Industria e Comércio Ltda.
Av. Prof. Benedicto Montenegro 419
CEP 13.140-000 - Paulinia - SP
0800 176 111
CDN
Kärcher Canada Inc.
6975 Creditview Road Unit #2
Mississauga, Ontario L5N 8E9
1-800-465-4980
HK
Kärcher Limited
Unit 10, 17/F.
APEC Plaza
49 Hoi Yuen Road
Kwun Tong, Kowloon (02) 357-5863
Karcher S.p.A. Via A.Vespucci 19 21013 Gallarate (VA) 848-998877
IRL
Karcher Limited
12 Willow Business Park
Nangor Road
Clondalkin Dublin 12
(01) 409 77 77
KOR
Karcher (Korea) Co. Ltd.
162 Gukhoe-daero
(872-2 Sinjeong-Dong)
Seoul, Korea
02-322-6588, A/S 1544-6577
MAL
Karcher Cleaning Systems Sdn. Bhd. No.8, Jalan Serindit 2
Bandar Puchong Jaya
47100 Puchong, Selangor (03)58821148
MEX
Karcher Mexico, SA de CV
Av. Gustavo Baz No. 29-C
Col. Naucalpan Centro
Naucalpan, Edo. de Mexico
C.P. 53000 Mexico
018000241313
NZ
Karcher Limited
12 Ron Driver Place
East Tamaki,Auckland
(09)274-4603
P
NEOPARTSII-Equipamentos,S.A. Av. Infante D.Henrique, Lote 35
1800-218 Lisboa 218558300
PL
Kärcher Sp. zo.o.
UI. Stawowa 140
31-346 Krakow
(012)6397-222
PRC
Kärcher Cleaning Systems Co., Ltd.
Part B, Building 30,
No. 390 Ai Du Road
Shanghai Waigaoquiao 200131
(021)5046-3579
RO
Karcher Romania s.r.l.
Sos.Odaii Nr.439
013606Bucuresti 0372709001
RUS
OOO «Kepxep»
109147,MockBa
yn.TaraHcKa,Д.34,ctp.3
+74952283945
S
Kärcher AB
Tagenevagen 31
42502 Hisings-Karra (031)577-300
SGP
Karcher Asia Pacific Pte. Ltd.
5 Toh Guan Road East
01-00 Freight Links
Express Distripark
Singapore 608831
6897-1811
SK
Kärcher Slovakia, s.r.o.
Beniakova 2
94901 Nitra
037 6555 798
TR
Kärcher Servis Ticaret A.S.
9 Eylül Mahallesi
307 Sokak No. 6
Gaziemir / Izmir
(0232) 252-0708
TWN
Karcher Limited
5F/6. No.7
Wu-Chuan 1st Rd
Wu-Ku Industrial Zone
Taipei County
(02) 2299-9626
UA
Kärcher Ukraine
Kilzeva doroga, 9
03191, Kyiv
(044) 594 75 75
UAE
Karcher FZE
Jebel Ali Free Zone
RA 8,XB1,Jebel Ali,Dubai (04)8836-776
USA
Alfred Karcher, Inc
2170 Satellite Blvd
Suite 350
Duluth, GA 30097
678-935-4545; 877-527-2437
ZA
Kärcher (Pty.) Limited
144 Kuschke Street
Meadowdale
Edenvale 1614
(011) 574-5360