
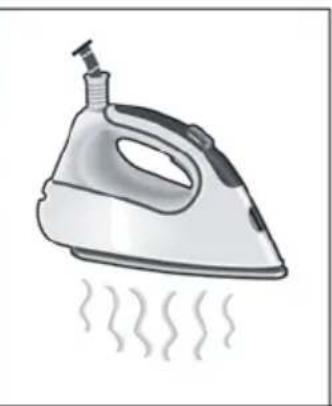
Slider TS47 TS4731100 - Iron SIEMENS - Free user manual and instructions
Find the device manual for free Slider TS47 TS4731100 SIEMENS in PDF.
| Product type | Steam generator with iron |
| Brand | Siemens |
| Model | Slider TS47 TS4731100 |
| Dimensions (approx.) | 35 x 25 x 30 cm |
| Weight (approx.) | 5 kg |
| Power supply | 230 V ~ 50 Hz, 2400 W |
| Water tank capacity | 1.4 L |
| Steam pressure | Up to 6 bars (estimation) |
| Continuous steam flow | Up to 120 g/min (estimation) |
| pulseSteam function | Three powerful steam jets for tough creases |
| intelligentSteam function | Additional steam after releasing the button |
| Ironing programs | Synthetic, Wool, Cotton/Jeans, Linen, allTextile, antiShine |
| silencePlus mode | 50% reduction in steaming noise |
| Automatic shut-off | After 8 minutes of inactivity |
| Vertical steaming | Yes, for curtains and hanging clothes |
| Anti-limescale system | calc'nClean Plus anti-limescale filter + calc'nClean program |
| Soleplate | Smooth soleplate with removable textile protection |
| Included accessories | Textile protection soleplate, removable iron rest |
| Safety | Automatic shut-off, hot surface indicator, iron lock (secureLock) |
| Maintenance | Regular filter cleaning and descaling with calc'nClean |
Frequently Asked Questions - Slider TS47 TS4731100 SIEMENS
User questions about Slider TS47 TS4731100 SIEMENS
0 question about this device. Answer the ones you know or ask your own.
Ask a new question about this device
Download the instructions for your Iron in PDF format for free! Find your manual Slider TS47 TS4731100 - SIEMENS and take your electronic device back in hand. On this page are published all the documents necessary for the use of your device. Slider TS47 TS4731100 by SIEMENS.
USER MANUAL Slider TS47 TS4731100 SIEMENS
www siemens-home.bsh-group.com
de Gebrauchsanleitung
en Operating instructions
fr Notice d'utilisation
nl Gebruiksaanwijzing
es Instrucciones de uso
pt Instruções de utilização
el O8nyiec xpnong
tr Kullanma talimati
pl Instrukcja obstugi
hu Hasznalatiutasitasok
uk IHCTpyKci3 BnKOpNCTaHH
ru HctpyKn no Kcnnyataa
ro Instruetiuni de folosire
ar
Register your product online


| Index | pag |
| DEUTSCH6 | |
| ENGLISH15 | |
| FRANÇAISE23 | |
| NEDERLANDS32 | |
| ESPÁÑOL41 | |
| PORTUGUES50 | |
| ΕΥΑΗNIKA 59 | |
| TÜRKÇE68 | |
| POLSKI76 | |
| MAGYAR85 | |
| ΥΚΑΙΝΥΚΑ 93 | |
| ΡΥСΚΙΝΙ 102 | |
| ROMÁN111 | |
| العربية | 127 |
| EAHNIKA | PORTUGUES | ESPANOL | NEDERLANDS | FRANÇAISE | ENGLISH | DEUTSCH |
| ROMÁN | PYCCGMV | YKPAHcMbKA | MAGYAR | POLSKI | TÜRKIÇE |
Thank you for buying the slider TS47 steam station, the new steam-ironing system from Siemens.
Carefully read through the operating instructions for the appliance and safeguard them for future reference.
You can download this manual from the local homepages of Siemens.

Open the leaflet sides
General safety instructions
During the use, the decalcifying or rinsing aperture of the boiler is under pressure and must not be opened.
The iron must not be left unattended while it is connected to the supply mains.
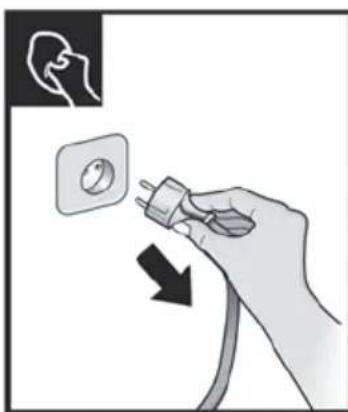
- Remove the plug from the socket before filling the appliance with water or before pouring out the remaining water after use.
The appliance must be used and placed on a stable surface.
- When placed on its stand, make sure that the surface on which the stand is placed is stable.
The iron should not be used if it has been dropped, if there are visible signs of damage or if it is leaking water. It must be checked by an authorized Technical Service Centre before it can be used again. - With the aim of avoiding dangerous situations, any work or repair that the appliance may need, e.g. replacing a faulty mains cable, must only be carried out by qualified personnel from an Authorised Technical Service Centre.
This appliance can be used by children aged from 8 years and above and persons with reduced physical, sensory or mental capabilities or lack of experience and knowledge if they have been given supervision or instruction concerning use of the appliance in a safe way and understand the hazards involved. Children shall not play with the appliance. Cleaning and user maintenance shall not be made by children without supervision. -
Keep the iron and its cord out of reach of children less than 8 years of age when it is energized or cooling down.
This appliance is designed only for household use up to 2000m above sea level.
CAUTION. Hot surface. Surface is liable to get hot during us -
This appliance has been designed exclusively for normal household use in a home environment.
- This appliance must be used only for the purposes for which it was designed, i.e. as an iron. Any other use will be considered improper and consequently dangerous. The manufacturer will not be held responsible for any damage arising from misuse or improper use.
- This appliance is to be connected and used in accordance with the information stated on its characteristics plate.
- This appliance must be connected to an earthed socket. If it is absolutely necessary to use an extension cable, make sure that it is suitable for 16A and has a socket with an earth connection.
- If the safety fuse fitted in the appliance blows, the appliance will be rendered inoperative. To restore normal operation the appliance will have to be taken to an authorised Technical Service Centre.
- In order to avoid that, under unfavourable mains conditions, phenomena like transient voltage drops or lighting fluctuations can happen, it is recommended that the iron is connected to a power supply system with a maximum impedance of 0.37 . If necessary, the user can ask the public power supply company for the system impedance at the interface point.
- The appliance must never be placed directly under the tap to fill the water tank.
- Unplug the appliance from the mains supply after each use, or if a fault is suspected.
-
The electrical plug must not be removed from the socket by pulling the cable.
-
Never immerse the iron in water or any other fluid.
- Do not leave the appliance exposed to weather conditions (rain, sun, frost, etc.)
Important:
- This appliance reaches high temperatures and produces steam during use, this could cause scalds or burns if not used properly.
- The steam hose, base station, metal plate at the bottom of the removable iron pad (2) and in particular the iron can get hot when used. This is normal.
- Never aim the steam at people or animals.
- Do not allow the power cable to come into contact with the soleplate when it is hot.
- Be aware that the system can keep on steaming for a short additional time after releasing the steam trigger. This is a normal function.
Advice on disposal
Our goods come in optimised packaging. This basically consists in using non-contaminating materials which should be handed over to the local waste disposal service as secondary raw materials. Your local town council can give you information about how to dispose of obsolete appliances.
This appliance is labelled in accordance with European Directive 2012/19/EU concerning used electrical and electronic appliances (waste electrical and electronic equipment - WEEE).
The guideline determines the framework for the return and recycling of used appliances as applicable throughout the EU.
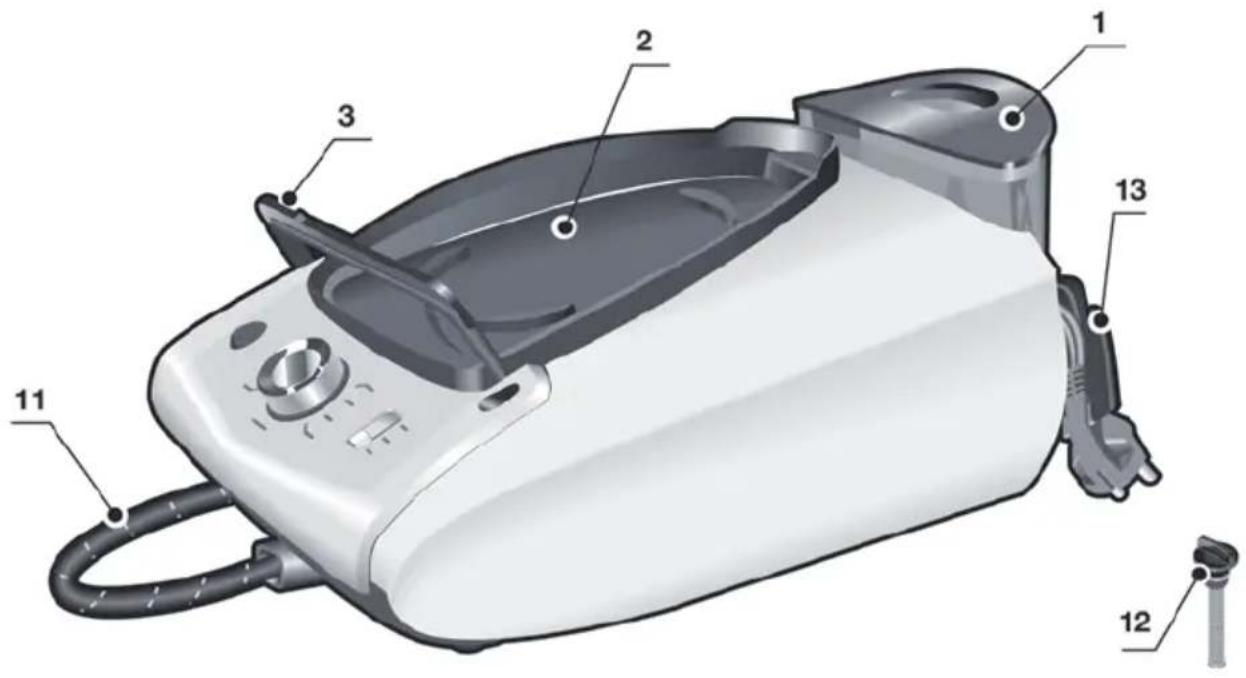
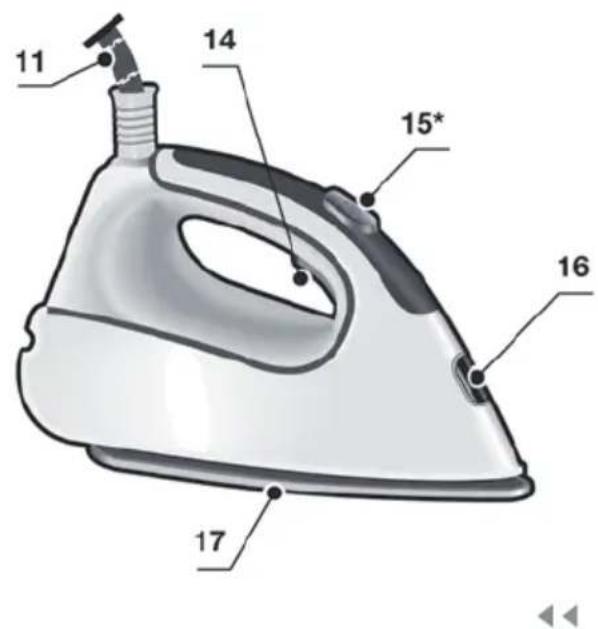
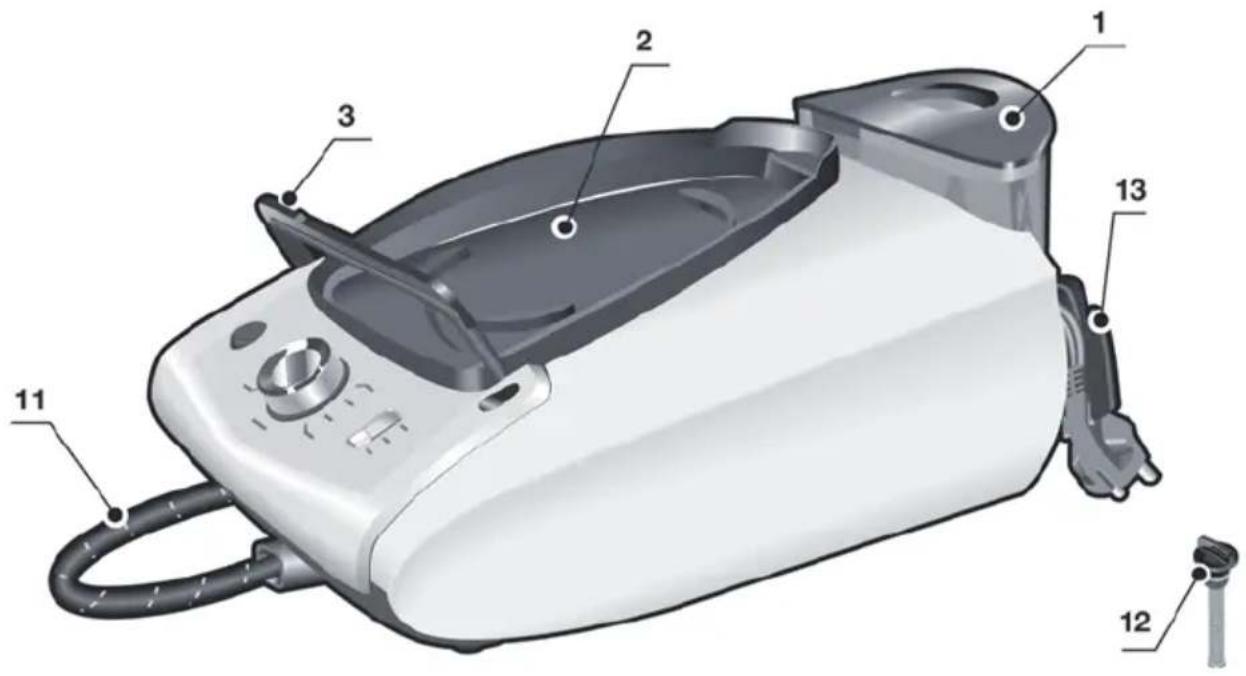
Description
- Water tank
- Removable iron pad
- Iron lock system "secureLock"
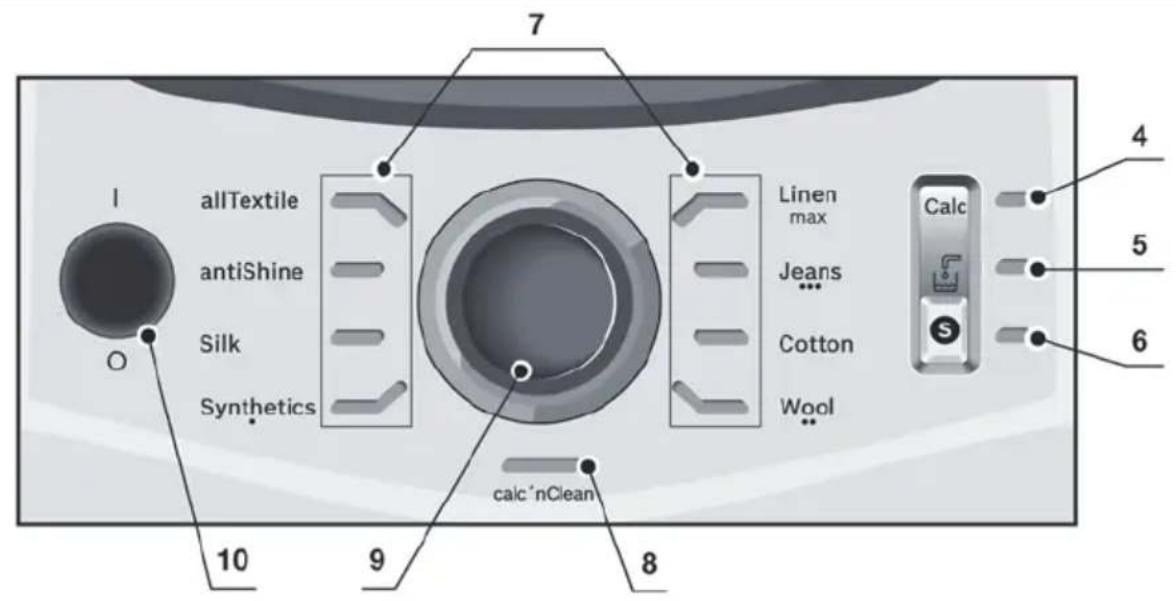
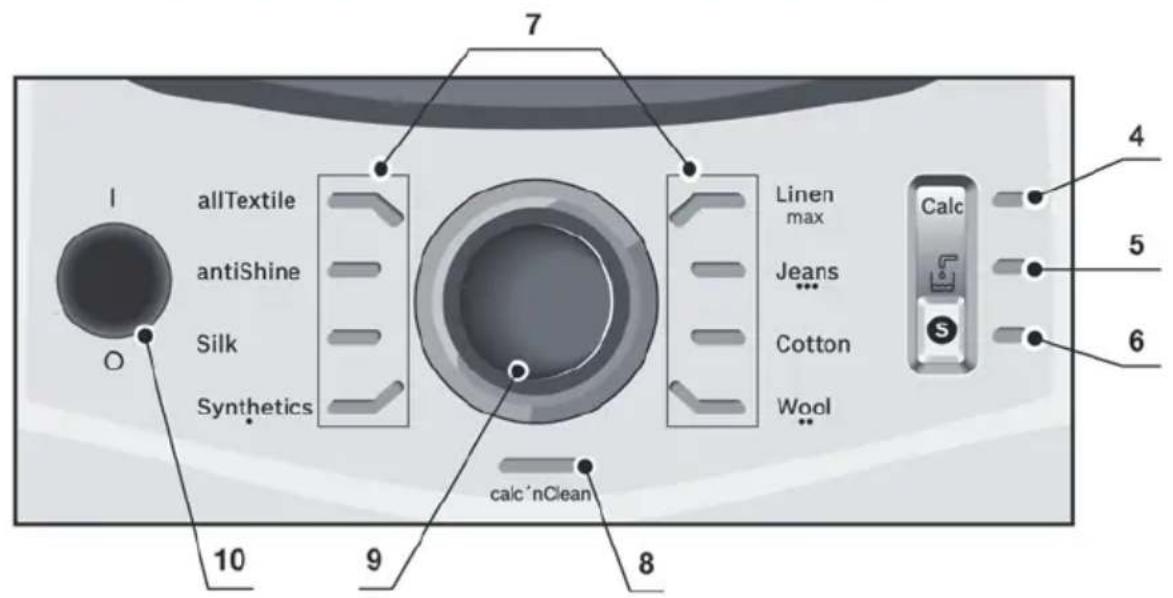
- "Calc" automatic clean warning indicator light
- "Water tank empty" indicator light
- "silencePlus" button and indicator light (blue)
- Ironing programme indicator lights
- "calc'nClean" decalcification programme and indicator light
-
Programme selector and illuminated ring.
-
"on-off" power button.
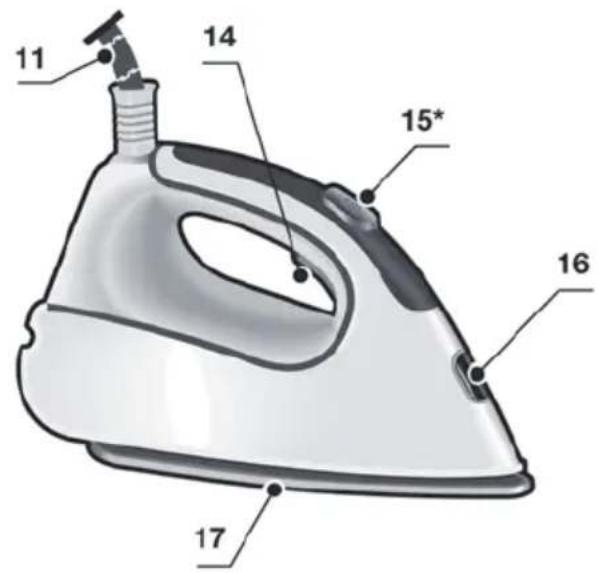
- Steam hose
- "calc'nClean Plus" scale collector
- Mains cable with storage facility
- Steam release button
- Steam shot button "pulseSteam"
- Iron pilot light
- Soleplate
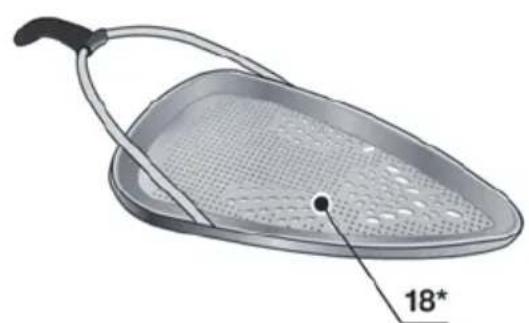
- Fabric-protection soleplate cover*
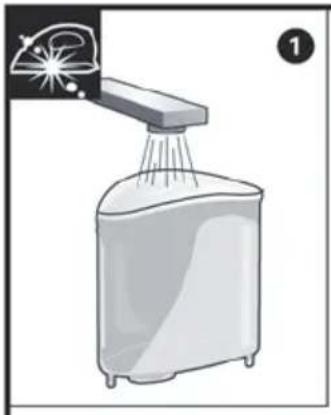
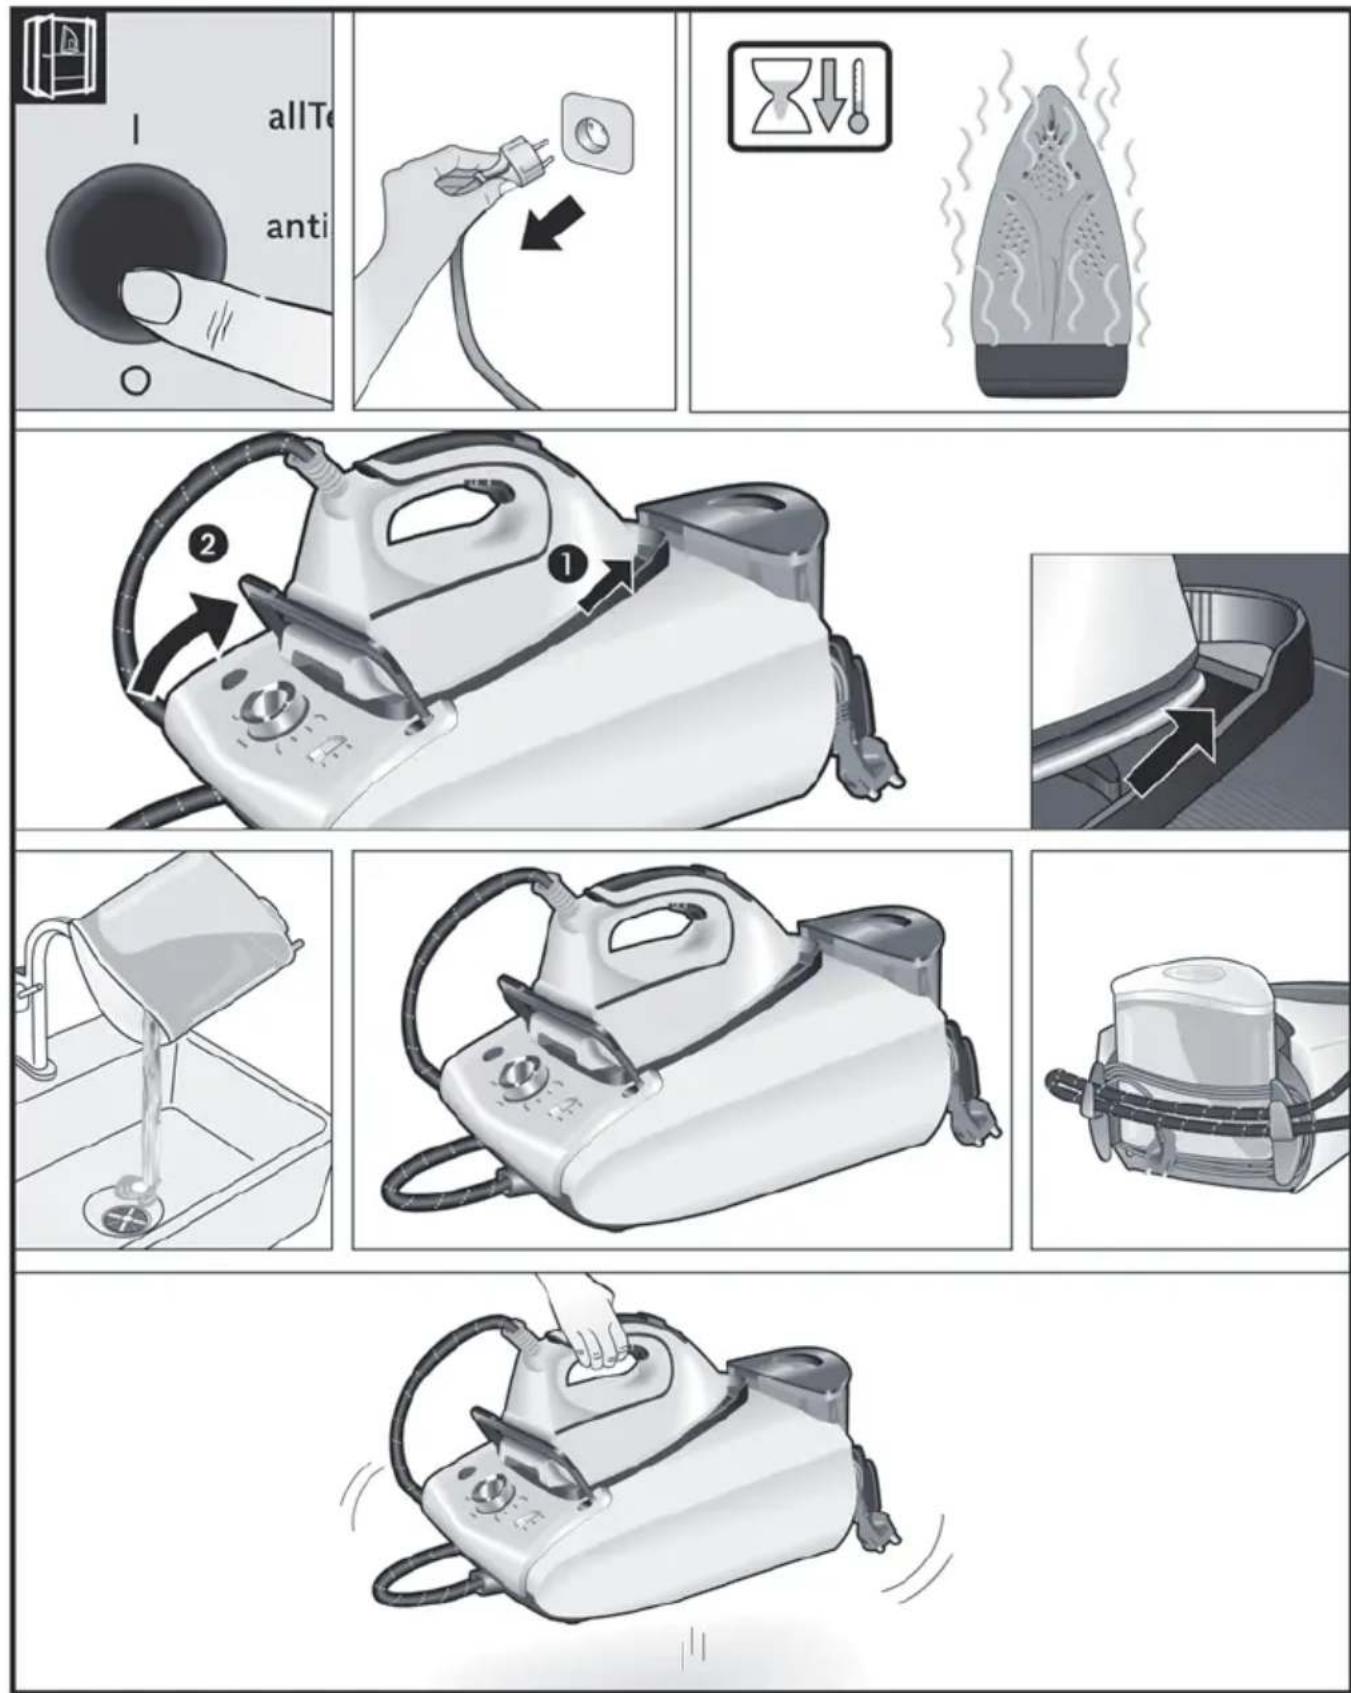
1. Preparations
See the leaflet sides
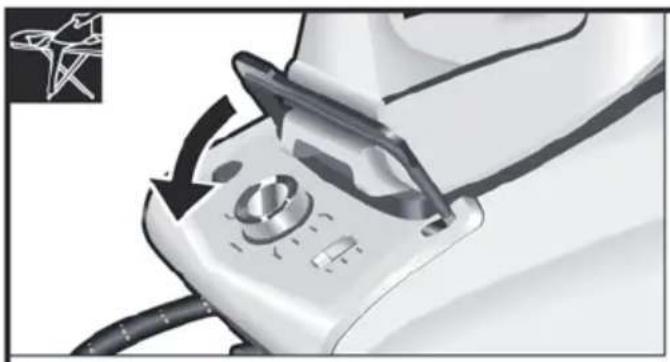
- Release the iron from its lock system (3) by pulling the lever located at the heel of the iron backwards.
- Remove any label or protective covering from the soleplate.
- Place the appliance horizontally on a solid, stable surface. You may remove the iron pad from the appliance and place the iron on it on another solid, stable, horizontal surface.
- Fill the water tank, making sure not to pass the "max" level mark.
- Unwind the mains cable (13) fully and plug it into an earthed socket.
- Set the power button (10) to the on position.
- The appliance will shift automatically to the "allTextile" programme (see section 3.1.). The corresponding indicator light (7) will flash, and after a few minutes, will remain lit continuously. Two beeps will be heard indicating that the appliance is ready to use.
The steam generator will take more time to reach this state only upon the initial heating up, or after performing the de-scaling operation (calc'nClean).
When water is already present in the steam generator during regular use, heat up time to reach the operating temperature will be faster.
- This appliance has a built-in water level sensor. The "Water tank empty" indicator light (5) will light and three beeps will be heard when the water tank has to be filled.
Attention! If the water tank is empty when one of the ironing programs is selected, the indicator light (7) corresponding to such programme will flash until the water tank is filled.
Important:
- Normal tap water can be used. To prolong the optimum steam function, mix tap water with distilled water 1:1. If the tap water in your area is very hard, mix tap water with distilled water 1:2.
- You can inquire about the water hardness with your local water supplier.
- The water tank can be filled at any time while using the appliance.
- To avoid damage and/or contamination of the water tank and the boiler, do not put perfume, vinegar, starch, descaling agents, additives
or any other type of chemical product into the water tank.
Any damage caused by the use of the aforementioned products, will make the guarantee void.
- The iron is not designed to rest on its heel. Please always position it horizontally on the iron pad (2).
- The iron pad can be placed into the specially designed recess on the appliance or somewhere suitable alongside the ironing area.
Never rest the iron on the appliance without the iron pad!
- During its first use the iron may produce certain vapours and odours, along with white particles on the soleplate, this is normal and it will stop after a few minutes.
- While the steam release button is pressed, the water tank may produce a pumping sound, this is normal, indicating that water is being pumped to the steam tank.

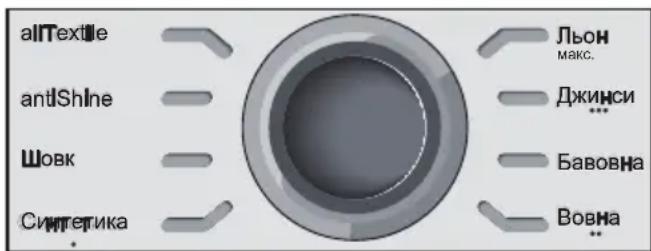
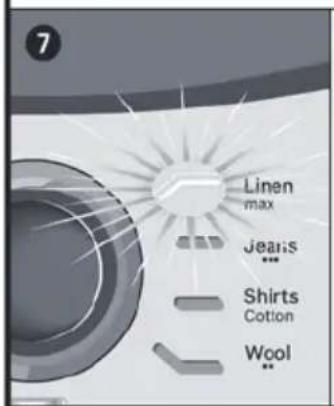
2. Programme selection
See the leaflet sides
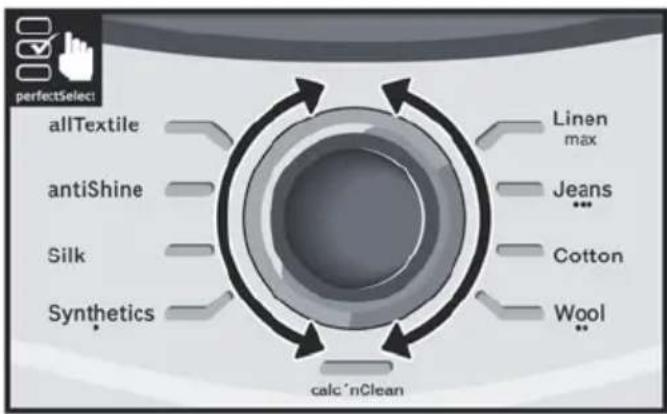
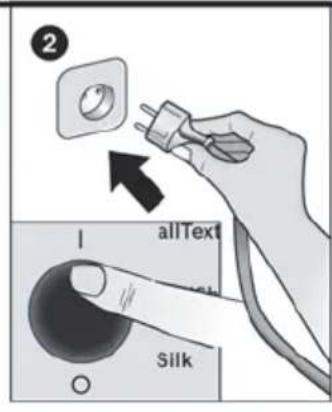
Your steam station has a programme selector (9) for choosing the different ironing programs.
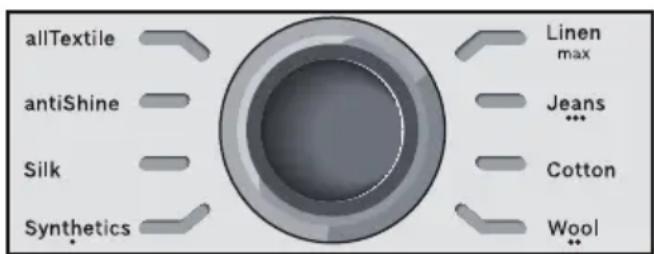
Each programme automatically sets an appropriate combination of temperature and steam which is suitable for the kind of garment selected.
By turning the programme selector you can choose the kind of garment and fabric to be ironed. The corresponding indicator light (7) will flash until the temperature and steam level suitable for the programme selected are reached.
From this moment on, the indicator light will remain lit continuously and two beeps will be heard indicating that the appliance is ready to use.
If the garment to be ironed does not correspond to any of the programs supplied, check the temperature instructions shown on the care label of the garment.
Temperature Programme
Synthetics
Wool
Cotton /Jeans
max Linen
Tips:
- Sort your garments out based on their cleaning symbol labels, always starting with clothes that have to be ironed at the lowest temperatures.
- For mixed fabrics, select the temperature corresponding to the most delicate fabric.
If you are not sure what the garment is made of then begin ironing at a low temperature and decide on the correct temperature by ironing a small section not usually seen when worn - At the beginning of each use, it is possible that drops of water will be dispensed alongside steam.
Therefore, it is advisable to try the iron on the ironing board or a piece of cloth to start with.
- For better ironing results, iron the last strokes without steam to dry the garment.
3. Special programs

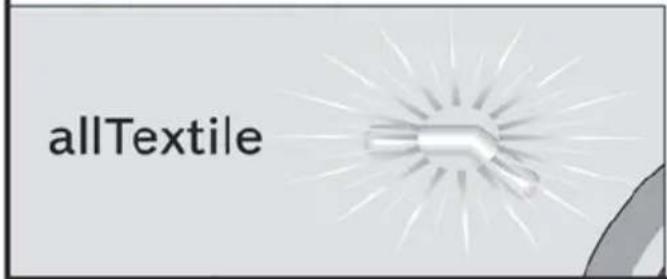
3.1. "allTextile" programme
See the leaflet sides
This steam station has an "allTextile" programme. If this programme is selected, an appropriate combination of temperature and steam is set, which is suitable for all fabrics that can be ironed.
The "allTextile" programme prevents clothes from being damaged due to an unsuitable temperature being selected.
The "allTextile" programme does not apply to fabrics that cannot be ironed. Please check the garment care label for details or try ironing on a part of the cloth not visible normally.

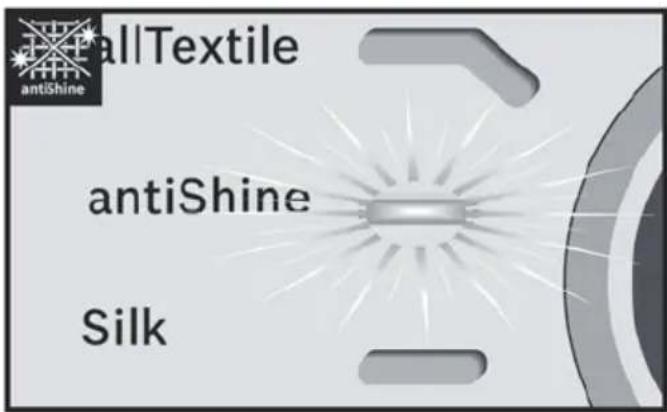
3.2. "antiShine" programme
See the leaflet sides
This steam station has an "antiShine" programme. If this programme is selected and the steam release button (14 or 15) is regularly pressed, the risk of shiny marks on the garment due to the ironing is reduced.

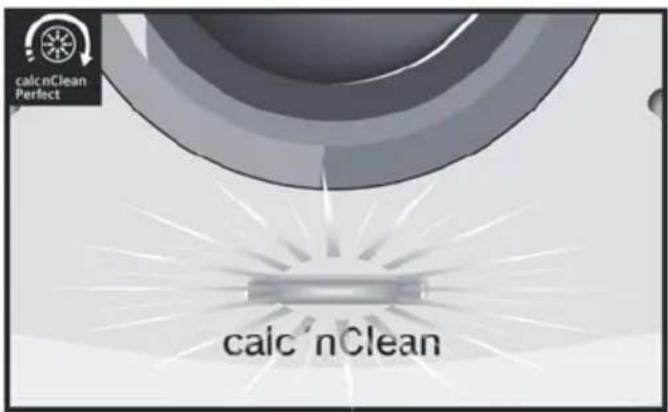
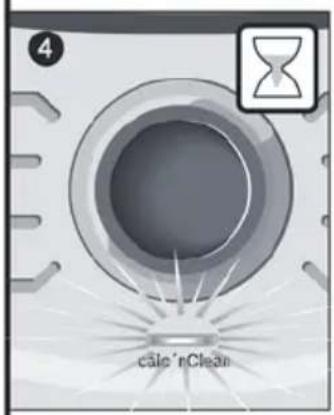
3.3. "calc'nClean" programme
See section 11.

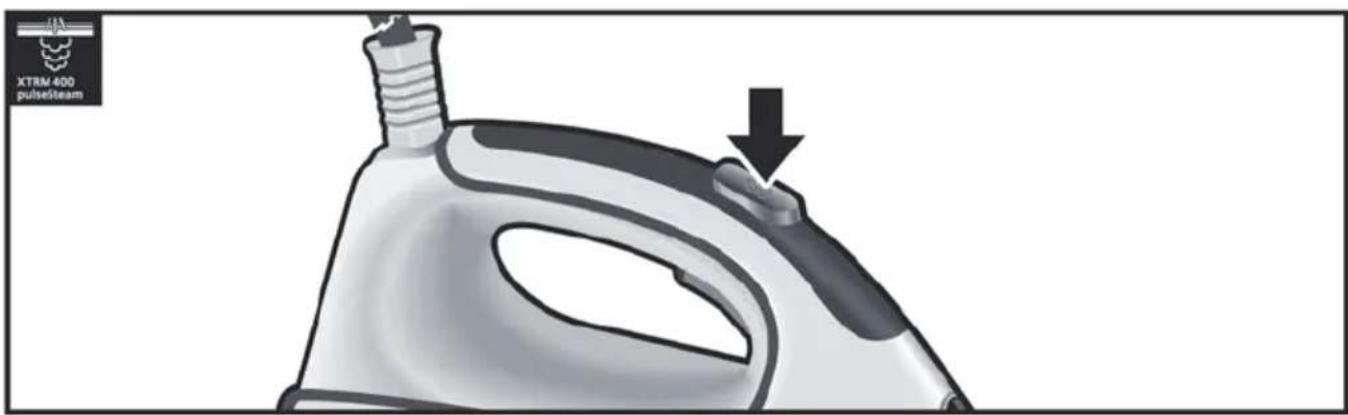
4. "pulseSteam" function
See the leaflet sides
This appliance has a special function for tackling difficult creases.
When the steam release button is activated, the steam generator will release three powerful shots of steam so that the steam reaches even deeper into the fabrics.
Briefly press the steam shot button (15) on the top of the handle.
Remarks:
It is possible to stop the shots of steam by quickly pressing the steam button again.
- Some water drops may appear when you use the "pulseSteam" function for the first time.
The water drops will disappear after you have used the function for some time.
5. "intelligentSteam" function
This system has intelligent Steam control, which, after releasing the steam release button (14 or 15), provides a small amount of additional steam.
The additional steam can always be stopped by briefly pressing the steam release button once again.

6. Ironing without steam
Begin ironing but without pressing the steam release button.

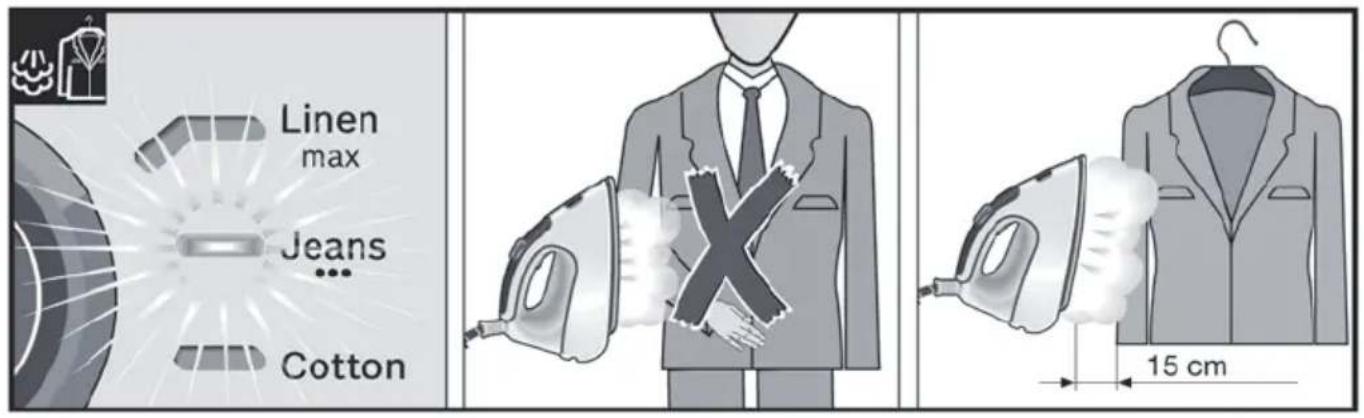
7. Vertical steam
See the leaflet sides
This can be used to remove creases from hanging clothes, curtains etc.
Warning!
Never direct the steam jet at garments that are being worn.
Never aim the steam at people or animals.
- Select "Jeans / ···" programme to get the optimal steam amount.
- Hold the iron in an upright position 15cm away from the garment being steamed.
- You can steam iron curtains and hanging garments (jackets, suits, coats...) by placing the iron in a vertical position and pressing the steam release button (14 or 15).

8. "silencePlus" button
Push the "silencePlus" button (6).
If the "silencePlus" setting is activated, you can reduce the steaming noise for more than 50% (^*) , and still achieve good results when ironing most of your garments.
It is advisable to use the normal setting only for thick and very wrinkled fabrics.
(*) In comparison to the maximum setting.

9. Auto shut-off
If during ironing, the steam release button (14 or 15) on the iron handle is not pressed for a certain length of time (8 minutes), the steam station will automatically switch off.
The illuminated ring around the programme selector (9) will flash when auto shut-off has been activated. Three beeps will be heard at the same time.
To switch the steam station back on, press the steam release button again.

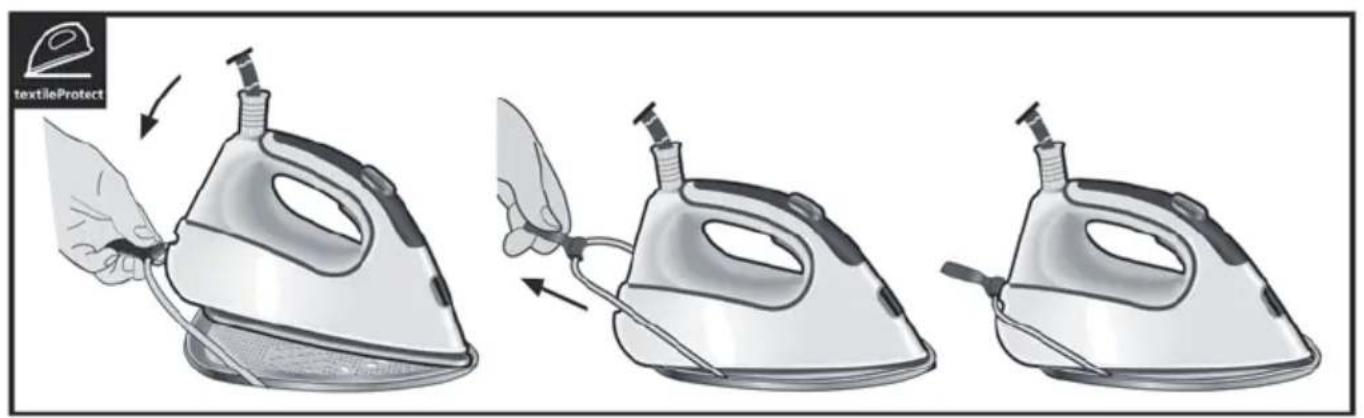
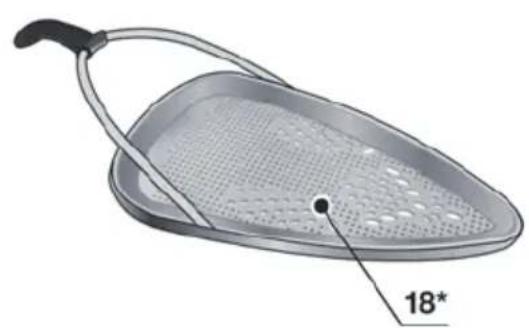
10. Fabric protection soleplate cover *
See the leaflet sides
The fabric-protection soleplate cover (18^*) is used for steam-ironing delicate garments at maximum temperature without damaging them. Use of the soleplate cover also does away with the need for a cloth to prevent shine on dark materials.
It is advisable to first iron a small section on the inside of the garment to see if it is suitable.
To attach the soleplate cover to the iron, place the tip of the iron into the end of the soleplate cover and pull the elastic strap over the lower rear of the iron until it fits tightly. To release the soleplate cover, pull the elastic strap and remove the iron.
The fabric-protection soleplate cover may be purchased from our customer service or from our website.
Accessory code (After-sales)
Name of accessory (online shop)
571510 TZ20450

11. calc'nClean Perfect
Automatic clean warning
The "Calc" automatic clean warning indicator light (4) will flash indicating that boiler and iron steam chamber must be rinsed.
Leave the appliance unplugged for more than two hours, check carefully that the appliance is cold and that the water tank (1) is empty.
Please proceed as follows:
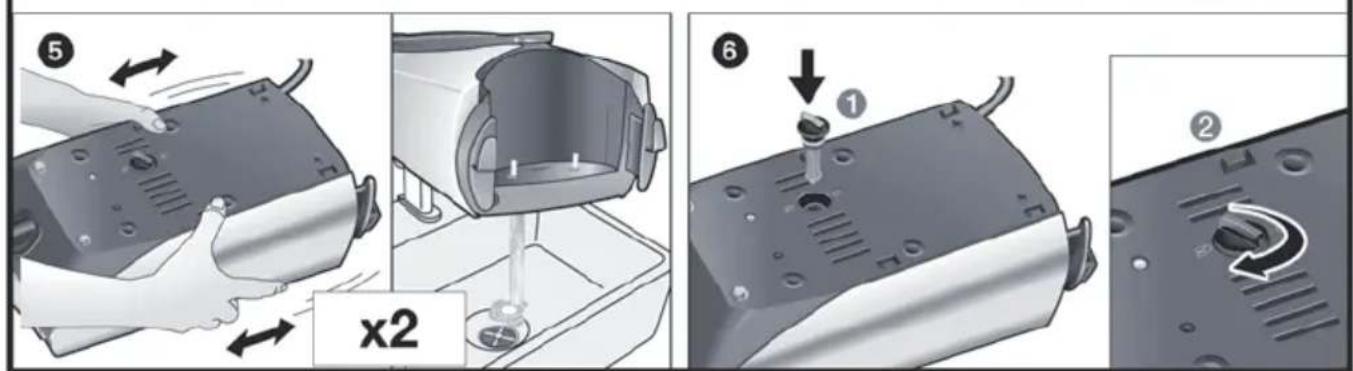
11.1. Cleaning the Boiler
See the leaflet sides
Do not use descending agents for rinsing out the boiler, as they could damage it.
Fix the iron to the stand by inserting the tip of the iron into the front slot and moving the lock system (3) against the heel of the iron. Place your appliance on the edge of your kitchen sink.
Unscrew the scale collector (12) and take it out.
To wash the scale collector, place it under the water tap and wash it up until calc residues are removed. Squeeze it as indicated in the picture a).
To obtain the best result, you may immerse the scale collector for approximately 30 minutes in tap water (250 ml) mixed with a measure (25 ml) of descending fluid, as indicated in the picture b). Then, rinse it again with water (very important!).
The descending fluid can be obtained from our Aftersales Service or Specialist outlets:
Accessory code
(After-sales)
Name of accessory
(Specialist outlets)
00311715 TDZ1101
Holding your steam generator in upside down position, and using a jug, fill the boiler (in the base unit) with 1/4 litre of water.
5 Shake the base unit for a few moments and then empty it completely over a sink or bucket. To obtain the best result, we recommend that this operation is performed twice.
Important: before re-closing, make sure no water remains in the boiler.
Replace and tighten up the scale collector.
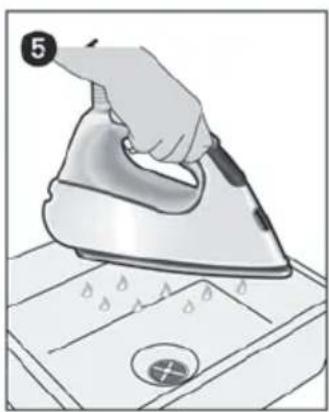
11.2. Rinsing the iron steam chamber
See the leaflet sides
Fill the tank with tap water.
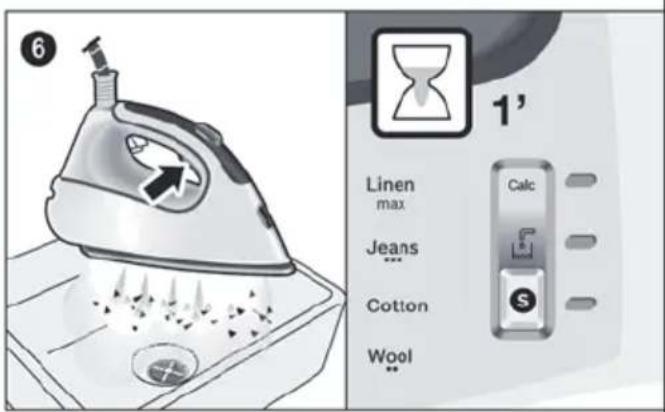
Plug in the mains cable and set the power button (10) to the "I" position.
3 By turning the programme selector (9), choose "calc'nClean" decalcification programme. The indicator light (7) will start flashing.
Wait until the indicator light (8) stops flashing and remains lit continuously. Two beeps will be heard at the same time.
Hold the iron over the sink or a container to collect the water.
Press the steam release button (14) and gently shake the iron. Boiling water and steam will be released, carrying scale and/or deposits that might be inside.
After approximately one minute, the "Calc" automatic clean warning indicator light (4) will go off.
Keep on shaking the iron gently for five minutes while the steam release button is pressed, so that water and steam clean the chamber completely.
Without pressing the steam release button (14), turn the programme selector (9) and choose "Linen / max" programme. The water in the steam chamber will start evaporating.
Wait until all the water inside the chamber has been evaporated. Then, you can set the power button (10) to the "O" position.
To clean the soleplate, immediately rub off any residue by running the hot iron over a wet cotton cloth.

12. Cleaning & Maintenance
See the leaflet sides

Attention! Risk of burns!
Always unplug the appliance from the mains supply before carrying out any cleaning or maintenance operation on it.
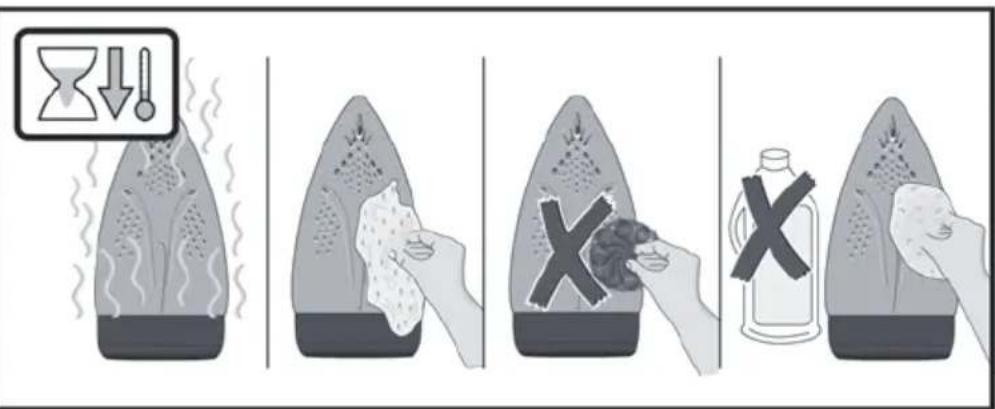
- After ironing, pull out the plug and allow the appliance to cool down before cleaning.
- Wipe the housing, handle and iron body with a damp cotton cloth.
- If the soleplate is soiled with dirt or scale, clean it with a damp cotton cloth.
- If the cloth is synthetic, it may melt due to the high temperature on the soleplate. Switch off the steam and rub off any residue immediately with a thickly folded, damp cotton cloth.
- Never use abrasive products or solvents. To keep the soleplate smooth, you should avoid hard contact with metal objects. Never use a scouring pad, or chemicals to clean the soleplate.
13. Storing the appliance
See the leaflet sides
- Set the power button to the "O" position and disconnect the mains cable.
- Always allow the appliance to cool down before storing it.
- Place the iron on the iron pad (2), standing on the soleplate, and fix it by inserting the tip of the iron into the front slot and moving the lock system (3) against the heel of the iron.
- Empty the water tank, store the mains cable on the cord storage facility and the steam hose in the storage fixing. Do not wrap the cords too tight.
- Hold the iron's handle when moving the appliance.

Tips to help you save energy
Steam production consumes the most energy. To help minimise the energy used, follow the advice below:
- Start by ironing the fabrics that require the lowest ironing temperature. Check the recommended ironing temperature on the label on the garment.
- Try to iron the fabrics while they are still damp and reduce the steam setting. Steam will be generated from the fabrics rather than the iron.
If you tumble dry your fabrics before ironing them, set the tumble drier on the 'iron dry' programme.

Trouble shooting
| Problem Possible causes Solution | ||
| The "Calc" indicator light (4) flashes. | 1. Boiler and iron must be rinsed. | 1. Rinse the boiler and the iron according to the cleaning instructions in this manual. |
| The ironing programme indicator light (7) flashes continuously. | 1. The water tank (1) is empty. 1. Fill the water tank. | |
| The steam generator does not come on. | 1. There is a connection problem. | 1. Check the mains cable (13), the plug and the socket. |
| 2. The power button is not switched on. | 2. Set the power button (10) to the "l" position. | |
| The iron does not heat up. | 1. The power button is not switched on. | 1. Set the power button (10) to the "l" position. |
| 2. The temperature is set to a low position. | 2. Set the temperature to the desired position. | |
| The iron begins to smoke when switched on. | 1. During first use: certain components on the appliance have been lightly greased at the factory and may produce a little smoke when initially heated. | 1. This is completely normal and will stop after a short while. |
| 2. During subsequent use: the soleplate may be soiled. | 2. Clean the soleplate according to the cleaning instructions in this manual. | |
| Water flows through the holes on the soleplate. | 1. The water is condensing inside the pipes because steam is being used for the first time or has not been used for a long time. | 1. Point the iron away from the ironing area and press the steam release button until steam is produced. |
| Problem Possible causes Solution | ||
| Dirt comes out through the soleplate. | 1. There is a build up of scale or minerals in the boiler and iron. 2. Chemical products or additives have been used. | 1. Carry out a cleaning cycle (see "calc'nClean Plus" section). 2. Never add products to the water. Use tap water mixed 50% with distilled or demineralised water. To prolong the optimum steam function, mix tap water with distilled water 1:1. If the tap water in your area is very hard, mix tap water with distilled water 1:2. Clean the soleplate with a damp cloth. |
| The iron does not produce any steam. | 1. The boiler is not switched on or the water tank is empty. 2. The water tank is not fitted onto the housing correctly. | 1. Set the power button (10) to the "I" position, and/or fill the water tank. 2. Fit the water tank back onto the hou sing correctly. |
| The ironed garment turns dark and/or sticks to the soleplate. | 1. The selected temperature is too high and has damaged the garment. | 1. Select a suitable temperature for the material being ironed and clean the soleplate with a damp cloth. |
| The soleplate turns brown. | 1. This is a regular consequence of continued use over a long period of time. | 1. Clean the soleplate with a damp cloth. |
| The appliance makes a pumping sound. | 1. Water is being pumped into the steam tank. 2. The water tank is not fitted onto the housing correctly. 3. The sound will not stop. | 1. This is normal. 2. Fit the water tank back onto the hou sing correctly. 3. If the sound will not stop, do not use the steam generator and contact an authorised technical service centre. |
| Loss of pressure during ironing. | 1. Steam release button has been activated for too long a period of time, that is, it has been pressed too frequently. | 1. Use the steam release button at intervals. This improves the ironing result as the textiles will be steamed, dried and ironed properly. |
| Water spots appear on the garment during ironing. | 1. May be caused by steam condensed on the ironing board. | 1. Wipe the textile cover of the ironing board, and iron any water drops to dry them. |
| Water spots appear on the garment during use of the "pulseSteam" function. | 1. Water spots are caused by steam condensation in the hose when cooling down after use. | 1. Water drops stop coming out of the soleplate after using the "pulseSteam" function for some time. |
| The hose gets hot during use. | 1. This is normal. It is caused by the steam passing through the hose during steam ironing. | 1. Place the hose on the opposite side so that you cannot touch the hose during ironing. |
| Water leakage from the boiler. | 1. Scale collector (12) located at the bottom of the appliance is loose. | Tighten up the scale collector. |
| The iron does not stop steaming after placing it on the pad (2). | 1. "pulseSteam" function has been activated. | 1. Just press the trigger once again and the iron will stop steaming at once. |
If the above does not solve the problem, get in touch with our customer service.
4. Funcão "pulseSteam"
5. Funcão "intelligentSteam"
Este centro de engomar esta equipado com um control de vapor inteligente, orial,deois de liberar o botao de saida do vapor (14 ou 15), continua dando una很小a cantidade de vapor adicular.
3.1. "allTextile" program
3.2. "antiShine" program
PekomeHdaqii 3 yTnJI3aqi
Hawi TObapn Noctaaytbcy nokpauehi ynapobci. Lc 03hauae, 0o dIy Hei BnKOpNCTOBcyTbC MaTePiAIn, kI He BnKlnkaOTb 3a6pydHeHH HABKOINHbOcrepeOBuTa Ta kI cIi D BiDaTu Do MicceBOi CnyXbN yTnla3auii BiXoDIB K BTOpHH CyPOBHy. Y MiceBi paDi BaWOrO MCTa BN 3MOxKeTe OTPMaTu INΦopMaio Ipo Te, kCniD yTnI3yBatn CTapi eJekTpponpncTrooi.
Cen npncptpi MapKOBaHn BIDNOBIDHO DO BIMOR CBponecboi DnpeKTHBn 2012/19/ CC zoDo eNktpuHnx Ta eNkTPOHNx npncTpoIB, kI BnWn3 ekcnnyataui (BIXxOdi
BID eNeKTpHnX Ta eNeKtpoHHnx npncTpoIB - WEEE).
LdHpeKtNa BCTaHOBNIc HOpMn NOBepHeHH Ta yTnI3auii BnKOpNCtAHnx eNeKTponpncTpoIB Ta di c Ha Bci Tepntopii EC.
Опис пистоно
- Pe3epByap nЯ BODn
2.3HIMHa niiKlaKa dny npackn - Cnctema fikcaui npacku «secureLock»
- INDnkaTop, 10 nonepaKae npo Heo6xHictb abTomatuHoro ouuueHHA «Calc»
- INDnKaTOp «Pe3epByap JIa BOu nopoJHii
- INDnKaTOp (CNIH) i KhoNka «silencePlus»
- INdkatopnpnporpam npacyBaHHa
- Поррама вдалени наknу «calc'nClean» Ta iHdkaTop
9.перемикaynporpamikilbcebepiicbiybaHHa - BIMNKaJXNBJIeHHJ
- Zhynp dny napu
- ΦínbTp Дп BAДаJIeHHЯ HabKIny «calc'nClean Plus»
- Ka6eIb JxNBeHn8 3 npuctocyBaHHm dnn 3roptaHH
- Khonka Bnnyczy napi
- Khonka Bynucky napi «pulseSteam»
- INДикаТОр npackn
- Niðoʊba
- TkaHH*

1.Пид�товka
TINB.CknadeniCTopinKn
- Bi'd'edhaite npacky BiD cnCTemn fikcaii (3), notarhyBun DoHn3y BaxkInb, lo ytpmye HxKHO qactHy npackn.
- 3Himitb Bci etnkeTkn Ta 3axnchy ynaKOBky 3 NiDOWBN npackn.
- YctahOBiTB npnCTpiR rOpN3OHTaIbHO Ha MiCy Ta CTIKy NOBepxHIO. MoXHa 3HrTn NiKNaDky DnI npackn 3 nPcSTpoTo Ta NOKnaCTn II Ha IHsU MlCy, CTIKy, rOpN3OHTaIbHy NOBepxHIO.
- HanobHITb pe3epByap dIy BOI TaK, 06 BOa He nepeBnUyBaIa BiIMtKy MaKcImaJIbHOrO pIBHa.
- NobHicTIO po3rOpHITb Ka6eJIb XKVBJIeHHa Ta NiDKIIOUHTb Ioro Do 3a3emNeHOi po3eTKn.
- YctaHOBIb roIOBnBUMKau (10) Ha No3HaKy «YBIMKHeHO».
- Ппст piь abTomTuHо nepeMKeTbCЯ Ha nporpamy «allTextile» (ДИВ. рo3ди 3.1.). BiDnoiHn iHnKaTOp (7) noUHe mRatn, a uepe3 DeKJIbKa XBnInn 3aRopNTbCЯ NOCTiHm CBiTnom. Bn noUyTe Dba 3ByKOBi CnHaJI,яki
NOBIDOMJIHOTb IPO rOTOBHICTb IpNCtpoIO do po60TN.
Iaporehepatop notpe6ye 6iJIbwe yacy dIy IocrHHeHHa bOro cTAnHy iD qac noaTKOBoro HarpBaHHra nCnI npoBeeHHn pOueDpyn OunuennB BiD hakiny (calc'nClean).
KoINB npoceci peryyapnHO BVNKOpncTaHH Bnaporehepatopi npncyTHBa, Yac HarpiBaHHI dIa DocarHHeHH Po6Ooi Tempepatypcckopooyctbcra.
- Léni pncptpi ochauehen y6yobAHm ceHCOPOM pIBHra BOi.N.Y pa3i Heo6xidHocTi HAnOBHeHHpe3epByapa dna BOi 3aropntbcr iHnkaTOp «Pe3epByap dna BOi npOxHi (5)i Bn nouyTe Tpr 3BykoBx CnHaJI.
YBara! Kaio y paizi Bn6opy oDiiei 3 nporpam npacyBaHHpe3epByap nnBOn 6ynde npoxHIM, To iHdkatop (7) uei nporpamMnraTme, nokn Bu He HanoBHnTe pe3epByap nnBoN.
BaxJnBO!
BnMOKeTe BnKOpNCTOByBaTn 3BnuaHy BOy 3 BOdONpOBOy.
ДяТOrO 6o6 NOOBxHTN ONTUMaJIbHy DiOФyHKuB iDnapIOBaHH,po36abJrTe BOOpPoiBDy BDOY DnCTINbOBAHOU y cnIBBiIDHOWeHHi 1:1.B TOMy BnnaKky, RaIoo JopCTKicTB BoOn y BaWOMy perioHi 3aHaNTKO BnCOKa,peKOMeHnyEMO po36abJrTN BOOpPoiBDy BDOY DnCTINbOBAHOU y cnIBBiIDHOWeHHi 1:2.
Ihopmaio 0do cTyneHIO xOpctKocTi BOi Bn MoKeTe OTpMaTu Ha IIpnpemCTBi BOOnOCTaun Hn BaWOro MicTa.
-Пд уас ВИКОРиСТаHHЯ писТpoю Bn можete
нанOBHHTи pe3eрByap BOДЮ y 6удь-якIN
MOMeHT.
yHnKaIte noKoJxHeb Ta/a6o 3a6pydHeHHpe3epByapy Ina BOni Ta 6aky naporeHepaTopa, He BnKOpNCToBnyTe apomatn3atopn, oet, domiikn, 3ac06n npOTn HAKIny Ta iHni xiMiuHi 3ac06n.
Hikon He cTaBTe npacky Ha Kopnyc npncTropo 6e3 ndknaDn npackn!
-Пд уас nepшо ВИКОпstаннл пackи 3 Hei MOxут b ITN CNEцчicni 3anaxn Ta napa, a 3 ПIOswBIMOxuyt cINaTnC6IINI NopoWnHKn. LcE c HopMaJIbHm Ta npuINHITbcr 3a KInbKa XBNINH.
KoHnHaTuscheHo KhoNky BUnyScKy nap, Bu moXeTe noUytu 3Byk nomn y cepenHi npictpo. Ue HopMaJIbHO Ta O3Naue, Io BOda nepeKauyctbcra Do 6aky naporehepaTopa.

2. Вибір поррамn
TINB. cknadeni CTOPiHKN
Iapobacanzio ochaueHa nepemukayem nporpam (9), 3a donomorojo koro Bm moKeTe Bn6npatni pi3Hn nporpaMn npacyBaHH.
KoXHa nporpama aBTOMaTnUHO 3aJaE HaIeXHy KombiHaCiIO HalaStyBaHb TempepaTyPi iNoaHi napu, IIO NiIXoNDtB dIg InpacyBaHHra Tnx a60 IHxN BnO6iB.
IobepaOnu nepemkaU nporpam, Bm moKeTe Bn6upaTu TnO odary a6o TkauHn, kky Heo6xIDHO npacyBaTu. BiNObiDn iHdkatop (7) mIrataMe, nOKn npacka He harpiEtbcra Do notpi6HoI Tempepatypi I He 3aie pekmm noDaqi napi, nepeDbauhen nporpamoIO.
IOTIM iHnkaTOp 3aropntbCnOCTiHnM CBITnOM, i Bn noyete Dba 3BykOBnx cnHaJI, IIO nOBIOMJIHOt b npo rTOBHiCTb npncTpOo do po6OtN.
Якwo matepian Bnpo6y,якno Heo6xidno npacyBaTn,He BiNobiJaE JODHni 3 HaBbHX nporpaM,O3HaNoMTecr 3 peKOMeHdaIaIMn Odo TeMnpaTyPi npacyBaHHra,HaBeDeHmHa npNIky Bnpo6y.
TemnepaTypa Iporpama
CnHTeTnka (Synthetics)
Bobha (Wool)
- - - BaBOBHa (Cotton) / Jeans
max JboH (Linen)
Iopadn:
- Po36epiB 6iHn3Hy B 3aIeXhoCTi BiD cIIMBOJIb Ha etIKeTKax Ta NOUHaIte IpacyBaHHa 3aBXdN 3peuE, IIO NOTpe6yIoTb HAIHNXQoi TempepaTypn IpacyBaHHa.
-Дяпасувань Oягу 3i 3MiшаHOТКанини ВберітБ TemnéраTypy, lo BДпОВдaе Hαнбільш DeNikatHi TkaHиH. - RaKuo Bn He BneBHeHi, 3 Koo TkaHnHn 3po6IeHO 6iIN3Hy, noCHITb npacyBaHHa 3 HauHxKoI TempepaTyra Obeipitb Notpi6Hn Bam pibeh HarpiBaHHa NonpacyBaBUn HeBeJInky dIinHKy, kY He BnDHO nIq Yac BnKOpncTahHry 6iIN3HN.
- Uopa3y Ha nooyatky BnKOpncTaHH napack npa3om i3 napoIO MOKyTb BHXODNTu Kpani Bodn. Tomy cnooyatky pekomeHdyecpnoBecTu npackoIO NO DoUzI dJa npacyBaHHa 60 no HenotpiHi TkaHHi.
Дя OTpmaHЯ ONTmAmbHnx pe3yIbTaTIB HanpiKInci npacyBaHHa BIMKHITb napy Ta Kijbka pa3iB npoBeiTB npackoIO no TkaHHi 6e3 3BOJoxeHHa, zo6 do6pe npocuHTn ii.
3. CneuiaJIbHi nporpaMn

BndaJIeHnHaPiDbiWeHomy OJ3I, WToPax Too.
YBara!
Hikon He o6pO6nTe cTpymom napn OJr, HADyHTn Ha IIOdei.
Hikon He cnpaMOByTe napy Ha IIOeJ TbapnH.
- Bùbèpīt b nporpamy «Jeans / …», ǚo6 npacka Bùpòbǎnla ONTUMànbHy kɪnbKiCTb napu.
- TpmaTe npacky y BepTKkaIbHomy noJoxeHHi Ha BiIcTaHI 15 cm BiI d OJrgy, kNIO o6po6n8ctbca napoi.
- 3aBicn Ta OJrHa NIIiYkax (niIXaK, KOCTHOMn, NaIbTa TOo) MoXHa npacyBaTn 3 napoO, yTpIMyHOn npacky y BepTnKaIbHOMy NOIOxEHHI Ta HATNCKAHOuH Ha KHONKy BUNyCKy napn (14 a6o 15).

8. Pexim «silencePlus»
HaTnCHITb KhONkY (silencePlus) (6).
AKNBByBaBn HanaWtBuHnR «silencePlus», BmOKeTe 3MeHnTn Wym BiD BuxOy napi 6InbHix Ha 50% Ta OTPmByBatn He3MiHNo kicHnpe3yIbTaT Ni d Yac npacyBaHHa 6InbWoCTi BnIDIB Ondry.
PekomeHdyEcBcBnKOpNCTOByBaTn CtaHdapThe HanaHTyBaHH TINbKn DnI npacyBaHH TOBCTNX Ta DYxke 3IM'ATnx TKaHH.
(*) nopieHrHO 3 MaKcMaJIbHUM HanaumyBaHHaM.

9. ABTomatnyHe BmKHeHHa
JaKIO nID YAC npacyBaHHK HONKy BnNyCKy napi (14 a6o 15)) Ha pyuCi npackHe HaTnCKaTN npOTAROM NEBHO Yacy (8 XBnJIIN),napoBa CTAHIZI ABTOMATNUHOBMNKAeTBcR.
Kilbcebe NiicBiyBaHH,po3TaIIOBaHe HABKOIO nepemikaya nporpam (9),noHne MIRATu y pa3i AKTINBaCi yHKci ABOTMaTHUHO BIMKHeHH. Y ueMomet Bn noyete Tpu 3ByKOBi CnHaII. 3HOBy yBIMKHyTu napoby cTAHIO, cnId ue pa3 HaTINCHTu KHONKY BNYCKy napN.

10. TkaHnH\*
TnB. cknadeni CTopinkn
CobetbI no yTnIn3aun
IpoDyKznaHaWeiΦnMpblNoCTabTReTcB ONTmN3npoBaHHoYnakOBke.YnakOBka Ipn3BeDeHa n3 He3aPra3HryOuNX OkpyKaHOuyo CpeDy MaTePnaIOB, KOTOpbIe NOJNeXaT yTNIN3aUIN B MeCTHO CnyX6e No yTNIN3aUIN OTXODOB BAueCTBe BTOpNUHOrO cbIpB. INΦopMaUHO ob yTNIN3aUIN OTPa6OTaHHbIX 3JIeKTPOPi6OpOB Bbl MOxTe NOLyHTB MecTHOH aDMNHNCtPaUIN.
HnKOrda He nCNoIb3yIte cTpyu npa Ipa O6pa6oTKn OeXdbI,HaTeOu Ha IIOeN. HnKOrda He HnPaBnIte nap Ha IIOeN JxNBOTbIX.
- BbIbePte nporpamMy «Jeans / …», yTo6bl yTIOB BbIPAbaTbIBaONITIMaNbHoe KOINueCTBO napa.
2.ДерхиTe yTHor B BepTKaJIbHOM NOLOXKeHn Ha pacCToHn 15 cm OT OeJbI, KOtopa o6pa6aTbIbAeTc npom. - MoXHo 6pa6aTbIbTaB napom 7Topb I Bn Cnryo OdeJy (NnJxakn, NnA TbB, NaNbTO n T. d.) pacnoJoxn yTOr BeptnKaJIbHO n Haxab Ha KhoNky BblNycka npa n3 noDowBbl (14 nn 15).

8. Pēχιm silencePlus
Haxmnte Ha KhoNky «silencePlus» (6).
BknHvB pexnM silencePlus, bI moKeTe yMeHbWntb Wym OT BbIXOda napa 6oJee Yem Ha 50% , noyuay yIOBNETBOpHTeNbHbI pe3yIbTat npi IpaXeHN IpaKTnueckN BCEx BnOB OdEJIbl.
PekomeHdyetcnaCNoIb3ObaTbObbHbIpeXIM TOJIbKO IJIraIgAnKeHnToJTOCTOnN CINbHO N3MToT KAHN.
(^*) nO cpaehHeHUo C MaKcUMaJIbHbIM 3HaYeHuEeM.

9. ABTomatnueckoe OTKJIIOUeHne
EcnB npocece rnajxeHn KhONKa BbInycka napa n3 noDooBbl (14 nn 15)Ha pyKe yTOra He haxmaeTcB TeueHne ONpeJeHnHO BpemEn (8 MInHyT), napOBa CTahCnA ABTomatNueeCKn OTKJIIOUaETcra.
KoIbueBaJ noDCBeTka, pacnoLoXeHHa BOKpyr nepeKluOyateTn nporpamM (9), HauHET MIRatb npn aKTNbAUuN FyHKUABOMATUeCKOROTKJIIOUeHNA. B 3TOT MOMENT Bbl yCblIuNTe Tpr 3ByKObbix cnHaHa.
YTo6bI CHOBA BKNIOHTb napOByIO CTaHUNIO,CHOBA HAXMITE KHOIKy BbINyCKa npa N3 NOoBbI.

10. 3auntHaTeKCTnIbHa nOdoWBa\*
Tcm.cnoxehhbe ctpaHHu
3Ta nooBa nCnoB3yETc8 (18*) dIra rnaKeHb c napOM DeNkAaTHbIX Beuei npMakCmMaNbHO TEmnepaType, He nobpeXdAn ux. NcnoB3ObaHne 3aHTHO TEKCTINbHO NIOoWBbl TaKke NCKNoaET Heo6xOIMOCtB NCNOB3OBaTb TpRKnY DnI ppeoTbpaueHn6 Blecka Ha TEMhixTkAhX. Mbi peKomeHdyem Bam nepeHaayanom rnaKeHb I nonpo6oBaTb rJaNTb Ha He6oJbWom yactke Ha ByTpHeH CTOpOHe Beu, I NOHa6nIoDaTb pe3yIbTaTbl.
UTo6bI yCTaHOBnTb 3aunTHyIO NOoWBy, NOMeCTInTe OcTpbI KOHnK yTOrA B KOHeC 3aunTHOINoOoWBbl I NOTAHTE 3a 3JnactHyIO JeHTy BDOJIb HIXHeN 3aHneYacTN yTOrA Do Tex NOP, NOKa OHa He 6yJeT ODeTa. UTo6bI CHrTb 3aunTHyIO NooWBy, NOTAHTE 3a 3JnactHyIO JeHTy, UTo6bI OTDeJIuNTb NooWBy OT yTOrA.
3aunTHyTO TEKCTINbHyIO NOOswBy MOXHO npno6peCTN B Cnyx6e NoCTnpoJaX INN B CneuaJn3npoBaHbIX MaRa3nHax.
571510 TZ20450
He nCnoIb3yIte IJn npOMbIBaHnnaPaporehepaTopa CpeICTBa IJn ydaJIeHnHaKINN,NOTOMy UTO OHN MOrTy Ero NOBpeiNTb.
3aФИKcHpyTe yTHOr, NOMEcTb Hoc yTHOra B nepeHn Ia3 n npJxab pbUar cNCTeMbI φHKcauN (3) K HIXHeY qactn yTHOra. NocTaBbTe np6Op Ha KpaO paKOBnHbl.
BbikpyTnte nIbTp (12) nI3BneKeTe ero.
3ДлгпромьваняблOKаHaKONПЕнЯHaKINI NOMeCTNTe erO NOd CTpyU npOTOHOBdI IN pPOMOnTE DO NOHOrO ydaJIeHnO OCTaTKOB HaKInI. CoXmTe erO TaK, KaK 3TO nOKa3aHO Ha pncyHke a).
Дя полученя ONTUMaJIbHOro pe3yIbTaTAta MoXHo NOrpy3nTb 6LoK HAKOpJIeHry HAKINHa 30 MmHyT B BODy n3-NoJ KpaHa (250 m), CMeUaHHyO C OndHcMepoN (25 mCpeDCTBa OT HAKIN, KaK Noka3aHO Ha pucyHke b). 3aTeM ChOBa npomOtte 6JOK BODoI (3To OueHbaxHo!).
XnKocTb dny ydaJeHna HAKINMOxHO npo6pctN B OTdene nocnenpoaJHO O6cnyKbAHNA INB CneuaJIIN3npOBaHHbIX Mara3NuHax.
4. Functia "pulseSteam"
A se observa clapetele rabatabile
| الله الحرفية الحرفية الحرفية الحرفية الحرفية الحرفية الحرفية الحرفية الحرفية الحرفية الحرفية الحرفية الحرفية الحرفية الحرفية الحرفية الحرفية الحرفية الحرفية الحرفية الحرفية الحرفية الحرفية الحرفية الحرفية الح註冊 الله الح註冊 الله الح註冊 الله الح註冊 الله الح註冊 الله الح註冊 الله الح註冊 الله الح註冊 الله الح註冊 الله الح註冊 الله الح註冊 الله الح註冊 الله الح註冊 الله الح註冊 الله الح註冊 الله الح註冊 الله الح註冊 الله الح註冊 الله الح註冊 الله الح註冊 الله الح註冊 الialelelelelelelelelelelelelelelelelelelelelelelelelelelelelelelelelelelelelelelelelelelelelelelelelelelelelelelelelelelelelelelelelelelelelelelelelelelelelelelelelelelelelelelelelelelelelelelelelelelelele lelelelelelelelelelelelelelelelelelelelelelelelelelelelelelelelelelelelelelelelelelelelelelelelelelelelelelelelelelelelelelelelelelelelelelelelelelelelelelelelelelelelelelelelelelelelelelelelelelelele. 1 | .1 | .1 | .1 |
| .1 | .1 | .1 | .1 |
| .1 | .1 | .1 | .1 |
| .1 | .1 | .1 | .1 |
| .1 | .1 | .1 | .1 |
| .1 | .1 | .1 | .1 |
| .1 | .1 | .1 | .1 |
| .1 | .1 | .1 | .1 |
| .1 .1 | .1 .1 | .1 .1 | .1 .1 |
| .1 .1 | .1 .1 | .1 .1 | .1 .1 |
| .1 .1 | .1 .1 | .1 .1 | .1 .1 |
| .1 .1 | .1 .1 | .1 .1 | .1 .1 |
| .1 .1 | .1 .1 | .1 .2 | .1 .2 |
| .1 .1 | .1 .1 | .1 .2 | .1 .2 |
| .1 .1 | .1 .1 | .1 .2 | .1 .2 |
| .1 .1 | .1 .1 | .1 .2 | .1 .2 |
| .1 .1 | .1 .1 | .1 .2 | . .1 .2 |
| .1 .1 | .1 .1 | .1 .2 | .1 .2 |
| .1 .1 | .1 .1 | .1 .2 | .1 .2 |
| .1 .1 | .1 .1 | .1 .2 | .1 .2 |
| .1 .1 | .1 .1 | .2 .2 | .1 .2 |
| .1 .1 | .1 .1 | .2 .2 | .1 .2 |
| .1 .1 | .1 .1 | .2 .2 | .1 .2 |
| .1 .1 | .1 .1 | .2 .2 | .1 .2 |
| .1 .1 | .1 -1 | .2 .2 | .1 .2 |
| .1 .1 | .1 -1 | .2 .2 | .1 .2 |
| .1 .1 | .1 -1 | .2 .2 | .1 .2 |
| .1 .1 | .1 -1 | .2 .2 | .1 .2 |
| .1 .1 .1 | .1 -1 | .2 .2 | .1 .2 |
| .1 .1 .1 | .1 -1 | .2 .2 | .1 .2 |
| .1 .1 .1 | .1 -1 | .2 .2 | .1 .2 |
| .1 .1 .1 | .1 -1 | -1 -1 | -1 -1 |
| .1 .1 .1 | .1 -1 | -1 -1 | -1 -1 |
| .1 .1 .1 | .1 -1 | -1 -1 | -1 -1 |
| .1 .1 .1 | .1 -1 | -1 -1 | -1 -1 |
| .1 .1 .1 | -1 -1 | -1 -1 | -1 -1 |
| .1 .1 .1 | -1 -1 | -1 -1 | -1 -1 |
| .1 .1 .1 | -1 -1 | -1 -1 | -1 -1 |
| .1 .1 .1 | -1 -1 | -1 -1 | - |
| .1 .1 .1 | -1 -1 | -1 -1 | - |
| .1 .1 .1 | -1 -1 | -1 -1 | - |
| .1 .1 .1 | -1 -1 | -1 -1 | - |
| .1 .1 .1 | -1 -1 | -1 -1 | |
| .1 .1 .1 | -1 -1 | -1 -1 | - |
| .1 .1 .1 | -1 -1 | -1 -1 | - |
| .1 .1 .1 | -1 -1 | -1 -1 | - |
| .1 .1 .1 | -1 -1 | -1 -1 | - - |
| .1 .1 .1 | -1 -1 | -1 -1 | - |
| .1 .1 .1 | -1 -1 | -1 -1 | - |
| .1 .1 .1 | -1 -1 | -1 -1 | - |
| .1 .1 .1 | -1 -1 | -1 -1 -1 | - |
| .1 .1 .1 | -1 -1 | -1 -1 | - |
| .1 .1 .1 | -1 -1 | -1 -1 | - |
| .1 .1 .1 | -1 -1 | -1 -1 | - |
| .1 .1 .1 | -1 -1 -1 | -1 -1 | - |
| .1 .1 .1 | -1 -1 -1 | -1 -1 | - |
| .1 .1 .1 | -1 -1 -1 | -1 -1 | - |
| .1 .1 .1 | -1 -1 -1 | -1 -1 | - |
aL 4
0
1
2
3
4
5
6
7
8
9
j.13
a 8) a a a a a a a a a a a a a a a a a a a a a a a a a a a a a a a a a a a a a a a a a a a a a a a a a a a a a a a a a a a a aaa
(14) jj j j j j j j j j j j j j j j j j j j j j j j j j j j j j j j j j j j j j j j j j j j j j j j j j j j j j j j j j
20.8 10 10
e 1000000000000000000000000000000000000000000000000
1
2
3
4
5
6
7
8
9

Ailalg 12
j
!

g E g 1 1 1 1 1 1 1 1 1 1 1
155 1 1 1 1 1 1 1 1 1 1 1 1 1 1 1 1 1 1 1
aaiyol 8oall gagg jglal 2
i 3
calc'nClean Perfect .11

"silencePlus" w.h.8

suiogjg 1
(4) "Calc" 510000000000000000000000000000000000000000000000000000000000000000000000000000
11.1

a
y 1
1
(3) 1 jj jy jolal 2
. Jizl all jglg 12
Jgus 3
a a a a a a a a a a a a a a a a a a a a a a a a a a a a a a a a a a a a a a a a a a a a a a a a a a a a a a a a a a a a a a a aaa
“pulseSteam”.4

j 1
"intelligentSteam" 5
p jll sill pail aol 10 ill 12 g jy j j j j j j j j j j j j j j j j j j j j j j j j j j j j j j j j j j j j j j j j j j j j j j j j j j j jj j j j j j j j j j j j j j j j j j j j j j
aaii 1
j 1
6

. 1
7

aai 1
Cgaiiie Ciae iie 1iie aie gao aiie jay
aalall aal al gbal iLal (i)
:
4
a 12

y
JJe JJeJeJe JeJeJeJeJeJeJeJeJeJeJeJeJeJeJeJeJeJeJeJeJeJeJeJeJeJeJeJeJeJeJeJeJeJeJeJa
15 15 20
a
:
1 1 1 1 1 1 1 1 1 1 1 1 1 1
aill aieeallrll a jil iablll
i 1
1 1
a 1
y
ecljbjbblui jSalln palsuus Js aydiie
g 1111111111111111
S ADB = S COD + S_ BDO
.3
"allTextile" 3.1

j
"allTextile" joljolj jolj jolj jolj jolj jolj jolj jolj jolj jolj jolj jolj jolj jolj jolj jolj jolj jolj jolj jolj jolj jolj jolj jolj jolj jolj jolj jolj jolj jolj jolj jolj jolj
L.S SAs gill guall e! gil aSla
allTextile"
aiee eae
yI ylll 1e "allTextile"
a
a 2 a 1
1
"antiShine" 3.2

j
"antiShine" jj j j j j j j j j j j j j j j j j j j j j j j j j j j j j j j j j j
15 14)
Sll Jaa aal 1
"calc'nClean" 3.3

- j = 1,1 , j 1
(2)olsooll
Laaaspaasall jll gssj say aaii ojs
y .sll aia 1j 1 j
a 1
jol jol jol jol jol jol jol jol jol
120 1
.
1
1 1
jai jia jia clai jia jia
2

Jr Jr Jr Jr Jr Jr Jr Jr Jr
Jusuui jaljgl aill jilll j
aalol o 100000000000000000000000000000000000000000
a1 = 12,an + 1 = n2 - 1an
.(calc'nClean)
JaiyIcLiljldla 1g0 Jdally cdo g jic
i 1
.
e iioi . clll 5 giuaal 2000 jueaiau 29jog jieill 128.8
(5)“jlaol
eall jjie ojo dic
Slll j 1
(7)
.
P_ A = 2
aiai el JaxiuJay
ccll cllg aaiiell cia jol, jilai o jyauai
, Siabio 1111111111111111111111111111111
1.2 1aall cllly aaiial all e jol
clall aie ie clall jue jus jiu
.
JJIJIJIJIJIJIJIJIJIJIJIJIJIJIJIJIJIJIJIJIJIJIJIJIJIJIJIJIJIJIJIJIJIJIJIJIJIJIJIJIJIJIJIJIJIJIJIJIJIJIJIJIJIJIJIJIJIJIJIJIJIJIJIJIJIJIJIJIJIJIJIJIJIJIJIJIJIJIJIJIJIJIJIJIJIJIJIJIJIJIJIJIJIJIJIJIJIJIJIJIJ
(Linen) max
P 众
410
1 1 1 1 1 1 1 1 1 1 1 1 1 1
oclllg jolj g jn jns jns a clij
alil alll 1gall slw gaw gall gll
a. sols 8
a1 = 23,an + 1 = an - an - 1
a
aLw g o 501 2000 0000 0000
aJl 1 JllgXb! jaiuuiuill
.
a
yolalall aulllll ally y. xba jka
2.21204 4.21304 j5j6d4
ailllgluogllnssLioic aigagall yjy
a glce 1y
jpiinall jSg jll iG. gJ 0.37
J 1
Jusgill gao zie pllil a glao
j j 1
L
"calc'nClean Plus" aLsIaIaIaIaIaIaIaIaIaIaIaIaIaIaIaIaIaIaIaIaIaIaIaIaIaIaIaIaIaIaIaIaIaIaIaIaIaIaIaIaIaIaIaIaIaIaIaIaIaIaI
slll 13
j.14
“pulseSteam” zj.15
aiio oI Sall ayol jwll aioll .16
ol all oic 17
* 18
all jj .1
2
"secureLock" 3
"Calc" 4
"5
()“slaa”aalb jj g
Sll 7
aJyj 8
"calc'nClean"
aaiiaai 9
aaiiaai
slider TS47
Siemens
J 1
aiai g yic jjll Jaoai Jd oJc
12,13,14,15
i 1
.Siemens
aalil
a 1
4
□
a aallll 1 1 1 1 1 1 1 1 1 1 1 1
alilijol no o
gws 1e g jgl Joo
Jolal
口
aie aie 1
Aaaii i 1
1 8 8
jlll lalil 15
Jll j 2. jie jaiy bui jil 1 g i j w
jglalilallll 1 j 1 1 1 1 1 1 1 1 1 1 1 1
.
8 jn nn JbJ1 Jglnn ne 1y bI yIyIyIyIyIyIyIyIyIyIy
. 1
J 1
1
j_l = 1 与 l : x^2 + y^2 - 4x + 3 = 0 相切
G
□
可
1 1


www.siemens-home.bsh-group.com

- General safety instructions
- Important:
- Advice on disposal
- Description
- Preparations
- Any damage caused by the use of the aforementioned products, will make the guarantee void.
- Never rest the iron on the appliance without the iron pad!
- Programme selection
- Temperature Programme
- Tips:
- Special programs
- "allTextile" programme
- See the leaflet sides
- "antiShine" programme
- "calc'nClean" programme
- "pulseSteam" function
- Remarks:
- "intelligentSteam" function
- Ironing without steam
- Vertical steam
- This can be used to remove creases from hanging clothes, curtains etc.
- Warning!
- Never direct the steam jet at garments that are being worn.
- "silencePlus" button
- Auto shut-off
- Fabric protection soleplate cover *
- calc'nClean Perfect
- Automatic clean warning
- Cleaning the Boiler
- Rinsing the iron steam chamber
- Cleaning & Maintenance
- Attention! Risk of burns!
- Storing the appliance
- Tips to help you save energy
- Trouble shooting
- Funcão "pulseSteam"
- Funcão "intelligentSteam"
- "allTextile" program
- "antiShine" program
- PekomeHdaqii 3 yTnJI3aqi
- Опис пистоно
- 1.Пид�товka
- BaxJnBO!
- Вибір поррамn
- TINB. cknadeni CTOPiHKN
- TemnepaTypa Iporpama
- Iopadn:
- CneuiaJIbHi nporpaMn
- YBara!
- Pexim «silencePlus»
- ABTomatnyHe BmKHeHHa
- TkaHnH\*
- TnB. cknadeni CTopinkn
- CobetbI no yTnIn3aun
- Pēχιm silencePlus
- ABTomatnueckoe OTKJIIOUeHne
- 3auntHaTeKCTnIbHa nOdoWBa\*
- Functia "pulseSteam"
- j.13
- Ailalg 12
- !
- calc'nClean Perfect .11
- "silencePlus" w.h.8
- suiogjg 1
- 11.1
- “pulseSteam”.4
- "intelligentSteam" 5
- 6
- 7
- 4
- .3
- "allTextile" 3.1
- "antiShine" 3.2
- "calc'nClean" 3.3
- 2
- P 众
- a
- aalil
Brand : SIEMENS
Model : Slider TS47 TS4731100
Category : Iron