R507 - Receiver SHERWOOD - Free user manual and instructions
Find the device manual for free R507 SHERWOOD in PDF.
Frequently Asked Questions - R507 SHERWOOD
User questions about R507 SHERWOOD
0 question about this device. Answer the ones you know or ask your own.
Ask a new question about this device
Download the instructions for your Receiver in PDF format for free! Find your manual R507 - SHERWOOD and take your electronic device back in hand. On this page are published all the documents necessary for the use of your device. R507 by SHERWOOD.
USER MANUAL R507 SHERWOOD
R&TTE Directive 1999/5/EC

This symbol indicates the presence of uninsulated "dangerous voltage" within the product's enclosure that may be of sufficient magnitude to constitute a risk of electric shock.

This symbol indicates important operating and maintenance (servicing) instructions in the literature accompanying the appliance.
WARNING: TO REDUCE THE RISK OF FIRE OR ELECTRIC SHOCK, DO NOT EXPOSE THIS APPLIANCE TO RAIN OR MOISTURE.
CAUTION
- Leave space around the unit for sufficient ventilation.
- Avoid installation in extremely hot or cold locations, or in an area that is exposed to direct sunlight or heating equipment.
- Keep the unit free from moisture, water, and dust.
- Do not let foreign objects in the unit.
- Keep the ventilation openings clear of items, such as newspapers, linens, or curtains.
- Keep open flame from candles or other sources away from the unit.
- Observe the local regulations regarding disposal of packaging materials, exhausted batteries and old equipment.
- Do not expose the unit to dripping or splashing, or place objects filled with liquids such as vases.
- Do not let insecticides, benzene, or thinner come in contact with the unit.
- Never disassemble or modify the unit in any way.
Notes on the AC power cord and the wall outlet
- The unit remains connected to AC power as long as it is plugged into the wall outlet, even if the unit has been turned off.
-
To completely disconnect this product from AC power, disconnect the plug from the wall socket outlet.
-
When setting up this product, make sure that the AC outlet you are using is easily accessible.
- Disconnect the plug from the wall outlet when not using the unit for long periods of time.

dtshHD
Master Audio
Manufactured under license under U.S.
Patent Nos:5.956.674;5.974.380
6.226.616:6.487535:7.212872
6,228,018,737,568,742,472, 7,333,929; 7,392,195; 7,272,567 &
other U.S. and worldwide patents issued & pending. DTS-HD, the Symbol, & DTS-HD and the Symbol together are registered trademarks & DTS-HD Master Audio is a trademark of DTS, Inc. Product includes software. © DTS, Inc. All Rights Reserved.

DOLBY.
TRUEHD
Manufactured under license from
Dolby Laboratories, Dolby, Pro
Logic, and the double-D symbol are
trademarks of Dolby Laboratories.

OMI
HDMI, the HDMI Logo, and High
Definition Multimedia Interface are
trademarks or registered trademarks
of HDMI Licensing LLC in the United States and other contries.
- DTS-HD Master Audio and Dolby TrueHD is applicable only for R-607.
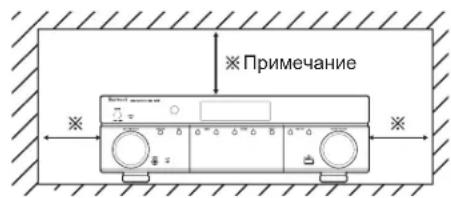
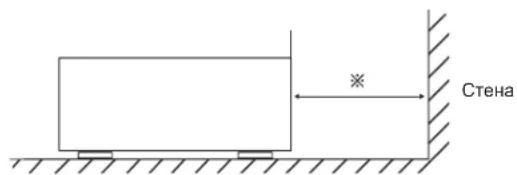
Caution regarding installation
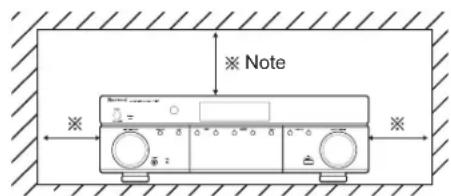
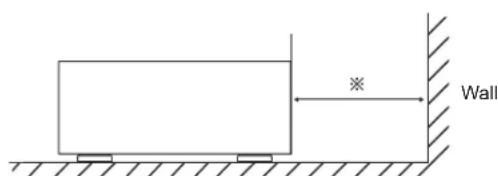
Do not block ventilation openings or stack other equipment on the top.
※ Note: For heat dispersal, do not install this unit in a confined space such as a bookcase or similar enclosure.
Table of Contents
2 SAFETY INFORMATION
4 GETTING STARTED
4 Front Panel
4 Rear Panel
5 Remote Control
6 Placement
7 CONNECTIONS
7 Connect Your Speakers
7 Connect Your Subwoofer
8 Connect Your TV or Video Display
9 Connect Your Audio and Video Source Devices
13 Connect the Tuner Antennas
13 Connect to AC Power
13 Install the Batteries in the Remote Control
14 SETUP
16 OPERATION
20 TROUBLESHOOTING
21 SPECIFICATIONS
14 Turn On the AVR
14 Configure the AVR for Your Speakers
16 Operating Your AVR
16 Listening to FM and AM Radio
17 Listening to Media on a USB Device
17 Selecting a Surround Mode
18 Advanced Functions
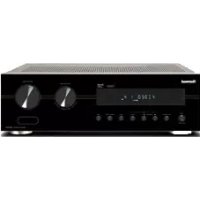
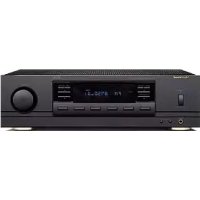
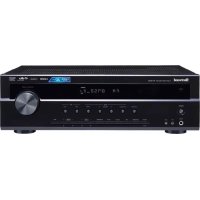
Getting Started
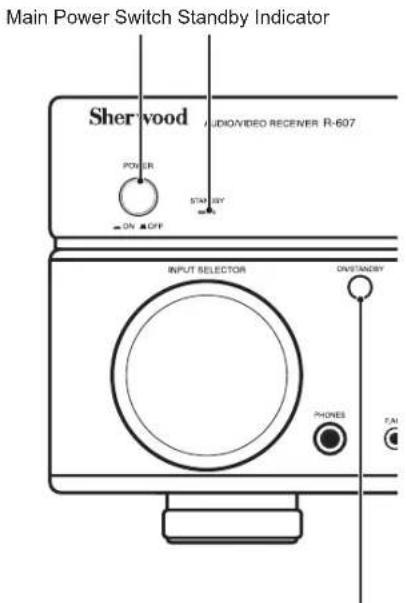
Front Panel

1 Main Power Switch
2 Standby Indicator
3 On/Standby Switch
4 IR Sensor
5 Display
6 Surround Select Buttons
7 Master Volume Control
8 Input Selector
9 Headphone Connector
10 F.AUX Input Connector
11 Band Select Button
12 Tuning Up/Down Buttons
13 Preset Select Buttons
14 Stereo Mode Button
15 USB Port
Rear Panel
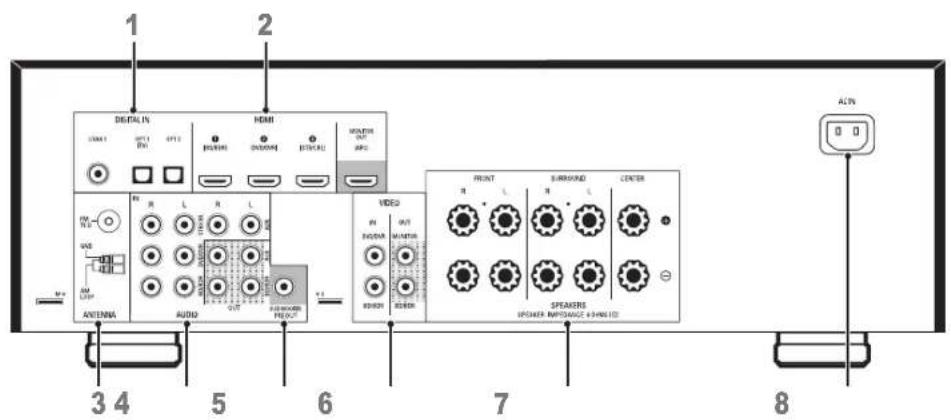
1 Digital Audio Connectors
2 HDMI Connectors
3 Tuner Antenna Connectors
4 Analog Audio Connectors
5 Subwoofer Connector
6 Composite Video Connectors
7 Speaker Connectors
8 AC Input Connector
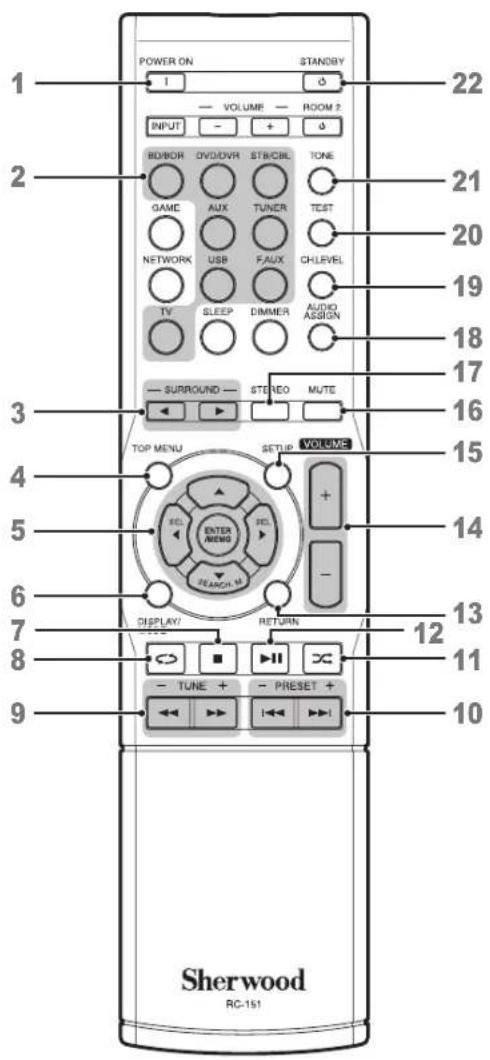
Remote Control
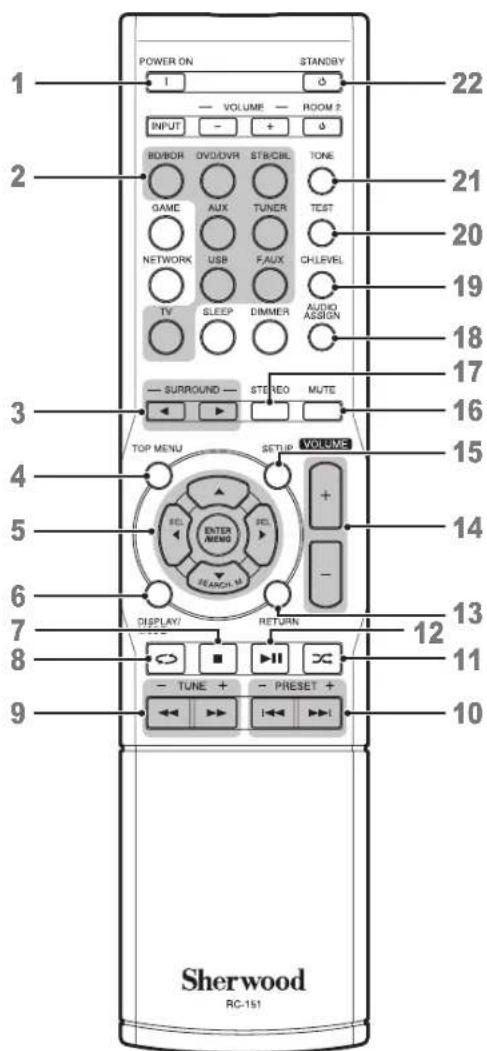
1 Power On Button
2 Source Select Buttons
3 Surround Select Buttons
(The GAME and NETWORK buttons are not available.)
4 Top Menu Button
5 Select Buttons
ENTER/MEMO Enter/Memory Button
SEARCH.M RDS Search Button
(* The SEARCH.M button is available only in models that are distributed in Europe.)
6 Display/Mode Button
7 Stop Button
8 Repeat Button
9 Tuning Up/Down Buttons
Rewind/Fast forward Buttons
10 Preset Station Up/Down Buttons
Previous/Next Buttons
11 Random Button
12 Play/Pause Button
13 Return Button
14 Volume Up/Down Buttons
15 Setup Menu Button
16 Mute Button
17 Stereo Mode Button
18 Audio Assign Button
19 Channel Level Button
20 Test Tone Sequence Button
21 Tone Control Button
22 Standby Button
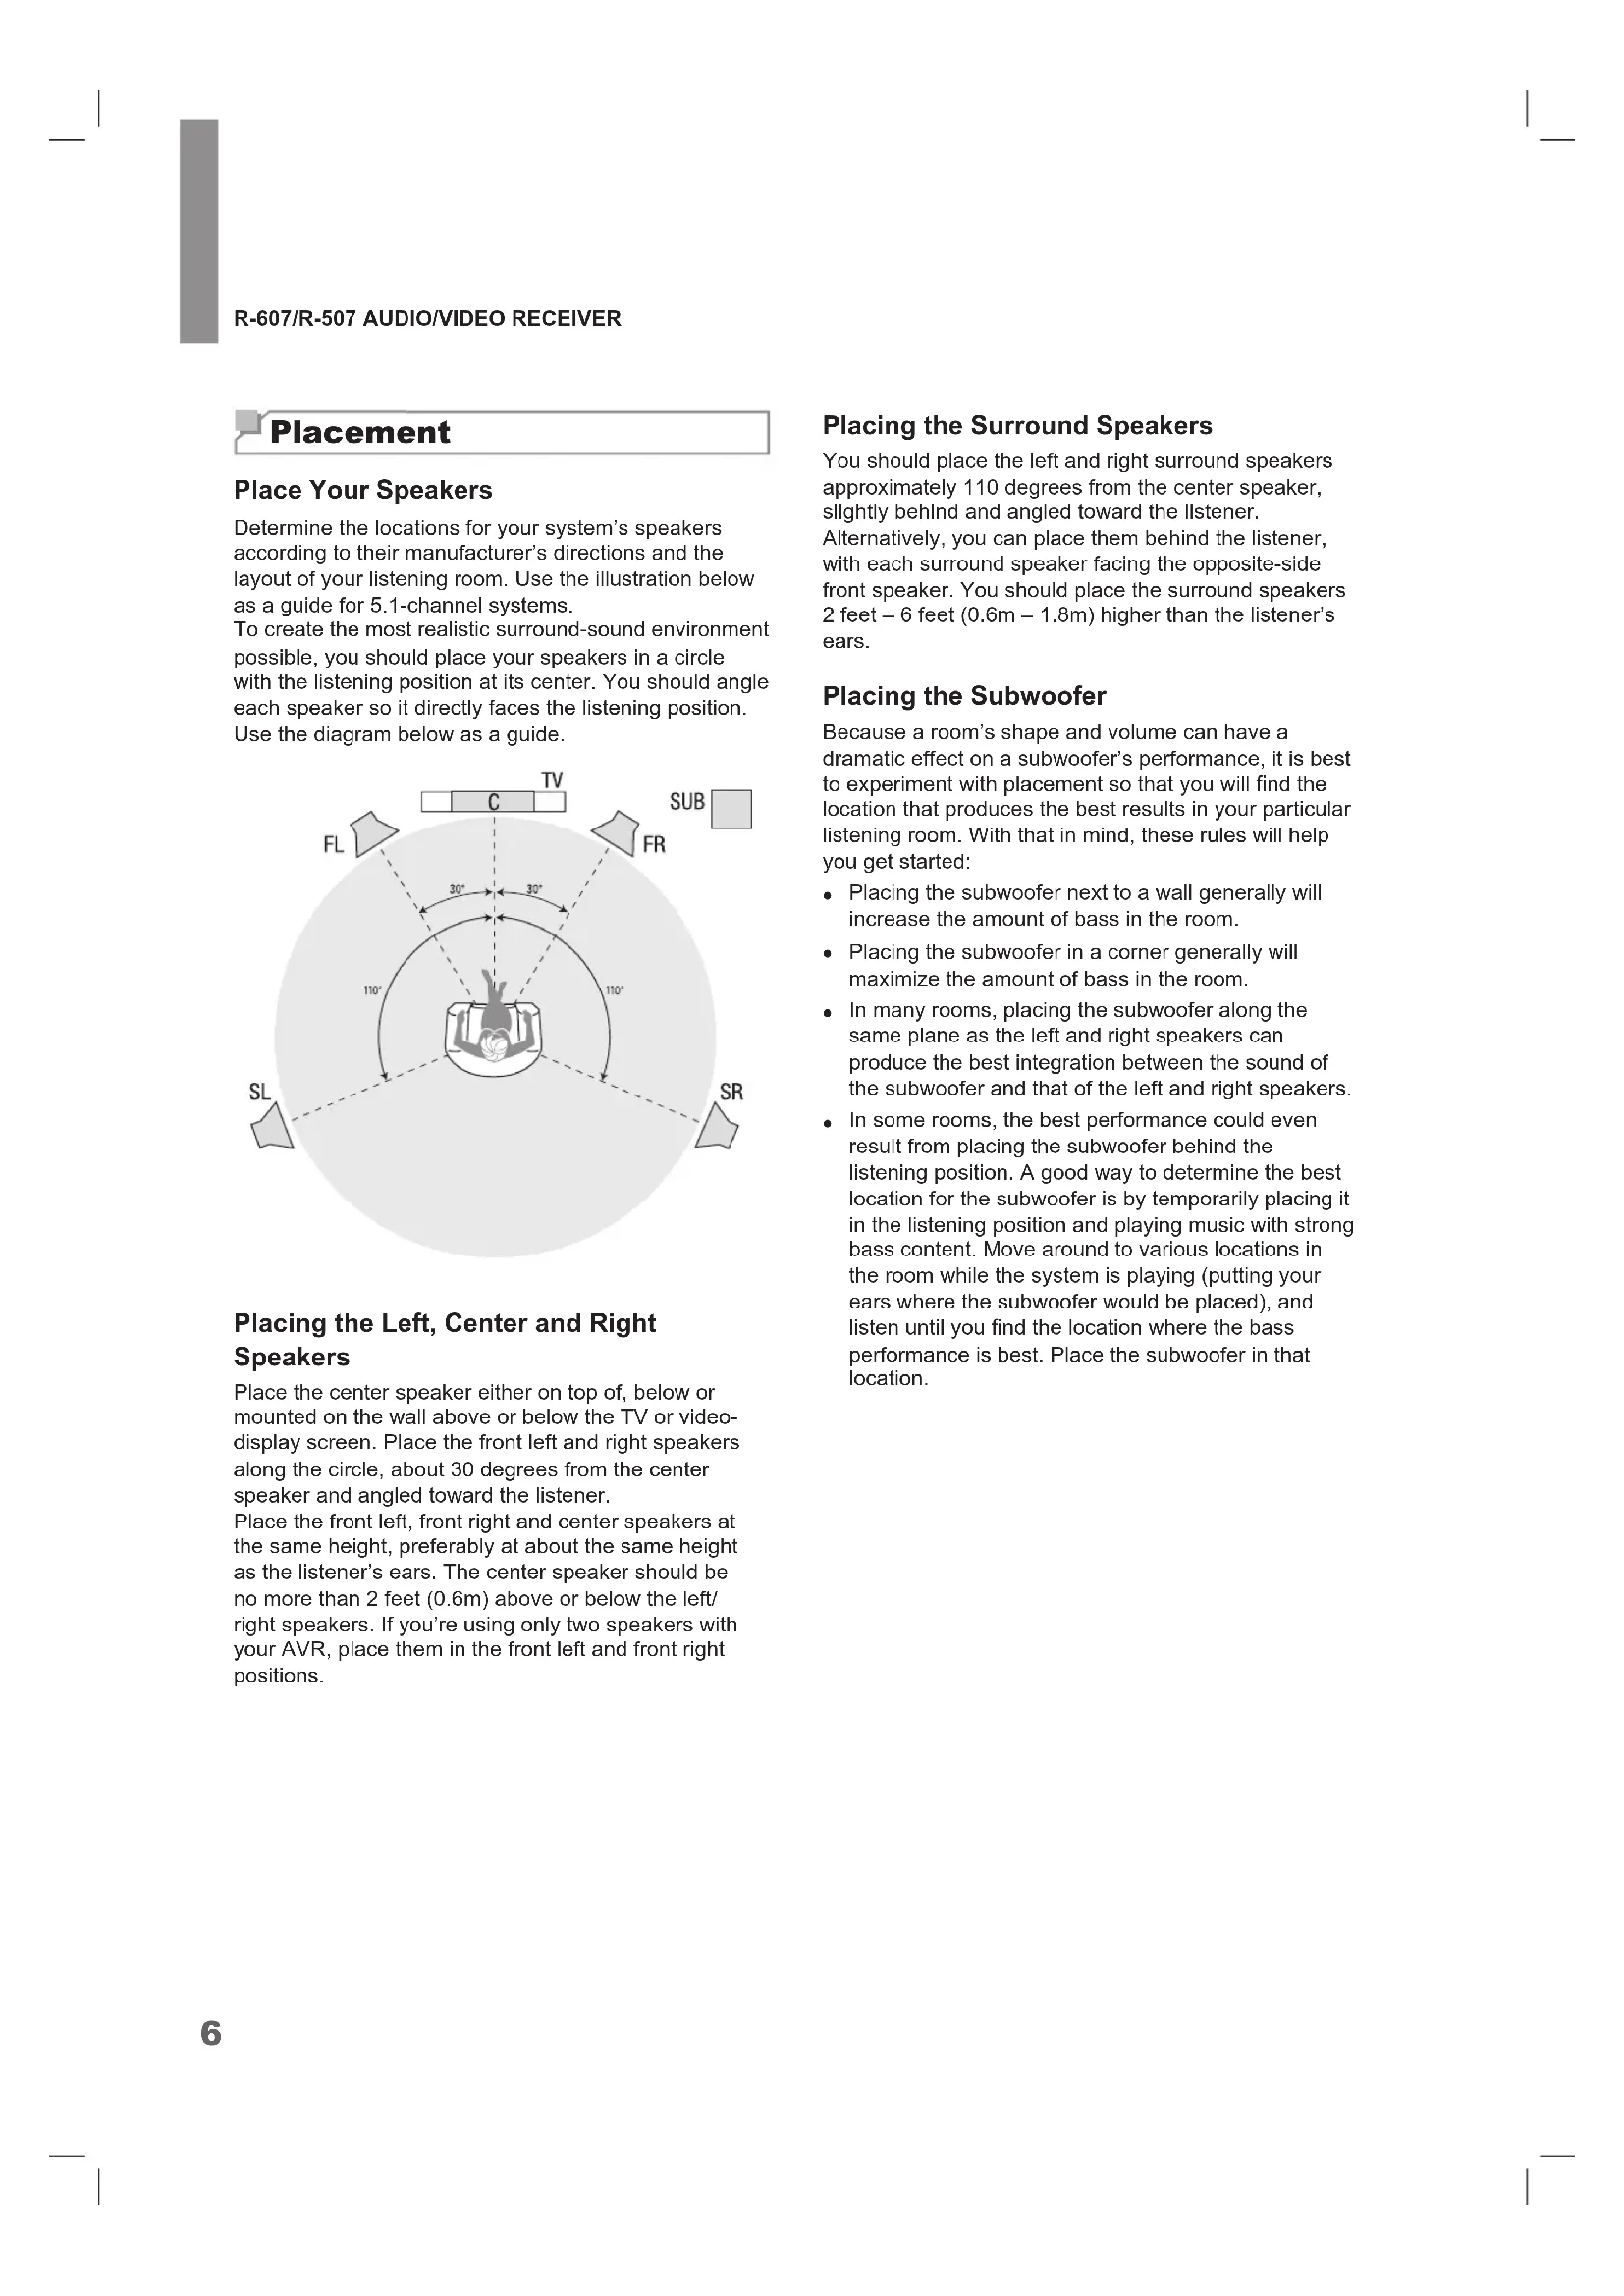
Placement
Place Your Speakers
Determine the locations for your system's speakers according to their manufacturer's directions and the layout of your listening room. Use the illustration below as a guide for 5.1-channel systems.
To create the most realistic surround-sound environment possible, you should place your speakers in a circle with the listening position at its center. You should angle each speaker so it directly faces the listening position.
Use the diagram below as a guide.

Placing the Left, Center and Right Speakers
Place the center speaker either on top of, below or mounted on the wall above or below the TV or videodisplay screen. Place the front left and right speakers along the circle, about 30 degrees from the center speaker and angled toward the listener.
Place the front left, front right and center speakers at the same height, preferably at about the same height as the listener's ears. The center speaker should be no more than 2 feet (0.6m) above or below the left/right speakers. If you're using only two speakers with your AVR, place them in the front left and front right positions.
Placing the Surround Speakers
You should place the left and right surround speakers approximately 110 degrees from the center speaker, slightly behind and angled toward the listener.
Alternatively, you can place them behind the listener, with each surround speaker facing the opposite-side front speaker. You should place the surround speakers 2 feet -6 feet (0.6m - 1.8m) higher than the listener's ears.
Placing the Subwoofer
Because a room's shape and volume can have a dramatic effect on a subwoofer's performance, it is best to experiment with placement so that you will find the location that produces the best results in your particular listening room. With that in mind, these rules will help you get started:
- Placing the subwoofer next to a wall generally will increase the amount of bass in the room.
- Placing the subwoofer in a corner generally will maximize the amount of bass in the room.
- In many rooms, placing the subwoofer along the same plane as the left and right speakers can produce the best integration between the sound of the subwoofer and that of the left and right speakers.
- In some rooms, the best performance could even result from placing the subwoofer behind the listening position. A good way to determine the best location for the subwoofer is by temporarily placing it in the listening position and playing music with strong bass content. Move around to various locations in the room while the system is playing (putting your ears where the subwoofer would be placed), and listen until you find the location where the bass performance is best. Place the subwoofer in that location.
Connections

Caution
Before making any connections to the audio/ video receiver, ensure that the AVR's AC cord is unplugged from the AVR and the AC outlet. Making connections with the AVR plugged in and turned on could damage the speakers.
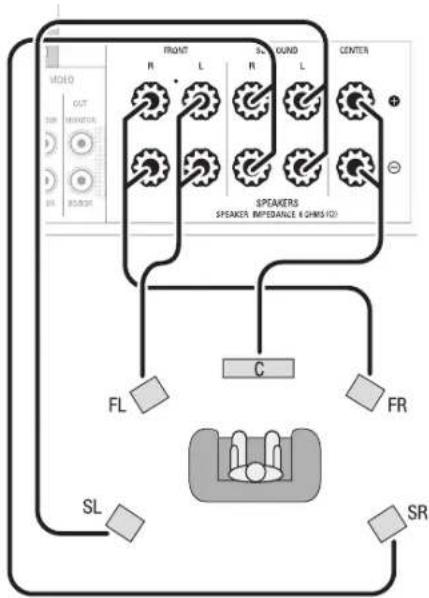
Connect Your Speakers
How to use the AVR's speaker terminals
1
Unscrew Cap

2
Insert Bare Wire
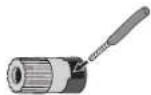
3
Tighten Cap
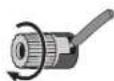
Always connect the colored (+) terminal on the AVR to the (+) terminal on the speaker (usually red), and the black (-) terminal on the AVR to the (-) terminal on the speaker (usually black).

Caution
Make sure the (+) and (-) bare wires do not touch each other or the other terminal. Touching wires can cause a short circuit that can damage your AVR.
Connect the speakers as shown in the illustration.
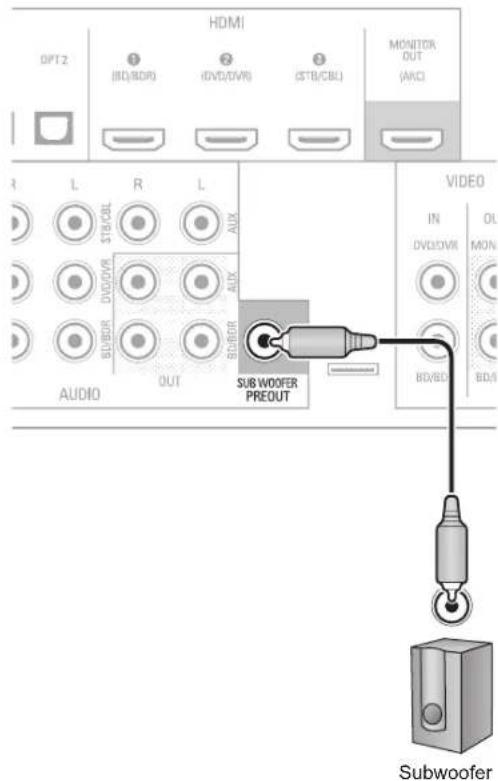
Connect Your Subwoofer
Use a single RCA audio cable to connect the AVR's Subwoofer Pre-Out connector to your subwoofer. Consult your subwoofer's user manual for specific information about making connections to it.
Rear Panel
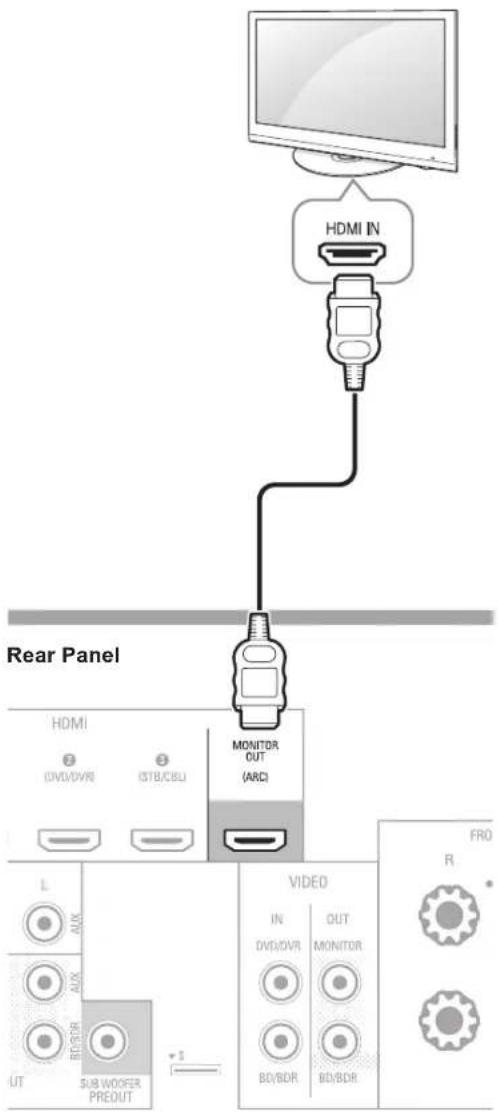
Connect Your TV or Video Display
HDMI Monitor Out Connector
If your TV has an HDMI connector and you have HDMI video source devices, use an HDMI cable (not supplied) to connect your TV to the AVR's HDMI Monitor Out connector.
It will provide the best possible picture quality.
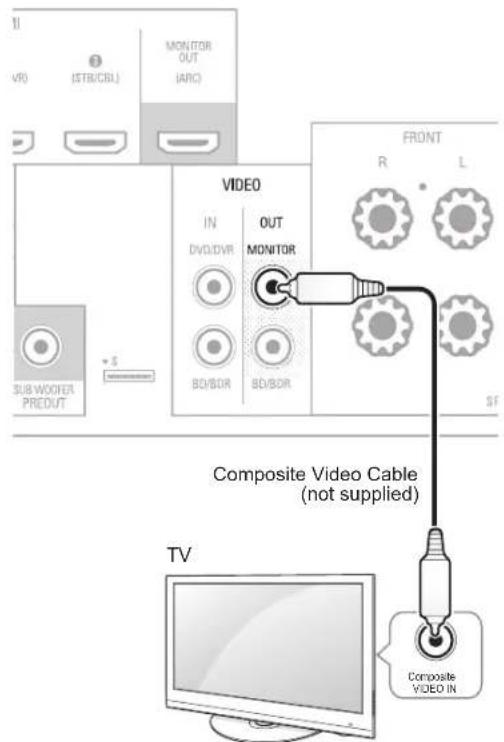
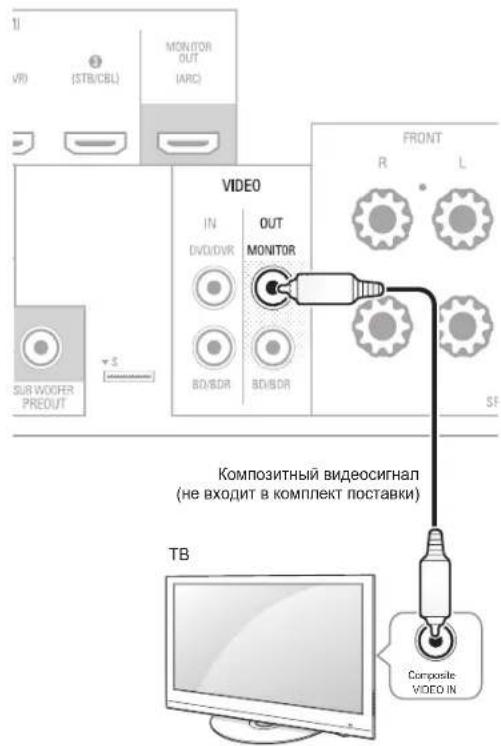
Composite Video Monitor Out Connector
If your TV does not have an HDMI connector, or if your TV does have an HDMI connector but you are connecting some source devices with only composite video connectors, use a composite video cable (not included) to connect the AVR's Composite Monitor Out connector to your TV's composite video connector.
Rear Panel

Note
- The AVR's on-screen display (OSD) only appears through the Composite Monitor Out connector. If you want to use the AVR's OSD menus you need to connect its Composite Monitor Out connector to your TV even if you are not connecting any composite video source devices to the AVR.
Connect Your Audio and Video Source Devices
Source devices are components where a playback signal originates, e.g., a Blu-ray Disc^TM or DVD player; a cable, satellite or HDTV tuner; etc. Your AVR has several different types of input connectors for your audio and video source devices: HDMI, composite video, optical digital audio, coaxial digital audio and analog audio.
Each of your AVR's source buttons is assigned to an analog audio input connector.
The digital inputs are not assigned to any specific sets of analog inputs. Once you select a source device you can use the remote control's DIGITAL button to select the specific audio input connection (HDMI, coaxial digital, optical digital, analog) that you want to listen to. (Note: You cannot select an audio input connection for the FM/AM or USB source buttons.)
As you connect your various source components, fill out the "Source Device Connected" and "Digital Audio Input Connector Used" columns in the following table. It will make it easy to keep track of which devices you have connected to which connectors.
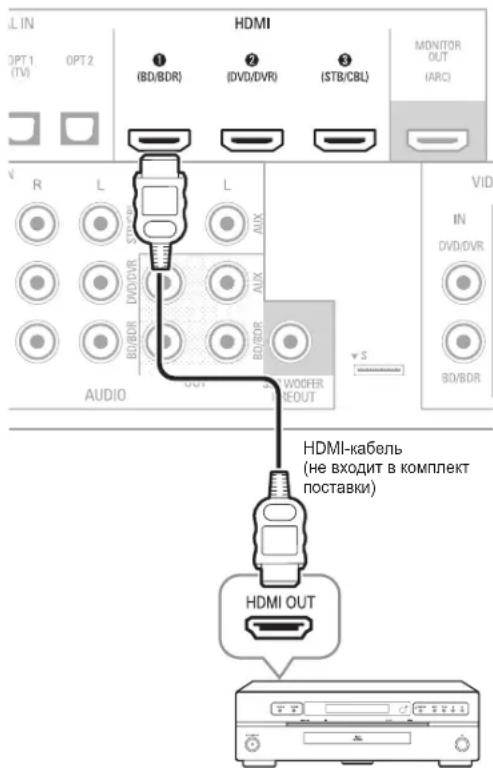
HDMI Devices
If any of your source devices have HDMI connectors, using those connectors will provide the best possible video and audio performance quality. Since the HDMI cable carries both digital video and digital audio signals, you do not have to make any additional audio connections for devices you connect via HDMI cables.
If you have a TV equipped with the HDMI Audio Return Channel function, its sound is fed to the AVR via the HDMI Monitor Out connection's Audio Return Channel, and it will not require additional audio connections to the AVR.
Rear Panel
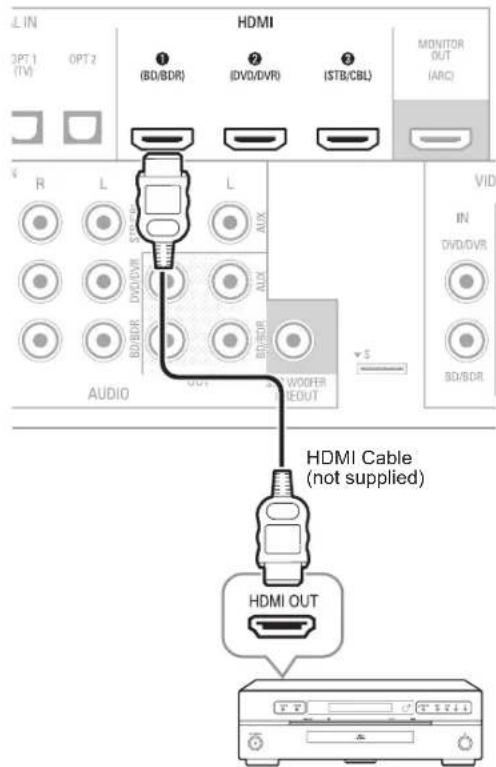
HDMI-Equipped Source Device
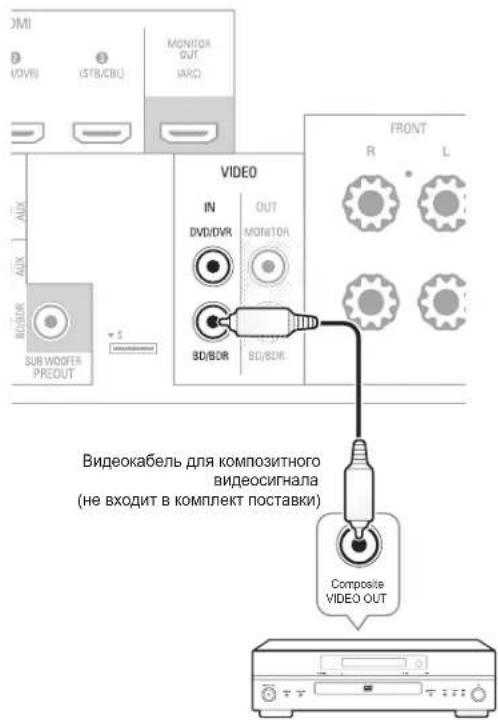
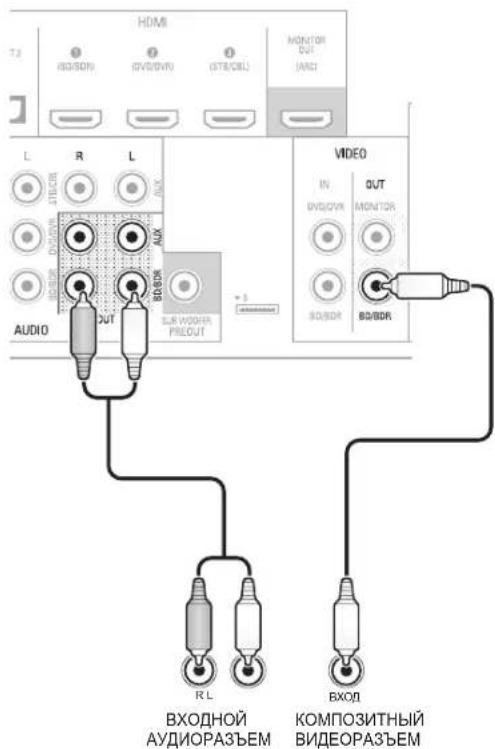
Composite Video Devices
You will need to make composite video connections from your source devices that do not have HDMI video connections. You will also need to make an audio connection from the device to the AVR.
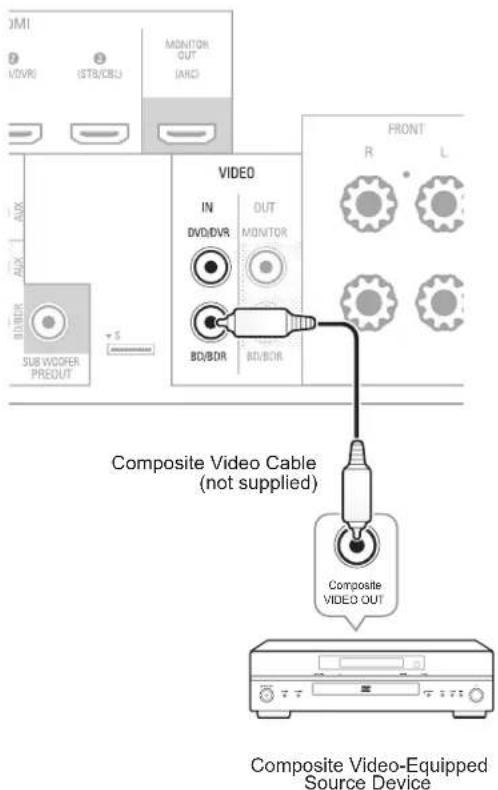
Rear Panel
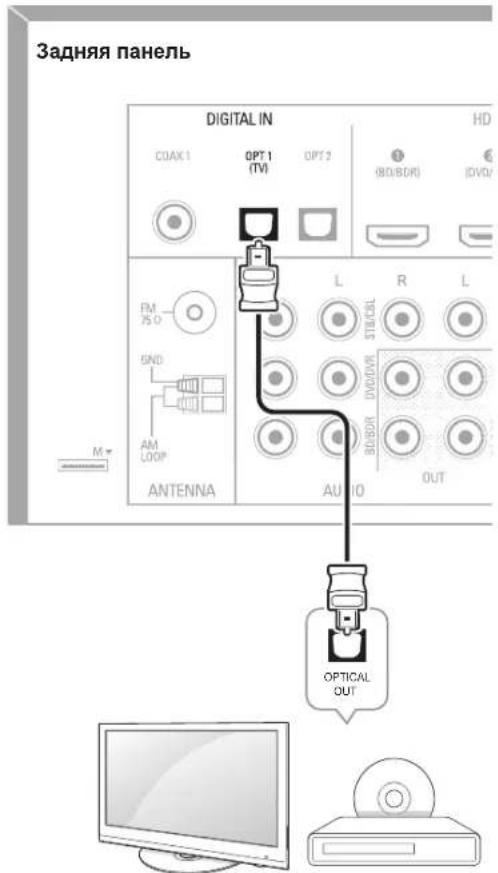
Optical Digital Audio Devices
If your source devices have optical digital outputs, connect them to the AVR's optical digital audio connectors.

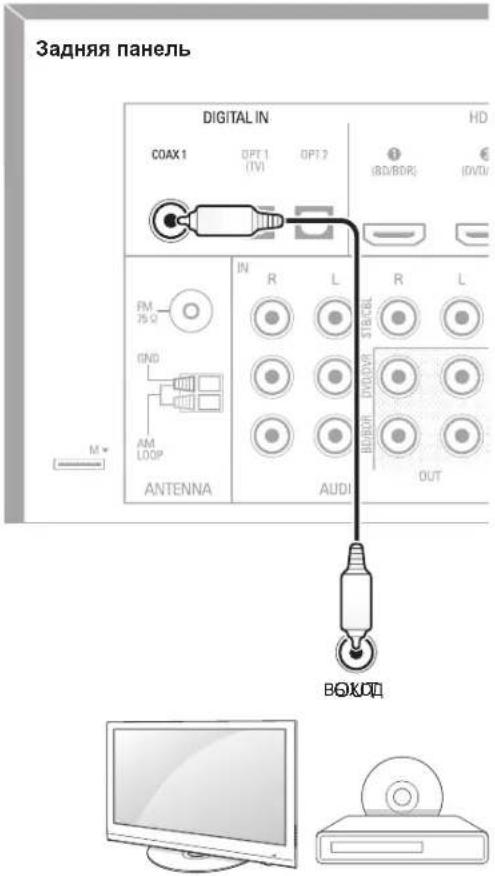
Coaxial Digital Audio Devices
If your source devices have coaxial digital outputs, connect them to the AVR's coaxial digital audio connectors.
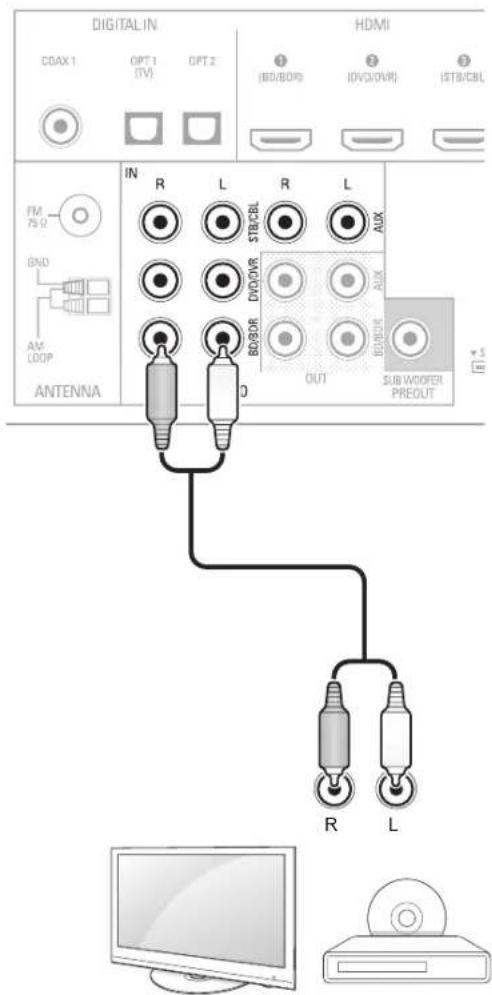
Make analog audio connections from your source devices that do not have HDMI or digital audio connections. If you're connecting video sources to the AVR's Video 1 or Video 2 audio inputs, you must also connect the source device's composite video output to the corresponding composite video connector.
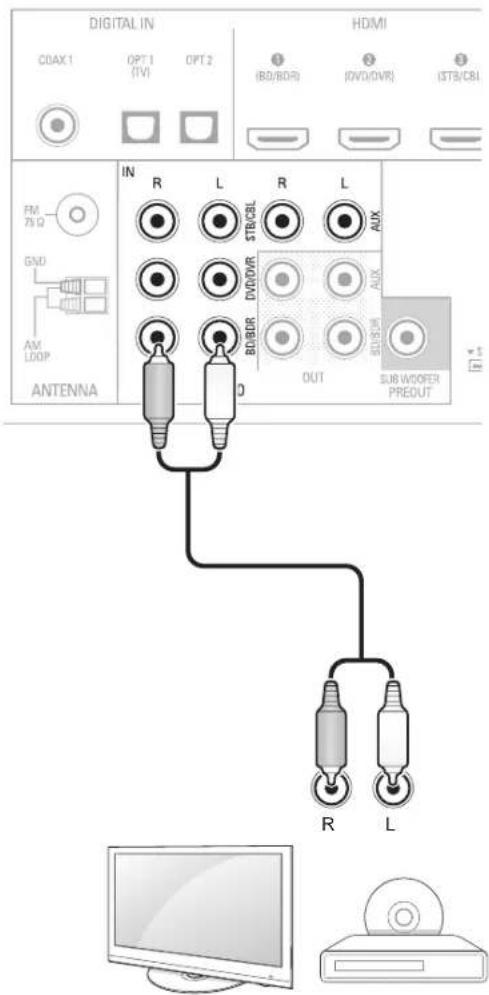
Rear Panel
TV, DVD Player, etc.
Audio Recorder
Connect an analog audio recorder's inputs to the AVR's analog audio Tape Out connectors.
You can record any analog audio input signal (except Tape In).
Rear Panel
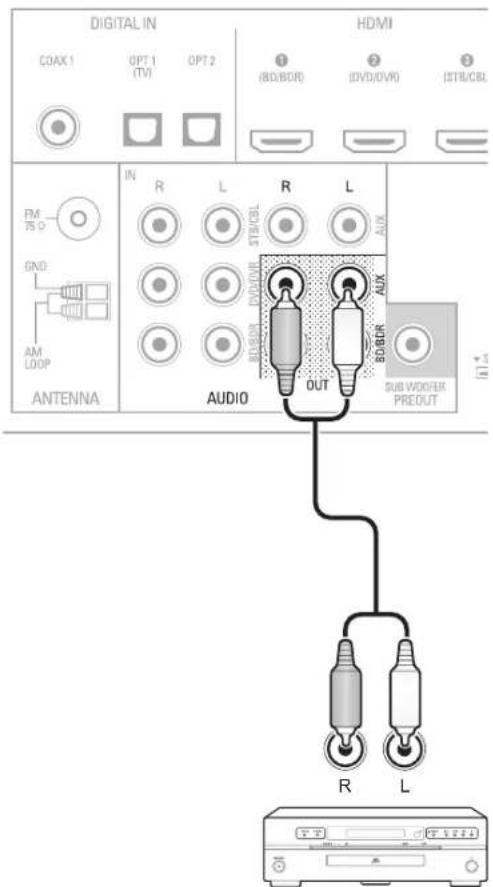
Analog Audio Recording Device
Video Recorders
Connect an analog video recorder's video input connector to the AVR's Video 1 Out composite video connector and its audio input connectors to the AVR's Video 1 Out analog audio connectors. You can record the Video 2 composite video input signal.
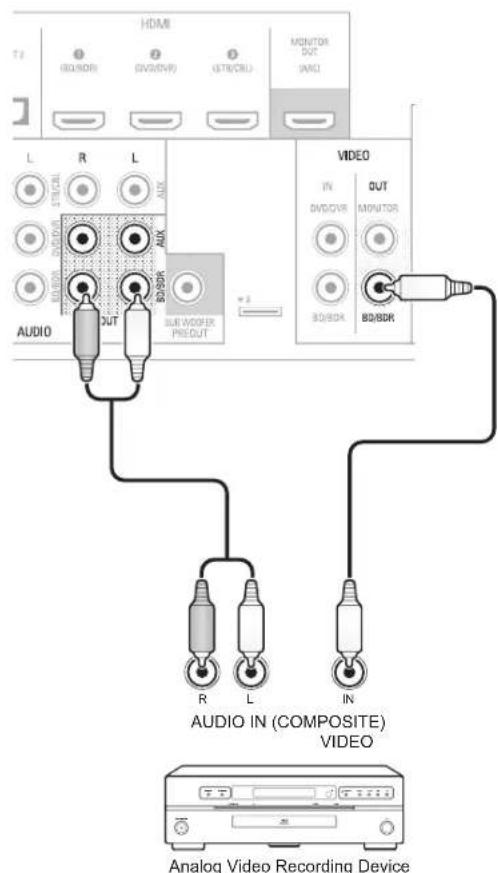
Rear Panel
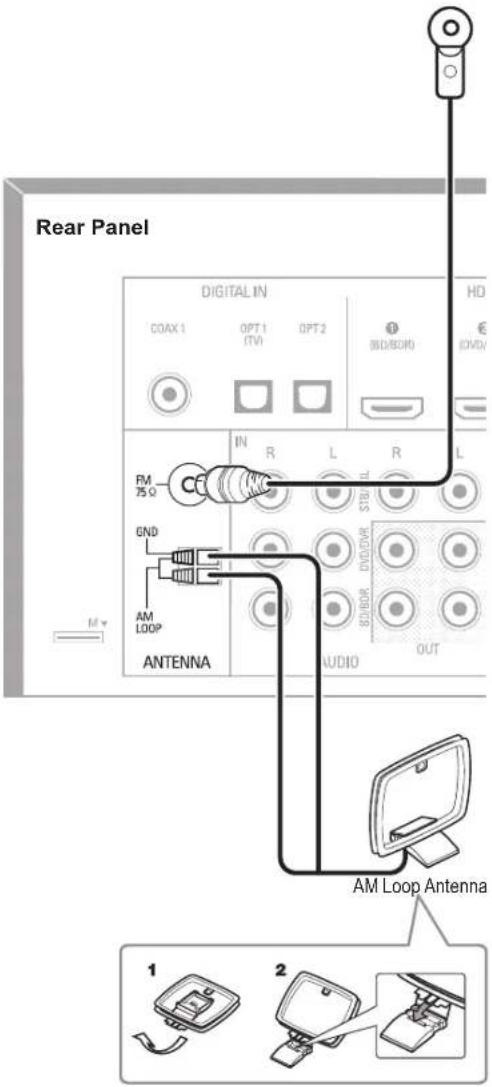
Connect the Tuner Antennas
- Connect the supplied FM antenna to the AVR's FM 75Ω antenna connector. For the best reception, extend the FM antenna as far as possible.
- Bend and fold the base of the supplied AM antenna as shown and connect the antenna wires to the AVR's AM and Gnd connectors. Rotate the antenna as necessary to minimize background noise.
Connect to AC Power
Connect the AC power cord to the AVR's AC Input connector and then to a working AC power outlet.
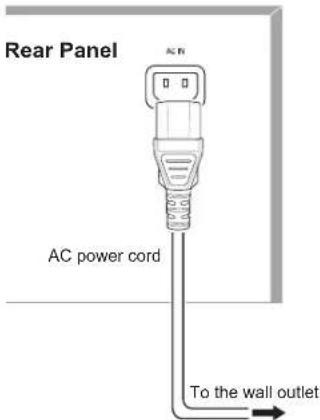

Note
Before connecting the AC power cord, make sure that the AC voltage listed on the AVR's back panel matches the AC voltage used in your country.

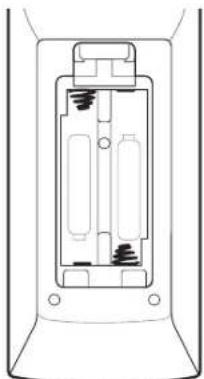
Install the Batteries in the Remote Control
Remove the remote control's battery cover, insert the two supplied AAA batteries as shown in the illustration, and replace the battery cover.

Note
- Remove the protective plastic from the AVR's front panel to keep it from reducing the remote control's effectiveness.
Setup
Turn On the AVR
1 Set the AVR's Main Power switch to "On". (The Standby indicator will glow red.)
2 Press the front-panel On/Standby button.
On/Standby Button
On the remote control, you can only turn on or off the AVR to standby mode by following the steps below. When the power button is pressed on the main unit, you cannot turn on the main unit even by pressing the power button on the remote control.
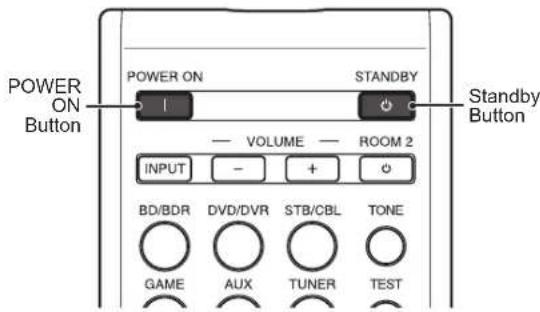
1 Press POWER ON on the standby mode.
Press STANDBY to turn on the standby mode.
Configure the AVR for Your Speakers
You will be using the following remote control buttons to configure your AVR:
1 Turn on your TV and select the TV input where you connected the AVR's Composite Monitor Out connector in Connect Your Audio and Video Source Devices, on page 9.

Note
- Although you can configure the AVR using only its front-panel message display, it is much easier to use the On-Screen Display (OSD) menu system.
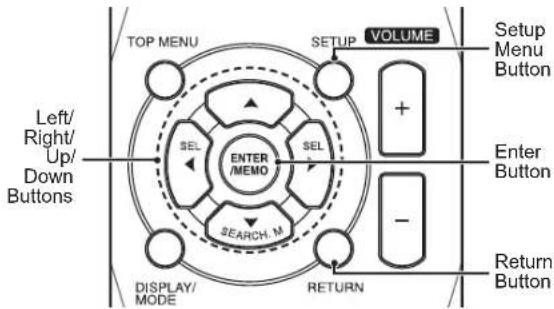
Press the remote control's SETUP button. The AVR's OSD System Setup menu will appear on the TV.
System Setup
- Speaker Setup
2.HDL Setup
3. Audio Setting's
4. Auto Power Control
5. Speakers On/Off
3 Use the remote's arrow and ENTER buttons to select "Speaker Setup". The Speaker Setup menu will appear.
- Speaker Setup
a. Speaker Setting
。
Channnel Level
d. Speakeer (iusttance
4 Select "Speaker Settings". The Speaker Settings menu will appear.
1a. Speaker Setting's 1a.
Front
(L)
Center
[ LARGE ]
Surround L/R
[ LARGE ]
Subwoofer
YES
Use the remote's left and right arrow buttons to select NO, SMALL or LARGE for the Front, Center and Surround speaker positions, depending on the speakers you have connected to the receiver.
NO: Select this setting if you have not connected a speaker in that position (not available for the Front speakers).
SMALL: Select this setting if the speaker is not capable of producing clean, deep bass energy at output levels that match those produced by a powered subwoofer. All bass in that channel is removed from that speaker and is sent to the subwoofer (or to the Front speakers if Subwoofer is set to NO). Most speakers (unless they are large and powerful) should be considered SMALL.
LARGE: Select this setting if the speaker is capable of producing clean, deep bass energy at output levels that match those produced by a powered subwoofer. All bass in that channel is sent to that speaker.
When you're finished, press the remote control's RETURN button to return to the Speaker Setting menu.

Note
- If your system has a subwoofer and you set the Front speakers to LARGE, the subwoofer may not output audio except for Dolby Digital and DTS encoded program material that contains LFE channel information. If you set your Front speakers to LARGE and you want your subwoofer to reproduce bass from all program material, set the Subwoofer to PLUS (see below).
- For Subwoofer, select YES (if your system has a subwoofer), NO (if your system does not have a subwoofer), or PLUS (if your system has a subwoofer, you set your Front speakers to LARGE and you want your subwoofer to reproduce bass from all program material).
6 For now you can skip the "Crossover" setting.
7 Select "Speaker Distance". The Speaker Distance menu will appear.
1d. Speaker DistanceId.
Units
[FEET]
Front L
(上)
Center
[10.8ft]
Front R
[10.0ft]
Surround R
[18.0ft]
Surround L
[10.8ft]
SubuOofoB
[10.0ft]

Note
The unit display may differ depending on the distributed models.
Measure the distance from each speaker in your system to the listening position. Write down the distances.
9 Use the remote's left and right arrow buttons to change the distance setting for each speaker so it matches the distance you wrote down in step 8. When you're finished, press the remote control's RETURN button to return to the Speaker Setting menu.
10 Select "Channel Level". The Channel Level menu will appear. Use the remote's left and right arrow buttons to set Test Tone to "Manual" and press the remote's ENTER button. After the on-screen countdown you will hear test noise through the front left speaker.
- Channel Level 10
Test Tone
[Tab]
11 Sit in the main listening position and adjust the AVR's volume control so the test noise is moderately loud. Note the volume of the test noise through the first speaker. Press the remote's down arrow button to advance the test noise to each of your system's speakers and note the volume level of the noise in each speaker.
12 As you advance the test noise through the speakers, use the remote's left and right arrow buttons to adjust the volumes of the channels until all of them play at the same volume. When you're finished, press the remote's SETUP button to turn off the on-screen menus.
Operation
Operating Your AVR
Now that you have installed your components and completed a basic configuration, you are ready to begin enjoying your home theater system.
Controlling the Volume
Adjust the volume either by turning the front-panel Volume knob (clockwise to increase volume or counterclockwise to decrease volume) or by pressing the Volume Up/Down buttons on the remote.
Muting the Sound
To mute all speakers and the headphones, press the Mute button on the remote. Any recording in progress will not be affected. The MUTE message will appear in the front-panel display as a reminder. To restore the sound, press the Mute button again, or adjust the volume.
Listening Through Headphones
Plug the 1/4-inch stereo plug on a pair of headphones into the front-panel Phones jack for private listening.

Note
For information about turning off the speakers during headphone listening, see page 14.
Selecting a Source
There are two different ways to select a source:
- Rotate the front-panel INPUT SELECTOR.
- Directly select any source by pressing its Source Selector button on the remote.
The AVR selects the analog audio and video inputs assigned to the source and any other settings you made during setup.
The digital audio inputs are not assigned to any specific sets of analog inputs. Once you select a source device you can use the remote control's Audio Input Select (DIGITAL) button to select the specific audio input connection (HDMI, coaxial digital, optical digital, analog) that you want to listen to. (Note: You cannot select an audio input connection for the FM/AM or USB source buttons.)
The source name, the selected audio input and the surround mode will appear on the front panel.
Video Troubleshooting Tips
If there is no picture:
-
Check the source selection.
-
Check all connections for a loose or incorrect connection.
- Check the video-input selection on the TV/display device.
Additional Tips for Troubleshooting HDMI Connections
- Turn off all devices (including the TV, the AVR and any source components).
- Unplug the HDMI cables, starting with the cable between the AVR and the TV, and continuing with the cables between the AVR and each source device.
- Carefully reconnect the cables from the source devices to the AVR. Connect the cable from the AVR to the TV last.
- Turn on the devices in this order: TV, AVR, source devices.

Note
- Depending upon the particular components involved, the complexity of the required communication between HDMI components may cause delays of up to a minute in the completion of some actions, such as input switching or switching between SD and HD channels.
Listening to FM and AM Radio
Select the AM/FM source. Use the Tuning Up/Down buttons to tune a station, which will be shown on the front-panel display.
For automatic tuning, press and hold the Tuning Up/ Down buttons to scan stations until a station with acceptable signal strength is found. For manual tuning, press each Tuning button until the desired station is found. Using the FM Mono mode may improve the reception of weaker stations.
Preset Stations
A total of 30 stations (AM and FM combined) may be stored as presets. When the desired station has been tuned in, press the Memory button and the preset number will flash on the front-panel Message display. Use the remote's Number buttons to enter the desired preset number.
To tune a preset station, press the Preset Up/Down buttons or enter the preset number using the remote's Number buttons.
RDS
RDS(Radio Data System) is a method for sending information signals together with the transmitter signals. These codes contain Program Service name (PS), A list of Program Types (PTY), Radio Text (RT).

Note
- RDS is available only in models that are distributed in Europe.
RDS is only possible in the FM band. - RDS searches for the preset stations only. If no stations have been stored in the memory, or if the program type could not be found among the preset stations, "NO PTY" is displayed.
Listening to Media on a USB Device
Your AVR is compatible with USB 2.0 or USB 1.1 media in the FAT 16 or FAT 32 file format and is compatible with the following MP3 and WMA media:
- MP3: Bit rates between 96 - 320kbps. Fixed bitrates at 44.1kHz sampling is recommended. Variable bit-rates (VBR) are playable, but playing time may be displayed incorrectly. Files must have a“.mp3” file extension.
WMA: Bit rates of 64kbps or higher. NOTE: Bit rates of 80kbps and 256kbps are not compatible. Files must have a .wma" file extension.
A maximum number of 65,536 folders and files can be supported.
Playing files on a USB device

Insert the USB drive into the AVR's front-panel USB port.

Caution
- Do not connect a personal computer or peripheral to the USB port. USB hubs are not supported.

Select USB as the source device. "USB" will appear on the front-panel display, and after the AVR loads the contents of the current folder the USB playback screen will appear on the OSD.
Use the remote's Transport Control buttons to control playback.
To browse the contents of the current folder, press the remote's RETURN button. The USB folder screen will appear on the OSD for 20 seconds.
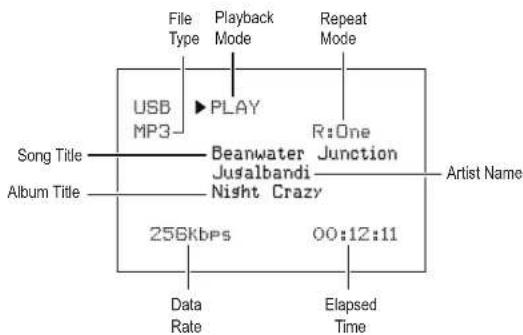
USB
Last
002/010
[Ants Ate My Silkworms.mp3]
[Night Crazy.mp3]
[Beanwater Junction, Part 1]
[Yarmishun Jim.mp3]
[Successfully Assimilated, P]
[The Lost Transit Center.mp]
[Successfully Assimilated, P]
[Beanwater Junction, Part 2]
ENTER Next
Use the remote's UP/Down and ENTER buttons to highlight and select tracks.

Caution
- To prevent damage or malfunction, press the remote's Slop (■) Transport Control button before removing the USB device from the AVR's USB port.

Selecting a Surround Mode
Selecting a surround mode can be as simple or sophisticated as your individual system and tastes. Feel free to experiment, and you may find a few favorites for certain sources or program types. You can find more detailed information on surround modes in Audio Processing and Surround Sound, below.
To select a surround mode, press the Surround Mode Select buttons. Each press advances to the next available surround mode.
Digital surround-sound modes, such as Dolby Digital and DTS systems, are available only with specially encoded programs, such as those available via HDTV, DVD and Blu-ray Disc media and digital cable or satellite television. Other surround modes such as Dolby Pro Logic II may be used with digital or analog signals to create a different surround presentation or to use a different number of speakers.
Surround mode selection depends upon the number of speakers in your system, the programs you are watching or listening to, and your personal tastes.
Advanced Functions
Much of the adjusting and configuration your AVR requires is handled automatically, with little intervention required on your part. You can also customize your AVR to suit your system and your tastes. In this section, we will describe some of the more advanced adjustments available to you.
Audio Processing and Surround Sound
Audio signals can be encoded in a variety of formats that affect not only the quality of the sound but also the number of speaker channels and the surround mode. You may also manually select a different surround mode, when available.
Analog Audio Signals
Analog audio signals usually consist of two channels left and right. Your AVR offers several options for analog playback:
- Stereo: When you want conventional 2-channel playback, press the STEREO button. Sound will be output from the front left and right speakers.
- 5-Ch Stereo: When you want to hear stereo sound through all of the system's speakers (such as during a party), select 5CH STEREO via the Surround Mode Select buttons. This plays the left-channel signal through the front left and surround left speakers, the right-channel signal through the front right and surround right speakers, and a summed mono signal through the center speaker.
- Analog Surround Modes: Your AVR is able to process 2-channel audio signals to produce multi-channel surround sound, even when no surround sound has been encoded in the recording. Among the available modes are Dolby Pro Logic II, Dolby Pro Logic, DTS Neo: 6, Theater, Hall, Stadium, Club and Arena modes. Use the Surround Mode Select buttons to select one of these modes.
Digital Audio Signals
Digital audio signals offer greater flexibility and capacity than analog signals and allow the encoding of up to 5.1 channels of discrete channel information directly into the signal. The result is improved sound quality and startling directionality, since each channel's information is transmitted independently of the other channels. High-resolution recordings sound extraordinarily distortion-free, especially in the high frequencies.
Digital surround-sound formats include Dolby Digital 2.0 (two channels only), Dolby Digital 5.1, Dolby Digital EX, Dolby Digital Plus, Dolby TrueHD, DTS-HD High-Resolution Audio, DTS-HD, DTS 5.1, DTS 96/24, 2-channel PCM modes in 44.1kHz 48kHz 88.1kHz 96kHz or 176.4kHz and 5.1 or 7.1 multichannel PCM. (Your AVR will downmix the discrete surround back
channel information in 6.1-channel and 7.1-channel recordings into your system's surround left and surround right channels.)
Surround Mode Selection
Surround-mode selection depends upon the format of the incoming audio signal as well as your personal taste. Although there is never a time when all of the AVR's surround modes are available, the table below indicates which surround modes are available for a given input.
| Input Signal Format | Available Surround Modes |
| Dolby TrueHD(Only for R- 607), Dolby Digital Plus (Only for R- 607), Dolby Digital (7.1-channel/5.1-channel) | Corresponding Dolby TrueHD(Only for R-607) or Dolby Digital mode (Theater, Hall, Stadium, Club, Arena and 5-Ch Stereo are also available for 5.1-channel programs) |
| Dolby Digital (2.0-channel) | Dolby Pro Logic II Movie, Dolby Pro Logic II Music, Dolby Pro Logic II Game, Dolby Pro Logic |
| DTS-HD (Only for R- 607), DTS, DTS 96/24 | Corresponding DTS Mode(Theater, Hall, Stadium, Club, Arena and 5-Ch Stereo are also available for 5.1-channel programs) |
| PCM (2-channel), Analog (2-channel) | Dolby Pro Logic II Movie, Dolby Pro Logic II Music, Dolby Pro Logic II Game, Dolby Pro Logic, DTS Neo:6 Cinema, DTS Neo:6 Music, Theater, Hall, Stadium, Club, Arena, 5-Ch Stereo |
| MP3/WMA | Dolby Pro Logic II Movie, Dolby Pro Logic II Music, Dolby Pro Logic II Game, Dolby Pro Logic, DTS Neo:6 Cinema, DTS Neo:6 Music, Theater, Hall, Stadium, Club, Arena, 5-Ch Stereo |
When in doubt, check the broadcast or the jacket of your disc for more information on which surround modes are available. Usually, nonessential sections of a disc, such as trailers, extra materials or the disc menu, are available only in Dolby Digital 2.0 (2-channel) or PCM 2-channel mode. Look for an audio setup section in the disc's menu.
Also, make sure your disc player's audio output is set to the original bitstream rather than 2-channel PCM. Stop play and check the player's output setting.
Adjusting the Channel Volumes
In addition to using the AVR's built-in test noise to configure the AVR for your speakers as explained in Configure the AVR for Your Speakers, you can also adjust the volume of any channel at any time to compensate for individual program sources or your personal taste.
Press the remote's Channel Level button. The Message Display will show the left channel volume level.
2 Use the remote's up and down arrow buttons to display the channel you want to adjust.
3 Use the remote's left and right arrow buttons to adjust the channel's volume.
Press the RETURN button when you're finished.
Recording
Two-channel analog audio signals, as well as composite video signals, are normally available at the appropriate recording output connectors. To make a recording, connect your audio or video recorder to the appropriate AVR output connectors as described in the Making Connections section, insert blank media in the recorder and make sure the recorder is turned on and recording while the source is playing. Refer to the recording device's instructions for complete information about making recordings.

Note
- The AVR does not convert digital signals to analog. Only devices connected to the analog audio and composite video input connections can be recorded.
HDMI video sources are not available for recording. - Please make certain that you are aware of any copyright restrictions on any material you record. Unauthorized duplication of copyrighted materials is prohibited by law.
Sleep Timer
The sleep timer sets the AVR to play for up to 90 minutes and then turn off automatically. Press the Sleep button on the remote, and the time until turn-off will be displayed on the front-panel Message display The available settings are 30min 60 min., 90 min. and OFF.
When the sleep timer has been set, a small crescentmoon icon will appear on the front-panel display.
If you press the SLEEP button after the timer has been set, the remaining play time will be displayed. Press the SLEEP button again to change the play time.
Processor Reset
If the AVR behaves erratically after a power surge, first turn off the front-panel Main Power switch and unplug the AC power cord for at least 3 minutes. Plug the cord back in and turn the AVR on. If this procedure doesn't help, reset the AVR's processor as described below.

Note
- Resetting the processor will erase all user configurations, including speaker and level settings, and tuner presets. After a reset, reenter all of these settings from your notes in the Appendix worksheets.
To reset the AVR's processor:
Press the front-panel Standby/On switch to place the unit in the Standby mode (the Standby Indicator LED will turn red).
2 Press and hold the SURROUND down button on the remote control as pressing and holding the front-panel Standby/On switch simultaneously.
3 When the RESET message "RESET?" appears on the front-panel Message display, press BAND.
4 When the RESET message "OK?" appears on the front-panel Message display, press BAND.
Memory
If the AVR is unplugged or experiences a power outage, it will retain your user settings for up to two weeks.
Troubleshooting
If you experience any of the following difficulties while using the system, use this troubleshooting guide to help remedy the problem before requesting servicing. Should any problem persist, consult your nearest authorized dealer or authorized independent company.
If the unit does not operate normally due to external influence such as static electricity, disconnect the power plug from the outlet and insert again to return to normal operating conditions.
| Symptom Cause Solution | ||
| Unit does not function when Main Power switch is turned on. | No AC power. | Ensure that the power cord is plugged into a live AC power outlet. |
| Front-panel Message display lights, but there's no sound or picture. | Intermittent input connection. Mute is on. Volume control is turned down. | Secure all input and speaker connections Press Mute button. Turn up Volume control. |
| No sound from any speaker. | Speakers set to "Off" in System Setup menu. | Set speakers to "On" in System Setup menu. See page 14, for more information. |
| No sound from any speaker; PROTECT message appears on Message display. | Amplifier is in protection mode due to possible short circuit. Amplifier is in protection mode due to internal problems. | Check all speaker wires at speaker and AVR connections for crossed wires. Contact your local service center. |
| No sound from center or surround speakers. | Incorrect surround mode. Program material is monophonic. Incorrect speaker configuration. Program material is stereo. | Select a surround mode other than stereo. Mono programs contain no surround information. Check the speaker configuration in the setup menu. The surround decoder may not create center- or surround-channel information from non-encoded stereo programs. |
| Unit does not respond to remote control commands. | Weak batteries in remote. AVR not selected. Remote sensor is obscured. | Change batteries in remote. Press the Setup/AVR button. Ensure that the AVR's front-panel remote sensor is in the line of sight of the remote. |
| Intermittent buzzing in tuner. | Local interference. | Move the AVR or antenna away from computers, fluorescent lights, motors or other electrical appliances. |
Specifications
| Audio Section | |
| Power Output | 100 W x 7ch (20 Hz~20 kHz, 6 Ohms, THD 1 %/Only Channel Driven) 75 W x 2ch (20 Hz~20 kHz, 6 Ohms, THD 0.1 %/Stereo Mode) |
| Input sensitivity/impedance 200 mV/47k ohms | |
| Signal-to-noise ratio (IHF-A) 95 dB | |
| Surround system adjacent-channel separation | Dolby Pro Logic/PLII: 40 dB Dolby Digital: 55 dB DTS: 55 dB |
| Frequency response 10Hz - 100kHz: ±3 dB | |
| High instantaneous-current capability (HCC) ±25 amps | |
| FM Tuner Section | |
| Frequency range 87.5 - 108.0 MHz | |
| Usable sensitivity IHF 1.3 μV/13.2 dBf | |
| Signal-to-noise ratio (mono/stereo) 65 dB/62 dB | |
| Distortion (mono/stereo) 0.2%/0.3% | |
| Stereo separation 35 dB @ 1 kHz | |
| Image rejection 80 dB | |
| IF rejection 80 dB | |
| AM Tuner Section | |
| Frequency range 520 - 1720 kHz, 522 - 1161 kHz | |
| Signal-to-noise ratio 45 dB | |
| Usable sensitivity (loop) 500 μV | |
| Selectivity (±10kHz) 30 dB | |
| IF rejection 80 dB | |
| Video Section | |
| Television format | NTSC/PAL |
| Input level/impedance | 1 Vp-p/75 ohms |
| Output level/impedance | 1 Vp-p/75 ohms |
| Video frequency response (composite video) | 10 Hz - 8 MHz (-3 dB) |
| HDMI | With 3 D and Deep Color |
| General Specifications | |
| Power requirement | AC 120 V/60 Hz, AC 230 V/50 Hz |
| Power consumption | <0.5 W (standby), 280 W maximum |
| Dimensions (W×H×D, including protruding parts) | 17.1" x 5.4" x 14.9" (435mm x 138mm x 379mm) |
| Weight (Net) | 17.6lb (8kg) |
R&TTE Directive 1999/5/EC

-
Speaker Setup
-
HMI Setup
- Audio Settings
- Auto Power Control
- Speakers On/Off
1d. Speaker DistanceId.
Units
[FEET]
Front L
(上)
Center
[10.8f]
Front R
[10.0ft]
Surround R
[10.8ft]
Surround L
[10.0ft]
Subscoper
[10.8ft]

Remarque
[Beanwater Junction, Part 1]
[Yarmishun Jim.mp3]
[Successfully Assimilated, P]
[The Lost Transit Center.mp]
[Successfully Assimilated, P]
[Beanwater Junction, Part 2]
ENTER Next
R&TTE Directive 1999/5/EC

2.HOMI Setup
3. Audio Setting's
4. Auto Power Control
5. Speakers On/Off
1d. Speaker Distanoid.
Units
[FEET]
Front L
(1)
Center
[10.0ft]
Front R
[10.8ft]
Surround R
[10.9ft]
Surround L
[10.8f]
Subwoofer
[10.0ft]

Nota
[Beanwater Junction, Part 1]
Yarmishun Jim.mp3
[Successfully Assimilated, P]
[The Lost Transit Center.mp]
[Successfully Assimilated, P]
[Beanwater Junction, Part 2]
ENTER Next
R&TTE Directive 1999/5/EC

- Speaker Setup
2.HOI Setup - Audio Settings
- Auto Power Control
- Speakers On/Off
1d. Speaker DistanceId.
Units
[FEET]
Front L
(1)
Center
[10.0ft]
Front R
[10.8ft]
Surround R
[10.9ft]
Surround L
[10.8f]
Subcoofer
[10.0ft]

Hinweis
1c. Channel Levelic.
Test Tone
[Tab]
[Beanwater Junction, Part 1]
Yarmishun Jim.mp3
[Successfully Assimilated, P]
[The Lost Transit Center.mp]
[Successfully Assimilated, P]
[Beanwater Junction, Part 2]
ENTER Next
R&TTE Directive 1999/5/EC

3TOT CUMBOI yka3b1BaET Ha nPcYCTBHe HEn3OInpOBAHHORO «Onachoro HanpXeHn» BHyTpN KOpNyCa, KOtOpoe MoKet CTaTb npuHHO npaxeHn 3JIeKtpUeCKM TOKOM.

3TO CMBON yka3bBAe H BaXhIe IHCTpyKUIN NO 3KcNpyaTauu N O6CnykmbHIO B COIpOBOKdaIOuei DOKYMeHTaUN yCTpoJCTBa.
BHIMAHHE: IJIY CHINKENH PNCKA IOPAXEHN 3NEKTPUeCKM TOKOM HE IOBEBPATE 3TO YCTPOICTBO BO3JECTBNIIOJXJN INI BNAI.
BHIMAHNE
OCTABTe PIOCTPAHCTBO BOKpyr yCTPOIcTBA dIra OBeCneHnna DOCTaTOHNO BEHTINIAUIN.
I36eAaTye UcTaOBKvUcTPOCTBaB VpuE3buaHIO rOpRHei HINXOJHOHOKpyKaIoUe CpeE, NOd Bo3eJaTBeM npRbIXoHNHeuHbX PuYei NnHarpeBaTeNbX npRbOpB.
-136eaiTe Bo3dEiCTBnBnA,BObI nPi Nbln
He donyckaTe nonadaHnnoctopoHHnx npedMeTOB BHytpb 3dennr.
He 3aropaxmbaTe BeHTnIyIOHHbIe OTBepTna KaMmNn60 npedMeTaMn, HapnMep, rataTAMn, canpeTKamn HJIn WToPAMn.
He donyckaTe BO3deNCTBnO TOKpbItoro nlaMeHH, HAnpMmep, CBeueH IN DpyrHX MTOUYHKOB ORHa YCTPOINCTBO.
C6nDnTe npBnA yTnM3aun yNakOBKn, pa3pKeHHbIX 6atapeek nCTaporo o60pyoBaHn.
HeNoDBeRpaTteYcTPOIcCTBO3DJIeCTBnIO KANEb HINb6pIaI, TaIcKe He YcTaHabNIMBaTe H NIX HANoJIHeHHeIe JHKXIOCTbIO npdMetbIa, HAnPIMpe, B3aIb.
He donyckaiTe KOHTaTa yCTpoiCTBa C NHCeKTHUdAmN, 6EH3HOM mI pACTBOpNTeTAMN.
HnB KOem Cnyae He pa36npaTe HHe MoepHN3npyIte yctpoIcBO.
PpHMeaHHcB3aHHbIe cKa6eIeM 3JNEKTPoNTAHN H CTeBOH po3Eko
YCTPOINCTBOOCTCA NOKNIOHHeHBM K 3NEKTPMueCKO CETN nepMeHHORTO KONA NOKO HNOKNIHOeHo K0eTKe, DaKe eCNJ nepKEKHOaTeB NIEKTPOPNTAHNA YcPTOPCTBA BbIKHOeH.
Длг�NonHOrO OTKJIOHcHnry yCTpoIcTbA OT 3JIeKTPuYeCKoCetN BbHbTe BUNKy m3 pO3ETK.
- Pn yctaHOBKe n3denny y6eDntecb, YTO IMeETcdoCTyn K 3NEKTPnueckoP03eTke.
PnO TcYCTBmN IcNoB3oBaHnry YcTPOyCTBa B TeUeHne dIITHeBHO BApMeHN OTKIOHNe TE WtENCeBHyBO BnIKy OT 3NEKTPnHECKOH PO3ETKn.

dtshD
Master Audio
N3rOtaBnBaeTcno NlueH3m cGorlaCHO nateHTAM CIIIA No:5,956,674;5,974,380; 6,226,616;6,487,535;7,212,872; 7,333,929;7,392,195;7,272,567 n
dpym, KOtOpBie DeIeCTByOT Ha TeppnTOpM CUSA I BCero Mnpa, KOTOpBie yye NOnyEnbIM NIM HAXOITcB CTAJIN NOnyEnHIN. DTSHD, Symbol, n DTS-HD Symbol ABNIOCTcAeprncTpPOBaHHBMn ToproBBmMapkAm, DTS-HD Master Audio AByNEcTcTOPBOB MaMPKoD LTS, INC. B KomnKeT NoctabKn ycToPcTBx BDQmT nporpaMMHe o6ecneHHe. DTS, Inc. BCE npaba 3auuHBeH.

DOLBY.
I3roTobnHO no nIpuHcHmDolby Laboratories.Dolby,Pro Logic,IMBoHoi D CmBOn RaJIaTOcTc TopRObIMm MapKAMn Dolby Laboratories.

DMI
HDMI, norotun HDMi n HighDefinition Multimedia Interface
HIGH DEFINITION MULTIMEDIA INTERFACE
3apeHCTpnpoBaHHbIMTOptOBbIMM MapKaMM KOMnAHN HDMI Licensing LLC B CUSA IN DpymX CTpaHax.
- DTS-HD Master Audio i Dolby TrueHD npimehmbl TOnbko dnyyctpoctBa R-607.
Mepb npedoctoPOKHOCT npu yctaHOBe
He nepekpbIaIte BeHTnIaIauIOHbIe OTBepCTNa I He CTaBbTe Ha yCTpoIcTBO dpyroe o6OpdyoBaHne.
※PnmeaHHe: B cTgX paccenBaHnTeIIOIbHe pa3MeaIte yCTpoiCTBO 3akpytOM IPOCTpaHCTBe, HApnPmep, B KHJHKHO
Copepkne
82 INHΦOPMAUЯ O B3ONACHOCTN 3KcπIyATAUIN
84 HauJIO PABOTbl
84 PepednnaheB
84 3aHnaHaHeB
85ДиctaHIOHOHoe ynpaBneHne
86 YcTaHOBka
87 NOJKJIIOUCHEN
87 PoiKJIIOHHe INHAMKOB
87 PoiKJIIOUeHHe ca6Bypepa
88 PoiKJIuHHe NteIeBn3opa nnDnCnpe
89IoiKJIIOHHeHyeCTpoiCTB,KOTOpbIEABJIHOITcNCTOCHIKAMnayDIO-N BIDeOCHHaJa
93 PoiKJIIOUeHHe TIOHepa aHTeHHbI
93 PoiKJIIOHHe K 3JIeKTPnuecko ceTn IepemEHoro Toka
93 YcTaHOBKa 6aTapeB bNyIbT dNCTaHcNoHHoro ynpabHeHn
94 HACTPOIKA
94 BkIIOueHHe IpoeKTopa
94 Hactpoika ayduio-/BvdeopeceNBepa npa 60tbc BaHmM dHaMaKamn
96 3KcPJIyATAUJRA
96 3Kcnnyataaaydno-/BndeopeceBepa
96 PpocnyuBbAHne FM- n AM-paNo
97 IpocnyuBbHne cnHana ot MyIbTmEiNHyix yCTpoiCTB uepe3 USB-pa3beM
97 Bb6op peKIma 06bemHoro 3Byka
98 PacunpeHHbIe fynKcIMn
100 NONCK INCNPABJEHNE HENCPABHOCTEI
101 TEXHnueCKNE XAPAKTEPNUCTNKN
Hauano pa60tbi
PepednnaHeIb
1 OCHOBHn BbIKJIOuATeN bIeKToPOnTuHa
2 HndkaTOp pexnma oxndaHna
3 PpeeknoateBk./pexnM0xndHn
4 Nk-datnK
5 DnCnnnei
6 KhoKbBbObapeXMMOB0bEmHOro3Byka
7 OchOBHoi peryIop yOoBHa rpoMkoCTn
8 CenekT0P BXOdHbIX pa3beMOB
9 Pa3bEmnHayuHINKOB
10 Bxodno pa3bem «F.AUX»
11 Khonka Bv6opa Dnana30Ha
12 KhoNk HactpoK BBeepx/BHm3
13 Khonkn Bb6opa npedctahOBok
14 Khonika pexkima ctepeo
15 USB-pa3bem
3aHnaHeIb

1 LnfoPoBbIe aydnopaaBeMbI
2 Pa3beMbHDMI
3 Pa3bembl TIOhepa aHTeHHbl
4 Ananorobbteaynopa3beMbI
5 Pa3bEmblnnoKlnuOeHnca6byepa
6 Pa3bEmblnKOMN03HTHOBNEOCINHana
7 Pa3beMbI dNn NOKNIQUEHn DnHaMnKOB
8 BxOHN pa3bem nIa NOKIOUChHn 3JIeKTPoNTAHn nepeMeHHoro ToKa
Дистанционhoe ynpabnneHne
1 KhoNka «BKn.»
2 KhoNka BbOpa NcToHnKa CnHnA
3 Khonkn Bb6opa peXIMOB 06bEmHoro 38yKa (KhONkAGEMN NETWORKOTcyTCTbyHot.)
4 KhoNka BbIcOba rJIaBHOrMeHIO
5 △/V/ KhoKbBb6opa
ENTER/MEMO Khonka Enter/Memory
SEARCH.M KhoNka noncKa cHCTeMbI
paanHopMaun
( Khonka SEARCH.M mmeetc TOnbko B MoedjAx, npoabaembix B ctpaHax Ebpont).
6 Khonka Bb6opa «DucnnepeKIM»
7 KHONKa《cTOn》
8 Khonka《noBTOp》
9 KhoNkHAcTpoKn BBepx/BHn3
KhoNKepeMeOTKn Ha3aBnpePe
10 Khonn Bb6opa npedyctaHOBNEHNO cTaHmBBepx/ BH3
Khoikn BbIbopa npdeIduyun/cneIyouun
11 KhoJnka «B cIyauHOM npraKe»
12 Khonka《Bocnpo3BeDHeHn/na3a》
13 Khonka《Bosbpat》
14 KhonkpeyinpoBkyoBrypomokctn
15 Khonka Bb3Oba MeHIO HAcTpoKn
16 Khonka BpemeHHoro OTKIOUeHn 3Byka
17 Khonka Bb6opa cTepeopeeKIMa
18 Khonka Bb6opa 3BykoBOrO KaHana
19 Khonka perynipOBK yPOBn rpoMkOCTKaHana
20 Khonka nocneboTaBbHcTn TectObIX CmHaNoB
21 KhoNka ynpabNeHH TECTOBbIM CnHAnOM
22 Khonka(pexim oxindaHn
YctaHOBka
PacnoJIOXeHne DnHaMnKOB
OnpeHNTMeCTaYCTAHOBKnINHAMNKOBBaWei CNTEMBIB COOTBETCBMNCHCTPKUAMNIMNXPON3BOJNTENI INO6CTAHOBKN B KOMHATE DnnpocNYuHBNAH.NcIOb3yTe npNBeEHHe HNKe pncyHN BKAueCTBe pyKOBoCTBA Dn5.1-KaHaNbHbIXCtTEM. 4TOb6Co3DaTb camoe peAInCTNHOe ObemHOe 3BYKOBOE OKpyKeHHe BbDOnkHbPa3MecNTbDnHAMKIN NO Kpyr, B CEHTPe KOTOPoB6yET HaxoHbTCMeTO DnnpocNYuHBNAH. BblDOnkHbHakNoHbKaKdbmDnHAMNK TAK, YTOb6bOH6bln HanpabNeH HenOpceDCTBeHHo Ha MeTO DnnpocNYuHBNAH. NcIOb3yTe npBvEBehHyHO HNKe cxemyB KaueCTBe pyKOBOCTBA.
YcTaHOBkaJeBoro, cHTpaIbHoro n npaBoro DnHAMKOB
Pa3MeCTNe UeHTpaNbHbI DnHAMNK HABepxHy IIN NOI
TeJIeB3OPOm INI 3aKpeITNE erHO HA CTHe BbIe INI NHNKe
3KpAHa TELEB3Opa INI dncnner. Pa3MeCTNe nepeDnHE JEBBI
IN npabBn DnAMHK No Kpyr, HAKNOHTE IN NOI yTNOM OKON0
30 rpaDCOB NO OTHoEHNIO K CEHTpaNbHOMy DnHAMMKY IN
HanpBaBte NO HApapBneHIO K cNYwATENI.
YcTAHOBtE NepeDNH NEBBI, NepeDNH INPabBn U CEHTpaNbHBI
DnHAMNK HA ODHOB Bicote, PnpOHTeNBHO HA BICOTE
yywe cnYwateNl. LcHTpaNBbHb DNHAMNK DOJKeH HAXODNTBCAR
Ha Blicote He GoJee 2 FyTOB (0,6 M) BbIe INI NHXe NEBOrO /
I npABOrO DnAMHKOB. Ecnbl bNcNoB3yete B ayINO-/
BnDEOpecuBePe TOBko DBA DnHAMKa, YcTAHOBtE IN H
No3Nsiu NpeDEhro NEBORO INpeDEhro NpABORO DnHAMKOB.
YcTaHOBka DnHaMKNOB 06bEmHOrO 3ByKa
BbIdoJNkhblyycTahOBnblJeBbI npabBIMINHAMMnO6bEMHORO 3ByKa HEMHORO C3aDnOTcEHTpaBHLORo DNAMMkNO JYrNM OnpimepHO 110 rpaDCOB OT Hero NOBepHyTB INo yrnom NO HanpabEnHIO K cnyuataHIO. NBIb MoKeTe YCTAHOBtHX No3aDN CnyuataHIO.PnI 3TONKAKJbN 3INHAMMkoB O6bEMHORO 3ByKa DoJIKNb 6bTb HapabLeH B pOTINBOONIOXKHyTO CTOPOH TYpeDNx DNAMMKB. BbI doJNkhblyycTAHOBnblINAMMkn OBEMHORO 3ByKa Ha pacctOrHH 2-6ΦyTob (0,6M-1,8M) BBWSeYPOBBHa yweCNYuataHn.
YcTaHObKa ca6ByΦepa
Nockobky fopma KOMHbI ypOBeH rPOMKcTNI MOryT OKa3aB cyueCTBeHHoe BnHnHae HxapaKTEpMCTKN pa60tBi cAbBypepa,nyuBcero HauaTa bKcnepeMeHTnpoBaT CycTaHOBko Ca6bypepa,TObbl HaNT MeCTo, KOtoPoE obceNeuBaet HauNyUWe pe3yIbTaBb KOKpeTHO KOMHaTe dI npocnyuBHaHc. CneDyUWe npabUnn oMOnrY BaH Haatb pa60Ty:
YcTaHOBka cabBypepa rIOM CO CTeHOB B CEJIOM YBeJIINHT yPoBEH Hn3Knx YactOT B NOMEJENH.
- YcTaHOBka ca6ByepeBa Byrny yBeHnHT Do MaKcHMyMa
yPoEBHe Hn3Knx YactOT B NOMEueHN.
Bo MHOrnX NOMeueHnX yCTaHObKa cABBypepa BDoNb ToTJ KENIOCKOCTN, BDOJI KOTOPOI YCTaHOBNEHb JNeBb N npabBd INHaAMKnM, MoKeT OecneuHTb NyUwYIO HTERpaIIO 3Byka, INdAbaEMORo CaBpyepom, IN3ByKa, INdAbaEMORo NEbbIM nPpABbIMINHaAMKkAM.
B HeKOTOpbIX NOMEeHnX, HAnIyUWe XapakTePnCTnKMOKET DaKe OBeCeNeYb YcTaHOBKa CaSyBpepa No3aDNMeCtONOxKEHn CnyuATen. XopoWn CnoC6oNpEeNTb HAnIyUWe MeNc DoTn CaSyBpepa-3TO BPeMeHHOYCTAHOBITb ETo HA MeTO IpocNyUWBaHn BO CnpOn3BcETNuMy3bky C BcIOKIM YPOBHeM Hn3KnX qACTOT. IpeMeuaTeCaSyBypep B pa3hBe MeCTa NOMEeHn BO BpeMaBOCpOn3BedeHn 3Byka (Baun yUn DonkHb HaxOHTbcB TOM MeTE, Te 6yTe HaxOHTbcA CaSyBpe). Bbl DonkHbCNYuTa, Noka He HauDeTe MeCTo, B KOTOpom XapakTePnCTNKN H3KnX qACTot 6yUT HAnIyUWBm. YcTaHOBtce CaSyBpeB 3OTOM MeCTe.
PokloueHna

BHHMaHne
Ipepe npoknoueHemK aytno-/BnedeopecnBepy KaKx-1n60 pa3bEmOB,y6eNTecb,TOKa6enb 3JNEKTPOINHTAHNIE nepeMeHHORo TOKA aydnio-/ BnedeopecnBepaOTkIOueOHOT aytno-/BnedeopecnBepa N O T 3JNEKTPNHECKO CTeN. POnkIOueHHe pa3bEmOB B MOMHT, KOrDa aytno-/BnDEopeCNBP NOkTIIOueH K JNEKTPNHECKO CTeN IN BKNIOueH, MOKeT NOBpeNTb DInHAMMK.
Noekluoyehne nnhamNKOB
Kak nCnoJb3OBA Tb KneMMbl AYNO-/ BnDEOPECNBEP, npEHa3HaueHHbI e dna NOdkIOUeHn DAHAMKOB
1
CHIMMTE KpbIUKy
2
BCTABTe oroneHHbI npoBd
3
3aTnHe Kpbilkiy

Bcerda noKIOHauTe 1eBETHyO (+) KIeMMy pa3bema AYIO-/ BUNDEOPECINBEPA K KneMMe (+) DnHAMnka (O6bUHO KPacbH), n cepHyo KIeMMy (-) p3bema AYINO-/BUNDEOPECINBEPA K KneMMe (-) DnHAMnka (O6bUHO cepHyb).

BHHMaHne
Y6eINTecb, YTO oroJIeHHbIe npOBOa (+) n (-) He cOpRiKacAOCTaDpyrC DpyROM HHe KAcAOTc DpyrOIN KEMMb. CoPnIKoCHOBHe NPOBOOB MOKeT CTaB npNHOH KOPOTKOrO 3aMblaKaHnH, YTO MOKeT NOBpeNTb BAI ayINO-/BIVdeOpoeCIBep.
IopKIOUHTe DnHAMNK, KAK NOKa3aHO Ha pncyHke.
PoiKJIoueHne ca6ByΦepa
IcnoIb3yIte OunnapHb aynokabeB pa3bema RCA dnn
noKlnouhenpa3bema Pre-Out ayduo-/bnpeopceBepa K
BaWemy ca6bypepy.Boee noDpO6HyIO HOpmauio 0
noKnloueHm CMOTPHe B pykoBOdCTBe No kCnnyataum Baewero
ca6bypepa.
3aHnaHnB

CaBbyep
IopKJIIOUeHHe TeJeBn3Opa HJN DInCnJeA
BbIXoHoiHDMI-pa3bemMOHHTopa
EcnB Bawaem TeneBn3ope ImeemcTa pa3bEm HDMI y Bac
ImeHOTcHDMI-yCTpoiCTBa, KOtOpbe RAJIHOITcNCTOCHKAMM
BHeoCnHaJa, McOnbl3yTe HDMI-ka6BeJb (He BXoNTB
KOMNIeKT NoctaBN)IaI NOkKnIOUeHnTEneBn3Opa K BbIXoDHOMY
HDMI-pa3bEm MOHTopa, KOtOpb HaxoNDTC Ha ayDNo-/
BnDeopeCnBepe.
DaHhbl cnooc6 NokknOueHn ObecneHT HaunyUwee KaeeCTBO
n06paKeHn.
KOMNo3HTbI BbIXoHOn pa3bEm BnDeOcHrHaMa MOHTopa
EcIN B Baam TeneBn3ope OTCyTcByET HDMI-pa3bem nHn ecnn OH mmeTc, HO bI NOkNIOUu K HemyKaue-NU6 dpye UcmpoucMea Ypee3 KOMNOSUMHbE BuDEOpa3bEmbI NCNOB3yIte BIDeOKa6JIb DnA KOMN0THORO CNHana (HE BXODITB KOMNIEKT NocTabK), YTObI NOkNIQUHTB BIXoHOH KOMN0THBpa3bEM MOHOTOPa, KOtOpB HaxoDITcAayADIO-BnDEopeCMBe, K KOMN0THOMY BIDeopa3bEMy BAwero TB.
3aHnaHaHeJb

PpimechaHne
3KpaHHe MeHIO ayNo-/BnDeopecNBepa 0To6pKaJaTcT TaIbKO Upe3 KOMNo3nTHbBbIXoHOH pa3bEm MOHTOpA. EcnI BbXOTnTe IcNO3bOaTB 3KpaHHoe MeHO ayNo-/BnDeopecNBepa, Heo6xoJIMo NODKNIOHTb KOMNo3nTHb BxIOHOpa3bEM MOHTOpA KBaIeMy TeNEBn3Opy, JaKe ecNb BbI He NODKNIOUHN KaKe-JIno yCTpojCTBa-NTocNHKn KOMNo3nTHOrO BnDeocnHaHa K ayNo-/BnDeopecNBepe
IopKJIoueHne yctpoiCTB, KOtOpbIe ABJIOTcN ICTOuHNKaMn aydno- N BnDEoCHHaJa
YcTPOCTBA,KOTOpBIEAIBIHTCnHOTNHkAMN CnHnHa, -3TO YcTPOCTBA,B KOTOpBIX CnHnIaNtO TBCNPON3BeDeHnBlu-rayDiscTMnNOTDVD-1nEepa,kabeBnHOrO,CNYTHNKOBORn HNDTV-TIOHEPA n. d.BBaWEM ayDnO-/BNDeopeCnBepe NmEETC HeCKoJIbKO pa3NJuHbIX TNOB BXOINbIX pa3BeMBO DnYcTPOCTB,KOTOpBIEAIBIHTCnTOHNKAMn AyINO BnDEOCnHnA:HDM,KOMNo3nTHbN BnDEopa3bEm, ONTNueckmUΦpOBoi ayDnOpa3bEM,KoAKCnALbHbnUΦpOBoi ayDnOpa3bEm nAnlOROBbl ayDnOpa3bEm.
KaKJa KaHKnKa NCTOCHNka CnHaJbAaWero aayno-/ BIndeopeceBepa Ha3NaeHa dIy OTeNbHO BxOHDHO aHaONBOrO ayDnopa3bema.
UΦOBIE BXOHBIE pa3bEMI He Ha3HaueHbI DnK KaNX-
N60 KOHPETBIX TINOB aHAnorOBbIX BXoDHbIX pa3bEMOB.
Pocne Bblbopa YcTPOCTBA-NCTOCHNA CnHnAba Bbl MoXeTe
NCNtB3OaBb LΦPOBbIE KONKn HnYnbTe NCTAHNOHHORO
ynpabHe, YTOb bblpaTb KOHPeTHB XBOHOH ayDnOpa3bEM
(HDMI, KoakcnAhnblu cHpOboi, ONTneckn UΦpOboi,
anAnorobb PAbEM), Yepe3 KOTopBe bbl XOTITE NOKIOuHTB
ycTPOCTBO. PmmeuaHBe: Bbl He MOxete BblpaTb BXOHOH
ayDnOpa3bEM nF-/AM-paio nnn USB-pa3bema).
PnnoKIOHueHHn pa3nnHbX yctpoCTB-NCOTOHNOB CnHana 3anoJHNTNE pONCTOBN NOKIOHueHHbe YcTPOIcTBa- nCTOHNKn CnHana] NcN0NtB3oBaHHBe LcΦpOBBe XbOHNb aydnapa3eMb] TaTabne Hxke.3To o6bnrnt otCnEeHt, KAKHe yCTPOIcTBa KAKIM pa3beMaM Bbl NOKIOHouHH.
HDMI-yctpoicTba
EcIn B KaKIN-JIN60 IN3 BaINX yCTPOHCTB-NCTOCHIKOB CnHnAHA nmeHOTc HDMI-pa3bEmbl, nCOnb3y 3TN pa3bEmbl bbl cmOKeTe 0eCEneHb HauNyUwee KaeCTBO BOCpON3BEdEHn BnDeo-n ayDnOcnHnA. TaK kAH HDMI-ka6Enb nepeaet uDpOBoi BnDeo-/ayDnOcnHnA, Bam He HyKHO NOkJIIOuATb KaKe-nI60 dONOHInHeNBle ayDnOpa3bEmbl npN IOKnIOueHN yCTPOHCTBa ueP3 HDMl-Ka6Enb.
Ecni y Bac imMeetc TB, B KOtOpom Imeetc FyHKUa
6bpaTHoro ayDnOKaHana HDMi-pa3bema, ayDnOCHHaN MOxHO
noDKIIOHTB K ayDn-O/BnDEopeCINBEpy cep3 bIXoDHOH HDMi-
pa3bem MoHITOPa 6bpaTHoro ayDnOKaHana. B 3ToM cIyae He
notpe6yETc DOJONHTBbHoro noKJIIOUeHnA ayDnOCHHaN K
ayDNo-BnDEopeCINBEpy.
3aHnaHnB
ENJI B ABEUM YCOTPOB-BOHCTOHNCHI CNTHANA IMEETCA HDMI-Pa3bEM
IOnKIOHcHHe yCTPOINCTB-NCTOHNKOB KOMN03HTHO BUNDEOCnHaJa
ECINBAM Heo6xOJIMo 6ydt NODKIOHTb KOMN03NTHbIE BnDEOpa3bEMbOT BAuNX yCTPOINCTB-NCTOHNKOB CNrHana, B KOTopbIX OTCYCTBYOT BnDEOpa3bEmbI HDMI, Bbl TaKke DoJIKNHbI 6ydtTe NOKIOHTb ayDIOOCINHAn OT BAuWero YCTPOINCTBA K aydIO-/BnDEOpocieBepy.
3aHnaHnB
EeBnBBAWEMYCTPOBCTBE- MCTOUYHKNECUNHNA IMEEOTcK KOMN03NTHHB BUADEQP33EM
IopKnHcHHe yCTPOBCTB-NCTOHKNOB ayDnOcnHanaYepe3 uNpOBoONTueckn pa3bem
ECINB BAWINX yCTPOIcTBAX-NTOCHKAX CnHNA IMEOTC NIOPOBBIE ONTHeCKNBE BVXIDHbE pa3eMbl, NOKNIOHTe INK NIOPOBBIM ONTHeCKMN ayDnOpa3EBMaM ayDNO-/BnDEOpCEBepa.
TB, DVD-nneep n.Ⅱ.
IopKnIOUeHHe yCTpOInCTB-NCTOHnKOB ayDnOncrHana yepe3 uNΦpOBoi KOaKcnaJIbHbI pa3BeM
EcimBaWixyctpOCTBax-ICTOHTHkAXCITHana IMeOTcR
IIOPOBBIOKAKCNAbHBHe BbXoDnHBe pa3bEmbI,POIKNIOHTe
IX KUPOBBIM KOAKCNAbHBm ayDNOpa3bEmam ayDnO-/
BNDopeocBepa.
TB, DVD-nneep n.T.
IopKnIOueHHe yCTPOINCTB-NCTOHNKOB aydnocnHaHaYepe3 aHaNoRObI pa3beM
OcuyeCTBnIte noKJIOHEnHe BaIINx yCTpoiCTB nCTOCHIKOB CnHana Ype3 aHaIORoBle ayDnopa3bEmbl, ECnn B HNx OTCyTCTBYOT HDMI-pa3bEmbl Nn UmPPOBbIe ayNDopa3bEmbl. EcnB bI NOKJIIOvAeTe nCTOCHNI BnDEOCIRHnA K ayNDopa3bEmam BnDeo 1] INN BnDeo 2] ayDnO-/BnDEOpECNBepa, Bbl TaokE DOnKHBb I NOKTHNtKMO3NTHb BnDEOpA3bEM yCTPOICTBa-NCTOHHKa CnHnA K COOTBeTCTByIOUeM y KomNo3HTOMy BnDEOpA3bEmy.
3aDnnaHnB
TB, DVD-nneep nT.
MaHnHToΦOhBi
PQKIOUHTE BxOINbIe pa3EBm bAHAANOBOr MArHIToPOHa K aHAnAOBbIM bByOINbIM ayDnOpa3bEmAM «Tape Out» aydno-i BInDEOpecBepa.
Bb MoKeTe 3aIncbIbTaIIO6o anAanorOBb ayDnOcnHAn (3a NCKHOeHEm «Tape In»).

3aHnaheB
AhaorobBmHHToPoh
BndeomarHHToΦOhbl
IopKIOHHTe aHaIoroBb BXOHO BInDeopa3bEM BInEOGMHTofoHa K BxIOHOMy KOMNO3THOMY BInDeopa3bemy «BIneo 1» ayNo-/BIneOpecBepa N BXOHOy aaynOpa3bem BInEOGMHTofoHa K BixIOHOMy aHaIoroBOMy aynOpa3bemy ayDo-/BIneOpecBepa «BIneo 1». Bl MoKeTe 3aNcBtAbT BXOHO KOMNO3THbN BInDeocnHan Chepe pa3bEm «BIneo 2».
3aHnaHaHeIb

- Speaker Setup
- HON1 Setup
- Audio Settings
- Auto Power Control
- Speakers On/Off
3 IcnoIb3yIte cTpeNkHa nyIbTe dIctaHIOHOHOrO ynpAbeHn HONKY «ENTER»ДЯ BbIbopa OuMn «Speaker Setup》.PorBtca MeHIO HAcTpOka DINHAMIKOB.
1. Speaker Setup
Bb6op nctouHnka cnHaHa
CyueCTByeT Dba CnOcOba Bb6paTb NCTOuHKn CNHaHa:
-ПовернITEpykyБыбopa BXoДHOrO CnHnA NaIIN.
BbIbePte KaKoi-Im6o NcToCHNK CnHnla, HaxaB KHOkny Bblbopa nCTOCHNka CnHnla Ha nyIbTe DnCTaHIOHOHor ynpabHeHH.
AyINO-/BIndeopeoecnBep BbIbepeT aHaNoorOBbIe ayINO- N BInOeOp3aBEmbl, HaaHaeHHeBbIe IaNTOUHNKa CINrHana, a TaKKe BCE OcTaBbHbIe HAcTpoKn, KOTOpBle Bbl CPeNaIb BO BpeM yctAHOBKM.
BxodnbIe uHbIyIaOpabMbHe Ha3HaueHbI IaKnx- bIO6 KOHXpeTbIX aHAnorOBX BxOHDbX pa3bEMOB. Nocne bIbopa HcToOHNcNcHnA MoNO HO cNoONb3oBaTb KHOkY bIbopa BxOHOH aHyopab3bEma (UHPOBOGO) HnytBe nCTaHUNHOHOr ynpabNeHHIaBbopa OnpeDeHNHO bXoHO rApDnOpab3bEma (HDMl, KoAcnHbHO rHPOBOrO, ONTHecKOuHPOBOrO, aHANORBOrO), CnHrAOT KOTOPRo Bx oTNTe npocLywTa. (Ppmeahne: BHe Me MokTe Bb6paTb BxOHOH aHyopab3bEma IINKIO bIbopa NcTOHKnOB CnHnA FM / AM nn USB).
Ha nepeHne naneHn noaBntc HaaBHHe NCTOCHNk CnHaja, BbIbpaHHb BXoHDn ayDnopa3bEm n pexm ObemHO 3Byka.
PekomeHdaunno yctpaHeHHo HncpabBHOCTe, CBraaHHbIX C BuDeocnHaJOM
EcjinOTcyTCTByetN306paKeHne:
- PpOBeBpe BbIbOp NcToCHnKa CmHaHa.
PIOBEBPeIpaBnBbHOCTbNOKJIIOUeHnHaNCHe NOKIIIOUeHnBCEx pa3beMOB.
PioBepbTe BblpaHHb BxOHOB BnDeopab3bEM TeNEBn3opa/ DnCnpe.
DOnOHHTeBHeIe CoBeTbI no yCTpaHEnH HENoJaOK, CBA3aHHbIX c pa3bemom HDMI
BbIKIOHTe BCE yCTPOINCTBA (BKIOUOaTeIeEBIN3Op,ayINO-/ BnDEopeCINBP IN BCE yCTPOINCTBA-NCTOHNI CNHANOB).
- OTKIQUHTE Ka6eNB HDMI, NaHnHa C Ka6eNMa MeKJy ayINO-/ BUNEOpeCINBepOM N TeNEBn3OpOM, N DaJIe KaeEINM MeKJy ayINO-/BUNEOpeCINBepOM N KaKdBIM N yCTPoIcTB-NcTOHKNOB CNHana.
Octopokno NOBTOPOHO NOkKIOUHTe KaEBb OT yCTPOHCTBaNCTOCHNA CnHrAa K ayDIO-/BnDEopeCnEBpy. B nOcneHIOO OepeBb NOkKIOUHTe KaEBb OT ayDIO-/BnDEopeCnEBpa K TENEBNOy.
BKnIOuHTe yCTpOHTBa B CneIyHOUeM NOpJKe: TB, ayDIO-/ BnDEoepCINBep YCTpOHTBa-NCTOCHNk CNrHana.

PpimmeaHne
B3aBMCIMOCTHOT KOHKPeTHBIX NOKJIIOUeHHbIX KOMHOHTOB, CIOXHOCTb Heo6xOIMbIX NOKJIIOUeHm Mekdy HDMI-KOMPOHETMAM MOKeT pNBECTn K 3aepKKam Do OJHOINMHyTb Pn3 3aBePseHm HEKOToPbIX DeEChTBM, TAKHX KAK peNEKIIIOHeHme BXOdHbIX pa3bEmOB INI pepeKIIIOHeHme MeKdy SD- n HD-KaHaIaMn.

[Beanwater Junction, Part 1] [Yarmishun Jim.mp3]
[Successfully Assimilated, P] [The Lost Transit Center.mp] [Successfully Assimilated, P] [Beanwater Junction, Part 2]
ENTER Next
HaxaTneM KHOON BBePx/BnH3 N KHOKN «ENTER» BbIeJIte n Bbl6epTe TpeKn.

BHHMaHHe
ДпгпсдгбшнговждгьИ ИН нснрвьхочи,нхмЛТКнКУСТС(■)Ha Пиьт Дисанциону npaBNeHn,knKny npyPbIeHn Вocnpo3BdEHNmpeNepd3NBeVeuHemUSB- yctpo3Ba n3 USB-pa3bema ayduNo-/BndeopecnBepa.

Bb6op peXmma o6bemHoro 3Byka
Bb6op pexm06bemHoro 3Byka moKet 6b1b npocTbIM nIN CNOxHbIM, B 3aBNCMOCn OT BaWe nCTeMb I BKycOB. He CTChraTEcB 3CKNEPMEHTNPOBaTb N Bbl CMOXeTe HauTn HEckoBko N36paHHbIX nTOCHYNOB CNrHaNA IN N36paHHbIX TnIOB nporpamM. Bbl MoKeTe HauN ToNoofoNHOHOpMaUHIO O pexmMax o6bemHoro 3Byka B paDeJean ba6pObTKa ayDnO3Byka" n bEmHbIK 3Byk), KOTOpbe npINBOyTcR HnKe.
IyBb6opa pexMma 06bemHoro 3Byka HAKMITE KONKY Bbl6opa pexMma 06bemHoro 3Byka. PnKaXDM HAKATMN Bbl6npaetcnaDenyoUcn DoCTynhBi peMm 06bemHoro 3Byka.
Pexmbu npbooro oobemhoro 3Byka, TAKNE KAK Dolby Digital n DTS, doctynbtoTolko dna cneuaanbho 3aoknpoabaHbix
nporpam, KOtOpbIe nepeaIOrcape3 HDTV-pa3bEm, DVD- npeep, npeep Blu-Ray dNckOB u ndpoBoe ka6BbHOe nn cyTNKOBoe TEeBNIDHe. Dpyne pexMbl o6bEMHOrO 3Byka, TAKNE Kac Dolby Pexm Pro Logic II MoXET cNOB3oBaTcBc IAnDnFpOboBx IN AnAHOroBbIX CnHAnOB C cEJIbIO CO3dHnPA3NIHbIX ppe3ENTaUc C O6BEHMbIM 3BYKOM IN INCNOJb3OBAHnRA pa3INHOrO KOINHECTBa INHaMKNOB.
Bb6oppeKIMMAOBbEMHOR3ByKa3aBNCNTOTKONUeCTBa DnHaMKOB BBAWeCnCTMe, npOrpaMM, KoTopbIe BblCMOTpTe UIN CNYaete, a TaKe OE BAUXNlNHbIX npedNoHTEHNI.
PacunpeHHbIe yHKcHm
Bolbwaactbpeynpobkn KOnHpypaun BaWero ayno-/ BndeopecnBepa npoBDntc ABOTAMTueckn npn He6bnwom BmeWATenbCTBe C Baeu CTOpOBy. Bt KaTKe MokTe HAcTpOHTb ayDNo-/BnDEeBepB, T0b5b OH COOTBeTcBOBAn BAeW cNCTeMe nBaWIM Bkycam. B 3OM pa3dene Mbl OINiEhem HEKOTOpBte I3 60one pODBHyTBIX peynpOBok, KOtOpBeIOCTyTNbI DnBac.
06pa6oTka aydnocnHaJa n o6bEmhB 3ByK
3ByKOBbIe CnHbIb MOrY bItb 3aKaOpOBAHbIb pa3JIuHbIX
pOpMaTAX, KOtOpB IbnHO THe ToIbKO Ha KaueCTBO 3ByKa, Ho
Ha KOnUcTeBO KAJAOB IIN DaNHAMKOB IN pExM IO bEbmHO
3ByKa. BtAKeO MoKeTE BpyHyIO Bb6paTb DpyrO pEXM
0bEbmHO 3ByKa, eCIn TAKoBbIE IMeIoTC.
Ahaorobbieaydnopa3beMbI
Ahaorobbie ayinocnHabbl oBHycoCtOaTn 1DByx KaHaoB -IeBoro n npaboro.Baai ayino-/BndeopecncBep npednaet HecklonkBo BapnHToB aHaororBO BoCppon3BeDeHHa:
Ctepeo:Ecnn BblxOTnTE NOyUHTB BocnpOIm3BeDeHMe B pexmme 06bIHyoro 2-KaHaNbHOBO BOCpOIN3BeDEHn, HaxMnTe KhONky "STEREO".3Byk BydET BBIOBnTcRa Ha nepeDnHe IeBbIn npAbaB DnHAMnIK.
5-kaHbHeO cTepeo: Ecnn Bbl XOTNE CbIaATb CTpeo3ByK uepe3 BCE DNHAMNK CNCTeMbI (HanpImep, BO BpeMn BeueepnHK), Bbl6epnte «5CH STEREO» HAKatneM KHONK Bbl6opa pexima obemHoro 3Byka. B 3tOM pexime neBbI KAHAN BOCPON3BODITcyepe3 nepedHNI neBbI DNAMIK N NeBbI DNAMIK ObemHoro 3Byka, a npabbl KaHAN BOCPON3BOIDTCype3 nepedHNI npabbl DNAMIK n npabbl DNHAMK ObemHoro 3Byka. ObuMI MOHCINrHAN BOCPON3BOIDTCype3 CEHTpaJIbHBI DNAMIK.
Pexnmba ananoroboro 6bemHoro 3Byka: Baaydno/- BndeopceBep MoKeT opa6aTbIaTb 2-kanabHbe ayinocnHbIb I nOlyeHm HMOKoHaNbHOro 6bemHoro 3Byka dae np OTCyTCTBNIOpOBKn 0bemHoro 3Byka B 3aHcN. CpeDn DCtynbIX pexnMoB NMeOTc cneyuOne: Dolby Pro Logic II, Dolby Pro Logic, DTS Neo: 6, tearp, 3an, ctaioh, kny6 n apeha. Ucnonb3yue KhoNkn Bblopa peXnMoB 6bemHoro 3Byka, YTO6bblb6paTb Odn H3 3THx peXnMoB.
UnpoBbI ayDnOcnHJIbI
LHΦpOBe aydnocnHaIbI oBcneCnBaIOT 60nbIyIO n6KoCTb NMOUHOCTb NO CPABHEHIO C aHANOROBIMn CnTHANAMN INo3BOJIAOT KOINPOBATb Do 5.1 KAHANOB DnCKpeTHORO HΦOpMaHnHOH KAnA HeNOceDCTBeHNO B CnHApN B p3yIbTate NOBbIaAeTC KAAeCTBO N BeNHKOnENHAR HapPabHeHHOCb 3Byka, TAK KAC IHΦOpMaJIr KKaJOrO KaHAna
pepeaetc H3aBNCmO OT dpyHx KaHaNoB. BbICOKoe pa3peHHe 3aNcN 3ByuT 6e3 NcKaJKeHn, Oo6eHn Ha BbICOKX qACTOTax.
ΦopMaTbI ΦΦpOBOrO obEhMHO 3ByKa BkHIOaIOT cneIyIOUne ΦopMaTbI: Dolby Digital 2.0 (ToIbKO Da KaHAn), Dolby Digital 5.1, Dolby Digital EX, Dolby Digital Plus, Dolby TrueHD, DTS-HD High- Resolution Audio, DTS-HD, DTS 5.1, DTS 96/24, 2-KaHaNbHbI PCM-peKIMbl dny aCtoT 44,1 KfU, 48 KfU, 88,1 KfU, 96 KfU uN 176,4 KfU dny MHOrOkaHbHOb HmMyJbCho-KoOBoB MoynauuN 5.1 uN 7.1 KaHApOB. (BaA aydIo-/BiJeOpecnBep 6yEt MKNiPoBaTB NcCKPeTHbI obEeMHbI 3ByK 6.1-KaHaNbHbIX uN 7.1-KaHaNbHbIX 3aIcapB e N leBb I npabB KaHaNb oBeMHO 3ByKa BaWe CnCTeMbI).
Bb6op pexima o6bemHoro 3Byka
Bb6p pexm06bemHoro 3Byka 3aBnCt OT fOpMaTa BxOJHO raynoinr hana, a TaIOE OT BAINX npeDNOHTeH. XOT He BCE pexm06bemHoro 3Byka aydo-/BnDEopecBepa 6bIaIOT docTynHb. B Tabiune HNKe pnpBOdTc peKmMb o6bemHoro 3Byka, doCTynHbIe Dnla daHHoro BXoHOro pa3bema.
| ΦopMaT BXODHOro CnHaJa | ДocTyuHbIe peXHMbl obJemHoro 3Byka |
| Dolby TrueHD (Толъко дья R-607), Dolby Digital Plus (Толъко дья R-607), Dolby Digital (7.1-kanalbHbI / 5.1-kanalbHbI) | СоotBetCTByeT Форматam Dolby TrueHD (Толъко дья R-607) уи peXmMy Dolby Digital (TeaTp, Зал,стадион, кльб,.apеha, 5-kanalbHbI cTepeopeXIM, a ТаKKe ДocTupenФормAT 5.1-kanalbHbIX nporpamM) |
| Dolby Digital (2.0 kanala) | Сюда вховатформаты Dolby Pro Logic II Movie, Dolby Pro Logic II Music, Dolby Pro Logic II Game, Dolby Pro Logic |
| DTS-HD (Толъко дья R-607), DTS, DTS 96/24 | СоOTBetCTByeT peXmMy DTS (TeaTp, зал,стадион, кльб,.apeha и 5-kanalbHbI cTepeopeXIM, a ТаKKe ДocTupenФормAT 5.1-kanalbHbIX nporpamM) |
| PCM (2-kanalbHbI), ananorobv (2-kanalbHbI) | Dolby Pro Logic II Movie, Dolby Pro Logic II Music, Dolby Pro Logic II Game, Dolby Pro Logic, DTS Neo:6 Cinema, DTS Neo:6 музьika, TeaTp, зал,стадион, кльб,.apeha и 5-kanalbHbI cTepeopeXIM |
| MP3/WMA | Dolby Pro Logic II Movie, Dolby Pro Logic II Music, Dolby Pro Logic II Game, Dolby Pro Logic, DTS Neo:6 Cinema, DTS Neo:6 музьika, TeaTp, зал,стадион, кльб,.apeha и 5-kanalbHbI cTepeopeXIM |
EcnBbcomHeBaTeCb, npOBepbTe TpaHcnpyEmb CnHAn
HnnPOTHTe HNΦOPMaUHO Ha BaaEM DnCKe, YTO6bI NOnyHtB
6OJIee NOpObHyIO NΦOPMaUHO O DoCTynHBx PekmMax
OsbemHoro 3Byka. KaNpABNo, HecyueCTBeHNbIe pa3dEnb
DnCKa, HApIMep, TpeINpeB, DOONHInTeHbIe MaTePnAbI
HmNEo DNckA DOCTYNbI ToJbKO B FOpMaTe Dolby Digital
2.0 (2-KaHaNbHb) INPi PCM 2-KaHaNbHom peKIme CMOTpnTe
pa3dEn ayMDnOHAcTpoek B MeHO DNCKA.
KpOME TOrO, y6eINTcB, yTO aYDNOBbXOD BaWero nIeepa DNCKOB
ycTaHOBNe H aOpINHbHb 6bTObB bNToK, a He 2-KaHaNbHb
PCM-PEKIM. OctaHOBNTe BocPonBBeDeHne I npOBepbTe
HactPOKn BBxODHOrO CnHana nIpepa.
HactpoKa ypOBHe rIrpOMKocT KaHaIOB
Kpome nCIOJIb3OBAHnI BCTpoeHHbIX TcTeOBbIX CnIHaIOB aydno-/BVIEopeocBHepe IIN HACTPOIK NPepeHNX DNHAMNKOB, KAK YKAaHO B NYHKTE KOHfUpyPauH duHAMUKOE ayduo/- eideopeceepa, Bbl TaKke MOKeTe HAcTPOITb yPoBeH rPOMKoCTN IIOBORa KaHAna B IIOBOE BPEM, YTObI KOMNEHCIpBaTb OTNIuH N B KAHX-JIb6O YCTPOIeTBAX-NCTOHnKAX 3ByKa B COOTBETCBMN C BaWM BKYCOM.
1
HaxMMTe KhoNkpyerynnpOBKn yPOBn rPOMKocTn 3ByKOBOrKaHAna Ha Nylte DnCTaHnOHHO ynpabneHnHa dncnnee noarntc coo6eHne, oTo6paXaioOee ypoBeHb rPOMKocTn JEBORo KaHana.
2
HaxmTe KhoNk Co CTeJkAMn BBepx N Bn3, Tc06bl OTo6pa3ntb KaHJ, KOtOpBb Bx XOTNE HAcTpOHTb.
3
IcnoJb3yIte KhoNk Co cTpeKAMn BneBn BnpaHO Ha nyIbTe dNCTaHIOOHHO ynpaBHeHn DnpepyInpOBKn ypoBH rPOMKOCTn KaHana.
Tocne 3aBepWeHnHaKmITE KOnKy B03BPAT
3aanncb
IbYkHaHbIbIe aHaIIOBObIe IuΦpOBBe ayDnOcHHaIbI, a TaKke KOMNo3NtHbIe ayDnOcHHaJIbI obyHNO pOdaIOTcyepe3 COoTBETCTByUOHe BxOJHbIe pa3bEmbl dJa 3aNcN. JIra 3aNcNIOKnOHTe BaAI ayDnO- ININ BnDEopeKOpdep K COoTBETCTByUOIM BxOJHbIM pa3bEamM ayDnO-/BnDEopeCnBepa, KAK yKa3aHO Bpa3JeN oDknOuyehu, BCTaBbTe NcyToH NOcTbe INFOPMaUM cBepOpdep N y6eInTeC,TO peKOpdep BKNIOueH IN BeTe 3aNcB BO BPem BOCPOnB3eDEHH CnIHana nctCHNYKOM CnIHana. POnHyIO HnΦopMaUIO O 3aNcN CMOTnPte B INHCTpyKUIN No 3KcNpyatauN 3aNcNbBaIooero yCTpoiCTBa.

PpimmeaHne
Aydno/BnDoepeocBep He npeo6pa3yeT UΦpOBoBle CnHbIb B aHAnoRObE. 3aNcMb MoKet npOn3BODtbcr TOnbKO HaYCTpoiCTBa, NOkKnIOeHHbIe K BXoHbIM aHAnoRObbIM ayHOpa3BeMaM N BXoHbIM KOMnO3nTHbIM BnDEoPa3eMaM.
B03MOXHOCTb 3aHNC CnHnA OYcTPOIcTB- nCTOUYHKOB CnHnA BΦOpMaTe HDMIOYcTcByET.
- PóxányIcta, y6eIITecb, yTO Bb 3Haete o6o Bcex
OrpAHHeHIX, C8Ba3AHbIX c ABTOPCKIMn npabaMn,
dIy IIO6bIX MaTePnAIOB, KOTOpBE bI 3AnCbIBaBeTc.
HecAHKUnOHIpOBaHHoe KOINPObAHme MaTePnAIOB,
3aUInuIeHHbX abTOPCKIMn npabaMn, 3anpeUeHO
3AKOHOM.
Taimepcnperepekma
TaMepCnIepeo peKMA yCTaHAbNBAeT ayDIO-/BHydeopecBep HbOcnPon3BeHeMe B TeYeHe NO 90 MNHT, a 3aTeM BbIKNoaTcABOMaTHueckn.
HaKmTe KhoNkI cyraeero pexMma HnybTe DnctaHOnHOHOro YnpabHeNn Nbl6epnte Bpemr DO OKnOHeNry yCTPOINCTBA, KOtOpoe 6ydt OTobpaKaTbc Ha nepeDnei NaHei DNcPiEe. IMeetBocMOxHcToB bIbPaTb Bpemr 《30 min.》,《60 min.》 《90 min.》N《OFF》.
Iocne yctaHOBKn TaMepa Ha dncnnee nepeDHe naneHn 6ydet OTo6paKaTbCn He6oJIbOu CmBON nOnymecra.
Ecnn Bbl HnKMeTe KhoNkY «SLEEP» nocne yctahOBKn TaHmepa, Ha dnCnnee 6yDet OToBpaKAtb cocr octabueecr BpeMn Bocnp3BeDHeNn. HnKMeTe KhoNkY «SLEEP» eue pa3, YToBb N3MeHnTb BpeM BocnpOn3BeDHeNn.
Ipeep3arpy3ka npouecoppa
Ecni aynno-BnDeopecncBep pa6oTaet HectaunbHNo nocne ckaKHa HnprkEHHN, Chauana BblKIOHHTe OCHOBHOn BblKIOUaTeNb 3JKeKTPOHtAHn Ha nepeDHeN PAHEIN, a 3ATEm OKKIOHNTe KaBeB 3JKeTPOHtAHn MNHMym Ha 3 MmHytI. CHOba NpKIOUHTe KaBeB 3JKeTPOHtAHn IN BklIOHHTe ayINO-/BnDeopecncBep. Ecn 3To He yCTpaHReT HeNCnPabHOCtB, nep3aRpy3nte npOecccop ayINO-/BnDeopecncBep, KAK YKa3aHO Hnke.

PpimmeaHne
- Pnne3arpyrzke npoueccopa 6dyt ydaIeHb BCE nOJIb3OBATEJBCKHe HaCTpoKn, BKIOUcA HAcTPOKn IIN DaHAMIKOB, HAcTPOKn YpOBH TaPOMKoCTN IN HAcTPOKN TIOHEpa. Iocne c6poca 3aHOBO BBeJInTe Bce 3TN NapameTpbl 13 BaWIX NOMeTOB INpINaFaeMbIX NmCTax DnI 3aIncEi.
Inepe3arpy3kn npoueccopa ayno/- BndeopecnBepa Heo6xoImo:
1
HaxmTe nepeKnIOuATEnb《Standby/On》,KOTOpb HaxoITcHa nepeDHei naHei,YTO6b nepeKnIOUHTb ycToIcTBO CnAaPm peXMM (HINDAkATOp 3NeKTPoNtAHnA 3aOpNTcK paChbIM UBeTom).
2
Haxmnte u ydepkmbaTe haxatoi KhoNky
《SURROUND》Ha npbte DnctahuOnHO ynpabneHnna,
oHOBpeMeHNO hXab u ydepKmbaB KaONky (Standby/
On>Ha nepeHne nAnHn.
3
KordaHa dinCnnee nepeHnei naHeJIn noBHTc coo6ueHene «RESET?》,Hakmte KhoNkY «BAND»
4
KordaHa nDcNnnee nepeDneH naHEni noBntcO coo6eHHe «OK?», hakmTe KhoNkY «BAND».
Namrmb
Ecnn aydno-/BnDeopeocnBep OTKIOHcHcNOT cTIN INI pONCXOJAT OKKIOHcHcN 3NEKTPoNITAHN, B HEM 6yDyT COXPAHbCBAUIN NOJIb3OBaTeBckHe NaCTPOKn B TeeHHeJeB.
Понск и Историческая Неццравност
PnnoBHeHn HncnpaBHOCTe BO Bpem 3KcNpyatauun CnCTeMb IOnb3yIeTcB 3TN pykoBOCTBOM NO NONCKY INCnpaBHeHNO HncnpaBHOCTe BO BtIOBA cepBmCHOn cny6bI. Ecn HncnpaBHOCTb yctpaHHTb He ydaonoc, npokOHcybTpuyTeCB c 6NIkAIMM dIepom nIN B aTOPTO3BOAHHO He3aBNCMOI KOMNAHIN. EcnnycToCTBO He pa6oTaet HopMaBHO n3-3a BHEUHX NOMEX, TAKIX KAC CTATueceKoe 3NEKtpuHecTB, OTKNIOHTe BNIky 3NEKtpoNTaHBO n3 PO3ETKN I CHOBA BCTABBe ee dJa BO3BPATA K HopMaBHOmy pexkMy pa60bTy cTPOCTBa.
| Симпом Плични | Устраенье несярно | |
| УстwoCTBO He paBOTaET,КORA OCHOBNO BvIKIQUATENB элктponITAЯ BvIQUeH. | ОТсутCTBYE АLEKTPOPITANHEперемногToKа. | Убениясь,чTO КабелюдочиЗLEKTPOPITANHЯ BvIKIQUeH в pa60taIOUyUpo3eTKу элктpruceckо сети перемногToKа. |
| Загораетяифорmaционный диспей,КOTOBY haxODITcRЯ napeydne napanel, HoOTCYTCTBYET 3bYk ИлиИЗБРAXGEH. | HeycstoyuINBoe coedInHEne BxOJHO ra3bEma.BKIIQUeH peximВpeMeHHOROotKIIQUeHrya.YmehbSeH yproBeH bГROMKoCTN. | ПлOTHO р�ЖIMTe Bce BxOJHbIe pa3bEmby npa3bEmbl DINOHAMIKOB.HaxMMITE KhoJKNy BpeMeHHORO otKIIQUeHrya.b.YbeNCHyTe yproBeH bГROMKoCTN. |
| ДиHamIMKn He BOCpOIN3BODrA T3bYk. | HacTroPOMДINAMIKOBycTaHOBLeHbHa «Off» B MeHIOHacTroPOMK. | YctahOBITE HAcTroPOMDINAMIKOB Na «On»B MeHIO HAcTroPOMK.CMOTPITE cTpaHnCa94 ДЯ пОуeHrydОпОПнITe lyHOrN INΦOPMAZIM. |
| OTCytCTBYET 3bYk BOBEx DINOHAMIKAX;HaNHΦopMaционHOM dinCJIpeNoBILoc coObScheHne «3ALIITA». | UcINITeB pa6OtaeT B pexIMe3aIITbI IO prinUHNE BO3MOXHOROkoPOTKOrO 3aMbIKAH.N.YcINITeB pa6OtaeT BpeKIMe 3aIITbI IO prinUHNe BO3HNIKHOBEHry BHyTPeHNHXHeNCpAPBHOCTeH. | ПрOBерTe, He 3aIpyanCb li npOboDA INHAMIKOB B MeCTax POKKlOUeHrya K DINOHAMIKAM I ayDINO-/BVIDeOpECHBepy?СБЯКITeB C BAISHM MeCTHbIM cepBICHBIMZeHTPOM. |
| OTCytCTBYET 3bYk BцЕТРынБуДINAMIKaXИиВ ДINOHAMIKAX oBbEMHOrO 3bYka. | HeBepHbI pexIM obbemHoro 3bYka.PepeDAca CINHanaIporpAMMbI pOIN3BODITcB MOHOFOnHueCKOM pexIMe.HeBepHnaKoHФИguraiaДINOHAMiKa.PepeDAca CINHanaIporpAMMbI pOIN3BODITcB CtepeOΦOnHueCKOM pexIMe. | Выб epite Дуг�о ржIM obbemHoro 3bYka,He cTepeO.BMOHOFOnHueCKIXnporpAMmax HecoDEPKITc DaHbIX dIpy pexIMa obbemHoro 3bYka.PpOBerTe KOHФИguraiaO DINOHAMIKOB BMeHIO UcTAHOBK.I.DekODeP obbemHoro 3bYka MochTe HecoZdaBaTb CINHApI dIpy ceHpAlbHORO kAHana IINI dIpy kAHana obbemHoro 3bYka BHeKOДINOBaHbIX cTepeOpORpAMMax. |
| UcTpoIcTBNo He pearIpuyetHa komAnDbI pylbTaDINCTAHIOHNO ynpABLHeH.N. | PaarJxHbIb BiapaeB INpbTeDINCTAHIOHNO ynpABLHeH.N.He BbIbpaH aYdINO-/BVIDeOpECHBep. | Заменite bStapen B pInbTeDINCTAHIOHNO ynpABLHeH.N.HaxMMITE KhoJNKUy «HACTroPOMa / ayDINO-/BVIDeOpECHBep?U6eDITcB,чTO daTchN ha pepeDneI pAnelI aYdINO-/BVIDeOpECHBepa HaxOHTcB B pIamO BvIDIMOCtCo cTcOPhbI pylbTaDINCTAHIOHNO ynpABLHeH.N. |
| В ТЮHepe рincSyTCTBYETnoCTOHNHOe JxJxKaHHe. | MeCTHbIe nomexi. | ПерemeCTHte aydINO-/BVIDeOpECHBep IInaHTENHy pOdaIbIe OT KOMlbIOTepob,ФиуорсeHTNbIXЯМI,ЗeКТрodBiratelneIиДугх«ЗeKТрОрпбов. |