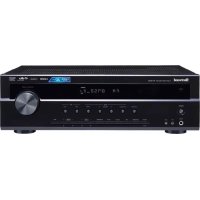
RD606i - Receiver SHERWOOD - Free user manual and instructions
Find the device manual for free RD606i SHERWOOD in PDF.
User questions about RD606i SHERWOOD
0 question about this device. Answer the ones you know or ask your own.
Ask a new question about this device
Download the instructions for your Receiver in PDF format for free! Find your manual RD606i - SHERWOOD and take your electronic device back in hand. On this page are published all the documents necessary for the use of your device. RD606i by SHERWOOD.
USER MANUAL RD606i SHERWOOD
This symbol is intended to alert the user to the presence of uninsulated "dangerous voltage" within the product's enclosure that may be of sufficient magnitude to constitute a risk of electric shock to persons.

This symbol is intended to alert the user to the presence of important operating and maintenance (servicing) instructions in the literature accompanying the appliance.
WARNING: TO REDUCE THE RISK OF FIRE OR ELECTRIC SHOCK, DO NOT EXPOSE THIS APPLIANCE TO RAIN OR MOISTURE.
Caution regarding installation
Note: For heat dispersal, do not install this unit in a confined space such as a bookcase or similar enclosure. Be sure to leave a space around this unit equal to, or greater than, shown below. Left, right and rear sides : 20 cm, top side : 40 cm
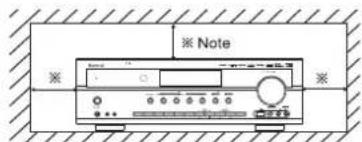

Do not block ventilation openings or stack other equipment on the top.
FOR YOUR SAFETY
| EUROPE AUSTRALIA | 220 V -240 V | Units shipped to Australia are designed for operation on 230 V AC only. To ensure safe operation, the three-pin plug supplied must be inserted only into a standard three-pin power point which is effectively earthed through the normal household wiring. Extension cords used with the equipment must be three-core and be correctly wired to provide connection to earth. Improper extension cords are a major cause of fatalities. The fact that the equipment operates satisfactorily does not imply that the power point is earthed and that the installation is completely safe. For your safety, if in any doubt about the effective earthing of the power point, consult a qualified electrician. PAN-EUROPEAN UNIFIED VOLTAGE All units are suitable for use on supplies 220-240 V AC. |
CAUTION
-Leave a space around the unit for sufficient ventilation.
- Avoid installation in extremely hot or cold locations, or in an area that is exposed to direct sunlight or heating equipment.
- Keep the unit free from moisture, water, and dust.
- Do not let foreign objects in the unit.
- The ventilation should not be impeded by covering the ventilation openings with items, such as newspapers, table-cloths, curtains, etc.
- No naked flame sources, such as lighted candles, should be placed on the unit.
- Please be care the environmental aspects of battery disposal.
- The unit shall not be exposed to dripping or splashing for use.
- No objects filled with liquids, such as vases, shall be placed on the unit.
- Do not let insecticides, benzene, and thinner come in contact with the set.
- Never disassemble or modify the unit in any way.
Notes on the AC power cord and the wall outlet.
- The unit is not disconnected from the AC power source(mains) as long as it is connected to the wall outlet, even if the unit has been turned off.
To completely disconnect this product from the mains, disconnect the plug from the wall socket outlet.
- When setting up this product, make sure that the AC outlet you are using is easily accessible.
- Disconnect the plug from the wall outlet when not using the unit for long periods of time.

Information for Users on Collection and Disposal of Old Equipment and used Batteries
These symbols on the products, packaging, and/or accompanying documents mean that used electrical and electronic products and batteries should not be mixed with general household waste. For proper treatment, recovery and recycling of old products and used batteries, please take them to applicable collection points, in accordance with your national legislation.
By disposing of these products and batteries correctly, you will help to save valuable resources and prevent any potential negative effects on human health and the environment which could otherwise arise from inappropriate waste handling.
For more information about collection and recycling of old products and batteries, please contact your local municipality, your waste disposal service or the point of sale where you purchased the items.
[Information on Disposal in other Countries outside the European Union]
These symbols are only valid in the European Union. If you wish to discard these items, please contact your local authorities or dealer and ask for the correct method of disposal.
Note for the battery symbol (bottom two symbol examples): The sign Pb below the symbol for batteries indicates that this batteries contains lead.
![SHERWOOD RD606i - [Information on Disposal in other Countries outside the European Union] - 1](/content/2026/02/361788/images/165de0d3a3ae7455f8f366e93433a591f78621841a0e5becd80a01b92c27a276.jpg)
CONTENTS
Introduction
- READ THIS BEFORE OPERATING YOUR UNIT | 2
System Connections 4
Front Panel Controls | 10
Remote Controls 12
- REMOTE CONTROL OPERATION RANGE | 13
- LOADING BATTERIES | 13
Operations
LISTENING TO A PROGRAM SOURCE | 14
- SURROUND SOUND | 16
ENJOYING SURROUND SOUND 17
LISTENING TO RADIO BROADCASTS 22
LISTENING TO RDS BROADCASTS(FM ONLY) | 24 (RDS Tuner(Regional Option for some countries in Europe, etc.))
LISTENING TO INTERNET RADIO BROADCASTS, MUSIC FILES 26
RECORDING 34
OTHER FUNCTIONS 35
CONFIRMING THE HDMI FUNCTION 36
System Setup| 37
- SETTING THE SYSTEM SETUP | 39
- SETTING THE INPUT SETUP | 41
- SETTING THE SPEAKER SETUP | 42
- SETTING THE CH LEVEL SETUP | 46
- SETTING THE PARAMETER SETUP | 48
- SETTING THE HDMI SETUP | 50
Troubleshooting Guide | 52
Specifications 53
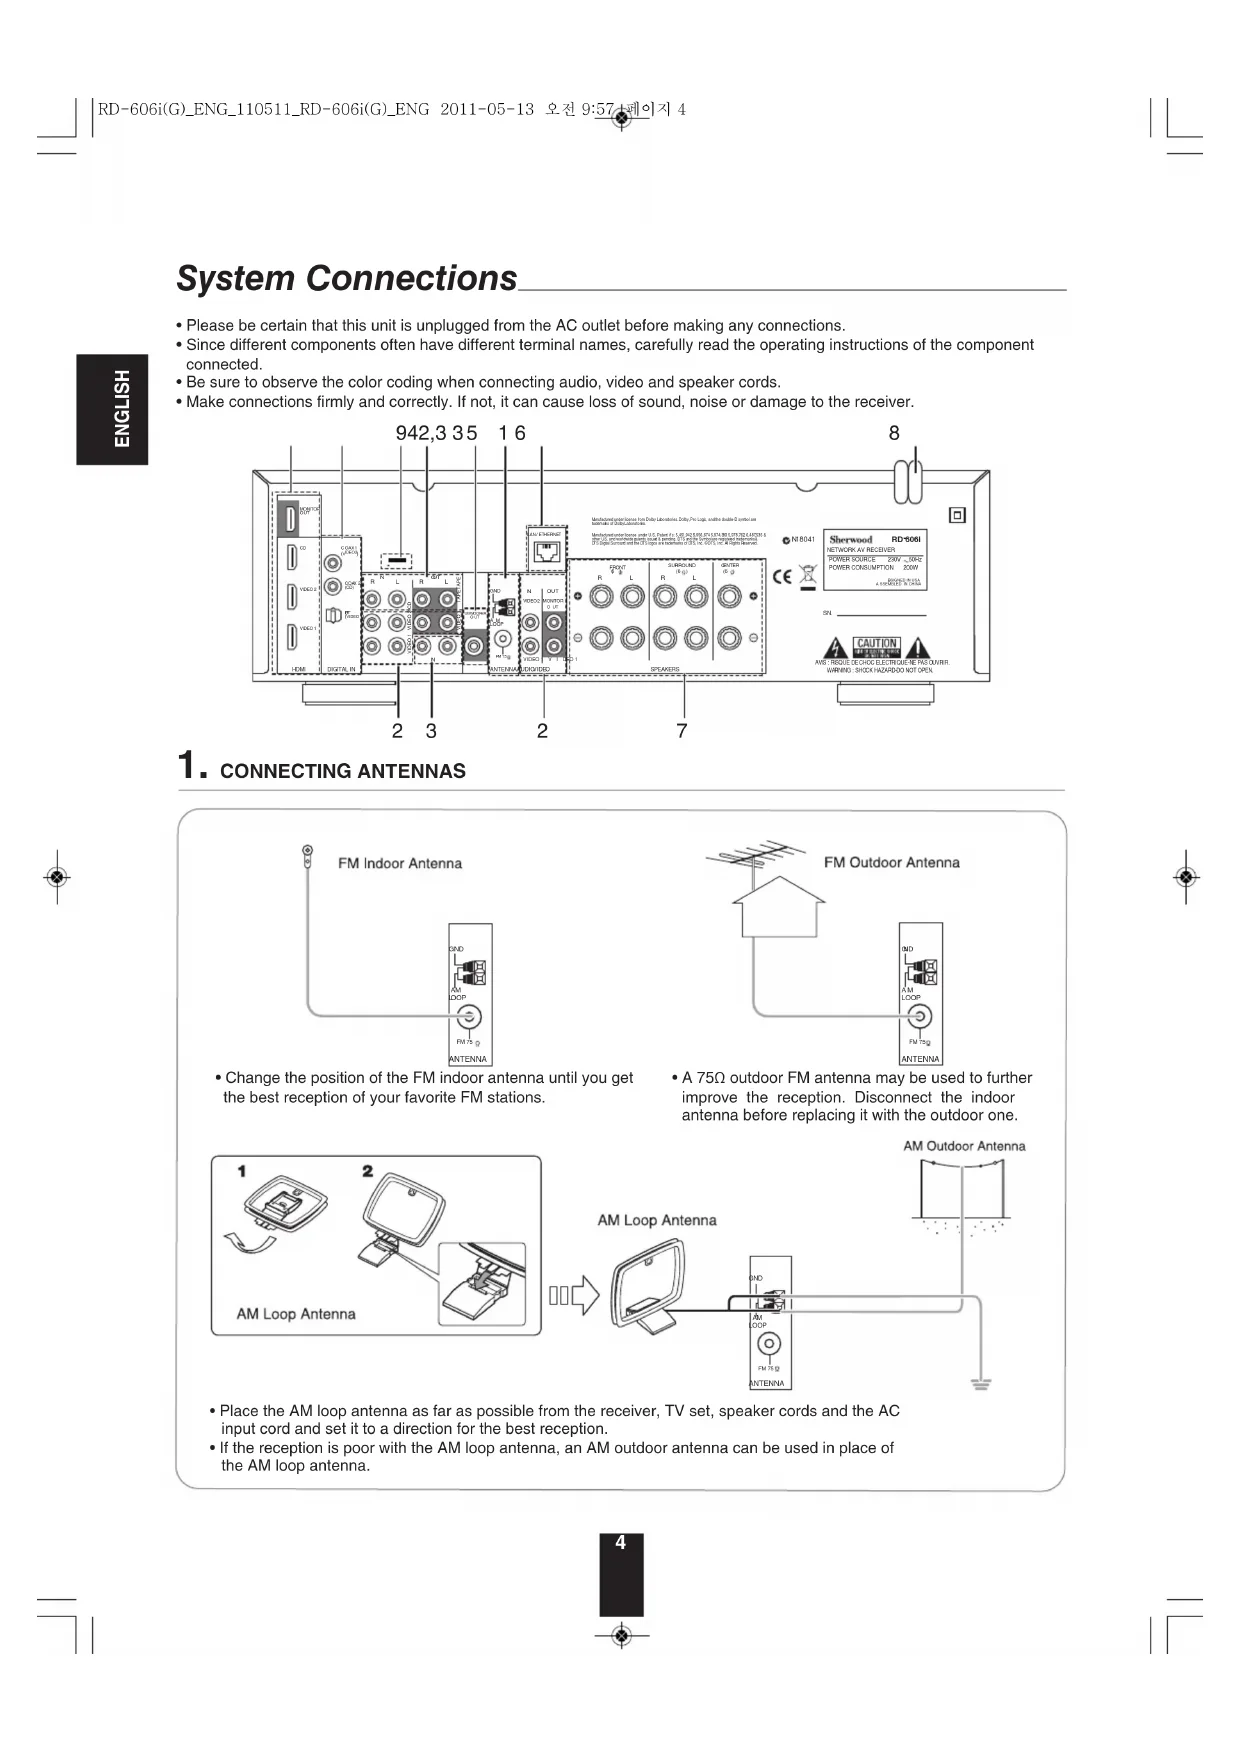
System Connections
- Please be certain that this unit is unplugged from the AC outlet before making any connections.
- Since different components often have different terminal names, carefully read the operating instructions of the component connected.
- Be sure to observe the color coding when connecting audio, video and speaker cords.
- Make connections firmly and correctly. If not, it can cause loss of sound, noise or damage to the receiver.
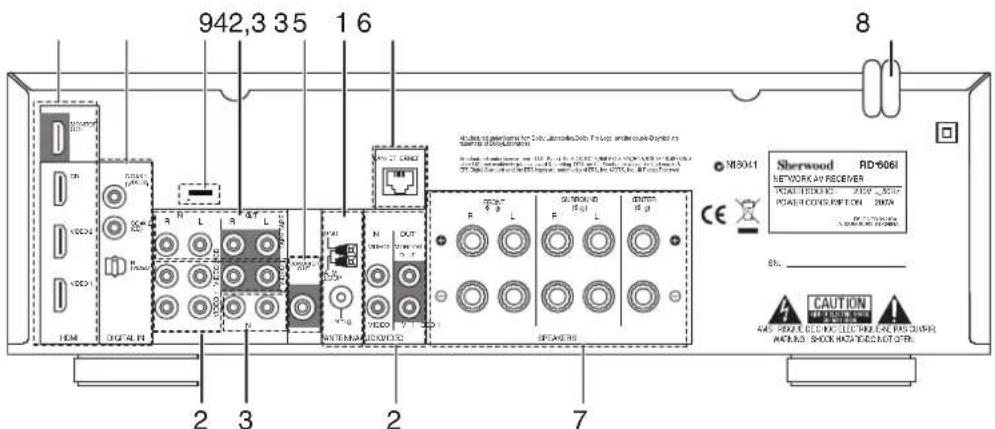
1. CONNECTING ANTENNAS
FM Indoor Antenna
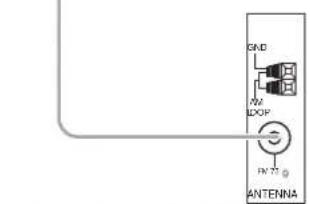
- Change the position of the FM indoor antenna until you get the best reception of your favorite FM stations.
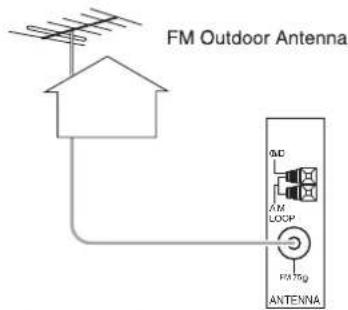
A 75Ω outdoor FM antenna may be used to further improve the reception. Disconnect the indoor antenna before replacing it with the outdoor one.

- Place the AM loop antenna as far as possible from the receiver, TV set, speaker cords and the AC input cord and set it to a direction for the best reception.
- If the reception is poor with the AM loop antenna, an AM outdoor antenna can be used in place of the AM loop antenna.
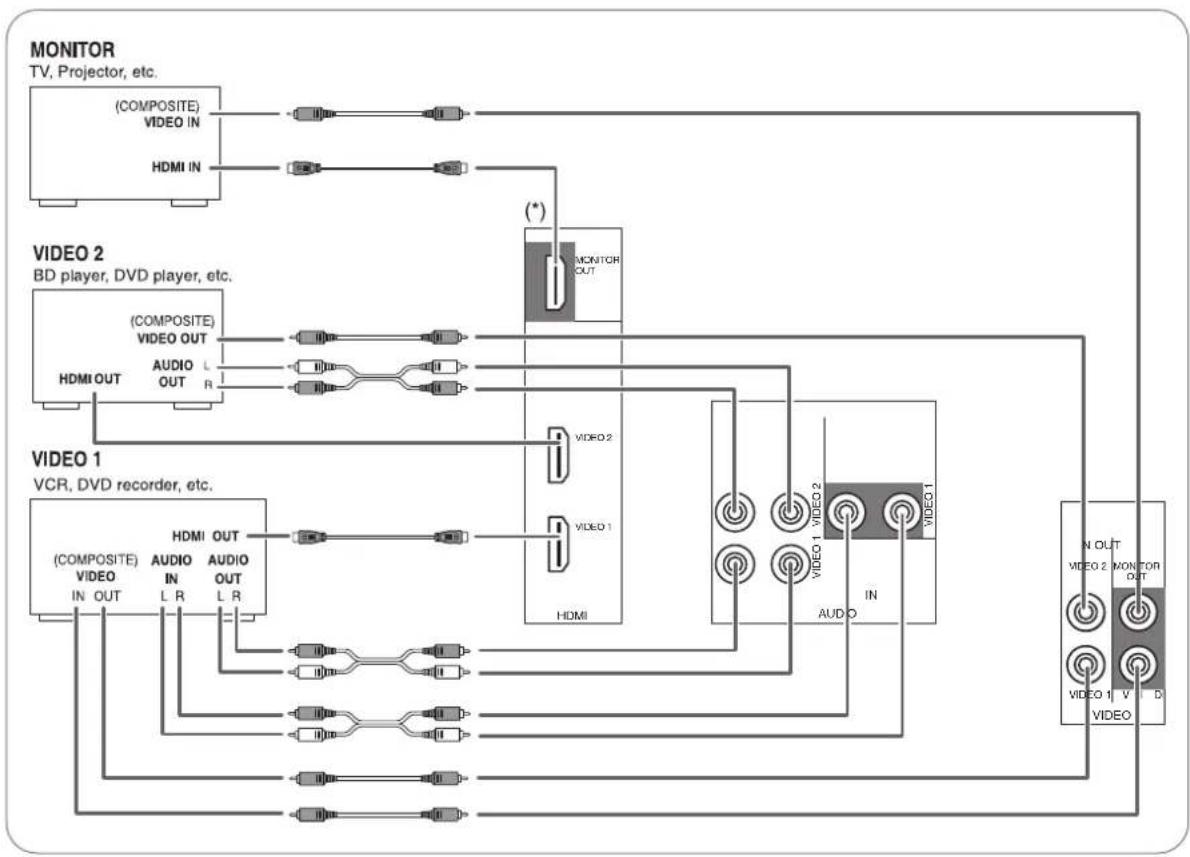
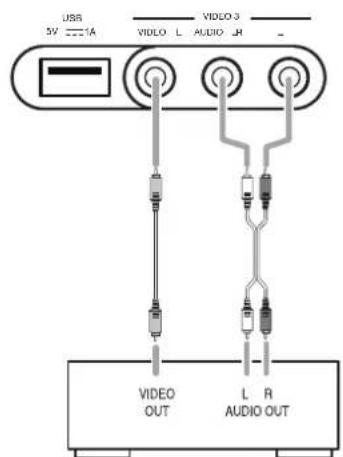
2. CONNECTINGVIDEOCOMPONENTS
- The jacks of VIDEO 1 may also be connected to a DVD recorder or other digital video recording component. For details, refer to the operating instructions of the component to be connected.
The jacks of VIDc0 2 can also be connected to an additional video component such as a cable TV tuner or satellite system.
There are (composite)VIDEO jacks for analog video connections and the HDMI connectors for digital video and audio connections. - For your reference, the excellence in picture quality is as follows: "HDMI" > "(composite)VIDEO".
Notes :
- When recording video program sources through the (composite)VIDEO 1 OUT jack or viewing video program sources through the (composite)MONITOR OUT jack, you must connect the (composite)VIDEO IN jack to the video playback components such as BD player, DVD player, etc.

Continued
■HDMI (High Definition Multimedia Interface) connection : (*)
- You can connect the source component (DVD player, etc.) to the display component (TV, projector, etc.) through this receiver with using a commercially available HDMI cord.
- The HDMI connection can carry uncompressed digital video signals and digital audio signals.
- The HDMI video stream signals (video signals) are theoretically compatible with DVI-D. When connecting to a TV monitor, etc., equipped with DVI-D connector, it is possible to connect using a commercially available HDMI-DVI converter cord. Since the HDMI-to-DVI connection cannot carry any audio signals, set the HDMI AUDIO OUT to AMP to hear the HDMI digital audio signals on this receiver.(For details, refer to "When selecting the HDMI AUDIO OUT" on page 50.)
Copyright protection system
This unit supports HDCP (High-bandwidth Digital Contents Protection), technology to protect copyright of digital video signals against illegal duplication. HDCP must also be supported on the components connected to this unit.
HDMI, the HDMI logo and High-Definition Multimedia Interface are trademarks or registered trademarks of HDMI licensing LLC.
Notes:
- For stable signal transfer, we recommend using HDMI cables that are a maximum of 5 meters in length.
- Among the components that support HDMI, some components can control other components via the HDMI connector. For details on the HDMI function, refer to "CONFIRMING THE HDMI FUNCTION" on page 36 and "SETTING THE HDMI SETUP" on page 50.
- The audio signals from the HDMI connector (including the sampling frequency and bit length) may be limited by the component that is connected.
- The video signals will not be output properly if a component incompatible with HDCP is connected.
- If the resolutions of the video signals which are output from the MONITOR OUTs and your monitor TV are not matched, the picture is not clear, natural or displayed. In this case, change the setting of the resolution on the source component (BD player, etc.) to one which the monitor TV can handle. (For details, refer to the operating instructions of the source component.)
- When you want to enjoy only the picture on your TV, not the sound, you should set the HDMI AUDIO OUT to AMP not to output the digital audio signal from the HDMI MONITOR OUT of this receiver. (For details, refer to "When selecting the HDMI AUDIO OUT" on page 50.)
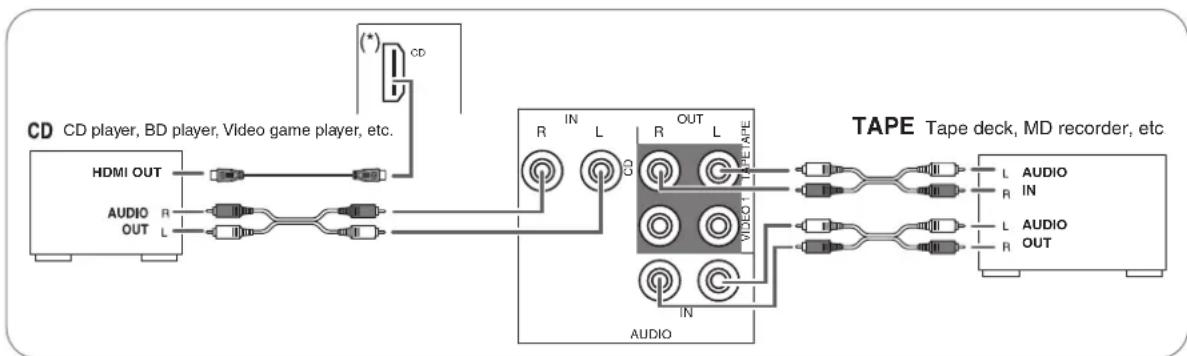
3. CONNECTING AUDIO COMPONENTS
- The TAPE IN/OUT jacks can be connected to audio recording equipment such as a tape deck, an MD recorder, etc.
- The HDMI IN of CD can be connected to an additional video component without analog video jacks.

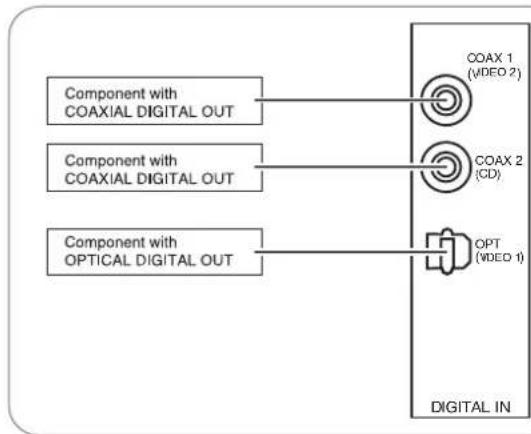
4. CONNECTING DIGITAL INS
- The OPTICAL and the COAXIAL DIGITAL OUTs of the components that are connected to CD,VIDEO 1 andVIDEO 2 of this unit can be connected to these DIGITAL INs.
- A digital input should be connected to the components such as a CD player, DVD player, etc. capable of outputting DTS Digital Surround, Dolby Digital or PCM format digital signals, etc.
- For details, refer to the operating instructions of the component connected.
- When making the COAXIAL DIGITAL connection, be sure to use a 75Ω COAXIAL cord, not a conventional AUDIO cord.
- Some of the commercially available optical fiber cords cannot be used for the equipment. If there is an optical fiber cord which cannot be connected to your equipment, consult your dealer or nearest service organization.
■Note:
- Be sure to make either a OPTICAL or a COAXIAL DIGITAL connection on each component. (You don't need to do both.)
Digital input default settings
If you connect the DIGITAL INs to your components, it is easier to do so following the default settings.
- If your DIGITAL connections are different from default settings, you should assign the DIGITAL INs you used with the "When selecting the DIGITAL IN" procedure on page 41.
The default settings are as follows: OPTICAL IN :VIDEO 1, COAX 1 IN :VIDEO 2, COAX 2 IN : CD
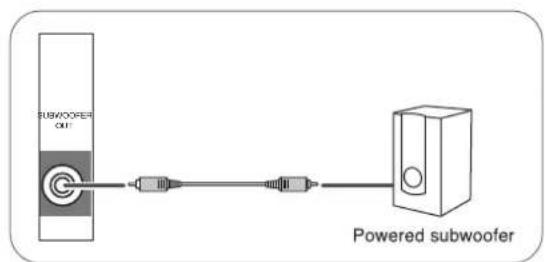
5. CONNECTING SUBWOOFER PREOUT
- To emphasize the deep bass sounds, connect a powered subwoofer.
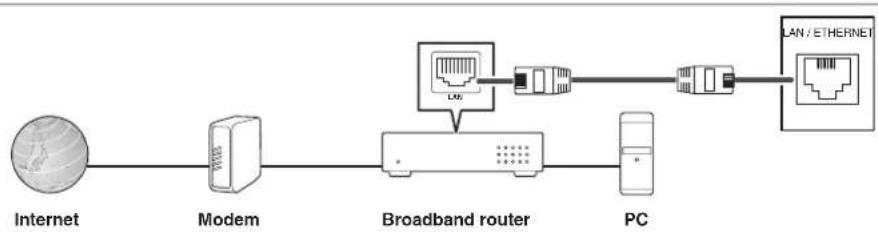
6. CONNECTING TO NETWORK
- To connect this unit to a broadband home network to listen to internet radio broadcast, connect the LAN/ETHERNET connector of this unit to your router with a Ethernet cable (CAT-5 or greater recommended).
Notes
- After making a broadband internet connection, you should set the communication settings. (For details, see "When selecting "Network" on page 32.)
- When using a broadband internet connection, a contract with an internet service provider is required. For more information, contact your nearest internet service provider.
Refer to the operating instructions of the equipment because the connected equipment and connection method may differ depending on your internet environment. - Use a Ethernet cable/rodert supporting 10 BASE-T/100 BASE-TX.
- Some Ethernet cables are easily affected by noise. We recommend using a sheilded type cable.

7. CONNECTING SPEAKERS
- Be sure to connect speakers firmly and correctly according to the channel(left and right) and the polarity (+ and -). If the connections are faulty, no sound will be heard from the speakers, and if the polarity of the speaker connection is incorrect, the sound will be unnatural and lack bass.
- For installing the speakers, refer to "Speaker placement" on page 9.
- After installing the speakers, first adjust the speaker settings according to your environment and speaker layout.
(For details, refer to "SETTING THE SPEAKER SETUP" on page 42.)
Caution :
- Be sure to use the speakers with the impedance of 6 ohms or above.
- Do not let the bare speaker wires touch each other or any metal part of this unit. This could damage this unit and/or the speakers.
- Never touch the speaker terminals while the AC input cord is connected to the wall AC outlet. Doing so could result in electric shocks.
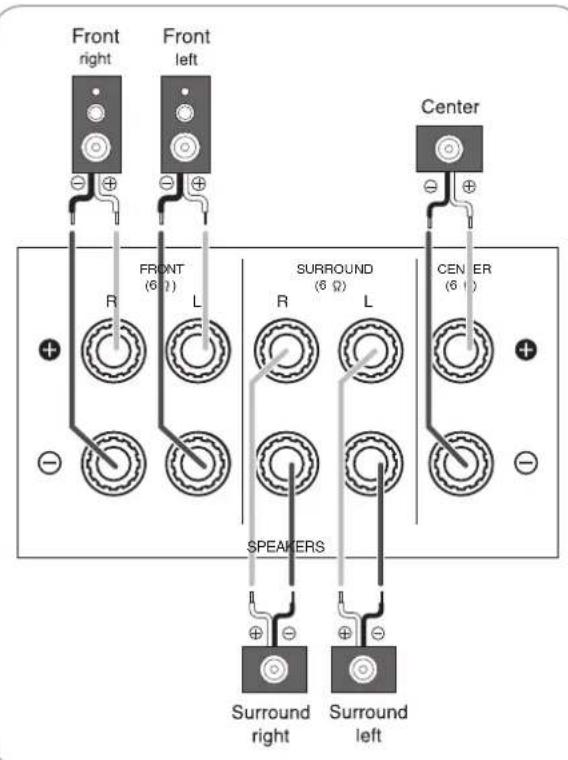
Connecting speaker wire
-
Strip away approx. 10 mm (3/8 inch) of wire insulation, then twist the wire ends tight.
-
Loosen by turning the speaker terminal counterclockwise.

- Insert the bare part of the wire.

- Tighten by turning it clockwise.

8. AC INPUT CORD
- Plug the cord into a wall AC outlet.
9. TERMINAL FOR UPGRADES
This terminal may be used in the future to update the operating software so that it will be able to support new digital audio formats, etc.
■Note :
- Programming for upgrades requires specialized programming knowledge and for that reason we recommend that it only be done by qualified installers.

Speaker placement
Ideal speaker placement varies depending on the size of your room and the wall coverings, etc. The typical example of speaker placement and recommendations are as follows:
■Front left and right speakers and center speaker
- Place the front speakers with their front surfaces as flush with TV or monitor screen as possible.
- Place the center speaker between the front left and right speakers and no further from the listening position than the front speakers.
- Place each speaker so that sound is aimed at the location of the listener's ears when at the main listening position.
Surround left and right speakers
- Place the surround speakers approximately 1 meter (40 inches) above the ear level of a seated listener on the direct left and right of them or slightly behind.
Subwoofer
- The subwoofer reproduces powerful deep bass sounds. Place a subwoofer anywhere in the front as desired.
Notes :
- When using a conventional TV, to avoid interference with the TV picture, use only magnetically shielded front left and right and center speakers.
To obtain the best surround effects, the speakers except the subwoofer should be full range speakers.
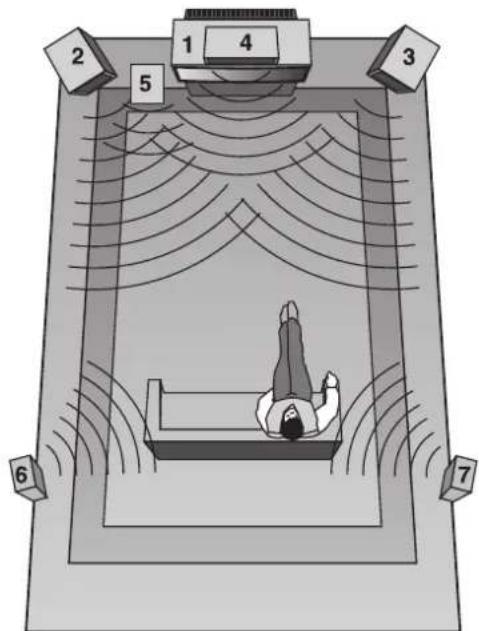
- TV or Screen
- Front left speaker
- Front right speaker
- Center speaker
- Subwoofer
- Surround left speaker
- Surround right speaker
Front Panel Controls
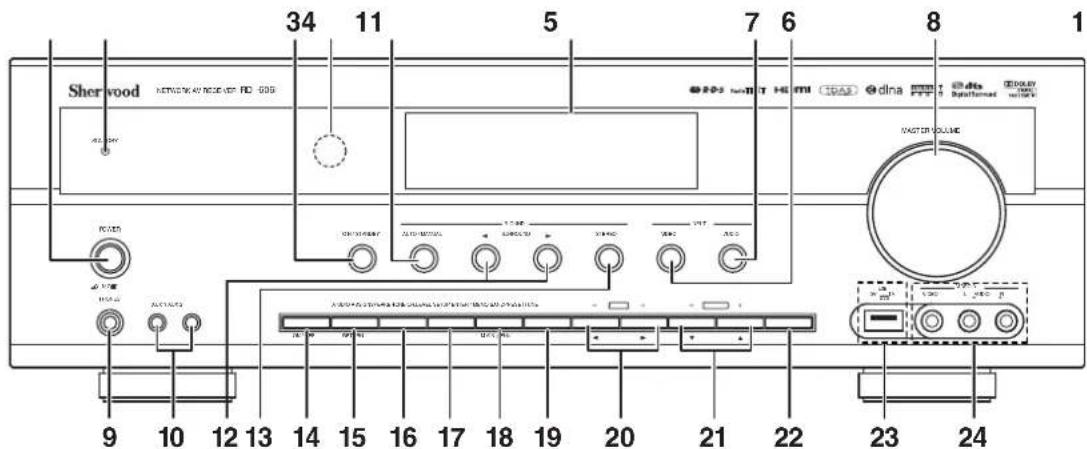
- POWER switch
- STANDBY indicator
- POWER ON/STANDBY button
- REMOTE SENSOR
- FLUORESCENT DISPLAY For details, see below.
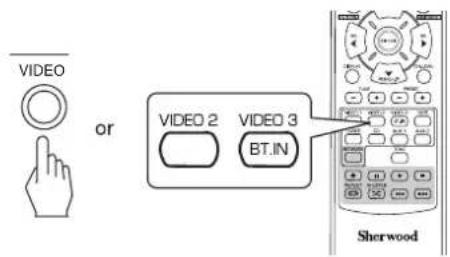
- VIDEO INPUT SELECTOR button
- AUDIO INPUT SELECTOR button
- MASTER VOLUME knob
- HEADPHONE jack
10.AUX 1,2 IN jackets For details, see no - AUTO/MANUAL button
- SURROUND MODE SELECT(▶/▲) buttons
-
STEREO button
-
SPEAKER button
- AUDIO ASSIGN button
16.TONE MODE button
17.CHANNEL LEVEL button - SETUP button
- ENTER/MEMORY button
- TUNING UP/DOWN(+/-),
CURSOR LEFT/RIGHT(▲/▶) buttons - PRESET UP/DOWN(+/-), CURSOR UP/DOWN(▲/▼) buttons
- BAND button
- USB connector For details, see next page.
24.VIDEO 3 IN jacks For details, see next page.
FLUORESCENT DISPLAY
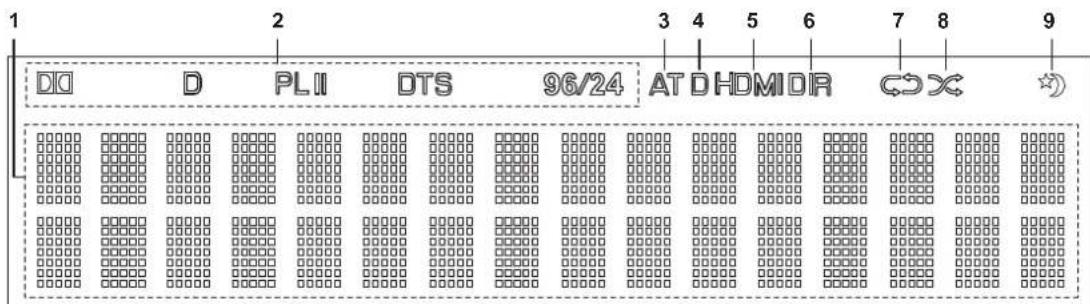
- Input, frequency, volume level, surround mode, operating information, etc.
-
Surround mode indicators
3.AUTO indicator
4.DIGITAL INPUT indicator
5.HDMI indicator -
DIRECT indicator
- REPEAT indicator
- SUFFLE indicator
- SLEEP indicator
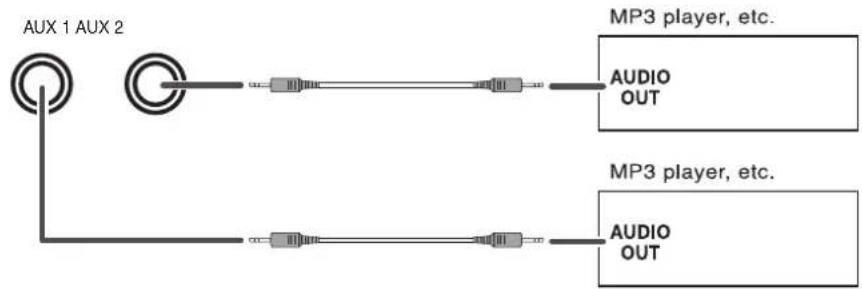
AUX 1,2 IN JACKS
- The AUX 1, 2 IN jacks can be connected to additional audio components such as an MP3 player, etc.
■Note :
- When connecting these jacks to an MP3 player, etc., you should use the stereo mini cord, not a mono mini cord.
USB CONNECTOR
- An USB memory device can be connected to the USB connector to listen to MP3 or WMA files stored on it through this unit. (For details, refer to "When selecting "USB" on page 30.)
■Note :
- After USB playback, remove the USB memory device in the stop mode or the standby mode.

VIDEO 3 IN JACKS
- The Video 3 IN jacks may be also connected to an additional video component such as a camcorder, a video game player, etc.
VIDEO 3 Camcorder, video game player, etc.
Remote Controls
ENGLISH
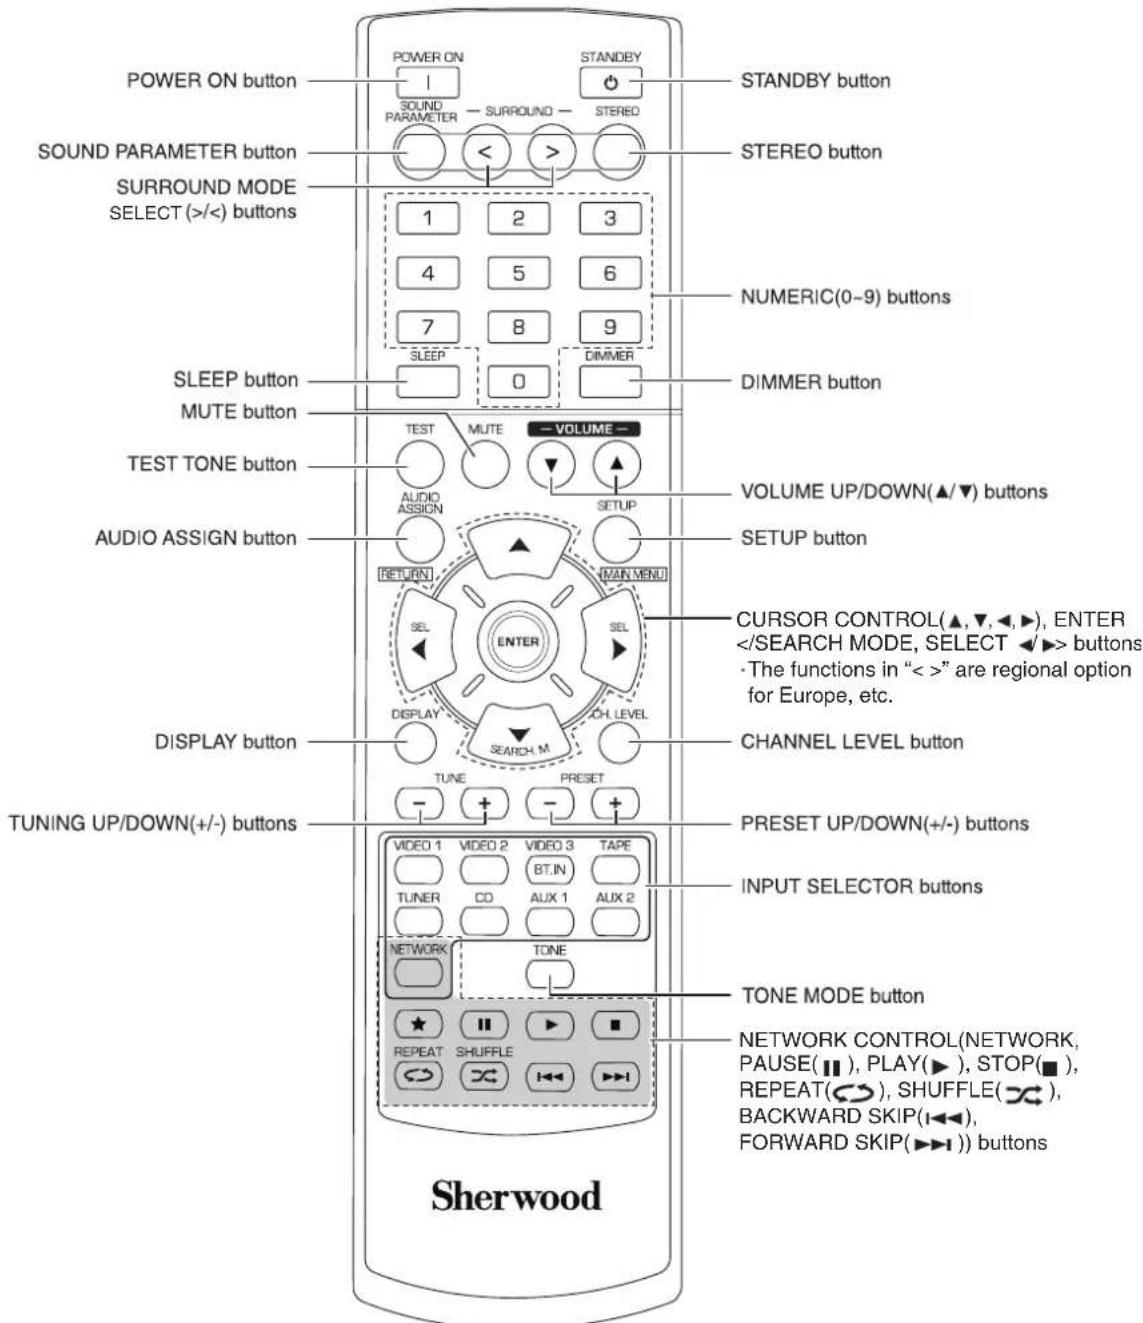
■Note:
The RATING () button is not available for this receiver.
- Use the remote control unit within a range of about 7 meters (23 feet) and angles of up to 30 degrees aiming at the remote sensor.
LOADING BATTERIES
- Remove the cover.

- Load two batteries ("AAA" size, 1.5 V) matching the polarity.
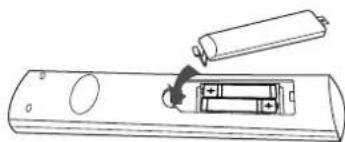
- Remove the batteries when they are not used for a long time.
- Do not use the rechargeable batteries (Ni-Cd type).
Operations
Note: Before operating this receiver, first set this unit as desired for optimum performance, doing the system setup procedures. (For details, refer to "System Setup" on page 37.)
LISTENING TO A PROGRAM SOURCE
Before operation
- Enter the standby mode.
The STANDBY indicator lights up. This means that the receiver is not disconnected from the AC mains and a small amount of current is retained to support the operation readiness. - To switch the power off, push the POWER switch again.
- Then the power is cut off and the STANDBY indicator goes off.
Auto Power Save
-
The auto power save is a function that automatically turns the power off to enter the standby mode. When any button is not pressed for more than the time you set, it will function. (For details, refer to "When selecting the AUTO POWER SAVE" on page 39.)
-
In the standby mode, turn the power on.
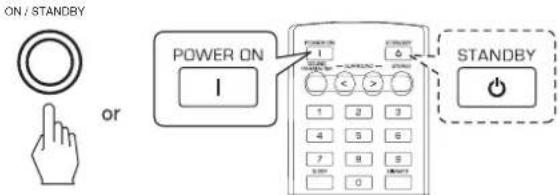
Each time the POWER ON/STANDBY button on the front panel is pressed, the receiver is turned on to enter the operating mode or off to enter the standby mode.
- On the remote control, press the POWER ON button to enter the operating mode or press the STANDBY button to enter the standby mode.
- Switch the speakers on.
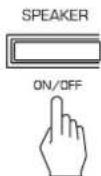
- Then "SPEAKER ON" is displayed and the sound can be heard from the speakers connected to the speaker terminals.
-
When using the headphones for private listening, press the SPEAKER button again to switch the speakers off ("SPEAKER OFF" is displayed).
-
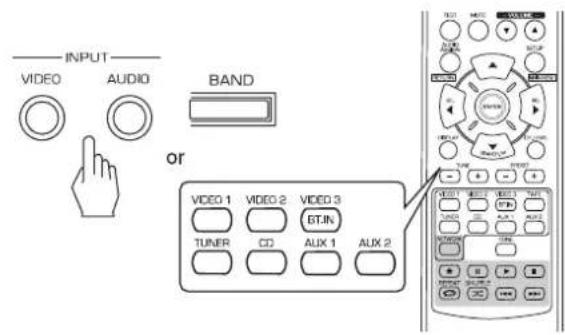
Select the desired input source.
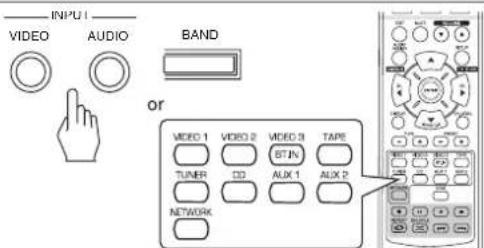

Each time the "VIDEO" button on the front panel is pressed, the input source changes as follows: VIDEO 1 VIDEO 2 VIDEO 3
Each time the "AUDIO" button on the front panel is pressed, the input source changes as follows: CD AUX 1 TV AUX 2 TAPE NET/USB TUNER (Frequency display)
*: Only when the HDMI CONTROL is set to ON, you can hear the digital audio signals from TV via a HDMI cable. (For details, refer to "When selecting the HDMI CONTROL" on page 50.)
- When selecting NET/USB, refer to "LISTENING TO INTERNET RADIO BROADCASTS, MUSIC FILES" on page 26.
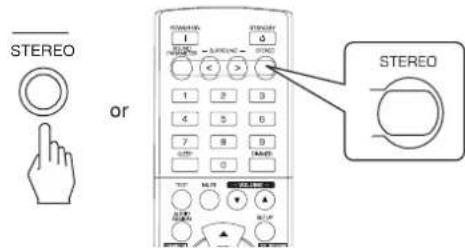
Each time the BAND button(or the TUNER button on the remote control) is pressed, the band changes as follows: FM STEREO FM MONO AM
When CD,VIDEO 1 ~ 2 is selected as an input source
- Select the digital or the analog input connected as desired.
Each time this button is pressed, the corresponding input is selected as follows:

■Notes :
- When the HDMI IN connector is connected to your video component, you cannot assign the audio input as desired. (It means that only the HDMI digital audio signals can be heard.)
- When the HDMI IN connector is not connected (and the "HDMI" indicator flickers), you can assign the audio input.
- When VIDEO 3, AUX 1, AUX 2, TAPE, TV, NET/USB or tuner is selected as an input source, the signal input cannot be selected.
- When the selected digital input is not connected, the "D(Digital)" indicator flickers and the analog input is automatically selected.
- The selected digital input or analog input is automatically assigned to the corresponding input source on the INPUT setup menu. (For details, refer to "SETTING THE INPUT SETUP" on page 41.)
- The sound from the component connected to the selected digital input can be heard regardless of the selected input source.
5. Operatethe selected component for playback.
- When playing back the program sources with surround sound, refer to "ENJOYING SURROUND SOUND" on page 17.
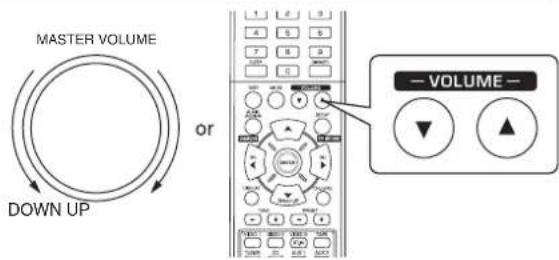
6. Adjust the (overall) volume.
7. To mute the sound.
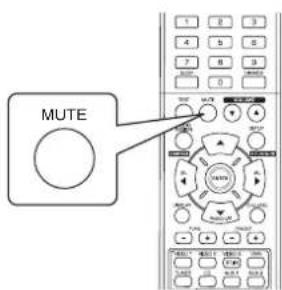
"MUTING" is displayed.
To resume the previous sound level, press it again.
8. To listen with the headphones.

- Be sure to switch the speakers off.
- When listening to a DTS or Dolby Digital program source, if the headphones are plugged in and the SPEAKER button is set to off, it enters the 2CH downmix mode automatically. (For details, refer to "2CH downmix mode" on page 17.)
Note:
- Be careful not to set the volume too high when using headphones.
Adjusting the tone (bass and treble)
9. Enter the tone mode.
The tone mode is displayed for several seconds.

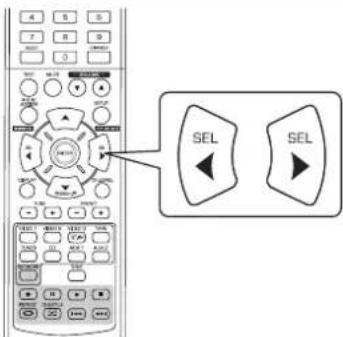
10. Press the CURSOR LEFT(▲)/RIGHT(▶) buttons to select the desired tone mode.

Each time these buttons are pressed, the tone mode is selected as follows:
OFF: To listen to a program source without the
tone effect.("DIR" lights up.)
ON : To adjust the tone for your taste.(DIR" goes off.)
When the TONE is set to ON to adjust the tone (bass and treble).
11. Press the CURSOR UP(▲)/DOWN(▼) buttons to select the desired tone.
Each time these buttons are pressed, the tone is selected as follows:

12. Press the CURSOR LEFT(4)/RIGHT(>) buttons to adjust the selected tone as desired.
The tone level can be adjusted within the range of -10 +10 dB.
In general, we recommend the bass and treble to be adjusted to 0 dB (flat level).
Extreme settings at high volume may damage your speakers.
- If the tone display disappears, start from the step 9 again.
SURROUND SOUND
This receiver incorporates a sophisticated Digital Signal Processor that allows you to create optimum sound quality and sound atmosphere in your personal Home Theater.
Surround modes
DTS Digital Surround
DTS Digital Surround(also called simply DTS) supports up to 5.1 discrete channels and uses less compression for high fidelity reproduction. Use it with DVDs and CDs bearing the DTS logo.
DTS 96/24
This is high resolution DTS with a 96 kHz sampling rate and 24 bit resolution, providing superior fidelity. Use it with DVDs bearing the DTS 96/24 logo.
Manufactured under license under U.S. Patent Nos: 5,956,674; 5,974,380; 6,487,535 & other U.S. and worldwide patents issued & pending. DTS, the Symbol, & DTS and the Symbol together are registered trademarks & DTS Digital Surround and the DTS logos are trademarks of DTS, Inc. Product includes software. © DTS, Inc. All Rights Reserved.
Dolby Digital
Dolby Digital is the multi-channel digital signal format developed by Dolby Laboratories. Discs bearing the Dolby Digital logo includes the recording of up to 5.1 channels of digital signals, which can reproduce much better sound quality, spatial expansion and dynamic range characteristics than the previous Dolby Surround effect.
Dolby Pro Logic II surround
This mode applies conventional 2- channel signals such as digital PCM or analog stereo signals as well as Dolby Surround signals, etc. to surround processing to offer improvements over conventional Dolby Pro Logic circuits. Dolby Pro Logic II surround includes 2 modes as follows:
- Dolby Pro Logic II Movie
When enjoying movies, this mode allows you to further enhance the cinematic quality by adding processing that emphasizes the sounds of the action special effects.
- Dolby Pro Logic II Music
When listening to music, this mode allows you to further enhance the sound quality by adding processing that emphasizes the musical effects.
Dolby Pro Logic
This mode expands any 2-channel source(including Dolby Surround source) for 4 channel(front left, center, front right and surround) playback. The surround channel is monaural, but is played through two surround speakers.
Manufactured under license from Dolby Laboratories. Dolby, Pro Logic, and the double-D symbol are registered trademarks of Dolby Laboratories.
- The following modes apply conventional 2-channel signals such as digital PCM or analog stereo signals to high performance Digital Signal Processor to recreate sound fields artificially. Select one of the 6 provided surround modes according to the program source you want to play.
Theater
This mode provides the effect of being in a theater when watching a play.
■Movie
This mode provides the effect of being in a movie theater when watching a movie.
■Hall
This mode provides the ambience of a concert hall for classical music sources such as orchestral, chamber music or an instrumental solo.
Game
This mode is suitable for video games.
Stadium
This mode provides the expansive sound field to achieve the true stadium effect when watching baseball or soccer games.
Multi CH Stereo
This mode is designed for playing background music. The front and surround channels create a stereo image that encompasses the entire area.
Note: Before surround playback, first perform the speaker setup procedure, etc. on the SETUP menu for optimum performance. (For details, refer to "SETTING THE SPEAKER SETUP" on page 42.)
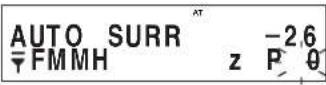
Depending on how to select a surround mode, select the auto surround mode or the manual surround mode.

Each time this button is pressed, the mode changes as follows: Auto surround mode : The optimum surround mode will be ("AT(Auto)" indicator automatically selected depending on the signal lights up.) format being input.
Manual surround mode: You can select the desired of different ("AT(Auto)" indicator surround modes selectable for the signal goes off.) being input with using the SURROUND MODE SELECT (> / <) buttons.
Notes:
- When the SPEAKER button is set to off or "CENTER" and "SURR"(Surround) are set to "NO", the auto surround mode is invalid.
- Even when the auto surround mode is selected and the same type of digital signal format is being input, the optimum surround mode may vary depending on whether the speaker type is set to "NO" or not.
- When the auto surround mode is selected, the surround modes other than the optimum surround mode cannot be selected.
When selecting the manual surround mode with pressing the AUTO/MANUAL button on the front panel Select the desired surround mode.
Each time the SURROUND MODE SELECT (> / <) buttons are pressed, the surround mode changes depending on the input signal format as follows:
| Signal format being input | Selectable surround mode |
| Dolby Digital EX 6.1 channel sources, Dolby Digital 5.1 channel sources | DOLBY DIGITAL or <2 CH IN> *1 |
| Dolby Digital 2 channel sources, PCM (2 channel) sources, Analog stereo sources | DOLBY PLII MOVIE, DOLBY PLII MUSIC, THEATER, MOVIE, HALL, GAME, STADIUM, MULTI CH STEREO, DOLBY PRO LOGIC or <2 CH IN> *1 |
| DTS sources, DTS 96/24 sources | Corresponding DTS mode or <2 CH IN> *1 |
1: When "CENTER" and "SURR"(Surround) are set to "NO", any surround mode cannot be selected and the source can be reproduced either in the stereo mode or in the 2CH downmix mode.
To cancel the surround mode for stereo operation
- Depending on the signal format which is being input, either the stereo mode or the 2CH downmix mode is selected.
- To cancel either the stereo mode or the 2CH downmix mode, select the surround mode with using the SURROUND MODE SELECT (> / <) buttons.
2CH downmix mode
This mode allows the multi-channel signals encoded in DTS or Dolby Digital format to be mixed down into 2 front channels and to be reproduced through only two front speakers or through headphones.
- When the SPEAKER button is set to off to listen with headphones while playing the multi-channel digital signals from DTS or Dolby Digital sources, it will enter the 2CH downmix mode automatically.

When adjusting the sound parameters
-
While playing digital signals form Dolby Digital program source or listening in Dolby Pro Logic II Music mode, you can adjust their parameters for optimum surround effects.
-
Press the SOUND PARAMETER button.
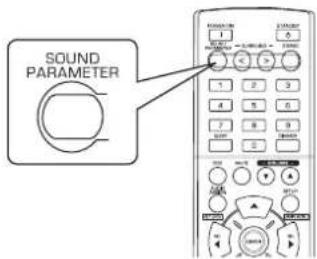
- Then "DRC: ~" (or "PANorama: ~") is displayed for several seconds.
-
If the parameter mode disappears, press this button again.
-
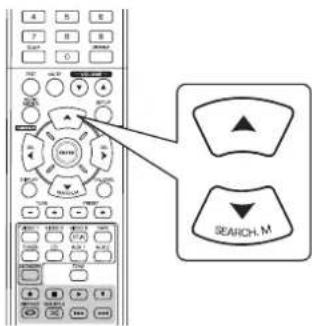
Press the CURSOR UP(▲)/DOWN(▼) buttons to select the desired parameter.
Each time these buttons are pressed, the parameter mode changes as follows:
"“DRC" "PANorama" "C.WIDTH" "DIMENSIONM" (Dynamic Range (Center width Compression) control)
- "DRC" can be selected only while playing digital signals from Dolby Digital source.
-
"PANorama", "C.WIDTH" and "DIMENSION" can be selected only while listening in Dolby Pro Logic II Music mode.
-
Press the CURSOR LEFT( /RIGHT (巴) buttons to adjust the selected parameter as desired.

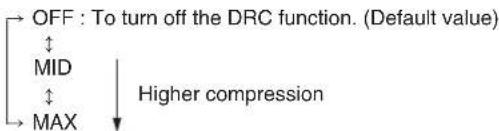
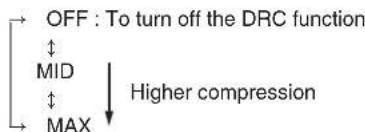
When selecting the "DRC (Dynamic Range Compression)"
- This function compresses the dynamic range of previously specified parts of the Dolby Digital sound track (with extremely high volume) to minimize the difference in volume between the specified and non-specified parts. This makes it easy to hear all of the sound track when watching movies at night at low levels.
■Note :
- In some Dolby Digital softwares, DRC setting may not be valid.
When selecting the "PANorama"
This mode extends the front stereo image to include the surround speakers for an exciting "wraparound" effect with side wall imaging.
Select "OFF" or "ON"(default value: OFF).
When selecting the "C. WIDTH(Center width)" control This adjusts the center image so it may be heard only from the center speaker, only from the left/right speakers as a phantom image, or from all three front speakers to varying degrees.
The control can be set in 8 steps from 0 to 7(default value : 3).
When selecting the "DIMENSION" control
This gradually adjusts the soundfield either towards the front or towards the rear. The control can be set in 7 steps from -3 to +3 (default value:0).
- Repeat the above steps 2 and 3 to adjust other parameters.
Adjusting each channel level with test tone
- The volume level of each channel can be adjusted easily with the test tone function.
Note : When the SPEAKER button is set to off, the test tone function does not work.
1. Enter the test tone mode.

The test tone mode is displayed and will be heard from the speaker of each channel for 2 seconds as follows:
FL → C → FR → SR → SL → SW → Front Center Front Surround Round Subwoofer Left Right Right Left
- When the speaker setting is "NO", the test tone of the corresponding channel is not available.
- At each channel, adjust the level as desired until the sound level of each speaker is heard to be equally loud.
-
You can select the desired channel with pressing the CURSOR UP(▲)/DOWN(▼) buttons.
-
Cancel the test tone function.
Adjusting the current channel level
After adjusting each channel level with test tone, adjust the channel levels either according to the program sources or to suit your tastes.
- You can adjust the current channel levels as desired. These adjusted levels are just memorized into user's memory ("CAL"), not into preset memory ("REF 1", "REF 2").
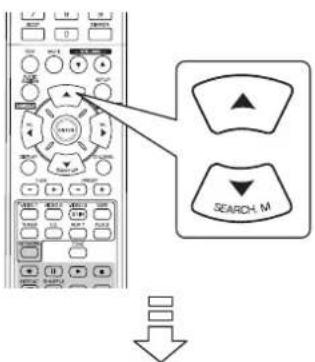
1. Press the CHANNEL LEVEL button.
- Then the memory mode ("CAL", etc.) is displayed for several seconds.
- When the memory mode or channel level disappears, press this button again.
2. Select the desired channel.
Each time these buttons are pressed, the corresponding channel is selected as follows:
REF1,2(orCAL) LEFT CENTER RIGHT
<>: Possible only when the digital signals from Dolby Digital or DTS program sources that includes LFE signal are input.
- Depending on the speaker settings ("NO") and surround mode, etc., some channels cannot be selected.
- When the SPEAKER button is set to off, only the Front Left, Front Right (and LFE) channels can be selected.
3. Adjust the level of the selected channel as desired.
The LFE level can be adjusted within the range of -10 0 dB and other channel levels within the range of -15 +15 dB.
- In general, we recommend the LFE level to be adjusted to 0 dB. (However, the recommended LFE level for some early DTS software is -10 dB.) If the recommended levels seem too high, lower the setting as necessary.
4. Repeat the above steps 2 and 3 to adjust each channel level.
Memorizing the adjusted channel levels
-
You can memorize the adjusted channel levels into preset memory("REF 1", "REF 2") and recall the memorized whenever you want.
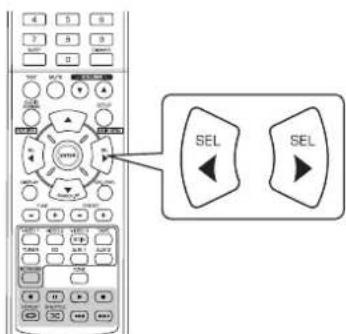
-
After performing the steps 1 ~ 4 in "Adjusting the current channel level" procedure on page 20, press the ENTER/(MEMORY) button.
-
Then "i" of "REF 1" indication flickers for several seconds.
-
Select the desired one of REF 1 and REF 2.
If the preset memory disappears, perform the above step 1 again.
- Confirm your selection.
The adjusted channel levels have now been memorized into the selected memory.
Recalling the memorized channel levels
- Press the CHANNEL LEVEL button.

"CAL" (or "REF 1", etc.) is displayed for several seconds.
- If the channel level mode display disappears, press this button again.
- Select the desired one of REF 1 and REF 2.
- Then the channel levels memorized into the selected preset memory are recalled.
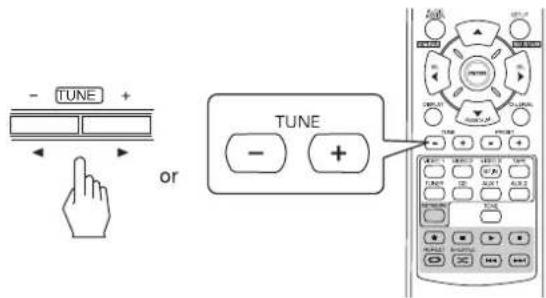
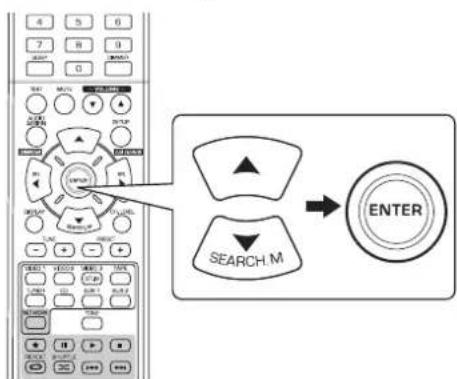
LISTENING TO RADIO BROADCASTS
Auto tuning
1. Select the desired band.
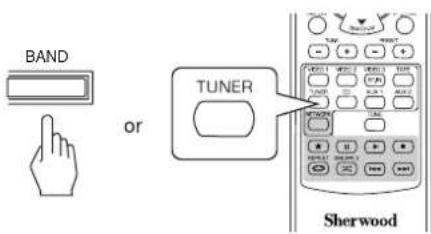
Each time this button is pressed, the band changes as follows:

- When FM stereo broadcasts are poor because of weak broadcast signals, select the FM mono mode to reduce the noise, then FM broadcasts are reproduced in monaural sound.
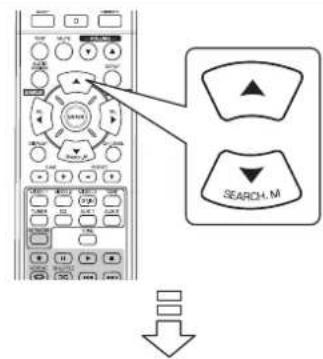
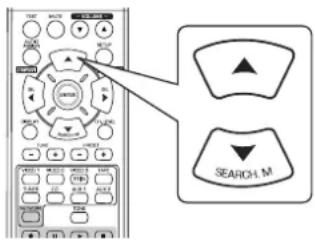
2. Press the TUNING UP (+) DOWN(-) buttons for more than 0.5 second.
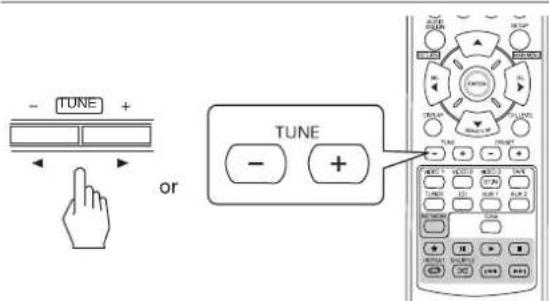
- The tuner will now search until a station of sufficient strength has been found. The display shows the tuned frequency.
If the station found is not the desired one, simply repeat this operation. - Weak stations are skipped during auto tuning.
Manual tuning
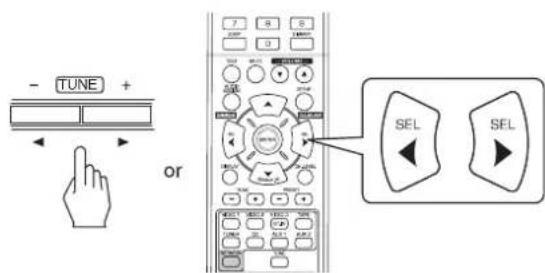
- Manual tuning is useful when you already know the frequency of the desired station.
After selecting the desired band, press the TUNING UP (+) /DOWN(-) buttons repeatedly until the right frequency has been reached.
Auto presetting
- Auto presetting function automatically searches for FM stations only and store them in the memory.
While listening to FM radio broadcasts, press and hold down the ENTER/(MEMORY) button for more than 2 seconds.

- Then "AUTO MEM" flickers and this receiver starts auto presetting.
- To stop auto presetting, press this button again.
- Up to 30 FM stations can be stored.
Notes:
FM stations of weak strength cannot be memorized.
- To memorize AM stations or weak stations, preform "Manual presetting" procedure with using "Manual tuning" operation.
Manual presetting
- You can store up to 30 preferred stations in the memory.
- Tune in the desired station with auto or manual tuning.
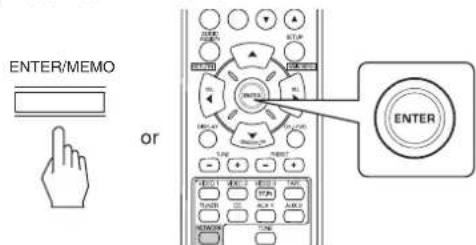
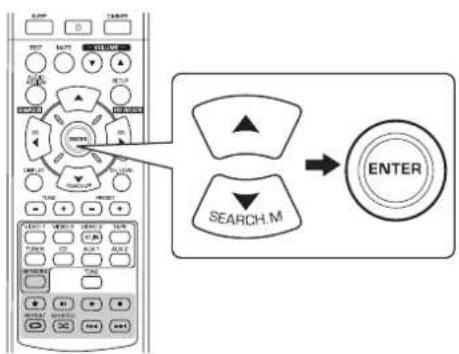
- Press the ENTER/(MEMORY) button.
ENTER/MEMO


-
Then preset number flickers.
-
Select the desired preset number (1~30) and press the ENTER/(MEMORY) button.

- When using the NUMERIC buttons on the remote control.
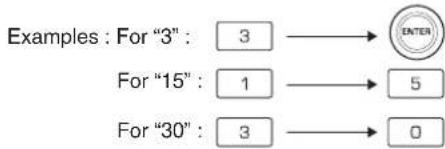
The station has now been stored in the memory.
- When specifying a two digit number with using the NUMERIC buttons, the station is stored automatically without pressing the ENTER/(MEMORY) button.
- A stored frequency is erased from the memory by storing another frequency in its place.
- Repeat the above steps1 to 3 to memorize other stations.
■ MEMORY BACKUP FUNCTION
The following items, set before the receiver is turned off, are memorized.
- INPUT SELECTOR settings
- Surround mode settings
- Preset stations,etc.
Tuning to preset stations
After selecting the tuner as an input source, select the desired preset number.
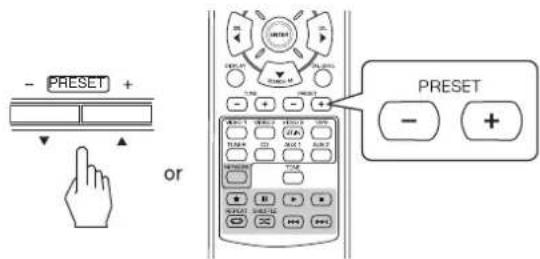
- When using the NUMERIC buttons on the remote control.
Examples: For "3":
For "15":


For "30":


RDS Tuner (Regional Option for some countries in Europe, etc.)
LISTENING TO RDS BROADCASTS(FM ONLY)
RDS(Radio Data System) is a method for sending information signals together with the transmitter signals. Your tuner is capable of translating these signals and putting the information on the display. These codes contain the following information. Program Service name (PS), A list of Program Types (PTY), Radio Text (RT).
Notes :
In the other countries, RDS tuning function cannot be available.
- RDS is only possible in the FM band.
- RDS searches for the preset stations only. If no stations have been stored in the memory, or if the program type could not be found among the preset stations, "NO PTY" is displayed.
Therefore, preset the radio stations before searching for RDS stations.
Searching for stations by program type
-
You can search for stations by program type.
-
In the FM mode, press the SEARCH MODE button.
-
PTY SEARCH is displayed for several seconds.
-
While displaying "PTY SEARCH", select the desired program type.
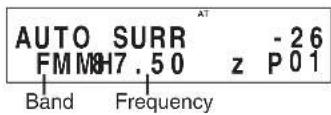
AT 售 PTY: News -26 FMMH z P-89
Each time these buttons are pressed, one of different types of programs is selected.
(News, Affairs, Info, Sport, Educate, Drama, Culture, Science, Varied, Pop M, Rock M, Easy M, Light M, Classics, Other M, Weather, Finance, Children, Social, Religion, Phone In, Travel, Leisure, Jazz, Country, Nation M, Oldies, Folk M, Document)
-
If "PTY SEARCH" disappears, press the SEARCH MODE button again.
-
While displaying the selected program type, press the ENTER button.
The tuner starts searching through the preset station for a match.
- When a station is found, the search stops and the station plays.
- If no station is found, "NO PTY" is displayed.
Displaying RDS information
In the FM mode,
Each time this button is pressed, the display mode changes as follows:
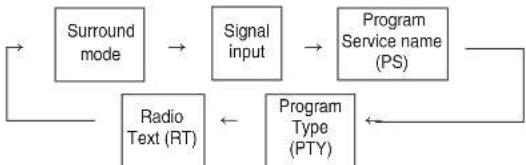
- Program Service Name(PS)-The name of the radio station.
- Program Type(PTY)-This indicates the kind of program currently being broadcast.
- Radio Text(RT)-Messages sent by the radio station. For example, a talk radio station may provide a phone number as RT.
If the signals are too weak or no RDS service is available, "NO NAME", "NO PTY" or "NO TEXT" will be displayed.
LISTENING TO INTERNET RADIO BROADCASTS, MUSIC FILES
- You can listen to Internet radio broadcasts or music files stored on a USB memory device or a computer (media server).
Internet Radio
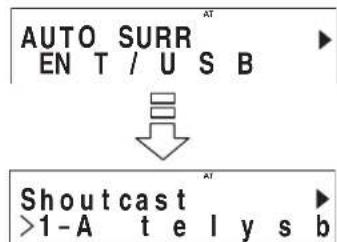
- Internet radio refers to radio broadcasts distributed over the internet. Internet radio stations from around the world can be tuned in by accessing Shoutcast website.
Shoutcast (http://www.shoutcast.com)
Shoutcast is a free internet radio broadcast service provided by Shoutcast. You can use Shoutcast without registration.
■Note :
- There are many Internet radio stations on the Internet, and the quality of the programs they broadcast as well as the bit rate of the tracks varies widely. Generally, the higher the bit rate, the higher the sound quality, but depending on the communication lines and server traffic, the music or audio signals being streamed may be interrupted. Inversely, lower bit rates mean a lower sound quality but less tendency for the sound to be interrupted.
USB Memory Devices
- A USB memory device can be connected to the USB conneter to play music files stored on it.
Only USB memory devices conforming to mass storage class and MTP(Media Transfer Protocol) standards can be played on this unit. - This unit supports FAT16 or FAT32 file format system for USB memory device.
DLNA (Digital Living Network Alliance) media server
- This unit can play music files on a DLNA-compatible media server(computer or consumer electronics) connected to it via your home network. You can share the music files easily by using Windows Media Player ver 11.
2011 Digital Living Network Alliance. All rights reserved. DLNA® and DLNA & Design® are trademarks or registered trademarks of Digital Living Network Alliance. All rights reserved. Unauthorized use is strictly prohibited.
Notes :
- You should connect the computer (media server) to the same local network with this unit.
- This unit supports only the DMP(Digital Media Player) of DLNA. Some functions may not work on the device that does not support the DLNA fully.
Compatible Audio File Formats
- For Internet radio, USB memory device and media server playback, this unit supports the following music file formats.
| File format | Sampling frequency | Bit rate Extensión | |
| MP3 (MPEG-1 Audio Layer-3) | 32/44.1/48 kHz 3 | 2 ~ 320 kbps | .mp3, .MP3 |
| WMA (Windows Media Audio) | 32/44.1/48 kHz 3 | 2 ~ 320 kbps | .wma, .WMA |
Variable bit-rate files are supported.
MPEG Layer-3 audio coding technology licensed from Fraunhofer IIS and Thomson.
- Windows Media and the Windows logo are trademarks or registered trademarks of Microsoft Corporation in the United States and/or other countries.
Basic Operation
1. Make the necessary preparations.
① Check the network environment, then turn on this unit. (See "CONNECTING TO NETWORK" on page 7.)
② If settings are required, make the network settings, etc. (See "When selecting Settings" on page 32.)
③ If the computer is used as a media server, prepare the computer. Install Windows Media Player ver. 11. (See "Configuring the Windows Media Player ver. 11." on page 31.)
2. Select the "NET/USB" as an input source.
The "NET/USB" is selected and then the status memorized last will be resumed.
- When the power is turned on and then "NET/USB" is selected, the main menu is displayed (see the step 3 below).
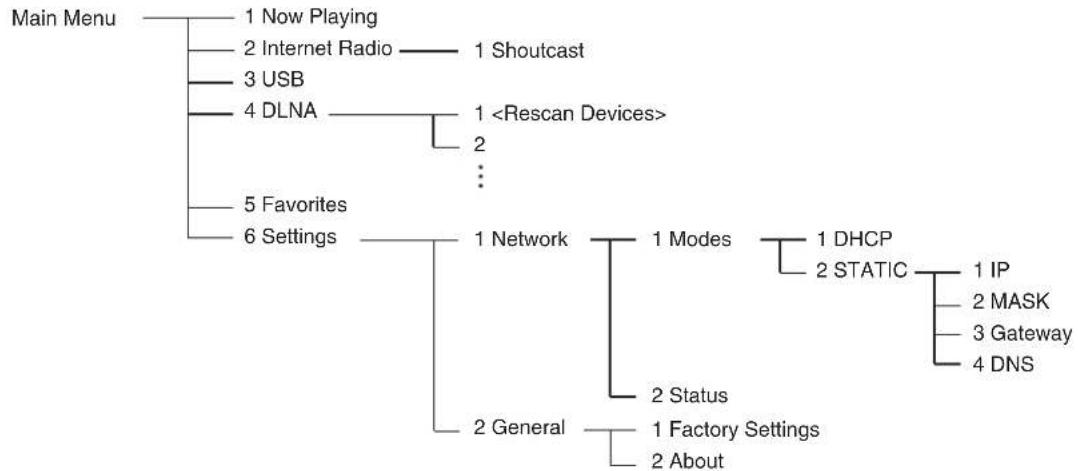
3. To select an item on the main menu, press the SETUP/(MAIN MENU) button.
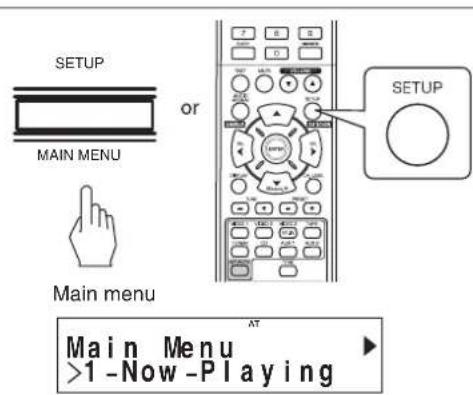
- Then the main menu is displayed.
4. Select the desired item, then press the ENTER button.

- When selecting "Now Playing", see page 29.
- When selecting "Internet Radio", see page 29.
- When selecting "USB", see page 30.
- When selecting "DLNA", see page 30.
- When selecting "Favorites", see page 31.
- When selecting "Settings", see page 32.
- For details on setup menu flow, see page 28.
5. Repeat the above step 4 until the desired station, music file or setting option, etc. is selected.
- Then the selected is played or set to.
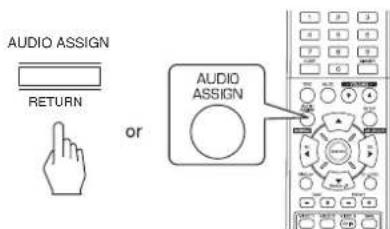
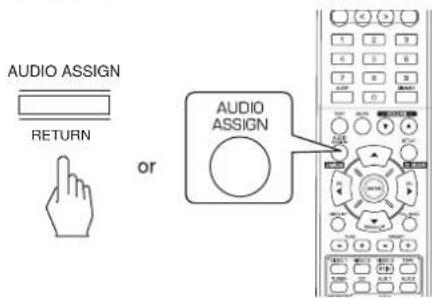
- When the AUDIO ASSIGN(/RETURN) button is pressed on a sub-menu, it will return to the previous status.
- When the SETUP/(MAIN MENU) button is pressed on a sub-menu, it will return to the main menu.
■Playback operations
- During playback of internet radio broadcasts or music files, you can play them in different playback modes.
To stop playback
During playback, press the STOP() button.
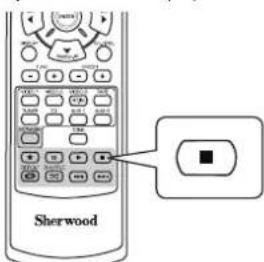
- Then the playback will be stopped.
To start playback, press the PLAY(▶) button.
To pause playback
During playback, press the PAUSE(1) button.
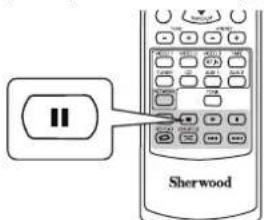
- Then the playback will be stopped at the point where this button is pressed.
- To resume playback from this point, press the PLAY(▶) button.
To skip ahead or back
During playback of music file.
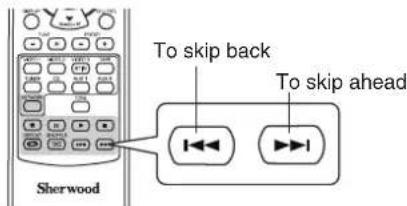
Each time the button is pressed, a music file is skipped.
To play repeatedly
During playback of the desired music file, press the REPEAT() button.
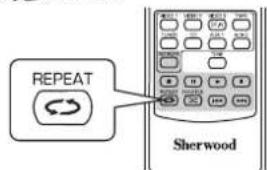
- Then "C" lights up and the music files on the folder are played repeatedly.
- To cancel the repeat playback, press this button again.
To play in random order
During playback of music files, press the SHUFFLE button.

- Then “×” lights up and the music files on the folder are played in random order.
- To cancel the random playback, press this button again.
■Note :
-
The skip mode, repeat mode and random mode can be used when playing only music files stored on a USB memory device.
-
For your reference, setup menu flow is as follows :
Setup menu flow
When selecting "Now Playing"
- You can display the information on the Internet radio broadcast or music file being played.
Press the CURSOR UP(▲)/DOWN(▼) buttons to select the desired display mode.
Example: When playing an Internet radio broadcast
Each time the button is pressed, the mode changes as follows
station/device name song title Add to favorites* artist name album name
*: Not available while playing music files or internet radio stations registered in the "Favorites" list.
Notes :
- Characters except "A~Z", "a~z", "0~9", "-" may not be displayed.
- If the information on station name, song title or artist name, etc. is not available, it will not be displayed correctly.
When selecting the "Add to favorites"
① Press the ENTER button.
- Then "OK" is displayed.
(2) Press the ENTER button to confirm your selection. - Then the station or music file is registered in the favorite list. (For details on the favorite operation, see "When selecting "Favorites" on page 31.)
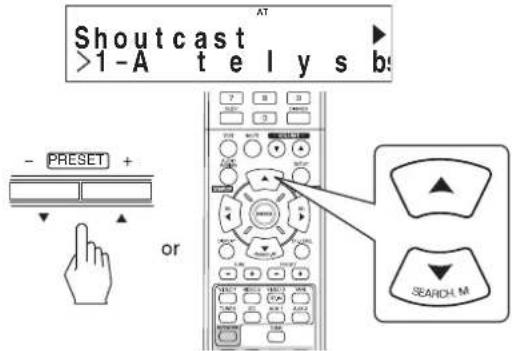
When selecting "Internet Radio"
- You can listen to Internet radio broadcasts provided by Shoutcast.
- Press the ENTER button.
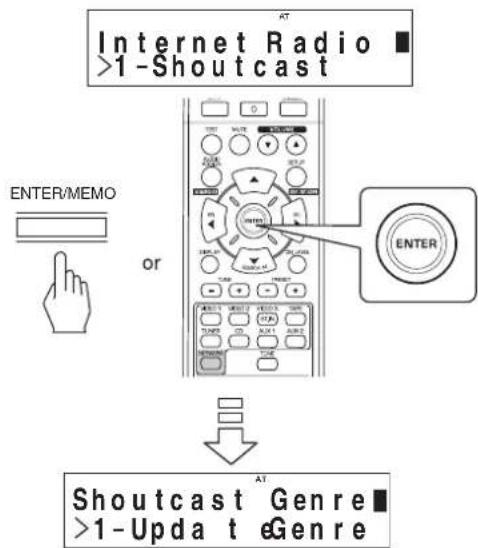
- Press the CURSOR UP(▲)/DOWN(▼) buttons to select the desired category (or item), then press the ENTER button.
- Repeat the above step 2 until the desired broadcast is listened to.
Example: When playing an internet radio broadcast

- While playing a broadcast, each time the CURSOR UP(▲) or DOWN(▼) button is pressed, the display mode changes.
- For details on display mode, see "When selecting "Now Playing" above.
When selecting "USB"
- You can listen to music files stored on a USB memory device.
■Note : -
Before selecting "USB", connect the USB memory device to the USB connector on the front panel.
-
Press the CURSOR UP(▲)/DOWN(▼) buttons to select the desired folder (or music files), then press the ENTER button.

- Repeat the above step 1 until the desired music file is selected.
Example: When playing a music file

- While playing a music file, each time the CURSOR UP(▲) or DOWN(▼) button is pressed, the display mode changes.
- For details on display mode, see "When selecting "Now Playing" on page 29.
When selecting "DLNA"
-
You can listen to music files stored on a computer(media server) connected to this unit via your home network.
■Note:
To play music files stored on your computer, you should configure the Windows Media Player ver 11. first. (For details, see "Configuring the Windows Media Player ver. 11" on page 31.) -
Start your computer (media server).

- Press the CURSOR UP(▲)/DOWN(▼) buttons to select your computer as a media server, then press the ENTER button.
- When your computer is not displayed in the list, select
to rescan all available media servers. - Press the CURSOR UP(▲)/DOWN(▼) buttons to select the desired category, then press the ENTER button.
- Repeat the above step 3 until the desired music file is selected.
Example: When playing a music file

- While playing a music file, each time the CURSOR UP(▲) or DOWN(▼) button is pressed, the display mode changes.
- For details on display mode, see "When selecting "Now Playing" on page 29.
■Configuring the Windows Media Player ver. 11.
-
Run the Windows Media Player ver. 11 on your computer.
-
Select "Library" tab in the menu bar, and then select "Media Sharing".
-
In the "Media Sharing" dialog box, select the "Share my media" check box, and then click "OK".
-
In the list of devices, select this unit, and then click "Allow".
-
Click "OK" to close the dialog box.
-
Then the Windows Media Player ver. 11 configuration has been completed.
- You can play the music files in your Windows Media Player ver. 11 library through this unit.
Notes :
- The Windows Media Player ver. 11 can be downloaded for free from the Microsoft Web site.
- If the fire wall restricts access, the Windows Media Player ver. 11 cannot be configured.
When selecting "Favorites"
Note:
- You can listen to Internet radio stations or music files registered in the "Favorites" list or delete them.
- When the USB memory device is disconnected or your computer (media server) is turned off, the music files stored on them cannot be played.
- Press the CURSOR UP(▲)/DOWN(▼) buttons to select the desired station or file, then press the ENTER button.
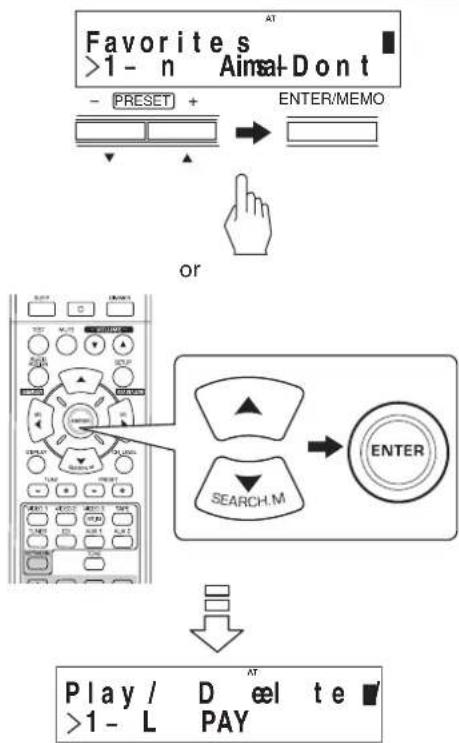
- Press the CURSOR UP(▲)/DOWN(▼) buttons to select "PLAY", "DELETE" or "CANCEL", then press the ENTER button.
Example: When playing a music file

- When "PLAY" is selected, the selected station or music file will be played.
- When "DELETE" is selected, the selected station or music file will be deleted in the "Favorites" list.
- When "CANCEL" is selected, your selection will be canceled.
While playing a station or music file, each time the CURSOR UP (▲) or DOWN (▼) button is pressed, the display mode changes. - For details on display mode, see "When selecting "Now Playing" on page 29.
When selecting "Settings"
- When listening to Internet radio broadcasts or music files for the first time, first make settings for network, etc. for optimum performance.
- Select the desired item, then press the ENTER button.
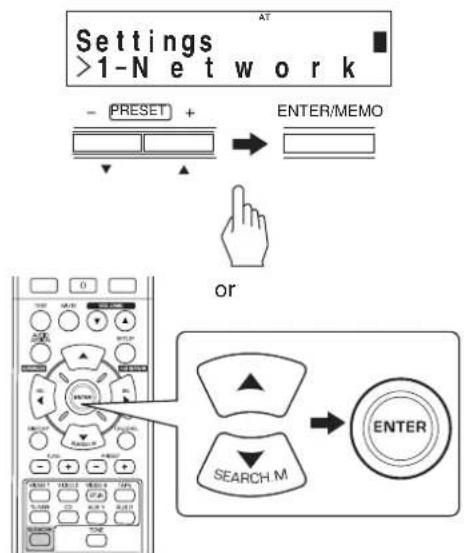
Each time the CURSOR UP () or DOWN () button is pressed, the setting mode changes as follows. Network General
- When selecting "General", see page 33.
■When selecting "Network"
- To listen to Internet radio stations, music broadcasts or music files stored on your computer via your home network, you should configure network settings first.

- Press the CURSOR UP(▲)/DOWN(▼) buttons to select "Modes" or "Status", then press the ENTER button.
Example: When selecting "Modes"

- When "Modes" is selected, you can configure network settings.
- When selecting "Status", you can check the information on network settings (see page 33).
When selecting "Modes"
-
Press the CURSOR UP(▲)/DOWN(▼) buttons to select "DHCP" or "STATIC", then press the ENTER button.
-
If your router's DHCP server is enabled, you can select "DHCP".
- If it is disabled, select "STATIC".
- In case of selecting "DHCP"
- When "Switch to DHCP mode?" is displayed, press the ENTER button.

- The network settings are automatically configured and the "Status" menu will be displayed. (See "When selecting "Status" on page 33.)
- In case of selecting "STATIC"
- You can set the network settings manually when the router's DHCP server is disable.
Note:
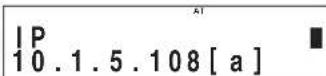
- Because the following information of the router is required, confirm the information prior to the manual setting: IP address, Subnet mask, Gateway, DNS.

① Press the CURSOR UP(▲)/DOWN(▼) buttons to select the desired setting item, then press the ENTER button.
Each time the CURSOR UP () or DOWN () button is pressed, the setting mode changes as follows.
IP MASK Gateway DNS
Example: When selecting "IP"
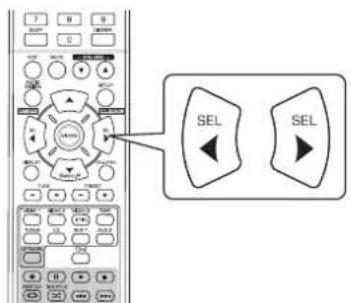
② Press the CURSOR LEFT(▲)/RIGHT(▲) buttons to move to the desired digit.
- To delete a number, press the CURSOR LEFT(▲) button. Each time this button is pressed, numbers are deleted one by one.
③ Press the CURSOR UP(▲)/DOWN(▼) buttons to enter the desired number.
Each time the CURSOR UP () or DOWN () button is pressed, the character changes as follows. a~z, A~Z, 1~0 and characters(@, , blank, etc.)
Repeat the above steps 2 and 3 to complete the entry.
⑤ To confirm your entry, press the CURSOR RIGHT(▲) button to move to the digit next to the lowest, then press the ENTER button.
- Then the "Static Mode" menu will be displayed.
⑥ Repeat the above steps ① ⑤ to enter other setting items.
⑦ Press the AUDIO ASSIGN(/RETURN) button to return to previous status.

Apply Changes? >1-OK
Press the CURSOR UP () /DOWN () buttons to select "OK" or "CANCEL", then press the ENTER button.
- When "OK" is selected, the network settings are applied and the "Status" menu will be displayed. (See "When selecting "Status" below.)
- When "CANCEL" is selected, the network settings are not applied and the "Network Modes" will be displayed.
When selecting "Status"
- You can check the network settings (such as MODE, IP address, GW(Gateway) and DNS server) successively.
Status.MODE:dh OK
- To return to the previous status, press the ENTER button.
When selecting "General"
General Setting >1-Factory Sett
- Press the CURSOR UP(▲)/DOWN(▼) buttons to select "Factory Settings" or "About", then press the ENTER button.
Example : When selecting "Factory Settings"
Warning: Alles >1-OK
- When "Factory Settings" is selected, you can reset the "Network" settings and stations or music files registered in the "Favorites" list to the factory default.
- When "About" is selected, you can check the general information such as type of this unit, software version and MAC address.
When selecting "Factory Settings"
-
Press the CURSOR UP(▲)/DOWN(▼) buttons to select "OK" or "CANCEL", then press the ENTER button.
-
When "OK" is selected, they are reset to the factory default.
- When "CANCEL" is selected, then the previous status is returned to without resetting.
When selecting "About"
- You can check the type of this unit, software version and MAC address successively.
About. Intemet OK
- To return to the previous status, press the ENTER button.
RECORDING
The digital signals from the "NET/USB", coaxial, optical digital input or HDMI IN can be heard but cannot be recorded.
- When recording the analog signals from CD,VIDEO 1~2, be sure to select the analog input. (For details, refer to "When CD,VIDEO 1~2 is selected as an input source" on page 14.)
The volume and tone (bass, treble) settings have no effect on the recording signals.
Recording with TAPE
- Select the desired input as a recording source, except for TAPE.
- Start recording on the TAPE.
- Start play on the desired input.
Dubbing from video components onto VIDEO 1
- Select the desired of VIDEO 2~3 as a recording source except VIDEO 1.
- Start recording on the VIDEO 1.
- Start play on the desired input.
- The audio and video signals from the desired input will be dubbed onto the VIDEO 1 and you can enjoy them on the TV set and from the speakers.
OTHER FUNCTIONS
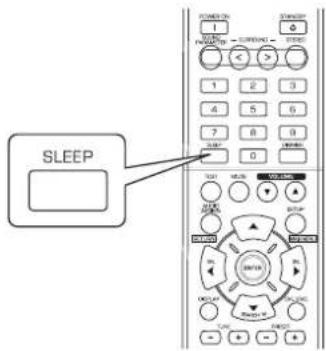
Operating the sleep timer
The sleep timer allows the system to continue to operate for a specified period of time before automatically shutting off.
To set the receiver to automatically turn off after the specified period of time.
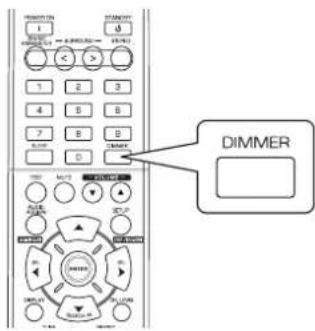
Adjusting the brightness of the fluorescent display
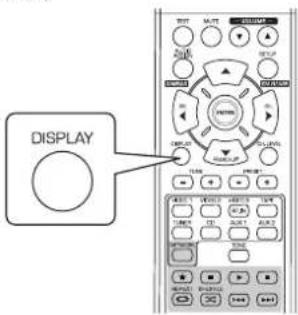
Displaying the operation status
During playback,
Each time this button is pressed, the sleep time changes as follows:

While operating the sleep timer, " lights up.
- When the sleep time is selected, the fluorescent display is dimly lit.

Each time this button is pressed, the brightness of the fluorescent display changes as follows:
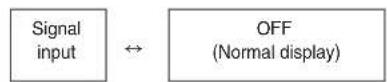
- In the display OFF mode, pressing some buttons cancel the display OFF mode to display the operation status.
Each time this button is pressed, the display mode changes as follows:
- When the RDS tuner function is available in your country, for details on the FM mode information, see "Displaying RDS information" on page 25.
CONFIRMING THE HDMI FUNCTION
To use the HDMI control functions properly, it is recommend to confirm the HDMI control functions usable with each connected component by performing the following operations.
■Note:
Some HDMI control functions may not work with certain components and TV that are not compatible with them.
Before operation
- Check that this receiver, TV and player, etc are connected by HDMI cables.
- Check that the HDMI control of TV and the HDMI-connectable player are enabled.
(For details on the setups of TV and player, refer to their operating instructions.)
- Set the HDMI CONTROL and the POWER CONTROL to ON to enable the HDMI control of this receiver. (For details, refer to "SETTING THE HDMI SETUP" on page 50.)
Confirming the basic HDMI operations
- Turn the power on for all the components connected by HDMI cables.
- Switch the TV input to the HDMI input connected to this receiver.
- Switch this unit input to the HDMI input source.
- Confirm that its picture is displayed and the sound is heard from the speakers properly.
Confirming the HDMI control functions
- Turn the power on for all the components connected by HDMI cables.
-
Turn the TV off to enter the standby mode.
-
Confirm that all the components are turned off.
- With all the components off, start playback on a player (connected by HDMI cable).
- Confirm that all the components are turned on and the inputs of this unit and TV are switched automatically.
System Setup
The setup menu is displayed on the fluorescent display and allows you to perform the setup procedures easily. In most situation s, you will only need to set this once during the installation and layout of your home theater, and it rarely needs to be changed later.
The setup menu consists of 6 main menus; system, input, speaker, CH level, parameter and HDMI.
These menus are then divided up into various sub-menus.
■Note:
- Only when an input source other than "NET/USB" is selected, you can perform the system setup procedure.
Navigating through the setup menu
The explanations here assume you are using the buttons on the remde control when performing the setup menu operation. Howver, you can use the buttons on the front panel as well.
The buttons on the front panel correspond to those on the remote control as shown below.
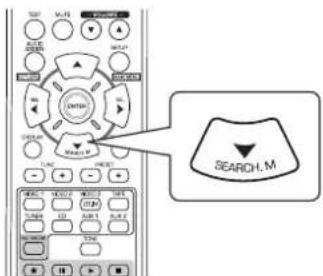
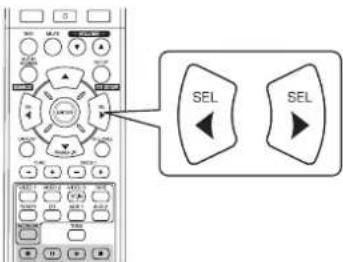
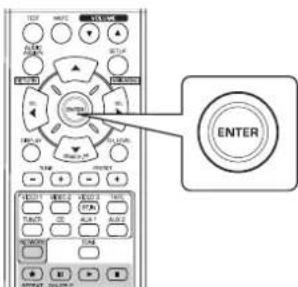
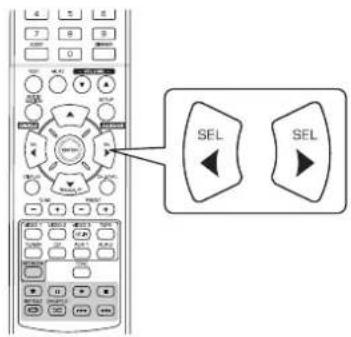
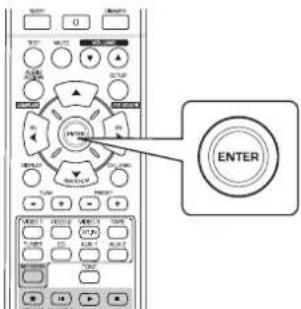
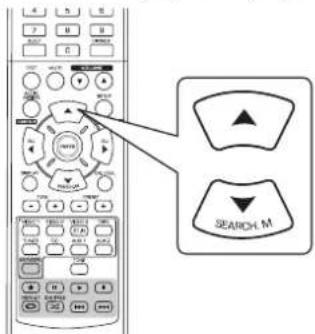
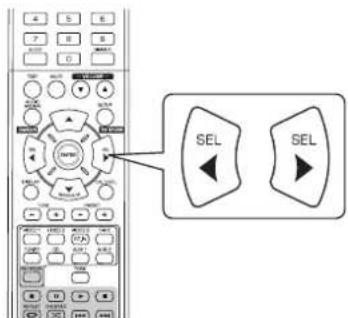
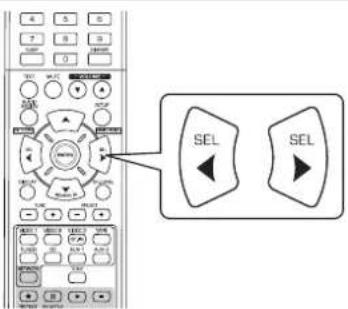
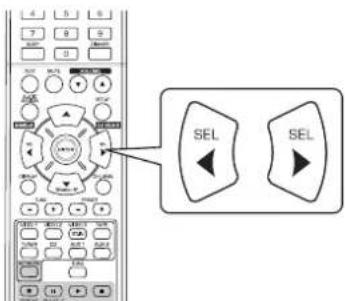
| Button on the remote control | SETUP | ENTER | SEL | SEL | SEARCH M |
| Button on the front panel | SETUP | ENTER / MEMO | -TUNE + | -PRESET + | |
| MAIN MENU | |||||
- Turn the setup menu on.
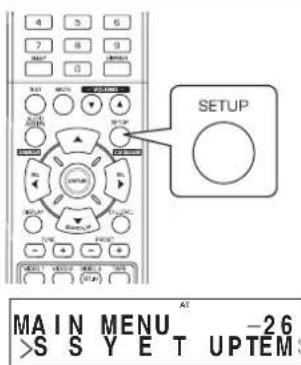
-
The setup menu will be shown.
To turn the menu off, press this button again. -
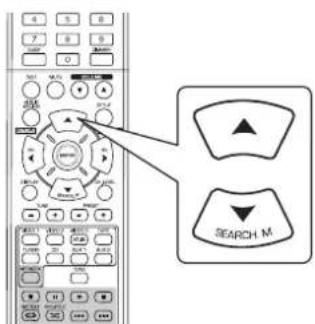
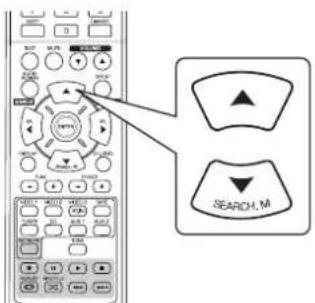
Select the desired menu using the CURSOR UP(▲)/DOWN(▼) buttons.
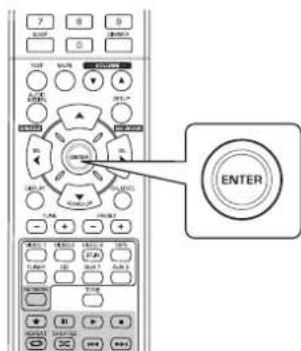
- Confirm your selection.
- When selecting "SYSTEM SETUP", see "SETTING THE SYSTEM SETUP" on page 39.
- When selecting "INPUT SETUP", see "SETTING THE INPUT SETUP" on page 41.
- When selecting "SPEAKER SETUP", see "SETTING THE SPEAKER SETUP" on page 42.
- When selecting "CH LVL SETUP", see "SETTING THE CH LEVEL SETUP" on page 46.
- When selecting "PARAMETER SETUP", see "SETTING THE PARAMETER SETUP" on page 48.
- When selecting "HDMI SETUP", see "SETTING THE HDMI SETUP" on page 50.
- When selecting "EXIT", the setup menu will be turned off.
Setup menu flow
- The setup menu flow is as follows :


- When "RETURN" is selected on a sub-menu, it will return to the previous menu.
- When the AUDIO ASSIGN(/RETURN) button is pressed on a sub-menu, it will return to the previous menu, too.
Note : During setup menu operation, only the (POWER ON/)STANDBY button and the buttons required for system setup will function.
SETTING THE SYSTEM SETUP

- SW(SUBWOOFER) MODE : To select the desired subwoofer mode.
TONE: To adjust the tone (bass and treble) as desired.
A.P.S(AUTO POWER SAVE): To set the power-off time as desired. -
RETURN: To return to the previous menu.
-
Press the CURSOR UP(▲)/DOWN(▼) buttons to select the desired item.
- Press the CURSOR LEFT(▲)/RIGHT(▶) buttons to set the selected item as desired
When selecting the SUBWOOFER MODE
- "SW + " mode is effective only when "FRONT" and "CENTER" are set to "LARGE" and "SUB-W"(Subwoofer) is set to "YES" on the SPEAKER SETUP menu. (For details, refer to "SETTING THE SPEAKER SETUP" on page 42.)
NORM: When the low frequency signals of channels set to "LARGE" are reproduced from those channels only. In this mode, the low frequency signals that are reproduced from the subwoofer channel is only the low frequency signals of LFE (from the multi-channel sources that contains LFE (Low Frequency Effects) channel, also called the ".1" channel) and the channels set to "SMALL".
SW +: When the low frequency signals of channels set to "LARGE" are reproduced simultaneously from those channels and the subwoofer channel. In this mode, the low frequency range expands more uniformly through the room, but depending on the size and shape of the room, interference may result in a decrease of the actual volume of the low frequency range.
When selecting the AUTO POWER SAVE
- The auto power save is a function that automatically turns the power off to enter the standby mode. When any button is not pressed for more than the time you set, it will function.
- You can set the power-off time as desired.
OFF 2HOUR 4HOUR 6HOUR (To turn off the function)
When selecting the TONE
OFF: To listen to a program source without the tone effect. ("DIR" lights up.)
ON: To adjust the tone for your taste. ("DIR" goes off.)
■When the TONE is set to ON to adjust the tone (bass and treble)
① Press the ENTER button to enter the tone setting mode.
② Press the CURSOR UP(▲)/DOWN(▼) buttons to select the desired tone.

When selecting the BASS

③ Press the CURSOR LEFT(▲)/RIGHT(▶) buttons to adjust the selected tone as desired.
The tone level can be adjusted within the range of -10 +10 dB.
In general, we recommend the bass and treble to be adjusted to 0 dB (flat level).
- Extreme settings at high volume may damage your speakers.
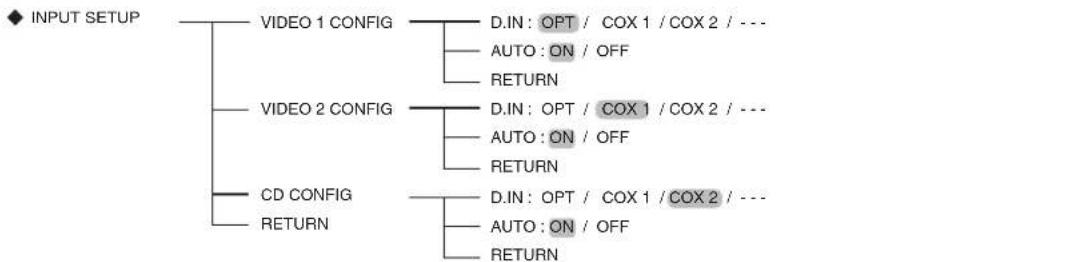
SETTING THE INPUT SETUP
INPUT SETUP
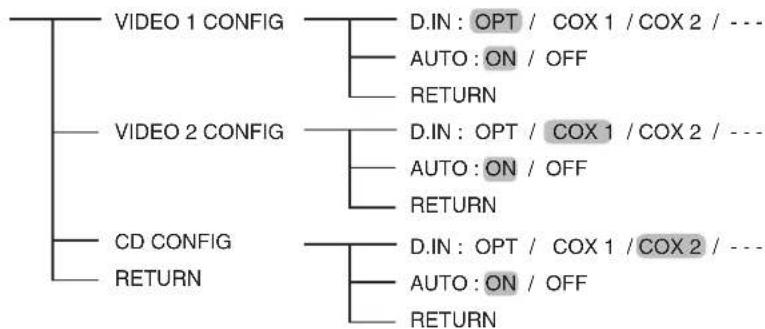
- D.IN(DIGITAL IN) : To assign the connected DIGITAL INs to the desired input.
- AUTO(AUTO SURROUND) : To select the auto surround mode or the manual surround mode.
-
RETURN: To return to the previous menu.
-
Press the CURSOR UP(▲)/DOWN(▼) buttons to select the desired input source, then press the ENTER button.

Example: When selecting the VIDEO 1
VIDEO1 CFG -30 >D.IN OPT
- Press the CURSOR UP(▲)/DOWN(▼) buttons to select the desired item.
- Press the CURSOR LEFT(▲)/RIGHT(▶) buttons to set the selected item as desired.

When selecting the DIGITAL IN
- You should assign the connected DIGITAL INs to the desired input source. (For details, refer to "CONNECTING DIGITAL INS" on page 7.)
- You can select the desired of OPT (optical), COX 1(coaxial 1), COX 2(coaxial 2) and -- (analog).
Notes :
In such a case that a DIGITAL IN is assigned to two input sources or more, when these input sources are selected, the digital audio signals can be heard from the same DIGITAL IN.
- When the HDMI IN connector is connected to your video component, the DIGITAL IN setting is invalid.
When selecting the AUTO SURROUND
- Depending on how to select a surround mode, you can select the auto surround mode or the manual surround mode.
OFF (Manual surround mode): You can select the desired of different surround modes selectable for the signal being input with using the SURROUND MODE SELECT (> / <) buttons. (For details, refer to "when selecting the manual surround mode with pressing the AUTO/MANUAL button on the front panel" on page 17.)
ON(Auto surround mode) : The optimum surround mode will be automatically selected depending on the signal format being input.
Notes :
- When the SPEAKER button is set to off or "CENTER" and "SURR"(Surround) are set to "NO", the auto surround mode is invalid.
- Even when the auto surround mode is selected and the same type of digital signal format is being input, the optimum surround mode may vary depending on whether the speaker type is set to "NO" or not.
- When the auto surround mode is selected, the surround modes other than the optimum surround mode cannot be selected.

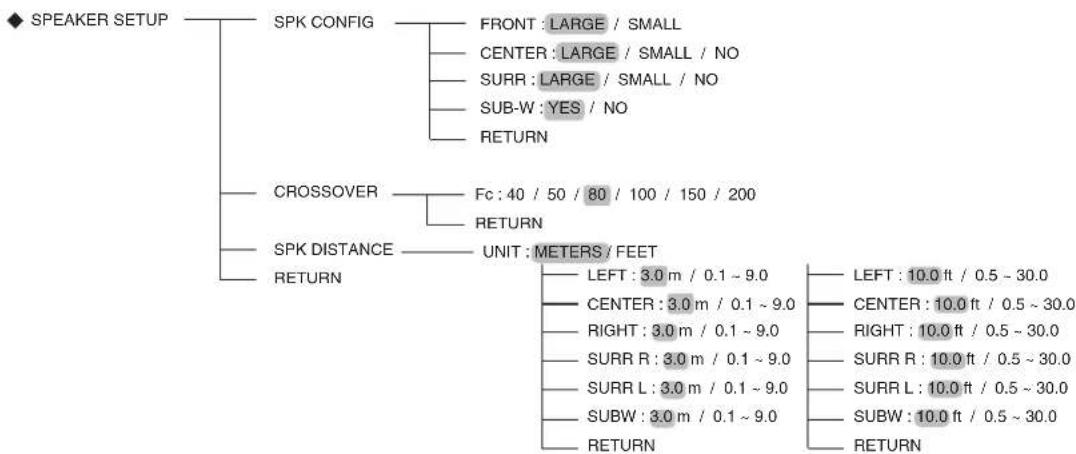
SETTING THE SPEAKER SETUP
After you have installed this receiver and connected all the components, you should adjust the speaker settings for the optimum sound acoustics according to your environment and speaker layout.
- Even when you change speakers, speaker positions, or the layout of your listening environment, you should adjust the speaker settings, too.
ENGLISH
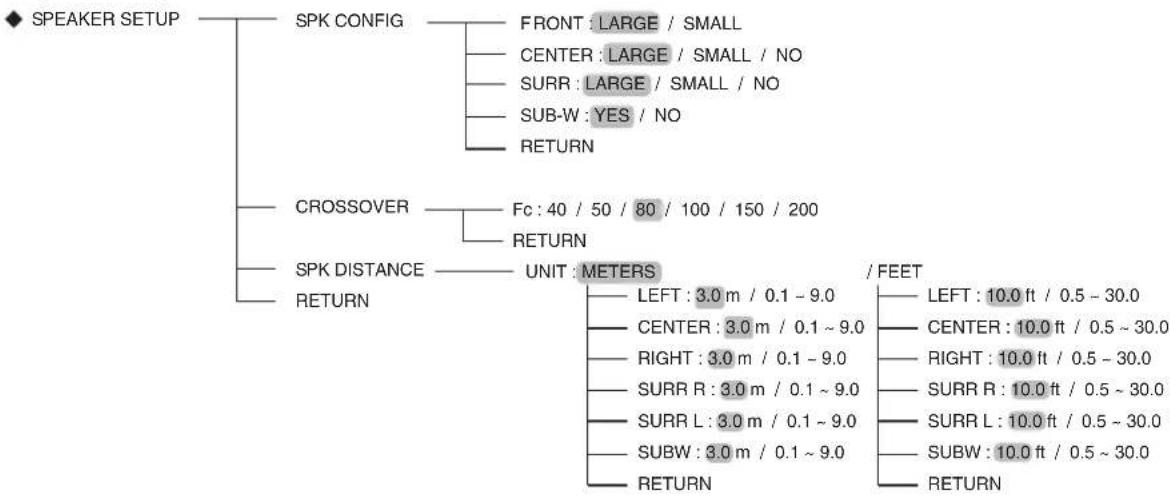
- SPK(SPEAKER) CONFIGURATION : To select the sizes of the speakers that are connected.
CROSSOVER : To select the desired crossover frequency. - SPK(SPEAKER) DISTANCE: To enter the distance between the listening position and each speaker to set the delay time automatically for optimum surround playback.
- RETURN: To return to the previous menu.
When selecting the SPEAKER CONFIGURATION
- Press the CURSOR UP () /DOWN () buttons to select the "SPK CONFIG", then press the ENTER button.
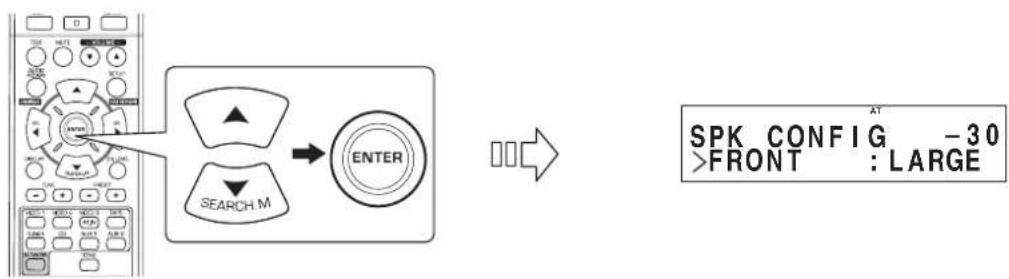
- Press the CURSOR UP(▲)/DOWN(▼) buttons to select the desired speaker.
- Press the CURSOR LEFT(▲)/RIGHT(▲) buttons to set the selected speaker as desired.
- Depending on your speaker type, you can select one of these following speaker types.
- Front, Center and Surround speakers :
LARGE : Select this when connecting speakers that can fully reproduce sounds below crossover frequency.
SMALL : Select this when connecting speakers that can not fully reproduce sounds below crossover frequency.
When this is selected, sounds below crossover frequency are sent to the subwoofer or speakers which are set to "LARGE" (when not using a subwoofer).
NO : Select this when no speakers are connected. When this is selected, sounds are sent to the speakers which are not set to "NO".
- Subwoofer:
YES : Select this to output LFE signals and bass frequencies of channels set to "SMALL" form the subwoofer.
NO : Select this when the subwoofer is not connected. The bass frequencies are output from other speakers.
Notes :
- When speakers are set to "SMALL", you should set their crossover frequency correctly according to their frequency characteristics. (For details, refer to "When selecting the CROSSOVER" on page 44.)
-
When the "FRONT" is set to "SMALL", "CENTER" and "SURR"(Surround) cannot be set to "LARGE" and the "SUB-W" (Subwoofer) cannot be set to "NO".
-
Repeat the above steps 2 and 3 until the speakers are all set to the desired mode.
■About the speaker size
- Select "LARGE" or "SMALL" not according to the actual size of the speaker but according to the speaker's capacity for playing low frequency (bass sound below frequency set on the "CROSSOVER" menu) signals.
If you do not know, try comparing the sound at both settings (setting the volume to a level low enough so as not to damage the speakers) to determine the proper setting.
When selecting the CROSSOVER
-
When speakers are set to "SMALL", be sure to set their crossover frequency correctly according to their frequency characteristics.
-
Press the CURSOR UP(▲)/DOWN(▼) buttons to select the "CROSSOVER", then press the ENTER button.
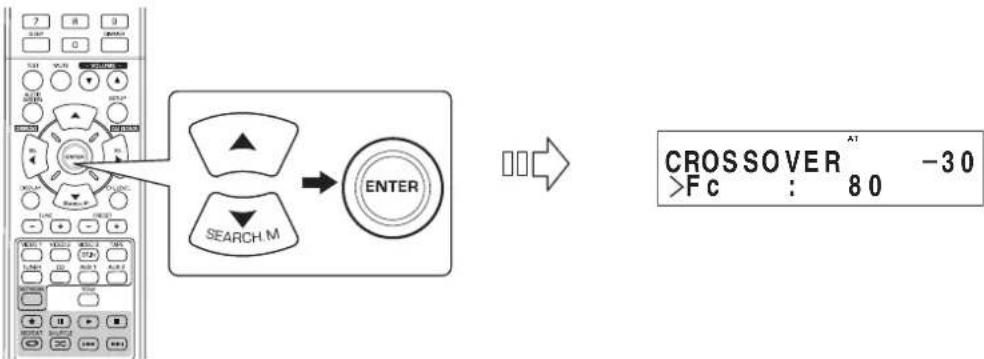
- Press the CURSOR LEFT( /RIGHT ) buttons to set the crossover frequency as desired.
- You can select the crossover frequency among 40, 50, 80, 100, 150 and 200 Hz .
About the crossover frequency
- When speakers are set to "SMALL", low frequencies in those channels that are below the crossover frequency are to output from subwoofer or front speakers which are set to "LARGE" (when not using a subwoofer).
Refer to the operating instructions of the speakers to be connected. If the frequency range of your speaker is 100Hz 20kHz the crossover frequency should be set to 100Hz (or slightly higher).
When selecting the SPEAKER DISTANCE
- Press the CURSOR UP(▲)/DOWN(▼) buttons to select the "SPK DISTANCE", then press the ENTER button.
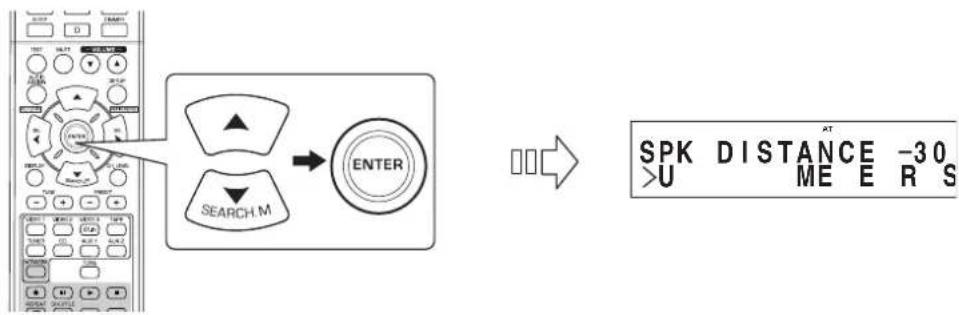
- Press the CURSOR UP(▲)/DOWN(▼) buttons to select the desired item.
■Note:
-
You cannot select the speakers set to "NO".
-
Press the CURSOR LEFT(▲)/RIGHT(▶) buttons to set the selected item as desired.
When selecting the desired unit
- You can select either "METERS" or "FEET".
Once a unit is selected, the distances are automatically changed in the selected unit.
When setting the distance
-
You can set the distance within the range of 0.1 9.0 meters in 0.1 meter intervals (or 0.5 30.0 feet in 0.5 feet intervals).
-
Repeat the above steps 2 and 3 until the distances are all set as desired.
About the speaker distance
When enjoying multi-channel surround playback with Dolby Digital and DTS sources, etc., it is ideal that the center and surround speakers, etc. should be the same distance from the main listening position as the front speakers. By entering the distance between the listening position and each speaker, the delay times of center and surround speakers, etc. are automatically adjusted to create an ideal listening environment virtually as if the center and surround speakers, etc. were at their ideal locations respectively.
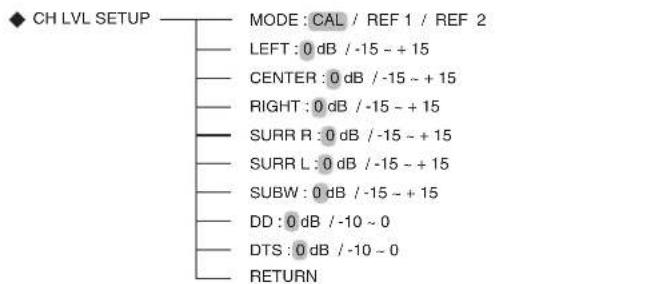
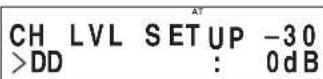
SETTING THE CH LEVEL SETUP

CH LVL SETUP MODE: CAL/REF1/REF2
LEFT:0dB/-15\~+15
CENTER:0dB/-15\~+15
RIGHT:0 dB/-15~+15
SURR R:0 dB /-15~+15
SURRL:0dB/-15\~+15
SUBW:0dB/-15\~+15
DD:0dB/-10~0
DTS:0 dB/-10~0
RETURN
Note: Depending on the speaker settings ("NO", etc), some channels cannot be selected.
Adjusting the current channel level
-
You can adjust the current channel levels as desired. These adjusted levels are just memorized into user's memory("CAL"), not into preset memory ("REF 1", "REF 2")
After adjusting each channel level with test tone, adjust the channel levels either according to the program sources or to suit your tastes. (For details, refer to "Adjusting each channel level with test tone" on page 19.) -
Press the CURSOR UP(▲)/DOWN(▼) buttons to select the desired channel.
Example: When selecting Dolby Digital source's LFE
- Press the CURSOR LEFT(▲)/RIGHT(▲) buttons to adjust the level of the selected channel or program source's LFE as desired.
The LFE level can be adjusted within the range of -10 0 dB and other channel levels within the range of -15 +15 dB
- In general, we recommend the LFE level to be adjusted to 0 dB. (However, the recommended LFE level for some early DTS software is -10 dB.) If the recommended levels seem too high, lower setting as necessary.
3. Repeat the above steps 1 and 2 to adjust each channel level.
Memorizing the adjusted channel levels
- You can memorize the adjusted channel levels into preset memory("REF 1", "REF 2") and recall the memorized whenever you want.
- After performing the steps 1 ~ 3 in "Adjusting the current channel level" procedure on page 46, press the ENTER button.


CH LVL SETUP-30 >M DE REF1O:
-
Then "1" of "REF 1" indication flickers.
-
Press the CURSOR LEFT(▲)/RIGHT(▲) buttons to select the desired preset memory, then press the ENTER button.
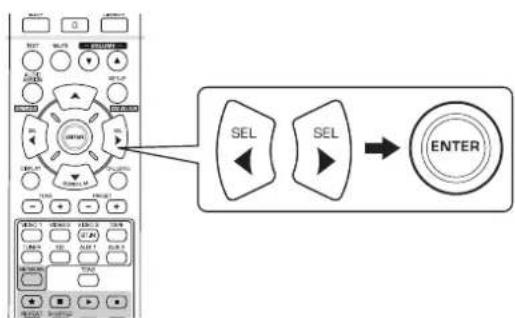
Each time the CURSOR LEFT( ) or RIGHT( ) button is pressed, "REF 1" or "REF 2" is selected.
- The adjusted channel levels have now been memorized into the selected memory.
Recalling the memorized channel levels
- Press the CURSOR UP(▲)/DOWN(▼) buttons to select the "MODE ~".
CH LVL SETUP -30 >M DE CALO:
-
"CAL" may be displayed instead of "REF 1" or "REF 2".
-
Press the CURSOR LEFT(▲)/RIGHT(▶) buttons to select the desired one of REF 1 and REF 2.
- Then the channel levels memorized into the selected preset memory are recalled.
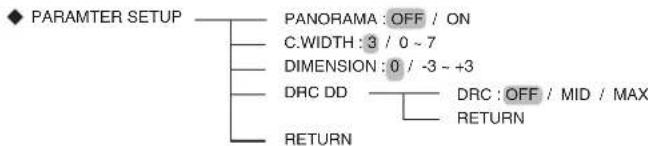
SETTING THE PARAMETER SETUP

DOLBY PRO LOGIC II MUSIC PARAMETERS : To adjust the various Dolby Pro Logic II Music parameters for optimum (PANorama, C.WIDTH(CENTER WIDTH), surround effect. DIMENSION)
- DRC DD(DYNAMIC RANGE COMPRESSION DOLBY DIGITAL): To adjust the dynamic range compression that makes faint sound easier to hear at low volume levels.
- RETURN: To return to the previous menu.
When selecting "PANorama", "C.WIDTH", "DIMENSION"
- You can adjust the various Dolby Pro Logic II Music parameters for optimum surround effect.
■Note:
-
The parameter settings are valid only when listening in Dolby Pro Logic II Music mode.
-
Press the CURSOR UP(▲)/DOWN(▼) buttons to select the desired parameter.
- Press the CURSOR LEFT( / RIGHT) buttons to adjust the selected parameter as desired.

When selecting the "PANorama"
This mode extends the front stereo image to include the surround speakers for an exciting "wraparound" effect with side wall imaging. Select "OFF" or "ON"(default value:OFF).
When selecting the "C. WIDTH"(CENTER WIDTH) control
This adjusts the center image so it may be heard only from the center speaker, only from the left/right speakers as a phantom image, or from all three front speakers to varying degrees. The control can be set in 8 steps from 0 to 7 (default value : 3).
■When selecting the "DIMENSION" control
This gradually adjusts the soundfield either towards the front or towards the rear. The control can be set in 7 steps from -3 to +3 (default value:0).
- Repeat the above steps 1 and 2 to adjust other parameters.
When selecting "DRC DD"
This function compresses the dynamic range of previously specified parts of the Dolby Digital sound track (with extremely high volume) to minimize the difference in volume between the specified and non-specified parts. This makes it easy to hear all of the sound track when watching movies at night at low levels.
Notes:
- This setting is valid only when the digital signals from the Dolby Digital program source are being input.
-
In some Dolby Digital softwares, this setting may not be valid.
-
Press the CURSOR UP(▲)/DOWN(▼) buttons to select "DRC DD", then press the ENTER button.
- Press the CURSOR LEFT( / RIGHT ) buttons to adjust the dynamic range compression as desired.

SETTING THE HDMI SETUP
HDMI SETUP HDMI:AMP/THROUGH
CEC:OFF/ON
POWER:OFF/ON
RETURN
HDMI(HDMI AUDIO OUT) : To output the digital audio signals from the HDMI MONITOR OUT connector.
- CEC(HDMI CONTROL): To link operations with components connected to HDMI connectors and compatible with HDMI control.
- POWER(POWER CONTROL): To link the power ON/OFF status of this unit to components.
- RETURN: To return to the previous menu.
1. Press the CURSOR UP(▲)/DOWN(▼) buttons to select the desired item.
2. Press the CURSOR LEFT(▲)/RIGHT(▲) buttons to set the selected item as desired.
When selecting the HDMI AUDIO OUT
The HDMI connection can carry uncompressed digital video signals and digital audio signals.
- Depending on whether the digital audio signals input into the HDMI IN are output from the HDMI MONITOR OUT of this receiver or not, you should set the HDMI AUDIO OUT correctly.
AMP: Not to output the HDMI digital audio signals from the HDMI MONITOR OUT of this receiver, meaning these signals are heard from the speakers connected to this receiver.
THROUGH : To output the HDMI digital audio signals from the HDMI MONITOR OUT, meaning these signals are heard from the speakers of your TV.
Note:
- When the HDMI AUDIO OUT is set to THROUGH, no sound will not be heard from the speakers connected to this unit.
When selecting the HDMI CONTROL
- The HDMI control function allows input selection of this unit to be interlocked with the operation of the connected components.
OFF: Not to use the HDMI CONTROL function.
ON: To use the HDMI CONTROL function. - When the HDMI CONTROL is set to ON, you can also use the ARC(Audio Return Channel) function, enabling the TV to send the audio signals to this receiver via a HDMI cable.
Notes:
- The HDMI control function may not work depending on the connected component and its settings.
To use the ARC function, the TV that supports the ARC function is required. - For details on HDMI CONTROL and POWER CONTROL, refer to "CONFIRMING THE HDMI FUNCTION" on page 36.
When selecting the POWER CONTROL
- The power control function allows the power status of this unit to be interlocked with the power ON/OFF and start of playback of the connected components.
OFF: Not to use the POWER CONTROL function.
。
ON: To use the POWER CONTROL function.
■Note:
- The POWER CONTROL can be set only when the HDMI CONTROL is set to ON.
Troubleshooting Guide
If a fault occurs, run through the table below before taking your receiver for repair.
If the fault persists, attempt to solve it by switching the receiver off and on again. If this fails to resolve the situation, consult your dealer. Under no circumstances should you attempt to repair the receiver yourself. This could void the warranty.
| PROBLEM POSSIBLE | CAUSE REMEDY | |
| No power | ·The AC input cord is disconnected. ·Poor connection at AC wall outlet or the outlet is dead or off. | ·Connect cord securely. ·Check the outlet using a lamp or another appliance. |
| No sound | ·The speaker wires are disconnected. ·The master volume is adjusted too low. ·The MUTE button is pressed to ON. ·Incorrect selection of input source. ·Incorrect connections between the components. ·The HDMI AUDIO OUT is set to THROUGH. ·The settings related to audio are set incorrectly. | ·Check the speaker connections. ·Adjust the master volume. ·Press the MUTE button to cancel the muting effect. ·Select the desired input source correctly. ·Make connections correctly. ·Set it to AMP. (For details, refer to "When selecting the HDMI AUDIO OUT" on page 50.) ·Set the settings correctly. (For details, refer to "SETTING THE INPUT SETUP" on page 41.) |
| No sound from the surround speakers | ·Surround mode is switched off(stereo mode). ·Master volume and surround level are too low. ·Monaural source is used. ·Surround speaker setting is "NO". | ·Select a surround mode. ·Adjust master volume and surround level. ·Select a stereo or surround source. ·Select the desired surround speaker setting. |
| No sound from the center speaker | ·Stereo mode, etc is selected. ·Center speaker setting is "NO". ·Master volume and center level are too low. | ·Select the desired surround mode. ·Select the desired center speaker setting. ·Adjust master volume and center level. |
| No picture | ·Video connections between this unit and the monitor TV are not made correctly. ·Incorrect selection of input source on the monitor TV. | ·Make proper video connections. ·Select the input source correctly. |
| No picture with an HDMI connection | ·HDMI connection between this unit and the monitor TV are not made correctly. ·The monitor TV or other equipments do not support HDCP. | ·Make proper HDMI connection. ·This unit will not output video signal unless the connected equipments supports HDCP. |
| Noise or distorted picture | ·Video format of your monitor TV, DVD player, etc. is different from PAL. | ·Change the video format to PAL. |
| Stations cannot be received | ·No antenna is connected. ·The desired station frequency is not tuned in. ·Antenna is in wrong position. | ·Connect an antenna. ·Tune in the desired station frequency. ·Move antenna and retry tuning. |
| Preset stations cannot be received | ·An incorrect station frequency has been memorized. ·The memorized stations are cleared. | ·Memorize the correct station frequency. ·Memorize the stations again. |
| Poor FM reception | ·No antenna is connected. ·The antenna is not positioned for the best reception. ·Weak signals. | ·Connect an antenna. ·Change the position of the antenna. ·Install an outdoor FM antenna. |
| Continuous or intermittent hissing noise during AM reception, especially at night. | ·Noise is caused by motors, fluorescent lamps or lightning, etc. | ·Keep the receiver away from noise sources. ·Install an outdoor AM antenna. |
| Cannot connect to network. | ·Network down. ·The computer's or router's firewall is activated. | ·Check that network is working. ·Check the computer's or router's firewall settings. |
| Internet radio broadcast cannot be played. | ·Ethernet cable is not properly connected or network is disconnected. ·Program is broadcasting in non-compatible format. ·Internet radio station is not currently broadcasting. | ·Check the connection status. ·Only internet radio programs in MP3 and WMA formats can be played in this unit. ·Tune in a radio station that is currently broadcasting. |
| Remote control unit does not operate. | ·Batteries are not loaded or exhausted. ·The remote sensor is obstructed. | ·Replace the batteries. ·Remove the obstacle. |
Specifications
AMPLIFIER SECTION
Power output, stereo mode, 6 Ω, THD 0.7%, 40 Hz~20 kHz | 2x100 W
Total harmonic distortion, 6 Ω, 100 W, 1 kHz | 0.05%
- Intermodulation distortion
60 Hz: 7 kHz= 4:1 SMPTE, 6 Ω, 100 W | 0.1%
Input sensitivity, 47k Line (CD, TAPE,VIDEO) 250 mV
- Signal to noise ratio, IHF "A" weighted Line (CD, TAPE, VIDEO) | 95 dB
Frequency response Line (CD, TAPE,VIDEO), 20 Hz~50 kHz +0 dB, -3 dB
Output level TAPEREC,2.2kΩ 250mV PREOUT(Subwoofer),1kΩ 1.5V
- Bass/Treble control, 100 Hz/10 kHz ±10 dB
- Surround mode, only channel driven
- Front power output, 6 Ω, 1 kHz, THD 0.7 % | 100 W / 100 W
- Center power output, 6 Ω, 1 kHz, THD 0.7 % | 100 W
- Surround power output, 6 Ω, 1 kHz, THD 0.7 % | 100 W / 100 W
DIGITAL AUDIO SECTION
Sampling frequency 32,44.1,48,96 kHz
- Digital input level
Coaxial, 75 Ω | 0.5 Vp-p
Optical, 660 nm | -15~21 dBm
VIDEO SECTION
Video format PAL
- Input sensitivity (=Output level), 75Ω Video (Composite (normal)) | 1 Vp-p
HDMI connector 19 pin
FM TUNER SECTION
Tuning frequency range 87.5~108 MHz
- Usable sensitivity, THD 3%, S/N 26 dB | 12.8 dBf
46 dB quieting sensitivity, mono/stereo 20.2/45.3 dBf
- Signal to noise ratio, 65 dBf, mono/stereo | 55 / 50 dB
Total harmonic distortion, 65 dBf,1 kHz, mono/stereo 0.5/1.0%
Frequency response, 30Hz 12kHz ± 3.0 dB
- Stereo separation, 1 kHz | 30 dB
- Capture ratio | 4 dB
IF rejection ratio 80 dB
AM TUNER SECTION
Tuning frequency range 522~1611 kHz
- Usable sensitivity 500 V/m
- Signal to noise ratio | 40 dB
- Selectivity | 25 dB
GENERAL
Power supply 230 V ~ 50 Hz
Power consumption 200W
Dimensions (WxHxD, including protruding parts) 435x143x359 mm (17-3/8x5-5/8x14-1/8 inches)
Weight (Net) 8.9 kg (19.6 lbs)
Note: Design and specifications are subject to change without notice for improvements.
Einleitung
BITTE LESEN SIE DIESE HINWEISE VOR INBETRIEBNAHME DES GERÄTS

CAUTION
RISK OF ELECTRIC SHOCK DO NOT OPEN

VORSICHT: ZUR VERMEIDUNG VON STROMSCHLAG GERATEGEHAUSE NICH T OFFNEN.
ES BEFINDEN SICH KEINE VOM VERBRAUCHER WARTBAREN TEILE IM INNERN DES GERATS. REPARATUR UND WARTUNG NUR DURING FACHPERSONAL.

Dieses Symbol weist auf gefährliche Hochspannung im Gerat hin, die zu Stromschlag führen kann.

Dieses Symbol weist auf wichtige Bedienungs- und Wartungsanleitungen hin.
WARNHINWEIS: ZUR VERMEIDUNG VON FEUER UND STROMSCHLAG GERAT WEDER REGEN NOCH FEUCHTIGKEIT AUSSETZEN.
Installationshinweise
Bitte beachten Sie: Bauen Sie这点es Gerät nicht umschlossen ein, beispelsweise in einem Bucherschrank oder in einemähnlichen Gehäuse.
Lassen Sie um das Gerät ausreichend Platz.
Links, rechts und an der Rückseite: 20 cm, oben: 40 cm
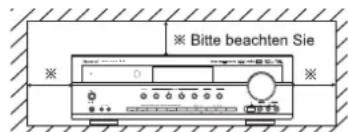
Blockieren Sie nicht die Luftungsschlitze und stellen Sie keine anderen Geräte oben auf dem Gerät ab.
SICHERHEITSHINWEISE
| EUROPA AUSTRALIEN | 220 V - 240 V | Geräte für den australischen Markt sind für eine Netzspannung von 230V~ konzipiert. Für einen sicheren Betrieb darf der dreistfütige Netzstecker nur an einer ordnungsgemäß geerdeten Standard Haushaltssteckdose angeschlossen werden. Sollten Sie für das Gerät ein Verlängerungskabel benutzen, so muss these disedrig verkabelt und geerdet sein. Nicht ordnungsgemäß Veränderungskabel stellen eine große Gefahrenquelle dar. Allein die Tatsache, dass these Gerät einwandfrei Funktioniert, weist nicht daraufhin, dass die Steckdose geerdet ist und dass die Elektroinstallation safer ist. Zu ihrer eigenen Sicherheit wenden Sie sich im Zweifelsfall in Bezug auf die korrekte Erdung der Steckdoseitte an einen Elektrofachmann. VEREINHEITLICHTE EUROPÄISCHE NETZSPANNUNG Alle Geräte sind für eine Netzspannung von 220-240V~ geeignet. |
VORSICHT
- Lassen Sie rings um das Gerät genügend Raum für ausreichende Luftung.
- Installieren Sie das Gerat nicht in besondere—heißen oder kalten Umgebauten, in direkter Sonneneinstrahlung oder in unmittelbarer Höhe von Heizgeräten.
Schützen Sie das Gerät vor Feuchtigkeit, Wasser und Staub.
Fuhren Sie keine Fremdkörper in das Gerät ein. - Blockieren Sie keinesfalls die Lufungsschlze mit Zeitungen, Tischüchem, Gardinen oder ähnlich.
- Stellen Sie keine offenen Flammen (wie brennende Kerzen) auf dem Gerät ab.
- Bitte entsorgen Sie Batterien umweltgerecht.
- Setzen Sie das Gerät weder Tropfwasser noch Spritzwasser aus.
- Stellen Sie keine wassergeführten Gegenstände (wie Vasen) auf dem Gerät ab.
- Lassen Sie das Gerät nicht mit Insektenvernichtungsmitteln, Waschbenzin oder Verdünner in Berührung kommt.
- Demontieren oder modifizieren Sie das Gerät nicht.
■Hinweise zum Netzkabel und zur Steckdose. - Dieses Gerät ist nicht vom Stromnetz getrennt, solange der Netzstecker in der Steckdose steckt, selbst wenn das Gerät ausgeschaltet ist.
- Beim Ziehen des Netzsteckers fassen Sieitte stets am Stecker an, nicht am Kabel ziehen.
- Bei längerer Nichtbenutzungziehen Sieitte den Netzstecker.
Die Steckdose sollte sich in unmittelbarer Nähne des Geräts befinden und muss jederzeit frei zugänglich sein.

Verbraucherinformationen zur Sammlung und Entsorgung von Algeräten und erschöpften Batterien
Diese Symbole auf Produkt, Verpackung und/oder beigefugen Dokumenten bedeuten, dass gebrachte elektrische und elektronische Geräte sowie Batterien nicht mit dem Hausmüll entsorgt werden führen. Für ordnungsgemäß Behandlung, Wiedergewinnung und Recycling von Altgeräten und erschöpften Batterien geben Sie dieseitte bei einer entsprechenden Sammelstelle gemäßörtlicher Richtlinien ab.

Durch die ordnungsgemäß Entsorgung dieser Geräte und Batterien helfen Sie bei der Einsparung wertvoller Ressourcen mit und vermeiden Sie mögliche negative Folgen für Umwelt und Gesundheit, welche anderenfalls aufgrund unsachgemäß Abfallentsorgung entstehen können.
Für weitere Informationen zu Sammelstellen und zum Recycling von Algeraten und Batterien setzen Sie sichitte mit ihrer Kommunalverwaltung, dem Entsorgungsunternehmen oder mit der Verkaufsstelle, in welcher Sie die Produkte gekauft haben, in Verbindung.
[Informationen zur Entsorgung in Ländern außerhalb der Europäischen Union]
These Symbole gelten nur innerhalb der Europäischen Union. Zur Entsorgung dieser Produkte setzen Sie sich bitte mit den ortlichen Behörden oder Ihr Frem Fachhändler in Verbindung. Heinweise für das Batterysymbol (untere beiden Symbolbeispiele):
Die Bezeichnung Pb unterhalb des Batteriesymbols bedeutet, dass diese Batterie Blei enthalt.
INHALT
Einleitung
BITTE LESEN SIE DIESE HINWEISE VOR INBETRIEBAHME DES GERATSI 2
Systemanschluss 4
Bedienelemente Frontblende 10
Fernbedienung 12
- REICHWEITE DER FERNBEDIENUNG 13
BATTERIEN EINSETZEN I 13
Bedienungshinweise
WIEDERGABE EINER PROGRAMMQUELLE 14
- SURROUND SOUND I 16
- SURROUND SOUND 17
RADIO HOREN 22
WIEDERGABEVONRDS-SENDERN (NURUKW) 1 24
(RDS Tuner (Regionale Option für einige europäische Länder))
-INTERNETRADIO UND MUSIKDATEIEN HÖREN
AUFNAHMEI 34
SONSTIGEFUNKTIONEN 35
HDMI-FUNKTION BESTÄTIGEN 36
Systemeinstellungen 37
SYSTEM EINSTellenLEN 39
EINGANGSEINSTELLUNGEN 41
LAUTSPRECHER EINSTELLUNGEN 42
KANALPEGELEINSTELLUNGEN 46
PARAMETER EINSTELLEN | 48
HDMIEINSTELLEN 50
Störungserkennung 52
Spezifikationen 53
Systemanschluss
- Nehmen Sie den Netzanschluss erst vor, nachdem alle Anschlüsse des Systems vorgenommen wurden.
- Unterschiedliche Komponenten haben früig abweichende Bezeichnungen der Anschüsse, davon lesen Sie die Bedienungsanleitungen der anzuschließlich den Komponenten bereits aufmerksam durch.
- Bitte beachten Sie beim Anschluss der Audio-, Video- und Laufsprecherkabel die Farbcodierung.
- Schlieben Sie die Stecker fest und korrekt an, anderenfalls kann es zu Tonausfälle, Störungen oder Schäden am Receiver kommt.

1. ANTENNENANSCHLUSS
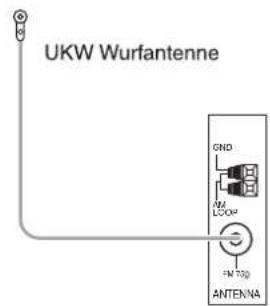
- Richten Sie die UKW-Wurfantenne aus, um den besten Empfang ihrer Lieblingssender zu gewährleisten.
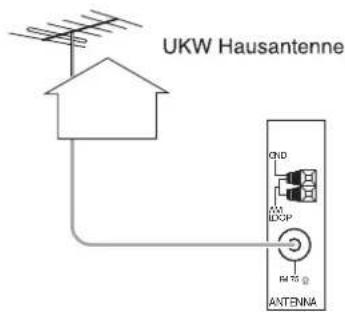
Mit einer 75Ω UKW-Hausantenne verbessern Sieden Empfang. Ziehen Sie die Wurfantenne vor dem Anschluss der Hausantenne ab.
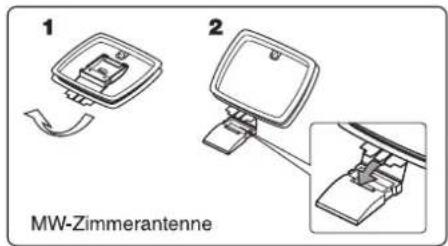
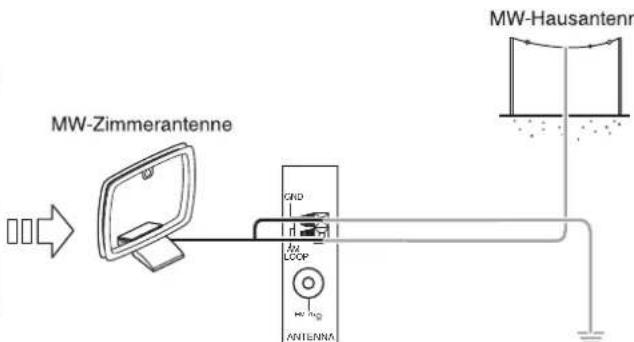
- Stellen Sie die MW-Zimmerantenne so welt wie möglich von Receiver, Fernseher, Lautsprecher- und Netzkabeln enternt auf und richten Sie die Antenna für besten Empfang aus.
- Ist das Empfangssignal mit der MW-Zimmerantenne nicht ausreichend, so konnen Sie alternative eine MW-Hausanterne benutzen.
2. ANSCHLUSS VIDEOGERÄTE
An die VIDEO 1 Buchsen konnen Sie ebenfalle einen DVD-Rekorder oder ein andes digitales Videoaufzeinungsgerat anschlieBen. Einzelheiten entnehmer Sieitte der Bedienungsanleitung des anzuschlieBenden Gerats.
- An die VIDEO 2 Buchsen konnen Sie ebenfalls eine zusätzliche Videokomponente wie Kabelempfänger oder Satellitensystem anschließen.
- Es stehen (Composite) VIDEO-Buchsen für Analog-Videoanschlüsse und die HDMI-Anschlüsse für digitales Video- und Audio zur Verfügung.
Die Reihenfolge der Bildqualität ist, ^nHDM^n (Composite) VIDEO.
■Bitte beachten Sie :
- Bei der Aufnahme von Videoprogrammquellen über (Composite) VIDEO 1 OUT oder bei der Anzeige von Videoprogrammquellen über (Composite) MONITOR OUT muss (Composite) VIDEO IN an der Videokomponente wie BD-Player, DVD-Player angeschlossen sein.
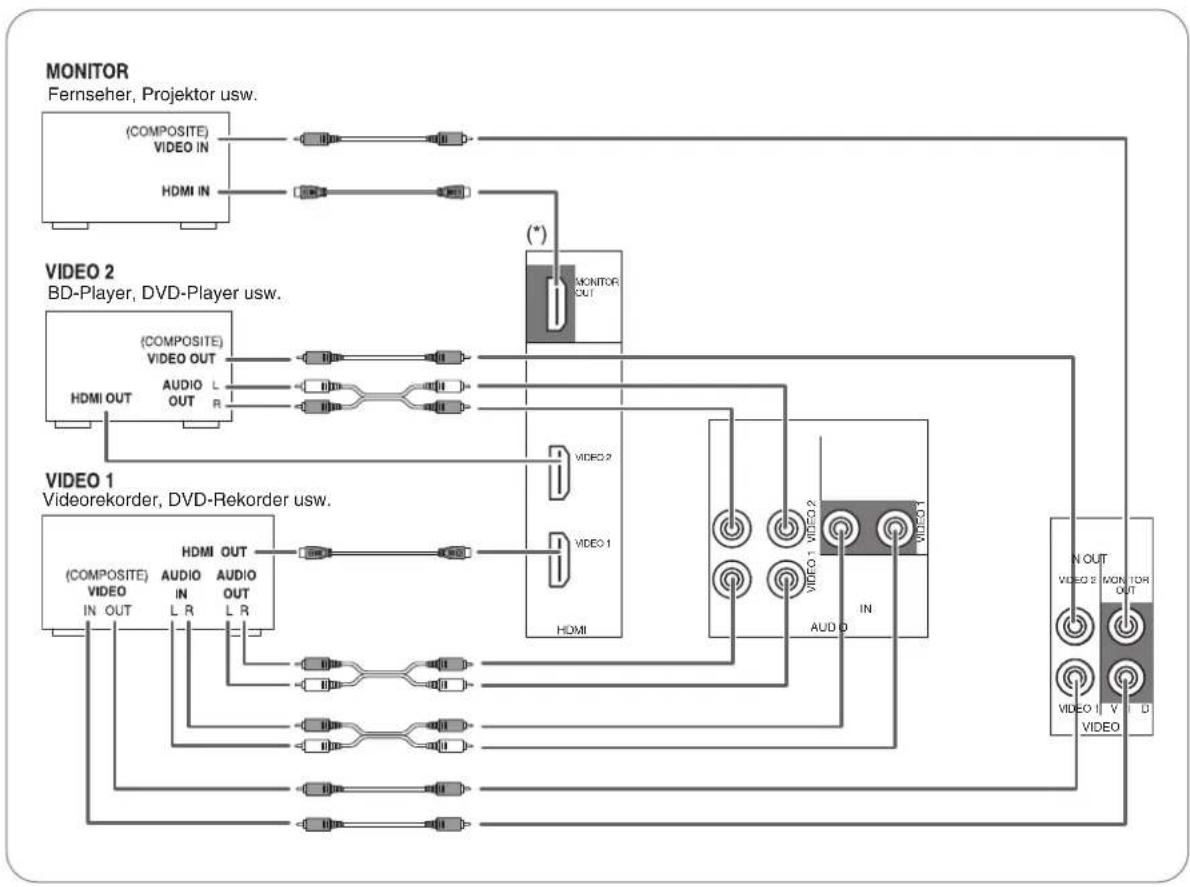

Fortsetzung
HDMI (High Definition Multimedia Interface) Anschluss (*)
- Sie können die Signalquelle (DVD-Player usw.) am Anzeigegerät (Fernseher, Projektor usw.) über diesen Receiver mit einem HDMI-Kabel anschließen, welches Sie im Fachhandel erwerben.
- Der HDMI-Anschluss kann nicht komprimierte digitale Videosignale und digitale Audiosignale übertragen.
Die Signale des HDMI Video Stream (Videosignale) sind theoretisch mit DVI-D kompatibel. Beim Anschluss eines Fernsehers, der über DVI-D Anschluss verfügbar, ist die Benutzung eines HDMI-DVI/Adapterkabels möglich. Da der HDMI-zu-DVI Anschluss keine Audiosignale überträgt, Da der HDMI-zu-DVI-Anschluss keine Audiosignale überträgt, stellen Sie HDMI AUDIO OUT auf AMP ein, um die digitalen HDMI-Audiosignale auf thism Receiver zu horen (Einzelheiten siehe „Auswahl HDMI AUDIO OUT" auf Seite 50).
Urheberrechtsschutzsystem
- Dieses Gerat Unterstützung HDCP (High-bandwidth Digital Contents Protection), eine Technologie zum Urheberrechtsschutz digitaler Videosignale gegen illegales Kopieren. HDCP muss ebenfalls von den angeschlossenen Komponenten unterstützt werden.
HDMI, das HDMI-Logo und High-Definition Multimedia Interface sind Marken oder eingetragene Marken von HDMI Licensing LLC.
Bitte beachten Sie:
- Für eine stabile Signalübertragung empfehlen wir die Benutzung von HDMI Kabeln von nicht mehr als 5 m Lange.
Von den Komponenten, welche HDMI unterstützenken, konnen einige andere Komponenten über den HDMI-Anschluss steuern. Einzelheiten zur HDMI-Funktion siehe ,HDMI-FUNKTION BESTÄTIGEN" auf Seite 36 und "HDMI EINSTELLLEN" auf Seite 50.
Die Audiosignale vom HDMI-Anschluss (einschließlich Abstastfrequenz und Bitlange) konnen durch die angeschlossene Komponente limitiert sein.
Die Videosignale werden nicht ordnungsgemäß ausgegeben, wenn eine nicht HDCP-kompatible Komponente angeschlossen ist. - Sind die Auflösungen der Videosignale von MONITOR OUT und ihrem Fernseher nicht aufeinander abgegliedchen, so ist das Bild verschwommen oder wird nicht angezeigt. In thisem Falländern Sieitte die Einstellungen der Auflösung der Quellenkomponente (BD-Player usw.) zu einer Auflösung, welche Ihr Fernseher verarbeiten kann (Einzelheiten entnehmer Sieitte der Bedienungsanleitung der Quellenkomponente).
- Wollen Sie nur das Bild auf Ihrlem Fernseher anzeigen und nicht den Ton wiedergeben, so stellen Sie HDMI AUDIO OUT auf AMP ein, womit das digitale Audiosignal über HDMI MONITOR OUT these Receivers nicht ausgegeben wird (Einzelheiten entnahmen Sieitte dem Abschnitt „Auswahl HDMI AUDIO OUT" auf Seite 50).
3. ANSCHLUSS AUDIOGERÄTE
- An die TAPE IN/OUT Buchsen konnen Audioaufzeichungsgeräte, wie beispielsweise ein Kassettendeck, ein MD-Rekorder usw. angeschlossen werden.
HDMIN des CD-Players kann an einer zusätzlichen Videokomponente ohne Analog-Videobuchsen angeschlossen werden.
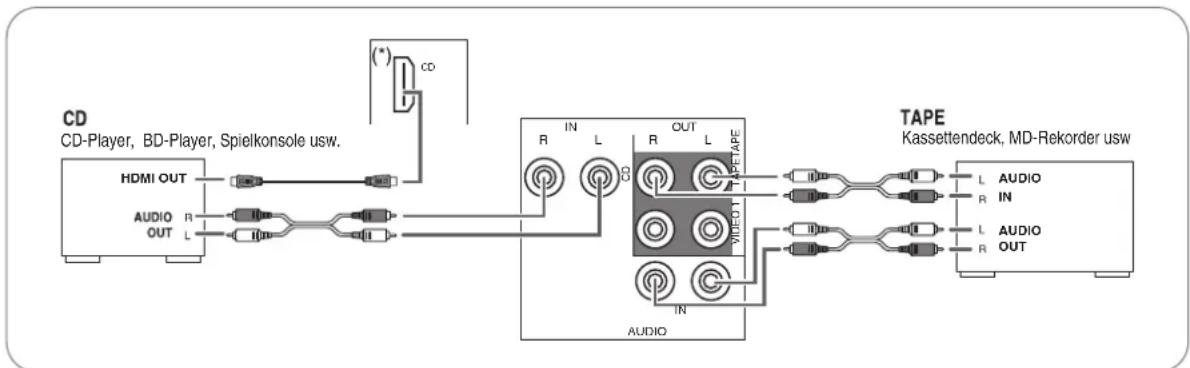

4. ANSCHLUSS DIGITALER EINGänge
Die OPTISCHEN und KOAXIAL-DIGITALAUSGANGE der Komponenten, welche an CD und VIDEO 1 ~VIDEO 2 deses Gerats angeschlossen sind, können an diesen DIGITALEINGANGEN angeschlossen werden.
- An einem Digitaleingang sollenn Geräte wie beispielsweise ein CD-Player, LD-Player, DVD-Player usw. mit DTS Digital Surround, Dolby Digital oder mit PCM-formatigen Digitalsignalen usw. angeschlossen werden.
- Einzelheiten entnehmer Sieitte der Bedienungsanleitung des anzuschliebenden Gerats.
Bei KOAXIAL-DIGITALANSCHLUSS benutzen Sieitte ein 75Ω KOAXIALKABEL,kein gewohnliches AUDIOKABEL.
- Einige der optischen Glasfaserkabel konnen für diesen Gerät nicht benutzt werden. Konnen optische Glasfaserkabel nicht an ihren Geräten angeschlossen werden, so setzen Sie sichitte mit ihrer Fachhandlcr oder dem autorisierten Kundendienst in Verbindung.
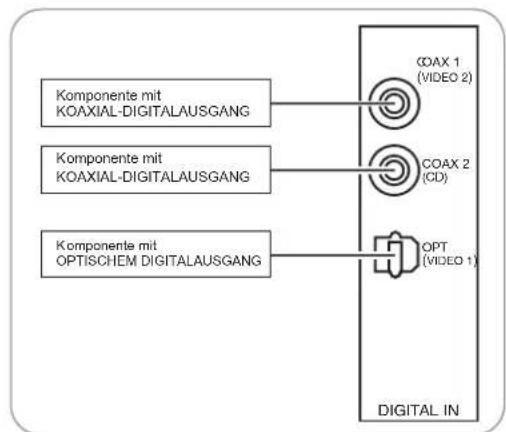
■Bitte beachten sie :
-itte behmen Sie entweder einen OPTISCHEN oder einen KOAXIAL-DIGITALLEN ANSCHLUSS der Komponenten vor (nicht beide).
Standardestellungen der Digitaleingänge
- Beim Anschluss der DIGITALEINGANGE Ihr Komponenten ist es einfacher, den Standardeinstellungen zu folgen.
- Weichen ihre DIGITALANSCHLUSSE von den Standardeinstellungen ab, so sollen den Sie die DIGITALEINGANGE zuordnen, wie unter „Auswahl DIGITAL IN" auf Seite 41 beschrieben.
Die Stangeinstellungen sind folgende: OPTICAL IN:VIDEO 1, COAX IN:VIDEO 2, COAX2 IN:CD
5. ANSCHLUSS SUBWOOFER PRE OUT
- Zur Verstärkung der Basse schlieben Sie einen aktiven Subwoofer an.

6. VERBINDUNG MIT DEM NETZWERK
Zum Anschluss these Gerats an einem Breitband-Heimnetzwerk zum Horen von Internetradio schlieben Sie den Anschluss LAN/ETHERNET des Gerats über Ethernetkabel (CAT-5 oder großer empfohlen) an Ihr dem Router an.
■Bitte beachten Sie:
- Nach dem Aufbau einer Breitband-Internetverbindung besteht. Sie die Kommunikationseinstellungen vor (Einzelheiten siehe „Auswahl von „Network“ auf Seite 32).
- Zur Nutzung einer Breitband-Internetverbindung mussen Sie einen entsprechenden Vertrag mit einem Internet-Dienstanbieter abschieden.
Für weitere Informationen setzen Sie sichitte mit Ihr Internet-Dienstanbieter in Verbindung.
- Lesen Sie ebenfaies die Bedienungsanleitungen der weiteren Gerate aufmerksam durch, da Einzelheiten abweichen konnen und von Ihr Internetumgebung abhagen.
Benutzen Sie Ethernetkabel/Router mit Unterstützung von 10 BASE-T/100 BASE-TX. - Einige Ethernetkabel sind störanfällig. Wir empfehlen abgeschirmte Kabel.
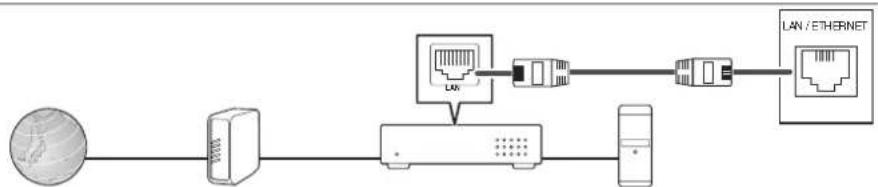
Internet Modem Breitbandrouter
PC


7. ANSCHLUSS LAUTSPRECHER
- Schlieben Sie die Laufsprecher fest und korrekt am entspruchenden Kanal (links und rechts) und mit der korrekten Polarität (+ und -) an. Bei nicht ordnungsgemäß ausgeführten Anschüssen haben Sie keinen Ton von den Laufsprechem und bei vertauschter Polarität klingt der Sound unnatürlich und die Basse fehlen.
Zur Installation der Laufsprecher siehe Abschnitt Aufstellen der Laufsprecher" auf Seite 9. - Nach der Installation der Laufsprecher gleichen Sie bereits zunachst die Laufsprechereinstellungen entsprechend ihrer tatsächlichen Umgebung und dem Laufsprecherlayout ab. (Einzelheiten finden Sie im Abschnitt "LAUTSPRECHER EINSTELLUNGEN" auf Seite 42
Achtung :
-itte benutzen Sie ausschlieBlich Lautsprecher mit einer Impedanz von 6 Ohm oder hoher.
- Achten Sie daraufuf, dass die blanken Laufsprecherkabel weder miteinander noch mit Metalteilen theses Gerats in Berührung kommt, das kann zu Schaden am Gerät und/oder an den Laufsprechem führen.
- Berühren Sie keinesfalls die Lautspeicheranschlüsse, während das Gerät am Netz angeschlossen ist, das kann zu Stromschlag führen.

Anschluss der Laatsprecherkabel
| 1. Isolieren Sie die Kabel etwa 10 mm ab und verzwirbeln Sie die Kabelenden. | 2. Mit Linksdrehung öffnen Sie den Laatsprecheranschluss. | 3. Setzen Sie das abisolierte Kabel ein. | 4. Mit Rechtsdrehung schreiben Sie den Laatsprecheranschluss. |
8. NETZKABEL
- Stecken Sie den Netzstecker in die Steckdose.
9. ANSCHLUSSE ZUR AKTUALISIERUNG
- Diese Anschlüsse können in Zukunft zur Aktualisierung der Software benutzt werden, um beispelseweise neue digitale Audioformate zu unterstützen.
■Bitte beachten Sie:
Die Programmierung fur Aktualisierungen benotigt besondere Programmierkennisse, thereof empfehlen wir, dies durch einen qualifizierten Installateur durchfuhren zu halten.

Aufstellen der Laatsprecher
Die Idealposition der Laufsprecher hangt unter anderen von ihrer Raumgroße sowie der Wandverkleidung ab. Ein typisches Beispiel für die Aufstellung der Laufsprecher finden Sie nachstehend:
Laufsprecher vorn links und rechts sowie mittlerer Laufsprecher
- Stellen Sie die vorderen Lautsprecher mit denen Vorderseite möglichst auf gleicher Höhe wie Fernseher oder Bildschirm auf.
- Stellen Sie den mittleren Laufsprecher zwischen dem linken und rechten vorderen Laufsprecher und nicht weiter entfernt von der Sitzposition auf, als die vorderen Laufsprecher.
- Richten Sie die Lautspeicher auf die Kopfhohe der hauptsächlichen Sitzposition aus.
■ Linker undrechtier Surround-Lautsprecher
- Stellen Sie die Surround-Lautsprecher etwa 1 Meter über Kopfhohe der Sitzposition direkt links und rechts oder etwas nach hinten versetzt auf.
Subwoofer
- Der Subwoofer erzeugt kräfigte Bände. Stellen Sie den Subwoofer vom an beliebiger Stelle auf.
Bitte beachten Sie:
- Haben Sie einen herkömmlichen Fernseher, so benutzen Sieitte ausschlieBlich magnetisch abgeschirmte Laufsprecher vom links und rechts sowie in der Mitte, um Bildstorungen zu vermeiden.
- Für Beste Surround-Effekte sollen alle Lautsprecher, außer dem Subwoofer, Full-Range-Lautsprecher sein.
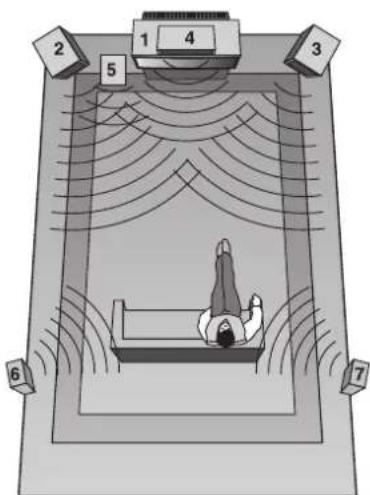
- Fernseher oder Leinwand
- Lautsprecher torn links
- Laufsprecher vom rechts
- Mittlerer Lautsprecher
- Subwoofer
- Surround-Lautsprecher links
- Surround-Lautsprecher rechts
Bedienelemente Frontblende
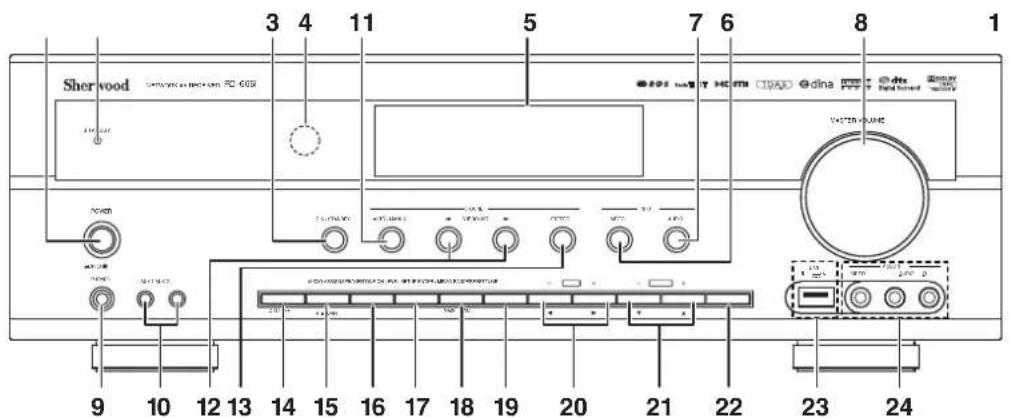
- POWER: Hauptschalter
- STANDBY Statusanzeige
- ON/STANDBY: Ein/Aus-Schalter
- SENSOR FERNBEDIENUNG
- FLUORESZENZANZEIGE
Einzelheiten nachstehend.
6. UMSCHALTER VIDEOEINGANGE
7. UMSCHALTER AUDIOEINGANGE
8. MASTER-LAUTSTARKE
9. KOPFHÖRERBUCHSE
0.AUX1.2 EINGANGE
Einzelheiten{nachsteSeite.
1. AUTO/MANUAL Taste
12. Auswahltasten SURROUNDMODUS (▶/▲)
13. STEREO Umschalter
- LAUTSPRECHER Taste
- AUDIO ZUORDNUNG Taste
- TONMODUS Taste
- KANALPEGEL Taste
- SETUP Taste
- ENTER/MEMORY Taste
- TUNING UP/DOWN (+/-), CURSOR
LEFT/RIGHT(▲/▶) - PRESET UP/DOWN (+/-), CURSOR
UP/DOWN ( /) - BANDWAHL Umschalter
- USB-Port
Einzelheiten nachste Seite.
24.VIDEO3 EINGANGE
Einzelheiten nachste Seite.
FLUORESZENZANZEIGE
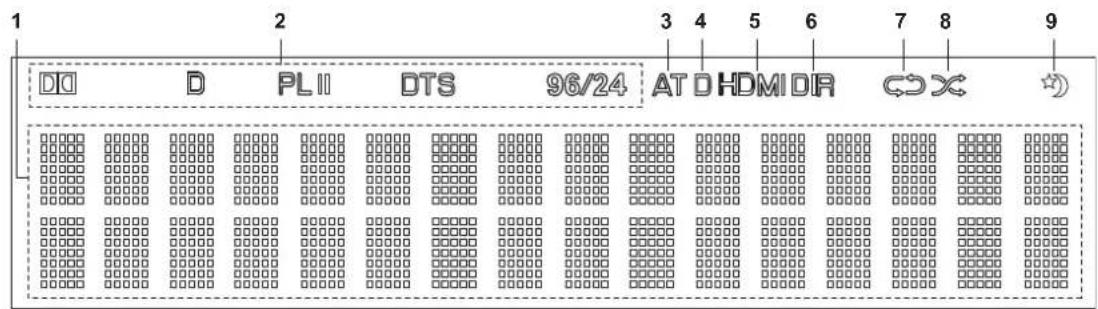
- Eingang, Freqenz, Lautstärkepegel,
Surroundmodus, Betriebsinformationen usw. - Surroundmodus Statusanzeigen
- AUTO Statusanzeige
-
DIGITALEINGANG Statusanzeige
-
HDMI Statusanzeige
- DIREKT Statusanzeige
- WIEDERHOLUNG Statusanzeige
- ZUFALL Statusanzeige
- SLEEPTIMER Statusanzeige
AUX 1,2 EINGANGE
Die AUX 1, 2 Eingänge konnen an eine zusätzliche Audiokomponente wie MP3-Player angeschlossen werden.
■Bitte beachten sie :
- Beim Anschluss beispiesweise eines MP3-Players benutzen Sieitte ein Kabel mit Stereo-Klinke,kin Monokabel.
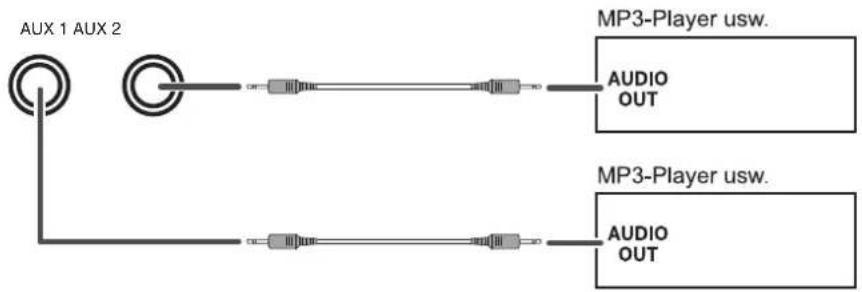
USB-PORT
- Ein USB-Speichermedium kann am USB-Port zur Wiedergabe von MP3- oder WMA-Dateien auf thisem Gerät angeschlossen werden (Einzelheiten siehe „Bei Auswahl von „USB“ auf Seite 30.)
Bitte beachten Sie:
- Trennen Sie nach der USB-Wiedergabe das USB-Speichermedium im Stopp- oder Stand-by-Modus ab.
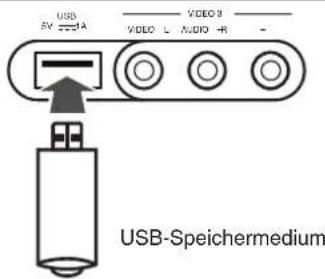
VIDEO 3 EINGÄNGE
An die VIDEO 3 EINGänge konnen ebenfalls zusätzliche Videokomponenten wie Camcorder, Spielkonsole usw. angeschlossen werden.
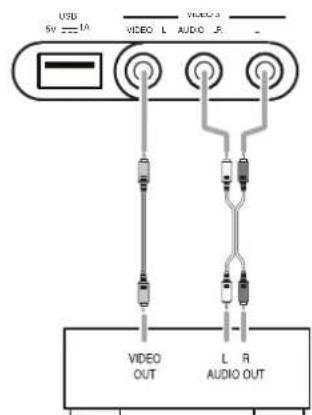
VIDEO 3 Camcorder, Spielkonsole usw.

Fernbedienung
DEUTsCH
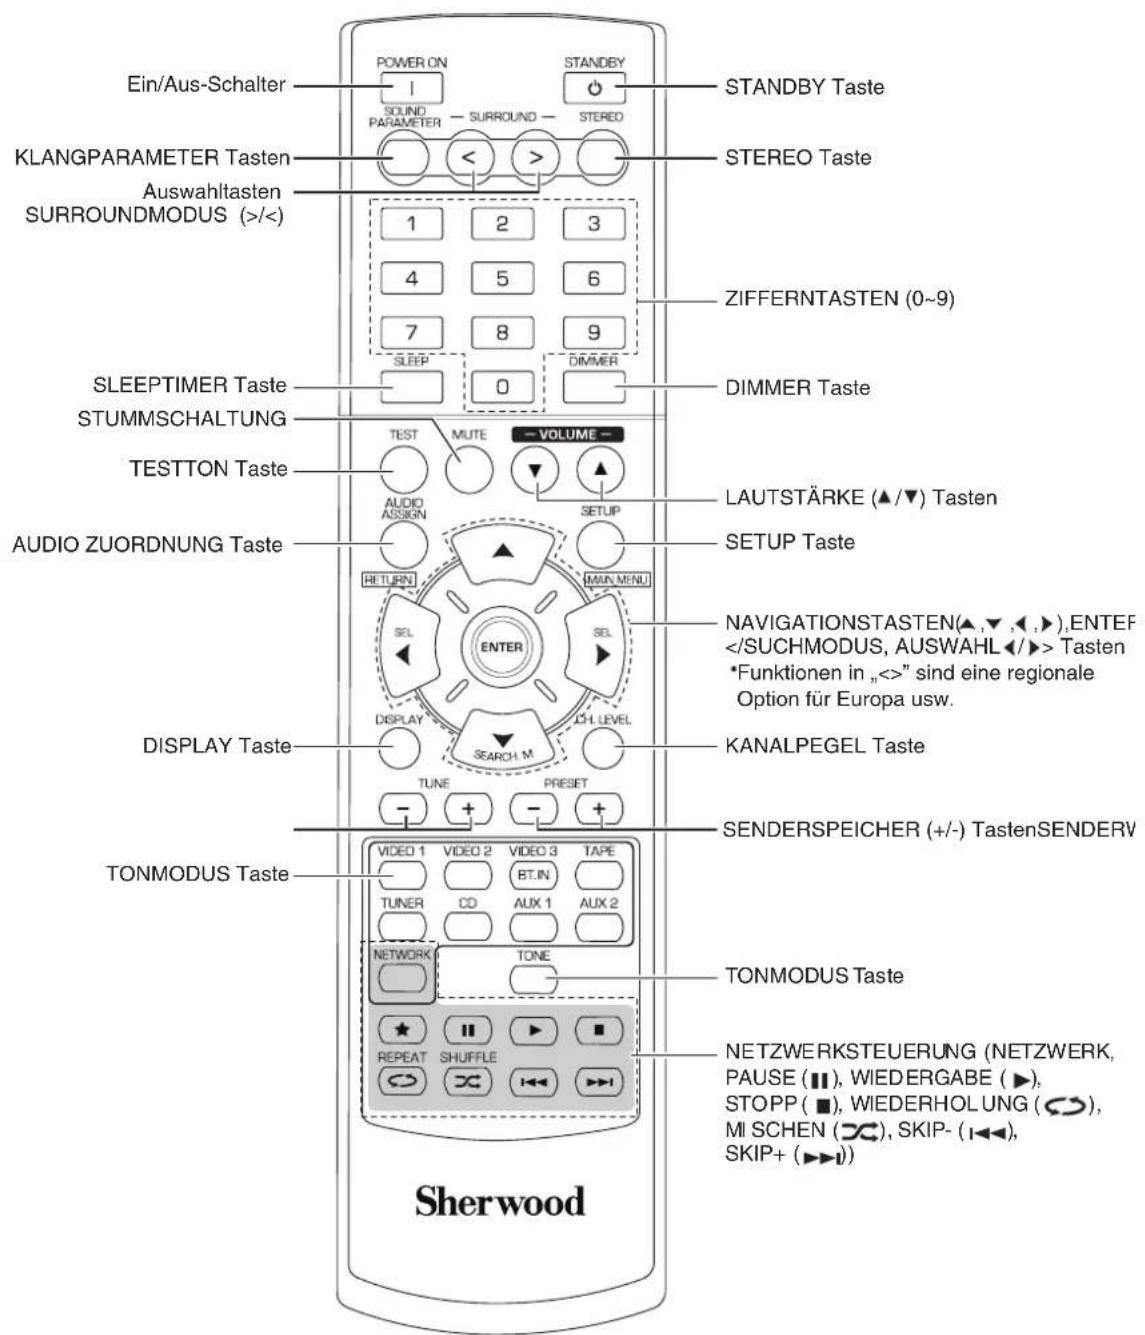
■Bitte beachten sie :
- BEWERTUNG (★) steht für diesen Receiver nicht zur Verfügung.
REICHWEITE DER FERNBEDIENUNG
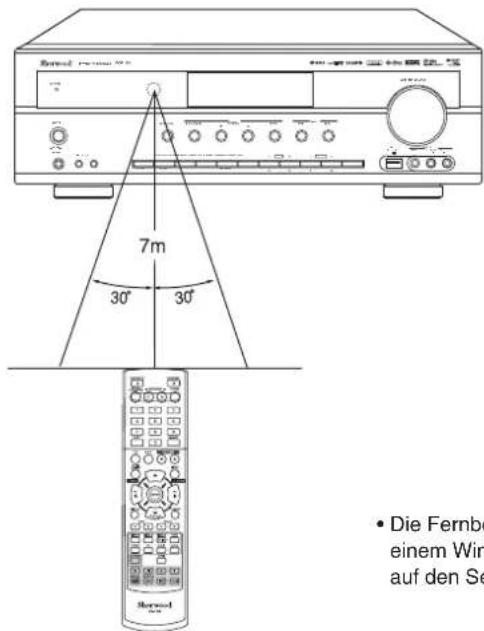
- Die Fernbedienung hat eine Reichweite von etwa 7 Metern bei einem Winkel von jeweils 30 Grad. Richten Sie die Fernbedienung auf den Sensor im Receiver aus.
BATTERIEN EINSETZEN
- Offnen Sie das Batteriefach.

- Setzen Sie zwei Batterien (AAA, 1,5 V) mit der korrekten Polarität ein.

- Bei längerer Nichtbenutzungephenmen Sieitte die Batterien aus der Fernbedienung.
Benutzen SieittekeineAkkus(Ni-Cd).
Bedienungshinweise
■Bitte beachten Sie : Vor der Benutzung des Receivers halten Sieitte zunachst die Einstellungen fur beste Leistung vor (Einzelheiten finden Sie im Abschnitt „Systemeinstellungen" auf Seite 37).
WIEDERGABE EINER PROGRAMMQUELLI
Erste Schritte
Schalten Sie den Receiver in Stand-by Modus.
Die STANDBY Anzeige leuchtet auf. Der Receiver ist nicht vom Netz getrennt und hat eine geringe Leistungsaufnahme zur Unterstützung der Betriebsbereitschaft.
Zum Ausschalten drücken Sie erneut den Hauptschaff. POWER.
Die Spanningsversorgung wird unterbrochen und die STANDBY Anzeige erlisch.
Automatische Energieeinsparung
Die automatische Energieeinsparung schaltet die Spannungsversorgung automatisch aus und ruft den Stand-by-Modus auf. Erfolgst für die voreingestellte Zeit kein Tastendruck, so wird die Funktion aktiviert (Einzelheiten siehe „Auswahl AUTOMATISCHE ENERGIEEINSPARUNG" auf Seite 39.)
- Schalten Sie den Receiver im Stand-by Modus ein.
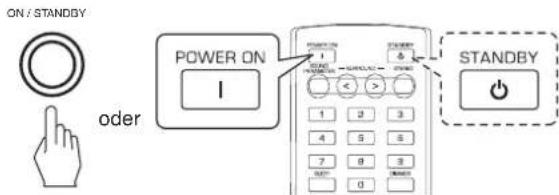
- Mit jedem Tastandruck auf ON/STANDBY auf der Frontblende wird der Receiver entweder in den Betriebsmodus eingeschaltet oder in Stand-by Modus ausgeschaltet.
-
Drucken Sie POWER ON auf der Fernbededierung zum Aufrufen des Betriebsmodus oder drucken Sie STANDBY zum Aufrufen des Stand-by Modus.
-
Schalten Sie die Laufsprecher ein.
SPEAKER
- "SPEAKER ON" wird angezeigt und der Ton wird über die angeschlossenen Lautspricher besteht.
-
Bei Anschluss von Kopfhören für privaten Hörgenuss drücken Sie erneut SPEAKER, um die Laufsprecher auszuschalten (.SPEAKER OFF' wird angezeigt).
-
Wahlen Sie die gewünschte Eingangsquelle.
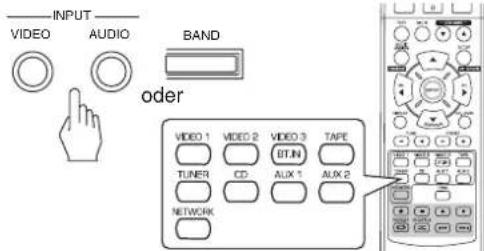
- Mit jedem Tastendruck auf „VIDEO" auf der Frontblende wird die Eingangsquelle wie folgt umgeschalte: VIDEO 1 → VIDEO 2 → VIDEO 3
- Mit jedem Tastendruck auf "AUDIO" auf der Frontblende wird die Eingangsquelle wie folgt umgeschaltet: CD AUX 1 TV AUX 2 TAPE NET/USB TUNER (Frequenzanzeige)
*: Nur wenn HDMI CONTROL auf ON eingestellt ist, hören Sie die digitalen Audiosignale vom Fornseher über HDMI-Kabel. (Einzelheiten siehe „Auswahl HDMI CONTROL" auf Seite 50).
Bei Auswahl von NET/USB siehe,INTERNETRADIO UND MUSIKDATEIEN HOREN auf Seite 26. - Mit jedem Tastendruck auf BAND (oder TUNER auf der Fernbedienung)ändert sich das Frequenzband wie folgt: FM STEREO → FM MONO → AM
Auswahl von CD,VIDEO 1-2 als Eingangsquelle
- Wahlen Sie den gewünschten Digital- oder Analogeingang.

Mit jedem Tastendruck wird der entsprechende Eingang wie folgt gewählt:
OPT COAX.1 COAX.2 ANALOG
Bitte beachten Sie:
- Ist HDMI IN an ihrer Videokomponente angeschlossen, dann können Sie den Audioeingang nicht wunschgemäß zuordnen (nur die HDMI digitalen Audiosignale können gehört werden).
- Ist HDMI IN nicht angeschlossen (und die Anzeige „HDMI" blinkt), können Sie den Audioeingang zuordnen.
- Bei Auswahl von VIDEO 3, AUX 1, AUX 2, TAPE, TV, NET/USB oder tuner als Eingangsquelle kann der Digitaleingang nicht gewählt werden.
- Ist der gewählte Digitaleingang nicht angeschlossen, blinking die Anzeige „D (Digital)" und der Analogeingang wird automatisch gewählt.
Der gewähte Digitaleingang oder Analogeingang wird automatisch im Einstellungsmenu INPUT der entsprechenden Eingangsguelle zugeordnet (Einzelheiten siehe "EINGANGSEINSTELLUNGEN" auf Seite 41). - Der Ton von dem am ausgewählten Digitaleingang angeschlossenen Gerat kann unabhängig von der gewählten Eingangsquelle gehört werden.
5. Wiedergabe von der gewählten Komponente.
- Bei Wiedergabe der Programmquellen mit Surround Sound siehe „SURROUND SOUND" auf Seite 17.
6. Stellen Sie die (Master-) Lautstärke ein.
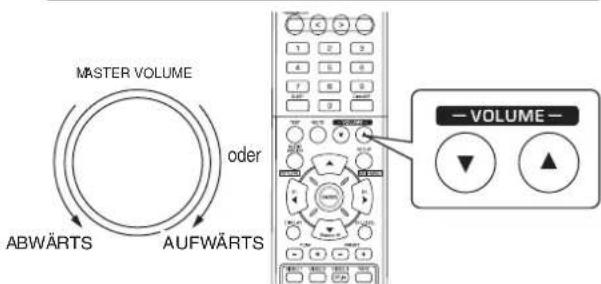
7. Stummschaltung
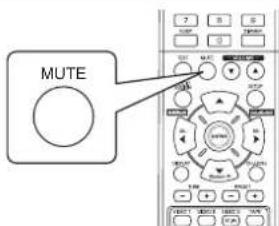
-MUTING"blinkt.
- Mit erneutem Tastendruck haben Sie die Stummschaltung wieder auf.
8. Benutzung der Kopfhörer.

Schalten Sie die Laufsprecher aus.
- Bei Wiedergabe einer DTS oder Dolby Digital Programmelle wird beim Anschluss der Kopfhörer und ausgeschalten Lautspruchern automatisch der 2-Kanal-Downmixmodus aufgerufen (Einzelheiten finden Sie im Abschnitt „2-Kanal-Downmixmodus" auf Seite 17.)
Bitte beachten Sie:
- Stellen Sie die Lautstärke bei der Benutzung von Kopfhören nicht zu hoch ein.
Klangeinstellung (Basse und Hohen)
9. Rufen Sie den Klangmodus auf.
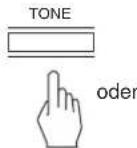
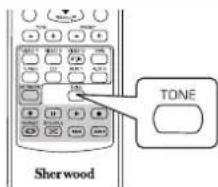
- Der Klangmodus wird für eineugekunden angezeigt.

10. Mit den NAVIGATIONSTASTEN LINKS(4)/RECHTS (▶) wahren Sie den gewünschten Klangmodus.
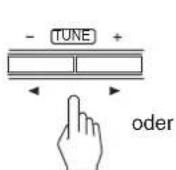
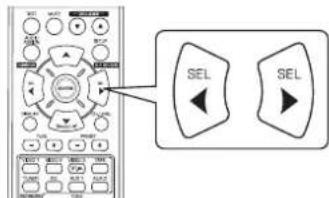
- Mit jedem Tastendruck schalten Sie den Klangmodus wie folgt um:
OFF: Wiedergabe einer Programmquelle ohne den Klangeffekt (die „DIR" Statusanzeige leuchtet auf)
ON: Einstellen der Klangeffekte nach persönlich
Geschmack (die „DIR" Statusanzeige erlischt)
Sind die Klangeinstellungen mit TONE aktiviert, dann stellen Sie den Klang (Basse und Höhen) ein.
11. Mit den NAVIGATIONSTASTEN AUFWÄRTS (▲)/ ABWÄRTS (▼) wahren Sie den gewündsten Klang.
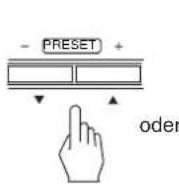
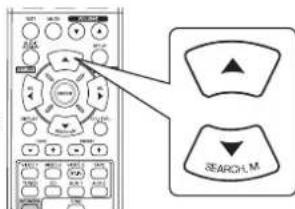
- Mit jedem Tastendruck schalten Sie den Klang wie folgt um:
[ \text{BASS} \leftrightarrow \text{TREBLE (Höhen)} \leftrightarrow \text{TONE: ON} ]
12. Mit den NAVIGATIONSTASTEN LINKS(4)/RECHTS (5) stellen Sie den gewählten Klang wunschgemäß ein.
- Der Klangpegel kann im Bereich zwischen -10 ~ +10 dB eingestellt werden.
- Allgemein empfehlen wir, Basse und Höhen auf 0 dB (Flat Level) einzustellen.
- Extreme Einstellungen können ihre Laufsprecher bei hohen Lauststärken beschädigen.
- Erlischdt das Klangdisplay, so beginnen Sie erneut mit Schritt 9.
SURROUND SOUND
- Dieser Receiver ist mit einem hoch entwickelten digitalen Signalprozessor ausgestattet, welcher Ihnen eine optimale Soundqualität und Soundatmosphäre in Ihrigen eigenen Heimkino liefert.
Surround-Modi
DTS Digital Surround
DTS Digital Surround (oder einfach DTS) unterstützt bis zu 5.1 diskrete Kanäle, die allgemein aufgrund der geringeren Audiokompression eine bessere Klangqualität liefern. Benutzung mit DVDs und CDs mit dem DTS-Logo.
DTS 96/24
Hierbei handelt es sich um hochauflosendes DTS mit 96 kHz Abtastrate und 24 Bit Auflösung, es liefert überdurchschnittliche Wiedergabetreue. Für DVDs mit dem DTS 96/24 Logo.
Hergestellt unter Lizenz nach US-Patenten Nr.: 5,956,674; 5,974,380; 6,487,535 sowie andere US-amerikanische und weltweite ausgestellte und schwendende Patente. DTS, das Symbol sowie DTS und das Symbol sind eingetragene Marken und DTS Digital Surround und die DTS-Logos sind Marken von DTS, Inc. Produkt enthalt Software. © DTS, Inc. Alle Rechte vorbehalten.
Dolby Digital
Dolby Digital ist das Mehrkanal-Digitalsignformat der Dolby Laboratories. Discs mit dem Dolby Digital Logo enthalten Aufzeichnungen von bis zu 5.1-Kanal Digitalsignalen zur Reproduktion einer viel higheren Klangqualität, räumlichen Ausdehnung und Dynamikbereichcharakteristik als der frühere Dolby Surround Effekt.
Dolby Pro Logic II Surround
Dieser Modus wendet auf konventionelle 2-Kanalsignale, wie digitale PCM oder analoge Stereosignale wie auch Dolby Surroundsignale und dergleichen, Surroundverarbeitung zur Verbesserung gegenüber konventionellen Dolby Pro Logic Schaltungen an. Dolby Pro Logic II Surround umfasst die nachstehenden 2 Modi:
- Dolby Pro Logic II Movie
Beim Betrachten von Filmen erlaubt ihren dieser Modus durch zusätzliches Processing eine weitere Verbesserung der Filmqualität, wodurch der Sound der Action Special Effects betont wird.
Dolby Pro Logic II Music
Beim Horen von Musik erlaubt Ohnen dieser Modus durch zusätzliches Processing eine weitere Verbesserung der Klangqualität, wodurch die musikalischen Effekte betont werden.
Dolby Pro Logic
Dieser Modus erweiter jegliche 2-Kanalquellen (einschlieBlich Dolby Surround Signalquellen) auf 4 Kanale (vorn links, Mitte, vorn rechts und Surround) zur Wiedergabe. Der Surroundkanal ist in Mono, wird jedoch über zwei Surround-Laatsprecher wiedergegeben.
Hergestellt unter Lizenz von Dolby Laboratories.
Dolby, Pro Logic und das Doppel-D-Symbol sind eingetragene Marken der Dolby Laboratories.
- Nachstehende Modi wenden auf konventionelle 2-Kanal-Signale, wie digitale PCM oder analoge Stereosignale einen Hochleistungs-Digitalsignalprojessor zur künstlichen Nachstellung von Klangfeldern an.
Theater
Dieser Modus liefert Effekte, als wurden Sie im Theater ein Schauspiel sehen.
■ Movie
In this modus haben Sie Effekte wie im Kino.
Hall
Dieser Modus liefert die Atmosphäre eines Konzertsaals für klassische Musik wie Orchester- oder Kammermusik oder ein Instrumentalsolo.
Game
Dieser Modus ist für Videospiele geeignet.
Stadium
Dieser Modus liefert das ausgedehnte Klangfeld zur Erreichung eines wahrheiten Stadioneffekts, wenn Sie sich Baseball- oder Fußballspielte ansehen.
Multi CH Stereo
Dieser Modus ist zur Wiedergabe von Hintergrundmusik konzipiert. Vordere, Surround- und wichtere Surroundkanä kreieren ein Stereoabbild, welches den gesamtten Bereich umspannt.
SURROUND SOUND
■Bitte beachten Sie: Vor der Surround-Wiedergabe behnmen Sieitte zunachst die Einstellung der Lautsprecher im SETUP-Menu für optimale Leistung vor (Einzelheiten finden Sie im Abschnitt, LAUTSPRECHER EINSTELLUNGEN" auf Seite 42).
Abhängig von der Auswahl des Surroundmodus wahren Sie den automatischen Surroundmodus oder den manuellen Surroundmodus.

- Mit jedem Tastendruck schalten Sie den Modus wie folgt um: Automatischer Surroundmodus: Der optimale Surroundmodus wird automatisch gewählt, abhängig vom Eingangssignal.
Manueller Surroundmodus: Wahlen Sie den gewünschten (AT erischt) Surroundmodus für den Signalegang mit auswahltasten SURROUNDMODUS (> / < )
■Bitte beachten sies :
- Schalten Sie SPEAKER aus oder sind „CENTER" und „SURR"(Surround) auf „NO" eingestellt, dann ist der automatische Surroundmodus ungültig.
- Self bet wenn der automatische Surroundmodus gewahlt wird und ein gleichartiges digitales Signatort anliegt, kann der optimale Surroundmodus abhängig von der Laatsprechereinstellung auf NO^面 abweichen.
- Ist der automatische Surroundmodus gewählt, so kann kein anderer Surroundmodus als der optimale Surroundmodus gewählt werden.
Auswahldes manuellen Surroundmodus mit AUTO/MANUAL auf der Frontblende
Wahlen Sie den gewünschten Surroundmodus
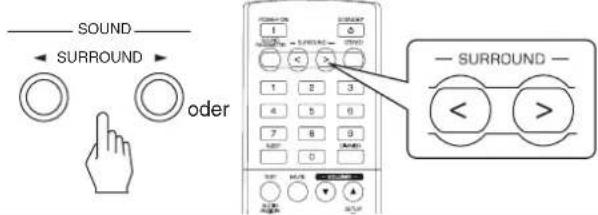
- Mit jedem Tastendruck auf auswahltasten SURROUNDMODUS (> / <) ändert sich der Surroundmodus entsprechend des Eingangssignalformats wie folgt:
| Eingangssignalformat Währbarer Surroundmodus | |
| Dolby Digital EX 6.1-Kanal-Quellen, Dolby Digital 5.1-Kanal-Quellen | DOLBY DIGITAL oder <2 CH IN>∗1 |
| Dolby Digital 2-Kanal-Quellen PCM (2-Kanal) Quellen Analog-Stereo-Quellen | DOLBY PLII MOVIE, DOLBY PLII MUSIC, THEATER, MOVIE, HALL, GAME, STADIUM, M.CH STEREO, DOLBY PRO LOGIC oder <2 CH IN>∗1 |
| DTS Quellen, DTS 96/24 Quellen | Entspruchen DTS modus oder <2 CH IN>1 |
1: Sind „CENTER" und „SURR"(Surround) auf „NO" eingestellt, dann kann kein Surroundmodus gewählt werden und die Quelle kann entweder in Stereo- oder 2CH-Downmixmodus wiedergegeben werden.
■Beenden des Surroundmodus zur Stereowiedergabe
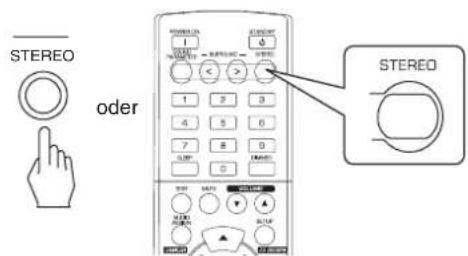
- Abhängig vom Eingangssignalformat wird entweder der Stereomodus oder der 2-Kanal-Downmixmodus gewählt.
- Zur Deaktivierung entweder des Stereomodus oder des 2CH-Downmixmodus wahlen Sie den Surroundmodus mit auswahltasten SURROUNDMODUS(>/<).
2-Kanal-Downmixmodus
- Dieser Modus erlaubt das Heruntermischen der Mehrkanalsignale im DTS oder Dolby Digital Format in 2 Frontkanäe und die Wiedergabe über nur die beiden vorderen Lautsprecher oder über Kopfhörer.
- Bei Einstellung der Laatsprechertaste SPEAKER auf Deaktivierung zum Horen der Mehrkanal-Digitalsignale von DTS oder Dolby Digital Quellen über Kopfhörer wird der 2-Kanal-Downmixmodus automatisch aufgerufen.

Einstellen der Soundparameter
- Bei der Wiedergabe von Digitalsignalen von Dolby Digital Programmquellen oder Horen von Dolby Pro Logic II Musikmodus können Sie die Parameter für optimale Surrounddefekte einstehen.
1. Drucken Sie die SOUND PARAMETER Taste.
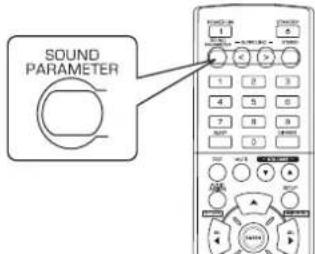
- Für einige Sekunden wird „DRC: ~"(oder „PANORAMA: ~") angezeigt.
- Erlischt der Parametermodus, so drücken Sie diese Tasteitte erneut.
2. Mit den NAVIGATIONSTASTEN AUFWÄRTS (p) /ABWÄRTS (q) wahren Sie den gewünschten Parameter.
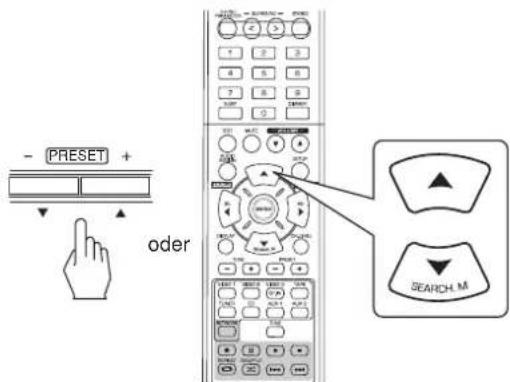
- Mit jedem Tastendruckändert sich der Parametermodus wie folgt:
"DRC" "PANorama" "C.WIDTH" "DIMENSION"
(Dynamic Range) Compression)
(Mittlere Breitenregelung)
"DRC" kann nur gewählt werden, wenn Digitalsignale von einer Dolby Digital Quelle wiedergegeben werden.
"PANORAMA", "C.WIDTH" und "DIMENSION" kann nur bei der Wiedergabe in Dolby Pro Logic II Musikmodus gewählt werden.
3. Mit den NAVIGATIONSTASTEN LINKS (t) /RECHTS (u) stellen Sie den gewählten Parameter wunschgemäß ein.
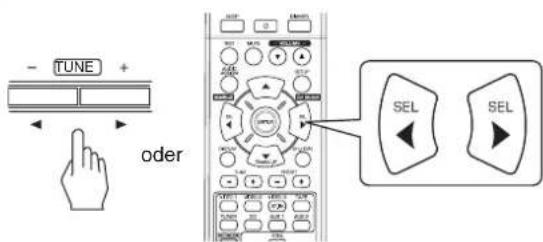
Auswahl „DRC (Dynamic Range Compression)“
These Funktion komprimiert den Dynamikbereich eines zuvor spezifierten Teils des Dolby Digital Soundtracks (mit extrem hoher Lautstärke), um die Lautstärkespitzen anzupassen.
Dies erleichtert das Horen des gesamten Soundtracks beim Sehen von Filmen nachts mit niedriger Lautstärke.
CBitte beachten Sie:
- Für einige Dolby Digital Software ist die DRC-Einstellung nicht möglich.
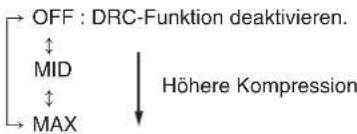
AuswahldesPANORAMA"Modus
Dieser Modus erweitert das vordere Stereo-Klangbild zum Einsatz der Surround-Lautsprecher für einen aufregenden „Wraparound" Effekt mit Seitenwandabbildung. Wahlen Sie "OFF" oder "ON" (Standardeinstellung: OFF).
Auswahl der „C. WIDTH (Mittlere Breiten)" Regelung Hier stellen Sie das mittlere Klangbild ein, sodass es nur über den mittleren Laufsprecher, nur von den linken/rechten Laufsprechem als Phantom-Klangbild oder von allen drei vorderen Laufsprechem in entsprechenden MaBen gehört wird.
Die Einstellung erfolgt in 8 Stufen zwischen 0 und 7 (Standardreinstellung: 3).
Auswahld der DIMENSION"Regelung
Hier wird das Klangfeld schrittweise mehr nach vorn oder nach halten eingestellt. Die Einstellung erfolgt in 7 Stufen zwischen -3 und +3 (Standardebinstellung: 0).
4. Wiederholen Sie obige Schritte 2 und 3 zur Einstellung der anderen Parameter.
Einstellen der einzelnen Kanäle mit dem Testton
- Der Lautstärkepegel jeges Kanals kann mit der Testtonfunktion leicht eingestellt werden.
■Bitte beachten sie : Sind die Laufsprecher mit der SPEAKER Taste deaktiviert, so haben Sie keine Testtonfunktion.
1. Rufen Sie den Testtonmodus auf.
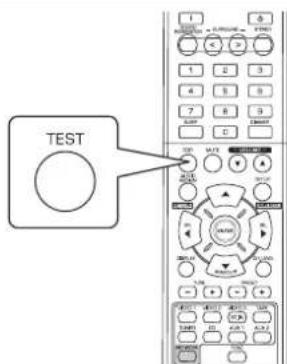
- Der Testtonmodus wird angezeigt und wird nacheinander wie folgt vom Laufsprecher des entsprechenden Kanals für 2 Sekunden übertragen:
FL C FR SR SL SW Vorn Mitte Vorn Surround Surround Subwoofer links rechts rechts links
-
Ist die Laufsprechereinstellung „NO“, so ist der Testton des entsprechenden Kanals nicht verfügbar.
-
Stellen Sie den Pegel für jeder Kanal ein, bis der Klangpegel aller Laatsprecher gleich laut ist.

-
Wahlen Sie den gewünschten Kanal mit den NAVIGATIONSTASTEN ▲/▼.
-
Beenden Sie die Testtonfunktion.
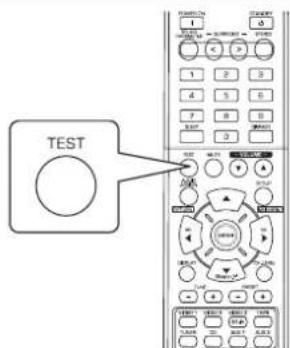
Einstellen des Kanalpegels
- Nach dem Einstellen der Kanalpegel mit dem Testton stellen Sie die Kanalpegel entweder entsprechend der Programmquelle oder nach ihrem persönlichen Geschmack ein.
- Der Kanalpegel kann beliebig eingestellt werden. Diese eingestellen Pegel werden nur im Nutzerspeicher ("CAL") abgelegt, nicht im Speicher für die Voreinstellungen ("REF 1", "REF 2").
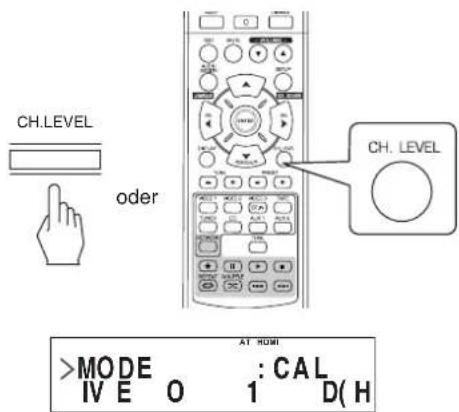
1. Drücken Sie die KANALPEGEL Taste.
- Der Speichermodus ("CAL" usw.) wird für einige Sekunden angezeigt.
Erischt der Speichermodus oder der Kanalpegel, so drucken Sie diese Taste erneut.
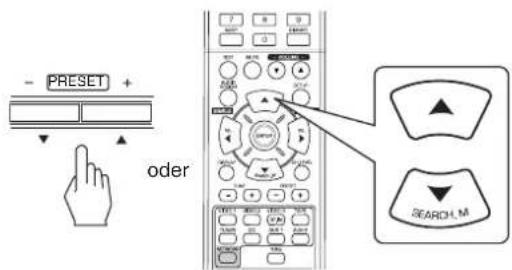
2. Wahlen Sie den gewünschten Kanal.
- Mit jedem Tastendruck wird der entsprchende Kanal wie folgt gewählt:
REF1,2(oder CAL) LEFT CENTER RIGHT
< >: Nur bei Digitalisgnaleingang von Dolby Digital oder DTS Programmquellen mit LFE-Signal kann der LFE-Pegel angezeigt werden.
- Abhängig von Laufsprechereinstellungen ("NO") und Surroundmodus usw., eineige Kanäle können nicht gewählt werden.
- Bei Einstellung der Laufsprechertaste SPEAKER auf Deaktivierung können nur der vordere linke, vordere rechte (und der LFE-) Kanal gewählt werden.
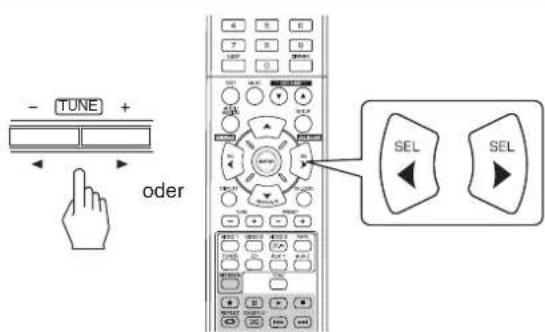
3. Stellen Sie den Pegel des gewählten Kanals wunschgemäß ein.
- Der LFE-Pegel kann im Bereich -10~0 dB eingestellt werden, die anderen Kanalpegel im Bereich von -15 ~ +15 dB.
-
Allgemein empfehlen wir, den LFE-Pegel auf 0 dB einzustellen (der empfohlene LFE-Pegel für eine frühe DTS Software ist jedoch -10 dB). Erscheinen die empfohlenen Pegel zu hoch, so stellen Sie diese niedriger ein, falls möglich.
-
Wiederholen Sie obige Schritte 2 und 3 zur Einstellung aller Kanalpegel.
Speichern der eingestellen Kanalpegel
-
Sie konnen die eingestellen Kanalpegel in den Voreinstellungen speichern (REF 1, REF 2) und jederzeit aufrufen.
-
Nach den Schritten 1 ~ 4 in „Einstellen des Kanalpegels" auf Seite 20 drücken Sie die ENTER/(MEMORY) Taste.
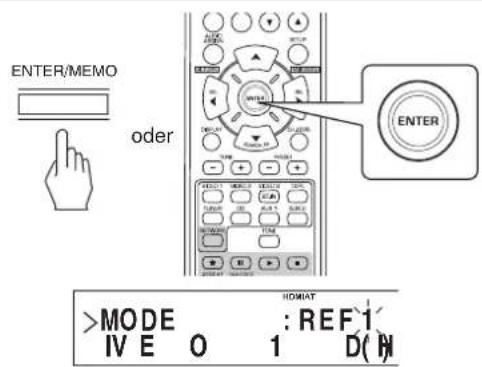
Die "1" in REF 1" blinkt für eineuge Sekunden.
- Wahlen Sie zwischen REF 1 und REF 2.
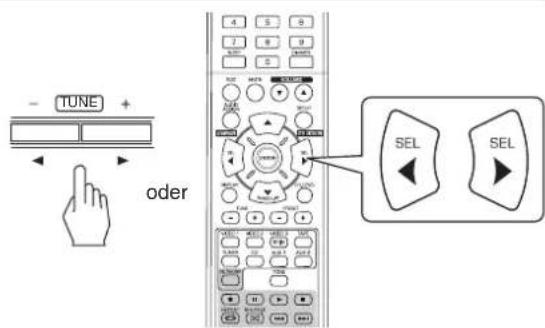
-
Erlischt die Voreinstellung, so wiederholen Sieitte Schritt 1.
-
Bestätigen Sie ihre Auswahl.
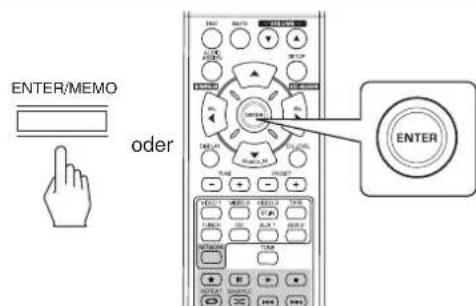
Die eingestellen Kanalpegel sind nun im gewählten Speicher abgelegt.
Aufrufen der gespeicherten Kanalpegel
- Drücken Sie die KANALPEGEL Taste.
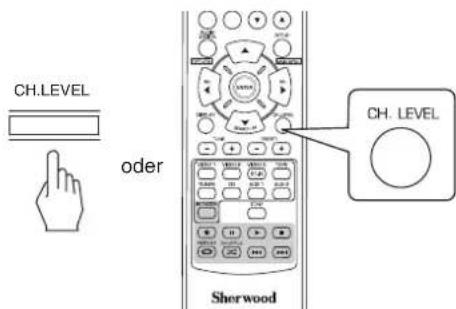
CAL"oder,REF1"usw.) wird fur eineige Sekunden angezeigt.
- Erlisch die Anzeige des Kanalpegelmodus, so drucken Sie diese Tasteitte erneut.
- Wahlen Sie zwischen REF 1 und REF 2.
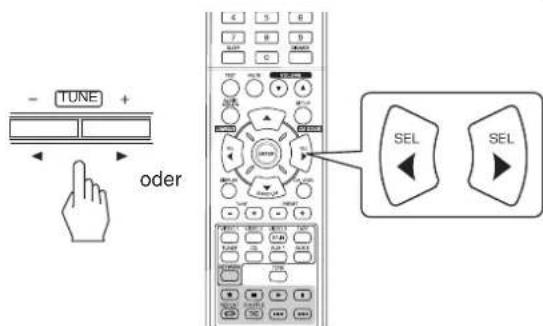
- Hiermit werden die in den Voreinstellungen gespeicherten Kanalpegel aufgerufen.
RADIO HÖREN
Automatische Sendersuche
- Wahlen Sie das gewünschte Frequenzband.
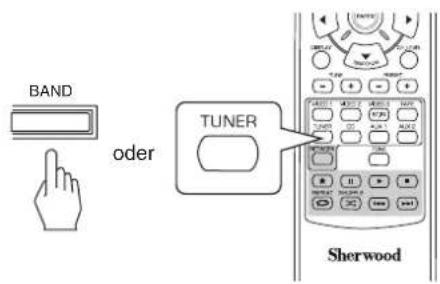
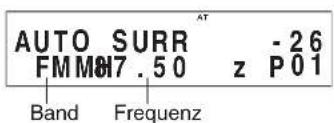
- Mit jedem Tastendruck wird das Frequenzband wie folgt umgeschaltet:

-
Bei schlechtem UKW Stereoempfang aufgrund schwacher Signale wahlen Sieitte FM Mono zur Storunterrückung. Hiermit haben Sie den UKW-Empfang in Mono.
-
Halten Sie die SENDERWAHL (+) /(-) Tasten für länger als 0,5 Sekunden gedrückt.
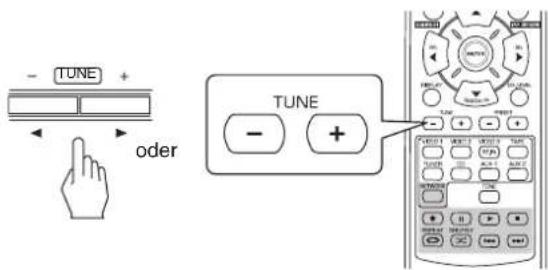
- Der Tuner suchen nun, bis er einen Sender mit ausreichender Signalstarke gegunden hat. Die Frequenz wird im Display angezeigt.
- Handelt es sich bei dem aufgefundenen Sender nicht um den gesuchten Sender, so wiederholen Sie die Suche einfach.
- Schwache Sender werden bei der automatischen Sendersuche übersprungen.
Manuelle Sendersuche
Die manuelle Sendersuche ist hilfreich, wenn Sie bereits die Frequenz des gewünschten Senders kennen.
- Nach der Auswahl des gewünschten Frenzbandes drücken Sie mehrfach SENDERWAHL (+) / (-), bis die gewünschte Frenz angezeigt wird.
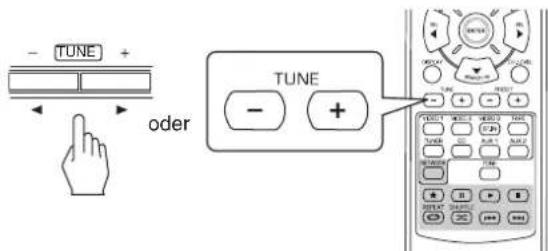
Automatische Sendersuche und Speicherung
Die automatische Sendersuche und Speicherungucht automatisch nur nach UKW-Sendern und speichert diese im Senderspeicher.
- Beim Horen von UKW oder Mittelwelle halten Sie die Taste ENTER/(MEMORY) für mehr als 2 Sekunden gedrückt.

"AUTO MEM" blinkt und der Receiver beginn mit der automatischen Sendersuche und Speicherung.
Zur Beendigung der automatischen Sendersuche und Speicherung drucken Sie die Taste erneut.
- Bis zu 30 UKW-Sender konnen gespeichert werden.
Bitte beachten Sie:
- UKW-Sender mit schwachem Signal konnen nicht gespeichert werden.
-
Zur Speicherung von Mittelwelle-Sendern oder schwachen Sendern führen Sieitte die "Manuelle Speicherung" und die "Manuelle Sendersuche" durch.
-
Sie können bis zu 30 Sonder in den Senderspeicher aufnehmen.
- Stellen Sie den gewünschten Sender manuell oder automatisch ein.
- Drücken Sie ENTER/(MEMORY).
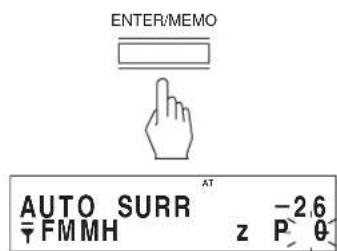
,MEM" blinkt.
3. Wahlen Sie den gewünschten Senderspeicher (1~30) und drucken Sie ENTER/(MEMORY).
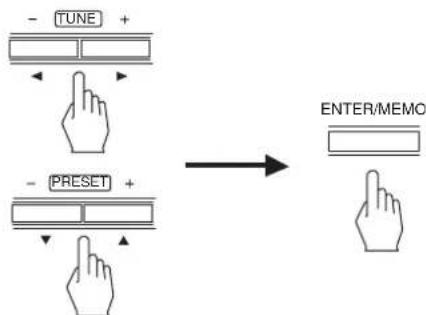
- Benutzung der Zifferntasten auf der Fernbedienung.
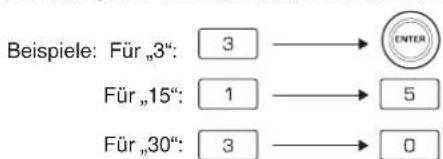
- Der Sender ist nun gespeichert.
- Bei Eingabe einer zweistelligen Nummer mit den Zifferntasten wird der Sender automatisch gespeichert, ohne ENTER (/MEMORY) zu drücken.
-
Eine gespeicherte Frequenz wird durch Überschreiben mit einer neuen Frequenz gelöscht.
-
Wiederholen Sie obige Schritte 1 bis 3 zur Speicherung weiterer Sender.
■ BACKUP-SPEICHERFUNKTION
Nachstehende Einstellungen werden gespeichert, bevordr Receiver ausgeschelt wird.
Auswahleinstellung fur EINGANG
- Surroundmodus
- Senderspeicher usw.
Aufrufen der SenderspeicherManuelle Speicherung
- Nach Auswahl des Tuners als Eingangsquelle wahlen Sie den gewünschten Senderspeicher.
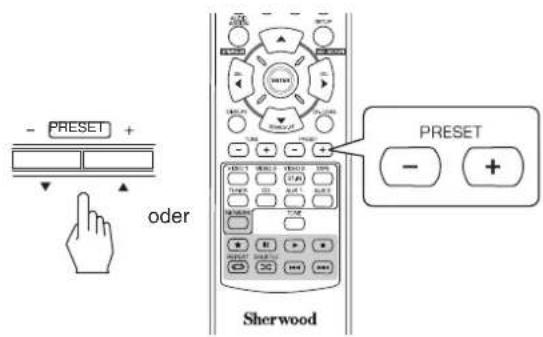
- Benutzung der Zifferntasten auf der Fernbedienung.
Beispiele: Für 3^4 :
Fur,15:

Innerhalb von

2 Sekunden

Innerhalb von

2 Sekunden


RDS Tuner (Regionale Option für eine europäische Länder)
WIEDERGABEVONRDS-SENDERN (NURUKW)
RDS (Radio Data System) ist eine Methode zum Senden von Informationen zusammen mit den Sendersignalen. Ihr Tuner kann diese Signale übersetzen und die Informationen auf dem Display wiedergeben. Diese Codes enthalten die folgenden Informationen: Programmname (PS), eine(Liste von Programmtypen (PTY), Radiotext (RT).
■Bitte beachten Sie:
- In einigen Ländern stehen möglicherweise die RDS-Tunerfunktion nicht zur Verfügung.
- RDS ist nur im UKW-Frequenzband möglich.
- RDSucht nur nach den Sendern im Senderspeicher. Wenn keine Sender im Speicher abgelegt wurden oder wenn die Programmart nicht unter den voreingestelltten Sendern zu finden ist, wird „NO PTY" angezeigt.
Daher müssen vor der Suche nach RDS-Sendern die Sender gespeichert werden.
Suche nach Sendern mit Programmtyp
-
Sie können Sender mit Programmtypuchen.
-
Drücken Sie im UKW-Modus SEARCH MODE.
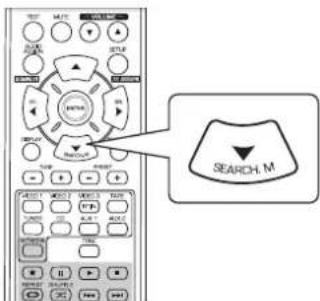
-
PTY SEARCH" wird für einige Sekunden angezeigt.
-
Wahlen Sie während der Anzeige von „PTY SEARCH" den gewünschten Programtyp.
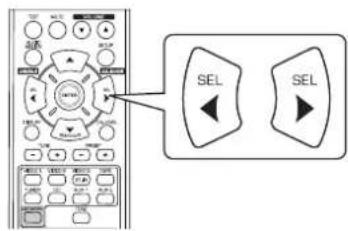
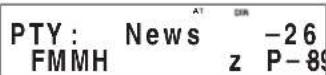
- Mit jedem Tastendruck wird ein anderer Programmtyp ausgewählt.
(News, Affairs, Info, Sport, Educate, Drama, Culture, Science, Varied, Pop M, Rock M, Easy M, Light M, Classics, Other M, Weather, Finance, Children, Social, Religion, Phone In, Travel, Leisure, Jazz, Country, Nation M, Oldies, Folk M, Document)
-
Wird, PTY SEARCH" ausgebrendet, so drücken Sie erneut SEARCH MODE.
-
Drücken Sie während der Anzeige des gewählten Typs ENTER.
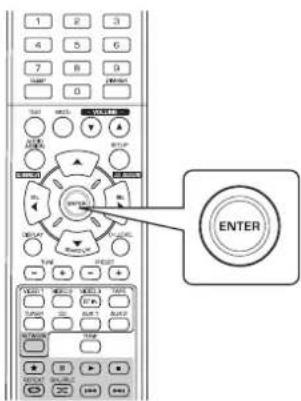
- Der Tuner durchsucht die gespeicherten Sender nach einem Treffer.
Die Suche wird beim Auffinden eines Senders unterbrochen und der Sender wird gespielt. - Wenn kein Sender gefunden wurde, wird „NO PTY" angezeigt.
RDS-Information anzeigen
Im UKW-Modus:
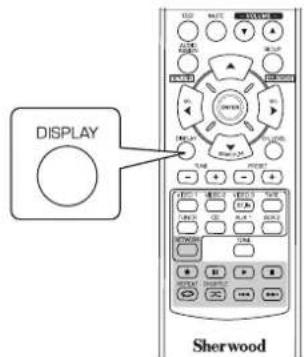
- Mit jedem Tastendruckändert sich der Anzeigemodus wie folgt:
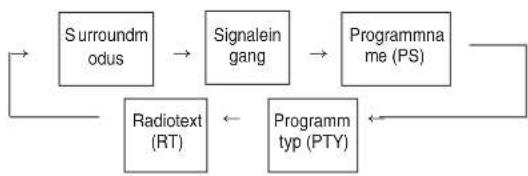
- Programmname (PS) - Name des Senders.
- Programmtyp (PTY) - Liefert Informationen über die Art der aktuell ausgestrahlten Sendung.
- Radiotext (RT) - Vom Sender übermittelte Meldungen.
Zum Beispiel kann ein Talk-Sender eine Telefonnummer als RT anbieten. - Wenn die Signale zu schwach sind oder kein RDS-Dienst verfügbar ist, wird „NO NAME“, „NO PTY“, oder „NO TEXT“ angezeigt.
INTERNETRADIO UND MUSIKDATEIEN HÖREN
- Sie konnen Internetradio oder auf einem USB-Speichermedium oder Computer (Mediaserver) gespeicherte Musikdaten horen.
Internetradio
- Internetradio bezieht sich auf Radiosendungen über das Internet. Internetradiosender aus aller Welt konnen über die Website Shoutcast eingestellt werden.
Shoutcast (http://www.shoutcast.com)
Shoutcast ist ein kostenfreier Internet-Radiodienst von Shoutcast. Sie können Shoutcast ohne Anmeldung benutzten.
Bitte beachten Sie:
- Es gibt eine ganze Reihe von Internet-Radiosenden und die Qualität der übertragenen Programme sowie die Bitrate der Tracks weicht erheblich voneinander ab. Allgemein gilt: Jehigher die Bitrate,estobetter die Klangqualitat.Abhangig von den Kommunikationsleitungen und dem Serververkehr konnen die gestreamten Musik-oder Audiosignale jedoch unterbrochen sein. Auf der anderen Seite bedeuten gingere Bitraten eine gingere Klangqualitat,dafur wird der Ton allerdings auch seltener unterbrochen.
USB-Speichermedien
- Ein USB-Speichermedium kann am USB-Port auf der Frontblende oder an der Geräterückseite zur Wiedergabe von Musikdaten angeschlossen werden.
- Nur USB-Speichermedien, welche der Massenspeicherklasse und MTP (Media Transfer Protocol) Normen entsprechchen, können auf thisem Geräw wiederergegeben werden.
- Dieses Gerat Unterstützung FAT16 oder FAT32 Dateiform für USB-Speichermedien.
DLNA (Digital Living Network Alliance) Medienserver
- Dieses Gerät kann Musikdateien auf einem DLNAkompatiblen Medienserver (Computer oder Unterhaltungselektronik) wiedergeben, der über ihr Heimnetzwerk angeschlossen ist. Sie können die Musikdateien leicht mit dem Windows Media Player 11 freigegeben.
© 2011 Digital Living Network Alliance. Alle Rechte vorbehalten.
DLNA® und DLNA & Design® sind Marken oder eingetragene Marken der Digital Living Network Alliance. Alle Rechte vorbehalten. Unbefugte Benutzung ist strikt verboten.
■Bitte beachten Sie:
- Der Computer (Mediaserver) muss sich auf dem gleichen lokalen Netzwerk wie das Gerät befinden.
- Dieses Gerat unterstützt nur den DMP (Digital Media Player) von DLNA. Einige Funktionen arbeiten möglicherweise nicht auf Geräten, die DLNA nicht vollständig unterstützen.
Koportible Audiodateiformate
- Zur Wiedergabe von Internetradio, USB-Speichermedien und Mediaserver unterstützt这点es Gerät die folgenden Musikdateiformate.
| Dateformat Abstastfrequenz Bitrate Dateiendung | ||
| MP3 (MPEG-1 Audio Layer-3) | 32/44,1/48 kHz | 32 ~ 320 kbps .mp3 , .MP3 |
| WMA (Windows Media Audio) | 32/44.1/48 kHz | 32 ~ 320 kbps .wma , .WMA |
- Dateien mit variabler Bitrate werden unterszt.
MPEG Layer-3 Audio-Codiertechnologie lizenziert durch Fraunhofer IIS und Thomson. - Windows Media und das Windows Logo sind Marken oder eingetragene Marken der Microsoft Corporation in den Vereinigten Staaten bzw. anderen Ländern.
Allgemeine Bedienungshinweise
1. Treffen Sie die notwendigen Vorbereitungen.
① Überprüfen Sie die Netzwerkumgebung, dann schalten Sie diese Gerät ein (siehe „VERBINDUNG MIT DEM NETZWERK" auf Seite 7).
② Sind Einstellungen notwendig, so melden Sie Ihr Konto an und nehmen Sie die notwendigen Netzwerkeinstellungen vor (siehe „Bei Auswahl von „Settings" auf Seite 32).
③ Wird der Computer als Mediaserver benutzt, so bereiten Sieihn entsprechend vor. Installieren Sie Windows Media Player Version 11 (siehe „Windows Media Player Version 11 konfigurieren" auf Seite 31).
2. Wahlen Sie „NET/USB“ als Eingangsquelle.
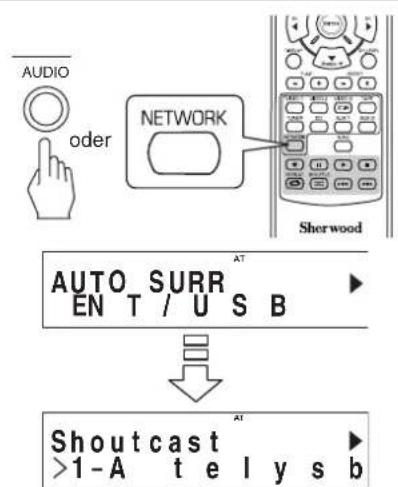
.NET/USB" wird gewählt und der letzte Status wird fortgesetzt.
- Nach dem Einsatz und der Auswahl von „NET/USB“ wird das Hauptmenu angezeigt (siehe nachstehend Schritt 3).
3. Zur Auswahl eines Menüpunktes im Hauptmenü drücken Sie SETUP/(MAIN MENU).
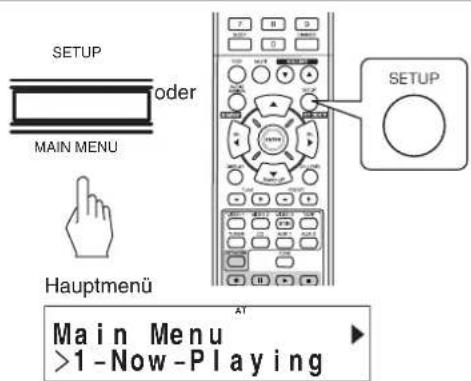
- Das Hauptmenu wird angezeigt.
4. Wahlen Sie den gewünschten Menupunkt, dann drucken Sie ENTER.
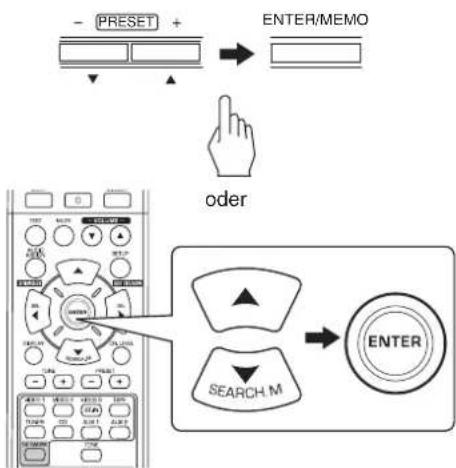
Bei Auswahl von ,Now Playing" siehe Seite 29.
- Bei Auswahl von „Internet Radio" siehe Seite 29.
Bei Auswahl von USB siehe Seite 30.
Bei Auswahl von DLNA siehe Seite 30.
- Bei Auswahl von „Favorites“ siehe Seite 31.
- Bei Auswahl von „Settings" siehe Seite 32.
- Details zum Einstellungensmenu führen Sie auf Seite 28.
5. Wiederholen Sie Schritt 4 oben, bis der gewünschte Sender, die Musikdatei oder die Einstellung gewählt ist.
Die entsprechende Auswahl wird wiedergegeben bzw. eingestellt.
- Mit Tastendruck auf AUDIO ASSIGN (/RETURN) in einem Untermenü kehren Sie in das vorherige Menu zurück.
- Mit Tastendruck auf SETUP (/MAIN MENU) in einem Untermenü kehren Sie in das Hauptmenu zurück.
Wiedergabe
- Wahlend der Wiedergabe von Internet-Radiosendungen oder Musikdaten stehen. Ihnen verschiedene Wiedergabemodi zur Verfügung.
Wiedergabe beenden
Während der Wiedergabe drucken Sie die Stoppaste (■).

Die Wiedergabe wird beendet.
Zur Fortsetzung der Wiedergabe drucken Sie die Wiedergabetaste ()
Wiedergabe unterbrechen (Pause)
Während der Wiedergabe drucken Sie die Pausetaste (I).

Die Wiedergabe wird an dieser Stelle unterbrochen.
Zur Fortsetzung der Wiedergabe von gleicher Stelle drucken Sie die Wiedergabetaste ()
Skip vorwarts oder zurück
Während der Wiedergabe von Musikdateien.
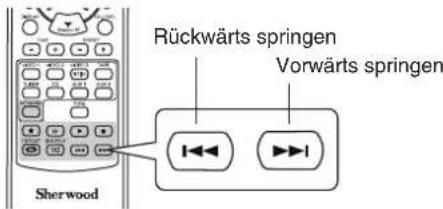
- Mit jedem Tastendruck Springen Sie eine Musikdatie weiter.
- Das Einstellungsmenu ist wie folgt aufgebaut:
Wiederholung
Während der Wiedergabe drucken Sie die Wiederholungstaste ( ).
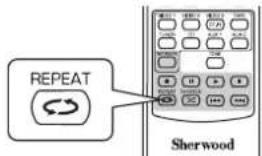
- Ichte auf und die Musikdateien in dem Ordner werden wiederholt.
Zum Verlassen der Wiederholungsfunktion drucken Sie die Taste erneut.
Zufallswiedergabe
Während der Wiedergabe drücken Sie Zufallstate (DC).
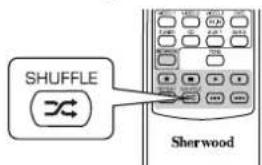
- lechtet auf und die Musikdateien in dem Ordner werden nach dem Zufallsprinzip wiedergegeben.
Zum Verlassen der Zufallsfunktion drucken Sie die Taste erneut.
Bitte beachten Sie:
- Sprung-, Wiederholungs- und Zufallsmodus stehen Ohnen nur bei Wiedergabe von Musikdaten von einem USB-Speichermedium zur Verfügung.
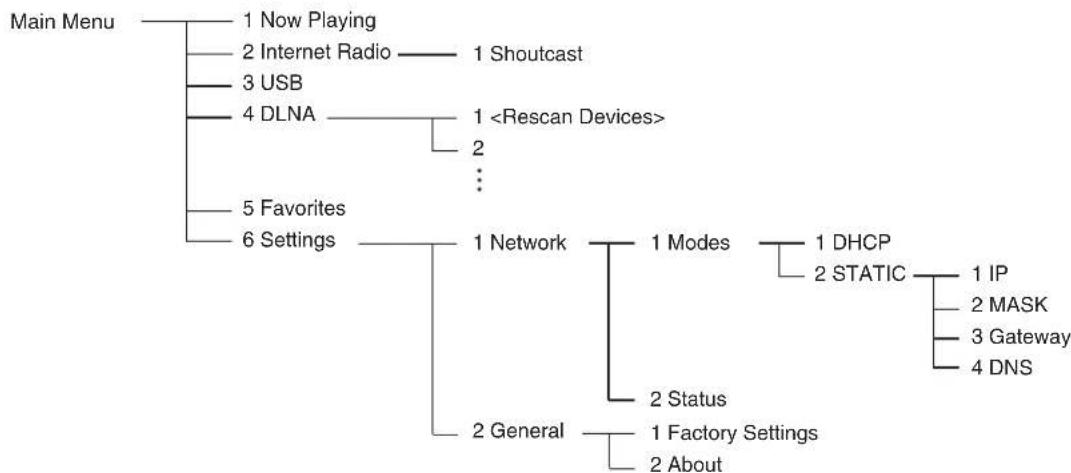
Systemeinstellungen Ablaufdiagramm
Bei Auswahl von „Now Playing“
- Sie können Informationen zur Internet-Radiosendung oder zu Musikdateien anziegen.
Drucken Sie CURSOR AUFWÄRTS (▲)/ABWÄRTS (▼) zur Auswahl des gewünschten Anzeigemodus.
Beispiel: Bei Wiedergabe einer Internet-Radiosendung
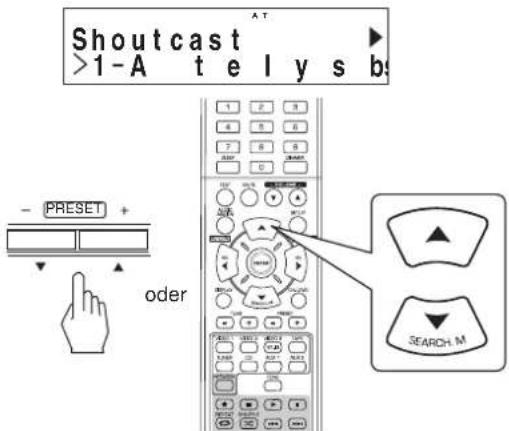
- Mit jedem Tastendruck schalten Sie den Modus wie folgt um
Sender- oder Gerätename Musiktitel Add to favorites* Interpret Album
*: Nicht verfügbar während der Wiedergabe von Musikdaten oder Internetradiosenden in der „Favoritenliste".
■Bitte beachten Sie:
- Nur Schriftzeichen, A Z^n , a z^n , 0 9^n , "werden angezeigt.
- Sind Informationen zu Sendername, Musiktitel oder Interpret usw. nicht verfügbar, so erfolgt keine Anzeige.
■Bei Auswahl von „Add to favorites"
① Drucken Sie ENTER.
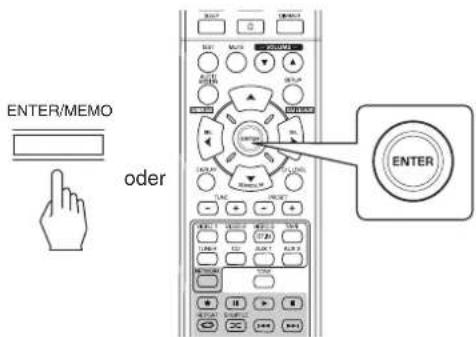
- OK wird angezeigt.
② Drucken Sie ENTER zur Bestätigung. - Damit wird der Sender oder die Musikdatie in der Favoritenliste gespeichert (Einzelheiten zu Favoriten siehe, Bei Auswahl von „Favorites" auf Seite 31).
Bei Auswahl von „Internet Radio"
- Sie können Internetradio von Shoutcast horen.
1. Drucken Sie ENTER.
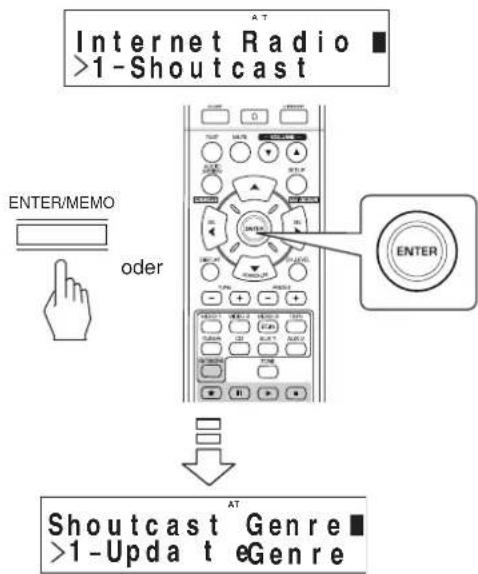
- Drücken Sie CURSOR AUFWARTS (▲)/ ABWARTS (▼) zur Auswahl der gewünschten Kategorie (oder Menüpunkt), dann drücken Sie ENTER.
- Wiederholen Sie obigen Schritt 2, bis der gewünschte Sender eingestellt ist.
Beispiel: Wiedergabe eines Senders von Reciva

- Wahrend einer Sendung schalten Sie mit jedem Tastendruck auf AUFWÄRTS (▲) oder ABWÄRTS (▼) den Anzeigemodus um.
- Einzelheiten zum Anzeigemodus siehe oben „Auswahl von Now Playing".
Bei Auswahl von „USB“
-
Sie können Musikdateien von einem USB-Speichermedium wiedergeben.
■Bitte beachten Sie:
Vor der Auswahl von,USB schlieBen Sie das USB-Speichermedium am USB-Port auf der Frontblende an. -
Drücken Sie CURSOR AUFWÄRTS (▲)/ ABWÄRTS (▼) zur Auswahl des gewürschten Ordners (oder der Musikdatei), dann drucken Sie ENTER.

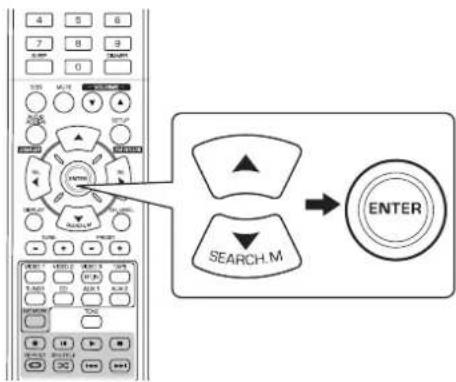
- Wiederholen Sie obigen Schritt 1, bis die gewünschte Musikdatei gewählt ist.
Beispiel: Wiedergabe einer Musikdatei

- Wiedergabe einer Musikdatei schalten Sie mit jedem Tastendruck auf AUFWÄRTS (▲) oder ABWÄRTS (▼) den Anzeigemodus um.
- Einzelheiten zum Anzeigemodus siehe „Auswahl von Now Playing" auf Seite 29.
Bei Auswahl von „DLNA“
-
Sie konnen Musikdateien wiedergeben, die auf einem über Ihr Heimnetzwerk angeschlossenen Computer (Medienserver) gespeichert sind.
Bitte beachten Sie:
Vor der Wiedergabe von Musikdateien von Ihr Computer konfigurieren Sie zunachst Windows Media Player 11 (Einzelheiten siehe „Windows Media Player 11 konfigurieren" auf Seite 31). -
Starten Sie ihren Computer (Mediaserver).

- Drucken Sie CURSOR AUFWARTS (▲)/ ABWARTS (▼) zur Auswahl Ihres Computers als Mediaserver, dann drucken Sie ENTER.
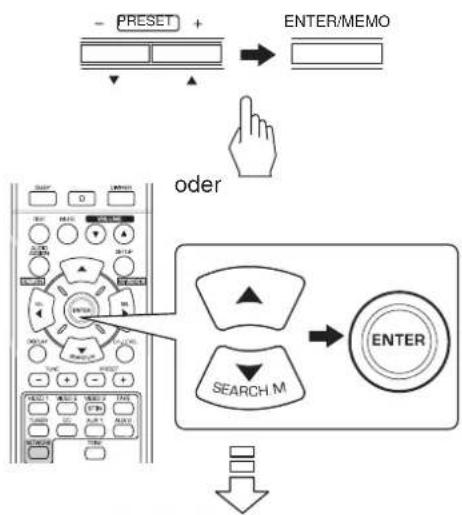

- Wird Ihr Computer nicht in der Liste angezeigt, dann wahren Sie „Rescan Devices“, um nach allen verfügbaren Mediaservern zuuchen.
- Drucken Sie CURSOR AUFWÄRTS (▲)/ ABWÄRTS (▼) zur Auswahl der gewürschten Kategorie, dann drucken Sie ENTER.
- Wiederholen Sie obigen Schritt 3, bis die gewünschte Musikdatei gewählt ist.
Beispiel: Wiedergabe einer Musikdatei

- Wiedergabe einer Musikdatei schalten Sie mit jedem Tastendruck auf AUFWÄRTS (▲) oder ABWÄRTS (▼) den Anzeigemodus um.
- Einzelheiten zum Anzeigemodus siehe „Auswahl von Now Playing" auf Seite 29.
Windows Media Player Version 11 konfigurieren.
- Lassen Sie den Windows Media Player Version 11 auf Ihr Computer ablaufen.
- Wahlen Sie die Registerkarte „Library“(Bibliothek) in der Menüleiste, dann wahlen Sie „Media Sharing“(Medienfreigeben).
- Im Dialogfenster „Media Sharing" (Medienfreigeben) haken Sie das Kästchen "Share my media"(Meine Medien freigeben) ab, dann klichen Sie "OK".
- In der Geräteleiste wahren Sie diese Gerät, dann klichen Sie „Allow“(Erlauben).
- Klichen Sie "OK", um das Dialogfenster zuschlieBen.
Die Konfiguration des Windows Media Player Version 11 ist beendet. - Sie können ihre Musikdateien in Ihrer Windows Media Player Version 11 Bibliothek über these geser wiedergeben.
■Bitte beachten Sie:
- Windows Media Player Version 11 kann kosten von der Microsoft-Website heruntergeladen werden.
- Hindert Sie die Firewall am Zugriff, dann kann der Windows Media Player Version 11 nicht konfiguriert werden.
Bei Auswahl von „Favorites“
- Sie können Internet-Radiosender oder Musikdateien in Ihrer „Favorites" anhoren oder loschen.
Bitte beachten Sie:
-
Ist das USB-Speichermedium abgetrennt oder Ihr Computer (Mediaserver) ist ausgeschaltet, dann konnen die Dort gespeicherten Musikdateien nicht wiedergegeben werden.
-
Drücken Sie CURSOR AUFWÄRTS (▲)/ ABWÄRTS (▼) zur Auswahl des gewünschten Senders oder der Datei, dann drücken Sie ENTER.

oder

- Drücken Sie CURSOR AUFWÄRTS (▲)/ ABWÄRTS (▼) zur Auswahl von „PLAY" oder „DELETE" oder „CANCEL" dann drücken Sie ENTER.
Beispiel: Wiedergabe einer Musikdatei
Favorites 1 S UB
- Bei Auswahl von „PLAY“ wird der gewählte Sender bzw. die Datei wiedergegeben.
- Bei Auswahl von „DELETE“ wird der gewählte Sender bzw. die Datai in der „favorites“ gelöscht.
- Bei Auswahl von „CANCEL" wird ihre Auswahl verworfen.
- Wiedergabe einer Musikdatei schalten Sie mit jedem Tastendruck auf AUFWÄRTS (▲) oder ABWÄRTS (▼) den Anzeigemodus um.
- Einzelheiten zum Anzeigemodus siehe „Auswahl von „Now Playing" auf Seite 29.
Bei Auswahl von „Settings"
- Vor der ersten Wiedergabe von Internetradiosendungen oder Musikdaten fühmen Sie zunachst für optimale Leistung die Einstellungen für das Netzwerk vor.
- Wahlen Sie den gewünschten Menupunkt, dann drücken Sie ENTER.
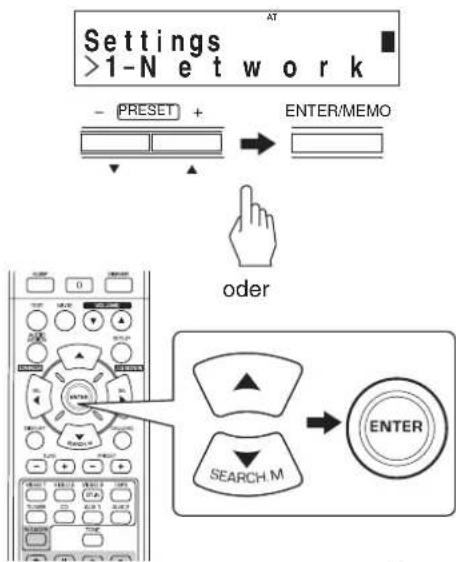
- Mit jedem Tastendruck auf CURSOR AUFWÄRTS (▲) oder ABWÄRTS (▼) schalten Sie den Einstellmodus wie folgt um. Network ↔ General
Bei Auswahl von General siehe Seite 33.
Auswahl von „Network"
Zum Horen von Internetradiosenden, Musiksendaungen oder Musicdateien über Ihr Heimnetzwerk, die auf Ihr Computer gespeichert sind, müssen Sie zunachst die Netzwerkeinstellungen konfigurieren.

- Drucken Sie AUFWÄRTS (▲)/ABWÄRTS (▼) zur Auswahl von „Modes" oder „Status", dann drucken Sie ENTER.
Beispiel: Auswahl von „Modes"
Ntwo >1-DHCP
Modrk
- Bei Auswahl von „Modes“ konnen Sie die Netzwerkeinstellungen konfigurieren.
- Bei Auswahl von „Status“ konnen Sie die Informationen zu den Netzwerkeinstellungen überprüfen (siehe Seite 33).
Auswahl von „Modes"
-
Drücken Sie AUFWÄRTS (▲)/ABWÄRTS (▼) zur Auswahl von „DHCP" oder „STATIC", dann drücken Sie ENTER.
-
Ist der DHCP-Server Ihres Routers aktiviert, können Sie "DHCP" wahlen.
Bei Deaktivierung wahlen Sie,STATIC
*Auswahl von ,DHCP - Wird, Switch to DHCP mode?° angezeigt, drücken Sie ENTER.

Die Netzwerkeinstellungen werden automatisch konfiguriert und das Menu "Status" wird angezeigt (siehe Auswahl von Status auf Seite 33).
* Auswahl von ,STATIC
- Sie können die Netzwerkeinstellungen manuell einstellen, wenn der DHCP-Server Ihres Routers deaktiviert ist.
Bitte beachten Sie:
- Nachstehende Informationen zum Router werden besteht, davon bestätigten Sie die Informationen, bevor Sie mit der manuellen Einstellung beginnen: IP-Adresse, Subnetzmaske, Gateway, DNS.

① Drücken Sie AUFWÄRTS (▲)/ABWÄRTS (▼) zur Auswahl des gewünschten Menüpunkts, dann drücken Sie ENTER.
- Mit jedem Tastendruck auf AUFWÄRTS (▲) oder ABWÄRTS (▼)ändert sich der Einstellungsmodus wie folgt:

Beispiel: Auswahl von „IP"

② Drucken Sie LINKS (▲)/RECHTS (▶), um zur gewünschten Stelle zu navigieren.
Zum Löschen einer Ziffer drucken Sie LINKS ( ).Mit jedem Tastendruck wird jeweils eine Ziffer gelöscht.
③ Drucken Sie AUFWÄRTS (▲)/ABWÄRTS (▼) zur Eingabe der gewündsten Ziffer.
Mit jedem Tastendruck auf AUFWARTS (▲) oder ABWARTS (▼) durchlaufen Sie die Schriftzeichen wie folgt: a~z, A~Z, 1~0 und Sonderzeichen (@, Leertaste usw.).
④ Wiederholen Sie die Schritte 2 und 3, um die Eingabe zu beenden.
⑤ Zur Bestätigung Ihrer Eingabe drucken Sie RECHTS (▶), um zur Stelle darüber denben der untersten zu navigieren, dann drucken Sie ENTER.
- Das Menu „Static Mode" wird angezeigt.
⑥ Wiederholen Sie die Schritte ① ⑤ zur Eingabe Weiterer Einstellungspunkte.
⑦ Drucken Sie AUDIO ASSIGN (/RETURN), um in den vorherigen Status zurückzukehren.
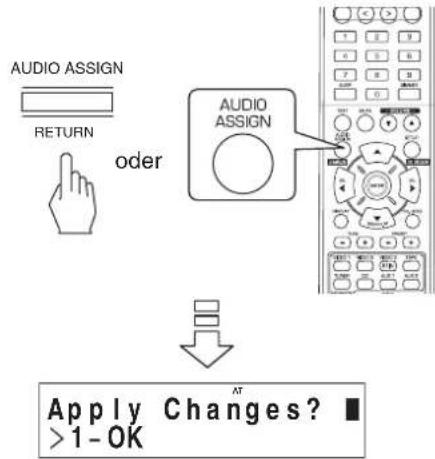
Auswahl von "OK" oder "CANCEL", dann drucken Sie ENTER.
Bei Auswahl von OK werden die Netzwerkeinstellungen angewandt und das Menu Status" wird angezeigt (siehe nachstehend,Auswahl vonStatus).
- Bei Auswahl von „CANCEL“ werden die Netzwerkeinstellungen angewandt und „Network Modes" wird angezeigt.
Auswahl von „Status"
- Hier überprüfen Sie nacheinander ihre Netzwerk einstellungen (wie Modus, IP-Adresse, GW (Gateway) und DNS-Server).
Status.MODE:dh >1-OK
- Zur Rückkehr in den vorherigen Status drücken Sie ENTER.
Auswahl von „General"
General Setting >1-Factory Sett
- Drücken Sie AUFWARTS (▲)/ABWARTS (▼) zur Auswahl von „Factory Settings" oder „About", dann drucken Sie ENTER.
Beispiel: Auswahl von „Factory Settings"
Warning: Alles >1-OK
- Bei Auswahl von „Factory Settings“ konnen Sie die Einstellungen „Network“ sowie Sender oder Musikdateien in der „Favoritenliste“ zu den Werkseinstellungen zusammen.
- Bei Auswahl von „About“ konnen Sie allgemeine Informationen wie Gerätotyp, Softwareversion und MAC-Adresse anzeigen.
Auswahl von „Factory Settings"
- Drucken Sie AUFWÄRTS (▲)/ABWÄRTS (▼) zur Auswahl von „OK“ oder „CANCEL“, dann drucken Sie ENTER.
Bei Auswah von OK werden die Einstellungen zu den Werkseinstellungen zurückgestellt.
- Bei Auswahl von „CANCE“ kehren Sie ohne Rückstellung in den vorherigen Status zurück.
Auswahl von „About"
- Sie können Geräte typ, Softwareversion und MAC-Adresse nacheinander anzeigen.
About. Internet >1-OK
- Zur Rückkehr in den vorherigen Status drücken Sie ENTER.
AUFNAHME
Die Digitalsignale vom "NET/USB", koaxialen, optischen Digitaleingang oder vom HDMI EINGANG konnen gehort, jeder nicht aufgezeichnet werden.
- Bei der Aufnahme von Analog signalen von CD, VIDEO 1 ~ 2 wahlen Sieitte den Analogeingang. (Einzelheiten finden Sie im Abschnitt „Auswahl von CD,VIDEO 1~2 als Eingangsquelle" auf Seite 14.)
- Lautstärke- und Klangeinstellungen (Basse, Hohen) haben keinen Einfluss auf die Aufnahmesignale.
Aufnahme mit TAPE
- Wahlen Sie den gewünschten Eingang als Aufnahmequelle, außer TAPE.
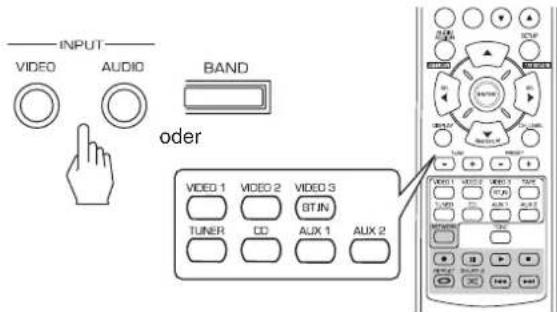
- Starten Sie die Aufnahme mit TAPE.
- Starten Sie die Wiedergabe der gewünschten Eingangsquelle.
Überspielen von Videokomponenten auf VIDEO 1
- Wahlen Sie VIDEO 2 ~3 als Aufnahmequelle, nicht VIDEO 1.
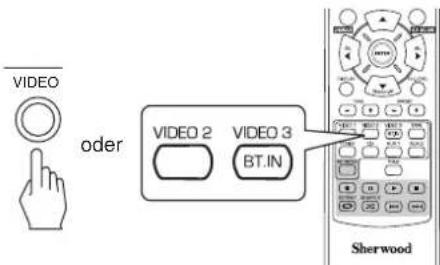
- Starten Sie die Aufnahme mit VIDEO 1.
- Starten Sie die Wiedergabe des gewünschten Eingangs.
Die Audio- und Videosignale vom Eingang werden auf VIDEO 1 übertragen und Sie haben sie auf dem Fernseher und den Laufsprechem.
SONSTIGEFUNKTIONEN
Sleeptimer
Mit dem Sleeptimer konnen Sie das System sich automatisch nach einer gewissen Zeit ausschalten halten.
- Einstellen des Receivers auf automatische Ausschaltung nach einem voreingestalten Zeitraum.
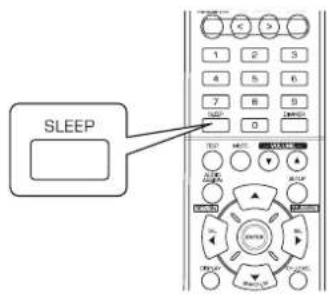
Einstellen der Helligkeit des Fluoreszenzdisplays

Anzeige des Betriebsstatus
Während der Wiedergabe:
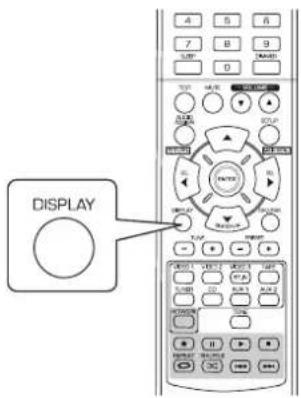
- Mit jedem Tastendruck durchlaufen Sie die Voreinstellungen des Sleeptimers wie folgt:
10→20→30→---→90→OFF Einheit:Minuten
- Bei aktiviertem Sleeptimer leuchtet, in Display.
-
Bei eingestellter Ausschaltzeit ist das Display nur schwach beleucht.
-
Mit jedem Tastendruck schalten Sie die Helligkeit des Fluoreszenzdisplays wie folgt um:
ON→Dimmer→OFF -
Bei ausgeschaltetem Display schalten Sie es mit Tastendruck auf eine beliebige Taste zur Anzeige des Betriebsstatus wieder ein.
-
Mit jedem Tastendruck schalten Sie den Anzeigemodus wie folgt um:

- Steht in Ihr dem Land die RDS-Tunerfunktion zur Verfügung, siehe Einzelheiten zum UKW-Modus unter „RDS-Informationen anziegen" auf Seite 25.
HDMI-FUNKTION BESTÄTIGEN
Zur korrekten Benutzung der HDMI-Steuerfunktion empfehlen wir, die nutzbaren HDMI-Steuerfunktionen fur jeder angeschlossene Komponente zu verifizieren, indem Sie folgende Schritte ausführten.
■Bitte beachten Sie:
- Einige HDMI-Steuerg functionen arbeiten möglicherweise nicht mit allen Komponenten und Fernsehern, die nicht kompatibel sind.
Vor Inbetriebnahme
- Vergewissem Sie sich, dass dieser Receiver, Fernseher und Player usw. über HDMI-Kabel angeschlossen ist.
- Vergewisern Sie sich, dass die HDMI-Steuerung von Fernseher und HDMI-Player aktiviert ist (Einzelheiten zur Einstellung von Fernseher und Player finden Sie in deren Bedienungsanleitungen).
- Stellen Sie HDMI CONTROL und POWER CONTROL zur Aktivierung der HDMI-Steuierung these Receivers auf „ON“ ein (Einzelheiten siehe „HDMI EINSTELLLEN“ auf Seite 50).
Allgemeinen HDMI-Betrieb bestätigten
- Schalten Sie alle über HDMI-Kabel angeschlossenen Komponenten ein.
- Stellen Sie den TV-Eingang auf HDMI für diesen Receiver ein.
- Stellen Sie den Eingang für diesen Gerät auf die HDMI-Eingangsquelle ein.
Vergewisern Sie sich, dass das Bild angezeigt und der Ton korrekt uber die Lautspecher ubertragen wird.
HDMI-Steuerfunktionen bestätigten
-
Schalten Sie alle über HDMI-Kabel angeschlossenen Componenten ein.
2.Schalten Sie den Fernseher in Stand-by-Modus. -
Vergewissern Sie sich, dass all Komponenten ausgeschaltet sind.
- Mit allen Komponenten ausgeschaltet starten Sie die Wiedergabe des Players (über HDMI-Kabel angeschlossen).
Vergewisern Sie sich, dass all Komponenten eingeschaltet sind und dass die Eingänge desses Geräts und des Fernsehers automatisch eingestellt werden.
Systemeinstellungen
- Das Einstellungsmenü wird im Fluoreszenzdisplay angezeigt und vereinfacht die Einstellungen. In den meisten Situationen muss Sie diese Einstellung während der Installation und des Layouts Ihr Heimkinos nur einmal durchführten und eine später Umstellung ist nur in Ausnahmefällen nötig. Das Einstellungsmenü besteht aus 6 Hauptmenü: System, Eingang, Lautsprechereinstellungen, Kanalpegel, Parameter und HDMI. Diese Menü sind in eine Reihe von Untermenü unterteilt.
Bitte beachten Sie:
- Nur bei Auswahl der Eingangsquelle anders als NET/USB, konnen Sie die Systemeinstellungen vornehmen.
Navigation im Einstellungsmenu
Die nachstehenden Erklarungen gehen davon, dass Sie fur das Einstellungsmenu die Fernbedienung benutzen. Sie konnen jedoch ebenfalls die Tasten auf der Frontblende benutzen. Die Tasten auf der Frontblende entsprechen den Tasten auf der Fernbedienung wie folgt.
| Tasten auf der Fernbedienung | SETUP | ENTER | SEL | SEL | SEARCH.M |
| Tasten auf der Frontblende | SETUP | ENTER / MEMO | -TUNE+ | -PRESET+ | |
| MAIN MENU | - | - | |||
- Rufen Sie das Einstellungenmenu auf.
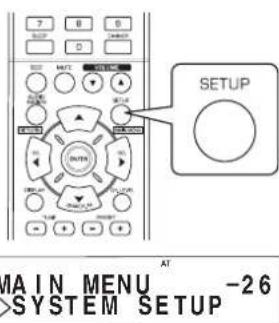
- Das EinstellungsmENU wird angezeigt.
-
Mit erneutem Tastendruck verlassen Sie das Menu wieder.
-
Wahlen Sie das gewünschte Menu mit den NAVIGATIONSTASTEN AUFWÄRTS (▲)/ ABWÄRTS (▼).
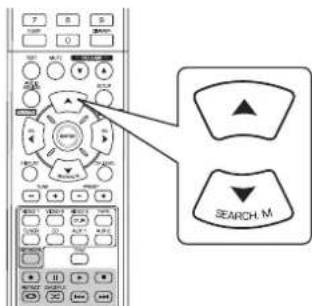
- Bestätigen Sie ihre Auswahl.

Bei Auswahl von „SYSTEM SETUP" siehe „SYSTEM EINSTELLLEN" auf Seite 39.
- Bei Auswahl von „INPUT SETUP" siehe
EINGANGSEINSTELLUNGEN auf Seite 41.
- Bei Auswahl von „SPK SET" siehe „LAUTSPRECHER EINSTELLUNGEN" auf Seite 42.
Bei Auswahl von „CH LVL SETUP" siehe „KANALPEGEL EINSTELLUNGEN" auf Seite 46..
Bei Auswahl von ,PARAMTER SETUP" siehe ,PARAMETER EINSTELLEN auf Seite 48.
- Bei Auswahl von „HDMI SETUP" siehe „HDMI EINSTELLEN" auf Seite 50.
- Bei Auswahl von "EXIT" verlassen Sie das EinstellungsmENU.
Systemeinstellungen Ablaufdiagramm
- Der Ablauf der Systemeinstellungen ist wie folgt:

- Bei Auswahl von „RETURN" im Untermenü kehren Sie in das vorherige Menu zusück.
Wird AUDIO ASSIGN(RETURN) in einem Untermenü gedrückt, so kehren Sie ebenfals in das vorherige Menu zureck.
■ Bitt bechten Sie: Wahrnd der Systemeinstellungen sind nur die (POWER ON/) STANDBY Taste sowie die fur die Systemeinstellungen notwendigen Tasten beegt.
SYSTEM EINSTELLLEN

- SW MODE (SUBWOOFERMODUS): Auswahl des gewünschten Subwoofermodus.
TONE: Klangeinstellungen (Basse und Hohen).
A.P.S (AUTOMATISCHE ENERGIEEINSPARUNG): Gewünschte Ausschaltzeit einstellen. - RETURN: Rückkehr in das vorherige Menü.
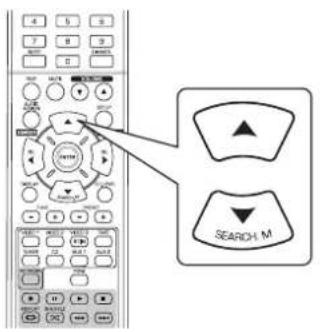
1. Mit den NAVIGATIONSTASTEN AUFWÄRTS(▲)/ ABWÄRTS(▼) wahren Sie das gewünschte Menüelement.
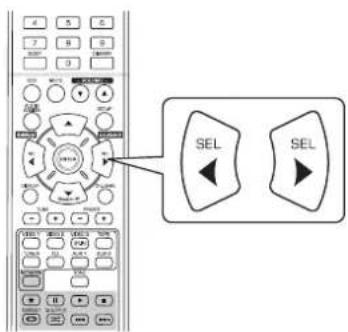
2. Mit den NAVIGATIONSTASTEN LINKS (▲)/RECHTS (▲) stellen Sie das gewählte Menüelement ein.
AuswahldesSUBWOOFER-Modus
SW ^+ "ist nur wirksam, wenn im LAUTSPRECHERMENU _FRONT" und _CENTER" auf _LARGE" und _SUB-W" (Subwoofer) auf YES" eingesellt ist (Einzelheiten siehe _LAUTSPRECHER EINSTELLUNGEN" auf Seite 42.)
NORM : Sind die Niederfrequenzsignale von Kanalen auf „LARGE" eingestellt, so werden sie nur von diesen Kanalen reproduziert. In diesen Modus sind die Niederfrequenzsignale, welche vom Subwoofer reproduziert werden, nur die Niederfrequenzsignale von LFE (von den Mehrkanalquellen, welche LFE-Kanäle (Low Frequency Effects), auch „1" Kanal genannot) enthalten und die Kanäle müssen auf „SMALL" eingestellt sein.
SW +: Es werden die auf "LARGE" eingestellt den Niederfrequenzsignale von Kanalen gleichzeitig vonjenen Kanalen und dem Subwooferkanal reproduziert. In this Modus verlauf der Niederfrequenzbereich einheitlicher durch den Raum, jeder kann es in Abhängigkeit von Raumgroße und Grundriss zu Störungen mit verringerter tatsächlichen Lautstärke im Niederfrequenzbereich kommt.
Auswahl AUTOMATISCHE ENERGIEEINSPARUNG
Die automatische Energieeinsparung schaltet die Spanningsversorgung automatisch aus und ruft den Stand-by-Modus auf. Erfolgt fur die voreingestellte Zeit kein Tastendruck, so wird die Funktion aktiviert.
- Sie können die gewünschte Ausschaltzeit einstellen.

Auswahl TONE
OFF : Wiedergabe einer Programmquelle ohne Klangeeffekte ("DIR" leuchtet).
ON: Einstellung des Klanges ( „DIR" erlischt).
■ Einstellung von TONE auf ON zur Klangeinstellung (Basse und Hohen)
①. Mit ENTER rufen Sie den Klangeinstellmodus auf.
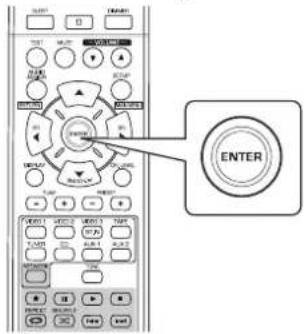
② .Mit den NAVIGATIONSTASTEN / wahlen Sie den gewünschten Klangmodus.
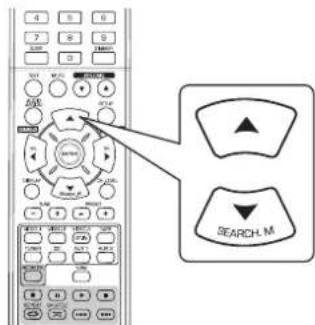

Auswahl BASS
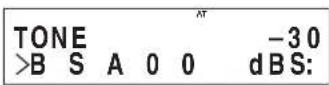
③. Mit den NAVIGATIONSTASTEN / stellen Sie den gewählten Klang ein.

- Der Klangpegel kann im Bereich -10 +10 dB eingestellt werden.
- Allgemein empfehlen wir, Basse und Hohen auf 0 dB (Flat Level) einzustellen.
- Extreme Einstellungen mit hoher Lautstärke können zur Beschädigung ihrer Laufsprecher führen.
- Wiederholen Sie die vorstehenden Schritte ②und ①zur Beendigung der Einstellungen.
EINGANGSEINSTELLUNGEN
INPUT SETUP
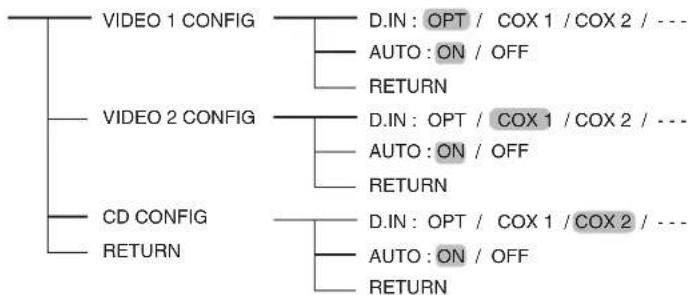
D.IN DIGITALEINGANGE): Zuordnung der angeschlossenen Einänge DIGITAL IN zum gewünschten Eingang.
- AUTO (AUTO SURROUND): Auswahl des automatischen Surroundmodus oder des manuellen Surroundmodus.
- RETURN: Rückkehr in das vorherige Menu.
- Mit den NAVIGATIONSTASTEN AUFWÄRTS (▲)/ABWÄRTS (▼) wahren Sie die gewünschte Eingangssquelle, danach drücken Sie ENTER.
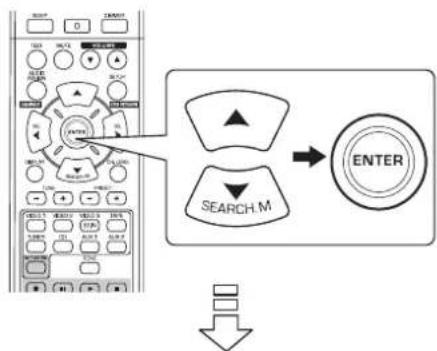

Beispiel) Bei Auswahld der VIDEO 2
- Mit den NAVIGATIONSTASTEN AUFWARTS (▲)/ ABWARTS (▼) wahren Sie das gewünschte Menüelement.
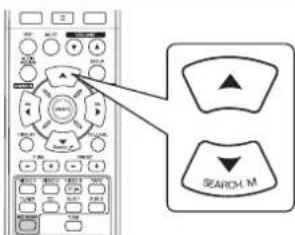
- Mit den NAVIGATIONSTASTEN LINKS (▲)/RECHTS (▲) stellen Sie das gewählte Menüelement wunschgemäß ein.
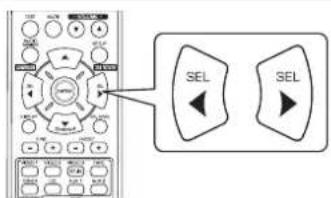
Auswahl DIGITAL IN
- Ordnen Sie die angeschlossenen DIGITALEINGÄNGE zu (Einzelheiten siehe Abschnitt „ANSCHLUSS DIGITALER EINGÄNGE" auf Seite 7).
Wahlen Sie zwischen OPT (optisch), COX 1 (koaxial 1), COX 2 (koaxial 2) und -- (analog).
■Bitte beachten Sie :
- Für den Fall, dass ein DIGITALEINGANG zwei oder mehr Eingangsquellen zugeordnet ist, konnen die digitalen Audiosignale vom gleichen DIGITALEINGANG gehört werden, wenn diese Eingangsquellen gewährt sind.
- Ist HDMI IN an Ihr Videokomponente angeschlossen, dann sind die DIGITAL IN Einstellungen ungültig.
Auswahl von AUTO SURROUND
- Sie können entweder den automatischen oder den manuellen Surroundmodus wahren.
OFF (Manueller Surroundmodus): Wahlen Sie den gewünschten Surroundmodus für den Signaleingang mit auswahltasten
SURROUNDMODUS (> / <) . (Einzelheiten finden Sie im Abschnitt „Auswahl des manuellen Surroundmodus mit AUTO/MANUAL auf der Frontblende" auf Seite 17.)
ON(Automatischer Surroundmodus) : Der optimale Surroundmodus wird automatisch abhängig vom Eingangssignalformat gewählt.
■Bitte beachten sies :
- Schalten Sie SPEAKER aus oder sind „CENTER" und „SURR(Surround)" auf „NO" eingestellt, dann ist der automatische Surroundmodus ungültig.
- Self test der automatische Surroundmodus gewählt wird und ein gleichartiges digitales Signalformat anliegt, kann der optimale Surroundmodus abhängig von der Laatsprechereinstellung auf NO^ abweichen.
- Ist der automatische Surroundmodus gewählt, so kann kein anderer Surroundmodus als der optimale Surroundmodus gewählt werden.
LAUTSPRECHER EINSTELLUNGEN
- Nach der Installation des Receivers und dem Anschluss aller Komponenten fühmen Sie die Lautsprachereinstellungen für optimalen Klang entsprechend ihrer Umgebung und des Lautspricher-Layouts vor.
- Auch beim Austausch von Laatsprechem oder ihrer Umsetzung, der Veränderung der Sitzposition oder des Layouts ihrer Umgebung sollenn Sie eine neue Einstellung der Laatsprecher vornehmen.

- SPK (SPEAKER) CONFIGURATION: Auswahl der Grübe der angeschlossenen Laufsprecher.
CROSSOVER: Auswahl der gewünschten Crossoverfrequenz. - SPK (SPEAKER) DISTANCE: Eingabe der Enternung zwischen der Sitzposition und jedem einzelnen Lautsprecher, um die Verzogerungszeit für optime Surroundwiedergabe automatisch einzustellen.
- RETURN: Rückkehr in das vorherige Menu.
Auswahi SPEAKER KONFIGURATION
- Mit den NAVIGATIONSTASTEN AUFWÄRTS (▲) /ABWÄRTS (▼) wahren Sie „SPK CONFIG“, danach drücken Sie ENTER.
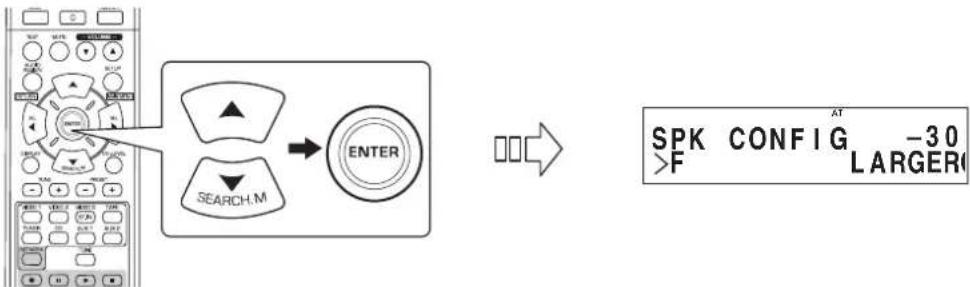
- Mit den NAVIGATIONSTASTEN AUFWÄRTS (▲)/ABWÄRTS (▼) wahren Sie den gewünschten Lautsprecher.
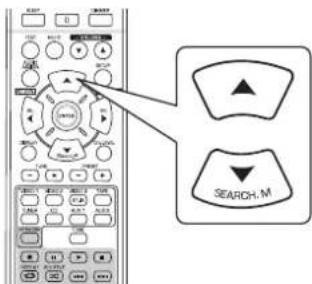
- Mit den NAVIGATIONSTASTEN LINKS (▲)/RECHTS (▶) stellen Sie den gewählten Laufsprecher wunschgemäß ein.
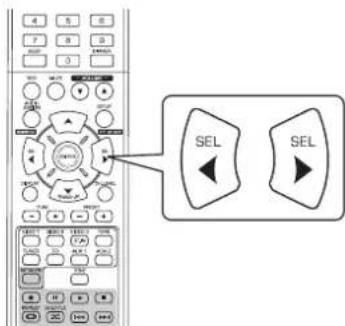
- Abhängig vom Laufsprechertype können Sie einen der folgenden Laufsprechertypeen wahren.
Vordere, mittlerer und Surrounddlaufsprecher:
LARGE: Wahlen Sie diese Einstellung beim Anschluss von Laatsprechem, welche Frenzen unterhalb der Crossoverfrequenz wiedergeben konnen.
SMALL: Wahlen Sie diese Einstellung beim Anschluss von Laatsprechem, welche keine Frenzen unterhalb der Crossoverfrequenz wiedergeben konnen. Bei dieser Auswahl werden Frenzen unterhalb der Crossoverfrequenz an den Subwoofer oder an Laatsprecher übertragen, die auf "LARGE" eingestellt sind (wenn Sie kein den Subwoofer benutzen).
NO: Wahlen Sie diese Einstellung, wenn keine Laufsprecher angeschlossen sind. Bei dieser Auswahr wird der Ton an jene Laufsprecher übertragen, die nicht auf "NO" eingestellt sind.
- Subwoofer :
YES: Wahlen Sie dies zur Ausgabe der LFE-Signale und Bassfrequenzen von auf „SMALL“ eingestelltten Kanälen vom Subwoofer.
NO: Wahlen Sie diese Einstellung, wenn kein Subwoofer angeschlossen ist. Die Bassfrequenzen werden von anderen Laufsprechem ausgegeben.
■Bitte beachten Sie:
- Sind Laatsprecher auf „SMALL“ eingestellt, so sollen den Crossoverfrequenz korrekt entsprichend ihrer Frequenzcharakteristiken einstellen (Einzelheiten siehe „Auswahl CROSSOVER“ auf Seite 44).
-
Ist F^ (Front) auf „SMALL“ eingestellt, dann konnen „CENTER“ und „SURR“(Surround) nicht auf „LARGE“ und „SUB-W“ (Subwoofer) nicht auf „NO“ eingestellt werden.
-
Wiederholen Sie die vorstehenden Schritte 2 und 3, bis alle Laufsprecher auf den gewünschten Modus eingestellt sind.
■Hinweise zur Laufsprechergebnis
Wahlen Sie "LARGE" oder "SMALL" nicht entsprechend der tatsächlichen Groß des Lautsprechers, sondern nach der seiner Fähigkeit, tiefe Frequenzsignale (Basse unterhalb der eingestellen Frequenz wiederzugegeben, die im Menu "CROSSOVER" eingestellt wurde).
- Wenn Sie diese nicht wissen, versuchen Sie, den Klang bei beiden Einstellungen zu vergleichen, um die richtige Einstellung zu bestimmen (stellen Sie die Lautstärke niedrig genug ein, um die Laatsprecher nicht zu beschädigen).
Auswahl CROSSOVER
-
Sind Lautsprecher auf „SMALL“ eingestellt, so vergewissem Sie sich davon, dass ihre Crossoverfrequenz korrekt entsprechend ihrer Freqenzcharakteristien eingestellt ist.
-
Mit CURSOR AUFWÄRTS (▲) / ABWÄRTS (▼) wahren Sie „CROSSOVER", dann drucken Sie ENTER.
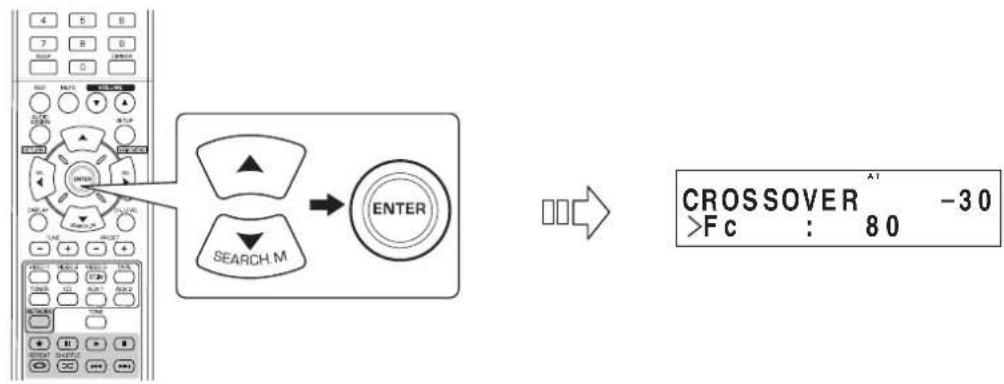
- Mit CURSOR LINKS (▲) / RECHTS (▶) stellen Sie die Crossoverfrequenz ein.
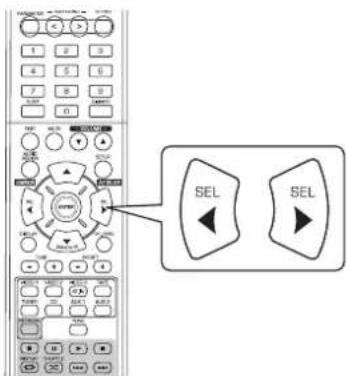
Die Crossoverfrequency kann auf 40, 50, 80, 100, 150 und 200Hz eingestellt werden.
■Hinweise zur Crossoverfrequenz
- Sind die Lautspricher auf „SMALL“ eingestellt, dann werden tiefe Frenzenen auf diesen Kanälen, die unterhalb der Crossoverfrequenz liegen, über den Subwoofer oder die vorderen Lautspricher ausgegeben, die auf „LARGE“ eingestellt sind (wenn kein Subwoofer verwendet wird).
- Schlagen Sie in der Bedienungsanleitung der Laufsprecher nach, die angeschlossen werden sollen. Wenn der Frequenzbereich Ihrer Laufsprecher bei 100Hz 20kHz liegt, muss die Crossoverfrequenz auf 100Hz eingestellt werden (oder etwas hörher).
Auswahl DISTANCE
- Mit den CURSOR AUFWÄRTS (▲) / ABWÄRTS (▼) wahren Sie „SPK DISTANCE“, danach drücken Sie ENTER.

- Mit den CURSOR AUFWÄRTS (▲) / ABWÄRTS (▼) wahren Sie das gewünschte Menüelement.
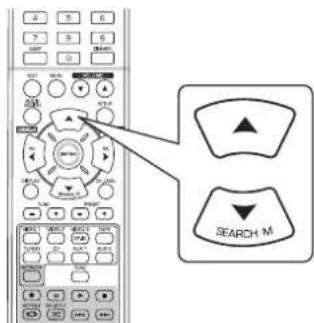
■Bitte beachten Sie:
- Sie können nicht den Subwoofer und die auf „NO" eingestelltten Laufsprecher wahren.
- Mit den CURSOR LINKS (▲) / RECHTS (▶) stellen Sie den gewählten Menüpunkt ein.
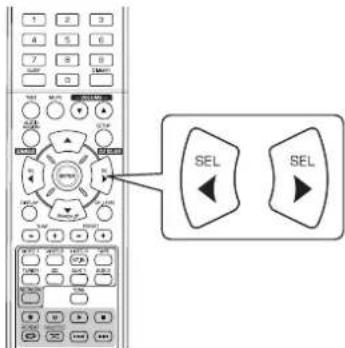
Auswahldergewunschten Einheit
- Sie können METER oder FEET wahren.
- Nach der Auswahl der Einheit werden die Abstände automatisch in die gewährte Einheit umgerechnet.
Einstellen der Entfernung -
Sie können die Entfernung zwischen 0,1 und 9.0m in 0,1 Meter Intervallen einstehen (oder 0,5 ~ 30 Fuß in 0,5-Fuß-Schritten).
-
Wiederholen Sie die vorstehenden Schritte 2 und 3, bis alle Entfernungen eingestellt sind.
Informationen zur Entfernung der Laufsprecher
Be der Wiedergabe von Mehrkanal-Surround Sound mit Dolby Digital und DTS Quellen sind der mittlere und die SurroundLaustprecher Idealerweise in der gleichen Entfernung von der hauptsächlichen Sitzposition wie die vorderen Laustprecher. Durch Eingabe der Entfernung zwischen der Sitzposition und jeder Laustprecher werden die Verzogerungszeiten fur denmittleren und die Surround-Laustprecher automatisch zur Erzeugung einer idealen Hörumgebung eingestellt, gewissermaBen als waren der mittlere bzw. die Surround-Laustprecher in ihrer Idealposition.
KANALPEGELEINSTELLUNGEN
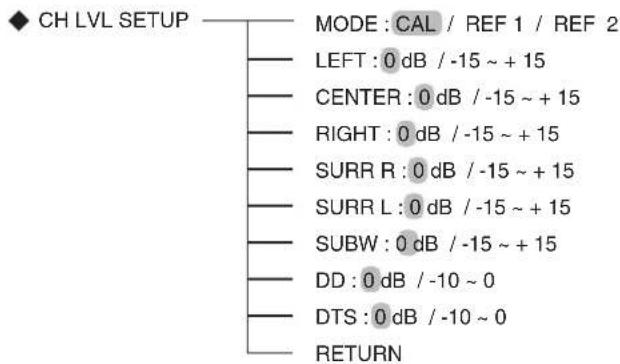
Bitte beachten Sie:
Abhängig von den Laatsprechereinstellungen (NO" usw.) konnen einige Kanale nicht gewählt werden.
Einstellen des Kanalpegels
- Der Kanalpegel kann beliebig eingestellt werden. Diese eingestellen Pegel werden nur im Benutzerspeicher (.CAL") abgelegt, nicht im Voreinstellungsspeicher (.REF 1", .REF 2").
- Nach der Einstellung der Kanalpegel mit dem Testton stellen Sie die Kanalpegel entweder entsprechend der Programmquellen oder nach eigem Geschmack ein (Einzelheiten finden Sie im Abschnitt „Einstellen der einzelnen Kanale mit dem Testton" auf Seite 19).
1. Mit den CURSOR AUFWÄRTS (▲) / ABWÄRTS (▼) wahren Sie den gewürschten Kanal.
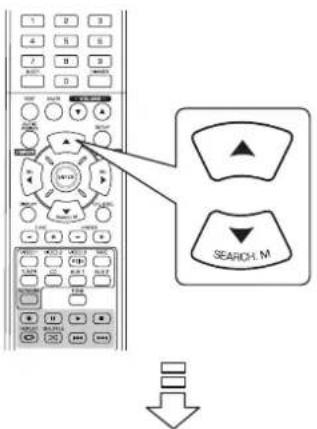
Beispiel: Bei Auswahl von LFE der Dolby Digital Quelle
2. Mit den CURSOR LINKS (▲) / RECHTS (▶) stellen Sie den Pegel des gewählten Kanals oder den LFE-Pegel der Programmquelle ein.
Der LFE-Pegel kann im Bereich -10~0 dB eingestellt werden, die anderen Kanalpegel im Bereich von -15 ~ +15 dB.
- Allgemein empfehlen wir, den LFE-Pegel auf 0 dB einzustellen (der empfohlene LFE-Pegel für eine frühe DTS Software ist jeder -10 dB). Erscheinen die empfohlenen Pegel zu hoch, so stellen Sie diese niedriger ein, falls nicht.
3. Wiederholen Sie obige Schritte 1 und 2 zur Einstellung aller Kanalpegel.
Speichern der eingestellten Kanalpegel
- Sie konnen die eingestellten Kanalpegel in den Voreinstellungen (REF 1, REF 2) speichern und jederzeit aufrufen.
- Nach den Schritten 1-3 im Abschnitt „Einstellen des Kanalpegels" auf Seite 46, danach drücken Sie ENTER.

CH LVL SETUP-30 >M DE REF10:
Die,1" in der Anzeige,REF 1" blinkt.
- Mit den CURSOR LINKS (▲)/RECHTS (▶) wahlen Sie die gewünschte Speicherstelle, danach drücken Sie ENTER.
- Mit jedem Tastendruck auf die NAVIGATIONSTASTEN t oder u wird zwischen REF 1" und REF 2" umgeschaltet.
Die eingestallen Kanalpegel sind nun entspruchend gespeichert.
Aufrufen der gespeicherten Kanalpegel
- Mit den CURSOR AUFWARTS (▲) / ABWARTS (▼) wahren Sie MODE (Speichermodus).
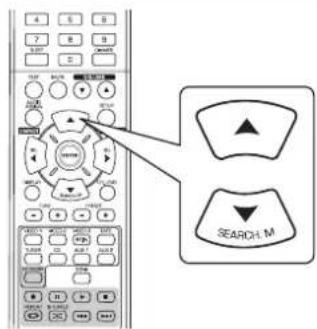

CH LVL SETUP -30 >M DE CALO:
"CAL" wird möglicherweise anstatt. REF 1" oder REF 2" angezeigt.
- Mit den CURSOR LINKS (▲)/RECHTS (▶) wahren Sie zwischen REF 1 und REF 2.
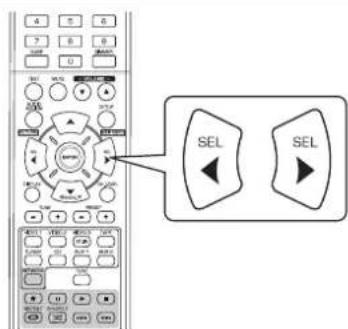
- Hiermit werden die in den Voreinstellungen gespeicherten Kanalpegel aufgerufen.
PARAMETER EINSTELLLEN
PARAMTER SETUP
PANorama : OFF / ON
C.WIDTH:3/0~7
DIMENSION:0/-3~+3
DRC DD
DRC:OFF/MID/MAX
RETURN
RETURN
DOLBY PRO LOGIC II MUSIKPARAMETER: Einstellen der verschiedene Dolby Pro Logic II Musikparameter für optimale (PANorama, C.WIDTH (MITTLERE BREITE), Surroundeffekte. DIMENSION)
- DRC DD (DYNAMIC RANGE COMPRESSION DOLBY DIGITAL): Einstellen der Komprimierung des Dynamikbereichs, mit dem leisere TONE bei niedriger Lautstärke better gehört werden.
- RETURN: Rückkehr in das vorherige Menu.
Bei Auswahl von „PANorama“, „C.WIDTH“, „DIMENSION“
-
Sie können die verschiedene Dolby Pro Logic II Musikparameter für optimale Surrounddefekte einstellen.
■Bitte beachten Sie :
Die Parametereinstellungen sind nur im Dolby Pro Logic II Musikmodus gültig. -
Mit CURSOR AUFWÄRTS (▲) / ABWÄRTS (▼) wahren Sie den gewürschten Parameter.
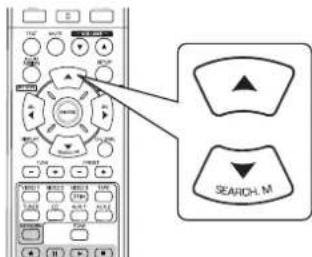
- Mit CURSOR LINKS (▲) / RECHTS (▶) stellen Sie den gewählten Parameter ein.
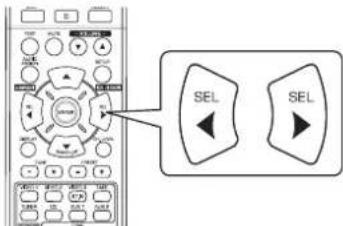
Auswahl ,PANORAMA“ Modus
Dieser Modus erweitert das vordere Stereoabbbild zum Einschluss der Surroundlautsprecher fur einen spannenden „Wraparound" Effekt mit Seitenwandabbild. Wahlen Sie "OFF" oder "ON" (Standardwert: OFF).
Auswahl Steuerung „C. WIDTH"
Dies stell das mittlere Abbild ein, um nur vom mittleren Laufsprecher, nur vom linken/rechten Laufsprecher als Phantomabbild oder in entsprechlichem Maß von allen drei vorderen Laufsprechem gehört zu werden. Die Steuerung kann in 8 Schritten zwischen 0 und 7 (Standardwert: 3) erfolgen.
■Ausb Wahl Steuerung „DIMENSION“
Dies stell das Klangfeld schrittweise entweder in Richtung vordere oder hintere Laatsprecher ein. Die Steuerung kann in 7 Schritten zwischen -3 und +3 (Standardwert: 0) eingestellt werden.
- Wiederholen Sie obige Schritte 1 und 2 zur Einstellung weiterer Parameter.
Auswahl „DRC DD"
- Diese Funktion komprimiert den Dynamikbereich eines zuvor spezifizierten Teils des Dolby Digital Soundtracks (mit extrem hoher Lautstärke), um die Lautstärkespitzen anzupassen.
Dies erleichtert das Horen des gesamtten Soundtracks beim Sehen von Filmen nachs mit niedriger Lautstärke.
■Bitte beachten Sie:
- These Einstellung ist nur guttig, wenn die Digitalsignale von der Dolby Digital Programmquelle anliegen.
Die Parameteinstellungen sind nur im Dolby Pro Logic II Musikmodus gültig.
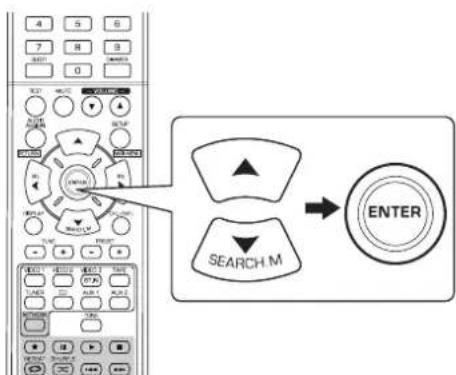
- Mit CURSOR LINKS (▲) / RECHTS (▶) stellen Sie die Kompression des Dynamikbereichs ein.
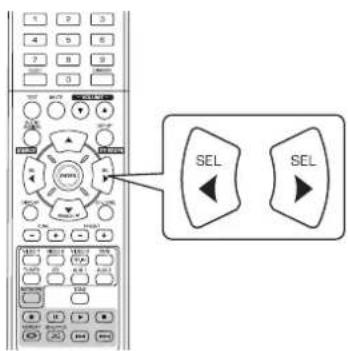
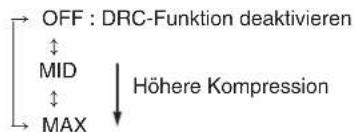
HDMI EINSTELLEN
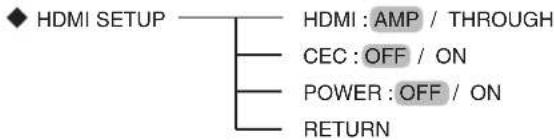
- HDMI (HDMI AUDIOAUSGANG): Ausgabe der digitalen Audiosignale über den Anschluss HDMI MONITOR OUT.
- CEC (HDMI-STEUERUNG): Gemeinsame Bedienung über HDMI angeschlossener und mit HDMI-Steuierung kompatibler Komponenten.
- POWER (EIN/AUS-STEUERUNG): Verbindung des EIN/AUS Status these Geräts mit den Komponenten.
- RETURN: Rückkehr in das vorherige Menu.
1. Mit CURSOR AUFWÄRTS (▲) / ABWÄRTS (▼) wahlen Sie den gewünschten Menüpunkt.
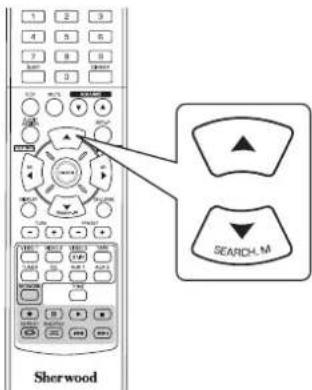
2. Mit CURSOR LINKS (▲) / RECHTS (▶) stellen Sie den gewählten Menupunkt ein.
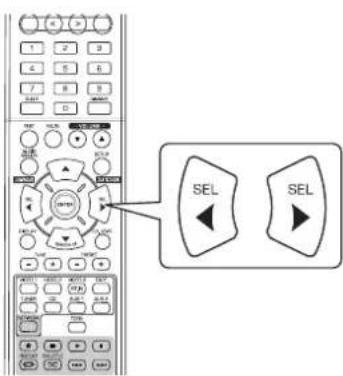
Auswahl HDMI AUDIO OUT
- Der HDMI-Anschluss kann nicht komprimierte digitale Videosignale und digitale Audiosignale übertragen. Abhängig davon, ob die digitalen Audiosignaleingänge auf HDMI IN über HDMI MONITOR OUT these Receivers ausgegeben werden, muss HDMI AUDIO OUT korrekt eingestellt sein.
AMP:Kein Ausgang der digitalen HDMI-Audiosignale uber HDMI MONITOR OUT these Receivers, these Signale werden also uber die an thisem Receiver angeschlossenen Lautsprecher gehort.
THROUGH : Ausgang der digitalen HDMI-Audiosignale über HDMI MONITOR OUT these Receivers,these Signale werden also uber die Lautsprecher Ihres Fernsehers gehort.
Bitte beachten Sie:
- Ist HDMI AUDIO OUT auf THROUGH eingestellt, so haben Sie keinen Ton von den an dieser Gerät angeschlossenen Laufsprecher.
Auswahl HDMI CONTROL
Die HDMI-Steuerfunktion ermoiglich die Auswahldes Eingangs these Gerats in Verbindung mit den angeschlossenen Komponenten. OFF: HDMI-Steuerfunktion ist deaktiviert.
ON: HDMI-Steuerfunktion ist aktiviert.
- Ist HDMI CONTROL auf ON eingestellt, dann können Sie ebenfalls die Funktion ARC (Audio Return Channel) benutzten, womit der Fernseher die Audiosignale über HDMI-Kabel an diesen Receiver übertragen kann.
■Bitte beachten Sie:
Die HDMI-Steuerfunktion hangt von den angeschlossenen Komponenten und deren Einstellungen ab.
- Zur Nutzung der ARC-Funktion muss Ihr Fernseher die ARC-Funktion unterstützen.
- Einzelheiten zu HDMI CONTROL und POWER CONTROL siehe, HDMI-FUNKTION BESTÄTIGEN auf Seite 36.
Auswahl POWER CONTROL
Die Ein/Aus-Steuerfunktion ermoiglich die Verbindung des EIN/AUS-Status these Gerats und den Start der Wiedergabe angeschlossener Komponenten.
OFF: POWER CONTROL ist deaktiviert.
ON: POWER CONTROL ist aktiviert.
Bitte beachten Sie:
- POWER CONTROL kann nur eingestellt werden, wenn HDMI CONTROL auf ON eingestellt ist.
Störungserkennung
Kommen es zu einer Fehlfunktion, so setzen Sie sichitte zunachst die nachstehende Tabelle an, bevor Sie sich an den Kundendienst wenden.
Konnen Sie die Fehlfunktion nicht abstellen, so schalten Sie den Receiver aus und danach wieder ein.kommen Sie auch hiermitt nicht weiter, so wenden Sie sichitte an ihren Fachhandler. Unterkosten Umstanden versuchen Sie selbst, die Reparatur durchzufahren, hiermit verlieren Sie ihre Garantieansprüche.
| PROBLEM MÖGliche | HE URSACHE LösUNGSVORSCHLAG | |
| Keine Spanningsversorgung. | ·Das Netzkabel ist nicht angeschlossen. ·Schlechter Anschluss des Netzkabels oder Steckdose defekt. | ·Schlieben Sie das Netzkabel korrekt an. ·Überprüfen Sie die Steckdose. |
| Kein Ton. | ·Die Lautspracherkabel sind nicht angeschlossen. ·Die Master-Lautstärke ist zu niedrig eingestellt. ·MUTE wurde gedrück. ·Falsche Auswahr der Eingangssquelle. ·Falscher Anschluss der Komponenten. ·HDMI AUDIO OUT ist auf THROUGH eingestellt. ·Die Audioeinstellungen sind nicht korrekt. | ·Überprüfen Sie die Lautsprachersanschluss. ·Stellen Sie die Master-Lautstärke ein. ·Drücken Sie MUTE zur Aufhebung der Stummschaltung. ·Wahlen Sie die gewünschte Eingangssquelle korrekt. ·Nehmen Sie die Anschlüsse korrekt vor. ·Stellen Sie auf AMP ein (Einzelheiten siehe Abschnitt „Auswahr HDMI AUDIO OUT" auf Seite 50). ·Berichtigen Sie die Einstellungen (Einzelheiten siehe Abschnitt „EINGANG EINSTELLEN" auf Seite 41). |
| Kein Ton von den Surround-Laatsprechem. | ·Surroundmodus ist deakliegt (Stereomodus). ·Master-Lautstärke und Surroundpegel sind zu niedrig eingestellt. ·Es wird eine Monoquelle benutzt. ·Surround-Laatsprecher sind auf „NO" eingestellt. | ·Wahlen Sie einen Surroundmodus. ·Stellen Sie Master-Lautstärke und Surroundpegel ein. ·Wahlen Sie eine Stereo- oder Surroundquelle. ·Wahlen Sie die gewünschte Surround-Laatsprechereinstellung. |
| Kein Ton vom mittleren Laatsprecher. | ·Stereomodus usw. ist gewählt. ·Mittlerer Laatsprecher ist auf „NO" eingestellt. ·Master-Lautstärke und mittlerer Pegel sind zu niedrig eingestellt. | ·Wahlen Sie den gewünschten Surroundmodus. ·Wahlen Sie die gewünschte Einstellung des mittleren Laatsprechers. ·Stellen Sie Master-Lautstärke und mittleren Pegel ein. |
| Kein Bild. | ·Die Videoanschlüsse zwischen thisem Gerät und dem Femsheher sind fehlerthalt. ·Falsche Auswahr der Eingangssquelle auf dem Femsheher. | ·Korrigieren Sie die Videoanschlüsse. ·Wahlen Sie die korrekte Eingangssquelle. |
| Kein Bild über HDMI-Anschluss. | ·HDMI-Anschluss zwischen thisem Gerät und dem Femsheher ist fehlerthalt. ·Femsheher oder andere Geräte unterstützen nicht HDCP. | ·Korrigieren Sie den HDMI-Anschluss. ·Dieses Gerät gibt keine Videosignale aus, wenn es nicht an Geräten angeschlossen ist, die HDCP unterstützen. |
| Bildstörungen oder verzerrtes Bild. | ·Videoformat von Femsheher, DVD-Player usw. ist nicht PAL. | ·Stellen Sie das Videoformat auf PAL um. |
| Kein Empfang von Radiosenden. | ·Es ist keine Antenne angeschlossen. ·Die gewünschte Senderfrequenz ist nicht eingestellt. ·Die Antenne ist falsch ausgerichtet. | ·Schließen Sie eine Antonne an. ·Stellen Sie die gewünschte Senderfrequenz ein. ·Richten Sie die Antenne neu aus. |
| Senderspeicher können nicht empfangen werden. | ·Es wurde eine falsche Senderfrequenz gespeichert. ·Die Senderspeicher wurden gelöscht. | ·Speichern Sie die korrekte Senderfrequenz. ·Speichern Sie die Sender ermut. |
| Schlechter UKW Empfang. | ·Es ist keine Antenne angeschlossen. ·Die Antenne ist falsch ausgerichtet. ·Schwache Signale. | ·Schließen Sie eine Antonne an. ·Richten Sie die Antenne neu aus. ·Montieren Sie eine UKW-Hausantenne. |
| Ständige oder zeitweise Zischgeräuche bei MW-Empfang, insbesondere nachs. | ·Störungen werden durch Motoren, Neonlampen oder Gewitter usw. verursacht. | ·Halten Sie den Receiver von Störquellen fern. ·Montieren Sie eine MW-Hausantenne. |
| Verbindung mit Netzwerk nicht möglich. | ·Netzwerk lauft nicht. ·Die Firewall des Computers oder des Routers ist aktiviert. | ·Vergewissem Sie sich, dass das Netzwerk arbeitet. ·Überprüften Sie die Firewalleinstellungen des Computers oder des Routers. |
| Internet-Radiosendung kann nicht gehört werden. | ·Das Ethemetkelabel ist nicht korrekt angeschlossen oder das Netzwerk ist abgetrennt. ·Programm wird in nicht kompatiblem Format übertragen. ·Internet-Radiosender überträgt gerade nicht. | ·Überprüften Sie den Verbindungsstatus. ·Nur Internet-Radioprogramme im Format MP3 und WMA konnen auf这点em Gerät wiedergegeben werden. ·Stellen Sie einen Sender ein, der gerade überträgt. |
| Fernbedienung faktioniert nicht. | ·Die Batterien sind erschöpf. ·Der Sensor wird behindert. | ·Tauschen Sie die Batterien aus. ·Entfermen Sie Hinderisse. |
Spezifikationen
■VERSTÄRKER
Ausgangsleistung, Stereomodus, 6 Ω, THD 0,7%, 40 Hz~20 kHz | 2x100 W
Gesamtklirrfactor,6Ω,100W,1kHz 0.05%
- Intermodulationsverzerrung
60 Hz: 7 kHz = 4 : 1 SMPTE, 6 Ω, 100 W | 0,1 %
- Eingangsempfindlichkeit, 47 kΩ Line (CD, TAPE, VIDEO) | 250 mV
Rauschabstand, IHF, "A"-bewertet Line (CD, TAPE, VIDEO) 95 dB
- Frequenzgang Line (CD, TAPE,VIDEO), 20 Hz~50 kHz | +0 dB, -3 dB
Ausgangspiegel TAPEREC,2,2kΩ| 250mV PREOUT(Subwoofer),1kΩ| 1,5V
Basse-/Hohensteuerung, 100 Hz/10 kHz ±10 dB
- Surroundmodus, nur kanalgetrieben
Front Ausgangsleistung, 6 Ω, 1 kHz, THD 0,7 % | 100 W / 100 W
Mitte Ausgangsleistung, 6 Ω, 1 kHz, THD 0,7 % | 100 W
Surround Ausgangsleistung, 6 Ω, 1 kHz, THD 0,7 % | 100 W / 100 W
■DIGITALAUDIO
- Abtastfrequenz 32,44,1,48,96 kHz
- Digitaler Eingangspegel Koaxial, 75 Ω | 0,5 Vp-p Optisch, 660 nm | -15 ~ -21 dBm
VIDEO
- Videoformat | PAL
- Eingangsempfindlichkeit (= Ausgangspiegel), 75 Ω Video (Composite (normal)) | 1 Vp-p
HDMI Anschluss 19-pin
UKW TUNER
- Frequenzbereich | 87,5 ~ 108 MHz
- Nutzbare Empfindlichkeit, THD 3%, Rauschabstand 26 dB | 12,8 dBf
46 dB Dammungsempfindlichkeit, Mono/Stereo 20,2/45,3 dBf
Rauschabstand, 65 dBf, Mono/Stereo | 55/50 dB
Gesamtkirrfaktor, 65 dBf, 1 kHz, Mono/Stereo | 0,5/1,0% - Frequenzgang, 30 Hz~12 kHz | ±3,0
- Stereotrennung, 1 kHz | 30 dB
Erfassungsverhältnis 4 dB - ZF Gleichtaktunterrückungsverhältnis 80 dB
MW TUNER
- Frequenzbereich | 522 ~ 1611 kHz
- Nutzbare Empfindlichkeit | 500 μV/m
Rauschabstand 40 dB
Trennscharfe 25 dB
■ALLGEMEIN
- Spannungsvorsorgung | 230 V ~ 50 Hz
Leistungsaufnahme 200W
Abmessungen (BxHxT, einschlieblich uberstehender Teile) 435x143x359 mm
Gewicht (netto) 8,9 kg
Bitte beachten Sie: Änderung von Design und Spezifikationen, auch ohne Vorankündigung, vorbehalten.
Introduccion
LEA ESTO ANTES DE UTILIZAR SU EQUIPO


PRECAUCION: PARA REDUCIR EL RIESGO DE DESCARGA ELECTRICA, NO DESMONTE LA TAPA (NI EL PANEL TRASERO). NO HAY PIEZAS REPARABLES POR EL USUARIO EN EL INTERIOR. LLEVLO A REPARAR A PERSONAL DE SERVICIO CUALIFICADO.

Este Trickolo pretende alertar al usuario de la presencia de "tensiones peligrosas" sin aislamento en el interior del equipo, que poder ser de magnitud suficiente para constituir un risgo de descarga electrica para las personas.

Este的概率 pretende alertar al usuario de la presencia de instructaciones de mantenimiento (servicio técnico) y funciona bajo el河水 en la literatura que acomaña al aparato.
ADVERTENCIA: PARA EVITAR EL RIESGO DE INCENDIO O DE DESCARGA ELECTRICA, NO EXPONGA EL APARATO A LA LLUVIA O LA HUMEDAD.
Precauciones sobre la instalacion
Note: Para una buena dispersion del calor, no instale este equipo en espacios reducidos como en un mueble libreria o en recintos similares.
Asegürese de departing un espacio alrededor de esta unidad, igual o mayor que el做不到 abajo.
Lados izquierdo, correcho y trasero: 20 cm, lado superior: 40 cm
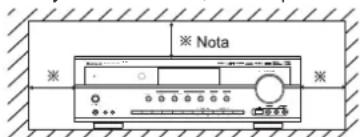
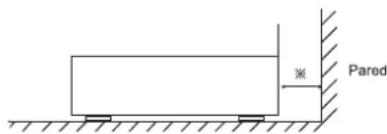
No obstruya las ranuras de ventilacion ni apile除外o equipo encima.
PARASU SEGURIDAD
| EUROPA AUSTRALIA | 220 V - 240 V | Los equipos enviados a Australia está disniñados paraFuncionalso con 230 VCA. Paraasegurar unFuncionamento seguro,el enchufe de tres patillasministradodebe serutilido en tomas de corriente estandaresde tres orificios que esténefectivamenteconectadas atierra através del cableado normal del hogar.Cablesde extensionusados con el equipo deben ser de tres hilos yestarcorrectamenteconectados paraproportionarconnexiónatierra. Los cablesde extensioninadecuadossonla principalcausa de las muertes.Elheiro dequeel equipofuncione bien noimplicaque la toma de corriente tenga toma de tierra yque la instalaciónseacompletamentesegura. Para su seguidosieneqa duda sobre la correctaconexióna tierra de la toma de corriente,consulte con un electricistaequalficado.TENSIÑONUNIFICADAENEUROPA Todo losequiposson adecuadosparauna alimentaciónde220-240VCA. |
PRECAUCION
- Deje espacio alrededor del equipo para una ventilacion adecuada.
- Evite su instalación en Lugares extremadamente calientes o fríos, o en和地区 sobre quede expuesto a la luz directa del sol o a equipos de calefacción.
- Mantenga el equipo libre de humedad, agua y polvo.
- No permita que caigan objetos en el interior del equipo.
- Compruebe que no se impide la ventilacion por tapar las ranuras de ventilacion con objetos como periodicos, manteles, cortinas, etc.
- No podería colocar sobre el equipo llamas desprotegidas, como velas encendidas.
- Por favoronga enCNTas los aspectos de proteccion ambiental al deshacerse de las pilas.
- El equipo no debería quedar expuesto a goteos ni salpicaduras por motivo de uso.
- No se colocarán objetos llenos de liquido, como jarrones, sobre el aparato.
- No permita que insecticidas, bencina y aguarras他们在contacto con el aparato.
- Nunca desmonte ni modifie el equipo de ningunaforma.
■ Notas sobre el cable de alimentacion electrica y la toma de corriente. - El equipo vigue recibiendo alimentacion de Corriente Alterna,msteadas continuede enchufado a la toma de corriente, incluso si está apagado.
- Para desconectar Completely el producto de la corriente electrica, desconnecte el enchufe de la toma de corriente.
- Cuando este configurando la instalacion del producto, compruebe que la toma de corriente que está usingo es de fácil acceso.
- Desconecte el enchufe de la toma de corriente cuando no use el equipo durante largos periodos de tiempo.
Información para los usuario sobre eliminación y recogida de equipos viejos y pilas gastadas.
Estos@simbolos sobre los equipos, embalajes y/o documents que los asociaran indican que los productos electricos y electrónicos y las pilas no deben eliminarse mezclados con la basura general del hogar. Para un tratimiento adequado, haga una recogida selectiva y recycle los productos viejos y las pilas, por favor llévelos a los+puntos de recogida en cuestion, seguin sus leyes nationales.

Eliminando these products y pilas correctamente, ayudar a��var recursos validos y evaporar efectos potencialmente negativos para la salute humana y el medio ambiental que de othero modo podr汕an surgir por un manejo inadequado de la basura.

Pb
Para más información sobre la recogida y el reciclaje de equipos viejos y pilas, por favorpongase en contacto con su ayuntamiento, su servicios de recogida selectiva de basura o con el punto de vente donde compró los objetos.
[Información sobre la eliminación en otros Países para de la Unión Europea]
Estos simulos solo son validos en la Unión Europea. Si眼看 a deshacerse de这些东西 objetivos, por favorpongase en contacto con las autoridades locales y pregunte por la correcta forma de eliminacion.
Notasobre"simbolos en la bateria (los dos ultimos"simbolos comoejemplo):
El signo Pb bajo del symbolo de las pilas indica que esaa pila contiene plomo.
INDICE
Introduccion
- LEA ESTO ANTES DE UTILIZAR SU EQUIPO 1 2
Conexión del problema | 4
Controles del Panel Frontal 10
Control a distancia 12
ALCANCE DE FUNCIONAMENTO DEL MANDO A DISTANCIA 13
COLOCACION DE LAS PILAS 13
Funcionamento
OIR UNA FUENTE DE PROGRAMAS I 14
SONIDO ENVOLVENTE 16
DISFRUTAR DEL SONIDO ENVOLVENTE 17
- OIR EMISIONES DE RADIO 1 22
OIR EMISIONES RDS (SOLO FM) I 24
(Sintonizadora RDS (Oportun regional en algunos Países de Europa, etc.))
- OIR RETRANSMISIONES DE RADIO POR INTERNET, ARCHIVOS DE MUSICA | 26
GRABAR 34 - OTRAS FUNCIONES 35
CONFIRMAR LA FUNCION HDMI 36
Configuración del Sistema | 37
AJUSTANDO EL SISTEMA 39
AJUSTANDO LAS ENTRADAS 41
AJUSTANDO LAS CONFIGURACION DE ALTAVOCES 42
AJUSTANDO LA NIVEL DE CANAL 46
AJUSTANDO LOS PARÁMETROS 48
AJUSTANDO EL HDMI 50
Guia de resolution de problemas 52
Especificaiones 53
Conexión del sistema
- Por favor, compruebe que esta unidad está desenchufada de la toma de corriente alterna antes de realizarrialquier conexion.
- Ya que equipos differentes usan a meno differente nomenclatura en sus terminales, lea cuidadosamente las instrucciones de referencia del equipo que conecte.
- Asegürese de cumplir con el número de colores cuando conecte los cables de audio, video y altavas.
- Realice las conexiones correctamente y con firmeza. De lo contrario pueda ocurrir perdidas de sonido, ruidos o daños en el receptor.
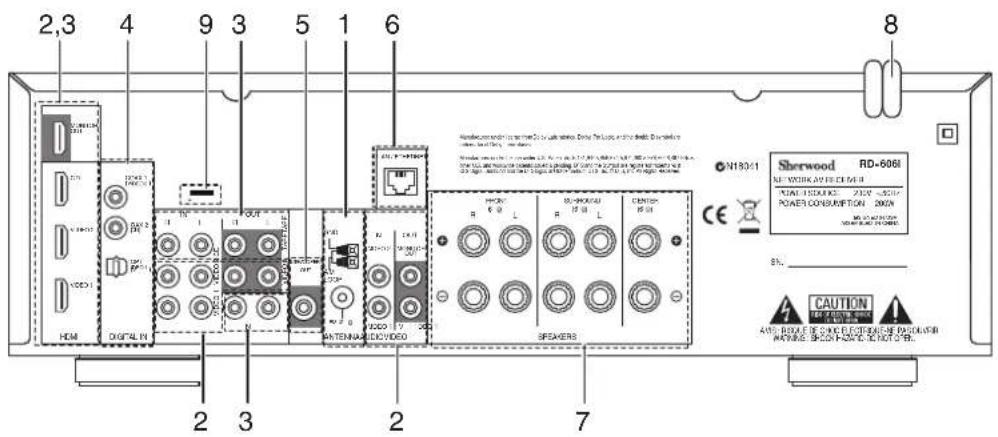
1. CONEXION DE LAS ANTENAS
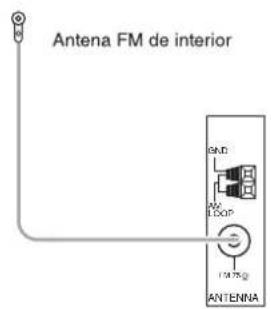
- Cambie de posicion la antenna FM de interior hasta Obtener la mejor recepcion de sus estaciones FM favoritas.
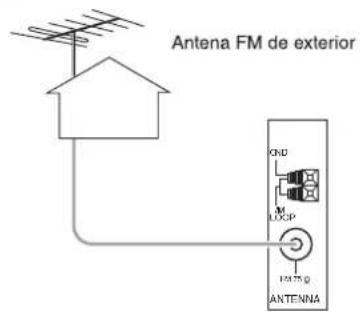
- Puede usar una antenna exterior de 75 para melhorar más la recepción. Desconecte la antenna interior antes de reemplazarla por una exterior.
- Coloque la antenna AM de lazo lo más lejos posible del receptor, de la TV, de los cables de los altavoces y del cable de alimentacion, y orientela para una mayor recepcion.
- Si la Reception es pobre con la antenna AM de lazo. Puede usar una antenna AM exterior en lugar de la antenna de lazo.

2. CONEXION DE LOS EQUIPOS DE VIDEO
- Los conectores de VIDEO 1 también puede connectarse a una grabadora DVD o a un equipo de grabación de video digital. Para los detalles, lea las instrucciones de funciona el equipo a conectar.
- Los conectores de VIDEO 2 también puede connectarse a un equipo de video adicional como una sintonizada de TV o un sistema satélite.
Hay conectores de video (compuesto) para conexiones analogicas de video y conectores HDMI para video digital y conexiones de audio. - Para que loonga como referencia, la excelencia en calidad de imagen es la asigniente: "HDMI" > "VIDEO (compuesto)".
■ Nota :
- Cuando grabe fuentes de programa de video a工程技术 de video 1 (compuesto) o vea fuentes de programa de video a工程技术 de video 2 (compuesto), debe conectar la entrada de VIDEO IN (compuesto) al equipo de reproduccion de video, como unroduactor BD, reproductor DVD, etc.

Continua
Conexión HDMI (Interfaz Multimedia de Alta Definisión): (*)
- Usted pueda conectar los equipos fuente (reproductor DVD, etc.) a un equipo de presentacion (TV, projector, etc.) a trovés de este receptor using an cable HDMI comercial.
La connexion HDMI能把llar snales de video digital y snales de audio digital sin comprir. - Las señales de flujo de video (señales de video) son teorically compatible con DVI-D. Cuando se convece a una pantalla TV, etc., equipada con un conductor DVI-D, es possible hacer la connexion using an cable convertor HDMI-DVI disponible en tiendas de electrónica.
Ya que la connexion HDMI-a-DVI no puedaellar signal de audio, Ya que la connexion HDMI-a-DVI no puee transporte rseales de audio, conecte las calidas HDMI AUDIO OUT a un Amplificador para oir las senales de audio HDMI de est receptor. (vea la seccion "Cuando seleccionla calidad HDMI AUDIO OUT" en la pagina 50.)
■ Sistema de proteccion dearethos de autor
- Este unidad soporta el HDCP (Proteccion de contenido digital de alto ancho de banda), Tecnologia para proteger las senales de video digital contra su copia ilegal. HDCPDebe ser soportado también por los equipos conectados a esta unidad.
- HDMI, el logo HDMI logo y High-Definition Multimedia Interface (Interfaz Multimedia de Alta-Definacion) son MARCAS comeciales o marcas commerciales registradas de la SRL de licencias HDMI.
Notas:
- Para una transferencia de senal estable, le recomendamos que use cables HDMI de 5 metros de longitud como Tmaximo.
- Entre los equipos que soportan HDMI, algunos peuvent controlarthers equipos a través del conector HDMI. Para poderlos detalles de la configuración HDMI, vea la sección "CONFIRMAR LA FUNCION HDMI" en la págin36 y "AJUSTANDO EL HDMI" en la páqina 50.
- Las señales de audio procedentes del conector HDMI (incluidas la Frequencia de muestreo y la longitud de bits)SEO estan limitadas por el equipo que se conecte.
Las senales de video no saldran correctamente si connecta un equipo no compatible con HDCP.
Si la resolution de las senales de video que salgan por las calidas MONITOR OUT no se corresponde con la de su pantalla TV, la imagen no sera clara, natural o no se mostrara. En este caso, cambie el valor de la resolution en el equipo fuente (reproductor BD, etc.) a uno que pueda soportar su pantalla TV. (Para mas detalles, lea las instrucciones de funciona del equipo fuente connectado.) - Cuando quiera disfurar solo de laImagen en su TV, y no del sonido, debenajsurar la calidad HDMI AUDIO a AMP para inhabilitar la calidad de audio digital de la calidad HDMI MONITOR de este receptor. (Para mas detalles, lea "Cuando seleccione la calidad HDMI AUDIO OUT" en la pagina 50.)
3. CONEXION DE LOS EQUIPOS DE AUDIO
- Las conexiones TAPE IN/OUT pueda conectarse a quipos de grabacion de audio como pletinas de cassette, grabadoras MD, etc.
- El HDMI IN del CD pueda connectarse a un componente de video adicional sin clavijas de video analógicas.


4. CONEXIONES 'DIGITAL IN'
- LassonianconectadosalCDyVIDEO1\~VIDEO2deesteaparatocouldenconectaraseasstanasentradasDIGITALIN'.
- Una entrada digital deben conectarse a equipos como reproductores de CDs, reproductores LD, reproductores DVD, etc. capaces deularar snales de sonido envolvente DTS, Dolby Digital o snales digitales en formato PCM, etc.
- Para poderarlos detailles,lea las instruccionedesfunctionamento de los equipos conectados.
- Cuando realice una connexion COAXIAL DIGITAL, asegürese de usar un cable COAXIAL de 75 Ω y no un cable de AUDIO convencional.
- Algunos cables commerciales de fibra optica no se pueda usar con este equipo. Si tiene un cable de fibra optica que no pueda conectar en su equipo, consulte con su vendedor o con el servicios técnico más proximo.
■ Nota :
- Asegürese de realizar una connexion OPTICA o DIGITAL COAXIAL en cada uno de los equipos. (No necesita hacer ambas.)
Configuración por defecto de la Entrada digital - Si conecta las entradas DIGITAL IN a sus equipos, es más fácil hacerlo siguiendo la configuración por defecto.
- Si su conexiones DIGITAL son differsente de la configuracion por defecto, deben asignar las entradas DIGITAL IN usadas utilizing el procedimiento "Cuando seleccion DIGITAL IN" de la page 41.
- La configuración por defecto es laARRY: OPTICA IN :VIDEO 1, COAX 1 IN :VIDEO 2, COAX 2 IN : CD
5. CONEXION 'SUBWOOFER PRE OUT'
- Para realizar los sonidos muy graves, conecte un Subwoofer con etapa de potencia.
6. CONEXION A LA RED
- Para conectar esta unidad a una red casera de banda ancha para eschucar las transmisiones de radio en Internet, conecte el conector LAN/ETHERNET de esta unidad con el enrutador con un cable de Ethernet (se recomienda CAT-5 o superior).
Notas :
- Después de realizar una connexion de Internet de banda ancha, deben ajustar la configuración de communicator. (Para poder los detalles, vea "Cuando se selección a Network" en la page 32.)
- Cuando use la connexion de Internet de banda ancha, esnecessary un contrato con el proveedor de servicios de Internet. Para mas informacion, contacte con su proveedor de servicios de Internet mas proximo.
- Lea las instrucciones de funciona del equipo ya que el equipo conectado y el modo de connexion puede variar dependiendo del entorno de Internet.
- Utilice un cable de Ethernet/enrutador compatible con 10 BASE-T/100 BASE-TX.
- Algunos cables de Ethernet peuvent verse fácilmente afectados por el ruido. Recomendamos utiliser un cable de tipo blindado.

7. CONEXION DE LOS ALTAVOCES
- Asegürese de conectar los altavoces con firmeza y corrección de acuerdo con el canal (izquierdo y derecho) y la polaridad (+ y -). Si realiza mal las conexiones, no se oirá ningún sonido por los altavoces, y si la polaridad de la conexión de los altavoces es incorrecta, el sonido sera poco natural y sin graves.
- Para la instalación de los altavoces, lea "Colocacion de los altavoces" en la頁a 9.
- Después de instalar los altavoces, primero ajuste la configuración de los mismos según el ambiente y la disposición de los altavoces. (Para más detalles, lea "AJUSTANDO LAS CONFIGURACION DE ALTAVOCES" en la頁a 42.)
Precaución:
- Compruebe que los altavoces tienen una impedancia de 6 ohmios o más.
- No permitted that the cables desnudos de los altavoces se toquen el uno al otro, ni a partes metálicas de este equipo. Este podra averiar el equipo o los altavoces.
- Nunca toque los terminales de los altavoces@mIENTAS tenga el cable de alimentacion conectado a la toma de corriente. Si lo hace podria recibir una descarga electrica.
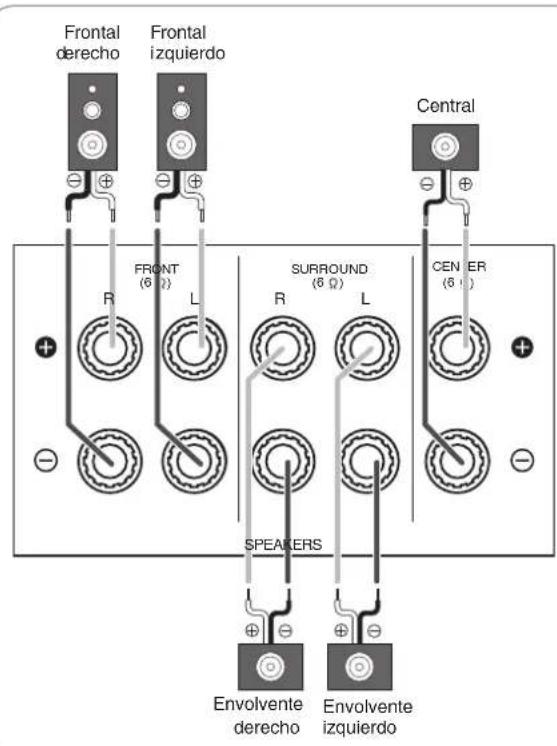
Conectando los cables de los altavoces
| 1. Pele aprox. 10 mm (3/8 pulgadas) del aislamento del cable y bajo unafirmamente los filamentos del cable en espiral. | 2. Afloje el terminal del altovoz girando en sentido contrario a las agujas del reloj. | 3. Introduzca la parte pelada del cable. | 4. Apriete el terminal girandolo en sentido de las agujas del reloj. |
8. CABLE DE ALIMENTACION DE CORRIENTE
- Enchufe el cable en la toma de corriente.
9. CONECTORES PARA ACTUALIZACIONES
- Estos terminales se podran usar en el futuro paraactualizar el software operativo de manera que pueda soportar nuevo formatos de audio digital, etc.
■ Nota :
- La programacion de lasactualizaciones requiereconocimientos especializados enprogramacion y por这么大rzonle recomendamos que sea realizadas unicamente por instaladores提供优质.
Colocacion de los altavoces
La colocacion ideal de los altavoces varia segun el tameno de la habitacion y el acabado de las paredes, etc. Un exemple típico de colocacion de los altavoces y recomendaciones es elsiguito:
Altavoces Frontal izquierdo, Frontal izquierdo y Central
- Coloque los altavoces frontales con sus superficies delanteras lo más alineadas posibles con la TV o la pantalla del monitor.
- Coloque el altovoz central entre los altovoces derecho o izquierdo y no más alejado de la posicion de escucha que los altovoces centrales.
- Coloque cada altovoz de modo que el sonido apunte a la posicion de los oidos del oyente cuando está en la posicion principal de audicion.
Altavoces izquierdo y derecho del sonido envolvente.
- Coloque los altavoces del sonido envolvente
approximadamente 1 metro (40 pulgadas) sobre el nivel de los oidos del oyente en posicion de sentado a izquierda y derecha, o ligeramente detras.
Subwoofer
- El subwoofer reproduce los sonidos muy graves de gran potencia. Coloque el subwoofer en cualquier lugar de la habitación que dese.
Notas:
- Cuando utilise una TV convencional, para evitar interferencias sobre laImagen de la TV, utilise solamente altavoces frontales izquierdo y derechocho que tengan proteccion magnetica.
- Para Obtener los最好的 resultados con el sonido envolvente, todos los altavoces excepto el subwooferPEARian ser de rango completo.
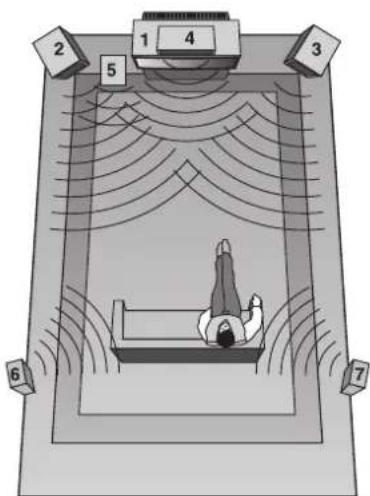
- TV o pantalla
- Altavoz frontal izquierdo
- Altavoz frontal derecho
- Altavoz Central
- Subwoofer
- Sonido envolvente izquierdo
- Sonido envolvente derecho
Controles del Panel Frontal
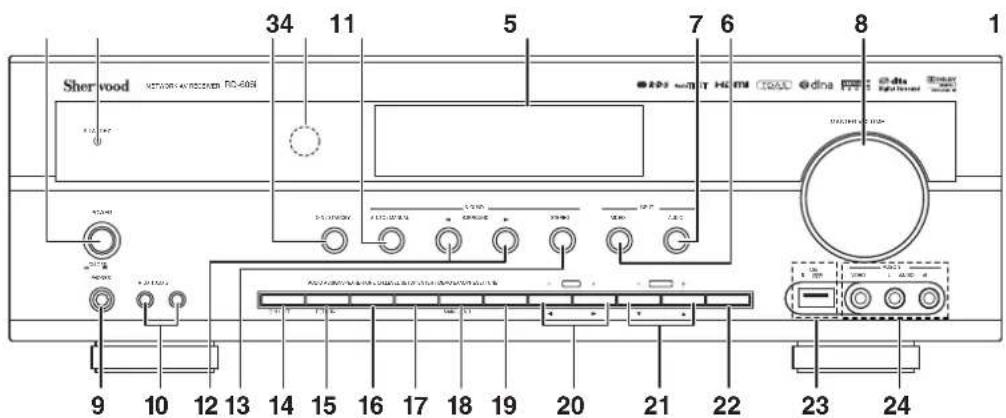
- Interruption de ALIMENTACION
- Indicador de modo STANDBY
- Botón de ENCENDIDO/STANDBY
- SENSOR A DISTANCIA
- PANTALLA FLUORESCENTE
Para mas detalle lea a continuacion.
- Botón SELECTOR ENTRADA VIDEO
- Botón SELECTOR ENTRADA AUDIO
- Rueda CONTROL MAESTRO VOLUMEN
- Salida para AURICULARES
- Conectores de entrada AUX 1, 2 Para detalles, vea la pagina suiviente.
- Botón AUTO/MANUAL
-
Botones de SELECTION DE MODO ENVOLVENTE (SURROUND MODE SELECT) ( / )
-
Boton ESTEREO
- Botón de ALTAVOCES
- Botón de ASSIGNACION de AUDIO
- Botón MODO DE TONO
- Boton NIVEL DE CANAL
- Botón CONFIGURACION
- Boton ACEPTAR/MEMORIA
20.Botones SINTONIA ARRIBA/ABAJO (+ / - ) CURSORIZQUIERDA/DERECHA (一 /一) - Botones SUBIR/BAJAR (+/-) PRESINTONIA, CURSOR ARRIBA/ABAJO (▲/▼)
- Botón de BANDA
- Conector USB
Para detalles, vea la pagina siguientes.
- Conexiones de ENTRADA VIDEO 3
Para detalles, vea la paginasuma.
PANTALLA FLUORESCENTE
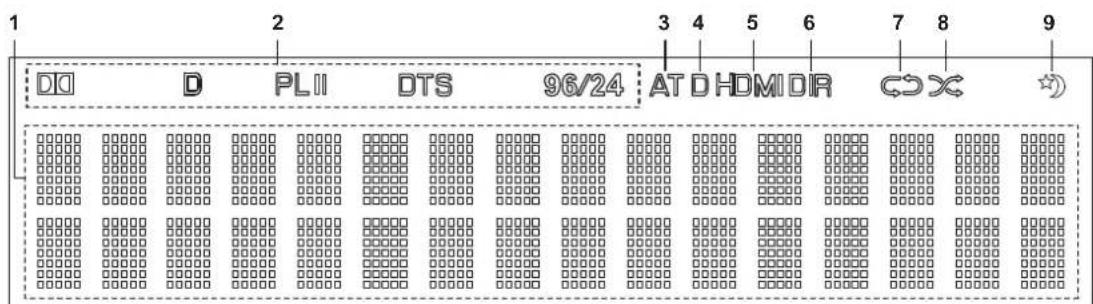
- Entrada, fecuencia, nivel de volumen, modo de Sonido envolvente, informacion de funcionaamento, etc.
- Indicadores de modo de Sonido envolvente
- Indicador AUTO
- Indicador de ENTRADA
-
Indicador HDMI
-
Indicador de DIRECTO
- Indicador de REPETIR
- Indicador ALEATORIO
- Indicador de APAGADO AUTOMÁTICO
ENCHUFES AUX 1,2 IN
■ Nota:
- Los conectores de entrada AUX 1 y 2 peuvent conectarse a equipos de audio adiconiales como un reproductor MP3, etc.
- Cuado conecte un reproductor MP3, etc. a este conector, poderia usar un cable mini estereo y no un cable mini mono.
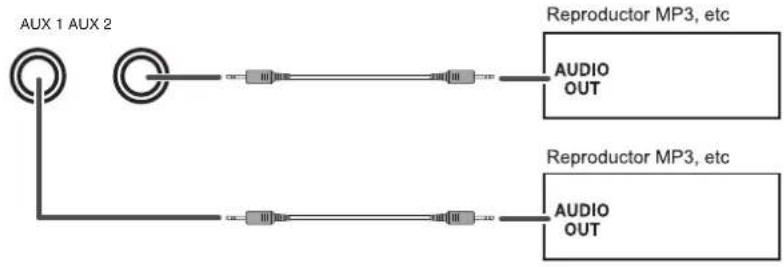
CONECTOR USB
- Puede conectarse un dispositivo de almacenimiento USB en el conector USB para eschar cacheros MP3 o WMA almacenados a工程技术, Consulte "Cuando selección "USB" en la page 30.)
■ Nota:
- Al finalizar la reproduccion USB, retire el dispositivo USB con el sistema detenido o en modo Standby.
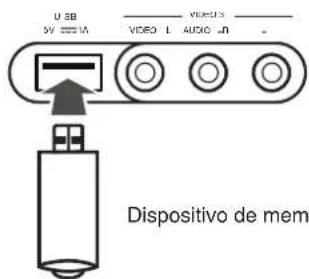
Dispositivo de memoria USB
CONEXIONES DE ENTRADA DE 'VIDEO 3'
- Las conexiones de entrada VIDEO 3 puede connectarse también a un equipo de video adicional como una videocamara, una consola de videojuegos, etc.
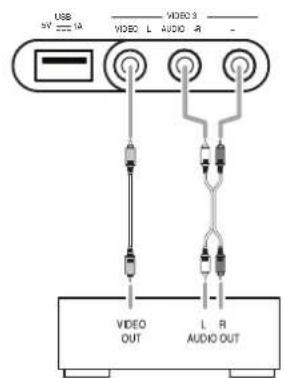
VIDEO 3 Videocamara, Consola videojuegos, etc.
Control a distancia
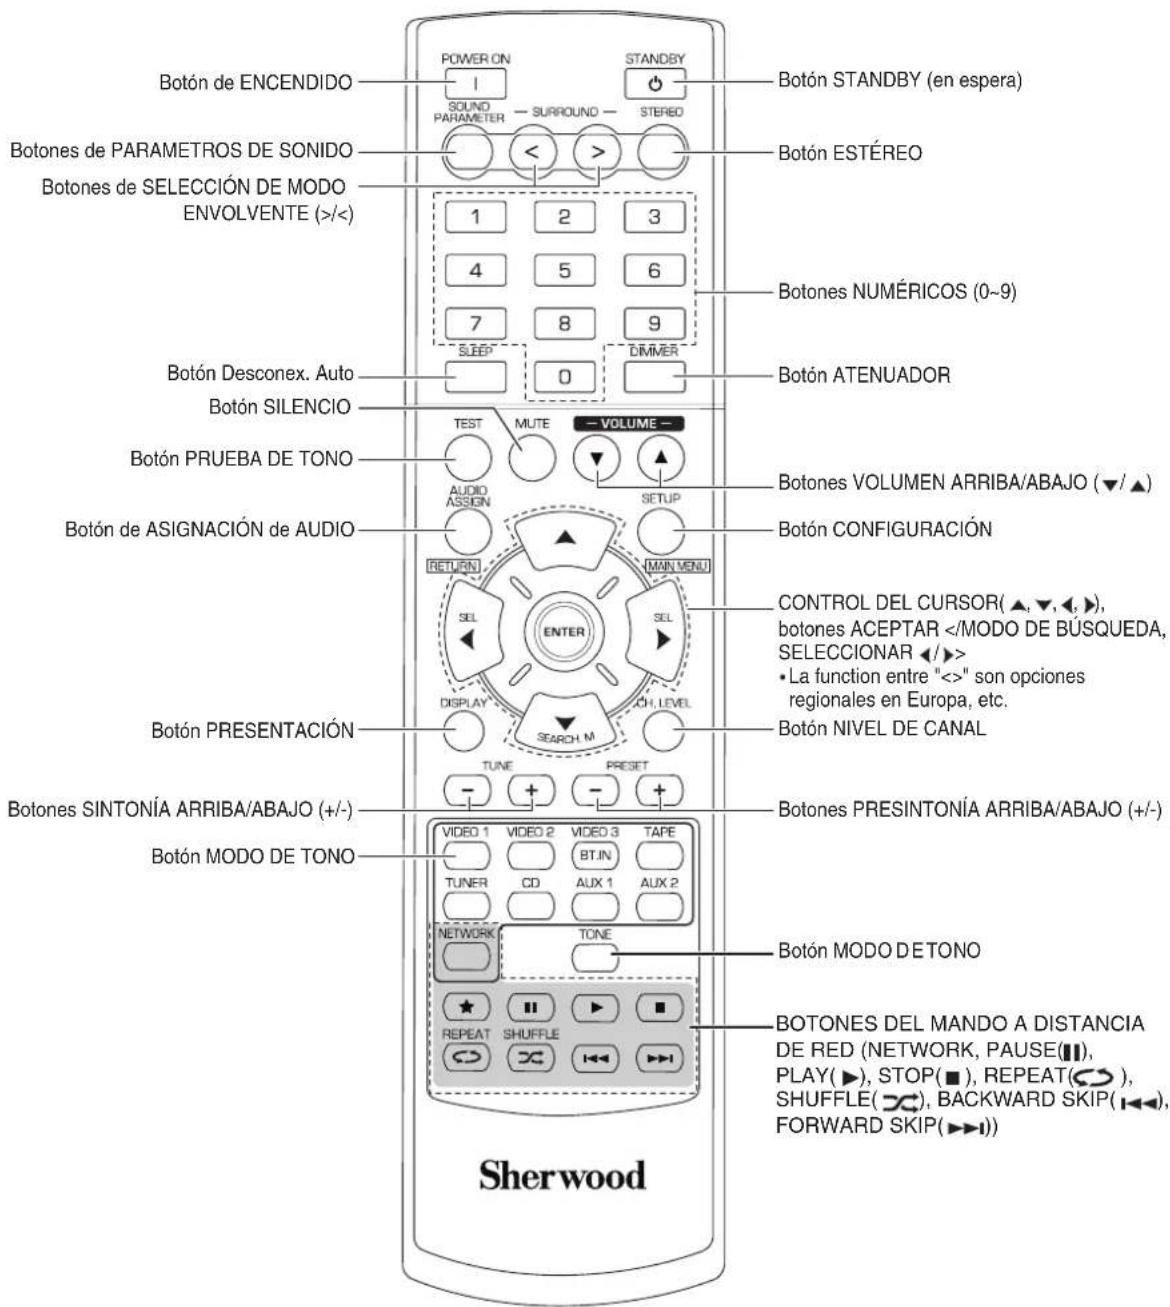
■ Nota:
- El botón RATING (★) no está disponible para este receptor.
ALCANCE DE FUNCIONAMENTO DEL MANDO A DISTANCIA
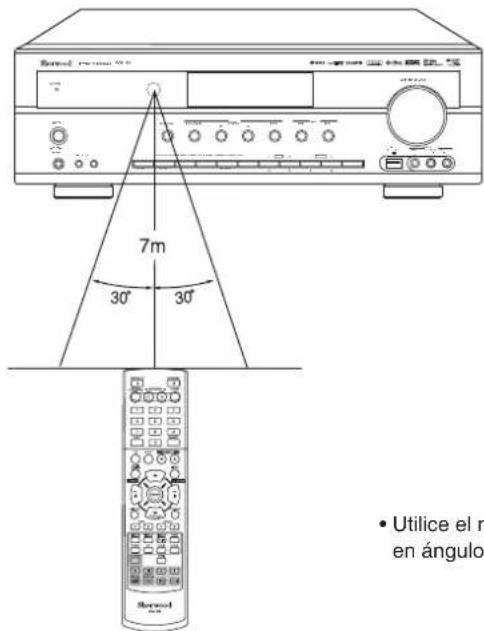
- Utilice el mando a distancia a una distancia de 7 metros (23 pies) y en ángulos de hasta 30 grados apuntando hacía el sensor remot.
COLOCACION DE LAS PILAS
- Retire la tapa.
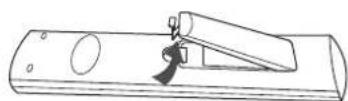
- Coloque dos pilas ("AAA", 1,5V)HCIHcdo correspond la polaridad.
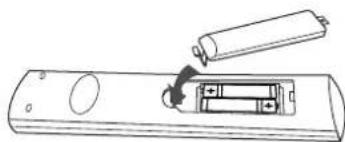
- Saque las pilas cuando no las use durante largos periodos de tiempo.
- No use pilas recargables (como Ni-Cd).
Funcionamento
■ Nota : Antes de hacer configurar este receptor, configurarlo para un rendimiento optimo, efectuando el procedimiento de configuracion delsystema. (Para mas detalles, lea "Configuracion del Systema" en la page 37.)
OIR UNA FUENTE DE PROGRAMAS
Antes de hacerlo funciona
- Entre en modo en espéra (Standby).
- El indicator de STANDBY se illumina. Esto indica que el receptor está conectado a la corriente alterna y recibe unalittlea资质adaparmantenerse en estado de 'listoparaccionar'.
- Para apagar el equipo completeness, vuelva a pulsar el interruptor POWER.
- Entonces se corta la corriente y el indicator de STANDBY se apaga.
Ahorrador de energia automática
- El ahorroder de energia automática es una función de apagado automático para pagar al modo de espara (standby). Si no se pulsa rigún botón más alla del tiempo establecido, este se pondrá en funcionaimiento. (Para mayor información, consulte "Cuando se selección el AHORRADOR DE ENERGIA AUTOMÁTICO en la頁ina 39.)
- Aside el modo Standby, encienda el equipo.
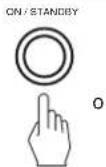
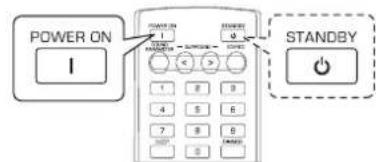
- Cada vez que pulse el botón POWER ON/STANDBY en el panel frontal, el receptor se enciende para entrada en modo de funciona bajo o se apaga para entrada en modo en espera (Standby).
-
En el mando a distancia, pulse el botón POWER ON para entrada en modo de funciona o pulse el botón STANDBY para entrada en modo en expectsa (Standby).
-
Encienda los altavoces.

SPEAKER

ON/OFF
- Entoces aparece en pantalla "SPEAKER ON" y puede oir el sonido a工程技术 de los altavoces conectados a los terminales de altavoces.
-
Cuando use auriculares para audicion privada, pulse el boton SPEAKER other than para apagar los altavoces (aparece "SPEAKER OFF" en la pantalla).
-
Selezione la fuente de entrada que desee.
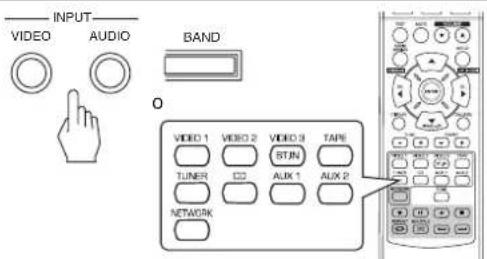
- Cada vez que pulse el botón "VIDEO" en el panel frontal, la fuente de entrada cambia del siguientes modo:

- Cada vez que pulse el botón "AUDIO" en el panel frontal, la fuente de entrada cambia del siguientes modo:

: Solo cuando el Control HDMI está activado (ON)ouldra oir las señas de audio digital desde la TV a través del cable HDMI: (Para detalles,lea "Cuando seleccione HDMI CONTROL" en la pagea 50.)
- Cuando selección NET/USB, vea "OIR RETRANSIMIONES DE RADIO POR INTERNET, ARCHIVOS DE MUSICA" en la page 26.
- Cada vez que pulse el botón BAND (o el botón TUNER en el mando a distancia), la selección de la banda cambía delsignificanto modo:

Cuando selezione CD,VIDEO 1~2 como fuente de entrada
- Selección la entrada digital o analógica conectada que quiera.
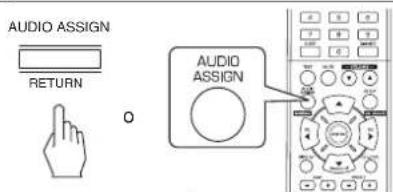
- Cada vez que pulse este botón, la entrada correspondiente es selecciónada comocede:

Notas :
- Cuandoonga el conector de entrada HDMI IN conectado a su equipo de video, no pueda asignar la entrada de audio como desee. (Sóle se pueda oir las senales de audio digital HDMI.)
- Cuando el conductor HDMI IN no está conectado (y el indicator "HDMI" parpadea),oulda asignar la entrada de audio.
- Cuando haya seleccionado VIDEO3, AUX 1, AUX 2, TAPE, TV, NET/USB o radio (tuner) como fuente de entrada, la entrada digital no pueda seleccionarse.
- Cuando le entrada digital seleccionar nuestra conectada, el indicator "D (digital)" parpadea y la entrada analógica se selección en forma automática.
- La entrada digital o analógica selección de asigna automatistically a la fuente de entrada correspondiente del menu de configuración de ENTRADAS. (Para más detalles, lea "AJUSTANDO LAS ENTRADAS" en la頁a 41.)
- El sonido precedente de los equipos connectados a la entrada digital seleccionada puede oírse independiente.mente de la fuente de entrada seleccionada.
5. Haga funciona el equipo seleccionado.
- Cuando esté reproduciendo fuentes de programa con sonido envolvente, vea la sección "DISFRUTAR DEL SONIDO ENVOLVENTE" en la頁面 17.
6. Ajuste el volumen (general).
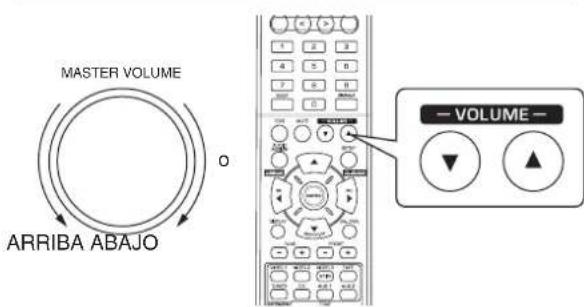
7. Para silenciar el sonido.
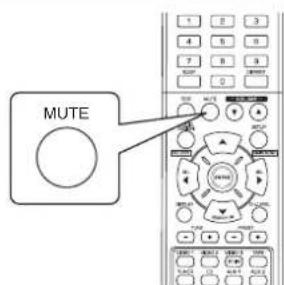
"MUTING" parpadeara.
- Para regresar al nivel de sonido anterior, vuévalo a pulsar.
8. Para oir por los auriculares.

- Asegurese de apagar los altavoces.
- Cuando esté escuchando una fuente de programa DTS o Dolby Digital, si los auriculares están conectados y el botón SPEAKER está apagado (OFF), el equipo kommt automaticamente a modo downmix de 2 Canales. (Para más detalles, lea "Modo downmix de 2 canales" en la頁a 17.)
■ Nota:
- Tenga cuidado de no establecer el volumen demasiado alto cuando use los auriculas.
Ajustar el tono (graves y agudos)
9. Entre en modo tono.
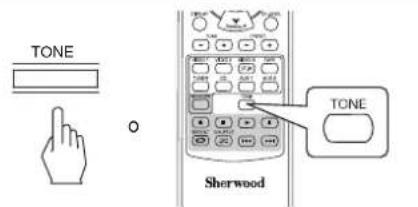
- El modo de tono aparecerá durante various segundos.

- Pulse los botones CURSOR IZQUIERDA(▲)/ DERECHA(>) para selectionar el modo de tono deseado.
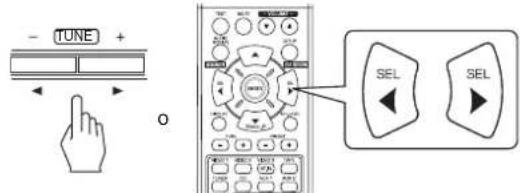
- Cada vez que pulse estas botones, el modo tono se selecciona de la?singularmente manera: OFF: Para oir la fuente de programa sin efecto de tono.
(El indicator "DIR" se ilumina.)
ON: Para ajustar el tono a su gusto.
(El indicator "DIR" se apaga.)
■Selezione TONO en ON para ajustarlo(graves y agudos)
11. Pulse el CURSOR ARRIBA(▲)/ABAJO(▼) para seleccionar el tono deseado.

Cada vez que pulse estas botones, el tono se selecciona del modo singulare: BASS TREBLE TONE:ON
-
Pulse los botones CURSOR IZQUIERDA(▲)/ DERECHA(▲) paraaabstareltonoselectionadoasu gusto.
-
El nivel de tono puede ajustarse dentro del margen de -10 ~+10 dB.
- En general, le recomendamos que los graves y agudos se ajusten a 0 dB (nivel plano).
- Ajustes extremos a volumen alto puede averiar sus altavoces.
- Si la presentación del tono desaparece, vuela a empezar desde el paso 9.
SONIDO ENVOLVENTE
- Este receptor incorpora un sofisticado procesador de senales digitales que le permite crear una calidad de sonido y una atmósfera acústica optimas en su Home Theater personal.
Modos de sonido envolvente
DTS Digital Surround
El Sonido Envolvente Digital DTS (tanbién llamado simplemente DTS) soporta hasta 5.1 canales diferenciados yutiliza menos compresion para una reproduccion de alta fidelidad. Uselo con DVDss y CDs que lleven el logo DTS.
DTS 96/24
Este es un DTS de alta resolution con una velocidad de muestreo de 96 kHz y unaResolution de 24 bit, proportionsando una fidelidad superior. Uselo con DVDs que Ileven el logo 96/24.
Fabricado bajo licencia de los nombres de patente de EE. UU.: 5,956,674; 5,974,380; 6,487,535 y otros nombres de patente de EE. UU. e internacionales asignados y perdentes. DTS, el symbolo y DTS, y el symbolo+juntos son MARCAS registRADAS y DTS Digital Surround, y los logotipos DTS son MARCAS registRADAS de DTS, Inc. El producto incluye software. © DTS, Inc. Todos los derechos reservados.
Dolby Digital
Dolby Digital es el formatting de senal digital multi-canal desarrollado por los Laboratorios Dolby. Los discos que llevan el logo Dolby Digital incluyen grabaciones de hasta 5.1 canales de senales digitales, que peuvent reproducir mucho mayor las caracteristicas de calidad de sonido, expansión espacial y rango dinámico, que los efectos Dolby Surroundán anteriores.
Dolby Pro Logic II Surround
Este modo aplicá señales de 2 canales convenciones como PCM digital o señales estéreo analógicas asi como también señales Dolby Surround, etc. al proceso envolvente, para(ofrecer mejoras en los circuitos Dolby Pro Logic). convenciones. El sonido envolvente Dolby Pro Logic II incluye los 2 modelos siguientes:
Dolby Pro Logic II Movie
Cuando disfrute depelliculas,este mode le permite melhor masaún la calidad cinematáticaañadiendo procesos que enfatizan los sonidos de los efectos especials deccion.
- Dolby Pro Logic II Music
Cuando oiga música, este modo le permite mejorar más aun la calidad de sonidoañadiendo procesos que enfatizan los efectos musicales.
Dolby Pro Logic
Este modo expande该如何 fuente de 2 canales (incluyendo fuentes Dolby Surround) para una reproduccion en 4 canales (frontal izquierdo, central, frontal derecho y envolvente). El canal de sonido envolvente es monoaural, pero se reproduce a trovés de dos altavoces para sonido envolvente
Fabricado bajo licencia de Dolby Laboratories.
Dolby, Pro Logic y el símbolo Doble-D son marcas commerciales registradas de Laboratorios Dolby.
- Los siguientesodos aplican senales convenciones de 2 canales, tales como PCM digital o senales estéreo analógicas, a procesadores de senal digital de alto rendimiento para recrear Campos de sonido artificialmente. Selección uno de los 6 Holocausts de sonido envolvente proportionsionados según la fuente de programa que deseee escuchar.
Theater
Este modo proportiencia el efecto de estar en un cine.
cuando está viendo unapellicula.
■Movie
Este modo proportiencia el efecto de estar en un cine.
cuando está viendo unapellicula.
■Hall
Este modo le proportiencia el ambiente de una sala de conciertos para fuentes de musica clásica como música de orquesta, de CAMERA o un solo instrumental.
■Game
Este modo esADECADUADO para videojuegos.
Stadium
Este modo proportiencia el campo de sonido expansivo para conseigir el efecto de un estudio verdadero cuando vea partidos de baloncesto o de fútbol.
■Multi CH Stereo
Este modo estáaxyinado parareproducirmúsica defondo. Los canales frontal,envolvente yenvolvente posterior crean una imagen estereo que abarca toda el area.
DISFRUTAR DEL SONIDO ENVOLVENTE
■Note: Antes de la reproduccion con sonido envolvente, primero efectue el procedimiento de configuracion de los altavoces, etc. en el menu SETUP para Obtener un rendimiento optimo. (Para mas detalles, lea "AJUSTANDO LAS CONFIGURACION DE ALTAVOCES" en la page 42.)
Dependiendo del modo de sonido envolvente seleccionado, usted peut elegir el modo automatico o el modo manual.

- Cada vez que pulse este botón, el modo cambia como vigue:
- Modo Auto Surround: El modo involvente (Surround)®,optimo está en el auto) se選擇ado automátamente dependedo del ilumina.)
- Modo Manual Surround: Usted可以选择ar el modo Sonido (El indicator "AT(Auto)" se apaga.)
- Envolvente (Surround) que quiera entre los differentes moda seleccionables para la seals de entrada, utilizingos botones de SELECTION DE MODO ENVOLVENTE (> / < )
Notas :
- Cuando el botón ALTAVOZ (SPEAKER) se apaga o "CENTER" y "SURR(envolrente" se ponen en "NO", el modo envolvente automatico queda inhabitido.
- Incluso cuando el modo de sonido envolmente sea selectionado y el tipo de formatting de la seals digital tengala, el mode optimo del sonido digital peut varier dependiendo de si el tipo de altavoz está desactivado (NO) o no.
- Cuando selecciona el modo envolvente automatico, no pueda selectionar un modo diferente al modo envolvente optimo elevado por el sistemas.
■ Cuando seleccione el modo de sonido envolvente manual pulsando el boton AUTO/MANUAL en el panel frontal. Seleccione el sonido envolvente que dese.
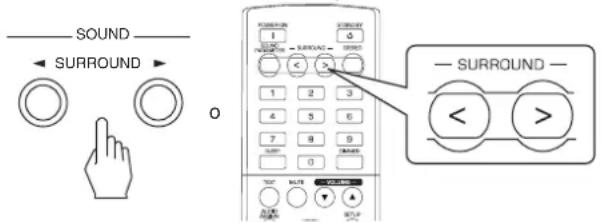
- Cada vez que se pulsan los botones de SELECTION DE MODO ENVOLVENTE (> / <) , el modo envolvente cambia dependiendo del formatting de la seals de entrada de la?singular forma:
Formato de la seals de entrada Modb envolvente seleccionable
| Fuentes Dolby Digital EX 6.1 canales, Fuentes Dolby Digital 5.1 canales | DOLBY DIGITAL o <2 CH IN> *1 |
| Fuentes Dolby Digital 2 canales, Fuentes PCM (2 canales), Fuentes analógicas estéreo | DOLBY PLII MOVIE, DOLBY PLII MUSIC, THEATER, MOVIE, HALL, GAME, STADIUM, M.CH STEREO, DOLBY PRO LOGIC o <2 CH IN> *1 |
| Fuentes DTS, Fuentes DTS 96/24 | Correspondencia DTS o <2 CH IN> *1 |
*1: Cuando "CENTER" y "SURR(envolvente") se colocan en "NO", no pueda seleccionarse ningún modo envolvente y la fuente pueda reproducirse ya sea en modo estéreo o en el modo 2CH downmix.
■ Cancel el modo involvente para reproduccion en estereo
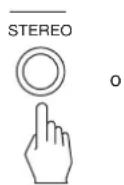
- Dependiendo del formatting de senal que está entrada, se selección o el modo estéreo o el modo downmix de 2 canales.
- Para cancelar los发展模式 Estéreo o Downmix 2CH, selección el modo de sonido envolvente usingo los botones de SELECTION DE MODO ENVOLVENTE (> / <) .
Modo downmix de 2 canales
- Este modo permite que se nales multi-canal codificadas en formato DTS o Dolby Digital se mezclen para Obtener 2 canales frontales y se pueda reproducir a工程技术 de dos altavoces frontales o por los auriculas.
- Cuando el botón SPEAKER está desactivado (OFF) para usar los auriculas durante la reproducción de senales digitales multi-canal procedentes de fuentes DTS o Dolby Digital, entrada automatically en modo downmix de 2 canales.

Cuandoajuste los parámetros de sonido
- Mientras se reproducecen senales digitales del programa fuente Dolby Digital o se escucha el modo Dolby Pro Logic II Music,ouldajustar sus parametros para efectos envolventes optimos.
1. Pulse el botón SOUND PARAMETER.
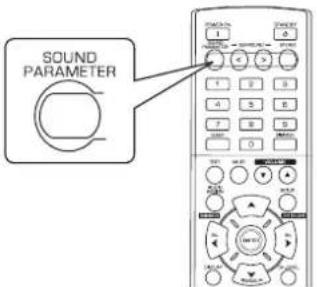
- Entoces apareceré en la pantalla "DRC: ~" (o "PANorama: ~") Durante various segundos.
- Si el modo de parámetros desaparece, vuela a pulsar este botón.
2. Pulse el CURSOR ARRIBA(▲)/ABAJO(▼) para seleccionar el parametro deseado.
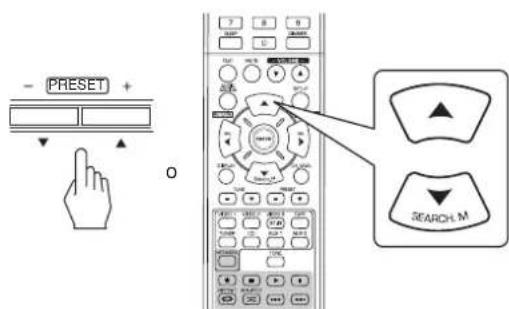
Cada vez que pulse these botones, el mode de los parametros cambia de la asigniente forma: "DRC" "PANORAMA" "C.WIDTH" "DIMENSION" (Comprision de rango dinamico) (Control del ancho central)
" DRC" peut seleccionarse solamente cuando se reproducecen senales digitales desde la fuente Dolby Digital.
- "PANorama", "C.WIDTH" y "DIMENSION"sole se pueda selectionar cuando esteyendo música en modo Dolby Pro Logic II.
3. Pulse los botones CURSOR IZQUIERDA(▲)/DERECHA(▲) paraajsar el parametro seleccionado como desee.
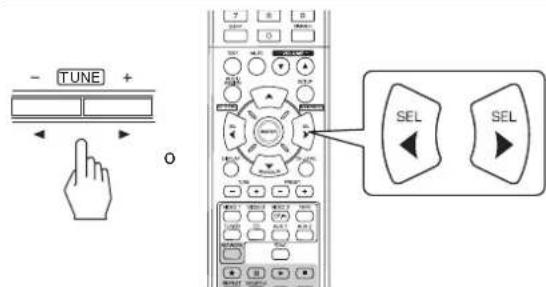
Cuando se selección "DRC (compresión de rango dinámico)"
Estamericano.
Arenas de la rancia, en general, no se consideran.
Ellos que ellos que les aplicaran.
En general, no se consideran.
Esto facilita eschar todas las pistas de sonido, cuando se miranpelliculas por la noche, con bajo volumen.
■ Nota :
- En algunos softwares Dolby Digital, el modo nocturno puede no ser valido.
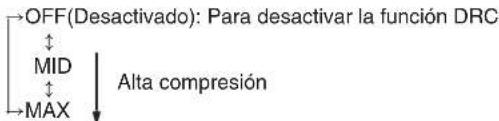
Cuando selecciona el modo "PANorama"
Este modo extende la imagen estereo frontal para incluir los altavoces de sonido envolvente para un efecto "envolvente" con imagen lateral.
Selezione "OFF" o "ON"(valor por defecco: OFF).
Cuando selezione el control "C. WIDTH (ancho central)"
Esta option ajusta laImagen central de modo que pueda oirse solo por el altovoz central, solo por los allavoces izdo/dcho como imagen fantasma, o por los tres altavoces para differentes grado.
El control puede ajustarse en 8 niveles de 0 a 7 (valor por defecto: 3).
Cuando selezione el control "DIMENSION"
Este ajusta gradualmente el campo de sonido o hacía el frente o hacía la parte final. El control pueda ajustarse en 7 niveles de -3 a +3 (valor por defecto: 0).
4. Repita los pasos 2 y 3 anteriores para ajustarotiros parametros.
Ajustar cada nivel de canal con el tono de prueba
- EL nivel de volumen de cada canal se pueda ajustar fácilmente con la función de tono de prueba.
■ Nota: Cuandoonga el boton SPEAKER desactivado (OFF), la functiOn de tono de prueba no funciona.
1. Entre en modo tono de prueba (TEST).
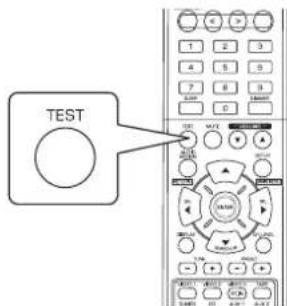
- El modo de prueba aparece en la pantalla y se oirá por el altovoz de cada canal durante dos segundos de lasuma眼看:
| FL Frontal aquía | C Central | FR Frontal deseño | SR Envolvente der elto | SL Envolvente Izquierdo | SW Subwoofer |
-
Cuando la configuración de altavoces es "NO", el tono de prueba correspondiente al canal no está disponible.
-
En cada canal, ajuste el nivel a su gusto hasta que el nivel de sonido de cada altovoz sea igual de alto.

-
Usted puede selectionar el canal deseado usingo los botones CURSOR ARRIBA(▲)/ABAJO(▼).
-
Cancelar la funciona de tono de prueba.
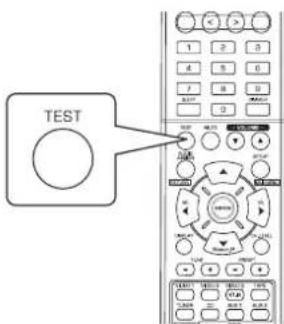
Ajustar el nivel del canal actual
- Después de ajustar el nivel del canal con el tono de prueba, ajuste los niveles del canal, o de acuerdo con las fuentes de programa o para que se acomode a sus gustos.
- Usted puedaajsitar el nivel del canal actual cuando lo desea. Estos niveles ajustados se memorizan en el acto, bajo la memoria del usuario ("CAL"), no en la memoria presintonizada ("REF 1", "REF 2").
1. Pulse el botón CHANNEL LEVEL.
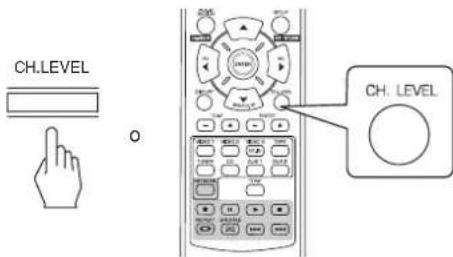

- Entonces aparece en la pantalla el modo de memoria ("CAL", etc.) durante various段时间.
- Cuando el modo de memoria o el nivel del canal desaparezcan, pulse este boton另一边 vez.
2. Seleccione el canal deseado
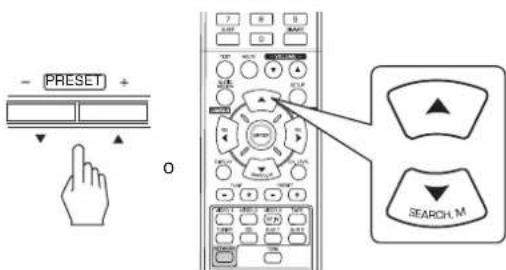
Cada vez que pulse these botones, el canal correspondiente se selecciona del modo suiviente:
REF1,2(oCAL) LEFT CENTER RIGHT
<< : Sólo cuando entren lasSELLA digitales procedentes de fuentes de programa Dolby Digital o DTS que incluyen sELFE, el nivel LFE pueda aparecer en planta.
- Dependiendo de la configuración de altavas (NO) y del modo del sonido envolvente, etc. no se podrá selecciónar algunos canales.
- Cuando el botón SPEAKER está desactivado (OFF), solo se pueda selectúnar los canales Frontal izquierdo, Frontal derecho (y LFE).
3. Ajuste el nivel del canal seleccionado como guste.
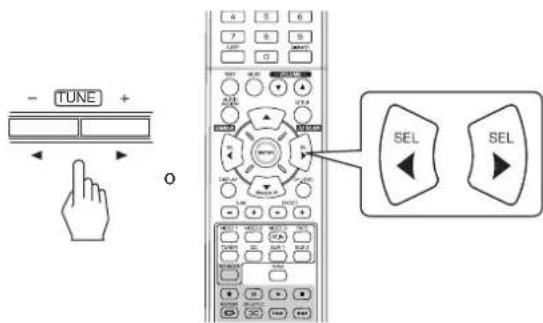
- El nivel LFE pueda ajustarse Dentro del margen de -10~0 dB y los除外 niveles de canal Dentro del margen de -15 ~ +15 dB.
- En general, le recomendamos que el nivel LFE se ajuste a 0 dB. (Sin embargo, le recomendamos que el nivel LFE para algunos de los primeros softwares DTS sea -10 dB.) Si los niveles recomendados parecen demasiado alto, bajelos tanto como sea Neededo.
4. Repita los pasos 2 y 3 anteriores para ajustar cada nivel de canal.
Memorizar los niveles de canal ajustados
-
Usted pueda guardar en la memoria presintonizada ("REF 1", "REF 2") los niveles de canal ajustados, y recuperarlos en el momento que quiera.
-
Después de realizar los pasos 1 ~ 4 del procedimiento "Ajustar el nivel del canal actual" de la página 20, pulse el botón ENTER/(MEMORY).
- Entonces la indicación "1" o "REF 1" parpadeará durante varioushhos.
- Selecciona la memoria que desee entre REF 1 y REF 2.
- Si la memoria predeterminada desaparece, vuelva a realizar al paso 1 anterior.
- Confirme su selección.

0
- Los niveles de canal ajustados se han guardado ahora en la memoria seleccionada.
Recuperar los niveles de canal memorizados
- Pulse el botón CHANNEL LEVEL.
- Aparece el modo de memoria "CAL" (o "REF 1", etc.) en pantalla durante variedos segundos.
-
Si el modo de nivel de canal desaparece, vuelva a pulsar este botón.
-
Selecciona la memoria que deseee entre REF 1 y REF 2.
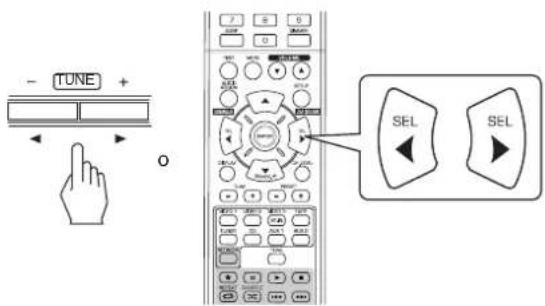
- Entonces se recuperan los niveles de canal memorizados de la memoria predeterminada seleccionada.
OIR EMISIONES DE RADIO
Sintonia Automática
1. Selezione la banda deseada
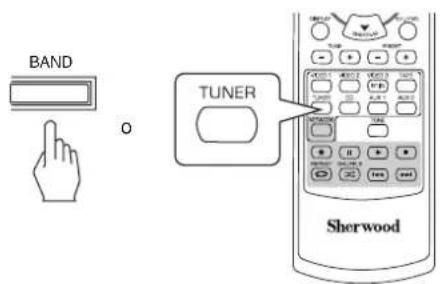
AUTO SURR -26 FMM017.50 z P01
Banda Frecuencia
- Cada vez que pulse este botón, la banda cambia del modo singular:

- Cuando las emisiones FM en estereo sean pOBres debido senales debiles, seleccione el modo FM mono para reducir el ruido,對於 las transmisiones FM sonaran en sonido monoaural.
2. Pulse los botones TUNING ARRIBA(+)/ABAJO(-) durante mas de 0,5segundos.
- El sintonizador de la radio buscará ahora hasta que工程技术 de la sintonación no se han podido.
Si la estación encontrada no es la que busca, simplemente repita la operation.
Las estaciones que no tengan la fuerza suficiente seran saltadas durante la sintonizacion.
Sintonia Manual
- La sintonía manual esutil cuando usted conoce la fecuencia de la estación deseada.
- Después de selección la banda deseada, pulse los botones TUNING ARRIBA(+)/ABAJO(-) varías vezes hasta que alcance la Frequencia correcta.
Memoración automática
- La función de memorización automáticabusca automatisticallysoloestacionesFMylasalmacena en la memoria.
- Mientras oye retransmisiónes radio FM o AM, mantenga pulsado el botón ENTER/(MEMORY) durante más de 2segundos.
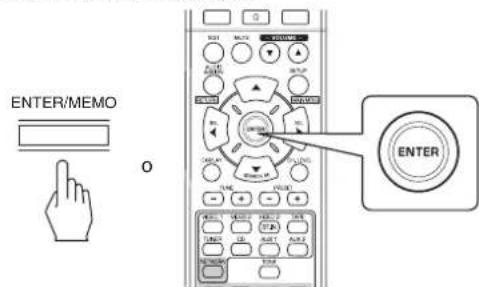
- Entoces parpadea en pantalla "AUTO MEM" y este receptor inicia la memorización automatica.
- Para detener la memorización automática, pulse或其他 vez este botón.
- Pueden almacenarse hasta 30 estaciones FM.
Notas:
Las estaciones FM con senal débil no pueda guardarse en memoria.
- Para guardar en memoria estaciones AM o estaciones débiles, efectue una "Memorización Manual" using la función de "Sintonía Manual".
- Usted puede almacenar hasta 30 estaciones preferidas en la memoria.
- Sintonice la estacion deseada con la sintonia automatica o con la manual.
- Pulse el botón ENTER/(MEMORY).

ENTER/MEMO

AUTO SURR -2.6 FMMH 2 P
- En la pantalla parpadeará "MEM" variedos segundos.
- Seleccione el numero de memoria que deseee (1~30) y pulse el boton ENTER/(MEMORY).
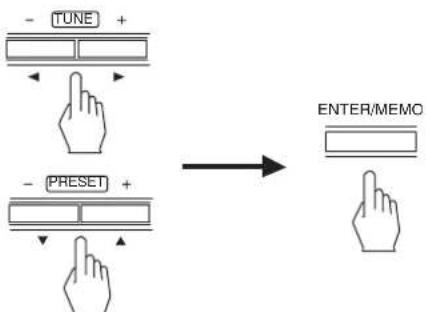
- Cuando use los botones NUMERICOS en el mando a distancia.
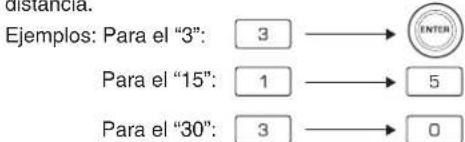
- La estación se ha guardado ahora en la memoria.
- Cuando se especifique un numero de dos digitos usingo los botones NUMERICOS, la estacion se guarda automatamente sin pulsar el boton ENTER/(MEMORY).
-
Una Frequencia almacenada se borra cuando se guarda.
otra Frequencia en su lugar. -
Repita los pasos del 1 al 3 anteriores para memorizarorasestaciones.
FUNCION DE COPIA DE SEGURIDAD EN MEMORIA
Los siguientes elementos, ajustados antes de apagar el receptor, se guardan en la memoria:
-
Ajustes del SELECTOR de ENTRADAS
-
Ajustes del modo de Sonido Envolvente
- Estaciones Memorizadas, etc.
Sintonizar las estaciones memorizadasMemorizacion Mani
- Después de selecciónaradio como fuente de entrada, selecciónel númerodememoria deseado.
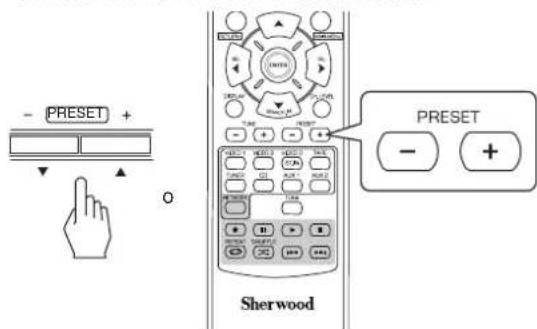
- Cuando use los botones NUMERICOS en el mando a distancia.
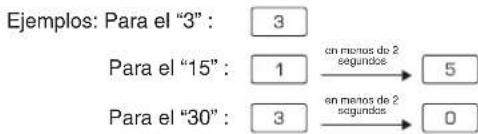

Sintonizada RDS (Oportun regional en algunos Países de Europa, etc.)
OIR EMISIONES RDS (SOLO FM)
El RDS (Sistema de Data of Radio) es un método para enviar senales de información unidas a las senales del transmisor. Su sintonizadora de radio es capaz de trasladar estas senales y colocar la informacion en la pantalla. Estoscottigos contienen la asigniente informacion. Nombre del Servicio de programas (PS), lista de los Tipos de programas (PTY), Texto Radio (RT).
Notas :
- En otros Países, la función RDS pueda no estar disponible.
- El sistema RDSsole es possible en la banda FM.
- RDSsole busca en las estaciones guardadas en memoria (presintonizadas). Si noiene estaciones guardadas en la memoria, o si el tipo de programa desado no se encuentra entre las estaciones presintonizadas, aparece "NO PTY" en la pantalla.
Por tanto, guarde estaciones en las memorias antes de buscar estaciones RDS.
Buscar estaciones segun tipo de programa
- Puedeocularestaciones segun tipo deprograma.
1. En modo FM, presione dos vezes el botón SEARCH MODE.
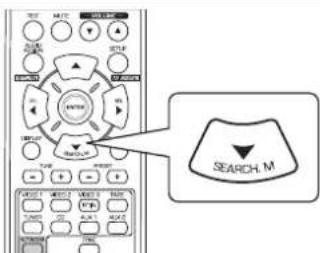
- Aparece "PTY SEARCH" en pantalla durante variedos segundos.
2. Mientras aparezca "PTY SEARCH" en pantalla, selección el tipo de programa deseado.
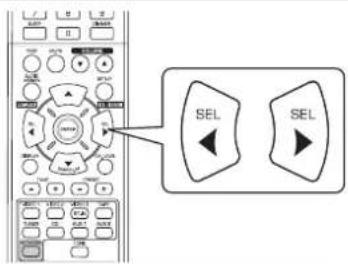

- Cada vez que pulse"These botones, selección uno de los they dos para programas.
(News, Affairs, Info, Sport, Educate, Drama, Culture, Science, Varied, Pop M, Rock M, Easy M, Light M, Classics, Other M, Weather, Finance, Children, Social, Religion, Phone In, Travel, Leisure, Jazz, Country, Nation M, Oldies, Folk M, Document)
- Si desaparece "PTY SEARCH" de la pantalla, pulse el botón SEARCH MODE otra vez.
3. Cuando aparézca en la pantalla el programa deseado, pulse el botón ENTER.
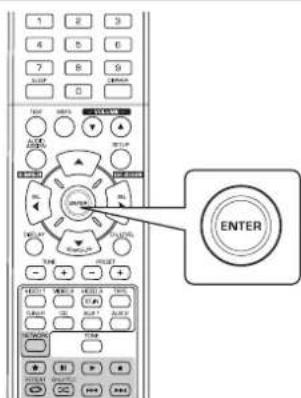
- La sintonizadora empieza aocular coincidencias entre las estaciones guardadas en las memorias.
- Cuando se encuesta la estación, la búsqueda se detiene y se reproduce la estación.
- Si no ENCuentra ninguna estación,做不到 "NO PTY".
Mostrar informacion RDS
En modo FM,
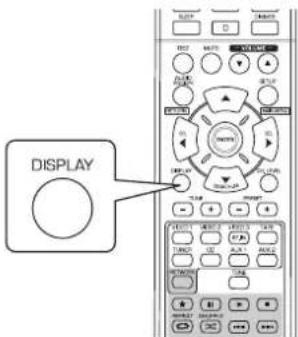
- Cada vez que pulse este botón, el modo de presentación cambia comocede:
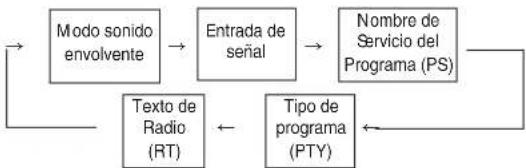
- Nombre de Servicio del Programa (PS)- El nombre de la estación de radio.
- Tipo de Programa (PTY)- Este indica la classe programa que se está emitiendo en este momento.
- Texto de Radio (RT)-Mensajes de texto enviados por la estación de radio. Por exemple, una estación de radio con intervencion de los oyentes puede proporcional en número de téléphone por RT.
- Si lasseyones demasiado debiles o no hay servicio RDS disponible, aparecera enpellala "NO NAME", "NO PTY"o "NO TEXT".
OIR RETRANSIONES DE RADIO POR INTERNET, ARCHIVOS DE MUSICA
- Usted可以选择 iras retransmisiones de radio por Internet o los archivos de musica almacenados en un dispositivo de memoria USB o en un PC (Servidor multimedia).
Radio por Internet
- Radio por Internet se refiere a las transmissions de radio distribuidas a征求意见 de Internet. Las estaciones de radio por Internet alrededor del mundo peuvent sintonizarse al ingresar al situo web Shoutcast.
Shoutcast (http://www.shoutcast.com)
Shoutcast es un service de retransmisión de radio por Internet Gratis proporcionado por Shoutcast. Puede using Shoutcast sin necessities de registrar.
■ Nota:
- Hay muchas estaciones de radio por Internet, y la calidad de los programas que retransmiten asi como la tasa de bits de las pistas de sonido varian是多么 deunas a除外. Por forma general, a mayor tasa de bits, mayor calidad de sonido, pero dependiendo de las lineas de communicator y del refrico del servidor, la música y las señales de audio que está recibiendo pueda tener tener interruptions. A la inversa, a menor tasa de bits, menor calidad de sonido pero menos tendencia a tener interruptiones de sonido.
Dispositivos de memoria USB
- Puede conectar un dispositivo de memoria USB en el puerto USB tanto del panel frontal como en el panel trasero, para reproducir los ARCHivos de música almacenados en el.
- Solamente los dispositivos de memoria USB que estén configurados como dispositivos de almacenimiento masivo y que cumplan con losstandares MTP (Protocolo de Transferencia Multimedia) se pueda reproducir en estaunidad.
-Estaunidadsoportaelsistema de formato dearchivos FAT16oFAT32paradispositivosdememoriaUSB.
Servidor de medios DLNA (Digital Living Network Alliance)
-Esta unidaduede reproducir ficheros de musica en un servidor de medios compatible con DLNA (ordenador o electronicos de consumo) conectado a la mesma a工程技术 de su red casera. Puede partir los ficheros de musica fácilmenteutilizingWindows Media Player ver.11.
2011 Digital Living Network Alliance. Todos los derechos reservados.
DLNA® y DLNA & Design® son marcas o MARCAS registradas de Digital Living Network Alliance. Todos los derechos reservados. Se prohíbe estrictamente su uso no autorizzato.
■ Nota:
- Debería conectar el PC (servidor multimedia) a la misma red local que esta unidad.
-EstaunidadesCompatible con el DMP (reproductordemedios digitales) del DLNA.Algunasfunciones podrian nofuncionar en eldispositivo que no es totalmentecompatible conelDLNA.
■ Formatos de audio compatibles
- Para radio por internet, dispositivos de memoria USB y reproduccion del servidor multimedia, esta unidad soportalos siguientes formatos de ARCHivos de musica.
| Fürmato de archivo | Frecuencia de muestreo | Tasa de bits | Extensaión |
| MP3 (MPEG-1 Audio Layer-3) | 32/44.1/48 kHz 3 | 2 ~ 320 kbps | .mp3, .MP3 |
| WMA (Windows Media Audio) | 32/44.1/48 kHz 3 | 2 ~ 320 kbps | .wma, .WMA |
- Soporta archivos con una tasa de muestro variable.
- La Tecnología de codificación de audio MPEG Layer-3 tiene licencia de Fraunhofer IIS and Thomson.
- Los logos de Windows Media y Windows son MARCAS comeciales o MARCAS commerciales registradas de Microsoft Corporation en los Estados Unidos y/o除外.
Funcionamento Basics
1. Efctue las preparaciones necessities.
① Compruebe su entorno de redes, y luego encienda esta unidad. (Para los detalles, lea "CONEXION A LA RED" en la pagina 7.)
② Si es besoino realizar ajustes, registre susCNTAs y efectue los ajustes necessarios, etc. (Vea "Cuando seleccione Settings" en la pagina 32.)
③ Si usa el PC como servidor multimedia, preparelo. Instale el Windows Media Player version 11. (Vea "Configurar el Windows Media Player ver 11." en la page 31.)
2. Selezione "NET/USB" como fuente de entrada.
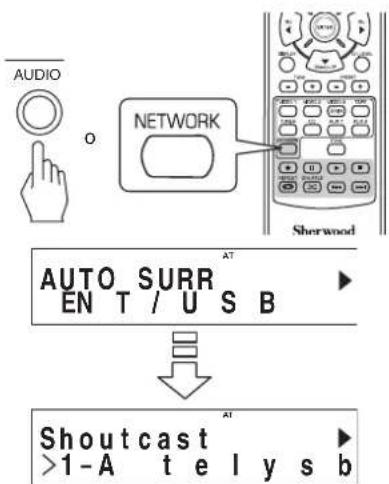
- Queda seleccionado el modo "NET/USB" y se recupera el ultimate estado memorizzato.
- Cuando enciende el aparato y bajo selecciona "NET/USB", aparece el menu principal (vea el paso 3 a continuacion).
3. Para seleccionar un elemento del menu principal, pulse el boton SETUP/(MAIN MENU).
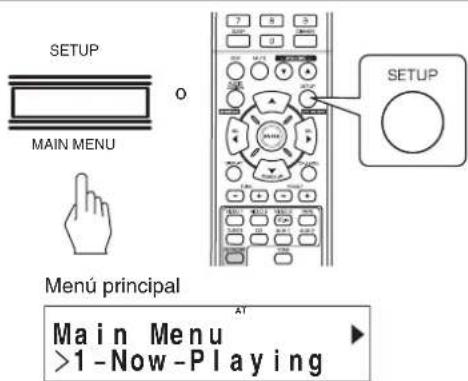
- Entoces aparece el menú de subítculos.
4. Seleectione el elemento deseado, luego pulse el boton ENTER.
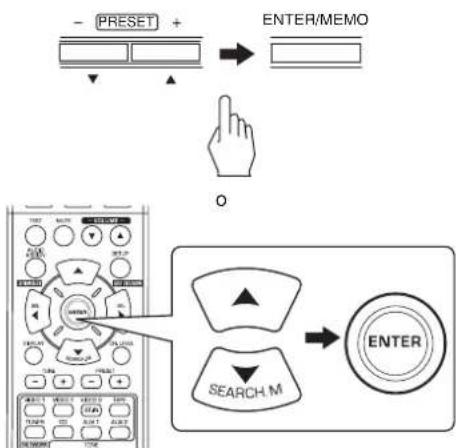
- Cuando selecciona 'Now Playing', vea la頁ina 29.
- Cuando seleccione "Internet Radio", vea la pagina 29.
- Cuando selecciona "USB", vea la pagina 30.
- Cuando selezione "DLNA", vea la página 30.
- Cuando selezione "Favorites", vea la pagina 31.
- Cuando selezione "Settings", vea la página 32.
- Para detailles sobre el flujo del menu de configuracion, vea la page 28.
5. Repita el paso 4 anterior hasta que la estación, el archivo de música o laooth de configuracion que desee quede seleccionado.
- Entonces lo seleccionado se reproducirir o se configurar.
- Cuando pulse el botón AUDIO ASSIGN (/RETURN) en un submenu, regresar al estado previo.
- Cuando pulse el botón SETUP/(MAIN MENU) en un submenu, regresar al menu principal.
■Funcionamente en reproduccion
- Durante la reproduccion de retransmisiones de radio por Internet o ARCHivos de música, puede oirlas en differentes modelos de reproduccion.
Para detener la reproduccion
Durante la reproduccion, pulse el boton DETENER(■).
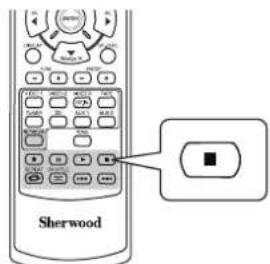
- Entones se detendrá la reproducción.
- Para起初 la reproduccion, pulse el boton REPRODUCIR(>.
Durante la reproduccion, pulse el boton PAUSA ( ).

Para hacer una停下a
- Entoces la reproduccion se detendra en el punto donte se pulsó el botón.
- Para reanudar la reproduccion desde este punto, pulse el boton REPRODUCIR(>.
Durante la reproduccion de un archivo de musica.
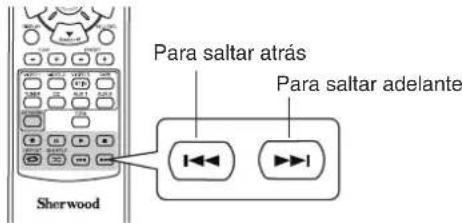
Para saltar adelante o atras
Cada vez que pulse el botón, salute un archivo de música.
Durante la reproduccion del archivo deseado, pulse el boton REPEAT ( ).
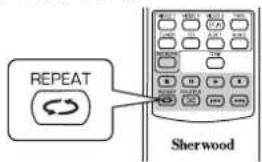
Para reproducir con repetition
- Entonces se ilumina "C" y los ARCHivos de música de la carpeta se reproducen repetidamente.
- Para cancelar la reproduccion repetida, pulse este boton另外一个 vez.
Durante la reproduccion de ARCHivos de musica, pulse el boton SHUFFLE (23).
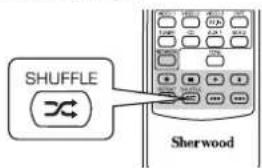
Para reproducir en orden aleatorio
- Entonces se ilumina " x" y los ARCHivos de música de la carpeta se reproducen aleatoriamente.
- Para cancelar la reproduccion aleatoria, pulse este boton另外一个 vez.
■ Nota:
-
Los发展模式 de salto, repetir y aleatorio se pueda usar cuando reproduce solamente ARCHivos de música almacenados en un dispositivo de memoria USB.
-
Para su referencia, el flujo del menu de configuración es elsignificanto:
Flujo del menu de configuración
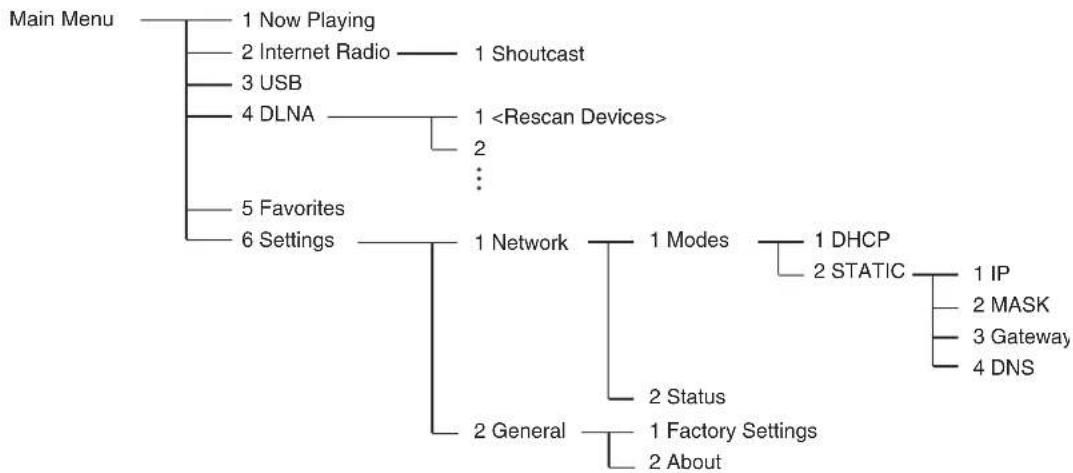
Cuando selecciona"Now Playing"
- Usted puede ver en la pantalla la informacion de la retransmision de radio por Internet o del archivo de musica que este eschuchando.
Pulse los botones CURSOR Arriba () / Abajo() para seleccionar el modo de presentacion deseado.
Ejemplo: Cuando esté escuchando una retransmisión de radio por Internet
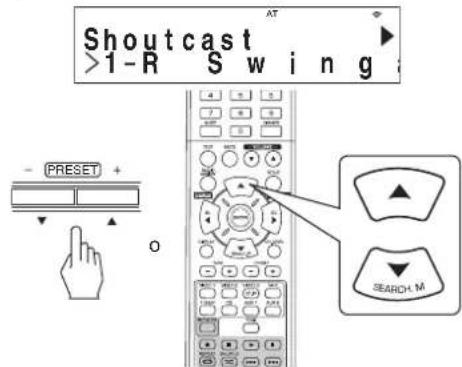
- Cada vez que pulse el botón, el modo cambia como sigue:
→ nombre de estación o disposativo ↔ titulo de la canción →Add to favorites ↔ nombre del artista ↔ nombre del album
: No disponible durante la reproduccion de:ficheros de musica o estaciones de radio de Internet registrados en la lista "Favorites".
Notas :
- Caracteres differentes a "A~Z", "a~z", "0~9", "-" pourrait quen o se vean.
- Si la información sobre el nombre de estación, titulo de la canción o nombre del artista, etc. no está disponibles, no se presentarácnorrectamente.
Cuando seleccione "Add to favorites" ① Pulse el boton ENTER.
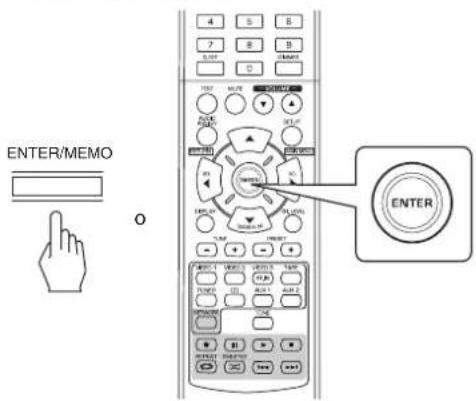
- Despues aparece "OK" en pantalla.
② Pulse el botón ENTER para confirmar su selección. - Entonces la estación o el archivo de música queja registrar en la lista de favoritos. (Para poder los detalles el funcionaimiento de favoritos, vea "Cuando seleccione "Favorites" en la pagina 31.)
Cuando selezione "internet radio"
- Puede eschar las transmissions de radio por Internet facilitadas por Shoutcast.
1. Pulse el botón ENTER.
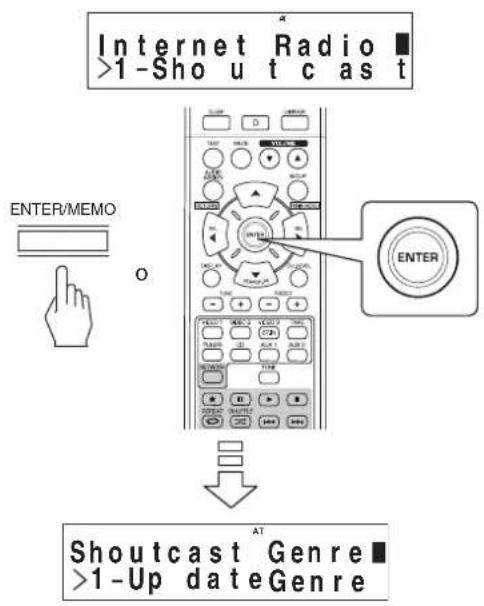
- Pulse los botones CURSOR arriba () /abajo () para seleccionar la categoria (o elemento) deseada, bajo pulse el boton ENTER.
- Repita el paso 2 anterior hasta que oiga la retransmisión眼看ada.
Ejemplo: Cuando reproduzca una retransmisión proporcionada por Reciva

- Mientras se reproduce una transmisión, cada vez que se pulsan el botón CURSOR ARRIBA (▲)/ABAJO (▼), cambía el modo de pantalla.
- Para mayor información sobre el modo de pantalla, ver "Cuando seleccióna "Now Playing" atrás.
Cuando selecciona "USB"
- Usted puedaoir ARCHIVOS de musica almacenados en un dispositivo de memoria USB.
■ Nota:
-
Antes de seleccionar "USB", conecte el dispositivo de almacenimiento USB en el conductor USB sobre el panel frontal.
-
Pulse los botones CURSOR arriba () /abajo () para seleccionar la carpeta (o los ARCHivos de música) deseada, bajo pulse el botón ENTER.
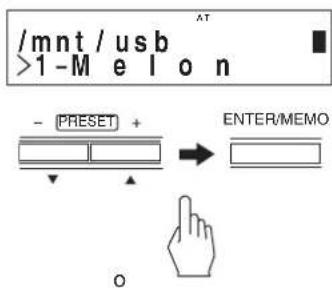
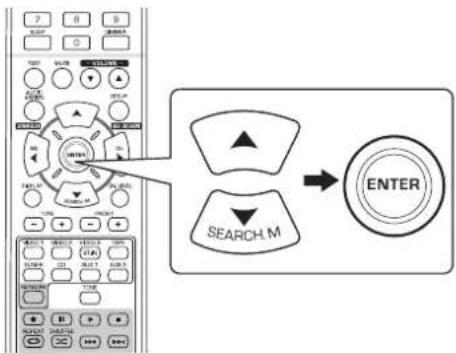
- Repita el paso 1 anterior hasta que oiga el archivo de música deseado.
Ejemplo: Cuando seleccione un archivo de musica

- Cuando seleccione un archivo de musica, cada vez que se pulsan el boton CURSOR ARRIBA (▲)/ABAJO (▼), cambia el modo de pantalla.
- Para mayor información sobre el modo de pantalla, ver "Cuando selección "Now Playing" en la頁ina 29.
Cuando selezione "DLNA"
■ Nota:
- Podra escuchar los:ficheros de musica almacenados en suordenador conectados a esta unidad a工程技术 de su red casera.
-
ParaREENING.
-
Arranque su PC (servidor multimedia).

- Pulse los botones CURSOR arriba(▲)/abajo(▼) para seleccionar su PC como servidor multimedia, y bajo pulse el botón ENTER.
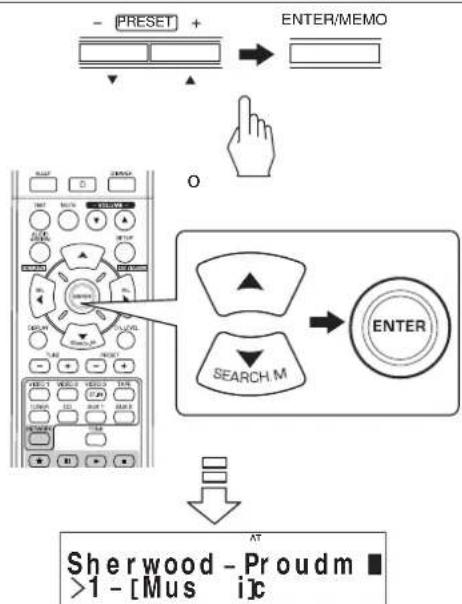
- Cuando su PC no aparezca en la lista, seleccione
para volver aocular todos los servidos multimedia disponibles. - Use los botones CURSOR arriba () /abajo () para seleccionar la categoria deseada, bajo pulse el boton ENTER.
- Repita el paso 3 anterior hasta que oiga el archivo de música deseado.
Ejemplo: Cuando selezione un archivo de musica

- Cuando selección un archivo de música, cada vez que se pulsan el botón CURSOR ARRIBA (▲)/ABAJO (▼), cambia el modo de pantalla.
- Para mayor información sobre el modo de pantalla, ver "Cuando seleccióna "Now Playing" en la página 29.
■Configurar el Windows Media Player ver. 11.
-
Execute el Windows Media Player ver. 11 en su PC.
-
Selezione la pestana "Library" en la barra dei menu, y luiq selezione "Media Sharing".
-
En el cuadro de dialogo del "Media Sharing", marque el cuadro "Sharing my media", y bajo haga 'clic' en "OK".
-
En la lista de dispositivos, selección esta unidad, y luegoonga 'clic' en "Allow".
-
Haga 'clic' en "OK" para cerrar el cuadro de dialogo.
-
Entonces habra finalizo la configuracion del Windows Media Player ver. 11.
-
Usted puedeREENCR ARCHIVOS DE MUSICA de la Biblioteca de su Windows Media Player ver. 11 usinga this unidad.
■Notas:
- Puede descargar Gratisamente el Windows Media Player ver. 11 desde el Sitio Web de Microsoft.
- Si el Cortafuegos les impide el acceso, no podra configurar el Windows Media Player ver. 11.
Cuando selezione "Favorites"
- Usted pueda oir las estaciones de radio por Internet o los ARCHivos de música registrados en la lista de "Favorites" o eliminarlos.
■Note:
- Cuandoonga el dispositivo de memoria USB desconectado o el PC (servidor multimedia) apagado, no podra reproducir los ARCHivos de música queonga almacenados en these.
- Pulse los botones CURSOR arriba () /abajo () para selectionar la estacion o el archivo que deseee, bajo pulse el boton ENTER.
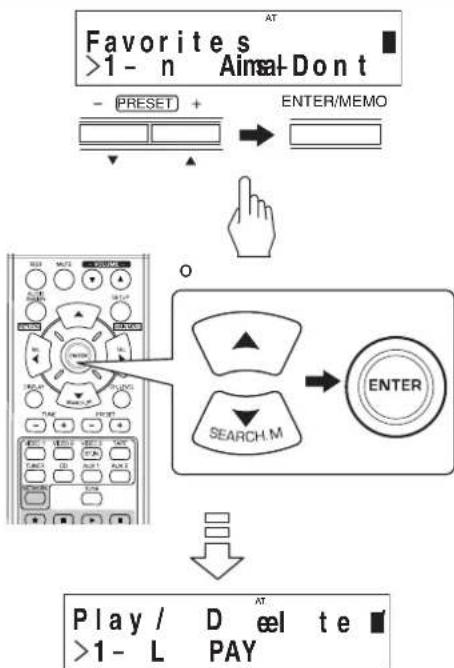
- Pulse los botones CURSOR arriba(▲)/abajo(▼) para seleccionar "PLAY" (Reproducir), "DELETE" (Eliminar) o "CANCEL", y bajo pulse el boton ENTER.
Ejemplo: Cuando seleccione un archivo de musica

- Cuando selección "PLAY", se reproducirá la estación o archival de música que haya selecciónado.
- Cuando selección "DELETE", eliminará de la lista de "favorites" laización o archivo de música que haya的选择ado.
- Cuando se selección "CANCEL", su selección se cancelará.
- Cuando selección un archivo de música, cada vez que se pulsan el botón CURSOR ARRIBA (▲)/ABAJO (▼), cambía el modo de pantalla.
- Para mayor información sobre el modo de pantalla, ver "Cuando seleccióna "Now Playing" en la pageina 29.
Cuando selezione "Settings"
- Cuando esucha las transmisiones de radio por Internet con los:ficheros de musica por primera vez,realice primero los ajustes para la red,etc. para un funcionajo optimo.
- Selección el elemento deseado, cuando pulse el botón ENTER.


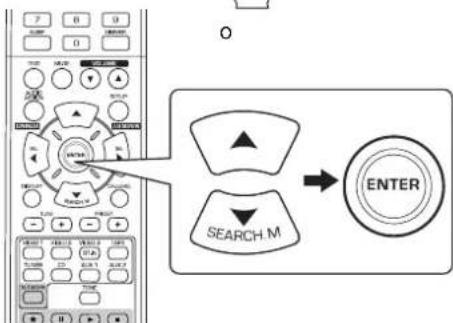
Cada vez que pulse uno de los botones de desplazimiento del CURSOR Arriba(▲)/Abajo(▼), el modo de configuracion cambia del modo de;) Network General
- Cuando se selecciona "General", ver paginga 33.
Cuando se selecciona "Network"
- Para eschar las estaciones de radio de Internet, las trasmisiones musicales o los:ficheros de musica almacenados en su ordinador a工程技术 de su red casera, necessities configurar primero los ajustes de red.

- Pulse los botones CURSOR ARRIBA (▲)/ABAJO (▼) para seleccionar "Modes" o "Status", posteriormente, pulse el botón ENTER.
Ejemplo: Cuando se selecciona "Modes"
Netwo >1-DHCP
Modrk
1
- Cuando "Modes" ha sido selectionado, puede configurar los ajustes de red.
- Cuando se seleccióna "Status", pueda comprobar la información en los ajustes de red (ver págin33).
Cuando se selecciona "Modes"
-
Pulse los botones CURSOR ARRIBA () /ABAJO () para seleccionar "DHCP" o "STATIC", posteriormente, pulse el boton ENTER.
-
Si el servidor DHCP de su enrutador está habilitado, pueda seleccionar "DHCP".
- Si está deshabilitado, selección "STATIC".
- En caso de seleccionar "DHCP"
- Cuando se muestra "Switch to DHCP mode?", pulse el botón ENTER.

- Los ajustes de red se configuran automatistically y se做不到 el menu "Status". (Ver "Cuando se selección "Status" en la頁a 33.)
- En caso de seleccionar "STATIC"
- Puedes seleccionar los ajustes de red manualmente cuando el servidor DHCP del enrutador está deshabitado.
■ Nota :
- Debido a que se requiere lasuma informacion del enrutador, confirmre la misma antes de ajustar manualmente: direccion IP,mascara de subnet,Gateway, DNS.

① Pulse los botones CURSOR ARRIBA (▲)/ABAJO (▼) para seleccionar el objeto de ajuste deseado, posteriormente, pulse el botón ENTER.
- Cada vez que pulsa el botón CURSOR ARRIBA (▲)/ABAJO (▼), el modo de ajuste Cambia del.), como el.

Ejemplo: Cuando se selecciona "IP"

② Pulse los botones CURSOR IZQUIERDA(▲)/DREecha(▲) para moverse hacía el digito deseado.
- Para eliminar un número, pulse el botón CURSOR IZQUIERDA (▲). Cada vez que se pulsa este botón, los nombres se borran de uno en uno.
③ Pulse los botones CURSOR ARRIBA () / ABAJO () para introducir el numero deseado.
- Cada vez que se pulsa el botón CURSOR ARRIBA (▲)/ABAJO (▼), el parácer cambía de lasuma forma.a~z, A~Z, 1~0 y characteres (@, , blanco, etc.)
④ Repite el paso anterior ② y ③ para completar la entrada.
(5) Para confirmar su entrada, pulse el botón CURSOR DERECHA(>) para moverse hacía elsignificante digito, posteriormente, pulse el botón ENTER. Se做不到 el menu "Static Mode".
⑥ Repita los pasos anteriores ① ~ ⑤ para entrada enotiros objetos de ajuste.
⑦ Pulse el botón AUDIO ASSIGN(/RETURN) para regresar al estado anterior.
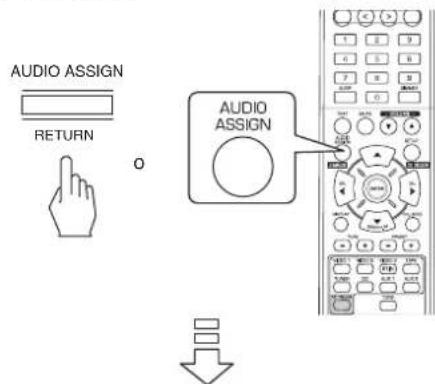
Apply Changes? >1-OK
para seleccionar "OK" o "CANCEL", entones pulse el botón ENTER.
- Cuando se selección "OK", se aplican los ajustes de red y se做不到 el menu "Status". (Ver "Cuando se selección "Status" más adelante.)
- Cuando se selección "CANCEL", no se aplican los ajustes de red y se做不到 a Network Modes".
Cuando se selecciona "Status"
- Puede comprabar los ajustes de red (tales como MODE, direccion IP, GW(Gateway) y DNS server) en forma suscesiva.
Status.MODE:dh >1-OK
- Para regresar al estado anterior, pulse el botón ENTER.
Cuando se selecciona "General"
General Setting >1-Factory Sett
- Pulse los botones CURSOR ARRIBA () / ABAJO (▼) para seleccionar "Factory Settings" o "About", posteriormente, pulse el boton ENTER.
Ejempo: Cuando se selecciona "Factory Settings"
Warning: Alles >1-OK
- Cuando se seleccióna "Factory Settings", pueda restablecer los ajustes de "Network" y las estaciones o los:ficheros de musica registrados en la lista "Favorites" a los ajustes de fabrica.
- Cuando se seleccióna "About", pueda comprobar informaciones generales, tales como el tipo de launidad, la version de software y la direccion MAC.
Cuando se selecciona "Factory Settings"
-
Pulse los botones CURSOR ARRIBA () / ABAJO () para seleccionar "OK" o "CANCEL", a continuacion pulse el boton ENTER.
-
Cuando se seleccióna "OK", se regresa a los ajustes de fabricula.
- Cuando se seleccióna "CANCEL",對於s se regresa al estado anterior sin reajustar.
Cuando se selecciona "About"
- Puede comprar, suscesivamente, el tipo de unidad, la version de software y la direccion MAC.
About. Intemet OK >1-OK
- Para regresar al estado anterior, pulse el botón ENTER.
GRABAR
Las snales digitales procedentes de las entradas digitales "NET/USB", coaxial y optica o de la entrada HDMI IN,能把 oirse pero no se podran grabar.
- Cando grabe las senales analógicas procedentes de CD, VIDEO 1 ~ 2, asegürese de selección la entradaanalógica. (Para mas detalles,lea "Cuando selección CD,VIDEO 1~2 como fuente de entrada" en la página 14.)
- Los ajustes de volumen y tono (graves y agudos) no tienen efecto sobre las señales de grabación.
Grabar con CINTA
- Selecciona la entrada que desee grabar excepto cinta (TAPE).
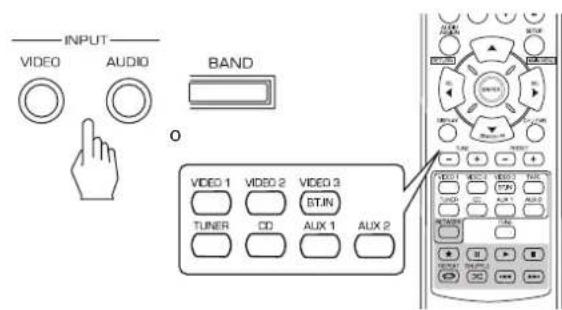
- Empiece a grabar sobre la TAPE.
- Inicia la reproduccion en la entrada que desea grabar.
Doblaje desde video por componentes sobreVIDEO1
- Selección la optación que deseee entre VIDEO 2 y VIDEO 3 como fuente de grabacion, pero no VIDEO 1.
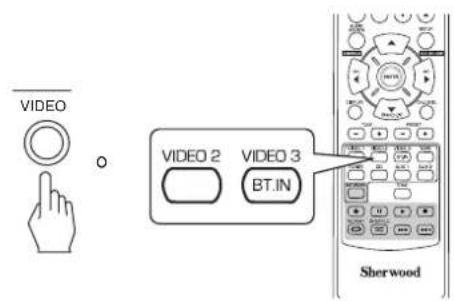
- Empiece a grabar sobre VIDEO 1.
- Inicia la reproduccion en la entrada que desea grabar.
Las snales de audio y video procedentes de VIDEO 2 seran dobladas en VIDEO 1 y pueda disfrutar deellas en la TV y en los altevoces.
OTRAS FUNCIONES
Funcionamento del Temporizador de desconexión
- El temporizador de desconexión permite que el sistema continueFuncionando durante un periodo de tiempo especificado antes de que se apague automatistically.
- Para establecer que el receptor se apague automatamente antes de un periodo de tiempo determinado.
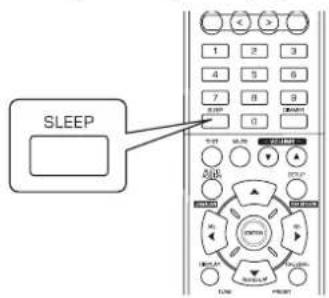
Ajustar el brillo de la pantalla fluorescente
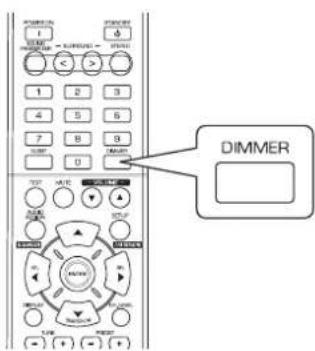
Presentación del estado de funciona
Durante la reproduccion,
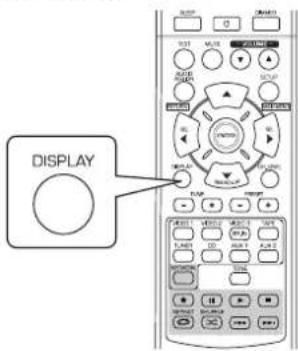
- Cada vez que pulse este botón, el tiempo para la desactivación cambia comocede:

- Mientras esté的功能ando la funciona, el icono "ilumina.
- Cuando selección el periodo para la desconexión, la pantalla fluorescente se ilumina débilmente.

- Cada vez que pulse este botón, el brillo de la pantalla.
fluorescente cambia del modoCEE: -
Con el modo de presentación DESACTIVADO, al pulsar cualquier botón activará otra vez la presentación para(""); no matter what the botón is.
-
Cada vez que pulse este botón, el modo de presentación cambia como sigue:
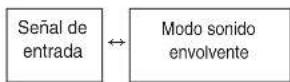
- Si la funciona de sintonización RDS está disponible en su País, para ver los detalles sobre la información del modo FM, lea la sección "Mostar información RDS" en la頁ina 25.
CONFIRMAR LA FUNCION HDMI
Para usar correctamente las functions de control HDMI, es recommendable confirmar que functions de control HDMI se pueda usar con cada equipo realizando las operaciones siguientes.
■ Nota:
- Algunas de las functions de control HDMI peuvent no functioning conCERTOS Equipos y TVs que no sean compatibles con dichas functiones.
Antes de hacerlo funcional
- Compruebe que este receptor, la TV y el reproductor, etc. esten conectados con los cables HDMI.
- Compruebe que el control HDMI de la TV y del reproductor con connexion HDMI está fácilados. (Para ver los detalles sobre la configuración de la TV y del reproductor, lea sus instrucciones de funciona).
- Active los controlles HDMI CONTROL y POWER CONTROL (ON) para hamitar el control HDMI de este receptor. (Para mas detalles, lea "AJUSTANDO EL HDMI" en la頁a 50.)
Confirmar las operaciones HDMIbasicas
1.Encienda todos los equipos conectados mediante cables HDMI.
2.Enchufe la entrada TV a la entrada HDMI connectada a este receptor.
3.Enchufe esta entrada de la unidad a fuente de entrada HDMI.
- Confirme que aparece laImagen en pantalla y que se oye correctamente el sonido por los altavoces.
Confirmar lamericanes de control HDMI
-
Encienda todos los equipos conectados mediante cables HDMI.
2.Apague la TV para entrada en modo en espera (standby). -
Confirme que todos los equipos estén apagados.
- Con todos los equipos apagados, inicia la reproduccion en un reproductor (conectado por cable HDMI).
- Confirme que todos los equipos estan encendidos y que las entradas de esta unidad y de la TV se activan automatistically.
Configuración del Sistema
- El menu de configuración se muestra en la pantalla fluorescente y le permite efectuar los procedimientos de ajuste con calidad. En la mayoría de situaciones, ustedsolenecitarajustarestouna sola vezdurante la instalacionydispositionde suHome Theater, y dificilmente necitaracambiarlo mas tarde.
El menu de ajuste consiste en 6 menus principales;istema, entrada, ajuste de altavoz, nivel de canal (CH), parametro y HDMI.
Estos menus estan divididos en various submenus.
■ Nota
- Sólo cuando selección una fuente diferente a NET/USB,ouldrivarlosprocedimientosde configuración delsystema.
■Navegar por el menu de configuración
- Las explicaciones importantes asumen que usted está usingo los botones del mando a distancia cuando utilize el menu de configuracion.
Sin embargo, usted también puede usar los botones del panel frontal. La correspondencia entre los botones del panel frontal y los del mando a distancia es la.),
| Button on the remote control | SETUP | ENTER | SEL | SEL | SEARCH M |
| Button on the front panel | SETUP | ENTER / MEMO | TUNE + | - PRESET + | |
| MAIN MENU | |||||
- Active el menu de configuración.
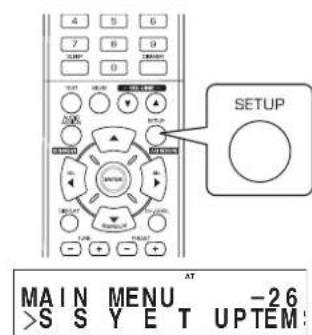
- El menu de configuración aparecerá en la pantalla.
-
Para desactivar el menu, pulse este botón otra vez.
-
SeLECTIONE el menu deseado usingo los botones CURSOR ARRIBA(▲)/ABAJO(▼).
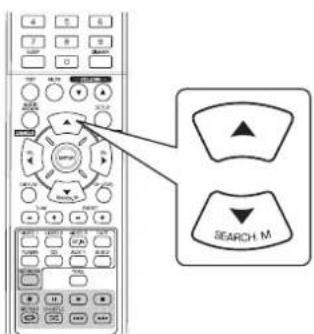
- Confirme su selección.
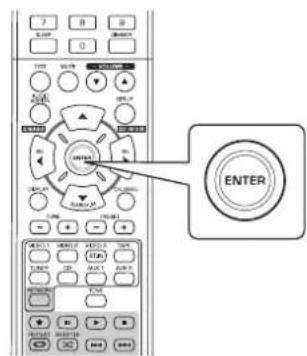
- Cuando selezione "SYSTEM SETUP", vea
"AJUSTANDO EL SISTEMA" en la頁ina 39. - Cuando seleccione "INPUT SETUP", vea "AJUSTANDO LAS ENTRADAS" en la page 41.
- Cuando selección "SPEAKER SETUP", vea "AJUSTANDO LAS CONFIGURación DE ALTAVOCES" en la頁ina 42.
- Cuando seleccione "CH LVL SETUP", vea "AJUSTANDO LA NIVEL DEL CANAL" en la page 46.
- Cuando selezione "PARAMTER SETUP", vea "AJUSTANDO LOS PARÁMETROS" en la página 48.
- Cuando seleccione "HDMI SETUP", vea "AJUSTANDO EL HDMI" en la page 50.
- Cuando selección "EXIT", el menu de configuración se desactivará.
Flujo del menu de configuración
- El flujo del menu de configuración es el paciente:
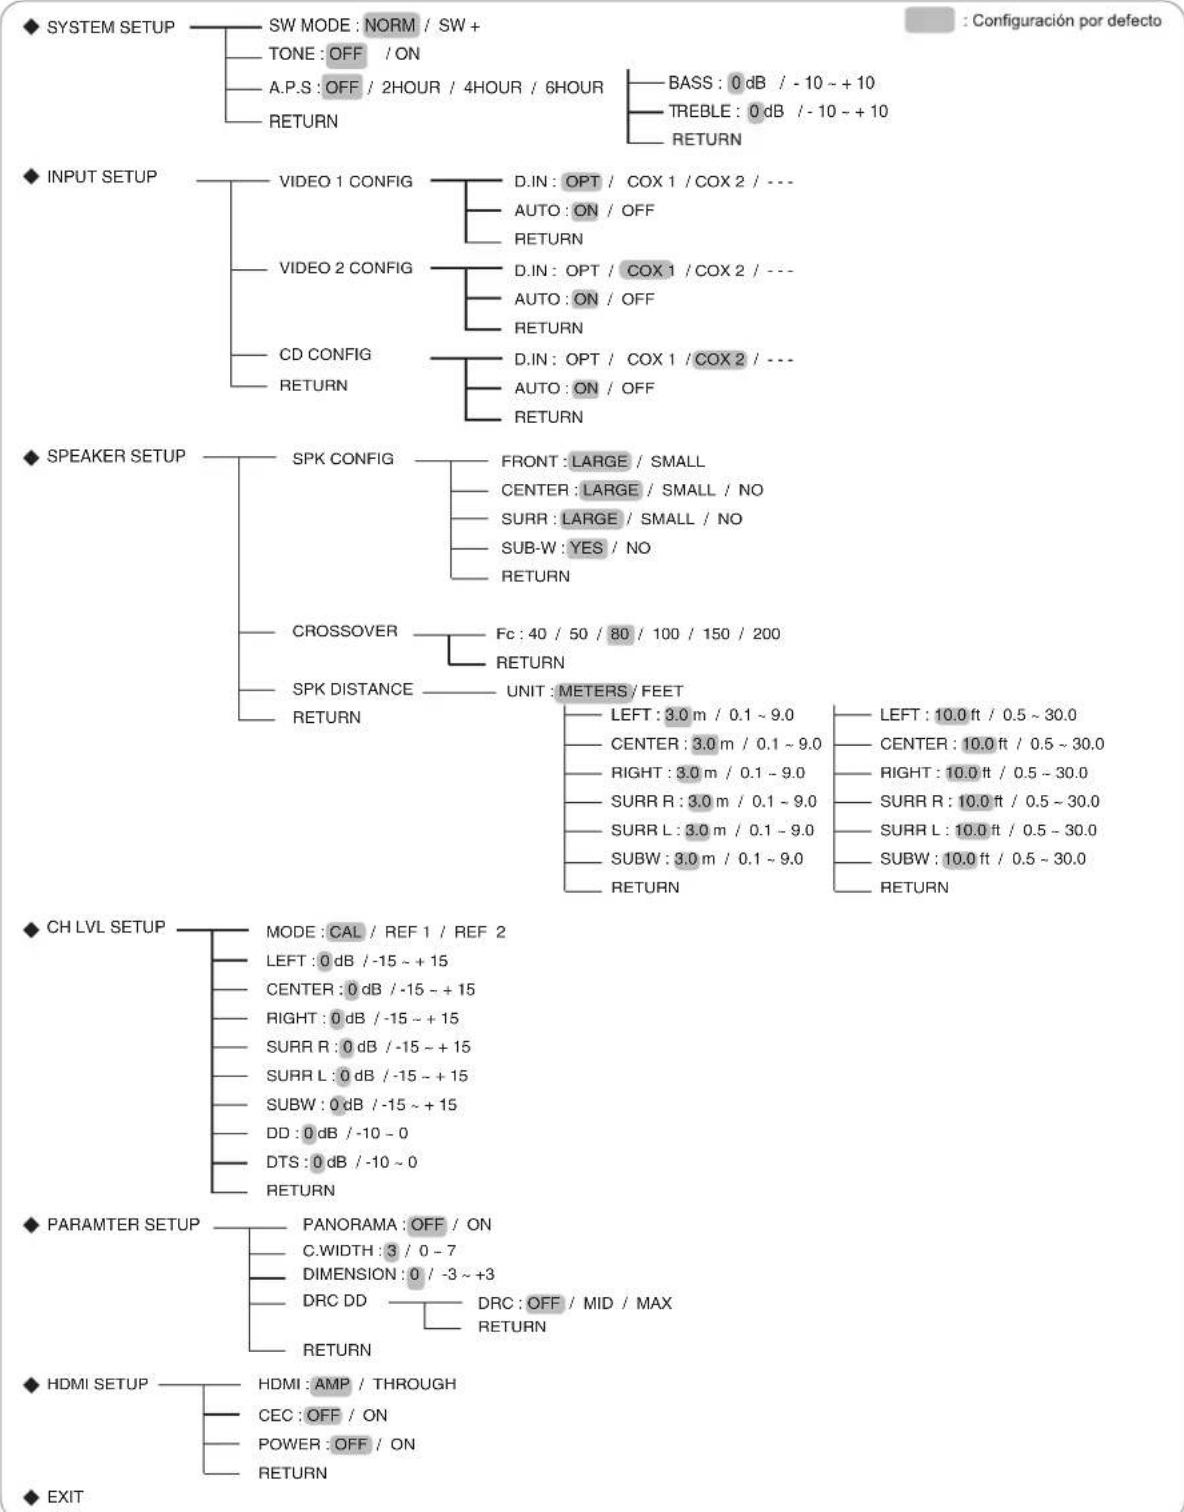
- Cuando selección "RETURN" en un sub-menú, regresará al menú previo.
- Cuando pulsa el botón AUDIO ASSIGN(/RETURN) en un sub-menú, también regresará al menú previo.
■ Nota: Mientras utilise el menu de configuración, solo funciona en botón (POWER ON/) STANDBY y los botonesesionarios para la configuración del sistemas.
AJUSTANDO EL SISTEMA

- SW MODE(MODO SUBWOOFER) : Para seleccionar el modo de subwoofer que desee.
TONE: Para ajustar el tono (graves y agudos) como desee.
A.P.S(AUTO POWER SAVE/AHORRADOR DE ENERGIA AUTOMÁTICO) : Para poner el tiempo de apagado como se desea. -
RETURN: Para regresar al menu previo.
-
Pulse el CURSOR ARRIBA(▲)/ABAJO(▼) para seleccionar el elemento que quiera.
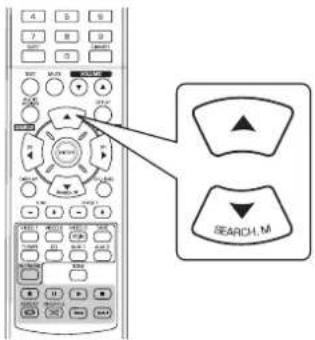
- Pulse el CURSOR IZQUIERDA(▲)/DERECHA(▲) para ajustar el elemento a su gusto.
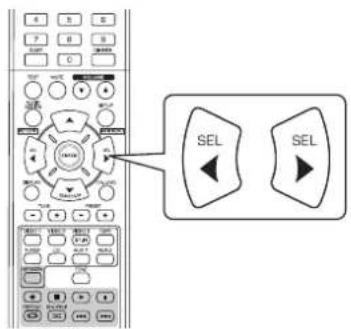
Cuando seleccione el modo SUBWOOFER
- El modo "SW +" funciona solamente cuando "FRONT" (FRENTE) y "CENTER" (CENTRO) estájustados, y "LARGE" (LARGO) y "SUB-W" (subaltavoz de bajos) seajustan en "YES" (Sl) en el menu SPEAKER SETUP (AJUSTE DEL ALTAVOZ). (Para mayor informacion, consulte "AJUSTANDO LAS CONFIGURACION DE ALTAVOCES" en la page 42.)
NORM: Cuando las señales de baja Frequencia de los canales ajustados a "LARGE" son reproduidas solamente desdethose canales.
En este modo, las senales de baja Frequencia que se reproducecen procedentes del canal subwoofer son las unicas snales de baja Frequencia del LFE (de las fuentes multi-canal que contiene el canal LFE (Efectos de baja frequencia), también llamado canal ".1"), y de los canales ajustados a "SMALL".
SW + : Cuando las señales de baja Frequencia de los canales ajustados a "LARGE" se reproduce simultaneamente desdethose canales y desde el canal subwoofer.
En este modo, el margen de las bajas Frequencias se expande mas uniformamente por toda la habitacion, pero dependiendo del時間 y forma de la habitacion,uede haber interferencias reduciendose el volumen actual del margen de bajas Frequencias.
Cuando se selección el AHORRADOR DE ENERGÍA AUTOMÁTICO
- El ahorrador de energia automática es una función de apagado automatico para entrada en el modo de espera (standby). Si no se pulsa ningún botón más alla del tiempo establecido, este se pondrá en funciona.
- Puede ajustar el tiempo de apagado como lo desee.

Cuando selezione TONE
OFF: Para oir la fuente de programa sin efecto de tono. (El indicator "DIR" se illumina.)
ON: Para ajustar el tono a su gusto. ("DIR" se apaga.)
Cuando ajuste el valor de TONE CONTROL en ON, para ajustar el tono (graves y agudos)
①. Pulse el botón ENTER para introducir el ajuste de tono
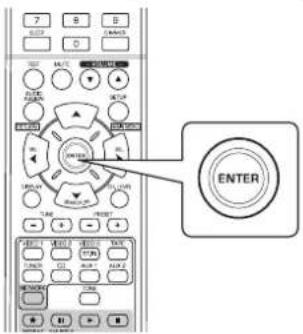
②. Pulse los botones CURSOR arriba(▲)/abajo(▼) para seleccionar el modo de tono deseado.
Cuando selezione BASS


③. Pulse los botones CURSOR izquierda(▲)/derecha(▲) para ajustar el tono seleccionado a su gusto.
- El nivel de tono pueda ajustarse dentro del margen de -10 ~ +10 dB.
- En general, le recomendamos que los graves y agudos se ajusten a 0 dB (nivel plano).
- Ajustes extremos a volumen altoPTIONAVERIAR sus altavoces.
AJUSTANDO LAS ENTRADAS
INPUT SETUP
D.IN DIGITAL IN): Para asignar las entradas DIGITALES a la entrada deseada.
- AUTO (SONIDO ENVOLVENTE AUTO): Para seleccionar el modo de sonido envolvente automatico o manual.
- RETURN: Para regresar al menu previo.
- Pulse los botones CURSOR ARRIBA(▲)/ ABAJO(▼) para seleccionar la fuente de entrada que quiera y bajo pulse el boton ENTER.

Ejemplo) Si selecciona elVIDEO 2
- Pulse el CURSOR ARRIBA(▲)/ABAJO(▼) para seleccionar el elemento deseado.
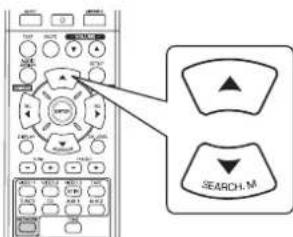
- Pulse el CURSOR IZQUIERDA(▲)/DERECHA(▲) para ajustar el elemento a su gusto.
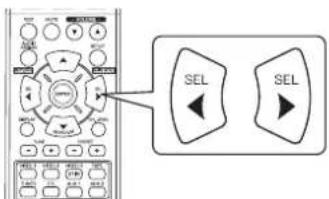
Cuando selezione DIGITAL IN
- Usted podría asignar las entradas DIGITAL IN conectadas según lo desee.
(Para mas detalles, lea "CONEXIONES DIGITAL IN" en la pagina 7.) - Usted能把 selec tionar ent OPT (optica), COX 1(coaxial 1),COX 2(coaxial 2) y -analog).
Notas:
- En el caso de que la entrada DIGITAL se asigne a dos o más+fuentes de entrada, cuando selección estas fuentes de entrada, las sénares de audio digital podran oirse procedentes de la mesma entrada DIGITAL.
- Cuandoonga el conector de entrada HDMI IN conectado a su equipo de video, la configuracion realizada en la entrada DIGITAL IN no tiene validiz.
Cuando selezione AUTO SURROUND
Dependiendo del modo de sonido envolvente seleccionado,usted能看出 elegir el modo automatico o el modo manual. OFF(Modo sonido envolvente manual) : Usted能看出 al mode Sonido Envolmente (Surround) que quira entre los differentes moots seleccionables para la senal de entrada,utilizando los botones de SELECTIOND MODE ENVOLVENTE (> / < ) .Para mas detalles,lea "Cuando seleccione el mode de sonido envolvente manual pulsando el boton AUTO/MANUAL en el panel frontal" en la pagina 17.)
ON(Modo sonido envolvente automático): El modo envolvente optimo sera seleccionado automatistically dependiendo del formato de senal de entrada.
Notas:
- Cuando el botón ALTAVOZ (SPEAKER) se apaga o "CENTER" y "SURR"(envolvente) se ponen en "NO", el modo envolventa automatico queda inhabilitado.
- Incluso cuando el modo de sonido envolvente sea seleccionado y el tipo de formatting de la senal digital tengaa salida, el mode optimo del sonido digital可以使var dependiendo de si el tipo de altavoz esta desactivado (NO) o no.
- Cuando selección el modo envolvente automatico, no pueda selectionar un modo diferente al modo envolvente optimo elegido por el sistema.

AJUSTANDO LAS CONFIGURACION DE ALTAVOCES
- Después de instalar este receptor y conectar todos los equipos, usted deberia ajustar la configuracion de los altavoces para una acústica de sonido optima dependiendo del ambiente y de la disposicion de los altavoces.
- Incluso cuando cambie de altavoces, o sus posiciones, o la distribución del空間 sobre el roto de los vales, y suces, como para un alvejo.
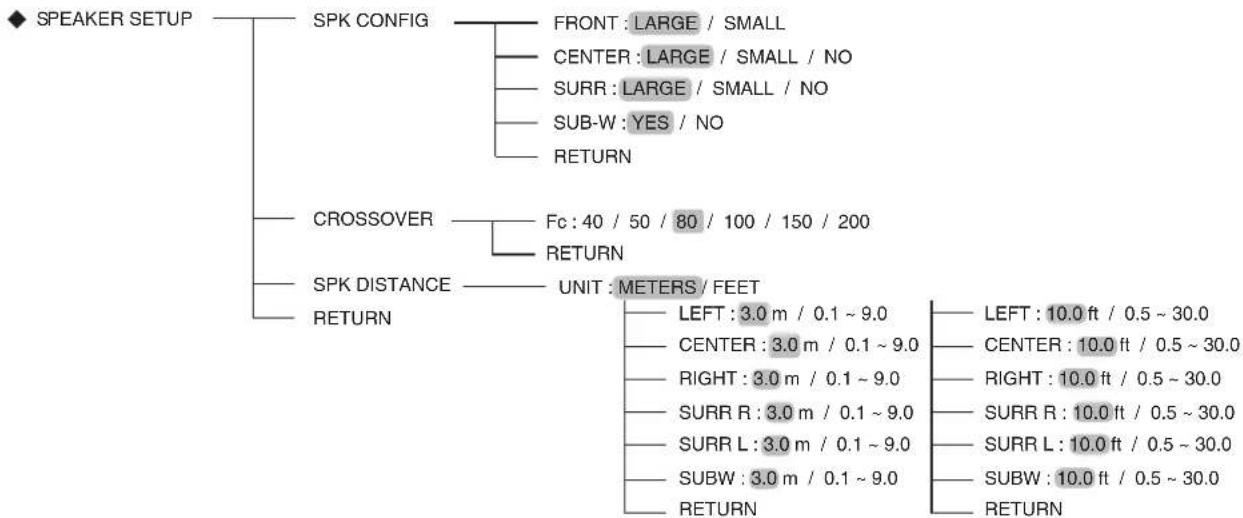
- SPK(ALTAVOCES) CONFIGURATION : Para seleccionar el dato de los altavoces que esan conectados.
CROSSOVER: Para seleccionar la fecuencia de corte deseada. - SPK(ALTAVOCES) DISTANCE: Para introducir la distancia entre la posicón de audición y cada altavoz, para establercer automatistically el tiempo de retardo para una reproducción optima del sonido envolvente.
- RETURN: Para regresar al menu previo.
Cuando selezione 'SPEAKER CONFIGURATION'
- Pulse los botones CURSOR ARRIBA(▲)/ ABAJO(▼) para selectionar "SPK CONFIG" y bajo pulse el botón ENTER.
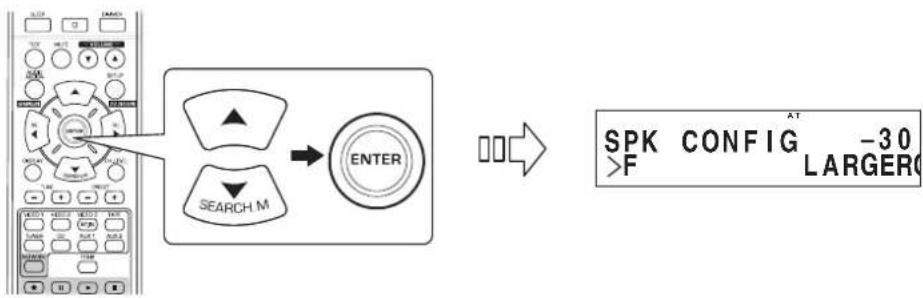
- Pulse los botones CURSOR ARRIBA(▲)/ABAJO(▼) para seleccionar el altovoz que desees.
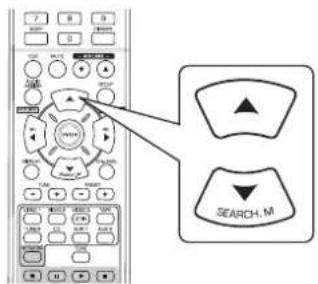
- Pulse el CURSOR IZQUIERDA(▲)/DERECHA(▲) para ajustar el altovoz seleccionado a su gusto.
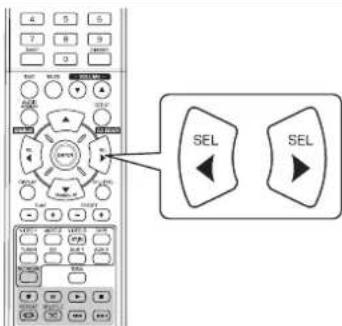
- Dependiendo de su tipo de altovoz, usted pueda selectionar uno de los siguientes temas.
- Altavoces del fronte, centro y envolventes:
LARGE: Selezione esta oplica cuando conecte altavoces que poderan reproducir todos los sonidos por bajo de la Frequencia de corte.
SMALL:Selezione esta cuando conecte altavoces que no podan reproducir todos los sonidos por bajo de la fecuencia de corte. Cando selezione this ajuste, los sonidos por debajo de la fecuencia de corte se envian al subwoofer o a los altavoces "LARGE (grandes)" (si no usa subwoofer).
NO : Selectione estajeste cuando no tenga ningu altavoz conectado. Cuando selecione estajuste, lo sonidos se envian a los altavoces que no tengan el ajuste "NO".
- Subwoofer :
YES : Selezione esta oplica para sacar las senales LFE y las bajas fecuencias de los canales ajustados en "SMALL" a trovés del Subwoofer.
NO : Selezione esta oplica cuando no tengas Subwoofer conectado. Las bajas freuencias saldran por los other altavoces.
Notas :
- Cuando ajuste los altavoces a "SMALL (pequeño)", ustedLEGALia establecer correctamente la fecuencia de corte según suscharacteristicas de fecuencia. (Para más detalles, lea "Cuando selección 'CROSSOVER' en la頁a 44.)
-
Cuando "F"(frente) se pone en "SMALL (PEQUENO)", "CENTER"(centroid) y "SURR"(envolvente) no pueda ponerse en "LARGE (LARGO)" y "SUB-W"(subaltavoz de bajos) no pueda ponerse en "NO".
-
Repita los pasos 2 y 3 anteriores hasta que los altovoces queden ajustados en el modo deseado.
Acerca del時間 de los altovasces
- Selezione "LARGE (grande)" or "SMALL (pequeño)" no de acuerdo con el tamanfo fisico del altovoz sino por la capacité del altovoz de reproducir senales Frequencias bajas (sonidos graves por bajo de la fecuencia establecida en el menu "CROSSOVER").
- Si no la conoce,intaente comparar el sonido de distinctas configuraciones (ajustando el volumen a un nivel suficientemente bajo para que no dae los altavoces) para determinar el ajuste adecuado.
Cuando selezione 'CROSSOVER'
-
Cuando los altavoces estén ajustados en "SMALL (pequeño)", asegürese de建立起 correctamente sus Frequencias de corte según sus caracteristicas de fecuencia.
-
Use los botones CURSOR ARRIBA(▲)/ABAJO(▼) para seleccionar "CROSSOVER" y bajo pulse el boton ENTER.

- Use los botones de desplazimiento del CURSOR IZQUIERDA( /DERECHA( ) paraaabstar la Frequencia de corte como dese.
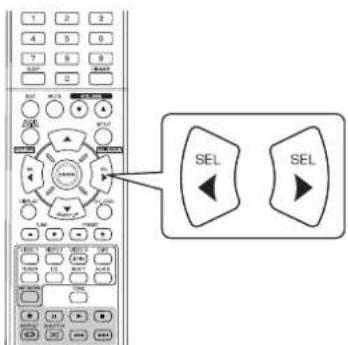
- Puede selectionar la fecuencia de corte entre 40, 50, 80, 100, 150 y 200 Hz.
Acerca de la Frequencia de corte
- Cuando los altavoces estan ajustados en "SMALL (pequeño), las bajas fecuencias en aquellos canales que estan por debajo de la fecuencia de corte son enviadas a la calidad del subwoofer o a los altavoces frontales que esten ajustados como "LARGE (grande)" (cuando no use un subwoofer).
- Lea las instrucciones de funciona en los altavoces conectados. Si el margen de freuencias de su altavoz es 100 Hz~20 kHz, la Frequencia de corte deberta establecerse en 100 Hz (o ligeramente superior).
Cuando selezione 'DISTANCE'
- Pulse los botones CURSOR arriba(▲)/abajo(▼) para seleccionar 'SPK DISTANCE' y bajo pulse el boton ENTER.
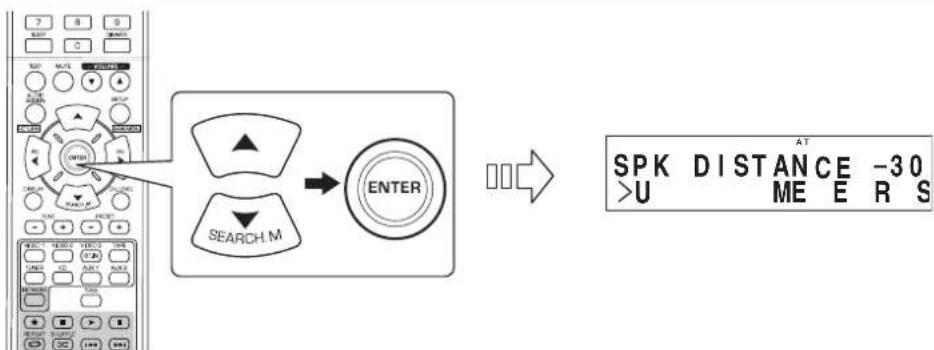
- Pulse el CURSOR arriba(▲)/abajo(▼) para seleccionar la option deseada.
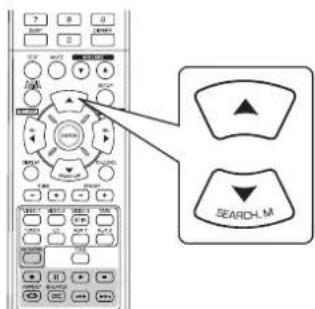
■Note:
-
NoURTADA SELECTIONAR el subwoofer ni los altavoces con el ajuste "NO".
-
Pulse el CURSOR izquierda( /derecha( ) para ajustar el elemento a su gusto.

Para seleccionar la unidad deseada
- Usted puede selectionar o "METERS(METROS)" o "FEET(PIES)".
- Una vez seleccionada la unidad, las distacias cambiaran automatistically a la unidad seleccionada.
Para ajustar la distancia
-
Usted puedeaabstaringdistancia dentrodemargend 0,1\~9,0 metros en intervals de 0,1 metros (o 0,5\~30 pies en intervals de 0,5 pies).
-
Repita los pasos 2 y 3 anteriores hasta que haya ajustados todas las distancias como desea.
Acerca de las distancia de los altavoces
Cuando este disrutando deuna reproduction de sonido envolvente multi-canal con fuentes Dolby Digital y DTS, es ideal que los altavoces centrales y los de sonido envolvente estuvieran a la misma distancia de la posicir principal de audicion que los altavoces frontales. Introduciendo la distancia entre la posicir de audacion y cada uno de los altavoces, los tiempos de retardo de los altavoces central y de sonido envolvente se ajustaran automatamente para crear virtuallyn el ambiente de audacion ideal como si los altavoces central y de sonido envolvente se entrainaran situados en sus positions ideales.
AJUSTANDO LA NIVEL DE CANAL
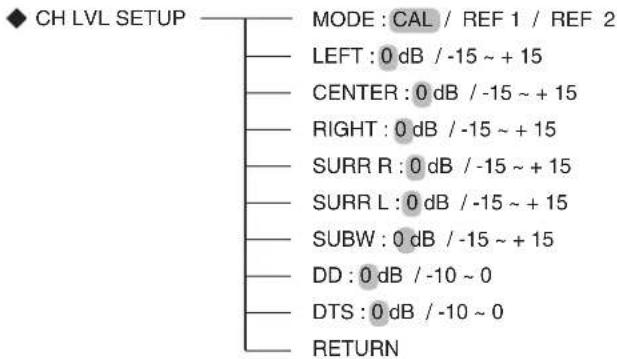
■Nota:
- Dependiendo de la configuración de altavoces ("NO", etc.), noURTAD SELECTIONAR ALGUOS CANAES.
Ajustar el nivel del canal actual
- Usted puedaajsar el nivel del canal actual cuando lo desea. Estos nivelesajsados se memorizan en el acto, bajo de la memoria del usuario ("CAL"), no en la memoria presintonizada ("REF 1", "REF 2").
- Después de ajustar cada nivel de canal con los tonos de prueba, ajuste los niveles de canal o según las fuentes de programa o para que se ajusten a sus gustos. (Para los detalles, lea "Ajustar cada nivel de canal con el tono de prueba" en la página 19.)
1. Pulse el CURSOR arriba(▲)/abajo(▼) para seleccionar el canal deseado.


Ejemplo: Cuando seleccione el LFE de las fuentes Dolby Digital
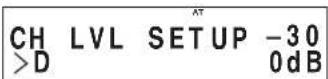
- Pulse los botones del CURSOR izquierda( /derecha () paraaabstar comodeseeel nivel del canal seleccionado o del LFE de la fuente de programa.
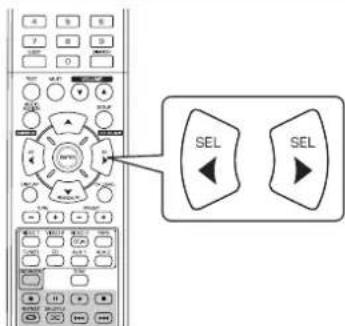
- El nivel LFE puede ajustarsearethdol margen de -10 0 dB y losothers niveles de canal dento del margen de -15 +15 dB.
-
En general, le recomendamos que ajuste el nivel LFE a 0 dB. (Sin embargo, le recomendamos que para todas versiones antiguaas de LFE sea -10 dB.) Si los niveles recomendados parecen demasiado alto, bajelos tanto como sea Neededario.
-
Repita los pasos 1 y 2 anteriores paraaabstar cada nivel de canal.
Memorizar los niveles de canal ajustados
- Usted puede guardar en la memoria presintonizada ("REF 1", "REF 2") los niveles de canal ajustados, y recuperarlos en el momento que quiera.
- Después de realizar los pasos 1~3 del procedimiento "Ajustar el nivel del canal actual" de la頁a 46, bajo pulse el botón ENTER.
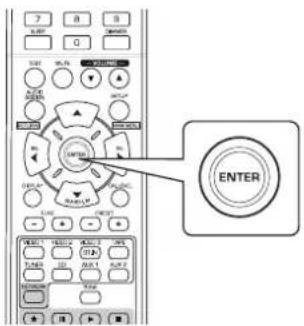

CH LVL SETUP -30 >M DE REF1O:
- Entoncs la indication "1" o "REF 1" parpadea en pantalla.
- Pulse los botones CURSOR izquierda( /derecha para seleccionar la memoria almacenada que deseey luego pulse el boton ENTER.
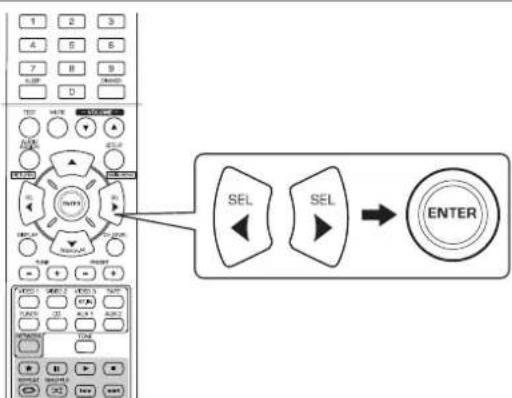
Cada vez que pulse el boton CURSOR izquierda( /derecha () , selecciona REF 1" o REF
- Los niveles de canal ajustados se hanGuardado ahora en la memoria seleccionada.
Recuperar los niveles de canal memorizados
- Pulse los botones CURSOR arriba(▲)/abajo(▼) para seleccionar 'MODE' (modo memoria).
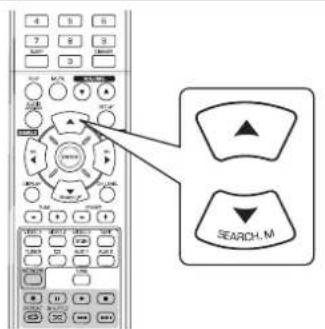

CH LVL SETUP -30 >M DE CALO:
-
Puede que aparezca "CAL" en vez de "REF 1" o "REF 2".
-
Pulse los botones CURSOR izquierda( /derecha () para seleccionar o REF 1' o REF 2' como desee.
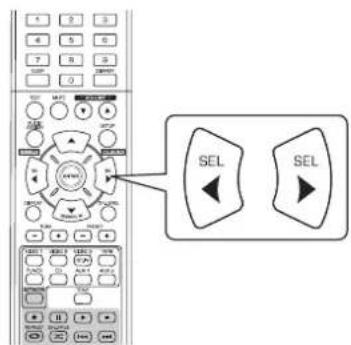
- Entonces se recuperan los niveles de canal memorizados de la memoria predeterminada seleccionada.
AJUSTANDO LOS PARÁMETROS
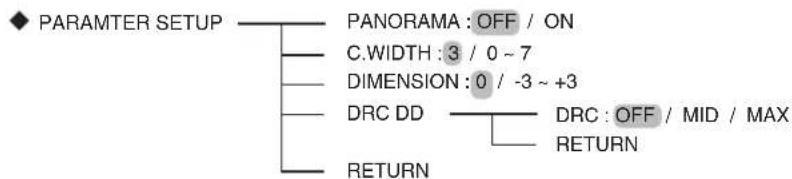
- PARÁMETROS DE DOLBY PRO LOGIC II MUSIC: Paraaabstar los diversos parámetros de Dolby Pro Logic II Music para un (PANORAMA, C.WIDTH(CENTRO ANCHO), efecto envolvente optimo. DIMENSION)
- DRC DD (COMPRESION DE RANGO DINAMICO DOLBY DIGITAL): Paraajustar la compresion del rango dinamico que permite esuchar fácilmente el sonido debil en bajo volumenes.
- RETURN: Para regresar al menu previo.
Cuando selezione "PANorama", "C.WIDTH", "DIMENSION"
- Puede ajustar los diversos parámetros de Dolby Pro Logic II Music para un efecto envolvente optimo.
■Notas:
-
Los ajustes de parámetros son validos solamente cuando eschúa en el modo Dolby Pro Logic II Music.
-
Pulse los botones CURSOR ARRIBA(▲)/ABAJO(▼) para seleccionar el parametro deseado.
- Use los botones de desplazimiento IZQUIERDA(↓)/DERECHA(>) para ajustar el parámetro selecciónado como deseee.
Cuando seleccione el modo "PANorama"
Este mode extende la imagen estereo frontal para incluir los altavoces de sonido envolmente para un efecto "envolvente" con imagen lateral. Seleccione "Off" u "On"(valor por defection: Off).
Cuando seleccione el control "C. WIDTH (ancho central)"
Esta option ajusta la imagen central de modo que pueda oirse solo por el altovoz central, solo por los altavoces izdo./dcho. como imagen fantasma, o por los tres altavoces para differedes grados. El control能把 ajustarse en 8 niveles de 0 a 7 (valor por defecto: 3).
Cuando seleccione el control "DIMENSION"
Esta optación ajusta gradualmente el camino de sonido o hacía el frente o hacía la parte trasera. El control puede ajustarse en 7 niveles de -3 a +3 (valor por defecto: 0).
- Repita los pasos 1 y 2 anteriores para ajustar otros parámetros.
Cuando selezione "DRC DD"
- Este funciona comprime el rango dinámico de las partes de la pista de sonido Dolby Digital asignadas previamente (con volumen extremadamente alto) para minimizar la diferencia en volumen entre las partes asignadas y las no asignadas. Esto facilita esrearchar todas las pistas de sonido,Thingras se miran pelliculas por la noche,con bajo volumen.
Notas :
- Este ajustes validos solamente quando las senas digitales de la fuente del programa Dolby Digital han sido introducidas.
- En algunos softwares Dolby Digital, ellos ajustes peuvent no ser validos.
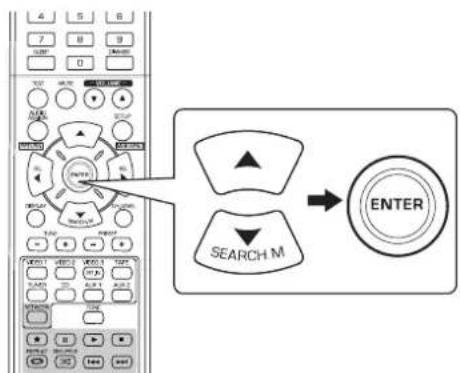
ENTER (ENTRADA).
2. Use los botones de desplazimiento IZQUIERDA( /DERECHA( ) para ajustar la compresion de rango dinamico como deseee.
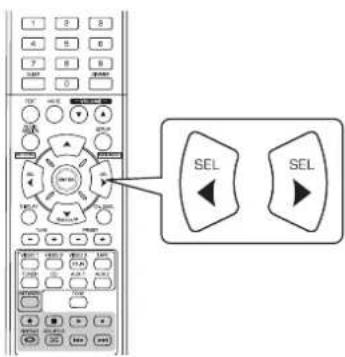
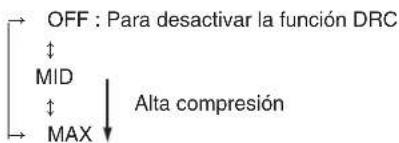
AJUSTANDO EL HDMI
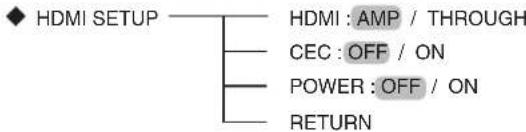
HDMI(SALIDA HDMI AUDIO): Para Obtener senhas de audio digital desde la calidad HDMI MONITOR OUT.
- CEC(CONTROL HDMI) : Para enlazar operaciones con los equipos conectados en los connectores HDMI y compatibles con el control HDMI.
- POWER(CONTROL DE ALIMENTACION): Para enlazar el estado de ENCENDIDO/APAGADO de esta unidad con los equipos connectados.
- RETURN: Para regresar al menu previo.

1. Pulse los botones CURSOR ARRIBA(▲)/ABAJO(▼) para seleccionar el elemento deseado.
2. Use los botones de desplazimiento del CURSOR IZQUIERDA(4)/DERECHA(1) para ajustar el parámetro selecciónado como desee.
Cuando seleccione la calidad HDMI AUDIO OUT
- La connexion HDMI pourrait落户 senas de video digital y senas de audio digital sin comprimir.
Dependiendo de si las señales de audio digital que entraran por HDMI IN salen por la calidad HDMI MONITOR OUT de este receptor o no, deben configurar laooth HDMI AUDIO OUT correctamente.
AMP: Para que no haya salida de senales de audio digital HDMI desde los connectores HDMI MONITOR OUT de este receptor, indica que estas senales se oyen desde los altevoces connectados a este receptor.
THROUGH: Para SACAR senales de audio digital HDMI desde la calidad HDMI MONITOR OUT,indicando que estas senales se oyen desdelos altavoces de su TV.
■ Nota:
- Cuando la calidad HDMI AUDIO OUT está ajustada a 'THROUGH', no se oirán los altavoces conectados a estaupon.
Cuando selezione HDMI CONTROL
- La función de control HDMI permite que la selección de las entradas de estaunidad está fjada con el funcionaimiento de los equipos conectados.
OFF(Desactivado) : Para no usar la funciona de control HDMI (HDMI CONTROL).
ON(Activado): Para usar la funciona de control HDMI.
- Cuando el CONTROL HDMI está activado (ON), también puede usar la funciona ARC (Canal de Retorno de Audio), permitiendo que la TV envie señas de audio a este receptor por el cable HDMI.
Notas :
- La funciona de control HDMI puede no funciona dependiendo de los equipos conectados y sus configuraciones.
- Para usar la funciona ARC, se requires un TV compatible con la funciona ARC.
- Para los detalles sobre el Control HDMI y el Control de la alimentación, lea "CONFIRMAR LA FUNCION HDMI" en la頁a 36.
Cuando selezione POWER CONTROL
- La direccion de control de alimentacion permite interconectar el estado de alimentacion de esta unidad con el ENCENDIDO/APAGADO y el inico de reproduccion de los equipos connectados.
OFF(Desactivado): Para no usar la función de control de alimentación.
ON(Activado): Para usar la funciona de control de alimentacion.
■ Nota:
- El control de alimentacionsolesepuedajustariselCONTROLHDMIestaactivado(ON).
Guía de resolución de problemas
Si ocurre un problema, lea la tabla?sigueante aleslvear su receptor a reparar.
Si el problema persiste, intente resolverlo apagando y encendiando el receptor. Si con this no resuelve la situacion, consulte con su vendedor. Bajo ninguna circunstancia intente reparar el receptor ustedismo. Este podria invalidar la garantia.
| PROBLEMA CAUSE | POSIBLE SOLUCION | |
| No enciende | ·El cable de alimentación está desconectado. ·Mala conexión a la toma de corriente o la toma de corriente no Tiene electrificad. | ·Conecte el cable con firmeza. ·Compruebe la toma de corriente usinguna bombilla u other electrodomésico. |
| No hay sonido | ·Los cables del altavoz está desconnectados. ·El volumen maestro está demasiado bajo. ·El botón MUTE está activado. ·Sección incorrecta de la fuente de entrada. ·Conexiones Incorrectas entre los equipos. ·La calidad HDMI AUDIO OUT está activada (THROUGH). ·La configuración relacionada con el audio está mal ajustada. | ·Compruebe la conexión de los altavoces. ·Ajuste el volumen maestro. ·Pulse el botón MUTE para desactivar el efecto de silencio. ·Selección correctamente la fuente de entrada. ·Realice las conexiones correctamente. ·Desactiva (ajuste AMP). (Para más detalles,lea "Cuando selección la calidad HDMI AUDIO OUT" en la pagina 50.) ·Ajuste la configuración correctamente. (Para más detalles,lea "AJUSTANDO LAS ENTRADAS" en la pagina 41) |
| Los altavoces del sonido envolvente no suean | ·El modo de sonido involventa está desactivado (modo estéreo) ·El volumen maestro y el nive del sonido involventa está demasiado bajos. ·Está usingando una fuente monoaural. ·El altovo de sonido involventa está ajustado a "NO". | ·Selección un modo de sonido involventa. ·Ajuste el volumen maestro y el nive del sonido involventa. ·Selección una fuente estéreo o de sonido involventa. ·Selección la configuración que deseel del altovo del sonido involventa. |
| El altovo central no sueana | ·Tiene selecciónado el modo estéreo, etc. ·El ajuste del altovo central es "NO". ·El volumen maestro y el nive central está demasiado bajos. | ·Selección el sonido involventa que deseee. ·Selección la configuración que deseel del altovo central. ·Ajuste el volumen maestro y el nivel central. |
| SinImagen | ·Las conexiones de video entree esta unidad y el monitor de TV no está realizadas correctamente. ·Mala selección de la fuente de entrada para el monitor TV. | ·Efectue las conexiones de video adequadas. ·Selección correctamente la fuente de entrada. |
| No hayImagen con una conexión HDMI | ·Las conexiones de video entree esta unidad y el monitor de TV no está realizadas correctamente. ·El monitor TV oequalquier或其他 componente en la linea de conexión no sopta HDCP. | ·Efectue las conexiones HDMI adequadas. ·De esta unidad no salen señales de video a menos que los equipos connectados sopterén HDCP. |
| Ruido oImagen distorsionada | ·El formatode video de su monitor TV,roduactor DVD,etc.esdistinctopAL. | ·Cambio el formattingode video a PAL. |
| No se reciben las estaciones | ·No está-connectada la antenna ·La Frequencia de la estación deseada no está sintonizada. ·La antenna está en mala posición. | ·Conecte la antenna ·Sintonice la Frequencia de la estación deseada. ·Mueva la antenna y vuelva a sintonizar. |
| No se reciben las estaciones memorizadas | ·Se ha memorizzato una Frequencia de estación erronea. ·Las estaciones memorizadas han sido eliminadas. | ·Memorice la Frequencia de estación correcta. ·Vuelva a memorizar las estaciones. |
| Recepción FM de mala calidad | ·No está-connectada la antenna. ·La antenna no está colocada para una recepción optima. ·Señales débilles. | ·Conecte la antenna. ·Cambio la posición de la antenna. ·Instale una antenna de FM en exteriores. |
| Ruido silbante continuo o intermittente durante la recepción de AM,especiallymente de noche. | ·Ruidos producidos por motores, Bombillas fluorescentes or relampagos,etc. | ·Maintenga el receptor alejado de las fuentes de ruidos. ·Instale una antenna de AM en exteriores. |
| No se pueda conectar a la red. | ·Red caida. ·Elsystema de seguidad (firewall) del ordensor o el enrutador está activo. | ·Compruebe que la red está的功能ando. ·Compruebe los ajustes del systema de seguidad (firewall) del ordensor o el enrutador. |
| No se pueda reproducir las retransmisiones de radio por Internet. | ·El cable de Ethernet no ha sido-connectado apropiamente con la red está desconnectada. ·El programa se está retransmitiendo en un formato no compatible. ·La direccion de radio por Internet no está retransmitiendo en este momento. | ·Compruebe el estado de la conexión. ·Esta�性ido solo puede reproducir programas de radio por Internet en formatos MP3 y WMA. ·Sintonice una direccion de radio que este retransmitiendo en estemomento. |
| El mando a distancia no funciona. | ·No Tiene pilas o estas estágastadas. ·El mando a distancia estáobstaculzado. | ·Cambio las pilas ·Retirecqualquier obtáculo. |
Especificaciones
SECCION DEL AMPLIFICADOR
- Salida de potencia, modo estéreo, 6 Ω, THD 0.7%, 40 Hz~20 kHz | 2×100 W
Distorsion armonica total, 6Ω, 100 W, 1 kHz | 0.05%
Distorsion de intermodulacion 60Hz:7kHz = 4:1 SMPTE,6Ω,100W.1% - Sensibilidad de entrada, 47 kΩ Linea (CD, CINTA, VIDEO) | 250 mV
- Relación postal-ruido, referencia IHF "A" Linea (CD, CINTA, VIDEO) | 95 dB
- Respuesta de Frecuencia
Linea (CD, CINTA, VIDEO), 20 Hz~50 kHz | +0 dB, -3 dB
Nivel de salute
GRAB.CINTA,2,2kΩ 250mV SALIDA PRE (Subwoofer),1kΩ 1,5V
Control Graves/Agudos, 100 Hz/10 kHz | ±10 dB
- Modo sonido envolvente, solo canal di Salida de potencia central, 6 Ω, 1 L Salida de potencia central, 6 Ω, 1 L
Salida de potencia sonido envolvente, 6 Ω, 1 kHz, THD 0,7 % | 100 W / 100 W
■SECCION DE AUDIO DIGITAL
Frecuencia de muestreo 32,44,1,48,96 kHz
Nivel de entrada digital Coaxial, 75Ω | 0,5 Vp-p Optico, 660 nm | -15 ~ -21 dBm
SECCION DE VIDEO
- Formato de video | PAL
- Sensibilidad de entrada (=Nivel de entrega), 75 Ω. Video (Compuesto (normal)) | 1 Vp-p
- Conector HDMI | 19 pines
SECCION DE LA SINTONIZadora DE FM
- Margen de Frequencias de sintonia | 87,5 ~ 108 MHz
Sensibilidadutil,THD 3 % S/R26dB12.8dBf
Sensibilidad de insonoracion de 46 dB, mono/estereo 20,2 / 45,3 dBf
Relacion senal-ruido,65 dBf, mono/estereo 55/50dB
Distorsion armónica total, 65 dBf, 1 kHz, mono/estéreo | 0,5 / 1,0% - Respuesta de Frequencia, 30 Hz~12 kHz | ±3,0 dB
- Separación estéreo, 1 kHz | 30 dB
- Relación de captura | 4 dB
Relación de rechazo de IF | 80 dB
SECCION DE SINTONIZadora DE AM
- Margen de freuencias de sintonia | 522 ~ 1611 kHz
Sensibilidadutil 500 V / m
Relación postal-ruido 40 dB - Selectividad | 25 dB
GENERAL
- Alimentación electrica | 230 V ~ 50 Hz
Consumo de potencia | 200 W - Dimensiones (AxAxP, incluyendo piezas sobresalientes) 435×143×359 mm (17-3/8×5-5/8×14-1/8 pulgadas)
- Peso (Neto) | 8,9 kg (19,6 lbs)
Note: El diseño y las espécificacionesétecnicasestán susuetosacambios pormajorasin previoaviso.
Introduction
A LIRE AVANT D'UTILISER L'APPAREIL


ATTENTION: AFIN DE REDUIRE LES RISQUE DE CHOC ELECTRIQUE, N'ENLEVEZ PAS LE COUVERCLE (OU LE PANNEAU ARRIERE). AUCUNE PIECE A L'INTERIEUR NE PEUT ETRE REPAREE PAR L'UTILISATEUR. EN CAS DE PROBLEMÉ, S'ADRESSER À DU PERSONNEL TECHNIQUE QUALIFIÉ.

Ce symbole sert à avertir l'utilisateur de la presence dans le boitier de l'appareil de tensions dangereuses non isolées posant des risques d'électrocution.

Ce symbole sert à averir l'utilisateur que la documentation fournie avec le matériel contient des instructions importantes concernant l'exploitation et la maintenance (réparation).
AVERTISSEMENT:POUR REDUIRE TOUT RISQUE D'INCENDIE OU DE CHOC ÉLECTRIQUE,NE PAS EXPOSER CET APPAREIL À LA PLUIE OU À L'HUMIDITÉ.
Avertissements concernant l'installation
Remarque : Pour la dissipation de la chaleur, ne pas placer cet apparéil dans un espace fermé, tel qu'une bibliothèque ou meuble similaire. Veillez à laisser un espace autour de cet apparéil, supérieur ou égal à ce qui est illustré ci-dessous. Côtés gauche, droite et arrière : 20 cm, Côté supérieur : 40 cm
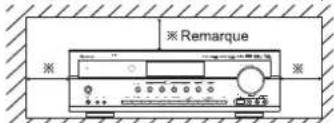
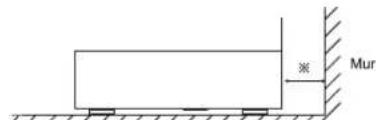
Ne pas couvir les ouvertures de ventilation et ne pas placer d'autres équipements au dessus de l'appareil.
POUR VOTRE SECURITE
| EUROPEAUSTRALIE | 220 V-240 V | Les apparêils expériés vers l'Australie sont conçus pour fonctionner uniquement à 230 V CA.Pour des raisons de sécurité, la fiche 3 broches doit être branchée uniquement dans une prise d'alimentation tripolaire standard connectée directement au circuit de mise à la terre de la maison. Les rallonges à utiliser avec cet équipement doivent être trifilaires et branchées correctement pour assurer une connexion à la terre.Les rallonges électriques inappropriées sont la cause de tous les accidents mortels. Le fait que l'appareil fonctionne de façon satisfaisante ne peut pas dire que la source d'alimentation est mise à la terre ou que l'installation est totalment sans risque. Pour votre sécurité, si vous avez unquelconque doute concernant la mise à la terre de la source d'alimentation, consultez un électricien qualifié.VOLTAGE PANEUROPEEN UNIFIETous les apparêils peuvent être utilisées sur des sources d'alimentation 220-240 V CA. |
ATTENTION
Laisser de l'espace autour de l'appareil pour assurer une ventilation suffisante.
- Eviter d'insteller dans des endroits trop chauds ou trop froids, ou dans une zone exposée directement au soleil ou à équipement de chauffage.
- Protégé l'appareil contre l'humidité, l'eau et la poussière.
- Eviter que des objets étrangers pénétrent dans l'appareil.
- Pour ne pas gérer la ventilation, les fentes de ventilation, ne doivent pas ettre couvertes par des objets tels que des jourmaux, nappes de table, ridesaux etc.
- Ne placer sur l'appareil aucune source de flamme neue, telle que des chandelierles allumées.
- Il faut tenir compte de la protection de l'environnement lors de la mise au rebut des piles.
- L'appareil ne doit pas etre exposé au ruisselement ni à la projection d'eau.
- Aucun objet rempli de liquide, un vase par exemple, ne doit etre place sur I'appareil.
- Ne pasmettre en contact des insecticides, du benzene ou un diluent avec l'appareil.
- Ne jamais démonter ou modifier l'appareil d'une manière ou d'une autre.
■Remarques concernant le cordon CA et la prise secteur.
- L'apparéil reste sous tension tant qu'il est branché à une prise scéleur, même s'il est étéeint.
- Pour déconnecter complètement cet appeareil du secteur, il faut le débrancher de la prise secteur.
- Lors de l'installation de cet apparéil, il faut s'assurer que la prise sectorue utilisée est facilement accessible.
- Débrancher l'appareil du secteur s'il ne va pas etre utilisé pendant une longue période.

Avis aux utilisateurs concernant la collecte et l'élimination des piles et des apparcellis usages
Appose sur le produit lui-même, sur son embailleage, ou figurant dans la documentation qui l'accompagne, ce pictogramme indique que les piles et appareils électriques et électroniques usages doivent être séparés des ordres menagères. Afin de permettre le traitement, la valorisation et le recyclage ajustés des piles et des appareils usages, veilliez les porter à un des points de collecte prévus, conformément à la législation nationale en vigueur.

En éliminant piles et apparèels usages conformément à la réglementation en vigueur, vous contribèze à prévenir le gaspillage de ressources précieuses ainsi qu'à protéger la santé humaine et l'environnement contre les effets potentiellement nocifs d'une manipulation inappropriée des déchets.
Pour de plus amples renseignements sur la collecte et le recyclage des piles et apparéels usages, veuilliez vous renseigner auprès de votre maine, du service municipal d'enlevement des déchets ou du point de vente ou vous avez acheté les articles concernés.
[Information relative à l'élimination des déchets dans les pays extérieurs à l'Union européen]
Ce pictogramme n'est valide qu'a l'intérieur de l'Union européenne. Pour éliminer ces articles, contactez les autorités locales ou votre revendeur afin de connaître la procédure d'élimination à suivre. Remarque relative au pictogramme sur les piles (voir les deux exemples ci-contre):
Le symbole Pb ci-contre pour les piles indique que cette pile contient du plomb.
SOMMAIRE
Introduction
A LIRE AVANT D'UTILISER L'APPAREIL 1 2
Raccordements du système | 4
Commandes du panneau frontal 10
Telecommande | 12
PORTEE DE LA TELECOMMANDE 13
MISE EN PLACE DES PILES 13
Fonctionnement
ECOUTER UNE SOURCE DE PROGRAMMES 14
- SONS SURROUND 16
ECOUTER DES SONS SURROUND 17
ECOUTER DES EMISSIONS RADIO 22
ECOUNTER DES EMISSIONS RDS (FM UNIQUEMENT) 24
(RDS Tuner (Option régionale pour certains pays Européens, etc.))
- ECOUTER DES EMISSIONS RADIO SUR INTERNET ET DES FICHIERS MUSIQUE | 26
ENREGISTREMENT 34
AUTRES FONCTIONS 35
CONFIRMATION DE LA FONCTION HDMI 36
Configuration du système 37
- CONFIGURATION DU SYSTEME | 39
- CONFIGURATION DE L'ENTREE | 41
- CONFIGURATION DES ENCEINTES | 42
- CONFIGURATION DU NIVEAU DES CANAUX | 46
- CONFIGURATION DES PARAMETRES | 48
REGLAGE DE L'HDMI 50
Guide de dépannage 52
Specifications 53
Raccordements du système
Assurez-vous que l'appareil est débranché du secteur avant d'effectuer tout raccordement.
- Etant donne que les différents composants ont souvent des noms différents, ayez soit de dire le mode d'emploi de chaque composant connecté.
Assurez-vous que le codage couleur est respecte lors de raccordements des cables audio, video et des enceintes.
Vérifie que tous les raccordements sont correctement faits et bien serrés. Dans le cas contraire, il risque d'y avoir perte de son, augmentation de bruit ou endommagement du récepteur.

1. RACCORDEMENT DES ANTENNES
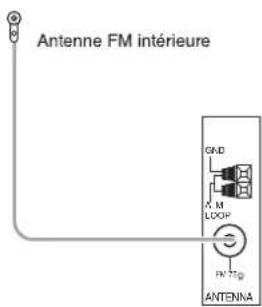
- Changez la position de l'antenne FM interieure jusqu'à ce que vous obtienez la(Meilleure réception des vos stations FM favorites.
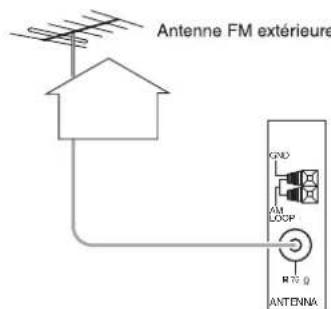
- Une antennae FM extérieure 75 Ω peut être utilisée pour améliorer la réception. Débranchez l'antenne interieure avant de la replacer par l'antenne extérieure.
- Placez l'antenne AM en boucle le plus loin possible du recepteur, poste telé, cables d'enceintes et d'alimentation et reglez-la dans une direction de bonne réception.
- Si la réception est mauvaise avec l'antenne AM en boucle, une antennae AM exterieure peut etre utilisée a sa place.
2. RACCORDEMENT DES COMPOSANTS VIDEO
- Les prises de VIDEO 1 peuvent aussi être connectées à un graveur DVD ou un autre composant d'enregistrement de video numérique. Pour plus de détails, reportez-vous au manuel de l'utilisateur du composant à connecter.
- Les prises de VIDEO 2 peuvent également être connectées à des composants video supplémentaires tel qu'un tuner télévision par cable ou un système satellite.
- Il y a deux types de connecteurs video (composite) pour les connexions video analogiques et les connecteurs HDMI pour les connexions video et audio numériques.
- À titre de référence, voici la qualité d'image dans l'ordre d'excellence : "HDMI" >("composite) VIDEO".
■Remarque :
Lorsque you enregistrez des programmes de sources video via la prise de sortie (composite) VIDEO 1 OUT ou lorsque you regardez des programmes de sources video via la prise de sortie (composite) MONITOR OUT, you nece connecter la prise d'entree (composite)VIDEO IN aux composants de lecture video tels que lecteurs BD, lecteurs DVD, etc.


Suite
Raccordement HDMI (Interface Multimédia Haute définition) : (*)
- Vous pouvez connecter le composant source (lecteur DVD, etc.) au composant de visualisation (TV, projecteur, etc.) via ce récepteur à l'aide d'un cable HDMI disponible dans le commerce.
- Une connexion HDMI peut accepter des signaux video numériques non compressés et des signaux audio numériques.
- Les signaux du flux videoi HDMI (signaux video) sont théoriquement compatibles avec l'interface DVI-D. Lors de connexion de moniter tele, etc., équipé d'interface DVI-D, on peut utiliser un cable de conversion HDMI-DVI se trouvant dans le commerce. Étant donné qu'une connexion HDMI-vers-DVI ne prend pas en charge les signaux audio, La connexion HDMI vers DVI ne pouvant pas transporter les signaux audio, réglez la sortie AUDIO HDMI OUT sur AMP pour entendre les signaux audionumeriques HDMI sur ce poste. (Pour plus d'informations, voir la rubrique "Selection de la sortie HDMI AUDIO OUT" page 50.)
Système de protection des droits d'auteur
- Cet apparéil intègre la technologie HDCP (High-bandwidth Digital Contents Protection) de protection des droits d'auteur des signaux video numériques contre la copie illégale. HDCP doit également être prise en charge par les composants connectés à cet apparéil.
- HDMI, le logo HDMI et l'Interface Multimédia Haute Définition sont des marques déposées ou commerciales de HDMI Licensing LLC.
■ Remarques :
- Pour que le transfert de signal soit stable, nous recommendons l'utilisation de cables HDMI de longueur inférieure à 5 metres.
- Certains des composants intégrant HDMI, peuvent contröler d'autres composants via le connecteur HDMI. Pour en savoir plus sur la fonction HDMI, veuillez consulter la rubrique “CONFIRMATION DE LA FONCTION HDMI” page 36 et “REGLAGE DE L'HDMI” page 50.
- Les signaux audio issus du connecteur HDMI (y compris la fréquence d'échantillonnage et la longueur des bits) peuvent être limités par le composant connecté.
- Les signaux video ne seront pas reproduits correctement si un composant incompatible HDCP est connecté.
- Si les résolutions des signaux video qui proviennent des sorties MONITOR OUT et de votre monateur télé ne correspondent pas, l'image ne sera pas claire, ou pas naturelle ou ne s'affiche pas du tout. Dans ce cas, changez le parametre de la résolution du composant source (lecteur BD, etc.) pour qu'il corresponde à celui du monateur télé. (Pour plus de détails, reportez-vous au mode d'emploi du composant à connecter.)
- Si vous ne souhaitez voir que la video à la télé, pas d'audio, vous doivent regardier la sortie HDMI AUDIO OUT sur AMP(désactivé) pour ne pas avoir de signal audio numérique issu de la sortie HDMI MONITOR OUT du récepteur. (Pour plus de détails, voir " Sélection de la sortie HDMI AUDIO OUT" à la page 50.)
3. RACCORDEMENT DE COMPOSANTS AUDIO
- Les prises d'entree/sortie TAPE IN/OUT peuvent etre connectees a des equipments d'enregistrement audio tels que qu'un magnetophone, un enregistrureur de Minidisques (MD), etc.
L'entree HDM du lecteur CD peut etre connectee a un composant video supplémentaire sans utilise de connecteurs video analogiques.
4. RACCORDEMENT D'ENTREES NUMERIQUES (DIGITAL IN)
- Les sorties NUMERIQUE OPTIQUE et NUMERIQUE COAXIALE des composants qui sont connectés à CD et VIDEO 1 ~ VIDEO 2 de cet apparéil peuvent être connectées aux entrées numériques DIGITAL IN.
- Une entree numerie doit etre connectee a des composants tels qu'un lecteur CD, lecteur LD, lecteur DVD, etc. capables de produire des signaux numeriques Surround de format DTS, Dolby Digital ou PCM etc.
- Pour plus de détails, reportez-vous au manuel de l'utilisateur du composant à connecter.
Lorsque you faites une connexion NUMERIQUE COAXIALE, un cable COAXIAL 75 Ω doit être utilisé et non un cable AUDIO classique. - Quelques cables de fibre optique disponibles dans le commerce ne peuvent ettre utilisés avec cet équipement. Si un cable de fibre optique ne peut pas etre connecte a votre équipement, consultez vous revendeur ou un service spécialise qui vous est proche.
■Remarque :
- Sur un composant, il faut ou faire une connexion NUMERIQUE OPTIQUE ou une connexion NUMERIQUE COAXIALE. (On n'a pas besoin des deux
Réglages par défaut des entrées numériques
- Si vous connectez les entrées DIGITAL IN à vos composants, il vous sera plus facile d'effectuer les réglages par défaut suivants.
- Si vos connexions DIGITAL sont différentes des réglages par défaut, vous nevez attribuer les entrées DIGITAL utilisées selon la procédure " Sélection de DIGITAL IN" de la page 41.
- Les réglages par défaut sont: OPTICAL IN :VIDEO 1, COAX 1 IN :VIDEO 2, COAX 2 IN : CD
5. RACCORDEMENT DE LA SORTIE SUBWOOFER PRE OUT
- Pour améliorer les basses fréquences (son riches en graves), connectez un subwoofer amplifié.

6. CONNEXION AU RESEAU
- Pour connecter cet apparéil à un réseau à large bande et écouter des émissions radio Internet, insérez le connecteur LAN/ETHERNET de cet apparéil à votre routeur à l'aide d'un cable Ethernet (CAT-5 ou plus recommendé).
■Remarques :
- Une fois qu'une connexion Internet à large bande est établie, vous doivent regardier les paramétres de communication. (Pour plus d'informations, reportez-vous à " Sélection de "Network" (RéSEAU)" page 32).
Lorsque you utilisez une connexion Internet large bande, cela suppose que you avez souscrit a un abonnement apres d'un fournisseur de services Internet. Pour plus d'informations, veuillez contacter vous fournisseur d'acces internet le plus proche. - Reportez-vous au mode d'emploi de l'équipement car la méthode de connexion de l'équipment peut varier en fonction de l'environnement Internet.
Utilisez un cable Ethernet/routeur supportant 10 BASE-T/100 BASE-TX. - Certeans cables Ethernet sont tres susceptibles au bruit. Nous vous recommandons d'utiliser un cable blinde.

Internet

Modem
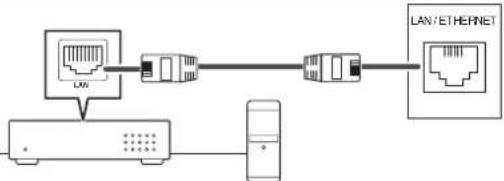
Routeur large bande
PC


7. RACCORDEMENT DES ENCEINTES
- Vérifiez que les connexions des enceintes sont bien serrées et correctes (canal gauche et canal droit et les signes + et -). Si les connexions sont erronées, les enceintes seront muettes, et si la polarité d'une enceinte est inversée, le son manquera de naturel et de graves.
- Pour l'installation des enceintes, voir "Emplacement des enceintes" à la page 9.
- Àprous l'installation des enceintes, réglez d'abord leurs paramètres en fonction de votre environnement et de leur disposition.
(Pour plus de détails, voir "CONFIGURATION DES ENCEINTES" à la page 42.)
Attention :
Assurez-vous d'utiliser des enceintes avec une impédance de 6 ohms ou plus.
- Ne laissiez aucun fil dénudé des enceintes se toucher ou toucher une partie métallique de cet apparéil. Cela pourrait endommager les enceintes et/ou l' apparéil.
- Ne touchez jamais les bornes des enceintes lorsque le cordon d'alimentation CA est connecté à une prise secteur. Vous risqueriez une électrocution.

Raccordez des fils des haut-parleurs
- Denudez environ. 10 mm (3/8 pouce) des fils, puis torsadez les extrémités fermement.

- Desserrez en tournant la borne de l'enceinte à gauche

- Insérez la partie dénudée du fil.

- Serrez en tournant la borne a droite.

8. ENTRÉE DU CORDON CA
- Branchez le cordon d'alimentation dans une prise secteur.
9. BORNES DE MISES A NIVEAU
- Ces bornes pourront par la suite servir à la mise à niveau du logiciel d'exploitation pour qu'il puisse prendre en charge de nouveaux formats audionumeriques ou autres.
Remarque :
- La programmation des mises à niveau nécessite des connaissances de spécialiste en programmation. Nous conseillons donc de ne le faire que par l'intermédiaire d'installateurs qualifiés.

Emplacement des enceintes
L'emplacement idéal des enceintes varie en fonction de la taille de votre piece, du revêtement des murs, etc. Voici un exemple typique d'emplacement de enceintes :
Enceintes avant gauche et droite et enceinte centrale
- Placez si possible, les enceintes avant de maniere que leurs surfaces frontales soient alignées avec la télé ou l'écran.
- Placez l'enceinte centrale entre les enceintes avant gauche et droite non loin de la position d'écoute de ces derniers.
- Placez chaque enceinte de manière que le son soit orienté vers les oreilles de l'auditeur qui est dans la position d'écoute principale.
Enceintes surround gauche et droite
- Placez les enceintes surround à environ 1 mètre (40 pouces) au dessus des oreilles de l'auditeur assis, direct à sa gauche et à sa droite ou légerement derrière.
Subwoofer (Enceinte d'extrêmes graves)
Le subwoofer reproduit les basses fréquences (son riche en graves). Placez un subwoofer n'importe où en face.
■ Remarques :
Pour élever les interférences avec l'image d'une télé classique, utilisez uniquement des enceintes avant gauche et droite et enceinte centrale dotées d'un blindage magnétique.
- Pour obtenir les valeurs effets surround, les enceintes à l'exception du subwoofer devraient etres des enceintes a gamme etendue.
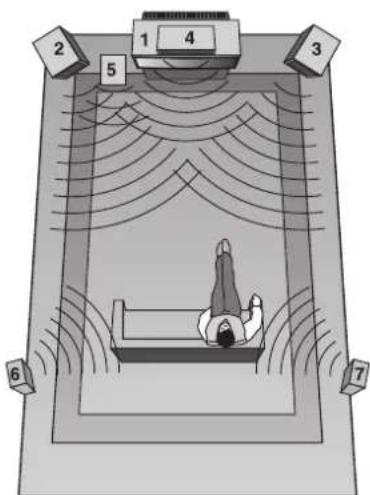
- Télé ou écran
- Enceinte avant gauche
- Enceinte avant droite
- Enceinte centrale
- Subwoofer (Enceinte d'extrêmes graves)
- Enceinte surround gauche
- Enceinte surround droite
Commandes du panneau frontal
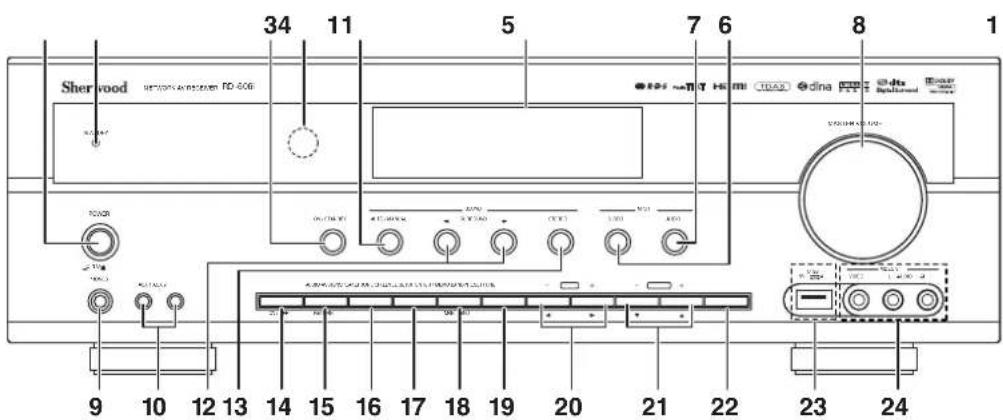
- Interrupteur marche/arrêt
- Temoin Veille
- Touche Marche/Veille
- Capteur de la télécommande
- Afficheur fluorescent
Pour plus de détails, voir ci-dessous.
- Touche selecteur de source videoe
- Touche selecteur de source audio
- Bouton de réglage de volume global
- Prise pour casque
- Prises d'entrée AUX 1, 2 Pour plus de détails, voir la page suivante.
- Interrupteur automatique/manuel
- Touches de selection du mode surround (▶/▲)
-
Touche Stereo
-
Touche enceintes
- Touche attribution audio
- Touche Mode tonalité
- Touche Niveau de canal (CH. LEVEL)
- Touche Configuration
- Touche Entrer/Memoire
- Touches TUNING Haut/Bas (+/-), curseur Haut/Bas(▲/▲)
- Touches PRESET Haut/Bas (+/-), curseur Haut/Bas (▲/▼)
- Bouton bande
- Connecteur USB Pour plus de détails, voir la page suivante.
- Prises VIDEO 3 (entree video) Pour plus de details, voir la page suivante.
AFFICHEUR FLUORESCENT
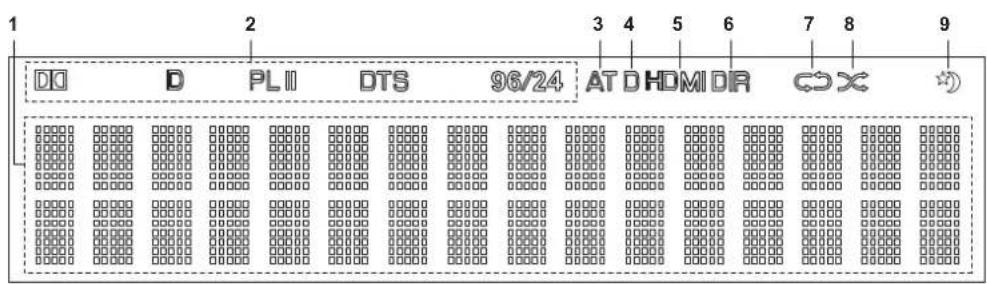
- Source, fréquence, niveau de volume, mode surround, informations de fonctionnement, etc.
- Indicateurs mode Surround
- Indicateur AUTO
-
Indicateur entree numérique
-
Indicateur HDMI
- Indicateur DIRECT
- Indicateur REPEAT
- Indicateur SHUFFLE
- Indicateur SLEEP
Connecteurs d'entrée AUX 1,2
- Les prises auxiliaires AUX 1, 2 peuvent etre connectees a des composants audio supplémentaires tels qu'un lecteur MP3, etc.
■Remarque : - Lorsque vous connectez cette prise à un lecteur MP3, etc., vous devez utiliser le mini cable stéreo et non le mini cable mono.
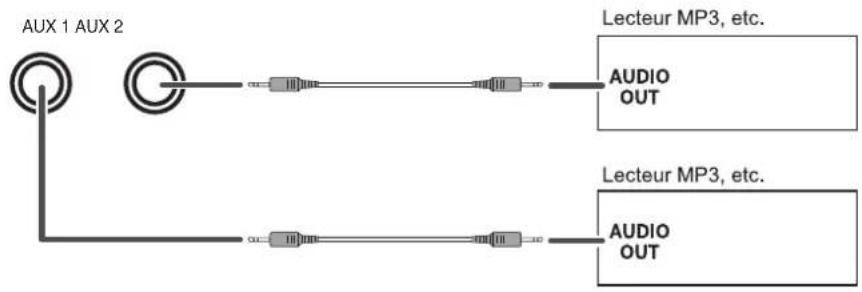
CONNECTEUR USB
- Cet apparéil permet de dire des fichiers MP3 ou WMA sauvégardés sur un dispositif de stockage de masse USB raccordé au port USB. (Pour plus de détails, reportez-vous à " Sélection de "USB" à la page 30).
■ Remarque : - Une fois la lecture USB terminée, retirez le dispositif USB en mode stop ou en mode veille.
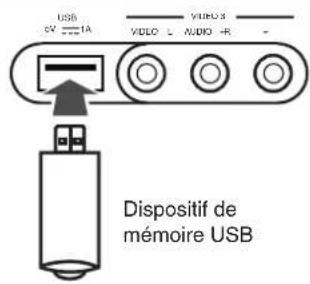
PRISESVIDEO3(entreé video)
- Les prises d'entrée VIDEO 3 IN peuvent être également connectés à un composant video supplémentaire tel qu'un caméoscope, une console de quelques-video, etc.
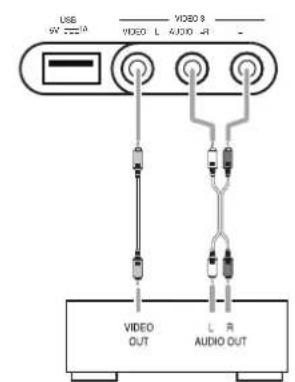
VIDEO 3 Caméscope, console de yeux video, etc.
Télécommande
FRANÇAIS
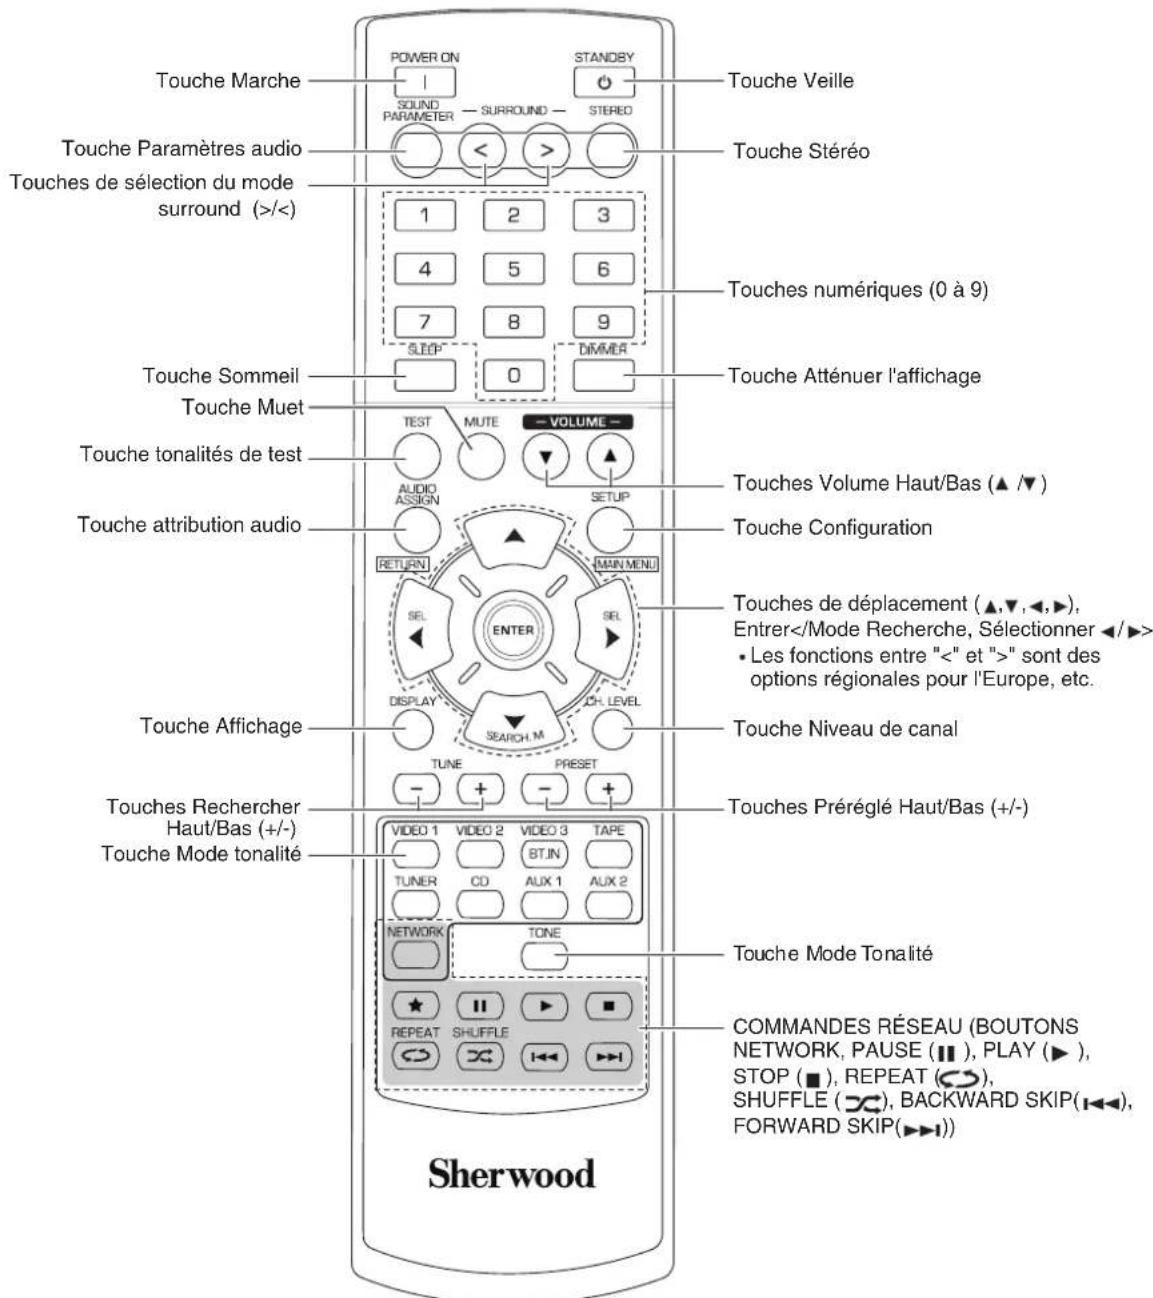
■Remarque :
Le bouton RATING () n'est pas disponible sur ce recepteur.
PORTEE DE LA TELECOMMANDE
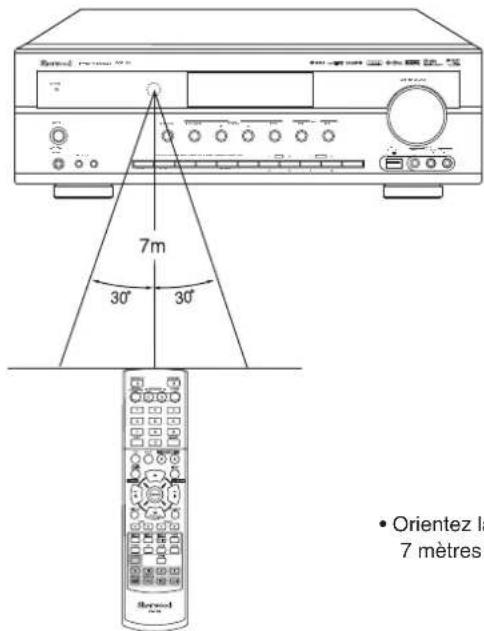
- Orientez la télécommande vers le capteur à une distance d'environ 7 metres (23 pieds) et des angles de 30 degrés.
MISE EN PLACE DES PILES
- Retirez le couvercle.

- Mettez en place deux piles ("AAA" size, 1,5 V) en respectant les polarités.

- Retirez les piles si vous n'allez pas utiliser l'appareil pendant une longue durée.
- N'utilisez pas des piles rechargeables (de type Ni-Cd).
Fonctionnement
■ Remarque: Avant d'utiliser ce recepteur, il faut effectuer les procedures de configuration système pour obtenir des performances optimes. (Pour plus de détails, voir "Configuration du système" à la page 37.)
ECOUTER UNE SOURCE DE PROGRAMMES
Avant l'utilisation
- Passez en mode Veille.
Le témoin Veille (STANDBY) s'allume.
Cela signifie que le récepteur n'est pas déconnecté du secteur et qu'une quantité de courant est mise à la disposition de la mise en marche.
Pour eteindre, appuyez de nouveau sur la touche Marche (POWER).
Le courant sera coupé et le témoin Veille (STANDBY) s'éteint.

Economiseur d'energie automatique
L'économie d'énergie automatique est une fonction qui coupe automatiquement l'alimentation pour passer en mode veille. Cette fonction est activée lorsqu'aucune touche n'est appuyée pendant une période qui dépasse la durée que vous avec fixe (Pour plus de détails, reportez-vous à "Selection AUTO POWER SAVE(Economiseur d'énergie automatique)" à la page 39).
1. En mode veille, allumez le recepteur.
ON/STANDBY
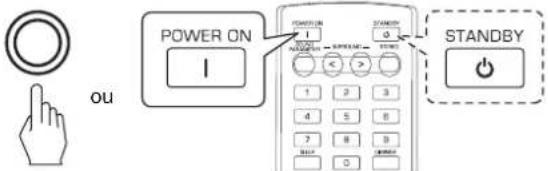
- Chaque fois que la touche Marche-arrêt/Veille du panneau frontal est appuyée, le récepteur s'allume pour passer en mode marche ou s'estient pour passer en mode veille.
- Appuyez sur la touche Marche (POWER) de la télécommande pour passer en mode marche ou appuyez sur la touche Veille (STANDBY) pour passer en mode veille.
2. Allumez les enceintes.
SPEAKER

ON/OFF

Puis "SPEAKER ON" sera affiché et le son peut être entendu à partir des enceintes connectées aux bornes des enceintes.
Pour écouter en privé à l'aide de casque, appuyez de nouveau sur la touche SPEAKER pour éteindre les enceintes ("SPEAKER OFF" sera affché).
3. Sélectionnez la source d'entrée souhaïée.
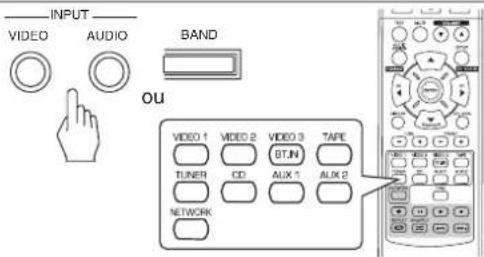
- Chaque fois que la touche "VIDEO" du panneau frontal est appuyée, la source d'entrée change dans cet ordre:
-VIDEO 1 →VIDEO 2 →VIDEO-3 - Chaque fois que la touche "AUDIO" du panneau frontal est appuyee, la source d'entree change dans cet ordre: CD AUX1 TV AUX 2 TAPE NET/USB TUNER (Affichage des fréquences)
*: Vous ne pouvez entendre les signaux audionumériques transmis du téléviseur par cable HDMI que si la COMMANDE HDMI est reglee sur ON. (Pour en savoir plus, veuillez consulter la rubrique "Selection de la commande HDMI" page 50.)
Lorsque you selectionnez NET/USB,veuillez consulter la rubrique "ECOUTER DES EMISSIONS RADIO SUR INTERNET ET DES FICHIERS MUSIQUE" a la page 26. - Chaque fois que la touche BAND (ou la touche TUNER de la télécommande) est appuyée, la bande change dans cet ordre :

La source d'entrée est CD,VIDEO 1 ouVIDEO 2
4. Sélectionnez le composant d'entrée numérique ou analogue.
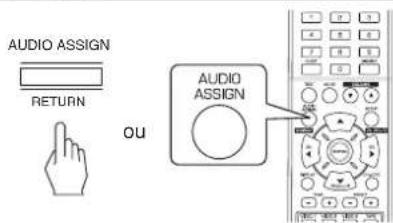
OPT COAX.1 COAX.2 ANALOG
- Chaque fois la touche est appuyée, l'entrée correspondante est seLECTIONnée dans cet ordre :
■Remarques :
- Lorsque le connecteur d'entrée HDMI IN est connecté à votre composant video, vous ne pouvez pas attribuer l'entrée audio comme vous le souhaitez. (Cela peut dire que绝大部分 les signaux audio numériques HDMI peuvent être entendus).
Lorsque le connecteur HDMI IN n'est pas connecté (et le témoin "HDMI" clignote), vous pouvez attribuer l'entrée audio.
LorsqueVIDEO 3, AUX 1, AUX 2, TAPE, TV, NET/USB ou tuner est selectionné comme source d'entrée, l'entrée numérique ne peut être selectionné.
Lorsque l'entrée numérique sélectionnée n'est pas connectee, le témoin "D (Digital)" clignote et l'entrée analogue est automatiquement sélectionnée. - L'entrée numérique ou analogique sélectionnée est automatiquement attribuée à la source d'entrée qui convient sur le menu de configuration de l'ENTREE. (Pour en savoir plus, veuillez consultier la rubrique "CONFIGURATION DE L'ENTREE" page 41.)
Le son issu du composant connecte à l'entrée numérique sélectionnée est entendu independament de la source d'entrée sélectionnée.
5. Lecture depuis le composant sélectionné.
6. Régler le volume général.
- Pour dire des sources de programmes avec son surround, voir "ECOUTER DES SONS SURROUND" à la page 17.
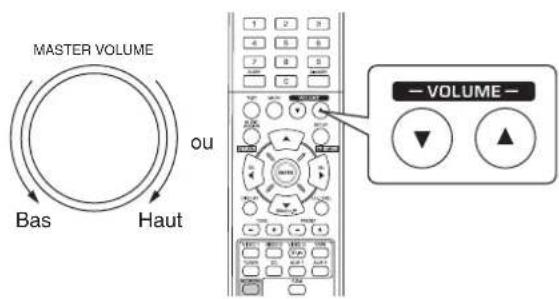
7. Pour couper le son.
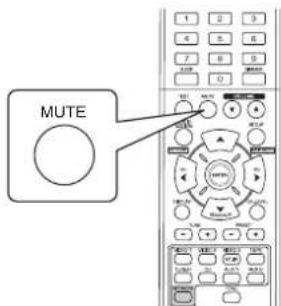
-MUTING"vaclignoter.
- Appuyez de nouveau pour restaurer le niveau de son antérieur.
8. Pour écouter à l'aide du casque.

Assurez-vous de couper les enceintes.
- Lorsque vous écoutez un programme de source DTS ou Dolby Digital, et si le casque est connecté et que la touche enceintes est sur off (déactivé), le récepteur passée automatiquement en mode downmix 2 canaux. (Pour plus de détails, voir "Mode downmix 2 canaux" à la page 17.)
■ Remarque :
- Faites attention à ne pas régler le volume très fort lorsque vous utilisez des écouteurs.
Réglage de la tonalité (graves et aigues)
9. Passez en mode tonalité.
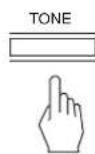
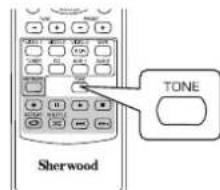
Le mode tonalité est affché pendant quelques secondes.

10. Utilisez les touches Gauche (▲)/Droite (▶) pour sélectionner le mode tonalité souhaïte.

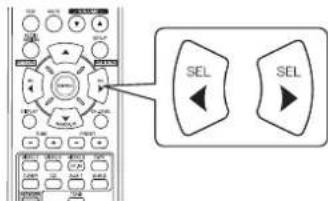
- Chaque fois ces touches sont appuyées, le mode tonalité change dans cet ordre :
OFF (désactivée): Pour écouter de sources de programme sans effet de tonalité.
(Indicateur "DIR" s'allume.)
ON (activée): Pour régler la tonalité à votre goût.
(Indicateur "DIR" s'éteint.)
■Vou pouve regler la tonalite lorsque TONE est regle sur ON (active).
11. Utilisez les touches Haut(▲)/Bas (▼) pour selectionner la tonalité souhaïée.
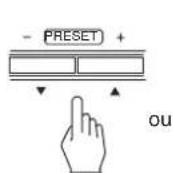
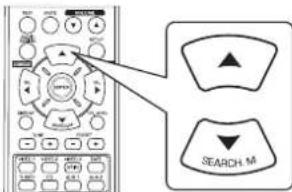
- Chaque fais ces touches sont appuyées, la tonalité change dans cet ordre: BASS TREBLE TONE: ON
12. Utilisez les touches Gauche (▲)/Droite (▶) pour régler la tonalité souhaïée.
Le niveau de tonalité peut être choisi dans l'intervalle -10 à +10 dB.
- En général, nous recommendons de régler les graves et aigues sur 0 dB (niveau plat).
- Les réglages à des niveaux de volume extrêmes peuvent endommager vos enceintes.
- Si l'affichage de tonalité disparait, recommence à partir de l'étépe 9.
SONS SURROUND
- Ce récepteur intégre un processeur de signal numérique (Digital Signal Processor) sophistique, permettant de creer n'importe qu'elle son d'ambiance dans votre cinédom, avec une qualité sonore optimale.
Modes Surround
DTS Digital Surround
Le DTS Digital Surround (aussi appelé DTS) offre 5.1 canaux indépendants et utilise moins de compression pour une reproduction de haute fidélité. A utiliser avec des DVD et CD portant le logo DTS.
DTS 96/24
Ce DTS à haute résolution avec une fréquence d'échantillonnage de 96 kHz et une résolution 24 bit fournit que qualité de très grande fidélité. À utiliser avec des DVD portant le logo DTS 96/24.
Fabrique sous licence des brevets americains n° 5,956,674; 5,974,380; 6,487,535 et autres brevets Américains, délivrés ou en instance dans le monde entier. DTS, le Symbole et DTS et le Symbole ensembles sont des marques déposées, et DTS Digital Surround et les logos DTS sont des marques déposées de DTS, Inc. Product y compris le logiciel. © DTS, Inc. Tous droits réservés.
Dolby Digital
Dolby Digital est un format de signal numérique multivoies développé par Dolby Laboratories. Les disques portant le logo Dolby Digital complconnent des signaux numériques 5.1 canaux, qui reproduisent qualité de son, expansion spatiale et gamme dynamique de caractéristiques gratuites que dans l'effect Dolby surround antérieur.
Dolby Pro Logic II surround
Ce mode applique des signaux conventionnels 2 canaux tels que les signaux numériques PCM, analogiques stéreo ou Dolby Surround etc., sur un processeur surround pour offrir beaucoup plus qu'un signal conventionnel Dolby Pro Logic. Le Dolby Pro Logic surround comprend 2 modes :
- Dolby Pro Logic II Movie
Lorsque vous regardez un film, ce mode permet d'accentuer l'effet cinéma grâce au traitement supplémentaire qui renforce lessons des effets spéciaux des actions.
- Dolby Pro Logic II Music
Lorsque vous écoutez de la musique, ce mode permet d'accentuer la qualité sonore grâce au traitement supplémentaire qui renforce les effets musicaux.
Dolby Pro Logic
Ce mode estend tout lecture de source 2 canaux (y compris les sources Dolby Surround) à 4 canaux (frontal gauche, centre, frontal droite et surround)
Le canal surround est monaural, mais reproduit via deux enceintes surround
Fabrique sous licence de Dolby Laboratories. Dolby, Pro Logic et le symbole du double D sont des marques déposées de Dolby Laboratories.
- Les modes suivants appliquent des signaux conventionnels 2 canaux tels que les signaux numériques PCM ou analogiques stéreo sur un processeur Digital Signal haute qualité pour recreer artificiellement des champs sonores. Sélectionnez l'un des 6 modes surround offerts en fonction de la source de programme à litre.
Theater
Ce mode donne la sensation d'être dans une salle de cinema regardant un film.
■Movie
Ce mode rappelle l'effet d'une salle de cinéma et convient au visionnage d'un film.
Hall
Ce mode fournit 'ambiance d'une salle de concert avec des sources de musique classique telle queorchestrale ou de chambre ou solo pour instrumentiste.
Game
Ce mode convient aux produits video.
Stadium
Ce mode foumit l'effet d'un champ sonore etendu pour atteindre l'ambiance d'un vrai stade lors de matches de base-ball ou de foot.
Multi CH Stereo
Ce mode est concu pour la musique de fond. Les canaux surround frontale et arrirée créé une image stéreo qui englobe toute la zone.
ECOUTER DES SONS SURROUND
■ Remarque : Pour obtenir des performances optimales, avant toute lecture surround, effectuez d'abord la procEDURE de configuration des enceintes, etc. dans le menu Configuration. (Pour plus de détails, voir "CONFIGURATION DES ENCEINTES" à la page 42.)
Selectionnez le mode surround auto ou le mode surround manuel en fonction de la maniere dont vous allez selectionnee le mode surround. Cheque fais cette touche est aprouvée, le mode change dans est ordre

- Chaque fais cette touche est appuyee, le mode change dans cet ordre: Mode surround auto : Le mode surround optimal sera automatiquement (Indicateur "AT" s'allume) selectionne en fonction du format du signal en entrée.
Mode surround manuel : Vous pouvez selectionner un mode surround (l'indicateur "AT" s'eteint) différent parmi les modes disponibles pour le signal en entrée à l'aide de selection du mode surround (> / <) .
■Remarques :
- Lorsque la touche SPEAKER est reglee sur Off ou "CENTER" et "SURR(Surround)" ne sont pas reglées sur "NO", le mode surround auto n'est pas valide.
- Meme lorsque le mode surround auto est selectionné et le même type de format de signal numérique est reçu, le mode surround optimum peut varier en fonction du type d'enceinte s'il est régé sur "NO" ou pas.
- Lorsque le mode surround auto est selectionné, les modes surround autres que le mode surround optimum ne peut être selectionné.
■ Sélectionnez le mode surround manuel en appuyant sur la touche AUTO/MANUAL du panneau avant
Selectionnez le mode surround souhaite.
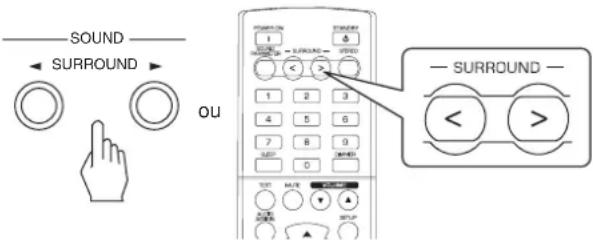
- Chaque fois qu'une touche de selection du mode surround (> / <) est appuyee, le mode surround change en fonction du format du signal d'entrée dans cet ordre :
| Format du signal en entrée | Mode surround disponible |
| Sources Dolby Digital EX 6.1 canaux, Sources Dolby Digital 5.1 canaux | DOLBY DIGITAL ou <2 CH IN> *1 |
| Sources Dolby Digital 2 canaux, Sources PCM (2 canaux), Sources analogiques stéréo | [DOLBY PLII MOVIE, DOLBY PLII MUSIC, THEATER, HALL, GAME, STADIUM, M.CH STEREO, DOLBY PRO LOGIC ou <2 CH IN> *1 |
| Sources DTS, Sources DTS 96/24 | Mode correspondant de DTS ou <2 CH IN> *1 |
*1: Lorsque "CENTER" et "SURR(Surround)" sont régles sur "NO", tout mode surround ne peut pas être sélectionné et la source peut être reproductive en mode stéreo ou en mode downmix 2 canaux.
Pour annuler le mode surround pour une lecture stéreo
STEREO

ou
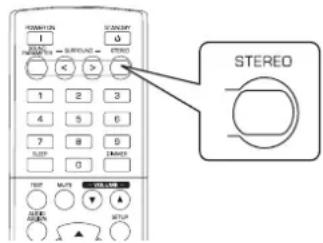
- En fonction du format du signal en entree, l'un des modes stereo ou downmix 2 canaux est selectionné.
- Pour annuler le mode stéreo ou downmix 2 canaux, Sélectionnéz le mode surround à l'aide de sélection du mode surround (> / <) .
Mode downmix 2 canaux
- Ce mode permet aux signaux multivoies encodés en format DTS ou Dolby Digital d'être démultiplexés en 2 canaux frontaux et d'être produits via deux enceintes frontales seulement ou via un casque.
- Lorsque la touche enceintes est mise sur off (désacté) utiliser le casque pour écouter la lecture des signaux numériques multivoies depuis des sources DTS ou Dolby Digital, il passée automatiquement en mode downmix 2 canaux.
Lors du réglage des paramètres audio
Lrs de lecture de signaux numériques depuis des sources de programmes Dolby Digital, ou lors d'ecoute de musique en mode Dolby Pro Logic II, you pouze ajuster leurs parametes pour obtenir un effet surround optimum.
- Appuyez sur la touche Paramétres audio (SOUND PARAMETER).
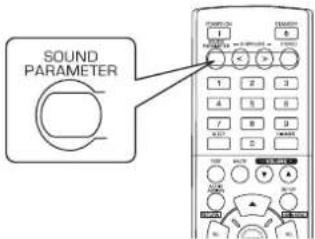
- Alors "DRC: ~" (ou "PANorama: ~") sera affichée pendant quelques secondes.
-
Si le mode paramètres disparait, appuyez de nouveau sur cette touche.
-
Utilisez les touches Haut ()/Bas() pour selectionner le paramètre souhaite.
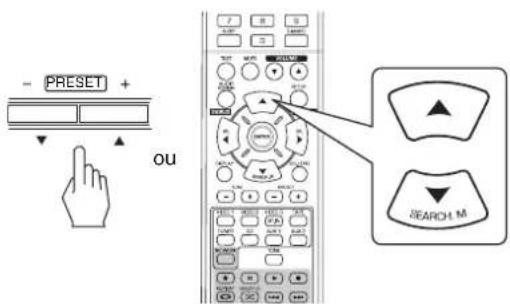
- Chaque fois ces touches sont appuyées, le mode paramètre change dans cet ordre :
"DRC" "PANORAM" "C.WIDTH" "DIMENSION"
(gamme de (controle de la) compression (largeur centrale) dynamique)
- " DRC" ne peut être sélectionné qu'en cours de lecture des signaux numériques depuis une source Dolby Digital.
-
"PANORAMA", "C.WIDTH" et "DIMENSION" peuvent être seLECTIONNées en cours de lecture de musique en mode Dolby Pro Logic II.
-
Utilisez les touches de déplacement Gauche(↓)/ Droite (▶) pour régler le paramètre souhaïte.
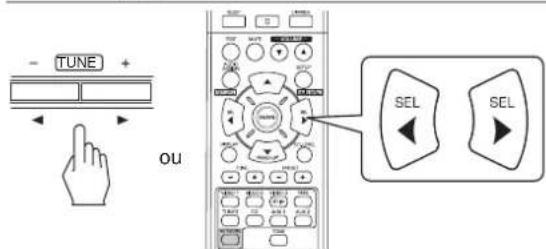
■ Sélection de "DRC (Dynamic Range Compression)" (gamme de compression dynamique)
Cette fonction compressée la gamme dynamique des parties précédemment spécifiées des pistes sonores Dolby Digital (à un volume extrémement élevé) pour minimiser les différences en volume entre les parties spécifiées et non spécifiées.
Ceci permet d'entendre facilement, la nuit, toute la bande sonore d'un film à bas volumes.
■Remarque :
- Sur certains logiciels Dolby Digital, le réglage DRC peut ne pas fonctionner.
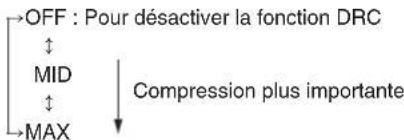
■ Sélection du mode "PANorama"
Ce mode transpose la stéreo frontale vers les deux enceintes surround, vous enveloppant ainsi avec le son des enceintes laterales pour creer une perspective sonore extraordinaire.
Selectionnez "OFF" ou "ON"(par défaut : OFF).
■ Sélection de "C. WIDTH (Center width)" (contrôle de la largeur centrale)
Cette commande permet de régler l'image sonore centrale de sort qu'elle ne peut être écoutee que sur I'enceinte centrale, sur les enceintes gauche/droite comme image virtuelle ou sur les trois enceintes avant a differents degrés. La plage de réglage va de 0 à 7 (par défaut : 3).
■ Sélection de "DIMENSION" (contrôle de dimension)
Cette commande permet de régler le champ sonore vers l'avant ou versus l'arrière. La plage de réglage va de -3 à +3 (par défaut : 0).
4. Répétez les étapes 2 et 3 ci-dessus pour régler d'autres paramètres.
Réglage du niveau de chaque canal à l'aide de TEST TONE (tonalités de test)
Le nivau de volume de chaque canal peut etre regle a laide de la fonction TEST TONE (tonalités de test).
■Remarque : Lorsque la touche enceintes (SPEAKER) est mise sur off (désactivé), la fonction TEST TONE (tonalités de test) ne marche pas.
1. Passez en mode tonalités de test.

- Le mode tonalités de test s'affiche et un son sera émispendant 2 secondes par chaque canal de chaque enceinte dans l'ordre suivant :

-
Si le paramètre d'une enceinte est "NO", le tonalités de test du canal correspondant ne se fait pas.
-
Reglez le niveau de volume de chaque canal comme vous le souhaitez de manière que toutes les enceintes seront entendues comme ayant le même niveau.

-
Vous pouvez seLECTIONner le canal souhaite à l'aide des touches de déplacement Haut (▲)/Bas (▼).
-
Annulez la fonction tonalités de test.
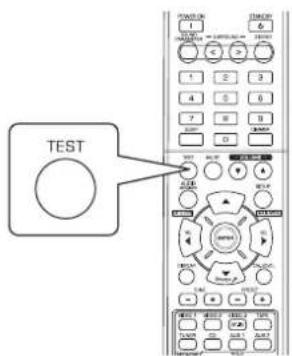
Régler le niveau du canal courant
- A pres avoi regle le nivea de cheque canal a l'aide des tonalites de test, reglez les niveaux en fonction des sources des programmes ou selon vos gouts.
-
Vous pouvez régler le niveau du canal courant comme vous le souhaitez. Les niveaux régés sont simplement mémorisés dans la mémoire utilisateur ("CAL"), et non dans la mémoire de préréglages ("REF 1", "REF 2").
-
Appuyez sur la touche Niveau de canal (CH. LEVEL).
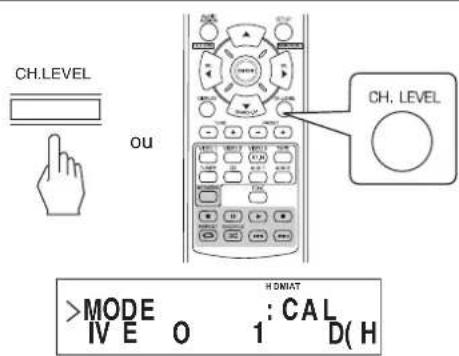
-
Alors le mode mémoire ("CAL", etc.) sera affichée pendant quelques secondes.
Lorsque le mode mémoire ou niveau de canal disparait, appuyez de nouveau sur cette touche. -
Sélectionnez le canal souhaïte.
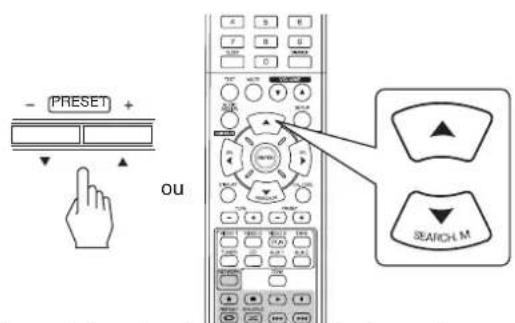
- Chaque fois ces touches sont appuyées, le canal correspondant change dans cet ordre :
- REF 1, 2 (ou CAL) ↔ LEFT ↔ CENTER ↔ RIGHT
↔ SUBW ↔ SURREL ↔ SURRER - <>: Seulément lorsque des signaux de sources de programmes Dolby Digital ou DTS qui incluent un signal LFE (Effets basse fréquence) sont entrés, que le niveau LFE est affchéé.
- En fonction des paramètres des enceintes ("NO") et du mode surround, etc., certains canaux ne peuvent pas être seLECTIONNés.
-
Lorsque la touche enceintes (SPEAKER) est mise sur off (désacté), seules les canaux Avant Gauche et Avant Droite (et LFE) peuvent être sélectionnées.
-
Reglez le niveau du canal sélectionné comme vous le souhaitez.
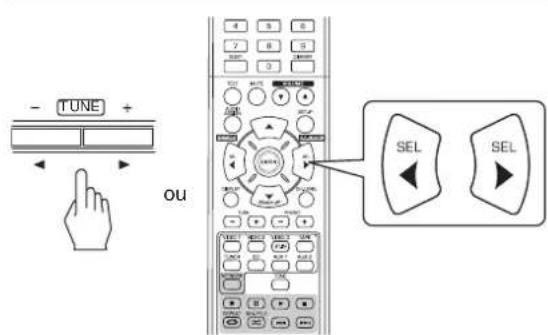
La plage de reglage du niveau LFE (Effets basse fréquence) va de -10 à 0 dB et les niveaux des autres canaux va de -15 à +15 dB.
- En général, nous recommendons de régler le niveau LFE sur 0 dB. (Bien que, le niveau LFE recommends sur quelques logiciels DTS plus récents est de -10 dB.) Diminuez les valeurs si les niveaux commandéssemblent trop élevés.
- Répétez les étapes 2 et 3 ci-dessus pour régler chaque niveau de canal.
Mémorisation des niveaux de canaux régles
-
Vous pouvez memoriser les niveaux de canaux régés dans la mémoire de prépréglages ("REF 1", "REF 2") et les rappeler quand vous voulez.
-
Àpres avoir effectué les étapes 1 à 4 dans la procédure "Régler le niveau du canal courant" à la page 20, appuyez sur la touche ENTER (/MEMORY).
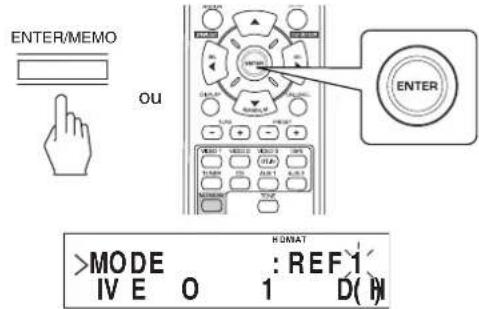
-
Alors le "1" de l'indication "REF 1" se met à clignoter pendant quelques secondes.
-
Sélectionnez REF 1 ou REF 2.
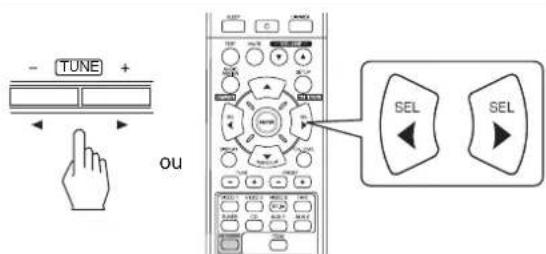
-
Si la mémoire prépréglée disparait, refaites l'étape 1 ci-dessus.
-
Confirmez voire selection.
- Les niveaux de canaux régles sont à présent mémorisés dans la mémoire sélectionnée.
Rappeler les niveaux de canaux mémorisés
- Appuyez sur la touche Niveau de canal (CH. LEVEL).
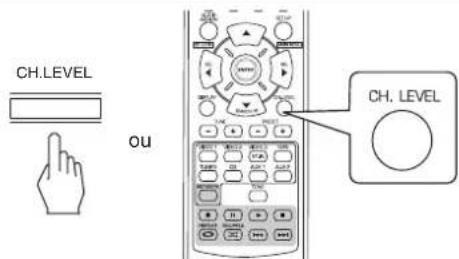
- "CAL" (ou "REF 1", etc.) sera affichée pendant quelques secondes.
-
Si le mode Niveau de canal disparait, appuyez de nouveau sur cette touche.
-
Sélectionnez REF 1 ou REF 2.

- Les niveaux de canaux mémorisés dans la mémoire de prêrglages sélectionné sont rapprorés.
ECOUTER DES EMISSIONS RADIO
Recherche automatique
1. Sélectionnez la bande souhaïée.
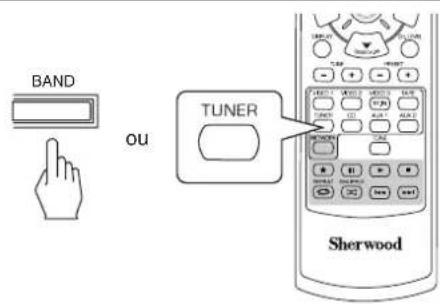

- Chaque fois cette touche est appuyée, la bande change dans cet ordre :

Si les émissions FM stéreo sont mauvaises à cause des faibles signaux de transmission, Sélectionnez le mode FM mono pour réduire le bruit, dans ce cas les émissions FM seront écoulés en monaural.
2. Appuyez sur les touches TUNING Haut (+)/ Bas (-) pendant plus de 0,5 seconde.
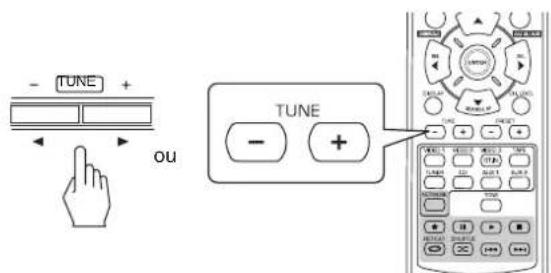
Le symtoniseur se met a la recherche et s'arrete des qu'il trouve une station de signal suffisamment puissant. L'écran affiche la fréquence syntonisé.
Si la station trouvee n'est pas celle que vous souhaitez, il suffit simplement de repeter cette operation.
- Les stations de faibles signaux sont ignores durant la recherche automatique.
Recherche manuelle
- La recherche manuelle est pratique lorsque vous connaissiez déjà la fréquence de station.
- Àprous la seLECTION de la bande souhaitee, appuyez plusieurs fois sur les touches TUNING Haut (+)/Bas (-) jusqu'à ce que la fréquence souhaitee soit atteinte.
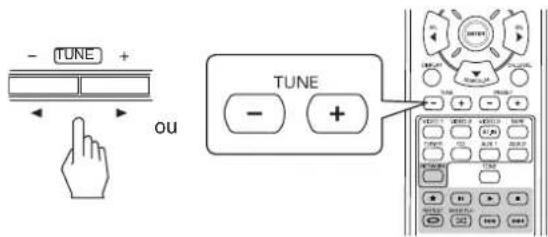
Balayage automatique des stations prerégées
La fonction balayage automatique des stations prerégles recherche automatiquement les stations FM seulement et les méorise.
- Pendant l'écoute d'émission radio FM ou AM, maintenez enforcée la touche ENTER/(MEMORY) pendant plus de 2 secondes.
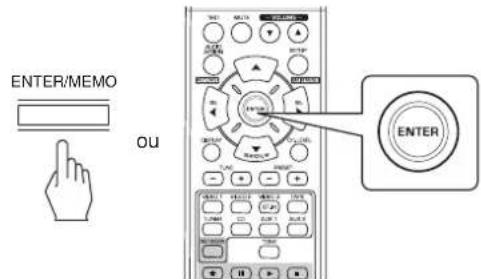
L'indication "AUTO MEM" se met a clignoter et le recepteur demarre le preréglage.
- Pour arrêté le prépréglage, appuyez de nouveau sur cette touche.
- On peut memoriser jusqu'à 30 stations FM.
■ Remarques :
- Les stations FM à faible signal ne peuvent pas être méorisées.
-
Pour memoriser les stations AM ou des stations faibles, effectuez la procEDURE "Prérglage Manuel" à l'aide de "Recherche manuelle".
-
Vous pouvez memoriser jusqu'à 30 stations souhaitees.
- Sélectionnez une station en effectuant la procédure de recherche automatique ou manuelle.
- Appuyez sur la touche ENTER/(MEMORY).

-MEM",etc.clignote.
- Sélectionnez le numéro de prééglage souhaité (de 1 à 30) et appuyez sur la touche ENTER/(MEMORY).
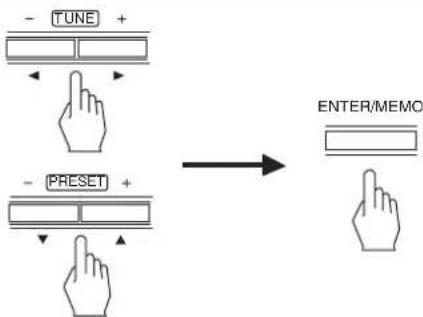
- Utilisation des touches CHIFFREES de la télécommande.

- Cette station est désormais mise en mémoire.
- Lorsqu'un nombre à deux chiffres est indiqué à l'aide des touches CHIFFREES, la station est automatiquement mise en mémoire sans qu'il ne soit nécessaire d'appuyer sur la touche ENTER/(MEMORY).
-
La fréquence qui vient d'être mémorisée efface l'ancienne fréquence se trouvant dans la même position mémoire.
-
Repetez les etapes 1 à 3 ci-dessus pour memoriser d'autres stations.
FONCTION DE SAUVEGARDE DE MEMOIRE
Les éléments suivants, régles avant d'eteindre le récepteur, sont mémorisés.
- Paramétres du sélecteur de source (INPUT SELECTOR)
- Paramètres du mode Surround
Stations Preregles, etc.
Se syntoniser à une station préregleePréreglage Manuel
- Àpres avoir sélectionné tunes comme source d'entree, selectionnez le numero de la station preréglée souhaitee.

- Utilisation des touches CHIFFREES de la télécommande.
Examples: Pour "3": 3
Pour "15": 1
en moins de 2 secondes
2 secondes
Pour "30": 3
en moins de
2 secondes
RDS Tuner (Option régionale pour certains pays Européens, etc.)
ECOUTER DES EMISSIONS RDS (FM UNIQUEMENT)
Le systeme RDS(Radio Data System) representation une methode d'envoi simultanee de signaux d'information et de signaux de transmission. Voitre tuner est capable de traduire ces signaux et d'afficher les informations sur I'ecran. Ces codes comprennent les informations suivantes : Nom du service de programme (PS), une liste de types de programme (PTY), Texte radio (RT).
■Remarques :
- Selon le pays, il est possible que la fonction RDS ne soit pas disponible.
La fonction RDS n'est possible que sur la bande FM.
La fonction RDS ne recherche que les stations en mémoire. Si aucune station n'a été mise en mémoire, ou si le type de programme n'est pas disponible sur les stations mémorisées, "NO PTY" s'affiche.
ll est par consequent essentiel de metre des stations de radio en memoire avant de lancer une recherche de stations RDS.
Recherche de stations par type de programme
- Vous pouvez rechercher des stations par type de programme.
- En mode FM, appuyez sur la touche SEARCH MODE.
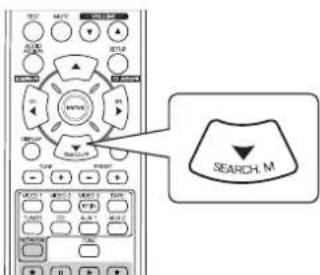
-
"PTY SEARCH" s'affiche durant quelques secondes.
-
Lorsque le message "PTY SEARCH" est affiché, sélectionné le type de programme de votrechoix.


- A chaque pression sur ces touches, un type de programme différé est sélectionné.
(News, Affairs, Info, Sport, Educate, Drama, Culture, Science, Varied, Pop M, Rock M, Easy M, Light M, Classics, Other M, Weather, Finance, Children, Social, Religion, Phone In, Travel, Leisure, Jazz, Country, Nation M, Oldies, Folk M, Document)
-
Si "PTY SEARCH" disparaït, appuyez de nouveau sur la touche SEARCH MODE.
-
Lorsque le type de programme sélectionné est affché, appuyez sur la touche ENTER.

Le tuner lance la recherche sur les stations méorisées.
Lorsqu'une station est trouvée, la recherche s'arrête et la station commence à émettre.
Si la recherche de station est infructueuse, "NO PTY" s'affiche.
Affichage des informations RDS
En mode FM,
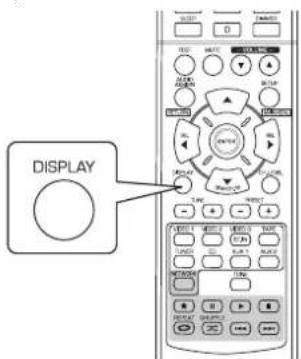
A chaque pression sur cette touche, le mode d'affichage change comme suit :
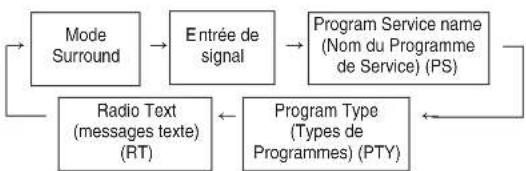
- Program Service Name(PS)-Le nom de la station de radio.
- Program Type(PTY)-Indique le type de programme à l'écoute.
- Radio Text(RT)-Messages envoyés par la station de radio. Par exemple, une station de libre Antenne peut donner un numéro de téléphone.
- Si les signaux sont trop faibles ou si aucun service RDS n'est disponible, l'écran affiche "NO NAME", "NO PTY" ou "NO TEXT".
ECOUTER DES EMISSIONS RADIO SUR INTERNET ET DES FICHIERS MUSIQUE
- Vou puez ecouter des émissions de radio sue Internet ou des fichiers musique stockés à part d'un dispositif de mémoire USB ou d'un ordinateur (serveur de media).
Radio sur Internet
- Radio Internet se refère aux émissions radio diffusées sur Internet. Des stations radio Internet du monde entier peuvent être écoutees en accédant au site web Shoutcast.
Shoutcast (http://www.shoutcast.com)
Shoutcast est un service de diffusion radio Internet gratuite fourni par Shoutcast. Vous pouvez utiliser Shoutcast sans vous inscrite.
■Remarque :
- Il existe un grand nombre de stations de radio sur Internet, et la qualité des programmes diffusés varie enormément, tout comme le début des morceaux. En général, plus le début est élevé,ILAmeure est la qualite du son, mais selon les lignes de communication et le traffic sur les serveurs, les signaux audio ou la musique diffusés peuvent etre coupes.
A l'inverse, des débits peut élevésdonnent une moinsonne qualité de son mais la transmission risque moinsd'être coupée.
Dispositif de mémoire USB
- Un dispositif de mémoire USB peut être raccordé au connecteur USB soit sur le panneau avant, soit sur le panneau arrêté afin d'écouter des fichiers musique stockés dessus.
Seuls les dispositifs de mémoire USB conformés à la classe de stockage de masse et les normes MTP (Protocole de transfert de media) peuvent être lus sur cet apparéil. - Cet apparéil prend en charge le système de format de fichiers FAT16 ou FAT32 pour le dispositif de mémoire USB.
■Serveur multimédia DLNA (Digital Living Network Alliance)
- Cet apparéil peut dire des fichiers audio sur un serveur multimédia compatible DLNA (ordinateur ou apparéil électronique) qui lui sont connectés via votre réseau domestique. Vous pouvez facilement partager les fichiers audio en utilisant Windows Media Player version 11.
2011 Digital Living Network Alliance. Tous droits réservés. DLNA® et DLNA & Design® sont des marques commerciales ou des marques déposées de Digital Living Network Alliance. Tous droits réservés. L'utilisation non autorisée est strictement interdite.
■Remarques :
- Vous doivent raccorder l'ordinateur (serveur de media) au même réseau local avec cet apparéil.
- Cet apparéil ne supporte que le DMP (Digital Media Player [lecteur multimédia numérique]) de la DLNA. Certaines fonctions peuvent ne pas fonctionner sur certains apparéil qui ne supportent pas totalement DLNA.
■ Formats de fichier audio compatibles
- Pour lire la radio sur Internet, un dispositif de mémoire USB et un serveur de média, cet apparéil supporte les formats de fichier musique suivants.
| Format de fichier | Fréquence d'échantillonnage | Débit binaire | Extension |
| MP3 (MPEG-1 Audio Layer-3) | 32/44.1/48 kHz 32 | ~ 320 kbps | .mp3, .MP3 |
| WMA (Windows Media Audio) | 32/44.1/48 kHz 32 | ~ 320 kbps | .wma, .WMA |
- Les fichiers à débit binaire variable sont supportés.
- Le principe de codage audio MPEG Layer 3 est une technologie sous licence Fraunhofer IIS et Thomson.
- Microsoft Media et le logo Windows sont des marques déposées ou des marques commerciales de Microsoft Corporation aux États-Unis et/ou dans certains autres pays.
Fonctionnement de base
1. Effectuez les préparations nécessaires.
① Vérifie l'environnement du réseau, puis mettez l'appareil sous tension. (Reportez-vous à "CONNEXION AU RESEAU" à la page 7).
② Si des paramétres sont requis, enregistrez vos comptes et paramétrz que le réseau, etc. (Reportez-vous à “Selection de Settings”(paramétrages) à la page 32).
③ Si l'ordinateur est utilisé comme serveur de media, préparez l'ordinateur. Installez Windows Media Player ver 11. (Reportez-vous à "Configuration de Windows Media Player ver 11." à la page 31).
2. Sélectionnez "NET/USB" comme source d'entrée.
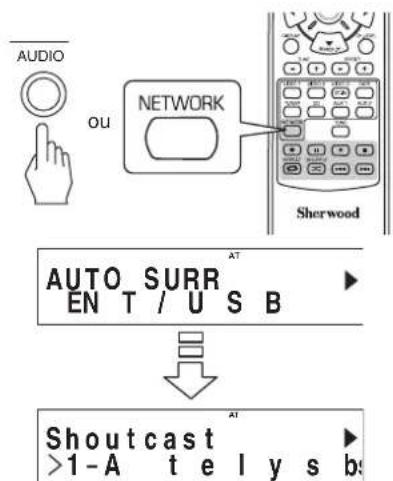
"NET/USB" est selectionné et donc le dernier statut méorisé sera repris.
Lorsque l'appareil est sous tension et "NET/USB" est selectionné, le menu principal s'affiche (reportez-vous à l'etape 3 ci-dessous).
3. PourCHOISIR un element dans le menu principal, appuyez sur la touche SETUP (/MAIN MENU).
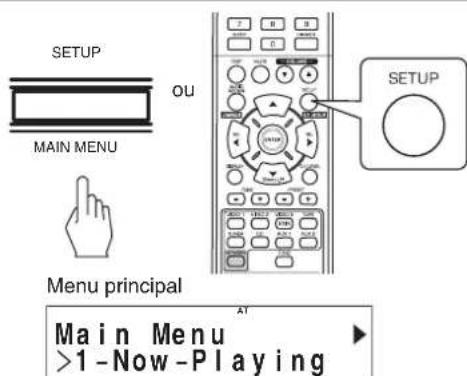
- Then the main menu is displayed.
4. Sélectionnez l'élément de votrechoix, puis appuyez sur la touche ENTER.
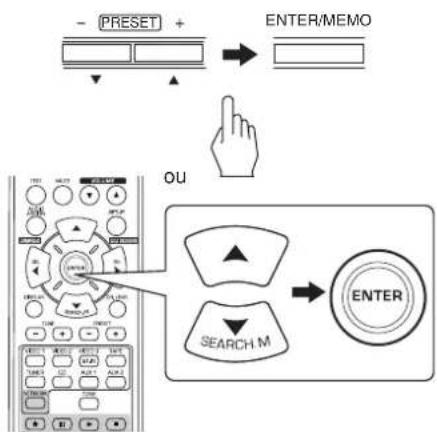
- Si vous seLECTIONnez "Now Playing" (lecture en cours), reportez-vous à la page 29.
- Si vous sélectionné "Internet Radio" (radio Internet), reportez-vous à la page 29.
- Si vous seLECTIONnez "USB" (bibliothèque de musique), reportez-vous à la page 30.
- Si vous seLECTIONnez "DLNA", reportez-vous à la page 30.
- Si vous sélectionnez "Favorites" (favoris), reportez-vous à la page 31.
- Si vous sélectionnez "Settings" (paramétrages), reportez-vous à la page 32.
- Pour plus d'informations sur la configuration du flux de menu, reportez-vous à la page 28.
5. Repetez l'etape 4 ci-dessus jusqu'à obtenir la station, le fichier musique ou le paramètre que vous souhaitez.
- Alors la seLECTION est lui ou définitie.
- Si vous appuyez sur la touche AUDIO ASSIGN/(RETURN) sur un sous-menu, l'écran revient également au statut précepté.
- Si vous appuyez sur la touche SETUP/(MAIN MENU) sur un sous-menu, l'écran revient également au menu principal.
■Opérations de lecture
- Pendant la lecture des émissions de radio sur Internet ou des fichiers musique, vous pouvez les écouter dans différents modes de lecture.
Pour arreter la lecture
Lors de lecture, appuyez sur la touche Stop(■).
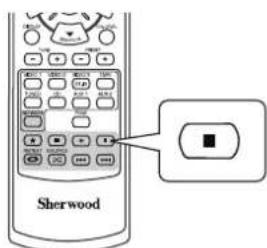
La lecture s'arrête.
- Pour démarrer la lecture, appuyez sur la touche PLAY(▶).
Pourmettrela lecture surpause
Lors de la lecture, appuyez sur la touche PAUSE( ).
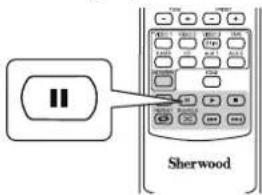
La lecture s'arrête à l'endetroit où vous avez appuyé sur la touche.
- Pour reprendre la lecture à ce même point, appuyez sur la touche PLAY(▲).
Pour aller vers I'avant ou l'arriere
Durant la lecture de fichier musique.
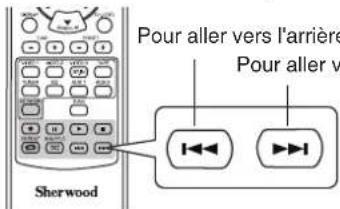
- Chaque fais que cette touche est appuyée, un fichier musique est sauté.
Pour lire plusieurs fois
Durant la lecture d'un fichier musique, appuyez sur la touche REPEAT( ).

- Ensuite, "C" s'allume et l'appareil lit les fichiers musique du repertoire plusieurs fois.
- Pour annuler la lecture repeteee, appuyez encore une fois sur cette touche.
Pour lire dans un ordre aléatoire
Durant la lecture d'un fichier musique, appuyez sur la touche SUFFLET(
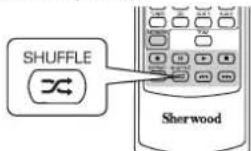
- Ensuite, “×” s'allume et l'appareil lit les fichiers musique du repertoire dans un ordre aléatoire.
- Pour annuler la lecture aléatoire, appuyez encore une fois sur cette touche.
■Remarque :
-
Les modes Sauter, Répéter et Aléatoire sont utilisables pour dire只需 des fichiers musique stockés sur un dispositif de mémoire USB.
-
Pour information, le déroulement du menu de configuration est le suivant :
Organigramme des menus
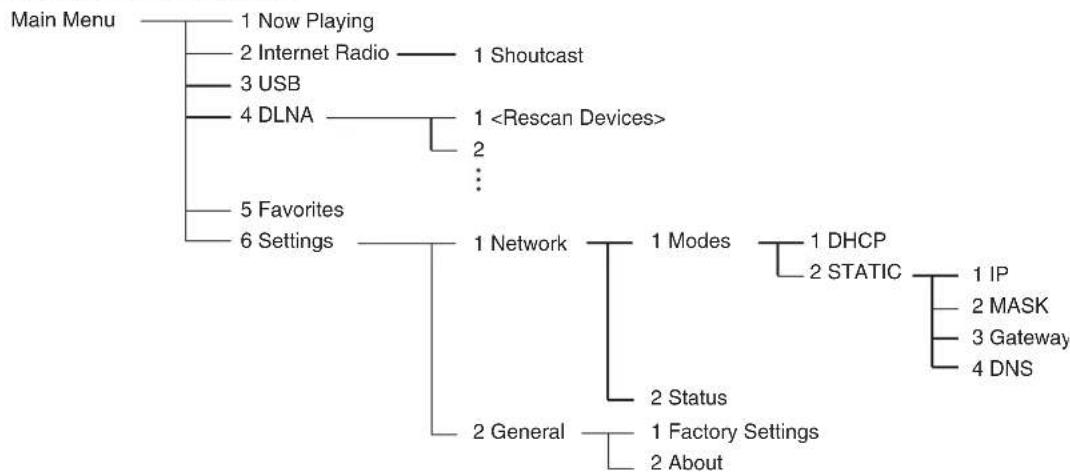
Selection de "Now Playing" (lecture en cours)
- Vous pouvez afficher les informations concernant l'émission de radio Internet ou le fichier musique en cours de lecture.
Utilisez les touches de NAVIGATION VERS LE HAUT(▲)/VERS LE BAS(▼) pour sélectionner le mode d'affichage souhaite.
Exemple : Vous écoutez une émission de radio sur Internet
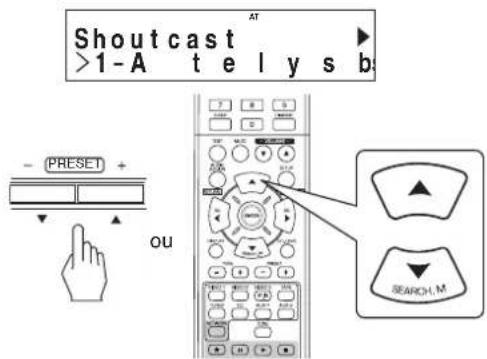
- Chaque fois que cette touche est appuyée, le mode change dans cet ordre :
station ou nom disposittif titre chanson Add to favorites* nom artiste nom album
*: Non disponible pendant la lecture de fichiers audio ou l'écoute de stations radio Internet de la liste " Favorites".
■Remarques :
- Caracteres sauf "A~Z", "a~z", "0~9", "-" peuvent ne pas s'afficher.
- Si I'information sur le nom de la station, le titre de la chanson ou le nom de l'artiste, etc. n'est pas disponible, elle peut ne pas s'afficher correctement.
Selection de "Add to favorites" (ajouter aux favors)
① Appuyez sur la touche ENTER.
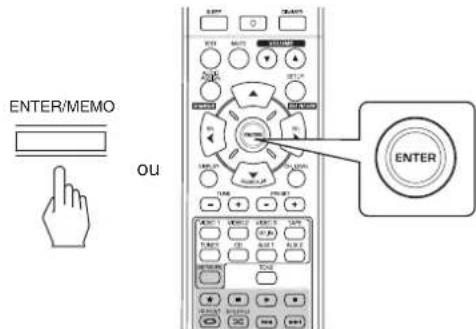
Puis "OK" apparait.
② Appuyez sur la touche ENTER pour confirmer toute seLECTION.
- Puis la station ou le fjicher musique est enregistré sur la liste des favors. (Pour plus d'informations sur les favors, reportez-vous à "Sélection de "Favorites" (favoris)" à la page 31).
Selection de "Internet Radio" (radio Internet)
- Vous pouvez écouter des émissions radio Internet émises par Shoutcast.
- Appuyez sur la touche ENTER.
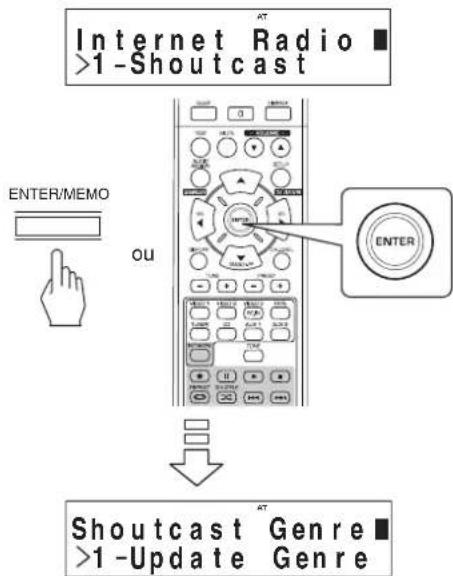
- Utilisez les touches de NAVIGATION VERS LE HAUT(▲)/VERS LE BAS(▼) pour sélectionner la catégorie (ou élément) souhaitée, puis appuyez sur la touche ENTER.
- Répétez l'étépe 2 jusqu'à entendre l'émission désirée.
Exemple : Lecture d'une émission fournie par Reciva

- Pendant l'écoute d'une émission, à chaque fois la touche Haut (▲) ou Bas (▼) est appuyée, le mode d'affichage change.
- Pour plus de détails sur le mode d'affichage, voir " Sélection de "Now Playing" ci-dessus.
Selection de "USB" (bibliothèque de musique)
- Vous pouvez écouter les fichiers audio stockés sur un dispositif de stockage de masse USB.
■Remarque : -
Avant de selectionner "USB", connectez le dispositif USB au port USB du panneau avant.
-
Utilisez les touches de NAVIGATION VERS LE HAUT(▲)/VERS LE BAS(▼) pour sélectionner le repertoire (ou fichiers musique) souhaite, puis appuyez sur la touche ENTER.


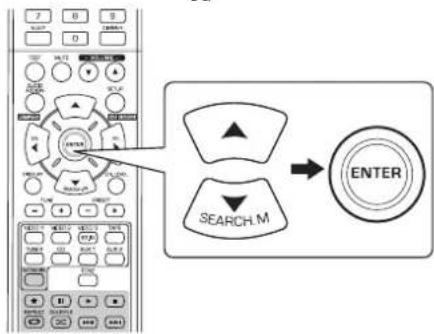
ou
- Repetez l'etape 1 jusqu'à entendre le fichier musique désiré.
Exemple:Lecture d'un fichier musique

Lecture d'un fichier musique, à chaque fois la touche Haut (▲) ou Bas (▼) est appuyée, le mode d'affichage change.
Pour plus de détails sur le mode d'affichage, voir "Sélection de "Now Playing" à la page 29.
Selection de "DLNA"
- Vous pouvez écouter des fichiers audio stockés sur un ordinateur (serveur multimédia) connecté à cet apparèil via votre réseau domestique.
Remarque :
-
Pour lire des fischiers audio stockés sur votre ordinateur, vous doivent désigné un configurer Windows Media Player version 11. First. (Pour plus de détails, voir "Configuration de Windows Media Player ver. 11" à la page 31).
-
Demarrez votre ordinaire (serveur de media).
DLNA Serrsve >1-
2. Appuyez sur les touches de NAVIGATION VERS LE HAUT(▲)/VERS LE BAS(▼) pour sélectionner votre ordinateur comme serveur de/media, puis appuyez sur la touche ENTER.

- Si vous ordinaire n'apparait pas sur la liste, Sélectionnez "Rescan Devices" (rescanner les périhériques) pour scanner à nouveau tous les serveurs de média disponibles.
3. Utilisez les touches de NAVIGATION VERS LE HAUT(▲)/VERS LE BAS(▼) pour sélectionner la catégorie souhaïée, puis appuyez sur la touche ENTER.
4. Repetez l'etape 3 jusqu'à entendre le fichier musique désiré.
Exemple:Lecture d'un fichier musique
DLNA Sears >1-Sherwood-Pro
Lecture d'un fichier musique, à chaque fois la touche Haut (▲) ou Bas (▼) est appuyée, le mode d'affichage change.
Pour plus de détails sur le mode d'affichage "Selection de "Now Playing" à la page 29.
■Configuration de Windows Media Player ver. 11.
1. Executez Windows Media Player ver. 11 sur votre ordinateur.
2. Sélectionnez "Library" (bibliothèque) dans la barre de menu, puis sélectionnez "Media Sharing" (Partage des fichiers multimédias).
3. Dans la boîte de dialogue "Media Sharing" (Partage des fichiers multimédias), Sélectionnez la case à cocher "Share my media", puis cliquez sur "OK".
4. Dans la liste des périhériques, Sélectionnez cet apparéil puis cliquez sur "Allow" (Autoriser).
5. Cliquez sur "OK" pour fermer la boîte de dialogue.
- La configuration de Windows Media Player ver. 11 est terminée.
- Vous pouvez écouter les fichiers musique sur toute bibliothèque Windows Media Player ver. 11 à travers cet apparéil.
■Remarques :
- Windows Media Player ver. 11 est téléchargeable gratuitement depuis le site web de Microsoft.
- Si le pare-feu restreint l'accès, Windows Media Player ver. 11 ne peut pas être configuré.
Selection de "Favorites" (favoris)
■Remarque :
- Vous pouvez écouter des stations de radio sur Internet ou des fichiers musique enregistrés dans la liste "Favorites" ou les supprimer.
Lorsque le dispositif de mémoire USB est déconnecté ou si vous ordinateur (serveur de media) est hors tension, les fichiers musique stockés dessus ne peuvent pas être lus.
1. Utilisez les touches de NAVIGATION VERS LE HAUT(▲)/VERS LE BAS(▼) pour sélectionner la station ou le fichier souhaite, puis appuyez sur la touche ENTER.

2. Utilisez les touches de NAVIGATION VERS LE HAUT(▲)/VERS LE BAS(▼) pour sélectionner "PLAY", "DELETE" ou "CANCEL", puis appuyez sur la touche ENTER.
Exemple:Lecture d'un fichier musique
Favorites >1-S UB
Lorsque you selectionnez "PLAY", la station ou le fichier musique choisi est lu.
Lorsque you selectionnez "DELETE", la station ou le fichier musique choisi est supprimé de la liste "favorites".
Lorsque "CANCEL" est selectionnée, votre selection sera annulée.
- Lecture d'un fichier musique, à chaque fois la touche Haut (▲) ou Bas (▼) est appuyée, le mode d'affichage change.
Pour plus de détails sur le mode d'affichage, voir " Sélection de "Now Playing" à la page 29.
Selection de "Settings" (paramétrages)
- Avant d'écouter une radio Internet ou dire des fichiers audio pour la première fois, effectuez d'abord les réglages du réseau, etc. pour obtenir des performances optimes.
1. Sélectionnez l'objet de votre besoin, puis appuyez sur la touche ENTER.


- Chaque fais que la touche de NAVIGATION VERS LE HAUT(▲)/VERS LE BAS(▼) est appuyée, le mode de paramétrage change dans l'ordre suivant: Network General
- Sélection de "General", voir page 33.
■ Sélection de "Network" (RéSEAU)
- Pour écouter les stations radio Internet, émissions de musique ou des fichiers audio stockés sur votre ordinateur via votre réseau domestique, vous doivent configurer les paramétres réseau en premier.
Netwo
>1-Mode Setrk
es
2. Appuyez sur la touche Haut () / Bas () pour selectionner "Modes" ou "Status", puis appuyez sur la touche ENTER.
Exemple : Sélection de "Modes"
Net two
>1-DHCP Modrk ■
- Lorsque "Modes" est selectionnée, vous pouvez configurer les paramétres réseau.
- Lors de la sélection de "Status", vous pouvez vérifier les paramétres réseau (voir page 33).
Sélection de "Modes"
3. Appuyez sur la touche Haut (▲)/Bas (▼) pour selectionner "DHCP" ou "STATIC" (Statique), puis appuyez sur la touche ENTER.
- Si le serveur DHCP de votre routeur est activé, vous pouvez selectionner "DHCP".
S'il est désacté, Sélectionnez "STATIC" (Statique).
* En cas de sélection de "DHCP"
Lorsque "Switch to DHCP mode?" s'affiche, appuyez sur la touche ENTER.

- Les paramétres réseau sont configurés automatiquement et le menu "Status" sera affché. (Voir " Sélection de "Status" (État), page 33).
* En cas de seLECTION de "STATIC" (Statique)
- Vous pouvez définir les paramétres réseau manuellement lorsque le serveur DHCP du routeur est désactisé.
■Remarque :
- Parce que les informations suivantes du routeur sont nécessaires, il faut les confirmer avant d'effectuer la configuration manuelle: IP address (adresse IP), Subnet mask (masque de sous-reseau), Gateway (passerelle), DNS.

① Appuyez sur la touche Haut (▲)/Bas (▼) pour sélectionner le paramètre souhaïte, puis appuyez sur la touche ENTER.
- Chaque fois que la touche Haut (▲) ou Bas (▼) est appuyée, le mode de réglage change comme suit.

Exemple: Sélection de "IP"

② Appuyez sur la touche Flèche gauche (▲)/Droite (▶) pour passer au chiffre souhaïte.
- Pour supprimer un chiffre, appuyez sur la touche gauche (▲). Chaque fois que cette touche est appuyée, les chiffres sont supprimés un par un.
③ Appuyez sur la touche Haut (▲)/Bas (▼) pour entrée le chiffre désire.
- Chaque fois que la touche Haut (▲) ou Bas (▼) est appuyée, le caractère change comme suit.
a ~ z, A ~ Z, 1 ~ 0 et les caractères (@, .space, etc.)
④ Repetez l'etape ② et ③ ci-dessus pour terminer la saisie.
Pour confirmer toute saisie, appuyez sur la touche Droite (▶) pour passer au chiffre suivant le plus petit, puis appuyez sur la touche ENTER.
- Le menu "Static Mode" sera affché.
⑥ Repetez les etapes ① ⑤ ci-dessus pour entrer les autres parametes.
⑦ Appuyez sur la touche ASSIGN AUDIO (/RETURN) pour returner à l'état précédent.

selectionner "OK" ou "CANCEL", puis appuyez sur la touche ENTER.
Lorsque "OK" est selectionné, les paramètres réseau sont appliqués et le menu "Status" sera affché. (Voir "Selection de "Status" (État) ci-dessous).
Lorsque "CANCEL" est seLECTIONne, les paramétres reseau ne sont pas appliqués et le menu "Network Modes" sera affché.
Sélection de "Status" (État)
- Vous pouvez vérifier les paramétres réseau (teils que mode, adresse IP, GW (passerelle) et serveur DNS) successivement.

- Pour returner à l'etat précédent, appuyez sur la touche ENTER.
■Selection de "General" (Général)

2. Appuyez sur la touche Haut ()/Bas() pour selectionner "Factory Settings" ou "About", puis appuyez sur la touche ENTER.
Exemple : Sélection de "Factory Settings"

- Lorsque "Factory Settings" est selectionné, vous pouvez réinitialiser les paramétres "Network" et les stations ou les fichiers audio enregistrés dans la liste "Favorites" par défaut.
Lorsque "About" est selectionné, vous pouvez vérifier les informations générales telles que le type de cet apparéil, la version du logiciel et l'adresse MAC.
Sélection de "Factory Settings" (Paramétres par défaut)
3. Appuyez sur la touche Haut () / Bas () pour selectionner "OK" ou "CANCEL", puis appuyez sur la touche ENTER.
Lorsque "OK" est selectionné, les paramètres par défaut sont rétablis.
Lorsque "CANCEL" est selectionne, il n'y aura pas de changement des parametes.
Sélection de "About" (A propos)
- Vous pouvez vérifier le type de cet apparéil, la version du logiciel et l'adresse MAC successivement.

- Pour returner à l'etat précédent, appuyez sur la touche ENTER.
ENREGISTREMENT
- Les signaux numériques à partir de sources "NET/USB", coaxiales, d'entrée optique numérique ou HDMI IN peuvent être écoutedes mais non enregistrés.
Lorsque you enregistrrez des signaux analogiques a partir de CD,VIDEO 1 ouVIDEO 2,assurez-vous de selectionner l'entrée analogue.
(Pour plus de détails, voir "La source d'entrée est CD,VIDEO 1 ouVIDEO 2" à la page 14.)
- Les réglages volume et tonalité (graves, aigus) n'ontaucun effet sur les signaux d'enregistrement.
Enregistrement avec TAPE (bande)
1. Sélectionnez l'entrée souhaïée comme source d'enregistrement à l'exception pour TAPE.

2. I'enregistrement sur TAPE.
3. Démarrez la lecture sur l'entrée souhaitation.
Copie depuis composants video sur VIDEO 1
1. Sélectionnez VIDEO 2 ou VIDEO 3 comme source d'enregistrement, pas VIDEO 1.

2. Demarrez I'enregistrement sur VIDEO 1.
3. Demarrez la lecture sur l'entrée souhaitee.
- Les signaux audio et video depuis VIDEO 2 seront copiés vers VIDEO 1 et vous pouvez les regarder sur le posté telé et les écouter aux enceintes.
AUTRES FONCTIONS
Utilisation de la minuterie sommeil
- La minuterie sommeil permet au systeme de continuer à fonctionner pendant une certaine durée avant son arrêt automatique.
- Pour régler le récepteur à s'arrête automatiquement après une certaine durée.

Réglage de la luminosité de l'afficheur fluorescent

Afficher l'etat de fonctionnement
Durant la lecture,

- Chaque fais cette touche est appuyée, le temps社会发展 change dans cet ordre :

Lorsque you utilisez la minuterie sommeil, " s'allume.
Lorsque you utilisez la minuterie sommeil, l'afficheur fluorescent devient faiblement eclairé.

- Chaque fois cette touche est appuyée, la luminosité de l'afficheur fluorescent change dans cet ordre :
- En mode d'écran esteint, une pression sur certains boutons permet d'activer l'écran pour afficher le statut de fonctionnement.
- A chaque pression sur cette touche, le mode d'affichage change comme suit :

- Lorsque la fonction tuner RDS est disponible dans votre pays. Pour en savoir plus sur les informations en mode FM, voir "Affichage des informations RDS" page 25.
CONFIRMATION DE LA FONCTION HDMI
Pour utiliser correctement les fonctions de HDMI, il est conseilé de confirmer les fonctions de commande HDMI possibles sur chaque composant connectée en procédant aux opérations ci-dessous.
Remarque:
- Certains fonctions de commande HDMI peuvent ne pas marcher avec certains composants et téléviseurs incompatibles.
Avant la mise en marche
- Verifiez que ce recepteur, le téléviseur, le lecteur, etc. sont bien raccordés par cables HDMI.
- Vérifiez que la commande HDMI du téléviseur et du lecteur raccordable HDMI est activée.
(Pour en savoir plus sur la configuration du téléviseur et lecteur, veuillez consulter leurs modes d'emploi respectifs.)
- Reglez le HDMI CONTROL et le POWER CONTROL sur ON pour activer la commande HDMI de ce récepteur. (Pour en savoir plus, veillez consulter la rubrique "REGLAGE DE L'HDMI" page 50.)
Confirmation des opérations HDMI de base
1. Mettez tous les composants raccordés par cables HDMI en marche.
2.Faites passer l'entrée TV a l'entrée HDMI raccordee a ce recepteur.
3.Faites passer l'entrée de I'appareil sur la source d'entreee HDMI.
- Confirmez que l'image s'affiche et que le son sort correctement des enceintes.
Confirmation des fonctions de commande HDMI
1.Mettez tous les composants raccordes par cables HDMI en marche.
2. Eteignez le téléviseur pour acceder au mode veille.
- Confirmez que tous les composants sont eteints.
3. Lorsque tous les composants sont eteints, lancez la lecture sur un lecteur (raccordé par cable HDMI).
- Confirmez que tous les composants sont en marche et que les entrées de cet apparéil et du téléviseur basculent automatiquement.
Configuration du système
Le menu de configuration s'affiche sur l'afficheur fluorescent et vous permit de réaliser facilement la procedures de configuration. Dans la plupart des cas, vous n'aurz a faire cela qu'une seule fois durant I installation et I agencement de vos enceintes, et necessite rarement des modifications ulterieures. Le menu configuration comprend 6 menus principaux: Système, Entree, Configuration des enceintes, Niveau canal, Paramêtres et HDMI. Ces menus contiennent plusieurs sous-menus.
■Remarque:
- Vous pouvez effectuer les procédures de configuration du système uniquement si vous Sélectionnez une autre source d'entrée que NET/USB.
- Parcourir les menus de configuration
- Les explications données ici supposent que vous utilise les de la télécommande pour effectuer les opérations de configuration. Mais vous peuvent également utiliser les touches du panneau frontal. Les touches du panneau frontal qui correspondant à ceux de la télécommande sont illustrées ci-dessous.
Touché de la télécommande SETUP ENTER SEL SEL SEARCH.M Touché sur la façade SETUP ENTER / MEMO - TUNE + - PRESET + MAIN MENU - - -
1. Activez le menu de configuration.


- Le menu de configuration sera affché.
- Appuyez de nouveau sur cette touche pour masquer le menu.
2. Sélectionnez le menu souhaite en se servant des touches de Haut (▲)/Bas (▼).

3. Confirmez votre sélection.

- Si vous sélectionnez "SYSTEM SETUP", veuillez consulter la rubrique "CONFIGURATION DU SYSTEME" page 39.
- Si vous sélectionnez "INPUT SETUP", veillez consulter la rubrique "CONFIGURATION DE L'ENTREE" page 41.
Pour selection de "SPEAKER SETUP", voir CONFIGURATION DES ENCEINTEs" à la page 42.
- Si vous sélectionné "CH LVL SETUP", veillez consultier la rubrique "CONFIGURATION DU NIVEAU DES CANAUX" page 46.
- Si vous sélectionnez "PARAMTER SETUP", veuillez consulter la rubrique "CONFIGURATION DES PARAMETRES" page 48.
- Si vous sélectionné “HDMI SETUP”, veuillez consultier la rubrique “REGLAGE DE L'HDMI” page 50.
- Pour selection de "EXIT" (QUITTER), le menu de configuration sera masqué.
Organigramme des menus
Voici I'organigramme des menus :

- Si "RETURN" est selectionné dans un sous-menu, le retour se fait au menu précédent.
Si you appuyez sur la touche AUDIO ASSIGN/(RETURN) sur un sous-menu, l'écran revient également au menu précédent.
Remarque: Durant les opérations de configuration du système, seules les touches (POWER ON) STANDBY et celles nécessaires à la configuration sont disponibles.

CONFIGURATION DU SYSTEME

- SW MODE(MODE SUBWOOFER) : Pour sélectionner le mode subwoofer requis.
TONE: Pour régler la tonalité (graves et aigues).
A.P.S (AUTO POWER SAVE [Economiseur d'énergie automatique]): Pour régler la durée de mise hors tension comme vous le souhaitez.
- RETURN (Returns) : Pour returner au menu precedent.
1. Utilisez les touches Haut () / Bas () pour selectionner I'elément souhaite.

2. Utilisez les touches Gauche («)/Droite («) pour régler l'élement comme vous le souhaitez.

Sélection du mode SUBWOOFER
- Le mode "SW + " n'est effectif que lorsque "FRONT" et "CENTER" sont régles sur "LARGE" et "Sub-W" (Subwoofer) est régle sur "YES" dans le menu SPEAKER SETUP. (Pour plus de détails, reportez-vous à "CONFIGURATION DES ENCEINTES" à la page 42.)
NORM : Lorsque les signaux de basses fréquences des canaux sont régés sur "LARGE" sont reproduits à partir de ces canaux uniquement.
Dans ce mode, les signaux de basses fréquences qui sont reproduits à partir du canal subwoofer sont uniquement les signaux de basses fréquences LFE (de sources multivoies qui contiennent un canal LFE (effets de basses fréquences), appelé aussi ".1" canal) et les canaux régés sur "SMALL".
SW + : Lorsque les signaux de basses fréquences des canaux régés sur "LARGE" sont simultanément produits à partir de ces canaux et du canal subwoofer.
Dans ce mode, la gamme de basses fréquences s'étend uniformément dans la salle, mais en fonction de la taille et de la forme de la salle des interférences peuvent survenir et diminuents le volume réel de la gamme de basses fréquences.
Selection AUTO POWER SAVE (Economiseur d'énergie automatique)
L'ecomiser d'enerie automatique est une fonction qui et int automatiquement l'appareil et le faire passer en mode veille.
Cette fonction est activee lorsqu'aucune touche n'est appuyee pendant une periode qui depasse la durée que vous avez fixe.
- Vous pouvez fixer cette période comme vous le souhaitez.
OFF 2HOUR (Heure) 4HOUR 6HOUR (Pour désactiver cette fonction)
Selection de TONE (TONALITE)
OFF (désacté): Pour écouter de sources de programme sans effet de tonalité. (l'indicateur "DIR" s'allume).
ON (activée) : Pour régler la tonalité à votre goût. (l'indicateur "DIR" s'éteint).
Lorsque TONE est sur ON (activée) pour régler la tonalité (graves et aigues)
① Appuyez sur la touche ENTER pour acceder au réglage de tonalité.

②. Utilisez les touches de déplacement HAUT(▲)/BAS(▼) pour sélectionner le mode de tonalité souhaïée.


Selection de BASS
③ Utilisez les touches de déplacement Gauche ()/Droite() pour regler la tonalité souhaïée.

Le niveau de tonalité peut être choisi dans l'intervalle -10 à +10 dB.
- En général, nous recommendons de régler les graves et aigues sur 0 dB (niveau plat).
- Les réglages à des niveaux de volume extrêmes peuvent endommager vos enceintes.
CONFIGURATION DE L'ENTREE
INPUT SETUP

D.IN DIGITAL IN): Pour attribuer les entrées numériques à la source requise.
- AUTO (AUTO SURROUND): Pour sélectionner le mode surround auto ou surround manuel.
- RETURN (Retourer) : Pour returner au menu précédent.
1. Utilisez les touches Haut ()/Bas() pour selectionner la source d'entrée souhaitee, puis appuyez sur la touche ENTER.

Example) Sélection de VIDEO 2

Selection de DIGITAL IN
- Vous doivent attribuer le composant connecté à DIGITAL IN.
(Pour plus de détails, voir "RACCORDEMENT D'ENTREES NUMERIQUES (DIGITAL IN)" à la page 7.)
- Vou puez selectionner celie souhaitee parmi OPT (optical), COX 1(coaxial 1), COX 2(coaxial 2) et - - - (analogique).
■Remarques :
- Dans le cas où DIGITAL IN est attribuée à plus de deux sources d'entrée, lorsque ces dernières sont sélectionnées, le signal audio numérique sera entendu depuis le même DIGITAL IN.
Lorsque le connecteur d'entree HDMI IN est connecte a sua composeant video, le parametre DIGITAL IN n'est pas valide.
When selecting the AUTO SURROUND
- Sélectionnez le mode surround auto ou le mode surround manuel en fonction de la manière dont vous allez seLECTIONnez le mode surround.
OFF (Désacté): Vous pouvez seLECTIONner un mode surround différent parmi les modes disponibles pour le signal en entrée à l'aide de seLECTION du mode surround (> / < ) .(Pour plus de détails, voir "SeLECTIONNZ le mode surround manuel en appuyant sur la touche AUTO/MANUAL du panneau avant" à la page 17.)
ON (acté) : Le mode surround optimal sera automatiquement sélectionné en fonction du format du signal en entrée.
■Remarques
Lorsque la touche SPEAKER est reglee sur Off ou "CENTER(CENTRE)" et "SURR(Surround)" ne sont pas regles sur "NO", le mode surround auto n'est pas valide.
- Mème lorsque le mode surround auto est sélectionné et le même type de format de signal numérique est reçu, le mode surround optimum peut varier en fonction du type d'enceinte s'il est régé sur "NO" ou pas.
Lorsque le mode surround auto est selectionne, les modes surround autres que le mode surround optimum ne peut etre selectionne.
CONFIGURATION DES ENCEINTES
- Àpèras avoir installé le récepteur et connecté tous les composants, vous devez régier les enceintes pour obtenir lessons acoustiques optimum en fonction de la vieille environnement et de leur disposition.
- Vous devez aussi régler les enceintes à chaque fois que vous changez leur emplacement ou leur disposition.

- SPEAKER CONFIGURATION (configuration des enceintes) : Pour selectionner la taille des enceintes connectées.
CROSSOVER: Pour selectionner la fréquence du crossover.
- SPEAKER DISTANCE (distance des enceintes): Pour entrer la distance entre la position d'écoute et chaque enceinte, cela peut de définir automatiquement le temps de retard et d'obtenir une lecture surround
- RETURN (Retourer) : Pour returner au menu précédent.
Sélection de CONFIGURATION
1. Utilisez les touches Haut (▲)/Bas (▼) pour selectionner "SPK CONFIG", puis appuyez sur la touche ENTER.

2. Utilisez les touches Haut () / Bas() pour selectionner l'enceinte souhaitee.

3. Utilisez les touches Gauche (▲)/Droite (▶) pour régler l'enceinte comme souhaïte.

- Sélectionnéz l'une des options suivantes en fonction du type de vos enceintes.
- Enceintes Frontale, Centrale et Surround :
LARGE : Sélectionnéz cet élément si vous branchez des enceintes pouvant restituer dessons sous la fréquence de crossover.
SMALL: Selectionnez cet element si vous branchez des enceintes ne pouvant pas restituer dessons sous la fréquence de crossover. Une fois cette selection effectuee, lessons sous la fréquence de crossover sont transmis au subwoofer ou aux enceintes régles sur "LARGE" (si vous n'utilise pas de subwoofer).
NO: Sélectionné ceci si aucune enceinte n'est raccordée. Une fois cette sélection effectuee, lessons sont transmis aux enceintes qui ne pas reglees sur "NO".
- Subwoofer:
YES : Sélectionnez cette option pour transmettre les signaux LFE et les basses fréquences des canaux régés sur “SMALL” à partir du subwoofer.
NO : Sélectionnez cette option si le subwoofer n'est pas raccordé. Les basses fréquences sont restituees par les autres enceintes.
■Remarques :
- Si les enceintes sont régles sur "SMALL", vous nevez regler leur fréquence crossover en fonction de leurs caractéristiques de fréquence. (Pour en savoir plus, veillez consulter la rubrique " Sélection du CROSSOVER" à la page 44.)
Lorsque F" (avant) est regle sur "SMALL, "CENTER"(Centre) et "SURR"(Surround) ne peuvent pas etre regles sur "LARGE" et le "SUB-W" (Subwoofer) ne peut pas etre regle sur "NO".
4. Repetez les étapes 2 et 3 jusqu'à ce que les enceintes soient toutes régles sur le mode requis.
A propos des tailles d'enceinte
- Ne sélectionnez pas "LARGE" ou "SMALL" en fonction de la taille réelle d'une enceinte, mais en fonction de la capacité de l'enceinte à restituer les signaux BASSE FRÉquence (son grave sous la fréquence définie sur le menu "CROSSOVER") signals.
- Si vous n'êtes pas sur de vous, faites des tests comparatifs sur les deux réglages (en baissant suffisament le volume pour ne pas endommager les enceintes) afin de découvertir le réglage adapté.
Sélection du CROSSOVER
- Si les enceintes sont régles sur "SMALL", vous devez régler leur fréquence crossover en fonction de leurs caractéristiques de fréquence.
1. Utilisez les touches de NAVIGATION VERS LE HAUT(▲)/VERS LE BAS(▼) pour sélectionner "CROSSOVER", puis appuyez sur la touche ENTER.

2. Utilisez les touches de NAVIGATION GAUCHE( /DROITE () pour regler la fréquence de crossover.

Pour regler la frquence de crossover, vous avez le choix entre 40, 50, 80, 100, 150 et 200Hz
A propos de la fréquence de crossover
- Lorsque les enceintes sont régles sur "SMALL", les basses fréquences sur ces canaux situées pour la fréquence de crossover sont restitues à partir du subwoofer ou des enceintes avant régles sur "LARGE" (si vous n'utilise pas de subwoofer).
- Veuillez consultier le mode d'emploi des enceintes à connecter. Si la plage de fréquence de votre enceinte est de 100 Hz à 20 kHz, il faut régler la fréquence de crossover sur 100 Hz (ou légarement plus).
Sélection de SPEAKER DISTANCE
1. Utilisez les touches HAUT(▲)/BAS(▼) pour selectionner "SPK DISTANCE", puis appuyez sur la touche ENTER.

2. Utilisez les touches de déplacement HAUT(▲)/BAS(▼) pour sélectionner l'élement souhaité.

Remarque:
- Vous ne pouvez pas selectionner le subwoofer alors que les enceintes sont regliées sur "NO".
3. Utilisez les touches de déplacement GAUCHE(▲)/DROITE(▲) pour régler l'élement comme souhaïet.

Selection de I'unité de mesure -You pouvezCHOISIR le metre ou le p
- Une fois l'unité de mesure estcision, les distances sont automatiquement transformées dans cette unité.
Selection de distance
- Vous pouvez régler la distance entre 0,1 à 9.0 mètes avec un pas de 0,1 mètre (ou 0,5 ~ 30 pied avec un pas de 0,5 pied).
4. Repetez les étapes 2 et 3 ci-dessus jusqu'à ce que toutes les distances soient régles comme souhaite.
A propos de la distance des enceintes
Dans l'idéal, lors d'écoute de sons surround multivoies depuis des sources Dolby Digital ou DTS etc., l'enceinte centrale et les enceintes surround devraient être à la même distance de la position d'écoute que les enceintes frontales. En entrant les distances entre la position d'écoute et chaque enceinte, les retards de l'enceinte centrale et des enceintes surround seront automatiquement régés pour creer un environnement d'écoute virtuel de manière que l'enceinte centrale et les enceintes surround étaient à leurs positions ideales respectivement.

CONFIGURATION DU NIVEAU DES CANAUX

Remarque :
- En fonction des paramètres des enceintes ("NO", etc.), certains canaux ne peuvent pas être seLECTIONNés.
Régler le niveau du canal courant
- Vous pouvez régler le niveau du canal courant comme vous le souhaitez. Les niveaux régles sont simplement mémorisés dans la mémoire utilisateur ("CAL"), et non dans la mémoire de préréglages ("REF 1", "REF 2").
- Àpres avoir régèle le niveau de chaque canal à l'aide de tonalités de test, réglez les niveaux en fonction des sources de programmes ou selon vos goûts.
(Pour plus de détails, voir "Réglage du niveau de chaque canal à l'aide de TEST TONE (tonalités de test)" à la page 19.)
1. Utilisez les touches HAUT(▲)/BAS(▼) pour selectionner le canal souhaite.


Exemple : Sélection des LFE d'une source Dolby Digital
CH LVL SETUP 30 >D 0dB
2. Utilisez les touches GAUCHE(▲)/DROITE(▲) pour régler le niveau du canal sélectionné ou la source de programmes LFE comme souhaïte.

La plage de reglage du niveau LFE (Effets basse fréquence) va de -10 à 0 dB et les niveaux des autres canaux va de -15 à +15 dB.
- En général, nous recommendons de régler le niveau LFE à 0 dB. (Bien que, le niveau LFE recommandé sur quelques logiciels DTS plus récents est de -10 dB). Diminuez les valeurs si les niveaux recommandéssemblant trop élevés.
3. Repetez les étapes 1 et 2 ci-dessus pour régler chaque niveau de canal.
Mémorisation des niveaux de canaux régés
- Vous pouvezRappeler les niveaux de canaux mémorisés
DLNA Sears >1-Sherwood-Pro
Lecture d'un fichier musique, à chaque fois la touche Haut (▲) ou Bas (▼) est appuyée, le mode d'affichage change. Pour plus de détails sur le mode d'affichage "Selection de "Now Playing" à la page 29. ■Configuration de Windows Media Player ver. 11. 1. Executez Windows Media Player ver. 11 sur votre ordinateur. 2. Sélectionnez "Library" (bibliothèque) dans la barre de menu, puis sélectionnez "Media Sharing" (Partage des fichiers multimédias). 3. Dans la boîte de dialogue "Media Sharing" (Partage des fichiers multimédias), Sélectionnez la case à cocher "Share my media", puis cliquez sur "OK". 4. Dans la liste des périhériques, Sélectionnez cet apparéil puis cliquez sur "Allow" (Autoriser). 5. Cliquez sur "OK" pour fermer la boîte de dialogue. - La configuration de Windows Media Player ver. 11 est terminée. - Vous pouvez écouter les fichiers musique sur toute bibliothèque Windows Media Player ver. 11 à travers cet apparéil.■Remarques :
- Windows Media Player ver. 11 est téléchargeable gratuitement depuis le site web de Microsoft. - Si le pare-feu restreint l'accès, Windows Media Player ver. 11 ne peut pas être configuré.Selection de "Favorites" (favoris)
■Remarque :
- Vous pouvez écouter des stations de radio sur Internet ou des fichiers musique enregistrés dans la liste "Favorites" ou les supprimer. Lorsque le dispositif de mémoire USB est déconnecté ou si vous ordinateur (serveur de media) est hors tension, les fichiers musique stockés dessus ne peuvent pas être lus. 1. Utilisez les touches de NAVIGATION VERS LE HAUT(▲)/VERS LE BAS(▼) pour sélectionner la station ou le fichier souhaite, puis appuyez sur la touche ENTER.  2. Utilisez les touches de NAVIGATION VERS LE HAUT(▲)/VERS LE BAS(▼) pour sélectionner "PLAY", "DELETE" ou "CANCEL", puis appuyez sur la touche ENTER. Exemple:Lecture d'un fichier musique Favorites >1-S UB Lorsque you selectionnez "PLAY", la station ou le fichier musique choisi est lu. Lorsque you selectionnez "DELETE", la station ou le fichier musique choisi est supprimé de la liste "favorites". Lorsque "CANCEL" est selectionnée, votre selection sera annulée. - Lecture d'un fichier musique, à chaque fois la touche Haut (▲) ou Bas (▼) est appuyée, le mode d'affichage change. Pour plus de détails sur le mode d'affichage, voir " Sélection de "Now Playing" à la page 29.Selection de "Settings" (paramétrages)
- Avant d'écouter une radio Internet ou dire des fichiers audio pour la première fois, effectuez d'abord les réglages du réseau, etc. pour obtenir des performances optimes. 1. Sélectionnez l'objet de votre besoin, puis appuyez sur la touche ENTER.   - Chaque fais que la touche de NAVIGATION VERS LE HAUT(▲)/VERS LE BAS(▼) est appuyée, le mode de paramétrage change dans l'ordre suivant: Network General - Sélection de "General", voir page 33.■ Sélection de "Network" (RéSEAU)
- Pour écouter les stations radio Internet, émissions de musique ou des fichiers audio stockés sur votre ordinateur via votre réseau domestique, vous doivent configurer les paramétres réseau en premier.| Netwo >1-Mode | Setrk es |
| Net two >1-DHCP | Modrk | ■ |
■Remarque :
- Parce que les informations suivantes du routeur sont nécessaires, il faut les confirmer avant d'effectuer la configuration manuelle: IP address (adresse IP), Subnet mask (masque de sous-reseau), Gateway (passerelle), DNS.  ① Appuyez sur la touche Haut (▲)/Bas (▼) pour sélectionner le paramètre souhaïte, puis appuyez sur la touche ENTER. - Chaque fois que la touche Haut (▲) ou Bas (▼) est appuyée, le mode de réglage change comme suit.  Exemple: Sélection de "IP"  ② Appuyez sur la touche Flèche gauche (▲)/Droite (▶) pour passer au chiffre souhaïte. - Pour supprimer un chiffre, appuyez sur la touche gauche (▲). Chaque fois que cette touche est appuyée, les chiffres sont supprimés un par un. ③ Appuyez sur la touche Haut (▲)/Bas (▼) pour entrée le chiffre désire. - Chaque fois que la touche Haut (▲) ou Bas (▼) est appuyée, le caractère change comme suit. a ~ z, A ~ Z, 1 ~ 0 et les caractères (@, .space, etc.) ④ Repetez l'etape ② et ③ ci-dessus pour terminer la saisie. Pour confirmer toute saisie, appuyez sur la touche Droite (▶) pour passer au chiffre suivant le plus petit, puis appuyez sur la touche ENTER. - Le menu "Static Mode" sera affché. ⑥ Repetez les etapes ① ⑤ ci-dessus pour entrer les autres parametes. ⑦ Appuyez sur la touche ASSIGN AUDIO (/RETURN) pour returner à l'état précédent.  selectionner "OK" ou "CANCEL", puis appuyez sur la touche ENTER. Lorsque "OK" est selectionné, les paramètres réseau sont appliqués et le menu "Status" sera affché. (Voir "Selection de "Status" (État) ci-dessous). Lorsque "CANCEL" est seLECTIONne, les paramétres reseau ne sont pas appliqués et le menu "Network Modes" sera affché.Sélection de "Status" (État)
- Vous pouvez vérifier les paramétres réseau (teils que mode, adresse IP, GW (passerelle) et serveur DNS) successivement.  - Pour returner à l'etat précédent, appuyez sur la touche ENTER.■Selection de "General" (Général)
 2. Appuyez sur la touche Haut ()/Bas() pour selectionner "Factory Settings" ou "About", puis appuyez sur la touche ENTER. Exemple : Sélection de "Factory Settings"  - Lorsque "Factory Settings" est selectionné, vous pouvez réinitialiser les paramétres "Network" et les stations ou les fichiers audio enregistrés dans la liste "Favorites" par défaut. Lorsque "About" est selectionné, vous pouvez vérifier les informations générales telles que le type de cet apparéil, la version du logiciel et l'adresse MAC. Sélection de "Factory Settings" (Paramétres par défaut) 3. Appuyez sur la touche Haut () / Bas () pour selectionner "OK" ou "CANCEL", puis appuyez sur la touche ENTER. Lorsque "OK" est selectionné, les paramètres par défaut sont rétablis. Lorsque "CANCEL" est selectionne, il n'y aura pas de changement des parametes. Sélection de "About" (A propos) - Vous pouvez vérifier le type de cet apparéil, la version du logiciel et l'adresse MAC successivement.  - Pour returner à l'etat précédent, appuyez sur la touche ENTER.ENREGISTREMENT
- Les signaux numériques à partir de sources "NET/USB", coaxiales, d'entrée optique numérique ou HDMI IN peuvent être écoutedes mais non enregistrés. Lorsque you enregistrrez des signaux analogiques a partir de CD,VIDEO 1 ouVIDEO 2,assurez-vous de selectionner l'entrée analogue. (Pour plus de détails, voir "La source d'entrée est CD,VIDEO 1 ouVIDEO 2" à la page 14.) - Les réglages volume et tonalité (graves, aigus) n'ontaucun effet sur les signaux d'enregistrement.Enregistrement avec TAPE (bande)
1. Sélectionnez l'entrée souhaïée comme source d'enregistrement à l'exception pour TAPE.  2. I'enregistrement sur TAPE. 3. Démarrez la lecture sur l'entrée souhaitation.Copie depuis composants video sur VIDEO 1
1. Sélectionnez VIDEO 2 ou VIDEO 3 comme source d'enregistrement, pas VIDEO 1.  2. Demarrez I'enregistrement sur VIDEO 1. 3. Demarrez la lecture sur l'entrée souhaitee. - Les signaux audio et video depuis VIDEO 2 seront copiés vers VIDEO 1 et vous pouvez les regarder sur le posté telé et les écouter aux enceintes.AUTRES FONCTIONS
Utilisation de la minuterie sommeil
- La minuterie sommeil permet au systeme de continuer à fonctionner pendant une certaine durée avant son arrêt automatique. - Pour régler le récepteur à s'arrête automatiquement après une certaine durée. Réglage de la luminosité de l'afficheur fluorescent
Afficher l'etat de fonctionnement
Durant la lecture,  - Chaque fais cette touche est appuyée, le temps社会发展 change dans cet ordre :  Lorsque you utilisez la minuterie sommeil, " s'allume. Lorsque you utilisez la minuterie sommeil, l'afficheur fluorescent devient faiblement eclairé.  - Chaque fois cette touche est appuyée, la luminosité de l'afficheur fluorescent change dans cet ordre : - En mode d'écran esteint, une pression sur certains boutons permet d'activer l'écran pour afficher le statut de fonctionnement. - A chaque pression sur cette touche, le mode d'affichage change comme suit :  - Lorsque la fonction tuner RDS est disponible dans votre pays. Pour en savoir plus sur les informations en mode FM, voir "Affichage des informations RDS" page 25.CONFIRMATION DE LA FONCTION HDMI
Pour utiliser correctement les fonctions de HDMI, il est conseilé de confirmer les fonctions de commande HDMI possibles sur chaque composant connectée en procédant aux opérations ci-dessous.Remarque:
- Certains fonctions de commande HDMI peuvent ne pas marcher avec certains composants et téléviseurs incompatibles.Avant la mise en marche
- Verifiez que ce recepteur, le téléviseur, le lecteur, etc. sont bien raccordés par cables HDMI. - Vérifiez que la commande HDMI du téléviseur et du lecteur raccordable HDMI est activée. (Pour en savoir plus sur la configuration du téléviseur et lecteur, veuillez consulter leurs modes d'emploi respectifs.) - Reglez le HDMI CONTROL et le POWER CONTROL sur ON pour activer la commande HDMI de ce récepteur. (Pour en savoir plus, veillez consulter la rubrique "REGLAGE DE L'HDMI" page 50.)Confirmation des opérations HDMI de base
1. Mettez tous les composants raccordés par cables HDMI en marche. 2.Faites passer l'entrée TV a l'entrée HDMI raccordee a ce recepteur. 3.Faites passer l'entrée de I'appareil sur la source d'entreee HDMI. - Confirmez que l'image s'affiche et que le son sort correctement des enceintes.Confirmation des fonctions de commande HDMI
1.Mettez tous les composants raccordes par cables HDMI en marche. 2. Eteignez le téléviseur pour acceder au mode veille. - Confirmez que tous les composants sont eteints. 3. Lorsque tous les composants sont eteints, lancez la lecture sur un lecteur (raccordé par cable HDMI). - Confirmez que tous les composants sont en marche et que les entrées de cet apparéil et du téléviseur basculent automatiquement.Configuration du système
Le menu de configuration s'affiche sur l'afficheur fluorescent et vous permit de réaliser facilement la procedures de configuration. Dans la plupart des cas, vous n'aurz a faire cela qu'une seule fois durant I installation et I agencement de vos enceintes, et necessite rarement des modifications ulterieures. Le menu configuration comprend 6 menus principaux: Système, Entree, Configuration des enceintes, Niveau canal, Paramêtres et HDMI. Ces menus contiennent plusieurs sous-menus. ■Remarque: - Vous pouvez effectuer les procédures de configuration du système uniquement si vous Sélectionnez une autre source d'entrée que NET/USB. - Parcourir les menus de configuration - Les explications données ici supposent que vous utilise les de la télécommande pour effectuer les opérations de configuration. Mais vous peuvent également utiliser les touches du panneau frontal. Les touches du panneau frontal qui correspondant à ceux de la télécommande sont illustrées ci-dessous.| Touché de la télécommande | SETUP | ENTER | SEL | SEL | SEARCH.M |
| Touché sur la façade | SETUP | ENTER / MEMO | - TUNE + | - PRESET + | |
| MAIN MENU | - | - | - | ||
Organigramme des menus
Voici I'organigramme des menus :  - Si "RETURN" est selectionné dans un sous-menu, le retour se fait au menu précédent. Si you appuyez sur la touche AUDIO ASSIGN/(RETURN) sur un sous-menu, l'écran revient également au menu précédent. Remarque: Durant les opérations de configuration du système, seules les touches (POWER ON) STANDBY et celles nécessaires à la configuration sont disponibles. CONFIGURATION DU SYSTEME
 - SW MODE(MODE SUBWOOFER) : Pour sélectionner le mode subwoofer requis. TONE: Pour régler la tonalité (graves et aigues). A.P.S (AUTO POWER SAVE [Economiseur d'énergie automatique]): Pour régler la durée de mise hors tension comme vous le souhaitez. - RETURN (Returns) : Pour returner au menu precedent. 1. Utilisez les touches Haut () / Bas () pour selectionner I'elément souhaite.  2. Utilisez les touches Gauche («)/Droite («) pour régler l'élement comme vous le souhaitez. Sélection du mode SUBWOOFER
- Le mode "SW + " n'est effectif que lorsque "FRONT" et "CENTER" sont régles sur "LARGE" et "Sub-W" (Subwoofer) est régle sur "YES" dans le menu SPEAKER SETUP. (Pour plus de détails, reportez-vous à "CONFIGURATION DES ENCEINTES" à la page 42.) NORM : Lorsque les signaux de basses fréquences des canaux sont régés sur "LARGE" sont reproduits à partir de ces canaux uniquement. Dans ce mode, les signaux de basses fréquences qui sont reproduits à partir du canal subwoofer sont uniquement les signaux de basses fréquences LFE (de sources multivoies qui contiennent un canal LFE (effets de basses fréquences), appelé aussi ".1" canal) et les canaux régés sur "SMALL". SW + : Lorsque les signaux de basses fréquences des canaux régés sur "LARGE" sont simultanément produits à partir de ces canaux et du canal subwoofer. Dans ce mode, la gamme de basses fréquences s'étend uniformément dans la salle, mais en fonction de la taille et de la forme de la salle des interférences peuvent survenir et diminuents le volume réel de la gamme de basses fréquences.Selection AUTO POWER SAVE (Economiseur d'énergie automatique)
L'ecomiser d'enerie automatique est une fonction qui et int automatiquement l'appareil et le faire passer en mode veille. Cette fonction est activee lorsqu'aucune touche n'est appuyee pendant une periode qui depasse la durée que vous avez fixe. - Vous pouvez fixer cette période comme vous le souhaitez. OFF 2HOUR (Heure) 4HOUR 6HOUR (Pour désactiver cette fonction)Selection de TONE (TONALITE)
OFF (désacté): Pour écouter de sources de programme sans effet de tonalité. (l'indicateur "DIR" s'allume). ON (activée) : Pour régler la tonalité à votre goût. (l'indicateur "DIR" s'éteint). Lorsque TONE est sur ON (activée) pour régler la tonalité (graves et aigues) ① Appuyez sur la touche ENTER pour acceder au réglage de tonalité.  ②. Utilisez les touches de déplacement HAUT(▲)/BAS(▼) pour sélectionner le mode de tonalité souhaïée.    Selection de BASS ③ Utilisez les touches de déplacement Gauche ()/Droite() pour regler la tonalité souhaïée.  Le niveau de tonalité peut être choisi dans l'intervalle -10 à +10 dB. - En général, nous recommendons de régler les graves et aigues sur 0 dB (niveau plat). - Les réglages à des niveaux de volume extrêmes peuvent endommager vos enceintes.CONFIGURATION DE L'ENTREE
INPUT SETUP  D.IN DIGITAL IN): Pour attribuer les entrées numériques à la source requise. - AUTO (AUTO SURROUND): Pour sélectionner le mode surround auto ou surround manuel. - RETURN (Retourer) : Pour returner au menu précédent. 1. Utilisez les touches Haut ()/Bas() pour selectionner la source d'entrée souhaitee, puis appuyez sur la touche ENTER.  Example) Sélection de VIDEO 2 Selection de DIGITAL IN
- Vous doivent attribuer le composant connecté à DIGITAL IN. (Pour plus de détails, voir "RACCORDEMENT D'ENTREES NUMERIQUES (DIGITAL IN)" à la page 7.) - Vou puez selectionner celie souhaitee parmi OPT (optical), COX 1(coaxial 1), COX 2(coaxial 2) et - - - (analogique). ■Remarques : - Dans le cas où DIGITAL IN est attribuée à plus de deux sources d'entrée, lorsque ces dernières sont sélectionnées, le signal audio numérique sera entendu depuis le même DIGITAL IN. Lorsque le connecteur d'entree HDMI IN est connecte a sua composeant video, le parametre DIGITAL IN n'est pas valide.When selecting the AUTO SURROUND
- Sélectionnez le mode surround auto ou le mode surround manuel en fonction de la manière dont vous allez seLECTIONnez le mode surround. OFF (Désacté): Vous pouvez seLECTIONner un mode surround différent parmi les modes disponibles pour le signal en entrée à l'aide de seLECTION du mode surround (> / < ) .(Pour plus de détails, voir "SeLECTIONNZ le mode surround manuel en appuyant sur la touche AUTO/MANUAL du panneau avant" à la page 17.) ON (acté) : Le mode surround optimal sera automatiquement sélectionné en fonction du format du signal en entrée. ■Remarques Lorsque la touche SPEAKER est reglee sur Off ou "CENTER(CENTRE)" et "SURR(Surround)" ne sont pas regles sur "NO", le mode surround auto n'est pas valide. - Mème lorsque le mode surround auto est sélectionné et le même type de format de signal numérique est reçu, le mode surround optimum peut varier en fonction du type d'enceinte s'il est régé sur "NO" ou pas. Lorsque le mode surround auto est selectionne, les modes surround autres que le mode surround optimum ne peut etre selectionne.CONFIGURATION DES ENCEINTES
- Àpèras avoir installé le récepteur et connecté tous les composants, vous devez régier les enceintes pour obtenir lessons acoustiques optimum en fonction de la vieille environnement et de leur disposition. - Vous devez aussi régler les enceintes à chaque fois que vous changez leur emplacement ou leur disposition.  - SPEAKER CONFIGURATION (configuration des enceintes) : Pour selectionner la taille des enceintes connectées. CROSSOVER: Pour selectionner la fréquence du crossover. - SPEAKER DISTANCE (distance des enceintes): Pour entrer la distance entre la position d'écoute et chaque enceinte, cela peut de définir automatiquement le temps de retard et d'obtenir une lecture surround - RETURN (Retourer) : Pour returner au menu précédent.Sélection de CONFIGURATION
1. Utilisez les touches Haut (▲)/Bas (▼) pour selectionner "SPK CONFIG", puis appuyez sur la touche ENTER.  2. Utilisez les touches Haut () / Bas() pour selectionner l'enceinte souhaitee.  3. Utilisez les touches Gauche (▲)/Droite (▶) pour régler l'enceinte comme souhaïte.  - Sélectionnéz l'une des options suivantes en fonction du type de vos enceintes. - Enceintes Frontale, Centrale et Surround : LARGE : Sélectionnéz cet élément si vous branchez des enceintes pouvant restituer dessons sous la fréquence de crossover. SMALL: Selectionnez cet element si vous branchez des enceintes ne pouvant pas restituer dessons sous la fréquence de crossover. Une fois cette selection effectuee, lessons sous la fréquence de crossover sont transmis au subwoofer ou aux enceintes régles sur "LARGE" (si vous n'utilise pas de subwoofer). NO: Sélectionné ceci si aucune enceinte n'est raccordée. Une fois cette sélection effectuee, lessons sont transmis aux enceintes qui ne pas reglees sur "NO". - Subwoofer: YES : Sélectionnez cette option pour transmettre les signaux LFE et les basses fréquences des canaux régés sur “SMALL” à partir du subwoofer. NO : Sélectionnez cette option si le subwoofer n'est pas raccordé. Les basses fréquences sont restituees par les autres enceintes.■Remarques :
- Si les enceintes sont régles sur "SMALL", vous nevez regler leur fréquence crossover en fonction de leurs caractéristiques de fréquence. (Pour en savoir plus, veillez consulter la rubrique " Sélection du CROSSOVER" à la page 44.) Lorsque F" (avant) est regle sur "SMALL, "CENTER"(Centre) et "SURR"(Surround) ne peuvent pas etre regles sur "LARGE" et le "SUB-W" (Subwoofer) ne peut pas etre regle sur "NO". 4. Repetez les étapes 2 et 3 jusqu'à ce que les enceintes soient toutes régles sur le mode requis.A propos des tailles d'enceinte
- Ne sélectionnez pas "LARGE" ou "SMALL" en fonction de la taille réelle d'une enceinte, mais en fonction de la capacité de l'enceinte à restituer les signaux BASSE FRÉquence (son grave sous la fréquence définie sur le menu "CROSSOVER") signals. - Si vous n'êtes pas sur de vous, faites des tests comparatifs sur les deux réglages (en baissant suffisament le volume pour ne pas endommager les enceintes) afin de découvertir le réglage adapté.Sélection du CROSSOVER
- Si les enceintes sont régles sur "SMALL", vous devez régler leur fréquence crossover en fonction de leurs caractéristiques de fréquence. 1. Utilisez les touches de NAVIGATION VERS LE HAUT(▲)/VERS LE BAS(▼) pour sélectionner "CROSSOVER", puis appuyez sur la touche ENTER.  2. Utilisez les touches de NAVIGATION GAUCHE( /DROITE () pour regler la fréquence de crossover.  Pour regler la frquence de crossover, vous avez le choix entre 40, 50, 80, 100, 150 et 200HzA propos de la fréquence de crossover
- Lorsque les enceintes sont régles sur "SMALL", les basses fréquences sur ces canaux situées pour la fréquence de crossover sont restitues à partir du subwoofer ou des enceintes avant régles sur "LARGE" (si vous n'utilise pas de subwoofer). - Veuillez consultier le mode d'emploi des enceintes à connecter. Si la plage de fréquence de votre enceinte est de 100 Hz à 20 kHz, il faut régler la fréquence de crossover sur 100 Hz (ou légarement plus).Sélection de SPEAKER DISTANCE
1. Utilisez les touches HAUT(▲)/BAS(▼) pour selectionner "SPK DISTANCE", puis appuyez sur la touche ENTER.  2. Utilisez les touches de déplacement HAUT(▲)/BAS(▼) pour sélectionner l'élement souhaité.  Remarque: - Vous ne pouvez pas selectionner le subwoofer alors que les enceintes sont regliées sur "NO". 3. Utilisez les touches de déplacement GAUCHE(▲)/DROITE(▲) pour régler l'élement comme souhaïet.  Selection de I'unité de mesure -You pouvezCHOISIR le metre ou le p - Une fois l'unité de mesure estcision, les distances sont automatiquement transformées dans cette unité. Selection de distance - Vous pouvez régler la distance entre 0,1 à 9.0 mètes avec un pas de 0,1 mètre (ou 0,5 ~ 30 pied avec un pas de 0,5 pied). 4. Repetez les étapes 2 et 3 ci-dessus jusqu'à ce que toutes les distances soient régles comme souhaite.A propos de la distance des enceintes
Dans l'idéal, lors d'écoute de sons surround multivoies depuis des sources Dolby Digital ou DTS etc., l'enceinte centrale et les enceintes surround devraient être à la même distance de la position d'écoute que les enceintes frontales. En entrant les distances entre la position d'écoute et chaque enceinte, les retards de l'enceinte centrale et des enceintes surround seront automatiquement régés pour creer un environnement d'écoute virtuel de manière que l'enceinte centrale et les enceintes surround étaient à leurs positions ideales respectivement. CONFIGURATION DU NIVEAU DES CANAUX
Remarque :
- En fonction des paramètres des enceintes ("NO", etc.), certains canaux ne peuvent pas être seLECTIONNés.Régler le niveau du canal courant
- Vous pouvez régler le niveau du canal courant comme vous le souhaitez. Les niveaux régles sont simplement mémorisés dans la mémoire utilisateur ("CAL"), et non dans la mémoire de préréglages ("REF 1", "REF 2"). - Àpres avoir régèle le niveau de chaque canal à l'aide de tonalités de test, réglez les niveaux en fonction des sources de programmes ou selon vos goûts. (Pour plus de détails, voir "Réglage du niveau de chaque canal à l'aide de TEST TONE (tonalités de test)" à la page 19.) 1. Utilisez les touches HAUT(▲)/BAS(▼) pour selectionner le canal souhaite.   Exemple : Sélection des LFE d'une source Dolby Digital CH LVL SETUP 30 >D 0dB 2. Utilisez les touches GAUCHE(▲)/DROITE(▲) pour régler le niveau du canal sélectionné ou la source de programmes LFE comme souhaïte.  La plage de reglage du niveau LFE (Effets basse fréquence) va de -10 à 0 dB et les niveaux des autres canaux va de -15 à +15 dB. - En général, nous recommendons de régler le niveau LFE à 0 dB. (Bien que, le niveau LFE recommandé sur quelques logiciels DTS plus récents est de -10 dB). Diminuez les valeurs si les niveaux recommandéssemblant trop élevés. 3. Repetez les étapes 1 et 2 ci-dessus pour régler chaque niveau de canal.Mémorisation des niveaux de canaux régés
- Vous pouvez- Utilisez les touches de déplacement HAUT(▲)/BAS(▼) pour selectionner MODE ~ (mode mémoire).
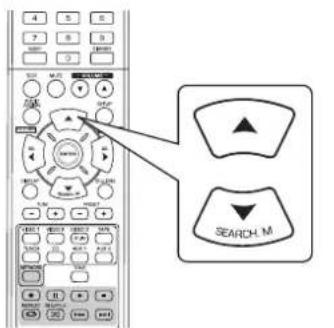
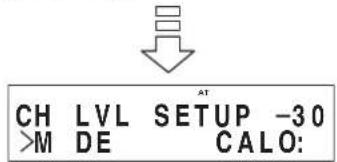
-
Il se peut que "CAL" soit affichée à la place de "REF 1" ou "REF 2".
-
Utilisez les touches GAUCHE(↓)/DROITE(>) pour selectionner REF 1 ou REF 2.
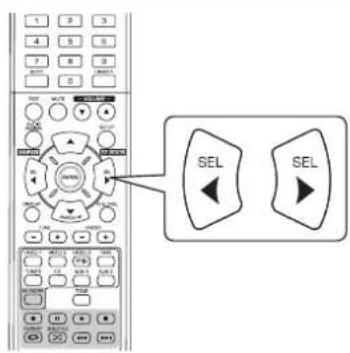
- Les niveaux de canaux mémorés dans la mémoire de préréglages sélectionnée sont rappelés.
CONFIGURATION DES PARAMETRES
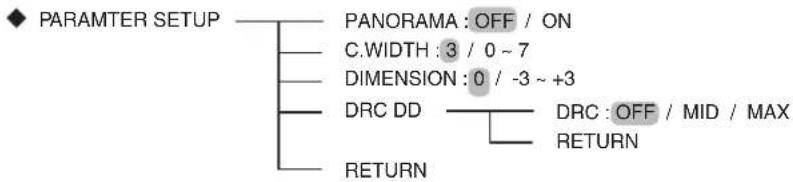
- PARAMÉTRES AUDIO DOLBY PRO LOGIC II : Pour régler différents paramètres audio Dolby Pro Logic II et obtenir l'effet (PANorama, C. WIDTH (CENTRE LARGEUR), surround optimal. DIMENSION)
- DRC DD (Dynamic Range Compression) [gamme de compression dynamique] : Pour régler la gamme de compression dynamique qui atténue facilement lessons écoulés à volumes élevés.
- RETURN (Retourer): Pour-retourer au menu précédent.
Selection des paramètres “PANorama”, “C.WIDTH”, “DIMENSION”
■Remarque :
- Vous pouvez régler différents paramètres audio Dolby Pro Logic II et Obtener l'effect surround optimal.
Le réglage des paramètres n'est valide que lors d'écoute de musique en mode Dolby Pro Logic II. - Utilisez les touches de NAVIGATION VERS LE HAUT(▲)VERS LE BAS(▼) pour selectionner le paramètre requis.

- Utilisez les touches de NAVIGATION GAUCHE( / DROITE( ) pour regler le parametre selectionné.
■ Sélection du mode “PANorama”
Ce mode allonge l'image stéreo avant pour inclure les enceintes surround et créé un effet enveloppant d'exception avec traitement d'image létal. Sélectionnez "OFF" ou "ON"(valeur par défaut : OFF).
■ Sélection de la commande "C. WIDTH (LARGEUR CENTRE)"
Ceci peut etre reglee l'imagine centrale pour qu'on ne puisse l'entendre que sur I'enceinte centrale, et qu'elle sote sur les enceintes gauches/droites comme une image fantome, ou sur les trois enceintes avant a divers degrés. Cette commande peut etre reglee par 8 echelons de 0 a 7 (valeur par defaut : 3).
■ Sélection de la commande “DIMENSION”
Ceci permet un réglage progressif du champ sonore soit vers l'avant, soit vers l'arrière. Cette commande peut être réglée par 7 échelons de -3 à +3 (valeur par défaut : 0).
- Répétez les étapes 1 et 2 ci-dessus pour régler les autres paramètres.
Selection de "DRC DD"
- Cette fonction compresse la gamme dynamique des parties precedement specifiées des pistes sonores Dolby Digital (à un volume extrémenté élevé) pour minimier les différences en volume entre les parties specifiées et non spécifiées. Ceci permet d'entendre facilement, la nuit, toute la bande sonore d'un film à bas volumes.
■Remarques :
Le mode nuit n'est valide que lorsque des signaux numériques de sources de programmes Dolby Digital ou DTS sont entrés. Sur certains logiciels Dolby Digital, ces réglages peuvent ne pas fonctionner.
- Utilisez les touches de NAVIGATION GAUCHE(▲)/ DROITE(▲) pour régler la compression de plage dynamique.
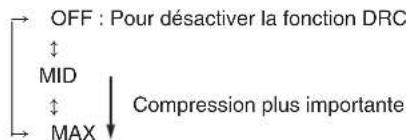
REGLAGE DE L'HDMI

HDMI(HDMI AUDIO OUT): Pour restituer les signaux audionumeriques à partir du connecteur de sortie HDMI MONITOR OUT.
- CEC(HDMI CONTROL) : Pour associier les opérations avec des composants raccordés aux connecteurs HDMI et compatibles avec la commande HDMI.
- POWER(POWER CONTROL): Pour associier le statut Marche/Arrêt de cet apparéil aux autres apparèils.
- RETURN: Pour revenir au menu précédent.
- Utilisez les touches de NAVIGATION VERS LE HAUT(▲)/VERS LE BAS(▼) pour sélectionner l'objet requis.

- Utilisez les touches de NAVIGATION GAUCHE(▲)/DROITE(▲) pour régler l'élement selectionné.
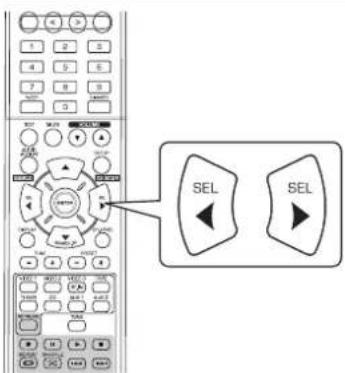
Selection de la sortie HDMI AUDIO OUT
Le raccordement HDMI peut transmettre des signaux videonumeriques et signaux audionumeriques décompressés.
Selon la restitution ou non de l'entrée de signaux audionumeriques sur HDMI IN a partir de la sortie HDMI MONITOR OUT sur ce recepteur, vous nevez regler la sortie HDMI AUDIO OUT comme il convient.
AMP: Pour ne pas sortir les signaux audionumeriques
HDMI à partir de la sortie HDMI MONITOR OUT de ce récepteur. De ce fait, ces signaux sont audibles sur les enceintes branchées sur ce récepteur.
THROUGH : Pour restituer les signaux audionumeriques HDMI a partir de la sortie HDMI MONITOR OUT. De ce fait, ces signaux sont restitués a partir des enceintes de votre téléviseur.
■Remarque :
- Lorsque la sortie HDMI AUDIO OUT est sur THROUGH, aucun son ne sortira des enceintes raccordées à cet apparéil.
Selection de la commande HDMI
- La fonction de commande HDMI permet d'associer la selection de l'entrée de cet apparéil au fonctionnement des éléments connectés.
OFF: Pour ne pas utiliser la fonction de COMMANDE
HDMI.
ON: Pour utiliser la fonction de COMMANDE HDMI.
Lorsque le HDMI CONTROL est sur ON, vous pouvez également utiliser la fonction ARC(Audio Return Channel), ce qui permet au télévisuer d'envoyer des signaux audio vers ce recepteur par un cable HDMI.
■Remarques :
- La fonction de commande HDMI peut ne pas marcher selon le composant raccordé et ses réglages.
- Pour utiliser la fonction ARC, il faut disposer d'un téléviseur supporting la fonction ARC.
- Pour en savoir plus sur la commande HDMI et la commande de puissance, veuillez consulter la rubrique "CONFIRMATION DE LA FONCTION HDMI" page 36.
Selection de la COMMANDE MARCHE/ARRET
- La fonction de commande Marche/Arrêt permet d'associer le statut de cet apparéil aux commandes MARCHE/ARRET et démarrage de la lecture des apparéils raccordés.
OFF: Pour ne pas utiliser la fonction de COMMANDE MARCHE/ARRET.
ON: Pour utiliser la fonction de COMMANDE MARCHE/ARRET.
■Remarque :
- La commande MARCHE/ARRET (POWER CONTROL) ne peut etre reglee que si la COMMANDE HDMI (HDMI CONTROL) est reglee sur ON.
Guide de dépannage
Si le récepteur ne fonctionne pas convenablement, reportez-vous au tableau suivant avant de l'emmerer pour réparation. Si l'anomalie persiste, essayez de la résoudre en éteignant puis en rallumant le récepteur. Si cela est sans effet, prenez contact avec votre revendeur. En aucune circunstance, ne tentez jamais de réparer le récepteur par vous-même. Cela entraîne l'annulation de la garantie.
| PROBLEME CAUSE POSSIBLE REMDE | ||
| Aucune alimentation | • Le cordon CA est débranché. • Mauvais branchement à la prise secteur ou cette dernière est morte ou pas activée. | • Branchez le cordon correctement. • Vérifiez la prise secteur à l'aide d'une lampe ou d'un autre apparil. |
| Absence de son | • Les cables d'enceintes sont débranchés. • Le niveau de volume global est régé au minimum. • La touche MUTE est mise sur ON. • Aucune source convenable n'a été sélectionnée. • Les raccordements des cables entre les composants ne sont pas corrects. • La sortie HDMI AUDIO OUT est sur THROUGH. • Les paramètres audio sont incorrects. | • Vérifiez les raccordements des enceintes. • Réglez le volume. • Appuyez sur la touche MUTE pour rétablier le son. • Sélectionnez une source d'entrée appropriée. • Raccordez les cables comme il convient. • A mesure sur AMP. (Pour plus de détails, voir "Sélection de la sortie HDMI AUDIO OUT" à la page 50.) • Entrez des paramètres corrects. (Pour plus de détails, voir "CONFIGURATION DE L'ENTREE" à la page 41.) |
| Absence de son des enceintes surround (ou hauteur avant) | • Le mode Surround est désactivé (mode stéréo). • Les niveaux de volume global et de surround sont au minimum. • Une source monaurale est utilisée. • Les enceintes surround sont régées sur "NO". | • Sélectionnez un mode surround. • Réglez les niveaux de volume global et de surround. • Sélectionnez une sources stéréo ou surround. • Sélectionnez un paramètre pour les enceintes surround. |
| Absence de son de l'enceinte centrale | • Mode stéréo, etc. est sélectionné. • Les enceintes centrales sont régées sur "NO". • Les niveaux de volume global et central sont au minimum. | • Sélectionnez le surround souhaité. • Sélectionnez un paramètre pour l'enceinte centrale. • Réglez les niveaux de volume global et central. |
| Pas d'image | • Les connexions video entre cet apparéil et le l'écran télé ne sont pas régées correctement. • Aucune source convenable n'a été sélectionnée. | • Effectuez les connexions video correctement. • Sélectionnez une source d'entrée appropriée. |
| Pas d'image avec une connexion HDMI | • Les connexions HDMI entre cet apparéil et le l'écran télé ne sont pas régées correctement. • L'écran télé ou les autres équipements ne prenant pas en charge HDCP. | • Effectuez les connexions HDMI correctement. • Cet apparéil ne reproduit des signaux video que si les équipements connectés prenent en charge HDCP. |
| Bruit d'image/image déformée | • Le format video de l'écran télé, lecteur DVD, etc. est différent de PAL. | • Changez le format video en PAL. |
| Impossible de receiveoir de stations | • Aucune antenne raccordée. • La fréquence de la station souhaitée n'est pas syntonisé. • L'antenna est mal orientée. | • Raccordez une ANTEN. • Sytonisez à la fréquence de la station souhaitée. • Réorientez l'antenne et réessayez la symtonisation. |
| Impossible de receiveoir de stations prérgliées | • Une fréquence incorrecte de station a été mémorisée. • Les stations mémorisées ont été effacées. | • Mémorisez des fréquences correctes de stations. • Mémorisez de nouveau les stations. |
| La réception FM est mauvaise | • Aucune antenne raccordée. • L'antenna est mal orientée par rapport à uneICA. • Signaux faibles. | • Raccordez une ANTEN. • Changez l'orientation de l'antenne. • Installes une ANTEN FM extérieure. |
| Des craquements et des sifflements sont produits en permanence ou par intermittence pendant la réception AM, surtout la nuit. | • Ces bruits peuvent être dus à des moteurs, à des lampes fluorescentes, à des éclairs, etc. | • Éloignez le récepteur de ces sources de bruit. • Installes une ANTEN AM extérieure. |
| Connexion au réseau impossibly. | • Pas de réseau. • Le pare-feu de l'ordinateur ou du routeur est activé. | • Vérifiez que le réseau fonctionne. • Vérifiez les paramètres du pare-feu de l'ordinateur ou du routeur. |
| Transmission radio internet impossible à restituer. | • Un cable Ethernet n'est pas connecté correctement ou le réseau est déconnecté. • La transmission du programme est effectué dans un format incompatible. • La station de radio internet ne diffuse pas actuellément. | • Vérifiez le statut de la connexion. • Seuls les programmes de radio Internet aux formats MP3 et WMA passent sur cet apparéil. • Placez-vous sur une station de radio qui diffuse. |
| La télécommande ne marche pas. | • Les piles sont absentes ou épipuisées. • Il y a un obstacle entre la télécommande et son capteur. | • Remplacez les piles. • Enlevez l'obstacle. |
Specifications
SECTION AMPLIFICATEUR
- Puissance de sortie, mode stéreo, 6 Ω, THD 0,7%, 40 Hz~20 kHz | 2×100 W
Distorsion harmonique totale, 6Ω, 100 W, 1 kHz | 0,05 %
Distorsion d'intermodulation 60Hz:7kHz = 4:1 SMPTE,6Ω,100W 0,1%
Sensibilité d'entrée, 47 kΩ Ligne (CD, BANDE, VIDEO) | 250 mV - Rapport signal sur bruit, réseau IHF "A"
Ligne (CD, BANDE, VIDEO) | 95 dB - Réponse en fréquence Ligne (CD, BANDE, VIDEO), 20 Hz~50 kHz | +0 dB, -3 dB
- Niveau de sortie ENR BANDE, 2,2 kΩ | 250 mV PRE OUT (Subwoofer), 1 kΩ | 1,5 V
Commandes Graves/Aigus, 100 Hz/10 kHz ±10 dB
Mode surround, uniquely un canal commande Puissance de sortie frontale, 6 1 kHz, THD 0,7 % | 100 W / 100 W Puissance de sortie centrale, 6 1 kHz, THD 0,7 % | 100 W Puissance de sortie Surround, 6 1 kHz, THD 0,7 % | 100 W / 100 W
SECTION AUDIO NUMERIQUE
- Fréquence d'échantillonnage | 32, 44,1, 48, 96 kHz
- Niveau d'entrée numérique Coaxial, 75 Ω | 0,5 Vp-p Optique, 660 nm | -15 ~ -21 dBm
SECTIONVIDEO
- Format Video | PAL
- Sensibilité d'entrée (=Niveau de sortie), 75 Ω
Video (Composite (normal)) | 1 Vp-p
Connecteur HDMI 19 pins
SECTION SYNTONISEUR FM
- Plage de syntonisation | 87,5 ~ 108 MHz
Sensibilité utilisable, THD 3%, S/N 26 dB | 12,8 dBf
Seuil de sensibilité à 46 dB, mono/stéreo | 20,2 / 45,3 dBf
Rapport signal sur bruit, 65 dBf, mono/stereo | 55/50 dB
Distorsion harmonique totale, 65 dBf,1 kHz, mono/stereo | 0,5/1,0% - Réponse en fréquence, 30 Hz~12 kHz | ±3,0 dB
- Séparation stéreo, 1 kHz | 30 dB
Rapport de capture | 4 dB - Réjection Fréquence Intermédiaire | 80 dB
SECTION SYNTONISEUR AM
- Plage de syntonisation | 522 ~ 1611 kHz
Sensibilité utilisable | 500 iV/m
Rapport signal sur bruit 40 dB - Sélectivité 25 dB
GÉNÉRALITÉS
- Alimentation | 230 V ~ 50 Hz
- Consommation | 200 W
Dimensions (LxHxP, parties saillantes incluses) 435x143x359 mm (17-3/8x5-5/8x14-1/8 pouces) - Poids (Net) | 8,9 kg (19,6 livres)
Remarque : a cause des améliorations continues, la conception et les caractéristiques sont sujettes à modification sans préavis.
BVeDeHne
NEPED3KCNJYATAUENYCTPOINCTBA03HAKOMbTECb CO CJEUYIOUMN NOLOXEHNA


BHIMAHNE CHM3NTb ONACHOCTb NOPAXEHN 2EETKTPYHECKM TOKOM, HE CHIMAYTE KpbIUKy (MIIN TbIbHyIO PAHEMb). BHYTPN YCTPOCTBCTA HET DETALJE, O6CLNYKBHME KOTOPBX DOLJHXO PIPBOBDITBCR POJIb3OBATEJIEM. PEMOH TYCPOCTBA DOLJIXE OCUYECTBILTCBc KBAJINPHUMPOBAHHIM NEPCOHAIOM.

DaHHb CmBBOI npEynpeXdaeT noB3oBaTeHn O HANHIN HEN3ONIPOBAHbIX NCTOHNKB "OnaCHOROp yPOBHn HApRKeHn B YcTpoCtBE, KOTOpBMOKet 6bItb DOCTaOHTHO BBCOKIM, TTObblnpdTabJIbPnCK NOPaKeHn 3JNEKTPNueCeKM TOKOM.

DaHHB CmBON npeDynpeKdaeT noJIb3oBaTeIaO hauHnB BaxKbXb INCHTPKcNl NO 3KcPnYaTaUcn I o6CbNyKBaHIO (peMOHTy) B cOpNOBtJeBHOJ DOKyMEHTAQUcY cTPOINCTBA.
PNEpyPEXEHEH: IJI R CHINKENI ONACHOIN BO3HNKHOBENI NOXAPA NII NOPAXEHN 3JEKTPUeCKM TOKOM, HE DONYCKAITE NONADAHN KANEb BOdb BHYtpb YCTPOCTBA NII BO3DEJCTBn BbICOKO YPOBH BIAJXHOCTN.
Mepb npedoctoopoxhoctn npu yctahOBke
PpmeHHe: B cIax paccnBaHn TEnnoTbHe pa3MeaAte yctpoCTBO B 3akpbITOM npocTaHCTBe, HAnpMep, B KHXKHM WkaCyH Npyrom 3akpytOM MeCTe. CneyET y6eJntBcA,HTO Bb OCTabNIO DOCTaTOHoe npocTaPCHCTBO BOKpyr daHHoro yctpoCTBa paBHoe nN 60nbuee no a3mepam, KOTopBie npbeDeHb Hnke. C neboi, npaboi n 3aDHei CTOPOH: 20 cm OT bepxHe ianeHn: 40 cm
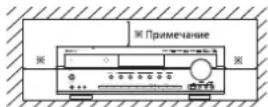
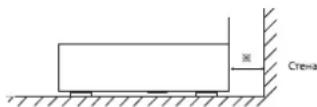
He nepekepbiaTe BEHTnlaOnHHbIe OTBepCTHn HcTAbTe Ha yctpoNCTBO pyroe o6opyoBaHne.
MEPbI BE3ONACHOCTN
| EBPONA ABCTPANIA | 220 B -240 B | Посавлисы в Бостралиу усторійся в Астралиу усторійся впгдзаизчесь вдя работы толъ крпногожени поимен Horo ТOKа 230 B. Для обсpenчения 663олачно работы усторійся впгдзаизчесь вдя работы толъ КOTКОПТСТНБЛштЕКР, KOTOPь BXODITВ COMПЛКЕТ Посавлики, HeobxodIMBOCTABNAYTOLьВСТАДТПУЗФИЗМЛЗКETКИЗССССССССССССССССССССССССССССССССССССССССССССССССССССССССССССССССССССССССССССССССССССССССССССССССССССCS Спосте мдамшил повдаки.Уддиніпьсьмь CBNTDAHOBHUMCSTDAHOBHUMCSTDAHOBHUMCSTDAHOBHUMCSTDAHOBHUMCSTDAHOBHUMCSTDAHOBHUMCSTDAHOBHUMCSTDAHOBHUMCSTDAHOBHUMCSTDAHOBHUMCSTDAHOBHUMCSTDAHOBHUMCSTDAHOBHUMCSTDAHOBHUMCSTDAHA ТСТЕМДОДТПОДТПОДТПОДТПОДТПОДТПОДТПОДТПОДТПОДТПОДТПОДТПОДТПОДТПОДТПОДТПОДТПОДТПОДТПОДТПОДТПОДТПОДТПОДТПОДТПОДТ ПОДТПОДТПОДТПОДТПОДТПОДТПОДТПОДТПОДТПОДТПОДТПОДТПОДТПОДТПОДТПОДТПОДТПОДТПОДТПОДТПОДТПОДТПОДТПОДТПОДТIPОДТПОДТПОДТПОДТПОДТПОДТПОДТПОДТПОДТПОДТПОДТПОДТПОДТПОДТПОДТПОДТПОДТПОДТПОДТПОДТПОДТПОДТПОДТПОДТПОДТSPОДТПОДТПОДТПОДТПОДТПОДТПОДТПОДТПОДТПОДТПОДТПОДТПОДТПОДТПОДТПОДТПОДТПОДТПОДТПОДТПОДТПОДТПОДТПОДТПОДТPPОДТПОДТПОДТПОДТПОДТПОДТПОДТПОДТПОДТПОДТПОДТПОДТПОДТПОДТПОДТПОДТПОДТПОДТПОДТПОДТПОДТПОДТПОДТПОДТПОДТPОДТПОДТПОДТПОДТПОДТПОДТПОДТПОДТПОДТПОДТПОДТПОДТПОДТПОДТПОДТПОДТПОДТПОДТПОДТПОДТПОДТПОДТПОДТПОДТПОДТPSOДТПОДТПОДТПОДТПОДТПОДТПОДТПОДТПОДТПОДТПОДТПОДТПОДТПОДТПОДТПОДТПОДТПОДТПОДТПОДТПОДТПОДТПОДТПОДТПОДТПOДТПОДТПОДТПОДТПОДТПОДТПОДТПОДТПОДТПОДТПОДТПОДТПОДТПОДТПОДТПОДТПОДТПОДТПОДТПОДТПОДТПОДТПОДТПОДТПОДТ ПСОДТПОДТПОДТПОДТПОДТПОДТПОДТПОДТПОДТПОДТПОДТПОДТПОДТПОДТПОДТПОДТПОДТПОДТПОДТПОДТПОДТПОДТПОДТПОДТПОДТPGOДТПОДТПОДТПОДТПОДТПОДТПОДТПОДТПОДТПОДТПОДТПОДТПОДТПОДТПОДТПОДТПОДТПОДТПОДТПОДТПОДТПОДТПОДТПОДТПОДТPGODTPODTPPODTPPODTPPODTPPODTPPODTPPODTPPODTPPODTPPODTPPODTPPODTPPODTPPODTPPODTPPODTPPODTPPODTPPODTPPODTPPODTPPODTPPODTPPODTPPODTPPODTPPODTPPODTPPODTPPODTPPODTPPODTPPODTPPODTPPPODTPPODTPPODTPPODTPPODTPPODTPPODTPPODTPPODTPPODTPPODTPPODTPPODTPPODTPPODTPPODTPPODTPPODTPPODTPPODTPPODTPPODTPPODTPPODTPPODTPPODTPPODTPPODTPPODTPPODTPPODTPPODTPPODTP |
BHIMAHNE
IINObecneHnIIOCTaTOHHOBHTMNAHBNOKpyYCTPOHCTBaHeo6xOIMMO OCTABITCBc06DHOpeNpOCTPAHCTBO.
- He yctaHABINBAIye YCTOPOHCTBO CIMUKOM XAPKHX NIN XOONIOBHX MECTAX, KOToPbIE NOIDBeXeHb BO3EeCTBNIO PIPMIX COJNEHbIX NIIeH NIN HArpeBaTeJIbIX npNpOB.
IaN03eAte Bo3dECTBnHa yCtPORcTBO BbCOKO YoBHO BbAxAHOCHTn, a TAKKe NOpanadHbV CTOPTBC BOuN HbYbn.
- He donyckaIte nonaDaHnB yctpoiCTBO noCTOPoHHnx npedmetOB.
He boknpyTe BeHTNIJIaIIO TYTEM nepeKpbTbTHe BHTNIJIaIOHHbIX OTBepCTHn
paJIINHbIMN INPEdEMETAM, HApHMep FA3eTM, CKATEpTBIO, 3aHaBeckAMn I.T.D.
He dOnyCAeTcR yCTaHABIMBaTb HA yCTpoIECTBO OKPbITbIEKTOCHMKN OTHN,
HApHMep 3aOKeHNbIE CBVM.
PyrnnnnaaHnnoB0anbHexbatapei, noxanyntca, coNIOaIae npraaIIno opaneKpykauo cpeDJI.
He donnyckaye, YTO6bI BO BPEM RAoBtBu yctpoCTBa Ha Hero Kanana Boda IINI nonpanada b6b3n.
H DojnyckAeTcYCTABHJMAHTb HAYCTPOBCTAHANHOJIENHHBxKJDKCtBOI npdEMTeB, HApHMeP, Ba3b.
He NyckaTe NonaaHnHa YcTpoCTBO INCkETNUIDoB,5e3HOaI pactBOPTenE.
HmKoemCn cyuea he pa56paitee HbeCHOTcmeHbMeHHBv CHTpCTBO. TIpMmehauan ana Kafabena nntahana nepehemooTOKA hncua hnohpo3
JaKe eCNIyCTPOIcTBO BbIKIOueHNOO OCTaTeCR NOKIIIOeHHBM K CETN 3JEKTPOINITAHN, NOKA OHO NOKIIIOeHNO K HACTEHNO pO3eTKE.
YTObI NOHIOCTBIO OTKIOHTB YCTPOIECTBO OT CETN3NEKTPOMTAHRA, BbHBTE WENTENCEIBHYO BINKY NACHTEHHO p03ETK.
PirachtopeyctbBA y6edTeB b HauHnIerKoro DoCTya K pO3eTKNepehemeroHoro TOKa, KOtOpYc Bbl cNcNb3eTy.
EcmYcTPOCTBOHeMnOJIb3yETCRBTeYEHMeIITeJIbHOBPOBEMH,BbHbTe WNTENCEMbHYIOBNKHaCtEHNOp3ETKN.

NtHFOPMaUNI ANONB0ATenEN OcOpey HYNTHAAMINCNIOHNBOAHORHO 6OOPYDBAHNAI 6bATEPAE
DAnHHBc CMMBOHbI HnKdINHx, yNkOBKB WmWnCOnpBOOcIeTHeBbIX DoKMyHTax O3HaVHOT, YTONCIOJIbOBAHTBe 3NeKTPWcckKe I NKeKTOPhHO BPiN6OpbyI aTAKKIE BAKyMnYrTOHpBbI bATEApEN,doJNCHbYtINMSPOBAtbcOTeJIbHO OTpyHIX sbTObIX bTOXoDB. B cENPAHADNEXAaEeNEpeBaOTKnMOJIb3OBAHbIX hN3EINbI bATEApEN, NOxAIyCTA, OTHOCITE IN B COOTBETCTByUQIe MnyKTb CbOPBa CooBTETCBMI CaAMHIaHNOAHBJMbI 3AKOHDoTeBbCTOM.
3a Chet npabnHbN YTNlNAZuHN N3dNn H batape Bbl NOMoKeTe coxpaHHTb YIeHHBe pceCybN INpDeTepaHTNb KAKHeJIHO BO3MOKHeB HeReTHAIBN BO3DcTBNa H 3doPobBe YchOBeKa OKpykAooYIO cpey, KOtOpHE MOrTy BO3HKnHYb PB e3yIbTaTE HeHaNDNeKaue Nepepa60Tkn OTXoJDb.
INI NONYEHHN DONONHTeNBbIX CBeDEHNI O c6ope INepeBAOTKe MNOJIb30BaHNbIX MdENII N Batapei,OBpatNTcB K MeCTbHM ROPoDcKHM BnACTM,B CnJyDb NO nepeBAOTKe OTXoDBIKN NIO MEcTYPOKNYKYNCTOPICTB.
[CtrlEeHb06yIYHmIaHnIeH3IeH3B 4dpTHx CtpHaHx 3a HpeIeIaHmE FapoeHekKoTcOeH3]
AnHnHe CmBMOIbI DeiCTBHTENBbl TOnBko B CTpAHax
Ebponeckoro CoKo3a.EcnH Heo6xOIMMa YtINN3aUNM H3dEnnA
0opatNTBe K MCTBbHM BnACTm HnDnEPy 3a NOnyEHMe
WhOpmauO npabInbHOM CnOCObe ytINN3aUN.
IIpnHcMaeHne Ia CmBIOA kAKyMjTApObX 6batape (BAHHHHX
HPnmeCmBIOB)
3AHK「PbIoI,CHCMBOHAKMYJITOPHEX6BATAPEY kya3BaBaeHTaHO,TOYDAHAN6BATApeCdoEKPDTCBHNEH.


CODEPKAHNE
BvBeHne
-PEPeI3KcJIYATAUHIEYCTBOOHA3HAKOMbTECbCOCLyIOUMNIOJIOXEHNRM1 2
IopKIOUeHnCnCTembl 4
3nementbI ynpabJeHna nepeDne nanei 10
DnCTaHcHOnHO ynpabHeHHI 12
DAJIbHOCTbPA5OTbIpybTAINCTAHUHNOHFOYIPABIEHnI 13
YCTAHOBKA BATAPENI 13
Pa60Ta yCTpoiCtBa
-ПОСЛУSHINBAHINEИСТОЧИКА ПОГРAMM I 14
OBbEMHbI 3BYK1 16
-ПОСЛУЛВАНЕ 0ББEMHOrO 3BYKA I 17
-ПЮСЛУSWIBAHNEРДИОПЕРDAU 22
- PIOCJLYUINBAHNE TPAHCJIULINRDS (TOJIbKO B DIIANA3OHE FM) 24 (TIOHERDS (PeroHaJIbHaONiIaINeHekOTobix cTpaH EbpOnbI N T.D.))
-ПОСЛУИВАНЕТРАHCJIMLИНHTEPHET-РАДIOCTAHCUIM,МY3bIKAJHBHIXФАЛOB 26
-3AINCbI 34
-ДРУГЕФΥΗΚΙΝΙ 35
ПОДТВЕРЖDEHNEФYHKLINHDMI 36
Hactpoika cncTeMbI 37
YCTAHOBKN CNTTEMbl 39
YCTAHOBKNBXOJA 41
HACTPOIKA INHAMKAK 42
- HACTPOIKA YPOBHR TPOMKOCTN KAHAJIOB I 46
YCTAHOBKA IAPAMETPA 48
YCTAHOBKMHDMI 50
PykoOBOCTBO NO yCTpaHENIO HEnCnpaBHOcteI 52
Texnueckne xapakTepcntkn 53
Повлоченя сnteMbI
- Ipeed BbINHHeHem KaHX-NIO BO NOKIOUeHn, NOXaIyIcTA, y6eNTecB, YTO DaHHoe ycTPOCTBO OTKNIOeHO O TNeKTpuecko CETn nepeMeHHoro ToKa.
Tak KaHa pa3HbX BHeuHx yCTpoHCTBax qACTO yKa3aHbPa3HbIe Ha3BaHn Pa3bEmOB, BHIMATEJIbHO IpOHTTE INHCTpyKUN NO 3KcNllyaataMn NOKNIOHaemBX BHeuHx yCTPOCTB. - 063aTeIbHo c6IIOdaIte CuTeOByu MapKnpoBky npn noKnquHm ayDnokKa6ene, BnDekok6ene n Ka6ene DnHaMKOB.
- PIOKIOHHeO6XoIMBOBINOHTbHaEeHOIpaBnBHO.Haue 3TO MOKeT pINBeCTN K NOTepe 3ByKa, BO3HKnHOeHIO WymOB INI NOpeXeHHo pecBepa.

1. NOДКЛIOЧЕНМ AHTEH
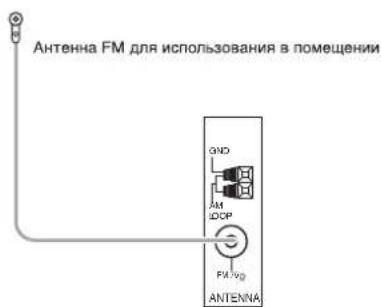
ДдяdoctxkeHnHaunuyeero npneMa cTaHcH FM HacptpoTe paonnoKeHne FM-aHTeHHbI.
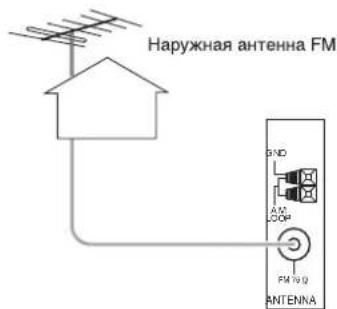
-ДядьhoeуnyuueHnKaueCTBa npneMa nCnoIb3yETc HApYxHa aHTeHnFA FM 75OM. OToeDmHt e aHTeHHy B NOMEueHn, npexJeem 3aMeHrTb ee HApXHO aHTeHHo.
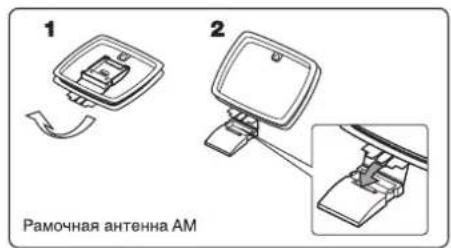

PacnoJoxKte pamoHyIO aHTeHHy AM kak moKHO daIbIe OT npMeHnka, TeNEBn3Opa, HHypOB KOHOK IOHypa NITAHN NEpeMeHHORo TOKa, HAnpaBbTe TAKIM Oba3OM, YTO6bl ObecneHTb HANUYUwe KaheCTBO pInema.
- Ecnn npn nCnoB3OBAHn paMOOH aHTEHb AM kaueCTBO npneMa OCTaETcH N3KIM, BO3MOXHO nCNoB3OBAHHe HApxHOB aHTEHb AM BmecTo paMOH.

2. NOДКЛIOЧЕНЕ BИDEOKOMNOHEHTOB
Pa3bEmi «VIDEO 1» TaKke MoryT 6bIb NOdkHueHb K DVD-pekOpepam INn dpYHM BHeHMM UcPOBbIM ycPoINCTBaM DnA3aNc BNdeOcnrHa.ДЯ NOyUeHn DOONHInTeMbHO INHcOpMaun CmOTpntE INCtpyKuHNO NO EKcNlyaTuIN NODKNIOHaEMOROBHEWHERO yCTPOINCTBA.
Pa3bEmbl «VIDEO 2» TaKke MoryT 6bITb NOkHIOueHb K TaKIM DOnOJHHTeHBIM BnDeoycToiCTBaM, KaK TIOHep Ka6eBHOrTeJIeBUNDEHIN IN CNYTHIKOBAR CNTEMA.
- IMeHTcKOMnO3nTHbIe (compoiSe) VIDEO rHe3da nIaNIOKJIooHEn aHaIorOBOro BIndeo, a TaKxE HDMI pa3bEmbln OKnIOHEnuΦpOBOrO BuDeo u ayDIO.
-ДЯспаьки,КауесТВОиЗOBбрахеняуБыBaETВСеДуюшЕнордke:"HDMI">"(composite)VIDEO".
PpmeHne:
- Bo Bpem 3aIncn BIneepnpaMM C rHe3da (composite) VIDEO 1 OUT, nnn npn pnoCMOTpe BIneep nporpaMMbI OT rHe3da (composite) MONITOR OUT taKnx ycTpoiCTB kaK BD nleep, DVD nleep n T.D., nx HxKHO NOKnIOHcTa b K rHe3dy (composite) VIDEO IN.
TeneBn3Op, npoeKToP u T.D.
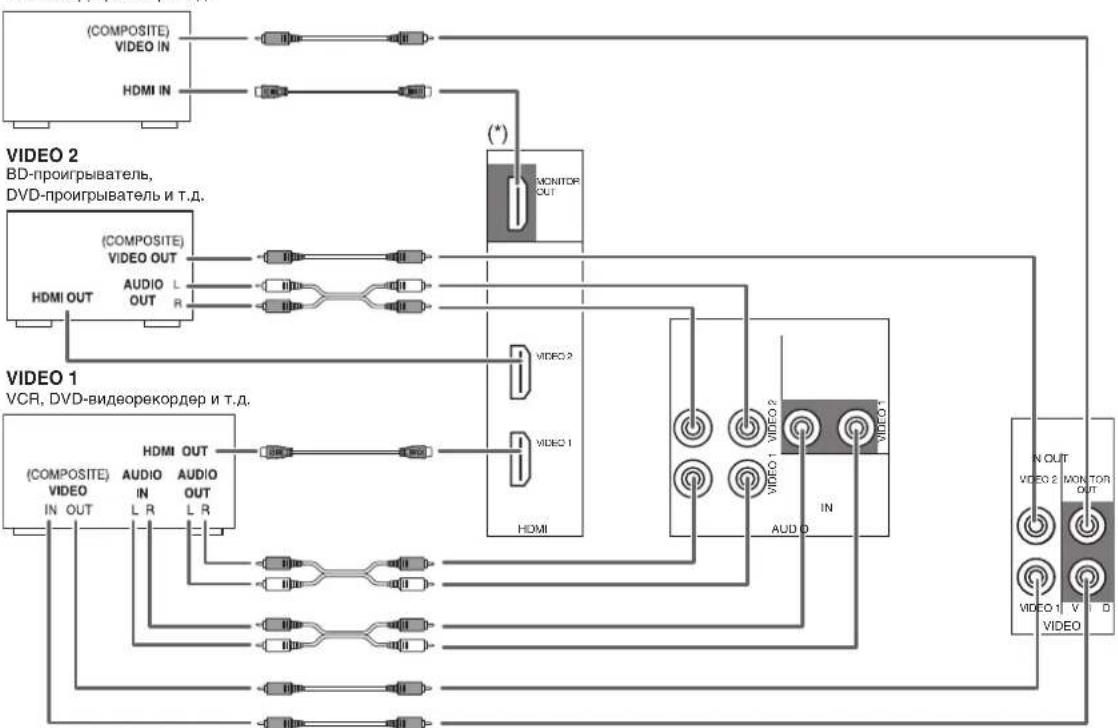
MONITOR
PpOdoJxKeHne
I OndKJIIOHcHHe pa3bema «HDMI» (MylbTmMeHbH INTEpEeC BbICOKO YETKoCTn). (^*)
- MoXHNO NOKNIOHITb BHeUHee yCTpOuCTBO-NUcTOnHK CnHnla (DVD-nPouRpbIbATEb N T.D.) K BHeUHEmy ycTPOiCTBy OTO6paKeHHn CnHnla (TeJIeBn3Op, nPoekTo n T.D.) c NOMoUb DaHnOro pecnBepa c NcNIOJb3OBaHmE NMeIOUeROCB npodae KaBeJIHDMI.
-Подкlio ue pa3bema «HDMI» no3BONeT nepeaBaTb HecKaTbIe cIΦpOBe BnDeocuHaJIbI n cIΦpOBe ayDnOcRHaJIbI.
IIOtOKoBbI BnDEocRHaHbI HDMI (BnDEocRHaHbI) TeOpTeUeCKn CoBmecMbI c pa3beMOM «DVI-D». Ipn IIOKJIIOueHIn K TB n DpyTUM yCTPOINCTBaAM, B KOTopbIX yCTaHOBnEH pa3BeM «DVI-D», IN MOxH0 NOKJIIOUHTb C NOMOuBIO IMEOUeOcR B npOdaJKe Ka6EJa-NepExoOnHka HDMl-DVI. TaK KaNp NoKJIIOueHIn pa3BeMOB «HDMl-DVI» He Moryr nepeDaBaTbcraKaKne-1n6o ayDnOCnHbI, NocKobky npN noKJIIOueHm TnA HDMI K DVI nepeDaay He cyuJe aynO ciHana He ocUeTBnAETcR, To dIra TorO, YTO6bI npocLywnBaT bncpOBoB 3ByKOBoCirHan HDMI hXKnHO coeHNHTb pa3BeM HDMl AUDIO OUT c rHe3dOM AMP. (NoDpO6HoCTn CMOTPte B pa3dene "Pnp BbIope HDMl AUDIO OUT" Ha cTp. 50.)
CnCTema 3aunTbI aBTOpcKx npab
-Данhoe yctpoiCTBO noДдержиаET texHONorIO «HDCP» (3aunTbI uNΦpOBO rU npOKoNOnCHOrO coepKmoro) dIra 3aunTbI aBTOPCkIX npab Ha unΦpOBBe BInDeOCIRHaI bI nI npOTnBOeIcTBn HeneraIbHOMy KOnnpOBaHIO. TexHONORHDCP TAKKe DoJnxHa noDdEprKNaBtCB BHeuHIMM yctpoiCTBaAMn, NOKIINoeHHbIMK DAHNOMY yCTpoiCTBy.
- "HDMI", Am6Jema «HDMI» «High-Definition Multimedia Interface» ABJIHTcT OTOBbIMN 3aKaAMN NIN 3aperIcTpnpoBaHHbIMN TOpOBbIMN 3HaKaAMN KOMNaHNHDMI licensing LLC.
PpmeuaHne:
-Дя устуйьои пердачни рекомендует снпonsьтбкаби,длна кOTopbIX He npeBbIaAET 5 MeTpOB.
CpeBn BHeunx yctpoiCTb, KOtOpie NOdepKnaIOT fOpmat "HDMI", HeKOTOpbie BHeunne yctpOCTBa MOrytynpaBnTb npyHMn BHeunmN yctpOcTBamn cNoMoUbpo pa3bema "HDMI". Boone noPpO6Ho o cyHKuIN HMI cmToptte B pa3dene "IOITBEPXDEHNE FyHKUIN HMI" Ha cTp. 36 n "YCTAHOBKN HMI" Ha cTp. 50.
AydnoHnabIOTpa3bema“HDMI"(BkNoaHaactOtyDnCKpeTn3auuN dInHy B6ntax)Moryr 6bItb orpaHHebl NOKIOUeHHBM BHeWM yCTPOINCTBOM.
BnEocHbI He 6yT noaBaTc npaBnBHO, cnnnoKIOHoe BHeWHe yCTPOCTBO HE COBMeTMO C TeHoJorne HDCP"(3aunTbUuPpOBOo WnpOKoONOCHO coepKIMoro).
- Ecnn pa3pewehen BndeocnHaoB, noaabaembIX OT BixOdbx pa3bEmOB «MONITOR OUT» n Baawero TeleBn3opa He COBnadaIOT, n3o6paXeHne 6ydt NeHTKIM, HeecTeCTBeHHbIM nHn He 6ydt OTO6paXaTbcra CoBCEM. B 3tOM cnyae n3MeHnTE HAcTPOkN pa3pewehen BHeHrero yCTpoCTBa-NCToHnKa CmHaJa (BD-nPeeP n T.d.) Ha ToT npAmeTp, KOTOpBn NOdEprXnBAeT TELEBn3Op. Dnna NOnyueHn DOONJHnTeJbHO INHcOpMaun CMOTpnte INHCTpyKuIO no 3KcIpyataun NoKnIOaemoro BHeHrero yCTpoCTBa.
- Ecnn Bby xOHTe npocMaTpnbTaToIbKO n3o6paKeHne Ha BaWem TeNeBn3ope 6e3 3Byka, Bam Heo6xOIMo yCTaHOBTb napamTp BixoHOro pa3bema «HDMI AUDIO OUT» Ha «AMP», tTOb6tOKNIOHTb noaay uNfpoBoro 3Byka n3 BixoHOro pa3bema «HDMI MONITOR OUT» daHHoro peCnBepa. (ДЯ NOJyEHHa DOnOJIHnTeJBHo HΦopMaun CMOTPte pa3dE«Pru BbyOpe HDMI AUDIO OUT» Ha cTpaHnue 50).
3. NOДКЛIOЧЕНЕ AYДNOKOMПОHEТOB
Pa3bEmbl TAPE IN/OUT (BXOD/BbIXOJ AYIOO3ANC) MoXHO noKNOHTb K o6opyoBaHIO dIa ayio3anCn, HapnpMep K kaccetno deKe, MD-pekopdepuy n.T.D.
BxOJ HDMINIeepaCD-dnckOBMOKET6bITNIOKNIOHENKDOIOHNHTeHOMyBnDcEOyCTPOiCTBy63NCIOJB3OBAHNA WTekepoB DnApeDaHn BnDEoCnHaNoB.

4. NOДКЛIOЧЕНЕ UПФРОВы IX BXODOB
- OINTUHECKNE IN KOAKCNAJIbHbIe LINΦPOBBIe BblXOДbl KOMNOHETOB, KOTOBIE NOKNIHOHbI K pa3bEaMam CD IN VIDEO 1 ~ VIDEO 2 daHoro yCTpoIcTBa, MOryT 6bl TnoKlnIOHeL NlΦPOBBIM BXOJAM.
K Unpobomy BXOy NOkNHOaOTc TaKne KOMNOHeHtbl, KaNPonrpBbATEb KOMNAKT-DnCKOB, LD-nponrpBbATEb, DVD-NpONrpBbATEb, cnoc6HbIe nepeDaBaTb UnpoBbIe CnHaBbI φopMaTob DTS Digital Surround, Dolby Digital nIN PCM.
-ДЯ NOJUYEHINДОJOHNITeJIbHbIX CBeDEHIN CM. INHCTpyKcHIN NO 3KcNlYaTaUIN NOJKNIOUaEMORO KOMNoHEHTa.
-Пи ВьлОнHeHn KOAKCnAJIbHOrO LlNΦPOBOrO coeIInHeHnI Heo6xOДmIO nCNoIb3OBaTb KOAKCnAJIbHbI Ishyp 75 OM BmecTo cTaHApTHorO AYDIO shypa. - HeKoTOpBie HmEIOUeNEcB INpOdaXe WHybpi 13 ONTNUeCKORO BOOKHnA HE MOrTy 6bIb NcNoJIb3OBAHbI DnI DaHnHO O6OpyDOBaHnA. PIn HAJIuYIM WHypa I3 ONTNUeCKORO BOOKHn, KOToPbI He MoKET 6bITb NOKIIouEH K O6OpyDOBaHnIO, NpOKOHcyIbTnpyITeCb C dINepOM INN

Приимеанne
- Y6eIntecb B BblonHeHn ONTtueCKOTo nn KOAKCNALbHO TO LlΦPOBOTO noKJIIOHeHn Ha KaJdOM KOMnoHeHTe. (B BblonHeHn OoON BnDOb noKJIIOHeHn HET Heo6xoDMocTu).
HactpoKn no yMOnuHaHIO uΦpoBbIX BxOdHbIX pa3beMOB
- EcnBb nocknouaeTe BxOndbte npoBbpe pa3bEmbl DIGITAL IN K Baunm Bheunm ycTpoNCTBaM, 3TO nere cdeNaTc nOMoubH HAcTPOeK NO yMOJUHaHIO.
EcnnLHPOBbIE pa3bEmBaWero bHEwHrero bctpOCTBAOTMHAOCTOA yctaHOBNEHHx NO yMOJAHIO, Bam Heo6xoJIMO haHaHTb IcNoTHbEyemBaMn UcΦPobBe BxoIDHe p3bEmI DIGITAL IN", nCnoJIbAY npAdoK deCTBm, npBedeHNN b pa3dene "Bb6Op PEXIMMA PABOTb PA3bEMA DIGITAL IN" na cTpaHne 41.
HacpoiKn no ymonuHaHHIO cneDuoune:
OPTICAL IN(onTnueckn) :VIDEO 1(Bndeo 1), COAX 1IN(koakcnabh) :VIDEO 2, COAX2 IN : CD
5. NOДКЛIOЧЕНЕ ПРЕДВAPИTEЛьHOrO BbIXOДA CAБBYΦEPA
- 4TObby ycnntb rIy6okne 6acOBbie 3Byk, noKIOHnTe ca6bypep.

6. NOДКЛIOЧЕНЕ K CETN
-Ди noДкlioueHЯ 3ToR np6Oba K wippOKoNOncH OdomaUHeH ceTn,чTObI cnyuTaB yepe3 Hee INHTepHET-paDNo, noKIOUHTe pa3bem LAN/ETHERNET 3ToR np6Oba K bauEmy poyTepy npn nomOu Ethernet ka6eY (peKOMeHdyetcCat-5 nIn BvIe).
PnmuMeuHaHn:
- Pocne 3aBepuHnnoKJIOUeHnK uIPOKOIOLOCHMy UHTepHeTy HxKHO BbINONHtB yCTaHOBky npaMeTpOB o6MeHa daHHbIMN. (PioDpO6HcTn cm. "EcnBb6paH"Network"(Cetb)" Ha cTp. 32.)
- PnncnoB3oAHm HnpokonocHOro noKIOueHn K INTepeHcy He6xoDnmo npeBaPntbHO 3aKIOuHTb corlaeHne C npOB aIepom INtepeHcyNyr.
IINyHnDOnONHnTeBHOHnHOpMaun Cnedyet 6paatbcaK 6nkaWemy nBa npobaiepy TaKx ycnyr.
Heo6xOIMO npouHTaB HnCTpyKuIN NO 3Knnyataun OobpyoBaHn, nockolky noKIOeHoe o6opyoBaHne n cnooc noKIOUeHn MOrT OTmHaTbCnB 3abncmoCTn OT BaWero MeCTHO INTEpHET-OKpyKeHN. - NcnoIb3yIe Ethernet ka6eIb/poyTepe, noIdePknBaIOue 10 BASE-T/100 BASE-TX.
- HeKoTOpBie Eternet Ka6eN cna60 3aunueHbO T yMBo. Mbl peKoMeHdyem NcNoIb3OBaTb 3KpaHnPoBaHhbIe Ka6eN.


7. NOДКЛIOЧЕНЕ ДИHAMNKOB
- y6eIITecb INpabINbHOM IN HaDEXHOM NOKIOUeHN INHAMNKOB COOTBECTBnC KAHANOM (NEbb IN npabB) IN pACNOJIOKeHnEM NIOUCOB (+N-) .Pn INeHaJeKHOM NOIKIOUeHN 3ByK IN3 INHAMNKOB He 6yDeT CbIWeH, a Pn IN HEPaBNbHOM paONIOJOeHN INIOOCB INP NOKIOUeHN INHAMNKOB 3ByK 6yDet HEECTBeHHbIM IN HeOCTaTOHHO HN3KM.
-ДЯ NOJUyehn CBeHEnO6 yCTaHOBKe DnHaMnKOB CM. pa3dEN «PaMeueHne DnHaMnKOB» Ha cTp.9.
Iocne yctahOBKn DNHAMKOB B nepByo OOpeDb OTPERyHpyNE HAcTPOKN DNHAMKOB B COOTBETCTBN CO CpeoN KOMTOHOBKO DNAMKOB. (DnONYueHnDonONHnTeBbHx CBeDeHn CM. pa3en "HACTPOUKA DNHAMKIA" Na ctp.42).
BHHMaHHe!
-063aTeBHo NcNoB3yIe DnHaMnK CnONHbM cIpOtnBJIeHNmE 6 Om nn Bblie.
-Ⅰ36eRaIe KOHTaKToI OROJIHHbIX IPOBOID DInHaAMNKOBdpyr C pyrom NnC MeTaNHeCKMn DeTaJAMNyCTpOcTBa. 3TO MOKeT PnBecTN K NOBpeKDeHIOyCTpOcTBa N/IN DNHaAMNKOB.
HkoRda He KacaiTecb KneMM dHAMKOB, KOrda KaebIeNkTpONIHaHHoNIOKJIIOUeH K3NeKTPnueckOPO3eKe NpeMeHHoro TOKA. 3To MoKet CTaBnpuHHOIN POpakHeHH 3NeKTPnueCKM TOKOM.
IopKluoyHeKeKa6eNnDnHaMka
1.Oronite n3oJauHn npoBa, npImepHo, ha 10 MM (3/8 kOJaMa). 3aTeM pNOTHO cKpyTNe KOHbI npoBa.

2.Ocna6bTe KEmMy DnHaMnKa, NOBOpaHmBa ee npOTnB YacOBo CTpeKN.

3.BctaBbTe oroneHHyU 100

4.3aTAHNTe KJEMMy, NOBOPaUNBa eE no YacOBoN CTpeNke.

8. WHYP NITAHN INEPEMEHHORO TOKAK
- PódklHuHTe shypr K HacTeHHoH po3EKe nepemehHoro ToKa.
9. rHE3DA dIa BbINOJIHEnAAnrpeiIOB
3TNrhe3daMoryTNCONb3oBaTbCBA6yUaemIINAOBHeHnpaOHOero nporpAMMHorO oecneHnKOTOpoe 6yDet BC OTOHRNIOIDepXHBaTB HOBIEuPPOBBie pOpMaTb ayDnOCnHAnOB nT.I.
PnmuMeuHne:
- PporpamMHOe BbINOJIHeHne anrpeJa Tpe6yeT CNEaIaNbHbIX 3HaHIN B O5NaCTn PporpamMPOBaHNA, NO3OMy Mbl peKoMeH dyem, YTO6bl anrpei npOn3BOIDNCr TOJbKO KBAJIINuPBOAHHbIM CNEuaNCTOM NO yCTaHOBKe O6OpyIOBaHNA.

Pa3MeueHHe DnHaMnKOB
IdeaIbHoe pa3MeueHHe DNHAMIKOB BapbnpyeTcB 3aBNCIMOCtN OT pa3Mepa KOMHaTbI, HAcTeHHbIX NOKpbTm I T.I. Hnke npBeDeH TINuHbI npMep n peKOMeHaauNo pa3MeueHIO DNAMIKOB.
IpeepnneBm npabBm nnHaMKn; ceHTpaBbHm DnHaMK
PacnoIoxKe Te nepeHne DnHAMKn TaK, YTO6b nx nepeDnnoBepxHOCTb HaxOAnlaCb Ha OJHom yPOBHe C 3KpaHOM TeneBn3opa NIN MOHnTopa.
IomeCTte ceHTpaNbHbI dHaMk MeKdy nepeDnHM NEBIM npeDnHM npaBbIM dHaMnKOM, H He daNbwe OT MecTONONOxEHN CnywateJI, Yem nepeHne DnHaMKN.
PacnoJoxKteKaXdbIINHAMNK TAK,HTO6b3ByK 6bln HappaBHeHEnOpceDCTBeHHoHa CnywataTn.
JIeBbie npaBbie uHaMnKo 6bemHoro 3Byka
Pacnooxte Dnhammkn ObemHoro 3Byka npimepHO Ha Blicote 1 Metp (40 dnoMOB) HAD roNoBc cnDraero Cnyuatae cnpaBa nCneBa nn HeMHoro No3a.
Ca6Bypep
Ca6Bypep Bocpnu3BOaNT MoUHbIe n rny6okne 6acOBbIe 3ByKn. Pa3MeCTnTe ca6BypeB nIO6OM MeCTe BnpePei no XeHaHIO.
PnmuMeaHne:
-ПиИСпЛьзOBaHи CTaHДapTHOrO TeLEBn3Opa BO n36eKaHne NOMEX IcNoIb3yIte TOnbKO 3KpaHnPoBaHHbIe OT MaHnTHOrO Bo3dEiCTBnI nepeHnE npeBbIe nNeBbIe, a TaKxJe CEHTpaNbHbIe DInHaMnKn.
ДдяdoctикеннHaunuhywero3cpektaobemhoro 3ByaHnHeo6xOdmoNcnoIb30BaTbDnHaMnKnNONHO dnana3OHa(Kpome ca6bypepa).
1.TeneBn3OpnnnKpaH
2.ПepeDnHnJIeBbIДИHAmuK
3.Передни npaBBiДИнhamNK
4.LeHTpaHbHmDnHaMnK
5.Ca6Bypep
6.Левий димамнok obemhoro 3Byka
7.ПаындИнамнбБeMHOrO 3Byka
3JIeMeHTbI ynpabLeHnHa nepeDHe nAHeJI
- POWER switch
2.ИндкаTopPEЖIMOXUDAHAHA
3.KhonkaBKJ.PEKIMOXKUDAHNA
4.DATUHKINCTAHUHOHHOYNPABJIENHA
5.ΦIIOOPECUEHTbIM DNCJIeI
DOnONHHTeJIbHbIe CBeDeHnCm.HNXe.
- Khojka CEJEKTOP BXODHO TO BUNDEOCNHAJA
7.Khonka CEJEKTOP BXODHO AYINOCIHHLA
8.OCHOBHAR pyKoRTKa perynnpOBKn rPOMKOCTN - Pa3bem HAYUHNIKNI
- THe3da AUX 1,2 IN
IOnonHnTeNbHyIO INHΦOpMaUIO CMOTpNTe Ha CneDyUoSei CTpaHnue - Khonka AUTO/MANUAL (ABTO/PYHOU)
- Khonk BblbOPA PEXNMA O5bEMHO
3ByuAHn(/) - Khonka CTEPEO
14.Khonka BKNIOUOEHINI INHAMIKOB
15. Khonka BbIbOPA AYINOCNHAJA
16. Khonka TONE MODE (PEKIM TOHA)
17. Khonka YPOBEHb KAHJIA
18. KhoNka HACTPOIKA
19. KhoNka BBOI / NAMRTb
20. KhoKn HACTPOKA BBEPX/BH3(+/-).
KYPCOP BJIEBO/BNPABO(4/
- KhoKn IPEyCTAHOB BBEPX/BH3 (+/-),
KYPCOP BBEPX/BHIN3(▲/▼) - Khonka Bb6opa DAHA3OHA
- USB-rHe3do
DOnONHnTeBHyIO INHFOPMaUIO CMOTPnTe Ha CneNyOuSei CTpaHmE
24.BXODHBIEPA3bEMblBUNDEOCNTHAIA"VIDEO3
DOnONHHTeBHyU INHΦOPMaUHO CMOTPte Ha cNeYIOUeI
CTpaHnue
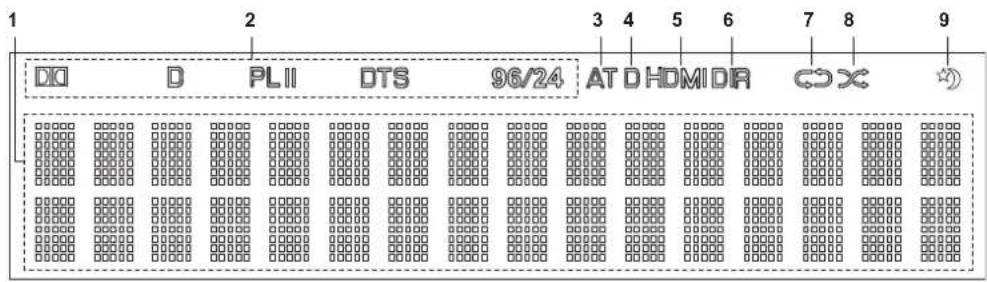
ΦJIIOOPECUENTbIДNcJIJIeI
1.BxOHNCHHnA,aCToTA,yPOBHeIrpOMKoCTn, 0bEmHOrO3ByKa,INHOpMaunOpaobTeN.T.D.
2. INHnKaTOpbi 06bEmHOrO 3Byka
3.Индикадop ABTO
4. INHnKaTOp LlΦPOBOI BXOJ
5.ИндикатopHDMI
- INHINKaTOp PPARMOI
7.Индikatop REPEAT (Повтося)
8.ИндкатOP SHUFFLE(Bocnpn3BeDHeN B npn3Bo NbHOM npaKke) - INHINKATOp HOHONPEXIM
BxodhblereHne3aAUX1,2IN
K rhe3dAM AUX 1,2 IN moXHO noKDIOUOaTB doONHnTeNbHbIe ayDNO yCTpoNCTBa, HAnpIMep, MP3 nIeep nT.
PpmeuHne:
- PnnoKIOHcHmN K DaHHomy pa3bemy npOnrpbBateJIa MP3 n dpynx KOMNOHENTOB BCERda Heo6xOIMO NCNoIb3OBaTb hp Ctepeo MHN BmecTo Whypa MOHO MNH.
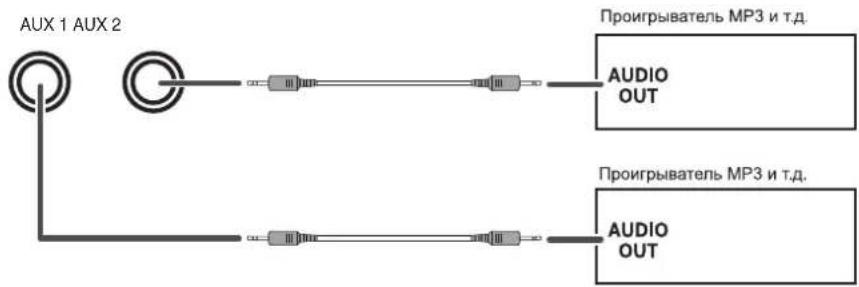
USB-PA3bEM
- USB namrmboKHO NOkNIOUaTB K USB pa3bemy i cnywaT bpe3 3OT np6op caiMb MP3 nn WMA, xpaHuaeneHa Hei. (Bonee noDpo6Ho C MOTpn "Bb6upar "USB" Ha cTp. 30.)
■Пумочанe:
- Tocne Bocnpoun3BedeHnC USB-yctpoNCTBa namTn ero Hado n3BneKaTb TOIbKO, KOrJa yCTpoNCTBO haoOnTCB pexKmE stop (cTo) nn standby (OxuaHn).
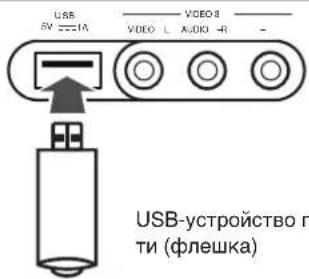
BXOДьIE PA3bEMbl BnDEOCnHILA“VIDEO 3”
K BxOHybIM pa3bEmam "VIDEO 3 IN" TaKke MoKeT 6bItb NOkIIOueHO DOnONHtEnbHOe BHeUHee BnDeOyCTpoiCTBO, HApPmep, BnDeOKaMepa,IrPOBaI pNCTabKa N.T.D.
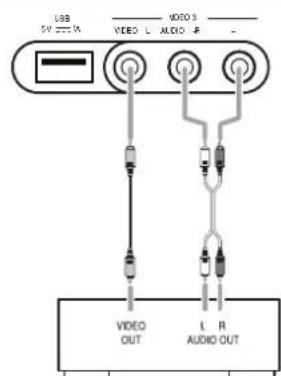
VIDEO 3 Bndeokamepa, BndeonnpctabKa n T.
ДистанцноHHOrу упавленья

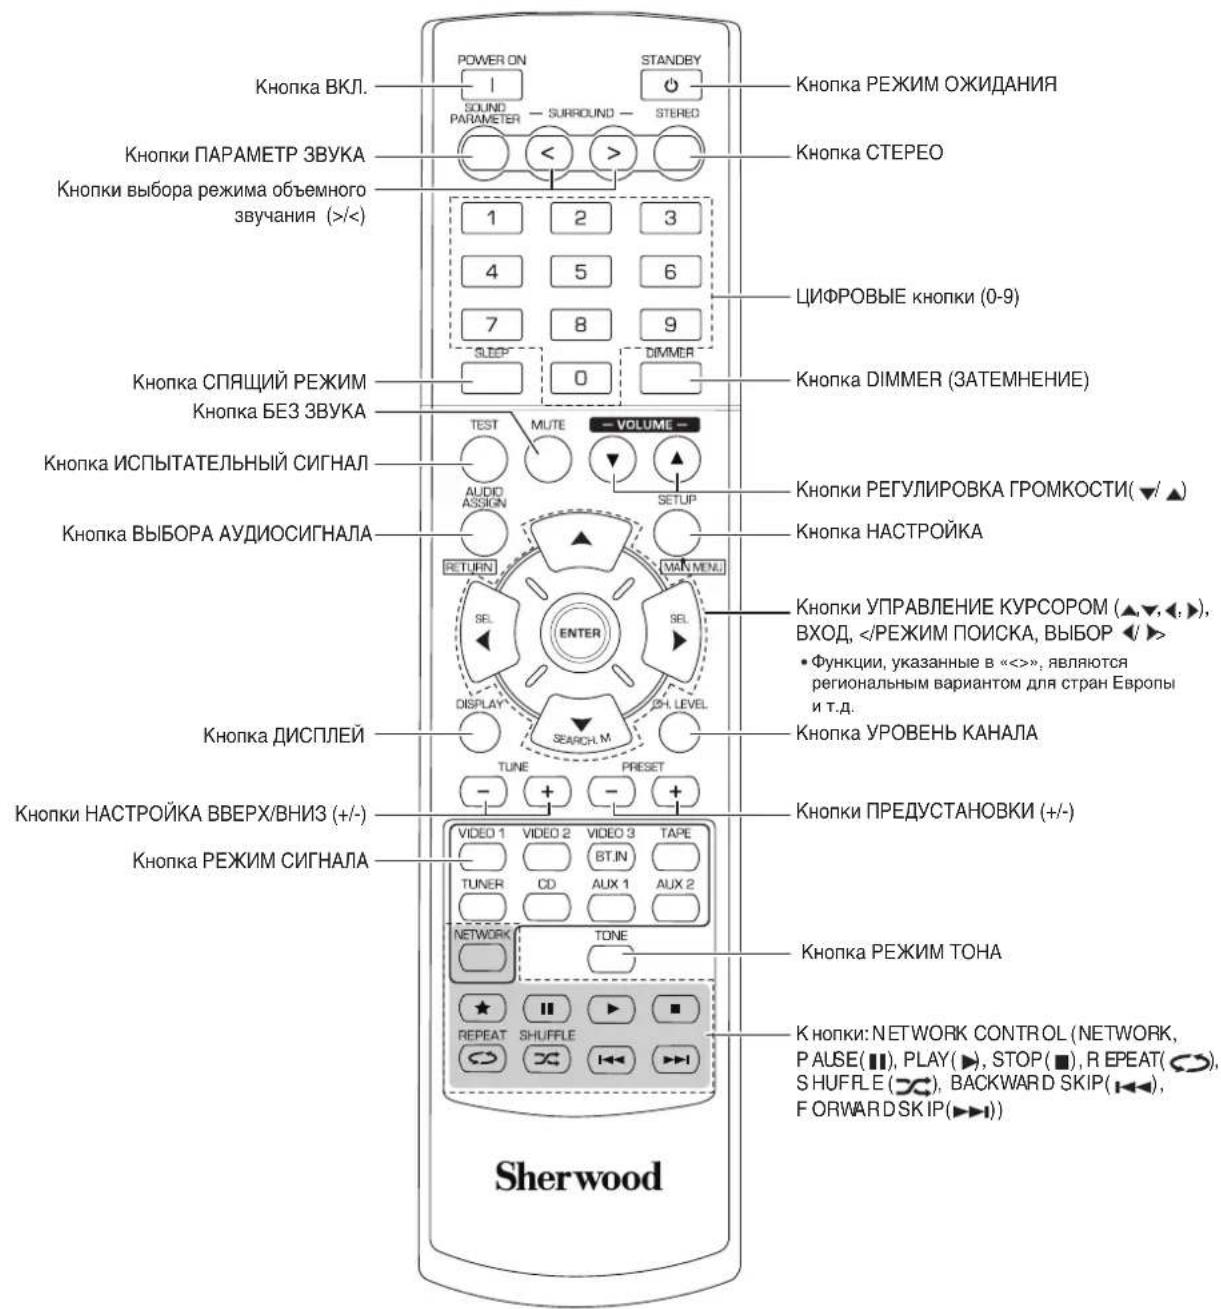
PnmuMaHne:
KhONKaRATING(BtOMpeCnBepe HeoocTyHa.

DAJIbHOCTb PABOTbI NylbTA IINCTAHUHNOHOrO YIPABNEHnA
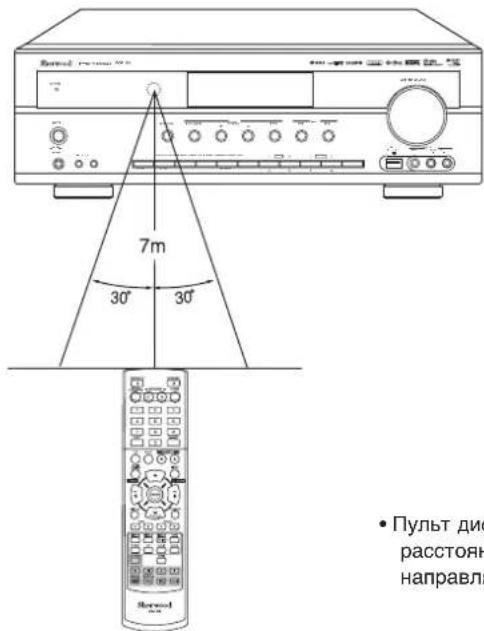
-Пульт ДИСТАнцИОнHOrуУпавлЕнHa HeO6xOДМо ИСОЛБ3OBaTbHa pacSTOrHIMdo 7 МетровсглOM OTKIOHEnHЯdo 30 rpaIycOB, HAnpabHЯ Пуьт Ha DaTчNK DИСТАнцИОнHOrуУпавлЕнHa.
YCTAHOBKA BATAPEI
- CHIMMTE KpbiKy.

- NOMECTIte DBe 6aTapei (pa3Mep «AAA», 1,5B) BOTCEK DnA 6aTapei, co6nIOaI nonpHocTB.

BbHbTe 6aTape,ecn OH He nCNOJb3yOTcA DNTeIbHOE BpMa.
He nCnoB3yIe nepeepaemble 6aTapeu (Ni-Cd).
Pa6ota yctpOncTba
■PnmuueHne: IpeE nCnONb3OBAHnEM yCTpoCTBa yCTaHOBnTE HxHbIe HAcTPOKN DnA DOCTNXeHN ONTMnALbHO pa60tI; dNr 3TOrO BbINOHInTe PNOeDpybI HAcTPOKN CnCTEmbl. (DNr NOnyehn ADOONHInTeJIbHbIX cBeEHm cm. pa3dEn «HaCtpoKa CnCTEmbl» Ha cTp. 37).
ПОСЛУSHBAHNE ИСТОЧИКА ПОГРAMM
Ipeep pa6bToi
BbIbepepeKIMOxuHaHn.
- INHdkatop STANDBY CBeNTTCR. 3TO O3NaaHT, 4TO NpEMNHK HE OTKHOHcHOT CETN 3NEKTPONTAHNA NEpeMeHHORO TOKA, INoDAeTCA He6oNBIOE KOHNCTBO TOKA dNn NODePxAHIN ROTOBHCNTV YCTPOINCTBA K PABOTE.
YTO6bI KTOJIOHbTb NITAHNE, BHOBb HAKMMTEB BbIKOHOATEh POWER (BKL.). - 3aTeM NITaHHe OTKIOHcEeTcN INHINKaTOp STANDBY rachet.

Функиг abTomatueckoro nepexoda B pexim OxuaHn
ФункиabTOMaTHeCKOrnepeXoDaBpeKIM OxJaHnABTOMaTHeCKNOTKIOuAET HAnpJxHeHne NITAHINNepeBODNTyCTPOINCTBO BpeKIM OxJaHnAR.KoJaKaH-JI6O KONka He HaKaTaB TeUeHHe nepHOda BpeMeHN, KOtOpBbI 0OnbYeCTaHOBJeHHoro,ToCTPOINCTBO ChOBa nepeMdet B06bHuHbpeKIM.(NoDpObHocn CM.BPa3DeNE"PpBbIoo pepeKIma AUTO POWER SAVE (ABTomaTHeCKOrOpeXoDA BpeKIM OxJaHaHn)Ha Ctp.39.)
1.BpeXIME OXINaHIN BKNIOHTe NITaHne.
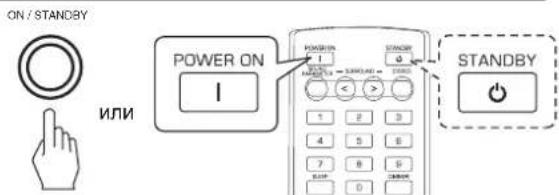
-Пинхаим кноги POWER ON/STANDBY (BKJ./PEXKIM OKNDAHIN) Na nepednei naneim pecinbep BKIOHcETCR N epexoDNT B pa6OCH pEXKIM, INI JIe BbIKIOUaTeCn IN nepexoDNT B pEXKIM OKNDAHIN.
Ha npbte DY, haxmITE KhoNky POWER ON (BKL.), To6b6 b6pa8 pa6ohn pexMHN HAXMITE KhoNky STANDBY (PEKMM OXNUDAHIN), To6b6 By6pa8 bpexMHN OXNUDAHIN.
-
BkIOHHTe DnHAMKIN.
-
3aTeMaH NaCnrrnee noBnReTcra Hnncb "SPEAKER ON", a n3 rromKorOOBOPrrteN, noKnJIOueHHbIX K CO tBeTCTByUOIm TepMnHaJAm, noBnReTcB 3yK.
PnI NcIOb3OaHHaHuyHKnOB, dNn BbIKJIOeHNr pOMKOrOBOpTe Hae KOnmTE KOnkY SPEAKER (HaDInnnee noBnTc HApNMc "SPEAKER OFF").
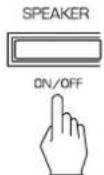
- BbIepeHTE nCTOCHNK BXoDHOrO CnHana.
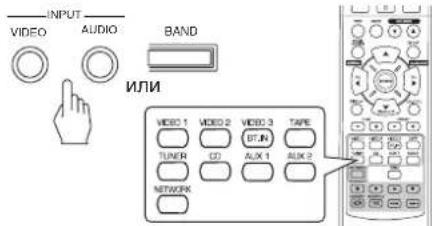
Пинхати Khonк«VIDEO»("BVIDEO")Ha nepeДнен панел NOCTOHMK BXOJHORO CINHana N3MeHNTc CNeDyIOUIM OBa3OM:
VIDEO1→VIDEO2→VIDEO3
Пин Наати КНОКИ “AUDIO”(“AUYNO")Ha nepeДнелпанел NGTOUHк BXODHORO CnHana N3MeHNTc CnEduOUM6oba3OM:
CD AUX1 TV AUX2 TAPE NET/USB TUNER (DincnneyactoTb)
:TolbkoKordaonHDMICONTROLyctaHOBneHO3HaueHHe ON,BblMOxete npocnyuBabTuPPOBBe ayduocnHaBIOT B-npemHnKa no Ka6eHIOHDMI. (Piop6HoctnCMoTPHTeBa3dJe "PpN Bbl6opeHDMI CONTROL"Ha ctp.50.)
PnBb6ope Ounu NET/USB,60nee noapo6Ho cm. "PPOCLJUH UBAHIE TPAHCJIARUMI INHTEPHET-PAIAIOCTAHLMU, MY3bIK AJBbHbIX FAIMINOB" Ha ctr. 26.
-Пиннжлгкнннннннннннннннннннннннннннннннннннннннннннннннннннннннннннннннн
Тупьтсдмчаноуурпьшен,ДИпаэзов
ИЗМЕНETСССССССССССССССССССССССССССССССССССССССССССССССССССССССССССССССCS
→FMSTEREO→FMMONO→AM
B KaueCTBe HcToUHnKa BxOJHOro CnHnAa BbIbpaH CD,VIDEO 1-2
- BbIepeHTe uHpOBoH mHaAnorOBb IxOd c Tpe6yEmbl NOKJIuOHeHm.
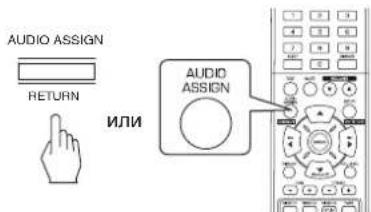
-Пин fixatn DaHNO KHONK COOTBETCTBYUOuIN BXOD Bb6upaetCB CNeDyouoem nopRKe:
OPT COAX.1 COAX.2 ANALOG
ItpmehaHne:
- Ecnn K0 BXOyHDMI IN noKKnIOUeHO BnIeo yCTpoIcTBO, Bbl He CMOXeTe Ha3HaUHTb ayDIO BXOJI NO CBOEMY XeJANIO. (B daHOM Cnyae moKHO npocnyuWbTaT bOnIbKO HDMUnpoBBe ayDIO CnIHAnIb.)
Korda Ka pa3bemyHDMI IN HnueRo He NoKnIuOeHO (mMraet HnDkaTOp "HDMI", Bbl MoXeTe Ha3HaHTb aydno BXoJ.
-Пи Вьборе разьемOB «VIDEO 3», «AUX 1», «AUX 2», «TAPE», «TV», «NET/USB» винносяв в Качев Источни вддогу сгнана уфpoьов вхонй разьем He Досточenv дд Вьборa.
ECnn BbIbpAHHmLdppBOBn BXoD He NODKIOHEn, HauHET M opraTb HNkAtopD(Digital) n ABOTaMTHeCKN BKNIOHTCn BbIbpAHHbAnAHLOROBb BXoD.
BbipahHHnUHPOBOHnnAnHOROBb BXoD 6ydet ABTomAT HNECKYCTAHOBEN COOTBETCTBYOUEMY IcTOHNKY BXOda B M EHO YCTAHOBKN INPUT (BXoD). (IIOpOboHcTN CMOTPnTE B pa3 Dene "YCTAHOBKN BXODA" na ctp. 41).
3BYK KOMNOHETA, NOKHOHHO R BbIbpaHOMU cPbOBomy BXOy, CbIuHen HeaBcIMo OT BblpaHORIO nCTOHNHA BXOHDORICIRHana.
5.BKIOUHTe BBIbpaHHbIK KOMHOHeHT dNBAOCnpon3BeDeHnA.
-ПиВОсРпОЗБЕДЕНИСТОЧИКOB ПОрразмС OББЕМHBIM 3BYKOM CM.pa3ДeЛ«ПОСЛУШИBAHИЕ OББЕМΗΟ 3BYKA»Ha cTp.17.
6. Hactpoite (o6uio) rpoMkoctb 3Byka.
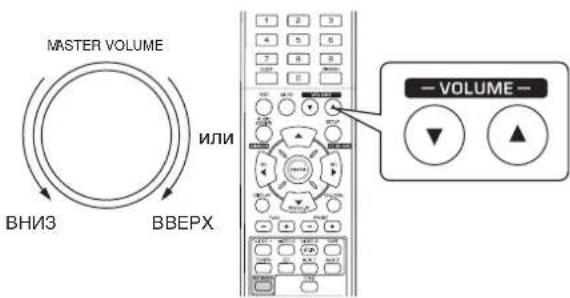
- y6paTb 3ByK.
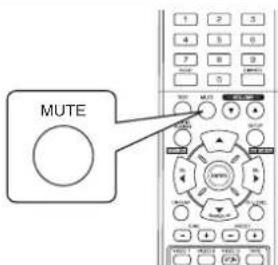
- 3amiraeT INHdkaTop «MUTING»(«5E33BYKA»)
4TobbBepHybPpeDbIyUO rpoMKocTb 3ByKa,CHOBa HaxMnte 3Ty KhoNky.
8.Прocnyшване с hayшнkaMn.

-Y6eNTecb,HTOINHAMMKNOTKIOHHebl.
- Ppi npocnyuBaan nctouHnka nporpammbl DTS nn Dolby Digital,ecnn HauynnKn noKkNoeHb K pa3bemy a KhoNkA SPEAKER (INHAMIK) HaxoNTCB NOIOXeHN BbIKL,yCTPOINCTBO ABOTMaTHueCKn nepexoDNT B pexm 2CH downmix (ymeHbWeHne Ycna KaHaON).(Ia nOlyueHn daonONHTbehix CbeHn CM.paDEn "peXm 2CH downmix"Ha ctp.17).
■Приимецни: - 100% 的 100%
-ПиИСПОЛБЗOBAHIN HayшнКOB n36eRaTeурзмсгнOrO yBENuHcHnI rPOMKocTn 3Byka.
HacTpoKa ToHa (Hn3Kne N BbICOKne YAcTObl)
9. BbIepeNTe peXIM TOHa
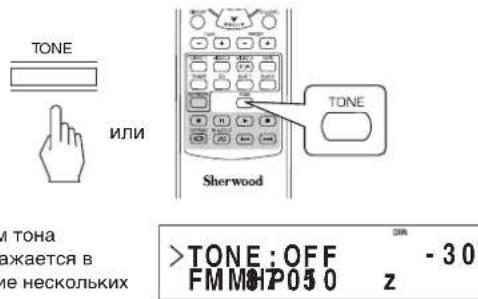
10. TTo6bI BbI6paTb Tpe6yEmbI peXIM TOHa, HaxmMaTe KHOKN BJI EBO (A)BIPABO (B).
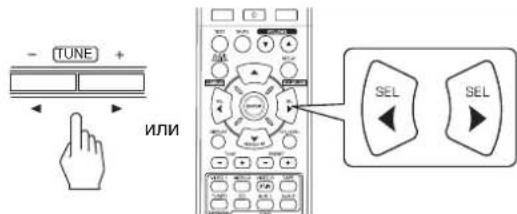
- Pn HaxkTm DaHHbIX KHONOK AKTNBvpyetc0oBTCTByIOUIN pexKUM TOHBA CNEdyIOUeM NOPdKe. OFF: NpocnyuBaHne ITOHtNka npOrpaMMb63 ToHOBJX ↑ 4fpeKToB. (HauHOT CBETnC HINdkaTOp «DIR'). ON: HactPoiKa Tpe6yEmrOToH.(HINdkaTOp «DIR»norachet).
PerynpoBka ToHa (Hn3Kne N BbICOKne YacToTbl).
11.ДЯ Вьбopa Heo6xOdMOrToHa HaxmMaTe KhoKn BBEPX (▲)/BHn3 (▼).
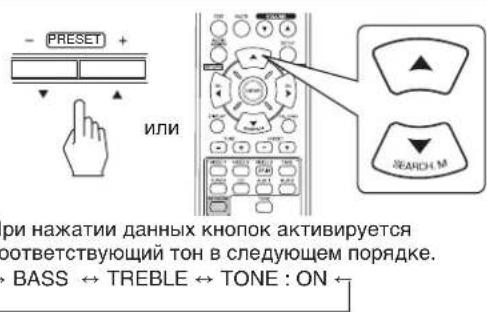
12. Дп Требуеми Настори Вьбраного TOHa
- POMKOCTb ToHa MoXHO HAcTpB B Duaana3oHe -10~+10 dE.
Kak npabnno, pekomehnyetcnahtpaanBaTb Hn3Ke n BbICOKne yactOTb Ha 0 d5 (poBbHyypoBeHb). - YCTAHOBKa Upe3MepHOI rPOMKoCTu MOXeT Bbl3BaTb NOBPEKDeHHe DNHAMKOB.
- Ecnn OkHO hactpoKu ToHa Ncye3aET, BHOb HaHHTe C 1wara 9.
ObbEMHbI 3ByK
B DaHnom pecnBepe yCTaHOBneH COBpemHbI cHpOBo3ByKOBo IpoUeCCOP, KOTOpb IIO3BOJrEe Bam nOlyuATb Ha do MaHem KInHOteAte ONTImaHbHOe KaueCTBO 3ByKa I CO3dAbTa b aTMocCepy HacbIeHHOrO 3ByHaHH.
Pexkmbi 06bemHoro 3ByaHn
DS Digital Surround
“DTS Digital Surround”(Takke Ha3bIaETc npocTo “DTS)noDpeKnBaeTo 5.1 DnckpeTHbIX KAHANOB INCNoIb3yET MeHbWInypoBeHcXATn DnBA BICOKO TOnHOCTN BOCpON3BeDEHNr.IcNoIb3yTe erO nla paObI c DVD-DnCKAMn n CD-DnCKAMn C norOTINOM "DTS"。
DS 96/24
FOpomat "DTS" BbICOKoRpa3peWHeHc cactToTOn DNCKpTeN3aHH 96 kTn aPa3peWHeM CnRHa2 26bTa oBeCneHbAeT NCKJIOHTenBHyTOHooCTb nepeDaH. IcONb3yTe daHHb peKmIa DVD-DncOBcO bO63NaHeHMe DTS 96/24.
N3roToBHeNo NnueHm, 3aunuHnHoiPiTaHTamn CuaN No: 5,956,674; 5,974,380; 6,487,535 nDpyrmm NaTeHTAmn CUA n Dpyrn X cTpaHa Mnpa, KOTopbIye kny OyneBnKOBaHbI HnXoAorTCB B npocec ce noTBePexdHen. DTS, Symbol, & DTS Sybmol Bmecte ABnHOT c3aprrntpnpobaaHbIMn TopoBbIMn Mapkamn KomnaHm & DTS Digital Surround, norOtnbIe DTS aBnTOCT TopoBbIMn Mapkamn Kom naHm DTS, Inc. N3deInne obnadaet yctahOBnEHbIM nporpAMMbIM ocecneHem. DTS, Inc. Bce npaba 3auHneHbI.
Dolby Digital
Dolby Digital ABNAETCApa3pa6oTaHHbIM KOMnHaHnei Dolby Laboratories fopmatom MHOROKaHaJIbHOrO cnppOBOrO 3By Ka. Ha nckax C norotinom Dolby Digital codepxatc 3an nCn B cfpmaTe 5.1 kaHAnOB cnppObIX CrrHaNoB, TTO daet ropa3do 60nee kaueCTBeHHoe 3ByaHne, npocT paHCTBEHHeO paCUnpeHne I xapaKTEpNCTKN DnHAMuEc Koro dnaHa3OHa NO cpBaHEHIO C npdeIduyIm fOpMaTo M Dolby Surround.
Dolby Pro Logic II Surround
JaHHa MoIeJIcNocO6Ha pacNo3HaBb KaK o6blHbIe DByK aHAnHbIe CnHbIb, TaKne KAKuΦpOBoIe IKM nn anAanor OBbl cTepeOcRHaJIb, TAK n CnHbIb φOpMaTa Dolby Surround n T.n. 3To No3BONaET yUyHbT bKaueCTBO n Cp a BHeHIO c O6blHbIM CXeMAMn Dolby Pro Logic.Cxema Dolby Pro Logic II BKIIHOaET B c6Ba Dba peXmHa, a IMEHHO:
Dolby Pro Logic II MOVIE
PnnpocmOte pmbaDHHbpeKIMn03BONETyN yuHTbKaueCTBO 3ByAHINyTEMpImeHEHcOC6ofo aIropITMa 06pa6OTKn, KOTporNDHePKBaTaCNCNo3yeMBie B cInbme CneuaNbHbIe 3ByKObIe 3fFekTbI.
Dolby Pro Logic II MUSIC
PnpnpocnyBaaHHMy3bIKDaHHbpeKIMn03BOJAEyUHHTBaKeCTBO 3ByaHHNpyTEM npmmeHHeN OCCOBO anlropitMa 6pa6OtKn, KOtOpBnNoDcpeKnBaET My3bKaIbHbIe 3oCfkeKTb KOMNO3uHN.
Dolby Pro Logic
B daHOM pexKIme npocxOuNT pacnpeDenHe NIObIx D BYXKaHaHbHbIX CInrHAnOB (BKnUoA rCInrHaNbl Dolby Surround) Ha YcTeBpe KaHana (nepeHnI neBbI, cHTpan bHbI, peepHn IpaBbI N obEmHbI). ObemHbI CInrHa n PpeCTaBnE T CO6O MOHOCHnA,IPOurPbBaEMbI uep3 DBe KOLOHKn ObeMHorO 3Byka.
ПОНБODИТСА NOЛUCEHМ ИФИМБДOLBYLaboratories.ЛогOTIMБOLby,ProLogicIДбОйhoeDЯВЛЮТСЗaperecTpPpOBaHHbIMNTOPROBbIMN3HaKaAMKOMNaHIMDLobyLaboratories.
CneDyIOUnepeKIMbI npImeHHTcIra TpaNIOOHbIX 2-KaHaNbHbIX cRHaNoB, HApNIpMep, uΦpOBOroΦopMaTa «PCM» IINn aHAnorOBbIX cTepeo CnHAnOB dNn o6paObTkn C nOMoCbI npOceCCopa UΦpOBbIX CnHANOB BbICOKO N pON3BODNTeJIbHOCTN C ueMbIO NCKycCTBeHHORO BOCC03dAHN 3ByKObIX nOJIe. BbIepeRte OND NcEMn IMHeOUXxCRpeKIMOB OBeHMHO 3ByKa B COOTBECTBUN C NCTOCHKOM CnHana, KOTOpBb BblXOTNE BOCpnON3BECTN.
Theater
DaHHb peKIM o6eCneuBaet 3ΦΦeKT npCyTCTBnB TeaTpBe BO BpEMI pOcMOtpa IpeDCTabHeHnA.
■ Movie
3TOT pexmMbocneuBaet co3aHHe 3pKKa KINHOe Ta npn npocmoTe pmbma.
Hall
JaHHbIpeKIMO6cneYBaETPocTpaHCTBeHHbIe
XapakTepcntkN KOHeptHOro 3aJa dIpynClyuBaHn
KJIaccNueckOMy3bIKn,HaNPmep,OpKeCTpOBO,
KaMePHoMy3bIKn ININHCTpyMeHTaBHOrCOJIO.
■ Game
3ToTpeKMM npiroeH dIra BOCppon3BedeHnBnDeOnrp.
Stadium
JaHHbpeKIM oEcbneuBaET 6BupHoe 3BykoBoe nOteIaIOCTNKeHn3Byka,KaKa HcTaAnHe BO BpemnpocMToPa 6eC60JbHbIX INn cyT6oJbHbIX MaTuH.
Multi CH Stereo
JaHHb peKIM CO3daH dIe BOCpOn3BedeHn My3bIkaIbHoro 0ha. IpeHNI KaHAN, KaHAN 06bEMHO 3ByKa N TbIbHBe KaHaJIb O6bEMHO 3ByKa CO3DAOT CtepeOeOΦeKT, KOtOpBI OKpyXaET BCE npocTpaHCTBO.
ПОСЛУSHINBAHNE OБъEMHOrO 3BYKA
■ПиMueyHnE: ПepeД BOCpOn3BcEHeHnEM O6bEmHO 3ByKa HAcTpOte KOnOHKn IpyrYe yCtpoCTBa B MeHIO SETUP (HACTPOIKA) ДЯ ВОБспeЧЕнг ONTmAbHOrO 3ФФeKТa. (ДЯ NOJUeHnДОJOHITeJIbHbIX CBeDeHn CM. pa3dE«HACTPOIKA DInHAMiKA» Ha cTp. 42).
IIO JENAHIO MOXHO Bb6paTb pyHoi peKIM O6bEMHORO 3ByKa INN Je aBOMaTHeCKn peKIM.

-Пи Кадом Нахати Ha 3Tu KhoNky peKIM MeHReTcB CJIeNyUOSe M NopRdKe:
ABTOMATUeCKn pexm: OTHMAbHBHbI 06bEMhB pexm 3Byka B (CBETNCR HNDKATOP "AT") bIbnpaETc ABTOMATUeCKn B 3aBNCIMOCT NOT OFPOMATA CINHJANA HA BXOJE.
PyHou pexKIM: MoxHO BbI6paTb 06bEmHbI pexKIM 3ByKa BpyHyO (HaJIncb *AT" rac pyKam KhoNKn BbIBOPA PEXIMA O5bEMHO 3ByAHINR (> / < )
PpimmeuHn:
Korda KhoNke SPEAKER yctaHOBHeNo 3HaueHne nn "CENTER" n "SURR" yctaHOBJeHO 3HaueHne "NO", pexkM o6bemHO 3ByaHnH ne DeiCTByET.
JaKe npYCTAHOBKE ABOTOMATUHECKORO BbIbOpa peXnma OBseMHORO 3Byka, a TaKke pRn NIOdaue CHHNA COOTBETCTBYIOeFOFopMaTAt OYCTPOCTBA-NTCHONHKI NcPpOBoro CnHrHa, ONITMAnbHbI peXm OBseMHORO 3Byka MoKET N3MeHRTbcR, 3ABNCMOCTO TOrTO, yCTAHOBJEN IIN TIN DInHAMKa HN“NOHET.
- EcnBb6paH ABtOMaTHeCKn pexm 06bEMHO 3Byka, HEnb3r Bb6paTb npytnpe xembl 06bEMHO 3Byka, Kpome ONTMaJIbHO.
Bb6op pyHoro peKmHa KhoNkoAUTO/MANUAL Ha nepeDnei naHei
Bb6op kenaemoro o6bemHoro peKIma.
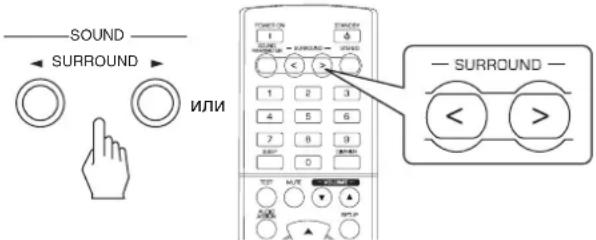
KaKdbpa3nocHehkaTnKHOOKKHOKNBbIEOP APEXIMA OEBEMHORO 3ByUAHN (> / < ) ,pexm0 6bemHoro 3ByuHaHn6yDet N3MeHrTaC B3aBNCMOC TnOTBXoHOro fOpMaTcNeDyUOUMO6pa3OM.
ΦopMaT BXoHOrO CnHnAba Bb6npaEmbI peKIM o6bemHOrO 3ByKa
| Источник каналов Dolby Digital EX 6,1 Источник каналов Dolby Digital 5,1 | DOLBY DIGITAL яй <2 CH IN>*1 |
| Источник каналов Dolby Digital 2, Источник ИКМ (2-kanahlы), | [I-DOLBY PLII MOVIE, DOLBY PLII MUSIC, THEATER, MOVIE, HALL, GAME, STADIUM, M.CH STEREO, DOLBY PRO LOGIC яй <2 CH IN>*1 |
| Аналоговные стених | Соotvetstbyя реким DTS яй <2 CH IN>*1 |
| Источник DTS, Источник DTS 96/24 |
1: Korda 3haeHnM "CENTER" n "SURR(Surround)" yctaHoBHeo 3haeHne "NO" (HeT), HeIb3y Bb6paTb kaoi-nbopeKIM o6bem Horo 3byuHaHn NcToUHK MoKeT 6bITb BocnpOn3BeHn B pexImax Ctepeo nn CmeuBaHn DByx KaHaNob (2CH downmix)
Ötmehapeximma oobemhoro 3Byka dny Bocnpn3BedeHnCtepeo
STEREO

NIM
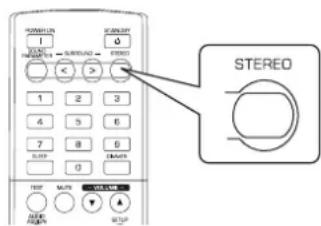
B3aBnCIMOCtNOTΦOpMaTbBXoHOrOcHrHaJAMoKHO Bbl6paTbCTepeOpEKMmIINPEKm2CHdownmix(peKm IOHHKaIOUeMOKKuHIpOBAHn)
-ДгOTMeHbIpeKIMOBCTepeoNIN npHydntelbHoro NOHJXEHnYcJa KaHaIOB CNeDyET npN NOMOu KHONoK KHOuN BbIEOPA PEXkIMA OBbEMHOrO 3ByAHnR (> / <) (0603aueHn) Bbl6paTb peKIM o6bEMHOrO 3ByaHnR. /6e3 deneHn Ha KOLOHKn/
Pexm 2CH downmix (pexmm noHnXaUoero MKNuPoBaHH)
-Данньий реким поЗовлессокрацаь чсно многоркальнбix сгнанов bфорmate DTS ИИ Dolby DigitaldoobHyoroCTepeo (2фpoHTaJIbHbIX KaHaI),a TaKke npocnyuBaTb nx Ype3 nepeHne KOLOHKn IIN HayHnKn.
- EcnB0 BpemBocnpn3BeHmMHOKHaNbHbXuPpOBx KaHAnOB NcToHKnOB DTS nDolby Digital yctaHOBtB dN KhoNk SPEAKER (KOJIOHKU) noLoXeHne «OFF» dI npocLyuBaHnC nOmoBHO hayHKnOB, ycTpoIcTBo aTOMatueckn nepeiDet B pexm 2CH downmix (pekm NoHkaIoero MKNIpobAHn).

Pn HacTpoKe npaMeTpOB 3ByuHaHn
- Pnp Bocpon3BedeHn cHpOBbix CnHAnOB nCTOHHKa nporpaMb Dolby Digital nI np npocnyuBaHn B pexmhe Dolby Pro Logic II Bbl Moxete OTperyIipOBaTb napametpbI 3TNx pexmOB nI npoyehn ONTMaJIbHbIX 3ByKOBbIX 3f peKTob.
1. Haxmte knonky SOUND PARAMETER.
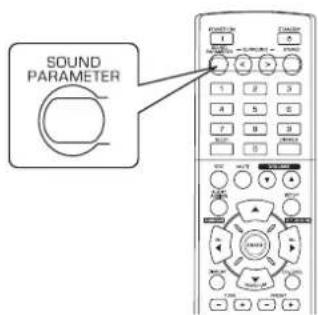
- Tocne 3TOrO Ha 3paHe B TeUeHne HeckoIbKnx CekyHd 6y det OTo6paKaTaBcR“DRC:~”(nnn“PANORAMA:\~")
EcnnpexnHacptpKnnapametpoBOTKNOHTc, cneNy et HaKaTb Ha DaHHyIO KHONKY CHOBA.
2.ДЯ Вьбopa кенимогу napametpa HaxmTe KhoHKn CURSOR UP(▲)/DOWN(▼).
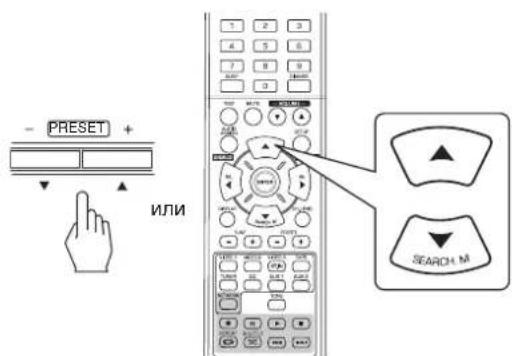
-Пин haжати 3Tnx KhoNOK peXmbl HaCTpoKn napamet
POB MEHOTCR B CNeDyUOeM NOpAKe:
"DRC" "PANORAMA" "C.WIDTH" "DIMENSION"
(Cxatne DnAMHn (PexHN (YnpaBHeN (YnpaBHeN
eckoro dnaIana30Ha) nahOpMa) npinHOH pa3MepaHn)
"DRMOKET6bITbBbIpaH TOnbKO npn BOCpOu3BeHnnUcPpOBbIX CnHAnOB OT NCTouHnKa Dolby Digital.
- PěkúMbí “PANORAMA”, “C.WIDTH”и “DIMENSION” moK Ho BvIbpaTb TóIbko IIpI npocnyuBauHn B pěkùMe Dolby Pro Logic II Music.
3.ДинхаэгкижenaemoronapaMeTpca cneet haxa TB KhoNk CURSOR LEFT(4)/RIGHT(>).
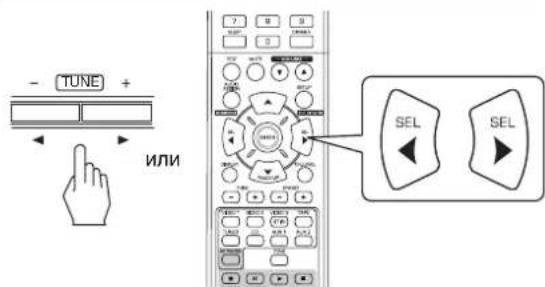
PnBb6ope"DRC(CxatneHnHaMHeCKOrO Dnana3 OHa)"
- 3Ta cyHKnCCKMaET DnHAMnueckm Dnana3oH paHee 3a aHHbIX cacte3 ByKOBOI dopoxKu Dolby Digital (Ha 3KCTpe m anBHO BBICOKOM yPOBE rPOMKOCtN), 4TO6bl CHMNTb pA3HOC Tb B rPOMKOTM MEJdy 3aDaHHbIMn H He 3aDaHHbIMn YAcTm N. 3To o6lnerHaet npocnyuBaHme BCero 3ByKOBOr TpaKaTa npn npocMOTpE PnJIbMOB NO BeUepam Pn Hn3KOM yPOBHE W yMa.
Pnmuehne:
B HeKoTOpbIX TINAX NpOrpaMMHOrO 06ecneHHeuDolby Digital yCTaHOBka DRC MOKeT OKa3aTbcH HeeIcTByOuei. OFF (BbIK)OTKnIOHTbФyHKmIO DRC

PnBb6pepexma“PANORAMA"
B daHOM pexIMpeponCXoDIT paunipneHme nepeIhero ctepe OONJI,TO pINBOJNT K BKNIOHEnIO B HrO KOLOHOK 06bEMHor O3ByaHN.3To,BCBOIO OepeB,PNBOJNT K NOABEHNIO 49eKTA "obOpauBaHN" CnONoB3OBAHm E6OKOBHX 3BYKObl X noJe. MoXHO BbIPaBtpe pexMki "OFF"(Bbl) nnn "ON"(B KJI)(NaCTPOKA NO yMOJuaHNO: OFF(BblKJI).
PnBbIbopepexma"C.WIDTH(YnpaBneHne uipnHO
B daHOM pexnme bInonHReTcH aCTpOka ceHTpaIbHoro 3b YKOBO rON TAKIM o6pa30M, yTO6bi eRO MOxHO 6blIO cblu aTB ToLBo N3 CEHTpAIBHO KOKOHK, ToLBo N3 neBOI/npaB OIK KOHOK KAKKaJyUINCA NCTOHNK 3ByKa HNt N3 BEx TPCxpeNDHX KOKOH Cpa3NJHoi CNIO. DaH HbI peXmIme8 8 CTeneHn HAcTPOKn OT 0 Do 7 (3aueHEn eNo yMOunHaHHo: 3).
Пи Вьбowe ржима “DIMENSION”
B daHOM pexnme 3bykoBoe none nowarObo cmeaetc nIb O bpe, n6o hazd. Pekn mMeet 7 cTeeneH hactpoKn OT-3do+3 (3haueHHe no ymoJuaHIO:0).
4.ДЯн�ркOCTaHbIXnapaMeTPOBcneIyETNOB TOPINbUarn2n3.
HactpoKa ypOBHa rpoMkOCTn KaJdoRo KaHaJa C nOMoUbIO HcNbItaTeNbHOrO CmHaHa
- YpoBHeB rpoMkOCTn KaJDoRo KaHana MoXHO NERKO HAcTpOnTb C NOMoUbO yHKuN INCbIaTeNbHoro CmHaHa.
PnmeuHHe: Ecn KhoNka SPEAKER BbIKNoyeHa, cyHKnur nCbItaTeNbHO CnHana He pa6oTaet.
1. BbIbePtepeXnM nCnblTaTeNbHOro ciHana.
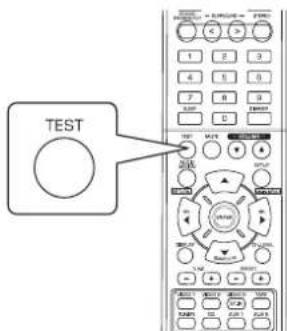
PexkIMNCbIaTeBHorO CnHana OTo6paKaTcHa Ha dncnnee, a cam CnHAn 03ByuMaEeTcKoNHOKoi dna KaKdOrO KaHana B TeueHHe 2 cekyHb CneDyUoE m nopAke:
| → FL → C → FR → SR → SL → SW | |
| Περεδημι Πεθτραλβήν Περεδημι Περεδημι Περεδημι Περεδημι Περεδημι Περεδημι Περεδημι Περεδημι Περεδημι Περεδημι Περεδημι Περεδημι | →Πραβύ Περβόν Περβόν Περβόν Περβόν Περβόν Περβόν Περβόν Περβόν Περβόν Περβόν Περβόν Περβόν Περβόν Περβόν Περβόν Φαβγφερ |
-ПиЗааданнйНастpoКе колонкN“NO(HT)”,проверочь сгналдя COOTBETCTBYUOJOero KaHana npoINpblBaT bca He 6yden.
2.ДЯKaJdOrO KaHana HAcTpOte Heo6XoIMbIy ypoBeHcRHa7a Do onpeJeHnCpeHne rPOMKoCTN 3ByuHaHn KaJDoI KOJOnHKn.
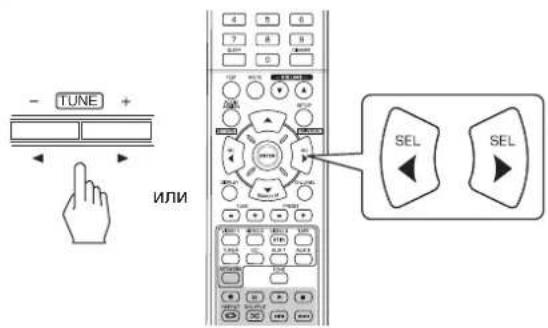
-
Xenaembki KaHAN MOXHO Bbi6paTb npN NOMOu KNOH OK CURSOR UP(▲)/DOWN(▼).
-
OTMeHInTe FyHKuIO NcblTaTeJIbHorO CnHAnA.
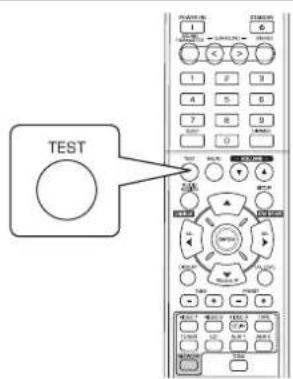
Hacpoika ypOBHa rPOMKoCTn TeKyuero KaHaJa
- Iocne HAcTpoKn yPoBn rPoMkoCTn KaJdoRo KaHana C NMOUbfo fHyKmN nCbIaTeNbHorO cHrHaNa HAcTpoTe yPoBeHb rPoMkoCTn KaHAnOB B COOTBeTcBn C NcTOHnKaAMn TB-npOrpaMM nIIN NCXoJa n3 Co6CTBeHHbx npEdNoTeHN.
-MoKHO HAcTpOHTb Heo6xOaMbI yPoBeHr pOMKOCTn TeKUeero KaHa. 3Tu HAcTpoEHHbe yPoBHN rPoMKOCTn coXpaHOTcB NOnb3OBAteNbckO nAmTn («CAL»), a He B nAmTn npEdBaPnteNbH0yctahOBKn («REF1», «REF2»).
1. Haxmte KhoNky CHANNEL LEVEL (YPOBEHb FpOMKoCTN KAHAJI).
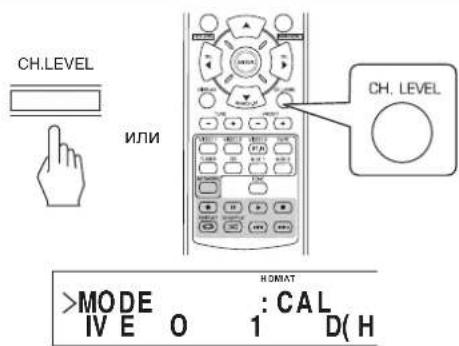
3aTeM OKHO pEXKIMa nAMrTn(CAL»I.T.)OTOBpa3NTcHa DCNpEe B TeeyHne HECKONbKx CekyHd.
-Посл eche3HOBeHnO kHa peXmMa namTn nIy npOBHn
rpoMkoCTn KaHaja NOBtPOHaHXMMTe daHHy KONKy.
2. BbI6epnTe Heo6xOaMlbKaHaJI.
-Пи Кадом Нахати Даньх KНОК АТИВИРЕСС COOTBECTBYOUIK KAHAH B CNEДУОБЕМ NOРДKE: REF1,2(ин CAL) LEFT CENTER RIGHT
B3aBNCIMOCnOT HAcTPOe DNHaMnKa (NO), a TAKKe OT pexmma 0bemHoro 3Byka nT.D., HeKOTOpbl KaHaJIb MOrY 6bITb HeOCTyINbI DnB Bb6opa.
Korda Khonka "SPEAKER" yctaHOBnHeA B noJoxeHne "BbIKL.,IINBa BB6opa DocTyNHb TOnbKO nepeHn IeBb IN pepeHn npAbB KAHabl (N KaHn ca6byepa).
3. HactpoTe ypoBHeB rpoMkoCTn TOnbKO dNBA6paHHoro KaHana.
-уpoBeH LFE moKHO hAcTpOnb b npdeJax danaa3oHa -10-0 d6, a ypoBeH rpomKocTn dpyrnx KaHaoB-B npdeJax-15\~+15d6.
PekomehdyetcBb6paTbnpyobnLFE3haeHne 0D5.TEm He MeHee,INHEKToTopoIPO DTS paHHx Bepcn pekomehdyetc,TTO6blypoBeH LFE6bl paBEN-10D).Ecnnpekomehdyemble3haeHn ypOBHeKaKyTCBbICOKMIMymEhBHTteix.
4. NOBTOPNE DeICTBn 2 n 3, yKa3aHHbIe Bblue, YTO6bl HAcTPONTb KaKDbI KAHJI.
CoxpaheHHe HactpoeHHoro ypOBHr rpOMKoCTn KaHaJa
-MoKHO coXpaHnTb HAcTpoEHnbl yPoBeHb rPOMKocTN KaHaB b NamrTn npeDbapnteHbHoY cTaHOBKn (REF 1>,REF2>)n pni Heo6xoJnMoCTN BOCCTaHOBt erO.
1.ПослЕ ВьINONHeHЯ DeIcTBи 1~4 npOeIpybl «HactpoiKa yPoBnI rPOMKocTn TeKyuIero KaHana»(ctp.20)HaxMnte KhONKy ENTER/(MEMORY) (BBOID(ПAMrTb)).
-3aTeMaHaIinCIneeB TeueHne HeckoJIbKINx CeKyHN 3aMnraet yka3aTeIb «1» nn «REF1」.
- Bb6epnte Heo6xOaMbI peXm namTn («REF 1» nn «REF 2»).
-
Ecn yka3aTeB naTn npEbnapntenbHou yCTaHOKn IORachET, NOBTOPOB BblIOHNTe DeIcTBne 1, yka3aHHoe BblIEe.
-
IoTBepeTe BbI6op.
Hactpoehhbl ypoBeb rpmKocTn KaHaTa coXpaHeB BbI6paHHOM pexmme naRTN.
BocTaHOBJIeHHe COxpaHeHHbIX yPoBHe KaHaIa
- Haxmte KhoNky CHANNEL LEVEL (VPOBEHb)
ΓPOMKOCTU KAHAJA).
Ha nncnnee BteeHne HeckonbKx cekynd oTo6pa3ntca HndkaTOp CAL(REF1>NT.)
- Ecnn HndkaT op pexmua ypoBna rpmkocn KaHaJaN Cue3HET, NOB TOPO HAKMITE DaHHyIO KHONKY.
- Bb6epnte Heo6xOuMbI pexm namrTn («REF 1» nn «REF 2»).
HactpoeHHbIypoBeHrpoMkOCTKahanaCOxpaHEB BbopaHOMpeKIMnamTn.
ПОСЛУSHВАНЕ РадиоpeДАЧ
ABTomatnuecka HactpoKa
- Bb6epnte Heo6xOaMbmy qactOTHbI dnaHaOH.

Ecni 3ByuHHe paIOnepeJa FM cTepeOBeaHaNn RbJIeTcH HeYIOBJIeTBOpITeHbIM n3-3a Cna6oR0 paIIOcnIHana, Bb6bpnte pexm FM MOHOeuaHn IIN cOKpaUeHHyPOBnI yMBo. Nocne 3TOrFM paIOnopeAaHn BOCpON3BOJATCR B MOHOFOHNHECKOM peXmE.
- Haxmte u yepxnbayte KhoNkn "TUNING +/- 60nee 0,5cekyHdbI.
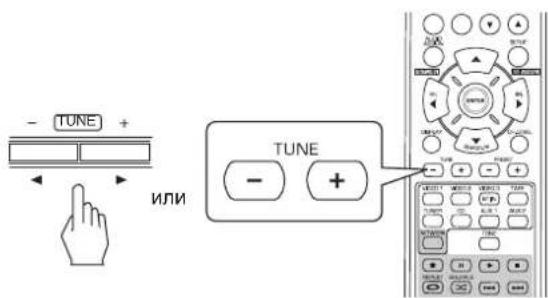
TIOHEP TENep 6yIeNCKaTB CTaHcIM IO Tex nop, nOK a He 6yIeT ObHApUKeHa KaKaI-Ni6o I3 HnX, ObNaJaO Ua JocTaTOH MoUHOCbHO CnHana. DncnneJnK AXET YACTPOIKN.
- Pn Heo6xoJIMOCTN BbIbopa Dpyro paJIOCTaHmnpocTO NOBTopNTe yka3aHHoe Bblwe DeIcTBne.
- ABTomatueckar hactpoika 6ydt nponyckaTab paiooctaHcM CO cnaib ypOBHe CMHaHa.
PyHnHaHacTpoKa
PyHnHa HAcTpoKa yDObHa,ecnN n3BecTHa Yactota Heo6xOIMoPpaIOCTaHUN.
-Поссе Вьбора Heo6xOДМоТ ДмANA30HaЧСТОБИстpo HaxIMaTe KHONKn“TUNING+/-”,нoka He6удET HaДeHa Heo6xOДМaЧСТОТа.
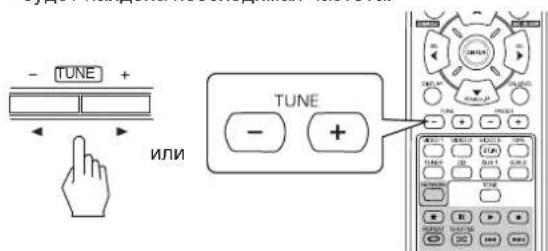
AByomatnueckaIpeBapnteHna HacTpoKa
ΦyHKUABTOMATUHECKO npeBapHTbHOH HAcTPOKn no3BOJREt ABTOMATUHECKN BbINOHNHTb NONCK TOnbKO FM-paIOCTAHm n COxpaHTb IN B NaMRTyCTPOINCTBa.
Bo Bpem npocnyuBaHn paDIOnepeDaB Dnana3OHe FM nI AM, HaxMnte yyepKNaBte KhoNky "ENTER/(MEMORY)" B TeHene 60nee 2 ceKyHd.
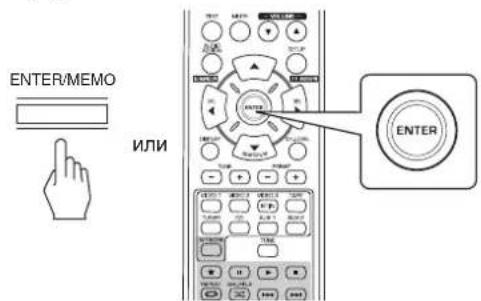
3aTeMaHaIcNlEe HaHET MIRAtb HINdNKatop "AUTO MEM" IN BkIOUHTCRApyHKua ABTomATnuecko npedBapnteHbHOHACTPOIKpeCNBepa.
4To6bIOCTaHOBnTbΦyHKUHOABTOMaTHUeCKOINpeBaPHTeHbHOHaCTpOuKN,NOBtOHO HaxMITE DaHHYIO KONKY.
- Moxho coxpaHntb do 30 FM paIIOCTAHm.
PpmeaHne:
FMpaiooctaHmcoCnabimypOBHemCnHaHeJb3aCOxpaHHTb.
-TO6bI coXpaHnTb AM paAnocTaHcHm nn paAnocTaHcHm CO cna6bIM yPoBHeM CnHaHa, BbINONHnTe onepaHIO pHyHO npeDbapntenbHO HAcTPOKn.
PuyHn npedBapnteIbHa nacTpoKa
B Namrty yctpoictba moxho coxpaHntb do 30 FM paiooctaun.
1. HactpoTe Heo6xOmyu paAnocTaHnIO c NOMOsbO cyHKnABTomatHeckOnnnpyHOH HActpoKn.
2. HaxmTe KhoNky «ENTER/(MEMORY)»
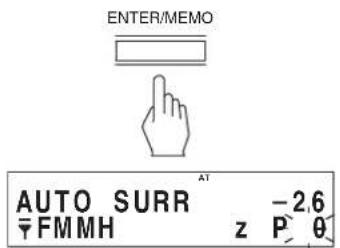
"MEM",нд.6уDt MraTb.
- Bb6epnte HOpEmpIJIpneBapNTeIbHOB NaCTpoNk (1~30) n HaxMnTe KhoNky «ENTER/(MEMORY)»
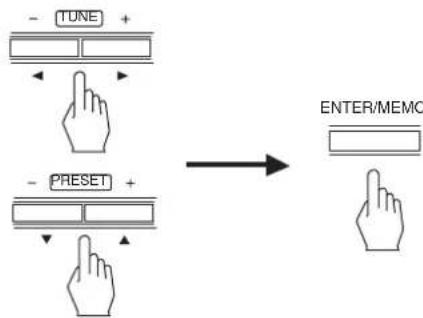
-Пи ИСПОЛБЗОВАнИ NИСФОВБIX KНОК HA ПУЛБTeДИСТА HЦИОНHOrO YINPABLNeHn.
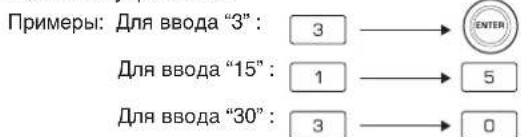
- Nocne 3TOrO cTaHcHg 6yDet 3aHeceHa B nAmrTb.
-
PnBBOHe Hmepa n3 DByx CnpC NMOUHcNpOboBkx KHONOK DNCTAHNOHHORy npabJeHn6 Byedt ABTOMaTHeCKN BbIOJIHeHa HAcTPOJka Ha CoXpaHeHHyO CTaHcIIO npN 3TOM He HApO HaxImaTb KhONKY ENTER(/MEMORY).
CoXpaHHeHHa Yactota CTnpaETcN 3n nAMTn Nocne coXpaHHeB MecTo Hee dpyroY aCTOTbl. -
NOBTOPuTe DeIeCTBnC 1 nO 3, yKa3aHHbIe BbIwe, YTO6bI COxpaHNTb Dpyrne paAnocTaHmN.
ФУHKUЯPE3EPBHOKONIPOBAHNIIAMRTN
Ipeed BbIKIOHEnEM peCINBepa coXpaHIOTc CneDyIOUHe NaCTPOEHHbIe npaMetpbl.
-Пааметры ВьБОРА BXODнбIX PA3ьEMOB
- NapaMeTpbi peKIMa 06bEmHOro 3ByKa
-ПпeдвapительноустановлпньгьсчтциNT.Д.
Ponck npedycaHOBLeHHbIX paHocTaHm
Поссе Вьбopa pecивера в Качеве�СТОУнka BXOДНО РИнHLA, ВьБЕРп Te HeOxODmbl HOMeP dI npEДВAPITENbHOr yCTaHOBKn.
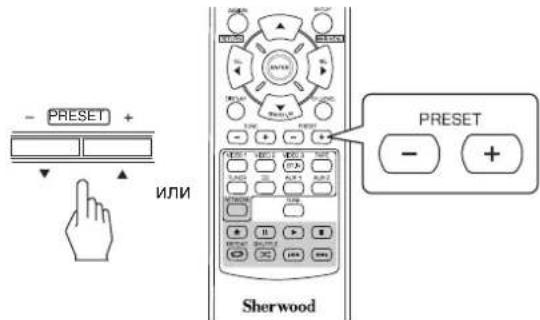
-Пи ИСОЛБЗOBAHИ NИСФОВБIX KHONOK HA ПУЛБТЕ ДИСТА HUHOHHORO YNPABJIENHA.
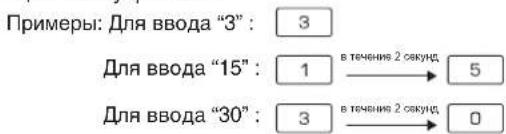
Tiohep RDS (PernohaJIbHaonuaI HeKOTOpbIX cTpaH Ebponbl n T.d.)
ПОСЛУSHIBAHNE TPAHCJIЯЦИ RDS (TOЛьКВДИАЗ3OHE FM)
RDS(CnCTMa DaHbIx paADNCTAHm) RABNTCE TEx HOHOrMepeAeHHOpMAHOHbX CnHAnOB BMEcE C HnANAM TpAHCNIUM. BaW ToHEB p CoToHNM PaCnO3HaBt 3TN CnHAnbI OTo6PaxAt b COOTBETCYIOH HOpMAIO HA DCnJIe. 3TN KOaB cOepKAT cn eUYKOIO HNOPAOMU. HanMeHOBAHne 6CnYKnBaOue PnporpAmbl (PS), CnCOK TINMO npORpAMPT (PTY), paIMoTeKT (RT).
PpmeHne:
B pyrnx ctpaHx yHKnR RDS TIOhepa He MoKeT 6bIb NcNoB3ObaHa.
-ФункцуRDS BO3MOxHаToIbKO BДиana3OHe FM.
ΦHyHKnRDS OcUeCTBNEET NOCTKONb Ko cpeDn CTaHmL, KOtOpBe cOxApaHEh B nAMrTn. EcnH NkAKnx CTaHmN He 6bIIO 3aHeCHO B nAMrTb NmE cEn H eOBapXyHn HxHb Tn npOrpAmmbl, cpeDn CTaHmB nAMrTn, ToHa DCINNEe 6yDet OTobpaKeHNO "NO PTY". PToTOMy HxHb BOHNNTb COxApaHEHne PAADIOCTAHN B nAMrTb NPepDcOyCECTBNeHEmn NOnCKA RDS cpeDn PAADIOCTAHMn.
Ponck paadoctahn no Tnny nepedaBaem np orpammbi
Bb mokeTe nckaTb cTaHmN no Tnny nporpaMMbl.
- Послеснадугки Ндпаань FM нахмite Кногу SEARCH MODE (Pexm nonka).
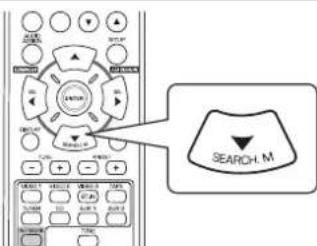
-Индікай "PTY SEARCH"(Пиэск) 6удет отобрахаць CBВТЕЧЕп HeCKONьКИСЕКУHД.
- PnO OTo6paKeHn Ha dncnnee "PTY SEARCH" (PonC K) cneDyET bBb6paTb HxKbI Tn nporpaMMbl.

PTY: News -26 FMMH P-89
Kakdbpa3nocHe HaKaTn3nX KhoNOK 6yDet Bb6paH Odn H3 cneDyouxu TnO nporpam. (News (HOBOCTN), Affairs (DEIOBBe 3AHRTN), Info (INHOPMALI), Sport (CIOPT), Educate (OSPA3OBAHIE), Drama (DPAMA), Culture (KYJbTYPA), Science (HAVKA), Varied (PA3HOE), Pop M (PON MY3bIKA), Rock M (POK MY3 bIKA), Easy M (PPOCTAR MY3bIKA), Light M (JIETKAR MY3bl KA), Classics (KLACCNKA), Other M (PA3HAR MY3bIKA), Weather (PNOODA), Finance (FUHAHCbI), Children (DETMI), Social (COLMALbHbIE DEIA), Religion (PEJTNIR), Phone In (TEENEOHHbIE 3BOHKU), Travel (PYTEUIECTBNI), Leisure (DCCYI), Jazz(DXA33), Country (CTPAHA), Nation M (HALIO HAJIbHMy3bIKA), Oldies (INRA NOXINbIX), Folk M (FOJI BKNOPHAR MY3bIKA), Document (JOKYMEHTbl)
EcnHnDnKaun "PTY SEARCH" (POnck) nCHe3Ja, To HaxMnt e KhoNkSy SEARCH MODE (Pexm noncKa) cHOBA.
3.Пиоотбрахени Вьбран HorO Tuna nporpaMMbI CneDy et Haxatb KhoNky ENTER (BboD).

TIOHEP HauHET NOCK COBnaDEHnCpeDn COxpaHeHHbIX B n amATN CTaHm.
-ПиОБнApHxEHINCTaHmN NOnCK6yTeT OCTaHOBnE n CT aHcIg6yTeTBOCpOu3BOoNTbCnBTeHeHne5ceKHyHd.
- EcnHnOdHnCTAHmHe 6bIIOo6hApyKeHo,6yTeT OTo6 paxeHO COo6uHHe "NO PTY" (OTcyTCTBnE Tnna CTAHm).
OTo6paKeHne HΦopMaunRDS
B pexime FM.

KaJbIpa3nocHe haxKaTHa 3ToI KHOKNpeXMM OTO6paKeHN HnDnCnEe 6yET MeHHTBCr CNEyOuOM 6pa3oM:
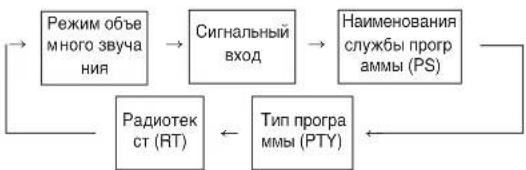
- Program Service Name(PS)-HaMHeMoBaHHe paAnocTaHm.
- Program Type(PTY) - 3To O3haaet TIN nporpMMbl, KOtopaB DaHHb MOMENT TpaHcIpyETCA.
* Radio Text(RT)- Coo6eHnI OtnpabHeHHbIe paHIOCTaHcnei. HapnIMep,paIOCTaHcNlra,tpAHCNPyHOuIaONbOooHHe co Cnyu aTeJAMMMOKETpePdABaTBtePeOHHbI HOpE B KaueCTBe padnoTEKTCTa (RT). - Ecnn CnHn TpaCnauu CnMkOM Cna6b nn paNocTaHnne Hne noDpeKnaeT ycnry RDS,TO HA nncnee 6ydt OTo6pax aTbca "NO NAME" (OTcyTcBne Nmeh), "NO PTY" (HeTtna p aNoCTaHn) nn "NO TEXT" (OTcyTcBne TeKcta) 6ydt OTo 6paxKaTbca Ha dmCnnee.
ПОСNYшИВAHNE TPAHCSIИНTEPHET-РАДNOCTAHЦИ, MY3bIKAlbHbIXФАЛIOB
- Bb moke Te Bb6paTb npocnyuBnBaHne TpaHcJIaIu INHTepHET-paIIOCTaHcIIu IIN My3bIkaIbHbIX paJIOB, coXpaHeHHbIX Ha USB-yctpoIcTBe nn KOMbIOTpe (MeHa cepBepe).
INHTepHET PaHNO
- VHTepHET-paNo -3To paNoBoeAahne, pacnpoCtpaHRem oe uepe3 VHTepHET. Ha cTaHcIMn VHTepHET-paNo BCero Mnpa MoXHO HAcTpOuTBcR apee3 caIIT Shoutcast.
Shoutcast (http://www.shoutcast.com)
Shoutcast 30 fo6ecnnaThb IVHTepHET-paNo pecypc, npoB aaindepom KOtporo RblreTc KOMnHaHn Shoutcast. Bb mo XeTe nonb3ObaTbcr yCyraMn Shoutcast 6e3 perntpaun.
■PnmeuHne:
B INHTepheTe cyueCTBye MHOXeCTBO INHTepHeT-paHIOc TaHcH, y KOTOpbIX KaeeCTBO TpaHCnIaN pOprpAMM, a T A kXeCKopoCt bpeJaun B 6ntax, CInbHo OTJNAoTcR. B O6Ueem Cnyuae, Yem Bblwe CKopoCt bpeJaun 6NTOB, TEM Bblwe KaeeCTBO 3ByKa, HO B 3aBNCIMOCTN OT JINH N CB3N I TpaFoka cETN, My3bIkaJIbHbIe HUN ayDINO CnHAnbl PnnppeJaevnoTKoA MOrY TpeBIBaTBcR. Hao6oPOT, MehBnne CKopoCTn peJaun 6NTOB, yxHyda a KaeeCTBO 3ByKa, IMeHOT ropa3Do MEhBuYIO TeHDeHcNIO K npepbBaHIO.
USB-yctpoictba namrtn (fneuken)
- USB-yctpoiCTBa namTn MOrTy 6bIb NOKIIouHeBly Upe3 USB-pa3bem Ha nepeDHei NIn 3aDHei NaHeJx INr BO cPon3BeDeHn My3bKaIbHbIX paINOB, KOTOpBie xpaHrTa Ha 3TxN yctpoiCTBax.
ToIbKO USB-ycTpoNCTBa, KOtOpBle NOdEpxKnBAOT npo OKon "mass storage class" n annapatHO-He3aBnCmbl np oTOkOJ MTP (Media Transfer Protocol), mory T Bocnpn3B OOnTbc Ha daHHom ycTpoNCTBe.
-3To yctpoCTBO NO.ДeepKINBaIOT φOpMaTbI pa3MeueHnHaDaHHbIX FAT16 nN FAT32 nIa USB-yctpoCTB.
MeMa cepBep DLNA (Digital Living Network Alliance (AInbHc unΦpoBbIX cTei dIa Doma))
-3TOT np60p MOKET npOurpbIbAaTb My3bIkaNbHbIe paIbI bT DLNA-COBMeCTnMOro Medna cepBepa (KOMnbIOTe pN I N 6bIBoBaJNEKTPOnHka), NOkNIOUeHHORO K BaWei Dom aWHei cTeu. BbMOKeTe JERKO NODeNITbcr My3bIkaNb H bIMn paIaNam, nCnoNb3yra Windows Media Player Bepcn 11.
© 2011 Digital Living Network Alliance. Bce npaba 3aunue Hbl.
DLNA, DLNA Design, ABJHOTC TOpROBIM MApKAMn IIN 3aperncTnpoBaHNbIMN TOpROBIMM MapKAMn Digital Living Network Alliance. Bce npaba 3aunueHbI. NcnoIb3OB anhe 6e3 pa3peWENr cTporo 3anpeJeHO.
PnmuMeaHHe:
BbI DoJIKNHbI NOJIKIIOHTb KOMNbIOTeP (MeJa cEpBep) K ToJ Ke JOKaJIbHO CETn, YTO N DaHHoe yCTpOCTBO.
3TOT np60p noDepKnaBaet n3 DLNA toIbKO DMP (nneep uΦpoBoi MeHa).Y np60pOB, KOtOpBie He noDpe KnaBOr DLNA noHOCtBIO, HEKOTOpBie cyHKmMOry T 6 e3DeiCTBOBaTb.
CobmecTmbie aydno oopMaTbi
- INBocnpoun3BeDnHINHTepHET-paDiNocTAnu,paIIO BcUSB-yctpoiCTB n paIIOB C MeNa cepBepa 3TO yCtPOICTBO NOIDepKnaeT paIInbI, cneNyUOux My3bikanbH bIXΦopMaTOB.
| Формат phайа | Частota диске Тиизули | Скорocсы поitsков� лeredачи данных | Расшиpenе |
| MP3 (MPEG-1 Audio Layer-3) | 32/44.1/48 кГ з 32 | - 320 к бит/cек | .mp3, .MP3 |
| WMA (Windows Media Audio) | 32/44.1/48 кГ з 32 | - 320 к bит/cек | .wma, .WMA |
-ПодэрхиBaetcфайысперемениpepaeнднHbIX.
JIueH3neHaTexHOJOrnAOyIOKOIpOBaHmMPEG Layer-3 0bnaIOT KOMNaHnFraunhofer IIS n Thomson.
- Jlorotnbl Windows Media n Windows rBnaOTc Toprob bIMn uIN 3aperncTpnpoBAHHbIMN Toprobm Mapkamn KOp npopauu Microsoft Corporation B CUSA uIN npyrnx ctp aHax.
Ba30BbIe onepaunn
- BbInonHnTe Heo6xOaMbIe noIroTOBHTbHbIe np oueDpybl.
①ПоверпсETСЕТБОКРУЖЕНЕ,a3aTeMВКЛIOчTEДАнHO e yCTPOnCTBO.(CM.“ПОДКЛIOЧЕHNEK CETN"Ha cTp.7.)
② EcHn Heo6xOJIMo 3aIaTb yCTaHOBKn, 3apeNCTpnpoBaTb B aun yHeTbIe 3aIcNn N BblOnHnTb CeTeBBe yCTaHOBKn n T. n.(Cm. "PnPbBbOpe Settings"Ha cTp. 32.)
③ Ecnn KOMNbIOTep HcNoB3yETCB KaYeCTBe MeHa cepBepa, To KOMNbIOTep CneJeT noJrTOBHTb. YcTaHOBHTb Windows Media Player BepCn11. (CM. "KoHpIyrpOpBaHue nporpaMM bI Windows Media Player BepCn11." Ha cTp. 31.)
- Bb6paTb onuio "NET/USB" B KaueCTBe BXoHOr O nctOuHnKa.
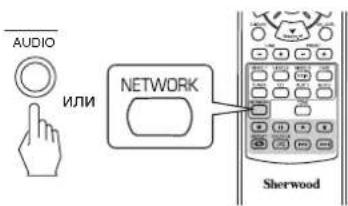


-Поссne noДТВЕРЖЕДИЕ ВБОБОА oniIN "NET/USB" 6yET BOC CTAHOBNEHO NOcIeJHHe 3aONMOHHEO COCTOHHe.
KorDa KBNIOHHe HANPRAKeHHe NITAHn N BbIbPaHa OINIA
“NET/USB, Ha dncnnee 6y etet oTo6paKeHo OCHOBHe MeHO (CM. nyHKT 3 HIXke).
-
- TTo6bI Bbl6paTb I03nHIO B OCHOBHom MeHIO, Ha KMnTe KhoNky SETUP (MAIN MENU).
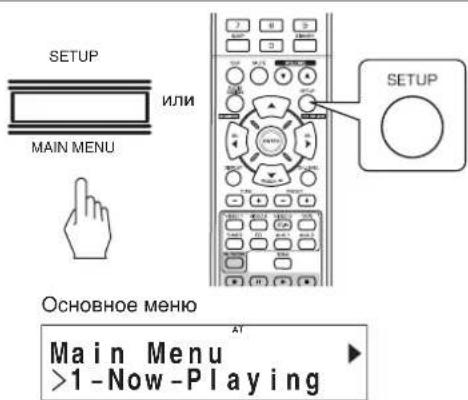
-ПослstOTO6удETOTOBpaXeHО OCHOBHe MeHIO.
- BbIbepeTe HxKHyIO nO3nUIO, a 3aTeM HaKMITE KhoNky ENTER.
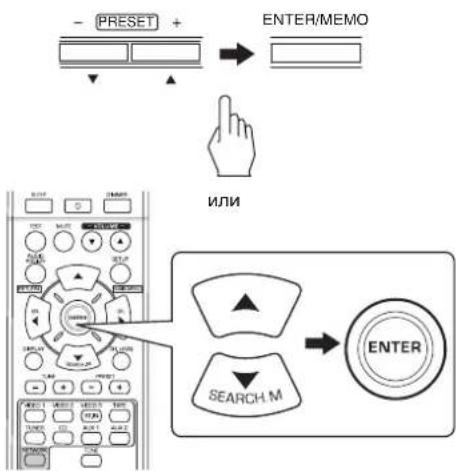
-Пи Вьборе "Now Playing" (Bocnpoun3BedeHne ceuac), cM. cTp. 29.
-При Вьборе "Internet Radio"(ИнтерпгТ-рдno),сm.стp.29.
- PnBb6pe "USB" (My3bikalh4 6n6nnteKa), cm. cTp. 30.
-Пи Вьборe "DLNA"(ФаинБИ КOMNьОтpe),СM.CTp.30.
-При Вьборе "Favorites"(нобимьг санци),см.ст.31.
-При Вьборе "Settings" (yctановки), cM. cTp. 32.
-Подрбнocm MEOHу cTahOBKn npametpoB nOTOKOB, CM. cTp.28.
- NOBTOPRnTe, npBBeHHe Bblwe NyHKtbi, Hau nHa c 4, do Tex nop, noka He 6yDet BblpaH yXHHbI My3bKaIbHbI paai nn OnuYcTaHO BKN I.T.I.
3aTeM6yETBOCPON3BeDeH Bb6paHHbI paJIINBxO D B COOTBECTBYIOU yCTAHOBKY.
Korda Haxata Khonka AUDIO ASSIGN(/RETURN) B noM MeHIO,6yIeT npou3BeHn nepexoB npebIyuee cocTo RHE.
Korda haxkata KHonka SETUP/(MAIN MENU) B noDMHe IO,TO 6ydt BbINONHeB BO3BpaT B OCHOBHe MeHO.
Oepaun Bocnpoun3BedeHn
-BoBpMaBOCnpOn3BeDeHnTeNETpaHcHnIuN VHTepHETpaIOCTaHnINmMy3bKaIbHbIX paJIOB,BblMOKeTe BbIONHATb 3TO BOCPOn3BeDeHneBpa3NJUHbIXpeKIMax.
4To6bIOCTaHOBtBBOcPpO3BeDeHne
Bo BpemB OBCPon3BeDenHn HaxMnte KhONKy Stop(■).
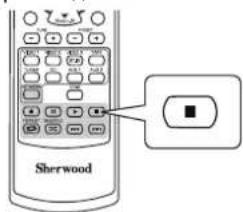
-ПослЕЗTOROBocnpoun3BedeHne6ydenTocTaHOBNeHO.
- 4To6bHaayatb Bocnpon3BeJeHne, HaxMNTe KHOIky PLAY(
4ro6bI cdeNaTb nay3y BocnpOn3BeDeHnA
Bo BpemBocnpoun3BeHnHaXmTe KOnKy PAUSE
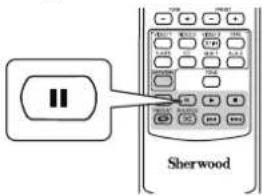
3aTeM BOCnpon3BeDHeHne 6yET BOCCTAHOBNEHO B TO M OMeHT, KOrda 6bina Haxata 3a KHONka.
-TO6bI BOCCTAHOBHTB BOCPON3BEDEHNE N3 3TOI TOKIN, HAKMTE KHOKNY PLAY(
Yto6bI nepeHTN K BOCnpOn3BeDeHIO CJeDyUoero
BoBpemBocpon3BeHnMy3bKaJIbHorOpaJna.
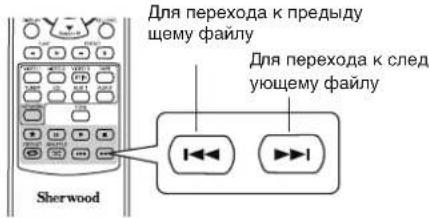
KaKbpa3nocHe HkaTnKHONKn,6yDet nponyeH O INH My3kakBHyI qaiI.
ДЯ NOBTOPHORBOBCPON3BeDeHn
BoBpEmBOcnpoun3BeDeHnHyxHOroMy3bikabHoroΦaIHaXkMTEKhONkyREPEAT(
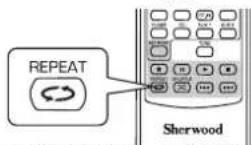
-Noce 3Toro 3aropntc" C"my3biknblhe paanbl B na nke 6dyT BCE BPemr NOBTOPCTC.
-OT6bl OTMeHHTb NOBTOPHOE BOCnpon3BeJeHHe, HaxMnte KH ONky 3Ty KHONKY CHOBA.
DJIaTOrO,HTo6bI BbINONHtB BocnpOn3BeDeHHe B npOn3 BOJbHOM NopRKe
Bo Bpemr Bocnpoun3BedeHnMy3bikalbHbIX paaiNoB, HaxMnte KhoNky SHUFFLE( ).
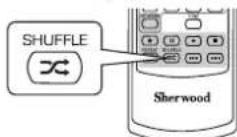
Pocne 3Toro 3aropntc“N My3bikabHbe paanbl B nA NKe Hauhyt BOCnpon3BODHTCB NpOun3BONbHOM npRnke.
-TO6bIOTMEHHTBBOCPON3BEDeHHe BnpON3BOJbHOM NOPRAK e,HAXMNTE KHONKY 3Ty KHONKY CHOBA.
Приимechanical:
Pexnmponycka, noBtopeHn H Bocnpo3BeHn B npO3B ObHOM npAKe Moryf 6byT McNoJb30BAhbl npN BOCpno3Be DEHNO TO MybikAbhix faiIOB, coXpaHeHHbx Ha USByCTPOCTBAX naMTN.
-ДИССРАВК,6NOK-CXeMa BByIINIT CNeIyIoum 06pa3OM:
Cxema MeHIO HacTpoKn
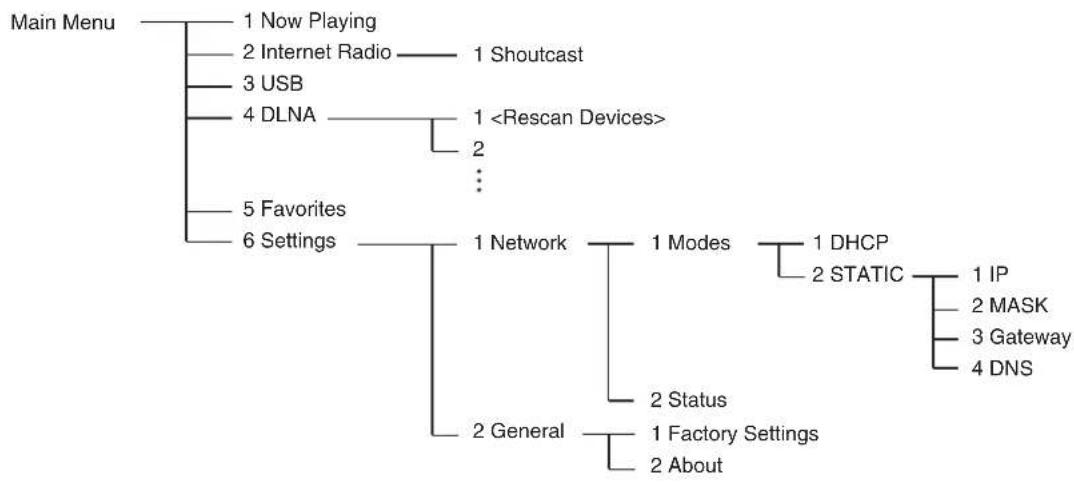
PnBocnpounBeHnn B pexnme "Now Playing"
Bmy MoKTe Bocnpn3BecTm HOpMaHIO O TpaHcNpyEmoI NHT epHET-paHOCTAHmIM My3bIKaHbHOM qaiNe.
HakimaiTe KhoNkn KYPCOPA BBEPX(▲)/BHIN3(▼),
HTO6bI BbIbpaTb HxKbI pExHM BOCnpon3BeDeHNA.
PpIMeP: Ppi Bocnpo3BeDeHmN INHeT-paDIOCTaHmN
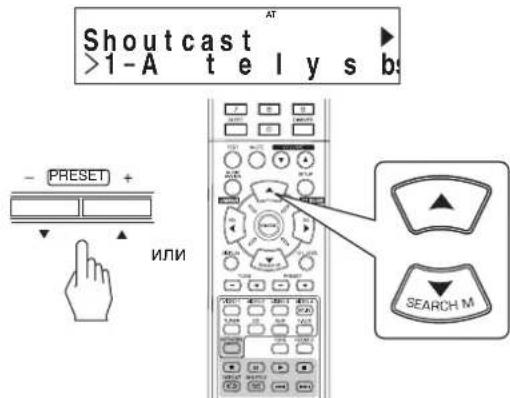
KaKdbi pa3 noCne HaxaTn KHOKN,peXm BOCnpo3BeHn6yDcET MeHTbCnEdyOuMm 06pa3OM
CTAHIIMINAHMENBOHANHEYCTPOYTBa 3ARONOBOKNECHMAdd to favorites ^ 念 IMMBNA HAMMOHOBANHEJIbOMA
:Heoctyno BO Bpem npomprbBaHnMy3bikanbHbix paHIO B INI npocJywnBaHn CTAHCm IVHTepHET-paHIO, 3apernt pipoBaHHbx B cncke "Favorites".
PpmeaHnA:
CUMBONbl, KOtOpbl He npnHaJneKaT cnNcKy “A-Z”,“a-z”, “0~9”,“-”-MOrYr He OTo6paKaTaBc H daNcPiJe.
- ECIN INHPOPMAUNO HANMEHOBAHN CTAHUN, HA3BAHNNEH NIN MENH NEBua n.T.I. HeOCTyNA, To OHA He MOKeT 6bl Tp npABINbHO OTo6paJeha.
Pn Bb6pe onu "Add to favorites" (doabntb NIO6 mble)
HaxmTe KhoNky ENTER.
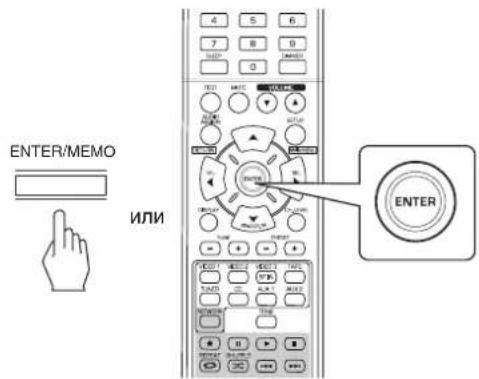
-ПосnéэТOrоБуДeтОТOBpaЖeHa KногKa"OK".
② Haxmnte KhoNky ENTER, TTo6bl noTBePnTB Baw BbI60 p.
- 3aTeM cTaHnIe HmMybKaJIbHbI pAun 6yUyt 3apeNCTpnp OBAHb B CnCKE IIOBumbIX CTAnu/ncen. (TOpOboCTOn o My3bKaJIbHbIX ONepaun, cm. "PpN BbIbope Favorites" Ha CT p. 31.)
PpBb6ope "Internet Radio"
Bbl moxete cnuyta b nepeaun INHTepHeT-paio, npedocTabn remble Shoutcast.
- Haxmte KhoNky ENTER.
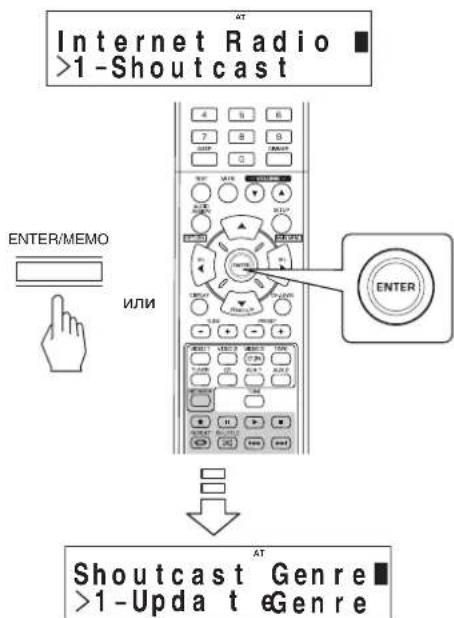
- HaximaiTe KhoiK KYPCOPA BBEPX(▲)/ BH3(▼)ДЯ BbI6pa HyxHoi KaTEROpM (HINn O3nU), 3aTeM HaxmTe KhoNky ENTER.
- NOBTOPRte npBBeHHb Bblwe nyHKT 2 do Tex nop, noka He 6ydt BbIpaHa HxKHa TpaHCnau R dI npocJyWuBaHua.
PpMep: PnBocnpo3BeHn TpaHcna, npedocTaN
Aemoi Reciva
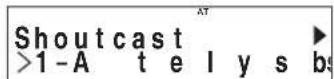
-Пи npocIpyuBaHm BeaHnKaKdoe HaxaTne KhoNKn KYPcOP BBEPX(▲) nIn BHn3(▼) nepeknOuaet pexn M dncnna.
Bone noDpO6Ho o pexmMax dncnner cm. "BbIbpaar Ce Hac 3ByuHT>> Bblwe.

PnBb6ope "USB"
BbMOXTe CnyuTaMbMy3bKaIbHbIe PaNbl, XpaHmblE B USB naMaTn.
PpmeaHne:
-PerdBb6opom"USB"noKIOUHTe USB naMTb K USB pa3 bemy Ha nepeHne naHei.
- Haxmae KhoNk KYPCOPA BBEPX(▲)/ BHIN3(▼)ДЯ BbI6opa HyxHoi nAnK (nIM My3bl KaIbHix paInIOB), a 3aTeM HaxmTE KhoNky ENTER.
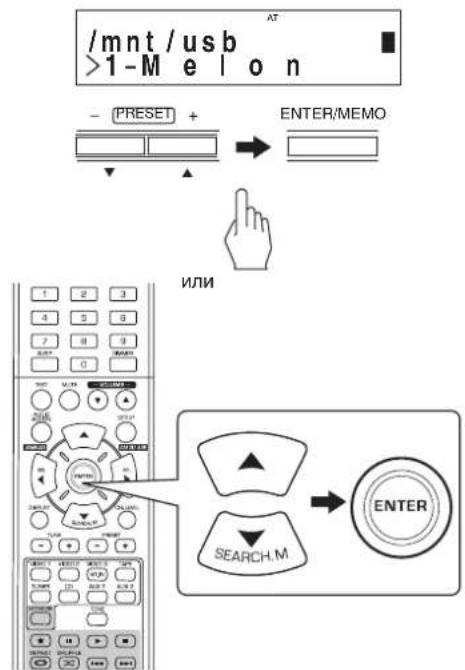
- NOBTOPAIte npuBEeHNbI Bblwe nyHKT 1 do Tex nop, noka He 6ydt BblpaH HxKbI My3bIaJIbH bI qaiI dnnpocnyuBaHn.
PpIMep: Ppi Bocnpo3BeDeHm My3bikanbHorO paHa

-BoBpMaBOcnpOn3BeDeHmMy3bikAJIbHoro paINa KaJd bIpa3 HaxaTne KhoNkynKyPCOPA BBEPX(▲)nHn BHU3(▼) nepeKnIOuayet peXHM dncnJe.
-BoJeeNoIpO6H0OpexKmMaxIncnnercM.«BbIbpaIa «Ce Nucac 3ByuT»»Ha cTp.29.
PpBb6ope "DLNA"
BblMOKeTe CnyuAaTb My3bKaIbHbIe faaIbI, XpaHIMbIe B KOM bHOtepe (MeDaCepBe), NOKKnHOeHHOM K 3OTMy npIOOpy Uepe3 Baay DomaunHIO Cetb.
PpimMeaHne:
Дпгпсушваньи Муькальхфалов,ханьхьВа WMEM KOMNBIOTepe, Bam ChaHana HxKHO OTKOHpyPoBaTb Windows Media Player Bepcm 11.(NoPobHo CM.KoHpyr npObaHne Windows Media Player 11"Ha strc.31)
- BknoHTe BaW KOMNbIOTep (MeNa cepBep).

- HaximMaTe KhoNk KYPCOPA BBEPX(▲)/ BHIN3(▼)ДЯ Вьбopa BaWero KOMNbIepeBa KaY ecTBe MeMa cepBepa, 3aTeM HxMnTe KhoNky ENTER.
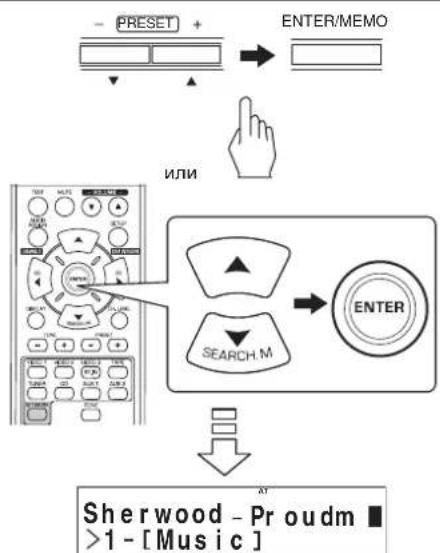
Korda Baawero Komblbotepe HET B cnicke Bblbopa yctpoiCTB, CneJeT Bblpatb
3. Haxmaite KhoNk KyPCOPA BBEPX(▲)/BH/3(▼)ДЯ Вьбopa hyxhoi KaTeOpn, 3aTeHaxmite KhoNky ENTER.
4. IOBTOPnTe npBBeHbI BblIe nyHKT 3 do Tex nop, noka He 6ydt Bbl6paH HxKbI My3bIkaJIbH bI qan IpnocnyuBaHH.
Ppimep:PiBn Bocnpon3BeHmMysbikanbHoro paHa

BoBpMaBOcnpOn3BeDeHnMy3bKaIbHOro paIa KaKd bIpaHaxKaTHe KHOKn KYPCOPA BBEPX(▲) nIIN BHN3(▼) nepeKlNoaet peKIM dncnlae.
Bolone noDpO6H o pexnMax dncnner cm. «BbIbpaar «ce HuaC 3ByuNT»» Ha cTp.29.
KoHpynpobAHne nporpaMMbl Windows Media Player Bepcnn 11.
- 3anyctnte nporpammy Windows Media Player Be pcnn 11 ha Baewem komnbjoTepe.
- BbIbePte BklaKa "Library" (BnIoTeKa) B ctp Oke MeHIO n 3aTeM BbIbePte onuio "Media Sharing" (DocTyN K Medna cpeDe).
- BДиANOROBOM OKHe "Media Sharing" (ДocTyн К м eДиа cpe) BbIbePnte KOHTpOJIbHoe OKHO "Share my media" (ДocTyн К моeJ MeDn a cpe), a 3aTeM HaKmTe KhoNky "OK".
- B cnncke yctpoiCTB bbIbepuTe 3TO yctpoiCTBO, a 3aTeM haxmnte Khonky "Allow" (PaapeuNTb).
-
5eIKNHnTe NO KhONKe "OK", YTO6bI 3aKpbTb dna IOROBoe OKHO.
-
Pocne 3TOrO KOHcHpynpoBaHne nporpaMMb Windows Media Player BepCm116ydtzabpeHo.
Bbl MoKTe BocPm3BOJtB faJIb n3 6bIIOTeKn npOrpa MMbl Windows Media Player Bepcnn 11 c nomoubdo daHoro y cTPOCTBA.
■PnmeyHn:
- Поррамma Windows Media Player Берн 11 может 6ьт b arpyхега бecпатно себ-cа'tа компанн Microsoft.
- ECnI qaepBON orpaHmHbAeT DocTy,To KOhPnHypnpoBaH ne pporpaMMb Windows Media Player bpcu 11 He MoKet 6 bTb BInonHeHo
Пи Вьборе "Favorites"
BbMOKETe npocnymbaHTNtEPHT-paHOCHaUN (TOnbk O npOeDcTaBnEMBe cepBNCOM Shoutcast) INy My3bIKaBHeI e pAan, zapeHCTpOpaBAAIB B cINCKe "Favorites" (NIO6HM bIE) INy ydANITb INX 3TOrO CNCKA.
Приимechanical:
KorDAUSBYCTPONCTBOOTKNIOHOHauWOMNBJOTEP(MUNa cepBep)OTKNIOH,TOHeJIb6yETBOCPON3BcTnMy3blKaJIbHbIepaHbI,KOTOpBIeXpAHrTcHABEM.
1. Haxmte KhoK KYPCOPA BBEPX(▲)/ BH3(▼)ДЯ Bb6opa cTaHcN nIn cfaiNa, 3aTe M Haxmte KhoKy ENTER.
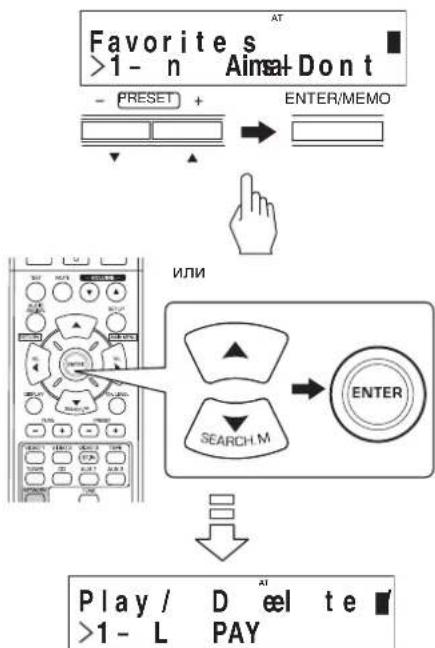
- Haxmaite KhoNk KYPCOPA BBEPX(▲)/ BHIN3(▼)nBb6opa "PLAY"(Bocnpn3Bectn), "DELETE"(VdaNTb)nn "CANCEL" a 3aTeHax mnte KhoNky ENTER.
PpIMep: PnBocnpOn3BeDeHm My3bKaIbHoro paIHa
Favorites >1- S UB
KordaBb6panaOnnra"PLAY”(Bocnpa3BecTn),TO Bb6 pahna cTaHnI INMy3bKaIbHbI paIN 6yDyT BOCPON 3BeDEHbI.
Korda BbIbpaHa onuN "DELETE" (YdaIITb), TO bIbpaHn aTahua nn My3bkaJIbHbI paIb 6yDt ydaIeHbI n3 cnIcKa "favorites"(nIO6MbIe).
- Ecnn Bb6paH "CANCEL", Baw Bb6op 6ydt ydaen.
BoBpMaBOOPnBeHMy3bKaIbHOroФaJIa KaJd bIpa3HaKanTKeHKnKYPcOPABBEPX(▲)nn BNH3()nepeKIOyaePekmDInCnPIe.
Bone noDpO6H o pexnMax nCnnen cm. “BbIbpaar «ce Huaac 3ByuHT»» Ha cTp. 29.
Pn BbIbepe onu "Settings"
-
DnnpocnyuBaHnpaDnOBeuaHnIINMy3bKaIbHbixΦ aNOB B NepBb pa3, Chayana HacTpoTe cetb n T.D. Ha ONTMaNbHOe cyHKUHOHPOBaHne.
-
BbI6epnTe HxKHyIO nO3nUHO, a 3aTeM hAxMnTe K HonKy ENTER.
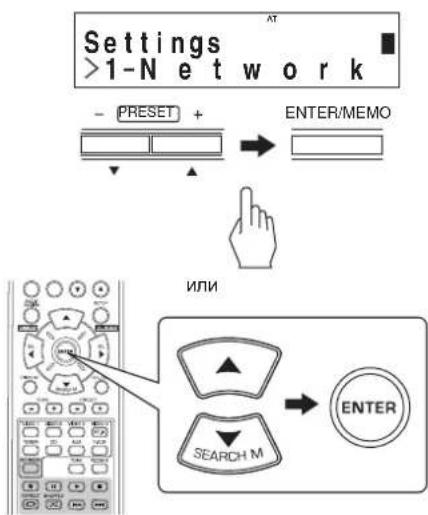
Kakdbpa3noche haxatna KhoNOK KYPCOPA BBEPX(▲)nn BHUN3(▼)noaunpexma yctahOBok 6 ydet MeHbca CneDyoum 6pa30m. Network General
- EcnBbipan "General", cm. ctp. 33.
EcnBbI6pan"Network
-ПлгпocушьанИ Иnteрнет-раимо CTанчи,Музык Льного ВцанИ ИИ Музькальнбх phaиOB,ХpaHIMbIX В Baшем Komlbotepe, NO Domaшен CETN,ВhaJaNe HeO 6xOДмО NaCTponTb CETb.
Netwo Setrk >1-Modes
- HaxMnte KhoNky KYPCCOP BBEPX(▲) nnn BHN 3(▼),ДЯТOrO,ЧTo6bI Bbl6paTb "Modes" nnn "Status",Затм HaxMnte KhoNky ENTER.
Ppimep:EcnnBb6pan "Modes"
Netwo Modrk >1-DHCP
- Ecnn Bb6paH "Modes", Bbl MoXeTe KOHpynpoBaTb Ha CTpoKy ceTu.
- Ecnn Bb6paH "Status", Bbl MoKeTe npOBepuTB INHOpMaU NIO O HacTpoKe CETn (CM. CTP. 33).
Ecnn BbI6paH "Modes"
-
Haxmte KhoNky KYPCCOP BBEPX(▲) nnn BHH 3(▼), nna TOrO, YTO6bI Bb6paTb "DHCP" nnn "STATIC", 3aTeM haxmte KhoNky ENTER.
-
Ecnn DHCP cepBep Bawaero poyTepa noKnIOueH, Bbl Mo JeTe BbIbupatb "DHCP".
-
EÇın OH ÖTKJIIOUÇEH, BBİbnpaınte“STATIC”.
-
B cnlyae bbl6opa "DHCP"
KordaHaHicnnee noBHTcra"SwitchtoDHCPmode?",h axmte KhoNky ENTER.
GettingIP.
- ABOTOMATUeCKN KOHnIpypIyOTCA HAcTPOKn CeTN, n a dncnnee NOBNTCA MeHO "Status". (CM. "Ecn BBipah "Status" Ha cTp. 33.)
- B cnyuæ Bbl6opa "STATIC"
- Ecnn DHCP cepBep moyTepe oTKIOHeH, Bbl MoXeTe Hac TpOHTb CeTb BpyHyIO.
Pnmueyane:
Tak kak Heo6xOma cIeMyouaun HOpMaun o poyert e, npei pyHoi hAcToPOkONoTBePnTe HOpMaUN IO: IP address (IP apec), Subnet mask (MACa noDCETN), Gateway (wnIO3), DNS.
AT Static Mode >IP:10.1.5.108
① Haxmnte KhoNkY KPCOP BBEPX(▲) INBHN3(▼),ДЯТОТ,Чтбы BьбpaTb HxHbIpyHKT HAcTpOуKn, 3aTeM Haхmnte KhoNkY ENTER.
PnKaKdOM HkaxaTm KHONKn KYPCCOP BBEPX(▲)nn BHN3(▼) pexkm hactpoyn MeHReTcB CJeanyoee noc neDoBaTeIbHOCTn.
IP MASK Gateway DNS
Приимер:Есни Вьбдан "IP"
10.1.5.108[a]
JaemyUuHpy.
Дд STИТAPAHUIIHФБIHAKIMITE KONIKY KYPCOP BJIEBO().Пи КAKDOM HAKATIN 3TOI KHONKI UHФБI CTnpaOTcOOnDA3aDpyR.
③ KhoNkamKyPCOP BBEPX(▲)/BHN3(▼) BbIepeTe Keena emyo unqpy.
-Пи Кадом Нахати Kногку KYPСОВ BBEPX(▲)ИИ BHN3(▼)Знaki менияст В сеуншей поседоватьНости. a~Z, A~Z, 1~0, aТakke Знaki (@ , , nponyck, etc.)
(4) NOBTOPNE BbIeynOMaHyTbe Warr ② n (3) dIra 3aBepWeHn A BBODa.
⑤ДЯ NOДТВЕРЖДЕНHA BAWERO BBOda, HAXMITE KONKY KYP COP BIPABO()ДЯ ПЕХODA Ha uKpy pydOM c camoI MaJIeHbKOJ, 3aTeM HAXMITE KONKY ENTER. -Ha DnCpNee NOBHTCA MeHIO "Static Mode".
⑥Ди BAODa OCTaBbIX NyHKTOB HAcTPOKIN NOBTOPte Bbl EynOMAHHTbe WArN ①~⑤.
⑦ДЯВОЗБРАТВПЕДБИДУСЕ COCTOHAHNE HAXMITE KHO nky AUDIO ASSIGN(/RETURN).
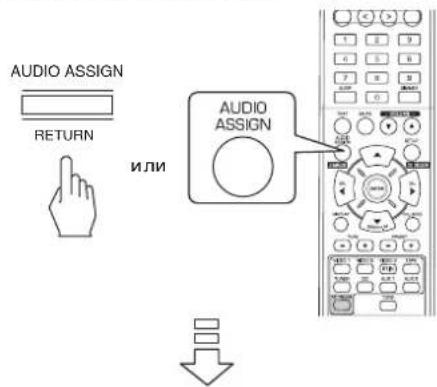
Apply Changes? >1-OK
HaKmTe KhONky KYPCOP BBEPX(▲) nnn BHIN3(▼),ДЯТОТо,ЧTo6bI BbIbpaTb "OK" nIn "CANCEL", 3aTeM H aKmTe KhoNky ENTER.
- Ecnn Bb6paH "OK", yctahOBKn ceTn npHHMaIOrTa, n Ha dncnnee noBnIeTcM MeHIO "Status". (Cm. "Ecnn B b6paH "Status" Hxke.)
- EcnBb6paH“CANCEL”,yCTaHOBc CETn He npHHMaIOTcN“Network Modes"He NOBtCn Ha DnCnnee.
Ecnn Bb6paH "Status"
- Bbl MOxKeT IPOBepu Tb yTaHOBKn cTeN (TaKne, KaK MODE, IP address, GW(Gateway) n DNS cepBep).
Status.MODE:d h >1-OK
-ДЯ BO3Bpata B npeDbIyUee COCTOHNHe HAXMITE KHON KY ENTER.
When selecting "General"
General Setting >1-Factory Sett
- Haxmte KhoNky KYPCOP BBEPX(▲) nHn BH 13(▼), dIra Toro, yTo6bI Bbl6paTb "Factory Settings" nn "About", 3aTeM haxmte KhoNky ENTER.
Приимер:ЕслвБьбразн"Factory Settings"
Warning: Alles >1-OK
Ecnn Bb6pan "Factory Settings", Bbl MoXeTe 06Hynntb "Network" yCTaHOBKn, a TaKxe CTaHcN Nn My3bIkaJIbHbI e paJIbI, 3apeNCTpnpOBAHHbI B cNcKe "favorites", do 3aBOdcknx.
- EcnBb6paH "About", BbMOKTe npOBepMb o6uYIO IN φopmaucIIO, TaKyO, KaT Tn3TOrO np60pa, nporpamHa RA BepCnN MAC aDpec.
Ecnn BbIbpaH“Factory Settings
-
Haxmte KhoNky KYPCOP BBEPX(▲) nnn BH 13(▼), dny TORO, yTo6bblBb6paTb "OK" nnn "CANCEL", 3aTeM Haxmte KhoNky ENTER.
-
EcnBb6paH "OK", OHn c6paCbBAHOCTcHa 3aBOckne yo TaHOBKn.
- Ecnn Bbl6paH "CANCEL", Torga Bo3Bpaaetc npedbyu 1ee coCTOHHe 6e3 c6poca.
Ecnn Bbl6pan "About"
BbMOKeTe npOBepnTb Tn3TOrO np6opAp, nporpaMMHy IO BepCno I MAC aDpec.
About. Internet >1-OK
-ДЯ BOЗВРАВпрдыdуоe COCTOнeнeнэнэнэнэнэнэнэнэнэнэнэнэнэнэнэнэнэнэнэнэнэнэнэнэнэнэнэнэнэнэнэнэнэнэнэнэнэнэнэнэнэнэнэнэнэнэнэнэнэнэнən
3ANCb
Takke uipobbie cunhaIbIOT uipobbix BxOdbix pa3beMOB “NET/USB”,“COAXIAL”nn “OPTICAL DIGITAL IN”nn BXoHoro pa3bema «HDMI IN" moKHO BOcPON3BOIDHT, HO HEnb3aannCaTb.
-ⅡIaHcnaHAnorOBbIX CnHANOB c CD,VIDEO 1~2 Heo6xOdmo NcNoB3oBaTB aHAnorOBbl pa3bEm BxoJa. (DOnOHHTeBbHbe CBeDEHHa CM.B pa3deJe B KaueCTBe nctOTHNkBA XoHOrO CnHAna Bb6paH CD,VIDEO 1~2"Ha cTp.14).
- NapaMeTpbI rPOMKOCTHn TOHaJIbHOCTn 3ByKa (Hn3KHe n BBICOKNE yAcTOTbl) He IpiMHeHAIOTc K 3aINCbIbAeMbIM CnIHrHaJAM.
3aHcBaAUYDnOKACCETY
- BbIbePte Tpe6yEmbI pa3bem BXOda B KaueCTBe IVcTOHnka 3aNNC (KpOme pa3bemaДЯ 3aNNC aYdNOKaccTebl).
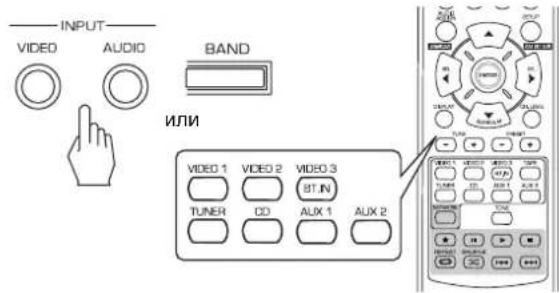
- Haxmte KhoNky 3aHcH na aydoKaccety.
- Haxmte KhoNky Bocnpn3BeHeHn Heo6xOIMoro BXoDHorO CnHana.
KonpoBaHne BnDEOKOMNHOHTOB B BnDe cnHana VIDEO1
- BbI6epnte HxKhbI n3 nCTOCHNKOB VIDEO 2~3 B KaueCTBe nCTOCHka 3aIINcH, HO He cIeJeYet nC NOlb3oBaTb dIa 3ToI ueJN VIDEO 1.
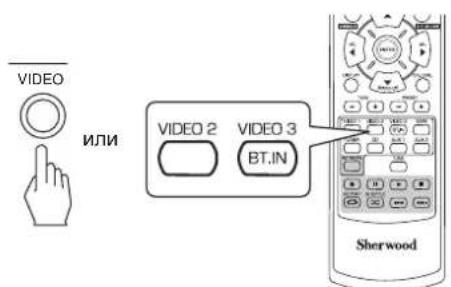
- BknoHte 3aHnCb Ha VIDEO 1.
-
Haxmte KhoNky Bocnpou3BepeHn Heo6xoDMoro BXoDHorO CnHana.
-
Aydno- n BnDeOeCnHnbl VIDEO 2 6dyT cKOnnpoBaHbB BnDE VIDEO 1, nix MoXHo 6yDet BoCpOn3BOJntb Ha 3kpaHe TeneBn3Opa n C NOMOuB aKyCTnueckoN CNTTEMbl.
DpyrHEyHKUH
IcnoB3OBAHne TaMepa HOHORo peKIma
TaHmep HooHoro peKIMMA No3BOJAE TcCTeMa pa60TaB B TeueHne OnpedeHHO BpeMeHN Do aBTOMaTHueCKORO BbIKIOUeHnR.
- YctaHOBKa npaMeTp aBtOMaTnueckOrO bBkIIOUeHn peCnBepa nO nCTeHn yka3aHHoro nepnoDa BpeMeHn.
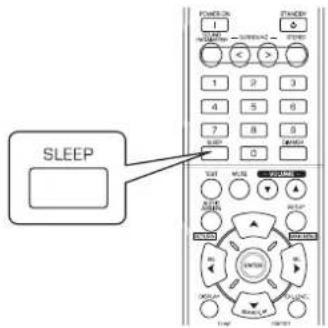
Hactpoika npkocntn nyopeceentHO nncnn
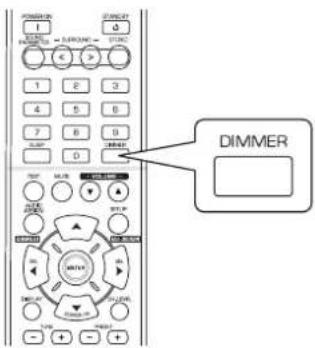
OTo6paXeHne coCToHHn pa60tbl
PnBocnpon3BeDenHn
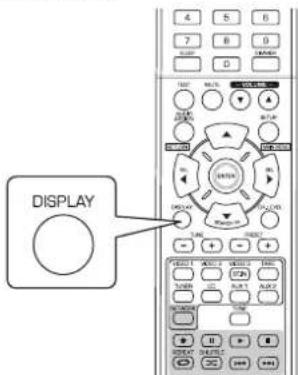
-Пи Кадом Нжати 3ToI KHONKI OTO6paxaETC0OCTBYOUIE BPEM RAHMEPA HOHORO pEXIMBA CNeDyUoIe NOpAKe:

- Pnp yctaHOBe TaHMepe HcHOro pexmHa dncnnee OTo6paKaetcaHdukatop «
PnBb6pe TaMepa HcHOro peKIma cnpyopeeHTbI dncnnTycKnlo OcBeueH.
PnKaJDM HaxaTm 3ToK HONK OTObpaXaeTc COOTBeCTByOuPmpeXmApKoCTnFnyopeCeHTHO DcNpE B CNeDyHouMe NopAKe:

Korda nncnne haxoDntcB pexnme OFF(BbIKJI),Ha KaTne IIOBOI KHOJKN 6yET npBOIDtB K erO npekpa UeHHIO IN BO3BpaueeHHIO DnCnIe B paOchn peXIM.
KaJbIpa3nocHeHaxaTn3ToKHNpexmOTo6p axeHHHaDnCnEe6yDetMeHATbcnEdyuumO6pa3 OM:

KordaФункиRDSdoCTynHbBauei cTpaHe, noDpo 6hocTN opeXmte TpaHcnaFM cmOtpTe B pa3dene "To6paxeHne HOpmaunRDS"Ha cTpaHnue 25.
IoNTBEPKDEHNE FYHKUNH HDMI
CneDyET nCNOB3OBaTb cyHKcHn ynpaBHeHn HDM npabNtHo, peKOMeHdyIOrT npOBepNTb hAnuYe npaBHeHn cyHKU nAMn HDM I na KaKDoRo noKnIOeHHOro KOMnoHEnTa, BInOnHnB CNeDyOuIe Opeauu.
PnpmeuHne:
- HeKOTOpbIe cyHKnUynpaBHeH HDMl Moryt He pa6oTaTc onpeJeHbIMN KOMNoHHTaMn, a TaKke ecTb TB-npneMH Nk, KOToPbIE He RBJIaOTCR COBMeCTHMblmC HUMN.
Ipeed hauajom onepaun
-Проверпь данньй пгшнк, TB-nршннк и плелер n.T.d., KOTOBIE NOДКIOUeHbI c nomоьho Ka6eNeH HDMl.
CneNyET npOBepntb, yTO ynpabHnene cyHKzmaHm HDMHa TB-npneMnke nHa nIepe, KOtobu IMeet noDKIOueHnE HDMI, dNCTbyOT.
(Bone no. np6no no yctahOBke TB-nneepa nneepa cmotpnte B pykoBOcTBax no 3Kcnnyatauun 3THx HCTpykun).
Cneyet yctahOBnTB HDMI CONTROL (YnpaBHeHne HDM) n POWER CONTROL (UnpaBHeHne BkIOueHne) B noIOxHeNc ON (BKn), cy6bI cJeNaTb BO3MOXHbIM npaBHeHne cyHKuRmHDMHa daHHOM npHemHKe. (NoDpO6HoCTn CMOTpTe B pa3deNe "YCTAHOBKl HDMi" Ha cTpaHnce 50.)
POnTBePckDeHnE ΦyHKcnoHnpoBaHn6a3OBbixΦyHKcH HDMl
1.BkHouHeHn HapRaeHn HntaHn BCex KOMNoHEtOB, KOtOpbI NOKnIOHeHb C NMOUbKO Ka6enei HDMI.
2.Подкlioуп Te TB-BxOД KO BxOу HDMI, KoTOpBie ecTb B 3ToM npHmHKe.
3.Поdkнioчte BXoД DAHHOR yCTpoIcTBA K BXOу HDMI nctOchNka.
Cneyetyb6eHtbcra,HTO306paXeHHe OTO6paXaETcHa 3KpaHe H3ByK H3INHAMIKOB 6bJaadet HxKbIM KaheCTBOM.
IoTBePxDeHHe HnHnYynpaBnEnnH yHKnA Mn HDMl
1.BkIOueHHe HAnpIXeHnI NtAHnB CExKOMNoHErTOB, KOToPbIe NIOKnIOUeHbI C NOMOuIbIO Ka6enei HDMI.
2.BbIKIOHTe TB-tpnEMHnK, YTO6blpeeyB pexmOxHJaHa.
Cneyet ybeunTbca, YTO BCE KOMNHOENTbBbIKIOHeHb.
3. Pocne OTKIOUeHnB BCEx KOMHOENTOB CNeIyET Haatb BocnpoN3BeHeHne IJIeepa (NOKIOUeHHoro c nomou bIO Ka6ena HDMl).
Cneyet y6eHtcb,HTO BCE KOMnoHbI HAcTpoEhbl, Bce BXoDbI daHHoro ycTpoiCTBa n TB-npnemHnK 6ydyT BKJIOuHaTcABTOMaTHueckn.
Hactpoika cnCTembl
- MeHIO HAcTPOIKN OTo6paKaAeTcHn HcIpyopecHTHom IINCIIIEe NIO3BOJIeT CJIERKOCbIb BInONHrTB IpOeUpybI HAcTPOIKN. B 60nbUnHCTBe CnyaEB, Heo6xOIMMo TOJbKO OINH pa3 HAcTPOITb CNTEmY B IpOceCE yCTAHOBKN KOMTOHOBKn DomauHero KNHOTeaTpA, a 3aTeM N3MeHArTB HAcTPOIKN NO Mpe Heo6xoIMocTN.
MeHIO yCTaHOBOK COCTOIN 36 OCHOBHbIX MEHIO: CNTeMbI, BXoJa, 3KBaIaN3epa DnHAMNKOB/NOMEUENH, yPOBHR KaHANO B, MHorokOMHaTHbIX NOMEUHN, npaAMETpOB IN HDMl. DaJe epe3 3TN MeHIO ocUeCTBnRETC DOCTyn K pa3NHyBMn NO DMEHIO.
IpimMeaHne:
- TOnbKO KOrDa B KaueCTBe NcToUHnKa BBeDeH NcToUHnK OTJInuHbI OT NET/USB, Bbl MoKeTe BblOnHnTb IpOceDpybl yCT aHOBKn CnCTeMbI.
IepeMeueHHe B MeHIO HaCTpOKn
-DAHHBIE NOHCHEHINIpeDnolraIOT MCNOB3OBAHNE KHONOKyNbTA DCCTAHIOHOYnpaBHeHINr DnR BbINONHeHINr DeNCTBm MEHIO HAcTPOIK.
TeH MeHee, MoKHO TaKKe IcNoIb3ObaTb KhoNk, paCnoNoXeHHbe Ha nepeDHe NaHeIn yCTpoIcTBa. KhoNkHa nepedne naHeIn ycToCTBa COOTBeTcByIO T KhoNkaM Ha Nylte dNCTaHnOHoro YnpabNeHn, KaK nokaHa h PncyHke HnKe.
| Конька на пьытейдостацьонноуразавлени | SETUP | ENTER | SEL | SEL | SEARCH M |
| Коньka напегденьпанень | SETUP | ENTER / MEMO | TUNE + | - PRESET + | |
| MAIN MENU | |||||
- AKTNBUPyTe MEHIO HAcTpoKn.
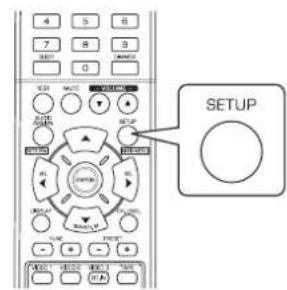

- OTo6pa3nTcM MeHIO HAcTpOiKN.
-
YTO6bI BbIKHQUHTb MeHIO HAcTpOuKN, NOBTopHO HaxMMTe KhONkY «SETUP».
-
Bb6epnte Tpe6yembl 3JIeMeHT MeHIO C
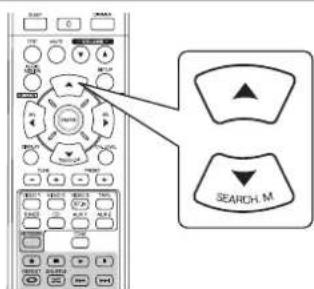
3.ПоТВердTe BbIбop.
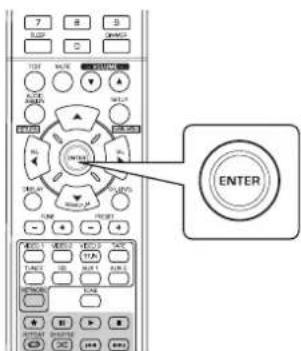
-Пи Вьборе onци "SYSTEM SETUP" (CnCTema) cmoTp nTe pa3dJI "YCTAHOBKN CNTECTMbl" Ha ctp. 39.
-Пи Вьборе onци "INPUT SETUP" (Bxod) cmoTpne p a3dien "YCTAHOBKN BXODA" Ha ctp. 41.
CBeHnO paBote B MeHIO «SPEAKER SET" (HACTPOIKA INHAMVIKA)cm.Bpa3dene “HACTPOIKA INHAMVIKA”Ha ctp.42.
-Пи Вьборе onци "CH LVL SETUP"(Уровькана) CMOTPte pa3dEN "HACTPOИKA YPOBHA ГРМКОCTN KAHAIOB"Ha ctp.46.
-Пи Вьборе onцп "PARAMTER SETUP"(Паразмеры) CMOTPnTe pa3dEN "YCTAHOBKA ПAPAMETPA"Ha cTp. 48.
-Пи Вьборе onци "HDMI SETUP"сmotрпе pa3дeн "YCTAHOBKINHDMI"ha ctp.50.
YTO6bI BbIKIOUHTb MeHIO HAcTpoKn, BbIbepTe nyHKT
Cxema MeHIO HacTpoKn
-Cxema MeHIO HacTPOKn IMeET CneDyUOuN BvI.
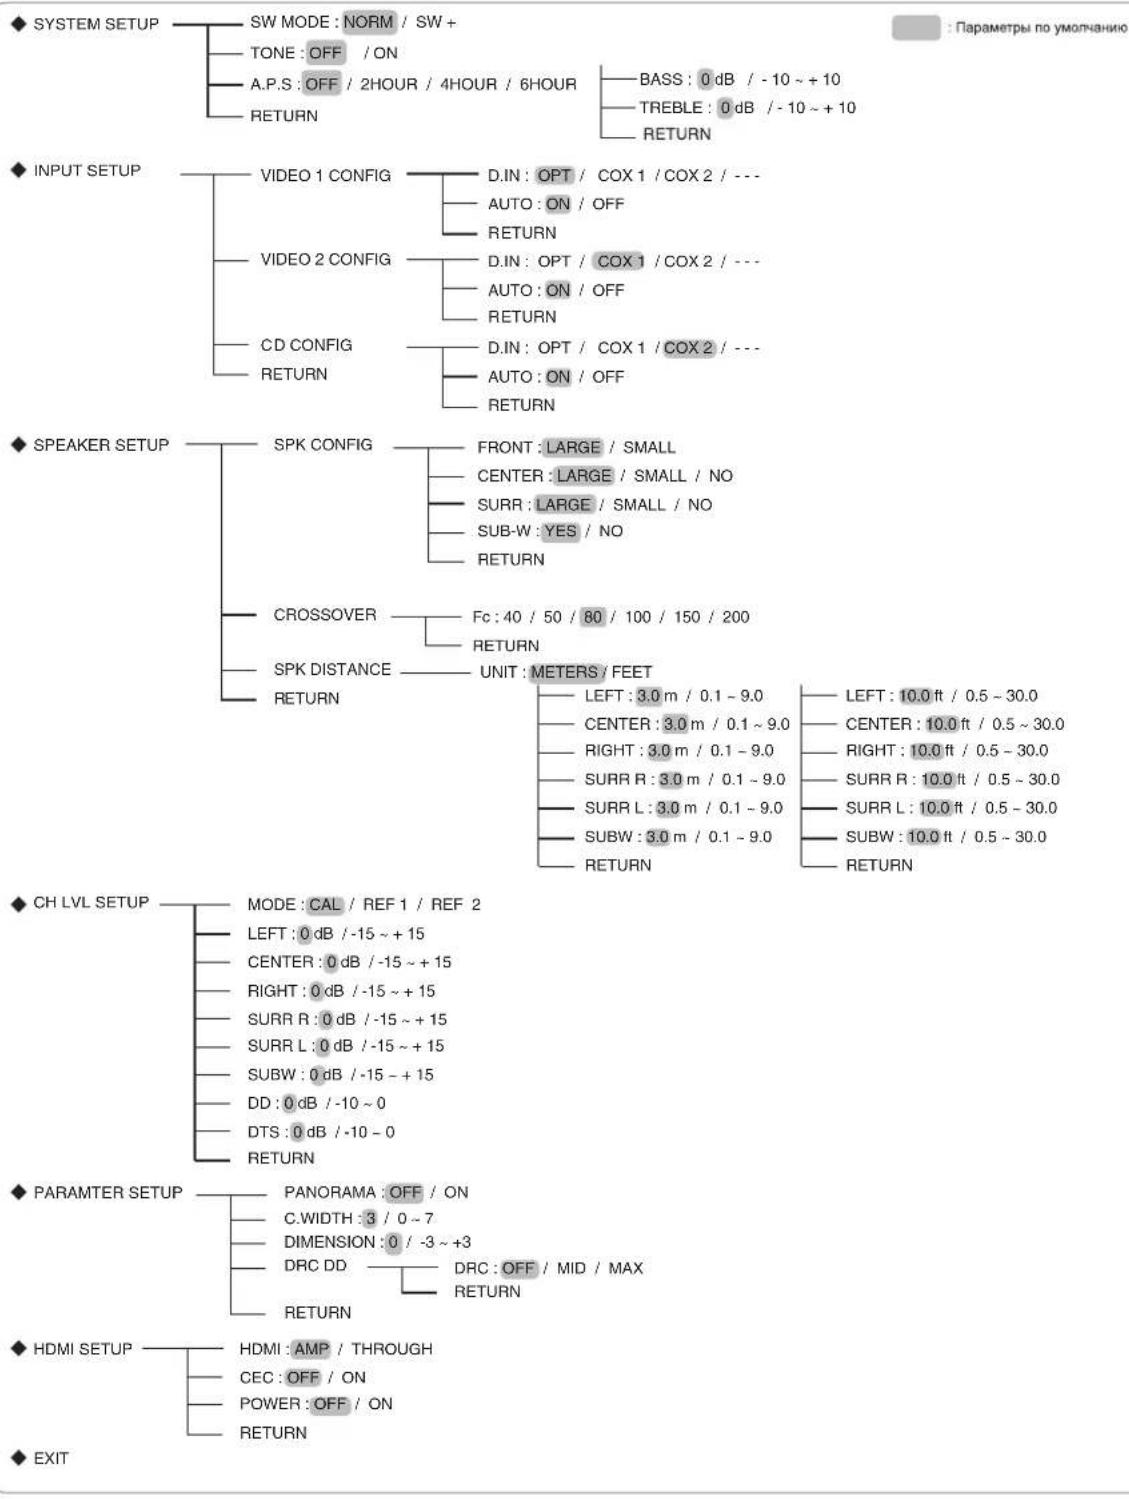
- Yto6bI nepeHn K npdeBdyuemy MeHIO, BbIbePte nyHKT NOmEHIO 四 RETURN》(HA3AD)
-Пинхатин ha KhoNky AUDIO ASSIGN(/RETURN) (3aDaTb yCTaHOBKn ayDIO (/O6paTHO)) B NOIMHeIO 3TO TOxke npBBe DT K BO3BpaueHIO B ppeDbI dyUee MEHO.
PnmuueHne:BoBpempa60tBMeHIO HAcTpoKIMoXHOICNOJIb3OBA TbToJIbKO KhoNky (POWER ON/STANDBY ((BKJ./)PEKIM OXUNDAHNA)IKHOKNI dIra HAcTpoKIN CNTeMbI.
YCTAHOBKN CNTEMbl
SYSTEM SETUP
- SW(PEXKIM CA6BvΦEPA) MODE : YTo6bI Bb6paTb HxKbIpeKIM ca6BvΦepa.
TONE (TOH). HactpoKa ToHa (Hm3Kne N BbICOKne HaCTObl).
A.P.S (ABTOMATUHECKOE BKNIOUEHNE PEXIMA OXUNDAHNA): YCTaHOBtB HxKHOe BpEMBAKIOHeHnpeKIM aOxNdaHn.
RETURN (BO3BPAT). Bo3bpat B npeBldyueee MeHIO.
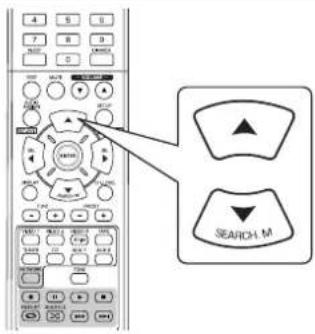
1. 1y06bI BbI6paTb Tpe6yEmbI 3neMeHT, HaxmuaTe KhoNk BBEPX (A)/BHn3(▼).
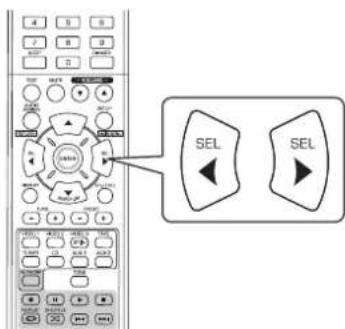
2.ДИН HACTPOKIN BbIbpaHHORO 3JIEMEHTa
Bb6oppekma SUBWOOFER (PEKIM CAEBYΦEPA)
- PexnM"SW + "Ффсгкгнвен тькогда, когдa"FRONT"и"CENTER"уctановпьи ha"LARGE", a"SUB-W" (Subwoofer) yctahOBJIH ha"YES"В MEHNO SPEAKER SETUP. (NoDpo6Ho CM."HACTPOIKN IROMKOROBOPITEJIEN" H A CTP.42.)
NORM:Hn3KoactOTthBcHnAblKaHaNoB,HacTpoEHbIXHa“LARGE”,BOCpOIN3BODaTcTObnkoC3tnxKaHaNoB.B 3tOMpeXIMHeH3KoactOTthBcHnAbl,KOTOpBleBOCpOIN3BODaTcN3KaHaNaCa6bypepa,ABnIOCTcToIbKO Hn3KoactOTthBMnCnHnAmnLFE(N3MHOROKaHaHbXbIXNtOCHNKOB,CoepXaunXKaHaLFE(Low Frequency Effects,Hn3KoactOTthBcEΦeKbI),TakKe N3BeCThBlkak KaHaJ(1)”,aTaKke KaHaNoB,HACTpoEHbIXHa “SMALL”.
SW+.:Hn3KoUacToTHbIe CnHaJIb KaHaJOB, HAcTpoEHbIX Ha «LARGE», BocIpOn3BoaTcra OHOBpeMeHNO c 3TNX KaHaJOB n KaHaJa ca6Bypepa.
B 3TOM pexkme dnaana3OH Hn3knx qactot pacnpedeHReTc 60onee paBHomepHO NO KOMHATE; TEM He MeHee, B 3aBNCUMOCTN OT pa3mepa H opMbl KOHAtbl, BO3MOXHbI NOMEXN MOrY T npNBecTN K CHNXEHN IprMKoCTN 3ByKa Hn3KOyACTOTHORO dnaana3OHa.
PnBbIbopepeXmAmATOPOWERSAVE(ABtOMaTneckoro nepexoDa BpeXmOxnaHn)
ΦyHKUABTOMATUeCKORO NEPEXOaB PEXKIM OXuHaHn, ABOTOMATUeCKN OTKIOUaET HAnpKaHeNIE NITAHN INepeBOuNT yCTPOIcTBo B PEXKIM OXuDaHn. Korda KaKaJ-Ni60 KHOJa HAxKaTa B TeueHne NepNoa BpeMeHn, KOtOpbI 6oJIbe yCTAH OBHeHoro, YCTPOIcTBo CHOBa HaHTB O6bUHOM pEXMme.
- YctahOBuNTb HyxHoe BpEma BKIOUeHnpeXmua OXnHaHn.
OFF 2HOUR(Yaca) 4HOUR 6HOUR(6 Yacob) (OTKIOUHTbФyHKUIO)
YINPABJIEHNE TOHAJb HOCTbIO
OFF:Порсуншовини NGToUHnka 3Byka 6e3 3ФФЕКТa ToHaJIbHOCr.(“DIR”3aropaeTc)
ON: HactpoKa ToHaJIbHocTn Ha BaW bKyc. («DIR» rachET).
Pn yctahOBke npametpa ON' dna oniun TONE' nla hactpoKn ToHaIbHocTn (H3Kne N BbICOKne qacToTbl).
①. HaxmTe KhoNkY «ENTER»ДЯ BXOa BpeKIM HAcTPOKn ToHaJIbHOCTn.
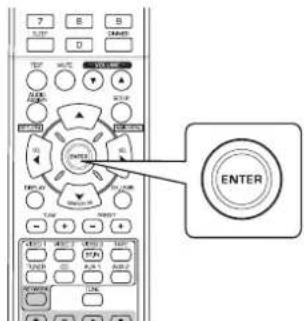
②. Haxmte KhoNk YIIPABJIEHnK YPCOPOM BBEPX(▲)/BHN3(▼) dna BbI6opa Heo6xOIMoro peXIma ToHaJIbHOCTn.
PYYKNN
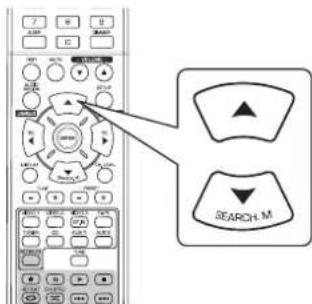

Bb6op onuunn "BASS"

③ .HaKMMTe KHOJIKN YNPABJIEHIN KYPCOPOM BJIEBO( / BIPABO (巴) IIN HAcTpoiKn BbI6paHnOro peXIMa ToHaJIbHOCTN Do Heo6xoDMorO ypOBH.

- ypoBHeb ToHAnbHOCTM MoXeT peYnIpObaTbCBA DnaNa3OHe -10 ~ +10 d5.
BueHOM, DnA yPOBHA HN3KNX N BbICOKNX YACTOT Mbl peKomeHdyem ycTaHOBNtB 3NaueHne O d5 (poBHnyyPoBeHb).
KpaHne npaMeTpbl npn BbCOKO rPOMKoTn MOrTy npBecTu K nobpeXdHHIO BaWux dHaMnKOB.
YCTAHOBKN BXODA
INPUT SETUP

D.IN DIGITAL IN):Yto6blcdeIaTb yCTaHOBKn IIN NOKJIIOUeHHbIX DIGITAL IN (LInpOboBix BxOIOB) K HxKHOy BxoOy.
- AUTO (ABTOMATHECKM N OBEMHbI 3BYK). Bb6op peXIMa ABtOMATHECKORIO IN pyHORO BKHOeHnOBEMHORO 3Byka.
- RETURN (BO3BPAT). BO3BPAT npebduyue meHIO.
1.ДЯ BBIbopa Tpe6yemoro nCTOuHnka BXoHOrO 3aTeM Haxmnte KhONky ENTER (BBOJ).
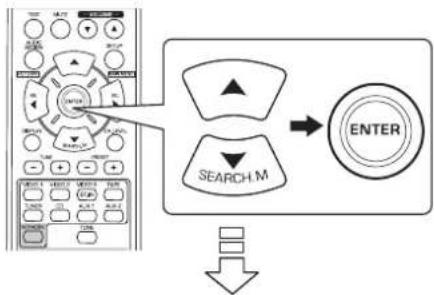
PpMep: Pnp BbIbope «VIDEO 1»

- 206bI BbIpaTb Tpe6yEmbI 3nEMeHT, HaxmMaTe
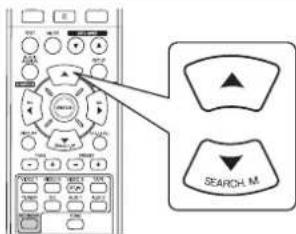
3.ДЯТPte6yEmHACTpOuKNBbIpaHHOrO3neMeHTa
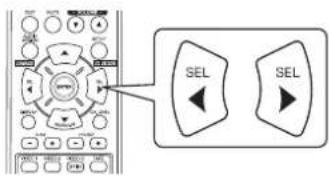
Bb6op PEXNMA PABOTbl PA3bEMA “DIGITAL IN”
BbdoKbHa3NaHHTbIOKJIIOUeHHBbBXOHyBa3bEmbl“DIGITALIN”nIReHO6xoMbIXpa3bEMOB.(nIaNOyehn IOnOHHeBHOHfOpMaunCMOTpntepa3dEIN“IODKJIIOUeHME LIOPOBBIX BXOHBIX BBXODHBIX PA3bEMOB"ha cTpanue7).
BbMOxTe Bb6paTb Heo6xoDmbl pa3bEM «OPT» (ontuueckni), COX 1" (KoakcnalbHb1 1), COX 2(KoakcnalbHb2) n -- (aHaorobbl).
PpMmeHne:
- Ecnu LINPOBOI BXOHa3nueHnHeNcKOJIbKnx NCTOCHNKOB XoDHoro CnHana,TO npBbIbope 3TUX NCTOHNIKOB Uppobbe aydnoCnHabby6dyT cnblHbHn H3 OJHO RINFOPOBOBO BXODA.
- Ecnn KO BXOyD HDMI IN noKIOHcHO BINOEO yCTPOINCTBO, yCTaHOBKn BXoOB DIGITAL IN He JeICbByeT.
Bb6op AUTO SURROUND (ABTOMATUeCKN OBbEMHbI 3BYK)
B 3aBnMocTOn OT cno6a Bb6opa pexima o6bemHoro 3ByaHn MOxHO Bb6paTb peXnM ABtOMaTneCKOro nnpyHORO BKIOUeHn OBemHoro 3Byka.
OFF(PyHIOI pEXHM 06bEMHO 3Byka):MOxHO bI6paTb 06bEmHbI pEXHM 3Byka BpyHyO pyKAMi KONIKi BblOPA PEXKIMA O5 bEMHO 3BYAHN(>/<). (DOnOHnTeBbIe CBeHdEcm. Bpa3dJe "BbIop pyHoro p exkMia KHOKOI AUTO/MANUAL Ha nepeHne NaHeM"Ha cTp.17).
ON(ABtOMaTHueckn peKMM o6bemHoro 3byka): B 3aBNCIMoCTn OT fOpMaTBAxOJaTeo CnHaJlAno ONTMaMbHbNpeKMM o6bemHoro 3Byka 6yDenBKLIOUaTbCn ABtOMaTHueckn.
PpmeaHnA
Korda KhoIke SPEAKER yctahOBHe 3aHHe Hn "CENTER" n "SURR(Surround)" yctahOBHeo 3aHHe Hne "NO", pexm o6bemHoro 3by YAHIN He DeJeCTByeT.
JaKe npYCTAHOBKe ATOMATNHeCKORO Bb6pa OeJHKMa 06bEMHoro 3ByKa, a TAKKcE npN NOdAue CnHana COOTBETCTBYIOero foPMATA OYCTPOINCTBA-NTOHTHNAU cIPOBOrO CNHANA, ONTAMALNB HpeKM O6bEMHoro 3ByKa MOKET N3MeHRtBC, B 3aBNCMOCTN OT TORO, YCTAOBJHENJ TIN DUNHAMKAHa H“NO"uHET.
- Ecni Bbl6paH ABTomatueckn peXmOBbemHoro 3Byka, HEnb3r Bbl6paTb Dpyrne peXmbl obbemHoro 3Byka, Kpome

HACTPOIKA INHAMMKA
Iocne yctaHOBn peCINBepa nIOKJIIOUeHnR BcEX KOMNOHETOB HeOxOdmo BbINOHNtB HAcTPOKY DnHAMNKOB dNDOCTNKeHn ONTMaIbHor aKyCTNuEckoro 3ByaHn, COOTBeTCTByoUeO OkpyXaIoUe NObCTaHOBKe I KomnoHOBKe DNHAMKOIB.
- Pnp Cmhe KOHOK, INP pacnnoOKeHn INI KOMNOHOBKn Heo6xOIMO TaKke BInOnHrTb HAcTpOy DuHaAMKOB.
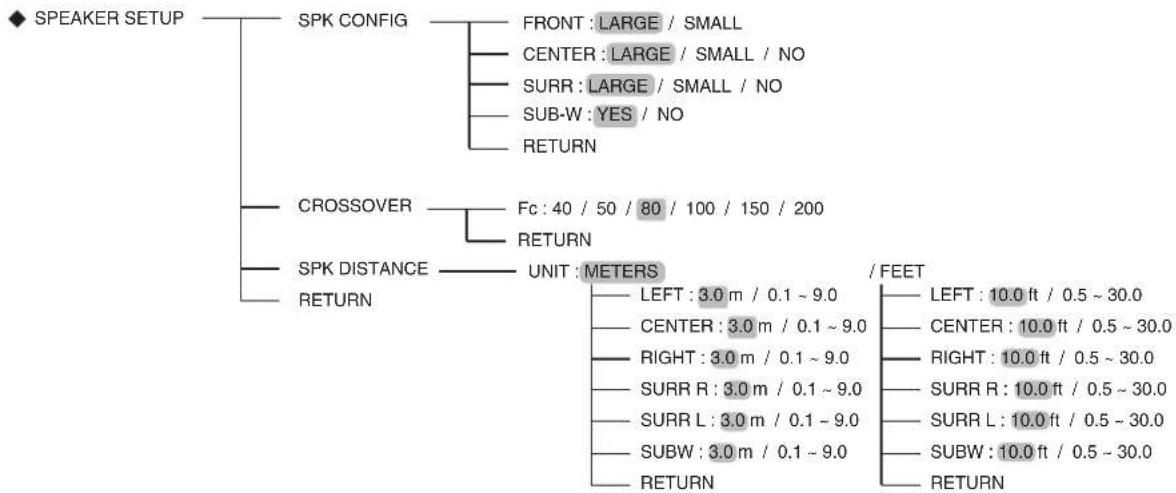
- SPK(SPEAKER) CONFIGURATION :Испобзетсдяг Вьбора размера кононок, Которь будт поknючы.
CROSSOVER (KpoccoBep):Дя Вьбора Heo6xOIMoH qactObTb KpoccoBepa. - SPK (SPEAKER) DISTANCE: История Мени Кождд Кождд Кождд Кождд Кождд Кождд Кождд Кождд Кождд Кождд Кождд Кождд Кождд Кождд Кождд Кождд Kождд Кождд Kождд Kождд Kождд Kождд Kождд Kождд Kождд Kождд Kождд Kождд Kождд Kождд Kождд Kождд Kождд Kождд Kождд Kождд Kождд Kождд Kождд Kождд Kождд Kождд Kождд YTOBOYCTAHOBNTB BPEM 3aepKKN NO BPEMeHn ABToMaTHneCKN N DOCTHRHTb ONTIN MAnbHOrO 3oPfekTa O6bEMHOrO 3ByaHnRn Pn BOCpOns3BeDeHn.
- RETURN (Bo3bpaT): Ддя ВОЗврашени впр徝ыduушee MeHIO.
PnBbIbope onuun CONFIGURATION (KOHΦNΓYPALUN)
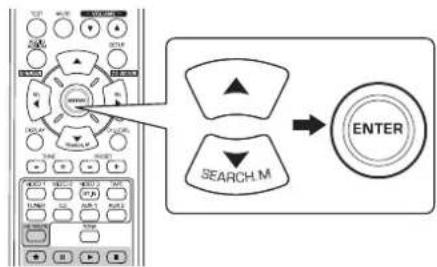


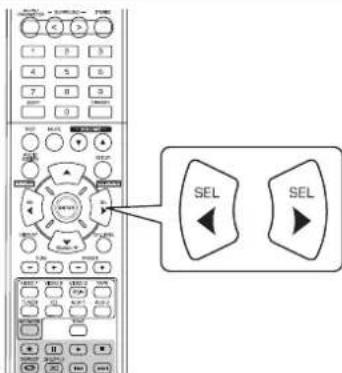
B 3aBnCmOCTOn OT TnA DnHAMKa MoKHO BbIpaTb OndHy n3 CneDyUoxNX HAcTpoeK:
- PpeHnra, cHTpaJIbHaK KOLOHKn I KOLOHKn OObemHOrO 3ByaHnA:
LARGE (Bolbne) : Bb6epnte 3ty yctahOBky npn noKnHueHH nHaAMKOB, KOtOpBIE NOHOCTBIO Bocnpn3BOaHT 3ByKn C HAcTOTOn HNKe HAcT0b KpOCCOBepa.
SMALL (MaIbIe) : Bb6epTe 3Ty yctaHOBky npn noKnIOueHm dHaAMNKOB, KOtOpBe He MOryT NOHocTbO BOCpON3BecTN 3ByKN C cactoToH Hxke cactoToB Kpoccobepa. Pn Bblbope 3ToY uCTaHOBKn 3ByKn, cactota KOTopbIX Mehwe cactoTbK poccobepa BydHT hnpabnrtb Ca Ha ca6bype npn dHaAMNKc C yctaHOBko "LARGE" (BoIbWne) (Korda ca6bypepe He nCnoNb3yETc).
NO (Her) : Bb6epnte 3Tu yctaHOBKn, KOrDa He NoKlnOyeHO HnKaKnx DnHaMnKOB. KorDa Bb6paHa 3Tu yctaHOBKa, 3ByKOB bHe CnHaJIbI 6ydyT HanpabNtBcH Ha DnHaMnKn, KOToPbIM He CdeJaHa yctaHOBKa "NO" (Her).
Ca6Byep:
YES (Дa): Bыбөрптэуүхановдлг Быхндхсгнанов LFEи bacoьхчacтOT канanob, kotopbim cdenahya yctahob Ka "SMALL" (MaIb) рр налчи саыфepa.
NO (Her) : Bb6epnte 3ty yctahOBky, kOrda ca6Bypep He noDKnOueH. BacobBie YactoTbI 6ydyT BOCnpn3BODHTbcnYepe3 Dpyrtne nnHaMKN.
PpmeHHe:
Korda DnHAMmKam CdeHa yCTaHOBa "SMALL" (MaIbI), Bbl DoJXhbl yCTaHOBt bacToTy KpOcOBep a n3Tnx dHAMM KOB npabNtbo H BOOTBETCTBm cHX YACTOThbIM XapakTePncTNIkAMn. (Boone noDpO6Ho CMOTpnte B pa3dene "PiN Bbl6o pe onuIN CROSSOVER (KpoccoBep) Ha cTp. 44.)
- EcnI nI KOnOHok "F"(IpeEHNHe) cdeNaHa yctaHOBKa "SMALL" (MaIbI), To IINK OJIOHOK "CENTER"(LcHTpaNbHbI) n "SURR"(ObemHoro 3ByaHn) He moKeT 6bItb cdeNaHa yCTaHOBKa "LARGE" (BoNbHne) n OnuN "SUB-W"(Ca6Byfep) He moKeT 6bItb cdeNaHa yCTaHOBKa "NO" (HeT).
- NOBTOPNe npBBeHbIe BblIe nyHKtI 2 n 3 do Tex nop, noka Bcem dHaMnKam He 6ydt cdeNaHa HyxH aYCTaHOBA.
O pa3mepax DnHaMnKOB
- Bb6paTye yCTaHOBKn "LARGE" (BoIbwo) nn "SMALL" (MaIbI) He B 3aBcIMOCn OT peaIbHOro pa3mepa DnHaMnka, a B 3aBNCMOCTN OT erO CNOC6HOCTN BOCPON3BOIDnTB Hn3Kne YAcTOtbl (6acbl, YAcTota KOTopblx HnKe YcTaHOBHeHHo YAcT Otbl B MeHIO "CROSSOVER" (KpoccoBep).
- EcnBbHe 3haeKakyo yctAHOBky CneIyET Bb6paTb, To nonbTaTeCb cpaBHb KaeeCTBO 3ByKa, BblONHINB NOcneDob aTeJIbHO pa3HbIE BapnAHTbYCTAHOBOK (ypoBeHb YCTAHOBKn rPOMKOCTN DOnJxEH 6bITb yCTAHOBJIEN HO DOCTaTOHNO Hm3KIM, Tc 6bI He nobpeNTb dHaAMNK) dna OnpeDenHn npabunbHorO 3Naehn.
Ppi BbIbope onCROSSOVER (KpoccoBep)
Korda DnHAMHKam CdeHa YcTaHOBA "SMALL" (MaIbI), cneyet y6eHTbcra, TTo Chactota KpoccoBepa Bb6paHa npabIN bHO B COOTBeTCTBm C NMeIOUIMC XapAKTePNCtIKAMN DnHAMKa.
- Haxmarg KhoNk INEPEMUEHHK YPCOPA BBEPX (▲)/BHN3 (▼), BbIbepeTe onuio "CROSSOVER" (KPOCCOBEP), a 3aTeM haxmte KhoNky ENTER (BboD).
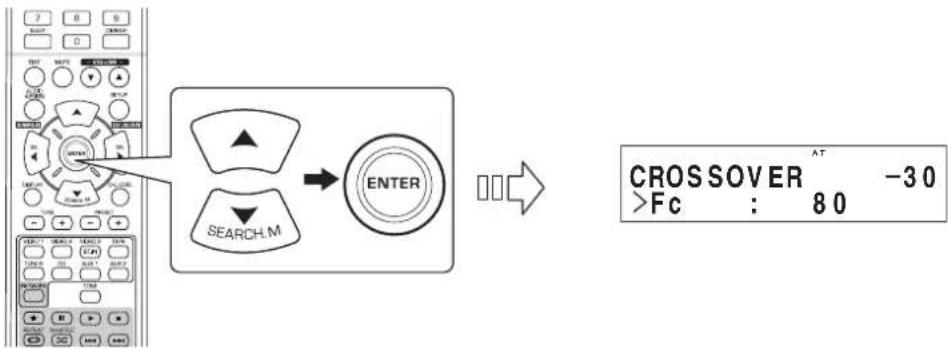
- Haximai Te Khoi IEPEMEHHK YPCOPA BIEBO()/BnPABO()Ira TOrO, yTo6bYcTaHOBtH yxHyIO hactOTy kpccoBepa.

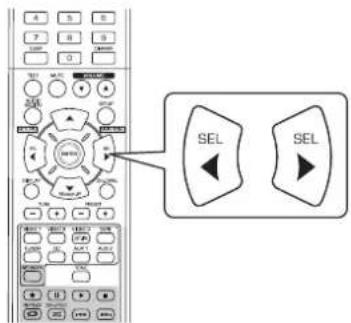
BbMoKeTe yCTaHOBnTb Ondo n3CneDyIOuX 3NaueHn qKpOcCOBepa -40,50,80,100,150n200T.
O yactoTe KpoccoBepa
KOrda DnHAMNKam CdenaHa yCTAHOBKa "SMALL" (MaIbI), HN3Kne YactOTbB 3Tnx KaHANOB TaKOBbl, YTO COCTABJIOUe C nHana, YACTOTA KOTopbIX HNKe YactOTb KPOCCOBepa, HanpaBnHOrTa Ha cAbBypep nnnepeHne DNHAMKN, dNRA KOtOpbIX CdenaHa yCTAHOBKa "LARGE"(BoIbwoi) (Korda caBbypepe He nCnonb3yETc).
CMOTPNE INCTpyKUNI NO 3KcNnyataUNINHAMNKOB, KOTOpBIE NOKnIOUeHbIK CnCTMe. EOn DNAnaON HAcToTbI y BaWer o DInHAMKa coCTabIeRt O100rdo20Ku, Yactote KpoccoBepa DoXHa 6bItb CdeNaHa ycTaHOBa 100r (mN Heckon bKO Bblie).

Pn BbIbepe onuH SPEAKER DISTANCE
- Haxmte KhoNk UYPABJIeHnK VPCOPOM BBEPX(▲)/BHN3(▼) dIy BbIbopa onuIN «SPK DISTANCE», a 3aTeM haxmte KhoNky «ENTER».
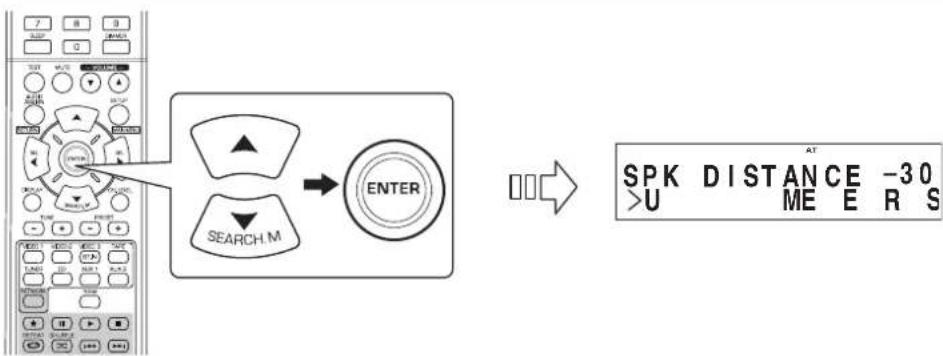
- Haxmte KhoNk ynpABHeHn KYPCOPOM BBEPX(▲)/BHN3(▼) nBa BbIbopa Heo6xoDmO onuMn.
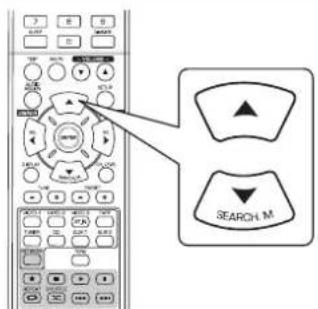
PnmeuHne:
BbHe MoXKeTe BbI6paTb ca6Bypep n DnHaMnKn, dNn KOTopbY yCTaHOBnEn napameTp ^
- Haxmte KhoNk yIPABJehn KYPcOPOM BJIeBO()/BIPABO(ДЯн HabTpoKbbl6paHHoonm.
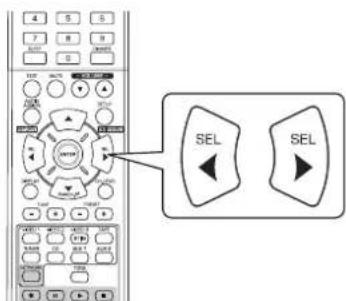
Bb6op Heo6xOdmoOnu
Bb moxete BblpaTb «METERS» nn «FEET
KakToIbkoOnUINBbIpaHa,INCTaHUNDN BbIpaHHO ONUINABTOMATNCECKNNEPECHTbIBaOTCA.
YCTAHOBKa DnCTaHcNn
BbMOxTe yCTAHOBnTB nCTaHmIO B npdeJax 0,1~9,0 MeTPOB C nHTepBaIOM 0,1 MeTp (nn 0,5~30 cyTOB C nHTepBaIOM 0,5 cyTa).
- NOBTOPuTe yka3aHHbIe Bblwe 1arn 2 n 3, NOKa BCE dNCTaHcIM He 6ydyT COOTBeTCTByIOcIM O6pa3OM yCTaHOBJIeHbI.
HΦopmaquaO dNCTaHux paCIOJIOKeHH DAHAMKOB
Pn npocnyuBaHH 3aHce n cObemhBIM 3ByKOM c HMOUbIO NcToHHKOB Dolby Digital, DTS n T.D., ZeHTpaJIbHbI yHaAMNK u DNHAMNK OobEMHORO 3Byka B Ieaeane DoJNkhB paCOnaratbca HA TOM Xe paCtOHm OT cNyWATEH, YTO INpeepHHe DNAMHK. Pn yCTaHOBKe pacCToHnM MEXdy CNYaTelem KKaXdbIM DNAMNKOM BpEma 3aDepkKn CEHTpaJIbHOrO DNAMNKu u DNHAMNKOB ObemHORO 3Byka ABTomATnueckn HAcTpaNBaeTcA DnCo3dAHn UDeaJIbHbIX ycNOB II pOcnyuBaHH, kak ecnn 6bl ceHTpaJIbHbI DNAMNK u DNAMNK OobEMHORO 3Byka HaxOINNCB B IeaeJIbHOM MeCTONOLOXEHNI.
HACTPOIKA YPOBHRPOMKOCTN KAHAJIOB
CH LVL SETUP
MODE:CAL/REF1/REF2
LEFT:0dB/-15~+15
CENTER:0 dB/-15\~+15
RIGHT:0 dB/-15~+15
SURR R:0 dB /-15\~+15
SURRL:0dB/-15\~+15
SUBW:0dB/-15\~+15
DD:0dB/-10~0
DTS:0dB/-10~0
RETURN
Pnmeuahne:
B3aBnCmOCTnOT HAcTpoEK DnHAMnKa(NO"NT.D.)HEKOTOpbIe KaHaJIbIMORYT 6bITb HeNoCTynHbI dNBAbopa.
Hacptponka ypOBn rpmKocT Nekuero KaHana
BbMOXETHeHAcTpOHTb Heo6xOIMMb yPoBeH rPOMKCTn TeKyUero KaHa. HAcTpoEHb yPoBeH rPOMKCTn coXpaHReTcB NoJb3OBaTeNbckOn nAmTn (CAL), a He B nAmTn npEbpAteNbHOyctahOBKn (REF1, REF2).
Iocne HAcTpoKn yOoBH rPoMkOCTN KaKdOro KaHana C NOMoBIO NcBbTaTeNbHorO CnHana, npOBeDnte HAcTpoKy yOoBH rPoMkOCTN KaHAnOB B COOTBETCTBMN C NcTOHMKOM CNHana NnB C BoOTBETCTBN C BaUMM BKYCOM. (JnnyoHHeHr DOnONHTeBHO INHOpMaun CMOTpTE pa3Je "HaCtpoKa yOoBH rPoMkOCTN KaKdOro KaHana c NOMoBIO NcBbTaTeNbHorO CnHana HA CTpaHNue 19).
- Haxmte KhoNk ynpABJEHnK YPCOPOM BBEPX(▲)/BHN3(▼) nR Bb6opa Heo6xoJIMOro KaHana.
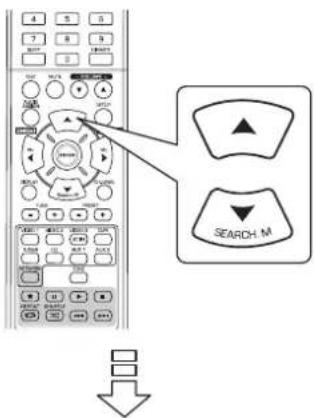
Ppimep: Ppi BbIbope nctOuHKnOB Dolby Digital nnLFE
CH LVL SETUP -30 >D 0 dB
- Haxmte KhoNk UNPABJEHnK YPCOPOM BJI EBO()/BIPABO()IaHaCTpoKn ypoBHr pOMKOCTn Bb6paHnro KaHana nn Heo6xoJIMoro ypoBHn HN3KNX YACTOT nctOuHnKa CnHana.
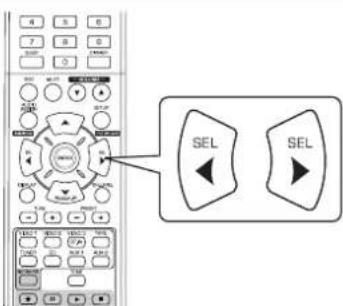
-уpoBHeHn3KnxYACTOT moXHO HAcTpOHTb B npdeJax dnaIa30Ha -10-0 5, a ypoBeHb rPOMKOCTn Dpyrnx KaHaoB B npdeJenax -15 ~ +15 5b.
BueOM mbpeKomeHdyem ycTaHaBnBaTb ypoBeHb HIN3KNX YACTOT Ha 0 d5. (Ho nra HeKOtOpbix paHHx Bepcni nporpaMMHO o6eNeeyH NDS mb peKomeHdyem ycTaHaBnBaTb ypoBeHb HIN3KNX YACTOT-10 d5).Ecnn peKomeHdyemble 3naueHryypoBHe KaKyTcCnnkOM BbICOKMn,ymEhBwnte nx Do Heo6xoIMbIX.
3.Днгнсрккдогкана,новтпд。
CoxpaHeHne HacTpoEHHoro ypOBHa rPOMKoCTn KaHaJa
BbMOxTe CoXpaHnTb HAcTpoEHHbI yPoBeHb rPOMKoCTN KaHana B nAmrTn PpeBapHTeNBHOYcTaHOBKn(“REF1”,“REF2"),INBOcCTaHOBtBero npH Heo6xOIMOCtN.
1. Nocne BbInonHeHHaRb 1~3Bpa3dene «HacTpoiKa yPoBHa rPoMkoCTn TeKyuIero KaHana» Ha cTpaHnue 46, a 3aTeM Haxmnte KhoNkY «ENTER».
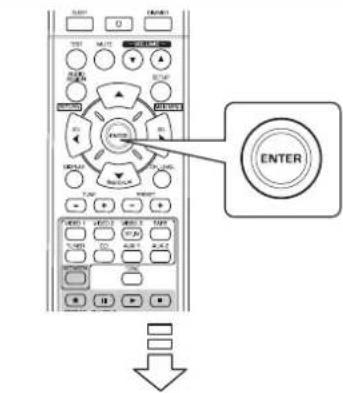

- 3aTeM HaHHeT MraTb "1" INHnKaToPA "REF 1".
- Haxmte KhoKn YNPABJEHNA KYPCOPOM BJIeBO()/BnPABO()IaB6pa Heo6xoJIMo paHee coXpaHeHNo IamrN, Haxmte KhoKny «ENTER»
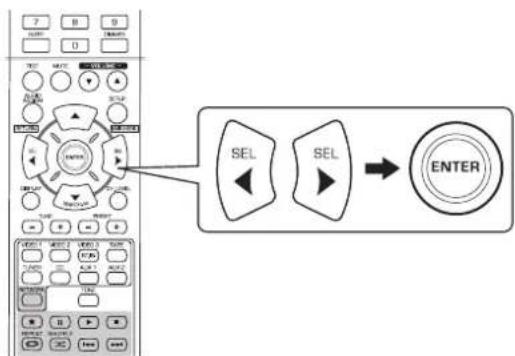
-Пи Кадом Нжати Kногok YNРABLEHINKYPCOPOM BIEBO()ИИВПAPBO()БИбираTeOnnA《REF1》ИИN《REF2》.
Tepeh HactpoeHHbIyypoBHn rpoMkOCTN KaHAncoxpaHeBb B BbipaHHom peKIMe nAMrN.
BocctaHOBneHne coXpaHeHHbIX ypoBHeI rPOMKoCTn KaHaJa
- Haxmte KhoNk YNPABJIeHnKyPCOPOM BBEPX(▲)/BHN3(▼)ДЯ BbIbopa onuIN «MODE» (pexim namrtn).

BMEcToHaDnCen 一 _ 1 ^ 一 HnN 一 _ 1 ^ 一 REF2M0KeT OTo6paKaTbCa HaDnCb CAL
2. Haxmte KhoKnYNPABJEHn KYPcOPOM BJIeBO(4)/BIPABO()IaBbopa OHOu n3 onuN «REF 1» nn «REF 2»
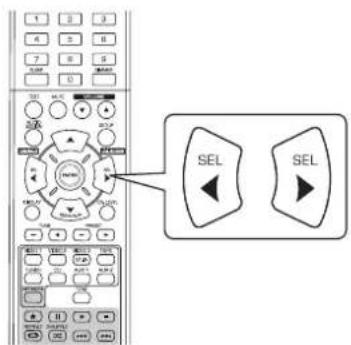
- 3aTeM nI NaMTn BbIbIbIaOTc COxpaHeHHbE B BbIbpaHHOM peXIMe NaMTn ypOBHn rpOMKocTn KaHaHa.
YCTAHOBKA NAPAMETPA

- IAPAMETpbI PEXKIMA DOLBY PROLOGIC II MUSIC: YTo6b otperyInpoBaTB napamETpbI Dolby Pro Logic II/Dolby Pro (PANORAMA(IIAHOPAMA), C.WIDTH(IIWIPNA LCEHT Logic IIx Music dIaDocTnxHnOnTImaJIbHO 06bEMHO 3ΦΦ PAJIbHOI KOJIOHKN), DIMENSION(PACCTOARHNE)) eKTa.
DRC DD(CXKATNE INHAMNUECKOTo DNANA3OHA DOLBY DIGITAL): Ch6bI OTepeYnipoBaTB BeINuHny CxKaTn DaHa MueeCKoTo DNana3OHa, YTO yIyUHT npocJyUnB aHHe cna6bIX 3ByKOB npi Boonee Hn3Knx yPOBHX rpOMKoCTn.
RETURN (BO3BPAT).NcnoIb3yETcIINB03BpTaB npebldyuee MeHIO
Пи Вьборе 3начени“PANORAMA”,"C.WIDTH”,"DIMENSION"
Bb moke Te Otperynpobatb napameTpbl Dolby Pro Logic II dny doctnxhenr ontnmaIbHoro o6bemHoro 3cpekta.
PpimmuHHe:
- UctahOBKn npametpa deHCTByIO TOLko npn npocnyuBaHH B pexkme Dolby Pro Logic II.
- Haxmaite KhoKn INPEMEUH N KPCOPA BBEPX (▲)/BHN3(▼) nBb6opa HxHoro npaMeTpa.
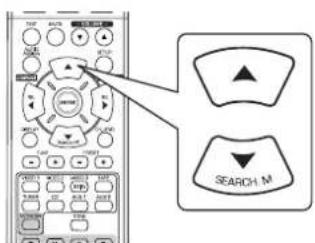
- Haxmte KhoNKePEMEueHnKyPCOPA BJEBO ( /BnPABO()Ira TOrO,YTO6bI yCTaHOBT npaMeTpy HyxHoe 3NaeHne.

KordaBbIbpaHpeXm"PANORAMA"(IIAHOPAMA)
3TO pexm pacuipaeT ctepeo3BkyoKyO npTepeHnX DnHaMkoB DoabnB OboHyounn "obBoJAKBaOoo" 3Φ fekT C cozdaHem npdctabHeHH 60kOBbix CTeH. Bbl6epnte "OFF" (BbKn) nnn "ON" (Bkn) (3haueHne no ymonuaHIO: OFF).
PnBb6peynpaBHeNc"CWIDTH"(WUPHNA LHTPAJIbHO)
To OTpynpye TcHpaBHyO Yacb 3ByKOBo KApTHKn Takm 6pa30, Yo6bl OHa 6ydt CbIuHa TObKO To cHTpaBHO rINHAMKn PnP bNpABB DInHAMKn 6dyT CO3daBaTb TOnbKO pAHTOMHyO KapTHHK ynn Bce Tpr NepeDnHex dHAMKa 6bydnt MmEHr HnPaBHeNe N3nyeHn. UnpaBHeMe MoKet 6bIb yCTaHOBeNo paBbIM OAnHomY n3 8 3haeHnOT 0do7 (3hauHne no ymoJuaHnHO:3).
PnBbIbOpye npaBHeHne "DIMENSION"(PaCcToHHe)"
3To 6ydt npboDntb K hactpoKe 3BykoBOro nno NIO HO HappaBHeHIO K nepeHemy, IIO NO HappaBHeHIO K 3aHEmy d INHAMKAM. YnpaBHeHne MoXeT 6bIb yCTaHOBHeO paBbIM OndHomY n3 73aHcHnO r-3do+3 (3HaueHne no yMOnUaHnO:0).
- NOBTOPINe nyHKtbi 1 n 2, yTo6bI OTperynipoBaTb octaBhIe npaMeTpbl.
PnBb6ope "DRC DD"
3Ta cyHKnCCKMaet DnHAMUeckn Dnana3oH paHee 3aHaHHbIX YactEn 3ByKOBoDopoxKn Dolby Digital (Ha 3KCTpeMaI bHO BbICOKOM yPOBHe rPOMKOCTN),YTO6bI CHN3NTb Pa3HOCTb B rPOMKcTm MEXy 3aDaHHbIMn H He 3aDaHHbIMn YactrMn.3To 06neraET npocnyuBaHne BCero 3ByKOBO TpaKaTApnpocMOte pMbMoN IO Beuepam Pn H3KOM yPOBHe Wyma.
PnmuMeuHne:
- 3Ta yCTaHOBka DeIcTBInbHa TOnbKO Torda, KOrda UcnpObIe CnHAnbl NocTyNaIOT Ha BXoD OT NcToHHKa BΦopMaTe Dolby Digital nn Dolby TrueHD.
B HeKoTOpbIX Tnax nporpaMMHOrO oecneueHr Dolby Digital 3Tu yCTaHOBKn MOrY Oka3aTbCnHeJeCTByIOUmmM
M HaxMMTe KhoNky ENTER (BboD).
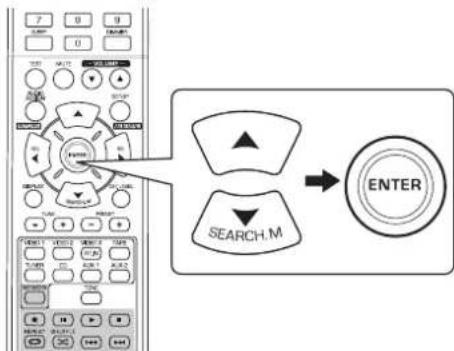
- Haxmte KhoKNI PEPEMEUHn KYPCOPA BIEBO ( /BIPABO()Ira toro,HTobI Otperynp BaTb CxATne DnHAMueCKoro DaNa30Ha Ha HyXHOe 3aueHne.
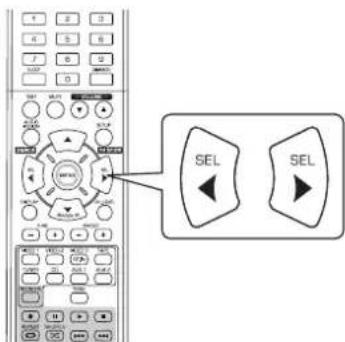
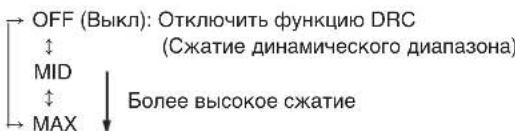
YCTAHOBKNHDMI
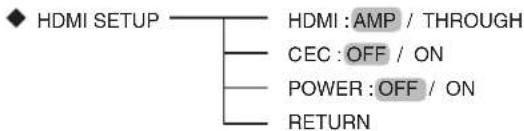
- HDMI(HDMI AUDIO OUT) :Испόньзуетсдглэй поученивбixoДьхаудиоцигнанов от paэбема HDMI MONITOR OUT.
- CEC(HDMI CONTROL) :Испοльзуетсдяг COBmecTHORO ИспьзOBaHЯОпацIMС KOMNHOHTAMN, NOДКЛIOUeHHbIMK pa3bemam HDMI И COBmecTmblx C HIMN уралнem HDMI.
· POWER(YIIPABJIEHHE HANPRXHEHEM IITAHNIA):Длп NOДКЛЮЧЕНС COCTOHRAN ON/OFF (BkI/BbIKI) DAHHORO yctpo NCTBA K KOMTOHEHTAM.
RETURN: Yto6bI BepHyTbC K npdeIduyeme My MeHIO.
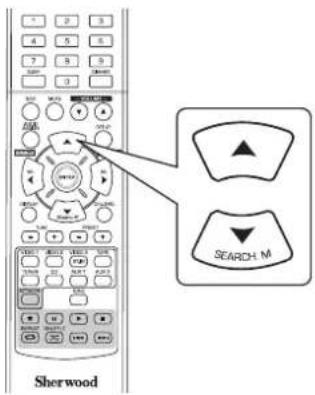
1. Haxmam KhoNk INPEMEUHnKYPCOPA BBEPX (▲) / BHn3 (▼), BbIepeTe HxKyu no3 nCIO.
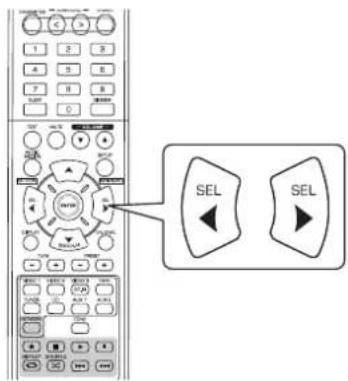
2. HaximaiTe KhoNk NEPEMEUEHIN KYPCOPA BJIeBO ( /BIPABO (一) Ira TORO, YTo6bl yCTaHOBtbpapaMeTpHyKHOe 3HaueHne.
PnBb6ope HDMI AUDIO OUT
IoiKIOHHeH HDM MoKET 6bITb BbINOnHeNo IaH HeCKaTbIX UcΦpOBbIX BnDEoCnIHAnOB N cUΦpOBbIx aYDnOcNHaHOB.
B 3aBnCmOCTn OT TORA RnIOTcR JIN BXoHbIe cIpPoBbl e ayDIOOCrHaJIbHDMI IN BbIXoHbIMn CnHrAImn pnpem Hnka HDMl MONITOR OUT nHt, BbldoJXhbl yctahO BnTb BixOHDMI AUDIOOUT npabInbHo.
AMP:To,TOUcfoBbI ayuocnHaJIbHDMI ABNIOCT aCINrHaAMn OT BixOda HDMI MONITOR OUT da HORo npEmHKa O3Haayet,TO 3TN CInrHaNA 6ydy T CJIbIHbI N3 DnHaMKOB,NOKJIIOueHHBX K npHem HIKY.
THROUGH: YctaHOBka dna aydnoCnHAnOB HDMI ot BbixoJa HDMI MONITOR OUT 03HaaeT, TTo CnHaNbI bdyT cblHbI TObKO nDINHAMKOB Baawero TB-npneMHnKa.
PnmuMeaHne:
Korda onuHDMI AUDIOOUT cenaHa yctahOBa THROUGH, Hnkakoro 3Byka He 6ydt CbIsho nDINHAM KOB,KOTOpBIE NOdknIOUeHbIK DaHHOMY yCTPOINCTB.
PnBb6opeHDMICONTROL
-Функиу npablenHn HDMI daet BO3MOxHOCt b OcyueCTB nTb Bb6op BXoД DAHHOrO yCTpoiCTBa TaKIM o6pa3OM,TO 6bl OH 6JOKuPobAICI BO BpEMa ONepaUN NOkNIOUeHn K OMHOHETOB.
OFF (BbKn): He nCnoNb3oBaTb cyHKuH O HDMI CONTROL (YnpaBneHMe HDMI).
ON (Bkn):Испоьзоваыфункию HDMI CONTROL (Ynp ablenneHne HDMI).
Korda yHKnHDMI CONTROL cenaHa ycTaHObKa ON (BKn), Bby moKeTe nCNoIb3OBaTb FyHKnIO ARC(KaHaO o 6paTHoro ayINOcHrHa), KOtopa Daet BO3MOXHOCTb TB- npneMHNK NOcbNa TaH No pneMHNK no Ka6e JIO HDMI.
PnmuMeaHne:
-Функшу npaBneHn HDM MoKet He pa6oTaB 3aBnCn MOCTN OT NOKNoeHHOrO KOMNoHeHTa N erO yCTaHOBOK.
-TO6bI NcONb3oBaTb cyHKuIO ARC, Heo6xoJIM TeJeBn3 op, KOToPbI NOdEepKnaeT 3Ty cyHKUIO.
Плдрбости no Исплььованю HDMI CONTROL (Унразиме HDMI) u POWER CONTROL (Урразиме Нарразиме петаши) CMOTPte B pa3dene "ПОДТВЕРЖДEHNEФYHKLINHDMI" ha cTp. 36.
PnBb6ope POWER CONTROL (YnpaBHeNBAKIOueHEm)
-ФунклгУ npaBHeHnB BkIIOHeHm DaeT Bo3MOxHOCTb YcTaHOBnT BoCToAHIO BKIOUHeHn DaHHORO yCTpoNCTBa 6NoKInPOB Ky C CoTOAHRnEM BkIOUHeHn/BbIKIOHeHn HapXeHn NITaHn I NyCKa BOCpON3BeDEHn NOkIOUHeHbIx KOMNOHeHTOB.
OFF (BbKn): He cne dyet nCIOJb3ObaT bФyHKmIO POWER CONTROL (YnpaBHeHn BkIIOeHnEM)
ON (BKn) :Пин И спосьзовани ФункцИР POWER CONTROL (Упразленив BKЛюченим).
PpimmuHne:
-ДИ POWER CONTROL (Упавлиян Bклочием) может сденина установka Tольков Том сныа, когда onцни HDMI CONTROL (Упавлияne HDMI) сденина установka ON (Вк).
PykoBODCTBO no yctpaHnIO HeNCpPaBHOCTeN
PnB03HKnHOBeHHN HeCNpABHOCTn BHaayane N3yUHe npiBedeHNHy HxKe Ta6nUy. Ecnn HeCNpABHOCTb He ydaIOcb ycTaPAHmTb camOCToTeIbHO, 6opATntEc b KBAImDmIpOBaHOMy CneuaHmCTy.
EcnHcnpabHOCTbOaETC,nonpOyTeYCTpaHHTe,bbKIOHNCHOBKIOHNpeCBep.EcNHYCTPAHHTBHeHCNPABHOCThe ydaIOCb, npokocnhytebcBaumdunepom.HnpckoxctobertbaxHe bIa3eTbpno3eTpeMOHTpeCnBepaCaOMTOPTbHO.B 30m clyoe6h3atyebctba no rapaHTHHOMOeCNkauHHo pno3boDTaehnAnHytnpyTOC.
| HENCNPABHOCTb BO3MOKHARI PIPNUHNA UYCTPAHHE | ||
| HET NITAHIA | •ОТКLOЧEN KABEL ПИТАНДЕ ВЕРЕМЕнTORO TOKA. •Плoxое сединене c posetckоу посьмпсу c nomошью лamblы идругогу усточа. | •ПлOTNO рОДКLOчENDE Кабел. •Прobерte рОзETKу cnomошью лamblы идругогу усточа. |
| HET 3BYKA | •ОТКLOЧEN KABEL ПИТАНДЕ ВЕPЕМЕнTORO DINOAMIKOB. •ОБшь уровьну ромкосту установин ha симшхом Нзтоке Заночи. •ВКLOCHEHA KhoIGNa "MUTE". •Выбан неberьни IncTochнik BxOДногу сгнана. •Неравильные рОДКLOчENHЯ М exd y BheuHIMM ystpoCTBam. •Установна орць "THROUGH" dny BxOДногу pa3ьема "HDMI AUDIO OUT". •Hastrochniya audinoobopudobanha uystahovneleni hybeperho. | •Прobерte рОДКLOчENDE ДИЗAMIKOB. •Hactpoite уровьну obseи rromkostу. •HaxmITE KhoIGNy "MUTE" dny Otmehы b6e3ZbUHORO pexmna. •ПрabivshBO b6ibepite Heo6xodimby incTochNK BxOДногу сгнана. •ПрabivshBO b6InonHite pOДКLOчENHry. •UctahOBITE oncHIO "AMP". (Дlya polynecHIN dIpONHITENHBI HINФOPMau mCMOTRite pa3dien "Ipr и b6bope HDMI AUDIO OUT" ha strpanichce 50). •UctahOBITE bERbIe hacstpoHy. (Дlya polynecHIN dIpONHITENHBI HINФOPMau mCMOTRite pa3dien "Ipr и b6bope HDMI AUDIO OUT" ha strpanichce 50). •UctahOBITE bERbIe hacstpoHy. (Дlya polynecHIN dIpONHITENHBI HINФOPMau mCMOTRITE pa3dien "YC TAHOBKIN BXODA" ha strpanichce 41). |
| ДИЗAMIKI OББEMHORO 3Byuchnia He BOCPON3BODAT 3Byuk | •ОТКLOЧEN PEXIM OББEMHORO 3Byka (стореорхим). •Уровьн obSEДн рOMKOSTN I yPoBEBH rOPMKOSTN 68bEMHORO 3Byka YCTANOHLEHЯ NaCIMKOM HN3KOe Заночи. •ИспolyзUTСТЯ MOHOFООЧESКИ INTOCHNIG CINHAN. •Параметры дИЗAMIKA o6bEMHORO 3Byka yCTANOHLEHЯ Ha "NO". •Быбан Формат "Dolby Virtual Speaker", ржим "stereo"и.T.d. •Установпапаметр "NO" dny ceNTpALNBORO dINAMIKA. •Уровьн obSEДн рOMKOSTN I yPoBEBH rOPMKOSTN c9TlPANBHorO KANHAp YA STAOHOBHЯ NaCIMKOM H4KOM YPOBHe. •Плeвспоть вИЗОСИннAGM MEXd y daHbIM yCTROBJCTBOM N TELEBUN3OPOM BlyINONHEO HepaBILHNo. •Выбан NeBEBH IncTochNik BxOДногу сгнана TeNEBUNOra. •Быбан NeBEBH IncTochNik BxOДногу cINHAN. HepaBILHNo. •Выбан NeBEBH IncTochNik BxOДногу cINHAN. HepaBILHNo. •TelenBIS3OR pAnrOeOBpODAHNe He noJdePexinBaet φoPMA T "HDCP". •ФoPMA BIDEOCSIRHAN Baoero TneBENsOBA, DVD- PINEERA. •Антугпс HaSTPOMTb radionostanuizn •H6b6OДMIMа ChACTOTA radioCTANZIMn He HACTPOHGE. •Пложенige AnteHBNb Yb6b6HIO HepaBILHNo. •TelenBIS3OR pAnrOeOBpODAHNe He noJdePexinBaet φoPMA T "HDCP". •ФoPMA BIDEOCSIRHAN Baoero TneBENsOBA, DVD- PINEERA. •Антугпс HaSTPOMTb radionostanuizn •H9b6OДMIMa ChACTOTA radioCTANZIMn He HACTPOHGE. •Пложенige AnteHBNb Yb6b6HIO HepaBILHNo. •TelenBIS3OR pAnrOeOBpODAHNe He noJdePexinBaet φoPMA T "HDCP". •ФoPMA BIDEOCSIRHAN BaoeroTneBENsOBA, DVD- PINEERA. •Антугпс HaSTPOMTb radionostanuizn •H9b6OДMIMa ChACTOTA radioCTANZIMn He HACTPOHGE. •Пложenige AnteHBNb Yb6b6HIO HepaBILHNo. •TelenBIS3OR pAnrOeOBpODAHNe He noJdePexinBaet φoPMA T "HDCP". •ФoPMA BIDEOCSIRHAN BaoeroTneBENsOBA, DVD- PINEERA. •Антугпс HaSTPomTb radionostanuizn •H9b6OДMIMa ChACTOTA radioCTANZIMn He HACTPOHGE. •Пложenige AnteHBNb Yb6b6HIO HepaBILHNo. •TelenBIS3OR pAnrOeOBpODAHNe He noJdePexinBaet φoPMA.T "HDCP". •HepaBILHNo B6b6HIO •HepaBILHNo B6b6HIO •HepaBILHNo B6b6HIO •HepaBILHNo B6b6HIO •HepaBILHNo B6b6HIO •HepaBILHNo B6b6HIO •HepaBILHNo B6b6HIO •HepaBILHNo B7d. •HepaBILHNo B6b6HIO •HepaBILHNo B6b6HIO •HepaBILHNo B6b6HIO •HepaBILHNo B6b6HIO •HepaBILHNo B6b6HIO •HepaBILHNo B6b6HIO •HepaBILHNo B8OHN •HepaBILHNo B8OHN •HepaBILHNo B8OHN •HepaBILHNo B8OHN •HepaBILHNo B8OHN •HepaBILHNo B8OHN •HepaBILHNo B8OHN •HepaBILHNo B8OHN •HepaBILH No B8OHN •HepaBILH No B8OHN •HepaBILH No B8OHN •HepaBILH No B8OHN •HepaBILH No B8OHN •HepaBILH No B8OHN •HepaBILH No B8OHN •HepaBILH No B8OHN •HepalBILN OY •HepaBILN OY •HepaBILN OY •HepaBILN OY •HepaBILN OY •HepaBILN OY •HepaBILN OY •HepaBILN OY •HepaBILN OY •HepaBILN OY •HepaBILN OY •HepalBILN OY •HepaBILN OY •HepaBILN OY •HepaBILN OY •HepaBILN OY •HepaBILN OY •HepaBILN OY •HepaBILN OY •HepaBILN OY •HepaBILN OYTAPINU. •HepaBILN OYTAPINU •HepaBILN OYTAPINU •HepaBILN OYTAPINU •HepaBILN OYTAPINU •HepaBILN OYTAPINU •HepaBILN OYTAPINU •HepaBILN OYTAPINU •HepaBILN OYTAPINU •HepaBILN OY •HepaBILN OY •HepaBILN OY •HepaBILN OY •HepaBILN OY •HepaBILN OY •HepaBILN OY •HepaBILN OY •HepaBILN OY •HepaBILN OYTAPINU •HepaBILN OYTAPINU •HepaBILN OYTAPINU •HepaBILN OYTAPINU •HepaBILN OYTAPINU •HepaBILN OYTAPINU •HepaBILN OYTAPINU •HepaBILN 0YTAPINU •HepaBILN 0YTAPINU •HepaBILN 0YTAPINU •HepaBILN 0YTAPINU •HepaBILN 0YTAPINU •HepaBILN 0YTAPINU •HepaBILN 0YTAPINU •HepaBILN 0YTapINU •HepaBILN 0YTAPINU •HepaBILN 0YTAPINU •HepaBILN 0YTAPINU •HepaBILN 0YTAPINU •HepaBILN 0YTAPINU •HepaBILN 0YTAPINU •HepaBILN 0YTAPIN/U •HepaBILN 0YTAPINU •HepaBILN 0YTAPINU •HepaBILN 0YTAPINU •HepaBILN 0YTAPINU •HepaBILN 0YTAPINU •HepaBILN 0YTAPINU •HepaBILN 0YTAPINU -3aOpOJEN DaTChN DuctanOOHNGO yupaBleHnA. | |
TexHnueckne xapaKTepeNCTnKN
UCNNTENb
MoHOCbBbIXOda,CTepeOpexM,6OM,THD0,7%,40Tμ~20KtU 2x100 B
- 06uee rapMOHueckoe nKkaKeHne, 6OM, 100BT, 1KtU 0.05%
- INHTepMoDyUaHIOHHO NCKaJKeHHe 60Tc:7KΓu=4:1 SMPTE,6OM,100BT 0.1%
BxOHaHyBCTBnTeBHOCTb,47KOM JINHHa(KoMaKT-DnCK,KaccTea,BuDeo) 250MB
-OTHOWeHHe CnHaJI/7yM, no IHF "A" JINHNA (KomnaKT-DnCK, Kaccetα, BnDeo) 95 d6
-actoTHaXapakTeepntka JINHn(KomnaKT-dnck,kaccetTa,Bndeo)20T\~50KtU +0d5,-3dB
- YpOBeHb CnHaHa Ha BbIXoDe TAPEREC,2,2KOM 250MB PREOUT(CabByep),1KOM1
PerynpobKaBepxHnxHnHexhXuactoT,10F/10KfU ±10d6
- Pexim obemhoro 3Byka, toIbko nIob3yemble kaHabl IpeednBbIXOHaMa MOHocTB,6OM,1KΓU,THD0,7% | 100BT/100BT LcHTpaJIbHaB bIXOHaMa MOHocTB,6OM,1KΓU,THD0,7% | 100BT BbIXOHaMa MoHocTB obemhoro 3ByaHaHa,6OM,1KΓU,THD0,7% | 100BT/100BT
UHPOBOE AYIO
- Yactota duickpeTn3aun | 32,44,1,48,96 KTu
- YpOBeHb cIuΦpOBo RbXoDa KoakcnaIbHbI, 75 OM | 0,5 Vp-p ONTnueckn 660 Hm | -15 ~ -21 dBm
■BnDEO
ΦopMaT BnDeo | PAL
BxOHaHyBCTBnTeJIbHocTb(=YpOBeHcHnHaHaBaBixOe),75OM BnDeo(Komno3HTHe(06bIHOe))|1Vp-p
Pa3bemHDMI KOHTAKT 19
FM-TIOHEP
- Duaana30 nepectpoynuactotbl 87,5~108M
- PeaBnaYyBCTbnteBHOCTb,THD 3%,S/N 26 d5 | 12,8d5Φ
HOMHaJIbHaIyBCTBnteJIbHOCTb46d5,MOHO/CTepeo 20,2/45,3Φ - OTHOHeHne CnHaJ/WM, 65 dΦ, MoHO/cTepeo | 55 / 50 dE
- O6uee rapMOHnueckoe nckaeHne, 65 dΦ, 1 KΓu, MOHO/CTepeo | 0,5/1,0%
- YactOTTHaXapaKTepeNCTnKa, 30 Tg ~12 KfU ±3,0 d5
- PEPexoHoe 3aTyxHHe MeJy cTepeokHaIamn, 1 KU 30 dE
- OTHOHEHne 3axBaTa 4d6
Ko3ΦpHnueHTnoaBHeHnIF 80d6
AM-TIOHEP
-ДианаэнпесгponкчсToTb| 522~1611Kr
- PeanbHaYyBCTBnTeBnHOCTb 500 μV/m
- OTHOWeHHe CnHAn/Whm | 40 d6
- 136npaTeIbHocTb 25
OBUCEE
-Питане | 230В~50Ф
-Notpe6neHHe 3Heprn | 200BT
Pa3mepb(LxBxD,BKNIOHAR BbICTynHOUne yactn) 435×143×359MM(17-3/8×5-5/8×14-1/8HIOHMOB)
Bec (HeTTo) | 8,9 Kr
PpmeaHHe: H3aHn H xapaKTepeCTNkM OMyr H3MeHrTaBc8e3 npEbaPteNbHO ryeDMNEHn.
RD-606i
NETWORK AV RECEIVER
NETZWERK AV RECEIVER
RED RECEPTEUR AV
RESEAU RECEPTOR DE AV
AUYNO/BNDEO CETN PECNBEP