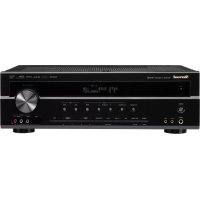
RD5405 - Receiver SHERWOOD - Free user manual and instructions
Find the device manual for free RD5405 SHERWOOD in PDF.
Frequently Asked Questions - RD5405 SHERWOOD
User questions about RD5405 SHERWOOD
0 question about this device. Answer the ones you know or ask your own.
Ask a new question about this device
Download the instructions for your Receiver in PDF format for free! Find your manual RD5405 - SHERWOOD and take your electronic device back in hand. On this page are published all the documents necessary for the use of your device. RD5405 by SHERWOOD.
USER MANUAL RD5405 SHERWOOD
This symbol is intended to alert the user to the presence of uninsulated "dangerous voltage" within the product's enclosure that may be of sufficient magnitude to constitute a risk of electric shock to persons.

This symbol is intended to alert the user to the presence of important operating and maintenance (servicing) instructions in the literature accompanying the appliance.
WARNING : TO REDUCE THE RISK OF FIRE OR ELECTRIC SHOCK, DO NOT EXPOSE THIS APPLIANCE TO RAIN OR MOISTURE.
Caution regarding installation
Note : For heat dispersal, do not install this unit in a confined space such as a bookcase or similar enclosure.

Do not block ventilation openings or stack other equipment on the top.
FOR YOUR SAFETY
| EUROPE AUSTRALIA | 220 V-240 V | Units shipped to Australia are designed for operation on 24 0 V AC only.To ensure safe operation, the three-pin plug supplied must be inserted only into a standard three-pin power point which is effectively earthed through the normal household wiring. Extension cords used with the equipment must be three-core and be correctly wired to provide connection to earth.Improper extension cords are a major cause of fatalities. The fact that the equipment operates satisfactorily does not imply that the power point is earthed and that the installation is completely safe. For your safety, if in any doubt about the effective earthing of the power point, consult a qualified electrician.PAN-EUROPEAN UNIFIED VOLTAGEAll units are suitable for use on supplies 220-240 V AC. |
CAUTION
- Leave a space around the unit for sufficient ventilation.
- Avoid installation in extremely hot or cold locations, or in an area that is exposed to direct sunlight or heating equipment.
- Keep the unit free from moisture, water, and dust.
- Do not let foreign objects in the unit.
- The ventilation should not be impeded by covering the ventilation openings with items, such as newspapers, table-cloths, curtains, etc.
- No naked flame sources, such as lighted candles, should be placed on the unit.
- Please be care the environmental aspects of battery disposal.
• The unit shall not be exposed to dripping or splashing for use. - No objects filled with liquids, such as vases, shall be placed on the unit.
- Do not let insecticides, benzene, and thinner come in contact with the set.
- Never disassemble or modify the unit in any way.
■ Notes on the AC power cord and the wall outlet.
- The unit is not disconnected from the AC power source(mains) as long as it is connected to the wall outlet, even if the unit has been turned off.
• To completely disconnect this product from the mains, disconnect the plug from the wall socket outlet.
- When setting up this product, make sure that the AC outlet you are using is easily accessible.
- Disconnect the plug from the wall outlet when not using the unit for long periods of time.


Pb
Information for Users on Collection and Disposal of Old Equipment and used Batteries
These symbols on the products, packaging, and/or accompanying documents mean that used electrical and electronic products and batteries should not be mixed with general household waste. For proper treatment, recovery and recycling of old products and used batteries, please take them to applicable collection points, in accordance with your national legislation.
By disposing of these products and batteries correctly, you will help to save valuable resources and prevent any potential negative effects on human health and the environment which could otherwise arise from inappropriate waste handling.
For more information about collection and recycling of old products and batteries, please contact your local municipality, your waste disposal service or the point of sale where you purchased the items.
[Information on Disposal in other Countries outside the European Union]
These symbols are only valid in the European Union. If you wish to discard these items, please contact your local authorities or dealer and ask for the correct method of disposal.
Note for the battery symbol (bottom two symbol examples): The sign Pb below the symbol for batteries indicates that this batteries contains lead.
CONTENTS
Introduction
- READ THIS BEFORE OPERATING YOUR UNIT | 2
System Connections | 4
Front Panel Controls | 8
Remote Controls | 9
• REMOTE CONTROL OPERATION RANGE | 10
- LOADING BATTERIES | 10
Operations
• LISTENING TO A PROGRAM SOURCE | 11
• SURROUND SOUND | 14
• ENJOYING SURROUND SOUND | 15
• LISTENING TO RADIO BROADCASTS | 20
• LISTENING TO RDS BROADCASTS(FM ONLY) | 22
(RDS Tuner(Regional Option for some countries in Europe, etc.))
- RECORDING | 24
• OTHER FUNCTIONS | 25
• USING DIFFERENT FUNCTIONS ON THE FRONT PANEL | 26
System Setup | 27
- SETTING THE SYSTEM | 29
- SETTING THE INPUT | 31
- SETTING THE SPEAKER SETUP | 32
- SETTING THE CH LEVEL | 36
- SETTING THE PARAMETER | 38
Troubleshooting Guide | 40
Specifications | 41
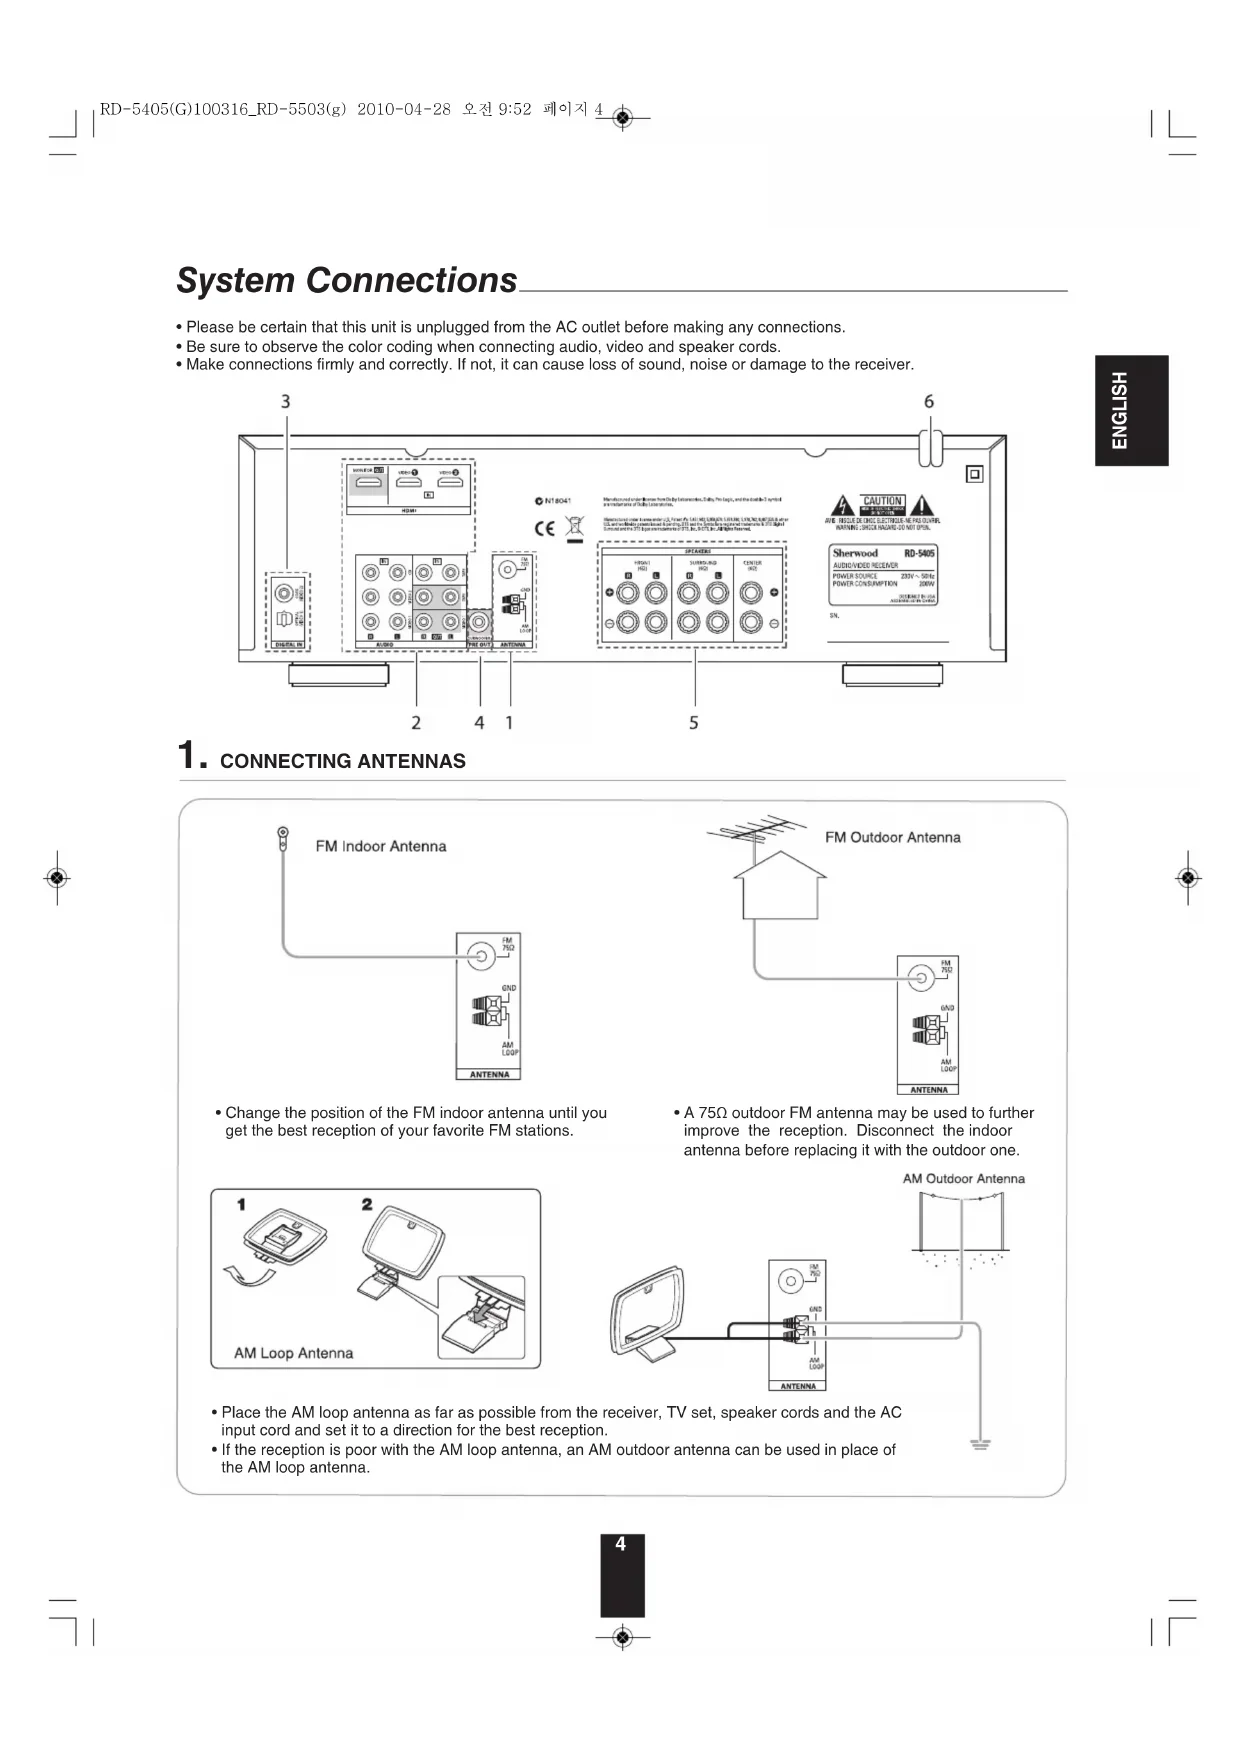
System Connections
- Please be certain that this unit is unplugged from the AC outlet before making any connections.
- Be sure to observe the color coding when connecting audio, video and speaker cords.
- Make connections firmly and correctly. If not, it can cause loss of sound, noise or damage to the receiver.
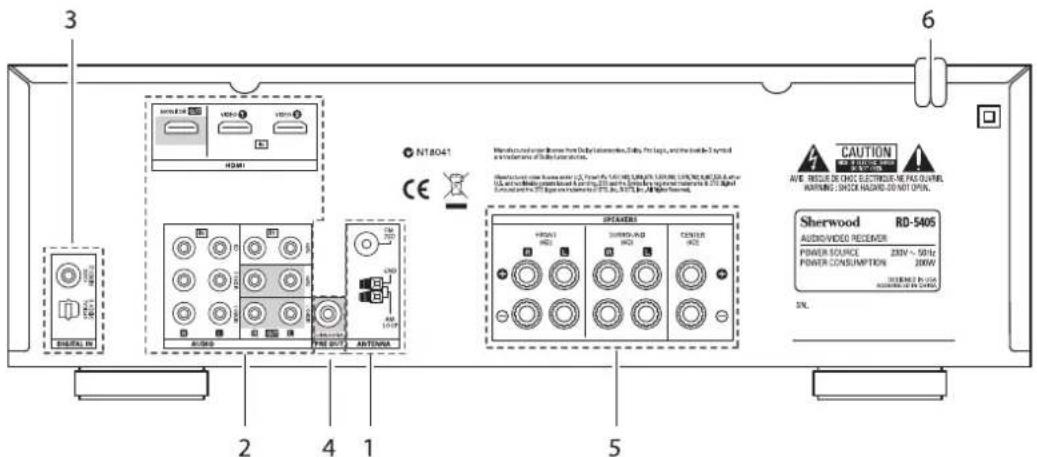
text_image
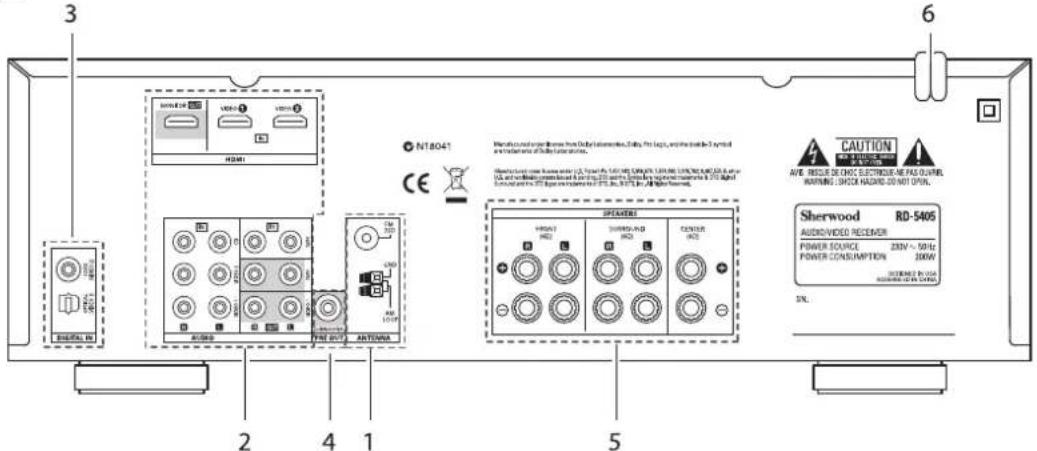
3 6 NT8041 CE 2 4 1 5 AUDIO/RD SHERWOOD RD-5405 AUDIVIDVIDEO RECEIVER POWER SOURCE 230V ~ 50Hz POWER CONSUMPTION 200W SHROOMS PLUGA AUDIVIDED BY GARDEN CHAFTOR HOLDING SPREADER HOLDING SPREADER-RD SPREADER-RD CENTER RQ CAUTION AVE REQUIRE DE CHOC ELECTRICUE NE PAUL OUTRUN RATING: SHOCK HAZING DO NOT OPEN. SERWOOD RD-5405 31. CONNECTING ANTENNAS
text_image
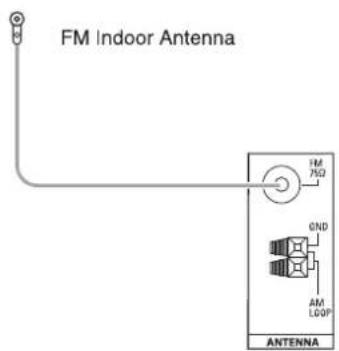
FM Indoor Antenna HM 75Ω 0ND AM LGDP ANTENNA- Change the position of the FM indoor antenna until you get the best reception of your favorite FM stations.
text_image
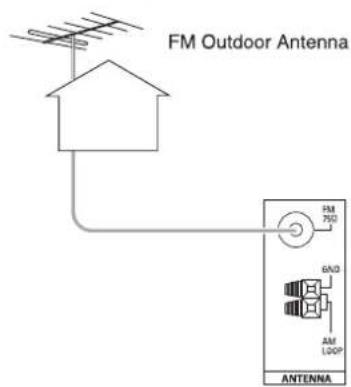
FM Outdoor Antenna FM 75Ω 6A/D AM LOOP ANTENNA- A 75Ω outdoor FM antenna may be used to further improve the reception. Disconnect the indoor antenna before replacing it with the outdoor one.
text_image
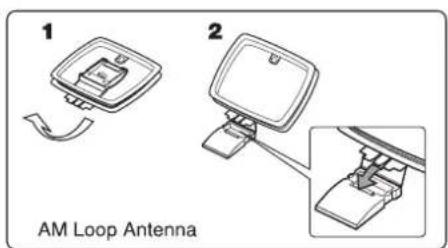
1 2 AM Loop Antenna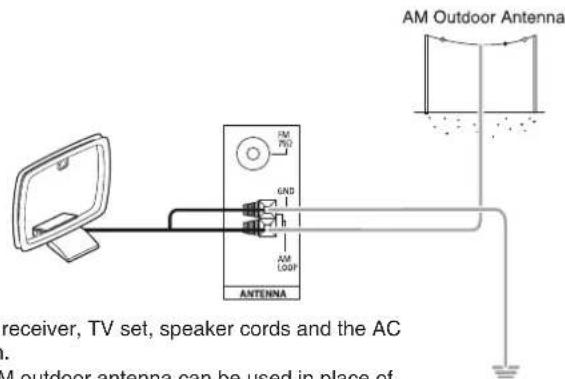
text_image
AM Outdoor Antenna AM PRO GND h AM LOOP ANTENNA receiver, TV set, speaker cords and the AC AM outdoor antenna can be used in place of- Place the AM loop antenna as far as possible from the receiver, TV set, speaker cords and the AC input cord and set it to a direction for the best reception.
- If the reception is poor with the AM loop antenna, an AM outdoor antenna can be used in place of the AM loop antenna.
2. CONNECTING AUDIO/VIDEO COMPONENTS
flowchart
graph TD
    subgraph Video 2
        A["CD player"] -->|L| B["IN"]
        C["Video 2"] -->|R| D["IN"]
        E["OUT HDMI"] -->|L| F["IN"]
        G["IN"] -->|R| H["IN"]
    end

    subgraph Video 1
        I["MONITOR TV, Projector, etc."] --> J["IN HDMI"]
        K["IN"] --> L["HDMI"]
        M["VIDEO 1"] --> N["IN"]
        O["VIDEO 2"] --> P["HDMI"]
    end

    subgraph Audio
        Q["AUDIO OUT"] --> R["IN"]
        S["AUDIO IN"] --> T["IN"]
    end

    subgraph Tape
        U["AUDIO OUT"] --> V["IN"]
        W["AUDIO IN"] --> X["IN"]
    end

    A --> I
    C --> I
    E --> I
    G --> I
    I --> J
    J --> K
    K --> L
    L --> M
    M --> U
    U --> W
    W --> G
    G --> G
    style Video 2 fill:#f9f,stroke:#333
    style Video 1 fill:#ccf,stroke:#333
    style Audio fill:#cfc,stroke:#333
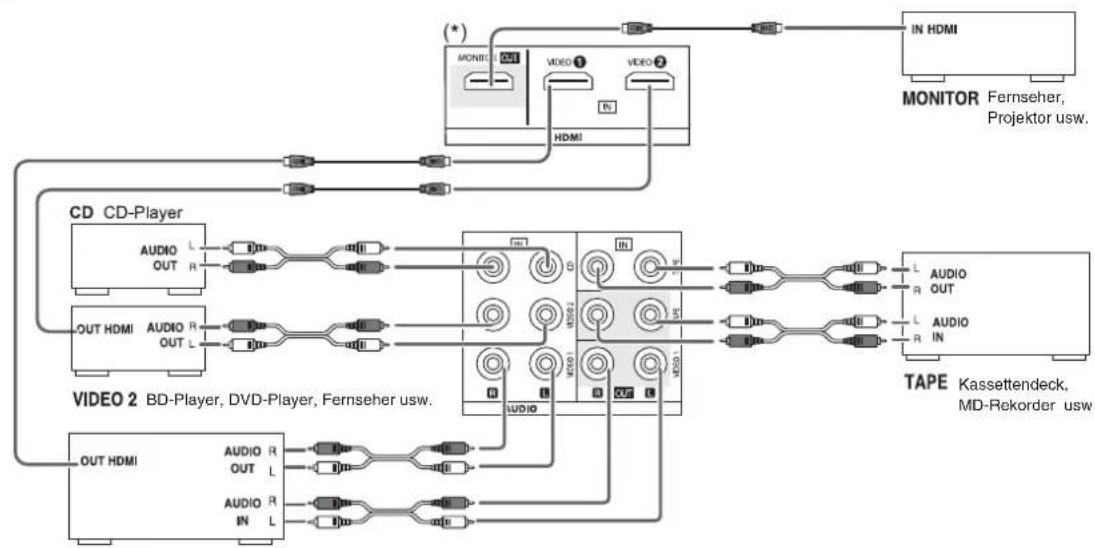
VIDEO 1 BD player, DVD player, tape deck, MD recorder, etc.
• The VIDEO 1/VIDEO 2 jacks may be connected to AUDIO jacks of video components such as BD player, DVD player, TV, etc..
- The TAPE IN/OUT jacks and the VIDEO 1 IN/OUT jacks can be connected to audio recording equipment such as a tape deck, an MD recorder, etc..
■HDMI (High Definition Multimedia Interface) connection : (\*)
- You can connect the source component (BD player, etc.) to the display component (TV, projector, etc.) through this receiver with using a commercially available HDMI cord.
- The HDMI connection can carry uncompressed digital video signals and digital audio signals.
- This receiver can output digital video and digital audio signals from the HDMI MONIOTR OUT of this receiver without passing through any circuits as they were input into the HDMI IN(, meaning the audio signals which are input into the HDMI IN cannot be reproduced on this receiver).
• HDMI, the HDMI logo and High-Definition Multimedia Interface are trademarks or registered trademarks of HDMI licensing LLC.
Notes :
- Depending on the connected component, unreliable signals transfer may happen.(For details, refer to the operating instruction of your component)
- For stable signal transfer, we recommend using HDMI cords that are a maximum of 5 meters in length.
3. CONNECTING DIGITAL INs
- The OPTICAL and the COAXIAL DIGITAL OUTs of the components that are connected to CD and VIDEO 1 of this unit can be connected to these DIGITAL INs.
- A digital input should be connected to the components such as a CD player, DVD player, etc. capable of outputting Dolby Digital or PCM format digital signals, etc.
- For details, refer to the operating instructions of the component connected.
- When making the COAXIAL DIGITAL connection, be sure to use a 75Ω COAXIAL cord, not a conventional AUDIO cord.
- All of the commercially available optical fiber cords cannot be used for the equipment. If there is an optical fiber cord which cannot be connected to your equipment, consult your dealer or nearest service organization.
■Note : Be sure to make either a OPTICAL or a COAXIAL DIGITAL connection on each component. (You don't need to do both.)
flowchart
graph LR
    A["Digital IN"] --> B["Component with COAXIAL DIGITAL OUT"]
    A --> C["Component with OPTICAL DIGITAL OUT"]
■Digital input default settings
- If you connect the DIGITAL INs to your components, it is easier to do so following the default settings.
- If your DIGITAL connections are different from default settings, you should assign the DIGITAL INs you used with the "When selecting the DIGITAL IN" procedure on page 31.
• The default settings are as follows: OPTICAL : VIDEO 1, COAX : VIDEO 2
4. CONNECTING SUBWOOFER PRE OUT
• To emphasize the deep bass sounds, connect a powered subwoofer.
flowchart
graph LR
    A["PRE OUT"] --> B["Switch"]
    B --> C["Powered subwoofer"]

5. CONNECTING SPEAKERS
- Be sure to connect speakers firmly and correctly according to the channel(left and right) and the polarity(+ and -). If the connections are faulty, no sound will be heard from the speakers, and if the polarity of the speaker connection is incorrect, the sound will be unnatural and lack bass.
- For installing the speakers, refer to "Speaker placement" on page 7.
- After installing the speakers, first adjust the speaker settings according to your environment and speaker layout. (For details, refer to "SETTING THE SPEAKER SETUP" on page 32.)
Caution :
- Be sure to use the speakers with the impedance of 6 ohms or above.
- Do not let the bare speaker wires touch each other or any metal part of this unit. This could damage this unit and/or the speakers.
- Never touch the speaker terminals while the AC input cord is connected to the wall AC outlet. Doing so could result in electric shocks.
text_image
Front right Front left Center FRONT SPEAKERS SURROUND CENTER (602) (602) Surround right Surround left■ Connecting speaker wire
1. Strip away approx. 10 mm (3/8 inch) of wire insulation, then twist the wire ends tight. | 2. Lossen by turning the speaker terminal counter-clockwise. | 3. Insert the bare part of the wire. | 4. Tighten by turning it clockwise. |
6. AC INPUT CORD
- Plug the cord into a wall AC outlet.

Speaker placement
Ideal speaker placement varies depending on the size of your room and the wall coverings, etc. The typical example of speaker placement and recommendations are as follows:
■Front left and right speakers and center speaker
- Place the front speakers with their front surfaces as flush with TV or monitor screen as possible.
- Place the center speaker between the front left and right speakers and no further from the listening position than the front speakers.
- Place each speaker so that sound is aimed at the location of the listener's ears when at the main listening position.
■Surround left and right speakers
- Place the surround speakers approximately 1 meter (40 inches) above the ear level of a seated listener on the direct left and right of them or slightly behind.
Subwoofer
- The subwoofer reproduces powerful deep bass sounds. Place a subwoofer anywhere in the front as desired.
Notes :
- When using a conventional TV, to avoid interference with the TV picture, use only magnetically shielded front left and right and center speakers.
- To obtain the best surround effects, the speakers except the subwoofer should be full range speakers.
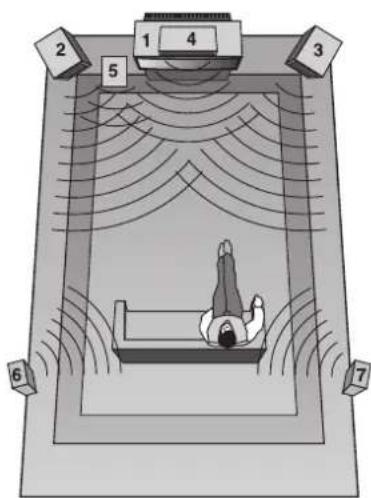
text_image
Diagram of a person lying in bed inside a large room with numbered labels indicating positions or zones.- TV or screen
- Front left speaker
- Front right speaker
- Center speaker
- Subwoofer
- Surround left speaker
- Surround right speaker
Front Panel Controls
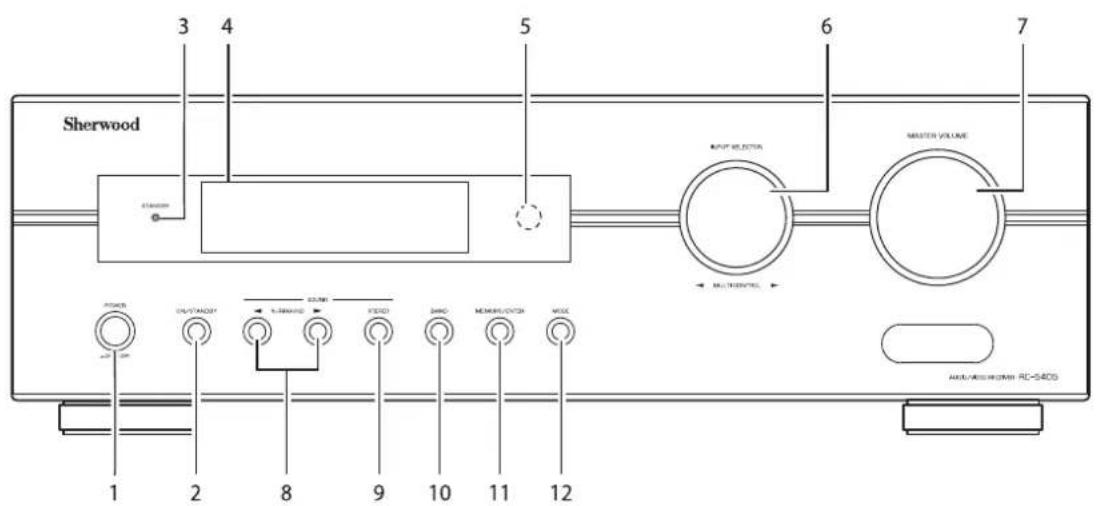
text_image
Sherwood 3 4 5 6 7 OUTPUT SELECTOR MASTER VOLUME MULTIENIX POWER 1 2 8 9 10 11 12 ON/OFF/INCH/ON AUX/AUX/INCH/ON RC-540S- POWER switch
- POWER ON/STANDBY button
- STANDBY indicator
- FLUORESCENT DISPLAY
For details, see below.
- REMOTE SENSOR
-
INPUT SELECTOR/MULTI CONTROL knob
-
MASTER VOLUME CONTROL knob
- SURROUND MODE UP/DOWN (▶/◀) buttons
-
STEREO button
-
BAND button
-
MEMORY/ENTER button
- MODE button
■FLUORESCENT DISPLAY

text_image
RDS TPTA PTY ST TUNED * PRESET MEM dB kHz MHz DTS D D PLII DSP AUTO DIGITAL DIRECT 2 3 4 5 6- Input, frequency, volume level, operating information, etc.
- Surround mode indicators
- AUTO indicator
- DIGITAL INPUT indicator
- DIRECT indicator
-
Preset number, sleep time display
-
MEMORY indicator
- PRESET indicator
-
SLEEP indicator
-
TUNED indicator
- STEREO indicator
- RDS indicators
(Regional option for Europe, etc.)
Remote Controls
ENGLISH
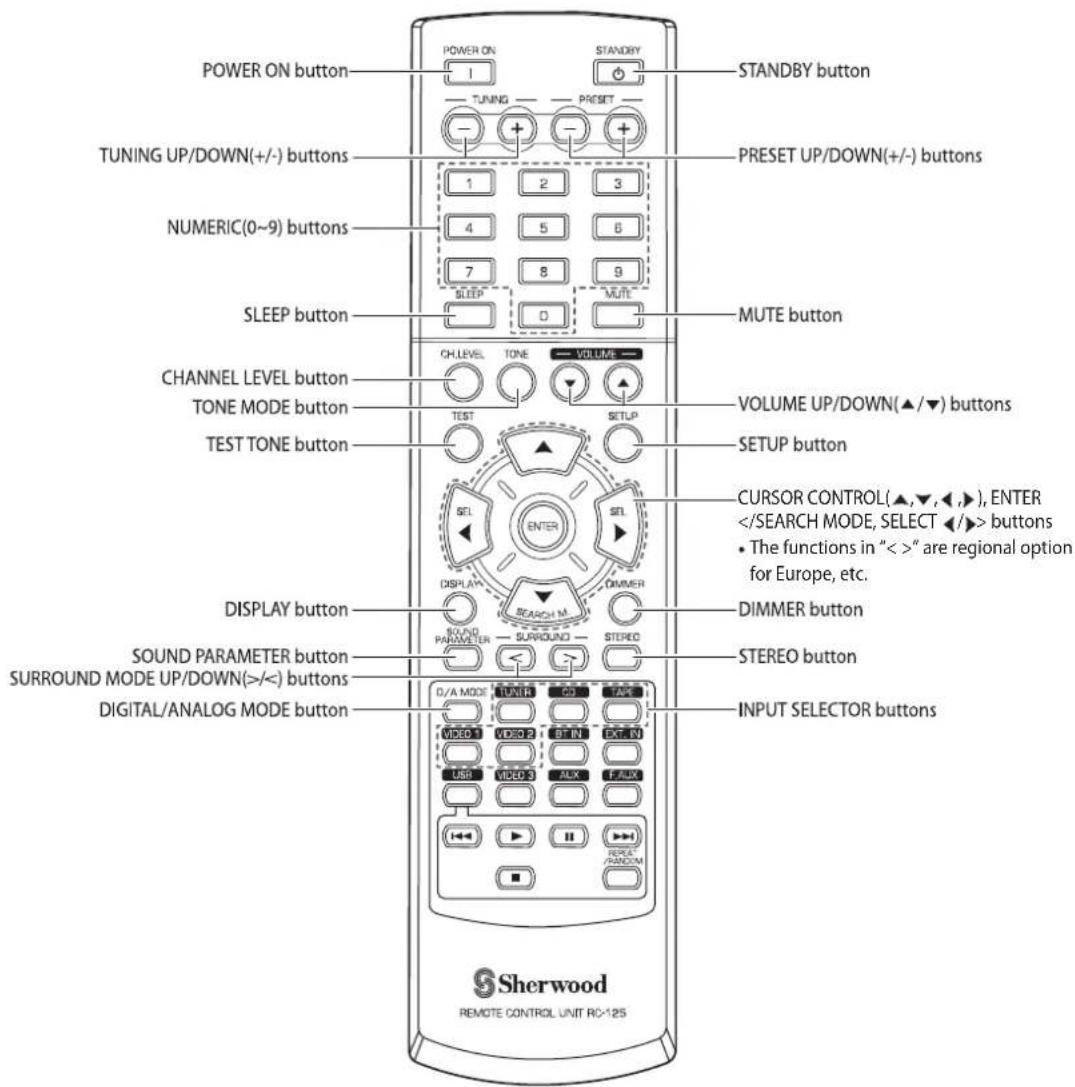
text_image
POWER ON button TUNING UP/DOWN(+/-) buttons NUMERIC(0~9) buttons SLEEP button CHANNEL LEVEL button TONE MODE button TEST TONE button DISPLAY button SOUND PARAMETER button SURROUND MODE UP/DOWN(>|/>) buttons DIGITAL/ANALOG MODE button STANDBY button PRESET UP/DOWN(+/-) buttons MUTE button VOLUME UP/DOWN(▲/▼) buttons SETUP button CURSOR CONTROL(▲,▼,◄,►), ENTERNote:
- Some input selector buttons(BT IN, EXT. IN, USB, VIDEO 3, AUX, F.AUX) and USB transport buttons(◀◀, ▶H, ▶▶■, REPEAT/RANDOM) are not available for this unit.
text_image
7m 30° 30° • Use the feet) and- Use the remote control unit within a range of about 7 meters (23 feet) and angles of up to 30 degrees aiming at the remote sensor.
LOADING BATTERIES
- Remove the cover.
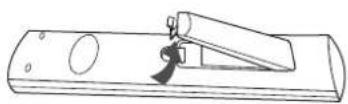
- Load two batteries ("AAA" size, 1.5 V) matching the polarity.

natural_image
Line drawing of a remote control device with a battery and switch (no text or symbols)- Remove the batteries when they are not used for a long time.
- Do not use the rechargeable batteries (Ni-Cd type).
Operations
■Note : Before operating this receiver, first set this unit as desired for optimum performance, doing the system setup procedures. (For details, refer to "System Setup" on page 27.)
LISTENING TO A PROGRAM SOURCE
Before operation
- Enter the standby mode.
- The STANDBY indicator lights up. This means that the receiver is not disconnected from the AC mains and a small amount of current is retained to support the operation readiness.
- To switch the power off, push the POWER switch again.
-
Then the power is cut off and the STANDBY indicator goes off.
-
In the standby mode, turn the power on.


text_image
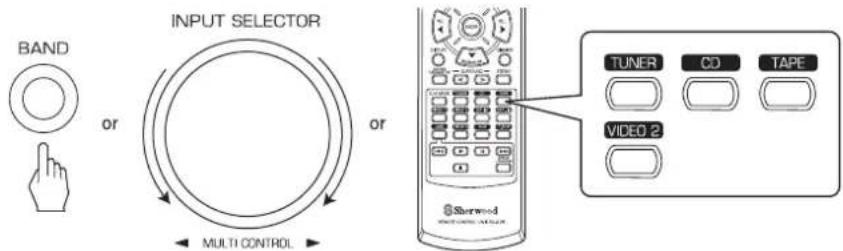
ON/STANDBY or POWER ON I STANDBY- Each time the POWER ON/STANDBY button on the front panel is pressed, the receiver is turned on to enter the operating mode or off to enter the standby mode.
- On the remote control, press the POWER ON button to enter the operating mode or press the STANDBY button to enter the standby mode.
-
In the standby mode, if the INPUT SELECTOR button is pressed or the INPUT SELECTOR/MULTI CONTROL knob is rotated, the receiver is turned on automatically and the desired input is selected.
-
Select the desired input source.
text_image
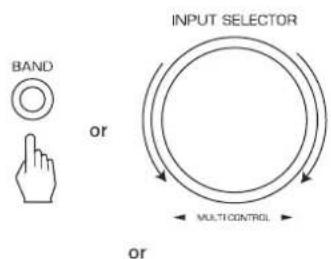
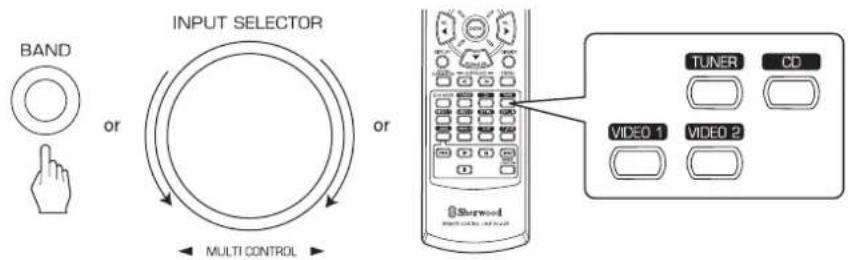
BAND or INPUT SELECTOR MULTI CONTROL or
text_image
TUNER CD TAPE VIDEO 1 VIDEO 2 Sherwood$$ \begin{array}{l}\rightarrow \text { TUNER } \leftrightarrow \text { CD } \leftrightarrow \text { TAPE } \leftrightarrow \text { VIDEO 1 } \leftrightarrow \text { VIDEO 2 }\(\text { Frequency display })\end{array} $$
• Each time the INPUT SELECTOR/MULTI CONTROL knob is rotated, the input source changes as follows:
• Each time the BAND button on the front panel or the TUNER button on the remote control is pressed, the band changes as follows:
$$ \rightarrow \text { FM ST } \rightarrow \text { FM MONO } \rightarrow \text { AM } $$
When VIDEO 1, VIDEO 2 is selected as an input source
- Select the digital or the analog input connected as desired.
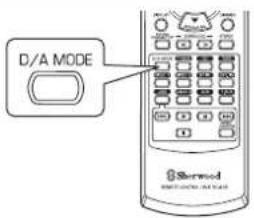
text_image
D/A MODE Shermed• Each time this button is pressed, the corresponding input is selected as follows:
$$ \rightarrow \quad o (\text { p t i c a l }) \rightarrow \quad c (\text { o a x i a l }) \rightarrow \quad A (\text { n a l o g }) $$
Notes :
- When TUNER, TAPE or CD is selected as an input source, the digital input cannot be selected.
- When the selected digital input is not connected, the "DIGITAL" indicator flickers and the analog input is automatically selected.
- The selected digital or analog input is automatically assigned to the corresponding input source on the INPUT setup menu. (For details, refer to "SETTING THE INPUT" on page 31.)
-
The sound from the component connected to the selected digital input can be heard regardless of the selected input source.
-
Operate the selected component for playback.
- When playing back the program sources with surround sound, refer to "ENJOYING SURROUND SOUND" on page 15.
- Adjust the (overall) volume.
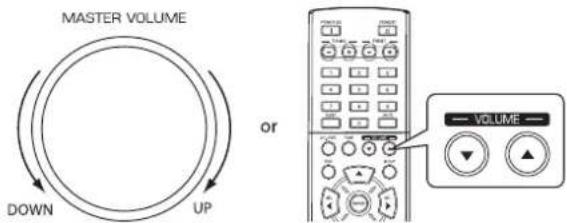
text_image
MASTER VOLUME DOWN UP or VOLUME- To mute the sound.

text_image
MUTE- "MUTE" will flicker.
• To resume the previous sound level, press it again.
Adjusting the tone (bass and treble)
7. Enter the tone mode.

text_image
TONETONE: OFF
- The tone mode is displayed for several seconds.
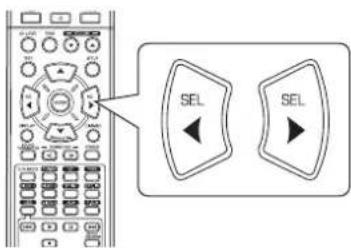
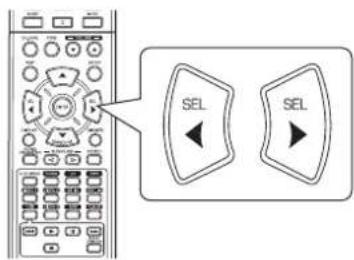
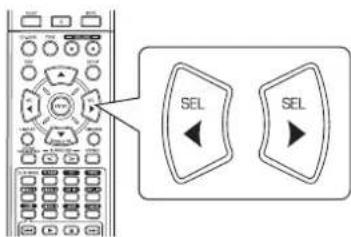
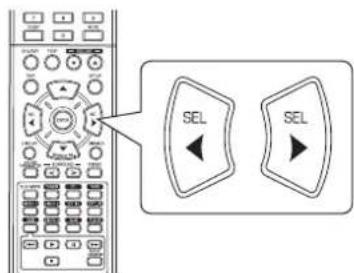
8. Press the CURSOR LEFT(◀)/RIGHT(▶) buttons to select the desired tone mode.
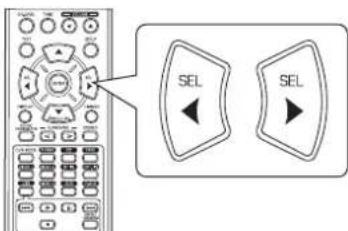
text_image
Diagram showing a remote control with two labeled buttons labeled 'SEL' pointing left and right respectively.• Each time these buttons are pressed, the tone mode is selected as follows :
OFF: To listen to a program source without the tone effect.
("DIRECT" indicator lights up.)
ON : To adjust the tone for your taste.
("DIRECT" indicator goes off.)
■When the TONE is set to ON to adjust the tone (bass and treble).
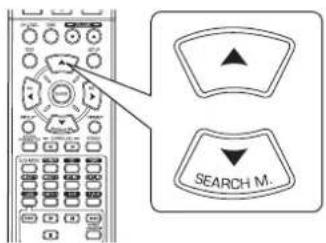
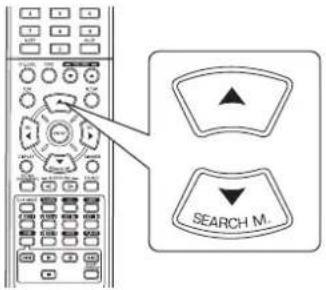
9. Press the CURSOR UP(▲)/DOWN(▼) buttons to select the desired tone.
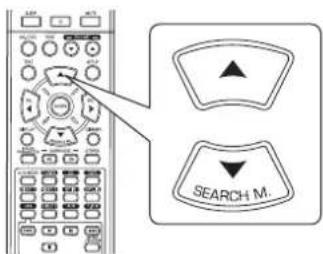
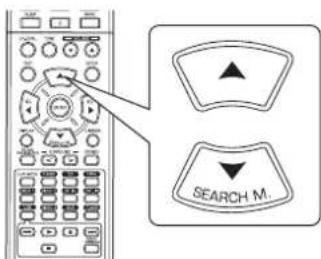
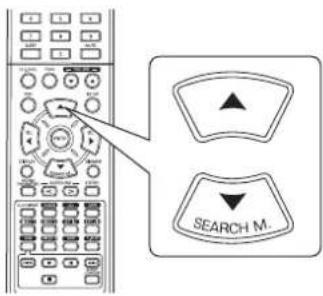
text_image
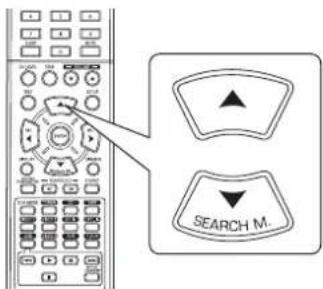
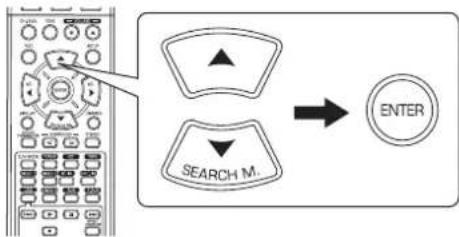
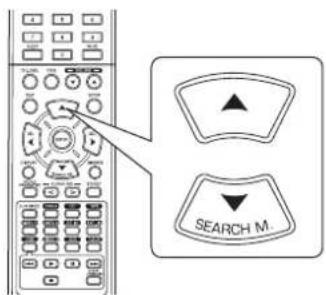
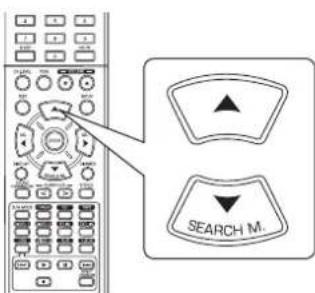
SEARCH M.• Each time these buttons are pressed, the tone is selected as follows :
→ BASS ↔ TRBL (treble) ↔ TONE: ON ←
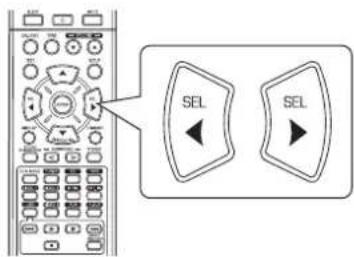
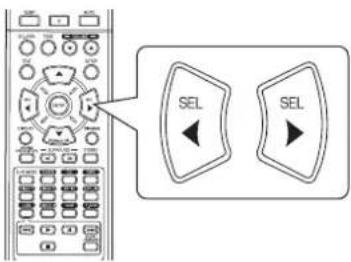
10. Press the CURSOR LEFT(◀)/RIGHT(▶) buttons to adjust the selected tone as desired.

text_image
Diagram showing a remote control with two labeled buttons labeled 'SEL' pointing to different function keys.- The tone level can be adjusted within the range of -10 \~ +10 dB.
- In general, we recommend the bass and treble to be adjusted to 0 dB (flat level).
- Extreme settings at high volume may damage your speakers.
- To complete tone adjustment, repeat the above steps 9 and 10.
- If the tone display disappears, start from the step 7 again.
SURROUND SOUND
- This receiver incorporates a sophisticated Digital Signal Processor that allows you to create optimum sound quality and sound atmosphere in your personal Home Theater.
Surround modes
■DTS Digital Surround
DTS Digital Surround(also called simply DTS) is a multi-channel digital signal format which can handle higher data rates. Discs bearing the DTS logo include the recording of up to 5.1 channels of digital signals, which can be generally thought to provide better sound quality due to the lower audio compression required. If also provides wide dynamic range and separation, resulting in magnificent sound.
Manufactured under license under U.S. Patent #'s: 5,451,942; 5,956,674; 5,974,380; 5,978,762; 6,487,535 & other U.S. and worldwide patents issued & pending. DTS and DTS Digital Surround are registered trademarks and the DTS logos and Symbol are trademarks of DTS, Inc. © 1996-2008 DTS, Inc. All Rights Reserved.
■Dolby Digital
Dolby Digital is the multi-channel digital signal format developed by Dolby Laboratories. Discs bearing the Dolby Digital logo includes the recording of up to 5.1 channels of digital signals, which can reproduce much better sound quality, spatial expansion and dynamic range characteristics than the previous Dolby Surround effect.
■Dolby Pro Logic II surround
This mode applies conventional 2-channel signals such as digital PCM or analog stereo signals as well as Dolby Surround signals, etc. to surround processing to offer improvements over conventional Dolby Pro Logic circuits. Dolby Pro Logic II surround includes 2 modes as follows:
• Dolby Pro Logic II Movie
When enjoying movies, this mode allows you to further enhance the cinematic quality by adding processing that emphasizes the sounds of the action special effects.
• Dolby Pro Logic II Music
When listening to music, this mode allows you to further enhance the sound quality by adding processing that emphasizes the musical effects.
■Dolby Pro Logic
This mode expands any 2-channel sources(, including Dolby Surround sources) for 4 channel(front left, center, front right and surround) playback. The surround channel is monaural, but is played through two surround speakers.
Manufactured under license from Dolby Laboratories. Dolby, Pro Logic, and the double-D symbol are registered trademarks of Dolby Laboratories.
- The following modes apply conventional 2-channel signals such as digital PCM or analog stereo signals to high performance Digital Signal Processor to recreate sound fields artificially.
Matrix
This mode reproduces a delayed signals from the surround channels to emphasize the sense of expansion for music sources.
Church
This mode provides the ambience of a church for baroque, string orchestral or choral group music.
Theater
This mode provides the effect of being in a movie theater when watching a movie source.
Hall
This mode provides the ambience of a concert hall for classical music sources such as orchestral, chamber music, or an instrumental solo.
Stadium
This mode provides the expansive sound field to achieve the true stadium effect when watching baseball or soccer games.
- Before surround playback, first perform the speaker setup procedure, etc. on the SETUP menu for optimum performance. (For details, refer to "SETTING THE SPEAKER SETUP" on page 32.)
- Even when the auto surround mode is selected and the same type of digital signal format is being input, the optimum surround mode may vary depending on whether the speaker type is set to "N (None)" or not.
- When 96 kHz PCM digital signal is being input, only the stereo mode will be selected.
■Select the desired surround mode
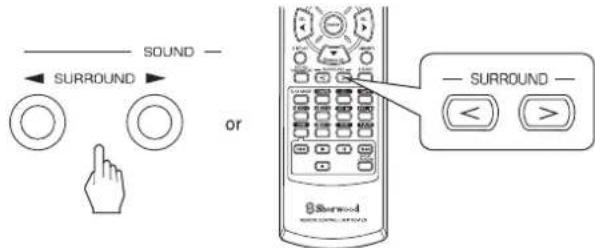
• Each time the SURROUND MODE UP/DOWN (▶, >/◀, <) buttons are pressed, the surround mode changes as follows :
Manual surround mode : You can select the desired of ("AUTO" indicator goes off.) different surround modes selectable for the signal being input.
Auto surround mode : The optimum surround mode will ("AUTO" indicator lights up.) be automatically selected depending on the signal format being input.
| Signal format being input Selectable surround mode | |
| Dolby Digital 5.1 channel sources | [DOLBY DIGITAL, AUTO SURROUND] or |
| Dolby Digital 2 channel sources | [DOLBY PLII MOVIE, DOLBY PLII MUSIC, DOLBY PRO LOGIC, AUTO SURROUND] or |
| DTS sources | [DTS, AUTO SURROUND] or |
| PCM (2channel) sources, Analog stereo sources | [DOLBY PLII MOVIE, DOLBY PLII MUSIC, DOLBY PRO LOGIC, MATRIX, CHURCH, THEATER, HALL, STADIUM, AUTO SURROUND] or |
- Depending on speaker setting, some surround modes can be selected or not as follows :
[ ] : Possible only when "CENTER" or/and "SURR (Surround)" is/are not set to "N (None)".
<> : Possible only when "CENTER" and "SURR (Surround)" are set to "N (None)".
■To cancel the surround mode for stereo operation
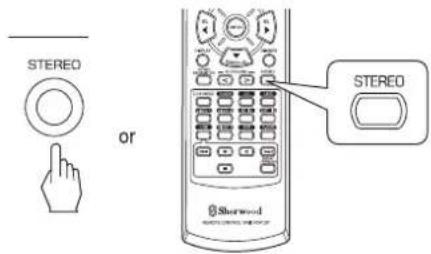
text_image
STEREO or STEREO Sherwood- Depending on the signal format which is being input, either the stereo mode or the 2CH downmix mode is selected.
- To cancel either the stereo mode or the 2CH downmix mode, select the surround mode with using the SURROUND MODE UP/DOWN (▶, > / ◀, <) buttons.
■2CH downmix mode
- This mode allows the multi-channel signals encoded in Dolby Digital or DTS format to be mixed down into 2 front channels and to be reproduced through only two front speakers.
When adjusting the sound parameters
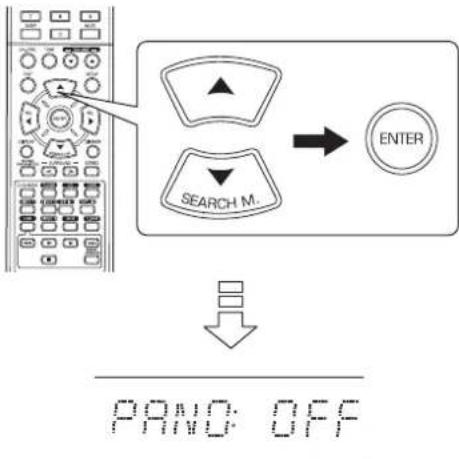
- While playing digital signals from Dolby Digital or DTS program source or listening in Dolby Pro Logic II Music mode, you can adjust their parameters for optimum surround effect.
- Press the SOUND PARAMETER button.

text_image
SOUND PARAMETER Sherwood METHNICUM CONTROL- Then "NIGHT: \~" (or "PANO: \~") is displayed for several seconds.
-
If the parameter mode disappears, press this button again.
-
Press the CURSOR UP(▲)/DOWN(▼) buttons to select the desired parameter.
text_image
SEARCH M.• Each time these buttons are pressed, the parameter mode changes as follows:
→ "NIGHT" ↔ "PANO" ↔ "C.WIDTH" ↔ "DIMEN" (Night mode) (Panorama mode) (Center width control) (Dimension control)
- "NIGHT" can be selected only while playing digital signals from Dolby Digital or DTS source.
- "PANO", "C.WIDTH" and "DIMEN" can be selected only while listening in Dolby Pro Logic II Music mode.
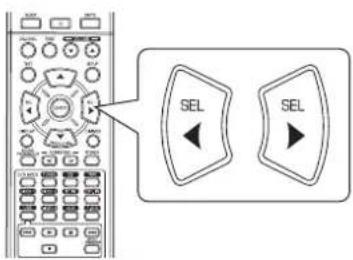
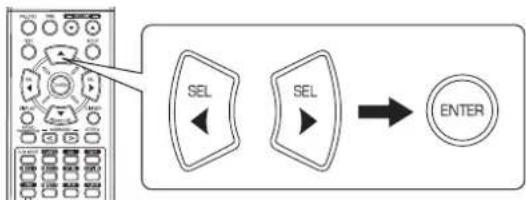
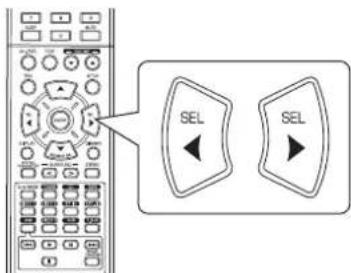
- Press the CURSOR LEFT(◀)/RIGHT(▶) buttons to adjust the selected parameter as desired.
text_image
Diagram showing a control panel with two labeled buttons labeled 'SEL' pointing to different function keys.■When selecting the "NIGHT (Night mode)"
This function compresses the dynamic range of previously specified parts of Dolby Digital or DTS sound track (with extremely high volume) to minimize the difference in volume between the specified and non-specified parts. This makes it easy to hear all of the sound track when watching movies at night at low levels. The night mode can be set in 11 steps from 0.0 to 1.0 (default value: 0.0).
■Note : In some Dolby Digital or DTS softwares, the night mode may not be valid.
■When selecting the "PANO (Panorama)" mode
This mode extends the front stereo image to include the surround speakers for an exciting "wraparound" effect with side wall imaging.
Select "OFF" or "ON"(default value: OFF).
■When selecting the "C. WIDTH (Center width)" control
This adjusts the center image so it may be heard only from the center speaker, only from the left/right speakers as a phantom image, or from all three front speakers to varying degrees.
The control can be set in 8 steps from 0 to 7(default value: 3).
■When selecting the "DIMEN (Dimension)" control
This gradually adjusts the soundfield either towards the front or towards the rear. The control can be set in 7 steps from -3 to +3 (default value : 0).
- Repeat the above steps 2 and 3 to adjust other parameters.
Adjusting each channel level with test tone
- The volume level of each channel can be adjusted easily with the test tone function.
- Enter the test tone mode.
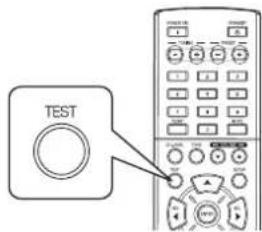
text_image
TESTTEST-FL
- The test tone mode is displayed and will be heard from the speaker of each channel for 2 seconds as follows:

- When the speaker setting is "N (None or No)", the test tone of the corresponding channel is not available.
- At each channel, adjust the level as desired until the sound level of each speaker is heard to be equally loud.

text_image
SEL SEL- You can select the desired channel with the CURSOR UP(▲)/DOWN(▼) buttons.
- Cancel the test tone function.
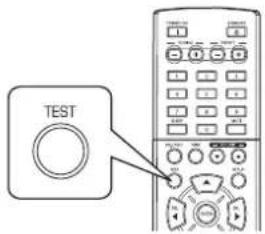
text_image
TESTAdjusting the current channel level
- After adjusting each channel level with test tone, adjust the channel levels either according to the program sources or to suit your tastes.
- You can adjust the current channel levels as desired. These adjusted levels are just memorized into user's memory ("CAL"), not into preset memory("REF 1", "REF 2").
1. Press the CHANNEL LEVEL button.
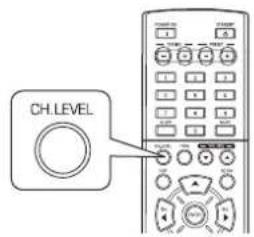
text_image
CH.LEVELMODE CAL
- Then the memory mode ("CAL", etc.) is displayed for several seconds.
- When the memory mode or channel level disappears, press this button again.
2. Select the desired channel.
text_image
SEARCH M.• Each time these buttons are pressed, the corresponding channel is selected as follows:
REF 1, 2 (or CAL) FL C FR
<>: Only when the digital signals from Dolby Digital or DTS program sources that include LFE signal are input, LFE level can be displayed.
- Depending on the speaker settings ("N (None or No)") and surround mode, etc., some channels cannot be selected.
3. Adjust the level of the selected channel as desired.
text_image
SEL SEL- The LFE level can be adjusted within the range of -10\~0 dB and other channel levels within the range of -15 \~ +15 dB.
- In general, we recommend the LFE level to be adjusted to 0 dB.(However, the recommended LFE level for some early DTS software is -10 dB.) If the recommended levels seem too high, lower the setting as necessary.
4. Repeat the above steps 2 and 3 to adjust each channel level.
Memorizing the adjusted channel levels
- You can memorize the adjusted channel levels into preset memory("REF 1", "REF 2") and recall the memorized whenever you want.
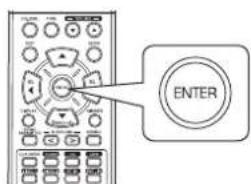
- After performing the steps 1 \~ 4 in "Adjusting the current channel level" procedure on page 18, press the ENTER button.

text_image
ENTERMODEREP
- Then "1" of "REF 1" indication flickers for several seconds.
- Select the desired one of REF 1 and REF 2.
text_image
SEL SEL- If the preset memory disappears, perform the above step 1 again.
- Confirm your selection.
text_image
ENTER- The adjusted channel levels have now been memorized into the selected memory.
Recalling the memorized channel levels
- Press the CHANNEL LEVEL button.

text_image
CH.LEVEL- "CAL" (or "REF 1", etc.) is displayed for several seconds.
-
If the channel level mode display disappears, press this button again.
-
Select the desired one of REF 1 and REF 2.
text_image
SEL SEL- Then the channel levels memorized into the selected preset memory are recalled.
LISTENING TO RADIO BROADCASTS
Auto tuning
1. Select the desired band.
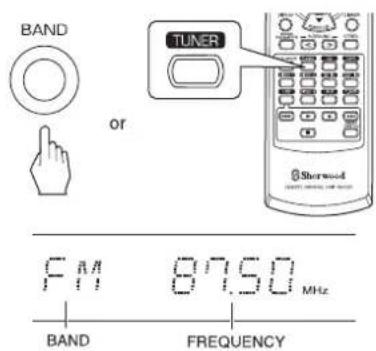
text_image
BAND or TUNER Sherwood F11 87.50 MHz BAND FREQUENCY• Each time this button is pressed, the band changes as follows;

- When FM stereo broadcasts are poor because of weak broadcast signals, select the FM mono mode to reduce the noise, then FM broadcasts are reproduced in monaural sound.
2. Press the TUNING UP(+)/DOWN(-) buttons for more than 0.5 second.
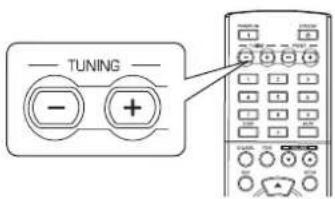
text_image
TUNING - +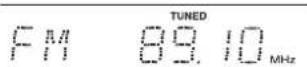
- The tuner will now search until a station of sufficient strength has been found. The display shows the tuned frequency and "TUNED".
- If the station found is not the desired one, simply repeat this operation.
- Weak stations are skipped during auto tuning.
Manual tuning
- Manual tuning is useful when you already know the frequency of the desired station.
- After selecting the desired band, press the TUNING UP(+) / DOWN(-) buttons repeatedly until the right frequency has been reached.

text_image
TUNING - +Auto presetting
• Auto presetting function automatically searches for FM stations only and store them in the memory.
- While listening to radio broadcasts, press and hold down the (MEMORY/) ENTER button for more than 2 seconds.
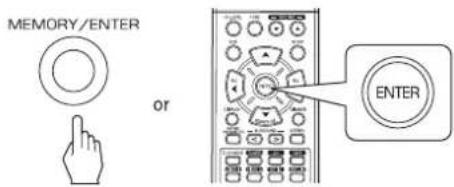
text_image
MEMORY/ENTER or ENTER- Then "AUTO MEM" flickers and this receiver starts auto presetting.
- Up to 30 FM stations can be stored.
Notes:
• FM stations of weak strength cannot be memorized.
- To memorize AM stations or weak stations, preform "Manual presetting" procedure with using "Manual tuning" operation.
Manual presetting
- You can store up to 30 preferred stations in the memory.
-
Tune in the desired station with auto or manual tuning.
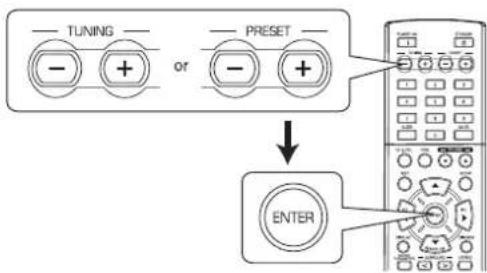
-
Press the ENTER button.

text_image
ENTER TUNED WHESSET MEM F11 89.10 MHz U DIRECT- "MEM" is flickering for several seconds.
- Select the desired preset number (1\~30) and press the ENTER button.
flowchart
graph TD
    A["--- TUNING ---"] --> B["--- + or ---"]
    C["--- PRESET ---"] --> D["--- - +"]
    B --> E["↓"]
    D --> E
    E --> F["ENTER"]
- When using the NUMERIC buttons on the remote control.
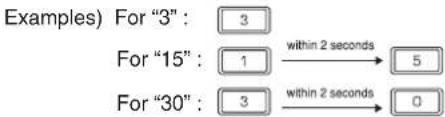
text_image
Examples) For "3": 3 For "15": 1 for "30": 3 within 2 seconds within 2 seconds 5 0• The station has now been stored in the memory.
- When using the NUMERIC buttons, the station is stored automatically without pressing the ENTER button.
- A stored frequency is erased from the memory by storing another frequency in its place.
- If "MEM" goes off, start again from the above step 2.
- Repeat the above steps1 to 3 to memorize other stations.
■ MEMORY BACKUP FUNCTION
The following items, set before the receiver is turned off, are memorized.
- INPUT SELECTOR settings
- Surround mode settings
- Preset stations,etc.
Tuning to preset stations
• After selecting the tuner as an input source, select the desired preset number.

text_image
PREF PREF PREF PREF PREF PREF PREF PREF PREF PREF PREF PREF PREF PREF PREF PREF PREF PREF PREF PREF PREF PREF PREF PREF PREF PREF PREF PREF PREF PREF PREF PREF PREF PREF - PRESET - +- When using the NUMERIC buttons on the remote control.
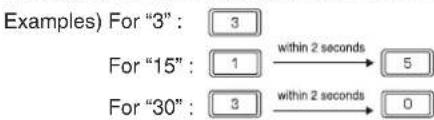
flowchart
graph LR
    A["Examples) For "3": 3"] --> B["For "15": 1"]
    B --> C["within 2 seconds"] --> D["5"]
    E["For "30": 3"] --> F["within 2 seconds"] --> G["0"]
RDS Tuner (Regional Option for some countries in Europe, etc.)
LISTENING TO RDS BROADCASTS(FM ONLY)
RDS(Radio Data System) is a method for sending information signals together with the transmitter signals. Your tuner is capable of translating these signals and putting the information on the display. These codes contain the following informations. Program Service name (PS), A list of Program Types (PTY), Traffic Announcement (TA), Clock Time (CT), Radio Text (RT).
Note :
- In the other countries, RDS tuner function cannot be available.
RDS search
- Use this function to automatically search and receive the stations offering RDS services.
- In the FM mode, select the RDS search mode.
text_image
SEARCH M.• Each time this button is pressed, the search mode changes as follows;
→ RDS SRCH → TP SRCH → PTY SRCH → OFF
- When "RDS SRCH" is displayed, press the ENTER button.
RDS SARCH
text_image
ENTER- The tuner automatically searches stations offering RDS services and the station name is displayed.
- If no RDS station is found, "NO RDS" is displayed.
- When "RDS SRCH" is not displayed, repeat again from the above step 1.
TP search
- Use this function to automatically search and receive the stations broadcasting the traffic program.
- In the FM mode, press the SEARCH MODE button twice.
text_image
SEARCH M.- "TP SRCH" is displayed.
- When "TP SRCH" is displayed, press the ENTER button.
TP SRCH

text_image
ENTER- The tuner automatically searches for stations broadcasting the traffic program.
- "NO TRAFF" is displayed if the signal is too weak or there are no stations broadcasting the traffic program.
- When "TP SRCH" is not displayed, repeat again from the above step 1.
PTY search
- Use this function to automatically search and receive the stations broadcasting the desired program type.
- In the FM mode, press the SEARCH MODE button three times.
text_image
SEARCH M.PTY SACH
- "PTY SRCH" is displayed.
- When "PTY SRCH" is displayed, select the desired program type.
text_image
SEL SELNEWS
- Each time these buttons are pressed, one of 32 different types of programs is selected. (NEWS, AFFAIRS, INFO, SPORT, EDUCATE, DRAMA, CULTURE, SCIENCE, VARIED, POP M, ROCK M, EASY M, LIGHT M, CLASSICS, OTHER M, WEATHER, FINANCE, CHILDREN, SOCIAL, RELIGION, PHONE IN, TRAVEL, LEISURE, JAZZ, COUNTRY, NATION M, OLDIES, FOLK M, DOCUMENT, TEST, ALARM, NONE) - When "PTY SRCH" is not displayed, repeat again from the above step 1.
- When the desired program is displayed, press the ENTER button.

text_image
ENTER- The tuner automatically searches a station offering PTY services. - If no station is found, "NO PROG" is displayed.
DISPLAY
In the FM mode,
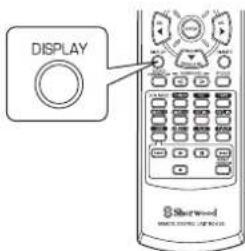
text_image
DISPLAY Sharwood HOLDEN OFFICE• Each time this button is pressed, the display mode changes as follows:
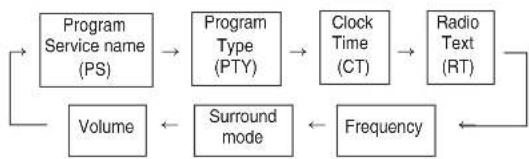
flowchart
graph LR
    A["Program Service name (PS)"] --> B["Program Type (PTY)"]
    B --> C["Clock Time (CT)"]
    C --> D["Radio Text (RT)"]
    D --> E["Frequency"]
    E --> F["Surround mode"]
    F --> G["Volume"]
    G --> A
- If the signals are too weak or no RDS service is available, "NO NAME", "NO PTY", "NO TIME" or "NO TEXT" will be displayed.
RECORDING
- When recording the analog signals from VIDEO 1 or VIDEO 2, be sure to select the analog input. (For details, refer to "When VIDEO 1, VIDEO 2 is selected as an input source" on page 12.)
- The volume and tone (bass, treble) settings have no effect on the recording signals.
- When you select tuner, CD or VIDEO 2 as a recording source, recording may be made on TAPE, VIDEO 1 or both simultaneously.
Recording with TAPE
- Select the desired input as a recording source except for TAPE.
text_image
BAND or INPUT SELECTOR or MULTI CONTROL TUNER CD VIDEO 1 VIDEO 2-
Start recording on the TAPE.
-
Start play on the desired input.
Recording with VIDEO 1
- When the audio recording equipment is connected to the VIDEO 1 jacks, you can record the audio signals.
- Select the desired input as a recording source except for VIDEO 1.
text_image
BAND OR INPUT SELECTOR OR MULTI CONTROL TUNER CD TAPE VIDEO 2-
Start recording on the VIDEO 1.
-
Start play on the desired input.
OTHER FUNCTIONS
Operating the sleep timer
- The sleep timer allows the system to continue to operate for a specified period of time before automatically shutting off.
• To set the receiver to automatically turn off after the specified period of time.

text_image
SLEEP• Each time this button is pressed, the sleep time changes as follows:
$$ \left[\begin{array}{c}\rightarrow 1 0 \rightarrow 2 0 \rightarrow 3 0 \rightarrow \dots \rightarrow 9 0 \rightarrow O F F\\text { Unit:minutes }\end{array}\right] $$
- While operating the sleep timer, " lights up.
- When the sleep time is selected, the fluorescent display is dimly lit.
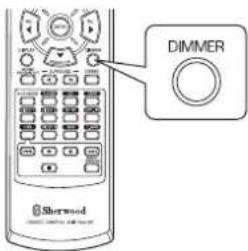
Adjusting the brightness of the fluorescent display
text_image
Dimmer Sherwood• Each time this button is pressed, the brightness of the fluorescent display changes as follows:
$$ \rightarrow \text { ON } \rightarrow \text { dimmer } \rightarrow \text { OFF } $$
- In the display OFF mode, pressing any button will restore the display ON mode.
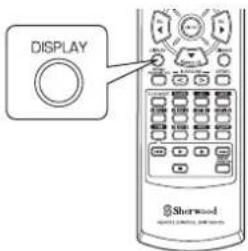
Displaying the operation status
During playback,
text_image
DISPLAY Shorwood SHORWOOD CONTROL 2014-03-01• Each time this button is pressed, the display mode changes as follows:
flowchart
graph LR
    A["Surround mode"] --> B["Volume"]
    B --> C["Input source"]
    C --> A
- When RDS tuner function is available in your country, for details on the FM mode information, see "DISPLAY" on page 23.
USING DIFFERENT FUNCTIONS ON THE FRONT PANEL
- You can use the different functions easily with the specific buttons on the front panel.
1. Select the desired setting mode.

- Depending on the selected input source, each time this button is pressed, the mode changes as follows and is displayed for several seconds:
→ [ PRESET → TUNE → ] CH LEVEL OFF ← TONE < ← D/A SET> (Current input display)
[] : Selectable only when the tuner is selected.
<>: Selectable only when the VIDEO 1, VIDEO 2 is selected.
2. Enter the selected mode.

- The setting mode will be cancelled in several seconds. Should this happened, perform the above step 1 again.
3. Set the selected mode as desired.

■When selecting "PRESET" (Preset tuning mode)
- Each time this knob is rotated, the preset station will be tuned to.(For details, refer to "Tuning to preset stations" on page 21.)
■When selecting "TUNE" (Auto/manual tuning mode)
- Depending on whether this knob is rotated over several steps once or one by one slowly, Auto tuning or manual tuning will function. (For details, refer to "Auto tuning" and "Manual tuning" on page 20.)
■ When selecting "CH LEVEL" (Channel level adjustment mode)
- You can adjust the current channel levels as desired. (For details, refer to "Adjusting the current channel level" on page 18.)
① Press the MODE button to select the desired channel.
② Rotate this knob to adjust the level of the selected channel as desired.
③ Repeat the above steps ① and ② to adjust each channel level.
■When selecting "D/A SET" (Digital/Analog input mode)
- Each time this knob is rotated, the digital(optical or coaxial) or the analog input will be selected.(For details, refer to "When VIDEO 1, VIDEO 2 is selected as an input source" on page 12.)
■ When selecting "TONE" (Tone adjustment mode)
• Each time this knob is rotated, the tone mode is selected as follows:
OFF: To listen to a program source without the tone effect. ("DIRECT" indicator lights up.)
ON : To adjust the tone for your taste. ("DIRECT" indicator goes off.)
When the TONE is set to ON to adjust the tone (bass and treble)
① Press the MODE button to select the desired tone.
② Rotate this knob to adjust the selected tone as desired.
③ To complete tone adjustment, repeat the above steps ① and ②.
4. Exit the setting mode.

System Setup
- The setup menu is displayed on the fluorescent display and allows you to perform the setup procedures easily. In most situations, you will only need to set this once during the installation and layout of your home theater, and it rarely needs to be changed later. The setup menu consists of 5 main menus; system, input, speaker setup, CH level and parameter. These menus are then divided up into various sub-menus.
1. Turn the setup menu on. 3. Confirm your selection.

text_image
SETUPSYSTEM
• The setup menu will be shown.
• To turn the menu off, press this button again.
2. Select the desired menu using the CURSOR UP(▲)/DOWN(▼) buttons.

text_image
SEARCH M.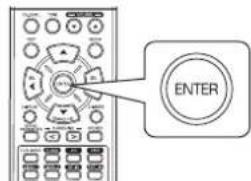
text_image
ENTER- When selecting "SYSTEM", see "SETTING THE SYSTEM" on page 29.
- When selecting "INPUT", see "SETTING THE INPUT" on page 31.
- When selecting "SPK SET", see "SETTING THE SPEAKER SETUP" on page 32.
- When selecting "CH LEVEL", see "SETTING THE CH LEVEL" on page 36.
- When selecting "PARAMTR", see "SETTING THE PARAMETER" on page 38.
- When selecting "EXIT", the setup menu will be turned off.
■ Setup menu flow
• The setup menu flow is as follows :

- When "RETURN" is selected on a sub-menu, it will returns to the previous menu.
■Note : During setup menu operation, only the (POWER ON/) STANDBY button and the buttons required for system setup will function.
SETTING THE SYSTEM

text_image
◆ SYSTEM SW : NORM / SW + TONE : OFF / ON RETURN BASS 0 / -10 ~ +10 TRBL 0 / -10 ~ +10 RETURN- SW (SUBWOOFER) : To select the desired subwoofer mode.
- TONE : To adjust the tone (bass and treble) as desired.
-
RETURN: To return to the previous menu.
-
Press CURSOR UP(▲)/DOWN(▼) buttons to select the desired item.
text_image
SEARCH M...- Press the CURSOR LEFT(◀)/RIGHT(▶) buttons to set the selected item as desired
text_image
Diagram showing a remote control panel with two labeled buttons labeled 'SEL' pointing left and right respectively.When selecting the SUBWOOFER mode
- "SW +" mode is effective only when "FRONT" and "CENTER" are set to "L" and "SUB-W" is set to "Y" on the SPK SET menu. (For details, refer to "SETTING THE SPEAKER SETUP" on page 32.)
- While playing the 2 channel source in MATRIX, CHURCH, THEATER, HALL or STADIUM mode, the low frequency signals can be reproduced from subwoofer regardless of the subwoofer mode setting.
NORM: When the low frequency signals of channels set to "L" are reproduced from those channels only. In this mode, the low frequency signals that are reproduced from the subwoofer channel is only the low frequency signals of LFE (from the multi-channel sources that contains LFE (Low Frequency Effects) channel, also called the ".1" channel) and the channels set to "S".
SW +: When the low frequency signals of channels set to "L" are reproduced simultaneously from those channels and the subwoofer channel. In this mode, the low frequency range expands more uniformly through the room, but depending on the size and shape of the room, interference may result in a decrease of the actual volume of the low frequency range.
When selecting the TONE
OFF: To listen to a program source without the tone effect. ("DIRECT" indicator lights up.)
↓
ON : To adjust the tone for your taste. ("DIRECT" indicator goes off.)
■When the TONE is set to ON to adjust the tone (bass and treble)
① Press the CURSOR UP(▲)/DOWN(▼) buttons to select the desired tone.
text_image
SEARCH M.
When selecting the BASS
BRASS
② Press the CURSOR LEFT(◀)/RIGHT(▶) buttons to adjust the selected tone as desired.
text_image
Diagram showing a control panel with two labeled buttons labeled 'SEL' pointing to different function keys.- The tone level can be adjusted within the range of -10 \~ +10 dB.
- In general, we recommend the bass and treble to be adjusted to 0 dB (flat level).
- Extreme settings at high volume may damage your speakers.
- To complete tone adjustment, repeat the above steps ① and ②.
SETTING THE INPUT
◆ INPUT
flowchart
graph TD
    A["VID 1 CFG"] --> B["D.IN : OPT / COAX / ANL"]
    A --> C["AUTO : OFF / ON"]
    A --> D["RETURN"]
    E["VID 2 CFG"] --> F["D.IN : OPT / COAX / ANL"]
    E --> G["AUTO : OFF / ON"]
    E --> H["RETURN"]
• D.IN (DIGITAL IN) : To assign the connected DIGITAL INs to the desired input.
- AUTO (AUTO SURROUND) : To select the auto surround mode or the manual surround mode.
- RETURN: To return to the previous menu.
- Press the CURSOR UP(▲)/DOWN(▼) buttons to select the desired input source, then press the ENTER button.
flowchart
graph TD
    A["Search M."] --> B["ENTER"]
    C["Arrow"] --> A
Example) When selecting the VIDEO 2
DIN: CORAX
- Press the CURSOR UP(▲)/DOWN(▼) buttons to select the desired item.
text_image
SEARCH M.- Press the CURSOR LEFT(◀)/RIGHT(▶) buttons to set the selected item as desired.

text_image
SEL SELWhen selecting the DIGITAL IN
- You should assign the connected DIGITAL INs to the desired of VIDEO 1 and VIDEO 2. (For details, refer to "CONNECTING DIGITAL INs" on page 5.)
- You can select the desired of OPT (optical), COAX(coaxial) and ANL (analog).
Notes : - In such a case that a DIGITAL IN is assigned to two input sources or more, when these input sources are selected, the digital audio signals can be heard from the same DIGITAL IN.
- When TUNER, TAPE or CD is selected as an input source, the digital input("OPT", "COAX") cannot be selected.
When selecting the AUTO SURROUND
- Depending on how to select a surround mode, you can select the auto surround mode or the manual surround mode. OFF(Manual surround mode): You can select the desired of different surround modes selectable for the signal being input with using the SURROUND MODE UP/DOWN (▶, >/◀, <) buttons. (For details, refer to "ENJOYING SURROUND SOUND" on page 15.)
ON(Auto surround mode): The optimum surround mode will be automatically selected depending on the signal format being input.
Notes :
- Even when the auto surround mode is selected and the same type of digital signal format is being input, the optimum surround mode may vary depending on whether the speaker type is set to "N (None)" or not.
- When 96 kHz PCM digital signal is being input, only the stereo mode will be selected.
SETTING THE SPEAKER SETUP
• After you have installed this receiver and connected all the components, you should adjust the speaker settings for the optimum sound acoustics according to your environment and speaker layout.
- Even when you change speakers, speaker positions, or the layout of your listening environment, you should adjust the speaker settings, too.

flowchart
graph TD
    A["◆ SPK SET"] --> B["CONFIG"]
    B --> C["FRONT : L / S"]
    B --> D["CENTER : L / S / N"]
    B --> E["SURR : L / S / N"]
    B --> F["SUB-W : Y / N"]
    B --> G["RETURN"]
    A --> H["DISTANCE"]
    H --> I["UNIT : M"]
    I --> J["FL : 3.0 M / 0.0 ~ 9.0"]
    I --> K["C : 3.0 M / 0.0 ~ 9.0"]
    I --> L["FR : 3.0 M / 0.0 ~ 9.0"]
    I --> M["SR : 1.5 M / 0.0 ~ 9.0"]
    I --> N["SL : 1.5 M / 0.0 ~ 9.0"]
    I --> O["SW : 3.0 M / 0.0 ~ 9.0"]
    I --> P["RETURN"]
    A --> Q["X-OVER"]
    Q --> R["FC : 80 Hz / 40 ~ 200"]
    Q --> S["RETURN"]
    style A fill:#f9f,stroke:#333
    style H fill:#ccf,stroke:#333
    style Q fill:#cfc,stroke:#333
- CONFIG (CONFIGURATION) : To select the sizes of the speakers that are connected.
- DISTANCE: To enter the distance between the listening position and each speaker to set the delay time automatically for optimum surround playback.
• X-OVER (CROSSOVER): To select the desired crossover frequency. - RETURN: To return to the previous menu.
When selecting the CONFIGURATION
- Press the CURSOR UP(▲)/DOWN(▼) buttons to select the "CONFIG", then press the ENTER button.
text_image
SEARCH M.. ENTER
FRONT: L
- Press the CURSOR UP(▲)/DOWN(▼) buttons to select the desired speaker.
text_image
SEARCH M.- Press the CURSOR LEFT(◀)/RIGHT(▶) buttons to set the selected speaker as desired.
text_image
Diagram showing a remote control interface with two 'SEL' buttons and directional arrows pointing to the left panel.- Depending on your speaker type, you can select one of these following speaker types. L(Large): Select this when connecting speakers that can fully reproduce sounds below crossover frequency. S(Small): Select this when connecting speakers that can not fully reproduce sounds below crossover frequency. When this is selected, sounds below crossover frequency are sent to the subwoofer or speakers which are set to "L (Large)" (when not using a subwoofer)
N(None): Select this when no speakers are connected. When this is selected, sounds are sent to the speakers which are not set to "N (None)".
Y(Yes)/N(No): Select the desired depending on whether a subwoofer is connected or not.
Notes:
- When speakers are set to "S (Small)", you should set their crossover frequency correctly according to their frequency characteristics. (For details, refer to "When selecting the CROSSOVER" on page 35.)
- When "SUB-W" is set to "N (No)", "FRONT" is automatically set to "L (Large)".
-
When the "FRONT" is set to "S (Small)", "CENTER" and "SURR" cannot be set to "L (Large)".
-
Repeat the above steps 2 and 3 until the speakers are all set to the desired mode.
■About the speaker size
- Select "L (Large)" or "S (Small)" not according to the actual size of the speaker but according to the speaker's capacity for playing low frequency (bass sound below frequency set on the "X-OVER" menu) signals.
- If you do not know, try comparing the sound at both settings (setting the volume to a level low enough so as not to damage the speakers) to determine the proper setting.
When selecting the DISTANCE
- Press the CURSOR UP(▲)/DOWN(▼) buttons to select the DISTANCE, then press the ENTER button.

flowchart
graph TD
    A["Left Panel"] --> B["Search Mode"]
    B --> C["ENTER"]
    D["Down Arrow"] --> E["Next Step"]
UNIT : M
- Press the CURSOR UP(▲)/DOWN(▼) buttons to select the desired item.
text_image
SEARCH M■Note :
- You cannot select the speakers set to "N (None or No)".
- Press the CURSOR LEFT(◀)/RIGHT(▶) buttons to set the selected item as desired.

text_image
SEL SEL■When selecting the desired unit
- You can select either "M (Meter)" or "FT (Feet)".
- Once a unit is selected, the distances are automatically changed in the selected unit.
■When setting the distance
- You can set the distance within the range of 0.0 \~ 9.0 meters in 0.3 meter intervals (or 0 \~ 30 feet in 1 feet intervals).
- Repeat the above steps 2 and 3 until the distances are all set as desired.
■About the speaker distance
When enjoying multi-channel surround playback with Dolby Digital sources, etc., it is ideal that the center, surround and subwoofer speakers should be the same distance from the main listening position as the front speakers. By entering the distance between the listening position and each speaker, the delay times of center, surround and subwoofer speakers are automatically adjusted to create an ideal listening environment virtually as if the center, surround and subwoofer speakers were at their ideal locations respectively.
When selecting the CROSSOVER
- When speakers are set to "S (Small)", be sure to set their crossover frequency correctly according to their frequency characteristics.
- Press the CURSOR UP(▲)/DOWN(▼) buttons to select the "X-OVER", then press the ENTER button.

flowchart
graph TD
    A["Search M."] --> B["ENTER"]
    C["Arrow"] --> A
F_c : 80HZ
- Press the CURSOR LEFT(◀)/RIGHT(▶) buttons to set the crossover frequency as desired.

text_image
Diagram showing a control panel with two labeled buttons labeled 'SEL' pointing left and right, connected by an arrow.- You can adjust the crossover frequency within the range of 40 \~ 200 Hz in 10 Hz intervals.
■About the crossover frequency
- When speakers are set to "S (Small)", low frequencies in those channels that are below the crossover frequency are to output from subwoofer or front speakers which are set to "L (Large)" (when not using a subwoofer).
- Refer to the operating instructions of the speakers to be connected. If the frequency range of your speaker is 100 Hz\~20 kHz, the crossover frequency should be set to 100 Hz(or slightly higher).
SETTING THE CH LEVEL
◆ CH LEVEL —— MODE : CAL
| FL | 0 dB / -15 ~ +15 |
| C | 0 dB / -15 ~ +15 |
| FR | 0 dB / -15 ~ +15 |
| SR | 0 dB / -15 ~ +15 |
| SL | 0 dB / -15 ~ +15 |
| SW | 0 dB / -15 ~ +15 |
| DD | 0 dB / -10 ~ 0 |
| DTS | 0 dB / -10 ~ 0 |
| RETURN | |
/ REF 1 / REF 2
| FL | 0 dB / -15 ~ +15 |
| C | 0 dB / -15 ~ +15 |
| FR | 0 dB / -15 ~ +15 |
| SR | 0 dB / -15 ~ +15 |
| SL | 0 dB / -15 ~ +15 |
| SW | 0 dB / -15 ~ +15 |
| DD | 0 dB / -10 ~ 0 |
| DTS | 0 dB / -10 ~ 0 |
| RETURN | |
| FL | 0 dB / -15 ~ +15 |
| C | 0 dB / -15 ~ +15 |
| FR | 0 dB / -15 ~ +15 |
| SR | 0 dB / -15 ~ +15 |
| SL | 0 dB / -15 ~ +15 |
| SW | 0 dB / -15 ~ +15 |
| DD | 0 dB / -10 ~ 0 |
| DTS | 0 dB / -10 ~ 0 |
| RETURN | |
■Note : Depending on the speaker settings ("N (None or No)"), some channels cannot be selected.
Adjusting the current channel level
- You can adjust the current channel levels as desired. These adjusted levels are just memorized into user's memory("CAL"), not into preset memory ("REF 1", "REF 2")
-
After adjusting each channel level with test tone, adjust the channel levels either according to the program sources or to suit your tastes. (For details, refer to "Adjusting each channel level with test tone" on page 17.)
-
Press the CURSOR UP(▲)/DOWN(▼) buttons to select the desired channel.

text_image
SEARCH M.Example) When selecting Dolby Digital source's LFE
III
0 dB
- Press the CURSOR LEFT(◀)/RIGHT(▶) buttons to adjust the level of the selected channel or program source's LFE as desired.

text_image
SEL SEL- The LFE level can be adjusted within the range of -10 0 dB and other channel levels within the range of -15 +15 dB
-
In general, we recommend the LFE level to be adjusted to 0 dB. (However, the recommended LFE level for some early DTS software is -10 dB.) If the recommended levels seem too high, lower setting as necessary.
-
Repeat the above steps 1 and 2 to adjust each channel level.
Memorizing the adjusted channel levels
- You can memorize the adjusted channel levels into preset memory("REF 1", "REF 2") and recall the memorized whenever you want.
- After performing the steps 1 \~ 3 in "Adjusting the current channel level" procedure on page 36, press the ENTER button.

text_image
ENTER

- Then "1" of "REF 1" indication flickers.
- Press the CURSOR LEFT(◀)/RIGHT(▶) buttons to select the desired preset memory, then press the ENTER button.
flowchart
graph LR
    A["Radio System"] --> B["SEL"]
    B --> C["ENTER"]
    style A fill:#f9f,stroke:#333
    style C fill:#bbf,stroke:#333
- Each time the CURSOR LEFT(◀) or RIGHT(▶) button is pressed, "REF 1" or "REF 2" is selected.
- The adjusted channel levels have now been memorized into the selected memory.
Recalling the memorized channel levels
- Press the CURSOR UP(▲)/DOWN(▼) buttons to select the "MODE \~".
text_image
SEARCH M.

- "CAL" may be displayed instead of "REF 1" or "REF 2".
- Press the CURSOR LEFT(◀)/RIGHT(▶) buttons to select the desired one of REF 1 and REF 2.

text_image
SEL SEL- Then the channel levels memorized into the selected preset memory are recalled.
SETTING THE PARAMETER
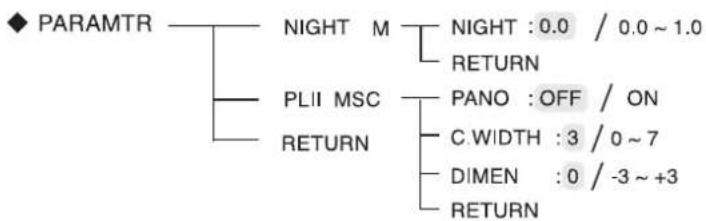
flowchart
graph TD
    A["PARAMTR"] --> B["NIGHT M"]
    A --> C["PLII MSC"]
    A --> D["RETURN"]
    B --> E["NIGHT : 0.0 / 0.0 ~ 1.0"]
    B --> F["RETURN"]
    C --> G["PANO : OFF / ON"]
    C --> H["C.WIDTH : 3 / 0 ~ 7"]
    C --> I["DIMEN : 0 / -3 ~ +3"]
    C --> J["RETURN"]
- NIGHT M (NIGHT MODE) : To adjust the dynamic range compression that makes faint sound easier to hear at low volume levels.
- PLII MSC (DOLBY PLII MUSIC) : To adjust the various surround parameters for optimum surround effect.
- RETURN: To return to the previous menu.
When selecting the NIGHT MODE
- This function compresses the dynamic range of previously specified parts of Dolby Digital or DTS sound track (with extremely high volume) to minimize the difference in volume between the specified and non-specified parts. This makes it easy to hear all of the sound track when watching movies at night at low levels.
Notes:
-
The night mode setting is valid only when the digital signals from Dolby Digital or DTS program source are being input.
• In some Dolby Digital or DTS softwares, the night mode setting may not be valid. -
Press the CURSOR UP(▲)/DOWN(▼) buttons to select the "NIGHT M", then press the ENTER button.

flowchart
graph TD
    A["Left Mobile Phone"] --> B["Search Mode"]
    B --> C["ENTER"]
    D["Down Arrow"] --> E["Next Button"]
NIGHT:0.0
- Press the CURSOR LEFT(◀)/RIGHT(▶) buttons to adjust the dynamic range compression as desired.
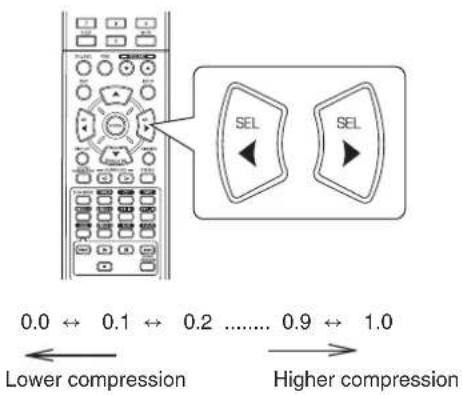
text_image
0.0 ↔ 0.1 ↔ 0.2 ...... 0.9 ↔ 1.0 Lower compression Higher compressionWhen selecting the DOLBY PLII MUSIC
-
You can adjust the various surround parameters for optimum surround effect.
■Note: The parameter settings are valid only when listening in Dolby Pro Logic II Music mode. -
Press the CURSOR UP(▲)/DOWN(▼) buttons to select the "PLII MSC", then press the ENTER button.
flowchart
graph TD
    A["Left Panel"] --> B["Search Mode"]
    B --> C["ENTER"]
    D["Down Arrow"] --> E["PAND: OFF"]
- Press the CURSOR UP(▲)/DOWN(▼) buttons to select the desired parameter.
text_image
SEARCH M.- Press the CURSOR LEFT(◀)/RIGHT(▶) buttons to adjust the selected parameter as desired.
text_image
Diagram showing a control panel with two labeled buttons labeled 'SEL' pointing left and right, connected by an arrow.■When selecting the "PANO (Panorama)" mode
This mode extends the front stereo image to include the surround speakers for an exciting "wraparound" effect with side wall imaging. Select "OFF" or "ON"(default value:OFF).
■When selecting the "C. WIDTH (Center width)" control
This adjusts the center image so it may be heard only from the center speaker, only from the left/right speakers as a phantom image, or from all three front speakers to varying degrees. The control can be set in 8 steps from 0 to 7 (default value : 3).
■When selecting the "DIMEN (Dimension)" control
This gradually adjusts the soundfield either towards the front or towards the rear. The control can be set in 7 steps from -3 to +3 (default value : 0).
- Repeat the above steps 2 and 3 to adjust other parameters.
Troubleshooting Guide
If a fault occurs, run through the table below before taking your receiver for repair.
If the fault persists, attempt to solve it by switching the receiver off and on again. If this fails to resolve the situation, consult your dealer. Under no circumstances should you attempt to repair the receiver yourself. This could void the warranty.
| PROBLEM POSSIBLE CAUSE REMEDY | ||
| No power | The AC input cord is disconnected.Poor connection at AC wall outlet or the outlet is inactive. | Connect the cord securely.Check the outlet using a lamp or another appliance. |
| No sound | The speaker cords are disconnected.The master volume is adjusted too low.The MUTE button on the remote control is pressed to ON.Incorrect selection of the input source.Incorrect connections between the components. | Check the speaker connections.Adjust the master volume.Press the MUTE button to cancel the muting effect.Select the desired input source correctly.Make connections correctly. |
| No sound from the surround speakers | Surround mode is switched off(stereo mode).Master volume and surround level are too low.A monaural source is used.Surround speaker setting is “N”. | Select a surround mode.Adjust master volume and surround level.Select a stereo or surround source.Select the desired surround speaker setting. |
| No sound from the center speaker | Surround mode is switched off(stereo mode).Center speaker setting is “N”.Master volume and center level are too low. | Select the desired surround.Select the desired center speaker setting.Adjust master volume and center level. |
| Stations cannot be received | No antenna is connected.The desired station frequency is not tuned in.The antenna is in wrong position. | Connect an antenna.Tune in the desired station frequency.Move the antenna and retry tuning. |
| Preset stations cannot be received | An incorrect station frequency has been memorized.The memorized stations are cleared. | Memorize the correct station frequency.Memorize the stations again. |
| Poor FM reception | No antenna is connected.The antenna is not positioned for the best reception. | Connect an antenna.Change the position of the antenna. |
| Continuous hissing noise during FM reception, especially when a stereo broadcast is received. | Weak signals. | Change the position of the antenna.Install an outdoor FM antenna. |
| Continuous or intermittent hissing noise during AM reception, especially at night. | Noise is caused by motors, fluorescent lamps or lightning, etc. | Keep the receiver away from noise sources.Install an outdoor AM antenna. |
| Remote control unit does not operate. | Batteries are not loaded or exhausted.The remote sensor is obstructed. | Replace the batteries.Remove the obstacle. |
Specifications
■ AMPLIFIER SECTION
• Power output, stereo mode, 6 Ω, THD 0.7%, 40 Hz\~20 kHz | 2× 50 W
• Total harmonic distortion, 6 Ω, 50 W, 1 kHz | 0.09 %
• Intermodulation distortion
60 Hz : 7 kHz = 4 : 1 SMPTE, 6 Ω, 50 W | 0.1 %
- Input sensitivity, 47 kΩ
Line (CD, TAPE, VIDEO) | 280 mV
• Signal to noise ratio, IHF "A" weighted
Line (CD, TAPE, VIDEO) | 92 dB
- Frequency response
Line (CD, TAPE, VIDEO), 20 Hz\~50 kHz | +0 dB, -3 dB
- Output level
TAPE/VIDEO 1 REC, 2.2 kΩ | 280 mV
• Bass/Treble control, 100 Hz/10 kHz | ±10 dB
- Surround mode, only channel driven
Front power output, 6 Ω, 1 kHz, THD 0.7 % | 70 W / 70 W
Center power output, 6 Ω, 1 kHz, THD 0.7 % | 70 W
Surround power output, 6 Ω, 1 kHz, THD 0.7 % | 70 W / 70 W
DIGITAL AUDIO SECTION
• Sampling frequency | 32, 44.1, 48, 96 kHz
- Digital input level
Coaxial, 75 Ω | 0.5 Vp-p
Optical, 660 nm | -15\~-21 dBm
■ FM TUNER SECTION
• Tuning frequency range | 87.5\~108 MHz
• Usable sensitivity, THD 3%, S/N 26 dB | 12.8 dBf
• 46 dB quieting sensitivity, mono/stereo | 20.2 / 45.3 dBf
• Signal to noise ratio, 65 dBf, mono/stereo | 55 / 50 dB
• Total harmonic distortion, 65 dBf, 1 kHz, mono/stereo | 0.5 / 1.0 %
• Frequency response, 30 Hz\~12 kHz | ±3.0 dB
• Stereo separation, 1 kHz | 30 dB
• Capture ratio | 4 dB
• IF rejection ratio | 80 dB
AM TUNER SECTION
- Tuning frequency range | 522\~1611 kHz
• Usable sensitivity | 500 μV/m
• Signal to noise ratio | 40 dB - Selectivity | 25 dB
GENERAL
• Power supply | 230 V \~ 50 Hz
• Power consumption | 200 W
- Dimensions (W× H× D, including protruding parts) | 440× 141× 358.5 mm (17-3/8× 5-1/2× 14-1/8 inches)
• Weight (Net) | 9.5 kg (20.9 lbs)
Note: Design and specifications are subject to change without notice for improvements.
Einleitung
BITTE LESEN SIE DIESE HINWEISE VOR INBETRIEBNAHME DES GERÄTS


VORSICHT
VORSICHT ZUR VERMEIDUNG VON STROMSCHLAG GERÄTEGEHÄUSE NICHT ÖFFNEN. ES BEFINDEN SICH KEINE VOM VERBRAUCHER WARTBAREN TEILE IM INNERN DES GERÄTS. REPARATUR UND WARTUNG NUR DURCH FACHPERSONAL.

Dieses Symbol weist auf gefährliche Hochspannung im Gerät hin, die zu Stromschlag führen kann.

Dieses Symbol weist auf wichtige Bedienungs- und Wartungsanleitungen hin.
WARNHINWEIS : ZUR VERMEIDUNG VON FEUER UND STROMSCHLAG GERÄT WEDER REGEN NOCH FEUCHTIGKEIT AUSSETZEN.
InstallationsBitte beachten Sie:
Bitte beachten Sie: Bauen Sie dieses Gerät nicht umschlossen ein, beispielsweise in einem Bücherschrank oder in einem ähnlichen Gehäuse.
text_image
※ Bitte beachten Sie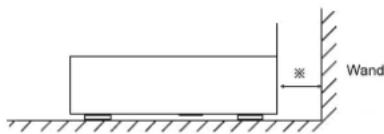
text_image
※ WandBlockieren Sie nicht die Lüftungsschlitze und stellen Sie keine anderen Geräte oben auf dem Gerät ab.
SICHERHEITSBITTE BEACHTEN SIE
| EUROPA AUSTRALIEN | 220 V - 240 V | Geräte für den australischen Markt sind für eine Netzspannung von 240V~ konzipiert. Für einen sicheren Betrieb darf der dreistiftige Netzstecker nur an einer ordnungsgemäß geerdeten Standard Haushaltssteckdose angeschlossen werden. Sollten Sie für das Gerät ein Verlängerungskabel benutzen, so muss dieses dreidrig verkabelt und geerdet sein. Nicht ordnungsgemäße Verlängerungskabel stellen eine große Gefahrenquelle dar. Allein die Tatsache, dass dieses Gerät einwandfrei funktioniert, weist nicht darauf hin, dass die Steckdose geerdet ist und dass die Elektroinstallation sicher ist. Zu Ihrer eigenen Sicherheit wenden Sie sich im Zweifelsfall in Bezug auf die korrekte Erdung der Steckdose bitte an einen Elektrofachmann. VEREINHEITLICHTE EUROPÄISCHE NETZSPANNUNG. Alle Geräte sind für eine Netzspannung von 220-240V~ geeignet. |
VORSICHT
- Lassen Sie rings um das Gerät genügend Raum für ausreichende Lüftung.
- Installieren Sie das Gerät nicht in besonders heißen oder kalten Umgebungen, in direkter Sonneneinstrahlung oder in unmittelbarer Nähe von Heizgeräten.
- Schützen Sie das Gerät vor Feuchtigkeit, Wasser und Staub.
- Führen Sie keine Fremdkörper in das Gerät ein.
- Blockieren Sie keinesfalls die Lüftungsschlitze mit Zeitungen, Tischtüchern, Gardinen oder ähnlichem.
- Stellen Sie keine offenen Flammen (wie brennende Kerzen) auf dem Gerät ab.
- Bitte entsorgen Sie Batterien umweltgerecht.
- Setzen Sie das Gerät weder Tropfwasser noch Spritzwasser aus.
- Stellen Sie keine wassergefüllten Gegenstände (wie Vasen) auf dem Gerät ab.
- Lassen Sie das Gerät nicht mit Insektenvernichtungsmitteln, Waschbenzin oder Verdünner in Berührung kommen.
- Demontieren oder modifizieren Sie das Gerät nicht.
■Bitte beachten Sie: zum Netzkabel und zur Steckdose.
- Dieses Gerät ist nicht vom Stromnetz getrennt, solange der Netzstecker in der Steckdose steckt, selbst wenn das Gerät ausgeschaltet ist.
- Beim Ziehen des Netzsteckers fassen Sie bitte stets am Stecker an, nicht am Kabel ziehen.
- Bei längerer Nichtbenutzung ziehen Sie bitte den Netzstecker.
- Die Steckdose sollte sich in unmittelbarer Nähe des Geräts befinden und muss jederzeit frei zugänglich sein.

Verbraucherinformationen zur Sammlung und Entsorgung von Altgeräten und erschöpften Batterien
Diese Symbole auf Produkt, Verpackung und/oder beigefügten Dokumenten bedeuten, dass gebrauchte elektrische und elektronische Geräte sowie Batterien nicht mit dem Hausmüll entsorgt werden dürfen. Für ordnungsgemäße Behandlung, Wiedergewinnung und Recycling von Altgeräten und erschöpften Batterien geben Sie diese bitte bei einer entsprechenden Sammelstelle gemäß örtlicher Richtlinien ab.

Durch die ordnungsgemäße Entsorgung dieser Geräte und Batterien helfen Sie bei der Einsparung wertvoller Ressourcen mit und vermeiden Sie mögliche negative Folgen für Umwelt und Gesundheit, welche anderenfalls aufgrund unsachgemäßer Abfallentsorgung entstehen könnten.

Für weitere Informationen zu Sammelstellen und zum Recycling von Alteräten und Batterien setzen Sie sich bitte mit Ihrer Kommunalverwaltung, dem Entsorgungsunternehmen oder mit der Verkaufsstelle, in welcher Sie die Produkte gekauft haben, in Verbindung.
[Informationen zur Entsorgung in Ländern außerhalb der Europäischen Union] Diese Symbole gelten nur innerhalb der Europäischen Union. Zur Entsorgung dieser Produkte setzen Sie sich bitte mit den örtlichen Behörden oder Ihrem Fachhändler in Verbindung. Bitte beachten Sie: für das Batteriesymbol (untere beide Symbolbeispiele): Die Bezeichnung Pb unterhalb des Batteriesymbols bedeutet, dass diese Batterie Blei enthält.
INHALT
Einleitung
• BITTE LESEN SIE DIESE HINWEISE VOR INBETRIEBNAHME DES GERÄTS | 2
Systemanschlüsse | 4
Bedienelemente Frontblende | 8
Fernbedienung | 9
• REICHWEITE DER FERNBEDIENUNG | 10
• BATTERIEN EINSETZEN | 10
Bedienungshinweise
• WIEDERGABE EINER PROGRAMMQUELLE | 11
• SURROUND SOUND | 14
• SURROUND SOUND | 15
• RADIO HÖREN | 20
• UKW-RADIO MIT RDS HÖREN | 22
( RDS Tuner (Regionale Option für einige europäische Länder))
• AUFNAHME | 24
• SONSTIGE FUNKTIONEN | 25
• FUNKTIONEN AUF DER GERÄTEFRONT | 26
Systemeinstellungen | 27
• SYSTEMEINSTELLUNGEN | 29
• EINGANGSEINSTELLUNGEN | 31
• LAUTSPRECHEREINSTELLUNGEN | 32
• KANALPEGELEINSTELLUNGEN | 36
• PARAMETEREINSTELLUNGEN | 38
Störungserkennung | 40
Spezifikationen | 41
Systemanschlüsse
- Nehmen Sie den Netzanschluss erst vor, nachdem alle Anschlüsse des Systems vorgenommen wurden.
- Bitte beachten Sie beim Anschluss der Audio-, Video- und Lautsprecherkabel die Farbcodierung.
- Schließen Sie die Stecker fest und korrekt an, anderenfalls kann es zu Tonausfällen, Störungen oder Schäden am Receiver kommen.
text_image
3 6 N18041 CE Audiou 2 4 1 5 SHERWOOD RD-5405 AUDIVIDVIDEO RECEIVER POWER SOURCE 250V ~ 50Hz POWER CONSUMPTION 200W INTENDED BY: Audiou SHERWOOD RD-5405 AUDIVIDVIDEO RECEIVER POWER SOURCE 250V ~ 50Hz POWER CONSUMPTION 200W INTENDED BY: Audiou1. ANTENNENANSCHLUSS

text_image
UKW Wurfantenne 1M 75Ω 0ND AM LOOP ANTENNA- Richten Sie die UKW-Wurfantenne aus, um den besten Empfang Ihrer Lieblingssender zu gewährleisten.
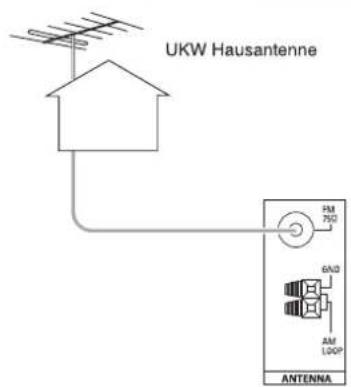
text_image
UKW Hausantenne PM 750 6A/D AM LOOP ANTENNA- Mit einer 75Ω UKW-Hausantenne verbessern Sie den Empfang. Ziehen Sie die Wurfantenne vor dem Anschluss der Hausantenne ab.

text_image
1 2 MW-Zimmerantenne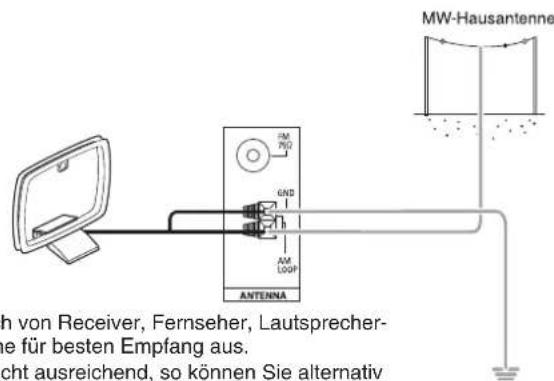
text_image
MW-Hausantenne h von Receiver, Fernseher, Lautsprecher- e für besten Empfang aus. icht ausreichend, so können Sie alternativ- Stellen Sie die MW-Zimmerantenne so weit wie möglich von Receiver, Fernseher, Lautsprecher- und Netzkabeln entfernt auf und richten Sie die Antenne für besten Empfang aus.
- Ist das Empfangssignal mit der MW-Zimmerantenne nicht ausreichend, so können Sie alternativ eine MW-Hausantenne benutzen.
2. ANSCHLUSS AUDIO-/VIDEOKOMPONENTEN
flowchart
graph TD
    subgraph_CD_CD_plates["CD CD-Player"]
        A1["OUT HDMI"] --> B1["VIDEO 2 BD-Player"]
        A2["OUT HDMI"] --> B2["VIDEO 2 BD-Player"]
        A3["OUT HDMI"] --> B3["VIDEO 2 BD-Player"]
    end

    subgraph_Video_C_plates["Video 2 BD-Player, DVD-Player, Fernseher usw."]
        C1["IN HDMI"] --> D1["MONITOR"]
        C2["IN HDMI"] --> D2["MONITOR"]
        C3["IN HDMI"] --> D3["MONITOR"]
    end

    subgraph_TAPE_Trape["TAPE Kassettendeck, MD-Rekorder usw."]
        E1["IN HDMI"] --> F1["MONITOR"]
        E2["IN HDMI"] --> F2["MONITOR"]
        E3["IN HDMI"] --> F3["MONITOR"]
    end

    A1 --> B1
    A2 --> B2
    A3 --> B3
    C1 --> D1
    C2 --> D2
    C3 --> D3
    E1 --> F1
    E2 --> F2
    E3 --> F3
    F1 --> D1
    F2 --> D2
    F3 --> D3
    D1 --> F1
    D2 --> F2
    D3 --> F3
    F1 --> F1a["L"]
    F2 --> F2a["R"]
    F3 --> F3a["L"]

    style CD_CD plates fill:#f9f,stroke:#333
    style Video_C plates fill:#ccf,stroke:#333
    style TAPE_Trape fill:#cfc,stroke:#333
VIDEO 1 BD-Player, DVD-Player, Kassettendeck, MD-Rekorder usw.
- An die VIDEO 1/VIDEO 2 Buchsen können die entsprechenden Komponenten, wie BD-Player, DVD-Player, Fernseher usw. angeschlossen werden.
- An die TAPE IN/OUT und VIDEO 1 IN/OUT Buchsen können Audioaufzeichnungsgeräte, wie Kassettendeck, MD-Rekorder usw. angeschlossen werden.
■HDMI (High Definition Multimedia Interface) Anschluss: (\*)
- Schließen Sie die Quellenkomponente (BD-Player usw.) am Anzeigegerät (Fernseher, Projektor usw.) über diesen Receiver über HDMI-Kabel an (im Fachhandel erhältlich).
- Der HDMI-Anschluss überträgt unkomprimierte digitale Video- und Audiosignale.
- Dieser Receiver gibt digitale Video- und Audiosignale über HDMI MONIOTR OUT aus, ohne sie durch andere Schaltkreise zu schleifen, sofern sie an HDMI IN angeschlossen sind (was bedeutet, das über HDMI IN eingehende Signale auf diesem Receiver nicht reproduziert werden können).
- HDMI, das HDMI-Logo und High-Definition Multimedia Interface sind Marken oder eingetragene Marken von HDMI Licensing LLC.
■Bitte beachten Sie
- Abhängig von der angeschlossenen Komponente kann es zu unzuverlässiger Signalübertragung kommen (Einzelheiten siehe Bedienungsanleitung Ihrer Komponente).
- Für stabile Signalübertragung empfehlen wir die Benutzung von HDMI-Kabeln mit einer Länge von nicht mehr als 5 m.
3. ANSCHLUSS DIGITALER EINGÄNGE
- Die OPTISCHEN und KOAXIAL-DIGITALAUSGÄNGE der Komponenten, welche an CD und VIDEO 1 dieses Geräts angeschlossen sind, können an diesen DIGITALEINGÄNGEN angeschlossen werden.
- An einem Digitaleingang sollten Geräte wie beispielsweise ein CD-Player, Player, DVD-Player usw. mit DTS Digital Surround, Dolby Digital oder mit PCM-formatigen Digitalsignalen usw. angeschlossen werden.
- Einzelheiten entnehmen Sie bitte der Bedienungsanleitung des anzuschließenden Geräts.
- Bei KOAXIAL-DIGITALANSCHLUSS benutzen Sie bitte ein 75 Ω KOAXIALKABEL, kein gewöhnliches AUDIOKABEL.
- Einige der optischen Glasfaserkabel können für dieses Gerät nicht benutzt werden. Können optische Glasfaserkabel nicht an Ihren Geräten angeschlossen werden, so setzen Sie sich bitte mit Ihrem Fachhändler oder dem autorisierten Kundendienst in Verbindung.
■Bitte beachten Sie: Bitte nehmen Sie entweder einen OPTISCHEN oder einen KOAXIAL-DIGITALEN ANSCHLUSS der Komponenten vor (nicht beide).
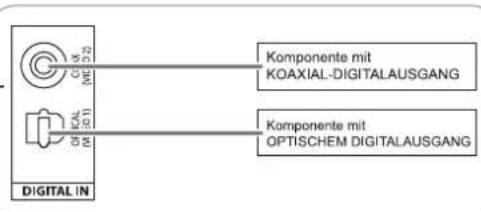
text_image
Komponente mit KOAXIAL-DIGITALAUSGANG Komponente mit OPTISCHEM DIGITALAUSGANG DIGITAL IN■Digitaleingang Standardeinstellungen
- Bei Anschluss der Eingänge DIGITAL IN an Ihren Komponenten folgen Sie bitte den Standardeinstellungen.
- Weichen Ihre DIGITAL-Anschlüsse von Standardeinstellungen ab, so ordnen Sie die benutzten Anschlüsse DIGITAL IN entsprechend der Anleitungen in „Auswahl des DIGITALEINGANGS (DIGITAL IN)“ auf Seite 31 zu.
• Die Standardeinstellungen sind wie folgt: OPTICAL: VIDEO 1, COAX: VIDEO 2
4. ANSCHLUSS SUBWOOFER PRE OUT
- Zur Verstärkung der Bässe schließen Sie einen aktiven Subwoofer an.
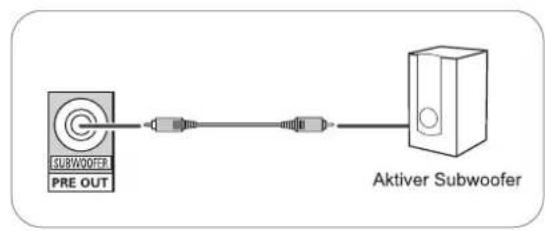
flowchart
graph LR
    A["PRE OUT SUBWOOFER"] --> B["Switch"]
    B --> C["Aktiver Subwoofer"]
5. ANSCHLUSS LAUTSPRECHER
- Schließen Sie die Lautsprecher fest und korrekt am entsprechenden Kanal (links und rechts) und mit der korrekten Polarität (+ und -) an. Bei nicht ordnungsgemäß ausgeführten Anschlüssen haben Sie keinen Ton von den Lautsprechern und bei vertauschter Polarität klingt der Sound unnatürlich und die Bässe fehlen.
- Zur Installation der Lautsprecher siehe Abschnitt „Aufstellen der Lautsprecher“ auf Seite 7.
- Nach der Installation der Lautsprecher gleichen Sie bitte zunächst die Lautsprechereinstellungen entsprechend Ihrer häuslichen Umgebung und dem Lautsprecherlayout ab. (Einzelheiten finden Sie im Abschnitt „LAUTSPRECHEREINSTELLUNGEN“ auf Seite 32.)
Achtung :
- Bitte benutzen Sie ausschließlich Lautsprecher mit einer Impedanz von 6 Ohm oder höher.
- Achten Sie darauf, dass die blanken Lautsprecherkabel weder miteinander noch mit Metallteilen dieses Geräts in Berührung kommen, das kann zu Schäden am Gerät und/oder an den Lautsprechern führen.
- Berühren Sie keinesfalls die Lautsprecheranschlüsse, während das Gerät am Netz angeschlossen ist, das kann zu Stromschlag führen.
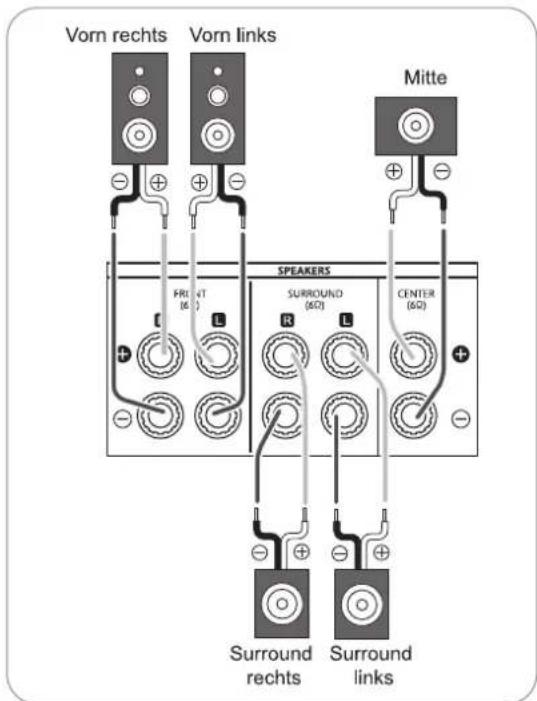
text_image
Vorn rechts Vorn links Mitte FRONT (60) SPEAKERS SURROUND (60) CENTER (60) Surround rechts Surround links■Anschluss der Lautsprecherkabel
1. Isolieren Sie die Kabel etwa 10 mm ab und verzwirbeln Sie die Kabelenden. | 2. Mit Linksdrehung öffnen Sie den Lautsprecheranschluss. | 3. Setzen Sie das abisierte Kabel ein. | 4. Mit Rechtsdrehung schließen Sie den Lautsprecheranschluss. |
6. NETZKABEL
- Stecken Sie den Netzstecker in die Steckdose.


Aufstellen der Lautsprecher
Die Idealposition der Lautsprecher hängt unter anderem von Ihrer Raumgröße sowie der Wandverkleidung ab. Ein typisches Beispiel für die Aufstellung der Lautsprecher finden Sie nachstehend:
■ Lautsprecher vorn links und rechts sowie mittlerer Lautsprecher
- Stellen Sie die vorderen Lautsprecher mit deren Vorderseite möglichst auf gleicher Höhe wie Fernseher oder Bildschirm auf.
- Stellen Sie den mittleren Lautsprecher zwischen dem linken und rechten vorderen Lautsprecher und nicht weiter entfernt von der Sitzposition auf, als die vorderen Lautsprecher.
- Richten Sie die Lautsprecher auf die Kopfhöhe der hauptsächlichen Sitzposition aus.
■ Linker und rechter Surround-Lautsprecher
- Stellen Sie die Surround-Lautsprecher etwa 1 Meter über Kopfhöhe der Sitzposition direkt links und rechts oder etwas nach hinten versetzt auf.
Subwoofer
- Der Subwoofer erzeugt kräftige Bässe. Stellen Sie den Subwoofer vorn an beliebiger Stelle auf.
■ Bitte beachten Sie:
- Haben Sie einen herkömmlichen Fernseher, so benutzen Sie bitte ausschließlich magnetisch abgeschirmte Lautsprecher vorn links und rechts sowie in der Mitte, um Bildstörungen zu vermeiden.
- Für beste Surround-Effekte sollten alle Lautsprecher, außer dem Subwoofer, Full-Range-Lautsprecher sein.

text_image
Diagram of a person lying in bed inside a large room with numbered labels and sound waves indicating sound or vibration.- Fernseher oder Leinwand
- Lautsprecher vorn links
- Lautsprecher vorn rechts
- Mittlerer Lautsprecher
- Subwoofer
- Surround-Lautsprecher links
- Surround-Lautsprecher rechts
Bedienelemente Frontblende
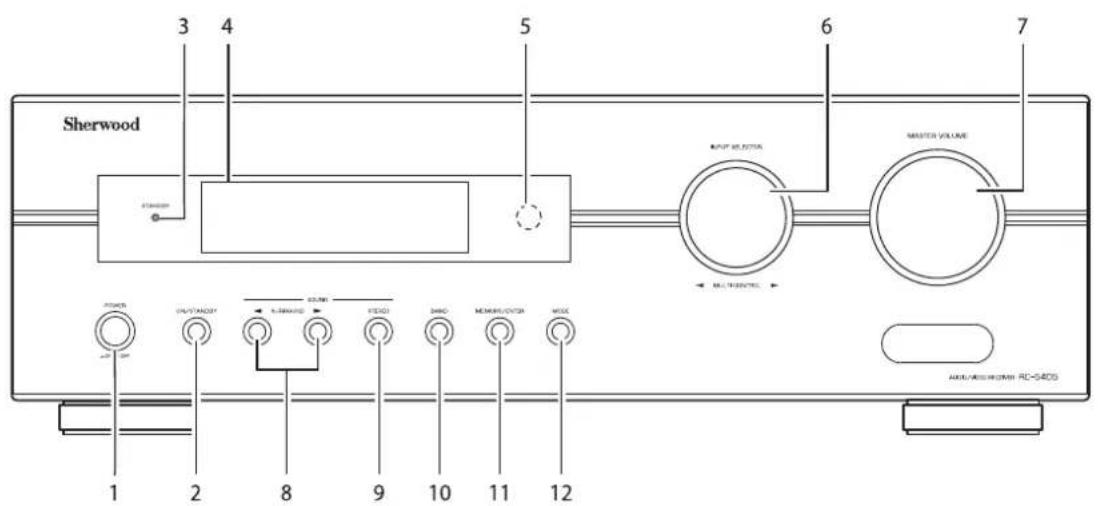
text_image
Sherwood 3 4 5 6 7 OUTPUT SELECTOR MASTER VOLUME MULTICONTENTS POWER 1 2 8 9 10 11 12 AVOC/AVOC/AVOC/RC-54DS- POWER: Hauptschalter
- ON/STANDBY: Ein/Aus-Schalter
- STANDBY Statusanzeige
- FLUORESZENZANZEIGE Einzelheiten nachstehend.
- SENSOR FERNBEDIENUNG
-
AUSWAHL EINGANGSQUELLE/MULTI-CONTROL Drehregler
-
MASTER-LAUTSTÄRKE
- SURROUNMODUS AUFWÄRTS/ABWÄRTS
- STEREO Umschalter
- BANDWAHL Umschalter
- MEMORY/ENTER Taste
- MODUS

FLUORESZENZANZEIGE
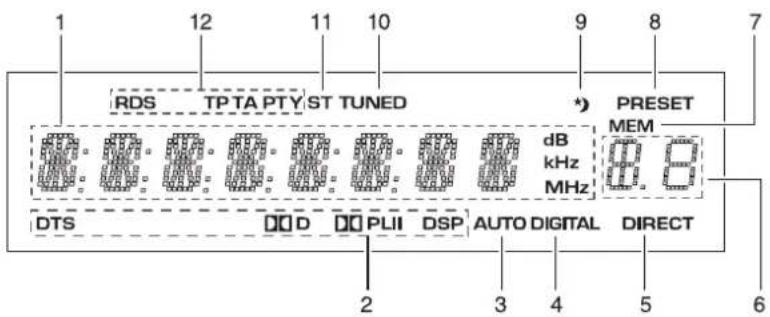
text_image
RDS TP TA PTY ST TUNED *) PRESET MEM dB kHz MHz DTS DD D PLII DSP AUTO DIGITAL DIRECT 2 3 4 5 6 7- Eingang, Frequenz, Lautstärkepegel, Betriebsinformationen usw.
- Surroundmodus Statusanzeigen
- AUTO Statusanzeige
- DIGITALEINGANG Statusanzeige
- DIREKT Statusanzeige
-
Senderspeicher, Anzeige automatische Abschaltung
-
MEMORY Statusanzeige
- SENDER SPEICHER Statusanzeige
- SLEEPTIMER Statusanzeige
- SENDER Statusanzeige
- STEREO Statusanzeige
- RDS Statusanzeige
(Regionale Option für Europa usw.)
Fernbedienung
DEUTSCH
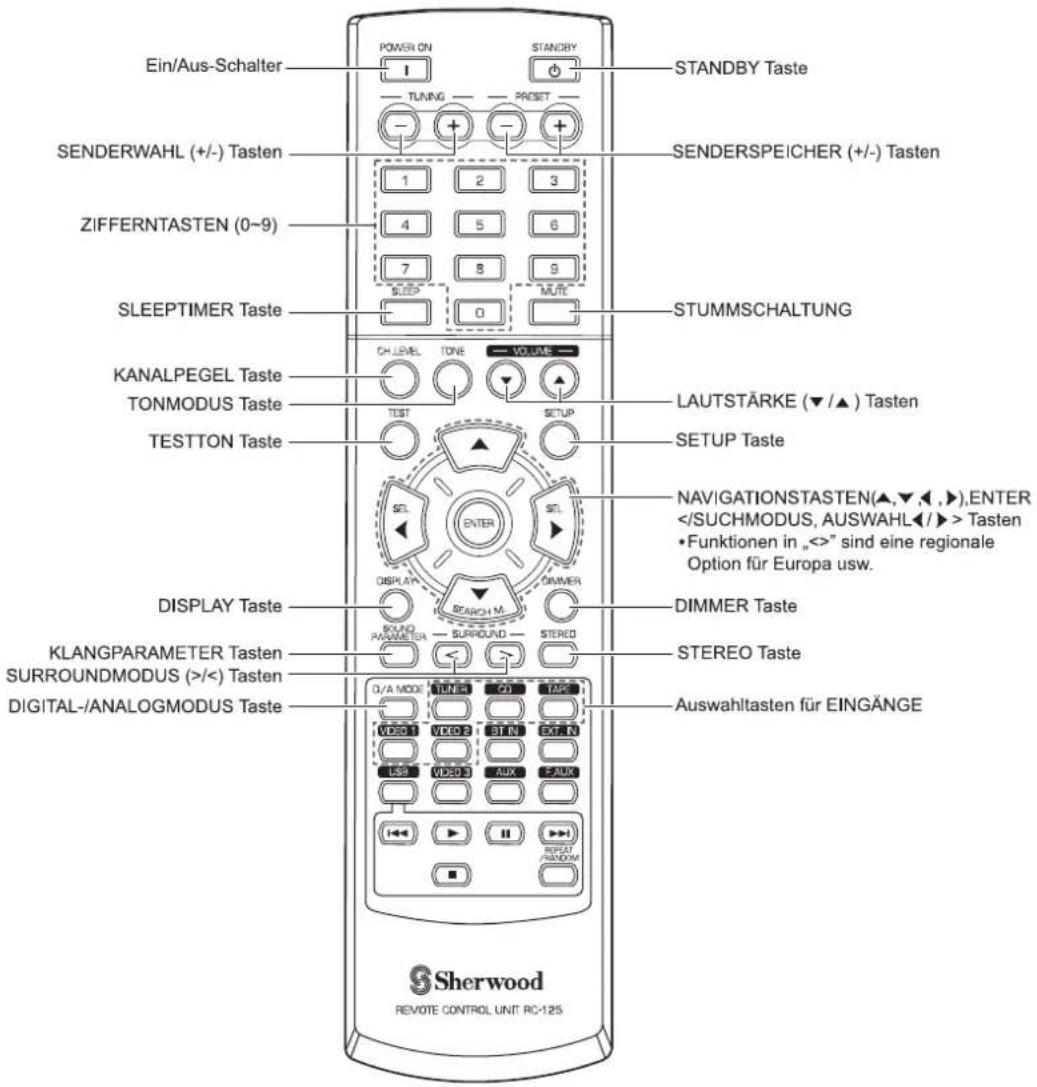
text_image
Ein/Aus-Schalter POWER ON STANDBY STANDBY Taste TUNING PROSET SENDERWAHL (+/-) Tasten 1 2 3 SENDERSPEICHER (+/-) Tasten ZIFFERNTASTEN (0~9) 4 5 6 7 8 9 SLEEP MUTE SLEEPTIMER Taste 0 STUMMSCHALTUNG KANALPEGEL Taste CH LEVEL TONE VOLUME LAUTSTÄRKE (▼/▲) Tasten TONMODUS Taste TEST SETUP TESTON Taste SETUP Taste DISPLAY Taste DISPLAY M. DIMMER KLANGPARAMETER Tasten SOLUO PARAMETER SURROUND STEREO SURROUNDMODUS (>/<) Tasten DIAL-ANALOGMODUS Taste D/A MODE TUNER CD TAKE VIDEO 1 VIDEO 2 STAIN EXTAIN LISA VIDEO 3 AUX EAUX RESET REPEAT RANDOM REPEAT RANDOM DAWALTASTEN für EINGÄNGE SERWOOD REVOTE CONTROL UNIT RC-125■ Bitte beachten Sie: Einige Auswahltasten für Eingangsquellen (BT IN, EXT. IN, USB, VIDEO 3, AUX, F.AUX) sowie USB-Funktionstasten(◀◀, ▶H, ▶▶■, REPEAT/RANDOM) stehen für dieses Gerät nicht zur Verfügung.
REICHWEITE DER FERNBEDIENUNG
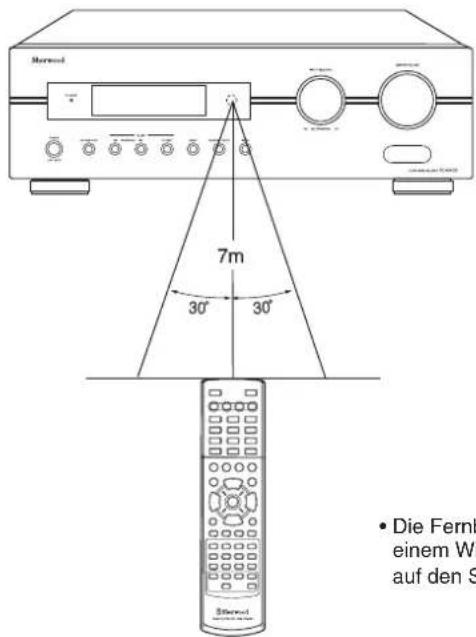
text_image
7m 30° 30° • Die Fernb einem W auf den S• Die Fernbedienung hat eine Reichweite von etwa 7 Metern bei einem Winkel von jeweils 30 Grad. Richten Sie die Fernbedienung auf den Sensor im Receiver aus.
BATTERIEN EINSETZEN
- Öffnen Sie das Batteriefach.
- Setzen Sie zwei Batterien (AAA, 1,5 V) mit der korrekten Polarität ein.

natural_image
Line drawing of a remote control with a battery and switch (no text or symbols)- Bei längerer Nichtbenutzung nehmen Sie bitte die Batterien aus der Fernbedienung.
- Benutzen Sie bitte keine Akkus (Ni-Cd).
Bedienungshinweise
■ Bitte beachten Sie : Vor der Benutzung des Receivers nehmen Sie bitte zunächst die Einstellungen für beste Leistung vor (Einzelheiten finden Sie im Abschnitt „Systemeinstellungen“ auf Seite 27).
WIEDERGABE EINER PROGRAMMQUELLE
Erste Schritte
- Schalten Sie den Receiver in Stand-by Modus.
• Die STANDBY Anzeige leuchtet auf. Der Receiver ist nicht vom Netz getrennt und hat eine geringe Leistungsaufnahme zur Unterstützung der Betriebsbereitschaft. -
Zum Ausschalten drücken Sie erneut den Hauptschalter POWER.
• Die Spannungsversorgung wird unterbrochen und die STANDBY Anzeige erlischt. -
Schalten Sie den Receiver im Stand-by Modus ein.
text_image
ON/STANDBY oder POWER ON I STANDBY- Mit jedem Tastendruck auf ON/STANDBY auf der Frontblende wird der Receiver entweder in den Betriebsmodus eingeschaltet oder in Stand-by Modus ausgeschaltet.
- Drücken Sie POWER ON auf der Fernbedienung zum Aufrufen des Betriebsmodus oder drücken Sie STANDBY zum Aufrufen des Stand-by Modus.
- Im Stand-by-Modus schaltet sich der Receiver automatisch ein und wählt die gewünschte Eingangsquelle, sofern die AUSWAHLTASTE FÜR DIE EINGANGSQUELLE gedrückt oder der MULTI-CONTROL Drehregler gedreht wird.

- Wählen Sie die gewünschte Eingangsquelle.
text_image
BAND oder INPUT SELECTOR MULI CONTROL oder
text_image
Sherwood TUNER CD TAPE VIDEO 1 VIDEO 2- Mit jedem Tastendruck/jeder Drehung AUSWAHL EINGANGSQUELLE/MULTI-CONTROL wird die Eingangsquelle wie folgt umgeschaltet:
TUNER → CD → TAPE → VIDEO 1 → VIDEO 2 (Frequenzanzeige)
- Mit jedem Tastendruck auf BAND auf der Gerätefront oder TUNER auf der Fernbedienung wird das Frequenzband wie folgt umgeschaltet:
→ FM ST → FM MONO → AM
Auswahl von VIDEO 1, VIDEO 2 als Eingangsquelle
- Wählen Sie den gewünschten Digital- oder Analogeingang.
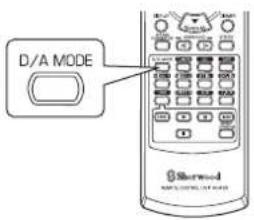
text_image
D/A MODE Sherwood- Mit jedem Tastendruck wird der entsprechende Eingang wie folgt gewählt:

■ Bitte beachten Sie:
- Bei Auswahl von TUNER, TAPE oder CD als Eingangsquelle kann der Digitaleingang nicht gewählt werden.
- Ist der gewählte Digitaleingang nicht angeschlossen, so blinkt die „DIGITAL“ Statusanzeige und der Analogeingang wird automatisch gewählt.
- Der gewählte Digital- oder Analogeingang wird der entsprechenden Eingangsquelle im EINGANGSMENÜ automatisch zugeordnet (Einzelheiten finden Sie im Abschnitt „EINGANGSEINSTELLUNGEN“ auf Seite 31.)
-
Der Ton von dem am ausgewählten Digitaleingang angeschlossenen Gerät kann unabhängig von der gewählten Eingangsquelle gehört werden.
-
Wiedergabe von der gewählten Komponente.
- Bei Wiedergabe der Programmquellen mit Surround Sound siehe „SURROUND SOUND“ auf Seite 15.
- Stellen Sie die (Master-) Lautstärke ein.
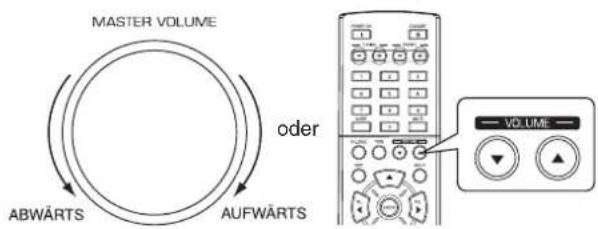
text_image
MASTER VOLUME oder ABWÄRTS AUFWÄRTS VOLUME
- Stummschaltung.
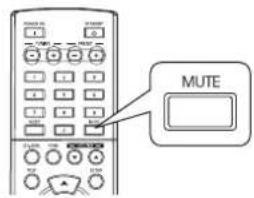
text_image
MUTE• „MUTE“ blinkt.
- Mit erneutem Tastendruck heben Sie die Stummschaltung wieder auf.
Klangeinstellung (Bässe und Höhen)
7. Rufen Sie den Klangmodus auf.
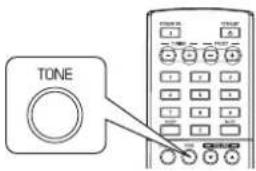
text_image
TONE
TONE: OFF
- Der Klangmodus wird für einige Sekunden angezeigt.
8. Mit den NAVIGATIONSTASTEN LINKS (◀)/RECHTS (▶) wählen Sie den gewünschten Klangmodus.
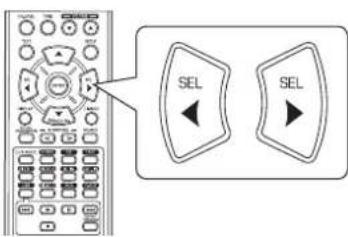
text_image
Diagram showing a remote control with two labeled buttons labeled 'SEL' pointing to different button positions.- Mit jedem Tastendruck schalten Sie den Klangmodus wie folgt um:
OFF: Wiedergabe einer Programmquelle ohne den Klangeffekt
↑ (die „DIRECT“ Statusanzeige leuchtet auf)
ON: Einstellen der Klangeffekte nach persönlichem Geschmack
(die „DIRECT“ Statusanzeige erlischt)
■ Sind die Klangeinstellungen mit TONE aktiviert, dann stellen Sie den Klang (Bässe und Höhen) ein.
9. Mit den NAVIGATIONSTASTEN AUFWÄRTS (▲)/ABWÄRTS (▼) wählen Sie den gewünschten Klang.
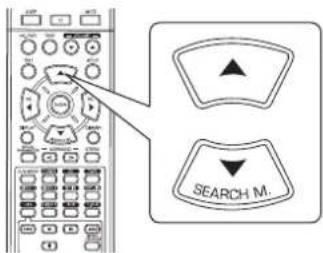
text_image
SEARCH M.- Mit jedem Tastendruck schalten Sie den Klang wie folgt um :
→BASS ←TRBL (Höhen) ←TONE : ON ←
10. Mit den NAVIGATIONSTASTEN LINKS (◀)/RECHTS (▶) stellen Sie den gewählten Klang wunschgemäß ein.

text_image
SEL SEL- Der Klangpegel kann im Bereich zwischen -10 \~ +10 dB eingestellt werden.
- Allgemein empfehlen wir, Bässe und Höhen auf 0 dB (Flat Level) einzustellen.
- Extreme Einstellungen können Ihre Lautsprecher bei hohen Lautstärken beschädigen.
- Zur Vervollständigung der Klangeinstellungen wiederholen Sie obige Schritte 9 und 10.
- Erlischt das Klangdisplay, so beginnen Sie erneut mit Schritt 7.
SURROUND SOUND
- Dieser Receiver ist mit einem hoch entwickelten digitalen Signalprozessor ausgestattet, welcher Ihnen eine optimale Soundqualität und Soundatmosphäre in Ihrem eigenen Heimkino liefert.
Surround-Modi
■DTS Digital Surround
DTS Digital Surround (oder einfach DTS) ist ein Mehrkanal-Digitalsignalformat zur Verarbeitung höherer Datenübertragungsraten. Discs mit dem DTS-Logo enthalten Aufzeichnungen von bis zu 5.1-Kanal Digitalsignalen, die allgemein aufgrund der geringeren Audiokompression eine bessere Klangqualität liefern. Es liefert ebenfalls einen breiteren Dynamikbereich und Trennung und damit einen hervorragenden Klang.
Hergestellt unter Lizenz nach US-Patenten Nr.: 5, 451,942; 5, 956,674; 5, 974,380; 5, 978,762; 6,487,535 sowie anderen US-amerikanischen und weltweiten Patenten und angemeldeten Patenten. DTS und DTS Digital Surround sind eingetragene Marken und die DTS-Logos und das Symbol sind Marken von DTS, Inc. ©1996-2008 DTS, Inc. Alle Rechte vorbehalten.
■Dolby Digital
Dolby Digital ist das Mehrkanal-Digitalsignalformat der Dolby Laboratories. Discs mit dem Dolby Digital Logo enthalten Aufzeichnungen von bis zu 5.1-Kanal Digitalsignalen zur Reproduktion einer viel höheren Klangqualität, räumlichen Ausdehnung und Dynamikbereichcharakteristik als der frühere Dolby Surround Effekt.
■Dolby Pro Logic II Surround
Dieser Modus wendet auf konventionelle 2-Kanalsignale, wie digitale PCM oder analoge Stereosignale wie auch Dolby Surroundsignale und dergleichen, Surroundverarbeitung zur Verbesserung gegenüber konventionellen Dolby Pro Logic Schaltungen an. Dolby Pro Logic II Surround umfasst die nachstehenden 2 Modi:
• Dolby Pro Logic II Movie
Beim Betrachten von Filmen erlaubt Ihnen dieser Modus durch zusätzliches Processing eine weitere Verbesserung der Filmqualität, wodurch der Sound der Action Special Effects betont wird.
• Dolby Pro Logic II Music
Beim Hören von Musik erlaubt Ihnen dieser Modus durch zusätzliches Processing eine weitere Verbesserung der Klangqualität, wodurch die musikalischen Effekte betont werden.
■ Dolby Pro Logic
Dieser Modus erweitert jegliche 2-Kanalquellen (einschließlich Dolby Surround Signalquellen) auf 4 Kanäle (vorn links, Mitte, vorn rechts und Surround) zur Wiedergabe. Der Surroundkanal ist in Mono, wird jedoch über zwei Surround-Lautsprecher wiedergegeben.
Hergestellt unter Lizenz von Dolby Laboratories. Dolby, Pro Logic und das Doppel-D-Symbol sind eingetragene Marken der Dolby Laboratories.
- Nachstehende Modi wenden auf konventionelle 2-Kanal-Signale, wie digitale PCM oder analoge Stereosignale einen Hochleistungs-Digitalsignalprozessor zur künstlichen Nachstellung von Klangfeldern an.
Matrix
Dieser Modus reproduziert ein verzögertes Signal von den Surroundkanälen zur Unterstreichung des Weitegefühls für Musikquellen.
Church
Dieser Modus liefert die Atmosphäre einer Kirche für Barock-, Streichorchester- oder Chormusik.
Theater
Dieser Modus liefert Effekte wie im Kino.
Hall
Dieser Modus bietet eine Umgebung wie im Konzertsaal für klassische Musik, wie Orchester, Kammermusik oder Instrumentalsolos.
■Stadium
Dieser Modus liefert das ausgedehnte Klangfeld zur Erreichung eines wahrhaften Stadioneffekts, wenn Sie sich Baseball- oder Fußballspiele ansehen.
SURROUND SOUND
■ Bitte beachten Sie:
- Vor der Surround-Wiedergabe nehmen Sie bitte zunächst die Einstellung der Lautsprecher im SETUP-Menü für optimale Leistung vor (Einzelheiten finden Sie im Abschnitt „LAUTSPRECHEREINSTELLUNGEN“ auf Seite 32).
- Selbst bei Auswahl des Auto-Surroundmodus und gleichem digitalen Signalformat als Eingang kann der optimale Surroundmodus abhängig von der Einstellung des Lautsprechertyps auf „N (None)” abweichen.
- Bei Eingang von 96 kHz PCM Digitalsignal wird nur der Stereomodus gewählt.
■ Surroundmodus wählen
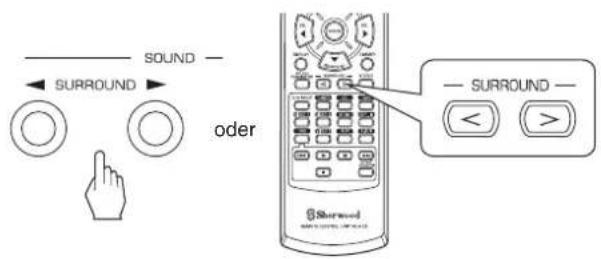
text_image
Diagram showing sound control interface with surround buttons and a door labeled 'oder' pointing to the device.- Mit jedem Tastendruck auf SURROUNDMODUS AUFWÄRTS/ABWÄRTS (▶, > / ◀, <) wird der Surroundmodus wie folgt umgeschaltet: Manueller Surroundmodus : Sie wählen den gewünschten („AUTO“ Statusanzeige erlischt.) Surroundmodus für das Eingangs-Signalformat mit den SURROUND (>/<) Tasten.
Automatischer Surroundmodus : Der optimale ("AUTO" Statusanzeige leuchtet auf.) Surroundmodus wird automatisch gewählt, abhängig vom Eingangs-Signalformat.
| Eingangssignalformat Wählbarer Surroundmodus | |
| Dolby Digital 5.1-Kanal-Quellen | [DOLBY DIGITAL, AUTO SURROUND] oder |
| Dolby Digital 2-Kanal-Quellen | [DOLBY PLII MOVIE, DOLBY PLII MUSIC, DOLBY PRO LOGIC, AUTO SURROUND] oder |
| Quellen DTS | [DTS, AUTO SURROUND] oder |
| PCM (2-Kanal) QuellenAnalog-Stereo-Quellen | [DOLBY PLII MOVIE, DOLBY PLII MUSIC, DOLBY PRO LOGIC, MATRIX, CHURCH, THEATER, HALL, STADIUM, AUTO SURROUND] oder |
- Abhängig von der Lautsprechereinstellung können die Surroundmodi wie folgt gewählt werden:
[ ]: Nur möglich, wenn „CENTER“ und/oder „SURR (Surround)” nicht auf „N (None)” eingestellt ist/sind.
< >: Nur möglich, wenn „CENTER“ und „SURR (Surround)“ auf „N (None)“ eingestellt sind.
■Beenden des Surroundmodus zur Stereowiedergabe
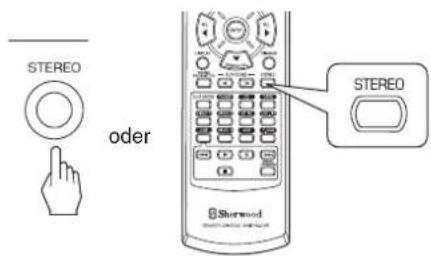
text_image
STEREO oder STEREO Shorwood- Abhängig vom Eingangssignalformat wird entweder der Stereomodus oder der 2-Kanal-Downmixmodus gewählt.
- Zur Deaktivierung entweder des Stereomodus oder des 2CH-Downmixmodus wählen Sie den Surroundmodus mit SURROUNDMODUS AUFWÄRTS/ABWÄRTS
$$ (\blacktriangleright , > / \blacktriangleleft , < ). $$
■ 2-Kanal-Downmixmodus
- Dieser Modus erlaubt das Heruntermischen der Mehrkanalsignale im Dolby Digital oder DTS Format in 2 Frontkanäle und die Wiedergabe über nur die beiden vorderen Lautsprecher oder über Kopfhörer.
Einstellen der Soundparameter
- Bei der Wiedergabe von Digitalsignalen von Dolby Digital oder DTS Programmquellen oder beim Hören in Dolby Pro Logic II Musikmodus können Sie deren Parameter für optimalen Surroundeffekt einstellen.
1. Drücken Sie die SOUND PARAMETER Taste.
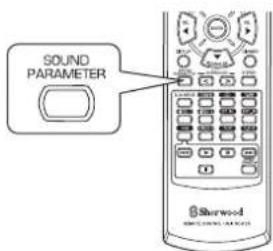
text_image
SOUND PARAMETER Sterwood- Für einige Sekunden wird „NIGHT: \~“ (oder „PANO: \~“) angezeigt.
- Erlischt der Parametermodus, so drücken Sie diese Taste bitte erneut.
2. Mit den NAVIGATIONSTASTEN AUFWÄRTS (▲) /ABWÄRTS (▼) wählen Sie den gewünschten Parameter.
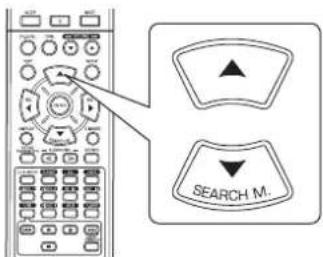
text_image
SEARCH M.- Mit jedem Tastendruck ändert sich der Parametermodus wie folgt:
→ "NIGHT" ↔ "PANO" ↔ "C.WIDTH" ↔ "DIMEN" (Nachtmodus) (Panoramamodus) (Mittlere Breitenregelung) (Größenregelung)
- „NIGHT“ kann nur bei der Wiedergabe von Digitalsignalen von einer Dolby Digital oder DTS Quelle gewählt werden.
- „PANO“, „C.WIDTH“ und „DIMEN“ kann nur bei der Wiedergabe in Dolby Pro Logic II Musikmodus gewählt werden.
3. Mit den NAVIGATIONSTASTEN LINKS (◀) /RECHTS (▶) stellen Sie den gewählten Parameter wunschgemäß ein.

text_image
SEL SEL■ „NIGHT (Nachtmodus)” wählen
Diese Funktion komprimiert die Dynamik zuvor festgelegter Bereiche des Dolby Digital oder DTS Soundtracks (mit extrem hoher Lautstärke), um die Lautstärkedifferenz zwischen spezifizierten und nicht spezifizierten Bereichen zu minimieren. Hierdurch wird das Hören des gesamten Soundtracks beim Betrachten von Filmen des Nachts mit verringerter Lautstärke verbessert. Der Nachtmodus kann in 11 Schritten von 0.0 bis 1.0 (Standardeinstellung: 0.0) eingestellt werden.
■ Bitte beachten Sie: Bei bestimmter Dolby Digital oder DTS Software ist der Nachtmodus nicht gültig.
■ Auswahl des „PANO (Panorama)” Modus
Dieser Modus erweitert das vordere Stereo-Klangbild zum Einschluss der Surround-Lautsprecher für einen aufregenden „Wraparound“ Effekt mit Seitenwandabbildung. Wählen Sie „OFF“ oder „ON“ (Standardeinstellung: OFF).
■ Auswahl der „C. WIDTH (Mittlere Breiten)“ Regelung Hier stellen Sie das mittlere Klangbild ein, sodass es nur über den mittleren Lautsprecher, nur von den linken/rechten Lautsprechern als Phantom-Klangbild oder von allen drei vorderen Lautsprechern in unterschiedlichen Maßen gehört wird. Die Einstellung erfolgt in 8 Stufen zwischen 0 und 7 (Standardeinstellung: 3).
■ Auswahl der „DIMEN (Größen)“ Regelung
Hier wird das Klangfeld schrittweise mehr nach vorn oder nach hinten eingestellt. Die Einstellung erfolgt in 7 Stufen zwischen -3 und +3 (Standardeinstellung: 0).
4. Wiederholen Sie obige Schritte 2 und 3 zur Einstellung der anderen Parameter.
Einstellen der einzelnen Kanäle mit dem Testton
- Der Lautstärkepegel jedes Kanals kann mit der Testtonfunktion leicht eingestellt werden.
1. Rufen Sie den Testtonmodus auf.
DEUTSCH

text_image
TESTTEST-FL
- Der Testtonmodus wird angezeigt und wird nacheinander wie folgt vom Lautsprecher des entsprechenden Kanals für 2 Sekunden übertragen:

flowchart
graph LR
    A["FL"] --> B["C"]
    B --> C["FR"]
    C --> D["SR"]
    D --> E["SL"]
    E --> F["SW"]
    style A fill:#f9f,stroke:#333
    style F fill:#f9f,stroke:#333
    subgraph Vorn Links
        G["Vorn links"] --> H["Mitte"] --> I["Vom"] --> J["rechts"] --> K["Surround"] --> L["links"] --> M["Subwoofer"]
    end
- Ist die Lautsprechereinstellung „N (None/No oder Keiner)“, so ist der Testton des entsprechenden Kanals nicht verfügbar.
2. Stellen Sie den Pegel für jeden Kanal ein, bis der Klangpegel aller Lautsprecher gleich laut ist.
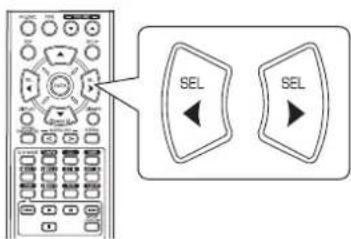
text_image
SEL SEL- Wählen Sie den gewünschten Kanal mit den NAVIGATIONSTASTEN ▲/▼.
3. Beenden Sie die Testtonfunktion.
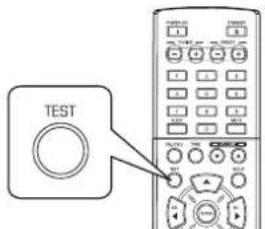
text_image
TESTEinstellen des Kanalpegels
- Nach dem Einstellen der Kanalpegel mit dem Testton stellen Sie die Kanalpegel entweder entsprechend der Programmquelle oder nach Ihrem persönlichen Geschmack ein.
- Der Kanalpegel kann beliebig eingestellt werden. Diese eingestellten Pegel werden nur im Nutzerspeicher („CAL“) abgelegt, nicht im Speicher für die Voreinstellungen („REF 1“, „REF 2“).
1. Drücken Sie die KANALPEGEL Taste.
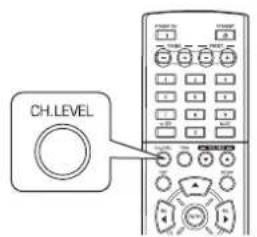
text_image
CH.LEVELMODE: CAL
- Der Speichermodus („CAL“ usw.) wird für einige Sekunden angezeigt.
- Erlischt der Speichermodus oder der Kanalpegel, so drücken Sie diese Taste erneut.
2. Wählen Sie den gewünschten Kanal.
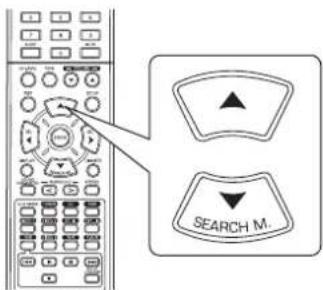
text_image
SEARCH M.- Mit jedem Tastendruck wird der entsprechende Kanal wie folgt gewählt:
→ REF 1, 2 (oder CAL) ↔ FL ↔ C ↔ FR →
< >: Nur bei Digitalsignaleingang von Dolby Digital oder DTS Programmquellen mit LFE-Signal kann der LFE-Pegel angezeigt werden.
- Abhängig von den Lautsprechereinstellungen („N (None/No oder Keiner)“) und dem Surroundmodus können einige Kanäle nicht gewählt werden.
3. Stellen Sie den Pegel des gewählten Kanals wunschgemäß ein.
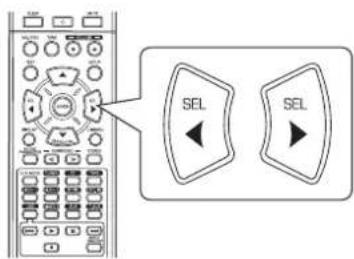
text_image
SEL SEL- Der LFE-Pegel kann im Bereich -10\~0 dB eingestellt werden, die anderen Kanalpegel im Bereich von -15 \~ +15 dB.
- Allgemein empfehlen wir, den LFE-Pegel auf 0 dB einzustellen (der empfohlene LFE-Pegel für einige frühe DTS Software ist jedoch -10 dB). Erscheinen die empfohlenen Pegel zu hoch, so stellen Sie diese niedriger ein, falls nötig.
4. Wiederholen Sie obige Schritte 2 und 3 zur Einstellung aller Kanalpegel.
Speichern der eingestellten Kanalpegel
- Sie können die eingestellten Kanalpegel in den Voreinstellungen speichern („REF 1“, „REF 2“) und jederzeit aufrufen.
- Nach den Schritten 1 \~ 4 in „Einstellen des Kanalpegels“ auf Seite 18 drücken Sie die ENTER Taste.

text_image
ENTER
• Die „1“ in „REF 1“ blinkt für einige Sekunden.
- Wählen Sie zwischen REF 1 und REF 2.
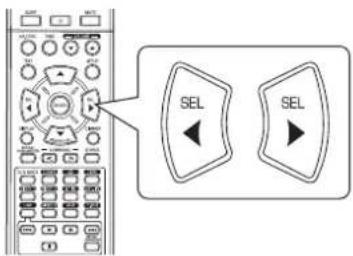
text_image
SEL SEL- Erlischt die Voreinstellung, so wiederholen Sie bitte Schritt 1.
- Bestätigen Sie Ihre Auswahl.
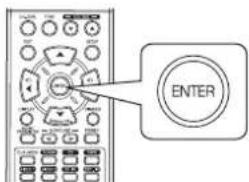
text_image
ENTER• Die eingestellten Kanalpegel sind nun im gewählten Speicher abgelegt.
Aufrufen der gespeicherten Kanalpegel
- Drücken Sie die KANALPEGEL Taste.

text_image
CH. LEVEL- „CAL“ (oder „REF 1“ usw.) wird für einige Sekunden angezeigt.
-
Erlischt die Anzeige des Kanalpegelmodus, so drücken Sie diese Taste bitte erneut.
-
Wählen Sie zwischen REF 1 und REF 2.
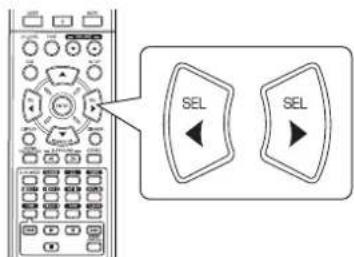
text_image
SEL SEL- Hiermit werden die in den Voreinstellungen gespeicherten Kanalpegel aufgerufen.
RADIO HÖREN
Automatische Sendersuche
1. Wählen Sie das gewünschte Frequenzband.
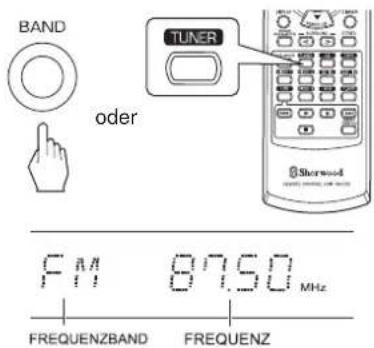
text_image
BAND oder TUNER Sherwood F11 87.50 MHz FREQUENZBAND FREQUENZ- Mit jedem Tastendruck wird das Frequenzband wie folgt umgeschaltet:

- Bei schlechtem UKW Stereoempfang aufgrund schwacher Signale wählen Sie bitte FM Mono zur Störunterdrückung. Hiermit haben Sie den UKW-Empfang in Mono.
2. Halten Sie die SENDERWAHL (+)/(-) Tasten für länger als 0,5 Sekunden gedrückt.
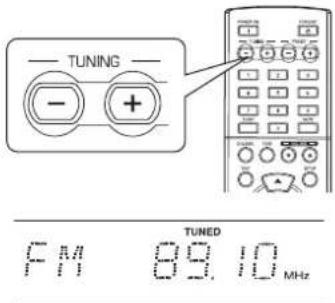
text_image
TUNING - + FM 89.10 MHz TUNED- Der Tuner sucht nun, bis ein Sender mit ausreichender Signalstärke aufgefunden wurde. Im Display werden die Frequenz und „TUNED“ angezeigt.
- Handelt es sich bei dem aufgefundenen Sender nicht um den gesuchten Sender, so wiederholen Sie die Suche einfach.
- Schwache Sender werden bei der automatischen Sendersuche übersprungen.
Manuelle Sendersuche
• Die manuelle Sendersuche ist hilfreich, wenn Sie bereits die Frequenz des gewünschten Senders kennen.
- Nach der Auswahl des gewünschten Frequenzbandes drücken Sie mehrfach SENDERWAHL (+) / (-), bis die gewünschte Frequenz angezeigt wird.
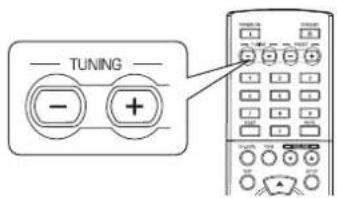
text_image
TUNING - +Automatische Sendersuche und Speicherung
• Die automatische Sendersuche und Speicherung sucht automatisch nur nach UKW-Sendern und speichert diese im Senderspeicher.
- Halten Sie (MEMORY/) ENTER für mehr als 2 Sekunden gedrückt, während Sie einen UKW-Sender eingestellt haben.
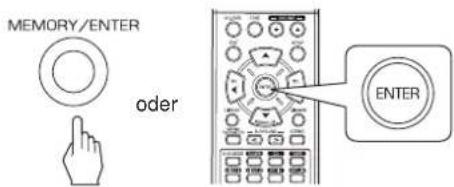
text_image
MEMORY/ENTER oder ENTER- „AUTO MEM“ blinkt und der Receiver beginnt mit der automatischen Sendersuche und Speicherung.
- Bis zu 30 UKW-Sender können gespeichert werden.
■Bitte beachten Sie:
- UKW-Sender mit schwachem Signal können nicht gespeichert werden.
- Zur Speicherung von Mittelwelle-Sendern oder schwachen Sendern führen Sie bitte die „manuelle Speicherung“ und die „manuelle Sendersuche“ durch.
Manuelle Speicherung
- Sie können bis zu 30 Sender in den Senderspeicher aufnehmen.
-
Stellen Sie den gewünschten Sender manuell oder automatisch ein.
-
Drücken Sie ENTER.

text_image
ENTER TUNED RESET MEM MHz DIRECT- „MEM“ blinkt für einige Sekunden.
- Wählen Sie den gewünschten Senderspeicher (1\~30) und drücken Sie ENTER.
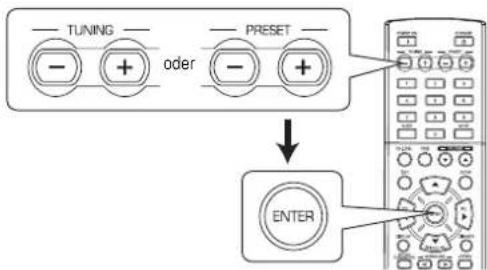
flowchart
graph TD
    A["--- Tuning ---"] --> B["--- + oder"]
    C["--- PRESET ---"] --> D["--- +"]
    B --> E["ENTER"]
    D --> E
    E --> F["---"]
- Benutzung der ZIFFERNTASTEN auf der Fernbedienung.
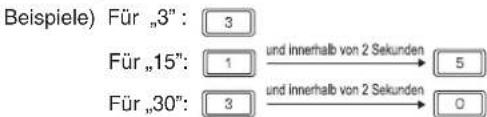
text_image
Beispiele) Für „3“: 3 Für „15“: 1 und Innerhalb von 2 Sekunden 5 Für „30“: 3 und Innerhalb von 2 Sekunden 0- Der Sender ist nun im Senderspeicher gespeichert.
- Bei der Benutzung der ZIFFERNTASTEN wird der Sender automatisch gespeichert, ohne dass Sie ENTER drücken müssen.
- Eine gespeicherte Frequenz wird durch das Überschreiben mit einer neuen Frequenz ge
-
Erlischt „MEM“, so beginnen Sie erneut ab Schritt 2.
-
Wiederholen Sie obige Schritte 1 bis 3 zur Speicherung weiterer Sender.
■BACKUP-SPEICHERFUNKTION
Nachstehende Einstellungen werden gespeichert, bevor der Receiver ausgeschaltet wird.
• Auswahlinstellung für EINGANG
- Surroundmodus
- Senderspeicher usw.
Aufrufen der Senderspeicher
- Nach Auswahl des Tuners als Eingangsquelle wählen Sie den gewünschten Senderspeicher.
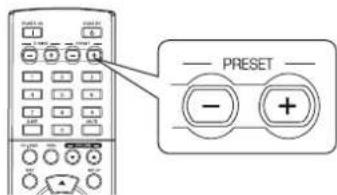
text_image
PRESET - +- Benutzung der ZIFFERNTASTEN auf der Fernbedienung.
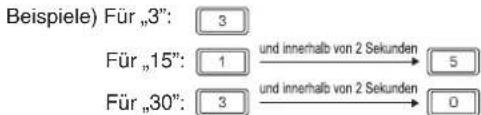
text_image
Beispiele) Für „3“: 3 Für „15“: 1 und innerhalb von 2 Sekunden 5 Für „30“: 3 und innerhalb von 2 Sekunden 0RDS Tuner(Regionale Option für einige europäische Länder)
UKW-RADIO MIT RDS HÖREN
RDS (Radio Data System) ist ein System zur Übertragung von zusätzlichen Informationen gemeinsam mit den Programmen. Ihr Tuner kann diese Signale in Display-Informationen umsetzen. Diese Codes enthalten die nachstehenden Informationen: Sendername (PS), Programmtyp (PTY), Verkehrsdurchsagen (TA), Uhrzeit (CT) und Radiotext (RT).
■ Bitte beachten Sie : In den anderen Ländern steht die RDS-Tuner-Funktion nicht zur Verfügung.
RDS-Suche
- Mit dieser Funktion suchen und empfangen Sie automatisch Sender mit RDS-Diensten.
- Wählen Sie im UKW-Modus den RDS-Suchmodus.
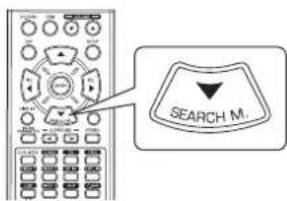
text_image
SEARCH M.- Mit jedem Tastendruck schalten Sie den Suchmodus wie folgt um:
→ RDS SRCH → TP SRCH → PTY SRCH → OFF
- Drücken Sie ENTER, sobald „RDS SRCH“ angezeigt wird.
RDS SARCH
text_image
ENTER- Der Tuner sucht automatisch nach Sendern mit RDS-Diensten, der jeweilige Sendername wird angezeigt.
- Wird kein RDS-Sender gefunden, dann wird „NO RDS“ angezeigt.
- Wird „RDS SRCH“ nicht angezeigt, so wiederholen Sie bitte Schritt 1.
TP-Suche
- Mit dieser Funktion suchen und empfangen Sie automatisch Sender, welche Verkehrsmeldungen übertragen.
- Drücken Sie im UKW-Modus zweimal die SUCHMODUS-Taste.
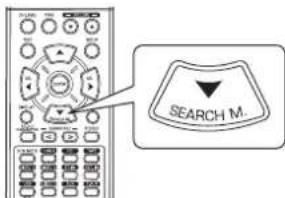
text_image
SEARCH M.• „TP SRCH“ wird angezeigt.
- Drücken Sie ENTER, sobald „TP SRCH“ angezeigt wird.
TP SRCH
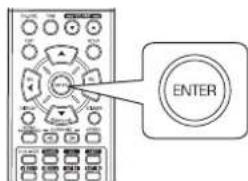
text_image
ENTER- Der Tuner sucht automatisch nach Sendern mit Verkehrsmeldungen.
- „NO TRAFF“ wird angezeigt, sofern das Signal zu schwach ist oder kein Verkehrssender gefunden werden kann.
- Wird „TP SRCH“ nicht angezeigt, so wiederholen Sie bitte Schritt 1.
PTY-Suche
- Mit dieser Funktion suchen und empfangen Sie automatisch Sender mit dem gewünschten Programmtyp.
- Drücken Sie im UKW-Modus dreimal die SUCHMODUS-Taste.
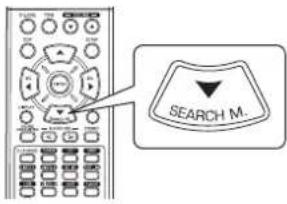
text_image
SEARCH M.PTY SARCH
• „PTY SRCH“ wird angezeigt.
- Wählen Sie den gewünschten Programmtyp, sobald „PTY SRCH“ angezeigt wird.
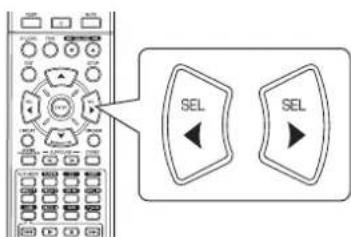
text_image
SEL SELNEWS
- Mit jedem Tastendruck wird zwischen den 32 verschiedenen Programmtypen umgeschaltet. (NEWS, AFFAIRS, INFO, SPORT, EDUCATE, DRAMA, CULTURE, SCIENCE, VARIED, POP M, ROCK M, EASY M, LIGHT M, CLASSICS, OTHER M, WEATHER, FINANCE, CHILDREN, SOCIAL, RELIGION, PHONE IN, TRAVEL, LEISURE, JAZZ, COUNTRY, NATION M, OLDIES, FOLK M, DOCUMENT, TEST, ALARM, NONE)
-
Wird „PTY SRCH“ nicht angezeigt, so wiederholen Sie bitte Schritt 1.
-
Drücken Sie ENTER, sobald der gewünschte Programmtyp angezeigt wird.

text_image
ENTER- Der Tuner sucht automatisch nach Sendern mit PTY-Diensten.
- Wird kein entsprechender Sender gefunden, so wird „NO PROG“ angezeigt.
DISPLAY
Im UKW-Modus:
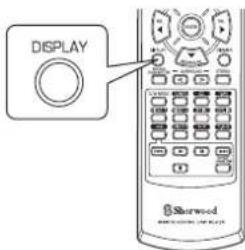
text_image
DISPLAY Sherwood- Mit jedem Tastendruck wird der Displaymodus wie folgt umgeschaltet:
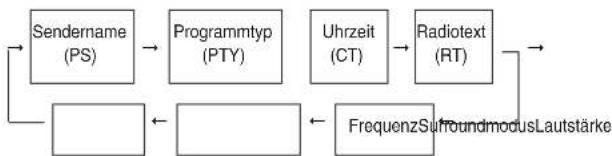
flowchart
graph TD
    A["Sendername (PS)"] --> B["Programmtyp (PTY)"]
    B --> C["Uhrzeit (CT)"]
    C --> D["Radiotext (RT)"]
    D --> E["FrequenzSurroundmodusLautstärke"]
    E --> F[" "]
    F --> G[" "]
    G --> H[" "]
    H --> I[" "]
    I --> J[" "]
- Sind die Signale zu schwach oder es steht kein RDS-Dienst zur Verfügung, so wird „NO NAME“, „NO PTY“, „NO TIME“ oder „NO TEXT“ angezeigt.
AUFNAHME
- Bei der Aufnahme von Analogsignalen von VIDEO 1 oder VIDEO 2 wählen Sie bitte den Analogeingang. (Einzelheiten finden Sie im Abschnitt „Auswahl von VIDEO 1, VIDEO 2 als Eingangsquelle“ auf Seite 12.)
- Lautstärke- und Klangeinstellungen (Bässe, Höhen) haben keinen Einfluss auf die Aufnahmesignale.
- Bei Auswahl von TUNER, CD oder VIDEO 2 als Aufnahmequelle können Sie über TAPE, VIDEO 1 oder beide gleichzeitig aufnehmen.
Aufnahme mit TAPE
- Wählen Sie den gewünschten Eingang als Aufnahmequelle, außer TAPE.
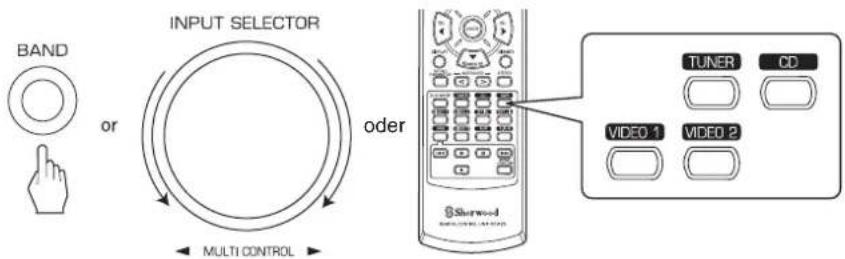
text_image
BAND or INPUT SELECTOR oder MULTI CONTROL TUNER CD VIDEO 1 VIDEO 2-
Starten Sie die Aufnahme mit TAPE.
-
Starten Sie die Wiedergabe der gewünschten Eingangsquelle.
Aufnahme über VIDEO 1
- Bei Anschluss des Audioaufnahmegeräts an VIDEO 1 können Sie die Audiosignale aufnehmen.
- Wählen Sie den gewünschten Eingang als Aufnahmequelle, außer VIDEO 1.
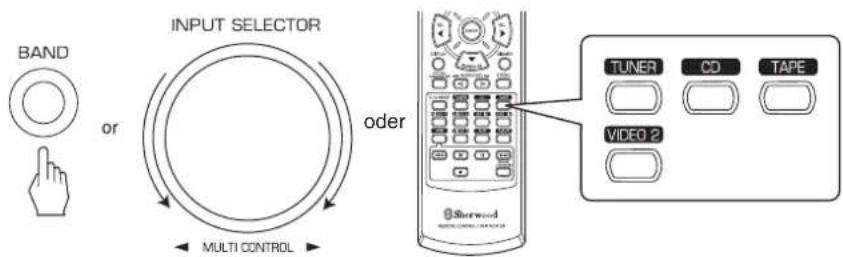
text_image
BAND or INPUT SELECTOR oder MULTI CONTROL TUNER CD TAPE VIDEO 2-
Starten Sie die Aufnahme mit VIDEO 1.
-
Starten Sie die Wiedergabe des gewünschten Eingangs.
SONSTIGE FUNKTIONEN
Sleeptimer
- Mit dem Sleeptimer können Sie das System sich automatisch nach einer gewissen Zeit ausschalten lassen.
- Einstellen des Receivers auf automatische Ausschaltung nach einem voreingestellten Zeitraum.
DEUTSCH
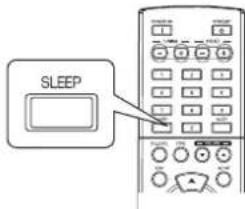
text_image
SLEEP- Mit jedem Tastendruck durchlaufen Sie die Voreinstellungen des Sleeptimers wie folgt: 10 → 20 → 30 → --- → 90 → OFF Einheit: Minuten
- Bei aktiviertem Sleepimer leuchtet, "m Display.
- Bei eingestellter Ausschaltzeit ist das Display nur schwach beleuchtet.
Einstellen der Helligkeit des Fluoreszenzdisplays

text_image
Dimmer Sherwood- Mit jedem Tastendruck schalten Sie die Helligkeit des Fluoreszenzdisplays wie folgt um: →ON →Dimmer →OFF
- Ist das Display deaktiviert (OFF), so aktivieren Sie es mit Tastendruck auf eine beliebige Taste.
Anzeige des Betriebsstatus
Während der Wiedergabe:
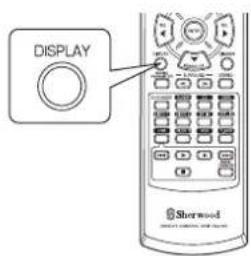
text_image
DISPLAY Sherwood- Mit jedem Tastendruck schalten Sie den Anzeigemodus wie folgt um:
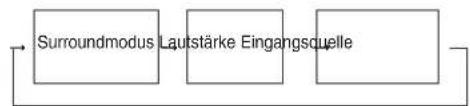
flowchart
graph LR
    A["Surroundmodus"] --> B["Lautstärke Eingangsquelle"]
    B --> C["Bottom Path"]
- Stehen in Ihrem Land die Funktionen des RDS Tuners zur Verfügung, so entnehmen Sie Einzelheiten zu den UKW-Modus-Informationen bitte dem Abschnitt „DISPLAY“ auf Seite 23.
FUNKTIONEN AUF DER GERÄTEFRONT
- Sie können die unterschiedlichen Funktionen einfach mit den entsprechenden Tasten auf der Gerätefront aufrufen.
- Wählen Sie den gewünschten Einstellmodus.

- Abhängig von der gewählten Eingangsquelle wird der Modus mit jedem Tastendruck wie folgt umgeschaltet und für einige Sekunden angezeigt:
→[PRESET →TUNE →] CH LEVEL OFF ← TONE < ← D/A SET> (Aktuelle Eingangsquelle)
[ ]: Nur wählbar, wenn der Tuner gewählt ist. < >: Nur wählbar, wenn VIDEO 1, VIDEO 2 gewählt ist.
- Geben Sie den gewählten Modus ein.

- Der Einstellmodus wird nach einigen Sekunden deaktiviert. In diesem Fall wiederholen Sie bitte Schritt 1.
- Stellen Sie den gewählten Modus wunschgemäß ein.
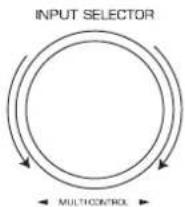
■ „PRESET" (Senderspeichermodus) wählen
- Mit jeder Drehung des Drehknopfes wird ein neuer Senderspeicher aufgerufen (Einzelheiten siehe Abschnitt „Aufrufen der Senderspeicher“ auf Seite 21).
■ „TUNE“ (automatische/manuelle Sendersuche) wählen
- Abhängig davon, ob der Drehknopf über mehrere Stufen oder langsam einzeln gedreht wird, haben Sie die automatische oder die manuelle Sendersuche (Einzelheiten siehe Abschnitte „Automatische Sendersuche“ und „Manuelle Sendersuche“ auf Seite 20).
■ „CH LEVEL“ (Kanalpegeleinstellmodus) wählen
- Sie können die Kanalpegel wunschgemäß einstellen (Einzelheiten siehe Abschnitt „Einstellen des Kanalpegels“ auf Seite 18).
① Mit MODE wählen Sie den gewünschten Kanal.
② Mit dem Drehknopf stellen Sie den Pegel des gewählten Kanals wunschgemäß ein.
③ Wiederholen Sie die obigen Schritte ① und ② zur Einstellung der anderen Kanalpegel.
■ „D/A SET" (Digital-/Analogeingangsmodus) wählen
- Mit jeder Drehung des Drehknopfes schalten Sie zwischen dem Digital- (optisch oder koaxial) und dem Analogeingang um (Einzelheiten siehe Abschnitt „Auswahl von VIDEO 1, VIDEO 2 als Eingangsquelle“ auf Seite 12).
■ „TONE" (Toneinstellmodus) wählen
- Mit jeder Drehung des Drehknopfes schalten Sie den Ton wie folgt um: OFF: Hören einer Programmquelle ohne den Toneffekt („DIRECT“ leuchtet im Display). ON: Manuelle Einstellung des Tons („DIRECT“ erlischt im Display).
◆ Ton bei Einstellung von TONE auf ON (Bässe und Höhen) einstellen
① Mit MODE wählen Sie den gewünschten Ton.
② Mit dem Drehknopf stellen Sie den gewählten Ton wunschgemäß ein.
③ Wiederholen Sie die obigen Schritte ① und ② zur Einstellung der anderen Toneinstellungen.
- Einstellmodus verlassen.

Systemeinstellungen
- Das Einstellungsmenü wird im Fluoreszenzdisplay angezeigt und vereinfacht die Einstellungen. In den meisten Situationen müssen Sie diese Einstellung während der Installation und des Layouts Ihres Heimkinos nur einmal durchführen und eine spätere Umstellung ist nur in Ausnahmefällen nötig. Das Einstellungsmenü besteht aus 5 Hauptmenüs: System, Eingang, Lautsprechereinstellung, Kanal-Pegel und Parameter. Diese Menüs sind in verschiedene Untermenüs unterteilt.
1. Rufen Sie das Einstellungsmenü auf.
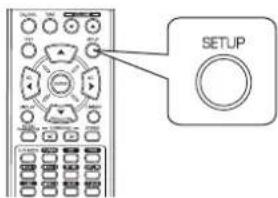
text_image
SETUPSYSTEM
• Das Einstellungsmenü wird angezeigt.
- Mit erneutem Tastendruck verlassen Sie das Menü wieder.
2. Wählen Sie das gewünschte Menü mit den NAVIGATIONSTASTEN AUFWÄRTS (▲)/ABWÄRTS (▼).
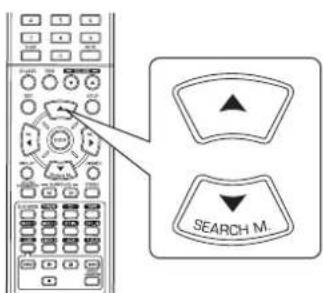
text_image
SEARCH M.3. Bestätigen Sie Ihre Auswahl.

text_image
ENTER- Bei Auswahl von „SYSTEM“ siehe „SYSTEMEINSTELLUNGEN“ auf Seite 29.
- Bei Auswahl von „INPUT“ siehe „EINGANGSEINSTELLUNGEN“ auf Seite 31.
- Bei Auswahl von „SPK SET“ siehe „LAUTSPRECHEREINSTELLUNGEN“ auf Seite 32.
- Bei Auswahl von „CH LEVEL“ siehe „KANALPEGELEINSTELLUNGEN“ auf Seite 36.
- Bei Auswahl von „PARAMTR“ siehe „PARAMETEREINSTELLUNGEN“ auf Seite 38.
- Bei Auswahl von „EXIT“ verlassen Sie das Einstellungsmenü.
■Systemeinstellungen Ablaufdiagramm
- Der Ablauf der Systemeinstellungen ist wie folgt :
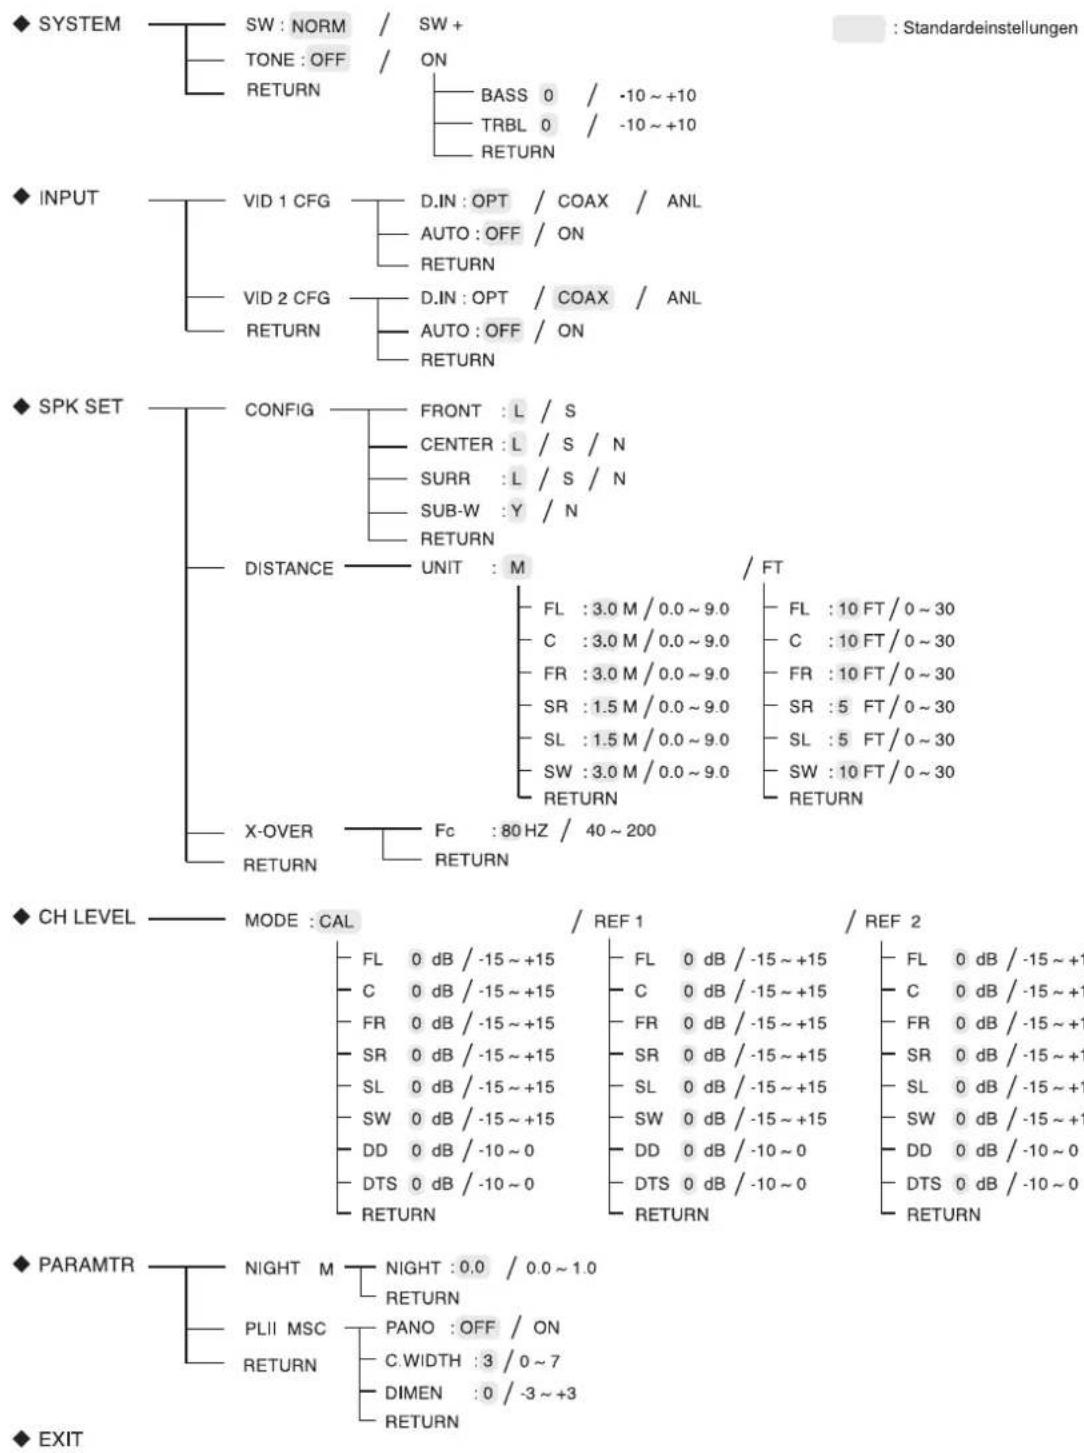
- Bei Auswahl von „RETURN“ im Untermenü kehren Sie in das vorherige Menü zurück.
■ Bitte beachten Sie: Während der Systemeinstellungen sind nur die (POWER ON/) STANDBY Taste sowie die für die Systemeinstellungen notwendigen Tasten belegt.
SYSTEMEINSTELLUNGEN
text_image
◆ SYSTEM SW : NORM / SW + TONE : OFF / ON RETURN BASS 0 / -10 ~ +10 TRBL 0 / -10 ~ +10 RETURN- SW (SUBWOOFER): Auswahl des gewünschten Subwoofermodus.
• TONE: Klangeinstellungen (Bässe und Höhen). -
RETURN: Rückkehr in das vorherige Menü.
-
Mit den NAVIGATIONSTASTEN AUFWÄRTS (▲) /ABWÄRTS (▼) wählen Sie das gewünschte Menüelement.
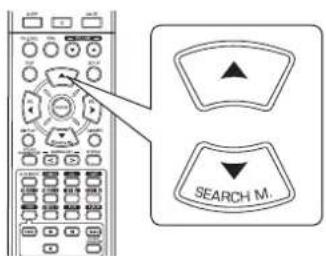
text_image
SEARCH M.- Mit den NAVIGATIONSTASTEN LINKS (◀)/RECHTS (▶) stellen Sie das gewählte Menüelement ein.

text_image
SEL SELAuswahl des SUBWOOFER-Modus
- Der „SW +“ Modus ist nur wirksam, wenn im SPK SET Menü „FRONT“ auf „L“ und „SUB- W“ auf „Y“ eingestellt ist (Einzelheiten entnehmen Sie bitte dem Abschnitt „LAUTSPRECHEREINSTELLUNGEN“ auf Seite 32).
- Bei Wiedergabe einer 2-Kanalquelle in MATRIX, CHURCH, THEATER, HALL oder STADIUM Modus werden die Niederfrequenzen über den Subwoofer ausgegeben, unabhängig von der Moduseinstellung des Subwoofers.
NORM : Sind die Niederfrequenzsignale von Kanälen auf „L“ eingestellt, so werden sie nur von diesen Kanälen reproduziert. In diesem Modus sind die Niederfrequenzsignale, welche vom Subwoofer reproduziert werden, nur die Niederfrequenzsignale von LFE (von den Mehrkanalquellen, welche LFE-Kanäle (Low Frequency Effects), auch „1“ Kanal genannt) enthalten und die Kanäle müssen auf „S“ eingestellt sein.
SW +: Es werden die auf „L“ eingestellten Niederfrequenzsignale von Kanälen gleichzeitig von jenen Kanälen und dem Subwooferkanal reproduziert. In diesem Modus verläuft der Niederfrequenzbereich einheitlicher durch den Raum, jedoch kann es in Abhängigkeit von Raumgröße und Grundriss zu Störungen mit verringerter tatsächlicher Lautstärke im Niederfrequenzbereich kommen.
Auswahl des KLANGES (TONE)
OFF: Wiedergabe einer Programmquelle ohne Klangeffekte („DIRECT“ Statusanzeige leuchtet auf.)
↑
ON: Klangeinstellung nach Ihrem persönlichen Geschmack („DIRECT“ Statusanzeige erlischt.)
■Bei Aktivierung von TONE stellen Sie den Klang ein (Bässe und Höhen)
① Mit den NAVIGATIONSTASTEN AUFWÄRTS (▲)/ABWÄRTS (▼) wählen Sie den gewünschten Klang.
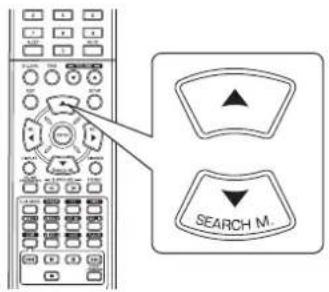
text_image
SEARCH M.
Bei Auswahl der BASS
BASS 0
② Mit den NAVIGATIONSTASTEN LINKS (◀)/RECHTS (▶) stellen Sie den gewählten Klang wunschgemäß ein.
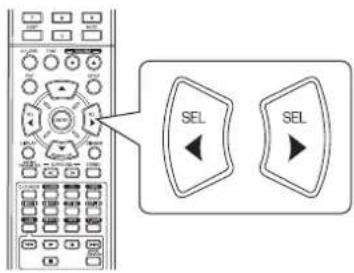
text_image
SEL SEL- Der Klangpegel kann im Bereich -10 \~ +10 dB eingestellt werden.
- Allgemein empfehlen wir, Bässe und Höhen auf 0 dB (Flat Level) einzustellen.
- Extreme Einstellungen mit hoher Lautstärke können zur Beschädigung Ihrer Lautsprecher führen.
- Wiederholen Sie die vorstehenden Schritte ① und ② zur Fertigstellung der Einstellungen.
EINGANGSEINSTELLUNGEN
◆ INPUT
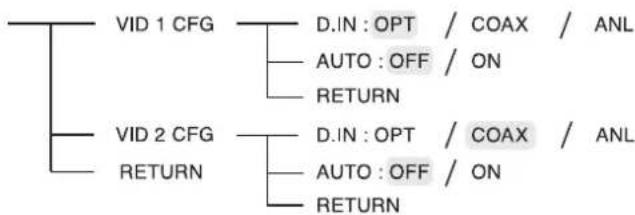
flowchart
graph TD
    A["VID 1 CFG"] --> B["D.IN: OPT / COAX / ANL"]
    A --> C["AUTO: OFF / ON"]
    A --> D["RETURN"]
    E["VID 2 CFG"] --> F["D.IN: OPT / COAX / ANL"]
    E --> G["AUTO: OFF / ON"]
    E --> H["RETURN"]
• D.IN (DIGITAL IN): Zuordnung der angeschlossenen DIGITALEINGÄNGE zu dem gewünschten Eingang.
• AUTO (AUTO SURROUND): Auswahl des automatischen Surroundmodus oder des manuellen Surroundmodus.
- RETURN: Rückkehr in das vorherige Menü.
- Mit den NAVIGATIONSTASTEN AUFWÄRTS(▲)/ABWÄRTS (▼) wählen Sie die gewünschte Eingangsquelle, danach drücken Sie ENTER.
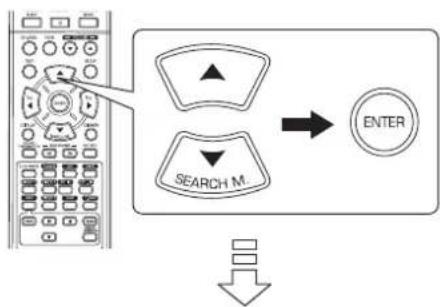
flowchart
graph TD
    A["Search M"] --> B["ENTER"]
    C["Input"] --> A
    D["Down Arrow"] --> B
Beispiel) Bei Auswahl der VIDEO 2
DIN CORX
- Mit den NAVIGATIONSTASTEN AUFWÄRTS (▲)/ABWÄRTS (▼) wählen Sie das gewünschte Menüelement.
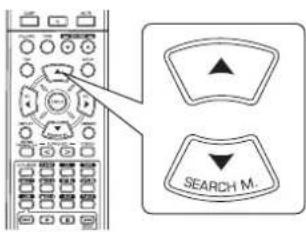
text_image
SEARCH M.- Mit den NAVIGATIONSTASTEN LINKS (◀)/RECHTS (▶) stellen Sie das gewählte Menüelement wunschgemäß ein.
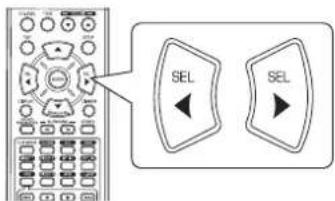
text_image
Diagram showing a remote control with two 'SEL' buttons and directional arrows indicating selection or navigation.Auswahl des DIGITALEINGANGS (DIGITAL IN)
- Sie müssen die angeschlossenen DIGITALEINGÄNGE den gewünschten VIDEO 1 und VIDEO 2 zuordnen (Einzelheiten finden Sie im Abschnitt „ANSCHLUSS DIGITALER EINGÄNGE“ auf Seite 5).
- Wählen Sie zwischen OPT (optisch), COAX (koaxial) und ANL (analog).
- Für den Fall, dass ein DIGITALEINGANG zwei oder mehr Eingangsquellen zugeordnet ist, können die digitalen Audiosignale vom gleichen DIGITALEINGANG gehört werden, wenn diese Eingangsquellen gewählt sind.
- Bei Auswahl von TUNER, TAPE oder CD als Eingangsquelle kann der Digitaleingang („OPT“, „COAX“) nicht gewählt werden.
■Bitte beachten Sie :
Auswahl von AUTO SURROUND
- Sie können entweder den automatischen oder den manuellen Surroundmodus wählen.
OFF(Manueller Surroundmodus): Wählen Sie den gewünschten Surroundmodus für das Eingangssignal mit dem mit den
SURROUND (▶, >/◀, <) Tasten.(Einzelheiten finden Sie im Abschnitt „SURROUND SOUND“ auf Seite 15.)
ON(Automatischer Surroundmodus) : Der optimale Surroundmodus wird automatisch abhängig vom Eingangssignalformat gewählt.
■Bitte beachten Sie :
- Selbst bei Auswahl des Auto-Surroundmodus und gleichem digitalen Signalformat als Eingang kann der optimale Surroundmodus abhängig von der Einstellung des Lautsprechertyps auf „N (None)" abweichen.
- Bei Eingang von 96 kHz PCM Digitalsignal wird nur der Stereomodus gewählt.
LAUTSPRECHEREINSTELLUNGEN
- Nach der Installation des Receivers und dem Anschluss aller Komponenten nehmen Sie die Lautsprechereinstellungen für optimalen Klang entsprechend Ihrer Umgebung und des Lautsprecher-Layouts vor.
- Auch beim Austausch von Lautsprechern oder ihrer Umsetzung, der Veränderung der Sitzposition oder des Layouts Ihrer Umgebung sollten Sie eine neue Einstellung der Lautsprecher vornehmen.
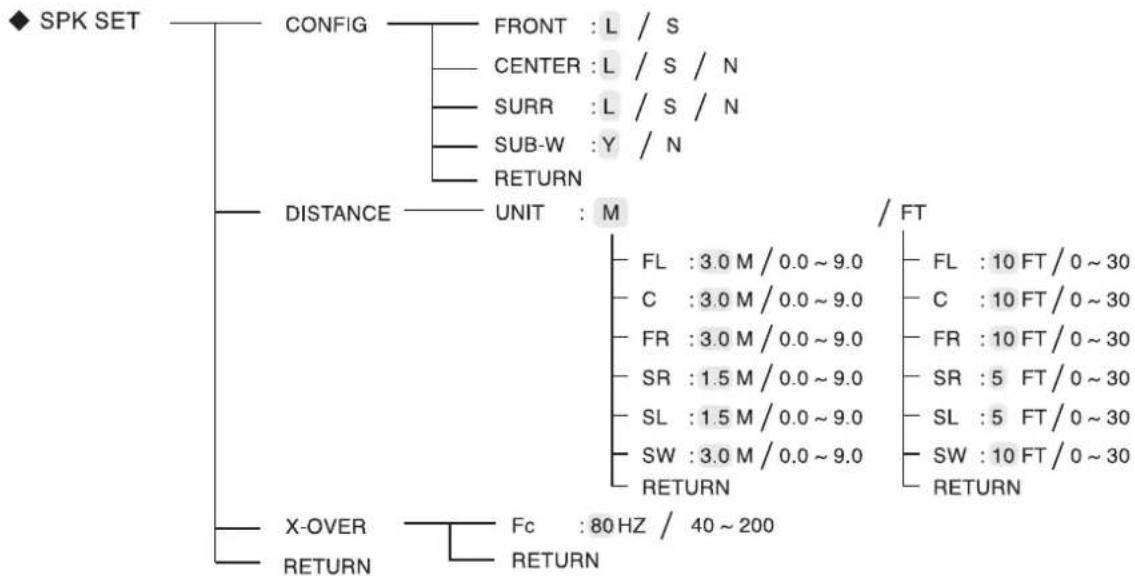
flowchart
graph TD
    A["◆ SPK SET"] --> B["CONFIG"]
    B --> C["FRONT : L / S"]
    B --> D["CENTER : L / S / N"]
    B --> E["SURR : L / S / N"]
    B --> F["SUB-W : Y / N"]
    B --> G["RETURN"]
    A --> H["DISTANCE"]
    H --> I["UNIT : M"]
    I --> J["FL : 3.0 M / 0.0 ~ 9.0"]
    I --> K["C : 3.0 M / 0.0 ~ 9.0"]
    I --> L["FR : 3.0 M / 0.0 ~ 9.0"]
    I --> M["SR : 1.5 M / 0.0 ~ 9.0"]
    I --> N["SL : 1.5 M / 0.0 ~ 9.0"]
    I --> O["SW : 3.0 M / 0.0 ~ 9.0"]
    I --> P["RETURN"]
    A --> Q["X-OVER"]
    Q --> R["FC : 80 Hz / 40 ~ 200"]
    Q --> S["RETURN"]
    style A fill:#f9f,stroke:#333
    style H fill:#ccf,stroke:#333
    style Q fill:#cfc,stroke:#333
- CONFIG (KONFIGURATION): Auswahl der Größe der angeschlossenen Lautsprecher.
- DISTANCE: Eingabe des Abstands zwischen der Sitzposition und jedem Lautsprecher zur Einstellung der automatischen Verzögerungszeiten für optimale Surroundwiedergabe.
• X-OVER (CROSSOVER): Auswahl der gewünschten Überschneidungsfrequenz. - RETURN: Rückkehr in das vorherige Menü.
Auswahl der KONFIGURATION
- Mit den NAVIGATIONSTASTEN AUFWÄRTS (▲)/ABWÄRTS (▼) wählen Sie „CONFIG“, danach drücken Sie ENTER.
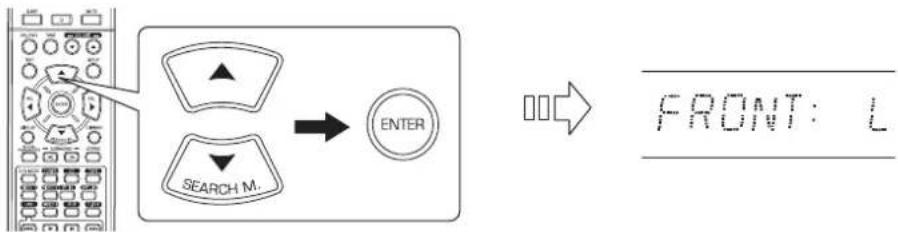
flowchart
graph LR
    A["User Interface"] --> B{Search M.}
    B --> C["ENTER"]
    C --> D["→"]
    D --> E["FRONT: L"]
- Mit den NAVIGATIONSTASTEN AUFWÄRTS (▲)/ABWÄRTS (▼) wählen Sie den gewünschten Lautsprecher.
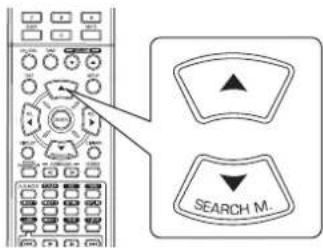
text_image
SEARCH M.- Mit den NAVIGATIONSTASTEN LINKS (◀)/RECHTS (▶) stellen Sie den gewählten Lautsprecher wunschgemäß ein.

text_image
SEL SEL- Abhängig von der Bauart Ihrer Lautsprecher wählen Sie eine der nachstehenden Lautsprechertypen.
L (groß): Wählen Sie diese Einstellung beim Anschluss von Lautsprechern, welche den Sound unterhalb der Überschneidungsfrequenz voll reproduzieren können.
S (klein): Wählen Sie diese Einstellung beim Anschluss von Lautsprechern, welche den Sound unterhalb der Überschneidungsfrequenz nicht voll reproduzieren können. Bei entsprechender Auswahl wird der Sound unterhalb der Überschneidungsfrequenz an den Subwoofer oder Lautsprecher mit Einstellung „L (groß)“ übertragen (sofern kein Subwoofer benutzt wird).
N (keiner): Wählen Sie diese Einstellung, wenn kein Lautsprecher angeschlossen ist. Bei entsprechender Auswahl wird der Sound an Lautsprecher übertragen, die nicht auf „N (keiner)“ eingestellt sind.
Y (Ja)/N (Nein): Wählen Sie die entsprechende Einstellung abhängig davon, ob ein Subwoofer angeschlossen ist oder nicht.
■Bitte beachten Sie
- Bei der Einstellung von Lautsprechern auf „S (klein)” müssen Sie deren Überschneidungsfrequenz korrekt entsprechend derer Frequenzeigenschaften einstellen (Einzelheiten finden Sie im Abschnitt „Auswahl der ÜBERSCHNEIDUNGSFREQUENZ (CROSSOVER)” auf Seite 35).
- Ist „SUB-W“ auf „N (Nein)“ eingestellt, so ist „FRONT“ automatisch auf „L (groß)“ eingestellt.
-
Ist „FRONT“ auf „S (klein)“ eingestellt, so können „CENTER“ und „SURR“ nicht auf „L (groß)“ eingestellt werden.
-
Wiederholen Sie die vorstehenden Schritte 2 und 3, bis alle Lautsprecher auf den gewünschten Modus eingestellt sind.
■ Informationen zur Größe der Lautsprecher
- Wählen Sie „L (groß)“ oder „S (klein)“ nicht entsprechend der körperlichen Größe der Lautsprecher, sondern entsprechend der Kapazität zur Wiedergabe von Niederfrequenzsignalen (Bässe unterhalb der Frequenz, welche im „X-OVER“ Menü eingestellt ist).
- Sind Sie sich nicht sicher, so versuchen Sie den Sound in beiden Einstellungen (stellen Sie die Lautstärke gering genug ein, um die Lautsprecher nicht zu beschädigen), um die korrekte Einstellung zu bestimmen.
Auswahl der ENTFERNUNG (DISTANCE)
- Mit den NAVIGATIONSTASTEN AUFWÄRTS (▲)/ABWÄRTS (▼) wählen Sie DISTANCE, danach drücken Sie ENTER.

flowchart
graph TD
    A["Search M."] --> B["ENTER"]
    C["Arrow"] --> B
    D["Arrow"] --> B
UNIT : M
- Mit den NAVIGATIONSTASTEN AUFWÄRTS (▲) /ABWÄRTS (▼) wählen Sie den gewünschten Lautsprecher.
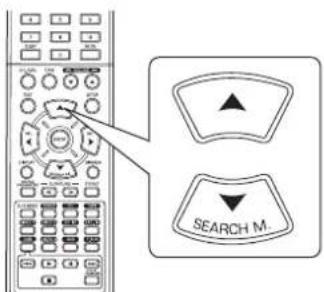
text_image
SEARCH M...■ Bitte beachten Sie :
- Sie können die Lautsprecher nicht auf „N(None oder No)“ einstellen.
- Mit den NAVIGATIONSTASTEN LINKS (◀)/RECHTS (▶) stellen Sie die gewählten Lautsprecher wunschgemäß ein.
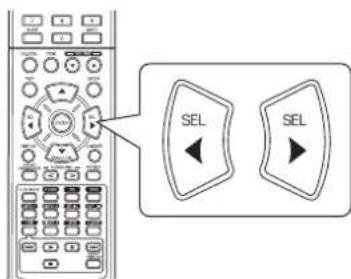
text_image
Diagram showing a remote control interface with two 'SEL' buttons and directional arrows pointing to the left panel.■Auswahl der gewünschten Einheit
- Wählen Sie zwischen „M (Meter)" und „FT (Fuß)".
- Nach der Auswahl der Einheit werden die Abstände automatisch in die gewählte Einheit umgerechnet.
■ Einstellen der Entfernung
- Sie können die Entfernung zwischen 0,0 und 9,0 m in 0,3 Meter Intervallen einstellen (oder 0 \~ 30 Fuß in 1-Fuß-Schritten).
- Wiederholen Sie die vorstehenden Schritte 2 und 3, bis alle Entfernungen wunschgemäß eingestellt sind.
■ Hinweise zum Abstand der Lautsprecher
Bei Mehrkanal-Surroundwiedergabe von Dolby Digital Quellen sollten sich mittlerer, Surround- und Subwoofer-Lautsprecher idealerweise im gleichen Abstand von der Sitzposition befinden, wie die vorderen Lautsprecher. Durch die Eingabe des Abstands zwischen der Sitzposition und jedem Lautsprecher werden die Verzögerungszeiten für mittleren, Surround und Subwoofer-Lautsprecher automatisch eingestellt, um eine ideale Hörumgebung zu schaffen, als befänden sich mittlerer, Surround- und Subwoofer-Lautsprecher in idealer Position.
Auswahl der ÜBERSCHNEIDUNGSFREQUENZ (CROSSOVER)
- Bei Einstellung der Lautsprecher auf „S (klein)“ achten Sie bitte darauf, die Überschneidungsfrequenz korrekt entsprechend ihrer Frequenzeigenschaften einzustellen.
- Mit den NAVIGATIONSTASTEN AUFWÄRTS (▲) /ABWÄRTS (▼) wählen Sie „X-OVER“, danach drücken Sie ENTER.
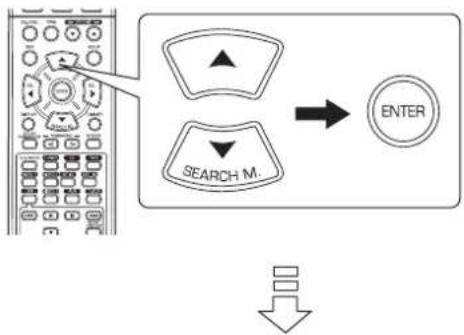
flowchart
graph TD
    A["Search M."] --> B["ENTER"]
    C["Arrow"] --> A
F_c : 80HZ
- Mit den NAVIGATIONSTASTEN LINKS (◀)/RECHTS (▶) stellen Sie die gewünschte Überschneidungsfrequenz wunschgemäß ein.

text_image
SEL SEL- Sie können die Überscheidungsfrequenz im Bereich zwischen 40 und 200 Hz in 10 Hz Intervallen einstellen.
■ Informationen zur Überschneidungsfrequenz
- Bei Lautsprechereinstellung auf „S (klein)” werden die Niederfrequenzen auf diesen Kanälen, welche unterhalb der Überschneidungsfrequenz liegen, vom Subwoofer oder den vorderen Lautsprechern, die auf „L (groß)“ eingestellt sind, übertragen (sofern kein Subwoofer benutzt wird).
- Entnehmen Sie Einzelheiten bitte den Bedienungsanleitungen der anzuschließenden Lautsprecher. Ist der Frequenzbereich Ihrer Lautsprecher 100 Hz\~20 kHz, so muss die Überschneidungsfrequenz auf 100 Hz (oder etwas höher) eingestellt werden.
KANALPEGELEINSTELLUNGEN
◆ CH LEVEL —— MODE : CAL

text_image
- FL 0 dB / -15 ~ +15 - C 0 dB / -15 ~ +15 - FR 0 dB / -15 ~ +15 - SR 0 dB / -15 ~ +15 - SL 0 dB / -15 ~ +15 - SW 0 dB / -15 ~ +15 - DD 0 dB / -10 ~ 0 - DTS 0 dB / -10 ~ 0 - RETURN/ REF 1 / REF 2

text_image
FL 0 dB / -15 ~ +15 C 0 dB / -15 ~ +15 FR 0 dB / -15 ~ +15 SR 0 dB / -15 ~ +15 SL 0 dB / -15 ~ +15 SW 0 dB / -15 ~ +15 DD 0 dB / -10 ~ 0 DTS 0 dB / -10 ~ 0 RETURN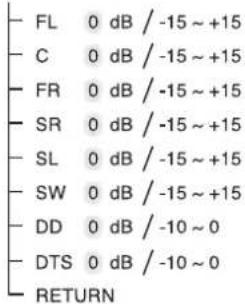
text_image
FL 0 dB / -15 ~ +15 C 0 dB / -15 ~ +15 FR 0 dB / -15 ~ +15 SR 0 dB / -15 ~ +15 SL 0 dB / -15 ~ +15 SW 0 dB / -15 ~ +15 DD 0 dB / -10 ~ 0 DTS 0 dB / -10 ~ 0 RETURN■ Bitte beachten Sie : Abhängig von den Lautsprechereinstellungen („N (None/No oder Keiner)“) können einige Kanäle nicht gewählt werden.
Einstellen des aktuellen Kanalpegels
- Sie können die aktuellen Kanalpegel wunschgemäß einstellen. Diese eingestellten Pegel werden nur im Benutzerspeicher („CAL“) abgelegt, nicht im Voreinstellungsspeicher („REF 1“, „REF 2“).
-
Nach der Einstellung der Kanalpegel mit dem Testton stellen Sie die Kanalpegel entweder entsprechend der Programmquellen oder nach eigenem Geschmack ein (Einzelheiten finden Sie im Abschnitt „Einstellen der einzelnen Kanäle mit dem Testton“ auf Seite 17).
-
Mit den NAVIGATIONSTASTEN AUFWÄRTS (▲) /ABWÄRTS (▼) wählen Sie den gewünschten Kanal.

text_image
SEARCH M.Beispiel) Auswahl LFE für Dolby Digital Quelle


- Mit den NAVIGATIONSTASTEN LINKS (◀)/RECHTS (▶) stellen Sie den Pegel des gewählten Kanals oder LFE der Programmquelle wunschgemäß ein.

text_image
SEL SEL- Der LFE-Pegel kann im Bereich zwischen -10 und 0 dB, andere Kanalpegel können im Bereich zwischen -15 und +15 dB eingestellt werden.
-
Allgemein empfehlen wir, den LFE-Pegel auf 0 dB einzustellen (der empfohlene LFE-Pegel für einige frühe DTS Software ist jedoch -10 dB). Erscheinen die empfohlenen Pegel zu hoch, so stellen Sie diese niedriger ein, falls nötig.
-
Wiederholen Sie die obigen Schritte 1 und 2 zur Einstellung aller Kanalpegel.
Speicherung der eingestellten Kanalpegel
- Sie können die eingestellten Kanalpegel in den Voreinstellungen („REF 1“, „REF 2“) speichern und jederzeit aufrufen.
- Nach den Schritten 1 \~ 3 in „Einstellen des aktuellen Kanalpegels“ auf Seite 36 drücken Sie ENTER.
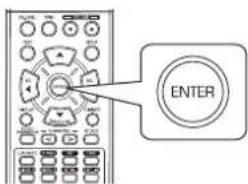
text_image
ENTER
MODEREF
- Danach blinkt die „1“ der „REF 1“ Anzeige.
- Mit den NAVIGATIONSTASTEN LINKS (◀)/RECHTS (▶) wählen Sie die gewünschte Voreinstellung, danach drücken Sie ENTER.
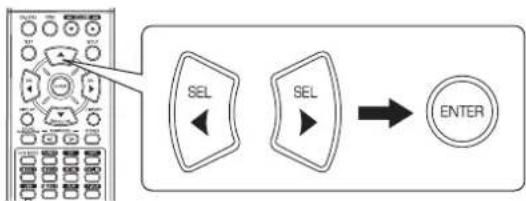
flowchart
graph LR
    A["Control Panel"] --> B["SEL"]
    B --> C["ENTER"]
- Mit jedem Tastendruck auf die NAVIGATIONSTASTEN LINKS (◀) oder RECHTS (▶) wird zwischen „REF 1“ und „REF 2“ umgeschaltet.
• Die eingestellten Kanalpegel wurden nun in den gewählten Speicher übernommen.
Aufrufen der gespeicherten Kanalpegel
- Mit den NAVIGATIONSTASTEN AUFWÄRTS (▲)/ABWÄRTS (▼) wählen Sie „MODE \~”.

text_image
SEARCH M...
MODE CAL
- Möglicherweise wird „CAL“ anstatt „REF 1“ oder „REF 2“ angezeigt.
- Mit den NAVIGATIONSTASTEN LINKS (◀)/RECHTS (▶) wählen Sie zwischen REF 1 und REF 2.

text_image
SEL SEL- Hiermit werden die im gewählten Voreinstellungsspeicher abgelegten Kanalpegel angezeigt.
PARAMETEREINSTELLUNGEN

flowchart
graph TD
    A["PARAMTR"] --> B["NIGHT M"]
    A --> C["PLII MSC"]
    A --> D["RETURN"]
    B --> E["NIGHT : 0.0 / 0.0 ~ 1.0"]
    B --> F["RETURN"]
    C --> G["PANO : OFF / ON"]
    C --> H["C.WIDTH : 3 / 0 ~ 7"]
    C --> I["DIMEN : 0 / -3 ~ +3"]
    C --> J["RETURN"]
- NIGHT M (NACHTMODUS): Einstellen der Kompression des Dynamikbereichs zur besseren Hörbarkeit schwacher Geräusche bei niedrigem Lautstärkepegel.
- PLII MSC (DOLBY PLII MUSIC): Einstellen der unterschiedlichen Surroundparameter für optimale Surroundeffekte.
- RETURN: Rückkehr in das vorherige Menü.
Auswahl des NACHTMODUS
- Diese Funktion komprimiert den Dynamikbereich zuvor spezifizierter Teile des Dolby Digital oder DTS Soundtracks (mit extrem hoher Lautstärke) zur Minimierung der Lautstärkedifferenz zwischen den spezifizierten und nicht spezifizierten Teilen. Dies vereinfacht das Hören des Soundtracks des Nachts mit heruntergeregelter Lautstärke.
■Bitte beachten Sie :
• Die Nachtmoduseinstellung ist nur gültig, wenn die Digitalsignale von Dolby Digital oder DTS Programmquellen stammen.
- Bei einiger Dolby Digital oder DTS Software ist die Nachtmoduseinstellung möglicherweise nicht verfügbar.
- Mit den NAVIGATIONSTASTEN AUFWÄRTS (▲) /ABWÄRTS (▼) wählen Sie „NIGHT M“, danach drücken Sie ENTER.
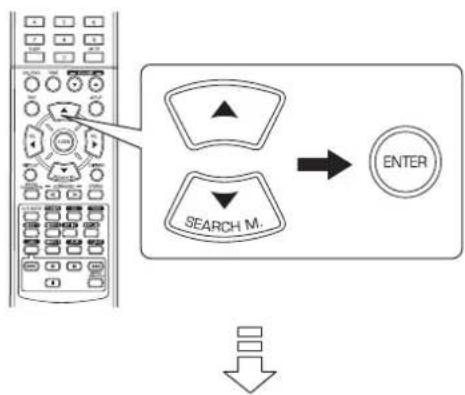
flowchart
graph TD
    A["Remote Control Panel"] --> B["Search Mode"]
    B --> C["ENTER"]
    style A fill:#f9f,stroke:#333
    style B fill:#ccf,stroke:#333
    style C fill:#cfc,stroke:#333
NIGHT:0.0
- Mit den NAVIGATIONSTASTEN LINKS (◀)/RECHTS (▶) stellen Sie den Dynamikbereich der Kompression ein.
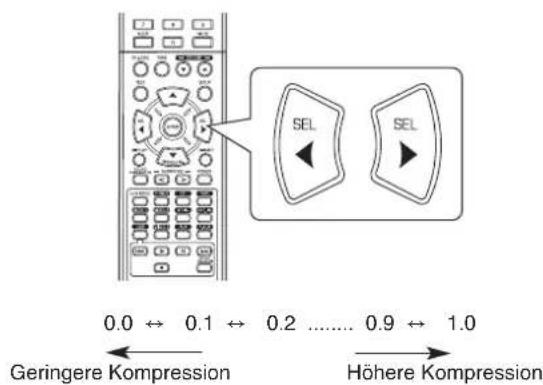
text_image
0.0 ↔ 0.1 ↔ 0.2 ...... 0.9 ↔ 1.0 Geringere Kompression Höhere KompressionAuswahl von DOLBY PLII MUSIC
-
Sie können die unterschiedlichen Surroundparameter für optimale Surroundeffekte einstellen.
■ Bitte beachten Sie: Die Parametereinstellungen sind nur im Dolby Pro Logic II Musikmodus gültig. -
Mit den NAVIGATIONSTASTEN AUFWÄRTS (▲) /ABWÄRTS (▼) wählen Sie „PLII MSC“, danach drücken Sie ENTER.
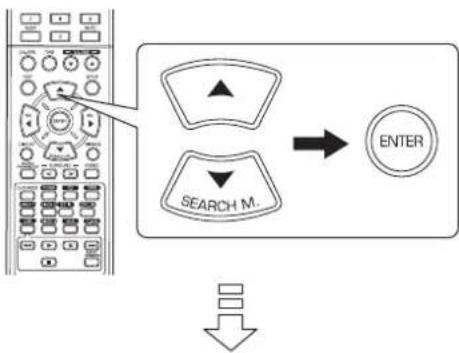
flowchart
graph TD
    A["Remote Control Panel"] --> B["Search Mode"]
    B --> C["ENTER"]
    D["Down Arrow"] --> B
PANO: OFF
- Mit den NAVIGATIONSTASTEN AUFWÄRTS (▲) /ABWÄRTS (▼) wählen Sie den gewünschten Parameter.
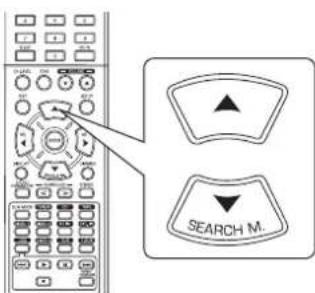
text_image
SEARCH M.- Mit den NAVIGATIONSTASTEN LINKS (◀)/RECHTS (▶) stellen Sie den gewählten Parameter wunschgemäß ein.
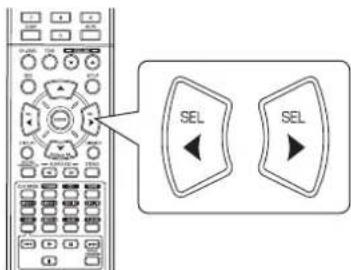
text_image
Diagram showing a remote control interface with two 'SEL' buttons and directional arrows pointing to the left panel.■Auswahl des „PANO (Panorama)” Modus
Dieser Modus erweitert das vordere Stereo-Klangbild zum Einschluss der Surround-Lautsprecher für einen aufregenden „Wraparound“ Effekt mit Seitenwandabbildung. Wählen Sie „OFF“ oder „ON“ (Standardeinstellung: OFF).
■Auswahl der „C. WIDTH (Mittlere Breiten)” Regelung Hier stellen Sie das mittlere Klangbild ein, sodass es nur über den mittleren Lautsprecher, nur von den linken/rechten Lautsprechern als Phantom-Klangbild oder von allen drei vorderen Lautsprechern in unterschiedlichen Maßen gehört wird. Die Einstellung erfolgt in 8 Stufen zwischen 0 und 7 (Standardeinstellung: 3).
■Auswahl der „DIMEN (Größen)“ Regelung
Hier wird das Klangfeld schrittweise mehr nach vorn oder nach hinten eingestellt. Die Einstellung erfolgt in 7 Stufen zwischen
-3 und +3 (Standardeinstellung: 0).
4. Wiederholen Sie die vorstehenden Schritte 2 und 3 zur Einstellung weiterer Parameter.
Störungserkennung
Kommt es zu einer Fehlfunktion, so sehen Sie sich bitte zunächst die nachstehende Tabelle an, bevor Sie sich an den Kundendienst wenden.
Können Sie die Fehlfunktion nicht abstellen, so schalten Sie den Receiver aus und danach wieder ein. Kommen Sie auch hiermit nicht weiter, so wenden Sie sich bitte an Ihren Fachhändler. Unter keinen Umständen versuchen Sie selbst, die Reparatur durchzuführen, hiermit verlieren Sie Ihre Garantieansprüche.
| PROBLEM MÖGLICHE URSACHE LÖSUNGSVORSCHLAG | ||
| Keine Spannungsversorgung. | Das Netzkabel ist nicht angeschlossen.Schlechter Anschluss des Netzkabels oder Steckdose defekt. | Schließen Sie das Netzkabel korrekt an.Überprüfen Sie die Steckdose. |
| Kein Ton. | Die Lautsprecherkabel sind nicht angeschlossen.Die Master-Lautstärke ist zu niedrig eingestellt.MUTE auf der Fernbedienung wurde gedrückt.Falsche Auswahl der Eingangsquelle.Falscher Anschluss der Komponenten. | Überprüfen Sie die Lautsprecheranschlüsse.Stellen Sie die Master-Lautstärke ein.Drücken Sie MUTE zur Aufhebung der Stummschaltung.Wählen Sie die gewünschte Eingangsquelle korrekt.Nehmen Sie die Anschlüsse korrekt vor. |
| Kein Ton von den Surround-Lautsprechern. | Surroundmodus ist deaktiviert (Stereomodus).Master-Lautstärke und Surroundpegel sind zu niedrig eingestellt.Es wird eine Monoquelle benutzt.Surround-Lautsprecher sind auf „N“ eingestellt. | Wählen Sie einen Surroundmodus.Stellen Sie Master-Lautstärke und Surroundpegel ein.Wählen Sie eine Stereo- oder Surroundquelle.Wählen Sie die gewünschte Surround-Lautsprechereinstellung. |
| Kein Ton vom mittleren Lautsprecher. | Surroundmodus ist deaktiviert (Stereomodus).Mittlerer Lautsprecher ist auf „N“ eingestellt.Master-Lautstärke und mittlerer Pegel sind zu niedrig eingestellt. | Wählen Sie den gewünschten Surroundmodus.Wählen Sie die gewünschte Einstellung des mittleren Lautsprechers.Stellen Sie Master-Lautstärke und mittleren Pegel ein. |
| Kein Empfang von Radiosendern. | Es ist keine Antenne angeschlossen.Die gewünschte Senderfrequenz ist nicht eingestellt.Die Antenne ist falsch ausgerichtet. | Schließen Sie eine Antenne an.Stellen Sie die gewünschte Senderfrequenz ein.Richten Sie die Antenne neu aus. |
| Senderspeicher können nicht empfangen werden. | Es wurde eine falsche Senderfrequenz gespeichert.Die Senderspeicher wurden gelöscht. | Speichern Sie die korrekte Senderfrequenz.Speichern Sie die Sender erneut. |
| Schlechter UKW Empfang. | Es ist keine Antenne angeschlossen.Die Antenne ist falsch ausgerichtet. | Schließen Sie eine Antenne an.Richten Sie die Antenne neu aus. |
| Ständige Zischgeräusche bei UKW-Empfang, insbesondere bei Stereosendern. | Schwache Signale. | Richten Sie die Antenne neu aus.Montieren Sie eine UKW-Hausantenne. |
| Ständige oder zeitweise Zischgeräusche bei MW-Empfang, insbesondere nachts. | Störungen werden durch Motoren, Neonlampen oder Gewitter usw. verursacht. | Halten Sie den Receiver von Störquellen fern.Montieren Sie eine MW-Hausantenne. |
| Fernbedienung funktioniert nicht. | Die Batterien sind erschöpft.Der Sensor wird behindert. | Tauschen Sie die Batterien aus.Entfernen Sie Hindernisse. |
Spezifikationen
■VERSTÄRKER
- Ausgangsleistung, Stereomodus, 6 Ω, THD 0,7%, 40 Hz\~20 kHz | 2×50W
• Gesamtklirrfaktor, 6 Ω, 50 W, 1 kHz | 0,09 %
• Intermodulationsverzerrung
60 Hz: 7 kHz = 4 : 1 SMPTE, 6 Ω, 50 W | 0,1 %
• Eingangsempfindlichkeit, 47 kΩ
Line (CD, TAPE, VIDEO) | 280 mV
• Rauschabstand, IHF „A“-bewertet
Line (CD, TAPE, VIDEO) | 92 dB
- Frequenzgang
Line (CD, TAPE, VIDEO), 20 Hz\~50 kHz | +0 dB, -3 dB
- Ausgangspegel
TAPE/VIDEO 1 REC, 2,2 kΩ | 280 mV
• Bässe-/Höhensteuerung, 100 Hz/10 kHz | ±10 dB - Surroundmodus, nur kanalgetrieben
Front Ausgangsleistung, 6 Ω, 1 kHz, THD 0,7 % | 70 W / 70 W
Mitte Ausgangsleistung, 6 Ω, 1 kHz, THD 0,7 % | 70 W
Surround Ausgangsleistung, 6 Ω, 1 kHz, THD 0,7 % | 70 W / 70 W
DIGITALAUDIO
• Abtastfrequenz | 32, 44,1, 48, 96 kHz
• Digitaler Eingangspegel
Koaxial, 75 Ω | 0,5 Vp-p
Optisch, 660 nm | -15 \~ -21 dBm
■UKW TUNER
• Frequenzbereich | 87,5 \~ 108 MHz
- Nutzbare Empfindlichkeit, THD 3%, Rauschabstand 26 dB | 12,8 dBf
• 46 dB Dämmungsempfindlichkeit, Mono/Stereo | 20,2 / 45,3 dBf
• Rauschabstand, 65 dBf, Mono/Stereo | 55 / 50 dB
• Gesamtkirrfaktor, 65 dBf, 1 kHz, Mono/Stereo | 0,5 / 1,0 %
• Frequenzgang, 30 Hz\~12 kHz | ±3,0 dB
• Stereotrennung, 1 kHz | 30 dB
• Erfassungsverhältnis | 4 dB
• ZF Gleichtaktunterdrückungsverhältnis | 80 dB
■MW TUNER
• Frequenzbereich | 522 \~ 1611 kHz
• Nutzbare Empfindlichkeit | 500 μV/m
• Rauschabstand | 40 dB
• Trennschärfe | 25 dB
ALLGEMEIN
- Spannungsversorgung | 230 V \~ 50 Hz
• Leistungsaufnahme | 200 W - Abmessungen (B×H×T, einschließlich überstehender Teile) | 440×141×358,5 mm
• Gewicht (netto) | 9,5 kg
Bitte beachten Sie: Änderung von Design und Spezifikationen, auch ohne Vorankündigung, vorbehalten.
Introduction
A LIRE AVANT D'UTILISER L'APPAREIL

ATTENTION:
AFIN DE REDUIRE LES RISQUE DE CHOC ELECTRIQUE, N'ENLEVEZ PAS LE COUVERCLE (OU LE PANNEAU ARRIERE). AUCUNE PIÈCE À L'INTÉRIEUR NE PEUT ÊTRE RÉPARÉE PAR L'UTILISATEUR. EN CAS DE PROBLÈME, S'ADRESSER À DU PERSONNEL TECHNIQUE QUALIFIÉ.

Ce symbole sert à avertir l'utilisateur de la présence dans le boîtier de l'appareil de tensions dangereuses non isolées posant des risques d'électrocution.

Ce symbole sert à avertir l'utilisateur que la documentation fournie avec le matériel contient des instructions importantes concernant l'exploitation et la maintenance (réparation).
AVERTISSEMENT : POUR REDUIRE TOUT RISQUE D'INCENDIE OU DE CHOC ÉLECTRIQUE, NE PAS EXPOSER CET APPAREIL À LA PLUIE OU À L'HUMIDITÉ.
Avertissements concernant l'installation
Remarque : Pour la dissipation de la chaleur, ne pas placer cet appareil dans un espace fermé, tel qu'une bibliothèque ou meuble similaire.
text_image
※ Remarque
text_image
MurNe pas couvrir les ouvertures de ventilation et ne pas placer d'autres équipements au dessus de l'appareil.
POUR VOTRE SECURITE
| EUROPE AUSTRALIE | 220 V - 240 V | Les appareils expédiés vers l'Australie sont conçus pour fonctionner uniquement à 240 V CA. Pour des raisons de sécurité, la fiche 3 broches doit être branchée uniquement dans une prise d'alimentation tripolaire standard connectée directement au circuit de mise à la terre de la maison. Les rallonges à utiliser avec cet équipement doivent être trifilaires et branchées correctement pour assurer une connexion à la terre. Les rallonges électriques inappropriées sont la cause de tous les accidents mortels. Le fait que l'appareil fonctionne de façon satisfaisante ne veut pas dire que la source d'alimentation est mise à la terre ou que l'installation est totalement sans risque. Pour votre sécurité, si vous avez un quelconque doute concernant la mise à la terre de la source d'alimentation, consultez un électricien qualifié.VOLTAGE PANEUROPEEN UNIFIETous les appareils peuvent être utilisées sur des sources d'alimentation 220-240 V CA. |
ATTENTION
- Laisser de l'espace autour de l'appareil pour assurer une ventilation suffisante.
- Eviter d'installer dans des endroits trop chauds ou trop froids, ou dans une zone exposée directement au soleil ou à équipement de chauffage.
- Protéger l'appareil contre l'humidité, l'eau et la poussière.
- Eviter que des objets étrangers pénètrent dans l'appareil.
- Pour ne pas gêner la ventilation, les fentes de ventilation, ne doivent pas être couvertes par des objets tels que des journaux, nappes de table, rideaux etc.
- Ne placer sur l'appareil aucune source de flamme nue, telle que des chandelles allumées.
- Il faut tenir compte de la protection de l'environnement lors de la mise au rebut des piles.
• L'appareil ne doit pas être exposé au ruissellement ni à la projection d'eau. - Aucun objet rempli de liquide, un vase par exemple, ne doit être placé sur l'appareil.
- Ne pas mettre en contact des insecticides, du benzène ou un diluent avec l'appareil.
- Ne jamais démonter ou modifier l'appareil d'une manière ou d'une autre.
■Remarques concernant le cordon CA et la prise secteur - L'appareil reste sous tension tant qu'il est branché à une prise secteur, même s'il est éteint.
- Pour déconnecter complètement cet appareil du secteur, il faut le débrancher de la prise secteur.
- Lors de l'installation de cet appareil, il faut s'assurer que la prise secteur utilisée est facilement accessible.
- Débrancher l'appareil du secteur s'il ne va pas être utilisé pendant une longue période.

Avis aux utilisateurs concernant la collecte et l'élimination des plies et des apparells usagés
Apposé sur le produit lui-même, sur son emballage, ou figurant dans la documentation qui l'accompagne, ce pictogramme indique que les piles et appareils électriques et électroniques usagés doivent être séparés des ordures ménagères. Afin de permettre le traitement, la valorisation et le recyclage adéquats des piles et des appareils usagés, veuillez les porter à l'un des points de collecte prévus, conformément à la législation nationale en vigueur.

En éliminant piles et appareils usagés conformément à la réglementation en vigueur, vous contribuez à prévenir le gaspillage de ressources précieuses ainsi qu'à protéger la santé humaine et l'environnement contre les effets potentiellement nocifs d'une manipulation inappropriée des déchets.
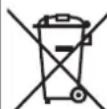
Pour de plus amples renseignements sur la collecte et le recyclage des piles et appareils usagés, veuillez vous renseigner auprès de votre mairie, du service municipal d'enlèvement des déchets ou du point de vente où vous avez acheté les articles concernés.
[Information relative à l'élimination des déchets dans les pays extérieurs à l'Union européenne]
Ce pictogramme n'est valide qu'à l'intérieur de l'Union européenne. Pour éliminer ces articles, contactez les autorités locales ou votre revendeur afin de connaître la procédure d'élimination à suivre. Note relative au pictogramme sur les piles (voir les deux exemples ct-contre) :
Le symbole Pb ci-contre pour les piles indique que cette pile contient du plomb.
CONTENTS
Introduction
• A LIRE AVANT D'UTILISER L'APPAREIL | 2
Raccordements du système | 4
Commandes du panneau frontal | 8
Télécommande | 9
• PORTEE DE LA TELECOMMANDE | 10
• MISE EN PLACE DES PILES | 10
Fonctionnement
• ECOUTER UNE SOURCE DE PROGRAMMES | 11
• SONS SURROUND | 14
• ECOUTER DES SONS SURROUND | 15
• ECOUTER DES EMISSIONS RADIO | 20
• ECOUTER DES EMISSIONS RDS (FM SEULEMENT) | 22 (Syntoniseur RDS (Option régionale dans certains pays Européens, etc.))
• ENREGISTREMENT | 24
• AUTRES FONCTIONS | 25
• UTILISATION DES DIFFERENTES FONTIONS DU PANNEAU AVANT | 26
Configuration du système | 27
- CONFIGURATION DU SYSTEME | 29
- CONFIGURATION DES ENTREES | 31
- CONFIGURATION DES ENCEINTES | 32
- CONFIGURATION DU NIVEAU DES CANAUX | 36
- CONFIGURATION DES PARAMETRES | 38
Guide de dépannage | 40
Spécifications | 41
Raccordements du système
- Ne pas brancher le cordon CA dans une prise secteur jusqu'à ce que toutes les connexions soient achevées.
- Assurez-vous que le codage couleur est respecté lors de raccordements des câbles audio, vidéo et des enceintes.
- Vérifiez que tous les raccordements sont correctement faits et bien serrés. Dans le cas contraire, il risque d'y avoir perte de son, augmentation de bruit ou endommagement du récepteur.
text_image
3 6 M18041 CE M200 AVR. REEUE DE CHOC ELECTRIC/ME PEA/QUIVEL AMOUNTING SHOCK HAZING OR MIT OPEN. DAVID/VIDEO RECEIVER POWER SOURCE 230V~50Hz POWER CONSUMPTION 200W Sherwood RD-5405 SIN.1. RACCORDEMENT DES ANTENNES
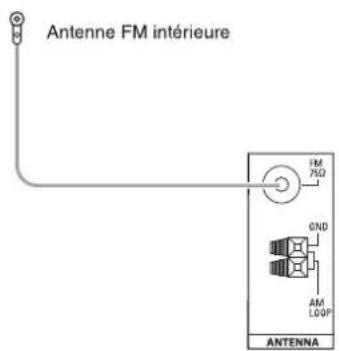
text_image
Antenne FM intérieure FM 75Ω 0ND AM LOOP ANTENNA- Changez la position de l'antenne FM intérieure jusqu'à ce que vous obteniez la meilleure réception des vos stations FM favorites.
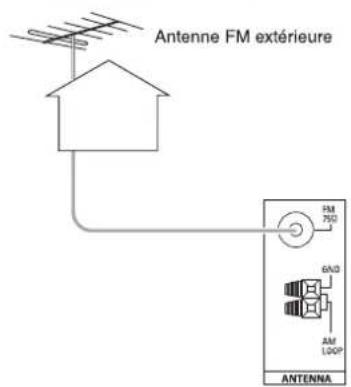
text_image
Antenne FM extérieure FM 75Ω 6A/D AM LOOP ANTENNA- Une antenne FM extérieure 75 Ω peut être utilisée pour améliorer la réception. Débranchez l'antenne intérieure avant de la remplacer par l'antenne extérieure.
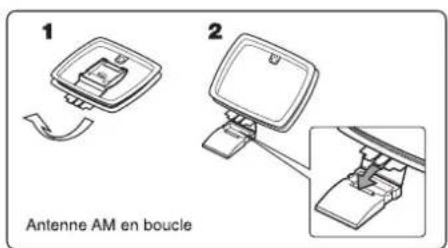
text_image
1 2 Antenne AM en boucle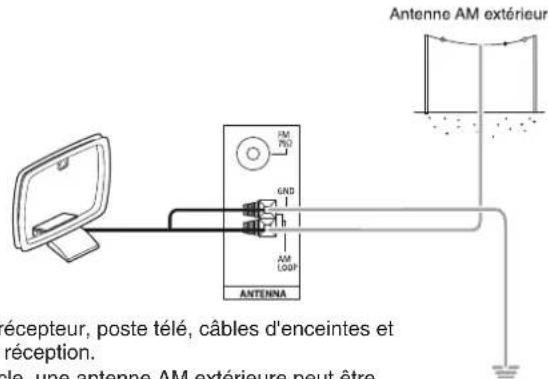
text_image
Antenne AM extérieure FM PGP GND AM LOGP ANTENNA récepteur, poste télé, câbles d'enceintes et réception. cle, une antenne AM extérieure peut être- Placez l'antenne AM en boucle le plus loin possible du récepteur, poste télé, câbles d'enceintes et d'alimentation et réglez-la dans une direction de bonne réception.
- Si la réception est mauvaise avec l'antenne AM en boucle, une antenne AM extérieure peut être utilisée à sa place.
2. CONNEXION DE COMPOSANTS AUDIO/VIDEO
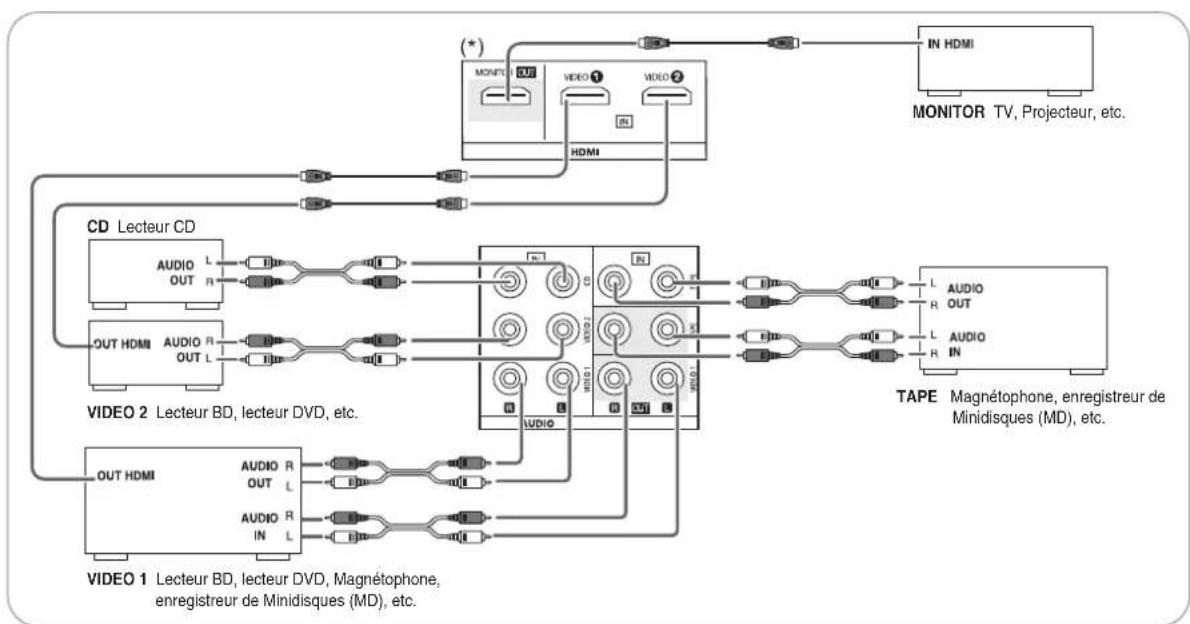
flowchart
graph TD
    subgraph LCD
        A["MONITOR TV, Projecteur, etc."] --> B["IN HDMI"]
        C["VIDEO 1 Lecteur BD, lecteur DVD, Magnétophone, enregistreur de Minidisques (MD), etc."] --> D["TAPE Magnétophone, enregistreur de Minidisques (MD), etc."]
    end
    subgraph DVD
        E["OUT HDMI"] --> F["VIDEO 2 Lecteur BD, lecteur DVD, etc."]
        G["IN HDMI"] --> H["TAPE Magnétophone, enregistreur de Minidisques (MD), etc."]
    end
    subgraph TAPE
        I["IN HDMI"] --> J["TAPE Magnétophone, enregistreur de Minidisques (MD), etc."]
        K["IN HDMI"] --> L["TAPE Magnétophone, enregistreur de Minidisques (MD), etc."]
    end
    M["CD"] --> N["L Audio OUT L"]
    M --> O["AUDIO R OUT L"]
    M --> P["OUT HDMI"]
    M --> Q["OUT HDMI"]
    style LCD fill:#f9f,stroke:#333
    style DVD fill:#ccf,stroke:#333
    style TAPE fill:#cfc,stroke:#333
- Les prises VIDEO 1/VIDEO 2 peuvent être connectées aux prises AUDIO des composants vidéo tels que lecteur BD, lecteur DVD, TV, etc.
- Les prises d'entrée/sortie TAPE IN/OUT et VIDEO 1 peuvent être connectées à des équipements d'enregistrement audio tels que magnétophone, enregistreur de Minidisques (MD), etc.
■ Raccordement HDMI (Interface Multimédia Haute définition) : (\*)
- Vous pouvez connecter le composant source (lecteur BD, etc.) au composant de visualisation (TV, projecteur, etc.) via ce récepteur à l'aide d'un câble HDMI disponible dans le commerce.
- Une connexion HDMI peut accepter des signaux vidéo numériqu es non compressés et des signaux audio numériques.
- Ce récepteur peut transférer les signaux vidéo et audio numériques provenant des entrées HDMI IN vers la sortie HDMI MONITOR OUT et sans passer par les circuits internes de l'amplificateur. Les signaux audio injectés par les entrées HDMI IN ne peuvent donc pas être reproduits par l'amplificateur.
- HDMI, le logo HDMI et l'Interface Multimédia Haute Définition sont des marques déposées ou commerciales de HDMI Licensing LLC.
■ Remarques :
- En fonction des composants connectés, le transfert de signal peut être instable.
(Pour plus de détails, reportez-vous au manuel de l'utilisateur du composant à connecter.) - Pour que le transfert de signal soit stable, nous recommandons l'utilisation de câbles HDMI de longueur inférieure à 5 mètres.
3. RACCORDEMENT D'ENTREES NUMERIQUES (DIGITAL IN)
- Les sorties NUMERIQUE OPTIQUE et NUMERIQUE COAXIALE des composants qui sont connectés à CD et VIDEO 1 de cet appareil peuvent être connectées aux entrées numériques DIGITAL IN.
- Une entrée numérique doit être connectée à des composants tels qu'un lecteur CD, lecteur LD, lecteur DVD, etc. capables de produire des signaux numériques Surround de format DTS, Dolby Digital ou PCM etc.
- Pour plus de détails, reportez-vous au manuel de l'utilisateur du composant à connecter.
- Lorsque vous faites une connexion NUMERIQUE COAXIALE, un câble COAXIAL 75 Ω doit être utilisé et non un câble AUDIO classique.
- Quelques câbles de fibre optique disponibles dans le commerce ne peuvent être utilisés avec cet équipement. Si un câble de fibre optique ne peut pas être connecté à votre équipement, consultez votre revendeur ou un service spécialisé qui vous est proche.
■ Remarque : Sur un composant, il faut ou faire une connexion NUMERIQUE OPTIQUE ou une connexion NUMERIQUE COAXIALE. (On n'a pas besoin des deux à la fois.)
■Réglages par défaut des entrées numériques
- Si vous connectez les entrées DIGITAL IN à vos composants, il vous sera plus facile d'effectuer les réglages par défaut suivants.
- Si vos connexions numériques sont différentes des réglages par défaut, vous devez attribuer les entrées DIGITAL utilisées selon la procédure "Sélection de DIGITAL IN" de la page 31.
- Les réglages par défaut sont : OPTICAL : VIDEO 1, COAX : VIDEO 2
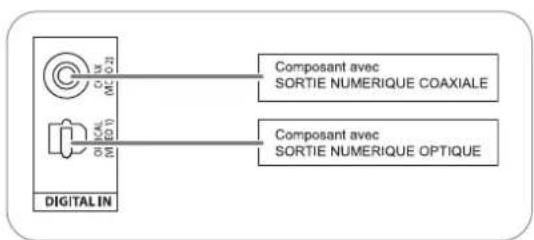
text_image
Composant avec SORTIE NUMERIQUE COAXIALE Composant avec SORTIE NUMERIQUE OPTIQUE DIGITAL IN4. RACCORDEMENT DE LA SORTIE SUBWOOFER PRE OUT
- Pour améliorer les basses fréquences (son riche en graves), connectez un subwoofer amplifié..

flowchart
graph LR
    A["PRE OUT"] --> B["Switch"]
    B --> C["Subwoofer amplifié"]
5. RACCORDEMENT DES ENCEINTES
- Vérifiez que les connexions des enceintes sont bien serrées et correctes (canal gauche et canal droit et les signes + et -). Si les connexions sont erronées, les enceintes seront muettes, et si la polarité d'une enceinte est inversée, le son manquera de naturel et de graves.
- Pour l'installation des enceintes, voir "Emplacement des enceintes" à la page 7.
- Après l'installation des enceintes, réglez d'abord leurs paramètres en fonction de votre environnement et de leur disposition. (Pour plus de détails, voir "CONFIGURATION DES ENCEINTES" à la page 32.)
Attention :
- Assurez-vous d'utiliser des enceintes avec une impédance de 6 ohms ou plus.
- Ne laissez aucun fil dénudé des enceintes se toucher ou toucher une partie métallique de cet appareil. Cela pourrait endommager les enceintes et/ou l'appareil.
- Ne touchez jamais les bornes des enceintes lorsque le cordon d'alimentation CA est connecté à une prise secteur. Vous risquez d'être électrocuté.
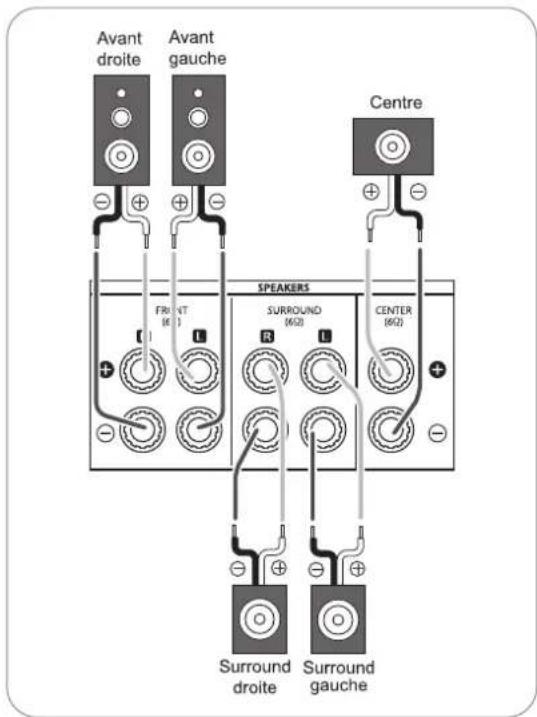
text_image
Avant droite Avant gauche Centre FR VT R SURROUND (6x2) CENTER (6x2) SPEAKERS Surround droite Surround gauche■Raccordez des fils des haut-parleurs
1. Dénudez environ. 10 mm (3/8 pouce) des fils, puis torsadez les extrémités fermement. | 2. Desserrez en tournant la borne de l'enceinte à gauche | 3. Insérez la partie dénudée du fil. | 4. Serrez en tournant la borne à droite. |
6. ENTRÉE DU CORDON CA
- Branchez le cordon d'alimentation dans une prise secteur.

Emplacement des enceintes
L'emplacement idéal des enceintes varie en fonction de la taille de votre pièce, du revêtement des murs, etc. Voici un exemple typique d'emplacement de enceintes :
■ Enceintes avant gauche et droite et enceinte centrale
- Placez si possible, les enceintes avant de manière que leurs surfaces frontales soient alignées avec la télé ou l'écran.
- Placez l'enceinte centrale entre les enceintes avant gauche et droite non loin de la position d'écoute de ces derniers.
- Placez chaque enceinte de manière que le son soit orienté vers les oreilles de l'auditeur qui est dans la position d'écoute principale.
■ Enceintes surround gauche et droite
- Placez les enceintes surround à environ 1 mètre (40 pouces) au dessus des oreilles de l'auditeur assis, direct à sa gauche et à sa droite ou légèrement derrière.
■ Subwoofer (Enceinte d'extrêmes graves)
- Le subwoofer reproduit les basses fréquences (son riche en graves). Placez un subwoofer n'importe où en face.
■ Remarques :
- Pour éviter les interférences avec l'image d'une télé classique, utilisez uniquement des enceintes avant gauche et droite et enceinte centrale dotées d'un blindage magnétique.
- Pour obtenir les meilleurs effets surround, les enceintes à l'exception du subwoofer devraient êtres des enceintes à gamme étendue.
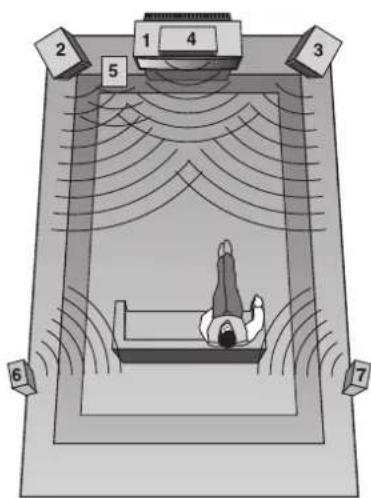
text_image
Diagram of a person lying in bed inside a large room with numbered labels and sound waves indicating sound or vibration.- Télé ou écran
- Enceinte avant gauche
- Enceinte avant droite
- Enceinte centrale
- Subwoofer (Enceinte d'extrêmes graves)
- Enceinte surround gauche
- Enceinte surround droite
Commandes du panneau frontal

text_image
Sherwood 3 4 5 6 7 OUTPUT SELECTOR MASTER VOLUME MULTIENCENT POWER 1 2 8 9 10 11 12 AVOC/AVOC/AVOC/RC-54DS- Interrupteur marche/arrêt
- Touche Marche/Veille
- Témoin Veille
- Afficheur fluorescent
Pour plus de détails, voir ci-dessous.
- Capteur de la télécommande
-
Bouton Sélecteur de source d'entrée/multicommande
-
Bouton de réglage de volume global
- Touches Mode surround et déplacement vers le
Haut/Bas (▶/◀)
- Touche Steréo
- Bouton Bande
- Touche Mémoire/Enter
- Touche Mode
■ AFFICHEUR FLUORESCENT
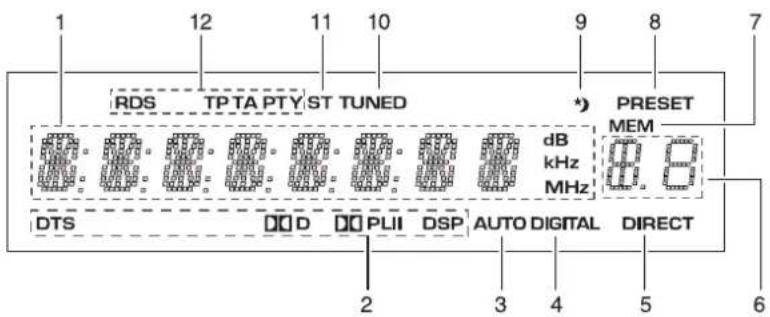
text_image
RDS TP TA PTY ST TUNED PRESET MEM dB kHz MHz DTS DD D PLII DSP AUTO DIGITAL DIRECT 12 11 10 9 8 7 2 3 4 5 6- Source, fréquence, niveau de volume, informations de fonctionnement, etc.
- Indicateurs mode Surround
- Indicateur AUTO
- Indicateur entrée numérique
- Indicateur DIRECT
-
Numéro préréglé, temps Sommeil
-
Indicateur Mémoire
- Indicateur Préréglage
-
Indicateur Sommeil
-
Indicateur Syntonisé
- Indicateur Stéréo
- Indicateur RDS
(option régionale pour l'Europe, etc.)
Télécommande

text_image
Touche Marche POWER ON STANDRY 1 TUNING PRESIT + - + - + - 1 2 3 4 5 6 7 8 9 SLEEP MULTI 0 Touche Veille Touches Préréglé Haut/Bas (+/-)Touches Reche Touches numériques (0 à 9) Touche Sommeil Ch LEVEL TONE VOLUME Touches Numiveau de canal Touches Mode tonalité TEST SETUP Touches Volume Haut/Bas (▼/▲) Touches Configuration Touches de déplacement (▲,▼,◀,▶), Entrer • Les fonctions entre "<" et ">" sont des options régionales pour l'Europe, etc. Touches tonalités de test SETL ENTER SETL DISPLAY DRUMMER SOUND PARAMETER SURROUND STEREO Touches Affichage Touches Paramètres audio Touches Mode Surround Haut/Bas (>/< Touches mode Numérique/Analogique O/A MODE TUNIR CD TAPR VIDEO 1 VIDEO 2 ST IN EXTR IN USB VIDEO 3 AUX FAUX RESET RANDOM Touche Stéréo Touches SÉlecteur Source Sherwood REVOTE CONTROL UNIT RC-125■Remarque : certaines touches Sélecteur de source d'entrée (BT IN, EXT. IN, USB, VIDEO 3, AUX, F.AUX) et touches de navigation USB(◀◀, ▶, II, ▶◀, ■, Répéter/Aléatoire) ne sont pas disponibles sur cet appareil.
PORTEE DE LA TELECOMMANDE
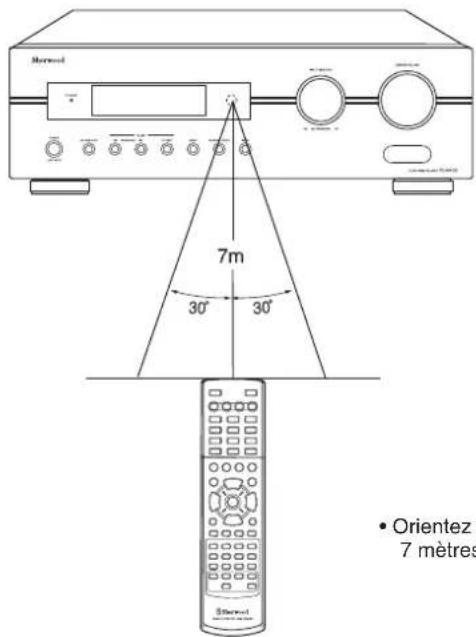
text_image
Orientez 7 mètres- Orientez la télécommande vers le capteur à une distance d'environ 7 mètres (23 pieds) et des angles de 30 degrés.
MISE EN PLACE DES PILES
- Retirez le couvercle.

- Mettez en place deux piles ("AAA" size, 1,5 V) en respectant les polarités.

natural_image
Line drawing of a remote control panel with a battery and switch (no text or symbols)- Retirez les piles si vous n'allez pas utiliser l'appareil pendant une longue durée.
• N'utilisez pas des piles rechargeables (de type Ni-Cd).
Fonctionnement
■ Remarque : Avant d'utiliser ce récepteur, il faut effectuer les procédures de configuration système pour obtenir des performances optimales. (Pour plus de détails, voir "Configuration du système" à la page 27.)
ECOUTER UNE SOURCE DE PROGRAMMES
Avant l'utilisation
- Passez en mode Veille.
- Le témoin Veille (STANDBY) s'allume. Cela signifie que le récepteur n'est pas déconnecté du secteur et qu'une quantité de courant est mise à la disposition de la mise en marche.
- Pour éteindre, appuyez de nouveau sur la touche Marche (POWER).
-
Le courant sera coupé et le témoin Veille (STANDBY) s'éteint.
-
En mode veille, allumez le récepteur.

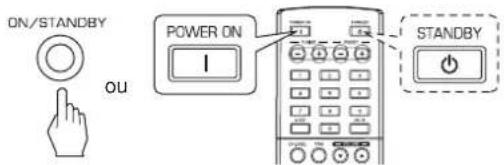
text_image
ON/STANDBY OU POWER ON I STANDBY- Chaque fois que la touche Marche-arrêt/Veille du panneau frontal est appuyée, le récepteur s'allume pour passer en mode marche ou s'éteint pour passer en mode veille.
- Appuyez sur la touche Marche (POWER) de la télécommande pour passer en mode marche ou appuyez sur la touche Veille (STANDBY) pour passer en mode veille.
-
En mode veille, si le bouton Sélecteur de source d'entrée (Sélecteur de source d'entrée/multicommande) est tournée ou appuyée, le récepteur s'allume automatiquement et la source souhaitée est sélectionnée.
-
Sélectionnez la source d'entrée souhaitée.
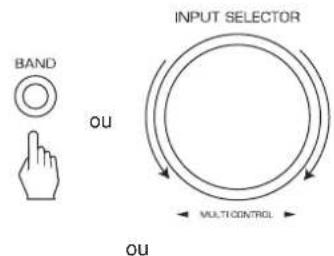
text_image
BAND OU INPUT SELECTOR MULTI-CONTROL OU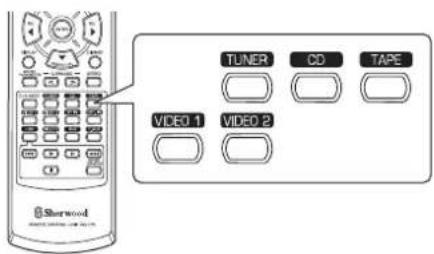
text_image
TUNER CD TAPE VIDEO 1 VIDEO 2- Chaque fois que le bouton Sélecteur de source d'entrée est tournée, la source d'entrée change dans cet ordre :
→ TUNER ↔ CD ↔ TAPE ↔ VIDEO 1 ↔ VIDEO 2 ← (Affichage des fréquences)
- Chaque fois que la touche BAND du panneau avant ou la touche TUNER de la télécommande, est appuyée, la bande change dans cet ordre :
FM ST → FM MONO → AM
La source d'entrée est VIDEO 1, VIDEO 2
- Sélectionnez le composant d'entrée numérique ou analogique.

text_image
D/A MODE Sherwood- Chaque fois la touche est appuyée, l'entrée correspondante est sélectionnée dans cet ordre : o(ptical) c(oaxial) A(nalog)
■ Remarques :
- Lorsque TUNER, TAPE ou CD est sélectionné comme source d'entrée, l'entrée numérique ne peut être sélectionnée.
- Lorsque l'entrée numérique sélectionnée n'est pas connectée, l'indicateur "DIGITAL" clignote et les entrées analogiques sont sélectionnées automatiquement.
- L'entrée numérique ou analogique sélectionnée est automatiquement attribuée à la source d'entrée correspondante dans la menu Configuration de l'Entrée. (Pour plus de détails, voir "CONFIGURATION DES ENTREES" à la page 31.)
-
Le son issu du composant connecté à l'entrée numérique sélectionnée est entendu indépendamment de la source d'entrée sélectionnée.
-
Lecture depuis le composant sélectionné.
- Pour lire de sources de programmes avec son surround, voir "ECOUTER DES SONS SURROUND" à la page 15.
- Régler le volume général.
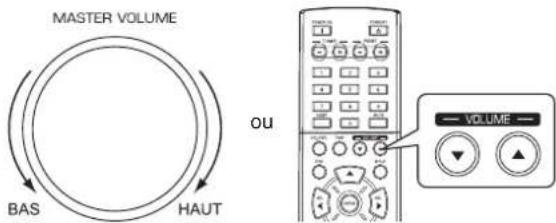
text_image
MASTER VOLUME BAS HAUT OU VOLUME- Pour couper le son.
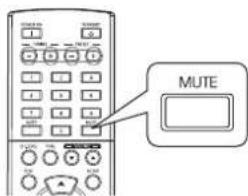
text_image
MUTE- "MUTE" va clignoter.
- Appuyez de nouveau pour restaurer le niveau de son antérieur.
Réglage de la tonalité (graves et aigues)
7. Passez en mode tonalité.

text_image
TONETONE: OFF
- Le mode tonalité est affiché pendant quelques secondes.
8. Utilisez les touches Gauche (◀)/Droite (▶) pour sélectionner le mode tonalité souhaité.
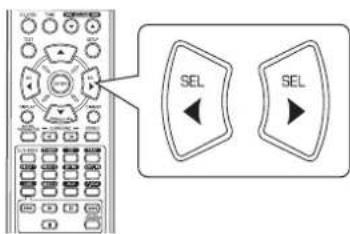
text_image
SEL SEL- Chaque fois ces touches sont appuyées, le mode tonalité change dans cet ordre :
OFF (désactivée) : Pour écouter de sources de programme sans effet de tonalité. ↑ (l'indicateur "DIRECT" s'allume.)
ON (activée) : Pour régler la tonalité à votre goût. (l'indicateur "DIRECT" s'éteint.)
■Vous pouvez régler la tonalité lorsque TONE est réglé sur ON (activé).
9. Utilisez les touches Haut(▲)/Bas (▼) pour sélectionner la tonalité souhaitée.
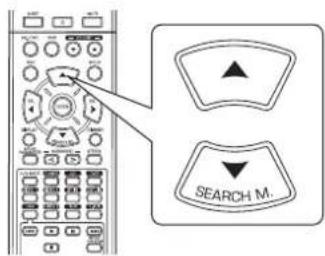
text_image
SEARCH M.- Chaque fois ces touches sont appuyées, la tonalité change dans cet ordre : →BASS ←TRBL (aigues) ←TONE : ON ←
10. Utilisez les touches Gauche (◀)/Droite (▶) pour régler la tonalité souhaitée.
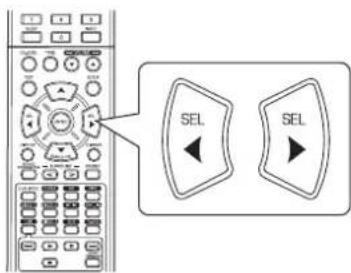
text_image
SEL SEL- Le niveau de tonalité peut être choisi dans l'intervalle -10 à +10 dB.
- En général, nous recommandons de régler les graves et aigues sur 0 dB (niveau plat).
- Les réglages à des niveaux de volume extrêmes peuvent endommager vos enceintes.
- Pour compléter le réglage de tonalité, répétez les étapes 9 et 10.
- Si l'affichage de tonalité disparaît, recommencez à partir de l'étape 7.
SONS SURROUND
- Ce récepteur intègre un processeur de signal numérique (Digital Signal Processor) sophistiqué, permettant de créer n'importe quelle son d'ambiance dans votre cinédom, avec une qualité sonore optimale.
Modes Surround
■DTS Digital Surround
DTS Digital Surround (aussi appelé DTS) est un format de signal numérique multivoies qui peut traiter des hauts débits de données. Les disques portant le logo DTS comprennent des signaux numériques 5.1 canaux, qui sont généralement sensés fournir une meilleure qualité de son grâce à la faible compression audio. Il fournit également une large gamme dynamique et une séparation donnant lieu à un son magnifique.
Fabriqué sous licence sous les numéros de brevets américains suivants : 5,451,942; 5,956,674; 5,974,380; 5,978,762; 6,487,535 et d'autres brevets américains et étrangers émis et en cours. DTS et DTS Digital Surround sont des marques déposées et les logos et les Symboles DTS sont des marques de DTS, Inc. © 1996-2008 DTS, Inc. Tous droits réservés
Dolby Digital
Dolby Digital est un format de signal numérique multivoies développé par Dolby Laboratories. Les disques portant le logo Dolby Digital comprennent des signaux numériques 5.1 canaux, qui reproduisent qualité de son, expansion spatiale et gamme dynamique de caractéristiques meilleures que dans l'effet Dolby surround antérieur.
■Dolby Pro Logic II surround
Ce mode applique des signaux conventionnels 2 canaux tels que les signaux numériques PCM, analogiques stéréo ou Dolby Surround etc., sur un processeur surround pour offrir beaucoup plus qu'un signal conventionnel Dolby Pro Logic. Le Dolby Pro Logic surround comprend 2 modes :
• Dolby Pro Logic II Movie
Lorsque vous regardez un film, ce mode permet d'accentuer l'effet cinéma grâce au traitement supplémentaire qui renforce les sons des effets spéciaux des actions.
• Dolby Pro Logic II Music
Lorsque vous écoutez de la musique, ce mode permet d'accentuer la qualité sonore grâce au traitement supplémentaire qui renforce les effets musicaux.
■Dolby Pro Logic
Ce mode étend toute lecture de source 2 canaux (y compris les sources Dolby Surround) à 4 canaux (frontal gauche, centre, frontal droite et surround) Le canal surround est monaural, mais reproduit via deux enceintes surround
Fabriqué sous licence de Dolby Laboratories. Dolby, Pro Logic et le symbole du double D sont des marques déposées de Dolby Laboratories
- Les modes suivants appliquent des signaux conventionnels 2 canaux tels que les signaux numériques PCM ou analogiques stéréo sur un processeur Digital Signal haute qualité pour recréer artificiellement des champs sonores.
Matrix
Ce mode reproduit un retard audio à partir des canaux surround pour accentuez la sensation d'expansion des sources de musique.
■Church (église)
Ce mode fournit l'ambiance d'une église avec une musique baroque, un orchestre à cordes ou un choral.
■Theater
Ce mode donne la sensation d'être dans une salle de cinéma regardant un film.
Hall
Ce mode fournit l'ambiance d'une salle de concert avec des sources de musique classique telle que orchestrale ou de chambre ou solo pour instrumentiste.
■Stadium (stade)
Ce mode fournit l'effet d'un champ sonore étendu pour atteindre l'ambiance d'un vrai stade lors de matchs de baseball ou de foot.
ECOUTER DES SONS SURROUND
■ Remarques :
- Pour obtenir des performances optimales, avant toute lecture surround, effectuez d'abord la procédure de configuration des enceintes, etc. dans le menu Configuration. (Pour plus de détails, voir "CONFIGURATION DES ENCEINTES" à la page 32.)
- Même lorsque le mode surround auto est sélectionné et le même type de format de signal numérique est reçu, le mode surround optimum peut varier en fonction du type d'enceinte s'il est réglé sur NO ou pas.
- Si un signal numérique PCM 96 kHz est entrée, seul le mode stéréo sera sélectionné.
■ Sélectionnez le mode surround souhaité
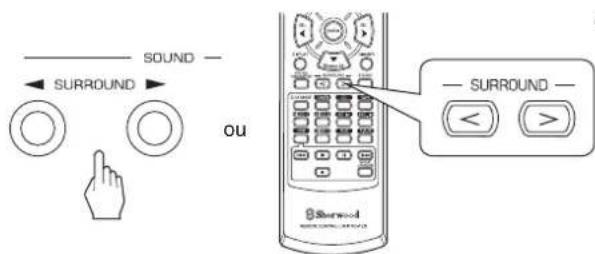
text_image
SOUND — ← SURROUND → ou SURROUND — < >- Chaque fois que la touche Surround Haut/Bas (▶, > / ◀, ◀), est appuyée, le mode surround change dans cet ordre : Mode surround manu el : Vous pouvez sélectionner un (je têmp in "AUTO" s'été int) mode surround différent parmi les modes disponibles pour le signal en entrée.
Mode surround auto (le émoin "AUTO" s'allume.)
: Le mode surr ou nd optimal sera automatiquement sélectionné en fonction du format du signal en entrée.
| Format du signal en entrée Mode surround disponible | |
| Sources Dolby Digital 5.1 canaux | [DOLBY DIGITAL, AUTO SURROUND] ou |
| Sources Dolby Digital 2 canaux | [DOLBY PLII MOVIE, DOLBY PLII MUSIC, DOLBY PRO LOGIC, AUTO SURROUND] ou |
| Sources DTS | [DTS, AUTO SURROUND] ou |
| Sources PCM (2 canaux),Sources analogiques stéréo | [DOLBY PLII MOVIE, DOLBY PLII MUSIC, DOLBY PRO LOGIC, MATRIX, CHURCH, THEATER,HALL, STADIUM, AUTO SURROUND] ou |
- En fonctions des réglages de l'enceinte, certains modes surround peuvent être sélectionnés ou pas comme suit :
[ ] : Possible uniquement si "CENTER" ou/et "SURR (Surround)" ne sont pas réglées sur "N (Aucun)".
< > : Possible uniquement si "CENTER" et "SURR (Surround)" sont réglées sur "N (Aucun)".
■Pour annuler le mode surround pour une lecture stéréo
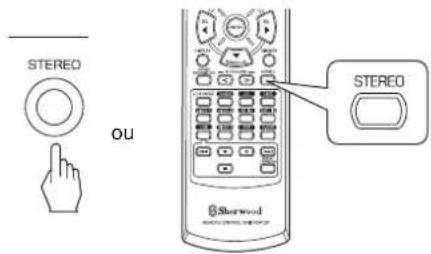
text_image
STEREO OU STEREO Sharwood- En fonction du format du signal en entrée, l'un des modes stéréo ou downmix 2 canaux est sélectionné.
- Pour annuler le mode stéréo ou downmix 2 canaux, sélectionnez le mode surround à l'aide de la touche Surround Haut/Bas (▶, > / ◀, <).
■Mode downmix 2 canaux
- Ce mode permet aux signaux multivoies encodés en format Dolby Digital ou DTS d'être démultiplexés en 2 canaux frontaux et d'être reproduits via deux enceintes frontales seulement ou via un casque.
Lors du réglage des paramètres audio
- Lors de lecture de signaux numérique depuis des sources de programme Dolby Digital ou DTS, ou lors d'écoute de musique en mode Dolby Pro Logic II, vous pouvez ajuster leurs paramètres pour obtenir un effet surround optimum.
1. Appuyez sur la touche Paramètres audio (SOUND PARAMETER).
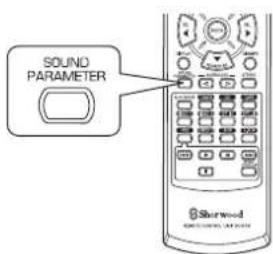
text_image
SOUND PARAMETER Shawood- Alors "NIGHT : \~" (ou "PANO : \~") sera affichée pendant quelques secondes.
- Si le mode paramètres disparaît, appuyez de nouveau sur cette touche.
2. Utilisez les touches Haut (▲)/Bas (▼) pour sélectionner le paramètre souhaité.
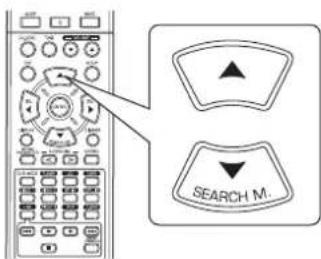
text_image
SEARCH M.- Chaque fois ces touches sont appuyées, le mode paramètre change dans cet ordre :
| → "NIGHT" ↔ "PANO" ↔ "C.WIDTH" ↔ "DIMEN" ← | ||
| (Mode Nuit) | (Mode Panoramique) | (contrôle de la largeur centrale) (Contrôle de dimension) |
- "NIGHT" ne peut être sélectionné en cours de lecture de signaux numériques depuis une source Dolby Digital ou DTS.
- "PANO", "C.WIDTH" et "DIMEN" peuvent être sélectionnés en cours de lecture de musique en mode Dolby Pro Logic II.
3. Utilisez les touches de déplacement Gauche(◀)/Droite (▶) pour régler le paramètre souhaité.
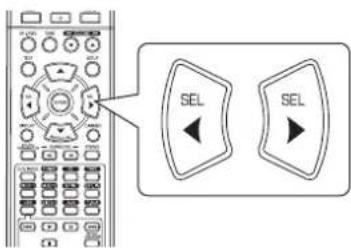
text_image
SEL SEL■ Sélection du mode "NIGHT (mode nuit)"
Cette fonction compresse la gamme dynamique des parties précédemment spécifiées de piste sonore Dolby Digital ou DTS(à un volume extrêmement élevé) pour minimiser les différences en volume entre les parties spécifiées et non spécifiées. Ceci permet d'entendre facilement, la nuit, toute la bande sonore d'un film à bas volume. La plage de réglage va de 0,0 à 1,0 (par défaut 0,0)
■ Remarque : sur certains logiciels Dolby Digital ou DTS, le mode nuit peut ne pas être applicable.
■ Sélection du mode "PANO (Panoramique)"
Ce mode transpose la stéréo frontale vers les deux enceintes surround, vous enveloppant ainsi avec le son des enceintes latérales pour créer une perspective sonore extraordinaire. Sélectionnez "OFF" ou "ON"(par défaut : OFF).
■ Sélection de "C. WIDTH (Center width)" (contrôle de la largeur centrale)
Cette commande permet de régler l'image sonore centrale de sorte qu'elle ne peut être écoutée que sur l'enceinte centrale, sur les enceintes gauche/droite comme image virtuelle ou sur les trois enceintes avant à différents degrés. La plage de réglage va de 0 à 7 (par défaut : 3).
■ Sélection de "DIMEN (Dimension)" (contrôle de dimension)
Cette commande permet de régler le champ sonore vers l'avant ou vers l'arrière. La plage de réglage va de -3 à +3 (par défaut : 0).
4. Répétez les étapes 2 et 3 ci-dessus pour régler d'autres paramètres.
Réglage du niveau de chaque canal à l'aide de TEST TONE (tonalités de test)
- Le niveau de volume de chaque canal peut être réglé à l'aide de la fonction TEST TONE (tonalités de test).
1. Passez en mode tonalités de test.

text_image
TESTTEST-FL
- Le mode tonalités de test s'affiche et un son sera émis pendant 2 secondes par chaque canal de chaque enceinte dans l'ordre suivant :

text_image
FL → C → FR → SR → SL → SW Avant gauche Centre Avant droite Surround droite Surround gauche Subwoofer (Enceinte d'extrêmes graves)- Si le paramètre d'une enceinte est "N (Aucun ou Non)", le tonalités de test du canal correspondant ne se fait pas.
- Réglez le niveau de volume de chaque canal comme vous le souhaitez de manière que toutes les enceintes seront entendues comme ayant le même niveau.

text_image
SEL SEL- Vous pouvez sélectionner le canal souhaité à l'aide des touches de déplacement Haut (▲)/Bas (▼).
- Annulez la fonction tonalités de test.

text_image
TEST
Régler le niveau du canal courant
- Après avoir réglé le niveau de chaque canal à l'aide des tonalités de test, réglez les niveaux en fonction des sources des programmes ou selon vos goûts.
-
Vous pouvez régler le niveau du canal courant comme vous le souhaitez. Les niveaux réglés sont simplement mémorisés dans la mémoire utilisateur ("CAL"), et non dans la mémoire de préréglages ("REF 1", "REF 2").
-
Appuyez sur la touche Niveau de canal (CH. LEVEL).
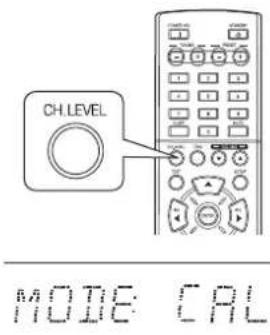
text_image
CH.LEVEL MODE CAL- Alors le mode mémoire ("CAL", etc.) sera affichée pendant quelques secondes.
-
Lorsque le mode mémoire ou niveau de canal disparaît, appuyez de nouveau sur cette touche.
-
Sélectionnez le canal souhaité.

text_image
SEARCH M.- Chaque fois ces touches sont appuyées, le canal correspondant change dans cet ordre :
< >: Seulement lorsque des signaux de sources de programmes Dolby Digital ou DTS qui incluent un signal LFE (Effets basse fréquence) sont entrées, que le niveau LFE est affiché. - En fonction des paramètres des enceintes "N (Aucun ou Non)" et du mode surround, etc., certains canaux ne peuvent pas être sélectionnés.
$$ \begin{array}{c} \text { REF 1, 2 (ou CAL) } \leftrightarrow \text { FL } \leftrightarrow \text { C } \leftrightarrow \text { FR } \ \text { < DD ou DTS> } \leftrightarrow \text { SW } \leftrightarrow \text { SL } \leftrightarrow \text { SR } \ \text { Niveau LFE } \end{array} $$
- Réglez le niveau du canal sélectionné comme vous le souhaitez.

text_image
SEL SEL- La plage de réglage du niveau LFE (Effets basse fréquence) va de -10 à 0 dB et les niveaux des autres canaux va de -15 à +15 dB.
-
En général, nous recommandons de régler le niveau LFE sur 0 dB. (Bien que, le niveau LFE recommandé sur quelques logiciels DTS plus récents est de -10 dB.) Diminuez les valeurs si les niveaux recommandés semblent trop élevés.
-
Répétez les étapes 2 et 3 ci-dessus pour régler chaque niveau de canal.
Mémorisation des niveaux de canaux réglés
- Vous pouvez mémoriser les niveaux de canaux réglés dans la mémoire de préréglages ("REF 1", "REF 2") et les rappeler quand vous voulez.
- Après avoir effectué les étapes 1 à 4 dans la procédure "Régler le niveau de canal courant" à la page 18, appuyez sur la touche ENTER.
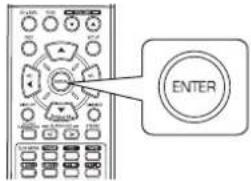
text_image
ENTER
- Alors le "1" de l'indication "REF 1" se met à clignoter pendant quelques secondes.
- Sélectionnez REF 1 ou REF 2.
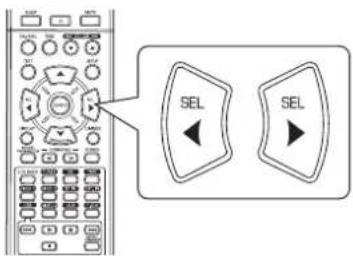
text_image
SEL SEL- Si la mémoire préréglée disparaît, refaites l'étape 1 ci-dessus.
- Confirmez votre sélection.
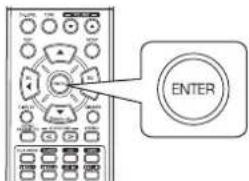
text_image
ENTER- Les niveaux de canaux réglés sont à présent mémorisés dans la mémoire sélectionnée.
Rappeler les niveaux de canaux mémorisés
- Appuyez sur la touche Niveau de canal (CH. LEVEL).
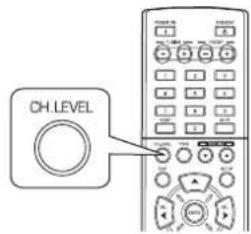
text_image
CH. LEVEL- "CAL" (ou "REF 1", etc.) sera affichée pendant quelques secondes.
-
Si le mode Niveau de canal disparaît, appuyez de nouveau sur cette touche.
-
Sélectionnez REF 1 ou REF 2.
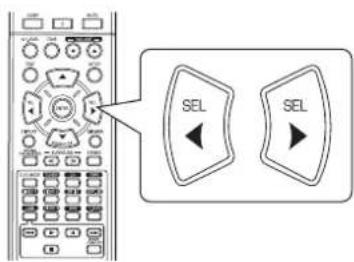
text_image
SEL SEL- Les niveaux de canaux mémorisés dans la mémoire de préréglages sélectionnée sont rappelés.
ECOUTER DES EMISSIONS RADIO
Recherche automatique
1. Sélectionnez la bande souhaitée.
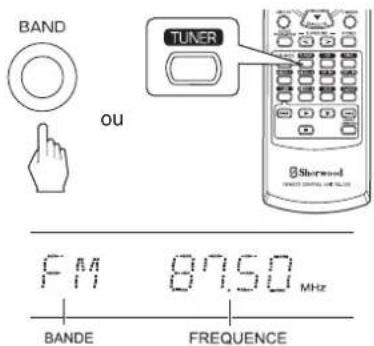
text_image
BAND ou TUNER Barrowd F11 87.50 MHz BANDE FREQUENCE- Chaque fois cette touche est appuyée, la bande change dans cet ordre :
$$ \begin{array}{c}\rightarrow \text {FM ST} \rightarrow \text {FM MONO} \rightarrow \text {AM}\\text {(}" S T" s ^ {\prime} a l l u m e) \quad \text {(}" S T" s ^ {\prime} e t e i n t)\end{array} $$
- Si les émissions FM stéréo sont mauvaises à cause des faibles signaux de transmission, sélectionnez le mode FM mono pour réduire le bruit, dans ce cas les émissions FM seront écoutés en monaural.
2. Appuyez sur les touches TUNING Haut (+)/Bas (-) pendant plus de 0,5 seconde.
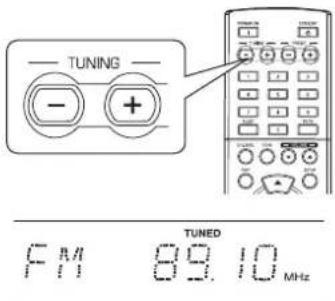
text_image
TUNING - + TUNED F/1 89.10 MHz- Le syntoniseur se met à la recherche et s'arrête dès qu'il trouve une station de signal suffisamment puissant. La fréquence trouvée ainsi que l'indication "TUNED" seront affichées.
- Si la station trouvée n'est pas celle que vous souhaitez, il suffit simplement de répéter cette opération.
- Les stations de faibles signaux sont ignorées durant la recherche automatique.
Recherche manuelle
- La recherche manuelle est pratique lorsque vous connaissez déjà la fréquence de station.
- Après la sélection de la bande souhaitée, appuyez plusieurs fois sur les touches TUNING Haut (+) / Bas (-) jusqu'à ce que la fréquence souhaitée soit atteinte.
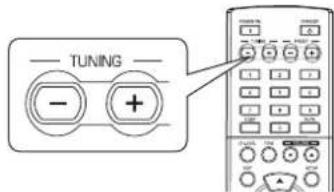
text_image
TUNING - +Balayage automatique des stations préréglées
- La fonction balayage automatique des stations préréglées cherche automatiquement les stations FM seulement et les mémorise.
- Pendant l'écoute d'émission radio FM, maintenez enfoncée la touche (MEMORY/) ENTER pendant plus de 2 secondes.
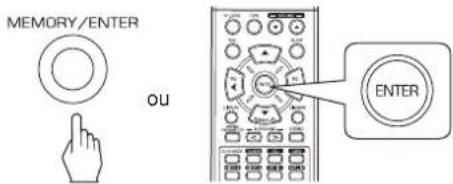
text_image
MEMORY/ENTER OU ENTER- L'indication "AUTO MEM" se met à clignoter et le récepteur démarre le préréglage.
- On peut mémoriser jusqu'à 30 stations FM.
■Remarques :
- Les stations FM à faible signal ne peuvent pas être mémorisées.
- Pour mémoriser les stations AM ou des stations faibles, effectuez la procédure "Préréglage Manuel" à l'aide de "Recherche manuelle".
Préréglage Manuel
- Vous pouvez mémoriser jusqu'à 30 stations souhaitées.
-
Sélectionnez une station en effectuant la procédure de recherche automatique ou manuelle.
-
Appuyez sur la touche ENTER.

text_image
ENTER TUNED PAA 89.10 MHz RESET MEM DIRECT- "MEM" se met à clignoter pendant quelques secondes.
- Sélectionnez le numéro de préréglage souhaité (de 1 à 30) et appuyez sur la touche ENTER.

flowchart
graph TD
    A["--- Tuning"] --> B["OU"]
    C["--- Preset"] --> D["OU"]
    B --> E["---"]
    D --> F["---"]
    E --> G["ENTER"]
    F --> G
- Utilisation des touches numériques de la télécommande.
Exemples) Pour "3" :

Pour "15" :

Pour "30" :
dans moins de 2 secondes

dans moins de 2 secondes

- La station est à présent mémorisée.
- Lorsque vous utilisez les touches numériques, la station est mémorisée automatiquement sans avoir à appuyer sur la touche ENTER.
- La fréquence qui vient d'être mémorisée efface l'ancienne fréquence se trouvant dans la même position mémoire.
-
Si l'indication "MEM" s'éteint, recommencez à partir de l'étape 2 ci-dessus.
-
Répétez les étapes 1 à 3 ci-dessus pour mémoriser d'autres stations.
■FONCTION DE SAUVEGARDE DE MEMOIRE
Les éléments suivants, réglés avant d'éteindre le récepteur, sont mémorisés.
- Paramètres du sélecteur de source (INPUT SELECTOR)
- Paramètres du mode Surround
• Stations Préréglées, etc.
Se syntoniser à une station préréglée
- Après avoir sélectionné tuner comme source d'entrée, sélectionnez le numéro de la station préréglée souhaitée.
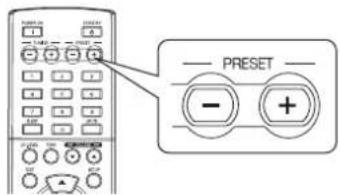
text_image
PRESET - +- Utilisation des touches numériques de la télécommande.
Exemples) Pour "3" :

Pour "15":

dans moins de 2 secondes

Pour "30" :

dans moins de 2 secondes

Syntoniseur RDS (Option régionale dans certains pays Européens, etc.)
ECOUTER DES EMISSIONS RDS (FM SEULEMENT)
RDS (Radio Data System) est une méthode d'envoi de signaux d'informations en même temps que les signaux de transmission. Votre tuner est capable de traduire ces signaux et d'afficher leurs informations. Ces codes contiennent les informations suivantes.
Le nom du Programme de Service (PS), la liste des Types de Programmes (PTY), des informations concernant la circulation routière (TA), l'heure actuelle (CT), les nouvelles des stations (RT).
■Remarque :
- Dans les autres pays, la fonction recherche RDS n'est pas disponible.
Recherche de RDS
- Utilisez cette fonction pour rechercher et recevoir automatiquement des stations offrant des services RDS.
- En mode FM, sélectionnez le mode Recherche de RDS.
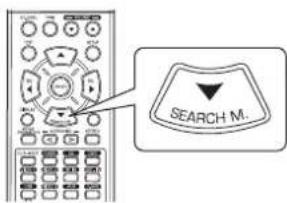
text_image
SEARCH M.- Chaque fois cette touche est appuyée, le mode Recherche change dans cet ordre : → RDS SRCH → TP SRCH → PTY SRCH → OFF
- Lorsque l'indication "RDS SRCH" est affichée, appuyez sur la touche ENTER.
RIS SARCH
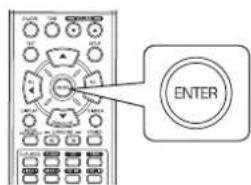
text_image
ENTER- Le tuner recherche automatiquement les stations offrant des services RDS et le nom de la station est affiché.
- Si aucune station RDS n'est trouvée, "NO RDS" est affiché.
- Si "RDS SRCH" ne s'affiche pas, recommencez à partir de l'étape 1 ci-dessus.
Recherche de TP
- Utilisez cette fonction pour rechercher et recevoir automatiquement des stations diffusant des informations routières.
- En mode FM, appuyez deux fois sur la touche SEARCH MODE.

text_image
SEARCH M.- "TP SRCH" s'affiche.
- Lorsque l'indication "TP SRCH" est affichée, appuyez sur la touche ENTER.
TP SRCH
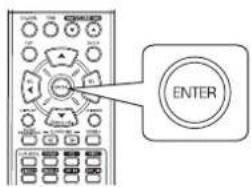
text_image
ENTER- Le tuner recherche automatiquement les stations diffusant des informations routières.
- "NO TRAFF" est affiché lorsque le signal est trop faible ou il n'y a aucune station diffusant des informations routières.
- Si "TP SRCH" ne s'affiche pas, recommencez à partir de l'étape 1 ci-dessus.
Recherche de PTY
- Utilisez cette fonction pour rechercher et recevoir automatiquement des stations par type de programmes.
- En mode FM, appuyez trois fois sur la touche SEARCH MODE.
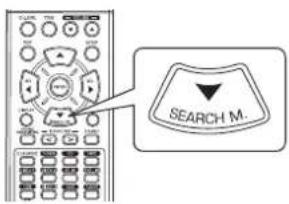
text_image
SEARCH M.PTY SACH
• "PTY SRCH" s'affiche.
- Lorsque "PTY SRCH" est affichée, sélectionnez le type de programmes souhaité.
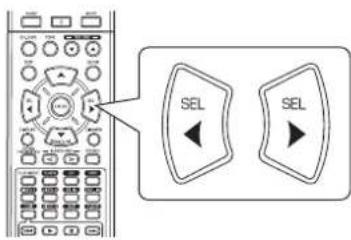
text_image
SEL SELNEWS
- Chaque fois ces touches sont appuyées, l'un des 32 différents types de programmes est sélectionné. (NEWS, AFFAIRS, INFO, SPORT, EDUCATE, DRAMA, CULTURE, SCIENCE, VARIED, POP M, ROCK M, EASY M, LIGHT M, CLASSICS, OTHER M, WEATHER, FINANCE, CHILDREN, SOCIAL, RELIGION, PHONE IN, TRAVEL, LEISURE, JAZZ, COUNTRY, NATION M, OLDIES, FOLK M, DOCUMENT, TEST, ALARM, NONE) - Si "PTY SRCH" ne s'affiche pas, recommencez à partir de l'étape 1 ci-dessus.
- Lorsque le programme souhaité est affiché, appuyez sur la touche ENTER.
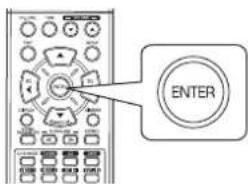
text_image
ENTER- Le tuner recherche automatiquement les stations offrant des services PTY.
- Si aucune station n'est trouvée, "NO PROG" est affiché.
AFFICHAGE
En mode FM,
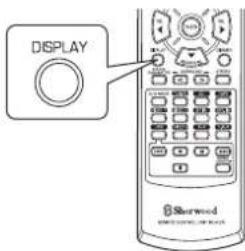
text_image
DISPLAY Starwood- Chaque fois cette touche est appuyée, le mode d'affichage change dans cet ordre :
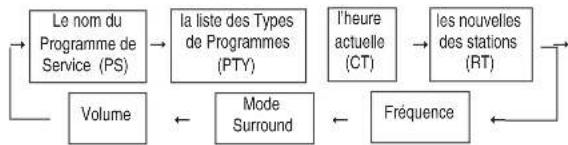
flowchart
graph LR
    A["Le nom du Programme de Service (PS)"] --> B["la liste des Types de Programmes (PTY)"]
    B --> C["l'heure actuelle (CT)"]
    C --> D["les nouvelles des stations (RT)"]
    D --> E["Fréquence"]
    E --> F["Mode Surround"]
    F --> G["Volume"]
    G --> A
- Si les signaux sont trop faibles ou si aucun service RDS n'est disponible, alors l'une des indications suivantes sera affichée : "NO NAME", "NO PTY", "NO TIME" ou "NO TEXT".
ENREGISTREMENT
- Lorsque vous enregistrez des signaux analogiques à partir de VIDEO 1 ou VIDEO 2, assurez-vous de sélectionner l'entrée analogique.
(Pour plus de détails, voir "La source d'entrée est VIDEO 1, VIDEO 2" à la page 12.) - Les réglages volume et tonalité (graves, aigus) n'ont aucun effet sur les signaux d'enregistrement.
- Lorsque vous sélectionnez tuner, CD ou VIDEO 2 comme source d'enregistrement, l'enregistrement peut être depuis TAPE, VIDEO 1 ou les deux simultanément.
Enregistrement avec TAPE (bande)
- Sélectionnez l'entrée souhaitée comme source d'enregistrement à l'exception pour TAPE.
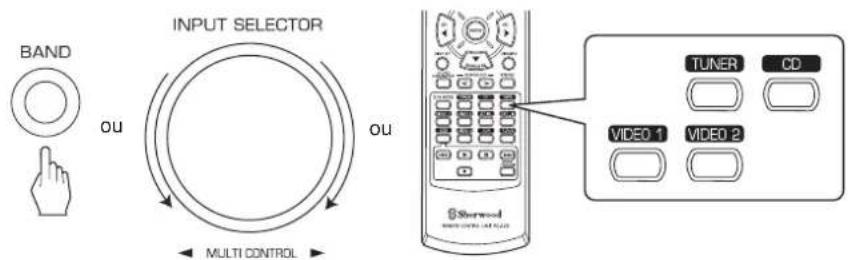
text_image
BAND OU INPUT SELECTOR OU MULTI CONTROL TUNER CD VIDEO 1 VIDEO 2-
l'enregistrement sur TAPE.
-
Démarrez la lecture sur l'entrée souhaitée.
Enregistrement depuis VIDEO 1
- Lorsqu'un équipement audio est connecté aux prises VIDEO 1, vous pouvez enregistrer les signaux audio.
- Sélectionnez l'entrée souhaitée comme source d'enregistrement à l'exception pour VIDEO 1.
text_image
BAND OU INPUT SELECTOR OU MULTI CONTROL TUNER CD TAPE VIDEO 2-
Démarrez l'enregistrement sur VIDEO 1.
-
Démarrez la lecture sur l'entrée souhaitée.
AUTRES FONCTIONS
Utilisation de la minuterie sommeil
- La minuterie sommeil permet au système de continuer à fonctionner pendant une certaine durée avant son arrêt automatique.
- Pour régler le récepteur à s'arrêter automatiquement après une certaine durée.
text_image
SLEEP- Chaque fois cette touche est appuyée, le temps sommeil change dans cet ordre :

- Lorsque vous utilisez la minuterie sommeil, " *) s'allume.
- Lorsque vous utilisez la minuterie sommeil, l'afficheur fluorescent devient faiblement éclairé.
Réglage de la luminosité de l'afficheur fluorescent
text_image
Dimmer Sherwood- Chaque fois cette touche est appuyée, la luminosité de l'afficheur fluorescent change dans cet ordre :

- En mode affichage OFF (désactivé), l'appui sur n'importe quelle touche rétablit le mode affichage ON (activité).
Afficher l'état de fonctionnement
Durant la lecture,
text_image
DISPLAY Shorwood- Chaque fois cette touche est appuyée, le mode d'affichage change dans cet ordre :

flowchart
graph LR
    A["Mode Surround"] --> B["Volume"]
    B --> C["Source d'entrée"]
    C --> A
- Si la fonction recherche RDS est disponible dans votre pays, pour plus de détails sur le mode information FM, voir "AFFICHAGE" à la page 23.
UTILISATION DES DIFFERENTES FONTIONS DU PANNEAU AVANT
- Vous pouvez utiliser facilement les différentes fonctions à l'aide de touches particulières du panneau avant.
1. Sélectionnez le mode surround souhaité.

- En fonction de la source d'entrée, chaque fois cette touche est appuyée, le mode change dans cet ordre et reste affiché pendant quelques secondes :
→[PRESET →TUNE →] CH LEVEL OFF ← TONE < ← D/A SET > ←
(Affichage de l'entrée actuelle)
[ ] : Sélectionnable seulement si le tuner est sélectionné.
< > : Sélectionnable seulement si VIDEO 1 ou VIDEO 2 est sélectionné.
2. Entrer le mode sélectionné.

- Le mode Réglage sera annulé dans quelques secondes. Dans ce cas, effectuez de nouveau l'étape 1.
3. Réglez le mode sélectionné comme souhaité.

■ Sélection du mode "PRESET"(Mode stations préréglées)
- Chaque fois le bouton est tourné, la station préréglée sera syntonisée. (Pour plus de précisions, reportez-vous à "Se syntoniser à une station préréglée" à la page 21).
■ Sélection de "TUNE"(mode de syntonisation Auto/manuel)
- La syntonisation automatique ou manuelle sera effectuée en fonction de la manière dont est tournée le bouton, rapidement ou pas à pas. (Pour plus de précisions, reportez-vous à "Recherche automatique" et "Recherche manuelle" à la page 20).
■ Sélection de "CH LEVEL"(Mode Réglage du niveau de chaque canal)
- Vous pouvez régler le niveau du canal courant comme vous le souhaitez. (Pour plus de précisions, reportez-vous à "Régler le niveau du canal courant" à la page 18).
① Appuyez sur la touche MODE pour sélectionner le canal souhaité.
② Tournez ce bouton pour régler le niveau du canal comme souhaité.
③ Répétez les étapes ① et ② ci-dessus pour régler chaque niveau de canal.
■ Sélection de "D/A SET"(Mode d'entrée numérique/analogique)
- Chaque fois ce bouton est tourné, l'entrée numérique (optique ou coaxiale) ou l'entrée analogique est sélectionnée. (Pour plus de précisions, reportez-vous à "La source d'entrée est VIDEO 1, VIDEO 2 à la page 12).
■ Sélection de "TONE"(Mode réglage de tonalité) - Chaque fois ce bouton est tourné, le mode de tonalité change dans cet ordre :
OFF : pour écouter de sources de programme sans effet de tonalité.(l'indicateur "DIRECT" s'allume.)
ON : pour régler la tonalité à votre goût. (l'indicateur 'DIRECT" s'éteint.)
♦ Lorsque TONE est sur ON (activée) pour régler la tonalité (graves et aigues)
① Appuyez sur la touche MODE pour sélectionner la tonalité souhaitée.
② Tournez ce bouton pour régler la tonalité sélectionnée comme souhaité.
③ Pour compléter le réglage de tonalité, répétez les étapes ① et ②.
4. Quittez le mode de réglage.
MEMORY/ENTER

Configuration du système
- Le menu de configuration s'affiche sur l'afficheur fluorescent et vous permet de réaliser facilement la procédures de configuration. Dans la plupart des cas, vous n'aurez à faire cela qu'une seule fois durant l'installation et l'agencement de vos enceintes, et nécessite rarement des modifications ultérieures. Le menu de configuration comprend 5 menus principaux : Système, Entrée, Configuration des enceintes, Niveau canal et Paramètres. Ces menus contiennent plusieurs sous-menus.
1. Activez le menu de configuration.

text_image
SETUPSYSTEM
- Le menu de configuration sera affiché. - Appuyez de nouveau sur cette touche pour masquer le menu.
2. Sélectionnez le menu souhaité en se servant des touches de Haut (▲)/Bas (▼).

text_image
SEARCH M.3. Confirmez votre sélection.
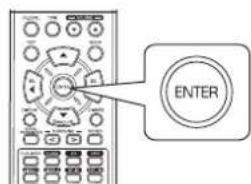
text_image
ENTER- Pour sélection de "SYSTEM", voir "CONFIGURATION DU SYSTEME" à la page 29.
- Pour sélection de "INPUT" (ENTREE), voir "CONFIGURATION DES ENTREES" à la page 31.
- Pour sélection de "SPK SET", voir "CONFIGURATION DES ENCEINTES" à la page 32.
- Pour sélection de "CH LÉVÊL" (NIVEAU CANAL), voir "CONFIGURATION DU NIVEAU DES CANAUX" à la page 36.
- Pour sélection de "PARAMTR", voir "CONFIGURATION DES PARAMETRES" à la page 38.
- Pour sélection de "EXIT" (QUITTER), le menu de configuration sera masqué.
■Organigramme des menus
• Voici l'organigramme des menus :
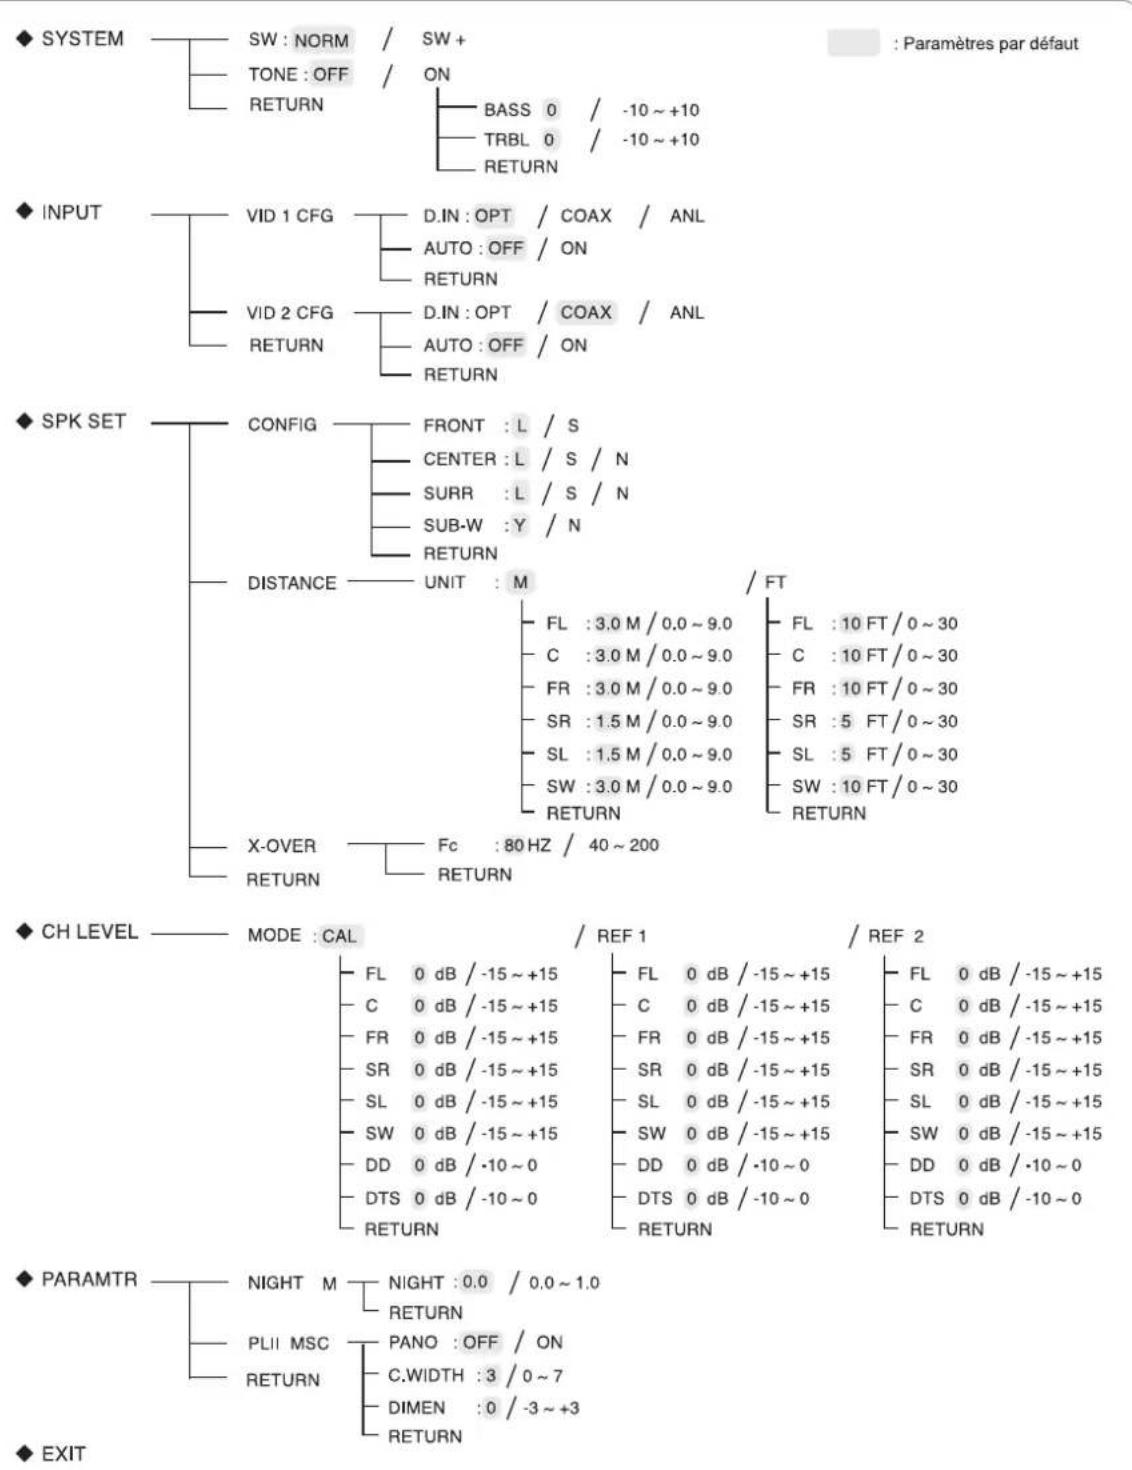
- Si "RETURN" est sélectionné dans un sous-menu, le retour se fait au menu précédent.
■Remarque : Durant les opérations de configuration du système, seules les touches (POWER ON/) STANDBY et celles nécessaires à la configuration sont disponibles.
CONFIGURATION DU SYSTEME
◆ SYSTEM
text_image
SW : NORM / SW + TONE : OFF / ON RETURN BASS 0 / -10 ~ +10 TRBL 0 / -10 ~ +10 RETURN- SW (SUBWOOFER) : Pour choisir le mode subwoofer souhaité.
• TONE : Pour régler la tonalité (graves et aigues). -
RETURN (Retourner) : Pour retourner au menu précédent.
-
Utilisez les touches Haut (▲)/Bas (▼) pour sélectionner l'élément souhaité.
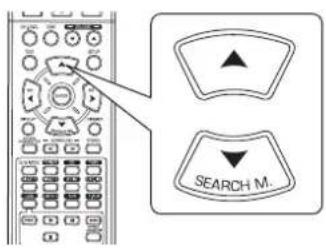
text_image
SEARCH M.- Utilisez les touches Gauche (◀)/Droite (▶) pour régler l'élément comme vous le souhaitez.
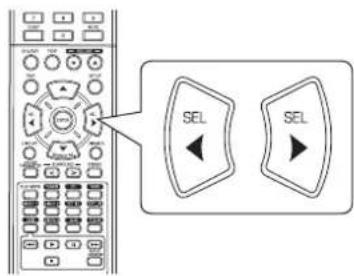
text_image
Diagram showing a remote control panel with two labeled buttons labeled 'SEL' pointing left and right respectively.Sélection du mode SUBWOOFER
- Le mode "SW +" ne fonctionne que lorsque "FRONT" est mis sur "L" et "SUB-W" est mis sur "Y" dans le menu SPK SET. (Pour plus de détails, voir "CONFIGURATION DES ENCEINTES" à la page 32.)
- Lors de lecture à partir d'une source 2 canaux en mode MATRIX, CHURCH, THEATER, HALL ou STADIUM, les signaux de basses fréquences sont reproduits à partir du subwoofer indépendamment du mode de réglage du subwoofer.
NORM : Lorsque les signaux de basses fréquences des canaux sont réglés sur "L" sont reproduits à partir de ces canaux uniquement.
Dans ce mode, les signaux de basses fréquences qui sont reproduits à partir du canal subwoofer sont uniquement les signaux de basses fréquences LFE (de sources multivoies qui contiennent un canal LFE (effets de basses fréquences), appelé aussi ".1" canal) et les canaux réglés sur "S".
SW + : Lorsque les signaux de basses fréquences des canaux réglés sur "L" sont simultanément reproduits à partir de ces canaux et du canal subwoofer.
Dans ce mode, la gamme de basses fréquences s'étend uniformément dans la salle, mais en fonction de la taille et de la forme de la salle des interférences peuvent survenir et diminuent le volume réel de la gamme de basses fréquences.
Sélection de TONE
OFF (désactivée) : Pour écouter de sources de programme sans effet de tonalité. (l'indicateur "DIRECT" s'allume.)
↑↓
ON (activée) : Pour régler la tonalité à votre goût. (l'indicateur "DIRECT" s'éteint.)
■Lorsque TONE est sur ON (activée) pour régler la tonalité (graves et aigues)
① Utilisez les touches Haut (▲)/Bas (▼) pour sélectionner la tonalité souhaitée.
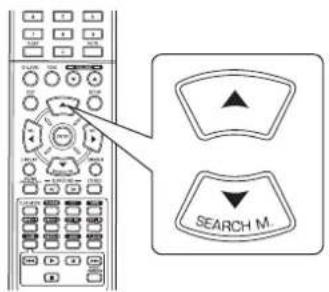
text_image
SEARCH M.
Sélection de BASS
BASS 0
② Utilisez les touches Gauche (◀)/Droite (▶) pour régler la tonalité souhaitée.
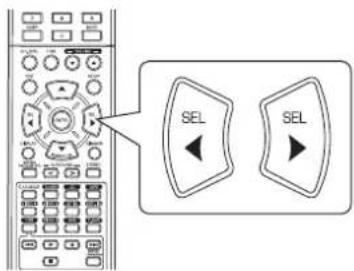
text_image
SEL SEL- Le niveau de tonalité peut être choisi dans l'intervalle -10 à +10 dB.
- En général, nous recommandons de régler les graves et aigues sur 0 dB (niveau plat).
- Les réglages à des niveaux de volume extrêmes peuvent endommager vos enceintes.
- Pour compléter le réglage de tonalité, répétez les étapes ①et ② ci-dessus.
CONFIGURATION DES ENTREES
◆ INPUT
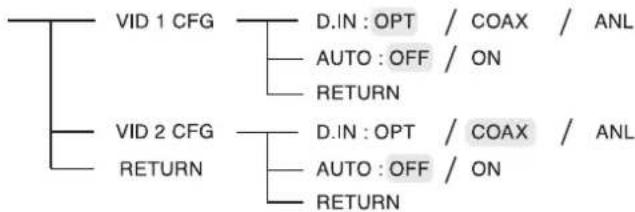
flowchart
graph TD
    A["VID 1 CFG"] --> B["D.IN : OPT / COAX / ANL"]
    A --> C["AUTO : OFF / ON"]
    A --> D["RETURN"]
    E["VID 2 CFG"] --> F["D.IN : OPT / COAX / ANL"]
    E --> G["AUTO : OFF / ON"]
    E --> H["RETURN"]
• D.IN (DIGITAL IN) (entrée numérique) : Pour attribuer le composant connecté à DIGITAL IN à l'entrée souhaitée.
- AUTO (AUTO SURROUND) : Pour sélectionner le mode surround auto ou surround manuel.
- RETURN (Retourner) : Pour retourner au menu précédent.
- Utilisez les touches Haut (▲)/Bas (▼) pour sélectionner la source d'entrée souhaitée, puis appuyez sur la touche ENTER.

flowchart
graph TD
    A["Search Mode"] --> B["ENTER"]
    C["User Interface"] --> A
Exemple) Sélection de VIDEO 2
DIN: COAX
- Utilisez les touches Haut (▲)/Bas (▼) pour sélectionner l'élément souhaité.
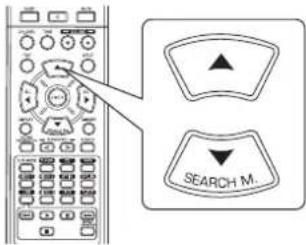
text_image
SEARCH M.- Utilisez les touches Gauche (◀)/Droite (▶) pour régler l'élément comme souhaité.
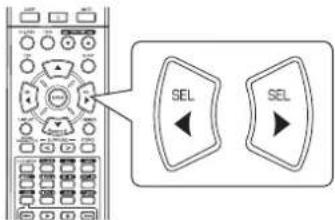
text_image
SEL SELSélection de DIGITAL IN
- Vous devez attribuer le composant connecté à DIGITAL IN à VIDEO 1, VIDEO 2.
(Pour plus de détails, voir "RACCORDEMENT D'ENTREES NUMERIQUES (DIGITAL IN)" à la page 5.) - Vous pouvez sélectionner celle souhaitée parmi OPT (optical), COAX (coaxial) et ANL (analogique).
■Remarques :
- Dans le cas où DIGITAL IN est attribuée à plus de deux sources d'entrée, lorsque ces dernières sont sélectionnées, le signal audio numérique sera entendu depuis le même DIGITAL IN.
- Lorsque TUNER, TAPE ou CD est sélectionné comme source d'entrée, l'entrée numérique ("OPT", "COAX") ne peut être sélectionnée.
Sélection de AUTO SURROUND
- Sélectionnez le mode surround auto ou le mode surround manuel en fonction de la manière dont vous allez sélectionnez le mode surround.
OFF (Désactivé)
(Mode surround manuel)
Vous pouvez sélectionner un mode surround différent parmi les modes disponibles pour le signal en entrée à l'aide des touches Haut/Bas (▶,>/-◀,<) du mode surround.
↑↓
(Pour plus de détails, voir "ECOUTER DES SONS SURROUND" à la page 15.)
ON (activé)
: Le mode surround optimal sera automatiquement sélectionné en fonction du format du signal en entrée.
(Mode surround auto)
■Remarques :
- Même lorsque le mode surround auto est sélectionné et le même type de format de signal numérique est reçu, le mode surround optimum peut varier en fonction du type d'enceinte s'il est réglé sur NO ou pas.
- Si un signal numérique PCM 96 kHz est entrée, seul le mode stéréo sera sélectionné.
CONFIGURATION DES ENCEINTES
- Après avoir installé le récepteur et connecté tous les composants, vous devez régler les enceintes pour obtenir les sons acoustiques optimum en fonction de votre environnement et de leur disposition.
- Vous devez aussi régler les enceintes à chaque fois que vous changez leur emplacement ou leur disposition.

flowchart
graph TD
    A["◆ SPK SET"] --> B["CONFIG"]
    B --> C["FRONT : L / S"]
    B --> D["CENTER : L / S / N"]
    B --> E["SURR : L / S / N"]
    B --> F["SUB-W : Y / N"]
    B --> G["RETURN"]
    A --> H["DISTANCE"]
    H --> I["UNIT : M"]
    I --> J["FL : 3.0 M / 0.0 ~ 9.0"]
    I --> K["C : 3.0 M / 0.0 ~ 9.0"]
    I --> L["FR : 3.0 M / 0.0 ~ 9.0"]
    I --> M["SR : 1.5 M / 0.0 ~ 9.0"]
    I --> N["SL : 1.5 M / 0.0 ~ 9.0"]
    I --> O["SW : 3.0 M / 0.0 ~ 9.0"]
    I --> P["RETURN"]
    A --> Q["X-OVER"]
    Q --> R["FC : 80 Hz / 40 ~ 200"]
    Q --> S["RETURN"]
    style A fill:#f9f,stroke:#333
    style H fill:#ccf,stroke:#333
    style Q fill:#cfc,stroke:#333
- CONFIG (CONFIGURATION) : Pour sélectionner la taille des enceintes connectées.
- DISTANCE : Pour entrer la distance entre la position d'écoute et chaque enceinte, cela permet de définir automatiquement le temps de retard et d'obtenir une lecture surround optimale.
- X-OVER (CROSSOVER (répartiteur)) : Pour sélectionner la fréquence du crossover.
- RETURN (Retourner) : Pour retourner au menu précédent.
Sélection de CONFIGURATION
- Utilisez les touches Haut (▲)/Bas (▼) pour sélectionner "CONFIG", puis appuyez sur la touche ENTER.
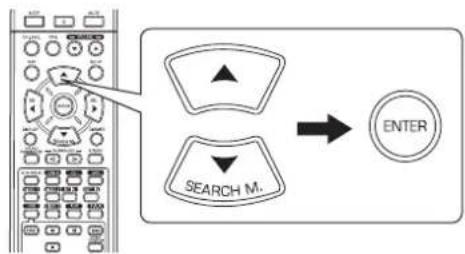
flowchart
graph TD
    A["Search Mode"] --> B["ENTER"]
    C["User Interface"] --> A

FRONT: L
- Utilisez les touches Haut (▲)/Bas (▼) pour sélectionner l'enceinte souhaitée.
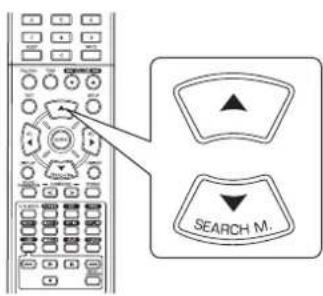
text_image
SEARCH M.- Utilisez les touches Gauche (◀)/Droite (▶) pour régler l'enceinte comme souhaité.

text_image
Diagram showing a remote control panel with two 'SEL' buttons and directional arrows indicating selection or navigation.- Sélectionnez l'une des options suivantes en fonction du type de vos enceintes.
L (grand): Sélectionnez cette option si vos enceintes peuvent reproduire pleinement les sons au dessous de la fréquence du crossover.
S (petit): Sélectionnez cette option si vos enceintes ne peuvent pas reproduire pleinement les sons au dessous de la fréquence du crossover. Si cette option est sélectionnée, les sons au dessous de la fréquence du crossover sont envoyés au subwoofer ou aux enceintes qui sont réglées sur "L (grand)" (quand le subwoofer n'est pas utilisé).
N (Aucun): À sélectionner si aucune enceinte n'est connectée. Si cette option est sélectionnée, les sons sont envoyés aux enceintes qui ne sont pas réglées sur "N (Aucun)".
Y (Oui)/N (Non): À sélectionner en fonction du subwoofer s'il est connecté ou pas.
■Remarques :
- Lorsque les enceintes sont réglées sur "S (petit)", vous devez régler correctement la fréquence du crossover en fonction des caractéristiques de leurs fréquences. (Pour plus de détails, voir "Sélection de CROSSOVER" à la page 35.)
- Si "SUB-W" est réglé sur "N (Non)", "FRONT" est automatiquement réglé sur "L (grand)".
- Si "FRONT" est réglé sur "S (petit)", "CENTER" et "SURR" ne peuvent pas être réglés sur "L (grand)".
- Répétez les étapes 2 et 3 ci-dessus jusqu'à ce que toutes les enceintes soient réglées sur le mode souhaité.
- À propos de la taille des enceintes
- Sélectionnez "L (grand)" ou "S (petit)" non pas en fonction de la taille réelle de vos enceintes mais en fonction de leurs capacités à lire les signaux de basses fréquences (sons graves au dessous de la fréquence réglée dans le menu "X-OVER").
- Si vous n'avez aucune idée, pour trouver le bon réglage, essayez de comparer les sons avec les deux réglages (en réglant le volume à un niveau suffisamment bas pour ne pas endommager les enceintes).
Sélection de DISTANCE
- Utilisez les touches Haut (▲)/Bas (▼) pour sélectionner "DISTANCE", puis appuyez sur la touche ENTER.
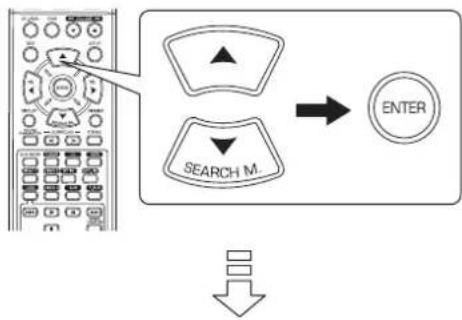
flowchart
graph TD
    A["Search M"] --> B["ENTER"]
    C["Arrow"] --> B
UNIT : 11
- Utilisez les touches Haut (▲)/Bas (▼) pour sélectionner le haut-parleur souhaité.
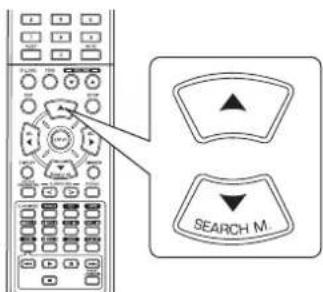
text_image
SEARCH M.■Remarque :
- Vous ne pouvez pas sélectionner les enceintes réglées sur "N (None ou No)".
- Utilisez les touches Gauche (◀)/Droite (▶) pour régler les enceintes comme souhaité.

text_image
SEL SEL■ Sélection de l'unité de mesure
- Vous pouvez sélectionner "M (Mètre)" ou "FT (Feet (pieds))".
- Une fois l'unité de mesure est choisie, les distances sont automatiquement transformées dans cette unité.
■ Sélection de distance
- Vous pouvez régler la distance entre 0,0 à 9.0 mètres avec un pas de 0,3 mètre (ou 0 \~ 30 pied avec un pas de 1 pied).
- Répétez les étapes 2 et 3 ci-dessus jusqu'à ce que toutes les distances soient réglées comme souhaité.
- À propos de la distance des enceintes
Dans l'idéal, lors d'écoute de sons surround multivoies depuis des sources Dolby Digital etc., l'enceinte centrale et les enceintes surround et surround arrière devraient être à la même distance de la position d'écoute que les enceintes frontales. En entrant les distances entre la position d'écoute et chaque enceinte, les retards de l'enceinte centrale et des enceintes surround et surround arrière seront automatiquement réglés pour créer un environnement d'écoute virtuel de manière que l'enceinte centrale et les enceintes surround et surround arrière étaient à leurs positions idéales respectivement..
Sélection de CROSSOVER
- Lorsque les enceintes sont réglées sur "S (petit)", vous devez régler correctement la fréquence du crossover en fonction des caractéristiques de leurs fréquences.
- Utilisez les touches Haut (▲)/Bas (▼) pour sélectionner "X-OVER", puis appuyez sur la touche ENTER.
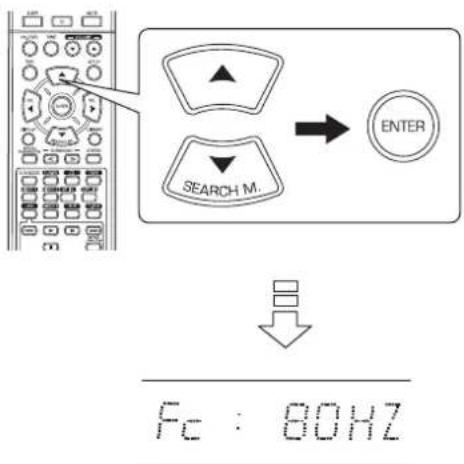
text_image
SEARCH M. ENTER Fc : 80HZ- Utilisez les touches Gauche (◀)/Droite (▶) pour régler la fréquence du crossover comme souhaité.

text_image
Diagram showing a control panel with two 'SEL' buttons and directional arrows pointing to the left panel.- Vous pouvez régler la fréquence du crossover entre 40 et 200 Hz avec un pas de 10 Hz.
■ À propos de la fréquence du crossover
- Lorsque les enceintes sont réglées sur "S (petit)", les basses fréquences des canaux qui sont au dessous de la fréquence du crossover sont émises du subwoofer ou des enceintes frontales qui sont réglées sur "L (grand)" (quand le subwoofer n'est pas utilisé).
- Pour plus de détails, reportez-vous au manuel de l'utilisateur des enceintes à connecter. Si la gamme de fréquences de vos enceintes est entre 100 Hz et 20 kHz, la fréquence du crossover devrait être 100 Hz (ou légèrement plus élevée).
CONFIGURATION DU NIVEAU DES CANAUX

CH LEVEL

MODE : CAL
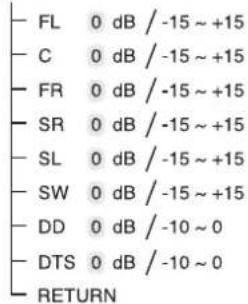
text_image
- FL 0 dB / -15 ~ +15 - C 0 dB / -15 ~ +15 - FR 0 dB / -15 ~ +15 - SR 0 dB / -15 ~ +15 - SL 0 dB / -15 ~ +15 - SW 0 dB / -15 ~ +15 - DD 0 dB / -10 ~ 0 - DTS 0 dB / -10 ~ 0 - RETURN/ REF 1
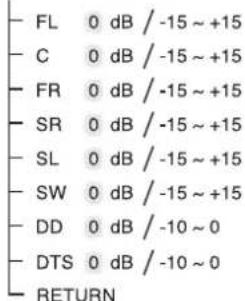
text_image
FL 0 dB / -15 ~ +15 C 0 dB / -15 ~ +15 FR 0 dB / -15 ~ +15 SR 0 dB / -15 ~ +15 SL 0 dB / -15 ~ +15 SW 0 dB / -15 ~ +15 DD 0 dB / -10 ~ 0 DTS 0 dB / -10 ~ 0 RETURN/ REF 2
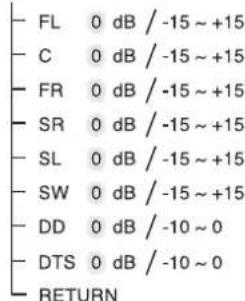
text_image
- FL 0 dB / -15 ~ +15 - C 0 dB / -15 ~ +15 - FR 0 dB / -15 ~ +15 - SR 0 dB / -15 ~ +15 - SL 0 dB / -15 ~ +15 - SW 0 dB / -15 ~ +15 - DD 0 dB / -10 ~ 0 - DTS 0 dB / -10 ~ 0 - RETURN■ Remarque : En fonction des paramètres des enceintes ("N (Aucun ou Non)"), certains canaux ne peuvent pas être sélectionnés.
Régler le niveau du canal courant
- Vous pouvez régler le niveau du canal courant comme vous le souhaitez. Les niveaux réglés sont simplement mémorisés dans la mémoire utilisateur ("CAL"), et non dans la mémoire de préréglages ("REF 1", "REF 2").
- Après avoir réglé le niveau de chaque canal à l'aide des tonalités de test, réglez les niveaux en fonction des sources des programmes ou selon vos goûts. (Pour plus de détails, voir "Réglage du niveau de chaque canal à l'aide de TEST TONE" à la page 17.)

Utilisez les touches Haut (▲)/Bas (▼) pour sélectionner le canal souhaité.
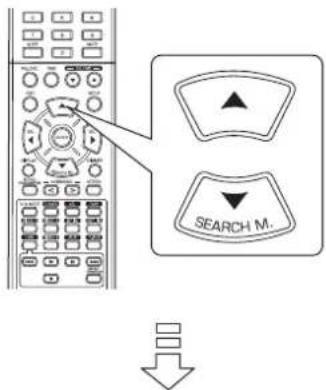
text_image
SEARCH M.Exemple) Sélection de source LFE de Dolby Digital
111
0 dB

Utilisez les touches Gauche (◀)/Droite (▶) pour régler le niveau du canal sélectionné ou la source de programmes LFE.

text_image
SEL SEL- La plage de réglage du niveau LFE (Effets basse fréquence) va de -10 à 0 dB et les niveaux des autres canaux va de -15 à +15 dB.
- En général, nous recommandons de régler le niveau LFE sur 0 dB. (Bien que, le niveau LFE recommandé sur quelques logiciels DTS plus récents est de -10 dB.) Diminuez les valeurs si les niveaux recommandés semblent trop élevés.

Répétez les étapes 1 et 2 ci-dessus pour régler chaque niveau de canal.
Mémorisation des niveaux de canaux réglés
- Vous pouvez mémoriser les niveaux de canaux réglés dans la mémoire de préréglages ("REF 1", "REF 2") et les rappeler quand vous voulez.
- Après avoir effectué les étapes 1 à 3 dans la procédure "Régler le niveau du canal courant" à la page 36, appuyez sur la touche ENTER.
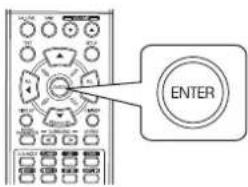
text_image
ENTER
MODEREF.
- Alors le "1" de l'indication "REF 1" se met à clignoter.
- Utilisez les touches Gauche (◀)/Droite (▶) pour sélectionner la position de mémoire de préréglage souhaitée, puis appuyez sur la touche ENTER.
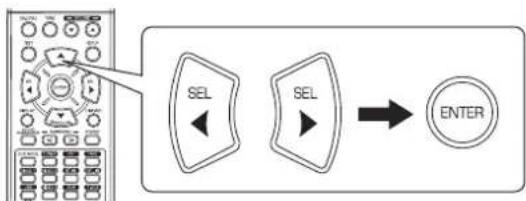
flowchart
graph LR
    A["Radio System"] --> B["SEL"]
    B --> C["ENTER"]
    style A fill:#f9f,stroke:#333
    style C fill:#ccf,stroke:#333
- Chaque fois que vous appuyez sur la touche Gauche (◀) ou Droite (▶), "REF 1" ou "REF 2" est sélectionné.
- Les niveaux de canaux réglés sont à présent mémorisés dans la mémoire sélectionnée.
Rappeler les niveaux de canaux mémorisés
- Utilisez les touches Haut (▲)/Bas (▼) pour sélectionner "MODE \~".

text_image
SEARCH M.
MODE CAL
- Il se peut que "CAL" soit affichée à la place de "REF 1" ou "REF 2".
- Utilisez les touches Gauche (◀)/Droite (▶) pour sélectionner REF 1 ou REF 2.
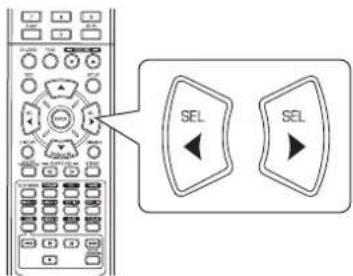
text_image
Diagram showing a remote control panel with two labeled 'SEL' buttons, connected to a directional arrow pointing left.- Les niveaux de canaux mémorisés dans la mémoire de préréglages sélectionnée sont rappelés.
CONFIGURATION DES PARAMETRES

flowchart
graph TD
    A["PARAMTR"] --> B["NIGHT M"]
    A --> C["PLII MSC"]
    A --> D["RETURN"]
    B --> E["NIGHT : 0.0 / 0.0 ~ 1.0"]
    B --> F["RETURN"]
    C --> G["PANO : OFF / ON"]
    C --> H["C.WIDTH : 3 / 0 ~ 7"]
    C --> I["DIMEN : 0 / -3 ~ +3"]
    C --> J["RETURN"]
- NIGHT M (NIGHT MODE (mode nuit)) : Pour régler la gamme de compression dynamique qui fait faiblir facilement les sons écoutés à volume élevé.
- PLII MSC (DOLBY PLII MUSIC) : Pour régler différents paramètres surround et obtenir l'effet surround optimal.
- RETURN (Retourner) : Pour retourner au menu précédent.
Sélection du mode NIGHT MODE (mode nuit)
- Cette fonction compresse la gamme dynamique des parties précédemment spécifiées de piste sonore Dolby Digital ou DTS (à un volume extrêmement élevé) pour minimiser les différences en volume entre les parties spécifiées et non spécifiées.
Ceci permet d'entendre facilement, la nuit, toute la bande sonore d'un film à bas volume.
■Remarques :
- Le mode nuit n'est valide que lorsque des signaux numériques de sources de programmes Dolby Digital ou DTS sont entrées.
-
Sur certains logiciels Dolby Digital ou DTS, le mode nuit, peut ne pas être valide.
-
Utilisez les touches Haut (▲)/Bas (▼) pour sélectionner "NIGHT M", puis appuyez sur la touche ENTER.
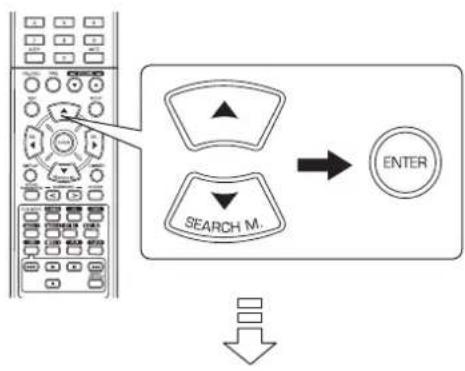
flowchart
graph TD
    A["Mobile Phone Interface"] --> B["Search M."]
    B --> C["ENTER"]
NIGHT:0.0
- Utilisez les touches de déplacement Gauche (◀) /Droite (▶) pour régler la gamme de compression dynamique comme souhaitée.

text_image
SEL SEL0.0 ↔ 0.1 ↔ 0.2 ...... 0.9 ↔ 1.0 Compression plus faible Compression plus élevée
Sélection de DOLBY PLII MUSIC
-
Vous pouvez régler différents paramètres surround et obtenir l'effet surround optimal.
■ Remarque : Le réglage des paramètres n'est valide que lors d'écoute de musique en mode Dolby Pro Logic II. -
Utilisez les touches Haut (▲)/Bas (▼) pour sélectionner "PLII MSC", puis appuyez sur la touche ENTER.
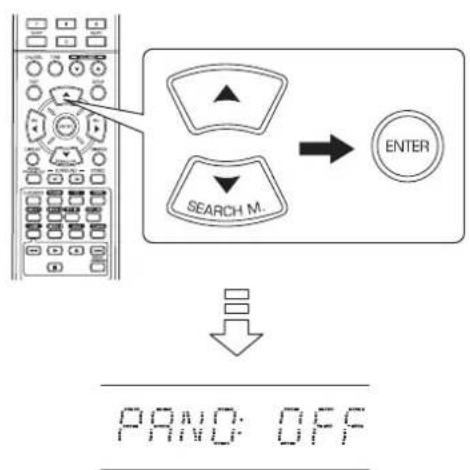
flowchart
graph TD
    A["Left Panel"] --> B["Search Mode"]
    B --> C["ENTER"]
    D["Down Arrow"] --> E["PAND OFF"]
- Utilisez les touches Haut (▲)/Bas (▼) pour sélectionner le paramètre souhaité.
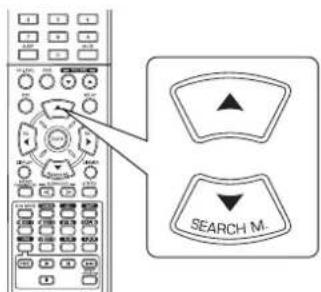
text_image
SEARCH M.- Utilisez les touches de déplacement Gauche (◀)/Droite (▶) pour régler le paramètre souhaité.
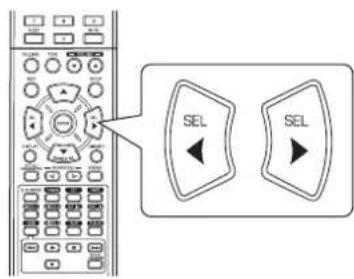
text_image
SEL SEL■Sélection du mode "PANO (Panoramique)"
Ce mode transpose la stéréo frontale vers les deux enceintes surround, vous enveloppant ainsi avec le son des enceintes latérales pour créer une perspective sonore extraordinaire. Sélectionnez "OFF" ou "ON"(par défaut : OFF).
■Sélection de "C. WIDTH (contrôle de la largeur centrale)"
Cette commande permet de régler l'image sonore centrale de sorte qu'elle ne peut être écoutée que sur l'enceinte centrale, sur les enceintes gauche/droite comme image virtuelle ou sur les trois enceintes avant à différents degrés. La plage de réglage va de 0 à 7 (par défaut : 3).
■Sélection de "DIMEN (contrôle de dimension)"
Cette commande permet de régler graduellement le champ sonore vers l'avant ou vers l'arrière. La plage de réglage va de -3 à +3 (par défaut : 0).
- Répétez les étapes 2 et 3 ci-dessus pour régler d'autres paramètres.
Guide de dépannage
Si le récepteur ne fonctionne pas convenablement, reportez-vous au tableau suivant avant de l'emmener pour réparation. Si l'anomalie persiste, essayez de la résoudre en éteignant puis en rallumant le récepteur. Si cela est sans effet, prenez contact avec votre revendeur. En aucune circonstance, ne tentez jamais de réparer le récepteur par vous-même. Cela entraîne l'annulation de la garantie.
| PROBLEME CAUSE | POSSIBLE REMEDE | |
| Aucune alimentation • Le cordon | CA est débranché.• Mauvais branchement à la prise secteur ou cette dernière n'est pas active. | • Branchez le cordon correctement.• Vérifiez la prise secteur à l'aide d'une lampe ou d'un autre appareil. |
| Absence de son | • Les câbles d'enceintes sont débranchés.• Le niveau de volume global est réglé au minimum.• La touche MUTE de la télécommande est mise sur ON (activé).• Aucune source convenable n'a été sélectionnée.• Les raccordements des câbles entre les composants ne sont pas corrects. | • Vérifier les raccordements des enceintes.• Réglez le volume.• Appuyez sur la touche MUTE pour rétablir le son.• Sélectionnez une source d'entrée appropriée.• Raccordez les câbles comme il convient. |
| Absence de son des enceintes surround | • Le mode Surround est désactivé (mode stéréo).• Les niveaux de volume global et de surround sont au minimum.• Une source monaurale est utilisée.• Les enceintes surround sont réglées sur "N". | • Sélectionnez un mode surround.• Réglez les niveaux de volume global et de surround.• Sélectionnez une sources stéréo ou surround.• Sélectionnez un paramètre pour les enceintes surround. |
| Absence de son de l'enceinte centrale | • Le mode Surround est désactivé (mode stéréo).• L'enceinte centrale est réglée sur "N".• Les niveaux de volume global et central sont au minimum. | • Sélectionnez le surround souhaité.• Sélectionnez un paramètre pour l'enceinte centrale.• Réglez les niveaux de volume global et central. |
| Impossible de recevoir de stations | • Aucune antenne raccordée.• La fréquence de la station souhaitée n'est pas syntonisée.• L'antenne est mal orientée. | • Raccordez une antenne.• Syntonisez à la fréquence de la station souhaitée.• Réorientez l'antenne et réessayez la syntonisation. |
| Impossible de recevoir de stations préréglées | • Une fréquence incorrecte de station a été mémorisée.• Les stations mémorisées ont été effacées. | • Mémorisez des fréquences correctes de stations.• Mémorisez de nouveau les stations. |
| La réception FM est mauvaise | • Aucune antenne raccordée.• L'antenne est mal orientée par rapport à une meilleure réception. | • Raccordez une antenne.• Changez l'orientation de l'antenne. |
| Des craquements et des sifflements sont produits en permanence pendant la réception FM, surtout lorsque l'émission est en stéréo. | • Signaux faibles. | • Changez l'orientation de l'antenne.• Installez une antenne FM extérieure. |
| Des craquements et des sifflements sont produits en permanence ou par intermittence pendant la réception AM, surtout la nuit. | • Ces bruits peuvent être dus à des moteurs, à des lampes fluorescentes, à des éclairs, etc. | • Éloignez le récepteur de ces sources de bruit.• Installez une antenne AM extérieure. |
| La télécommande ne marche pas. | • Il y a un obstacle entre la télécommande et son capteur. | • Remplacez les piles.• Enlevez l'obstacle. |
Spécifications
■SECTION AMPLIFICATEUR
- Puissance de sortie, mode stéréo, 6 Ω, THD 0,7%, 40 Hz\~20 kHz | 2×50 W
• Distorsion harmonique totale, 6 Ω, 50 W, 1 kHz | 0,09 %
• Distorsion d'intermodulation
60 Hz : 7 kHz= 4 : 1 SMPTE, 6 Ω, 50 W | 0,1 %
- Sensibilité d'entrée, 47 kΩ
Ligne (CD, BANDE, VIDEO) | 280 mV
- Rapport signal sur bruit, réseau IHF "A"
Ligne (CD, BANDE, VIDEO) | 92 dB
- Réponse en fréquence
Ligne (CD, BANDE, VIDEO), 20 Hz\~50 kHz | +0 dB, -3 dB
- Niveau de sortie
ENR BANDE/VIDEO 1, 2,2 kΩ | 280 mV
• Commandes Graves/Aigus, 100 Hz/10 kHz | ±10 dB
- Mode surround, uniquement un canal commandé
Puissance de sortie frontale, 6 Ω, 1 kHz, THD 0,7 % | 70 W / 70 W
Puissance de sortie centrale, 6Ω, 1 kHz, THD 0,7 % | 70 W
Puissance de sortie Surround, 6 Ω, 1 kHz, THD 0,7 % | 70 W / 70 W
■SECTION AUDIO NUMERIQUE
- Fréquence d'échantillonnage | 32, 44,1, 48, 96 kHz
- Niveau d'entrée numérique
Coaxial, 75 Ω | 0,5 Vp-p
Optique, 660 nm | -15 \~ -21 dBm
■SECTION SYNTONISEUR FM
- Plage de syntonisation | 87,5 \~ 108 MHz
- Sensibilité utilisable, THD 3%, S/N 26 dB | 12,8 dBf
- Seuil de sensibilité à 46 dB, mono/stéréo | 20,2 / 45,3 dBf
- Rapport signal sur bruit, 65 dBf, mono/stéréo | 55 / 50 dB
- Distorsion harmonique totale, 65 dBf,1 kHz, mono/stéréo | 0,5 / 1,0 %
- Réponse en fréquence, 30 Hz\~12 kHz | ±3,0 dB
- Séparation stéréo, 1 kHz | 30 dB
• Rapport de capture | 4 dB - Réjection Fréquence Intermédiaire | 80 dB
■SECTION SYNTONISEUR AM
- Plage de syntonisation | 522 \~ 1611 kHz
• Sensibilité utilisable | 500 μV/m
• Rapport signal sur bruit | 40 dB - Sélectivité | 25 dB
GÉNÉRALITÉS
• Alimentation | 230 V \~ 50 Hz
• Consommation | 200 W
- Dimensions (L×H×P, parties saillantes incluses) | 440×141×358,5 mm (17-3/8×5-1/2×14-1/8 pouces)
• Poids (Net) | 9,5 kg (20,9 livres)
Remarque : à cause des améliorations continues, la conception et les caractéristiques sont sujettes à modification sans préavis.
Introducción
LEA ESTO ANTES DE UTILIZAR SU EQUIPO


PRECAUCIÓN
PARA REDUCIR EL RIESGO DE DESCARGA ELÉCTRICA, NO DESMONTE LA TAPA
(NI EL PANEL TRASERO). NO HAY PIEZAS REPARABLES POR EL USUARIO EN EL INTERIOR. LLÉVELO A REPARAR A PERSONAL DE SERVICIO CUALIFICADO.

Este símbolo pretende alertar al usuario de la presencia de "tensiones peligrosas" sin aislamiento en el interior del equipo, que pueden ser de magnitud suficiente para constituir un riesgo de descarga eléctrica para las personas.

Este símbolo pretende alertar al usuario de la presencia de instrucciones de mantenimiento (servicio técnico) y funcionamiento importantes en la literatura que acompaña al aparato.
ADVERTENCIA : PARA EVITAR EL RIESGO DE INCENDIO O DE DESCARGA ELÉCTRICA, NO EXPONGA EL APARATO A LA LLUVIA O LA HUMEDAD.
Precauciones sobre la instalación
Nota: Para una buena dispersión del calor, no instale este equipo en espacios reducidos como en un mueble librería o en recintos similares.
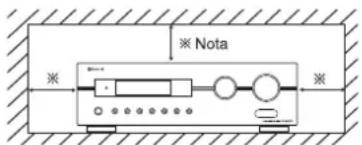
text_image
※ Nota ※
text_image
ParedNo obstruya las ranuras de ventilación ni apile otro equipo encima.
PARA SU SEGURIDAD
| EUROPA AUSTRALIA | 220 V - 240 V | Los equipos enviados a Australia están diseñados para funcionar sólo con 240 VCA. Para asegurar un funcionamiento seguro, el enchufe de tres patillas suministrado debe ser utilizado en tomas de corriente estándares de tres orificios que estén efectivamente conectadas a tierra a través del cableado normal del hogar. Cables de extensión usados con el equipo deben ser de tres hilos y estar correctamente conectados para proporcionar conexión a tierra. Los cables de extensión inadecuados so principal causa de las muertes. El hecho de que el equipo funcione bien no implica que la toma de corrietenga toma de tierra y que la instalación sea completamente segura. Para su seguridad, si tiene alguna duda sobre la correcta conexión a tierra de la toma de corriente, consulte con un electricista cualificado. TENSIÓN UNIFICADA EN EUROPA Todos los equipos son adecuados para una alimentación de 220-240 VCA. |
PRECAUCIÓN
- Deje espacio alrededor del equipo para una ventilación adecuada.
- Evite su instalación en lugares extremadamente calientes o fríos, o en áreas donde quede expuesto a la luz directa del sol o a equipos de calefacción.
- Mantenga el equipo libre de humedad, agua y polvo.
- No permita que caigan objetos en el interior del equipo.
- Compruebe que no se impide la ventilación por tapar las ranuras de ventilación con objetos como periódicos, manteles, cortinas, etc.
- No debería colocar sobre el equipo llamas desprotegidas, como velas encendidas.
- Por favor tenga en cuentas los aspectos de protección ambiental al deshacerse de las pilas.
- El equipo no debería quedar expuesto a goteos ni salpicaduras por motivo de uso.
- No se colocarán objetos llenos de líquido, como jarrones, sobre el aparato.
- No permita que insecticidas, bencina y aguarrás entren en contacto con el aparato.
- Nunca desmonte ni modifique el equipo de ninguna manera. ■Notas sobre el cable de alimentación eléctrica y la toma de corriente
- El equipo sigue recibiendo alimentación de Corriente Alterna mientras continúe enchufado a la toma de corriente, incluso si está apagado.
- Para desconectar completamente el producto de la corriente eléctrica, desconecte el enchufe de la toma de corriente.
- Cuando esté configurando la instalación del producto, compruebe que la toma de corriente que está usando es de fácil acceso.
- Desconecte el enchufe de la toma de corriente cuando no use el equipo durante largos periodos de tiempo.

Información para los usuarios sobre eliminación y recogida de equipos viejos y pilas gastadas.
Estos símbolos sobre los equipos, embalajes y/o documentos que los acompañan indican que los productos eléctricos y electrónicos y las pilas no deberían eliminarse mezclados con la basura general del hogar. Para un tratamiento adecuado, haga una recogida selectiva y recicle los productos viejos y las pilas, por favor llévelos a los puntos de recogida en cuestión, según sus leyes nacionales.

Eliminando estos productos y pilas correctamente, ayudará a salvar recursos valiosos y evitar efectos potencialmente negativos para la salud humana y el medio ambiental que de otro modo podrían surgir por un manejo inadecuado de la basura.

Para más información sobre la recogida y el reciclaje de equipos viejos y pilas, por favor póngase en contacto con su ayuntamiento, su servicio de recogida selectiva de basura o con el punto de venta donde compró los objetos.
[Información sobre la eliminación en otros países fuera de la Unión Europea]
Estos símbolos sólo son válidos en la Unión Europea. Si desea deshacerse de estos objetos, por favor póngase en contacto con las autoridades locales y pregunte por la correcta forma de eliminación.
Nota sobre símbolos en la batería (los dos últimos símbolos como ejemplo):
El signo Pb debajo del símbolo de las pilas indica que esa pila contiene plomo.
CONTENTS
Introducción
• LEA ESTO ANTES DE UTILIZAR SU EQUIPO | 2
Conexión del sistema | 4
Controles del Panel Frontal | 8
Control a distancia | 9
- ALCANCE DE FUNCIONAMIENTO DEL MANDO A DISTANCIA | 10
• COLOCACIÓN DE LAS PILAS | 10
Funcionamiento
• OÍR UNA FUENTE DE PROGRAMAS | 11
• SONIDO ENVOLVENTE | 14
• DISFRUTAR DEL SONIDO ENVOLVENTE | 15
• OÍR EMISIONES DE RADIO | 20
• OÍR EMISIONES RDS (SÓLO FM) | 22
(Sintonizadora RDS (Opción regional en algunos países de Europa, etc.))
• GRABAR | 24
• OTRAS FUNCIONES | 25
• USAR OTRAS FUNCIONES DEL PANEL FRONTAL | 26
Configuración del Sistema | 27
• AJUSTANDO EL SISTEMA | 29
• AJUSTANDO LAS ENTRADAS | 31
- AJUSTANDO LAS CONFIGURACIÓN DE ALTAVOCES | 32
• AJUSTANDO EL NIVEL DEL CANAL | 36
• AJUSTANDO LOS PARÁMETROS | 38
Guía de resolución de problemas | 40
Especificaciones | 41
Conexión del sistema
- No enchufe el cable de alimentación a la toma de Corriente Alterna (CA) hasta que haya completado todas las conexiones.
- Asegúrese de cumplir con el código de colores cuando conecte los cables de audio, vídeo y altavoces.
- Realice las conexiones correctamente y con firmeza. De lo contrario pueden ocurrir pérdidas de sonido, ruidos o daños en el receptor.
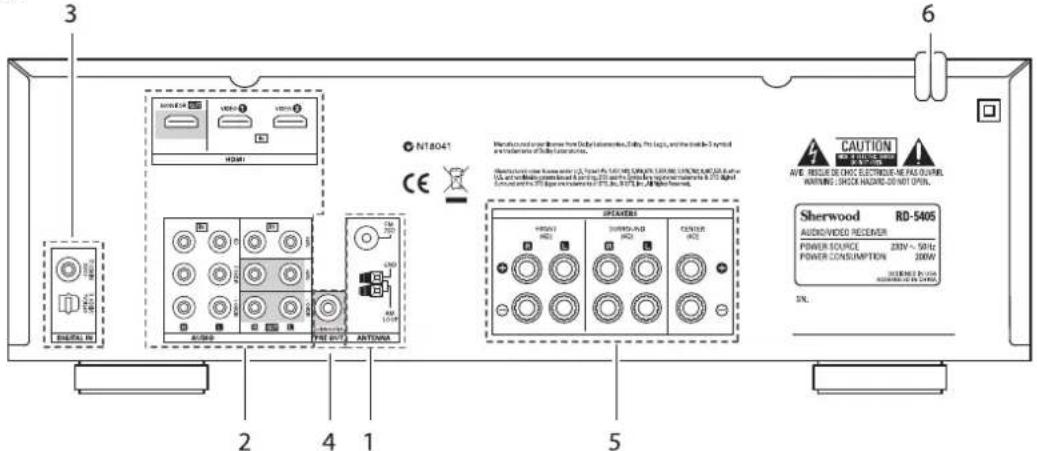
text_image
3 6 N18041 CE 2 4 1 5 AudiR/VR AUDI/RD SHIRDA-RD CENTER SHERWOOD RD-5405 AUDIVIDVER RECEIVER POWER SOURCE 20W ~ 50Hz POWER CONSUMPTION 200W SHERWOOD RD-5405 CAUTION AIR ROLLER ELECTRIC-PE FLOW RUNNING SWITCH MOUNT-OUT SNL1. CONEXIÓN DE LAS ANTENAS
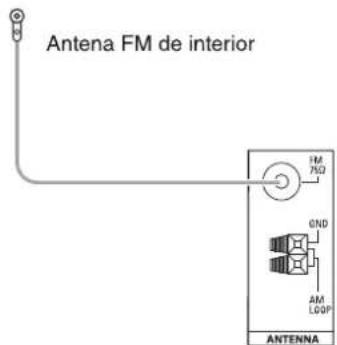
text_image
Antena FM de interior FM 7ND 0ND AM LGDP ANTENNA- Cambie de posición la antena FM de interior hasta obtener la mejor recepción de sus estaciones FM favoritas.
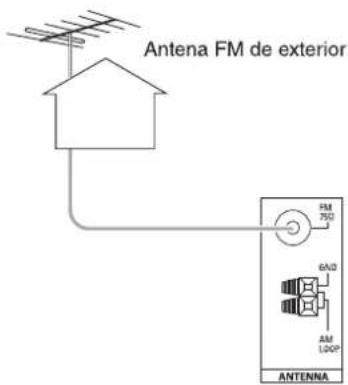
text_image
Antena FM de exterior FM 750Ω 6A/D AM LOOP ANTENNA- Puede usar una antena exterior de 75Ω para mejorar más la recepción. Desconecte la antena interior antes de reemplazarla por una exterior.
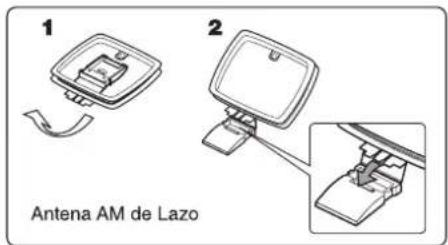
text_image
1 2 Antena AM de Lazo- Coloque la antena AM de lazo lo más lejos posible del receptor, de la TV, de los cables de los altavoces y del cable de alimentación, y oriéntela para una mejor recepción.
- Si la recepción es pobre con la antena AM de lazo. Puede usar una antena AM exterior en lugar de la antena de lazo.
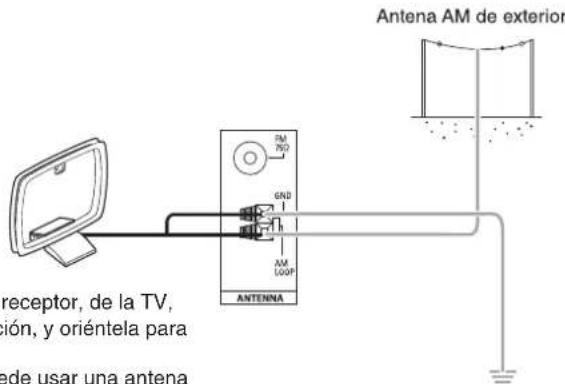
text_image
Antena AM de exterior FM ISO GND AM LOOP ANTENNA receptor, de la TV, ión, y oriéntela para ede usar una antenna2. CONEXIÓN DE LOS EQUIPOS DE AUDIO/VIDEO
flowchart
graph TD
    A["CD Reproductor CDs"] --> B["IN HDMI"]
    A --> C["MONITOR TV, Proyector, etc."]
    D["VIDEO 2 Reproductor BD, Reproductor DVDs, etc."] --> E["IN HDMI"]
    D --> F["MONITOR TV, Proyector, etc."]
    G["OUT HDMI"] --> H["IN HDMI"]
    G --> I["MONITOR TV, Proyector, etc."]
    J["AUDIO OUT"] --> K["IN HDMI"]
    J --> L["MONITOR TV, Proyector, etc."]
    M["AUDIO R OUT"] --> N["IN HDMI"]
    M --> O["MONITOR TV, Proyector, etc."]
    P["AUDIO IN"] --> Q["IN HDMI"]
    P --> R["MONITOR TV, Proyector, etc."]
    S["AUDIO R OUT"] --> T["IN HDMI"]
    S --> U["MONITOR TV, Proyector, etc."]
    V["AUDIO IN"] --> W["IN HDMI"]
    V --> X["MONITOR TV, Proyector, etc."]
    Y["AUDIO R OUT"] --> Z["IN HDMI"]
    Y --> AA["MONITOR TV, Proyector, etc."]
    AB["VIDEO 1 Reproductor BD, Reproductor DVDs, pletina de cassette, grabadora MD, etc."] --> AC["IN HDMI"]
    AB --> AD["MONITOR TV, Proyector, etc."]
- Los conectores VIDEO 1/VIDEO 2 pueden conectarse a los conectores de AUDIO de otros equipos como reproductor BD, reproductores de DVD, TVs, etc..
- Los conectores TAPE IN/OUT y los VIDEO 1 IN/OUT pueden conectarse a equipos de grabación de audio como pletinas de cassette, grabadoras MD, etc..
■ Conexión HDMI (Interfaz Multimedia de Alta Definición): (\*)
- Usted puede conectar los equipos fuente (reproductor BD, etc.) a un equipo de presentación (TV, proyector, etc.) a través de este receptor usando un cable HDMI comercial.
- La conexión HDMI puede llevar señales de vídeo digital y señales de audio digital sin comprimir.
- Este receptor puede sacar señales de vídeo digital y señales de audio digital a través de HDMI MONITOR OUT sin que tengan que pasar por ningún circuito, tal y como entran por las conexiones HDMI IN (esto significa que las señales de audio que entran por las entradas HDMI no se pueden reproducir en este receptor).
- HDMI, el logo HDMI logo y High-Definition Multimedia Interface (Interfaz Multimedia de Alta-Definición) son marcas comerciales o marcas comerciales registradas de la SRL de licencias HDMI.
Notas:
- Dependiendo del equipo conectado, puede haber transferencias de señales poco fiables.
(Para más detalles, lea el manual de funcionamiento de su equipo.) - Para una transferencia de señal estable, le recomendamos que use cables HDMI de 5 metros de longitud como máximo.
3. CONEXIONES 'DIGITAL IN'
- Las salidas OPTICA y COAXIAL DIGITAL de los equipos que están conectados al CD y VIDEO 1 de este aparato pueden conectarse a estas entradas 'DIGITAL IN'.
- Una entrada digital debería conectarse a equipos como reproductores de CDs, reproductores LD, reproductores DVD, etc. capaces de desarrollar señales de sonido envolvente DTS, Dolby Digital o señales digitales en formato PCM, etc.
- Para conocer los detalles, lea las instrucciones de funcionamiento de los equipos conectados.
- Cuando realice una conexión COAXIAL DIGITAL, asegúrese de usar un cable COAXIAL de 75 Ω y no un cable de AUDIO convencional.
- Algunos cables comerciales de fibra óptica no se pueden usar con este equipo. Si tiene un cable de fibra óptica que no puede conectar en su equipo, consulte con su vendedor o con el servicio técnico más próximo.
■ Nota: Asegúrese de realizar una conexión ÓPTICA o DIGITAL COAXIAL en cada uno de los equipos. (No necesita hacer ambas.)
■Configuración predeterminada de la entrada Digital
- Si conecta sus equipos usando las entradas DIGITAL IN, es más fácil hacerlo usando la configuración predeterminada.
- Si sus conexiones DIGITALES son diferentes de las de la configuración predeterminada, debería asignar las entradas DIGITAL IN usando el procedimiento "Cuando selecciones las entradas DIGITALES" de la página 31.
- La configuración predeterminada es la siguiente : ÓPTICA : VIDEO 1, COAX : VIDEO 2
text_image
Equipo con Salida DIGITAL COAXIAL Equipo con Salida DIGITAL ÓPTICA DIGITAL IN4. CONEXIÓN 'SUBWOOFER PRE OUT'
- Para realizar los sonidos muy graves, conecte un Subwoofer con etapa de potencia.
flowchart
graph LR
    A["SUBWOOFER PRE OUT"] --> B["Subwoofer con etapa de potencia"]
    B --> C["End"]
5. CONEXIÓN DE LOS ALTAVOCES
- Asegúrese de conectar los altavoces con firmeza y corrección de acuerdo con el canal (izquierdo y derecho) y la polaridad (+ y -). Si realiza mal las conexiones, no se oirá ningún sonido por los altavoces, y si la polaridad de la conexión de los altavoces es incorrecta, el sonido será poco natural y sin graves.
- Para la instalación de los altavoces, lea "Colocación de los altavoces" en la página 7.
- Después de instalar los altavoces, primero ajuste la configuración de los mismos según el ambiente y la disposición de los altavoces.
(Para más detalles, lea "AJUSTANDO LAS CONFIGURACIÓN DE ALTAVOCES" en la página 32.)
Precaución:
- Compruebe que los altavoces tienen una impedancia de 6 ohmios o más.
- No permita que los cables desnudos de los altavoces se toquen el uno al otro, ni a partes metálicas de este equipo. Esto podría averiar el equipo o los altavoces.
- Nunca toque los terminales de los altavoces mientras tenga el cable de alimentación conectado a la toma de corriente. Si lo hace podría recibir una descarga eléctrica.
text_image
Frontal derecho Frontal izquierdo Central FR VT SURROUND CENTER SPEAKERS R L + - + - + - + - Envolvente derecho Envolvente izquierdo■Conectando los cables de los altavoces
1. Pele aprox. 10 mm (3/8 pulgadas) del aislamiento del cable y luego una firmemente los filamentos del cable en espiral. | 2. Afloje el terminal del altavoz girando en sentido contrario a las agujas del reloj. | 3. Introduzca la parte pelada del cable. | 4. Apriete el terminal girándolo en sentido de las agujas del reloj. |
6. CABLE DE ALIMENTACIÓN DE CORRIENTE
- Enchufe el cable en la toma de corriente.

Colocación de los altavoces
La colocación ideal de los altavoces varía según el tamaño de la habitación y el acabado de las paredes, etc. Un ejemplo típico de colocación de los altavoces y recomendaciones es el siguiente:
■ Altavoces Frontal izquierdo, Frontal izquierdo y Central
- Coloque los altavoces frontales con sus superficies delanteras lo más alineadas posibles con la TV o la pantalla del monitor.
- Coloque el altavoz central entre los altavoces derecho e izquierdo y no más alejado de la posición de escucha que los altavoces centrales.
- Coloque cada altavoz de modo que el sonido apunte a la posición de los oídos del oyente cuando esté en la posición principal de audición.
■ Altavoces izquierdo y derecho del sonido envolvente.
- Coloque los altavoces del sonido envolvente aproximadamente 1 metro (40 pulgadas) sobre el nivel de los oídos del oyente en posición de sentado a izquierda y derecha, o ligeramente detrás.
Subwoofer
- El subwoofer reproduce los sonidos muy graves de gran potencia. Coloque el subwoofer en cualquier lugar de la habitación que desee.
Notas:
- Cuando utilice una TV convencional, para evitar interferencias sobre la imagen de la TV, utilice solamente altavoces frontales izquierdo y derecho que tengan protección magnética.
- Para obtener los mejores resultados con el sonido envolvente, todos los altavoces excepto el subwoofer deberían ser de rango completo.
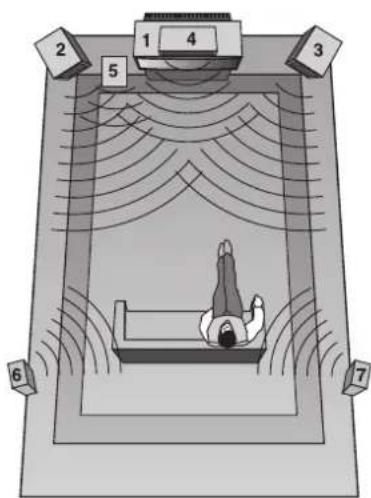
text_image
1 2 3 4 5 6 7- TV o pantalla
- Altavoz frontal izquierdo
- Altavoz frontal derecho
- Altavoz Central
- Subwoofer
- Sonido envolvente izquierdo
- Sonido envolvente derecho
Controles del Panel Frontal

text_image
Sherwood 3 4 5 6 7 OUTPUT SELECTOR MASTER VOLUME MULTI-PENTAL POWER 1 2 8 9 10 11 12 AVOC/AVOC/AVOC/RC-54DS- Interruptor de ALIMENTACIÓN
- Botón de ENCENDIDO/STANDBY
- Indicador de modo STANDBY
- PANTALLA FLUORESCENTE
Para más detalle lea a continuación.
- SENSOR A DISTANCIA
-
SELECTOR INPUT/MULTI CONTROL
-
Rueda CONTROL MAESTRO VOLUMEN
- Botones MODO SURROUND ARRIBA/ABAJO (▶/◀)
- Botón ESTÉREO
- Botón de BANDA
- Botón MEMORIA/ACEPTAR
- Botón MODE
■PANTALLA FLUORESCENTE
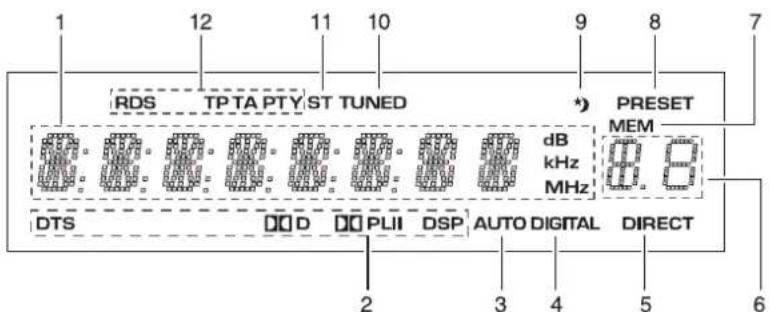
text_image
RDS TPTA PTY ST TUNED PRESET MEM dB kHz MHz DTS D PLII DSP AUTO DIGITAL DIRECT 2 3 4 5 6- Entrada, frecuencia, nivel de volumen, información de funcionamiento, etc.
- Indicadores de modo de Sonido envolvente
- Indicador de AUTO
- Indicador de ENTRADA
- Indicador de DIRECTO
-
Número de presintonía, presentación del tiempo para la desconex. Auto
-
Indicador de MEMORIA
- Indicador de PRESINTONÍA
- Indicador desconex. Auto (SLEEP)
- Indicador de SINTONIZADO
- Indicador de ESTÉREO
- Indicadores RDS
(Opción regional para Europa, etc.)
Control a distancia
ESPAÑOL
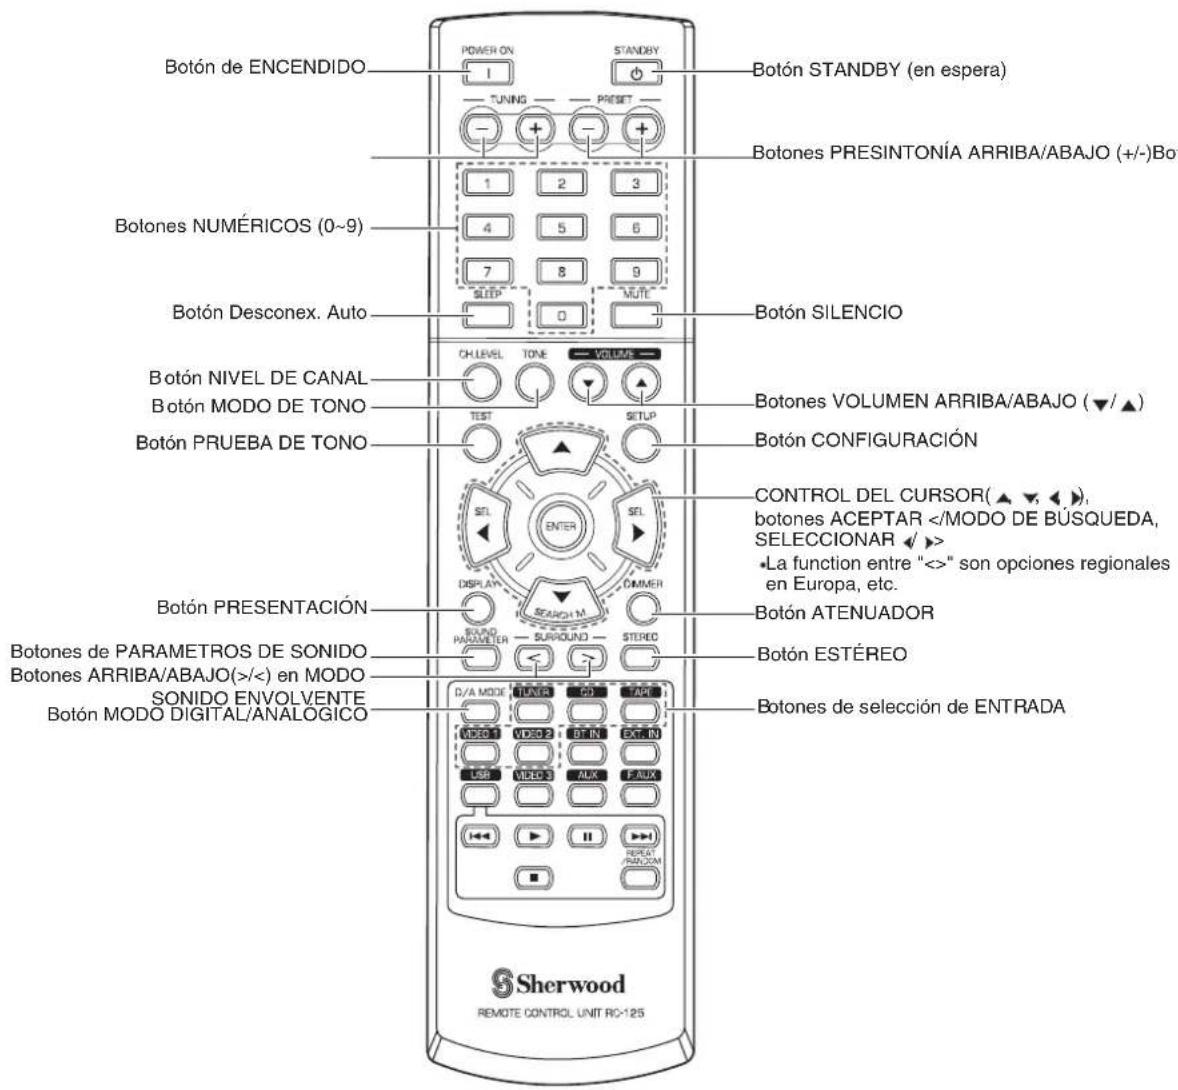
text_image
Botón de ENCENDIDO POWER ON STANDBY 1 TUNING PRESET - + - + - 1 2 3 Botón SISTENIO Botones PERSINTONÍA ARRIBA/ABAJO (+/-) Bot 1 2 3 Botones NUMÉRICOS (0~9) 4 5 6 7 8 9 SLEEP MUTL Botón Desconex. Auto CH.LEVEL TONE VOLUME Botón SILENCIO Botón NIVEL DE CANAL BOTÓN VOLUMEN ARRIBA/ABAJO (▼/▲) BOTÓN MODO DE TONO TEST SETUP Botón CONFIGURACIÓN CONTROL DEL CURSOR(▲▼,▲), botones ACEPTAR La function entre "<>" son opciones regionales en Europa, etc. BOTÓN PRUEBA DE TONO DISPLAY DRAGON M CAMMER BOTÓN PRESENTACIÓN SOUND PARACTER SURROUND STEREO BOTÓN ATENUADOR Botón DE PARAMETROS DE SONIDO Botones ARRIBA/ABAJO(+/)<) en MODO BOTÓN ENVOLVENTE BOTÓN MODO DIGITAL/ANALOGICO D/A MODE LUNER CD TAPR VIDEO 1 VIDEO 2 DT IN EXTRIN LISH VIDEO 3 AUX FAUX RESET PROCOM BOTÓN ESTÉREO Botón de selección de ENTRADA Sherwood REMOTE CONTROL UNIT RC-125■ Nota: Algunos de los botones del selector de entrada (BT IN, EXT. IN, USB, VIDEO 3, AUX, F.AUX) y botones de transporte USB(◀◀, ▶, II, ▶▶, ■, REPETIR/ALEATORIO) no están disponibles para esta unidad.
ALCANCE DE FUNCIONAMIENTO DEL MANDO A DISTANCIA
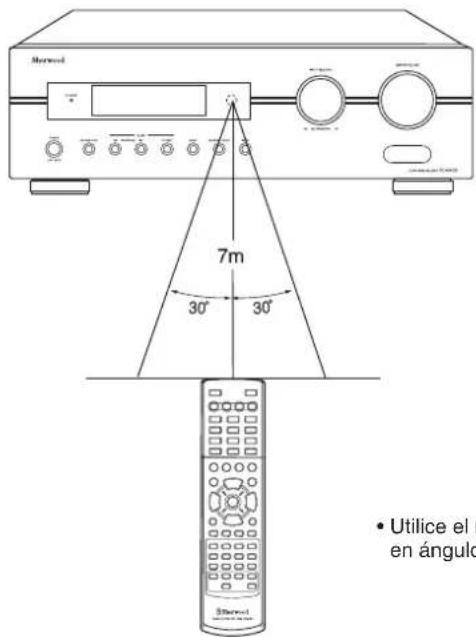
text_image
Barwood 7m 30° 30° • Utilice el en ángulo- Utilice el mando a distancia a una distancia de 7 metros (23 pies) y en ángulos de hasta 30 grados apuntando hacia el sensor remoto.
COLOCACIÓN DE LAS PILAS
- Retire la tapa.

- Coloque dos pilas ("AAA", 1,5V) haciendo corresponder la polaridad.
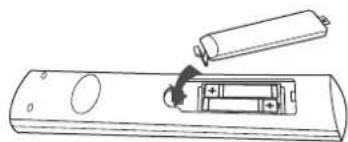
natural_image
Line drawing of a remote control device with a battery and switch (no text or symbols)- Saque las pilas cuando no las use durante largos periodos de tiempo.
- No use pilas recargables (tipo Ni-Cd).
Funcionamiento
■ Nota : Antes de hacer funcionar este receptor, configúrelo para un rendimiento óptimo, efectuando el procedimiento de configuración del sistema. (Para más detalles, lea "Configuración del Sistema" en la página 27.)
OÍR UNA FUENTE DE PROGRAMAS
Antes de hacerlo funcionar
- Entre en modo en espera (Standby).
- El indicador de STANDBY se ilumina. Esto indica que el receptor está conectado a la corriente alterna y recibe una pequeña cantidad para mantenerse en estado de 'listo para funcionar'.
- Para apagar el equipo completamente, vuelva a pulsar el interruptor POWER.
-
Entonces se corta la corriente y el indicador de STANDBY se apaga.
-
Desde el modo Standby, encienda el equipo.

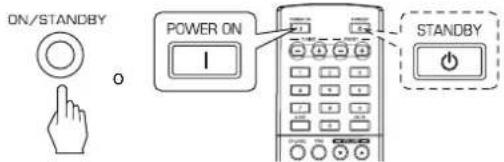
text_image
ON/STANDBY POWER ON I STANDBY- Cada vez que pulse el botón POWER ON/STANDBY en el panel frontal, el receptor se enciende para entrar en modo de funcionamiento o se apaga para entrar en modo en espera (Standby).
- En el mando a distancia, pulse el botón POWER ON para entrar en modo de funcionamiento o pulse el botón STANDBY para entrar en modo en espera (Standby).
-
Con el equipo en Standby, si pulsa el botón INPUT SELECTOR o gira el selector INPUT/MULTI CONTROL, el receptor se enciende automáticamente y selecciona la entrada deseada.
-
Seleccione la fuente de entrada que desee.
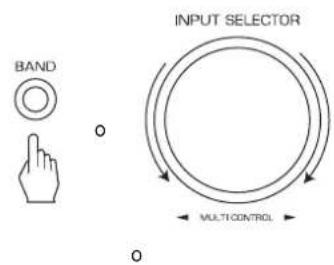
text_image
BAND INPUT SELECTOR MULTI CONTROL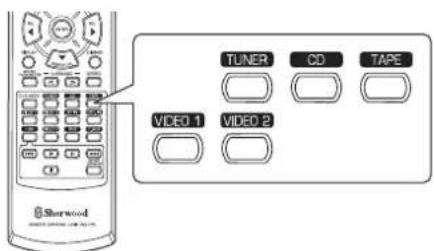
text_image
Sherwood TUNER CD TAPE VIDEO 1 VIDEO 2- Cada vez que gire el selector INPUT/MULTI CONTROL, la fuente de entrada cambia del siguiente modo:
→ TUNER ↔ CD ↔ TAPE ↔ VIDEO 1 ↔ VIDEO 2 ← (Frecuencia) - Cada vez que pulse el botón BAND en el panel frontal o el botón TUNER en el mando a distancia, la banda cambia del siguiente modo:
→ FM ST → FM MONO → AM
Cuando selecciona VIDEO 1, VIDEO 2 como fuente de entrada
3. Seleccione la entrada digital o analógica conectada que quiera.
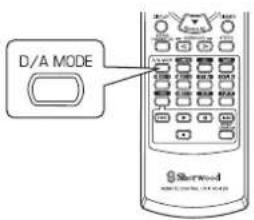
text_image
D/A MODE Sherwood- Cada vez que pulse este botón, la entrada correspondiente es seleccionada como sigue:
$$ \rightarrow \mathrm{o} (\text { p t i c a l }) \rightarrow \mathrm{c} (\text { o a x i a l }) \rightarrow \mathrm{A} (\text { n a l o g }) $$
Notas:
- Cuando haya seleccionado TUNER, TAPE o CD como fuente de entrada, la entrada digital no puede seleccionarse.
- Cuando la señal digital seleccionada no está conectada, el indicador "DIGITAL" parpadea y la entrada analógica es seleccionada automáticamente.
- La entrada digital o analógica seleccionada se asigna automáticamente a la fuente de entrada correspondiente del menú de configuración de ENTRADAS. (Para más detalles, lea "AJUSTANDO LAS ENTRADAS" en la página 31.)
- El sonido procedente de los equipos conectados a la entrada digital seleccionada puede oírse independientemente de la fuente de entrada seleccionada.
4. Haga funcionar el equipo seleccionado.
- Cuando esté reproduciendo fuentes de programa con sonido envolvente, vea la sección "DISFRUTANDO DEL SONIDO ENVOLVENTE" en la página 15.
5. Ajuste el volumen (general).
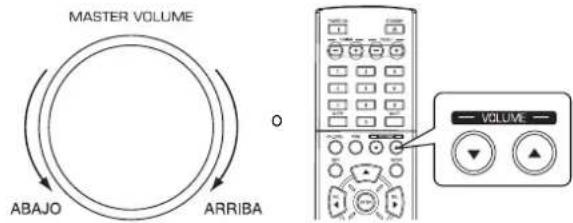
text_image
MASTER VOLUME ABAJO ARRIBA VOLUME6. Para silenciar el sonido.
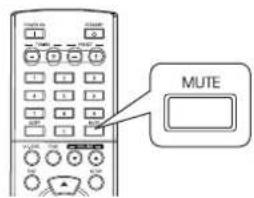
text_image
MUTE- "MUTE" parpadeará.
- Para regresar al nivel de sonido anterior, vuélvalo a pulsar.
Ajustar el tono (graves y agudos)
7. Entre en modo tono.
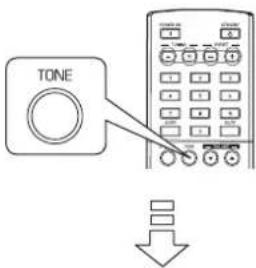
text_image
TONETONE: OFF
- El modo de tono aparecerá durante varios segundos.
- Pulse los botones CURSOR IZQUIERDA(◀)/DERECHA(▶) para seleccionar el modo de tono deseado.
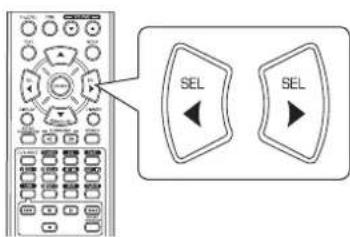
text_image
SEL SEL- Cada vez que pulse estos botones, el modo tono se selecciona de la siguiente manera:
OFF: Para oír la fuente de programa sin efecto de tono. (El indicador "DIRECT" se ilumina.)
ON: Para ajustar el tono a su gusto. (El indicador "DIRECT" se apaga.)
■ Seleccione TONO en ON para ajustarlo (graves y agudos)
- Pulse el CURSOR ARRIBA(▲)/ABAJO(▼) para seleccionar el tono deseado.
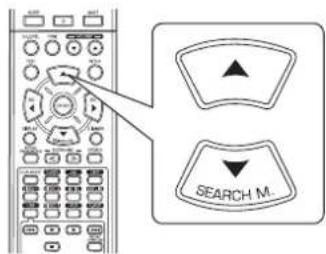
text_image
SEARCH M.- Cada vez que pulse estos botones, el tono se selecciona del modo siguiente:
BASS ←TRBL (agudos) ←TONE : ON ←
- Pulse los botones CURSOR IZQUIERDA(◀)/DERECHA(▶) para ajustar el tono seleccionado a su gusto.
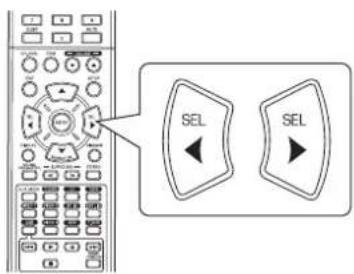
text_image
Diagram showing a control panel with two labeled buttons labeled 'SEL' pointing to different function keys.- El nivel de tono puede ajustarse dentro del margen de -10 \~ +10 dB.
- En general, le recomendamos que los graves y agudos se ajusten a 0 dB (nivel plano).
- Ajustes extremos a volumen alto pueden averiar sus altavoces.
- Para completar el ajuste de tono, repita los pasos 9 y 10 anteriores
- Si la presentación del tono desaparece, vuelva a empezar desde el paso 7.
SONIDO ENVOLVENTE
- Este receptor incorpora un sofisticado procesador de señales digitales que le permite crear una calidad de sonido y una atmósfera acústica óptimas en su Home Theater personal.
Modos de sonido envolvente
■ Sonido envolvente Digital DTS
El sonido envolvente Digital DTS (también llamado simplemente DTS) es un formato de señal digital multi-canal que puede manejar mayores tasas de datos. Los discos que lleven el logo DTS incluyen la grabación de hasta 5.1 canales de señales digitales, que generalmente son pensadas para proporcionar una mejor calidad de sonido gracias a que necesitan una menor compresión de audio.
También proporciona un rango dinámico y una separación de frecuencias más amplios, resultando un sonido magnífico.
Fabricado bajo licencia de las Patentes EE.UU. núm.: 5.451.942; 5.956.674; 5.974.380; 5.978.762; 6.487.535 y otras patentes EE.UU. y del resto del mundo registradas y pendientes. DTS y DTS Digital Surround son marcas comerciales registradas y los logos DTS, símbolos son marcas comerciales de DTS, Inc. © 1996-2008 DTS, Inc. Reservados todos los derechos.
■Dolby digital
Dolby Digital es el formato de señal digital multi-canal desarrollado por los Laboratorios Dolby. Los discos que llevan el logo Dolby Digital incluyen grabaciones de hasta 5.1 canales de señales digitales, que pueden reproducir mucho mejor las características de calidad de sonido, expansión espacial y rango dinámico, que los efectos Dolby Surround anteriores.
■Dolby Pro Logic II Surround
Este modo aplica señales de 2 canales convencionales como PCM digital o señales estéreo analógicas así como también señales Dolby Surround, etc. al proceso envolvente, para ofrecer mejoras en los circuitos Dolby Pro Logic convencionales. El sonido envolvente Dolby Pro Logic II incluye los 2 modos siguientes:
• Dolby Pro Logic II Movie
Cuando disfrute de películas, este modo le permite mejorar más aún la calidad cinemática añadiendo procesos que enfatizan los sonidos de los efectos especiales de acción.
• Dolby Pro Logic II Music
Cuando oiga música, este modo le permite mejorar más aún la calidad de sonido añadiendo procesos que enfatizan los efectos musicales.
■ Dolby Pro Logic
Este modo expande cualquier fuente de 2 canales (incluyendo fuentes Dolby Surround) para una reproducción en 4 canales (frontal izquierdo, central, frontal derecho y envolvente).
El canal de sonido envolvente es monoaural, pero se reproduce a través de dos altavoces para sonido envolvente.
Fabricado bajo licencia de Dolby Laboratories.
Dolby, Pro Logic y el símbolo Doble-D son marcas comerciales registradas de Laboratorios Dolby.
- Los siguientes modos aplican señales convenciones de 2 canales, tales como PCM digital o señales estéreo analógicas, a procesadores de señal digital de alto rendimiento para recrear campos de sonido artificialmente.
Matrix
Este modo reproduce una señal con retraso desde los canales envolventes para enfatizar la sensación de expansión para las fuentes de música.
Church
Este modo proporciona el ambiente de una iglesia para música barroca, de grupos de cuerda o corales.
■ Theater
Este modo proporciona el efecto de estar en un cine cuando está viendo una película.
Hall
Este modo proporciona el ambiente de una sala de conciertos de música clásica para orquestas, música de cámara, o solo instrumental.
■ Stadium
Este modo proporciona el campo de sonido expansivo para conseguir el efecto de un estadio verdadero cuando vea partidos de baloncesto o de fútbol.
DISFRUTAR DEL SONIDO ENVOLVENTE
Notas:
- Antes de la reproducción con sonido envolvente, primero efectúe el procedimiento de configuración de los altavoces, etc. en el menú SETUP para obtener un rendimiento óptimo. (Para más detalles, lea "AJUSTANDO LA CONFIGURACIÓN DE ALTAVOCES" en la página 32.)
- Incluso cuando tenga seleccionado el modo de sonido envolvente en automático y la entrada sea una señal digital del mismo tipo, el modo de sonido envolvente óptimo puede variar dependiendo si el tipo de altavoz está configurado en "N" (Ninguno) o no lo está.
- Cuando la entrada sea una señal digital PCM de 96 kHz, sólo seleccionará el modo estéreo.
■ Seleccionar el modo de sonido envolvente deseado

text_image
Diagram showing sound control interface with surround controls and a radio button labeled 'SURROUND'- Cada vez que pulse los botones SURROUND MODE ARRIBA/ABAJO (▶, > / ◀, <), el modo del sonido envolvente cambia de la siguiente manera: Modo Manual Surround : Usted puede seleccionar el (El indicador "AUTO" se apaga.) modo que desee entre los diferentes modos seleccionables para la señal de entrada. Modo Auto Surround : El modo envolvente óptimo será seleccionado automáticamente dependiendo del formato de señal de entrada.
| Formato de la señal de entrada Modo envolvente seleccionable | |
| Fuentes Dolby Digital 5.1 canales | [DOLBY DIGITAL, AUTO SURROUND] o |
| Fuentes Dolby Digital 2 canales | [DOLBY PLII MOVIE, DOLBY PLII MUSIC, DOLBY PRO LOGIC, AUTO SURROUND] o |
| Fuentes DTS | [DTS, AUTO SURROUND] o |
| Fuentes PCM (2 canales), Fuentes analógicas estéreo | [DOLBY PLII MOVIE, DOLBY PLII MUSIC, DOLBY PRO LOGIC, MATRIX, CHURCH, THEATER, HALL, STADIUM, AUTO SURROUND] o |
- Dependiendo de la configuración del altavoz, algunos modos de sonido envolvente pueden ser o no seleccionados según se indica:
[ ]: Sólo es posible cuando "CENTER" y/o "SURR" (envolvente) no están configurados en "N" (Ninguno). < >: Sólo es posible cuando "CENTER" y "SURR" (envolvente) están configurados en "N" (Ninguno).
■ Cancelar el modo envolvente para reproducción en estéreo
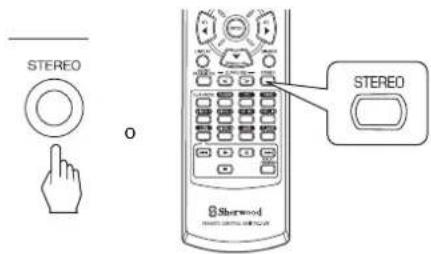
text_image
STEREO O STEREO Sherwood- Dependiendo del formato de señal que esté entrando, se selecciona o el modo estéreo o el modo downmix de 2 canales.
- Para cancelar los modos Estéreo o Downmix 2CH, seleccione el modo de sonido envolvente usando los botones SURROUND MODE ARRIBA/ABAJO (▶, > / ◀, <).
■ Modo downmix de 2 canales
- Este modo permite que señales multi-canal codificadas en formato Dolby Digital o DTS se mezclen para obtener 2 canales frontales y se puedan reproducir a través de dos altavoces frontales o por los auriculares.
Cuando ajuste los parámetros de sonido
- Cuando reproduzca señales digitales procedentes de fuentes Dolby Digital o DTS, o escuche música en modo Dolby Pro Logic II, usted puede ajustar sus parámetros para un efecto envolvente óptimo.
1. Pulse el botón SOUND PARAMETER.
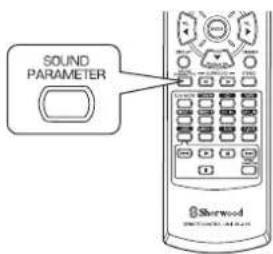
text_image
SOUND PARAMETER Sterwood- Entonces aparecerá en la pantalla "NIGHT : \~" (o "PANO : \~") Durante varios segundos.
- Si el modo de parámetros desaparece, vuelva a pulsar este botón.
2. Pulse el CURSOR ARRIBA(▲)/ABAJO(▼) para seleccionar el parámetro deseado.
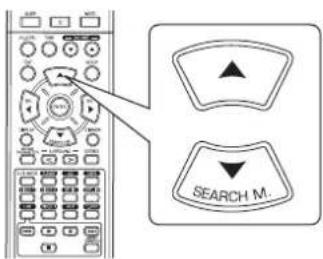
text_image
SEARCH M.- Cada vez que pulse estos botones, el modo de los parámetros cambia de la siguiente manera:

- El modo nocturno ("NIGHT") sólo se puede seleccionar cuando reproduzca señales digitales procedentes de fuentes Dolby Digital o DTS.
- "PANO", "C.WIDTH" y "DIMEN" sólo se pueden seleccionar cuando esté oyendo música en modo Dolby Pro Logic II.
3. Pulse los botones CURSOR IZQUIERDA(◀)/DERECHA(▶) para ajustar el parámetro seleccionado como desee.
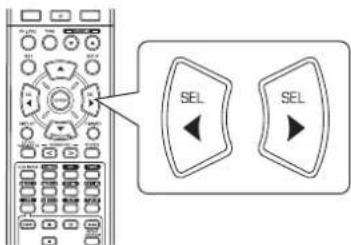
text_image
SEL SEL■ Cuando seleccione el modo nocturno "NIGHT" Esta función comprime el rango dinámico de partes especificadas previamente de la pista de sonido Dolby Digital o DTS (con un volumen extremadamente alto) para reducir la diferencia de volumen entre las partes especificadas y las no especificadas. Esto facilita la audición de toda la pista cuando vea la película de noche con un nivel de sonido bajo. El modo nocturno puede ajustarse en 11 niveles desde 0.0 hasta 1.0 (valor por defecto: 0.0).
■ Nota: En algunos softwares de Dolby Digital o DTS, el modo nocturno puede no ser válido.
■ Cuando selecciona el modo "PANO (Panorama)" Este modo extiende la imagen estéreo frontal para incluir los altavoces de sonido envolvente para un efecto "envolvente" con imagen lateral. Seleccione "OFF" o "ON"(valor por defecto: OFF).
■ Cuando seleccione el control "C. WIDTH (ancho central)" Esta opción ajusta la imagen central de modo que pueda oírse sólo por el altavoz central, sólo por los altavoces izdo/dcho como imagen fantasma, o por los tres altavoces para diferentes grados. El control puede ajustarse en 8 niveles de 0 a 7 (valor por defecto: 3).
■ Cuando seleccione el control "DIMEN (Tamaño)" Este ajusta gradualmente el campo de sonido o hacia el frente o hacia la parte final. El control puede ajustarse en 7 niveles de -3 a +3 (valor por defecto: 0).
4. Repita los pasos 2 y 3 anteriores para ajustar otros parámetros.
Ajustar cada nivel de canal con el tono de prueba
- EL nivel de volumen de cada canal se puede ajustar fácilmente con la función de tono de prueba.
1. Entre en modo tono de prueba (TEST).
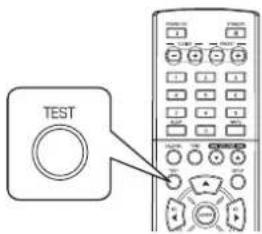
text_image
TESTTEST-FL
- El modo de prueba aparece en la pantalla y se oirá por el altavoz de cada canal durante dos segundos de la siguiente manera:

- Cuando la configuración de altavoces es "N (Ninguno o No)", el tono de prueba correspondiente al canal no está disponible.
- En cada canal, ajuste el nivel a su gusto hasta que el nivel de sonido de cada altavoz sea igual de alto.
text_image
SEL SEL- Usted puede seleccionar el canal deseado usando los botones CURSOR ARRIBA(▲)/ABAJO(▼).
- Cancelar la función de tono de prueba.
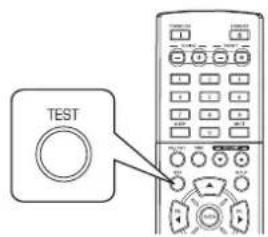
text_image
TEST
Ajustar el nivel del canal actual
- Después de ajustar el nivel del canal con el tono de prueba, ajuste los niveles del canal, o de acuerdo con las fuentes de programa o para que se acomode a sus gustos.
- Usted puede ajustar el nivel del canal actual cuando lo desee. Estos niveles ajustados se memorizan en el acto, dentro de la memoria del usuario ("CAL"), no en la memoria presintonizada ("REF 1", "REF 2").
1. Pulse el botón CHANNEL LEVEL.

text_image
CH.LEVELMODE CAL
- Entonces aparece en la pantalla el modo de memoria ("CAL", etc.) durante varios segundos.
- Cuando el modo de memoria o el nivel del canal desaparezcan, pulse este botón otra vez.
2. Seleccione el canal deseado.
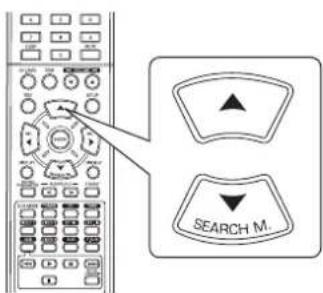
text_image
SEARCH M...- Cada vez que pulse estos botones, el canal correspondiente se selecciona del modo siguiente:
REF 1, 2 (o CAL) FL C FR- SW SL SR Nivel LEF
<>: Sólo cuando entren las señales digitales procedentes de fuentes de programa Dolby Digital o DTS que incluyan señales LFE, el nivel LFE puede aparecer en pantalla. - SW SL SR Nivel LEF
- Dependiendo de la configuración de altavoces ("N (Ninguno o No)") y del modo del sonido envolvente, etc. no se pueden seleccionar algunos canales.
3. Ajuste el nivel del canal seleccionado como guste.
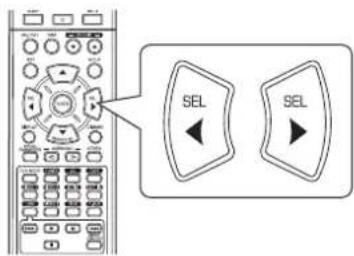
text_image
SEL SEL- El nivel LFE puede ajustarse dentro del margen de -10\~0 dB y los otros niveles de canal dentro del margen de -15 \~ +15 dB.
- En general, le recomendamos que el nivel LFE se ajuste a 0 dB. (Sin embargo, le recomendamos que el nivel LFE para algunos de los primeros softwares DTS sea - 10 dB.) Si los niveles recomendados parecen demasiado altos, bájelos tanto como sea necesario.
4. Repita los pasos 2 y 3 anteriores para ajustar cada nivel de canal.
Memorizar los niveles de canal ajustados
- Usted puede guardar en la memoria presintonizada ("REF 1", "REF 2") los niveles de canal ajustados, y recuperarlos en el momento que quiera.
- Después de realizar los pasos 1 \~ 4 del procedimiento "Ajustar el nivel del canal actual" de la página 18, pulse el botón ENTER.
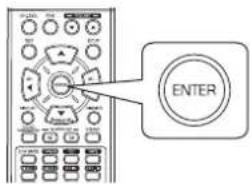
text_image
ENTER
- Entonces la indicación "1" o "REF 1" parpadeará durante varios segundos.
- Seleccione la memoria que desee entre REF 1 y REF 2.
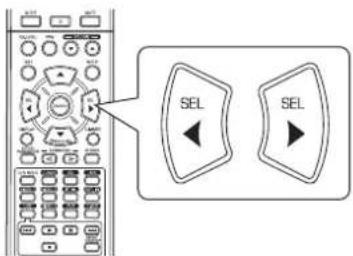
text_image
SEL SEL- Si la memoria predeterminada desaparece, vuelva a realizar al paso 1 anterior.
- Confirme su selección.
text_image
ENTER- Los niveles de canal ajustados se han guardado ahora en la memoria seleccionada.
Recuperar los niveles de canal memorizados
- Pulse el botón CHANNEL LEVEL.
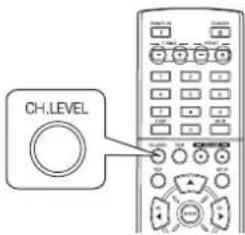
text_image
CH.LEVEL- Aparece el modo de memoria "CAL" (o "REF 1", etc.) en pantalla durante varios segundos.
- Si el modo de nivel de canal desaparece, vuelva a pulsar este botón.
- Seleccione la memoria que desee entre REF 1 y REF 2.
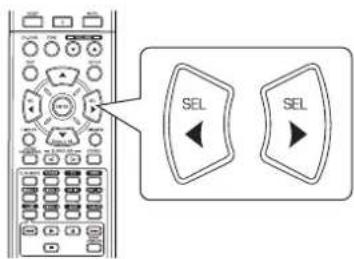
text_image
SEL SEL- Entonces se recuperan los niveles de canal memorizados de la memoria predeterminada seleccionada.
OÍR EMISIONES DE RADIO
Sintonía Automática
1. Seleccione la banda deseada.
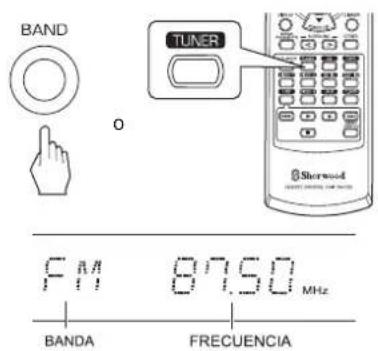
text_image
BAND TUNER Sherwood F M 87.50 MHz BANDA FRECUENCIA- Cada vez que pulse este botón, la banda cambia del modo siguiente:

- Cuando las emisiones FM en estéreo sean pobres debido señales débiles, seleccione el modo FM mono para reducir el ruido, entonces las transmisiones FM sonarán en sonido monoaural.
2. Pulse los botones TUNING ARRIBA(+)/ABAJO (-) durante más de 0,5 segundos.
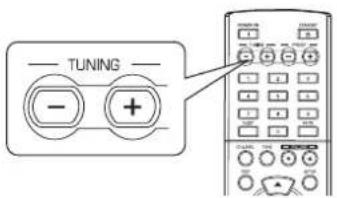
text_image
TUNING - +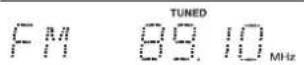
- La sintonizadora buscará ahora hasta que encuentre una estación con la fuerza suficiente. La pantalla mostrará la frecuencia sintonizada y "TUNED".
- Si la estación encontrada no es la que busca, simplemente repita la operación.
- Las estaciones que no tengan la fuerza suficiente son saltadas durante la sintonización.
Sintonía Manual
- La sintonía manual es útil cuando usted conoce la frecuencia de la estación deseada.
- Después de seleccionar la banda deseada, pulse los botones TUNING ARRIBA(+) /ABAJO(-) varias veces hasta que alcance la frecuencia correcta.
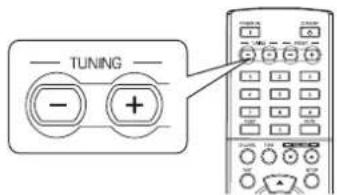
text_image
TUNING - +Memorización automática
- La función de memorización automática busca automáticamente sólo estaciones FM y las almacena en la memoria.
- Mientras oye emisoras radio FM, mantenga pulsado el botón (MEMORY/) ENTER durante más de 2 segundos.
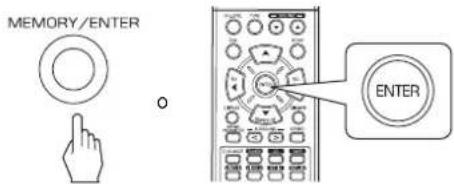
text_image
MEMORY/ENTER ENTER- Entonces parpadea en pantalla "AUTO MEM" y este receptor inicia la memorización automática.
- Pueden almacenarse hasta 30 estaciones FM.
Notas:
- Las estaciones FM con señal débil no pueden guardarse en memoria.
- Para guardar en memoria estaciones AM o estaciones débiles, efectúe una "Memorización Manual" usando la función de "Sintonía Manual".
Memorización Manual
- Usted puede almacenar hasta 30 estaciones preferidas en la memoria.
-
Sintonice la estación deseada con la sintonía automática o con la manual.
-
Pulse el botón ENTER.
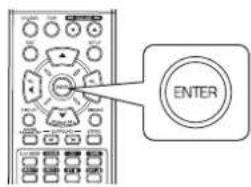
text_image
ENTER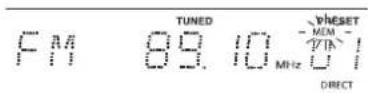
- En la pantalla parpadeará "MEM" varios segundos.
- Seleccione el número de memoria que desee (1\~30) y pulse el botón ENTER.
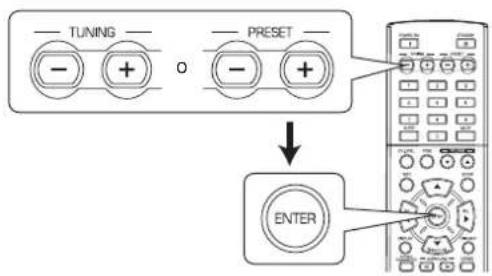
flowchart
graph TD
    A["--- TUNING ---"] --> B["--- +"]
    C["--- PRESET ---"] --> D["--- +"]
    B --> E["ENTER"]
    D --> E
    style A fill:#f9f,stroke:#333
    style C fill:#f9f,stroke:#333
    style E fill:#ccf,stroke:#333
- Cuando use los botones NUMÉRICOS en el mando a distancia.
Ejemplos) Para el "3": 3
Para el "15": 1 en menos de 2 segundos 5
Para el "30": 3 en menos de 2 segundos D
- La estación se ha guardado ahora en la memoria.
- Cuando use los botones NUMÉRICOS, la estación se guarda automáticamente sin presionar el botón ENTER.
- Una frecuencia almacenada se borra cuando se guarda otra frecuencia en su lugar.
-
Si "MEM" se apaga, inicie otra vez el procedimiento desde el paso 2.
-
Repita los pasos del 1 al 3 anteriores para memorizar otras estaciones.
■FUNCIÓN DE COPIA DE SEGURIDAD EN MEMORIA
Los siguientes elementos, ajustados antes de apagar el receptor, se guardan en la memoria:
- Ajustes del SELECTOR de ENTRADAS
- Ajustes del modo de Sonido Envolvente
- Estaciones Memorizadas, etc.
Sintonizar las estaciones memorizadas
- Después de seleccionar la radio como fuente de entrada, seleccione el número de memoria deseado.
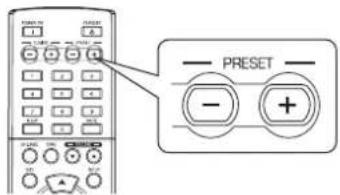
text_image
PRESET - +- Cuando use los botones NUMÉRICOS en el mando a distancia.
Ejemplos) Para el "3": 3 Para el "15": 1 en menos de 2 segundos 5 Para el "30": 3 en menos de 2 segundos 0
Sintonizadora RDS (Opción regional en algunos países de Europa, etc.)
OÍR EMISIONES RDS (SÓLO FM)
El RDS (Sistema de Datos de Radio) es un método para enviar señales de información unidas a las señales del transmisor. Su sintonizadora de radio es capaz de trasladar estas señales y colocar la información en la pantalla. Estos códigos contienen la siguiente información.
Nombre del Servicio de programas (PS), lista de los Tipos de programas (PTY), Avisos de Tráfico (TA), Información horaria (CT), Texto Radio (RT).
■Nota:
- En otros países, la function de sintonización RDS puede no estar disponible.
Búsqueda RDS
- Use esta función para buscar y recibir automáticamente las estaciones que ofrecen servicios RDS.
- En modo FM, seleccione el modo búsqueda RDS.
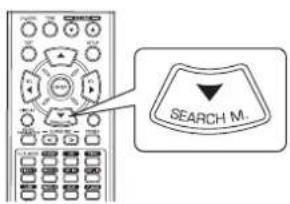
text_image
SEARCH M...- Cada vez que pulse este botón, el modo de búsqueda cambia del modo siguiente:
→ RDS SRCH → TP SRCH → PTY SRCH → OFF
- Cuando aparezca en la pantalla "RDS SRCH", pulse el botón ENTER.
RDS SARCH
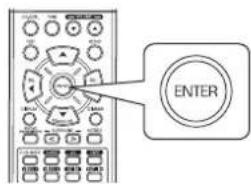
text_image
ENTER- La sintonizadora busca estaciones que ofrezcan servicios RSD y muestra su nombre.
- Si no encuentra ninguna estación RSD, mostrará "NO RDS".
- Cuando no aparezca "RDS SRCH" en la pantalla, repita otra vez el paso 1 anterior.
Búsqueda TP
- Use esta función para buscar y recibir automáticamente las estaciones que ofrecen programas sobre Tráfico.
- En modo FM, presione dos veces el botón SEARCH MODE.
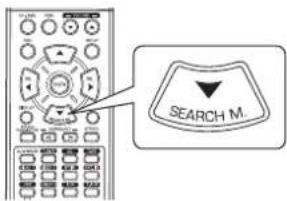
text_image
SEARCH M.- Aparece en pantalla "TP SRCH".
- Cuando aparezca en la pantalla "TP SRCH", pulse el botón ENTER.
TP SARCH
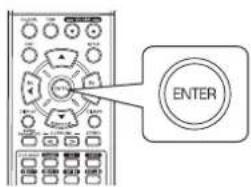
text_image
ENTER- La sintonizadora busca automáticamente estaciones que emitan programas de tráfico.
- Aparece en pantalla "NO TRAFF" si la señal es demasiado débil o si no hay estaciones emitiendo programas de tráfico.
- Cuando no aparezca "TP SRCH" en la pantalla, repita otra vez el paso 1 anterior.
Búsqueda PTY
- Use esta función para buscar y recibir automáticamente las estaciones que ofrecen programas del tipo seleccionado.
- En modo FM, presione tres veces el botón SEARCH MODE.
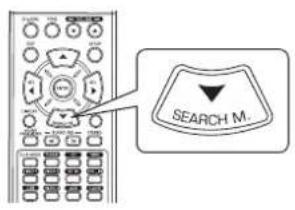
text_image
SEARCH M.PTY SARCH
- Aparece en pantalla "PTY SRCH".
- Cuando aparezca "PTY SRCH" en la pantalla, seleccione el tipo de programa que desee.
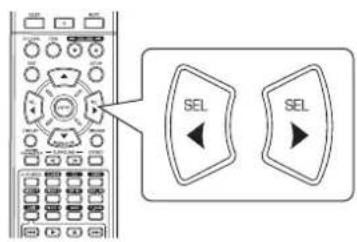
text_image
SEL SELNEWS
- Cada vez que pulse estos botones, seleccionará unos de los 32 tipos de programas. (NEWS, AFFAIRS, INFO, SPORT, EDUCATE, DRAMA, CULTURE, SCIENCE, VARIED, POP M, ROCK M, EASY M, LIGHT M, CLASSICS, OTHER M, WEATHER, FINANCE, CHILDREN, SOCIAL, RELIGION, PHONE IN, TRAVEL, LEISURE, JAZZ, COUNTRY, NATION M, OLDIES, FOLK M, DOCUMENT, TEST, ALARM, NONE) - Cuando no aparezca "PTY SRCH" en la pantalla, repita otra vez el paso 1 anterior.
- Cuando aparezca en la pantalla el tipo de programa que quiere buscar, pulse el botón ENTER.
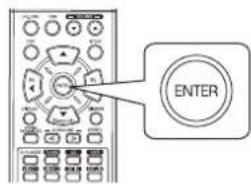
text_image
ENTER- La sintonizadora busca automáticamente una estación que ofrezca dichos servicios PTY
- Si no encuentra ninguna estación, mostrará "NO PROG".
PRESENTACIÓN
En modo FM,

text_image
DISPLAY Shenwood AMG COLDING CONTROL- Cada vez que pulse este botón, el modo de presentación cambia como sigue:
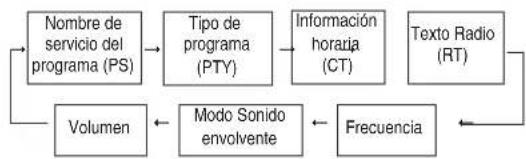
flowchart
graph TD
    A["Nombre de servicio del programa (PS)"] --> B["Tipo de programa (PTY)"]
    B --> C["Información horaria (CT)"]
    C --> D["Texto Radio (RT)"]
    D --> E["Frecuencia"]
    E --> F["Modo Sonido envolvente"]
    F --> G["Volumen"]
    G --> A
- Si las señales son demasiado débiles o no hay servicio RDS disponible, aparecerá en pantalla "NO NAME", "NO PTY", "NO TIME" o "NO TEXT".
GRABAR
- Cando grabe las señales analógicas procedentes de VIDEO 1 o VIDEO 2 asegúrese de seleccionar la entrada analógica. (Para más detalles, lea "Cuando seleccione VIDEO 1, VIDEO 2 como fuente de entrada" en la página 12.)
- Los ajustes de volumen y tono (graves y agudos) no tienen efecto sobre las señales de grabación.
- Cuando usted seleccione la radio, CD o VIDEO 2 como fuente de grabación, la grabación ha de realizarse sobre la salida TAPE, VIDEO 1 o en ambas simultáneamente.
Grabar con CINTA
- Seleccione la entrada que desee grabar excepto cinta (TAPE).
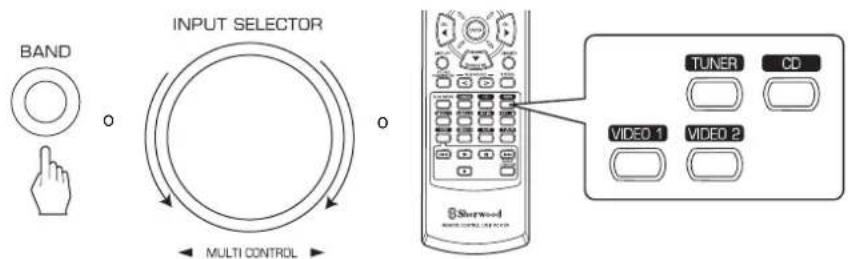
text_image
BAND INPUT SELECTOR MULTI CONTROL TUNER CD VIDEO 1 VIDEO 2-
Empiece a grabar sobre la CINTA.
-
Inicie la reproducción en la entrada que desea grabar.
Grabando sobre VIDEO 1
- Cuando tenga conectado el equipo de grabación de audio en los conectores VIDEO 1, podrá grabar las señales de audio.
- Seleccione la entrada que desee grabar como fuente de grabación, excepto la de VIDEO 1.
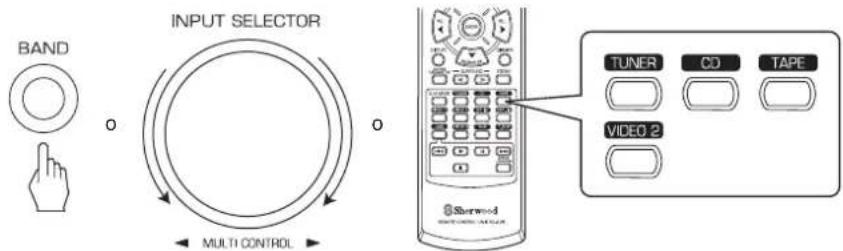
text_image
BAND INPUT SELECTOR MULTI CONTROL TUNER CD TAPE VIDEO 2-
Empiece a grabar sobre VIDEO 1.
-
Inicie la reproducción en la entrada que desea grabar.
OTRAS FUNCIONES
Funcionamiento del Temporizador de desconexión
- El temporizador de desconexión permite que el sistema continúe funcionando durante un periodo de tiempo especificado antes de que se apague automáticamente.
- Para establecer que el receptor se apague automáticamente después de un periodo de tiempo determinado.
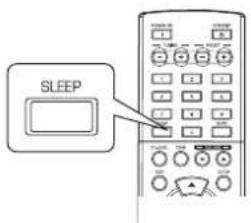
text_image
SLEEP- Cada vez que pulse este botón, el tiempo para la desactivación cambia como sigue:

- Mientras esté funcionando la función, el icono " *e ilumina.
- Cuando selecciona el periodo para la desconexión, la pantalla fluorescente se ilumina débilmente.
Ajustar el brillo de la pantalla fluorescente

text_image
Dimmer Sherwood- Cada vez que pulse este botón, el brillo de la pantalla fluorescente cambia del modo siguiente:

- En el modo de pantalla apagada (OFF), al pulsar cualquier botón se reactivará la iluminación de la pantalla.
Presentación del estado de funcionamiento
Durante la reproducción,
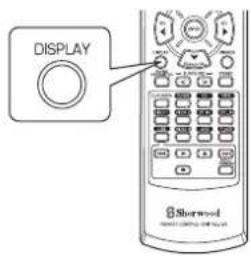
text_image
DISPLAY Shorwood- Cada vez que pulse este botón, el modo de presentación cambia como sigue:
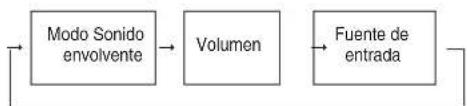
flowchart
graph LR
    A["Modo Sonido envolvente"] --> B["Volumen"]
    B --> C["Fuente de entrada"]
- Si la función de sintonización RDS está disponible en su país, para ver los detalles sobre la información del modo FM, vea "PRESENTACIÓN" en la página 23.
USAR OTRAS FUNCIONES DEL PANEL FRONTAL
- Usted puede usar fácilmente las otras funciones con los botones específicos del panel frontal.
- Seleccione el modo de configuración deseado.

- Dependiendo de la fuente de entrada, cada vez que pulse este botón, el modo cambia de la manera siguiente y aparece en pantalla varios segundos:

(Presentación de la entrada actual)
[ ] : Seleccionable únicamente en modo de funcionamiento Radio.
<> : Seleccionable únicamente en modo funcionamiento VIDEO 1 o VIDEO 2.
- Entre en el modo seleccionado.

- El modo de configuración se cancelará en varios segundos. Si esto ocurre, vuelva a realizar el paso 1 anterior.
- Ajuste el modo seleccionado como desee.
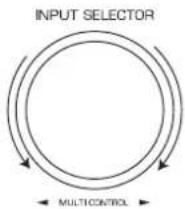
■ Al seleccionar "PRESET" (modo de sintonía preprogramada)
- Cada vez que gire el selector, se sintonizará la estación preprogramada. (Para los detalles, lea "Sintonizar las estaciones memorizadas" en la página 21.)
■ Al seleccionar "TUNE"(modo de sintonía Auto/manual)
- Dependiendo de si gira el selector varios pasos de una vez, o lo hace paso a paso lentamente, se activará la función de sintonía automática o manual. (Para más detalles, lea "Sintonía Automática" y "Sintonía Manual" en la página 20.)
■Al seleccionar "CH LEVEL" (Modo de ajuste del nivel del canal)
- Usted puede ajustar el nivel del canal actual cuando lo desee. (Para los detalles, lea "Ajustar el nivel del canal actual" en la página 18.)
① Presione sobre el botón MODE para seleccionar el canal que desee.
② Gire este selector para ajustar el nivel del canal seleccionado a su gusto.
③ Repita los pasos ① y ② anteriores para ajustar el nivel de cualquier otro canal.
■Al seleccionar "D/A SET" (Modo de Entrada Digital/Analógica)
- Cada vez que gire el selector, seleccionará la entrada digital (óptica o coaxial) o la entrada analógica. (Para los detalles, lea "Cuando selecciona VIDEO 1, VIDEO 2 como fuente de entrada" en la página 12.)
■Al seleccionar "TONE" (modo de ajuste del tono) - Cada vez que gire el selector, el modo de tono se selecciona de la siguiente manera:
OFF : Para oír la fuente de programa sin efecto de tono. ↑ (El indicador "DIRECT" se ilumina.)
ON : Para ajustar el tono a su gusto. (El indicador "DIRECT" se apaga.)
◆Al seleccionar 'TONE' en ON para ajustarlo (graves y agudos)
① Pulse el botón MODE para seleccionar el tono deseado.
② Gire este selector para ajustar el tono seleccionado a su gusto.
③ Para completar el ajuste de tono, repita los pasos ① y ② anteriores.
- Salir del modo configuración.

Configuración del Sistema
- El menú de configuración se muestra en la pantalla fluorescente y le permite efectuar los procedimientos de ajuste con facilidad. En la mayoría de situaciones, usted sólo necesitará ajustar esto una sola vez durante la instalación y disposición de su Home Theater, y difícilmente necesitará cambiarlo más tarde. El menú de configuración consta de 5 menús principales: sistema, entradas, ajuste de altavoces, nivel de canal y parámetros. Estos menús se dividen a su vez en diferentes sub-menús.
1. Active el menú de configuración. 3. Confirme su selección.
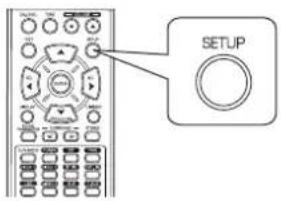
text_image
SETUPSYSTEM
- El menú de configuración aparecerá en la pantalla.
- Para desactivar el menú, pulse este botón otra vez.
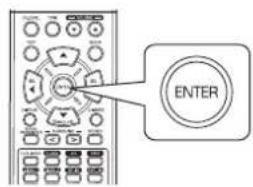
text_image
ENTER2. Seleccione el menú deseado usando los botones CURSOR ARRIBA(▲)/ABAJO(▼).
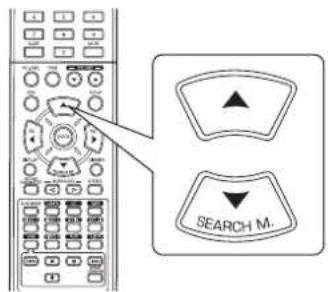
text_image
SEARCH M.- Cuando seleccione "SYSTEM", vea "AJUSTANDO EL SISTEMA" en la página 29.
- Cuando seleccione "INPUT", vea "AJUSTANDO LAS ENTRADAS" en la página 31.
- Cuando seleccione "SPK SET", vea "AJUSTANDO LAS CONFIGURACIÓN DE ALTAVOCES" en la página 32.
- Cuando seleccione "CH LEVEL", vea "AJUSTANDO EL NIVEL DEL CANAL" en la página 36.
- Cuando seleccione "PARAMTR", vea "AJUSTANDO LOS PARÁMETROS" en la página 38.
- Cuando selecciona "EXIT", el menú de configuración se desactivará.
■Flujo del menú de configuración
- El flujo del menú de configuración es el siguiente:
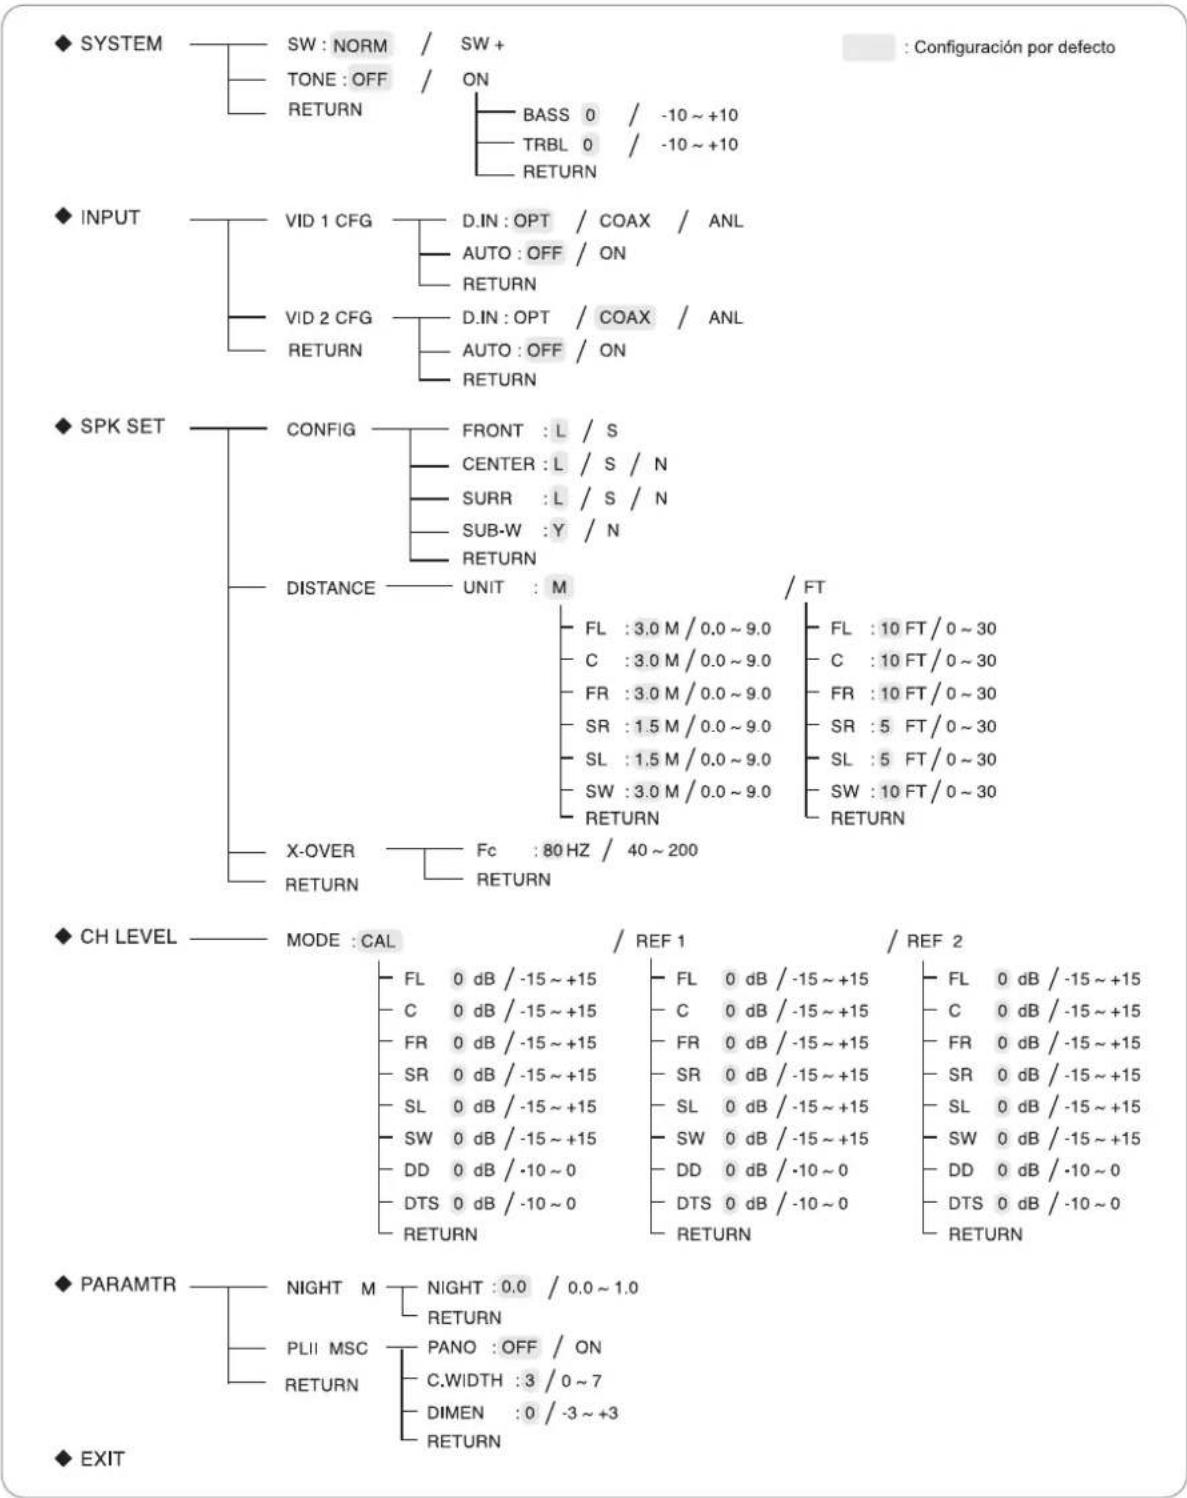
flowchart
graph TD
    A["◆ SYSTEM"] --> B["SW : NORM / SW +"]
    A --> C["TONE : OFF / ON"]
    A --> D["RETURN"]
    B --> E["BASS 0 / -10 ~ +10"]
    B --> F["TRBL 0 / -10 ~ +10"]
    B --> G["RETURN"]
    H["◆ INPUT"] --> I["VID 1 CFG"]
    H --> J["VID 2 CFG"]
    H --> K["RETURN"]
    I --> L["D.IN : OPT / COAX / ANL"]
    I --> M["AUTO : OFF / ON"]
    I --> N["RETURN"]
    J --> O["D.IN : OPT / COAX / ANL"]
    J --> P["AUTO : OFF / ON"]
    J --> Q["RETURN"]
    R["◆ SPK SET"] --> S["CONFIG"]
    R --> T["DISTANCE"]
    S --> U["FRONT : L / S"]
    S --> V["CENTER : L / S / N"]
    S --> W["SURR : L / S / N"]
    S --> X["SUB-W : Y / N"]
    S --> Y["RETURN"]
    Z["X-OVER"] --> AA["Fc : 80 Hz / 40 ~ 200"]
    AB["◆ CH LEVEL"] --> AC["MODE : CAL / REF 1 / REF 2"]
    AC --> AD["FL 0 dB / -15 ~ +15"]
    AC --> AE["C 0 dB / -15 ~ +15"]
    AC --> AF["FR 0 dB / -15 ~ +15"]
    AC --> AG["SR 0 dB / -15 ~ +15"]
    AC --> AH["SL 0 dB / -15 ~ +15"]
    AC --> AI["SW 0 dB / -15 ~ +15"]
    AC --> AJ["DD 0 dB / -10 ~ 0"]
    AC --> AK["DTS 0 dB / -10 ~ 0"]
    AC --> AL["RETURN"]
    AM["◆ PARAMTR"] --> AN["NIGHT M NIGHT : 0.0 / 0.0 ~ 1.0"]
    AM --> AO["RETURN"]
    AP["◆ EXIT"] --> AQ["PLII MSC PANO : OFF / ON"]
    AP --> AR["C.WIDTH : 3 / 0 ~ 7"]
    AP --> AS["DIMEN : 0 / -3 ~ +3"]
    AP --> AT["RETURN"]
- Cuando selecciona "RETURN" en un sub-menú, regresará al menú previo.
■ Nota: Mientras utilice el menú de configuración, sólo funcionarán el botón (POWER ON/) STANDBY y los botones necesarios para la configuración del sistema.
AJUSTANDO EL SISTEMA

text_image
◆ SYSTEM SW : NORM / SW + TONE : OFF / ON RETURN BASS 0 / -10 ~ +10 TRBL 0 / -10 ~ +10 RETURN- SW (SUBWOOFER): Para seleccionar el modo de subwoofer que desee.
- TONE: Para ajustar el tono (graves y agudos) como desee.
- RETURN: Para regresar al menú previo.
1. Pulse el CURSOR ARRIBA(▲)/ABAJO(▼) para seleccionar el elemento que quiera.
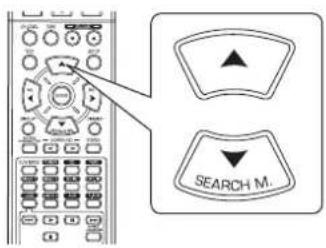
text_image
SEARCH M.2. Pulse el CURSOR IZQUIERDA(◀)/DERECHA(▶) para ajustar el elemento a su gusto.
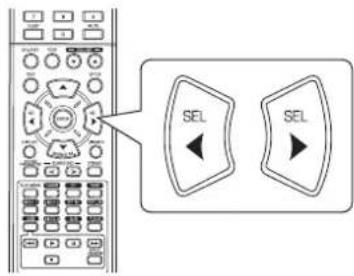
text_image
Diagram showing a remote control interface with two labeled 'SEL' buttons, one pointing left and the other pointing right.Cuando seleccione el modo SUBWOOFER
- El modo "SW + " sólo es efectivo cuando "FRONT" está ajustado a "L" y el "SUB-W" está ajustado a "Y" en el menú de configuración de altavoces.(Para más detalles, lea "AJUSTANDO LAS CONFIGURACIÓN DE ALTAVOCES" en la página 32.)
- Mientras reproduce la fuente del canal 2 en modo MATRIX, CHURCH, THEATER, HALL o STADIUM, las señales de baja frecuencia pueden reproducirse desde el subwoofer independientemente de la configuración del modo subwoofer.
NORM : Cuando las señales de baja frecuencia de los canales ajustados a "L" son reproducidas solamente desde esos canales. En este modo, las señales de baja frecuencia que se reproducen procedentes del canal subwoofer son las únicas señales de baja frecuencia del LFE (de las fuentes multi-canal que contiene el canal LFE (Efectos de baja frecuencia), también llamado canal ".1"), y de los canales ajustados a "S".
SW + : Cuando las señales de baja frecuencia de los canales ajustados a "L" se reproducen simultáneamente desde esos canales y desde el canal subwoofer. En este modo, el margen de las bajas frecuencias se expande más uniformemente por toda la habitación, pero dependiendo del tamaño y forma de la habitación, puede haber interferencias reduciéndose el volumen actual del margen de bajas frecuencias.
Cuando seleccione 'TONE'
OFF: Para oír la fuente de programa sin efecto de tono. (El indicador "DIRECT" se ilumina.)
↓
ON: Para ajustar el tono a su gusto. (El indicador "DIRECT" se apaga.)
■Seleccione 'TONE' en ON para ajustarlo (graves y agudos).
①. Pulse los botones CURSOR ARRIBA(▲)/ABAJO(▼) para seleccionar el tono deseado.
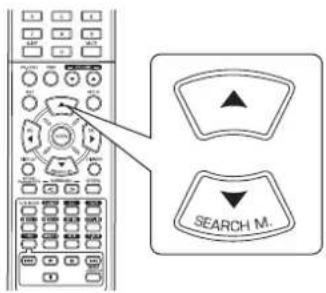
text_image
SEARCH M.
Ejemplo) Si selecciona el BASS
BASS 0
②. Pulse los botones CURSOR IZQUIERDA(◀)/DERECHA(▶) para ajustar el tono seleccionado a su gusto.
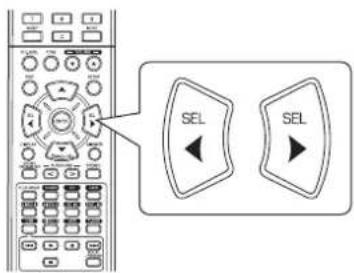
text_image
Diagram showing control panel with two 'SEL' buttons and directional arrows pointing to the left panel.- El nivel de tono puede ajustarse dentro del margen de -10 \~ +10 dB.
- En general, le recomendamos que los graves y agudos se ajusten a 0 dB (nivel plano).
- Ajustes extremos a volumen alto pueden averiar sus altavoces.
- Para completar el ajuste de tono, repita los pasos ① y ② anteriores.
AJUSTANDO LAS ENTRADAS
◆ INPUT

flowchart
graph TD
    A["VID 1 CFG"] --> B["D.IN: OPT / COAX / ANL"]
    A --> C["AUTO: OFF / ON"]
    A --> D["RETURN"]
    E["VID 2 CFG"] --> F["D.IN: OPT / COAX / ANL"]
    E --> G["AUTO: OFF / ON"]
    E --> H["RETURN"]
• D.IN (ENTRADAS DIGITALES): Para asignar las entradas DIGITALES a la entrada deseada.
- AUTO (SONIDO ENVOLVENTE AUTO): Para seleccionar el modo de sonido envolvente automático o manual.
- RETURN: Para regresar al menú previo.
- Pulse los botones CURSOR ARRIBA(▲)/ABAJO(▼) para seleccionar la fuente de entrada que quiera y luego pulse el botón ENTER.

flowchart
graph TD
    A["Search M."] --> B["ENTER"]
    C["Arrow"] --> A
Ejemplo) Si selecciona el VIDEO 2

- Pulse el CURSOR ARRIBA(▲)/ABAJO(▼) para seleccionar el elemento deseado.

text_image
SEARCH M.- Pulse el CURSOR IZQUIERDA(◀)/DERECHA(▶) para ajustar el elemento a su gusto.

text_image
SEL SELCuando seleccione las entradas DIGITALES
- Usted podría asignar la entrada DIGITAL conectada al VIDEO 1 o al VIDEO 2 según lo desee.
(Para más detalles, lea "CONEXIONES 'DIGITAL IN'" en la página 5.)
- Usted puede seleccionar entre OPT (óptica), COAX (coaxial) y ANL (analógica) según lo desee.
Notas:
- En el caso de que la entrada DIGITAL se asigne a dos o más fuentes de entrada, cuando seleccione estas fuentes de entrada, las señales de audio digital podrán oírse procedentes de la misma entrada DIGITAL.
- Cuando seleccione TUNER, TAPE o CD como fuente de entrada, la entrada digital ("OPT", "COAX") no puede seleccionarse.
Cuando seleccione 'AUTO SURROUND'
- Dependiendo del modo de sonido envolvente seleccionado, usted puede elegir el modo automático o el modo manual.
OFF(Modo sonido envolvente manual): Usted puede seleccionar el modo que quiera entre los diferentes modos seleccionables para la
señal de entrada, utilizando los botones SURROUND MODE arriba/abajo (▶, > / ◀, <).
(Para más detalles, lea "DISFRUTAR DEL SONIDO ENVOLVENTE" en la página 15.)
ON (Modo sonido envolvente automático): El modo envolvente óptimo será seleccionado automáticamente dependiendo del formato de señal de entrada.
Notas:
- Incluso cuando tenga seleccionado el modo de sonido envolvente en automático y la entrada sea una señal digital del mismo tipo, el modo de sonido envolvente óptimo puede variar dependiendo si el tipo de altavoz está configurado en "N" (Ninguno) o no lo está.
- Cuando la entrada sea una señal digital PCM de 96 kHz, sólo seleccionará el modo estéreo.
AJUSTANDO LAS CONFIGURACIÓN DE ALTAVOCES
- Después de instalar este receptor y conectar todos los equipos, usted debería ajustar la configuración de los altavoces para una acústica de sonido óptima dependiendo del ambiente y de la disposición de los altavoces.
- Incluso cuando cambie de altavoces, o sus posiciones, o la distribución del espacio donde los va a escuchar, también debería ajustar la configuración de los altavoces.

flowchart
graph TD
    A["◆ SPK SET"] --> B["CONFIG"]
    B --> C["FRONT : L / S"]
    B --> D["CENTER : L / S / N"]
    B --> E["SURR : L / S / N"]
    B --> F["SUB-W : Y / N"]
    B --> G["RETURN"]
    A --> H["DISTANCE"]
    H --> I["UNIT : M"]
    I --> J["FL : 3.0 M / 0.0 ~ 9.0"]
    I --> K["C : 3.0 M / 0.0 ~ 9.0"]
    I --> L["FR : 3.0 M / 0.0 ~ 9.0"]
    I --> M["SR : 1.5 M / 0.0 ~ 9.0"]
    I --> N["SL : 1.5 M / 0.0 ~ 9.0"]
    I --> O["SW : 3.0 M / 0.0 ~ 9.0"]
    I --> P["RETURN"]
    A --> Q["X-OVER"]
    Q --> R["FC : 80 Hz / 40 ~ 200"]
    Q --> S["RETURN"]
    style A fill:#f9f,stroke:#333
    style H fill:#ccf,stroke:#333
    style Q fill:#cfc,stroke:#333
- CONFIG (CONFIGURACIÓN): Para seleccionar el tamaño de los altavoces que están conectados.
- DISTANCE: Para introducir la distancia entre la posición de audición y cada altavoz, para establecer automáticamente el tiempo de retardo para una reproducción óptima del sonido envolvente.
- X-OVER (CROSSOVER): Para seleccionar la frecuencia de corte deseada.
- RETURN: Para regresar al menú previo.
Cuando seleccione 'CONFIGURATION'
- Pulse los botones CURSOR ARRIBA(▲)/ABAJO(▼) para seleccionar "CONFIG" y luego pulse el botón ENTER.
flowchart
graph TD
    A["Search M."] --> B["ENTER"]
    C["Arrow"] --> A
    D["Arrow"] --> B
FRONT: L
- Pulse los botones CURSOR ARRIBA(▲)/ABAJO(▼) para seleccionar el altavoz que desee.

text_image
SEARCH M.- Pulse el CURSOR IZQUIERDA(◀)/DERECHA(▶) para ajustar el altavoz seleccionado a su gusto.
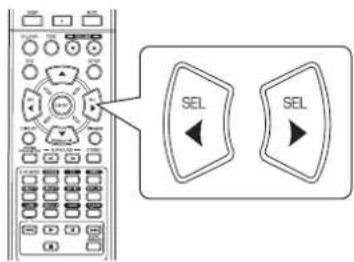
text_image
Diagram showing a remote control interface with two 'SEL' buttons and directional arrows pointing to the left panel.- Dependiendo de su tipo de altavoz, usted puede seleccionar uno de los siguientes tipos.
L(grande) : Seleccione este cuando conecte altavoces que puedan reproducir todos los sonidos por debajo de la frecuencia de corte.
S(pequeño): Seleccione este cuando conecte altavoces que no puedan reproducir todos los sonidos por debajo de la frecuencia de corte. Cando seleccione este ajuste, los sonidos por debajo de la frecuencia de corte se envían al subwoofer o a los altavoces "L (grandes)" (si no se usa subwoofer).
N(ninguno) : Seleccione este ajuste cuando no tenga ningún altavoz conectado. Cuando seleccione este ajuste, lo sonidos se envían a los altavoces que no tengan el ajuste "N(ninguno)".
Y(si)/N(no) : Seleccione la opción dependiendo si tiene o no un subwoofer conectado.
Notas:
- Cuando ajuste los altavoces a "S (pequeño)", usted debería establecer correctamente la frecuencia de corte según sus características de frecuencia. (Para más detalles, lea "Cuando seleccione 'CROSSOVER'" en la página 35.)
- Cuando el "SUB-W" está ajustado a "N (no)", el valor "FRONT" se establece automáticamente en "L (grande)".
-
Cuando "FRONT" se ajusta a "S (pequeño)", "CENTER" y "SURR" no pueden ajustarse a "L (grande)".
-
Repita los pasos 2 y 3 anteriores hasta que los altavoces queden ajustados en el modo deseado.
■Acerca del tamaño de los altavoces
- Seleccione "L (grande)" o "S (pequeño)" no de acuerdo con el tamaño real del altavoz sino por la capacidad del altavoz de reproducir señales de frecuencias bajas (sonidos graves por debajo de la frecuencia establecida en el menú "X-OVER").
- Si no la conoce, intente comparar el sonido de distintas configuraciones (ajustando el volumen a un nivel suficientemente bajo para que no dañe los altavoces) para determinar el ajuste adecuado.
Cuando seleccione 'DISTANCE'
- Pulse los botones CURSOR ARRIBA(▲)/ABAJO(▼) para seleccionar 'DISTANCE' y luego pulse el botón ENTER.

flowchart
graph TD
    A["Search M."] --> B["ENTER"]
    C["Arrow"] --> A
UNIT : 11
- Pulse los botones CURSOR ARRIBA(▲)/ABAJO(▼) para seleccionar el altavoz que desee.

text_image
SEARCH M.■Nota:
- No puede seleccionar los altavoces con el ajuste "N (ninguno o No)".
- Pulse el CURSOR IZQUIERDA(◀)/DERECHA(▶) para ajustar los altavoces seleccionados como desee.

text_image
SEL SELPara seleccionar la unidad deseada
- Usted puede seleccionar tanto "M (metros)" como "FT (pies)".
- Una vez seleccionada la unidad, las distancias cambiarán automáticamente a la unidad seleccionada.
Para ajustar la distancia
- Usted puede ajustar la distancia dentro del margen de 0,0 \~ 9,0 metros en intervalos de 0,3 metros (o 0 \~ 30 pies en intervalos de 1 pies).
- Repita los pasos 2 y 3 anteriores hasta que haya establecido las distancias como desea.
■ Acerca de las distancia de los altavoces
Cuando esté disfrutando de una reproducción de sonido envolvente multi-canal con fuentes Dolby Digital, lo ideal sería que el altavoz central y los de sonido envolvente estuvieran a la misma distancia de la posición principal de audición que los altavoces frontales. Introduciendo la distancia entre la posición de audición y cada uno de los altavoces, los tiempos de retardo de los altavoces central, de sonido envolvente y subwoofer se ajustarán automáticamente para crear virtualmente el ambiente de audición ideal como si los altavoces central y de sonido envolvente se encontraran situados respectivamente en sus posiciones ideales.
Cuando seleccione 'CROSSOVER'
- Cuando los altavoces estén ajustados en "S (pequeño)", asegúrese de establecer correctamente sus frecuencias de corte según sus características de frecuencia.
- Pulse los botones CURSOR ARRIBA(▲)/ABAJO(▼) para seleccionar "X-OVER" y luego pulse el botón ENTER.
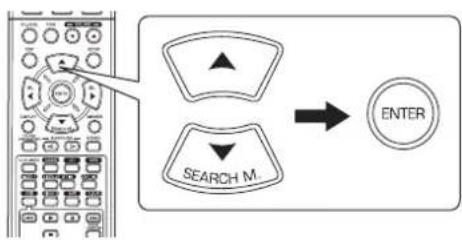
flowchart
graph TD
    A["Start"] --> B["Search M"]
    B --> C["ENTER"]

F_c : 80HZ
- Pulse el CURSOR IZQUIERDA(◀)/DERECHA(▶) para ajustar las frecuencia de corte como desee.

text_image
SEL SEL- Usted puede ajustar la frecuencia de corte dentro del margen de 40 \~ 200 Hz en intervalos de 10 Hz.
■Acerca de la frecuencia de corte
- Cuando los altavoces están ajustados en "S (pequeño)", las bajas frecuencias en aquellos canales que están por debajo de la frecuencia de corte son enviadas a la salida del subwoofer o a los altavoces frontales que estén ajustados como "L (grande)" (cuando no use un subwoofer).
- Lea las instrucciones de funcionamiento de los altavoces conectados. Si el margen de frecuencias de su altavoz es 100 Hz\~20 kHz, la frecuencia de corte debería establecerse en 100 Hz (o ligeramente superior).
AJUSTANDO EL NIVEL DEL CANAL
◆ CH LEVEL —— MODE : CAL

text_image
- FL 0 dB / -15 ~ +15 - C 0 dB / -15 ~ +15 - FR 0 dB / -15 ~ +15 - SR 0 dB / -15 ~ +15 - SL 0 dB / -15 ~ +15 - SW 0 dB / -15 ~ +15 - DD 0 dB / -10 ~ 0 - DTS 0 dB / -10 ~ 0 - RETURN/ REF 1 / REF 2
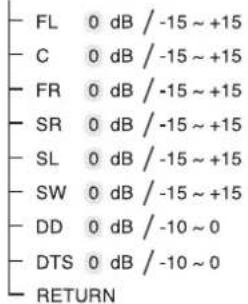
text_image
FL 0 dB / -15 ~ +15 C 0 dB / -15 ~ +15 FR 0 dB / -15 ~ +15 SR 0 dB / -15 ~ +15 SL 0 dB / -15 ~ +15 SW 0 dB / -15 ~ +15 DD 0 dB / -10 ~ 0 DTS 0 dB / -10 ~ 0 RETURN/ REF 2

text_image
FL 0 dB / -15 ~ +15 C 0 dB / -15 ~ +15 FR 0 dB / -15 ~ +15 SR 0 dB / -15 ~ +15 SL 0 dB / -15 ~ +15 SW 0 dB / -15 ~ +15 DD 0 dB / -10 ~ 0 DTS 0 dB / -10 ~ 0 RETURN■ Nota: Dependiendo de la configuración de altavoces ("N (Ninguno o No)"), algunos canales no pueden ser seleccionados.
Ajustar el nivel del canal actual
- Usted puede ajustar el nivel del canal actual cuando lo desee. Estos niveles ajustados se memorizan en el acto dentro de la memoria del usuario ("CAL"), no en la memoria presintonizada ("REF 1", "REF 2").
-
Después de ajustar el nivel del canal con el tono de prueba, ajuste los niveles del canal, o de acuerdo con las fuentes de programa o para que se acomode a sus gustos. (Para más detalles, lea "Ajustar cada nivel de canal con el tono de prueba" en la página 17.)
-
Pulse el CURSOR ARRIBA(▲)/ABAJO(▼) para seleccionar el canal deseado.
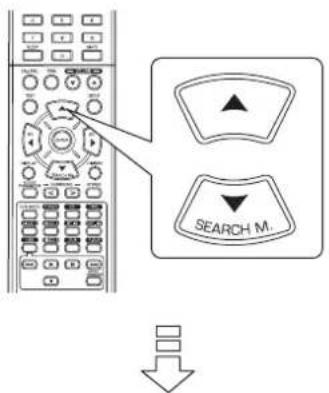
text_image
SEARCH M.Ejemplo) Cuando seleccione el LFE de las fuentes Dolby Digital

- Pulse los botones del CURSOR IZQUIERDA(◀)/DERECHA(▶) para ajustar como desee el nivel del canal seleccionado o del LFE de la fuente de programa.

text_image
SEL SEL- El nivel LFE puede ajustarse dentro del margen de -10\~0 dB, y otros niveles de canal dentro del margen de -15 \~ +15 dB.
-
En general, le recomendamos que el nivel LFE se ajuste a 0 dB. (Sin embargo, le recomendamos que el nivel LFE para algunos de los primeros softwares DTS sea -10 dB.) Si los niveles recomendados parecen demasiado altos, bájelos tanto como sea necesario.
-
Repita los pasos 1 y 2 anteriores para ajustar cada nivel de canal.
Memorizar los niveles de canal ajustados
- Usted puede guardar en la memoria presintonizada ("REF 1", "REF 2") los niveles de canal ajustados, y recuperarlos en el momento que quiera.
- Después de realizar los pasos 1 \~ 3 del procedimiento "Ajustar el nivel del canal actual" de la página 36, pulse el botón ENTER.
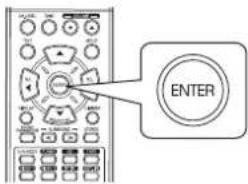
text_image
ENTER
MODEREP,
- Entonces la indicación "1" o "REF 1" parpadea en pantalla.
- Pulse los botones CURSOR IZQUIERDA(◀)/DERECHA(▶) para seleccionar la memoria almacenada que quiera y luego pulse el botón ENTER.
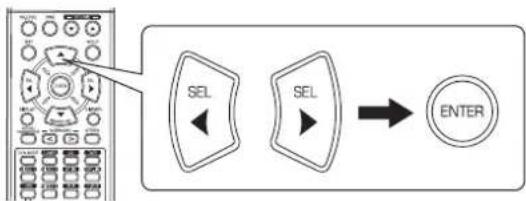
flowchart
graph LR
    A["Radio System"] --> B["SEL"]
    B --> C["ENTER"]
    style A fill:#f9f,stroke:#333
    style C fill:#ccf,stroke:#333
- Cada vez que pulse el botón CURSOR IZQUIERDA(◀) o DERECHA(▶), selecciona o "REF 1" o "REF 2".
- Los niveles de canal ajustados se han guardado ahora en la memoria seleccionada.
Recuperar los niveles de canal memorizados
- Pulse los botones CURSOR ARRIBA(▲)/ABAJO(▼) para seleccionar "MODE \~".
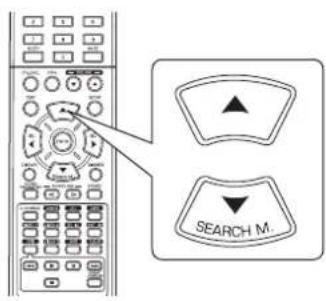
text_image
SEARCH M.
MODE CAL
- Puede que aparezca "CAL" en vez de "REF 1" o "REF 2".
- Pulse los botones CURSOR IZQUIERDA(◀)/DERECHA(▶) para seleccionar o REF 1 o REF 2.

text_image
SEL SEL- Entonces se recuperan los niveles de canal memorizados de la memoria predeterminada seleccionada.
AJUSTANDO LOS PARÁMETROS

flowchart
graph TD
    A["PARAMTR"] --> B["NIGHT M"]
    A --> C["PLII MSC"]
    A --> D["RETURN"]
    B --> E["NIGHT : 0.0 / 0.0 ~ 1.0"]
    B --> F["RETURN"]
    C --> G["PANO : OFF / ON"]
    C --> H["C.WIDTH : 3 / 0 ~ 7"]
    C --> I["DIMEN : 0 / -3 ~ +3"]
    C --> J["RETURN"]
- NIGHT M (MODO NOCTURNO) : Para ajustar la compresión del rango dinámico que hace que el sonido débil sea más fácil de oír a niveles bajos de volumen.
- PLII MSC (MÚSICA DOLBY PLII): Para ajustar diversos parámetros del sonido envolvente para un efecto envolvente óptimo.
- RETURN: Para regresar al menú previo.
Cuando seleccione el modo 'NIGHT MODE'
- Esta función comprime el rango dinámico de partes especificadas previamente de la pista de sonido Dolby Digital o DTS(con volumen extremadamente alto) para reducir la diferencia de volumen entre las partes especificadas y las no especificadas. Esto facilita la audición de toda la pista cuando vea la película de noche con un nivel de sonido bajo.
Notas:
- El ajuste del modo nocturno sólo es válido cuando tiene entrada de señales digitales procedentes de fuentes de programas Dolby Digital o DTS.
-
En algunos softwares Dolby Digital o DTS, el modo nocturno puede no ser válido.
-
Pulse los botones CURSOR ARRIBA(▲)/ABAJO(▼) para seleccionar "NIGHT M" y luego pulse el botón ENTER.
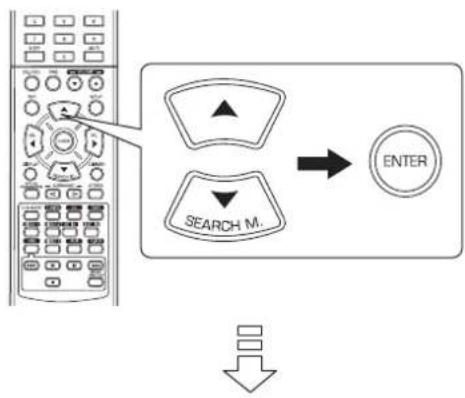
flowchart
graph TD
    A["Left Mobile Phone"] --> B["Search Mode"]
    B --> C["ENTER"]
    D["Down Arrow"] --> E["Next Button"]
NIGHT:0.0
- Pulse los botones CURSOR izquierda(◀)/derecha(▶) para ajustar la compresión del rango dinámico a su gusto.

text_image
0.0 ↔ 0.1 ↔ 0.2 ...... 0.9 ↔ 1.0 ← Menor compresión → Mayor compresiónCuando seleccione MÚSICA DOLBY PLII
-
Usted puede ajustar diversos parámetros del sonido envolventes para un efecto envolvente óptimo.
■ Nota: Los ajustes de parámetros sólo son válidos cuando escuche en modo Dolby Pro Logic II. -
Pulse los botones CURSOR ARRIBA(▲)/ABAJO(▼) para seleccionar "PLII MSC", luego pulse el botón ENTER.
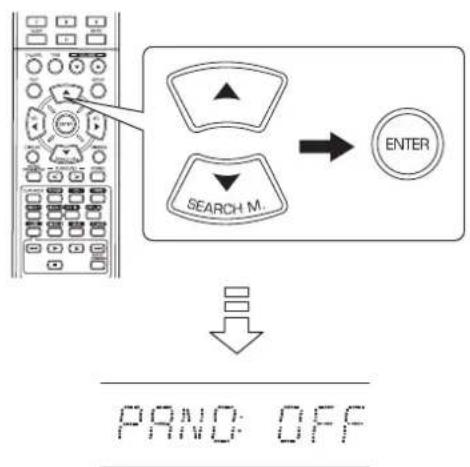
flowchart
graph TD
    A["Left Panel"] --> B["Search Mode"]
    B --> C["ENTER"]
    D["Down Arrow"] --> E["PAND: OFF"]
- Pulse el CURSOR ARRIBA(▲)/ABAJO(▼) para seleccionar el parámetro deseado.
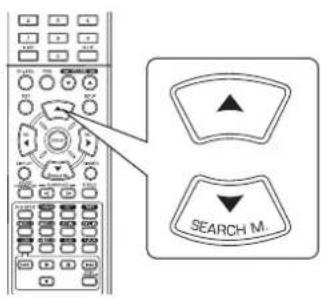
text_image
SEARCH M.- Pulse los botones CURSOR IZQUIERDA(◀)/DERECHA(▶) para ajustar el parámetro seleccionado como desee.

text_image
SEL SEL■Cuando seleccione el modo "PANO (Panorama)"
Este modo extiende la imagen estéreo frontal para incluir los altavoces de sonido envolvente para un efecto "envolvente" con imagen lateral. Seleccione "OFF" u "ON"(valor por defecto: OFF).
■Cuando seleccione el control "C. WIDTH (ancho central)"
Esta opción ajusta la imagen central de modo que pueda oírse sólo por el altavoz central, sólo por los altavoces izdo/dcho como imagen fantasma, o por los tres altavoces para diferentes grados. El control puede ajustarse en 8 niveles de 0 a 7 (valor por defecto: 3).
■Cuando seleccione el control "DIMEN (Tamaño)"
Esta opción ajusta gradualmente el campo de sonido o hacia el frente o hacia la parte final. El control puede ajustarse en 7 niveles de -3 a +3 (valor por defecto: 0).
- Repita los pasos 2 y 3 anteriores para ajustar otros parámetros.
Guía de resolución de problemas
Si ocurre un problema, lea la tabla siguiente antes de llevar su receptor a reparar.
Si el problema persiste, intente resolverlo apagando y encendiendo el receptor. Si con esto no resuelve la situación, consulte con su vendedor. Bajo ninguna circunstancia intente reparar el receptor usted mismo. Esto podría invalidar la garantía.
| PROBLEMA CAUSA | POSIBLE SOLUCIÓN | |
| No enciende • El cable de alimentación está desconectado.• Mala conexión a la toma de corriente o la toma de corriente no tiene electricidad. | • Conecte el cable con firmeza.• Compruebe la toma de corriente usando una bombilla u otro electrodoméstico. | |
| No hay sonido | • Los cables del altavoz están desconectados.• El volumen maestro está demasiado bajo.• El botón MUTE del mando a distancia está activado (ON).• Selección incorrecta de la fuente de entrada.• Conexiones incorrectas entre los equipos. | • Compruebe la conexión de los altavoces.• Ajuste el volumen maestro.• Pulse el botón MUTE para desactivar el efecto de silencio.• Seleccione correctamente la fuente de entrada.• Realice las conexiones correctamente. |
| Los altavoces del sonido envolvente no suenan | • El modo de sonido envolvente está desactivado (modo estéreo).• El volumen maestro y el nivel del sonido envolvente están demasiado bajos.• Está usando una fuente monoaural.• El altavoz de sonido envolvente está ajustado a "N". | • Seleccione un modo de sonido envolvente.• Ajuste el volumen maestro y el nivel del sonido envolvente.• Seleccione una fuente estéreo o de sonido envolvente.• Seleccione la configuración que desee del altavoz del sonido envolvente. |
| El altavoz central no suena | • El modo de sonido envolvente está desactivado (modo estéreo)• El altavoz central está ajustado a "N".• El volumen maestro y el nivel central están demasiado bajos. | • Seleccione el sonido envolvente que desee.• Seleccione la configuración que desee del altavoz central.• Ajuste el volumen maestro y el nivel central. |
| No se reciben las estaciones | • No está conectada la antena.• La frecuencia de la estación deseada no está sintonizada.• La antena está en mala posición. | • Conecte la antena.• Sintonice la frecuencia de la estación deseada.• Mueva la antena y vuelva a sintonizar. |
| No se reciben las estaciones memorizadas | • Se ha memorizado una frecuencia de estación errónea.• Las estaciones memorizadas han sido eliminadas. | • Memorice la frecuencia de estación correcta.• Vuelva a memorizar las estaciones. |
| Recepción FM de mala calidad | • No está conectada la antena.• La antena no está colocada para una recepción óptima. | • Conecte la antena.• Cambie la posición de la antena. |
| Ruido silbante continuo durante la recepción de FM, especialmente cuando se recibe una emisión en estéreo. | • Señales débiles. | • Cambie la posición de la antena.• Instale una antena de FM en exteriores. |
| Ruido silbante continuo o intermitente durante la recepción de AM, especialmente de noche. | • Ruidos producidos por motores, bombillas fluorescentes o relámpagos, etc.• No tiene pilas o estas están gastadas. | • Mantenga el receptor alejado de las fuentes de ruidos.• Instale una antena de AM en exteriores. |
| El mando a distancia no funciona. | • El mando a distancia está obstaculizado. | • Cambie las pilas.• Retire cualquier obstáculo. |
Especificaciones
■SECCIÓN DEL AMPLIFICADOR
- Salida de potencia, modo estéreo, 6 Ω, THD 0,7%, 40 Hz\~20 kHz | 2×50 W
- Distorsión armónica total, 6 Ω, 50 W, 1 kHz | 0,09 %
• Distorsión de intermodulación
60 Hz : 7 kHz= 4 : 1 SMPTE, 6 Ω, 50 W . I 0,1 %
- Sensibilidad de entrada, 47 kΩ
Línea (CD, CINTA, VÍDEO) | 280 mV
- Relación señal-ruido, referencia IHF "A"
Línea (CD, CINTA, VÍDEO) | 92 dB
- Respuesta de Frecuencia
Línea (CD, CINTA, VÍDEO), 20 Hz\~50 kHz | +0 dB, -3 dB
- Nivel de salida
GRAB. CINTA/VÍDEO, 2,2 kΩ | 280 mV
• Control Graves/Agudos, 100 Hz/10 kHz | ±10 dB
- Modo sonido envolvente, sólo canal dirigido
Salida de potencia central, 6 Ω, 1 kHz, THD 0,7 % | 70 W / 70 W
Salida de potencia central, 6 Ω, 1 kHz, THD 0,7 % | 70 W
Salida de potencia sonido envolvente, 6 Ω, 1 kHz, THD 0,7 % | 70 W / 70 W
■SECCIÓN DE AUDIO DIGITAL
- Frecuencia de muestreo | 32, 44,1, 48, 96 kHz
- Nivel de entrada digital
Coaxial, 75 Ω | 0,5 Vp-p
Óptico, 660 nm | -15 \~ -21 dBm
■SECCIÓN DE LA SINTONIZADORA DE FM
- Margen de frecuencias de sintonía | 87,5 \~ 108 MHz
- Sensibilidad útil, THD 3%, S/R 26 dB | 12,8 dBf
- Sensibilidad de insonorización de 46 dB, mono/estéreo | 20,2 / 45,3 dBf
- Relación señal-ruido, 65 dBf, mono/estéreo | 55 / 50 dB
- Distorsión armónica total, 65 dBf, 1 kHz, mono/estéreo | 0,5 / 1,0 %
- Respuesta de frecuencia, 30 Hz\~12 kHz | ±3,0 dB
- Separación estéreo, 1 kHz | 30 dB
- Relación de captura | 4 dB
- Relación de rechazo de IF | 80 dB
■SECCIÓN DE SINTONIZADORA DE AM
- Margen de frecuencias de sintonía | 522 \~ 1611 kHz
- Sensibilidad útil | 500 μV/m
- Relación señal-ruido | 40 dB
- Selectividad | 25 dB
GENERAL
- Alimentación eléctrica | 230 V \~ 50 Hz
- Consumo de potencia | 200 W
- Dimensiones (AxAxP, incluyendo piezas sobresalientes) | 440×141×358.5 mm (17-3/8×5-1/2×14-1/8 pulgadas)
- Peso (Neto) | 9,5 kg (20,9 lbs)
Nota: El diseño y las especificaciones técnicas están sujetos a cambios por mejoras sin previo aviso.
Введение
ПЕРЕД ЭКСПЛУАТАЦИЕЙ УСТРОЙСТВА ОЗНАКОМЬТЕСЬ СО СЛЕДУЮЩИМИ ПОЛОЖЕНИЯМИ


ВНИМАНИЕ
ЧТОБЫ СНИЗИТЬ ОПАСНОСТЬ ПОРАЖЕНИЯ ЭЛЕКТРИЧЕСКИ М ТОКОМ, НЕ СНИМАЙТЕ КРЫШКУ (ИЛИ ЗАДНЮЮ ПАНЕЛЬ). В НУТРИ УСТРОЙСТВА НЕТ ДЕТАЛЕЙ. ОБСЛУЖИВАНИЕ КОТОРЫХ ДОЛЖНО ПРОВОДИТЬСЯ ПОЛЬЗОВАТЕЛЕМ. РЕМОНТ УСТ РОЙСТВА ДОЛЖЕН ОСУЩЕСВЛЯТЬСЯ КВАЛИФИЦИРОВАННЫМ ПЕРСОНАЛОМ.

Данный символ предупреждает пользователя о наличии не изолированных источников «опасного уровня напряжения» в устройстве, который может быть достаточно высоки м, чтобы представлять риск поражения электрическим то ком.

Данный символ предупреждает пользователя о наличии важных инструкций по эксплуатации и обслуживанию (ре монту) в сопроводительной документации устройства.
ПРЕДУПРЕЖДЕНИЕ: ДЛЯ СНИЖЕНИЯ ОПАСНОСТИ ВОЗНИКНОВЕНИЯ ПОЖАРА ИЛИ ПОРАЖЕНИЯ ЭЛЕКТРИЧЕСКИМ ТОКОМ, НЕ ДОПУСК АЙТЕ ПОПАДАНИЯ КАПЕЛЬ ДОЖДЯ ВНУТРЬ УСТРОЙСТВА ИЛИ ВОЗДЕЙСТВИЯ ВЫСОКОГО УРОВНЯ ВЛАЖНОСТИ.
Меры предосторожности при установке
Примечание: В целях рассеивания теплоты не размещайте устройство в закрытом пространстве, например, в книжном шкафу или другом закрытом месте.

text_image
Примечание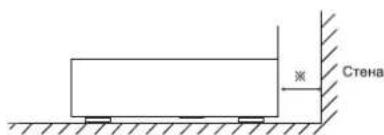
text_image
СтенаНе перекрывайте вентиляционные отверстия и не ставьте на устройство другое оборудование.
МЕРЫ БЕЗОПАСНОСТИ
| ЕВРОПА АВСТРАЛИЯ | 220 В - 240 В | Поставляемые в Австралию устройства предназначены для работы только при напряжении переменного тока в 240 В. Для обеспечения безопасной работы устройства трехконтактный штекер, который входит в комплект поставки, необходимо вставлять только в стандартную электрическую розетку, надежно заземленную в системе домашней проводки. Удлинители, используемые вместе с оборудованием, должны быть трехжильными. Они должны быть правильно подключены для обеспечения заземления.Использование неподходящих удлинителей является основной причиной несчастных случаев со смертельным исходом. У довлетворительная работа оборудования не означает, что электрическая розетка заземлена, а установка устройства является полностью безопасной. В целях безопасности при возникновении сомнений в надежности заземления электрической розетки необходимо проконсультироваться с квалифицированным электриком.ЕДИНЫЙ ЕВРОПЕЙСКИЙ СТАНДАРТ НАПРЯЖЕНИЯВсе устройства подходят для работы от сети с напряжением переменного тока 220-240 В. |
ВНИМАНИЕ
- Для обеспечения достаточной вентиляции вокруг устройства необходимо оставить свободное пространство.
- Не устанавливайте устройство в слишком жарких или холодных местах, которые подвержены воздействию прямых солнечных лучей или нагревательных приборов.
- Избегайте воздействия на устройство высокого уровня влажности, а также попадания в устройство воды и пыли.
- Не допускайте попадания в устройство посторонних предметов.
- Не блокируйте вентиляцию путем перекрытия вентиляционных отверстий р азличными предметами, например газетами, скатертью, занавесками и т.д.
- Не допускается устанавливать на устройство открытые источники огня, нап ример зажженные свечи.
- При утилизации использованных батарей, пожалуйста, соблюдайте правила по охране окружающей среды.
- Не допускайте, чтобы во время работы устройства на него капала вода или попадали брызги.
- Не допускается устанавливать на устройство наполненные жидкостью предметы, например вазы.
- Не допускайте попадания на устройство инсектицидов, бензола и раствори телей.
- Ни в коем случае не разбирайте и не вносите изменения в устройство.
■Примечания для кабеля питания переменного тока и настенной розетки. - Даже если устройство выключено, оно остается подключенным к сети электропитания, пока оно подключено к настенной розетке.
- Чтобы полностью отключить устройство от сети электропитания, выньте штепсельную вилку из настенной розетки.
- При настройке устройства убедитесь в наличии легкого доступа к розетке переменного тока, которую Вы используете.
- Если устройство не используется в течение длительного времени, выньте ш тепсельную вилку из настенной розетки.

Информация для пользователей о сборе и утилизации и спользованного оборудования и батарей
Данные символы на изделиях, упаковке и/или сопроводите льных документах означают, что использованные электрические и электронные приборы, а также аккумуляторные ба тареи, должны утилизироваться отдельно от других бытовых отходов. В целях надлежащей переработки использованных изделий и батарей, пожалуйста, относите их в соответю твующие пункты сбора в соответствии с Вашим национальным законодательством.

За счет правильной утилизации изделий и батарей вы поможете сохранить ценные ресурсы и предотвратить какие-либо о возможные негативные воздействия на здоровье человек а и окружающую среду, которые могут возникнуть в результате ненадлежащей переработки отходов.

Для получения дополнительных сведений о сборе и перера ботке использованных изделий и батарей, обратитесь к мес тным городским властям, в службу по переработке отходов или по месту покупки устройств.
[Сведения об утилизации изделия в других странах за предела ми Европейского Союза]
Данные символы действительны только в странах Европей ского Союза. Если необходима утилизация изделия, обрати тесь к местным властям или дилеру за получением информации о правильном способе утилизации.
Примечание для символа аккумуляторных батарей (два нижин х примера символов):
Знак «Рв» под символом аккумуляторных батарей указывает на то, что данная батарея содержит свинец.
СОДЕРЖАНИЕ
Введение
ПЕРЕД ЭКСПЛУАТАЦИЕЙ УСТРОЙСТВА ОЗНАКОМЬТЕСЬ СО СЛЕДУЮЩИМИ ПОЛОЖЕНИЯМИ 1 2 •
Подключение устройства 1 4
Элементы управления на передней панели 18
Пульт дистанционного управления 19
• ДИАПАЗОН РАБОТЫ ПУЛЬТА ДИСТАНЦИОННОГО УПРАВЛЕНИЯ I 10
• УСТАНОВКА ЭЛЕМЕНТОВ ПИТАНИЯ | 10
Эксплуатация
• ПРОСЛУШИВАНИЕ ЗАПРОГРАММИРОВАННОГО ИСТОЧНИКА | 11
ОБЪЕМНЫЙ ЗВУК | 14•
• ПРОСЛУШИВАНИЕ ОБЪЕМНОГО ЗВУКА I 15
• ПРОСЛУШИВАНИЕ РАДИОПЕРЕДАЧ 1 20
- ПРОСЛУШИВАНИЕ РАДИОПРОГРАММ с ФУНКЦИЕЙ ПЕРЕДАЧИ ДАННЫХ (ТОЛЬКО ДИАПАЗОН FM) | 22
(Приемник данных по радиосигналу (Региональная опция для некоторых стран в Европе и других регионах))
• ЗАПИСЬ 1 24
• ПРОЧИЕ ФУНКЦИИ | 25
- ИСПОЛЬЗОВАНИЕ ЭЛЕМЕНТОВ УПРАВЛЕНИЯ НА ПЕРЕДНЕЙ ПАНЕЛИ 26
Настройка системы | 27
• НАСТРОЙКА СИСТЕМЫ 1 29
• НАСТРОЙКА ВХОДНОГО СИГНАЛА | 31
• НАСТРОЙКА КОЛОНОК 1 32
• НАСТРОЙКА УРОВНЯ КАНАЛА I 36
• НАСТРОЙКА ПАРАМЕТРА | 38
Инструкция по устранению неисправностей | 40
Технические характеристики | 41
Подключение устройства
• Перед подключением следует убедиться в том, что шнур устройства не подключен к розетке переменного тока.
- При подключении шнуров аудио и видео сигнала, а также проводов от колонок необходимо следовать цветовой мар кировке.
- Следует выполнять подключения правильно и вставлять провода плотно. В противном случае может наблюдаться попадание звука, посторонние шумы или произойдет повреждение ресивера.
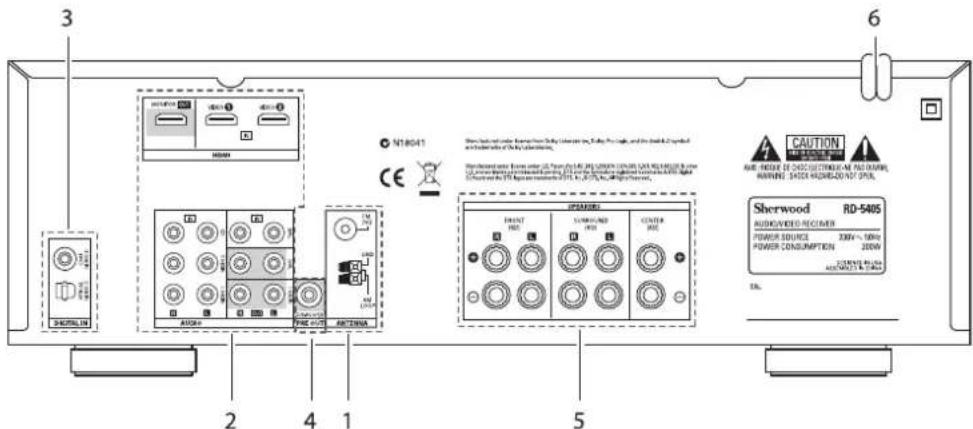
text_image
3 6 N18041 CE AIR CAUTION AIR FROUPE DE CHOCOLECTRONIC AIR SWITCH WARNING: SHOCK REDRAGE/2015 07/01. RD-540S AUDIOWEED RECOVATOR POWER SOURCE 200kV ~ 100kV POWER CONSUMPTION 200kW SHRWOOD RD-540S AIRS RUNS RUNS RUNS RUNS RUNS RUNS RUNS RUNS RUNS RUNS RUNS RUNS RUNS RUNS RUNS RUNS RUNS RUNS RUNS RUNS RUNS RUNS RUNS RUNS RUNS RUNS RUNS RUNS RUNS RUNS RUNS RUNS RUNS RUNs1. ПОДКЛЮЧЕНИЕ АНТЕНН
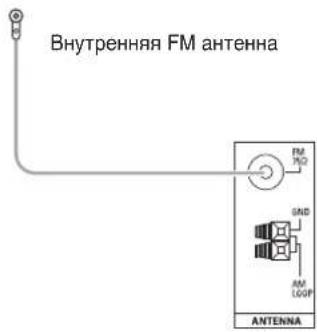
text_image
Внутренняя FM антенна FM 100 500 AM LOOP ANTENNA- Меняйте расположение внутренней FM антенны до тех пор, пока. Вы не получите самое лучшее качеств во сигнала своих любимых FM станций.
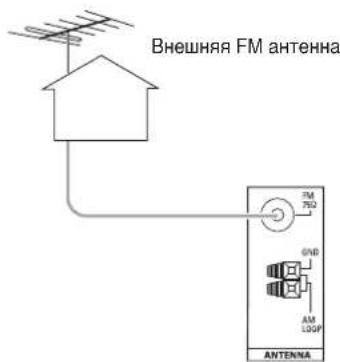
text_image
Внешняя FM антенна FM 750Ω GND AM LOOP ANTENNA- Для дальнейшего улучшения качества приема си гнала можно. использовать внешнюю FM антенн у на 75 Ω. Перед заменой внутренней антенны на внешнюю следует отсоединить внутреннюю ан тенну от ресивера.
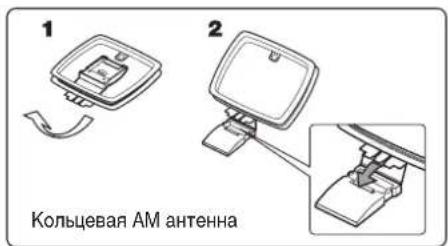
text_image
1 2 Кольцевая АМ антенна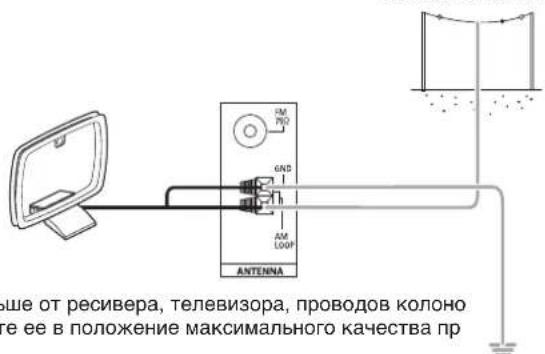
text_image
ше от ресивера, телевизора, проводов колоно е ее в положение максимального качества пр- Установите кольцевую АМ антенну как можно дальше от ресивера, телевизора, проводов колоно к и кабеля подачи . питания. После этого установите ее в положение максимального качества приема сигнала.
• В том случае, если при использовании внутренней АМ антенны не удается достичь желаемого качества сигнала, вместо . нее может быть использована внешняя АМ антенна.
2. ПОДКЛЮЧЕНИЕ АУДИО/ВИДЕО УСТРОЙСТВ
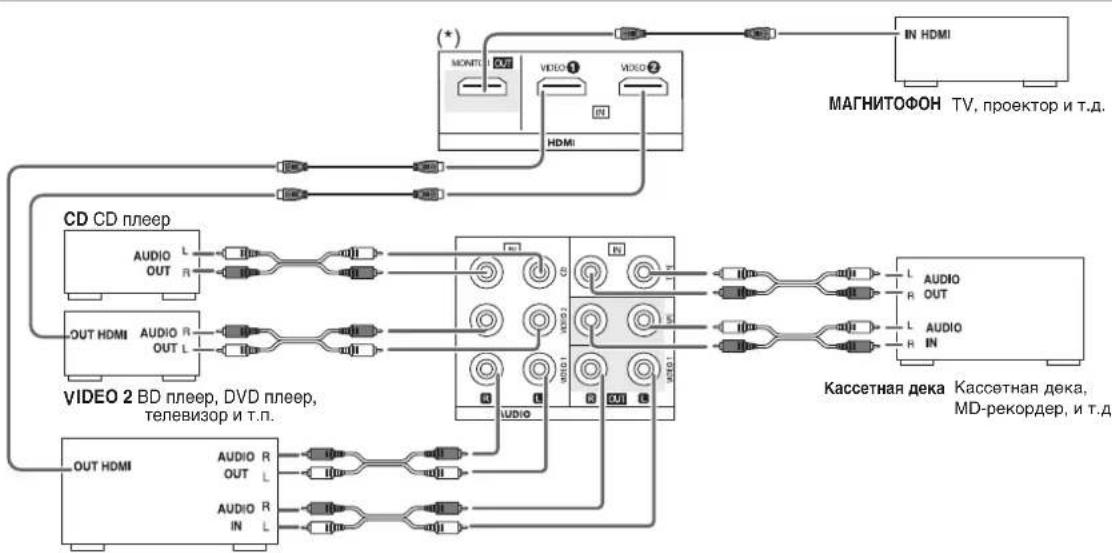
flowchart
graph TD
    A["CD CD плieep"] --> B["OUT HDMI"]
    A --> C["OUT HDMI"]
    A --> D["OUT HDMI"]
    A --> E["VIDEO 2 BD плieep, DVD плieep, телевизор и т.п."]
    A --> F["VIDEO 2 BD плieep, DVD плieep, телевизор и т.п."]
    G["Кассетная дека"] --> H["IN HDMI"]
    G --> I["IN HDMI"]
    G --> J["IN HDMI"]
    G --> K["IN HDMI"]
    L["МАГНИТОФОН"] --> M["TV, проектор и т.д."]
    N["AUDIO OUT"] --> O["Audio R"]
    P["AUDIO IN"] --> Q["Audio R"]
    R["AUDIO OUT"] --> S["Audio R"]
    T["AUDIO IN"] --> U["Audio R"]
    V["AUDIO OUT"] --> W["Audio R"]
    X["AUDIO IN"] --> Y["Audio R"]
    Z["AUDIO OUT"] --> AA["Audio R"]
    AB["AUDIO IN"] --> AC["Audio R"]
    AD["AUDIO OUT"] --> AE["Audio R"]
    AF["AUDIO IN"] --> AG["Audio R"]
VIDEO 1 BD плеер, DVD плеер, магнитофон, минидиск рекодер и т.п.
- Контакты VIDEO 1/VIDEO 2 можно подключить к AUDIO выходам видеоустройств, таких как BD плеер, DVD плеер, телевизор и т.п.
- Контакты TAPE IN/OUT и VIDEO 1 IN/OUT можно подключать к звукозаписывающему оборудованию, такому как магнитофо н, минидиск рекодер и т.п.
■ Подключение HDMI (High Definition Multimedia Interface, мультимедийный интерфейс высокой четкости). (\*)
- Можно подключить компонент-источник (BD плеер, DVD-проигрыватель и т.д.) к компоненту отображения (телевизор, проектор и т.д.) с помощью данного приемника с использованием имеющегося в продаже шнура HDMI.
- Подключение HDMI позволяет передавать несжатые цифровые видеосигналы и цифровые аудиосигналы.
- Данный приемник может передавать цифровые видео- и аудиосигналы из разъема HDMI MONITOR OUT (ВЫХОД МОНИТОРА HDMI) приемника, не проходя через сигналы, поступающие в разъем HDMI IN (ВХОД HDMI) (аудиосигналы, поступающие в HDMI IN, не могут быть воспроизведены на данном ресивере).
- HDMI, эмблема HDMI и High-Definition Multimedia Interface являются торговыми знаками или зарегистрированными торговыми знаками компании HDMI licensing LLC.
■ Примечание:
- В зависимости от подключенного компонента, передача сигнала может быть ненадежной.
(Для получения дополнительных сведений см. инструкцию по эксплуатации соответствующего компонента). - Для устойчивой передачи сигнала рекомендуется использовать шнуры, длина которых не превышает 5 метров.
3. подключение цифровых входов
- К данным ЦИФРОВЫМ ВХОДАМ можно подключить ОПТИЧЕСКИЕ и КОАКСИАЛЬНЫЕ ВЫХОДЫ устройств, которые подключены к входам CD и VIDEO 1 данного устройства.
- Цифровой вход следует подключать к таким устройствам как CD плееры, LD плееры, DVD плееры и т. п, которые могут выдавать цифровые сигналы в формате Dolby Digital или PCM и т.п.
- Более подробная информация находится в инструкции к подключаемому устройству.
- При выполнении COAXIAL DIGITAL (КОАКСИАЛЬНОГО ЦИФРОВОГО) подключения следует убедиться в том, что используется КОАКСИАЛЬНЫЙ кабель на 75 Ω, а не обычный АУДИО кабель.
- С данным устройством можно использовать не все имеющиеся в продаже оптические кабели. В том случае, если есть оптический кабель, который нельзя подключить к вашему оборудованию, следует обратиться к дилеру или в ближайшую сервисную службу.
■ Примечание: Каждый компонент подключается с использованием либо ОПТИЧЕСКОГО, либо КОАКСИАЛЬНОГО ЦИФРОВ ОГО соединения. (Нет необходимости использовать оба этих соединения одновременно).
■Заводские установки цифрового входа
- Если вы хотите подключить входы DIGITAL INs к компонентам, легче это сделать при помощи заводских установок.
- Если DIGITAL подключения отличаются от заводских установок, необходимо подписать используемые вами входы DIGITAL INs согласно процедуре "When selecting the DIGITAL IN" (Выбор DIGITAL IN) на стр. 31.
• Заводские установки следующие: OPTICAL(оптический) : VIDEO 1(видео 1), COAX(коаксиальный) : VIDEO 2(видео 2)
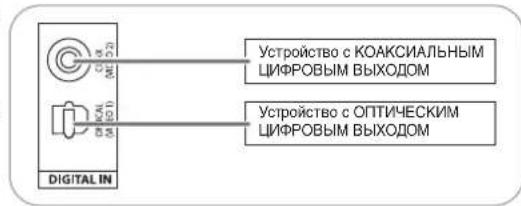
text_image
Устройство с КОАКСИАЛЬНЫМ ЦИФРОВЫМ ВЫХОДОМ Устройство с ОПТИЧЕСКИМ ЦИФРОВЫМ ВЫХОДОМ DIGITAL IN4. ПОДКЛЮЧЕНИЕ САБВУФЕРА
- Для усиления глубины звучания басов следует подключить з апитываемый отдельно сабвуфер.
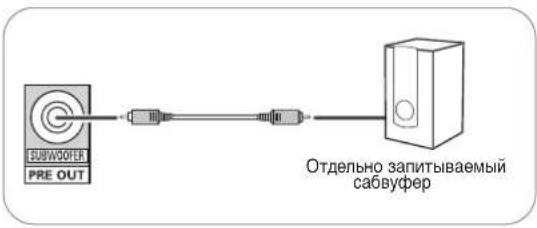
flowchart
graph LR
    A["PRE OUT"] --> B["Switch"]
    B --> C["Server"]
    style A fill:#f9f,stroke:#333
    style C fill:#ccf,stroke:#333
    note right of C: Отдельно запитываемый сабвуфер
5. подключение колонок
- Колонки следует подключать согласно каналам (левый и правый) и согласно полярности (+ и -). Подключенные пр овода должны быть надлежащим образом закреплены. При слабом соединении будет наблюдаться пропадание зву ука. При нарушении полярности звук будет неестественным и в нем будет не хватать басового звучания.
- Установка колонок описана в разделе "Расположение ко лонок" на странице 7.
- После установки колонок следует прежде всего настроить колонки в соответствии с их расположением и организацией окружающего пространства. (Более подробная информация приведена в разделе "НАСТРОЙКА КОЛОНОК" на странице 32.)
Осторожно:
- Следует использовать колонки с импедансом в 6 ом или выше.
- Соприкосновение оголенных проводов колонок друг с другом или металлическими предметами недопустимо. В противном случае данное устройство и/или колонки могут быть повреждены.
- Никогда не касайтесь клемм динамиков, когда кабель электропитания подключен к электрической розетке переменного тока. Это может стать причиной поражения электрическим током.
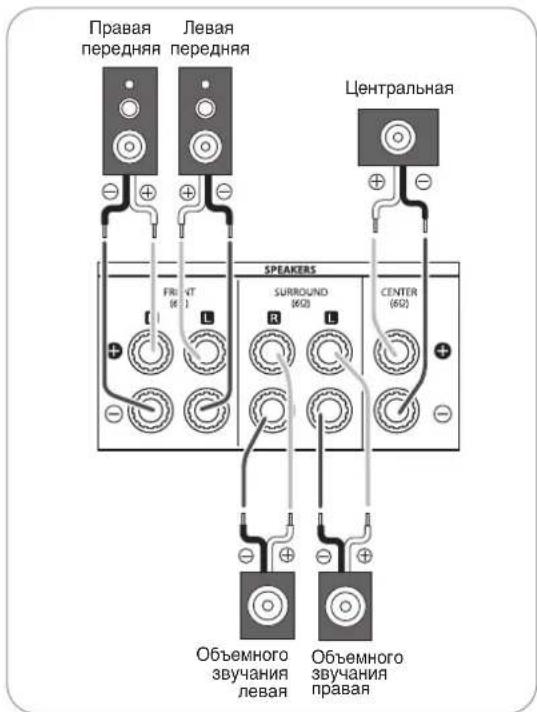
text_image
Правая передняя Левая передняя Центральная SPEAKERS FR1 (6) AT L SURROUND (652) CENTER (652) Объемного звукания левая Объемного звукания правая■Подключение кабеля динамика
1. Оголите изоляцию провода, примерно, на 10 мм (3/8 дюйма). Затем плотно скрутите концы провода. | 2. Ослабьте клемму динамика, поворачивая ее против часовой стрелки. | 3. Вставьте оголенную часть провода. | 4. Затяните клемму, поворачивая ее по часовой стрелке. |
6. шнур подачи питания
- Воткните вилку шнура в настенную электророзетку переменного тока.

Расположение колонок
Идеальное положение колонок зависит от размеров комнаты, покрытия стен и т.п. Стандартное рекомендуемое размещение колонок описано далее:
■Предние левая и правая колонки, а так же цен тральная колонка
- Установите пердние колонки так, чтобы их фронтальные поверхности располагались как можно ближе к плоскост и расположения экрана телевизора или монитора.
- Установите центральную колонку между левой и правой колонками. Центральная колонка не должна располагаться от слушателя дальше, чем левая и правая колонки.
- Установите колонки таким образом, чтобы звук был направлен в сторону ушей располагающегося в точке прослушивания слушателя.
■Правая и левая колонки объемного звучания
- Установите колонки объемного звучания на высоте приб лизительно 1 метр над уровнем расположения ушей сидя щего слушателя точно справа или слева от слушателя ил и слегка позади него.
Сабвуфер
- Сабвуфер воспроизводит мощные глубокие басы. Установите сабвуфер по желанию в любом месте впереди слушателя.
Примечания:
- При использовании обычных телевизоров следует приме нять экранированные передние левую, правую и центральную колонки. Это позволит избежать искажения телеви зионной картинки.
- Для достижения максимального эффекта объемного зву чания все колонки за исключением сабвуфера должны 6 быть широкополосными.

text_image
Diagram of a person lying in bed inside a large room with numbered labels and sound waves indicating sound or vibration.- Телевизор или экран
- Передняя левая колонка
- Передняя правая колонка
- Центральная колонка
- Сабвуфер
- Левая колонка объемного звучания
- Правя колонка объемного звучания
Элементы управления на передней панели
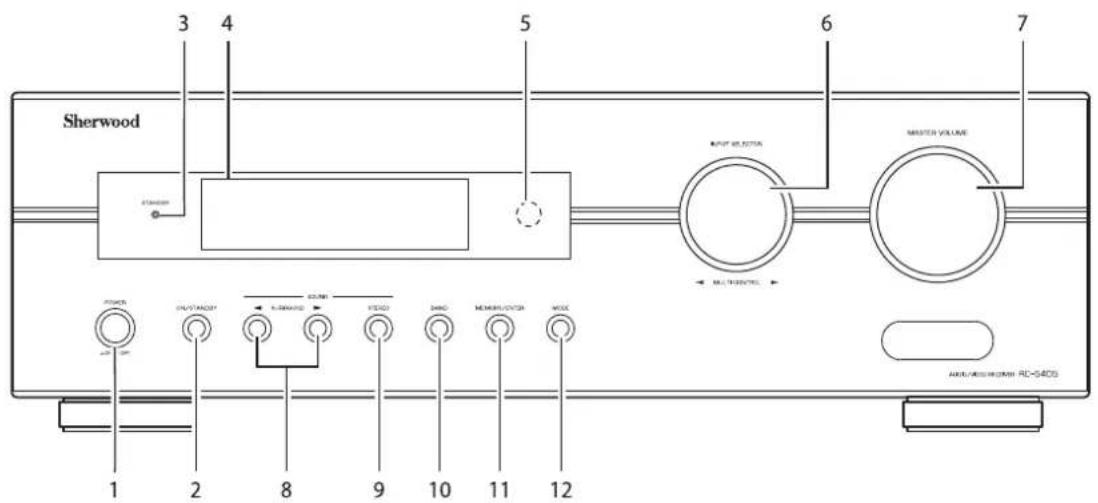
text_image
Sherwood 3 4 5 6 7 OUTPUT SELECTION MASTER VOLUME MULTICTION POWER OUTSTATION U-BRANDS FEDD SHRC MEMBRUTOX MEX 1 2 8 9 10 11 12 AUX/RAMBRUTOX RC-54DS- Выключатель POWER (ПИТАНИЕ)
- Кнопка POWER ON/STANDBY (ВКЛЮЧЕНИЕ ПИТАНИЯ /ПЕРЕХОД В РЕЖИМ ОЖИДАНИЯ)
- Индикатор STANDBY (ОЖИДАНИЕ)
- ЛЮМИНЕСЦЕНТНЫЙ ЭКРАН Более подробная информация приведена далее.
-
ОКНО ПРИЕМА СИГНАЛА ПУЛЬТА ДИСТАНЦИОННОГО УПРАВЛЕНИЯ
-
Ручка ВЫБОРА ВХОДНОГО СИГНАЛА/УПРАВЛЕНИЯ
- Ручка НАСТРОЙКИ УРОВНЯ ГРОМКОСТИ
- Кнопки ПЕРЕКЛЮЧЕНИЯ РЕЖИМА ОБЪЕМНОГО ЗВУЧАНИЯ (▶/◀)
- Кнопка STEREO (CTEPEO)
- Кнопка BAND (ЧАСТОТА)
- Кнопка MEMORY/ENTER (ПАМЯТЬ/ВВОД)
- Кнопка MODE (РЕЖИМ)
■ЛЮМИНЕСЦЕНТНЫЙ ЭКРАН

text_image
RDS TPTA PTY ST TUNED dB kHz MHz PRESET MEM DTS D PLII DSP AUTO DIGITAL DIRECT 2 3 4 5 6- Входящий сигнал, частота, уровень громкости, рабочая информация и т.п.
- Индикаторы режима объемного звучания
- Индикатор AUTO (ABTO)
- Индикатор DIGITAL INPUT (ЦИФРОВОЙ ВХОДЯЩИЙ СИГНАЛ)
- Индикатор DIRECT (ПРЯМОЙ)
-
Заранее установленный номер, экран времени ожидания
-
Индикатор MEMORY (ПАМЯТЬ)
- Индикатор PRESET (ПРЕДВАРИТЕЛЬНАЯ НАСТРОЙКА)
- Индикатор SLEEP ("УСНУТЬ")
- Индикатор TUNED (ПРИЕМНИК)
-
Индикатор STEREO (CTEPEO)
-
Индикаторы RDS (Передача данных по радио) (Региональная настройка для Европы и других регионов)
Пульт дистанционного управления

text_image
Кнопка POWER ON (ВКЛЮЧЕНИЕ ПИТАНИЯ) Кнопки TUNING UP/DOWN(+/-) (НАСТРОЙКА) Цифровые кнопки (0-9) Кнопка SLEEP («УСНУТЬ») Кнопка CHANNEL LEVEL (УРОВЕНЬ КАНАЛА) Кнопка TEST TONE (ПРОВЕРКА СИГНАЛА) Кнопка DISPLAY (ЭКРАН) Кнопка SOUND PARAMETER (ПАРАМЕТРЫ ЗВУКА) Кнопки SURROUND MODE UP/DOWN(> / <) (РЕЖИМ ОБЪЕМНОГО ЗВУЧАНИЯ) Кнопка DIGITAL/ANALOG MODE (АНАЛОГОВЫЙ/ЦИФРОВОЙ РЕЖИМ) POWER ON STANDBY TUNING PRESET KHONKA STANDBY (ОЖИДАНИЕ) KHONK PRESET UP/DOWN(+/-) (ПРЕДВАРИТЕЛЬНЫЕ НАСТРОЙКИ) KHONK MUTE (ЗВУК) KHONK VOLUME UP/DOWN(▲/▼) (ГРОМКОСТЬ) KHONK SETUP (НАСТРОЙКА) KHONK управления курсором(▲▼,▲,▲), ENTER (BBOD) » функции являются региональными возможностями для Европы и других стран KHONK DIMMER (ДИММЕР) KHONK STEREO (CTEPEO) KHONK ВЫБОРА ИСТОЧНИКА ВХОДЯЩЕГО СИГ- НАЛА Sherwood REMOTE CONTROL UNIT RC-125■Примечание:
- Некоторые кнопки выбора источника входящего сигнала (BT IN, EXT, IN, USB, VIDEO 3, AUX, F.AUX) и кнопки перед ачи через USB (◀◀, ⚠▶▶■, REPEAT/RANDOM) являются неактивными при использовании пульта с данным устройством.


ДИАПАЗОН РАБОТЫ ПУЛЬТА ДИСТАНЦИОННОГО УПРАВЛЕНИЯ
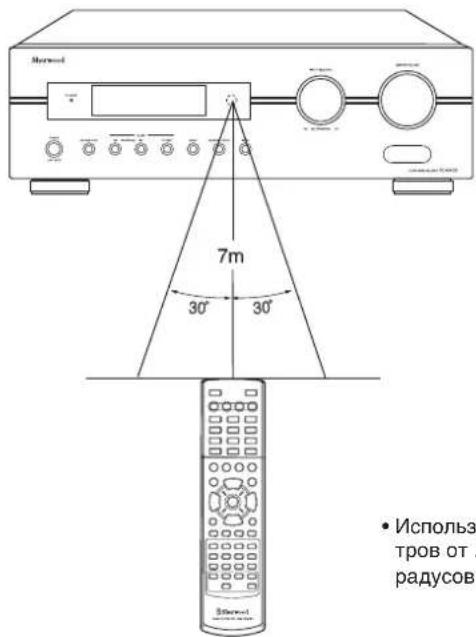
text_image
7m 30° 30° • Используров от радусов- Используйте пульт дистанционного управления в пределах 7 метров от . окна приема сигнала пульта и под углом не более 30 г радусов по направлению на окно приема сигнала пульта.
УСТАНОВКА ЭЛЕМЕНТОВ ПИТАНИЯ
- Снимите крышку батарейного отсека.

- Вставьте два элемента питания (размер "AAA", 1,5 B) соблюдая полярность.

natural_image
Line drawing of a remote control device with a battery and switch (no text or symbols)- Удалите из пульта элементы питания в том случае, если пульт не будет использоваться в течение для тельного времени.
- Не используйте аккумуляторы (типа Ni-Cd).
Эксплуатация
■Примечание: Перед началом эксплуатации устройства выполните его настройку для оптимальной работы. Для этого следует выполнить настройку системы. (Смотри страницу 27, "Настройка системы")
ПРОСЛУШИВАНИЕ ЗАПРОГРАММИРОВАННОГО ИСТОЧНИКА
Перед началом эксплуатации
• Переведите устройство в режим ожидания.
• Загорится индикатор STANDBY.
Это обозначает, что ресивер не отключен от подачи питания и на него подается небольшое напряжение, которое поддерживает систему в работоспособном состоянии.
- Для отключения питания необходимо снова нажать кнопку POWER.
-
После этого подача питания на устройство п рекращается и индикатор STANDBY гаснет.
-
Включите питание в режиме ожидания.
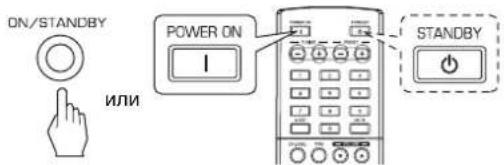
text_image
ON/STANDBY ИЛИ POWER ON I STANDBY- При каждом нажатии кнопки POWER ON/STANDBY на предней панели устройства ресивер либо включается в рабочем режиме, либо переходит в режим ожидания.
- Для включения в рабочем режиме нажмите на пульте дистанционного управления кнопку POWER ON. Для в хода в режим ожидания нажмите на пульте кнопку STANDBY.
-
При нажатии кнопки INPUT SELECTOR или повороте ручки INPUT SELECTOR/MULTI CONTROL в режиме о жидания ресивер автоматически переходит в рабочий режим с выбором желаемого источника входящего си гнала.
-
Выберите желаемый источник входящего сигнала.
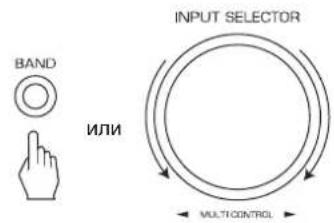
text_image
BAND ИЛИ INPUT SELECTOR MULTI CONTROL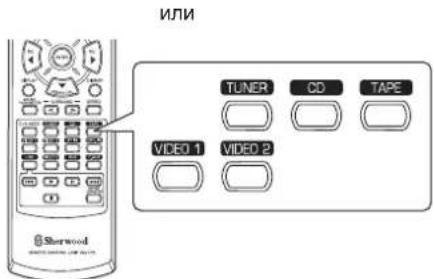
text_image
ИЛИ TUNER CD TAPE VIDEO 1 VIDEO 2 Sherwood- При каждом повороте ручки INPUT SELECTOR/MULTI CONTROL проис-. ходит выбор источника входящего сигнала. Переключение осуществ-вляется в следующем порядке:
→ TUNER ↔ CD ↔ TAPE ↔ VIDEO 1 ↔ VIDEO 2 ( Экран отображения частоты) - При каждом нажатии кнопки BAND на предней панел и или кнопки TUNER на пульте дистанционного управления происходит смена частоты. Смена осуществляется в следующей последовательности:
→ FM ST → FM MONO → AM
При выбранных в качестве источника входящего сигнала VIDEO 1 и VIDEO 2
- По желанию выберите подключенный цифровой и ли аналоговый вход.
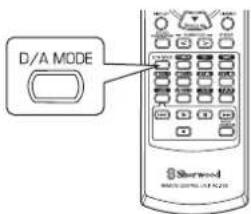
text_image
D/A MODE Sherwood WORLD 20751-03-20- При каждом нажатии данной кнопки будет выбран со ответствующий вход. Выбор осуществляется в следующем порядке:
→ o(оптический) → c(коаксиальный) → A(аналоговый)
Примечания:
- При выбранных в качестве источника входящего сигнала TUNER, TAPE или CD невозможно выбрать цифровой вход.
- В том случае, если выбранный вход не подключен к устройству, индика- тор "DIGITAL" начнет мигать и авто матически будет выбран аналоговый вход.
- Выбранный цифровой или аналоговый вход автоматически присваива-ется соответствующему источнику входящего сигнала в меню настройки INPUT (ВХОД). (Более подробная информация приведена в разделе "НАС ТРОЙКА ВХОДНОГО СИГНАЛА" на странице 31).
-
Поступающий от подключенного к выбранному цифровому входу ис-точника сигнал будет слышен вне зависимости от выбранного источника входящего сигнала.
-
Управление проигрыванием выбранного источника сигнала.
- При проигрывании источников с объемным звучание м руководствуйтесь пунктом "ПРОСЛУШИВАНИНЕ ОБЪЕМНОГО ЗВУКА" на странице 15.
- Настройка громкости.
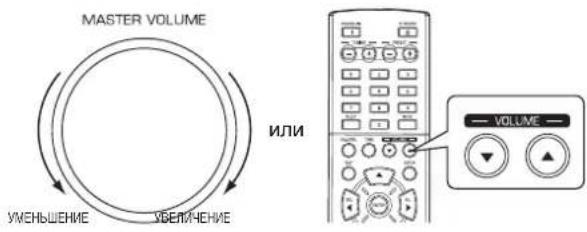
text_image
MASTER VOLUME ИЛИ УМЕНЬШЕНИЕ УБЕЛЯЧЕНИЕ VOLUME- Для отключения звука.

text_image
MUTE- Индикатор "MUTE" будет мигать.
- Для возврата к предыдущему уровню громкости нажм ите ее еще раз.
Настройка тона (низкие и высокие частоты)
7. Войдите в режим настройки тона..
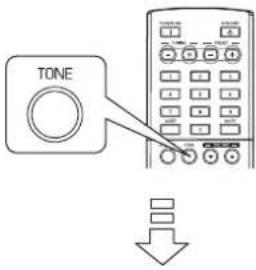
text_image
TONETONE: OFF
- Режим тона будет отображаться в течение нескольк их секунд.
- Для выбора желаемого режима настройки тона следует воспользоваться кнопками КУРСОР ВЛЕВО (◀)/ВПРАВО (▶).
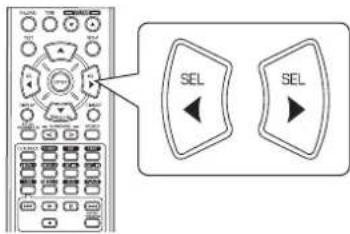
text_image
Diagram showing a remote control with two 'SEL' buttons and directional arrows pointing to the left panel.- При каждом нажатии данной кнопки смена режима управления тоном происходит следующим образом:
OFF(BЫКЛ): Для прослушивания источника без эффе ↑ кта тона. (Загорается индикатор "DIRECT")
ON(BKL): Для настройки тона. (Индикатор "DIRECT" гаснет.)
■При включенном режиме настройки ТОНА (низкие и высокие частоты).
- Для выбора желаемого тона следует нажать кнопки КУРСОР ВВЕРХ (▲)/ВНИЗ (▼).

text_image
SEARCH M.- При каждом нажатии данных кнопок выбор тона происходит в следую- щей последовательности: →BASS(БАС)↔TRBL(BЫСОКИЕ)↔TONE: ON(TОН ВКЛ)
- Настройте величину тона при помощи кнопок КУ РСОР ВЛЕВО (◀)/ВПРАВО (▶).
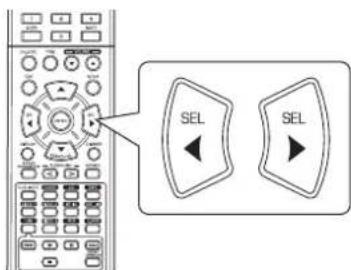
text_image
Diagram showing a remote control with two 'SEL' buttons and an arrow pointing to the left panel.- Уровень тона можно настраивать в диапазоне от . 10 до + 10 дБ.
- Рекомендуется настраивать низкие и высокие частоты на уровень в 0 дБ.
- Крайние уровни настройки могут повредить колонки при проигрыва- нии с высокой громкостью.
- Для завершения настройки тона следует повторить шаги 9 и 10.
- Если экран настройки тона погаснет, следует возобно вить работу с шага 7.
ОБЪЕМНЫЙ ЗВУК
- В данном ресивере установлен современный цифровой звуковой процессор, который позволяет Вам получать на до машнем кинотеатре оптимальное качество звука и создавать атмосферу насыщенного звучания.
Режимы объемного звучания
■DTS Digital Surround (эффект объемного звука цифрового домашнего кинотеатра, технология DTS)
DTS Digital Surround (или просто DTS) – формат многоканального цифрового сигнала, который может обрабатывать более высокие скорости передачи данных. Диски с обозначением DTS включают в запись вплоть до 5.1 каналов цифрового звучания, что обычно используется для обеспечения лучшего качества звука за счет более низкого уровня сжатия звука.
Использование данного формата также обеспечивает более широкий динамический диапазон и интервал, что позволяет добиться великолепного звучания.
Изготовлен по лицензии патентов США: 5,451,942; 5,956,674; 5,974,380; 5,978,762; 6,487,535 и других патентов США и мира, изданных и получаемых. DTS и DTS Digital Surround являются зарегистрированными торговыми марками, а логотип DTS и Символ являются торговыми марками фирмы DTS, Inc. © 1996-2008 DTS, Inc. Все права защищены.
■Dolby Digital
Dolby Digital является разработанным компанией Dolby Laboratories форматом многоканального цифрового звука. На дисках с логотипом Dolby Digital содержатся зап иси в формате до 5.1 каналов цифровых сигналов, что дает гораздо более качественное звучание, прост ранственное расширение и характеристики динамического диапазона по сравнению с предыдущим формато м Dolby Surround.
■Объемный звук формата Dolby Pro Logic II
Данная модель способна распознавть как обычные двук анальные сигналы, такие как цифровые ИКМ или аналоговые стереосигналы, так и сигналы формата Dolby Surround и т.п. Это позволяет улучшить качество по сра внению с обычными схемами Dolby Pro Logic. Схема Dolby Pro Logic II включает в себя два режима, а именно:
• Dolby Pro Logic II MOVIE
При просмотре фильмов данный режим позволяет улу чшить качество звучания путем применения особого алгоритма обработки, который подчеркивает используе мые в фильме специальные звуковые эффекты.
• Dolby Pro Logic II MUSIC
При прослушивании музыки данный режим позволяет улучшить качество звучания путем применения особог о алгоритма обработки, который подчеркивает музыкальные эффекты композиции.
■Dolby Pro Logic
В данном режиме происходит распределение любых д вухканальных сигналов (включая сигналы Dolby Surround) на четыре канала (передний левый, центральный, передний правый и объемный). Объемный сигнал представляет собой моносигнал, проигрываемый через две колонки объемного звука.
Производится по лицензии фирмы Dolby Laboratories. Логотипы Dolby, Pro Logic и двойное D являются зарегестрированными торговыми знаками компании Dolby Laboratories.
- При выборе следующих режимов обычные двуканальные сигналы, такие как цифровой ИКМ или аналоговый стереосигнал, подаются на Процессор цифровых сигналов для искусственного создания эффекта объемного звучания.
■Matrix (МАТРИЦА)
В данном режиме сигнал с задержкой подается в коло нки объемного звука, что создает эффект объемного з вучания музыкальных источников.
■Church (ЦЕРКОВЬ)
В данном режиме реализован эффект прослушивания в церкви. Используется для прослушивания музыки в стиле барокко, записей струнных оркестров и хорового пения.
■Theater (КИНОТЕАТР)
В данном режиме создается эффект просмотра видео фильма в кинотеатре.
Hall (ЗАЛ)
В данном режиме создается ощущение присутствия в концертном зале.
Используется для прослушивания классической музыки и, оркестров, камерной музыки или инструментальных соло.
■ Stadium (СТАДИОН)
В данном режиме создается эффект присутствия в большом концертном помещении. Используется для достижения эффекта присутствия при просмотре спортивных трансляций со стадионов.
ПРОСЛУШИВАНИЕ ОБЪЕМНОГО ЗВУКА
■Примечания :
- Перед прослушиванием объемного звука следует выполнить настройку колонок, которая осуществляется в меню SETUP (НАСТРОЙКА). (Более подробная информация содержится в разделе "НАСТРОЙКА КОЛОНОК" на странице 32)
- Даже при выборе автоматического режима объемного звучания и при поступлении входящего сигнала того же типа оптимальный режим объемного звучания может варьироваться в зависимости от того, установлен ли режим колон ок на "N"(Отсутсвуют).
- При поступлении цифрового сигнала 96 кГц ИКМ можно выбрать только стерео-режим.
■Выберите желаемый режим объемного звучания
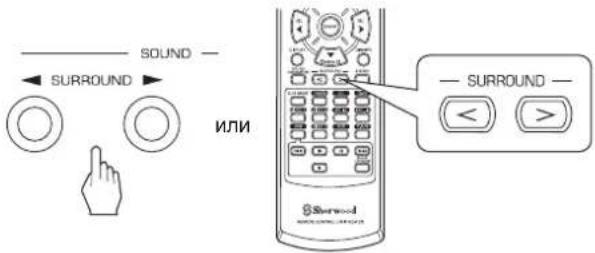
text_image
SOUND — ← SURROUND → ИЛИ — SURROUND — < >- При каждом нажатии кнопок SURROUND MODE UP/DOWN(схематические изображения) смена режима объемного звучания происходит следующим о бразом:
Ручной выбор режима объемно го звучания(Индикатор "AUTO" (ABTO) выключится) - Пользователь может самоили стоятельно выбрать желаемый для просл ушиваемого сигнала режим объемного звучания. Автоматический выбор режима объемного звучани (Индикатор "AUTO" (ABTO) включится) - Оптимальный режим объемного звучания будет выбран автома т ически в зависимости от типа входящего сигнала.
| Формат входящего сигнала | Выбираемые режимы объемного звучания |
| Источники Dolby Digital 5.1 | [DOLBY DIGITAL, AUTO SURROUND] или |
| Источники Dolby Digital 2 | [DOLBY PLII MOVIE, DOLBY PLII MUSIC, DOLBY PRO LOGIC, AUTO SURROUND] или |
| ИсточникиDTS | [DTS, AUTO SURROUND] или |
| Источники ИКМ (2 канала),Аналоговые стерео источники | [DOLBY PLII MOVIE, DOLBY PLII MUSIC, DOLBY PRO LOGIC, MATRIX, CHURCH, THEATER,HALL, STADIUM, AUTO SURROUND] или |
• В зависимости от настройки колонок могут быть доступны все или не все режимы объемного звучания:
[] : Доступны в том случае, если ЦЕНТРАЛЬНАЯ (CENTER) и/или ОБЪЕМНЫЕ (SURR) колонки не установлены в режим "N"(Отсутсвуют).
<>: Доступны только в том случае, если ЦЕНТРАЛЬНАЯ (CENTER) и/или ОБЪЕМНЫЕ (SURR) колонки установлены в режим "N" (Отсутствуют). /левая колонка/
■Для выхода из режима объемного звучания и перехода в стерео режим
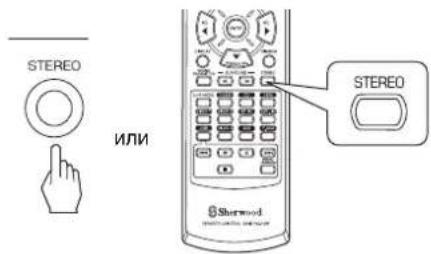
text_image
STEREO ИЛИ STEREO Shertwood- В зависимости от формата входящего сигнала будет в выбран либо режим стерео, либо режим принудительно го сокращения числа каналов до двух.
- Для отмены режимов стерео или принудительного понижения числа каналов следует при помощи кнопок SURROUND MODE UP/DOWN (обозначения) выбрать режим объемного звучания. /без деления на колонки/
■Режим принудительного понижения числа каналов до двух
• Данный режим позволяет понизить число каналов в записанных в формате Dolby Digital или DTS многоканальных сигналах до двух передних каналов и воспроизвести их только через две передние колонки.
При настройке параметров звучания
- При проигрывании цифровых сигналов с источника Dolby Digital или DTS или прослушивания в режиме Dolby Pro Logic II Music можно настроить параметры данных режимов для получения оптимального эффекта объемного звучания.
1. Нажмите кнопку SOUND PARAMETER.
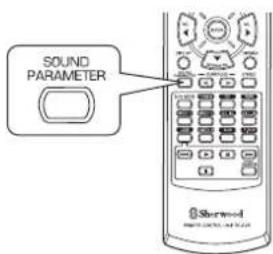
text_image
SOUND PARAMETER Sterwell- После этого на эране в течение нескольких секунд бу дет отображаться "NIGHT : \~" (или "PANO : \~").
- Если режим настройки параметров отключится, следует нажать на данную кнопку снова.
2. Для выбора желаемого параметра нажмите кнопки CURSOR UP(▲)/DOWN(▼).
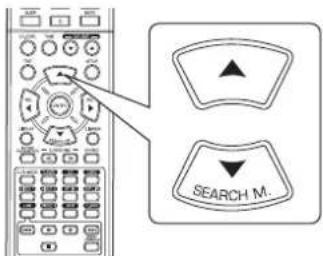
text_image
SEARCH M.- При нажатии этих кнопок режимы настройки параметров меняются в следующем порядке:
| →"NIGHT"(Ночнойм) | ↔"PANO"(Режин (Управление (Управление панорамы) | ↔"C.WIDTH"(шириной) | ↔"DIMEN"(размерами) |
- Режим "NIGHT" можно выбрать только при проигрыва- нии цифровых сигналов с источника Dolby Digital или DTS.
- Режимы "PANO", "C.WIDTH" и "DIMEN" можно выбрать только при прослушивании в режиме Dolby Pro Logic II Music.
3. Для настройки желаемого параметра следует нажать кнопки CURSOR LEFT(◀)/RIGHT(▶).
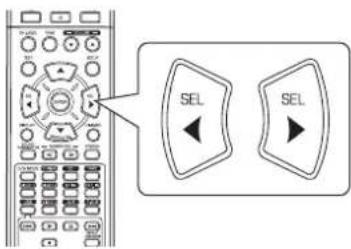
text_image
SEL SEL■При выборе режима "NIGHT (Ночной режим)" Данная функция используется для уменьшения динам ического диапазона ранее указанных частей звуковой дорожки Dolby Digital или DTS (с повышенным уровнем громкости) для уменьшения различий в громкости указанных и неуказанных частей. Это позволяет прослушивать всю дорожку при просмотре фильмов ночью на низкой громкости. Ночной режим имеет 11 степеней нас тройки с 0.0 до 1.0 (настройка по умолчанию . 0.0).
■Примечание: Ночной режим может быть неактивен при работе с некторыми программным и пакетами Dolby Digital или DTS.
■ При выборе режима "PANO (Панорама)"
В данном режиме происходит расширение переднего стереополя, что приводит к включению в него колонок объемного звучания. Это, в свою очередь, приводит к появлению эффекта "обворачивания" с использованием бо ковых звуковых полей. Можно выбрать режимы "OFF" (ВЫКЛ) или "ON" (ВКЛ) (настройка по умолчанию: OFF (ВЫКЛ)).
■При выборе режима "С. WIDTH(Управление шири ной)"
В данном режиме выполняется настройка центрального о звукового поля таким образом, чтобы его можно был о слышать только из центральной колонки, только из левой/правой колонок как кажущийся источник звука или из всех трех передних колонок с различной силой. Данный режим имеет 8 степеней настройки от 0 до 7 (значение по умолчанию: 3).
■При выборе режима "DIMEN (Управление размером)"
В данном режиме звуковое поле пошагово смещается либо вперед, либо назад. Режим имеет 7 степеней нас тройки от -3 до +3 (значение по умолчанию: 0).
4. Для настройки остальных параметров следует пов торить шаги 2 и 3.
Настройка уровня громкости каждого канала при помощи проверочного сигнала
- Уровень громкости каждого канала можно легко настроить при помощи проверочного сигнала.
- Войдите в режим использования проверочного сигнала.
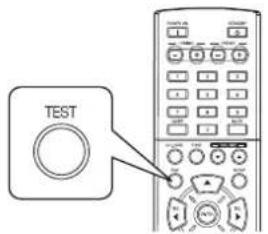
text_image
TESTTEST-FL
- На экране отразится индикатор проверочного сигнала, который будет слышен из каждой колонки для каждого канала в течение 2 секунд. Порядок проигрывания сигнала следующий:

- При заданной настройке колонки "N (Отсутсует)", про оверочный сигнал для соответствующего канала прои грываться не будет.
- Для каждого канала настройте желаемый уровень громкости таким образом, чтобы громкость всех к олонок была одинаковой.
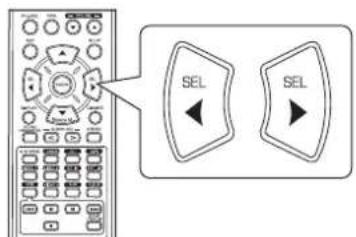
text_image
SEL SEL- Желаемый канал можно выбрать при помощи кнопок CURSOR UP(▲)/ DOWN(▼).
- Выйти из режима использования проверочного сигнала.
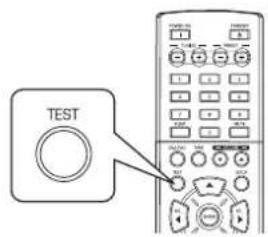
text_image
TEST

Настройка уровня текущего канала
- После настройки громкости каждого канала с использованием проверочного сигнала следует настроить уровни каналов либо в соответствии с источником сигнала, либо в соответствии с собственными вкусами.
-
Существует возможность по желанию настроить уровни каналов. Данные настройки сохраняются в памяти пользоват ательских настроек ("CAL"), но не в памяти предоставленных настроек ("REF 1", "REF 2").
-
Нажмите кнопку CHANNEL LEVEL (УРОВЕНЬ КАН АЛА).
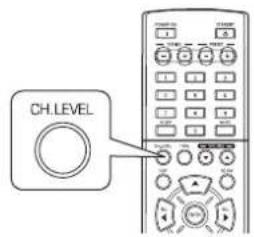
text_image
CH.LEVELMODE CAL
- После этого на несколько секунд отображается режи м запоминания ("CAL" и т.п.).
-
После отключения отображения режима запоминания или уровня канала нажмите данную кнопку еще раз.
-
Выберите желаемый канал.
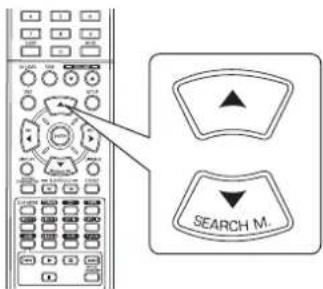
text_image
SEARCH M.- При каждом нажатии данных кнопок происходит выбор соответствующего канала. Каналы переключаются в следующем порядке:
→ REF 1, 2 (или CAL) ↔ FL ↔ C ↔ FR ← →
<>: Уровень LFE отображается тольков том случае, если на устройство подаются цифровые сигналы от источников Dolby Digital или DTS, которые включают в себя сигнал LFE.
- В зависимости от настроек колонок ("N (Отсутсвую т)") и режима объемного звучания может не быть воз можности выбрать некоторые каналы.
- Настройте уровень выбранного канала на желаем ую величину.

text_image
SEL SEL- Уровень LFE можно настроить в пределах от . 10 до 0 дБ. Уровни осталь-. ных каналов можно настроить в пределах от . 15 до +15 дБ.
-
Рекомендуется выбрать для уровня LFE значение 0 дБ. (Тем не менее, для некоторого ПО DTS ранних версий рекомендуется, чтобы уровень LFE был равен -10 дБ). Если рекомендуемые значения уровней кажутся высокими, уменьшите их.
-
Повторите шаги 2 и 3 для настройки уровня каждого канала.
Запоминание настроенных уровней каналов
- Настроенные уровни каналов можно сохранить в память предварительных настроек («REF 1», «REF 2») и вызвать их из памяти в любой момент.
- Нажмите кнопку ENTER после выполнения шагов 1 . 4 из описанной на странице 18 процедуры "Настро йка уровня текущего канала".
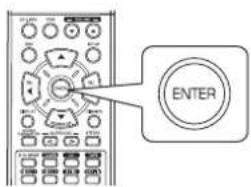
text_image
ENTERMODEREP
- После этого несколько секунд будет мигать значок "1" или "REF 1".
- Выберите желаемую память из REF 1 и REF 2.

text_image
SEL SEL- Если настоящие установки памяти исчезнут, еще раз выполните описан-ный выше шаг 1.
- Подтвердите Ваш выбор.
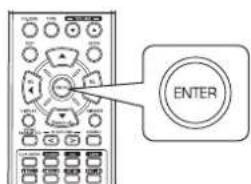
text_image
ENTER- Теперь настроенные уровни каналов сохранены в выбранной памяти.
Вызов из памяти сохраненных величин уровней каналов
- Нажмите кнопку CHANNEL LEVEL.
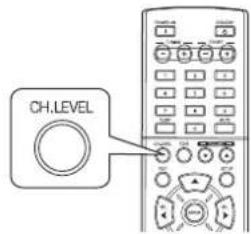
text_image
CH.LEVEL- Значок «CAL « (или «REF 1» и т.п.) отображается в те чение несколькихсекунд.
-
Нажмите данную кнопку еще раз в том случае, если п ропадет индикациярежима настройки уровня канала.
-
Выберите желаемую память из REF 1 и REF 2.

text_image
SEL SEL- После этого из памяти будут вызваны ранее сохраненные в выбраннуюпамять настройки уровней каналов.
ПРОСЛУШИВАНИЕ РАДИОПЕРЕДАЧ
Автоматическая настройка
1. Выберите желаемый диапазон частот.
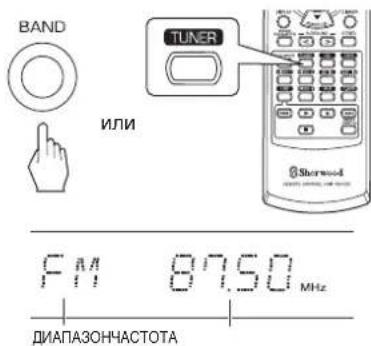
text_image
BAND ИЛИ TUNER Sherwood F M 87.50 MHz ДИАПАЗОНЧАСТОТА- При каждом нажатии данной кнопки частота переключается следующимобразом;
→ FM ST → FM MONO → AM (загорается "ST") (символ "ST" гаснет)
- При плохом уровне сигнала FM стерео станций для у меньшения помехследует выбрать режим FM моно. После этого сигнал FM станций будетвоспроизводиться в моно режиме.
2. Нажмите и удерживайте кнопки TUNING UP(+)/DOWN(-) внажатом состоянии более чем 0,5 секунд.
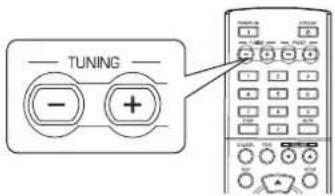
text_image
TUNING - +TUNED FM 89.10MHz
- Приемник будет осуществлять поиск сигнала до тех пор, пока не будетнайдена станция с хорошим сигналом. На дисплее будет отображенанастроенная часто та и знак «TUNED».
- В том случае, если вместо желаемой станции была н айдена какая-либоная, следует просто повторить д анную операцию.
- Во время автоматической настройки станции со слабым сигналом про-пускаются.
Настройка вручную
- Режим ручной настройки может оказаться полезным в том случае, есливы уже знаете частоту выбранной с танции.
- После выбора желаемого диапазона частот следует нажимать кнопкиTUNING UP(+) / DOWN(-) до тех пор, пока не будет выбрана желаемаячастота.

text_image
TUNING - +Автоматическая предварительная настройка
• В данном режиме осуществляется автоматический по иск и сохранение впамяти станций FM диапазона.
- Во время прослушивания радиопередач нажмите кнопку (MEMORY/)ENTER и удерживайте ее в нажатом сос тоянии более 2 секунд.
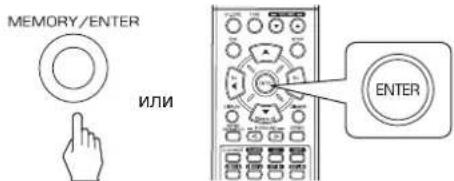
text_image
MEMORY/ENTER ИЛИ ENTER- После этого замигает индикатор «AUTO MEM» и начнется автоматиче-ская предварительная настройка.
• В памяти можно сохранить до 30 FM станций.
Примечания:
- Нельзя сохранить в памяти FM станции со слабым уровнем сигнала.
- Для сохранения АМ станций или FM станций со слабым уровнем сигналаследует выполнить ручную предварительную настройку. Для этого сле-дует воспользоваться функцией "Настройка и сохранение вручную".
Настройка и сохранение вручную
• В памяти можно сохранить до 30 FM станций.
-
Настройте желаемую станцию в режиме ручной или автоматической настройки.
-
Нажмите кнопку ENTER.
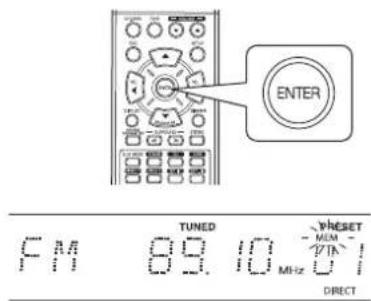
text_image
ENTER TUNED Preset FM 89.10 MHz DIRECT- Индикатор «МЕМ» будет мигать в течение нескольких секунд.
- Выберите желаемый номер ранее сохраненной станции (от 1 до30) и нажмите кнопку ENTER.
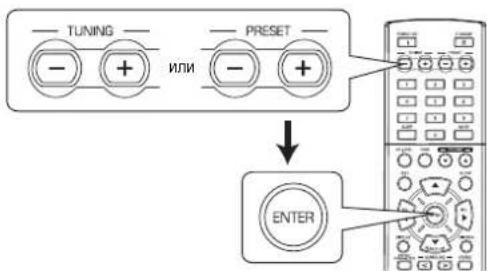
flowchart
graph TD
    A["− TUNING"] --> B["+"]
    C["− PRESET"] --> D["−"]
    E["→"] --> F["ENTER"]
- При использовании ЦИФРОВЫХ кнопок пульта диста нционного управления.
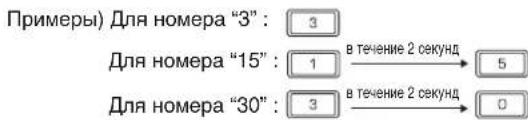
text_image
Примеры) Для номера "3": 3 Для номера "15": 1 → в течение 2 секунд → 5 Для номера "30": 3 → в течение 2 секунд → 0- Теперь станция сохраняется в памяти.
- При использовании ЦИФРОВЫХ кнопок пульта дистанционного управления станция автоматически сохраняется в памяти без нажатия кнопкиENTER.
- Записанная в память частота стирается в том случае, если на ее позициюзаписывается другая частота.
- Если индикатор «МЕМ» погаснет, начните работу с шага 2.
- Повторите шаги с 1 по 3 для запоминания других с танций.
■ФУНКЦИЯ СОХРАНЕНИЯ ИНФОРМАЦИИ В ПАМЯТИ
В памяти сохраняется следующая настроенная до вык лючения ресивера информация.
• Настройки источника ВХОДНОГО СИГНАЛА
- Настройки режима объемного звучания
- Настроенные и сохраненные станции и т.п.
Настройка на ранее сохраненные станции
- Выберите желаемый ранее сохраненный номер после выбора радио-приемника в качестве источника вход ного сигнала.
text_image
PRESET - +- При использовании ЦИФРОВЫХ кнопок пульта дистанционного управления.
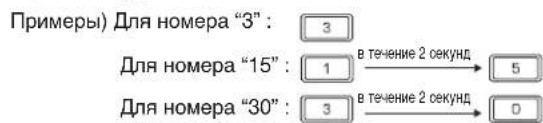
text_image
Примеры) Для номера "3" : 3 Для номера "15" : 1 в течение 2 секунд → 5 Для номера "30" : 3 в течение 2 секунд → 0Приемник данных по радиосигналу (Региональная опция для некоторых стран в Европе и других регионах)
ПРОСЛУШИВАНИЕ РАДИОПРОГРАММ С ФУНКЦИЕЙ ПЕРЕДАЧИ ДАННЫХ (ТОЛЬКО ДИАПАЗОН FM)
RDS (передача данных по радиосигналу) это технология, позволяющая посылать информационные сигналы вм есте с сигналами радиопередач. Данныйприемник может транслировать подобные сигналы и выводить инфор мацию на экран. Данные коды имеют следующие значения. Название программы(PS), перечень типов програм м (PTY), информация о дорожной обстановке (TA), точное время (CT), радиотекст (RT).
■Примечание: В других странах функция RDS недоступна.
Поиск RDS
- Используйте данную функцию для автоматического поиска и прослушивания станций, которые предлагают услугу RDS (прием данных по радиосигналу).
- В режиме FM выберите режим поиска RDS.
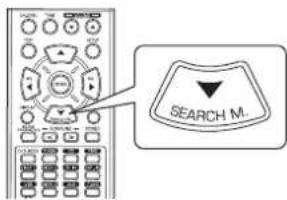
text_image
SEARCH M.- При каждом нажатии данной кнопки режим поиска меняется в следующей последовательности: → RDS SRCH → TP SRCH → PTY SRCH → OFF (Выкл)
- Нажмите кнопку ENTER когда отобразится символ "RDS SRCH".
RDS SARCH
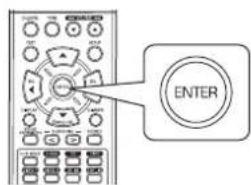
text_image
ENTER- Приемник начинает автоматический поиск станций, предлагающихуслуги RDS и название станции.
• В том случае, если не будет найдено ни одной станции RDS, отображается символ «NO RDS». - Если символ «RDS SRCH» не отображается, повтор ите операции, начинаяс шага 1.
Поиск ТР
- Используйте данную функцию для автоматического поиска и прослушивания станций, которые передают информацию по дорожной обстановке.
- В режиме FM трижды нажмите кнопку SEARCH MODE.
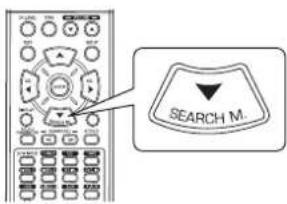
text_image
SEARCH M.- Отображается символ "TP SRCH".
- Нажмите кнопку ENTER когда отобразится символ "TP SRCH".
TP SARCH
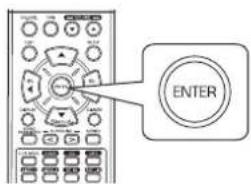
text_image
ENTER- Приемник начинает автоматический поиск станций, передающих инфор-мацию о дорожной обстановке.
• В том случае, если не будет найдено ни одной подо бной станции, ото-бражается символ «NO TRAFF». - Если символ «TP SRCH» не отображается, повтори те операции, начинаяс шага 1.
Поиск PTY
- Используйте данную функцию для автоматического поиска и прослушивания станций, которые передают программы желаемого типа.
- В режиме FM трижды нажмите кнопку SEARCH MODE.
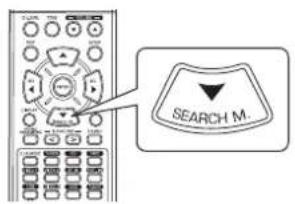
text_image
SEARCH M.PTY SARCH
- Отображается символ "PTY SRCH".
- Выберите желаемый тип программы, когда отобра зится символ "PTY SRCH".
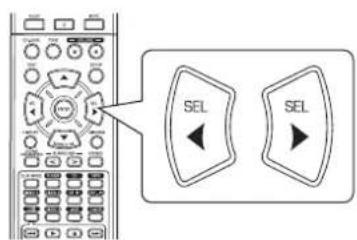
text_image
SEL SELNEWS
- При каждом нажатии данной кнопки выбирается один из 32 разных типов программ. (NEWS, AFFAIRS, INFO, SPORT, EDUCATE, DRAMA, CULTURE, SCIENCE, VARIED, POP M, ROCK M, EASY M, LIGHT M, CLASSICS, OTHER M, WEATHER, FINANCE, CHILDREN, SOCIAL, RELIGION, PHONE IN, TRAVEL, LEISURE, JAZZ, COUNTRY, NATION M, OLDIES, FOLK M, DOCUMENT, TEST, ALARM, NONE) - Если символ «PTY SRCH» не отображается, повторите операции, начинаяс шага 1.
- Нажмите кнопку ENTER когда отобразится желае мый тип программы.
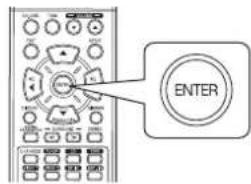
text_image
ENTER- Приемник начинает автоматический поиск станций, предлагающихуслуги PTY. - В том случае, если не будет найдено ни одной подо бной станции, ото-бражается символ "NO PROG".
ЭКРАН
В режиме FM,
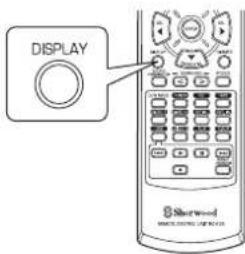
text_image
DISPLAY Sherwood MASCULAR ACCESS- При каждом нажатии данной кнопки режим отображения меняется вследующей последовательности:
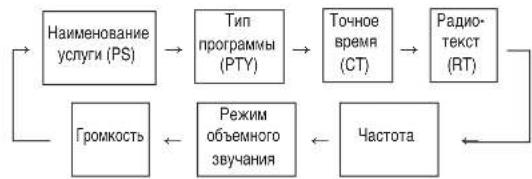
flowchart
graph LR
    A["Наименование услуги (PS)"] --> B["Тип программы (PTY)"]
    B --> C["Точное время (CT)"]
    C --> D["Радио-текст (RT)"]
    D --> E["Частота"]
    E --> F["Режим объемного звучания"]
    F --> G["Громкость"]
    G --> A
- В том случае, если сигнал слишком слабый, использование услуг RDSневозможно. На экране будет ото бражаться "NO NAME", "NO PTY", "NO TIME" или "NO TEXT".
ЗАПИСЬ
- При записи аналоговых сигналов с VIDEO 1 или VIDEO 2 необходимо выбрать аналоговый вход. (Более подробная информация приведена в разделе "При выбранных в качестве источника входящего сигнала VIDEO 1 и VIDEO 2" на странице 12)
- Настройки громкости и тона (высоких и низких частот) не оказывают на записываемые сигналы никакого влияния.
- При выборе приемника, CD или VIDEO 2 в качестве источника записываемого сигнала запись можно вести на МАГН ИТОФОН, VIDEO 1 или на оба этихустройства одновременно.
Запись при помощи МАГНИТОФОНА
- Выберите любой желаемый источник записываемого сигнала за исключением TAPE (МАГНИТОФОНА).

text_image
BAND ИЛИ INPUT SELECTOR ИЛИ MULTI CONTROL TUNER CD VIDEO 1 VIDEO 2-
Начните запись на ТАРЕ (МАГНИТОФОН).
-
Начните воспроизведение на желаемом источнике входного сигнала.
Запись при помощи VIDEO 1
- Вы можете записывать аудиосигналы в том случае, если звукозаписывающее оборудование подключено к разъем ам VIDEO 1.
- Выберите любой желаемый вход в качестве источника записываемого сигнала за исключением VIDEO 1.

text_image
BAND ИЛИ INPUT SELECTOR ИЛИ MULTI CONTROL TUNER CD TAPE VIDEO 2-
Начните запись на VIDEO 1.
-
Начните воспроизведение на желаемом источнике входного сигнала.
ПРОЧИЕ ФУНКЦИИ
Работа с таймером отключения
- Таймер отключения позволяет системе продолжать работу в течение указанного период • да времени, по истечении которого происходит автоматическоеотключение.
- Для настройки автоматического отключения ресивера по истечении определенного периода времени.
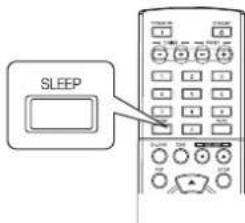
text_image
SLEEP- При каждом нажатии данной кнопки время отключение меняется вследующей последовательности:

- При работе с таймером отключения отображается с имвол " "*
- При выборе времени отключения люминесцентный д исплей горит суменьшенной яркостью.
Настройка яркости люминесцентного экрана
РУССКИЙ
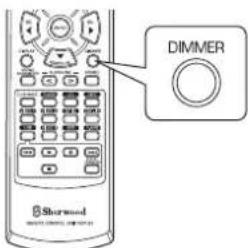
text_image
Dimmer Sherwood- При каждом нажатии данной кнопки режим отображения меняется вследующей последовательности:

- Включение отключенного дисплея произойдет про и нажатии любой кнопки.
Отображение информации о рабочем состоянии
Во время воспроизведения,
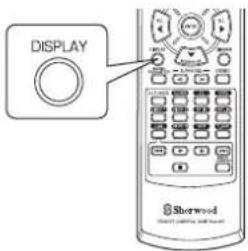
text_image
DISPLAY Sherwood- При каждом нажатии данной кнопки яркость люмине сцентного дисплеяменяется в следующей последовательности:
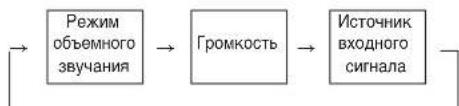
flowchart
graph LR
    A["Режим объемного звучания"] --> B["Громкость"]
    B --> C["Источник входного сигнала"]
• В том случае, если в вашей стране доступна функция RDS, вам следует обратиться к разделу "ЭКРАН" на с транице 23 за более подробной информацией по использованию режима FM.
ИСПОЛЬЗОВАНИЕ ЭЛЕМЕНТОВ УПРАВЛЕНИЯ НА ПЕРЕДНЕЙ ПАНЕЛИ
- Различные функции можно включать при помощи расположенных на передней панели кнопок.
- Выберите желаемый режим настройки.

- В зависимости от выбранного источника входящего с игнала при каждомнажатии данной кнопки режим me няется в следующей последовательности и отображается на несколько секунд:

(Отображение текущего входе)
[ ]: Можно выбрать только в том случае, если используется п-риемник.
<>: Можно выбрать только в том случае, если используются VIDEO 1 или VIDEO 2.
- Войдите в желаемый режим настройки.

- Выход из режима настройки произойдет в течение не скольких секунд. Если это произойдет, начните работу с шага 1.
- Задайте желаемый режим настройки.
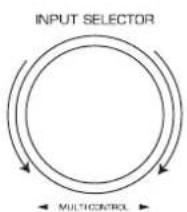
flowchart
graph TD
    A["INPUT SELECTOR"] --> B["MultiControl"]
    B --> C["Output"]
    style A fill:#f9f,stroke:#333
    style B fill:#ccf,stroke:#333
    style C fill:#cfc,stroke:#333
■ При выборе функции "PRESET" (Режим предварительной настрой-ки)
- При каждом повороте данной ручки будет происходить выбор ранее настроенной станции. (Смотри раздел "Нас тройка и сохранение вручную" на странице на странице 21).
■ При выборе функции "TUNE" (Режим автоматической/ручной на-стройки)
- Режимы автоматической или ручной настройки включатся в зависимости-сти от того, как будет вращаться данная ручка – медленно или быстро. (Более подробная информация находится в Разделах "Автоматическая настройка" и "Настройка вручную" на странице 20.)
■ При выборе функции "CH LEVEL" (Режим настройки уровня канала)
- Существует возможность настраивать уровни текущих каналов нажелаемую величину. (Более подробная информация находится в разделе "Настройка уровня текущего канала" на странице 18.)
① Нажмите кнопку MODE для выбора желаемого канала.
② Поверните данную ручку для настройки уровня выб ранного канала.
③ Повторите шаги ① и ② для настройки уровня каждого канала.
■При выборе функции "D/A SET" (Выбор цифрового/ана логовоговходов)
- При каждом повороте данной ручки будет происходит y выбор цифро-вого (оптического или коаксиального) или аналогового входа. (Смотрираздел "При выборе в качестве источника входящего сигнала VIDEO 1 и VIDEO 2" на странице 12).
■При выборе функции "TONE" (Режим настройки тона)
- При каждом повороте данной ручки будет происходит ь выбор тона:
OFF(BЫКЛ): Для прослушивания источника без применения эффектатона. (Загорится индикатор "DIRECT".)
ON(): Для настройки тона. (Индикатор "DIRECT" гаснет.)
◆ При включении режима TONE для выполнения настро- йки тона(низкие и высокие частоты)
① Нажмите кнопку MODE для выбора желаемого тона.
② Вращайте данную ручку для настройки выбранного тона.
③ Для завершения настройки тона повторите шаги ① и ②.
- Выйдите из режима настройки.
MEMORY/ENTER

Настройка системы
- Меню настройки системы отображается на люминесцентном экране и позволяет вам с лег • костью выполнять настройку. В большинстве случаев вам не-обходимо выполнить настройки только при установке домашнего кинотеатра. Изменение настроек в дальнейшем требуется крайне редко. Меню настройки системы состоит из 5 основных меню: система, входной сигнал, настройка колонок, уровень канала и параметры. Данные меню под-разделяются на различные подменю.
1. Включите меню настройки. 3. Подтвердите выбор.
text_image
SETUPSYSTEM
- Откроется меню настройки. - Для выключения меню необходимо нажать данную кнопку еще раз.
2. Выберите желаемое меню при помощи кнопок CURSOR UP(▲)/ DOWN(▼).

text_image
SEARCH M.
text_image
ENTER- При выборе меню "SYSTEM" (СИСТЕМА), смотри раз дел "НАСТРОЙКА СИСТЕМЫ" на странице 29.
- При выборе меню "INPUT" (ВХОДНОЙ СИГНАЛ), смотри раздел "НАСТРОЙКА ВХОДНОГО СИГНАЛА" на странице 31.
- При выборе меню "SPK SET" (НАСТРОЙКА КОЛОНОК), смотри раздел "НАСТРОЙКА КОЛОНОК" на странице 32.
- При выборе меню "CH LEVEL" (НАСТРОЙКА УРОВНЯ КАНАЛА), смотрираздел "НАСТРОЙКА УРОВНЯ КАН АЛА" на странице 36.
- При выборе меню "PARAMTR" (ПАРАМЕТРЫ), смотри раздел "НАСТРОЙКА ПАРАМЕТРА" на странице 38.
- При выборе пункта "EXIT" (ВЫХОД) меню настройки будет выключено.
■Состав меню настройки
- Меню настройки устроено следующим образом:
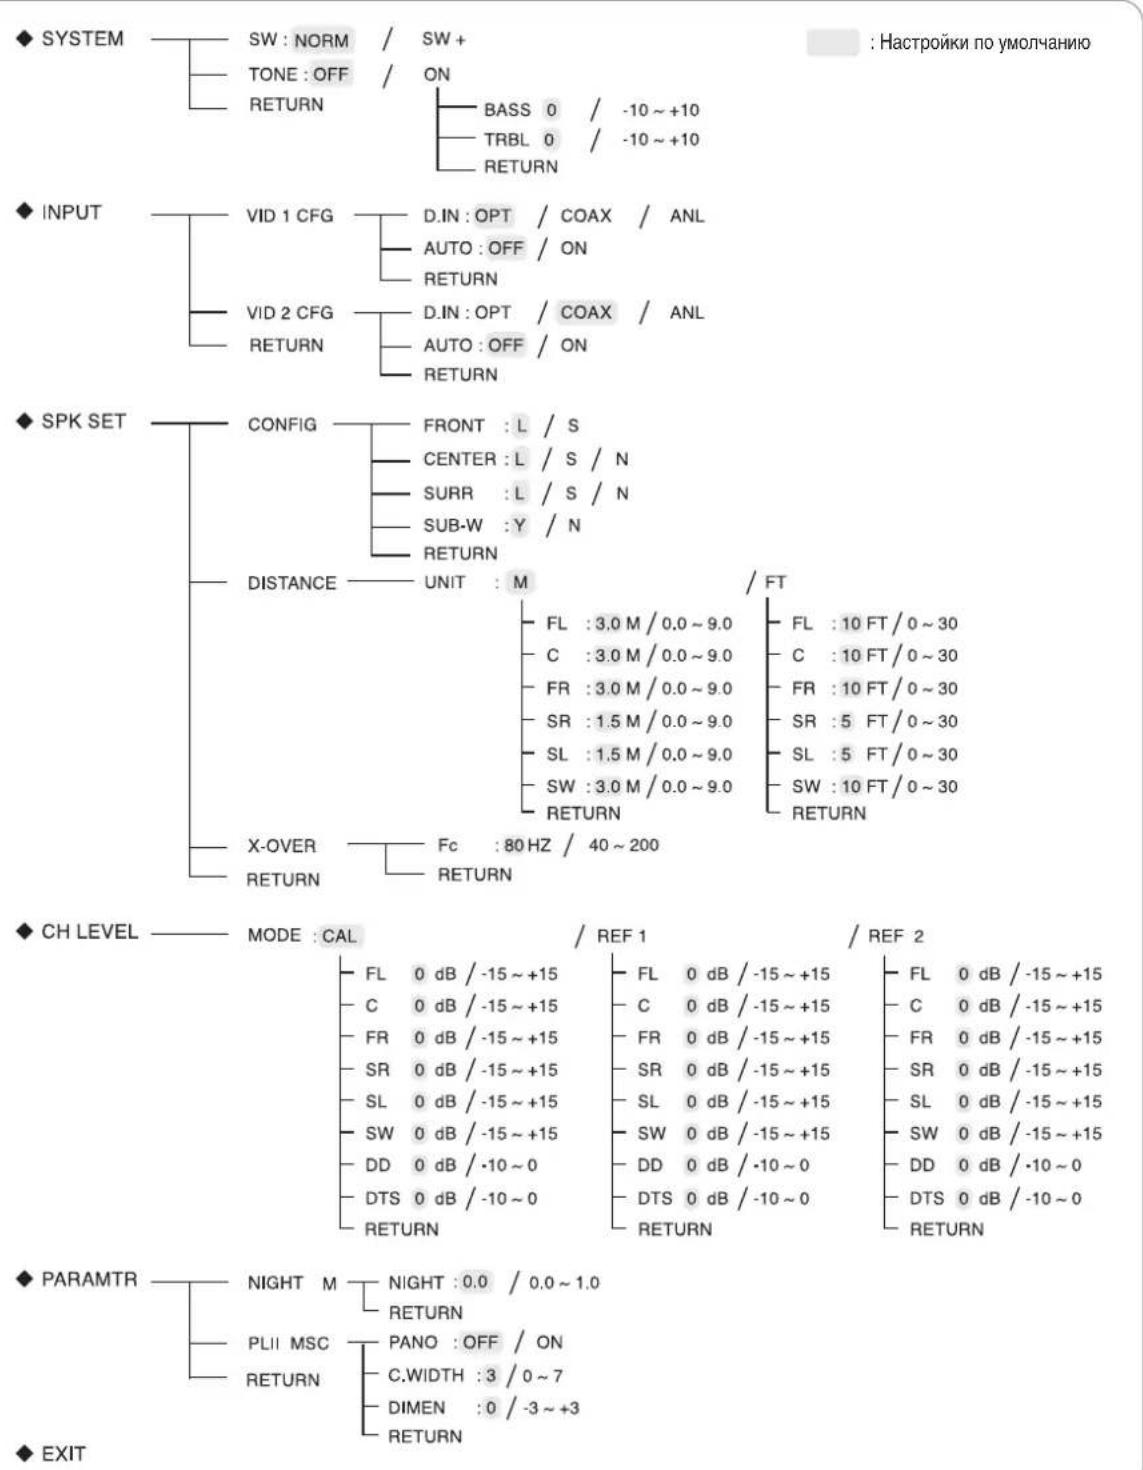
- При выборе в подменю пункта «RETURN» (ВОЗВРАТ) произойдет выход в предыдущее меню.
■Примечание: В режиме работы меню настройки будут функционировать только кнопка (POWER ON/) STANDBY и необходимые для настройки системы кнопки.
НАСТРОЙКА СИСТЕМЫ
◆ SYSTEM
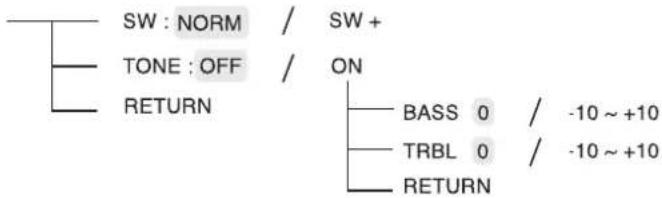
text_image
SW : NORM / SW + TONE : OFF / ON RETURN BASS 0 / -10 ~ +10 TRBL 0 / -10 ~ +10 RETURN- SW (САБВУФЕР) : Для выбора желаемого режима работы сабвуфера.
• TONE : Для настройки тона (высоких и низких частот). -
RETURN : Для возврата в предыдущее меню.
-
Для выбора желаемого пункта нажмите кнопки CURSOR UP(▲)/DOWN(▼).
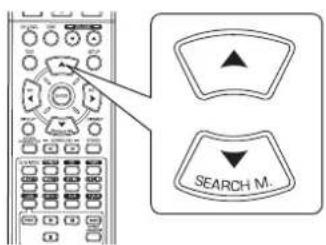
text_image
SEARCH M.- Для подтверждения выбора желаемого пункта на жмите кнопки CURSOR LEFT(◀)/RIGHT(▶).

text_image
Diagram showing a remote control interface with two labeled buttons labeled 'SEL' pointing left and right respectively.Для выбора желаемого режима работы сабвуфера
- Режим "SW+" доступен только в том случае, если в меню SPK SET параметры "FRONT", "CENTER" или "SURR" настроены на значение "L" и "SUB-W" на-строен на значение "Y". (смотри раздел "НАСТРОЙКА КОЛОНОК" на старнице 32.)
- При проигрывании двухканального источника в режимах MATRIX, CHURCH, THEATER, HALL или STADIUM низкие ча стоты можно воспроизводить черезсабвуфер вне зависимости от установленного режима работы сабвуфера.
NORM : Воспроизводятся низкие частоты только для тех каналов, для которых установлено значение "L". В данном режиме сабвуфером воспроизводятся только те низкие частоты, которые поступают от канала LFE (от многоканальных источников сканалом LFE (Эффекты низких частот), также известным как канал ".1"), и о т каналов, для которых выставлено значение "S".
SW + : При установленном для низких частот каналов значении «L» данные частоты воспроизводятся как по этим каналам, так и по каналу сабвуфера. В данном режиме диапазон низких частот распределяется по комнате более равномерно, но, в зависимости от размеров и формы комнаты, может произойти наложение сигналов, что может привести к уменьшению фактического уровня громкости низкочастотного диапазона.
При настройке тона
OFF : Для прослушивания источника без эффектов тона (загорается символ "DIRECT")
↓
ON : Для настройки тона. (символ "DIRECT" гаснет)
■При включении режима TONE для выполнения настройки тона (низкие и высокие частоты)
① Для выбора желаемого диапазона (верхние и нижние частоты) нажмите кнопки CURSOR UP(▲)/DOWN(▼).

text_image
SEARCH M.
При выборе пункта BASS
BASS 0
② Для настройки выбранного тона нажмите кнопки CURSOR LEFT(◀)/RIGHT(▶).

text_image
Diagram showing a control panel with two labeled buttons labeled 'SEL' pointing to different function keys.- Уровень тона можно настроить в пределах от – 10 до + 10 дБ.
• В общем случае рекомендовано настраивать низкие и высокие частотына уровень 0 дБ (нейтральный уровень). - Крайние настройки могут повредить колонки при про слушивании навысокой громкости.
- Для завершения настройки тона повторите шаги ① и ②.
НАСТРОЙКА ВХОДНОГО СИГНАЛА
◆ INPUT
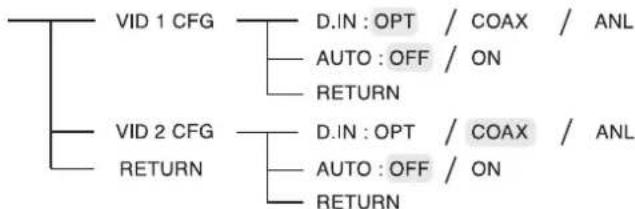
flowchart
graph TD
    A["VID 1 CFG"] --> B["D.IN: OPT / COAX / ANL"]
    A --> C["AUTO: OFF / ON"]
    A --> D["RETURN"]
    E["VID 2 CFG"] --> F["D.IN: OPT / COAX / ANL"]
    E --> G["AUTO: OFF / ON"]
    E --> H["RETURN"]
• D.IN (ЦИФРОВОЙ ВХОД) : Для ассоциации подключенных ЦИФРОВЫХ ВХОДОВ с желаемыми источниками.
- AUTO(АВТОМАТИЧЕСКИЙ РЕЖИМ ОБЪЕМНОГО ЗВУЧАНИЯ) : Для выбора автоматического или ручного режима объемного звучания.
- RETURN : Для возврата в предыдущее меню.
- Нажмите кнопки CURSOR UP(▲)/DOWN(▼) для вы бора желаемого источника входящего сигнала. После этого нажмите кнопку ENTER.

flowchart
graph TD
    A["Search Mode"] --> B["ENTER"]
    C["Input Phone"] --> A
Пример: При выборе VIDEO 2
DIN: CORX
- Нажмите кнопки CURSOR UP(▲)/DOWN(▼) для выбора желаемого пункта.
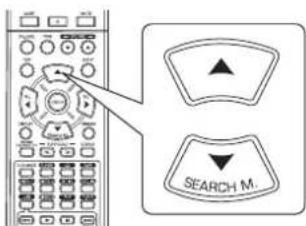
text_image
SEARCH M.- Для подтверждения выбора желаемого пункта на жмите кнопки CURSOR LEFT(◀)/RIGHT(▶).
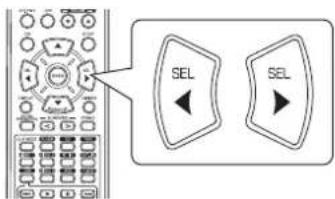
text_image
SEL SELПри выборе ЦИФРОВОГО ВХОДА
- Следует ассоциировать подключенные ЦИФРОВЫЕ УСТРОЙСТВА с желаемы входом VIDEO 1 и VIDEO 2. (Более подробная информация находится в разделе «ПОДКЛЮЧЕНИЕ ЦИФРОВЫХ ВХОДОВ» на странице 5.)
- Можно выбрать OPT (оптический), COAX (коаксиальный) и ANL (аналоговый) режимы.
■Примечания:
• В том случае, если ЦИФРОВОЙ ВХОД назначен для двух или более источников входящего сигнала при выборе данных источников, их цифровые аудио сигналы будут воспроизводиться через один и тот же ЦИФРОВОЙ ВХОД.
- Для таких источников входящего сигнала как TUNER, TAPE или CD нельзя назначить цифровой вход ("OPT", "COAX").
При выборе АВТОМАТИЧЕСКОГО РЕЖИМА ОБЪЕМНОГО ЗВУКА
• В зависимости от необходимого значения можно установить ручной или автоматический режим объемного звучания. OFF (Ручной режим объемного звучания) : При помощи кнопок SURROUND MODE UP/DOWN (▶, >/◀, <) можно выбрать разли чные режимы объемного звучания из доступных для данного входящего сигнала. (Более подробная информация находится в разделе «ПРОСЛУШИВАНИЕ ОБЪЕМ НОГО ЗВУКА» на странице 15.)
ON (Автоматический режим объемного звучания): В зависимости от формата входящего сигнала автоматически будет выбран оптимальный режим объемного звучания.
■Примечания:
- Даже в случае автоматического выбора режима объемного звучания и наличия соответствующего формата входящего сигнала, оптимальный режим объемного звучания может варьироваться в зависимости от того, включен ли режим колонки «N (От сутствует)» или нет.
- При поступлении цифрового сигнала 96 кГц ИКМ можно выбрать только режим стерео.

НАСТРОЙКА КОЛОНОК
- Для получения оптимально подходящего для окружающего пространства и распо • ложения колонок звучания необх одимо выполнить настройку коло-нок после установки ресивера и подключения всех компонентов.
- Настройки колонок следует выполнять также в тех случаях, когда вы меняете колонки, их расположение или орган изацию окружающего пространства.

flowchart
graph TD
    A["◆ SPK SET"] --> B["CONFIG"]
    B --> C["FRONT : L / S"]
    B --> D["CENTER : L / S / N"]
    B --> E["SURR : L / S / N"]
    B --> F["SUB-W : Y / N"]
    B --> G["RETURN"]
    A --> H["DISTANCE"]
    H --> I["UNIT : M"]
    I --> J["FL : 3.0 M / 0.0 ~ 9.0"]
    I --> K["C : 3.0 M / 0.0 ~ 9.0"]
    I --> L["FR : 3.0 M / 0.0 ~ 9.0"]
    I --> M["SR : 1.5 M / 0.0 ~ 9.0"]
    I --> N["SL : 1.5 M / 0.0 ~ 9.0"]
    I --> O["SW : 3.0 M / 0.0 ~ 9.0"]
    I --> P["RETURN"]
    A --> Q["X-OVER"]
    Q --> R["FC : 80 Hz / 40 ~ 200"]
    Q --> S["RETURN"]
    style A fill:#f9f,stroke:#333
    style H fill:#ccf,stroke:#333
    style Q fill:#cfc,stroke:#333
- CONFIG (КОНФИГУРАЦИЯ) : Для выбора размера подключенных колонок.
- DISTANCE (PACCTOЯНИЕ) : Для ввода расстояния от каждой колонки до слушателя, что позволяет определить время задержки сигнала для каждой колон-ки, что, в свою очередь, обеспечивает оптимальное объемное звучание.
• X-OVER (KPOCCOBEP) : Для выбора желаемой частоты разделения. - RETURN (ВОЗВРАТ): Для возврата в предыдущее меню.
При выборе пункта CONFIGURATION (КОНФИГУРАЦИЯ)
- Воспользуйтесь кнопками CURSOR UP(▲)/DOWN(▼) выбора режима "CONFIG". Затем нажми те кнопку ENTER.
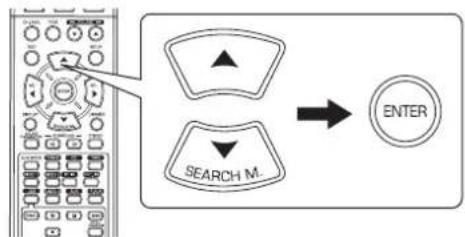
text_image
SEARCH M. ENTER
FRONT: L
- Для выбора желаемой колонки воспользуйтесь кн опками CURSOR UP(▲)/DOWN(▼).
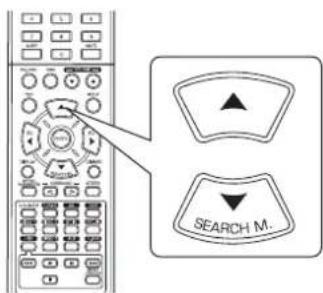
text_image
SEARCH M.- Для подтверждения настройки выбранной колонк и нажмите кнопки CURSOR LEFT(◀)/RIGHT(▶).
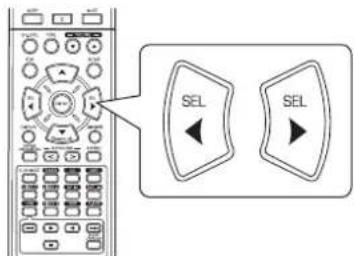
text_image
SEL SEL- В зависимости от типа колонок можно выбрать одну из следующих настроек.
L(Большие) : Выберайте данную настройку при использован ииколонок, которые могут воспроизводить полный спектр звука ниже частоты разделения.
S(Маленькие) : Выберайте данную настройку при использовании колонок, которые не могут воспроизводить полный спектр звука ниже частоты разделения. При выбореданной настройки лежащие ниже частоты разделения звуки посылаются на сабвуфер или те колонки, для которых выбрана настройка "L (Большие)" (когда сабвуфер не используется).
N(Отсутствуют): Выберайте данную настройку в том случае, если колонки не подключены. При выборе данной настройки звуки посылаются на те колонки, для которых не выбрана настройка "N (Отсутствуют)".
Y(Присутствуют)/N(Отсутствуют) : Выберите в зависимости от того, подключен ли сабвуфер или нет.
■Примечания:
- При выборе настройки колонок "S (Маленькие)", следует верно на-строить их частоту разделения согласно частотным характеристикам.
(Смотри раздел "При выборе пункта CROSSOVER (КРОССОВЕР)" на странице 35.)
- При установке "SUB-W" в режим "N (Отсутствует)", "FRONT" автоматиче-ски настраивается в режим "L (Большие)".
- При установке "FRONT" в режим "S (Маленькие)" для "CENTER" и "SURR" нельзя выбрать режим "L (Большие)".
- Повторяйте шаги 2 и 3 до тех пор, пока для всех к олонок не будет установлен желаемый режим.
■О размерах колонок
- Настройки "L (Большие)" или "S (Маленькие)" выбираются не согласно фактическому размеру колонок, а с согласно возможности колонок воспроизво-дить низки е частоты (частоты ниже настроенного в меню "X-OVER" значения).
- Если Вы не уверены в возможностях колонок, для оп ределения нужной настройки следует попробовать в оспроизведение в обоих режимах (уровень громкости должен быть достаточно низким, что предотвратит в оzmожное повреждение колонок).
При выборе пункта DISTANCE (РАССТОЯНИЕ)
- Выберите пункт DISTANCE (РАССТОЯНИЕ) при по мощи кнопок CURSOR UP(▲)/DOWN(▼) Затем наж мите кнопку ENTER.
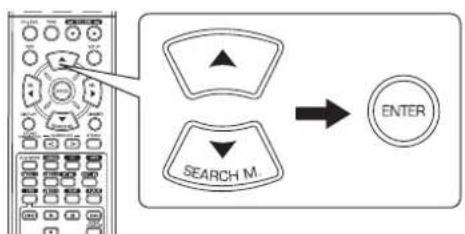
text_image
SEARCH M. ENTER
UNIT : M
- Нажмите кнопки CURSOR UP(▲)/DOWN(▼) для выбора желаемого пункта.

text_image
SEARCH MПримечание:
- Нельзя выбрать те колонки, для которых выставлена настройка «N (От-сутствует)».
- Выполните настройку желаемого пункта при помо щи кнопок CURSOR LEFT(◀)/RIGHT(▶).
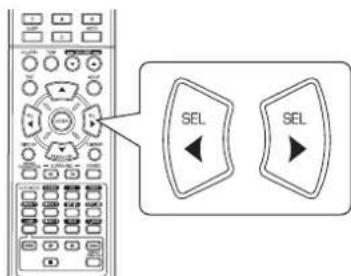
text_image
SEL SEL■При выборе желаемых единиц измерения
- Можно выбрать либо «М (Метры)» либо «FT (Футы)». - При выборе единицы измерения все расстояния авто матически ото-бражаются и изменяются в выбранных единицах.
■При настройке расстояния
- Расстояние можно выбрать в интервале от 0,0 до 9,0 метров с шагом в 0,3 м.
- Повторяйте шаги 2 и 3 до тех пор, пока все расстояния не будут настроены.
■О расстоянии до колонок
При прослушивании объемного звука с источников формата Dolby Digital и подобных источников лучше всего устанавливать центральную колонку, колонки объемного звучания и сабвуфер на том же расстоянии от слушателя, что и передние колонки. При вводе расстояния до каждой колонки автоматически определяется за держка сигнала для центральной колонки, колонок объемного звучания и сабвуфера. Это позволяет искусств венно создать ту же идеальную атмосферу звучания, которая была бы достигнута в случае установки всех к олонок на одинаковом расстоянии от слушателя.
При выборе пункта CROSSOVER (KPOCCOBEP)
- При выборе настройки колонок "S (Маленькие)", следует верно настроить их частоту разделения согласно частотным характеристикам.
- При помощи кнопок CURSOR UP(▲)/DOWN(▼) выберите "X-OVER", затем нажмите кнопку ENTER.
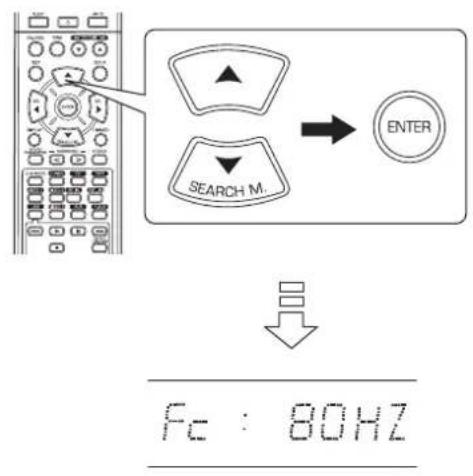
text_image
SEARCH M. ENTER Fc : 80HZ- Воспользуйтесь кнопками CURSOR LEFT(◀)/RIGHT(▶) для установки желаемой частоты разделения.
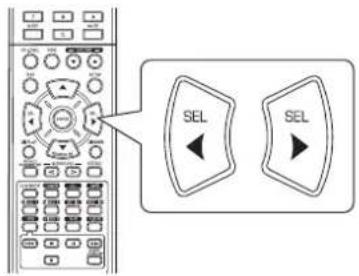
text_image
SEL SEL- Частота разделения может быть настроена в диапаз one от 40 до 200 Гц с интервалом в 10 Гц.
■О частоте разделения.
- При выборе настройки колонок "S (Маленькие)", низкие частоты потем каналам, которые лежат ниже час тоты разделения, проигрываются через сабвуфер и и передние колонки, для которых установлен режим "L (Большие)" (если сабвуфер не используется).
- Обратитесь к инструкции по эксплуатации тех колонок, которые под-ключены к системе. Если частотный диапазон колонок составляет 100 Гц – 20 кГц, то час тота разделения должна быть установлена на уровне 100 Гц или немного выше.
НАСТРОЙКА УРОВНЯ КАНАЛА
◆ CH LEVEL —— MODE : CAL

text_image
- FL 0 dB / -15 ~ +15 - C 0 dB / -15 ~ +15 - FR 0 dB / -15 ~ +15 - SR 0 dB / -15 ~ +15 - SL 0 dB / -15 ~ +15 - SW 0 dB / -15 ~ +15 - DD 0 dB / -10 ~ 0 - DTS 0 dB / -10 ~ 0 - RETURN/ REF 1 / REF 2

text_image
FL 0 dB / -15 ~ +15 C 0 dB / -15 ~ +15 FR 0 dB / -15 ~ +15 SR 0 dB / -15 ~ +15 SL 0 dB / -15 ~ +15 SW 0 dB / -15 ~ +15 DD 0 dB / -10 ~ 0 DTS 0 dB / -10 ~ 0 RETURN
text_image
FL 0 dB / -15 ~ +15 C 0 dB / -15 ~ +15 FR 0 dB / -15 ~ +15 SR 0 dB / -15 ~ +15 SL 0 dB / -15 ~ +15 SW 0 dB / -15 ~ +15 DD 0 dB / -10 ~ 0 DTS 0 dB / -10 ~ 0 RETURN■Примечание: В зависимости от выставленных настроек колонок «N (Отсутствует)» нельзя выбрать те или иные каналы.
Настройка уровня текущего канала
- Существует возможность настраивать уровни текущих каналов на желаемую величину. Настроенные уровни канало в сохраняются в пользовательскую память ("CAL"), а не в память предварительных настроек ("REF 1", "REF 2").
-
После настройки уровней каналов при помощи проверочного сигнала можно настроить уровни каналов согласно источникам звуковых сигналов или собственным предпочтениям. (Смотри раздел "Настройка уровня громкости каждого канала при помощи проверочного сигнала" на странице 17).
-
Воспользуйтесь кнопками CURSOR UP(▲)/DOWN(▼) для выбора желаемого канала.

text_image
SEARCH M.Пример: При выборе источников звукового сигнала Dolby Digital LFE

- При помощи кнопок CURSOR LEFT(◀)/RIGHT(▶) настройте уровень выбранного канала или LFE исто чника звукового сигнала.
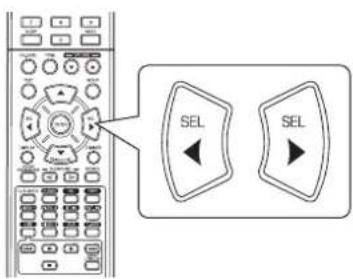
text_image
SEL SEL- Уровень канала LFE можно настроить в пределах от – 10 до + 10 дБ. Уро-вень остальных каналов можно настроить в пределах от – 15 до + 15 дБ.
-
Рекомендуется выбрать для уровня LFE значение 0 дБ. (Тем не менее, для некоторого ПО DTS ранних версий рекомендуется, чтобы уровень LFE был равен -10 дБ). Если рекомендуемые значения уровней кажутся высокими, уменьшите их.
-
Для настройки остальных каналов повторяйте шаг и 1 и 2.
Сохранение настроенных уровней каналов
- Настроенные уровни каналов можно сохранить в память предварительных настроек ("REF 1", "REF 2"), оттуда их можно извлечь в любой момент.
- Нажмите кнопку ENTER после выполнения шагов 1-3 из пункта "Настройка уровня текущего канала" на странице 36.
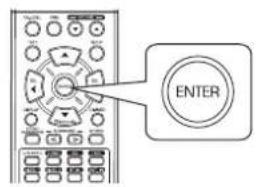
text_image
ENTER

- После этого замигает индикатор "1" из "REF 1".
- Для выбора желаемой памяти нажмите кнопки CURSOR LEFT(◀)/RIGHT(▶) Затем нажмите кнопку ENTER.
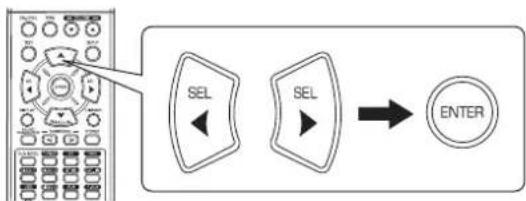
flowchart
graph LR
    A["Radio System"] --> B["SEL"]
    B --> C["SEL"]
    C --> D["ENTER"]
- При каждом нажатии кнопок CURSOR LEFT(◀) or RIGHT(▶) осуществляется выбор "REF 1" или "REF 2".
- Настроенные уровни каналов сохраняются в выбранную память.
Извлечение из памяти ранее сохраненных настроенных каналов
- Воспользуйтесь кнопками CURSOR UP(▲)/DOWN(▼) для выбора пункта "MODE \~".
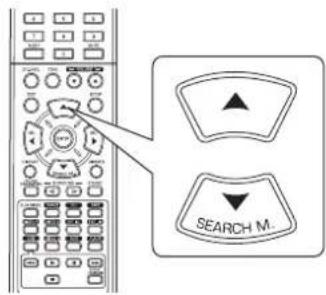
text_image
SEARCH M.

- Вместо символов "REF 1" или "REF 2" может отображаться символ "CAL".
- Воспользуйтесь кнопками CURSOR LEFT(◀)/RIGHT(▶) для выбора либо REF 1, либо REF 2.

text_image
SEL SEL- После этого из памяти извлекаются сохраненные ранее настройки уровней каналов.
НАСТРОЙКА ПАРАМЕТРА

flowchart
graph TD
    A["PARAMTR"] --> B["NIGHT M"]
    A --> C["PLII MSC"]
    A --> D["RETURN"]
    B --> E["NIGHT : 0.0 / 0.0 ~ 1.0"]
    B --> F["RETURN"]
    C --> G["PANO : OFF / ON"]
    C --> H["C WIDTH : 3 / 0 ~ 7"]
    C --> I["DIMEN : 0 / -3 ~ +3"]
    C --> J["RETURN"]
• NIGHT M (НОЧНОЙ РЕЖИМ): Используется для настройки уменьшения динамического диапазона, что облегчает про слушивание тихих звуков на малой громкости.
- PLII MSC (DOLBY PLII MUSIC): Используется для настройки различных параметров объемного звучания, что позволяет достичь оптимального качества объемного звука.
- RETURN (ВОЗВРАТ): Для возврата в предыдущее меню.
При выборе режима NIGHT MODE (НОЧНОЙ)
• В данном режиме снижается динамический диапазон выбранных звуковых дорожек Dolby Digital или DTS(повышенной громкости), что уменьшает разницу вгромкости между выбранными и невыбранными дорожками. Это облегчае т прослушивание видеофильмов ночью, когда необходимо слушать звук нанизкой громкости.
Примечания:
- Данный режим доступен только в том случае, если ресивер получает цифровые сигналы от источника формата Dolby Digital или DTS.
-
При использовании некоторых устройств Dolby Digital или DTS данный режим может быть недоступен.
-
При помощи кнопок CURSOR UP(▲)/DOWN(▼) выберите пункт "NIGHT M", затем нажмите кнопку ENTER.
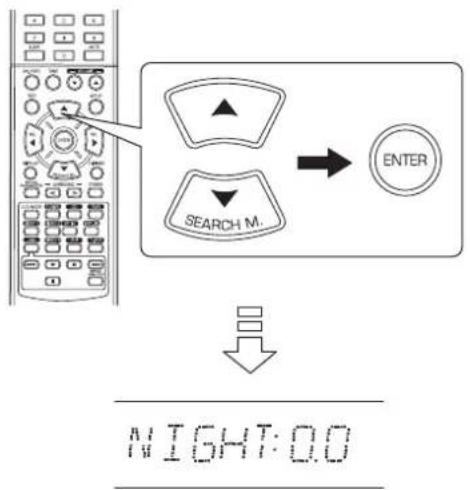
text_image
SEARCH M. ENTER NIGHT:0.0- Настройте степень уменьшения динамического диапазона при помощи кнопок CURSOR LEFT(◀)/RIGHT(▶).
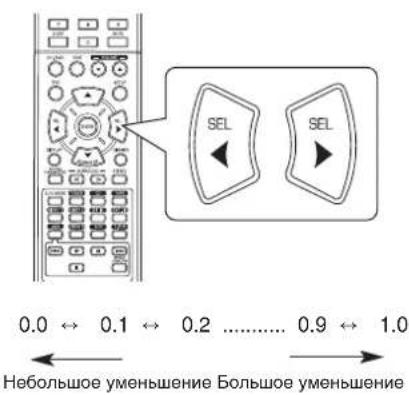
text_image
0.0 ↔ 0.1 ↔ 0.2 ...... 0.9 ↔ 1.0 Небольшое уменьшение Большое уменьшениеПри выборе пункта DOLBY PLII MUSIC
-
Можно настроить различные параметры объемного звучания, что позволяет достичь оптимального качества объемного звука.
■Примечание: Настройки данного параметра доступны только при прослушивании в режиме Dolby Pro Logic II Music. -
Воспользуйтесь кнопками CURSOR UP(▲)/DOWN(▼) для выбора режима «PLII MSC». Затем н ажмите кнопку ENTER.
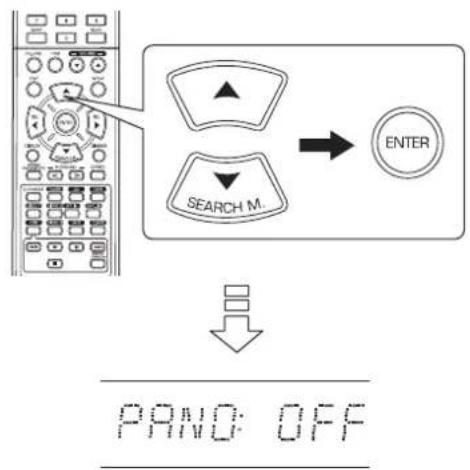
flowchart
graph TD
    A["Device"] --> B["Search Mode"]
    B --> C["ENTER"]
    D["PAND: OFF"] --> E["Down Arrow"]
- Воспользуйтесь кнопками CURSOR UP(▲)/DOWN(▼) для выбора желаемого параметра.
text_image
SEARCH M.- Воспользуйтесь кнопками CURSOR LEFT(◀)/RIGHT(▶) для настройки выбранного параметра..

text_image
SEL SEL■ При выборе режима "PANO (Панорама)" В данном режиме осуществляется расширение переднего звукового поляс включением в него колонок объем ного звучания. При этом достигается эффект «обворачивания», в формировании которого принимают участие боковые звуковые поля. Можно выбрать настройки "OFF" (ВЫКЛ) или "ON" (ВКЛ). Настройка по умолчанию: OFF.
■При выборе режима "C. WIDTH (Управление центром)"
Данный режим позволяет настроить центральное звуковое поле таким образом, что оно будет восприниматься только из центральной колонки, только из правой или левой колонок как условное звуковое поле или из всех трех колонок с разной степенью. Настройка ос уществляется в восемь шагов от 0 до 7. (Значение по у молчанию: 3).
■ При выборе режима "DIMEN (Направление)" В данном режиме настраивается положение звукового поля в направлении вперед-назад. Настройка осуществ вляется в семь шагов от -3 до +3. (Значение по умолчанию: 0).
- Повторите шаги 2 и 3 для настройки остальных параметров..
Инструкция по устранению неисправностей
В случае неисправностей попробуйте воспользоваться приведенной далее таблицей и только после этого отправляйте ресивер в ремонт.
Если неисправность не исчезает, попробуйте выключить и снова включить ресивер. Если решить проблему не удалось, проконсультируйтесь с дилером.
Ни при каких обстоятельствах не пытайтесь починить ресивер самостоятельно. Это может привести к аннулированию гарантии.
| ПРОБЛЕМА ВОЗМОЖНАЯ ПРИЧИНА СПОСОБ УСТРАНЕНИЯ | ||
| Не подается питание | • Кабель подачи питания отключен.• Плохой контакт в розетке переменного тока или розетка не работает. | Надежно подключите шнур питания.•Проверьте розетку при помощи лампочки или иного • прибора. |
| Отсутствует звук Шнуры колонок отсоединены•Установлен слишком низкий уровень громкости. •• На пульте дистанционного управления был включен режим MUTE• Неправильно выбран источник входящего сигнала Компоненты соединены неправильно. | Проверьте подключение колонок.•Настройте уровень громкости.• Нажмите кнопку MUTE для выхода из данного режима.• Правильно выберите источник входящего сигнала.• Подключите компоненты правильно. | |
| Нет звука в колонках объемного звучания | • Режим объемного звучания выключен (стереорежим)Установлен слишком низкий общий уровень громко •сти и уровень громкости объемного звука.• Используется источник звука формата моно.• Колонки объемного звучания настроены на режим "N". | • Включите режим объемного звучания.• Настройте общий уровень громкости и уровень громкости объемного звука.• Выберите стерео источник входящего сигнала или источник с объемным звучанием.• Выберите соответствующую настройку колонки |
| Нет звука в центральной колонке | • Режим объемного звучания выключен (стереорежим).• Центральная колонка настроена на режим "N".Установлен слишком низкий общий уровень громко •сти и уровень громкости центральной колонки. | • Выберите желаемый режим объемного звучания.• Выберите соответствующую настройку колонки• Настройте общий уровень громкости и уровень громкости центральной колонки. |
| Невозможно выполнить прием станций | • Антенна не подключена.• Частота желаемой станции не настроена.• Антенна находится в неправильном положении. | • Подключите антенну.• Настройте частоту желаемой станции.• Переместите антенну и попробуйте выполнить настройку еще раз. |
| Невозможно выполнить прием ранее настроенных станций | • Была сохранена частота ненужной станции.• Сохраненные станции были стерты. | • Сохраните частоту нужной станции.• Вновь выполните сохранение частот станций. |
| Плохой прием FM диапазона | • Антенна не подключена.• Антенна находится в неправильном положении. | • Подключите антенну.• Измените расположение антенны. |
| Постоянный шипящий звук во время приема FM диапазона, особенно в стереорежиме. | • Слабый сигнал. | • Измените расположение антенны.• Подключите внешнюю FM антенну. |
| Постоянный или прерывистый шипящий звук во время приема AM диапазона, особенно ночью | • Помехи вызываются двигателями, люминесцентными лампами, освещением и т.п. | • Устанавливайте ресивер на расстоянии от источников помех.• Подключите внешнюю AM антенну. |
| Пульт дистанционного управления не работает | • Не установлены или сели элементы питания• Датчик приема сигнала пульта заблокирован. | • Замените элементы питания.• Уберите препятствие. |
Технические характеристики
■УСИЛИТЕЛЬ
- Выходная мощность в стереорежиме, 6 Ω, Общее искажение высшими гармониками 0,7%, 40 Гц – 20 кГц | 2x50 Вт
- Общее искажение высшими гармониками, 6 Ω, 50 Вт, 1 кГц | 0,09 %
- Межмодуляционное искажение
60 Гц : 7 кГц=4 : код SMPTE 1, 6 Ω, 50 Вт | 0,1 %
• Входная чувствительность, 47 kΩ
Линейный (CD, TAPE, VIDEO) | 280 мВ
- Отношение сигнал/шум, Улучш. ВЧ "А"
Линейный (CD, TAPE, VIDEO) | 92 дБ
- Частотный отклик
Линейный (CD, TAPE, VIDEO), 20 Гц -50 кГц | +0 дБ, -3 дБ
- Выходной уровень
TAPE/VIDEO 1 REC, 2,2 кΩ | 280 мВ
• Упарвление высокими/низкими часотами, 100 Гц/10 кГц | ±10 дБ
- Режим объемного звучания, управляется каналами
Выходная мощность переднего канала, 6 Ω, 1 кГц, общее искажение высшими гармониками 0,7 % | 70 Вт / 70 Вт
Выходная мощность центрального канала, 6 Ω, 1 кГц, общее искажение высшими гармониками 0,7 % | 70 Вт
Выходная мощность канала объемного звучания, 6 Ω, 1 кГц, общее искажение высшими гармониками 0,7 % | 70 Вт / 70 Вт
■ЦИФРОВОЙ АУДИО СИГНАЛ
• Частота сэмплирования | 32, 44,1, 48, 96 кГц
• Уровень цифрового входа
Коаксиальный, 75 Ω | 0,5 Вр-р
Оптический, 660 нм | -15\~-21 дБм
■ FM ПРИЕМНИК
• Частотный диапазон настройки | 87,5\~108 МГц
- Чувствительность, общее искажение высшими гармониками 3%, S/N 26 дБ | 12,8 дБf
- Чувствительность при отношении сигнал-шум в 47 дБ, моно/стерео | 20,2 / 45,3 дБf
- Отношение сигнал/шум, 65 дБf, моно/стерео | 55 / 50 дБ
- Общее искажение высшими гармониками, 65 дБf, 1 кГц, моно/стерео | 0,5 / 1,0%
• Частотный отклик, 30 Гц – 12 кГц | ±3,0 дБ
• Стерео разделение, 1кГц | 30 дБ
• Коэффициент захвата | 4 дБ
• Коэффициент подавления ПЧ | 80 дБ
■АМ ПРИЕМНИК
• Частотный диапазон настройки | 522 -1611 кГц
• Полезная чувствительность | 500 μВ/м
- Отношение сигнал/шум | 40 дБ
• Чувствительность | 25 дБ
ОБЩИЕ
- Потребляемое напряжение | 230 В \~ 50 Гц
- Потребляемая мощность | 200 Вт
- Размеры (ШхВхД, включая выступающие части) | 440 x 141 x 358,5 мм
• Вес нетто 1 9,5 кг
■Примечание: С целью улучшения конструкция и технические характеристики могут быть изменены без предварительного уведомления.
RD-5405
AUDIO/VIDEO RECEIVER
AUDIO/VIDEO RECEIVER
RECEPTEUR AUDIO/VIDEO
RECEPTOR DE AUDIO/VIDEO
АУДИО/ВИДЕО ПРИЕМНИК