ERM 1233 G - Lawn mower Grizzly - Free user manual and instructions
Find the device manual for free ERM 1233 G Grizzly in PDF.
| Product type | Electric lawn mower |
| Brand | Grizzly |
| Model | ERM 1233 G |
| Motor power input | 1200 W |
| Mains voltage | 230 V / 50 Hz |
| Idle speed | 3700 rpm |
| Cutting diameter | 33 cm |
| Adjustable cutting heights | 20 / 40 / 60 mm (3 positions) |
| Protection class | II |
| Protection type | IP 24 |
| Weight | 11 kg |
| Grass catcher volume | 33 L |
| Sound pressure level (L_pA) | 73.5 dB(A) (K=1.91 dB) |
| Guaranteed sound level (L_wA) | 96 dB(A) |
| Vibration (a) | 2.03 m/s² |
| Maximum cable length | 75 m (type H05VV-F or H05RN-F) |
| Minimum cable cross-section | 1.5 mm² |
| Warranty | 24 months (domestic use) |
| Country of manufacture | Not specified |
Frequently Asked Questions - ERM 1233 G Grizzly
User questions about ERM 1233 G Grizzly
0 question about this device. Answer the ones you know or ask your own.
Ask a new question about this device
Download the instructions for your Lawn mower in PDF format for free! Find your manual ERM 1233 G - Grizzly and take your electronic device back in hand. On this page are published all the documents necessary for the use of your device. ERM 1233 G by Grizzly.
USER MANUAL ERM 1233 G Grizzly
Translation of the original instructions for use
Grizzly Service-Center 111

Grizzly Service-Center 111

Scope of Delivery 39
Intended Use 39
Safety Information 39
Pictorial Diagrams on the Equipment 40
General Safety Information 40
General Description 43
Function Description 43
Summary 43
Assembly 43
Assembling the Curved Handle 43
Assembling the Grass Box 44
Operation 44
Hanging On / Removing the Grass
Box 44
Adjusting the Cut Height 44
Switching On and Off 44
Working with the Lawnmower 45
Cleaning, Maintenance and Storage . 45
General Cleaning and Maintenance
Work 45
Changing the Blade 46
Storage 46
Disposal /Environmental Protection ... 46
Guarantee 46
Repair Service 47
Spare parts 47
Technical Specifications 47
Trouble Shooting 48
EC Declaration of Conformity 108
Exploded Drawing 110
Grizzly Service-Center 111

Before initial use, please read the operating instructions carefully, in order to avoid incorrect handling. Keep the instructions in a safe place and pass them on to any subsequent user so the information is available at all times.
Scope of Delivery
Carefully remove the equipment from the packaging and check whether the following parts are complete:
- Lawnmower and curved handle with connection cable
- Lower bar
- Lawn box (in three parts)
- 2 screws to attach the bar
- 2 wing nuts and screws for attaching the curved handle
- 2 holders to attach the connection cable
Intended Use
The equipment is designed only for mowing domestic lawns and grass areas.
Any other use that is not expressly permitted in these instructions may result in damage to the equipment and represent a serious risk to the user.
The equipment is intended for use by adults. It is not to be used by children or people who are unfamiliar with these instructions. The use of the equipment is prohibited in the rain or a damp environment.
The manufacturer will not be liable for damages caused by use other than for the intended purpose or by incorrect operation.
Safety Information
This section covers the basic safety regulations when working with the electric lawnmower.
Pictorial Diagrams on the Equipment
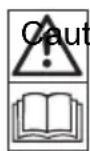
Read the operating instructions carefully.

Wear eye and ear protection.

Do not expose the equipment to the damp. Do not work in the rain and do not cut wet grass.

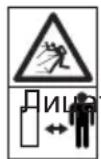
Risk of injury from parts being thrown up.
nearby people away from the mower.
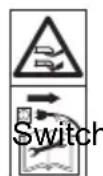
Caution - sharp cutting blade! Keep feet and hands away. Risk of injury!
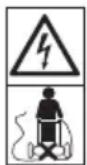
off the motor and disconnect the plug before adjustment or repair work or if the power cable is caught or damaged.
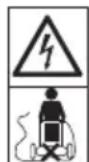
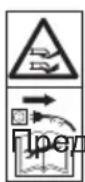
Danger of damaged power cable. Keep the power cable away from the cutting blade!

Caution! awnmower blade continues to run after switching off.

Noise level specification L_wa in dB.
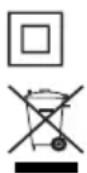
Protection class II
Do not dispose of electrical equipment in domestic waste.
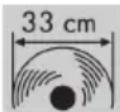
Cutting circle
General Safety Information

This equipment may cause serious injury in the case of improper use. In order to avoid injury to people and damage to property, the following safety information must be observed and users must familiarise themselves with all operating parts.
Preparation:
- This appliance is not intended for use by persons (including children) with reduced physical, sensory or mental capabilities, or lack of experience and knowledge, unless they have been given supervision or instruction concerning use of the appliance by a person responsible for their safety.
- Do not allow the use of this equipment by children or others who are unfamiliar with these operating instructions. Local regulations may specify the minimum age of the operator.
- Do not use the equipment when people and particularly children or pets are nearby.
Children should be supervised to ensure that they do not play with the appliance. - The operator or user is responsible for accidents, injuries to other people or damage to the property of others.
- Check the terrain on which the equipment is to be used and remove stones, sticks, wires and other foreign objects that could become caught and thrown up.
- Wear suitable work clothing such as stable shoes with non-slip soles and robust, long trousers. Do not use the equipment when barefoot or when wearing open sandals.
- Before each use, carry out a visual in
spection of the equipment. Do not use the equipment if protective devices (e.g. collision guard or grass bag), parts of the cutting device or bolts are missing, worn or damaged. To avoid imbalance, damaged tools and bolts are to be replaced only in sets.
Take care with equipment that has several cutting tools, as the movement of one blade may result in the rotation of the other blades.
- Use only spare parts and accessories supplied and recommended by the manufacturer. The use of non-original parts will immediately invalidate the guarantee.
Working with the Equipment:

Do not place feet or hands near or under rotating parts when working. Risk of injury!

Observe the noise protection and local regulations. The use of the equipment may be restricted or prohibited on certain days (e.g. Sundays and public holidays), at certain times of day (lunchtimes, nighttimes) or in certain areas (e.g. health resorts, hospitals etc.).
- Switch on the motor according to the instructions and only when your feet are at a safe distance from the cutting tools.
- Do not use the equipment in the rain, in poor weather, in a damp environment, or on wet grass. Work only in daylight or with good lighting.
- Do not work with the equipment when tired, lacking concentration or under the influence of alcohol or drugs. Always take breaks in good time. Take a
sensible approach to the work.
- When working, ensure a firm stance, particularly on slopes. Always work across the slope, never upwards or downwards. Take particular care when changing the direction of travel on the slope. Do not work on excessively steep slopes.
- Run the equipment only at a walking pace. Take particular care when turning the equipment around, pulling it towards you or going backwards.
- Switch on the equipment carefully and in accordance with the directions in these instructions. Ensure sufficient distance between feet and the rotating blades.
- Do not tilt the equipment when starting other than if it is necessary to do so when starting up in long grass. In this case, tilt the equipment by pressing down the handle bar such that the front wheels of the equipment are raised. Always check that both hands are in the working position before returning the equipment to the ground.
- Do not work without the grass box or collision guard. Keep away from the ejection hole at all times.

Caution! Danger! The blade continues to run after switching off. There is a risk of injury.
- The equipment is not to be lifted or transported while the motor is running. Switch off the equipment if it has to be tilted in transit, when crossing surfaces other than grass, and when the equipment is being transported to and from the surfaces to be mowed.
-
Always keep the grass ejection hole clean and clear. Remove cut material only when the equipment is stopped.
-
Do not leave the equipment unattended in the workplace.
- Do not work with equipment that is damaged, incomplete, or has been modified without the authorisation of the manufacturer. Do not use the equipment with damaged safety devices or screens or with missing safety equipment such as deflection and/or grass collection devices.
- Do not overload the equipment. Work only within the specified power range and do not change the regulator settings on the motor. Do not use low-powered machines for heavy work. Do not use your equipment for purposes other than those for which it is designed.
- Do not use the equipment near inflammable liquids or gases. Non-observance will result in a risk of fire or explosion.
- Do not lift or carry the equipment when the motor is running.
-
Switch off the equipment and disconnect the plug:
-
Whenever you leave the machine,
- Before cleaning the ejection hole or removing blockages,
- When the equipment is out of use,
- Before checking, cleaning or working on the equipment,
- If the power cable is damaged or frayed,
-
If the equipment has hit a foreign object or if strange vibrations occur during work. In this case, check the equipment for damage and have it repaired if applicable.
-
Do not place feet or hands near or under rotating parts. Do not stand in front of the grass ejection hole during sickle mowing.
Maintenance and Storage:
- Ensure that all nuts, bolts and screws are tightened firmly and the equipment is in safe working condition.
- Do not attempt to repair the equipment yourself unless you have been trained to do so. Any work not specified in these instructions is to be carried out only by customer service centres that we have authorised.
- Keep the equipment in a dry location and out of reach of children.
- Handle the equipment with care. Keep tools sharp and clean, in order to facilitate better and safer work. Follow the maintenance instructions.
- Wear protective gloves when changing the cutting device.
- Regularly check the grass collection device for wear and strains. For safety reasons, replace worn or damaged parts. When adjusting the blades, take particular care to avoid fingers being trapped between the rotating blades and fixed parts of the machine.
- Check that only replacement tools authorised by the manufacturer are used.
Electrical Safety:
- Ensure that the mains voltage matches the specifications on the rating plate.
- If possible, connect the equipment only to a socked with a residual current-operated protective device (RCD) with a release current of more than 30mA .
- Avoid bodily contact with earthed parts (e.g. metal fences, metal posts).
- Use only authorised power cables of type H05VV-F or H05RN-F, which are no more than 75m long and suitable for outdoor use. The power cable wire cross section must be at least 1.5mm Always
completely unroll cable drums before use. Check the cable for damage.
- To fix on the power cable, use the cable suspension intended for the purpose.
- Keep the power cable away from the cutting tool when working. The cutting blades may damage the power cable and result in contact with live parts. Always run the power cable behind the operator.
- Do not use the power cable to pull the plug from the socket. Protect the power cable from heat, oil and sharp edges.
- Switch off the equipment and disconnect the plug from the socket if the power cable is damaged. If the power cable is damaged, it must be replaced by the manufacturer, the customer services of the same, or a qualified person, in order to avoid hazards.
- Do not connect a damaged power cable to the mains. Do not touch a damaged power cable when it is connected to the mains. A damaged power cable may result in contact with live parts.
General Description
Function Description
The electric lawnmower has a cutting tool, which turns parallel to the cutting level. It is equipped with a high performance electric motor, robust plastic housing, safety switch, collision guard, and grass box. Additionally, the equipment is height adjustable to three levels and has smooth-running wheels. For the function of the operating parts, please refer to the descriptions below.

The illustration how to handle the appliance can be found on the pages 2-3.
Summary

1 Curved handle
2 Wing nuts
3 Lower bar
4 Grass box
5 Wheels
6 Lawnmower housing
7 Collision guard
8 Cable holder
9 Power cable outlet
10 Release button
11 Cable strain relief
12 Start lever
Assembly

Disconnect the plug before any work on the equipment. There is a risk of injury.
Assembling the Curved Handle

-
Insert the lower bar (3) into the slot on the lawnmower housing (6).
-
Fix the bar (3) using the enclosed screws (13).

Fix the curved handle (1) using the enclosed screws (14) and the wing nuts (2) on the lower bar (3). There are two possible positions.
- Clip the cable holder (8) into the bar (3) + curved handle (1) and thus fix the cable.

When both wing nuts are loosened, the curved handle can be folded down for storing the equipment. Ensure that the power cable is not caught.
Assembling the Grass Box

Wear protective gloves when carrying out maintenance and cleaning work on the tool to avoid injury from cuts.

-
Connect the two pieces of the collection box (16).
-
Connect the handle (15) in one of the two pieces of the collection box (16).

Do not work with the lawnmower without the collision guard or lawn box. There is a risk of injury.
Operation
Hanging On / Removing the Grass Box

-
To hang on the grass box (4), lift the collision guard (7) and hang on the grass box. Fold the collision guard (7) onto the grass box (4). It holds the grass box in the correct position.
-
To remove the grass box (4), lift the collision guard (7) and detach the grass box. Fold the collision guard (7) back onto the mower housing (6).
Adjusting the Cut Height

Switch off the equipment, disconnect the plug and wait for the blade to stop. There is a risk of injury.
The lawn mower can be adjusted to the following cutting heights by changing the position of the wheels:
60 mm - Tall cutting height
40 mm - Medium cutting height
20 mm - Short cutting height
- Reach under the body of the lawn mower (6) and pull the wheel axle towards you.
- While pulled, the wheel axle can be moved up or down to any of the three cutting heights.
- If the height is correct, just let go of the spring-loaded wheel axle to let it snap back into working position.
The correct height is around 20 - 40mm for a decorative lawn and around 40 - 60 mm for a used lawn.

A higher cut height should be selected for the first cut of the season.

Observe the noise protection and local regulations.
Switching On and Off

-
Insert the power cable plug into the socket (9) on the curved handle (1).
-
To relieve the strain, form a loop with the end of the power cable and hang this into the strain relief (11). See the diagram
- Connect the equipment to the power supply.
- Before switching on, ensure that the equipment is not in contact with any objects.
- To switch on, press the release button (10) on the handle at the same time as pressing the start lever (12). Release the release button (10).
- To switch off, release the start
lever (12).

After switching off the equipment, the blade continues to turn for several seconds. Do not touch the moving blade. There is a risk of injury.
Working with the Lawnmower
Regular mowing encourages increased foliage of the grass and kills off weeds at the same time. Therefore, not only does each mowing increase the density of the lawn, it also produces an evenly resilient lawn. The first cut is to be made in around April, at a growth height of 70 - 80mm . In the main vegetation period, the lawn is to be mowed at least once a week.
- Start mowing near the socket and work away from the socket.
Always keep the extension cable behind you and when you turn, move it to the side that has already been mowed. - Run the equipment at a walking pace, in tracks that are as even as possible. For gap-free mowing, the tracks should always overlap by a few centimetres.
- Adjust the cut height so the equipment is not overloaded. Otherwise, the motor may be damaged.
- On slopes, always work across the slope. Take particular care when going backwards and pulling the equipment.
- Clean the equipment after each use, as described in the chapter on "Cleaning, Maintenance and Storage".

Switch off the equipment after work and in order to transport it, disconnect the plug and wait until the blade stops. There is a risk of injury.
Cleaning, Maintenance and Storage

Have work that is not described in these instructions carried out by a customer service centre that we have authorised. Use only original parts.

Wear gloves when handling the blade.

Switch off the equipment before all maintenance and cleaning work, disconnect the plug and wait until the blade stops.
There is a risk of injury.
General Cleaning and Maintenance Work

Do not hose down the lawnmower with water.
Always keep the equipment clean. To clean, use a brush or cloth but no detergent or solvent.
- After mowing, use a piece of wood or plastic to remove adherent plant remains from the wheels, ventilation holes, ejection hole and blade area. Do not use hard or pointed objects, as these may damage the blade.
- Oil the wheels from time to time.
- Before each use, check the lawnmower for obvious defects such as loose, worn or damaged parts. Check that all nuts, bolts and screws are sitting firmly.
- Check the covers and protective devices for damage and check that they are sitting correctly. Replace them if necessary.
Changing the Blade
If the blade is blunt, it can be sharpened by a specialist workshop. If the blade is damaged or showing signs of imbalance, it must be replaced.

-
Turn the equipment over.
-
Use sturdy gloves and hold the blade (18) firmly. Turn the blade screw (17) anticlockwise off of the motor spindle (19) using a screwdriver.
-
Install the new blade (18) in the reverse order. Ensure that the blade (18) is positioned correctly and the screw (17) tightened firmly.
Storage

-
Keep the equipment dry and out of reach of children. Loosen the wing nuts and fold down the handle bar so the equipment takes up less space. Ensure that the cable is not caught.
-
Allow the motor to cool before storing the equipment in a confined space.
-
Do not cover the equipment with nylon bags as moisture could build up.
We will not be liable for damages caused by our equipment where these are caused by improper repair or the use of nonoriginal parts or by use other than for the intended purpose.
Disposal /Environmental Protection
Do not dispose of used oil in the sewage system or drains. Dispose of used oil in an environmentally correct manner - bring
it to a waste disposal center.
Be environmentally friendly. Return the tool, accessories and packaging to a recycling centre when you have finished with them.
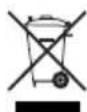
Machines do not belong with domestic waste.
The plastic and metal parts employed can be separated out and thus recycled use can be implemented. Ask our ServiceCenter for details.
Defective units returned to us will be disposed of for free.
Guarantee
-
This appliance has a 24-month guarantee; a shorter 12-month guarantee applies if the appliance is to be used for commercial purposes or for replacement appliances according to statutory regulations.
-
Damages, which can be attributed to natural wear, overloading or inappropriate use, are excluded from the guarantee. Certain component parts are subject to a normal wear and are excluded from the guarantee. In particular, these include: blade.
-
Furthermore, the prerequisite for guarantee services is that the references indicated in the operating instructions regarding cleaning and maintenance have been adhered to.
-
Damage, which has been caused from material or manufacturing faults, will be made good free of charge, by replacement delivery or repair.
This requires that the appliance is returned to the merchant undismantled and with proof of purchase and guarantee.
Repair Service
- Repairs, which are not covered by the guarantee, can be carried out for charge by our service center. Our service center will be glad to provide you with a cost estimate.
We can only process devices which have been packaged sufficiently and which have been dispatched with correct stamping.
Note: In case of complaint or service, please deliver your device cleaned, and with an indication of the defect, to our service address.
Devices sent in freight collect - by bulk freight, express or with other special freight - are not accepted.
Defective units returned to us will be disposed of for free.
Spare parts
The following spares are available from Grizzly Service-Center. Please indicate the machine type and the number of the spare part with your order.
Spareblade 13700209
Grass box 91093478
Technical Specifications
Electric Lawnmower .ERM 1233 G
Motor input power 1200 W
Mains voltage 230V\~,50 Hz
ldling speed 3700 min
Cutting circle 33 cm
Cut height 20/40/60mm
Protection class
Protection type.. IP 24
Weight 11 kg
Lawn box volume. 331
Sound pressure specification (LpA) .73.5 dB(A), K = 1.91 dB
Noise level specification (LWA) guaranteed 96 dB(A) measured 93.5 dB(A), K_WA = 1.91 dB
Vibration (a_n) 2.03 m/s
The noise and vibration values have been determined in accordance with the standards and regulations specified in the declaration of conformity.
Technical and visual modifications may be made without notice in the course of further development. All dimensions, information and specifications in these operating instructions are therefore not guaranteed. As such, no assertion of legal claims can be enforced on the basis of the operating instructions.
Trouble Shooting
| Problem Possible Cause | Fault Fixing | |
| Equipment does not start | Power is off | Check the socket, cable, wire and plug and have any repairs carried out by an electrician |
| Defective on/off switch | Repair by customer servicesWorn | |
| Defective motor | ||
| Grass too long | Set a greater cut height. Lift the front wheels slightly by pressing down on the handle bar. | |
| Motor stops | Blockage by foreign object | Remove the foreign object |
| Result unsatisfactory or motor labours | Cut height too low Set a high | Higher cut height |
| Blade blunt | Have the blade sharpened or replace it | |
| Blade area blocked Clean | the equipment | |
| Blade assembled incorrectly | Install the blade correctly | |
| Blade fails to turn | Blade blocked by grass Remove | remove the grass |
| Blade screw loose Tighten | the blade screw | |
| Strange noises, rattling or vibrations | Blade screw loose Tighten | the blade screw |
| Blade damaged Replace the blade | ||
#
Grizzly Service-Center 111

Grizzly Service-Center 111

Grizzly Service-Center 111

N3XBpbJnHe/ona3BaHe Ha OKoJHaTa
cpea 103
TapaHcna 103
TexHnueckn daHHN 104
Pe3epBn YacTn 105
DnaarHocTnKa 106
ДeКларачи3a cBOTBeTCTBHe
Ha EO 109
3HaK 3a B3pNBOOnaCHOCT 110
Grizzly Service-Center 111

MOnr, npEi nBpBOTo nyckaHe B EKcPiOaTaun npOyTeTe BHMaTeJHo, 3a Da npEDoTbPaTtTe rpeuHOTo N3NoJ3BaHe.
3ana3eTe nHCTpyKcIyTa nЯ npedabaIte Ha BCEK cIeDBAuNOTpe6nteI, 3a da MoKe INHOpMaunra Ta da e HAnuHa nO BCaKO BpeMe.
06em Ha doctabkata
I3BaTe BHNMaTeJHo ypea OT ONaKOBKaTa I npOBepeTe, daJI N cJeHnTe Yactn ca Ha JnCe:
- Kocayka 3a TpeBa N IbroBnHa DpbK-Kocayka Ka c eIeKtpnueckn Ka6en
-ДоЛeн npbT - KOW 3a Cb6upaHe Ha TpeBaTa (OT Tprn YacTn)
- 26oJTa 3a 3akpenBaHe Ha npbTa
- 2 крпунатуй КИ 6ОЛTOBE 3a 3akpenBaHe Ha Дьгобразнata Дрьжka
- 2дьрхач 3a 3akpenBaHe Ha eNeKtpn-uecknKa6eI
Пре徳назачени
UpebTe npedHa3NaueH cmo 3a KocHe Ha TpeBn I XpactOBn PLOuN B DomaknHCTBOTO. Bcya dpyra ynotpe6a, KOrTo He e CneuaJHO pa3peWeHa B Ta3n INHCTpyKzna, MoKe Da DOBeDe Do NOBpeDa B ypeDa I da npeCTabJIbBa cepNo3Ha 3aIaxa 3a NOn3Baunr Ro. UpebTe npedHa3Ha-yeH 3a ynoTpe6a OT Bb3pacTHN. Deza, KaKTo I JnCa, KOnTO He ca 3aNO3HaTN C Ta3N INHCTpyKzna, He 6NuBa Da I3NOJ3BaTypeDa. N3NoJ3BaHeto Ha ypeDa No BpeMe Ha DbXd IIN MOKpa OKoJHa cpeDa e 3a6paHeN. PpOJ3BOJNTeJIrT He Hocn OT-. PpOJ3B TOBOPHOCT 3a NOpeDi, KOnTO ca npuHHeHn OT yNoTpe6a npRAKO Yka3aHnraTa IInOT HenpaBnIHO bOpabeHe.
BG
He octabraye ypeda Ha BnaXHo MrcTo. He pa6oTe Te NO BpeMe Ha DbXd I He Kocete MOKpa TpeBa.
06uHnctpykun 3a 6e3oNaChocT
Onachoct OT hapaHbAhe OT OTCKoUHn NpeDMeTn.
Ta HaOKOJIO Da CToT daJIeU OT KocayKaTa.

Ipn HeKOMnTeHTHa ynoTpe6a Ha ypeDa,ToM MoKe Da npuHn cepNo3Hn HapaHbAHn. 3a da ce npedOTbpaTt QETn NO Xopa nnpdMetn, HnpemEnHo npoTeTe n Cb6JIOdaBaTe cJeHNte Yka3aHnra 3a 6e30nacHOCT n Ce
BHHMaHHe - ocTbp HOx! DpbXTe daJeu pbcete n KpaKaTa. Onac-. Or HocT OT HapaHbAHe!
ac-Onabano3HaIte MHOro do6pe c 6loka 3a ynpabJeHne Ha ypeJa.
HactpoKa IIN NOUcTbaHe
I3KIOUte MOTopa N dpbNHeTe
IeNCeNa OTMpexKaTa, INn aKO Ka-
6eNbTe 3aPNeTeH INn e NobpeDen.
Iodrotobka:
- YpeIbT He e npedHa3NaueH 3a Jnua c OrpaHueHn Phn3Nueckn, ceH3OpHn IIN yMCTBeH N Bb3MOXHOCTN (BKIOyTeJIHO n Deca) INI Da Ce I3NOJ3Ba npi JInCa Ha ONIT N IO3HaHn; TOBa e Bb3MOxHO camO, aKO Te 6bDaT HAbIOdaBAH OT KOMNeTeHTHO JnCe, OTROBaprao 3a TjXhata 6e3OnacHOCT INI Da IOnyabat OT Hero IHcTpyKcNk KaK Da Ce I3NoJ3Ba YpeIbT.
Hnkora He no3BOJBAIte DeTe nn Hpyro Nnue, KOeTo He no3HaBa NHCTpyKzraTa 3a yNoTpe6a, Da noJ3Ba ypeDa. MeCTHnTe pa3nope6n Morat
OnachocT OT NOBpeH eJekTpNueckn Ka6en.
ДрьхтecaбетадалецOTуразиOTнжовete!

BHHMaHHe!
HHe IIO INHePcIgHa HOXa Ha KocayKaTa.

IaHHn 3a HNBOTo Ha 3Byka Lwa B dB
da onpeJeT MHHMaHaTa Bb3pact Ha IIneTo, KOeTo NOn3Ba.
Pa6oTa c ypeDa:
Hnkora He n3noJ3BaIte ypea,do-Hkato B 6JIn3OCT mMa Xopa,oco6eHO Deua NDOMaUSHN JINBOTHN.
- Deuata Tp6Ba Da ce KOHTpoNpaT, 3a Da Cte cnrypn, Ye He cn nIrpAraT Cypeda.
- O6cnykBaunr nn no3Baunrte OTROBOpEn 3a 3IOnOlykn nn nIeTn cnpraMo dpyrn Xopa nn mMyueCTBOTO IM.
- Поберете Тереша, Вьрху Кочто щец с ползвуpeдьт, И отстранete Камьни, пьчки, тел и друг Тьрдипраздmetи, Кочto могатда 6бдат поВлесени Дд рот otckоуат.
Hocete noxoadpo paobto h o6keko kato 3paBn obyBn c HnIb3raun ce nOdMeTkn 3paB, bIbI gnHTaIOH. He n3noI3BaIte ypeDa, aKo cTe 6oc nn Hocnte OTbOpEH caHaJI.
- Ппени всяку уnotpe6а npabete or-ппелд ha ypeda. He n3noJ3BaIte ype-. Ida, akO npucnoc6JIeHn 3a 3aunTa (Hanp. npedna3nte n cpeu ydapn i Ko7a 3a cb6npaHe Ha TpeBa), yactn OT npucnoc6JIeHnETo 3a p3aHne nII60NTOBe IINCBaT, ca n3HOceHn IIN ca NOBpeDeHn. 3a npedotbpaTЯBaHe Ha dnc6baIahca nobpeDeHnTe INHCTpyMeHTN II 60NTOBe Tpr6Ba Da ce cMeHrT B KOMJIeKT.
-БыдeteВнмATEJIHипуpeNi c
ПОБе ue pexeuzn INHCTpymEnTn,Ть
КaTOДВИЖЕHNeTOHa eINH HOX MOKe
ДаdoBeTe Do BbPTeHe Ha obuayHnA
HOK.
- I3noJ3BaIte cAmo TaKINbpe3epBHN qactn n npHaadJeXHocTn, KOtO ca doCTaBeHn nn npenOpbuaHn OT npOn3BOIDTeJI. I3noJ3BaHeTo Ha dpyrN qactn BOiNo Do He3a6abHa 3aRy6a Ha npTeHcInTe 3a rapaHcN.
He n3npaaepaaymaaatepebute

I KpaKaTa Da He ca B 6JN3OCT NnI NpO BbPTaUte ce yactn. Cb- IeCTByBa OnaCHOCT OT HapaHraBaHe!

BHHMaBaIte 3a ona3BaHeto Ha TnUHa n Cb6IoudaBaYTe MeCTHHe pa3npoe6n. N3noN3BaHeto Ha ypeDa moKe Da e orpaHnueHo NN 3a6paHEno B onpeJeHn DNn (Ha np. B HeJeJn IIN npa3HNuHn Dn), B onpeJeHn YacObe Ha DeHn (Ha np. NO o6yd INn ppe3 HOuTa) INN B onpeJeHn paOnHn (Ha np. KypOpTN, KInNHKn iDp.).
BknHouBaIe MoTopa Cnopei HnCTpyKuNTe I cAmo Toraba, KOrato KpaKaTaBn ca Ha cnryphO pa3ctOraHne ot pe
HnHnHnHnHnHnHnHnHnHnHnHnHnHnHnHnHnHnHnHnHnHnHnHnHnHnHnHnHnHnHnHnHnHnHnHnHnHnHnHnHnHnHnHnHnHnHnHnHnHnH n Hn Hn Hn Hn Hn Hn Hn Hn Hn Hn Hn Hn Hn Hn Hn Hn Hn Hn Hn Hn Hn Hn Hn Hn Hn Hn Hn Hn Hn Hn Hn Hn Hn Hn Hn Hn Hn Hn Hn Hn Hn Hn Hn Hn Hn Hn Hn Hn Hn Hn H n H n H n H n H n H n H n H n H n H n H n H n H n H n H n H n H n H n H n H n H n H n H n H n H n H n H n H n H n H n H n H n H n H n H n H n H n H n H n H n H n H n H n H n H n H n H n H n H n H n H.
He pa6oTe c ypea, ako cTe n3-MopeHn Hn HeKOHueHTpnpaHn Hn CneJ yNOTpe6a Ha aIKOXOJ Hn MeDnKaMeHTn. CBoeBpeMeHHo cn npaBeTe nouBKn. IOnxoxJaTe pa3ymHo KbM pa6oTaT.
- Пов体现在 на paбота вимаьte 3a 6e3oIacHOTO NOLOXKeHne,OC6eHO cnPЯMoHaKNoHa.Pa6oTeTe BnHaRn HAnpeuHo HaHaKNoHa,HNKORA Bbpxy CkNoHa IIN HADOny.BdTe Oco6eHo BHIMATEJIHH,KOraTO npOMEHrTe Nocokata Ha DBNXeHne NOHaKNoHa.He pa6oTeTe NO n3BbHpeJHO CTpbMHN HaKNoHn.
- YnpabJbBaIte ypeJa cAmo 6aBHO.
BG
Быдete ocobeho BHHMaTeHn, KOraTo 6pbuatae,doBnJxabaTe KbM ce6e cn nIIN BpuaTe ypeDa B o6paTHa Nocoka.
BknIOuBaIte ypeDa BnMaTeJHo, KaKTo e cnopeyka3aHnraTb Ta3n HnCTpykU. BnMaBaIte 3a Heo6xo- DImata OTdaJIeueHocT Ha KpaKaTa OT BbpTAAIte ce HOKObE.
He haklaHnTe ypea npc CTapTnpaHETO,OCBeH aKO TOBa He e HEO6xoDIMO pRn nPnBnKBaHe BbB BnCOKa TpeBa.BTo3n cnyaHaknoHete ypeDa Ype3 HaTnCK Ha dpbXkTa TaKa,Ye npedHnTe KOJIeHa Hypea Jeko Da ce NobdnHaT. IpOBepaTe BNarN, daII npbUte CeHAMnPaT B pa6OTHO NOJoxKeHne, Ppei Da BVbpHeTe ypeDa B N3XODHO NOJoxKeHne Ha 3emrTa.
He pa6oTe 6e3 KoW 3a Cb6npaHe Ha TpeBaTa NII npEJa3nTeJ cpeUy yApn. CToIte BInHarN daJeu OT OTBopa 3a n3XBbPJIHe.

BHHMaHHe onaCHOCT! HOXbT ce DnBXn no nHePzna. CbIeCTByBa onaCHOCT OT HapaHraBe.
- YpeIbT He 6nBa Da ce NOBnra nn TpaHCnOpTnpa, DOKaTO MOTOpbT pa-60Tu. N3KJIuOye ypeDa, aKO Tp8Ba Da ce CbHe 3a TpaHCnOpTnpaHe, aKO Tp8Ba Da ce IpeKocn MrcTo 6e3 TpeBa n aKO Tp8Ba Da ce IpeHece Do NNOT PLOUHTe 3a KOCHe.
- Пдьркай Te BinhariчNTи OTny-WeH OTbopa 3a ИXBbpJrHeTo Ha TpeBaT.OTcTaPraHЯBaIte OkocHaTa TpeBa cAmO, KOraTO ypeDbT e B NOKoN.
He octabry Te ypea 6e3 Hau30p Ha MRCTO TO 3a KOceHe.
He pa6oTeTe c noBpeDen, Hen3npaBEN nI npemOnTupan 6e3 oO6peHneTo Ha npOn3BODntela ypei. He
n3noJ3BaIte ypeDa c nobpeHn npnc- noc6JIeHn 3a 6e3OpacHOCT nIn 3a- uNTa nIn IINcBAuN npncnoc6JIeHn 3a 6e3OpacHOCT kATO npncnoc6JIeHn 3a OTKIOHRAHe n/Inn yIaNbAHe Ha TpeBata.
He npoeotctbnaite ypeia.Pa6oTeTecamOBnocoueHnpa6oTeHOBXbaTn He npomeHnTe HacTroPkataHapeYJNaTopa KbM MoTopa.He n3noJ3BaITe MaunHcMaJka MoHocT3a TeKKa pa6ota.He n3noJ3BaIteypeia 3a cei, 3a konTo Toi He e npedHa3HaueH.
He n3noJ3BaIte ypeDa B 6n3ocTdo 3aapanm TeuHocn nn raoBe. Pnp HeCpa3BaHe CbueCTByBa ONaCHOCT OT NOkap nn EKcnIO3n.
- Hnkora He noBnraIte nIiNe Hocete ypeDa, DOKaTO MOTOpbT pa6OTn.
- I3KJIOUeTe ypeDa, n3BaJeTe uenceJa n ce yBepTe, Ye BCNUKN NOdBnKHN Yactn Ca B NOKOJ:
- BnHaN, KOraTo OCTaBNTe ypeDa nI He e 6nI nn3BaH,
-праздд отстранite NOBpedaTа Илп праздд отстранite поблел м в Канала 3a ИЗХБьрлар, -праздд отстранite NOBpeDA Илп праздд отстранite NOBpeDA Илп праздд отстранite NOBpeDA Илп праздд отстранite NOBpeDA Илп праздд отстранite NOBpeDA Илп праздд отстранite NOBpeDA Илп праздд oT StPahnte NOBpeDA Илп праздд oT StPahnte NOBpeDA Илп праздд oT StPahnte NOBpeDA Илп праздд oT StPahnte NOBpeDA Илп праздд oT StPahnte NOBpeDA Илп праздд oT StPahnte NOBpeDA - ako eIeKtpnuecknT Ka6eI e noBpeDeH nIe 3aIneTeH,
-празда перлесати постinte урета, - ako e nonaHaJI npedMeT. IpoBepTe 3a noBpeHnNo ypeDa nHaIpaBte Heo6xOdImnpeMOHT, PpeHn Da rO BkIIOUHTe OTHOB N da pa6OTnte c Hero,
- B cnyuaye ypeBbT 3aOnue He da Bn6pnpa n3BbHpeDnHO cInHo, e Heo6xOdIma He3a6abHa npOBepka.
He nocTaBraIte pBueTe IIN KpaKaTa B 6n3OCT INN NOB BbPTaUnte ce qactn. Pn KocHe Cbc Cbpn, He 6nBa Da ce 3acTaba nped OTBopa 3a
n3XbBpJHe Ha TpeBaTa.
PoaepbkkncbxpanHeHne:
- IorpnxkeTe ce 3a TOBa BCnUKNr-NonK, BnHTOBe n 6oTObE da ca do6pe3aBnTn UpeDbT Da e B 6e30nacHOcBCTOAHne 3a pa6ota.
He ce onntBaIte da pemOHtnpaTe camn ypeDa, TOBa e Bb3MOxHO, aKO nMaTe Heo6xOIMOTO o6pa3OBaHne. BcunKn DeiCTBn, KOnTO He ca OnncaHN B Ta3N INHCTpyKUry, MOraT Da ce N3BbPWBat cAmO OT YnblHOMOueH OT Hac cepBn3.
CbXpaHЯBaIte ypeHa Ha cyxo MrcTo n daJeue ot deua.
-Быдete rpnKINBn KbM ypeDa.ПОД-Быдete rpnA6BmBnBnBpyaJaEIpAeHpHpHpHpOa-3a ДыржайTe INHCTpyMeHTnte OCTprN TOBa npIcNocO6JIeHne 3a 3akayBaHe.
HnCTn,3a Da MoarT Da pa6oTt no- DObpe nno-6e30ancho.CneDbaTe yKa3aHnraTa 3a noDpBxka. Ka6eIbT da e daJeu OT HnCtpymeHa 3a p3aHe.HoxbT 3a KocHe moKe da NOBpeN Ka6eNa n Da doBeDe Do KOHcMeHrTe npncOcO6JIeHnETo 3a P3aHe. TaKT C npOBexJaUe eJekTpueCTBO qactn. PpHnHnHO eJekTpuecknT - PpOBePraIe peIOBHO yCTPOH-PpOBePraIeTeaepoBIOBpaMnHaBa 3aI pa6OteCTBOTo 3a yJaBHe Ha TpeBaTa 3a UINc cypeDa.
e186raBbaBbONHnHnHnNoTO cbc 3a-N36raBai 3emEHn YactN (HaNP. MeTaJHn orpa- dN, MetaJHn CTbJ6OBe). - Използваши само рашишни
eilektpruychkn ka6en ot Tiuna H05VV-F ии H05RN-F, koitto da e haH-MHoro 75 M nbIbI r 3a n3noJ3BaHe
Ha oTKpIto. HanpeyuHTo ceueHne Ha
npoBODnka Tp6Ba Da e NaH-Manko
1,5 MM². Прdiу ynoTpe6a BInarN
HanblHo pa3BvBaIte ka6eJa. Прoe-. Прoe
peTe ka6eNa 3a noBpeDi.
3a npnKpeBHeTo Ha eJeKtpnueckn
e rpuabBnBBbpybae npaDnHoo-3a TOBa npncnoc6JIeHne 3a 3aKaUBaHe.
BnHmabaTe no BpeMe ha pa6ota Ka6eIbT da e daJeU OT INHcTpymeHTa 3a pr3aHe. HoxbT 3a KocHe MoKe da NOBpeNi Ka6eNa I Da IOBeDe Do KOHTaKT C npOBexJaUn eJeKtpuYeCTBO qactn. PpHunHo eJeKtpuYeCKnT
BaNTeAeTIOBpOyIpaMnHaBa 3aI paBoTe-
n3HOCBaHe n DeΦopMnpaHe. OT CbO6paKeHn 3a CNrpyHocT CMeHete n3HOceHnte NnN NOBpeHn Yactn. Pn NoCTaBHeTo Ha Hoxa 6bDeTe OcOBeHO BnIMaTeJHn, 3a Da He 6b- dAT npNTuChAtn npbCTnte Bu MeKdy BbPTaUHTe Ce HOXOBe N HEnoDBrK-Hnte Yactn.
- PpOBepTe, daHn ce n3noJ3BaT pe- PpOBepTea HnKnnnKnnnKnnnpea da ce npe3epBHN YactN, KOnTO ca pa3peWeHn DOTBpaTAT ONaCHOCTN.
OT npoN3BOJNTeIa. He cBbP3BaIte NOBpeDeH eJeKtpUeCKn Ka6eI C eJeKtpUeCKaTa MpeXa. EJeKtpUecka 6e3onacNoCT: He nnaTe NOBpeHn eJeKtpUe-
BHMaBaTe 3a ToBa, daHn Happe-BHn XeHneTo NO eJekTpnuEcKaTa MpeXa CbBnada c DaHHnte OT TaBeIkata C HOMHaHNHe CTOnHOCTN.
- ПО ВьзМожноctВКЛючвайTe уретаВ
KoHTaKT CbC 3aunTa Cpeu yTeueH TOK (FI-npeKbcBauch) cN3KnUoyBauch TOK He noBuee ot 30mA
He n3noJ3BaIte ypeDa aKO Ka6eJIbTe NOBpeDeH NIn N3HOceH.
- I3KIIIOUeTe ypeDa n I3BaIeTe ⅢeNce- Ta oT KOHTaKTa, aKO eJIeKtpuYeCKnT Ka6eI e NOBpeDen. AKO npoBOdHnKbT Ⅲe NOBpeDn YpeDa, Tp8Ba Toi Da 6bJe CMeHeN OT pOn3BODnteJn NIn HeROBnA cepBn3 NIn OT JInCe C No
peTeDnHnnKnaIbIIOKnaIpaHa da ce npe- DOTBpataT ONaCHOCTN.
He cBbP3BaIte NOBpeH eJIeKtpnueckn Ka6eI c eJIeKtpnueckKaTa MpeXa. He nnaIte NOBpeHnE eJIeKtpnue
TeKaBnH, TOnKaTHBp3aH C eJekTpueckaT MpeXa. NObpeHnT Ka6e MoKe Da DoBeDe Do DOnnp Ha npOBexJaUn eJekTpueCTBO YaactN.
0670 onncahne
Grizzly Service-Center