
Landroid WG793E - Lawn mower WORX - Free user manual and instructions
Find the device manual for free Landroid WG793E WORX in PDF.

| Product type | Robotic lawn mower |
| Brand | WORX |
| Model | Landroid WG793E |
| Supply voltage | 100-240 V ~ 50/60 Hz (transformer included) |
| Maximum working area | Up to 500 m² (depending on wire configuration) |
| Maximum slope | 20° (35 %) |
| Cutting height | Adjustable (estimated 20-60 mm) |
| Cutting width | Not specified (estimated 18 cm) |
| Blade type | 4-sided reversible cutting blades |
| Battery | Rechargeable lithium-ion |
| Theft protection | 4-digit PIN code |
| Sensors | Tilt (blade stop when lifted), collision |
| Programming | Adjustable mowing schedules via integrated keypad |
| Charging | Automatic on charging dock with wire guidance |
| Installation | Boundary wire, pegs, and distance gauge included |
| Maintenance | Regular cleaning of grass clippings, blade rotation every month |
| Winter storage | Recharge the battery, store indoors, unplug the dock |
| Safety | Automatic blade stop when lifted |
| Power cable length | 15 m |
| Accessories included | Boundary wire spool (≈350 m), pegs, spare blades, hex key, distance gauge, installation guide |
Frequently Asked Questions - Landroid WG793E WORX
User questions about Landroid WG793E WORX
0 question about this device. Answer the ones you know or ask your own.
Ask a new question about this device
Download the instructions for your Lawn mower in PDF format for free! Find your manual Landroid WG793E - WORX and take your electronic device back in hand. On this page are published all the documents necessary for the use of your device. Landroid WG793E by WORX.
USER MANUAL Landroid WG793E WORX
text_image
WORX LANDROID® UNMANNED MOWING VEHICLE INSTALLATION GUIDE →LANDROID®
UNMANNED MOWING VEHICLE
INSTALLATION GUIDE

Installation guide EN P04
natural_image
Architectural sketch of a modern house with parked cars and a small robotic arm, surrounded by trees and outdoor furniture (no text or symbols)How to install your Landroid®L
The installation of the Landroid^®L is easy. Depending on the size of your garden, the entire process only takes a short amount of time. If your are like us, you hate having to waste your precious free time mowing your lawn. The Landroid^®L will prove to be your best investment eliminating the need to mow your lawn ever again. You can watch the installation demo video at www.worxlandroid.com.
The Android®L loves to mow
It is designed to mow often, maintaining a healthier and better looking lawn than ever before. Depending on the size of your lawn, the Landroid^ may be programmed to operate at any time or frequency with no restrictions. It is here to work for you.
Operating costs
Worried about your electricity bill? Let's do the math: if you let your Landroid^®L work 3 hours a day, 5 days a week, 25 weeks a year, your Landroid^®L will cost you approximately £4 in electricity*. Yes, £4 a year. A fraction of what you would spend in petrol for your noisy, polluting petrol mower.
Preparation
In the box
natural_image
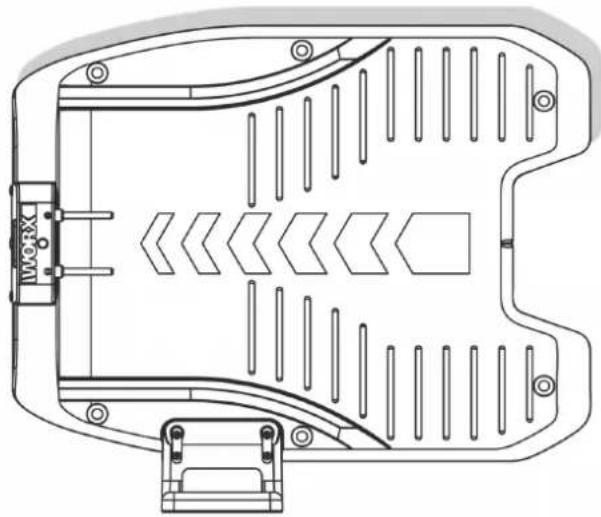
Technical line drawing of a mechanical housing or enclosure component (no text or symbols)
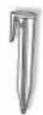
Base retention pegs

Spare blades
Wire pegs
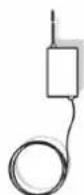
Power cord with AC/DC transformer
Distance gauge

natural_image
Circular diagram showing a mechanical component with an arrow indicating rotation or movement (no text or symbols)
Hex key
From your shed

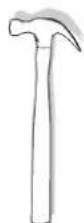
Scissors Hammer
natural_image
Top-down technical line drawing of a mechanical component with no visible text or symbolsLandroid®LCharging base
Boundary wire reel

Owner's manual
Installation guide
Programming and trouble shooting guide

Warranty statement
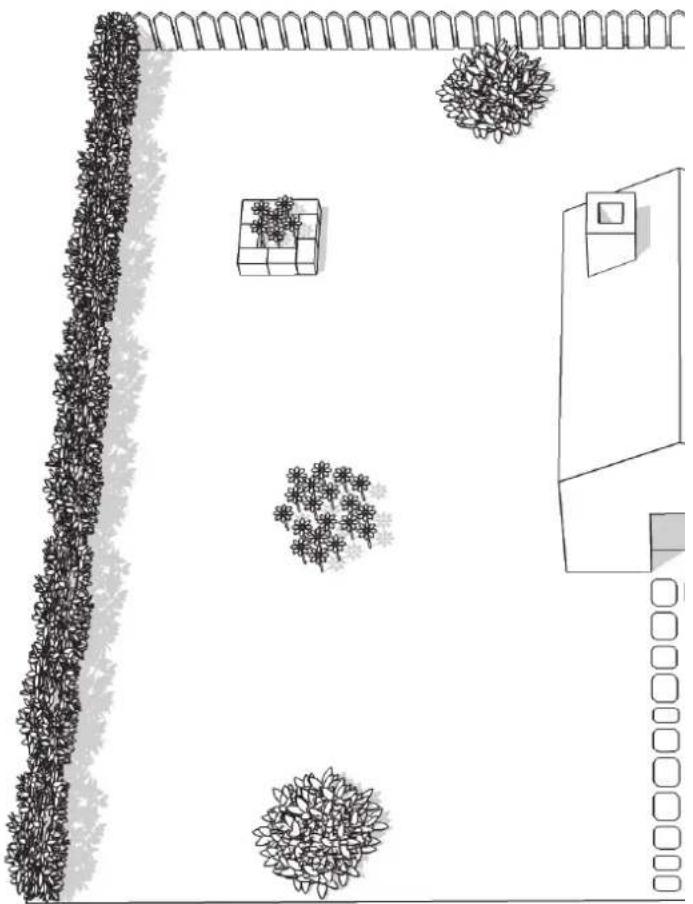
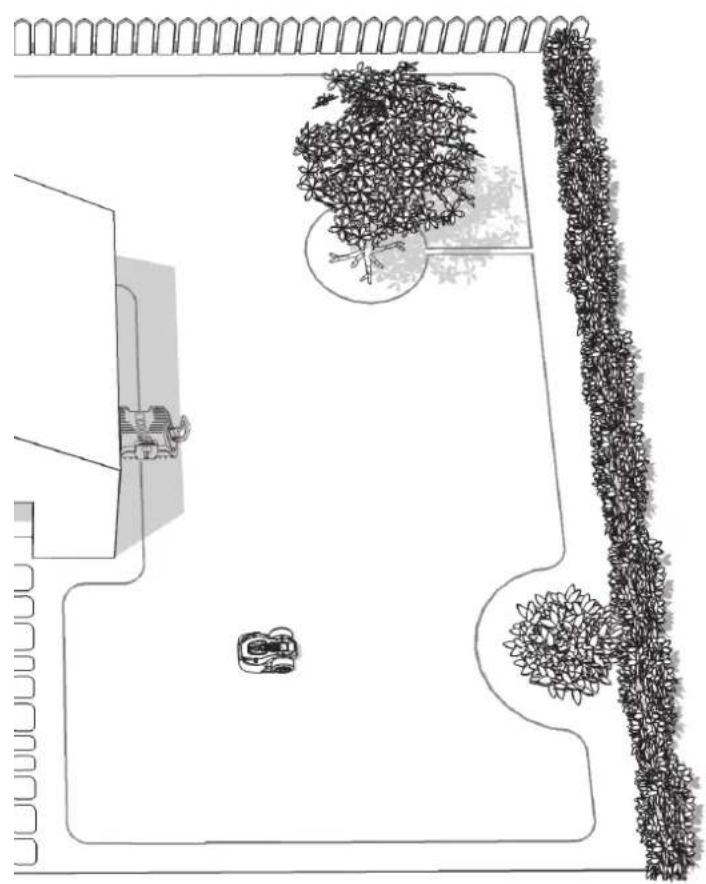
Landroid®L's new home-your garden
Let's start by having a closer look at Landroid^®L 's new home—your lawn—highlighting the areas where it can safely go and areas it's best for Landroid^®L to avoid.
natural_image
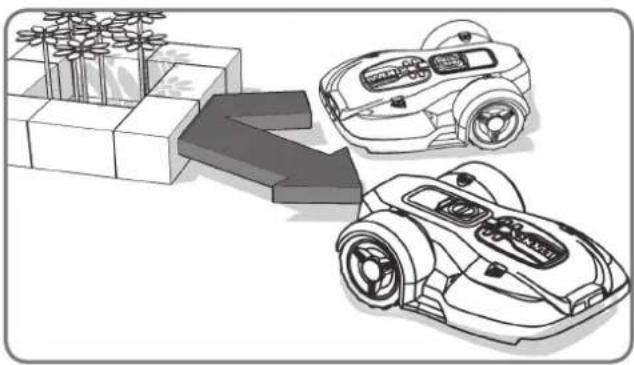
Illustration of two robotic vehicles with a directional arrow indicating flow or interaction (no text or symbols present)Obstacles that can be hit
When hitting any obstacle that's rigid, stable and taller than 15cm—such as a wall or a fence—your Landroid®L will simply stop and re-direct away from the obstacle.
natural_image
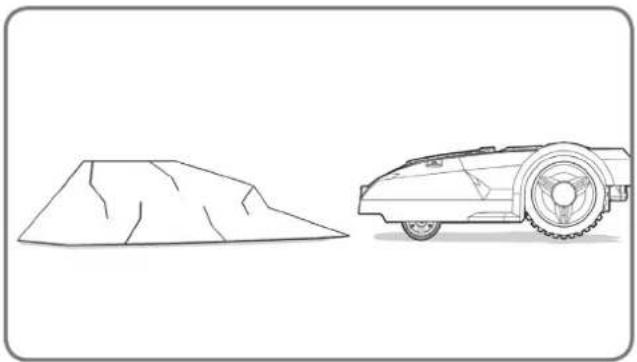
Line drawing of a vehicle with a broken roof and a tracked car (no text or symbols)Stones
Stones that are heavy enough not to be moved by your Landroid^®L can be safely hit. However, if any stone has an inclined surface that your Landroid^®L can climb, you should either remove it or exclude from the working area.
natural_image
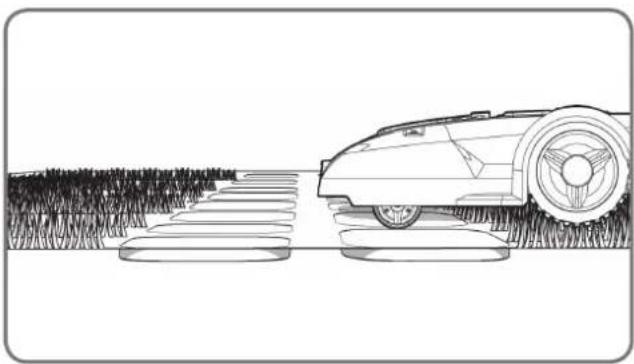
Line drawing of a robotic lawn on a grassy path with a cam, no text or symbols presentDriveways
If your driveway is level with your lawn, without any protruding surface, the Landroid^®L can freely run over it. If you'd like the Landroid^®L to avoid it, then only a 10cm* space between the Boundary Wire and the driveway is needed.
If it's covered with gravel, you should not allow the Landroid®L to travel over it, using the distance gauge in this case, keeping a 45cm* space between the boundary wire and the driveway.
*This is the recommended distance. Use the provided distance gauge to ensure proper installation.
natural_image
Top-down architectural layout diagram showing wall, tree, and room features (no text or symbols)
natural_image
Illustration of a garden scene with flowers and leaves, no text or symbols presentFlowerbeds, ponds, pools...
You certainly don't want your Landroid^®L to mow your flowers, or fall into the water. These areas should be avoided.
natural_image
Top-down architectural sketch of a building with a wall and two vertical structures, no text or symbols present
natural_image
Line drawing of a vintage car on a curved road (no text or symbols)Depressions and bumps
In the case of large bumps or dips, please consider if the blades could touch the ground; if this is the case, either make the inclines smoother or exclude those areas from your Landroid®'s operation.
text_image
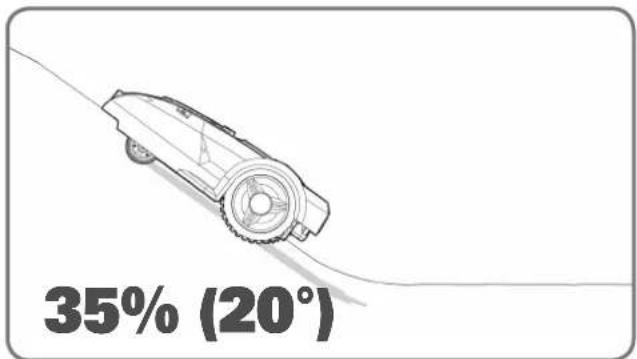
35% (20°)Slopes
Your Landroid^®L has the ability to safely climb slopes up to 35% (20°), so just avoid anything steeper than this.
natural_image
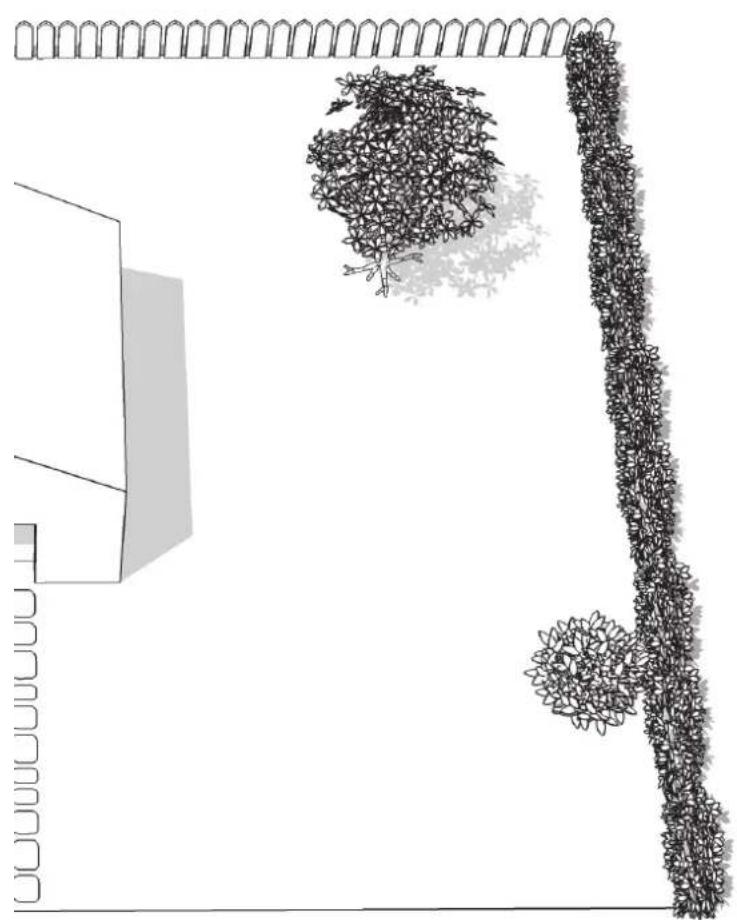
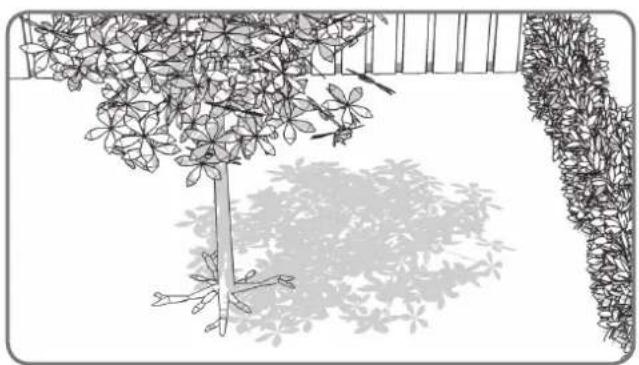
Black-and-white line drawing of a garden scene with a tree, shrubbery, and a fence (no text or symbols)Trees
If there are roots emerging from the ground, this area should be avoided in order not to damage the roots.
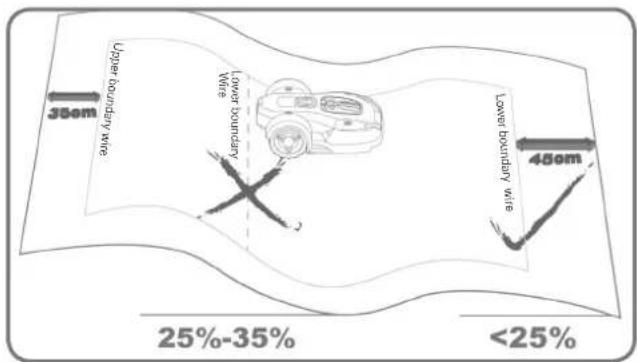
text_image
300m Upper boundary wire Lower boundary wire Lower boundary wire 480m 25%-35% <25%Placement of Boundary Wire on slopes
The Upper Boundary Wire should NOT be placed on slopes steeper than 35% (20°). The Upper Boundary Wire should have a distance of at least 35cm between any obstacles. The Lower Boundary Wire should NOT be placed on slopes steeper than 25% (15°). The Lower
Boundary Wire should have a distance of at least 45cm between any obstacles when it is positioned on a slope that is 25%.
Marking out Landroid®L's territory within your garden
Your Landroid^®L needs to know where to mow. This is why you have to mark its working area with a boundary wire that will form an invisible fence. This wire will also guide your Landroid^®L to its charging base. If your neighbor also uses a Landroid^®L , then you must keep a space of at least 2 metres between your Boundary Wire and your neighbors.
Please be aware that your Landroid® L will not be able to receive a signal from the Boundary Wire beyond the distance of 25m.
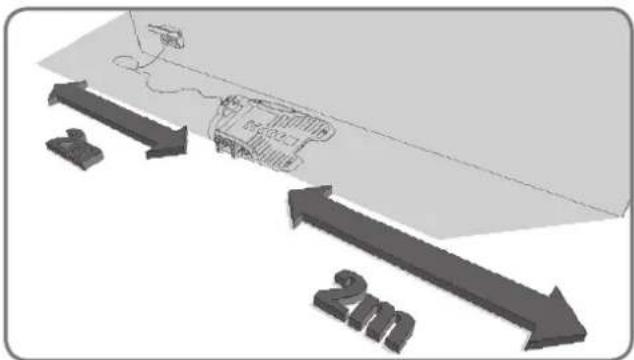
First of all, locate the best spot for the charging base, taking into account where your nearest outdoor electricity socket is. The charging base has a 15m power cord.
NOTE: Make sure the transformer and the electrical socket are kept in a dry area at all times.
text_image
Diagram illustrating a 2m scale with directional arrows and a small embedded diagram, likely representing a technical or engineering concept.The charging base should be placed along a straight line—allow 2 meters at both the front and the back. If possible, place the charging base in the shade—batteries are better recharged in a cool place.

natural_image
Diagram of a robotic car with a crossed diagonal line crossing it, no text or symbols present
natural_image
Diagram showing a car and a robot crossed by a diagonal line (no text or symbols)Make sure it is on a flat area, clear of any obstacles.
natural_image
Top-down architectural layout diagram showing a garden with trees, pathways, and a small room (no text or symbols)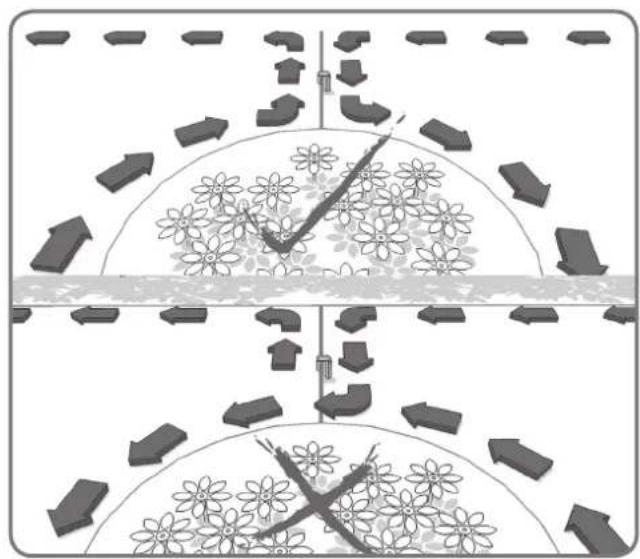
natural_image
Diagram showing two scenarios of traffic flow with directional arrows and flower patterns (no text or symbols)An island is an area that sits inside your lawn where you don't want Landroid^ to go. The boundary wire starts from the mowing boundary, goes straight to the island, around it and back to the boundary as shown by the arrows on the picture.
natural_image
Top-down architectural sketch of a garden layout with trees, a dog, and a car (no text or symbols)
text_image
1mIf your lawn has two or more separate areas connected to each other by means of a corridor, this should be at least 1 meters wide.
natural_image
Diagram of a chemical reactor with surrounding particles and flow arrows (no text or labels)If your lawns are not connected by a corridor that's wide enough, then you'll have to pick your Landroid^ up and move it to the other lawn. Landroid^ will mow this lawn no problem, but you'll have to bring it back to the charging base when the battery runs out.
natural_image
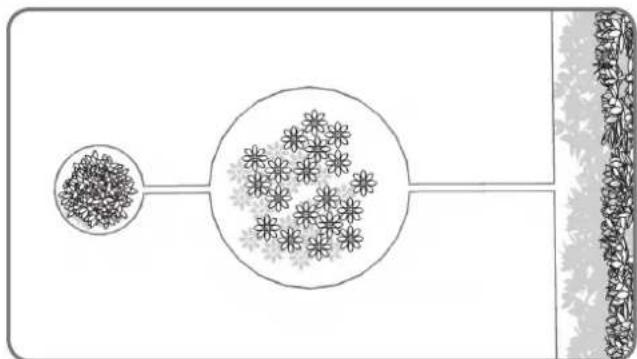
Diagram showing a container with granular material entering a circular structure, connected to a vertical strip of plant material (no text or symbols)In the case of two islands that are close to each other, it would be convenient to lay out the wire as illustrated above.
The Landroid®L can travel freely over the boundary wire in between the islands and the mowing boundary.
natural_image
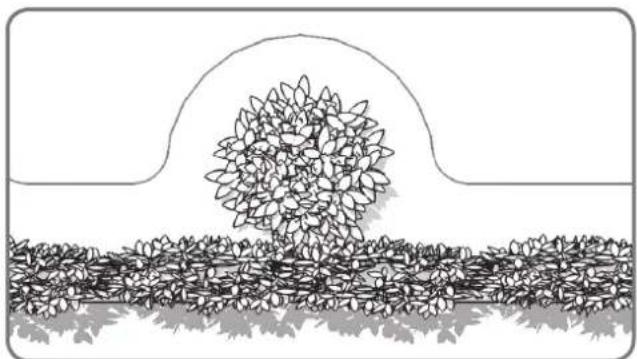
Black-and-white line drawing of a garden scene with a central leafy tree and surrounding shrubbery (no text or symbols)A forbidden area that's close to the mowing boundary should be a part of the boundary itself, as shown in the picture.
Installation
Pegging your boundary wire
We recommend that you first mow the lawn where the wire is to be laid using a normal lawn mower or a grass trimmer. This ensures that the wire is laid as close to the ground as possible so the Landroid ^® L does not accidentally cut the wire. The boundary wire is powered with a very low voltage so that it is totally safe to human beings and pets.
natural_image
Diagram showing a 3D block structure with a magnified inset of a mechanical component (no text or symbols)1
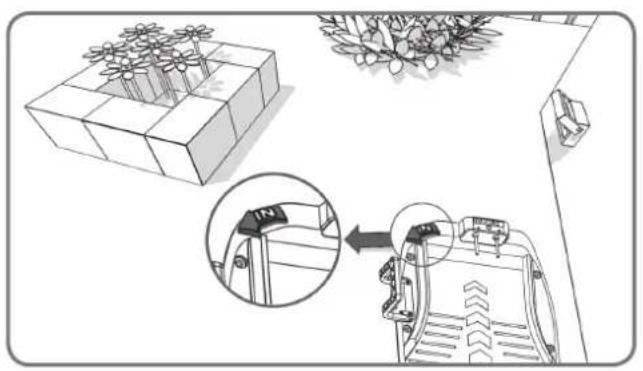
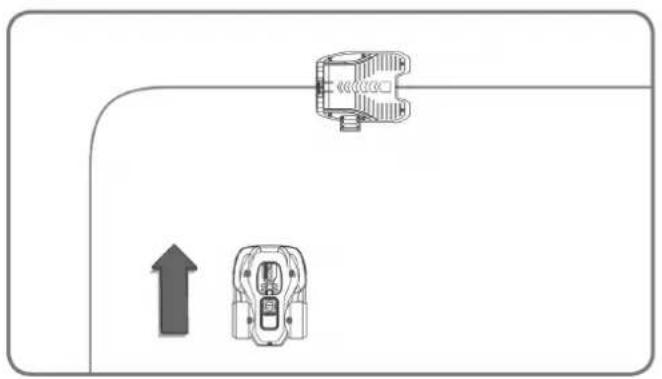
Place the Charging Base in its designated spot, without fixing it permanently. The "IN" arrow should be oriented so that it indicates the inside of your lawn.
natural_image
Technical line drawing of a mechanical housing component (no text or symbols)2
Feed the boundary wire through the tunnel underneath the charging base.
natural_image
Diagram of a vehicle chassis with attached components and directional arrows indicating flow or movement (no text or symbols)3
Leaving about 1 meter in length of extra wire, start from the rear of your charging base and begin pegging the wire along the boundary. When you've finished laying the wire along the boundary back to the charging base, leave another meter of extra wire and then cut it.
text_image
Diagram illustrating brick wall structure with dimension annotations and load arrows
text_image
30cm 45cm
text_image
800 450m
text_image
10cm 10cm
natural_image
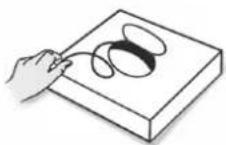
Illustration of a hand using a hammer to tighten or mark on a surface with three nail pins (no text or symbols)4
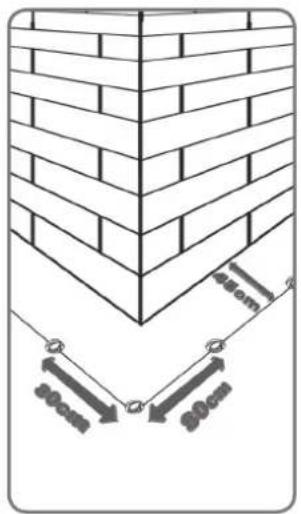
When laying the boundary wire, use the distance gauge to keep a 45cm* space between the wire and the boundary. However, in the case of an obstacle that is level with ground and safe for the Android®L to run over, such as a driveway or sidewalk, then only a 10cm* space is needed.
Each boundary peg should be placed around 80cm apart.
Knock the boundary pegs tight to the ground with the help of the hammer, although avoid putting too much pressure on the wire. Keep the boundary wire straight and tight between the pegs, there should not be any slack wire.
* This is the recommended distance. Use the provided distance gauge to ensure proper installation.

natural_image
Diagram showing a fence and hedge wall with two circular feet at the base (no text or symbols)
natural_image
Diagram showing directional arrows and geometric shapes on a path, surrounded by flowers and trees (no text or symbols)5
Ensure the Boundary Wire is perfectly straight in each corner.
6
When making an island with the boundary wire, follow the path as shown. The wire should run from the perimeter to outline the defined island and then return back to the perimeter. The boundary wire in between the island and perimeter should be laid close together and held in place by the same boundary peg. During operation, the Landroid^®L will be able to freely pass over this part of the wire.
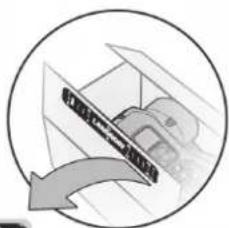
Connect the base to the boundary wire
natural_image
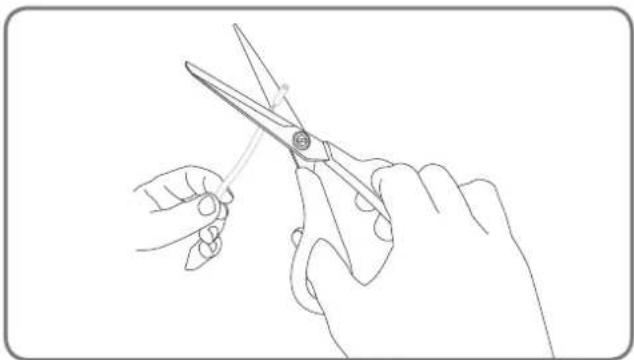
Line drawing of hands using scissors to cut a piece of paper (no text or symbols)1
Cut the two ends of the wire to a length that's appropriate convenient for reaching the clamps.
Strip the two ends of the wire.
text_image
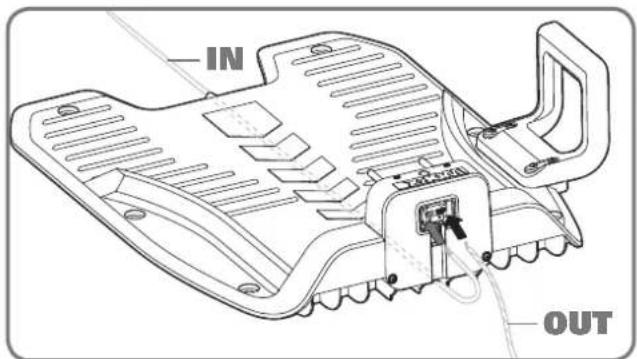
IN OUT2
When connecting to the charging base there will be an IN-wire and an OUT-wire, as shown. Connect the IN-wire to the red clamp of the charging base and the OUT-wire to the black clamp. Then close the cover.

text_image
IN OUT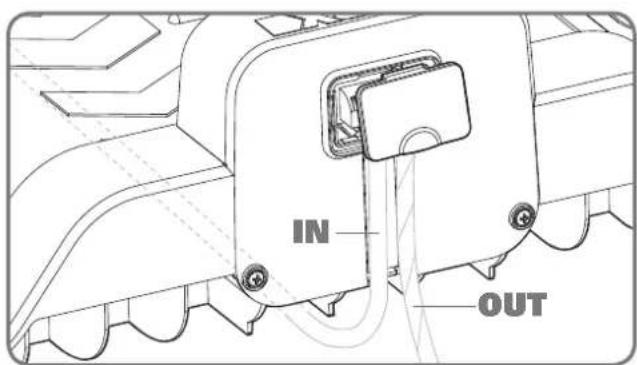
text_image
IN OUT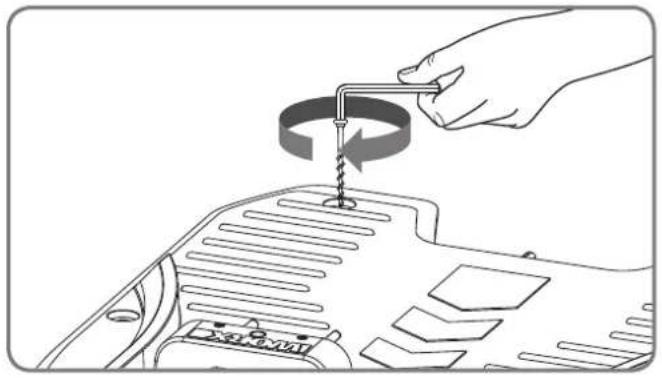
natural_image
Line drawing of a hand using a screwdriver to adjust the internal components of a car engine (no text or symbols)
text_image
1 2 a b 2 1
natural_image
Technical diagram of a mechanical assembly with internal components and directional arrows (no text or labels)
natural_image
Technical line drawing of a mechanical component with no visible text or symbols3
You can now permanently fix the charging base on the ground by tightening the supplied Base Retention Pegs with the supplied Hex key.
NOTE: Make sure the IN-wire is running straight through the tunnel underneath the charging base.
4
Connect the power cord to the transformer and then to the AC electrical socket, the LED on the charging base will turn on. If the LED is off, please refer to the Trouble shooting guide. When connecting, align the notch on the power cord connector (a) with the groove on the transformer connector (b).
Make sure to only screw or unscrew the highlighted piece of the connector.
If the green light does not come on, then check the power connections.
In case the power cord is within the working area, you may bury it as needed.
Turn on and test the installation
This is the exciting part where you can turn your Landroid^®L on for the first time.
natural_image
Diagram showing a vehicle with two directional arrows, one pointing upward and the other in a circular outline (no text or symbols)1
Place your Landroid®L inside the working area, a few meters from the back of the charging base.
2
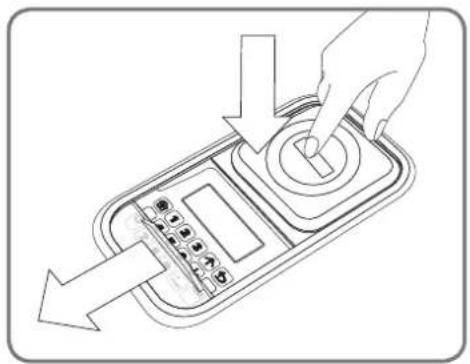
Open the keypad window by pressing the large red button on the top of your Android®L. Press and hold down the Power ON/OFF ⏻ key until the Android®L turns on. Input the default PIN 0000
natural_image
Line drawing of a hand pressing down on a control panel with arrows indicating motion (no text or symbols)
text_image
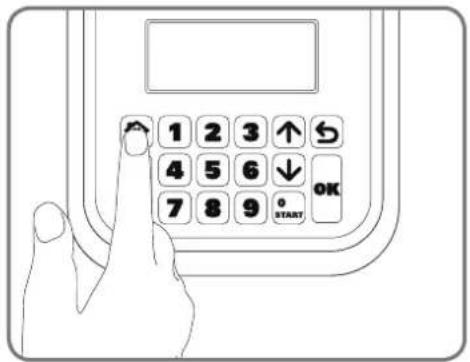
1 2 3 ↑ 4 5 6 ↓ 7 8 9 OK STARTPress the 🔗 key and close the keypad window: your Landroid^®L will now find its way to the charging base. Watch the Landroid^®L as it returns to the charging base and modify the positioning of the boundary wire if necessary. When the Landroid^®L successfully returns to the charging base, this means the installation has been successfully completed! Now your Landroid^®L will start to fully charge.
text_image
1 2 3 ↑ 4 5 6 ↓ 7 8 9 OK START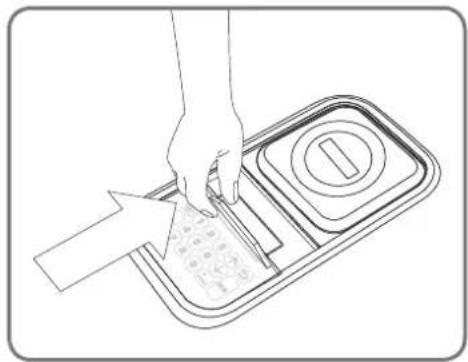
natural_image
Line drawing of a hand using a tool to cut a textured material into a tray with a circular button (no text or symbols)NOTE: If your Android®L is in the charging base during a time you have programmed it to mow, then simply press the STOP button and close keypad window to send it back to mowing.

- If your Landroid^®L is outside its territory, it will not move and the display will indicate "outside working area" error. Just move it inside its territory and repeat step 2.
- If your Landroid^ is inside its territory but the display says "outside working area", and the LED is on, it means you clamped the boundary wire ends incorrectly. Just reverse them.
- Your Landroid^®L should always remain switched on. If you ever need to turn it off, then make sure you place it within its boundary area before you switching it back on again.
- Should your Landroid®L stop operating unexpectedly, just press the STOP button, open its keypad window, press its ON/OFF key to ON, correct the problems, press START button, close its keypad window.
NOTE: Please refer to the Programming and Troubleshooting Guide for more information.
Programming
Having finished the installation, it is now time to program the Landroid®L when you want it to go to work by using the keypad display shown below. Please refer to the Programming and Troubleshooting Guide included in the packaging.

text_image
1 2 3 ↑ 4 5 6 ↓ 7 8 9 0 OK STARTReady to go?
The Landroid^ is designed for maintaining your grass at a perfect length during the season, but is not designed for deforesting a jungle.
Before starting it for the first time,
- You should mow your lawn to the desired height.
- Make sure the operating area is clear from objects such as toys and branches...
natural_image
Black-and-white sketch of a simple outdoor garden with a small house, bench, and garden equipment (no text or symbols)- Adjust the cutting height to its maximum level for the first mow and then adjust to your preferred lawn grass height.
text_image
Diagram showing a hand pressing down a valve with an inset dial indicating measurement ranges from 20 to 80 units.Next Spring, let your Android®L start mowing early, when the grass is still short, so that you can avoid a preliminary grass cut.
Keep it sharp

Always wear gloves when adjusting the blades.
The Landroid^®L does not cut grass like other mowers. Its Blades are razor sharp on all 4 edges and spin in both directions for maximum cutting capacity. Each blade of your Landroid^®L has 4 cutting edges. Depending on the frequency the Landroid^®L mows your lawn, the cutting blades will need to be flipped/rotated periodically for a new cutting edge. If your Landroid^®L is programmed to mow the lawn every day then the cutting blades will need to be rotated monthly for the best mowing results. Each cutting blade will last up to 4 months when it is programmed to mow every day. When the cutting blades are dull and worn out, they should be replaced with the spare blades provided with your Landroid^®L . Spare blades are also available at your nearest WORX retailer
Maintenance
Your Landroid^®L is engineered and built to stay outdoor regardless of adverse conditions. Just periodically clean its deck from grass clipping build ups and your Landroid^®L will mow for you trouble-free, year after year, season after season. Don't wash the machine with high pressure squirt gun. This may cause damage of the battery or the machine.
Winter storage
Even though it is tough, we would recommend that you store your Landroid^ in your shed or garage during the Winter. Before storing it, give your Landroid^ a full recharge that will preserve its battery from damage. You can then disconnect the plug of the charging base. A good tip to prolong the life of the battery is to periodically re-charge it during the Winter. A full charge every 3 months will be fine. We'd also suggest that you cover the base with a nylon sheet in Winter time.
Safety
Your Landroid^®L is safe to human beings and pets. First of all, there's a large clearance between the outer border of the machine and the blade. Moreover, the tilt sensors will instantly stop the blades if the unit is lifted from the ground.
Security
Your Landroid^®L is protected by a PIN code. This PIN code prevents unauthorised people from being able to use it. Once it's taken outside its territory, it will not be possible to re-start it by anyone who does not know the PIN code. This also means that you will not able to start your Landroid^®L if you forget your PIN code! We strongly recommend that you write your PIN code here for future reference. Even better, register your Landroid^®L online at www.worxlandroid.com and record your PIN code there. You'll be able to access your PIN code online any time.
Write your PIN code here

natural_image
Architectural sketch of a modern house with parked cars and a small robotic arm, surrounded by trees and outdoor furniture (no text or symbols)natural_image
Technical line drawing of a mechanical component with internal slots and mounting brackets (no text or symbols)
natural_image
Top-down technical line drawing of a device casing with labeled components (no readable text or symbols)Landroid®LLadebasis

Basis-
Haltenägel

Ersatzmesser
natural_image
Circular diagram with a stylized arrow and a document icon, no readable text or symbols present.Schraubenschlüssel
natural_image
Illustration of two robotic vehicles with a directional arrow indicating flow or interaction (no text or symbols present)natural_image
Line drawing of a vehicle with a broken roof and a tracked car (no text or symbols)Steine
natural_image
Line drawing of a robotic lawn on a grassy path with a car in the background (no text or symbols)natural_image
Top-down architectural layout diagram showing wall, tree, and room features (no text or symbols)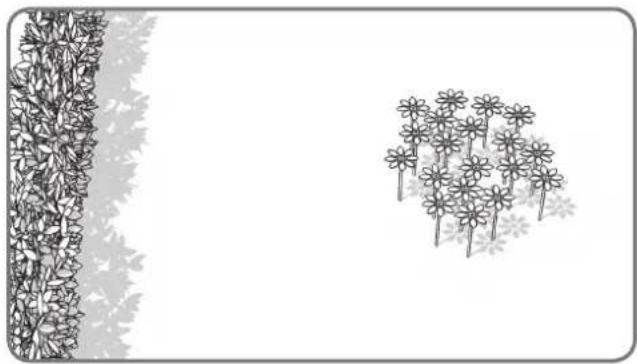
natural_image
Illustration of a garden scene with flowers and leaves, no text or symbols presentBlumenbeete, Teiche, Pools...
natural_image
Top-down architectural sketch of a building with a wall and two vertical structures, no text or symbols present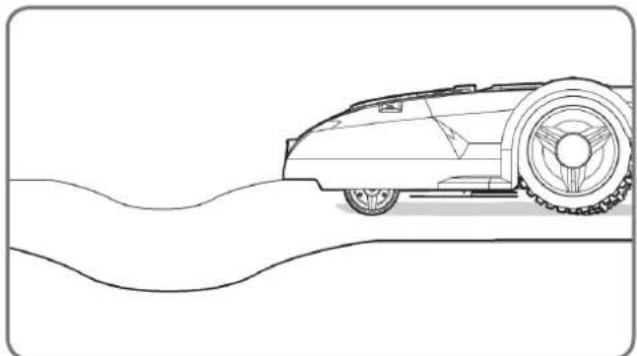
natural_image
Line drawing of a vintage car on a curved road (no text or symbols)Senken und Buckel
text_image
35% (20°)Steigungen
natural_image
Black-and-white line drawing of a garden scene with a tree, shrubbery, and a fence (no text or symbols)Bäume
text_image
Diagram illustrating a process with labeled arrows and a 2m scale indicator, showing directional flow or measurement.natural_image
Top-down architectural plan of a garden layout with plants, pathways, and central circular elements (no text or symbols)
natural_image
Diagram of a robotic car with a crossed diagonal line crossing it, no text or symbols present
natural_image
Diagram showing a car and a robot crossed by a diagonal line (no text or symbols)natural_image
Diagram showing two scenarios of traffic flow with directional arrows and flower patterns (no text or symbols)natural_image
Top-down architectural sketch of a garden layout with trees, a dog, and a car (no text or symbols)
text_image
1mnatural_image
Diagram of a mechanical device with surrounding components and directional arrows, no visible text or symbolsnatural_image
Diagram showing a container with granular material entering a circular structure, connected to a vertical strip of plant material (no text or symbols)natural_image
Black-and-white line drawing of a garden scene with a central leafy tree and surrounding shrubs (no text or symbols)natural_image
Diagram showing a 3D block structure with a magnified inset of a mechanical component (no text or symbols)1
natural_image
Technical line drawing of a mechanical housing component (no text or symbols)2
natural_image
Diagram of a vehicle chassis with attached components and directional arrows indicating flow or movement (no text or symbols)3
text_image
Diagram illustrating brick wall structure with dimension annotations and directional arrows indicating measurements.
text_image
30cm 45cm
text_image
80mm 45cm
text_image
10cm 10cm
natural_image
Illustration of a hand using a hammer to tighten or mark on a surface with three nail pins (no text or symbols)4
natural_image
Diagram showing a fence and hedge wall with two circular markers at the base (no text or symbols)
natural_image
Diagram showing directional arrows and geometric shapes on a paved path, surrounded by flowers and trees (no text or symbols)5
natural_image
Line drawing of hands using scissors to cut a piece of paper (no text or symbols)1
natural_image
Illustration of a hand using a tool to adjust a circular component on a vehicle intake manifold (no text or symbols present)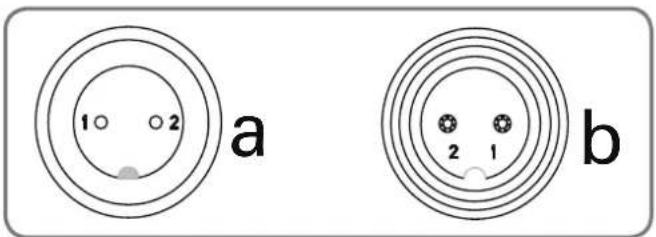
text_image
a b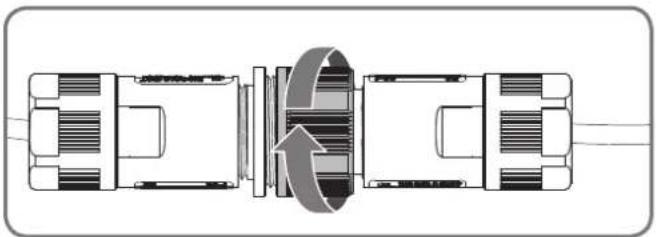
natural_image
Diagram of a mechanical or electrical component with internal structure and rotation arrow (no text or symbols)
natural_image
Technical line drawing of a mechanical component with two screws and a dial (no text or symbols)3
natural_image
Diagram showing two mechanical components with an upward arrow, no text or symbols present1
natural_image
Line drawing of a hand pressing down on a control panel with arrows indicating motion (no text or symbols)
text_image
1 2 3 ↑ 4 5 6 ↓ 7 8 9 OK STARTnatural_image
Line drawing of a hand using a tool to cut a textured material inside a tray (no text or symbols)natural_image
Landscape sketch of a simple house with benches, a water feature, and trees (no text or symbols)text_image
Technical diagram showing a hand operating a mechanical component with an inset dial indicating angular measurements from 0 to 60 degrees.natural_image
Architectural sketch of a modern house with parked cars and a small robotic arm, surrounded by trees and outdoor furniture (no text or symbols)natural_image
Technical line drawing of a mechanical housing or enclosure with internal compartments and mounting brackets (no text or symbols)
natural_image
Top-down technical line drawing of a device casing with labeled components (no readable text or symbols)Landroid®LSocle de recharge
natural_image
Circular diagram showing a mechanical component with an arrow indicating rotation or movement (no text or symbols)natural_image
Illustration of two robotic vehicles with a directional arrow indicating flow or interaction (no text or symbols present)Obstacles sans danger
natural_image
Line drawing of a vehicle with a broken roof and a separate flat roof, both without any text or symbols.Rochers
natural_image
Line drawing of a robotic lawn on a grassy path with a cam, no text or symbols presentAllées
natural_image
Top-down architectural layout diagram showing wall, garden, and room features (no text or symbols)
natural_image
Illustration of a garden scene with flowers and leaves, no text or symbols presentnatural_image
Diagram showing a wall-mounted structure with a curved wall and two vertical plant-like structures, no text or symbols present.
natural_image
Line drawing of a vintage car on a curved road (no text or symbols)Creux et bosses
text_image
35% (20°)Pentes
natural_image
Line drawing of a garden scene with a tree, fence, and hedge (no text or symbols)Arbres
text_image
Diagram illustrating a 2m scale with directional arrows and a small embedded diagram, likely representing a technical or engineering concept.natural_image
Top-down architectural plan of a garden layout with plants, pathways, and central circular elements (no text or symbols)
natural_image
Diagram of a robotic car with crossed diagonal lines indicating no movement or restriction (no text or symbols present)
natural_image
Diagram showing a car and a robot crossed by a diagonal line (no text or symbols)natural_image
Diagram showing two scenarios of traffic flow with directional arrows and flower patterns (no text or symbols)natural_image
Top-down architectural sketch of a garden layout with plants, a dog, and a car (no text or symbols)
text_image
1mnatural_image
Diagram of a mechanical device with surrounding components and directional arrows, no visible text or symbolsnatural_image
Diagram showing a container with granular material entering a circular chamber, connected to a vertical strip of plant tissue (no text or symbols)natural_image
Black-and-white line drawing of a garden scene with a central leafy tree and surrounding shrubs (no text or symbols)natural_image
Diagram showing a 3D block structure with a magnified inset of a mechanical component (no text or symbols)1
natural_image
Technical line drawing of a mechanical housing component (no text or symbols)2
natural_image
Diagram of a vehicle chassis with attached components and directional arrows indicating flow or movement (no text or symbols)3
text_image
Diagram illustrating brick wall structure with dimension annotations and directional arrows indicating measurements.
text_image
30cm 45cm
text_image
80mm 45cm4
text_image
10cm 10cm
natural_image
Illustration of a hand using a hammer to tighten or mark on a surface with three nail pins (no text or symbols)
natural_image
Diagram showing a fence and hedge wall with two circular markers at the base (no text or symbols)
natural_image
Diagram showing directional arrows and geometric shapes on a path, with no visible text or symbols.5
natural_image
Line drawing of hands using scissors to cut a piece of paper (no text or symbols)1
natural_image
Line drawing of a hand using a screwdriver to adjust the internal components of a car engine (no text or symbols)
text_image
1 2 a b 2 1
natural_image
Technical diagram of a mechanical assembly with internal components and directional arrows (no text or labels)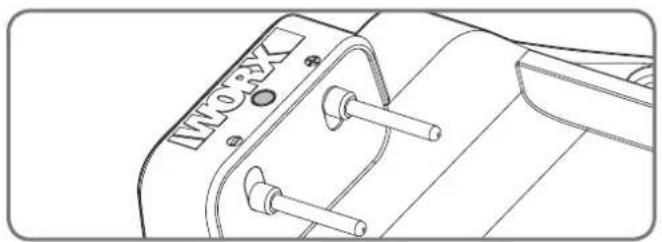
natural_image
Technical line drawing of a mechanical component with no visible text or symbols3
natural_image
Diagram showing a vehicle with two directional arrows, one pointing upward and the other in a circular outline (no text or symbols)1
natural_image
Line drawing of a hand pressing down on a control panel with arrows indicating downward motion (no text or symbols)
text_image
1 2 3 ↑ 4 5 6 ↓ 7 8 9 OK STARTnatural_image
Line drawing of a hand using a tool to cut a textured material into a tray with a circular button (no text or symbols)natural_image
Landscape sketch of a simple house with a small garden, bench, and outdoor furniture (no text or symbols)text_image
Diagram showing a hand pressing down a valve on a car's side panel with an analog dial indicating the value from 20 to 60.natural_image
Architectural sketch of a modern house with parked cars and a small robot, surrounded by trees and outdoor furniture (no text or symbols)Come installareLandroid®L
natural_image
Technical line drawing of a mechanical housing or enclosure with internal compartments and mounting brackets (no text or symbols)natural_image
Top-down technical line drawing of a mechanical component with no visible text or symbolsnatural_image
Circular diagram with a stylized arrow and a document icon, no readable text or symbols present.
Chiave
natural_image
Illustration of two robotic vehicles with a directional arrow indicating flow or interaction (no text or symbols present)natural_image
Line drawing of a vehicle with a broken roof and a separate flat roof, both without any text or symbols.Pietre
natural_image
Line drawing of a robotic lawn with grass and a cam, showing no text or symbolsVialetti
natural_image
Top-down architectural layout diagram showing wall, garden, and room features (no text or symbols)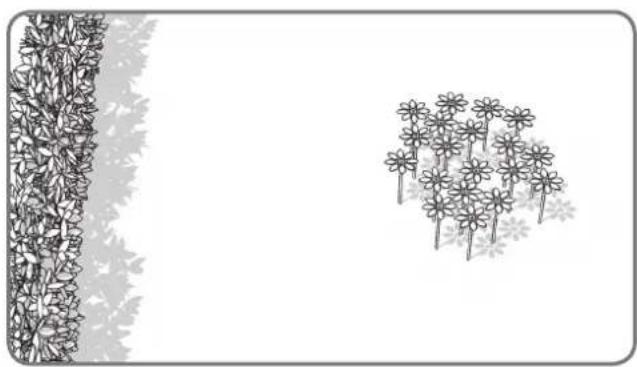
natural_image
Illustration of a garden scene with flowers and leaves, no text or symbols presentAiuole, laghetti, piscine...
natural_image
Diagram showing a wall-mounted structure with a vertical panel and a curved wall with dense foliage (no text or symbols)
natural_image
Line drawing of a vintage car on a curved road (no text or symbols)text_image
35% (20°)Superfici inclinate
natural_image
Black-and-white line drawing of a garden scene with a tree, shrubbery, and a fence (no text or symbols)Alberi
text_image
Diagram illustrating a 2m scale with directional arrows and a small embedded diagram, likely representing a technical or engineering concept.natural_image
Top-down architectural layout diagram showing a garden with trees, pathways, and a central room (no text or symbols)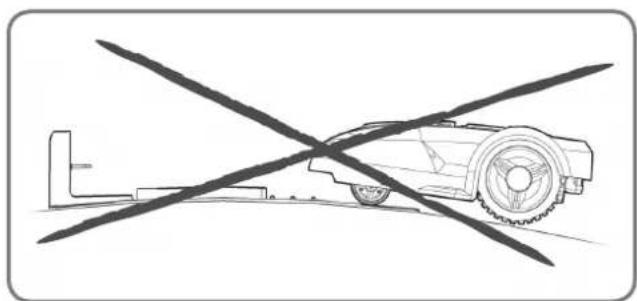
natural_image
Diagram of a robotic arm crossed with a diagonal line, no text or symbols present
natural_image
Diagram showing a vehicle with a cross-shaped crossed-out line and a smaller vehicle on the ground (no text or symbols)natural_image
Diagram showing two scenarios of a water channel with directional arrows and flower patterns, no text or symbols present.natural_image
Top-down architectural sketch of a garden layout with plants, a dog, and a car (no text or symbols)
text_image
1mnatural_image
Diagram of a mechanical device with surrounding components and directional arrows, no visible text or symbolsnatural_image
Diagram showing a container with granular material entering a circular chamber, connected to a vertical strip of plant tissue (no text or symbols)natural_image
Black-and-white line drawing of a garden scene with a central leafy tree and surrounding shrubs (no text or symbols)natural_image
Technical illustration showing a 3D block assembly with a close-up of a mechanical component, no text or symbols present.1
natural_image
Technical line drawing of a mechanical housing component (no text or symbols)2
natural_image
Technical illustration of a mechanical assembly with no visible text or symbols3
text_image
Diagram illustrating brick wall structure with dimension annotations and directional arrows indicating measurements.
text_image
30cm 45cm
text_image
80mm 45cm4
text_image
10cm 10cm
natural_image
Illustration of a hand using a hammer to tighten or mark on a surface with three nail pins (no text or symbols)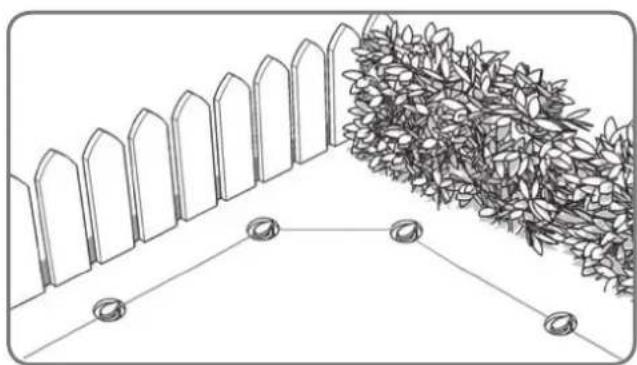
natural_image
Diagram showing a fence and hedge wall with two circular markers at the base (no text or symbols)5
natural_image
Diagram showing directional arrows and geometric shapes on a path, surrounded by flowers and trees (no text or symbols)6
natural_image
Line drawing of hands using scissors to cut a piece of paper (no text or symbols)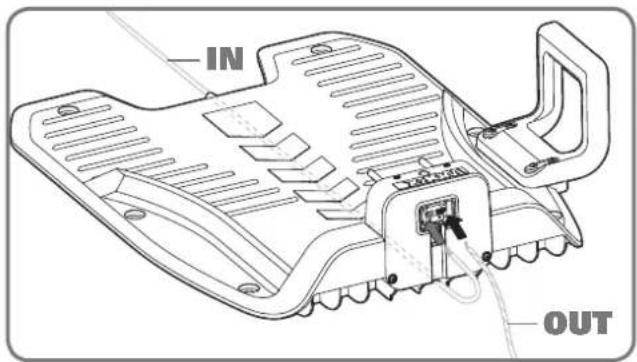
text_image
IN OUT
text_image
IN OUT
text_image
IN OUT1
natural_image
Line drawing of a hand using a screwdriver to adjust or install a circular component on a vehicle hood (no text or symbols)
text_image
1 2 a b 2 1
natural_image
Technical diagram of a mechanical assembly with internal components and directional arrows (no text or labels)
natural_image
Technical line drawing of a mechanical component with no visible text or symbols3
natural_image
Diagram showing a vehicle with two directional arrows, one pointing upward and the other in a circular outline (no text or symbols)1
natural_image
Line drawing of a hand pressing down on a control panel with arrows indicating motion (no text or symbols)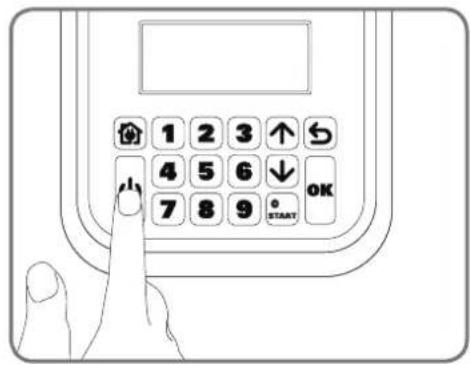
text_image
1 2 3 ↑ 4 5 6 ↓ 7 8 9 OK STARTnatural_image
Line drawing of a hand using a tool to cut a textured surface into a tray with a circular button (no text or symbols)natural_image
Landscape sketch of a simple house with benches, a pool, and trees (no text or symbols)text_image
Technical diagram showing a hand operating a valve with an inset dial indicating dial positions from 20 to 60 degrees.natural_image
Architectural sketch of a modern house with parked cars and a small robotic arm, surrounded by trees and outdoor furniture (no text or symbols)natural_image
Technical line drawing of a mechanical housing or enclosure with internal compartments and mounting brackets (no text or symbols)
natural_image
Top-down schematic of a device casing with labeled components (no readable text or symbols)Landroid®LBase de carga

natural_image
Circular diagram with a stylized arrow and a document icon, no readable text or symbols present.
Llave hexagonal
natural_image
Illustration of two robotic vehicles with a directional arrow indicating flow or interaction (no text or symbols present)natural_image
Line drawing of a vehicle with a broken roof and a separate flat roof, both without any text or symbols.Piedras
natural_image
Line drawing of a robotic lawn on a grassy path with a car in the background (no text or symbols)natural_image
Top-down architectural layout diagram showing wall, garden, and room features (no text or symbols)
natural_image
Illustration of a garden scene with flowers and leaves, no text or symbols presentParterres, estanques, piscinas...
natural_image
Top-down architectural sketch of a building with a wall and two vertical structures, no text or symbols present
natural_image
Line drawing of a vintage car on a curved road (no text or symbols)text_image
35% (20°)Pendientes
natural_image
Black-and-white line drawing of a garden scene with a tree, shrubbery, and a fence (no text or symbols)Árboles
text_image
350m Cable deflimbador superior Cable deflimbador inferior 480m 25%-35% <25%text_image
Diagram illustrating a 2m scale with directional arrows and a small embedded diagram, likely representing a technical or engineering concept.natural_image
Diagram of a robotic car with a crossed diagonal line crossing it, no text or symbols present
natural_image
Diagram showing a car and a robot crossed by a diagonal line (no text or symbols)natural_image
Top-down architectural layout diagram showing a central garden with surrounding trees and pathways (no text or symbols)
natural_image
Diagram showing two scenarios of traffic flow with directional arrows and flower patterns (no text or symbols)natural_image
Top-down architectural sketch of a garden layout with trees, a car, and a wall (no text or symbols)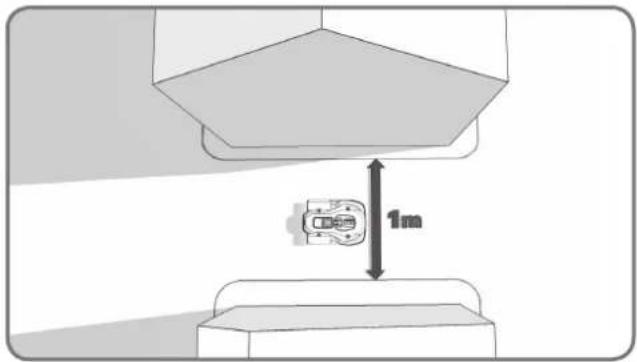
text_image
1mnatural_image
Diagram of a chemical reactor with surrounding structures and flow indicators (no text or labels)natural_image
Diagram showing a container with granular material entering a circular structure, connected to a vertical strip of plant material (no text or symbols)natural_image
Black-and-white line drawing of a garden scene with a central leafy tree and surrounding shrubs (no text or symbols)natural_image
Diagram showing a 3D block structure with a magnified inset of a mechanical component (no text or symbols)1
natural_image
Technical line drawing of a mechanical housing component (no text or symbols)2
natural_image
Diagram of a vehicle chassis with attached components and directional arrows indicating flow or movement (no text or symbols)3
text_image
Diagram illustrating brick wall structure with dimension annotations and load indicators
text_image
30cm 45cm
text_image
800 450m4
text_image
10cm 10cm
natural_image
Illustration of a hand using a hammer to tighten a bolt on a surface with three vertical pins (no text or symbols)natural_image
Diagram showing a fence and hedge wall with two circular markers at the base (no text or symbols)5
natural_image
Diagram showing directional arrows and flower patterns on a path, no text or symbols present6
natural_image
Line drawing of hands using scissors to cut a piece of paper (no text or symbols)
text_image
IN OUT
text_image
IN OUT
text_image
IN OUT1
natural_image
Illustration of a hand using a screwdriver to adjust or install a circular component on a vehicle engine (no text or symbols present)
text_image
1 2 a b 2 1
natural_image
Technical diagram of a mechanical assembly with internal components and directional arrows (no text or labels)
natural_image
Technical line drawing of a mechanical component with no visible text or symbols3
natural_image
Diagram showing two mechanical components with an upward arrow, no text or symbols present1
natural_image
Line drawing of a hand pressing down on a control panel with arrows indicating left-hand movement (no text or symbols)
text_image
1 2 3 ↑ 4 5 6 ↓ 7 8 9 OK START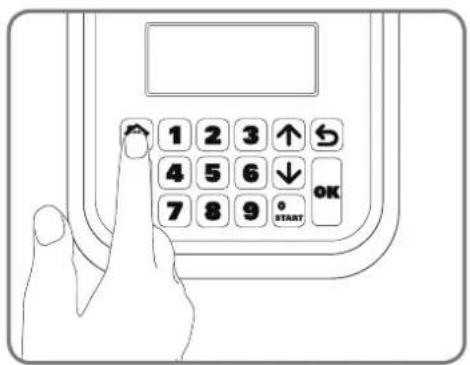
text_image
1 2 3 ↑ 4 5 6 ↓ 7 8 9 OK START
natural_image
Line drawing of a hand using a tool to cut a textured material into a tray with a circular button (no text or symbols)natural_image
Landscape sketch of a simple house with benches, a pool, and trees (no text or symbols)text_image
Technical diagram showing a hand operating a mechanical switch with a dial indicator and directional arrow indicating rotation or adjustment.natural_image
Architectural sketch of a modern house with parked cars and a small robotic arm, surrounded by trees and outdoor furniture (no text or symbols)Como instalar o seu Landroid®L
natural_image
Technical line drawing of a mechanical component with slots and mounting bracket (no text or symbols)
natural_image
Top-down technical line drawing of a device casing with labeled components (no readable text or symbols)Landroid®LBase de carga
natural_image
Circular diagram showing a mechanical component with an arrow indicating rotation or movement (no text or symbols)
Chave hexagonal
natural_image
Illustration of two robotic vehicles with a directional arrow indicating flow or interaction (no text or symbols present)natural_image
Line drawing of a vehicle with a broken roof and a tracked car (no text or symbols)Pedras
natural_image
Line drawing of a robotic lawn with grass and a cam, showing no text or symbolsCaminhos de acesso
natural_image
Top-down architectural layout diagram showing wall, central room, and surrounding plants (no text or symbols)
natural_image
Illustration of a garden scene with flowers and leaves, no text or symbols presentCanteiros de flores, lagos, piscinas...
natural_image
Diagram showing a wall-mounted structure with a vertical panel and a curved wall with dense foliage (no text or symbols)
natural_image
Line drawing of a vintage car on a curved road (no text or symbols)text_image
35% (20°)Inclinações
natural_image
Black-and-white line drawing of a garden scene with a tree, shrubbery, and a fence (no text or symbols)Árvores
text_image
Diagram illustrating a 2m scale with directional arrows and a small embedded chart, likely representing a technical or engineering concept.natural_image
Top-down architectural plan of a garden layout with trees, flower beds, and pathways (no text or symbols)
natural_image
Diagram of a robotic car with crossed diagonal lines indicating no movement or restriction (no text or symbols present)
natural_image
Diagram showing a car and a robot crossed by a diagonal line (no text or symbols)natural_image
Diagram showing two scenarios of traffic flow with directional arrows and flower patterns (no text or symbols)natural_image
Top-down architectural sketch of a garden layout with trees, a car, and a wall (no text or symbols)
text_image
1mnatural_image
Diagram of a mechanical or electrical device with surrounding components and directional arrows, no visible text or symbols.natural_image
Diagram showing a container with granular material entering a circular structure, connected to a vertical strip of plant material (no text or symbols)natural_image
Black-and-white line drawing of a garden scene with a central leafy tree and surrounding shrubbery (no text or symbols)natural_image
Technical illustration showing a 3D block assembly with a close-up of a mechanical component, no text or symbols present.1
natural_image
Technical line drawing of a mechanical housing component (no text or symbols)2
natural_image
Technical illustration of a mechanical assembly with no visible text or symbols3
text_image
Diagram illustrating brick wall structure with dimension annotations and directional arrows indicating measurement or load points.
text_image
30cm 45cm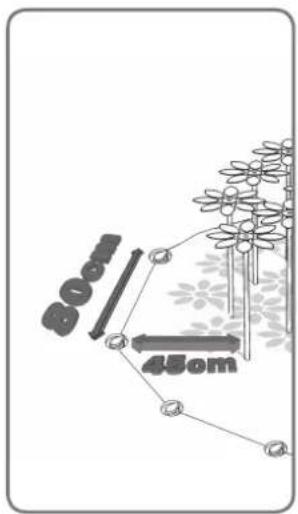
text_image
800 450m4
text_image
10cm 10cm
natural_image
Illustration of a hand using a hammer to tighten a bolt on a surface, with three nail pins below (no text or symbols)
natural_image
Diagram showing a fence and hedge wall with two circular feet at the base (no text or symbols)
natural_image
Diagram showing directional arrows and flower patterns on a path, no text or symbols present5
natural_image
Line drawing of hands using scissors to cut a piece of paper (no text or symbols)1
natural_image
Line drawing of a hand using a screwdriver to adjust or install a circular component on a vehicle engine (no text or symbols)
text_image
1 2 a b 2 1
natural_image
Technical diagram of a mechanical assembly with internal components and directional arrows (no text or labels)
natural_image
Technical line drawing of a mechanical component with no visible text or symbols3
natural_image
Diagram showing two mechanical components with an upward arrow, no text or symbols present1
natural_image
Line drawing of a hand pressing down on a control panel with arrows indicating motion (no text or symbols)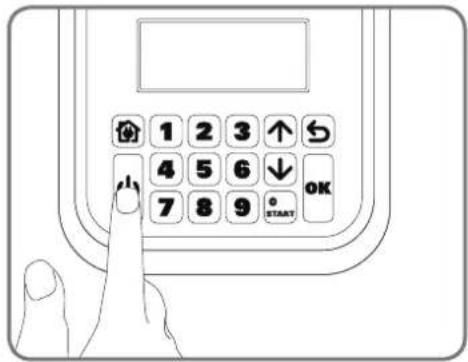
text_image
1 2 3 ↑ 4 5 6 ↓ 7 8 9 OK STARTnatural_image
Line drawing of a hand using a tool to cut a textured material into a tray (no text or symbols)natural_image
Landscape sketch of a simple house with benches, a pool, and trees (no text or symbols)text_image
Diagram showing a hand operating a valve mechanism with an inset dial indicating the scale from 20 to 60 units.natural_image
Architectural sketch of a modern house with parked cars and a small robotic arm, surrounded by trees and outdoor furniture (no text or symbols)natural_image
Technical line drawing of a mechanical component with internal slots and mounting brackets (no text or symbols)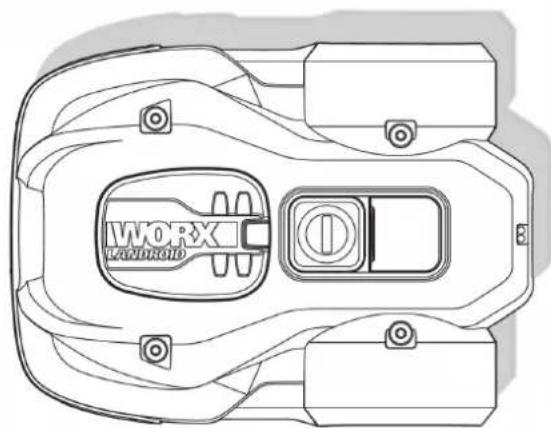
natural_image
Top-down technical line drawing of a device casing with labeled components (no readable text or symbols)natural_image
Circular diagram with a stylized arrow and a document icon, no readable text or symbols present.natural_image
Illustration of two robotic vehicles with arrows indicating flow or interaction (no text or symbols)natural_image
Line drawing of a vehicle with a broken roof and a separate flat roof, both without any text or symbols.Kameny
natural_image
Line drawing of a robotic lawn mower on a grassy path (no text or symbols)Příjezdové cesty
natural_image
Top-down architectural layout diagram showing a tree-lined wall, a small cube-shaped structure, and a room with a window (no text or symbols)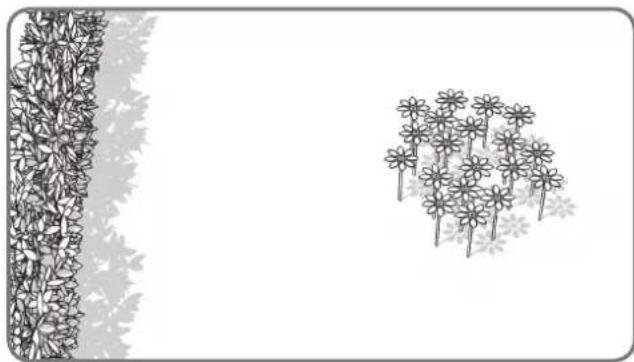
natural_image
Illustration of a garden scene with a vertical fence and a cluster of flowers (no text or symbols)natural_image
Diagram showing a wall-mounted structure with a vertical panel and a curved wall with dense foliage (no text or symbols)
natural_image
Line drawing of a vintage car on a curved road (no text or symbols)text_image
35% (20°)Svahy
natural_image
Line drawing of a garden scene with a tree, shrub, and hedge (no text or symbols)Stromy
text_image
Diagram illustrating a 2m scale with directional arrows and a small embedded diagram, likely representing a technical or engineering concept.natural_image
Top-down architectural plan of a garden layout with trees, flower beds, and pathways (no text or symbols)
natural_image
Diagram of a robotic car with a crossed tool, no text or symbols present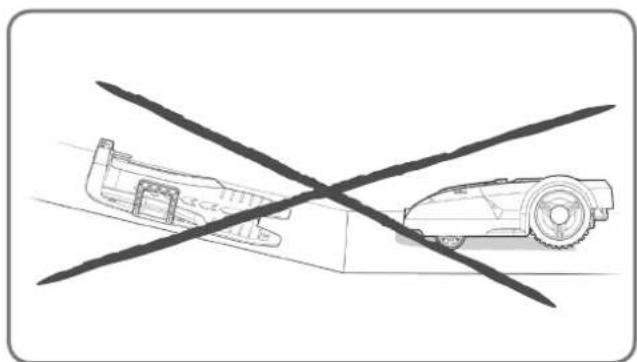
natural_image
Diagram showing a vehicle with a cross-shaped crossed-out line and a smaller vehicle on the ground (no text or symbols)natural_image
Diagram showing two scenarios of a flower field with directional arrows, no text or symbols presentnatural_image
Top-down architectural sketch of a garden layout with trees, a car, and a wall (no text or symbols)
text_image
1mnatural_image
Diagram of a mechanical or industrial system with a central device and surrounding components, enclosed by two vertical boundary lines (no text or symbols)natural_image
Diagram showing a container with granular material entering a circular structure, connected to a vertical strip of plant material (no text or symbols)natural_image
Black-and-white line drawing of a garden scene with a central leafy tree and surrounding shrubs (no text or symbols)natural_image
Technical illustration showing a 3D block assembly with a close-up of a mechanical component, no text or symbols present.1
natural_image
Technical line drawing of a mechanical housing component (no text or symbols)2
natural_image
Diagram of a mechanical component with directional arrows and a grid-like structure, no text or symbols present.3
text_image
Diagram illustrating brick wall structure with dimension annotations and load arrows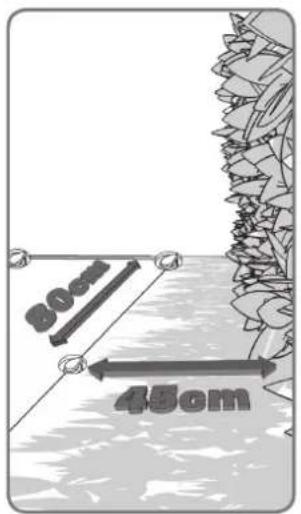
text_image
30cm 45cm
text_image
800 450m
text_image
10cm 10cm
natural_image
Illustration of a hand using a hammer to tighten a bolt on a surface, with three nail pins below (no text or symbols)4
natural_image
Diagram showing a fence and hedge wall with two circular markers at the base (no text or symbols)
natural_image
Diagram showing directional arrows and flower patterns on a path, no text or symbols present5
natural_image
Line drawing of hands using scissors to cut a piece of paper (no text or symbols)
text_image
IN OUT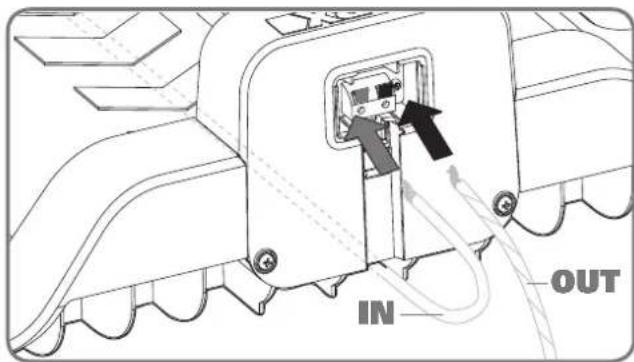
text_image
IN OUT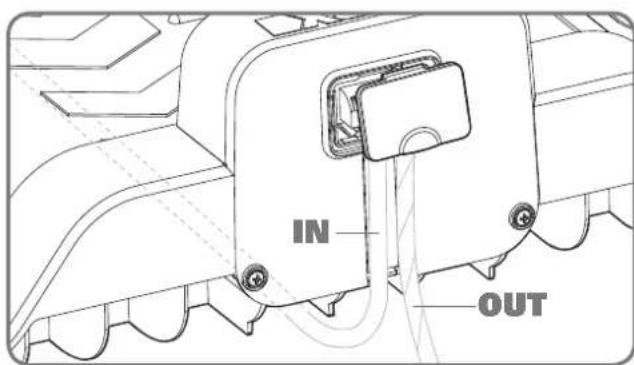
text_image
IN OUT1
natural_image
Line drawing of a hand using a screwdriver to adjust the internal components of a car engine (no text or symbols)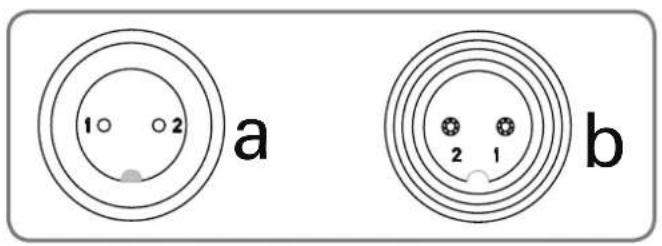
text_image
1 2 a b 2 1
natural_image
Technical diagram of a mechanical assembly with internal components and directional arrows (no text or labels)
natural_image
Technical line drawing of a mechanical component with no visible text or symbols3
natural_image
Diagram showing two vehicle components with an upward arrow, no text or symbols present1
natural_image
Line drawing of a hand pressing down on a control panel with arrows indicating left-hand movement (no text or symbols)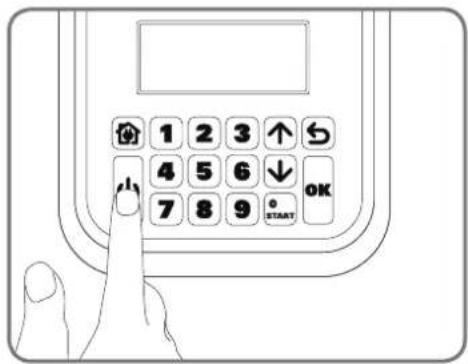
text_image
1 2 3 ↑ 4 5 6 ↓ 7 8 9 OK STARTnatural_image
Line drawing of a hand using a tool to cut a textured material into a tray with a circular button (no text or symbols)natural_image
Landscape sketch of a simple house with outdoor furniture and trees, no text or symbols presenttext_image
Diagram showing a hand pressing a valve on a car interior, with an inset dial indicating measurement ranges from 0 to 60.natural_image
Architectural sketch of a modern house with parked cars and a small robotic arm, surrounded by trees and outdoor furniture (no text or symbols)Ako nainštalovat' vašu kosačku Landroid®L
natural_image
Technical line drawing of a mechanical component with internal slots and mounting brackets (no text or symbols)natural_image
Top-down technical line drawing of a device casing with labeled components (no readable text or symbols)natural_image
Circular diagram with a stylized arrow and a document icon, no readable text or symbols present.Šesthranný Klúč
natural_image
Illustration of two robotic vehicles with arrows indicating flow or interaction (no text or symbols)natural_image
Line drawing of a vehicle with a broken roof and a separate flat roof, both without any text or symbols.Kamene
natural_image
Line drawing of a robotic lawn on a grassy path, with no text or symbols present.Príjazdové cesty
natural_image
Top-down architectural layout diagram showing a tree-lined wall, a small cube-shaped structure, and a room with a window (no text or symbols)
natural_image
Illustration of a garden scene with a vertical fence and a cluster of flowers (no text or symbols)Záhony, jazierka, bazény...
natural_image
Top-down architectural sketch of a building with a wall and two vertical structures, no text or symbols present
natural_image
Line drawing of a vintage car on a curved road (no text or symbols)Jamy a nerovnosti
text_image
35% (20°)Svahy
natural_image
Line drawing of a garden scene with a tree, shrub, and fence (no text or symbols)Stromy
text_image
Diagram illustrating a 2m scale with directional arrows and a small embedded diagram, likely representing a technical or engineering concept.natural_image
Top-down architectural layout diagram showing a garden with trees, pathways, and central circular elements (no text or labels)
natural_image
Diagram of a robotic car with a crossed tool, no text or symbols present
natural_image
Diagram showing a vehicle with a cross-shaped crossed-out line and a smaller vehicle on the ground (no text or symbols)natural_image
Diagram showing two scenarios of flower distribution under directional arrows, no text or symbols presentnatural_image
Top-down architectural sketch of a garden layout with plants, a dog, and a car (no text or symbols)
text_image
1mnatural_image
Diagram of a mechanical or industrial system with a central device and surrounding structural elements (no text or symbols)natural_image
Diagram showing a container with granular material entering a circular chamber, connected to a vertical strip of leaf-like structures (no text or symbols)natural_image
Black-and-white line drawing of a garden scene with a central leafy tree and surrounding shrubs (no text or symbols)natural_image
Technical illustration showing a 3D block assembly with a close-up of a mechanical component, no text or symbols present.1
natural_image
Technical line drawing of a mechanical housing component (no text or symbols)2
natural_image
Technical illustration of a mechanical assembly with no visible text or symbols3
Nechajte asi o 1 meter dížky vodiča naviac, začnite od zadnej strany nabíjacej základne a vodič upevňujte kolíkmi pozdíž vymedzenej oblasti. Po skončení pokládky vodiča pozdíž hranice, ktorá vymedzuje oblast' určenej na kosenie a jeho zavedenie naspät' do nabíjacej základne nechajte opät' o jeden meter vodiča naviac, a potom ho skrátte.

text_image
Diagram illustrating brick wall structure with dimension annotations and directional arrows indicating measurement or load points.
text_image
30cm 45cm
text_image
800 450m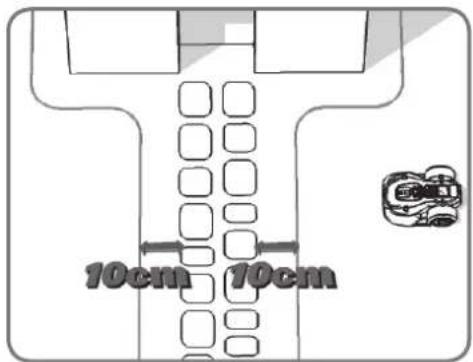
text_image
10cm 10cm
natural_image
Illustration of a hand using a hammer to tighten or mark on a surface with three nail pins (no text or symbols)4
natural_image
Diagram showing a fence and hedge wall with two circular feet at the base (no text or symbols)
natural_image
Diagram showing directional arrows and flower patterns on a path, no text or symbols present5
natural_image
Line drawing of hands using scissors to cut a piece of paper (no text or symbols)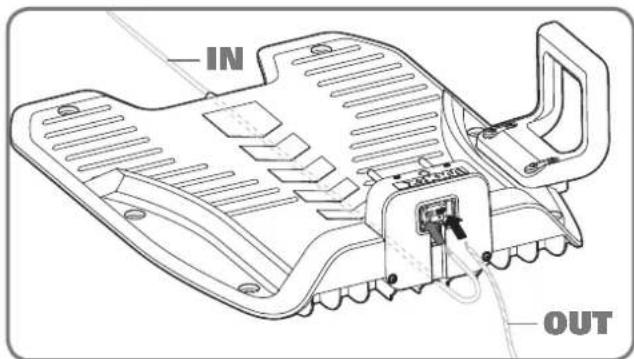
text_image
IN OUT
text_image
IN OUT
text_image
IN OUT1
Odstrihnite dva konce drôtu vo vhodnej dížke tak, aby dosiahli ku svorke.
natural_image
Line drawing of a hand using a screwdriver to adjust or install a circular component on a vehicle hood (no text or symbols)
text_image
1 2 a b 2 1
natural_image
Technical diagram of a mechanical assembly with internal components and directional arrows (no text or labels)
natural_image
Technical line drawing of a mechanical component with no visible text or symbols3
natural_image
Diagram showing a vehicle with two directional arrows, one pointing upward and the other in a circular outline (no text or symbols)1
natural_image
Line drawing of a hand pressing down on a control panel with arrows indicating left-hand movement (no text or symbols)
text_image
1 2 3 ↑ 4 5 6 ↓ 7 8 9 OK STARTStlačte tlačidlo
natural_image
Line drawing of a hand using a tool to cut a textured surface into a tray with a circular button (no text or symbols)natural_image
Black-and-white sketch of a simple outdoor garden with a small house, bench, and garden equipment (no text or symbols)text_image
Technical diagram showing a hand operating a valve mechanism with a dial indicator and directional arrow indicating rotation or movement.natural_image
Architectural sketch of a modern house with parked cars and a small robotic arm, surrounded by trees and outdoor furniture (no text or symbols)natural_image
Technical line drawing of a mechanical housing or enclosure with internal compartments and mounting brackets (no text or symbols)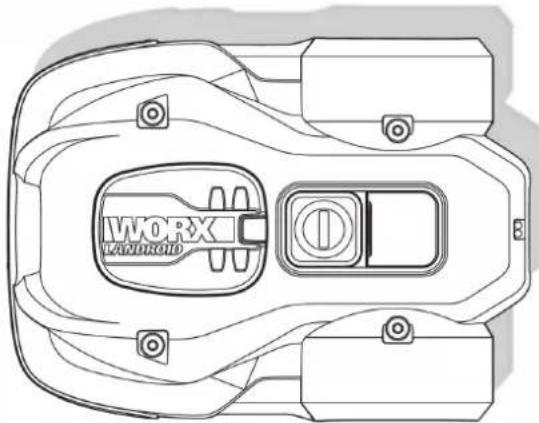
natural_image
Top-down technical line drawing of a mechanical component with no visible text or symbolsLandroid®LOpladestation
natural_image
Circular icon with a stylized arrow and diagonal line, no text or symbols present
Allennøgle
natural_image
Illustration of two robotic vehicles with a directional arrow indicating flow or interaction (no text or symbols present)natural_image
Line drawing of a vehicle with a broken roof and a tracked car (no text or symbols)Sten
natural_image
Line drawing of a robotic lawn on a grassy path with a cam, no text or symbols presentIndkørsler
natural_image
Top-down architectural layout diagram showing wall, tree, and room features (no text or symbols)
natural_image
Illustration of a garden scene with flowers and leaves, no text or symbols presentBlomsterbed, kær, swimmingpools...
natural_image
Top-down architectural sketch of a building with wall and vertical supports, showing abstract plant-like structures (no text or symbols)
natural_image
Line drawing of a vintage car on a curved road (no text or symbols)text_image
35% (20°)Bakker
natural_image
Black-and-white line drawing of a garden scene with a tree, shrubbery, and a fence (no text or symbols)Traer
text_image
Diagram illustrating a 2m scale with directional arrows and a small embedded diagram, likely representing a technical or engineering concept.natural_image
Diagram of a robotic arm crossed with a diagonal line, no text or symbols present
natural_image
Diagram showing a vehicle with a cross-shaped crossed-out line and a smaller vehicle on the ground (no text or symbols)text_image
stage 25m.
natural_image
Diagram showing two scenarios of a water channel with directional arrows and flower patterns, no text or symbols present.natural_image
Top-down architectural sketch of a garden layout with trees, a car, and a wall (no text or symbols)
text_image
1mnatural_image
Diagram of a chemical reactor with surrounding equipment and flow paths (no text or labels)natural_image
Diagram showing a container with granular material entering a circular structure, connected to a vertical strip of plant material (no text or symbols)natural_image
Black-and-white line drawing of a garden scene with a central leafy tree and surrounding shrubs (no text or symbols)natural_image
Technical illustration showing a 3D block assembly with a close-up of a mechanical component, no text or symbols present.1
natural_image
Technical line drawing of a mechanical housing component (no text or symbols)2
natural_image
Technical illustration of a mechanical assembly with no visible text or symbols3
text_image
Diagram illustrating brick wall structure with dimension annotations and directional arrows indicating measurements.
text_image
30cm 45cm
text_image
80mm 45cm
text_image
10cm 10cm
natural_image
Illustration of a hand using a hammer to tighten or mark on a surface with three nail pins (no text or symbols)4
natural_image
Diagram showing a fence and hedge wall with two circular markers at the base (no text or symbols)
natural_image
Diagram showing directional arrows and flower patterns on a path, no text or symbols present5
natural_image
Line drawing of hands using scissors to cut a piece of paper (no text or symbols)
text_image
IN OUT
text_image
IN OUT
text_image
IN OUT1
natural_image
Illustration of a hand using a screwdriver to adjust or install a circular component on a vehicle engine (no text or symbols present)
text_image
1 2 a b 2 1
natural_image
Technical diagram of a mechanical assembly with internal components and directional arrows (no text or labels)
natural_image
Technical line drawing of a mechanical component with no visible text or symbols3
natural_image
Diagram showing two mechanical components with an upward arrow, no text or symbols present1
natural_image
Line drawing of a hand pressing down on a control panel with arrows indicating left-hand movement (no text or symbols)
text_image
1 2 3 ↑ 4 5 6 ↓ 7 8 9 OK STARTnatural_image
Line drawing of a hand using a tool to cut a textured material into a tray with a circular button (no text or symbols)natural_image
Landscape sketch of a simple house with benches, a pool, and trees (no text or symbols)text_image
Technical diagram showing a hand operating a mechanical switch with a dial indicator and directional arrow indicating rotation or adjustment.natural_image
Architectural sketch of a modern house with parked cars and a small robot, surrounded by trees and outdoor furniture (no text or symbols)natural_image
Technical line drawing of a mechanical housing or enclosure with internal compartments and mounting brackets (no text or symbols)
natural_image
Top-down technical line drawing of a mechanical component with no visible text or symbolsnatural_image
Circular icon showing a stylized pen or ruler with a downward arrow, no text or symbols present.Klucz Sześciokątny
natural_image
Illustration of two robotic vehicles with arrows indicating flow or interaction (no text or symbols)natural_image
Line drawing of a vehicle with a broken roof and a separate flat roof, both without any text or symbols.Kamienie
natural_image
Line drawing of a robotic lawn on a grassy path with a car in the distance (no text or symbols)Podjazdy
natural_image
Top-down architectural layout diagram showing a tree-lined wall, a small cube-shaped structure, and a room with a window (no text or symbols)
natural_image
Illustration of a garden scene with a vertical fence and a cluster of flowers (no text or symbols)Klomby, sadzawki, baseny...
natural_image
Top-down architectural sketch of a building with a wall and two vertical structures, no text or symbols present
natural_image
Line drawing of a vintage car on a curved road (no text or symbols)text_image
35% (20°)Pochyłości
natural_image
Black-and-white line drawing of a garden scene with a tree, shrubbery, and a fence (no text or symbols)Drzewa
text_image
Diagram illustrating a process with labeled arrows and a 3D model, showing steps like '1', '2m', and '2m'.natural_image
Top-down architectural plan of a garden layout with trees, pathways, and a small room (no text or symbols)
natural_image
Diagram of a robotic car with a crossed tool, no text or symbols present
natural_image
Diagram showing a vehicle with a cross-shaped crossed-out area and a smaller vehicle on the ground (no text or symbols)natural_image
Diagram showing two scenarios of a flower field with directional arrows, no text or symbols presentnatural_image
Top-down architectural sketch of a garden layout with plants, a dog, and a car (no text or symbols)
text_image
1mnatural_image
Diagram of a mechanical or industrial system with a central device and surrounding structural elements (no text or symbols)natural_image
Diagram showing a container with granular material entering a circular chamber, connected to a vertical strip of plant tissue (no text or symbols)natural_image
Black-and-white line drawing of a garden scene with a central leafy tree and surrounding shrubs (no text or symbols)natural_image
Technical illustration showing a 3D block assembly with a close-up of a mechanical component, no text or symbols present.1
natural_image
Technical line drawing of a mechanical housing component (no text or symbols)2
natural_image
Technical illustration of a mechanical assembly with no visible text or symbols3
text_image
Diagram illustrating brick wall structure with dimension annotations and load arrows
text_image
30cm 45cm
text_image
800 450m4
text_image
10cm 10cm
natural_image
Illustration of a hand using a hammer to tighten or mark on a surface with three nail pins (no text or symbols)
natural_image
Diagram showing a fence and hedge wall with two circular markers at the base (no text or symbols)
natural_image
Diagram showing directional arrows and geometric shapes on a path, surrounded by flowers and trees (no text or symbols)5
natural_image
Line drawing of hands using scissors to cut a piece of paper (no text or symbols)
text_image
IN OUT
text_image
IN OUT
text_image
IN OUT1
natural_image
Line drawing of a hand using a screwdriver to adjust or install a circular component on a vehicle hood (no text or symbols)
text_image
1 2 a b 2 1
natural_image
Technical diagram of a mechanical assembly with internal components and directional arrows (no text or labels)
natural_image
Technical line drawing of a mechanical component with no visible text or symbols3
natural_image
Diagram showing two vehicle components with an upward arrow, no text or symbols present1
natural_image
Line drawing of a hand pressing down on a control panel with arrows indicating motion (no text or symbols)