NT 622VS - Electric oven BARTSCHER - Free user manual and instructions
Find the device manual for free NT 622VS BARTSCHER in PDF.
| Product type | Professional electric pizza oven |
| Brand | Bartscher |
| Model | NT 622VS |
| Product code | 2002094 |
| Dimensions (W × D × H) | 930 × 835 × 730 mm |
| Dimensions of the cooking chamber (each) | 610 × 640 × 150 mm |
| Weight | 150.6 kg |
| Power supply | 10 kW / 400 V ~ 50/60 Hz 3 NAC |
| Temperature range | 0 °C to 450 °C |
| Baking capacity | 2 × 4 pizzas Ø 30 cm |
| Material of the cooking chamber | Refractory brick assembly |
| Control type | Separate analog thermostat for top/bottom |
| Main functions | Baking pizzas and similar products, independent adjustment of top and bottom temperature |
| Interior lighting | Yes |
| Door | Glass door with handle |
| Cleaning | Clean the refractory hearth dry after each baking; chamber: cold brushing; exterior: soft cloth and mild detergent |
| Safety instructions | Hot surfaces (>60°C); use heat-resistant gloves; do not obstruct ventilation openings |
| Recommended accessory | Support NT 601N (W 840 × D 670 × H 900 mm, chromium-nickel steel) |
| Warranty | CE conformity; repairs by authorized technician only |
Frequently Asked Questions - NT 622VS BARTSCHER
User questions about NT 622VS BARTSCHER
0 question about this device. Answer the ones you know or ask your own.
Ask a new question about this device
Download the instructions for your Electric oven in PDF format for free! Find your manual NT 622VS - BARTSCHER and take your electronic device back in hand. On this page are published all the documents necessary for the use of your device. NT 622VS by BARTSCHER.
USER MANUAL NT 622VS BARTSCHER
1.1 Key to symbols 24
1.2 Important safety instructions 25
1.3 Proper use 28
2. General information 29
2.1 Liability and Warrantees 29
2.2 Copyright protection 29
2.3 Declaration of conformity 29
3. Transport, packaging and storage 30
3.1 Delivery check 30
3.2 Packaging 30
3.3 Storage 30
4. Technical data 31
4.1 Technical specification 31
4.2 Overview of parts 33
5. Installation and operation 35
5.1 Instructions for the installer 35
5.1.1 Installation instructions 35
5.1.2 Setting up 36
5.1.3 Electrical connection 37
5.2 User instructions 38
5.2.1 Safety instructions 38
5.2.2 First use 38
5.2.3 Control panel 39
5.2.4 Temperature regulation 41
5.2.5 Baking pizza 41
6. Cleaning 42
7. Possible Malfunctions 43
8.Waste disposal 44
Bartscher GmbH
Read this instruction manual before using and keep them available at all times!
This instruction manual contains information about the installation, operation and maintenance of the device and should be consulted as an important source of information and reference guide.
Awareness of the safety instructions and instructions for use in this manual will ensure the safe and correct use of the device.
In addition to the information given here, you should comply with any local Health and safety Controls and generally applicable safety regulations.
The instruction manual forms part of the product and should be kept near the device and easily accessible for anyone carrying out the installation, servicing, maintenance or cleaning.
Please keep these instructions and give them to future owners of the device.
1.Safety
This device is designed in accordance with the presently applicable technological standards. However, the device can pose a danger if handled improperly and inappropriately.
All persons using the device must follow the recommendations and instructions in this instruction manual.
1.1 Key to symbols
In this manual, symbols are used to highlight important safety instructions and any advice relating to the device. The instructions should be followed very carefully to avoid any risk of accident, personal injury or material damage.

WARNING!
This symbol highlights hazards which could lead to injury.

WARNING!
This symbol highlights dangerous situations which could lead to injury or death.
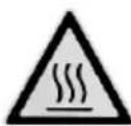
HOT SURFACE!
This symbol is a warning that the device surface is hot when in use. Ignoring this warning may result in burns!

CAUTION!
This symbol highlights dangerous situations which could lead to light injuries, or damage, malfunction, and/or destruction of the device.

NOTE!
This symbol highlights recommendations and information aimed for effective and trouble-free device operation.
1.2 Important safety instructions
- The device is not intended for use by individuals (including children) with physical or mental disabilities, insufficient experience, and/or insufficient knowledge unless such persons are under the care of a person responsible for their safety or have received instructions regarding appropriate use of the device.
- Children should be observed to ensure that they are not playing with the device.
- Do not move or tilt the device when in operation.
- Only use the device indoors.
- This device may only be operated in technically proper and safe condition.
- Prevent access of children to the package materials like plastic bags and foamed polystyrene elements. Suffocation hazard!
-
Only a qualified technician and using original spare parts and accessories should carry out repairs and maintenance of the device. Do not attempt to repair the device yourself.
-
Do not use any accessory or spare parts that have not been recommended by the manufacturer. These can be dangerous for the user or lead to damages of the device or personal injury, and further, the warranty expires.
- To prevent hazards and to ensure optimum efficiency, no modifications or alterations to the device that are not explicitly approved by the manufacturer may be undertaken.

DANGER! Electric shock hazard!
To avoid the hazard results please follow the safety instructions below.
- Never allow the power cable to come into contact with heat sources or sharp edges. The power cable should not hang over the side of the working surface. Ensure that no one can step on or trip over the cable.
- The power cable must not be folded, bent or tangled, and must always remain fully unrolled. Never place the device or other objects on the power cable.
- Do not lay the power cable over carpets or other inflammable materials. Do not cover the cable. Keep away the cable from operating range and do not immerse it into water.
- Check the power cord regularly for damage. Do not use the appliance if the power cord is damaged. If this cable is damaged, it must be replaced by customer service or a qualified electrician in order to avoid dangers.
- The supply cable must be disconnected from the socket only by pulling the plug.
-
Never carry or lift the device by the supply cable.
-
In any case do not open the device housing. In case of electrical or mechanical modifications the electric shock hazard will occur.
- Do not use any acid agents and make sure no water ingresses the device.
- Never operate the device with moist hands or standing on wet floor.
-
Disconnect the device from the electric power supply?
-
when the device is not used,
- in case of anomalies during operation,
before cleaning.
HOT SURFACE! Burn hazard!
To avoid the hazard results please follow the safety instructions below.
- Temperature of external parts of the pizza oven may exceed 60^ C . To avoid burns, do not touch the areas or parts which are marked with the above mentioned symbol with bare fingers or hands.
- When taking the pizza out of the oven use the heat-resistant gloves protecting hands and wrists. Furthermore, use kitchen utensils with long handles. During the operation of the device you can touch only door handles, switches or regulators.

WARNING! Fire or explosion hazard!
To avoid the hazard results please follow the safety instructions below.
-
Do not place any flammable objects or food products containing alcohol in the pizza oven: this may lead to self-ignition and fire, resulting in an explosion.
-
Never use the device near flammable materials, such as alcohol, spirits, or petrol. High temperature may cause their evaporation and due to contact with the ignition sources the deflagration may occur, and in result the injuries and damages.
-
In case of fire before the fire extinguishing activities remove the plug from the socket or disconnect the device from the power supply (pull the plug!).
Caution: Do not spray the device with water when it is still connected to the power supply: Electric shock hazard!
1.3 Proper use

CAUTION!
This device has been designed and built for commercial use and can be operated in kitchens by the qualified personnel only!
The operational safety of the device is assured only in case of proper use, according to the operation manual.
All technical activities like installation and maintenance must be performed by the qualified service personnel only.
The pizza oven is designed only for baking pizza and similar products.

CAUTION!
Any use going beyond the intended purpose and/or any different use of the device is forbidden and is not considered as conventional.
Any claims against the manufacturer or his authorized representative as a consequence of experiencing damages resulting from unconventional use are impossible.
The operator is liable for all damages resulting from inappropriate use.
2. General information 2.1 Liability and Warrantees
All the information and instructions in this manual take into account standard safety regulations, current levels of technical engineering as well as the expertise and experience we have developed over the years.
The instruction manual was translated with all due care and attention. However, we do not accept liability for any translation errors. The German version of this instruction manual is definitive.
If the delivery consists of a special model, the actual scope of delivery may differ from the descriptions and illustrations in this manual. This is also the case for special orders or when the device has been modified in line with new technology.

CAUTION!
Read this manual carefully and thoroughly before any operation of the device, and especially before turning it on!
Manufacturer is not liable for any damages or faults caused by:
- violation of advice concerning operation and cleaning;
- use other than designed;
- alterations made by user;
- use of inadequate spare parts.
We reserve the right to make technical changes for purposes of developing and improving the useful properties.
2.2 Copyright protection
The instruction manual including any texts, drawings, images or other illustrations is copyright. No part of this publication may be reproduced, transmitted or used in any form or by any means without permission in writing from the manufacturer. Any person who commits any unauthorized act in relation to this publication shall be liable to claims for damages. All rights reserved.

NOTE!
The contents, texts, drawings, pictures and any other illustrations are copyright and subject to other protection rights. Any person unlawfully using this publication is liable to criminal prosecution.
2.3 Declaration of conformity

The device complies with the current standards and directives of the EU. We certify this in the EC declaration of conformity. If required we will be glad to send you the according declaration of conformity.
3. Transport, packaging and storage
3.1 Delivery check
Please check the delivery upon completeness and transport damage immediately after receipt. In case of visible damage do not accept or accept the delivery with reservation only.
Note the extent of damage on the carrier's bill of delivery. Trigger off the complaint. Hidden damages should be reclaimed immediately after notice, as claims for damages can only be asserted within the effective period for complaints.
3.2 Packaging
Please do not throw away the covering carton of your device as it might be useful for storage purposes, when moving or, in case of damages, when the device must be sent back to a repair center. The outer and inner packing material should be removed completely from the device before installation.

NOTE!
If you liked to dispose the packing, consider the regulations applicable in your country. Supply re-usable packing materials to the recycling.
Please inspect the device upon completeness. In case any part is missing please contact our customer service center immediately.
3.3 Storage
Keep the package closed until installation and under consideration of the outside indicated positioning- and storage markings.
Packages should be stored under consideration of the following:
- do not store outdoors;
- keep it dry and dust-free;
- do not expose it to aggressive media;
- do not expose it to direct sunlight;
- avoid mechanical shocks and vibration;
- in case of longer storage ( >3 months) make sure you check the state of the packaging and the parts regularly, if required refresh or renew.
4. Technical data
4.1 Technical specification
Pizza oven series NT
- material: enamelled steel
- thermostatic analogue control of adjustable temperature from 0^ to 450^
- independent upper and lower temperature control
- internal isolation with rock wool
- internal lighting
- fire proof chamotte plate
| Name | Pizza Oven | |
| Code-no.: | 2002018 2002028 | |
| Model: | NT 501 | NT 502 |
| Temperature: from | 0 °C to 450 °C | |
| Power: 4 kW / 400 V | 50/60 Hz 2 NAC | 6 kW / 400 V 50/60 Hz 3 NAC |
| Device dimensions: | W 800 x D 750 x H 360 mm | W 800 x D 750 x H 510 mm |
| Baking chamber dimensions: | W 505 x D 530 x H 110 mm | each W 505 x D 530 x H 110 mm |
| Load: | 4 pizzas Ø 25 cm | 2 x 4 pizzas Ø 25 cm |
| Weight: 45.6 kg 63.0 kg | ||
| Name Pizza Oven | ||
| Code-no.: | 2002088 2002095 | |
| Model: | NT 621 | NT 622 |
| Temperature: | from 0 °C to 450 °C | |
| Power: | 5 kW / 400 V 50/60 Hz 2 NAC | 10 kW / 400 V 50/60 Hz 3 NAC |
| Device dimensions: | W 885 x D 790 x H 400 mm | W 885 x D 790 x H 710 mm |
| Baking chamber dimensions: | W 605 x D 630 x H 140 mm | each W 605 x D 630 x H 140 mm |
| Load: | 4 pizzas Ø 30 cm | 2 x 4 pizzas Ø 30 cm |
| Weight: | 59.6 kg | 102.8 kg |
**the entire baking chamber of this device is made of chamotte
| Name Pizza Oven | |
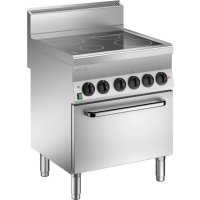
| Code-no.: | 2002094 |
| Model: | NT 622VS** |
| Temperature: from 0 °C to 450 °C | |
| Power: 10 kW / 400 | V 50/60 Hz 3 NAC |
| Device dimensions: | W 930 x D 835 x H 730 mm |
| Baking chamber dimensions: | each W 610 x D 640 x H 150 mm |
| Load: 2 x 4 pizzas Ø | 30 cm |
| Weight: 150.6 kg | |
| Name Pizza Oven | ||
| Code-no.: | 2002101 2002121 | |
| Model: | NT 901 | NT 921 |
| Temperature: from 0 °C to 450 °C | ||
| Power: | 6 kW / 400 V 50/60 Hz 3 NAC | 12 kW / 400 V 50/60 Hz 3 NAC |
| Device dimensions: | W 1190 x D 780 x H 395 mm | W 1190 x D 780 x H 710 mm |
| Baking chamber dimensions: | W 910 x D 610 x H 140 mm | each W 910 x D 610 x H 140 mm |
| Load: 6 pizza Ø 30 cm | 2 x 6 pizzas Ø 30 cm | |
| Weight: | 80.3 kg | 141.8 kg |
We reserve the right to make technical changes!
4.2 Overview of parts
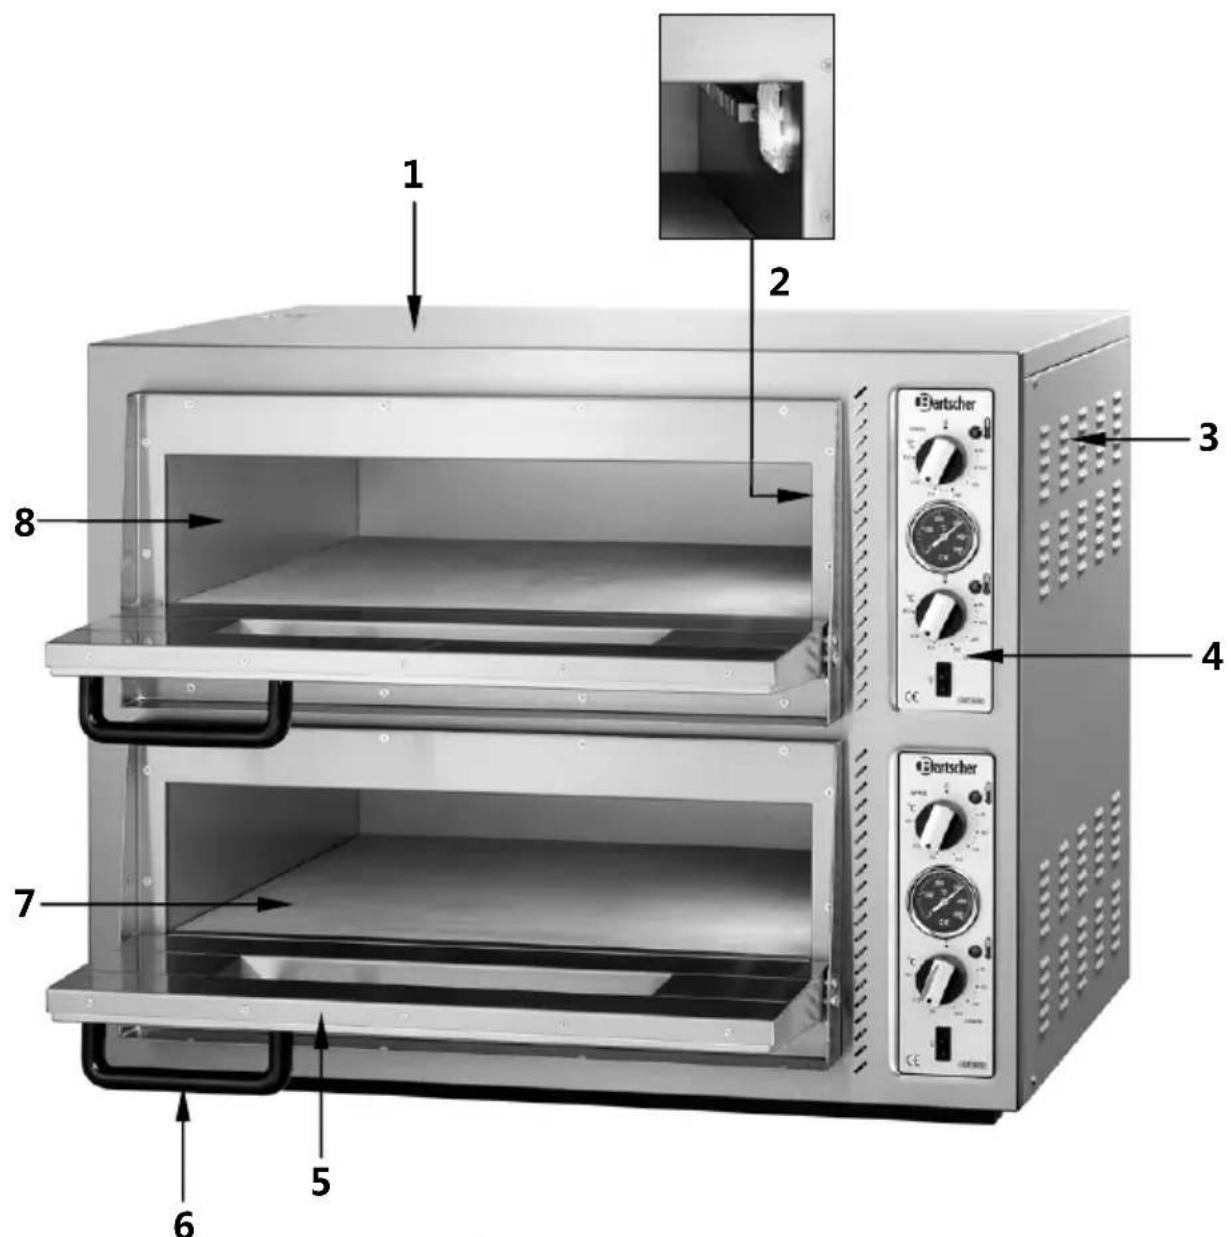
1 Housing
2 Internal lighting
3 Ventilation ducts
4 Control panel
5 Glass pane door
6 Door handle
7 Chamotte plate
8 Baking chamber
Additional accessories (not included in the delivery)
Base Unit NT 501N
designed for:
NT 501 / 2002018
NT 502 / 2002028
chrome-nickel steel
W 760× D 610xH900mm
weight: 14.6 kg
Code-no. 200316
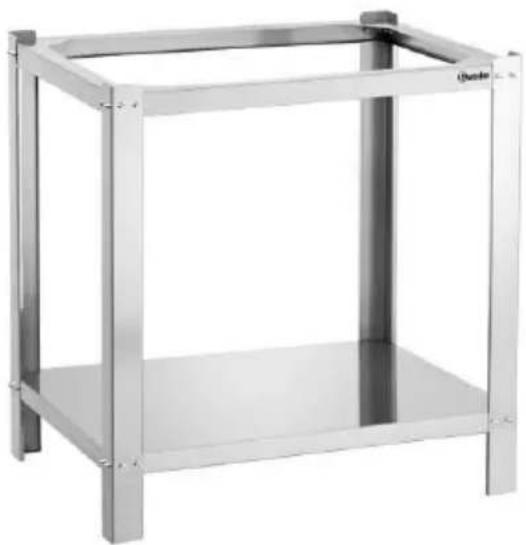
Base Unit NT 601N
designed for:
NT 621 / 2002088
NT 622/2002095
NT 622VS / 2002094
chrome-nickel steel
W 840 x D 670 x H 900 mm
weight: 13.7kg
Code-no. 200317
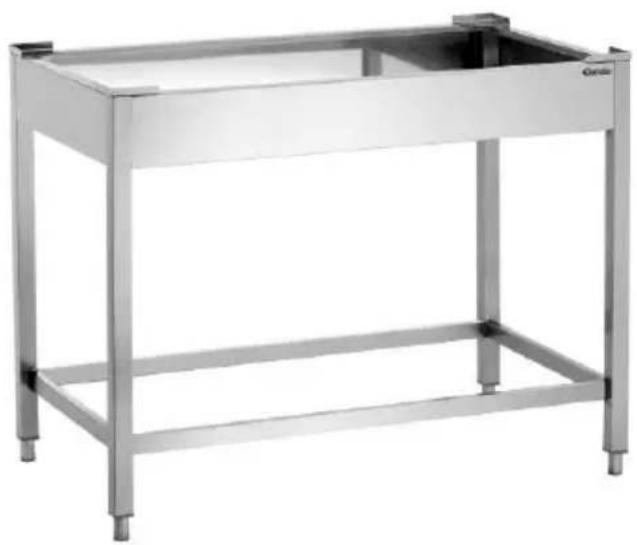
Base Unit NT 901N
designed for:
NT 901 / 2002101
NT 921 / 2002121
chrome-nickel steel
W 1155 x D 665 x H 900 mm
weight: 23.2kg
Code-no. 200318
5. Installation and operation
5.1 Instructions for the installer

CAUTION!
The installation and maintenance work related to the device may be performed only by the qualified and authorized technician, in accordance with international, national and location regulations.
5.1.1 Installation instructions
-
Before the installation and the use of the device, read carefully these operating instructions.
-
Any operation related to installation, assembly, operation and maintenance must be performed by the specialized personnel who has appropriate qualifications (manufacturer' or seller's authorisation). The required activities need to be performed while taking into account the installation regulations valid in a given country as well as the product safety legislation and health and safety regulations.
-
Defective installation, mistakes during the operation, conservation and cleaning, as well as possible changes and modifications may cause improper operation, damages and injuries.
-
Manufacturer will not assume any liability for personal injuries or material damages resulting from the failure to observe the aforementioned regulations or tampering with single components of the device or using non-original spare parts.
-
Make sure that there are no obstacles on the path to the installation site limiting access through doors, corridors or other communication routes.
NOTE: During the transport of the device, it may turn over, which might result in the damage to the device itself or other objects or in personal injuries. During the device's transport, use the measures appropriate for its weight. The device should not be pulled or tipped, but lifted perpendicularly to the floor and moved horizontally.
5.1.2 Setting up
- Unpack the device and remove the packaging. Remove the protective foil from the device before its first use. Make sure that it has been completely removed. Remove transportation safeguards from the baking chamber.

CAUTION!
Never remove the rating plate or warning labels from the device.
- The device must be installed in a closed and well-ventilated room (indoors).
- Before placing the device, check the dimensions and the exact position of electrical connections.
- To remove steam and odours place the pizza oven under a kitchen hood. Always make sure that the steam and odours are channelled outside.
- To avoid skidding or overturning of the oven, place the pizza oven on an even surface.
- Place the device on a stable, dry and water-proof and heat-resistant surface. The pizza oven may be also installed on an appropriate base unit (see item „Additional Accessories“, page 34).
- The place of installation must be easily accessible and sufficiently big to enable easy operation of the device and ensure proper air circulation.
- Never block or cover ventilation ducts of the device.
- The surface under the oven must support the weight of the oven with full load.
- Never place the device in a humid or wet environment.
- Never place the oven directly next to the walls, furniture, partitions made of flammable material or near the tanks with flammable materials (e.g. gas bottles). Leave the distance of at least 20~cm . If it is not possible, flammable elements should be isolated with inflammable thermal insulation, while observing fire protection regulations.
- The device is not designed for built-in installation or putting in a series with other devices.
- Leave the appropriate space for easily accessible power supply.
- Do not place any objects on the device.
5.1.3 Electrical connection

DANGER! Risk of electrical shock!
The device may cause injuries if installed improperly! Before installation the local power grid specification should be compared with that of the device (see rating plate). Connect the device only in case of full compliance!
- Before connecting the device to the power supply, make sure that the values of voltage and frequency shown on the rating plate are consistent with the data of the existing electrical installation.
Voltage tolerance shall not exceed ± 10% . - If the device is placed on the base with wheels that make it easy to move the device, it is recommended to connect it to the power supply first and then install the pizza oven at the site of operation.
- When moving the device, make sure that the power cord is not damaged.
- The power cord should be placed in such a way as to ensure that in no place it is exposed to the temperature exceeding 50^ .
- Electrical circuit must have at least 25A protection.
Recommended socket: CEE32A/400 V
Equipotential bonding connection
- Equipotential bonding conductor between different devices shall be connected to the terminal marked with The terminal is located at the rear side of the device.
- This terminal allows for connecting the equipotential bonding conductor (yellow-green colour) with a cross section from 4 to 10mm^2
- The device must be connected to the equipotential bonding circuit the effectiveness of which complies with the instructions included in the valid regulations.
5.2 User instructions

CAUTION!
Read carefully these operating instructions, because they include important instructions regarding safety and operation of the pizza oven. The device is intended for professional use and may be operated by the trained kitchen personnel only.
5.2.1 Safety instructions
- Open and close the pizza oven using door handles. During the operation avoid touching any metal parts of the device: Risk of burns!
Any control elements and door handles are protected against radiating heat. - Use extra care when opening the pizza oven's door. There is a risk of burn by escaping hot steam.
- Never block or cover ventilation ducts, never cover the pizza oven partially or fully. Do not place any objects on the device.
- In case of damaging or breaking glass elements of the door, replace it immediately (contact the technical support).
- In the event of the device's downtime (e.g. 12 hours), leave the glass door of the pizza oven slightly aiar.
5.2.2 First use
- Make sure that there are no objects in the baking chamber (packaging foil, polystyrene remains, operating instructions, etc.).
- Before the first use, check the correctness of the installation, stability and levelling of the device, as well as the quality of electrical connection.
- Before the operation, preheat the empty pizza oven for ca. 2 hours at the temperature set for 450^ . For this purpose follow the instructions included in item 5.2.4 „Temperature regulation“.
- The device may produce unpleasant smell caused by the post-production residues such as grease, oil or resin.
- Next, leave the device to cool down and clean it according to the instructions included in item 6 „Cleaning".
The device is ready to work.
5.2.3 Control panel
2002018

2002088 / 2002095 / 2002094 /
2002101 / 2002121
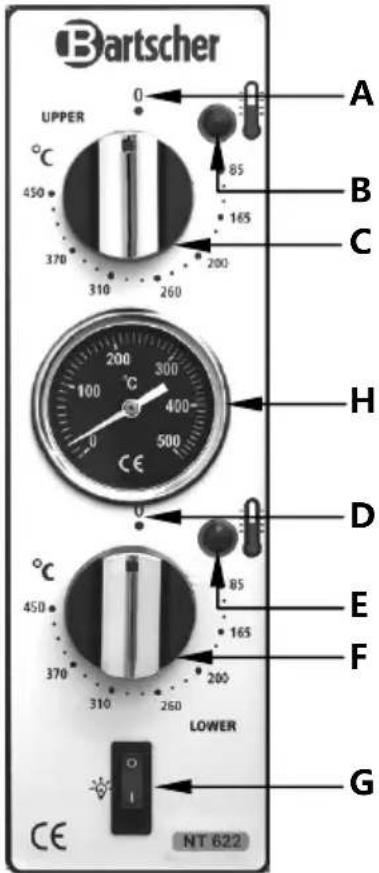
A ,0" position indicator
B Upper heating element control light
Temperature regulator, upper heating element
D „0“ position indicator
E Lower heating element control light
F Temperature regulator, lower heating element
G Internal lighting switch
A ,0" position indicator
B Upper heating element control light
C Temperature regulator, upper heating element
D,0" position indicator
E Lower heating element control light
F Temperature regulator, lower heating element
G Internal lighting switch
H Temperature indicator

NOTE!
Each baking chamber of the pizza oven series NT (except for 2002028) is equipped with two heating elements: One heating element is under the chamotte plate, and the other one – in the upper part of the pizza oven. Each heating element is controlled via separate temperature regulator.
2002028
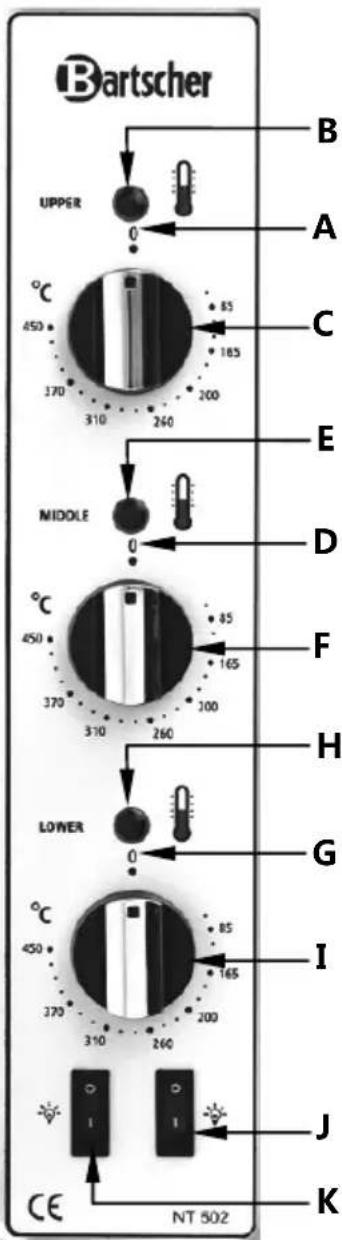
A „0“ position indicator
B Upper heating element control light
C Temperature regulator, upper heating element
D,0" position indicator
E Middle heating element control light
F Temperature regulator, middle heating element
G ,0" position indicator
H Lower heating element control light
I Temperature regulator, lower heating element
J Internal lighting switch - upper baking chamber
K Internal lighting switch - lower baking chamber
NOTE!
Pizza oven 2002028 has only one baking chamber, Which is divided into two separate parts by the chamotte plate put in the middle.
This pizza oven has 3 heating elements and 3 temperature regulators:
upper temperature regulator controls the upper heating element of the upper chamber,
lower temperature regulator controls the lower heating element of the lower chamber, and the medium temperature regulator controls lower heating element of the upper chamber and the upper heating element of the lower chamber, because the heating element is located directly under the chamotte plate in the middle of the baking chamber.
5.2.4 Temperature regulation

NOTE!
Before baking the pizza, the oven should be pre-heated to the desired temperature!
- Connect the device to the power supply.
- Set the desired temperature for the selected upper/lower heating element using the appropriate temperature regulators. The temperature of the pizza oven can be adjusted within the range from 0^ to 450^ . When baking pizza it is recommended to set the temperature in the range from 300^ to 400^ .
- Upper and lower heating element control lights come on during pre-heating of the device.
- Value of the temperature inside the baking chamber may be read on the temperature indicator of the device (except for pizza ovens, code-no. 2002018 and 2002028).
- When the set temperature has been reached, the control light will go off. When the temperature in the baking chamber decreases, the control light will come on again and the heater will start heating the baking chamber up to the set temperature.
5.2.5 Baking pizza
- After pre-heating the backing chamber, open the oven door using door handles.
- Place the prepared pizzas on the chamotte plate and close the door.
- Do not leave the pizza oven unattended during its operation. Observe the baking process through the window in the oven door,
- When the baking is finished, remove the pizzas from the oven.

WARNING! Danger of burns!
To avoid burns when removing pizza from the oven, use the heat-resistant gloves protecting hands and wrists. Furthermore, use kitchen utensils with long handles (e.g. pizza shovel).
6. Cleaning

WARNING!
Disconnect the device from the power supply before cleaning. Let the device cool down.
Never clean the device with use of water jet!
Be careful and do not let the water into the device.
o Regularly clean the device while taking special care in case of elements which come into contact with food products.
o Before cleaning, leave the device to cool down.
o Carefully remove any remains from the chamotte plate following every baking, using metal shovel or scraper, without any cleaning agents or water.

CAUTION!
To avoid damaging the chamotte plate do not clean or cool it with water.
In order to thoroughly clean the device at the end of the day, heat the pizza oven for 30 minutes at the highest temperature (only lower heating element should be switched on). Then switch the device off and on the next day brush the surface of the chamotte plate with cold waters.
Clean a cold baking chamber (except for pizza oven code-no. 2002094, in which the entire chamber is made of chamotte) with a soft, moist cloth. If necessary use a mild cleaning agent, and then wipe it with a cloth soaked with clean water to remove the remains of the cleaning agent.
Clean the entire baking chamber of the pizza oven code-no.2002094 after the device has cooled down, by removing remains from the chamotte plate and chamotte internal walls using a metal spatula or scraper, without using any cleaning agents or water.
Clean the device housing with a soft, moist cloth and a mild cleaning agent. Never use abrasive or acid or coarse cleaning agents as they may damage the device surface.
Clean the ventilation ducts in the housing regularly. If there is dirt or dust on the ventilation ducts, clean them using a brush or vacuum cleaner to ensure proper air circulation inside the chamber and optimal baking uniformity.
7. Possible Malfunctions
In case of any malfunction, disconnect the device from the power supply. Based on the table below, check whether it is possible to remove defects without notifying a customer service point or contacting the sales agent.
| PROBLEM CAUSE | SOLUTION | |
| The device is switched on. The control light is not lit and the device is not heating up. | • No power supply. • Damaged temperature regulator. | • Check the power supply and the connection cable. • Contact the sales agent. |
| Temperature is set, the control light is lit, but the device is not heating up. | • Damaged heating element. | • Contact the sales agent. |
| Temperature is set, it is increasing, but there is no possibility to adjust it. | • Damaged temperature regulator. | • Contact the sales agent. |
| Temperature is set, the device is heating up, but the control light is not lit. | • Damaged control light. | • Contact the sales agent. |
If you cannot remove the malfunctions:
- do not open the housing,
- notify the customer service point or contact the sales agent, while providing the following information:
type of malfunction;
- article and serial number (rating plate at the rear of the device).
8. Waste disposal
Discarding old devices
At the end of its service life the discarded device has to be disposed in accordance with the national regulations. It is advisable to contact a company which is specialized in waste disposal, or just contact the local disposal service in your community.

WARNING!
To exclude any abuse and the dangers involved make the waste device unfit for use before disposal. For that purpose disconnect device from mains supply and remove mains connection cable from the device.

CAUTION!
For the disposal of the device please consider and act according to the national and local rules and regulations.
Bartscher GmbH
4.1 Indications techniques
WAARSCHUWING! Brand- of explosiegevaar!
5.2.3 Panele obslugi
2002018
2002088 / 2002095 / 2002094 /
2002101 / 2002121
Regulator temperature, dolna grzatka
Ten piec do pizzy ma 3 grzalic i 3 regulatory temperature:
gorny regulator temperature sluzy do sterowania gorna grzalka gornej komory,
PnpobI depkaTb Do yCTaHOBKn B He paCnakOBaHHOM Bnde, co6IIOda HaHeceHHbIe Na BHeuHne CTOpOHe MapKInpOBKn No yCTaHOBKe I XpaHeHNo.
YnakOBKn XpaHbN NCKIIOHTeNbHO npn CneDyUOxuX yCNOBnx
He DepeKaTb NOD OTKpbITbIM He6om;
XpaHnTb BCYXOM IN CBO6OJHOM OT Nblnn MeCTe;
He NOdBepraTb BO3DeIcTBnIO arpeccNBbIX BeIeCTB;
- npedeoxpaHrTb OT BO3dEInCTBnCOnHeuHbIX Nyuei;
- n36eRaTb MexaHnuecknx CotpaeHn;
-пи дитьномхранен (болee 3 месаeВ) peуларно КОНТРОЛПОВАТь ошцee COCTOЯнe BCexЧaTeN yypaKOBKN.В сnyuae Heo6xODIMOCn OCBEXKNTb ИИ O6HOBNTb.
4. TexHnueckne daHHbIe
4.1 TexHnueckne xapaKTepeNCTnKN
B clyuae He npabnblhoy yctaHOBKn np6op moKeT cTaB npuHNOJNoJUyeHn TpaBM!
Ipeed yctaHOBKo np6opa cJeDuyeT cpaBHTb napaMeTpbl OkaJIbHOJ 3JeKTPnueCKo CeTu C TexHnueCKmN DaHHbIMn np6opa (cM. HOMHaJIbHbI ΣNTOK). Ipn6op MoxHo NOdkJIIOuAtb TOnbKO B CnTyauuN NOpHOrO COOTBETCTBna napaMeTpob!
- Ipeed nodknueHem npnbopa K nctouHky 3neKtponntaHna CneDyeT y6eINTbc, YTO npaMeTpbl HnprjKeHn uacToTbI, yka3aHHbIe Ha HOMHaNbHOM UNTke, COOTBeTCTBYOT npaMeTpam IMeIoUeCra cETN 3neKtpoNTaHn.
BéniuHa dOncyka ± 10%. - Ecn np6op He yctaHbIeH Ha nOCTabKe C KOJecnKamN dIy o6IerYeHn IepemeueHn, peKOMeHdyem cHaayana NODKNIOHTb ney dIy NIIcUk K NCTOCHKY 3JIeKTPoNTaHn, nocne Yero yCTaHOBtB ee COOTBEcTByIOUIM CNOCOBom Ha pa6ooyem MeCTe.
BoBpeMnepMeueHnCneDyETobHmHaHHeTObpeNTb 3NeKtpnueckn npOBoD. - IpoBOD nHTaHnA CNeDyET yNoXuTb TaKIM O6pa3OM, YTO6bl OH HnIe He 6bln NOdBepKeH BO3DeiCTBnIO TempePaTypbI Bblue 50^
- Θnéкт pineckа ць в розтke дожн ha IMeТь 3aиntу kaK MInHmym 25A.
- PekomeHnyem po3eTkY CEE32A/400 B
PpncoeDnHeHne ypaBnBaHna NOteHcnaJIOB
- Пювов уразьнваимnotehциалов мжду pa3ныIMnpиборамследупODCOEDHHTK 3axkIMy CCMBOJOM
CoOTBeTCTByUoIu3axm HaxOaNTcB 3aDHeu qactn np6opa.
3TOT 3aXMM DaET BO3MOXHOCTb NOcOeHNrTb PpOBoD IJa YpaBHBaHnA NOTeHcuaIOB (XeJITo-3eJIeHbI cBeT) CceHneM O T 4 Do 10 MM².
- Pnp6op DoJxhen 6bIb NOKJIHouen K KOHTpy ypaBHBaHnRA NOTeHuaNoB C 3ΦΦeKTINBHOCTbIO, COOTBeTCTByIOUeYka3AHm DeiCTByIOuNX ppeDncaHn.
5.2 Yka3aHnI dIy noIb3OBaTeJI

BHIMAHHE!
CneDyET BHNMaTeIbHO O3HaKOMTbcra DaHHO IHCTpyKcnei no
06cJynBaHHIO, NOCKoJIbKY OHa COpeXHT BaXHbIe Yka3aHnHa Ta Temy
6e3OnacHoCTn H KcNpYatau nn neu dner nncbl.
Pnp6op npedHa3NaueH dny npocceccnoHaJIbHorO nCNoJIb3OBaHHa, a erO
06cJynBaHHe DOJIxHO 6bITb NOPyuEHO COOTBeTCTByUoIIM o6pa3OM
NoDrTOBLeHHOMy nepcoHaNy n3 OTPaCNI
ractpoHOMn.PekomeHdaaun No texHnke 6e3OnacHOCTn
- Pechd nniu cne dyet OTKpbBaTb N 3aKpbBaTb C NOMOsbO pykN DBepn. Bo BpeMpaobToI cne dyet n36eRaTb npKacAHN K KaKM-Jn6o MeTaJIInueckm YactrM: ONaCHocTB noJyehn oXorOB! Bce 3JeMeHTbI obcnyKBaHn I pykN DBepei 3aunuhebl ot n3nyaemoro Tennla.
CobnOdaTbOCobyo OCTOpoxHocTb BO BpeMg OTKpbBaHnA DBepeNneu IJI nIcIb. Yrpo3a NOnyuHnA OXOROB B pe3yNbTaTe BblXoDa ropayero npa.
HnkOrda He 6IOKnpoBaTb H He 3aKpbBaTb BeHTnIaOnHHbIe OTBepCTna, He npNKpbBaTb Ney dIJI NnCzbl Hn YacTnHO, Hn NOnHoCTbIO. Ha npnbope He cneDyET yCTaHaBnBaTb HnKaKx PpeDMeTOB.
B cnyae noBpeKdEHHn IIN IIOLOMK nCTeKJIHHbIX 3JeMeHToB DBepeN IX CNeDyET HemeJHeHHO 3aMeHHTb (CBraTbC npeIcTaBtTeJEM cepBnCHOrO ceHTpa).
B cnyuae npoctoa npnbopa (hanpimep, 12 yacob) cTeKJIHHbIe DBePn neu InnaI nIuIcbl cIeDyET OCTaBNTb Cnerka OTKpbITbIMN.
A OTMeTKa yCTaHOBKN ,0
B KoHTpoJIbHaJaAMnOuKa BepxHero HArpeBaTeJIbHOrO 3JEMeHTa
C PeryJrTop TemnepaTpybI, BepxHn HArpeBaTeJIbHbI JIeMeHT
OTMeTKa yCTaHOBKn ,0"
E KoHTpoJIbHaJaAMNoUka cpeHero HArpeBaTeIbHOrO 3JEMeHtA
F PeryjIaTOp TemnepaTypbI dIra cpeIHero HArpeBaTeJIbHOrO 3JIeMeHTa
G OTmETka yCTaHOBKn ,0"
H KoHTpoJIbHaJaAMNoUka HIXKHeRo HApeBaTeJbHOrO 3JeMeHtA
I PeryJrTop TemnepaTpybl, HxHnHaRpeBaTeBHyI 3JeMeHT
J BkIIOuataTeJIb BHyTppeHHeRo OcBeUeHnB BepxHei pa6OyeKamepbl
K BkHouaTeIb BHyTpEHHero OcBeUeHnra HxKHe pa6oey kamepbbl
YKA3AHNE!
Peeb dIy nIu2002028 IMeet ToIbKO OndHy pa6oyu KaMepy, pa3dJeHHyo Ha DBe OTdEnbHbIe qactn C NOMOUsbIO paCNOJoxEHHoN IOcepeDInHe WAMOTHOIIITbl.
3Ta neyb dIy nIuIbI NMeet 3 HarpeBaTeIbHbIX 3IeMeNTa I 3 peryIaTopa TemnepaTypbl:
BepxHn peyIaTOp TemnepaTypbI CnyKNT nJa ynpaBHeHn BepxHm HaRpeBaTeIbHbIM 3JeMeHTOM BepxHe KaMepbl,
HnKHN-ДЯ ynpaBJIeHn HnXHM
HaRpeBaTeIbHbIM 3JIeMeHTOM HxKHei KaMepbl,
a CpeHn-ДЯ ynpaBJIeHn HxKHM
HaRpeBaTeIbHbIM 3JIeMeHTOM BepxHei KaMepbl N
BepxHM HaRpeBaTeIbHbIM 3JIeMeHTOM HxKHei
KaMepbl, T.K. HaRpeBaTeIbHbIM 3JIeMeHT HaxOHTc
HeNoCpeDCTBeHHo NOJ WAmOTHO JINTOn,
pacnoLoXeHHo B cepEnHe pa6Ouei KaMepbl.
5.2.4 PerynpoBaHne Tempeatypbl
YKA3AHNE!
Ipeed neeHnem nucbI neyb dnynnuCbI cneyuET Bcerda pa3orpeT do Tpe6yEmo TemepaTypbl!
- PoiocoeHHHTb np6Op K NcToHnky 3JeKTPoNTaHnY.
C nOMOuIcooTBeCTBvUOxNpeyIaTOPOB TeMnepaTypbI,ДЯ BbIbpaHHO pa6oey KaMepbl yCTaHOBnTB Tpe6yEmyIO TemnepaTypy dJa BepxHero/HnxHero HarpeBaTeNbHO rIeMeHTa.Bo3MOxHoCTb peYIpOBaHna TeMnpaTypbI neu dJI npuIpElyCMaTPnBaet Dnana30H 0 C-450 C.Bcnyae neyeHna Nucbl peKOMeHdyem yCTaHOBnTB TemnepaTypy ot 300 C do 400 C.
KoHTpoJIbHbIe JAmIOUcN BepxHrO N HIXHrO HarpeBaTeJbHOrO 3JIeMeHTa CBETTcR BO BpEMpa30rpeBa Pn6Opa. - Beлична Temnéратуры BNYtrpna pa6oey kamepbi noka3aHa Ha yka3aTeJe Temnépaтуры npnbopa (3a ncknoueHem neey dny niu cybI apt. 2002018 n 2002028).
Iocne doctnkeHna yCTaHOBJIeHHoTempeatpybIOKHTPOJbHaJaAMNoUka norachet. Korda Tempeatypa B pa6oey Kamepe CHN3NTc, KOHTPOJbHaJaAMNoUka NOBTOpHO 3acBeITTCn HAReBaTeJbHbI 3JeMeHT ONrTa Pa3OrpeET Kamepy neu INIINIOU4I DO YCTaHOBJIeHHoTempeatpybl.
5.2.5ПechенпцьI
- Pocne npedBapnteHoro pa3orpeBa neu IJra nucbi OTkpblb DBeprn neu IJnui, noIb3VcB pvKamN DBepen.
PnroTOBHeHvIO NmHy NOMeCTHTb Ha HAMOTHO INTEE 3aKpbl TB DBePN.
Bo Bpempa60tb neu dny nuiuye He cneyuet octabn8e3 npncmotpa. Habnda3a pooecom uepe3 cTeKnB DBePax neu dny nuiu.

OCTOPOXHO! Onachoctb noJyehn oKorob!
Bo n36eKaHne noLyuHnO OXoROB Bo BpeMn3bTnA
PiuZbln3 neu InIuZbl CJeDuyeT NoIb3oBaTbc
3aunTHbIMn pyKaBuNcAm NlInHOJ 3a 3aPCTb,
PpeDyCMOTpeHHbIMn IJIy BbICOKNX TempepaTyp.
Kpome TOro cIeDyET nCNoJb3OBAtB KxOHHbIe HnCTpyMeHTbIC dIIHHoR pyKoN (HaNP. IOnaTKn dJa nnucbl).
6. Ouinctka

OCTOPOXHO!
Ipeed ounstkoi OTcoeHnHTb np6op OT nctouHnka 3JIeKtpoNTaHn. PoOxdaTb, noka np6op ocTbIHet. IJra ounstkn np6opa He nCnoIb3OBaTb cTpyu BODbl noD daBJIeHnem!
Cleintb 3a Tem, yTo6bl B np6op He nonadaJa Boda.
O PeryIaRHO ouHuaTb np6op, co6IIOaJra oc6yUo TuaTeJIbHocTb B cIyuae 3JIeMeHTOB, KOToPbIE BXoJrT B KOHTaKT C NIIuSeBbIMn IPOdyKTamN.
O Ipeed ouhctkO OCTaBHT np6op octbIbTaB.
C nOMOJIbIO MeTaNJIueCKo JIOnaTKn IIN cKpe6ka, 6e3 npIMHeHna YNCTaIXxCpeDCTB IN BOdbl, NocLe KaJDoRo NeueHnA CTapaTeNbHO ydaJIHTb OCTaTKN PPOyKTOB C WAMOTHOI NNITbl.

BHUMAHNE!
UamotHyIO pIHTy HeJIb3a YnCTNTb IIN OXJaXdaTb C NOMOuB IO BODbl, T.K. 3TO rpo3nt ee NOBpeKdEHNEM.
OДЯ TuaTeNbHO OuNCTKn, B KOHcE DnH, B TeUeHne 30 MmHyT CneDyET pa3OrpeBaTb Neyb dIa Nucbl npi cAmoB blicOKo TemnepaType (BKnIOHTb TOlbKO OdINH HarpeBaTeNbHbI 3IeMeHr). DaIee BBkIOHTb neCb dIra Nucbl, n Ha CNeDyUOnn DeHb OuNCTNTb 5eTKo XONODHyIO NOBepxHOCTb 7AMOTHOIINTbl.
O XoIoHyu pa6oyu KaMepy (3a NCKIIOueHEm Neu IJIa PnUcbl apr. 2002094, B KOTOpO pa6OuaKaMepa NOHOCbIO BbINOJHeHa I3 WAMOTHO rINHbI) OCHCTNTb C NOMOsbMO MRKoB, BJaXHOcAeTKn. B cnyae CNbHbIX 3aRpa3HeHm MOxHO BOCNoJB3OBaTBcRA MfKIM YNCTaUM CpeDCTBOM, Nocne Yero IpotepeTB caPcETKO, HAMOueHHo YNCTO BoDOn, YTO6bI ydaJIITb OCTaTK UNCTaUeO cpeDCTBa.
O Bcpo pa6ooyu kamepy neyn IJIy nIuI cyI apr. 2002094 ouHCTnTb NOcne TOrO KaK OHa OCTbIHET, ydaJIy OCTaTKN u CMeTaY IN C WAMOTHOIN HHTBIX BHYTpEHHX CTeHOK C NOMOsbU MTeaJIInueCKOJ ONaTKn INN CKpe6ka.
He nCnoJIb3OBaTb BODy IIN YIcTЯUne CpeIcTBA.
O Kopnyc npnbopa Ounuatab c nOMoubmo Mrgkoi, BnaXHOJ caTKn CdoabHeM MRKOro MOUeero cpeCTBa. HkoRa He cneDyeT noB3OBaTbCra arpeccNBbIMN IIN COdePkaUNM KNCNOTBI YnCTAUNM CpeCDTBAMN, KOToPbIE MORIN 6bl NOUAPAATAb NOBepxHOctn npnbopa.
O PeryIaRHO npOBepaTb BEHTnIaIcIOHHbIe OTBepCTnB KOpnyce. B cIyuae 3arpa3HeHn IIN 3aIbIeHn OUcIcNTb OTBepCTnC NOMoIbI OeTK NII NblncocCa, YTO6bl obecneHTb CnpKpyaIO BO3dYxa BHyTpN pa6oye KamepbN paBHomepHoe neueHne.
7.Bo3MOxHbIe HEnCnPaBHOCTN
B cnyae nomex B pa6ote cneJeT OTKnHouHTb np6op ot nCTOuHnka 3JIeKTPoNTaHn. IcnoIb3yra HOpMaunIO B Ta6nue HnKe, cNeJeT npOBepNTb, MOxHO nn yCTpaHtB HeNCnpaBHocTN 6e3 npNBleueHnra cepBnCHoro nepcoHaJa nII INHOpMnPOBaHnra npodabua.