
XRBR 206 BW BB - Refrigerator AMANA - Free user manual and instructions
Find the device manual for free XRBR 206 BW BB AMANA in PDF.

| Product Type | Refrigerator-freezer |
| Brand | Amana |
| Model | XRBR 206 BW BB |
| Dimensions (W x D x H) | 60 cm x 65 cm x 170 cm (estimated) |
| Weight | 70 kg (estimated) |
| Power supply | 220-240 V, 50 Hz, 10 A |
| Ambient temperature range | 13 °C to 43 °C |
| Recommended freezer temperature | -17 °C to -16 °C |
| Recommended refrigerator temperature | 3 °C to 4 °C |
| Temperature controls | Separate controls for refrigerator and freezer, setting from 1 to 6, OFF position |
| Capacity | Not provided |
| Main features | Spillsaver™ shelves, humidity-controlled vegetable drawers, deli drawer, adjustable door bins, ice maker (optional), interior lighting |
| Installation | Allow 5 mm clearance on sides, 13 mm at top and rear for models with depth >60 cm |
| Maintenance and cleaning | Clean with sodium bicarbonate (4 tbsp per liter of warm water), avoid abrasive cleaners |
| Safety | Installation by a qualified engineer, grounded outlet, dedicated 10 A circuit |
| Spare parts and repairability | Contact the dealer or an authorized repairer, provide model number, P and serial number |
| General information | User manual available in multiple languages, after-sales service warranty |
Frequently Asked Questions - XRBR 206 BW BB AMANA
User questions about XRBR 206 BW BB AMANA
0 question about this device. Answer the ones you know or ask your own.
Ask a new question about this device
Download the instructions for your Refrigerator in PDF format for free! Find your manual XRBR 206 BW BB - AMANA and take your electronic device back in hand. On this page are published all the documents necessary for the use of your device. XRBR 206 BW BB by AMANA.
USER MANUAL XRBR 206 BW BB AMANA
natural_image
Simple line drawing of a refrigerator with no text or symbolsBottom Freezer Refrigerator
English 1
Deutsch....14
Français ....28
Sección española 42
natural_image
Seven identical gray diamond shapes arranged horizontally with black lines on each side (no text or symbols)THANK YOU FOR PURCHASING THIS REFRIGERATOR !
Please read this Owner's Manual thoroughly. This manual provides proper maintenance information.
Warranty service must be performed by an authorized servicer. The manufacturer also recommends contacting an authorized servicer if service is required after warranty expires. To locate an authorized servicer, contact your distributor.
When contacting your servicer, please provide the following information. Product information is on the serial plate, located on wall of fresh food section.
Model Number: ____
‘P’ Number: ____
Serial Number: ____
Date of Purchase: ____
Dealer Name: ____
Dealer Address:
Dealer Phone: ____
HOW TO OBTAIN REPLACEMENT PARTS AND SERVICES?
Problems? Save yourself the nuisance of unnecessary service calls; check the "Before Calling Service" section of the owner's manual.
Your new refrigerator has been carefully engineered and manufactured under strict quality standards and should give you satisfactory and dependable operation. However, like all mechanical merchandise, it may occasionally require adjustment, replacement parts, or maintenance. Should you ever need assistance, please contact the dealer from whom you purchased the refrigerator.
Provide the following:
- Model
• Manufacturing Number - Serial Number and all of the other data shown on the model serial plate.
• State briefly the trouble you are having.
The page area to the left has been provided to record valuable information.
KEEP INSTRUCTIONS FOR FUTURE REFERENCE!
Keep this manual and your sales receipt together in a safe place in case warranty service is required.
WHAT IF THESE FEATURES ARE DIFFERENT FROM MINE?
This book is intended to show the variety of features that are available in the product line. If interested in purchasing additional items available for your refrigerator, please contact your distributor.
CONTENTS
Introduction....1
Contents ....1
Important Safety Information ....2
Installing Your Refrigerator....3-4
Temperature Controls ....5
Fresh Food Features....6-7
Freezer Features 8
Care and Cleaning 9-10
Normal Operating Sounds ....11
Before You Call....12-13
IMPORTANT SAFETY INFORMATION
RECOGNIZE SAFETY SYMBOLS, WORDS, LABELS
DANGER
DANGER – Immediate hazards which WILL result in severe personal injury or death.
WARNING
WARNING – Hazards or unsafe practices which COULD result in severe personal injury or death.
CAUTION
CAUTION – Hazards or unsafe practices which COULD result in minor personal injury or product or property damage.
WHAT YOU NEED TO KNOW ABOUT SAFETY INSTRUCTIONS
Warning and Important Safety Instructions appearing in this manual are not meant to cover all possible conditions and situations that may occur. Common sense, caution and care must be exercised when installing, maintaining or operating refrigerator.
Always contact your dealer, distributor, service agent or manufacturer about problems or conditions you do not understand.
DANGER
To reduce risk of injury or death, follow basic precautions, including the following:
Proper Disposal of Your Refrigerator
IMPORTANT: Child entrapment and suffocation are not problems of the past. Junked or abandoned refrigerators are still dangerous – even if they sit out for “just a few days.” If you are getting rid of your old refrigerator, please follow the instructions below to help prevent accidents.
Before you throw away your old refrigerator or freezer:
➢ Take off the doors.
Leave the shelves in place so children may not easily climb inside.
INSTALLING YOUR REFRIGERATOR
These instructions were provided to aid you in the installation of your refrigerator. The manufacturer cannot be responsible for improper installation.
STEPS TO FOLLOW...
A qualified engineer must connect refrigerator in accordance with these installation instructions. Measure door opening and depth and width of refrigerator. Remove handles or doors if required. Engineer must also do the following:
- Follow local water and electrical company connection regulations.
- Complete water supply connection before electrical supply connection.
Service to or replacement of power cord must be performed by a qualified servicer.
- Install on an earthed outlet with a separate 220-240 volt, 50hz., 10A circuit.
- Protect soft flooring with cardboard or rugs.
- Provide 5 mm clearance at side of refrigerator and for models more than 60 cm deep, provide 12.7 mm clearance at top and back of refrigerator.
- 60 cm deep models.
Trim corners of counter top to a 45^ angle if counter top has 25 mm overhang.
HOW TO REMOVE WOODEN BASE
CAUTION
To avoid personal injury or property damage, two people must remove wooden base.
- Tape doors shut to prevent doors from opening unexpectedly.
- Slide appliance cart under side of refrigerator.
-
Wrap refrigerator with blanket or pad. Thread strap around refrigerator. Put foam shipping pads, located in shipping carton, under strap. Tighten strap securely.
-
Lower appliance cart to floor with appliance cart handles on bottom.
-
Remove top two bolts from skid.
-
Return refrigerator and appliance cart to an upright position. Remove strap.
-
Slide appliance cart under opposite side of refrigerator.
-
Repeat steps 3–5.
-
Remove wooden base.
-
Return refrigerator and appliance cart to an upright position and remove appliance cart.
IMPORTANT: Do not leave refrigerator on its side longer than necessary to remove bolts.
INSTALLING FRESH FOOD FRONT-MOUNT HANDLE
If installing handles for the first time, the fresh food handle can be located within the fresh food section. The handle trim will be located in the literature package.
Remove 14 " hex head screws from door face with hex head driver.
- If reversing door, remove door plugs from opposite side of door and insert in screw holes.
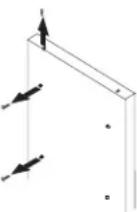
➢ Align handle holes with screw holes on door face and secure with 2 door face screws previously removed.
- Locate handle trim in literature pack and install over top and bottom of handle.
- Secure top handle trim with remaining screw removed previously.
- Snap bottom trim over bottom portion of handle.
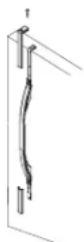
INSTALLING FREEZER HANDLE
If installing handle for the first time, the freezer handle can be located in the literature package inside the refrigerator.
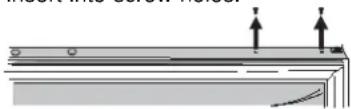
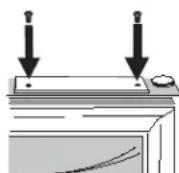
➢ Remove Phillips screws from top edge of freezer door opposite hinge side.
- Retain screws for later replacement.
- If reversing freezer door, remove door plugs from top edge of door and insert into screw holes.
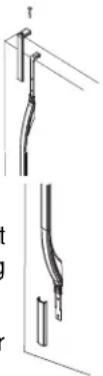
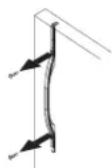
➢ Align handle holes with screw holes
on door edge and secure with screws previously removed.
HOW TO REMOVE AND REPLACE DOORS AND HINGES
- Contact a qualified engineer to perform this task.
REMOVING FRESH FOOD FRONT-MOUNTED HANDLE
➢ Remove top handle trim by removing top handle screw.
- Retain trim and screw for later replacement.
Pry bottom handle trim from handle with screwdriver flat blade wrapped in masking tape.
- Retain trim for later replacement.
➢ Removing two remaining handle screws and remove handle.
- Retain screws for later replacement.
natural_image
Technical line drawing of two mechanical components with no visible text or symbolsNOTE: Side-mounted fresh food handles are available in kits for some models. Please see your dealer for details.
REMOVING FREEZER HANDLE
Removing handle may be necessary when transporting refrigerator through tight spaces or when reversing door.
➢ Remove handle screws with Phillips screwdriver.
- Retain screws for later replacement.
To avoid damage to walls and flooring, protect soft vinyl or other flooring with cardboard, rugs or other protective material.
To avoid damage or breakage to adjusting bolt, do not use power tools to correct leveling.
DO NOT adjust refrigerator down to where the base of the refrigerator which supports the condenser is resting on the floor. Doing so may damage underside components.
TOOLS NEEDED:
- 38 " hex head driver
-
Level
-
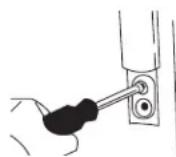
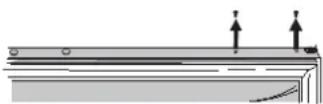
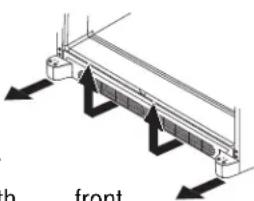
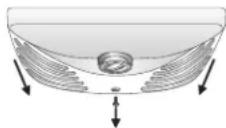
Remove toe grille and bottom hinge covers.
natural_image
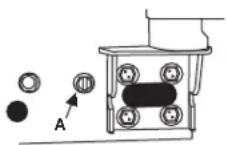
Diagram of a mechanical component with arrows indicating direction, labeled 'front' and 'h' (no text or symbols on the diagram itself)- Turn both front adjustment screws (A) clockwise to raise and counterclockwise to lower.
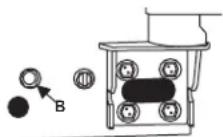
- Turn both rear adjustment screws (B) clockwise to raise and counterclockwise to lower.
- Check with level to verify 6 mm tilt to the back for proper door closure.
➢ If refrigerator is aligned and stable, replace toe grille.
FOR PULLOUT DRAWER ONLY:
- Turn both stabilizing legs clockwise until firmly against floor. Turn roller adjustment screws 2 to 3 times counterclockwise so that the full weight of refrigerator rests on stabilizing legs.
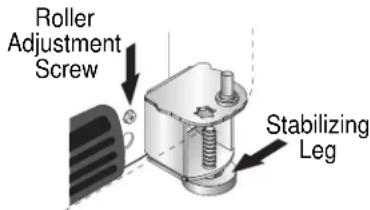
- Replace toe grille and bracket cover(s). See markings on inside of toe grille to insure proper placement.
- Snap bottom portion into place first. Press down on top of grille until top portion snaps into place.
WHAT IF MY REFRIGERATOR ROCKS?
➢ Turn rear adjustment screw clockwise to raise rocking corner.
➢ Replace toe grille.
TEMPERATURE CONTROLS
This refrigerator is designed to operate at a household temperature of 13^ to 43^ C.
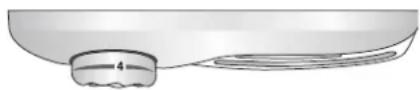
INITIAL SETTING
➢ Locate refrigerator controls at the top of fresh food compartment and freezer controls at top of freezer section. Set both controls to 4.
IMPORTANT: Neither section will cool if freezer control is set to OFF.
➢ Allow 24 hours for temperature to stabilize.
TEMPERATURE ADJUSTMENTS
➢ Check to see if freezer temperature is -17^ to -16^ C.
- T urn control to next highest number if too warm.
- T urn control to next lowest number if too cold. Allow 5 to 8 hours for adjustments to take effect.
➢ Check to see if fresh food temperature is 3^ to 4^ C.
- T urn control to next highest number if too warm.
- T urn control to next lowest number if too cold. Allow 5 to 8 hours for adjustments to take effect.
natural_image
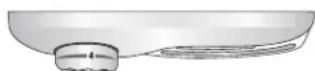
3D rendering of a mechanical component with a central hub and flanged side (no text or symbols)TEMPERATURE TEST
MATERIALS NEEDED:
• 2 thermometers that measure -21^ to 10^ C
• 2 drinking glasses
FREEZER
➢ Place thermometer in glass of vegetable oil in middle of freezer and continue with Temperature Adjustments.
IMPORTANT: Always start temperature adjustments with freezer section.
REFRIGERATOR
➢ Place thermometer in glass of water in middle of refrigerator and continue with Temperature Adjustments.
FRESH FOOD FEATURES
INTERIOR SHELVES
CAUTION
To avoid personal injury or property damage, observe the following:
➢ Confirm shelf is secure before placing items on shelf.
Handle tempered-glass shelves carefully. Shelves may break suddenly if nicked, scratched or exposed to sudden temperature change.
FULL-WIDTH SHELVES
To remove shelves:
➢ Unhook shelf from rear ladder assembly and pull out.
To reinstall shelves:
➢ Insert shelf hooks into rear ladder assembly and lower into place.
SPILLSAVER™
Spillsaver™ stationary shelves hold simple spills for easier cleaning
To remove shelves:
▶ Lift up and out.
To reinstall shelves:
➢ Reverse above procedure.
SPILLSAVER™ EASY GLIDE™ (SELECT MODELS)
Spillsaver™ Easy Glide™ shelves feature the convenience of
easy cleaning with a pullout design to reach items in the back. For ease of cleaning, glass shelf may be removed by pulling to full extension and lifting out of frame.
To remove shelf and frame:
Lift up and out.
To reinstall shelf and frame:
▶ Reverse above procedure.
REAR SHELF EXTENSIONS
(SELECT MODELS)
Rear shelf extensions help prevent articles from falling off the back of the shelf.
To remove shelf extension:
➢ Pull extension straight up from rear of shelf.
To reinstall shelf extension:
➢ Insert posts of the shelf extension into holes in the shelf frame.
DOOR STORAGE
DAIRY CENTER
The dairy center provides convenient storage for items such as butter, yogurt, cheese, etc.
This compartment is an adjustable feature located in the door. It can be moved to several different locations to accommodate storage needs.
To remove:
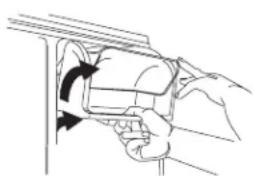
➢ Open dairy door, pull upward and tilt out.
natural_image
Line drawing of a hand holding a device with a curved arrow indicating rotation (no text or symbols)To reinstall:
➢ Reverse above procedure.
DOOR BUCKETS
Door buckets adjust to meet individual storage needs.
To remove buckets:
Slide bucket up and pull straight out.
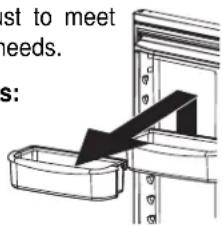
To reinstall buckets:
▶ Reverse above procedure.
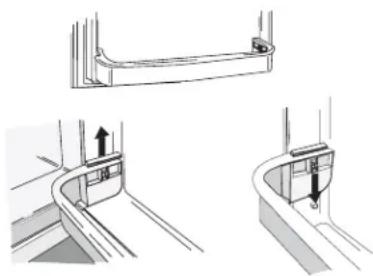
DOOR RETAINER
Door retainers remove for easy cleaning.
To remove:
▶ Slide retainer up and pull straight out.
To reinstall:
▶ Reverse above procedure.
natural_image
Technical line drawings of a curved mechanical component with directional arrows indicating assembly or movement (no text or symbols)WINE TRIVET/CAN RACK
The Wine Trivet/Can Rack accessory seats in the bottom of most drawer assembl

Beer bottles can be laid crosswise, or a single bottle may be laid in the center depression. Cans may also be stored, as illustrated.
FRESH FOOD FEATURES, CONT.
DRAWERS
HUMIDITY-CONTROLLED CRISPER DRAWERS
The crisper drawer keeps produce fresh longer by providing an environment with adjustable humidity.
The crisper controls regulate the amount of humidity in the crisper drawer. Use the low setting for produce with outer skins. Use the high setting for leafy produce.
LOW
- apples • grapes
- cauliflower • oranges
- corn - zucchini
- cucumbers
HIGH
• asparagus • fresh herbs
- broccoli • fresh sprouts
- cabbage - lettuce
- celery • spinach
When storing produce in humidity-controlled crispers:
DO NOT wash produce before placing in crispers. Any additional moisture added to the crispers may cause produce to prematurely spoil.
➢ DO NOT line crispers with paper towels. Towels will retain moisture.
➢ Follow control instructions carefully. Incorrect control settings may damage produce.
natural_image
Technical line drawing of a mechanical assembly with an inset showing a bracket and directional arrows (no text or symbols)TEMPERATURE- CONTROLLED DRAWERS
Deli/Crisper and Fresh Food Pantry
The Deli/Crisper system and Fresh Food Pantry system provide drawers with a variable temperature control that keeps the compartment up to 3°C colder than refrigerator temperature. This drawer can be used for deli storage or additional produce storage.
Controls
The Deli and Fresh Food Pantry controls regulate the air temperature in the drawers. Set control level to cold to provide normal refrigerator temperature for produce with outer skins. Use the coldest setting for meats or other deli items.
NOTE: Cold air directed to the Deli/Crisper System or Fresh Food Pantry can decrease refrigerator temperature. Refrigerator control may need to be adjusted.
SNACK DRAWER
This drawer can be used for storage of food items or extra produce. Some models may have a control feature. For operating instructions see the appropriate control category listed earlier.
natural_image
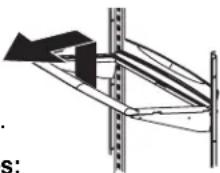
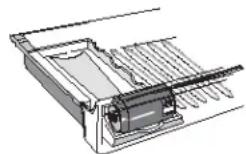
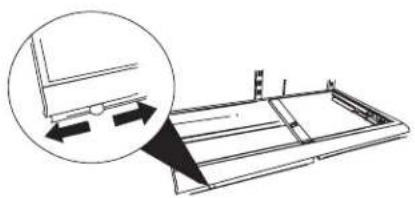
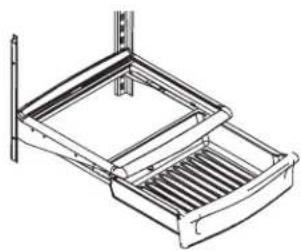
Technical line drawing of a mechanical device with a rectangular frame and vertical supports (no text or symbols)To remove drawers:
➢ Pull drawer out to full extension. Tilt up front of drawer and pull straight out.
To reinstall drawers:
➢ Insert drawer into frame rails and push back into place.
natural_image
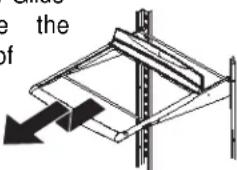
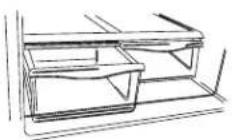
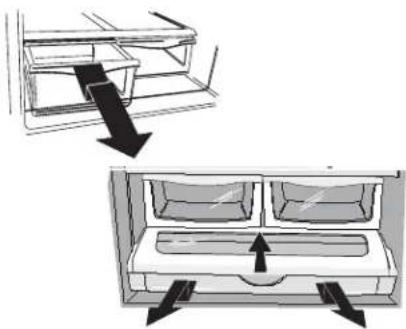
Diagram showing two views of a cabinet or enclosure with arrows indicating direction (no text or symbols present)To remove and install glass and frame:
➢ Remove drawer as instructed above.
➢ Place hand beneath frame to push up glass from underneath. Lift glass out.
▶ Lift frame from refrigerator liner rails.
To reinstall:
Reverse above procedure.
natural_image
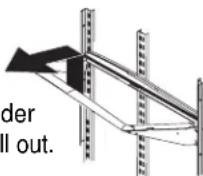
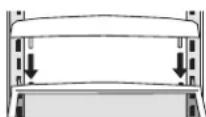
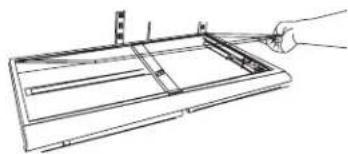
Line drawing of a hand holding a tool interacting with a rectangular panel or frame (no text or symbols)If refrigerator door does not open far enough to remove drawers:
Remove drawer furthest from hinge side of cabinet.
➢ Remove glass as instructed previously.
➢ Lift center divider from frame. Slide existing drawer away from hinge side of cabinet and remove.
natural_image
Technical line drawing of a mechanical assembly or mounting bracket (no text or symbols)FREEZER FEATURES
AUTOMATIC ICE MAKER
NOTE: Ice makers are available as a kit. Please see your dealer for more information.
SHELVES
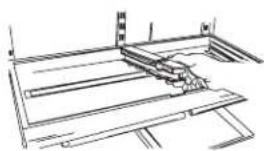
ICE SERVICE RACK (SELECT MODELS)
To install rack:
Slide L-shaped groove of shelf down over back wall screw. Push rack back until screw is stopped in L-shaped groove (1). Slide front portion of shelf over front wall screw (2).
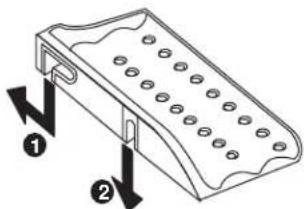
To remove rack:
➢ Reverse above procedure.
FIXED FREEZER SHELF
To remove shelf:
➢ Pull shelf out to full extension. Tilt up front of shelf and pull straight out.
To reinstall shelf:
➢ Insert shelf into refrigerator liner rails and push to back of compartment.
natural_image
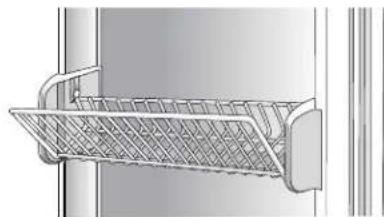
Line drawing of a shopping basket with handles, no text or symbols presentGLIDE-OUT FREEZER SHELF
To remove shelf:
➢ Pull shelf out to full extension. Tilt up front of shelf and pull straight out.
To reinstall shelf:
➢ Insert shelf into refrigerator liner rails and push to back of compartment.
natural_image
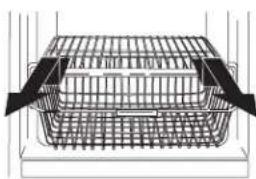
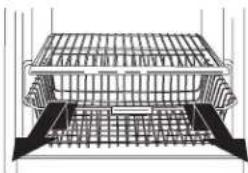
Isometric line drawing of a staircase with stairs and structural beams (no text or symbols)WIRE BASKET
To remove basket:
➢ Pull basket out to full extension. Tilt up front of basket and pull straight out.
To reinstall basket:
➢ Insert basket into refrigerator liner rails and push back into place.
natural_image
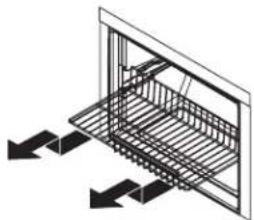
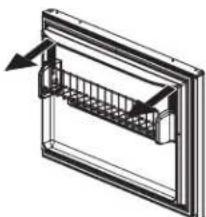
Technical line drawing of a multi-tiered metal cage or rack structure (no text or symbols)DOOR STORAGE
FIXED DOOR SHELF
The fixed door shelf provides convenient storage for frozen food items in freezer door.
To remove shelf:
➢ Lift assembly from side liner tabs and pull out.
natural_image
Isometric line drawing of a window frame with a grid and directional arrows (no text or symbols)To reinstall shelf:
➢ Fit ends of shelf assembly on liner tabs and slide down.
TILT-OUT BIN (SELECT MODELS)
The tilt-out bin in the freezer door tilts for ward for easy access to stored items.
▶ Lift assembly from side liner tabs and pull out.
➢ Fit ends of shelf assembly on liner tabs and slide down.
natural_image
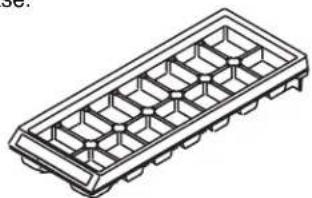
Technical illustration of a metal rack with mesh pattern, no text or symbols presentACCESSORIES
ICE CUBE TRAY
The ice cube tray provides an area to freeze cubes for manual dispensing of ice.
To release ice cubes from tray, hold tray upside down over a storage container and twist both ends of tray until cubes release.
natural_image
Isometric line drawing of a rectangular electronic component with internal grid structure (no text or symbols)CARE AND CLEANING
WARNING
To avoid electrical shock which can cause severe personal injury or death, disconnect power to refrigerator before cleaning. After cleaning, connect power.
CAUTION
To avoid personal injury or property damage, observe the following:
- Read and follow manufacturer's directions for all cleaning products.
- DO NOT place buckets, shelves or accessories in dishwasher. Cracking or warping of accessories may result.
| PART DO | DO NOT USE | |
| Textured Doors and Exterior | ➢ Abrasive or harsh cleaners➢ Ammonia➢ Chlorine bleach➢ Concentrated detergents or solvents➢ Metal or plastic-textured scouring pads | ➢ Use 4 tablespoons of baking soda dissolved in 1 quart (1 liter) warm soapy water.➢ Rinse surfaces with clean warm water and dry immediately to avoid water spots. |
| Cabinet Interior | ||
| Stainless Steel Doors and ExteriorIMPORTANT: Damage to stainless steel finish due to improper use of cleaning products or non-recommended products is not covered under this product's warranty. | ➢ Abrasive or harsh cleaners➢ Ammonia➢ Chlorine bleach➢ Concentrated detergents or solvents➢ Metal or plastic-textured scouring pads➢ Vinegar-based products➢ Citrus-based cleaners | ➢ Use warm, soapy water and a soft, clean cloth or sponge.➢ Rinse surfaces with clean warm water and dry immediately to avoid water spots. |
| Door Gaskets | ➢ Abrasive or harsh cleaners➢ Metal or plastic-textured scouring pads | |
| Condenser CoilRemove base grille to access | ➢ Use a vacuum cleaner hose nozzle. | |
| Condenser Fan OutletGrilleSee back of refrigerator | ➢ Use a vacuum cleaner hose nozzle with brush attachment. | |
| Accessories Shelves, buckets, drawers, etc. | ➢ A dishwasher | ➢ Follow removal and installation instructions from appropriate feature section.➢ Allow items to adjust to room temperature.➢ Dilute mild detergent and use a soft clean cloth or sponge for cleaning.➢ Use a plastic bristle brush to get into crevices.➢ Rinse surfaces with clean warm water.➢ Dry glass and clear items immediately to avoid spots. |
STAINLESS STEEL
There is a cleaner available for purchase from the manufacturer (Part # 31960801).
For a list of other recommended cleaning products, please contact your local distributor.
REMOVING ODORS FROM REFRIGERATOR
Remove all food.
Disconnect refrigerator.
➢ Clean the following items using the appropriate instructions in the Care and Cleaning table.
- W alls, floor and ceiling of cabinet interior
- Drawers, shelves and gaskets according to the instructions in this section.
Pay special attention to clean all crevices by completing the following steps.
– Dilute mild detergent and brush solution into crevices using a plastic bristle brush.
- Let stand for 5 minutes.
- Rinse surfaces with warm water. Dry surfaces with a soft, clean cloth.
➢ Wash and dry all bottles, containers and jars. Discard spoiled or expired items.
Wrap or store odor-causing foods in tightly sealed containers to prevent reoccurring odors.
Connect power to refrigerator and return food to refrigerator.
➢ After 24 hours, check if odor has been eliminated.
If odor is still present:
➢ Remove drawers and place on top shelf of refrigerator.
Pack refrigerator and freezer sections – including doors – with crumpled sheets of black and white newspaper.
➢ Place charcoal briquettes randomly on crumpled newspaper in both freezer and refrigerator compartments.
➢ Close doors and let stand 24-48 hours.
ENERGY SAVING IDEAS
This refrigerator is designed to be one of the most energy efficient refrigerators available. Reduce energy use by observing the following:
➢ Operate in normal household temperatures of 16^ to 43^ C away from heat sources and direct sunlight.
➢ Set refrigerator, freezer and Chiller Fresh™ system controls no colder than necessary.
Keep freezer section full.
Keep door gaskets clean and pliable. Replace gaskets if worn.
- Keep condenser coils clean.
REMOVE AND REPLACE LIGHT BULBS
WARNING
To avoid electrical shock which can cause severe personal injury or death, disconnect power to refrigerator before replacing light bulb. After replacing light bulb, connect power.
CAUTION
To avoid personal injury or property damage, observe the following:
Allow light bulb to cool.
➢ Wear gloves when replacing light bulb.
FRESH FOOD SECTION
➢ Remove screw from light shield. Retain for replacement.
Slide shield toward back of compartment to release from light assembly.
➢ Remove light bulbs.
➢ Replace with appliance bulbs no greater than 40 watts.
Replace light bulb cover by inserting tabs on light shield into liner holes on each side of light assembly. Slide shield toward front of refrigerator until it locks into place. DO NOT force shield beyond locking point. Doing so may damage light shield.
➢ Replace light shield screw.
Freezer
➢ Pinch rear tabs on light cover and pull straight down.
➢ Remove light bulb.
➢ Replace bulb with appliance bulb no greater than 40 watts.
➢ Insert front tabs of light cover into freezer liner and snap rear portion over light assembly until rear tabs engage.
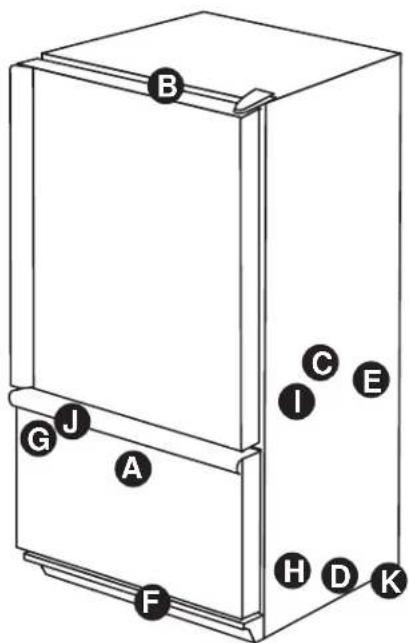
Today's refrigerators have new features and are more energy efficient. Foam insulation is very energy efficient and has excellent insulating capabilities, however, foam insulation is not as sound absorbent. As a result, certain sounds may be unfamiliar. In time, these sounds will become familiar. Please refer to this information before calling service.
| TOPIC | POSSIBLE CAUSE | SOLUTION |
| Clicking | ➢ Freezer control (A) clicks when starting or stopping compressor. | ➢ Normal operation |
| ➢ Defrost timer (B) sounds like an electric clock and snaps in and out of defrost cycle. | ➢ Normal operation | |
| Air rushing or whirring | ➢ Freezer fan (C) and condenser fan (D) make this noise while operating. | ➢ Normal operation |
| Gurgling or boiling sound | ➢ Evaporator (E) and heat exchanger (F) refrigerant makes this noise when flowing. | ➢ Normal operation |
| Thumping | ➢ Ice cubes from ice maker (select models) drop into ice bucket (G). | ➢ Normal operation |
| Vibrating noise | ➢ Compressor (H) makes a pulsating sound while running. | ➢ Normal operation |
| ➢ Refrigerator is not level. | ➢ See Installation Instructions for details on how to level your refrigerator. | |
| Buzzing | ➢ Ice maker water valve (I) hookup (select models) buzzes when ice maker fills with water. | ➢ Normal operation |
| Humming | ➢ Ice maker (J) is in the ‘on’ position without water connection. | ➢ Stop sound by raising ice maker arm to ‘off’ position. See Automatic Ice Maker section in your Owner’s Manual for details. |
| ➢ Compressor (H) can make a high-pitched hum while operating. | ➢ Normal operation | |
| Hissing or popping | ➢ Defrost heater (K) hisses, sizzles or pops when operational. | ➢ Normal operation |
BEFORE YOU CALL
OPERATION
| PROBLEM POSSIBLE CAUS | ES WHAT TO DO | |
| Freezer control and lights are on, but compressor is not operating | Refrigerator is in defrost mode. | Normal operation. Wait 40 minutes to see if refrigerator restarts. |
| Crisper drawer Control setting temperature is too warm | gs are too low. See section on Crisper drawer to Freezer controls are set too low. See controls section in Owner's Manual on how to adjust your controls. | adjust controls. |
| Drawer is improperly positioned. See section on Crisper drawer to verify drawer positioning. | ||
| Refrigerator does not Refrigerate operate | erator is not plugged in. Plug in refrigerator. | |
| Freezer control is not on. See controls section in Owner's Manual. | ||
| Fuse is blown, or circuit breaker needs to be reset. necessary. | Replace any blown fuses. Check circuit breaker and reset, if. | |
| Power outage has occurred. Call local power company listing to report outage. | ||
| Refrigerator still won't operate | Refrigerator is malfunctioning. | Unplug refrigerator and transfer food to another refrigerator. If another refrigerator is not available, place dry ice in freezer section to preserve food. Warranty does not cover food loss. Contact service for assistance. |
| Food temperature is too cold | Condenser coils are dirty. | Clean according to your Owner's Manual. |
| Refrigerator or freezer controls are set too high. | See controls section in Owner's Manual on how to adjust controls. | |
| Food temperature is too warm | Door is not closing properly. | Refrigerator is not level. See How to Level Your Refrigerator for details on how to level your refrigerator. |
| Check gaskets for proper seal. Clean, if necessary, according to cleaning instructions in Owner's Manual. | ||
| Check for internal obstructions that are keeping door from closing properly (i.e. improperly closed drawers, ice buckets, oversized or improperly stored containers or foodstuffs, etc.) | ||
| Controls need to be adjusted. | See the controls section in Owner's Manual for assistance on how to adjust your controls. | |
| Condenser coils are dirty. | Clean according to cleaning instructions in Owner's Manual. | |
| Rear air grille is blocked. | Check the positioning of food items in refrigerator to make sure grille is not blocked. Rear air grilles are located under crisper drawers. | |
| Door has been opened frequently, or has been opened for long periods of time. assure door is d | Reduce time door is open. Organize food items efficiently to open for as short a time as possible. | |
| Food has recently been added. | Allow time for recently added food to reach refrigerator or freezer temperature. | |
| Refrigerator has an odor | Compartment is dirty or has odor-causing food. | Refer to Care and Cleaning in Owner's Manual for odor removal instructions. |
| Water droplets form on outside of refrigerator | Check gaskets for proper seal. | Clean, if necessary, according to cleaning instructions in Owner's Manual. |
| Humidity levels are high. | Normal during times of high humidity. | |
| Controls require adjustment. See the controls section in Owner's Manual for assistance on how to adjust your controls. | ||
| Water droplets form on inside of refrigerator | Humidity levels are high or door has been been opened frequently. | See the controls section in Owner's Manual for assistance on how to adjust your controls. |
| Check gaskets for proper seal. | Reduce time door is open. Organize food items efficiently to assure door is open for as short a time as possible. | |
| Clean, if necessary, according to cleaning instructions in Owner's Manual. | ||
| Refrigerator or ice maker makes unfamiliar sounds or seems too loud | Normal operation. | Refer to noise section of Normal Operating Sounds guide in Owner's Manual. |
| PROBLEM POSSIBLE CAUSES WHAT TO DO | ||
| Crisper drawers do not close freely in the surrounding | Contents of drawer, or positioning of items compartment could be the drawers. obstructing drawer. | Reposition food items and containers to avoid interference with |
| Drawer is not in proper position. See Crisper drawer section for proper placement. | ||
| Refrigerator is not level. See How to Level Your refrigerator for details on how to level your refrigerator. | ||
| Drawer channels are dirty or need treatment. Clean drawer channels with warm, soapy water. Rinse and dry thoroughly. | ||
| Refrigerator runs too frequently long periods of time | Doors have been opened frequently or for assure door is open for as short a time as possible. | Reduce time door is open. Organize food items efficiently to |
| Allow interior environment to adjust for period the door has been opened. | ||
| Humidity or heat in surrounding area is high. Normal operation. | ||
| Food has recently been added. | Allow time for recently added food to reach refrigerator or freezer temperature. | |
| Refrigerator is exposed to heat by environment or by appliances nearby. | Evaluate your refrigerator's environment. Refrigerator may need to be moved to run more efficiently. | |
| Condenser coils are dirty. | Clean according to cleaning instructions in your Owner's Manual. | |
| Controls need to be adjusted. | See controls section in your Owner's Manual for assistance on how to adjust your controls. | |
| Door is not closing properly. Refrigerator is not level. See How to Level Your Refrigerator for details on how to level your refrigerator. | ||
ICE (refrigerators with icemaker only)
| PROBLEM | POSSIBLE CAUSES | WHAT TO DO |
| Refrigerator is leaking water | Plastic tubing was used to complete water connection. | The manufacturer recommends using copper tubing for installation. Plastic is less durable and can cause leakage. The manufacturer is not responsible for property damage due to improper installation or water connection. |
| Improper water valve was installed. | Check water connection procedure in your Installation Instructions. Self-piercing and 316 " saddle valves cause low water pressure and may clog the line over time. The manufacturer is not responsible for property damage due to improper installation or water connection. | |
| Ice forms in inlet tube to ice maker | Water pressure is low. | Water pressure must be between 20 to 100 pounds per square inch to function properly. A minimum pressure of 35 pounds per square inch is recommended for refrigerators with water filters. |
| Freezer temperature is too high. | See controls section in chapter called Installing Your Refrigerator on how to adjust your controls. Freezer is recommended to be between -18 to -17°C. | |
| Water flow is slower than normal | Water pressure is low. | Water pressure must be between 20 to 100 pounds per square inch to function properly. A minimum pressure of 35 pounds per square inch is recommended for refrigerators with water filters. |
| Improper water valve was installed. | Check water connection procedure in your Installation Instructions. Self-piercing and 316 " saddle valves cause low water pressure and may clog the line over time. The manufacturer is not responsible for property damage due to improper installation or water connection. |
natural_image
3D rendering of a mechanical component with a cylindrical head and flanged base (no text or symbols)TEMPERATURTEST
BENÖTIGTE MATERIALIEN:
natural_image
Line drawing of a hand holding a car seatbelt, with no text or symbols presentnatural_image
Technical line drawing showing three views of a curved mechanical component with mounting holes (no text or symbols)natural_image
Technical line drawing of a mechanical assembly with an inset magnified view showing internal components (no text or symbols)natural_image
Technical line drawing of a mechanical device with a grid and bracket (no text or symbols)natural_image
Diagram of a double door with arrows indicating direction (no text or symbols)natural_image
Line drawing of a hand holding a rectangular object with internal compartments (no text or symbols)natural_image
Diagram of a shopping basket with handles, no text or symbols presentHERAUSZIEHBARES GEFRIERFACHREGAL
natural_image
Technical line drawing of a metal rack or cage component (no text or symbols)ZUBEHÖR
EISWÜRFELSCHALE
natural_image
Isometric line drawing of a rectangular electronic component with internal grid structure (no text or symbols)natural_image
3D rendering of a mechanical component with a central cylindrical feature and flanged side (no text or symbols)TEST DE TEMPÉRATURE
natural_image
Technical line drawing showing three different mechanical or architectural components with directional arrows (no text or symbols)PORTE-BOUTEILLE/ SUPPORT À CANETTES
natural_image
Technical line drawing of a mechanical assembly with an inset magnified view showing a component being inserted (no text or symbols present)natural_image
Technical line drawing of a mechanical device with a rectangular frame and vertical supports (no text or symbols)natural_image
Diagram showing two views of a storage unit with arrows indicating direction (no text or symbols)natural_image
Line drawing of a hand holding a tool interacting with a rectangular panel or tray (no text or symbols)natural_image
Technical line drawing of a mechanical assembly or mounting bracket (no text or symbols)CARACTÉRISTIQUES DU COMPARTIMENT CONGÉLATEUR
MACHINE À GLAÇONS AUTOMATIQUE
Dépose :
natural_image
Diagram of a shopping basket with handles, no text or symbols presentCLAYETTE COULISSANTE DE CONGÉLATEUR
Dépose :
natural_image
Technical line drawing of a metal mesh rack or shelf unit (no text or symbols)ACCESSOIRES
ULE À GLAÇONS
natural_image
Isometric line drawing of a rectangular tray with internal grid structure (no text or symbols)AVERTISSEMENT
AVANDEONTACTER UN RÉPARATEUR
OPERATION
natural_image
Mechanical component diagram showing a motor with springs and housing, no visible text or symbolsTornillo Nivelador
natural_image
3D rendering of a mechanical component with a central spherical feature and flanged side (no text or symbols)PRUEBA DE LA TEMPERATURA
MATERIALES NECESARIOS:
natural_image
Technical line drawing of a curved mechanical component with mounting brackets and directional arrows (no text or symbols)DEJA PARA BOTELLAS DE VINO/LATAS DE REFRESCOS
natural_image
Technical line drawing of a mechanical assembly with an inset showing a component being inserted (no text or symbols present)CAJONES CON CONTROL DE TEMPERATURA
Cajón de fiambres/verdulero y alimentos frescos
natural_image
Technical line drawing of a mechanical device with a rectangular frame and vertical supports (no text or symbols)natural_image
Diagram of a device with two compartments and directional arrows indicating movement or force (no text or symbols)natural_image
Line drawing of a hand holding a rectangular object with internal components (no text or symbols)natural_image
Technical line drawing of a mechanical assembly or structural component (no text or symbols)Para sacar la bandeja:
natural_image
Diagram of a shopping basket with a handle, no text or symbols presentnatural_image
Technical illustration of a metal rack with grid pattern, mounted on a vertical shelf (no text or symbols)ACCESORIOS
CUBITERA
natural_image
Isometric line drawing of a rectangular tray with internal grid structure (no text or symbols)CUIDADO Y LIMPIEZA
ADVERTENCIA
ANTES DE SOLICITAR SERVICIO
FUNCIONAMIENTO
natural_image
Mechanical assembly diagram showing a spring-loaded housing with directional arrows indicating motion (no text or symbols)Stabiliseringsben
natural_image
Technical illustration of a mechanical component with a central bore and flanged base (no text or symbols)TEMPERATURTEST
DU BEHÖVER:
natural_image
Technical line drawings of three mechanical components with arrows indicating assembly or movement (no text or symbols)VIN- OCH BURKHYLLA
natural_image
Technical line drawing of a mechanical assembly with an inset showing a bracket detail (no text or symbols)LÄDOR MED TEMPERATURREGLERING
natural_image
Technical line drawing of a mechanical device with a rectangular frame and side rails (no text or symbols)Avtagning av lådan:
natural_image
Diagram showing two views of a storage unit with arrows indicating flow direction (no text or symbols)natural_image
Line drawing of a hand holding a rectangular object with internal horizontal bars (no text or symbols)natural_image
Technical line drawing of a mechanical assembly or mounting bracket (no text or symbols)FRYSFACKETS INREDNING
ISAUTOMAT
FAST HYLLA I FRYSFACKET
natural_image
Line drawing of a shopping basket with handle and side panels (no text or symbols)SKJUTBAR HYLLA I FRYSFACKET
natural_image
Technical illustration of a metal mesh structure with no visible text or symbolsTILLBEHÖR
BRICKA FÖR ISKUBER
natural_image
Isometric line drawing of a rectangular grid-like structure with no text or symbolsUNDERHÅLL OCH RENGÖRING
WARNING
INNAN DU RINGER
FUNKTION
JÄÄKAAPIN ASSETTAMINEN VAAKASUORAAN
HUOMAA
natural_image
3D rendering of a mechanical component with a cylindrical head and flanged side (no text or symbols)LÄMPÖTILAN TESTAUS
TARVITTAVAT VÄLINEET
natural_image
Technical line drawing of a mechanical component with three views (top, front, side), showing internal structure and movement arrows (no text or symbols)VIINIPULLO- JA TÖLKKITELINE
natural_image
Technical line drawing of a mechanical assembly with an inset magnified view showing internal components (no text or symbols)VETOLAATIKOT, JOIDEN LÄMPÖTILAA VÓIDAAN SÄÄTÄÄ
natural_image
Technical line drawing of a mechanical device with a rectangular frame and vertical supports (no text or symbols)natural_image
Diagram showing two views of a storage unit with arrows indicating flow direction (no text or symbols)natural_image
Line drawing of a hand holding a rectangular object with internal components (no text or symbols)natural_image
Technical line drawing of a mechanical assembly or mounting bracket (no text or symbols)PAKASTIMEN ERIKOISUUKSIA
AUTOMAATTINEN JÄÄPALAKONE
Hyllyn irrotus:
natural_image
Diagram of a shopping basket with handles, no text or symbols presentULOS VEDETTÄVÄ PAKASTINHYLLY
Hyllyn irrotus:
natural_image
Technical line drawing of a metal mesh structure with no visible text or symbolsLISÄVARUSTEET
JÄÄPALAKAUKALO
natural_image
Isometric line drawing of a rectangular electronic component with internal grid structure (no text or symbols)Hoito Ja PUHDISTUS
VAROITUS
ENNEN YHTEYDENOTTOA HUOLTOLIIKKEESEN
TOMNTA
natural_image
Mechanical assembly diagram showing a spring-loaded housing with directional arrows indicating motion (no text or symbols)Stabilisatievoetje
WAT ALS DE KOELKAST SCHUDT?
natural_image
3D rendering of a mechanical component with a central spherical feature and flanged base (no text or symbols)TEMPERATUURTEST
VEREISTE MATERIAAL:
- 2 thermometers die temperaturen van -21° en 10° kunnen meten.
• 2 drink glazen
DIEPVRIESGEDEELTE
natural_image
Illustration of hands using a tool to adjust or install a component, showing a curved arrow indicating rotation (no text or symbols present)natural_image
Technical line drawings of a curved mechanical component with three views (top, front, side), no text or symbols present.FLES-/BLIKJESREK
natural_image
Technical line drawing of a mechanical assembly with an inset magnified view showing a bracket detail (no text or symbols)LADEN MET TEMPERATUURREGELING
natural_image
Technical line drawing of a mechanical assembly with no visible text or symbolsnatural_image
Diagram of a device with two compartments and directional arrows indicating movement or force (no text or symbols)natural_image
Line drawing of a mechanical assembly with a hand holding a tool, no text or symbols presentnatural_image
Technical line drawing of a mechanical assembly or mounting bracket (no text or symbols)KENMERKEN VAN HET DIEPVRIESGEDEELTE
AUTOMATISCHE IJSMACHINE
natural_image
Line drawing of a shopping basket with handles, no text or symbols presentUITSCHUIFBARE LEGPLANK IN DIEPVRIESGEDEELTE
natural_image
Technical line drawing of a metal mesh rack or support structure (no text or symbols)ACCESSOIRES
IJSBAKJE
natural_image
Isometric line drawing of a rectangular electronic component with internal grid structure (no text or symbols)ONDERHOUD EN SCHOONMAAK
WAARSCHUWING
VOORDAT U MET EEN TECHNICUS CONTACT OPNEEMT
WERKING
natural_image
Mechanical assembly diagram showing a spring-loaded housing with arrows indicating force or movement (no text or symbols)natural_image
3D rendering of a mechanical component with a central spherical feature and flanged base (no text or symbols)PROVA DI TEMPERATURA
MATERIALI NECESSARI
(SOLO IN ALCUNI MODELLI)
(SOLO IN ALCUNI MODELLI)
natural_image
Technical line drawing of a curved mechanical component with mounting brackets and directional arrows indicating assembly (no text or symbols)RASTRELLIERA PER VINI E LATTINE
natural_image
Technical line drawing of a mechanical assembly with an inset magnified view showing a component being inserted (no text or symbols present)CASSETTI A TEMPERATURA CONTROLLATA
natural_image
Technical line drawing of a mechanical device with a gridded base and vertical supports (no text or symbols)natural_image
Diagram of a double door with arrows indicating force or movement (no text or symbols)natural_image
Line drawing of a hand holding a tool interacting with a rectangular frame (no text or symbols)natural_image
Technical line drawing of a mechanical assembly or mounting bracket (no text or symbols)CARATTERISTICHE DEL CONGELATORE
DISPOSITIVO AUTOMATICO PER FARE IL GHIACCIO
natural_image
Line drawing of a shopping basket with handles, no text or symbols presentRIPIANO ESTRAIBILE DEL CONGELATORE
natural_image
Technical line drawing of a metal mesh rack or shelf unit (no text or symbols)ACCESSORI
natural_image
Isometric line drawing of a rectangular tray or container with internal compartments (no text or symbols)ATTENZIONE
PRIMA DI CHIAMARE
FUNZIONMENTO
natural_image
3D rendering of a mechanical component with a cylindrical head and flanged side (no text or symbols)TEMPERATURMÅLING
MATERIALER SOM TRENGS:
natural_image
Line drawing of a hand holding a device with an arrow indicating rotation (no text or symbols)D∅RTRAU
D∅RHYLLER
natural_image
Diagram showing two views of a curved structure with directional arrows, no text or symbols presentVIN / BOKSSTATIV
natural_image
Technical line drawing of a mechanical assembly with no visible text or symbolsSKUFFER
FUKTIGHETSKONTROLLER TE FRUKT- OG GR∅NNSAKSSKUFFER
natural_image
Technical line drawing of a mechanical assembly with an inset magnified view showing a component being inserted (no text or symbols present)TEMPERATURKONTROLL ERTE SKUFFER
Spiskammer for ferskvarer
natural_image
Technical line drawing of a mechanical device with a gridded base and vertical supports (no text or symbols)natural_image
Diagram showing two views of a mechanical or architectural component with arrows indicating direction (no text or symbols present)natural_image
Line drawing of a hand holding a rectangular object with internal divisions and a vertical bar, no text or symbols presentnatural_image
Technical line drawing of a mechanical assembly or mounting bracket (no text or symbols)FRYSER-EGENSKAPER
AUTOMATISK ISBITMASKIN
natural_image
Line drawing of a shopping basket with grid lines and handle (no text or symbols)UTTREKKSBAR FRYSEHYLLE
natural_image
Technical line drawing of a metal rack or shelf with a grid pattern, no text or symbols presentTILBEH∅R
ISBITFORM
Du kan lage isbiter i isbitformen på manuelt vis.
natural_image
Isometric line drawing of a rectangular tray with internal grid structure (no text or symbols)STELL OG RENGJ∅RING
ADVARSEL
FOR DU RINGER FOR SERVICE
DRIFT
natural_image
3D rendering of a mechanical component with a central bore and flange (no text or symbols)KONTROL AF TEMPERATUR
HJÆLPEMIDLER:
• 2 termometre, som kan måle temperaturer mellem -21° og 10°C
• 2 d r i k k e g l a s
FRYSEREN
HYLDER I KÖLESKABETS FULDE BREDDE
Fjerne hylder:
natural_image
Line drawing of hands holding a device with an arrow indicating rotation (no text or symbols)ÅBNE OPBEVARINGSBOKSE
natural_image
Technical line drawings of a mechanical component with three views (top, front, side), no text or symbols present.VINHYLDE
natural_image
Technical line drawing of a mechanical component or housing assembly (no text or symbols visible)SKUFFER
FUGTIGHEDSREGULEREDE SKUFFER
natural_image
Technical line drawing of a mechanical assembly with an inset magnified view showing a component being inserted (no text or symbols present)TEMPERATURREGULERE DE SKUFFER
natural_image
Line drawing of a mechanical device with a rectangular frame and vertical supports (no text or symbols)Fjerne skuffer:
natural_image
Diagram showing two views of a mechanical component with arrows indicating direction (no text or symbols)natural_image
Line drawing of a hand holding a rectangular object with internal divisions and a vertical bar, no text or symbols presentnatural_image
Technical line drawing of a mechanical assembly or mounting bracket (no text or symbols)FUNKTIONER I FRYSEDELEN
AUTOMATISK ISTERNINGMASKINE
natural_image
Line drawing of a shopping basket with handle and side panels (no text or symbols)IKKE-FAST FRYSERHYLDE
Fjerne hylde:
OPBEVARING I FRYSERDØREN
FAST D∅RHYLDE
natural_image
Technical line drawing of a metal rack with grid pattern (no text or symbols)TILBEH∅R
OPBEVARINGBOKS TIL ISTERNINGER
I opbevaringsboksen til isterninger kan du fryse isterninger manuelt.
natural_image
Isometric line drawing of a rectangular electronic component with internal grid structure (no text or symbols)VEDLIGEHOLDELSE OG RENG∅RING
ADVARSEL
INDEN DU RINGER TIL KUNDESERVICE
DRIFT
natural_image
3D rendering of a mechanical component with a central hub and flanges (no text or symbols)ΔΟΚΙΜΗ ΘΕΡΜΟΚΡΑΣΙΑΣ
natural_image
Technical line drawing of a curved mechanical component with mounting holes and internal channels (no text or symbols)natural_image
Technical line drawing of a mechanical assembly with an inset showing a bracket detail (no text or symbols)natural_image
Technical line drawing of a mechanical device with a gridded base and vertical supports (no text or symbols)natural_image
Diagram of a device with two compartments and directional arrows indicating movement or force (no text or symbols)natural_image
Line drawing of a mechanical assembly with a hand holding a tool (no text or symbols)natural_image
Technical line drawing of a mechanical assembly or mounting bracket (no text or symbols)natural_image
Line drawing of a shopping basket with handles, no text or symbols presentnatural_image
Technical line drawing of a metal grate or rack structure (no text or symbols)ΠΡΟΣΘΕΤΑ ΕΞΑΡΤΗΜΑΤΑ
ПАГООНКН
natural_image
Isometric line drawing of a rectangular grid-like structure with no text or symbolsnatural_image
3D rendering of a mechanical component with a spherical end and flanged base (no text or symbols)natural_image
Technical line drawing showing three different mechanical or structural components with directional arrows (no text or symbols)SUPORTE PARA GARRAFAS/LATAS
natural_image
Technical line drawing of a mechanical assembly with an inset magnified view showing internal components (no text or symbols)GAVETAS COM CONTROLO DE TEMPERATURA
natural_image
Technical line drawing of a mechanical device with a grid and bracket (no text or symbols)natural_image
Diagram showing two views of a storage unit with arrows indicating direction (no text or symbols)natural_image
Line drawing of a hand holding a tool interacting with a rectangular panel or frame (no text or symbols)natural_image
Technical line drawing of a mechanical assembly or mounting bracket (no text or symbols)natural_image
Diagram of a shopping basket with a handle, no text or symbols presentPRATELEIRA DO CONGELADOR DESLIZANTE PARA FORA
natural_image
Technical illustration of a metal mesh structure with curved supports (no text or symbols)ACCESSÓRIOS
TABULEIRO PARA CUBOS DE GELO
natural_image
Isometric line drawing of a rectangular electronic component with internal grid structure (no text or symbols)CUIDADO E LIMPEZA
ADVERTÊNCIA AT
REMOÇÃO E TROCA DE LÂMPÁDAS
ADVERTÊNCIA
ANTES DE CHAMAR A ASSISTÊNCIA TÉCNICA
FUNCIONAMENTO
natural_image
Pure mechanical assembly diagram showing a bracket and vertical supports without any text or symbols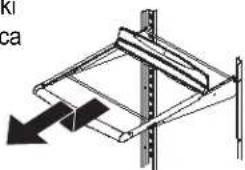
natural_image
Diagram of a mechanical assembly with a downward arrow indicating force or direction (no text or symbols)natural_image
Line drawing of a hand holding a small object with an arrow indicating rotation (no text or symbols)natural_image
Technical line drawings of a curved mechanical component with directional arrows indicating assembly or movement (no text or symbols)natural_image
Technical line drawing of a mechanical assembly with an inset magnified view showing a component (no text or symbols)DERECE KONTROLLÜ ÇEKMECELER
natural_image
Technical line drawing of a mechanical device with a gridded base and vertical supports (no text or symbols)natural_image
Diagram of a device with two compartments and directional arrows indicating movement (no text or symbols)SABIT DONDURUCU RAFI
natural_image
Line drawing of a shopping basket with handles (no text or symbols)KAYMALI DONDURUCU RAFI
Rafı takmak için
natural_image
Isometric line drawing of a structural frame with internal ribs and directional arrows (no text or symbols)TELLİ SEPET
Çıkartmak için
natural_image
Technical line drawing of a multi-tiered metal cage or rack structure (no text or symbols)KAPI RAFLARI
SABİT KAPI RAFI
natural_image
Technical line drawing of a window frame with internal structure and directional arrow (no text or symbols)Tekrar takmak için
natural_image
Technical line drawing of a metal rack or shelf with a grid pattern, mounted on a vertical support (no text or symbols)AKSESUARLAR BUZ KÜP TEPSİSİ
natural_image
Isometric line drawing of a rectangular tray or container with internal compartments (no text or symbols)BAKIM VE TEMİZLİK
! iKAZ
ARAMADAN ÖNCE
İŞLEM

- Bottom Freezer Refrigerator
- THANK YOU FOR PURCHASING THIS REFRIGERATOR !
- HOW TO OBTAIN REPLACEMENT PARTS AND SERVICES?
- KEEP INSTRUCTIONS FOR FUTURE REFERENCE!
- WHAT IF THESE FEATURES ARE DIFFERENT FROM MINE?
- CONTENTS
- IMPORTANT SAFETY INFORMATION
- RECOGNIZE SAFETY SYMBOLS, WORDS, LABELS
- DANGER
- WARNING
- CAUTION
- WHAT YOU NEED TO KNOW ABOUT SAFETY INSTRUCTIONS
- INSTALLING YOUR REFRIGERATOR
- STEPS TO FOLLOW...
- Service to or replacement of power cord must be performed by a qualified servicer.
- HOW TO REMOVE WOODEN BASE
- INSTALLING FRESH FOOD FRONT-MOUNT HANDLE
- INSTALLING FREEZER HANDLE
- HOW TO REMOVE AND REPLACE DOORS AND HINGES
- REMOVING FRESH FOOD FRONT-MOUNTED HANDLE
- REMOVING FREEZER HANDLE
- TOOLS NEEDED:
- FOR PULLOUT DRAWER ONLY:
- WHAT IF MY REFRIGERATOR ROCKS?
- TEMPERATURE CONTROLS
- INITIAL SETTING
- TEMPERATURE ADJUSTMENTS
- TEMPERATURE TEST
- MATERIALS NEEDED:
- FREEZER
- REFRIGERATOR
- FRESH FOOD FEATURES
- INTERIOR SHELVES
- FULL-WIDTH SHELVES
- SPILLSAVER™
- SPILLSAVER™ EASY GLIDE™ (SELECT MODELS)
- REAR SHELF EXTENSIONS
- (SELECT MODELS)
- To remove shelf extension:
- DOOR STORAGE
- DAIRY CENTER
- To remove:
- DOOR BUCKETS
- DOOR RETAINER
- WINE TRIVET/CAN RACK
- FRESH FOOD FEATURES, CONT.
- DRAWERS
- HUMIDITY-CONTROLLED CRISPER DRAWERS
- LOW
- HIGH
- TEMPERATURE- CONTROLLED DRAWERS
- Deli/Crisper and Fresh Food Pantry
- Controls
- SNACK DRAWER
- To remove drawers:
- To reinstall drawers:
- To remove and install glass and frame:
- To reinstall:
- If refrigerator door does not open far enough to remove drawers:
- FREEZER FEATURES
- AUTOMATIC ICE MAKER
- SHELVES
- ICE SERVICE RACK (SELECT MODELS)
- To install rack:
- To remove rack:
- FIXED FREEZER SHELF
- To remove shelf:
- To reinstall shelf:
- GLIDE-OUT FREEZER SHELF
- WIRE BASKET
- To remove basket:
- To reinstall basket:
- FIXED DOOR SHELF
- TILT-OUT BIN (SELECT MODELS)
- ACCESSORIES
- ICE CUBE TRAY
- CARE AND CLEANING
- STAINLESS STEEL
- REMOVING ODORS FROM REFRIGERATOR
- If odor is still present:
- ENERGY SAVING IDEAS
- REMOVE AND REPLACE LIGHT BULBS
- FRESH FOOD SECTION
- BEFORE YOU CALL
- TEMPERATURTEST
- BENÖTIGTE MATERIALIEN:
- HERAUSZIEHBARES GEFRIERFACHREGAL
- ZUBEHÖR
- EISWÜRFELSCHALE
- TEST DE TEMPÉRATURE
- PORTE-BOUTEILLE/ SUPPORT À CANETTES
- CARACTÉRISTIQUES DU COMPARTIMENT CONGÉLATEUR
- MACHINE À GLAÇONS AUTOMATIQUE
- Dépose :
- CLAYETTE COULISSANTE DE CONGÉLATEUR
- ACCESSOIRES
- ULE À GLAÇONS
- AVERTISSEMENT
- AVANDEONTACTER UN RÉPARATEUR
- PRUEBA DE LA TEMPERATURA
- MATERIALES NECESARIOS:
- DEJA PARA BOTELLAS DE VINO/LATAS DE REFRESCOS
- CAJONES CON CONTROL DE TEMPERATURA
- ACCESORIOS
- CUBITERA
- CUIDADO Y LIMPIEZA
- ADVERTENCIA
- ANTES DE SOLICITAR SERVICIO
- DU BEHÖVER:
- VIN- OCH BURKHYLLA
- LÄDOR MED TEMPERATURREGLERING
- Avtagning av lådan:
- FRYSFACKETS INREDNING
- ISAUTOMAT
- FAST HYLLA I FRYSFACKET
- SKJUTBAR HYLLA I FRYSFACKET
- TILLBEHÖR
- BRICKA FÖR ISKUBER
- UNDERHÅLL OCH RENGÖRING
- INNAN DU RINGER
- JÄÄKAAPIN ASSETTAMINEN VAAKASUORAAN
- HUOMAA
- LÄMPÖTILAN TESTAUS
- TARVITTAVAT VÄLINEET
- VIINIPULLO- JA TÖLKKITELINE
- VETOLAATIKOT, JOIDEN LÄMPÖTILAA VÓIDAAN SÄÄTÄÄ
- PAKASTIMEN ERIKOISUUKSIA
- AUTOMAATTINEN JÄÄPALAKONE
- Hyllyn irrotus:
- ULOS VEDETTÄVÄ PAKASTINHYLLY
- LISÄVARUSTEET
- JÄÄPALAKAUKALO
- Hoito Ja PUHDISTUS
- VAROITUS
- ENNEN YHTEYDENOTTOA HUOLTOLIIKKEESEN
- WAT ALS DE KOELKAST SCHUDT?
- TEMPERATUURTEST
- VEREISTE MATERIAAL:
- DIEPVRIESGEDEELTE
- FLES-/BLIKJESREK
- LADEN MET TEMPERATUURREGELING
- KENMERKEN VAN HET DIEPVRIESGEDEELTE
- AUTOMATISCHE IJSMACHINE
- UITSCHUIFBARE LEGPLANK IN DIEPVRIESGEDEELTE
- IJSBAKJE
- ONDERHOUD EN SCHOONMAAK
- WAARSCHUWING
- VOORDAT U MET EEN TECHNICUS CONTACT OPNEEMT
- PROVA DI TEMPERATURA
- MATERIALI NECESSARI
- RASTRELLIERA PER VINI E LATTINE
- CASSETTI A TEMPERATURA CONTROLLATA
- CARATTERISTICHE DEL CONGELATORE
- DISPOSITIVO AUTOMATICO PER FARE IL GHIACCIO
- RIPIANO ESTRAIBILE DEL CONGELATORE
- ACCESSORI
- ATTENZIONE
- PRIMA DI CHIAMARE
- TEMPERATURMÅLING
- MATERIALER SOM TRENGS:
- D∅RTRAU
- D∅RHYLLER
- VIN / BOKSSTATIV
- SKUFFER
- FUKTIGHETSKONTROLLER TE FRUKT- OG GR∅NNSAKSSKUFFER
- TEMPERATURKONTROLL ERTE SKUFFER
- Spiskammer for ferskvarer
- FRYSER-EGENSKAPER
- AUTOMATISK ISBITMASKIN
- UTTREKKSBAR FRYSEHYLLE
- TILBEH∅R
- ISBITFORM
- STELL OG RENGJ∅RING
- ADVARSEL
- FOR DU RINGER FOR SERVICE
- KONTROL AF TEMPERATUR
- HJÆLPEMIDLER:
- FRYSEREN
- HYLDER I KÖLESKABETS FULDE BREDDE
- ÅBNE OPBEVARINGSBOKSE
- VINHYLDE
- FUGTIGHEDSREGULEREDE SKUFFER
- TEMPERATURREGULERE DE SKUFFER
- Fjerne skuffer:
- FUNKTIONER I FRYSEDELEN
- AUTOMATISK ISTERNINGMASKINE
- IKKE-FAST FRYSERHYLDE
- Fjerne hylde:
- OPBEVARING I FRYSERDØREN
- FAST D∅RHYLDE
- OPBEVARINGBOKS TIL ISTERNINGER
- VEDLIGEHOLDELSE OG RENG∅RING
- INDEN DU RINGER TIL KUNDESERVICE
- ΔΟΚΙΜΗ ΘΕΡΜΟΚΡΑΣΙΑΣ
- ΠΡΟΣΘΕΤΑ ΕΞΑΡΤΗΜΑΤΑ
- ПАГООНКН
- SUPORTE PARA GARRAFAS/LATAS
- GAVETAS COM CONTROLO DE TEMPERATURA
- PRATELEIRA DO CONGELADOR DESLIZANTE PARA FORA
- ACCESSÓRIOS
- TABULEIRO PARA CUBOS DE GELO
- CUIDADO E LIMPEZA
- ADVERTÊNCIA AT
- REMOÇÃO E TROCA DE LÂMPÁDAS
- ADVERTÊNCIA
- ANTES DE CHAMAR A ASSISTÊNCIA TÉCNICA
- DERECE KONTROLLÜ ÇEKMECELER
- SABIT DONDURUCU RAFI
- KAYMALI DONDURUCU RAFI
- TELLİ SEPET
- KAPI RAFLARI
- SABİT KAPI RAFI
- AKSESUARLAR BUZ KÜP TEPSİSİ
- BAKIM VE TEMİZLİK
- ! iKAZ
- ARAMADAN ÖNCE
Brand : AMANA
Model : XRBR 206 BW BB
Category : Refrigerator