
ABB2224BRW - Fridge AMANA - Free user manual and instructions
Find the device manual for free ABB2224BRW AMANA in PDF.


| Product Type | Combined Refrigerator |
| Brand | Amana |
| Model | ABB2224BRW |
| Total Net Capacity | 525 L (18.5 ft³) |
| Refrigerator Capacity | 340 L |
| Freezer Capacity | 185 L |
| Dimensions (H × W × D) | 169 cm × 76 cm × 81 cm |
| Net Weight | 73 kg |
| Electrical Supply | 115 V ~ 60 Hz, 5 A |
| Annual Energy Consumption | 450 kWh/year |
| Energy Class | A+ |
| Refrigerant | R-134a (140 g) |
| Defrost | Automatic (refrigerator) and manual (freezer) |
| Lighting Type | 40 W incandescent bulb |
| Special Features | Adjustable glass shelves, vegetable bin, door bins, ice maker (optional) |
| Maintenance | Clean condenser coils every 6 months |
| Cleaning | Use a soft cloth and mild detergent; avoid abrasives |
| Safety | Leveling feet, door alarm (optional) |
| Spare Parts | Available on official website and authorized dealers |
| Repairability | Accessible compressor, sealed system; call a professional |
| Warranty | 1 year parts and labor |
Frequently Asked Questions - ABB2224BRW AMANA
User questions about ABB2224BRW AMANA
0 question about this device. Answer the ones you know or ask your own.
Ask a new question about this device
Download the instructions for your Fridge in PDF format for free! Find your manual ABB2224BRW - AMANA and take your electronic device back in hand. On this page are published all the documents necessary for the use of your device. ABB2224BRW by AMANA.
USER MANUAL ABB2224BRW AMANA
BOTTOM MOUNT OWNER'S MANUAL MANUEL D'UTILISATION DU RÉFRIGÉRATEUR À CONGÉLATEUR EN BAS
Table of Contents/Table des matières
REFRIGERATOR SAFETY....2
Refrigerator Safety 2
MAINTENANCE AND CARE 3
Cleaning 3
Changing the LED Module 4
Water Filtration System 4
Vacation and Moving Care 5
INSTALLATION INSTRUCTIONS 6
Unpack the Refrigerator 6
Electrical Requirements 6
Location Requirements 6
Water Supply Requirements....7
Connect the Water Supply 7
REFRIGERATOR FEATURES....8
Crisper Humidity Control 8
Ice Maker and Storage Bin (on some models) .....9
DOOR AND HANDLE INSTRUCTIONS 9
Refrigerator Doors and Drawer 9
Remove and Replace Door Handles 9
Remove Doors and Hinges 11
Reverse Doors (optional).... 13
Replace Doors and Hinges 14
Remove and Replace Freezer Drawer.... 15
PERFORMANCE DATA SHEET 17
Performance Data Sheet 17
SÉCURITÉ DU RÉFRIGÉRATEUR 22
Your safety and the safety of others are very important.
We have provided many important safety messages in this manual and on your appliance. Always read and obey all safety messages.

This is the safety alert symbol.
This symbol alerts you to potential hazards that can kill or hurt you and others.
All safety messages will follow the safety alert symbol and either the word "DANGER" or "WARNING." These words mean:
DANGER
WARNING
You can be killed or seriously injured if you don't immediately follow instructions.
You can be killed or seriously injured if you don't follow instructions.
All safety messages will tell you what the potential hazard is, tell you how to reduce the chance of injury, and tell you what can happen if the instructions are not followed.
IMPORTANT SAFETY INSTRUCTIONS
WARNING: To reduce the risk of fire, electric shock, or injury to persons when using your appliance, follow basic precautions, including the following:
■ Children should be supervised to ensure that they do not play with the appliance.
■ This appliance is not intended for use by persons (including children) with reduced physical, sensory, or mental capabilities, or lack of experience and knowledge, unless they have been given supervision or instruction concerning use of the appliance by a person responsible for their safety.
■ Do not use an extension cord.
If power supply cord is damaged, it must be replaced by the manufacturer, its service agent, or a similarly qualified person in order to avoid a hazard.
■ Connect to potable water supply only.
■ This appliance is intended to be used in household and similar applications such as: staff kitchen areas in shops, offices, and other working environments; farm houses and by clients in hotels, motels, and other residential-type environments; bed and breakfast-type environments; and catering and similar non-retail applications.
■ Do not store explosive substances such as aerosol cans with a flammable propellant in this appliance.
■ Do not use replacement parts that have not been recommended by the manufacturer (e.g., parts made at home using a 3D printer).
- Keep ventilation openings, in the appliance enclosure or in the built-in structure, clear of obstruction.
■ Do not use mechanical devices or other means to accelerate the defrosting process, other than those recommended by the manufacturer.
■ Do not damage the refrigerant circuit.
■ Do not use electrical appliances inside the food storage compartments of the appliance, unless they are of the type recommended by the manufacturer.
■ Ice maker kit can be added to some models. See serial tag inside the food compartment of appliance for ice maker kit model information.
■ A qualified service technician must install the water line and ice maker. See installation instructions supplied with ice maker kit for complete details.
SAVE THESE INSTRUCTIONS
Proper Disposal of Your Old Refrigerator
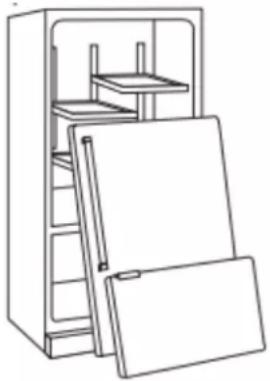
WARNING: Risk of child entrapment. Before you throw away your old refrigerator or freezer:
■ Take off the doors.
■ Leave the shelves in place so that children may not easily climb inside.
WARNING
Suffocation Hazard
Remove doors or lid from your old appliance.
Failure to do so can result in death or brain damage.
IMPORTANT: Child entrapment and suffocation are not problems of the past. Junked or abandoned refrigerators are still dangerous, even if they will sit for "just a few days." If you are getting rid of your old refrigerator, please follow these instructions to help prevent accidents.
Important information to know about disposal of refrigerant
Dispose of refrigerator in accordance with federal and local regulations. Refrigerants must be evacuated by a licensed, EPA-certified refrigerant technician in accordance with established procedures.
natural_image
Line drawing of an open refrigerator with multiple doors and shelves (no text or symbols)MAINTENANCE AND CARE
Cleaning
WARNING
Explosion Hazard
Risk of Fire or Explosion.
Flammable Refrigerant Used.
Do Not Use Mechanical Devices to Defrost Refrigerator.
.Do Not Puncture Refrigerant Tubing.
Both the refrigerator and freezer sections defrost automatically. However, clean both sections about once a month to avoid odor buildup. Wipe up spills immediately.
IMPORTANT:
Because air circulates between both sections, any odors formed in one section will transfer to the other. You must thoroughly clean both sections to eliminate odors. To avoid odor transfer and drying out of food, wrap or cover foods tightly.
■ For stainless steel models, stainless steel is corrosion-resistant and not corrosion-proof. To help avoid corrosion of your stainless steel, keep your surfaces clean by using the following cleaning instructions.
To Clean Your Refrigerator:
NOTE: Do not use abrasive or harsh cleaners such as window sprays, scouring cleansers, flammable fluids, muriatic acid, cleaning waxes, concentrated detergents, bleaches, or cleansers containing petroleum products on exterior surfaces (doors and cabinet), plastic parts, interior, and door liners or gaskets. Do not use paper towels, scouring pads, or other harsh cleaning tools.
- Unplug refrigerator or disconnect power.
- Hand-wash, rinse, and dry removable parts and interior surfaces thoroughly. Use a clean sponge or soft cloth and a mild detergent in warm water.
- Clean the exterior surfaces.
Painted metal: Wash painted metal exteriors with a clean, soft cloth or sponge and a mild detergent in warm water. Rinse surfaces with clean, warm water and dry immediately to avoid water spots.
Stainless steel: Wash stainless steel surfaces with a clean, soft cloth or sponge and a mild detergent in warm water. Rinse surfaces with clean, warm water and dry immediately to avoid water spots.
NOTE: When cleaning stainless steel, always wipe with the grain to avoid cross-grain scratching.
WARNING
Explosion Hazard
Risk of Fire or Explosion due to Puncture of Refrigerant Tubing;
Follow Handling Instructions Carefully.
Flammable Refrigerant Used.
- There is no need for routine condenser cleaning in normal home operating environments. If the environment is particularly greasy or dusty, or there is a significant pet traffic in the home, the condenser should be cleaned every 2 to 3 months to ensure maximum efficiency.
If you need to clean the condenser:
■ Pull refrigerator out away from the wall. See “Unpack the Refrigerator.”
■ Remove the base grille.
■ Vacuum coils when they are dusty or dirty.
■ Replace the base grille when finished.
■ Roll refrigerator back into place. Make sure to leave 1" (2.5 cm) between the cabinet back and the wall.
■ Check to see that the refrigerator is level.
- Plug in refrigerator or reconnect power.
Changing the LED Module
IMPORTANT: The lights in both the refrigerator and freezer compartments use LED technology that do not need to be replaced.
If an LED module(s) do not illuminate when the refrigerator and/or freezer door is opened, call for assistance or service. See "Quick Start Guide" for contact information.
Water Filtration System
Do not use with water that is microbiologically unsafe or of unknown quality without adequate disinfection before or after the system. Systems certified for cyst reduction may be used on disinfected waters that may contain filterable cysts.
IMPORTANT: The disposable water filter should be replaced at least every 6 months. If the water flow to the water dispenser or ice maker decreases noticeably before 6 months have passed, replace the water filter more often.
Install the Water Filter
To order a replacement filter, contact us at www.whirlpool.com/Parts & Accessories. See the "Quick Start Guide" for details.
NOTE: If the filter is not installed correctly, water may dispense a lower flow rate and there will be slower ice production. Improper filter installation may also cause the water filter housing to leak.
Right-Hand Side of Refrigerator Ceiling
- Locate the accessory packet in the refrigerator and remove the water filter.
- Take the water filter out of its packaging and remove the cover from the O-rings. Be sure the O-rings are still in place after the cover is removed.
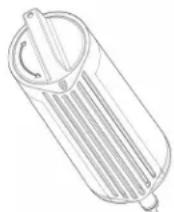
- The water filter compartment is located in the right-hand side of the refrigerator ceiling. Push latch on the filter door to release the catch, then lower the door.
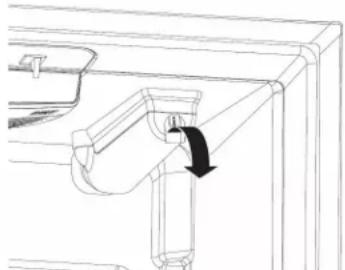
natural_image
Technical line drawing of a mechanical assembly with a black arrow indicating direction (no text or symbols)- Align the arrow on the water filter label with the cutout notch in the filter housing and insert the filter into the housing.
- Turn the filter knob clockwise 180 degrees (1/2 turn), until it locks into the housing.
NOTE: If the filter is not correctly locked into the housing, the water dispenser will not operate. Water will not flow from the dispenser.
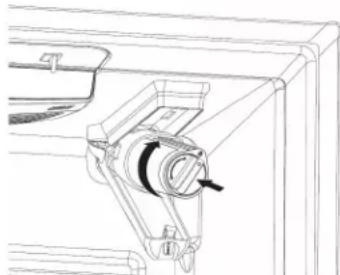
natural_image
Technical line drawing of a mechanical assembly with no visible text or symbols- While the compartment door is still open, lift the filter up into the compartment. Then, close the filter compartment door completely.
- Flush the water system. See "Flush the Water System" for details.
IMPORTANT: If you do not flush the water system, you may experience dripping and/or decreased flow from the water dispenser.
Flush the Water System
Air in the water dispensing system can cause the water dispenser to drip. After connecting the refrigerator to a water source or replacing the water filter, flush the water system.
Flushing the water dispensing system forces air from the water line and filter and prepares the water filter for use. Additional flushing may be required in some households.
NOTE: As air is cleared from the system, water may spurt out of the dispenser.
- Using a sturdy container, depress and hold the water dispenser paddle for 5 seconds.
- Release the dispenser paddle for 5 seconds. Repeat steps 1 and 2 until water begins to flow.
- Once water begins to flow, continue depressing and releasing the dispenser pad (5 seconds on, 5 seconds off) until a total 1 gallon (3.8 L) has been dispensed.
Replacing the Water Filter
To purchase a replacement water filter, use model number Filter A, contact your dealer, or call 1-800-422-9991 in the U.S.A. or 1-800-807-6777 in Canada.
Replacement filter part number and filter model names can be found on Performance Data Sheet page.
IMPORTANT: Air trapped in the water system may cause water and filter to eject. Always dispense water for at least 2 minutes before removing the filter or blue bypass cap.
- If applicable, press upward on the water filter cover to access the filter.
- Turn filter counterclockwise, and pull straight out to remove. NOTE: There may be some water in the filter. Some spilling may occur. Use a towel to wipe up any spills.
- Remove sealing label from replacement filter and insert the filter end into the filter head.
- Turn the filter clockwise until it stops. Snap the filter cover closed.
- Flush the water system. See "Flush the Water System" for details.
NOTE: The dispenser feature may be used without a water filter installed. Your water will not be filtered. If this option is chosen, replace the filter with the blue bypass cap.
Reset Water Filter Status
After replacing the water filter, press and hold Reset Filter or Filter Reset (depending on your model) for 3 seconds. The Order and Replace indicator lights will blink and then go off when the system is reset. On some models the indicator light will change to blue when the system is reset. See the "Quick Start Guide" for more information.
On models with Options and Measured Fill buttons located on the control panel: 3
After changing the water filter, reset the status light. Press the Options button to enter Options mode, then press Lock to initiate the reset, then press Measured Fill to confirm that you want to reset the status light. When the system is reset, the "Order" and "Replace" icons will disappear from the display screen.
On models with Water Filter button located on the control panel:
After changing the water filter, reset the status. Press and hold the Water Filter button for 3 seconds. When the system is reset, the water filter icon will return to Blue and the words "Replace Filter" will disappear from the display.
Vacation and Moving Care
Vacations
If You Choose to Leave the Refrigerator On While You're Away:
of Use up any perishables and freezer other items.
-
If your refrigerator has an automatic ice maker, and is connected to the household water supply, turn off the water supply to the refrigerator. Property damage can occur if the water supply is not turned off.
-
If you have an automatic ice maker, turn off the ice maker. NOTE: Raise the wire shutoff arm to Off (arm up) position.
-
Empty the ice bin.
If You Choose to Turn Off the Refrigerator Before You Leave
- Remove all food from the refrigerator.
- If your refrigerator has an automatic ice maker:
■ Turn off the water supply to the ice maker at least one day ahead of time.
■ When the last load of ice drops, raise the wire shutoff arm to the Off (up) position.
-
Empty the ice bin.
-
Turn off the Temperature control(s). See "Using the Controls" in the Quick Start Guide.
- Clean refrigerator, wipe it, and dry well.
- Tape rubber or wood blocks to the tops of both doors to prop them open far enough for air to get in. This stops odor and mold from building up.
Moving
When you are moving your refrigerator to a new home, follow these steps to prepare it for the move.
- If your refrigerator has an automatic ice maker:
■ Turn off the water supply to the ice maker at least one day ahead of time.
■ Disconnect the water line from the back of the refrigerator.
■ When the last load of ice drops, raise the wire shutoff arm to the Off (up) position.
- Remove all food from the refrigerator and pack all frozen food in dry ice.
- Empty the ice bin.
-
Turn off the Temperature control(s). See "Using the Controls" in the Quick Start Guide.
-
Unplug refrigerator.
- Clean, wipe, and dry thoroughly.
- Take out all removable parts, wrap them well, and tape them together so they don't shift and rattle during the move.
- Depending on the model, raise the front of the refrigerator so it rolls more easily or raise the leveling screws so they don't scrape the floor. See online "Adjust the Door(s)" or "Door Closing and Door Alignment."
- Tape the doors closed and tape the power cord to the back of the refrigerator.
When you get to your new home, put everything back and refer to "Installation Instructions" for preparation instructions. If your refrigerator has an automatic ice maker, remember to reconnect the water supply to the refrigerator.
INSTALLATION INSTRUCTIONS
Unpack the Refrigerator
WARNING
Excessive Weight Hazard
Use two or more people to move and install or un appliance.
Failure to do so can result in back or other injury.
Remove the Packaging
■ Remove tape and glue residue from surfaces before turning on the refrigerator. Rub a small amount of liquid dish soap over the adhesive with your fingers. Wipe with warm water and dry
- Do not use sharp instruments, rubbing alcohol, flammable fluids, or abrasive cleaners to remove tape or glue. These products can damage the surface of your refrigerator. For more information, see "Refrigerator Safety."
■ Dispose of/recycle all packaging materials.
When Moving Your Refrigerator:
Your refrigerator is heavy. When moving the refrigerator for cleaning or service, be sure to cover the floor with cardboard or hardboard to avoid floor damage. Always pull the refrigerator straight out when moving it. Do not wiggle or "walk" the refrigerator when trying to move it, as floor damage could occur.
Clean Before Using
After you remove all of the packaging materials, clean the inside of your refrigerator before using it. See the cleaning instructions in the "Maintenance and Care" section of your Owner's Manual. Important information to know about glass shelves and covers:
Do not clean glass shelves or covers with warm water when they are cold. Shelves and covers may break if exposed to sudden temperature changes or impact, such as bumping. Tempered glass is designed to shatter into many small, pebble-size pieces. This is normal. Glass shelves and covers are heavy. Use both hands when removing them to avoid dropping.
Electrical Requirements
WARNING
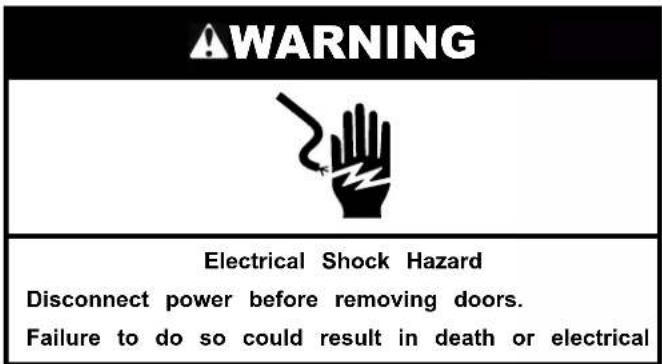
Electrical Shock Hazard
Plug into a grounded 3 prong outlet.
Do not remove ground prong.
Do not use an adapter.
Do not use an extension cord.
Failure to follow these instructions can result in death, fire, or electrical shock.
Before you move your refrigerator into its final location, it is important to make sure you have the proper electrical connection.
If the supply cord is damaged, it must be replaced by the manufacturer or its service agent or a similarly qualified person. Do not use a cord that shows cracks or abrasion damage along its length or at either the plug or connector end.
Recommended Grounding Method
A 115 V, 60 Hz, AC-only 15 A or 20 A fused, grounded electrical supply is required. It is recommended that a separate circuit serving only your refrigerator and approved accessories be provided. Use an outlet that cannot be turned off by a switch. Do not use an extension cord.
NOTE: Before performing any type of installation, cleaning, or removing a light bulb, turn the refrigerator to OFF. Depending on your model, turn the refrigerator control to the word OFF, or press the refrigerator down arrow touch pad until a dash (−) appears in refrigerator displays as shown. Disconnect the refrigerator from the electrical source. When you are finished, reconnect the refrigerator to the electrical source and reset the temperature controls to the desired setting. See "Quick Start Guide."
Location Requirements
WARNING
Explosion Hazard
Keep flammable materials and vapors, such as gasoline, away from appliance.
Use nonflammable cleaner.
Failure to do so can result in death, explosion, or fire.
IMPORTANT: This refrigerator is designed for indoor, household use only.
This appliance is intended to be used in a household and similar applications such as:
■ Staff kitchen areas in shops, offices and other working environments.
■ Farm houses and by clients in hotels, motels and other residential type environments.
■ Bed and breakfast type environments.
■ Catering and similar non-retail applications.
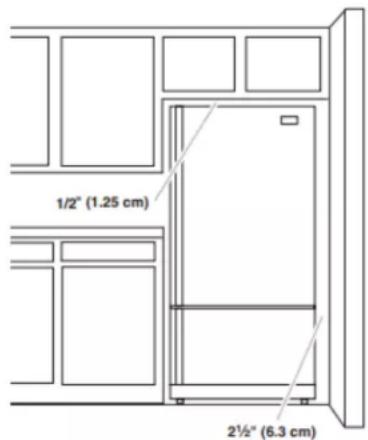
To ensure proper ventilation for your refrigerator, allow for 1/2" (1.25 cm) of space on each side and at the top. Allow for 1" (2.54 cm) of space behind the refrigerator. If your refrigerator has an ice maker, allow extra space at the back for the water line connections. When installing your refrigerator next to a fixed wall, leave 2½" (6.3 cm) minimum on the hinge side (some models require more) to allow for the door to swing open.
NOTE: This refrigerator is intended for use in a location where temperature ranges from a minimum of 55^ F ( 13^ C) to a maximum of 110^ F ( 43^ C). The preferred room temperature range for optimum performance, which reduces electricity usage and provides superior cooling, is between 60^ F ( 15^ C) and 90^ F ( 32^ C). It is recommended that you do not install the refrigerator near a heat source, such as an oven or radiator.
Water Supply Requirements
Gather the required tools and parts before starting installation. Read and follow the instructions provided with any tools listed here.
Tools Needed:
■ Flat-blade screwdriver
■ 1/4" Nut driver
■ 7/16" and 1/2" Open-end or two adjustable wrenches
1/4" Drill bit
■ Cordless drill
IMPORTANT:
■ Connect to a potable water supply only.
Do not use with water that is microbiologically unsafe or of unknown quality without adequate disinfection before or after the system. Systems certified for cyst reduction may be used on disinfected waters that may contain filterable cysts.
■ All installations must meet local plumbing code requirements.
■ Do not use a piercing-type or 3/16 " (4.76 mm) saddle valve which reduces water flow and clogs more easily.
■ Use copper tubing and check for leaks. Install copper tubing only in areas where the household temperatures will remain above freezing.
■ For models with water filters, the disposable water filter should be replaced at least every 6 months.
Water Pressure
A cold water supply with water pressure of between 35 psi and 120 psi (241 kPa and 827 kPa) is required to operate the water dispenser and ice maker. If you have questions about your water pressure, call a licensed, qualified plumber.
Reverse Osmosis Water Supply
IMPORTANT: The pressure of the water supply coming out of a reverse osmosis system going to the water inlet valve of the refrigerator needs to be between 35 psi and 120 psi (241 kPa and 827 kPa).
If a reverse osmosis water filtration system is connected to your cold water supply, the water pressure to the reverse osmosis system needs to be a minimum of 40 psi to 60 psi (276 kPa to 414 kPa).
If the water pressure to the reverse osmosis system is less than 40 psi to 60 psi (276 kPa to 414 kPa):
IMPORTANT: Flush the water system before calibrating Measured Fill. See "Flush the Water System" in the Owner's eManual.
If you have questions about your water pressure, call a licensed, qualified plumber.
Connect the Water Supply
Read all directions before you begin.
IMPORTANT:
■ Plumbing shall be installed in accordance with the International Plumbing Code and any local codes and ordinances.
■ The water tubing on the back of the refrigerator (which is used to connect to the household water line) is a PEX (cross-linked polyethylene) tube. Copper and PEX tubing connections from the household water line to the refrigerator are acceptable, and will help avoid off-taste or odor in your ice or water. Check for leaks. If PEX tubing is used instead of copper, we recommend contacting Service to obtain current part numbers.
■ Install tubing only in areas where temperatures will remain above freezing.
If you turn on the refrigerator before the water line is connected, turn off the ice maker to avoid excessive noise or damage to the water valve.
Connect to Water Line
- Unplug refrigerator or disconnect power.
- Turn off main water supply. Turn on nearest faucet long enough to clear line of water.
- Find a 1/2" to _4 " (12.7 mm to 31.8 mm) vertical cold water pipe near the refrigerator.
- Determine the length of copper tubing you need. Measure from the connection on the lower right rear of the refrigerator to the water pipe. Add 7 ft (2.1 m) to allow for cleaning. Use 1/4" (6.35 mm) O.D. (outside diameter) copper or PEX tubing. Be sure both ends of copper or PEX tubing are cut square.
- Using a cordless drill, drill a 1/4" (6.35 mm) hole in the cold water pipe you have selected.
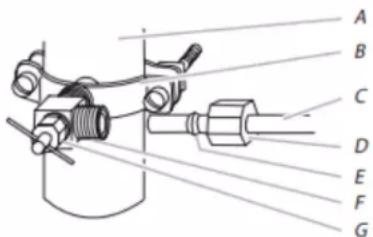
A. Cold water pipe
B. Pipe clamp
C. Copper or PEX tubing
D. Compression nut
E. Compression sleeve
F. Shutoff valve
G. Packing nut
[Non-Text]
- Fasten the shutoff valve to the cold water pipe with the pipe clamp. Be sure the outlet end is solidly in the 1/4" (6.35 mm) drilled hole in the water pipe and that the washer is under the pipe clamp. Tighten the packing nut. Tighten the pipe clamp screws slowly and evenly so the washer makes a watertight seal. Do not overtighten.
-
Slip the compression sleeve and compression nut on the copper tubing as shown. Insert the end of the tubing into the outlet end squarely as far as it will go. Screw compression nut onto outlet end with adjustable wrench. Do not overtighten or you may crush the copper tubing.
-
Place the free end of the tubing in a container or sink, and tube on the main water supply. Flush the tubing until water is clear. Turn off the shutoff valve on the water pipe.
Connect to Refrigerator
Depending on your model, the water line may come down from the top or up from the bottom. Follow the connection instructions for your model.
Style 1
-
Remove plastic cap from water valve inlet port. Attach the copper tube to the valve inlet using a compression nut and sleeve as shown. Tighten the compression nut. Do not overtighten. Confirm copper tubing is secure by pulling on copper tubing.
-
Create a service loop with the copper tubing. Avoid kinks when coiling the tubing. Secure copper or PEX tubing to refrigerator cabinet with a "P" clamp.
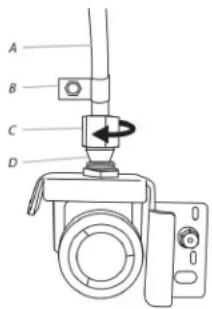
A. Copper or PEX tubing
C. Compression nut D. Compression sleeve
B. "P" clamp
- Turn on water supply to refrigerator and check for leaks. Correct any leaks.
Style 2
- Create a service loop (minimum diameter of 2 ft [61 cm]) with the copper or PEX tubing. Avoid kinks when coiling the tubing.
- Remove the plastic cap from water valve inlet port. Place a compression nut and sleeve on the copper or PEX tubing.
- Insert the end of the copper or PEX tubing into the water valve inlet port. Shape tubing slightly so that the tubing feeds straight into the port to avoid kinks.
- Slide the compression nut over the sleeve and screw into the water valve inlet port.
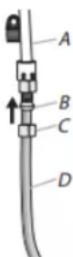
A. PEX water tubing
C. Compression nut D. Copper or PEX tubing
B. Sleeve
Using an adjustable wrench, hold the nut on the plastic water line to keep it from moving. Then, with a second wrench turn the compression nut on the copper tubing counterclockwise to completely tighten. Do not overtighten.
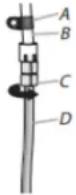
A. "P" clamp
C. Compression nut
B. PEX water line
D. Copper tubing
- Check connection by pulling on tubing. Attach the PEX water line to the refrigerator cabinet with a "P" clamp.
- Turn on water supply to the refrigerator and check for leaks. Correct any leaks.
Complete the Installation
WARNING
Electrical Shock Hazard
Plug into a grounded 3 prong outlet.
Do not remove ground prong.
Do not use an adapter.
Do not use an extension cord.
Failure to follow these instructions can result in death, fire, or electrical shock.
- Plug into a grounded 3-prong outlet.
NOTE: Allow 24 hours to produce the first batch of ice. Discard the first three batches of ice produced. Allow 3 days to completely fill the ice storage bin. - Flush the water system. See "Flush the Water Systems."
REFRIGERATOR FEATURES
Crisper Humidity Control
You can control the amount of humidity in the moisture-sealed crisper. Depending on your model, adjust the control to any setting between Fruit and Vegetables or Low and High.
■ Fruit/Low (open) for best storage of fruits and vegetables with skins.
■ Vegetables/High (closed) for best storage of fresh, leafy vegetables.
For information on additional features for your appliance, see online "Feature Guide."
Ice Maker and Storage Bin (on some models)
“you only want to remove and replace the doors, see Remove Doors and Hinges” and “Replace Doors and Hinges.”
■ Before you begin, turn the refrigerator control Off, and remove food and adjustable door or utility bins from the doors.
Ice Production Rate
Allow 24 hours to produce the first batch of ice. Discard the first three batches of ice produced.
Allow 3 days to completely fill the ice storage bin. The ice maker should produce approximately 3 lbs (1.4 kg) (8 to 12 batches) of ice in a 24-hour period.
To increase ice production, lower the freezer and refrigerator temperature, or see "Control Panel Descriptions" in the Quick Start Guide for details. Wait 24 hours between adjustments.
Ice Maker in the Freezer
Turn the Ice Maker On/Off:
Turn the Ice Maker On/Off for Icemaker without a switch:
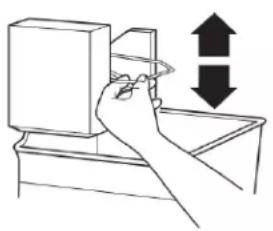
To turn on the ice maker, simply lower the wire shutoff arm.
To manually turn the ice maker off, lift the wire shutoff arm to the off (arm up) position and listen for the click.
Your ice maker has an automatic shutoff. As ice is made, the ice cubes will fill the ice storage bin and the ice cubes will raise the wire shutoff arm to the off (arm up) position. Do not force the wire shutoff arm up or down.
For icemakers with a switch:
For icemakers with a switch, use the switch to turn ON or Off the icemaker.
natural_image
Illustration of a hand holding a kitchen appliance with an upward and downward arrow indicating motion (no text or symbols)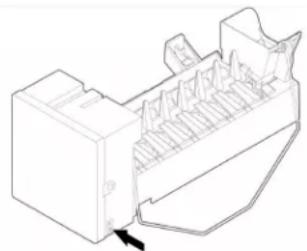
natural_image
Technical line drawing of a mechanical component with internal fins and a black arrow pointing to a feature (no text or symbols)Without switch With switch
NOTE: Turn off the ice maker before removing the ice storage bin to serve ice or to clean the bin. This will keep the ice cubes from dropping out of the ice maker and into the freezer compartment. After replacing the ice storage bin, turn on the ice maker.
Wash the ice storage bin with mild soap and warm water.
Slide the ice storage bin under the ice maker and push it toward the back as far as it will go.
DOOR AND HANDLE INSTRUCTIONS
Refrigerator Doors and Drawer
TOOLS NEEDED: 5/16", 3/8", 1/4" hex head socket wrench, a Torx† T20 screwdriver, a #2 Phillips screwdriver, and a flat-blade screwdriver
IMPORTANT:
- Your refrigerator may have a standard reversible refrigerator door with either a freezer door or freezer drawer, or French doors. Follow the instructions specific to the door style of your model.
Remove and Replace Door Handles REFRIGERATOR DOOR HANDLES
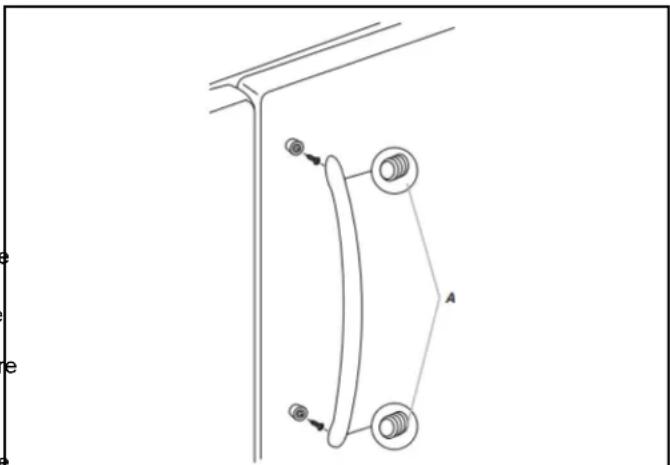
Refrigerator Door Handle Style 1
natural_image
Pure mechanical diagram showing a curved pipe or channel with two circular components and directional arrows, no text or symbols present.A. 3/32" Setscrew
■ Using a 3/32" or 1/8" hex key, loosen the two setscrews located on the side of each handle. Pull the handle straight out from the drawer. Make sure you keep the screws for reattaching the handles.
■ To replace the handles, reverse the directions.
Refrigerator Door Handle Style 2
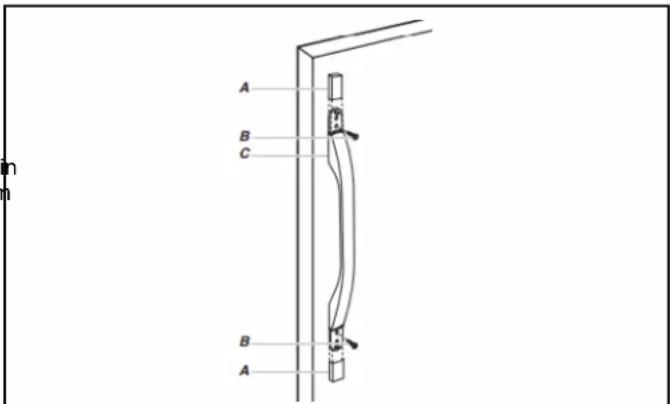
A. Handle Trim C. Refrigerator Door Handle
B. Flat-Head Handle Screws
■ Remove the screw cover.
■ Remove the handle assembly. Keep all parts together.
■ To replace the handles, reverse the directions.
Refrigerator Door Handle Style 3
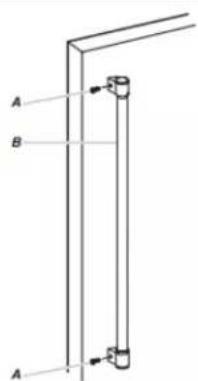
A. Flat-Head Handle Screws B. Refrigerator Door Handle
■ Using a 3/32" or 1/8" hex key, loosen the two setscrews located on the side of each handle. Pull the handle straight out from the drawer. Make sure you keep the screws for reattaching the handles.
■ To replace the handles, reverse the directions.
Refrigerator Door Handle Style 4
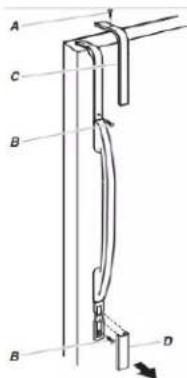
A. Trim Screw C. Top Trim
B. Handle Screws D. Bottom Trim
■ To remove the handle, remove the screw attaching the trim to the upper end of the handle. Using a flat-blade screwdriver wrapped in masking tape, pry the trim piece from the lower e of the handle. Then, remove the screws attaching the handle to the door.
■ To replace handle, reverse directions.
Refrigerator Door Handle Style 5
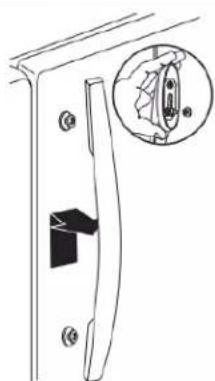
natural_image
Technical line drawing of a door handle with an inset showing a mechanical component detail (no text or symbols)- To remove the handle, grasp the lower part of the handle firmly, slide the handle up and pull the handle straight out from the door. - To replace the handle, position the handle so that the large holes in the mounting clips are down and align the holes with the door studs. Rotate the handle so that the mounting clips are flat against the door and slide the handle down to engage.
FREEZER DOOR HANDLES
Freezer Door Handle Style 1
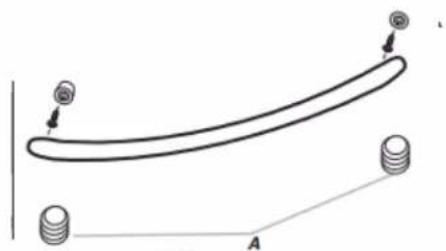
natural_image
Simple line drawing of a curved beam with two spherical ends and an angle labeled A (no text or symbols)A. 3/32" Setscrew
- Using a 3/32" or 1/8" hex key, loosen the two setscrews located on the side of each handle. Pull the handle straight out from the drawer. Make sure you keep the screws for reattaching the handles. - To replace the handles, reverse the directions.
Freezer Door Handle Style 2
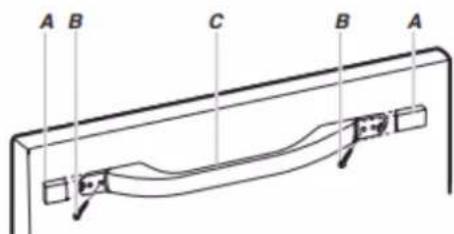
A. Handle Trim C. Freezer Drawer Handle
B. Flat-Head Handle Screws
■ Remove the screw cover.
■ Remove the handle assembly. Keep all parts together.
■ To replace the handles, reverse the directions.
Freezer Door Handle Style 3
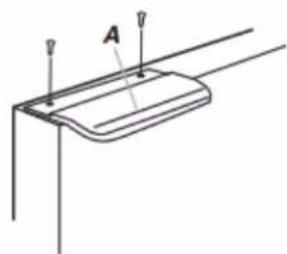
natural_image
Pure technical line drawing of a mechanical component with no text or symbolsA. Flat-Head Handle Screws
■ Remove screws and handle.
■ To replace handle, reverse directions.
Freezer Door Handle Style 4
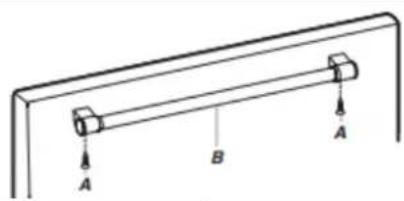
natural_image
Simple line drawing of a mechanical lever with labeled points A and B (no text or symbols beyond labels)A. Flat-Head Screws B. Freezer Drawer Handle
■ Remove screws and handle.
■ To replace the handles, reverse the directions.
Freezer Door Handle Style 5
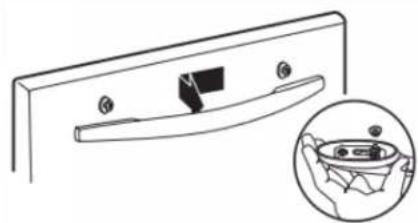
natural_image
Diagram of a bathroom sink with a magnified inset showing the interior area (no text or symbols)■ To remove the handle, grasp the lower part of the handle firmly, slide the handle up and pull the handle straight out from the door.
■ To replace the handle, position the handle so that the large holes in the mounting clips are down and align the holes with the door studs. Rotate the handle so that the mounting clips are flat against the door and slide the handle down to engage.
Remove Doors and Hinges
STANDARD DOOR
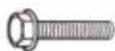
Hex Head Top Hinge Screw
Standard Door - Freezer drawer models
- Unplug refrigerator or disconnect power
- Keep the refrigerator door closed until you are ready to lift it free from the cabinet.
NOTE: Provide additional support for the door while the hinges are being moved. Do not depend on the door gasket magnets to hold the door in place while you are working.
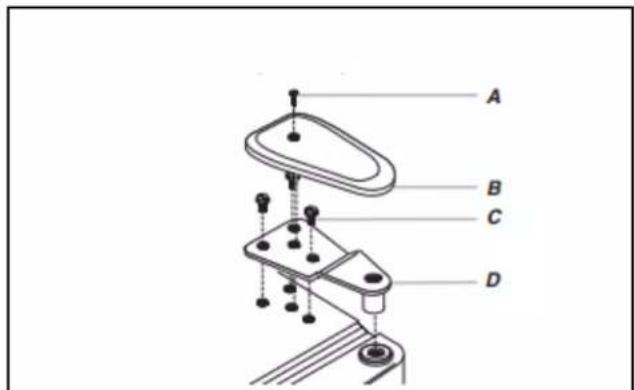
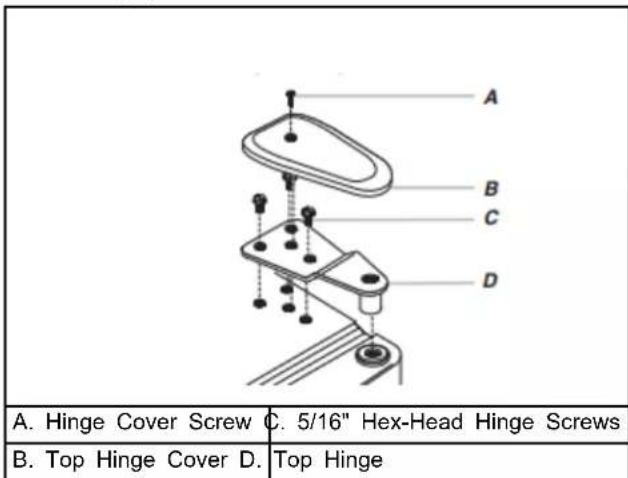
- Remove the parts for the top hinge as shown below. Lift the refrigerator door free from the cabinet.
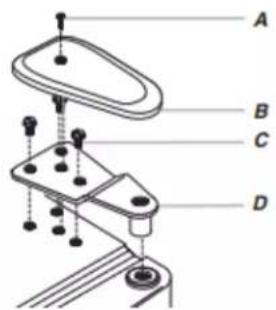
| A. Hinge Cover Screw | C. 5/16" Hex-Head Hinge Screws |
| B. Top Hinge Cover D. | Top Hinge |
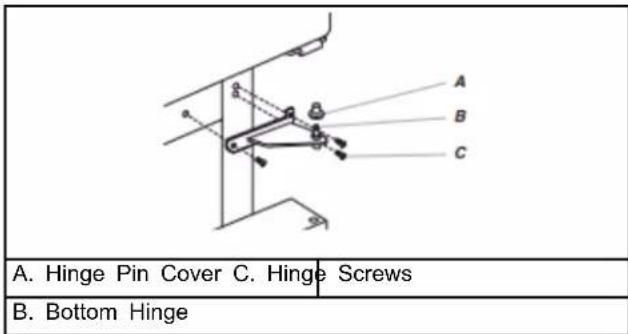
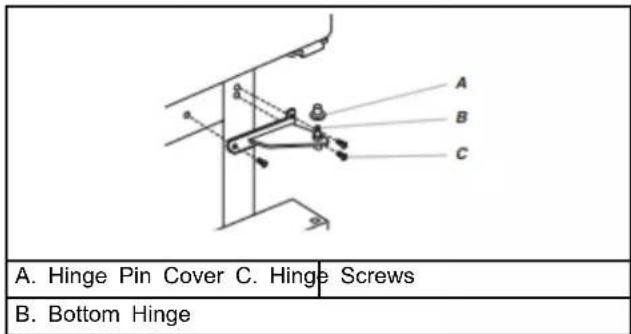
- Remove the parts for the bottom hinge as shown below.
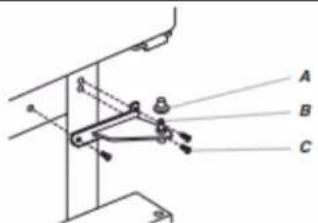
A. Hinge Pin Cover C. Hinge Screws
B. Bottom Hinge
Freezer door models
- Unplug refrigerator or disconnect power.
- Keep the freezer door closed until you are ready to lift it free from the cabinet.
NOTE: Provide additional support for the door while the hinges are being moved. Do not depend on the door gasket magnets to hold the door in place while you are working.
- Remove the parts for the top hinge as shown below. Lift the refrigerator door free from the cabinet.
| A. Hinge Cover Screw | C. 5/16" Hex-Head Hinge Screws |
| B. Top Hinge Cover D. | Top Hinge |
- Remove the center hinge pin and remove the hinge screws as3. shown below. Lift the freezer door free from the cabinet.
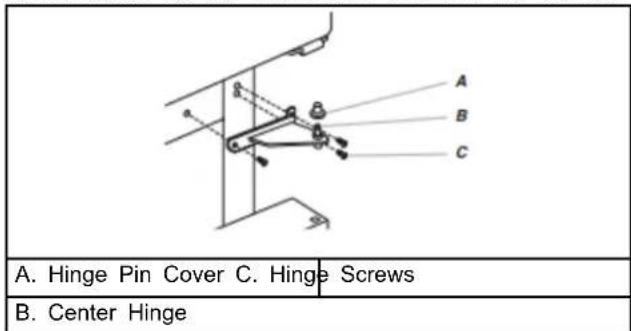
-
Remove the base grille by grasping the grille firmly with both hands and pulling it toward you.
-
Remove the parts for the bottom hinge as shown below.
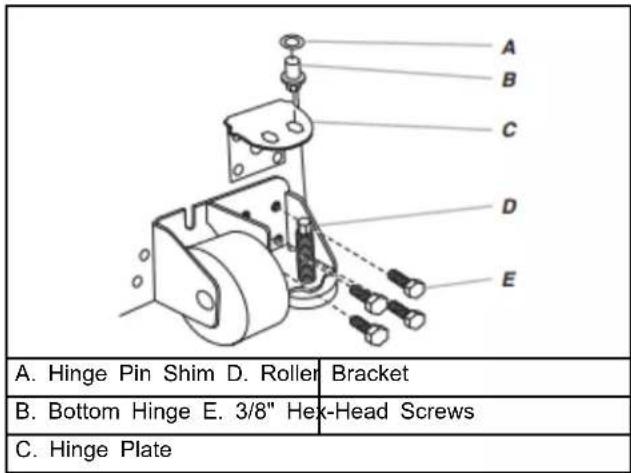
FRENCH DOORS
- Unplug refrigerator or disconnect power.
- Keep the refrigerator doors closed until you are ready to lift them free from the cabinet.
NOTE: Provide additional support for the refrigerator door while the hinges are being removed. Do not depend on the door gasket magnets to hold the door in place while you are working
Starting with the right-hand side door, remove the parts for the top hinge as shown below. Lift the refrigerator door from the bottom hinge pin.
- Remove the hinge pin cover from the bottom hinge pin and keep it for later use.
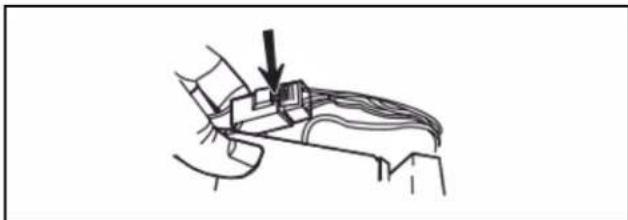
- Before removing the left-hand side door, disconnect the wiring plug located on top of the top hinge by wedging a flatblade screwdriver or your fingernail between the two sections..
natural_image
Line drawing of a hand holding a small object with an arrow pointing to it (no text or symbols present)NOTE: The green, ground wire remains attached to the hinge.
- Remove the parts for the left-hand side door top hinge as shown in the Top Hinge graphic in Step 3. Lift the door from the bottom hinge pin.
NOTE: Remove the hinge pin cover from the bottom hinge pin and keep it for later use.
Reverse Doors (optional)
IMPORTANT: If you want to reverse your door so it opens from the opposite side, follow these steps. If you are not reversing the door, see "Replace Door(s) and Hinges."
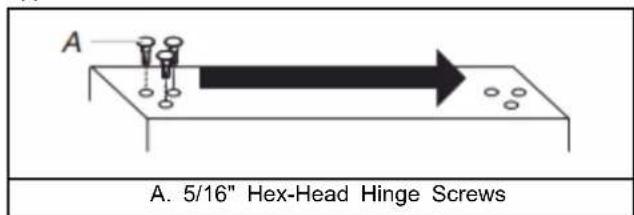
Cabinet
- Remove hinge screws from handle side and move them to opposite side.
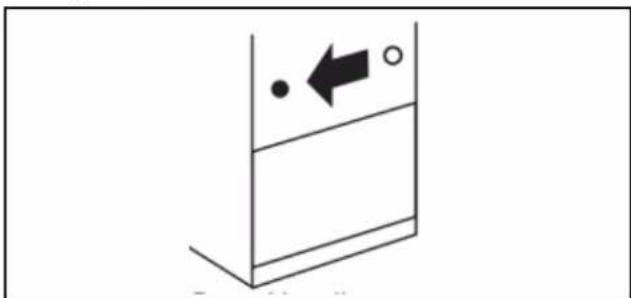
Refrigerator door
- Remove the refrigerator handle assembly. See "Remove and Replace Door Handles." Keep all parts together.
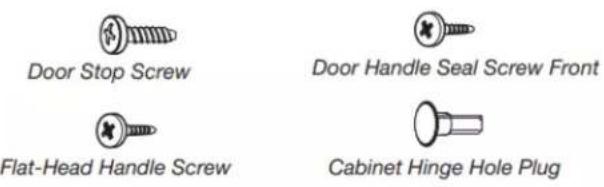
- Remove door handle seal screw front. Move to opposite side of refrigerator door as shown below.
natural_image
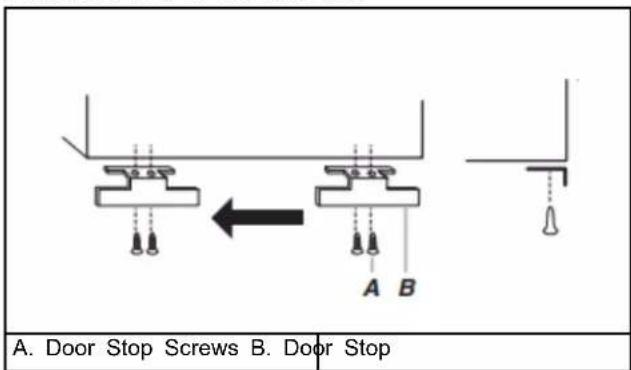
Simple line drawing of a container with an arrow pointing left and a small circle inside, no text or symbols present.- Remove the door stop. Move it to the opposite side of the refrigerator door as shown below.
- Attach refrigerator handle on opposite side of the refrigerator door with the two screws. Replace handle trim. See "Remove and Replace Door Handles."
- Tighten all screws. Set aside the door until hinges and freezer compartment drawer are in place.
Freezer door
- Remove the freezer handle assembly. See "Remove and Replace Door Handles." Keep all parts together.
- Remove door stop. Move to opposite side of freezer door as shown below.
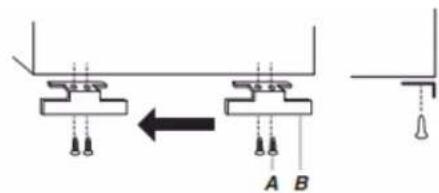
A. Door Stop Screws B. Door Stop
- Attach handle to opposite side of freezer door.
- Tighten all screws. Set the door aside.
- Remove the base grille by grasping the grille firmly with both hands and pulling it toward you.
NOTE: Place a shim under the bottom front edge of the refrigerator cabinet to take the weight off the roller brackets.
- Remove the screws from both roller brackets as shown below.
- Remove the hinge plate located behind the roller bracket and move it to the opposite side of the refrigerator. Move the hinge pin and shim to the outside hole on the hinge plate as shown below.
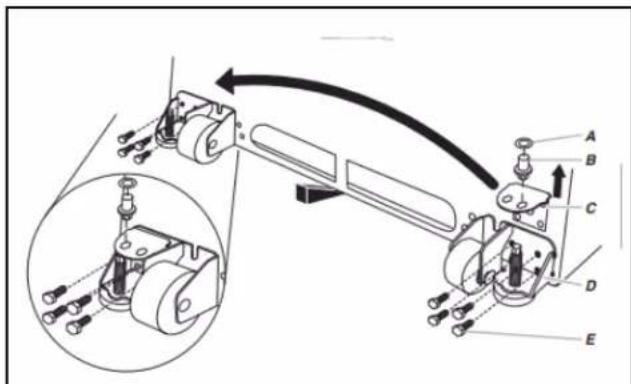
| A. Hinge Pin Shim D. Roller Bracket | |
| B. Bottom Hinge E. 3/8" | Hex-Head Hinge Screws |
| C. Hinge Plate | |
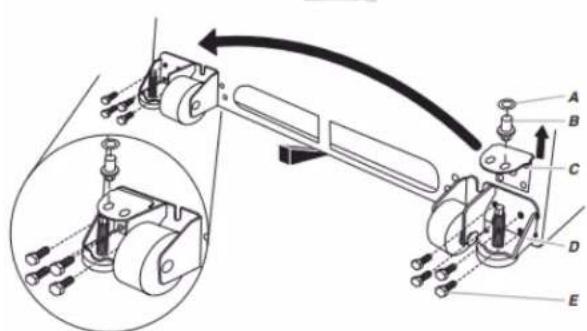
Replace Doors and Hinges
NOTE: Graphic may be reversed if door swing is reversed.
Standard Door - Freezer drawer models
- Replace the parts for the bottom hinge as shown below. Tighten screws.
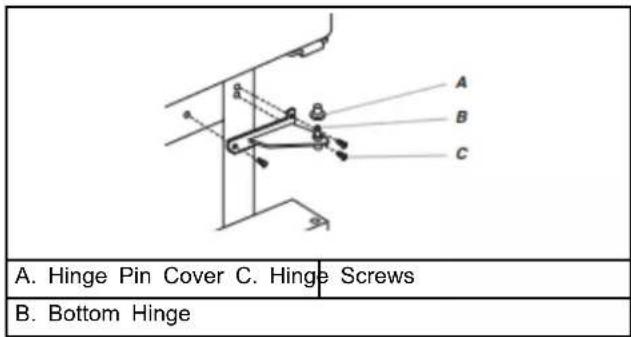
NOTE: Provide additional support for the door while the hinges are being moved. Do not depend on the door gasket magnets to hold the door in place while you are working.
- Assemble the parts for the top hinge as shown below. Do not tighten screws completely.
| A. Hinge Cover Screw | C. 5/16" Hex-Head Hinge Screws |
| B. Top Hinge Cover D. | Top Hinge |
- Adjust the door so that the bottom of the refrigerator door is aligned with the top of the freezer drawer. Tighten all screws.
Standard Door - Freezer door models
- Make sure the hinge plate is securely fastened behind the roller bracket and that the hinge pin is inserted into the outside hole. Fully tighten all roller bracket screws.
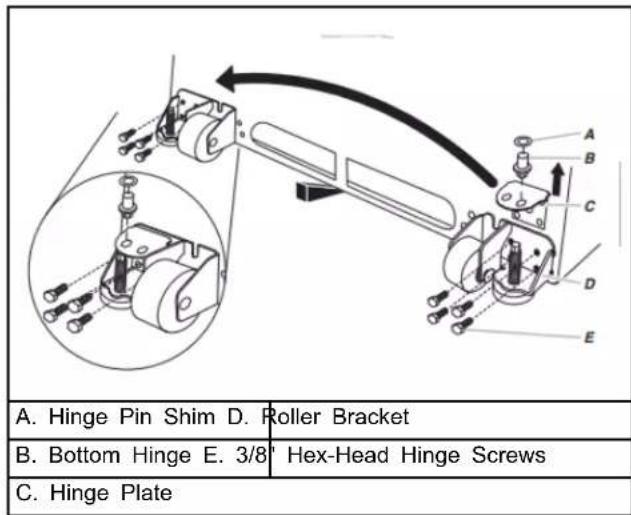
- Remove the shim that you placed under the front edge of the refrigerator cabinet. Replace the freezer door
NOTE: Provide additional support for the door while the hinges are being moved. Do not depend on the door gasket magnets to hold the door in place while you are working.
- Assemble the parts for the center hinge as shown below, and tighten all the screws. Replace the refrigerator door.
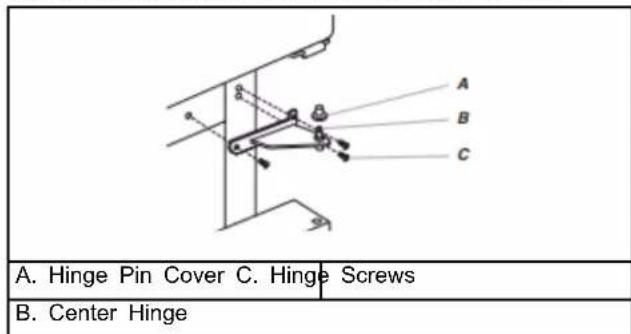
-
Assemble the parts for the top hinge as shown below. Do not tighten the screws completely.
-
Adjust the doors so that the bottom of the refrigerator door is aligned with the top of the freezer door. Tighten all screws.
French Door Models
- Assemble the parts for the top hinges as shown below. Do no IMPORTANT:
tighten the screws completely.
| A. Hinge Cover Screw | C. 5/16" Hex-Head Hinge Screws |
| B. Top Hinge Cover D. | Top Hinge |
- Replace the parts for the bottom hinges as shown below. Tighten screws. Replace the refrigerator doors.
NOTE: Provide additional support for the refrigerator doors while the hinges are being moved. Do not depend on the gasket magnets to hold the doors in place while you are working.
- Align each door so that the bottom of the refrigerator door aligns evenly with the top of the freezer drawer. Tighten all screws.
- Reconnect the wiring plug on top of the left-hand side refrigerator door. Replace the top hinge covers.
Remove and Replace Freezer Drawer
IMPORTANT:
■ Two people may be required to remove and replace the freezer drawer.
REMOVE DRAWER FRONT
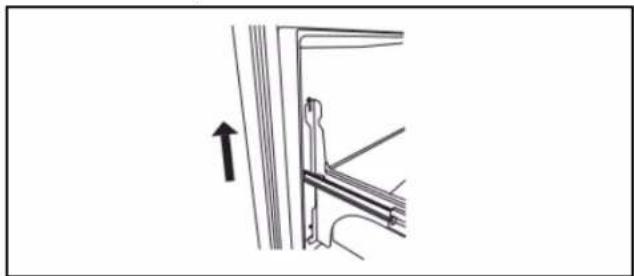
- Open the freezer drawer to full extension.
- Loosen the four screws attaching the drawer glides to the drawer front as shown below.
NOTE: Loosen screws three to four turns. Keep the screws in the drawer front.
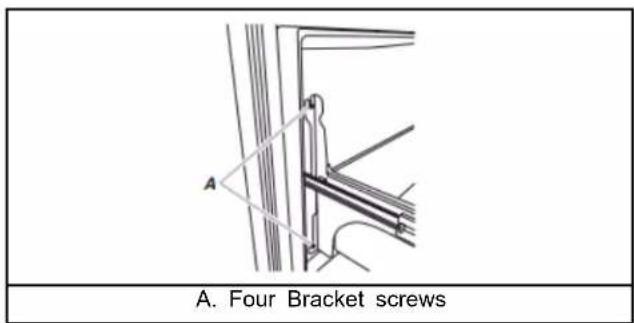
- Lift drawer front upward and off the screws.
natural_image
Diagram of a door frame with an arrow indicating upward motion (no text or symbols)Replace Drawer Front
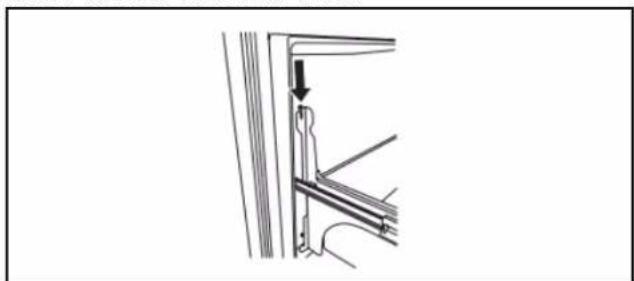
- Slide the drawer glides out of the freezer compartment. Insert the screws in the top of the drawer front into the slots in the drawer brackets as shown below.
natural_image
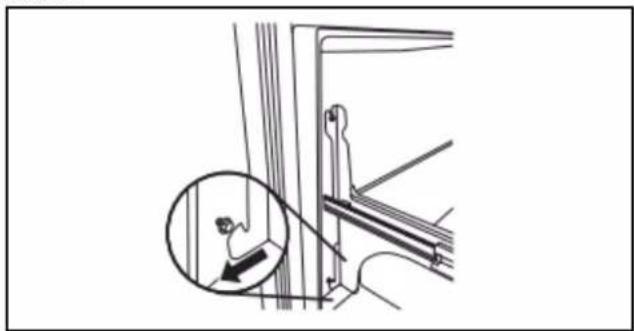
Technical line drawing of a door frame with a handle and arrow indicating direction (no text or symbols)- Pull the drawer brackets toward you to insert the two screws in the bottom of the drawer front into the brackets as shown below..
natural_image
Line drawing of a door frame with an inset showing a person climbing a ladder (no text or symbols)- Completely tighten the four screws.
Final Steps
- Check all holes to make sure that hole plugs and screws are in place. Reinstall top hinge cover.
- Replace the base grille.
WARNING
Electrical Shock Hazard
Plug into a grounded 3 prong outlet.
Do not remove ground prong.
Do not use an adapter.
Do not use an extension cord.
Failure to follow these instructions can result in death, fire, or electrical shock.
- Plug into a grounded 3 prong outlet.
- Return all removable door parts to door and food to refrigerator.
Door Closing and Door Alignment
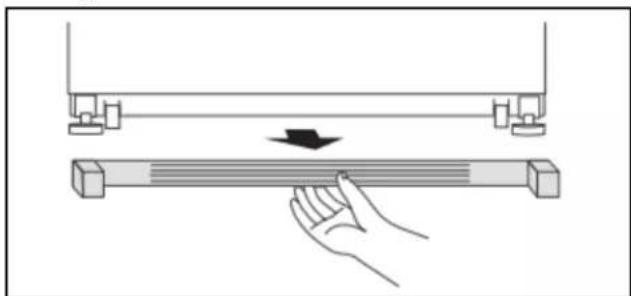
The base grille covers the leveling screws and roller assemblies located at the bottom of the refrigerator cabinet below the freezer door or drawer. Before making adjustments, remove the base grille and move the refrigerator to its final location.
- Remove the two screws fastening the base grille to the cabinet, and set the screws aside. Grasp the grille and pull it toward you.
natural_image
Diagram showing a hand pressing a horizontal bar with an arrow indicating motion (no text or symbols)- Move the refrigerator to its final location.
NOTE: To allow the refrigerator to roll easier, raise the leveling legs off the floor by turning the leveling screws counterclockwise. The front rollers will be touching the floor.
- So the doors will close easier, use a 1/4" hex driver to turn both leveling screws clockwise. This will raise the front of the refrigerator tilting it slightly downward to the rear. Turn both in leveling screws the same amount.
NOTE: Having someone push against the top of the refrigerator takes some weight off the leveling screws. This makes it easier to turn the screws.
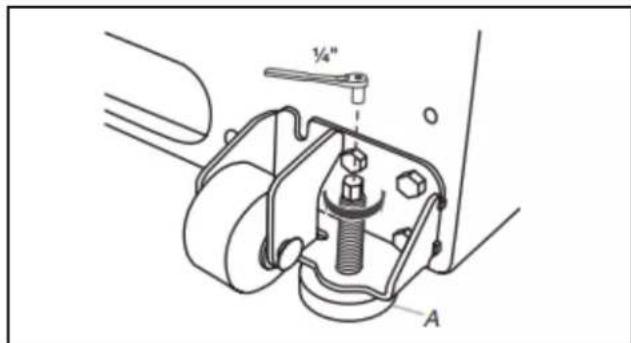
A. Leveling screw
- Open and close the doors to make sure they close as easily as you like. If not, increase the tilt by turning both leveling screws clockwise. It may take several turns of the leveling screw to allow the doors to close easier.
- Check for door alignment. If one door is lower than the other, adjust the leveling screw, on the lower side of the refrigerator. Using a 1/4" hex driver, turn the screw clockwise to raise that side of the refrigerator until the doors are aligned. It may take several turns of the leveling screw to raise the refrigerator.
NOTE: Having someone push against the top of the refrigerator takes some weight off the leveling screws. This makes it easier to turn the screws.
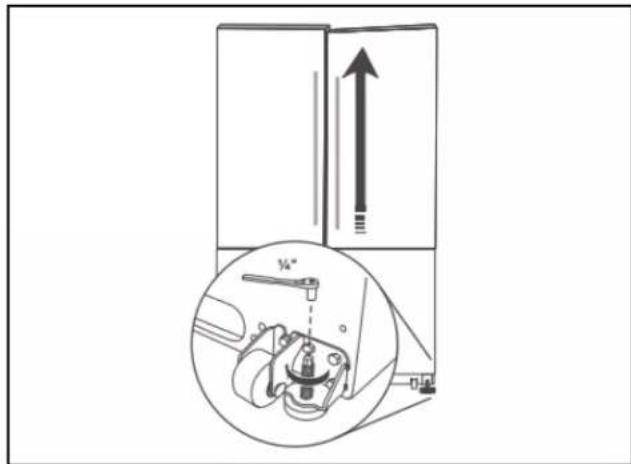
- Make sure the refrigerator is steady. If the refrigerator seems unsteady or rolls forward when the door or drawer is opened adjust the leveling screws. Using a 1/4" hex driver, turn the leveling screw on each side clockwise until the rollers are up and the leveling feet are firmly against the floor.
NOTE: Having someone push against the top of the refrigerator takes some weight off the leveling screws. This makes it easier to turn the screws.
- Replace the base grille by aligning the ends of the grille with the leveling assemblies on each side and snapping the grille into place.
PERFORMANCE DATA SHEET
Water Filtration System
Model W11569863 (PID), W11569861 (Without PID)
Replacement element model numbers:
EDRARXD1/EDRARXD1B/W11536439/WHRARXD1/ WHRARXD1B/ KADARXD1/ KADARXD1B/ MAYARSD1B/ MAYARXD1B
Capacity 200 Gallons (757 Liters) with PID W11569863, 100 Gallons (379 Liters) without PID W11569861.

System tested and certified by UL LLC against NSF/ANSI Standard 42, 53, 401 and CSA B483.1 for the reduction of contaminants specified on the Performance Data Sheet below.
This system has been tested according to NSF/ANSI Standards 42, 53, 401, and CSA B483.1 for the reduction of the substances listed below. The concentration of the indicated substances in water entering the system was reduced to a concentration less than or equal to the permissible limit for water leaving the system, as specified in NSF/ANSI Standards 42, 53, 401, and CSA B483.1.
| Substance Reduction Aesthetic Effects | Influent Challenge Concentration | Maximum Permissible Product Water Concentration | Average % Reduction | Minimum % Reduction |
| Chlorine Taste/Odor 2.0 | mg/L ± 10% ≥50% reduction | 99.39 99 | ||
| Particulate Class I* At le | ast 10,000 particles/mL | ≥85% reduction 99.52 99.33 |
| Contaminant Reduction | Influent Challenge Concentration | Maximum Permissible Product Water Concentration | Average % Reduction | Minimum % Reduction |
| Lead: @ pH 6.5 / @ pH 8.5 | 0.150 mg/L ± 10% 0.005 | mg/L 99.29/99.84 99.07 | 99.46 | |
| Mercury: @ pH 6.5 / @ pH 8.5 | 0.006 mg/L ± 10% 0.002 | mg/L 97.38/92.78 92.98 | 75.86 | |
| Asbestos 10 | ^7 to 10 fibers/L†† | ≥99% >99 | >99 | |
| Cysts† | 50,000/L min. | ≥99.95% | ≥99.997 | >99.997 |
| Atrazine | 0.009 mg/L ± 10% 0.003 | mg/L >98.98 | >98.95 | |
| Benzene | 0.015 mg/L ± 10% 0.005 | mg/L >99.28 | >99.17 | |
| Carbofuran | 0.080 mg/L ± 10% 0.040 | mg/L 83.93 58.7 | ||
| Lindane | 0.002 mg/L ± 10% 0.0002 | mg/L 95.22 | 95 | |
| P-Dichlorobenzene | 0.225 mg/L ± 10% 0.075 | mg/L 99.95 99.95 | ||
| Tetrachloroethylene | 0.015 mg/L ± 10% 0.005 | mg/L 99.33 99.29 | ||
| Toxaphene | 0.015 mg/L ± 10% 0.003 | mg/L 99.27 99.17 | ||
| O-Dichlorobenzene | 1.8 mg/L± 10% | 0.6 mg/L | >99.995 | >99.995 |
| Toluene | 3.0 mg/L ± 10% | 1.0 mg/L | >99.996 | >99.996 |
| Styrene | 2.0 mg/L ± 10% | 0.1 mg/L | >99.995 | >99.993 |
| 1,2,4-Trichlorobenzene | 0.210 mg/L ± 10% | 0.07 mg/L | >99.55 | >99.42 |
| Trichloroethylene | 0.3 mg/L ± 30% 0.005 | mg/L >99.96 | >99.95 | |
| Endrin | 0.006 mg/L± 10% | 0.002 mg/L 92.32 83.93 | ||
| Ethylbenzene 2.1 mg/L ± 10% | 10% 0.7 mg/L >99.99 >99.99 | |||
| 2,4 - D 0.210 mg/L ± 10% | 0.07 mg/L 98.89 94.76 | |||
| Turbidity 11 NTU ± 10% | 0.5 NTU 98.88 98.17 | |||
| Atenolol 200 ± 20% | 30 ng/L | 95.27 94.98 | ||
| Carbamazepine | 1400 ± 20% | 200 ng/L | 96.2 | 96.09 |
| Linuron | 140 ± 20% | 20 ng/L | 93.53 92.31 | |
| Meprobamate | 400 ± 20% | 60 ng/L | 94.54 | 94.32 |
| Trimethoprim | 140 ± 20% | 20 ng/L | 96.27 | 95.94 |
| DEET | 1400 ± 20% | 200 ng/L 96.32 96.21 | ||
| Metolachlor | 1400 ± 20% | 200 ng/L 96.67 96.5 | ||
| Bisphenol A | 2000 ± 20% | 300 ng/L 95.07 94.82 | ||
| Estrone | 140 ± 20% | 20 ng/L | 96.27 96.15 | |
| Nonylphenol | 1400 ± 20% | 200 ng/L 92.61 90.48 | ||
| Naproxen | 140 ± 20% | 20 ng/L | 96.09 95.83 | |
| Ibuprofen | 400 ± 20% | 60 ng/L | 95.44 95.13 | |
| TCPP | 5000 ± 20% | 700 ng/L 92.78 92.59 | ||
| TCEP | 5000 ± 20% | 700 ng/L 96.62 96.55 | ||
| Phenytoin | 200 ± 20% | 30 ng/L | 95.6 | 95.12 |
| VOC** 0.300 mg/L ± 10% | 0.015 mg/L | >99.58 >96.21 |
Test Parameters: pH = 7.5 ± 0.5 unless otherwise noted. Flow = 0.70 gpm (2.65 Lpm). Pressure = 60 psig (413.7 kPa). Temp. = 68°F to 71.6°F (20°C to 22°C). Rated service capacity = 200 gallons (757 liters) with PID, 100 gallons (379 liters) without PID.
The compounds certified under NSF 401 have been deemed as “emerging compounds/incidental contaminants.” Emerging compounds/incidental contaminants compounds that have been detected in drinking water supplies at trace levels. While occurring at only trace levels, these compounds can affect the public acceptance/ perception of drinking water quality.
It is essential that operational, maintenance, and filter replacement requirements be carried out for the product to perform as advertised. Property damage can occur if all instructions are not followed.
■ The disposable cartridge must be changed at least every 6 months. Spent adsorption media will not be regenerated and used.
■ Use replacement EDRARXD1/B, WHRARXD1/B, KADARXD1/B, MAYARXD1/. 2022 suggested retail price of \49.99 U.S.A \49.95 Canada. Prices are subject to change without notice. Available at www.everydropwater.com
■ The filter monitor system measures the amount of water that passes through the filter and alerts you when it is time to re the filter. To learn how to check the water filter status, see "the Controls" or "Water Filtration System" in the User Instruct or User Guide.
■ After changing the water filter, flush the water system. See "Flush the Water Systems" or "Water Dispenser" in the User Instructions or User Guide.
These contaminants are not necessarily in your water supply. While testing was performed under standard laboratory conditions, actual performance may vary.
■ The product is for cold water use only.
■ The water system must be installed in compliance with state local laws and regulations.
■ Actual performance may vary as the testing was performed under standard laboratory conditions.
■ Do not use with water that is microbiologically unsafe or of unknown quality without adequate disinfection before or after the system. Systems certified for cyst reduction may be used on disinfected waters that may contain filterable cysts. EPA Est. No. 85075-SG-001
■ Refer to the "Warranty" section (in the User Instructions or User Guide) for the Manufacturer's limited warranty, name and telephone number.
Application Guidelines/Water Supply Parameters
Water Supply Potable City or Well
Water Pressure 30 psi - 120 psi (207 kPa - 827 kPa) Using
Water Temperature 33°F - 100°F (0.6°C - 37.8°C)
Service Flow Rate 0.52 gpm (1.97 Lpm) @ 60 psi (413.7 kPa)
- Your water filtration system will withstand up to 120 pounds per square inch (psi) water pressure. If your water supply is higher than 80 psi, install a pressure reducing valve before installing the water filtration system.
■ Conforms to NSF/ANSI 53 for VOC reduction. See Table below and for individual contaminants and reduction performance.
*Class I particle size: >0.5 to >1 um
**This VOC performance accounts for 39 contaminant removals based on VOC surrogate testing
†Based on the use of polystyrene microsphere
Fibers greater than 10 um in length
Performance data sheet reduction claims for organic chemicals included by surrogate testing
| Substance Influent challenge concentration (mg/L) Maximum permissible product water concentration (mg/L) | ||
| alachlor 0.050 0.001 | ||
| altrazine 0.100 0.003 | ||
| benzene 0.081 0.001 | ||
| carbofuran 0.190 0.001 | ||
| carbon tetrachloride 0.078 0.0018 | ||
| chlorobenzene 0.077 0.001 | ||
| chloropicrin 0.015 0.0002 | ||
| 2,4-d 0.110 0.0017 | ||
| dibromochloropropane (DBCP) 0.052 0.00002 | ||
| o-dichlorobenzene 0.080 0.001 | ||
| p-dichlorobenzene 0.040 0.001 | ||
| 1,2-dichloroethane | 0.088 0.0048 | |
| 1,1-dichloroethylene | 0.083 0.001 | |
| cis-1,2-dichloroethylene | 0.170 0.0005 | |
| trans-1,2-dichloroethylene | 0.086 0.001 | |
| 1,2-dichloropropane | 0.080 0.001 | |
| cis- 1,3-dichloropropylene | 0.079 0.001 | |
| dinoseb 0.170 0.002 | ||
| endrin | 0.053 0.00059 | |
| ethylbenzene | 0.088 0.001 | |
| ethylene dibromide (EDB) | 0.044 0.00002 | |
| haloacetonitriles (HAN) | ||
| bromochloroacetonitrile | 0.022 0.0005 | |
| dibromoacetonitrile | 0.024 0.0006 | |
| dichloroacetonitrile | 0.0096 | 0.0002 |
| trichloraacetonitrile | 0.015 0.0003 | |
| haloketones (HK) | ||
| 1,1-dichloro-2-propanone | 0.0072 | 0.0001 |
| 1,1,1-trichloro-2-propanone | 0.0082 | 0.0003 |
| heptachor | 0.025 0.00001 | |
| heptachor epoxide 0.0107 | 0.0002 | |
| hexachlorobutadiene | 0.044 0.001 | |
| hexachlorocyclopentadiene | 0.060 0.000002 | |
| lindane | 0.055 0.00001 | |
| methoxychlor | 0.050 0.0001 | |
| pentachlorophenol 0.096 0.001 | ||
| simazine | 0.120 0.004 | |
| styrene | 0.150 0.0005 | |
| 1,1,2,2-tetrachloroethane 0.081 0.001 | ||
| tetrachloroethylene 0.081 0.001 | ||
| toluene 0.078 0.001 | ||
| 2,4,5-TP (Silvex) 0.270 0.0016 | ||
| tribromoacetic acid 0.042 0.001 | ||
| 1,2,4-trichlorobenzene 0.160 0.0005 | ||
| 1,1,1-trichloroethane 0.084 0.0046 | ||
| 1,1,2-trichloroethane 0.150 0.0005 | ||
| trichloroethylene 0.180 0.0010 | ||
| trihalomethanes (includes) | ||
| chloroform (surrogate chemical) | ||
| bromoform 0.300 0.015 | ||
| bromodichloromethane | ||
| chlorodibromomethane | ||
| xylenes (total) 0.070 0.001 | ||
Consumer Support 1.800.442.9991
By Whirlpool Corporation
2000 North M63
Benton Harbor, MI 49022
SÉCURITÉ DU RÉFRIGÉRATEUR
natural_image
Line drawing of a refrigerator with open doors and shelves (no text or symbols)ENTRETIEN ET RÉPARATION
Nettoyage
AVERTISSEMENT
Risque d'explosion
natural_image
Technical line drawing of a mechanical assembly with a directional arrow indicating motion (no text or symbols)natural_image
Technical line drawing of a mechanical assembly with no visible text or symbolsnatural_image
Diagram showing a hand inserting a device into a printer with arrows indicating the process (no text or symbols present)natural_image
Technical line drawing of a door handle with a magnified inset showing internal components (no text or symbols)natural_image
Simple line drawing of a mechanical lever with labeled points A and B (no text or symbols beyond labels)natural_image
Diagram of a bathroom sink with a magnified inset showing the interior sink (no text or symbols present)natural_image
Line drawing of a mechanical component with an arrow indicating a specific feature (no text or symbols present)Caisse
natural_image
Simple line drawing of a container with an arrow and circular symbols (no text or labels)natural_image
Diagram of a door frame with an arrow indicating direction (no text or symbols present)natural_image
Technical line drawing of a structural joint or bracket assembly (no text or symbols)natural_image
Technical line drawing of a door mechanism with an inset showing a person climbing a ladder (no text or symbols)natural_image
Diagram showing a hand pressing down on a horizontal bar with an arrow indicating compression or force (no text or symbols)FICHE DE DONNÉES DE PERFORMANCE
- BOTTOM MOUNT OWNER'S MANUAL MANUEL D'UTILISATION DU RÉFRIGÉRATEUR À CONGÉLATEUR EN BAS
- Table of Contents/Table des matières
- Your safety and the safety of others are very important.
- DANGER
- WARNING
- IMPORTANT SAFETY INSTRUCTIONS
- SAVE THESE INSTRUCTIONS
- Proper Disposal of Your Old Refrigerator
- MAINTENANCE AND CARE
- Cleaning
- IMPORTANT:
- To Clean Your Refrigerator:
- Changing the LED Module
- Water Filtration System
- Install the Water Filter
- Right-Hand Side of Refrigerator Ceiling
- Flush the Water System
- Replacing the Water Filter
- Reset Water Filter Status
- On models with Options and Measured Fill buttons located on the control panel: 3
- On models with Water Filter button located on the control panel:
- Vacation and Moving Care
- Vacations
- If You Choose to Turn Off the Refrigerator Before You Leave
- Moving
- INSTALLATION INSTRUCTIONS
- Unpack the Refrigerator
- Remove the Packaging
- When Moving Your Refrigerator:
- Clean Before Using
- Electrical Requirements
- Recommended Grounding Method
- Location Requirements
- Water Supply Requirements
- Tools Needed:
- Water Pressure
- Reverse Osmosis Water Supply
- Connect the Water Supply
- Connect to Water Line
- Connect to Refrigerator
- Style 1
- Style 2
- Complete the Installation
- REFRIGERATOR FEATURES
- Crisper Humidity Control
- Ice Maker and Storage Bin (on some models)
- Ice Production Rate
- Ice Maker in the Freezer
- For icemakers with a switch:
- DOOR AND HANDLE INSTRUCTIONS
- Refrigerator Doors and Drawer
- Remove and Replace Door Handles REFRIGERATOR DOOR HANDLES
- Refrigerator Door Handle Style 3
- Refrigerator Door Handle Style 4
- Refrigerator Door Handle Style 5
- FREEZER DOOR HANDLES
- Freezer Door Handle Style 1
- Freezer Door Handle Style 2
- Freezer Door Handle Style 3
- Freezer Door Handle Style 4
- Freezer Door Handle Style 5
- Remove Doors and Hinges
- STANDARD DOOR
- Standard Door - Freezer drawer models
- Freezer door models
- FRENCH DOORS
- Reverse Doors (optional)
- Cabinet
- Refrigerator door
- Freezer door
- Replace Doors and Hinges
- Standard Door - Freezer door models
- French Door Models
- Remove and Replace Freezer Drawer
- REMOVE DRAWER FRONT
- Replace Drawer Front
- Final Steps
- Door Closing and Door Alignment
- PERFORMANCE DATA SHEET
- Application Guidelines/Water Supply Parameters
- SÉCURITÉ DU RÉFRIGÉRATEUR
- ENTRETIEN ET RÉPARATION
- Nettoyage
- AVERTISSEMENT
- Caisse
- FICHE DE DONNÉES DE PERFORMANCE
Brand : AMANA
Model : ABB2224BRW
Category : Fridge